

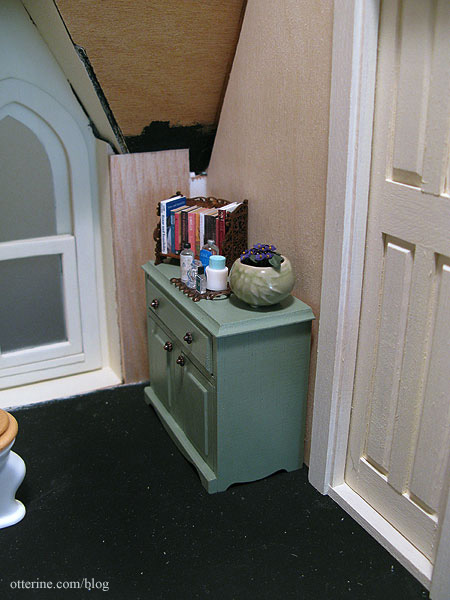
House of Miniatures Hutch Cabinet to bath cabinet
love House of Miniatures kits for their adaptability. This can be a quite formal piece, but with some soft Italian Sage paint by Folk Art and some copper knobs made from jewelry headpins it turns into a pretty bathroom cabinet.
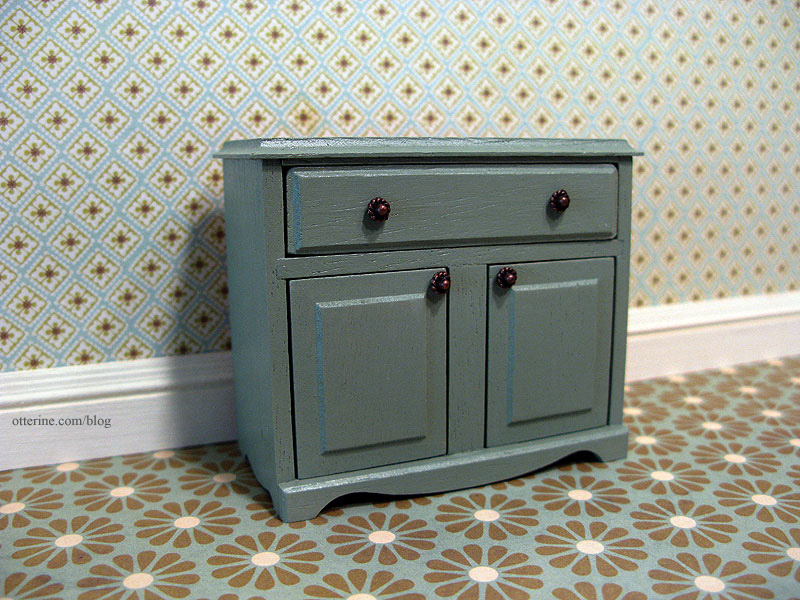
I’ve made one of these cabinets before, for the Newport. As with that cabinet, I added an extra piece of wood to fill in the gap between the drawer and the cabinet top.

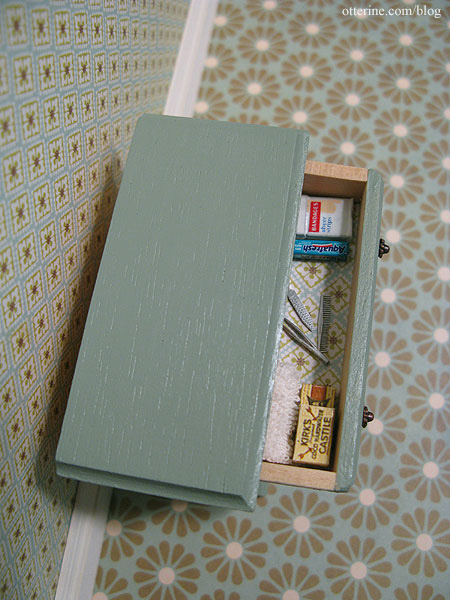
Now grandma has an attractive storage solution for all her necessities. :D I plan to put different items inside the cabinet but had these already on hand. I love hidden details even if they aren’t readily seen.

I lined the drawer with a scrap of Cute Little Diamonds paper by The Paper Studio, the same paper I’ll be using for the wallpaper. Grandma is frugal and has found a use for her leftover wallpaper scraps!
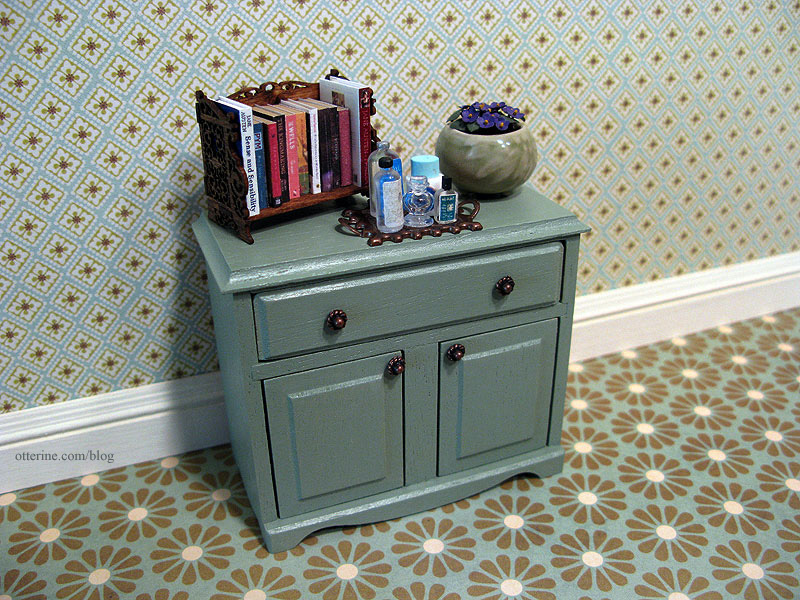
The bookshelf and African violets I made earlier will sit here. I also made up another jewelry finding tray as I had for the bedroom vanity. I will make new bottles specifically for this room but borrowed these from the Newport.
I found that I rather like the loud Flower Frenzy paper by We R Memory Keepers for the flooring. Adding sealer will yellow it a bit, but that will only add to the age of the floor.
I’m not sure if the cabinet will sit next to the door or next to the bathtub on the opposite wall. I’ll have to get the room put together before I make that decision.
Categories: Furniture, The Haunted Heritage
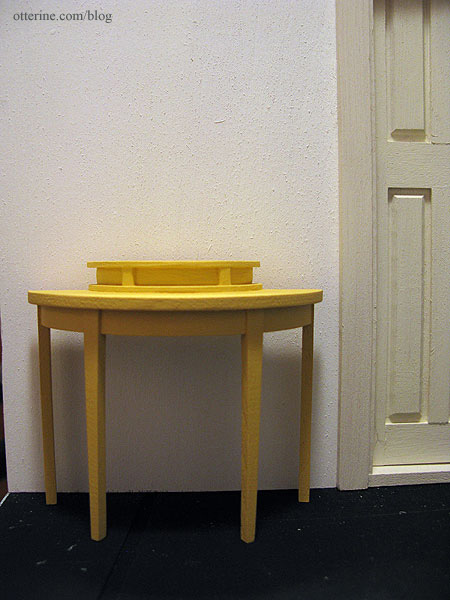
April 6, 2012 | 0 commentsHouse of Miniatures Hepplewhite Side Table
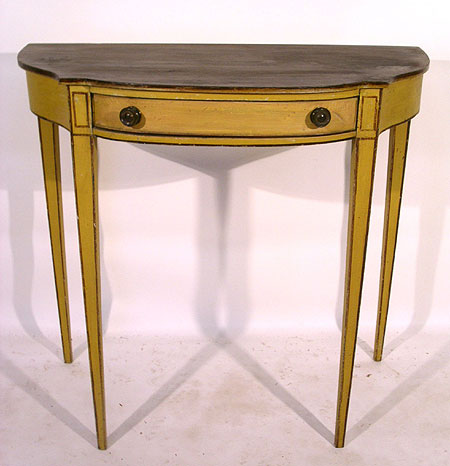
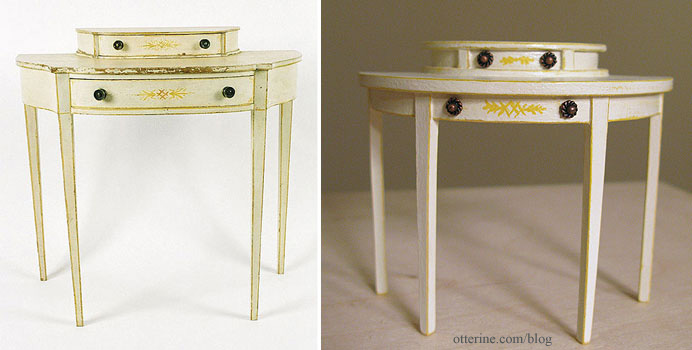
I did a quick google search for painted Hepplewhite tables and found three great inspiration pieces. I was looking for lighter finishes to stand out in the hallway. For a fantastic painted version of this table kit, check out Wasting Gold Paper. Fabulous!
First, this lovely c.1790 North Shore, Massachusetts Hepplewhite side table from Wiederseim.com. This real life table sold at auction for $3,000.
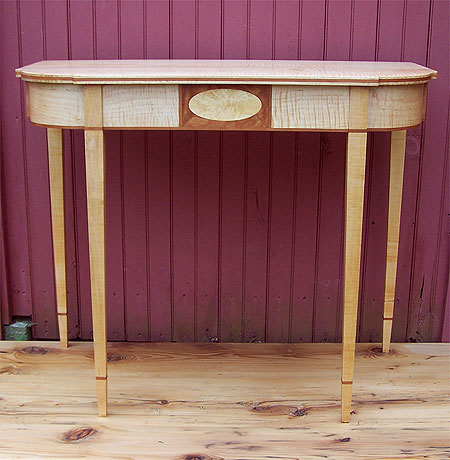
Second, a contemporary version by Craig Thomas White.
And, lastly, this c.1790 American Hepplewhite dressing table from antiques.com.
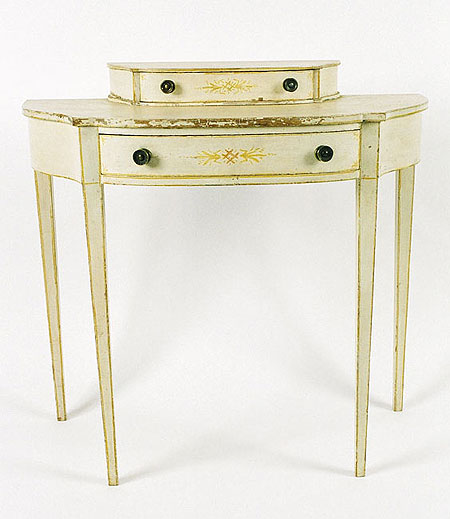
The last one is the clear winner for me. There is no drawer on the House of Miniatures table, but there’s no reason it can’t be faked with some drawer pulls.
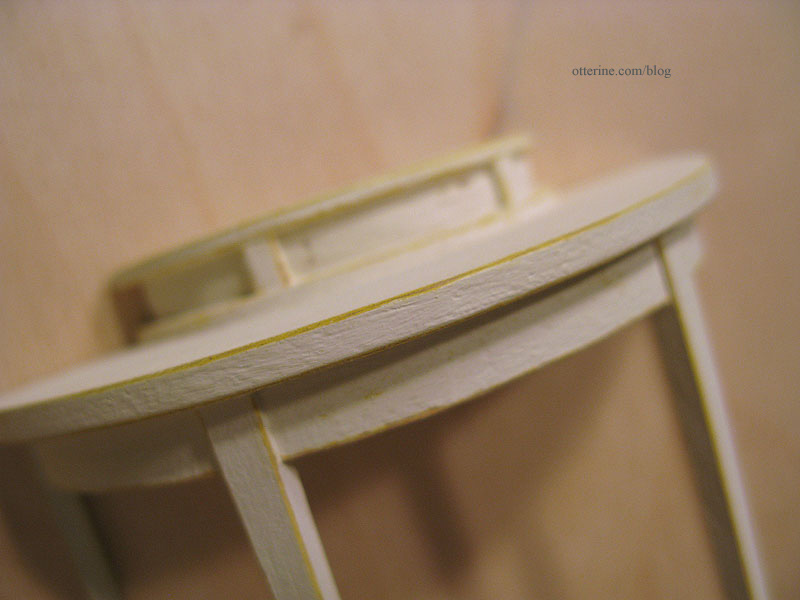
For the additional top detail, I used a Woodsies circle. To get the true center, I slipped it into a circle template I had from my art school days.
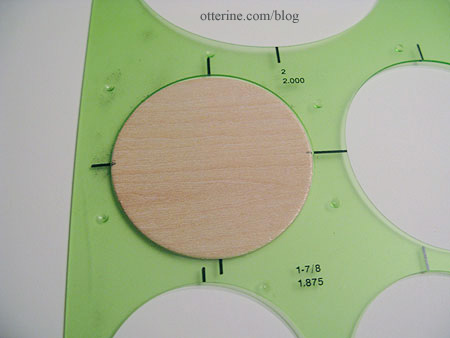
These markings then allowed me to measure how much of the circle I wanted for the top using some of the items I might use for display.
The middle is a scrap of balsa cut slightly smaller than the Woodsies half circles.
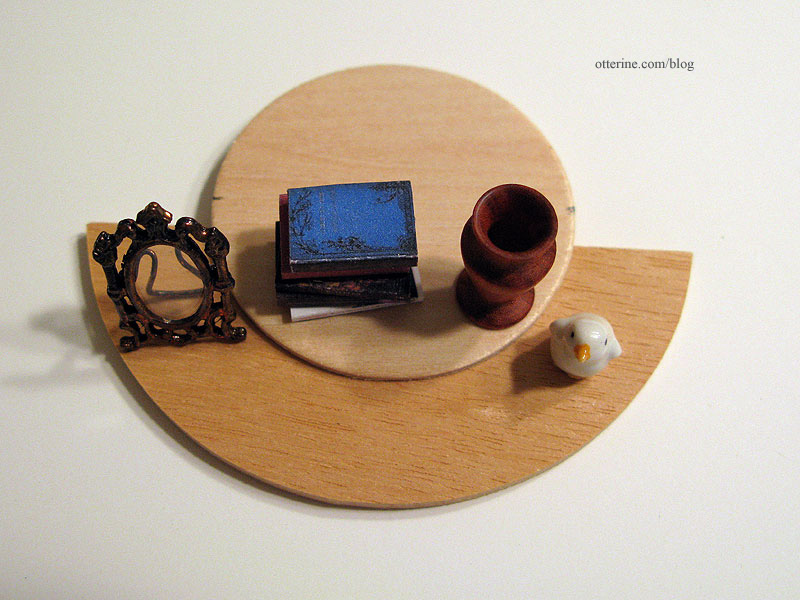
Since I wasn’t sure if I would like my addition once finished, I made another quick vignette with the border trim in place. I had to move the artwork up on the wall and added some of the accessories. As you can see, I added two small scraps of wood on the smaller top assembly to delineate the faux drawer. I think it’s going to be lovely.
I didn’t think I’d have a steady enough hand to paint only the edges with the yellow detailing, so I started with a full under layer of Moon Yellow by Folk Art. This took two thin coats of paint with a light sanding in between.
I covered this with Tapioca by Folk Art. Again, two thin coats of paint were needed. I used fine sandpaper to lift the lighter top coat to reveal the yellow beneath, some parts to the original wood for an extra bit of wear.
I added aged copper knobs (fancy head pins for making jewelry) and painted the wheat and crisscross details with a fine tip brush. I don’t think I did a half bad job considering I’ve not painted freehand tiny designs before.
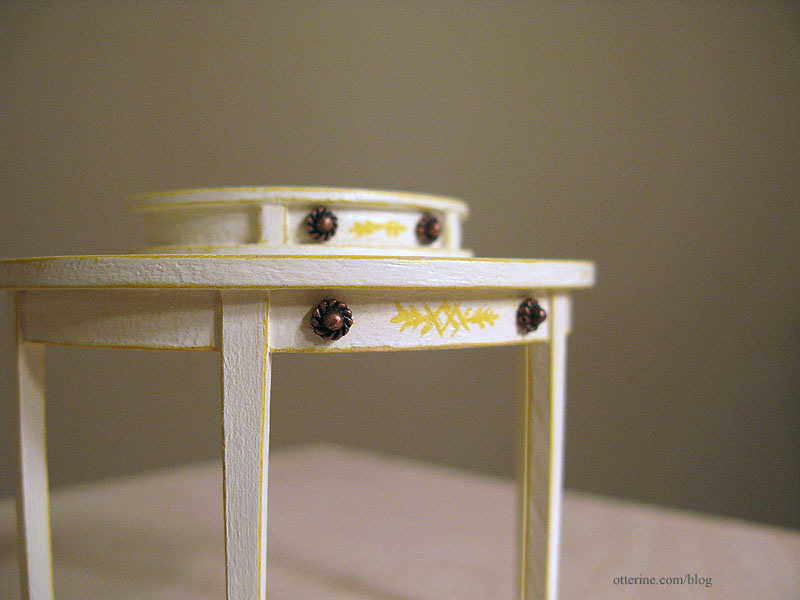
I then covered the table with a very thin coat of Delta Ceramcoat satin varnish.
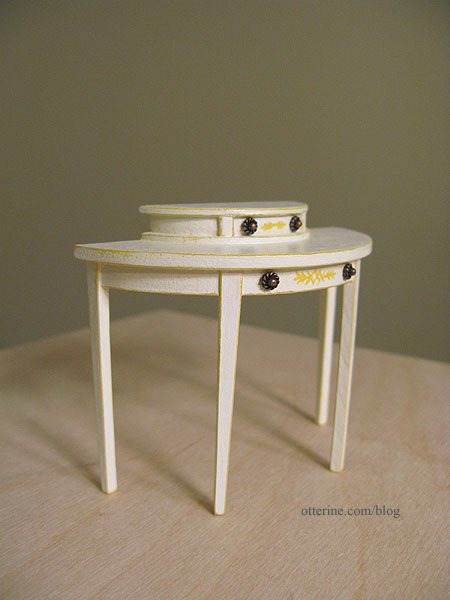
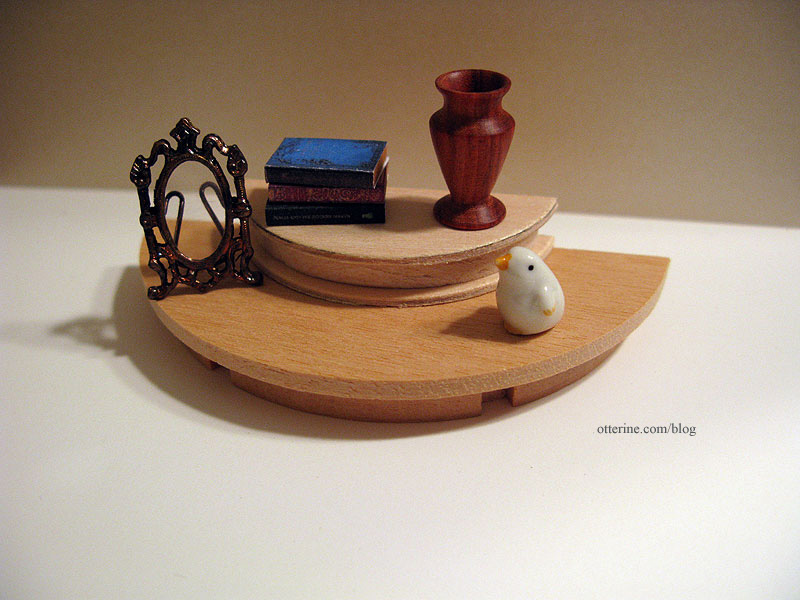
I love the way this table turned out! :D
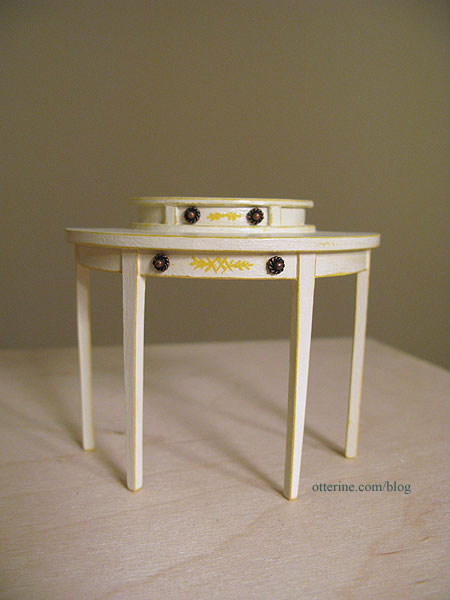
It has the same delicate look as the original.
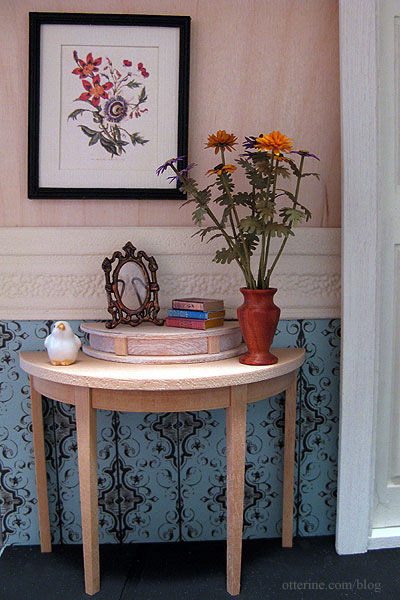
Here it is later in the finished upstairs hallway.
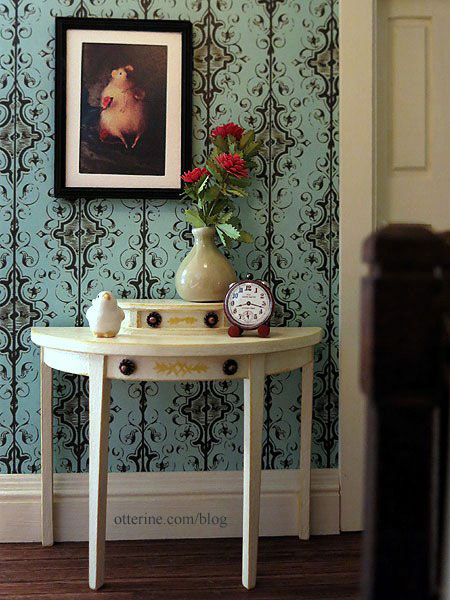
The artwork is a photograph from artisan Natasha Fadeeva. She makes the most amazing little animals. I just swoon over her mice!!! :D I contacted her about using the vintage mice photos in the Heritage, and she graciously gave me her permission. I made the tiny red alarm clock and the Bonnie Lavish red dahlias. The vase and bird figurine were purchased awhile ago, but I’m no longer sure of the vendor.
Categories: Furniture, The Haunted Heritage
April 4, 2012 | 0 commentsCutting plywood without power tools
Power tools are noisy, need appropriate space for setup and are a little intimidating to me. So, I use a standard utility knife with either a metal ruler or metal T-square to make my plywood cuts (technique learned from Real Good Toys). This is my cutting board on an old TV tray.

I use this method on everything from 1/64″ thick wood veneer to 3/8″ thick plywood, though the latter takes some doing. For boards up to 1/8″ thick, I cut on one side only. For thicker boards, I make cuts on both sides to meet in the middle. Here is that process.
I’ve photographed the process along the way with staged photos…meaning I am not actively cutting in these photos. I can’t hold the camera and photograph myself cutting, because cutting requires two hands, one to steady the board and ruler and the other to cut the board.
First, I make my guidelines on one side of the board. This is the doorway placement for the bathroom-to-hallway door on the new 1/4″ thick plywood wall, which I cut using this method. The top cut has already been started in this photo.

With a sharp blade in my utility knife, I cut along the lines using the T-square to start. This makes sure the lines are square with the bottom edge….no crooked doors allowed.

Once I have a deep line, I switch to the metal ruler because I can position the board and the ruler in a more comfortable position for me. You might find using only the T-square works best for you.

I cut part of the way through the board by making repeated cuts along the same lines. I then mark these cuts on the opposite side of the board.

I measure on the opposite side from where the cuts began and transfer the guidelines. I don’t do this in the beginning just in case my cuts are off a little from my initial guidelines on the first side.

I then repeat the cutting process with the T-square or metal ruler (or first one, then the other) on the new side. I flip the board back and forth, repeatedly cutting deeper into the grooves until the cuts meet in the middle. The board then separates and you are left with a reasonably clean edge.

If there is any excess wood on either side, I use the utility knife to clean up the edges.

I use 60 grit sandpaper to smooth out the edges, and we are ready to test out the door.

I obviously wouldn’t use this to scratch build an entire house from 3/8″ plywood, but it’s a usable method for the small amount of cuts I usually make during a build. Thicker boards take some elbow grease and patience — and a few breaks in between cuts, but this method gets the job done. :D
Categories: Tools
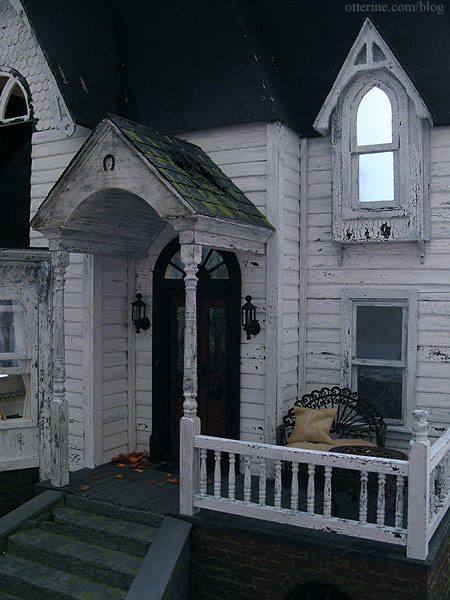
April 3, 2012 | 2 commentsHeritage – front porch dormer and window, part 2
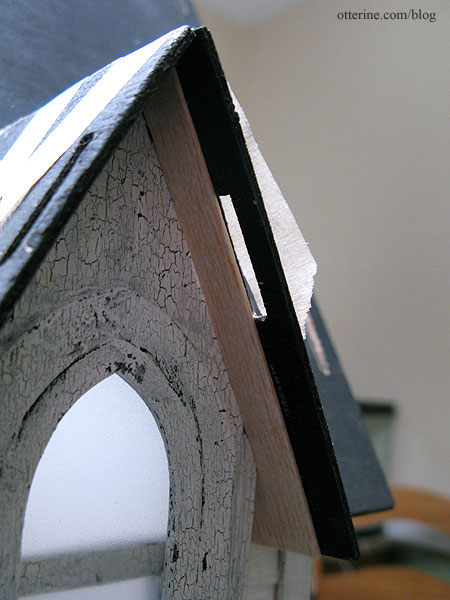
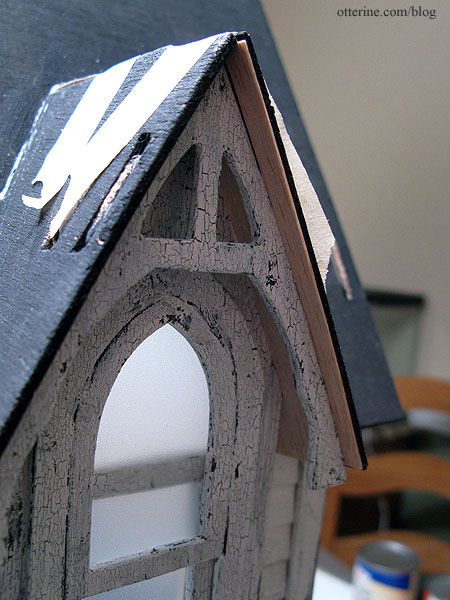
The eaves of the dormer are obviously formed by the roof pieces. Due to the die-cut tab-and-slot nature of this build, the slots are larger than necessary. When the pieces are glued together, there are gaps left around the tabs. In addition, the roof pieces don’t fit completely together, so it looks a little off to me.
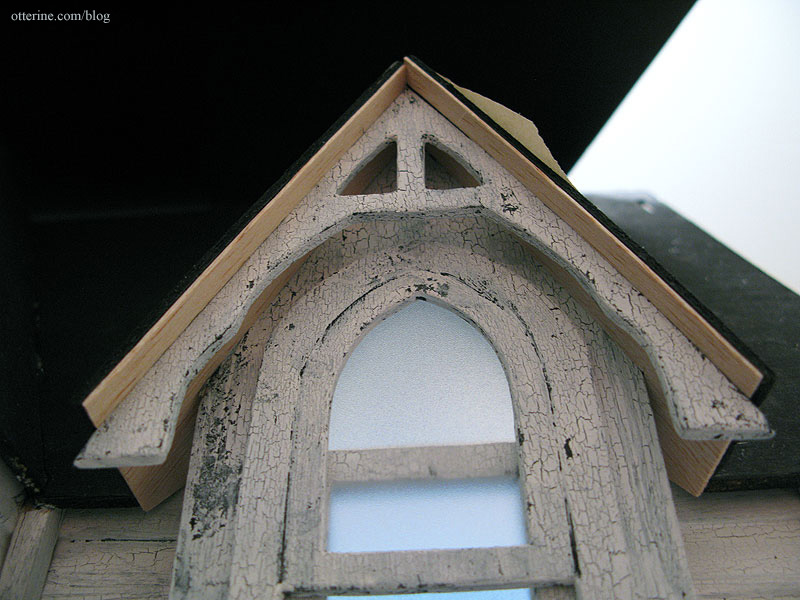
To disguise this method of construction, I used 1/32″ thick balsa wood to create a veneer layer. This will hide any gaps and holes without adding too much thickness. I first measured the distance between the wall and the back of the gable trim.
Once that piece was cut, I popped in the gable trim to trace the remaining exposed eave in front.
I did the same for the opposite side, and it already looks cleaner.
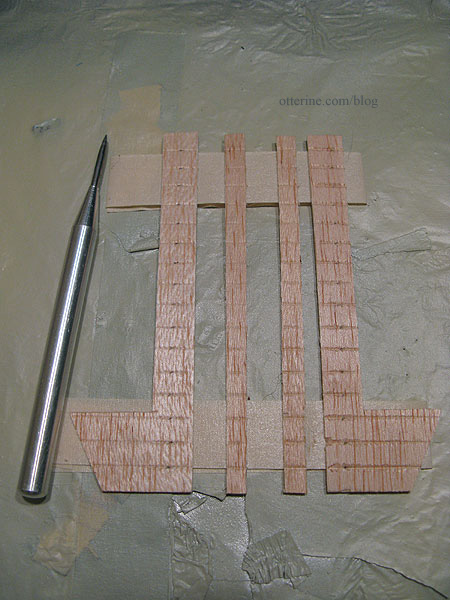
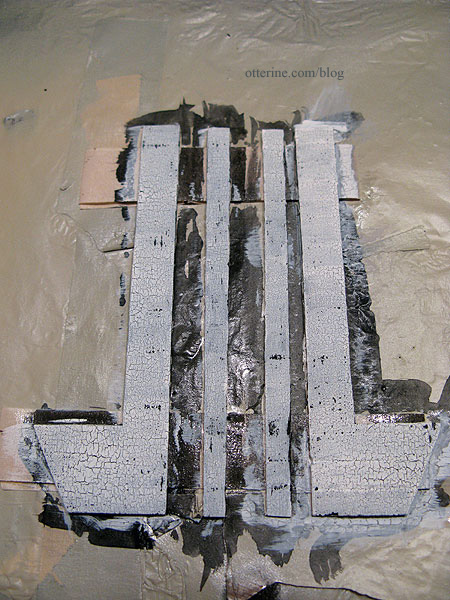
I taped the pieces in order on my painting board with the bottoms level. I measured 1/4″ increments to the top. Using an awl, I indented the wood along those measurements.
I treated the wood with a wash of black paint followed by the crackle medium.
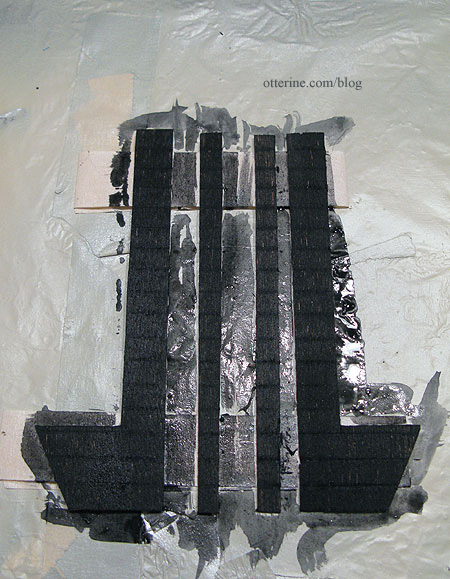
I then brushed on white paint. The lines are not all that visible, but I think it’s enough texture to do what I intended.
I glued the veneer pieces to the eaves and glued the now shortened gable trim piece in place. There will be trim along the front edges of the gable added later when the roof shingling is done.
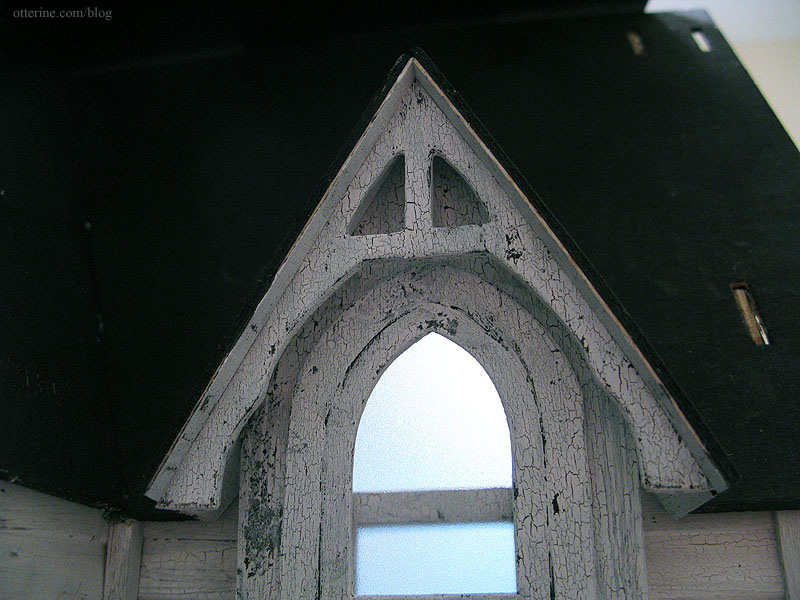
This was my test area to see if I liked this finish, and I really do. I think it adds a lot of realism for relatively little effort. I wasn’t going to cut individual boards for the eaves the way I have for porch ceilings. :D So, I’ll be repeating this process for the large gables when I get to them.
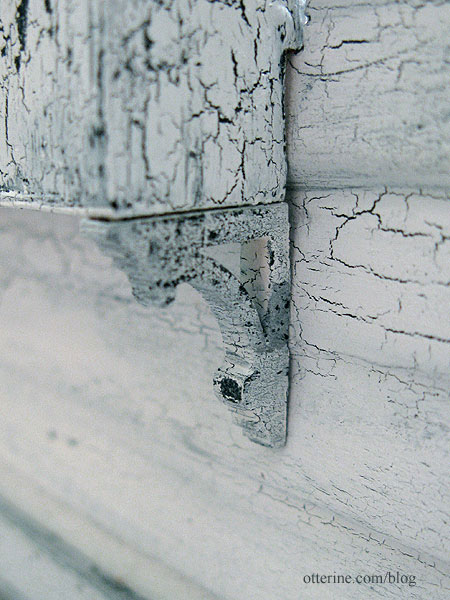
I added two laser cut brackets under the dormer window as well as some square trim on the sides. I used this trim since it mimics the look of the inner wall connectors.
The more white paint I apply to the house, the more you notice the extra grunge layer I put on the portico when I assembled it. Later on, the rest of the house will get this same treatment.
Categories: The Haunted Heritage
April 1, 2012 | 0 commentsHeritage – front porch dormer and window, part 1
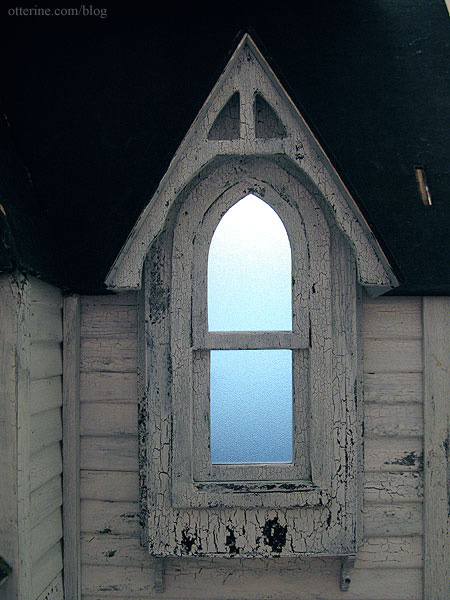
The second floor dormer window was to sit atop the original kit porch, which is no longer part of my Heritage.
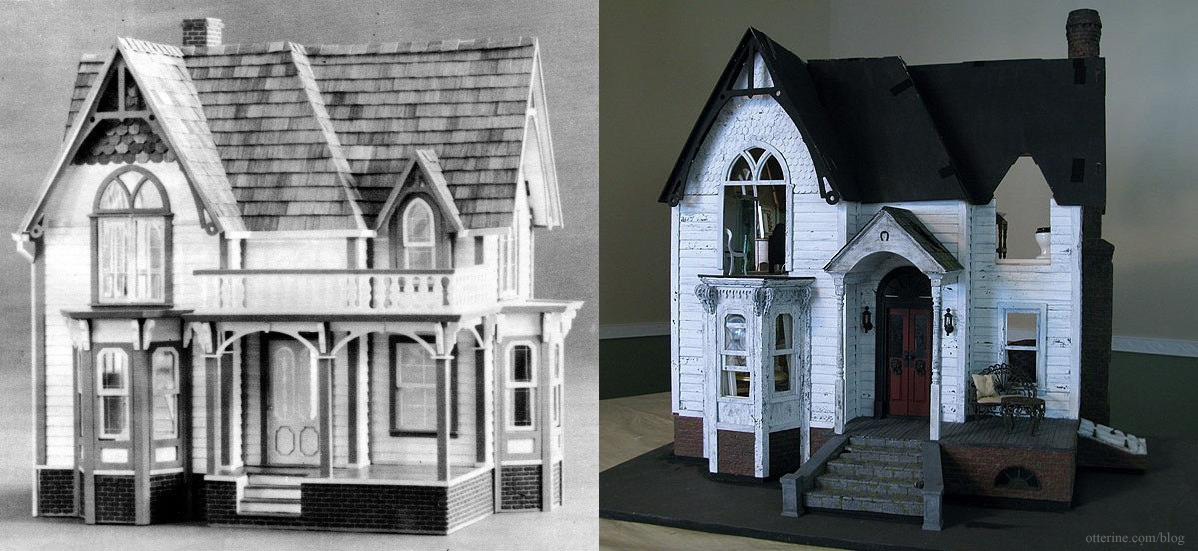
I also raised the ceiling in the parlor, but I can’t raise this window by the same amount since the roof pieces would no longer fit correctly. And, I can’t cut down the window. So, instead of building it per the kit instructions, I had to wing it.
First, I taped the window roof pieces to the main roof then tested out the main window piece. It didn’t even come close to fitting – the curse of die-cut parts. I fixed the top angle and was able to get the window to fit. It doesn’t help that the main window piece is also warped.

I added 5/8″ of scrap wood behind the lower portion of the window to hold the window straight out from the house.
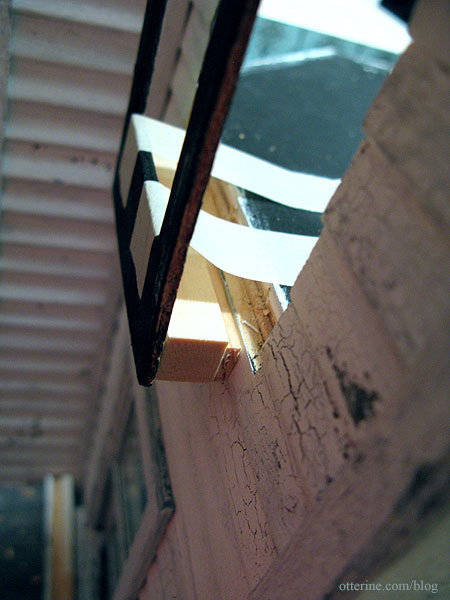
I cut new sides that lined up with the exterior window. I used balsa since it’s easy to cut and shape, and it won’t be holding any structural weight. Basically, I was just building this one piece at time, making it fit along the way. Once the basic structure was determined, I could work on fine-tuning the fit and aesthetic.
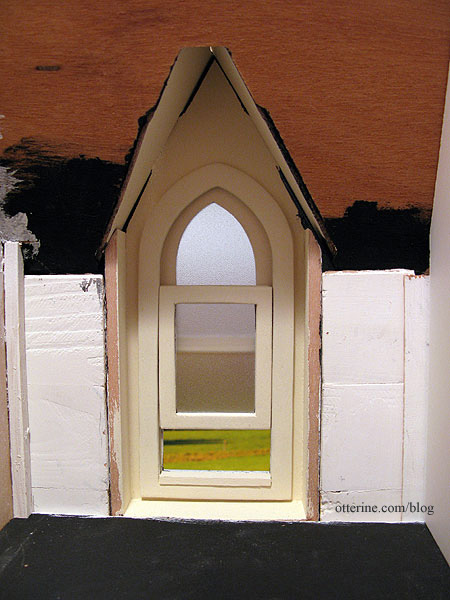
I think we have a winner! This window will have the same aged white paint as the rest of the windows.
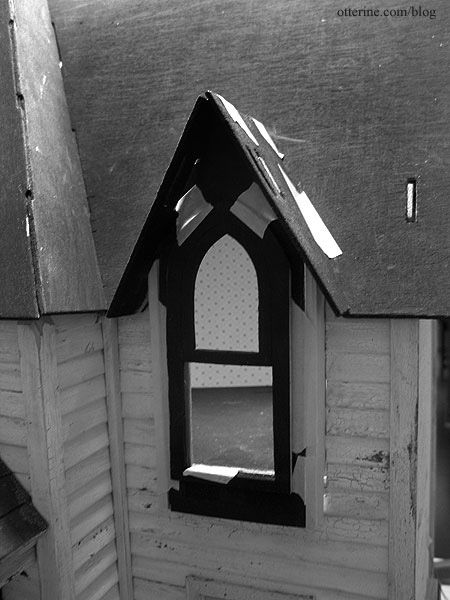
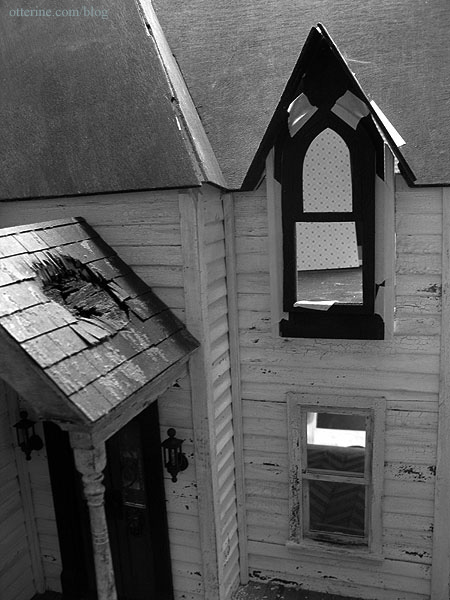
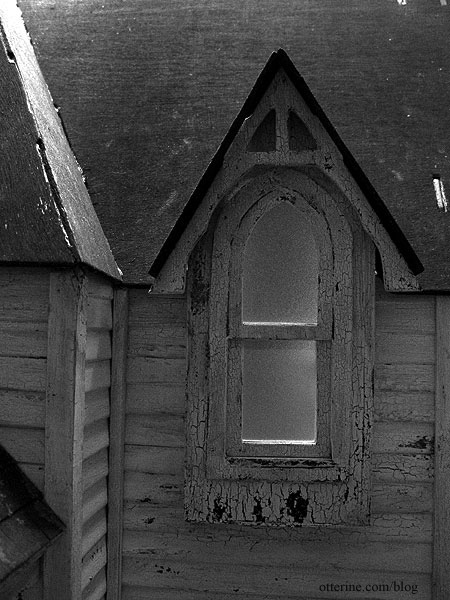
Today, you get black and white photos because my orange shirt reflected on the white house and messed up the colors. :D Looks a little creepy, no? The gaps around the window will be masked with trim, and I’ll finish the bottom of the exterior portion as well. I think it will work well with the portico and lower front window.
The new sides also line up with the interior walls. I’ll re-cut the new sides to fit better, but it already works better and should make it easier to decorate on the inside without all those silly wall connectors like the one in the corner there.
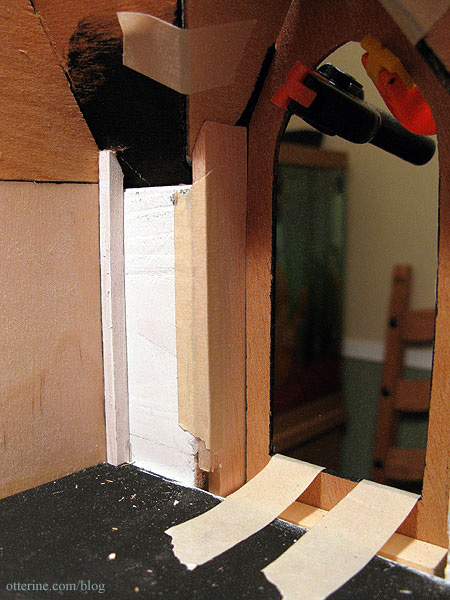
On the inside, this will now be a floor to dormer-ceiling window, so I’ve eliminated the sill. I trimmed the outside edges of the window frame pieces because they seemed bulky to me. This won’t effect the functionality of the window. I added a scrap of wood to fill in the hole and make the window level with the floor. Should be just enough room for flooring.
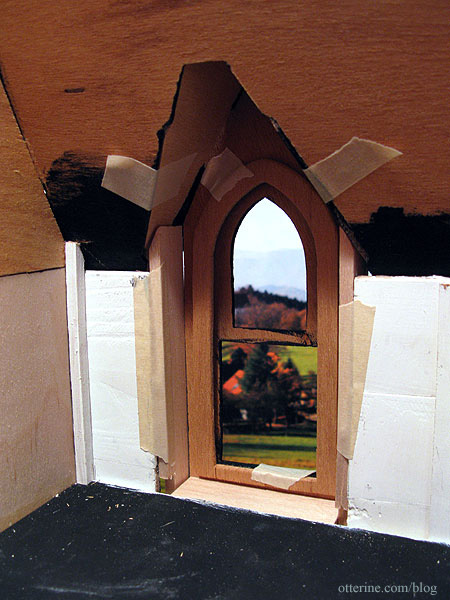
I cut new side walls for the dormer window and spent a fair amount of time repairing the old, brittle wood of the remaining original kit pieces. I decided to assemble and finish the window in its entirety before installing it, figuring it would be easier to touch-up the paint by doing it this way.
I opted for a fully painted interior to the dormer window assembly since I thought wallpapering would be too difficult in this small of an area. A painted window wouldn’t look out of place in an otherwise wallpapered room, in my opinion. Once the dormer roof pieces are in place permanently, I’ll fill in the gaps and touch up the paint.
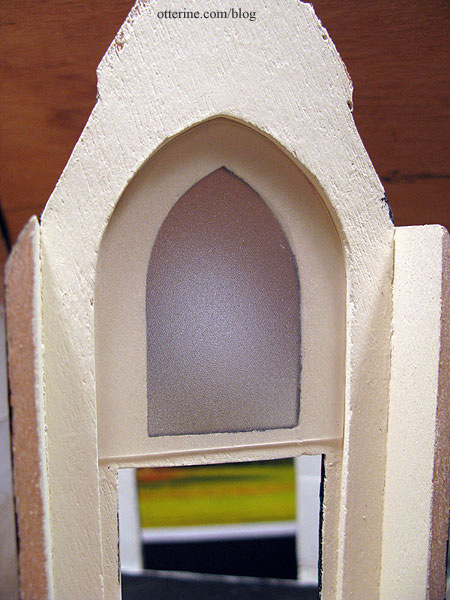
One of the nice things about working in an office is that when bound presentations need to be taken apart and shredded, I can snag the specialty papers. Here is a frosted tab page.
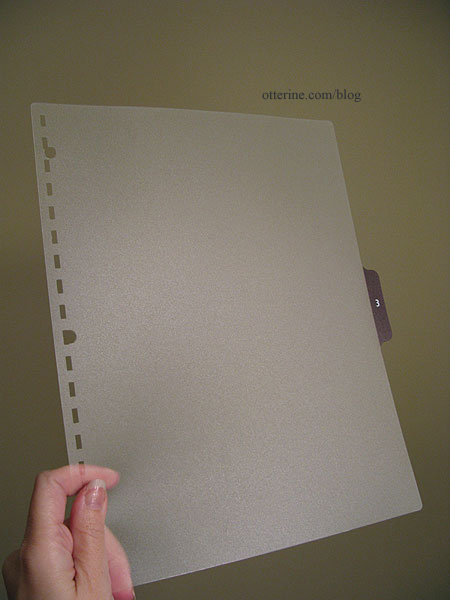
Cutting the window inserts from this material gives grandma a little privacy. :D
So, does the window work? Yes! Well, it’s a sticky window, but it works. :D
Aw, yeah…that’s creepy. :D
As you can see, I’ve painted the gable trim for the dormer. Both the roof pieces and this gable need to be adjusted to fit, but so far so good.
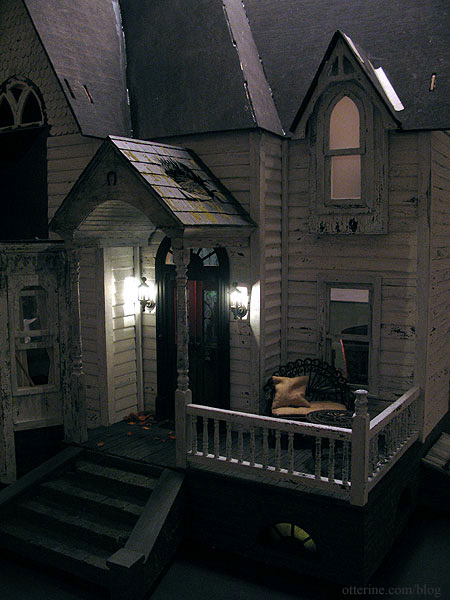
Finishing the exterior here. Finishing the interior here.
Categories: The Haunted Heritage
March 31, 2012 | 0 comments


NOTE: All content on otterine.com is copyrighted and may not be reproduced in part or in whole. It takes a lot of time and effort to write and photograph for my blog. Please ask permission before reproducing any of my content. Please click for copyright notice and Pinterest use.


