

Dollhouse miniature ice cubes
There are so many creative people out there who are incredibly generous to share their ideas on homemade and often inexpensive minis. The first time I saw mini ice cubes made from suction cups on My Small Obsession, I was amazed at how realistic they looked.
So, I went to the dollar store and bought a pack of suction cups. I cut them into strips and then into tiny cubes. I didn’t measure or try to make them perfect. In fact, I used all but the thinnest edge of the cups and tried to vary the size and shape. I wanted them to look like full cubes, broken cubes and shards. This is the amount of ice two 1 5/8″ diameter suction cups made.
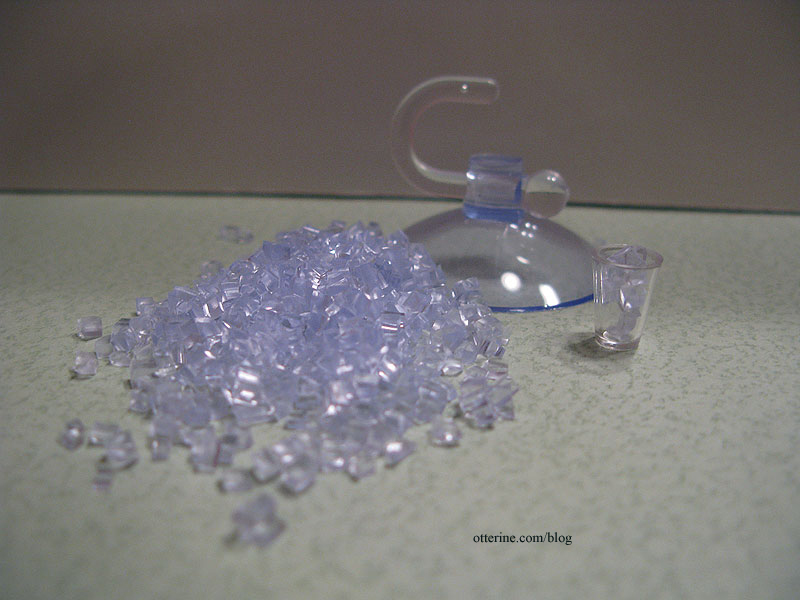
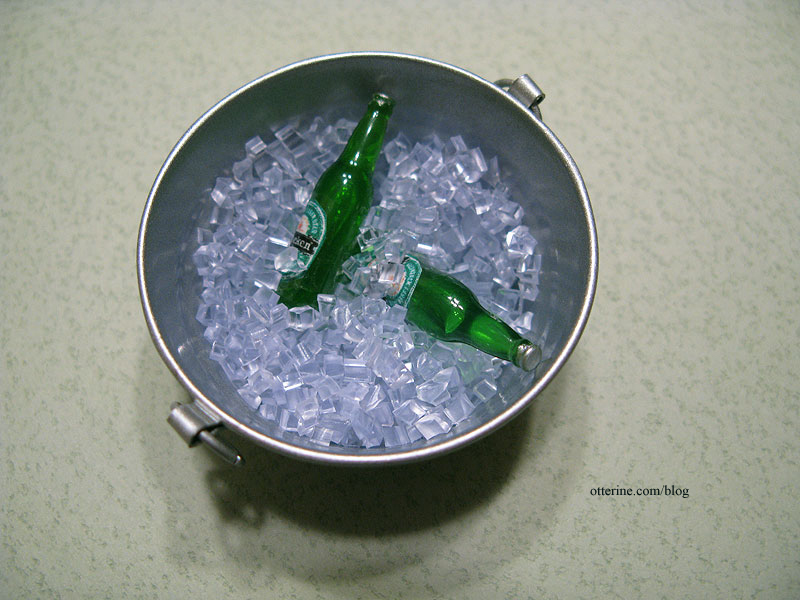
The ones I bought were a bit bluish in tone, and my ice cubes also turned out to be on the blue side. I worried that this might detract from their realism until I added a couple of mini beer bottles to a tub full of them. :D I think they look wonderful!
Categories: Miniatures
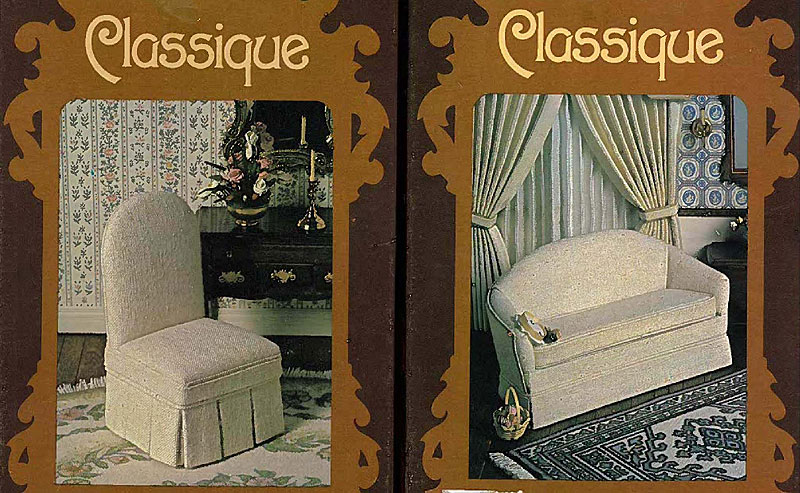
April 12, 2011 | 0 commentsVintage Millie August furniture kits
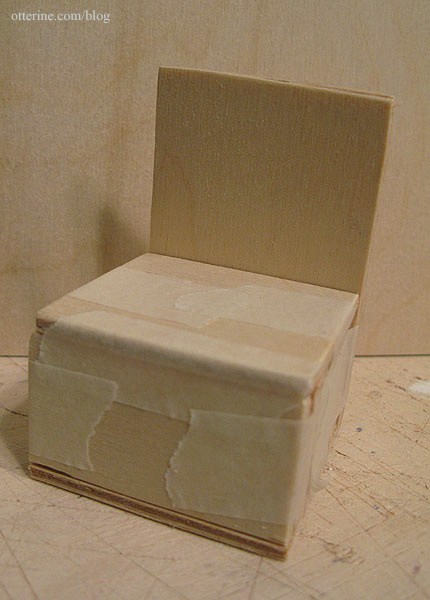
I found these two kits at a local hobby store that was having a moving sale. The fabric seemed a bit rough for scale, though the finished photos on the kits looked wonderful.
I had some ivory muslin in my fabric stash that seemed softer, but I stuck with the original fabric in the end and was glad I did. :D
My general impression was these kits are very thorough and have excellent detailed instructions, though there were parts that had no illustrations when you could have used some. I chose to make a photocopy of the pattern pieces before cutting them just in case I had to start over with my muslin fabric. I also copied the figure drawings so I didn’t have to keep flipping the paper over between the instructions and the drawings, which happened to be on opposite sides from one another.
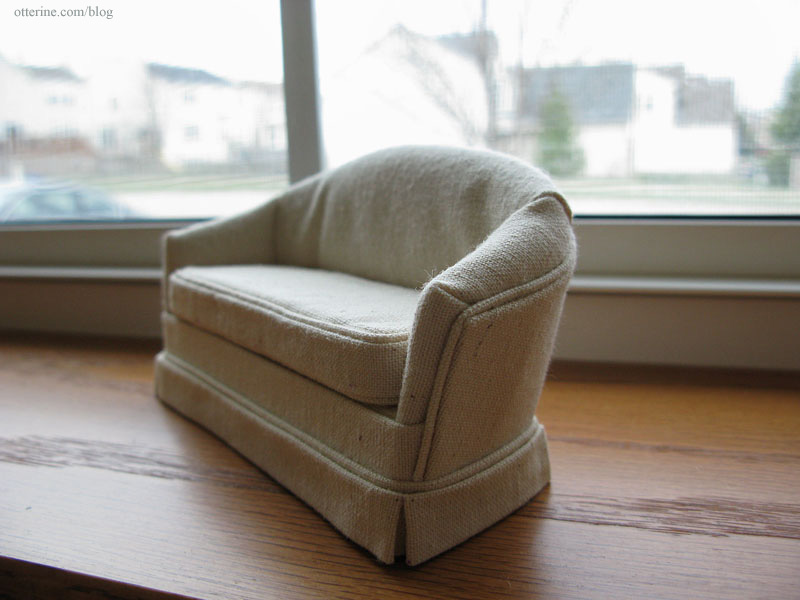
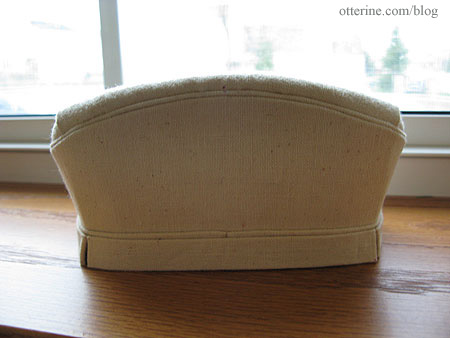
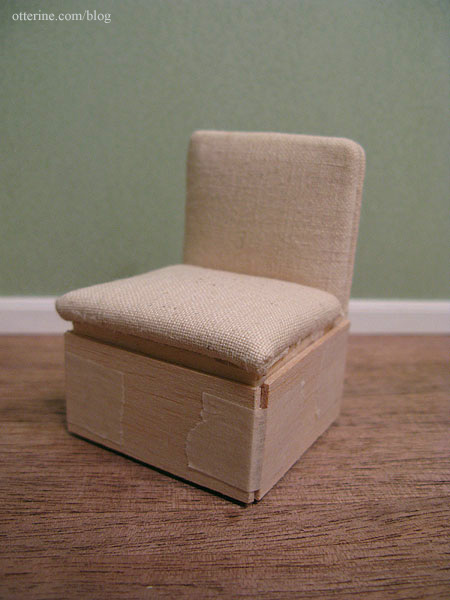
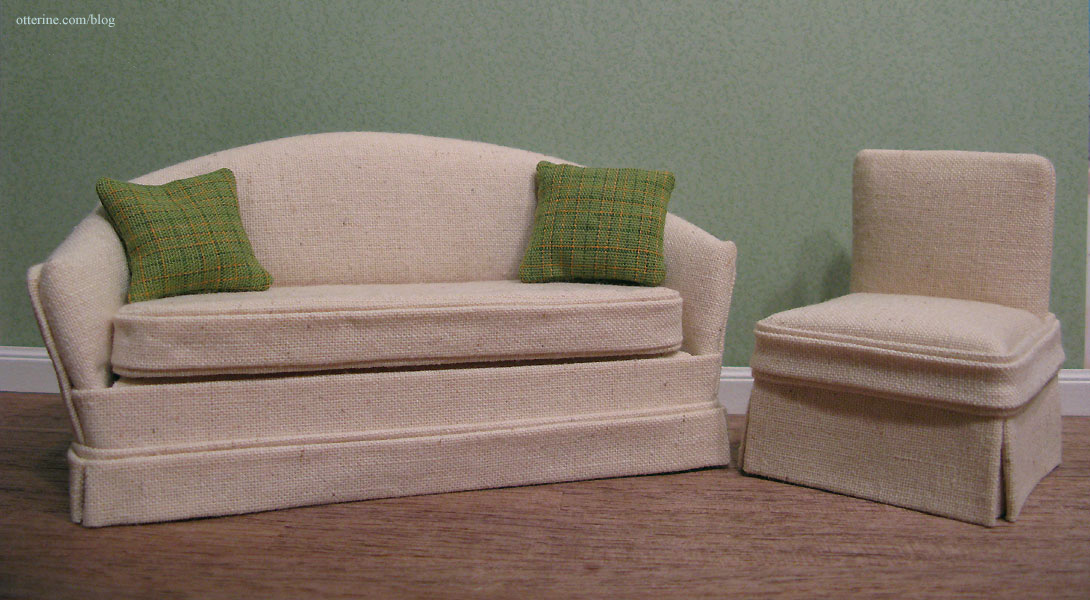
I tackled the couch first, and it went well from the start. Since the kit was old, the foam had yellowed significantly, so I lined the sides and front of the couch with natural muslin before adding the finished fabric. I didn’t want to take the chance that the yellow would show through once the couch was complete.
The most challenging part was creating the welting, or cording, but it’s the one element that really adds to the realism of the piece. Real life sized upholstered furniture has this detailing and it was worth the frustration and effort to get it to work.
All in all, the couch took me the better part of a day to put together, so I haven’t gotten to the chair just yet.
I added some green plaid pillows.
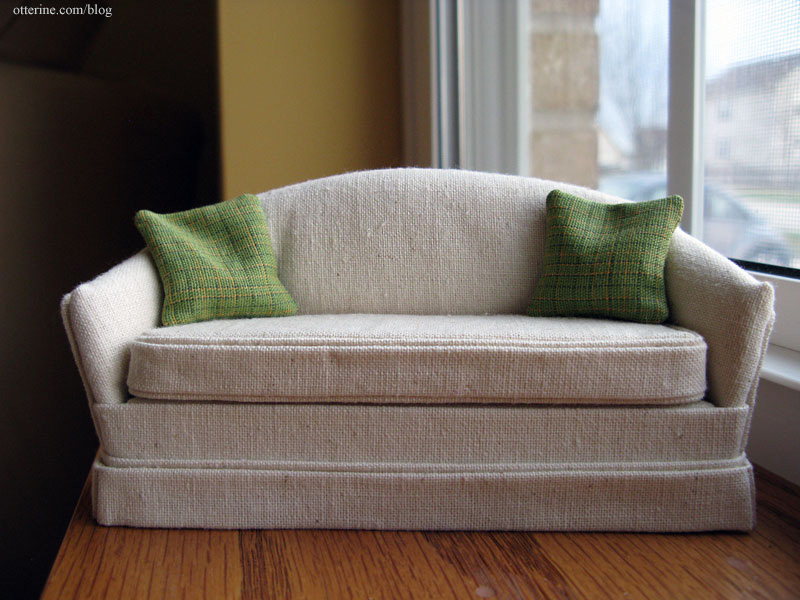
The kit has you build the couch as you would build one in real life size. I learned a lot putting this kit together and will put these skills to use the next time I make an upholstered item.
Ara, who has a blog called Addams Family Mini-Mansion, uses a small wood artist’s model when she builds custom furniture. I thought this was a brilliant idea, so I bought a couple myself from Barnes & Noble to use when either making kits as in this case or for when I get around to scratch-building more furniture. They are 5 3/4″ tall, so they equate to a person about 5’9″, which is perfect for getting the proper scale of things. They don’t articulate all that well, but they do a good job for me since I have no actual dolls to put in my miniature dwellings. :]

For the chair, I found the instructions to be a little lacking in comparison to the couch, so I was glad I finished the other kit first. It helped me figure out what to do when I wasn’t sure about the directions. The couch didn’t have an exact side chair counterpart, but I thought this would work well as an alternative. But, I didn’t want it to look like a vanity chair so much as a comfortable modern chair.
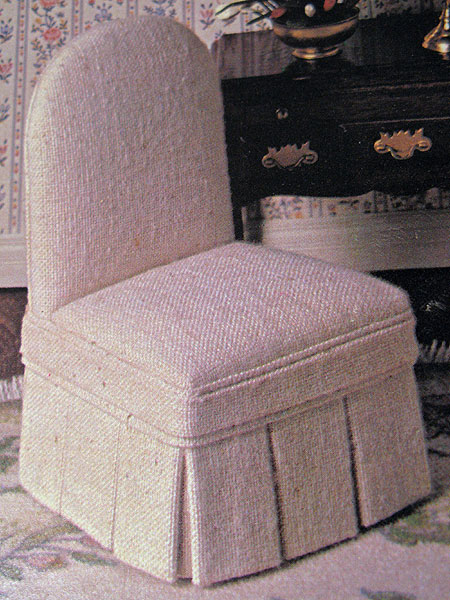
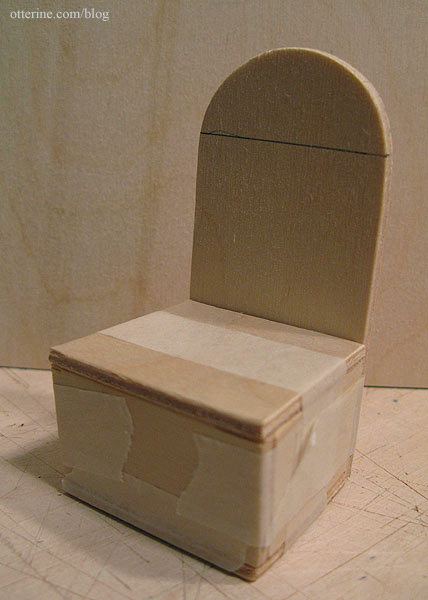
To that end, I cut off the top curve on the back.
Initially, instead of doing the multiple pleats around the chair, I mimicked the skirting I had done for the sofa to tie the two pieces together.
It turned out okay, but I felt it didn’t have the same polish as the couch. The problem was that the original design took all the extra fabric from pleated skirts into consideration and therefore the seat was cut large. I didn’t cut the seat down when that step came around not thinking about this end result…so my skirts ended up looking too thin for the overall lines of the chair. I didn’t care for the bulge in the middle.
My only real option was to remove the outer trim and the skirts and cut new pieces from the spare fabric included in the kit, because removing the seat assembly to cut it down would have meant tearing the whole thing apart. Not at all tempting.
I still didn’t want the multiple pleats, but I had to assemble one to see how thick it was. Once I had that measurement, I was able to figure out how much thickness I needed to add around the base to make up for the lack of the pleats. I added 1/16″ thick balsa wood around the sides and front.
I cut new corner pieces, skirts and the thin finishing trim. I was able to salvage one piece of trim from the first go around, but it was a little short in the back once fully assembled…but we won’t look at the back. I reassembled the skirts and trim and ended up with a much better result.
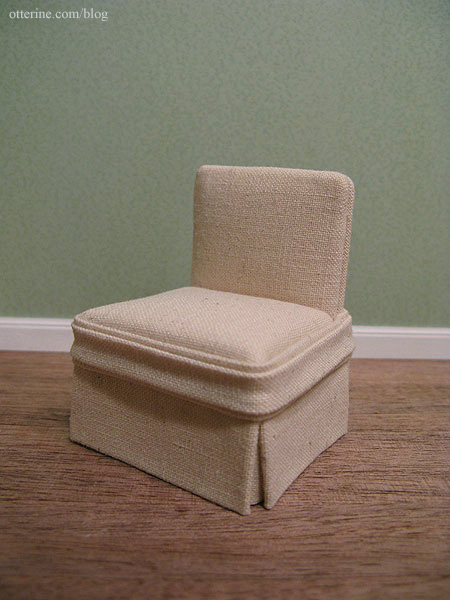
I still like the couch better overall, but the chair fits with the couch nicely enough, I think.
Categories: Baxter Pointe Villa, Furniture
April 10, 2011 | 0 commentsBishop, IMA and 3 Blind Mice shows – 2011
I was lucky enough to enjoy three local miniature shows this weekend: Bishop, 3Blind Mice and Independent Miniature Artisans (IMA) shows. I took no photos this year but did bring home lots of goodies.
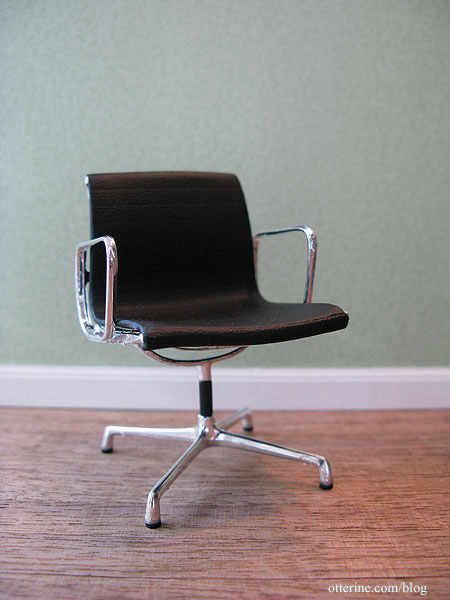
I’ve wanted one of these modern office chairs for some time now and found a great deal on it.
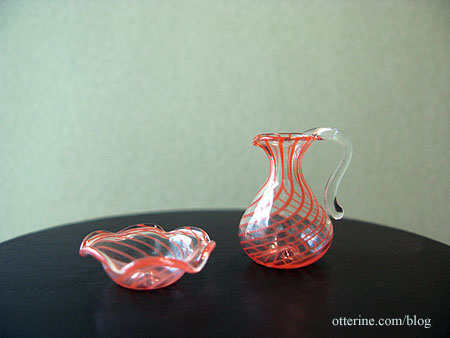
These are actual glass wine goblets. Both the glasses and the bottles are a little large in scale, but I really liked their realism.

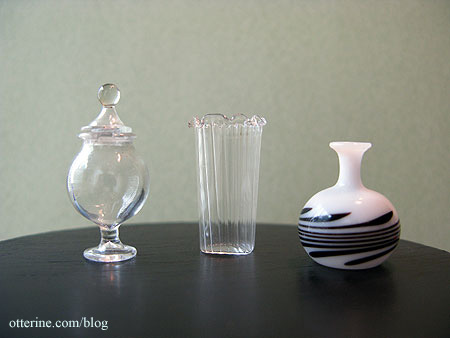
Found some awesome glass items…
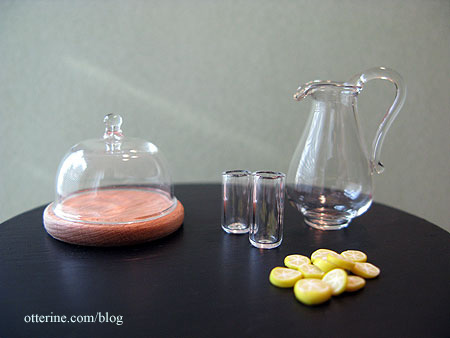
The pitcher, glasses and lemon slices were a set…like a mini kit to make your own lemonade or ice water setup.
These are incredibly detailed laser cut brass. Love those modern keys! The clock faces come with tiny hands.
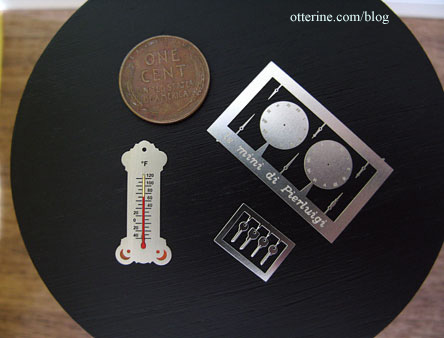
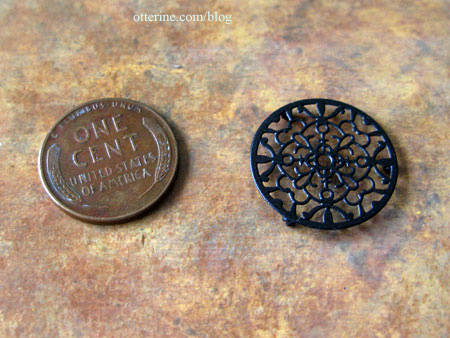
This trivet is from the same vendor as the brass above…very detailed and has tiny feet.
Some lovely fabrics. :] I could have spent a lot more here!

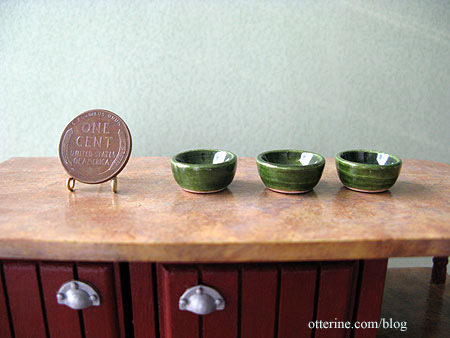
Alex Meiklejohn. These items were made on a pottery wheel. That large pot has the most marvelous metallic finish and will eventually hold a large indoor tree-plant.
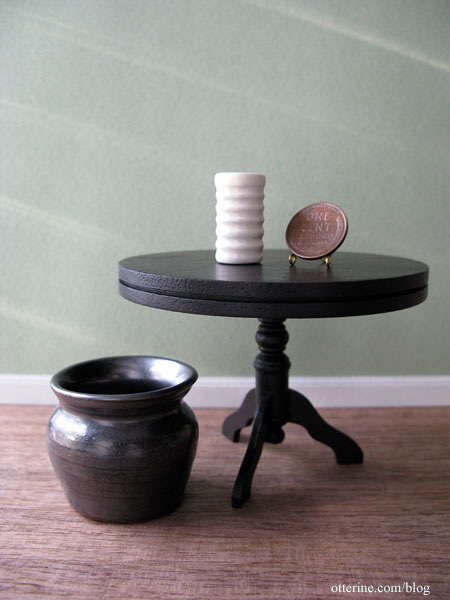
He had a wide variety of sizes and colors at very good prices.
Categories: Miniature Shows and Shops
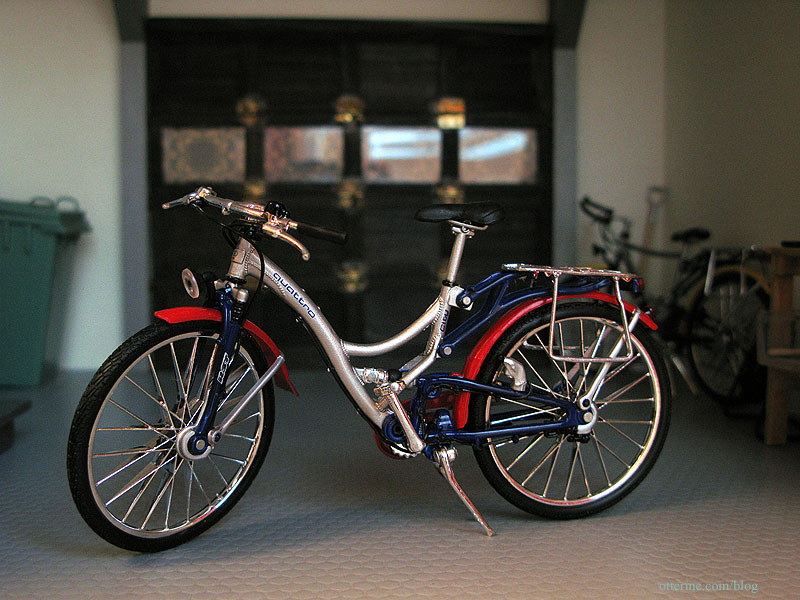
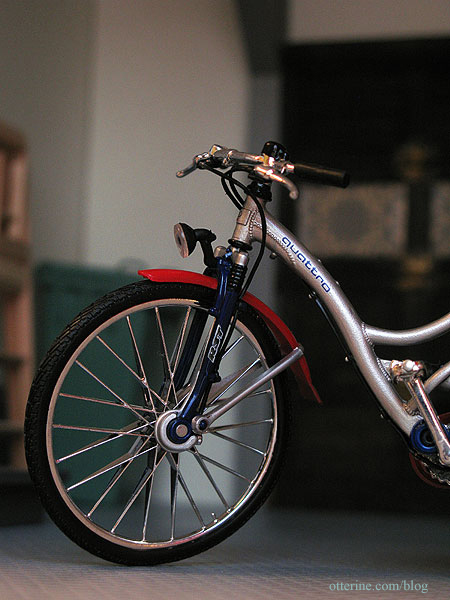
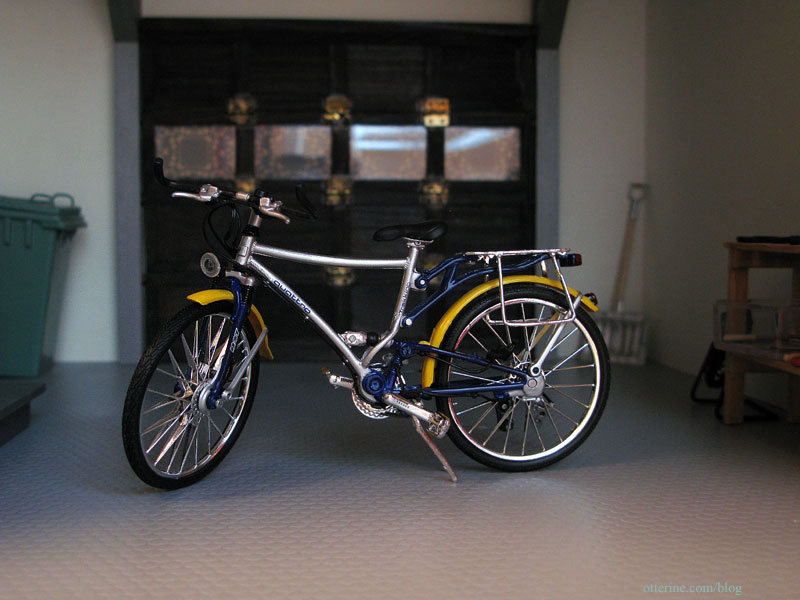
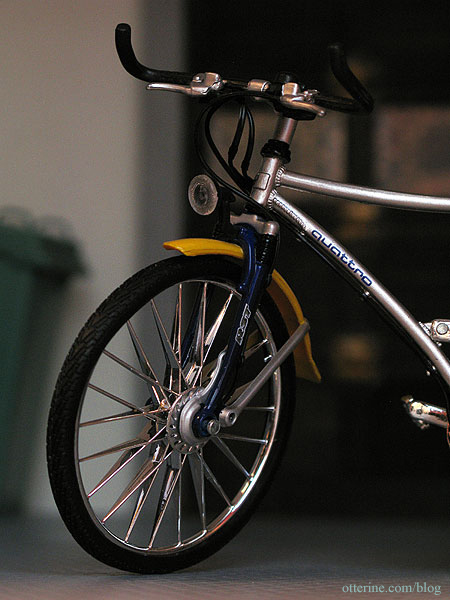
April 9, 2011 | 0 commentsMini bicycles
Now, I love my 1:14 scale remote control Audi TT, though in person it’s not as realistic as I would like. On the other hand, I just found some bicycles that are marvelously realistic! They are 1:12 scale diecast models by Maisto. First, the Audi Quattro Citybike.
And, the Audi Quattro Trekkingbike.
Finally, a Mercedes Benz Hybrid Bike. This should be the last of my collection, though. The three I bought were the ones I liked best.
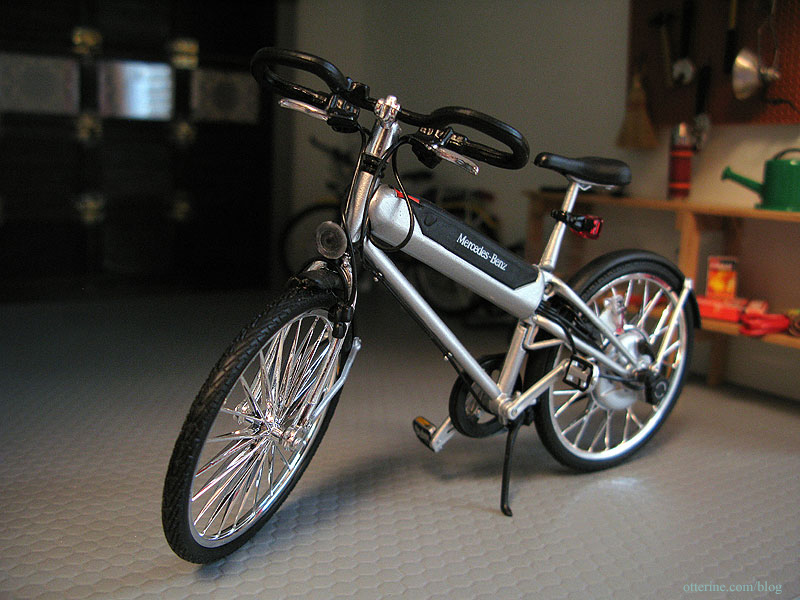
No, I haven’t kicked the Audi TT out, but I’ll have to figure out some storage solutions for the bicycles when the car is parked in the garage. I have a couple of ideas to keep it from feeling so cramped…though that is how most garages are.
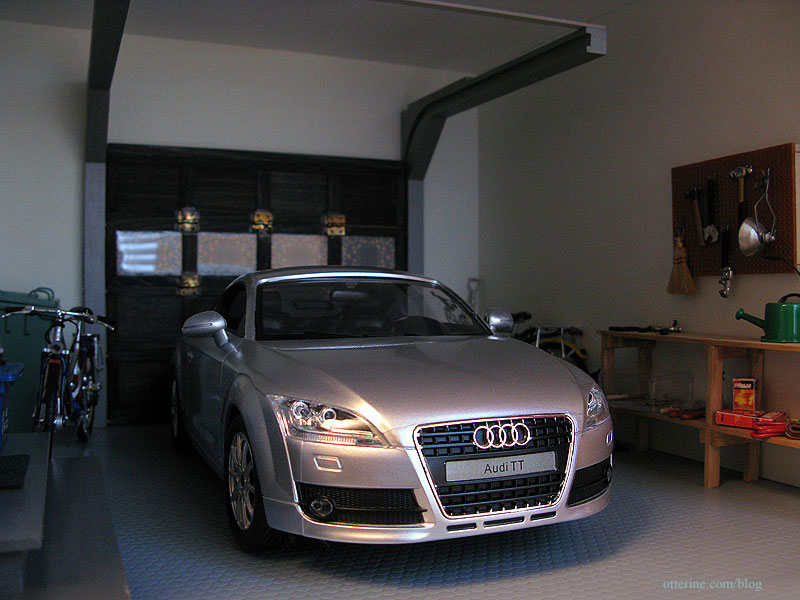
The more stuff I get crammed into the garage, the more realistic it feels. Yes, I know it’s insanely tidy, but it’s a new house. :D
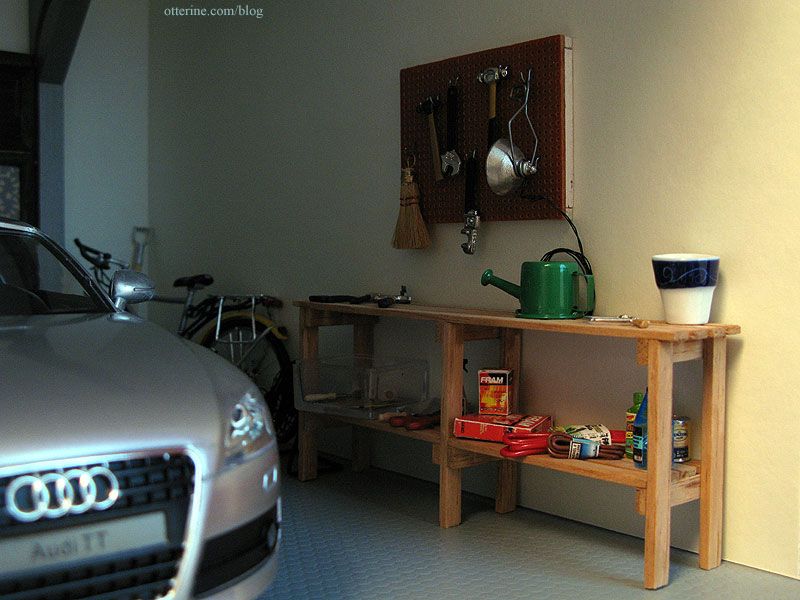
The shelves were made from balsa wood following instructions in the book Making Miniature Gardens by Freida Gray. The tools and accessories were all purchased, though I did paint a few of the tools to make them look more realistic. The pegboard has tiny hooks that can be moved around. The shop light works, too, though I don’t have it wired at the moment.
Categories: Model Cars, Vehicles
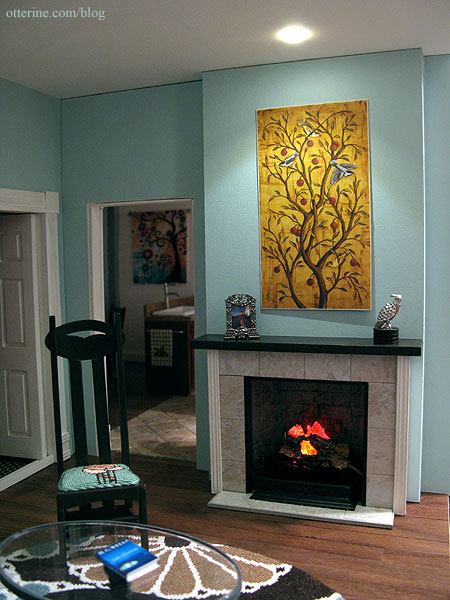
March 28, 2011 | 0 commentsInstalling NovaLyte LED Recessed Can Lights
Someone recently contacted me with questions about installing the NovaLyte recessed can lights, so I figured while I was replying I would post a blog entry on it in case anyone else was interested in how I installed them.
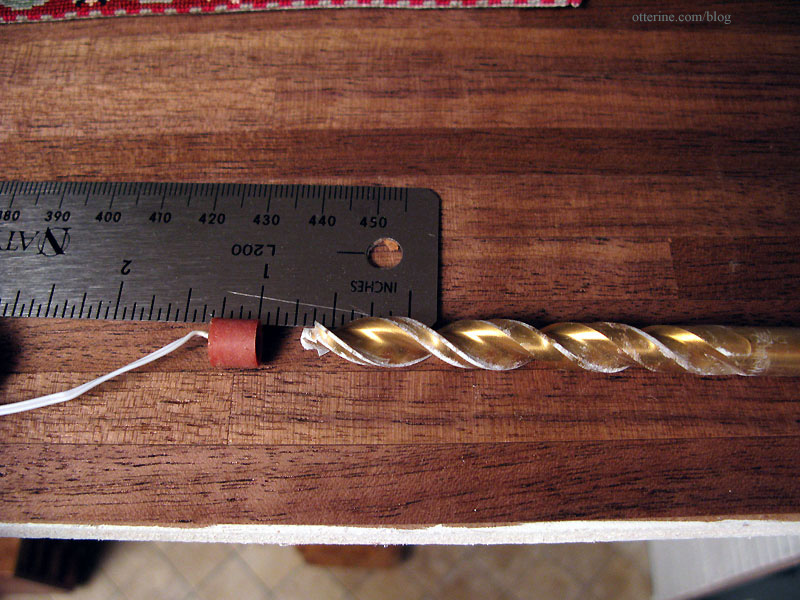
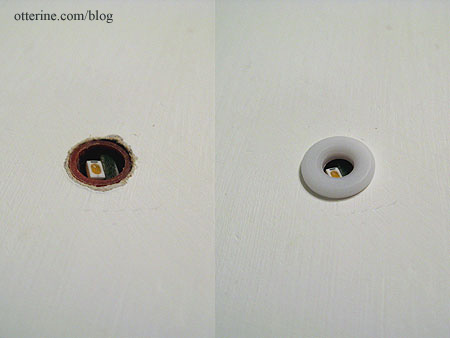
Here’s the LED without the finishing ring (that’s popped in place after you install the lights). According to the NovaLyte website (no longer active as of 2024), these measure 5/16″ L x 5/16″ W with a required clearance hole of 21/64″.
Here’s the LED with the 21/64″ Dewalt drill bit I used to make the clearance holes.
The walls and floors of the Newport are 3/8″ thick, so there was plenty of room for them to fit inside the drilled holes without having to build up the floor board. With thinner materials, you’ll need to pad either the ceiling these are lighting or the floor above to hide the excess. These are cohesive units and therefore can’t be cut down.
Here’s the light in place in the floor board. The can light illuminates the room below this floor. I found that feeding the wire up through the hole and pressing it in place gives a nice flush finish with the ceiling.
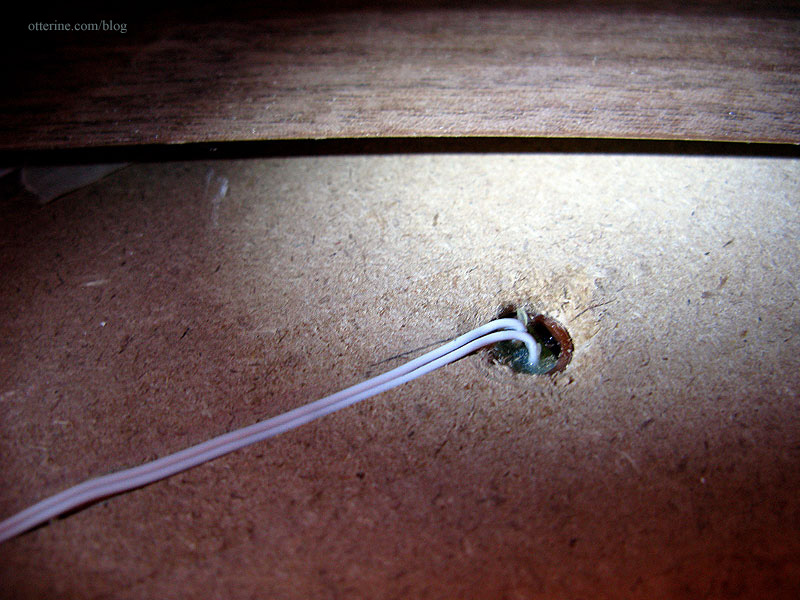
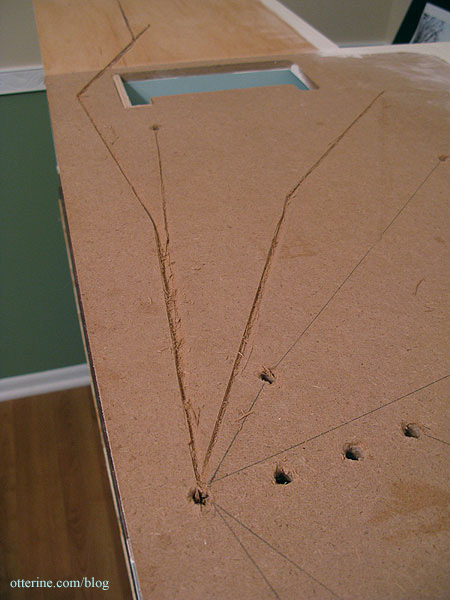
I’ve cut channels for my wires since I’ve hard-wired the Newport. If you’re working with tape wire, you’ll need to figure out how to best attach them. I know absolutely nothing about tape wire.
Using the 21/64″ drill bit gives the light a nice snug fit. The dress ring is then popped onto the light to finish it.
Here’s the finished look in the living room.
Categories: The Newport
January 26, 2011 | 0 comments


NOTE: All content on otterine.com is copyrighted and may not be reproduced in part or in whole. It takes a lot of time and effort to write and photograph for my blog. Please ask permission before reproducing any of my content. Please click for copyright notice and Pinterest use.


