

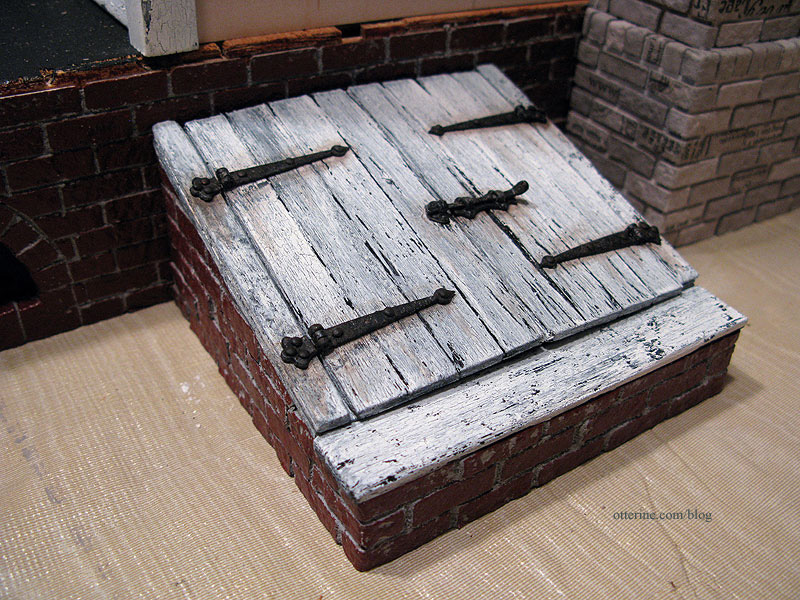
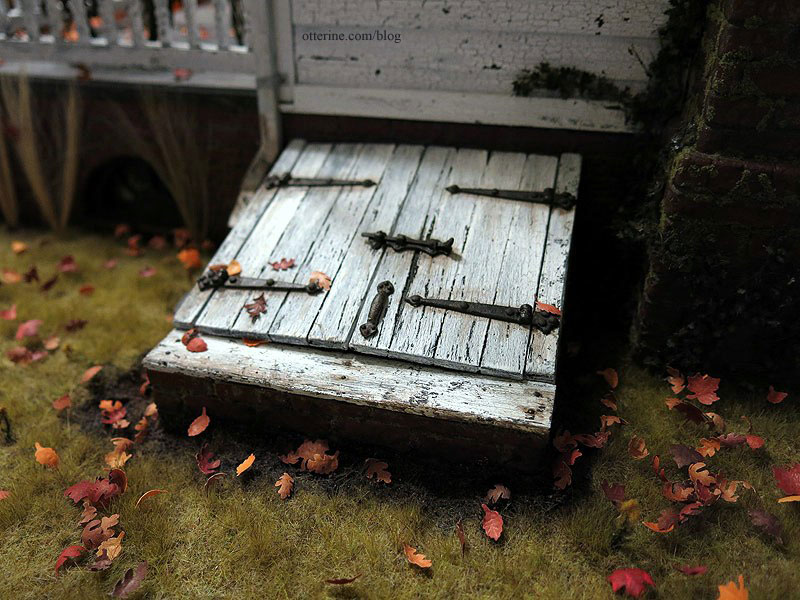
Heritage – cellar doors
I might end up putting in a flickering unit for the cellar lights and fireplaces, so I needed to plan ahead for an accessible place to hide the circuit board just in case. :D I figured a set of working cellar doors that allow access to the unit would be just the thing. And, who doesn’t think old cellar doors are creepy?
My inspiration comes from Jeremy Paul. I studied his design for the beautiful Tudor he is currently building, though I built mine out of foam core board, wood scraps and egg carton bricks.
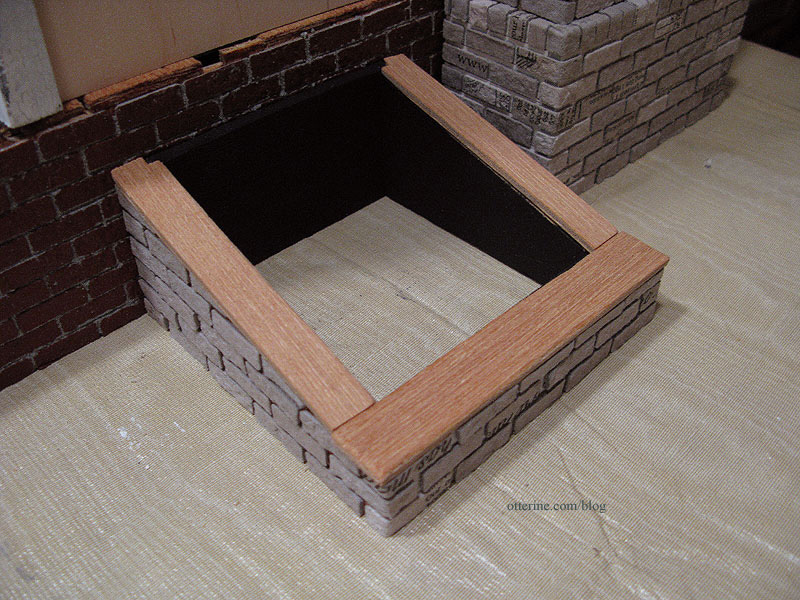
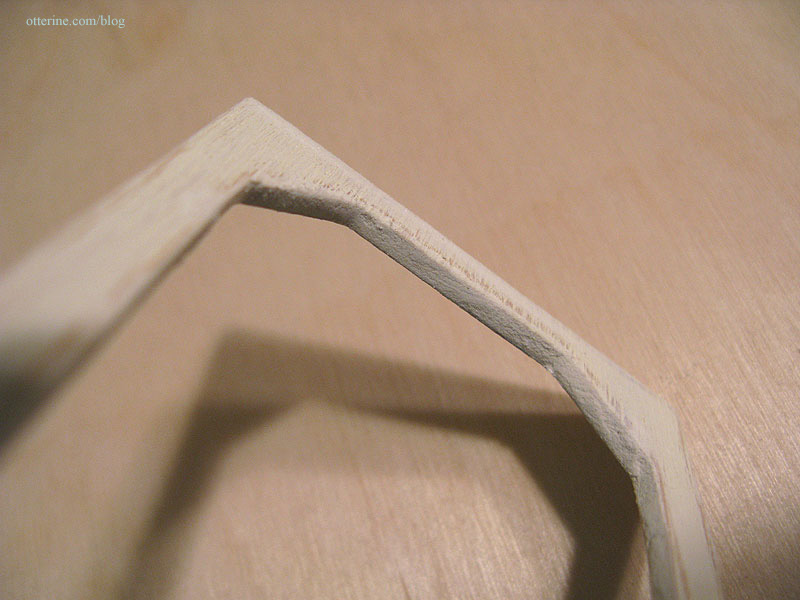
I started with a 1/4″ thick foam core board to get the general shape and size I wanted. I used 1/2″ thick foam core board for the front support and scrap wood from the Heritage kit for the back.
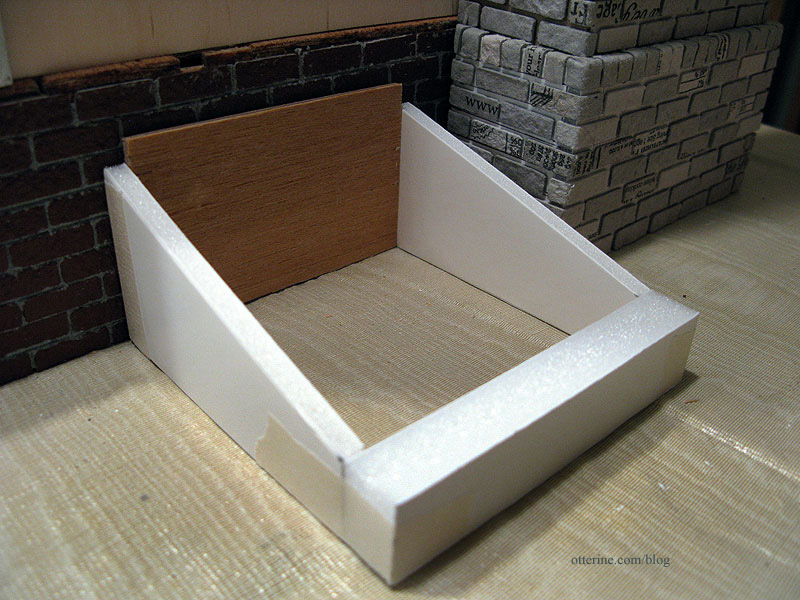
The back piece has a slight angle cut into it.
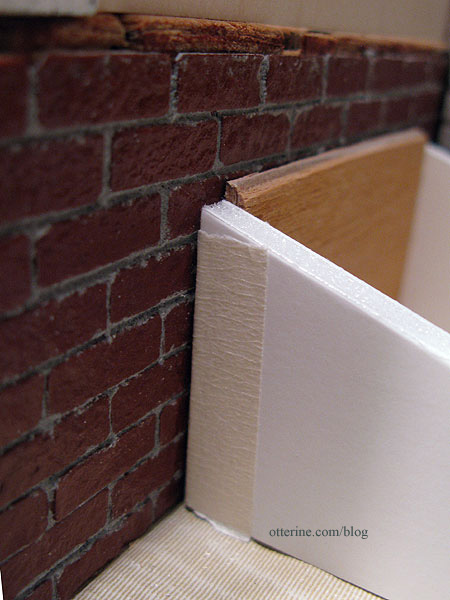
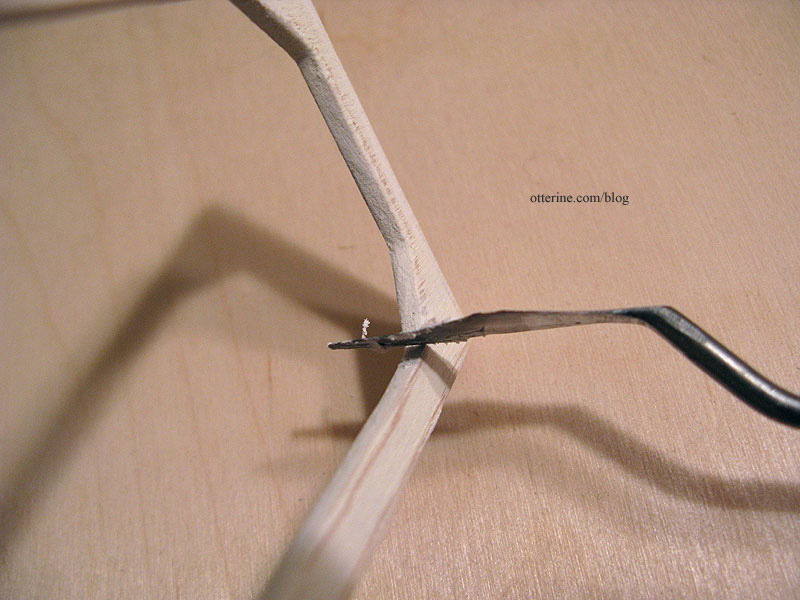
I glued more plywood scraps to the inside and outside for added stability.
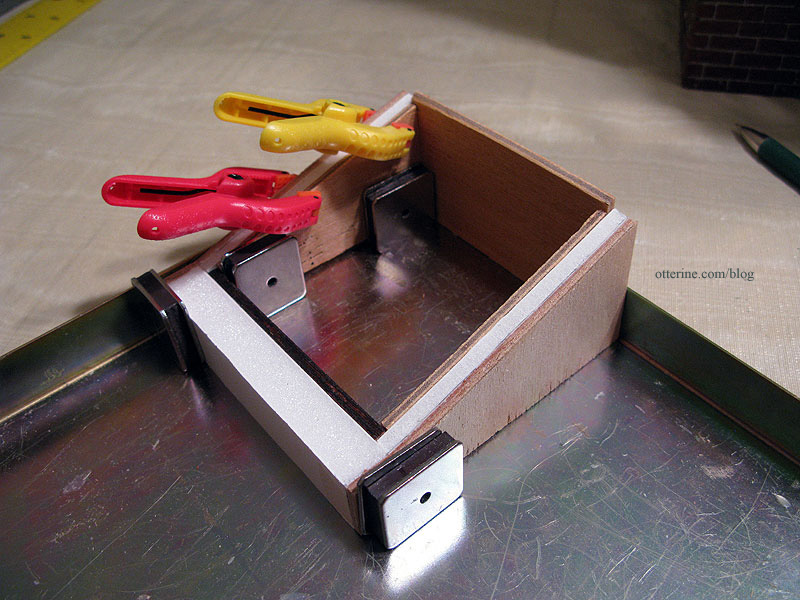
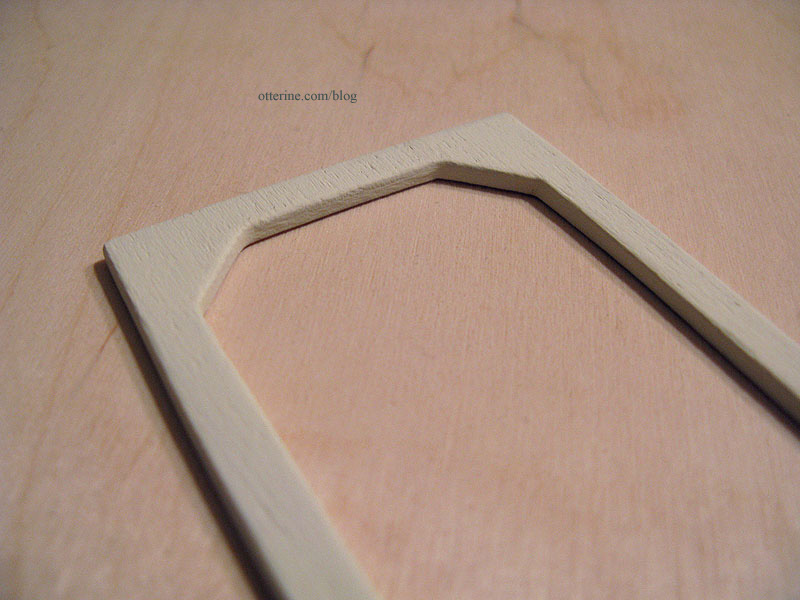
I covered the exterior with egg carton bricks painted and grouted to match the foundation. I sealed the interior wood with black paint.
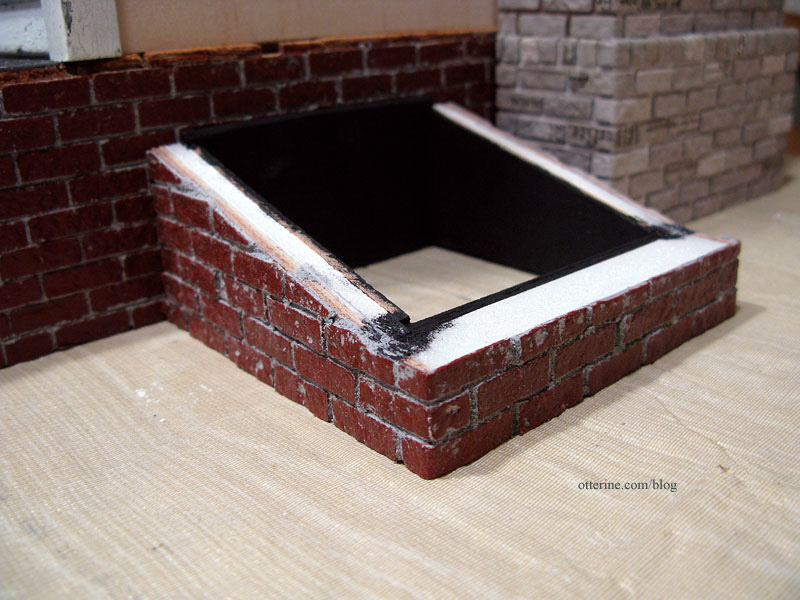
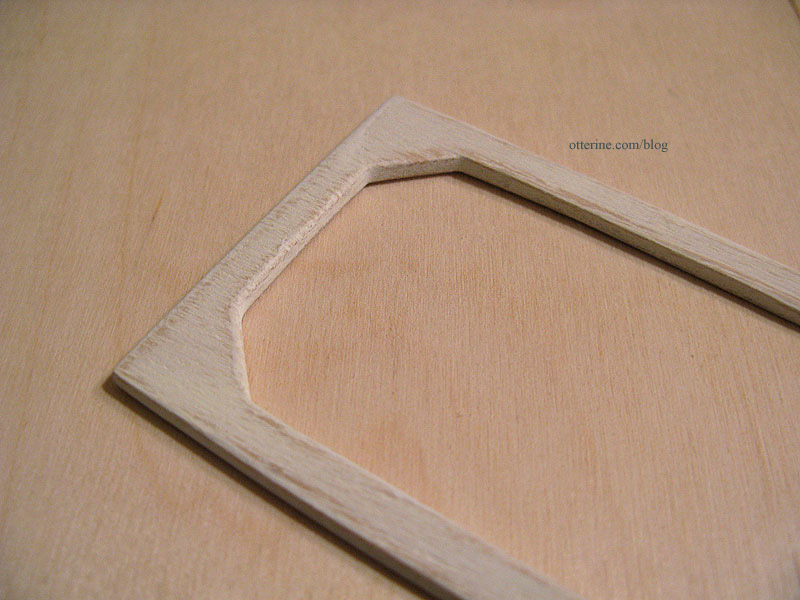
I covered the tops with plywood scraps to cover the exposed foam core centers.
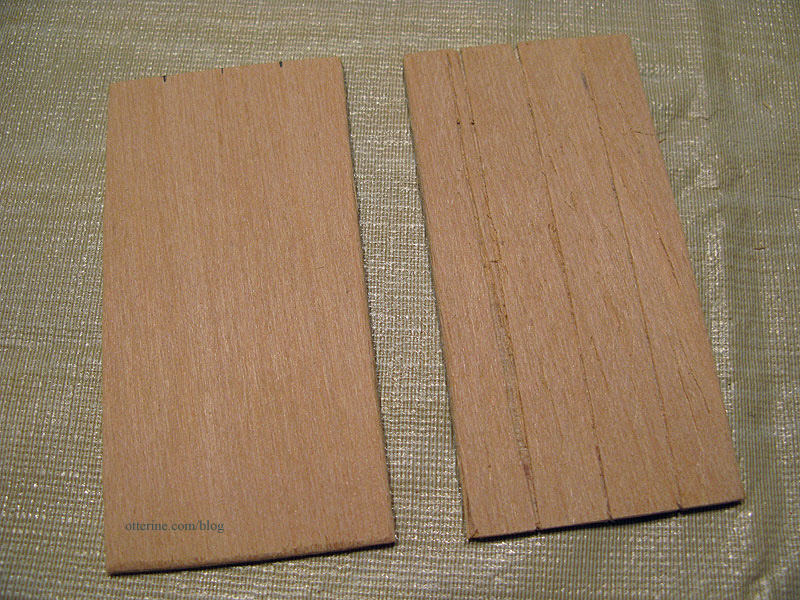
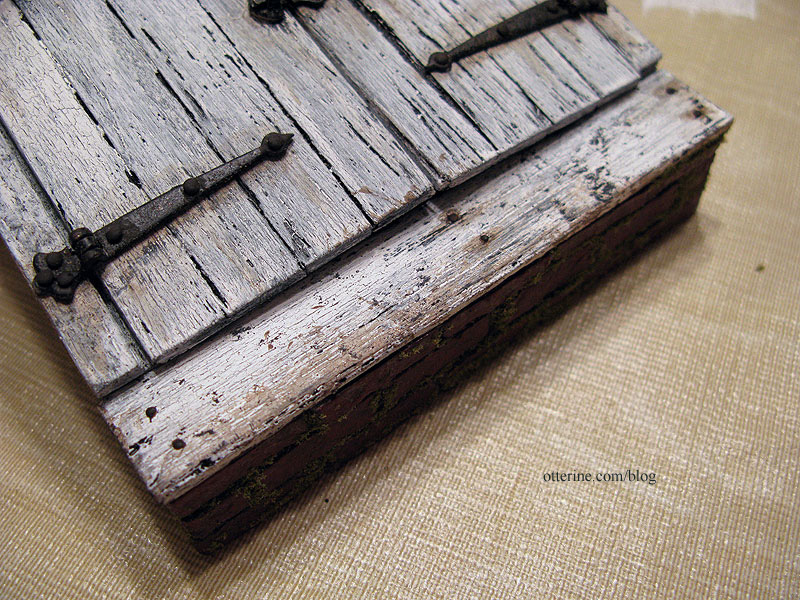
The doors are made from waste wood from the Heritage kit, scored to look like planks. It’s actually a positive that the wood is a little shoddy in this case! :D I did beat them up a bit more with an awl, though, to wear them out a bit more.
I painted and aged the wood in the same manner as the rest of the house. After fitting the doors in place, I glued another scrap of plywood to either side to hold the smaller end of the working hinges.
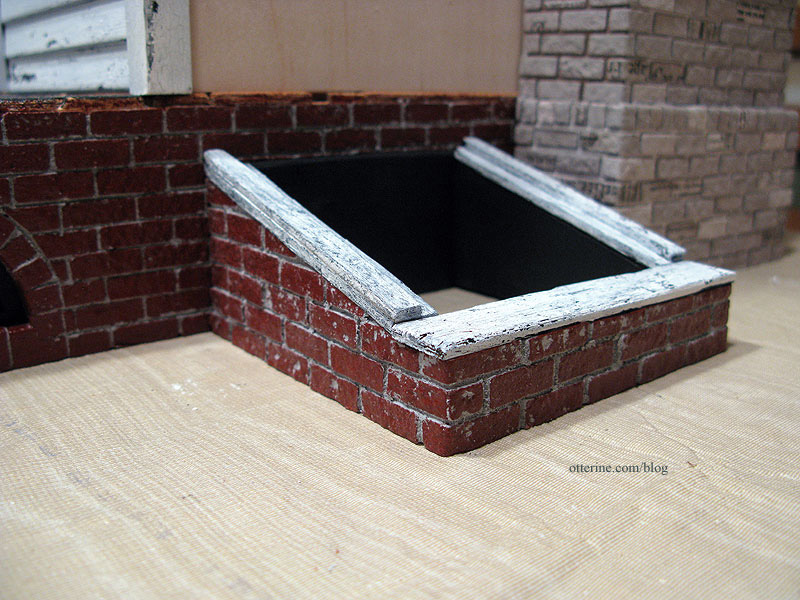
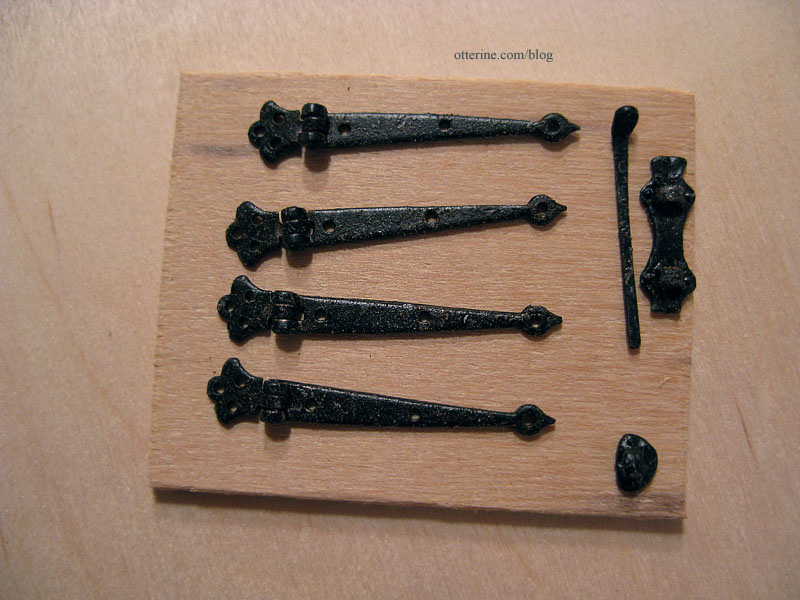
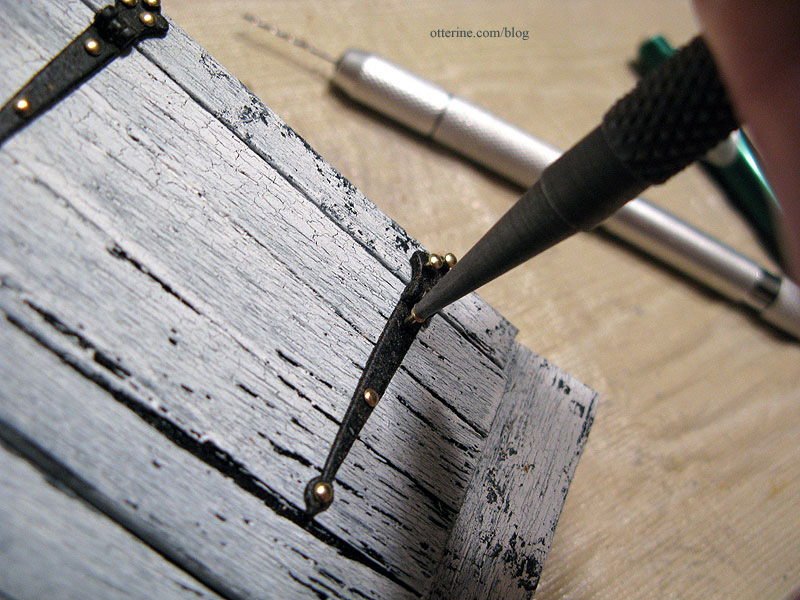
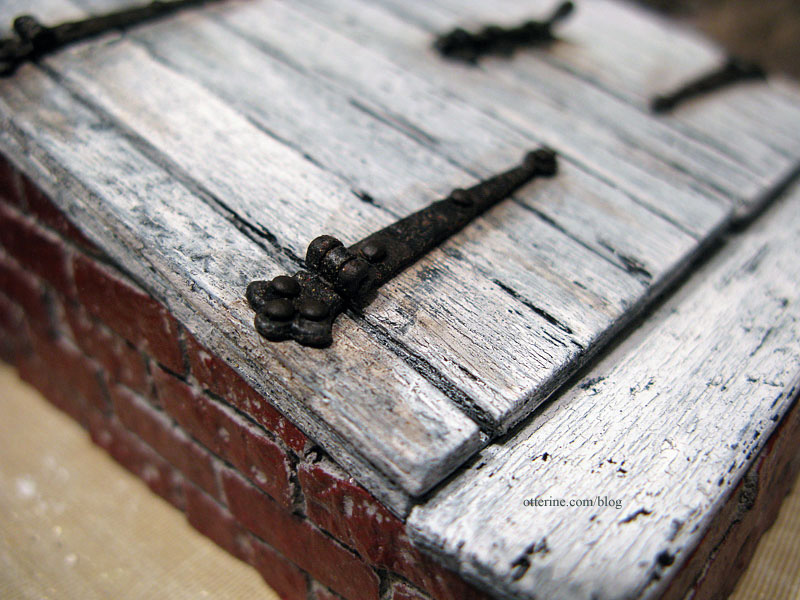
I used hinges by Dijon International and the latch is leftover from my Baslow Ranch supplies since I had built a custom wood latch for the barn door and didn’t end up using this latch. I sprayed them with Rustoleum brown paint but dabbed most of it off to keep it from binding the working parts. As it dried, I kept moving the hinges to make sure they would remain working. The paint gives it a nice rusted and corroded appearance.
To attach the hinges, I drilled pilot holes.
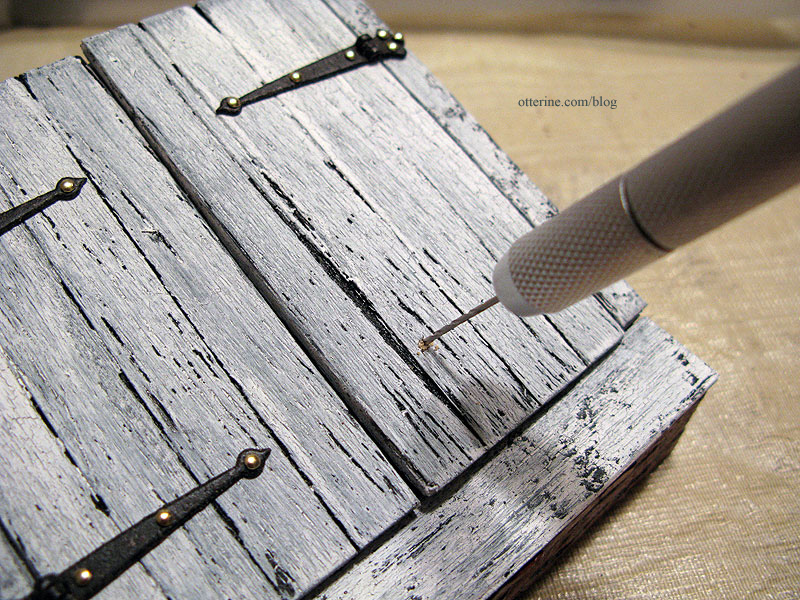
I then pushed in the nails as far as they would go by hand and followed up with a nail setter tapped with a rubber mallet.
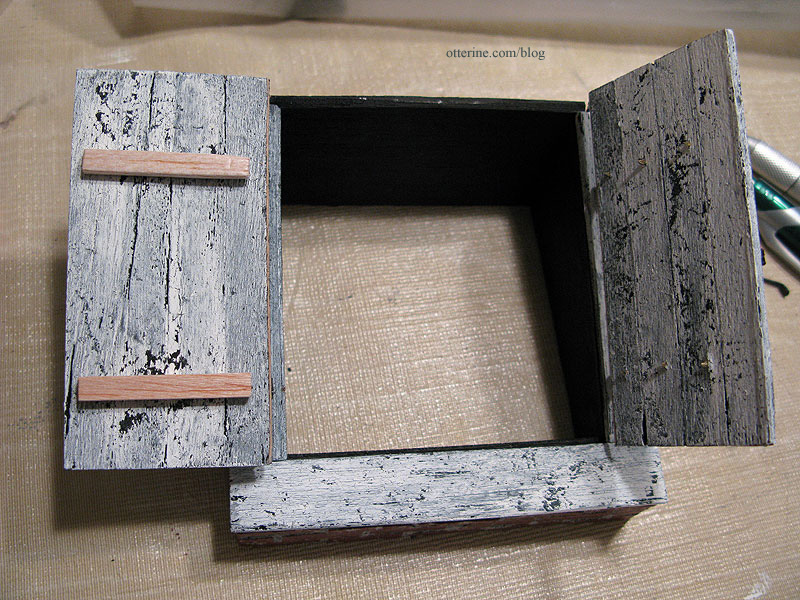
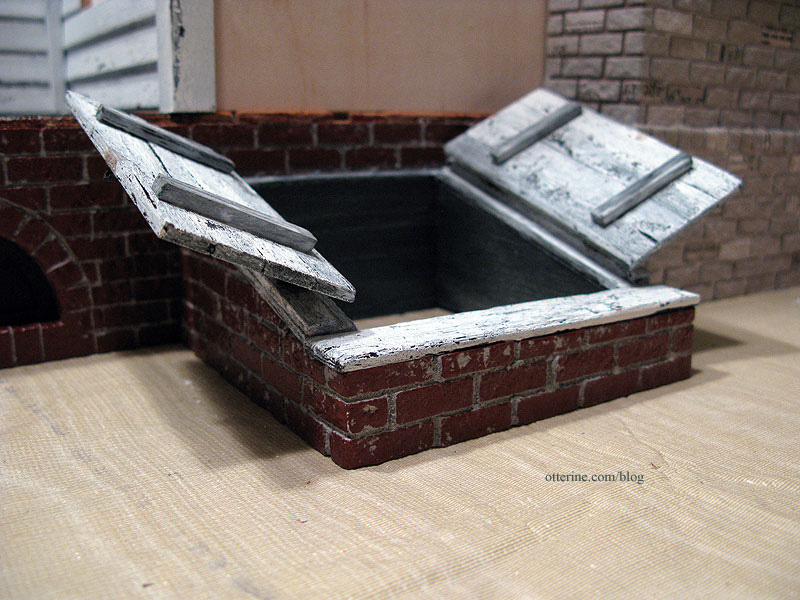
Even though the doors are made from a single board scored to look like planks, I added cross bars on the inner portion for added realism when the doors are open. I did this after all the pieces were assembled to make sure it wouldn’t interfere with the operation of the doors. I used balsa since it was easy to press over the nails sticking out on the underside of the doors.
The hinges come with bright brass nails, though, so I dabbed paint on them after assembly. I added a rusty paint wash around the hardware to age the wood. I love the effect of the textured paint on the hardware. :D
I’ll age the bricks and add moss later in the landscaping phase. I like that the doors ended up a little warped.
The whole assembly will be attached to the baseboard when I get to that part but for now is still removable. I’ll attach it after the chimney to make sure there’s no interference between the two.
I added old rusty nails.
I later added a handle as well.
Categories: The Haunted Heritage
September 26, 2011 | 0 commentsGriffins
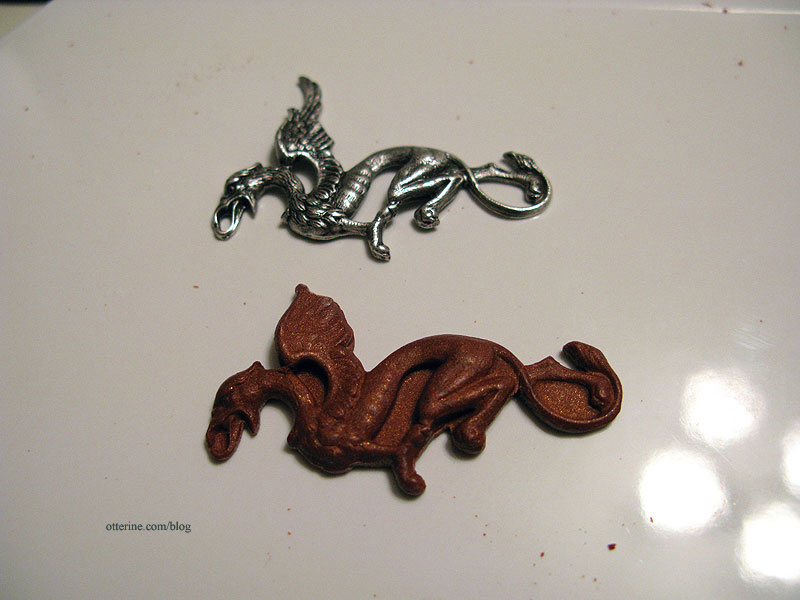
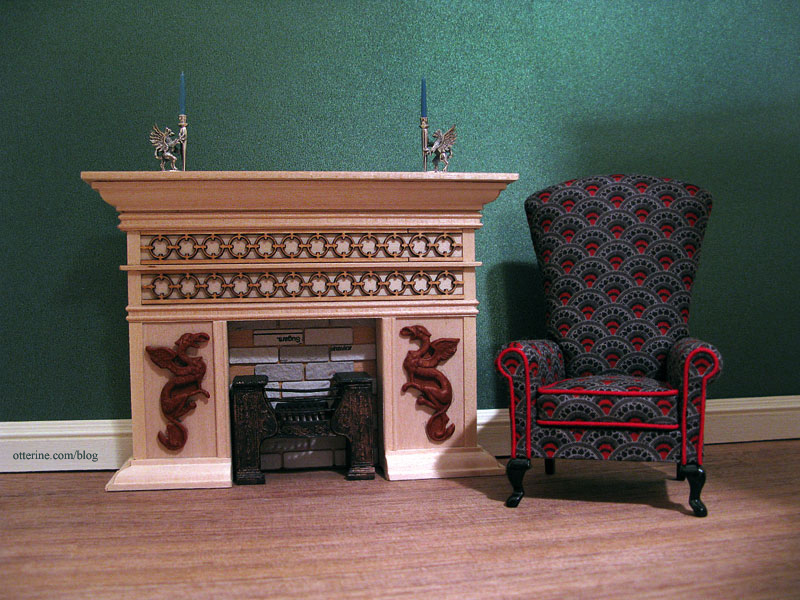
Continuing work on the fireplace. I’ve had this pin for quite a long time. It’s one of my favorite pieces of jewelry. I haven’t worn it in some time, so it needs to be cleaned!

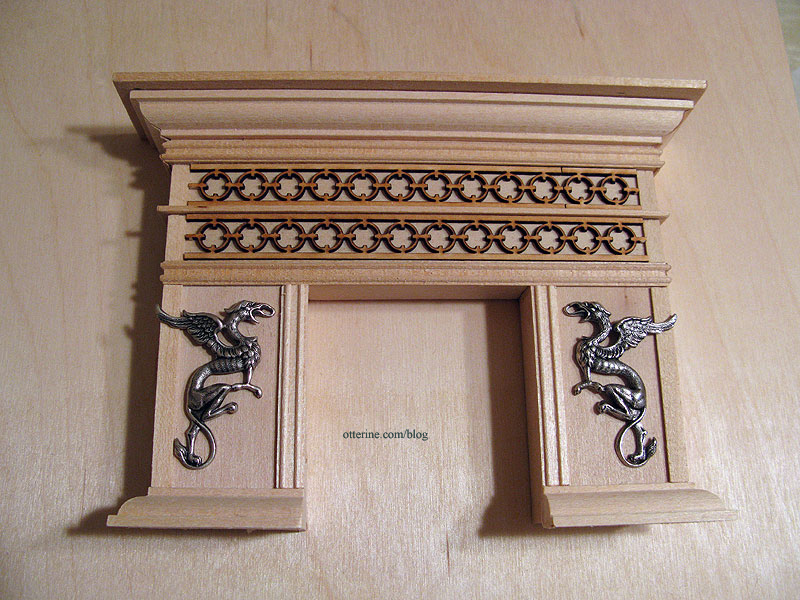
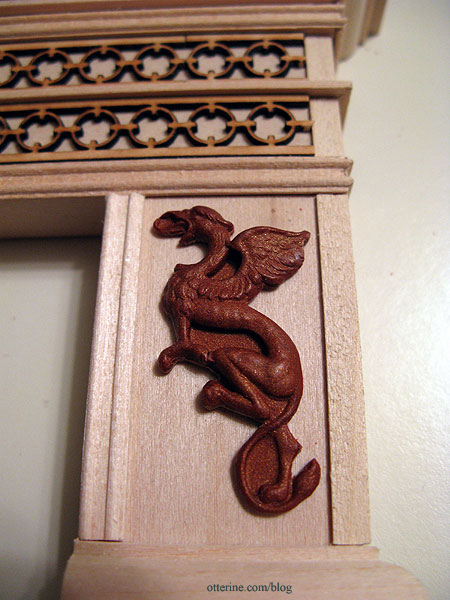
When I made the parlor fireplace, I left the two flat panels open for added designs. I really wanted to cast griffins for the areas, but as you can see, my griffin faces only one way.
I figured I might be able to find griffin earrings or pendants in mirror image in a style I liked well enough, but I never though I’d find the same griffins! They are larger than my original pin, though.
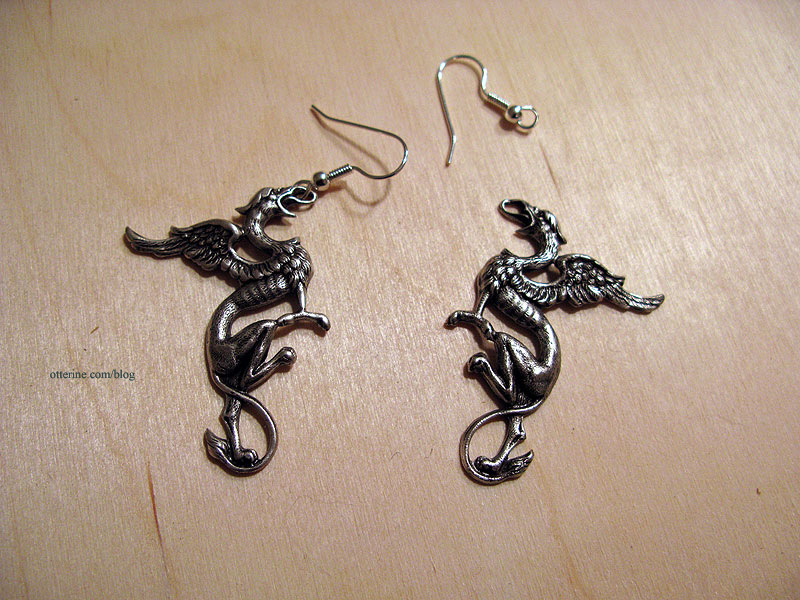
The only issue with the griffins was the fact that the wings were too big, so I planned to clip the long ends on my cast pieces. I didn’t think it would detract from the design.
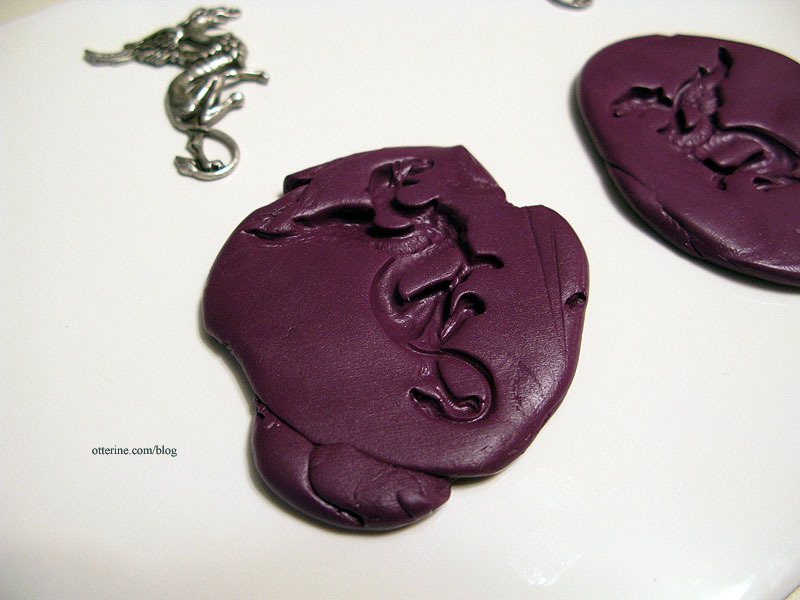
Using EasyMold silicone putty, I made molds of the griffins after carefully removing the earring wires. EasyMold is a two-part putty that you mix together. I tell you, this stuff feels weird!
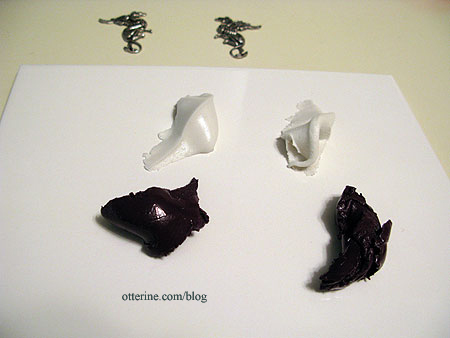
You press your original item into the mixed putty, which hardens in about 20 minutes, to make the mold. I pressed the griffins in with a board since they are thin and flat in areas. It made for a more uniform placement in the putty.
I then had to let the mold cure for 24 hours before making casts using DAP plaster of paris. Plaster is one of the few materials that requires you wait to use the mold. I had doubts that this was the proper material since the griffins are so delicate, but I gave it a try anyway. I wiped away the excess and let them set the required time. (Note: this was before I had experience with casting resin.)
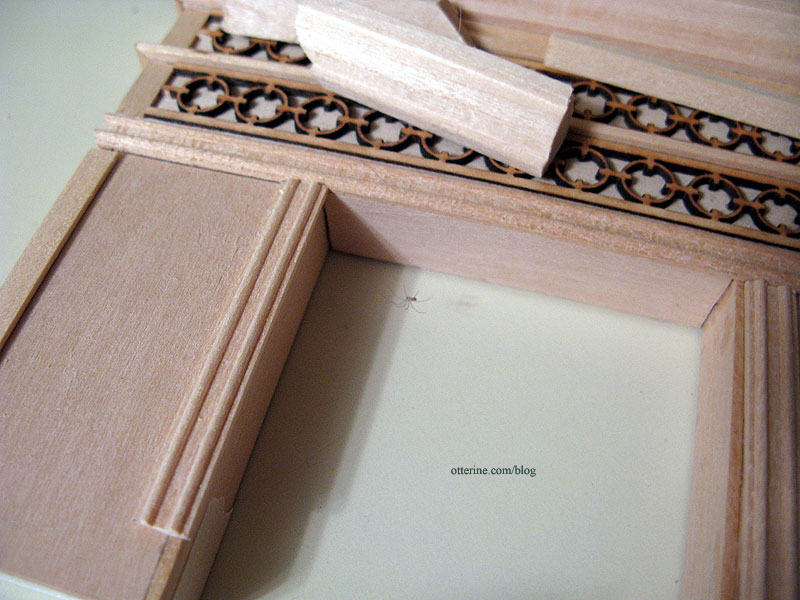
While I was waiting, I noticed something amiss…a tiny spider in my fireplace. Apparently I’m not working on the fireplace fast enough. :D Do you suppose in 1:12 scale, it’d be like a giant wolf spider hanging in there?! =shudder=
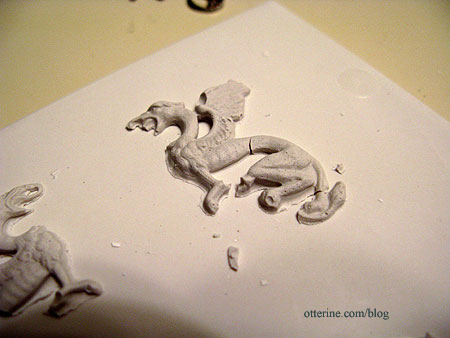
Once the time was up, I released them from the molds to find my suspicions were correct. The griffins are just too thin and fine for the plaster to work. The pieces broke, but it was nice to see the amount of detail the silicone mold had captured.
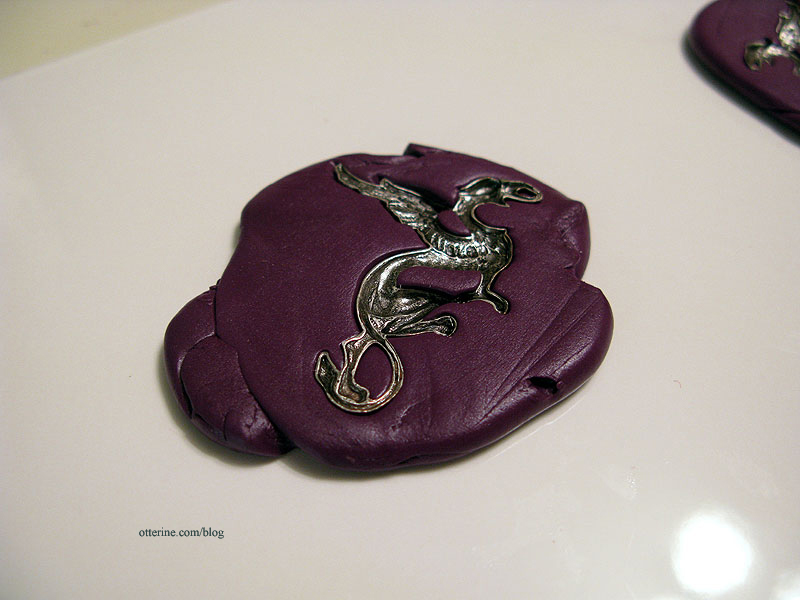
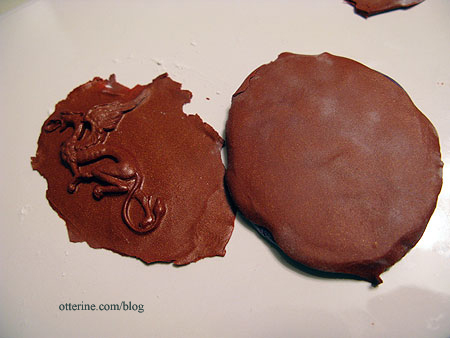
My second material was Pardo jewelry clay – pretty much just metallic polymer clay – in Tiger’s Eye, a coppery brown. I used this mainly because it was soft and the project I originally bought it for never came to fruition.
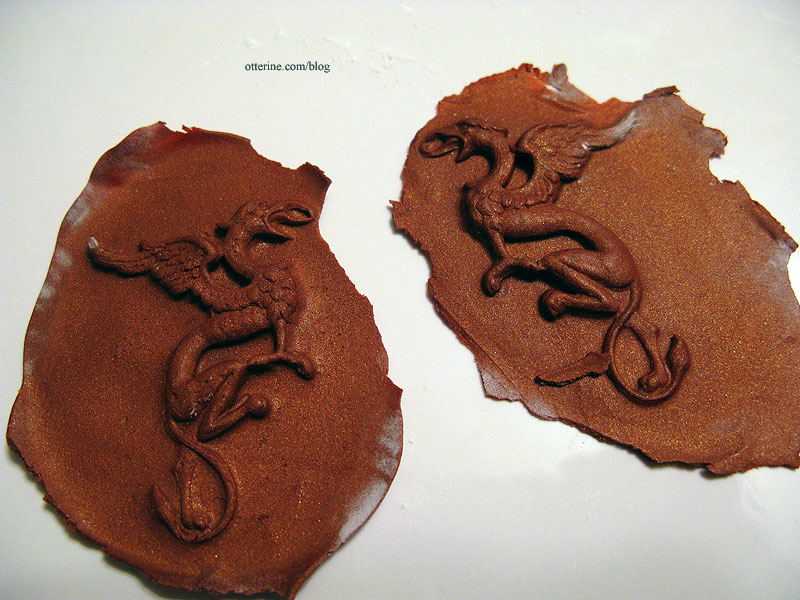
I pressed the clay into the mold and had planned to bake the clay while still in the molds. You can do that with these silicone molds, which I think is awesome. I put a bit of powder on the flat back and rolled with a rolling pin. One of the griffins came out of the mold during this process, and it was so well formed that I decided to just bake it out of the mold. I thought about cutting away the excess while the clay was pliable but I didn’t want to risk marring the design.
They turned out well.
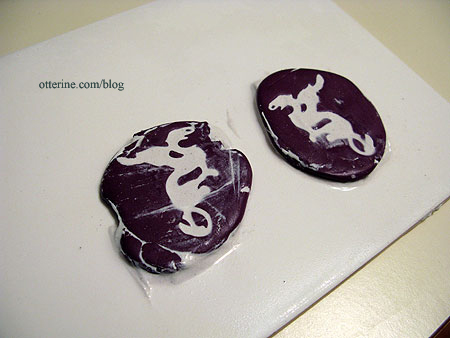
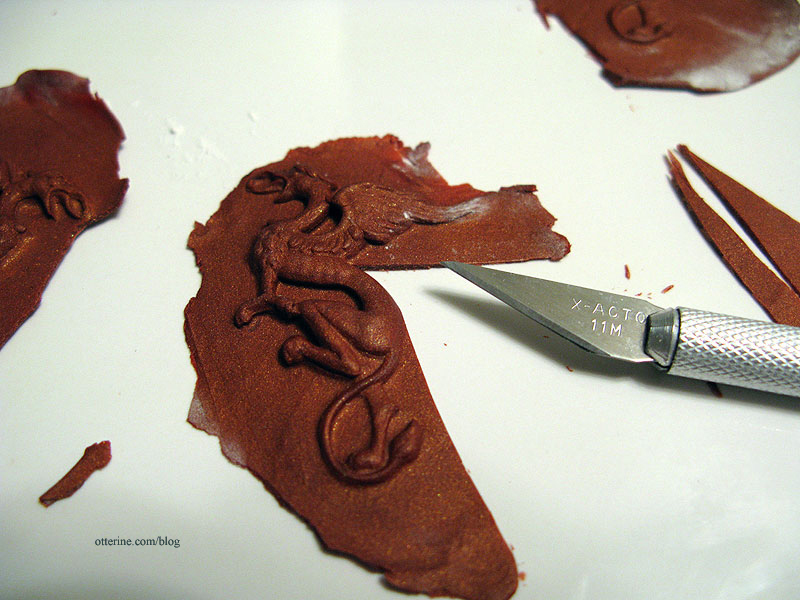
But, then I had to cut the excess off with an X-Acto knife. This was not easy, and I did end up with a few breaks.
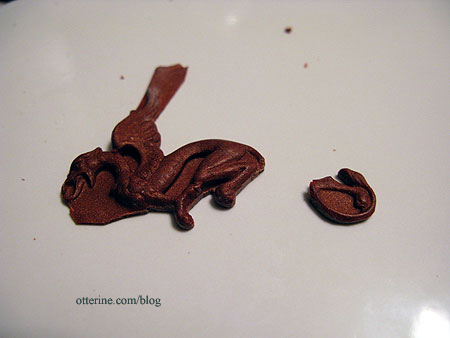
I think they turned out remarkably well, though, and I plan to use these as is.
One griffin doesn’t have the same fine detail as the other (a flaw of the original silver pieces), so they do look a bit different from one another.
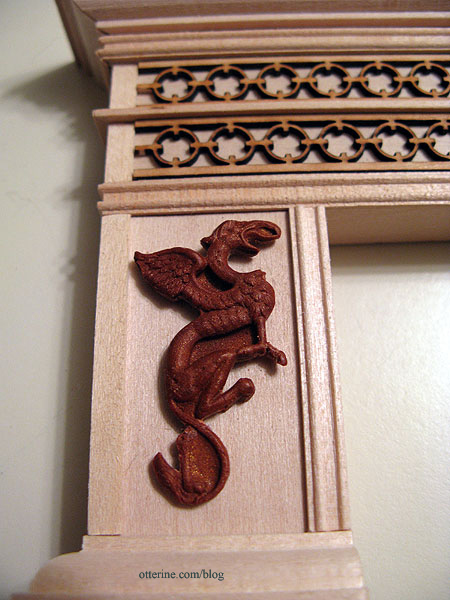
Once the whole thing is assembled and painted, I doubt these minor issues will even show anymore. Besides, a couple of imperfections on an old fireplace would hardly be out of the norm.
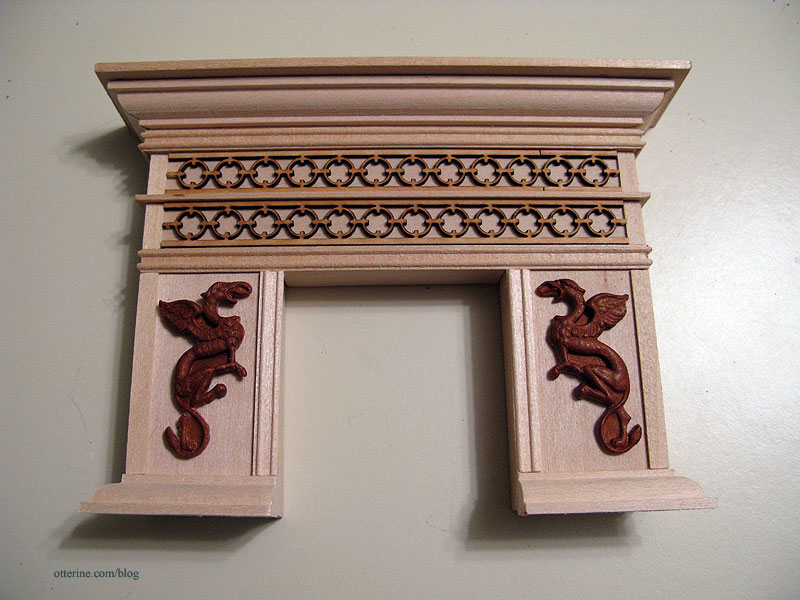
Nothing says spooky like adding a pair of mystical creatures!
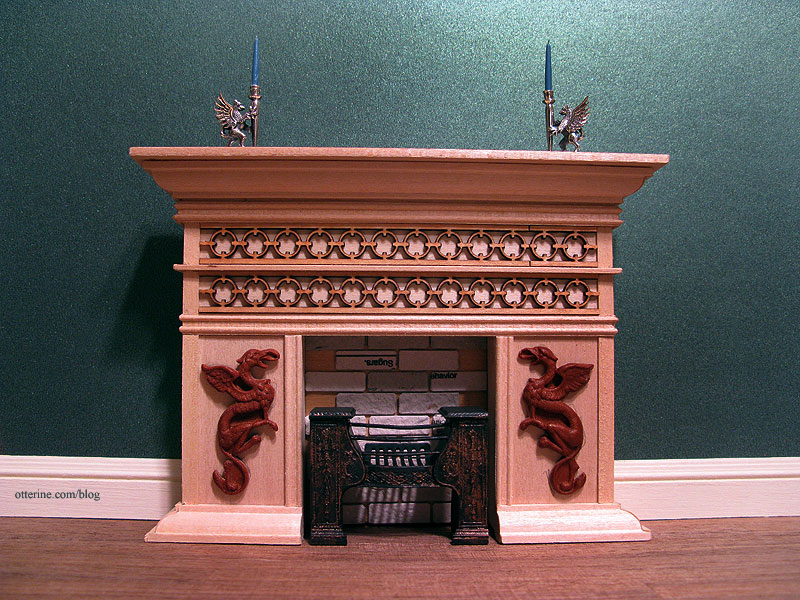
Accessories include griffin candlesticks by Don Henry, The Chair by Kris at 1 Inch Minis and the Phoenix parlour hob grate I put together and painted.
Categories: The Haunted Heritage
September 23, 2011 | 0 commentsRepairing shoddy wood
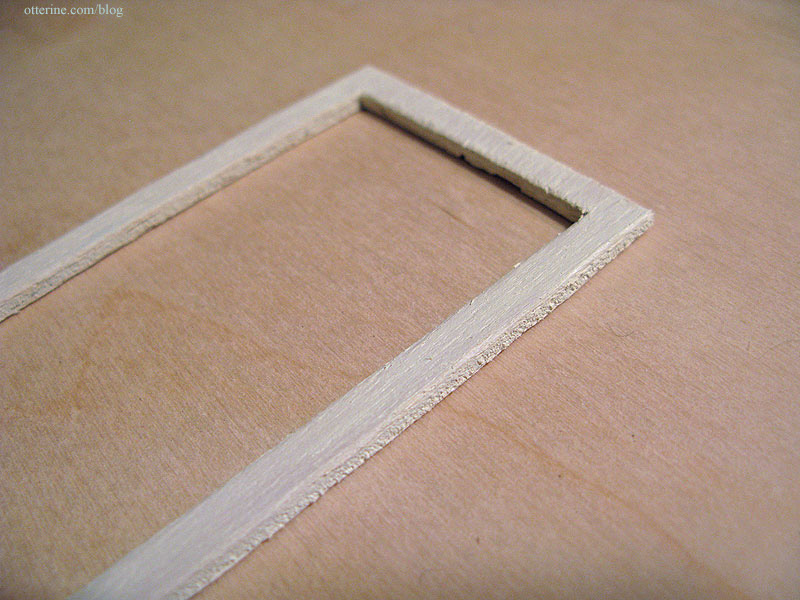
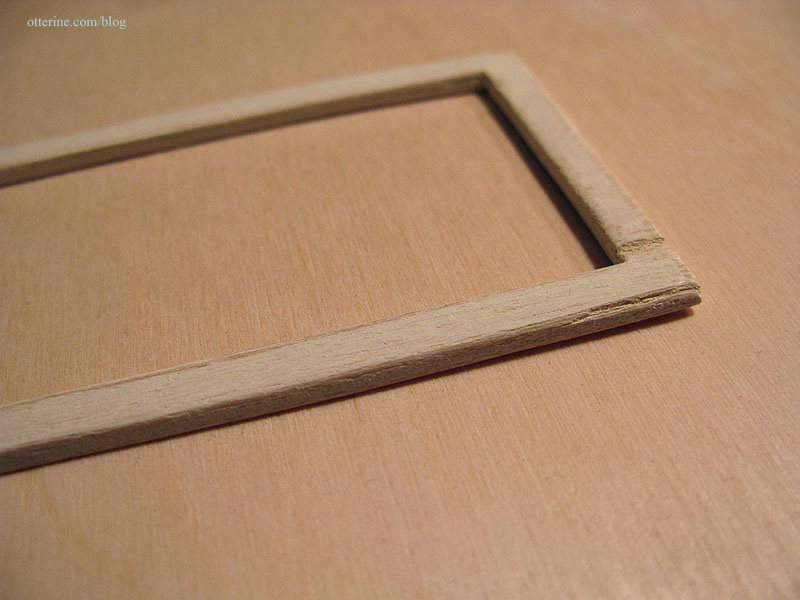
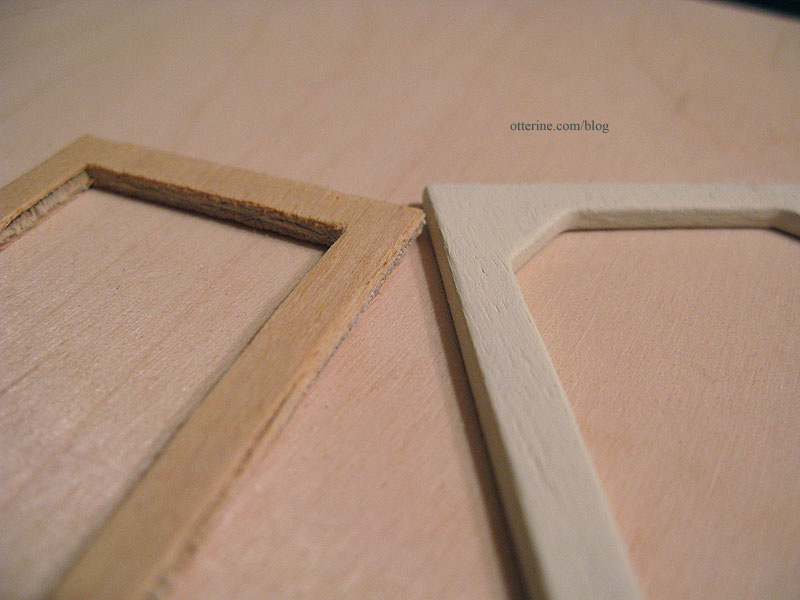
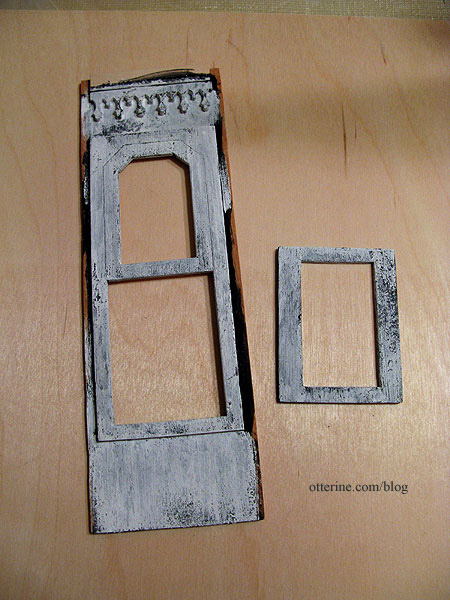
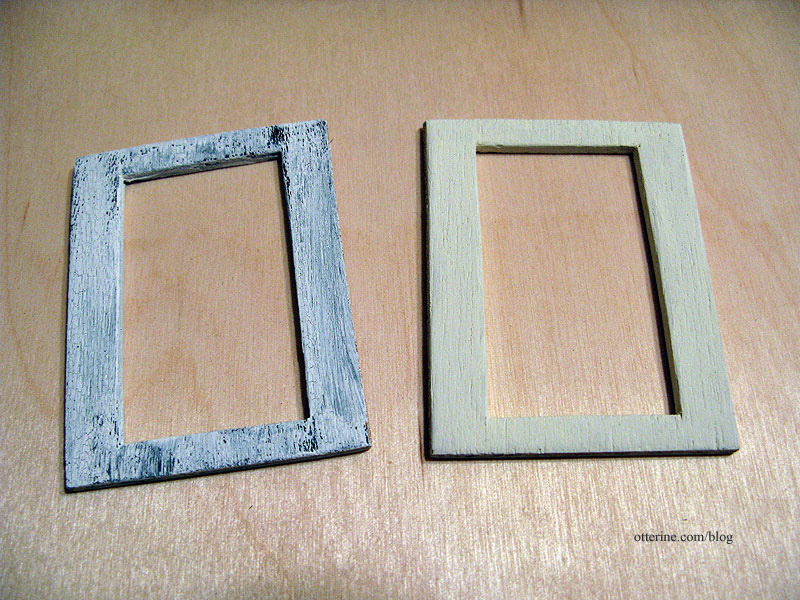
I’m guessing there are other ways to do this, but this is the method that works for me. The die-cut kit parts for the Heritage are mostly good, though a few are just plain awful. They are both dried up and poorly cut…stamped more than die-cut, actually. They are splintered and brittle.
I first cut them out from the frames with a blade trying to limit the splinters and uneven edges. I then sand them lightly to remove the obvious imperfections. I use 320 grit sandpaper since I mainly want to remove the top layers and not reshape the pieces.
As you can see, the wood is still pretty lousy – especially on the edges.

I paint one coat of acrylic, keeping the layer even and thin. I also paint in the direction of the grain instead of across it. Yes, it looks worse before it gets better. :\
I let it dry completely, even overnight before doing the next bit of sanding. The paint bonds to the wood fibers and makes it easier to achieve a smooth finish. I end up taking quite a bit of this first layer of paint off with sanding. It already looks better, even with those two bad places still needing repair.
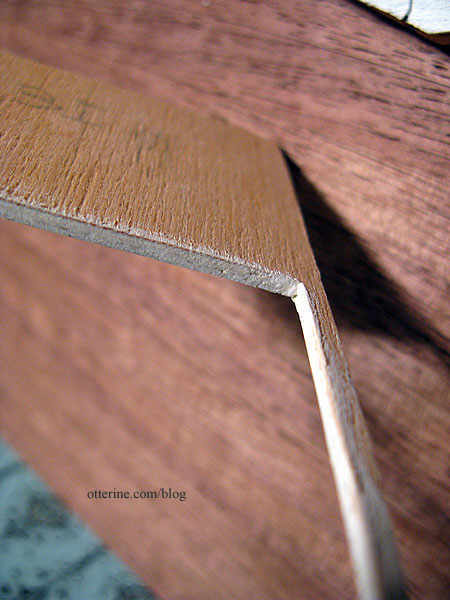
I then spackle any imperfections along the edges, applying the compound with my fingers. It’s easier than trying to use a large tool for application and the main objective is to push the spackling into the tiny gaps in the wood. Other than repairing obvious or larger flaws, I keep the spackling only on the edges. I don’t want to take away the wood grain by filling in the face of the frame.
When it builds up in the angles or corners, I clear out the excess with an old painting palette knife that’s seen better days…but it’s one of the most valuable tools in my miniature making toolbox! :D
After this has dried completely, I sand again. If there are any more obvious imperfections, I spackle those and wait for it to dry again.
I wipe down the piece to remove as much dust as possible and paint, again keeping with the grain of the wood. The key is to work with light layers and use long brushstrokes. The leftover dust will make the paint gum up a bit if it’s applied too heavily or overworked.
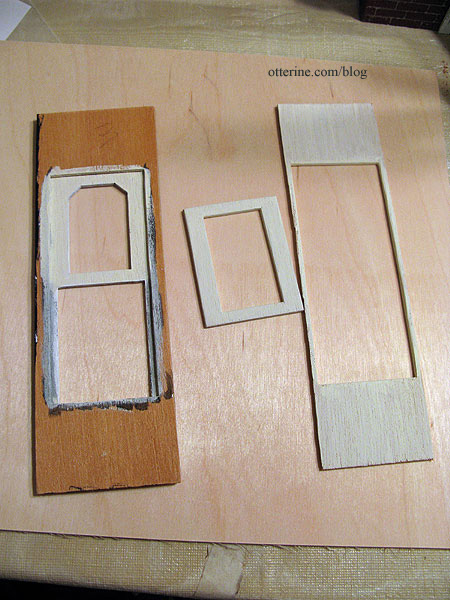
And, here we are…painted wood with a nice finish. :D
I don’t always use a sealer – depends on the type of finish I want. For interior trims, I leave them unsealed for a perfect matte finish.

This is a part freshly cut from the frame compared to my new finished piece.
Categories: The Haunted Heritage
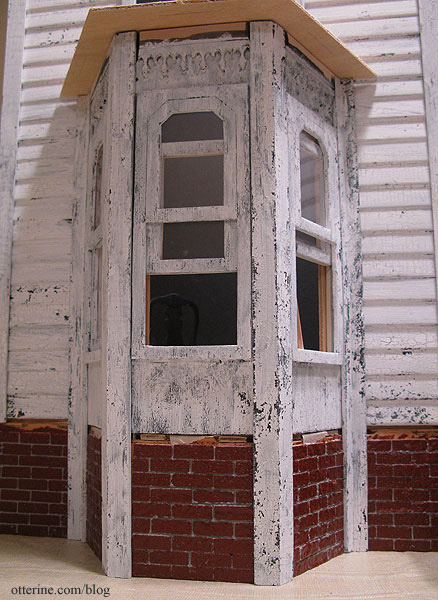
September 20, 2011 | 0 commentsHeritage – front bay window, part 4
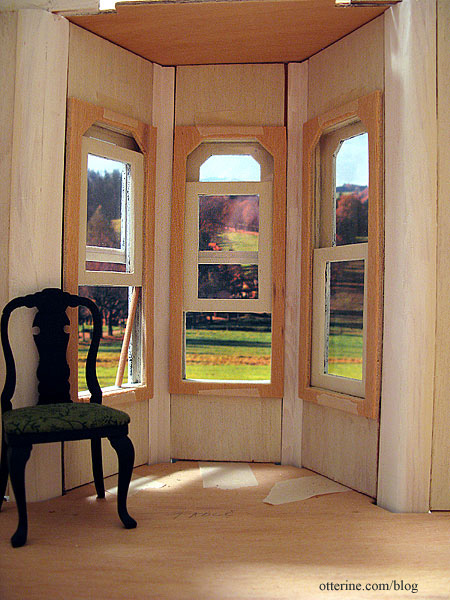
The outer bay windows have been finished with white paint crackled over the black base color.
I painted the portions of the inner and outer frames that would show on the interior with Vintage White by Folk Art. I painted the inner window sliding frames the same color. Even though the inner walls won’t show after wallpapering, I went ahead and painted those since the acrylic paint seals the wood for better wallpaper application.
For the pieces that would be on the interior, I spackled the rough die-cut edges and tried to smooth the not-so-great wood the best I could. I wanted it old not dilapidated.
I also opted to make the sliding portion of the window out of the two larger slider pieces that fit into the bay wall pieces, instead of using one bay wall large slider and one interior small slider. This might not make any sense to anyone other than a Heritage kit builder, but it worked better for what I had done with the wall padding. I eliminated the interior sliders altogether since they were just such shoddy wood and I didn’t need them to make the windows function.
I replaced the printed acetate windows with clear acetate. In order to sandwich a thin piece of acetate between two pieces of wood, I had to leave a space around the acetate to put glue so the wood pieces would bond together. The acetate has some thickness to it, obviously, so I had to clamp it all the way around until completely dry. Quite the contraption, no? :D

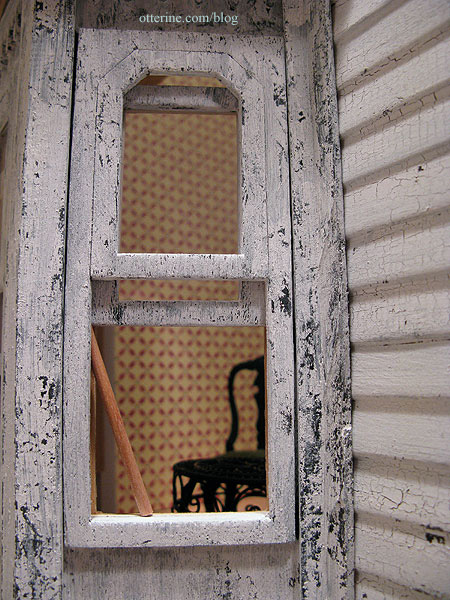
As I mentioned before, one window assembly is completely glued together and the window is shut. The wood for these pieces was beyond repair. (I love this shot!)
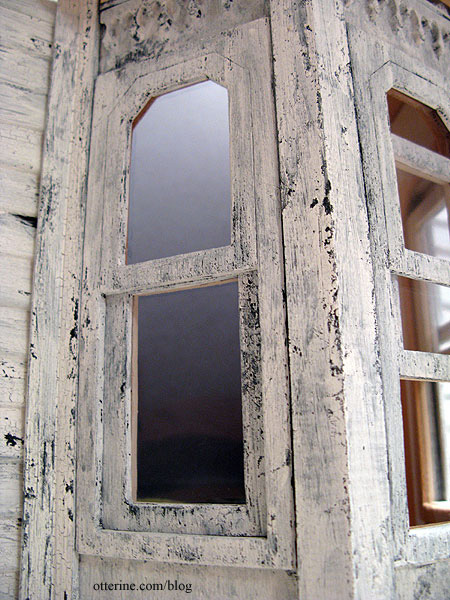
But, guess what? Two of the windows work!!!! :D The second window is set partially open, and though the window slider isn’t glued in place, the wood for this assembly is not in the best condition and doesn’t allow for very fluid raising and lowering of the window. But, it works!
The third window, however, works so well that I need a dowel to keep it propped open! :D How positively wonderful! (Love this shot, too!) It’s just like a real life old house – one window is painted shut, one window sticks and one won’t stay open!!! :D
The exterior corbels and trim still need to be added, but it’s starting to take shape, no?

I had such good luck saving some of the interior wood with spackling, sanding and painting that I am going to attempt to get these interior window trim arches to work as well.
Categories: The Haunted Heritage
September 18, 2011 | 0 commentsBeautiful umbrellas by Fran
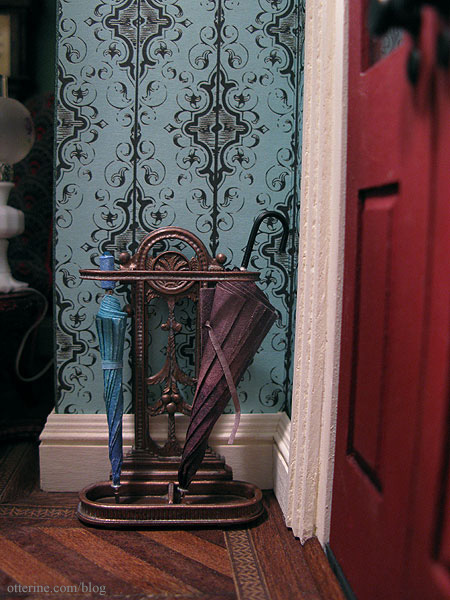
Some time back, Fran of FranMadeMinis and I started an email exchange. At that time, I discovered that she makes some of the most remarkable miniature umbrellas and luggage. I just knew I had to have one of these marvelous creations, but it ended up turning into two. :D Funny how that is.
To give her a sense of what I was looking for, I had to give her the backstory on the Heritage build. I told her I was leaning toward an old woman living in the house she’s always loved, but she can’t get around as well anymore and the place has fallen into disrepair. I didn’t want the umbrellas to be crazy tattered, just maybe a bit worn and well loved. I was thinking the umbrellas would be treasures in the house, even with – or especially because of – their age. One would be her lost love’s umbrella that didn’t feel right being anywhere else but still waiting by the door and the other would be the one he bought for her.
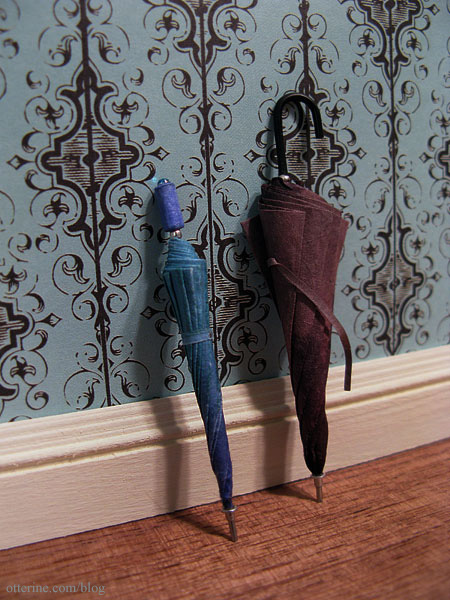
Aren’t they awesome? She completely captured what I was talking about! I love the faded classic black and the soft blues she used.

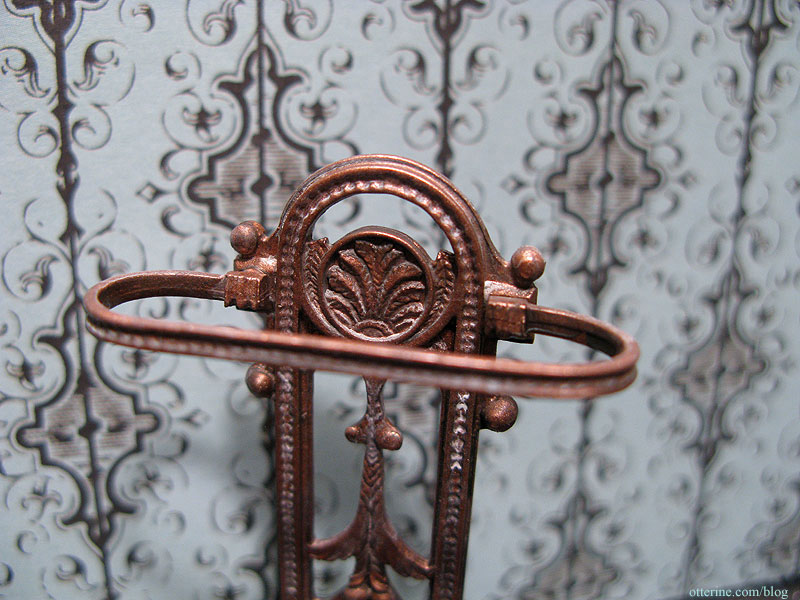
I assembled a Phoenix Model umbrella stand kit to display the umbrellas. I primed it with grey and then sprayed it Burnished Copper Metal by Rustoleum.
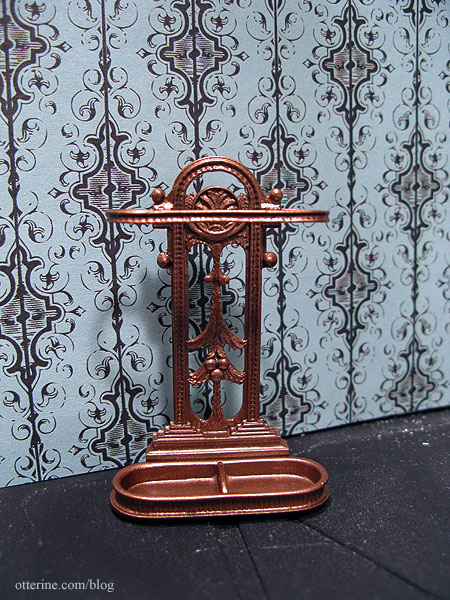
Once that was dry, I added a few paint washes. A few simple washes actually add weight to the piece, make it seem like a heavy piece you might stub your toe on if you’re not careful.
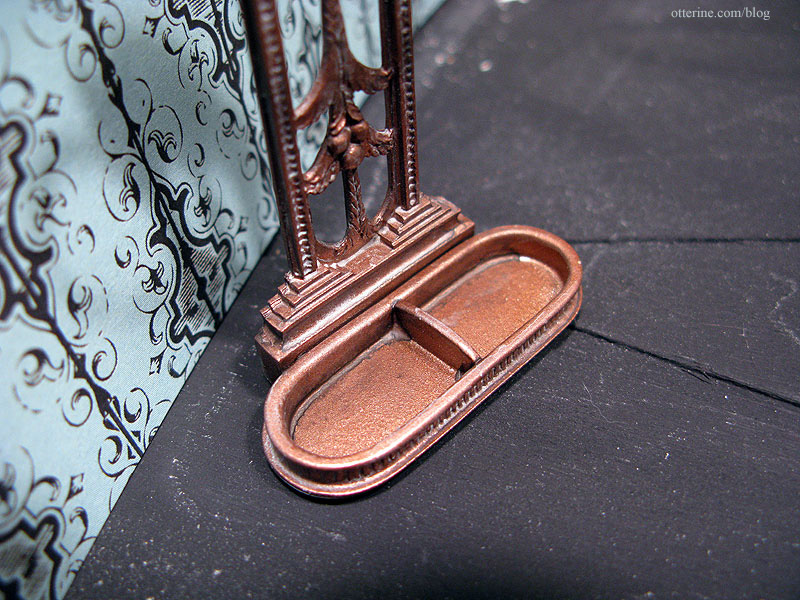
This piece has so many beautiful details – a true quality kit.
Add the beautiful umbrellas by Fran, and it’s the first vignette ready for a soon to be decorated foyer.
Categories: The Haunted Heritage
September 18, 2011 | 0 comments


NOTE: All content on otterine.com is copyrighted and may not be reproduced in part or in whole. It takes a lot of time and effort to write and photograph for my blog. Please ask permission before reproducing any of my content. Please click for copyright notice and Pinterest use.


