

Foyer to kitchen pocket door, part 2
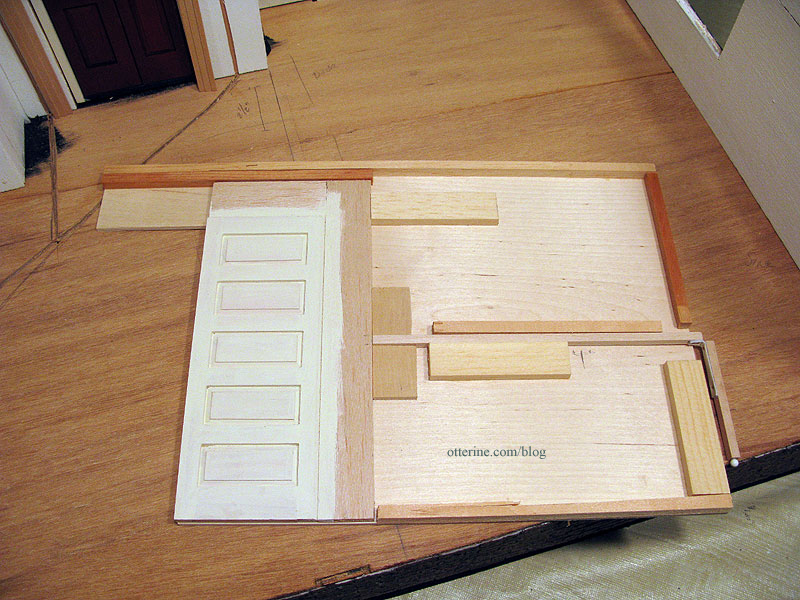
Continuing work on the pocket door. I decided to use 1/4″ thick wood for the inner connectors and pocket door mechanism instead of foam core board, using wood glue to create an especially strong bond. The reason for this is that the wall will serve as a structural wall and I want to cut down on the amount of give and warping it might have. Unlike Kathie’s tab and slot house example, this wall just sits inside the house and will be glued at contact points only, so I need a straight, strong wall.
I asked Kathie what she would have done differently, and she said she wished she had built in a way to open and close the door from the outside, like a string. As it is, she has to reach in to show that it works, and that requires the removal of furniture.
That got me thinking! How about a lever that comes out of an opening in the back of the pocket door wall. You would push the door closed and pull it open like a pop-up book. The lever itself could be hinged to lay flat when the door is open.
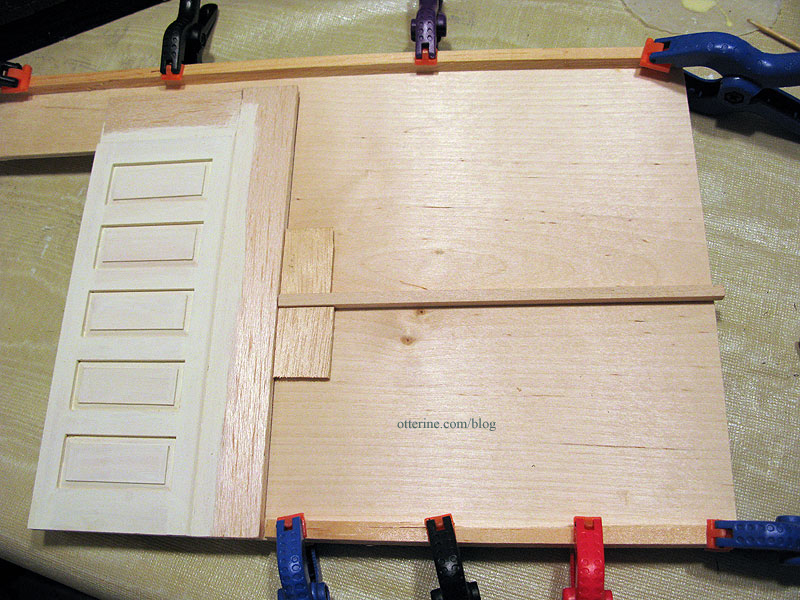
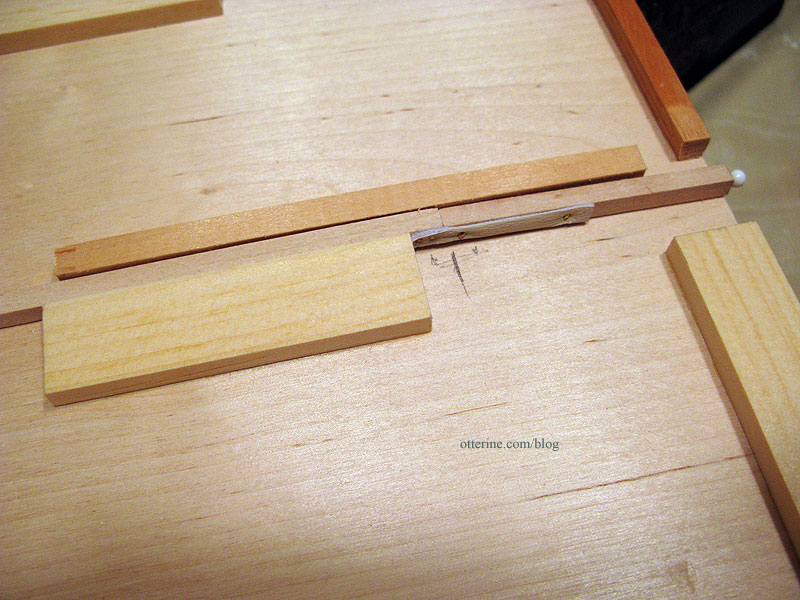
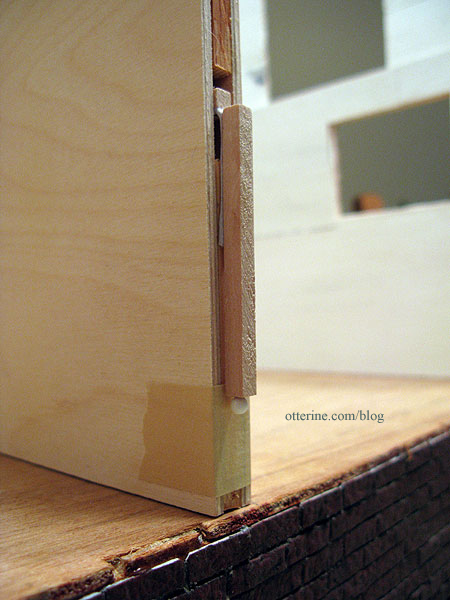
I added a piece of 3/16″ strip wood cut to the distance between the edge of the door assembly and the open back when the pocket door is open, with a little to spare. I added block supports to the end where the lever attaches to the door assembly to strengthen the connection.
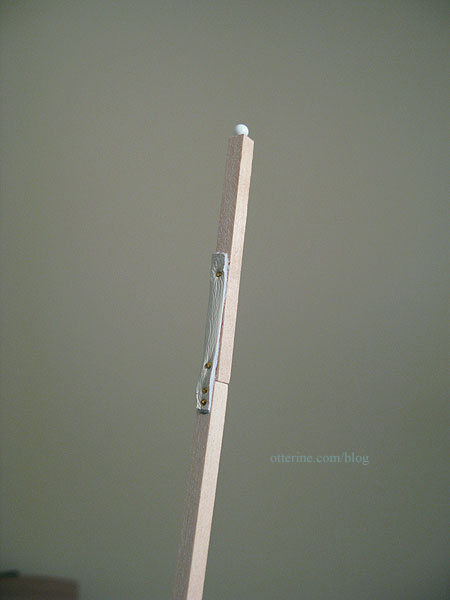
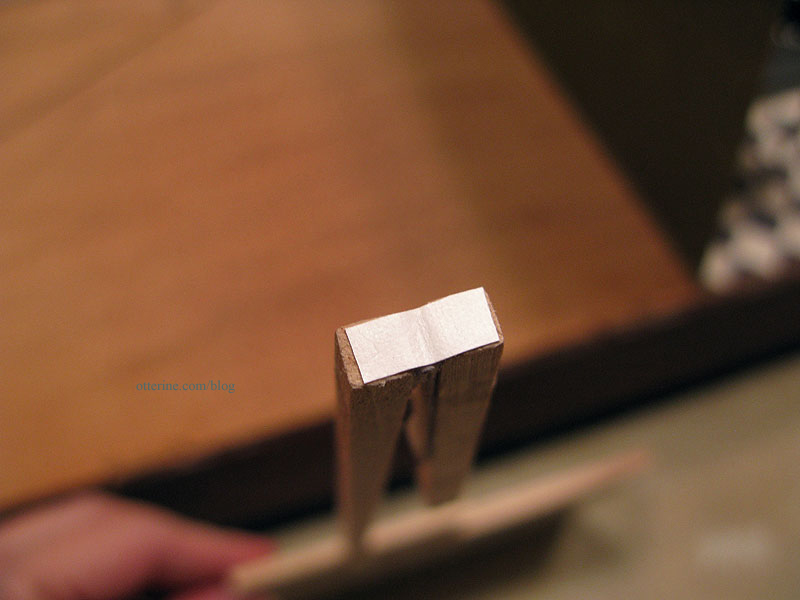
I added a hinge at the end of the lever and added more 3/16″ strip wood cut to the amount needed to make up the difference when the pocket door is closed. Even though there are tiny hinges on the market, I opted for a leather hinge instead. It’s flexible and won’t be damaged with some turning and bending the way a tiny metal hinge might be over time. I used brass brads for additional security after gluing the leather in place. To finish the lever, I added a sewing pin glued into the end.
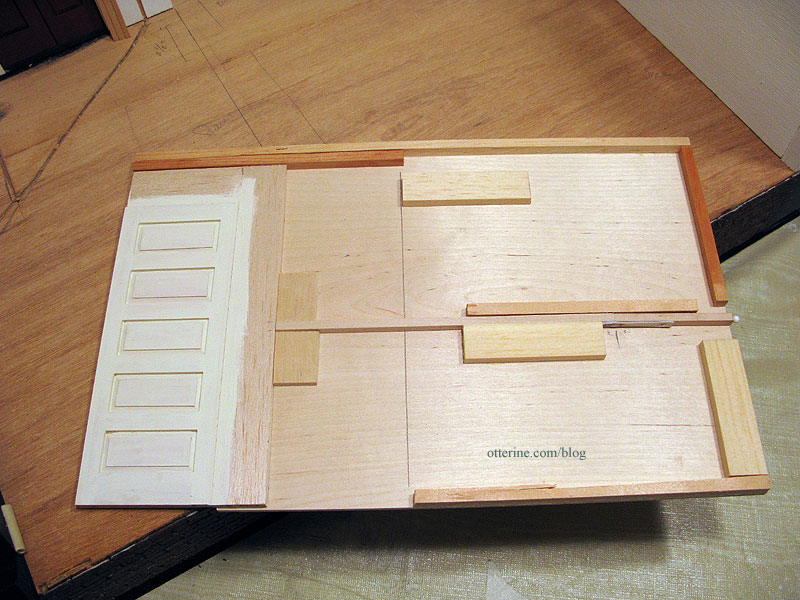
I used scrap bits of 1/4″ thick wood to create a channel for the door lever, a guide above the door and a stop to keep the door from going too far back into the wall when open. I also finished off the back with 1/4″ thick wood, leaving a larger opening than necessary for the lever. I will cover the back of this wall with a single piece of wood in the end, so these pieces are merely structural and not meant to serve as a clean finish for the back edge of this wall. Before final assembly, I’ll add some more 1/4″ thick wood scraps in the open areas to make sure the parlor wall has enough surface to bond to.
Here are the inner workings with the door closed…
And with the door open…
A close up of the hinge in place.
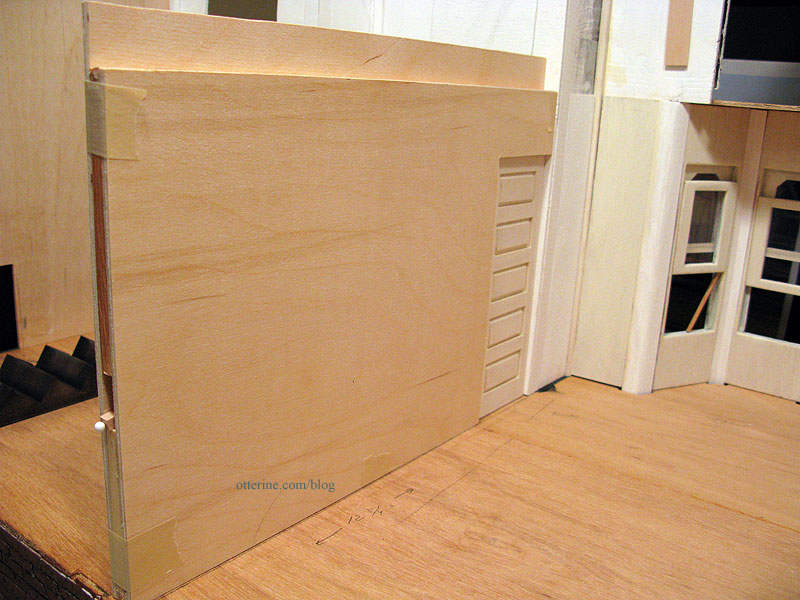
I taped the parlor wall to the assembly and set it in place. The mechanism needs to be treated gently, but it works! :D
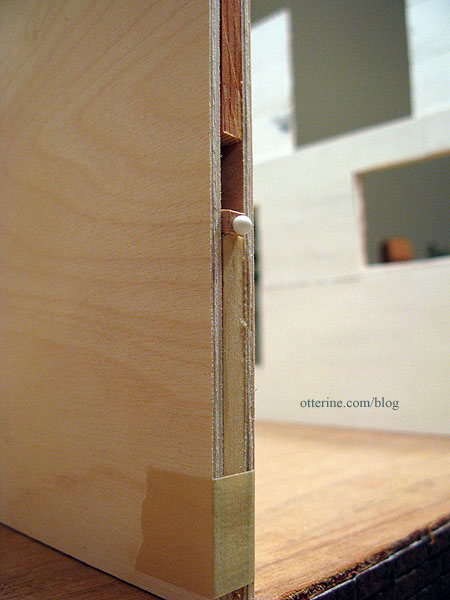
Here is the lever pushed in for the door closed, with the head of the pin showing. It is angled down for now since there is no finishing wood to keep it propped up.
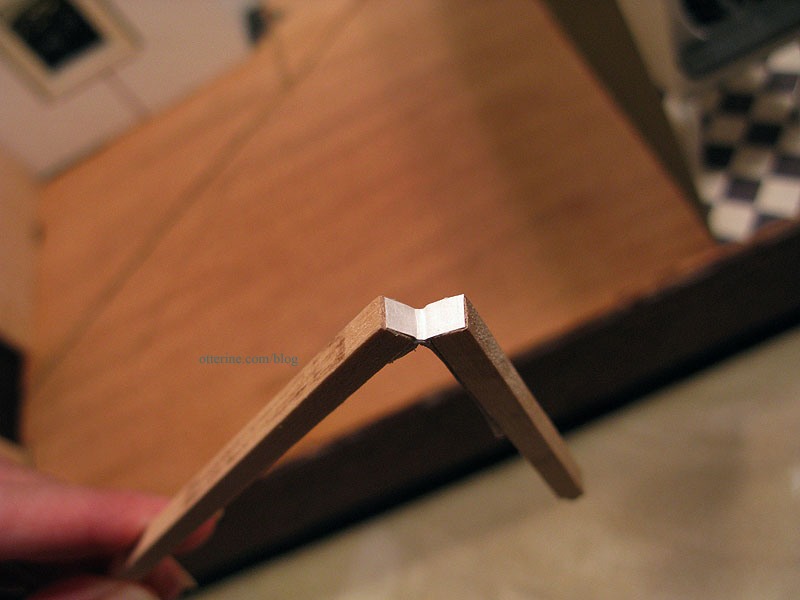
Here is the lever pulled out for the open door, with the hinge allowing the lever to sit flat against the back of the wall. I need to paint the lever, prime the walls and finish the door before I can glue the wall together permanently, but I am so pleased it works!
Fran sent me a suggestion for reinforcing the pocket door hinge: adding a piece of Tyvek to the inner part of the hinge. Tyvek is the strong, waxy paper that tear proof envelopes are made from, and since I work in an office, it is a daily material for me. I snipped a corner from a FedEx envelope and cut a tiny piece for the hinge.
Once glued in place, it keeps the hinge from twisting as it had been doing with the leather on only the one side. And, it’s so thin it doesn’t interfere with the hinge when the lever is straightened. Excellent idea, Fran! Thank you!
Part 3 here.
Categories: The Haunted Heritage
November 25, 2011 | 0 commentsFoyer to kitchen pocket door, part 1
I wasn’t opposed to putting in a regular swinging door from the foyer leading to the kitchen, but I’ve wanted to try making a pocket door for some time now. There are two excellent blog posts on dollhouse pocket doors that I found while researching. First, a fine set of pocket doors at Myrtlewood Manor where an upper track was used to keep the doors in place. Second, KathieB’s single pocket door where extra wood was attached to the door and foam core used to create the pocket.
I ended up choosing Kathie’s guide to follow since it seemed the easiest for me to figure out and I already had the materials on hand. It was also exactly the type of setup I wanted with a single door.
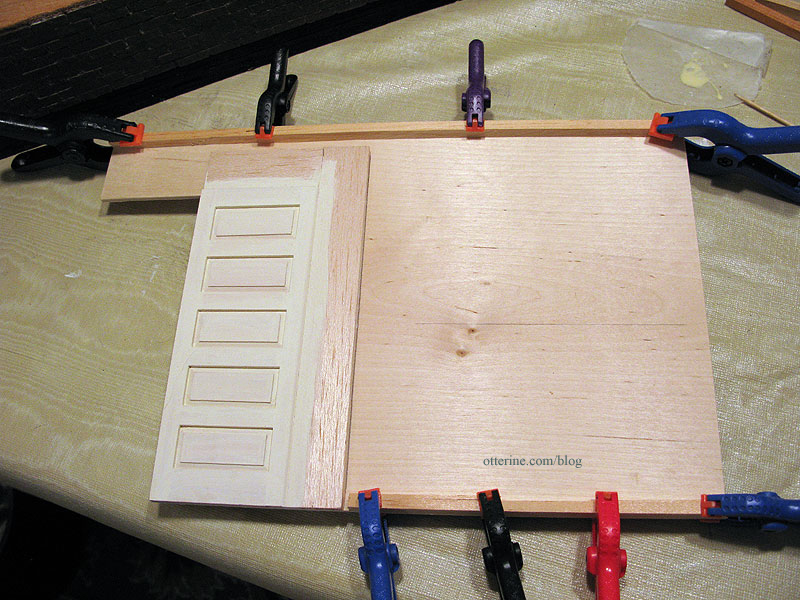
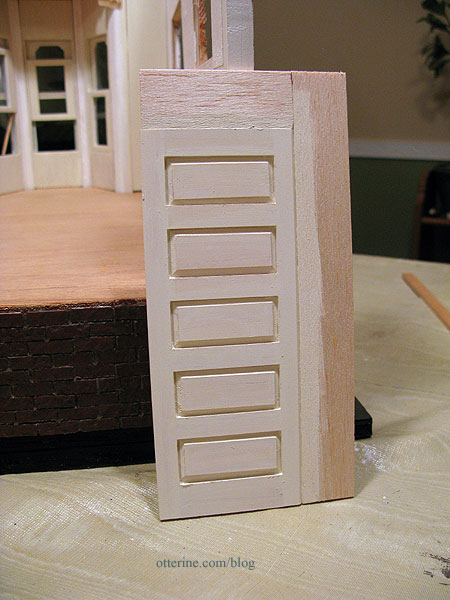
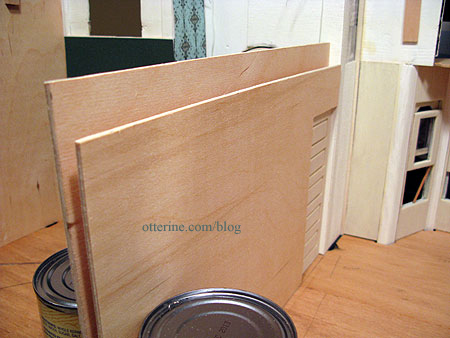
I added the extra pieces to the door and cut two outer wall pieces from 1/8″ thick plywood. I’ll use 1/4″ foam core board as the inner layer, just as in Kathie’s example. I’ve started painting the door Vintage White by Folk Art to match the trim I’ll be using.
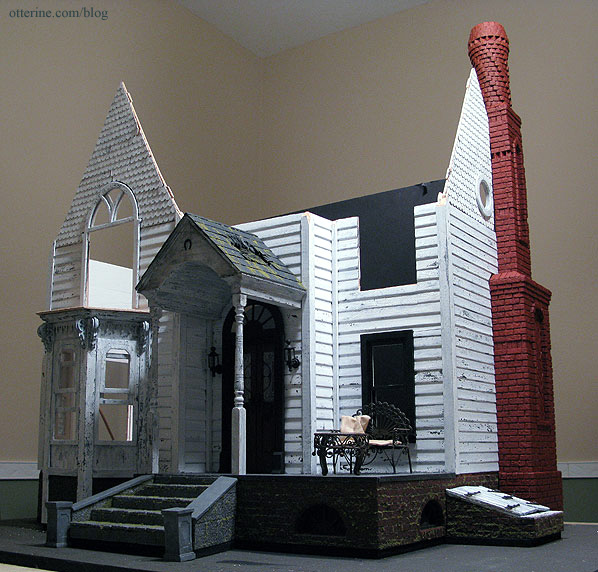
Putting in a pocket door wall also allows me to tackle another problem. My parlor ceiling will be a different height than my kitchen ceiling. However, the board for the second floor is a single piece that spans the entire area of the house. By having a wall made from various layers, each outside layer could be built to act as a support for its adjacent ceiling and I could cut the floor board into two separate pieces. Oh, that sounds so simple on paper. Ha ha.
My parlor wall is 9″ tall to accommodate the new Houseworks narrow stairs. I have the stairs as close as possible to the pocket door while still allowing for proper trim around the new doorway. If it were back much further, it would encroach on the bookcase and leave very little at the top of the stairs on the second floor.
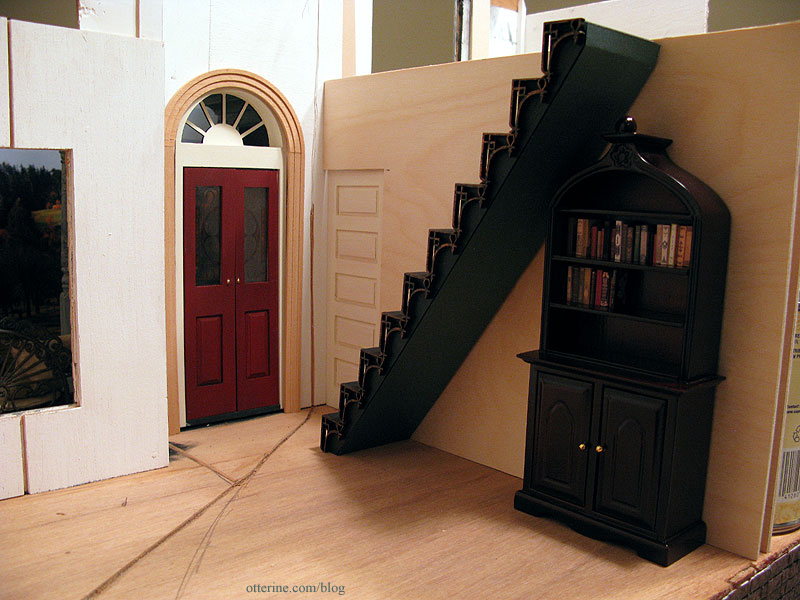
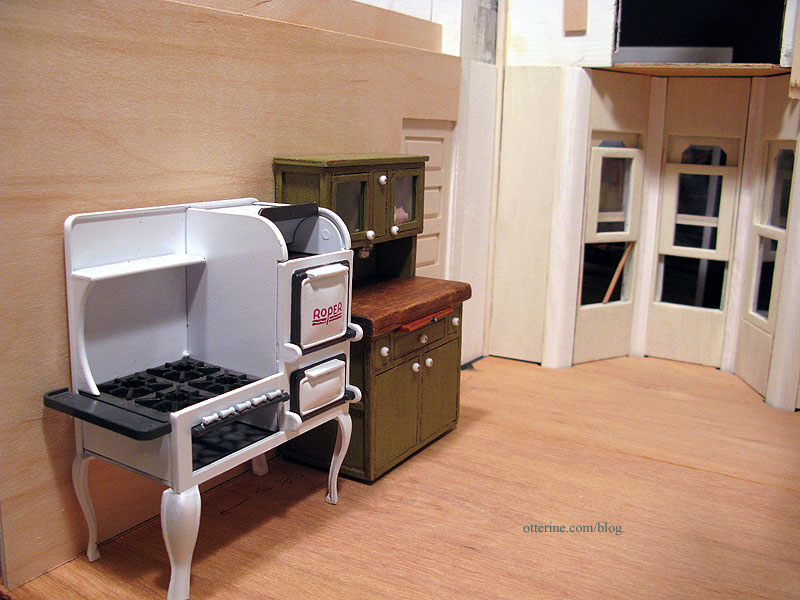
My kitchen wall is 8 1/8″ inches tall as intended for the original kit. The pocket door will be hard to see in this room with Keli’s fabulous Hoosier cabinet next to it. As you can see, there is just enough room for the Roper range, the Hoosier cabinet and the door. :D
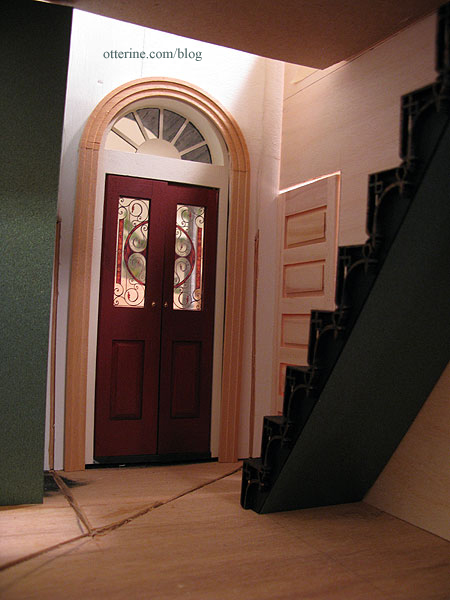
There are two remaining issues concerning the second floor board: the interior trim around the front door will hit right at ceiling height and the placement of the stairs presents challenges for fitting in a door to the bedroom (the room above the kitchen). I knew these would be issues to address when I chose the new front door and decided to place the stairs in the middle of the first floor.
My plan is to have a two-story foyer to address the trim around the front door. I’ll work out the upper hallway layout later but I already have some ideas in mind.
Part 2 here.
Categories: The Haunted Heritage
November 22, 2011 | 0 commentsHaunted Heritage chimney, part 7
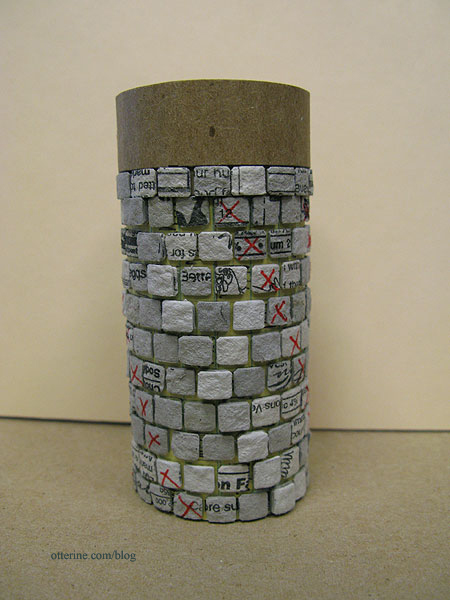
Continuing work on the chimney. After completing the topper, I had painted and set up some photos. After a few days of looking over the chimney and the photos, I still didn’t like the way the spirals were a little lost on my rendition. I added another later of egg carton bricks to the spirals to make them stand out more.
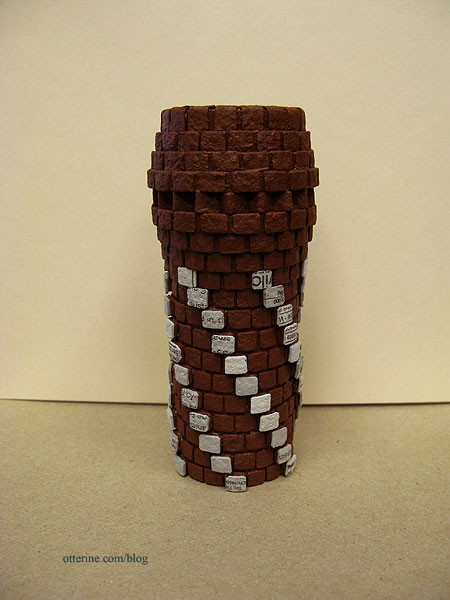
Once painted, I think the spirals look much better.
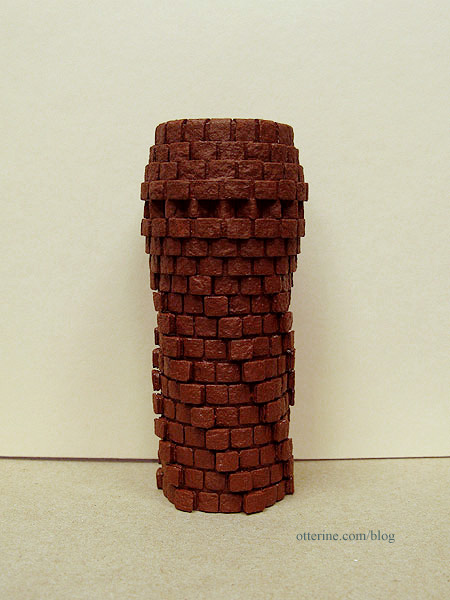
Since the sides show quite a bit, I filled in the gaps with spackling – using a toothpick to apply it.
Once dry, I painted again and now the bricks look solid instead of layered.
The spirals stand out much better, and the effect will be even more pronounced after I grout and age the chimney (you were so right, Keli).
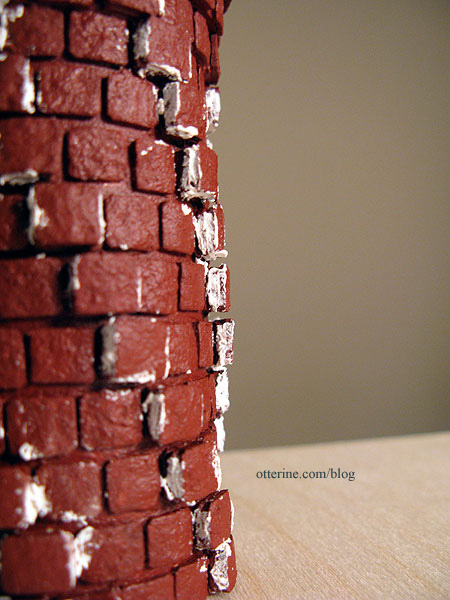
I also finished up the bridge between the topper and the middle section by adding a layer of 1/8″ foam core board.
I covered this section with bricks. The large gaps will be covered by the topper.
The topper is still removable since that section will be the most challenging to grout.
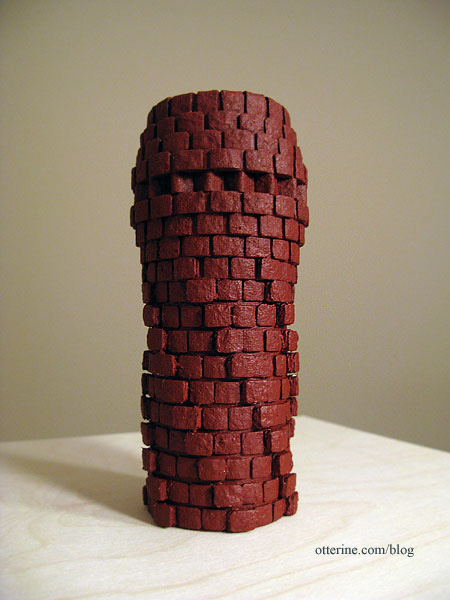
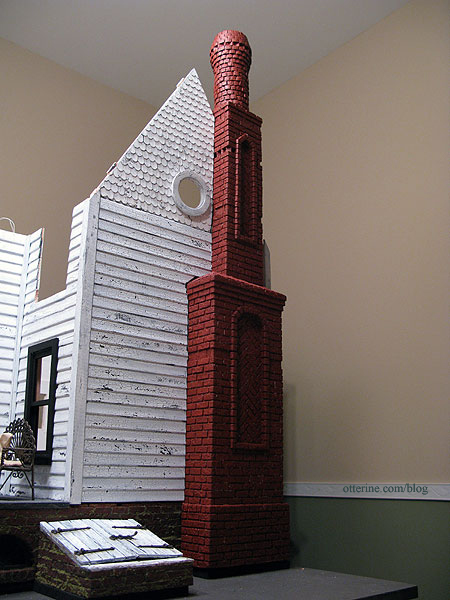
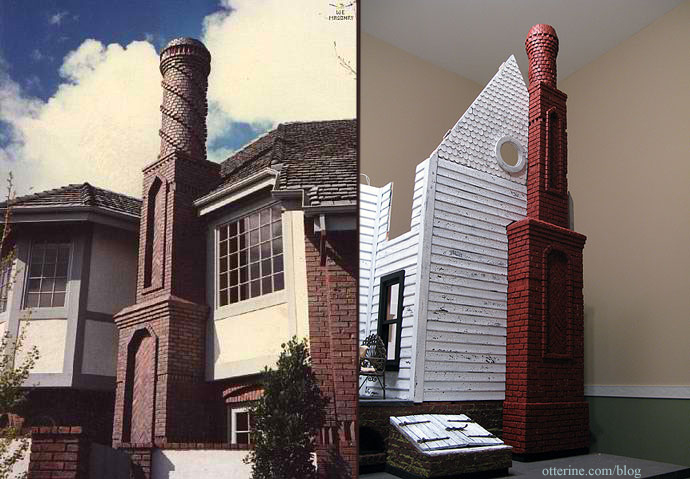
Here’s a new comparison shot with the W E Masonry original.
And, another overall shot. :D
Categories: The Haunted Heritage
November 19, 2011 | 0 commentsHeritage – front bay window, part 5
I finally got around to painting the fancy laser cut corbels for the bay window, crackling white paint over black the same as the rest of the exterior. I also added the fancy molding that finishes off the top of the bay window.
I wasn’t sure how well they would take the aging process, but I love the way they turned out.
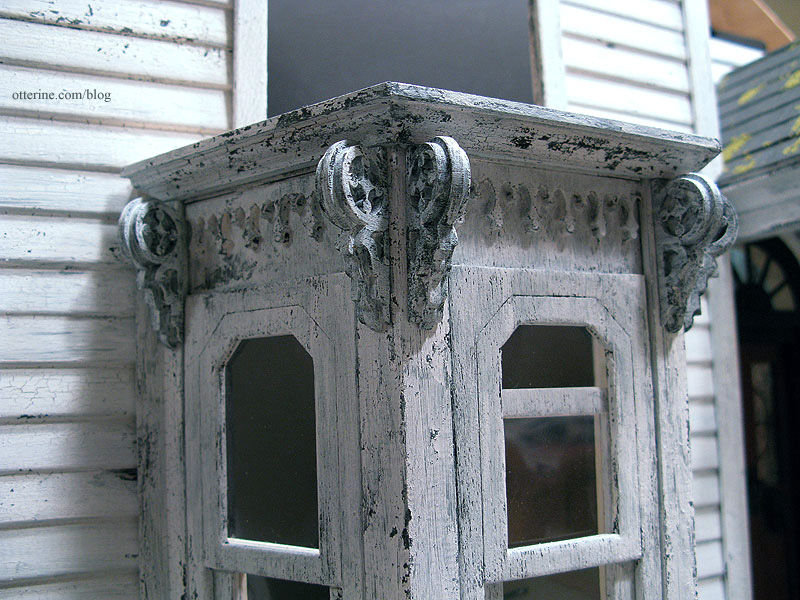
The corbels spice up the bay window to match the new fancy portico. :D
Finishing the rooftop here.
Categories: The Haunted Heritage
November 17, 2011 | 0 commentsHaunted Heritage chimney, part 6
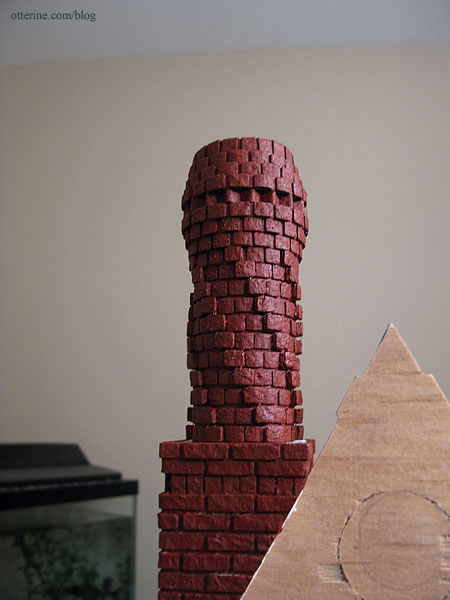
Continuing work on the chimney. Now that I’ve had plenty of practice with the lower and middle portions of my chimney, it is time to tackle the topper. The challenges include the fact that it is cylindrical, there are spirals of bricks around it, those bricks are smaller (the short ends) and there is a row built from bricks at an angle. :D
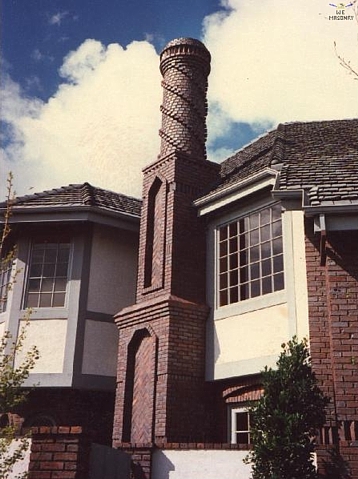
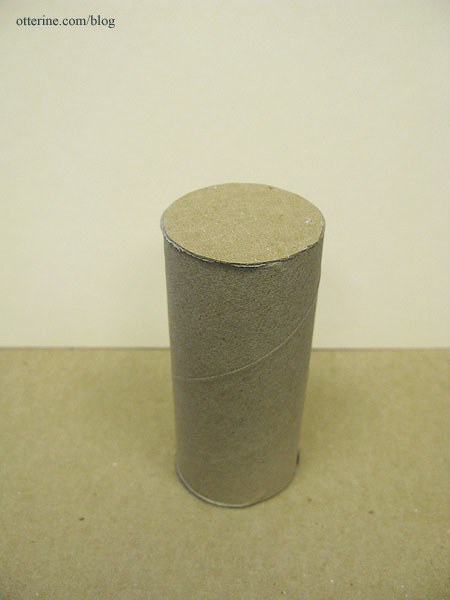
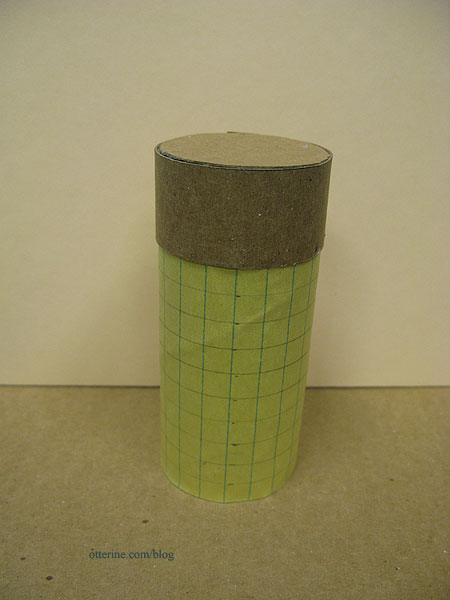
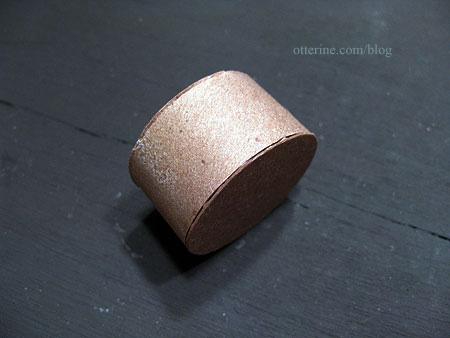
the original W E Masonry chimney What to address first? The basic shape. In my mockup version, I had used drawing paper rolled into a tube since I didn’t have a toilet paper tube on hand. After saving a few for this project, I started with one at its full height of 4 3/32″. I then stuffed the inside with aluminum foil to keep the tube from being crushed as I worked on it, or after completion for that matter.

I planned to make the angled bricks a bit differently than I had for the middle section, where I had gouged out the foam core and used wood supports for the bricks. I would be using the same wood supports, but this time there was no foam to glue the supports into. I made a cardboard circle and glued that to the top end of the tube. The supports would be glued to this circle. Above that row of supports, I would construct the very top portion with another toilet paper tube cut down to size.
I started with main base for the dimensional rows just under the angled bricks. I built this layer up with cardboard as I had done for the lower and middle sections.
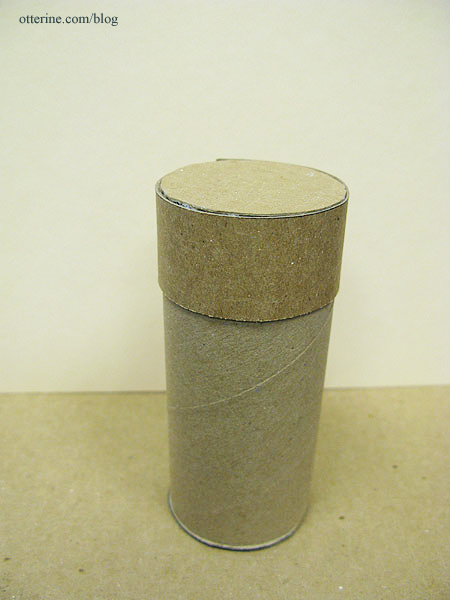
Using a paper tube provided a uniform support structure, but measuring evenly all around to draw guidelines wouldn’t be easy. Guess what has evenly spaced 5/16″ increments? Notebook paper! I cut a piece to size and drew the horizontal guidelines on it. It’s a rough guide not an exact pattern but it would help me keep things in line.
I thought about bricking on the flat paper and then gluing it to the tube, but I didn’t want to take the chance that I wouldn’t end up with a consistent and correct fit after putting in all the work. So, I glued the paper pattern to the tube before the brickwork.
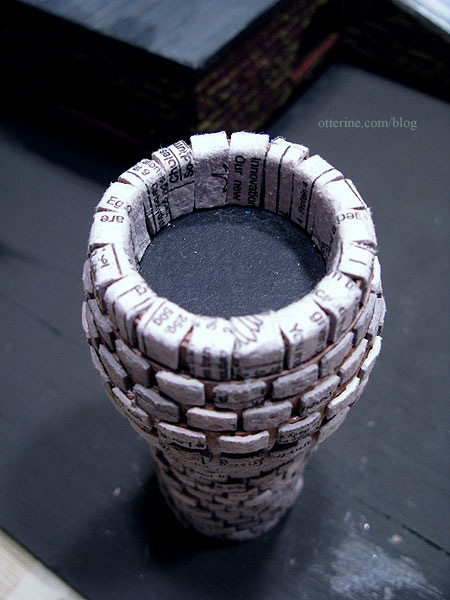
Since this portion was made from the “ends” of the bricks, I cut the bricks to just under 5/16″ in length. To make the egg carton bricks more cooperative, I bent each one to get it to curve slightly before gluing in place. These are a little tighter together than the rest of the chimney, but I think that works well for the design.
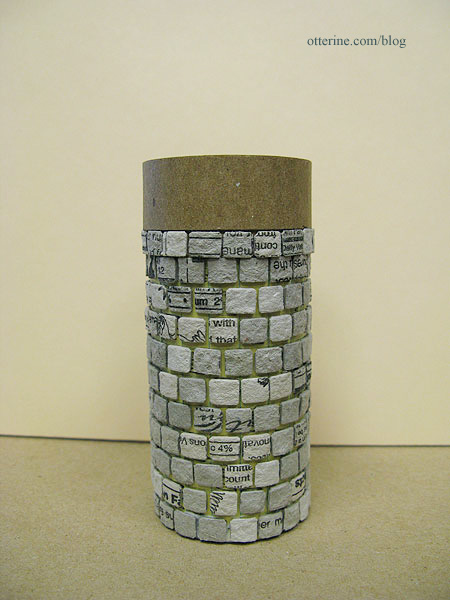
I marked the spiral brick pattern, ending up with six spirals. For the spiral design, I glued another brick on top of each brick in the pattern. The camera is flattening them out (there is one spiral completed in the photo below from top left to bottom right), but I think they’ll show up better once the chimney is painted and grouted (which is not going to be easy for this section). The spirals are more vertical than the original design, but I like them!
I finished up the bottom portion of the topper and ended up with a little castle turret. :D

To make the angled bricks, I cut 1/4″ strip wood into rough cubes and glued these to the top. Could I have purchased 1/4″ cubes to make things easier? Probably, but I was in my jammies at home and I already had a length of 1/4″ strip wood. :D
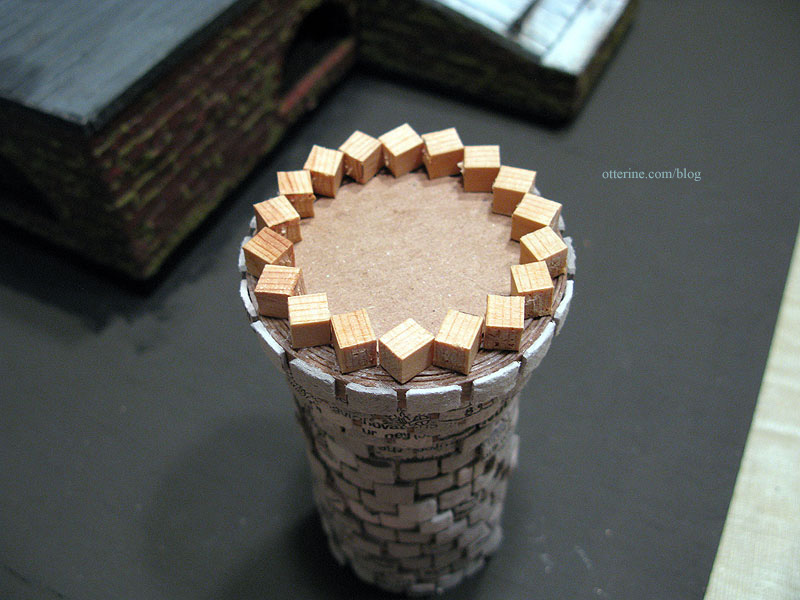
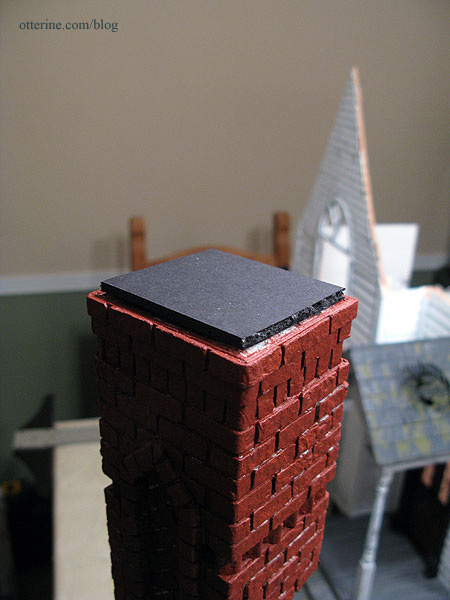
While these dried, I worked on the very top portion. I cut another toilet paper tube to 1″ tall and glued a cardboard circle to the bottom. This portion will be a mirror image of the rows below the angled bricks.
To finish the interior of the top, I cut three circles from 1/8″ black foam core board and glued them in place. This gave the top support as well.

Then came the cardboard layers before gluing the top onto the angled brick row.
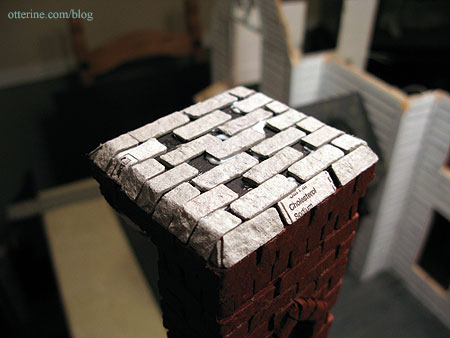
I wound some more cardboard on the inside of the tube to build up the thickness of the chimney wall.
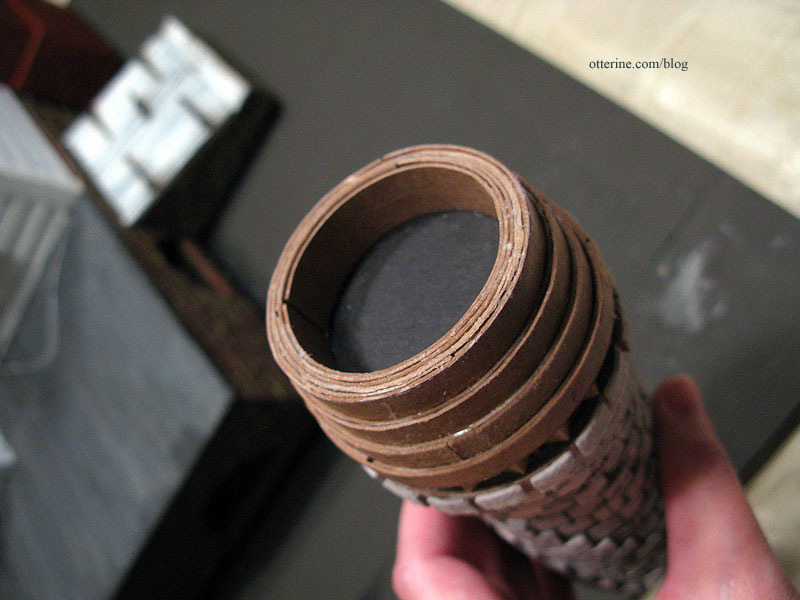
Once this assembly was secure, I glued on the tiny bricks trying to match the pattern of the rows below the angled bricks. Using egg carton pieces cut to fit, I covered the wood supports. I finished off the top of the chimney by folding the bricks over the top edge down to the foam core interior.
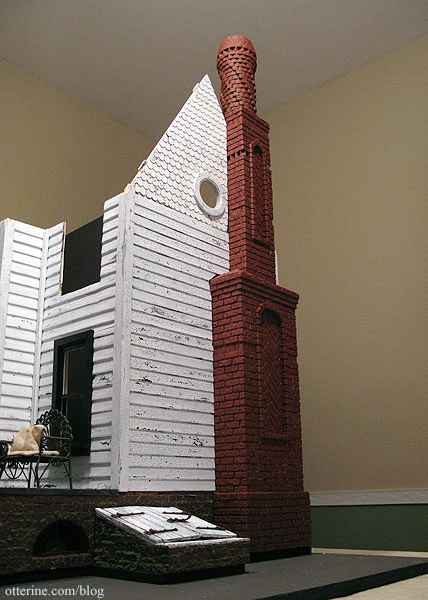
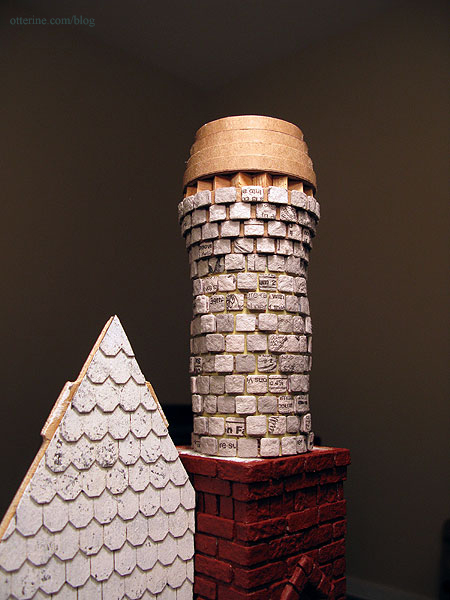
A quick coat of Liquitex Burnt Sienna and we’re starting to get somewhere! I still need to work on the bridge between the topper and middle section, but it will be of minimal visual impact.
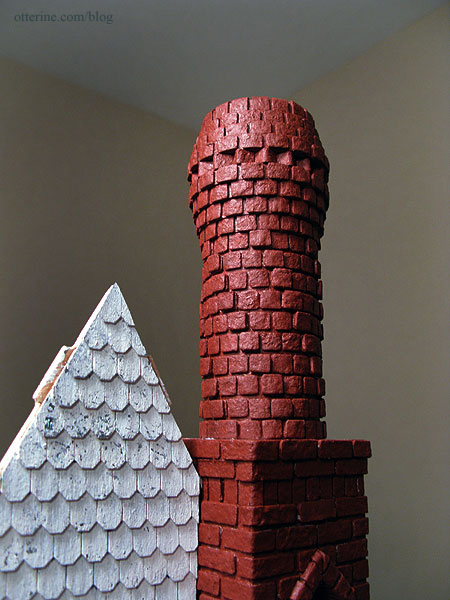
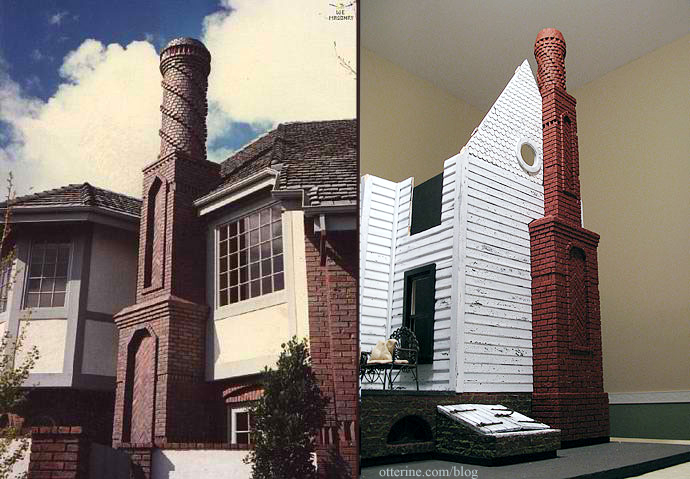
That’s one tall chimney — just under 28 1/2 inches high.
I was worried it was going to end up a smidge too tall but I think it works well.

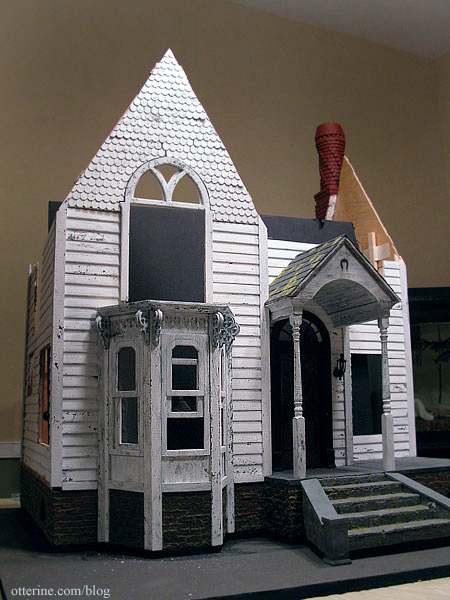
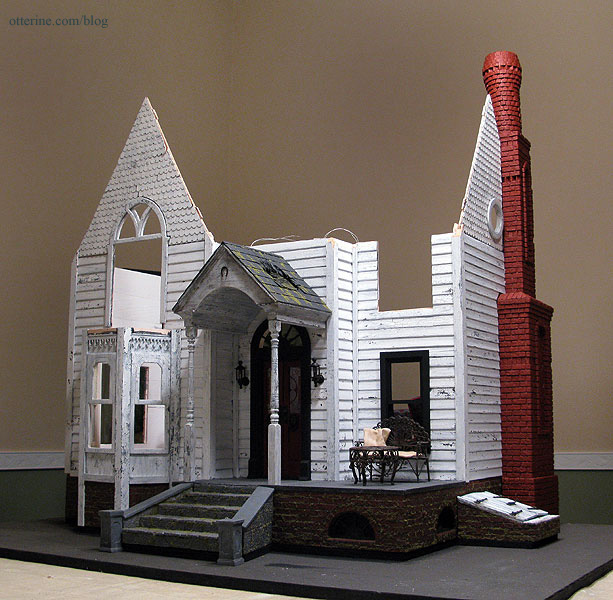
And, with the whole house as it is at the moment. :D Love!!!
So, what do you think? Have I captured the essence of the original W E Masonry chimney? :D
Next up: finishing the bridge between the topper and middle section, painting touch-ups, sealing and grouting.
Categories: The Haunted Heritage
November 12, 2011 | 0 comments


NOTE: All content on otterine.com is copyrighted and may not be reproduced in part or in whole. It takes a lot of time and effort to write and photograph for my blog. Please ask permission before reproducing any of my content. Please click for copyright notice and Pinterest use.


