

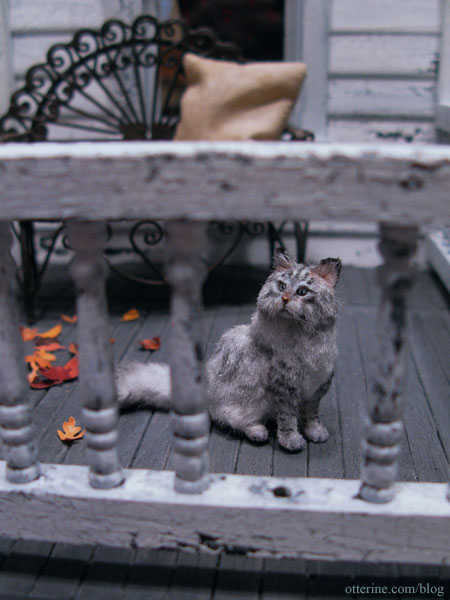
Ophelia
My relentless stalking has paid off! I now have a lovely kitty friend by *Reve*, the artist who made Grahame the badger.
This is Ophelia, a silver Maine Coon. Isn’t she a pretty kitty sitting on the porch on a fine autumn day? I love this photo!
Categories: Animals and birds
July 12, 2012 | 0 commentsFarmhouse hutch reproduction, part 1
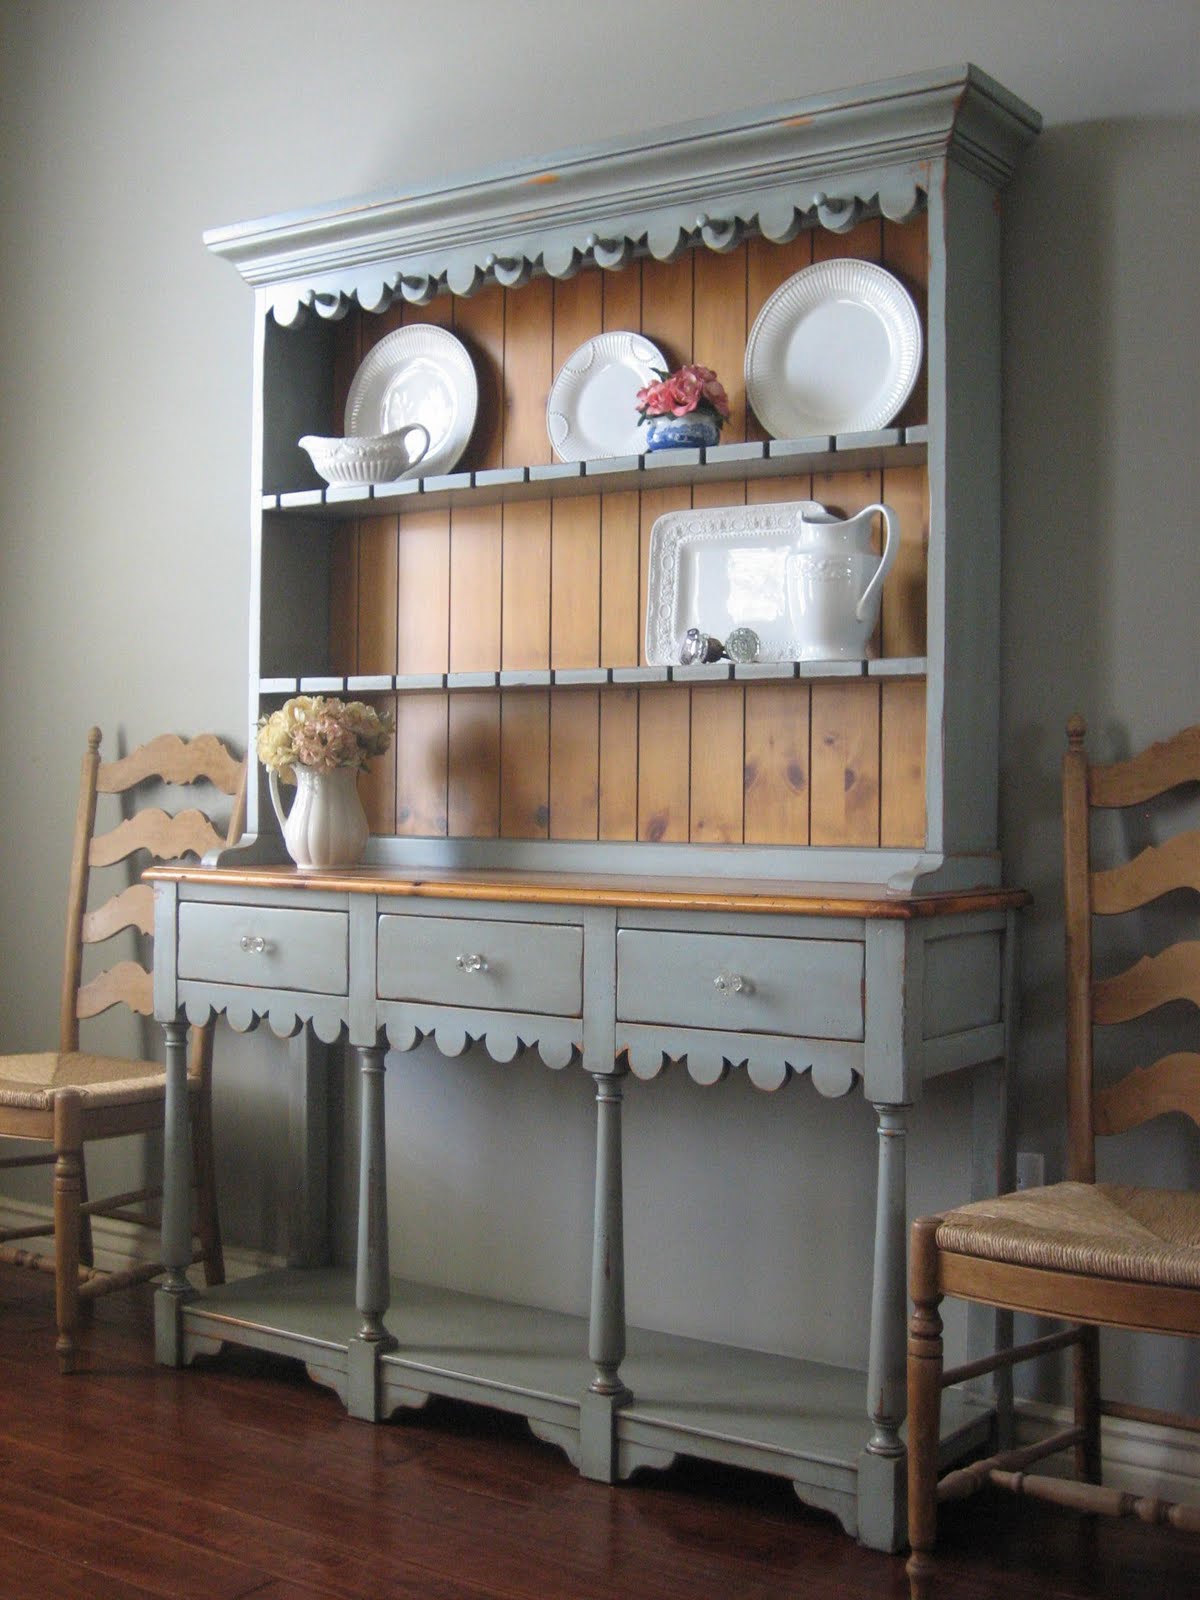
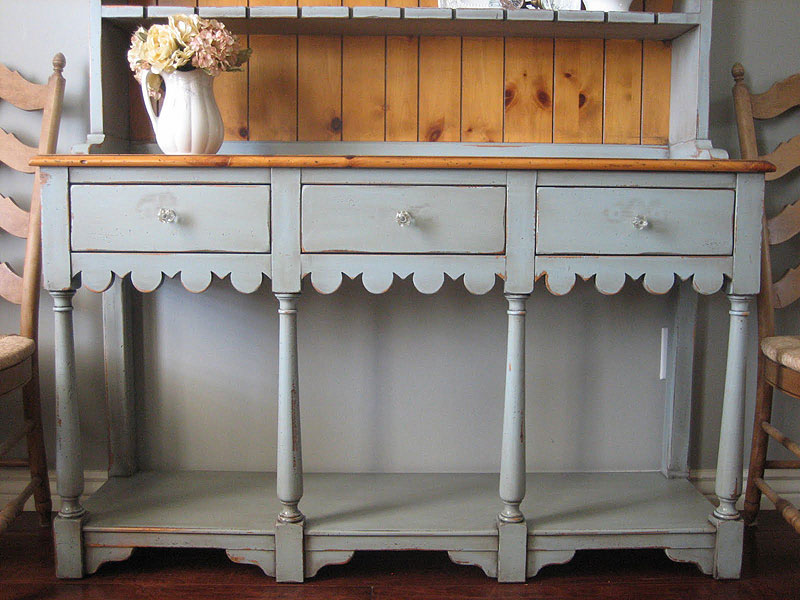
I have started my miniature reproduction of a farmhouse hutch I found on European Paint Finishes. Here’s the original farmhouse hutch for reference.
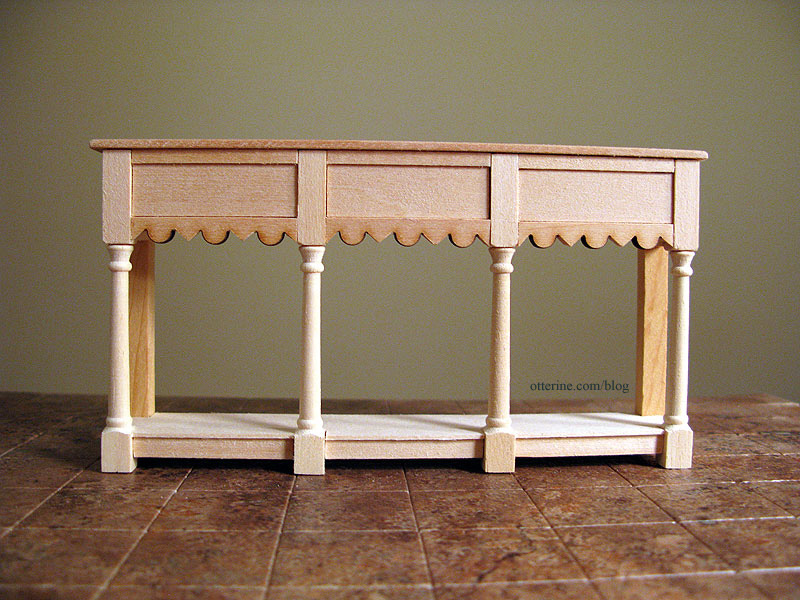
I have the base assembled and ready for paint and stain. The counter top is separate since I plan to stain it and paint the rest.
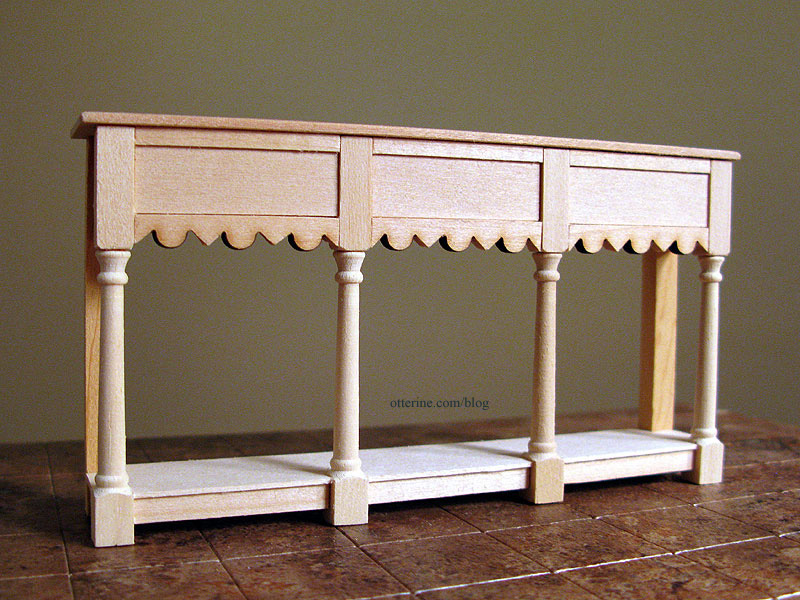
The drawers in my version are not functional, so I’ve recessed the front portions for now. I will make faux fronts to “float” in these openings to make the drawers more convincing.
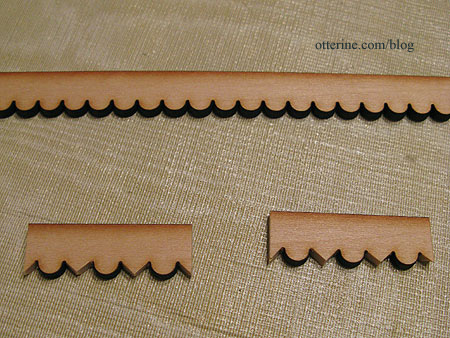
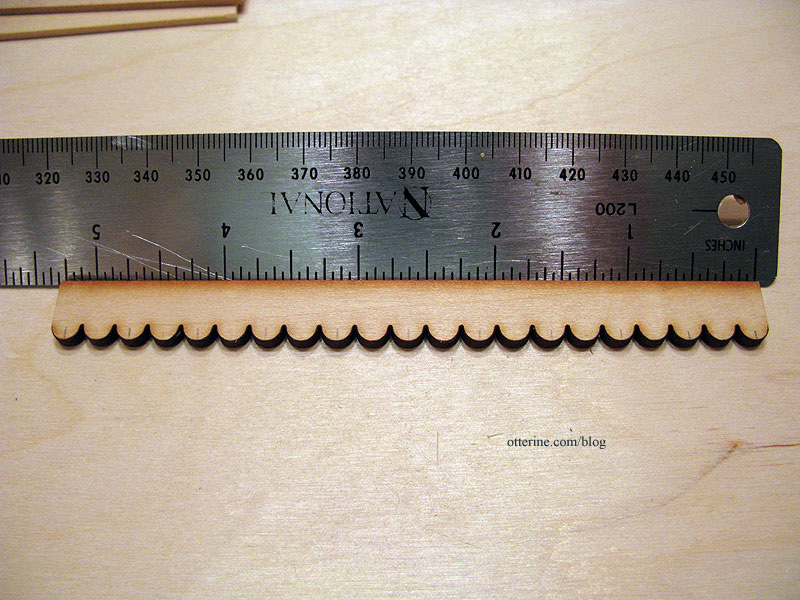
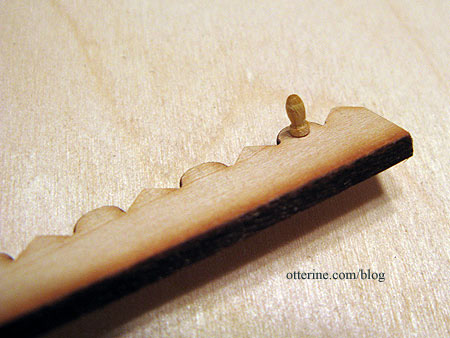
I used laser cut scallop trim from Heritage Laser Works, cutting every other scallop to a point to mimic the original. Mine has three complete scallops instead of four like the original to maintain the look of proper proportions.
Below is a more detailed shot of the original. The hutch is shown on a similarly colored wall, so at first I thought the bottom was enclosed on the back. It’s actually open between the back two square posts.
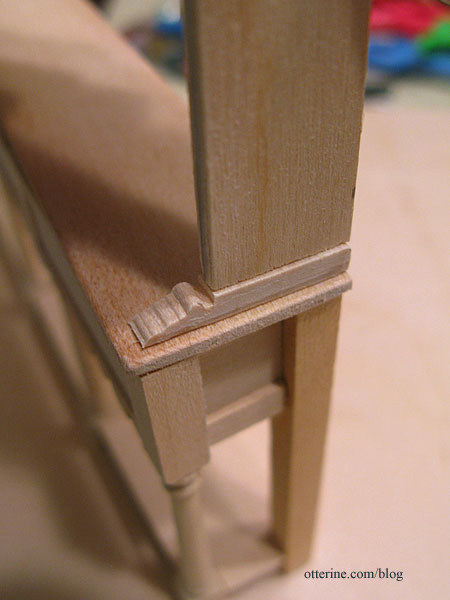
The front posts are Houseworks newel posts cut to fit. I may or may not add the bottom brackets. I have an idea how to make them, but they will be tiny and perhaps more trouble than they’re worth. I was trying to keep the height down on the overall piece and haven’t left much room for them.
This part of the hutch measures 5 3/4″ W x 3″ H x 1 1/16″ D.
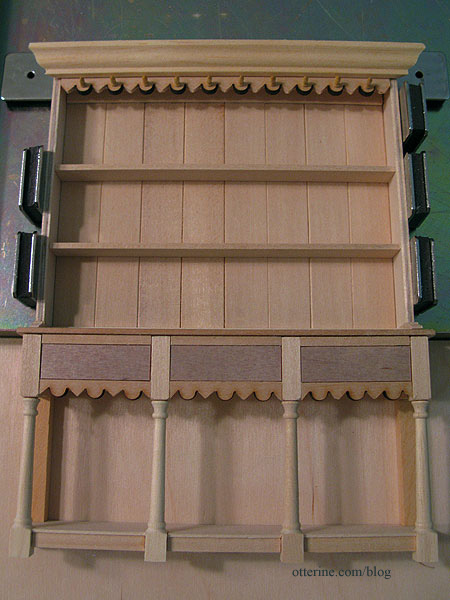
I forgot to mention that Patie of minisx2, where I found that delightful and whimsical modern cabinet, sent me some Dura-Craft wood from my want ad and included two bundles of cut wood for projects. It’s very nice wood, unlike what I’ve been finding in the craft and hobby stores lately. I’ve used it for the counter top of the base and the back of the hutch top.
Very little of the top is glued since the back will be stained and the rest painted, so it’s being held together with magnets in my gluing jig. Here’s an approximation of what it will look like with lower portion. As you can see, I’ve cut the veneer inserts for the faux drawers.
My first measurement for the top had to be the scallop trim since I needed complete scallops all the way across. Having them uneven, with one chopped off on one side and another whole on the opposite side would have offended my sensibilities. ;D
I order wood trims and parts from Manchester Wood Works quite often, and they include a small sample bag of various wood trims. I use these samples all the time when I just need a little bit of something to add to a project.
To create the decorative bases for the side panels, I used 1 1/16″ tall baseboard trim – a sample from Manchester Wood Works. I am guessing this might be for play scale. I’ve used half scale and quarter scale items in my full scale builds before, too. I cut thin cross sections, then measured the depth I would need based on my side panels.
Now I have wonderfully decorative bases without having to carve them individually. This was the method I had planned to use to make the lower brackets, but the space is just too small. Until I delve into quarter scale building, cutting wood that small just eludes me. :D
The pegs on the upper trim are model ship belaying pins. Just a quick drilled pilot hole and some glue, and there you have it!
Here is a close up of the original hutch top.

I ended up with 1 1/4″ spaces between my shelves to accommodate what the hutch will eventually hold. I’ll cut sides for the crown molding on top after it is all painted, stained and assembled. Things have a way of shifting during the building process and I find it’s best to fit that final trim at the end. I still need to add the notched details on the shelves, but I’m taking a break from the project for now. I can fiddle with these things only so long.
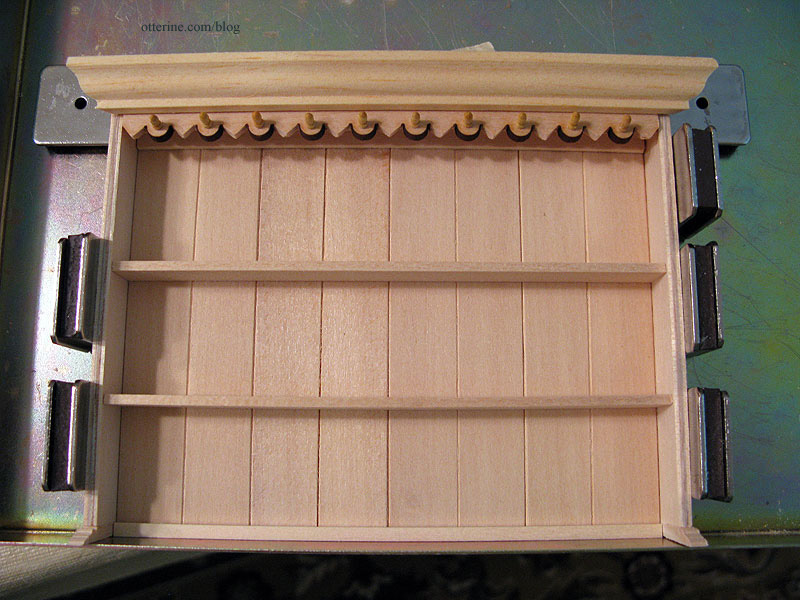
The hutch top measures 5 1/2″ W (not including the crown molding) x 4 1/2″ H x5/8″ D (not including the decorative bases), making the total unit 6 1/4″ W (with the crown molding) x 7 1/2″ H x 1 1/16″ D.
Categories: Furniture, The Aero Squadron Lounge
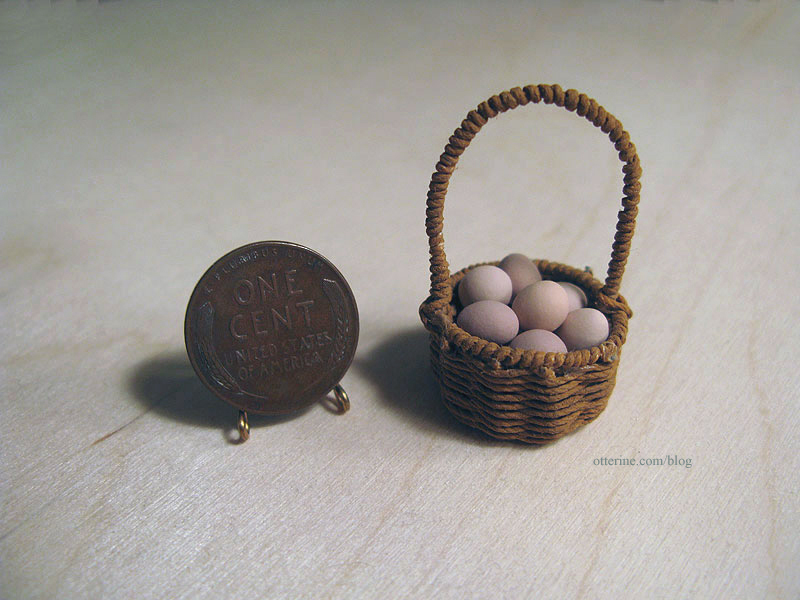
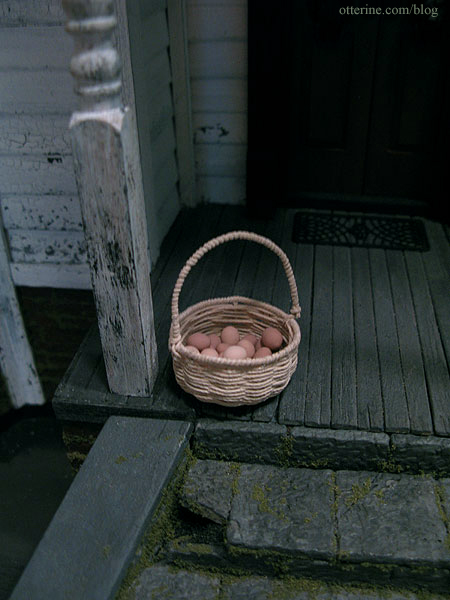
July 7, 2012 | 0 commentsEggs!
Tonight, I made a basket of eggs for my hens in progress. Well, Lyssa made the baskets shown in this post, but the eggs were made from clay tonight.
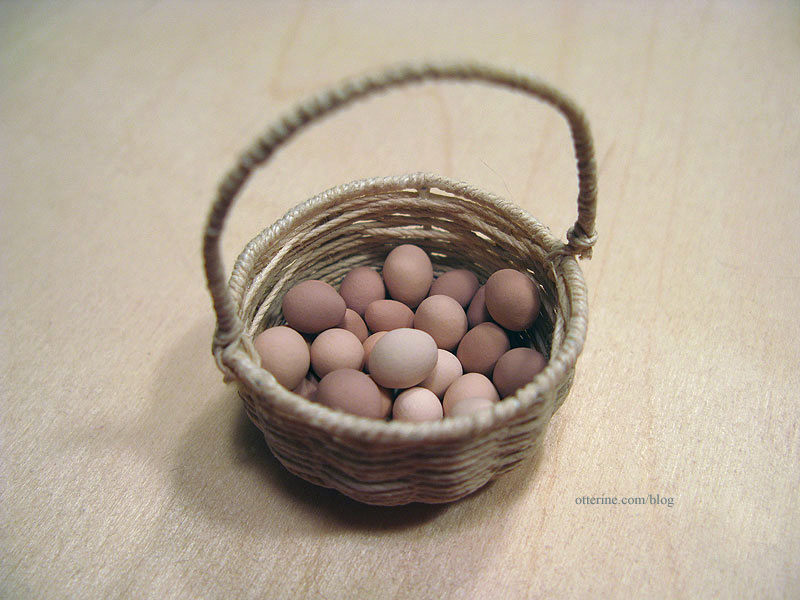
I mixed up five different colors of clay, all similar in tone, to mimic the natural variation of real life eggs. The particular breed I am emulating has lighter color eggs than the brown ones I buy at the store.
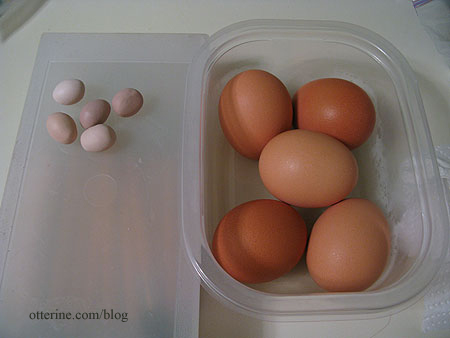
Eggs are not an easy thing to get right in clay, at least for me. The shape is somewhere between round and oval. Overall, I’m pleased with the way they turned out, and I can always pick the good ones to show on top. I made a lot more than I needed for that reason. My two hens would be exhausted laying all these eggs!
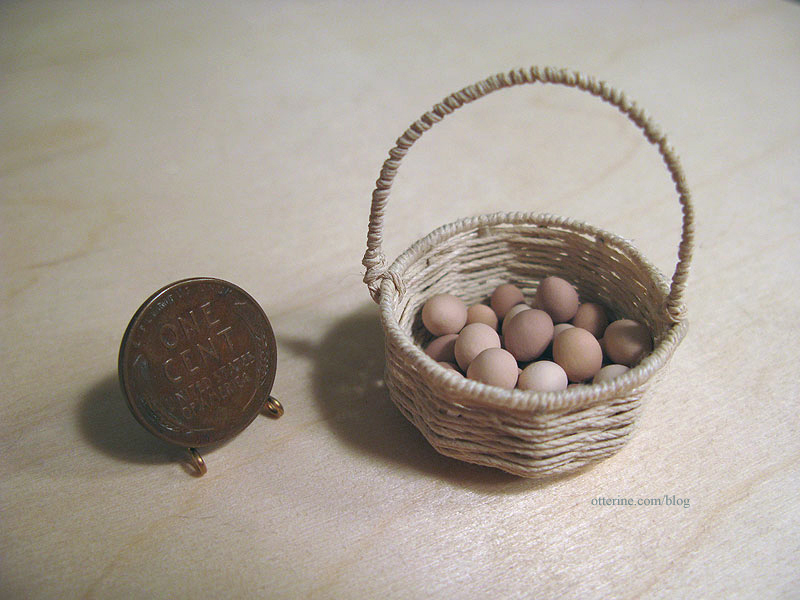
I do have a smaller basket from Lyssa, but I like the way the eggs look in the lighter color one. Perhaps it’s the number of eggs or the color of the basket I’m drawn to, I’m not sure which.
I borrowed the Heritage for a backdrop. :D
Categories: Miniatures
July 7, 2012 | 0 commentsGrahame
Grandma called and said she swore she saw something on the side of the house.
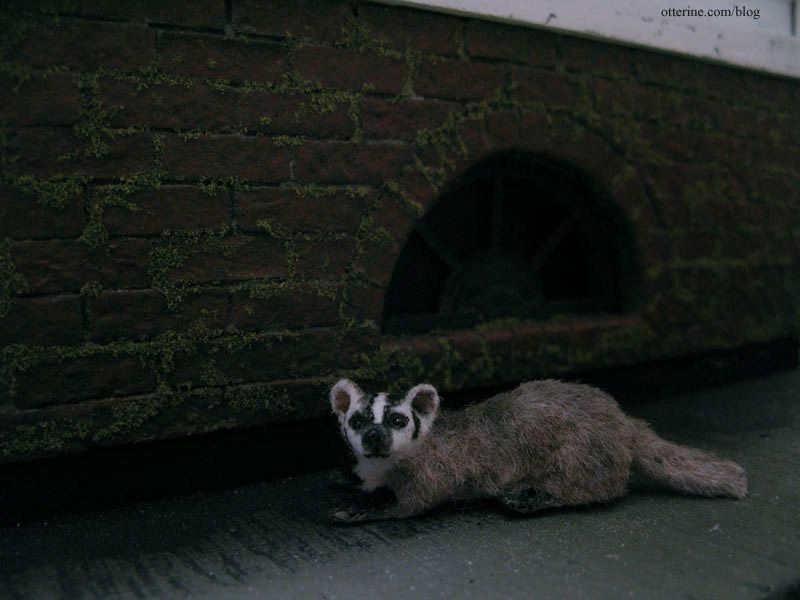
When she went outside to investigate, she found a varmint on her front porch! :O
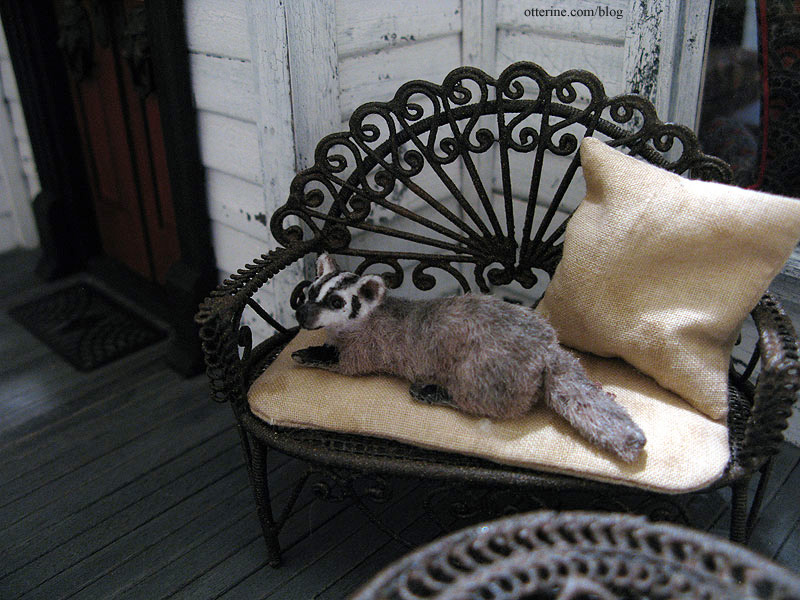
I found the artist *Reve* on eBay while looking for a miniature furred cat or small dog for grandma, but when this badger popped up in the listings I couldn’t resist! He’s so well made and realistic that I swear he’s going to dart across the lawn at any moment!
Categories: Animals and birds
July 4, 2012 | 0 commentsHeritage – The Tree, part 2
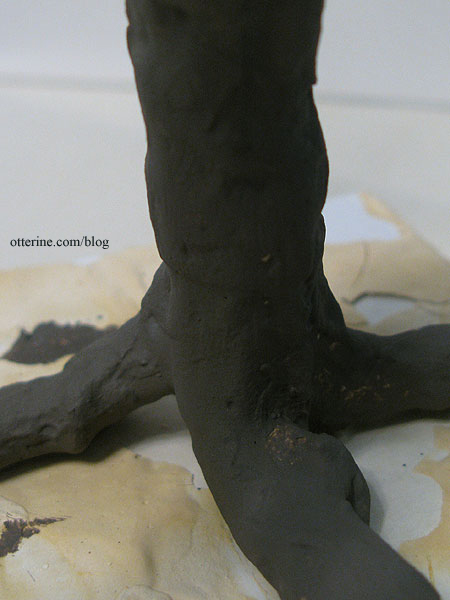
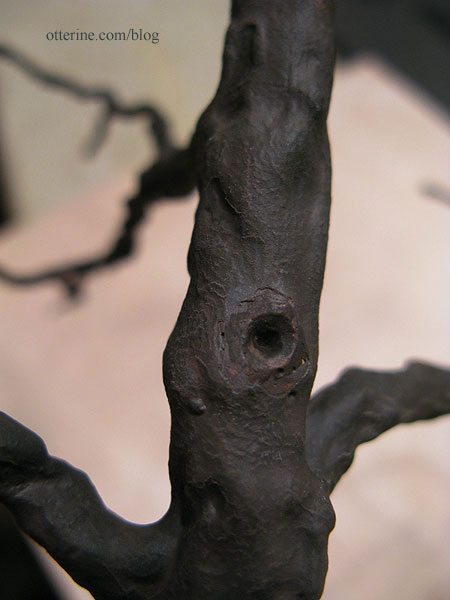
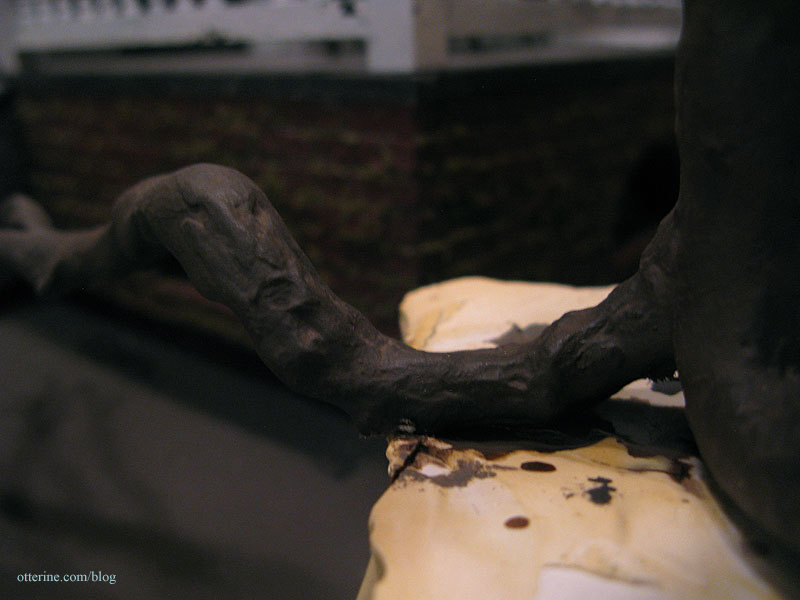
Continuing work on The Tree. I had considered carving bark texture into the putty but decided it was probably more work than it was worth. Instead, I did a quick sanding over the main trunk with 60 grit sandpaper. This removed the obvious smoothness and provided a nice texture. I also cleaned up any excess putty from around the roots.
Diane says most trees are more grey than brown, and when I was out today I noticed what she was talking about. :D
I started with an undiluted mix of Neutral Grey and Traditional Burnt Umber, both by Americana. This initial dark coat of paint really brought the tree to life!
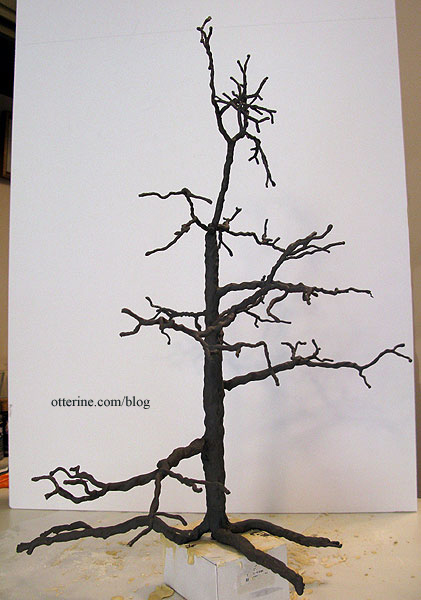
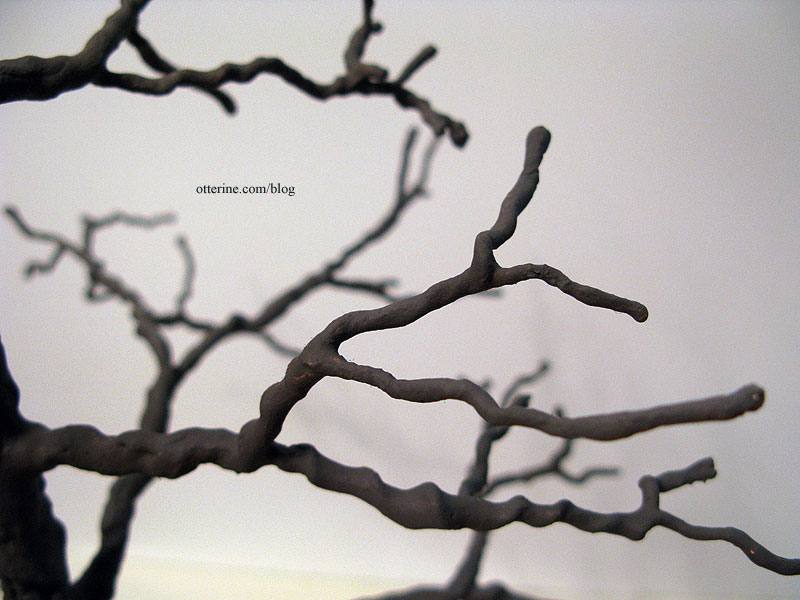
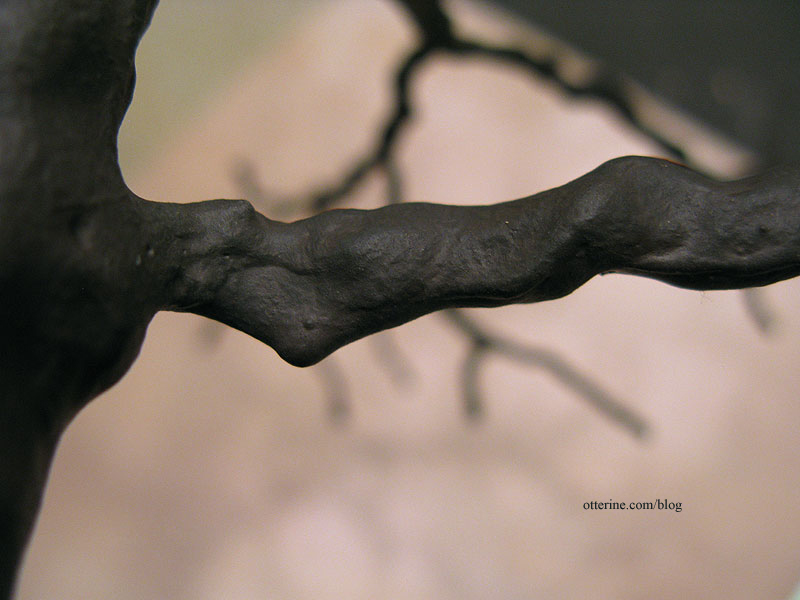
The branches twist and turn just like the real thing. I stippled the paint on to create additional texture which you can see here on the branches.
I think the lower trunk and root structure turned out great! :D
The next few steps were messy, so I didn’t take photos throughout. I did my second coat of paint with an undiluted mix of Asphaltum and Neutral Grey by Americana, with a dash of black. It darkened the tree too much. I followed that with a heavily diluted wash of Traditional Burnt Umber. It made the tree too brown. I followed that with a heavily diluted wash of Neutral Grey and Traditional Burnt Umber (like my first coat of paint), and that seemed to set things right. All these layered washes bring out a depth not achieved with a single application of regular paint.
On some of the bare portions, I scraped away where branches have fallen from the tree during its lifetime.
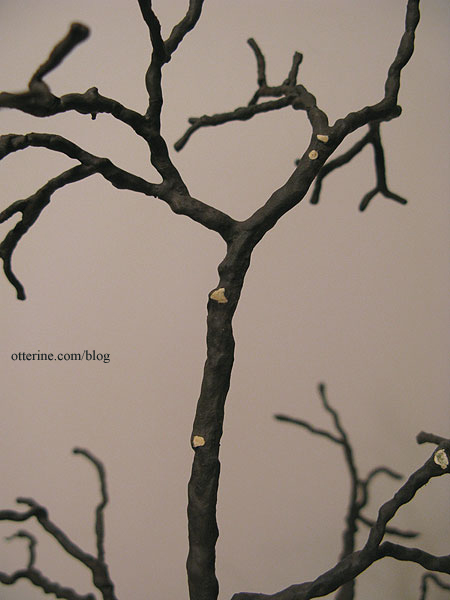
Some I made larger than others, carving out an actual hole.
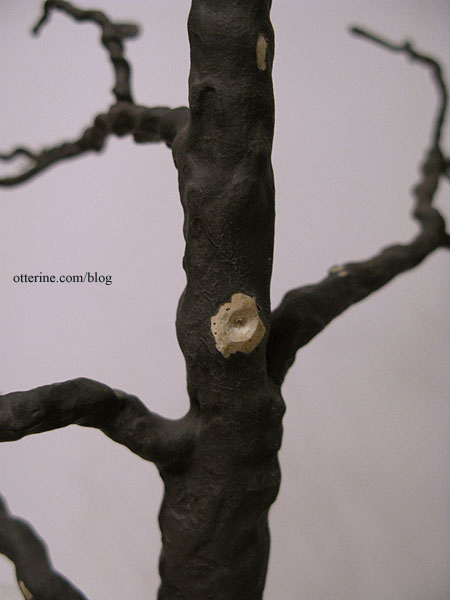
I then painted these individually to darken them. Now, if I wanted it to look like the village just came through to trim the trees along the street, I could have left them. :D
I love the texture on this tree! I am so pleased with the results.
Love, love, love it!
And, like any good haunted tree, you should be able to see faces in it. :O
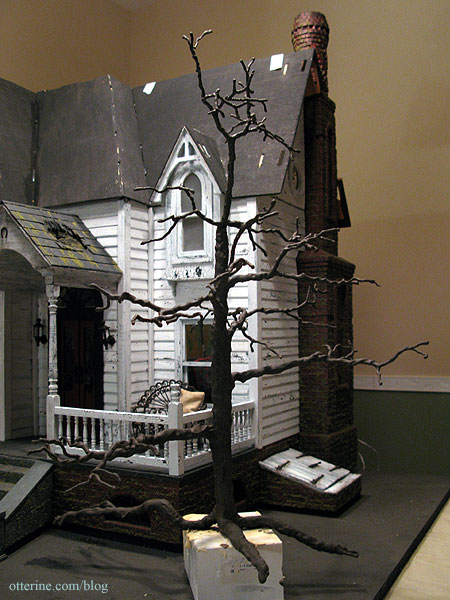
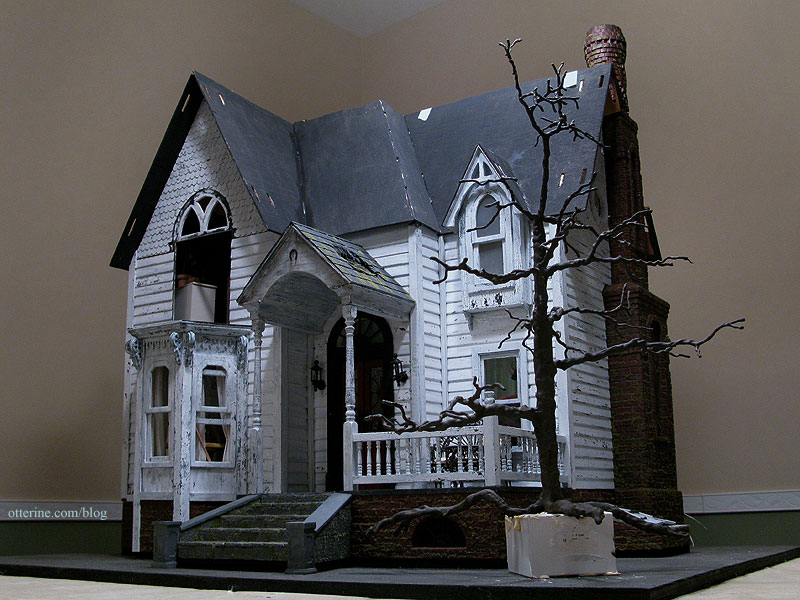
The tree will remain dormant for now, until I get to the landscaping part. I need to finish up the interior and shingle the roof first. I don’t need to be reaching over a tree trying to work! :D
Update: foliage added here.
Categories: Flowers, plants, and trees, The Haunted Heritage
July 1, 2012 | 0 comments


NOTE: All content on otterine.com is copyrighted and may not be reproduced in part or in whole. It takes a lot of time and effort to write and photograph for my blog. Please ask permission before reproducing any of my content. Please click for copyright notice and Pinterest use.


