
Half Clocked – The Clocks, part 3
Continuing my posts on the clocks from Half Clocked. Please click here for part 1, and click here for part 2.
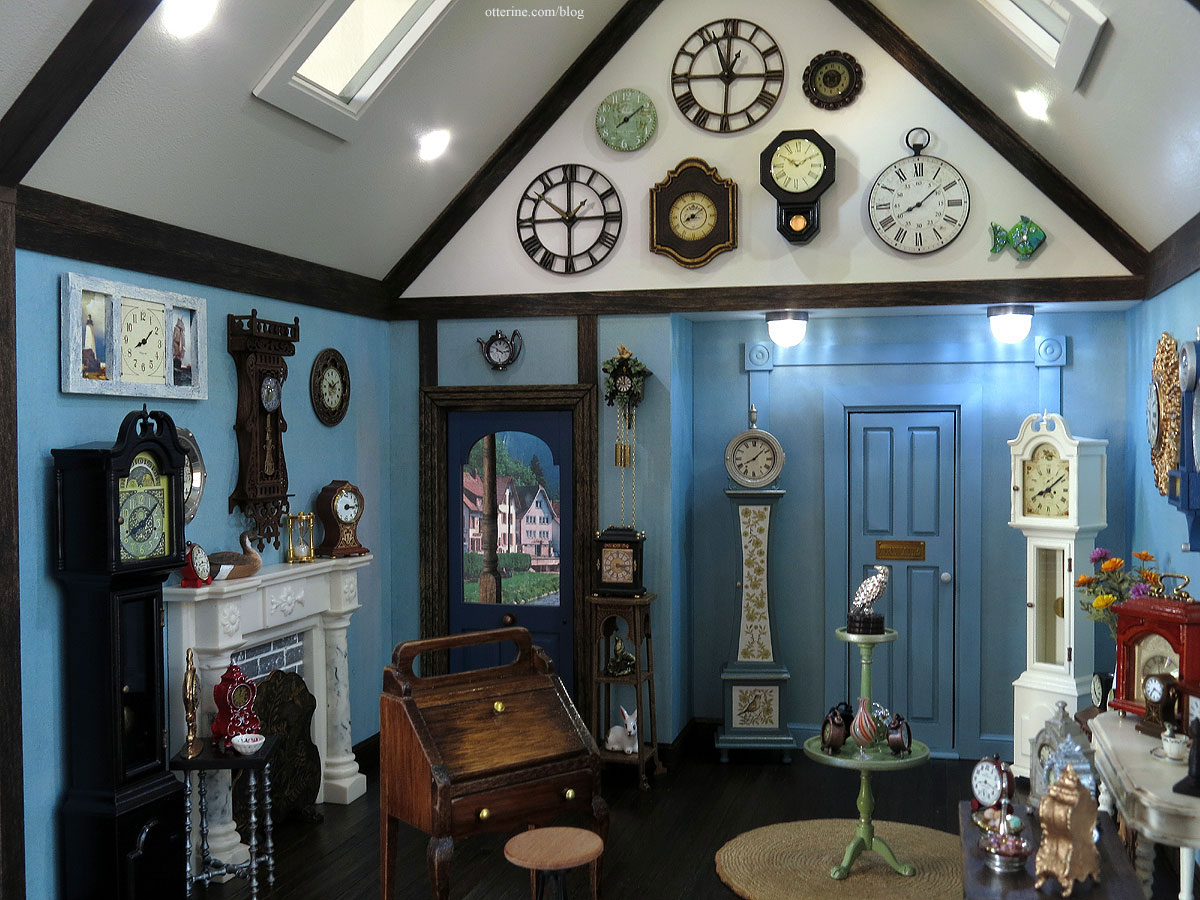
I have no chimney, but I am using a fireplace with a false brick insert. The fireplace was part of a miniatures lot I bought online. The material appears to be some sort of translucent resin. There are no markings or manufacturer details. The seller indicated that she purchased them in 1996 at The Dolls House Toys Ltd., Covent Garden, London. The fire screen is by Ellen Moore.
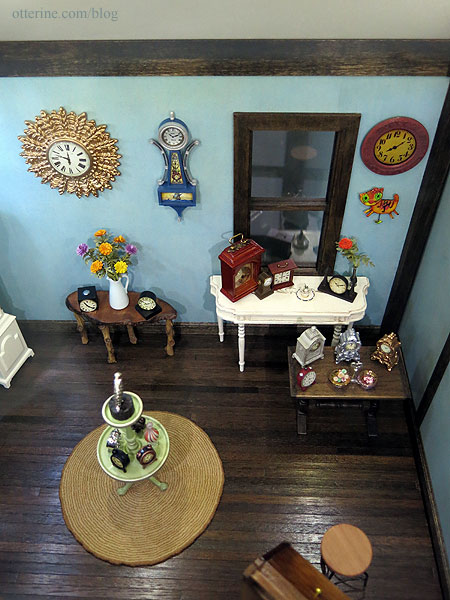
The modern side table was inspired by the Oly Studio Ichibad Side Table and made with Tiny Turnings. I needed some sort of cash transaction station for my shop, so I added a vintage desk from my stash and stool from Boutique Miniatures. The desk is a cheap miniature, but it has always appealed to me. It was also from a collection a friend gave to me after his mother passed, so it has that sentimental draw as well.
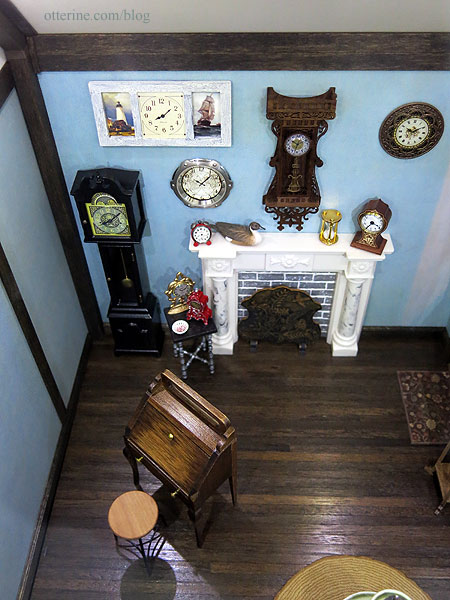
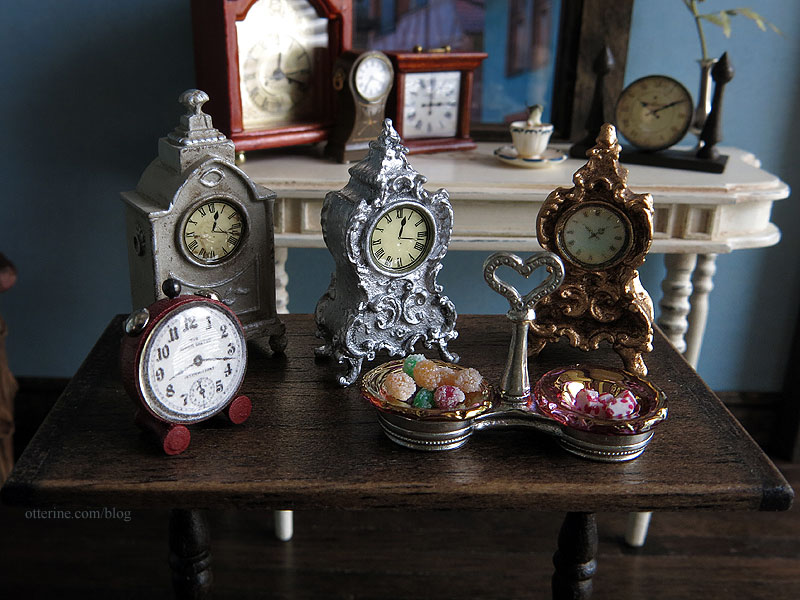
The porthole clock was made with a watch finding Bill sent me and a printed dial. I made the red alarm clock from wood shapes, Tiny Turnings, jewelry findings and a cabochon sticker for the face. It’s similar to the one I made for the Haunted Heritage, which I also borrowed for this build. The Art Deco working clock is from Halls Miniature Clocks. The laser cut Victorian wall clock is from D-Tales Miniatures, bought at the Bishop show. The hourglass is from Here Today Gone Tomorrow, and yes, it works. I think it counts maybe a only second or two.
The pintail drake decoy is by Linda Master, and the candy dish was from Manor House Miniatures. The two metal clocks were originally bright gold with cheap faces. I repainted them and added new faces, using Testors Clear Parts Cement and Window Maker for the red clock’s glass.
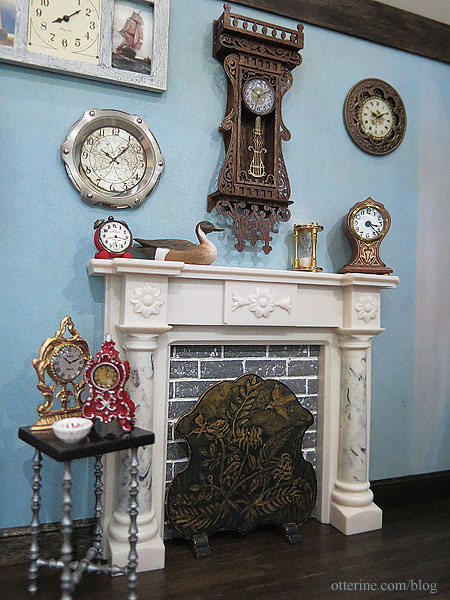
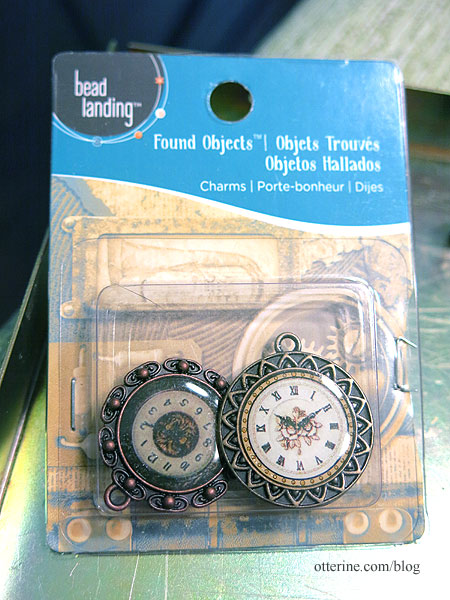
The round clock in the upper right is a jewelry finding with the bail removed with a metal jewelry frame glued around it.
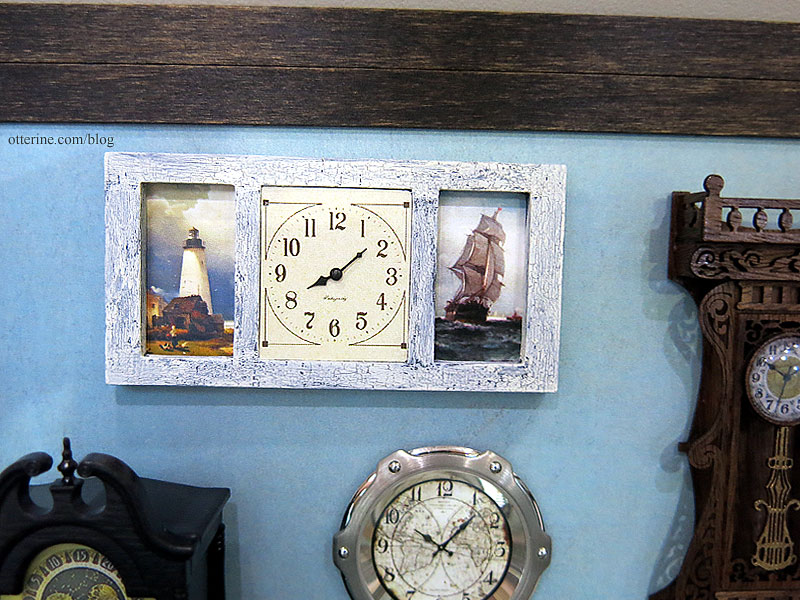
I made the clock with the paintings using an old laser cut wood scrap. I cut an insert for the middle to bring the clock dial forward and added watch hands. The artwork is cropped from paintings by Edward Moran, found on wiki.
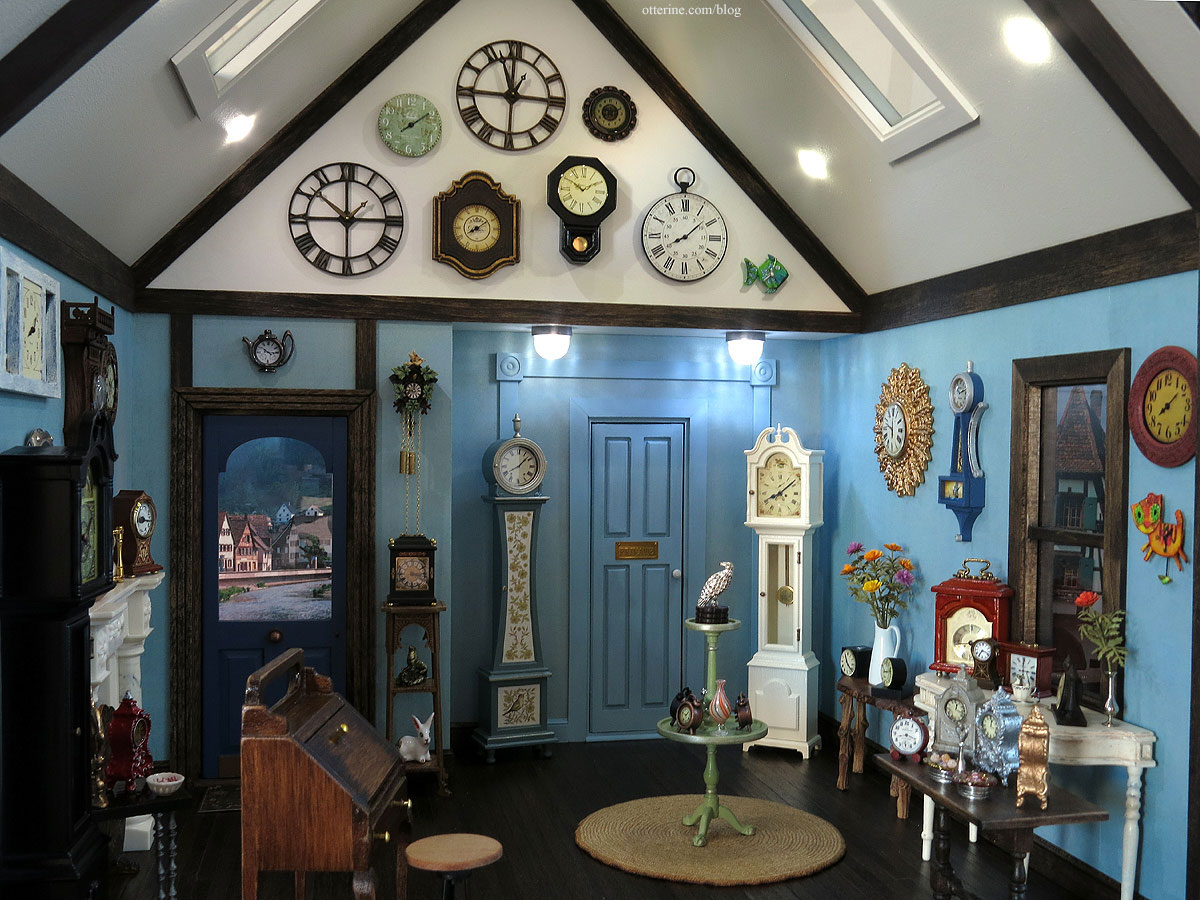
The rustic table is from Barbara Begley Miniature Gardens. I made the two table clocks from wood shapes, jewelry findings and cabochon stickers for the faces. The flowers were made from Bonnie Lavish kits.

The large gold clock started as a mirror.

I printed a new face and used a large cabochon sticker for the face.

I’ve made the Banjo wall clock from Cynthia Howe Miniatures before, but this time I went less traditional in color.
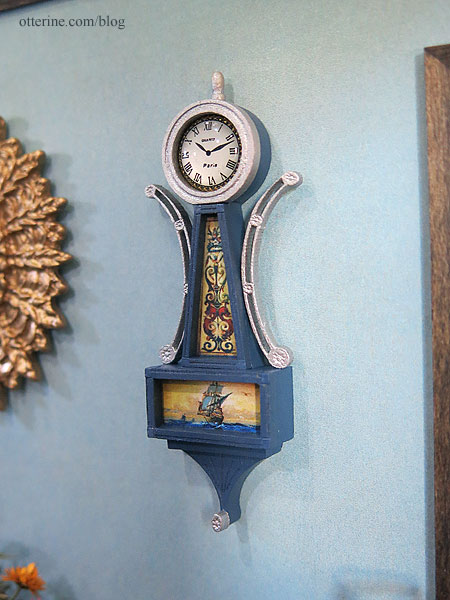
I might have to pick up more of these kits – they are so versatile.

At the last minute, I realized I needed a rug…so I swiped the Tree Ring rug for the space.
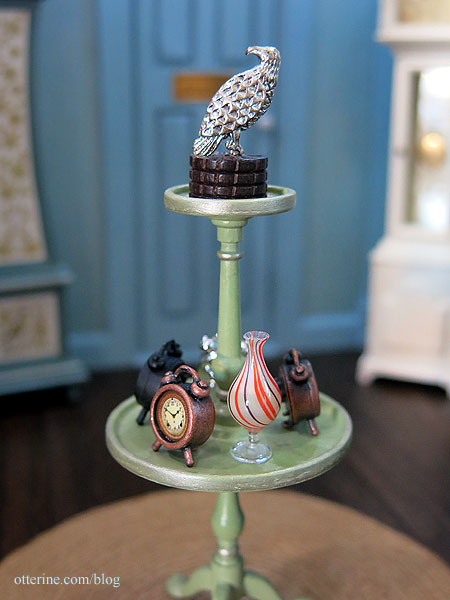
The tiered table has a selection of small clocks that I picked up from shows, but you can find them online. I made the bird statue from jewelry findings, and the spiral vase is from Patricia Paul.
The working mantel clock is from miniatures.com, the small Art Deco clock is from William Cambron Designs, and the small square clock is a half scale mini I’ve had in my stash awhile. I made the right hand table clock from wood shapes, Tiny Turnings and a cabochon sticker for the face. The silver bud vase came from Manor House Miniatures, and the flower was made from a Bonnie Lavish kit.
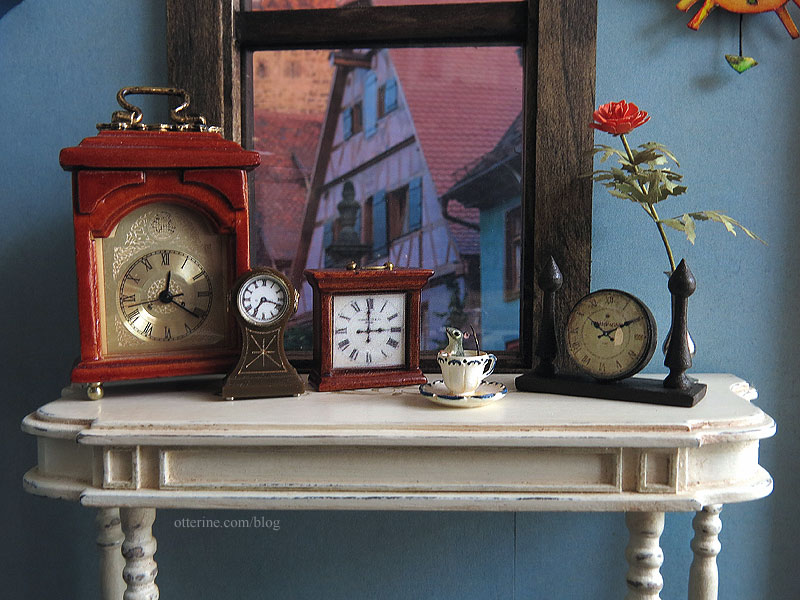
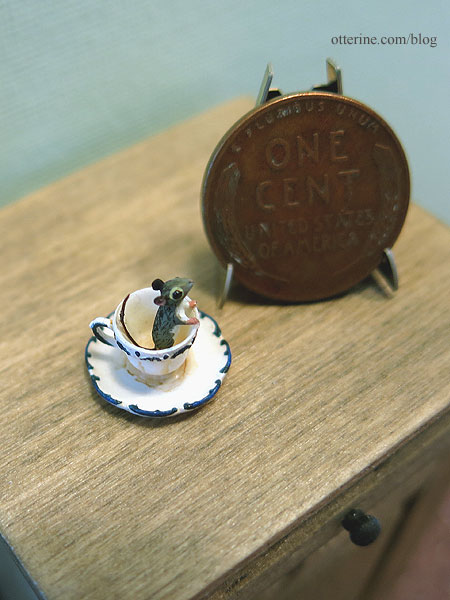
The mouse in the teacup is by Beth Freeman-Kane. Every clock shop needs a mouse, right? :D
The red alarm clock was made for the Heritage and borrowed for this build. The candy dish is from Blondie, and the candy was made by MiniFanaticus.
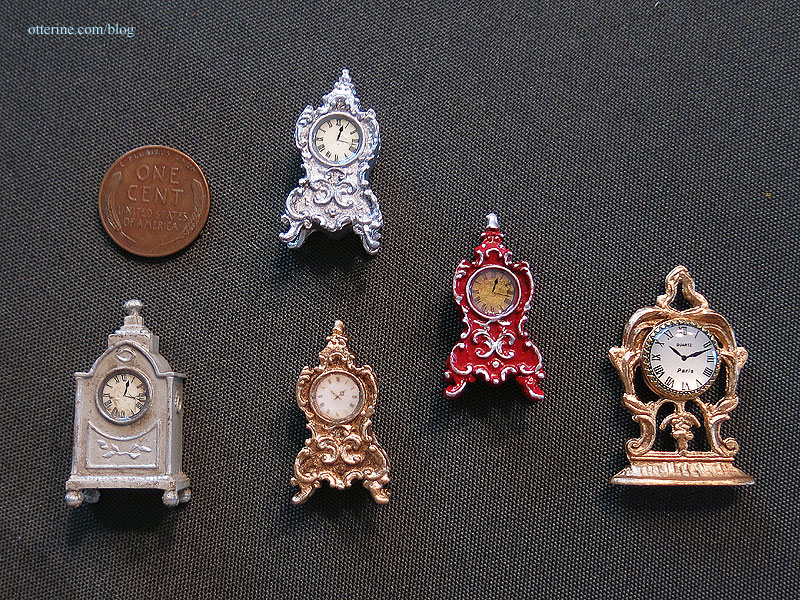
The two silvertone clocks are kits from Phoenix Model Developments. I also found two knock-offs at local shows that I refined and refinished. Since the Phoenix kits came with two faces per clock kit, I had an extra for the red clock. I printed my own for the other. For the paper/decal faces, I used Testors Clear Parts Cement and Window Maker for the glass. The gold clock on the far right was purchased at a local show and refined with new paint and dial.
That should do it! Whew! That’s a lot of clocks! :D
Categories: Half Clocked
January 10, 2019 | 0 commentsHalf Clocked – The Clocks, part 2
Continuing my posts on the clocks from Half Clocked. Please click here for part 1.
Debora made the beautiful brass clock. The brass had naturally aged while in storage, and that made the hands hard to see. I added a little black paint to bring them back. I cut and painted a block of basswood to serve as the wall mount and attached the clock to the porch.
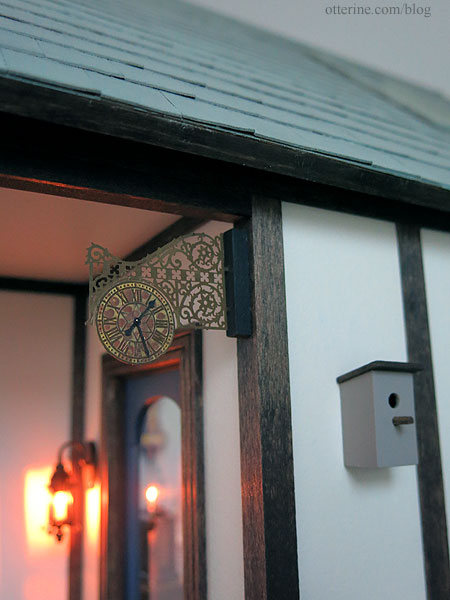
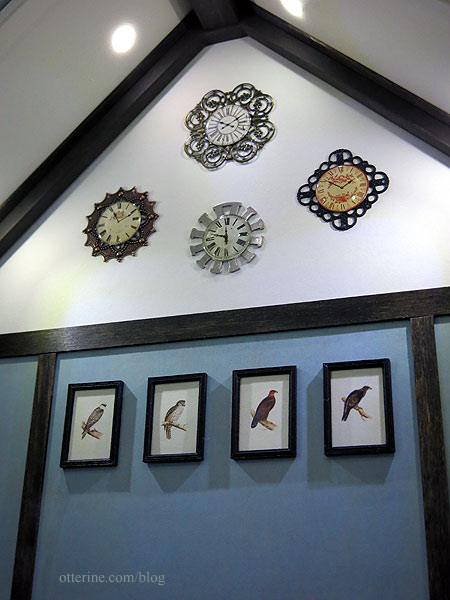
The front gable was enclosed to make more wall space, so I needed a lot of clocks to fill the area.
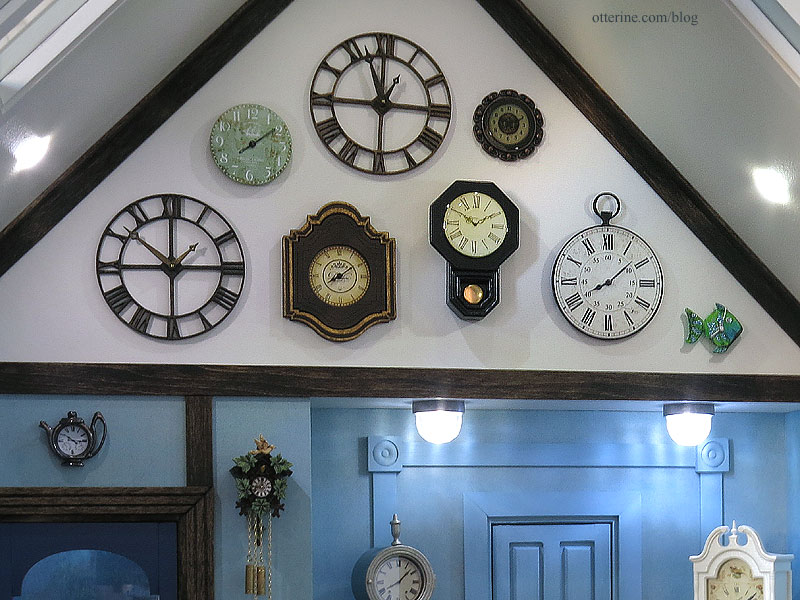
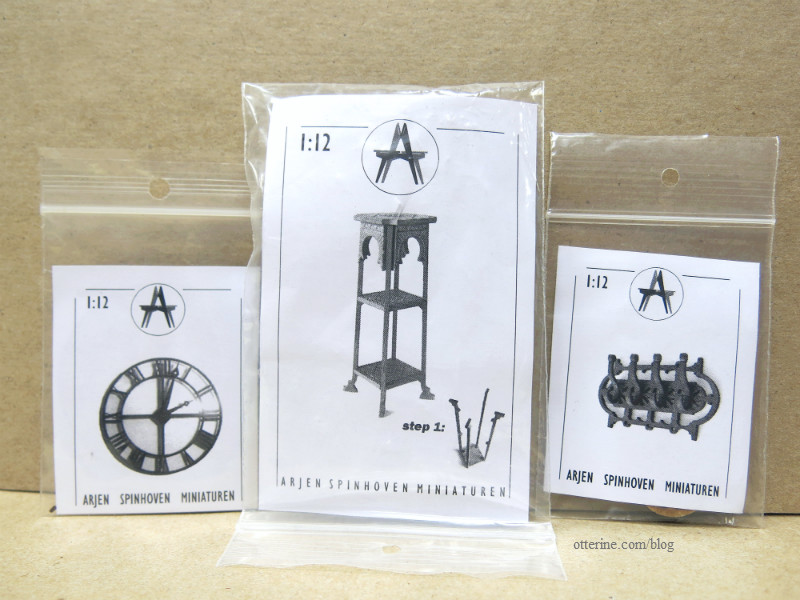
The two large openwork clocks are from Arjen Spinhoven. I painted them black and Liquitex Iridescent Bronze. The hands are cut as one piece, but I was able to give them some depth by shaving the front/back of each piece. One set separated during the process, so I was able to set it to a different time. Below, you can see the clock kit and the plant stand that is also used in the build.
The round pale green clock and the pocket watch clock are kits from Art of Mini.

I printed new dials and added watch hands.

The small round clock in the upper right is a jewelry finding with the bail removed.

The fancy framed clock was a frame kit by Diminutive Details.

I printed a new dial and added watch hands. I left off one of the laser cut trims in the final assembly since it seemed too overpowering.

The teapot clock is from the Newport. I printed a clock face, pasted it to a round bit of wood and pressed it into an open jewelry finding in the shape of a teapot.

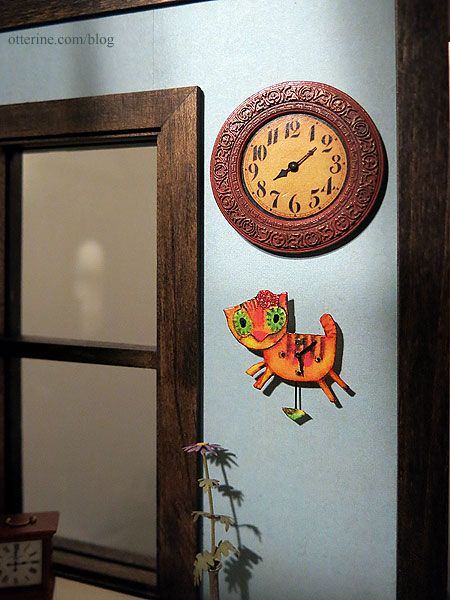
I purchased a whimsical clock kit from the online mini show, but I made only two of them for lack of time (it makes five clocks, but three are shown here).

These were to be dimensional, but the parts were so small I opted to make mine more in the line of pressed metal. I added block backs to give them a more realistic feel. They also have glitter accents and watch hands.

The cat clock is on the window wall. The clock above it is a metal scrapbook frame with a new printed face and watch hands.
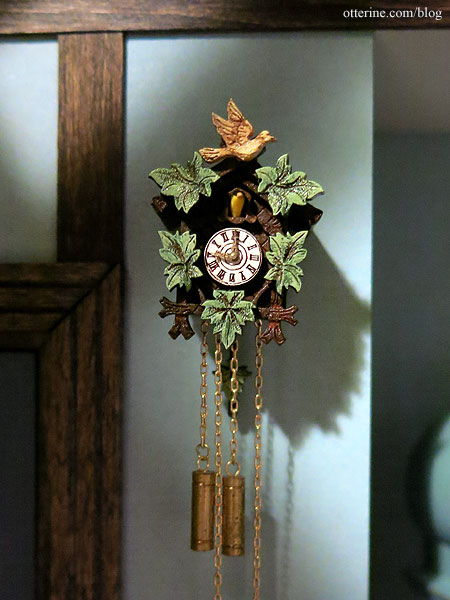
Yeah, had to have a cuckoo clock in the cuckoo clock, right? This awesome kit is from MiniaturasMyE.

It came with a wood cuckoo, but I wanted a little more realism. I thought I had a half scale bird from Barbara Meyer, but I couldn’t find it. Instead, I used a full scale bird and shaved it down to fit. It wasn’t until later that I realized the cuckoo was out but the time was not on the hour (or half hour).

I moved the hands to the right place…much better.
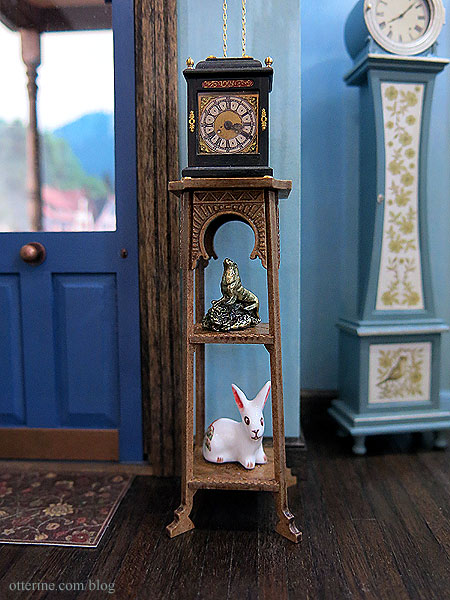
The fancy plant stand is from ArjenSpinhoven. I didn’t want to lose the carved detailing, so I stained it Minwax Driftwood and finished with Delta Ceramcoat Matte Varnish. The working clock on the top is from Halls Miniature Clocks, and the ceramic rabbit and brass seal figurine were likely from Manor House Miniatures.
Part 3 here.
Categories: Half Clocked
December 26, 2018 | 0 commentsHalf Clocked – The Clocks, part 1
I’m going to split the clock posts into a few to make it easier to navigate and manage. Many of the clocks in Half Clocked were purchased and a few were gifted, but a lot of them were made from kits and spare parts.
Miss Lydia Pickett Cottage Clock – made from a kit
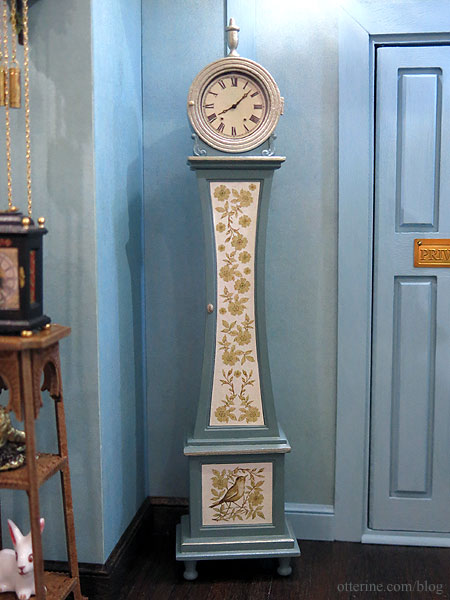
The one I spent the most time on was the Miss Lydia Pickett Cottage Clock (the construction ends here, but you can follow the posts back to see the whole process). This started as a 1:12 scale kit by Robin Betterley’s Miniatures.
I love Swedish Mora clocks, and if you do a google image search you will find an array of colors and styles. I’ve always been drawn to blue ones. I know the kit clock isn’t the traditional shape for the Mora clock, but it lent itself well to modification with that style in mind. I altered the top scrollwork, switched the skirts for bun feet and added a top finial, just for starters. The top and body doors don’t open and making opening doors wasn’t something I wanted to spend time on, but there’s no reason you can’t add faux detailing. I took some 3/16″ hinges and made notches to insert them later after painting.
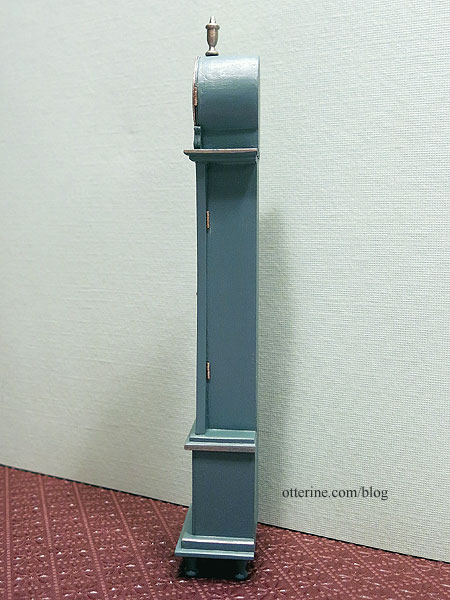
I painted the clock Greenscape by Folk Art and finished with Delta Ceramcoat Satin Varnish. The artwork for the body and base is from The Graphics Fairy. I used the image as is for the base but then used elements from the original to create a design for the body in PhotoShop.
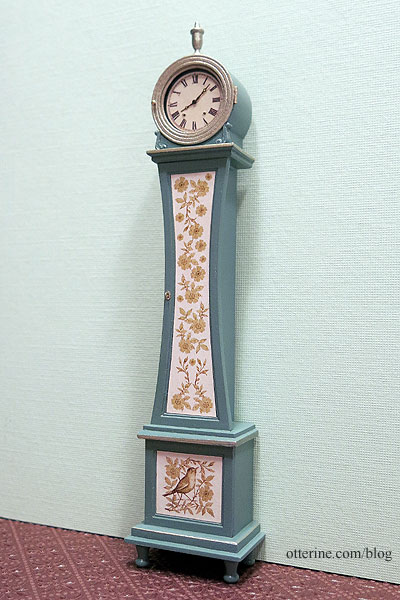
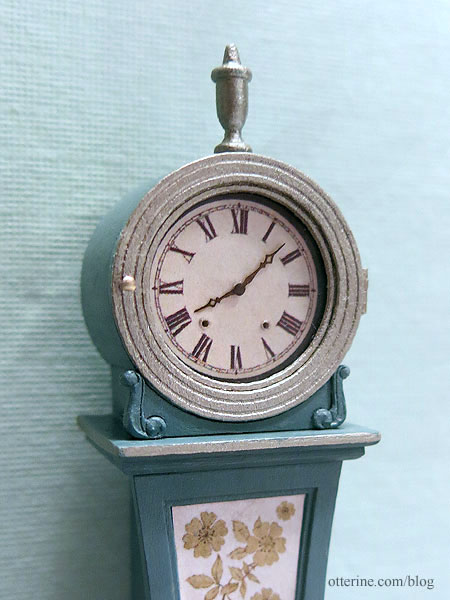
I printed a regular clock dial in a similar color to the body art as a replacement. I painted the clock face trims and the finial Taupe Metallic by Folk Art. I painted some accents in the same color on the body and base. The hands are Susanne Russo brasses, a lovely find of new old stock at a local show. I drilled winding holes as accents, lining them with a bit of paint.
Now I have a lovely Mora clock in mini. :]
Chrysnbon Clocks – made from kits
Debora sent me the Chrysnbon Curio Clock kit, and I found the Chrysnbon Grandfather Clock kit at a local show. These are plastic but make up so well with a little bit of care and patience.
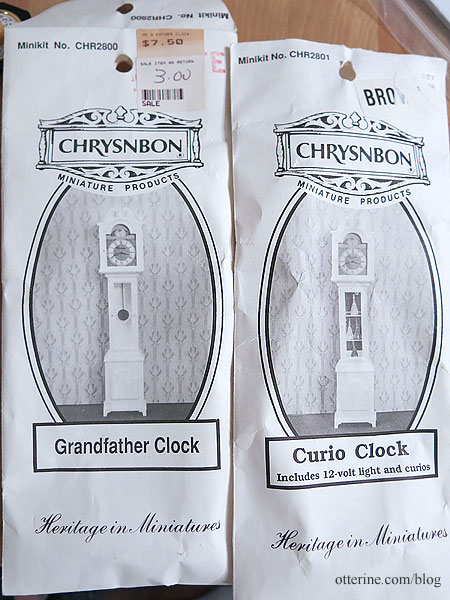
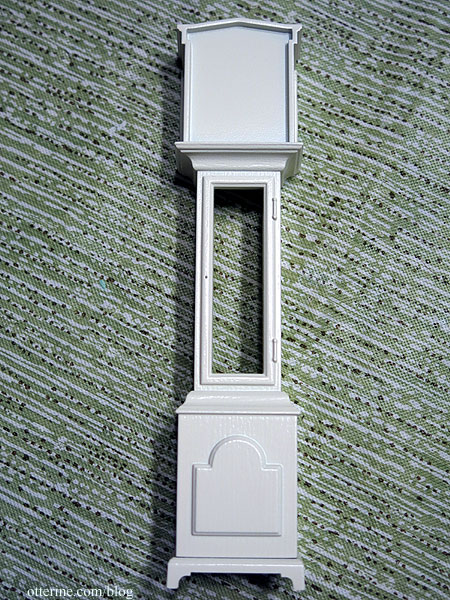
I primed both clocks in grey to remove the translucence of the plastic. After priming in grey, I sprayed the Grandfather Clock flat white. The final finish is Model Masters Wimbledon White, a leftover from the Model T.
This has a replacement dial made from a found image that I edited in PhotoShop. I pasted the printed face to heavier cardstock and used the kit sticker shape as a template to cut the face to fit. The face is glued in place.
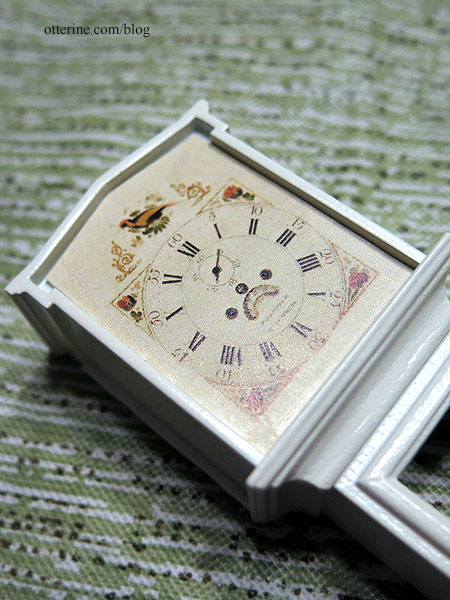
I drilled a hole in the center.
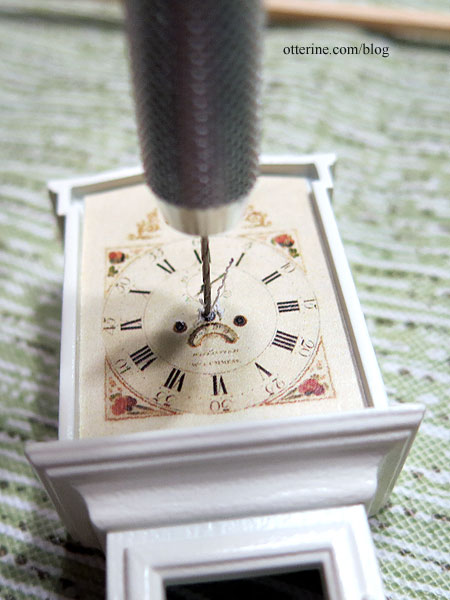
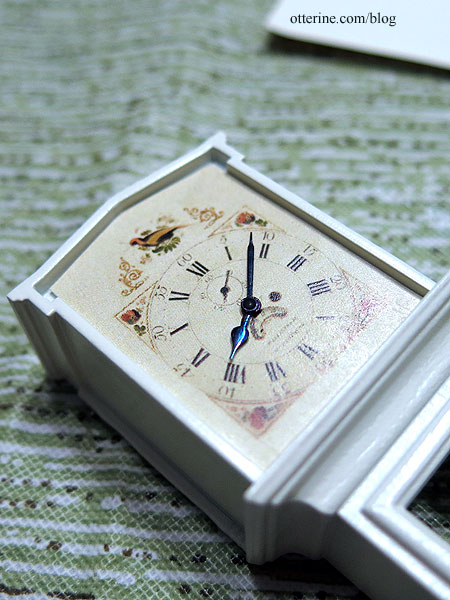
The hands are watch parts, held in place with a tiny brad.
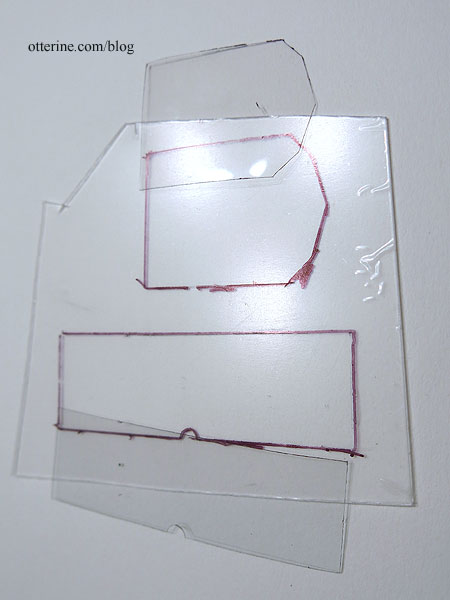
The flimsy acetate can look warped when glued, and in old kits it can be yellowed or brittle. I cut new pieces from 0.03″ thick plastic sheet.
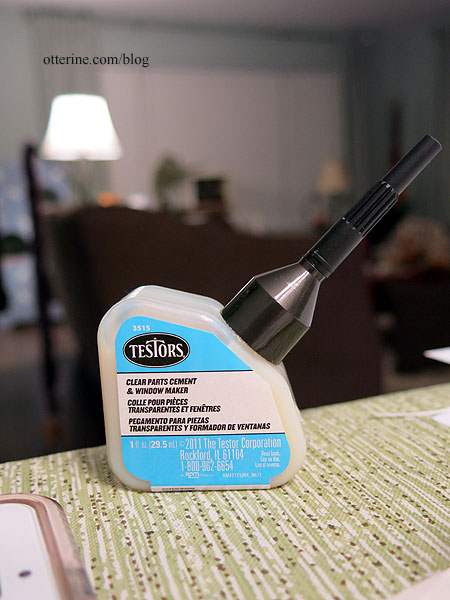
To glue these parts, I used Testors Clear Parts Cement and Window Maker.
You still need a bond that is plastic to plastic, so I scraped away the paint at the joins.
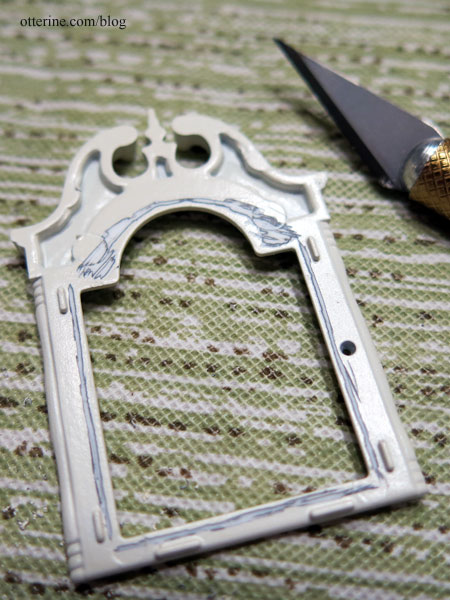
I painted the molded hinges and knobs Liquitex Iridescent Bronze. The brass pendulum rod and bob are included in the kit and are good quality.
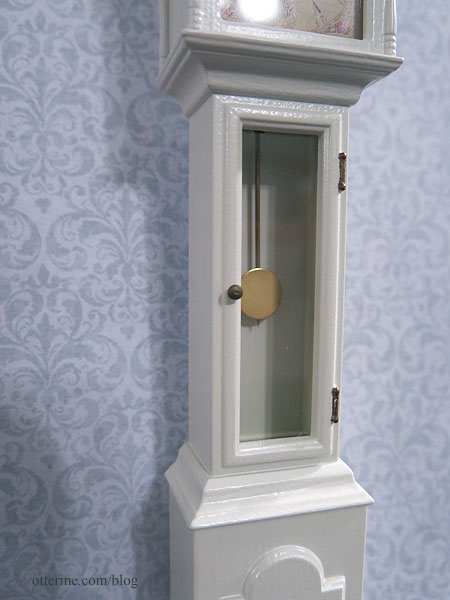
I love the way this clock turned out with the soft finish and delicate face.
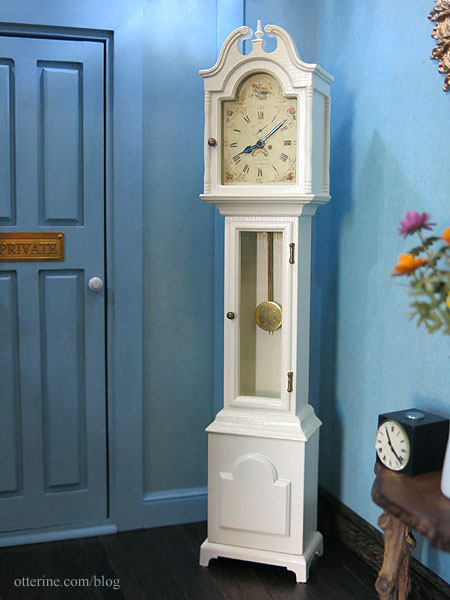
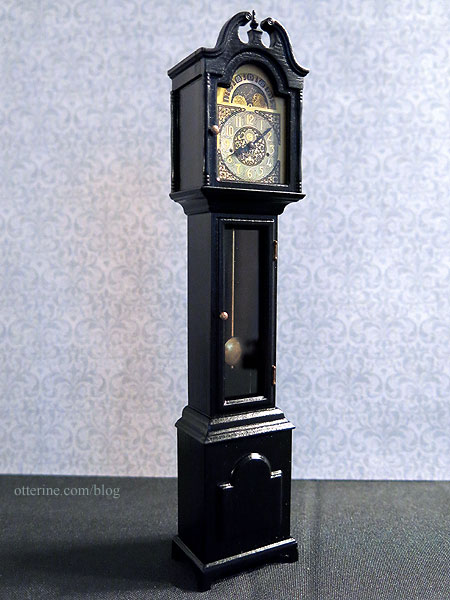
The Curio Clock was finished in Testors Semi Gloss Black. It gives a great sheen without being overpowering. I ended up converting it from a curio clock to a true grandfather clock with parts from a defunct House of Miniatures clock that could not be salvaged. I did run a wire for this clock’s light in the open space up front just in case, but I thought it was more striking with a brass pendulum.
First, I cut a new back from styrene sheet since the original was to be enclosed with a mirror back. I painted this to match the body.
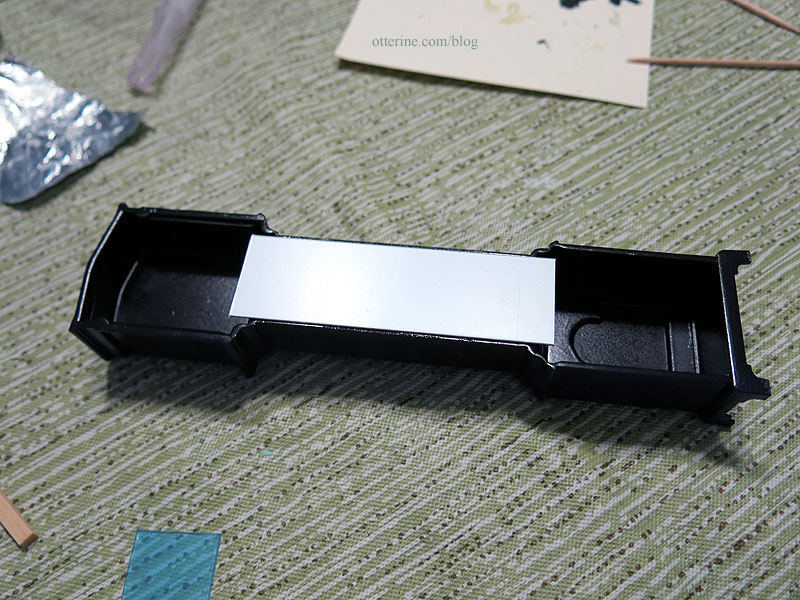
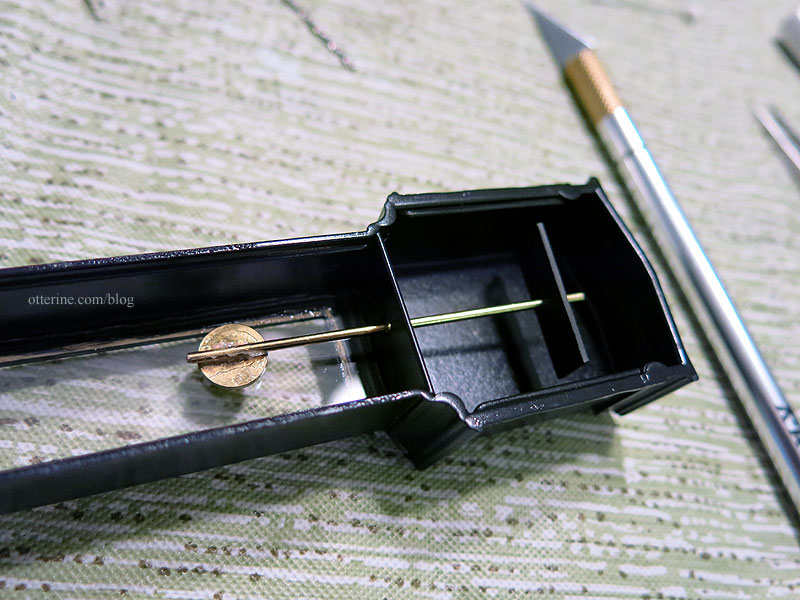
The clock has a hole for the curio light bulb that was too large for the brass pendulum rod. I cut a piece of styrene and drilled a smaller hole for the rod. Super glue gel holds the rod at the right height and holds the patch in place inside the upper compartment.
The dial is a replacement. I edited a found image in PhotoShop and used that instead. The hands are watch parts held in place with a tiny brad.
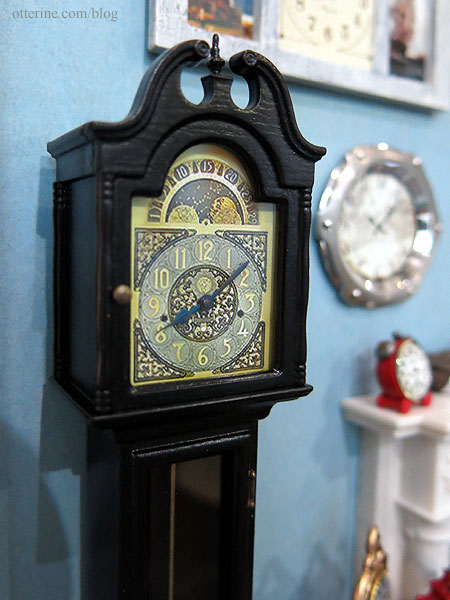
It looks very rich in black and brass. Again, the molded hinges and knobs are painted Liquitex Antique Bronze.
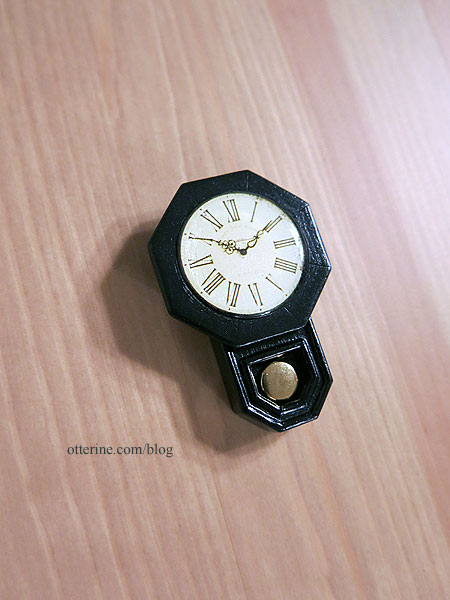
The Chrysnbon wall clock was something I never thought I would make. I bought the kit for the old telephone parts and the coat rack, but it was nice to have it as wall filler.
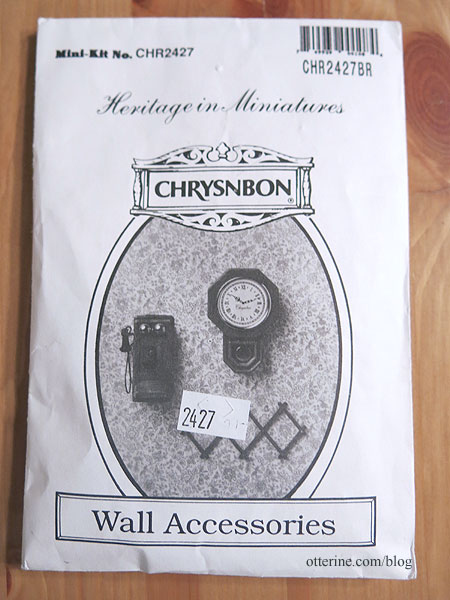
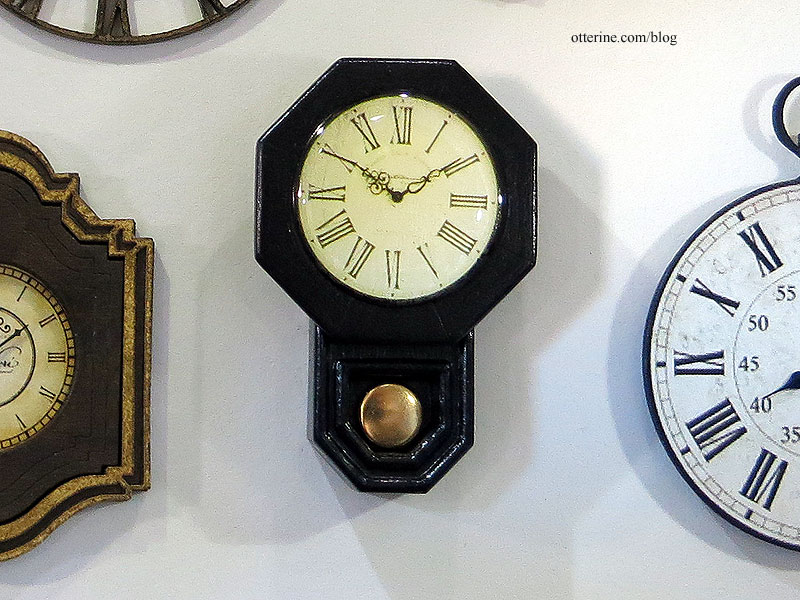
With a replacement dial it really shines. This is finished in Testors Semi Gloss Black.
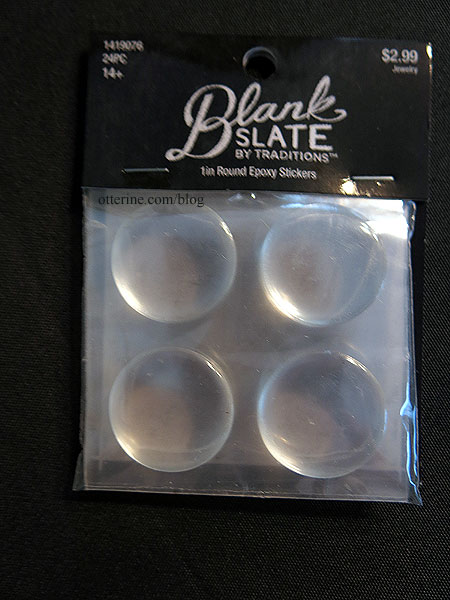
This has a printed face under a cabochon sticker that mimics a curved glass cover.
The new and improved clock found a place of prominence on the main gable. Not a filler clock, after all.
Categories: Half Clocked
December 19, 2018 | 0 commentsHalf Clocked
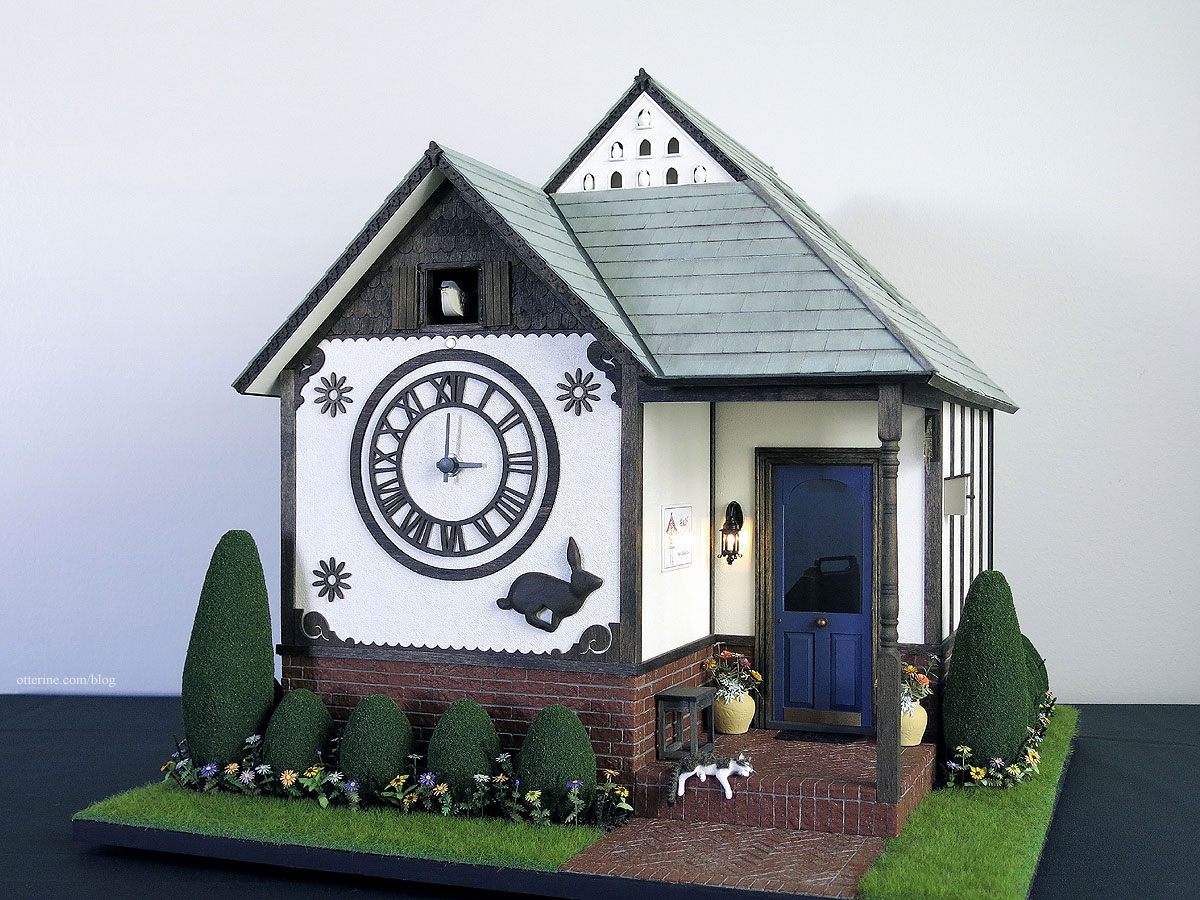
Introducing Half Clocked, my entry in the 2018 Creatin’ Contest by Hobby Builders Supply.
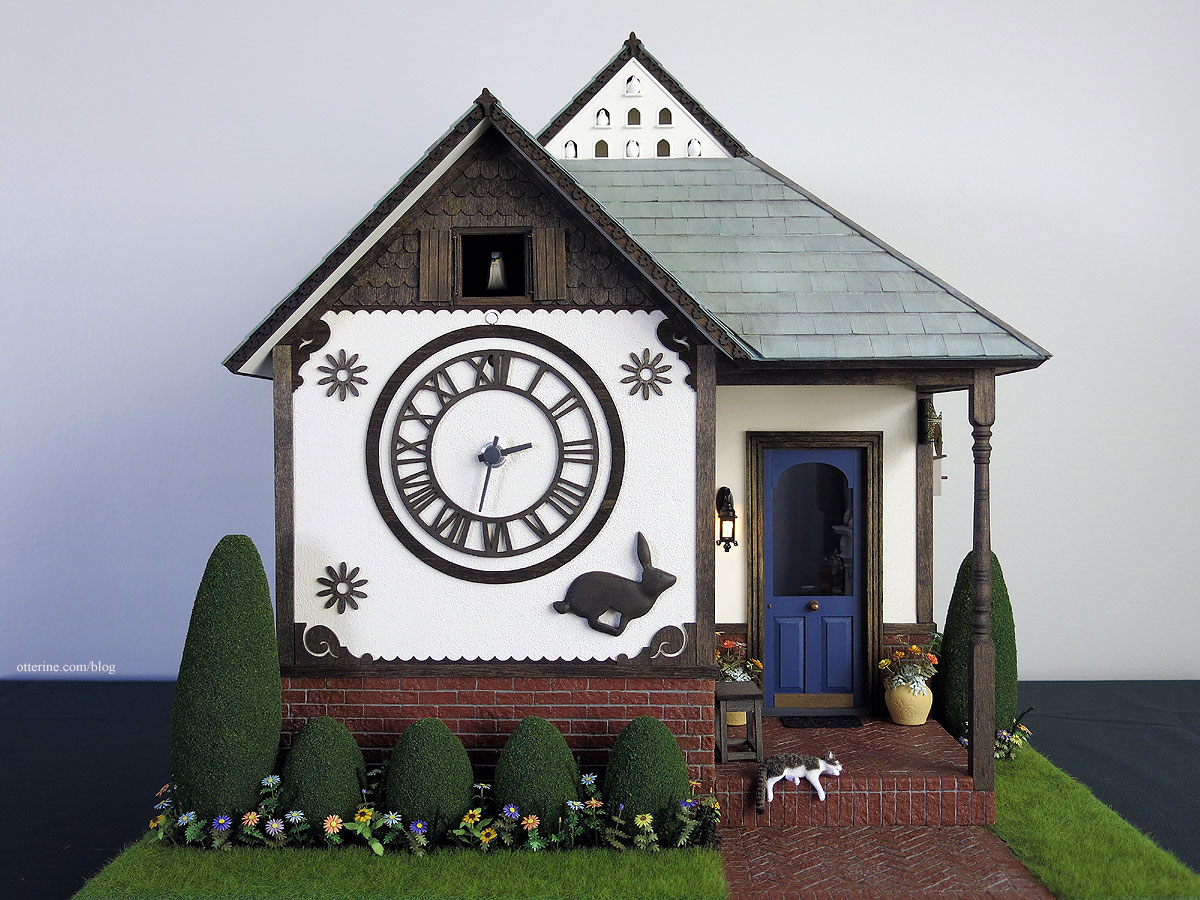
——–Half Clocked is situated in a market village known for its unique shops, mountain scenery and beautiful gardens. While the shop has timepieces for sale in every price range, the main attraction is the working cuckoo clock on the face of the building. Every hour and half hour, the cuckoo emerges from his home and bellows the time to the delight of onlookers. Half Clocked is open daily from 10 to 4, but the cuckoo sounds from sunrise to sunset.
Structural Changes
It all started with this year’s kit, the Three Gables House.
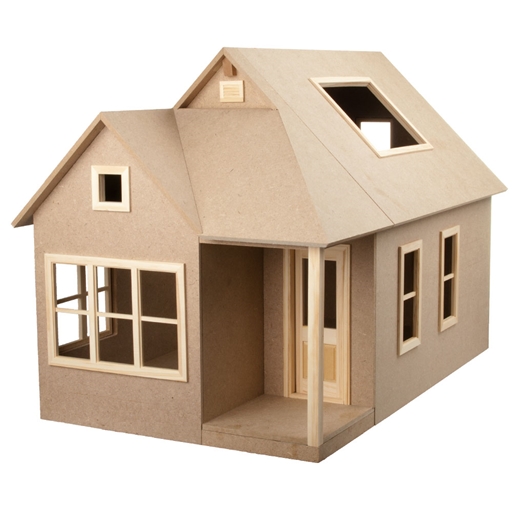
My original idea was to cut the kit down to the bare minimum depth in the front and make a wall-hanging cuckoo clock with minis decorating it. Then I thought, “Why have a normal cuckoo clock for a real life house when you can have a giant cuckoo come out of the front of a mini clock shop?!!” As soon as I searched, I immediately found two examples: one in Eble Uhren-Park, Germany and one in Britain.
The doors and windows that came with the kit were great, but I ended up rearranging their placement. I cut six inches from the depth, so now it’s much more cottage-y. I filled in three windows on the sides, leaving one single side window to conserve interior wall space.
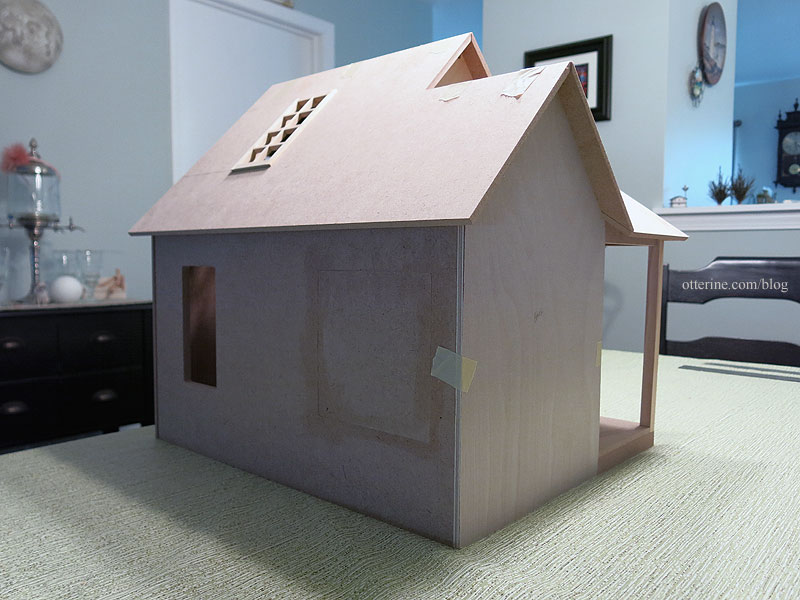
I cut a new front for the building since that was easier than trying to plug the large hole in the kit wall and then swapped out the main door for one a little fancier: a Design House shop door #1014.
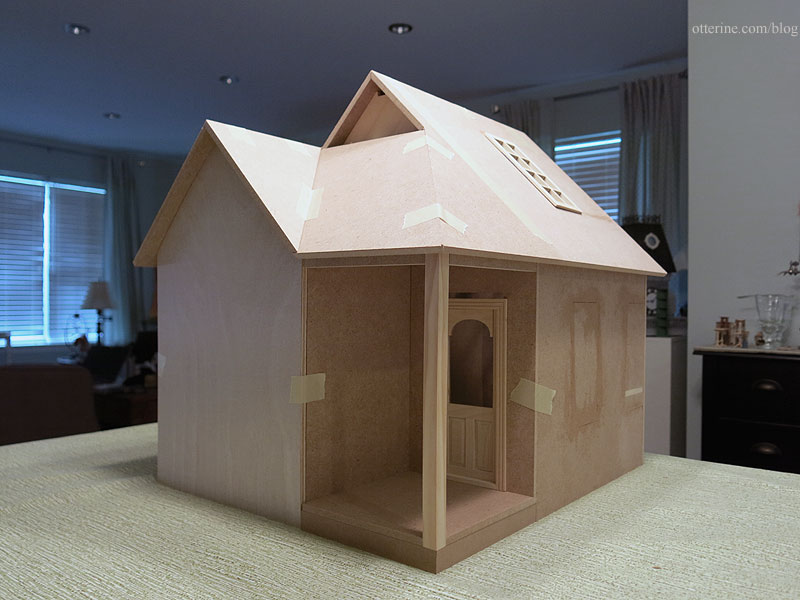
I cut a new enclosed gable board to have more wall space inside. The roof now has two smaller matching skylights as well.
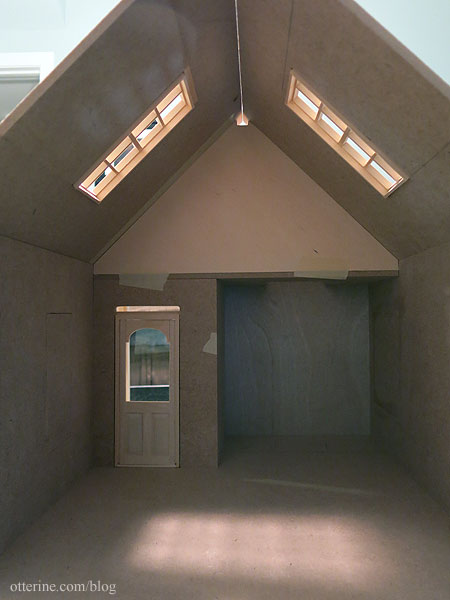
My modifications made for an open back structure, so I had to make a new back wall if I wanted something to keep the dust out. I originally considered a hinged back wall, but since I decided to have an eave on the back, hinging the house-shaped wall would not work. It would bind on the roof overhang. The solution, magnets. It works well to keep the dust and light out.
The vintage bird prints are from the Newport, made from images from A History of British Birds, published in the 1850s by Rev. Francis Orpen Morris.
The Cuckoo
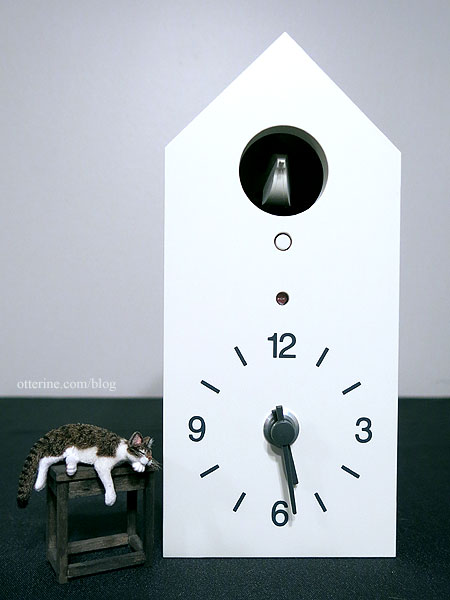
Having a working cuckoo clock enclosed in the structure didn’t seem that out of reach until I started looking for a mechanism to build around. It hadn’t occurred to me that I would need a pendulum and weights for the classic mechanism. So, then I searched for tabletop cuckoo clocks and found this amazing MUJI cuckoo clock (as an Amazon Associate, I earn from qualifying purchases). It’s a small, concise mechanism with actual bellows for that authentic sound. In fact, I liked it so much, I couldn’t bear to take it apart and had to order a second one to incorporate into Half Clocked.
Taking it apart turned out to be relatively easy, and then I just had to build my wall to suit. Fitting it to the back just required some braces.
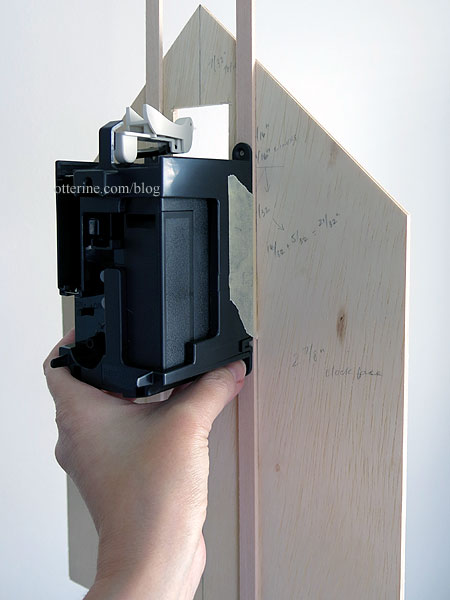
There’s obviously the hands and the bird, but there is also a light sensor so the clock doesn’t sound when dark and a test button to make the cuckoo come out on command. I had to line up my holes just so.
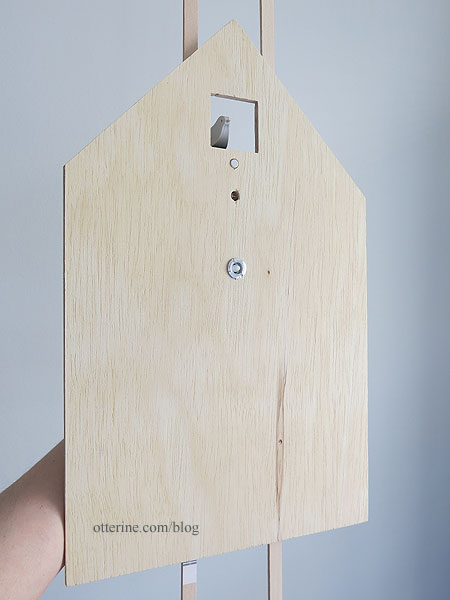
The clock face on the front wall went through many different versions before I settled on the final layout.
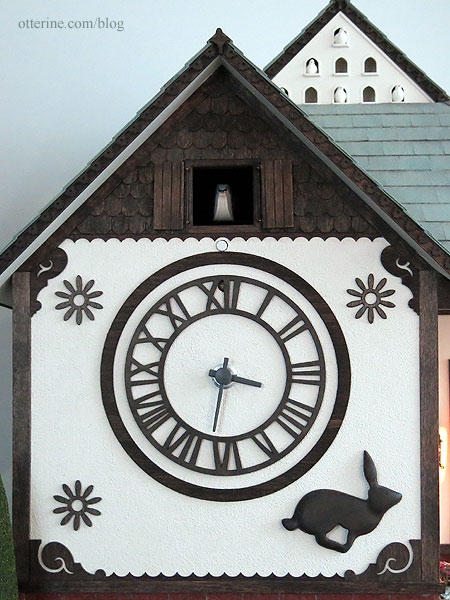
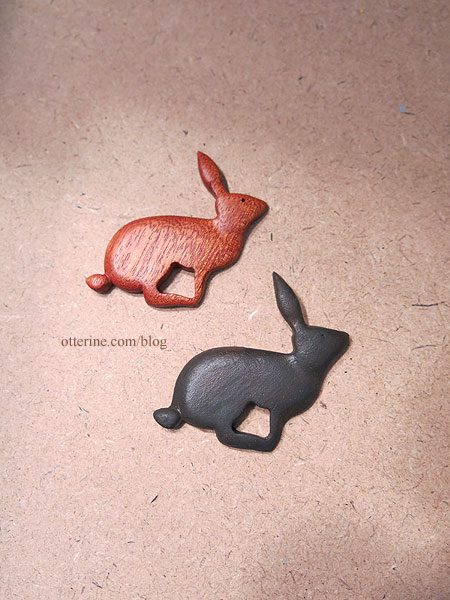
I had this lovely wood rabbit I bought back in 2012 from artbase. I always knew I wanted the rabbit on the clock face, but I didn’t want to alter the original for my purpose. I made a cast of it instead using EasyMold Silicone Putty and Alumilite Amazing Casting Resin, my first time using an opaque resin (as an Amazon Associate, I earn from qualifying purchases). I painted it dark brown to match the building trims. Pretty great for a maiden voyage, and it works well for my purposes. Here it is with the wood original.
The flowers are Finishing Accents by Darice, the Tando Creative chipboard clock dial was leftover from Roland’s Retreat, and the flourishes are new old stock Architect’s Choice bracket kits from All About Miniatures. The gables are finished with Greenleaf speed shingles in half scale, and the scallop trim is from Diminutive Details purchased at a local show.
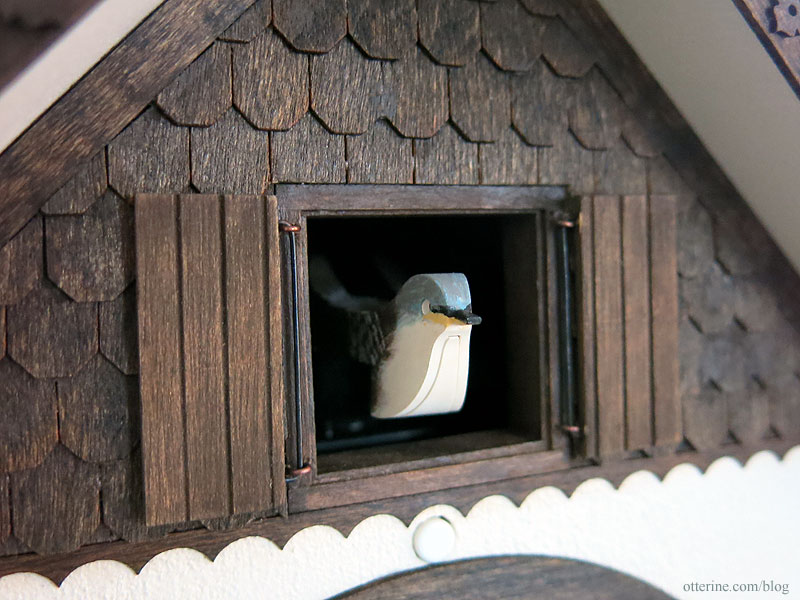
Originally, the door was meant to open and was cut as one solid piece. Since the cuckoo mechanism came from a modern clock without a door, I planned to engineer the hardware to fit. The parts didn’t work out partially because my door hinged on the left (fairly common in cuckoo clocks) and partially because the cuckoo arm extended on a curve instead of straight back and forth. I surrendered the battle and made a split door that’s always open.
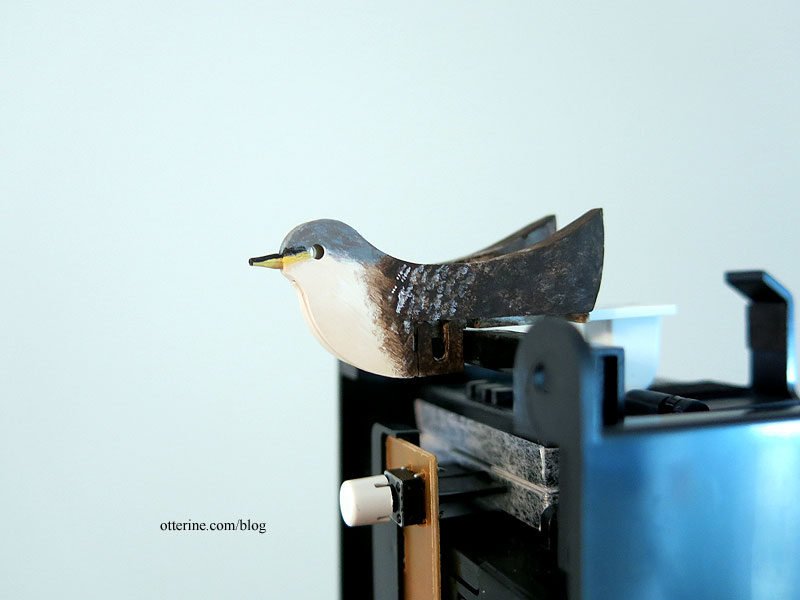
The white modern cuckoo got a makeover with acrylic paints to better resemble the real life great spotted cuckoo. :]
Exterior Detailing
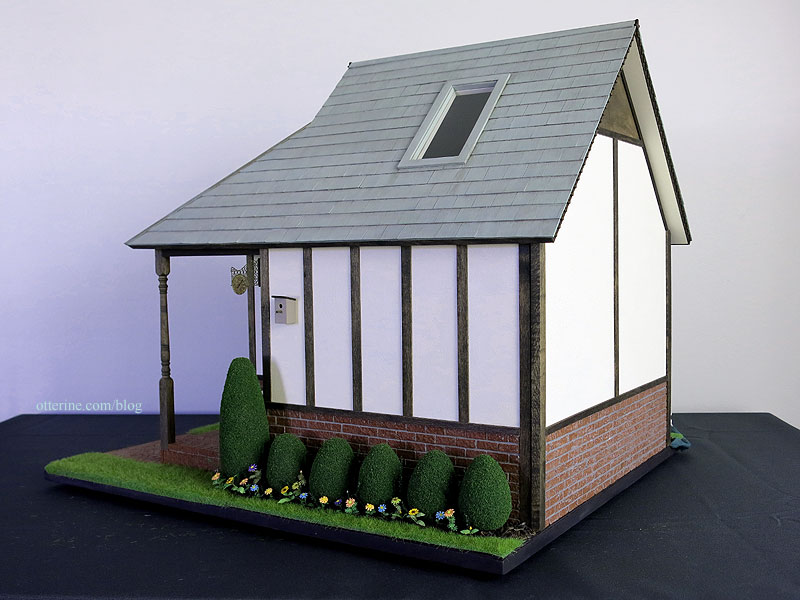
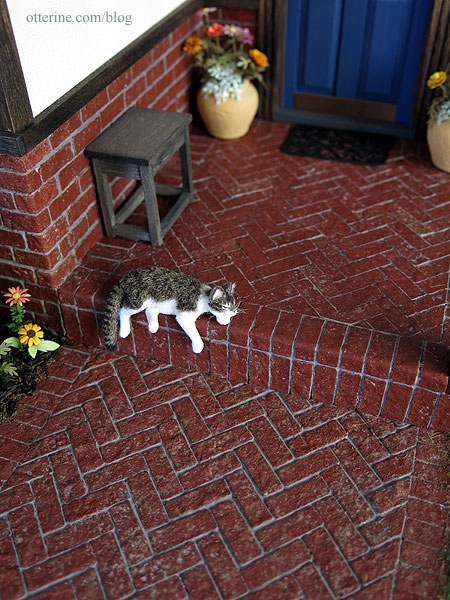
I went with a brick base again, so I was back to the egg carton brickwork. For the porch landing and walkway, I made a straight brick border with a herringbone center. I couldn’t find a true example of vertical bricks on the riser in real life from a quick image search, but it doesn’t look terribly out of place. These are painted my standard Liquitex Burnt Sienna. For the grout, I mixed spackling, neutral grey paint, black paint and Aleene’s Quick Dry glue. I added the glue just in case the paint made the spackling too thin to stay put. I replaced the kit post with a Houseworks turned post. Finn was a great buddy during the build. (He was made by JMDS.)
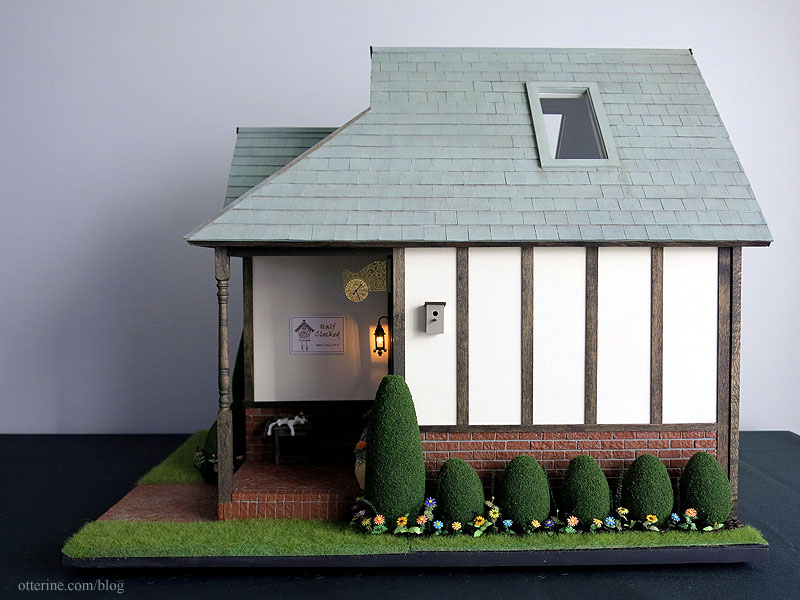
Above the brick, the stucco is a relatively easy though fickle finish. I spread spackling over the two walls where I filled in openings; the other two I left plain. After it dried, I sanded the areas smooth. The walls didn’t have to be completely flat. I just needed to mask the window outlines so their halos wouldn’t be seen later. Next up was a coat of Americana White Birch. This is a satin paint, so it has a lovely sheen once dry. I tapped the paint on with the flat side of a foam brush to achieve a light stucco finish. I stained the trim pieces Minwax Jacobean. I love this rich, dark chocolate brown. :] I’m usually a white trim gal.
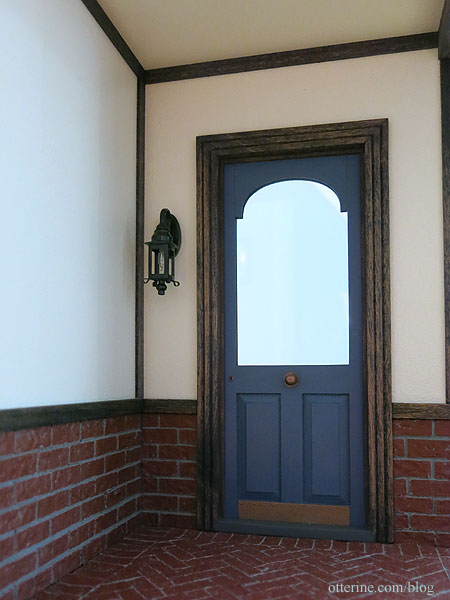
The door frame is stained Minwax Jacobean to match the rest of the trim, and the door is painted Night Sky by Americana. Though there are not a lot of colors available in the satin paint, I do like that using this paint eliminates the need for a final varnish coat. I added a paper kickplate. I also had to cut a new window insert since the paint apparently swelled the wood so much the original would no longer fit. I eliminated the draft that most dollhouse doors have. Since adding the draft block made the amount of room for hardware so limited, I opted for an old style center knob. Quirky, which fits. :D The hardware is by Classics.
I painted the porch ceiling stucco white so it would brighten the space. The front porch light is a coach lamp from HBS, and the door mat is a silver metal piece I painted black.
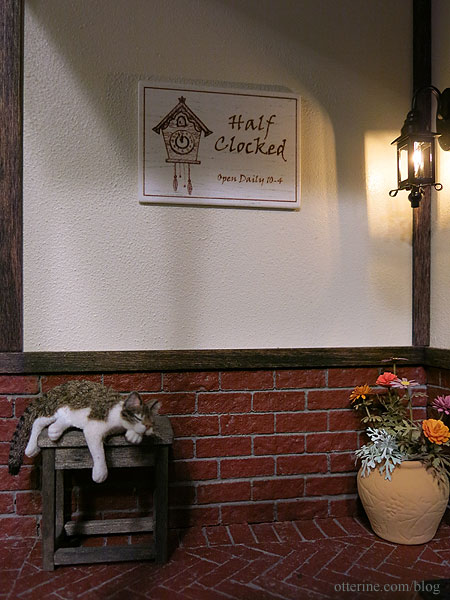
I made the sign using a graphic from iStock. I opted for subtle signage since I imagine it would be fairly obvious to passers-by which building was the clock shop. haaaaaa
Thanks to Sheila, we know what bargeboards are. :D I stained lengths of 1/16″ x 1/4″ basswood to attach to the exposed edges of the roof using Minwax Jacobean. On top of that, for the gables, I added Paulina trim from Heritage Laser Works. These are only 1/32″ thick and very delicate, so I had to come up with a way to stain them without breaking them (full post on that process here).
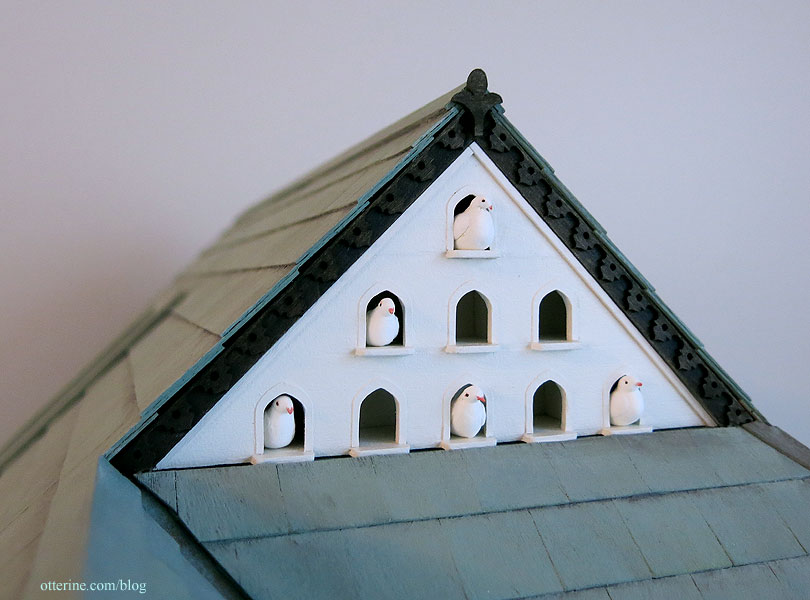
There’s a lovely space that is perfect for a built-in dovecote (just ask Sheila). I did some scouting around online, and found a great site for inspiration and instruction before attempting to make my own dovecote (parts one and two). Originally, I was going to cut a triangle and then cut the popholes, but I wasn’t getting good results. So, I re-engineered my approach. I’m very pleased with the end result. :]
My doves were made with Hearty Super Lightweight air dry clay and a little paint. :] The clay was easy to work with and set up overnight. It’s still pliable enough to squeeze the fat little birds into the popholes.
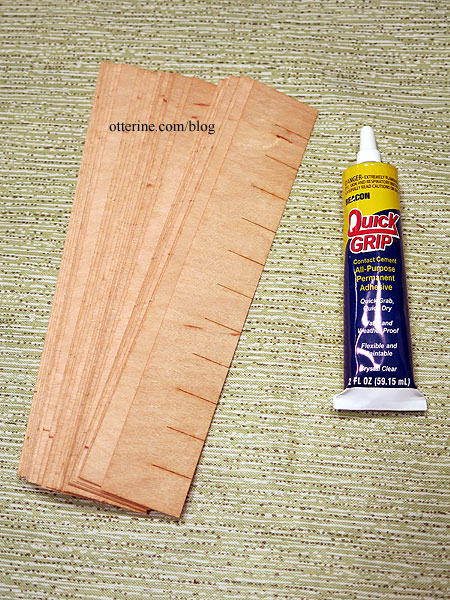
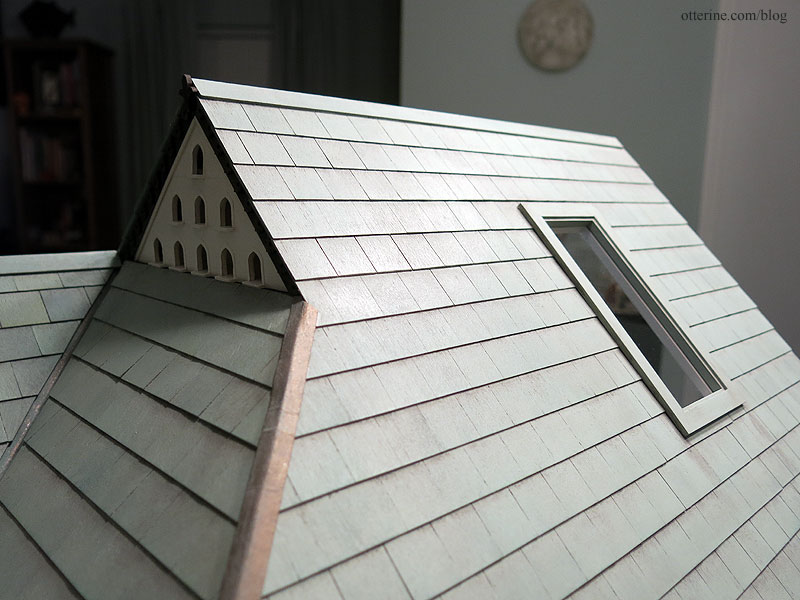
I used Greenleaf speed shingles for the roof. These are laser cut, thin wood. I use Quick Grip glue, which is stinky and messy, just the way a fun project should be. Utilizing movies and/or TV in the background makes the job bearable. (As an Amazon Associate, I earn from qualifying purchases.)
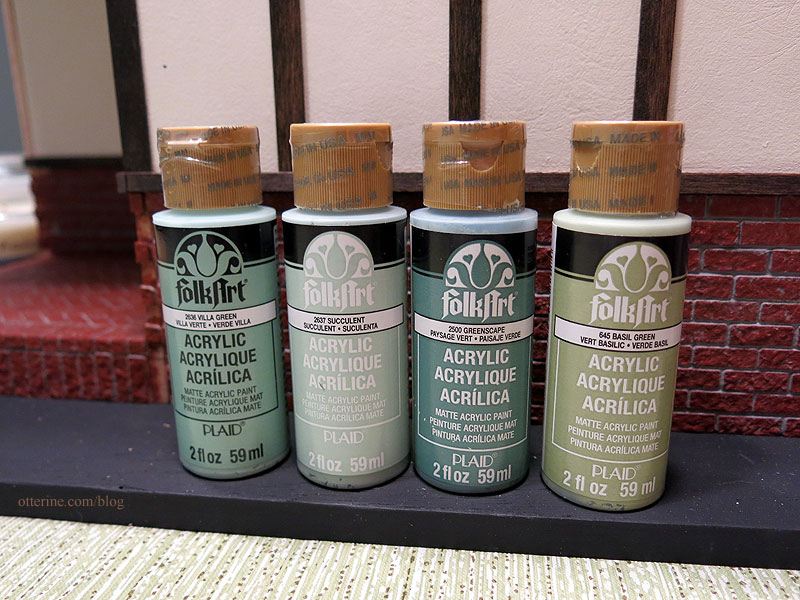
There’s one valley on the roof, so I lined that with Tyvek and painted it Liquitex Iridescent Bronze. The roof color was achieved using a mix of these paints by Folk Art: Villa Green, Succulent, Greenscape and Basil Green. There’s a Tudor house near my office with a green grey roof that I just adore, hence the color selection.
I ended up having to tone down the coloration with Slate Green by Americana and then using some aging washes to add depth. But, the greens gave the Tyvek flashing a wonderful patina. For the one roof hip, I cut a piece of cardboard to cover the join, painted this Liquitex Antique Bronze and gave it a light patina to match the rest.
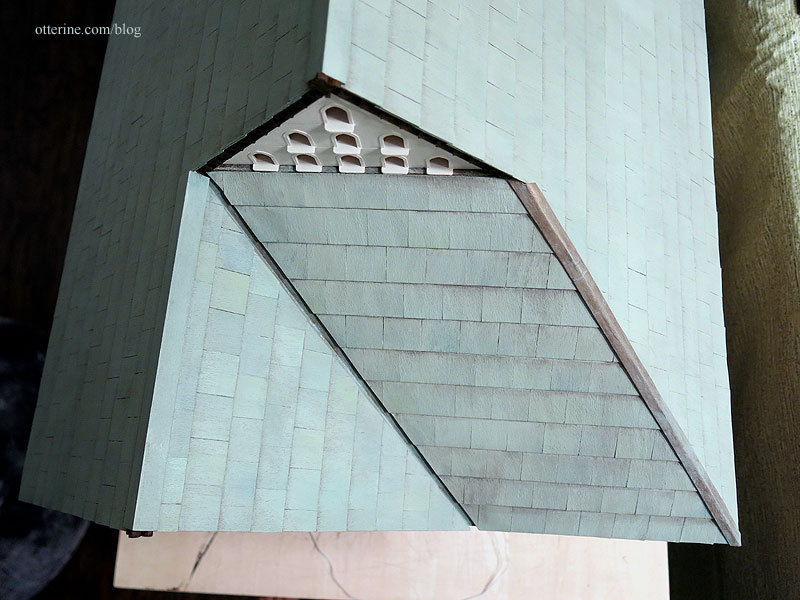
It’s not quite the color I was aiming for, but I truly love it. :]
Interior Detailing
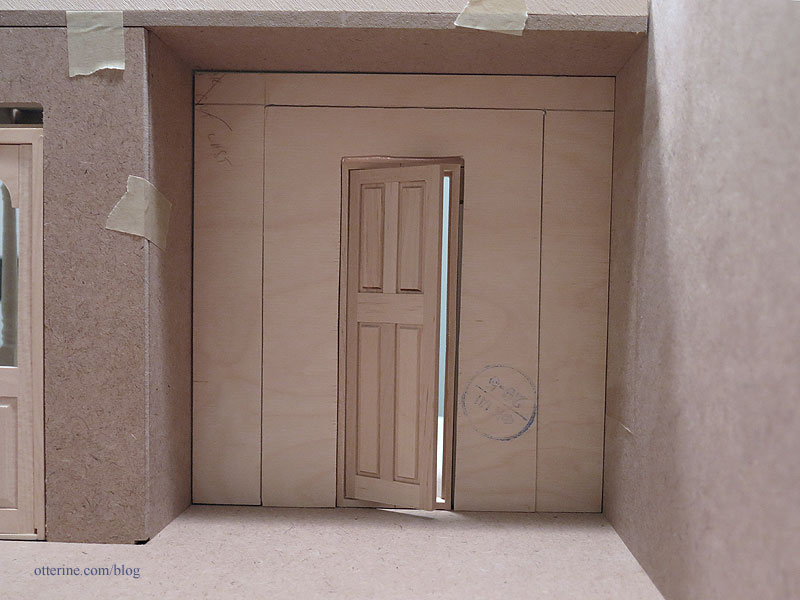
I added a removable interior wall (parts one, two, and three) to allow access to the clock mechanism while disguising its presence from the inside. I used a Classics narrow door since other interior doors looked proportionally too large for the space. I wanted to be able to access the front room more than the narrow door would allow, so I always planned to make the insert wall removable. This was a bit of hassle since I didn’t want the board to have gaps all around it nor did I want to continually risk scuffing the floor and ceiling moving it around. So, I cut the wall into two pieces – one to be a permanent part of the structure and one to be fully removable with the door acting as the handle.
The wallpaper is scrapbook paper Happenstance – Fluke by The Paper Loft. It is flat paper, but it has a printed design that looks like old fresco. You might recognize it from the first floor of Watson Mill. For the enclosed gable, I opted for plain drawing paper. It’s not pure white, so it works well for the space without being too much of a contrast. Since there’s a warm white vaulted ceiling, I didn’t think a big blue triangle would look right. The flooring is Houseworks red oak stained Minwax Jacobean and sealed with Delta Ceramcoat Matte Varnish.
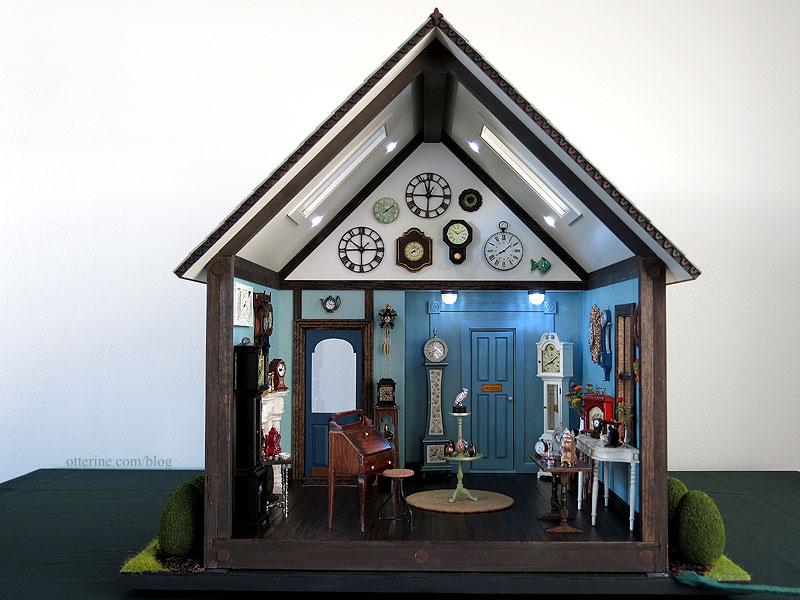
The removable wall trims were originally painted Ceramcoat Waterfall. It was nice, but it was darker than I wanted once in place. I was trying to make the door blend more with the wall as if to say, nothing to see here. I mixed the Ceramcoat Waterfall with Ceramcoat Blissful Blue to get a lighter color. I painted over the base coat of Ceramcoat Waterfall, and the result was much closer to my original idea. The brass plate is from The Dolls House Mall.
The baseboards around the room are Minwax Jacobean. I thought it might end up looking weird to have dark baseboards on the removable wall. Typically, when you’re painting a door the same color as the walls, the trims are also the same color. I didn’t want blue trims throughout, so I mixed the styles. Somehow, it works and looks relatively seamless. It might not be the cleanest solution, but I just didn’t want dark trim to interfere with the line of sight when the structure is filled and I needed that large of an opening. The wall is a tight fit, which is just fine.
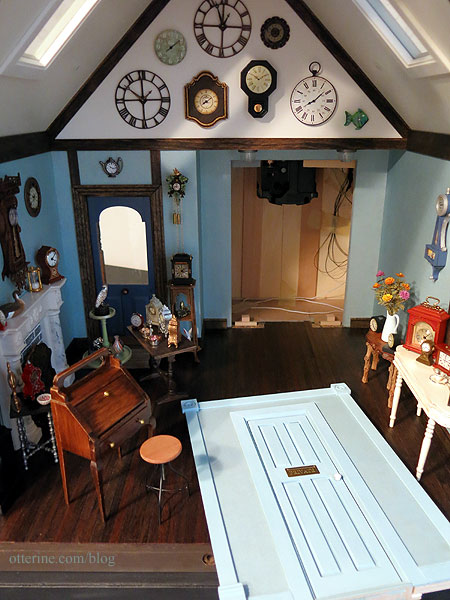
This won’t need to be removed often – just twice a year to change the time and replace the battery.
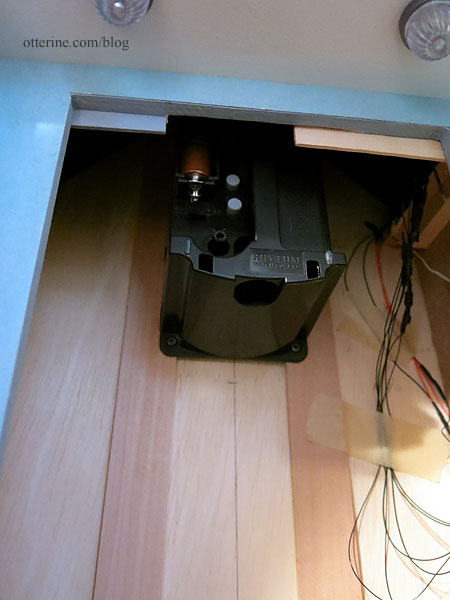
There isn’t a lot of space for lighting now that I’ve cut down the structure, so I’m opting for recessed ceiling lights alone for the interior. I’ve put NovaLyte can lights in past houses, but they require a 3/8″ thick board to sit flush. In this instance, I will fake it with LEDs from Evan Designs and nylon washers.
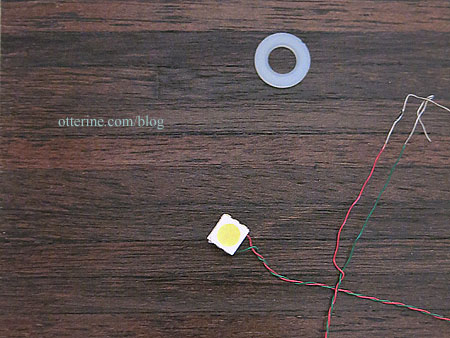
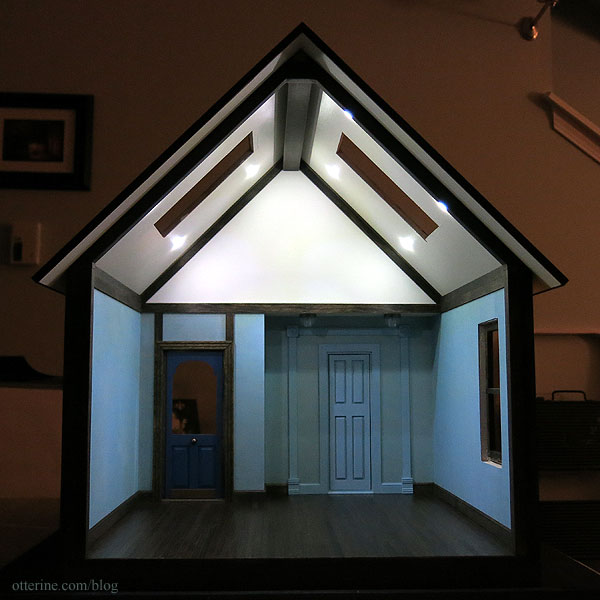
I put in eight lights for the ceiling. It might seem like a lot, but the vaulted ceiling is high above the living space and I wanted to be sure there was plenty of light.
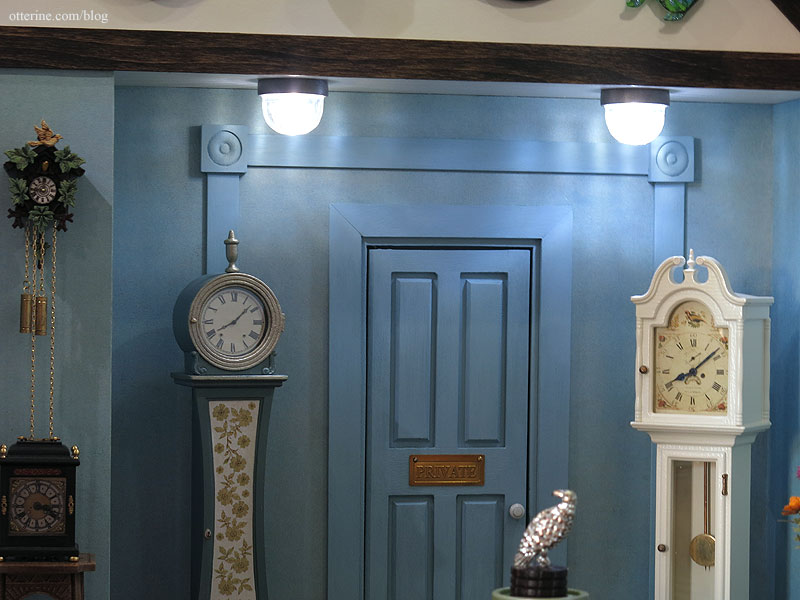
I added two new old stock ceiling light kits by Illinois Hobbycraft to the front alcove. I used LEDs for these as well.
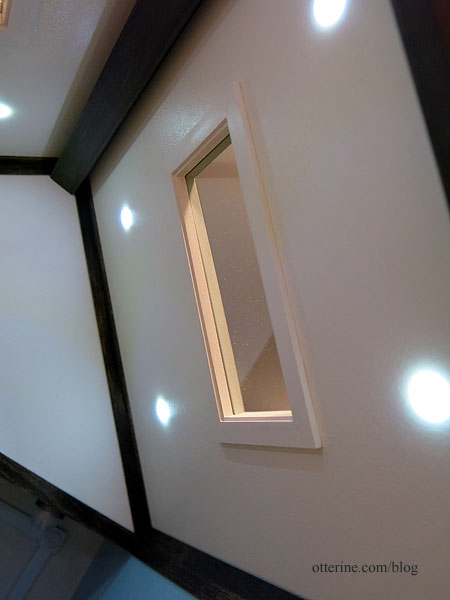
I was originally going to use Houseworks 8-light windows for the skylights, but one fit perfectly and the other didn’t. Since they would be right across from one another, there was no way to disguise the variation. I checked the kit windows, and they were the same size. Since they come as separate fronts and backs, they are easier to paint and finish. Plus, you don’t have to worry about slight differences in wall/roof thickness. I painted the interiors White Birch and the exteriors Slate Green, both by Americana. I cut new acrylic inserts since the kit glass was smaller than the full opening, and I didn’t want them to shift out of place.
The interiors blend well. I thought dark brown rectangles would be too much, so I didn’t stain them to match the rest of the trim. I think this was the right choice.
Furnishings, clocks and such
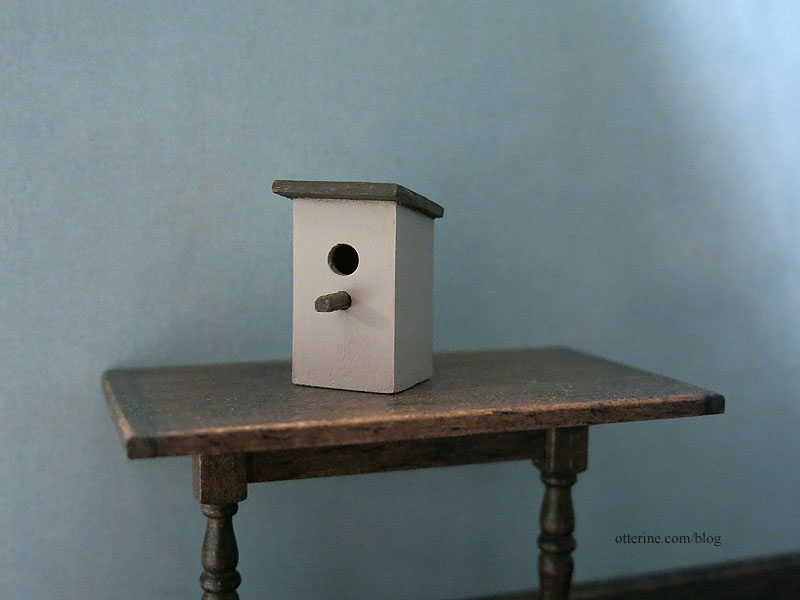
The birdhouse kit is from Art of Mini. Originally, I had painted the birdhouse green, but then I thought, “Why is just about every birdhouse I make green? I’m sure birds like other colors.” So, I painted over that with Battleship and painted the roof Bittersweet Chocolate, both by Americana. Now it’s a house suited for the unassuming bird who doesn’t like to draw attention. :D
This later ended up on the outside of the building. Debora made the beautiful brass clock. The brass had naturally aged while in storage, and that made the hands hard to see. I added a little black paint to bring them back. I cut and painted a block of basswood to serve as the wall mount and added the clock to the porch.

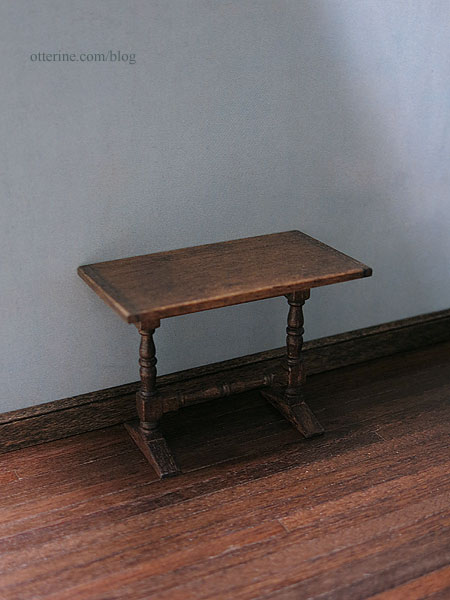
The trestle table is a House of Miniatures kit. After filling in any minor gaps with wood putty, I stained the piece Minwax Dark Walnut. I touched up any glue/putty areas with brown paint and then added a coat of Delta Ceramcoat Satin Varnish.
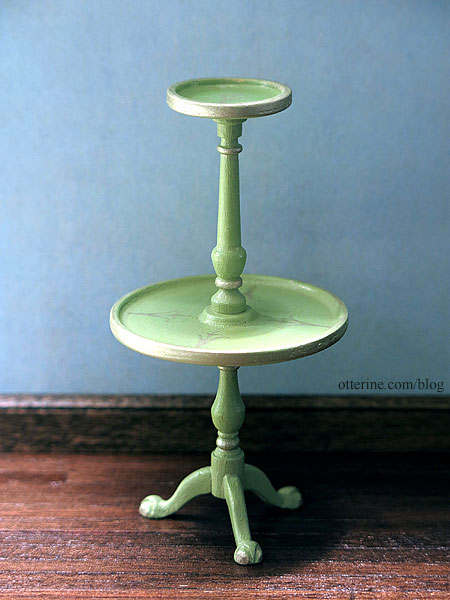
The Shenandoah Designs tiered server is one of those frustrating three-legged contraptions that make me swear even more than usual but often turn out so nicely. I started with a coat of Basil Green by Folk Art. I had to paint this since I always get glue everywhere when putting together any three-legged stand. I used one of the small rubber stamps with the same paint as the French side table to add some detailing.
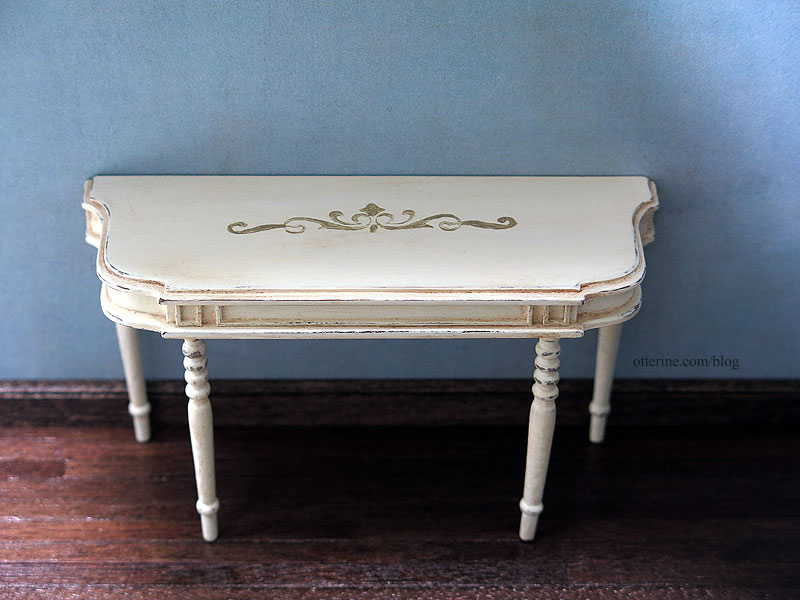
The French Side Table kit is from Art of Mini. I started with a coat of Bittersweet Chocolate by Americana. I want this to be an old table, perhaps once stained and lovely then re-purposed with a coat of paint (or three). The Folk Art Vintage White paint I had was very thick for being rather old, so I added some water. With the dark undercoat, it took several layers to even out. That added to the refinished look unexpectedly, so a nice happy accident. I rubbed the paint with a piece of brown paper bag to remove the high spots. Then I used a light grit sanding stick to bring out some of the dark details from underneath.
I added metallic detailing with Taupe by Folk Art. I used a rubber stamp and the same paint on the top (technique detailed here). I rubbed the piece again with a piece of brown paper bag until I had a nice sheen. The legs warped a little, but that adds to the antique feeling…at least that’s what I tell myself.
I have no chimney, but I am using a fireplace with a false brick insert. The fireplace was part of a miniatures lot I bought online. I have two that are very similar, and one is for the Brownstone. They are heavy, well made and have crisp detailing. The material appears to be some sort of translucent resin. There are no markings or manufacturer details. The seller indicated that she purchased them in 1996 at The Dolls House Toys Ltd., Covent Garden, London. The fire screen is by Ellen Moore.
The modern side table was inspired by the Oly Studio Ichibad Side Table and made with Tiny Turnings. I needed some sort of cash transaction station for my shop, so I added a vintage desk from my stash and stool from Boutique Miniatures. The desk is a cheap miniature, but it has always appealed to me. It was also from a collection a friend gave to me after his mother passed, so it has that sentimental draw as well. The laser cut Victorian wall clock is from D-Tales Miniatures, bought at the Bishop show. The hourglass is from Here Today Gone Tomorrow, and the pintail drake decoy is by Linda Master. The Art Deco working clock on the right mantel top is from Halls Miniature Clocks.

The black grandfather clock was made from a Chrysnbon kit.

For more details and pics of the clocks and accessories on this side of the room, click here.

The ivory grandfather clock is also Chrysnbon.

The blue Mora clock began with a Miss Lydia Pickett Cottage Clock (the construction ends here, but you can follow the posts back to see the whole process). This is a 1:12 scale kit by Robin Betterley’s Miniatures.

Yeah, had to have a cuckoo clock in the cuckoo clock, right? This awesome kit is from MiniaturasMyE. It came with a wood cuckoo, but I wanted a little more realism. I thought I had a half scale bird from Barbara Meyer, but I couldn’t find it. Instead, I used a full scale bird and shaved it down to fit.

The fancy plant stand is from Arjen Spinhoven. I didn’t want to lose the carved detailing, so I stained it Minwax Driftwood and finished with Delta Ceramcoat Matte Varnish. The working clock on the top is from Halls Miniature Clocks, and the ceramic rabbit and brass seal figurine were likely from Manor House Miniatures.

The rustic table is from Barbara Begley Miniature Gardens. At the last minute, I realized I needed a rug…so I swiped the Tree Ring rug for the space. Now, I can leisurely make a replacement. I’ve made the Banjo wall clock from Cynthia Howe Miniatures before, but this time I went less traditional.

For more details and pics of the clocks and accessories on this side of the room, click here.

The gable clocks are made from kits, jewelry findings and watch parts. Please click here for the detailed post.

The tiered table has a selection of small clocks that I picked up from shows, but you can find them online. I made the bird statue from jewelry findings, and the spiral vase is from Patricia Paul.

The Landscaping
I went with a modest and tidy landscaping for the build since it seemed reminiscent of a simplified cuckoo clock. The landscaping board is finished on the edges with iron-on veneer edging. I then glued layers of white 1/16″ foam sheets by Woodland Scenics using Weldbond glue. I went with thin foam so I could keep the land relatively flat on the baseboard while still allowing for natural unevenness.
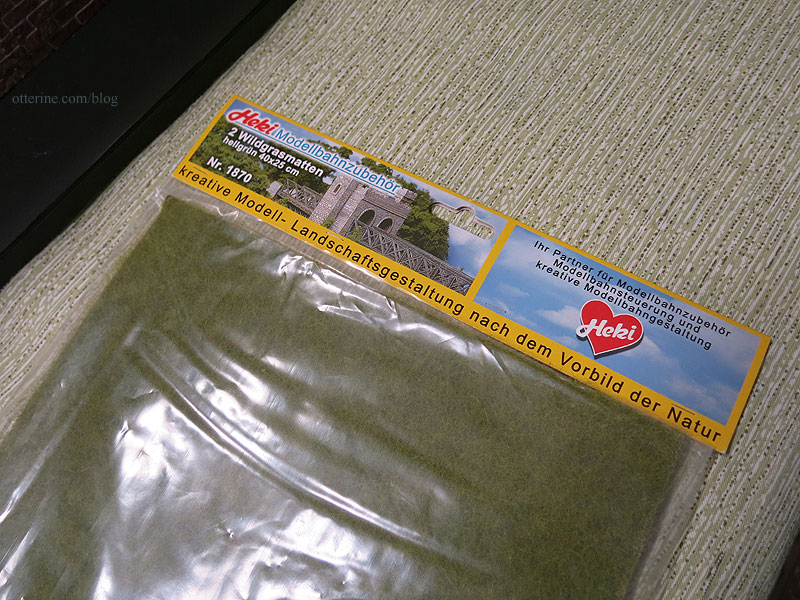
For the grass, I used Heki Summer Meadow Field Grass. It has a paper backing that isn’t the easiest to seam, but I do like the color, variation and texture. I also had it in my stash already, so that saved on costs.
Since I planned to have 20 shrubs around the structure, I opted for mulched areas. This cut down on the grass quite a bit. I added Woodland Scenics Fine Dark Brown Ballast as the mulch base, to serve as dirt. If there were any bare spots in the mulch, this would blend well. I held it the ballast and mulch in place with Woodland Scenics Scenic Cement applied with a pipette.
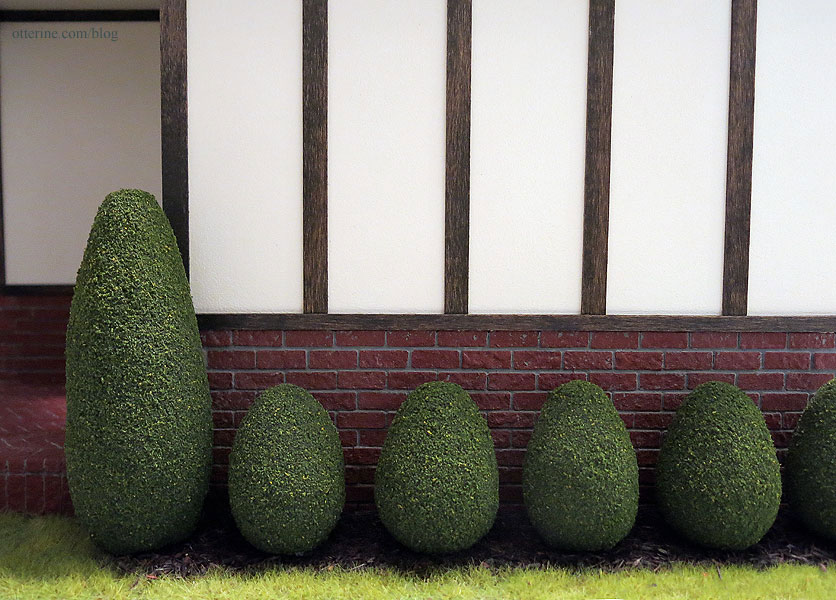
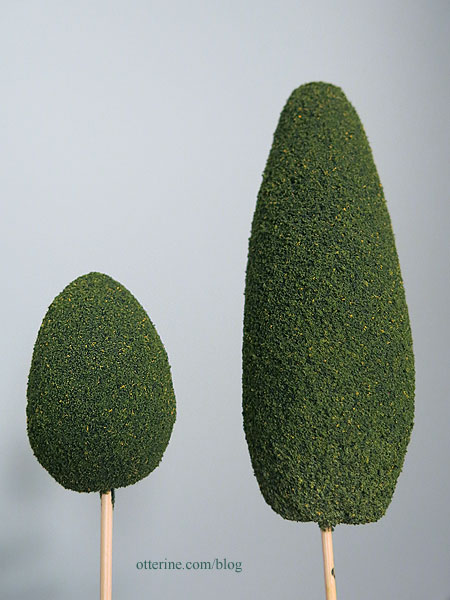
The shrubs were made from Styrofoam shapes and railroad scenery foliage (tutorial available in my etsy shop). I’m a huge fan of Squeeze Me trees and shrubbery, but if you need a lot of them, it can get very pricey.
Of course, at the last minute (two days before the deadline) I decided I needed flowers around my shrubs. My twenty shrubs. Flowers do not go a long way and take considerable time to make, but I did it. And, I think they add just the right amount of color. These were made from Bonnie Lavish kits, HBS So Easy kits (also Bonnie Lavish) and flower punches with origami paper. (As an Amazon Associate, I earn from qualifying purchases.) The flower pots on the porch were from Manor House Miniatures.
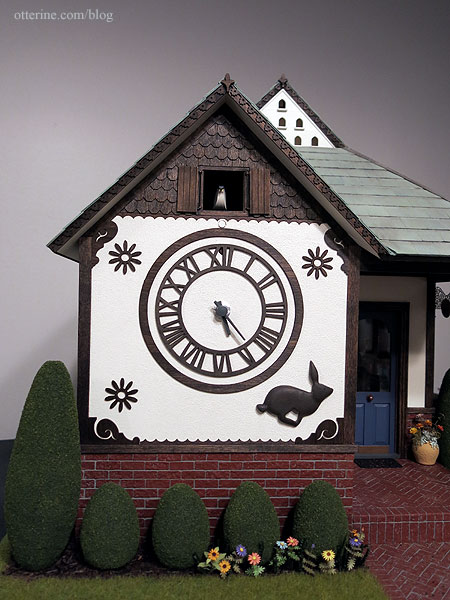
And, of course, you want to see the cuckoo in action. :D You know, it’s interesting to work on a miniature house that is constantly reminding you of time passing by while you’re building it.
Thank you all for the support during this crazy process of building! It means the world to me.
———————
Contest results: Half Clocked won an Honorable Mention in the 2018 HBS Creatin’ Contest! You can see the other winners and remaining entries posted here. Congratulations to all the entrants on your creativity and hard work!
Categories: Half Clocked
December 17, 2018 | 0 commentsHalf Clocked – skylights
I was originally going to use Houseworks 8-light windows for the skylights, but one fit perfectly and the other didn’t. Since they would be right across from one another, there was no way to disguise the variation. I checked the kit windows, and they were the same size. Since they come as separate fronts and backs, they are easier to paint and finish. Plus, you don’t have to worry about slight differences in wall/roof thickness. I painted the interiors White Birch and the exteriors Slate Green, both by Americana.

I cut new acrylic inserts since the kit glass was smaller than the full opening, and I didn’t want them to shift out of place.

I added some aging to the exteriors.

The interiors blend well. I thought dark brown rectangles would be too much, so I didn’t stain them to match the rest of the trim. I think this was the right choice.

With these installed, the structure itself is complete except for the back wall, which I hope to finish this week. (eek!) :D

Categories: Half Clocked
December 9, 2018 | 0 commentsHalf Clocked – fireplace insert
Since my fireplace is only for show, I made a flat brick insert from egg carton bricks instead of a firebox.

I glued the bricks to a paper grid and then cut the insert to fit.

Before installing, I painted the bricks Neutral Grey and then used spackling for the grout. I didn’t want any color to clash with the fire screen, which is black and gold, and the grey brings out the marble detailing.

I used a piece of thin cardstock to attach the brick insert to the fireplace.

I think this will be lovely with the baseboards and fire screen installed. I’m not sure I need a hearth since there will be no logs or even candles. More on that to come.

The fireplace was part of a miniatures lot I bought online. I have two that are very similar, and one is for the Brownstone. They are heavy, well made and have crisp detailing. The material appears to be some sort of translucent resin. There are no markings or manufacturer details. The seller indicated that she purchased them in 1996 at The Dolls House Toys Ltd., Covent Garden, London.
Categories: Half Clocked
December 2, 2018 | 0 commentsHalf Clocked – furnishings and such
Here is where we left off with the kits.

I also started a French side table kit by Art of Mini (shown on the right below; the corner cupboard is for Watson Mill).
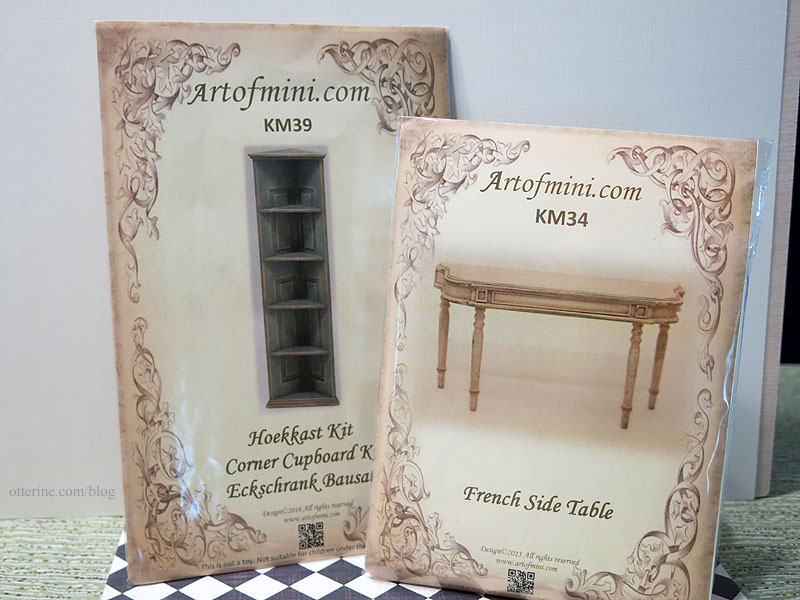
For the trestle table, I opted for a stained finish. After filling in any minor gaps with wood putty, I stained the piece Minwax Dark Walnut. I touched up any glue/putty areas with brown paint and then added a coat of Delta Ceramcoat Satin Varnish.

I painted the birdhouse green, but then I thought, “Why is just about every birdhouse I make green? I’m sure birds like other colors.” So, I painted over that with Battleship and painted the roof Bittersweet Chocolate, both by Americana. Now it’s a house suited for the unassuming bird who doesn’t like to draw attention. :D

For the French side table, I started with a coat of Bittersweet Chocolate by Americana. I want this to be an old table, perhaps once stained and lovely then re-purposed with a coat of paint (or three).

The Folk Art Vintage White paint I had was very thick for being rather old, so I added some water. With the dark undercoat, it took several layers to even out. That added to the refinished look unexpectedly, so a nice happy accident. I rubbed the paint with a piece of brown paper bag to remove the high spots. Then I used a light grit sanding stick to bring out some of the dark details from underneath.
I added metallic detailing with Taupe by Folk Art. I used a rubber stamp and the same paint on the top (technique detailed here). I rubbed the piece again with a piece of brown paper bag until I had a nice sheen.


The legs warped a little, but that adds to the antique feeling…at least that’s what I tell myself. :D

The tiered server started with a coat of Basil Green by Folk Art. I had to paint this since I always get glue everywhere when putting together any three-legged stand. I used one of the small rubber stamps with the same paint as the French side table to add some detailing.

This piece was also prone to warping, but I like the way it turned out. :]

I have a few more furnishings in mind, so more on that to come….

Categories: Furniture, Half Clocked
November 28, 2018 | 0 commentsHalf Clocked – landscaping
The landscaping board is finished on the edges with iron-on veneer edging. I then glued layers of white 1/16″ foam sheets by Woodland Scenics using Weldbond glue. I went with thin foam so I could keep the land relatively flat on the baseboard while still allowing for natural unevenness.
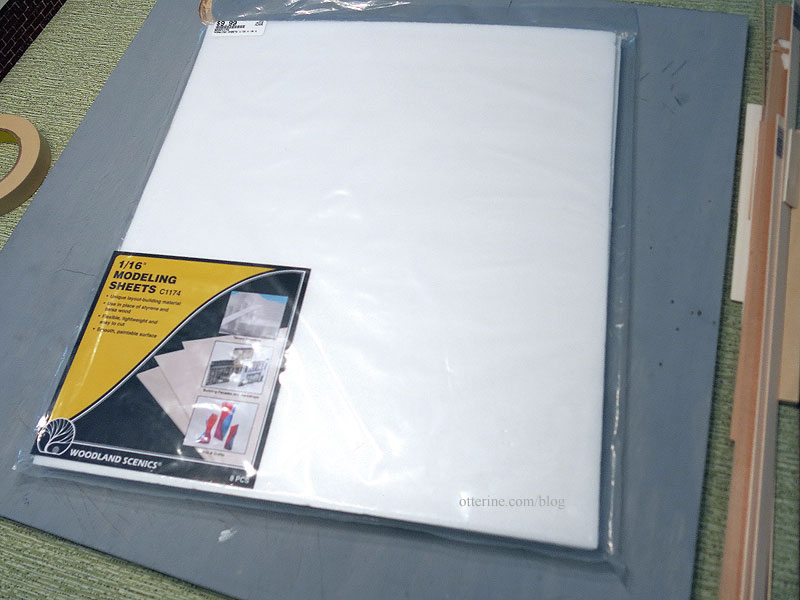
For the grass, I’m using Heki Summer Meadow Field Grass. It has a paper backing that isn’t the easiest to seam, but I do like the color, variation and texture. I also had it in my stash already, so that saved on costs.

Since I’ll be planting the 20 shrubs I made around the structure, I opted for mulched areas (shrubbery tutorial available in my etsy shop). This cut down on the grass quite a bit. I started in the back on one side and cut a strip of grass with an uneven edge for a more natural look.
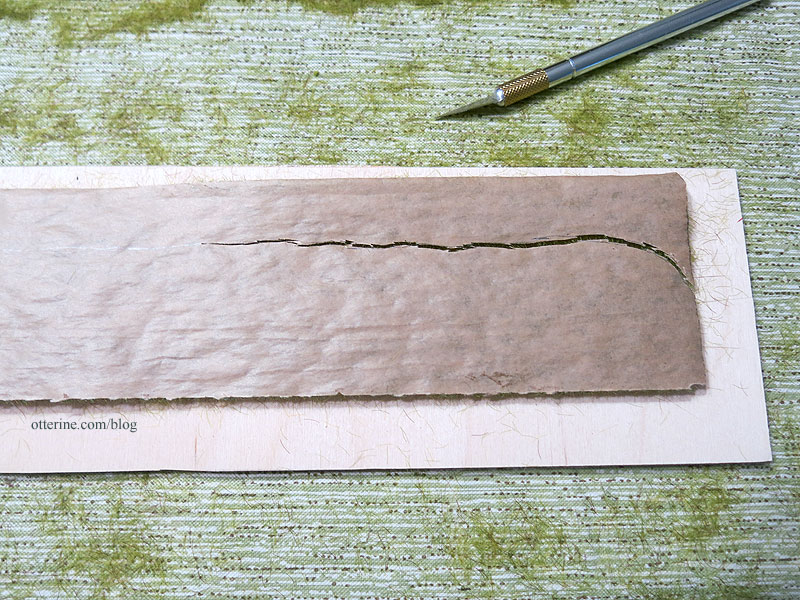
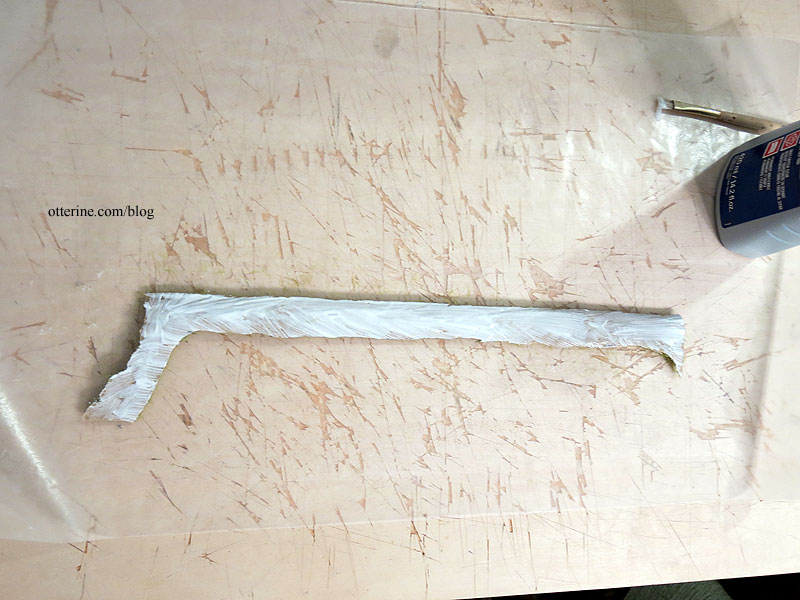
I glued this with Weldbond glue spread with a brush.
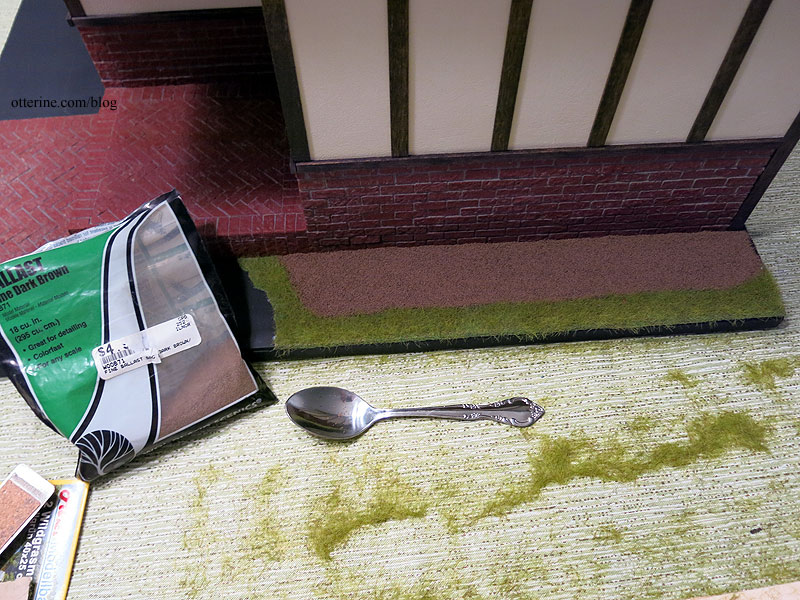
I added Woodland Scenics Fine Dark Brown Ballast as the mulch base, to serve as dirt. If there are any bare spots in the mulch, this will blend well.
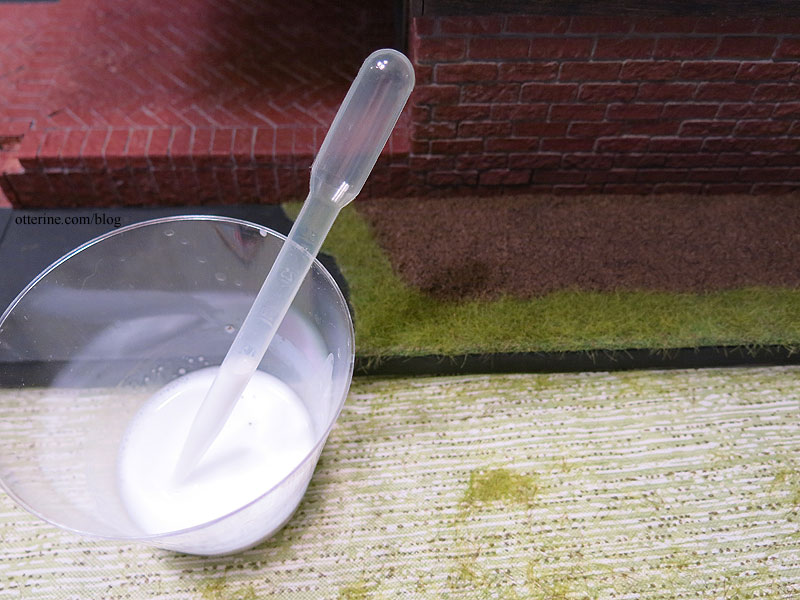
I held it in place with Woodland Scenics Scenic Cement applied with a pipette.
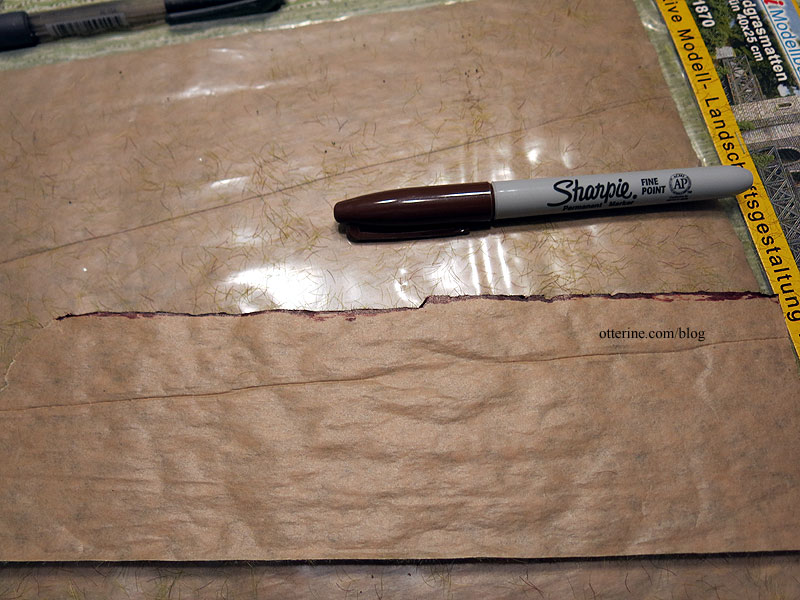
I colored the edge closest to the brick with a brown Sharpie to allow for better blending. The edge of the grass would be a light green otherwise and somewhat out of place.
I let the ballast dry overnight, then added the mulch. Again, I used Woodland Scenics Scenic Cement applied with a pipette.
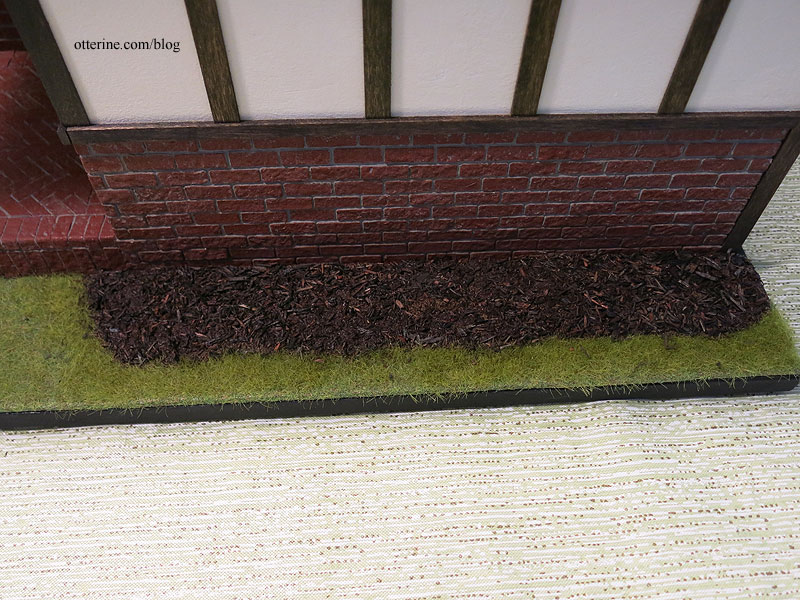
I let the mulch dry overnight and vacuumed the lawn to get rid of any excess. The shrubs are glued right on top of the mulch with Weldbond and a dab of super glue gel to hold them steady while the white glue dried. I foresee at least one of these popping off in the future, but at least they are easily repaired or replaced.
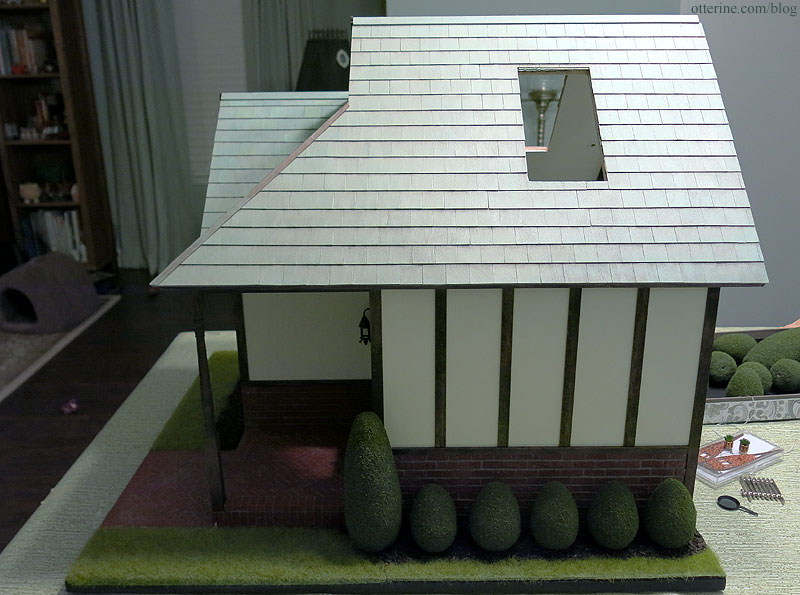
With the landscaping in place, it finally looks like a solid structure. :]

Categories: Half Clocked
November 27, 2018 | 0 commentsHalf Clocked – brick walkway
I am getting close to gluing the structure to the landscaping base, so I can start to work on the brick walkway. Here’s the porch already done.
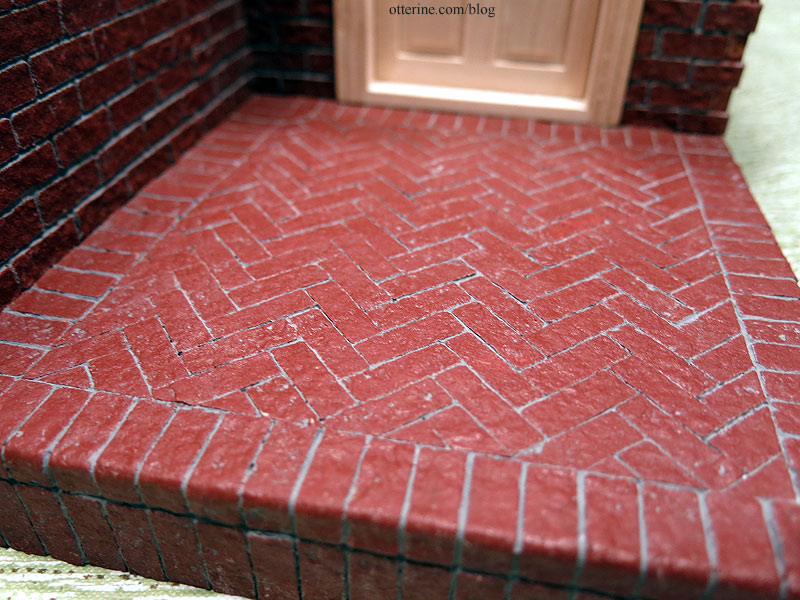
I started by marking a printed grid to match where the porch meets the walkway.

I wanted more herringbone, so I started with a 4.5″ by 5″ section.

Once that was done, I cut a template for the shape I wanted.

I glued that section to the base board.

I then individually cut the straight brick border.

Then paint….

Then grout was applied before the house was attached to the base. Easier to work with that way.

Categories: Half Clocked
November 25, 2018 | 0 commentsHalf Clocked – roof, part 3
Continuing work on the roof. I used 3/8″ corner molding to finish off the ridges.

Time for paint! I masked the roof trims and mixed a large tub of paint from the below grouping. There’s a Tudor house near my office with a green grey roof that I just adore, hence the color selection.

Once I had the roof painted with a thin base layer of the mixed paint, I used the unmixed and undiluted colors to paint individual shingles at random.


I took some of the mixed paint and added Staining Medium by Americana. I brushed this over the roof to blend the individual shingles. Light coats mean you can stop when you get the right shading. However, it just ended up way too bright blue in real life, though it looks fine in the photos.

I spread Slate Green by Americana over the entire surface. It toned down the color and unfortunately negated the need to have individually painted shingles. :\ Then it was too bright, so I used Neutral Grey by Folk Art mixed with Staining Medium to add some light aging and depth. Better. :D

Since the wood was too thick for the one roof hip, I cut a piece of cardboard to cover the join. I painted this Liquitex Antique Bronze and gave it a light patina.

With the painting complete, I could also add the remaining fancy gable trims, glue in the dovecote and add the final trims.

The doves were made with Hearty Super Lightweight air dry clay and a little paint. :] The clay was easy to work with and set up overnight. It’s still pliable enough to squeeze the fat little birds into the popholes. :D

Categories: Half Clocked
November 24, 2018 | 0 commentsHalf Clocked – roof, part 2
Continuing work on the roof. I glued on the front roof boards. So scary to be completely out of dry fit. For the most part, the pieces fit pretty well. The one minor gap will be easily disguised with shingles.
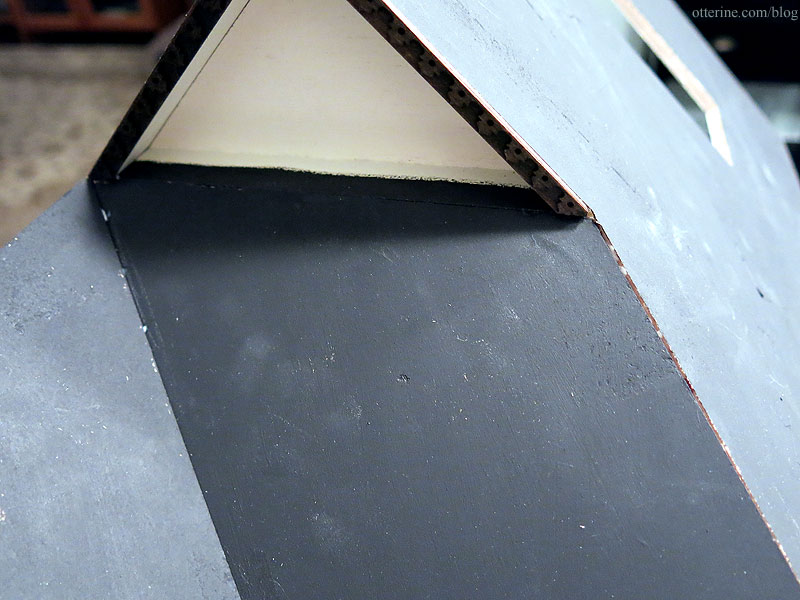
I am using Greenleaf speed shingles for the HC roof. These are laser cut, thin wood. I use Quick Grip glue, which is stinky and messy, just the way a fun project should be. I also utilize movies and/or TV in the background.

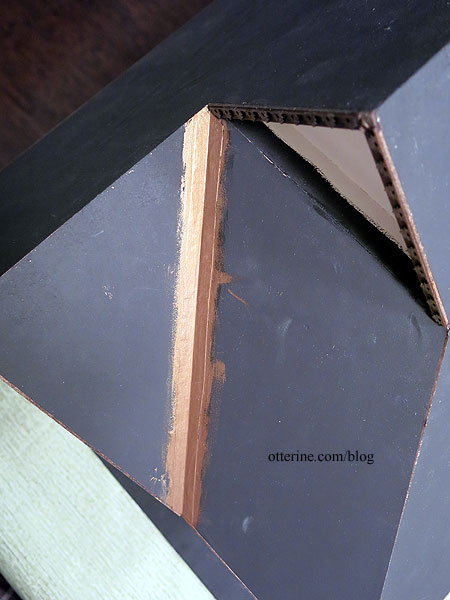
There’s one valley on the roof, so I lined that with Tyvek.
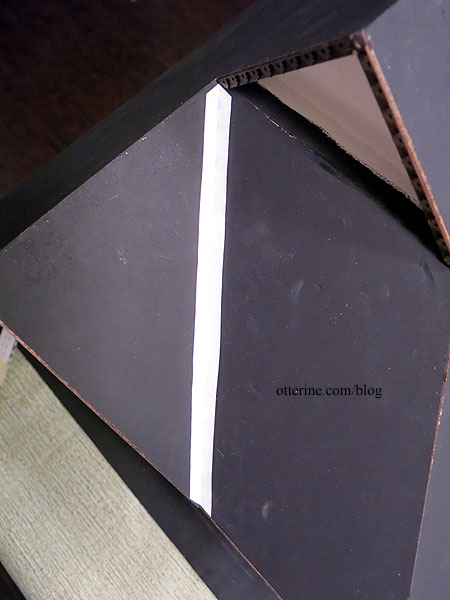
I painted it Liquitex Iridescent Bronze.
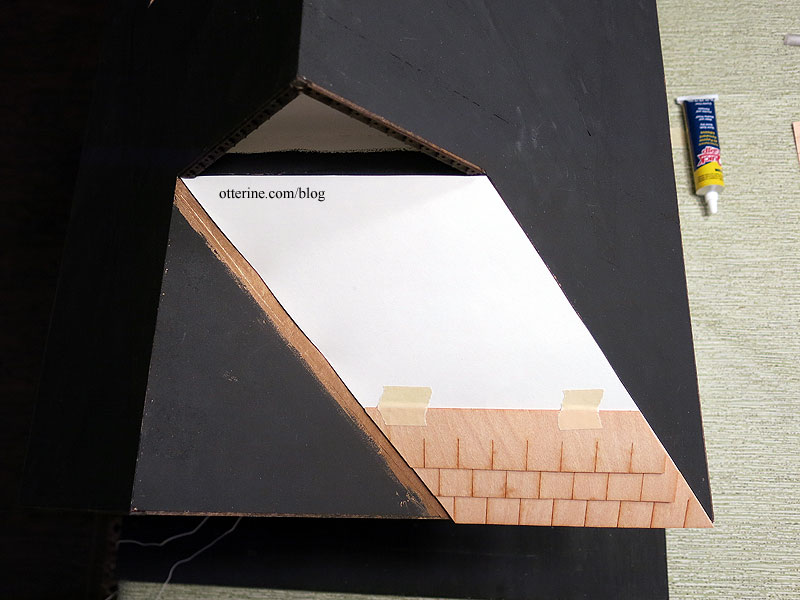
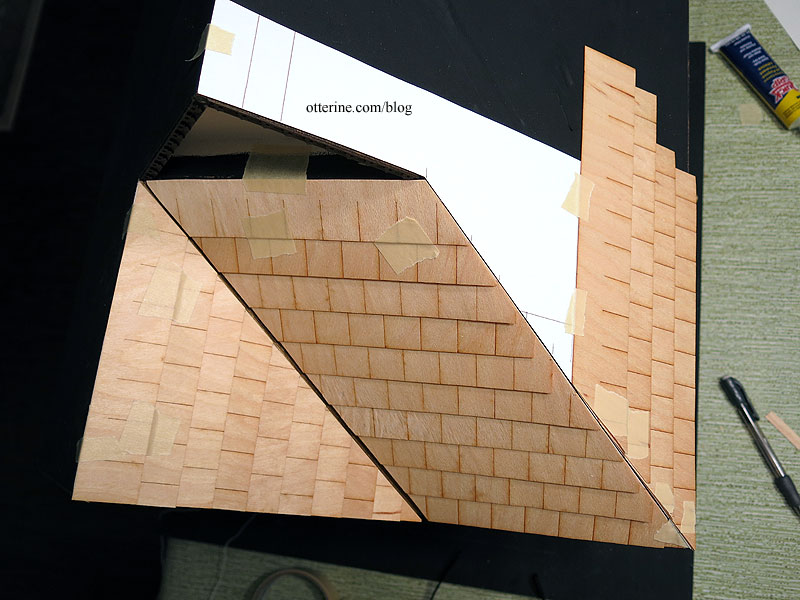
The templates for the front help a great deal. I find it’s easier to start with the small, complicated sections. You can even out placement on a long run, but in a small space you need accuracy and consistency. If the two small sections are off, it will be more obvious. I started with the parallelogrammatic template. (There’s a $175 word for ya!) I taped and cut each row, continually testing it on the actual roof. While I use the template to cut the strips, I glue the strips directly to the roof.
Next, I marked the rows on the triangular template. The spacing is not the same as it was on the first template, but the alignment is more important.
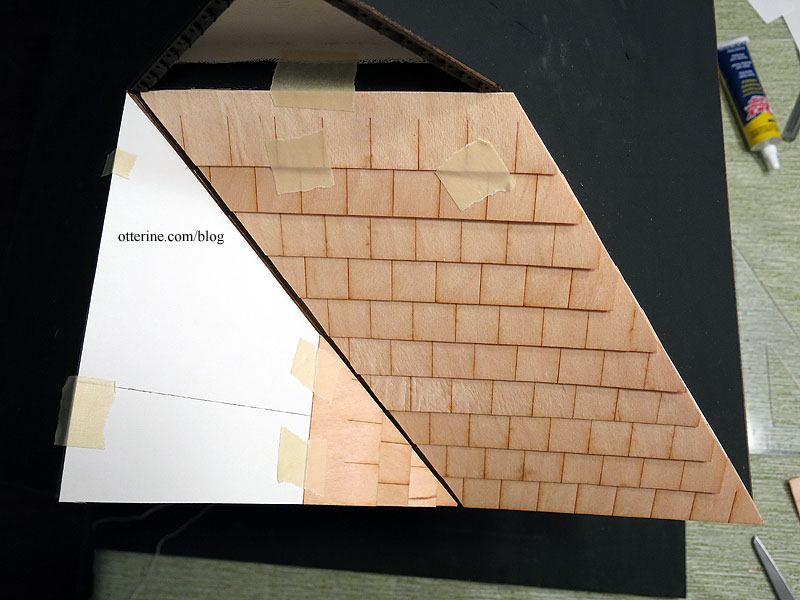
Next up was the remaining angled piece. I used only a partial template since the remaining portions will just follow the length of the roof.
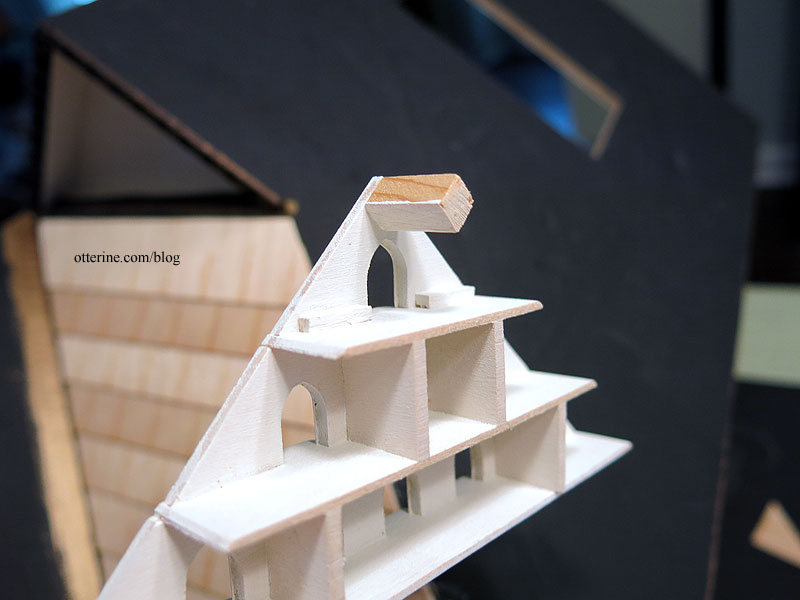
I added a post to the top of the dovecote to stabilize the apex.
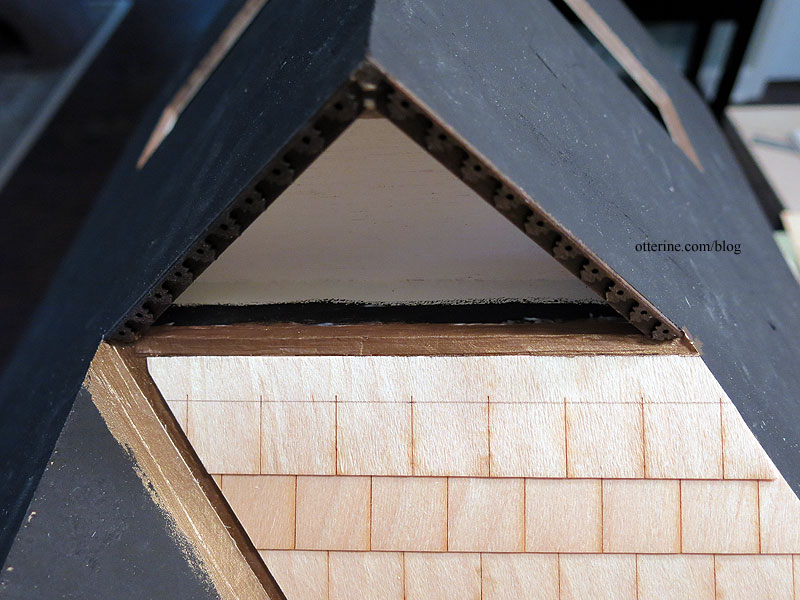
To finish the edge below the dovecote, I glued a strip of Tyvek painted Liquitex Iridescent Bronze.
It was a long day, but I got all the shingles in place.
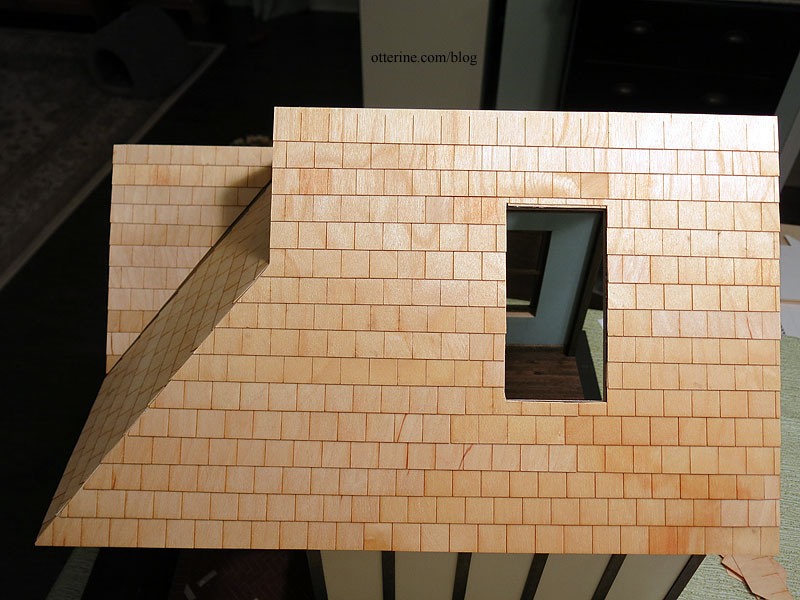
I ran out of Quick Grip and switched to Shoe Goo since that was all I had on hand and I didn’t want to run to the store. It’s thicker than Quick Grip but just as smelly.
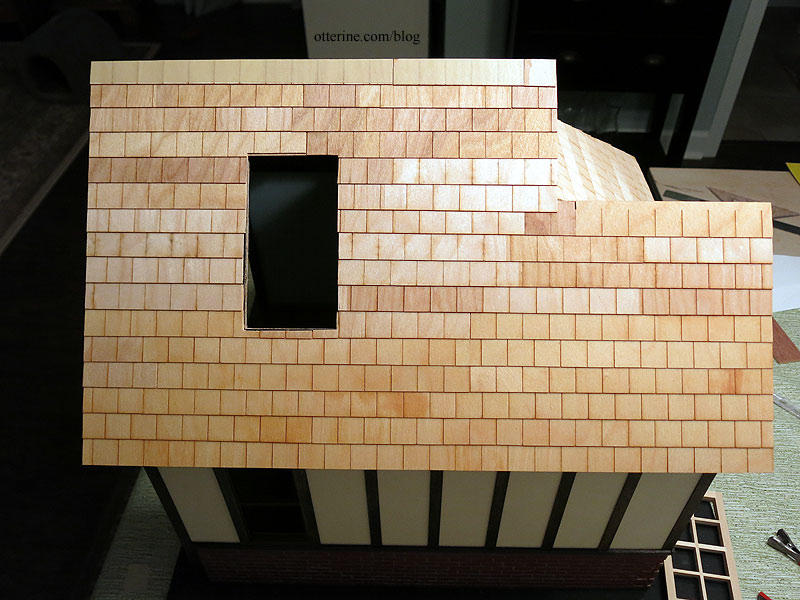
The one thing I didn’t think to do was measure the remaining long edge, so my rows differ in height from the opposite side. The rows are straight and uniform, so it’s not really obvious. Noted for next time.
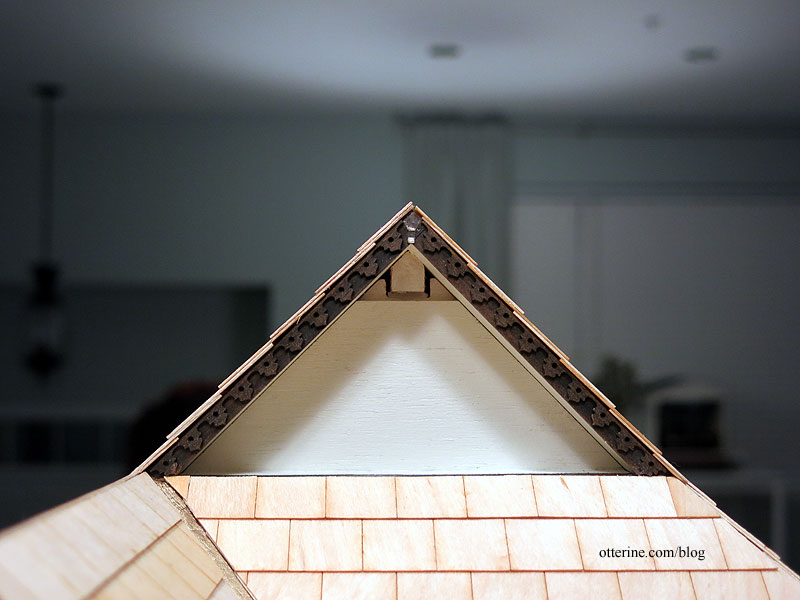
Categories: Half Clocked
November 17, 2018 | 0 commentsHalf Clocked – back wall
In the past, I’ve made sliding walls like the one for Ye Olde Taxidermist. For the current build, I don’t want a large gable blocking the interior view from the back. For Ye Olde Taxidermist, the narrow gable doesn’t block much of the interior.
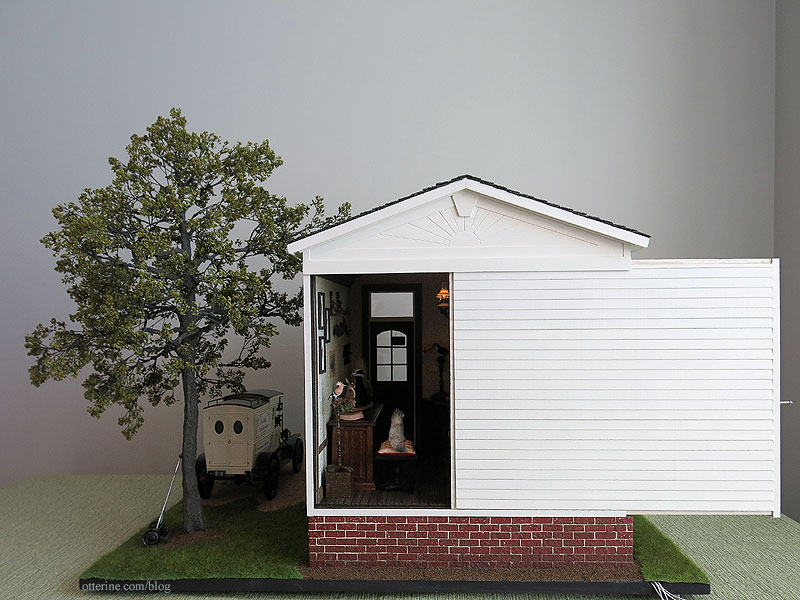
Milo Valley Farm has no gable to get in the way.
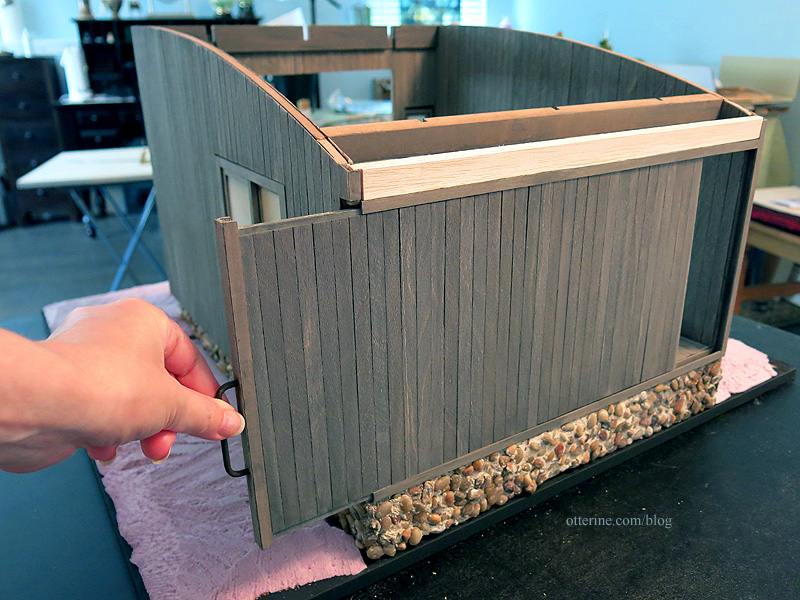
Since I decided to have an eave on the back, hinging the house-shaped wall would not work. It would bind on the roof overhang. Next solution, magnets.

These stick to each other as well and come marked positive and negative.

Super thin, which is perfect. The ruler is in 1/64″ increments. They are 3/8″ in diameter.

The wall is just a bit shorter than actual opening to remove it easily. The interior trim on the ceiling blocks any light that might shine through. The beautiful barrel was made by Bill. :]

I used a spade bit to make shallow holes for the round magnets. This was no problem for the lower area where it doesn’t matter if the bit pokes through the other side. On the sides just below the eave, I had to be careful because the bit is longer than the material is thick. The interior trims add to the thickness, but I had to cut just what I needed and not a smidge more. :\

For the apex, the magnet sits in the space I left at the end of the ceiling beam. Hmm, looks like I need a touch up. :\

There will be six magnets. Here the holes have been painted brown.

I will epoxy these in place, but just pushed in you can see they sit flush.

For the wall, I will cut small pieces of K&S 0.008 thickness tin sheet left over from the Otter Cove kitchen.

One magnet is strong enough to hold this partial sheet. Since the wall will be able to rest on the landscaping board, I think the six magnets will work well to keep it from shifting or falling away from the structure.
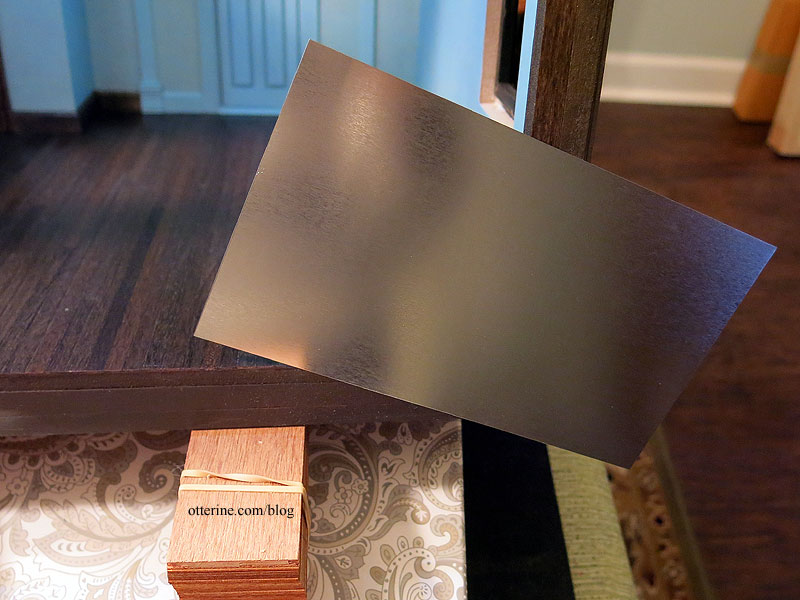
Before I go further, though, I need to work on finishing the wall inside and out. Considering I don’t need the back wall for the final build to make sense, I will leave this for later and continue on the main structure. It’s not a priority, but I wanted to get the prep work done before the structure was attached to the landscaping base.
Categories: Half Clocked
November 16, 2018 | 0 comments
NOTE: All content on otterine.com is copyrighted and may not be reproduced in part or in whole. It takes a lot of time and effort to write and photograph for my blog. Please ask permission before reproducing any of my content. (More on copyright)

Half Clocked – The Clocks, part 3
Continuing my posts on the clocks from Half Clocked. Please click here for part 1, and click here for part 2.
I have no chimney, but I am using a fireplace with a false brick insert. The fireplace was part of a miniatures lot I bought online. The material appears to be some sort of translucent resin. There are no markings or manufacturer details. The seller indicated that she purchased them in 1996 at The Dolls House Toys Ltd., Covent Garden, London. The fire screen is by Ellen Moore.
The modern side table was inspired by the Oly Studio Ichibad Side Table and made with Tiny Turnings. I needed some sort of cash transaction station for my shop, so I added a vintage desk from my stash and stool from Boutique Miniatures. The desk is a cheap miniature, but it has always appealed to me. It was also from a collection a friend gave to me after his mother passed, so it has that sentimental draw as well.

The porthole clock was made with a watch finding Bill sent me and a printed dial. I made the red alarm clock from wood shapes, Tiny Turnings, jewelry findings and a cabochon sticker for the face. It’s similar to the one I made for the Haunted Heritage, which I also borrowed for this build. The Art Deco working clock is from Halls Miniature Clocks. The laser cut Victorian wall clock is from D-Tales Miniatures, bought at the Bishop show. The hourglass is from Here Today Gone Tomorrow, and yes, it works. I think it counts maybe a only second or two.
The pintail drake decoy is by Linda Master, and the candy dish was from Manor House Miniatures. The two metal clocks were originally bright gold with cheap faces. I repainted them and added new faces, using Testors Clear Parts Cement and Window Maker for the red clock’s glass.

The round clock in the upper right is a jewelry finding with the bail removed with a metal jewelry frame glued around it.

I made the clock with the paintings using an old laser cut wood scrap. I cut an insert for the middle to bring the clock dial forward and added watch hands. The artwork is cropped from paintings by Edward Moran, found on wiki.

The rustic table is from Barbara Begley Miniature Gardens. I made the two table clocks from wood shapes, jewelry findings and cabochon stickers for the faces. The flowers were made from Bonnie Lavish kits.

The large gold clock started as a mirror.

I printed a new face and used a large cabochon sticker for the face.

I’ve made the Banjo wall clock from Cynthia Howe Miniatures before, but this time I went less traditional in color.

I might have to pick up more of these kits – they are so versatile.

At the last minute, I realized I needed a rug…so I swiped the Tree Ring rug for the space.

The tiered table has a selection of small clocks that I picked up from shows, but you can find them online. I made the bird statue from jewelry findings, and the spiral vase is from Patricia Paul.

The working mantel clock is from miniatures.com, the small Art Deco clock is from William Cambron Designs, and the small square clock is a half scale mini I’ve had in my stash awhile. I made the right hand table clock from wood shapes, Tiny Turnings and a cabochon sticker for the face. The silver bud vase came from Manor House Miniatures, and the flower was made from a Bonnie Lavish kit.

The mouse in the teacup is by Beth Freeman-Kane. Every clock shop needs a mouse, right? :D

The red alarm clock was made for the Heritage and borrowed for this build. The candy dish is from Blondie, and the candy was made by MiniFanaticus.

The two silvertone clocks are kits from Phoenix Model Developments. I also found two knock-offs at local shows that I refined and refinished. Since the Phoenix kits came with two faces per clock kit, I had an extra for the red clock. I printed my own for the other. For the paper/decal faces, I used Testors Clear Parts Cement and Window Maker for the glass. The gold clock on the far right was purchased at a local show and refined with new paint and dial.

That should do it! Whew! That’s a lot of clocks! :D
Categories: Half Clocked
January 10, 2019 | 0 commentsHalf Clocked – The Clocks, part 2
Continuing my posts on the clocks from Half Clocked. Please click here for part 1.
Debora made the beautiful brass clock. The brass had naturally aged while in storage, and that made the hands hard to see. I added a little black paint to bring them back. I cut and painted a block of basswood to serve as the wall mount and attached the clock to the porch.

The front gable was enclosed to make more wall space, so I needed a lot of clocks to fill the area.

The two large openwork clocks are from Arjen Spinhoven. I painted them black and Liquitex Iridescent Bronze. The hands are cut as one piece, but I was able to give them some depth by shaving the front/back of each piece. One set separated during the process, so I was able to set it to a different time. Below, you can see the clock kit and the plant stand that is also used in the build.

The round pale green clock and the pocket watch clock are kits from Art of Mini.

I printed new dials and added watch hands.

The small round clock in the upper right is a jewelry finding with the bail removed.

The fancy framed clock was a frame kit by Diminutive Details.

I printed a new dial and added watch hands. I left off one of the laser cut trims in the final assembly since it seemed too overpowering.

The teapot clock is from the Newport. I printed a clock face, pasted it to a round bit of wood and pressed it into an open jewelry finding in the shape of a teapot.

I purchased a whimsical clock kit from the online mini show, but I made only two of them for lack of time (it makes five clocks, but three are shown here).

These were to be dimensional, but the parts were so small I opted to make mine more in the line of pressed metal. I added block backs to give them a more realistic feel. They also have glitter accents and watch hands.

The cat clock is on the window wall. The clock above it is a metal scrapbook frame with a new printed face and watch hands.

Yeah, had to have a cuckoo clock in the cuckoo clock, right? This awesome kit is from MiniaturasMyE.

It came with a wood cuckoo, but I wanted a little more realism. I thought I had a half scale bird from Barbara Meyer, but I couldn’t find it. Instead, I used a full scale bird and shaved it down to fit. It wasn’t until later that I realized the cuckoo was out but the time was not on the hour (or half hour).

I moved the hands to the right place…much better.

The fancy plant stand is from ArjenSpinhoven. I didn’t want to lose the carved detailing, so I stained it Minwax Driftwood and finished with Delta Ceramcoat Matte Varnish. The working clock on the top is from Halls Miniature Clocks, and the ceramic rabbit and brass seal figurine were likely from Manor House Miniatures.

Part 3 here.
Categories: Half Clocked
December 26, 2018 | 0 commentsHalf Clocked – The Clocks, part 1
I’m going to split the clock posts into a few to make it easier to navigate and manage. Many of the clocks in Half Clocked were purchased and a few were gifted, but a lot of them were made from kits and spare parts.
Miss Lydia Pickett Cottage Clock – made from a kit
The one I spent the most time on was the Miss Lydia Pickett Cottage Clock (the construction ends here, but you can follow the posts back to see the whole process). This started as a 1:12 scale kit by Robin Betterley’s Miniatures.
I love Swedish Mora clocks, and if you do a google image search you will find an array of colors and styles. I’ve always been drawn to blue ones. I know the kit clock isn’t the traditional shape for the Mora clock, but it lent itself well to modification with that style in mind. I altered the top scrollwork, switched the skirts for bun feet and added a top finial, just for starters. The top and body doors don’t open and making opening doors wasn’t something I wanted to spend time on, but there’s no reason you can’t add faux detailing. I took some 3/16″ hinges and made notches to insert them later after painting.

I painted the clock Greenscape by Folk Art and finished with Delta Ceramcoat Satin Varnish. The artwork for the body and base is from The Graphics Fairy. I used the image as is for the base but then used elements from the original to create a design for the body in PhotoShop.

I printed a regular clock dial in a similar color to the body art as a replacement. I painted the clock face trims and the finial Taupe Metallic by Folk Art. I painted some accents in the same color on the body and base. The hands are Susanne Russo brasses, a lovely find of new old stock at a local show. I drilled winding holes as accents, lining them with a bit of paint.

Now I have a lovely Mora clock in mini. :]

Chrysnbon Clocks – made from kits
Debora sent me the Chrysnbon Curio Clock kit, and I found the Chrysnbon Grandfather Clock kit at a local show. These are plastic but make up so well with a little bit of care and patience.

I primed both clocks in grey to remove the translucence of the plastic. After priming in grey, I sprayed the Grandfather Clock flat white. The final finish is Model Masters Wimbledon White, a leftover from the Model T.

This has a replacement dial made from a found image that I edited in PhotoShop. I pasted the printed face to heavier cardstock and used the kit sticker shape as a template to cut the face to fit. The face is glued in place.

I drilled a hole in the center.

The hands are watch parts, held in place with a tiny brad.

The flimsy acetate can look warped when glued, and in old kits it can be yellowed or brittle. I cut new pieces from 0.03″ thick plastic sheet.

To glue these parts, I used Testors Clear Parts Cement and Window Maker.

You still need a bond that is plastic to plastic, so I scraped away the paint at the joins.

I painted the molded hinges and knobs Liquitex Iridescent Bronze. The brass pendulum rod and bob are included in the kit and are good quality.

I love the way this clock turned out with the soft finish and delicate face.

The Curio Clock was finished in Testors Semi Gloss Black. It gives a great sheen without being overpowering. I ended up converting it from a curio clock to a true grandfather clock with parts from a defunct House of Miniatures clock that could not be salvaged. I did run a wire for this clock’s light in the open space up front just in case, but I thought it was more striking with a brass pendulum.
First, I cut a new back from styrene sheet since the original was to be enclosed with a mirror back. I painted this to match the body.

The clock has a hole for the curio light bulb that was too large for the brass pendulum rod. I cut a piece of styrene and drilled a smaller hole for the rod. Super glue gel holds the rod at the right height and holds the patch in place inside the upper compartment.

The dial is a replacement. I edited a found image in PhotoShop and used that instead. The hands are watch parts held in place with a tiny brad.

It looks very rich in black and brass. Again, the molded hinges and knobs are painted Liquitex Antique Bronze.

The Chrysnbon wall clock was something I never thought I would make. I bought the kit for the old telephone parts and the coat rack, but it was nice to have it as wall filler.

With a replacement dial it really shines. This is finished in Testors Semi Gloss Black.

This has a printed face under a cabochon sticker that mimics a curved glass cover.

The new and improved clock found a place of prominence on the main gable. Not a filler clock, after all.

Categories: Half Clocked
December 19, 2018 | 0 commentsHalf Clocked
Introducing Half Clocked, my entry in the 2018 Creatin’ Contest by Hobby Builders Supply.
——–Half Clocked is situated in a market village known for its unique shops, mountain scenery and beautiful gardens. While the shop has timepieces for sale in every price range, the main attraction is the working cuckoo clock on the face of the building. Every hour and half hour, the cuckoo emerges from his home and bellows the time to the delight of onlookers. Half Clocked is open daily from 10 to 4, but the cuckoo sounds from sunrise to sunset.


Structural Changes
It all started with this year’s kit, the Three Gables House.

My original idea was to cut the kit down to the bare minimum depth in the front and make a wall-hanging cuckoo clock with minis decorating it. Then I thought, “Why have a normal cuckoo clock for a real life house when you can have a giant cuckoo come out of the front of a mini clock shop?!!” As soon as I searched, I immediately found two examples: one in Eble Uhren-Park, Germany and one in Britain.
The doors and windows that came with the kit were great, but I ended up rearranging their placement. I cut six inches from the depth, so now it’s much more cottage-y. I filled in three windows on the sides, leaving one single side window to conserve interior wall space.

I cut a new front for the building since that was easier than trying to plug the large hole in the kit wall and then swapped out the main door for one a little fancier: a Design House shop door #1014.

I cut a new enclosed gable board to have more wall space inside. The roof now has two smaller matching skylights as well.

My modifications made for an open back structure, so I had to make a new back wall if I wanted something to keep the dust out. I originally considered a hinged back wall, but since I decided to have an eave on the back, hinging the house-shaped wall would not work. It would bind on the roof overhang. The solution, magnets. It works well to keep the dust and light out.

The vintage bird prints are from the Newport, made from images from A History of British Birds, published in the 1850s by Rev. Francis Orpen Morris.

The Cuckoo
Having a working cuckoo clock enclosed in the structure didn’t seem that out of reach until I started looking for a mechanism to build around. It hadn’t occurred to me that I would need a pendulum and weights for the classic mechanism. So, then I searched for tabletop cuckoo clocks and found this amazing MUJI cuckoo clock (as an Amazon Associate, I earn from qualifying purchases). It’s a small, concise mechanism with actual bellows for that authentic sound. In fact, I liked it so much, I couldn’t bear to take it apart and had to order a second one to incorporate into Half Clocked.

Taking it apart turned out to be relatively easy, and then I just had to build my wall to suit. Fitting it to the back just required some braces.

There’s obviously the hands and the bird, but there is also a light sensor so the clock doesn’t sound when dark and a test button to make the cuckoo come out on command. I had to line up my holes just so.

The clock face on the front wall went through many different versions before I settled on the final layout.

I had this lovely wood rabbit I bought back in 2012 from artbase. I always knew I wanted the rabbit on the clock face, but I didn’t want to alter the original for my purpose. I made a cast of it instead using EasyMold Silicone Putty and Alumilite Amazing Casting Resin, my first time using an opaque resin (as an Amazon Associate, I earn from qualifying purchases). I painted it dark brown to match the building trims. Pretty great for a maiden voyage, and it works well for my purposes. Here it is with the wood original.

The flowers are Finishing Accents by Darice, the Tando Creative chipboard clock dial was leftover from Roland’s Retreat, and the flourishes are new old stock Architect’s Choice bracket kits from All About Miniatures. The gables are finished with Greenleaf speed shingles in half scale, and the scallop trim is from Diminutive Details purchased at a local show.
Originally, the door was meant to open and was cut as one solid piece. Since the cuckoo mechanism came from a modern clock without a door, I planned to engineer the hardware to fit. The parts didn’t work out partially because my door hinged on the left (fairly common in cuckoo clocks) and partially because the cuckoo arm extended on a curve instead of straight back and forth. I surrendered the battle and made a split door that’s always open.

The white modern cuckoo got a makeover with acrylic paints to better resemble the real life great spotted cuckoo. :]

Exterior Detailing
I went with a brick base again, so I was back to the egg carton brickwork. For the porch landing and walkway, I made a straight brick border with a herringbone center. I couldn’t find a true example of vertical bricks on the riser in real life from a quick image search, but it doesn’t look terribly out of place. These are painted my standard Liquitex Burnt Sienna. For the grout, I mixed spackling, neutral grey paint, black paint and Aleene’s Quick Dry glue. I added the glue just in case the paint made the spackling too thin to stay put. I replaced the kit post with a Houseworks turned post. Finn was a great buddy during the build. (He was made by JMDS.)

Above the brick, the stucco is a relatively easy though fickle finish. I spread spackling over the two walls where I filled in openings; the other two I left plain. After it dried, I sanded the areas smooth. The walls didn’t have to be completely flat. I just needed to mask the window outlines so their halos wouldn’t be seen later. Next up was a coat of Americana White Birch. This is a satin paint, so it has a lovely sheen once dry. I tapped the paint on with the flat side of a foam brush to achieve a light stucco finish. I stained the trim pieces Minwax Jacobean. I love this rich, dark chocolate brown. :] I’m usually a white trim gal.

The door frame is stained Minwax Jacobean to match the rest of the trim, and the door is painted Night Sky by Americana. Though there are not a lot of colors available in the satin paint, I do like that using this paint eliminates the need for a final varnish coat. I added a paper kickplate. I also had to cut a new window insert since the paint apparently swelled the wood so much the original would no longer fit. I eliminated the draft that most dollhouse doors have. Since adding the draft block made the amount of room for hardware so limited, I opted for an old style center knob. Quirky, which fits. :D The hardware is by Classics.
I painted the porch ceiling stucco white so it would brighten the space. The front porch light is a coach lamp from HBS, and the door mat is a silver metal piece I painted black.

I made the sign using a graphic from iStock. I opted for subtle signage since I imagine it would be fairly obvious to passers-by which building was the clock shop. haaaaaa

Thanks to Sheila, we know what bargeboards are. :D I stained lengths of 1/16″ x 1/4″ basswood to attach to the exposed edges of the roof using Minwax Jacobean. On top of that, for the gables, I added Paulina trim from Heritage Laser Works. These are only 1/32″ thick and very delicate, so I had to come up with a way to stain them without breaking them (full post on that process here).
There’s a lovely space that is perfect for a built-in dovecote (just ask Sheila). I did some scouting around online, and found a great site for inspiration and instruction before attempting to make my own dovecote (parts one and two). Originally, I was going to cut a triangle and then cut the popholes, but I wasn’t getting good results. So, I re-engineered my approach. I’m very pleased with the end result. :]
My doves were made with Hearty Super Lightweight air dry clay and a little paint. :] The clay was easy to work with and set up overnight. It’s still pliable enough to squeeze the fat little birds into the popholes.

I used Greenleaf speed shingles for the roof. These are laser cut, thin wood. I use Quick Grip glue, which is stinky and messy, just the way a fun project should be. Utilizing movies and/or TV in the background makes the job bearable. (As an Amazon Associate, I earn from qualifying purchases.)

There’s one valley on the roof, so I lined that with Tyvek and painted it Liquitex Iridescent Bronze. The roof color was achieved using a mix of these paints by Folk Art: Villa Green, Succulent, Greenscape and Basil Green. There’s a Tudor house near my office with a green grey roof that I just adore, hence the color selection.

I ended up having to tone down the coloration with Slate Green by Americana and then using some aging washes to add depth. But, the greens gave the Tyvek flashing a wonderful patina. For the one roof hip, I cut a piece of cardboard to cover the join, painted this Liquitex Antique Bronze and gave it a light patina to match the rest.

It’s not quite the color I was aiming for, but I truly love it. :]

Interior Detailing
I added a removable interior wall (parts one, two, and three) to allow access to the clock mechanism while disguising its presence from the inside. I used a Classics narrow door since other interior doors looked proportionally too large for the space. I wanted to be able to access the front room more than the narrow door would allow, so I always planned to make the insert wall removable. This was a bit of hassle since I didn’t want the board to have gaps all around it nor did I want to continually risk scuffing the floor and ceiling moving it around. So, I cut the wall into two pieces – one to be a permanent part of the structure and one to be fully removable with the door acting as the handle.

The wallpaper is scrapbook paper Happenstance – Fluke by The Paper Loft. It is flat paper, but it has a printed design that looks like old fresco. You might recognize it from the first floor of Watson Mill. For the enclosed gable, I opted for plain drawing paper. It’s not pure white, so it works well for the space without being too much of a contrast. Since there’s a warm white vaulted ceiling, I didn’t think a big blue triangle would look right. The flooring is Houseworks red oak stained Minwax Jacobean and sealed with Delta Ceramcoat Matte Varnish.

The removable wall trims were originally painted Ceramcoat Waterfall. It was nice, but it was darker than I wanted once in place. I was trying to make the door blend more with the wall as if to say, nothing to see here. I mixed the Ceramcoat Waterfall with Ceramcoat Blissful Blue to get a lighter color. I painted over the base coat of Ceramcoat Waterfall, and the result was much closer to my original idea. The brass plate is from The Dolls House Mall.
The baseboards around the room are Minwax Jacobean. I thought it might end up looking weird to have dark baseboards on the removable wall. Typically, when you’re painting a door the same color as the walls, the trims are also the same color. I didn’t want blue trims throughout, so I mixed the styles. Somehow, it works and looks relatively seamless. It might not be the cleanest solution, but I just didn’t want dark trim to interfere with the line of sight when the structure is filled and I needed that large of an opening. The wall is a tight fit, which is just fine.

This won’t need to be removed often – just twice a year to change the time and replace the battery.

There isn’t a lot of space for lighting now that I’ve cut down the structure, so I’m opting for recessed ceiling lights alone for the interior. I’ve put NovaLyte can lights in past houses, but they require a 3/8″ thick board to sit flush. In this instance, I will fake it with LEDs from Evan Designs and nylon washers.

I put in eight lights for the ceiling. It might seem like a lot, but the vaulted ceiling is high above the living space and I wanted to be sure there was plenty of light.

I added two new old stock ceiling light kits by Illinois Hobbycraft to the front alcove. I used LEDs for these as well.

I was originally going to use Houseworks 8-light windows for the skylights, but one fit perfectly and the other didn’t. Since they would be right across from one another, there was no way to disguise the variation. I checked the kit windows, and they were the same size. Since they come as separate fronts and backs, they are easier to paint and finish. Plus, you don’t have to worry about slight differences in wall/roof thickness. I painted the interiors White Birch and the exteriors Slate Green, both by Americana. I cut new acrylic inserts since the kit glass was smaller than the full opening, and I didn’t want them to shift out of place.
The interiors blend well. I thought dark brown rectangles would be too much, so I didn’t stain them to match the rest of the trim. I think this was the right choice.

Furnishings, clocks and such
The birdhouse kit is from Art of Mini. Originally, I had painted the birdhouse green, but then I thought, “Why is just about every birdhouse I make green? I’m sure birds like other colors.” So, I painted over that with Battleship and painted the roof Bittersweet Chocolate, both by Americana. Now it’s a house suited for the unassuming bird who doesn’t like to draw attention. :D

This later ended up on the outside of the building. Debora made the beautiful brass clock. The brass had naturally aged while in storage, and that made the hands hard to see. I added a little black paint to bring them back. I cut and painted a block of basswood to serve as the wall mount and added the clock to the porch.

The trestle table is a House of Miniatures kit. After filling in any minor gaps with wood putty, I stained the piece Minwax Dark Walnut. I touched up any glue/putty areas with brown paint and then added a coat of Delta Ceramcoat Satin Varnish.

The Shenandoah Designs tiered server is one of those frustrating three-legged contraptions that make me swear even more than usual but often turn out so nicely. I started with a coat of Basil Green by Folk Art. I had to paint this since I always get glue everywhere when putting together any three-legged stand. I used one of the small rubber stamps with the same paint as the French side table to add some detailing.

The French Side Table kit is from Art of Mini. I started with a coat of Bittersweet Chocolate by Americana. I want this to be an old table, perhaps once stained and lovely then re-purposed with a coat of paint (or three). The Folk Art Vintage White paint I had was very thick for being rather old, so I added some water. With the dark undercoat, it took several layers to even out. That added to the refinished look unexpectedly, so a nice happy accident. I rubbed the paint with a piece of brown paper bag to remove the high spots. Then I used a light grit sanding stick to bring out some of the dark details from underneath.
I added metallic detailing with Taupe by Folk Art. I used a rubber stamp and the same paint on the top (technique detailed here). I rubbed the piece again with a piece of brown paper bag until I had a nice sheen. The legs warped a little, but that adds to the antique feeling…at least that’s what I tell myself.

I have no chimney, but I am using a fireplace with a false brick insert. The fireplace was part of a miniatures lot I bought online. I have two that are very similar, and one is for the Brownstone. They are heavy, well made and have crisp detailing. The material appears to be some sort of translucent resin. There are no markings or manufacturer details. The seller indicated that she purchased them in 1996 at The Dolls House Toys Ltd., Covent Garden, London. The fire screen is by Ellen Moore.
The modern side table was inspired by the Oly Studio Ichibad Side Table and made with Tiny Turnings. I needed some sort of cash transaction station for my shop, so I added a vintage desk from my stash and stool from Boutique Miniatures. The desk is a cheap miniature, but it has always appealed to me. It was also from a collection a friend gave to me after his mother passed, so it has that sentimental draw as well. The laser cut Victorian wall clock is from D-Tales Miniatures, bought at the Bishop show. The hourglass is from Here Today Gone Tomorrow, and the pintail drake decoy is by Linda Master. The Art Deco working clock on the right mantel top is from Halls Miniature Clocks.

The black grandfather clock was made from a Chrysnbon kit.

For more details and pics of the clocks and accessories on this side of the room, click here.

The ivory grandfather clock is also Chrysnbon.

The blue Mora clock began with a Miss Lydia Pickett Cottage Clock (the construction ends here, but you can follow the posts back to see the whole process). This is a 1:12 scale kit by Robin Betterley’s Miniatures.

Yeah, had to have a cuckoo clock in the cuckoo clock, right? This awesome kit is from MiniaturasMyE. It came with a wood cuckoo, but I wanted a little more realism. I thought I had a half scale bird from Barbara Meyer, but I couldn’t find it. Instead, I used a full scale bird and shaved it down to fit.

The fancy plant stand is from Arjen Spinhoven. I didn’t want to lose the carved detailing, so I stained it Minwax Driftwood and finished with Delta Ceramcoat Matte Varnish. The working clock on the top is from Halls Miniature Clocks, and the ceramic rabbit and brass seal figurine were likely from Manor House Miniatures.

The rustic table is from Barbara Begley Miniature Gardens. At the last minute, I realized I needed a rug…so I swiped the Tree Ring rug for the space. Now, I can leisurely make a replacement. I’ve made the Banjo wall clock from Cynthia Howe Miniatures before, but this time I went less traditional.

For more details and pics of the clocks and accessories on this side of the room, click here.

The gable clocks are made from kits, jewelry findings and watch parts. Please click here for the detailed post.

The tiered table has a selection of small clocks that I picked up from shows, but you can find them online. I made the bird statue from jewelry findings, and the spiral vase is from Patricia Paul.

The Landscaping
I went with a modest and tidy landscaping for the build since it seemed reminiscent of a simplified cuckoo clock. The landscaping board is finished on the edges with iron-on veneer edging. I then glued layers of white 1/16″ foam sheets by Woodland Scenics using Weldbond glue. I went with thin foam so I could keep the land relatively flat on the baseboard while still allowing for natural unevenness.
For the grass, I used Heki Summer Meadow Field Grass. It has a paper backing that isn’t the easiest to seam, but I do like the color, variation and texture. I also had it in my stash already, so that saved on costs.

Since I planned to have 20 shrubs around the structure, I opted for mulched areas. This cut down on the grass quite a bit. I added Woodland Scenics Fine Dark Brown Ballast as the mulch base, to serve as dirt. If there were any bare spots in the mulch, this would blend well. I held it the ballast and mulch in place with Woodland Scenics Scenic Cement applied with a pipette.

The shrubs were made from Styrofoam shapes and railroad scenery foliage (tutorial available in my etsy shop). I’m a huge fan of Squeeze Me trees and shrubbery, but if you need a lot of them, it can get very pricey.

Of course, at the last minute (two days before the deadline) I decided I needed flowers around my shrubs. My twenty shrubs. Flowers do not go a long way and take considerable time to make, but I did it. And, I think they add just the right amount of color. These were made from Bonnie Lavish kits, HBS So Easy kits (also Bonnie Lavish) and flower punches with origami paper. (As an Amazon Associate, I earn from qualifying purchases.) The flower pots on the porch were from Manor House Miniatures.

And, of course, you want to see the cuckoo in action. :D You know, it’s interesting to work on a miniature house that is constantly reminding you of time passing by while you’re building it.
Thank you all for the support during this crazy process of building! It means the world to me.
———————
Contest results: Half Clocked won an Honorable Mention in the 2018 HBS Creatin’ Contest! You can see the other winners and remaining entries posted here. Congratulations to all the entrants on your creativity and hard work!
Categories: Half Clocked
December 17, 2018 | 0 commentsHalf Clocked – skylights
I was originally going to use Houseworks 8-light windows for the skylights, but one fit perfectly and the other didn’t. Since they would be right across from one another, there was no way to disguise the variation. I checked the kit windows, and they were the same size. Since they come as separate fronts and backs, they are easier to paint and finish. Plus, you don’t have to worry about slight differences in wall/roof thickness. I painted the interiors White Birch and the exteriors Slate Green, both by Americana.

I cut new acrylic inserts since the kit glass was smaller than the full opening, and I didn’t want them to shift out of place.

I added some aging to the exteriors.

The interiors blend well. I thought dark brown rectangles would be too much, so I didn’t stain them to match the rest of the trim. I think this was the right choice.

With these installed, the structure itself is complete except for the back wall, which I hope to finish this week. (eek!) :D

Categories: Half Clocked
December 9, 2018 | 0 comments
NOTE: All content on otterine.com is copyrighted and may not be reproduced in part or in whole. It takes a lot of time and effort to write and photograph for my blog. Please ask permission before reproducing any of my content. (More on copyright)


