

Jasper County Community Theater presents: Once Upon a Porch
Coming in just under the wire is my entry into the 2022 Creatin’ Contest by miniatures.com. It’s named Jasper County Community Theater presents: Once Upon a Porch.
——–Prologue (Narrator)
My grandma loved animals. She would donate to animal charities and volunteer at shelters. My grandpa, however, could not abide an animal in the house. Shortly after he passed, my grandma took in a stray dog she named Erasmus. He was a scruffy border terrier in desperate need of a bath. She believed that grandpa had sent her the dog he would never allow in the house while he was living. And, it really did seem that way in how Erasmus eased her grief.
One day, Erasmus ran away. I asked my grandma if she wanted me to help her look for him, put up flyers around town, see where he might’ve gone. She said he wasn’t her dog, that he belonged to the light and went where he was needed the most. I asked her, “But aren’t you sad, Grandma?”
She smiled softly, looked off into the distance and said, “Not as sad as the next person he’s gone to help.”
——–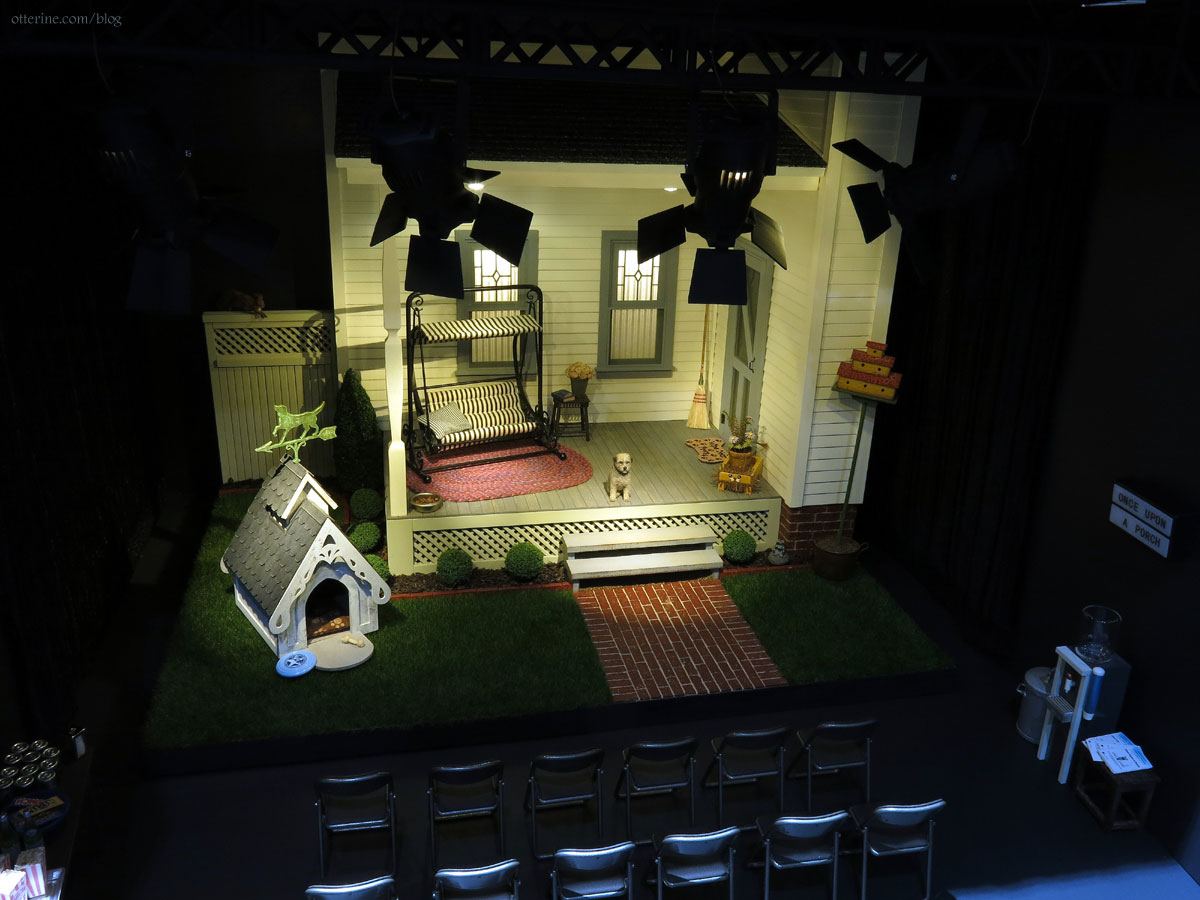
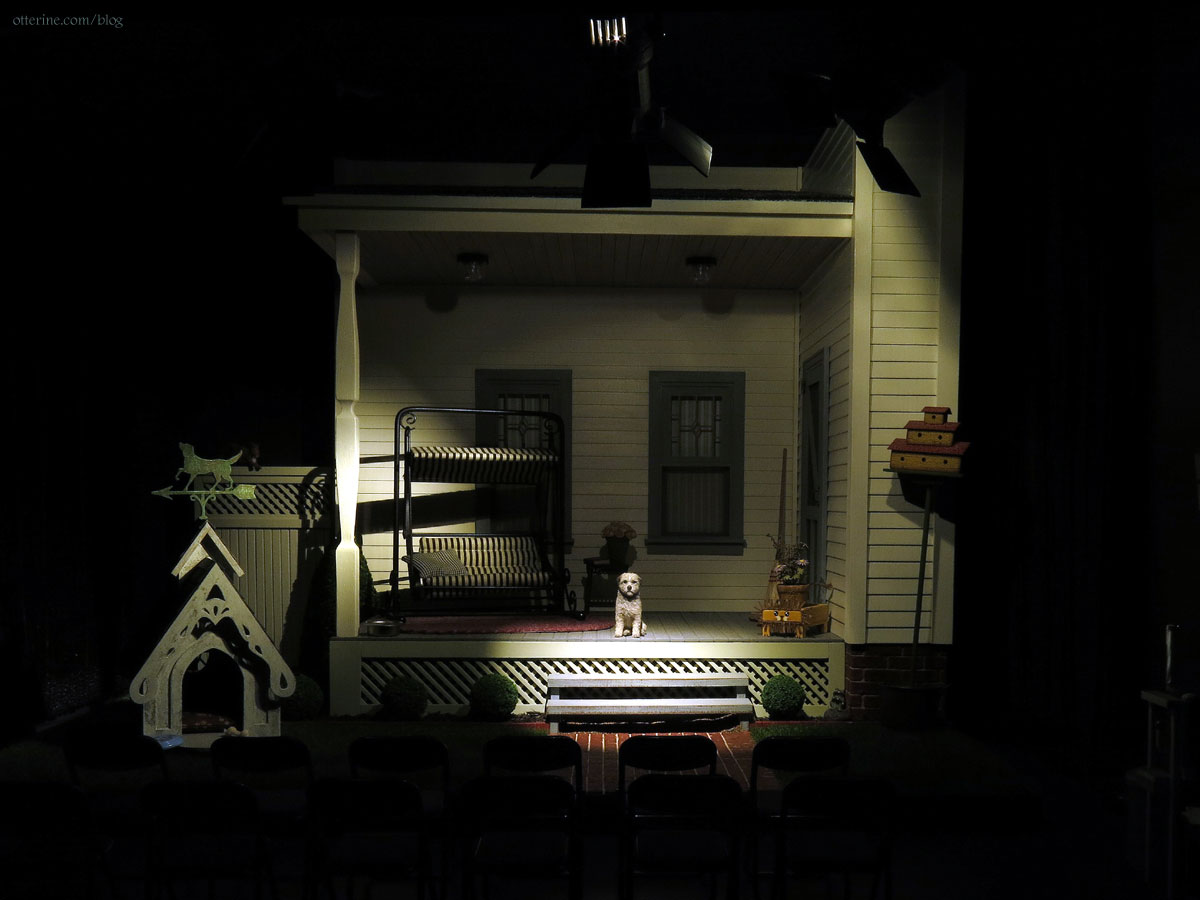
It’s opening night!
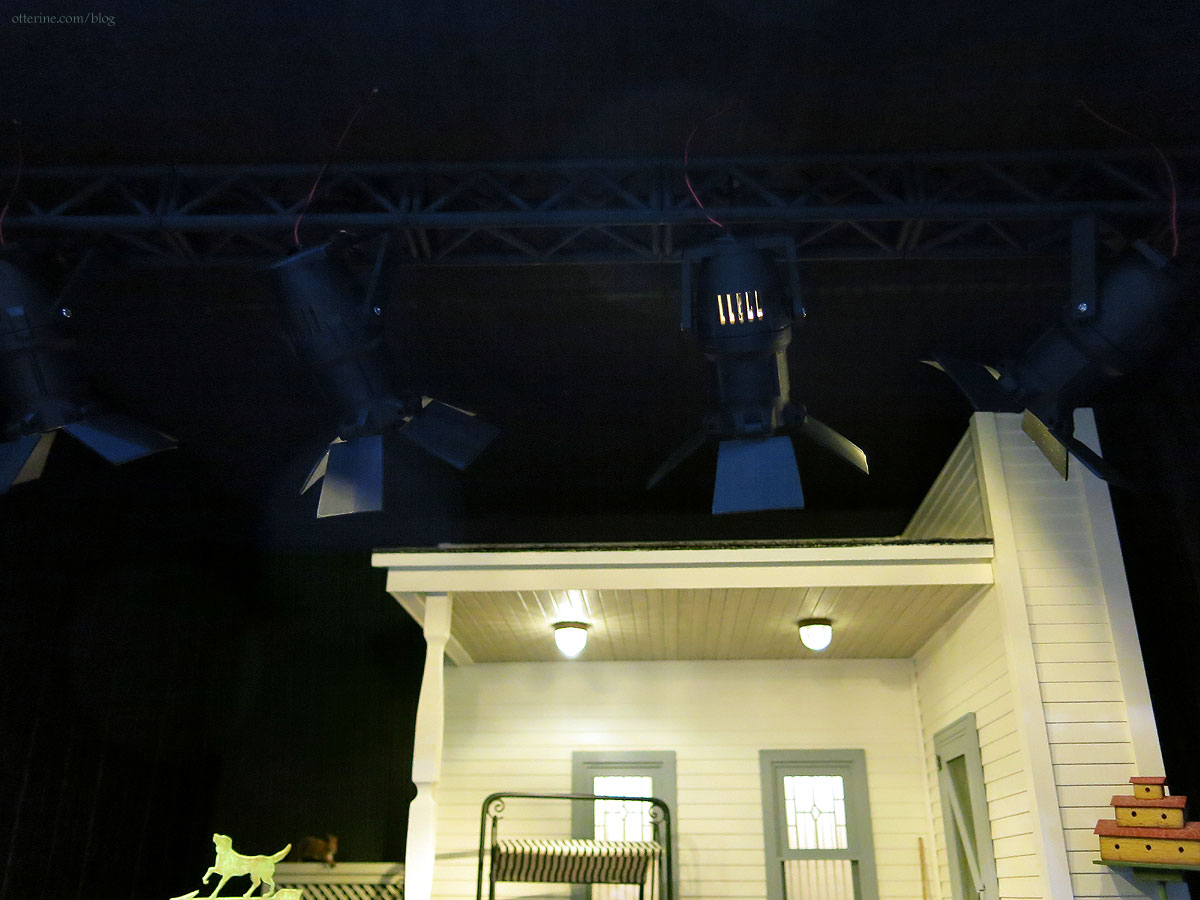
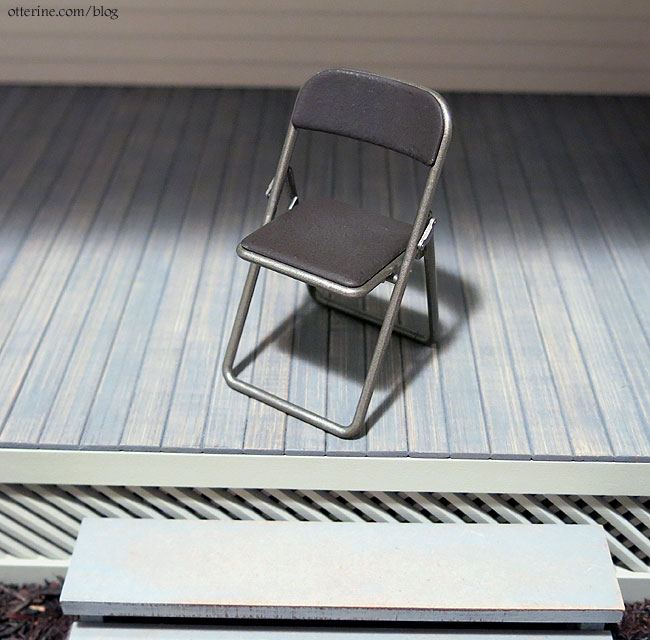
I love the dramatic lighting. It actually turned out so much better than I thought it would.
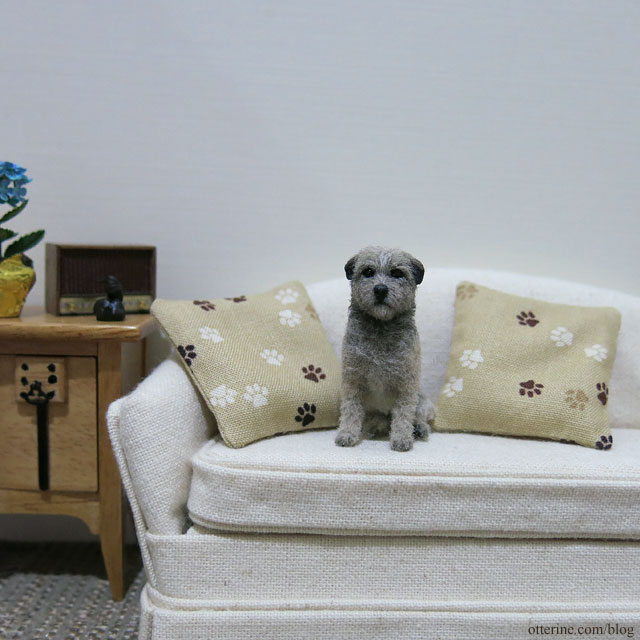
Gus is ready for his closeup!
When I first saw the Welcome All Porch, I always intended to just build it as a porch. Of all the houses I’ve built, none has a good porch for photographing my mini outdoor furniture for sale, so this would end up being a business prop. I figured I would just take some pretty pictures to turn in for the contest and not think much about it.
Then I began mulling over how I could set it up for photos, and it hit me: theater set design. Thus, the idea was born.
The main thing I would need? Stage lights! Luckily, there are creative people out there turning real life items into 3D printed miniatures. In my build, I used a stage truss by airbusa380 to hold the stage lights by Depronized and additions by caprinus. A huge thank you to my dear friend Debora and her husband for all the efforts in making these 3D parts a reality for my build.
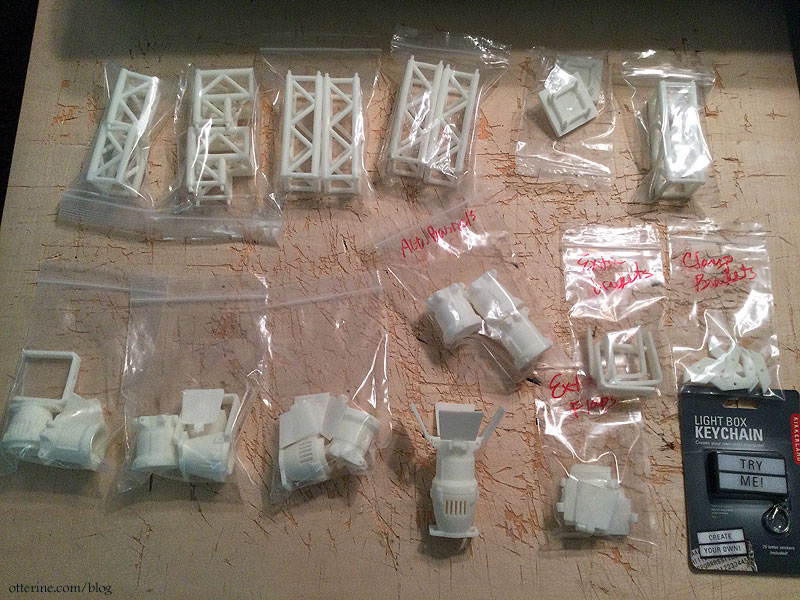
In the end, I had to rig the lights up however it would work because I ran short on time. Luckily, it’s dark in the theater so no one can see the code violations. haaaaaa!
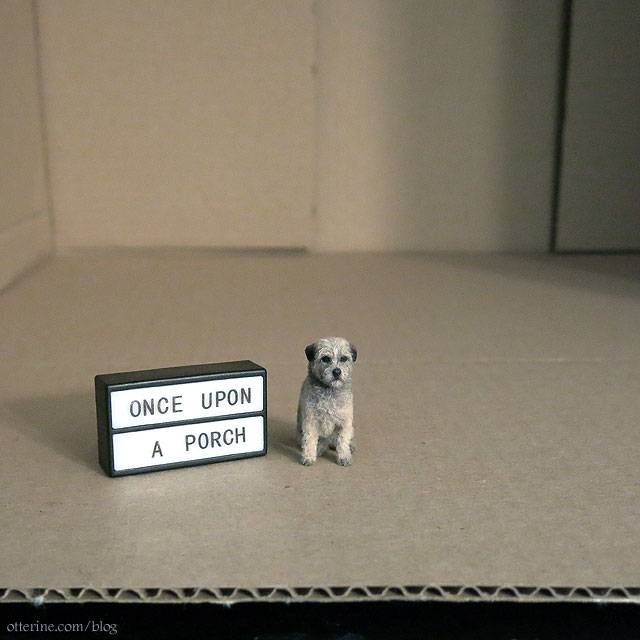
I found a Kikkerland light box keychain online. Though it does light up, the on/off switch doesn’t work, so I just keep the battery out and use it as a prop.
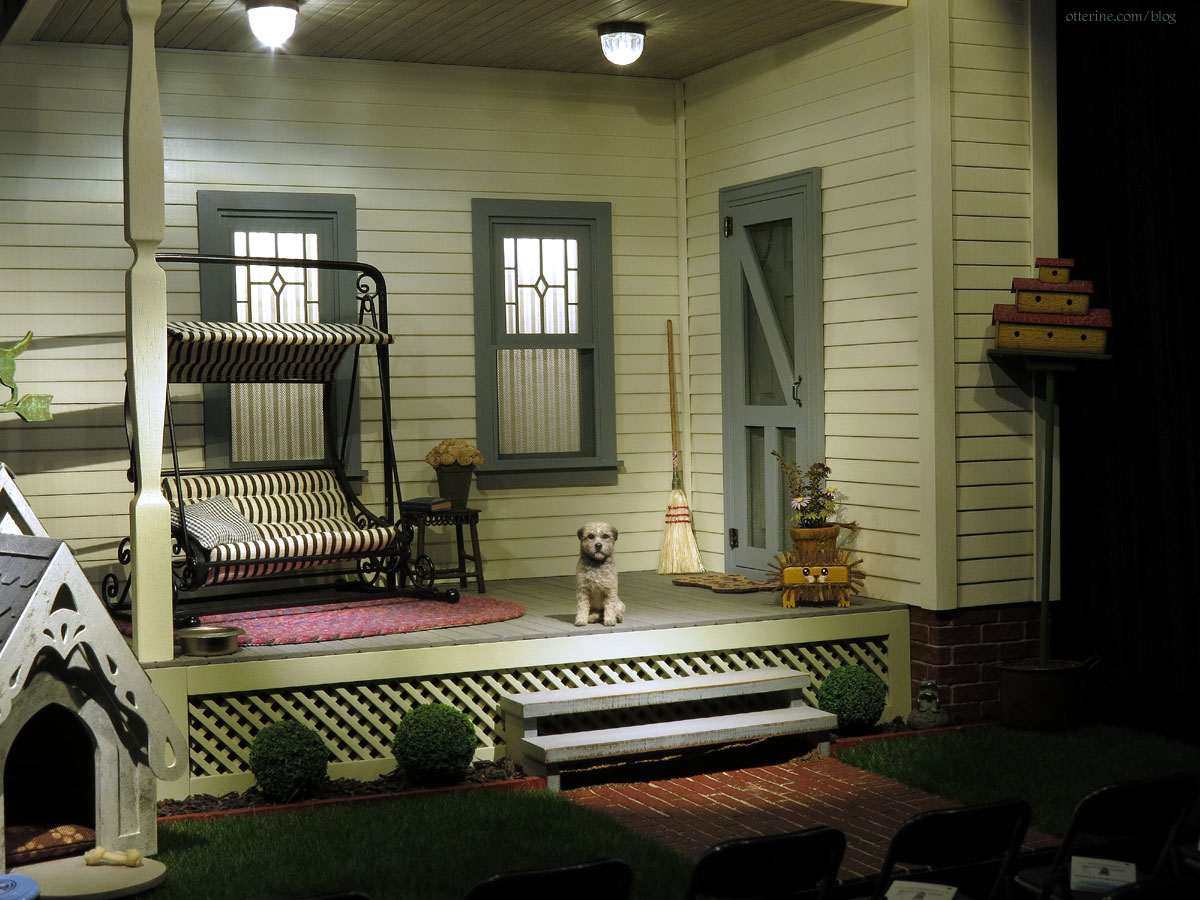
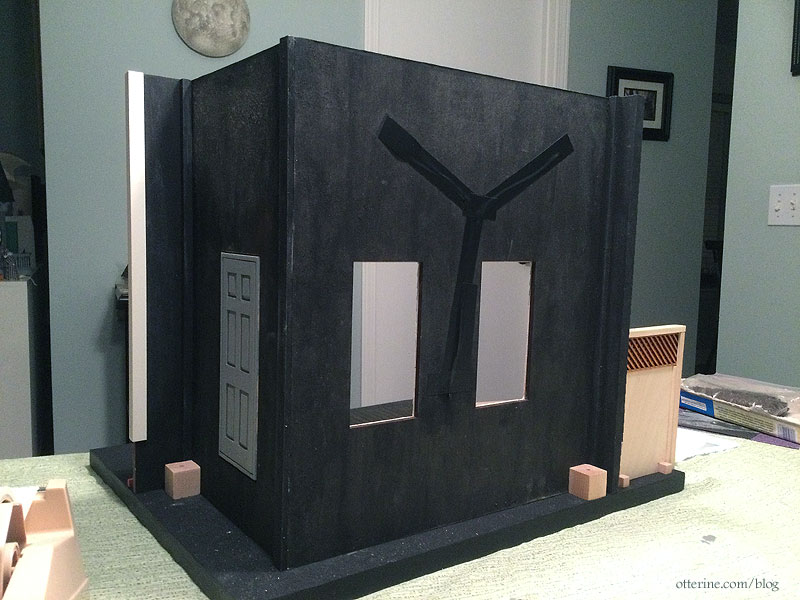
The porch footprint was larger than I expected, but it gave me more space to play and ended up working well for my idea. I cut down the pitch of the roof board, removed about an inch or so from the height and added a ceiling. I also flipped the back wall to have the windows closer to the door.

I used 3/8″ clapboard siding and egg carton brick for the foundation. The lattice was cut from a 24″ laser cut strip by Alessio Miniatures. I added two small side walls to give the illusion of a full structure. The roof is covered with vintage What’s Next asphalt shingles, and the porch post is vintage Miniature House.
The landscaping around the porch is Woodland Scenics fine ballast in brown topped with mulch from A Little More in Miniatures, Squeeze-me shrubbery from Model Builders Supply, brick edging by Andi Mini Brick & Stone, and Wild Grass in Dark Green by Heki from Scenic Express (they call it Summer Green TurfGrass on their website). The brick walkway is egg carton.
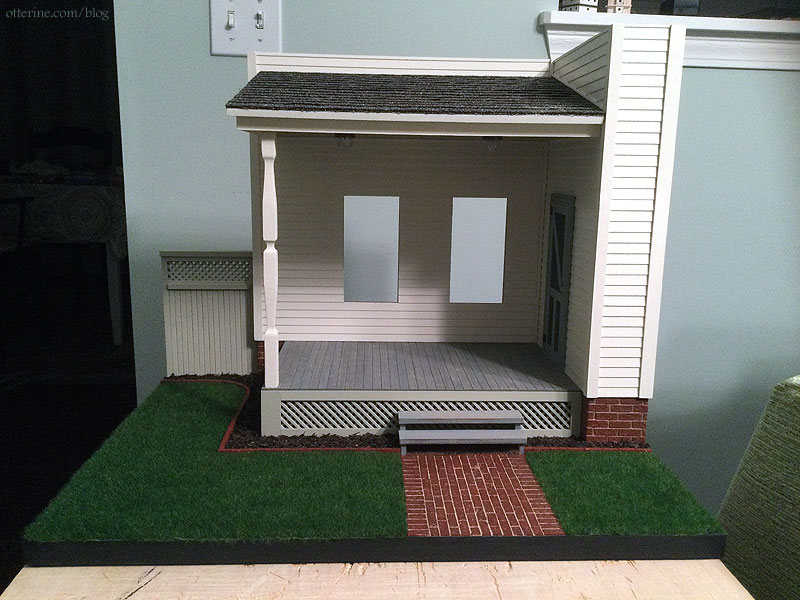
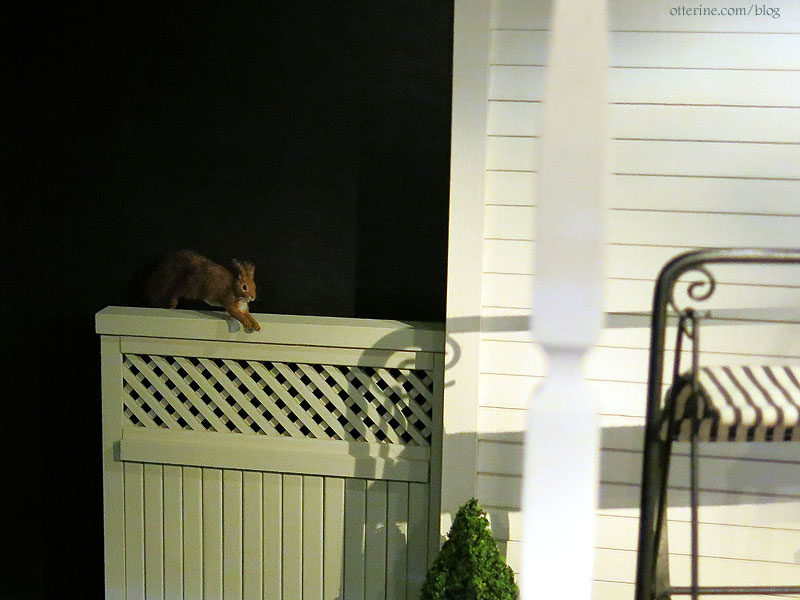
The privacy fence was made using the leftover bit of lattice, scrap wood and craft sticks. The squirrel hopping along the top was made by JMDS.
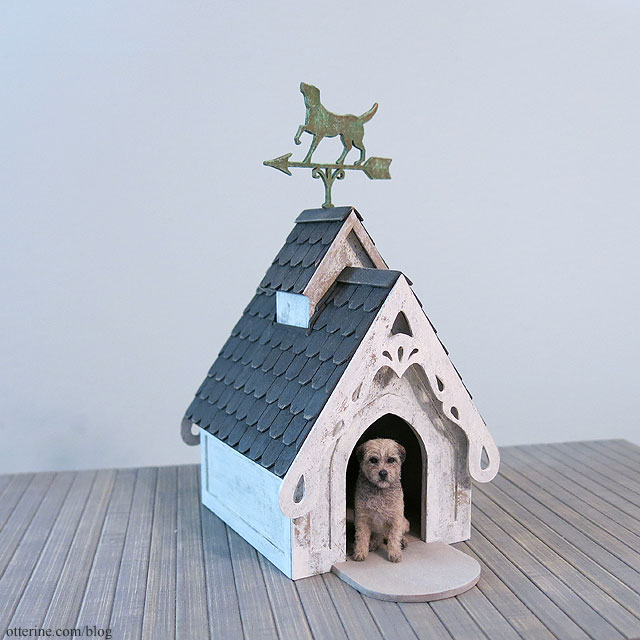
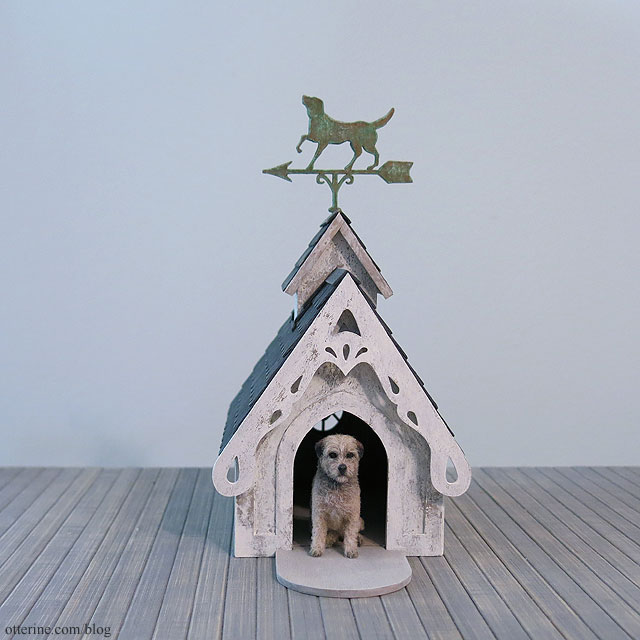
I’ve detailed the doghouse build in previous posts (one and two); it was made using a Robin Betterley kit: Miss Lydia Pickett and her dog house. I ended up making a brown paw print pillow for the interior and added a Frisbee and dog bone.
I used bamboo sticks to finish the ceiling and floor, omitting any boards where the bamboo nodes (knots) would be visible. This material is less expensive than strip wood and creates a lovely finish once stained and sealed. After some trial and error, and paint washes, I ended up with a whitewash natural ceiling and a grey wash natural floor.
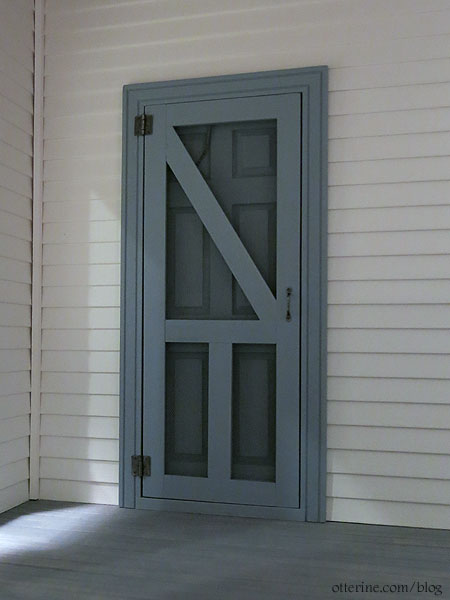
I made a screen door similar to the one from Ivy Hollow, but this one is all glued shut. You can still see the spring chain hanging on the inside, though. :]
The windows are enhanced with laser cut inserts from Laser Creations as well as screens made to fit the lower portion. Striped white fabric panels serve as shades to give the illusion of an interior room.

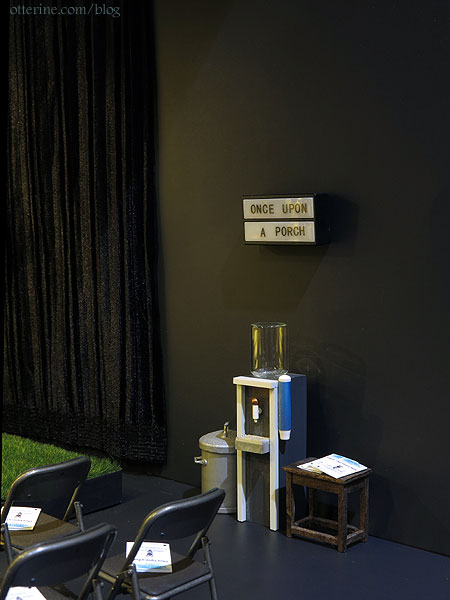
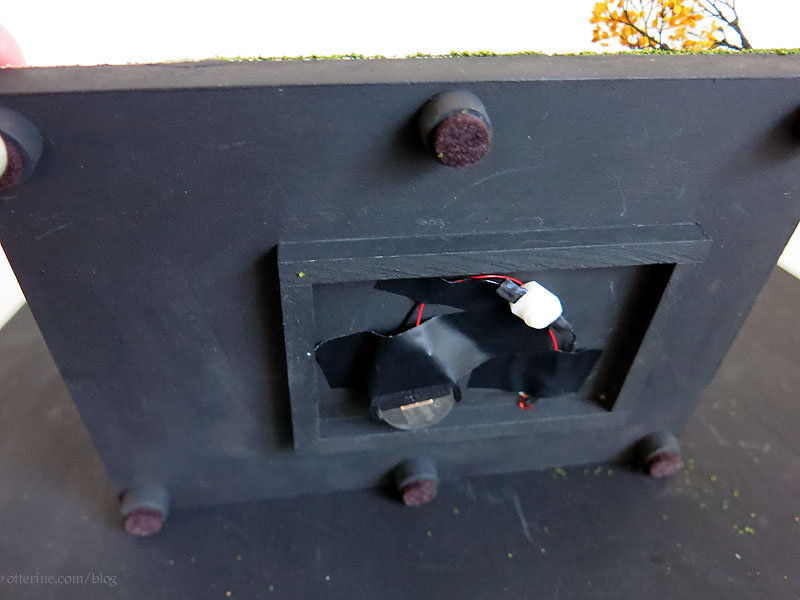
In reality, backstage is pretty basic. :D All the lighting was done using LEDs from Evan Designs. The porch light housings are vintage Hobby Craft. I later added a shallow box behind the windows to keep the light from creeping up behind the set.
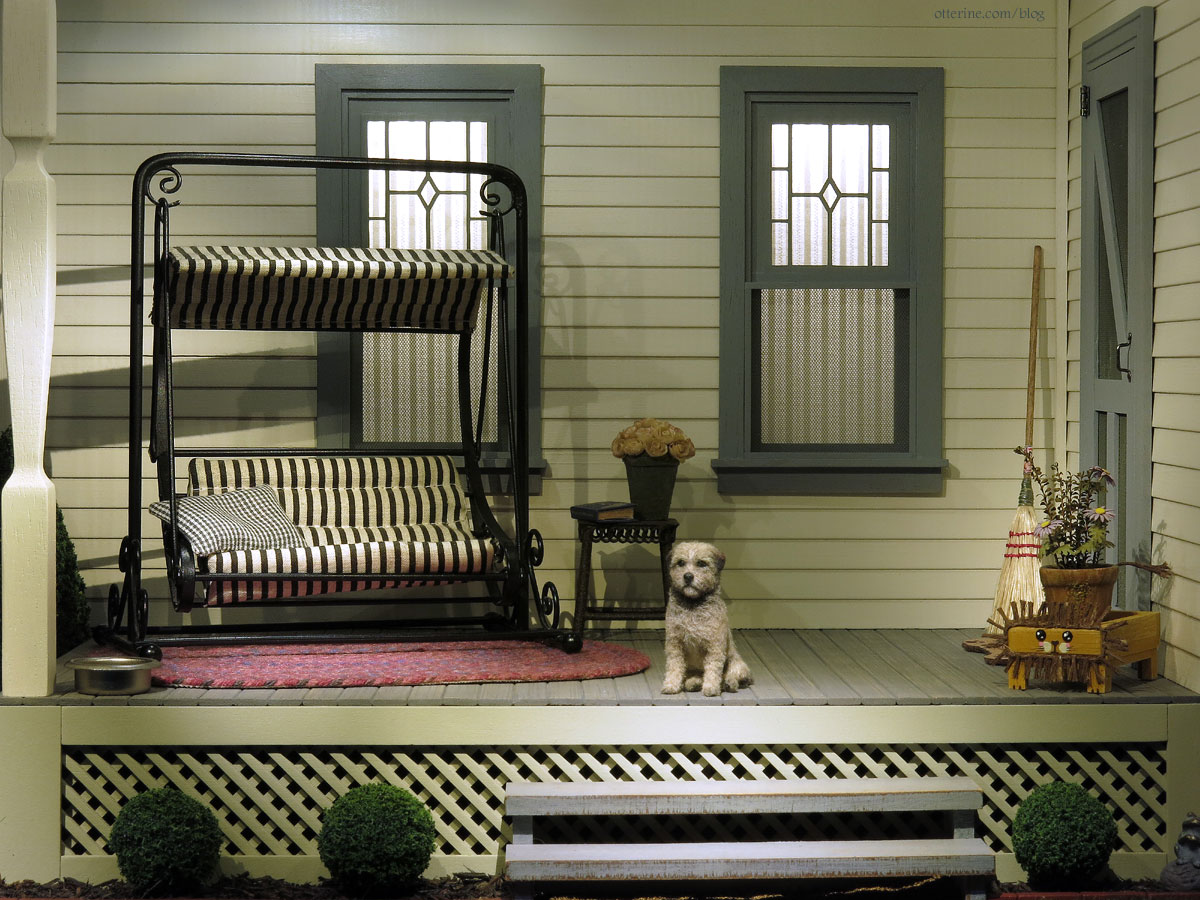
On stage is a vintage swing, J Curdie braided rug, roses by Art of Mini, broom by Wright Guide, lion planter by Dollhouse Smithery, and a wipe your paws doormat from miniatures.com. I can’t recall where the dog bowl with kibble came from. The frog is by Spencer’s Nook, and the vintage birdhouse from Lolly’s Dollhouses is planted in a rustic wash pot.
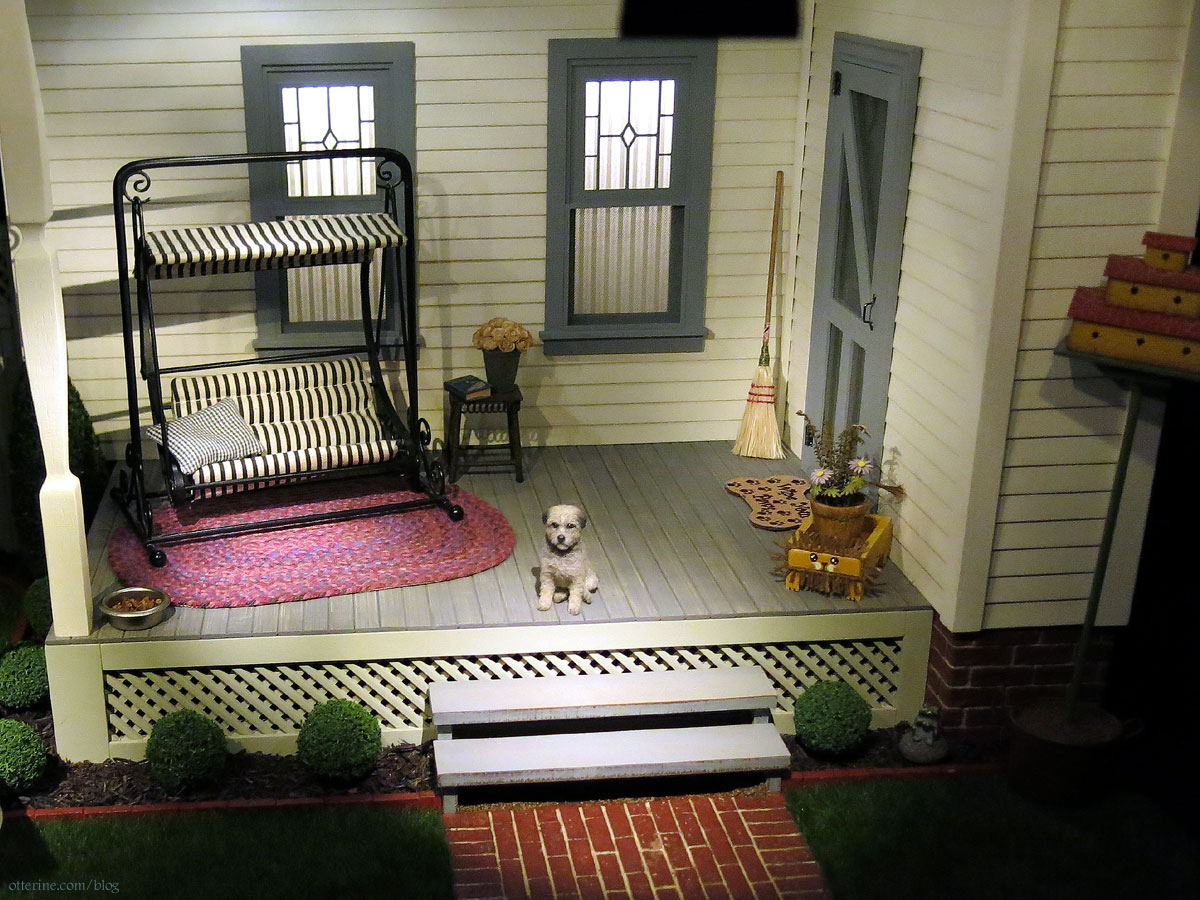
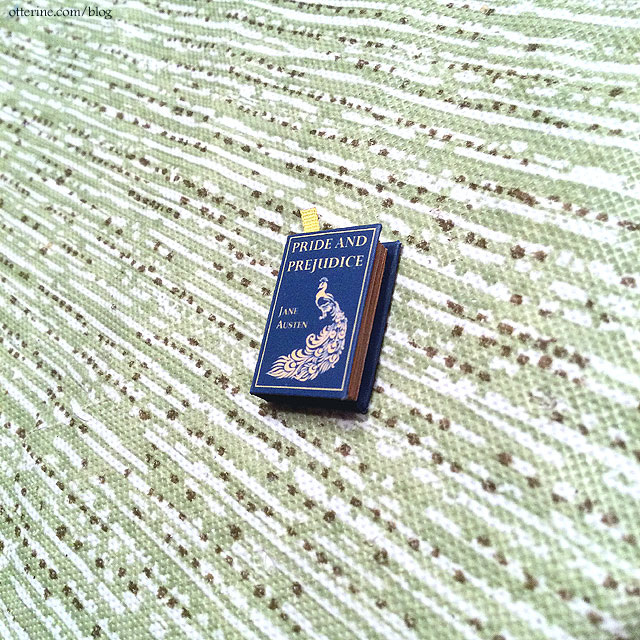
The beautiful mini Pride and Prejudice book was a gift from The Half of It.
The seating and concessions table were made from Hasegawa meeting room kits. They come molded in color and have quick snap together assembly, but I chose to paint mine.
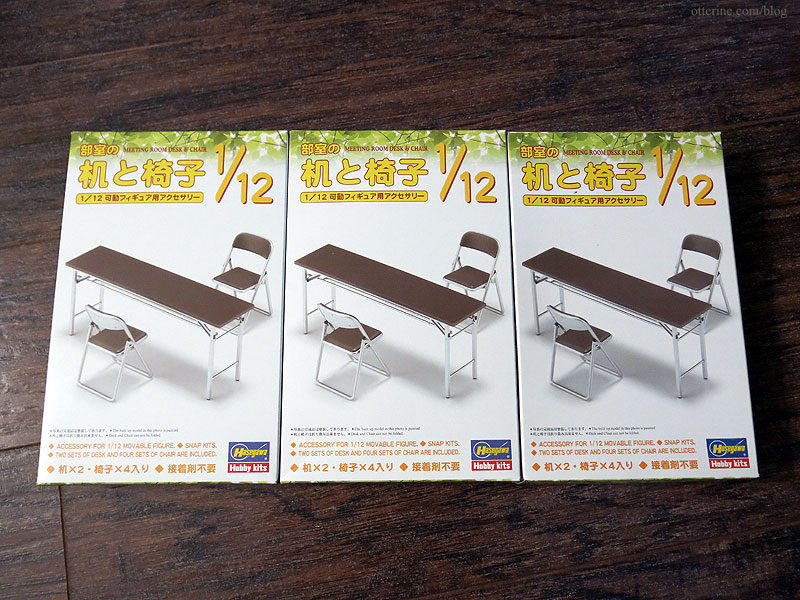
The frames are bronze metallic, and the seat parts are multiple layers of primer and paint buffed to a vinyl finish.
Our community theater is on a tight budget. Perhaps these were donated by a local business. Either way, a seat is waiting for you.
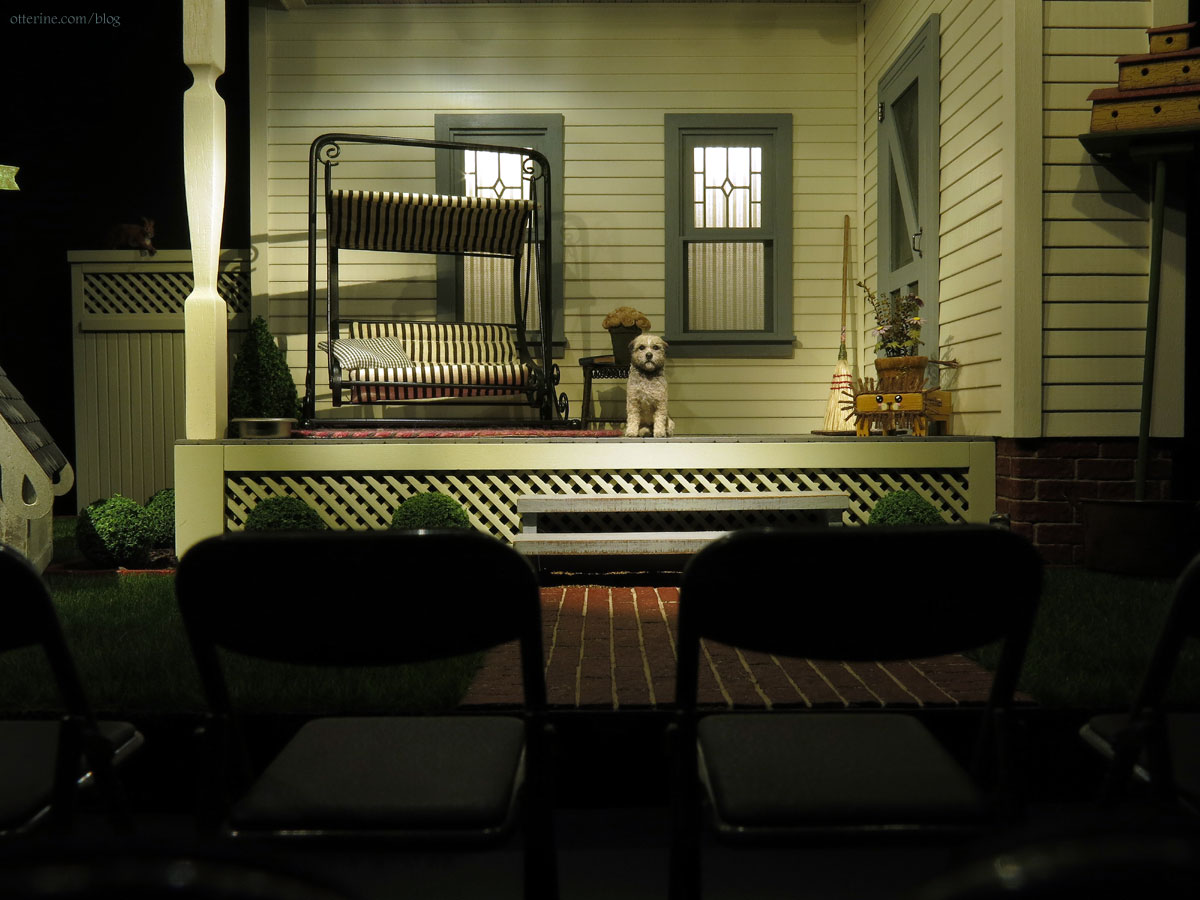
The concessions table had always been planned, but it was the last thing completed due to limited time.
The cotton candy is from miniatures.com (I added the plastic wrap), the bottled water is by Alma, the baskets are from M for Miniatures, the soda cans are basic miniatures, and the napkin holder is by Wright Guide. I made the candy using wrappers from Genies Mini House Shop. I can’t recall where the juice came from.
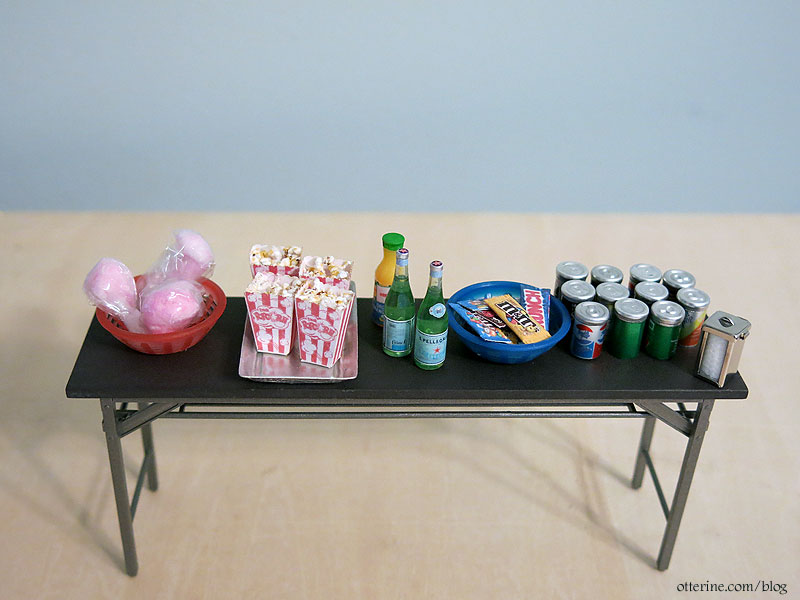
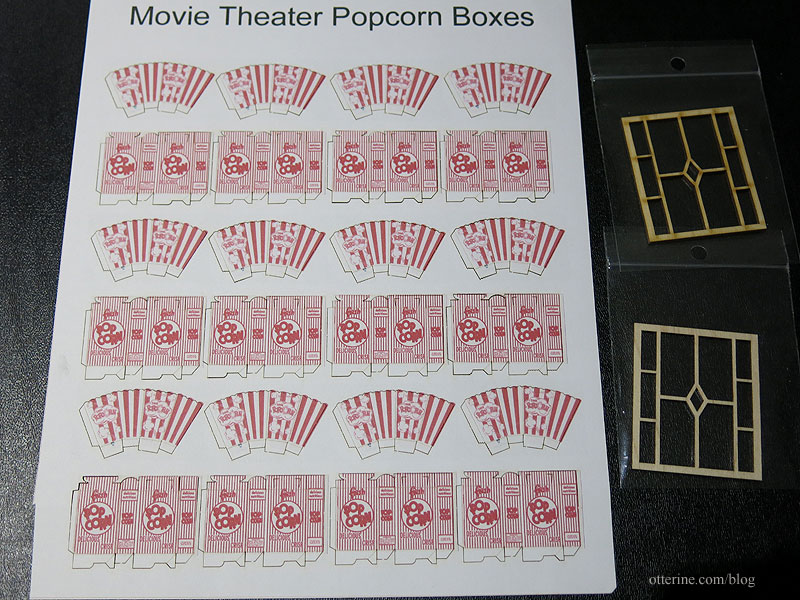
The popcorn containers are made from a laser cut print by Laser Creations, with popcorn made from beads, styrofoam and chalk pastels.
The water cooler and trash can are vintage miniatures found on eBay. I made the stool from a pattern in the book Finishing Touches by Jane Harrop.
The playbills were designed using part of a template in Word. There’s nothing on the inside, but the prologue is printed on the back.
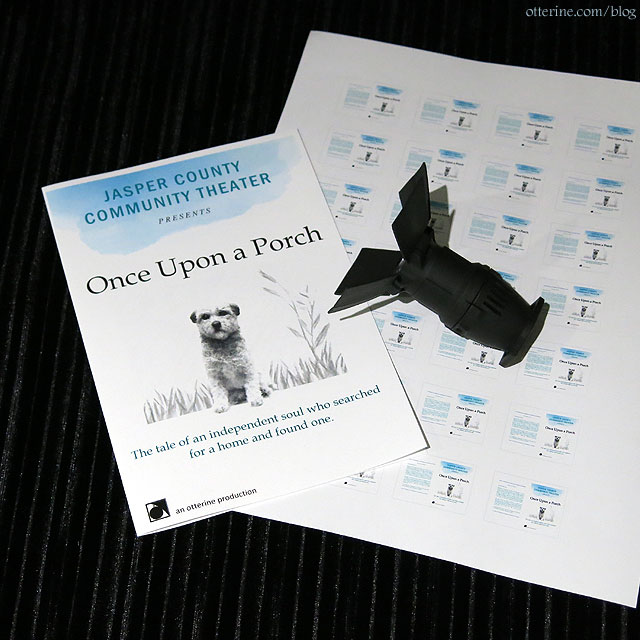

The part of Erasmus is played by darling Gus, who was made by Michal Gvir. I wanted a border terrier that was a little rough around the edges, an independent soul who searched for a home and found one. He just hasn’t been to the barber yet. Oh, the stories he could tell!
And, the community theater is named after my own rascal, Jasper. :D Yes, the theater is a shipping box painted black, then lined with poster board and pleated velvet curtains. All smoke and mirrors…like any great stage play.
——-
Thank you to the folks at miniatures.com for hosting this annual contest. It’s always so much fun to see what ideas are brought to life. Thank you to my friends and family for the encouragement and support. I’m looking forward to the next big (mini) thing! :DCategories: Once Upon A Porch
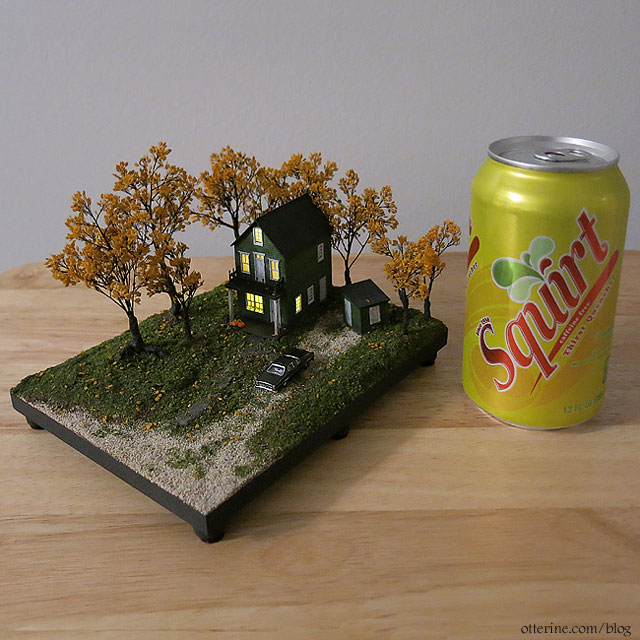
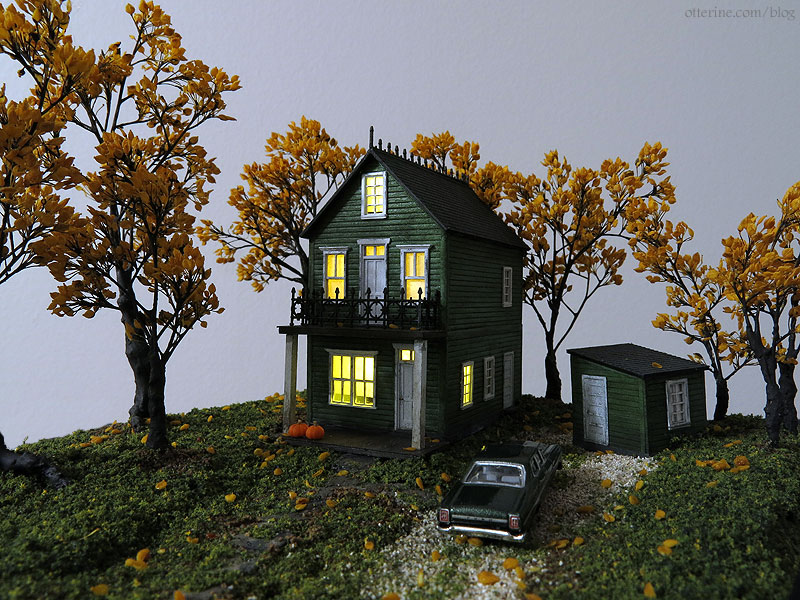
December 12, 2022 | 2 commentsSpooky Hollow – Halloween 2022
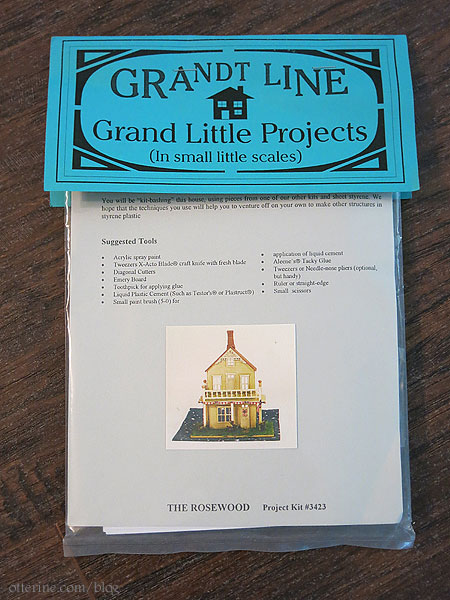
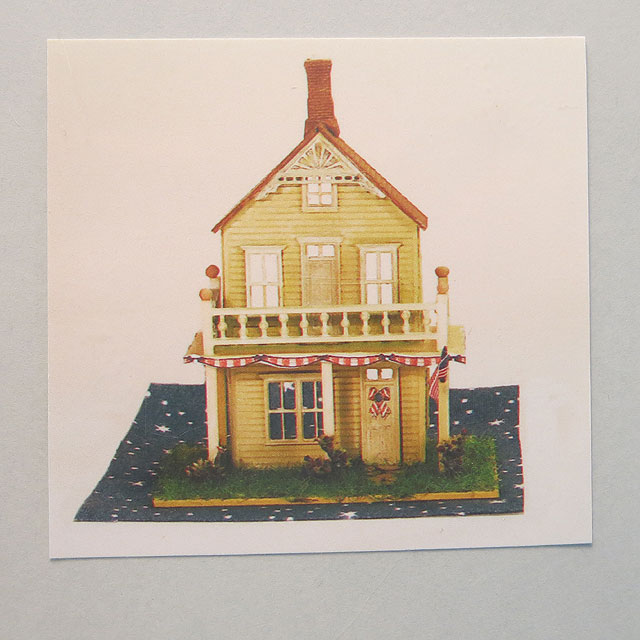
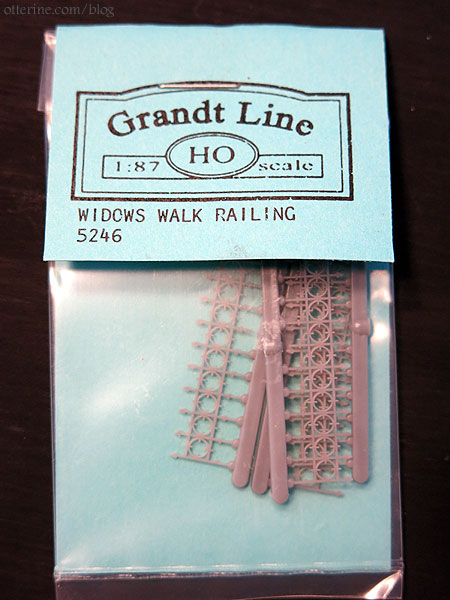
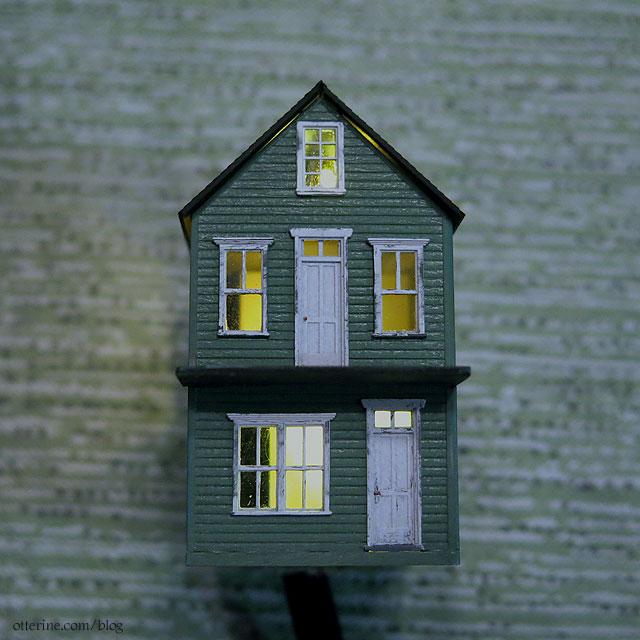
A couple of years ago, I started looking for a Grandt Line Spooky Hollow kit. While Grandt Line products are still around, these specialized kit bashing ensembles were apparently a limited run. Here is the kit photo. The project is N scale (1:160), which correlates to 1:144 scale or “dollhouse for a dollhouse” scale very well.
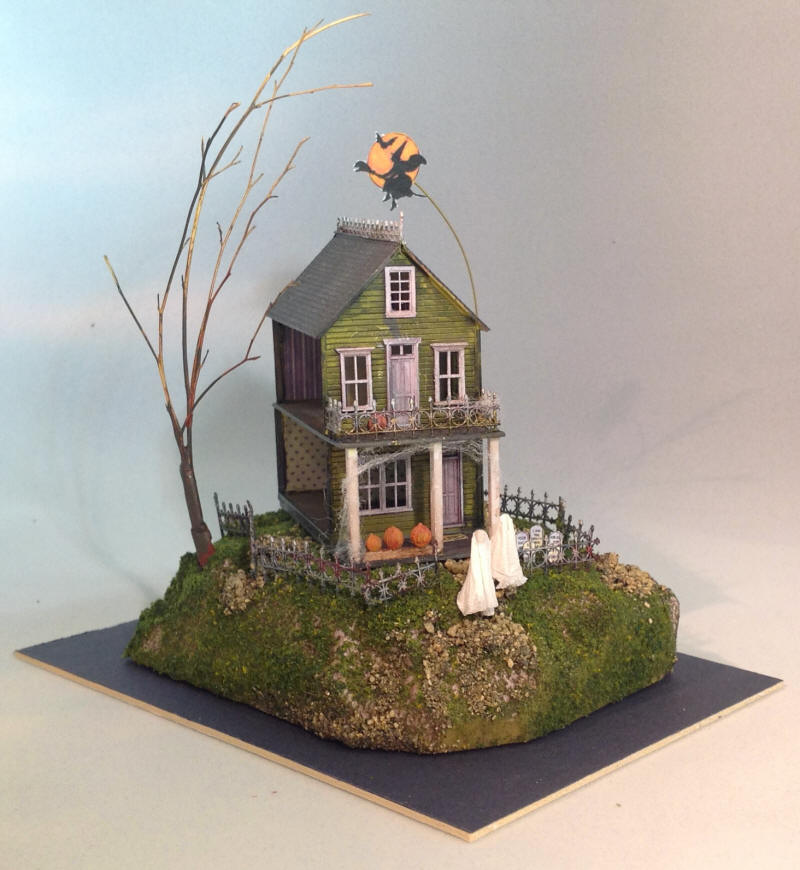
A friend made one awhile back and recognized that another kit was very similar in design. Rosewood Cottage is also one of the limited run kits, but I was able to find one at a good price.
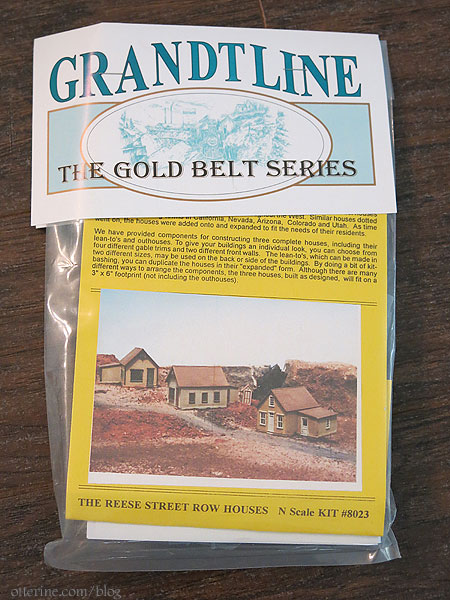
Unfortunately, it had different parts and was made as an open back house opposed to a long side opening house.
But, the instructions included a parts list that led me to find additional parts to make what I wanted. A huge thank you to San Juan Details for shipping me the Reese Street Row Houses kit so quickly.
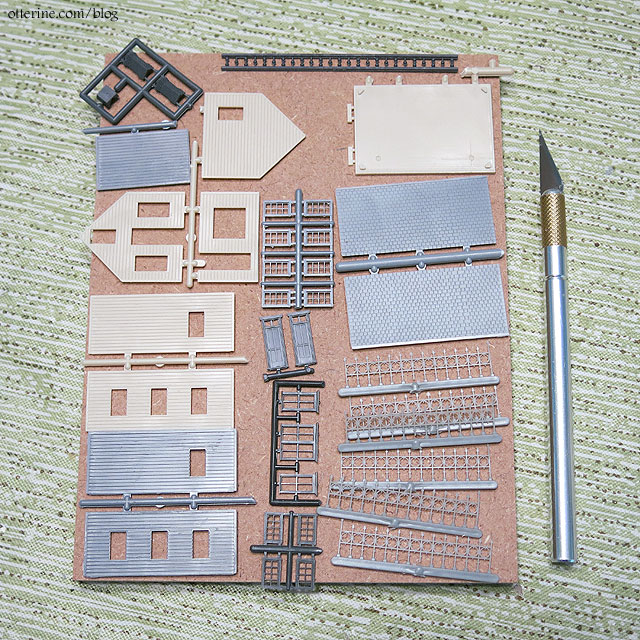
With all the parts now in hand, I could start making my own Spooky Hollow.
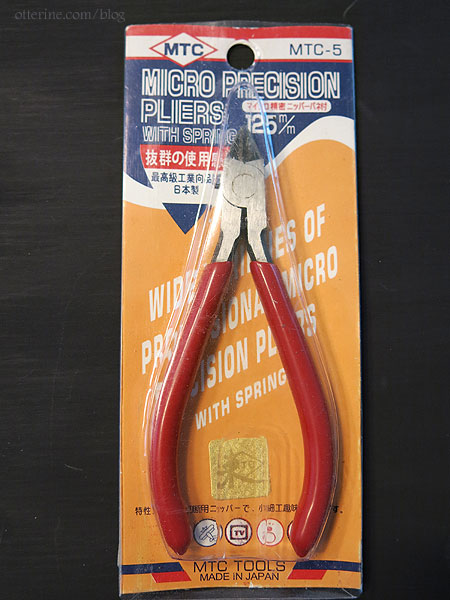
These MTC Tools Micro Precision Pliers are a lifesaver for snipping tiny and delicate parts.
I bought the Grandt Line widow’s walk in HO scale to accent the build as well.
The widow’s walk on my house is just the very top of the molded part. It was a test of wills to get it to glue on straight and secure.
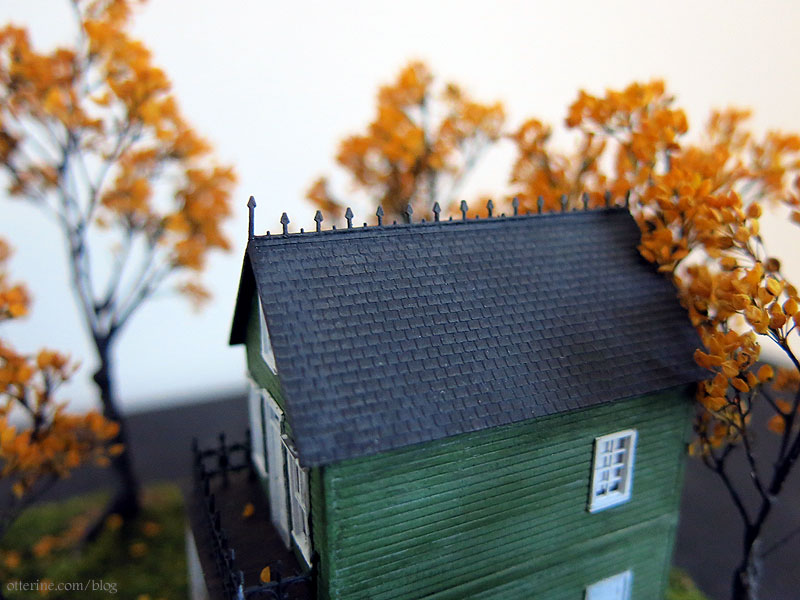
To finish the balcony and porch, I used some leftover adhesive backed micro wood from the Model T Van I built several years ago. In the end, the porch posts ended up a little wonky, but it’s an old, haunted house. I cut down more of the widow’s walk to make the balcony railing.
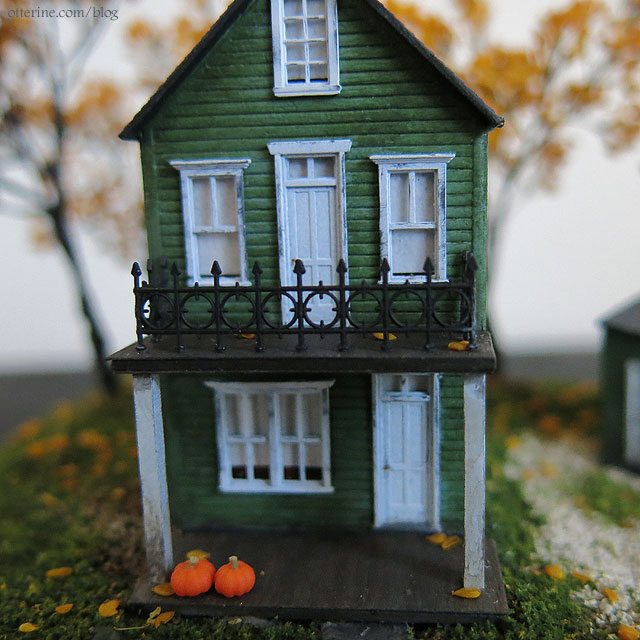
I used spray paint in moss green for the exterior, later adding some aging with acrylic paints for dimension. The windows and doors are primed in grey, then sprayed flat white.
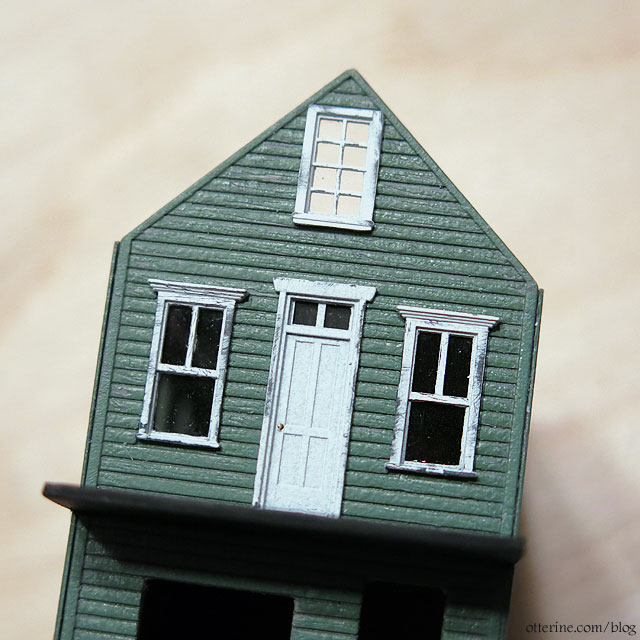
A little sanding brings forth the grey and adds a bit of age. Cutting, fitting and gluing the acetate film for the glass was an adventure. I used Testors clear parts cement, which made a bit of a mess. Good thing dirty windows are fitting for an old house.

The LEDs are pico 3V in warm white from Evan Designs. I used some Gallery Glass paint to tone down the brightness, going for a warm glow on a chilly autumn evening.
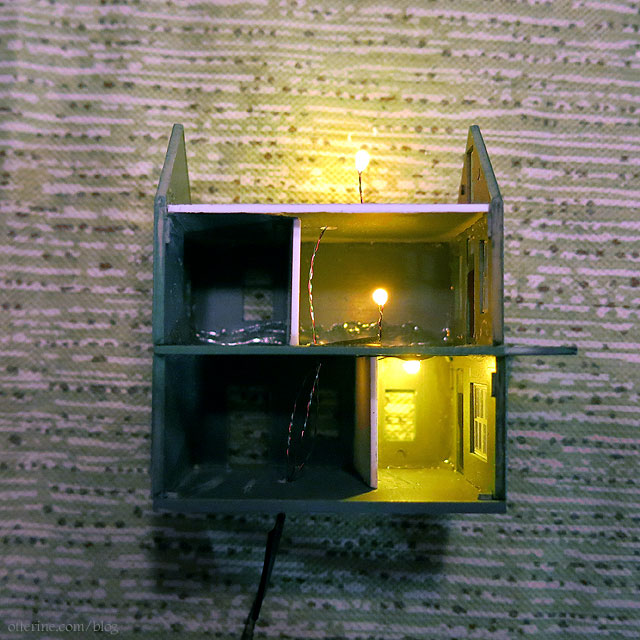
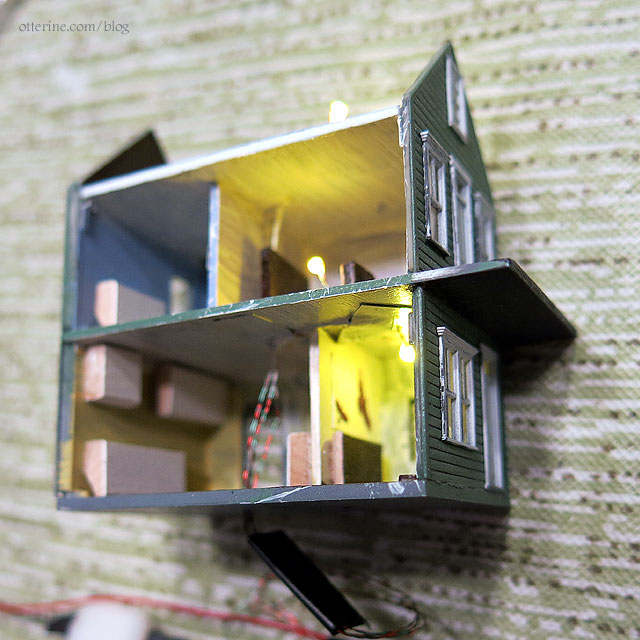
Since I would be adding LED lighting, I chose to enclose my tiny house. Once I had the lights in place and tested the look, I realized I needed to add paper shades to the windows or I would have to finish the interior. It’s rather amazing how much you can see through the tiny windows.
I painted the interior very roughly with acrylic paints and added some scraps of wood to represent furniture. The colors and shapes add dimension in reflected hues and shadows behind the thin window shades, some of which have a small gap at the bottom to allow you to almost peek inside. I even added some bird artwork on the foyer wall. You can discern it with the naked eye, but the camera doesn’t capture it well.
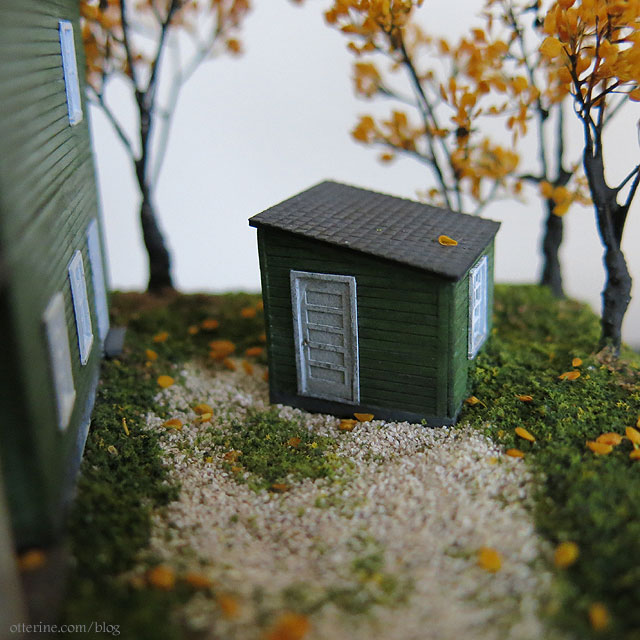
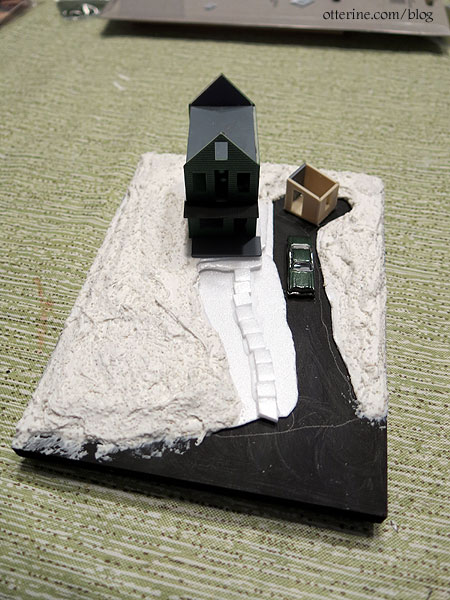
Since I had more than enough parts from the Reese Street kit, I made a matching shed.
The base is a scrap of mdf with feet added so I could add a battery and switch underneath. I made a box from strip wood to disguise the battery, switch and excess wiring.
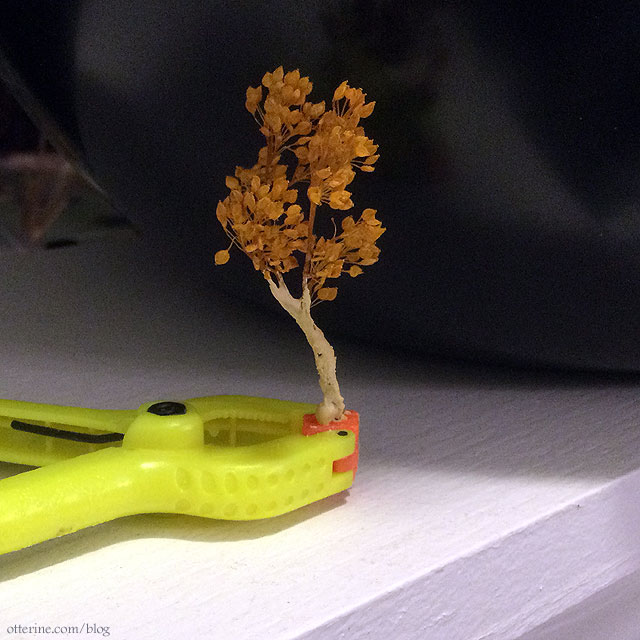
The trees are made using candytuft from Scenery Solutions. These are the same process I use for my large trees, using Durham’s Water Putty to build the trunks.
The landscaping was built up using thin sheets of styrofoam, including a stone walkway from the porch to the gravel driveway and road. Stucco patch applied unevenly over the styrofoam adds dimension to the landscape.
I used Woodland Scenics foliage, ballast and gravel, held in place by their Scenic Cement. I sprinkled some loose candytuft leaves on the ground as well.
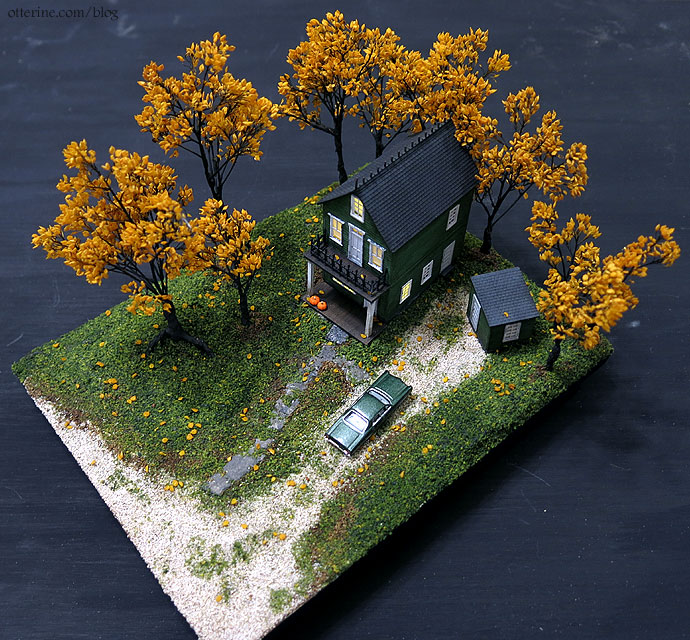
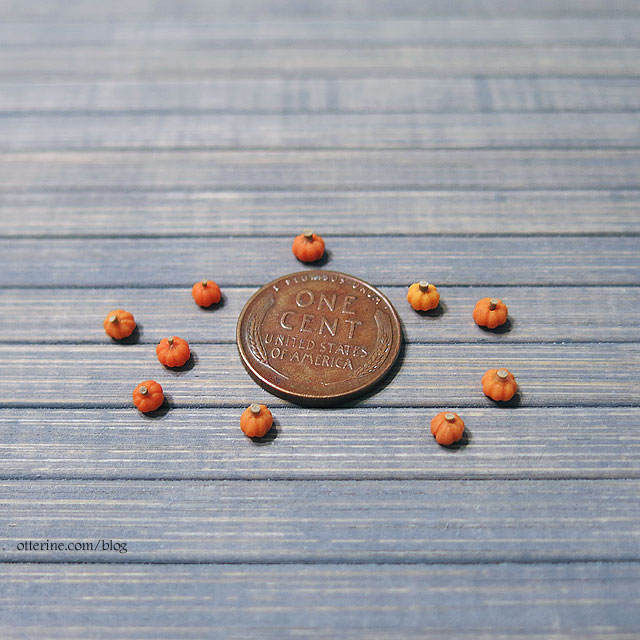
The tiny pumpkins were made by Kyle Lefort.
The car is a 1967 Ford Galaxie Custom 500 by Classic Metal Works. I ran across this when I was seeking small autos for the A-frame. I didn’t know then why I would need a Batmobile for the A-frame, but now I know it was meant to live at Sleepy Hollow.
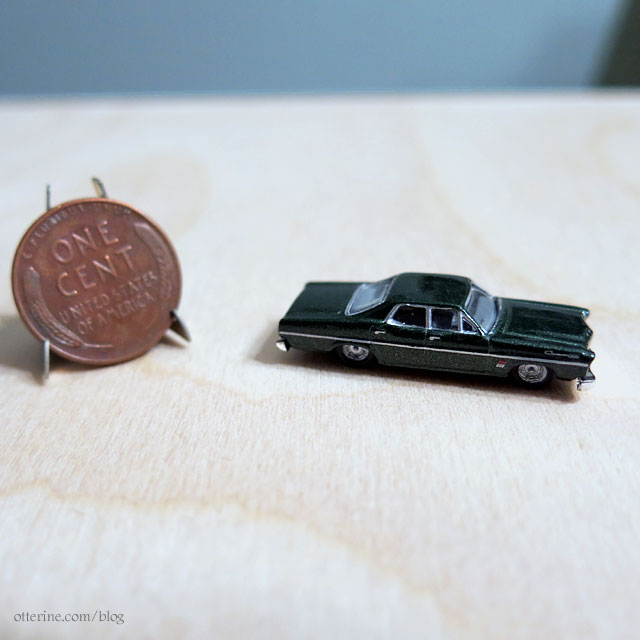
And, now to put the size in perspective….
Happy Halloween, everyone! :D
Categories: Micro Scale Models
November 5, 2022 | 0 commentsCat mummies
Many moons ago, I bought a cat mummy kit from L Delaney. One thing I didn’t realize about the kit was that it contained air dry clay. It was hard as a rock, so I used Sculpey terracotta color polymer clay since I have a lot of it and you paint the mummies anyway. It’s also soft and easy to work with.
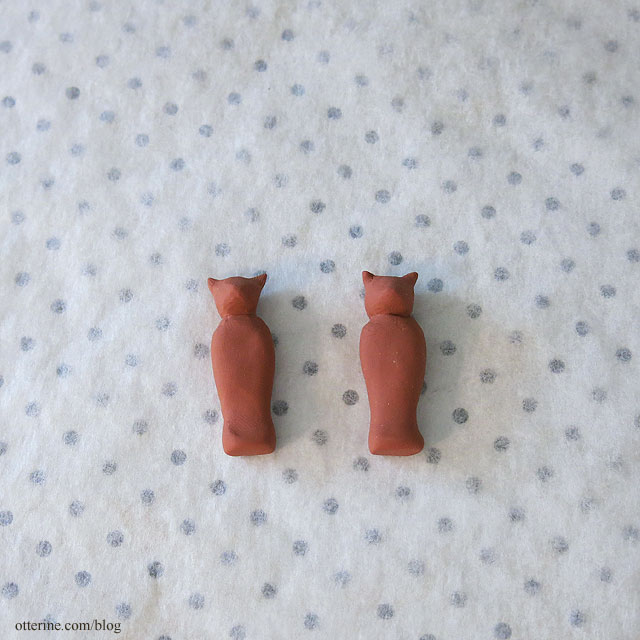
The paint included was also dry but I was able to reconstitute it with water. I made a swatch of it, so I could mix more of a similar color in the future. The kit comes with a lot of paper to use as mummy wrap, and you use 1/16″ wide strips. I could make a lot of mummies, but I started with a pair hoping to get at least one good one.
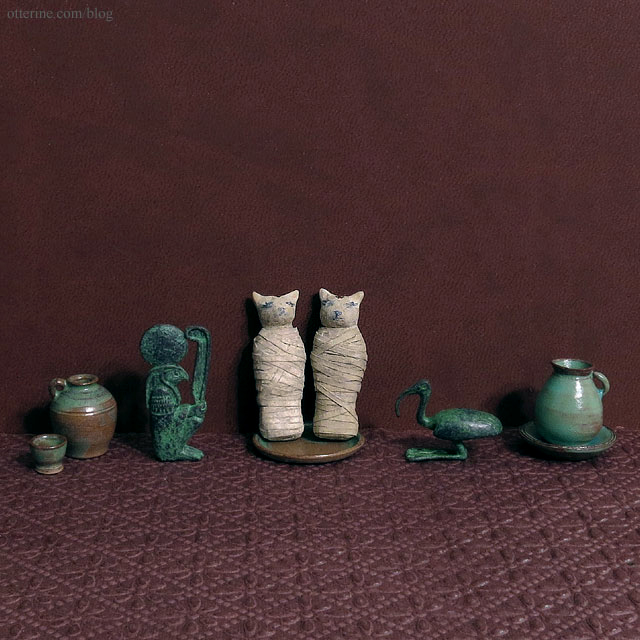
I ended up with two that complement one another well, don’t you think? :D
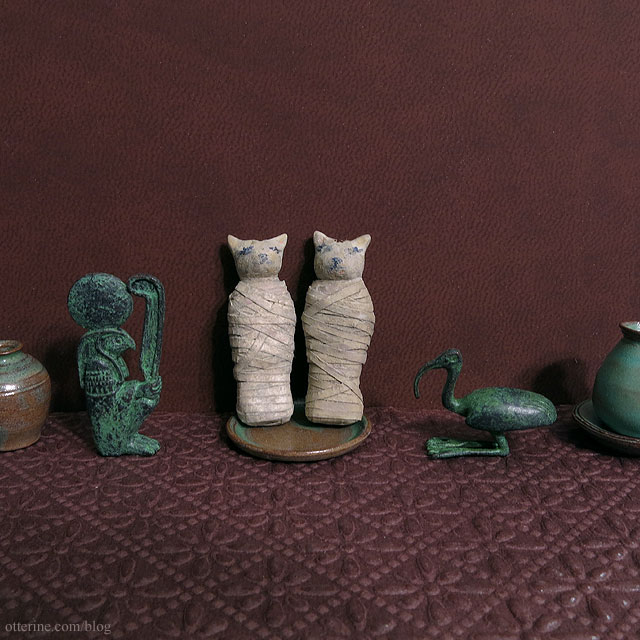
Ra and ibis statues by Neil Carter; ceramics by Carberlin Minis.
Categories: Animals and birds, Miniatures, Polymer clay
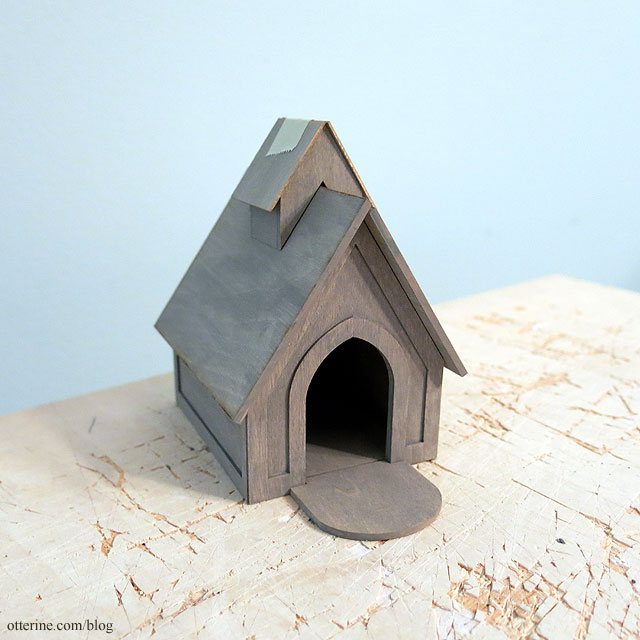
July 2, 2022 | 0 commentsA mini doghouse, part 2
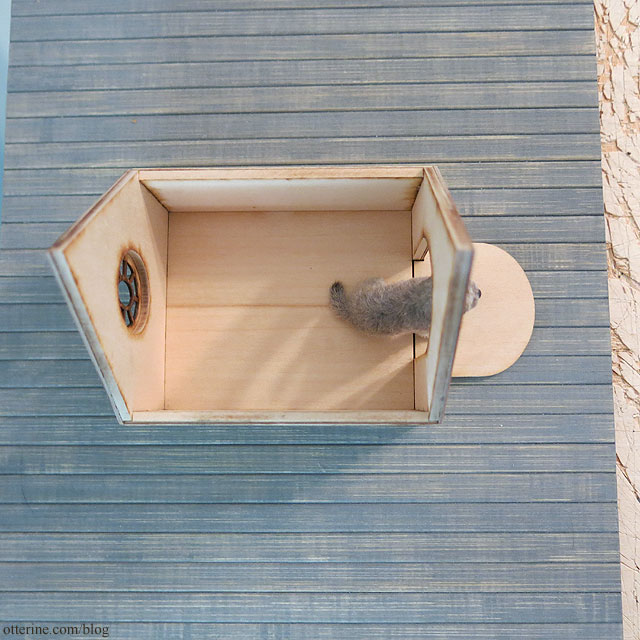
Continuing on the mini doghouse for Gus. There were no shingles in my kit, though they are mentioned in the instructions. Maybe I took them out to keep them from getting wrinkled, which seems like something I’d do, but I have no earthly idea where they would be. It was no worry since I had some suitable shingles in my stash of supplies. These are half scale speed shingles by Greenleaf.

Considering the door is small, I wanted to see if I could keep the roof separate to access the interior more easily. A few extra steps, but I think it’s just better in the long run.
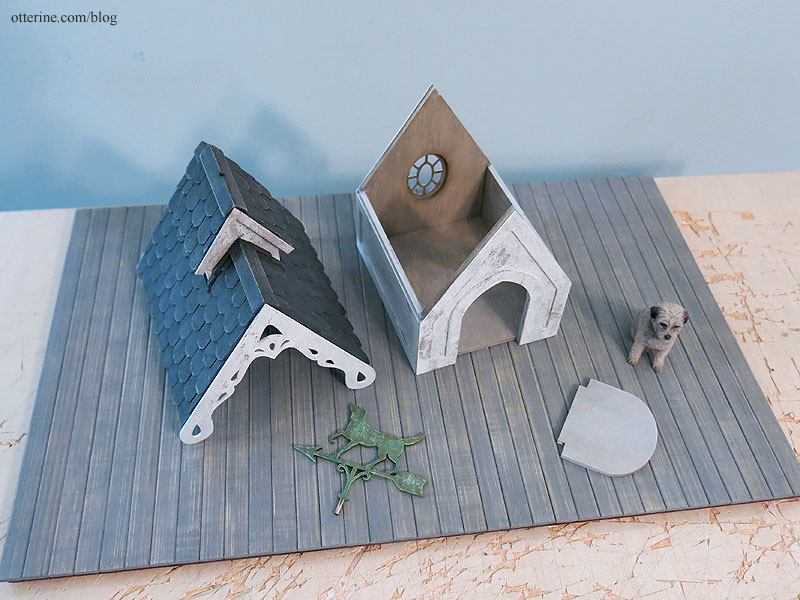
There’s an added beam inside to keep the roof from slipping out of place.
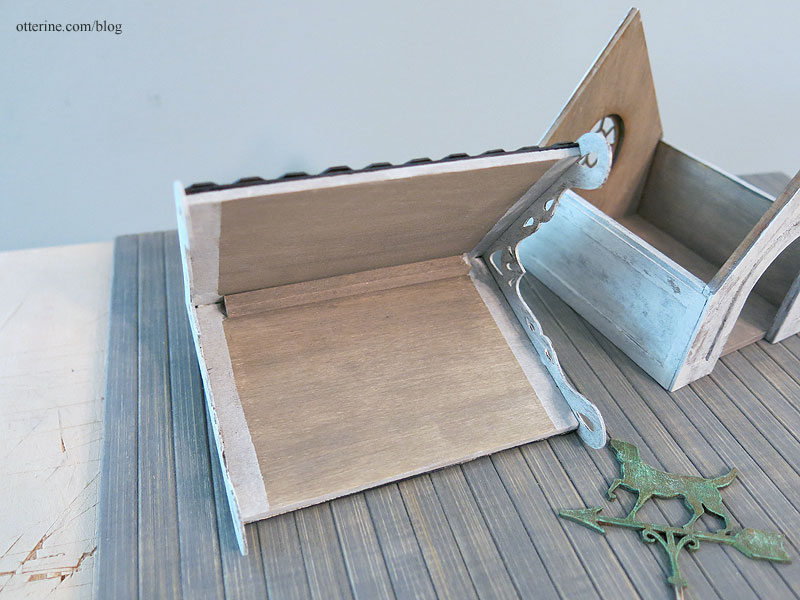
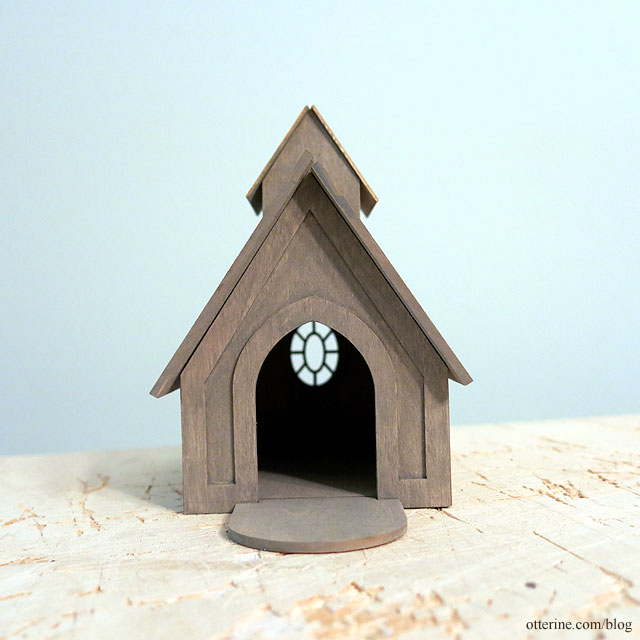
I painted the shingles a mix of black, brown and grey to start and then added some grey washes. For the house, I used crackle finish and off-white paint. The crackle finish was old, so it didn’t provide pronounced crackling, but that seems to work better for a smaller structure.
I still ended up with a nice aged finish.
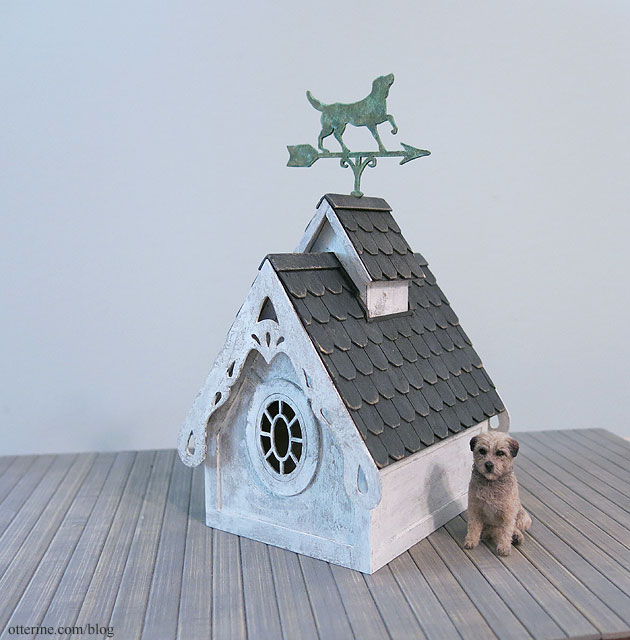
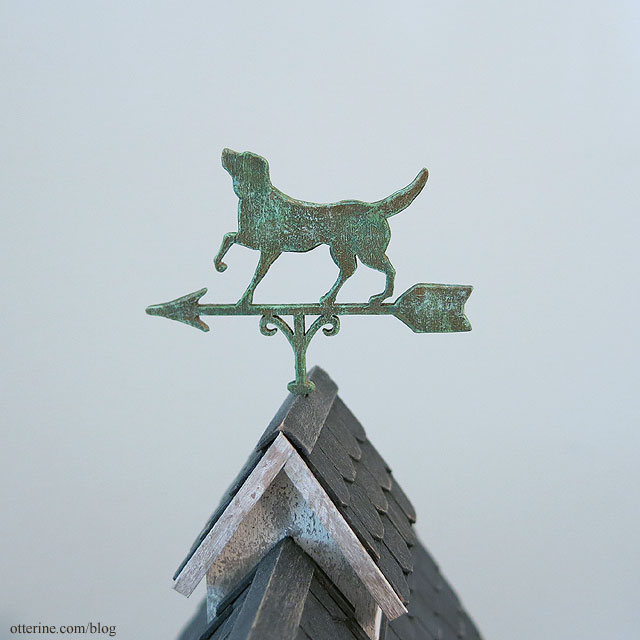
For the cupola, I added more trims to make it seem more realistic and more rain resistant. I painted the included weather vane to look like aged copper. It’s thin wood, so I worry about its longevity. I left it unglued for ease of removal in case I need to pack away the house or choose to replace it.
All that’s needed is a warm, comfy bed and some toys. :D
Categories: Animals and birds, Once Upon A Porch
June 26, 2022 | 0 commentsA mini doghouse, part 1
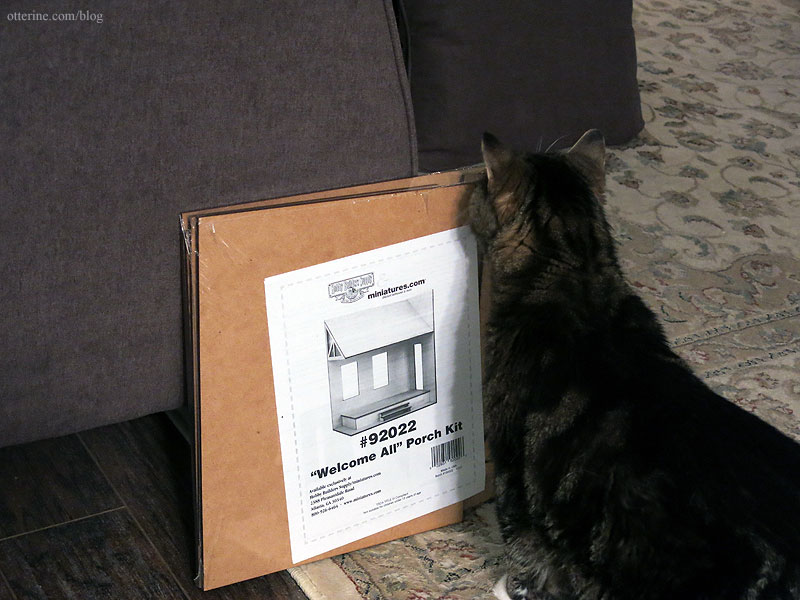
I’ve had this kit in my stash for some time now: Miss Lydia Pickett and her dog house.
It comes with a resin dog for you to paint, but Gus seems to have his eye on the residence. :D
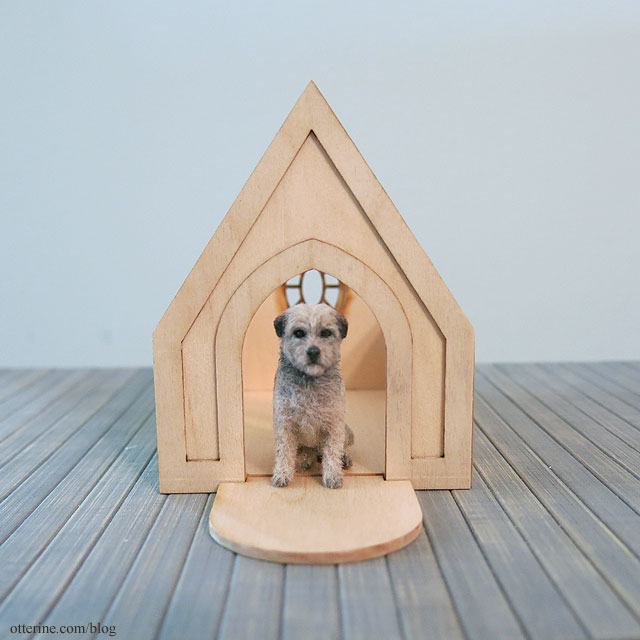
It’s a rather large house for Gus, but that just leaves room for more stuff inside.
It’s very fancy, and I plan to keep the original details for the most part.
As for the finish, I wanted a more aged look. I started with a wash of silver grey.
More to come….
Categories: Animals and birds, Once Upon A Porch
June 23, 2022 | 0 comments


NOTE: All content on otterine.com is copyrighted and may not be reproduced in part or in whole. It takes a lot of time and effort to write and photograph for my blog. Please ask permission before reproducing any of my content. Please click for copyright notice and Pinterest use.


