The Artist’s Studio – The Deck, part 8
Continuing work on The Deck. I completed Leaf 3 with its winding center vein.

Leaf 3 sits on top of the main deck and the two side leaves. I tried three different angles to see what looked best.


I liked this last layout the best, but before I could glue the top leaf to the main assembly I needed to address the stem.

This stem is partial since Leaf 3 will cover the front area and I didn’t want to cut more boards than necessary.

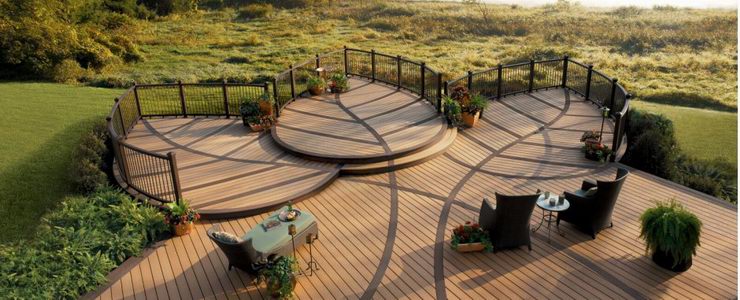
Here’s the original from Trex as a reminder.

I then glued Leaf 3 in place and finished up the walnut trim around the main and side decks.

I used the two scraps from the leaf inset cutouts to make two matching steps up to the side deck.

I cut posts to support the leaves. I originally had these closer to the tips but moved them back once I started planning the landscaping. They will still support the leaves, perhaps more readily in these positions, but mostly stay out of sight.

The entire deck will remain removable.

The side deck is one piece, and it slides forward until its interior trim abuts the front opening trim. For the front leaf deck , the trim by the front opening and the trim by the side deck keep it locked in place.

Who’s that under The Deck? It’s Woodrow!!! :D

Hooray! The Deck is done! :D
Categories: The Artist's Studio
April 28, 2013 | 0 commentsThe Artist’s Studio – The Deck, part 7
Continuing work on The Deck. I finished the second leaf in the same manner as the first leaf.

Before going further, I needed to see if I could replicate one part of the deck shown in the original inspiration piece. For reference, here is the beautiful deck from Trex.

One of the side leaves is inset and on the same plane as the main deck. I took a scrap of card from the recycling bin and traced Leaf 1.

I then put a layer of masking tape over the main deck to keep the wood from splitting and the boards from lifting during the cutting process. I traced the outline onto the taped section.

I then cut the main deck using the scroll saw. This was a one-shot deal. If it didn’t work, I’d have to reconstruct this part of the straight deck.

Moment of truth right before fitting…

It worked!!! :D

Having the leaf inset makes for easier furniture placement, too.

Since my deck is a smaller version of the original, I decided to inset Leaf 2 on the other side. This time, I cut it in deeper than Leaf 1.
Another feature of the original deck is that the leaves have stems that continue into the main deck. I cut pieces of walnut for the stems and marked them on the main deck. I removed the pieces from the deck and cut them to fit. I glued the pieces back in place with the walnut stems.

Marvelous! :D

On the underside, I had to attach the two leaves to the main deck. I opted for lengths of skinny sticks. These won’t be readily seen, even when viewing the under structure.

And, just so you don’t think my vacation week has been all work and no play, here’s a funny picture of Jasper. He’s sleeping in a pose I like to call The Frozen Shrimp. Haaaaaaaaa! :D

shrimp image from Wikipedia Categories: The Artist's Studio
April 27, 2013 | 0 commentsThe Artist’s Studio – Hummingbird shower part 5
For the final hummingbird tile mural, I cut around the drawing printout, leaving some bleed area around the edges. I used spray adhesive to mount the paper to mat board. Since I needed a close fit around the bottom edge where the shower base would sit, I used blue painter’s tape to mask off the bottom edge.

I then used the Triple Thick Gloss Glaze to seal the image. Once dry (two days later), I scored the tile lines with a stylus. Before removing the blue tape, I scored along the top of the tape to make sure it didn’t pull the glaze finish away from the tiles.

I cut along the center line and then the outer lines, leaving extra along the bottom. Oops…photographed them in the wrong order.

I propped the boards in place with the shower base to see how it looked and then glued them in place.

It’s hard to see the three dimensional aspect in the photos, but it looks just like high gloss tile in person. Hooray!

Next up, shower surround.
Categories: The Artist's Studio
April 26, 2013 | 0 commentsThe Artist’s Studio – The Deck, part 6
I taped the outer walnut boards and the center vein onto the frame support to mark where the support beams should end under the surface boards.

I cut the frame using the scroll saw, cutting in slightly to allow room for a veneer finish around the outside.


The local Home Depot had only the iron-on pre-glued veneer strips, and I didn’t want to wait to order online, so I used birch veneer. I had some leftover from previous projects. I cut a strip 1/4″ wide and glued it around the outer edge. It doesn’t hit every point, but that’s fine with me. It creates a natural, smooth finish around the outer edge and hides the framework (unless viewed from underneath).

After staining the veneer with Minwax Plantation Walnut, I began gluing the boards to the framework, using wood glue supplemented with super glue gel. Once I had the walnut pieces glued in place along the outer edge and center, I pressed the assembly flat with magazines and waited for the glue to dry.

Once the glue set on leaf 1, I started adding the cross boards using wood glue (and super glue gel only as needed). In some areas, the frame seems to show more than I would like but in the end it shouldn’t be as obvious.

By having the copy of the drawing underneath, I could see where to apply the glue so it wouldn’t seep out.

One leaf assembly done! :D

Categories: The Artist's Studio
April 25, 2013 | 0 commentsThe Artist’s Studio – The Deck, part 5
I finished up the second leaf for The Deck.

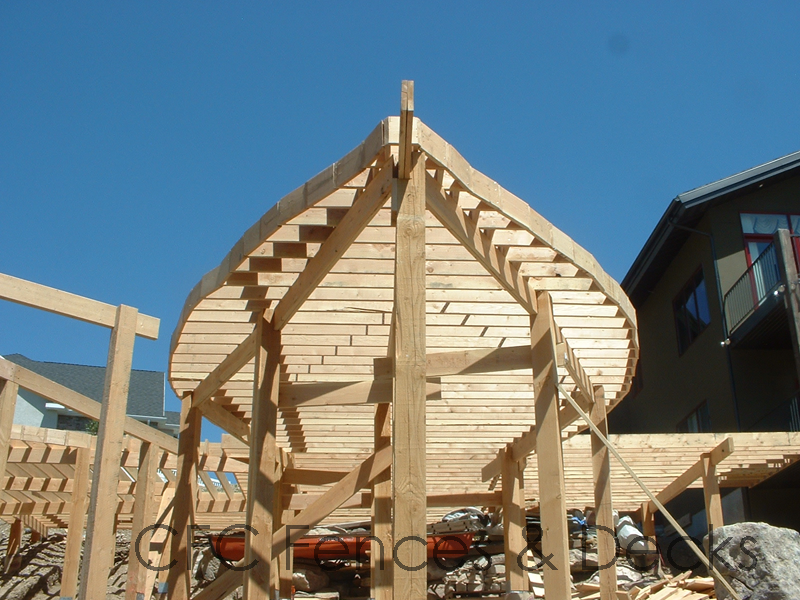
The third leaf had the most complicated design of the three, so I left it for last. Once the second leaf was complete, I went back to the first leaf and re-cut some of the boards for a better fit. Next was figuring out the framework. As a reminder, here is the frame support system for the real life deck.

image from CFC Fences & Decks I mainly needed a frame that would attach to each surface board and be stable enough to be elevated over the front of the landscape board. Using another printout of the first leaf, I began building the frame with a center beam. From there, I planned to cut skinny sticks (to save on cost) to create cross beams every half inch. This should create multiple glue points for each board. Here is my mockup to determine layout.

I notched the center beam and cross boards for a solid fit, using glue to reinforce the joins.


I used bass wood for the few areas where the skinny sticks were too short and left the ends long for now.

To add stability on the outer edge, I added more skinny sticks. These are not the cleanest cuts I’ve ever made, but you will see these only as the underneath structure of the deck.

I cut these notches using my handheld Dremel since they were angled and the main spine was glued together.

Next up…finishing the third leaf surface boards and building the basic frames for leaf 2 and leaf 3.
Categories: The Artist's Studio
April 24, 2013 | 0 comments
NOTE: All content on otterine.com is copyrighted and may not be reproduced in part or in whole. It takes a lot of time and effort to write and photograph for my blog. Please ask permission before reproducing any of my content. Please click for copyright notice and Pinterest use.


