
There’s a lovely space in the Three Gables House that is perfect for a built-in dovecote (just ask Sheila). I did some scouting around online, and found a great site for inspiration and instruction. I started by measuring the entire space available. The popholes need to be scaled from 4″ by 6″ (approximately 21/64″ x 1/2″ in 1:12 scale) and roughly 1/2″ apart (in scale). This gives me room for nine birds. I drew this template in Word.

Originally, I was going to cut a triangle and then cut the popholes, but I wasn’t getting good results. So, I re-engineered my approach. I cut 24/32″ wide strips of 3/32″ thick basswood and cut them to fit. I used strips of 1/16″ thick basswood to make each floor’s landing platforms. It also works well as a design element separating the levels. This might seem like a bit of over-engineering, but it just seemed the best way to get cleaner cuts without pulling my hair out.

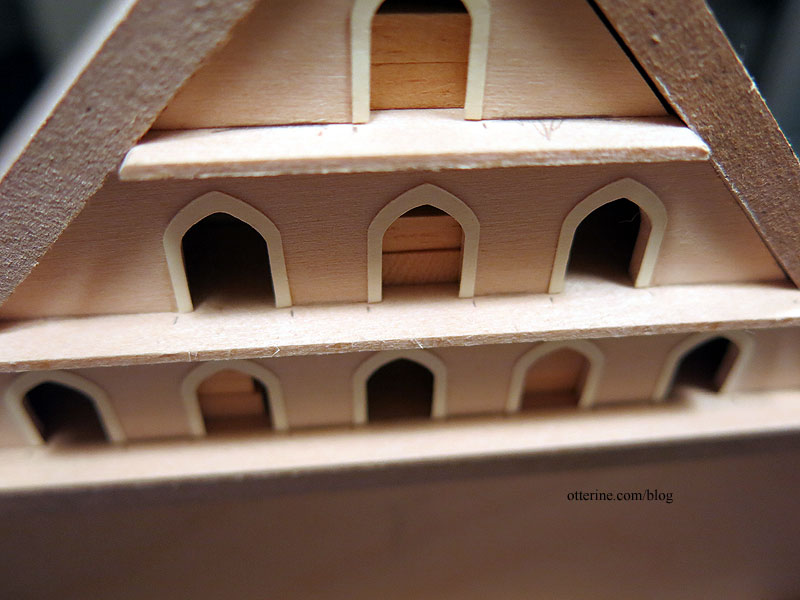
I marked then cut one pophole with my Proxxon scroll saw. I used that pophole as a template for the rest.

I didn’t get as good a result as I wanted. The holes varied too much for my liking. Yes, I know…time for a laser cutter. I edited an arch in Illustrator, imported it into Cricut Design Space and then used my Cricut to cut out cardstock trim for the popholes.

Now the holes are more uniform, and fancy to boot! :D

I marked the landing platform locations onto the floor boards and then cut those. I could have left the floors intact all the way across, but I wanted some pizzazz. :D
Time for construction. You can see I sanded the platform corners into curves.

I added vertical insert boards to make the interior compartments, but mainly for stability.

The upper compartment has small braces for the front wall.

I used spackling to even out any gaps.

I had to trim and slide the middle section over to line up the sections properly, but the final trims on the outer edges will disguise these issues.


