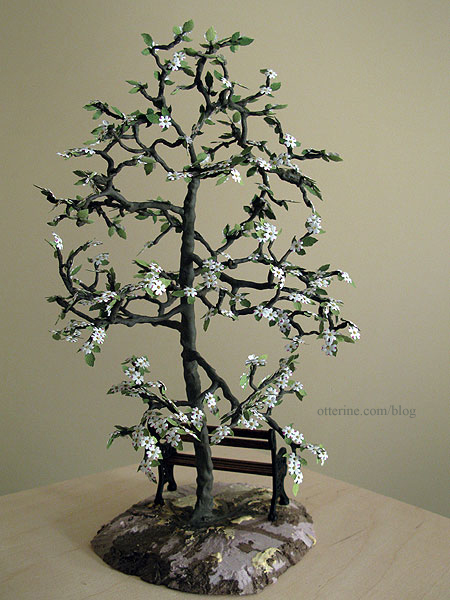
I am following the same DVD tutorial as I did for the Heritage tree: Master Miniaturists:
Landscaping Primer with Diane Myrick. This tree, however, is fuller, shorter and much less
knobby. Here’s the tree after adding the water putty and paint washes. The tree stands just under 11″ tall.

Who’s that there? Looks like Grahame the badger has wandered over. :D

Instead of using the foliage techniques used in the DVD tutorial, I wanted to use a technique to make a dogwood tree that would allow for close-up photos. This is what the flowers look like on a real dogwood.

I decided to use scrapbooking punches to make flowers and leaves. I have just under 100 branch tips on my tree, so I punched out 400 white flowers using the mini Hydrangea punch by Punch Bunch and colored each of them individually with markers. I ended up dumping about 20 or so for bad marker wielding. :D
I had two leaf choices – both with multiple leaves from each punch. This is the small ash punch by Punch Bunch with flowers.

This is the small tri leaf punch by Punch Bunch with flowers.

Both leaf sprigs are 5/8″ high, but the tri leaf sprig seems to work better overall in scale and shape. I will shape these to add vein texture and then glue the flowers and leaf sprigs to the tree skeleton. I’m also planning to add some dimension to the flower centers.

I knew I needed lighter color leaves, but none of my markers were the right shade of green. I ended up painting the strips of paper which resulted in a slight variation of greens. I think that’s okay considering it might add to the dimensionality instead of having a uniform green as the backdrop for the flowers.
Here they are…165 leaf sprigs. I’m not sure if I will need more flowers and leaves, but it seemed a good place to start.

I colored each stem with a brown marker. With the green paint base color, it turned the stems greyish green…perfect for matching the trunk. I then added veins to each leaf on the sprigs with a ball stylus. I had a few leaf casualties, but I kept the sprigs and the loose leaves.

The middle of a dogwood flower is actually a cluster of smaller flowers. To add dimension to mimic these clusters, I glued landscaping material by Woodland Scenics to the centers of my shaped flowers.


I glued flowers to a leaf sprig and then glued that assembly to the tree branch using Aleene’s Fast Grab. I usually use Aleene’s Quick Dry for just about everything, but this is a thicker glue that does what it says…it grabs fast! :D


Okay…164 more to go!

I finished putting on as many leaves and flowers on the dogwood tree as I thought looked good. I have a bunch left over, which is fine since this tree may need touching up from time to time and I won’t have to start the process of making new leaves and flowers from scratch.

The bench is by Phoenix Models. The “kit” comes with two white metal bench ends that you can paint, and you supply the wood in whatever length you wish. It’s a perfect solution when you need a completely custom size bench. It’s a sturdy little piece once you manage to wrangle all the wood ends into place.
I used some leftover Dura-Craft trim wood for the seat slats and skinny sticks for the back rest, stained with Minwax English Chestnut. I cut the boards 3.25″ in length, so the seat ended up at 3″ wide — a perfect loveseat under a pretty tree. :D

From the back, the tree looks a little fuller since there are more branches on this side. I had made it sparse on the front since I planned to have a bench there from the beginning.

It looks fullest from an aerial view (and in person since you can walk around it at the right level).

Overall, I love the way it turned out. It’s full but still allows you to see the building behind it.


