

Ye Olde Taxidermist
Introducing Ye Olde Taxidermist, my entry in the HBS Creatin’ Contest 2016.
——–
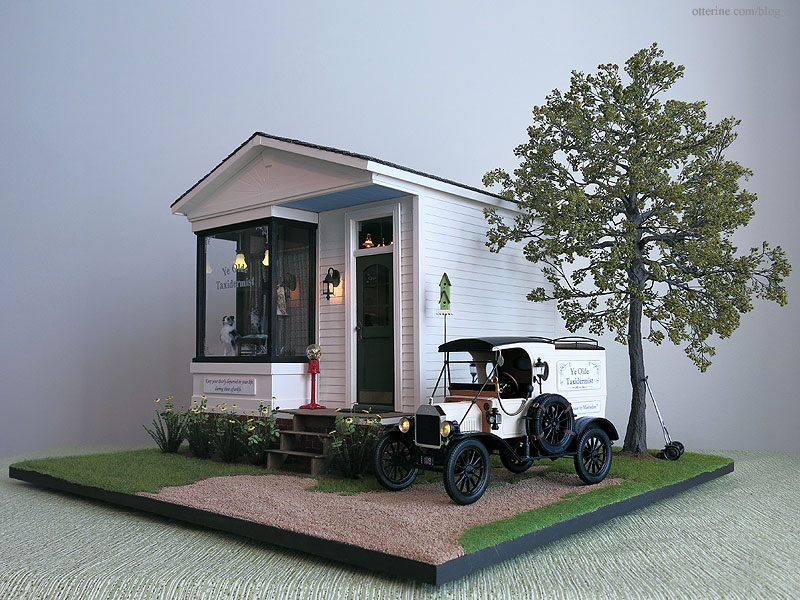
Keep your dearly departed in your life during their afterlife. That is the heartfelt mission of Ye Olde Taxidermist, though the shop also caters to naturalists by preserving fine animal and bird specimens for posterity.
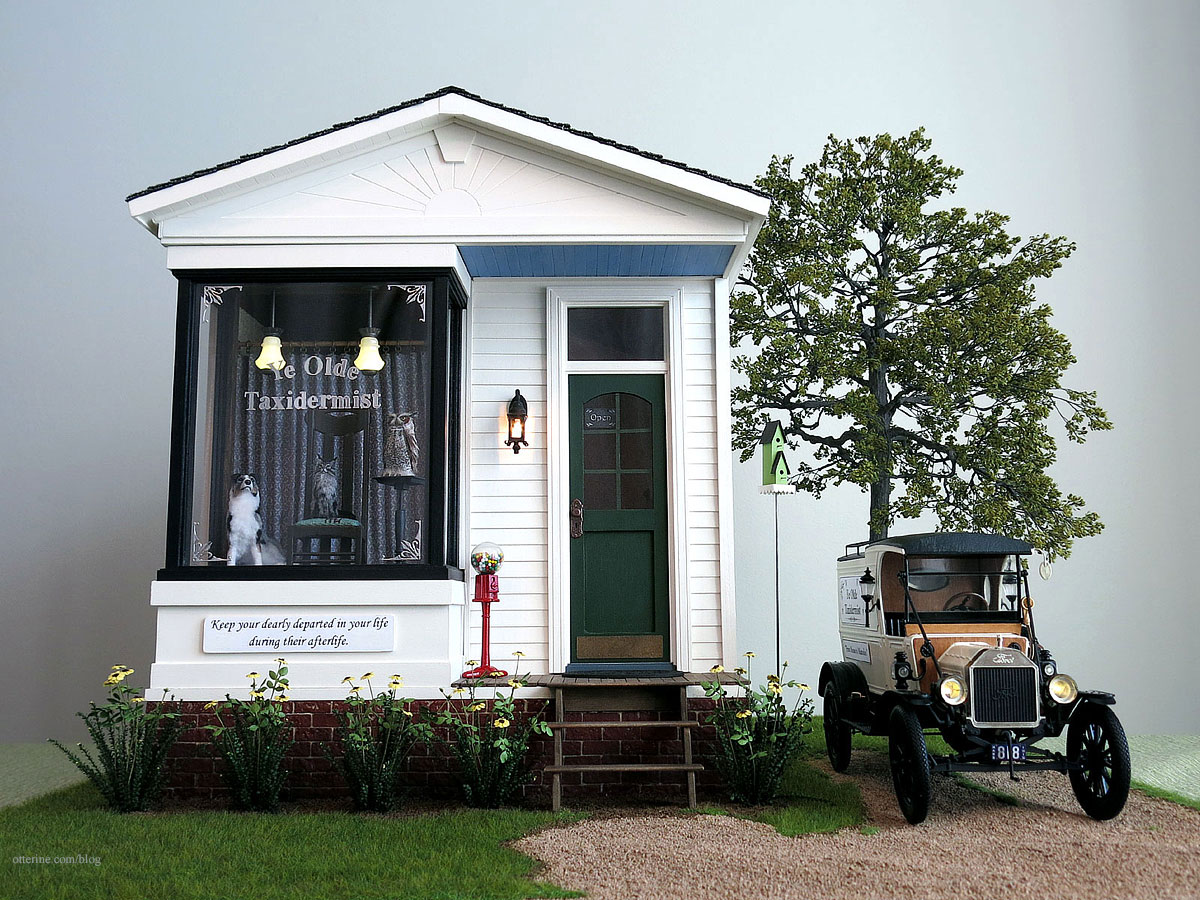
Ye Olde Taxidermist makes house, or farm, calls in a stylish Model T Van.
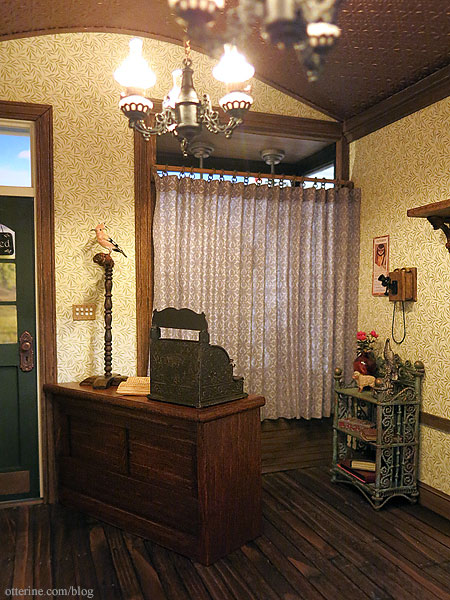
The shop even has a telephone, if you are so inclined.
No animals were harmed in the making of this build. In fact, they all had great fun seeing who could stay still the longest. Roland kept making his holy crap, I think I’ve been stuffed jokes and making this face, which caused an onslaught of giggling among the rest. Silly animals! :D
——–
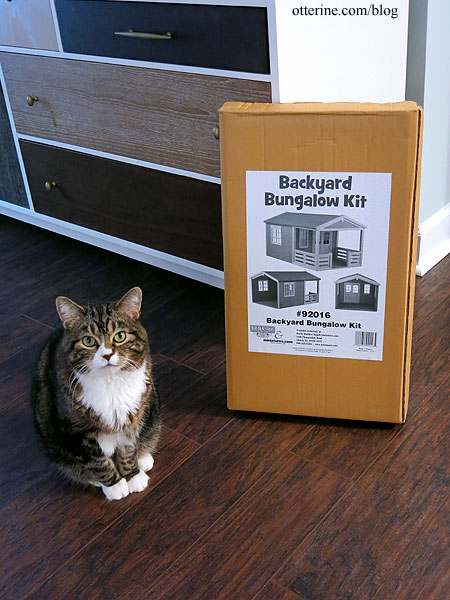
Ye Olde Taxidermist started as the Backyard Bungalow kit.
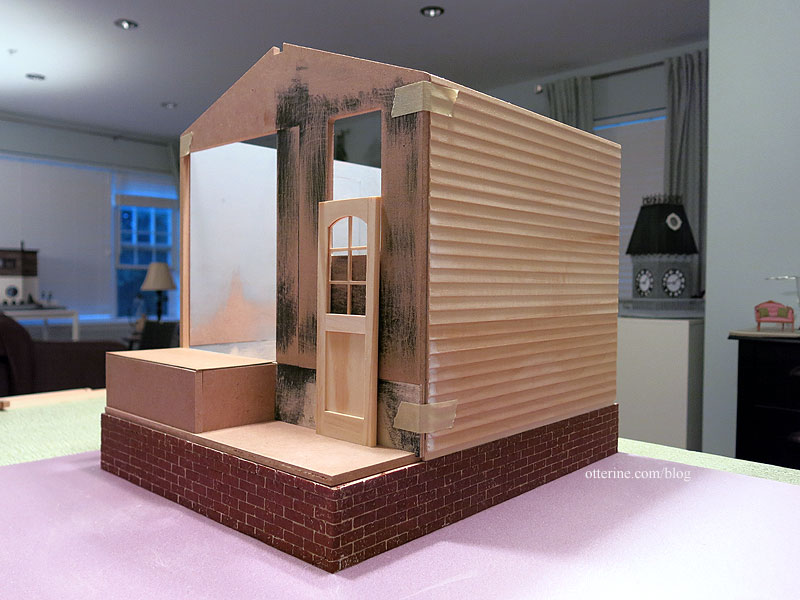
I added two inches to the foundation and cut down the depth of the front porch. The foundation has egg carton brickwork. I eliminated the side windows to save on wall space and covered the exterior with clapboard siding sheets.
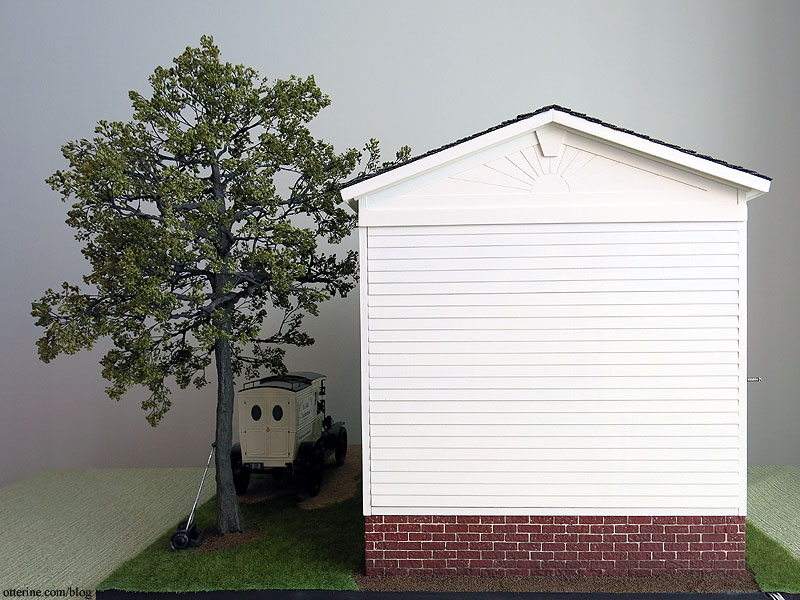
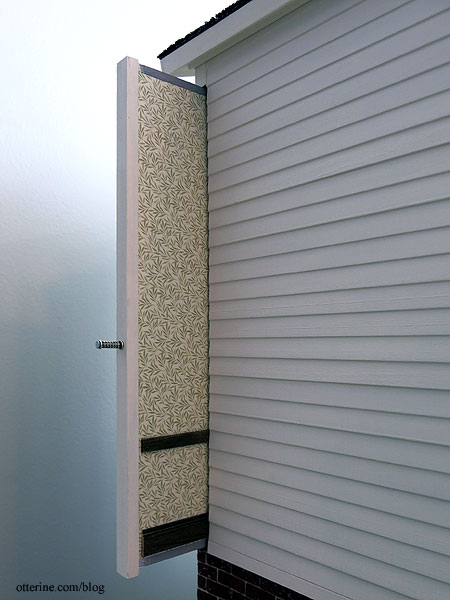
I added a removable back wall that is actually done in two pieces. The back sunburst gable is glued in place, but the lower wall slides out as needed. The exterior color is Warm White by Americana.
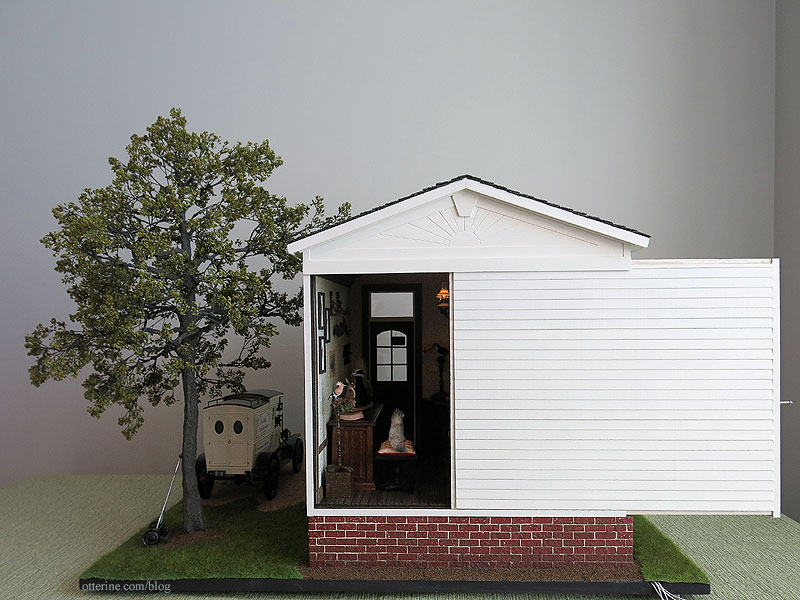
It has interior trim to match the side walls, so it looks seamless when viewed from inside. There’s a jewelry finding nailed to the side as a knob.
Suppose I should have put some art on that back wall. :D
I changed the kit’s double door to a single door with a transom window. The door color is Plantation Pine by Americana, and the frame is Warm White, also by Americana. I used Opryland door hardware and made the kickplates from heavy paper. I painted the paper antique bronze and added nail detailing. The door lamp is a black coach wall sconce.
The oval doormat is from Arjen Spinhoven Miniaturen. The porch soffit and floor boards are skinny sticks, with the soffit painted French Blue by Folk Art. The gumball dispenser is from Hobby Lobby.
The display window showcases some of the dearly loved pets of the shop owner. Sherwood is by Michal Gvir, Isabeau is by Maya Schippl, and Grover is by tmd_art.
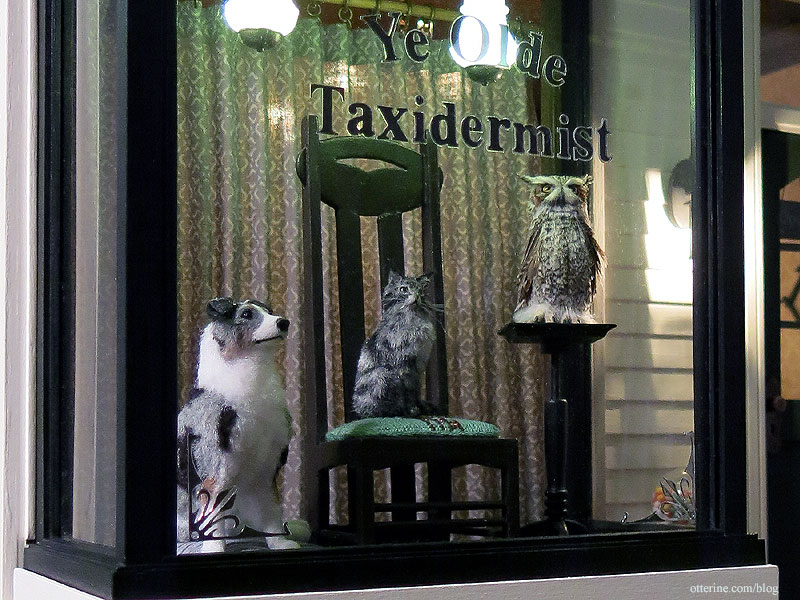
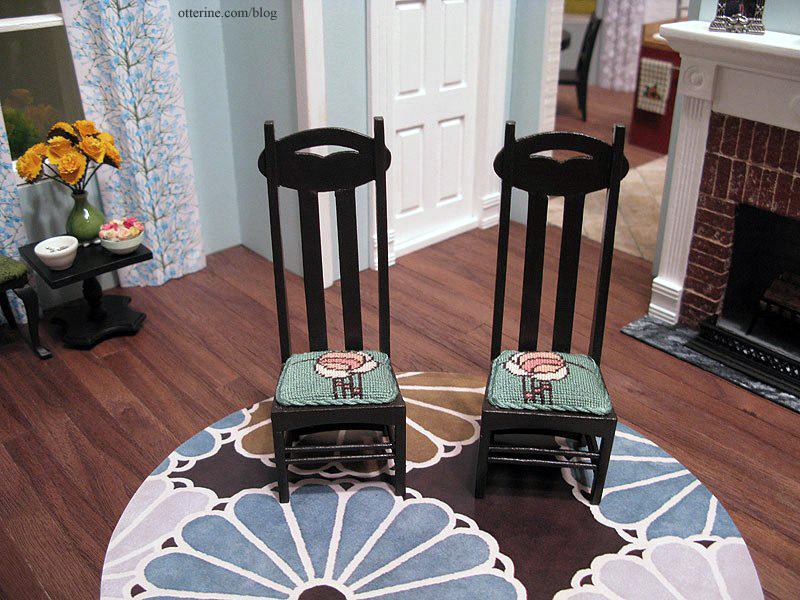
The Mackintosh chair features some of the first miniature needlework I stitched. I refinished the wood as well. I did research this chair to see if it would be good for a 1915 setting. Having been created in 1898-1899, it was already a bit dated. :D
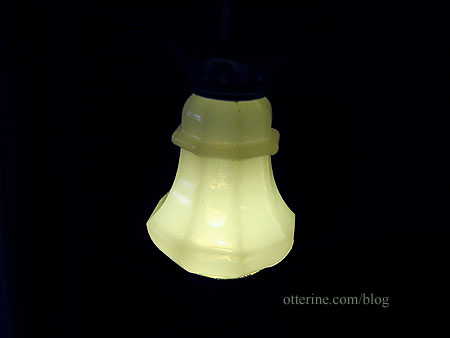
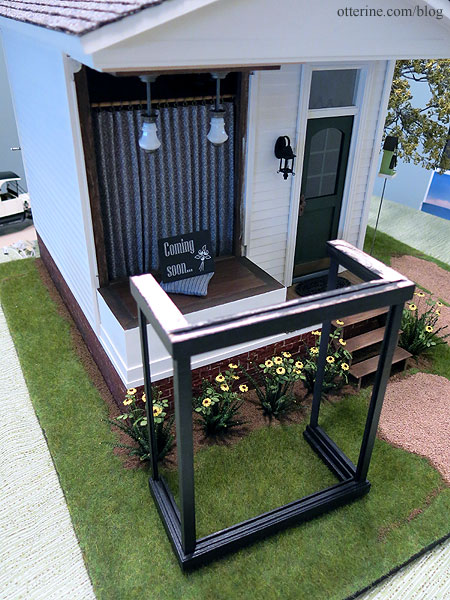
Grover’s stand was made using a candle stand kit by The House of Miniatures, with the height lowered just a bit. The window lights were made from Chrysolite kits (one from my stash, and one from Debora). I altered them from chain lights to post pendants with aluminum tubing. I also used 3mm LED bulbs from Evan Designs for longevity. They look like true bulbs as well. :]
The window unit and its base are removable for ease in changing the display. It would have been cumbersome to reach through the back of the building and set the display in reverse from behind. The window unit’s trim disguises the fact that it’s a separate assembly. I have the trim held on with museum putty.
The whole window assembly is built so I can remove the window plastic to replace it or just swap it out. At first I planned to slip the glass in through the top, hence the open slot. Now, the whole top trim is removable. I’ve also run one extra wire under the lower base just in case I ever want to add other lights to the window…or even create a Christmas display.
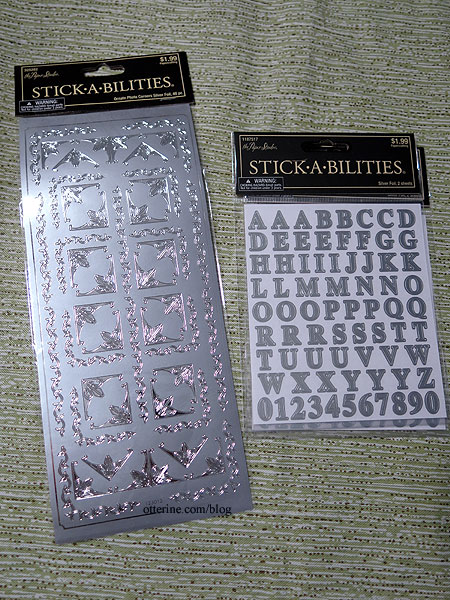
I used silver sticker letters and flourishes on the front pane.
I printed the sign on paper to help me place the silver letter stickers.
I like how this photo makes it look like a smaller scale build, like quarter scale.
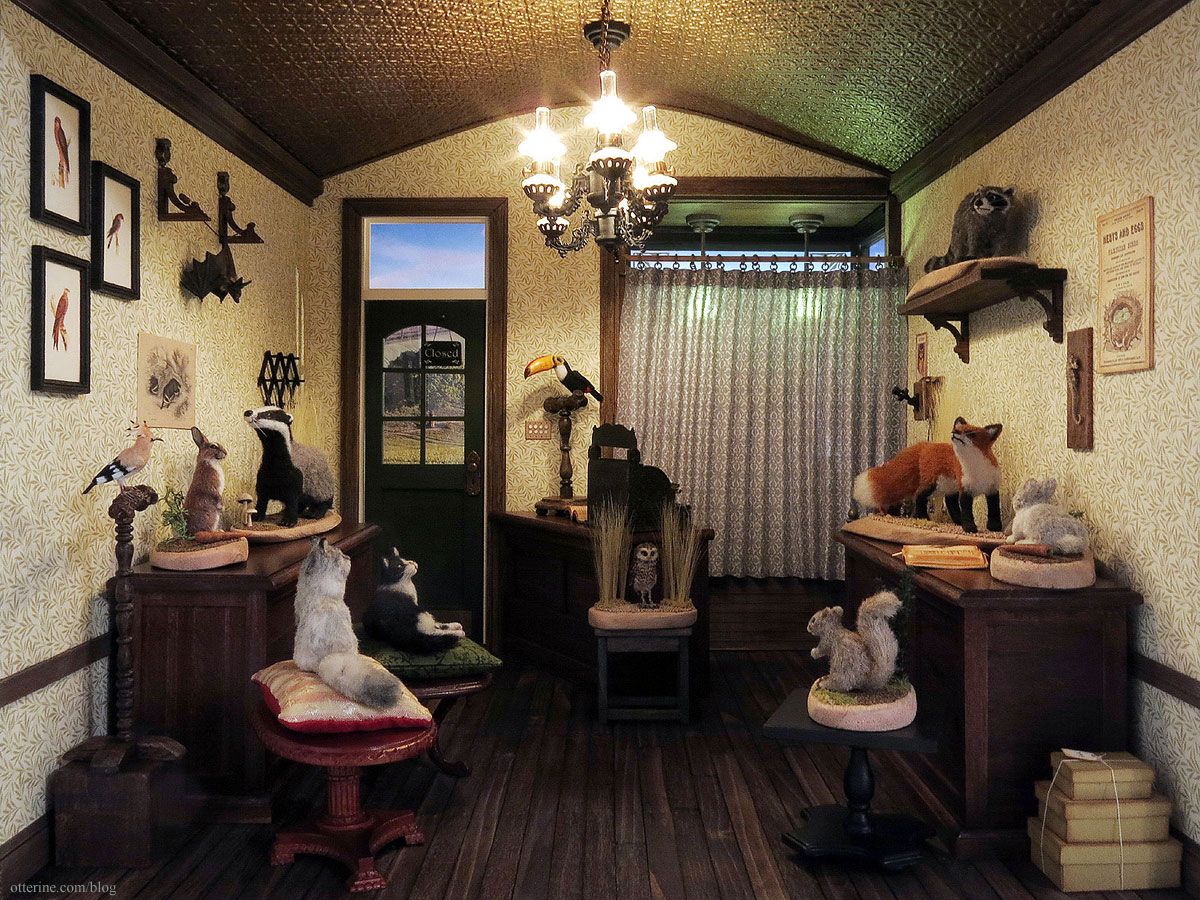
There’s a curtain separating the window from the main store interior. It is removable for cleaning or replacement as needed. The cash register was a gift from Barbara, though I did touch up the paint around the keys (a detail not seen after the effort). The ledger is from Looking Glass Miniature (the stack of string-tied boxes shown in other photos are also from here).
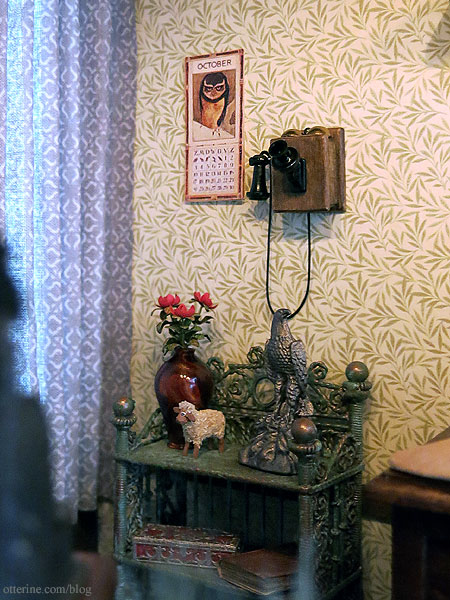
The wall calendar features the artwork of Theo van Hoytema. I edited the art to make an October 1915 calendar. The owl looks positively perturbed — too cute! I painted the copper plant stand with a delicate patina. The flowers and lamb are from Barb’s Corner; the eagle is from ABC Dolls & Miniatures. I made the griffin box from a kit by Lisa’s Little Things bought at one of the local shows.
I modified the Chrysnbon phone/clock/coat rack kit to make a smaller wall phone. I used the hook, receiver, mouthpiece and bells to make my own. I used scrap wood to make the housing and stained it medium brown. I painted the black parts with Testors semi-gloss black. I left off the name plate that many of these phones had since it would have been too small to be legible and would have detracted from the overall look.
The two large counters are from miniatures.com. I stained them Minwax English Chestnut and used a finishing technique to disguise any large grain or glue spots. The shorter counter by the door was made from a vintage kit found on eBay. I was able to cut the pieces into a custom angled counter that allowed better flow into the shop from the front door.
I made the reversible open/closed sign and painted a Chrysnbon coat rack. The umbrella is by FranMadeMinis. I used Brodnax Willow wallpaper and stained the interior trims.

I used three bird prints from A History of British Birds published in the 1850s by Rev. Francis Orpen Morris that I had made for The Newport many years back. They’ve been in storage for some time, so it’s nice to have a few displayed again.

For the rustic flooring, I used the leftovers from The Artist’s Studio flooring, various lengths of board Mike cut for me. I glued the individual boards directly to the mdf floor base using Elmer’s wood glue, supplemented as needed with dots of super glue gel. I sanded the boards with my Dremel Multi-Max oscillating tool, first using 60 grit paper followed by 120 grit paper. The end result was a smoother surface, but I left it a little uneven to keep the rustic beauty. I stained the floor with Minwax Dark Walnut. Since these were different types of wood, the stain didn’t mask the random coloration I liked so well. It just darkened the look overall. Dee-gorgeous! :D I had originally planned to sand this and apply another color as accent but I couldn’t touch this finish, though I did add nail detailing using an awl and paint.
The barrel ceiling ended up being more of a gentle curve, but I still love it. I used crown molding along the side walls as stops for a piece of mat board. It’s covered with textured scrapbook paper called Pressed Tiles – Brown, by The Paper Studio (purchased from Hobby Lobby). Love this paper! I painted it Liquitex Antique Bronze.

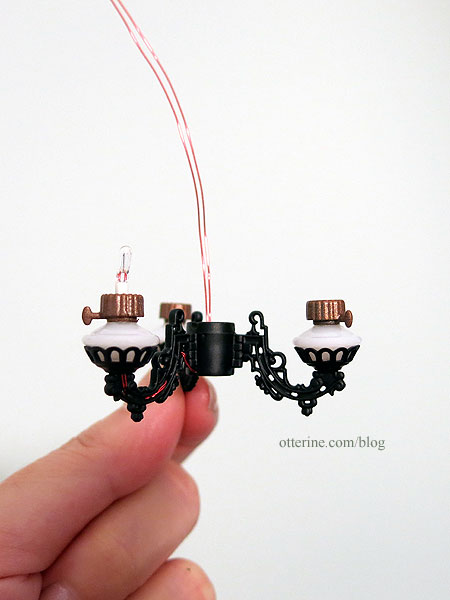
The three-light chandeliers were a test of wills. These were made from Chrysolite Heritage Chandelier kits given to me by Debora. I swapped out the included non-replaceable bulb lights for Cir-Kit Concepts candle sockets with varnished wires. The required splicing of six wires into two bundles of three, ending in one exit wire each, inside the main cone is not an easy task and you get one shot at it because you cut the wires so short. I had to scrap three sockets in one attempt. But, it all worked out in the end.
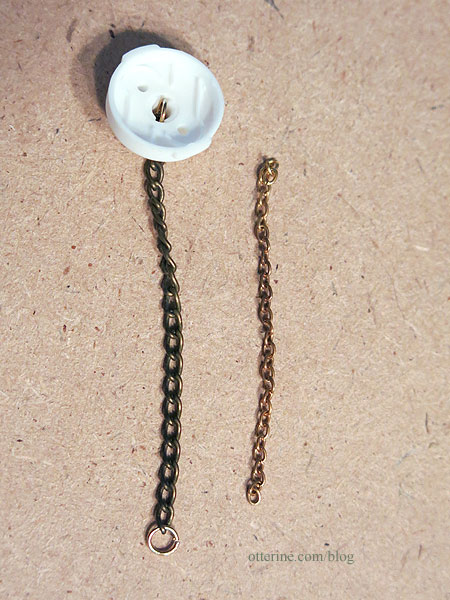
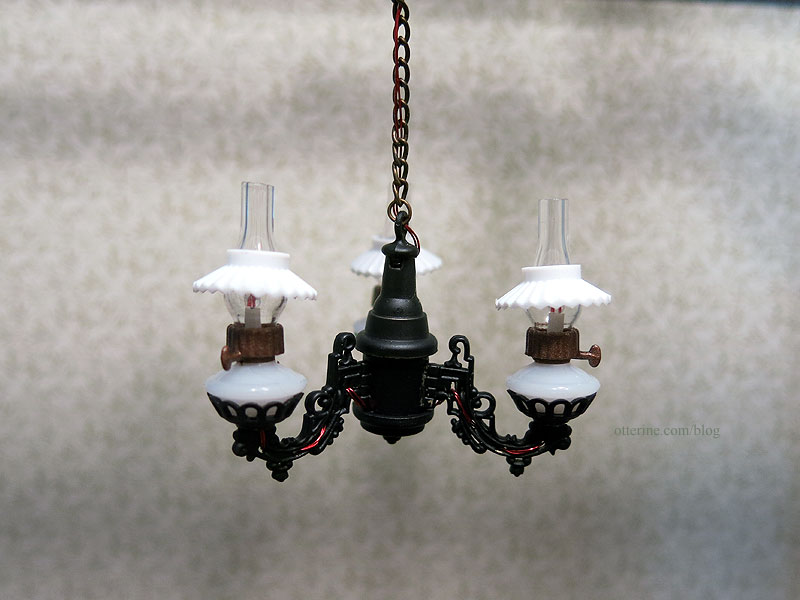
The chandeliers have bases that are glued to the ceiling. The fixtures have pieces that fit and twist into these brackets, so you can remove and pull them down as far as your wires will allow. This makes for easier servicing — no working in tight spaces. I used bronze acrylic paint to cover the red wires so they wouldn’t be as noticeable. I also changed out the included chain for heavier chain and used wax to hold the hurricanes and shades in place. They are fiddly but perfect for the space.

I made the light switch from polystyrene sheet and rod. Talk about fiddly and small. Those buttons are 1/16″ in diameter.
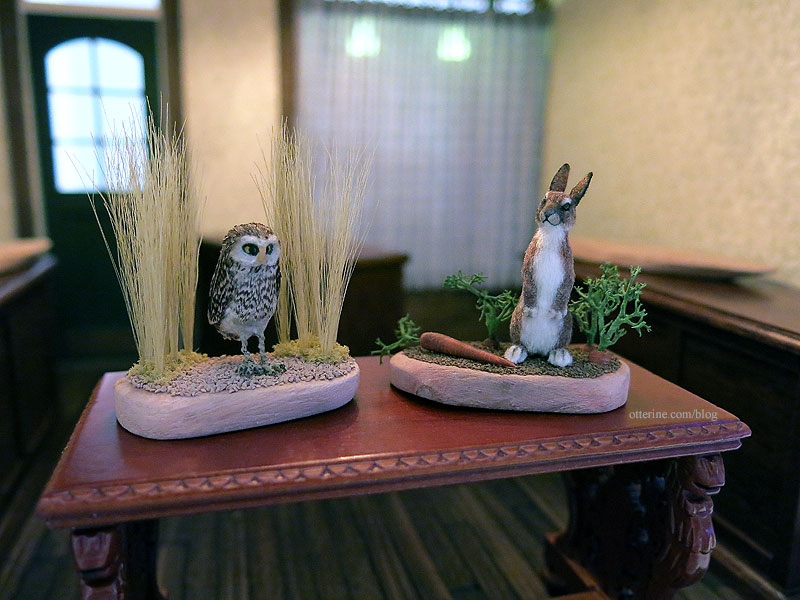
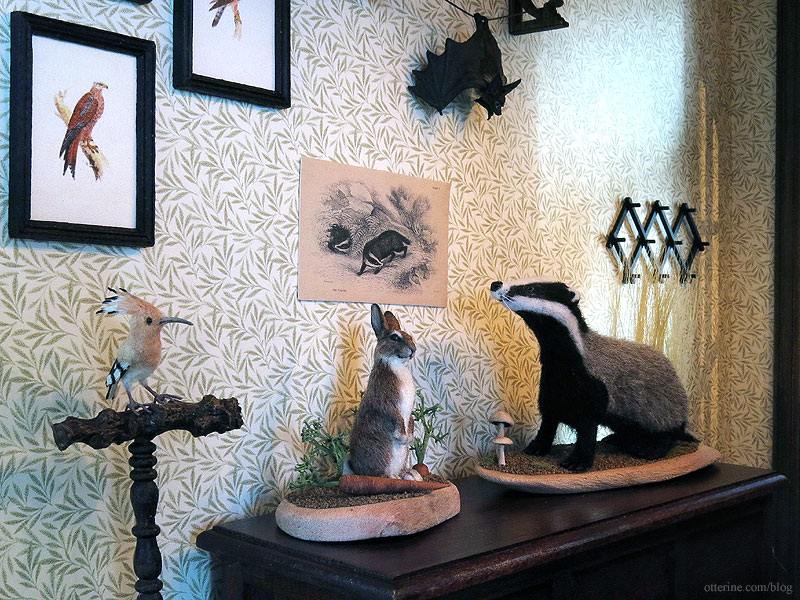
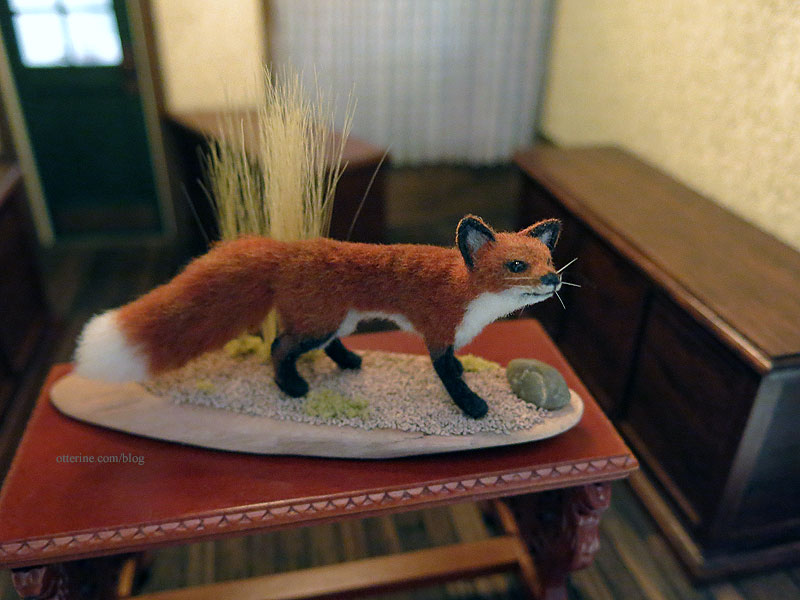
There are numerous animals on display. Most are artisan pieces I’ve collected over the years. I made tiny dioramas for them, though the animals are not glued in place to keep from damaging them.
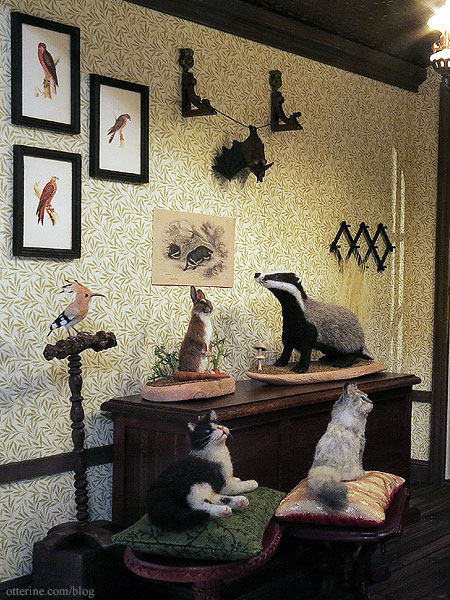
I used leftover scenery materials on top of driftwood pieces. Some bases were cut down and sanded to better fit the size of the animal while others were left as is from the bag.
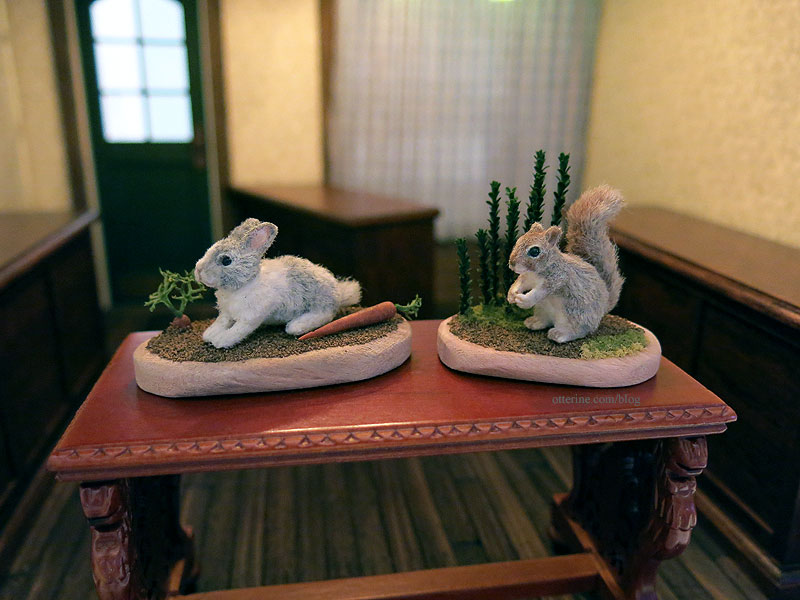
I made the Burrowing Owl, and Friedrich is by Michal Gvir. I made the carrots using the tutorial from Sugar Charm Shop — a few stumps to plant and full carrots for show.
Ophelia is by *Reve*, and Endora – by agzr*studios. I made soft pillow beds for each cat. Barbara sent me the red, pink and ivory silks as well as the nest artwork shown in other photos. The green quilting fabric is from my stash.

Hugo B. Agerton is by Steve Panner, who also made Roland Sneakypants shown earlier in this post. I made the mushrooms using Peiwen Petitgrand‘s book on making clay food.

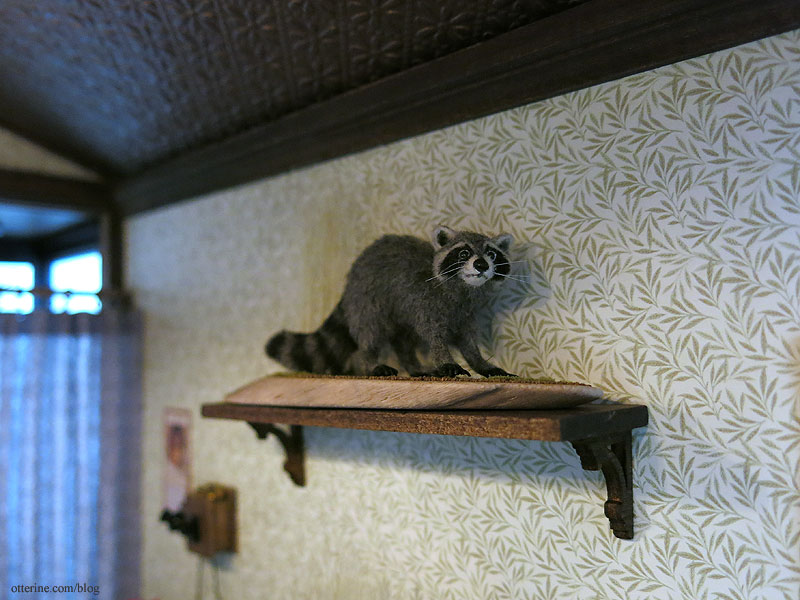
The badger art is from the Graphics Fairy, printed on parchment and mounted on card stock. Clyde the Hoopoe bird is by Katie Doka of FairiesMiniatures.
Sanford is by Steve Panner. I added an aquarium pebble, tall grass and bits of foliage to the base.
Juniper and Archer are both by *Reve*. I used more of the carrots for Juniper’s vignette.
Sam the Toco Toucan is by Katie Doka of FairiesMiniatures.
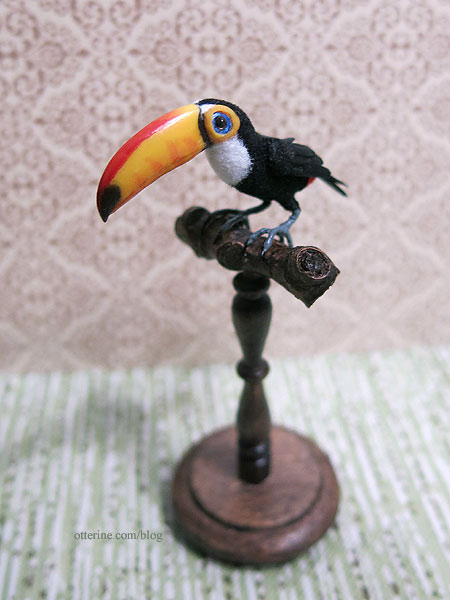
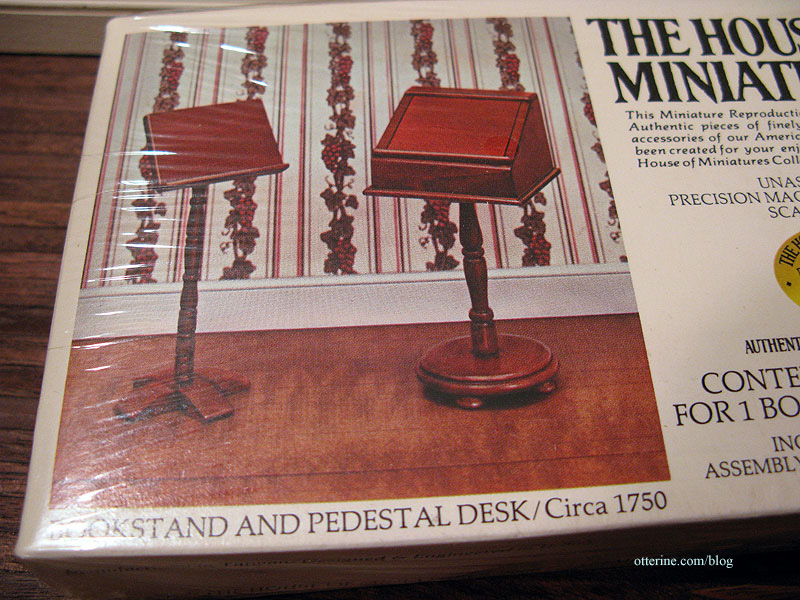
I re-purposed two House of Miniatures items for the bird perches — a bookstand and pedestal desk. I’ve kept the tops for other uses. I finished them in dark walnut with a satin varnish. I used pieces from the old tree branch I used in The Artist’s Studio with the wood stained to match.
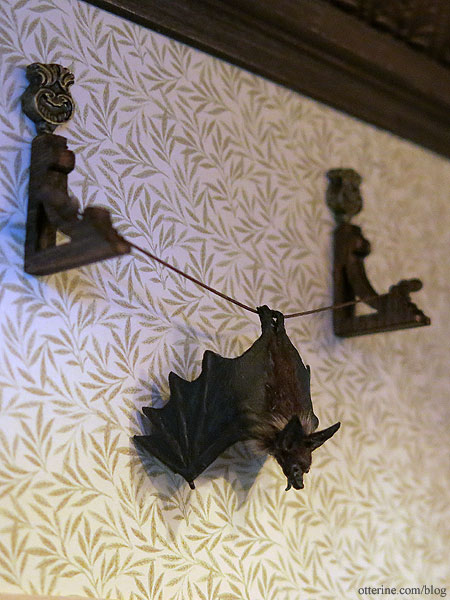
For Igraine by Olga Proshina, I stained two brackets and added jewelry finding accents. A thin floral wire capped with belaying pins holds the bat suspended.
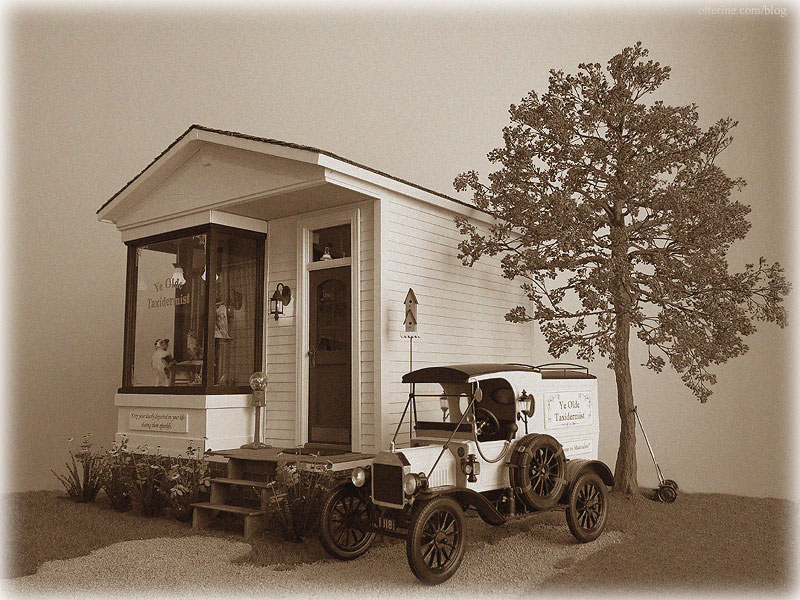
I went through many ideas before finally stopping on a vintage taxidermy shop set c. 1915.

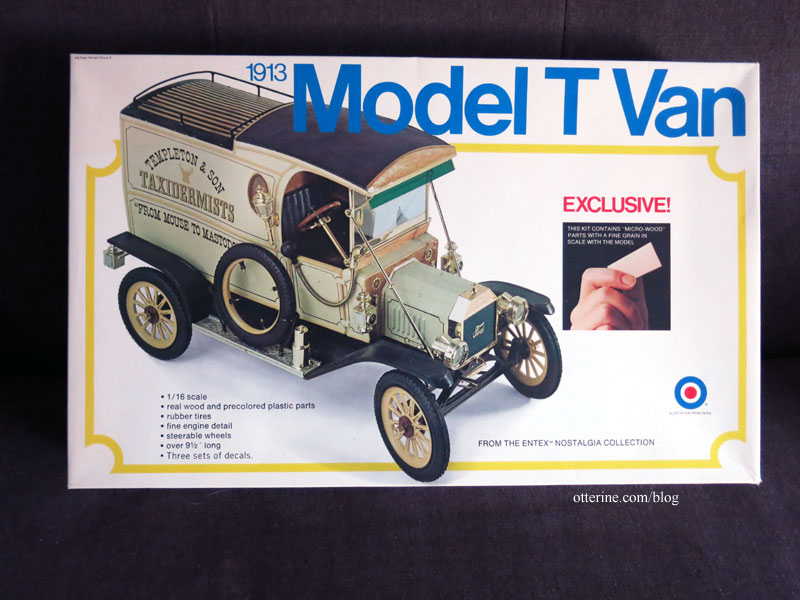
The other ideas were sound, but it was all decided once I found the 1:16 scale 1913 Model T Van kit by Entex that included decals for a taxidermist. From Mouse to Mastodon. I love it! :D
There was more than one kit release over time, but even though I had two kits with different front images, the parts were identical for both. Interestingly, this one is shown built with the driver’s side opposite but with the use of a spare tire instead of the plastic covers. That would not have been possible with the parts molded as they were. Four different sets of decals were included: Carnation Milk, Coca Cola, The Texas Company and Templeton & Son Taxidermists.
I ended up making my own removable sign boards for the van for a few reasons. I wasn’t keen on using the name on the included decals, and I wasn’t sure about my success in applying large decals either. And, I might want to use the van for something else in the future, so I can just swap out the boards. These are printed on regular paper and mounted to bristol paper for added weight. Mini hold wax keeps them in place without marring the paint finish.
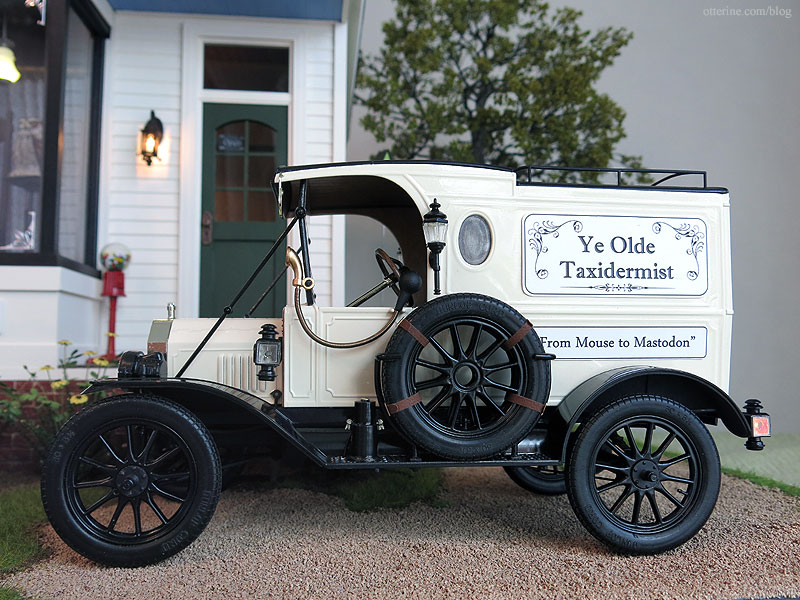
I have a full post dedicated to the 1913 Model T Van build with links back to the individual posts for easier reference. The van fits relatively well for scale in my final project, but I do love it even on its own. This was not an easy or forgiving kit. So many parts broke during assembly, and a few were even broken from the start. I had two kits, and even with that, I ended up having to glue the suspension so the front wheels would not turn and the van would not roll. But, I was able to add LED headlights and taillights. Overall, I’m glad I took on the task and I’m pleased with the look of the final model.
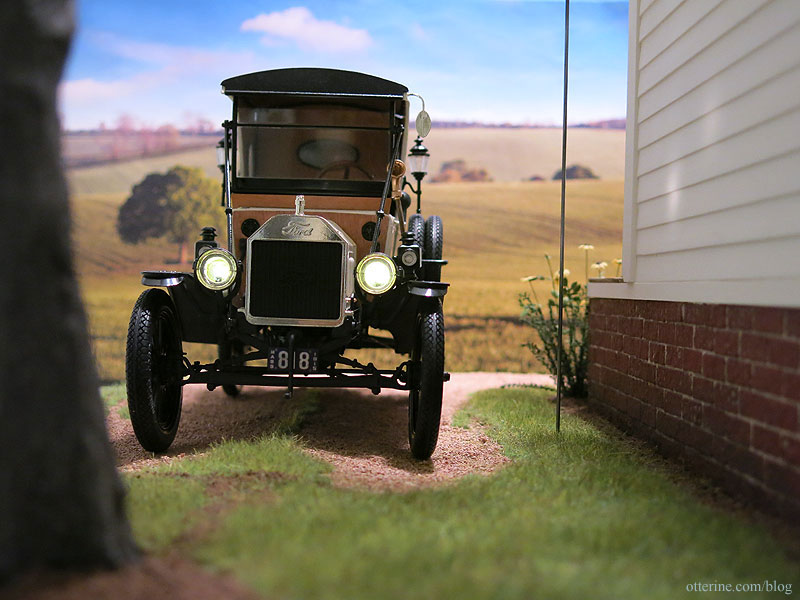
The backdrop used is a countryside landscape I found online with no discernible origin in a google search. I wanted something with a rural feeling.
The landscaping board is finished on the edges with iron-on veneer edging. I then glued layers of white 1/16″ foam sheets by Woodland Scenics using Weldbond glue. I went with thin foam so I could keep the land relatively flat on the baseboard while still allowing for natural unevenness.
I used Fine Ballast Dark Brown by Woodland Scenics for the dirt and Woodland Scenics Ballast left over from Baslow Ranch for the gravel. It’s all set in place with Woodland Scenics Scenic Cement. I’ve planted black-eyed Susans along the front. The stairs were built from scratch.
There are depressions in the gravel from where the van has pulled in and out along the side of the building.
The grass is Heki Wild Grass in dark green.
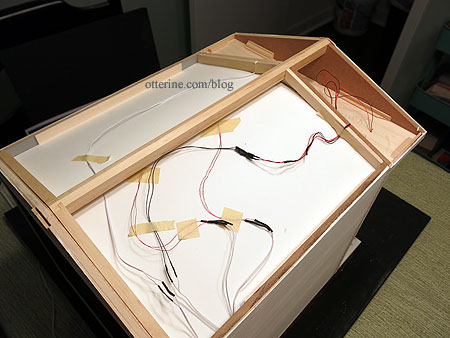
The roof is removable to provide access to all of the wiring as needed.
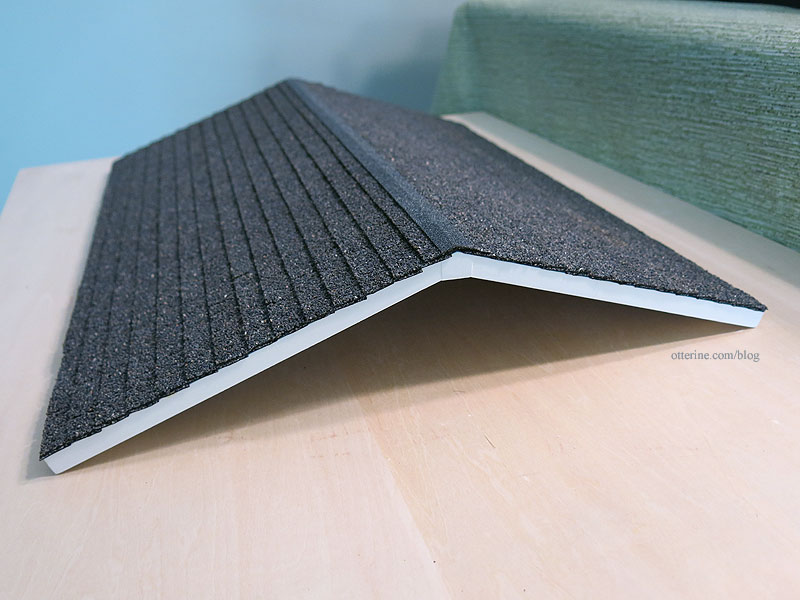
The roof is covered with asphalt shingles by What’s Next (found a vintage lot of these on eBay a few years back). The roof ridge is finished with heavy paper sprayed with stone finish spray paint. I’ve done a shingle lap before, but I just didn’t like the results I was getting this time around. As for whether asphalt was a correct material to use in 1915, well, you’ll be happy to know I did look it up.
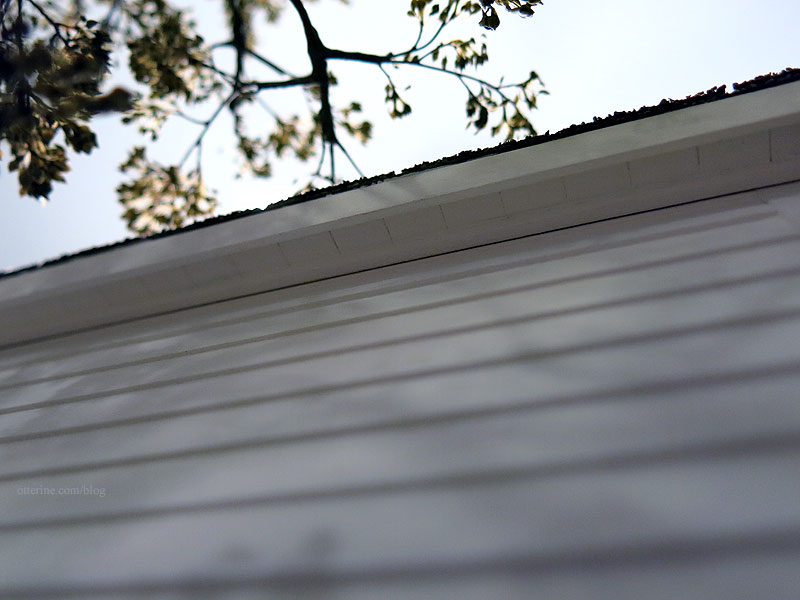
I wanted finished eaves, and I initially tried scoring the mdf boards. That wasn’t as clean as I wanted, so I used some super thin scored wood sheets from my stash and cut piece by piece. Added trims around the edge hold it all in place and disguise the fact that the roof is removable. From underneath, it looks clean and solid.
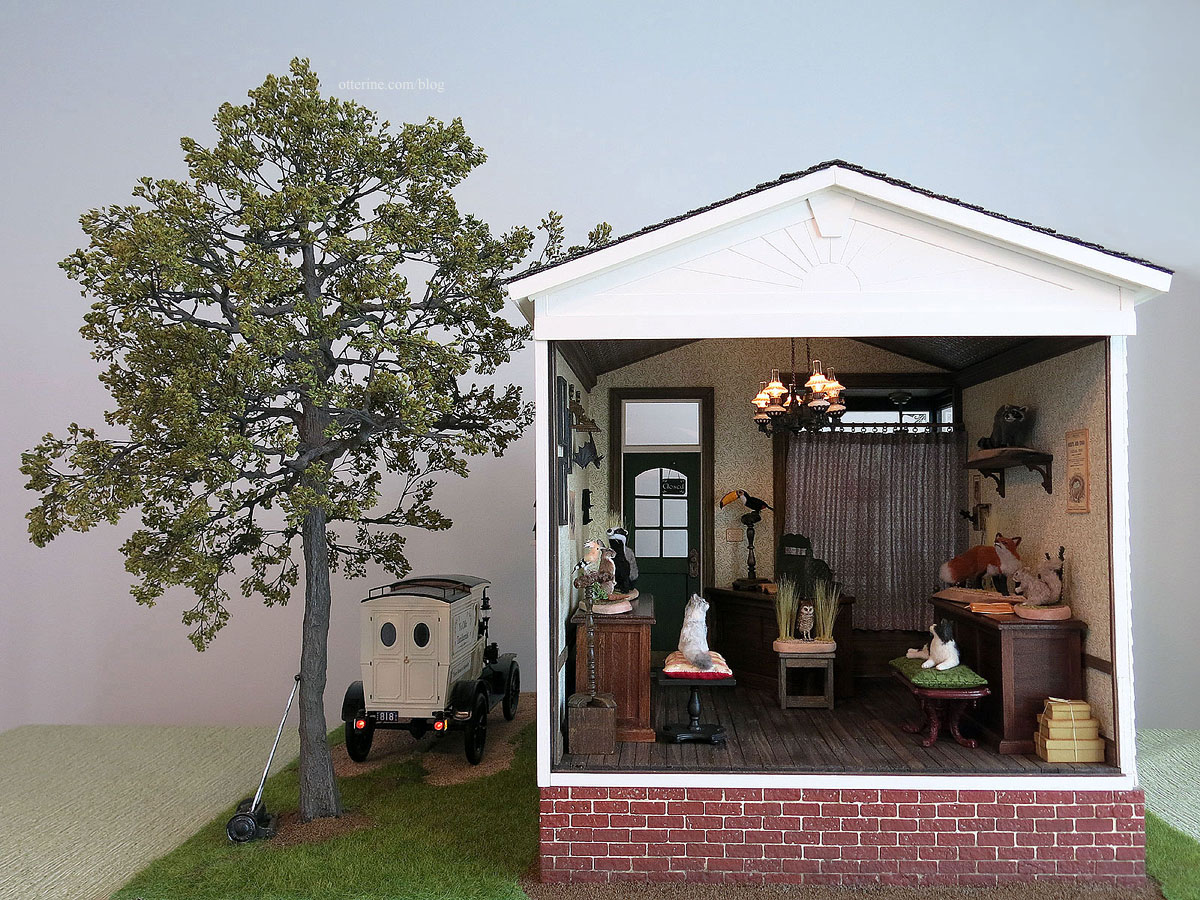
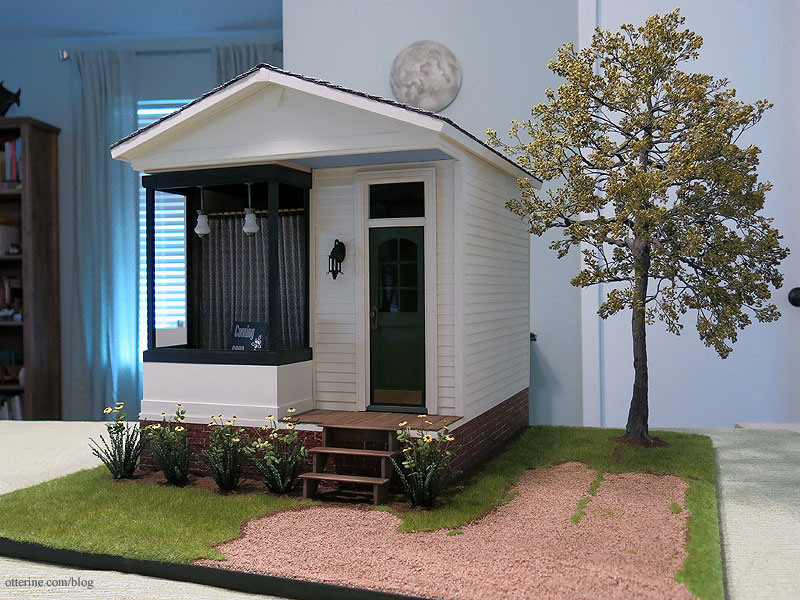
There’s a 19.5″ tall tree adjacent to the building. The height of the tree was meant to put the building in better proportion with the Model T Van since there are different scales at work here.
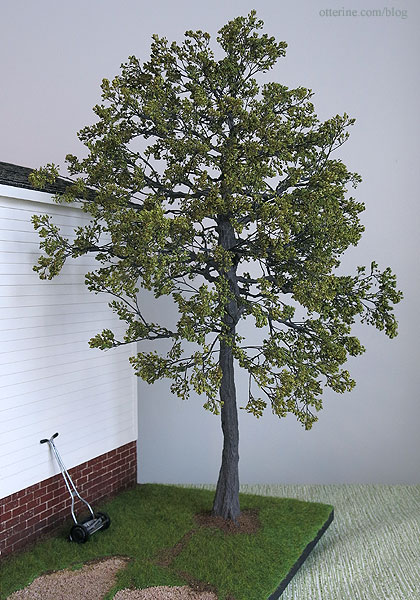
I made one branch to fit over the roof, because who is going to climb a ladder to trim it?
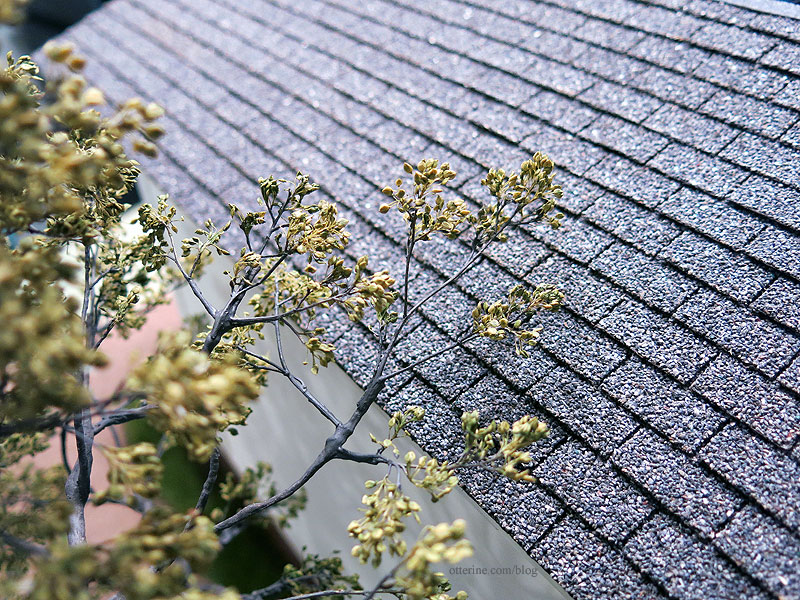
The canopy provides good coverage, but the bark texture is my favorite part. :]
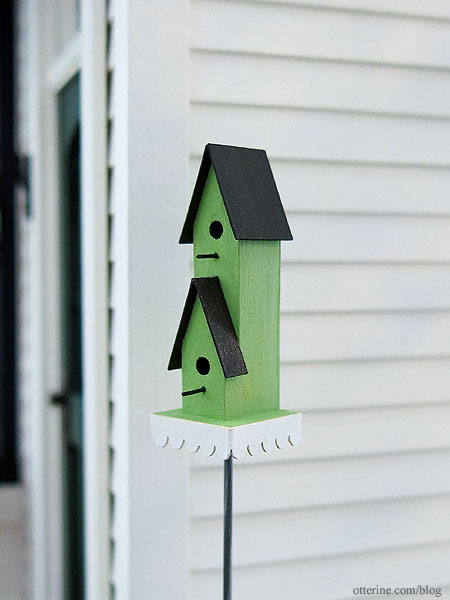
I made a birdhouse from a kit by Twilla’s Tiny Treasures, purchased at one of the local shows. I like a white birdhouse best, but next to a white house, spring green is my second favorite choice. It came with gingerbread detail, but I left that off for a simpler look.
There’s a handy push mower to make quick work of the upkeep. It’s a Phoenix Model kit from Jennifer’s of Walsall. It’s recommended to use Devcon 5 Minute Epoxy, so I bought some from amazon. This stuff stinks to high heaven with the hardener smelling like rancid, rotten eggs, but it is as advertised at least.
I sprayed the handles and blades with Testors Model Master Metalizer Lacquer in Aluminum Plate. It buffs to a fine metallic finish. I hand painted the grips semi-gloss black. To keep it simple, I chose black for the wheels and guard. The hubs and connecting rods are Testors Flat Olive Drab, leftover paint from the Sopwith Camel from years back. After assembly, I touched up the paint and added some grime detailing…just enough to give this mower a few years of service. I glued the handles half-way between resting and upright so it would look natural while still being able to sit close to a wall, or against a tree.

And, of course, when you’re back in 1915, you should have photos that feel as though you’ve stepped back in time.
Let’s take the van for a spin!

——
UPDATE: Ye Olde Taxidermist has won an Honorable Mention in the 2016 HBS Creatin’ Contest! It’s a great honor to have my work recognized. A huge thank you to HBS! You can see the winners and remaining entries posted here. Congratulations to all on your creativity and hard work!A special thank you to Debora, Bill, Lyssa and Barbara for your support, friendship and contributions to the build! And, a warm thank you to everyone for your kind comments and encouragement along the way!
Categories: Ye Olde Taxidermist
December 16, 2016 | 0 commentsMaking a tree – part 4
I stumbled across a wonderful tutorial by Connie Sauve on making realistic trees. (As of 2024, it seems her tutorial is no longer online.) She used a natural leaf material called candytuft.
I ordered candytuft in basil green from Scenery Solutions. I looked at the local floral shops, but the floral sprays they had were different and not really workable. I bought two bunches since I wasn’t sure how much I would need. I probably should have ordered more for this tall tree in the first place, and I did end up ordering three additional bunches. I will likely use three bunches overall, so I’ll have some leftover for next time and other projects.
Detail of the “leaves” shows the variegated color that works well for visual interest. (Unfortunately, as of 2024, candytuft is no longer readily available.)

Since I started with green, I had to paint only the stems. Quick and dirty, no fine detailing here. It transformed them immediately. I can certainly see why these are so popular in model railroading.
Since I changed the type of foliage, I ended up clipping a lot of the wire branches I added since the candy tuft flares out and works better with a shorter base branch. I bought clips at Michaels and used Aleene’s Quick Dry.

Adding the branches was actually less of a pain than one-at-a-time leaves with a quicker payoff.

I touched up the paint around the glued bits to blend in with the tree branch tips. Hooray! :D

Looks full until I turn it to the side.

Once the additional candytuft arrived, I was able to finish the tree and plant it.
I made one branch to fit over the roof, because who is going to climb a ladder to trim it?
After trying out this method of foliage, I will have a hard time going back to any other way.
Categories: Flowers, plants, and trees, Ye Olde Taxidermist
November 26, 2016 | 0 commentsChrysolite kits
Finding good lighting is always a challenge but not impossible. I’ve used Chrysolite kits in the past, and I like their adaptability even if they are more old fashioned in design.
I had one Zenith Hanging Lamp kit already, and Debora sent me a matching kit along with two Heritage Chandelier kits for my project.
They are finished in color, and in theory you can just put them together as is but I never work that way. I’m a perfectionist, and it bothers me when the plastic shows under the factory finish where the plastic parts separate from the sprue. So, I’ve chosen gunmetal for the single pendants and black for the chandeliers.
I also prefer replaceable bulbs. Now, some of these kits can be purchased with replaceable bulb sockets, but these did not have that feature. For the Heritage Chandeliers, I chose to use 3/16″ Cir-Kit candle sockets with varnished wires. The included kit bulbs are shown in the middle here.
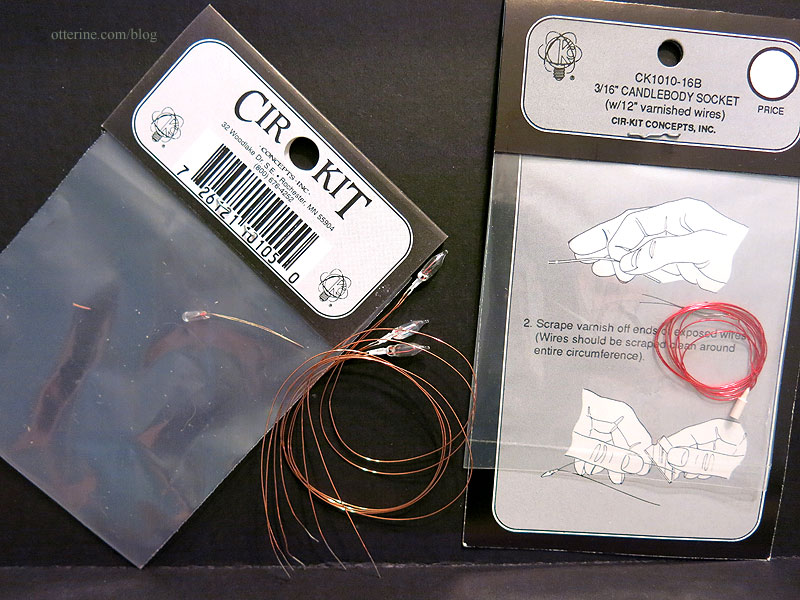
These were a test of wills. The required splicing of six wires into two bundles of three, ending in one exit wire each, inside the main cone is not an easy task and you get one shot at it because you cut the wires so short. I had to scrap three sockets in one attempt. But, it all worked out in the end. Here’s the first socket installed with the wires looped through the bracket.
I changed out the included chain for heavier (and darker) chain.
Here’s the first one 99% complete. I need to paint to cover the red wires so they won’t be as noticeable.
I also want to add wax to hold the hurricanes and shades in place. They will still be fiddly but more manageable.
They really are perfect for the space.
I changed the Zenith lamps to pendants with aluminum tubing. I used 3mm LED bulbs from Evan Designs since there is no way to make the bulbs changeable and LEDs last longer. I chose separating LEDs so I could feed the new wires through the tubes but still have these connected to the 12V system. Again, I’ve shown the original kit bulbs below.
Twisting the wires makes it easier to feed through the tubing.
I spray painted the pieces a darker gunmetal color to replace the factory brass paint finish before the final assembly.
The 3mm LEDs look like true bulbs as well. :]
The are perfect in the shop window.
Categories: Ye Olde Taxidermist
September 8, 2016 | 0 commentsSunburst gable
Here are the front gable parts that come with the Creatin’ Contest kit.

I started by gluing the bottom trim piece in place.

I cut a piece of paper to fit the surface above the lower trim piece. I cut a Woodsies circle in half and centered it on the paper. I marked the circle and upper trim placement on the piece of paper.
Using a protractor, I marked where I wanted my sunbeams to intersect the circle hub.
After drawing the lines, I checked the pattern to see if I liked the look. SOLD!
I used a tracing wheel (a sewing tool) and a ruler to transfer the marks onto a piece of 1/16″ thick basswood.
I cut along the dots with a blade and ruler.
I glued the upper long trims in place and then sanded the sunbeam pieces along the edges to remove any hint of the transfer dots. Starting with the largest pieces, I fine-tuned the fit and marked where to cut each sunbeam in order to frame the circle hub. This is all in dry fit — no glue on the sunbeam pieces or the circle hub just yet.

I continued until I reached the middle pair. Due to the cutting and sanding, these ended up too small for the space so I custom cut two new pieces to fit.

I glued the sunbeam pieces and circle hub in place before adding the small trim piece on top.
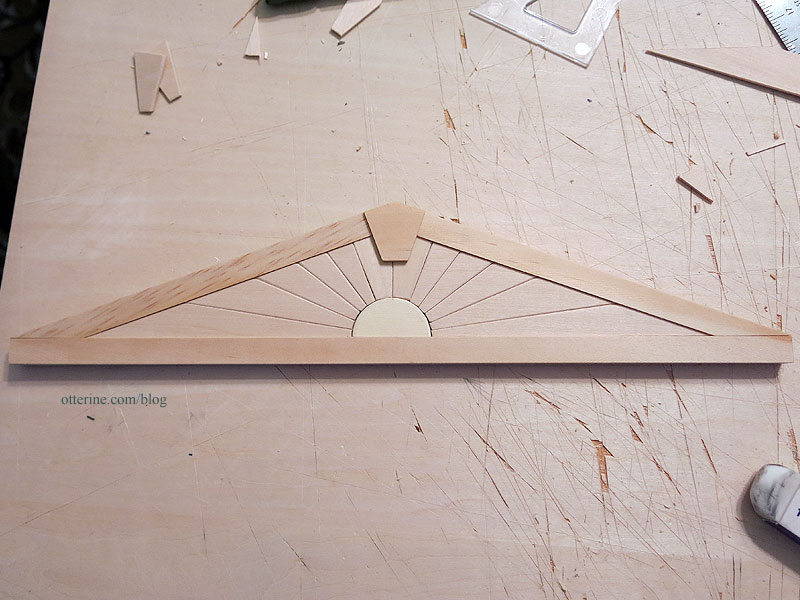
After painting, I added just enough detail.
Categories: Ye Olde Taxidermist
August 22, 2016 | 0 commentsMaking a tree – part 3
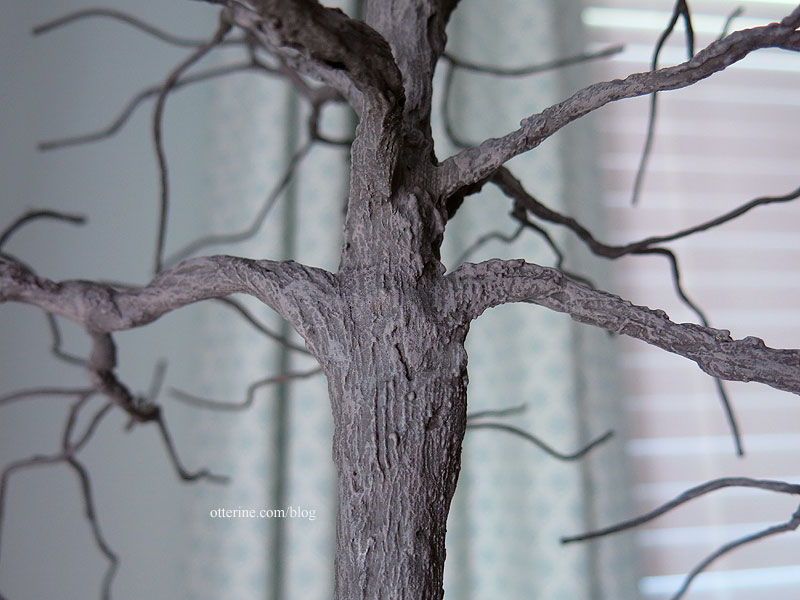
Continuing work on the tree. I filled the bottom of the trunk with water putty to make a solid base. I wasn’t worried about it toppling over, but I didn’t want the outer shell to crack if it were bumped or squeezed in the wrong way.

To achieve a good base color for the bark, I mixed Zinc and Bittersweet Chocolate by Americana. I stippled the paint onto the tree to avoid leaving obvious brush marks. After letting the paint dry, it was easier to see which areas were missed in the first go around.

I dry brushed some Zinc mixed with Mississippi Mud to highlight.
The lighter paint brought out the bark detail. It looks solid and treelike, no? :D
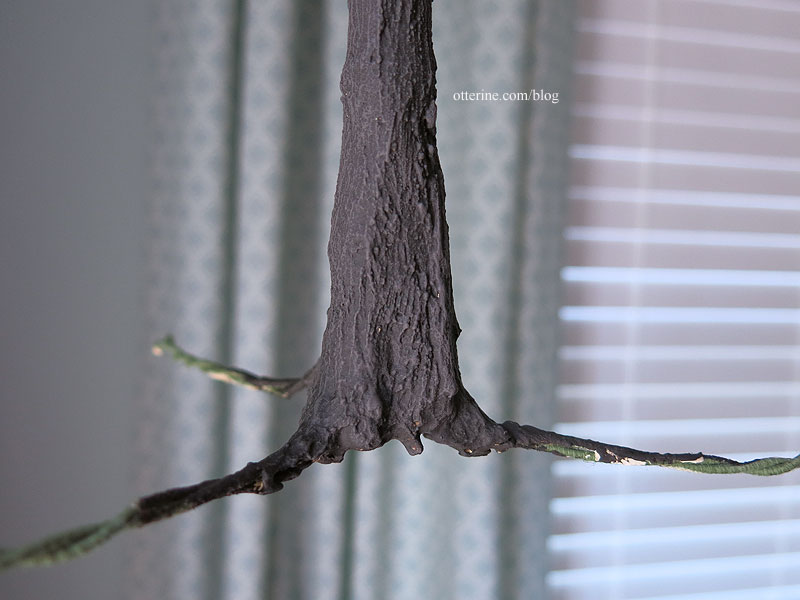
I like the slight bend in the trunk…seems much more natural.

A real tree has a great deal more branches than the base I’ve created, and those branches taper into batches of leaves. My purpose is to get the general feel of a tree and to accent the landscaping.
I have 95 base branches, which may seem like a lot, but there will be bare spots if I leave it as is. Adding branches after the putty has dried is not impossible, but there are some drawbacks and limitations. Yes, you can start out with more wires to have more base branches, but then you end up with more of the bulky base branches and not thin branches at the ends where they are needed the most. Carrying thin wires with the larger wires still adds bulk to the base branches.
I took short lengths of 30 gauge brown wire and curled them around the base branches where needed, adding 120 small branches. Now I have 215 branches for a much fuller tree.

I mixed Durham’s Water Putty again and covered the joins. This does create bulk and you can somewhat see the twists since I didn’t go overboard with the application, but this shouldn’t be a focal point once the putty is painted to match the bark and the foliage is added. I didn’t add these before finishing the base tree and branches because it is hard to paint the interior with all these fiddly branches on the outer surface. Much easier to just touch up the paint where needed.

Categories: Flowers, plants, and trees, Ye Olde Taxidermist
June 2, 2016 | 0 commentsMaking a tree – part 2
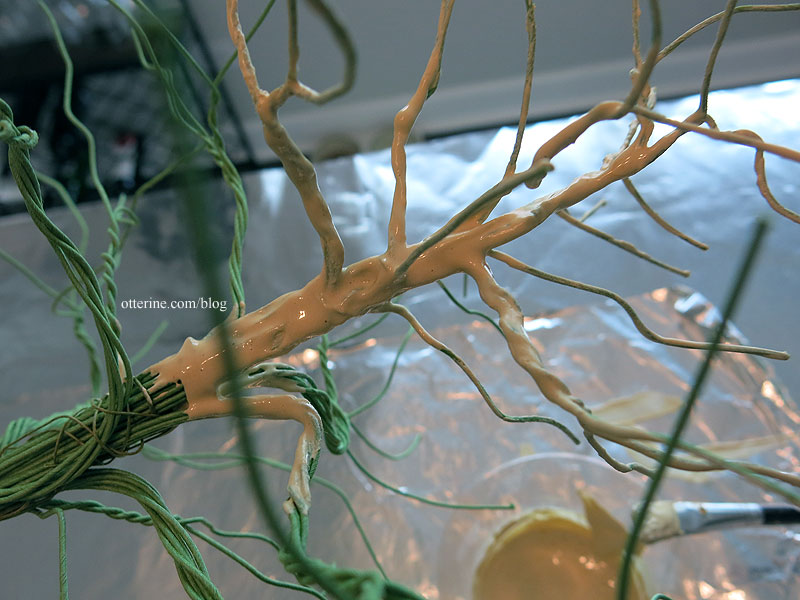
Continuing work on the tree. The water putty dried hard overnight. Some of the thin binding wires showed through the layer as expected and the texture was smooth due to the watery consistency of the first application.

I mixed more water putty, this time thicker than the consistency of pancake batter. I had to work quickly since the mixture wanted to set fast. I used a stiff brush to apply the putty, making bark-like texture with quick brushstrokes as I went.

I did this for the main branches and trunk, leaving the thinner branches with the lighter coat from yesterday. The paint will seal any bare spots on the thin branches, and I didn’t want to build any more bulk on those wires. This will also make the end wires more easily shaped and trimmed as needed. You can bend the putty covered wires a little, but you risk cracking the surface of the hardened putty.

I hadn’t covered the base of the trunk all that well initially since it was hard to hold the tree while the putty was wet on the upper portions.

This time, I filled in more and added the bark texture. I might need to fill in underneath once this layer dries to make the base solid.

Next up, paint will be applied and the tree should really come to life.
Categories: Flowers, plants, and trees, Ye Olde Taxidermist
May 29, 2016 | 0 commentsMaking a tree, part 1
Note: I began making the tree and then the process changed when I reached the foliage part, so there are some further alterations later in the process.
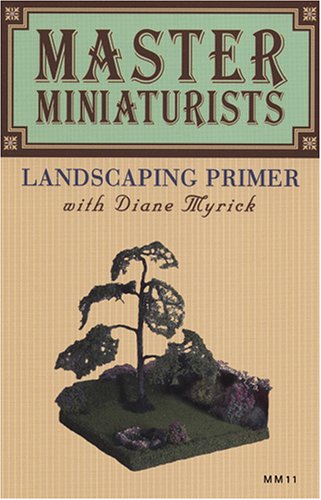
For the tree structure, I am following the same process as the ones I did for the Heritage maple and the dogwood, using the tutorial from the DVD Master Miniaturists: Landscaping Primer with Diane Myrick.
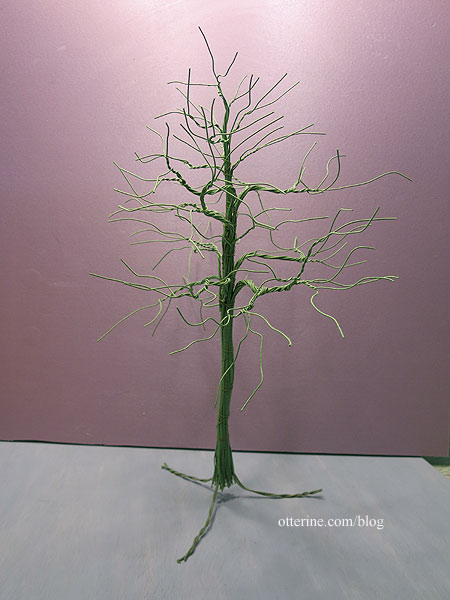
I bought a bulk of 22 gauge cloth covered wires that included 240 18″ pieces. I wanted a few small roots to help plant the tree, so I extended some pieces of 18 gauge floral wire below the main trunk of 80 wires. I used 28 gauge wire to tie the main wires together.
I want a relatively full tree, so I might need to add a few more branches. Currently, the height is 18″ from the bottom of the trunk to the top branch tip. There’s Friedrich at the base for size reference.
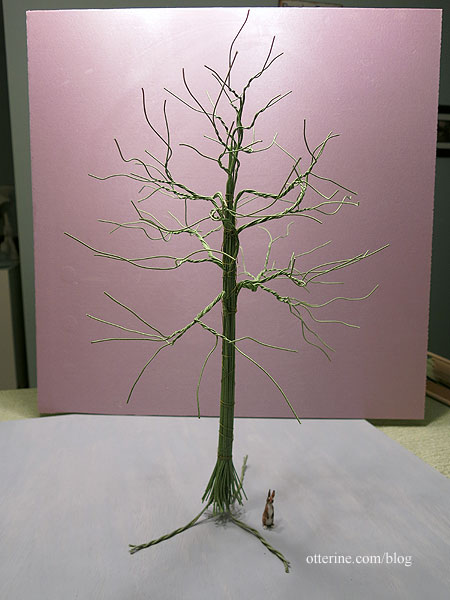
I added 7 more 22 gauge wires to the skeleton, making a few branches in the middle and on top. I also bent the trunk to make it more natural.
I mixed and applied Durham’s Water Putty to the wire skeleton. I bought a 4-pound container from Home Depot for roughly $8 back when I did the first tree, and there are still a lot of trees left in the container. The Durham’s Water Putty site shows some of the creative things you can do with it.
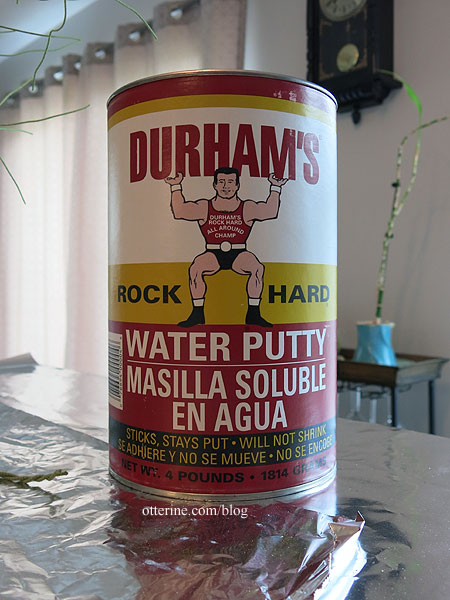
You can’t put this stuff down the drain, so the cups and brushes you use must be thrown in the trash. But, I did save the cup to reuse for the duration of the project. I’ll just mix new putty on top of the hardened putty left in the cup. No sense in wasting multiple cups. I buy short plastic cups from Dollar Tree. Very economical.
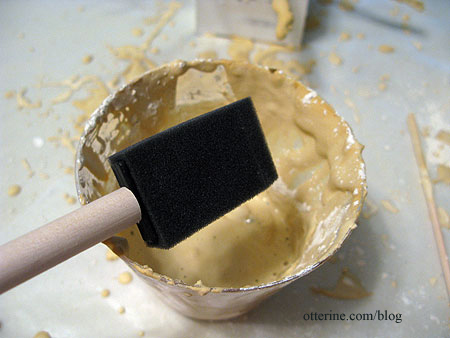
I mixed two heaping tablespoons of the powder with water to create a mix the consistency (and look) of pancake batter. The first coat is thin and incomplete. It’s mainly meant to seal the cloth covering on the wires and harden the joints. I used those super thin 28 gauge wires to avoid having obvious rings around the trunk, and it worked well.
It’s amazing how the putty transforms the wire skeleton. I didn’t apply the putty to the roots since those will be buried in the landscaping.

Once this dries, I’ll touch up the putty and work on the texture.
Categories: Flowers, plants, and trees, Ye Olde Taxidermist
May 28, 2016 | 0 comments


NOTE: All content on otterine.com is copyrighted and may not be reproduced in part or in whole. It takes a lot of time and effort to write and photograph for my blog. Please ask permission before reproducing any of my content. (More on copyright)

Ye Olde Taxidermist
Introducing Ye Olde Taxidermist, my entry in the HBS Creatin’ Contest 2016.
——–Keep your dearly departed in your life during their afterlife. That is the heartfelt mission of Ye Olde Taxidermist, though the shop also caters to naturalists by preserving fine animal and bird specimens for posterity.
Ye Olde Taxidermist makes house, or farm, calls in a stylish Model T Van.
The shop even has a telephone, if you are so inclined.
No animals were harmed in the making of this build. In fact, they all had great fun seeing who could stay still the longest. Roland kept making his holy crap, I think I’ve been stuffed jokes and making this face, which caused an onslaught of giggling among the rest. Silly animals! :D
——–
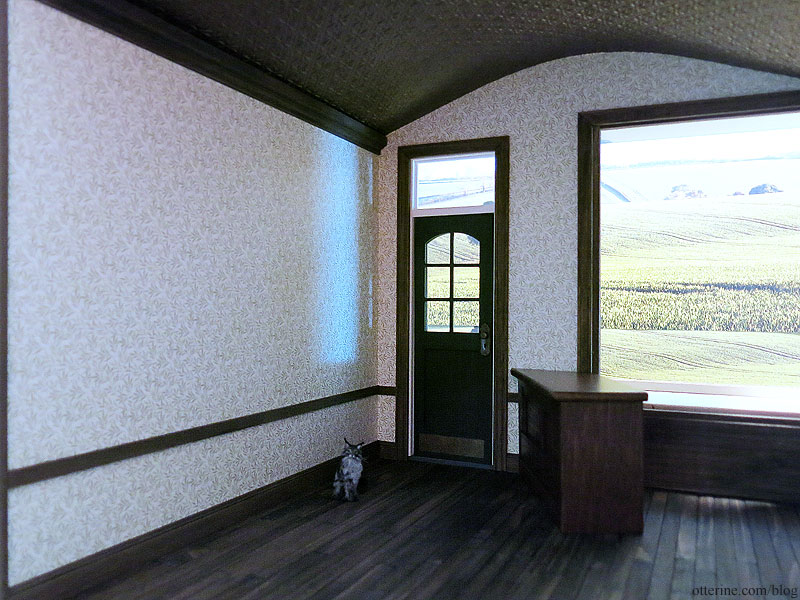
Ye Olde Taxidermist started as the Backyard Bungalow kit.
I added two inches to the foundation and cut down the depth of the front porch. The foundation has egg carton brickwork. I eliminated the side windows to save on wall space and covered the exterior with clapboard siding sheets.
I added a removable back wall that is actually done in two pieces. The back sunburst gable is glued in place, but the lower wall slides out as needed. The exterior color is Warm White by Americana.
It has interior trim to match the side walls, so it looks seamless when viewed from inside. There’s a jewelry finding nailed to the side as a knob.
Suppose I should have put some art on that back wall. :D
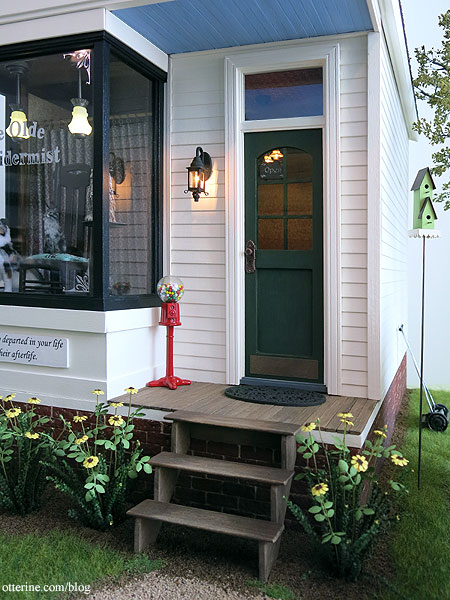
I changed the kit’s double door to a single door with a transom window. The door color is Plantation Pine by Americana, and the frame is Warm White, also by Americana. I used Opryland door hardware and made the kickplates from heavy paper. I painted the paper antique bronze and added nail detailing. The door lamp is a black coach wall sconce.
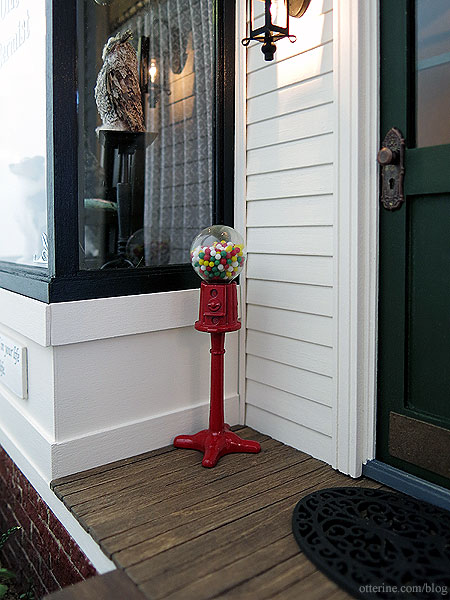
The oval doormat is from Arjen Spinhoven Miniaturen. The porch soffit and floor boards are skinny sticks, with the soffit painted French Blue by Folk Art. The gumball dispenser is from Hobby Lobby.
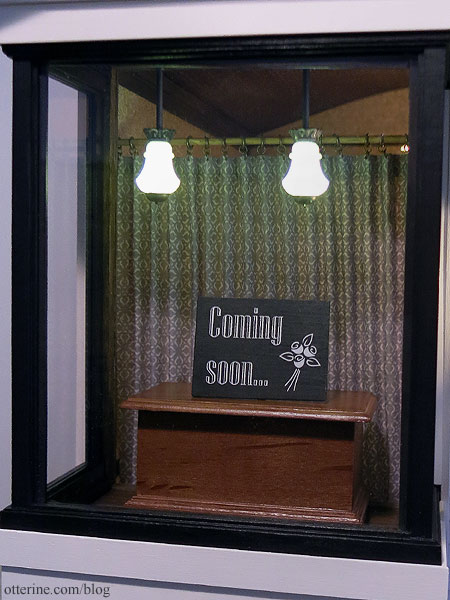
The display window showcases some of the dearly loved pets of the shop owner. Sherwood is by Michal Gvir, Isabeau is by Maya Schippl, and Grover is by tmd_art.
The Mackintosh chair features some of the first miniature needlework I stitched. I refinished the wood as well. I did research this chair to see if it would be good for a 1915 setting. Having been created in 1898-1899, it was already a bit dated. :D
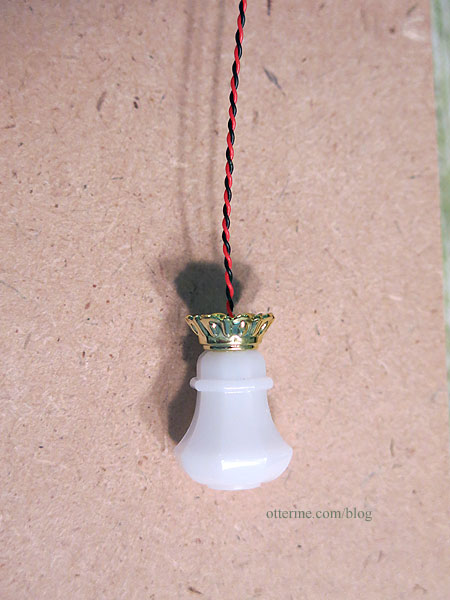
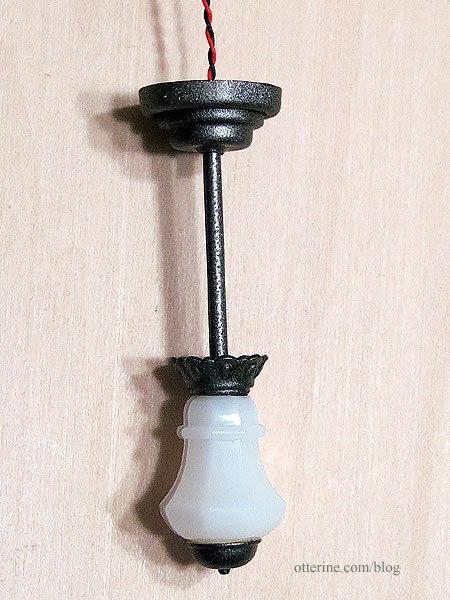
Grover’s stand was made using a candle stand kit by The House of Miniatures, with the height lowered just a bit. The window lights were made from Chrysolite kits (one from my stash, and one from Debora). I altered them from chain lights to post pendants with aluminum tubing. I also used 3mm LED bulbs from Evan Designs for longevity. They look like true bulbs as well. :]
The window unit and its base are removable for ease in changing the display. It would have been cumbersome to reach through the back of the building and set the display in reverse from behind. The window unit’s trim disguises the fact that it’s a separate assembly. I have the trim held on with museum putty.
The whole window assembly is built so I can remove the window plastic to replace it or just swap it out. At first I planned to slip the glass in through the top, hence the open slot. Now, the whole top trim is removable. I’ve also run one extra wire under the lower base just in case I ever want to add other lights to the window…or even create a Christmas display.
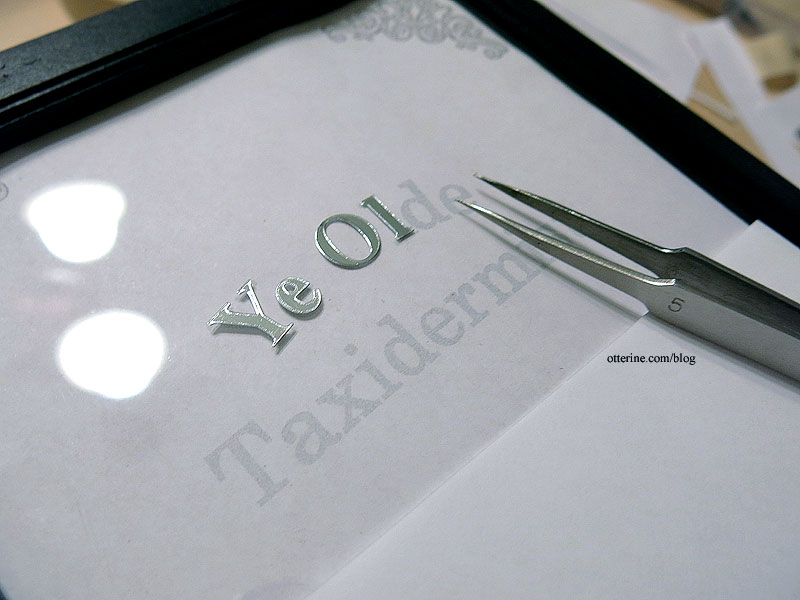
I used silver sticker letters and flourishes on the front pane.
I printed the sign on paper to help me place the silver letter stickers.
I like how this photo makes it look like a smaller scale build, like quarter scale.
There’s a curtain separating the window from the main store interior. It is removable for cleaning or replacement as needed. The cash register was a gift from Barbara, though I did touch up the paint around the keys (a detail not seen after the effort). The ledger is from Looking Glass Miniature (the stack of string-tied boxes shown in other photos are also from here).
The wall calendar features the artwork of Theo van Hoytema. I edited the art to make an October 1915 calendar. The owl looks positively perturbed — too cute! I painted the copper plant stand with a delicate patina. The flowers and lamb are from Barb’s Corner; the eagle is from ABC Dolls & Miniatures. I made the griffin box from a kit by Lisa’s Little Things bought at one of the local shows.
I modified the Chrysnbon phone/clock/coat rack kit to make a smaller wall phone. I used the hook, receiver, mouthpiece and bells to make my own. I used scrap wood to make the housing and stained it medium brown. I painted the black parts with Testors semi-gloss black. I left off the name plate that many of these phones had since it would have been too small to be legible and would have detracted from the overall look.
The two large counters are from miniatures.com. I stained them Minwax English Chestnut and used a finishing technique to disguise any large grain or glue spots. The shorter counter by the door was made from a vintage kit found on eBay. I was able to cut the pieces into a custom angled counter that allowed better flow into the shop from the front door.
I made the reversible open/closed sign and painted a Chrysnbon coat rack. The umbrella is by FranMadeMinis. I used Brodnax Willow wallpaper and stained the interior trims.
I used three bird prints from A History of British Birds published in the 1850s by Rev. Francis Orpen Morris that I had made for The Newport many years back. They’ve been in storage for some time, so it’s nice to have a few displayed again.
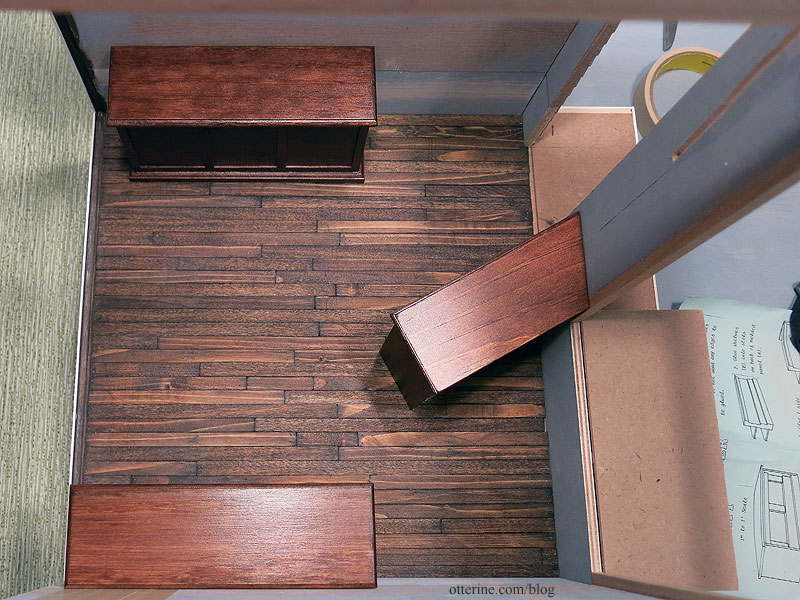
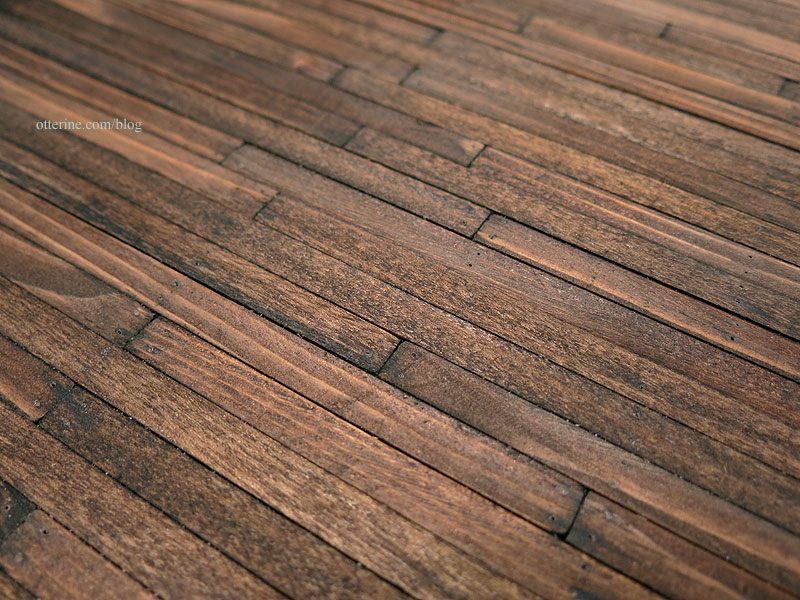
For the rustic flooring, I used the leftovers from The Artist’s Studio flooring, various lengths of board Mike cut for me. I glued the individual boards directly to the mdf floor base using Elmer’s wood glue, supplemented as needed with dots of super glue gel. I sanded the boards with my Dremel Multi-Max oscillating tool, first using 60 grit paper followed by 120 grit paper. The end result was a smoother surface, but I left it a little uneven to keep the rustic beauty. I stained the floor with Minwax Dark Walnut. Since these were different types of wood, the stain didn’t mask the random coloration I liked so well. It just darkened the look overall. Dee-gorgeous! :D I had originally planned to sand this and apply another color as accent but I couldn’t touch this finish, though I did add nail detailing using an awl and paint.
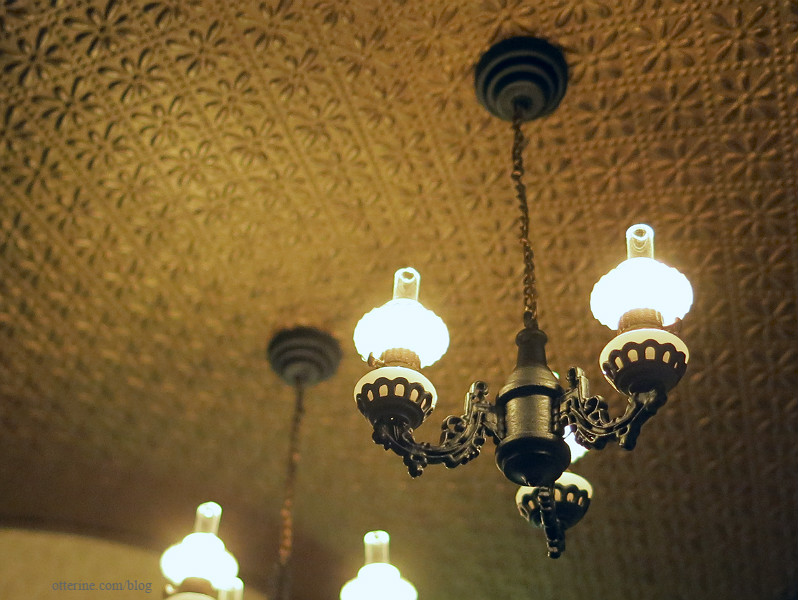
The barrel ceiling ended up being more of a gentle curve, but I still love it. I used crown molding along the side walls as stops for a piece of mat board. It’s covered with textured scrapbook paper called Pressed Tiles – Brown, by The Paper Studio (purchased from Hobby Lobby). Love this paper! I painted it Liquitex Antique Bronze.
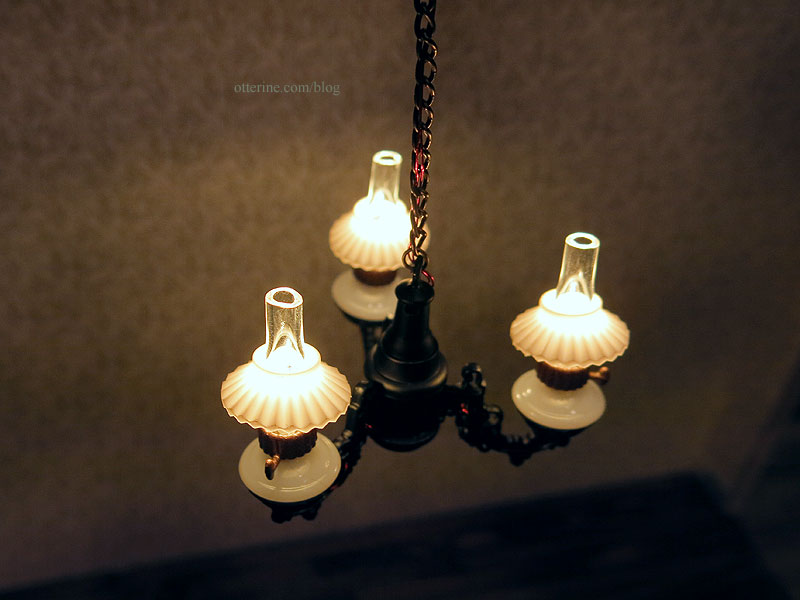
The three-light chandeliers were a test of wills. These were made from Chrysolite Heritage Chandelier kits given to me by Debora. I swapped out the included non-replaceable bulb lights for Cir-Kit Concepts candle sockets with varnished wires. The required splicing of six wires into two bundles of three, ending in one exit wire each, inside the main cone is not an easy task and you get one shot at it because you cut the wires so short. I had to scrap three sockets in one attempt. But, it all worked out in the end.
The chandeliers have bases that are glued to the ceiling. The fixtures have pieces that fit and twist into these brackets, so you can remove and pull them down as far as your wires will allow. This makes for easier servicing — no working in tight spaces. I used bronze acrylic paint to cover the red wires so they wouldn’t be as noticeable. I also changed out the included chain for heavier chain and used wax to hold the hurricanes and shades in place. They are fiddly but perfect for the space.
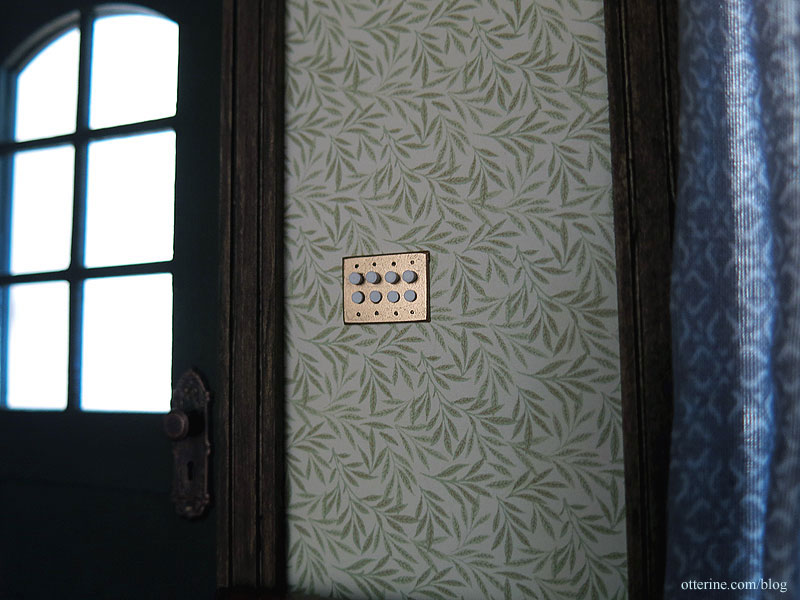
I made the light switch from polystyrene sheet and rod. Talk about fiddly and small. Those buttons are 1/16″ in diameter.
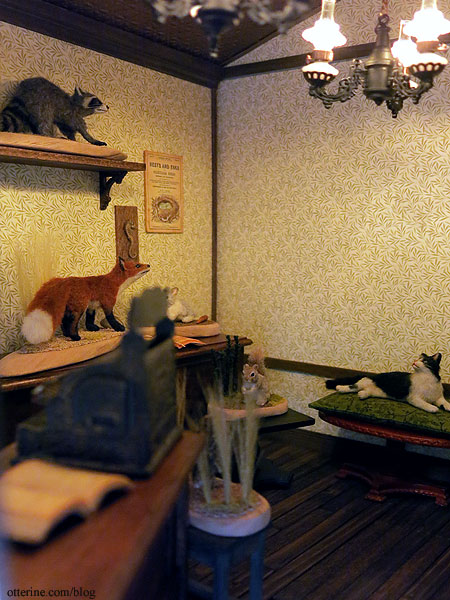
There are numerous animals on display. Most are artisan pieces I’ve collected over the years. I made tiny dioramas for them, though the animals are not glued in place to keep from damaging them.
I used leftover scenery materials on top of driftwood pieces. Some bases were cut down and sanded to better fit the size of the animal while others were left as is from the bag.
I made the Burrowing Owl, and Friedrich is by Michal Gvir. I made the carrots using the tutorial from Sugar Charm Shop — a few stumps to plant and full carrots for show.
Ophelia is by *Reve*, and Endora – by agzr*studios. I made soft pillow beds for each cat. Barbara sent me the red, pink and ivory silks as well as the nest artwork shown in other photos. The green quilting fabric is from my stash.
Hugo B. Agerton is by Steve Panner, who also made Roland Sneakypants shown earlier in this post. I made the mushrooms using Peiwen Petitgrand‘s book on making clay food.
The badger art is from the Graphics Fairy, printed on parchment and mounted on card stock. Clyde the Hoopoe bird is by Katie Doka of FairiesMiniatures.
Sanford is by Steve Panner. I added an aquarium pebble, tall grass and bits of foliage to the base.
Juniper and Archer are both by *Reve*. I used more of the carrots for Juniper’s vignette.
Sam the Toco Toucan is by Katie Doka of FairiesMiniatures.
I re-purposed two House of Miniatures items for the bird perches — a bookstand and pedestal desk. I’ve kept the tops for other uses. I finished them in dark walnut with a satin varnish. I used pieces from the old tree branch I used in The Artist’s Studio with the wood stained to match.
For Igraine by Olga Proshina, I stained two brackets and added jewelry finding accents. A thin floral wire capped with belaying pins holds the bat suspended.
I went through many ideas before finally stopping on a vintage taxidermy shop set c. 1915.
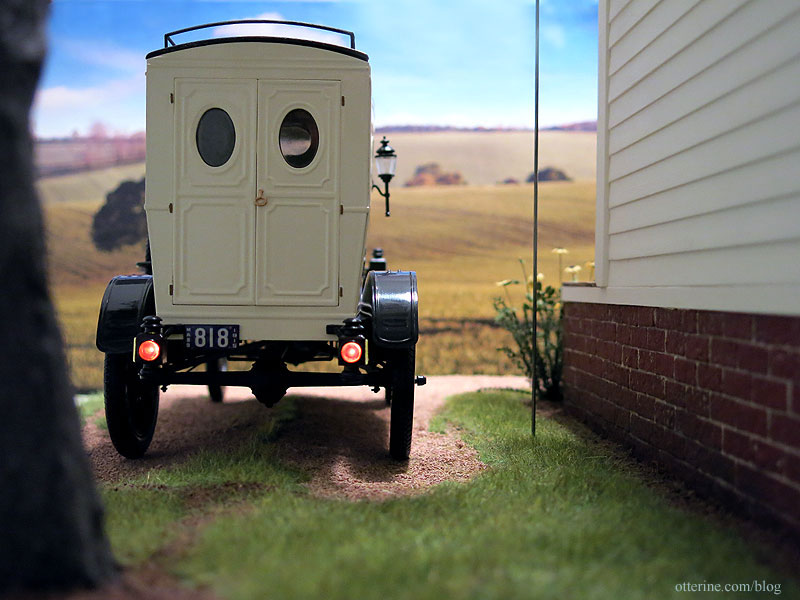
The other ideas were sound, but it was all decided once I found the 1:16 scale 1913 Model T Van kit by Entex that included decals for a taxidermist. From Mouse to Mastodon. I love it! :D
There was more than one kit release over time, but even though I had two kits with different front images, the parts were identical for both. Interestingly, this one is shown built with the driver’s side opposite but with the use of a spare tire instead of the plastic covers. That would not have been possible with the parts molded as they were. Four different sets of decals were included: Carnation Milk, Coca Cola, The Texas Company and Templeton & Son Taxidermists.
I ended up making my own removable sign boards for the van for a few reasons. I wasn’t keen on using the name on the included decals, and I wasn’t sure about my success in applying large decals either. And, I might want to use the van for something else in the future, so I can just swap out the boards. These are printed on regular paper and mounted to bristol paper for added weight. Mini hold wax keeps them in place without marring the paint finish.
I have a full post dedicated to the 1913 Model T Van build with links back to the individual posts for easier reference. The van fits relatively well for scale in my final project, but I do love it even on its own. This was not an easy or forgiving kit. So many parts broke during assembly, and a few were even broken from the start. I had two kits, and even with that, I ended up having to glue the suspension so the front wheels would not turn and the van would not roll. But, I was able to add LED headlights and taillights. Overall, I’m glad I took on the task and I’m pleased with the look of the final model.
The backdrop used is a countryside landscape I found online with no discernible origin in a google search. I wanted something with a rural feeling.
The landscaping board is finished on the edges with iron-on veneer edging. I then glued layers of white 1/16″ foam sheets by Woodland Scenics using Weldbond glue. I went with thin foam so I could keep the land relatively flat on the baseboard while still allowing for natural unevenness.
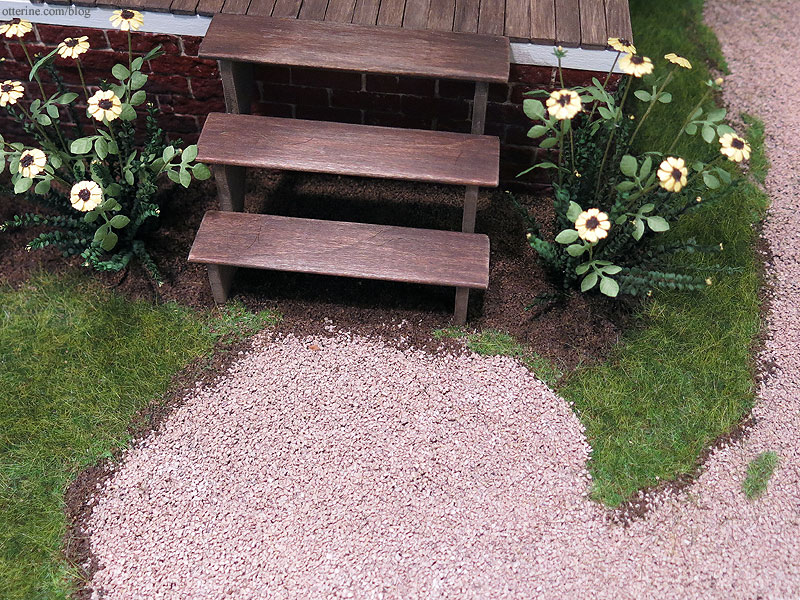
I used Fine Ballast Dark Brown by Woodland Scenics for the dirt and Woodland Scenics Ballast left over from Baslow Ranch for the gravel. It’s all set in place with Woodland Scenics Scenic Cement. I’ve planted black-eyed Susans along the front. The stairs were built from scratch.
There are depressions in the gravel from where the van has pulled in and out along the side of the building.
The grass is Heki Wild Grass in dark green.
The roof is removable to provide access to all of the wiring as needed.
The roof is covered with asphalt shingles by What’s Next (found a vintage lot of these on eBay a few years back). The roof ridge is finished with heavy paper sprayed with stone finish spray paint. I’ve done a shingle lap before, but I just didn’t like the results I was getting this time around. As for whether asphalt was a correct material to use in 1915, well, you’ll be happy to know I did look it up.
I wanted finished eaves, and I initially tried scoring the mdf boards. That wasn’t as clean as I wanted, so I used some super thin scored wood sheets from my stash and cut piece by piece. Added trims around the edge hold it all in place and disguise the fact that the roof is removable. From underneath, it looks clean and solid.
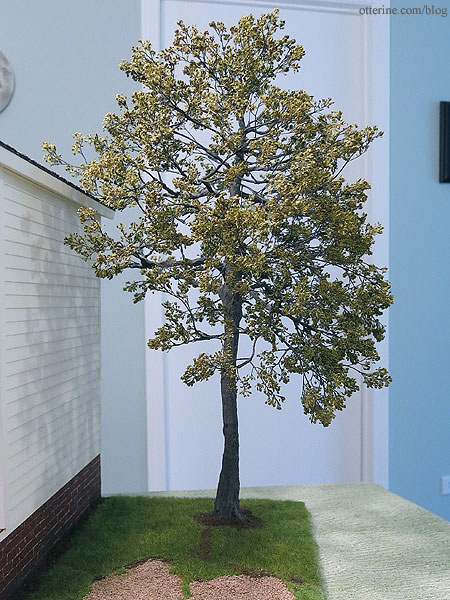
There’s a 19.5″ tall tree adjacent to the building. The height of the tree was meant to put the building in better proportion with the Model T Van since there are different scales at work here.
I made one branch to fit over the roof, because who is going to climb a ladder to trim it?
The canopy provides good coverage, but the bark texture is my favorite part. :]
I made a birdhouse from a kit by Twilla’s Tiny Treasures, purchased at one of the local shows. I like a white birdhouse best, but next to a white house, spring green is my second favorite choice. It came with gingerbread detail, but I left that off for a simpler look.
There’s a handy push mower to make quick work of the upkeep. It’s a Phoenix Model kit from Jennifer’s of Walsall. It’s recommended to use Devcon 5 Minute Epoxy, so I bought some from amazon. This stuff stinks to high heaven with the hardener smelling like rancid, rotten eggs, but it is as advertised at least.
I sprayed the handles and blades with Testors Model Master Metalizer Lacquer in Aluminum Plate. It buffs to a fine metallic finish. I hand painted the grips semi-gloss black. To keep it simple, I chose black for the wheels and guard. The hubs and connecting rods are Testors Flat Olive Drab, leftover paint from the Sopwith Camel from years back. After assembly, I touched up the paint and added some grime detailing…just enough to give this mower a few years of service. I glued the handles half-way between resting and upright so it would look natural while still being able to sit close to a wall, or against a tree.
And, of course, when you’re back in 1915, you should have photos that feel as though you’ve stepped back in time.
Let’s take the van for a spin!
——
UPDATE: Ye Olde Taxidermist has won an Honorable Mention in the 2016 HBS Creatin’ Contest! It’s a great honor to have my work recognized. A huge thank you to HBS! You can see the winners and remaining entries posted here. Congratulations to all on your creativity and hard work!A special thank you to Debora, Bill, Lyssa and Barbara for your support, friendship and contributions to the build! And, a warm thank you to everyone for your kind comments and encouragement along the way!
Categories: Ye Olde Taxidermist
December 16, 2016 | 0 commentsMaking a tree – part 4
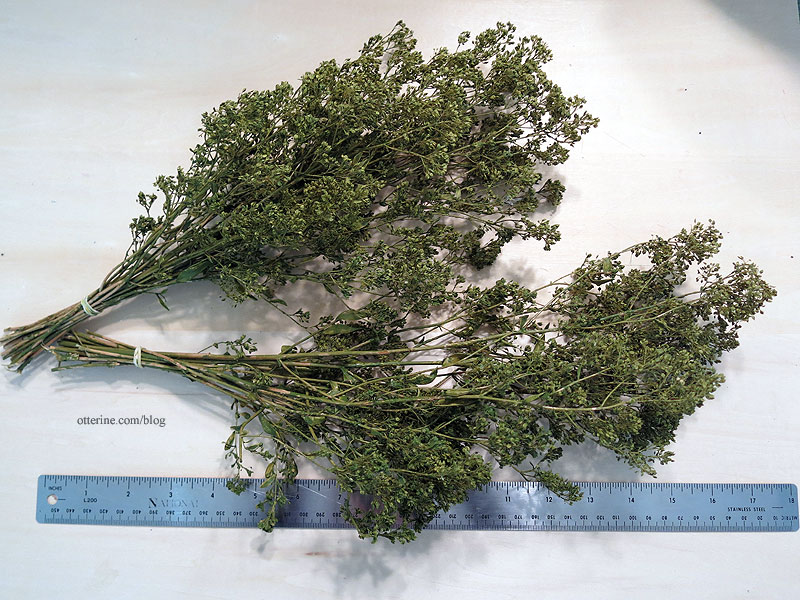
I stumbled across a wonderful tutorial by Connie Sauve on making realistic trees. (As of 2024, it seems her tutorial is no longer online.) She used a natural leaf material called candytuft.
I ordered candytuft in basil green from Scenery Solutions. I looked at the local floral shops, but the floral sprays they had were different and not really workable. I bought two bunches since I wasn’t sure how much I would need. I probably should have ordered more for this tall tree in the first place, and I did end up ordering three additional bunches. I will likely use three bunches overall, so I’ll have some leftover for next time and other projects.
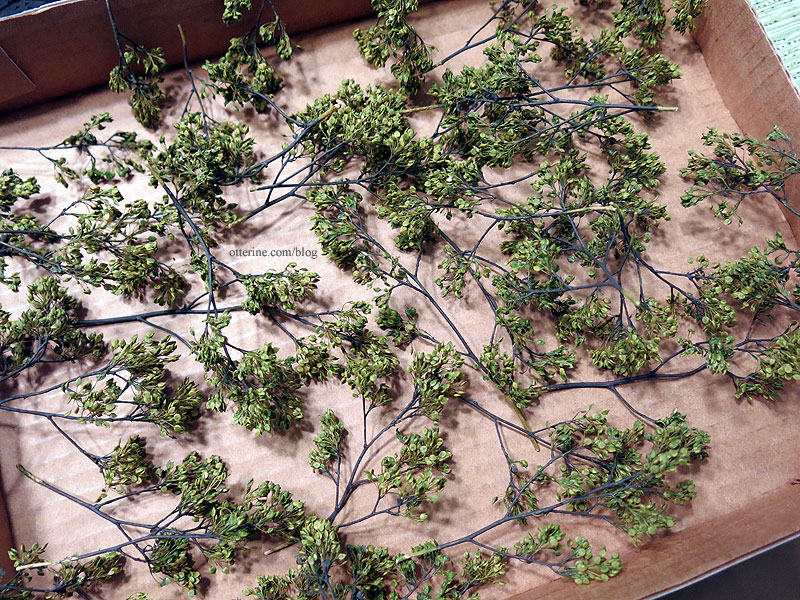
Detail of the “leaves” shows the variegated color that works well for visual interest. (Unfortunately, as of 2024, candytuft is no longer readily available.)
Since I started with green, I had to paint only the stems. Quick and dirty, no fine detailing here. It transformed them immediately. I can certainly see why these are so popular in model railroading.
Since I changed the type of foliage, I ended up clipping a lot of the wire branches I added since the candy tuft flares out and works better with a shorter base branch. I bought clips at Michaels and used Aleene’s Quick Dry.
Adding the branches was actually less of a pain than one-at-a-time leaves with a quicker payoff.
I touched up the paint around the glued bits to blend in with the tree branch tips. Hooray! :D
Looks full until I turn it to the side.
Once the additional candytuft arrived, I was able to finish the tree and plant it.
I made one branch to fit over the roof, because who is going to climb a ladder to trim it?
After trying out this method of foliage, I will have a hard time going back to any other way.
Categories: Flowers, plants, and trees, Ye Olde Taxidermist
November 26, 2016 | 0 commentsChrysolite kits
Finding good lighting is always a challenge but not impossible. I’ve used Chrysolite kits in the past, and I like their adaptability even if they are more old fashioned in design.
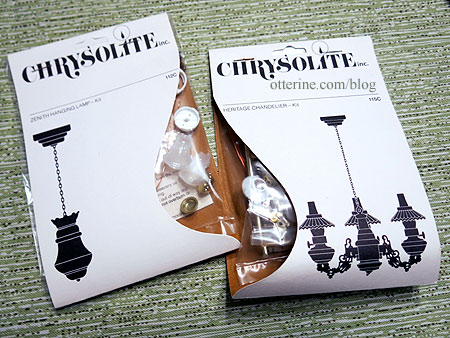
I had one Zenith Hanging Lamp kit already, and Debora sent me a matching kit along with two Heritage Chandelier kits for my project.
They are finished in color, and in theory you can just put them together as is but I never work that way. I’m a perfectionist, and it bothers me when the plastic shows under the factory finish where the plastic parts separate from the sprue. So, I’ve chosen gunmetal for the single pendants and black for the chandeliers.
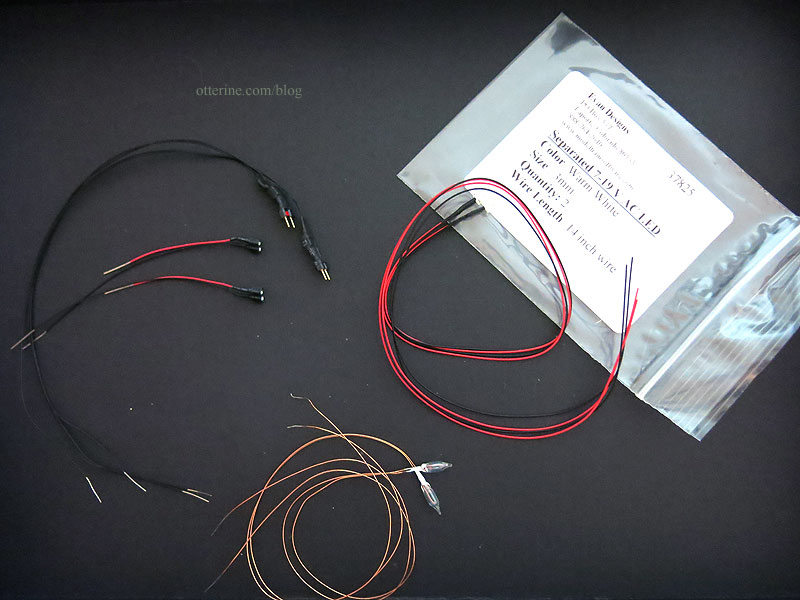
I also prefer replaceable bulbs. Now, some of these kits can be purchased with replaceable bulb sockets, but these did not have that feature. For the Heritage Chandeliers, I chose to use 3/16″ Cir-Kit candle sockets with varnished wires. The included kit bulbs are shown in the middle here.
These were a test of wills. The required splicing of six wires into two bundles of three, ending in one exit wire each, inside the main cone is not an easy task and you get one shot at it because you cut the wires so short. I had to scrap three sockets in one attempt. But, it all worked out in the end. Here’s the first socket installed with the wires looped through the bracket.
I changed out the included chain for heavier (and darker) chain.
Here’s the first one 99% complete. I need to paint to cover the red wires so they won’t be as noticeable.
I also want to add wax to hold the hurricanes and shades in place. They will still be fiddly but more manageable.
They really are perfect for the space.
I changed the Zenith lamps to pendants with aluminum tubing. I used 3mm LED bulbs from Evan Designs since there is no way to make the bulbs changeable and LEDs last longer. I chose separating LEDs so I could feed the new wires through the tubes but still have these connected to the 12V system. Again, I’ve shown the original kit bulbs below.
Twisting the wires makes it easier to feed through the tubing.
I spray painted the pieces a darker gunmetal color to replace the factory brass paint finish before the final assembly.
The 3mm LEDs look like true bulbs as well. :]
The are perfect in the shop window.
Categories: Ye Olde Taxidermist
September 8, 2016 | 0 commentsSunburst gable
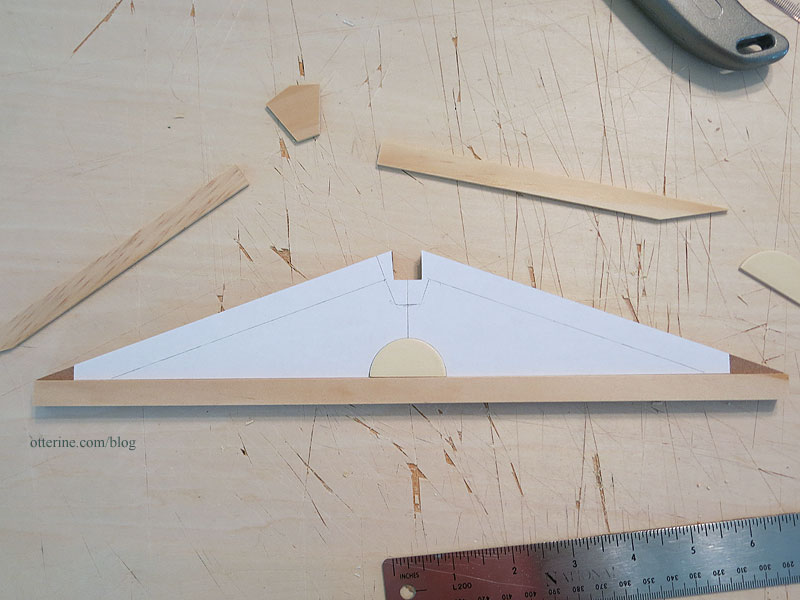
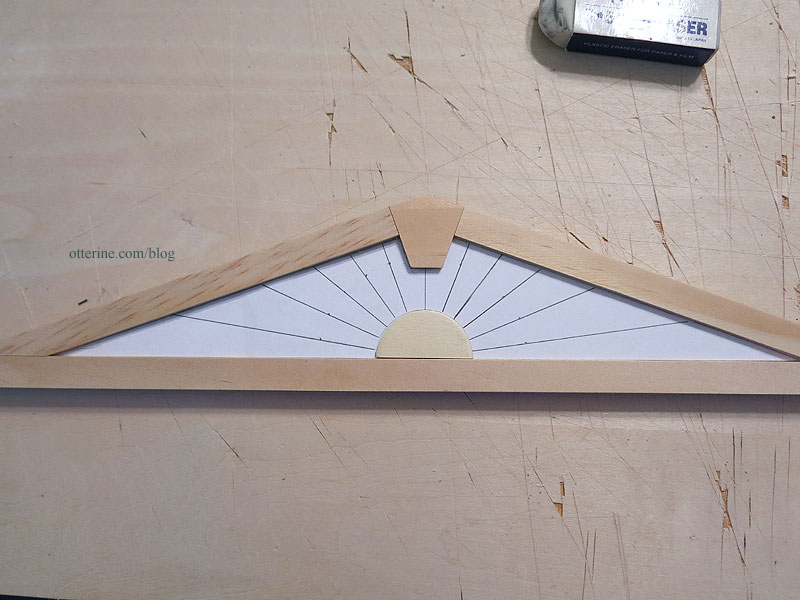
Here are the front gable parts that come with the Creatin’ Contest kit.
I started by gluing the bottom trim piece in place.
I cut a piece of paper to fit the surface above the lower trim piece. I cut a Woodsies circle in half and centered it on the paper. I marked the circle and upper trim placement on the piece of paper.
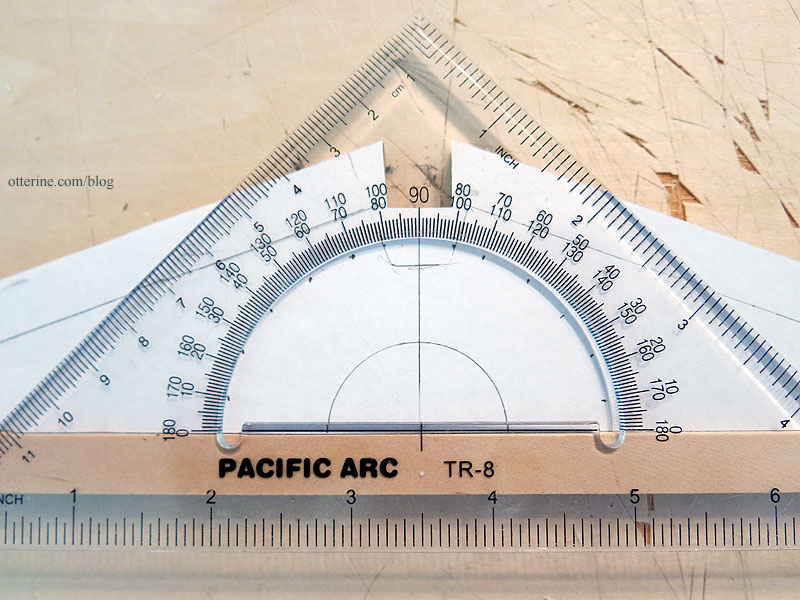
Using a protractor, I marked where I wanted my sunbeams to intersect the circle hub.
After drawing the lines, I checked the pattern to see if I liked the look. SOLD!
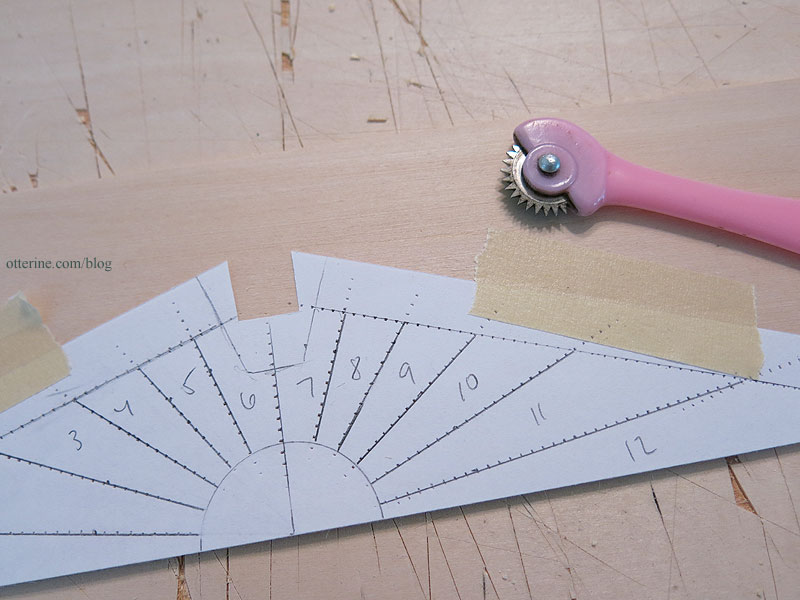
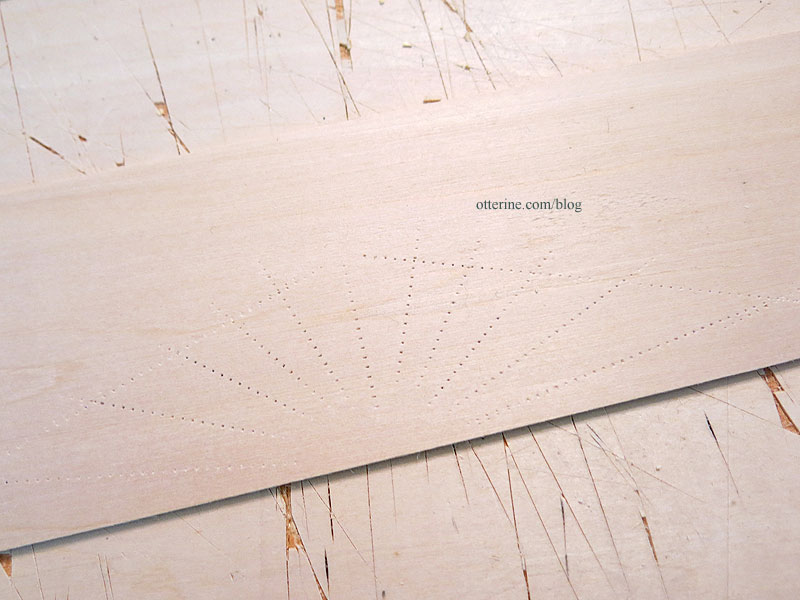
I used a tracing wheel (a sewing tool) and a ruler to transfer the marks onto a piece of 1/16″ thick basswood.
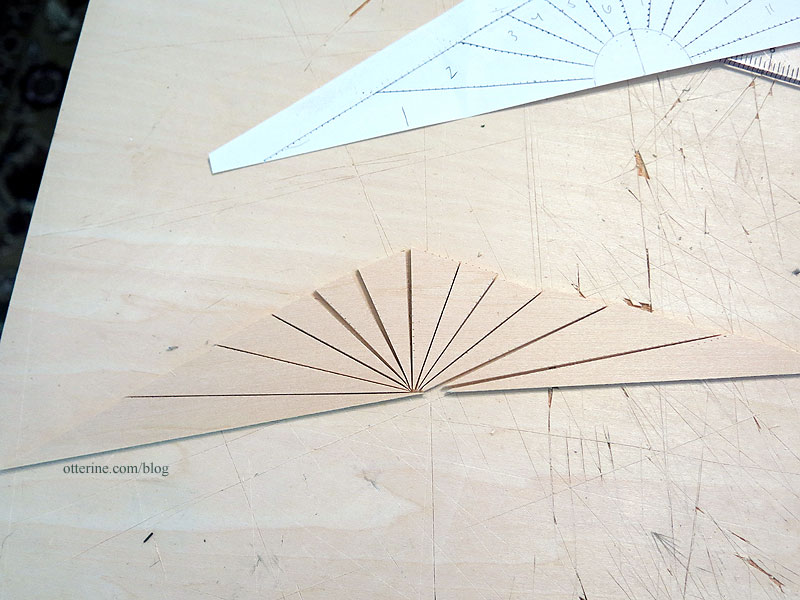
I cut along the dots with a blade and ruler.
I glued the upper long trims in place and then sanded the sunbeam pieces along the edges to remove any hint of the transfer dots. Starting with the largest pieces, I fine-tuned the fit and marked where to cut each sunbeam in order to frame the circle hub. This is all in dry fit — no glue on the sunbeam pieces or the circle hub just yet.
I continued until I reached the middle pair. Due to the cutting and sanding, these ended up too small for the space so I custom cut two new pieces to fit.
I glued the sunbeam pieces and circle hub in place before adding the small trim piece on top.
After painting, I added just enough detail.
Categories: Ye Olde Taxidermist
August 22, 2016 | 0 commentsMaking a tree – part 3
Continuing work on the tree. I filled the bottom of the trunk with water putty to make a solid base. I wasn’t worried about it toppling over, but I didn’t want the outer shell to crack if it were bumped or squeezed in the wrong way.
To achieve a good base color for the bark, I mixed Zinc and Bittersweet Chocolate by Americana. I stippled the paint onto the tree to avoid leaving obvious brush marks. After letting the paint dry, it was easier to see which areas were missed in the first go around.
I dry brushed some Zinc mixed with Mississippi Mud to highlight.
The lighter paint brought out the bark detail. It looks solid and treelike, no? :D
I like the slight bend in the trunk…seems much more natural.
A real tree has a great deal more branches than the base I’ve created, and those branches taper into batches of leaves. My purpose is to get the general feel of a tree and to accent the landscaping.
I have 95 base branches, which may seem like a lot, but there will be bare spots if I leave it as is. Adding branches after the putty has dried is not impossible, but there are some drawbacks and limitations. Yes, you can start out with more wires to have more base branches, but then you end up with more of the bulky base branches and not thin branches at the ends where they are needed the most. Carrying thin wires with the larger wires still adds bulk to the base branches.
I took short lengths of 30 gauge brown wire and curled them around the base branches where needed, adding 120 small branches. Now I have 215 branches for a much fuller tree.
I mixed Durham’s Water Putty again and covered the joins. This does create bulk and you can somewhat see the twists since I didn’t go overboard with the application, but this shouldn’t be a focal point once the putty is painted to match the bark and the foliage is added. I didn’t add these before finishing the base tree and branches because it is hard to paint the interior with all these fiddly branches on the outer surface. Much easier to just touch up the paint where needed.
Categories: Flowers, plants, and trees, Ye Olde Taxidermist
June 2, 2016 | 0 comments
NOTE: All content on otterine.com is copyrighted and may not be reproduced in part or in whole. It takes a lot of time and effort to write and photograph for my blog. Please ask permission before reproducing any of my content. (More on copyright)