

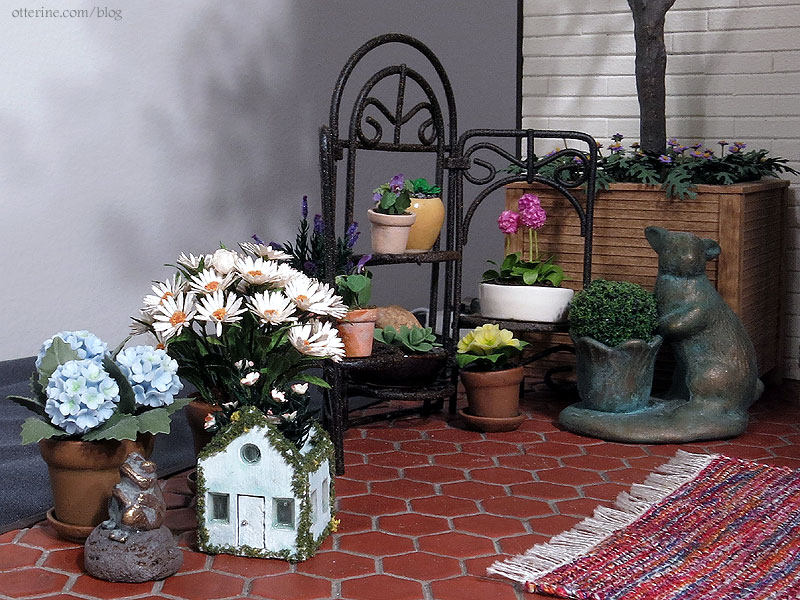
Whinnie’s Terrace
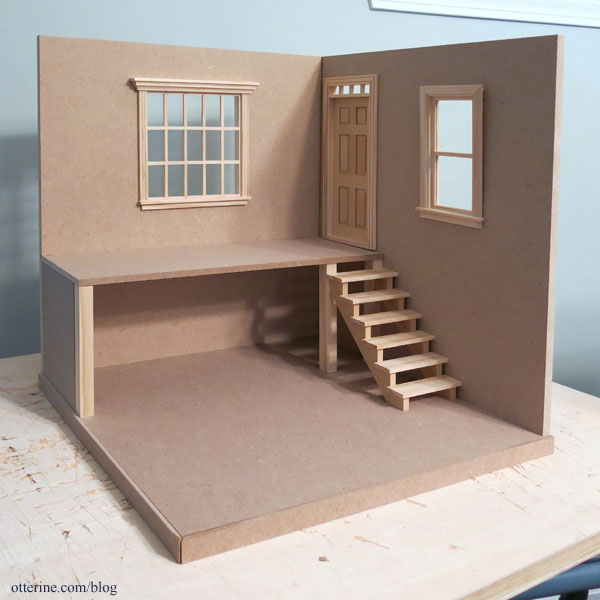
I had a different idea going for the HBS Creatin’ Contest at the beginning of the year that came to me before I saw the kit, The Corner Place. I built a few things that I loved, but I couldn’t get the final piece to look the way I wanted. I ended up taking a fresh kit and starting a more modest idea shortly before the deadline.
——–
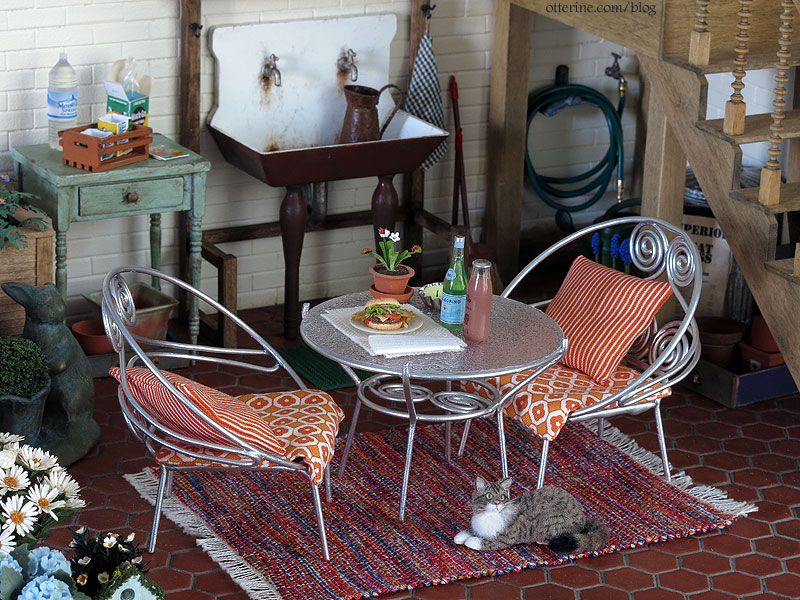
Whinnie’s Terrace is a quiet space to enjoy a meal, test your green thumb, and play with cats. Named after one of the sweetest cats to ever live who has left us for the rainbow bridge. I built a place of beauty and serenity to remember her by.
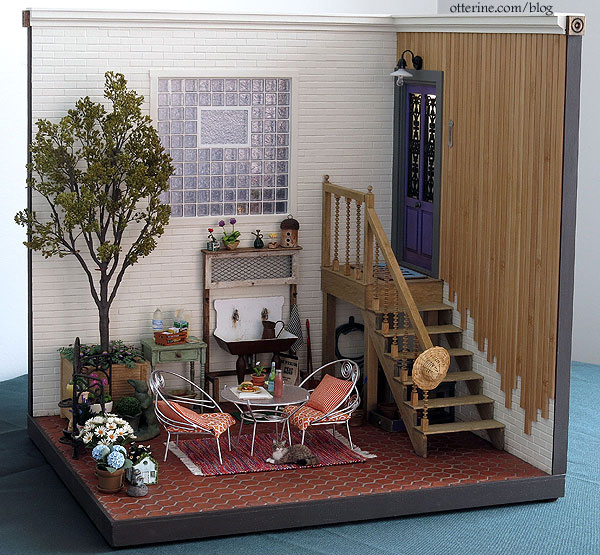
This is the first time I’ve dedicated a whole build to an exterior, so my selection of minis to include was different from what I normally do.
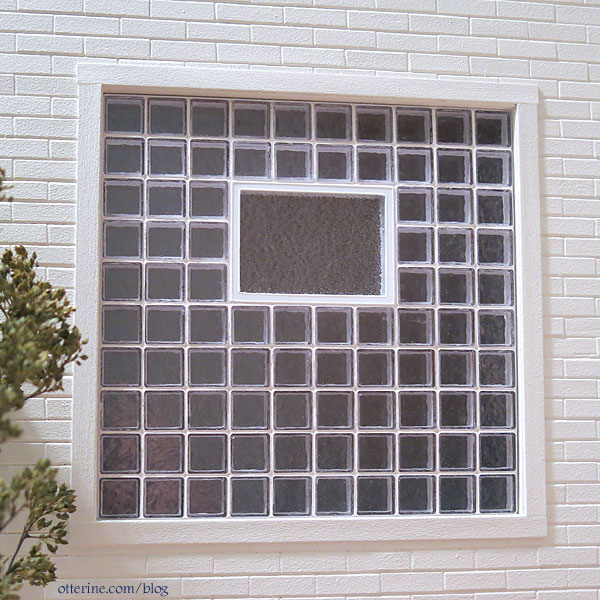
The glass block window I made for the previous project found a home here, so not all of my previous efforts had to be stored away.
I made some minis, bought some minis and received some minis as gifts.
After finishing the staging, I really wanted a burger on the patio. :D
I made only two modifications to the overall layout. I closed up the small side window and shortened the catwalk to a landing only.
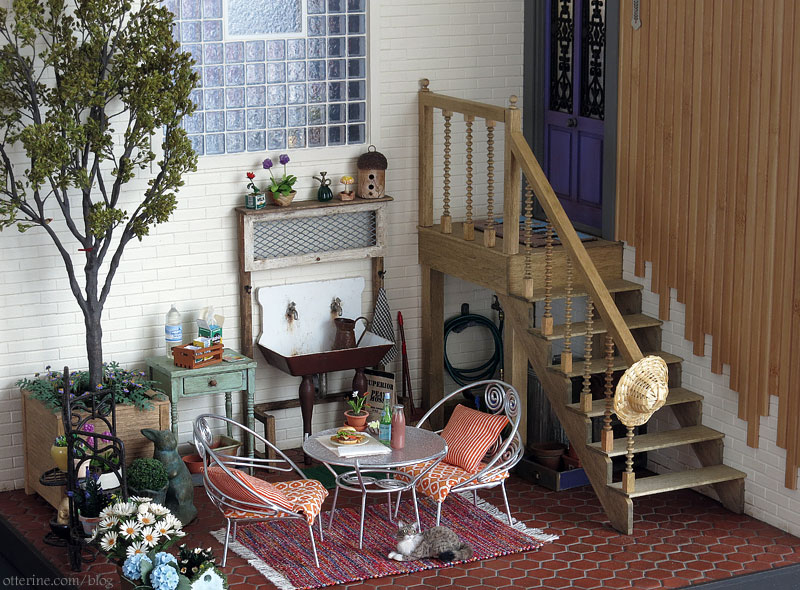
My muse Miss Whinnie from back in 2018. She loved hanging out in this old patio chair, so I thought an outdoor space in her honor would be a lovely project for a dismal year.
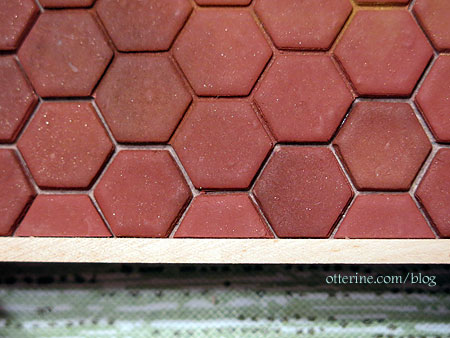
The terracotta hexagon tile flooring was made from polymer clay (parts one, two, and three)

It was labor intensive and time consuming, but I was very pleased with the end result.
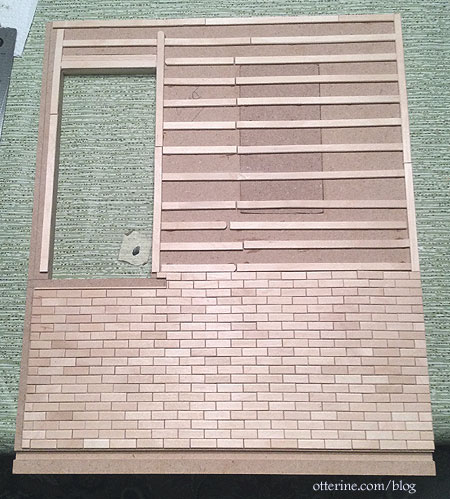
The walls are covered in wood brick made from skinny wood craft sticks by Creatology. I’ve done a tutorial on this finish in the past with a different brand of sticks, but it’s the same process.
For the back wall, I had to measure each row carefully to make sure it was even and level all the way up and around the window opening.
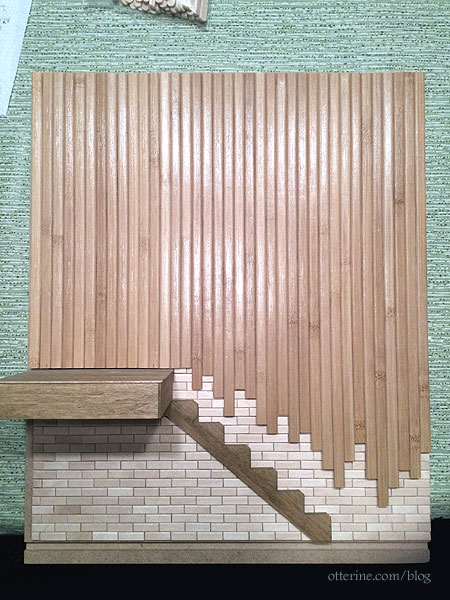
For the side wall, I had to cover only part of the lower wall with bricks since I applied what I term bamboo waterfall paneling to the majority of the wall. I used uncut sticks to give the same layer depth to the portion without bricks. I later painted the bricks White Birch satin by Americana.
The bamboo is from a table runner, and I left the finish untouched.
I freely share nearly every process when I make things with very few exceptions. The glass block window process is one of those exceptions, so there is no tutorial or materials list at this time. A few people have asked whether I would sell the blocks, but the window isn’t made of standalone individual blocks and would need to be as a whole window structure.
I originally wanted a working hopper vent for the window, but in the interest of saving time, I opted to make a solid window for the middle. I could have filled in the space with more glass blocks, but I like the break in the pattern the window provides. I built the window from styrene sheet, styrene rod and rippled water sheet.
The stairs were made using the mdf catwalk support from the kit, stair stringer and tread stock from Northeastern Scale Lumber, and random basswood. The stain is Driftwood by Minwax. The railings are vintage stock from Northeastern. I wish things like this were still made today. Fine accessories like these can make such a difference.
Under the stairs, I added a hose, holder and spigot. I’ve always wanted to do one of these, but I never had a build where it would fit so well.

I later added a watering can from Shepherd Miniatures and a vintage trash bin by Ken Ketteridge.
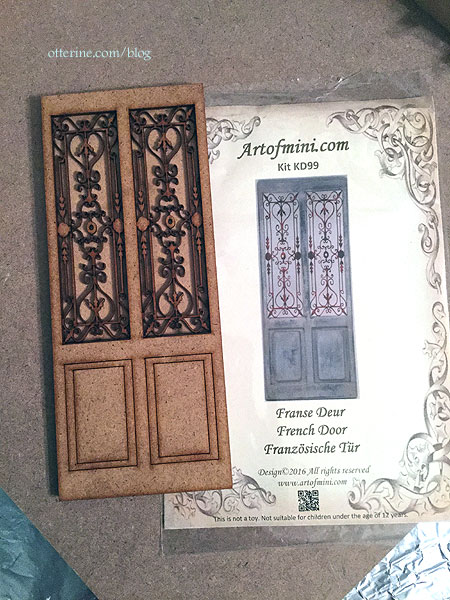
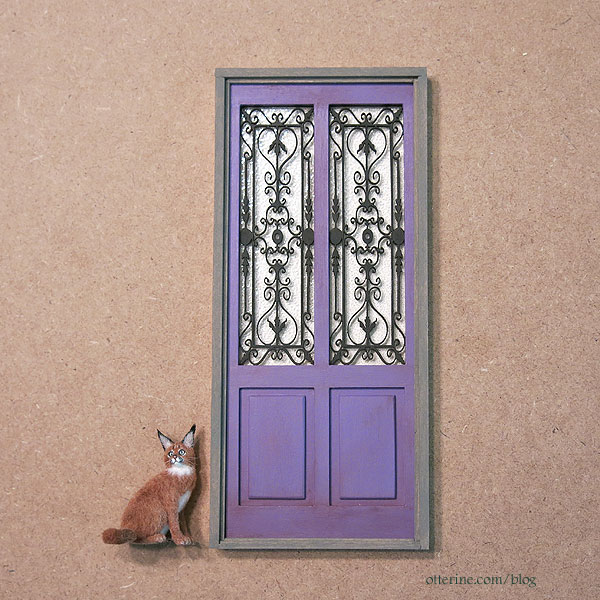
The fancy wrought iron door is a kit from Art of Mini.
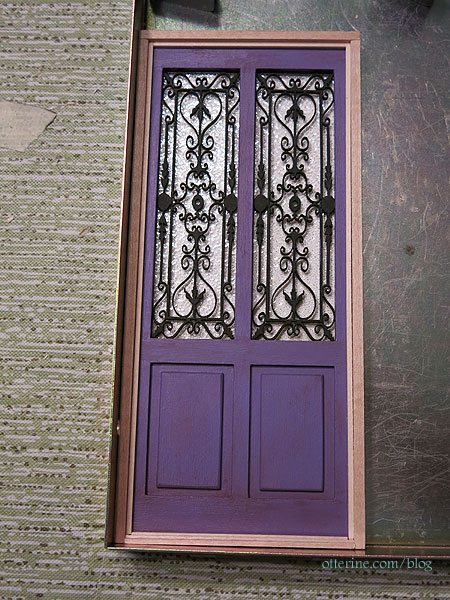
The door is painted Lilac Love by Folk Art, and the wrought iron is painted black brown. I built a door frame from basswood since this was not included with the kit, but this isn’t a working door. I added rippled water sheet as windows to simulate pebbled glass.
Once I got to lighting behind the door, the original paper I used for the shade proved to be too thick. I replaced it with a light swirl vellum.
I added gentle aging with pastels. It’s not an old door, but it has been exposed to the elements for a few seasons. The door knob is from Sussex Crafts, and the keyhole cover is from HBS. Since the amount of room for hardware is so limited, I opted for an old style center knob. The Meyers wall light is from HBS, and the thermometer was made by le mini di Pierluigi.
The French knot rug depicts five felines near and dear to me: River, Cloie, Jasper, Whinnie and Cosmo. They’ve each touched my life in a special way. The original pattern was made by Anne Ritter, and I was inspired by the rug made by Shelly Norris from this pattern. I altered the position, shape and size of the various cats to better suit the real life cats they represent. The rug measures 3 1/8″ by 1 3/4″ and took me 28 hours to stitch.
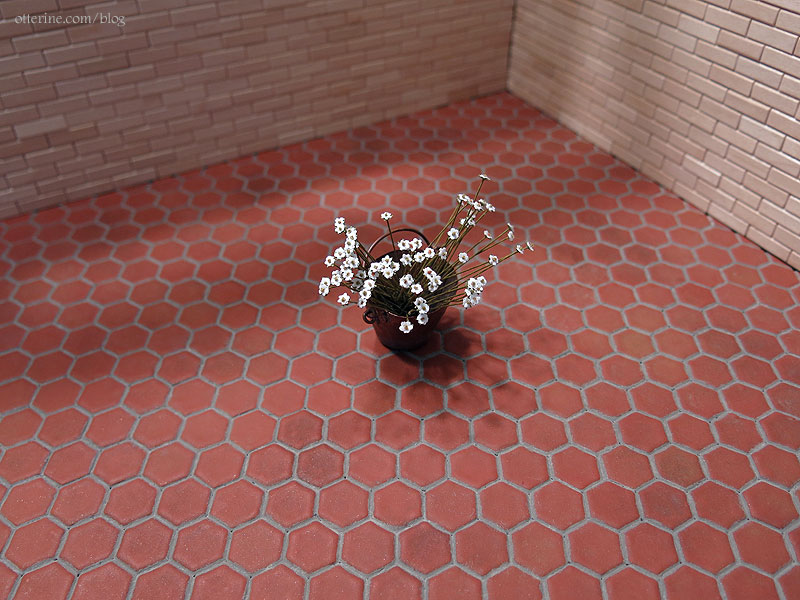
Of course, I had to include a lovable feline in the courtyard, so I chose Roux made by 2014erok.
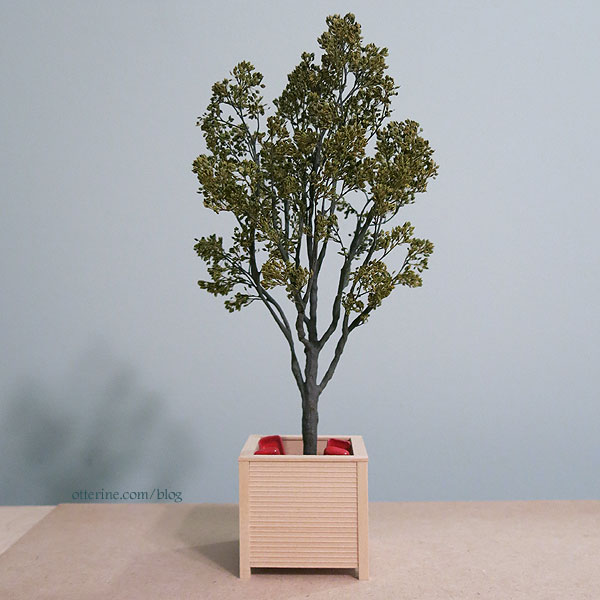
I made a container tree so that the space would have a large shade plant without permanently placing landscaping features (parts one and two).
I made some flowers and leaves to fill in around the base of the tree. It’s just enough to finish the look of a container tree.
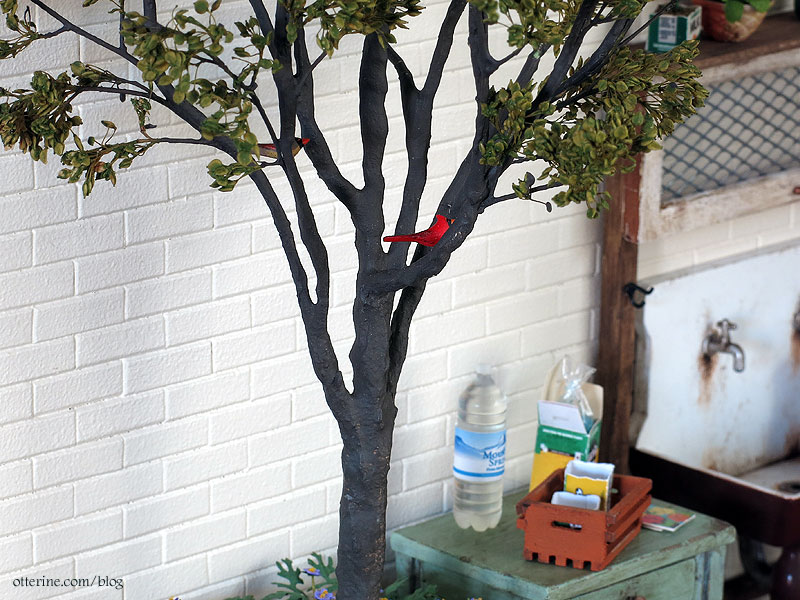
I added a pair of cardinals by Mini Gems, too. :D
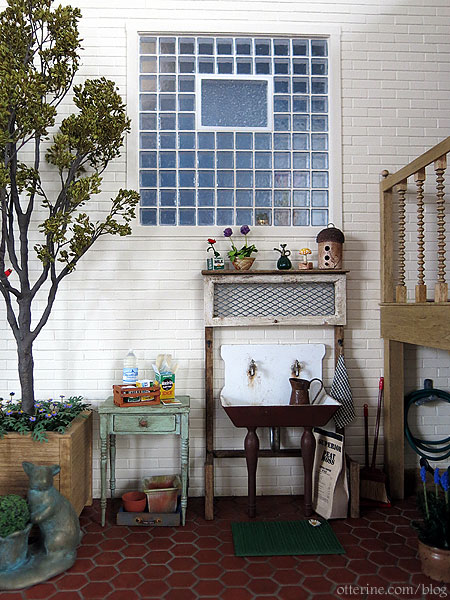
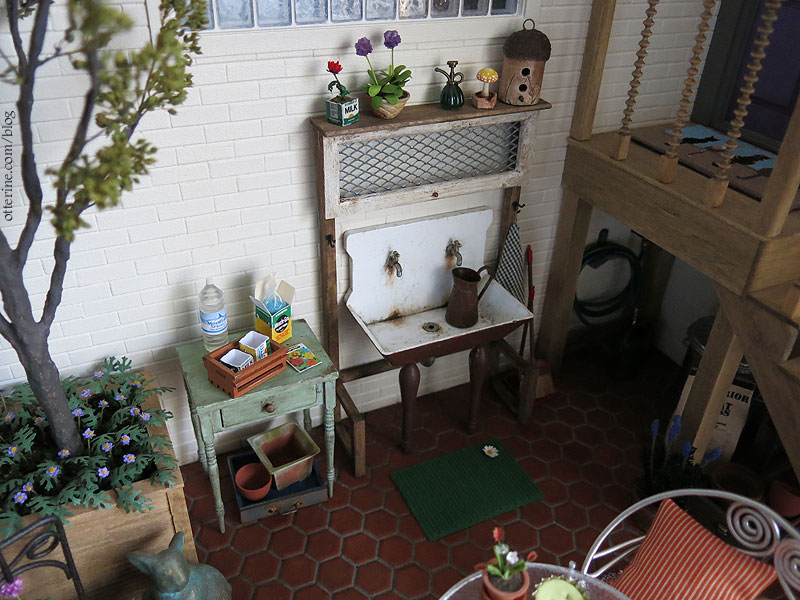
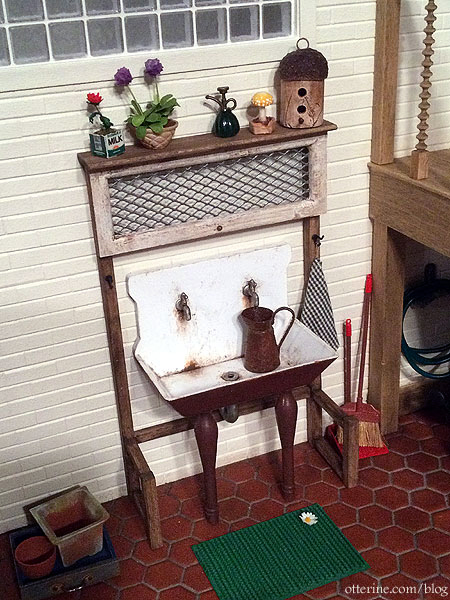
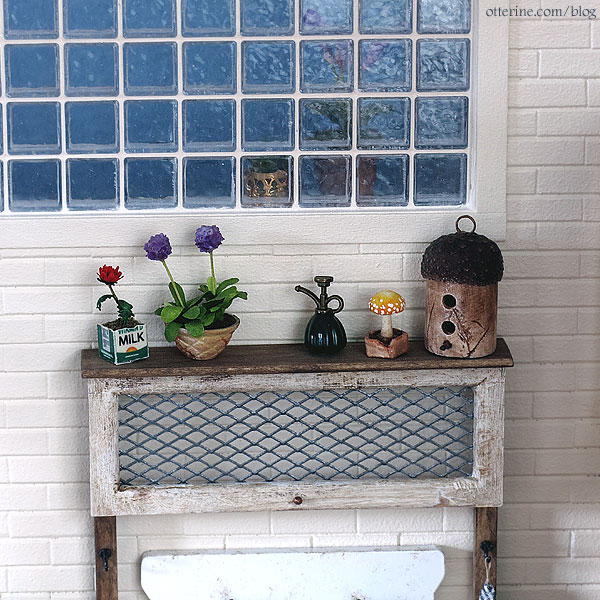
The sink is a vintage metal piece I bought at a local show years ago. I aged it with acrylic paint and added a metal washer for the drain. I’ve seen a lot of inspiration photos showing old shutters or windows above a garden sink, but I didn’t want to attach anything permanently to the wall that might limit the versatility of the build. I built a standing shelf using a door bought from a local show and basswood. I did have to replace the screen from the original since it was damaged. I added Chrysnbon hooks and a towel on a rope made from a scrap of fabric. The broom and dustpan set is from D’s Miniatures, the rustic pitcher is from Sinny’s Mini Art, and the doormat is from A Little More in Minis.
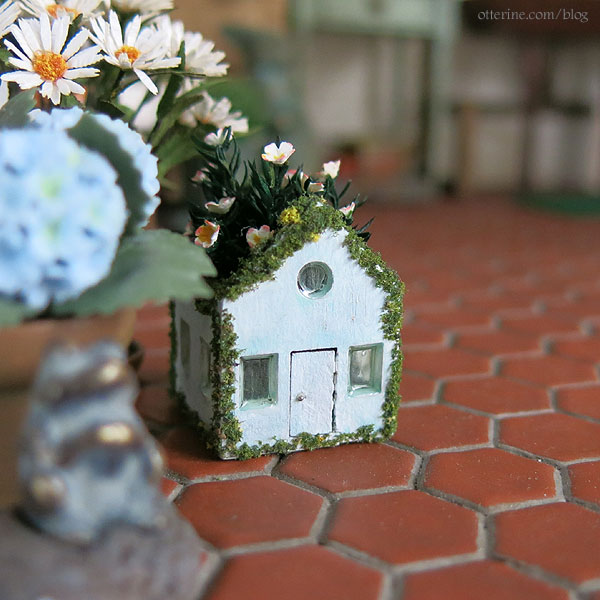
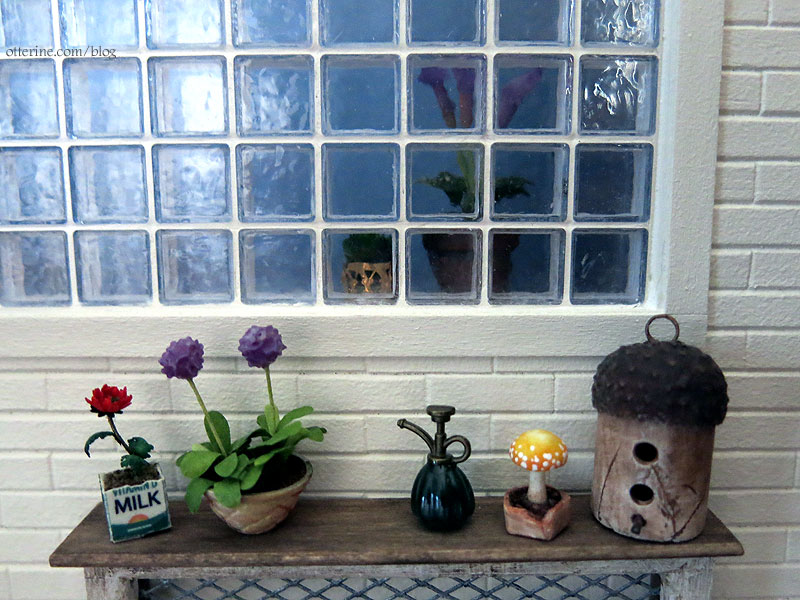
I made the milk carton flower from a true2scale kit, the purple flowers were a gift from a friend, the mister bottle is from HBS, the mushroom and acorn birdhouse are by 64tnt Miniatures.
I made a side table from a Hepplewhite Serpentine Table kit by The House of Miniatures. I cut the table top to a rectangle and replaced the legs. It’s painted Folk Art Villa Green over brown, then aged with brown paint washes.
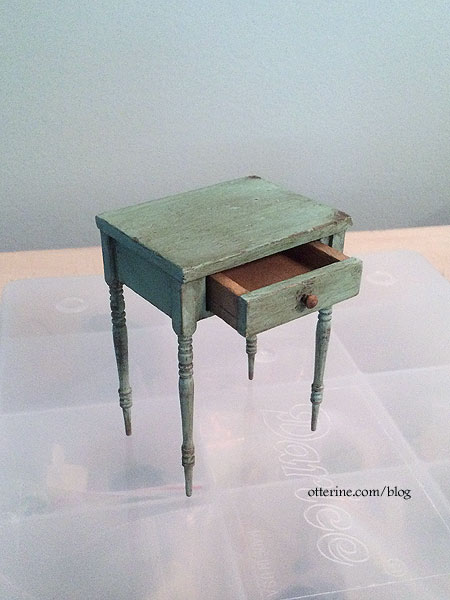
It’s now an old table repurposed for the courtyard. The old drawer is by Dollhouse Smithery and the square pot is by Braxton Payne.
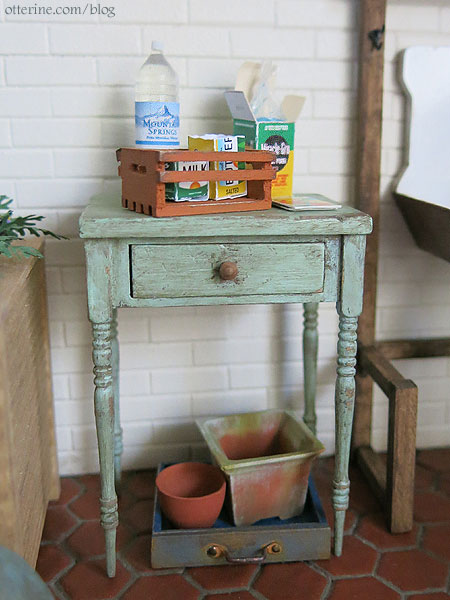
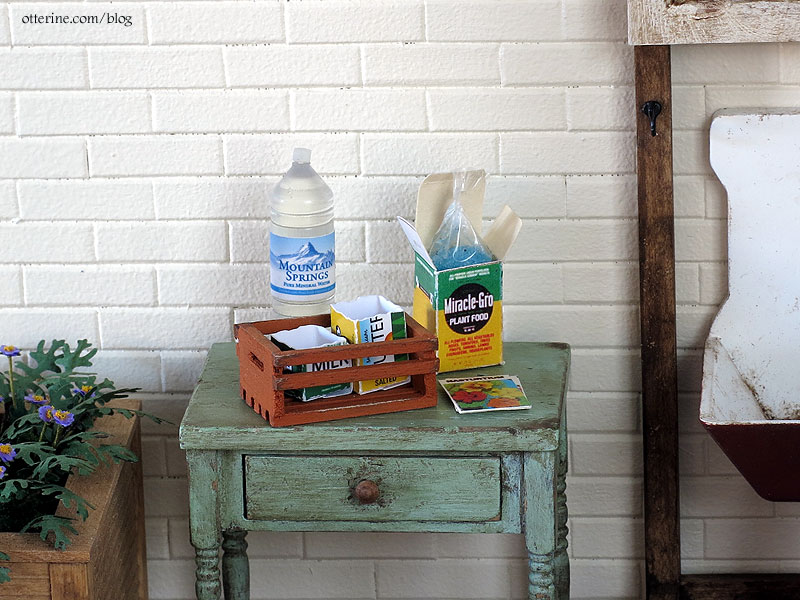
I’m not much of a gardener, but I can keep most potted plants alive as long as they are hardy species. :D My small setup includes a water bottle from Shepherd Miniatures, a crate by Dollhouse Smithery, Miracle-Gro by Wright Guide Minis, nasturtium and petunia seed packets made by me from a Farrow Industries kit, and butter and milk containers from a true2scale kit.
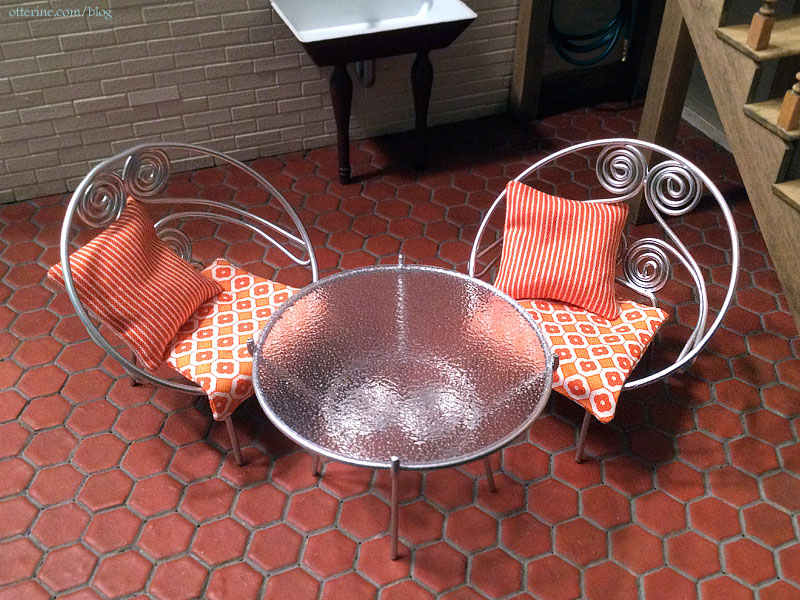
The patio set is a vintage white wire set scraped, repaired, repainted and upholstered in retro inspired fabrics. I cut a new tabletop from rippled water sheet.
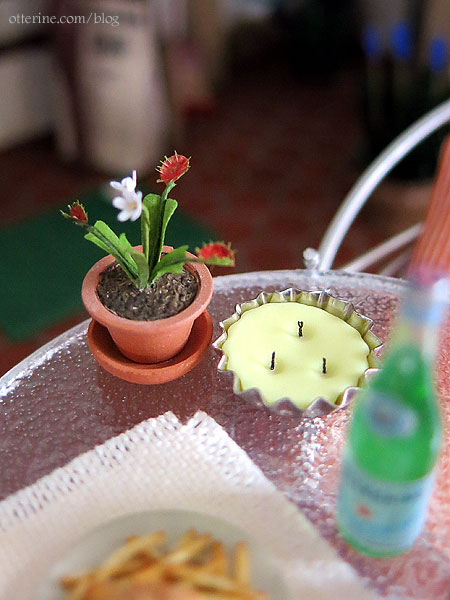
I decided at the last minute what I wanted on the table for staging the scene. I added a citronella candle (made by me) and a Venus fly trap plant by Lamis Minis in case the candle doesn’t work. :D
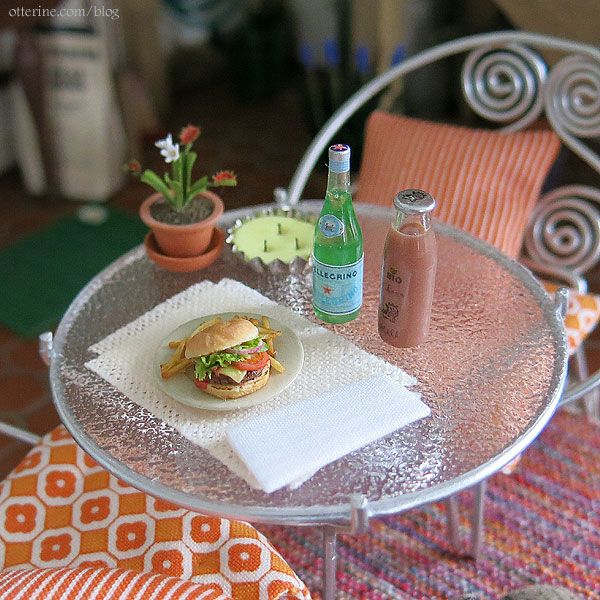
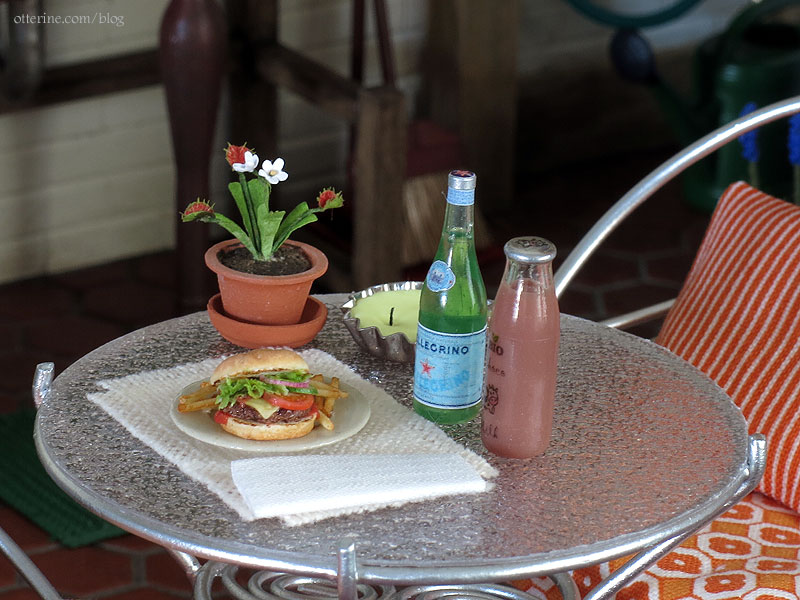
The placemat is vintage, and I made a quick napkin from a scrap of fabric. The Pellegrino water and chocolate milk are by Alma. The burger is by Sugar Charm Shop.
This all made me so hungry while taking pictures.
The rug is vintage and sent to me by Robina. We’re not sure who made it, but it’s an expertly woven rug in beautiful colors.
The various plants were purchased, gifts, or made by me. The frog is by Spencer’s Nook.
This one was made by my dear friend Debora. :]
To control the lighting behind the door and the view through the glass block window, I made small room boxes to attach to the back. The back of the build is covered in a remnant of real life wallpaper. The boxes are painted and papered, and held in place with support blocks and magnets. I added LEDs to each box.
This helps create the illusion of an interior building on the other side.
I didn’t want a full room behind the window, so I chose to make it look like a hallway or stairwell, with a couple of plants on the window sill inside.
Behind the scenes in my kitchen photo studio. :D
This small build brought me a lot of joy, and I couldn’t have asked for a better muse. We miss you and love you always, Whinnie.
UPDATE: Whinnie’s Terrace has received an Honorable Mention Award in the HBS Creatin’ Contest 2020! Thank you to all the fine folks at Hobby Builders Supply and to my friends, family and followers for all the encouragement and support along the way! Thank you, sweet Whinnie, for being a wonderful muse. I’m thrilled to have been recognized! :]
Categories: Whinnie's Terrace
December 19, 2020 | 0 commentsContainer tree, part 2
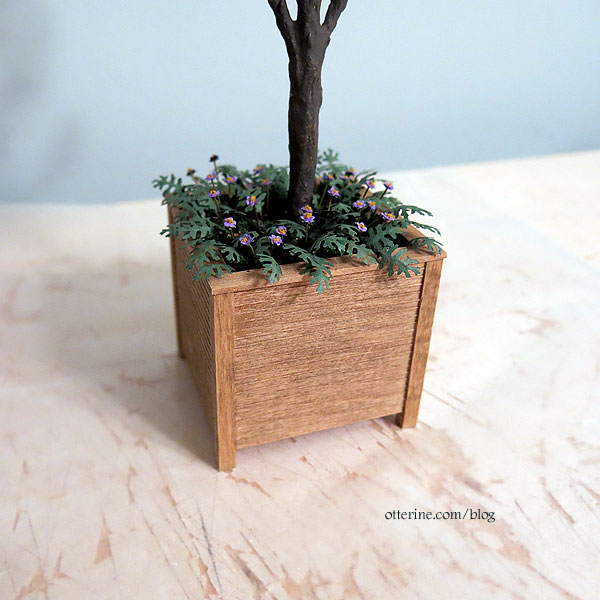
Completed the container tree. I built up the interior of the container with glued-in layers of foam, first thick layers of builders foam (shown below) and then thinner layers of white foam sheet to get to the right height.
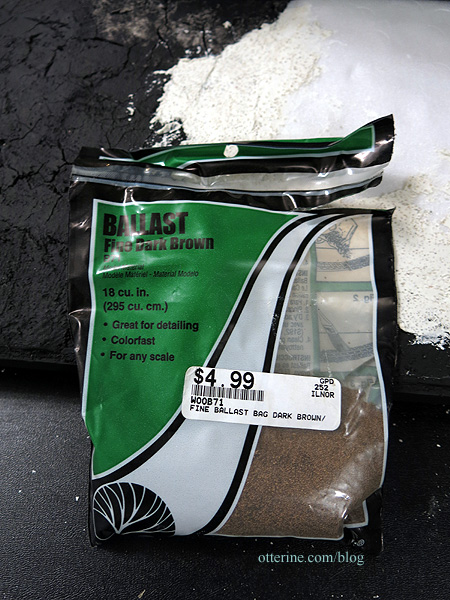
I filled the spaces around the foam with ballast glued in with Woodland Scenics scenic cement. My local go-to store is HobbyTownUSA.
I topped the ballast with loose underbrush foliage, again glued with scenic cement.

The flowers were made from pre-cut impatiens flowers purchased from a local show, loose yellow foliage and calyxes punched from origami paper.


I made leaves from a dusty miller punch and origami paper.

I attached the leaves and flowers to thin floral wire then planted these around the base of the tree to fill the container before the scenic cement had time to cure.
It’s just enough to finish the look of a container tree.
I added a pair of cardinals by Mini Gems, too. :D
Categories: Flowers, plants, and trees, Whinnie's Terrace
December 19, 2020 | 0 commentsContainer tree, part 1
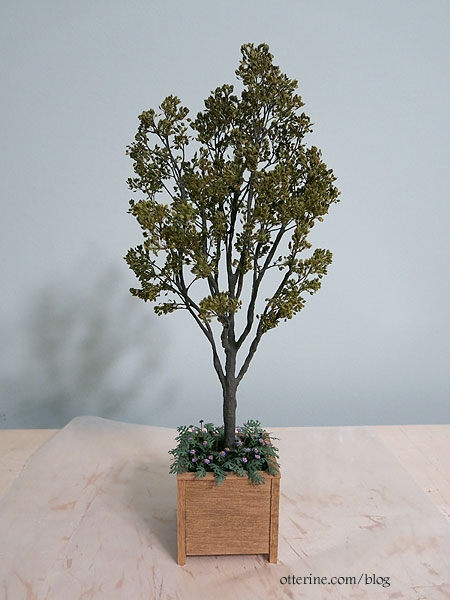
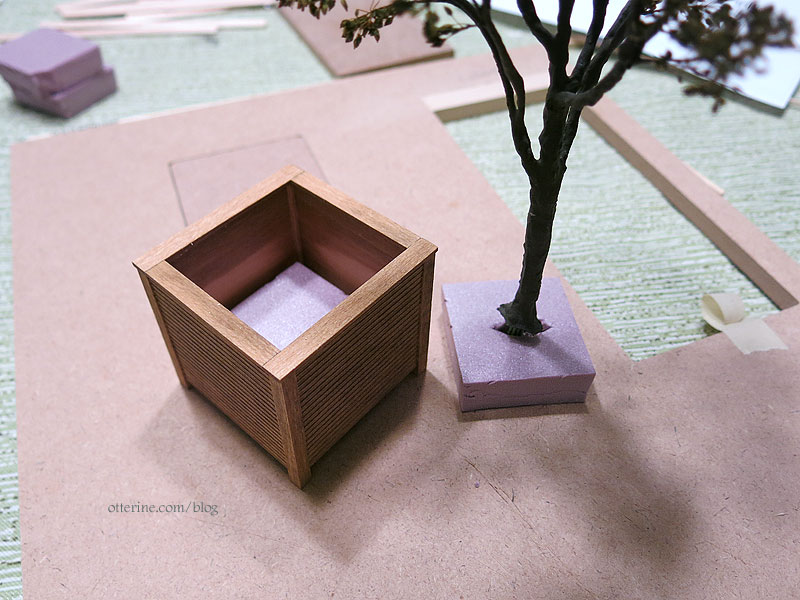
I made a small tree, but instead of planting this one in the ground, I wanted a container tree that I could reposition. I’m using the same wire and putty technique I’ve used in the past for the trunk, and candytuft for the foliage – notes at the bottom.
I measured the wire structure against the wall to make sure I had good height.
I used a clamp covered with plastic wrap to hold the tree while protecting the clamp.

Applying the putty.

Painting the tree.

Painting the separated candytuft branches — I ended up making quite a few more than shown here.

Ghost is modeling to show the smaller stature of the tree.

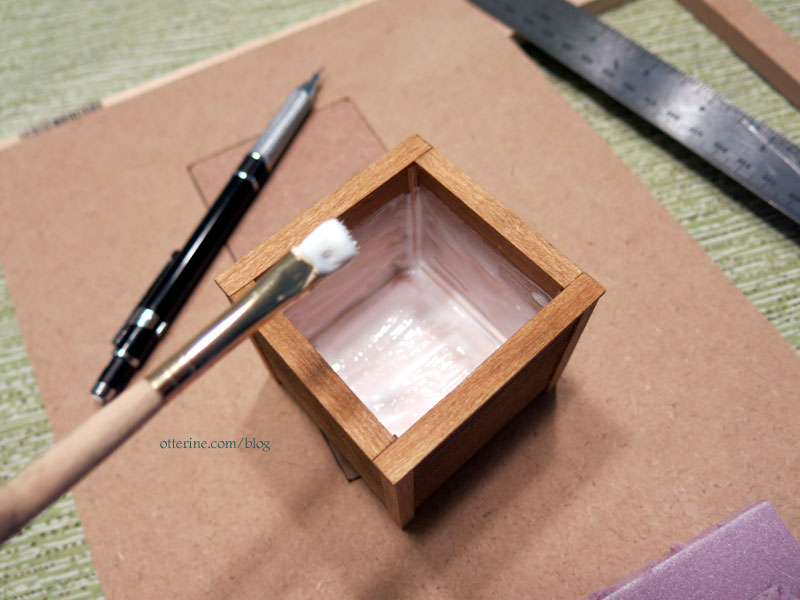
I built a container from basswood and small scale siding from my box of scraps.

I wanted something compact but believable in proportion to the tree.
I stained the planter box with Minwax stain; the color is Fruitwood.

I coated the interior with a heavy layer of tacky glue. This will seal it for when I get to planting the tree.
Update: finishing the container tree here.
———
Notes: Link to the first tree I made using this technique – follow the links in the first sentence back through the process. For the trunk, a good starting source if you can find it is the DVD Master Miniaturists: Landscaping Primer with Diane Myrick. I found mine through interlibrary loan. This whole series is just awesome! For the foliage, I used a tutorial by Connie Sauve on using candytuft, but the tutorial link is no longer active. I bought the candytuft from Scenery Solutions, but they no longer sell it.Categories: Flowers, plants, and trees, Whinnie's Terrace
November 20, 2020 | 0 commentsFancy wrought iron door
Backing up a little here for work previously started. After struggling to get my previous 2020 HBS Creatin’ Contest entry beyond the parts, I finally threw in the towel and started working on a fresh contest kit. I loved the elements I created for the previous entry, but I could not get them to work together the way I wanted. So, those parts are shelved for now and I forge ahead to complete the new entry in time.
The door is a kit from Art of Mini.
I painted the door Lilac Love by Folk Art. The wrought iron is painted black brown.

I built a door frame from basswood since this was not included with the kit. This won’t be a working door. I added rippled water sheet as windows to simulate pebbled glass.
A cut of textured scrapbook paper serves as a window shade for privacy. Since this is a door to nowhere, the back is not finished.

When light hits the door from behind, it creates a warm glow.

I added gentle aging with pastels. It’s not an old door, but it has been exposed to the elements for a few seasons. The door frame is primed here, but this is the general coloration I’m after. Ghost the caracal is by 2014erok.
Next up…finishing the frame and adding hardware.
Categories: Whinnie's Terrace
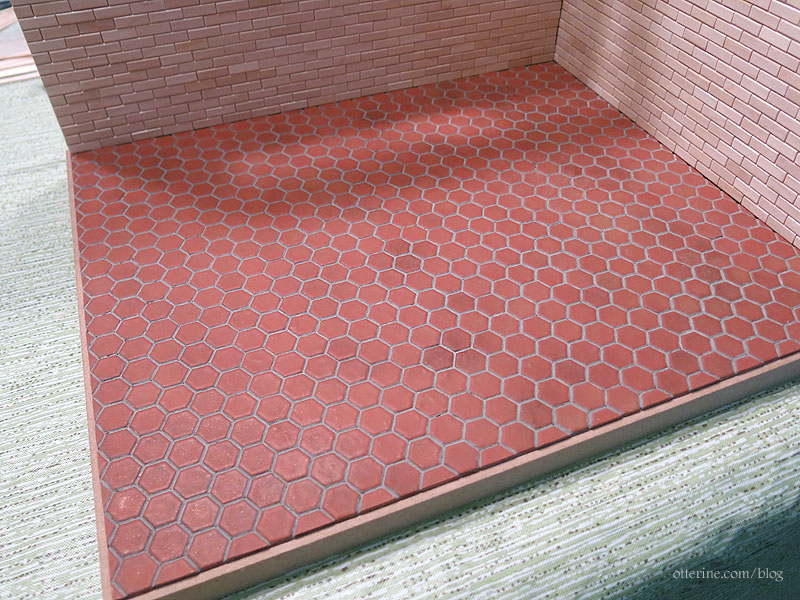
November 4, 2020 | 0 commentsHexagon clay tiles, part 3
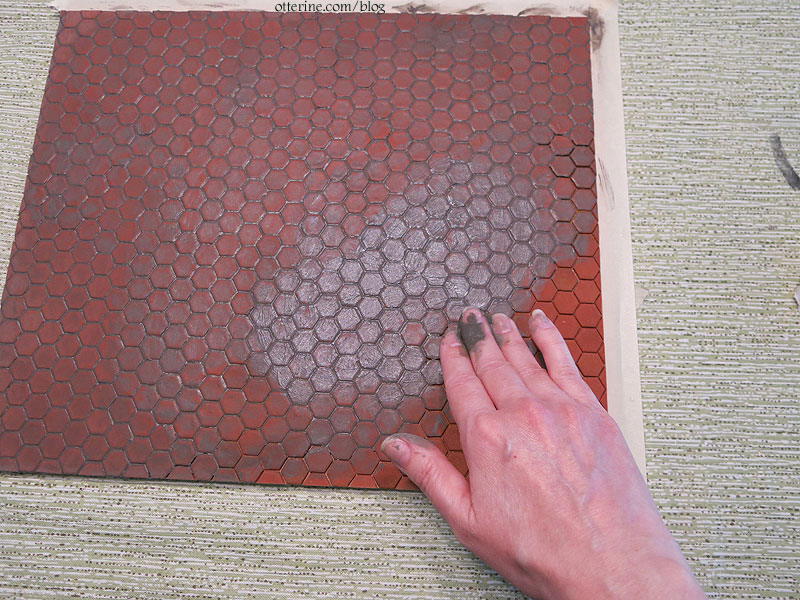
Continuing work on the hexagon clay tiles. Since my first tile grouping had too much bronzer, I figured it was a good choice to test the grout before trying on my finished tiles. I mixed brown and black paint with spackle to make a gentle (non-scouring) grout that was easy to spread. I used my finger to spread it into the grooves around the tiles.
I then wiped away the excess with a wet paper towel. It took a few passes to get it clean. The process lifted some of the tile color I had applied, but the end result was a more even tile so I wasn’t disappointed. If I want more variation, I can always paint after grouting.

I mixed a larger batch for the final floor and masked the areas around the edges where the walls will be glued to the floor board.
I spread the mixture with my fingers in sections and wiped away some of the excess as I went.
I washed the floor after the grouting was complete with water and paper towel. I saved a bit of the grout mixture just in case I needed to touch up any areas.

The initial wash left streaks, so I used a Q-tip to wash each tile individually.
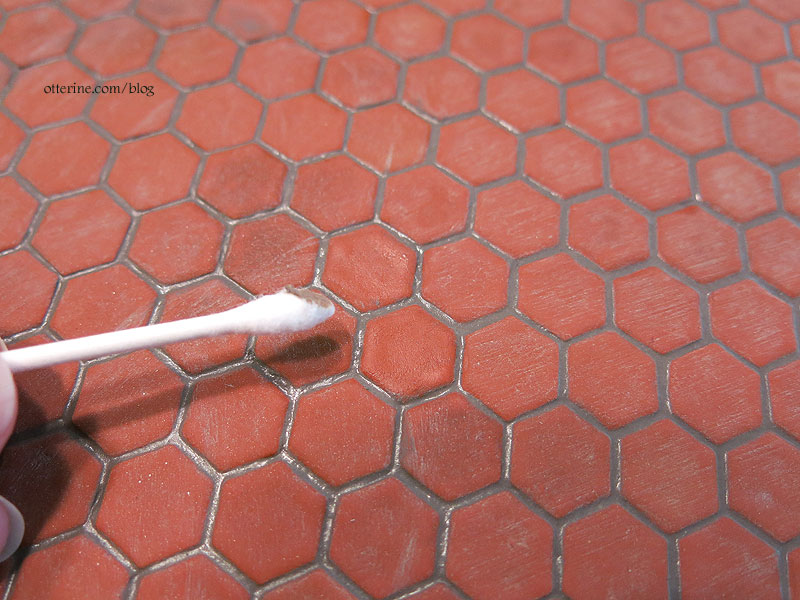
I did small sections and wiped with a dry, clean paper towel.
Once done, I wiped the entire floor with a damp paper towel again.

Then I wiped it dry. Very little color lifted in the last pass, so I called it done.

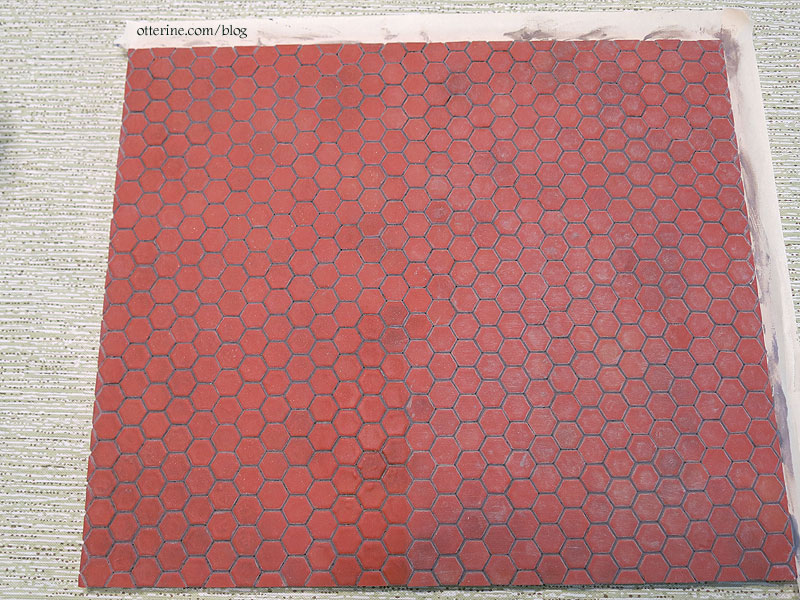
The final result has less color variation than the plain tiles, but I like that better.
I’m glad I gave it a try. :]
Categories: Polymer clay, Whinnie's Terrace
November 4, 2020 | 0 commentsHexagon clay tiles, part 2
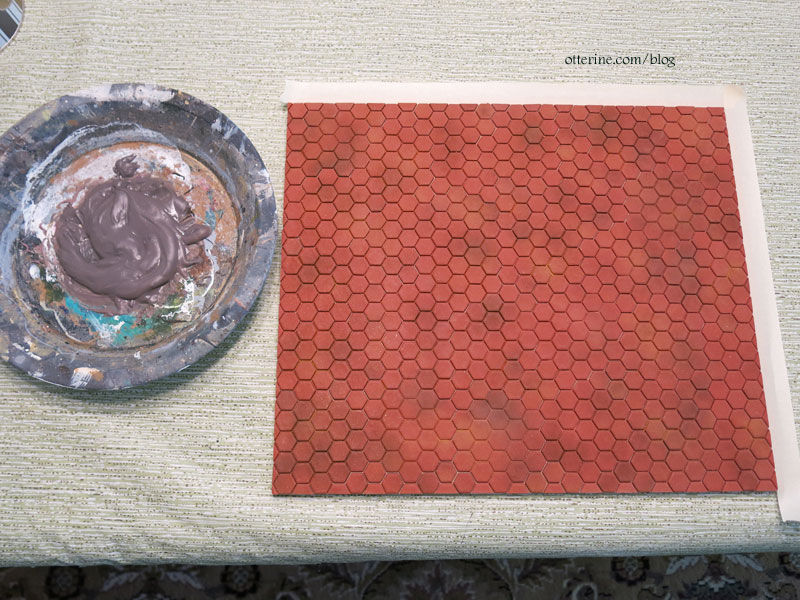
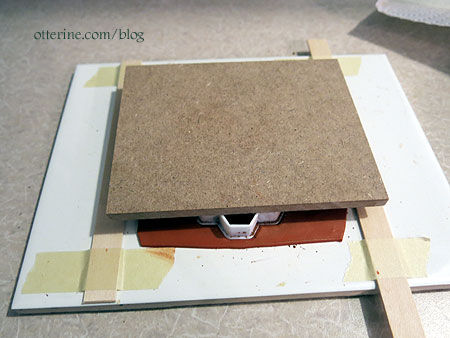
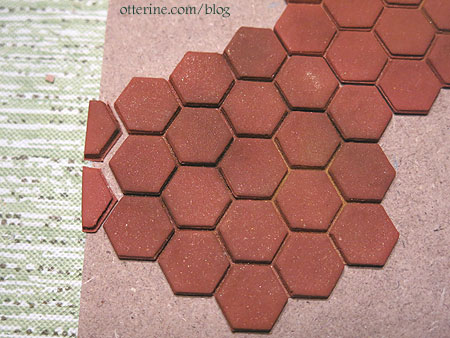
Continuing work on the hexagon clay tiles. The bottoms of the clay pieces turn out shiny from the ceramic tile base, so I sanded them lightly before gluing. I also lightly sanded the mdf floor board.

I used Weldbond to glue to the tiles to the floor board. I made roughly 30 groupings, and some fell apart in the process. Those I used to piece between and around the larger groupings.
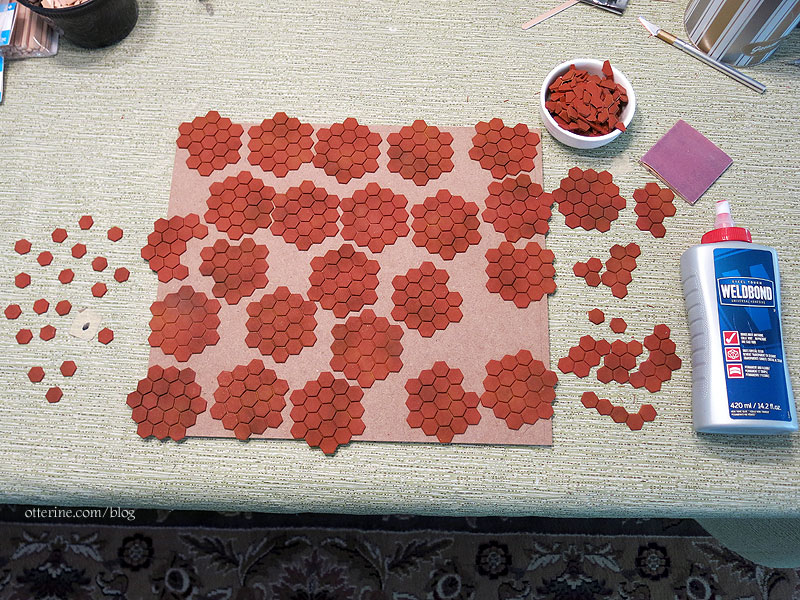
Since the individual hexagons had different measurements across depending on their orientation, I needed to make sure all of my hexagons were going the same direction. I measured each grouping and individual tile before gluing in place. I wasn’t guaranteed to have perfectly uniform application, but this gave me a fighting chance. :D
I started by laying out the edge sections and by luck ended up with full tiles front to back and side to side.

Since the tile groupings were unstable, I used a putty knife to pick them up and handle them.
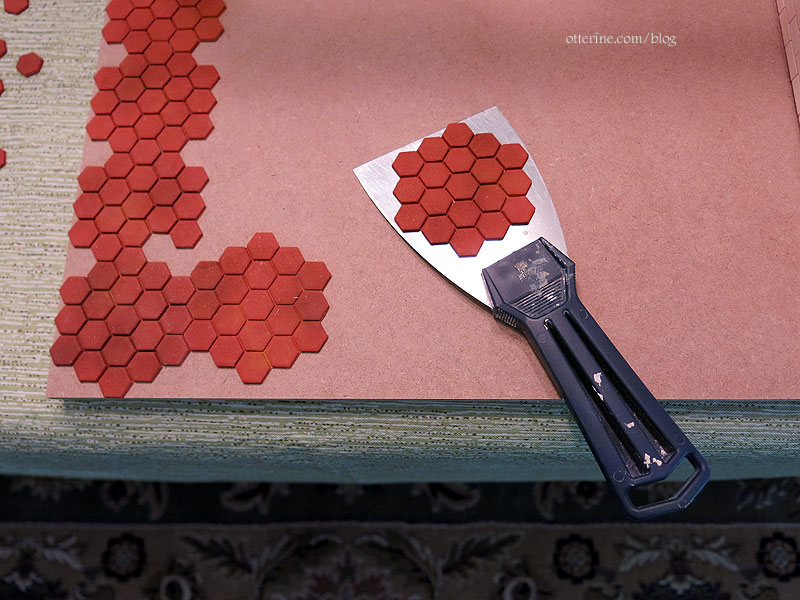
I tried to keep the groupings intact as much as possible, leaving small sections to piece later.
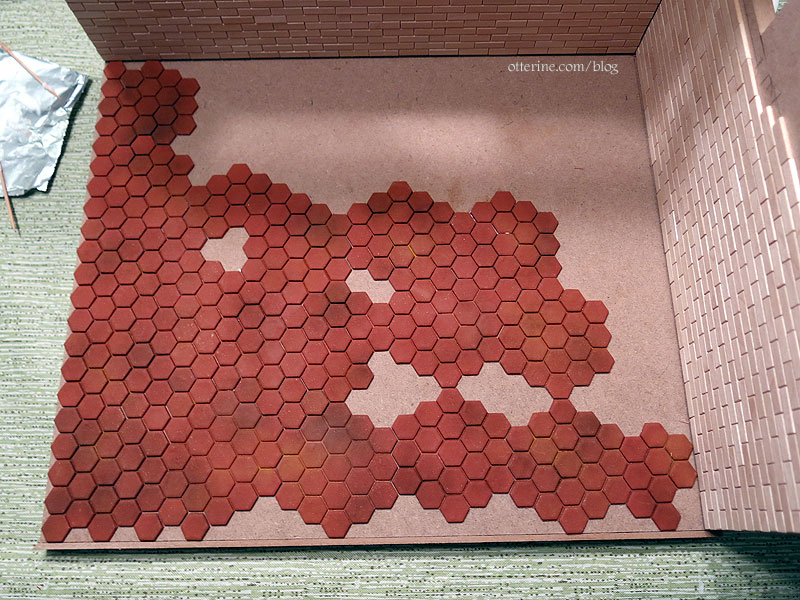
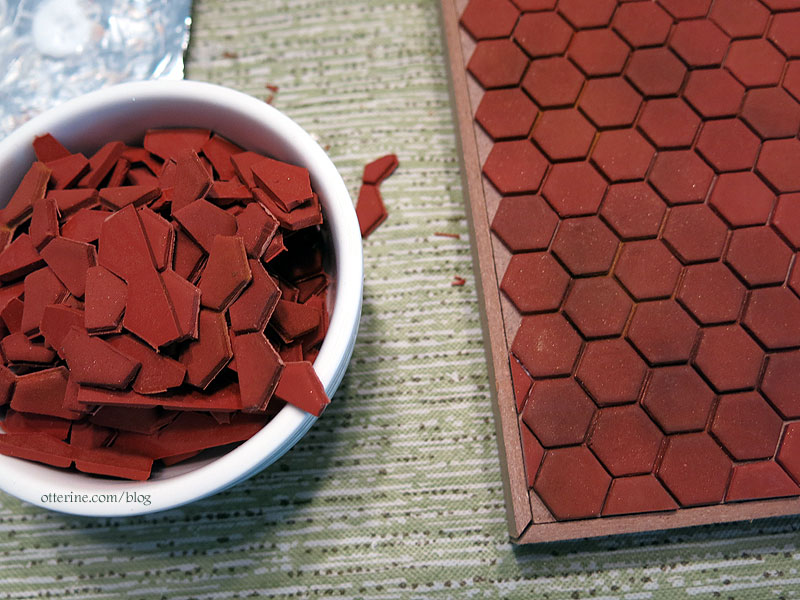
My bowl of scraps helped fill in the edges. Tedious, but I kept at it!
Hooray! :D
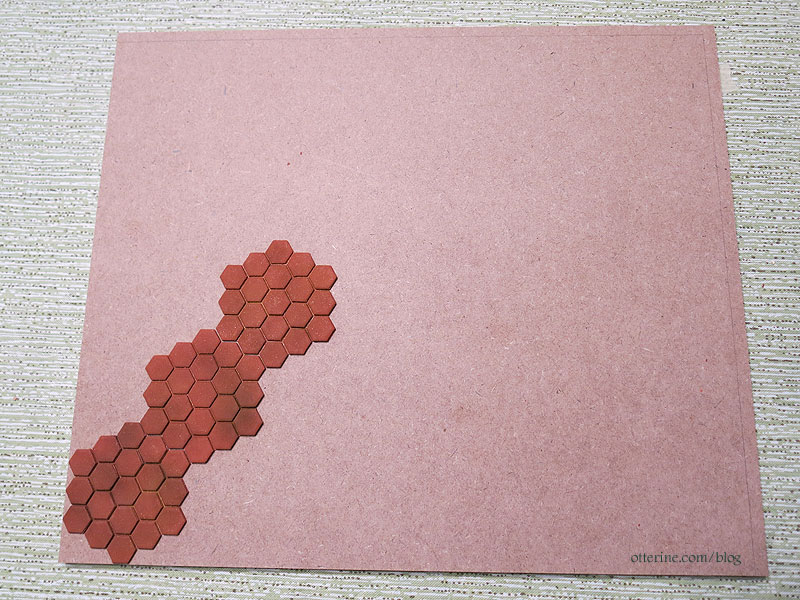
There’s finishing trim for the base on the front and side, but I didn’t apply tile all the way to those edges. I will add strip wood around the tile to protect and finish the edges. The spacing didn’t end up completely uniform but it’s close enough that it shouldn’t be obvious after grouting.
Categories: Polymer clay, Whinnie's Terrace
November 3, 2020 | 0 commentsHexagon clay tiles, part 1
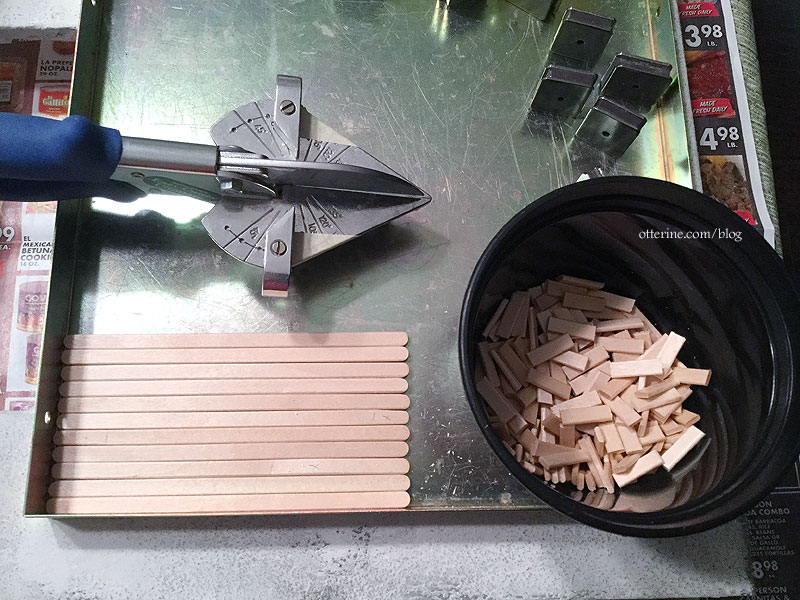
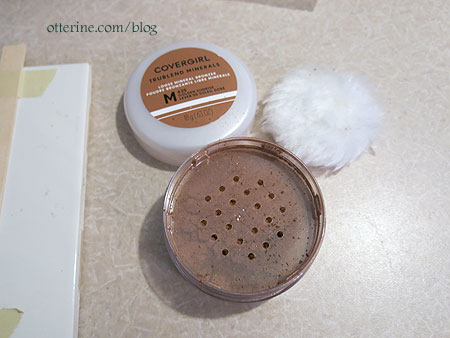
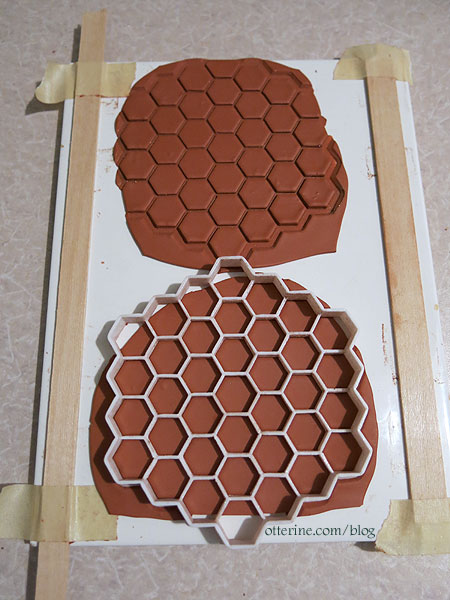
For my project, I envisioned hexagon terracotta tiles. You can buy these already made, but that can add up quickly. I also wanted to see if I could do it myself since I’ve worked with clay before. I bought Original Sculpey in terracotta. I have a ceramic tile working base, roller and cutter I found on eBay. More on the cutter in a moment.
I taped 1/16″ thick basswood strips to the ceramic tile and rolled out the clay. It’s soft and easy to work with. I had to cut away the edges a few times as the clay spread out.
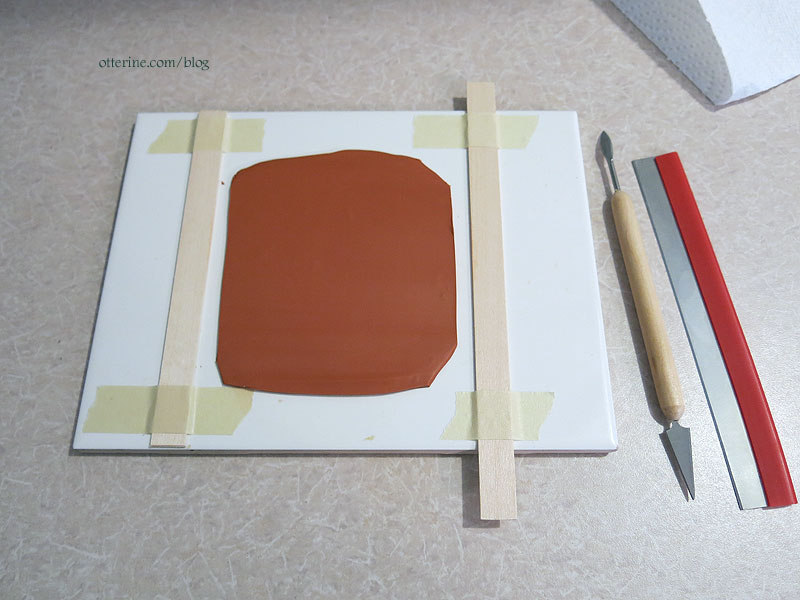
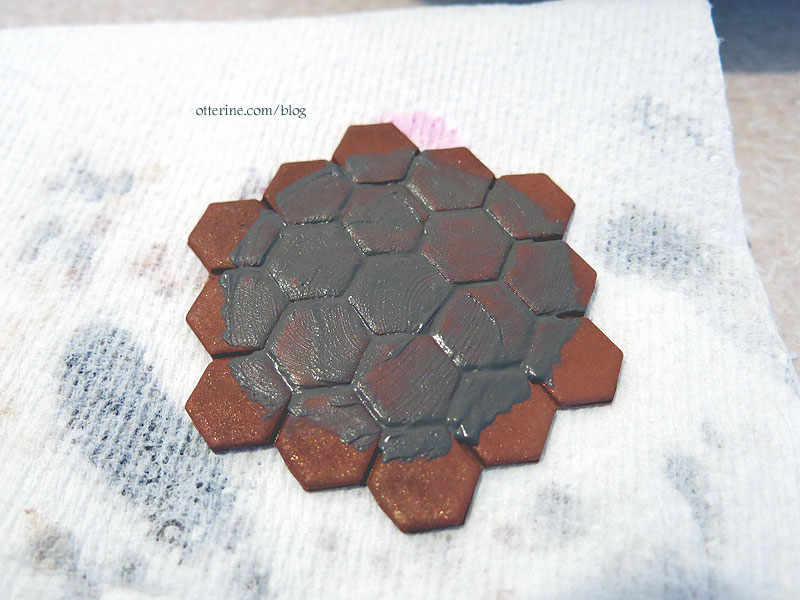
I’m using bronzer (make-up powder) to dust the cutter since I didn’t want white powder contrasting with the color of the tiles. It has some shimmer to it, which is a nice surprise. Very upscale tile made with gold dust. I did get too much bronzer on the first batch, but I was able to tone it down on the subsequent batches. The first batch will be my test sample for grouting and finishing.
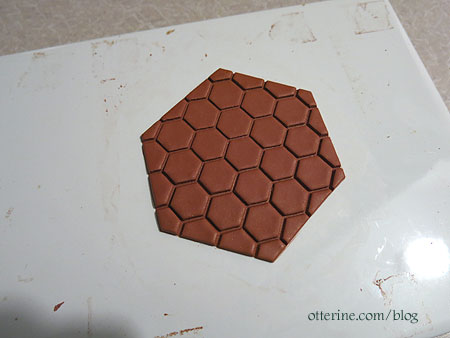
The cutter is designed to cut cookies/biscuits and leave a honeycomb design in the middle, so it has a deeper outer edge than the center pattern.
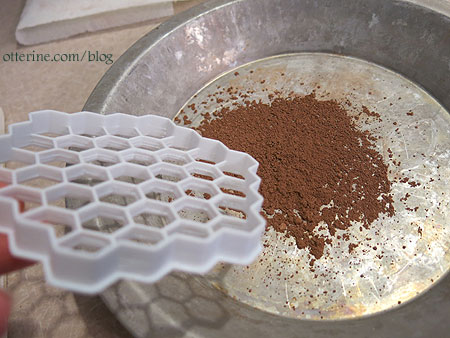
But, the other side is very uniform, so I just used it upside down.
I pressed the cutter into the clay with a board.
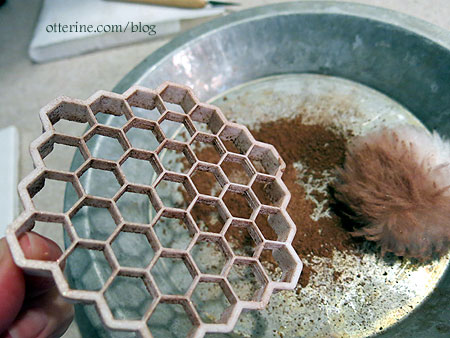
I patted the clay with a dry brush to remove some sheen and provide slight texture.
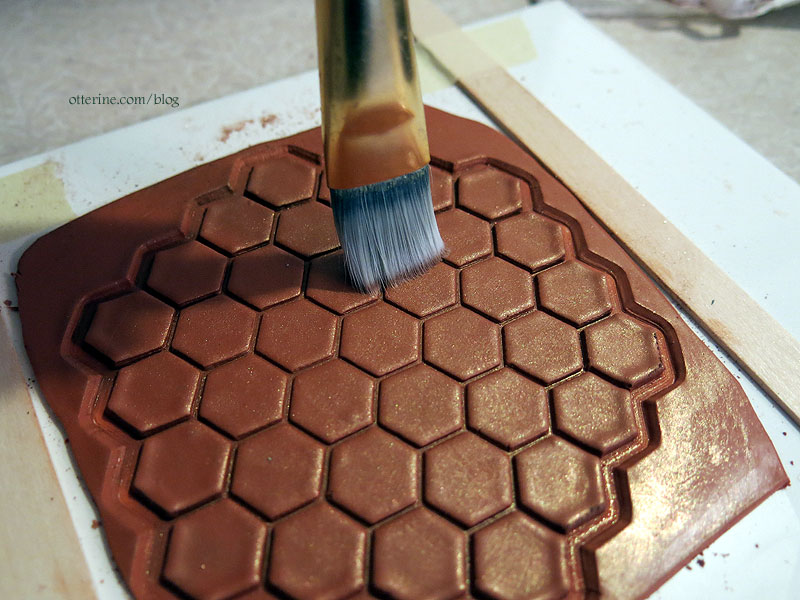
I shaved some pastels into a palette and dry brushed the tiles to vary the coloration. The chalk texture tones down the sheen, too. I used more on the later batches, and it looked better.

The cutter did not go all the way through, which was fine. The tiles around the edges aren’t usable because of the way the cutter is being used, but the middle ones turned out quite nice. I did cut away a lot of the scrap to reuse, but I baked the remaining shape intact otherwise. I’d rather cut the tiles apart after they bake instead of risking ruining them by cutting them before.
Choosing the baking time is always difficult for small, thin pieces of polymer clay, because you don’t want to burn the clay or end up with brittle pieces. I saw a video where 2mm strips (roughly 1/16 inch – the thickness I am making) were baked for 10 minutes and 60 minutes. The instructions on the clay package indicate baking 15 minutes per 1/4 inch. The video’s 10-minute sample snapped when bent and the 60-minute one was bendy and durable. I am going with 35 minutes to speed things along. After the first batch, I tested the clay after it cooled. It did eventually split when bent, but it took some force. For tiles that will be glued to a board, I called that a success.
I cut away the outer bits and left the main shape intact. I wanted to get a few batches done to see if I could lay them out in these large sections and then piece between them instead of laying tiles out one at a time.

I saved the leftovers since I will have to piece around the edges.
I have a lot to make! :O
So, I started doing two at a time.
Categories: Polymer clay, Whinnie's Terrace
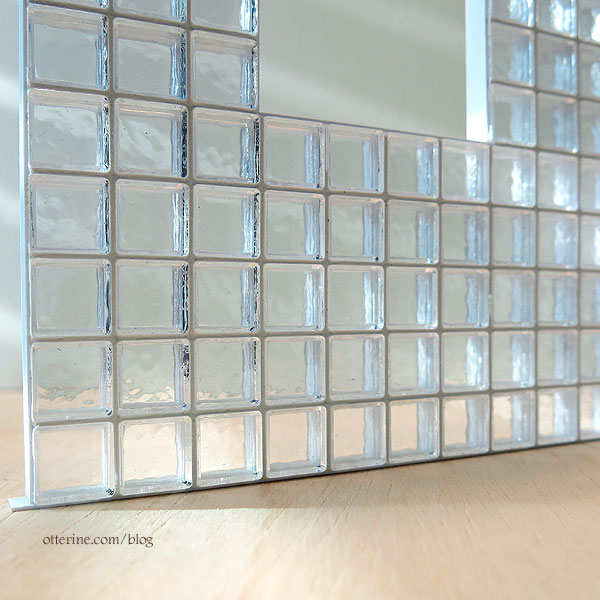
October 30, 2020 | 0 commentsGlass block window
I’ve started making a glass block window, and I am very pleased with the progress so far.

It looks like real glass.
The surface is wavy like the real deal, too.

Next up will be figuring out an approximation of a hopper vent (the tiny window insert that allows for airflow). :D

I originally wanted a working hopper vent for the window, but in the interest of saving time, I opted to make a solid window for the middle. I could have filled in the space with more glass blocks, but I like the break in the pattern the window provides. I built the window from styrene sheet, styrene rod and rippled water sheet.
As you know, I freely share nearly every process when I make things with very few exceptions. This process is one of those exceptions, so there is no tutorial or materials list at this time.
Categories: Whinnie's Terrace
July 8, 2020 | 0 comments


NOTE: All content on otterine.com is copyrighted and may not be reproduced in part or in whole. It takes a lot of time and effort to write and photograph for my blog. Please ask permission before reproducing any of my content. (More on copyright)

Whinnie’s Terrace
I had a different idea going for the HBS Creatin’ Contest at the beginning of the year that came to me before I saw the kit, The Corner Place. I built a few things that I loved, but I couldn’t get the final piece to look the way I wanted. I ended up taking a fresh kit and starting a more modest idea shortly before the deadline.
——–
Whinnie’s Terrace is a quiet space to enjoy a meal, test your green thumb, and play with cats. Named after one of the sweetest cats to ever live who has left us for the rainbow bridge. I built a place of beauty and serenity to remember her by.
This is the first time I’ve dedicated a whole build to an exterior, so my selection of minis to include was different from what I normally do.
The glass block window I made for the previous project found a home here, so not all of my previous efforts had to be stored away.
I made some minis, bought some minis and received some minis as gifts.
After finishing the staging, I really wanted a burger on the patio. :D
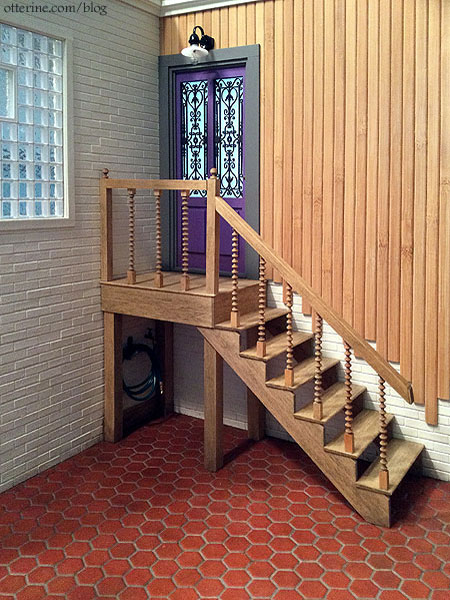
I made only two modifications to the overall layout. I closed up the small side window and shortened the catwalk to a landing only.
My muse Miss Whinnie from back in 2018. She loved hanging out in this old patio chair, so I thought an outdoor space in her honor would be a lovely project for a dismal year.
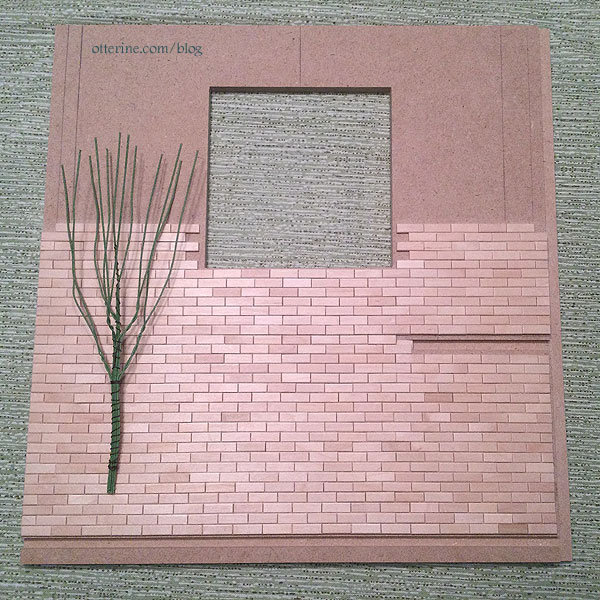
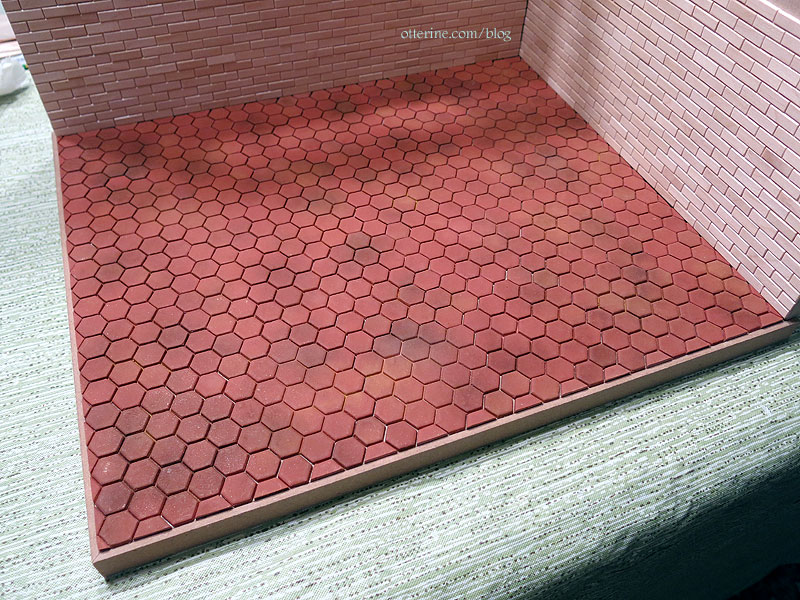
The terracotta hexagon tile flooring was made from polymer clay (parts one, two, and three)
It was labor intensive and time consuming, but I was very pleased with the end result.
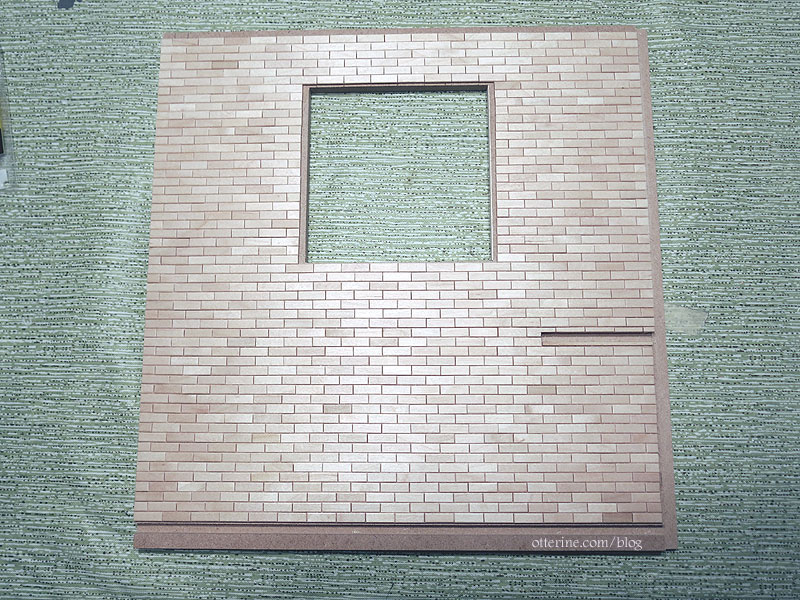
The walls are covered in wood brick made from skinny wood craft sticks by Creatology. I’ve done a tutorial on this finish in the past with a different brand of sticks, but it’s the same process.
For the back wall, I had to measure each row carefully to make sure it was even and level all the way up and around the window opening.
For the side wall, I had to cover only part of the lower wall with bricks since I applied what I term bamboo waterfall paneling to the majority of the wall. I used uncut sticks to give the same layer depth to the portion without bricks. I later painted the bricks White Birch satin by Americana.
The bamboo is from a table runner, and I left the finish untouched.
I freely share nearly every process when I make things with very few exceptions. The glass block window process is one of those exceptions, so there is no tutorial or materials list at this time. A few people have asked whether I would sell the blocks, but the window isn’t made of standalone individual blocks and would need to be as a whole window structure.
I originally wanted a working hopper vent for the window, but in the interest of saving time, I opted to make a solid window for the middle. I could have filled in the space with more glass blocks, but I like the break in the pattern the window provides. I built the window from styrene sheet, styrene rod and rippled water sheet.
The stairs were made using the mdf catwalk support from the kit, stair stringer and tread stock from Northeastern Scale Lumber, and random basswood. The stain is Driftwood by Minwax. The railings are vintage stock from Northeastern. I wish things like this were still made today. Fine accessories like these can make such a difference.
Under the stairs, I added a hose, holder and spigot. I’ve always wanted to do one of these, but I never had a build where it would fit so well.
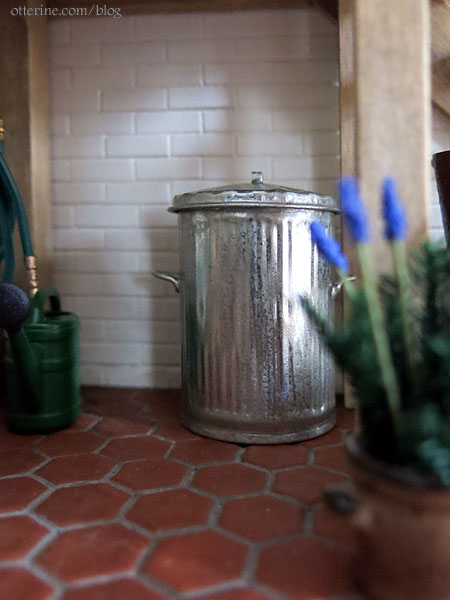
I later added a watering can from Shepherd Miniatures and a vintage trash bin by Ken Ketteridge.
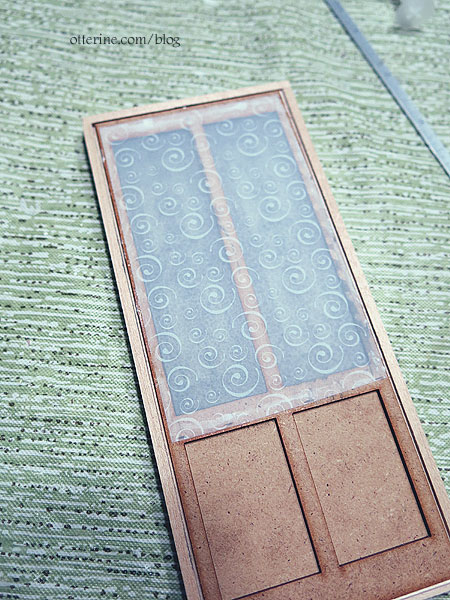
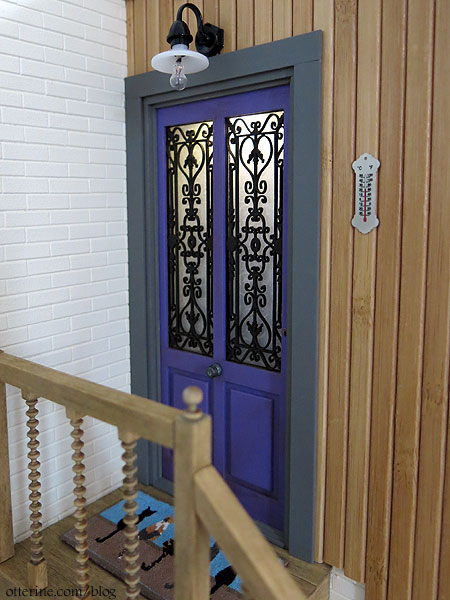
The fancy wrought iron door is a kit from Art of Mini.
The door is painted Lilac Love by Folk Art, and the wrought iron is painted black brown. I built a door frame from basswood since this was not included with the kit, but this isn’t a working door. I added rippled water sheet as windows to simulate pebbled glass.
Once I got to lighting behind the door, the original paper I used for the shade proved to be too thick. I replaced it with a light swirl vellum.
I added gentle aging with pastels. It’s not an old door, but it has been exposed to the elements for a few seasons. The door knob is from Sussex Crafts, and the keyhole cover is from HBS. Since the amount of room for hardware is so limited, I opted for an old style center knob. The Meyers wall light is from HBS, and the thermometer was made by le mini di Pierluigi.
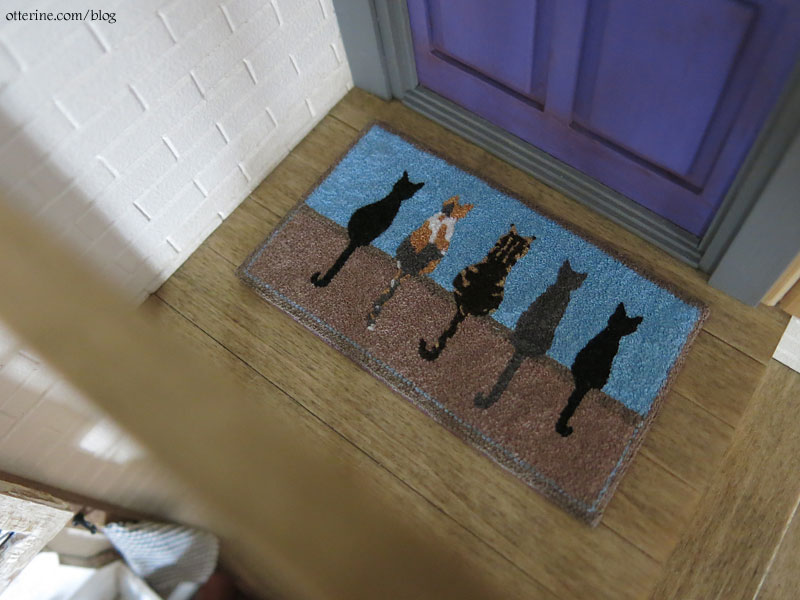
The French knot rug depicts five felines near and dear to me: River, Cloie, Jasper, Whinnie and Cosmo. They’ve each touched my life in a special way. The original pattern was made by Anne Ritter, and I was inspired by the rug made by Shelly Norris from this pattern. I altered the position, shape and size of the various cats to better suit the real life cats they represent. The rug measures 3 1/8″ by 1 3/4″ and took me 28 hours to stitch.
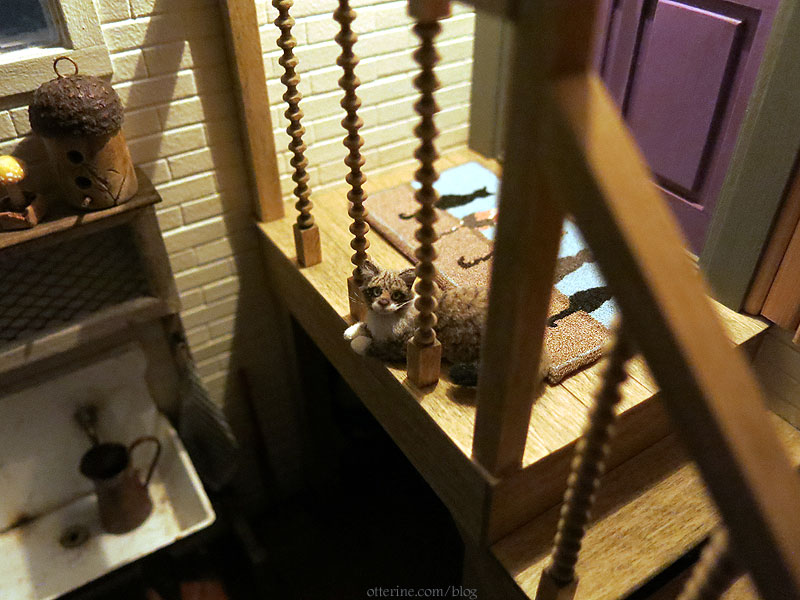
Of course, I had to include a lovable feline in the courtyard, so I chose Roux made by 2014erok.
I made a container tree so that the space would have a large shade plant without permanently placing landscaping features (parts one and two).
I made some flowers and leaves to fill in around the base of the tree. It’s just enough to finish the look of a container tree.
I added a pair of cardinals by Mini Gems, too. :D
The sink is a vintage metal piece I bought at a local show years ago. I aged it with acrylic paint and added a metal washer for the drain. I’ve seen a lot of inspiration photos showing old shutters or windows above a garden sink, but I didn’t want to attach anything permanently to the wall that might limit the versatility of the build. I built a standing shelf using a door bought from a local show and basswood. I did have to replace the screen from the original since it was damaged. I added Chrysnbon hooks and a towel on a rope made from a scrap of fabric. The broom and dustpan set is from D’s Miniatures, the rustic pitcher is from Sinny’s Mini Art, and the doormat is from A Little More in Minis.
I made the milk carton flower from a true2scale kit, the purple flowers were a gift from a friend, the mister bottle is from HBS, the mushroom and acorn birdhouse are by 64tnt Miniatures.
I made a side table from a Hepplewhite Serpentine Table kit by The House of Miniatures. I cut the table top to a rectangle and replaced the legs. It’s painted Folk Art Villa Green over brown, then aged with brown paint washes.
It’s now an old table repurposed for the courtyard. The old drawer is by Dollhouse Smithery and the square pot is by Braxton Payne.
I’m not much of a gardener, but I can keep most potted plants alive as long as they are hardy species. :D My small setup includes a water bottle from Shepherd Miniatures, a crate by Dollhouse Smithery, Miracle-Gro by Wright Guide Minis, nasturtium and petunia seed packets made by me from a Farrow Industries kit, and butter and milk containers from a true2scale kit.
The patio set is a vintage white wire set scraped, repaired, repainted and upholstered in retro inspired fabrics. I cut a new tabletop from rippled water sheet.
I decided at the last minute what I wanted on the table for staging the scene. I added a citronella candle (made by me) and a Venus fly trap plant by Lamis Minis in case the candle doesn’t work. :D
The placemat is vintage, and I made a quick napkin from a scrap of fabric. The Pellegrino water and chocolate milk are by Alma. The burger is by Sugar Charm Shop.
This all made me so hungry while taking pictures.
The rug is vintage and sent to me by Robina. We’re not sure who made it, but it’s an expertly woven rug in beautiful colors.
The various plants were purchased, gifts, or made by me. The frog is by Spencer’s Nook.
This one was made by my dear friend Debora. :]
To control the lighting behind the door and the view through the glass block window, I made small room boxes to attach to the back. The back of the build is covered in a remnant of real life wallpaper. The boxes are painted and papered, and held in place with support blocks and magnets. I added LEDs to each box.
This helps create the illusion of an interior building on the other side.
I didn’t want a full room behind the window, so I chose to make it look like a hallway or stairwell, with a couple of plants on the window sill inside.
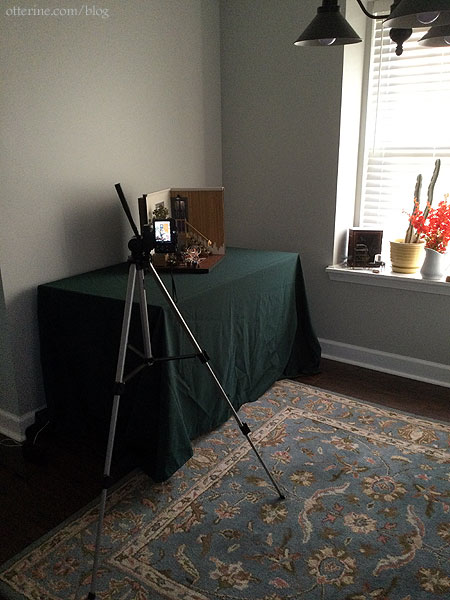
Behind the scenes in my kitchen photo studio. :D
This small build brought me a lot of joy, and I couldn’t have asked for a better muse. We miss you and love you always, Whinnie.
UPDATE: Whinnie’s Terrace has received an Honorable Mention Award in the HBS Creatin’ Contest 2020! Thank you to all the fine folks at Hobby Builders Supply and to my friends, family and followers for all the encouragement and support along the way! Thank you, sweet Whinnie, for being a wonderful muse. I’m thrilled to have been recognized! :]
Categories: Whinnie's Terrace
December 19, 2020 | 0 commentsContainer tree, part 2
Completed the container tree. I built up the interior of the container with glued-in layers of foam, first thick layers of builders foam (shown below) and then thinner layers of white foam sheet to get to the right height.
I filled the spaces around the foam with ballast glued in with Woodland Scenics scenic cement. My local go-to store is HobbyTownUSA.
I topped the ballast with loose underbrush foliage, again glued with scenic cement.
The flowers were made from pre-cut impatiens flowers purchased from a local show, loose yellow foliage and calyxes punched from origami paper.
I made leaves from a dusty miller punch and origami paper.
I attached the leaves and flowers to thin floral wire then planted these around the base of the tree to fill the container before the scenic cement had time to cure.
It’s just enough to finish the look of a container tree.
I added a pair of cardinals by Mini Gems, too. :D
Categories: Flowers, plants, and trees, Whinnie's Terrace
December 19, 2020 | 0 commentsContainer tree, part 1
I made a small tree, but instead of planting this one in the ground, I wanted a container tree that I could reposition. I’m using the same wire and putty technique I’ve used in the past for the trunk, and candytuft for the foliage – notes at the bottom.
I measured the wire structure against the wall to make sure I had good height.
I used a clamp covered with plastic wrap to hold the tree while protecting the clamp.
Applying the putty.
Painting the tree.
Painting the separated candytuft branches — I ended up making quite a few more than shown here.
Ghost is modeling to show the smaller stature of the tree.
I built a container from basswood and small scale siding from my box of scraps.
I wanted something compact but believable in proportion to the tree.
I stained the planter box with Minwax stain; the color is Fruitwood.
I coated the interior with a heavy layer of tacky glue. This will seal it for when I get to planting the tree.
Update: finishing the container tree here.
———
Notes: Link to the first tree I made using this technique – follow the links in the first sentence back through the process. For the trunk, a good starting source if you can find it is the DVD Master Miniaturists: Landscaping Primer with Diane Myrick. I found mine through interlibrary loan. This whole series is just awesome! For the foliage, I used a tutorial by Connie Sauve on using candytuft, but the tutorial link is no longer active. I bought the candytuft from Scenery Solutions, but they no longer sell it.Categories: Flowers, plants, and trees, Whinnie's Terrace
November 20, 2020 | 0 commentsFancy wrought iron door
Backing up a little here for work previously started. After struggling to get my previous 2020 HBS Creatin’ Contest entry beyond the parts, I finally threw in the towel and started working on a fresh contest kit. I loved the elements I created for the previous entry, but I could not get them to work together the way I wanted. So, those parts are shelved for now and I forge ahead to complete the new entry in time.
The door is a kit from Art of Mini.
I painted the door Lilac Love by Folk Art. The wrought iron is painted black brown.
I built a door frame from basswood since this was not included with the kit. This won’t be a working door. I added rippled water sheet as windows to simulate pebbled glass.
A cut of textured scrapbook paper serves as a window shade for privacy. Since this is a door to nowhere, the back is not finished.
When light hits the door from behind, it creates a warm glow.
I added gentle aging with pastels. It’s not an old door, but it has been exposed to the elements for a few seasons. The door frame is primed here, but this is the general coloration I’m after. Ghost the caracal is by 2014erok.
Next up…finishing the frame and adding hardware.
Categories: Whinnie's Terrace
November 4, 2020 | 0 commentsHexagon clay tiles, part 3
Continuing work on the hexagon clay tiles. Since my first tile grouping had too much bronzer, I figured it was a good choice to test the grout before trying on my finished tiles. I mixed brown and black paint with spackle to make a gentle (non-scouring) grout that was easy to spread. I used my finger to spread it into the grooves around the tiles.
I then wiped away the excess with a wet paper towel. It took a few passes to get it clean. The process lifted some of the tile color I had applied, but the end result was a more even tile so I wasn’t disappointed. If I want more variation, I can always paint after grouting.
I mixed a larger batch for the final floor and masked the areas around the edges where the walls will be glued to the floor board.
I spread the mixture with my fingers in sections and wiped away some of the excess as I went.
I washed the floor after the grouting was complete with water and paper towel. I saved a bit of the grout mixture just in case I needed to touch up any areas.
The initial wash left streaks, so I used a Q-tip to wash each tile individually.
I did small sections and wiped with a dry, clean paper towel.
Once done, I wiped the entire floor with a damp paper towel again.
Then I wiped it dry. Very little color lifted in the last pass, so I called it done.
The final result has less color variation than the plain tiles, but I like that better.
I’m glad I gave it a try. :]
Categories: Polymer clay, Whinnie's Terrace
November 4, 2020 | 0 comments
NOTE: All content on otterine.com is copyrighted and may not be reproduced in part or in whole. It takes a lot of time and effort to write and photograph for my blog. Please ask permission before reproducing any of my content. (More on copyright)