

Watson Mill – main room furnishings, part 3
Continuing work on the main room furnishings. Elizabeth suggested measuring the table height with Gustav in the seat, so that’s where I started in determining whether to cut down the table legs. I put the cabinet in the scene as well, since counter height and table height should have a slight difference. With the original legs, the table seems a tad high.
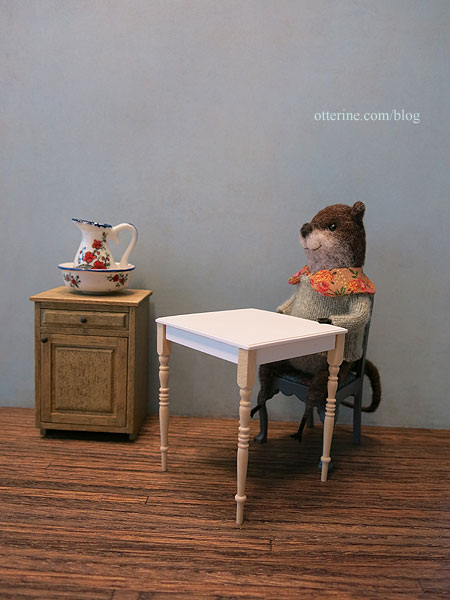
Since you can’t put the wood back on after cutting, I opted to place wood samples under the cabinet and chair to see how a 3/16″ reduction in the table legs would work. It seems a better proportion, and a modest 3/16″ reduction at the top of the legs would mean the table keeps its appealing tall, skinny profile for the most part.
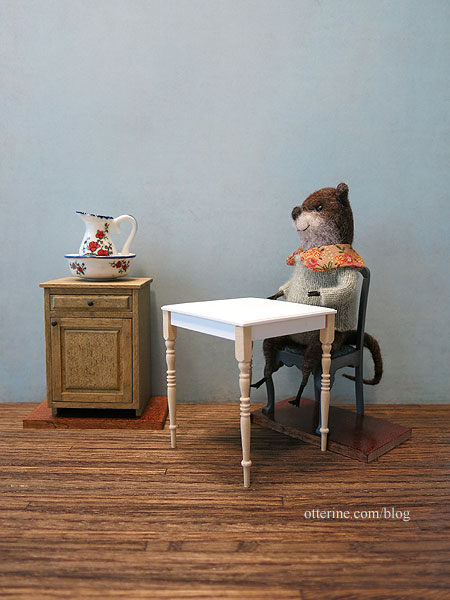
I needed to prep the table for whatever process I ended up using for the enamel tabletop design, which is likely to be delicate once applied. The less I have to handle the table after, the better. I started by wet sanding the top and discovered this is a very porous material, almost like cast plaster. I primed the entire piece with white craft paint and tidied up the glue spots from the manufacturer. The primer showed the flaws and air holes, so I filled and filed before giving it another coat of white.
I masked and painted the apron with Zinc by Americana to coordinate with the chairs. I cut and painted the table legs, too, but left them separate so I could work on the tabletop without fear of breaking the legs.
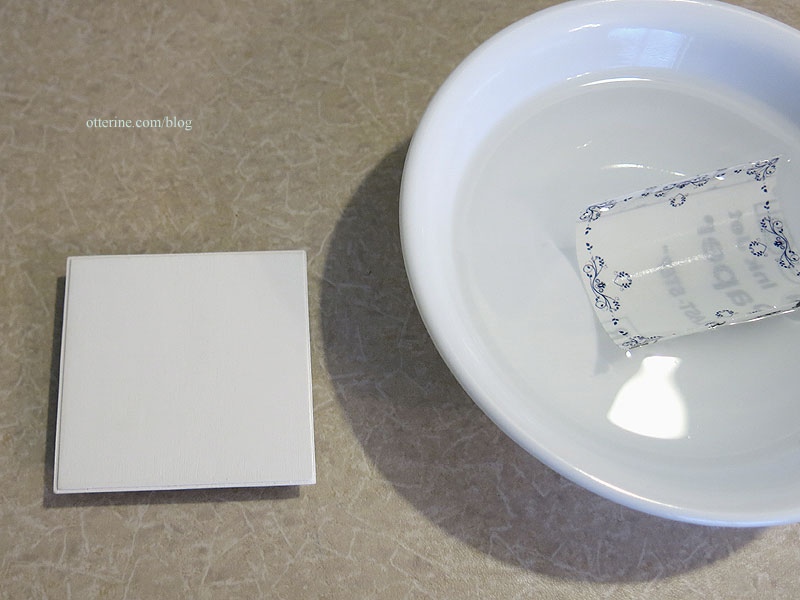
Time for the enamel tabletop. The material I opted for was water slip decal, using Testors Decal Bonding spray since I had that on hand.
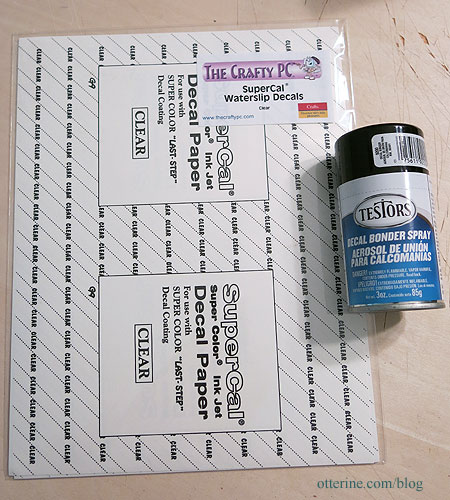
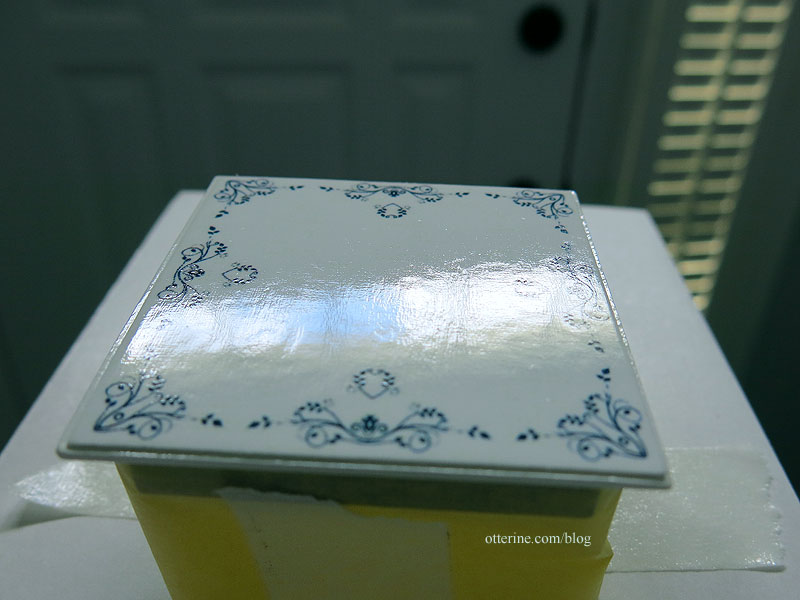
Because my design is so small, my intent was to cover the entire table with the film since there would be no way to cut around the tiny details. This should provide a uniform surface without a halo around the border design. It’s not easy to place a large decal. You have to give it a little more time in the bowl to loosen from the backing paper. Here it is on foam core board. It has a lovely gloss sheen on its own, but I wasn’t sure how delicate it would be without sealing. I opted for Testors Gloss Lacquer Overcoat since it had worked so well evening out over the Model T paint. Overall, the test sample was a success.

I then moved on to the final table.
I probably should have sanded the surface more beforehand, but it was too late. Even after the gloss sealer, the cross-hatch painting imperfections showed through. I guess it’s just an old, well-loved tabletop. I always trust the happy accidents, and the surface is not very noticeable in photographs unless you try to capture it.
I glued the legs on with white glue supplemented with super glue gel so they would grab fast but remain movable for a few minutes. Once dry, I touched up the paint between the apron and the legs then tried out the final table with the chairs and Gustav. I think we have a winner! :D

Categories: Watson Mill
June 25, 2017 | 0 commentsWatson Mill – main room furnishings, part 2
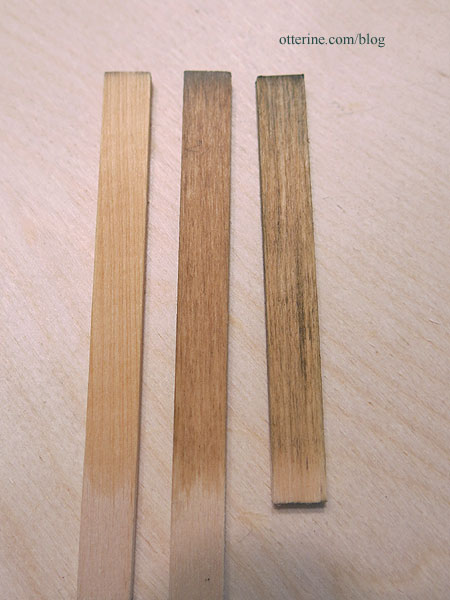
Continuing work on the main floor furnishings. I tried out some new Minwax stains I picked up at Lowes. This is Natural, Fruitwood and Driftwood (left to right) used on basswood scraps. Natural gives the grain a lift and a slight warm tone. I might use this on the circle library since it will seal the wood without changing the aspect much. Fruitwood is a lovely light color that coordinates well with Natural, so I will likely use this on the dumbwaiter and its cabinet. Driftwood has a green grey cast and works well with the grain.
I cut down the depth of the Houseworks 2″ kitchen cabinet by 1/4″ since it was a tad too deep and used Driftwood stain with satin varnish. The knobs are wood painted black. A beautifully rustic cabinet. :]
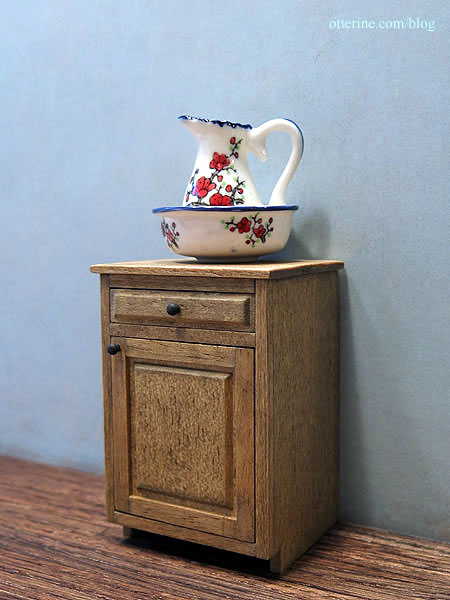
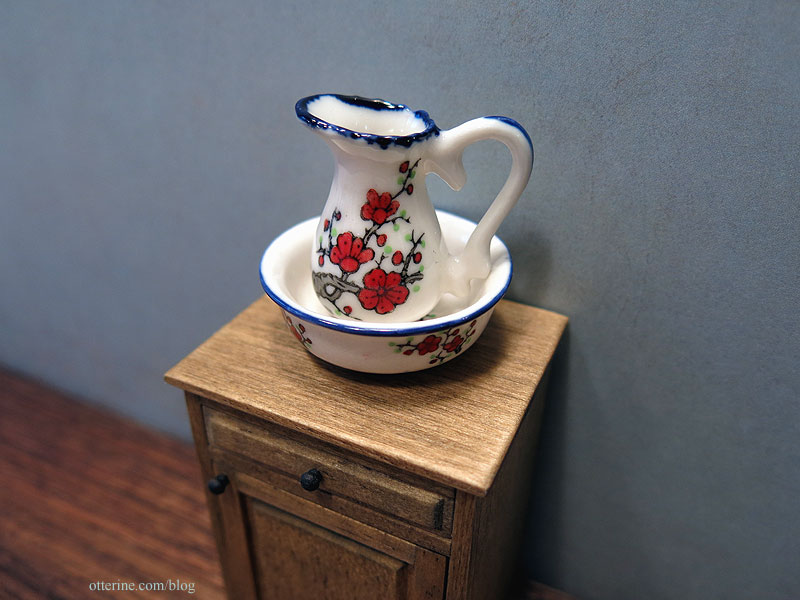
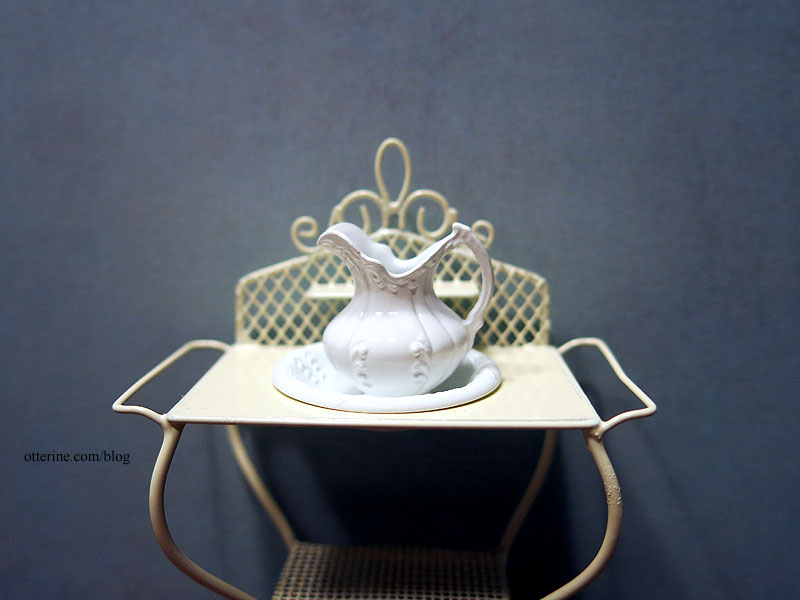
The pitcher and bowl are from my stash of minis. It’s a favorite that I had been hoping to use in the mill but it wouldn’t fit upstairs. Problem solved. It’s now a kitchen wash set.
I painted the kitchen chairs Zinc by Americana. What I like about this dark grey is the blue cast to it, which should go well with the enamel tabletop. I’ve been trying out processes for the tabletop, so more on that later. In case that doesn’t work out, it will still be a lovely color with a plain white tabletop. :]
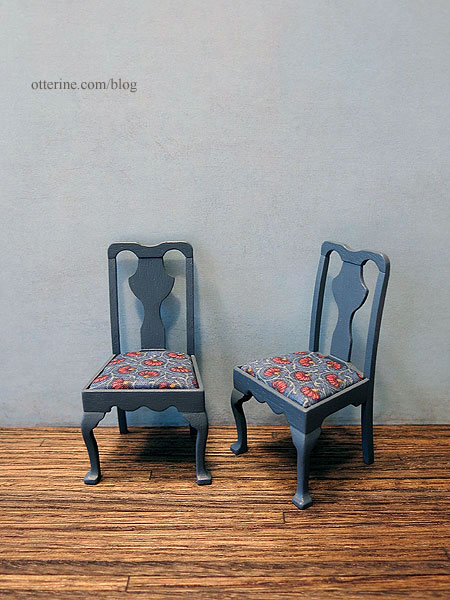
I finished with Delta Ceramcoat Satin Varnish and upholstered with a cotton print from my stash.
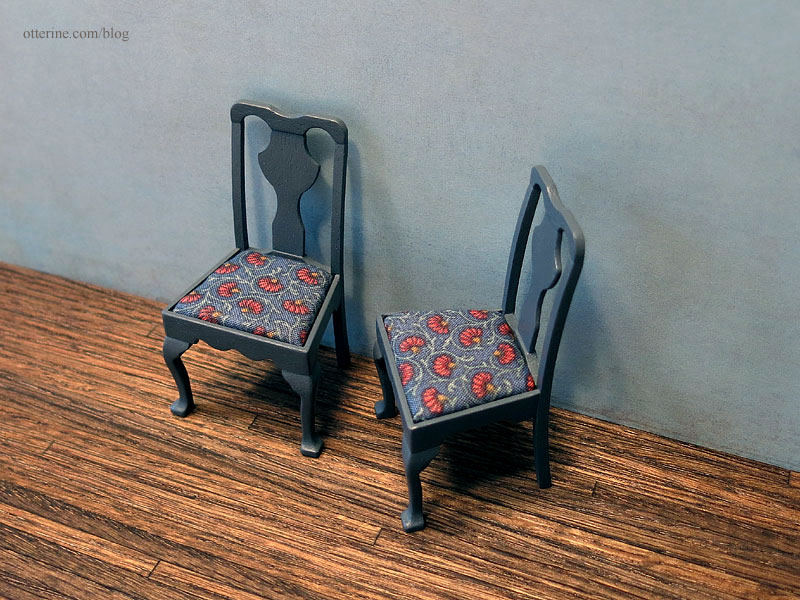
I replaced the damaged foam from the kit with two layers of white felt. The seats aren’t glued in since they fit well enough with tension alone. I can easily clean or replace as needed.
Categories: Watson Mill
June 23, 2017 | 0 commentsWatson Mill – foundation
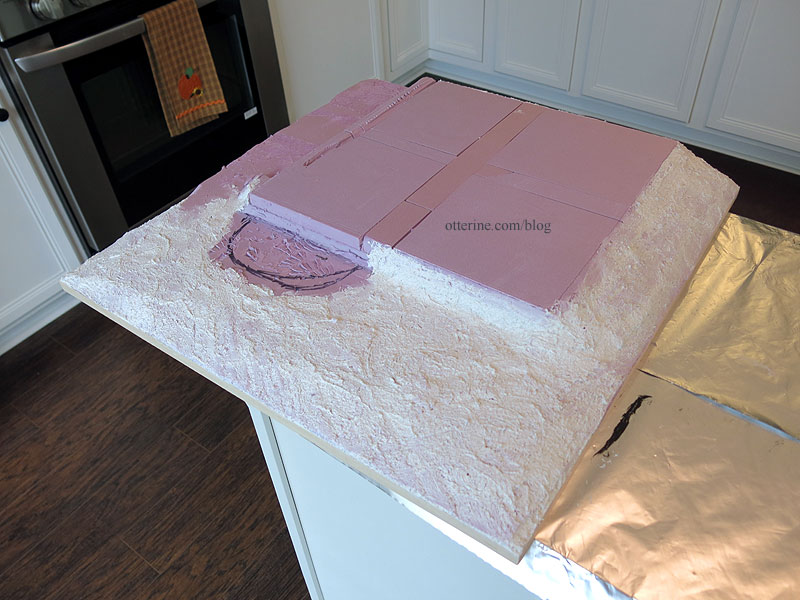
It might seem strange to start the landscaping with the mill in dry fit, but this will help me visualize how the mill will look in the end. I want a relatively steep landscape for the mill, considering the base board is 20″ square. I used layers of 1/2″ thick builders foam. I used a freshly cut whole piece for the bottom layer, but the other layers were made from scraps to use up the scraps. I used Weldbond glue to attach the layers and then pressed it flat with magazines overnight.
I’m 95% sure I want to do a wood shake exterior on the mill. I made a support system from 1″ plywood strips, adding a couple spare pieces of mdf that will help hold it in place when I glue it later on.

I cut pieces for the increase in slope to the door and added a rounded step at the top. Some of this might change in the end, but it helps to have it roughed in for now.

These pieces will stay loose until later on so I can further shape them for the final landscaping.
In the front, I want a bit of relatively flat land for some fun features to be revealed later. I think this is a good start, very tall and stately. :D

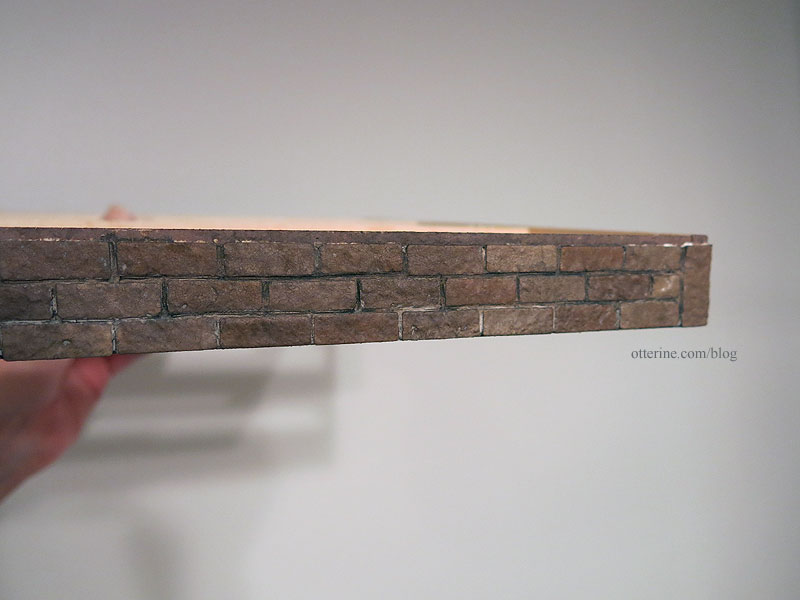
I had egg carton bricks on hand, so I didn’t bother to reinvent the wheel. Most of the time, I will measure my board and determine how many bricks across I need and adjust the measurements accordingly. It’s a small foundation, so I didn’t think it would matter much once landscaping is in. Since my bricks didn’t end well at the corners, I opted for corner stones cut to fit.

I chose brown based bricks instead of my usual brick red. :]

I started with an even brown base.

I then stippled on the other colors to create variations before sealing with Delta Ceramcoat Matte Varnish (which always dries shiny with how it is applied).

After it dried, I grouted with spackling.

I added a couple of dark brown and black washes to tone down the grout, then finished off with a spray of Testors Frosted Glass to dull the finish. There will be more aging during the landscaping process, but I love how it looks so far. You can still see the subtle color differences.
Categories: Watson Mill
June 16, 2017 | 0 commentsWatson Mill – enamel tabletop trials
A Greenleaf forum member suggested enamel tabletops, so I scouted around the net looking at examples. It seemed a grand idea, so I printed some designs I thought would work best in blue, black and orange-red. These are just on regular paper for testing the look, but I have some ideas in mind for transferring the design onto the table.
I was leaning toward the blue, so most of them are shown in that color. I’m not showing every printed design here since I narrowed down further. I printed open center designs…
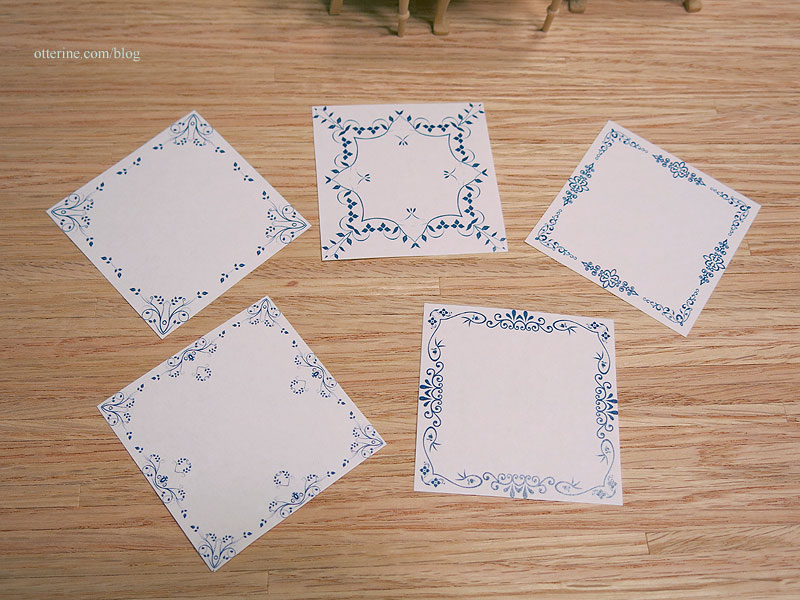
…and filled center designs.
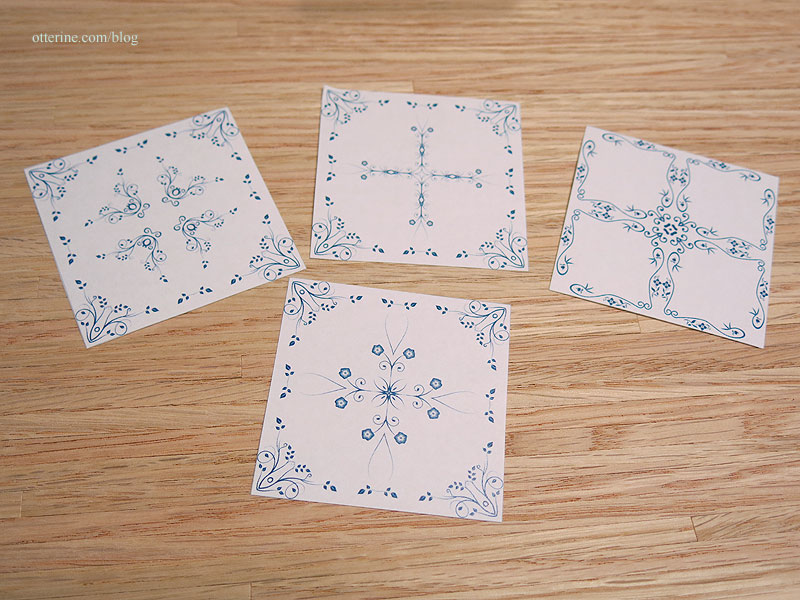
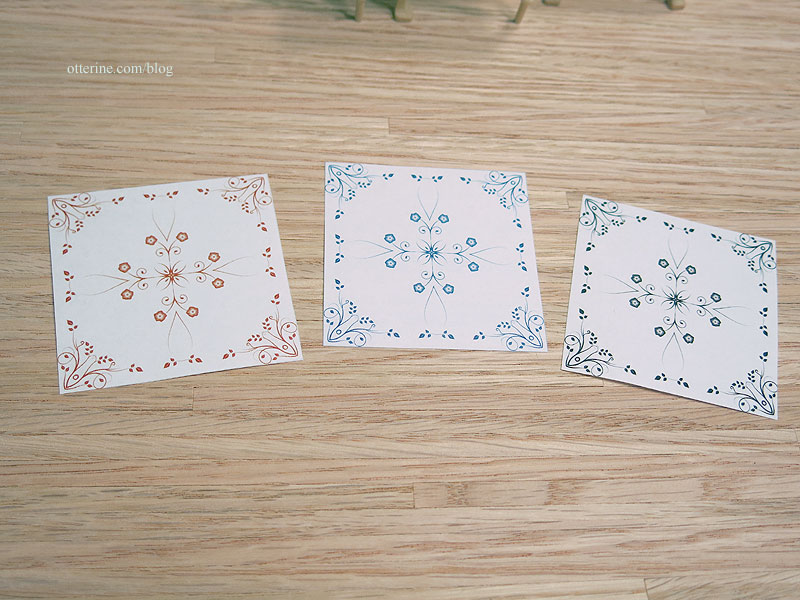
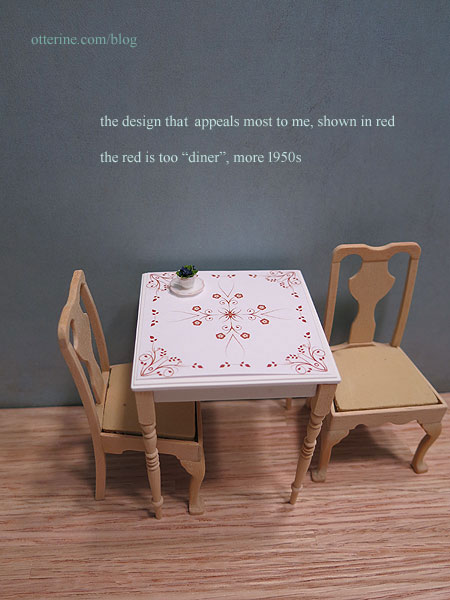
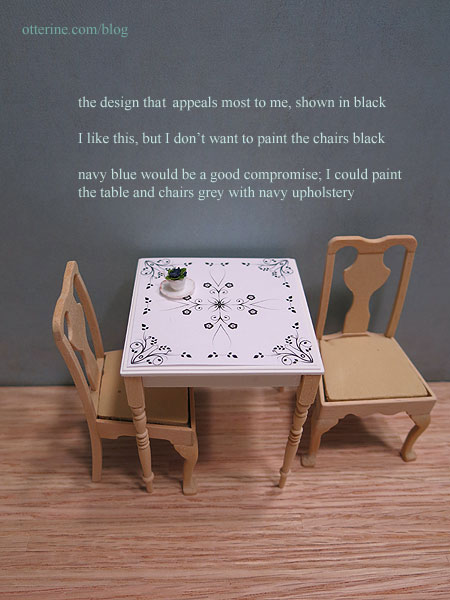
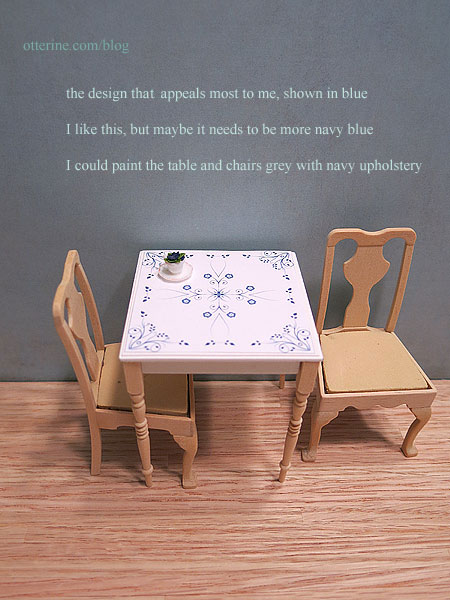
The one shown in all three colors is the design that appealed to me most on paper.
I made my notes on the pics as well. Granted, it is hard to tell with yellowish wood chairs, but you get the idea. The chairs and lower part of the table will be painted to coordinate best, even if that ends up being white with a coordinating color upholstery. I will also be toning down the red of the oak floors.
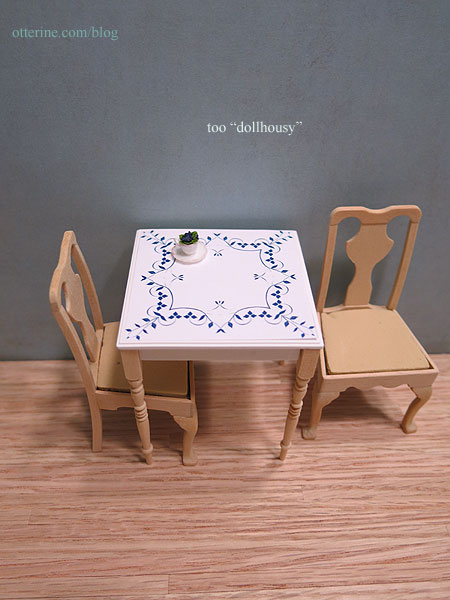
This one was too “dollhousy” to me. The design is rather bold and would compete with anything placed on the table.
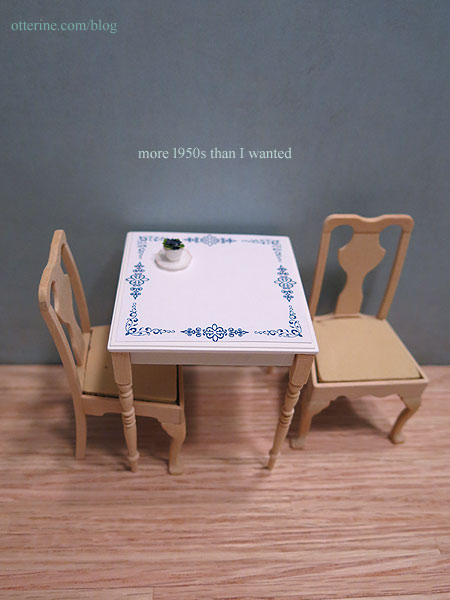
This is more of a retro style than I wanted, though it has its appeal in the right setting.
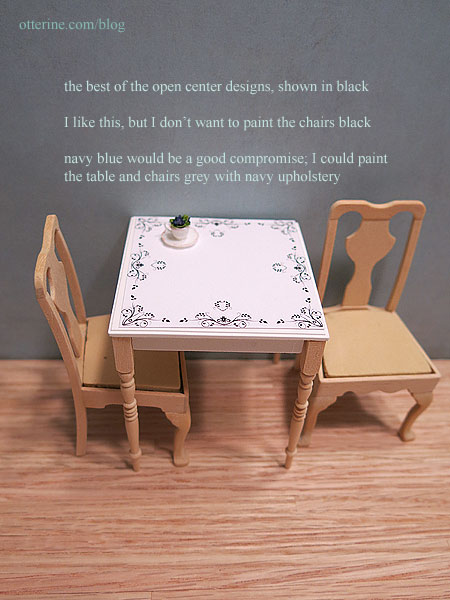
This one is the best of the open center designs. It’s delicate and complements the teacup flower made by Debora.

Here is the same design shown in black for comparison.
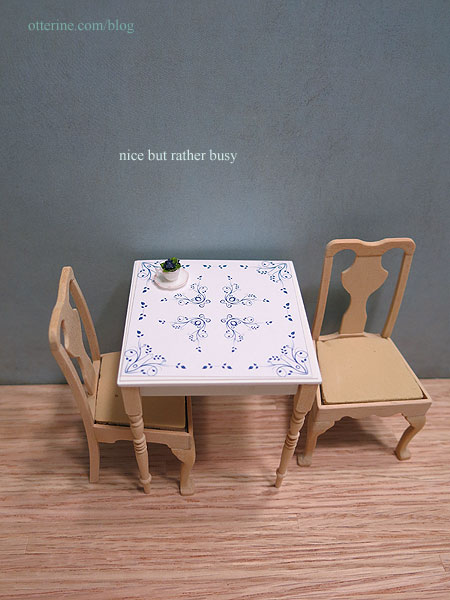
This one is delicate but rather busy.
I had thought this one would work well from the paper printout, but it ended up being more “diner” than I wanted.

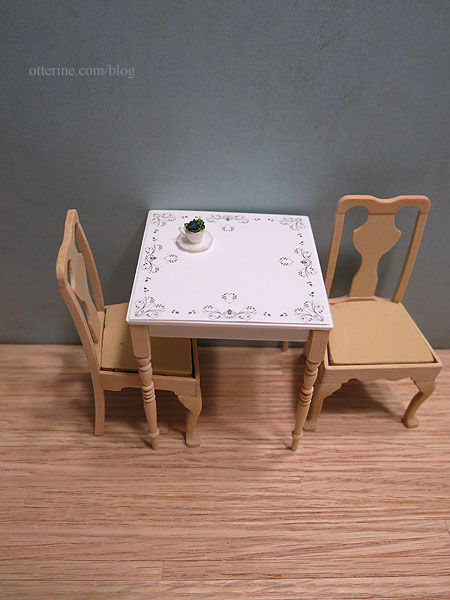
Here’s one showing the red. This is the design I like the most, but the red didn’t do it for me.
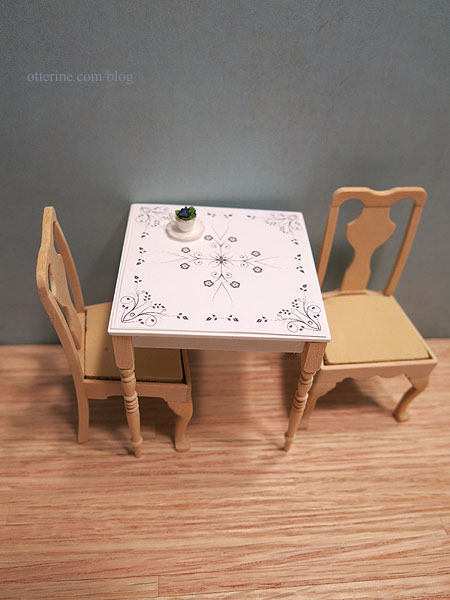
The black is almost there but a little stark.
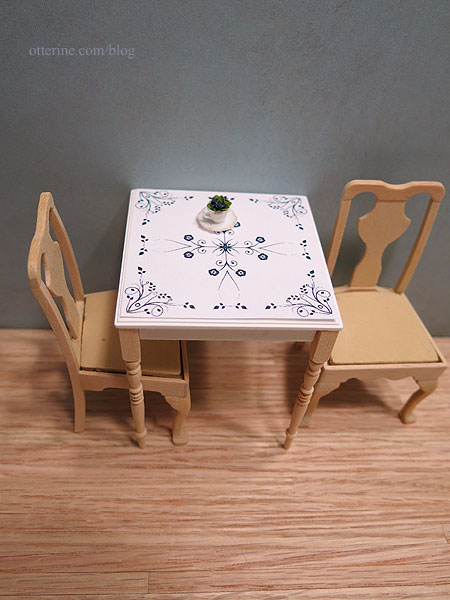
The blue is almost there but perhaps a little too light.
So in the final trials, I printed grey and navy blue tabletop designs. First, the open grey…a little washed out.
Open navy blue…ooooh, gorgeous!

Filled grey…meh.
Filled navy blue…not as nice as the lighter blue before, and to me the open navy blue still has that beat. I love the open navy blue design because it will frame whatever is featured on the table.
Update: finishing the table here.
Categories: Watson Mill
June 14, 2017 | 0 commentsWatson Mill – main room furnishings, part 1
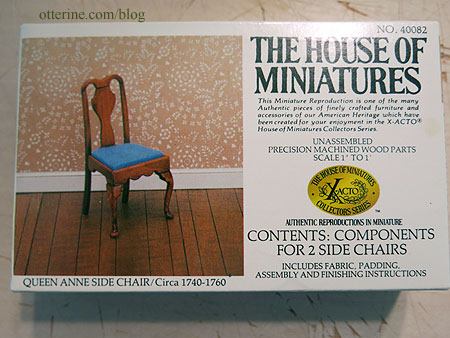
Now that I have the general layout, I can start making the final furnishings. I’ve raided my stash of furniture kits and took out a couple that I would not likely use otherwise. For the kitchen area, I will make two Queen Anne Side Chairs from The House of Miniatures. I don’t recall starting these before, but the kit is mid-assembly. It’s also possible they were started by someone else when I bought them. I have purchased a few lots of HoM kits before, so who knows? :D
I’ve built enough furnishings to be able to handle a piece already started. These are simple chairs with just enough interest. I have sanded the legs, but I never fully round them as the instructions or photos show. I like a bit of structure to cabriole legs even if it is not in keeping with the true style. The foam in the kits has been damaged, but that is easily substituted.

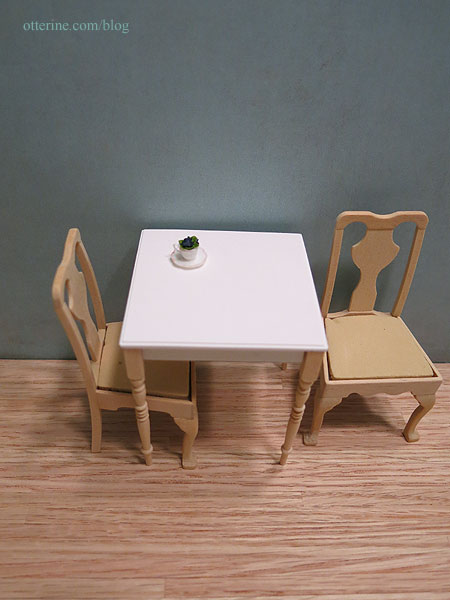
The table kit has a resin top and wood legs. I could not tell you where it came from, though. I bought it quite awhile ago. The legs have extra length and are easily shortened as needed. I’m not sure if I will paint the top or leave it white and just finish the legs and apron. I like the small size of the table, 2 3/8″ square.

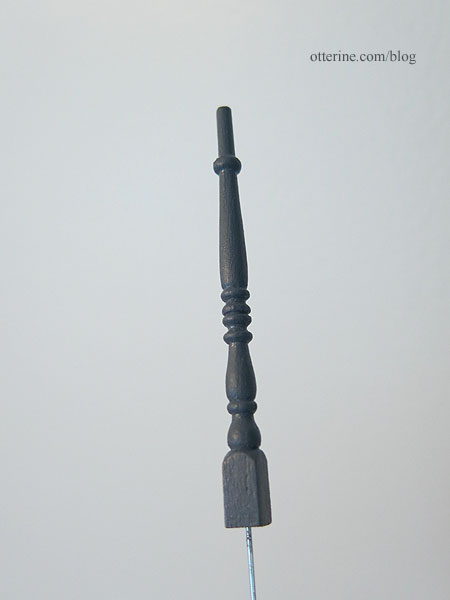
As you can see, I still have to cut the legs to the final height. I do like their lean shape.

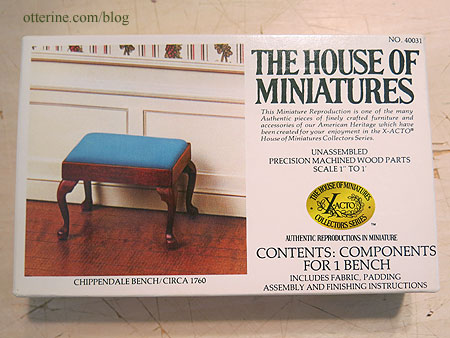
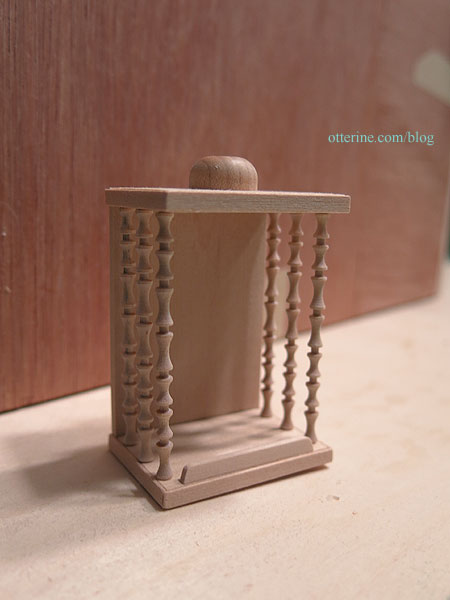
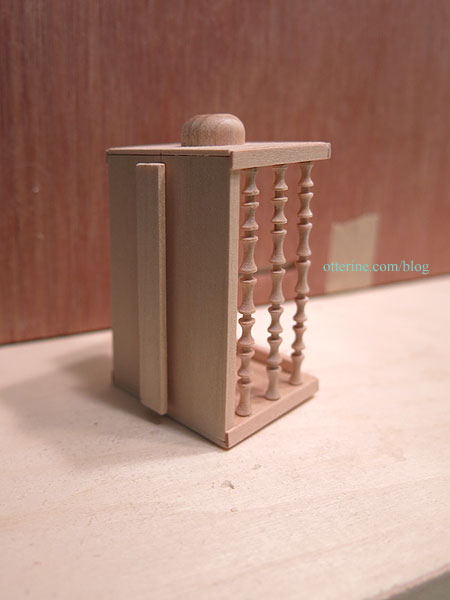
Two Chippendale Benches (also HoM) will replace the footstool and round stool I’ve been using as placeholders. The similar legs will go well with the chairs.
I plan to finish with bargello embroidery. One of these might seem a little large for the work table, but in a small home, furnishings have to do double duty. Once I have the work space set up, that should help, too.

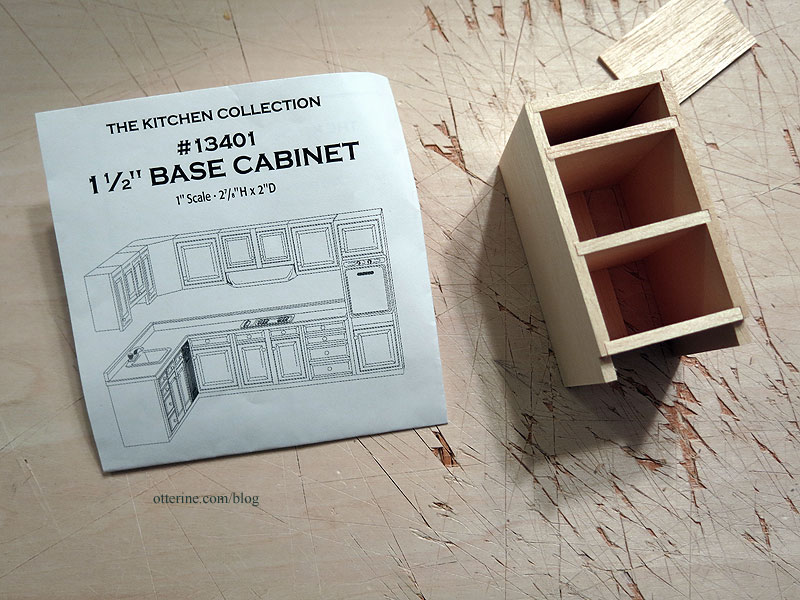
I have a Houseworks 2″ kitchen cabinet kit for the space in back. This will coordinate well with the dumbwaiter on the other side since that has a kit from the same series as the base cabinet.

These pieces fit well and use up some of my stash of kits. :D
Categories: Watson Mill
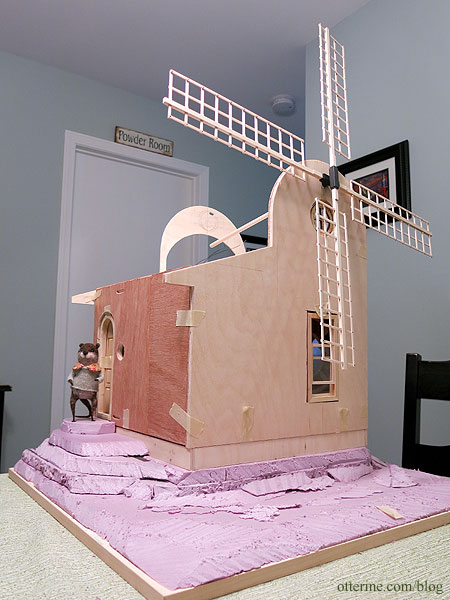
June 11, 2017 | 0 commentsWatson Mill
Just starting my usual recap post to make it easier to find things. This post will change as I get further along in the build.
————————-
Greenleaf Dollhouses held their Spring Fling contest for a number of years, including some years before miniatures became an everyday thing for me. The 2009 kit had an arch roof and an interesting shape. The kit is still available today, but I bought one some time ago for a someday project just in case they went out of production. Jen Barrick’s Loganberry Mill was one of the first miniature houses that drew me into the hobby. She dropped the scale down to half scale and made the most amazing sail set. It’s truly an inspirational build from the inner mechanisms to the realistic landscaping. So, that is where I started…with an idea for my own take on the kit…Watson Mill.
The initial dry fit:
I kept the full scale aspect and made this more of a fantasy build in the vein of Roland’s Retreat. That saved the hassle of adding a full kitchen and bathroom. My plan was a mill rehab with most of the inner workings of a proper mill long gone and replaced with the cozy decor of its current resident, Gustav. He was made by Johana of Rustles from the Meadow.

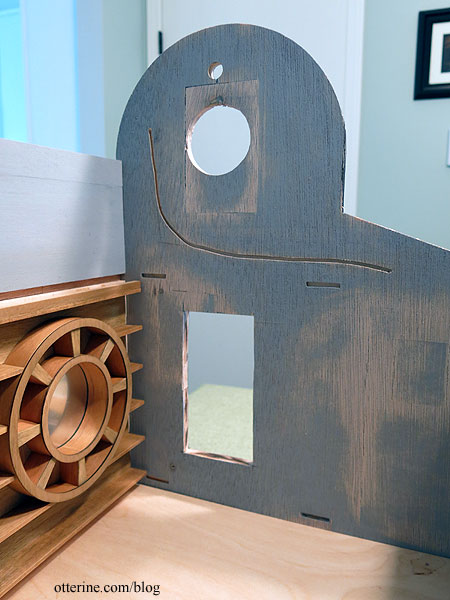
I added 4″ in depth to the kit since there were things I wanted that the small space of the original kit would not allow. I also moved the door to the side and padded the walls in preparation for working components.
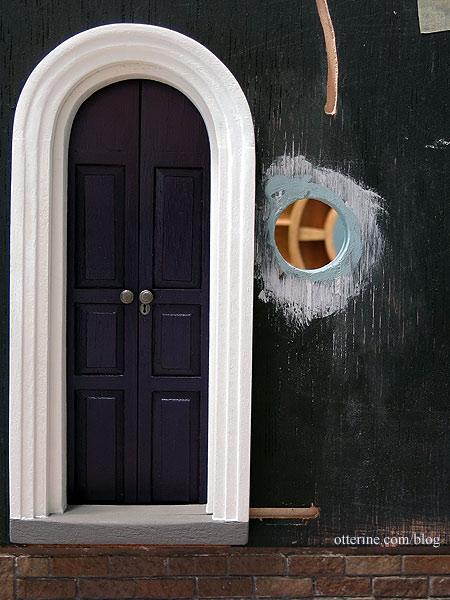
I wanted an arched door to keep with the curved aspect of the facade. There’s a relatively low ceiling on the first floor at 7 3/4″ tall, which knocks out the ability to use the lovely Palladian door that stands just under 9″ tall. I also didn’t want to overpower Gustav’s modest stature with an enormous door. Enter the Designer Home Hogarth window with shutters. I bought this new old stock window at a local miniature show.
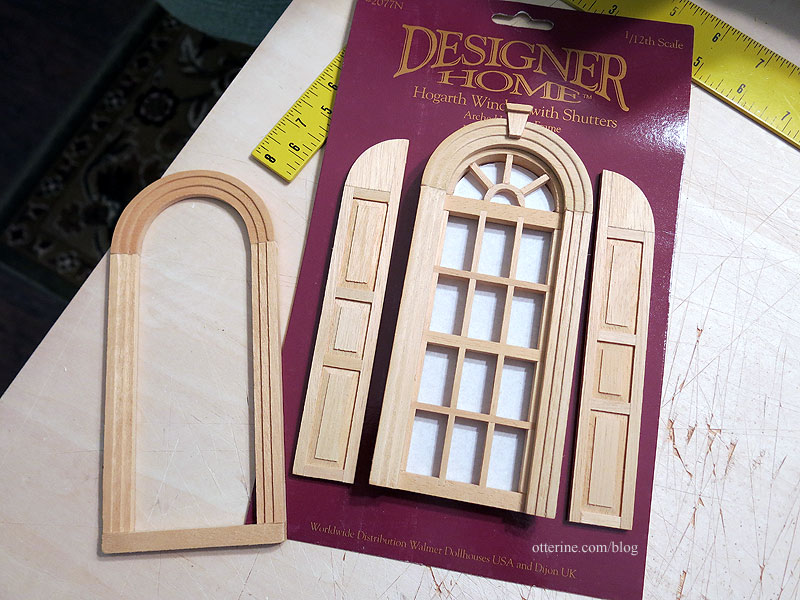
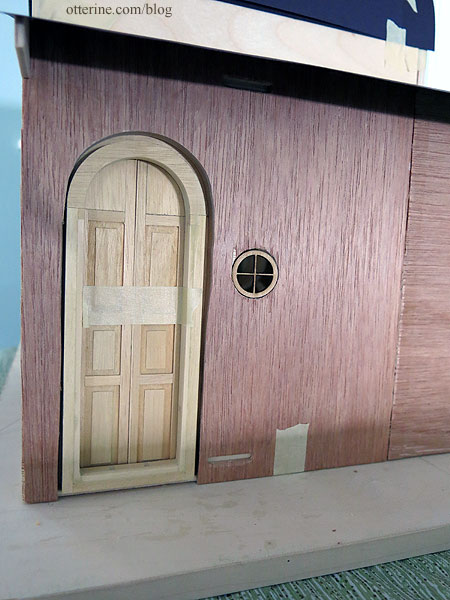
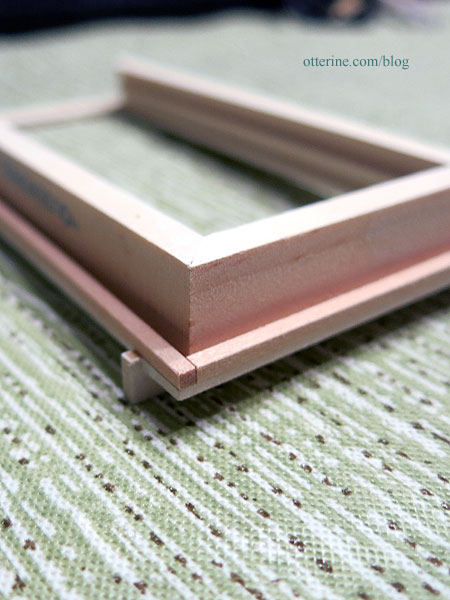
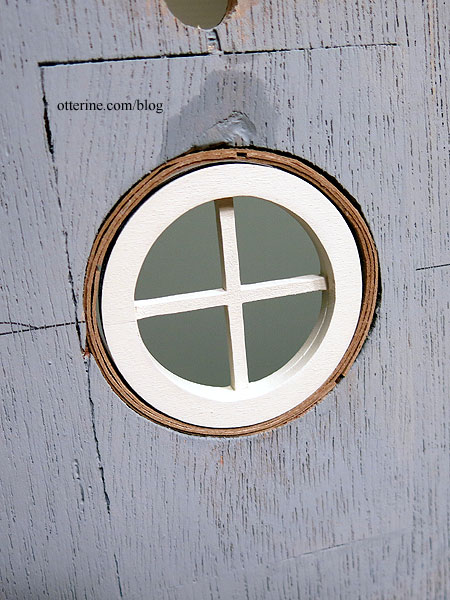
I cut the inside bits on the scroll saw, and pieces of strip wood were added to fill in as needed. Since doors open in, the frame had to be reversed with the fancy trim on the inside. On the outside, there is a nice deep entryway. There’s a tiny round window next to the door so Gustav can see who’s-a-knockin’ at the door. This the 1 1/8″ Simplicity Window from Heritage Laser Works. To cut this hole, I used a 1″ spade bit. Here’s a post on cutting holes for the various openings.
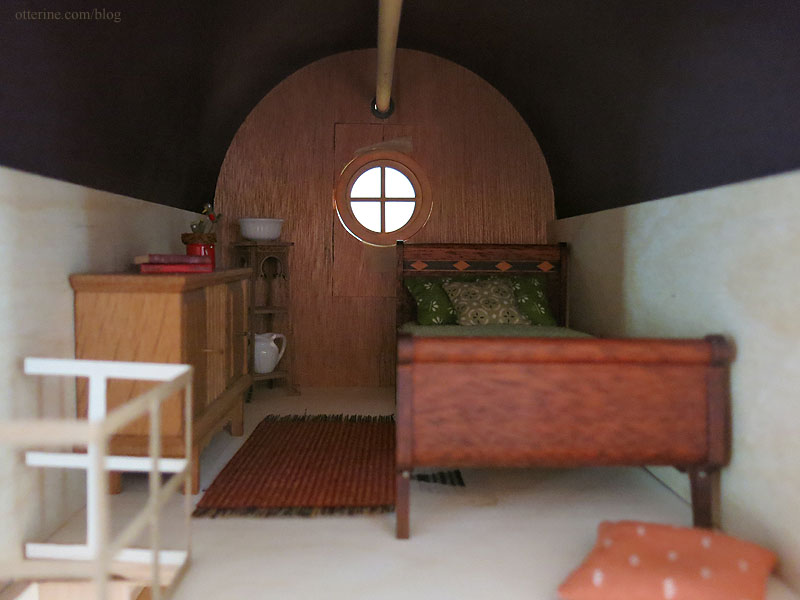
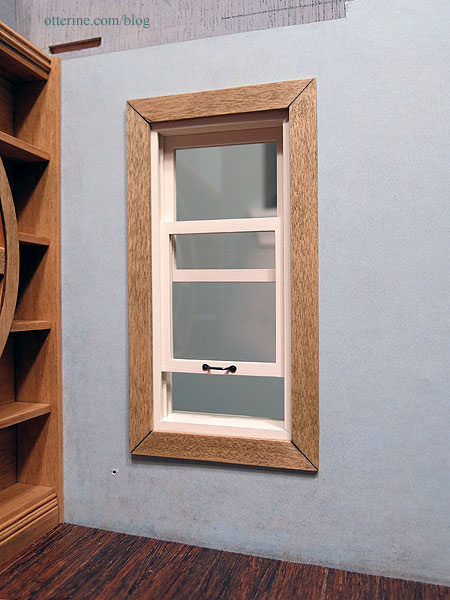
I’ve cut circular openings with the standard Dremel before, so that’s what I’ve used for the bedroom window – a 2 1/4″ Simplicity Window from Heritage Laser Works.
The Sails
The sails were a good deal of fiddly work (last process post here, follow the links at the top of each post to follow the process) with a few good mockups first. I did some research on windmills and a fair bit of virtual sightseeing, but I am by no means an expert. Watson Mill was not meant to be a precise model, though there are some remarkable works out there.
There’s a wealth of information in the online publication of The Dutch Windmill by Frederick Stokhuyzen (link no longer active), though I admit I skipped around to parts I needed. There’s also this awesome website with a video by The Yorktown Windmill Project showing how to make a common sail. (They also have a great page on the conical roof, which I have done in miniature in the past.) After seeing this real life example, I decided to change my design to match. My sails don’t have the gentle curve of the true sails, but again I was going for the essence.
As for the sails, they had to actually spin. :D Bruce Hirst has some great instruction on how he made his working mill, so that was a great starting point. I had the challenge of an open back structure so I needed to be creative in disguising and setting any mechanical details. I had to close up the arch near the upper back and addressed the mechanisms fairly early since that determined many adjustments to the basic structure.
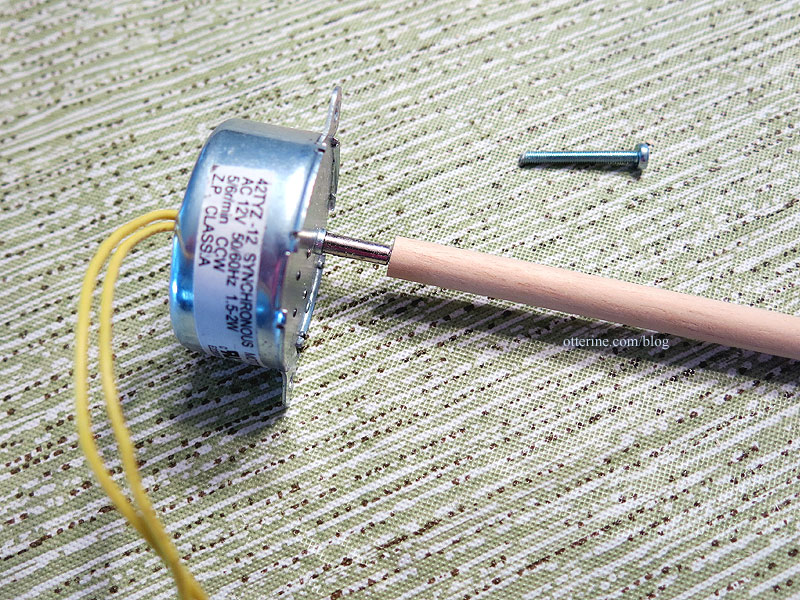
This is the latest post on the motor for details.
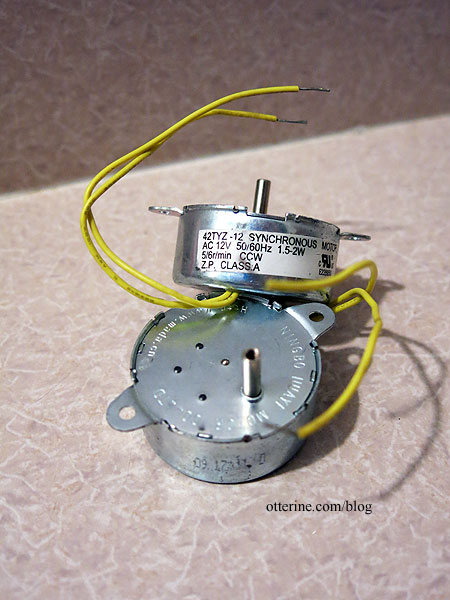
Seeing that this motor turns counterclockwise makes a difference in how the sails will be built. Even though the wind won’t power them, I want the sails to be built to correctly correspond to direction. Here is clockwise, and here is counterclockwise. You can see the difference in the lead edges and angles. Bruce Hirst has the correct configuration for clockwise sails, but I will be building mine opposite to suit the spin of my motor.
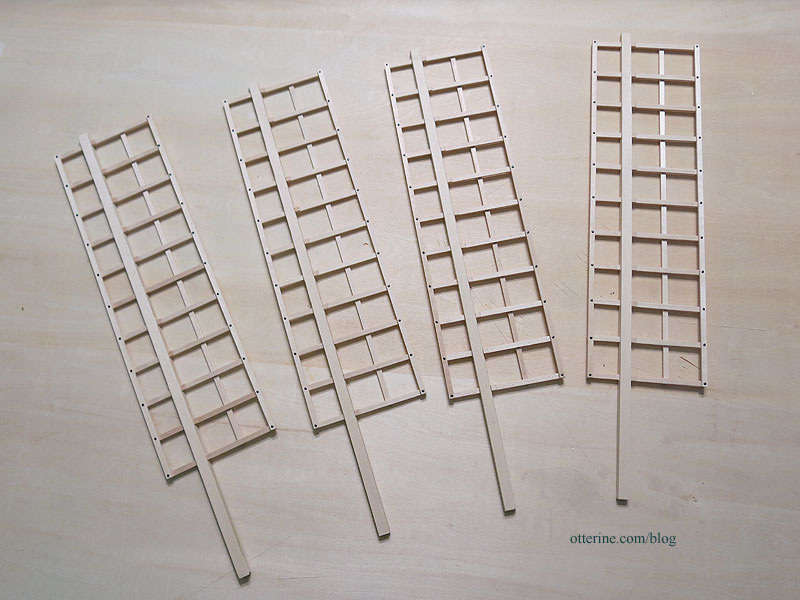
The sails are built from mainly 1/16″ x 1/8″ strip wood. There are 11 sailbars per sail at a length of 2.75″ each and 3 hemlaths (outer vertical strips) per sail at a length of 9″ each. Since I was cutting by hand, there were some gaps.
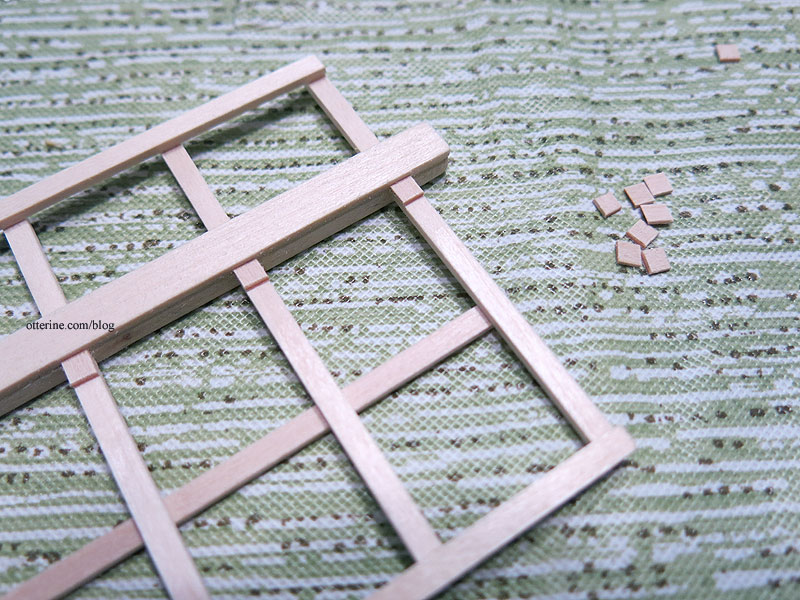
This might have been a bit of overkill for a model, but I also used nails in addition to the glue. I don’t need these suckers popping apart later on down the line, and since they will be motorized it’s likely worth the extra time and effort. I did drill pilot holes so I wouldn’t split the boards.
I developed a hub inspired by the 1:30 scale mill kit by Amati and this windmill build by Penterbak. It is built from styrene (plastic) instead of wood because I worried about longevity and solidity during operation. I used square tubing from Evergreen, glued in a cross formation using Testors cement. On the back, I glued a cap cut from round tubing to connect to the windshaft.
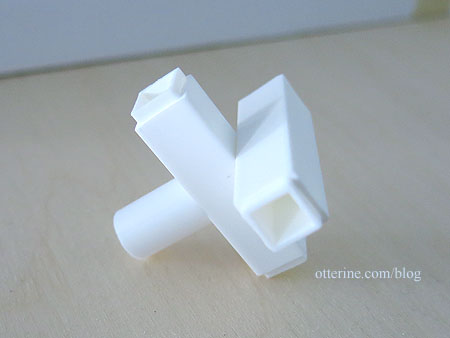
Shims were required to make the whips square where they entered the hub as was sanding to fit, my least favorite phrase in mini making. However, a tight fit in the hub means no glue or pins are required to keep it all in place. If I need to replace anything, just pull it apart at the hub.

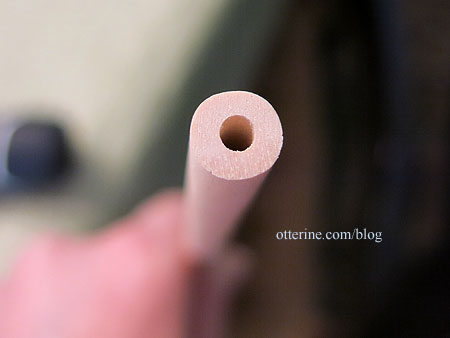
The shaft is a 5/16″ diameter wood dowel with a hole drilled in the center on one end.
The motor has a threaded shaft, so my friend and I went to the hardware store to find a suitable screw to fit. Another friend cut the heads from a few of the screws so I could attach one end to the wood shaft, and now I have a few spares for the future (or for the other motor in my stash).
To support the motor, I created a new back wall with a larger space along the barrel roof.
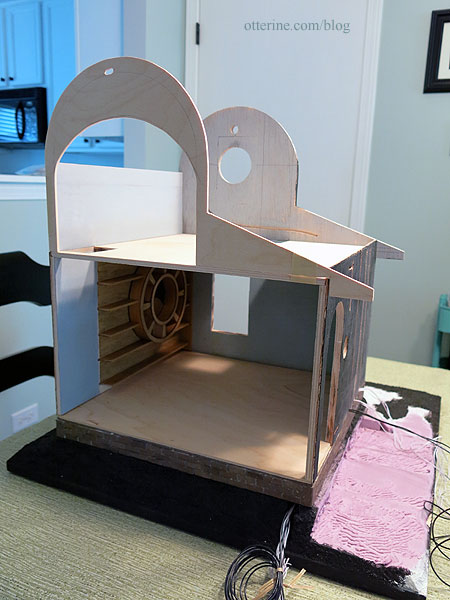
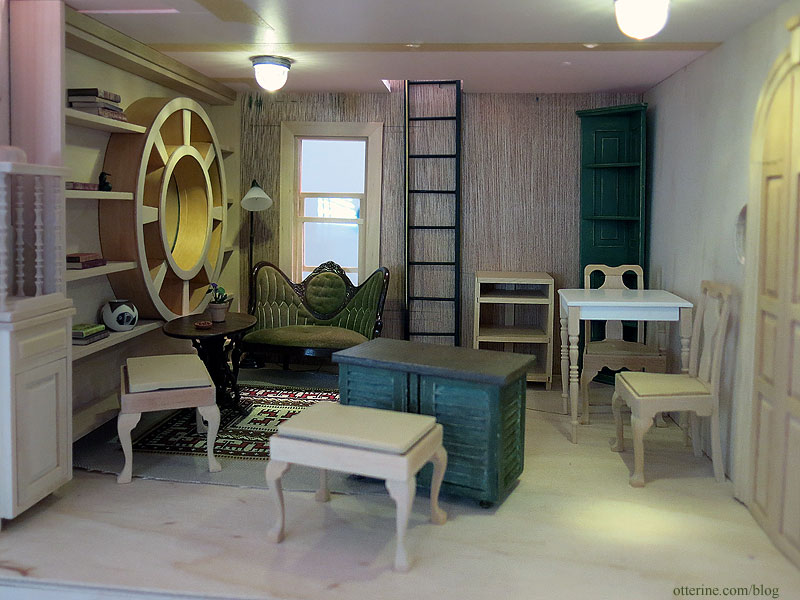
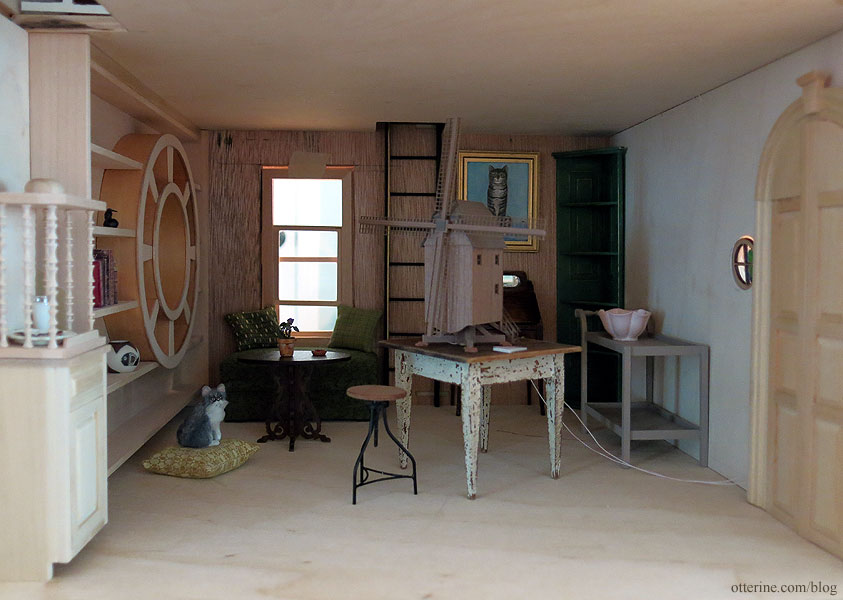
The Main Room
The wallpaper is Happenstance Fluke by The Paper Loft. I wanted the appearance of aged plaster joining directly with the flooring, so that’s what I tried to accomplish in the finished room. I stained the red oak flooring with Minwax Dark Walnut. I love the grain of this flooring but not the pink cast, and the dark walnut was able to highlight the grain and tone down the red. After it was completely dry, I burnished the surface with a scrap of paper bag and then sealed with two coats of Delta Ceramcoat Matte Varnish. It’s an old floor, but perhaps it was refinished during the renovations.
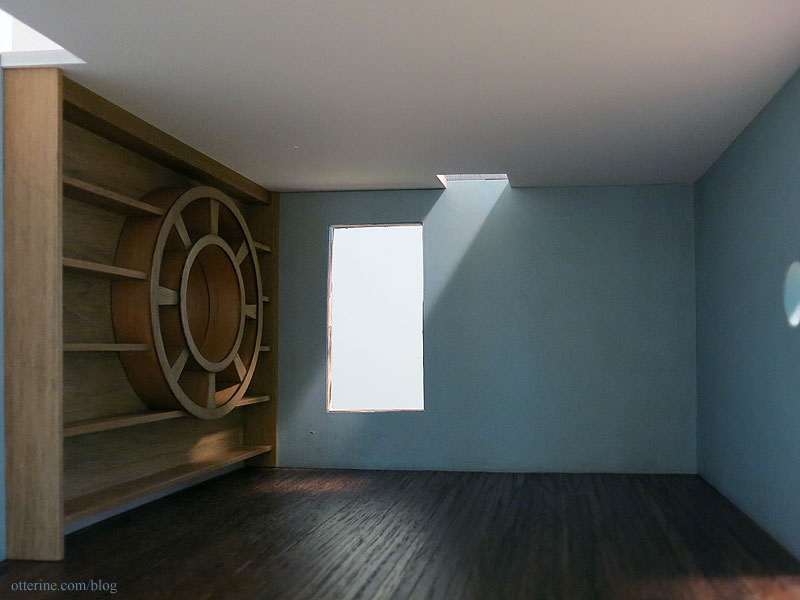
I finished the ceiling for the first floor in crisp white to reflect light. I stippled the paint to create a delicate texture I thought would go better with the aged appearance of the wallpaper. The texture also hides the wood grain.

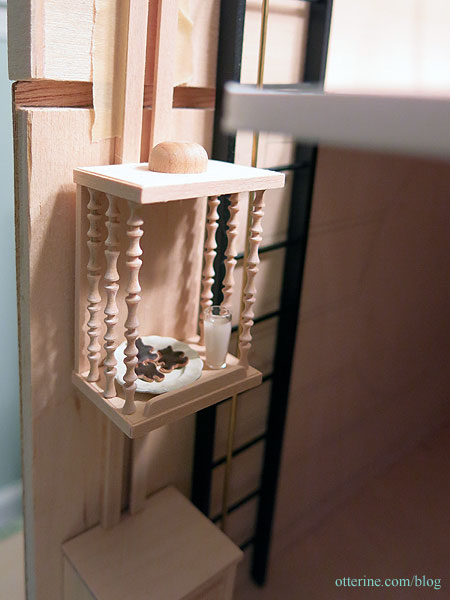
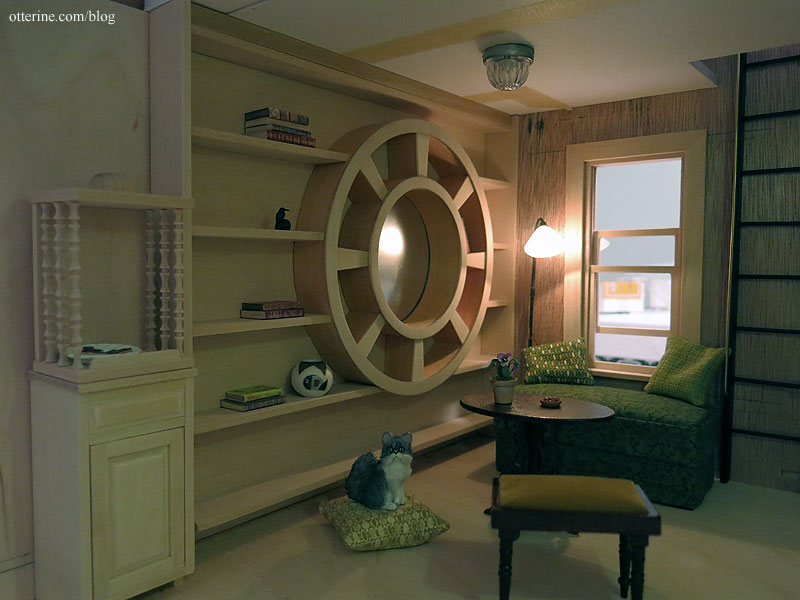
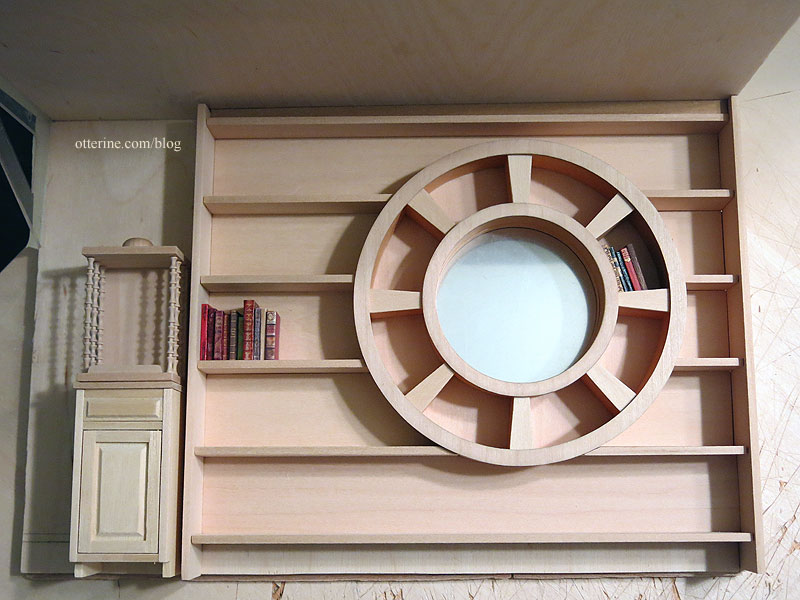
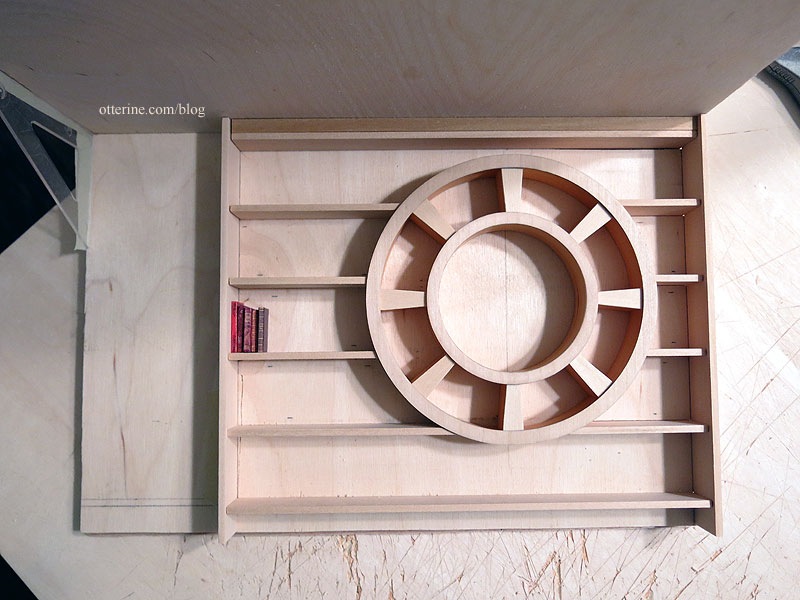
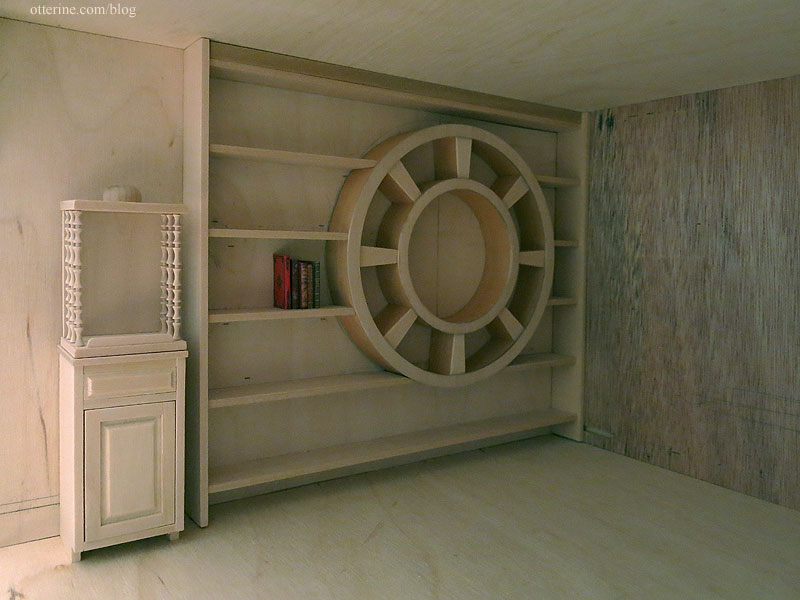
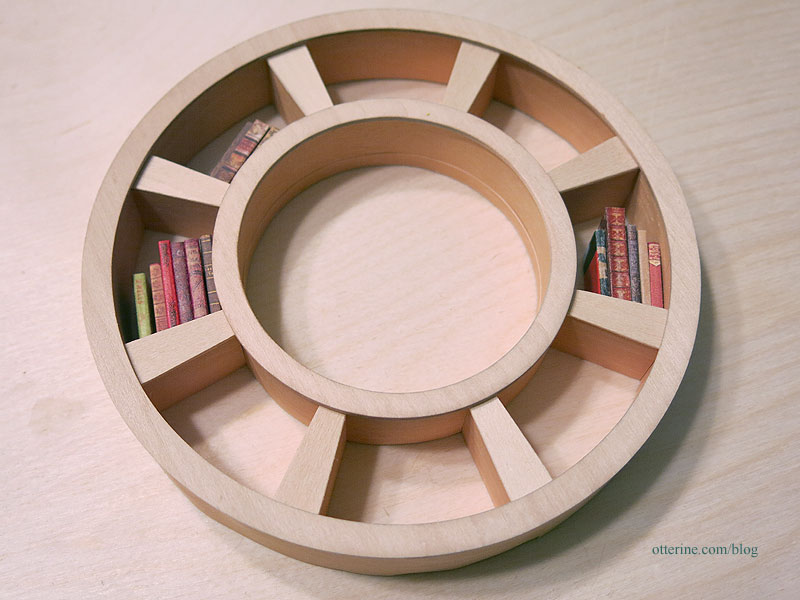
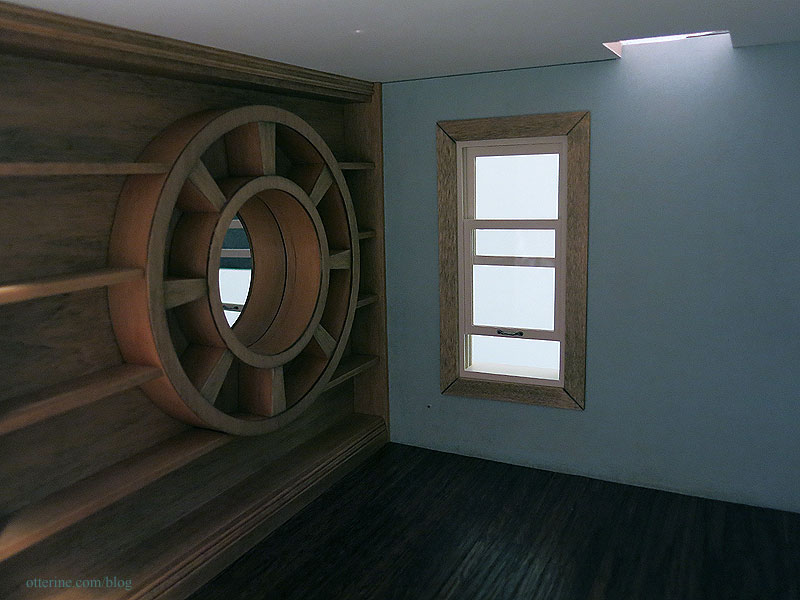
The big feature of the main room is the circle library (the process ends here, but you can click back through the links at the beginning of each post to see the full process). I started with cardboard rings and built the library from there.
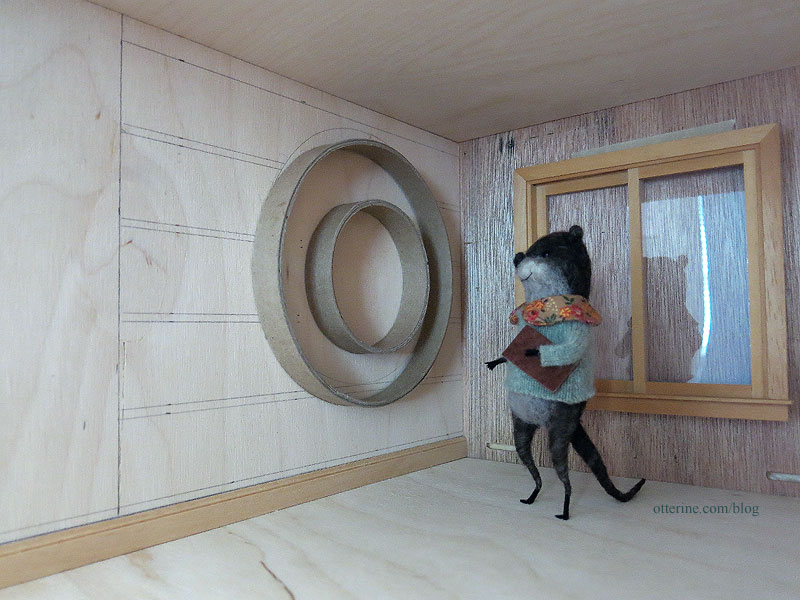
Cyd helped me out by cutting laser cut circles for finishing. I sanded away the charred edges and then glued it to the support structure. My supports are not uniform circles, so the laser cut trims help disguise any imperfections.
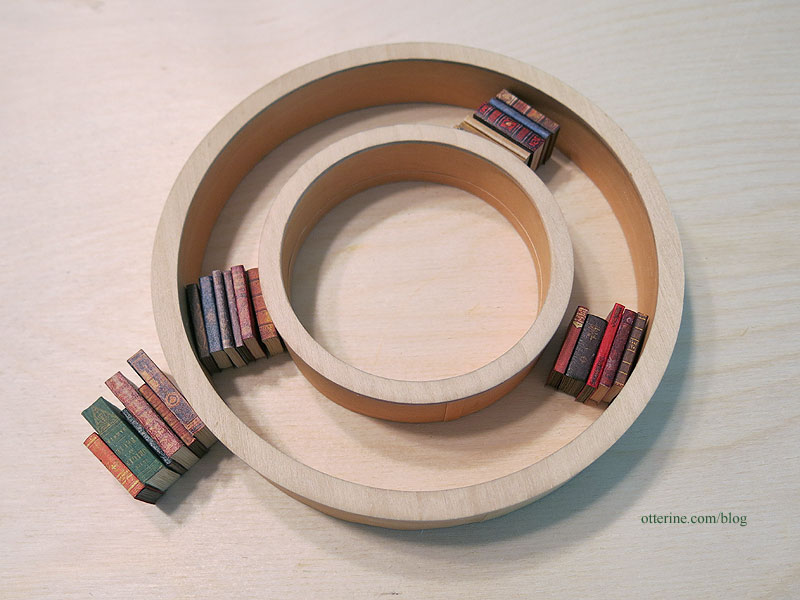
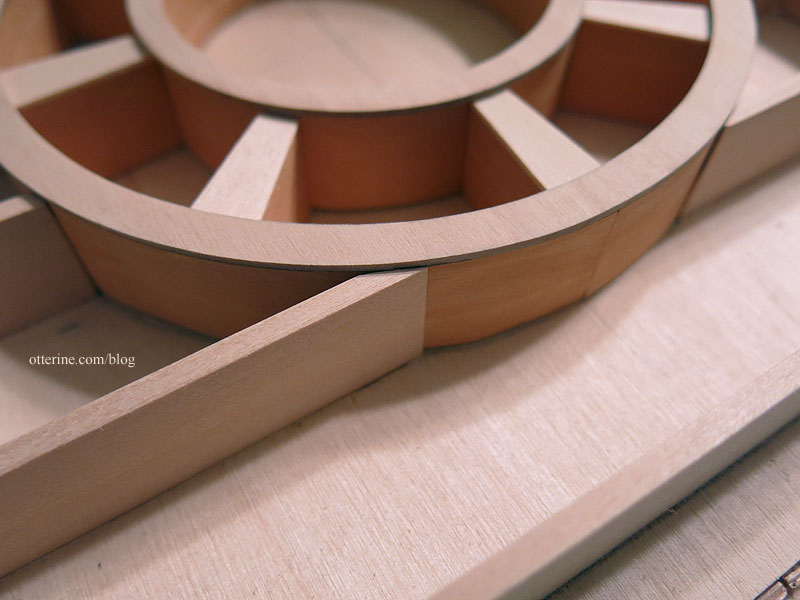
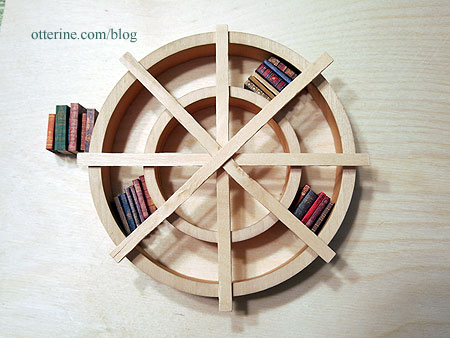
The original inspiration had 18 dividers, but my version has only eight for balance and fit. I made angled dividers to match the original.

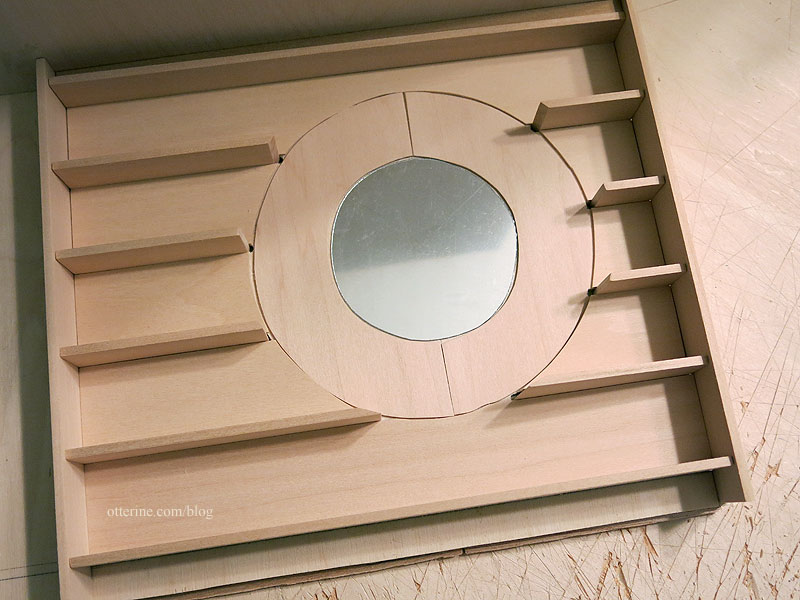
To build the shelves, I cut 1/8″ wide channels in the plywood wall using the Dremel Trio. The channels provide a sturdy hold for each shelf cut from 1/8″ basswood. I started with 1″ wide basswood strips and cut them down to end up with a roughly 3/4″ deep shelf. I hand cut the angles around the circle supports. Not easy. :\
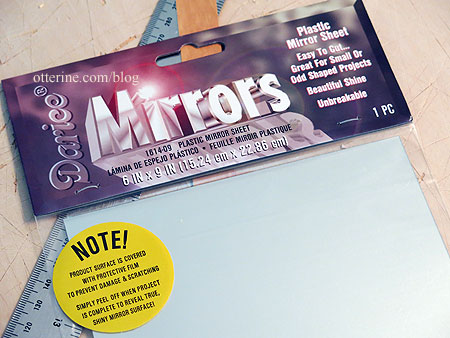
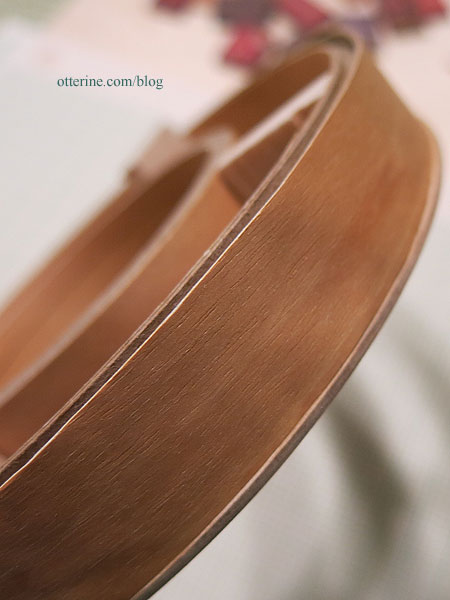
The curved edges sit under the circle, so the joins are not visible when the circle is in place. I cut Darice mirror sheet for the center section. After staining, it actually looks like it was made from reclaimed wood, which makes a lot of sense for an old mill. :] A happy accident.
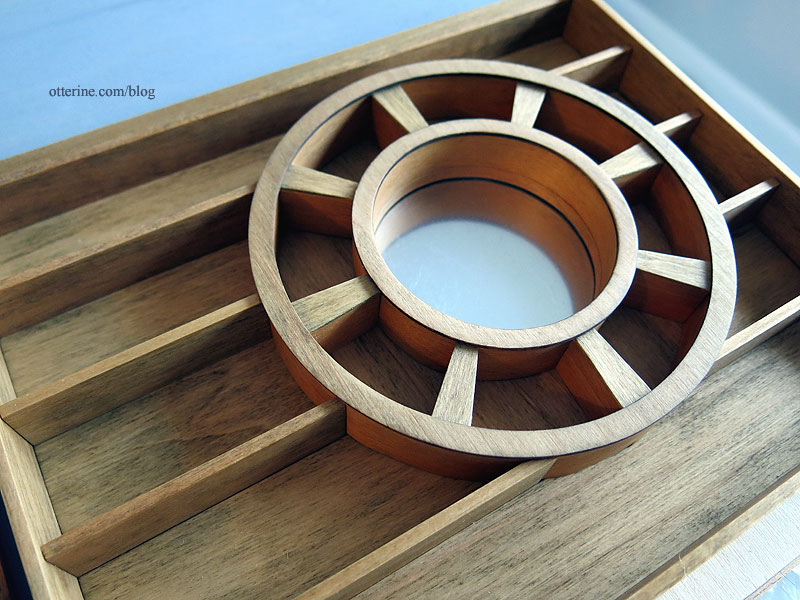
The circle portion can be taken out to clean or replace the mirror as needed.
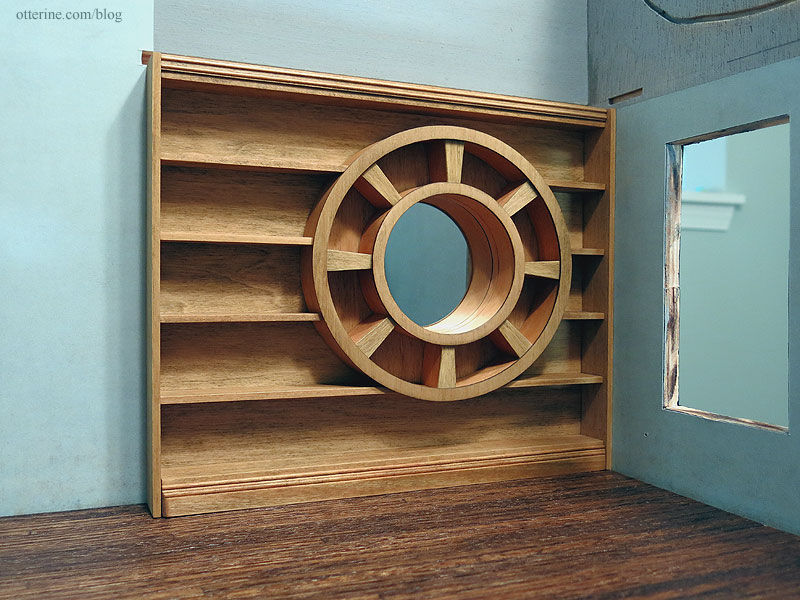
And, for final reference, here is the original again. I skipped the long curved trim for lack of space. Besides, I like mine as is. :]

no discernible source Yes, I need to make a lot of books! :O

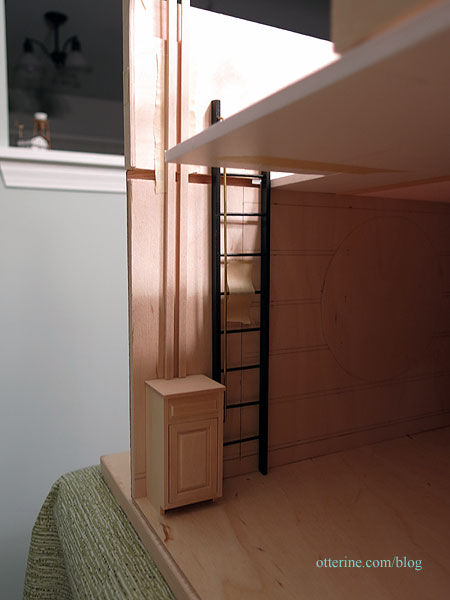
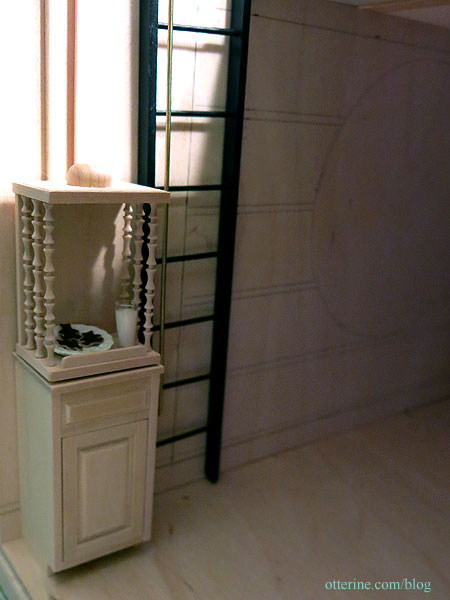
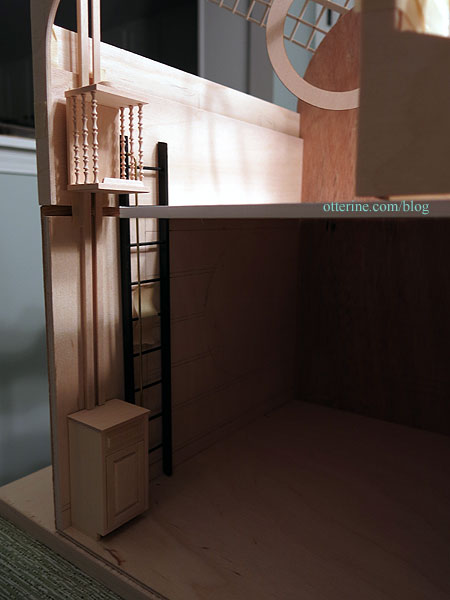
Not to be left out of the limelight, there’s also a working dumbwaiter (part one). I’ve had dumbwaiters in my idea file for some time now. There’s a great example of the mechanism here at Old House Online. The basic premise is relatively straightforward with just a lot of wood construction. The problem is, a fully enclosed dumbwaiter would block a significant part of the modest back opening, especially on the upper floor. So, I compromised between a bucket on a rope and an enclosed dumbwaiter. I built an open dumbwaiter car running on a track along the wall with a pulley system. This way, the car will move smoothly up and down to carry milk (or Scotch) upstairs and yet take up less visual space overall.
The car should rest at counter height when on the lower floor, so I bashed a 1 1/2″ Houseworks base cabinet by cutting down the depth. This also gives Gustav some storage in his small home. I built a fancy car from tiny turnings and basswood, then added a slider bar to the back. The track was formed from strip wood to make two channels facing one another. When I install the tracks after decorating, I plan to leave space enough at the top so I can slide the car off the track for cleaning, repairs or replacement.
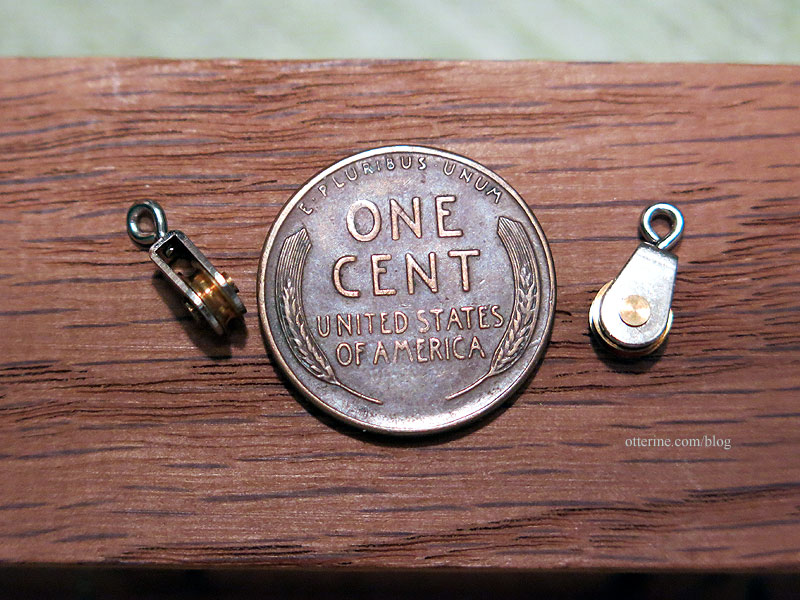
Here are the model ship single sheave blocks I ordered from the UK from Maritime Models. Yep, they actually work. These will be perfect for my dumbwaiter pulley system. :] So wee.
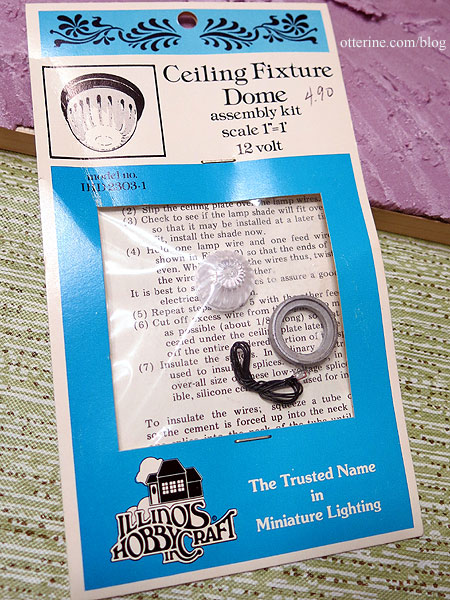
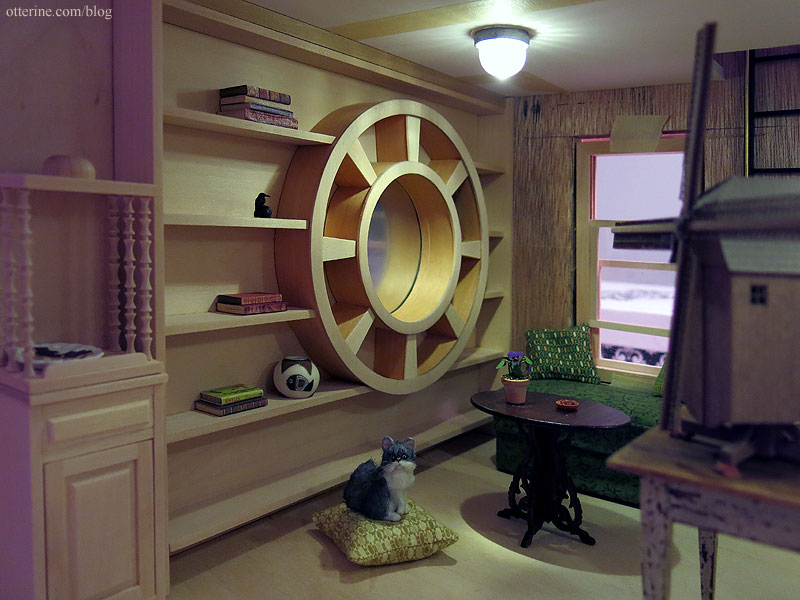
To illuminate the main room, I used two new old stock ceiling light kits by Illinois Hobbycraft.
The light above the circle library is lovely for showing the detail. The cat is Meeko made by JMDS.
There is not a lot of room for a wall sconce for reading, so the best bet is a floor lamp. This one is by Ray Storey.
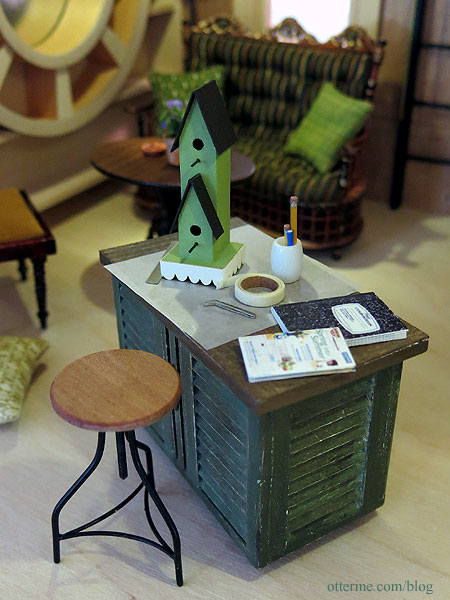
The other ceiling light sits closed to the door and compliments the layout I’ve chosen for the other side. This includes a modest kitchen and a work area toward the front. As much as we know he likes reading, I’ve always envisioned Gustav as a dabbler in minis.
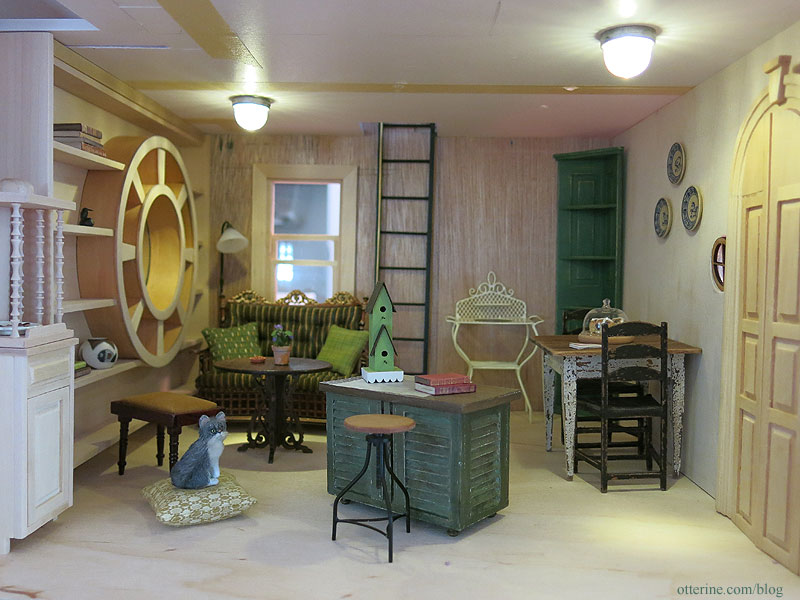
Perhaps he works smaller — maybe he makes birdhouses.
I purchased the settee from eBay. It’s so rare to see these in green upholstery instead of red. I had to do a bit of repair work, but it blended reasonably well. I think it fits the space and brings a bit of nostalgia to the room. Plus, what a great lounge chair for reading with that tall back support.
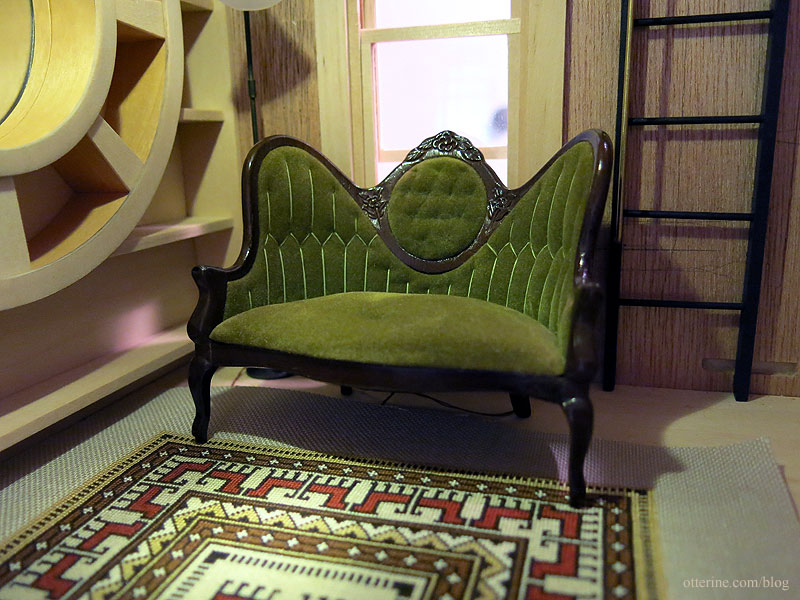
I figured I would try out the Tribal Foxes rug for the main room. No, I still haven’t finished the edges…have to be in the right frame of mind for that work. But, we can’t have the coffee table blocking the center details of the rug. Pushed to the side, it looks meant to be! :D In fact, this is how I would set up the room if I lived in it so I didn’t risk stubbing my toe each time I went to sit down.
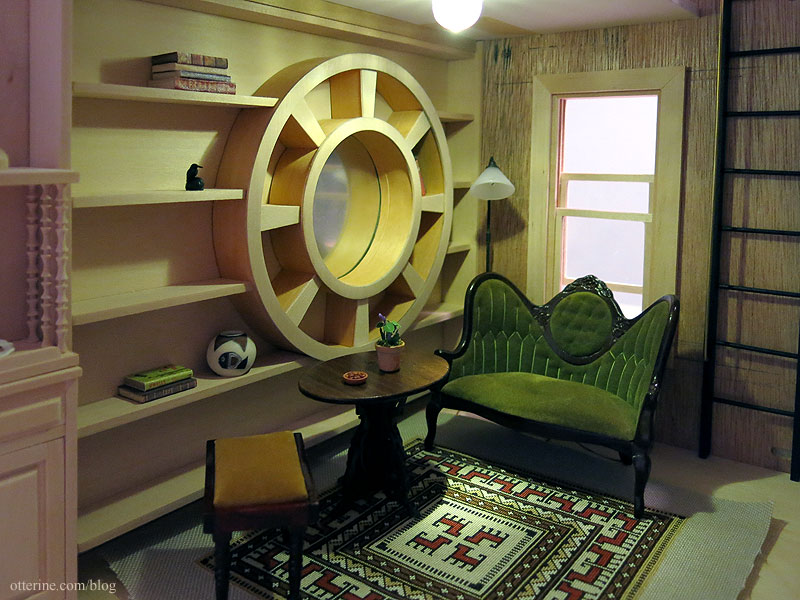
Two House of Miniatures Chippendale Benches complete the library area furnishings. One of these might seem a little large for the work table, but in a small home, furnishings have to do double duty.
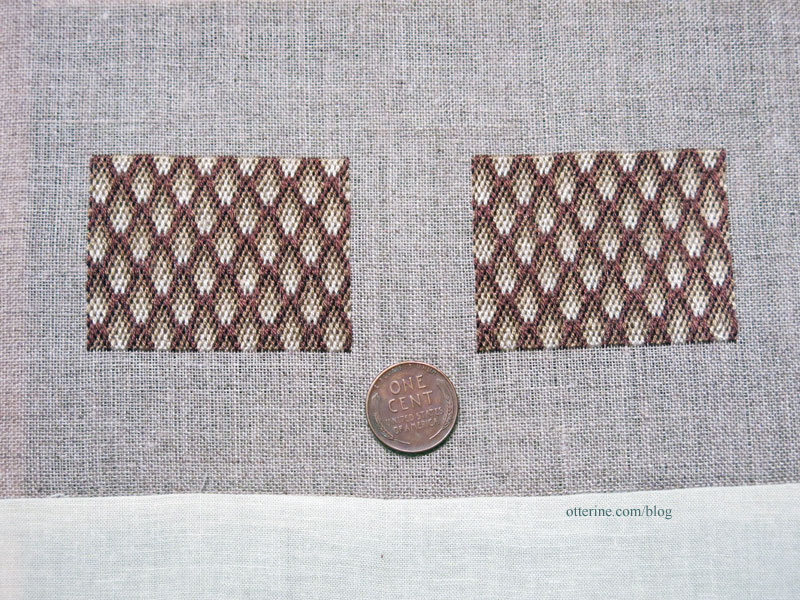
I stitched bargello seat covers for the benches using a pattern from the book Miniature Needlepoint and Sewing Projects by Kathryn Falk. The one on the left took 5 hours and the one on the right took 4.25 hours, just like the first time around. It must just take more time to plot the first one, whereas you can just copy for the second one. The 40 count linen was rough in a couple of places for the second one, so it might look a little threadbare in spots once done. It will just make it look old, so I’m not worried about it enough to redo it.
For the kitchen area, I made two Queen Anne Side Chairs from The House of Miniatures. These are simple chairs with just enough interest.
I have sanded the legs, but I never fully round them as the instructions or photos show. I like a bit of structure to cabriole legs even if it is not in keeping with the true style. They are painted Zinc by Americana. What I like about this dark grey is the blue cast to it. I finished with Delta Ceramcoat Satin Varnish and upholstered with a cotton print from my stash.
The table kit had plain white top made from some sort of porous material like cast plaster and wood legs. I could not tell you where it came from, though. I bought it quite awhile ago. I liked the small size of the table, 2 3/8″ square, though I did cut a modest 3/16″ from the top of the legs for better overall proportion while keeping the appealing tall, skinny profile.
A Greenleaf forum member suggested enamel tabletops, so after scouting around the net looking at examples I chose an open design printed in navy blue. I painted the apron and legs with Zinc by Americana to coordinate with the chairs. The tabletop material I opted for was water slip decal, using Testors Decal Bonding spray since I had that on hand.
I probably should have sanded the surface more beforehand. Even after the gloss sealer, the cross-hatch painting imperfections showed through. I guess it’s just an old, well-loved tabletop. I always trust the happy accidents, and the surface is not very noticeable in photographs unless you try to capture it. I think it turned out beautifully. :]
I cut down the depth of a Houseworks 2″ kitchen base cabinet by 1/4″ since it was a tad too deep and used Minwax Driftwood stain with satin varnish. The knobs are wood painted black. A beautifully rustic cabinet. :]
The pitcher and bowl are from my collection of minis. It’s a favorite that I had been hoping to use in the mill but it wouldn’t fit upstairs. Problem solved. It’s now a kitchen wash set.
The Bedroom
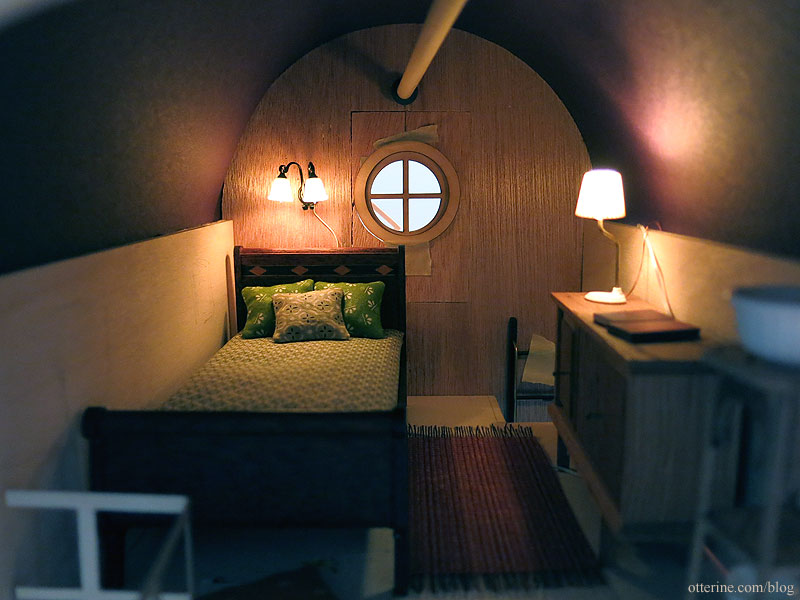
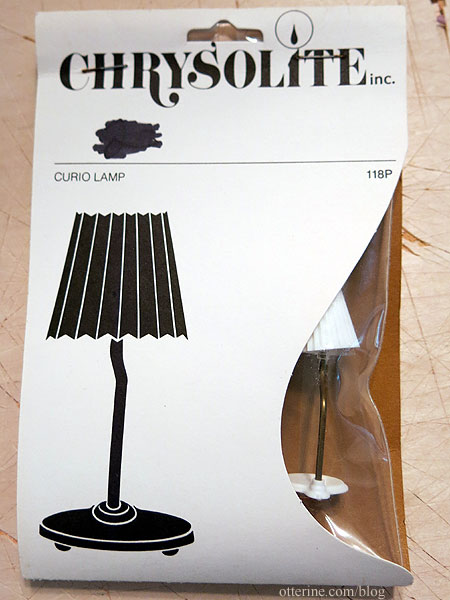
The bedroom is limited to table lamps or wall lamps considering the barrel ceiling and the windshaft. There’s a black double wall sconce with replaceable bulbs for above the bed and a Chrysolite table lamp for the cabinet. I think these fixtures give enough light right now, though I will be rewiring the Chrysolite lamp with an LED since the current bulb is non-replaceable. The LED will brighten the room a little.
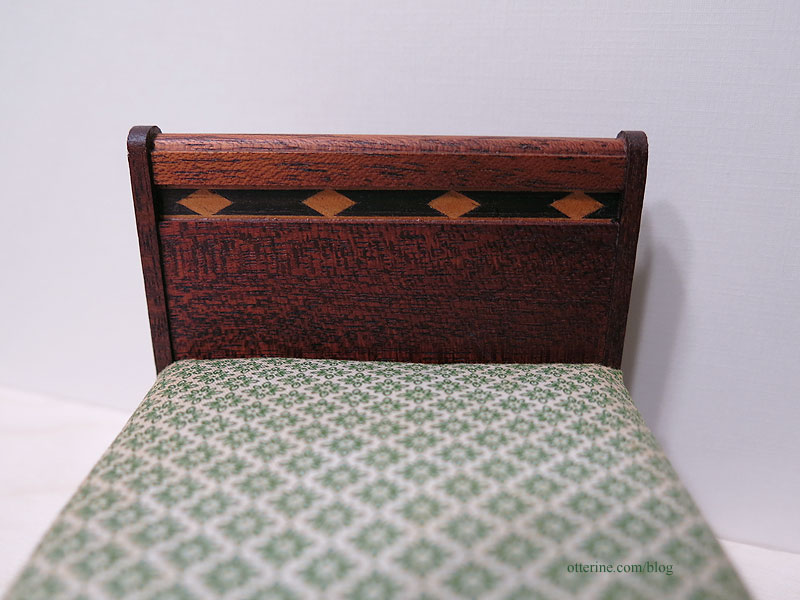
The gorgeous bed will likely end up in another house down the road, and I will make a replacement at that time. But, for now, I want it where I can admire it.
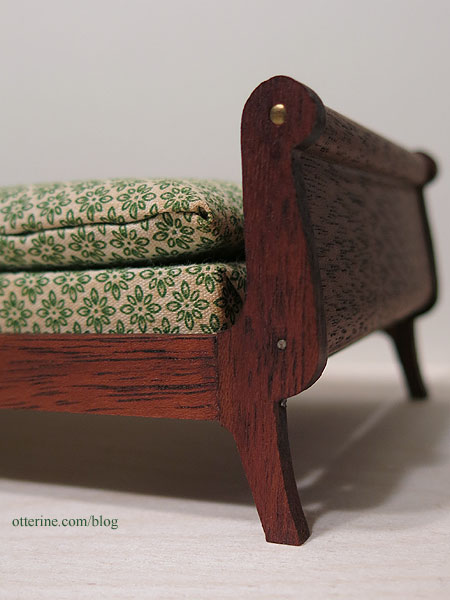
It’s a vintage bed with inlay and naturally aged bedding. I won’t cover up the existing fabric, but a folded sheet set ready to dress the bed might be lovely. It’s by Block House and came with the box.
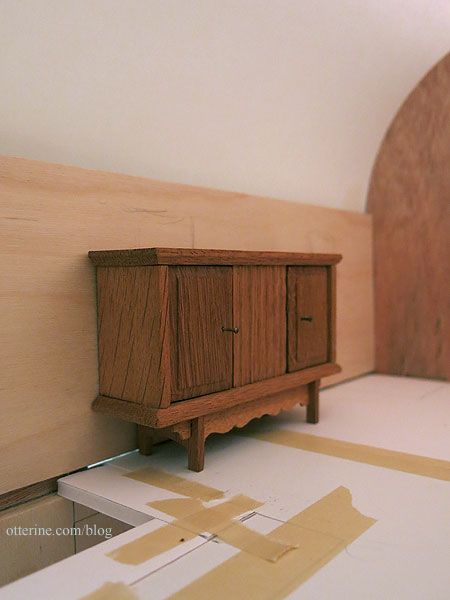
The cabinet is vintage Lisa of Denmark (similar to Lundby) that I picked up a few years ago. Being a slightly smaller scale, it has never worked well in any build to date. The mill, however, provides a perfect spot for it. Its hinge pins show on the top surface, but I can cover that well enough with a runner.
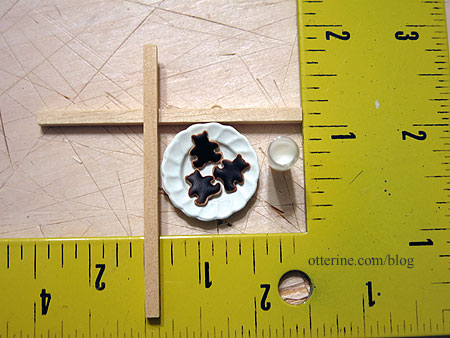
I bought this pale yellow metal wash stand from The Dolls House Emporium some time ago mainly because I liked the shape and color (looks like they don’t have it anymore). I decided to use this for the upper room of the mill and needed to find a bowl since one wasn’t included.
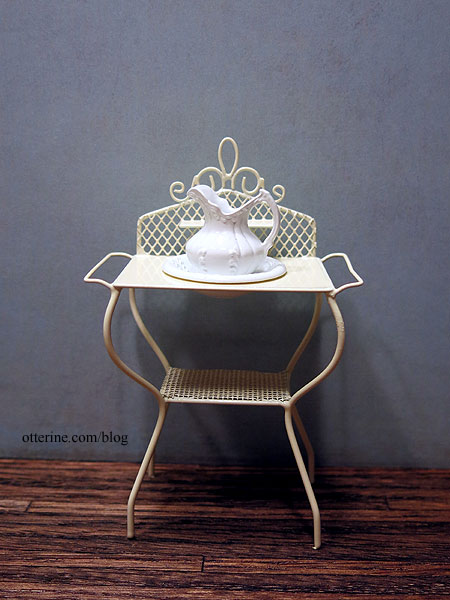
The small shelf in the back and the size of the hole limited what would fit. The ceramic bowls I had were either too small around and fell through the hole or were too tall and wouldn’t fit under the shelf. Debora said she had the Chrysnbon chamber set and would send me the bowl and pitcher. They are plastic but very well detailed. They also were a perfect fit. I sprayed them with white gloss spray paint followed by several coats of gloss sealer. They look fairly convincing as porcelain if you don’t look inside the pitcher to see the mold lines.
Landscaping and other exterior features
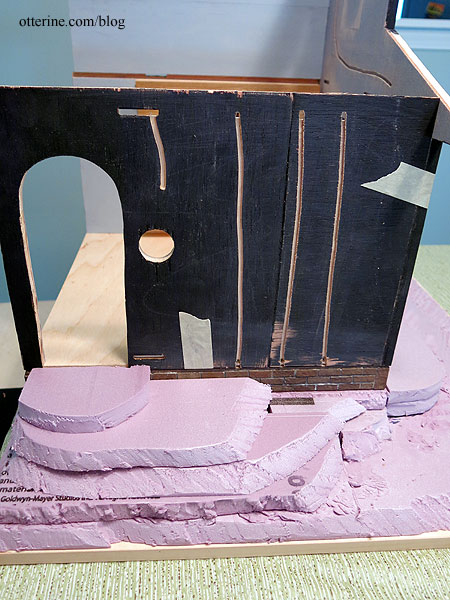
I want a relatively steep landscape for the mill, considering the base board is 20″ square. I built up layers of 1/2″ thick builders foam and marked where the mill will sit on top. After looking at this for a bit, I decided to add a modest foundation covered in egg carton bricks. I had egg carton bricks on hand, so I didn’t bother to reinvent the wheel. Most of the time, I will measure my board and determine how many bricks across I need and adjust the measurements accordingly. It’s a small foundation, so I didn’t think it would matter much once landscaping is in. Since my bricks didn’t end well at the corners, I opted for corner stones cut to fit. I chose brown based bricks instead of my usual brick red. There will be more aging during the landscaping process, but I love how it looks so far.
There will be a steep grade to the door that I had always had in mind for the build. These foam pieces will stay loose until later on so I can further shape them for the final landscaping. There will be more modification, but I think this is a good start, very tall and stately. :D
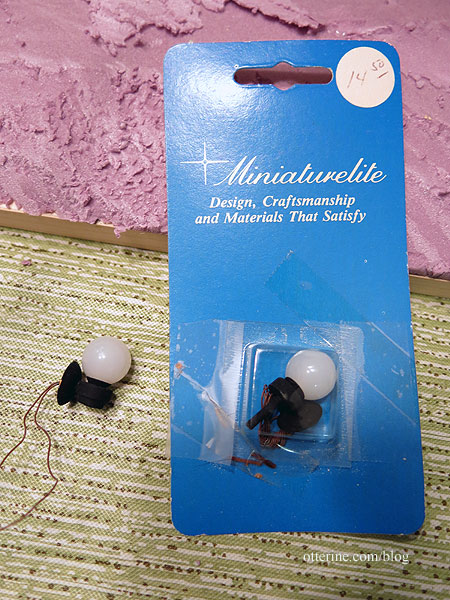
One of my weaknesses is new old stock lighting. I often rewire or use for parts. Outside, there will be a coach lamp.
This is a vintage lamp by Miniaturelite. I bought a grouping of these, two with posts and two without. I’ll take this apart and rewire with an LED.
For the exterior finish, I chose wood shakes. It apparently takes six years to forget what a right proper pain it is to wood shake an entire house. It’s a lovely finish though, and very forgiving especially on an old mill. Instead of dark cedar, this time I will be using light wood shakes that I can stain to look weathered. These are from the defunct and partial Tudor Queen Anne kit. No sense in buying supplies when I have some languishing in the stash. They are thin and rather uniform, which makes life easier.
First was determining the size of the individual shingles. True to scale shingles looked out of place for Baxter Pointe Villa, so I hand cut the 1,700 shingles by length and width to work best for proportion. Considering the mill structure is even smaller, I figured I would have to do the same. The 1/2″ by 3/4″ measurements used for Baxter Pointe Villa seemed like they would work for the mill as well.
I did a rough calculation and will need approximately 1,635 shakes. Not that far off from the amount needed for Baxter Pointe Villa, but there are fewer windows and no chimney for Watson Mill. After counting the bag, I discovered I have only 1,617 shakes. No margin for error. But, if need be, I will use other shakes for the small back wall. Houseworks makes nice light wood shakes that will work well enough to finish out the set. I will start here, though.
to be continued…
Categories: Watson Mill
June 1, 2017 | 0 commentsWatson Mill – cutting holes
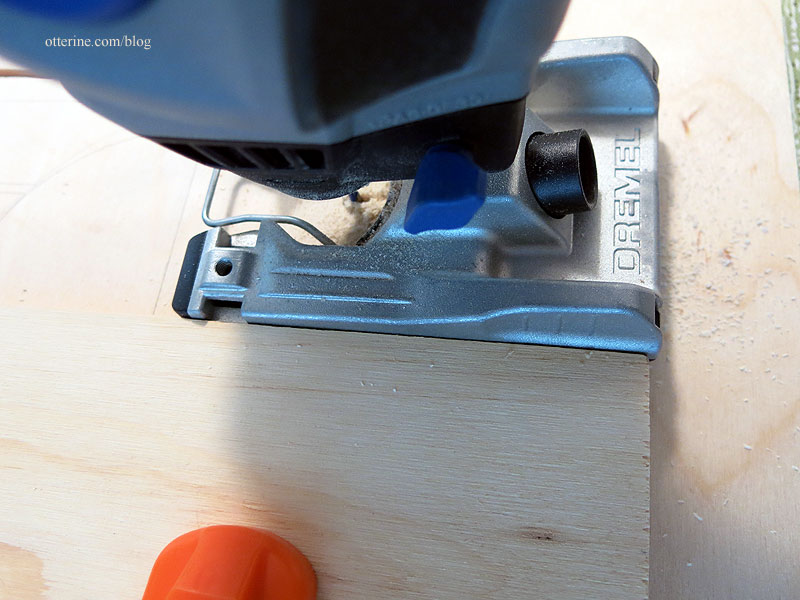
Time to cut the window, door and ceiling openings. I started with the simplest of the openings — straight cuts. I centered the lower front window under the windshaft and positioned it relative to the circle library for balance. I cut the opening with the Dremel Multi-Max using a 3″ wood/drywall blade. I like that it’s a straight blade so the cuts are relatively straight, but you have to watch you aren’t cutting at an angle. The vibration is heavy, though, so it can be hard to hold a long time as it makes your hands numb.
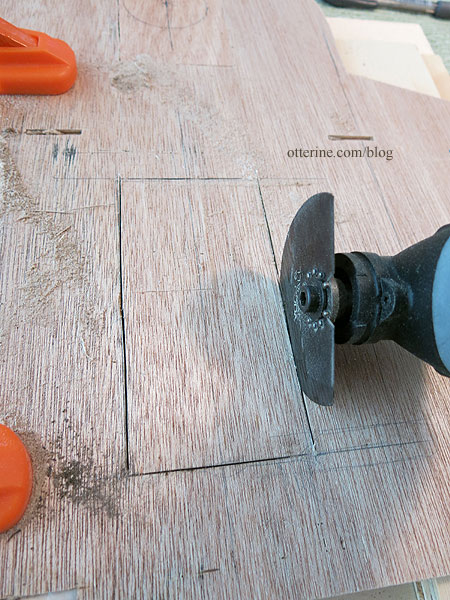
I cut holes in the ceiling board for the dumbwaiter and ladder with the Dremel Multi-Max. These edges will be lined with wood trim during finishing.
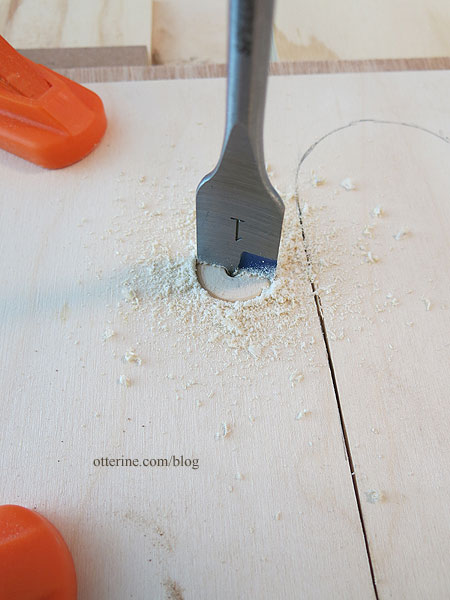
I positioned the arched door far to the back to leave as much space forward as possible while still having some room toward the back. I cut the straight sides with the Dremel Multi-Max and then cut the arch with the scroll saw. I made it larger than necessary to have some room to move it slightly. I also decided to put a tiny round window next to the door so Gustav can see who’s-a-knockin’ at the door. :D This the 1 1/8″ Simplicity Window from Heritage Laser Works.
For this hole, I used a 1″ spade bit.
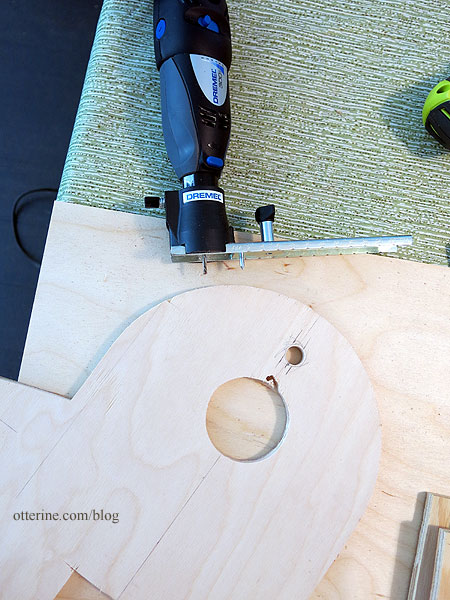
I’ve cut circular openings with the standard Dremel before, so that’s what I’ve used for the bedroom window, which is a 2 1/4″ Simplicity Window from Heritage Laser Works.
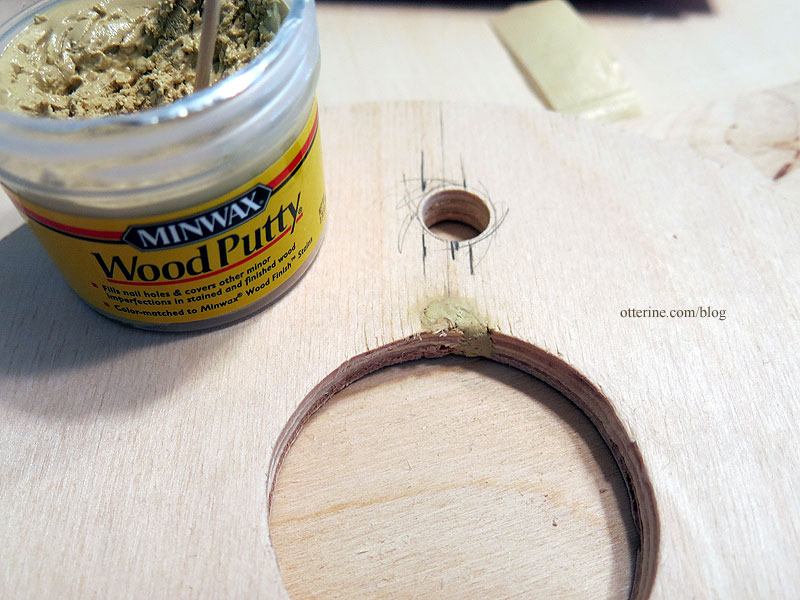
In my class with Tom Walden, I learned to make multiple passes with the Dremel to get a clean cut. That was my issue the first time I tried cutting circles; I tried cutting too much thickness at once. My issue this time was not checking the knob holding the pivot point in place after the first cut. The vibration loosened it, so it was cutting a larger circle than I wanted. I didn’t notice this until it was full on traveling outside the circle.
This is a fairly simple fix, though, so I just shrugged. I still swore, mind you. :D I filled the wayward hole with wood putty. I’ll wrap some cardboard circles to fill in some of the diameter of the hole. It will all be covered by interior and exterior finishes in the end.
There will be interior lighting, but I wanted to see how these openings effect the natural flow of light inside the mill. Back into dry fit. While another front window would be lovely, it would cut down on wall space, which is at a premium as is. I’m planning some shelves above the trolley, which may be replaced since it is a rather wide piece for the space.
Since the white paper I was using for the roof allowed light in, I tested the dry fit with black paper this time around. The bedroom is dark, but I think it’s cozy. With some added lamps, I think it will be just fine. Plus, the ceiling won’t be black in the end. I’ll skip adding any side windows here, therefore preserving wall space for decorating.
Categories: Tools, Watson Mill
May 27, 2017 | 0 commentsWatson Mill – circle library, part 4
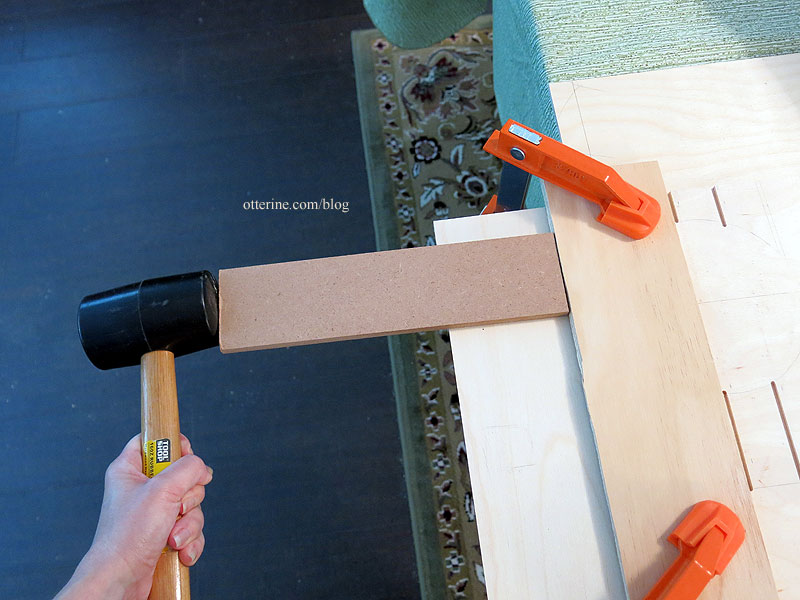
Continuing work on the circle library. Since the plywood wall would stain different from the basswood and veneer, I needed to cover it. That’s why I wasn’t especially careful in marking it up during the rest of the construction. To make custom templates, I taped drawing paper between the shelves.
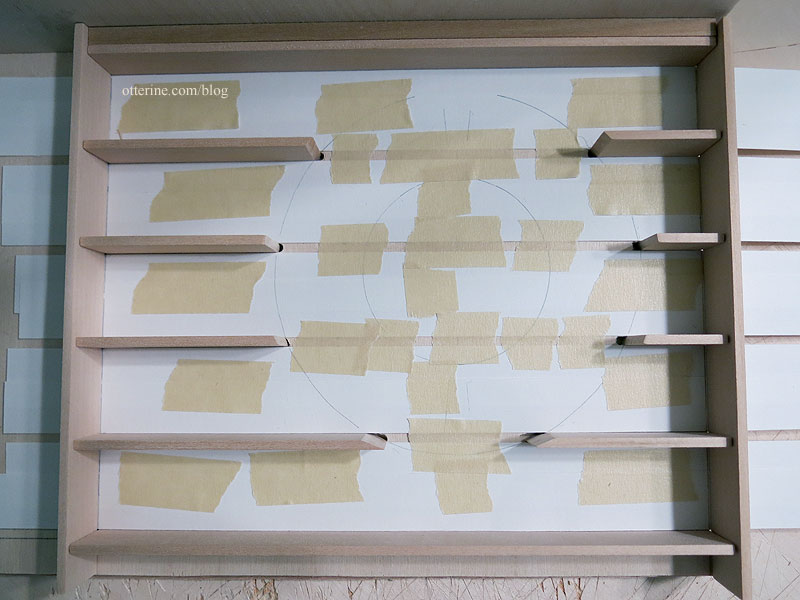
During my class with Bill Studebaker, I learned to work on the longest portions first, because you can always cut shorter sections from those long pieces if you mess them up. Yep, it took me five times to get that long bottom liner right, so I cut the smaller shelf liners from those incorrect pieces. Less waste. I cut the liners from 1/32″ thick basswood. This thickness of wood barely reduces the shelf depth, and I did take that into consideration when I cut the horizontal boards.
The curved edges sit under the circle, so the joins are not visible when the circle is in place. I cut two curved shapes for behind the shelves of the circle. The curves didn’t need to be precise, so I cut them with an X-Acto knife by hand.
I cut Darice mirror sheet for the center section. I will have to line the back of the mirror to bring it up to the matching 1/32″ thickness. I’ll use layers of paper when I get to that part. For now, I’ve left the protective film on it.
The original has what appears to be a light in the center, but I am skipping that part, too.
no discernible source I will cut the vertical support under the circle after assembly just in case things shift in the process. I’ll also decide whether to add the long curved trim after assembly. In the meantime, I plan to stain and finish these pieces separately in case of disaster. I can always recut, remake, redo, etc. But, it would be a right proper pain to tear out once installed. Besides, I have window/door/floor holes to cut and walls to prime. Best to install the library later after the mess.
I also have books to make behind the scenes. If I display full shelves of books with only spines facing the room, I would need roughly 30 inches worth of books. I have two inches worth of books currently made and a whole bunch in progress. There are a number of covers I like, so I will make a handful of book display stands so some covers face outward. I also would like to add some bookends and perhaps some knickknacks. This decreases the number of books needed, so I’ll finish what I have in progress and see if I need more. I have plenty of covers cut and insert strips ready.
Categories: Watson Mill
May 24, 2017 | 0 commentsWatson Mill – circle library, part 3
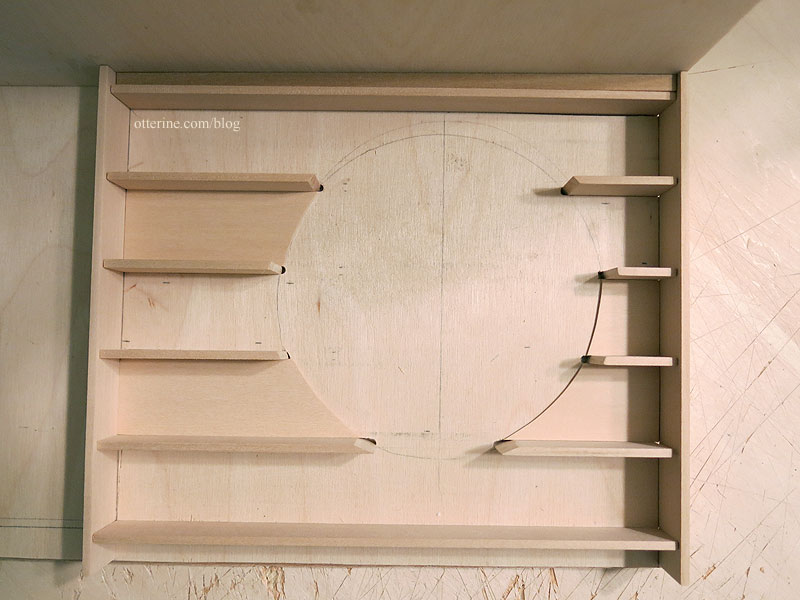
Continuing work on the circle library. With the ladder moved to the front wall, I now have 8 3/4″ of library wall space not including the two vertical end boards that will close it on the sides. I marked the final position of the center circle. This gives me a bit of shelf space to the right but allows me more room on the left to play. The left will be more visible anyway. To build the shelves, I cut 1/8″ wide channels in the plywood wall using the Dremel Trio.

Since I didn’t trust the wall edges to be straight, I used a fence board clamped in place.
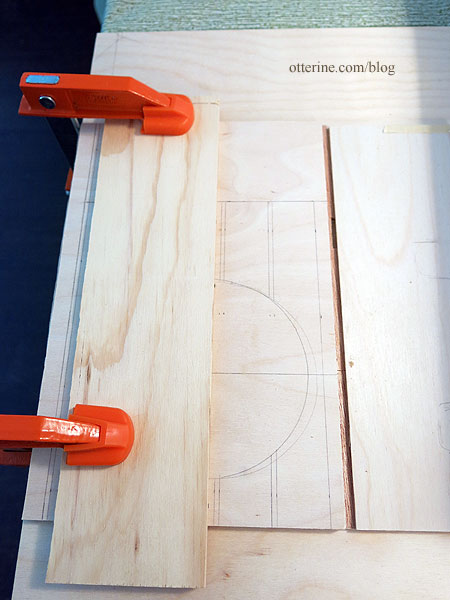
You can plunge cut with the Trio, which is a great feature. You can start anywhere along your line.
The bit made a channel slightly too narrow, so I tapped the fence board with a rubber mallet for a second run, widening the final channel to the proper width needed to fit the 1/8″ shelves.
The top channel is rough because there was something catching the bit in the wood and it was close to the edge. Once the ceiling is in, I will add trim to enclose the top space to keep it from being a dust-catcher space that’s difficult to clean, so the rough cut didn’t matter much. These might not be square to the floor or ceiling after the build is in place, but they are reasonably parallel to one another.
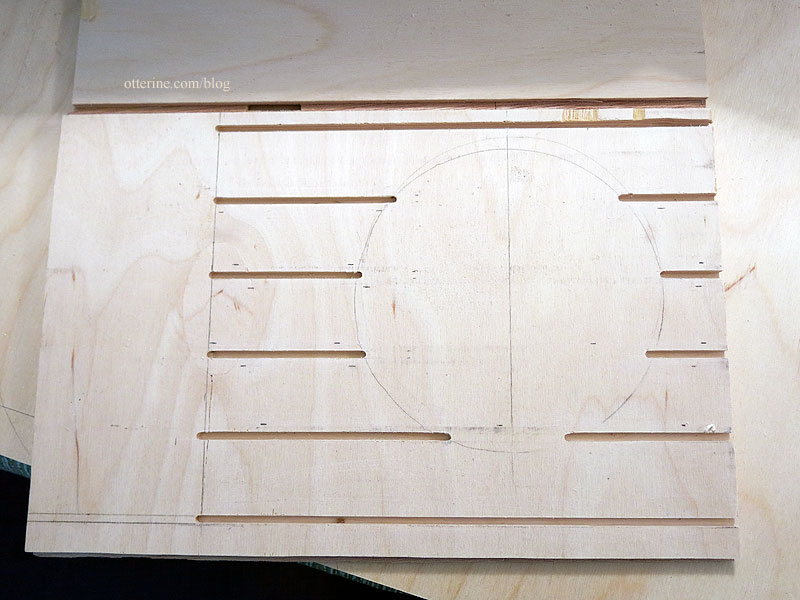
The channels provide a sturdy hold for each shelf cut from 1/8″ basswood. I started with 1″ wide basswood strips and cut them down to end up with a roughly 3/4″ deep shelf. I hand cut the angles around the circle supports. Not easy.
The two end boards are slightly deeper than the shelves. For the top, I cut a piece of 1/4″ strip wood for stability for the eventual final trim. I still need to cut the support piece for the bottom of the circle, but I am tapped out for the night. :D
The space under the bottom shelf will be enclosed by trim or baseboard in the end, and I left a bit of clearance on the bottom for flooring thickness.
Next up, covering the plywood back between the shelves and cutting the mirror for the center.
Categories: Watson Mill
May 21, 2017 | 0 commentsWatson Mill – circle library, part 2
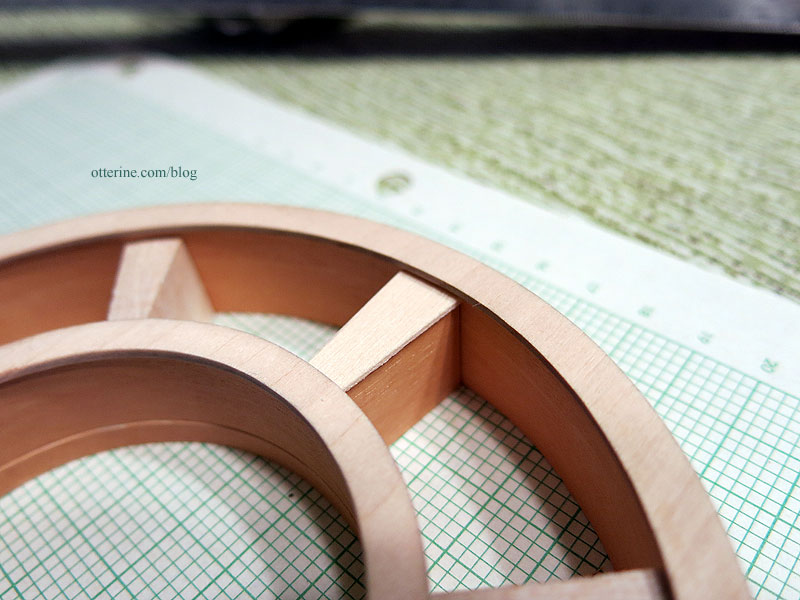
Continuing work on the circle library. The wood veneer buckled on the outer surfaces of the circle supports. I didn’t have enough to redo both circles, so I redid only the smaller one. I hope once the books are in place it won’t show. I also will have straight shelves abutting the large circle, so that might help, too.
The original inspiration had 18 dividers, but my version has only eight for balance and fit. I used scrap wood to try out the look first.
I made angled dividers to match the original. I covered the sides of the angled inserts with peel and stick wood that I had left over from the Model T Van build. I used additional adhesive just to make sure the bonds will hold over time. I again used the Elmer’s stainable wood glue. To finish the front edges, I cut shapes from 1/32″ basswood to match the laser cut circles.
I think this is a good approximation of the original. :]
Next up, the long straight shelves.
Categories: Watson Mill
May 20, 2017 | 0 commentsWatson Mill – Vintage Lundby and pulleys
I searched through my collection for items to add to the mill. I ran across this vintage Lundby piece I picked up a few years ago. (Note: this might actually be a Lisa of Denmark piece.)
Being a slightly smaller scale, it has never worked well in any build to date. The mill, however, provides a perfect spot for it.

Its hinge pins show on the top surface, but I can cover that well enough with a runner.

I bought this pale yellow metal wash stand from The Dolls House Emporium some time ago mainly because I liked the shape and color (looks like they don’t have it anymore). It didn’t come with a bowl, but I didn’t have a home in mind for it anyway so it went into storage.
I’ll be using this for the upper room of the mill and needed to find a bowl. The small shelf in the back and the size of the hole limited what would fit. The ceramic bowls I had were either too small around and fell through the hole or were too tall and wouldn’t fit under the shelf. Debora said she had the Chrysnbon chamber set and would send me the bowl and pitcher. They are plastic but very well detailed. They also were a perfect fit.
I sprayed them with white gloss spray paint followed by several coats of gloss sealer.
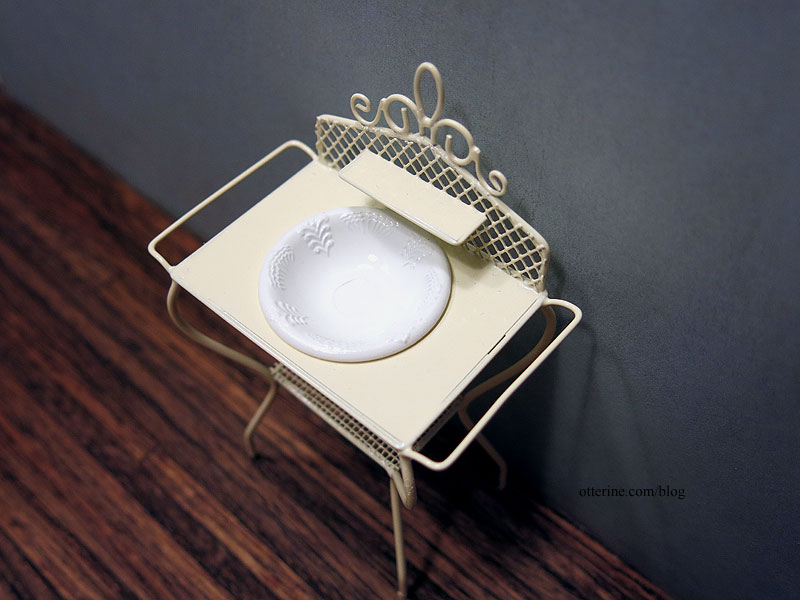
They look fairly convincing as porcelain if you don’t look inside the pitcher to see the mold lines.
Thank you, Debora, for helping Gustav stay clean and fresh! :D
I also received the model ship single sheave blocks I had ordered from the UK from Maritime Models. Yep, they actually work. These will be perfect for my dumbwaiter pulley system. So wee.
At the 3 Blind Mice show, they always have a tray of inexpensive little items to choose from with your entry fee. I thought this was perfect for Gustav. Always so much to do!

Ever feel like you’re being watched? hmm

Categories: Watson Mill
May 11, 2017 | 0 commentsWhat’d you call me?
A dumbwaiter, that’s what. :D As I mentioned previously, Gustav will have only a ladder leading to the upper room, so it would be cumbersome for him to bring up late night milk and cookies while maintaining safe practices on the ladder. I rigged up a bucket on a rope for the purpose of mockups, but the final setup needed to be more elegant, like a functional dumbwaiter.
I’ve had dumbwaiters in my idea file for some time now. There’s a great example of the mechanism here at Old House Online. The basic premise is relatively straightforward with just a lot of wood construction. I was planning to put the ladder to the upper room near the open back, so I’ll construct the dumbwaiter beside the ladder toward the open back so I can operate it without having to reach in through the house. Parlor tricks are so much better when there’s no fuss.
The problem is, a fully enclosed dumbwaiter would block a significant part of the modest back opening, especially on the upper floor. So, I shall make a compromise between the bucket on a rope and an enclosed dumbwaiter. I’ll have an open dumbwaiter car running on a track along the wall with a pulley system. This way, the car will move smoothly up and down to carry milk (or Scotch) upstairs and yet take up less visual space overall.
I started with the car measurements. To carry milk and cookies, the tray needed to be roughly 1 1/8″ deep x 1 1/2″ wide.
The car should rest at counter height when on the lower floor, so I bashed a 1 1/2″ Houseworks base cabinet by cutting down the depth. This also gives Gustav some storage in his small home.
I built a fancy car from tiny turnings and basswood.
I added a slider bar to the back of the car.
The track was formed from strip wood to make two channels facing one another. When I install the tracks after decorating, I plan to leave space enough at the top so I can slide the car off the track for cleaning, repairs or replacement.
The plate doesn’t quite fit anymore, so I’ll just use a slightly smaller one.
I love the way it looks so far, though. In fact, it’s such a nice element, I will try one more time to move the ladder so the dumbwaiter can be more easily photographed away from the open back edge.
Pulley rigging and final stain finishes to come later, but it’s already better than just a bucket on a rope. :D
Categories: Watson Mill
May 2, 2017 | 0 comments


NOTE: All content on otterine.com is copyrighted and may not be reproduced in part or in whole. It takes a lot of time and effort to write and photograph for my blog. Please ask permission before reproducing any of my content. (More on copyright)

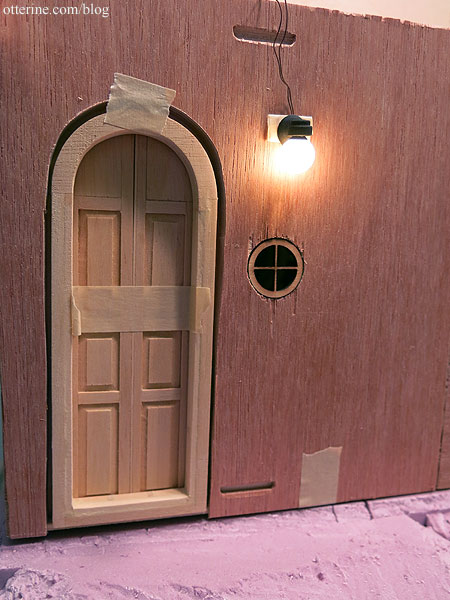
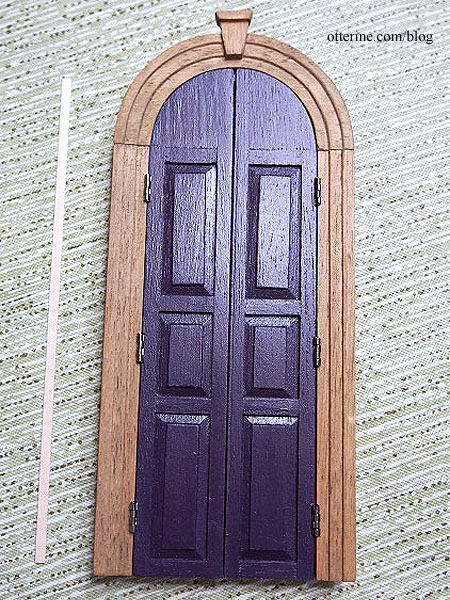
Watson Mill – door and windows, part 3
Continuing work on the door and windows. I spray painted four doorknobs and two keyholes in antique bronze since the area for door handles was so narrow. I had to put the knobs a little off center from one another due to the draft strip down the middle.
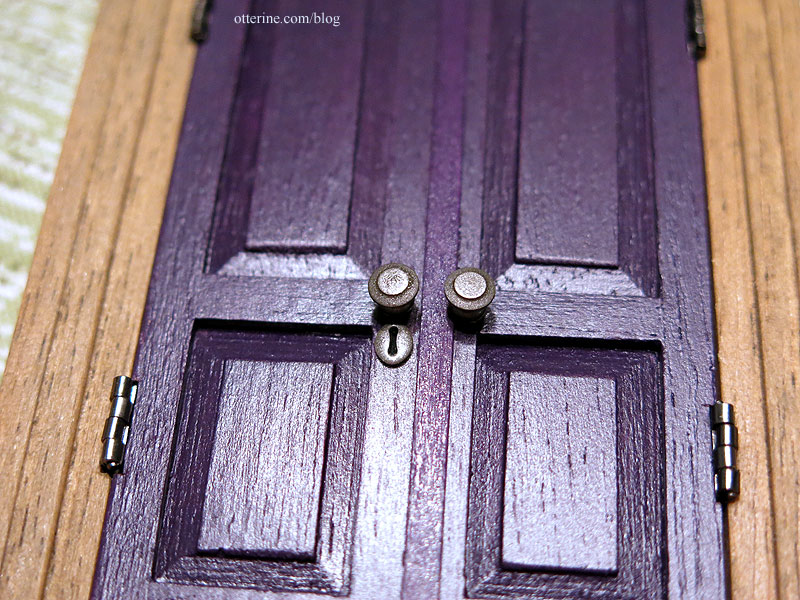
I love the way it turned out, though. :D

Right now, I have the outer trim held on with putty since I’ll need to use the curve to mark the shingles as I round the top. I tried to fix the bad sanding job on the curved portion, but I’m still not happy with it. (I found another of these vintage windows, so I can replace the outer trim.)
The threshold for the door was painted Neutral Grey after a good sanding to droop the middle as though it has been worn over the years. I’ll add some subtle aging once I do the landscaping.
The window I bought from Hobby Lobby would not go back together correctly, even though I was careful to keep the parts in the right order. I won’t put a wonky window in a build I’ve been so carefully planning. I painted a Houseworks window in replacement, using stained trim for the interior. The corner joins are somewhat pronounced from the stain, but it won’t matter with the window coverings and furniture placement.
I had to pad the exterior frame with strip wood since the thickness of the wall is 3/8″ but these are meant for 1/2″ thick walls.
As noted previously, I had to repair the window opening for the round upper window due to a wandering Dremel. I cut strips of cardboard and lined the hole until I had a suitable diameter to hold the window in place. This fix will be covered by wallpaper on the interior and wood shingles on the exterior.
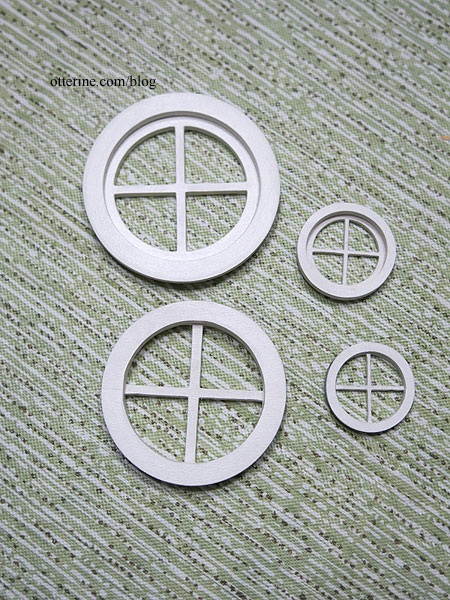
While I love the 2 1/4″ Simplicity Window from Heritage Laser Works, the front wall is 3/8″ thick. Each window comes with one 1/8″ thick center mullion piece and two 1/32 thick outer trim pieces. I bought three windows to have the parts needed to address the thicker wall. I will use two center mullions, one on each side of an acrylic window. I cut the cross bars from the third mullion piece to finish out the required thickness.
I glued three of the outer trim pieces together to make a thicker exterior trim piece then glued the two remaining outer trim pieces together to make the interior trim piece.

For the 1 1/8″ Simplicity Window from Heritage Laser Works, a little more work will be involved since the pieces aren’t as thick. But, to start, as with the larger round window, I glued four of the outer trim pieces together to make the exterior trim piece then glued the two remaining outer trim pieces together to make the interior trim piece.
I glued the outer trims to one mullion piece for each window. I won’t glue the windows in just yet since I want to use them as guides for cutting the shingles to fit. I painted these Americana White Birch in satin.
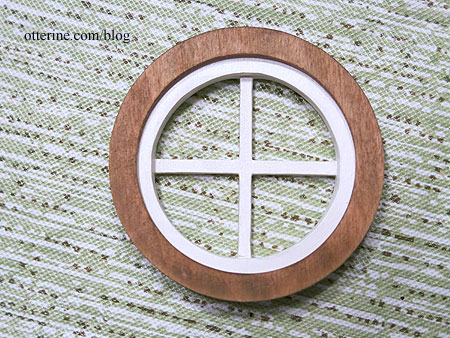
The interior trim is stained Minwax Driftwood.
I think I am ready to get the ceiling installed, then lighting, then back to the dumbwaiter and the ladder.
Categories: Watson Mill
September 27, 2017 | 0 commentsWatson Mill – door and windows, part 2
In my perusal of windmills online and from my own stash of vacation photos, I’ve found that the windows and door frames are often rust red or white. Check out this beautifully converted home, for example. I’ve opted for Americana White Birch in satin instead of true white. Painting frames instead of staining makes life easier all around. I don’t have to split between interior and exterior colors, and the filling on the arched door conversion won’t show.
I microwaved the window purchased from Hobby Lobby to take it apart since it was not the kind that already comes in parts for easier painting. White trim on the interior would be a bit stark, so I stained the interior trim Minwax Driftwood to coordinate with the circle library. The tiny bit of white showing will be fine and not as intrusive as large white frames. I need to finish the sashes, so this isn’t back together just yet. (Note: this window was later scrapped due to warping issues.)
To make life easier, I also microwaved the door frame to separate the interior trim. I was then able to work with all the pieces without masking.
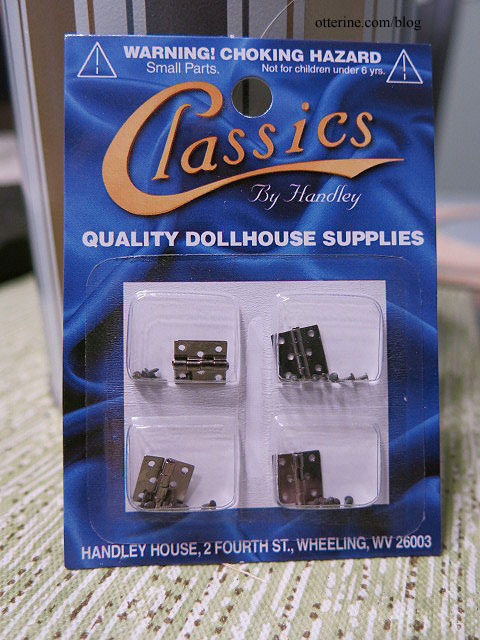
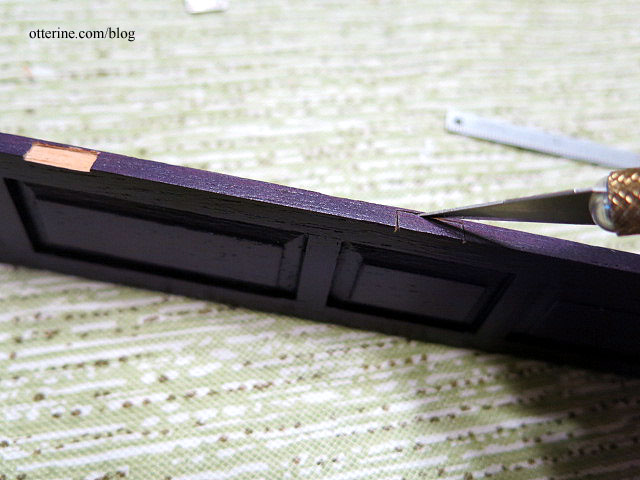
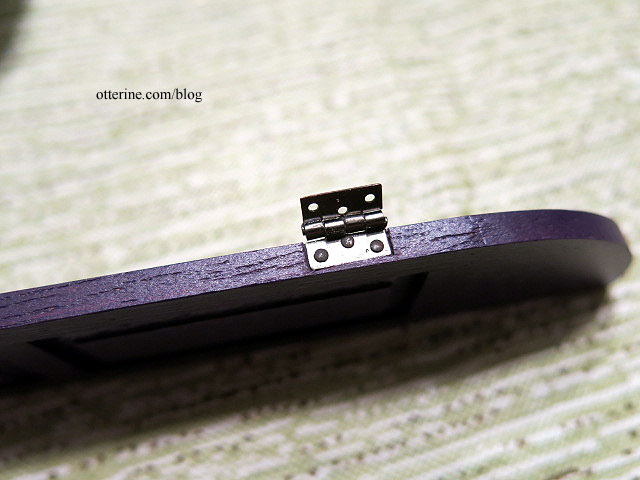
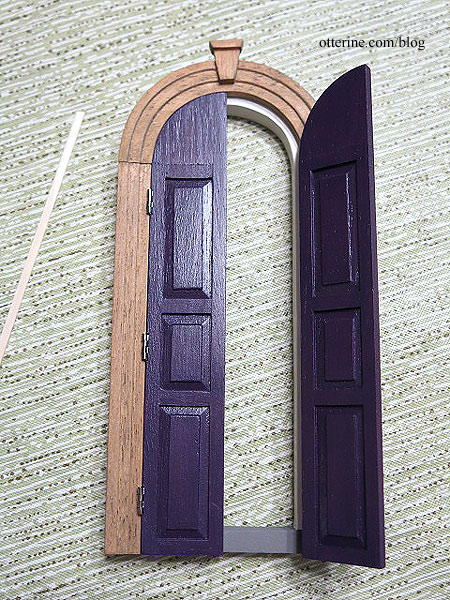
As for the door color, I fell in love with this inspiration photo. To achieve a close approximation, I used two coats of Aubergine by Folk Art followed by two coats of Purple Pansy by Anita’s. I finished it off with Krylon satin spray. The hinges are by Classics.
I cut mortises in the door panels to hang the doors like the real deal using a very sharp X-Acto knife to cut and shave the wood a little at a time. The mortises on the door ended up a little large, but both the door and hinges are dark so it will be less noticeable.
I matched up the two sides to get the hinges as even as possible.
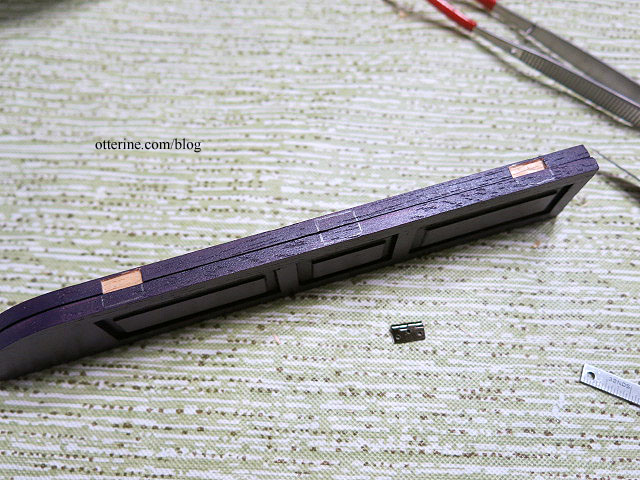
I painted the cut portions purple to blend better.
I used Aleene’s Quick Dry supplemented with super glue gel to hold the hinges in place.

I let that set, then drilled pilot holes for the nails.
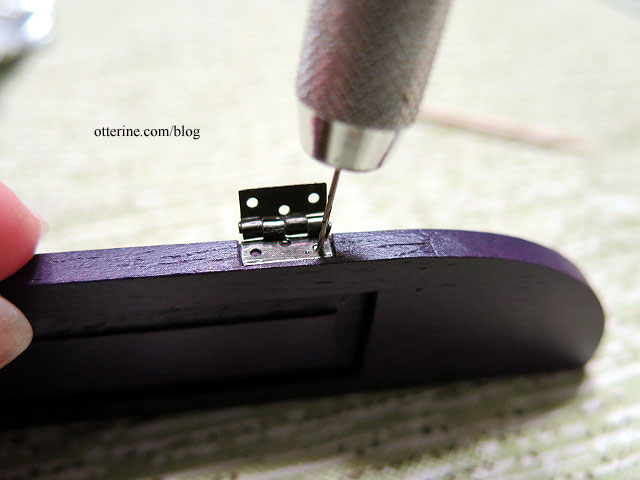
I added a dot of super glue gel to the nails except the one closest to the working portion. I didn’t want to risk getting any glue on the mechanism.
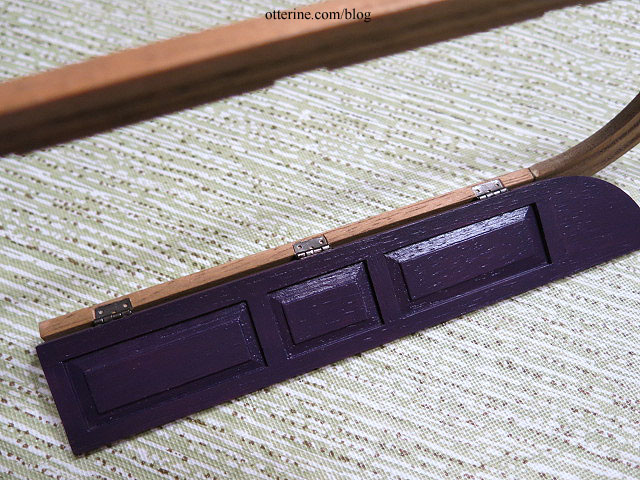
I set the completed door panel into the frame along with the one without hinges. I marked the hinge placement on the frame, then cut mortises to fit.
These turned out better after practicing on the door panels. I followed the same process for attaching the hinges to the frame.
After cutting the remaining frame mortises, I glued the trim back to the frame.

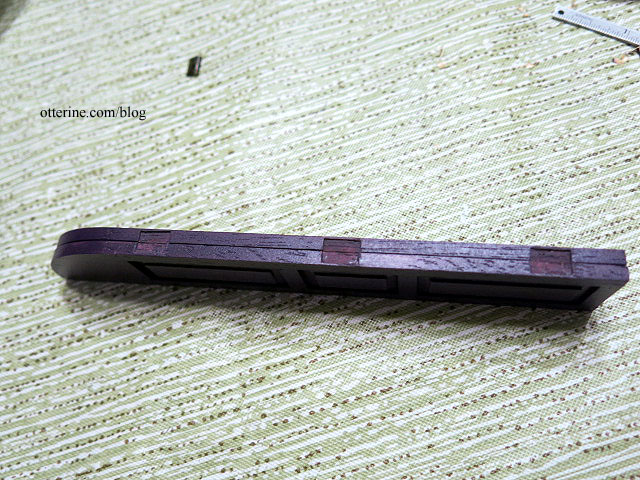
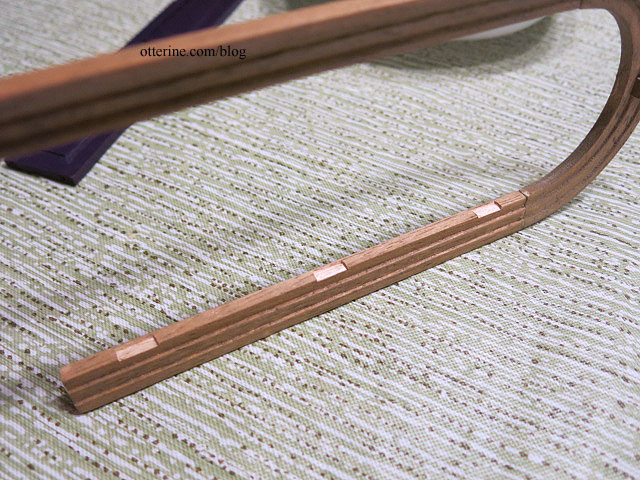
Tiny hinges are fiddly and temperamental, but the door turned out pretty well considering it started as a window with shutters. As expected, there was a gap between the door panels. If I had built the doors from scratch, I could have made a rabbet join down the middle. Instead of trying to reverse engineer that sort of thing from a ready-made component, I will just add a thin strip of wood painted to match down the middle on the interior.
The left panel hinges are fairly tight and don’t want to stay completely closed, so I might end up adding an interior bolt. We’ll see after I get the knobs in place.
Categories: Watson Mill
August 24, 2017 | 0 commentsWatson Mill – I’ve got the shakes again
It apparently takes many years to forget what a right proper pain it is to wood shake an entire house.
It’s a lovely finish though, and very forgiving especially on an old mill. Instead of dark cedar, this time I will be using light wood shakes that I can stain to look weathered. These are from the defunct and partial Tudor Queen Anne kit. No sense in buying supplies when I have some languishing in storage. They are thin and rather uniform, which makes life easier.
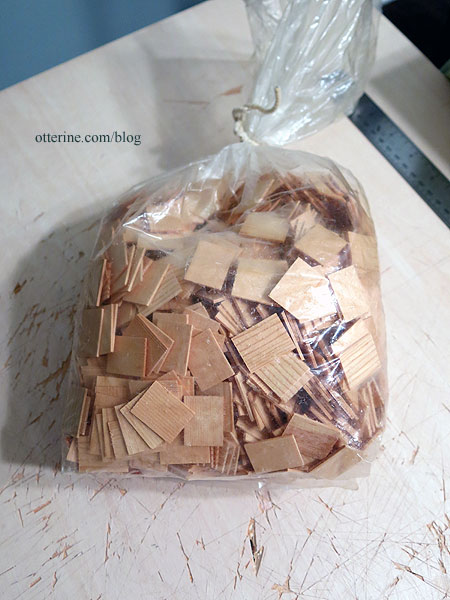
First was determining the size of the individual shingles. True to scale shingles looked out of place for Baxter Pointe Villa, so I hand cut the 1,700 shingles by length and width to work best for proportion. Considering the mill structure is even smaller, I figured I would have to do the same. The 1/2″ by 3/4″ measurements used for Baxter Pointe Villa seemed like they would work for the mill as well.
I did a rough calculation and will need approximately 1,635 shakes. Not that far off from the amount needed for Baxter Pointe Villa, but there are fewer windows and no chimney for Watson Mill. After counting the bag, I discovered I have only 1,617 shakes. :O No margin for error. But, if need be, I will use other shakes for the small back wall. Houseworks makes nice light wood shakes that will work well enough to finish out the set. I will start here, though.
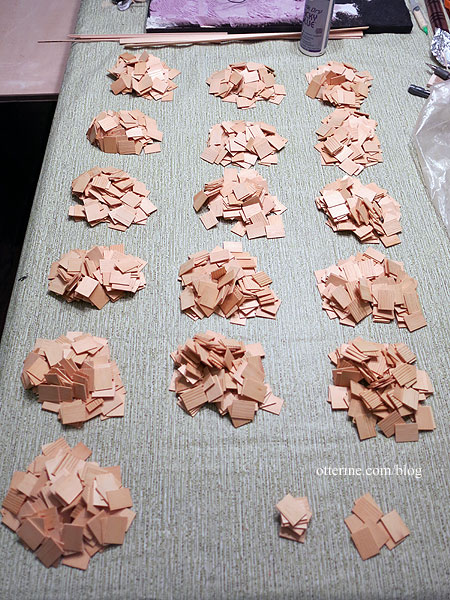
Cut, cut, cut. Once this bear of a task is done, I’ll stain the shingles before application. I’ll also have to finish the windows and door so I can get those installed prior to shingling.
Categories: Watson Mill
August 9, 2017 | 0 commentsWatson Mill – circle library, part 6
Continuing work on the circle library. I finished gluing the circle library boards and backing sheets, cut some paper shims for behind the mirror, removed the protective covering and pushed the circle in place.

The circle can be taken out to clean or replace the mirror as needed since it is held in place by tension alone.

After getting the walls up and the wallpaper in, I could address the final trims. I added a fancy routed trim for the top to cover the plain brace there. I added a piece of baseboard I believe I got from Debora when she was cleaning out some full scale supplies. I sanded the ends to curve toward the side trims since the baseboard was a little too thick for the space. After adding the final side trim, it was all done! Just need to fill it.
And, for final reference, here is the original again. I skipped the long curved trim for lack of space. Besides, I like mine as is. :]
no discernible source And, now for your dose of cute. Here’s Jasper in his new kitty bed. As many of you with cats know, they tend to like the box more than what comes in it. As I was unpacking the plush house, he was all eager to hop in the big cardboard box. He was just about to when I set the plush house on the ground off to the side. He made a beeline right into the plush house. Success! I even had to carry him upstairs in it (it has a handle), because he refused to come out.

Categories: Watson Mill
August 7, 2017 | 0 commentsWatson Mill – electrical plan
Before I could apply the wallpaper, I had to figure out my wiring plan. I’ll need two lines, one AC and one DC, since the windshaft motor and dollhouse lighting differ. Ceiling light channels are simple enough, but I needed to know which direction I was headed. I like to build in some access to the lighting, so I opted to head toward the empty space covered by the angled side roof. I can make this a removable roof panel easily enough, so my wiring will gather here.
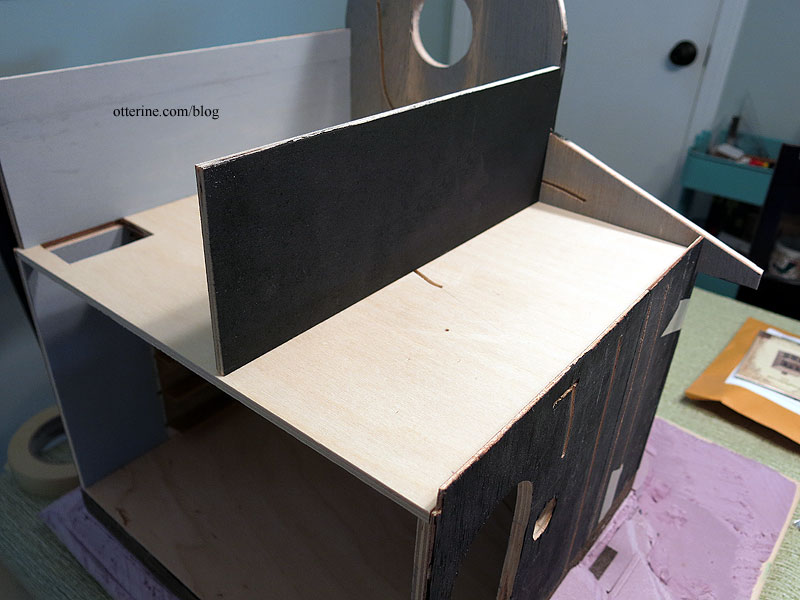
I made a channel on the front wall for the bedroom wall sconce. I’ll drill a hole for the table lamp later on during furniture placement, but I did drill a hole for the floor lamp in the lower room.
I made a channel for the coach lamp on the exterior heading up. I’ll likely use aluminum tubing to make conduit for the motor, hiding the wiring in plain sight, so I’ll wait on drilling final holes for that. This plan requires five dollhouse lighting wires and two motor wires in the tiny attic space (the floor lamp wiring will be buried in the landscaping foam without leading up to the attic space). I always add an extra dollhouse lighting wire in case inspiration strikes later, so I’ll up that to six wires in the attic space. I made three vertical channels on the side wall to run long wires from the attic space down the wall, through foundation and the landscaping foam, then out the back.
Getting out of dry fit for me always entails a lot of prep due to the chicken-or-egg scenarios that pop up along the way. Before I could glue the brick foundation in place, I needed to address part of the landscaping since I didn’t want to risk marring the brickwork. I used stucco patch to even out the builders foam slopes on three sides, leaving the door wall until later. I painted the finished portions black brown afterward.
I glued the brick foundation to the builders foam using Weldbond glue and weighted it under magazines overnight. The next night, I ran my wires for the attic space through the foam and out the back.
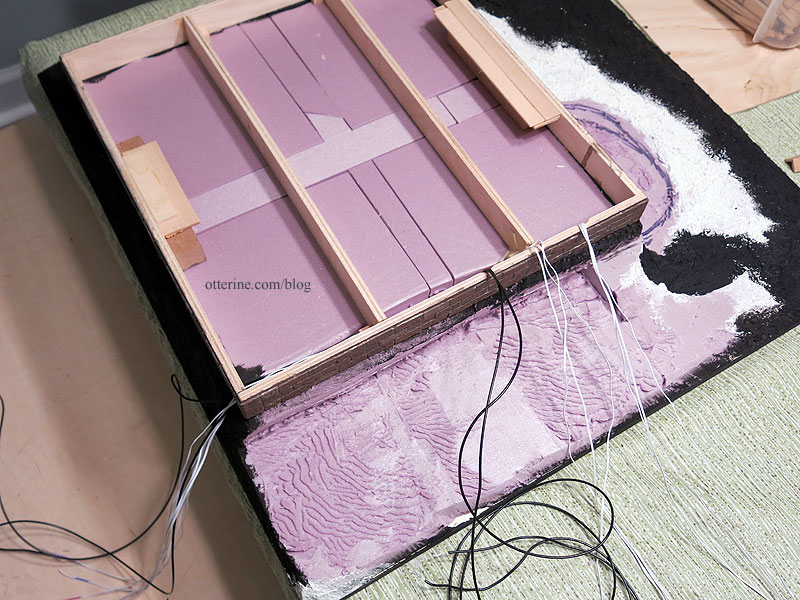
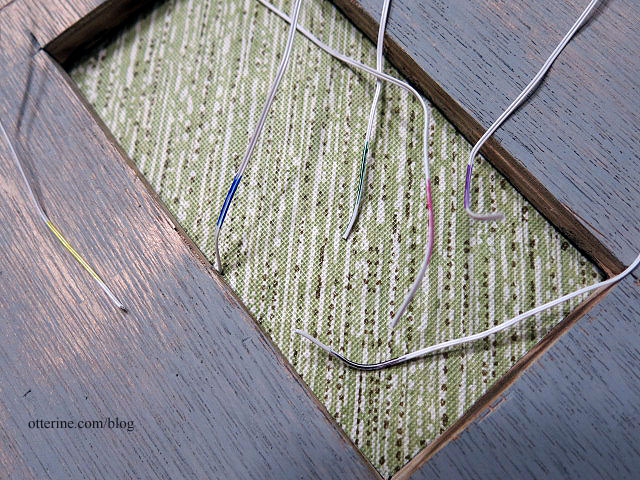
I used Sharpies this time to mark the ends so I didn’t have to guess which wire was which later on.
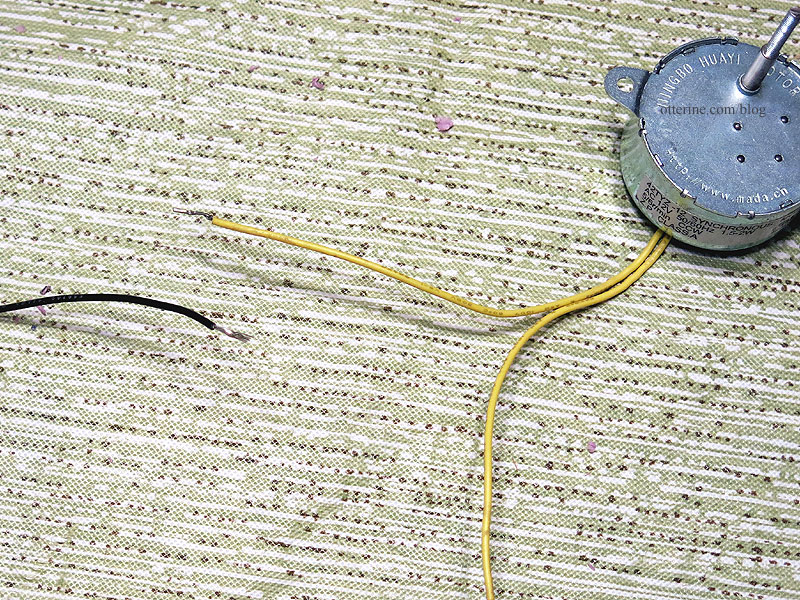
I didn’t bother for the motor wires since there are only two of them. I am using 22 gauge wire because it matches the lead wires from the motors.

I left a lot of lead for the motor wires but will still likely use an extension cord for the transformer. I ran the wire bunches through holes in the floor board that correspond to the side wall channels. To keep things from getting unruly, I taped the wires into looped bunches. For the wires coming out the back, I used twist ties since tape residue will wear off on the wires if you leave it too long. The taped bunches will be used right away.
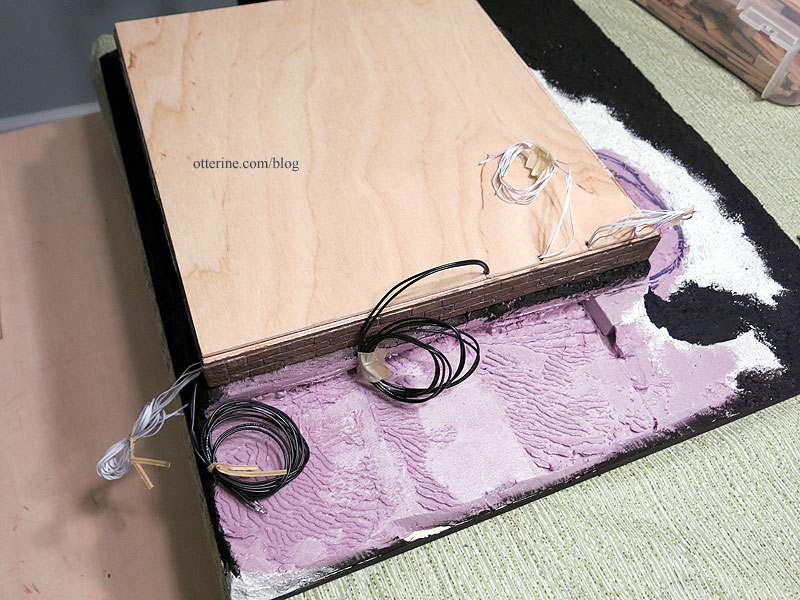
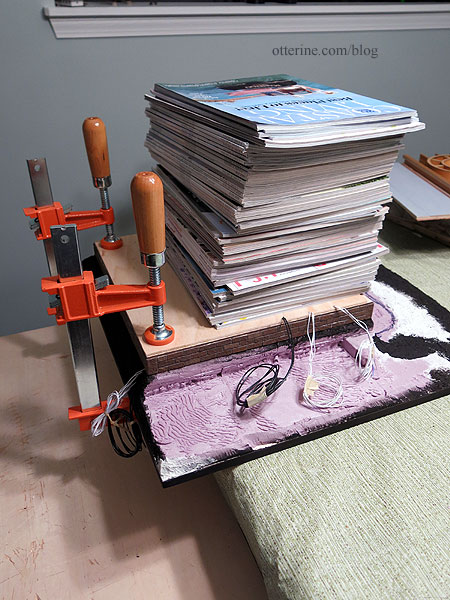
I then glued the bottom floorboard in place and weighted the assembly with magazines and large Jorgensen 6″ bar clamps. More drying time….
Categories: Watson Mill
August 2, 2017 | 0 comments
NOTE: All content on otterine.com is copyrighted and may not be reproduced in part or in whole. It takes a lot of time and effort to write and photograph for my blog. Please ask permission before reproducing any of my content. (More on copyright)