

Newport study with fireplace, part 3
Though the Newport was sold eventually, I’ve compiled some of the posts I made when I first started building it.
—-
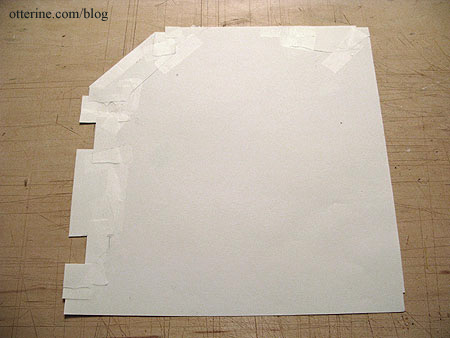
Continuing work on the study with fireplace. The first step of installing the flooring was to make a template of the room. I cut a rough outline and then taped bits of paper to cover any open areas. This method makes up for any warping there may be along the edges of the room.
I used dark wood flooring by Handley House; it comes on a paper backing so you can cut a single piece of flooring using a template instead of laying the wood down strip by strip. I did have to piece the wood a bit by the fireplace wall since the sheet was not wide enough to cover the entire width of the room.
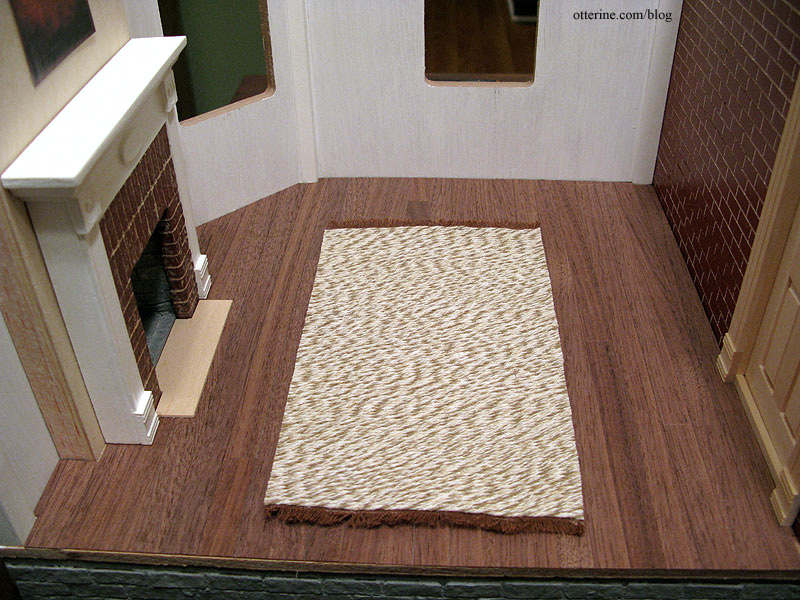
The flooring isn’t permanently affixed yet. There are a few gaps from the wall, but I think it turned out well for my first attempt at wood flooring. I painted the edges where the base floor will show to make the gaps less obvious, and there will be a baseboard around the perimeter as well.

I drilled holes in the chimney breast for the sconces and then glued the assembly to the wall. I used Yes! paste to attach the wallpaper (scrapbook paper by The Paper Company called Parchment Tan). There are three separate pieces. The first one I glued in place was on the angled wall with the window. I cut it with roughly 1/4″ edges on either side to go under the other two pieces to prevent gaps along the seams. (Note: I no longer recommend Yes paste – I use Wallpaper Mucilage instead. Yes paste has problems with longevity.)
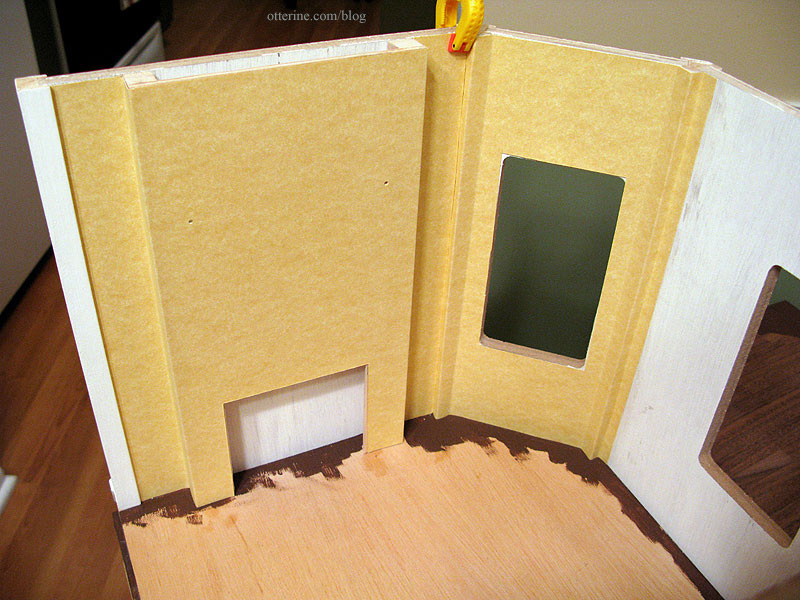
Once the wallpaper was done, I ran the wires for the sconces through the chimney breast. I plan to pull the wires up through the ceiling and run them along the floor of the second story to the power strip.

I think I am getting the hang of electrification! :D
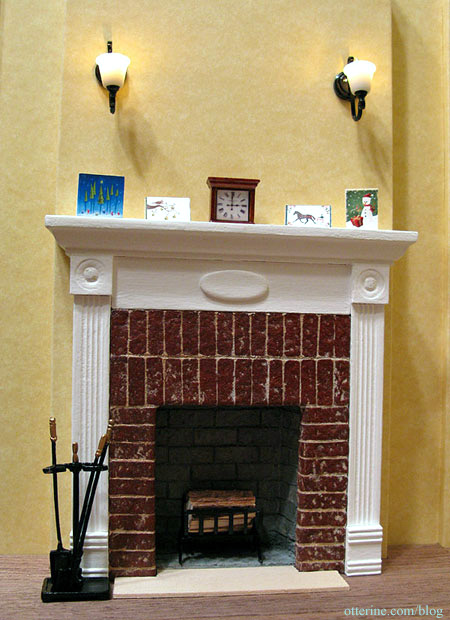
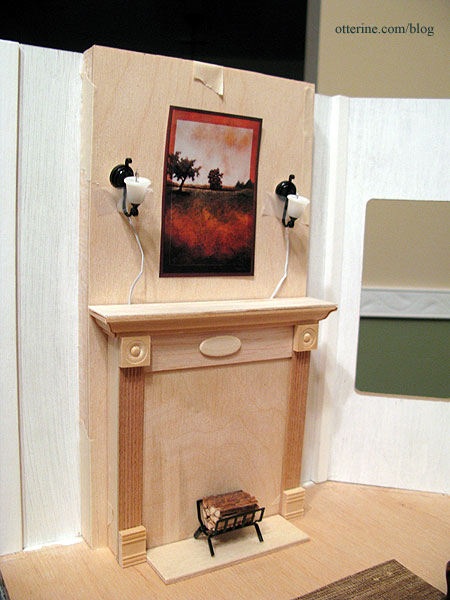
The painting above the fireplace is a cutout from a catalog I had years ago. Unfortunately, when I ripped it out, I didn’t get the full name of the artist, only the first name of Leigh. From what text is there, I think the title of the work is called Jeweled Cove (or at least begins with those words), though I haven’t been able to turn up anything on the internet about it.
I glued the paper image to a thin piece of balsa then cut and painted a wood frame to surround it. I bought the clock on eBay, and the elephants I’ve had for over twenty years.
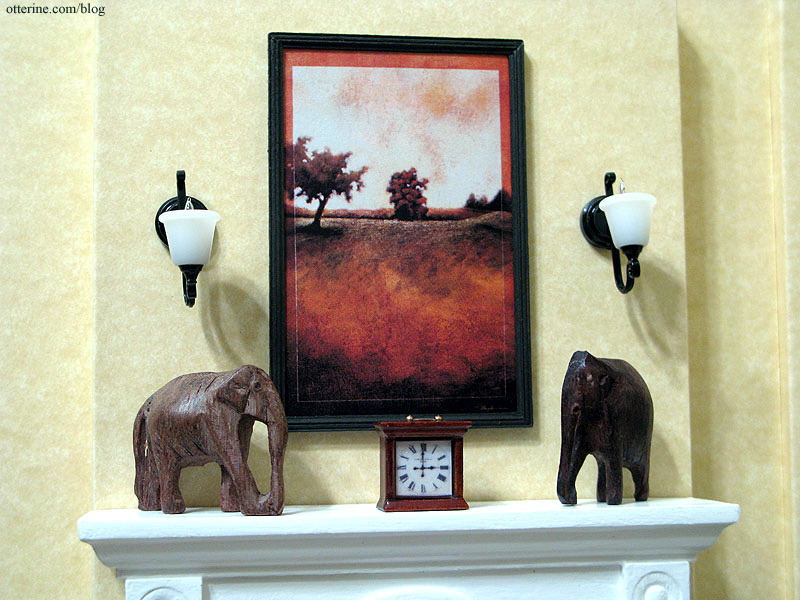
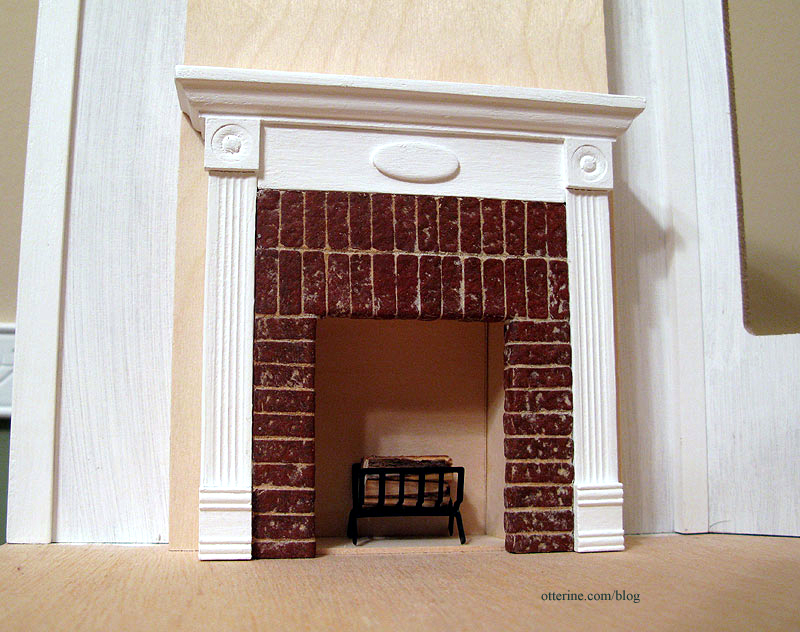
The fireplace fence is by Town Square Miniatures and was originally brass that I painted with acrylic paint to make it look like wrought iron.
Categories: The Newport
December 13, 2009 | 0 commentsNewport study with fireplace, part 2
Though the Newport was sold eventually, I’ve compiled some of the posts I made when I first started building it.
—-
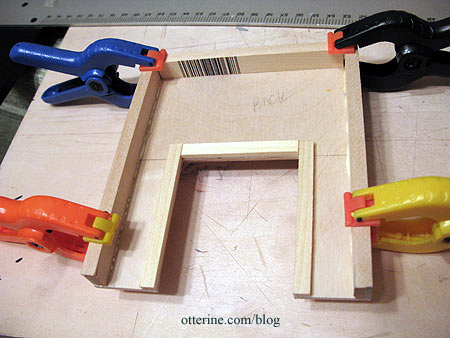
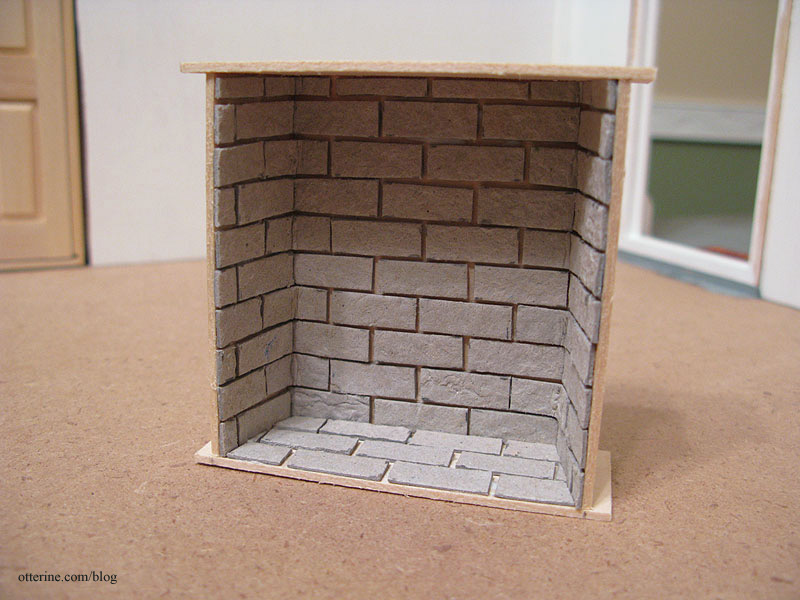
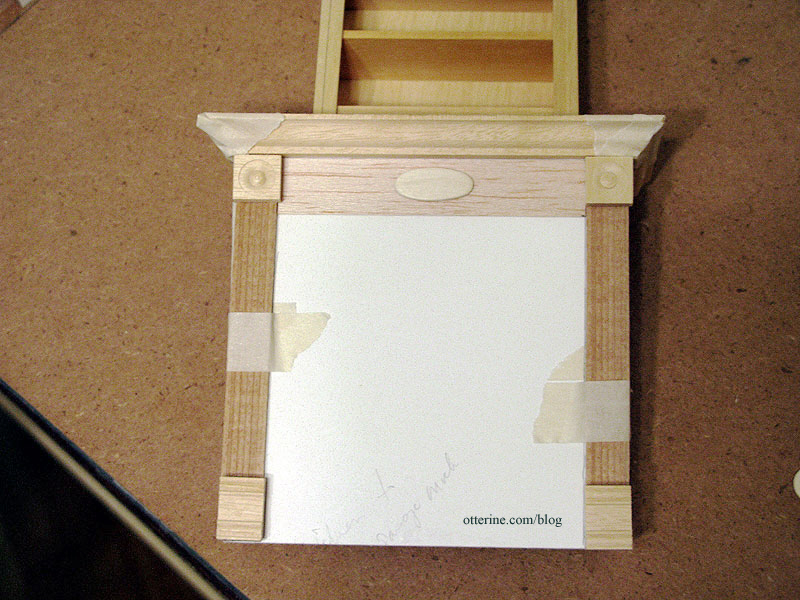
Continuing work on the study with fireplace. I cut the opening in the fireplace front and lined it with thin strips of wood. I’ll cut new egg carton bricks that are long enough to wrap around the edge made by these strips to give the illusion of solid bricks lining the opening. The sides and top of the fireplace structure were then glued in place.
I then built the firebox to fit behind the opening.
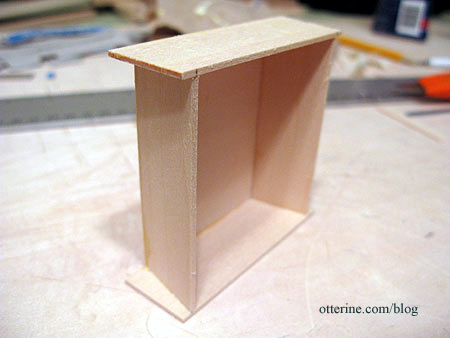
I will likely line this with egg carton bricks as well but in a different color than the outer brick.
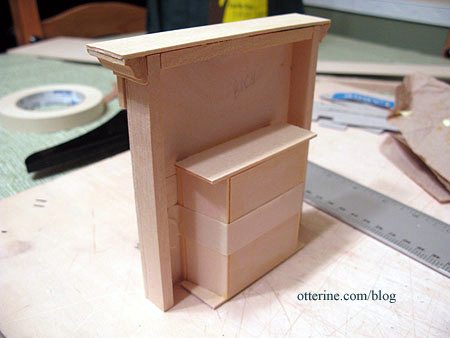
I then measured the opening needed in the chimney breast to fit the firebox. After cutting that opening, I attached the sides.
The chimney breast will be permanently affixed to the wall and wallpapered, but the fireplace, firebox and lighting unit used to simulate flames will be removable.
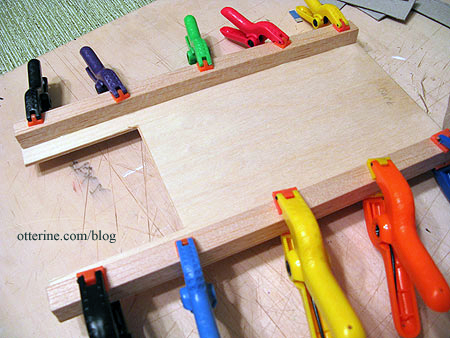
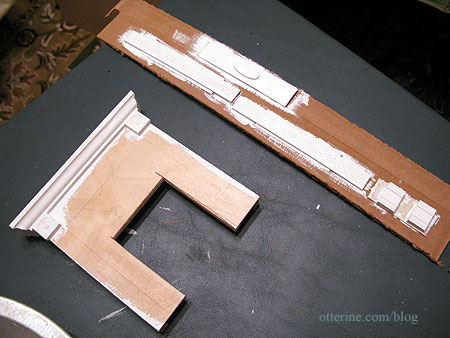
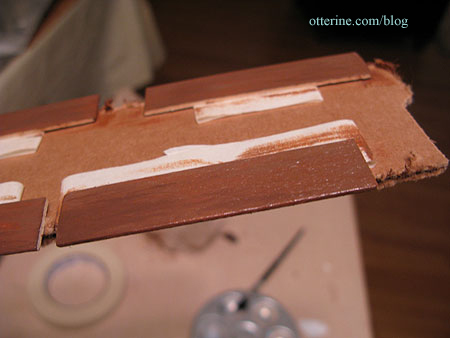
Since I’ll need to paint and grout the bricks on the front surface a different color from the trim, I taped the trim pieces to cardboard and painted them separately. Touch-ups are easier than trying to mask off entire areas.
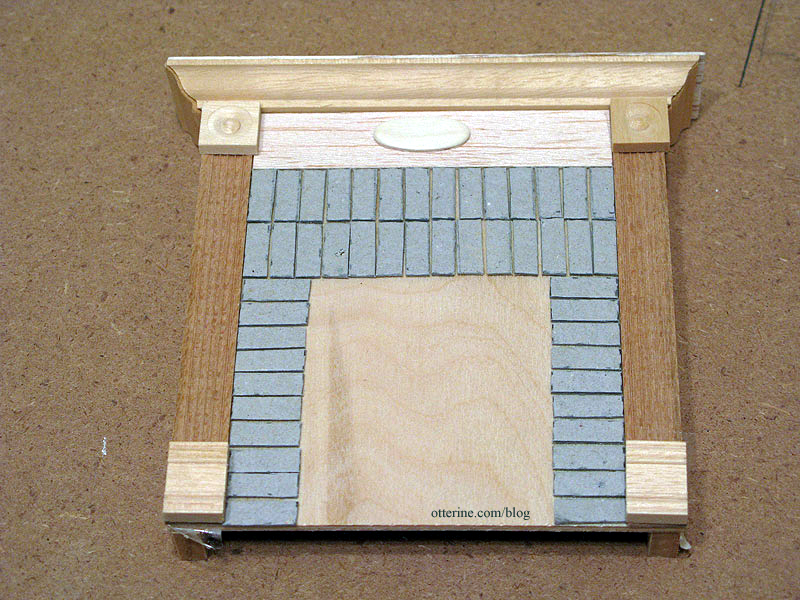
Here the egg carton bricks have been glued in place and are ready to be painted.

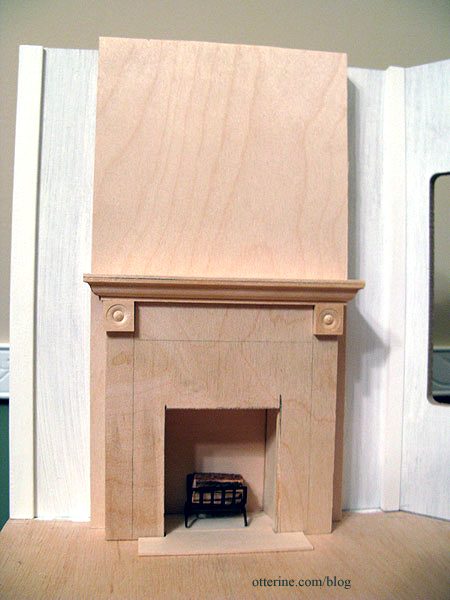
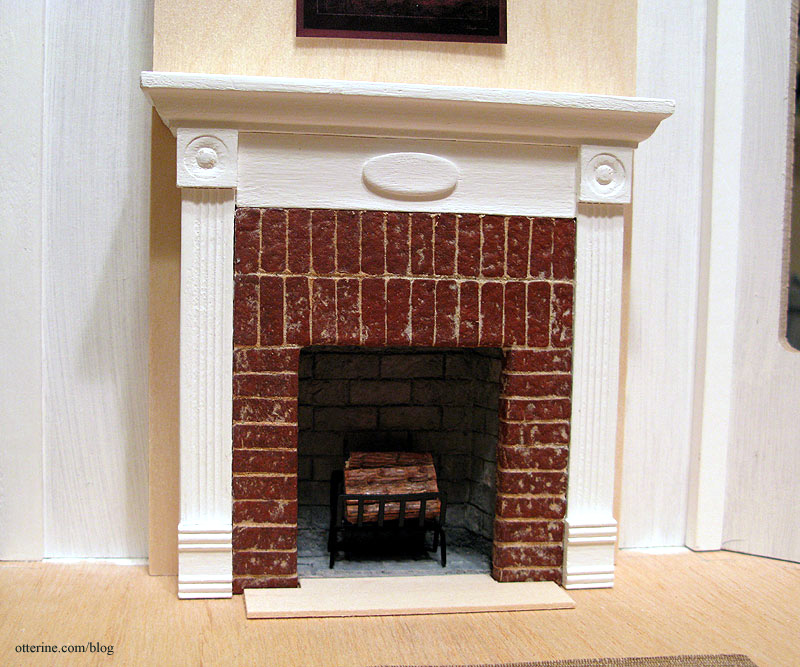
And, after painting, grouting and attaching the final trim, I have a finished fireplace mantel in the exact fashion I wanted.
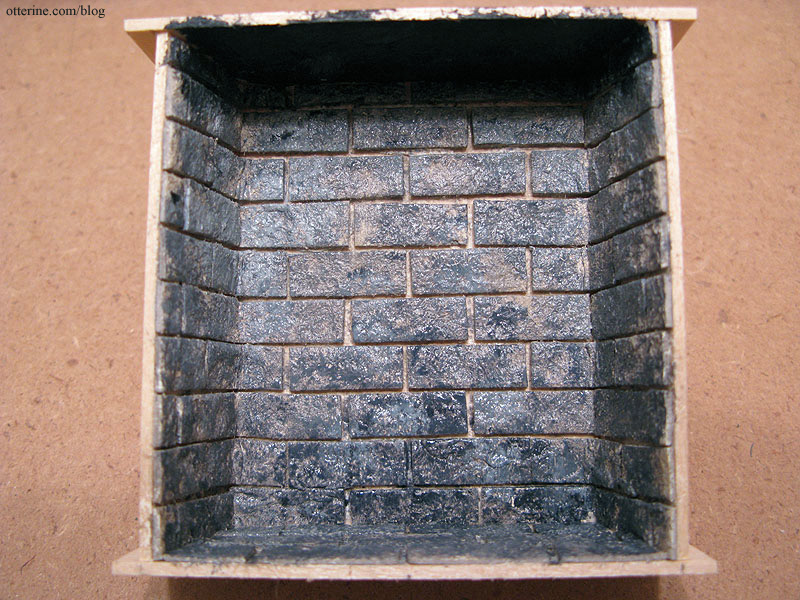
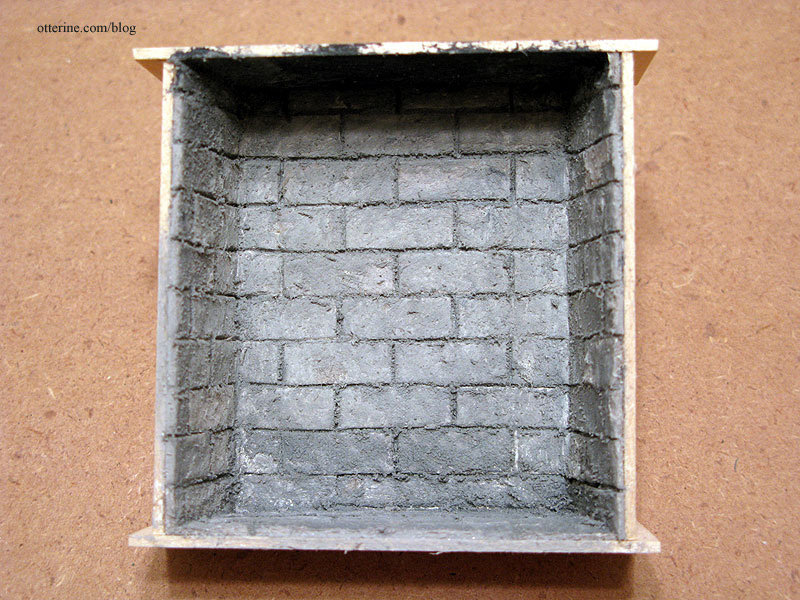
The next step in the fireplace construction was the firebox. I used the same egg carton brick technique as I did for the mantel brick but in a slightly larger size and without rounding the edges. I wanted it to look like a different type of material. I didn’t line the upper inside edge with bricks. I had cut the firebox to be taller than the front opening to give the illusion of the firebox opening up into the flue above.
I’ve found the best way to get a realistic look to the bricks is to do multiple layers of color. It looks dark and mottled, but the grout will even out the color overall.
I used Andi Mini Brick and Stone Mortar Mix to finish off the look. I scored the lines between the bricks with an awl to add more definition.
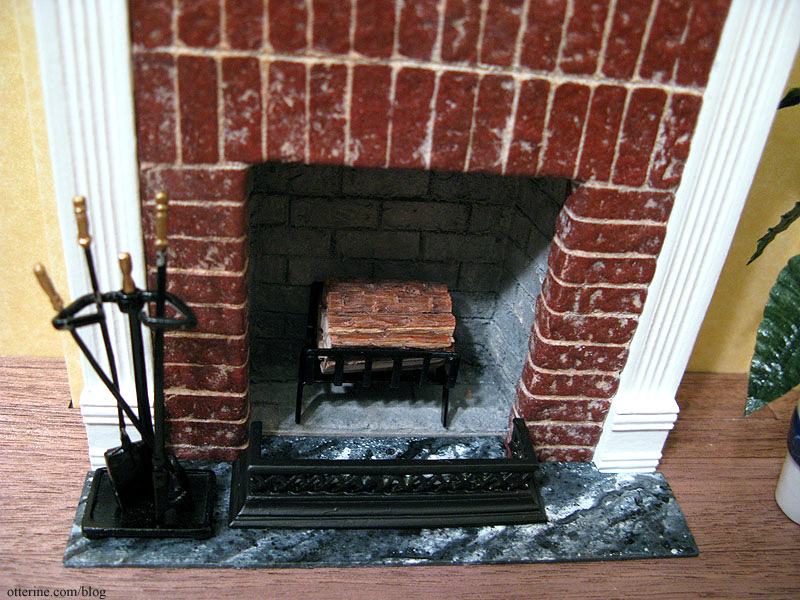
I will blacken the logs and add other touches to lend to the realism when I install the fire lighting. I will also be adding a hearth, though I haven’t decided on a finish for that just yet.
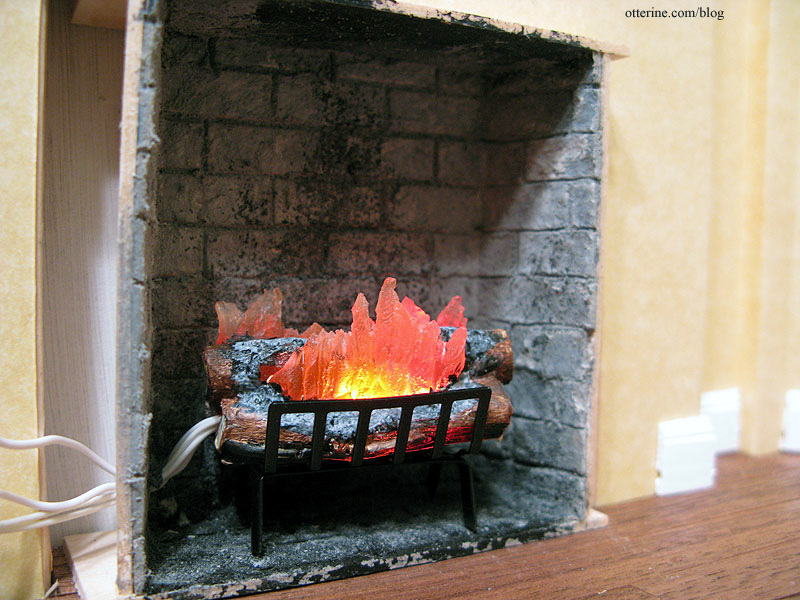
After getting the firebox finished, all that was left was to use light to simulate fire. I bought a resin piece online that has clear portions to allow light to shine through. It came with an orange bulb, but I added a red bulb to give more depth of color to the fire. After darkening the bottom and back of the firebox with diluted black paint, I drilled a hole in the side of the firebox and fed the lights through.
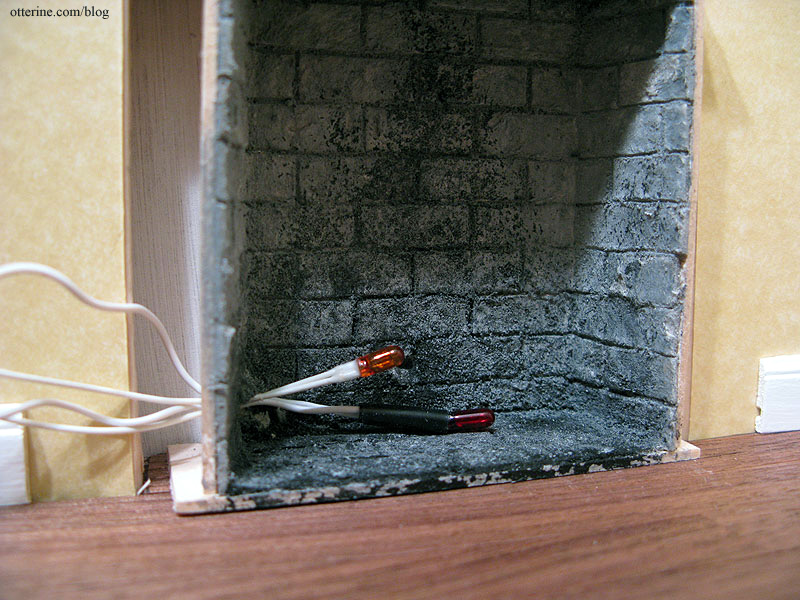
The lights sit inside an opening in the resin log piece, and the wires run up the chimney breast and through the ceiling.
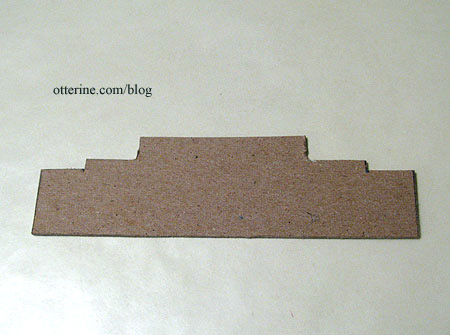
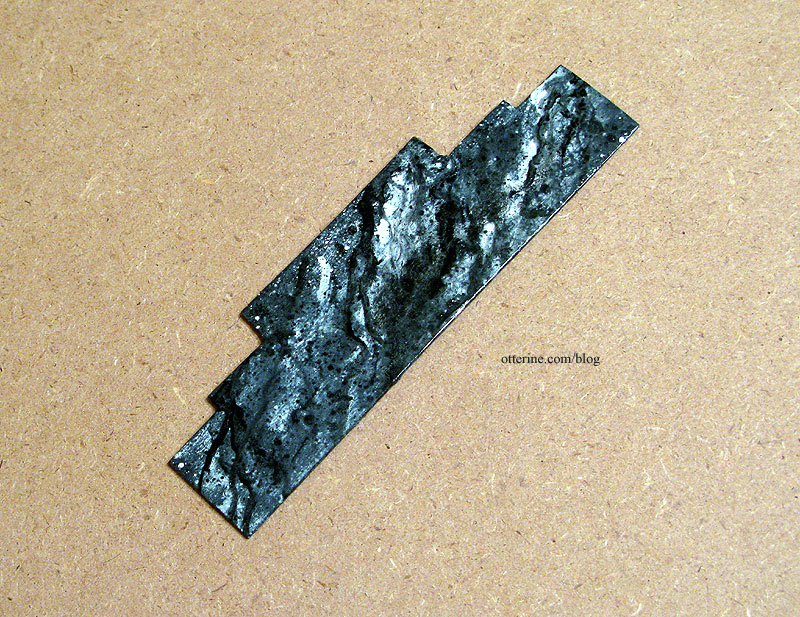
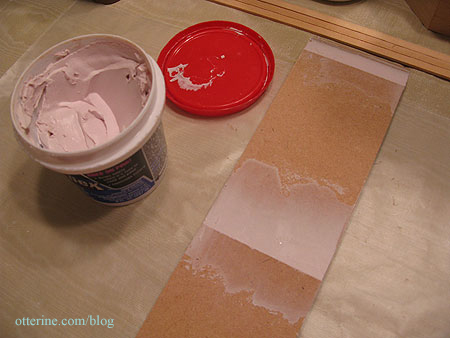
To finish off the fireplace, I made a marble-look hearth out of a piece of cardboard. I used the technique shown in the DVD by Master Miniaturists called Faux Finishes.
The cut cardboard before….
And, after….
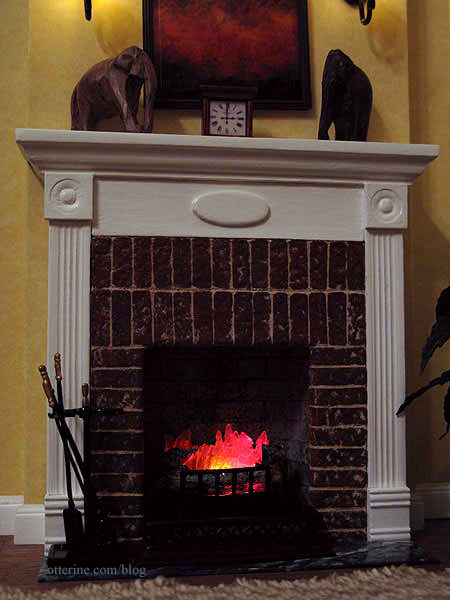
We now have a warm, cozy fireplace.
Categories: The Newport
December 12, 2009 | 0 commentsNewport – upgrading the stairs
The stairs that come with the Newport kit are made of mdf and needed to be assembled from three individual pieces. Since I planned to flip the stairs to accommodate the two story addition on the right side, I applied spackling to the back of the stair assembly to hide the seams.
I wanted the look of painted stair risers with stained wood treads, so I painted the entire assembly white (several coats with sanding in between to remove the “fuzziness” that mdf can get when painted) and then masked off the treads. I painted a base coat of brown and then did three layers of paint and glaze in two other colors of brown.
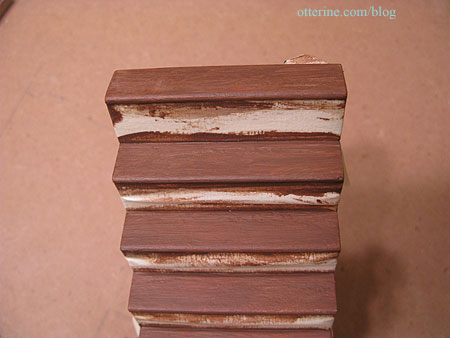
The faux wood attempt turned out well save for one small problem. No matter how well masked, the lines between the white and brown were not sharp enough for me. Any stray marks are especially obvious on a miniature scale and can ruin the illusion.
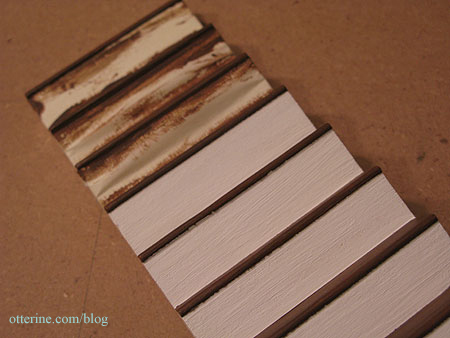
I looked into buying replacement stairs, but nothing fit as well as the parts that came with the kit. I still didn’t want to give up on the idea of having wood treads, so I first scraped off the front lip on the individual stairs that was meant to represent the tread and then sanded off most of the paint I had previously applied.
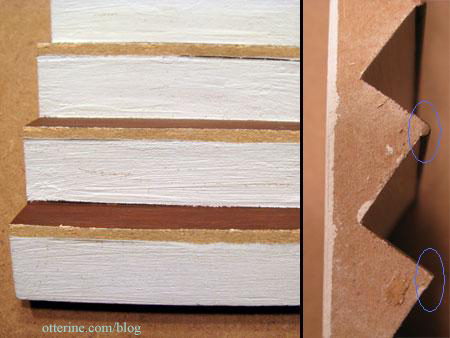
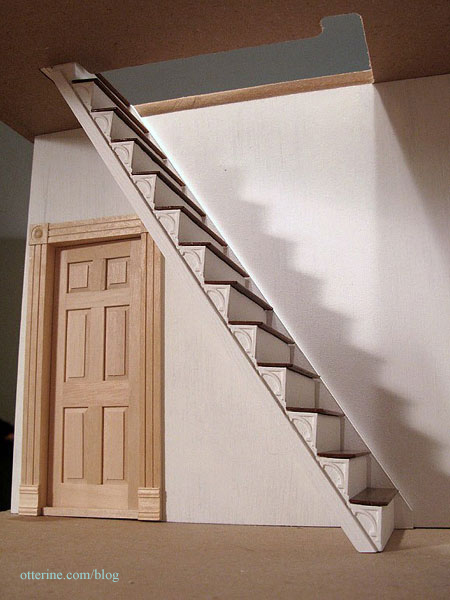
I added some fretwork since I didn’t care for the look of the plain stringer that came with the kit.
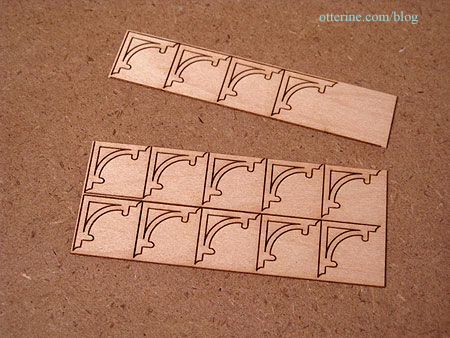
These are delicate laser cut pieces that were a chore to remove without breaking. I broke quite a few of them but since they were being glued to a flat surface, you couldn’t tell they were pieced.

To finish off the bottom edge, I added a piece of 1/8″ x 1/4″ strip wood.

I painted the entire assembly white, leaving some mdf exposed on the tops. I cut individual treads from a length of strip wood with a rounded edge and repeated the paint and glaze process I had originally done for the faux wood finish on these pieces.
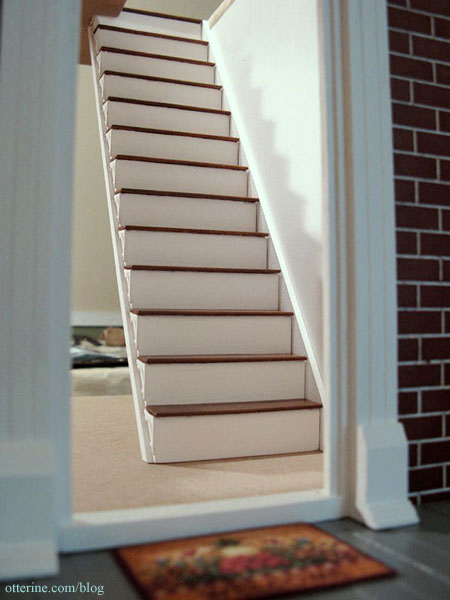
Once dry, I glued the treads in place. There will be a railing further along in the build, but I love the way this turned out.
It’s exactly what I had in mind.
Categories: The Newport
November 8, 2009 | 0 commentsNewport garage, part 1
Though the Newport was sold eventually, I’ve compiled some of the posts I made when I first started building it.
—-
The garage is made from the Foxhall Conservatory kit by Real Good Toys. I bought some 3/8″ Baltic birch plywood to replace the two pre-cut walls that came with the kit. I also lowered the whole structure by using the spacers included in the kit as the foundation. A friend with a jig saw helped me cut the walls down from their original height of 12″ to a new height of 10 15/16″. This height allowed for most of the original trim from the conservatory kit to still be used on the outside without the garage having too high of a ceiling on the inside. It also accommodated the height of the doorway into the kitchen. The stairs originally meant for the front porch of the conservatory will serve as the entry stairs to the kitchen from the garage.
Finding a Timberbrook garage door kit was an adventure. The few places that had them online were sold out. I called several local dollhouse shops and happened to find a store with one left in stock. I heard from one shop owner that Timberbrook is either out of business or selling their business. It’s a shame, too, since it is a good quality kit.
I’ve tried three cars for this space during the building phase. The first goes back to my original hobby of building model cars. Instead of making them showroom new, I would beat them up and make them the type of cars that make you wonder how they are still running. :D One of the first ones I built was a Datsun 240Z. So, when I happened upon a diecast metal 1970 Datsun 240Z in bright orange, I decided to go for it.
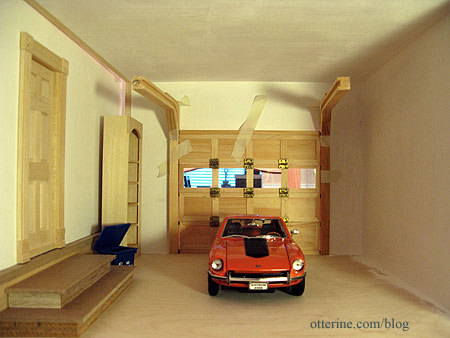
It is a beautiful model, but it is too small for the garage space. Usually 1:18 scale cars can hold their own with a 1:12 scale house, but the Datsun is a small sports car in real life making this particular car smaller than most 1:18 scale models. Now the Datsun sits on a display shelf instead.
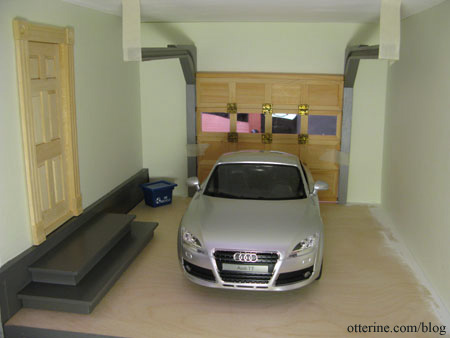
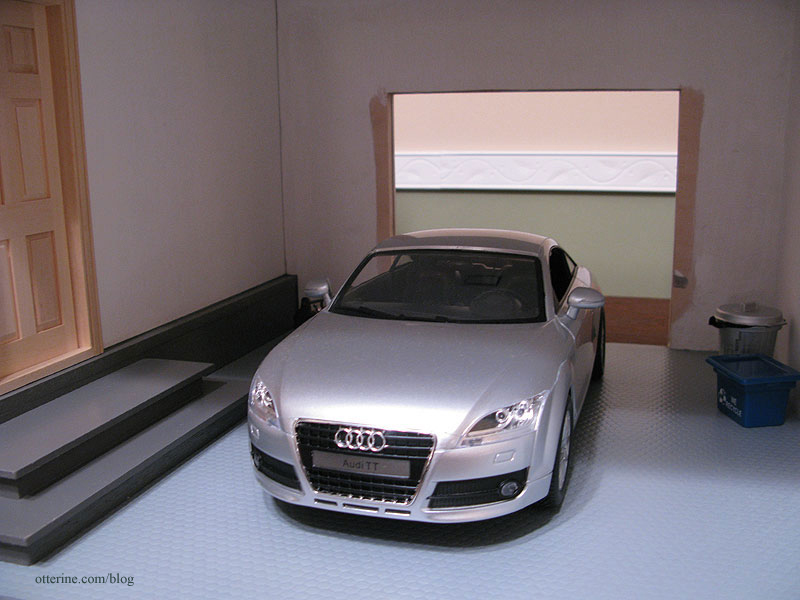
The second one I tried was a 1:14 scale remote control Audi TT. I like this one better for size but mostly for the fact that it has working lights (though annoyingly only when in motion). However, it’s a cheap, plastic car lacking in detail when compared to the Datsun. It is, after all, made to be driven fast and bumped into walls. :]

The Timberbrook garage kit is made of wood, so I painted the track pieces a mix of medium grey and iridescent silver. For the walls, I am planning to use scrapbook paper for finishing. I could paint, but it is difficult to get a smooth finish without brush strokes and other imperfections that ruin the illusion in a miniature setting. The paper here is by Martha Stewart in a color called swan, a very pale green (currently unattached until I finish the floor and add other elements). I decided not to have the egg carton stone finish on the exposed foundation of the house, figuring it would most likely be covered when putting on an addition. I did, however, paint it medium grey to blend with the stairs.
When I first started planning the Newport, I was a bit overwhelmed by the concept of electrification. After reviewing the types available, I opted for the round wire — or hard wire — technique. The main reason was I wanted the ability to have some lights on and others off, not all or nothing.
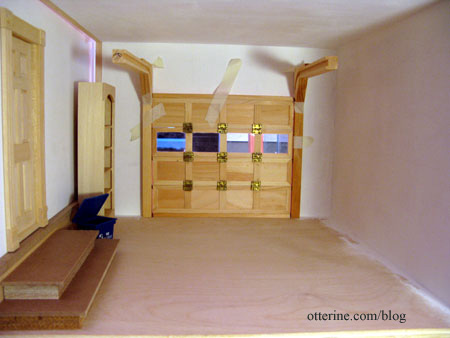
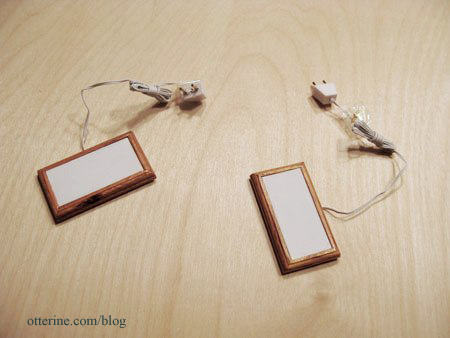
The lights I chose for the garage interior have twin bulbs and a wood cover that stays in place by magnets, connecting to a metal plate that is fixed to the ceiling.
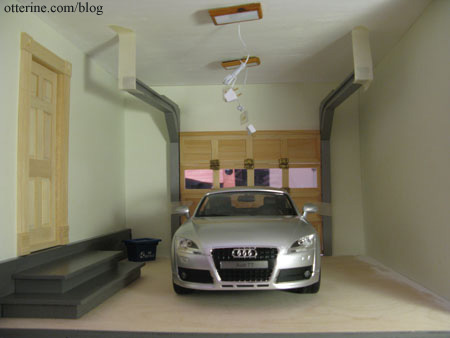
Testing out the position of the lights. This layout will light the entire garage and the garage door will obscure only one light when open.
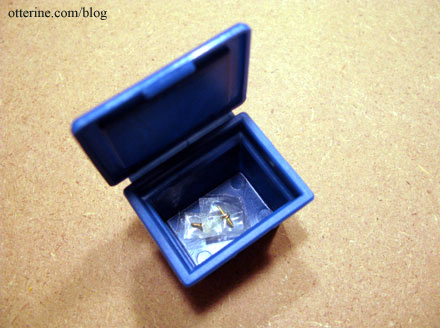
I used the miniature recycle bin to hold the tiny parts as I worked. It snaps closed, so no worrying about losing pieces.
I wasn’t crazy about the wood look of the lights, but choices for garage lighting were limited. On top of that, one of the wood covers had a large imperfection in the finish. After a bit of sanding to remove the varnish and some black paint, I had two modern garage fixtures.

I am so excited that my first attempt at electrification was a success!

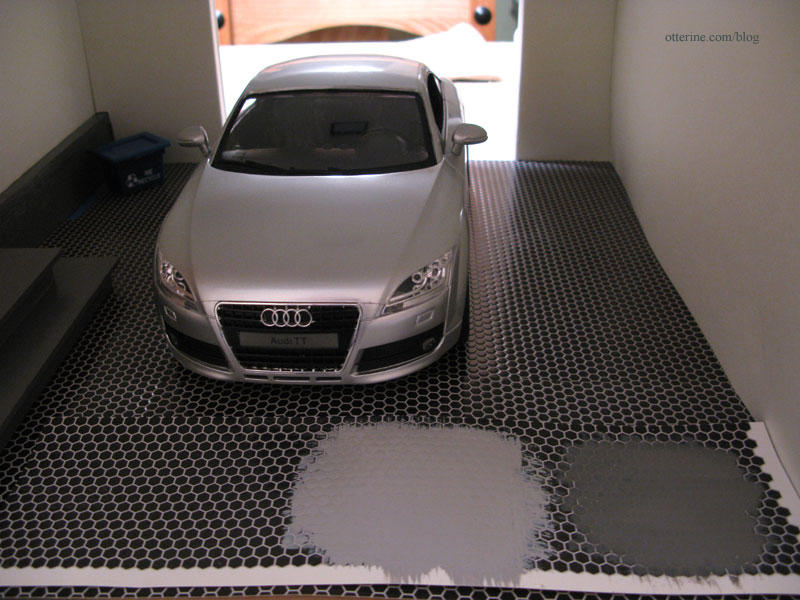
After perusing countless finished garage photos online, I decided to attempt the look of a vinyl floor liner. There are different types, colors and patterns, with one popular choice being black and white checkerboard. It does make a statement, but I wanted to go with something more subtle, like the look of grey coin-patterned vinyl floors.
If I thought dollhouse garage lights were limited, flooring options beyond paint were even tougher to find. To my knowledge, there wasn’t any material out there that I could use as is to mimic the look of vinyl flooring, so I decided to use black and white hexagon tile sheets by Handley House. They are made of heavy embossed paper that I thought would translate well after some grey paint and matte sealer spray.
Here’s the paper layout along with two test swatches of paint. The one on the right is the same medium grey I used to paint other portions of the garage. The one on the left is medium grey toned down with an equal amount of white paint. Overall, the scale of the hexagonal pattern works well.
Since there isn’t a piece of hexagon tile flooring on the market that would allow me to cover the entire floor surface without seaming, I decided any seams should look more planned than accidental and sloppy. I covered as wide a space as I could down the middle, front edge to back edge. I used Yes! paste to affix the paper to the plywood floor. (Note: I no longer recommend Yes paste – I use Wallpaper Mucilage instead. Yes paste has problems with longevity.)
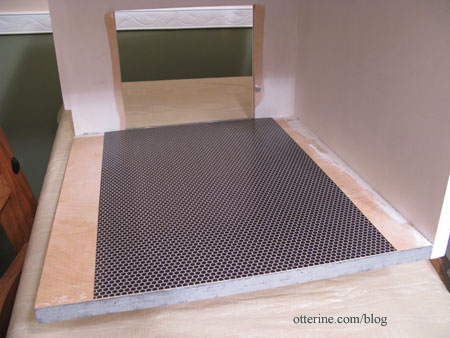
I then added a piece on either side to cover the remaining floor. The seams are still visible, but they will be mostly covered by garage items.

I didn’t like either of the color swatches I had done so I mixed mostly medium grey with some white and a dash of Payne’s grey. How’s that for an precise recipe? ;] The paint disguised the seams fairly well but caused some minor buckling in the paper where I hadn’t put enough paste, so I lifted the paper while it was still flexible and put more paste down. Problem solved.
After the paint dried, I sprayed on a light coat of matte sealer. Contrary to the name, the spray creates a fine satin sheen and becomes glossier the more you spray. The effect turned out exactly the way I had hoped.

The seams are far less noticeable since they don’t break the long line from the garage opening to the back.
Categories: The Newport
November 4, 2009 | 0 commentsNewport study with fireplace, part 1
Though the Newport was sold eventually, I’ve compiled some of the posts I made when I first started building it.
—-
The first floor room of the two story addition will be a study. The Newport kit didn’t come with fireplaces or chimneys, but I would like to have at least one fireplace. Most of the manufactured designs I’ve found don’t fit what I want (other than one very expensive one, of course), so I plan to make my own. There are several how to books out there, some more complicated than others, so I should be able to come up with something more along the lines of what I want.
I drew a rough sketch of a fireplace on paper without considering the accuracy of the scale for the front opening or mantle. I just wanted to get an idea of the look to see if I wanted to pursue the construction of the fireplace or not.
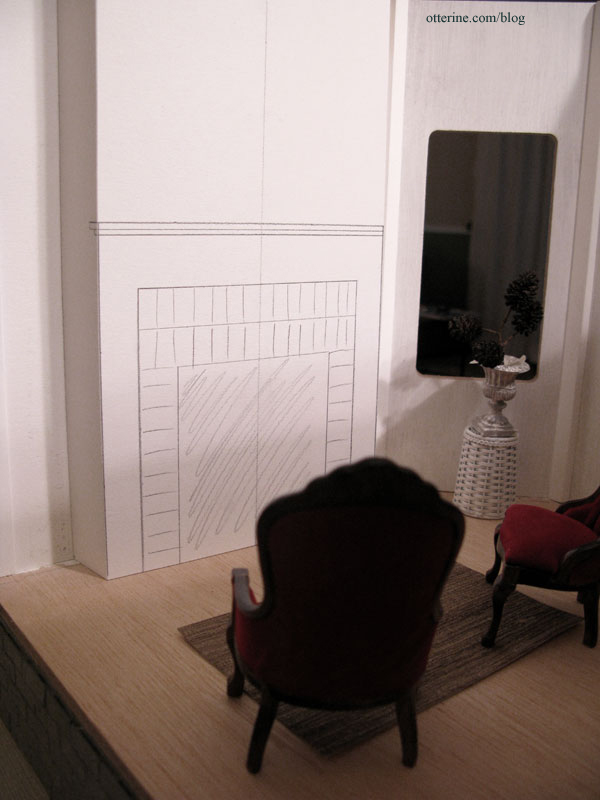
The exterior wall isn’t really conducive to having a chimney run from the ground up past the roof. I am using a one inch depth on the mockup, which would translate into one foot in real life. This will allow for a mantle large enough to decorate without taking up too much floor space. In the drawing, I have the chimney breast above the fireplace extending forward since it was easier to fold the paper to fit doing it that way. The end result, however, will be a separate fireplace unit that sits in front of the chimney breast wall.
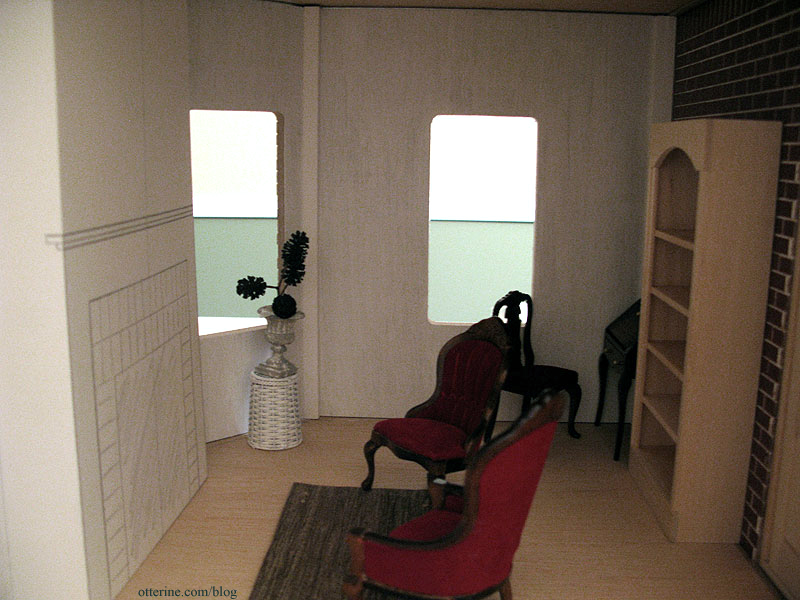
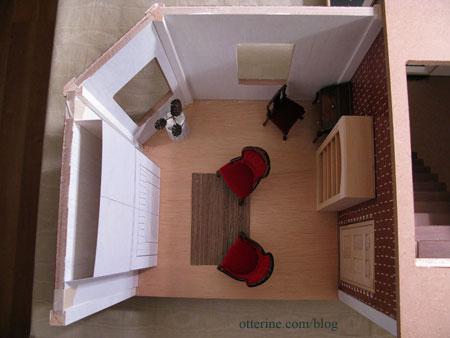
The three chairs and desk in the room were given to me by the friend who helped me cut my garage wall panels. I have some other ideas for this room, so I will likely use these pieces elsewhere, but they helped with the basic layout of the room.
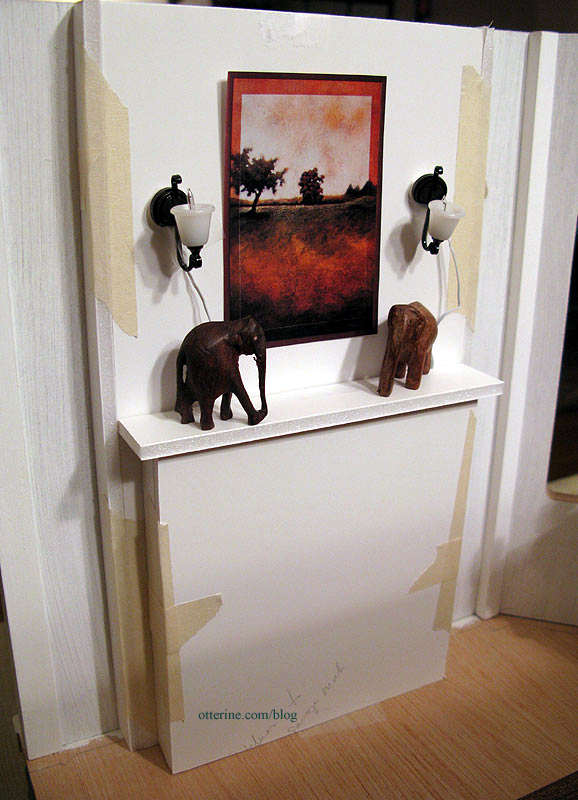
After my initial paper mockup, I decided I liked the look of the chimney breast. Still wanting a small depth overall, I made a foam core board mockup only 1/2″ deep. The mantelpiece has a depth of 9/16″ with the top having a slight overhang. I like the scale of it overall, so I will likely build my final pieces based on this model. I taped the lights in place and cut a sample painting from a catalog. The miniature elephants are wood pieces I’ve had for over twenty years.
After creating the egg carton stone foundation, I knew I would be able to simulate brick for the fire box and front of the fireplace. So, I took some wood pieces and created my own design for the mantel. I bought a strip of window casing trim specifically for the mantel, but the rest of the miscellaneous pieces were either extras or scrap wood from the build.
I like the result for looks and the fact that it was much more economical than a purchased fireplace.
I followed the same egg carton brick technique I used for the stonework on the foundation. Here is the layout of the unpainted bricks. The unfinished wood in the center will be cut out to create the fire box.
Categories: The Newport
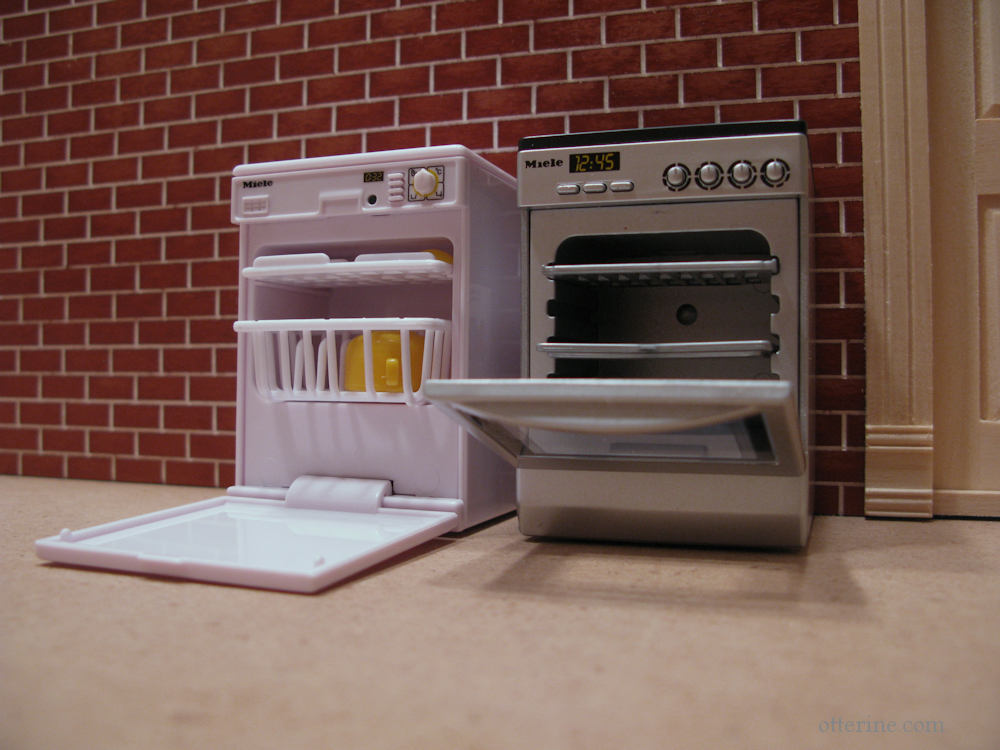
October 18, 2009 | 0 commentsMiniature Miele kitchen appliances
There are some fabulous miniatures on the market, and some carry “fabulous” prices. The miniaturist hobby itself can be pricey as a lot of little (pardon the pun) things add up. I’ve budgeted in some areas to be able to afford the more expensive items I want. In order to save money, I will be building a lot of the basic furniture myself, and I have found some good deals on craigslist and eBay for other things. I am getting ready to start building and decorating the kitchen, so I bought these miniature Miele appliances.
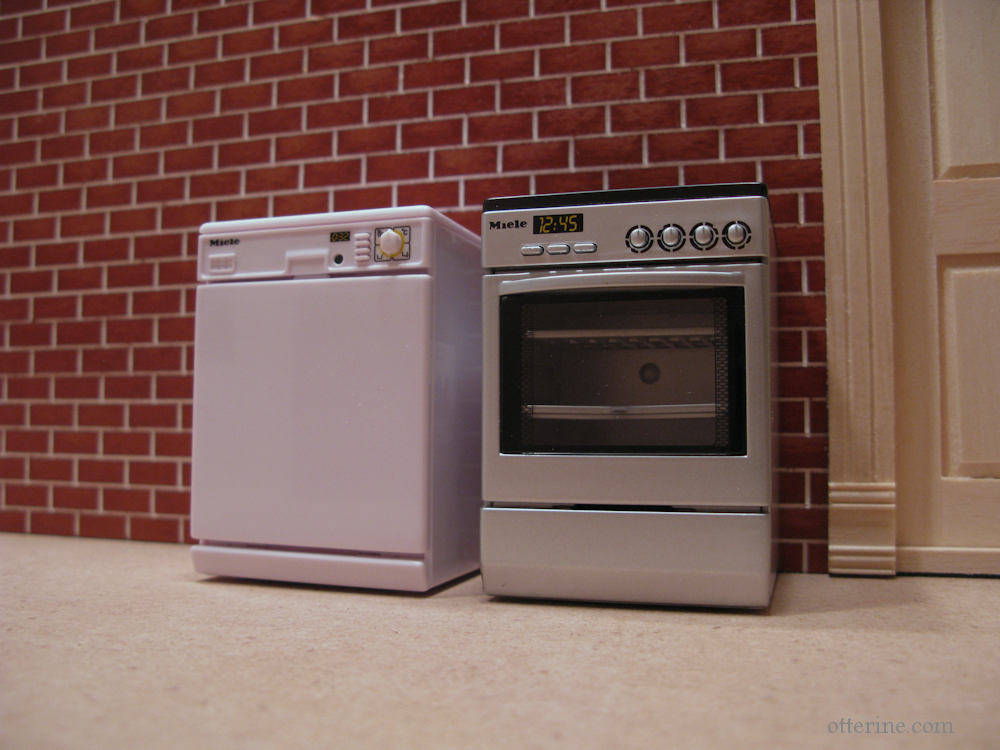
Both are battery operated and make sounds. The oven also lights up, and the dishwasher came with the yellow dishes.
Categories: Miniatures, The Newport
October 10, 2009 | 0 comments


NOTE: All content on otterine.com is copyrighted and may not be reproduced in part or in whole. It takes a lot of time and effort to write and photograph for my blog. Please ask permission before reproducing any of my content. (More on copyright)

Newport – guest bed, part 2
Continuing work on the guest bed. I had originally planned to follow the same method that I used for the Baslow Ranch bed but decided to make the mattress with foam core board as I had done with the box springs. I tried dressing the mattress I made for Baslow Ranch as a mockup for the guest room, but it didn’t look right. There needed to be more structure under the bed coverings, and foam core board provided that. It also allowed me to use up some of the scraps I had laying around.
I cut three layers of foam core board slightly smaller than the box springs to allow for fabric coverings.
Using the thin batting I had used to stuff the Baslow Ranch bed, I covered the top and sides of the foam core board to give the mattress a softer appearance.

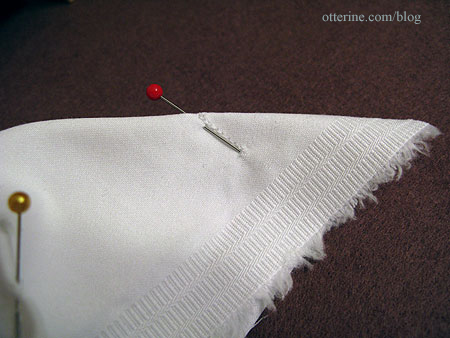
I pinned a scrap of white cotton sateen over the covered mattress and then sewed the corners to make a fitted sheet.
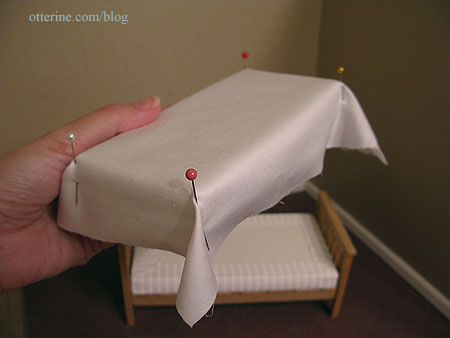
I turned it right side out, stretched it over the mattress and then glued the excess under the mattress.
Using the same fabric, I made a flat sheet, turning the edge under near the head of the bed. I didn’t sew the corners on this sheet. Instead, I folded the corners and glued the excess under the mattress.
I made a blanket for the bed using two coordinating cotton prints that came in a set from Joann Fabrics. I didn’t use any batting since the double thickness seemed to have enough weight. I pressed it into shape on the bed and dabbed a tiny bit of glue where needed to keep the blanket flat on the bed.
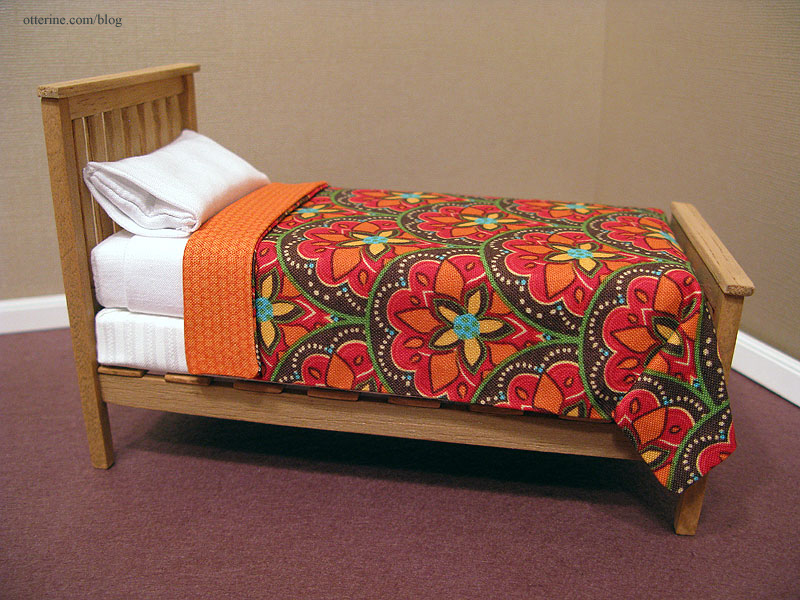
I made a pillow for the bed using the white sateen, filling it with beads. I then sewed a pillowcase out of the same fabric and squeezed the stuffed pillow into it. I like the way the pillow is bowed inside the crisp pillowcase; I think it adds a bit of realism.
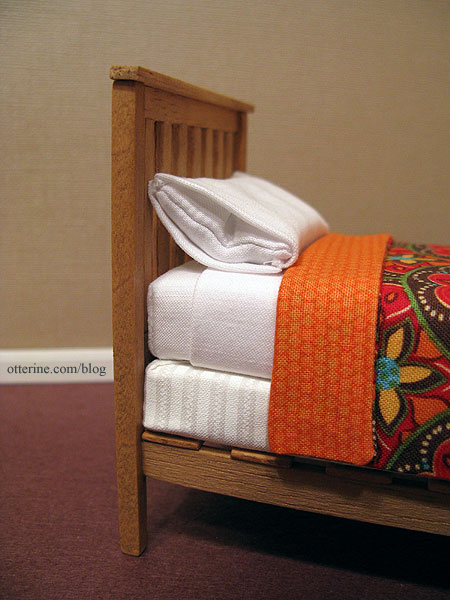
My first dressed bed! Hooray!
Categories: Furniture, The Newport
July 21, 2010 | 0 commentsNewport – master bedroom bed and box springs
I bought a Daisy House full bed kit before I knew I had the knack for scratch building furniture, but I still like it and think it was worth it. :D The wood in the kit was high quality, and it went together beautifully. The kit even comes with sandpaper, toothpicks and cotton swabs to help with assembly and finishing.
Instead of finishing the headboard and footboard with the supplied flat wood, I used the leftover carved post toppers from the House of Miniatures single bed kit I used for Baslow Ranch. I painted the bed black and sealed it with satin varnish by Delta Ceramcoat.

Interestingly enough, it looks a lot like our real life bed! :]

Even though I am mainly working on the guest room for the moment, I wanted to finish the master bed so I could complete some of the same steps needed for both beds at the same time…namely the mattresses and box springs.
For the box springs, I used three layers of foam core board glued together with tacky glue. I cut them smaller than the bed frames to leave room for fabric coverings.

I prepared a long strip of fabric by using HeatnBond (a fabric adhesive) to create a double thickness of material. The fabric would have been too thin to use a single layer.

After gluing one end of the strip to one of the shorter ends of the foam core board stack, I wrapped the strip all the way around the bed without using any glue until I got back to where I started. I didn’t want the sides to look glued down or for the layers of board to show through.

I clipped the corners on the top and bottom edges and then glued the flaps down on either side.

The result is a covered box spring pretty enough to show. The mattresses will cover the tops, so only the pretty fabric sides will show.

Categories: Furniture, The Newport
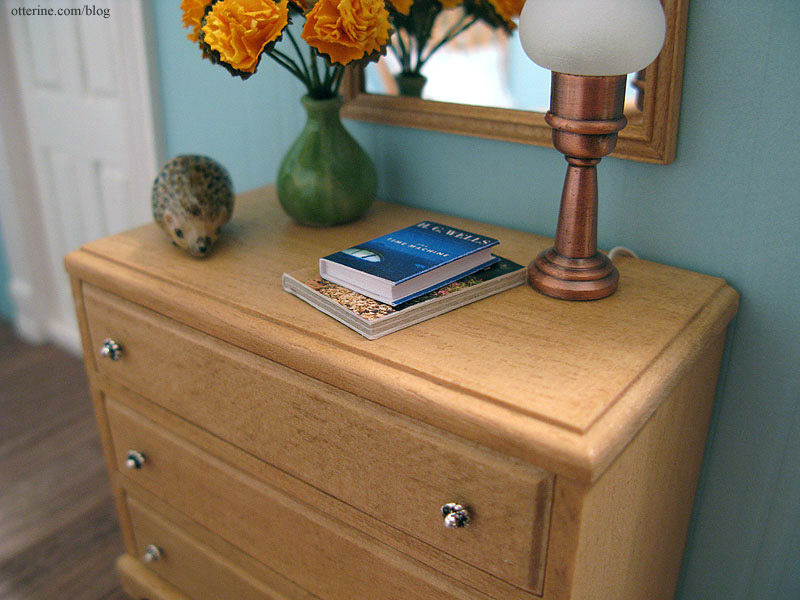
July 18, 2010 | 0 commentsHouse of Miniatures Chippendale 3-Drawer Chest
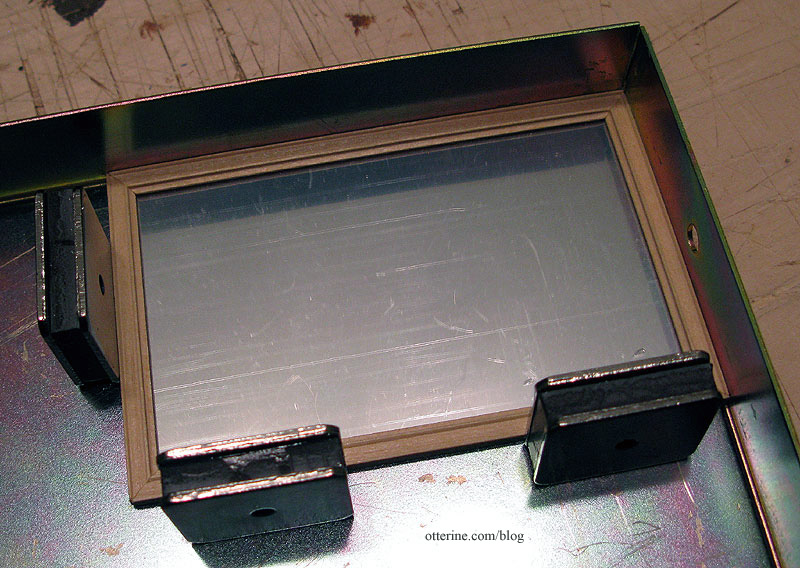
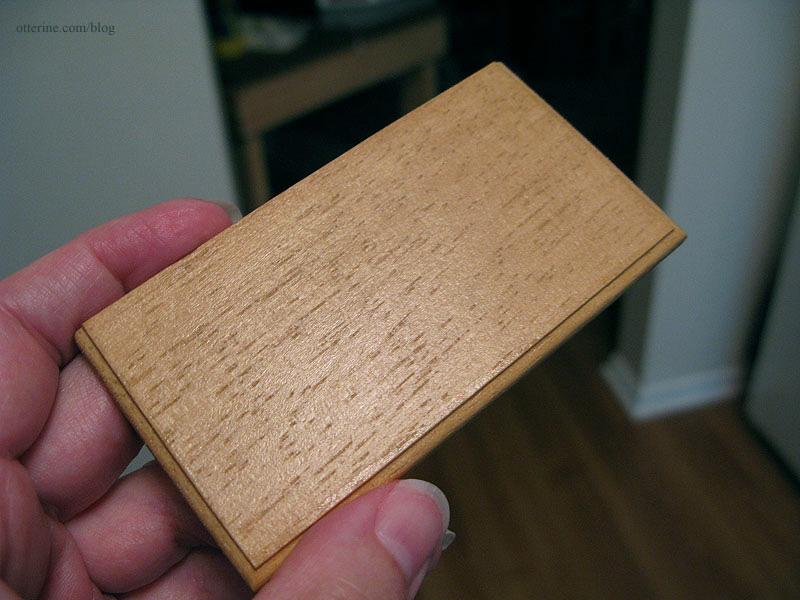
I scratch built a mirror from frame strip wood and plastic mirror sheet by Darice. This inexpensive material is awesome…it is thin enough to be cut with scissors to any size or shape and it has a perfect mirror finish. Much easier than using real glass mirrors for minis. The mirror looks scratched and cloudy in the photos since I haven’t removed the protective film yet.
The House of Miniatures dresser is mocked up here without the drawers…or glue for that matter. :]
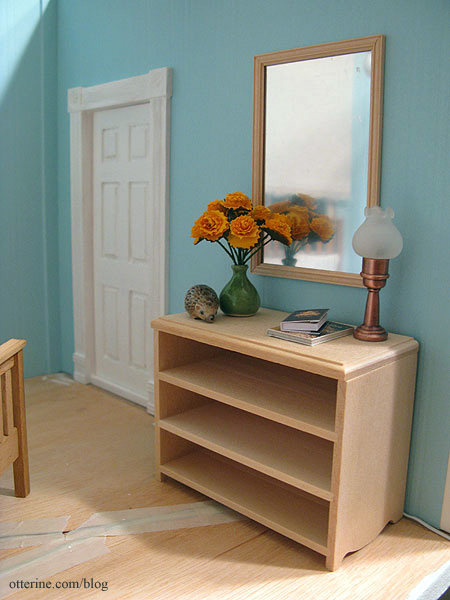
I finished the pieces with IKEA antique pine stain to match the bed and side table, also shown in the photo.
I sealed the stain with satin varnish by Delta Ceramcoat. It gives the wood a soft, subtle finish that I think looks very realistic in miniature.
The dresser kit went together flawlessly. I’ve used jewelry findings for the knobs.
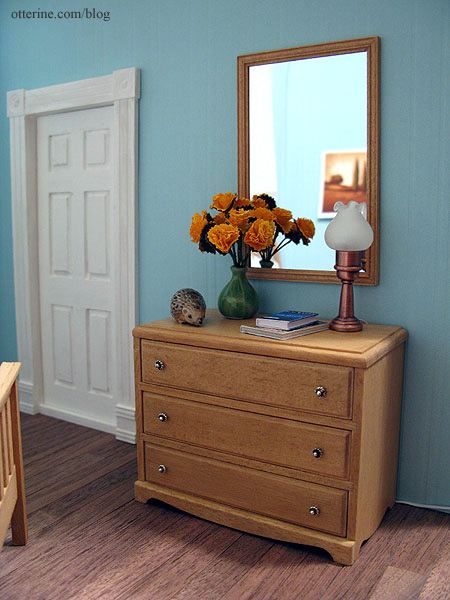
I just love the finish and details of this dresser…
Categories: Furniture, The Newport
July 17, 2010 | 0 commentsNewport – altering a prefabricated wall
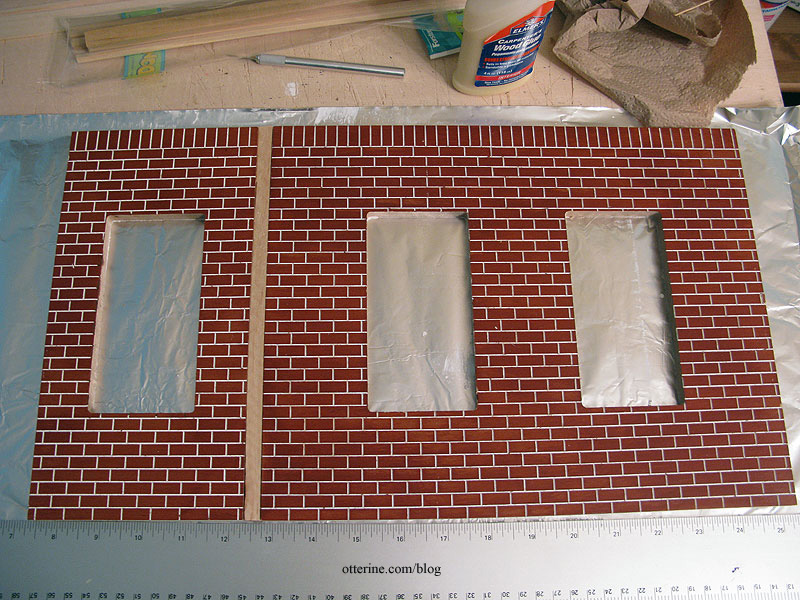
The brick on the Newport is a finish the manufacturer completes before shipping the kit. If it’s marred, there isn’t a way to fix it. And, there’s no way to replicate it, either. The photo of the front porch below shows how the front of the house is recessed by the front porch window.
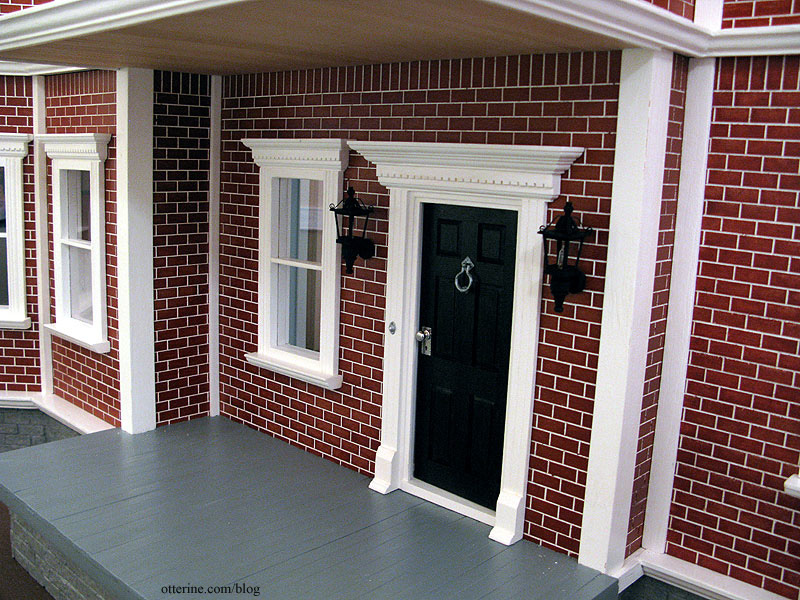
If built per the manufacturer instructions, the second floor would mimic this recessed pattern. Here’s the Real Good Toys photo showing the way the house is supposed to be put together.

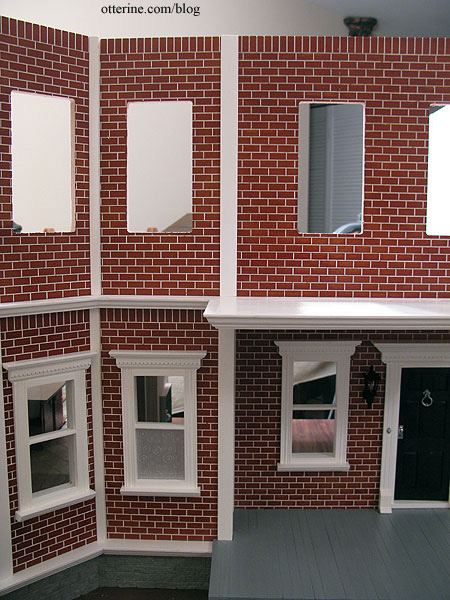
Since I extended the front porch, put the addition on the “wrong” side — I planned it that way :] — and flipped the stairs, I needed to push the front wall on the second floor forward. This not only eliminated the huge flat roof on top of the porch but also gave me more room inside the structure. My problem is getting the front to look like one continuous wall on the outside.
The rub is that the walls are pre-cut with the brick finish. So, I couldn’t just glue the two pieces together since (1) the brick pattern wouldn’t match, (2) there was a gap between the two wall pieces since there was supposed to be room for the connectors that make the recess, and (3) the reason for the recess in the first place was to give the illusion of a tower running up the middle.
To fix the gap, I used a 3/8″ x 3/8″ strip of wood.
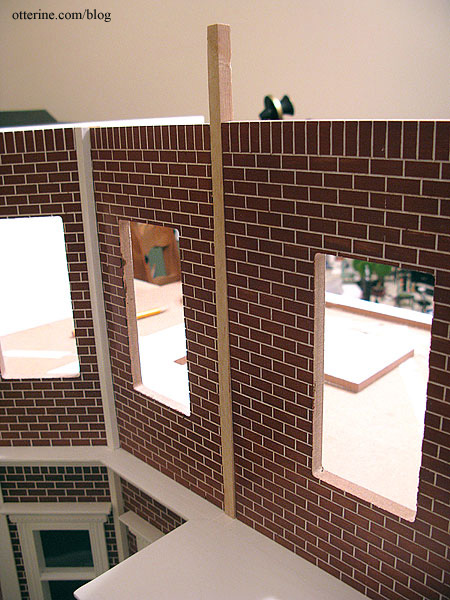
I glued each wall to the strip wood and let it dry.
To mask the strip wood and to follow the original vertical line of the mock tower, I cut a piece of 1/2″ x 1/16″ strip of wood and painted it white to match the other connectors. I glued it in place, lining it up with the connector on the first floor.
The strip wood connector won’t show on the inside once the wallpaper is in place. :] Problem solved!
Categories: The Newport
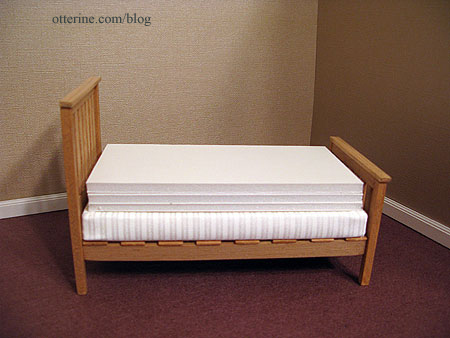
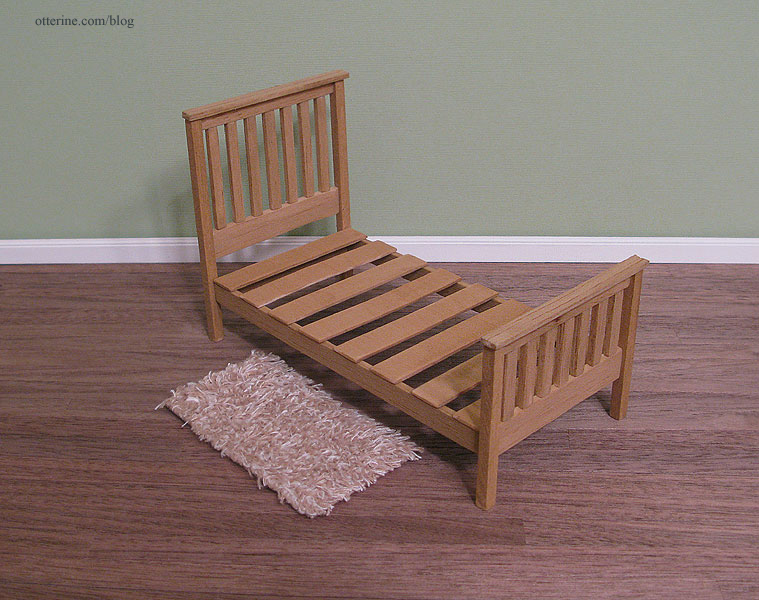
June 3, 2010 | 0 commentsNewport – guest bed, part 1
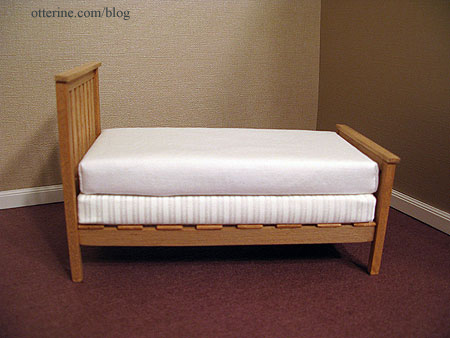
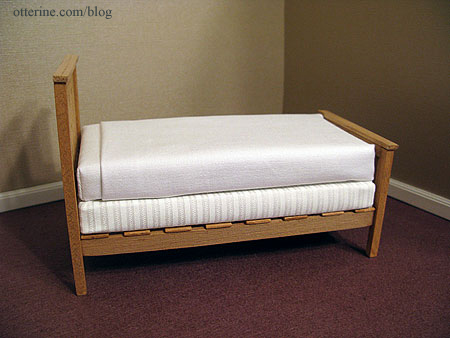
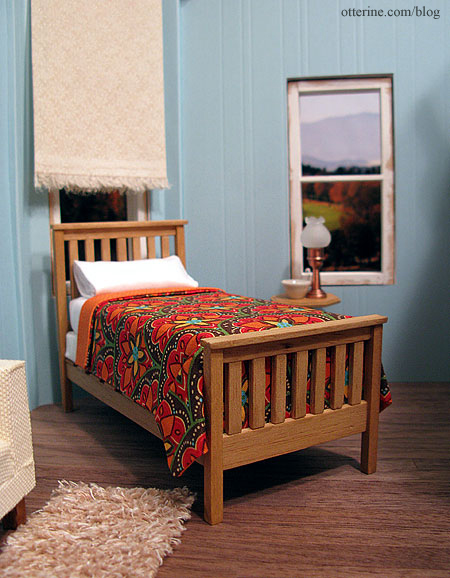
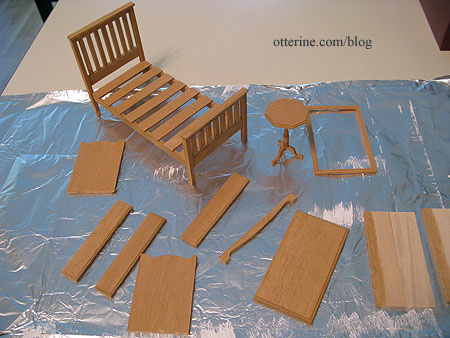
One of my favorite dollhouse furniture books is Thirties & Forties Miniatures in 1:12 Scale by Jane Harrop. There are a lot of great projects in this book that are both classic in design and usable in a more modern setting. I plan to make several of the items, but I decided to start with one of the more straightforward designs listed as “beginner” level: the single bed.
I used balsa wood for the build since I am not sure where I would find the obechi wood the book indicates. Balsa can damage easily, but I love the way it looks once stained. It’s also very easy to cut. (Note from the future – I would no longer use balsa to build, and this bed has suffered damage over the years.)
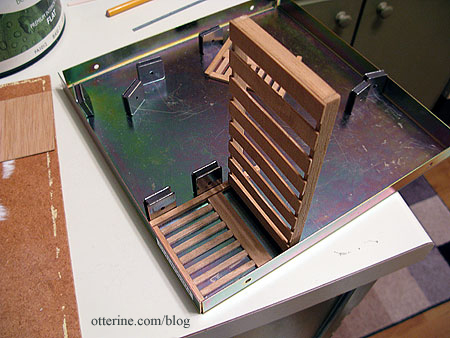
I love the look of the bed with the high headboard. I used antique pine stain from IKEA.
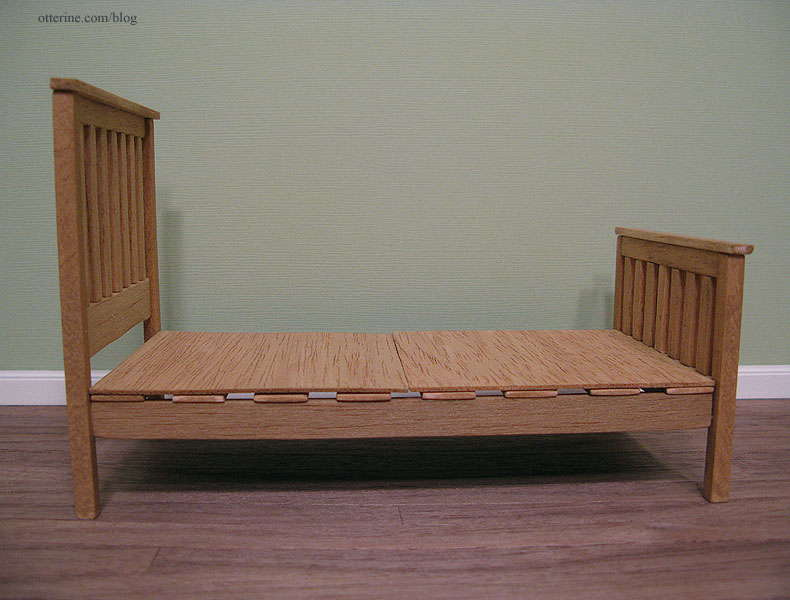
The most difficult part of the whole process was making sure the slats on the headboard and footboard were measured exactly.
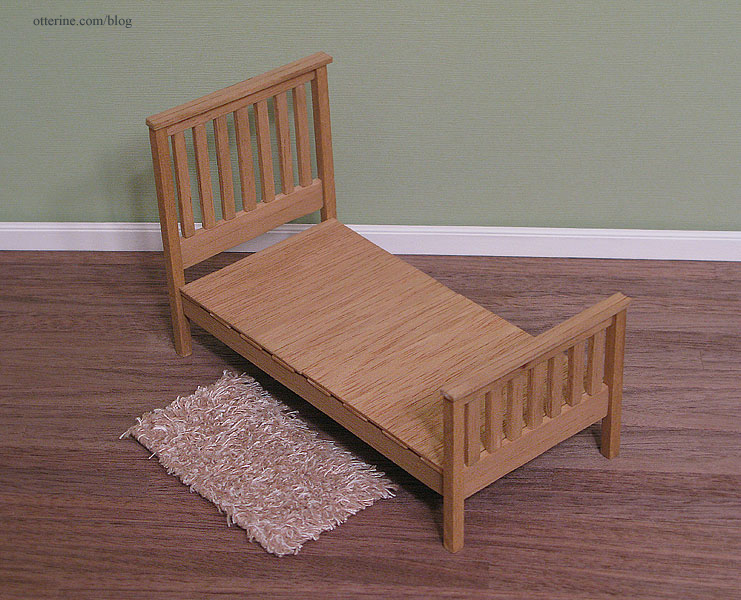
The bed has two flat boards (shown above) that I left unattached. Once I figure out the bedding, I’ll decide if I need them or not.
Categories: Furniture, The Newport
April 10, 2010 | 0 comments
NOTE: All content on otterine.com is copyrighted and may not be reproduced in part or in whole. It takes a lot of time and effort to write and photograph for my blog. Please ask permission before reproducing any of my content. (More on copyright)