

Heritage – bathroom finishing, part 4
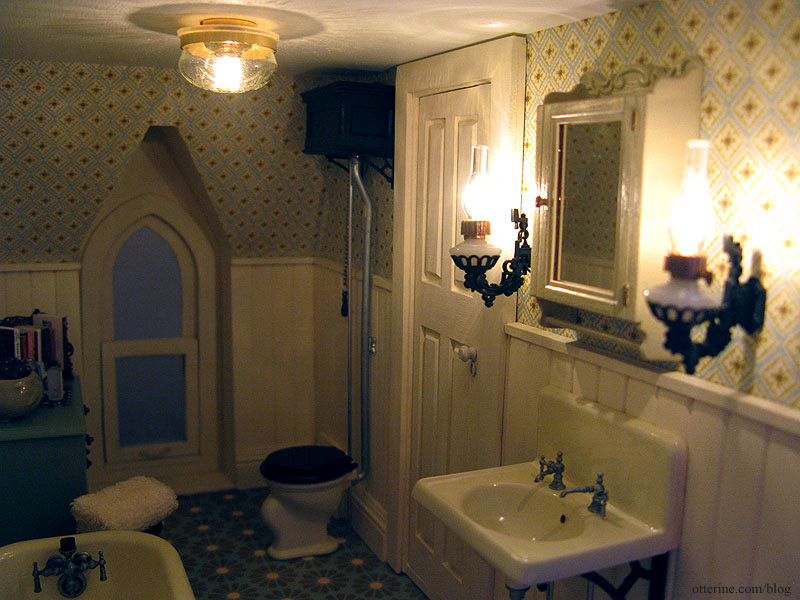
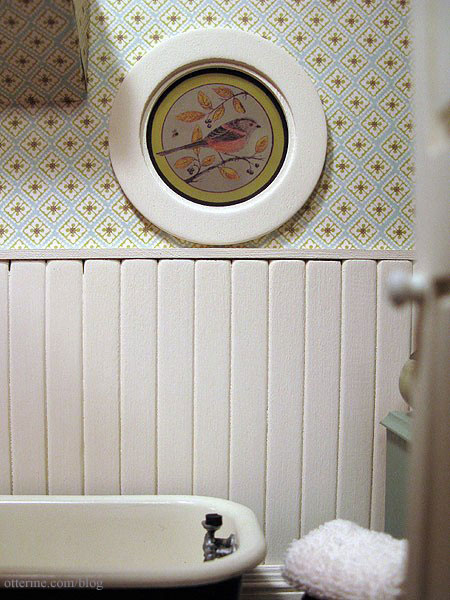
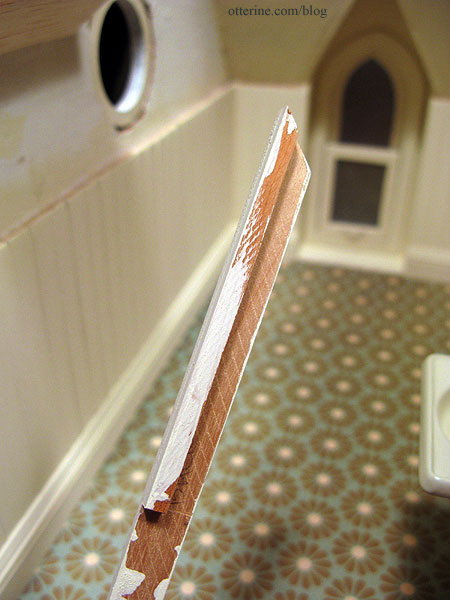
Continuing work on the bathroom. I finished the beadboard trim I started over the weekend.
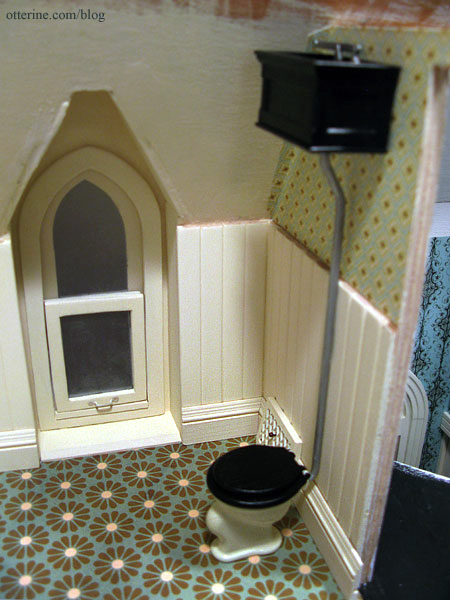
I cut a notch to accommodate the pipe running from the high tank to the loo.
I also added a water line with a shutoff valve to the tank just as I had done for the wall sink, though I didn’t think to take a better picture of it before I had the loo in place. Because the beadboard wall treatment adds some thickness, I had to glue the loo to the floor and the tank to the wall.
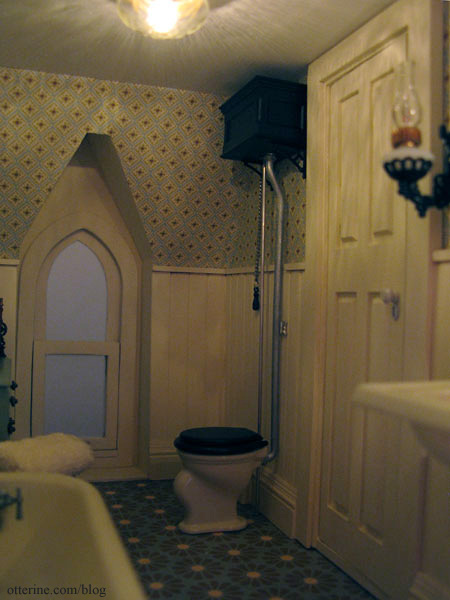
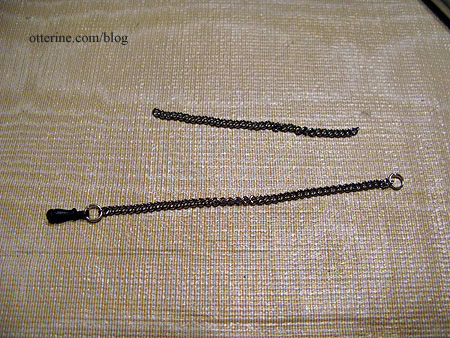
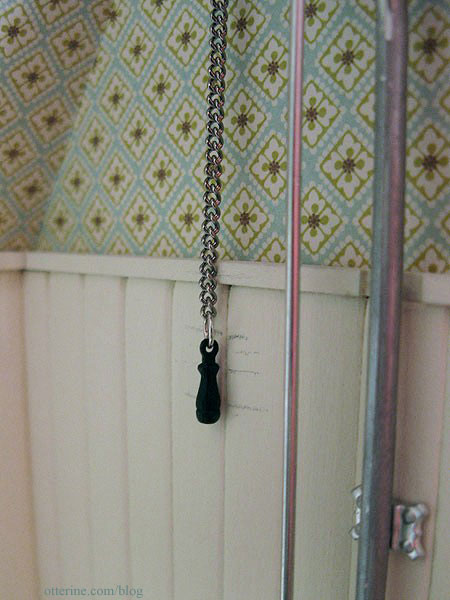
I shortened the chain that came with the kit, because it was nearly hitting the floor.
I figured the handle has been hitting the wall for years, so I dragged it across the beadboard to transfer some of the paint. :D
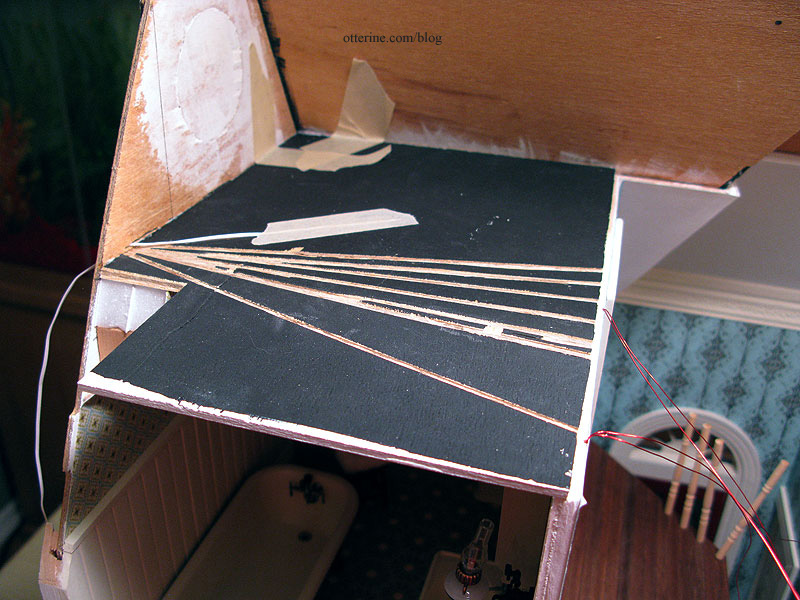
The new ceiling board for the bathroom has the required electrical channels already cut so it was ready to install.
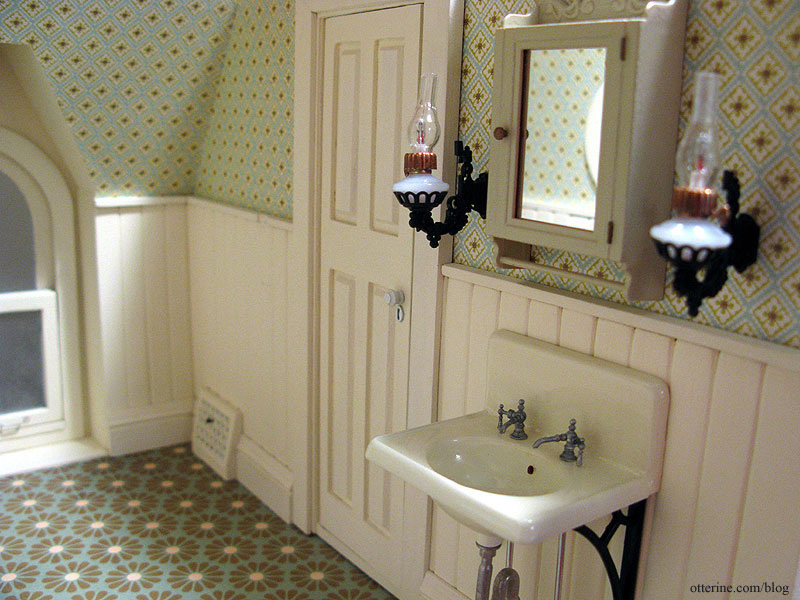
Love this room!
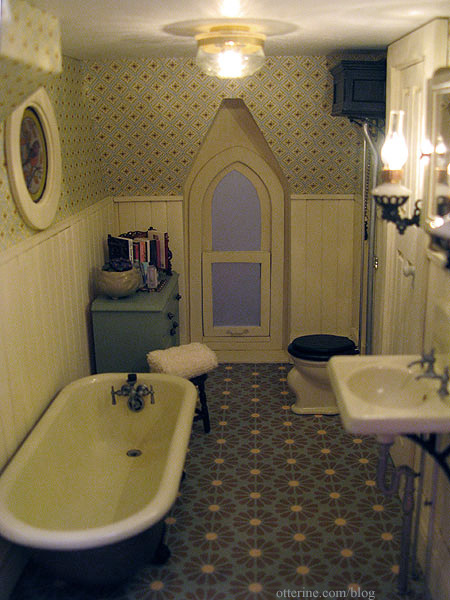
I need only a few more accessories, and this room will be complete! :]
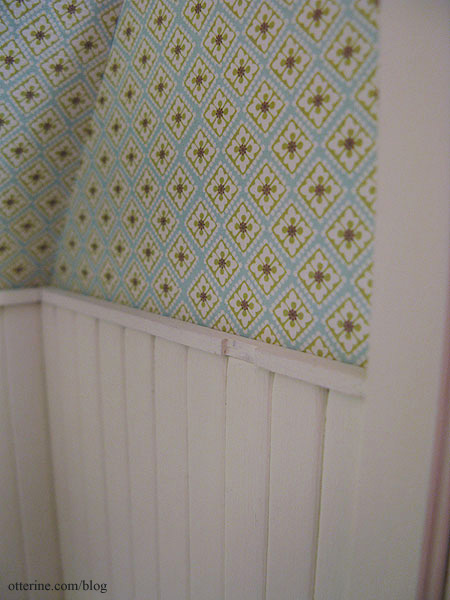
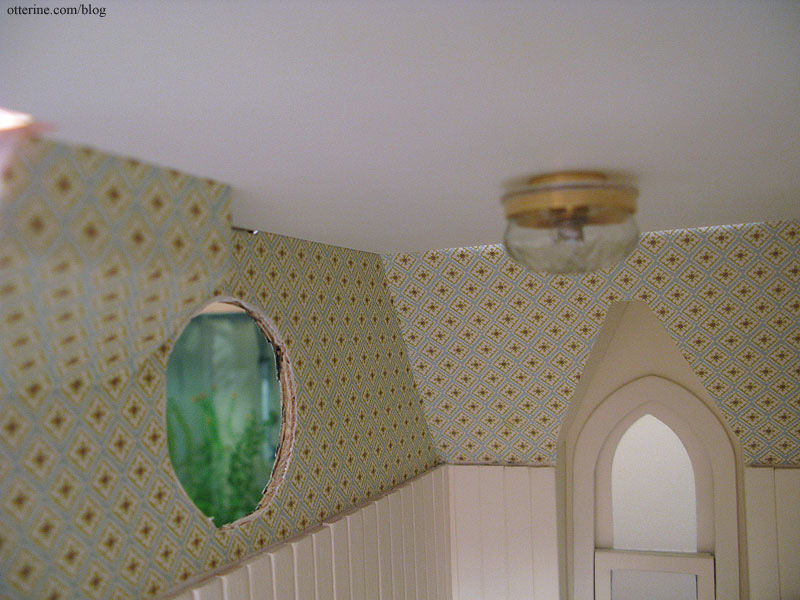
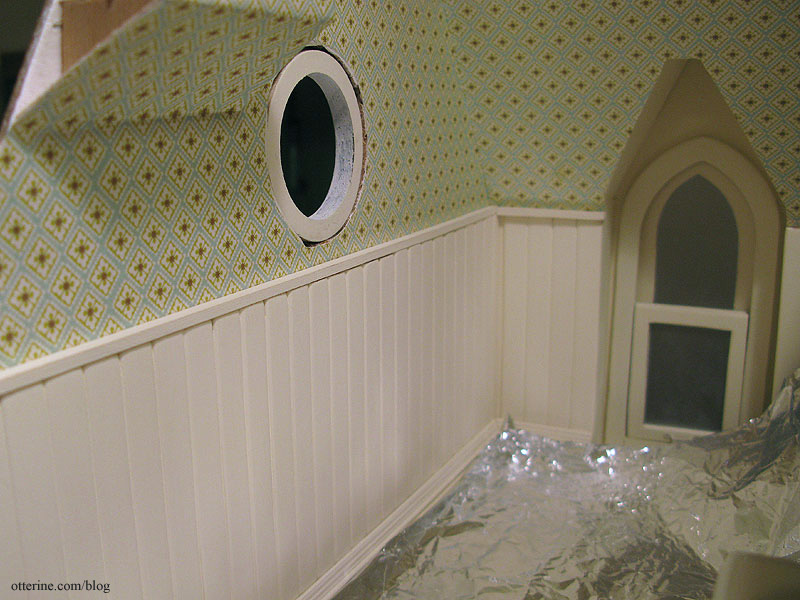
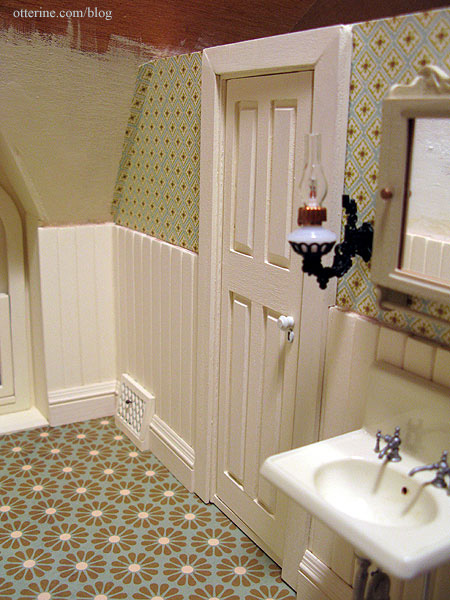
Update: After working on the back roof, I was able to finish up the bathroom wallpaper. I added one small strip of trim on the outer wall to disguise the tab and slot that had been showing in that area. I also added ceiling trim along the front wall to hide the slight gap there. I plan to add more trim around the outer wall here, but the height of the bathroom door makes it impossible to add the same trim to the inner wall. More on that to come.
Categories: The Haunted Heritage
June 11, 2012 | 0 commentsHeritage – bathroom finishing, part 3
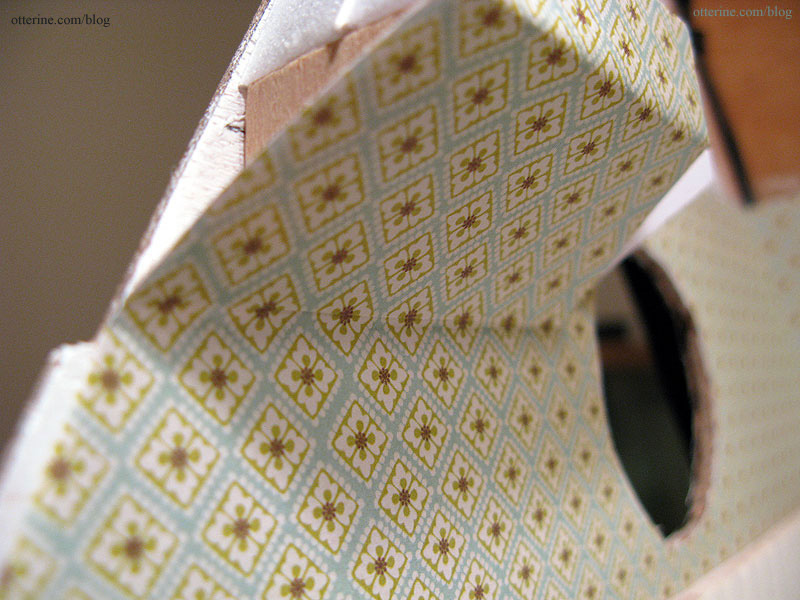
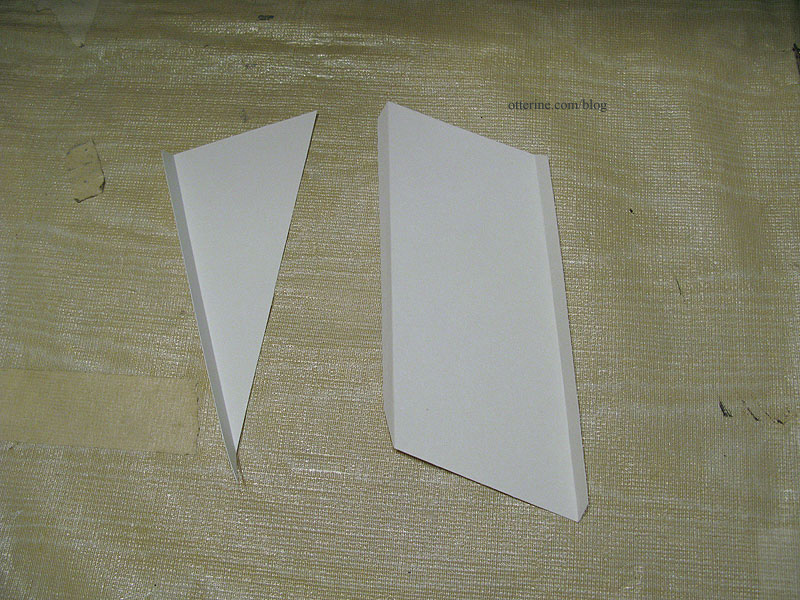
Continuing work on the bathroom. I had applied the wallpaper on the interior wall quite awhile ago, and I fully admit to procrastinating on the other two walls. I had never wallpapered around off angles like the one created by the interior chimney extension.
I had cut plain paper templates previously, so I used those to work on a new template to fit around the chimney extension.
I had one long piece for the wall and one smaller piece for the chimney.
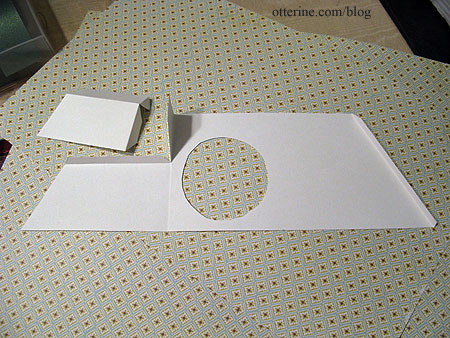
I first cut the long piece from the scrapbook paper – Cute Little Diamonds by The Paper Company – and applied it to the wall with Yes paste, leaving the small piece on the inner side of the chimney loose. (Note: I no longer recommend Yes paste – I use Wallpaper Mucilage instead. Yes paste has problems with longevity.)
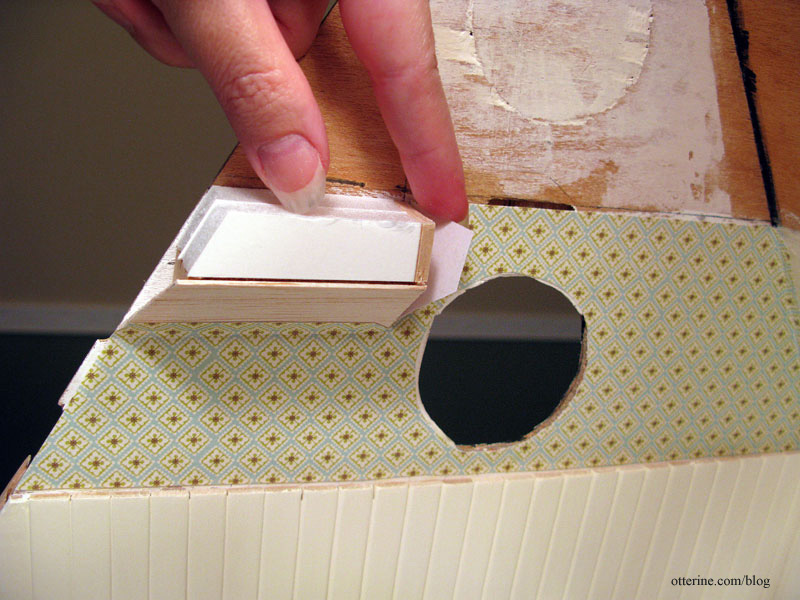
I pasted the wallpaper onto the front wall and then glued the smaller piece to the chimney. Now, that’s a nice seam, don’t you think? :D I’m rather proud of it! I guess all those years of sewing come in handy for pattern matching.
I glued the small flap from the main wallpaper piece in place. It’s not a perfect fit there, but the entire wall is covered and this side won’t be seen.
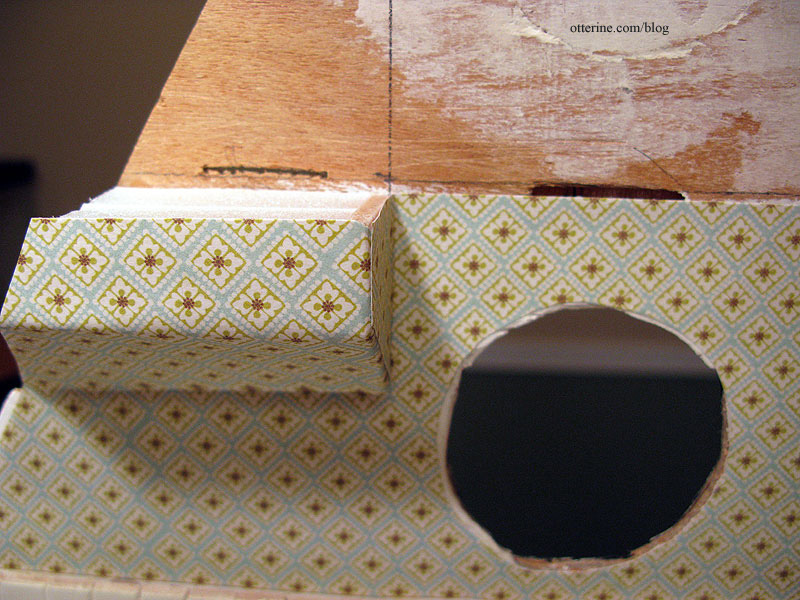
I already knew there would be sizing issues around the ceiling tab and on the front wall, but I plan to add some trim around the ceiling to hide these gaps.
Once the wall treatments were complete, I installed the outer window. I added a thin strip of wood to finish the beadboard, painted to match.
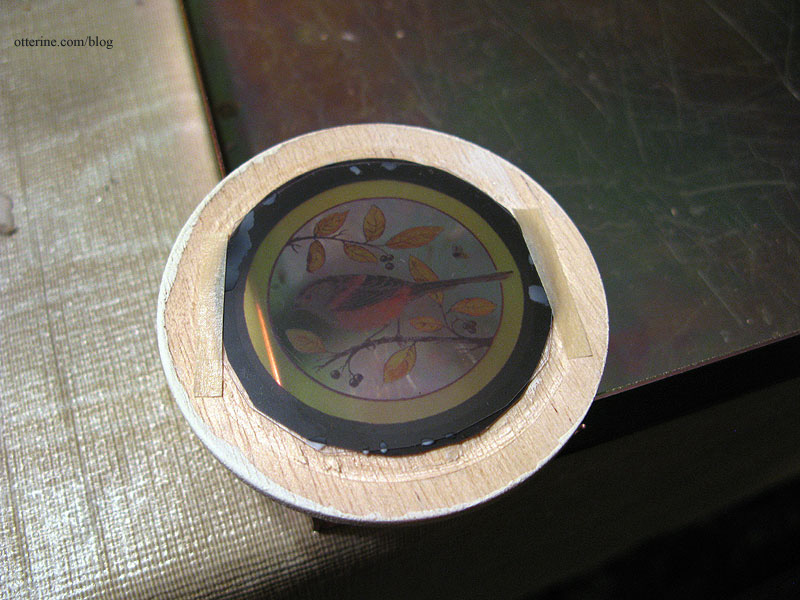
Since the back of the bird and bee window transparency print is dull, I cut a piece of clear acetate to act as the outside surface. I dabbed Aleene’s Quick Dry glue around the edges just to hold the two pieces together. (Bird and bee image by Flora used with permission.)
I dabbed glue around the edge of the assembled films and centered the interior trim over the image.

To keep the window from shifting in case the glue fails, I added two thin strips of masking tape.
I then glued the window to the wall. Lovely. :D
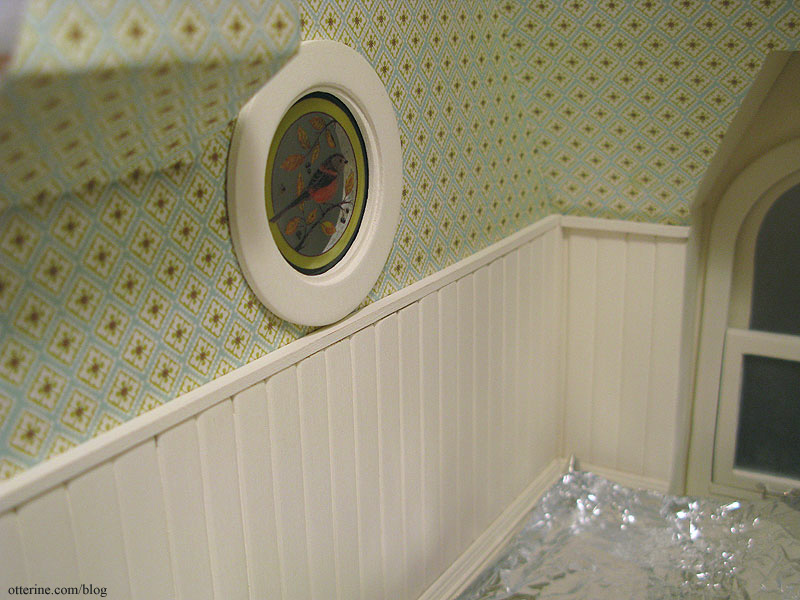
This room is just about complete.
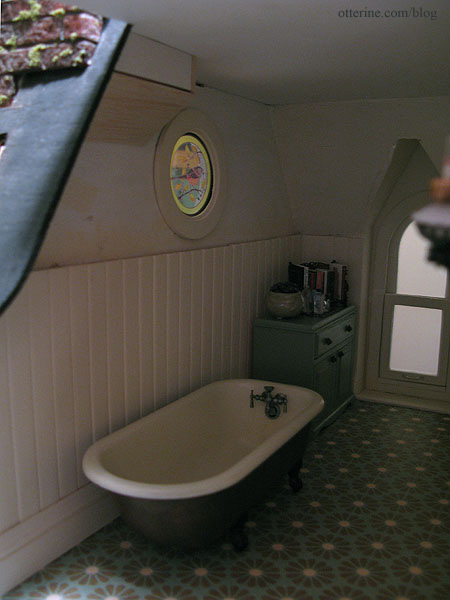
Here’s the window with the furniture and bathtub in place. :D
Categories: The Haunted Heritage
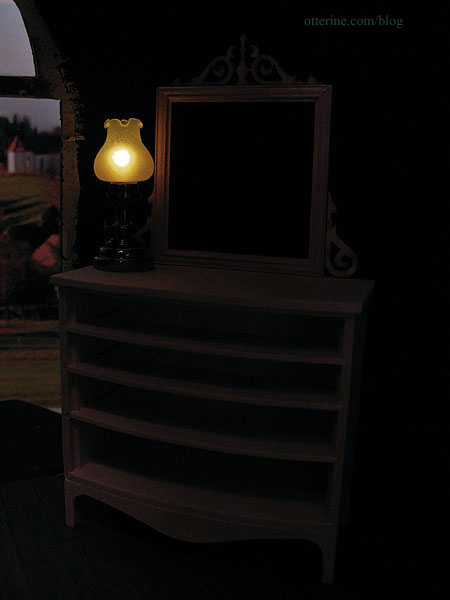
June 11, 2012 | 0 commentsFancy bow front dresser, part 1
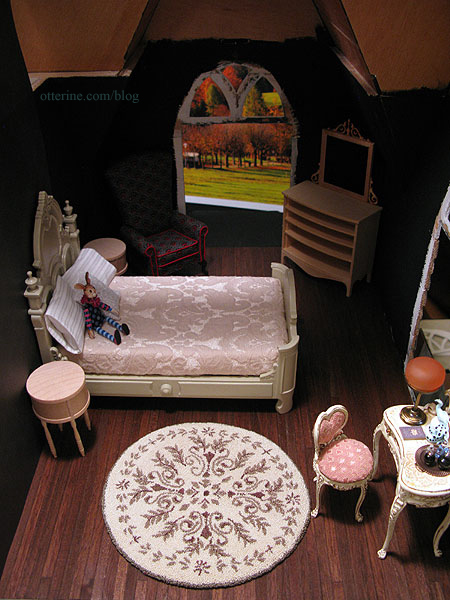
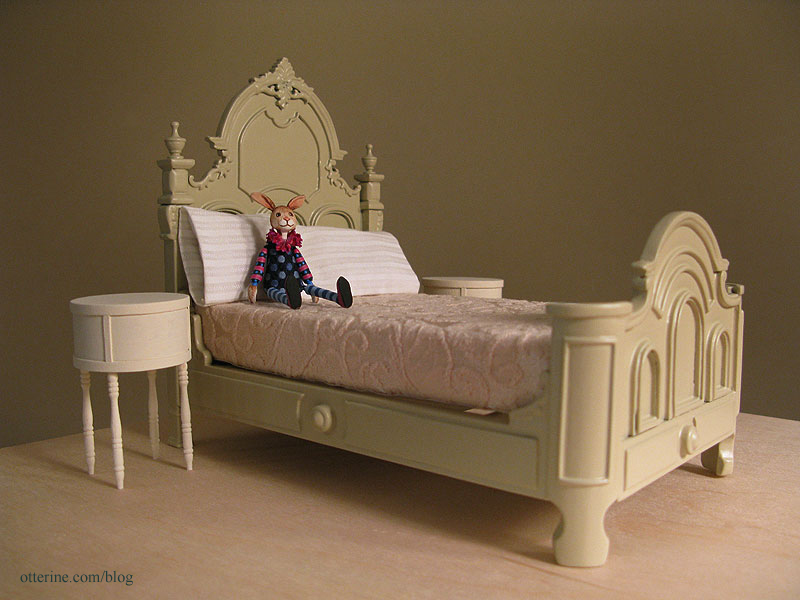
What I like most about the Heritage bedroom is while all required pieces are accounted for — fancy bed, nightstands and vanity — nothing matches exactly. I don’t mind a bedroom suite, but I rather like the idea that grandma has chosen pieces simply because they spoke to her not because they made up a matched set.
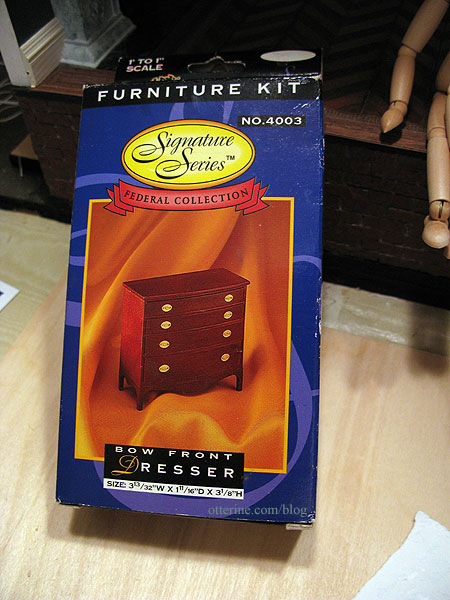
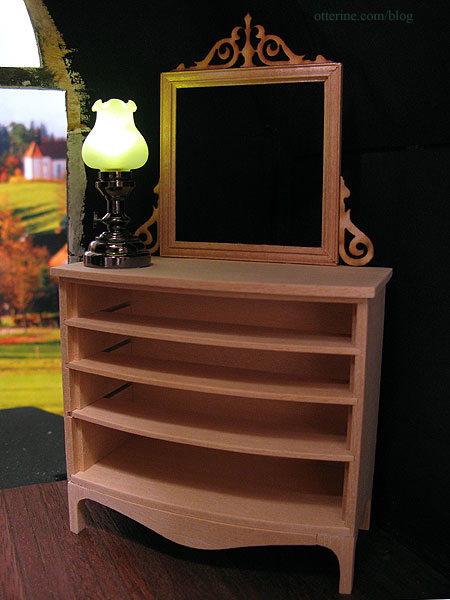
To that end, grandma still needed a dresser. I picked up a furniture and accessories lot from craigslist some time ago, and in it was a Houseworks bow front dresser kit.
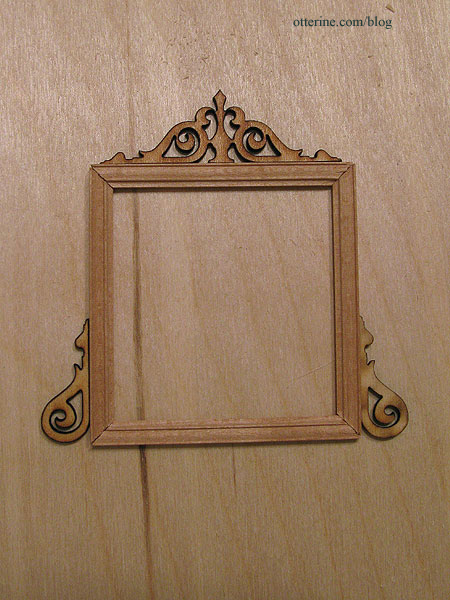
I made no changes to the base kit, though I did add a mirror made of frame strip wood.
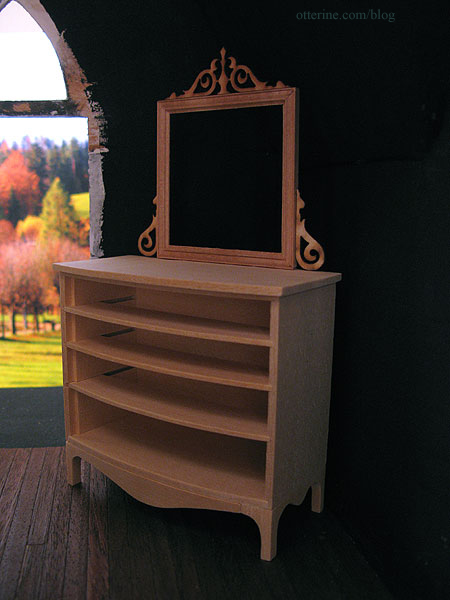
To fancy up the mirror, I added laser cut embellishments from Heritage Laser Works. They have such great things!
I made sure the dresser wouldn’t be too tall for the corner with the added mirror. I plan to angle the dresser so I can see more of it when looking into the room from the open back. Here I’ve used The Chair from the parlor as a stand in for the one I plan to make. I think everything will fit well in the room without seeming crowded.
I wasn’t keen on wiring this corner, so I picked up a battery operated LED lamp for the dresser. It’s been noted on other blogs and forums that these lights have a blue cast that’s not like candlelight or incandescent bulbs. A Greenleaf forum member, Debora, found a wonderful fix for it. She dotted some peach/orange glass paint on the tip of the bulb. The complementary color softens the blue and makes for much better light. The light from this lamp is actually a bit green.
The paint I had on hand for glass and ceramics wasn’t transparent, but I used just a little bit of it so it didn’t block out too much light. I had to mix red and yellow, but it worked! :D
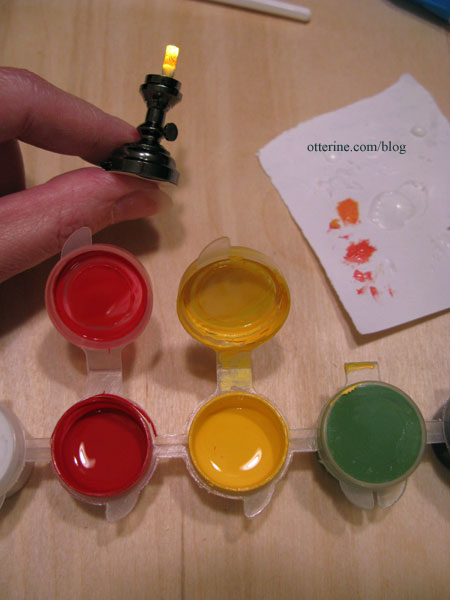
The red paint on the bulb is somewhat visible when the lamp is off, but I’d rather have a closer approximation of candlelight when the lamp is on, so it’s not really an issue for me.
Categories: Furniture, The Haunted Heritage
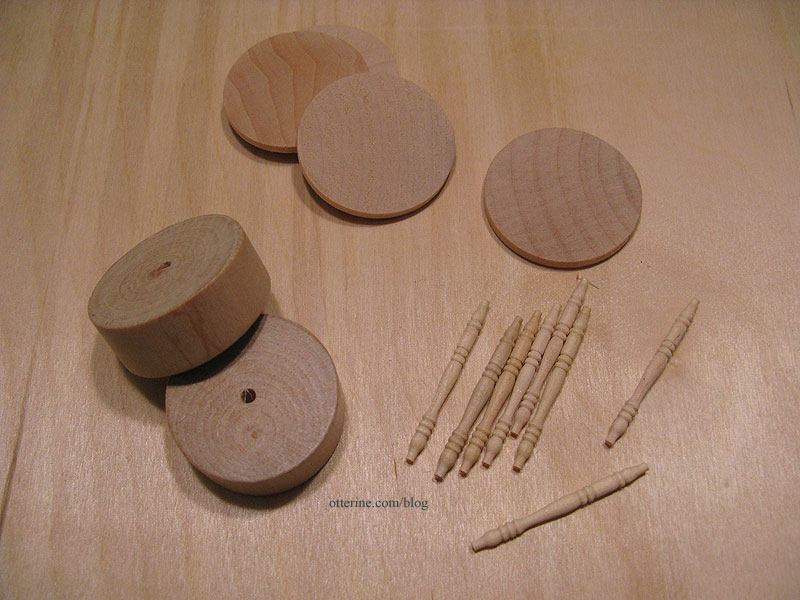
May 23, 2012 | 0 commentsAntique drum nightstands, part 1
I’ve been thinking awhile on the type of side tables I wanted for the Heritage bedroom. With the ornate bed and feminine vanity and chair, I needed something with antique style while not being overpowering.
My artist models came with round wood bases and metal pins to hold them up, though they stand on their own just fine. I removed these bases when I first got the models, but I kept them since they were smooth round wood shapes and I knew they would make a fabulous trash to treasure project some day.
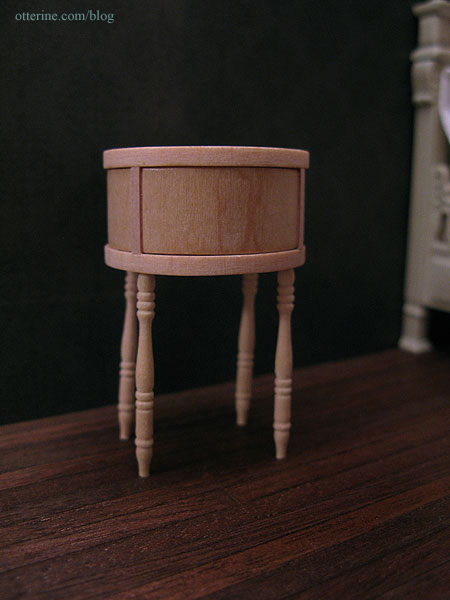
The bases measure 1 3/8″ in diameter and 9/16″ tall. I grouped them with 1 1/2″ x 1/8″ wood circles and Houseworks 1 9/16″ long spindles.
I first glued two circles to the top and bottom of the base.
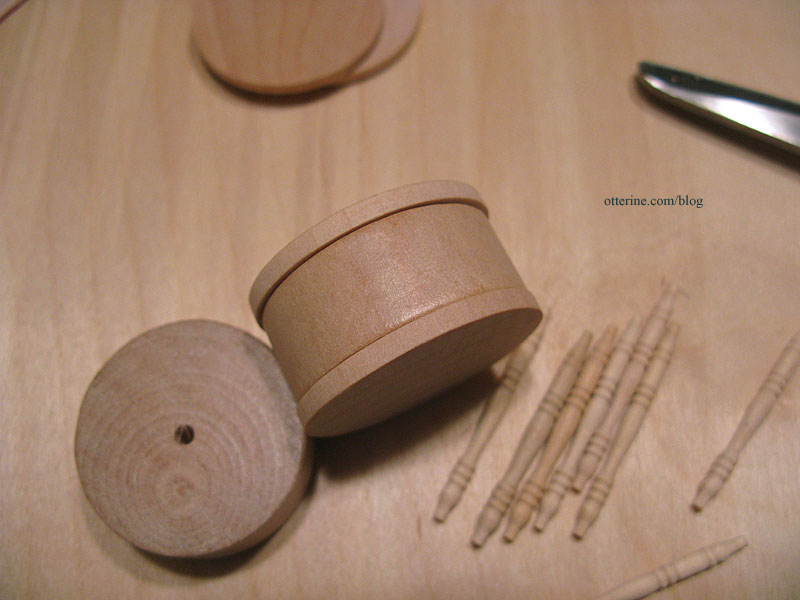
I then added thin veneer strips to delineate a front drawer.
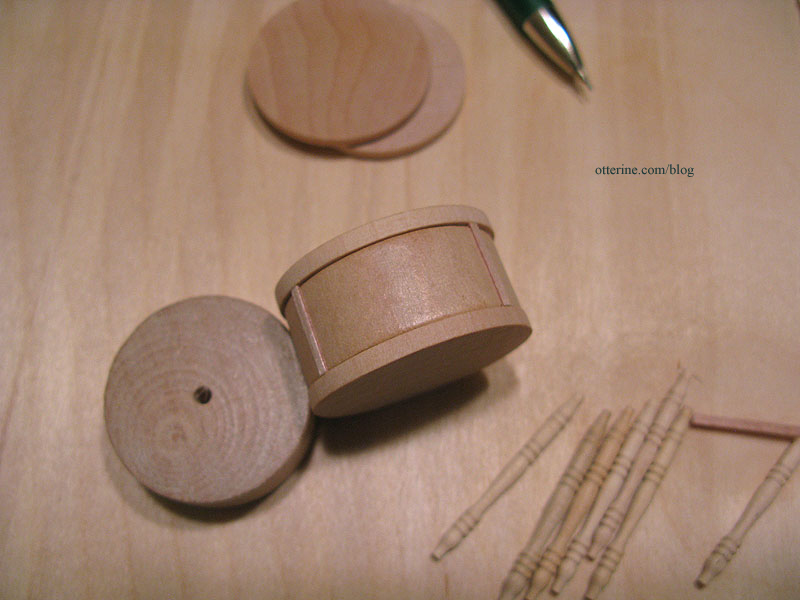
I drilled pilot holes for the four legs.
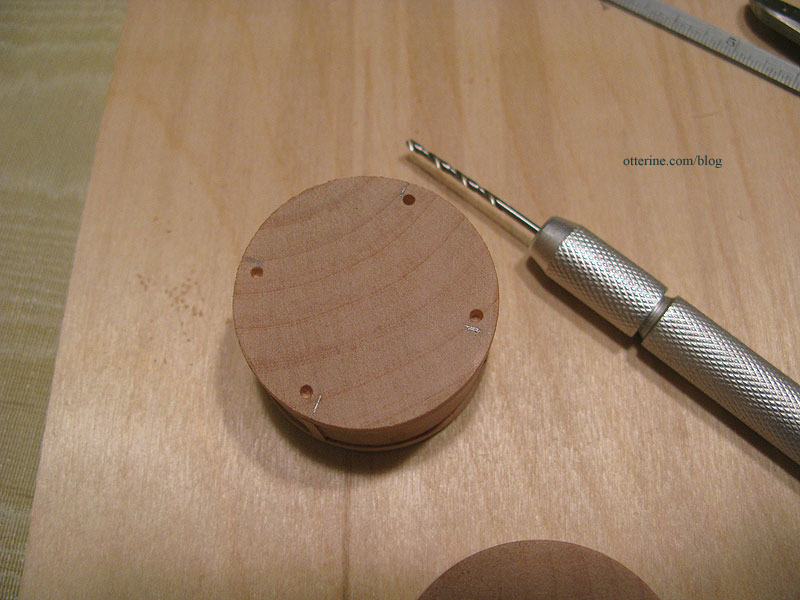
For now, I’ve just pushed the legs into place. I need a clear head and a steady hand to get these glued in straight and even since I like the tables without cross supports.
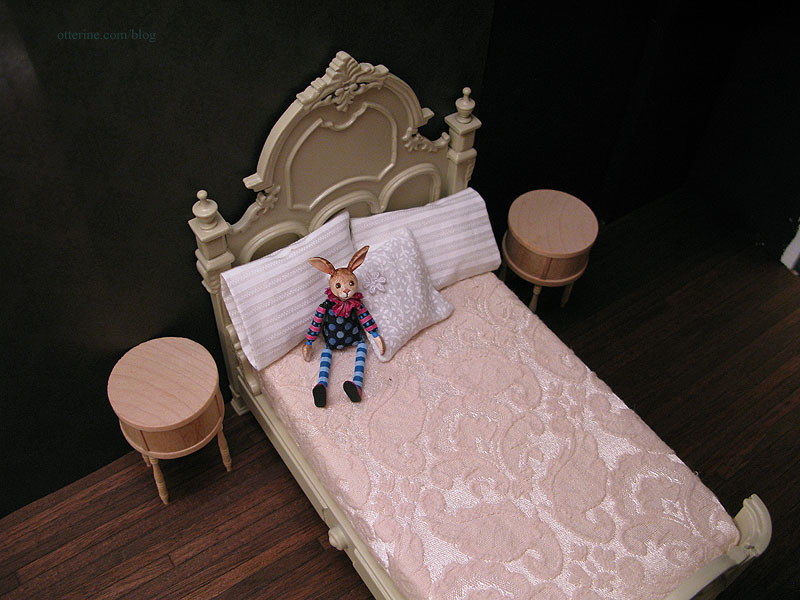
The pillows were made by me, and Mr. Rabbit is by K. Kuti. I still haven’t replaced the stock bedding that came with the Bespaq bed I’m in the process of refinishing.
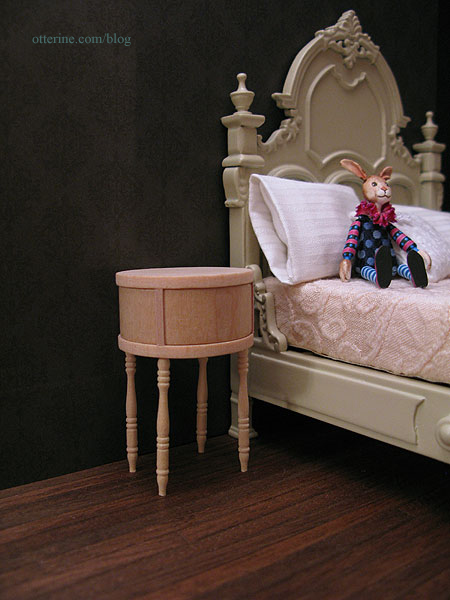
With some fancy painting and antique knobs, the nightstands will fit right in! :D They don’t take up much room but have a nice style.
The nightstands received a light spackling to remove some of the imperfections in the wood pieces as well as the rough grain that was showing through the paint. They will need at least one more coat of paint.
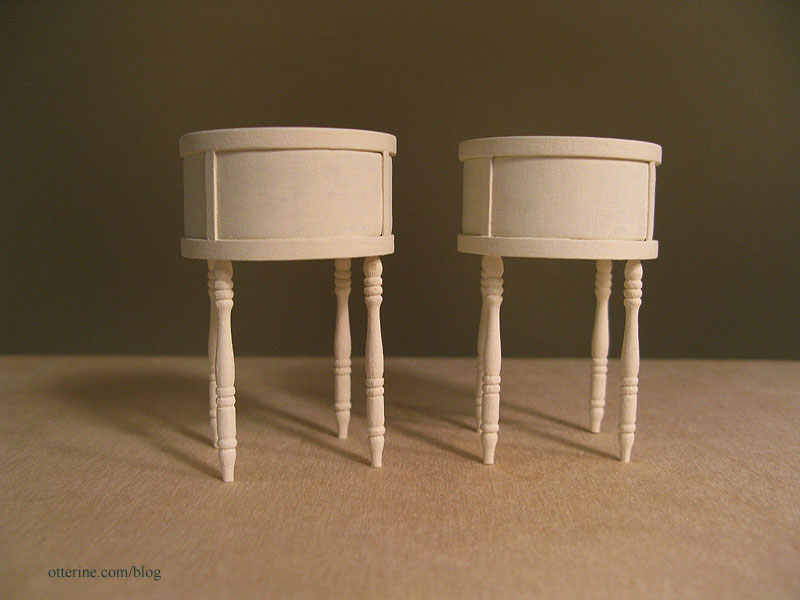
Even though the base coat is lighter than that of the bed, I think the pieces will coordinate well in room. As I mentioned before, I don’t want everything to match but be a collection of well-loved items.
I might give hand painting designs a try for these pieces. They seem to call out for fancying up beyond just pretty hardware, don’t they? I will practice on scraps first, though. I don’t want to have to start all over!
Categories: Furniture, The Haunted Heritage
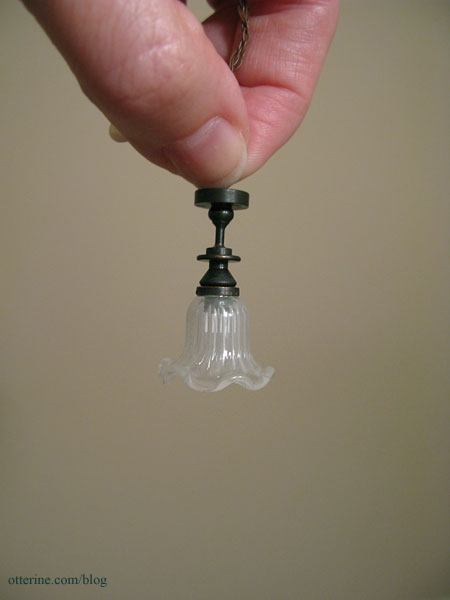
May 22, 2012 | 0 commentsBugs in the light fixtures
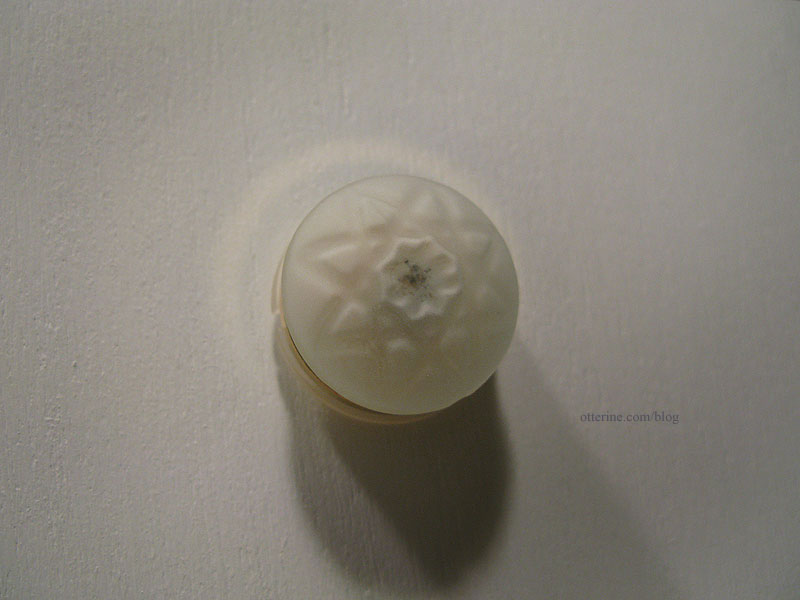
I tried out the new lights I recently ordered from miniatures.com. I made the rest of the wire channels in the bathroom ceiling board and touched up the white paint on the underside. I opted for the clear glass ceiling fixture in the bathroom since the wall sconces have clear glass hurricane shades.
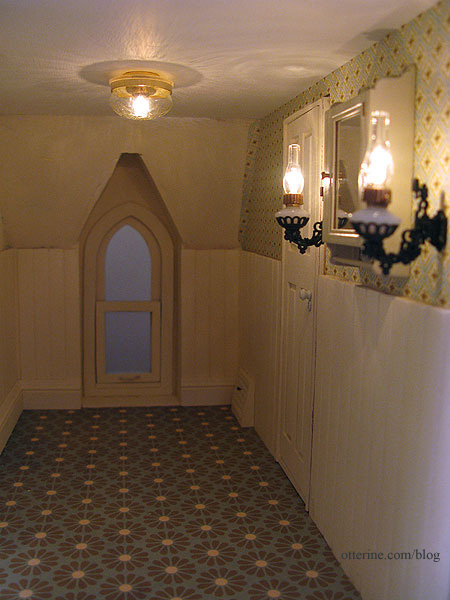
I’m not usually a fan of brass lights, but this works in the Heritage. It’s not an overwhelming amount of brass, and these types of fixtures are about the shallowest you can find on the market, which was important since the ceiling height is low here in the bathroom and in the hallway.
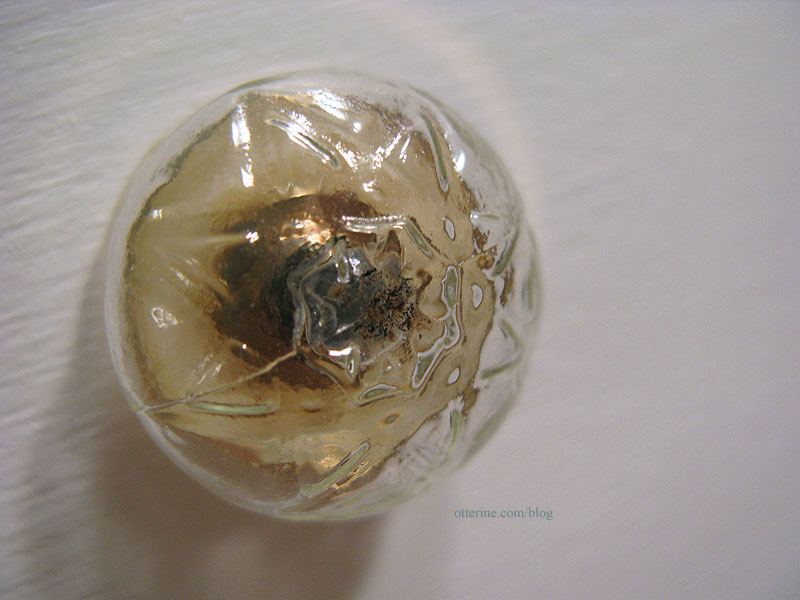
You know me; I am all about the realism. So, I added some 1:12 scale insects inside the globe. :D Lyssa egged me on when I joked about it to her, so she is to blame! It’s just a little dry-brushed brown and black paint, but it’s rather convincing in person. ;]
In the upper hallway, I’ve installed the same fixture only this time with a frosted globe. There will be another fixture toward the front for the foyer, but I needed some light here at the top of the stairs. Neither ceiling board is glued in place yet, so there are gaps showing.
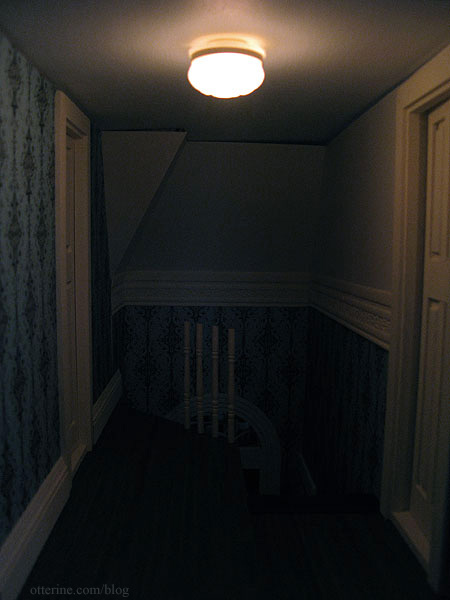
More bugs! :D
Categories: The Haunted Heritage
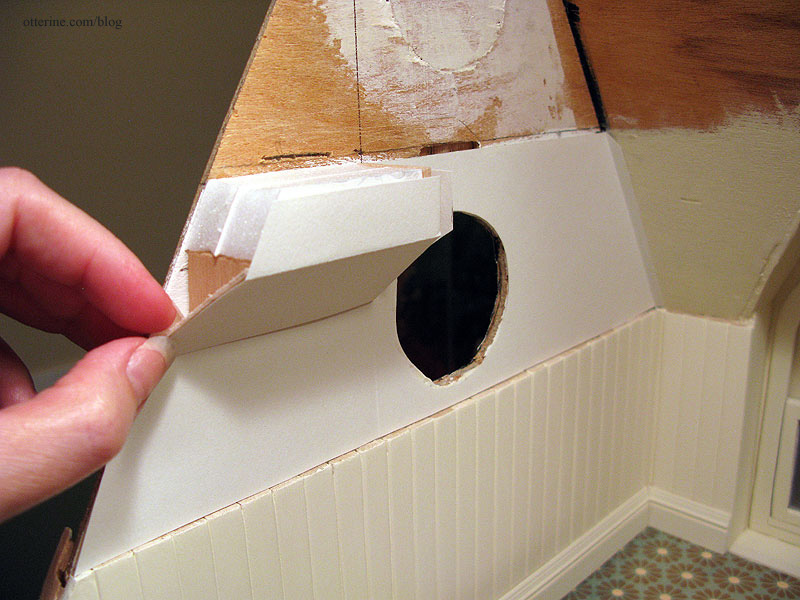
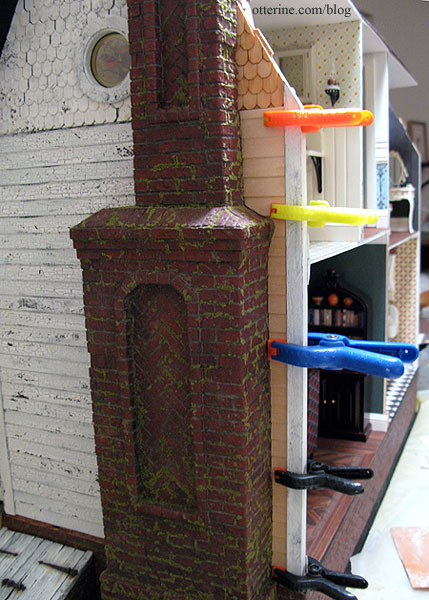
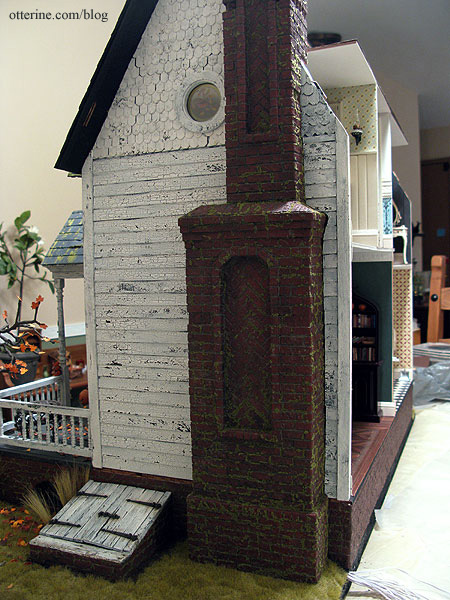
May 5, 2012 | 0 commentsHaunted Heritage chimney, part 9
Continuing work on the chimney. Time to work on the interior chimney sections. Only a small portion of the chimney continues through the bathroom with most of the inner portion in the attic. I formed the inside chimney from a double layer of 1/2″ thick foam core board and cut it to align with the outer chimney. The break between the top triangular piece and the bottom rectangular piece is where the ceiling board will sit. I’ll figure out the angled bricks in the attic section later.
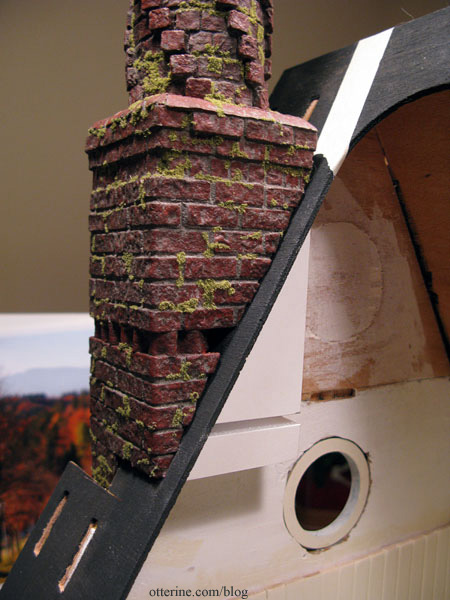
In the bathroom, I’m assuming the exposed brick would be covered, so I’ll cut wallpaper to cover it. In the attic, it will be exposed brick made to match the exterior but without the moss. Since the egg carton brick will add thickness to the attic portion, I added a layer of wood on the side of the bathroom piece to help make up the difference. The tapered bottom is built from scrap wood. This structure will also support the bathroom ceiling board.

It’s just enough to satisfy the realist in me that the chimney isn’t just tacked onto the outside, but it doesn’t obscure the window by being too large. In fact, to me, it looks like a perfectly imperfect vintage architectural detail. :D
Categories: The Haunted Heritage
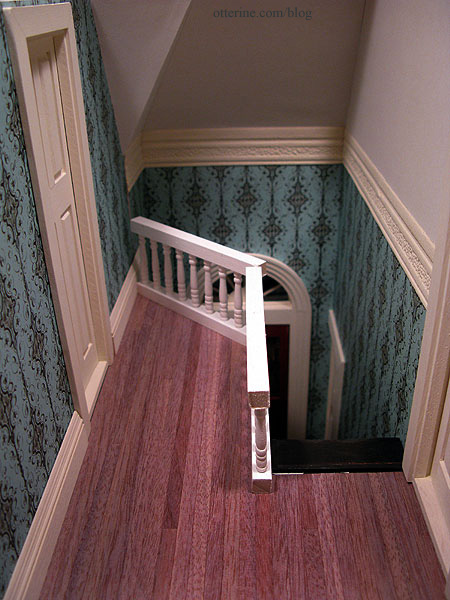
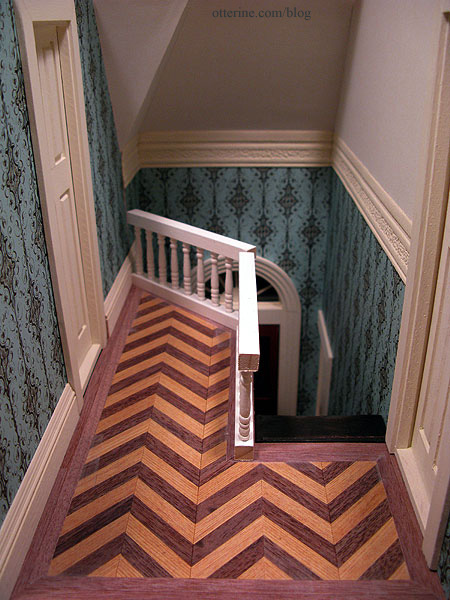
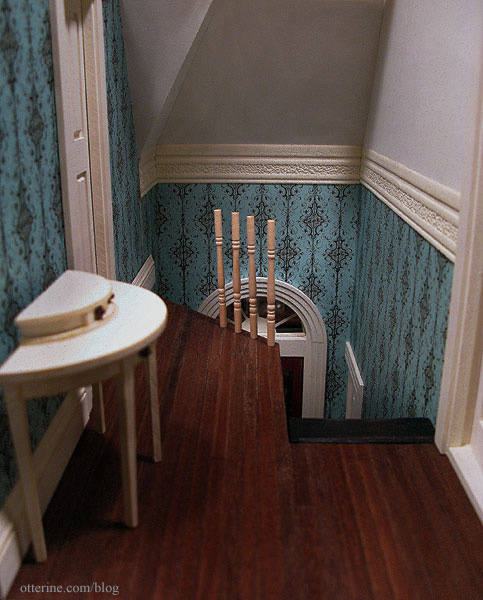
April 23, 2012 | 0 commentsHeritage – hallway flooring
Here are three flooring options up for consideration in the hallway. These are color copies and much lighter than the final flooring will be. It will be the same darker coloration as the fancy parlor floor. These are also quick mockups without consideration for the precise placement of the patterns and angles.
First, just plain wood flooring. Perfectly acceptable, and I know upstairs rooms weren’t as fancy as downstairs rooms where guests would be entertained. (April later pointed out that with only one bathroom in the house, guests would likely see this space.)
Second, herringbone in the middle with only the plain wood border. The railings I end up with will not have the bottom bar which obscures the plain wood edge in this photo. This is such a small space, I wonder if the herringbone overpowers the rest of the detailing.
Lastly, herringbone in the middle with the marquetry border inside the plain outer border. This is more polished than the second option, but it also has the same issue of overpowering the room. I don’t have enough of the marquetry border left from the parlor project, so I’ll have to order some more if I do end up using this last option.
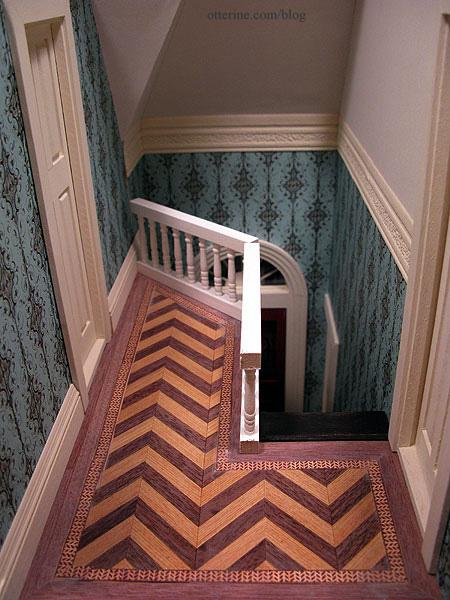
The plain floor was the clear winner for me. One nice thing about choosing the plain wood floor for the hallway is the fact that it was done in no time! I had just enough stained flooring with the bristol backing from the parlor floor project that I was able to use the leftovers. This had been previously finished with Minwax English Chestnut and then sanded to bring out the sheen of the wood. The sanding also makes the wood floor look old and well worn.
I installed the bathroom door and the rear piece of baseboard trim, too. I need to assemble the railings for the balcony before I can cut the forward piece.
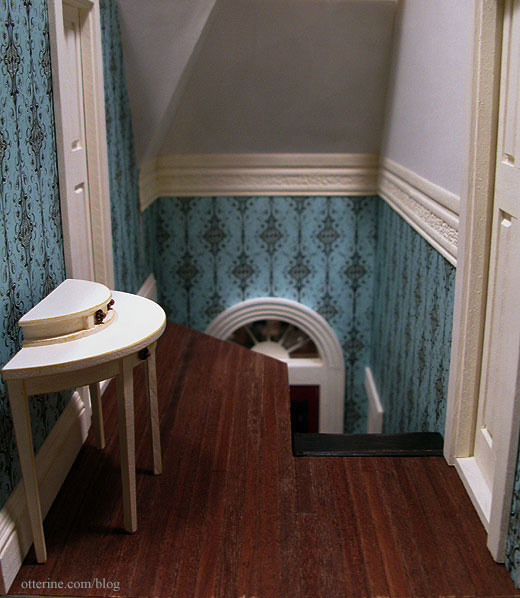
These are the tall spindles I plan to use.
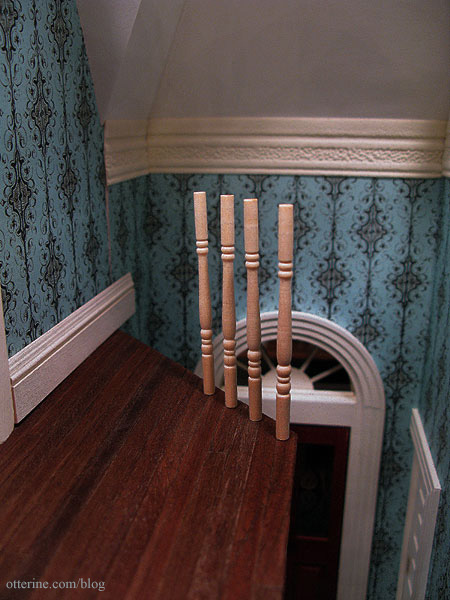
I got these in a miniatures lot. They are currently unfinished, but I am undecided if I will stain the spindles or paint them. I might do painted spindles with a stained railing. Either way, I’ll finish these with the stair spindles and railings all at the same time so it is a seamless finish from downstairs.
Categories: The Haunted Heritage
April 18, 2012 | 0 commentsHeritage – bedroom flooring and lighting plan
I cut the wood flooring for the bedroom. I was able to cut the entire room from one sheet of pre-made walnut flooring, which was a pleasant surprise. I had thought I would have to piece it from two sheets. I like the rich color of the parlor, so I decided to use the same stain, English Chestnut by Minwax.
Before I can actually apply the wallpaper, I need to plan the lighting layout for the room, including three table lamps. I’ll use my usual faux outlet technique.
I have the vanity light on the outside wall.
I decided these Heidi Ott lamps were the best match for the bed and the overall décor. Even though the Heidi Ott lamps are huge, they are the perfect color and the clear glass makes them the right visual weight.
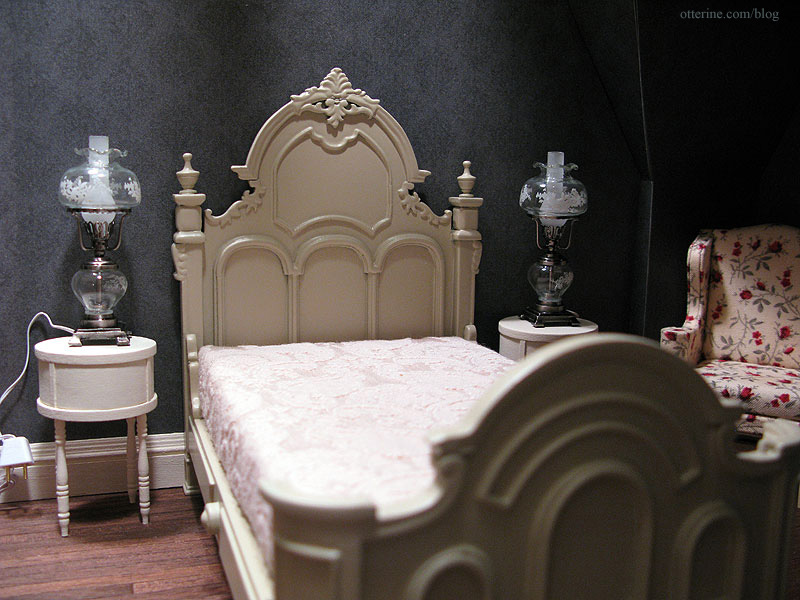
An elegant Ray Storey ceiling light will add a soft glow.
I have the battery operated light for the dresser in the front corner. This is a rather dark photo, but the lamp has a gunmetal finish.
All of these lamps will complement the vintage feminine ambiance of the room. :]
Categories: The Haunted Heritage
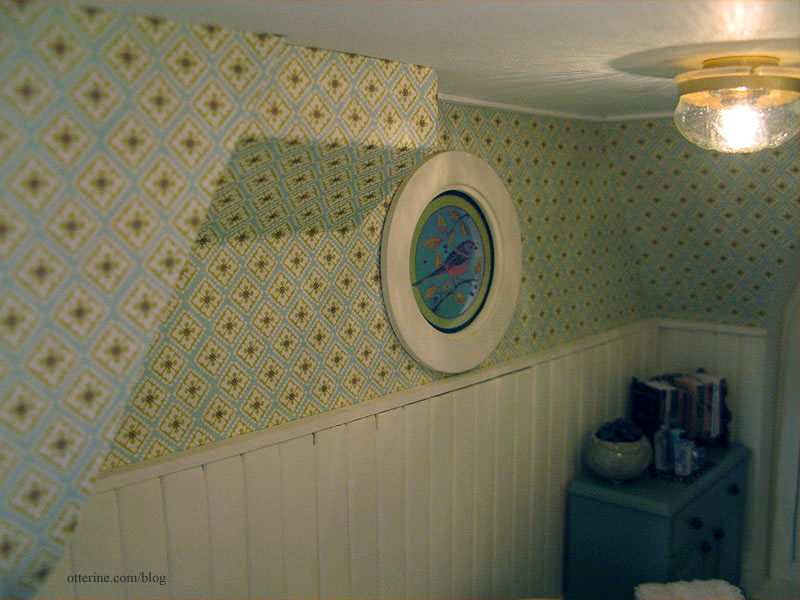
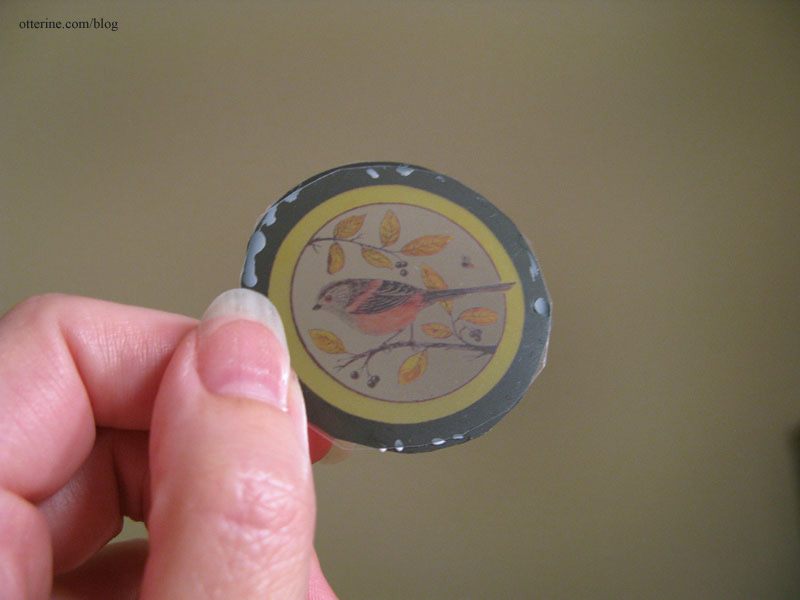
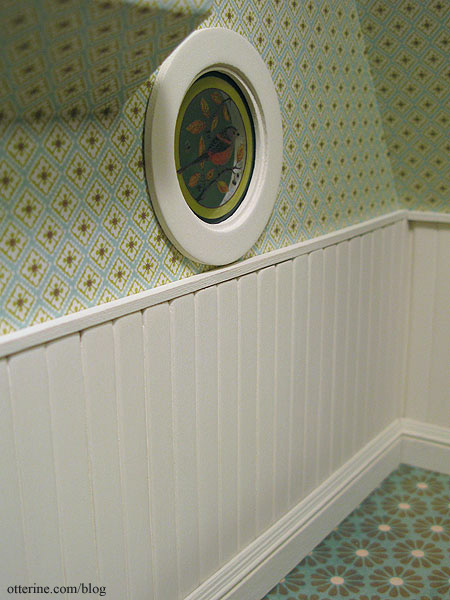
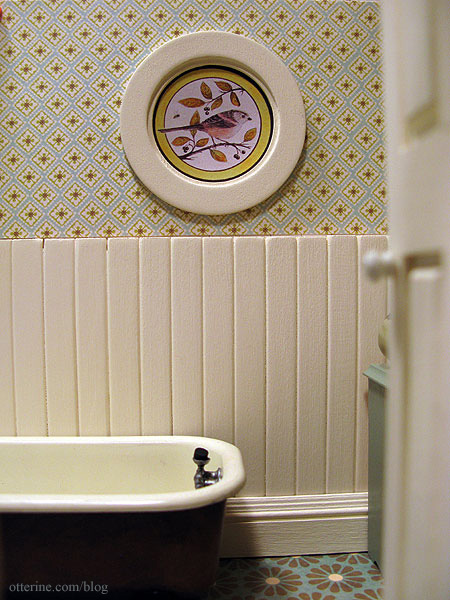
April 17, 2012 | 0 commentsHeritage – round stained glass window
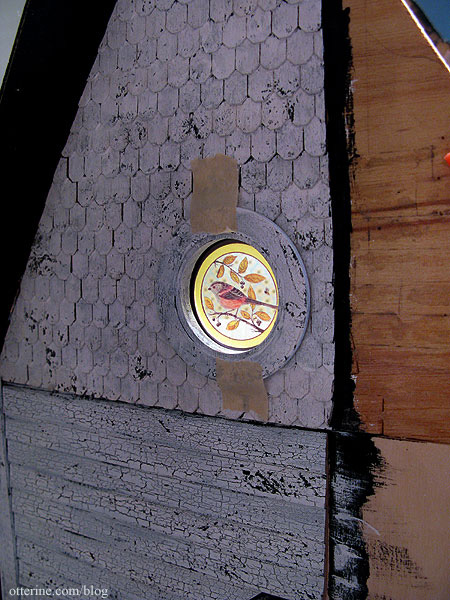
I am turning my focus to the round window. This isn’t a feature of the original Heritage kit but something I added when I eliminated the side bay window and replaced it with the massive chimney. This window sits in the bathroom, and I wanted to find something whimsical for the space.
This is a lovely bird and bee design by Flora at Through the Round Window. Love!
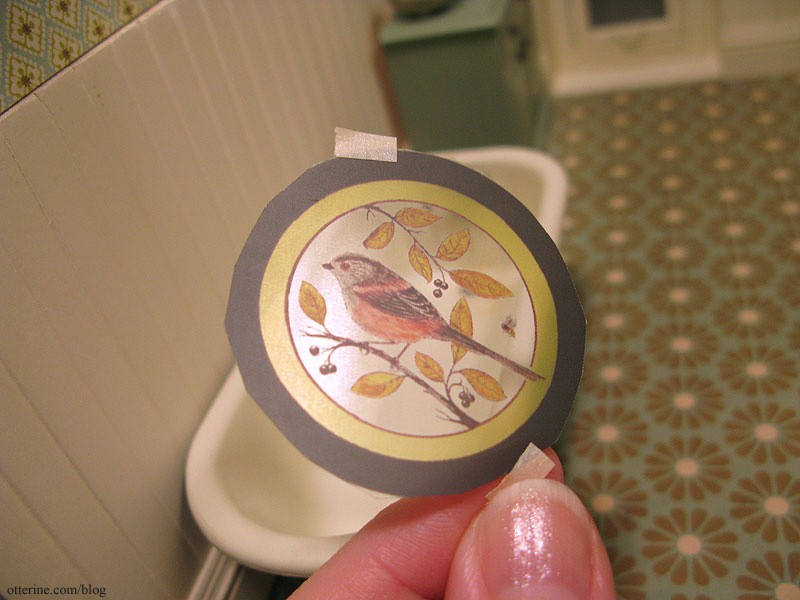
I contacted Flora, and she graciously granted me permission to use the window in the Heritage. Here I’ve printed it on regular paper to test the size. Right now it looks like a painting, but I think it will shine once printed on transparency film.

I edited the image in PhotoShop, turning the bird more grey and removing all stray spots. The white in the bird wouldn’t print on transparency and any spots would be magnified in this small scale. I bumped up the coloration since printing on transparency usually results in some color loss. Beautiful.

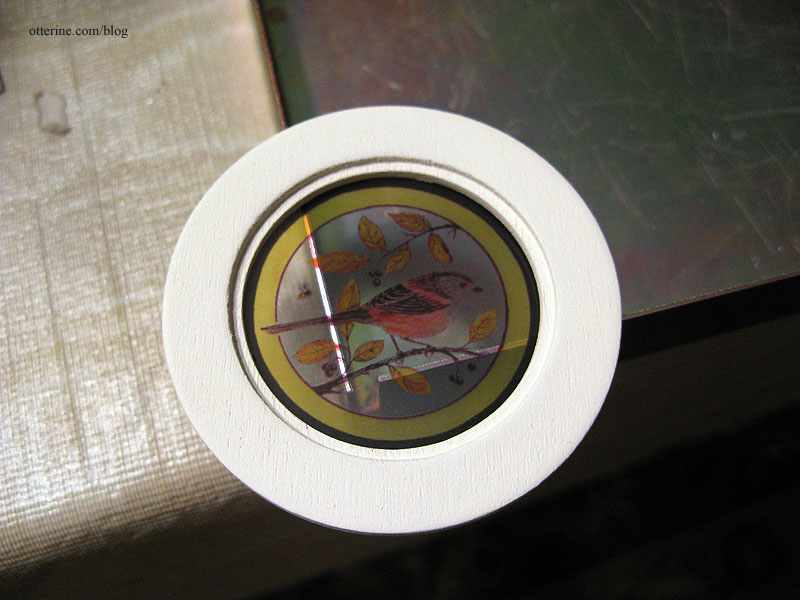
I also flipped the direction of the bird in PhotoShop since the printed side looks dull, and I wanted the bird to be facing the same direction as the original inside the room. I’ll cut a piece of plain acetate to cover the dull side so it will look glossy like glass when viewed from the outside.
I taped it in place and checked the view from the exterior. Fabulous.
Finishing here.
Categories: The Haunted Heritage
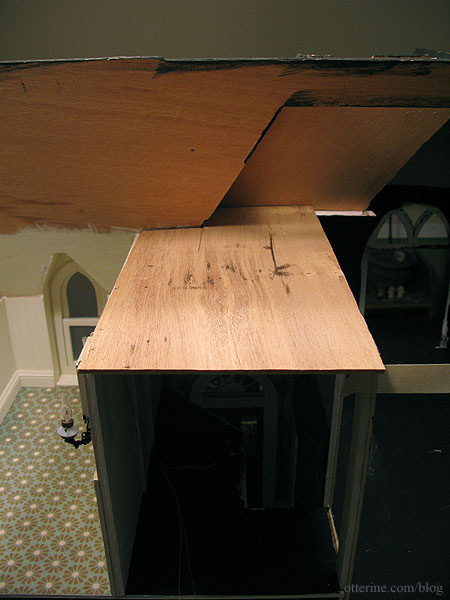
April 16, 2012 | 0 commentsHeritage – bathroom and hallway ceiling boards
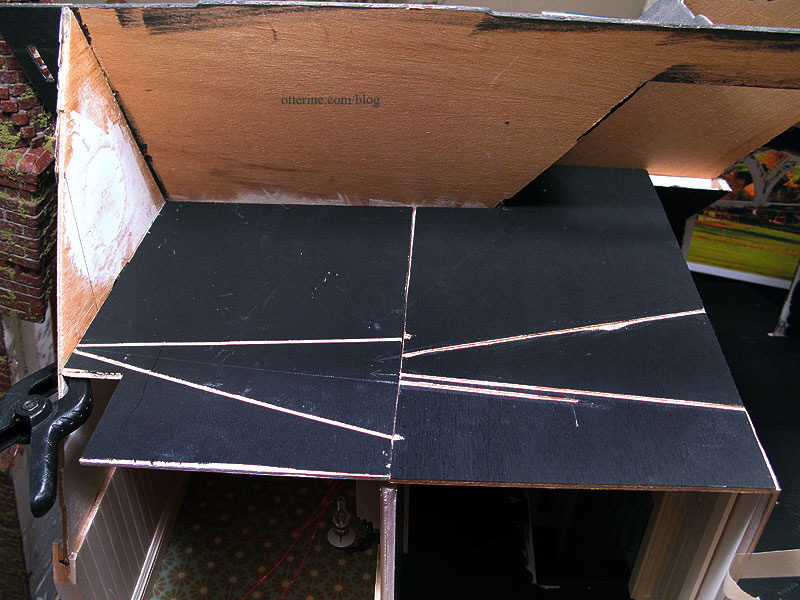
The original kit attic floor is a poor-fitting board to begin with, and it is pieced over the bedroom causing a noticeable seam on the ceiling. Additionally, since I added two walls on the second floor not originally intended as part of the house, I also need an attic floor that covers more area than the original. Trying to cut one board to span the entire house without having any fitting issues didn’t seem like something I wanted to attempt. So, I’ll be cutting each ceiling boards individually, having the seams over each new second floor wall.
The first one to be fitted is the bathroom ceiling board. I used the kit piece originally intended for the parlor ceiling, which I had replaced with new plywood.
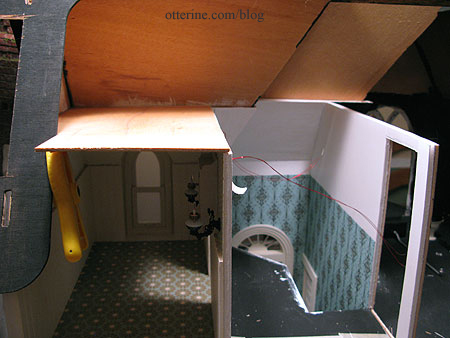
There is a back roof piece, so I notched out the ceiling board to accommodate it. I will add to the roof in back to “hide” the extra bit of interior space I’ve added so it won’t be seen from the exterior side views.
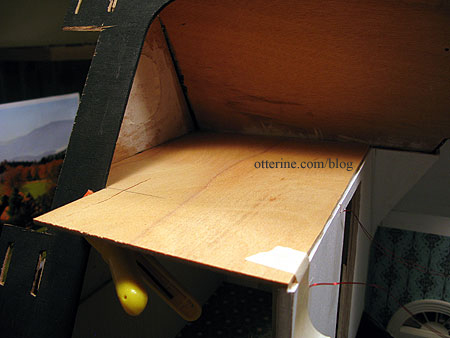
I cut the new ceiling board for the hallway portion of the attic using part of the original kit board.
I painted the ceiling boards white and primed the tops with black acrylic paint. I also started putting in the electrical channels for the lights. It’s easier to do this when the boards are removable and the channels can be cut on a flat surface. Even though I don’t have the bedroom ceiling cut yet, I’ve started making the extending channels for the planned lights over the first two ceiling boards as well.
Categories: The Haunted Heritage
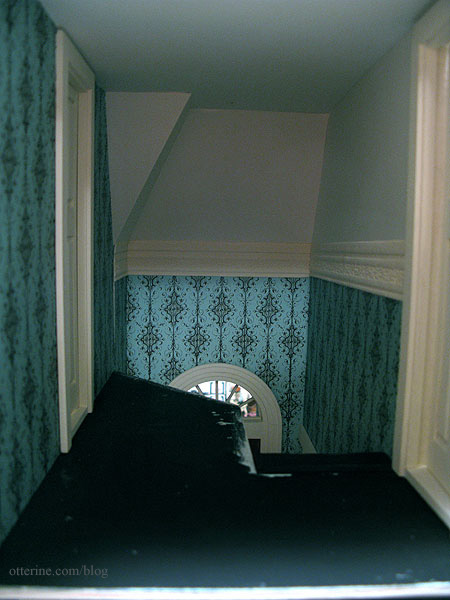
April 15, 2012 | 0 commentsHeritage – hallway wallpaper and trim
Continuing from the foyer wallpaper and trim post. I installed the wallpaper for the hallway, using plain drawing paper for the upper portion of the foyer. I like this material since the sheets are large (no seams on long walls), it has a nice texture and weight, and while it is a light color, it isn’t bright white. I used my usual method of scoring the paper to make tabs around corners. I find this makes for a cleaner finish.
Detail of the shaped pieces.
The wallpaper on the bathroom side wall is Turquoise Gothic Stripe. Once the papers were glued in place, I glued the anaglypta border in the foyer. Interestingly, the white drawing paper reflects the blue of the other paper and brings out the complementary yellow in the Vintage White painted trims.
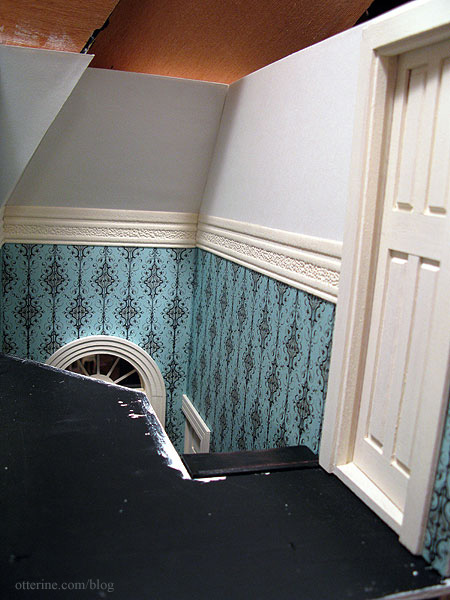
I haven’t glued the ceiling in place, but I propped it up to see the room enclosed. Not bad. :D
Categories: The Haunted Heritage
April 14, 2012 | 0 commentsHeritage – bathroom finishing, part 2
Continuing work on the bathroom. I started installing the baseboard permanently, including adding a board at the base of the dormer window where the flooring ends.
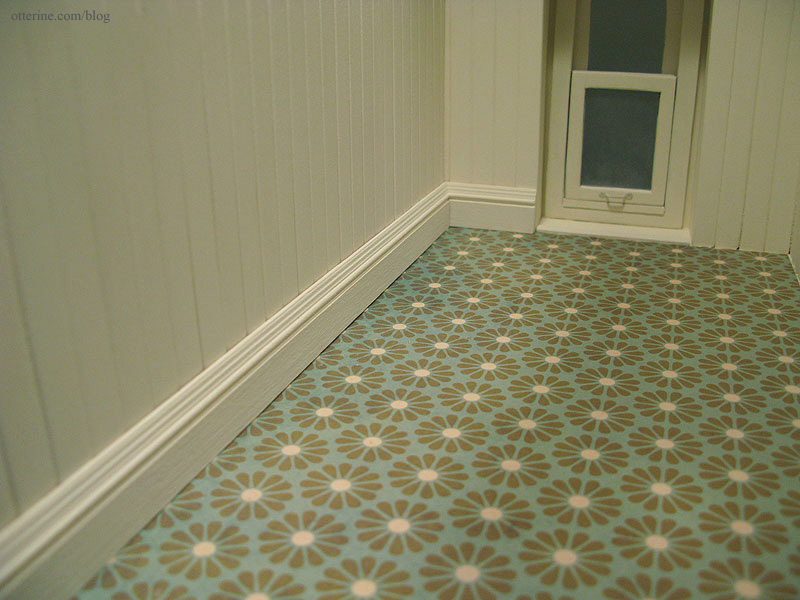
I made a heat register for the bathroom like the one in the kitchen, again using the tutorial by Kris at 1 Inch Minis. With the addition of water pipes for the sink, there wasn’t room for the register on that side of the room. The remaining portion of the inside wall will have either the tall tank toilet or a more updated version in roughly the same place, so I placed the register near the corner there.
The only change I made was to paint the exterior Vintage White by Folk Art to match the trim.
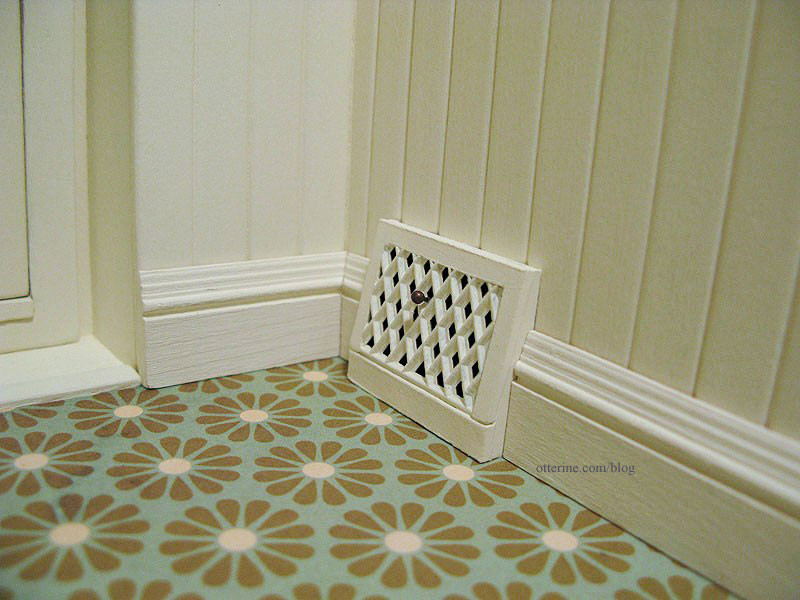
Since everything in this room is light in color save a few contrasting details, I thought a black register would draw too much attention.
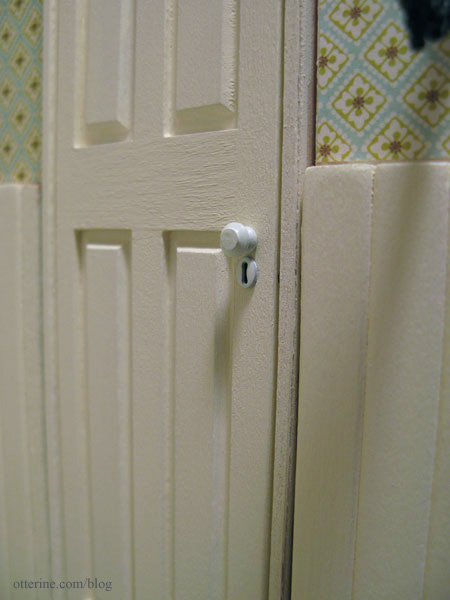
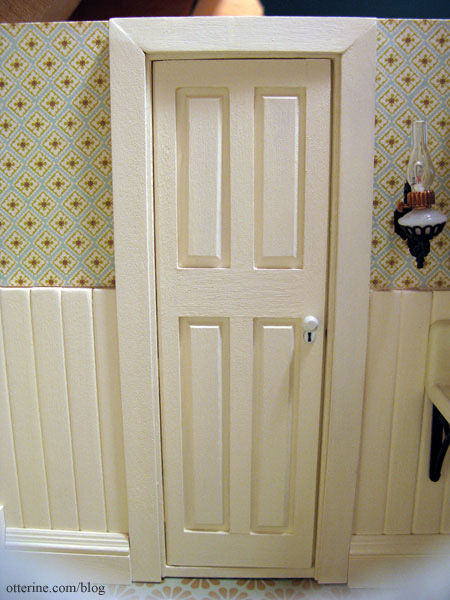
After working on the hallway, I was able to install the door, adding door knobs and keyholes. The keyhole covers are from Bindels Ornaments; they were brass but I spray painted them gloss white.
I installed the interior door trim. Since the beadboard has depth the upper wall doesn’t, the door trim has some added pieces around the top and sides to make up the difference.
I used spackling at the joins at the top and touched up the paint. (There’s a separate post on the Chrysnbon sink finishing.)
This view through the window will be obscured once the room is finished, but I had to get at least one shot of it.
Categories: The Haunted Heritage
April 13, 2012 | 0 comments


NOTE: All content on otterine.com is copyrighted and may not be reproduced in part or in whole. It takes a lot of time and effort to write and photograph for my blog. Please ask permission before reproducing any of my content. (More on copyright)

Categories:
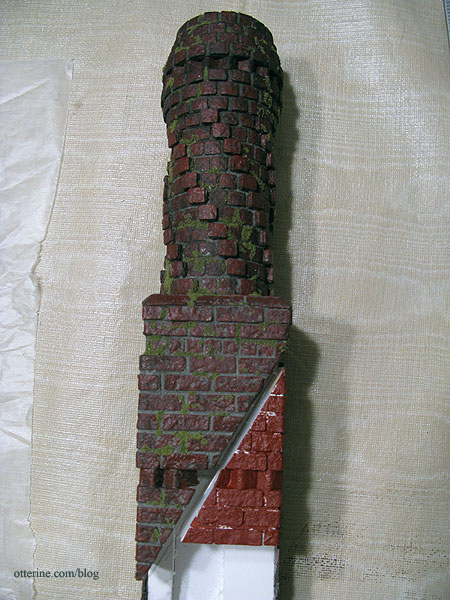
Heritage – chimney side gable trim
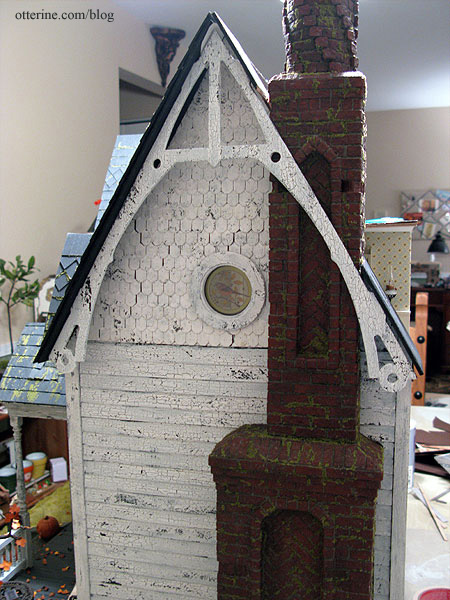
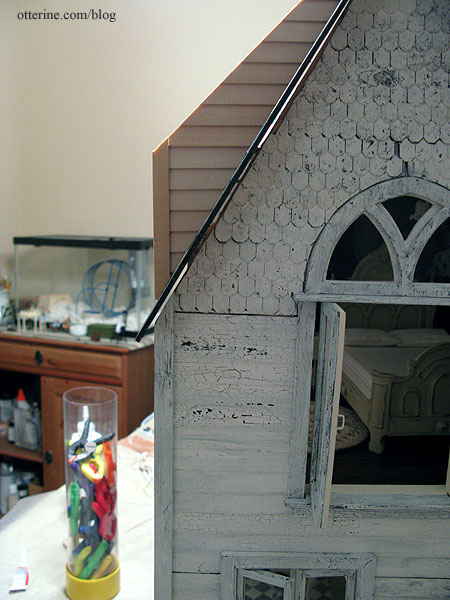
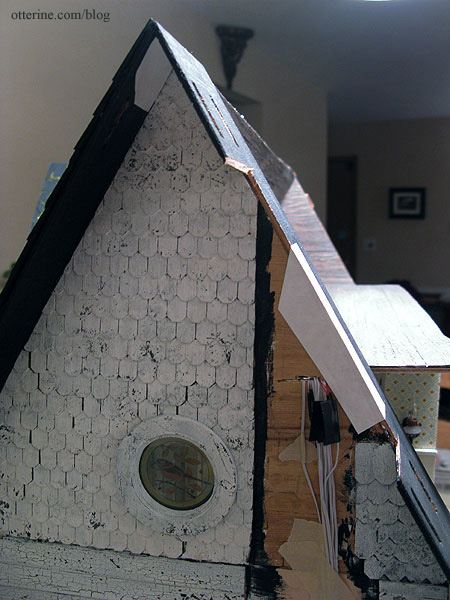
Unlike the front and left side gables, the chimney gable on the right posed problems with the gable trim. The chimney sticks out further than the roof edge and therefore blocks the space where the gable trim is intended to be.
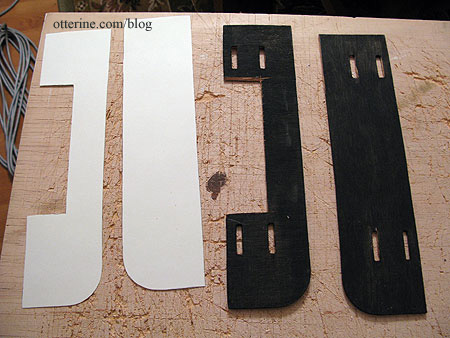
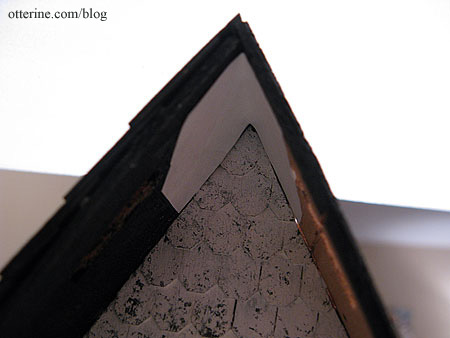
The gable trim’s tabs should align with the slots on the roof.
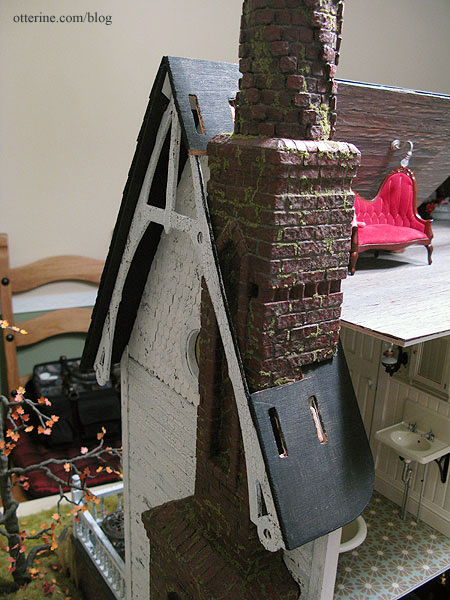
Whenever I have a situation like this, I try to find at least one real life example of a solution. In this case, I found one from Eastern Kentucky University. This shows the gingerbread trim added on either side of the chimney. Works for me! And, yes, had I thought this through earlier, I might have made adjustments to the roof boards, the chimney or both.
I lined up the whole gable trim piece with the chimney in place (but still removable). I marked the break on the main part first and made a few cuts to get a good fit. I had to adjust the tabs on the gable trim to fit better. Once I had that portion figured out, I measured and cut the smaller piece on the other side. Success!
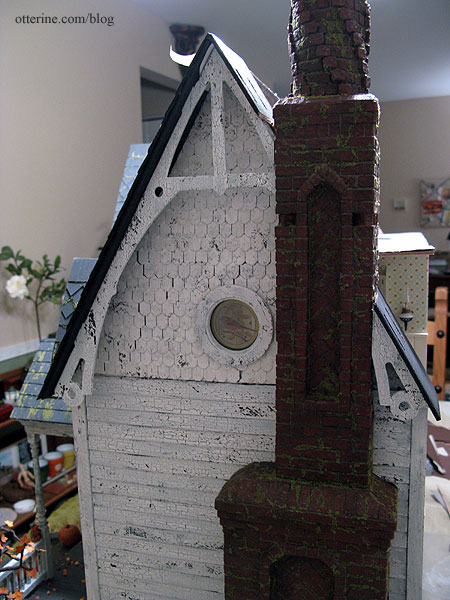
Completed chimney gable here.
Categories: The Haunted Heritage
January 12, 2013 | 0 commentsHeritage – back roof dormer, part 2
Continuing work on the back roof dormer. There’s a good deal of chicken or the egg happening with the attic and its new roof addition. Before I can glue the back roof pieces on, I need to finish them as much as possible. It is close to impossible to work on these areas once in place, because you effectively have to work backwards and without a clear view.
Since I will be cutting a new U-shaped back roof piece, I cut the original side roof pieces flush with the roof addition side walls.

I made a template of these pieces to help me with the interior attic boards and exterior roof shingles.
The roof addition side walls needed siding on the outside, which is easiest to apply when you can press the pieces flat to dry. I used scraps of the 1/2″ lap Houseworks siding I had used for the replacement side wall. To finish off the edges to match the rest of the house, I used 3/8″ corner molding for the back edges. I thought regular siding made more sense than matching the shingled gable since this is an architectural feature in the back of the house and not a decorative feature seen from the front.
I glued on the back roof piece for the left side and reinforced the joins with Tyvek where I could.
I did the same thing at the inside peak of the gable. Had I not finished the front roof previously, I would have added the Tyvek over the roof ridge instead.
Categories: The Haunted Heritage
January 11, 2013 | 0 commentsReplacement side wall siding completion
Remember how carefully I planned the siding around the chimney?
Yeah, well, it was somewhat a waste of time because it no longer lines up. I’ll need to edge the chimney with trim, which won’t detract from the realism.
But, before I can glue the chimney in place, I do need to finish up the rest of the siding for the wall and the gable. Since it would be a better fit if the gable shingles were under the chimney and the wall siding outside the chimney, that was the way I proceeded.
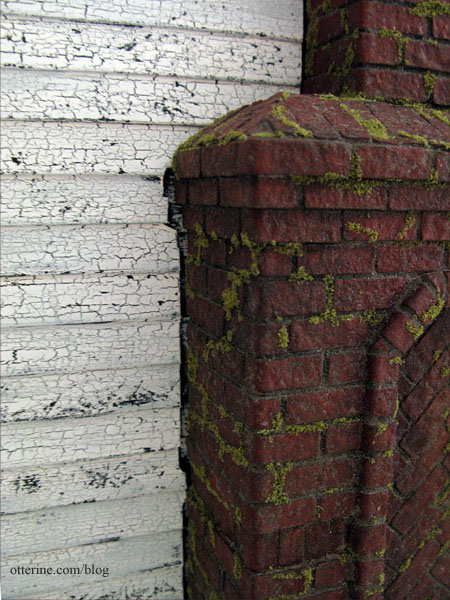
I painted and aged the siding and gable shingles to match the rest of the house.
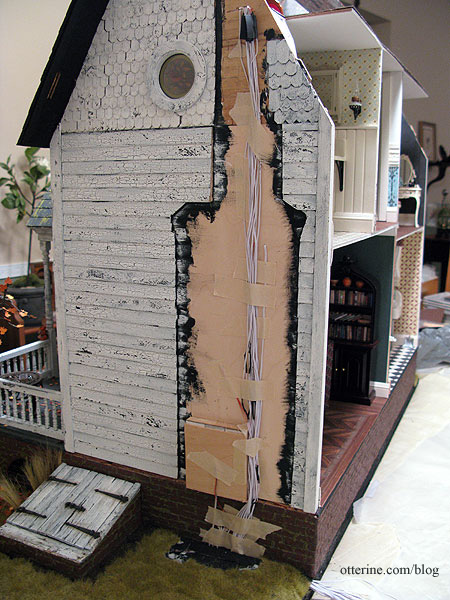
I replaced the sliver of builders foam to cover the mass of wires at the base. I didn’t glue it…just pressed it into the groove.
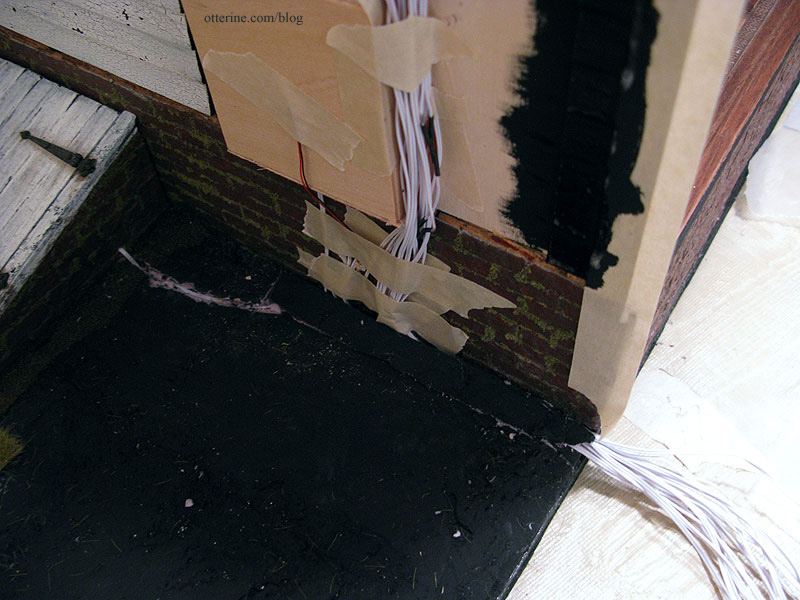
I painted the wire from the flickering LED in the fireplace and finished up the landscaping on this back corner. Well, there’s more to be added here and there, but the grass is in place.
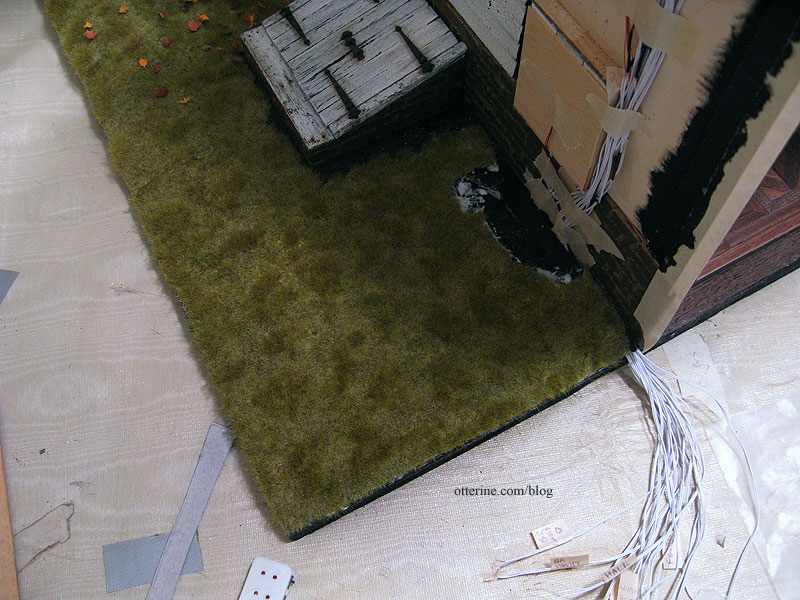
The chimney will cover the bare spot. :]
Categories: The Haunted Heritage
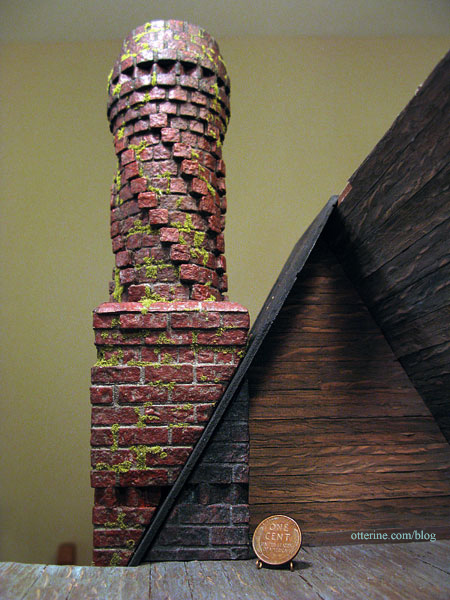
January 9, 2013 | 0 commentsHaunted Heritage chimney, part 10
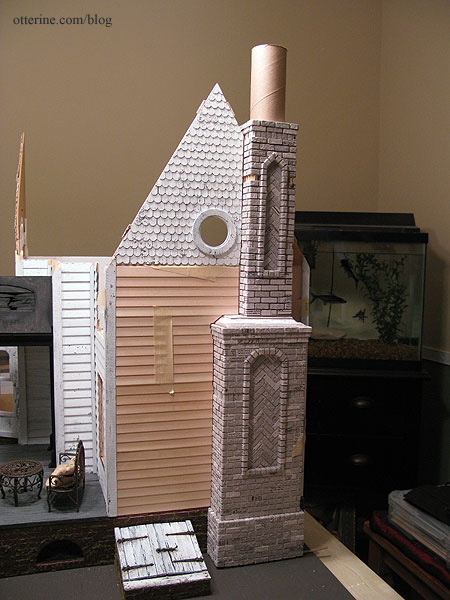
Continuing work on the chimney. I’ve bricked the interior chimney section. I will add trim around the bottom to disguise the fact that it will sit on top of the attic flooring.

It won’t really be seen side by side with the main chimney, but I did match up the rows of bricks. :D Here it is with its initial coat of Liquitex Burnt Sienna.
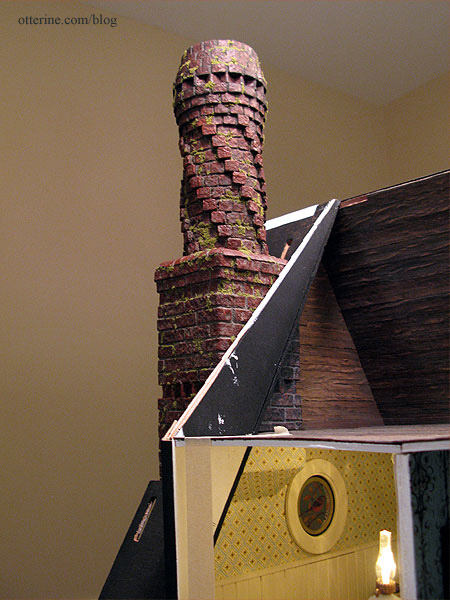
After grouting and aging the interior chimney piece, I installed the attic wall board and the chimney piece. The main chimney is still removable. Once the dormer wall is in place you won’t be able to see how well it all lines up, but I have this photo to prove it. :D
The below photo shows the exterior main chimney, the attic chimney and the covered chimney section in the bathroom. When viewed together, they create the illusion that the chimney is a solid structure with the house built around it.
Categories: The Haunted Heritage
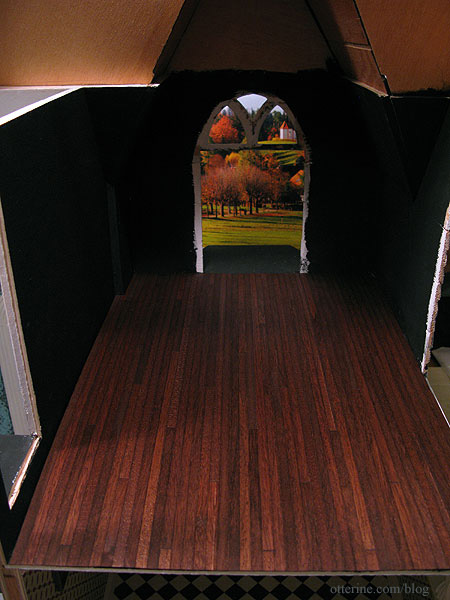
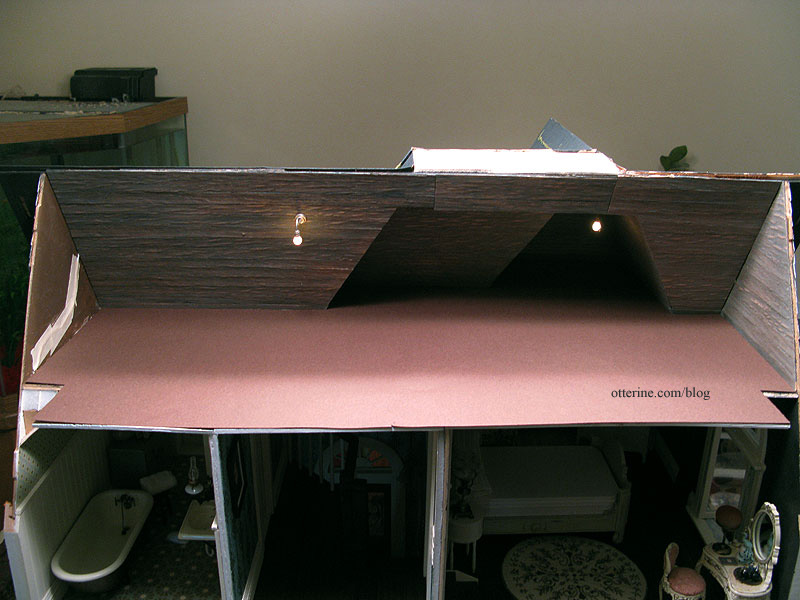
January 8, 2013 | 0 commentsGrandma’s attic – wood floor
Before the rafters and support beams could be put in place, the floor needed to be finished. Since I had so many wood strips on hand, I decided to use them for the flooring in addition to the walls. I made a template of the attic with plain paper first and adjusted the fit accordingly.
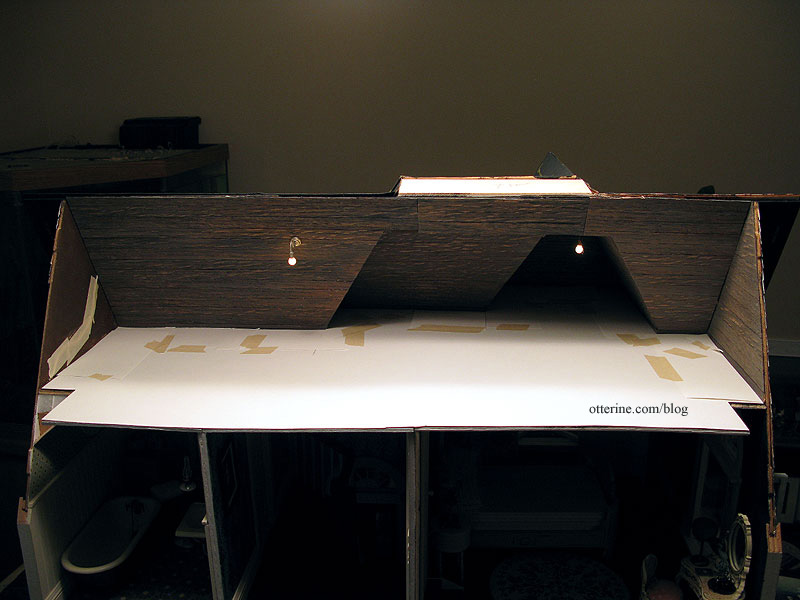
I then used that to make my final brown paper template.
I set a bunch of strips on the template to give me an idea of where the pieces would fall front to back so I could plan any less-than-full-width boards.
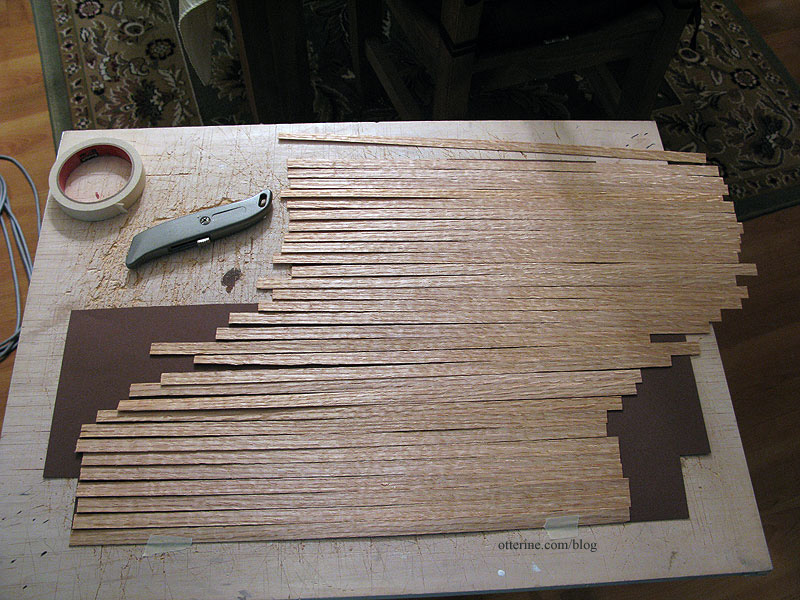
I glued the wood on in random lengths, one at a time. This took quite a bit of time. I painted it before gluing it in place, following the same process as the walls though I did sand once in between two coats of the initial brown base. I figured the floor would be smoother than the walls. I don’t think I’ll be foregoing pre-made flooring sheets for good, but it is a lovely look in the right circumstances. :D This would make a fine country floor.
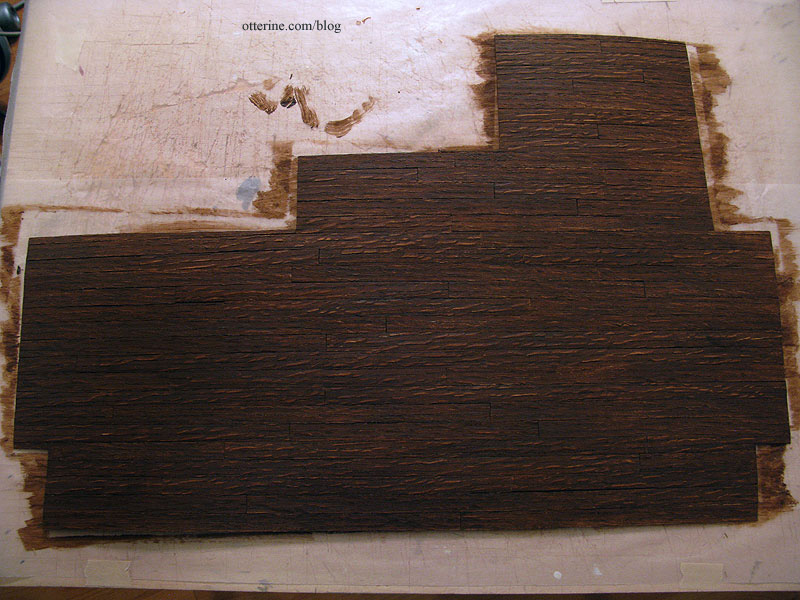
I “dusted” the corners and edges a little more with a heavier application of Slate Grey mixed with Staining Antiquing Medium. I also finished up the remaining wiring and tested all the lighting beforehand. This is by no means a guarantee that things won’t go awry in the future, but I at least know the connections were sound up to this point.
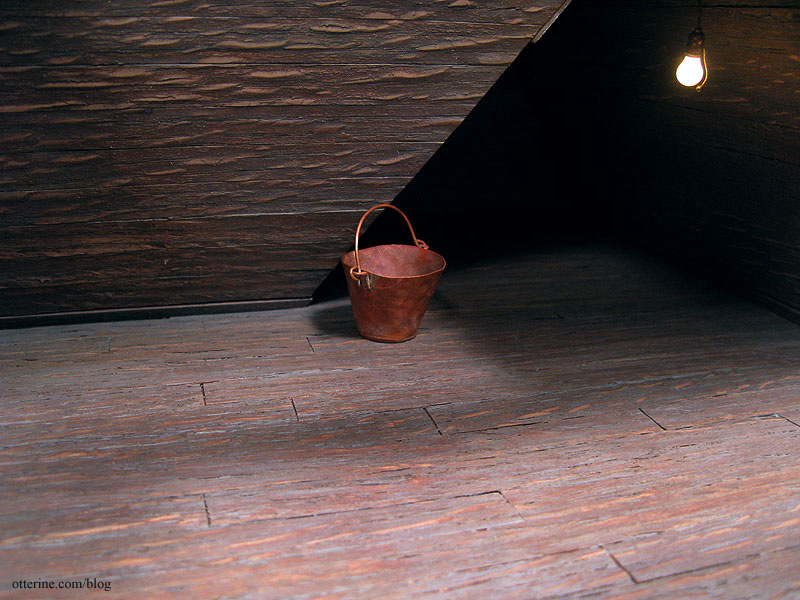
I tested the fit a final time and took a couple of photos to make sure the finishes looked good together. The floor appears dustier than the walls, which is the look I was aiming for. The copper bucket is from Celtic Juju.
I had been gluing in the templates with Aleene’s Quick Dry, but this time I used Yes paste since it would give me more time to apply the adhesive to the large surface. I taped the edges down and now it just needs to set. I will have to finish the back portions of the roof before I can install the beams and rafters, but I think it’s coming along well. (Note: I no longer recommend Yes paste – I use Wallpaper Mucilage instead. Yes paste has problems with longevity.)

The box of Christmas items was made by M Carmen; the snowman bead was purchased.
Categories: The Haunted Heritage
January 6, 2013 | 0 comments
NOTE: All content on otterine.com is copyrighted and may not be reproduced in part or in whole. It takes a lot of time and effort to write and photograph for my blog. Please ask permission before reproducing any of my content. (More on copyright)