

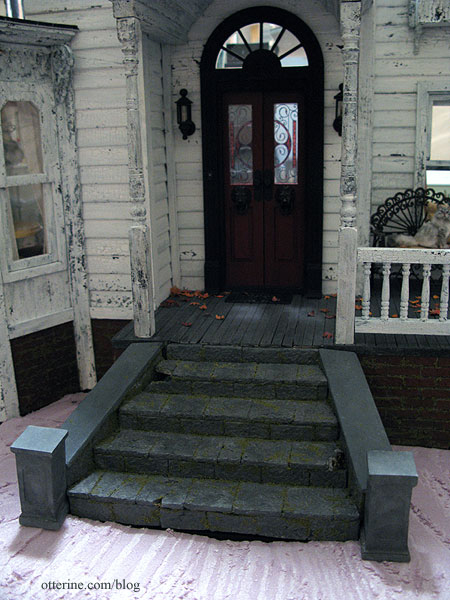
Martha Stewart mini mice!
Last year, I bought a package of these clever mouse silhouettes for my condo. They are great fun to tape up around the house for Halloween. (No, this isn’t my condo.)

image by Martha Stewart This past week, I discovered that there was a similar Martha Stewart edge punch with some of the same mice!
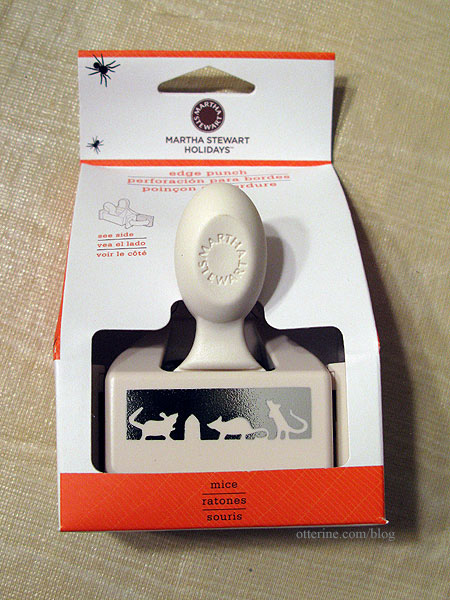
This packaging has such realistic spiders on it that it must immediately go into the recycling bin. If I half glance over and see those spiders, I will certainly jump. :O
You get three mice and one mouse hole per punch.
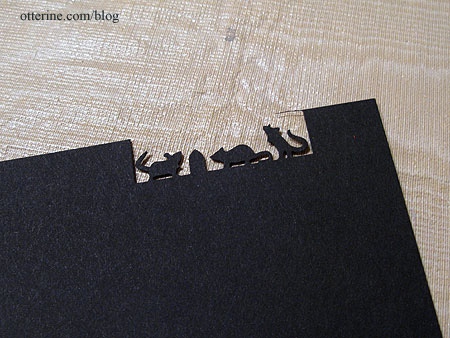
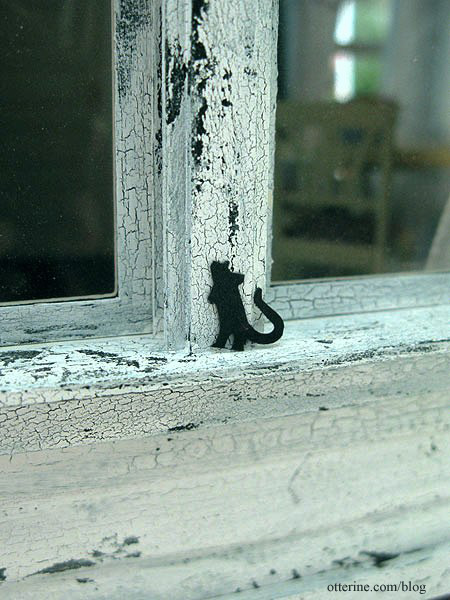
Now, I can decorate the Heritage, too! Eeeeeeeeeeeeeeeeek!
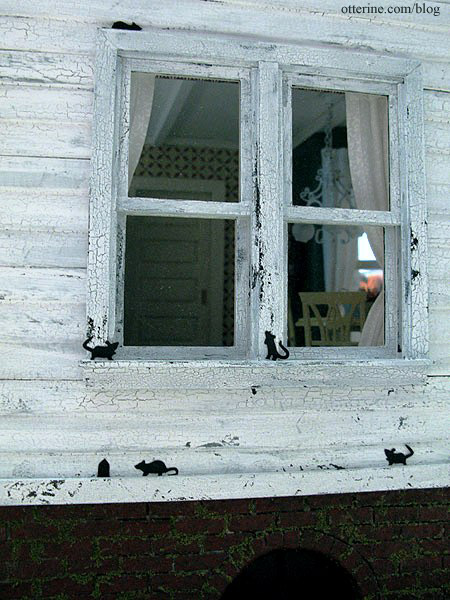
Ah, it’s the little things in life, isn’t it? :D
Categories: The Haunted Heritage
October 2, 2012 | 0 commentsHeritage – roof shingling, part 2
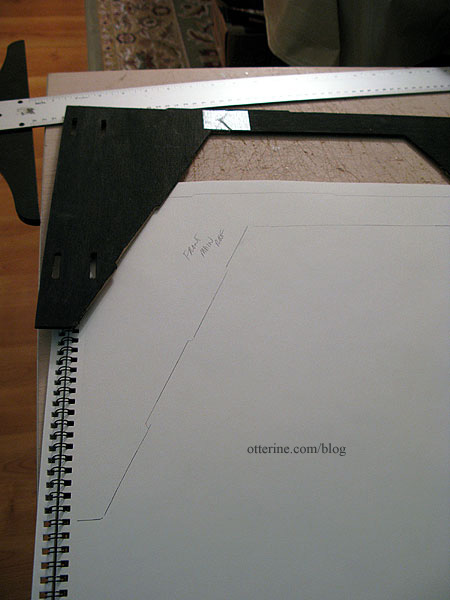
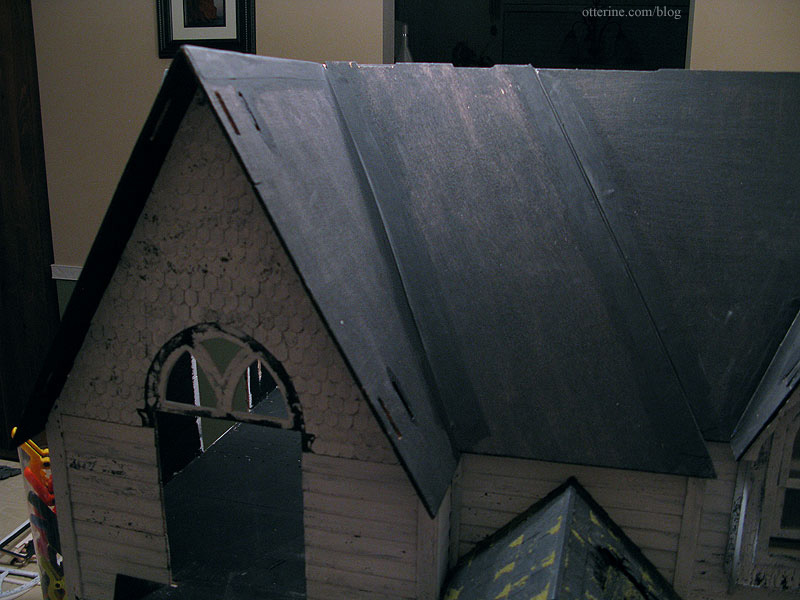
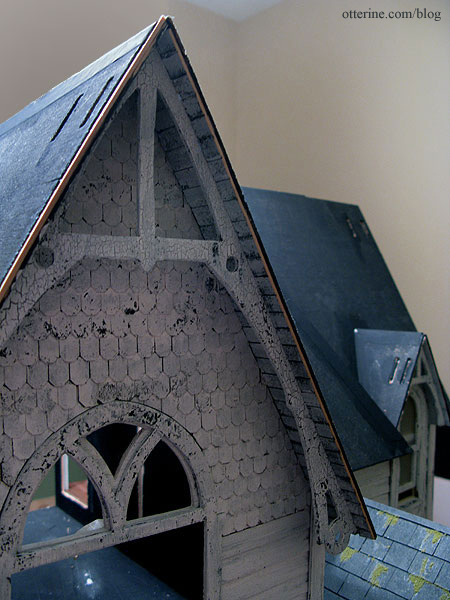
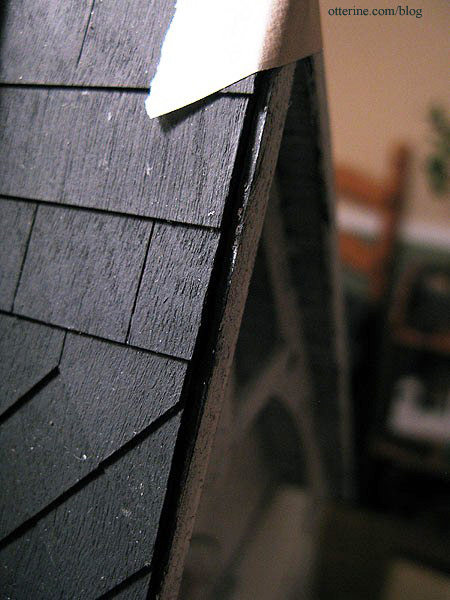
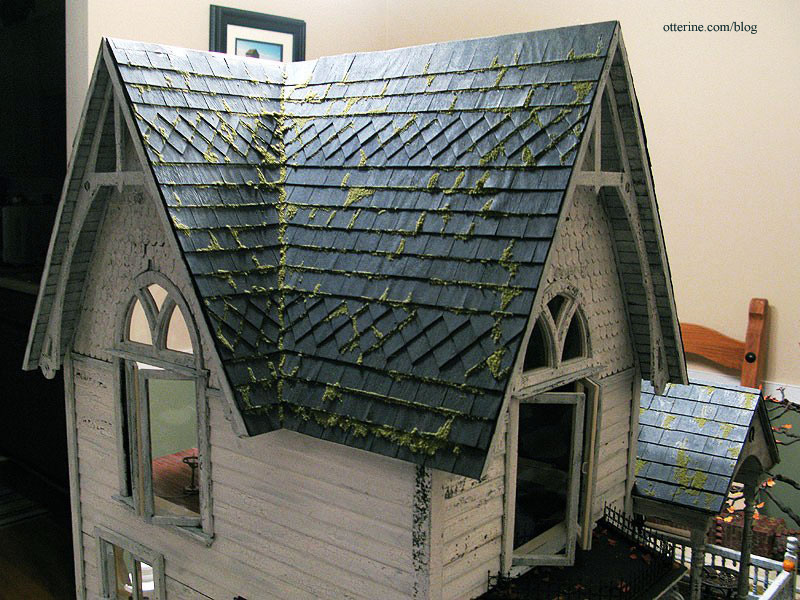
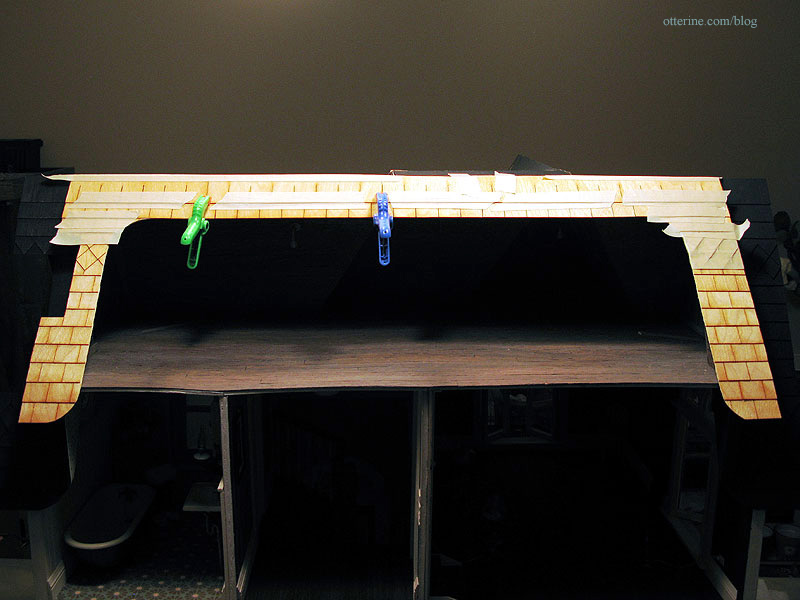
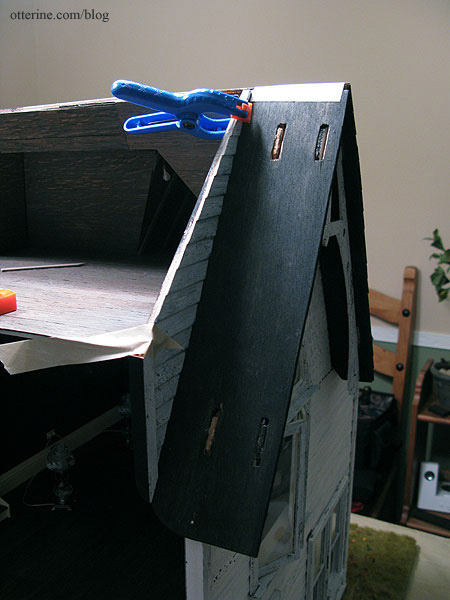
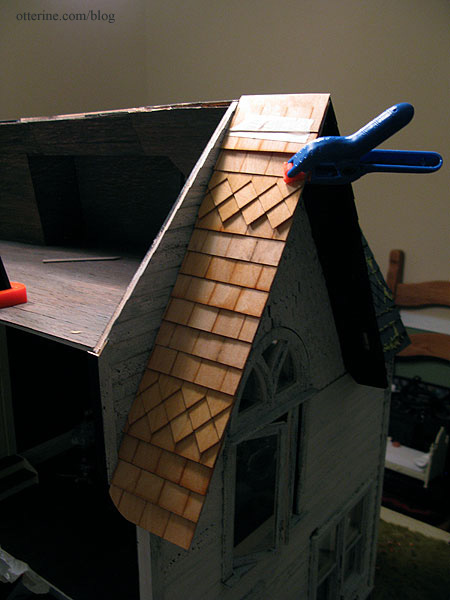
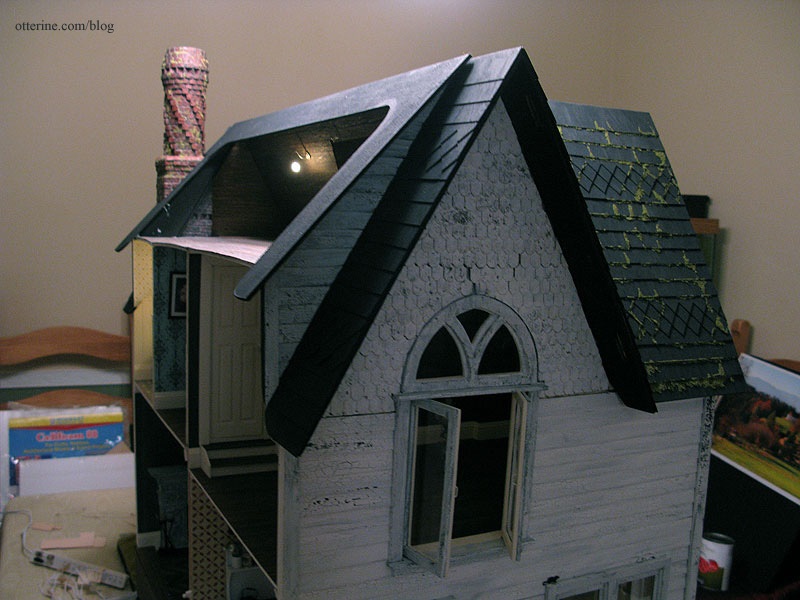
Continuing work on the roof. I finished the other side of the gable in the same manner as the first.
I then cut and adjusted my templates for the main front, side front and middle front pieces.
I started with the main front piece, following the same pattern.

I then finished the side front and middle front, leaving the outer edge of the middle front long. I will adjust that edge during the gluing process.
The middle front is where things are off the most with the roof alignment, which also translates into poor alignment of the shingle rows when following the template. This is the main reason I chose to cut all pieces before gluing the shingle strips to the house instead of first gluing the shingles to the templates and then the templates to the house. I can now apply each row and make sure the rows line up as precisely as possible. Of course, a few sagging rows might be appropriate for the Haunted Heritage. :D
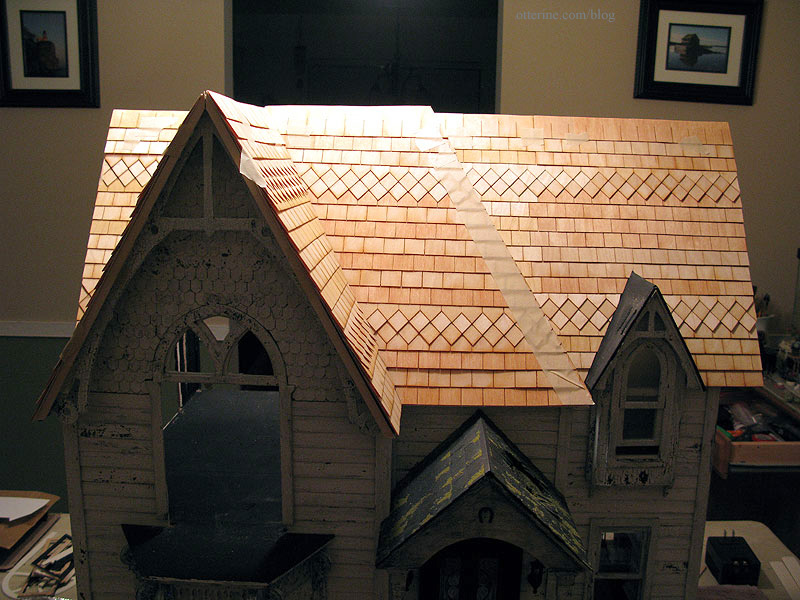
I will cut and apply the dormer shingles after the house shingles are glued in place.
Categories: The Haunted Heritage
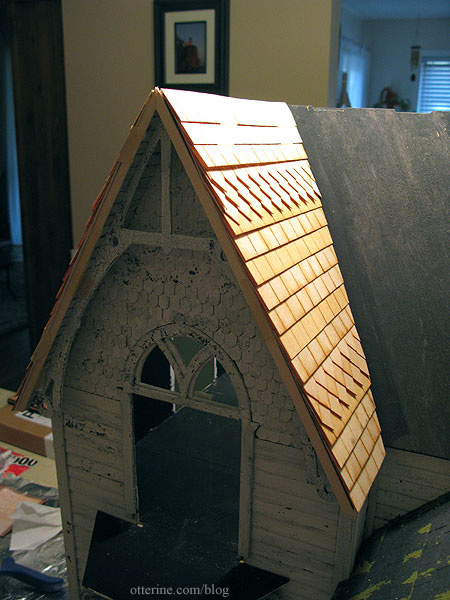
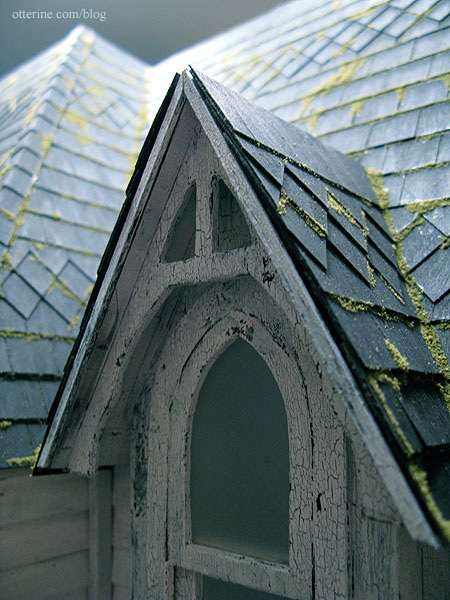
September 30, 2012 | 0 commentsHeritage – roof shingling, part 1
Continuing work on the roof. I will be using the same Greenleaf speed shingles as I did for the portico, though the roof will be remarkably intact. Either that, or grandma has had enough sense not to let the main roof go without repairs.
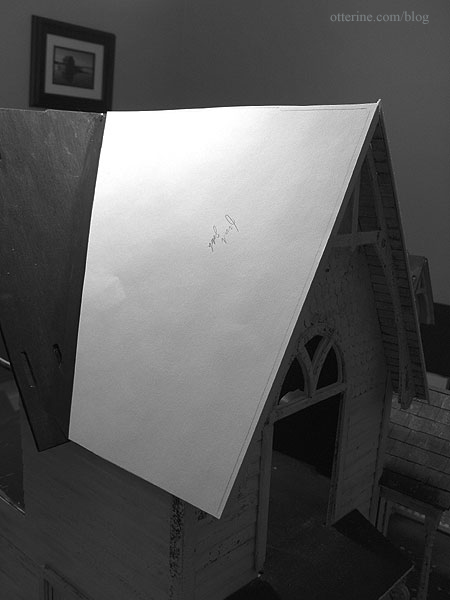
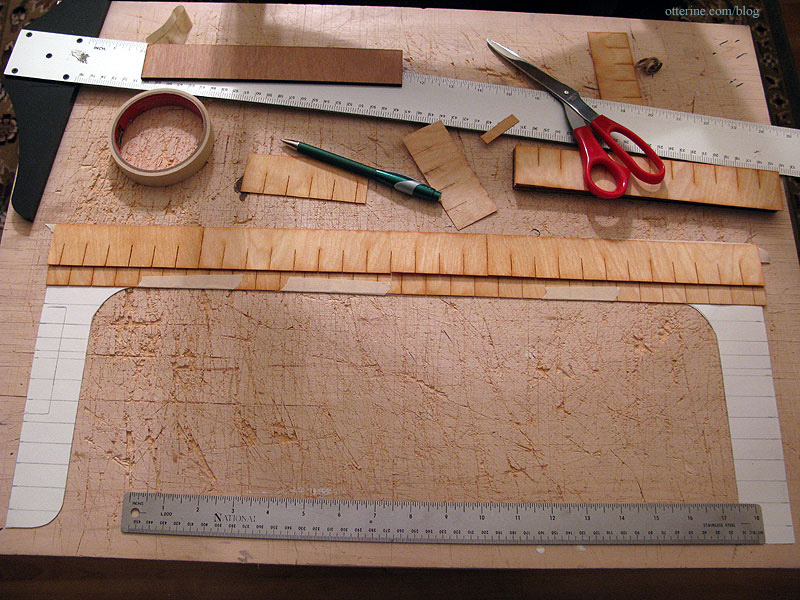
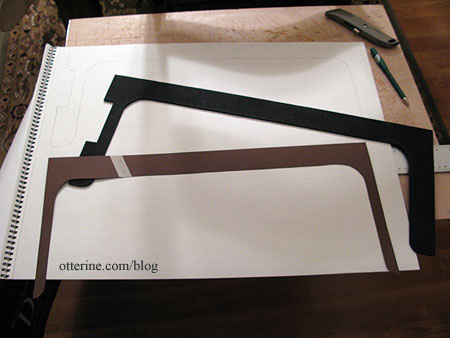
Back before I assembled the roof pieces, I had traced each piece onto drawing paper. These templates will now come in handy to measure out the speed shingle strips.
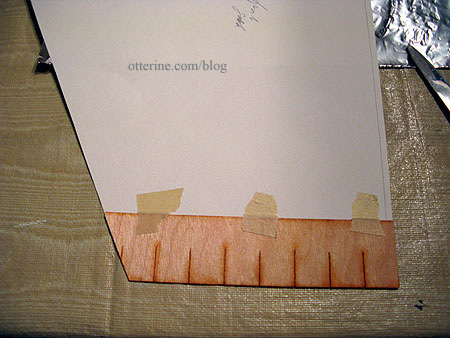
I cut the front gable template to fit.
Starting at the bottom, I cut the first shingle strip to fit the template.
I tested it out on the house to make sure I was off to a good start.
I won’t be gluing the shingles to the template but rather to the house directly, but I will cut the shingles using the template first.
Instead of following the tops of the laser cut lines, I am leaving a little less of each shingle exposed – 5/8″ to be precise. This is what I had done for the portico since it seemed to scale down the singles to a more realistic proportion for this particular house.
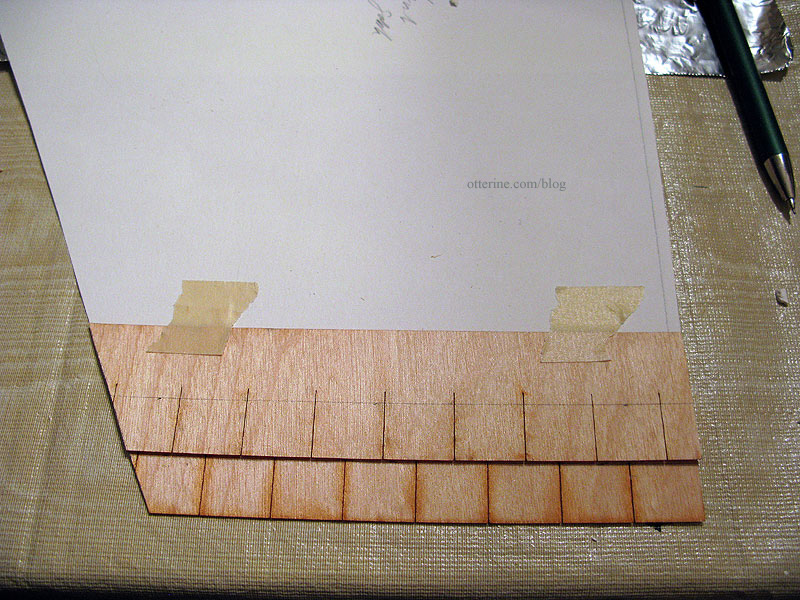
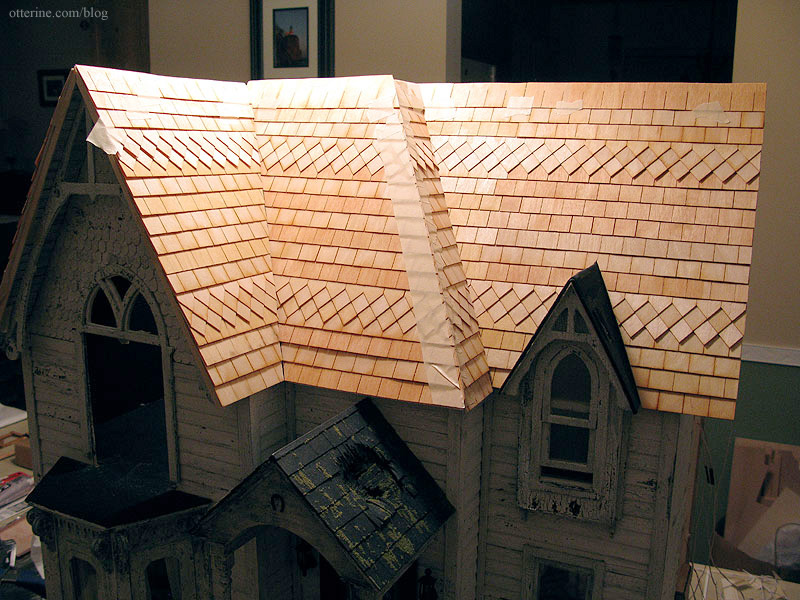
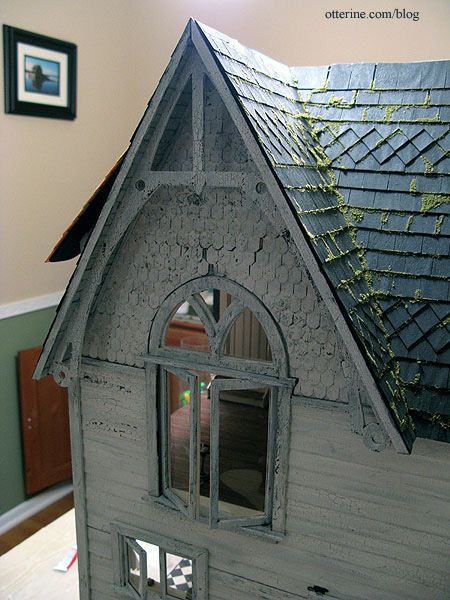
To add some visual interest, I inserted a few rows of diamond shaped shingles between the rectangular ones.
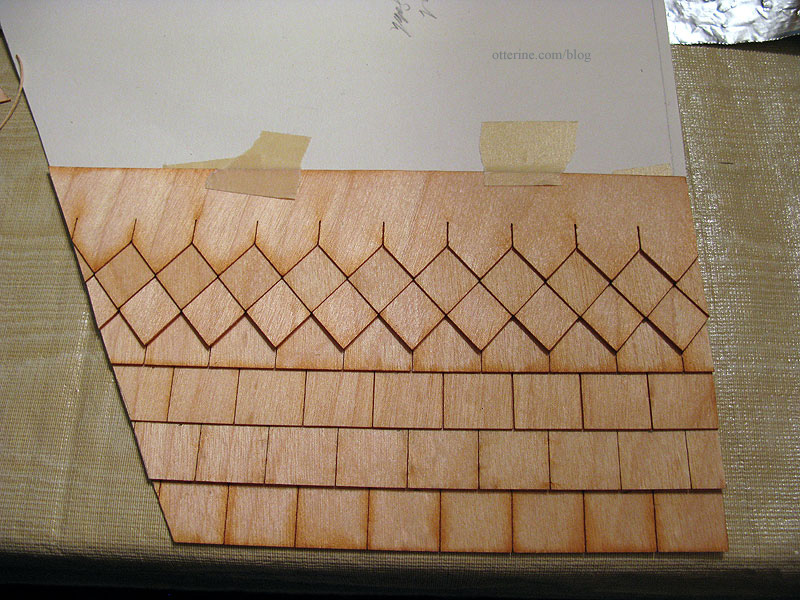
I added the second set of diamond shingles near the top, and I think it creates a lovely balance.

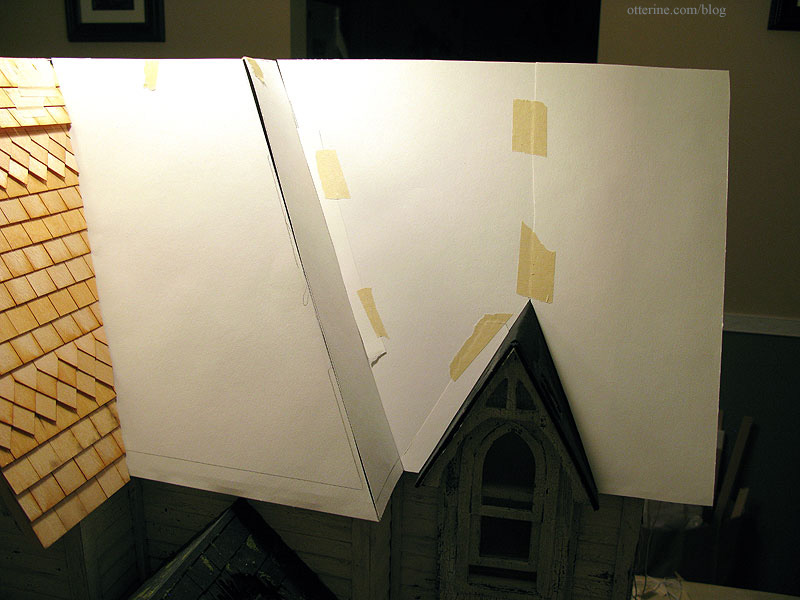
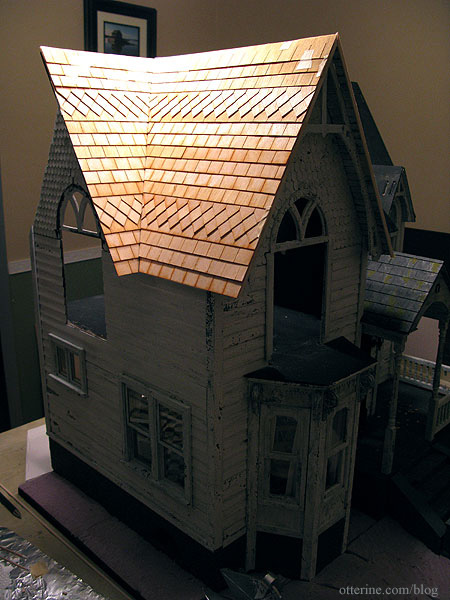
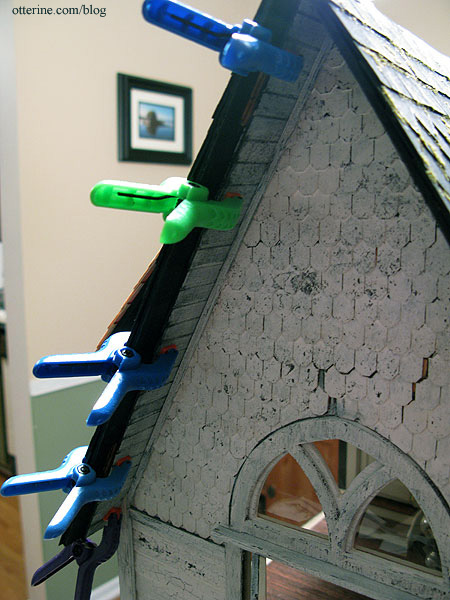
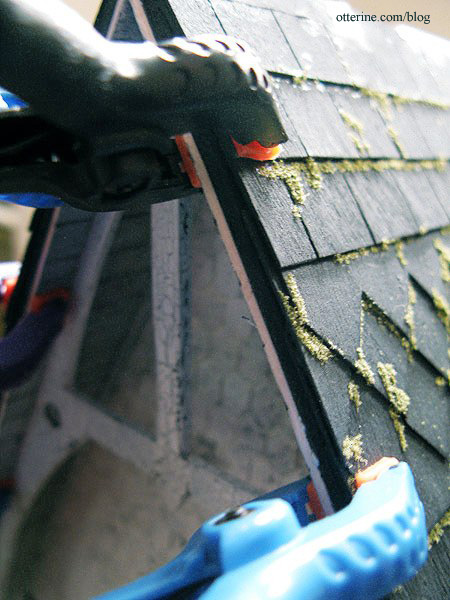
Next up was the left side of the front main roof. I cut my template and adjusted the fit behind the front gable template. All shingles will remain taped in place until I get the proper layouts completed, at least for adjacent panels. Once I get this side panel done, I can start gluing these two sections to the roof.
I took into consideration the front trim that will be added to the side gable and began applying shingles to the left front template.
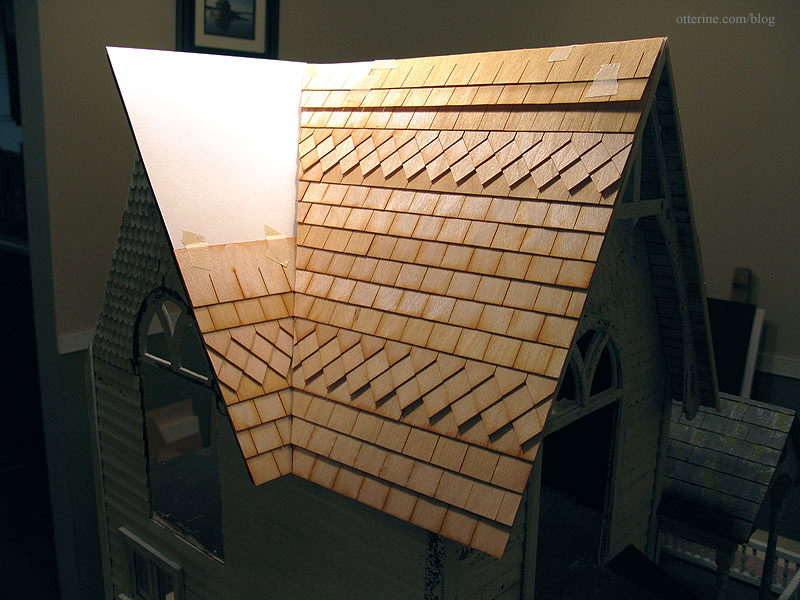
I think I’m on roll now!
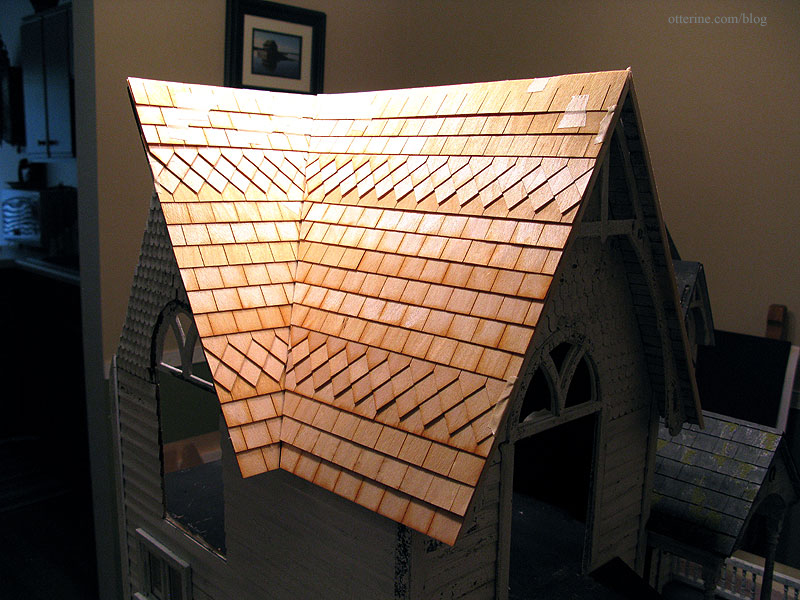
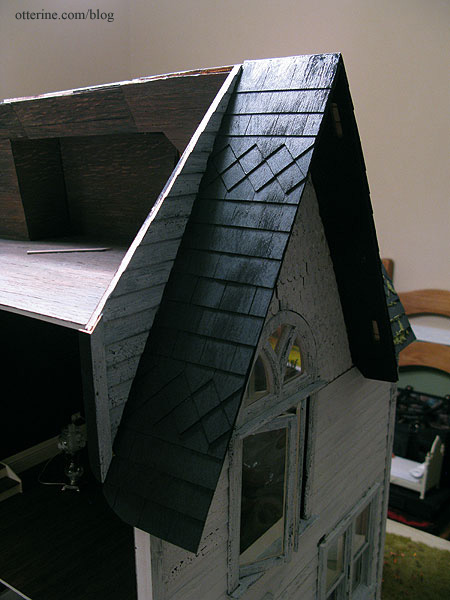
It looks a little unbalanced without the back portion of the side gable in place, not to mention the bright tones of the natural wood against the worn appearance of the house itself. I think it’s going to be marvelous and a little spooky once the dark colors are on.
I need a break from shingling for a bit. :D Good thing there is plenty to do.
Categories: The Haunted Heritage
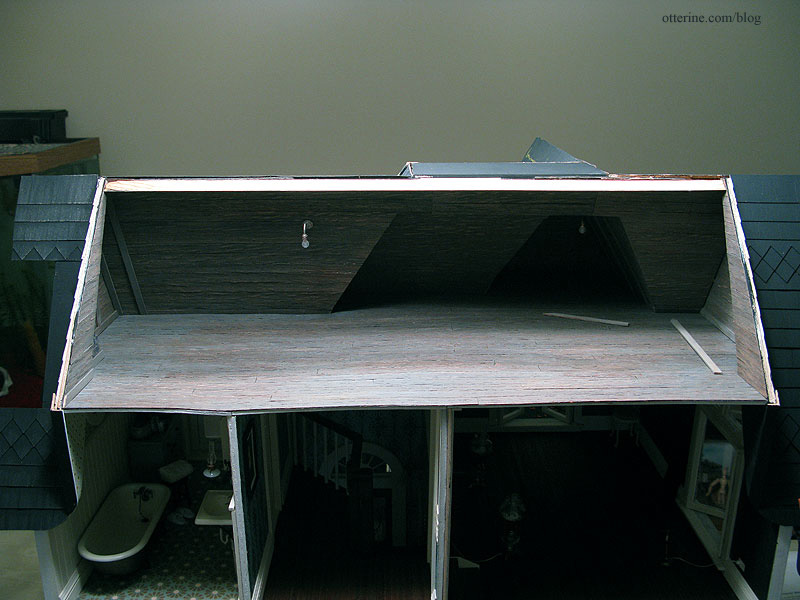
September 29, 2012 | 0 commentsHeritage – roof assembly, part 2
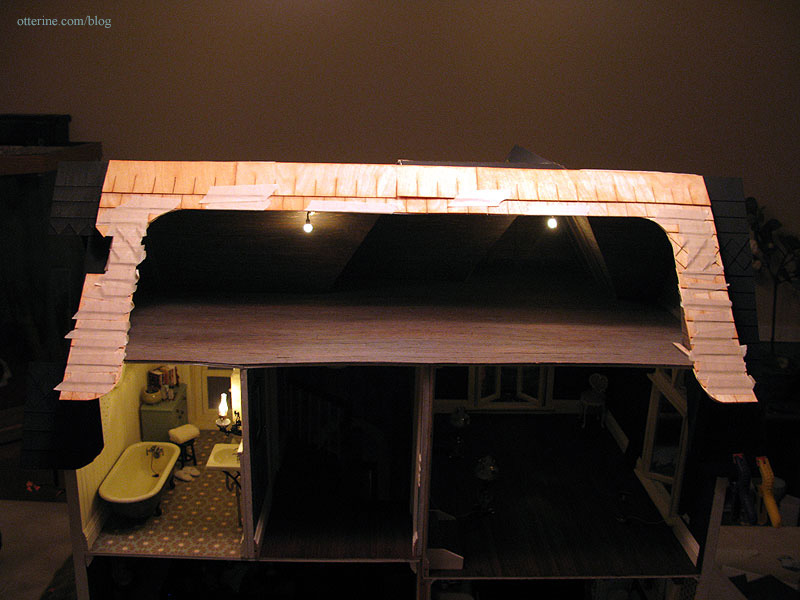
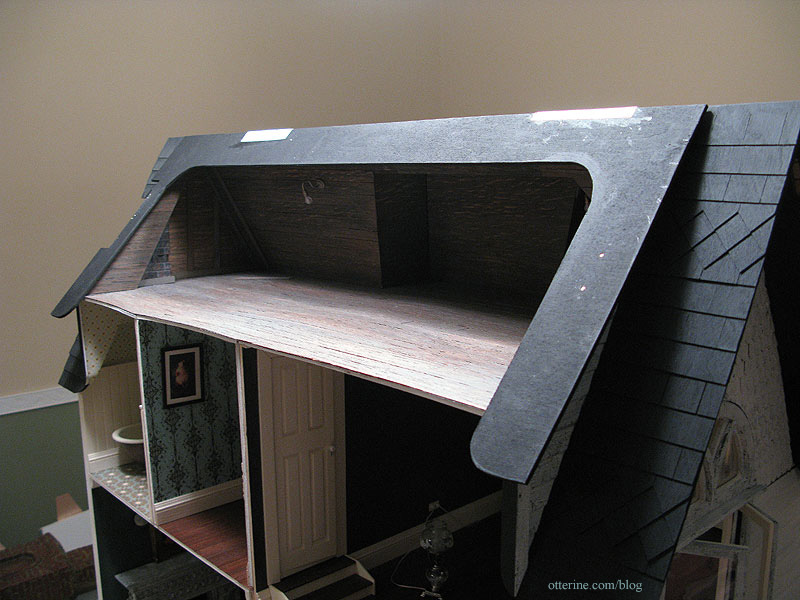
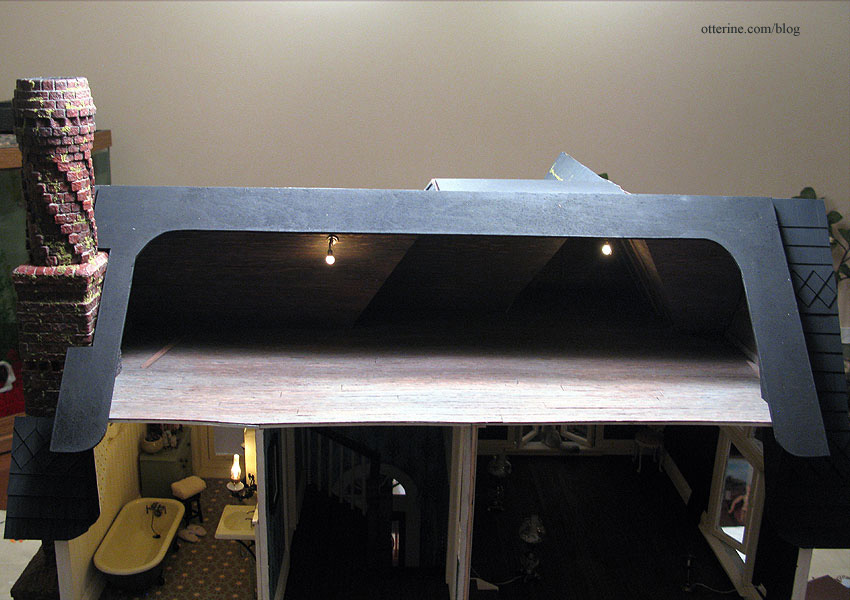
Continuing work on the roof. I have had the roof pieces glued in place for some time, except for the back piece which will need to remain removable until the interior has been completed. I also have to add the topmost piece, but that I will need to cut from plywood since the kit piece doesn’t fit at all. Luckily, the front can be shingled and mostly finished without worrying about the top and back just yet.
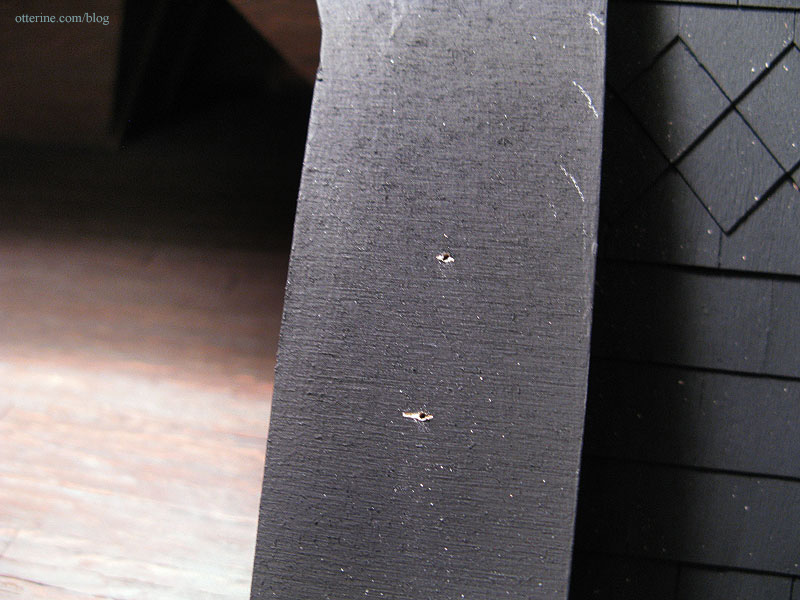
There were gaps between the roof pieces when I assembled that part of the kit. It was either operator error or old kit pieces, or a combination.
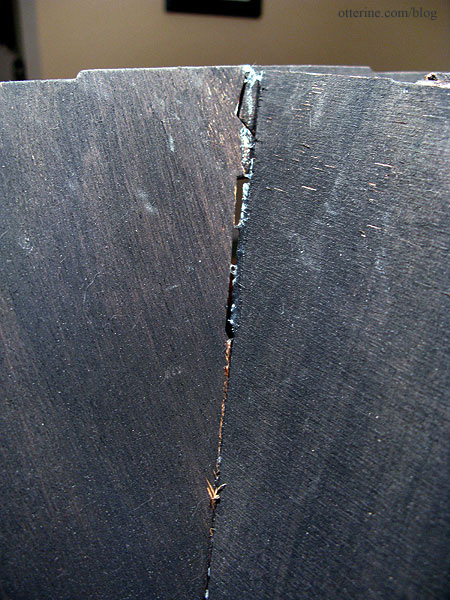
To reinforce the joins, I glued strips of Tyvek across the seams. Tyvek is the durable fiber paper that is used in FedEx envelopes, for instance. It’s thin enough to not interfere with the shingles and strong enough to add stability to the roof joins.
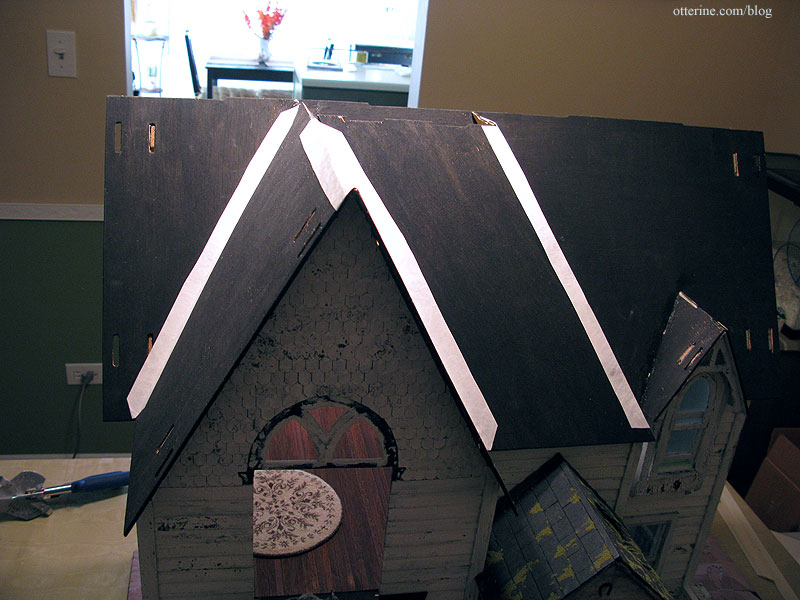
I painted over the reinforced seams in preparation for shingling. It already looks better!
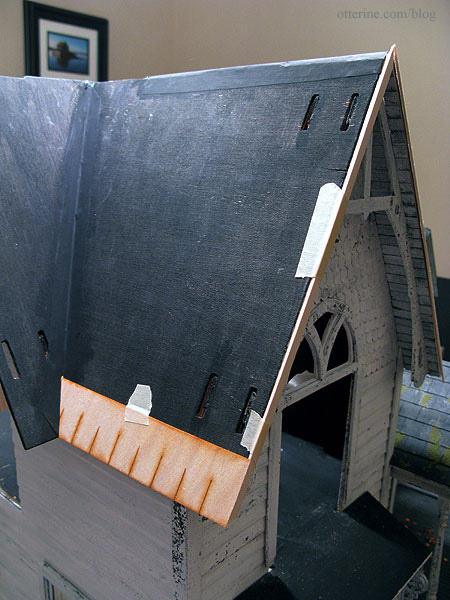
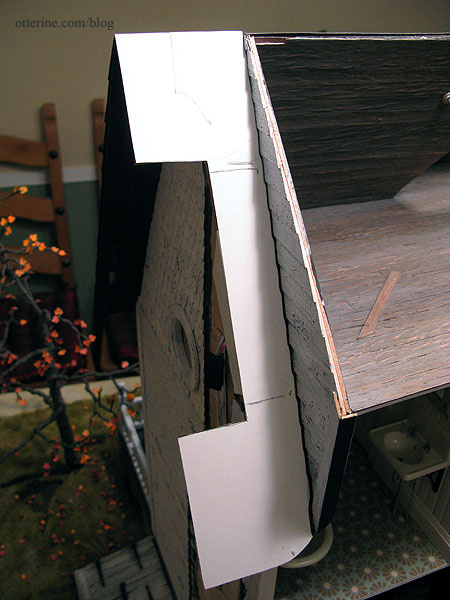
As I had done for the dormer window, I finished the eaves of the large front gable with trim wood scored to look like individual boards. I started with the space between the large gable trim and the house.
Apologies for the harsh lighting, but the house is turned on my work table in such a way that the light is in an awkward spot. I’ve masked out the light’s more severe glare as much as possible.

I then attached the gable trim before finishing the front portion of the eave.
This will hide the various gaps and imperfections from the construction problems I ran into while putting on the roof.
The side eaves can’t be finished until the interior is done, but this finished gable brings a lot of life to the front of the house.
For the dormer eave panels, the scored detailing was lost after painting. To solve that problem for the front eave, I used the awl to score the previous lines again after painting. It helped bring back the board detail. I love the way it looks!
I shaved the right front to even out the eave panel with the roof panel. On the left side, I had to add wood to make the two sides even. I then shaved the excess from the added wood to make a smooth edge.
I cut trim from 1/4″ x 1/16″ strip wood to finish the front edges of the eave. These will be finished and glued in place after the roof is complete.
I’m ready to start shingling! :D
Categories: The Haunted Heritage
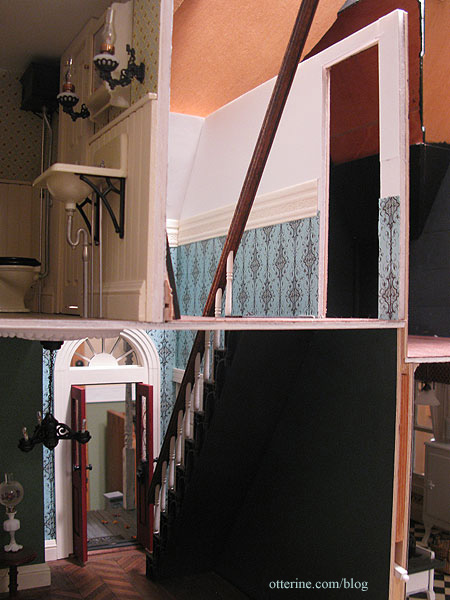
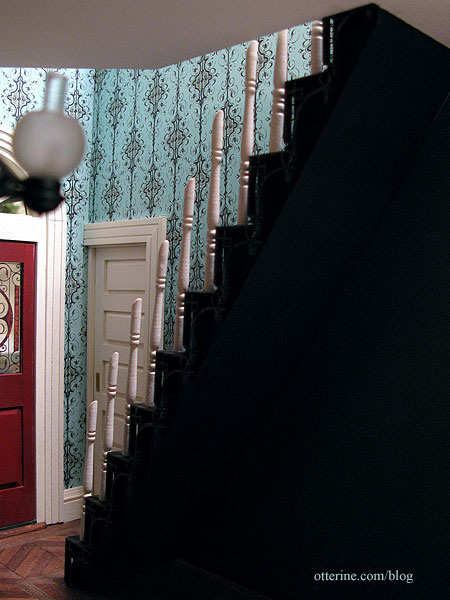
September 29, 2012 | 0 commentsHeritage interior staircase, part 5
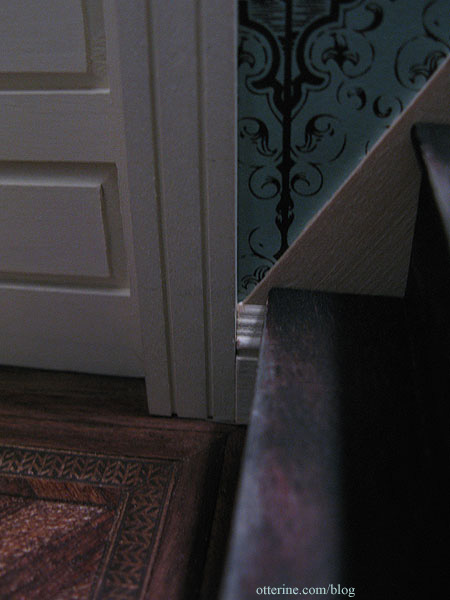
Continuing work on the interior staircase. When I cut the balcony and the adjacent stair opening, I left enough room to add a stringer. This completes the look of the baseboard trim up the staircase and addresses the slight warp in the pocket door wall that the stairs follow.
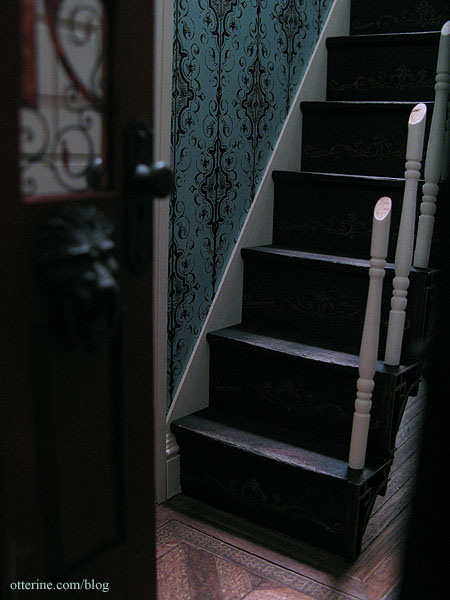
I used 1/16″ thick basswood sheet to make the stringer, tracing the outline of the stairs flush with the back and lower front. I added a little extra to the top to trim the stairs. I painted the visible part of the stringer Vintage White by Folk Art and the back edge black.
At the base of the stairs, the stringer meets the baseboard trim. Here the stringer is shown before finishing. This is one of my favorite views of this house that can be seen only with a camera.
I glued the stringer to the stairs to keep it in place.
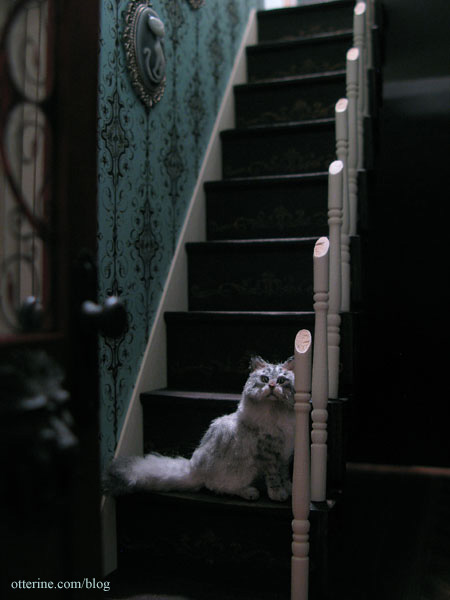
The stairs are still removable at this point, because I need to be able to work on the railing and newel posts. Oh, hello, Ophelia. :D
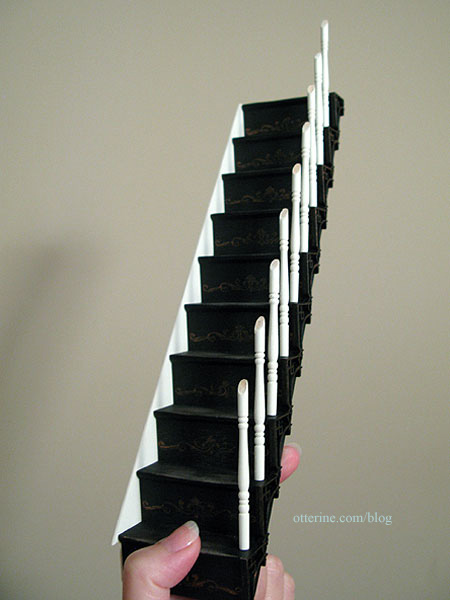
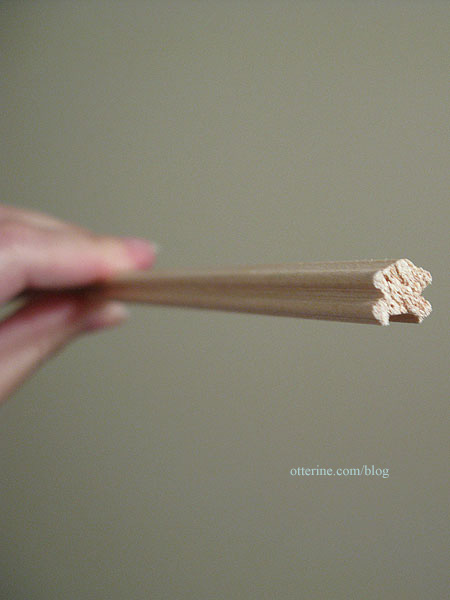
The railing supplied with the narrow staircase kit was obviously made for the flat balusters that came with the kit. The rounded spindles I used instead would not work with the supplied railing since the opening in the bottom of the railing was too narrow.
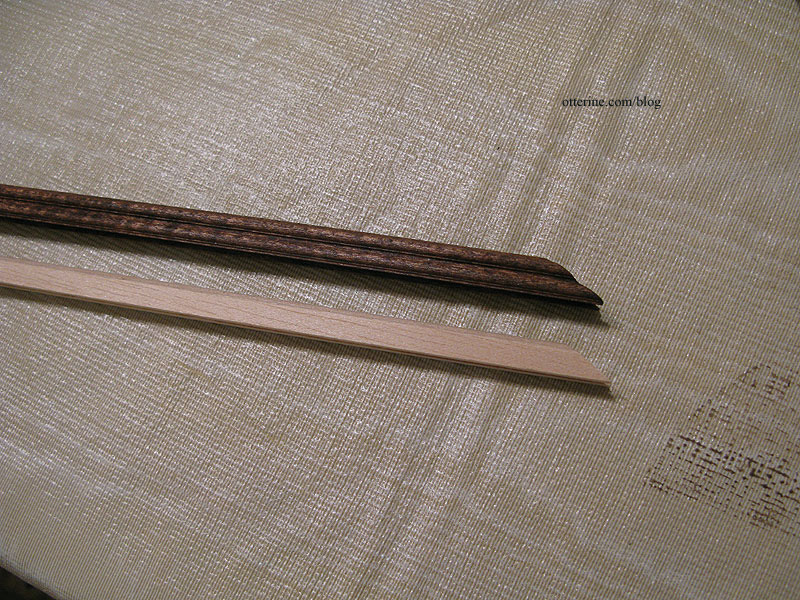
I bought replacement railing from Manchester Woodworks. This has a 3/16″ groove in the bottom, perfect for the tops of the spindles. I like the profile of this particular railing, too. It has a fancier look than the standard railing stock.
I like the look of white spindles with a stained railing, but I wasn’t sure if I should match the railing to the stairs or the flooring. Since the railing will continue around the upstairs balcony, I opted to match the railing to the floor and stained it Minwax English Chestnut.
When I stain or spray paint, I use a rubber glove to hold the piece (or the board with the pieces taped on). Saves me from soaking up chemicals through my skin, and there’s no clean-up involved. These gloves usually last through many applications, so I just set them aside to dry until next time.

I used the kit supplied railing as a guide to make the lower angle cut for the stair railing.
I fit the railing in place, leaving it long for now until I determine the length I need.
It fits perfectly over the angled tops of the spindles. It’s actually just sitting on them without any glue or wax. As hoped, the imperfections near the tops of the spindles are no longer noticeable with the railing in place.

This is the square newel post that came with the narrow stairs kit. I like it because of its heavy visual weight. I will stain it English Chestnut to match the floor and railing. I think painting it Vintage White would make it stand out too much since it is a sizeable piece.
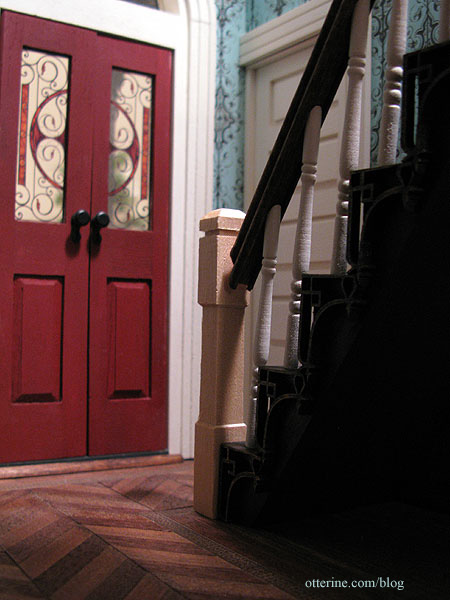
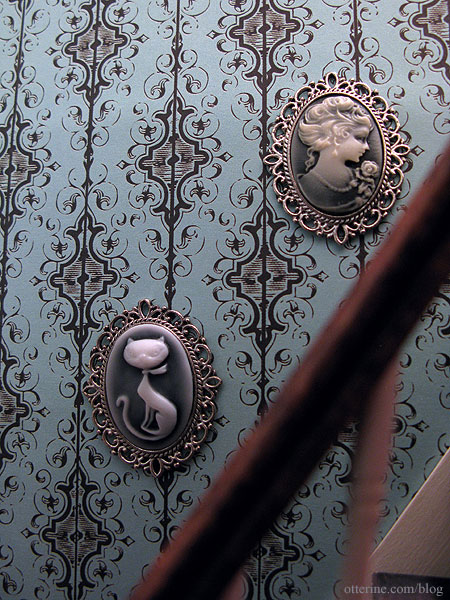
The cameos that will hang in the stairway are pendants from Fairy Tale Fantasies. One is a retro kitty and the other a beautiful vintage lady. I cut the loops from the tops to use them as framed art. I love their ghostly appearance.
Finishing the railing here.
Categories: The Haunted Heritage
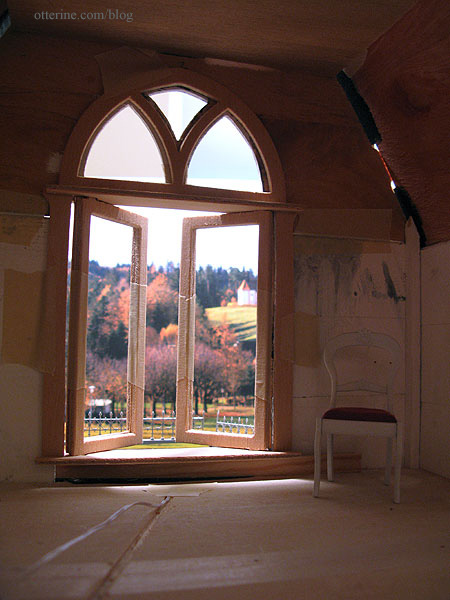
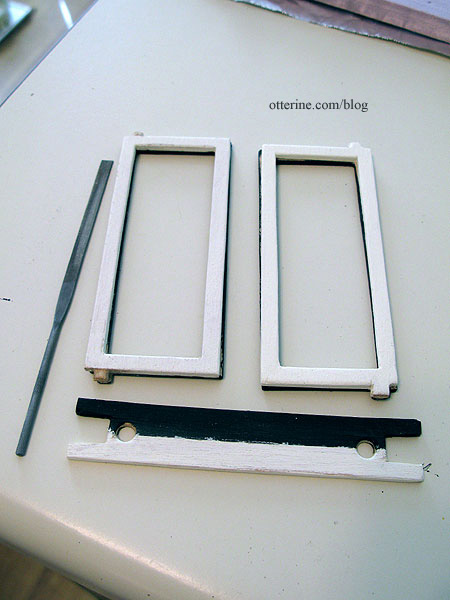
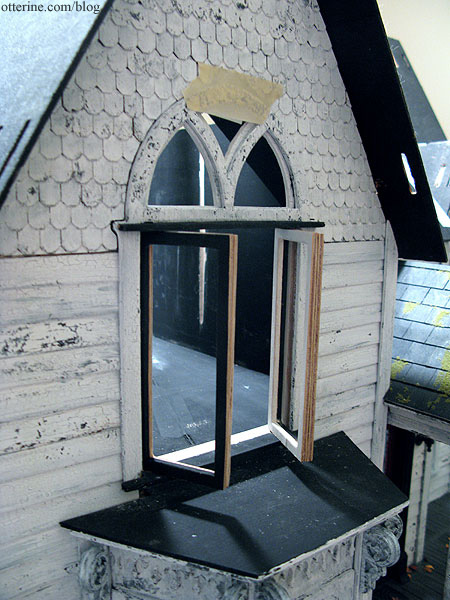
September 26, 2012 | 0 commentsHeritage – bedroom swinging windows, part 2
I was able to use the kit pieces for the bay windows and ended up with two of the three working. Just like a real life old house – one window is painted shut, one window sticks and one won’t stay open!!! :D The dormer window in the bathroom is also original and working, though I had to scratch build the dormer itself. I had to replace the front and side regular windows with Houseworks components since the kit pieces were too far gone to salvage. I also added a casement window in the kitchen and a round window in the bathroom.
The remaining two windows are the floor to ceiling swinging windows in the bedroom. Here’s the last mockup I did for them back in March, but I have worked on finishing the parts in the interim.
The kit pieces were in relatively good condition, and I was able to use them. I had to do a little repair work and filling with spackling as I had done for the bay windows. I have a post on salvaging shoddy wood here.
I primed and painted the interior Antique White by Folk Art, the color of all the interior trim. I primed the outside with black, the underlayer for eventual white crackled paint like the rest of the exterior.
Each swinging window is made from an interior and exterior piece with an acetate window insert between them. I don’t plan to use the printed kit acetate but plain clear acetate instead.
The windows have square tabs at the bottom that are to be sanded into a round peg and fitted into the upper and lower supports of the window frame. I used a metal file, and it worked very well.
The holes and pegs are not a perfect fit, but as long as they work that’s good enough for me.

Again, there will be a little “chicken or the egg” to the process of installing these windows, which seems to be a major theme of this house. The interior wallpaper needs to be completed before the windows are installed, otherwise you’d have to cut around the fancy trim after the fact. But, I didn’t want to risk ruining the paper, so I am doing as much fitting and finishing as possible before I work on the bedroom wallpaper.
The main problem with these windows is that they don’t close due to overlap in the middle and there is too much excess wood to use the “sand to fit” method.
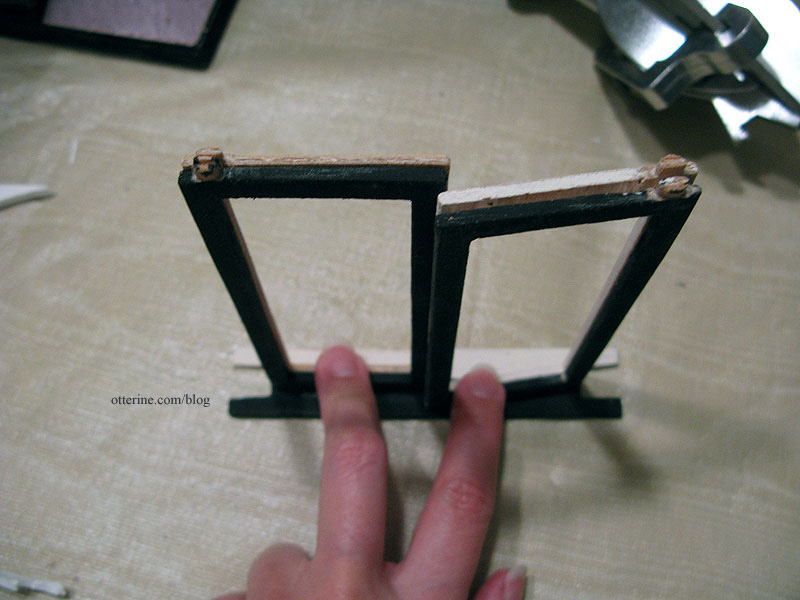
I managed to cut enough from the tops and the outer edge where the two windows meet in the middle to get this first one to close. It’s still tight, but I fear removing any more wood will just make it look lopsided. Good thing it’s an old, battered house, because I don’t know how I would get these original parts to turn out well otherwise.
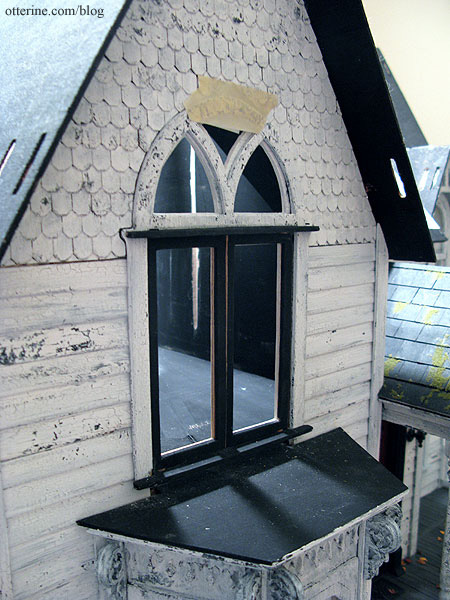
There were originally three swinging windows – one in the bathroom and two in the bedroom. Since I eliminated the one in the bathroom when I added the chimney, I have extra parts to use in case of disaster. As you can see, I’ve already pulled one of the pinch hitters into play.
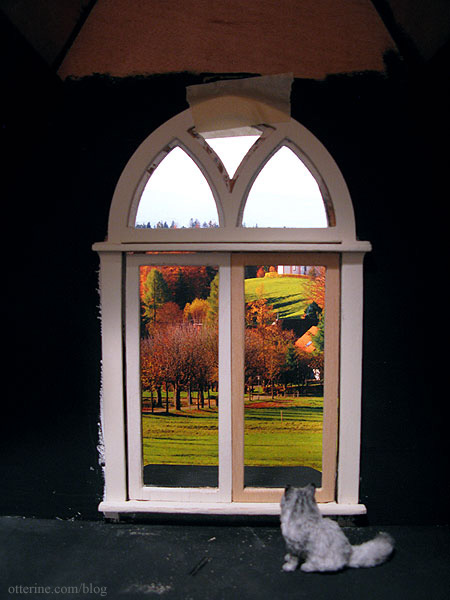
There will be open spaces all around the moving portions due to the nature of how the window is constructed. This bothers me for realism, but there really isn’t an easy way for me to address this. Even though I wanted the windows to function completely and close, I’ll likely display them open most of the time.
Continued here.
Categories: The Haunted Heritage
September 22, 2012 | 0 commentsHeritage – grandma’s neglected lawn, part 1
While I do have more builders foam in larger sheets, I thought I’d use up the numerous leftover scraps. They were just languishing in a bag and this would clear up some workspace. :D
I started cutting a puzzle of pieces to make the uneven ground surrounding the house.
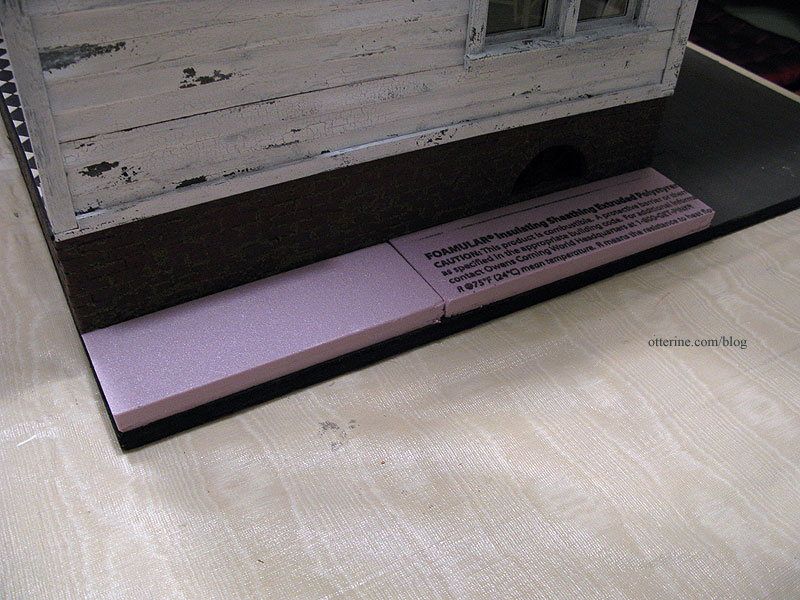
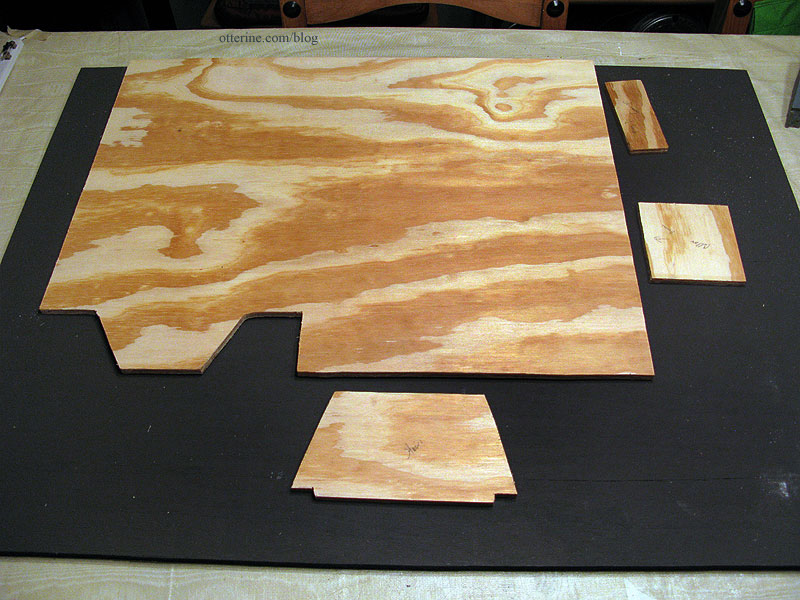
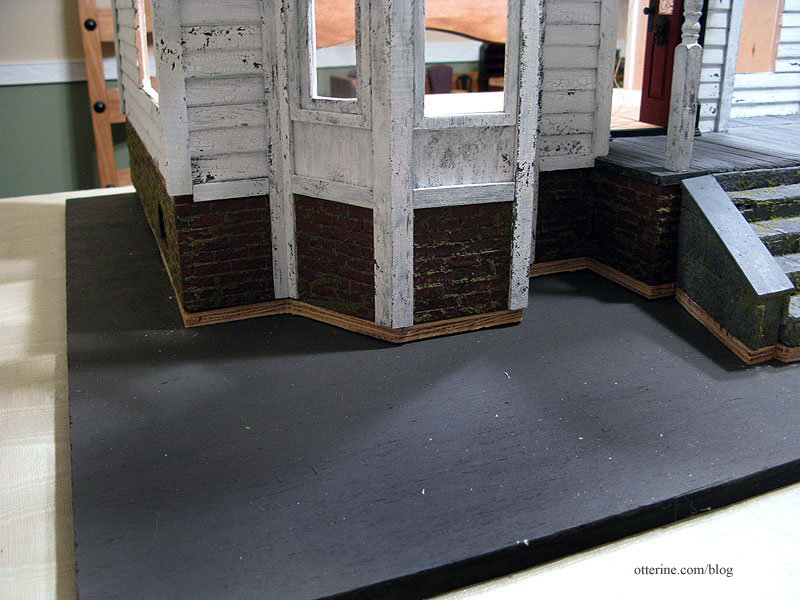
If you recall, I had glued the house foundation onto cut pieces of 3/8″ plywood to allow room between the brick foundation and the base board.
You can see the edges of the plywood below the foundation.
The builders foam is 1/2″ thick, but I planned to sculpt it anyway. I cut random amounts from the foam pieces, angling the slope down sharply around the outer edge of the base board. Yes, that’s Grahame and Woodrow playing ball on the bay window. :D
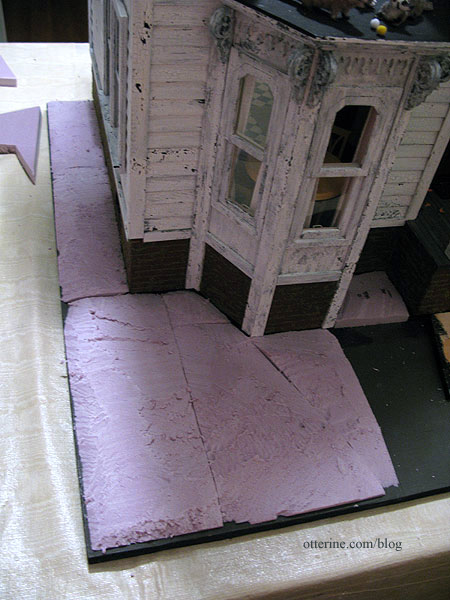
No wonder grandma never mows the lawn…she’d break her ankle! It doesn’t matter if the pieces aren’t a perfect fit. I can fill in those gaps with either scraps of foam or a bit of stucco patch.
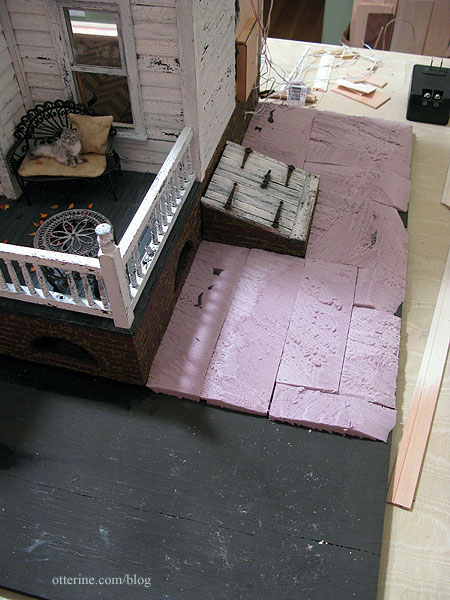
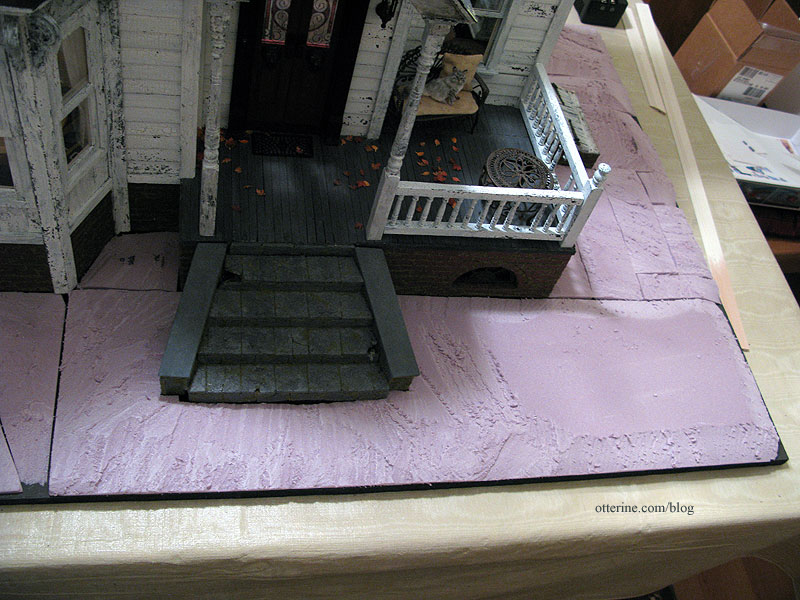
After using up most of the scraps, I cut a new piece for the larger remaining area, tracing out the base for the stone steps.
I saved the circular scrap from the tower for building up the area that will hold The Tree. Actually planting The Tree is going to take some work since part of the roots will be exposed and part will terminate under the surface.
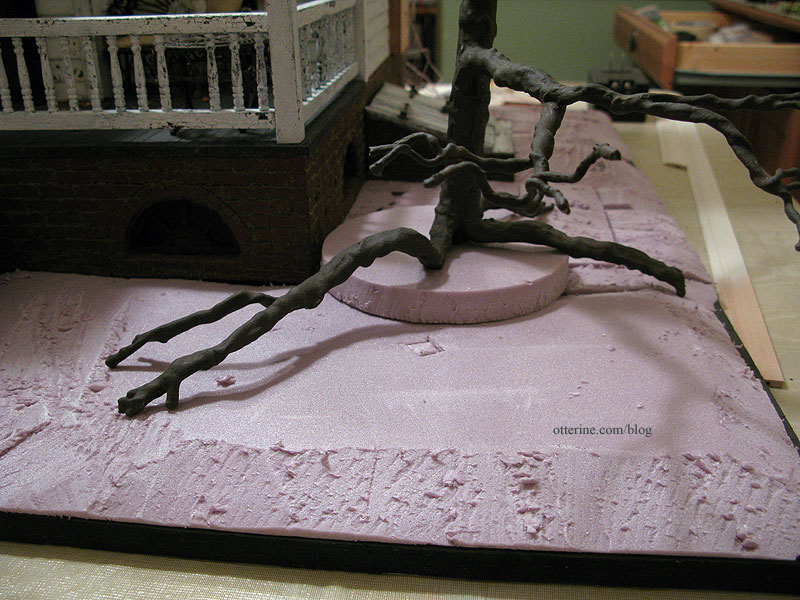
I have the trunk fairly close to the house so that the branches stay within barrier of the base board. The side is less of a problem than the front. I keep one side of my landscape boards no wider than 25″ so the houses will fit through the doorways in my real life house.
I’ve cut the area in front of the steps lower to make room for the pavers that will be placed in front, but I can see it’s not very even. I’ll have to adjust that a little. Having broken, weedy pavers is one thing, but we don’t want a death trap at the end of the stairs. Grandma isn’t foolish.
Continued in Part 2.
Categories: The Haunted Heritage
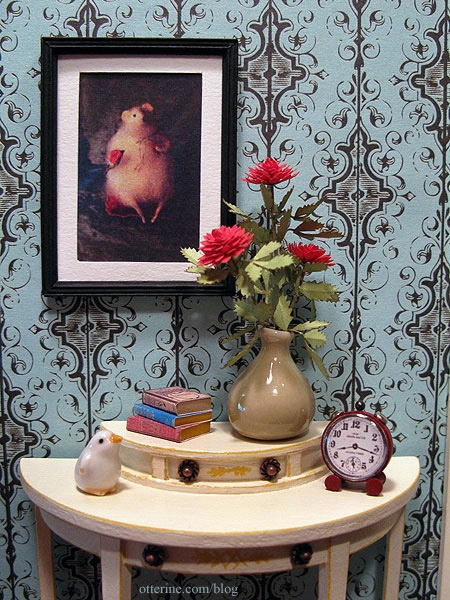
September 17, 2012 | 0 commentsHeritage – hallway vignette
The balcony railing is still a work in progress so this upstairs ‘room’ isn’t yet complete, but I have finished the vignette that will sit to the left of the bathroom door.
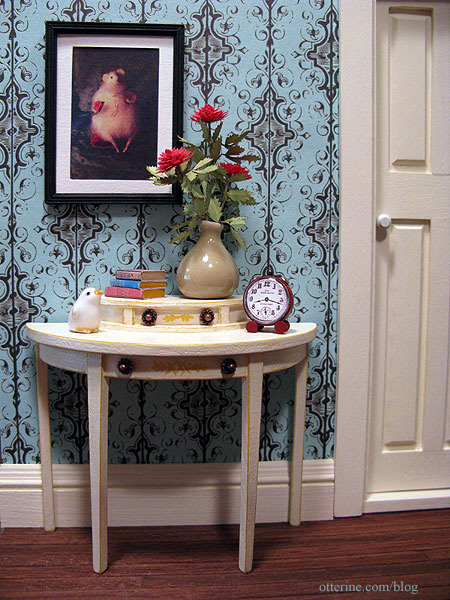
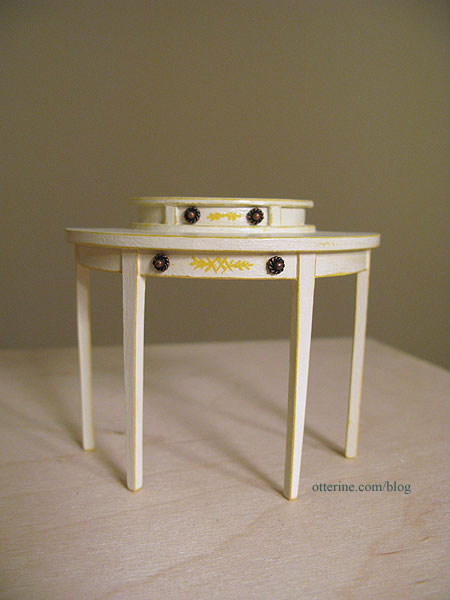
The table is a House of Miniatures Hepplewhite Side table with hand painted designs and added elements inspired by a real life sized antique table.
The books are some of the many I made while filling the parlor bookcase.
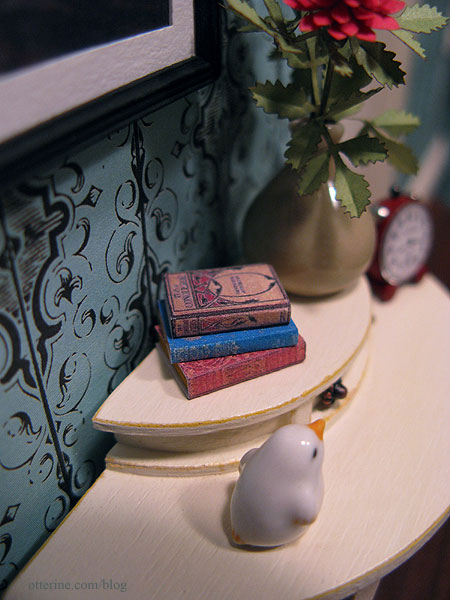
The vase and bird figurine were purchased awhile ago, but I’m no longer sure of the vendor. The red dahlias were made from a Bonnie Lavish kit.
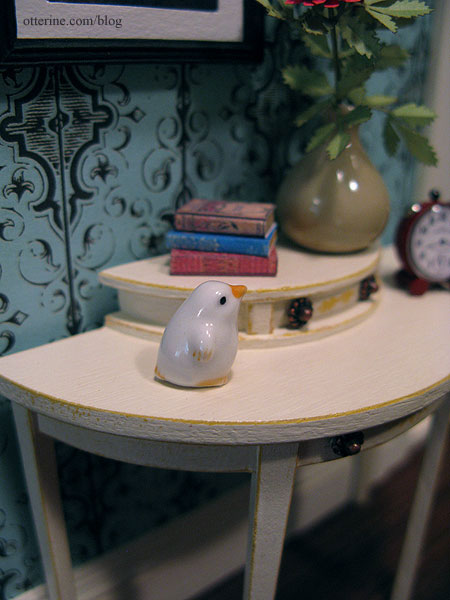
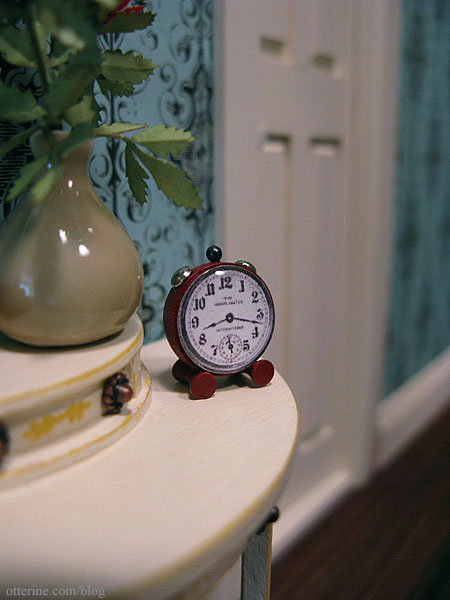
I made the tiny red alarm clock from bits and bobs. The face is a printed image from The Graphics Fairy with a clear cabochon sticker to simulate glass. I had made a set of vintage table clocks for another miniaturist through my etsy shop, and I liked the red one so well I knew I would need one for the Heritage.
The artwork is a photograph from artisan Natasha Fadeeva. She makes the most amazing little animals. I just swoon over her mice!!! :D I contacted her about using the vintage mouse photos in the Heritage, and she graciously gave me her permission. I haven’t yet framed the other.
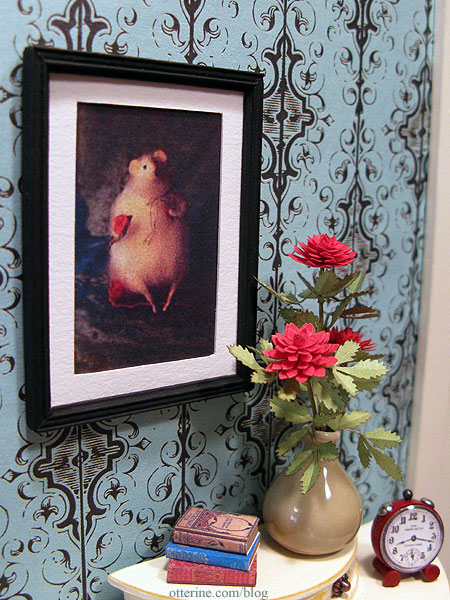
I love the red and round theme of this vignette. :D
Categories: The Haunted Heritage
September 16, 2012 | 0 commentsHeritage interior staircase, part 4
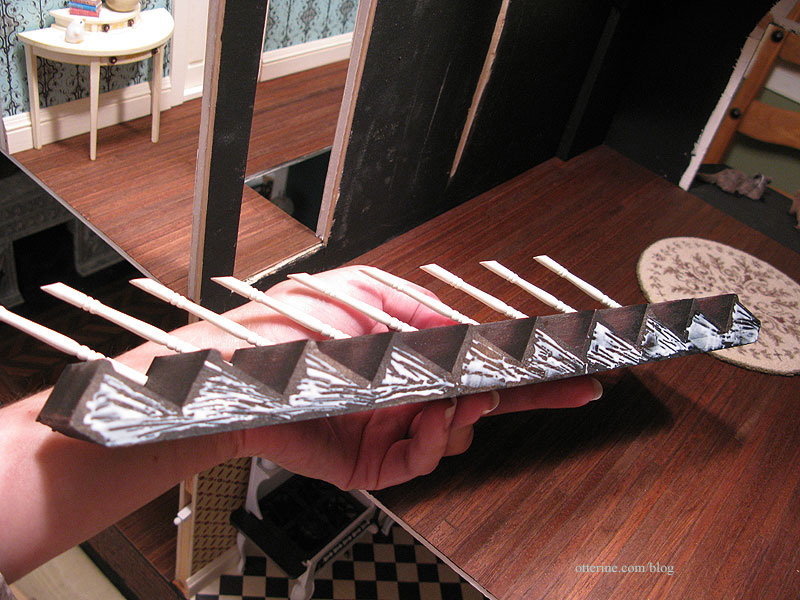
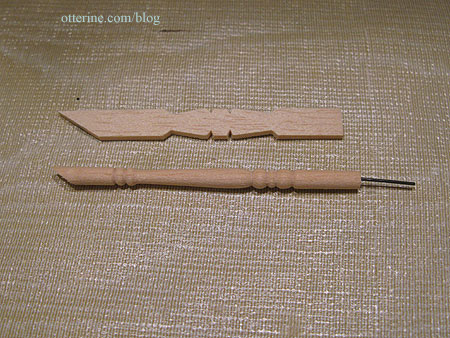
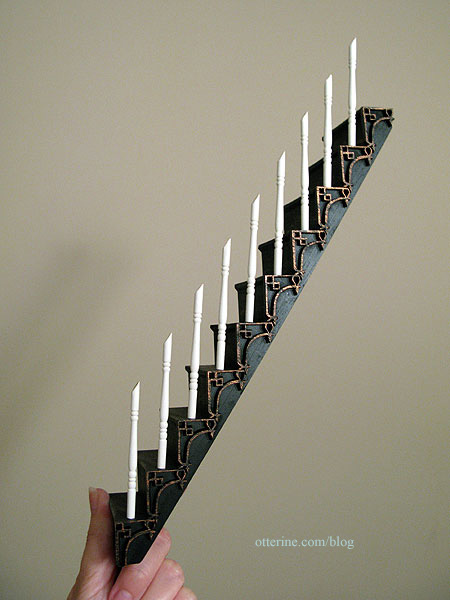
Continuing work on the interior staircase. This was my first time putting together a stair railing. The narrow stairs kit came with balusters, but I prefer the look of rounded posts to flat ones. I purchased a miscellaneous miniatures lot awhile ago that included the windows I used for the cellar as well as several packages of posts. The ones I’m using are Real Good Toys 3013A spindles.
There’s one thing that can be counted on when working with miniatures…you will knock into something held together with nothing but glue and it will crumble back into the pieces from which it was made. :\
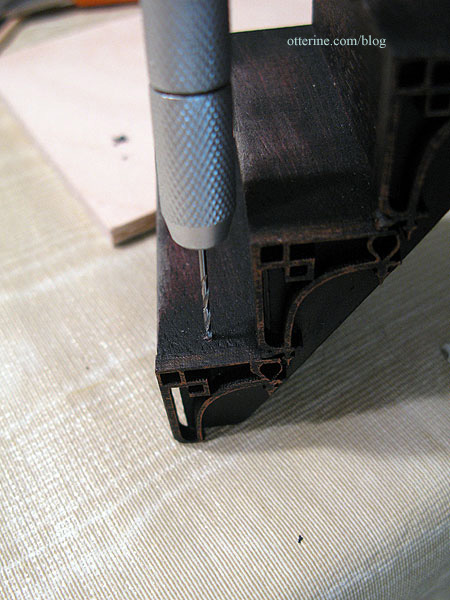
To help aid with this inevitability, I drilled pilot holes and added pins to the connections between the stairs and the posts. This is also helps keep things aligned when working with multiple parts that need to be glued all at the same time. It’s a tip I learned on the Greenleaf forum.
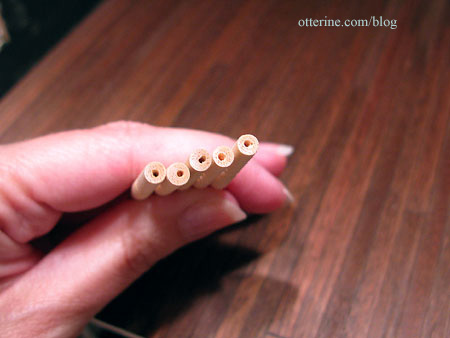
I used eyelet headpins mainly because I had an excess of them on hand. I used super glue gel to supplement the Aleene’s Quick Dry glue to insert the headpin into the drilled holes. I then cut the headpin to roughly 1/2″ (this is longer than I need but I will wait to cut them down until later).
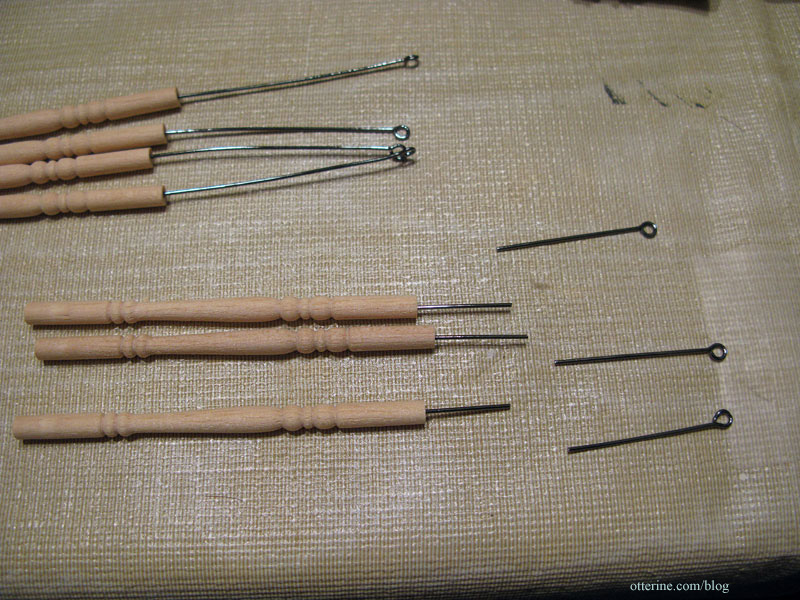
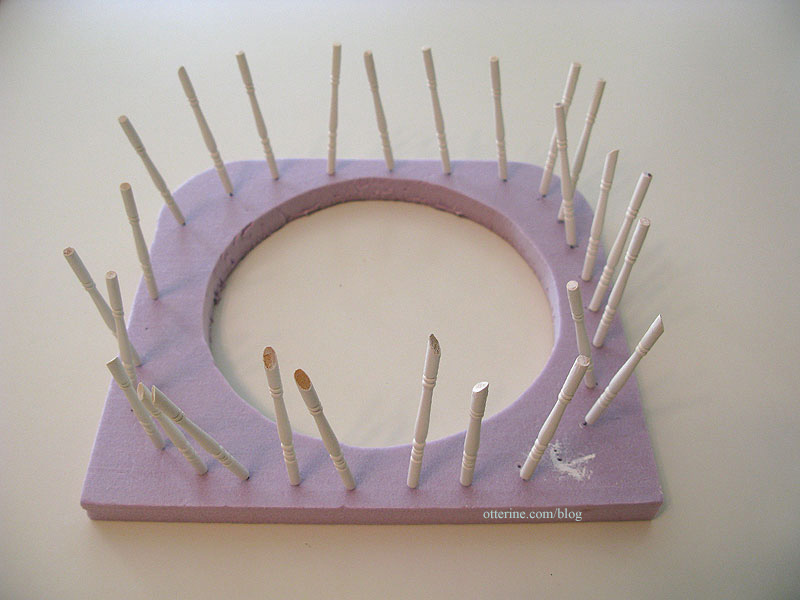
This allowed me to stick the spindles into a scrap of builders foam for painting.
For the stair spindles, I used the kit baluster to mark the angle needed.
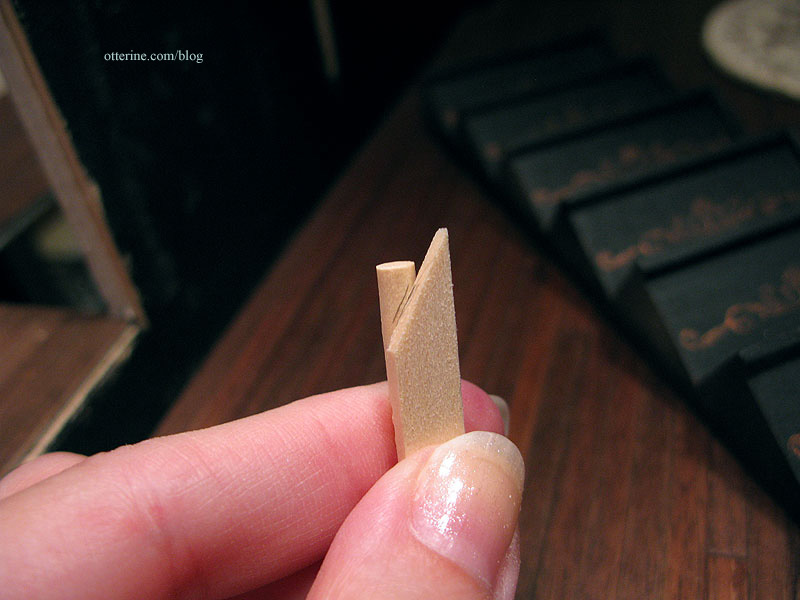
I then cut the top of the rounded spindle to match.
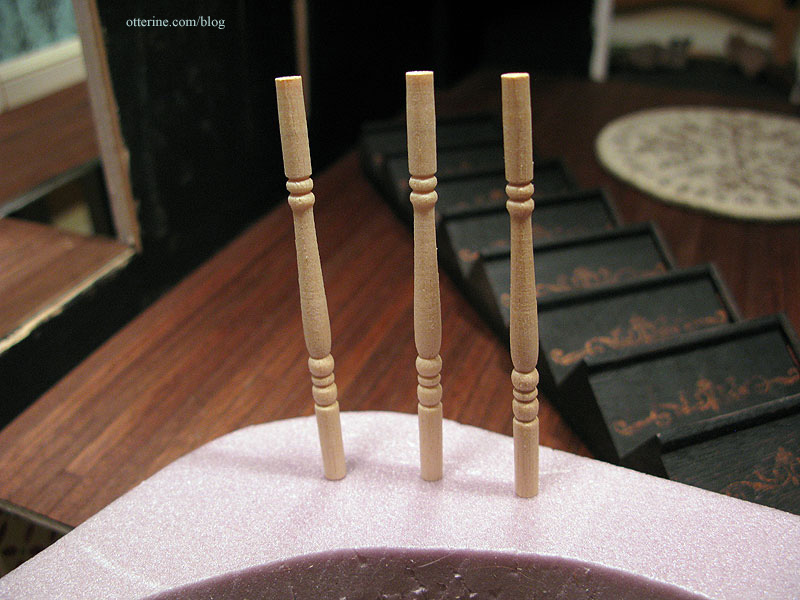
I painted the posts Vintage White to match the rest of the trim, sanded once and then painted a final time. Here are all the posts for the balcony as well as the ones for the stairs. Why do all this tedious work more than once?
Since drilling a tiny hole into the end of a round dowel doesn’t often end up right in the center, I chose to drill the corresponding holes in the stairs one at a time. After trimming the pin, I lined up the spindle with a stair and pressed the pin to make a mark.
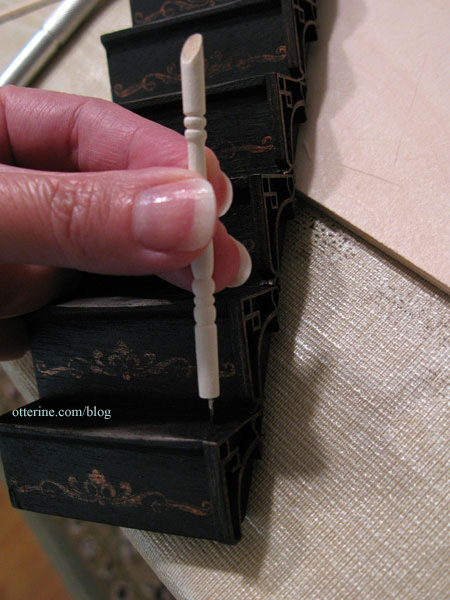
I drilled a hole into the stair at that mark.
Using super glue gel and Aleene’s Quick Dry, I attached the spindle to the stair then repeated all the way up. I’ve left the top one off for now since I will need to make sure I am able to attach the stair railing to the balcony railing on the upper floor. That’s probably best to do once I have the stairs glued in permanently. For now, the staircase is still removable and will be until I absolutely have to glue it in place.
I tried to sand down the lifted grain during the painting process, but bumps remained or recurred near the tops of some of the spindles no matter how much I sanded. I hope these will be less noticeable once the final railing is in place.
Categories: The Haunted Heritage
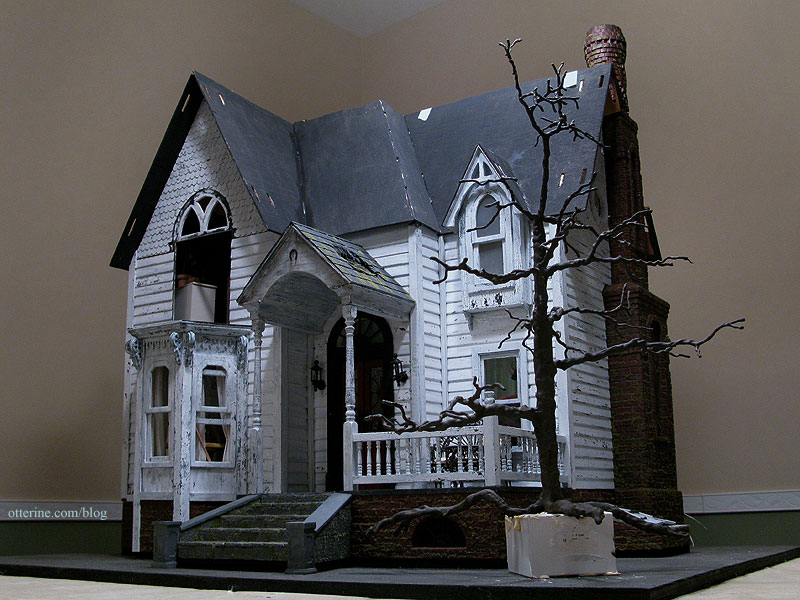
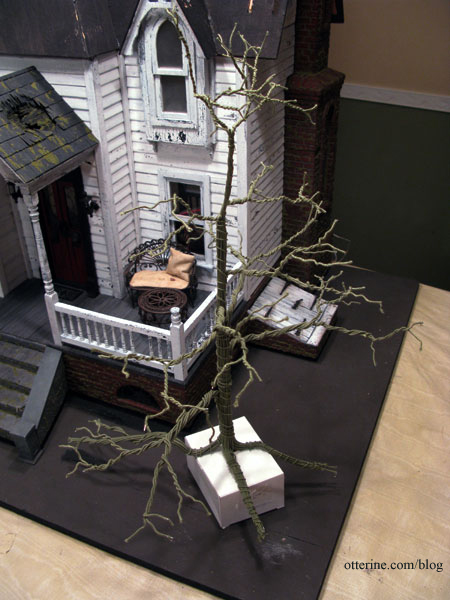
September 15, 2012 | 0 commentsHeritage – The Tree, part 2
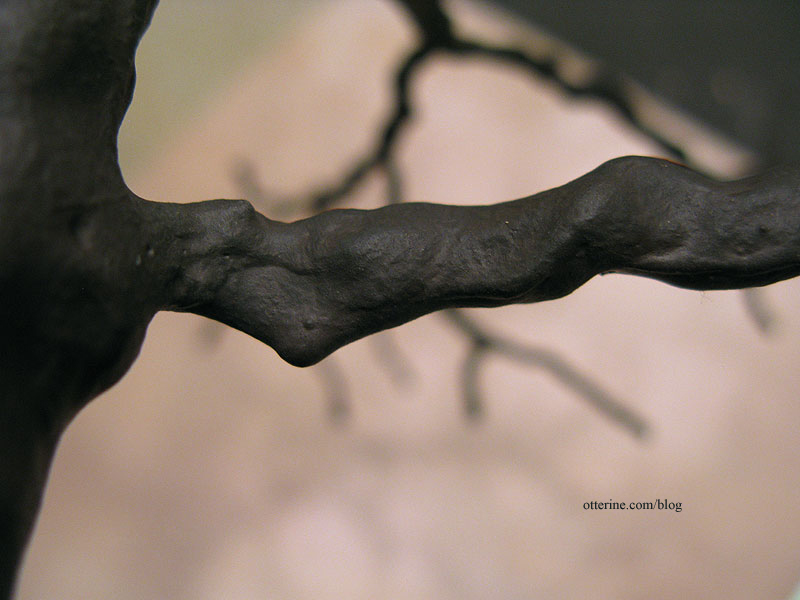
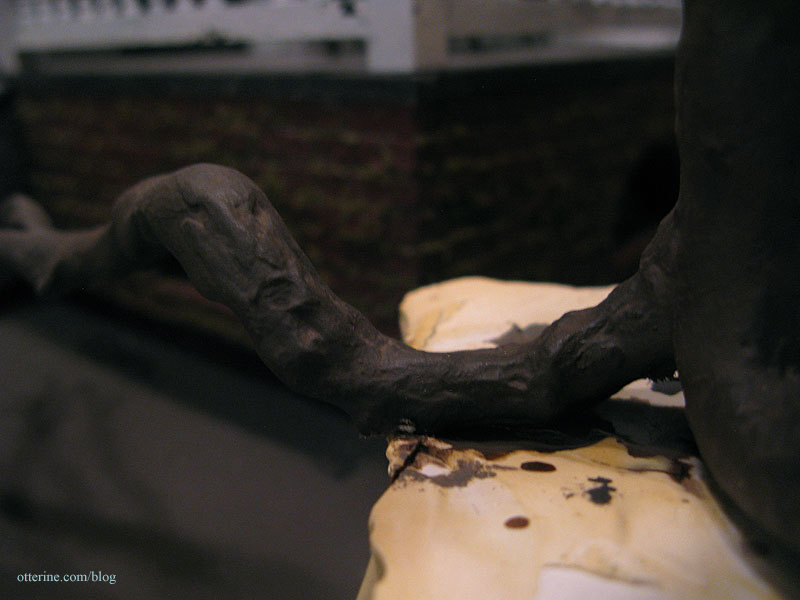
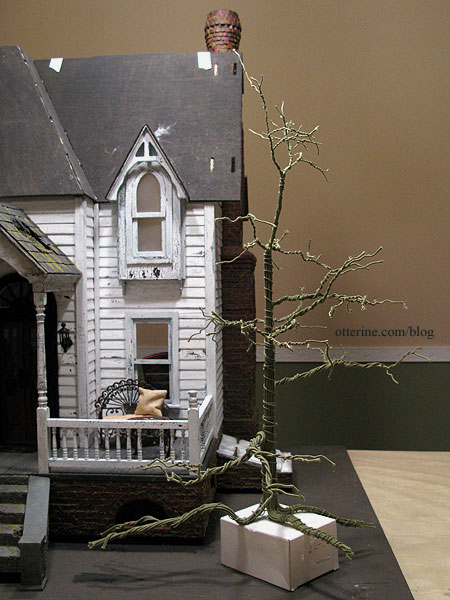
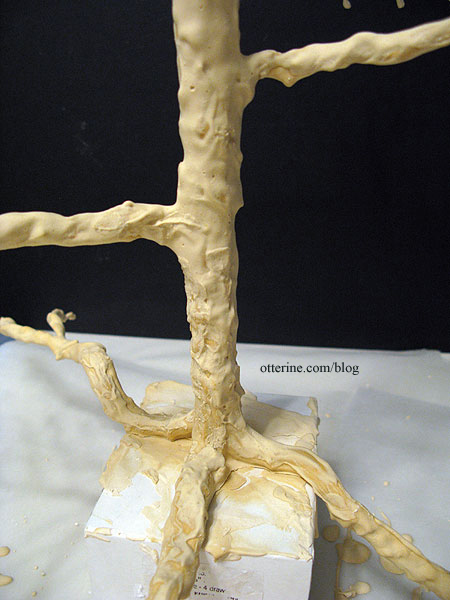
Continuing work on The Tree. I had considered carving bark texture into the putty but decided it was probably more work than it was worth. Instead, I did a quick sanding over the main trunk with 60 grit sandpaper. This removed the obvious smoothness and provided a nice texture. I also cleaned up any excess putty from around the roots.
Diane says most trees are more grey than brown, and when I was out today I noticed what she was talking about. :D
I started with an undiluted mix of Neutral Grey and Traditional Burnt Umber, both by Americana. This initial dark coat of paint really brought the tree to life!
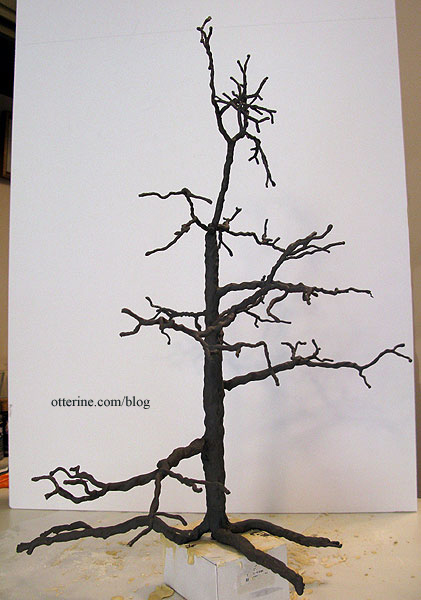
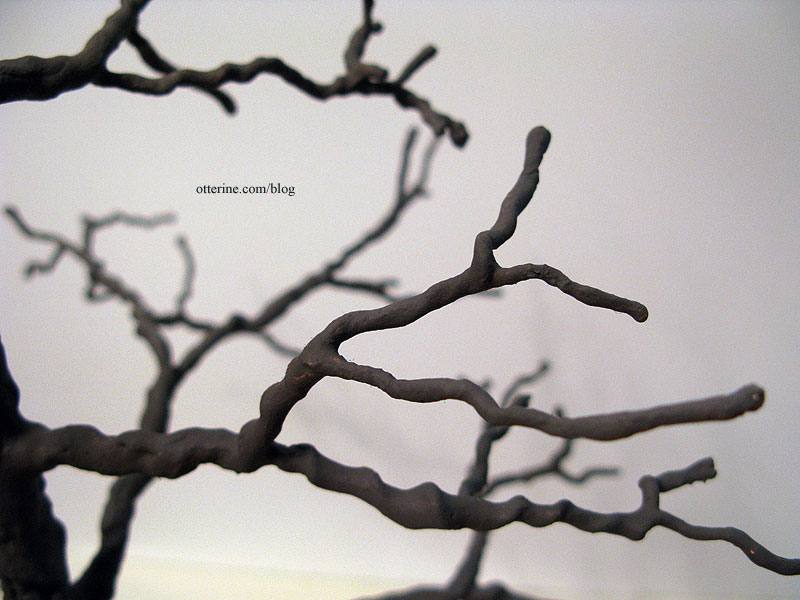
The branches twist and turn just like the real thing. I stippled the paint on to create additional texture which you can see here on the branches.
I think the lower trunk and root structure turned out great! :D
The next few steps were messy, so I didn’t take photos throughout. I did my second coat of paint with an undiluted mix of Asphaltum and Neutral Grey by Americana, with a dash of black. It darkened the tree too much. I followed that with a heavily diluted wash of Traditional Burnt Umber. It made the tree too brown. I followed that with a heavily diluted wash of Neutral Grey and Traditional Burnt Umber (like my first coat of paint), and that seemed to set things right. All these layered washes bring out a depth not achieved with a single application of regular paint.
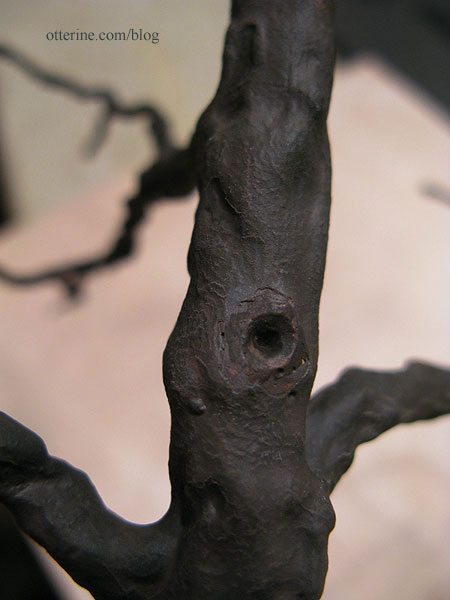
On some of the bare portions, I scraped away where branches have fallen from the tree during its lifetime.
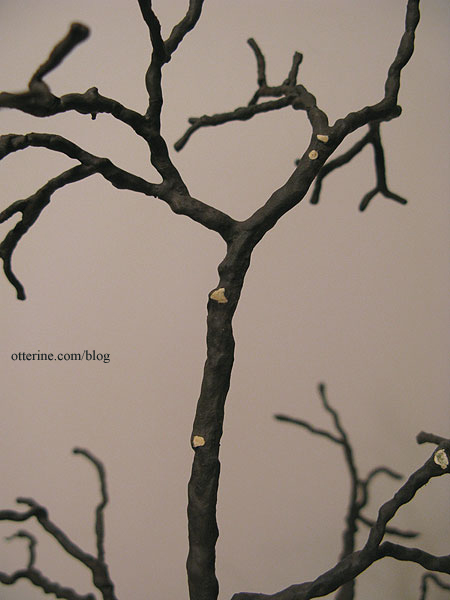
Some I made larger than others, carving out an actual hole.
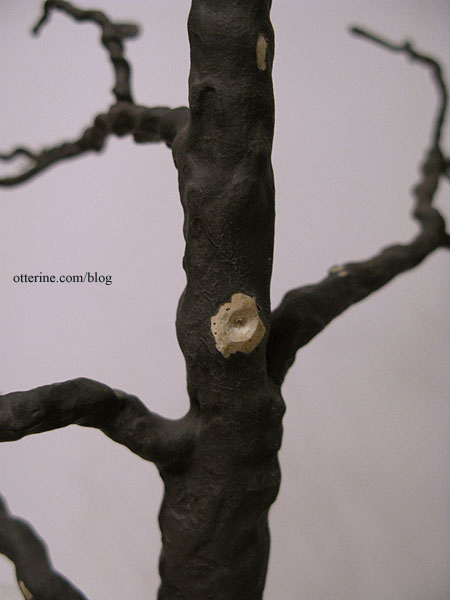
I then painted these individually to darken them. Now, if I wanted it to look like the village just came through to trim the trees along the street, I could have left them. :D
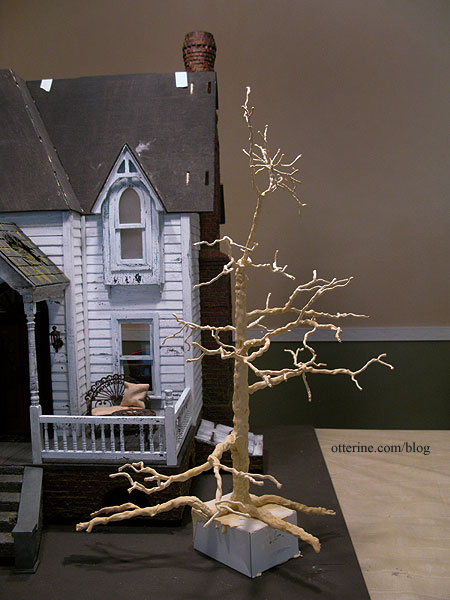
I love the texture on this tree! I am so pleased with the results.
Love, love, love it!
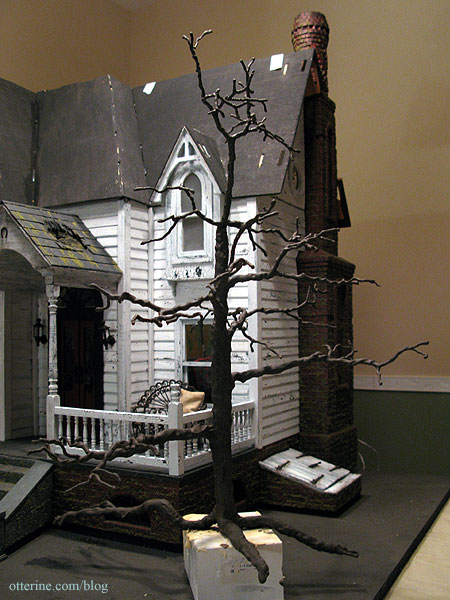
And, like any good haunted tree, you should be able to see faces in it. :O
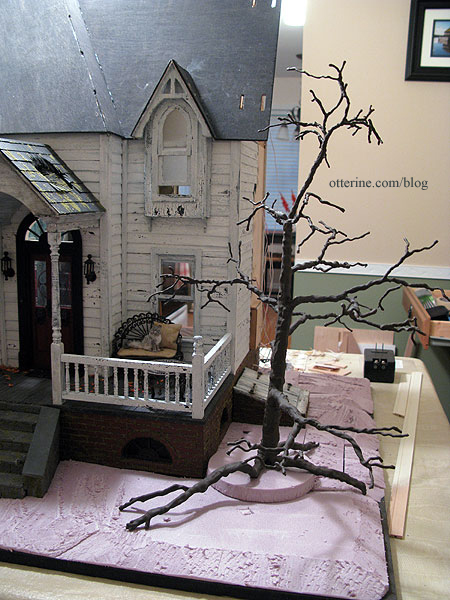
The tree will remain dormant for now, until I get to the landscaping part. I need to finish up the interior and shingle the roof first. I don’t need to be reaching over a tree trying to work! :D
Update: foliage added here.
Categories: Flowers, plants, and trees, The Haunted Heritage
July 1, 2012 | 0 commentsHeritage – The Tree, part 1
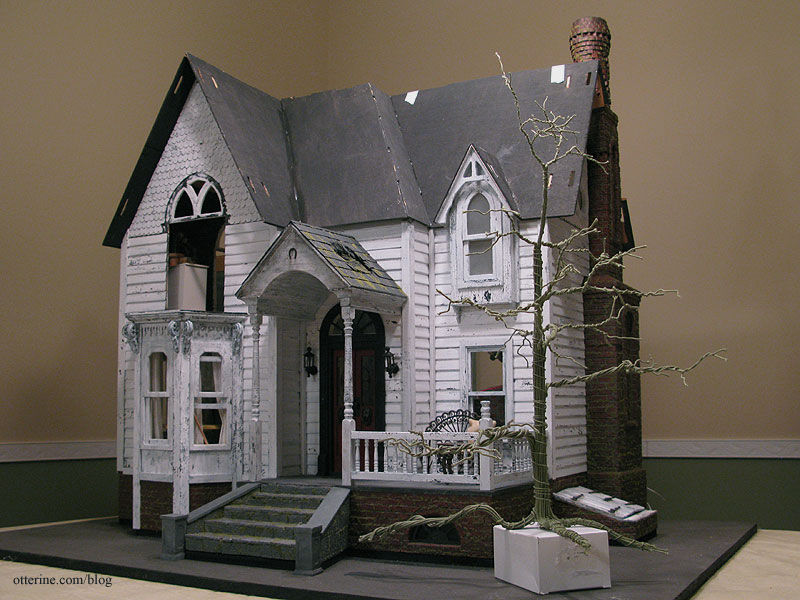
What’s a haunted farmhouse without a big ol’ creepy tree in the yard? :O
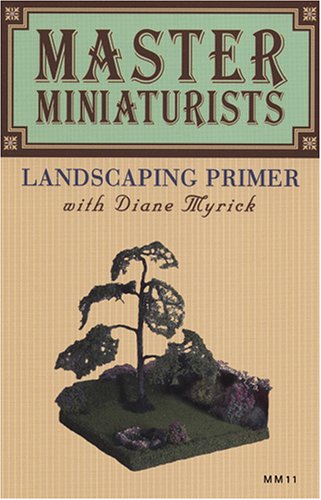
To build my tree, I used the tutorial from the DVD Master Miniaturists: Landscaping Primer with Diane Myrick. This whole series is just awesome!
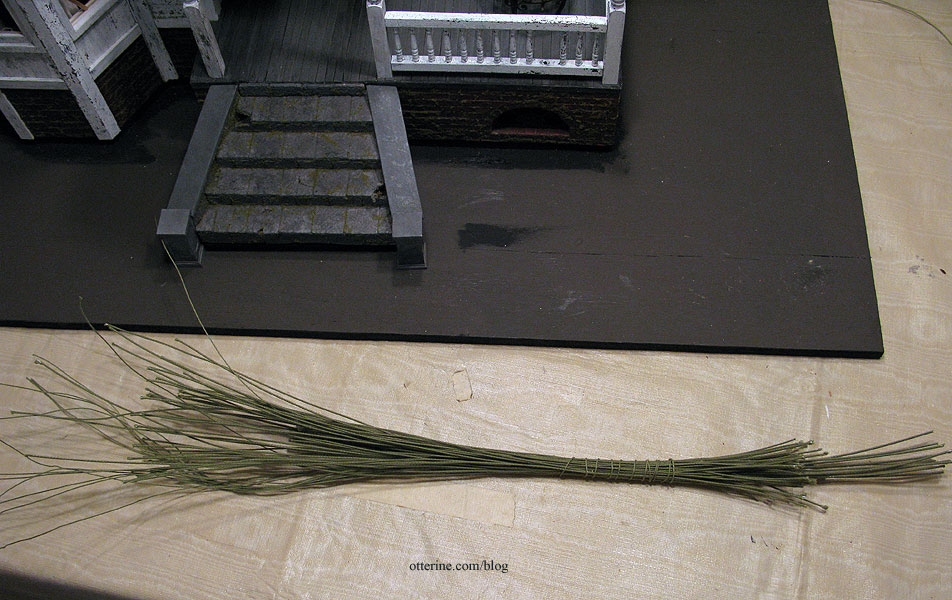
Diane made her tree from 40 pieces of floral wire, but I used 66 pieces: a mixture of 18″ pre-cut floral wire in 18 and 22 gauge. I supplemented the height with 14 pieces of 32 gauge floral wire purchased on a spool that I cut into 20″ lengths.
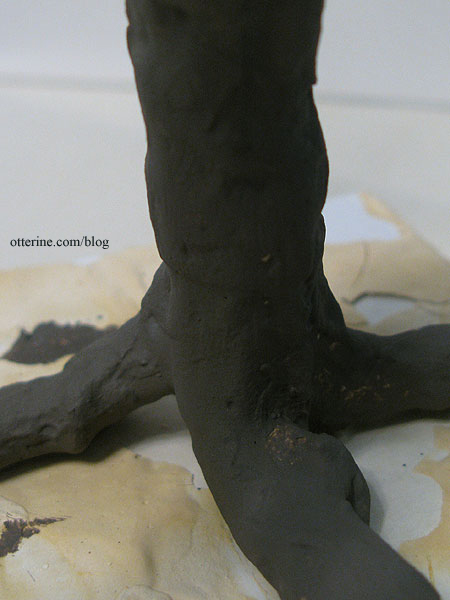
I wanted roots on mine, so I staggered the wires so that the thinnest wires were loose at the top and the thickest wires stuck out at the bottom. I wanted one long root, so I made sure I had a bundle for that as well.
Diane’s tutorial shows a tree with foliage. Since the Heritage is set in the autumn, my tree will be mostly bare (I think). Ha ha. To that end, I spent a lot of time shaping the branches. I also left the house side minus a branch, which might have hit the portico at some point. ;]
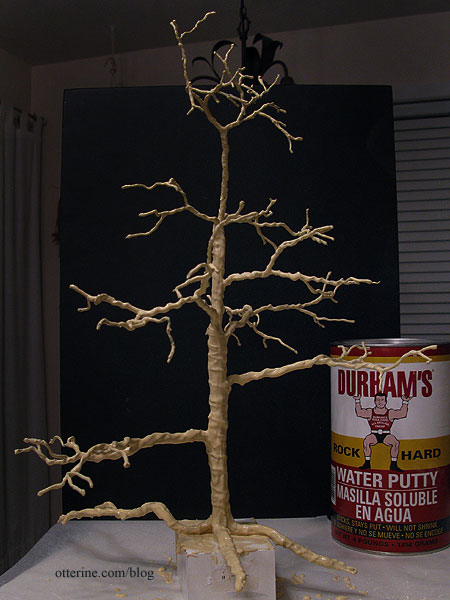
Here’s a nice aerial view of the tree, which stands 18″ tall. The tree has a spindle on the bottom that’s inserted into a box for right now. I will be adding a foam base when I get to the yard portion of landscaping for the tree to sit on, and the root tips will disappear into the ground.
In the tutorial, Diane used Durham’s Water Putty. I ended up with a 4-pound container of it from Home Depot. Did I need four pounds of water putty powder? Uh, no, but it was what was available locally (no shipping) and I had a Home Depot giftcard with enough on it to cover the modest $7.98 price tag. :D
Here it is just after the application.
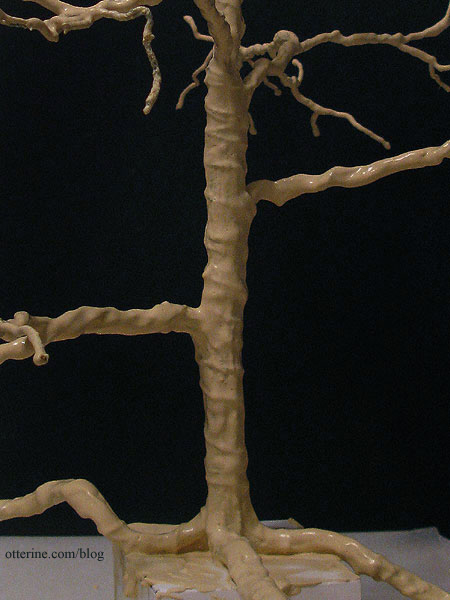
This was the first time I had worked with the putty and I found it to be a great material. The binding wires around the tree still show under the putty more than I think I want them to, so I might add another thin layer once this one sets. I do like the texture overall, though.
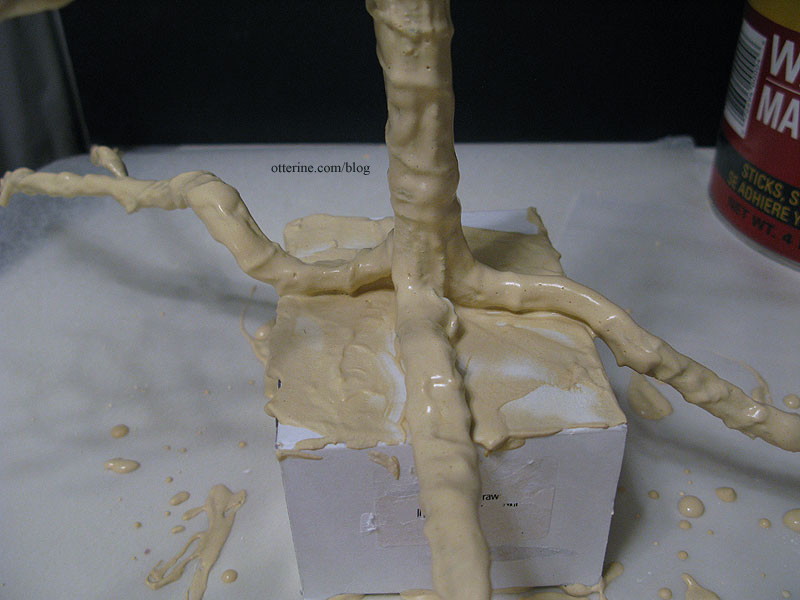
I scraped the excess putty from around the roots to keep them rounded and separate as the putty dried.
I left it overnight, and it dried hard and treelike! :D Some of the binding wires had softened in appearance but others still looked unnatural. I added another layer of putty over the areas that needed blending.
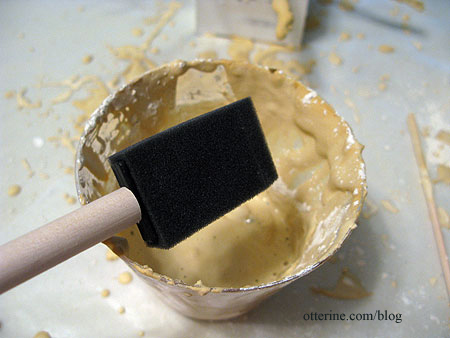
I had kept the cup from the night before, so I just mixed more putty in there. I used a fresh foam brush, though, because the other had hardened. You can’t put this stuff down the drain, so the cups and brushes you use must be thrown away in the trash.
Mike had recently used this material for making river rocks, so I asked him about the properties of it, namely whether you could carve it. He sent me to the Durham’s Water Putty site, and apparently you can do all sorts of things with it.
I used an awl and a file on the dried puddle from last night to see what it was like. It took the carved texturing very easily.
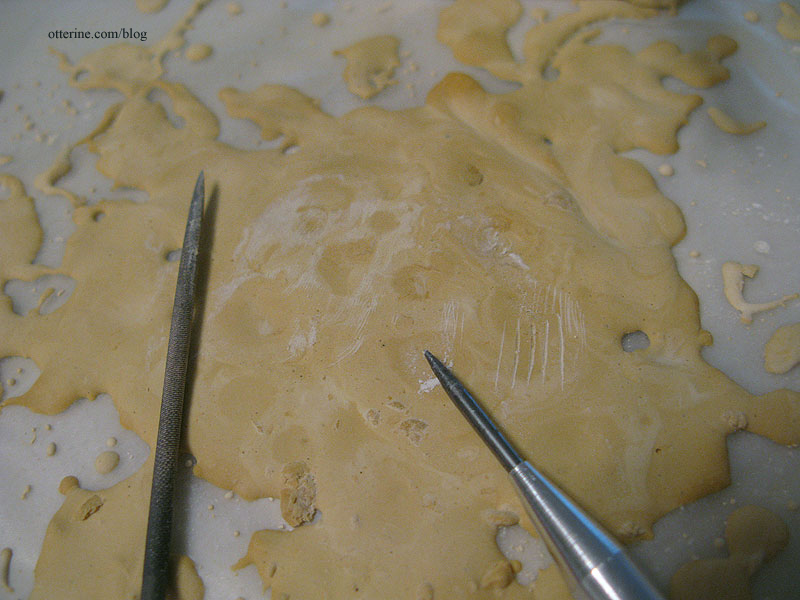
Even with the yellow coloration, it already looks like a real tree.
Next up will be painting once the second layer of putty dries.
Part 2 here.
Categories: Flowers, plants, and trees, The Haunted Heritage
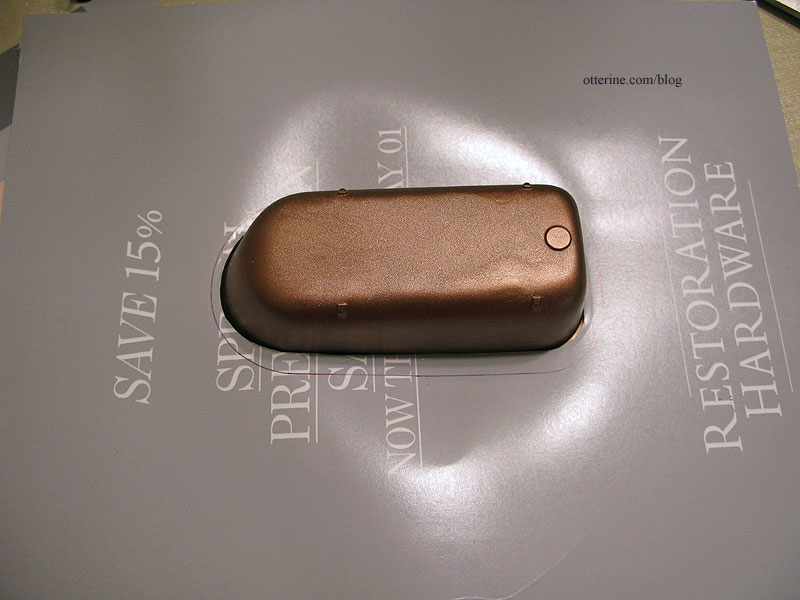
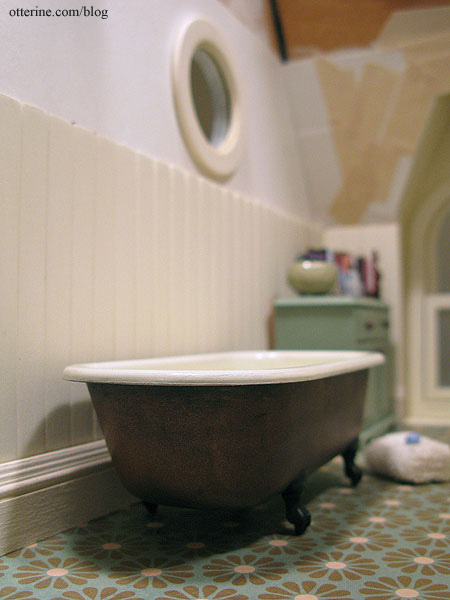
June 30, 2012 | 0 commentsHeritage – copper claw foot tub
Stepping further into creative license here. I know that a tall tank loo isn’t exactly 1920s, but I really like the Chrysnbon Victorian set for a vintage bathroom and I don’t know when I’ll next build a house where it would be even remotely appropriate. So, the Chrysnbon bathroom kit has found a home in the Haunted Heritage.
For the bathtub, I first masked off the top and sprayed the bottom with Burnished Copper Metal by Rust-Oleum. I let that set for well over a week, not for any particular reason other than life kept moving along after I sprayed it.
To make the inner portion a different color, I traced the tub onto a piece of heavy paper and cut an opening just wide enough to have the tub sit inside to cover the copper painted portion. Quite fitting that this is an ad for Restoration Hardware, no?
I used masking tape on the opposite side and pressed the tub onto the surface.
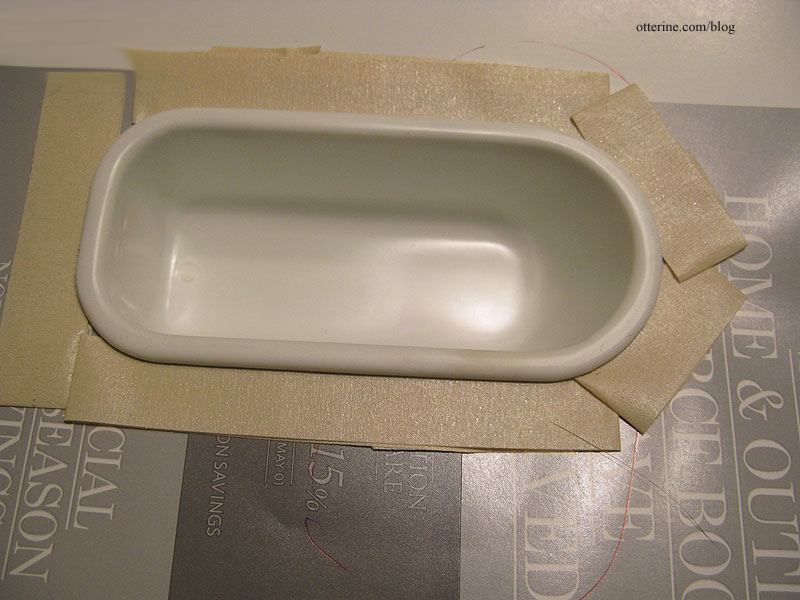
I sprayed the inner portion of the tub and the sides with Krylon Gloss Ivory. After the first coat, I noticed the inside of the tub wasn’t as glossy as the overhang. I thought that would work well for an old tub, so I didn’t add too much more paint to the bottom of the tub.
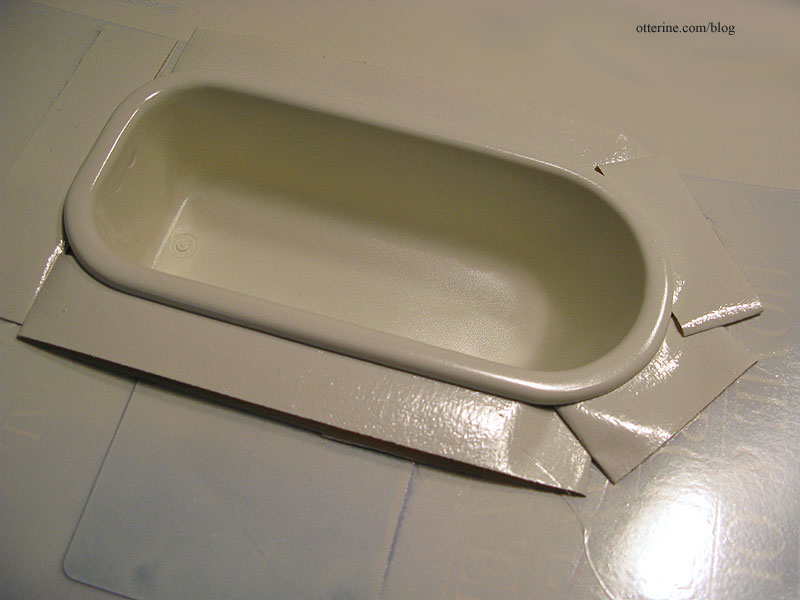
I sanded the edge to remove any excess paint and roughed up the surface in a few areas. It’s an old tub, after all. I had a little bit of overspray even with my precautions, but that didn’t matter in the end.

I used acrylic paint washes to darken and age the copper.
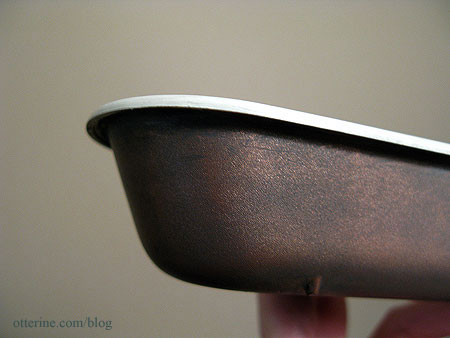
The feet were sprayed with flat black, but I added a black acrylic wash to them to tone down a little bit of the shine. I’ll age the inside of tub later when I install the faucets but so far, I love it!

The copper color of the tub brings out the copper color in the flooring. I love how this little plastic tub looks like real metal. :D
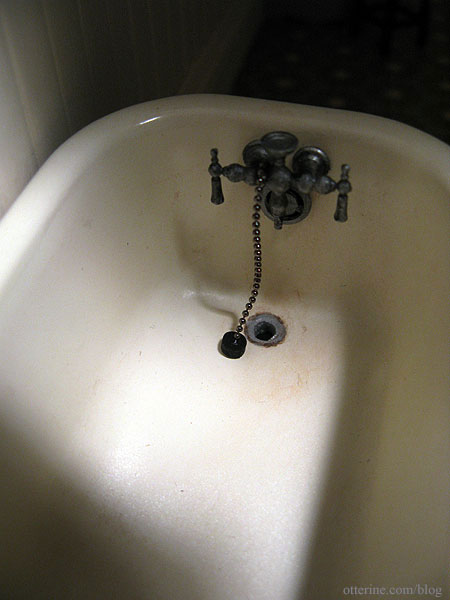
I painted the inner drain of the tub with Testors Aluminum and then added aging washes to the bathtub once the paint was dry. I watered down Terra Cotta acrylic paint by Folk Art and used it to simulate the residue of well water stains. It was a little bright, so I added a wash of dark brown. I wiped most of the pigment away going for subtle staining from years of luxurious baths.
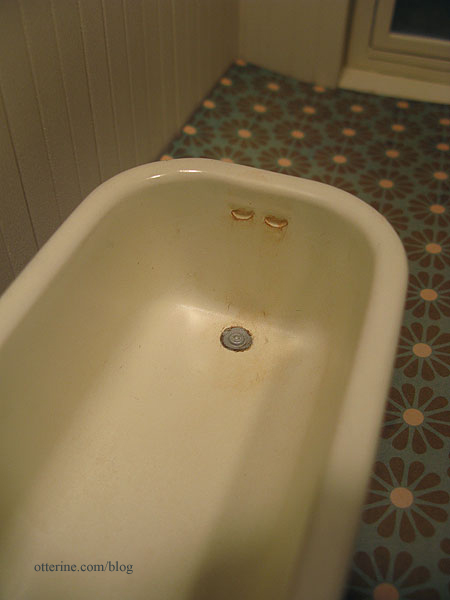
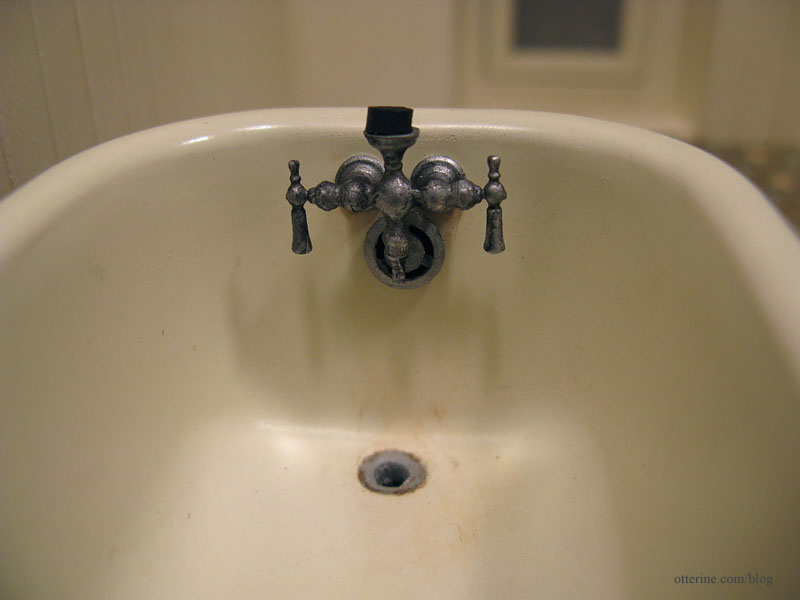
I assembled the tub faucets and painted them Testors Aluminum. I added a light wash of black to bring out the details before installing them in the tub. I also decided to add a stopper on a chain, so I drilled out the bottom of the tub to make an open drain.
If you have an open drain, you need a pipe…made from excess sprue (the frame around plastic molded parts) and a washer. The pipe is glued to the tub, but the washer will remain loose so it can sit flush with the floor while disguising the end of the pipe.

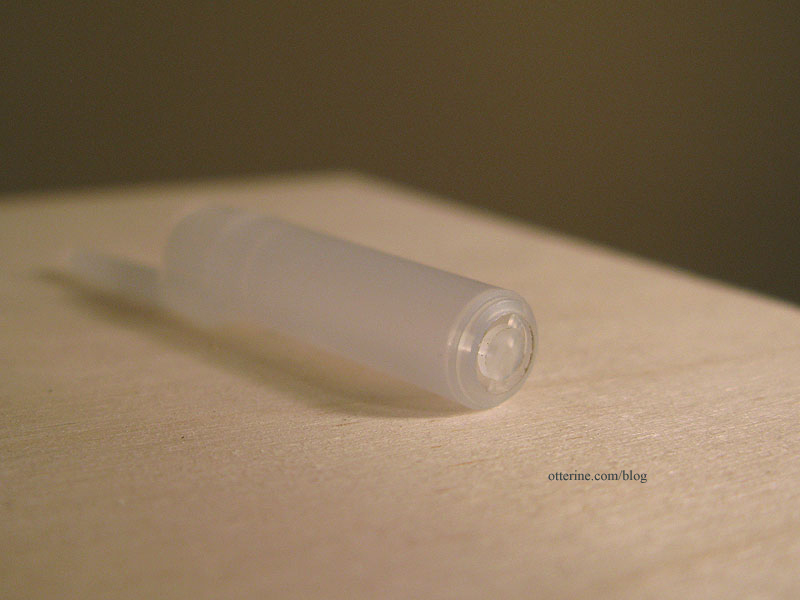
I added an overflow made from a pen cap.
Where’s the drain pipe for the overflow? Never you mind that! I have to draw the line somewhere. It’s not like the thing has actual running water. ;D
The stopper is made from a spare piece of sprue and is currently sitting in the stopper holder. How appropriate.
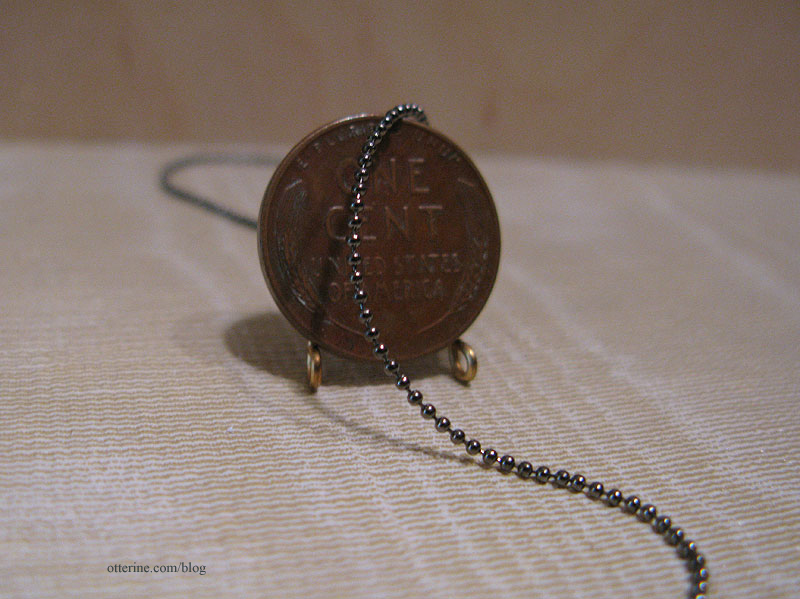
The finest chain I had on hand looked too bulky, and it was brass though I could have painted it if it had worked otherwise.
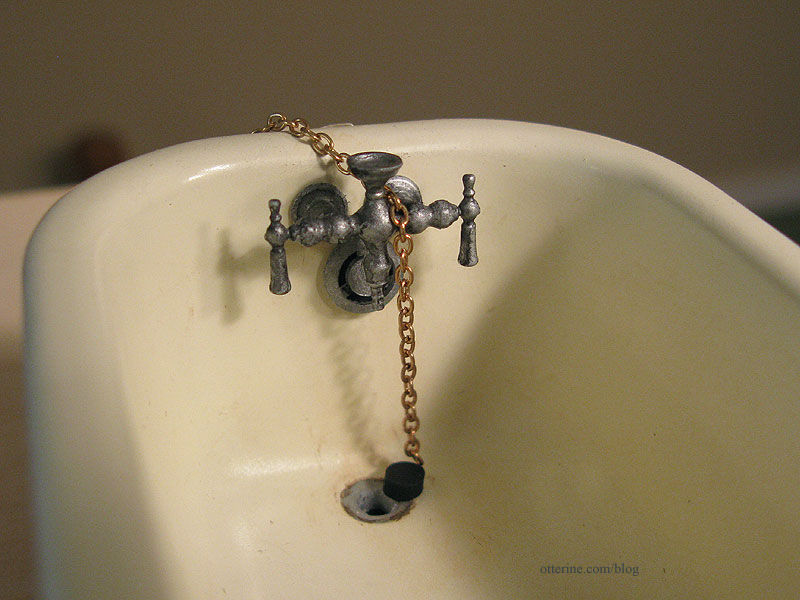
I went on the search for fine ball chain, but you can’t find it in the local stores around here. The smallest they have is 2mm, which is too large for scale. I bought a 5′ length of 1mm gunmetal ball chain from Cindy Chan since that was the lowest price I could find. I need to come up with some uses for the other 4′ 10″ of chain!
I cut a bit of chain longer than I needed and used super glue gel to attach it over the faucet. I bent it into a small curve with my fingernail to make sure it was a snug fit over the top.
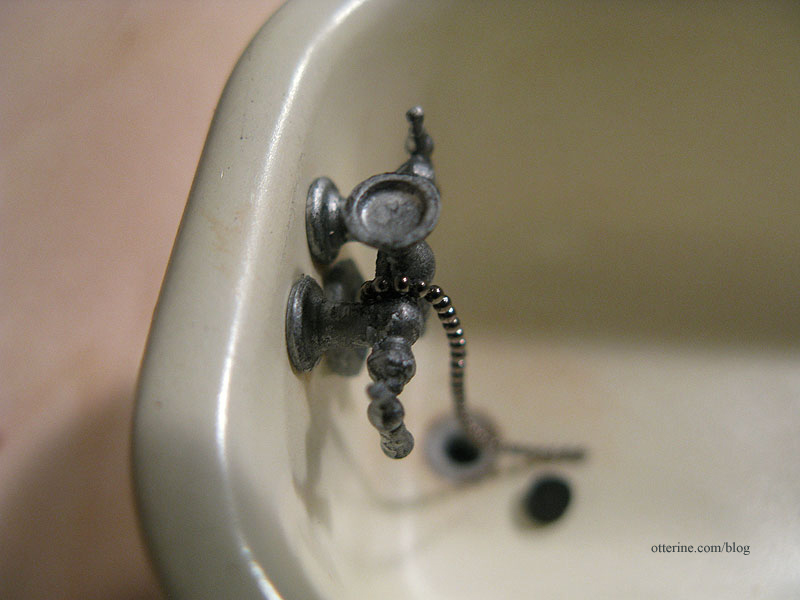
I placed the chain by the stopper I made from a spare piece of sprue to determine the final length of chain.
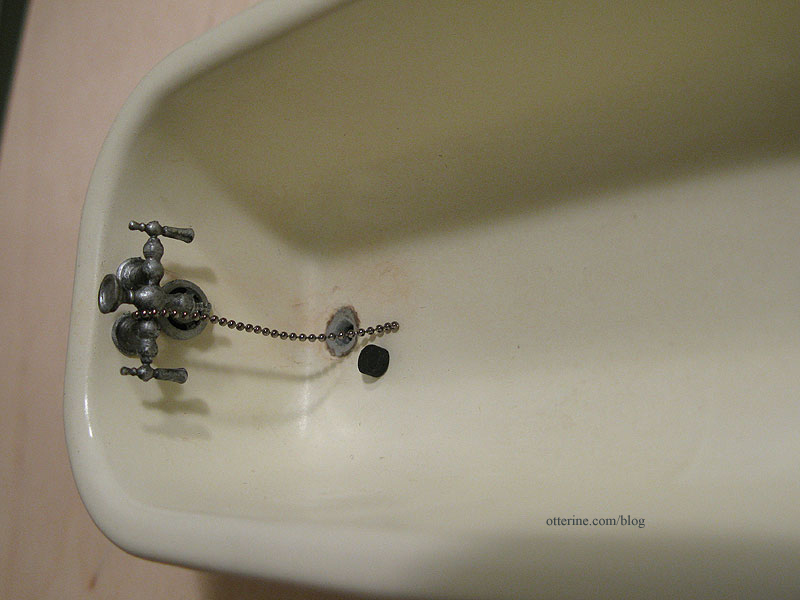
Since this is still large for exact scale, it doesn’t drape the way it would if it were real life chain. So, I made it just long enough to have some slack but look as though it has sufficient length to plug the drain. I attached the end of the ball chain to the stopper with super glue gel.
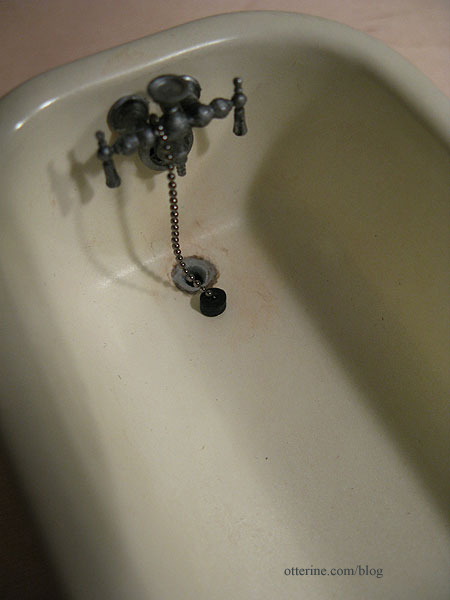
I might be able to manipulate the drape once the glue sets, but I think it looks pretty convincing as is. :D
Categories: The Haunted Heritage
June 19, 2012 | 0 comments


NOTE: All content on otterine.com is copyrighted and may not be reproduced in part or in whole. It takes a lot of time and effort to write and photograph for my blog. Please ask permission before reproducing any of my content. (More on copyright)

Categories:
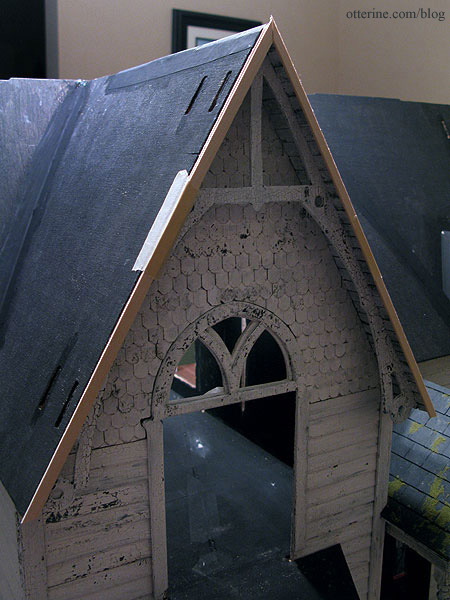
Heritage – gable and eave finishing
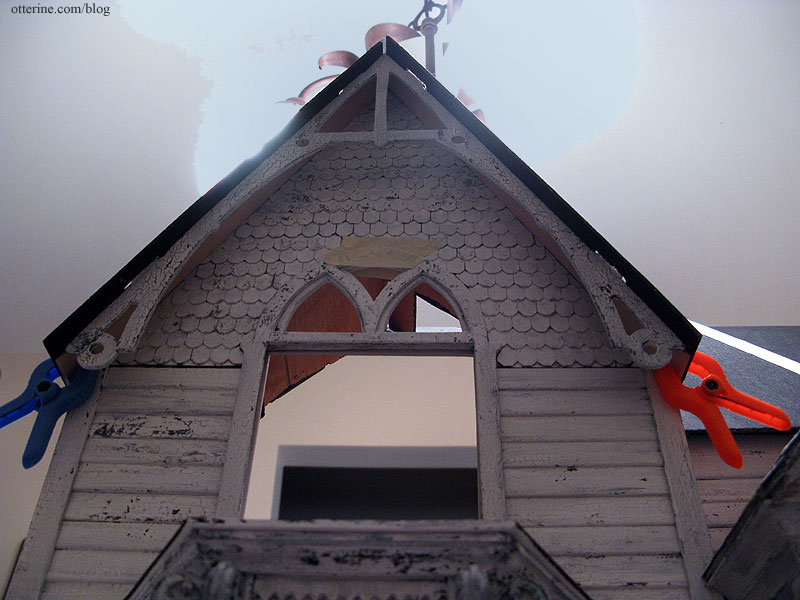
I added the final trim for the front gable between the eave and the house. I find that the more trim I add, the more realistic the house seems. (Note to April: if you plan on adding finishing trim like this, do it before adding the fancy gable gingerbread…trying to get my fingers in this space was interesting.) Yes, I am aware I need a wasp’s nest or hanging bat here. :D
I added the final trim for the front dormer on the outer edges and at the inner eave. I had to use tweezers to glue the inner trim in place. All that’s left for the dormer is the roof ridge finishing.
I completed the gable eaves and trims for the open side gable as I had done for the front gable. This time, I added the finishing trim between the eave and the house before adding the gingerbread.
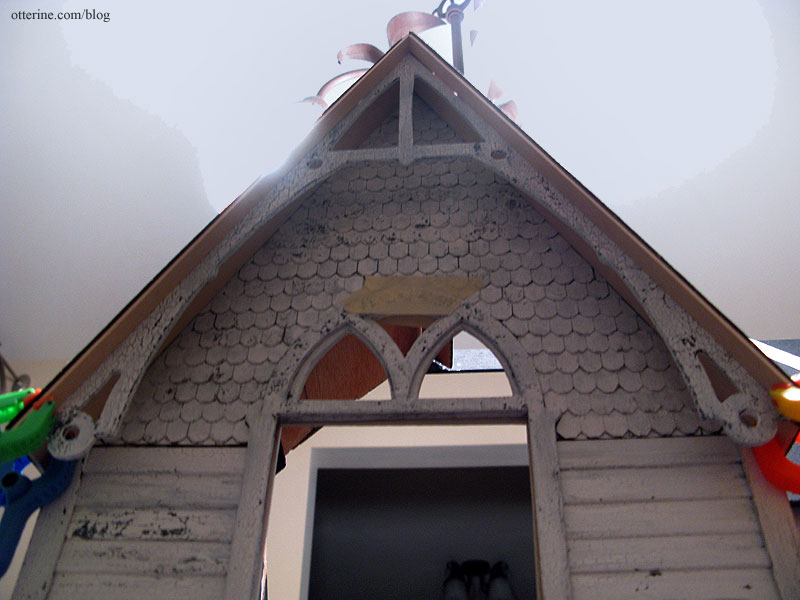
Before adding the outer edge trim, I checked the fit and cut any excess from the forward edge. The photo is a little blurry, but you can see the unpainted portion where I cut away the excess.
When I shingled the edges of both side gables, the shingles didn’t protrude over the edge as much as they had for the front gable and front dormer. The trim here sticks out just a little farther than the shingles, so I painted the top edge of the trim to match the roof to make it blend more. Again, it was hard to photograph with the way the house is sitting under the lights.
Some of the half scale shingles on the gable shrank away from the arch window and in the middle. This didn’t happen on the front gable, and I used the same glue and paint processes on each. Who knows? It works, though, for my falling apart manor. ;]
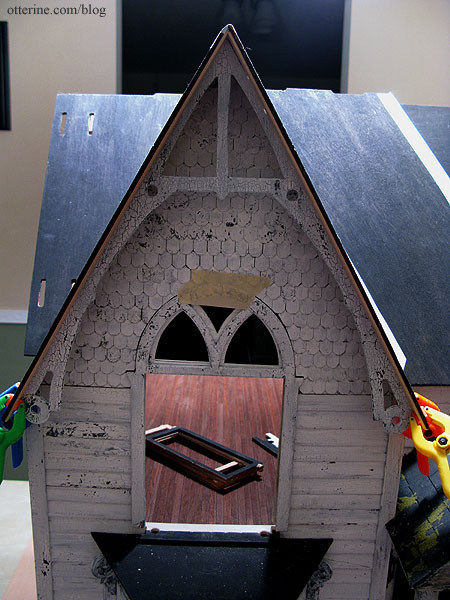
I like the way the two finished gables look together. :]
For the chimney gable, see part 1 and part 2.
Categories: The Haunted Heritage
January 24, 2013 | 0 commentsHeritage – back roof dormer, part 5
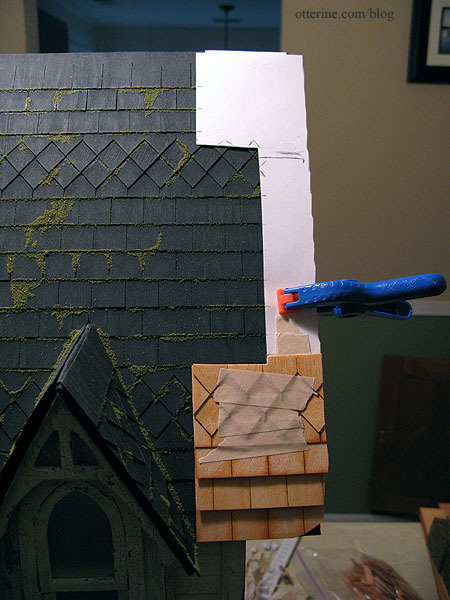
Continuing work on the back roof dormer. I glued on the flat roof and while that was drying, I cut the shingles for the new back roof using a paper template. I had to work from the top down so the shingles would align correctly over the open back and along each side section.
I taped the completed template onto the house to see if the layout works well. The back roof isn’t as long top to bottom as the other roof pieces, so the shingle pattern had to be adjusted slightly as well. I omitted the bottom diamond section but kept the top one. The chimney notch will be adjusted when I shingle the final roof piece, but I’ve left those pieces long for now.
Before gluing on the new back roof, I drilled pilot holes for pins to reinforce the joins.
I glued on the new back roof, adding Tyvek reinforcement over the roof ridge. The final finishing of the roof ridge will cover it.
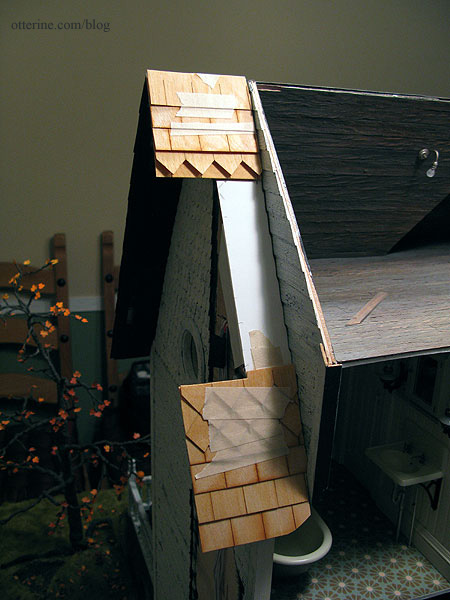
I shingled the new back roof, adjusting the shingles I had cut using the template. Here is the right side.

And, the left side. The chimney is still removable.
There are two long rows of shingles to complete the top. Before gluing on the top row, I taped it in place and marked where the roof ridge hit behind them. I cut the shingle strips along that line and glued them in place.
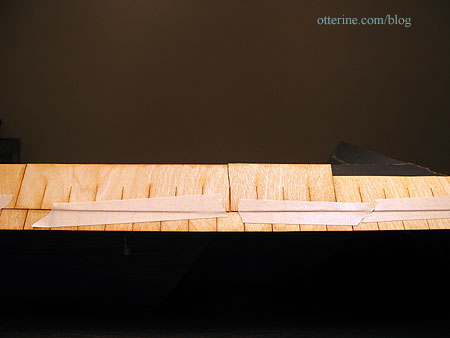
I taped and clamped the shingles to dry overnight.
Categories: The Haunted Heritage
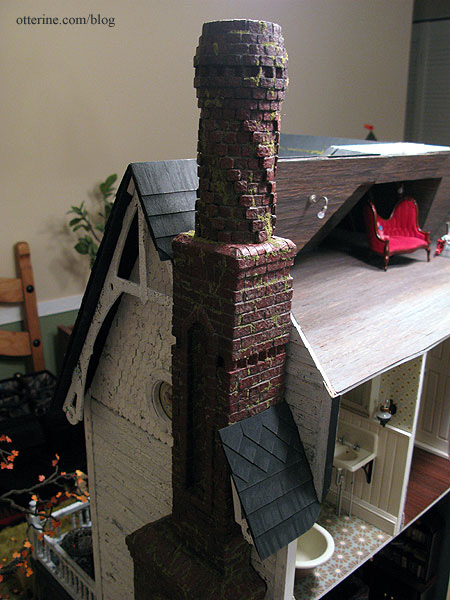
January 21, 2013 | 0 commentsGrandma’s attic – faux slats and rafters, part 3
I continued working on the faux slats and rafters for the attic. After getting the attic flooring done and installed, I cut the rafters to fit the forward gable and glued them in place.
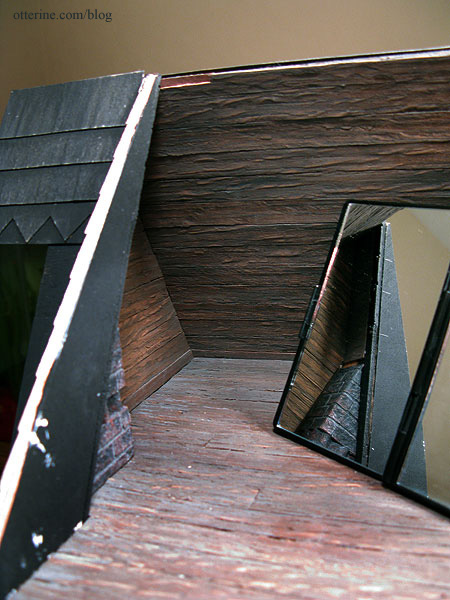
After adding the remaining roof pieces to finish off the back of the house and attaching the chimney to the house, I was able to work on finishing those portions of the attic walls. Had to use a mirror to work in some tight spots.
I glued in the beams and rafters in the two side gables and cut rough rafter lengths for the adjacent walls that will be trimmed to the correct length during final installation. I trimmed around the chimney as well.
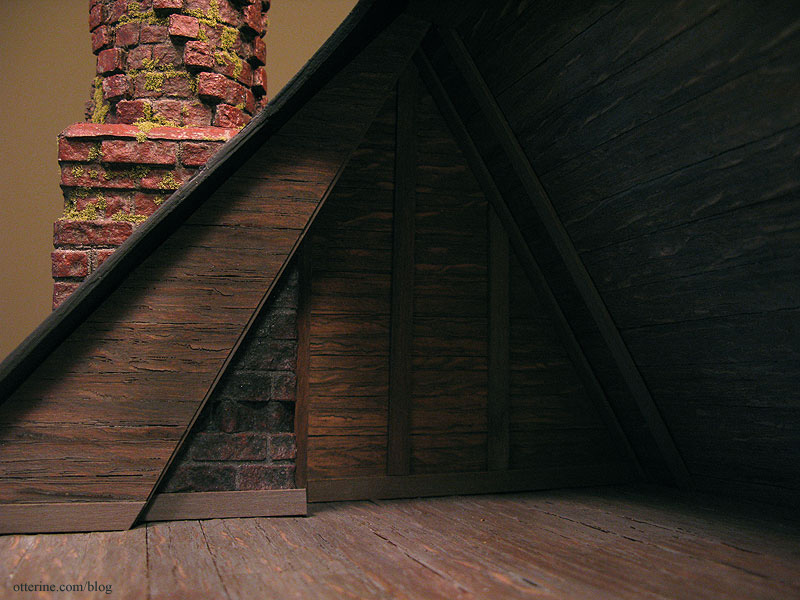
I installed the main long beam made from the triangular strip wood used in the forward gable. Because the angle of the roof changes with the added back dormer, the triangular beam spans only between the two new roof side addition walls. The unpainted portion will be covered by the new roof back piece. It is secured mostly by tension with a spot of glue and tape in the middle.
Categories: The Haunted Heritage
January 20, 2013 | 0 commentsHeritage – back roof dormer, part 4
Continuing work on the back roof dormer. I added the remaining side roof piece and its roof addition wall. I used the same pin technique used for the opposite side to help counteract any warping in the attic floor. I added some Tyvek reinforcements to the attic interior and over the roof ridge. The roof ridge finishing will cover this patch.
I shingled the back roof piece, first by making a template and then shingling directly onto the house before painting the new shingles to match.
Moss will come later.
I cut the new back roof piece from 1/8″ thick plywood using my foam template as a guide and then primed both sides with black acrylic paint. I finished the top of the flat roof with sandpaper and painted it black, too. Both final roof pieces remain unattached at this point.
I cut a paper template for the interior attic slats and rafters treatment as well as a template for the exterior roof shingles for the new back roof piece.
Next, I have a whole bunch of trim to add to the house, and most of it needed to have white paint crackled over black. Figuring it would be easiest to paint first and then add touch-ups to any clipped ends, I painted all of the long strips of wood whole. Those are drying right now.
Categories: The Haunted Heritage
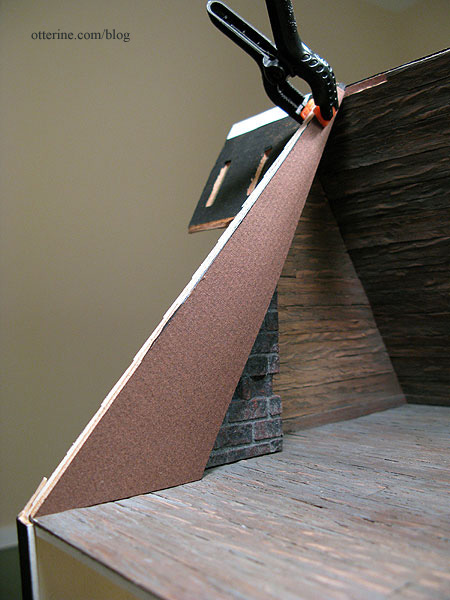
January 19, 2013 | 0 commentsHeritage – back roof dormer, part 3
Continuing work on the back roof dormer. Since I last posted about the dormer walls, I’ve added the aged paint treatment to them.
Before gluing the roof addition wall onto the roof, I adjusted the template for the shingles. I can’t place any thickness under the chimney portion, so I marked where the shingles will be. This is going to be an interesting bit of shingling.
The lower portion of the left side roof addition completes the bathroom outer wall and the upper part is an attic wall. I primed the top black and the bottom white. A warp in the bathroom ceiling board developed on this corner when I installed the attic flooring. I held the ceiling board down with masking tape while I mapped out my plan.
First, I drilled a bunch of holes in the ceiling board where it would be glued to the roof addition wall. I cut the ends from straight pins to make headless pins and glued them into the drilled holes.
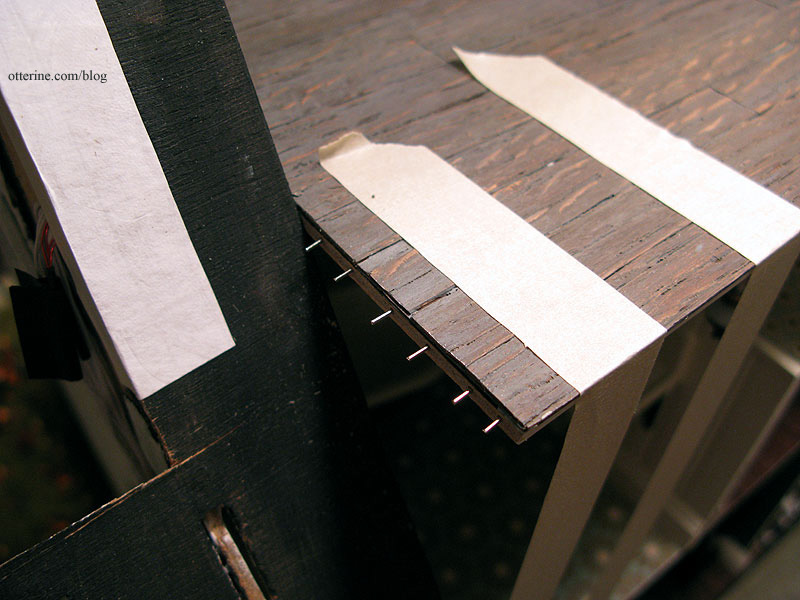
To mark the same spots on the roof addition wall, I dabbed some black paint onto the end of each pin and lightly pressed it to the wall. I drilled holes to match and tested the fit but didn’t get a photo.
I drilled three holes in the roof board to stabilize the join with the roof addition wall. I marked where these would be along the wall and drilled holes into the roof addition wall. I cut the pins to fit.
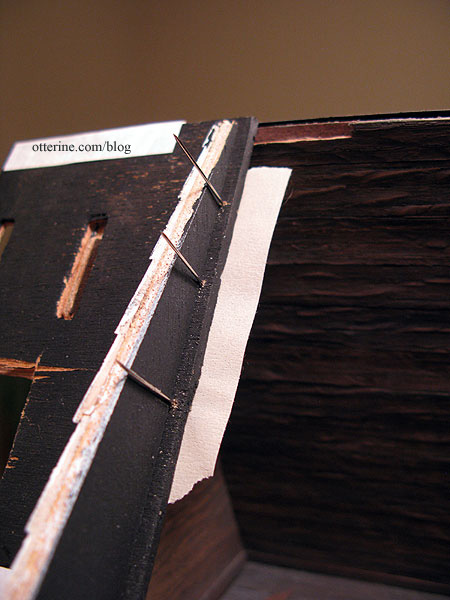
I added another pin in the bathroom along the roof board. I removed the longer pins from the roof board and spread glue where the pieces would meet. I pressed the wall into place along the short pins in the ceiling board. I then inserted the longer roof pins into the predrilled holes. This wall is solid!!! Hooray! :D
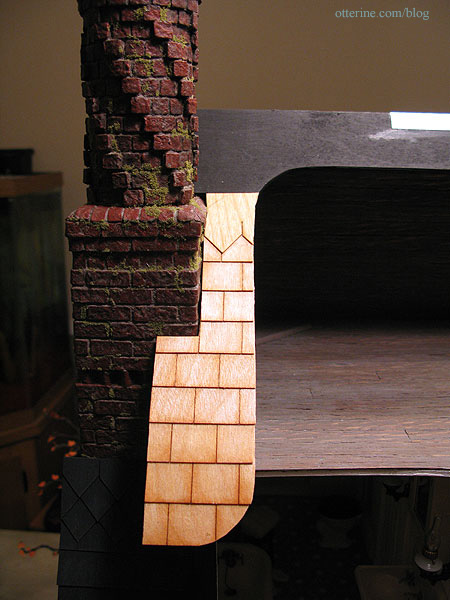
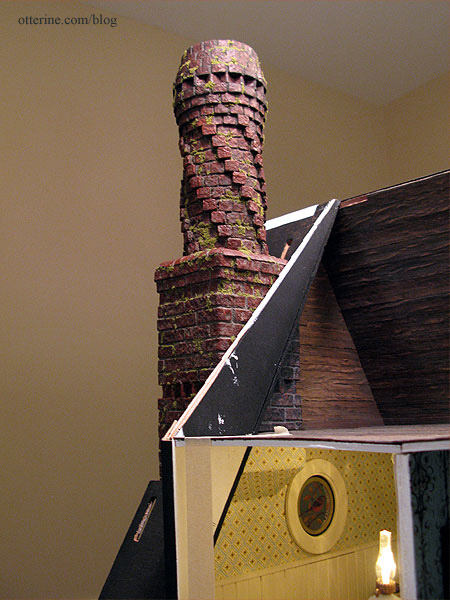
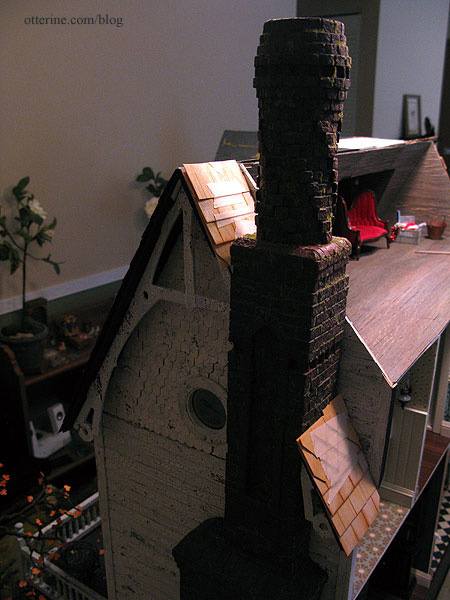
The below photo shows the exterior main chimney, the attic chimney and the covered chimney section in the bathroom. When viewed together, they create the illusion that the chimney is a solid structure with the house built around it.
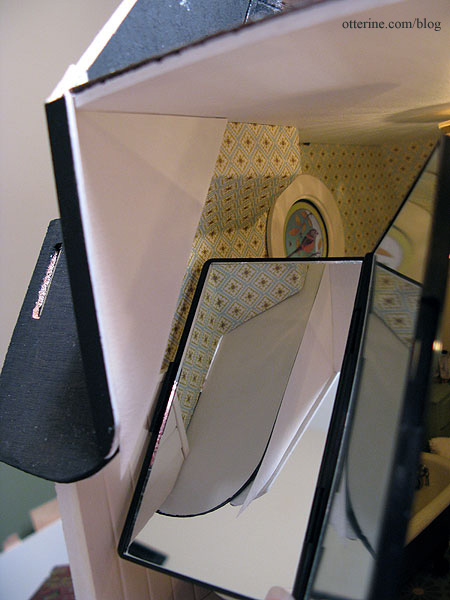
I made templates for the two areas where the roof board and the roof addition wall show in the bathroom. I had to check the fit of the interior one with a mirror because there is no way to see in there otherwise. I also used the mini bathroom lights as work lights. :D
I then made a template for the attic wall. This will have the same slat treatment as the rest of the attic.
Back to the roof template for shingling. I started at the bottom and followed the same square and diamond pattern I had done for the front roof. Once that section was cut and fitted around the chimney, I clipped it to the front roof to mark where the shingles would align.
I finished the shingling and fitting on the template following these markings. I’ll adjust that top row of diamond shingles on the lower half to be straight across when I do the final shingling.
Looks like it worked! :D
After gluing the shingles to the roof board, I painted the new roof with a blend of black and grey, then sanded the surface slightly to wear down the finish.
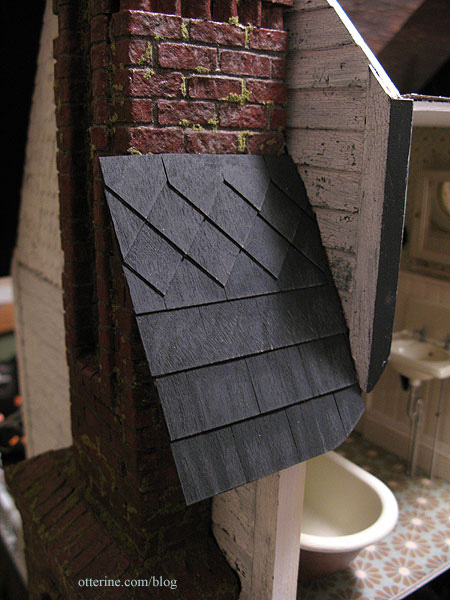
I still need to add the moss and address the flashing on the chimney, too. (From my limited research, I believe chimney flashing is usually under the shingles on the sides, but we’ll just ignore that.)
Categories: The Haunted Heritage
January 13, 2013 | 0 comments
NOTE: All content on otterine.com is copyrighted and may not be reproduced in part or in whole. It takes a lot of time and effort to write and photograph for my blog. Please ask permission before reproducing any of my content. (More on copyright)