

Heritage – stone steps, part 1
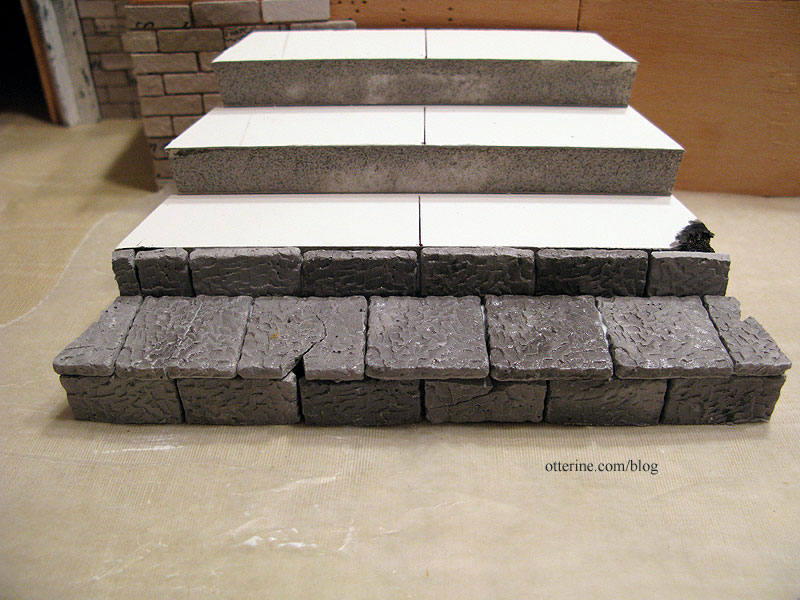
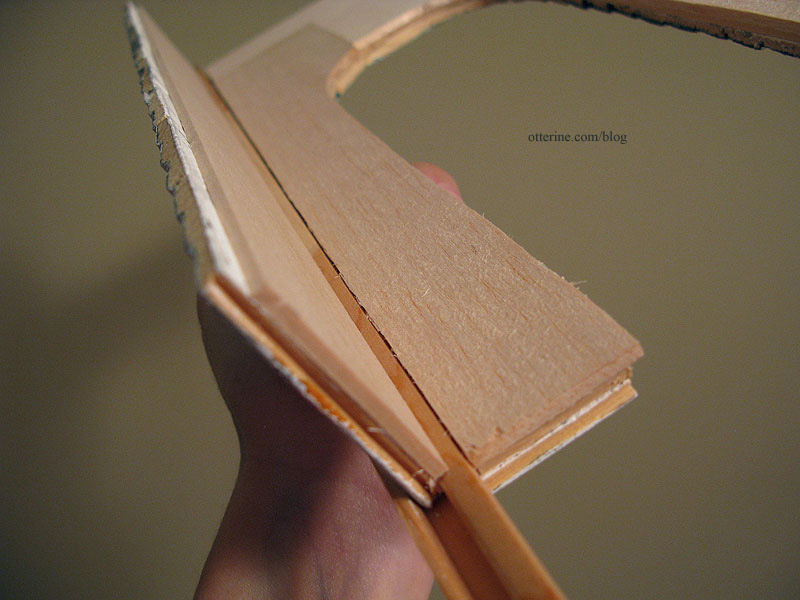
The new front stairs for the Heritage are made from a 1/2″ thick foam core base.
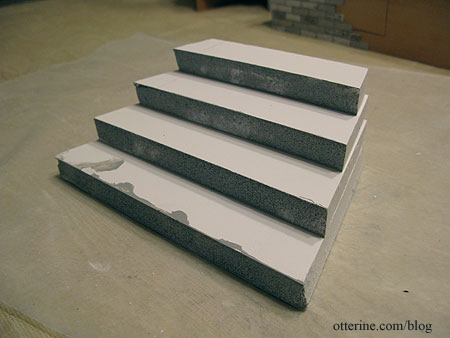
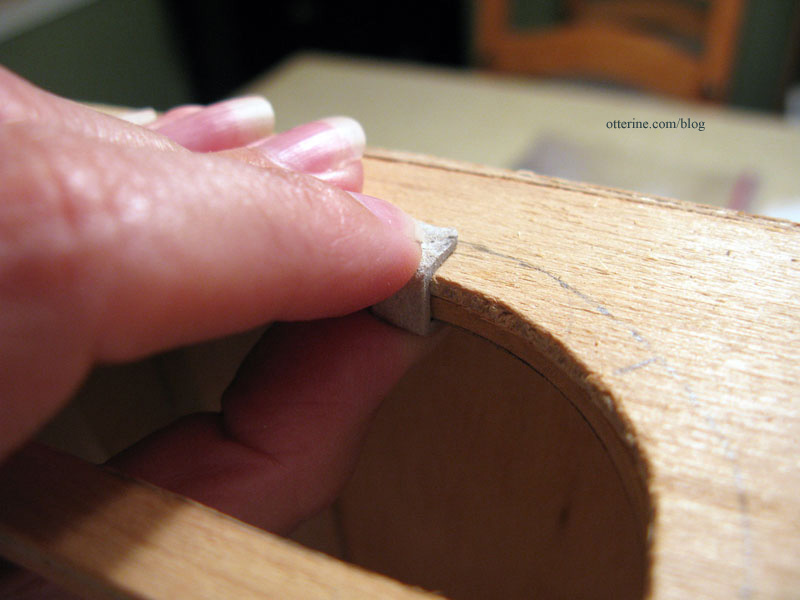
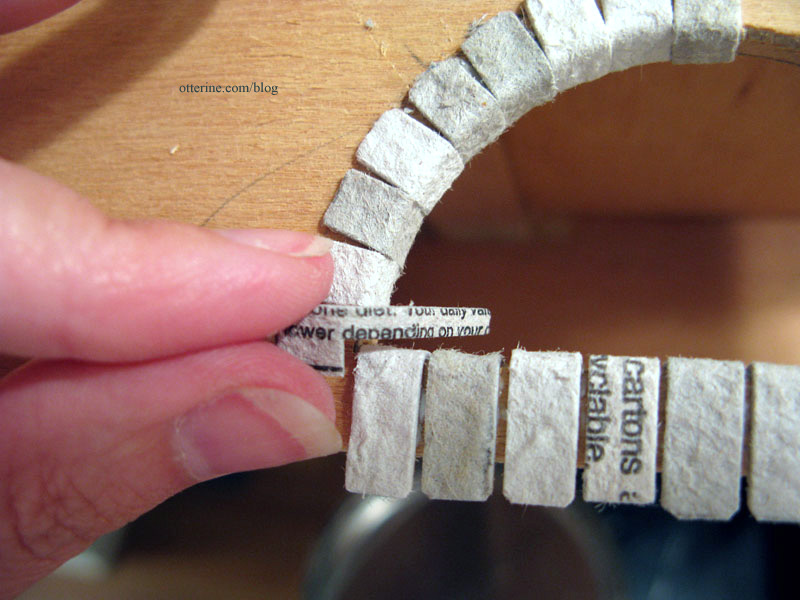
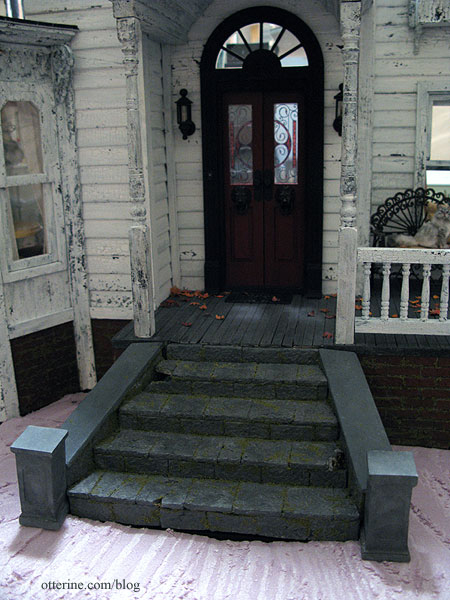
I had considered using paperclay for the stone texture, but I then remembered I already had 50 granite pavers in my stash of mini supplies. These can be easily cut with a utility knife, so I opted to use them instead. I started with the risers, cutting each 1″ paver in half.
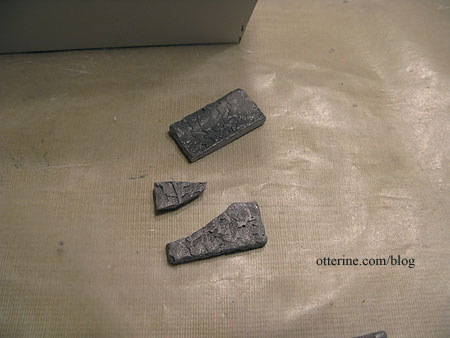
As I was getting the hang of cutting them, a couple of them broke. Perfect for my worn out old house! I gouged out the foam behind the hole in the paver and painted it black before gluing the broken pieces onto the foam base.
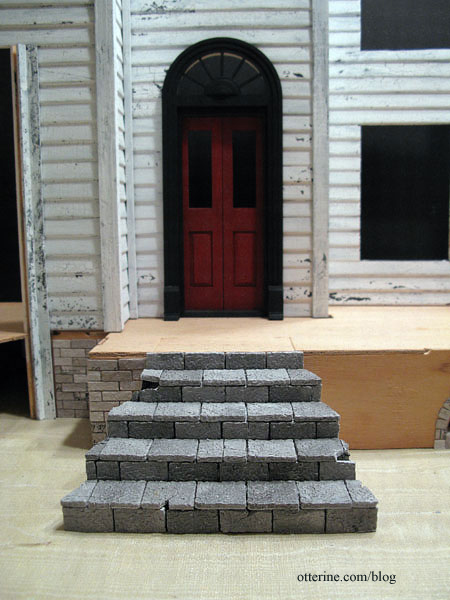
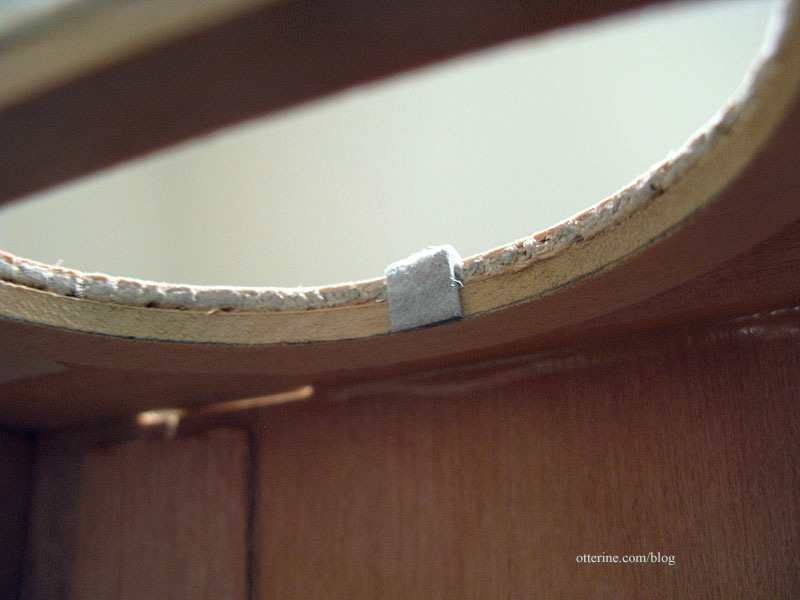
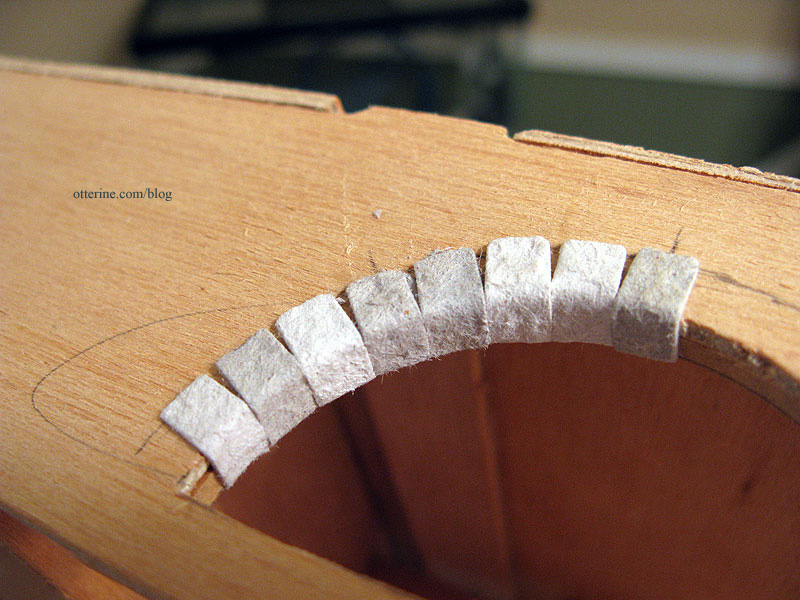
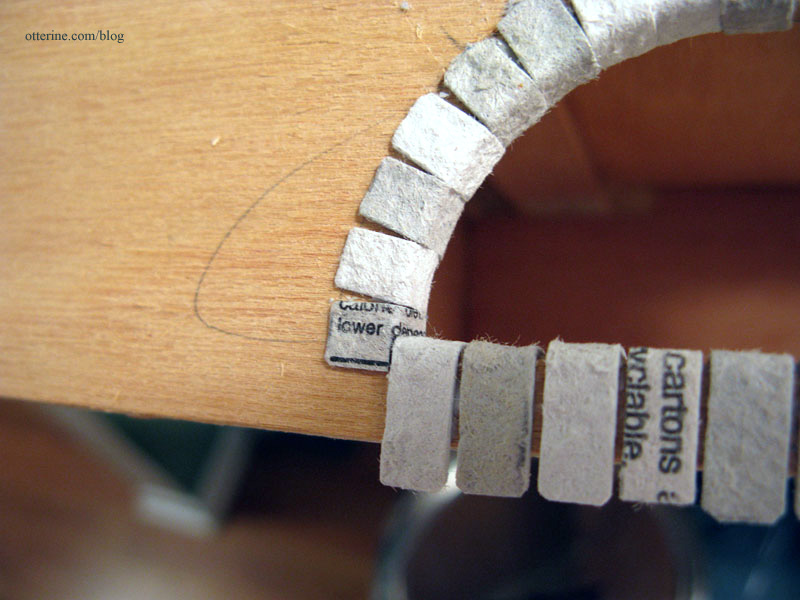
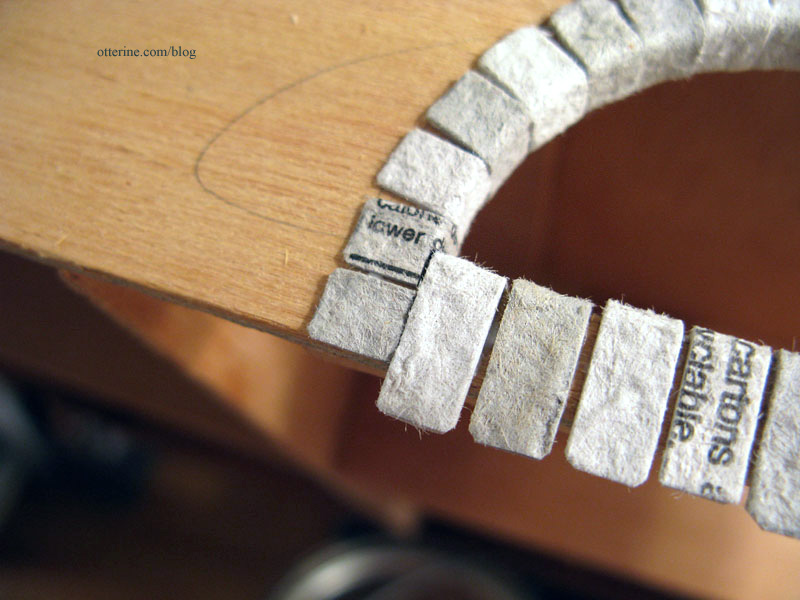
With the tread pavers in place, it looks awesome! :D
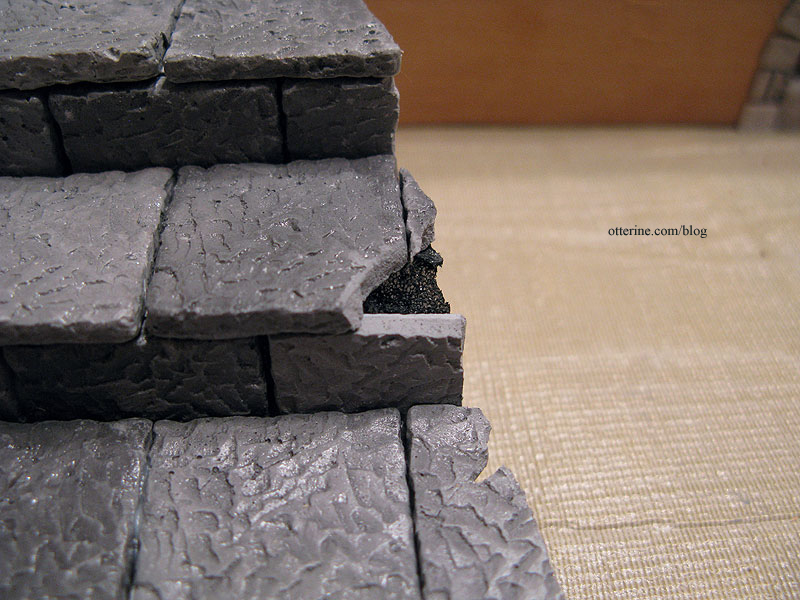
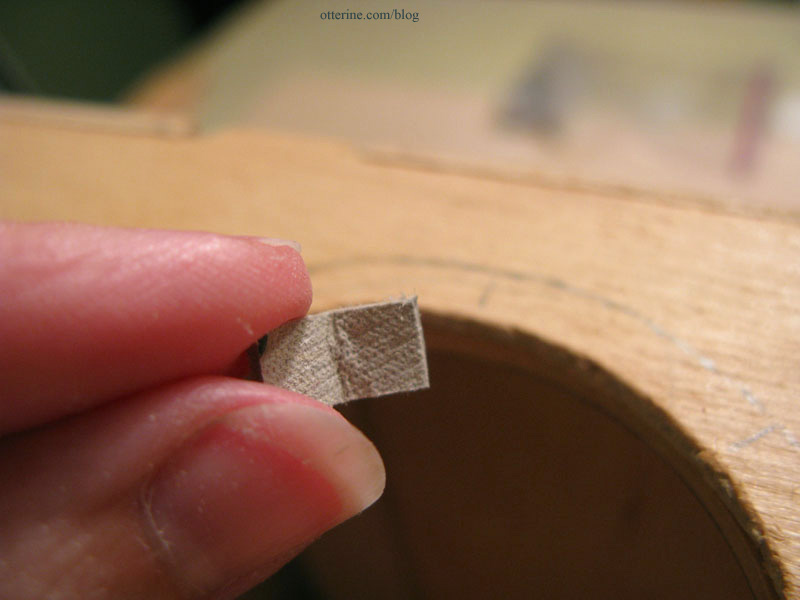
As you can see, some holes are larger than others. I can put plant matter and moss here when I get to the landscaping part.
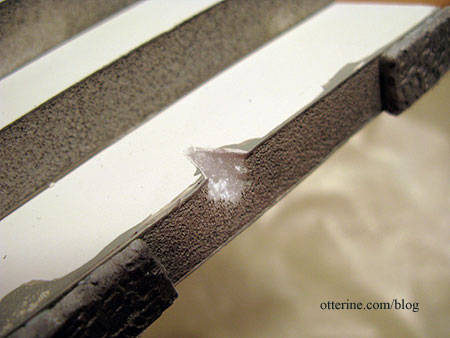
I decided to line the top of the foundation with stone as well. I thought having brick on this section would look inconsistent and out of place. Interestingly enough, trying to break them isn’t as easy as accidentally breaking them! But, I managed to intersperse some other breaks and holes throughout.
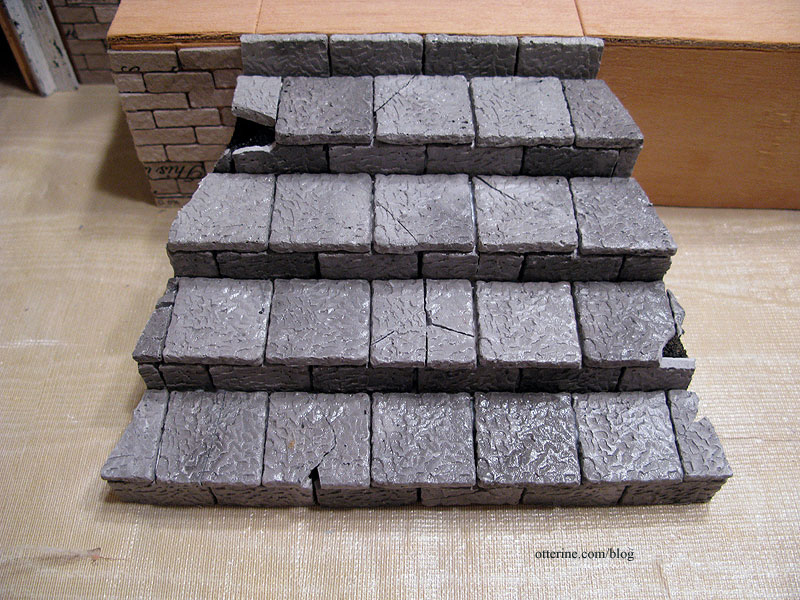
here’s still the aging process and grouting to come, but already I love the look of them!
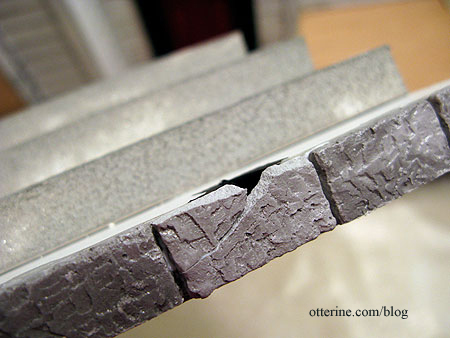
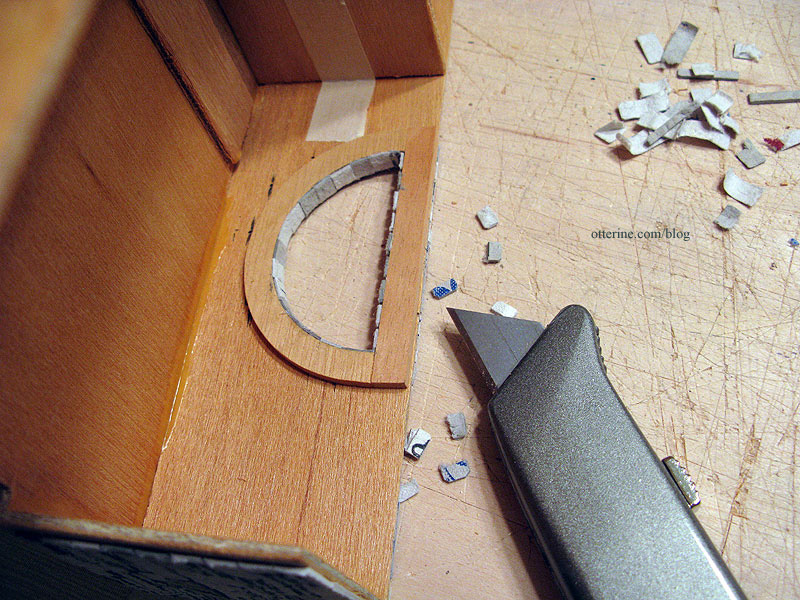
I used the remaining pavers to cover the exposed areas of the side walls. I’ll use a different material for the tops and there will be short pillars at the ends of the side walls. The base steps and side walls are not yet glued to each other or to the foundation. I need them separate to continue working on them.
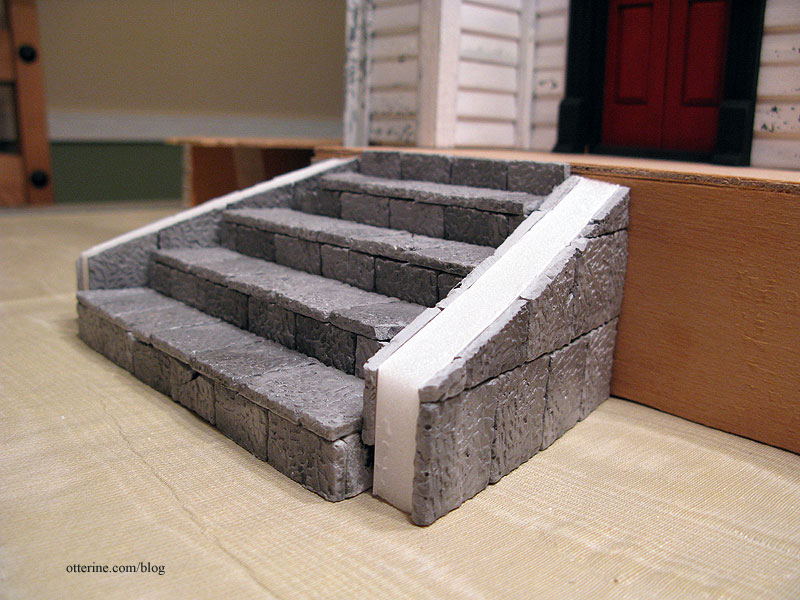
I had one full paver left over! I saved all the cut extras and shards to use later during landscaping. If I want the walkway to match the steps, however, I’ll need to get more pavers.
Categories: The Haunted Heritage
August 22, 2011 | 0 commentsPalladian Door – color
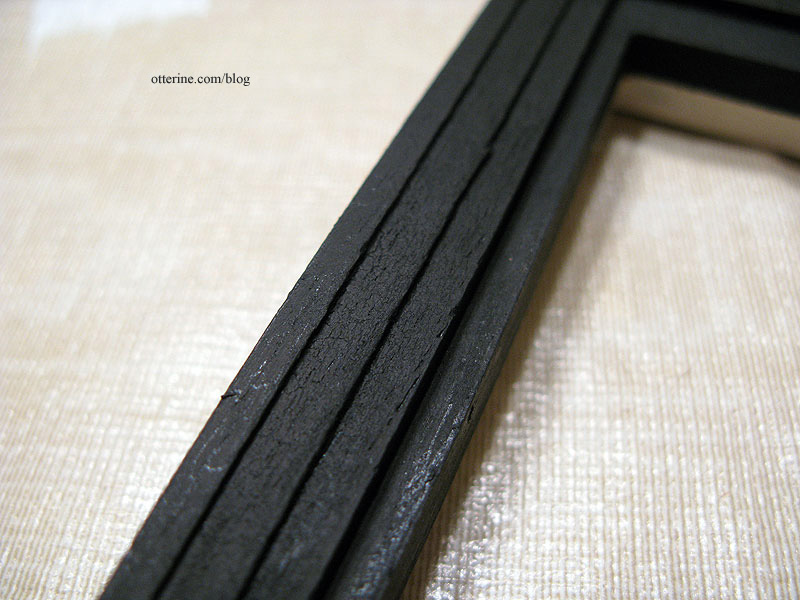
Continuing work on the Palladian door. Can you crackle black paint over a black underlayer? Well, yes you can! :D The effect is less obvious than if you use a high contrast color under your exterior color, but it still works.
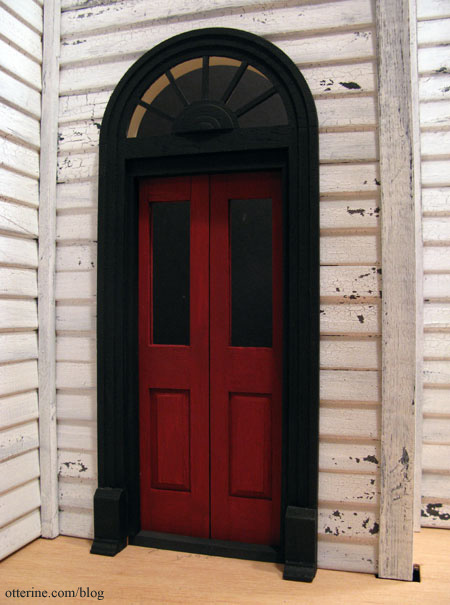
It just makes it look like old paint, which is actually what I was striving for.
With all of the white on the Heritage, I liked how the black door surround looked in contrast even though it was originally just the dark underlayer that was meant to have white paint crackled over it. So, I decided to keep it black. I’ve also started to paint the front door, using Barn Red by Americana. It still needs another coat and some modest aging, but I love it already!
For the interior frame of the door, I used Vintage White by Folk Art. This will be the color I use for any painted wood trim inside the house. I like the grey-white of the exterior, but the interior to me should have a yellow cast from cooking, candles, fireplaces and gas lighting to show its age.
Categories: The Haunted Heritage
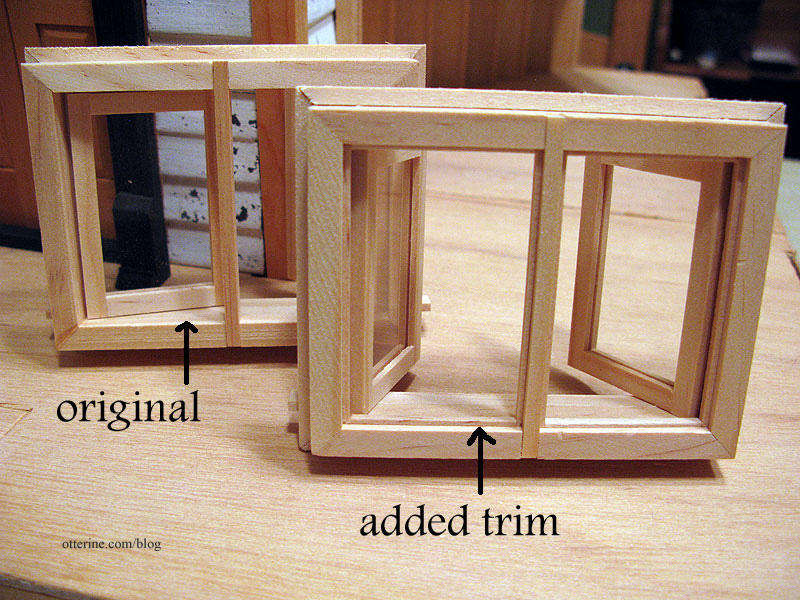
August 21, 2011 | 0 commentsFitting Houseworks components
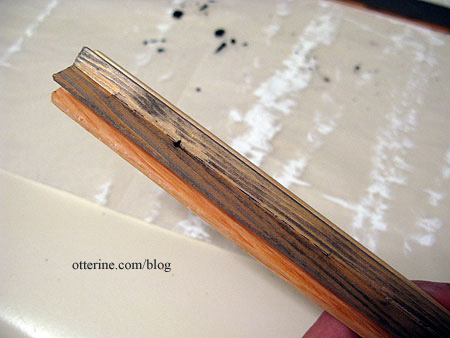
The casement window in the kitchen is a Houseworks component, and as such requires a deeper opening than the Heritage walls have. To get the window to fit properly, I added a border of 1/8″ thick strip wood under the outer frame. Here you can see the altered one compared to the original.
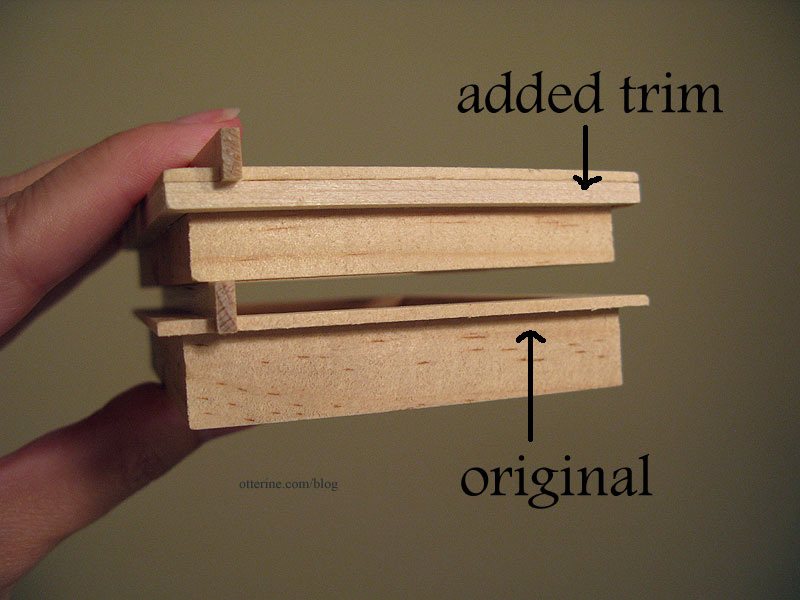
This helps the window sit outward in the opening without seeming out of scale.
This still leaves 1/8″ of overhang on the inside.
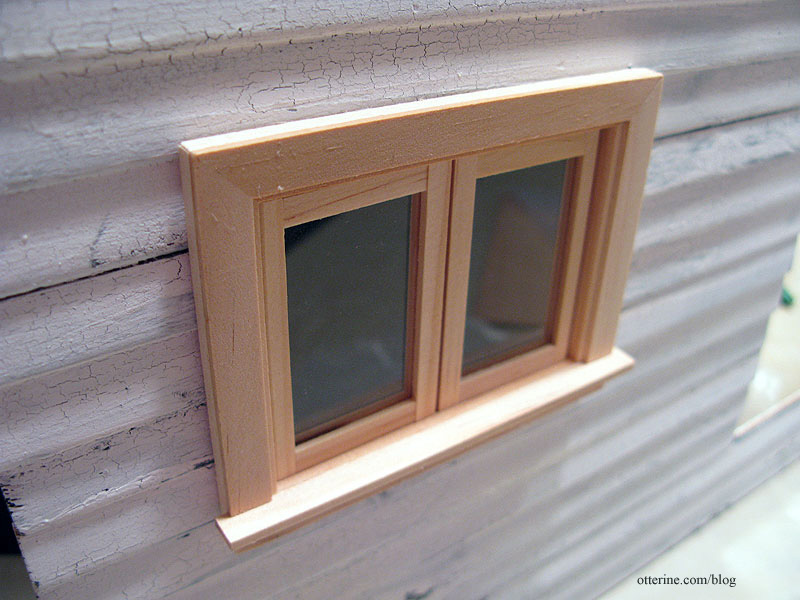
I later padded this kitchen wall when I added a new double working window. This made up the remaining part of the difference in depth between the original wall and the added windows.
The other issue of this window happened to be something I addressed for Baxter Pointe Villa; there were gaps all along the window edges allowing light in. I added strip wood along the inner edges to block this gap, though I had to leave a bit of wiggle room for the window to move correctly.
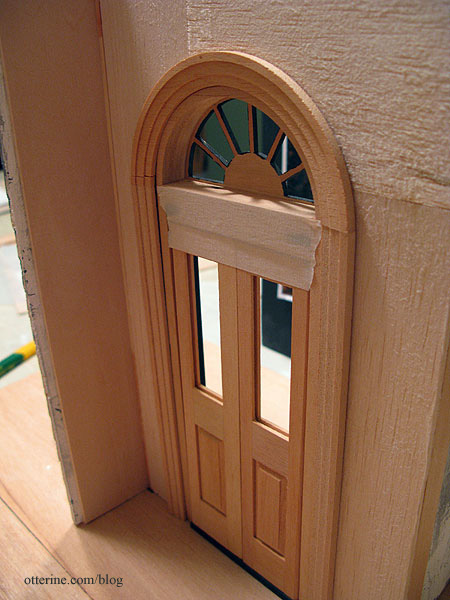
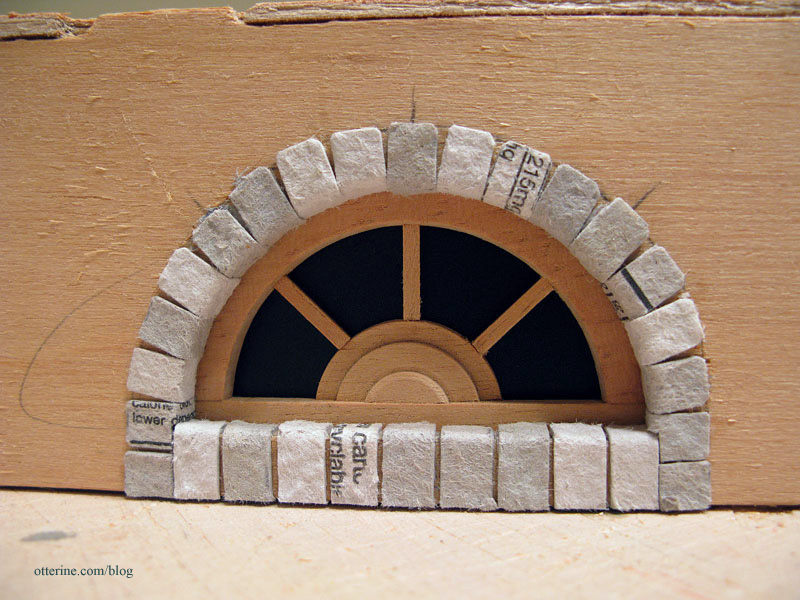
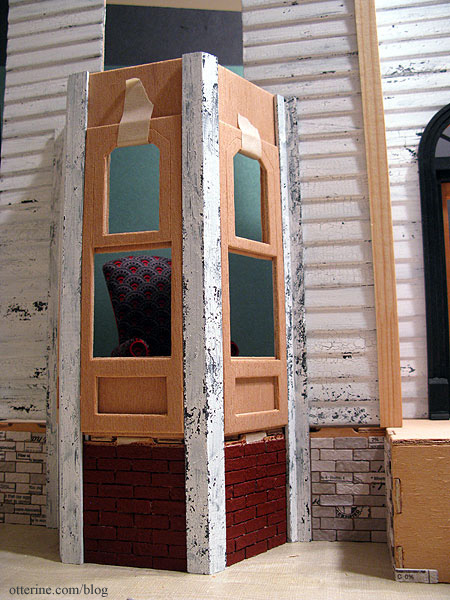
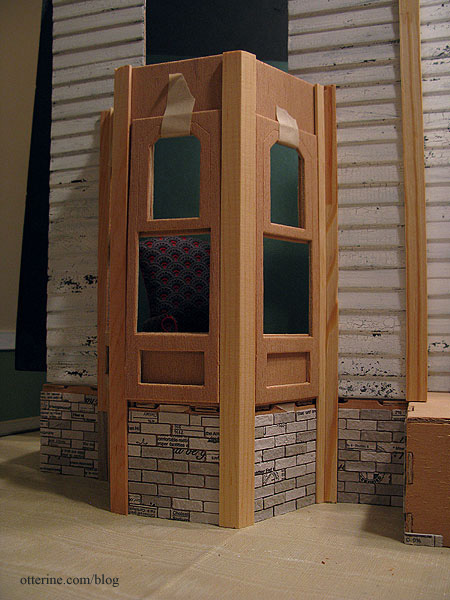
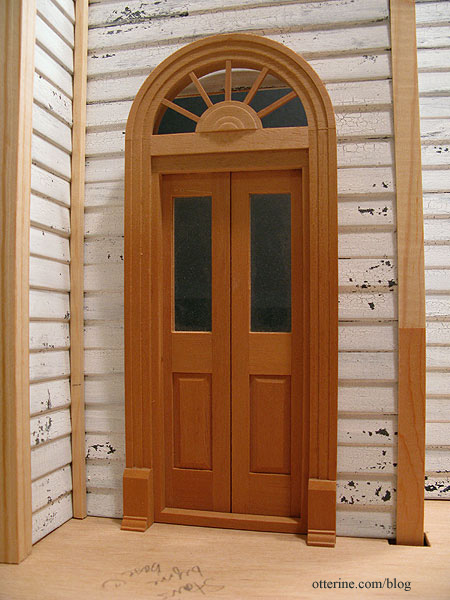
The front Palladian door was another matter. Because it has a rounded top, I would need to recreate this curve to near perfection otherwise it would look like a deliberate addition to the door, rundown house or not.
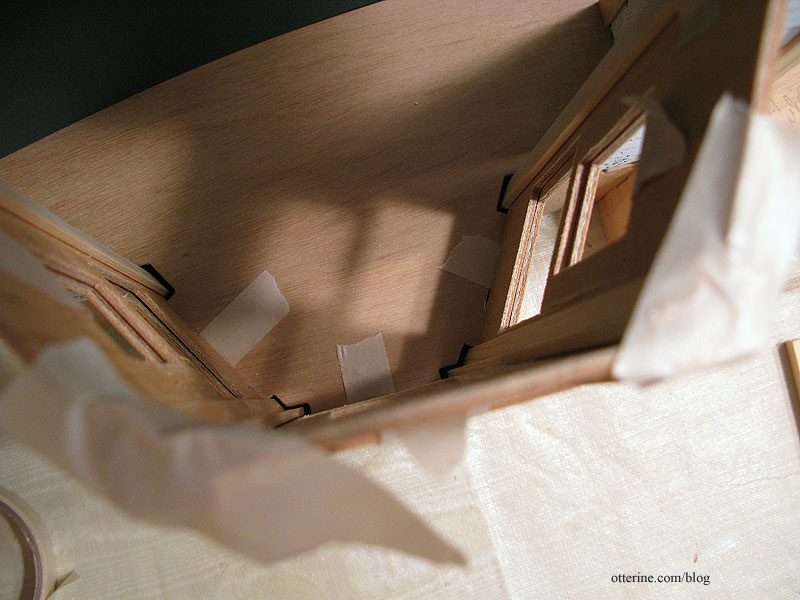
But, this wasn’t the only reason I tried something different for this particular component. I wanted to eliminate the obviousness of the connectors on either side of the front door to obtain a cleaner look to the foyer. To that end, I first lined the wall between the two connectors with 3/32″ thick basswood. This is the thickness of the connector edge leading toward the kitchen.
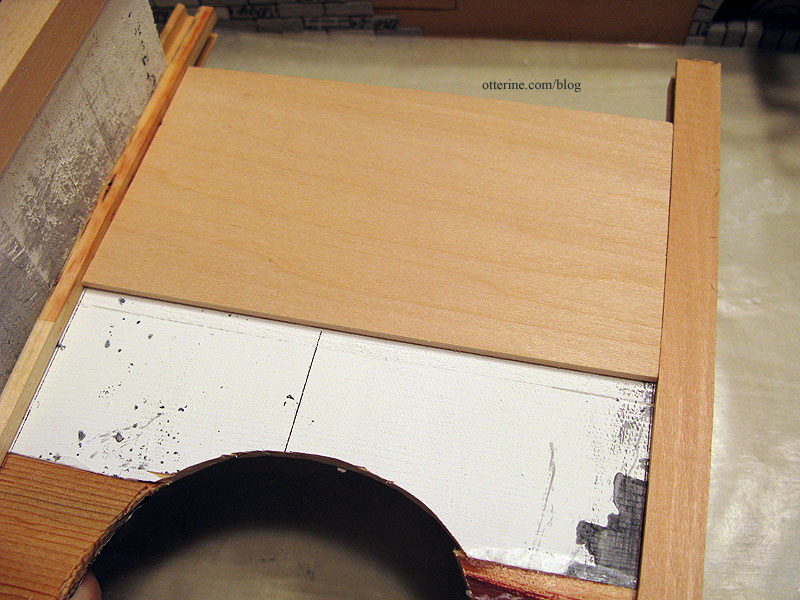
I then lined over this layer with 1/8″ thick balsa from the inner connector to the outer edge of the connector leading to the kitchen. I used bass wood and balsa since that’s what I had on hand. Balsa is also very easy to cut around curves.
The door opening then had enough thickness to accommodate the door upgrade.
To finish off the clean lines of the foyer, I filled in the side wall in the same manner as I had for the front wall. I needed only the 3/32″ bass wood layer since the front wall was now a flat surface and I needed to match only the opposite connector.
With the interior door trim taped in place, you can already see the cleaner lines of the walls.
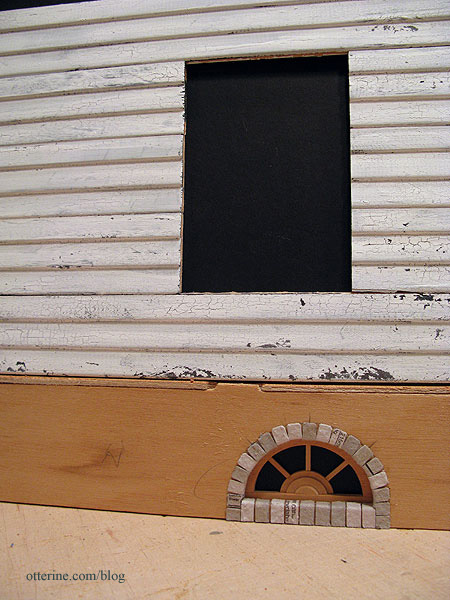
Padding the walls makes for a smoother surface to wallpaper. Dura-Craft walls assembled from siding pieces invariably have uneven back surfaces. For the walls I didn’t plan to pad, I spackled some of the deeper imperfections. Uneven walls work well for an aging house, but I wanted to be able to control the aged look not have it appear to be sloppy construction.

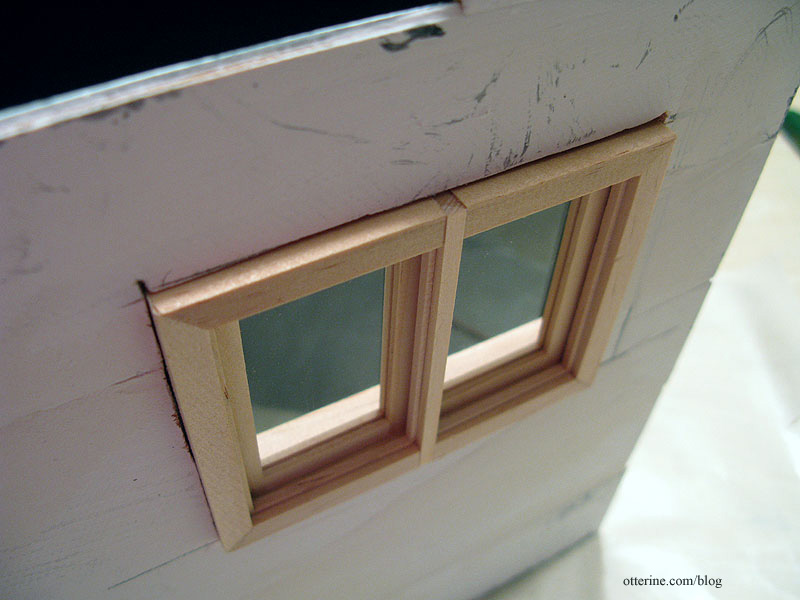
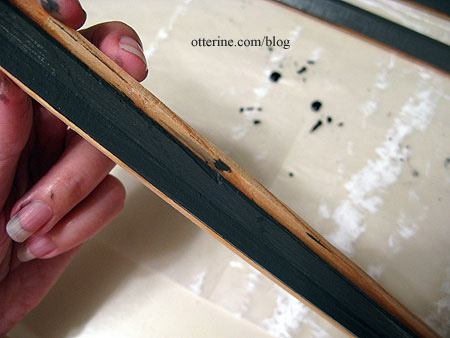
Conversely, if you have a wall that’s too thick for your component, strip wood can added. Here the window has a gap.
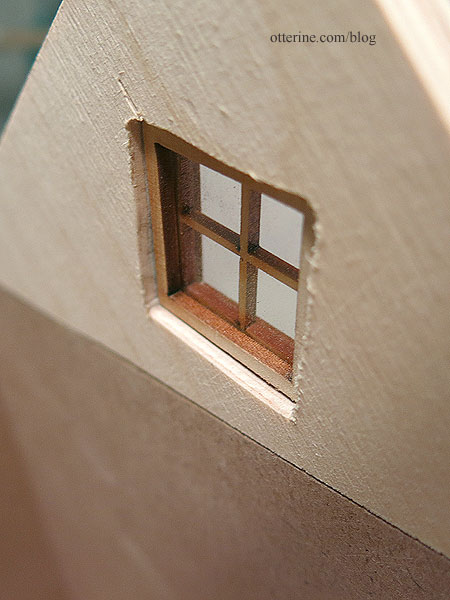
I added strip wood around the inner edge of the window to fill this gap.

Categories: The Haunted Heritage
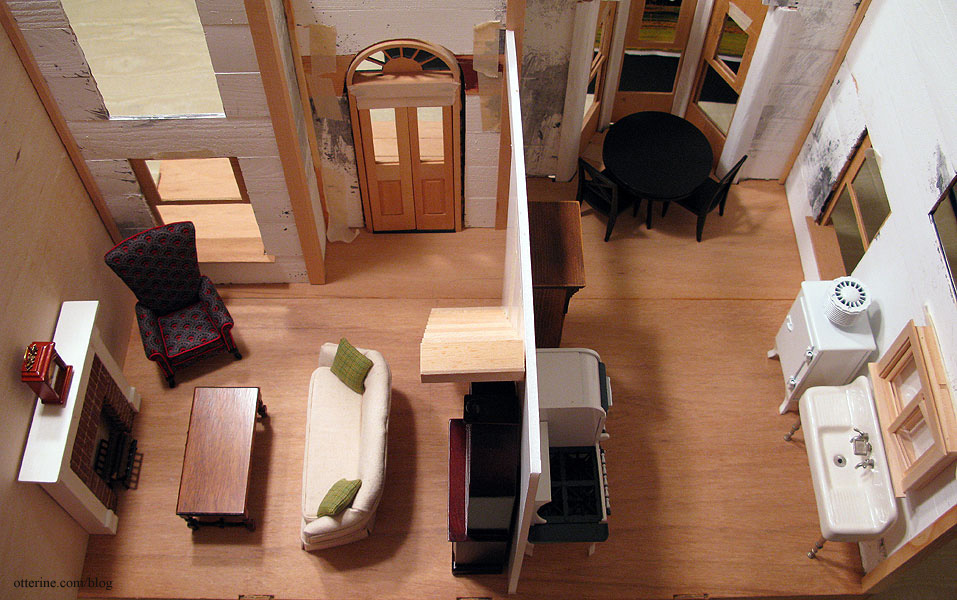
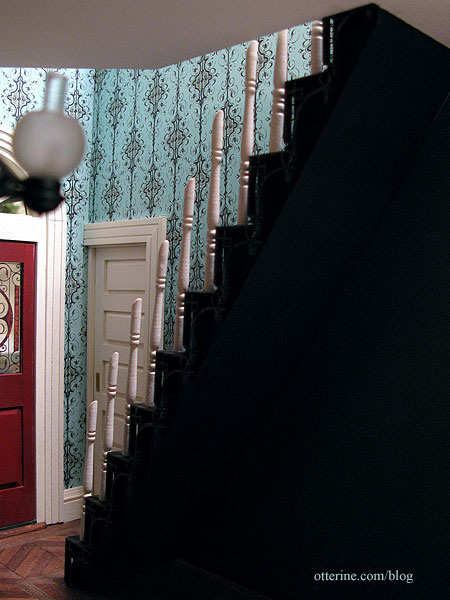
August 21, 2011 | 0 commentsHeritage interior staircase, part 1
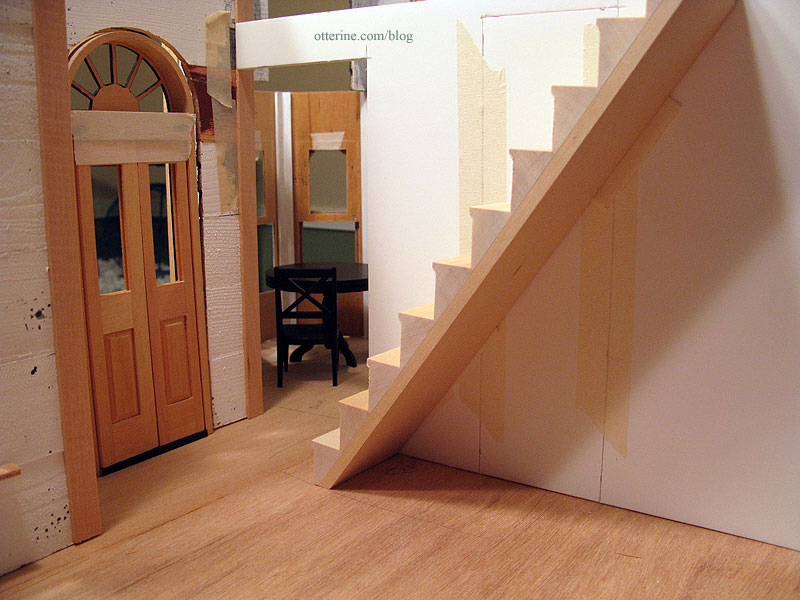
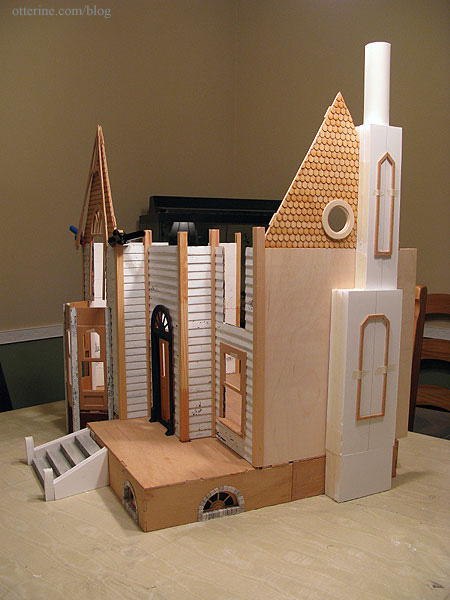
I will be using a set of Houseworks narrow stairs leading from just inside the entry door toward the open back of the house. It will take up minimal room while still allowing for a staircase, which I personally like for realism.
The adjacent wall will give me more wall space in the kitchen, leaving room for an old time hutch. This library cabinet is just a placeholder, but I already love the layout.
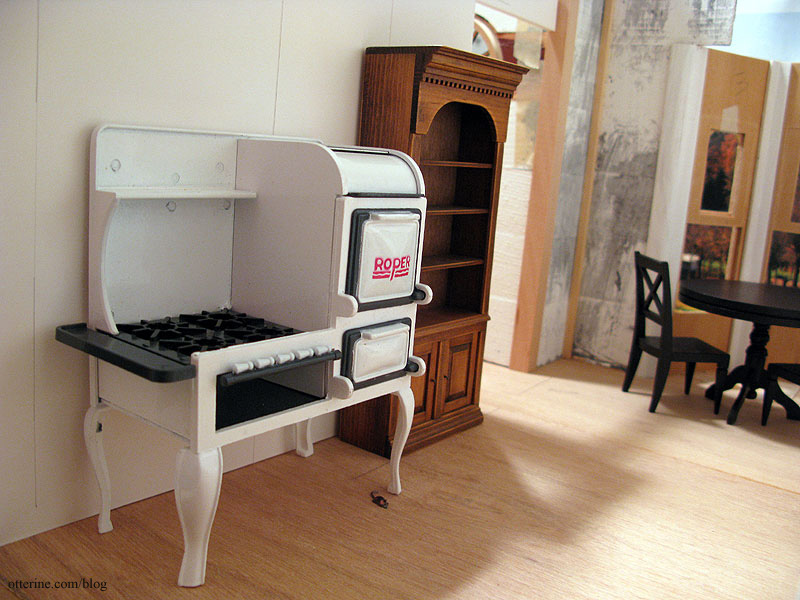
The table and chairs will occupy the bay window, and the refrigerator and sink will be opposite the stove and cabinet.
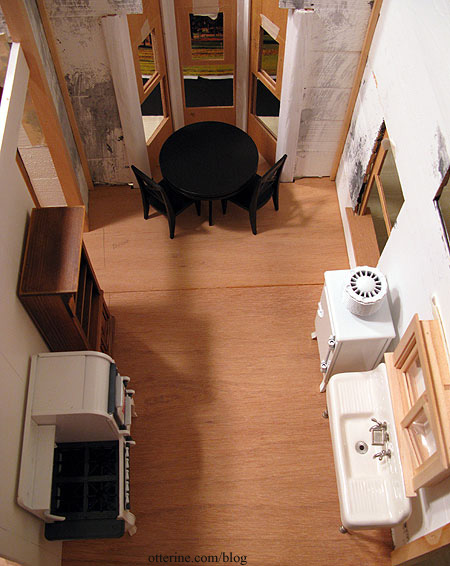
On the stairs side, the parlor layout works well and feels cozy.
The layout makes the best use of the available space.
So, here is the first floor layout in its entirety. :D
Categories: The Haunted Heritage
August 19, 2011 | 0 commentsHeritage – side bay window wall changes
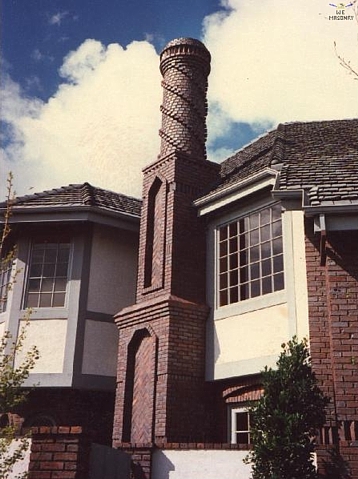
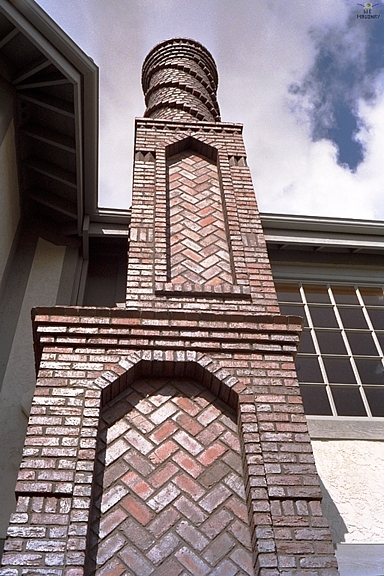
My mission, that I have chosen to accept, is to attempt a variation on this W E Masonry chimney for the haunted Heritage. (The website links to the original W E Masonry project seem to be defunct as of 2024. I couldn’t locate an updated location for this business.)
I will build the base from foam core board and cover it in egg carton bricks.
To that end, the side bay window has got to go. The first order of business in eliminating that window was fixing the foundation. I had glued the bay window floor on with wood glue, but it still came off pretty easily. I then used scraps from the die-cut boards to fill in the open space and to create backer boards to hold the piece in place.
The next step involves basically redoing the entire side wall of siding. Since Dura-Craft houses are made from specifically designed siding pieces, this wasn’t going to be easy. With the suggestion from Mike, I made a new wall from 1/8″ plywood which I will later cover with Houseworks 1/2″ lap siding. (I will cut this wall to an accurate fit once I start gluing the walls to the foundation.) I figured it was better to do the whole wall instead of trying to piece it since any discrepancies between the two types of siding would be pretty evident. Since this is a side wall, any slight difference in appearance between it and the front of the house won’t be as noticeable, especially with the corner connector dividing the two planes.
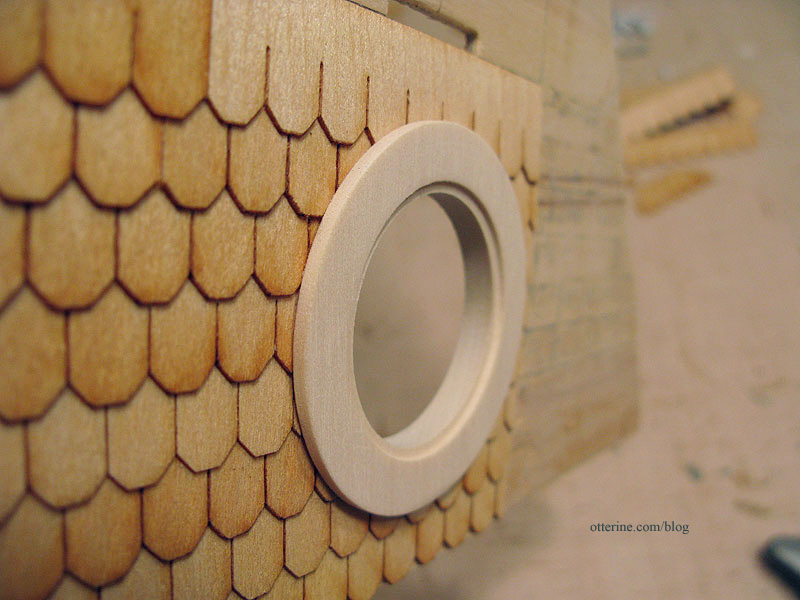
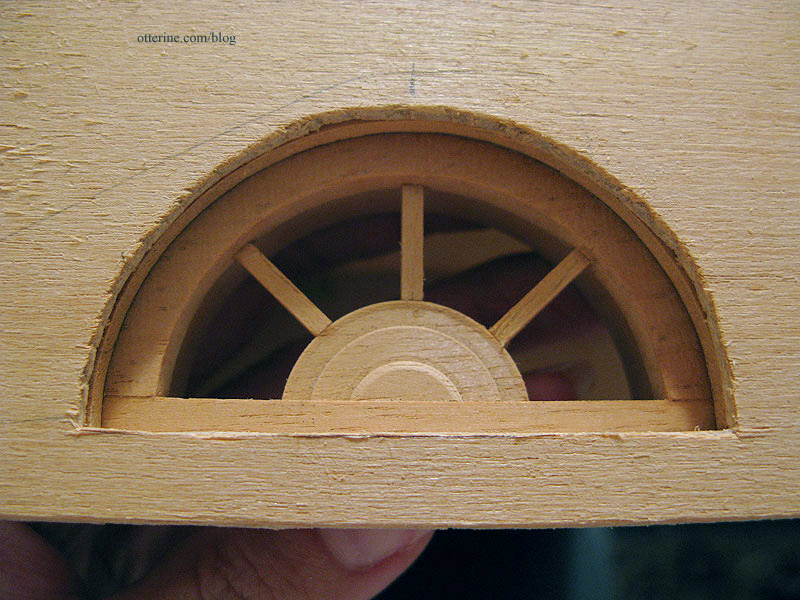
While redoing this wall, I also eliminated the swinging window that was to be above the bay window. In its place, I used the round window. Nothing says spooky like a round window on an old rundown house.
To do this, I left the die-cut parts intact on the gable window and filled in the bottom opening with the scrap that was meant to be cut from the gable. I then cut the round window shape. I was originally going to have this round window be in the attic (oh so creepy), but the gable trim would have partially blocked it. I just didn’t like the way that looked…so I moved it down to the second floor. After shingling the entire gable as I had done for the other two (those have the swinging windows intact), you won’t see where the gable is pieced.
Of course, after I started to shingle the gable I realized I probably should have waited until after I built the chimney so I could shingle around the chimney instead of behind it. So, I cut along the shingles and used a spackling knife to lift the rows before the glue set permanently.
It still didn’t seem like enough, so I cut it back a bit more. This is the minimum distance I would want from the window to the chimney. I will shingle the other side of the gable to the right of the chimney once I have the chimney built.
I also shingled up to the circle opening and set the window on top of the shingles since this window is made for 3/8″ thick walls. I’ll still need to fill in a bit on the other side for a good fit.
I put the house back into a quick dry fit to check things.

I used some 1/2″ foam core board and drawing paper rolled into a tube to make a quick mockup of the chimney I want to recreate. I used the spare bay window parts for the detailing since they had the right shape. I still need to build up the base to achieve all the detailing of the original, but I like the overall shape with the Heritage. I think it adds a lot to this side of the house now that the bay window is no more.
Categories: The Haunted Heritage
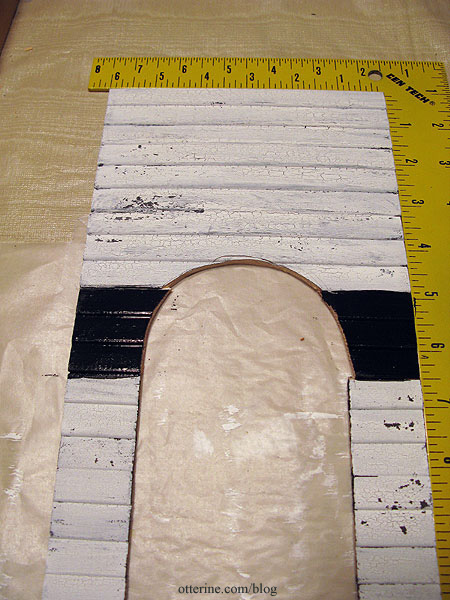
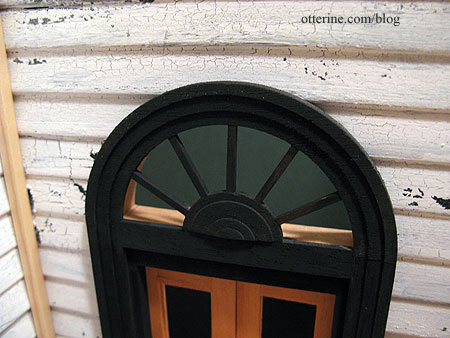
August 11, 2011 | 0 commentsHeritage – creepy cellar windows
I’ve added something creepy (but kinda exciting) to the Heritage.
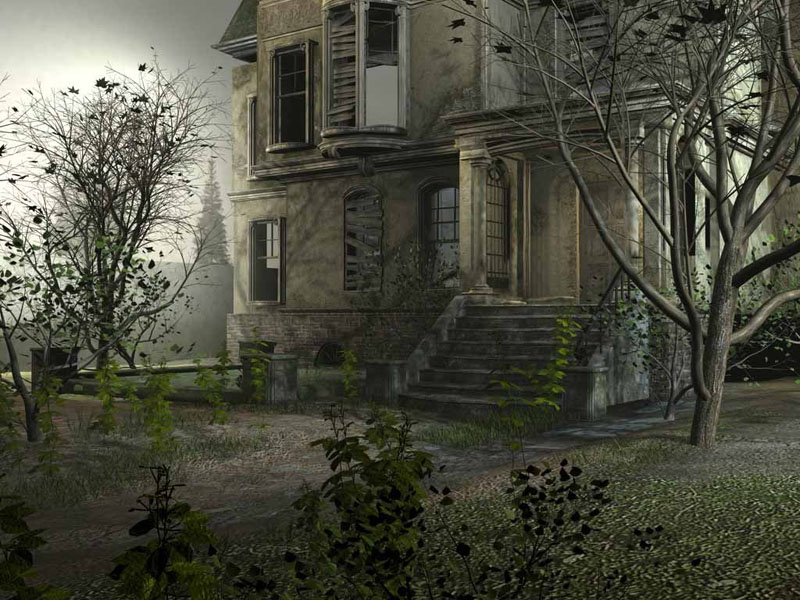
The egg carton brick foundation is turning out well, but I was glad it was slow going since in the meantime I found this inspiration photo. :O Don’t go in that house!!!!
no discernible source I used Houseworks Circlehead Windows, which mirror the Palladian front door. I scored a great deal on four of these windows as well as a bunch of turned spindle packs that I’ll use for my new staircase idea on the inside.
To set the windows inside the brick, I cut the openings smaller than the outer trim of the windows – using the supplied interior trim pieces as a guide.
I glued the interior trim behind that opening inside the foundation, making the window well a bit deeper.
I marked the top center of the window opening and drew a 1/4″ perimeter along the curved edge of the opening to use as a guide for my bricks.
The egg carton bricks I used for this portion of the foundation were 1″ long x 1/4″ wide. The standard bricks I’ve been using are 3/4″ long by 1/4″ wide, but I use these longer bricks for corners and, in the case of the new arch windows, to line the opening with a decorative brick treatment. The longer bricks give me plenty to work with even though I end up cutting a portion off during the process.
Holding one end of the brick at the top center position on the perimeter, I folded the brick around the edge and creased it.
I cut off the excess at the interior edge and glued it in place along the opening.
I then added the subsequent bricks to the right and left of the center brick, butting them close along the inner edge. As an aside, I like using egg cartons from different manufacturers since there are variations in the thickness of the material. When used together, they give a more realistic appearance, especially on an older building where settling has occurred over time. :] As I got near the lower edge, I realized I probably should have started with the bottom of the opening.
So, I stopped just short and finished that portion, lining the bricks vertically starting at the center. I left them long so I could cut them uniformly at the end. For the side brick at the lower edge, I cut it to fit around the bottom brick.
To finish off the side bricks, I cut a partial brick to fit.
I finished up the other side and then cut off the bottom vertical bricks with a utility knife.
And, since I really don’t want nosy eyes looking into my creepy basement (well, that, and the fact that there really is no creepy basement – just the foundation supports), I blacked out the acrylic inserts with a quick spray of flat black paint. Flat black paint gives the muted appearance of dirt clinging to the windows and can easily be dirtied up more with acrylic paint washes. I didn’t cover all of the acrylic to maintain a certain transparency since I’m thinking of adding some dim bulbs under the foundation just for added spookiness. :D What’s going on in that cellar?!!! :O
I still need to age and paint the windows themselves, but this is looking exactly as I had hoped. Now to conquer the others.
Categories: The Haunted Heritage
August 9, 2011 | 0 commentsHeritage – stair change and bay window work
Since I have another idea in mind for the entryway, I plugged the hole where the original stairs were to be with the very pieces that were originally cut from them along with a couple of backing pieces made from scraps from the die-cut boards.
The wood for the connectors for the bay window was a bit more resistant to the paint washes, so I followed up with a dark grey paint mixture. I painted only the portions that would face the exterior of the house since I am still deciding on what to do for the interior, but I wasn’t especially careful to avoid getting any paint on the interior portions. Any stray marks will all be covered eventually.

I also didn’t bother to repair any defects or cracks in the wood or gaps in the joins between pieces. All of these imperfections will actually work in my favor for an old rundown house. Maybe a tree branch fell on the house at some point. ;]
Once these dried, I used the same crackle medium and white paint process as I did for the siding. Now we’re getting somewhere. :D
I think the red brick is going to anchor the nearly all white-grey house very well.
Categories: The Haunted Heritage
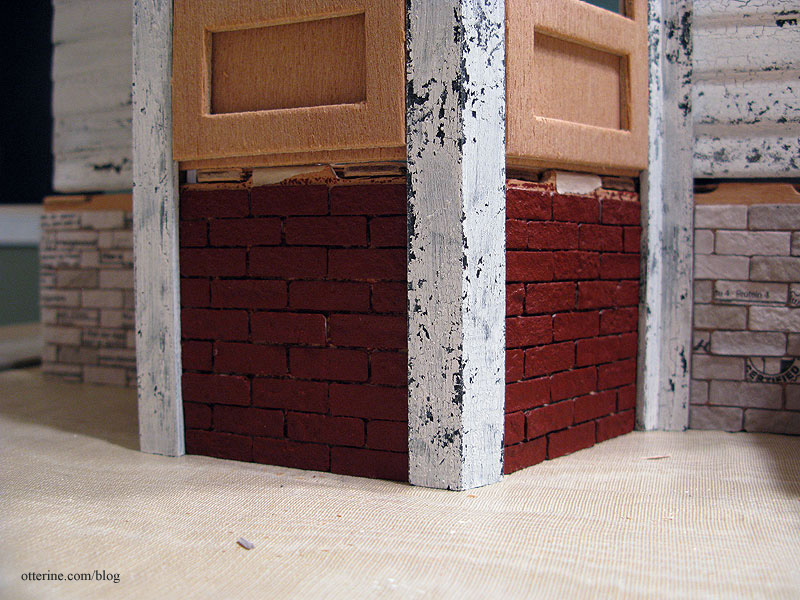
August 5, 2011 | 0 commentsEgg carton brick foundation
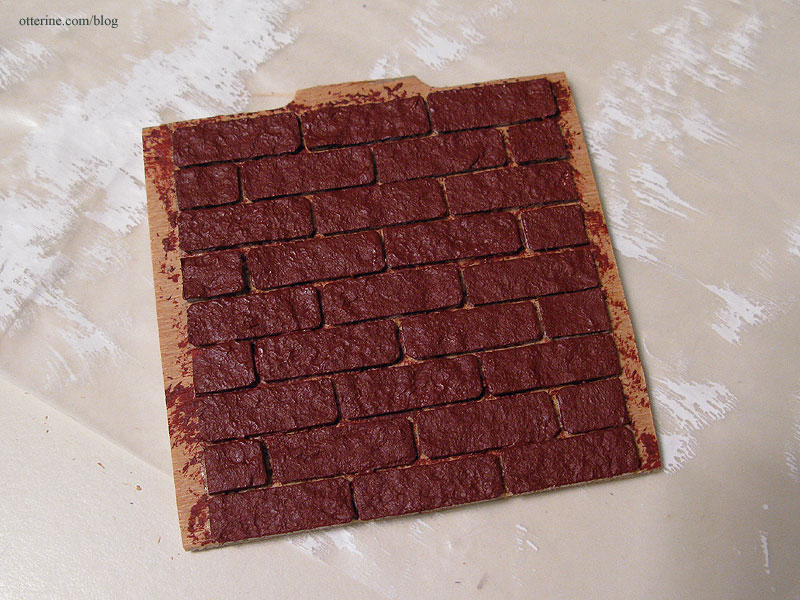
I spent some time tonight gluing on the egg carton bricks, starting with the area under the bay window that I fit the other night. I love it, as expected. :D There will be trim between the bottom of the siding and the top of the bricks.
I tried out the color I bought for the foundation: Liquitex Burnt Sienna. This is a thicker artist color acrylic, but it is a wonderful brick red color and has a great texture when stippled on with a stencil brush (two coats). It was on sale for 30% off at Hobby Lobby this week, so I didn’t mind paying a bit more for it. Grouting will come later.
Categories: The Haunted Heritage
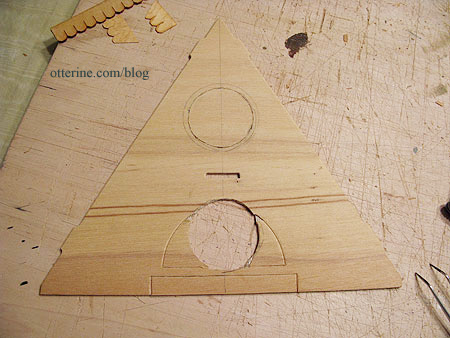
August 2, 2011 | 0 commentsHeritage – shingled gables
The three large gables are supposed to be shingled above the windows according to the instructions. The kit even includes fancy shingles for this purpose.

But, I think something about it is off. First, I think the shingles are too large. Second, and more importantly, I don’t think you’d leave any gable wood exposed on a real life house. It would either also be shingled or have some sort of siding on it. I am guessing the kit is like this to add some Victorian charm while making it a relatively easy job to add the shingles.
To remedy both of these points, I bought Greenleaf half scale speed shingle strips (octagon shape) with the plan to apply them to the entire gable.
Since I would ultimately be painting them, I decided to glue them onto the gable before staining them with the black/grey aging wash. I could always press the pieces flat while drying if they curled while painting and it didn’t matter if I got excess glue on the stained portions since the shingles would be covered by the crackle effect paint.
Here are the three samples I put together to test out which glue would work best and whether the same aging process as the siding would work here as well.
From left to right are Elmer’s wood glue, Aleene’s quick dry tacky glue and Quick Grip glue. I taped the shingles down while drying. The first two lifted after the dark wash. Not necessarily a bad thing on an old house as long as it doesn’t get out of hand.

I then brushed on crackle medium followed by white craft paint. Interestingly, the first one flattened out a bit with only a couple a lifts there and there. Still, I decided to stick (tee-hee) with the Quick Grip glue just for the fact that it dries so fast.

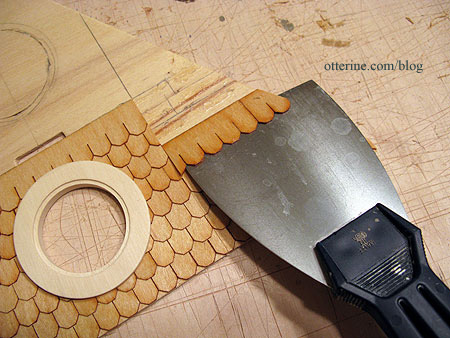
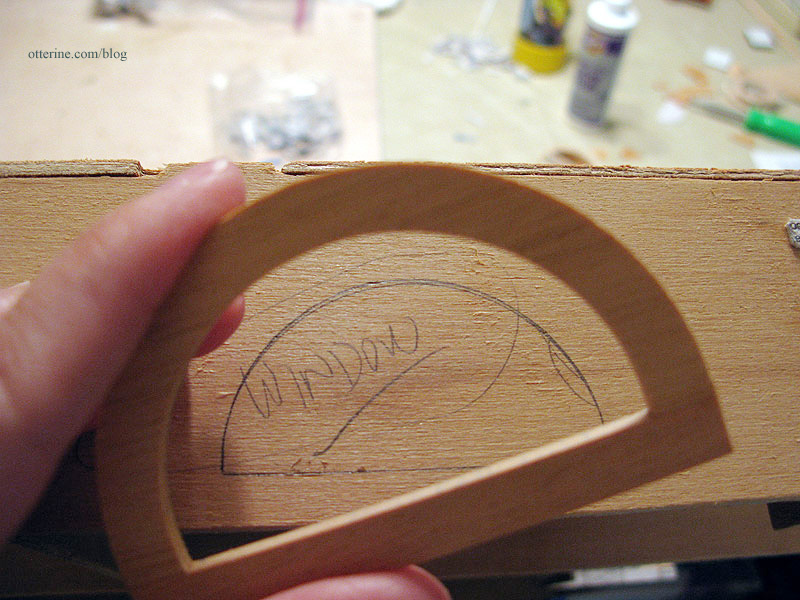
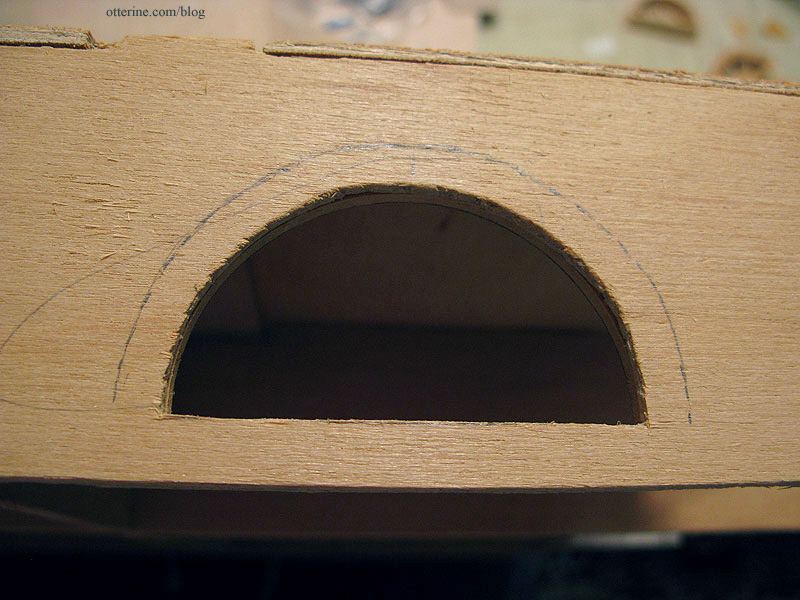
I started by placing the outer gable window trim on the gable and tracing around the edge.

I placed the first shingle strip so that the vertical lines between the shingles lined up with the bottom edge of the gable.

I placed the window trim over the first shingle strip and traced the outline.

I cut the shingle strip to fit with an X-Acto blade and then glued in place with Quick Grip.

The next row was applied so that the bottom shingles lined up with the top of the vertical lines of the first row. Again, I used the window trim as a template.


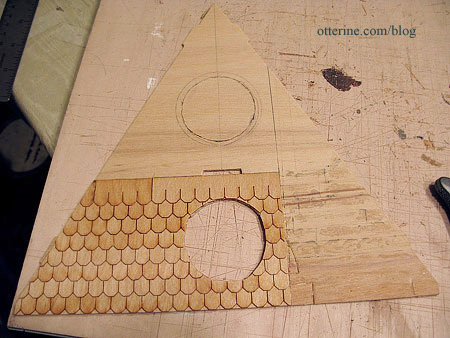
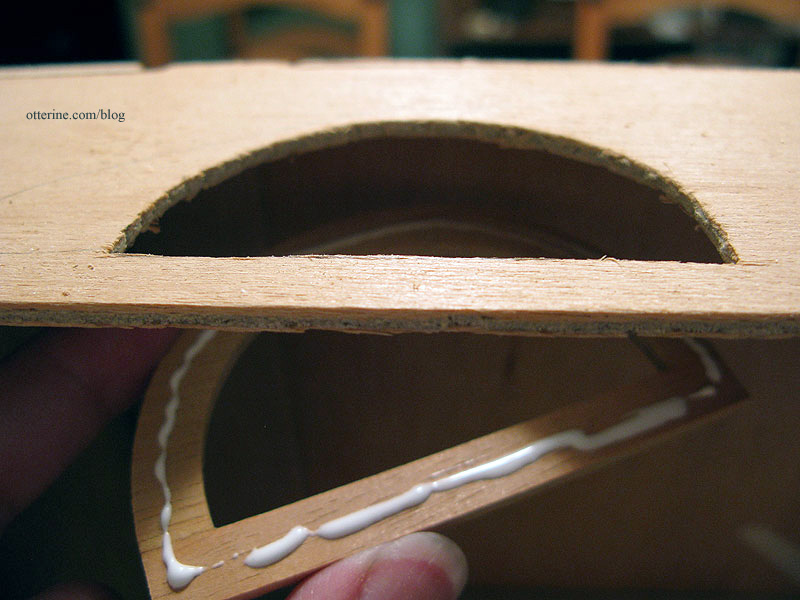
Once I had a few rows on, I cut the excess off the bottom and sides.

I’ll continue up to the top peak and then repeat for the other two gables, but I already think this looks like a better scale match. There will be trim between the gable shingles and siding to finish off the edge between the two.

I’m very pleased with the results of my experiment. I think it looks more like the real Victorian houses in my area than it would have with the kit’s oversize shingles.

I absolutely love the shape of the gable windows, too! I’ve adored this house for years, and it’s so much fun finally bringing it to life.

Note to or anyone who is building a Heritage: the diecut arches of the gables end up being a structural part of the finished swinging windows. If you want these to be pristine, take the time now to repair both the interior and exterior portions of these gable parts. You may choose to cut new parts if the kit parts are too far gone. I was able to salvage them later, but it would have been easier before assembly. It was hard to work with them upright. See this post for details.
Categories: The Haunted Heritage
August 1, 2011 | 0 commentsHeritage – front bay window, part 1
The bay windows are one of the nicer features of the Heritage, but they did take some work getting to fit correctly. I’m always leery of the phrase “sand to fit,” because it never works for me. The instructions state you need a distance of 2 1/4″ between the small connectors once in place, and to get there I had to cut 1/16″ off each side edge of the bay window walls and bay window bases. It still isn’t precisely that measurement, but now the whole thing fits solidly.
I also had to cut down the tabs on the main floor since they stuck out past the walls and bases.
Even with the structural integrity in place, there are still gaps between the connectors and the floor board. I wonder if this is more of an organic type of build where everything has a little wiggle room built in so that you can force things into being level and straight.
Categories: The Haunted Heritage
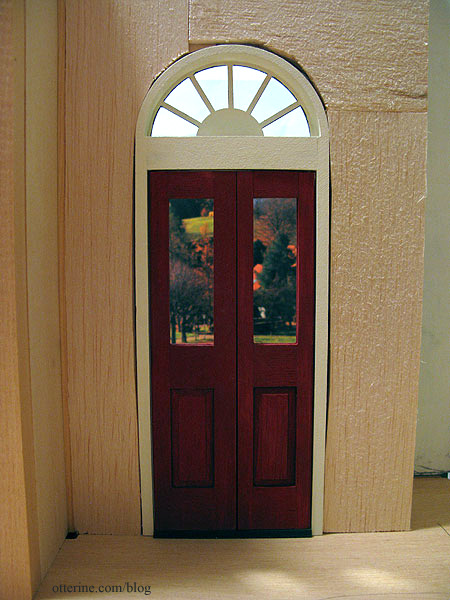
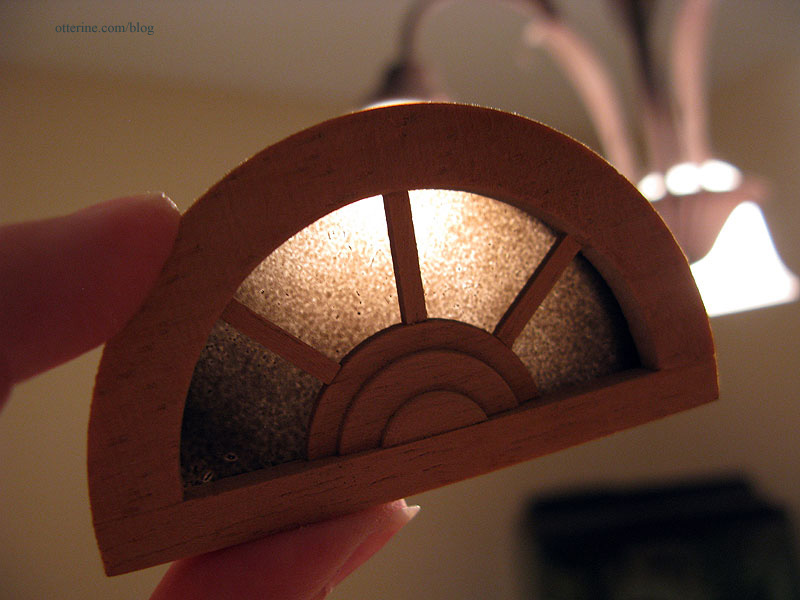
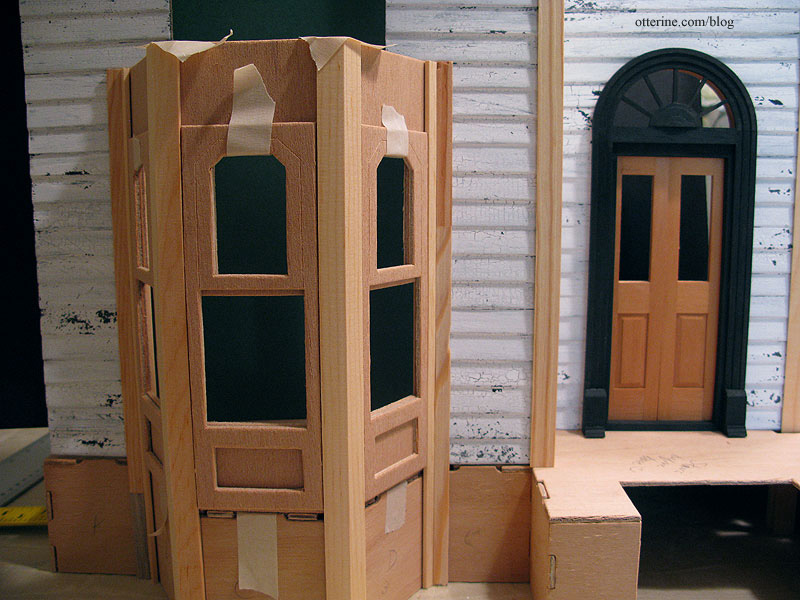
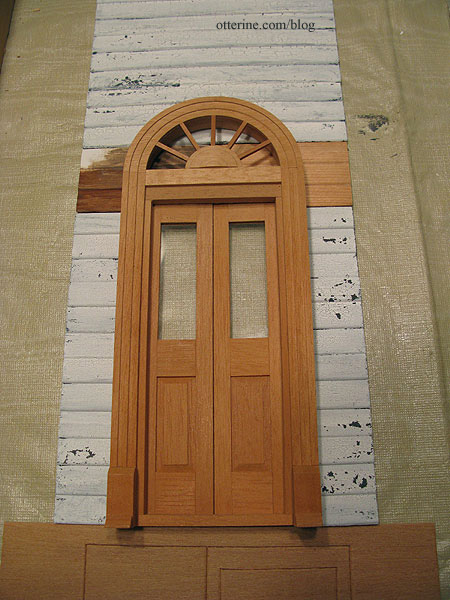
July 30, 2011 | 0 commentsPalladian Door – first upgrade
After seeing the dry fit with the Palladian door, I was sold!
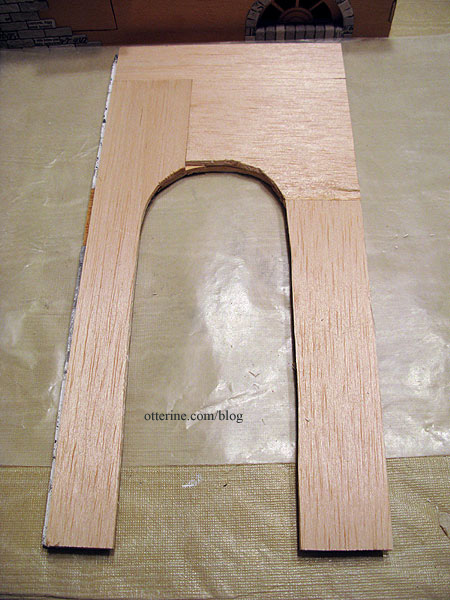
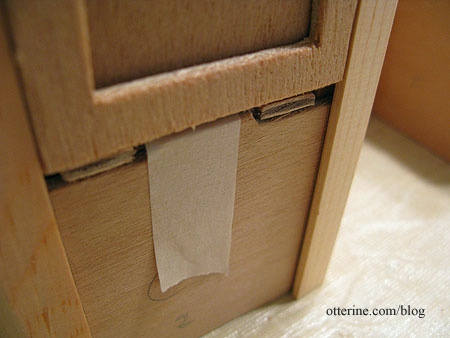
To get this door to work, I needed to adjust the rectangular hole to fit an arched door. You can’t tell from the above photo, but there were two triangle shaped gaps on either side of the top. Enter in two spare pieces from my old lost Dura-Craft kit. I had previously used one to try out finishes.
I had to disassemble the two long pieces on the front wall, but they pulled apart easily.
I marked the door opening on the new pieces and the bottom of the overhead piece and cut out the required opening.
My cuts aren’t the best since I had only a utility knife, but they work fine – no gaps. :]
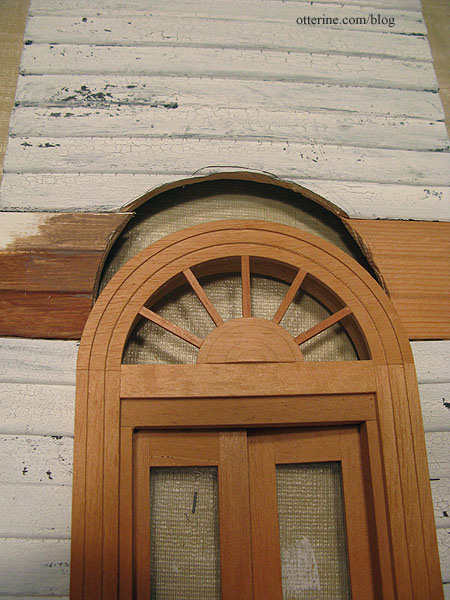
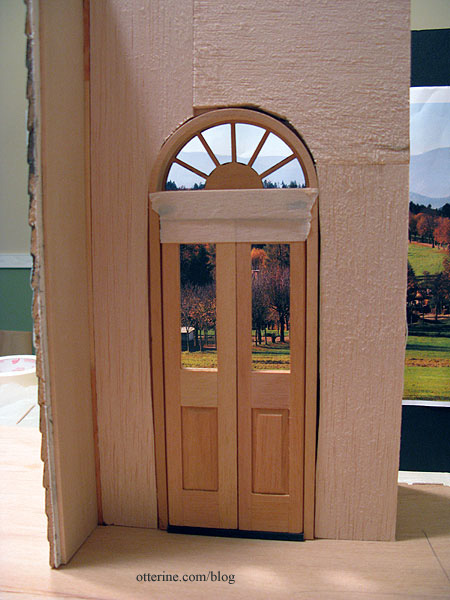
I glued the new pieces in and prepared the finish as I had for the rest of the walls.
Voilà! Since the wood of this door was on the red side, I’ve painted it charcoal grey as the base layer on the outer trim.

And, a close-up of the top.
I am undecided as to which color I’ll crackle over it, but I needed the dark underlayer besides. The interior trim color will coordinate with the interior finishes…so that is also undecided. I’m still thinking about a door color, too, but might go with blood red. No, literally! I somehow managed to cut myself on the door…first time in awhile that I’ve sacrificed blood to a project.
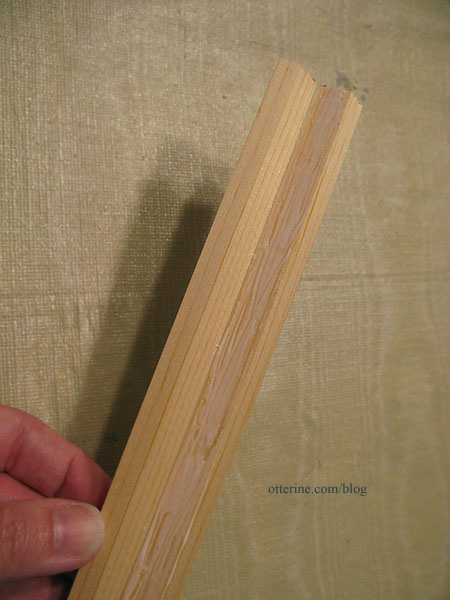
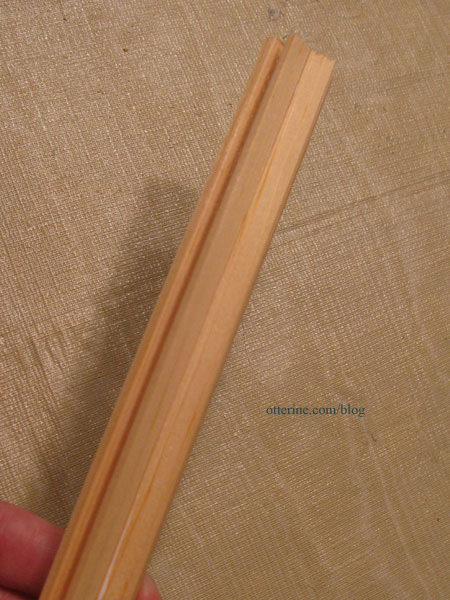
Now, this door change will require other changes. First, the front porch will have to be lifted to clear the top of this taller door, but I had already planned to replace the square posts with turned posts to dress it up a bit and those posts are taller anyway. I can cut them to the size I need. Second, there’s a window on top of the porch that will have to be shortened on the bottom. And third, the interior trim on this door will be too tall for the first floor ceiling. I am thinking a two-story foyer leading to my new centered staircase ought to fix that problem! Besides, a haunted house needs a dramatic entrance.
Categories: The Haunted Heritage
July 30, 2011 | 0 commentsHeritage – the first dry fit
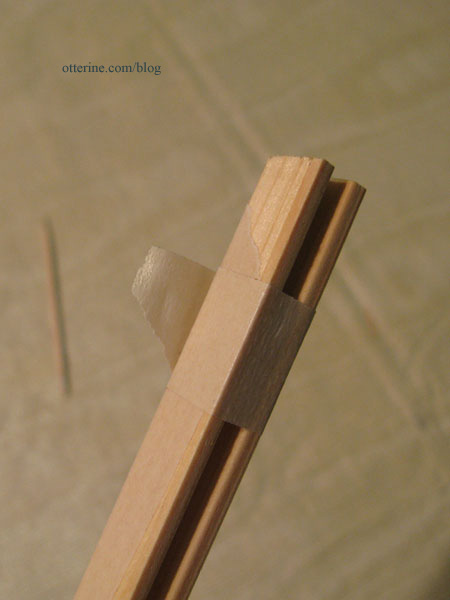
A few of the square connectors were broken in the kit, so while I await replacement pieces from Manchester Woodworks I used some extras from the Newport kit to set up the first dry fit.
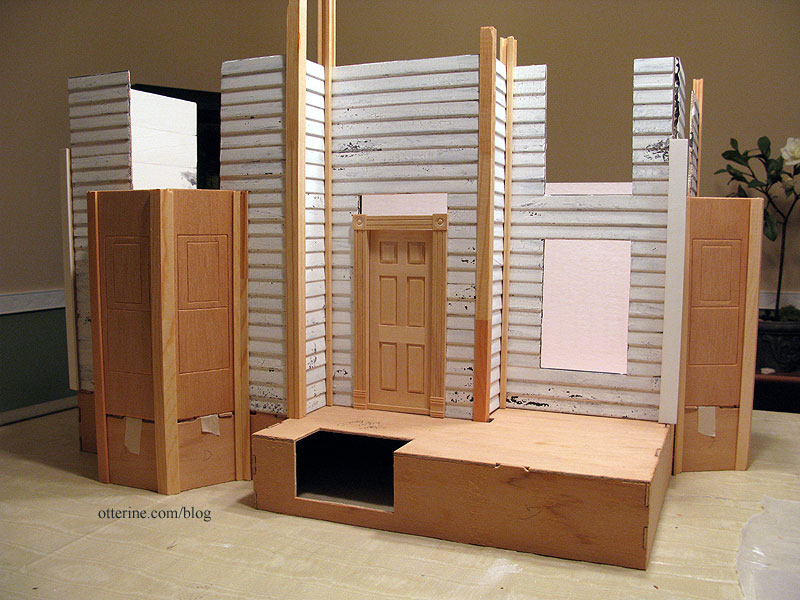
Above is a Houseworks interior door as a stand-in for the moment. But, I am considering using this gorgeous Houseworks Palladian Double Entry Door that I had in my stash from a bargain lot of miniatures I bought awhile ago. I even tried to sell it at a bargain price but no one wanted it. It was meant to be. Using this door will involve some extensive bashing, but that’s pretty much my way these days. (Yes, that’s the first note to myself written on the porch. It reads, “Stairs before base” with a smiley after.)
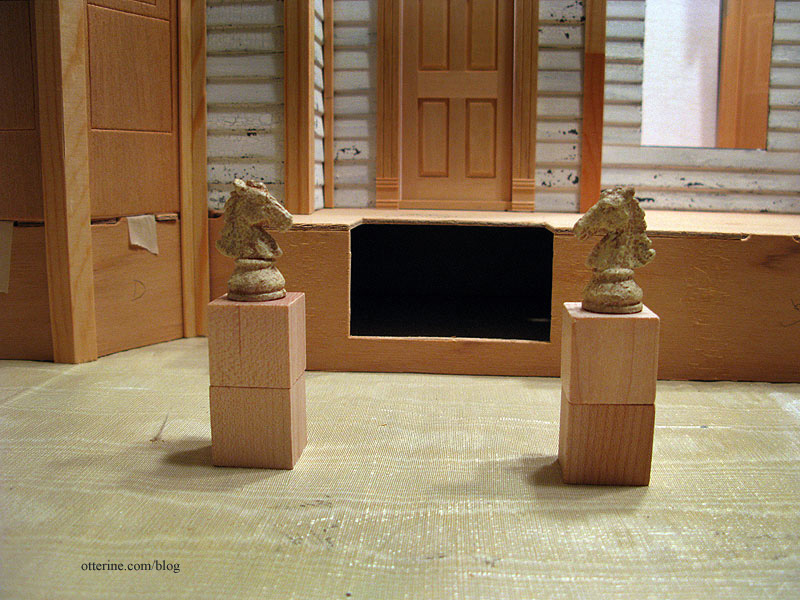
I also made a fine purchase from Katie’s Clay Corner…two stone horse heads. They are wonderfully made, and I see them atop columns on either side of an iron gate. =cue spooky music=
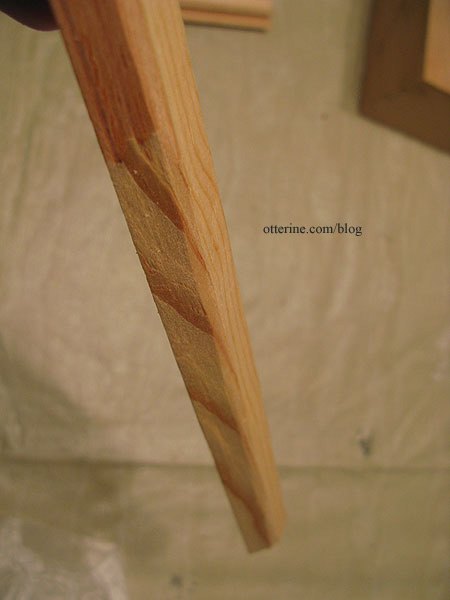
The angled bay window connectors for the Heritage needed to be cut from lengths of provided wood and assembled. I am glad this is not my first attempt at a kit so I have an idea of what the instructions are getting at and what the end result will be. I’ve mentioned my old Dura-Craft kit from when I was younger. That kit languished in the basement after overwhelming both my mom and me, then was lost almost entirely to a flood. Even with the limited experience I have now, I can easily see why this sort of kit overwhelmed us.
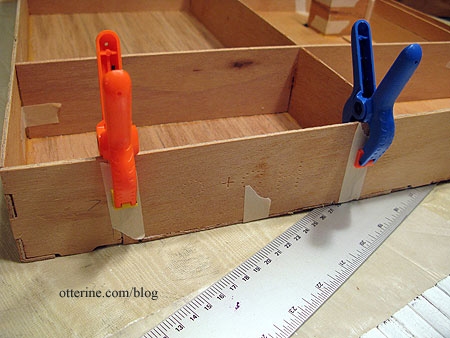
I cut the appropriate lengths for the small connectors and taped them together along the outer edge (without glue). This held them in place for me to check the fit.

I opened the two connector pieces like a book and spread glue along the inner surfaces.
I then pressed the glued edges together and taped around the assembly at the top, bottom and middle.
Easy peasy…until I got to the next step. I had to glue a small connector to a large connector then cut off the excess from the long edge.
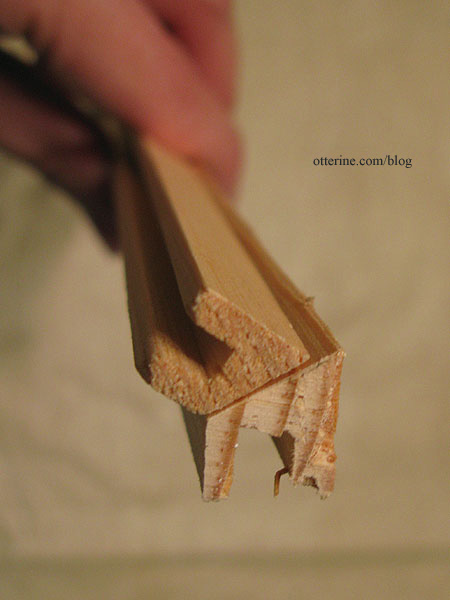
Uh…okay. I followed the same principle for assembly as above but first taped the inner edges together to keep the pieces in line while I applied the glue to the inner surface. Cutting off the excess was a bit of a leap of faith. I used a utility knife to score along the edge and removed most of the overhang.
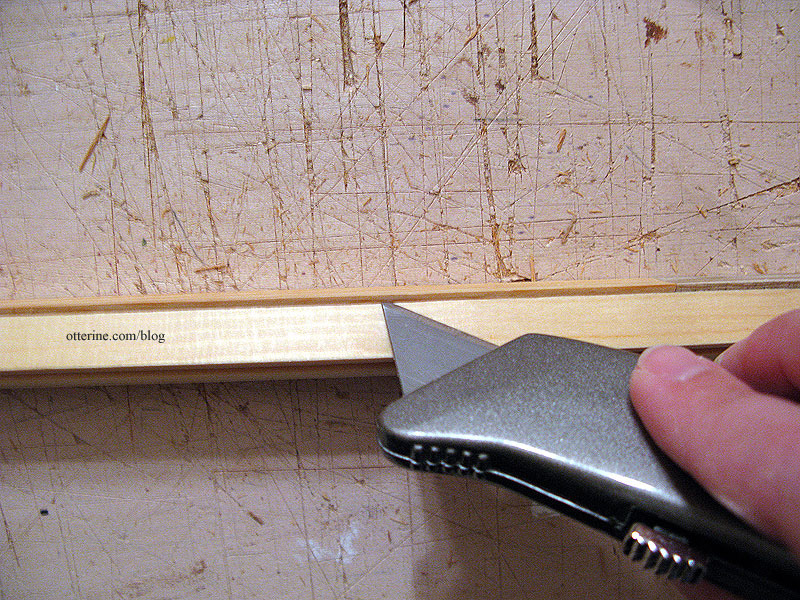
I then used the blade like a vegetable peeler to smooth it out. I was left with a choppy edge, though.
I sanded the edge it into a smooth, rounded corner. I actually think this unintentional detail might work wonderfully for an old house. But, it was my least favorite part so far.
Categories: The Haunted Heritage
July 29, 2011 | 0 comments


NOTE: All content on otterine.com is copyrighted and may not be reproduced in part or in whole. It takes a lot of time and effort to write and photograph for my blog. Please ask permission before reproducing any of my content. (More on copyright)

Categories:
Heritage – grandma’s neglected lawn, part 1
While I do have more builders foam in larger sheets, I thought I’d use up the numerous leftover scraps. They were just languishing in a bag and this would clear up some workspace. :D
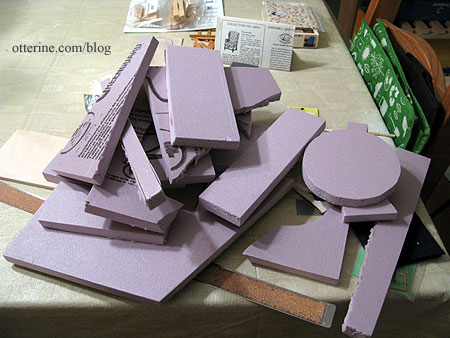
I started cutting a puzzle of pieces to make the uneven ground surrounding the house.
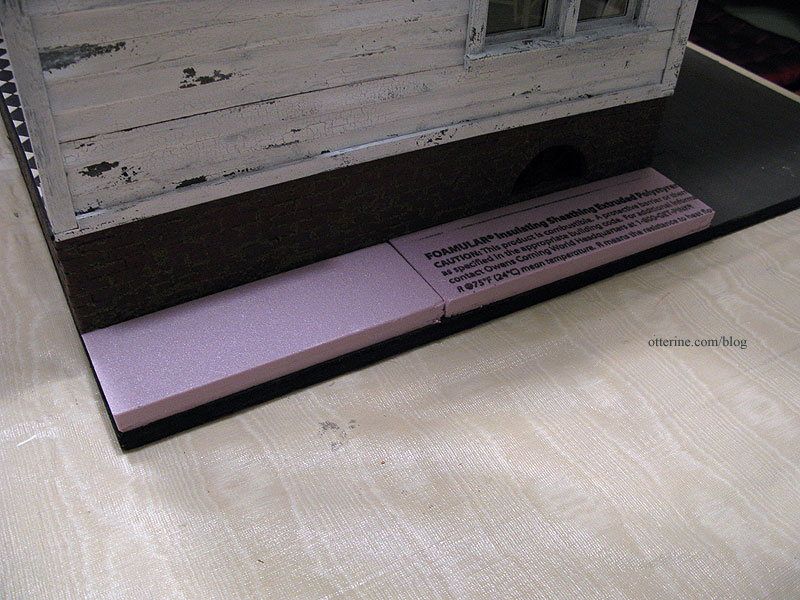
If you recall, I had glued the house foundation onto cut pieces of 3/8″ plywood to allow room between the brick foundation and the base board.
You can see the edges of the plywood below the foundation.
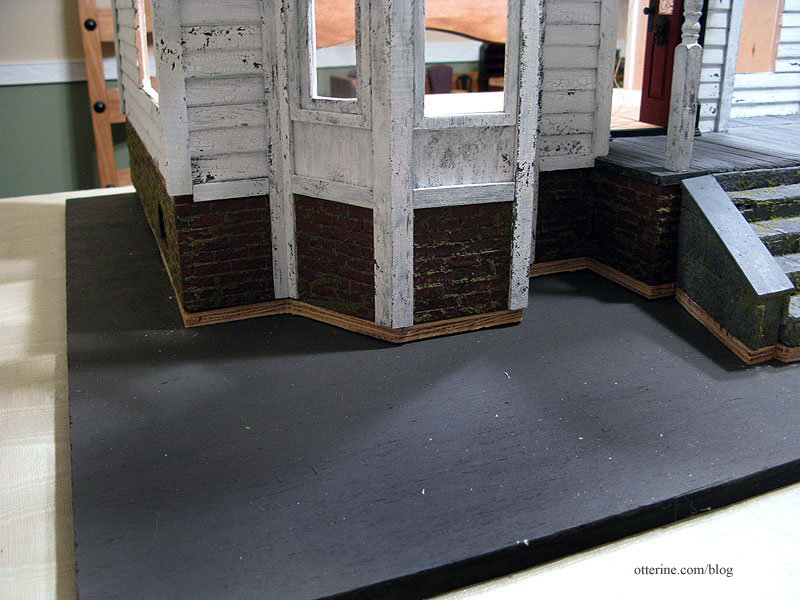
The builders foam is 1/2″ thick, but I planned to sculpt it anyway. I cut random amounts from the foam pieces, angling the slope down sharply around the outer edge of the base board. Yes, that’s Grahame and Woodrow playing ball on the bay window. :D
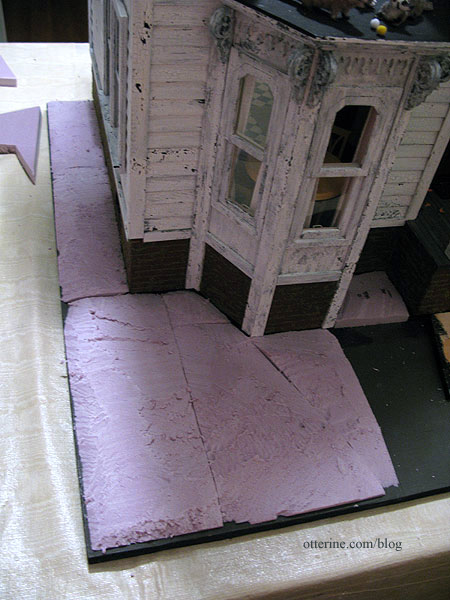
No wonder grandma never mows the lawn…she’d break her ankle! It doesn’t matter if the pieces aren’t a perfect fit. I can fill in those gaps with either scraps of foam or a bit of stucco patch.
After using up most of the scraps, I cut a new piece for the larger remaining area, tracing out the base for the stone steps.
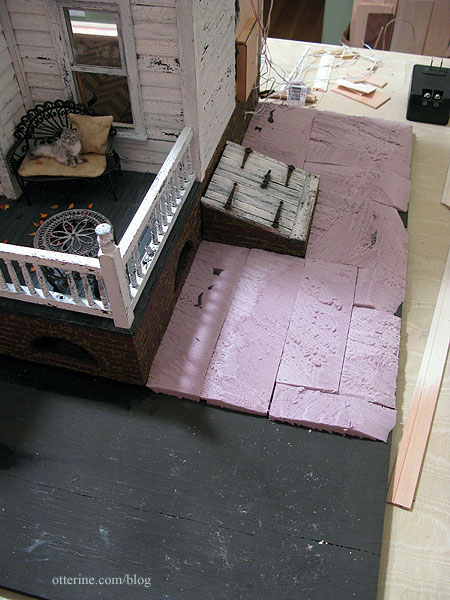
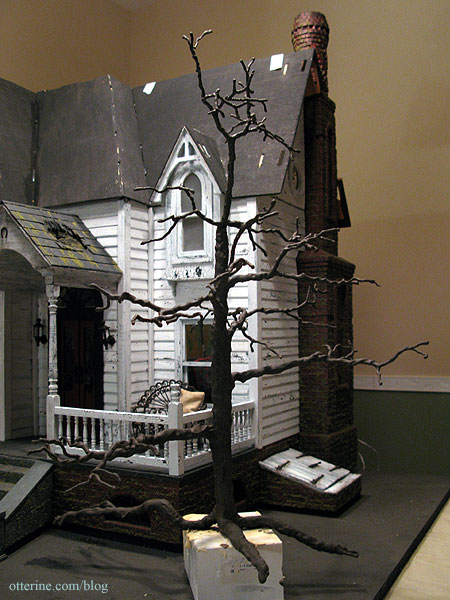
I saved the circular scrap from the tower for building up the area that will hold The Tree. Actually planting The Tree is going to take some work since part of the roots will be exposed and part will terminate under the surface.
I have the trunk fairly close to the house so that the branches stay within barrier of the base board. The side is less of a problem than the front. I keep one side of my landscape boards no wider than 25″ so the houses will fit through the doorways in my real life house.
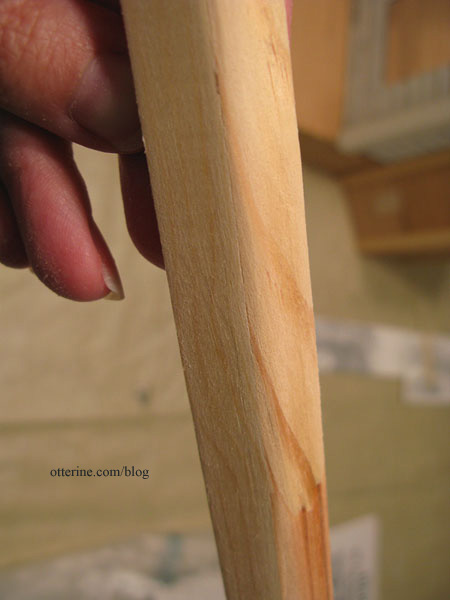
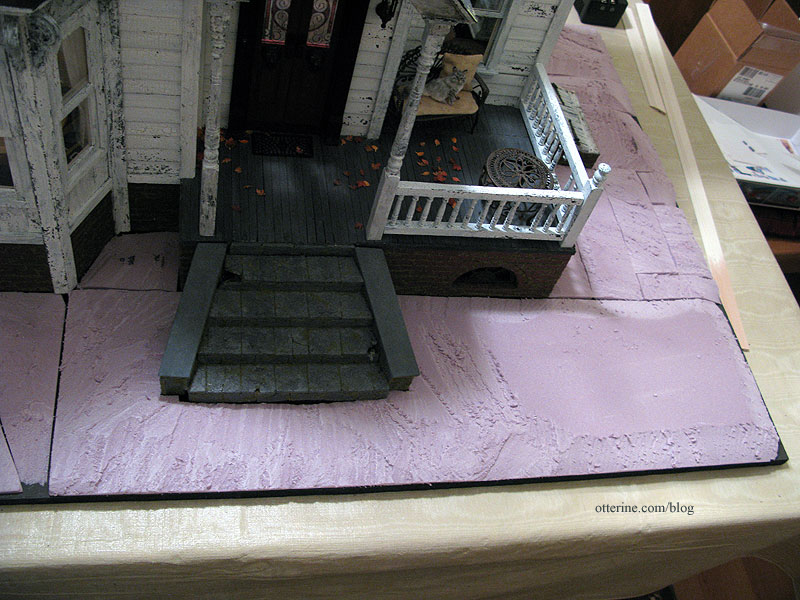
I’ve cut the area in front of the steps lower to make room for the pavers that will be placed in front, but I can see it’s not very even. I’ll have to adjust that a little. Having broken, weedy pavers is one thing, but we don’t want a death trap at the end of the stairs. Grandma isn’t foolish.
Continued in Part 2.
Categories: The Haunted Heritage
September 17, 2012 | 0 commentsHeritage – hallway vignette
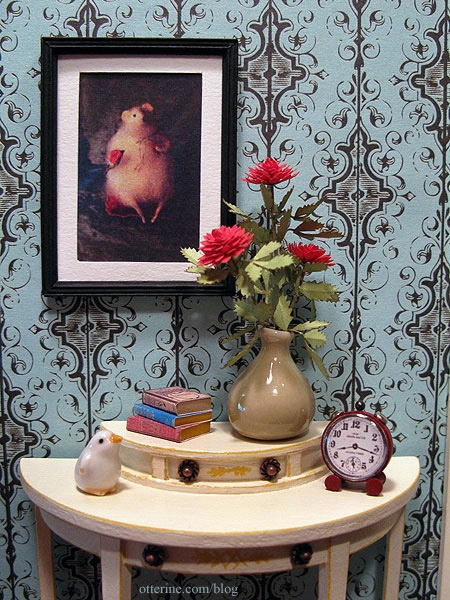
The balcony railing is still a work in progress so this upstairs ‘room’ isn’t yet complete, but I have finished the vignette that will sit to the left of the bathroom door.
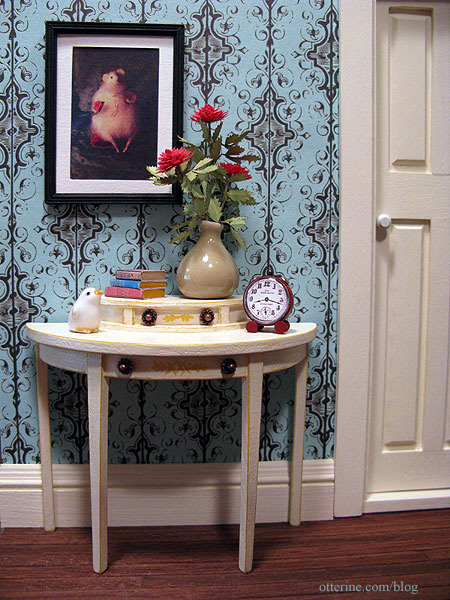
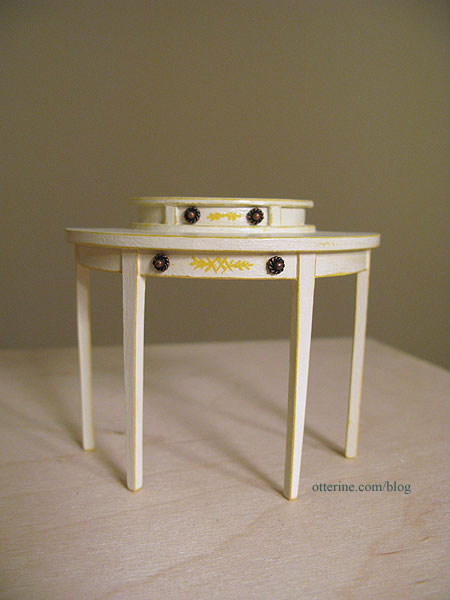
The table is a House of Miniatures Hepplewhite Side table with hand painted designs and added elements inspired by a real life sized antique table.
The books are some of the many I made while filling the parlor bookcase.
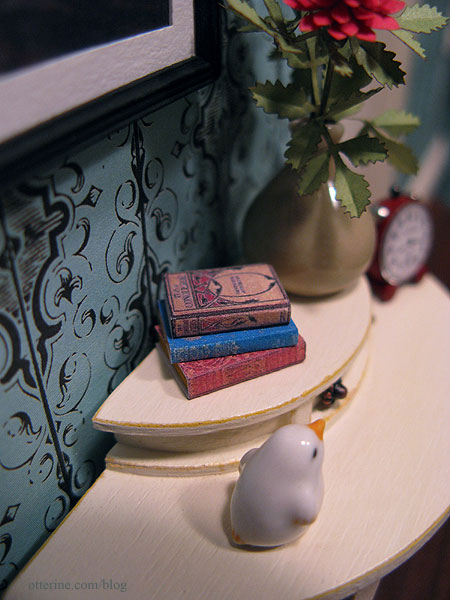
The vase and bird figurine were purchased awhile ago, but I’m no longer sure of the vendor. The red dahlias were made from a Bonnie Lavish kit.
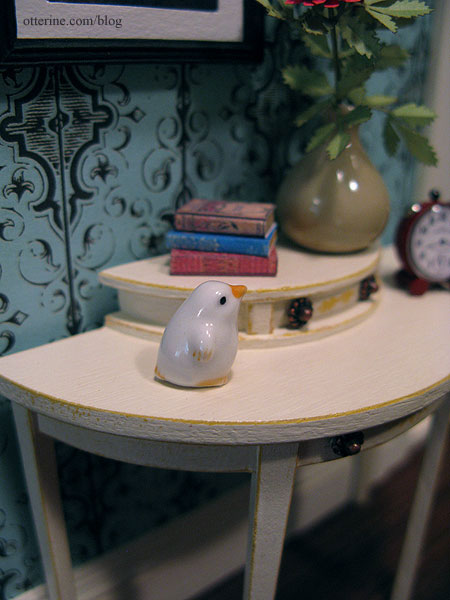
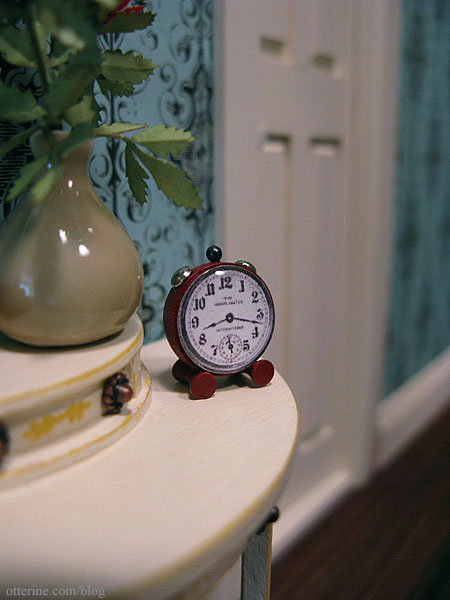
I made the tiny red alarm clock from bits and bobs. The face is a printed image from The Graphics Fairy with a clear cabochon sticker to simulate glass. I had made a set of vintage table clocks for another miniaturist through my etsy shop, and I liked the red one so well I knew I would need one for the Heritage.
The artwork is a photograph from artisan Natasha Fadeeva. She makes the most amazing little animals. I just swoon over her mice!!! :D I contacted her about using the vintage mouse photos in the Heritage, and she graciously gave me her permission. I haven’t yet framed the other.
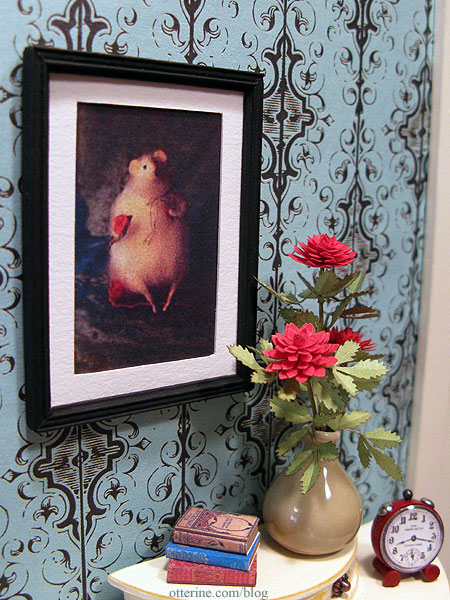
I love the red and round theme of this vignette. :D
Categories: The Haunted Heritage
September 16, 2012 | 0 commentsHeritage interior staircase, part 4
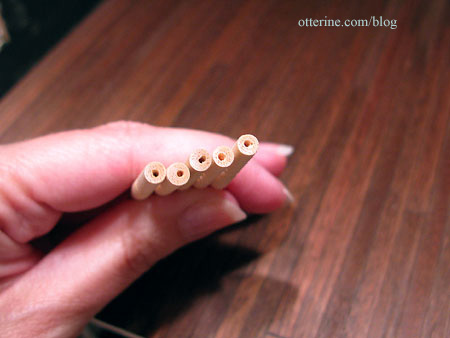
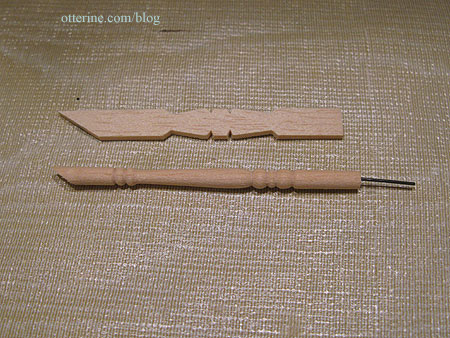
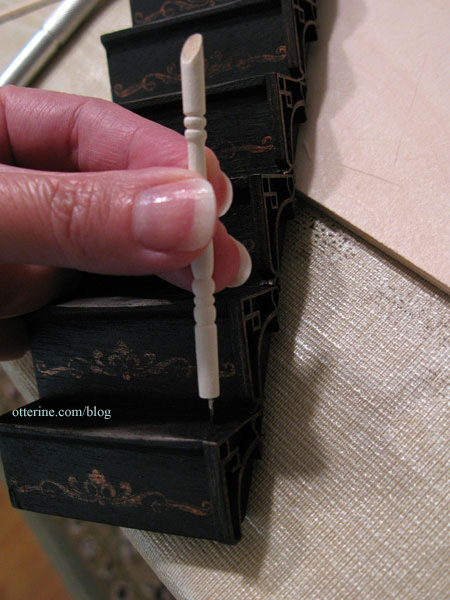
Continuing work on the interior staircase. This was my first time putting together a stair railing. The narrow stairs kit came with balusters, but I prefer the look of rounded posts to flat ones. I purchased a miscellaneous miniatures lot awhile ago that included the windows I used for the cellar as well as several packages of posts. The ones I’m using are Real Good Toys 3013A spindles.
There’s one thing that can be counted on when working with miniatures…you will knock into something held together with nothing but glue and it will crumble back into the pieces from which it was made. :\
To help aid with this inevitability, I drilled pilot holes and added pins to the connections between the stairs and the posts. This is also helps keep things aligned when working with multiple parts that need to be glued all at the same time. It’s a tip I learned on the Greenleaf forum.
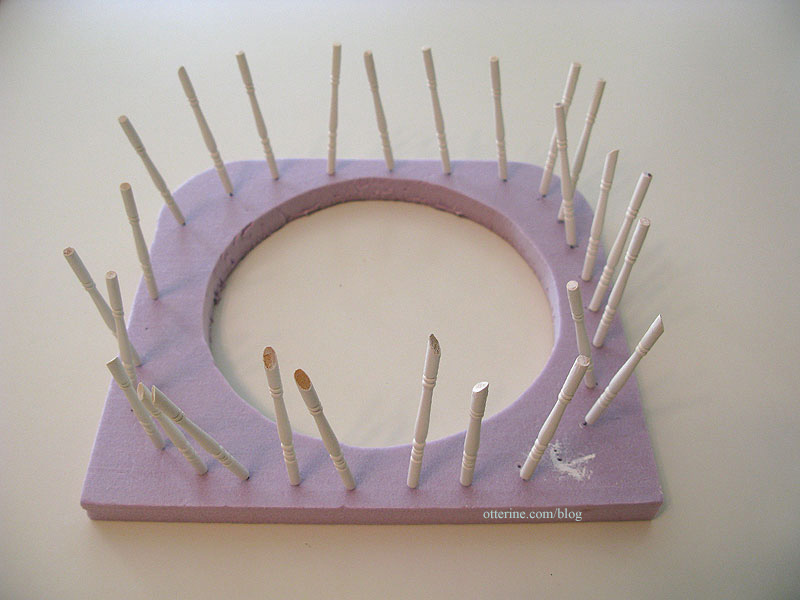
I used eyelet headpins mainly because I had an excess of them on hand. I used super glue gel to supplement the Aleene’s Quick Dry glue to insert the headpin into the drilled holes. I then cut the headpin to roughly 1/2″ (this is longer than I need but I will wait to cut them down until later).
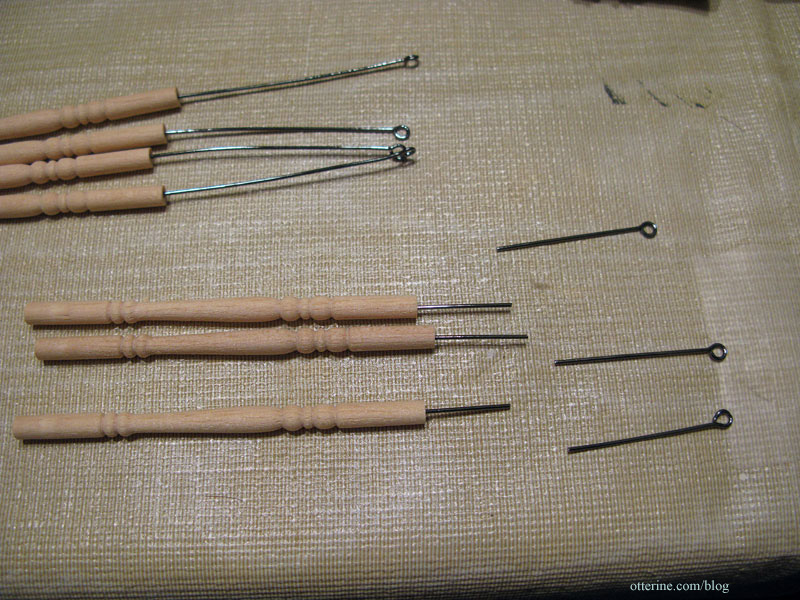
This allowed me to stick the spindles into a scrap of builders foam for painting.
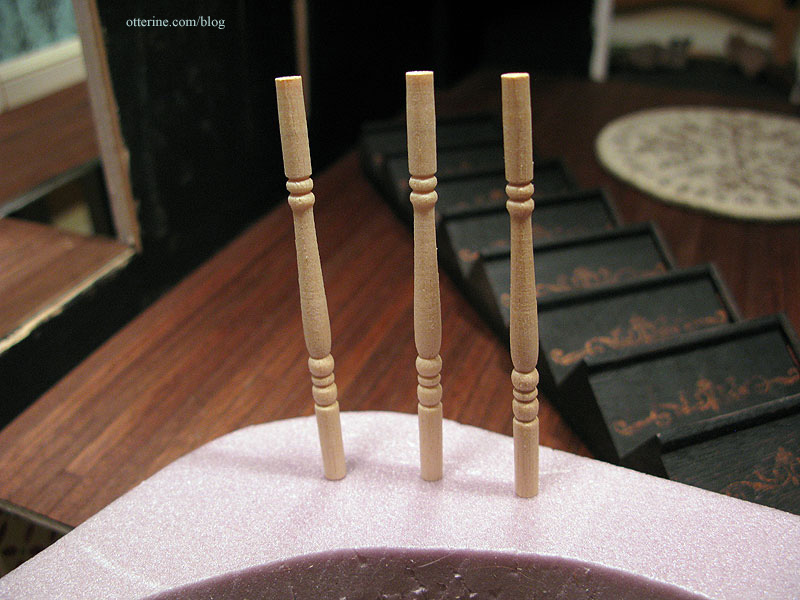
For the stair spindles, I used the kit baluster to mark the angle needed.
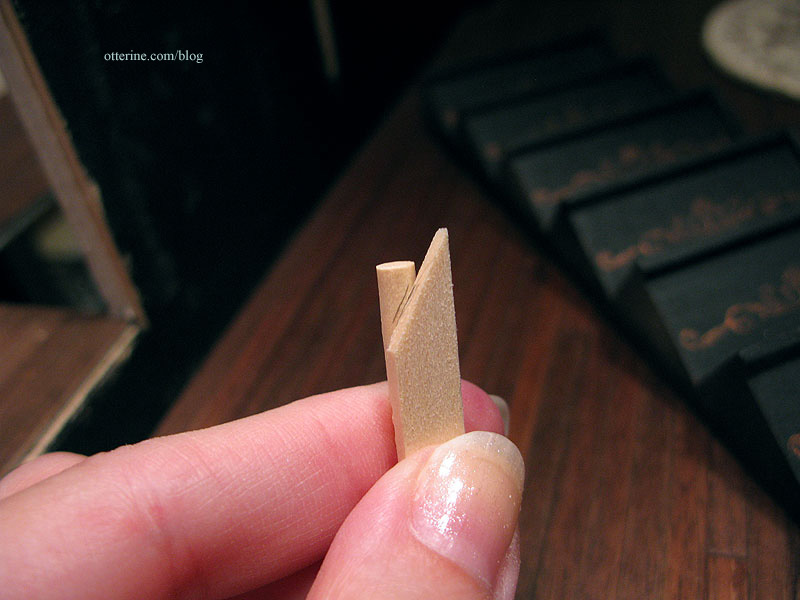
I then cut the top of the rounded spindle to match.
I painted the posts Vintage White to match the rest of the trim, sanded once and then painted a final time. Here are all the posts for the balcony as well as the ones for the stairs. Why do all this tedious work more than once?
Since drilling a tiny hole into the end of a round dowel doesn’t often end up right in the center, I chose to drill the corresponding holes in the stairs one at a time. After trimming the pin, I lined up the spindle with a stair and pressed the pin to make a mark.
I drilled a hole into the stair at that mark.
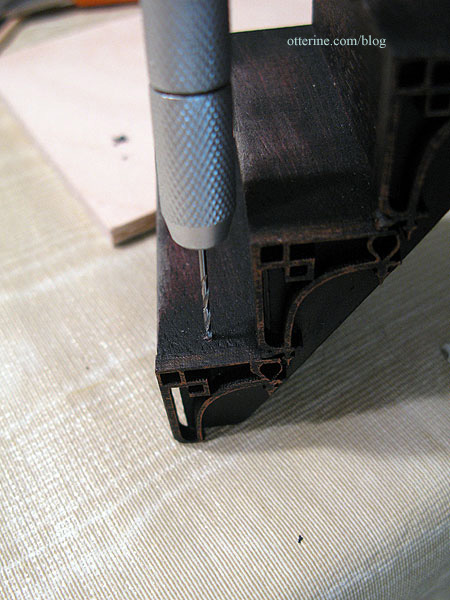
Using super glue gel and Aleene’s Quick Dry, I attached the spindle to the stair then repeated all the way up. I’ve left the top one off for now since I will need to make sure I am able to attach the stair railing to the balcony railing on the upper floor. That’s probably best to do once I have the stairs glued in permanently. For now, the staircase is still removable and will be until I absolutely have to glue it in place.
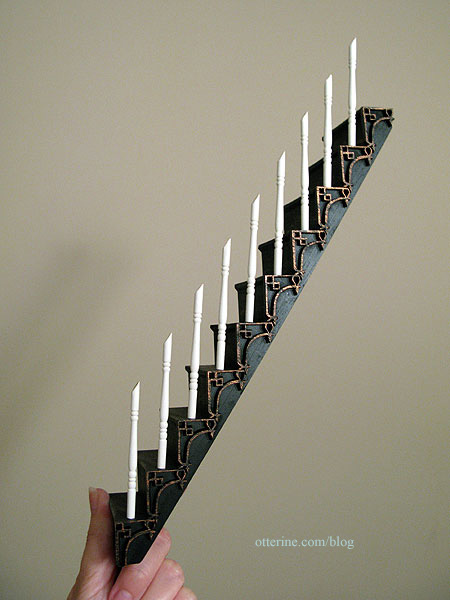
I tried to sand down the lifted grain during the painting process, but bumps remained or recurred near the tops of some of the spindles no matter how much I sanded. I hope these will be less noticeable once the final railing is in place.
Categories: The Haunted Heritage
September 15, 2012 | 0 commentsHeritage – The Tree, part 2
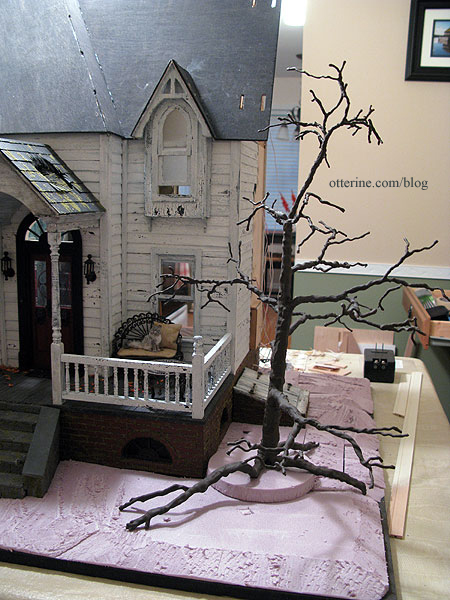
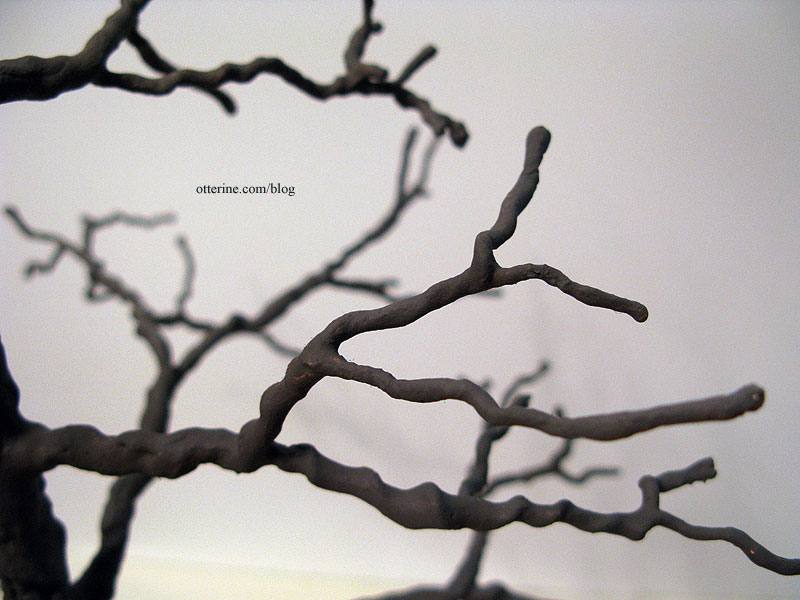
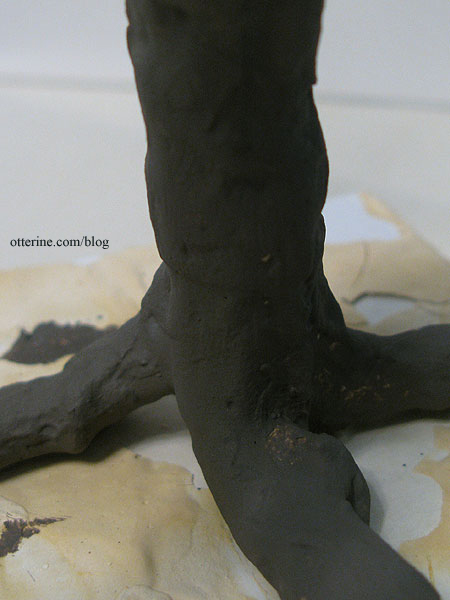
Continuing work on The Tree. I had considered carving bark texture into the putty but decided it was probably more work than it was worth. Instead, I did a quick sanding over the main trunk with 60 grit sandpaper. This removed the obvious smoothness and provided a nice texture. I also cleaned up any excess putty from around the roots.
Diane says most trees are more grey than brown, and when I was out today I noticed what she was talking about. :D
I started with an undiluted mix of Neutral Grey and Traditional Burnt Umber, both by Americana. This initial dark coat of paint really brought the tree to life!
The branches twist and turn just like the real thing. I stippled the paint on to create additional texture which you can see here on the branches.
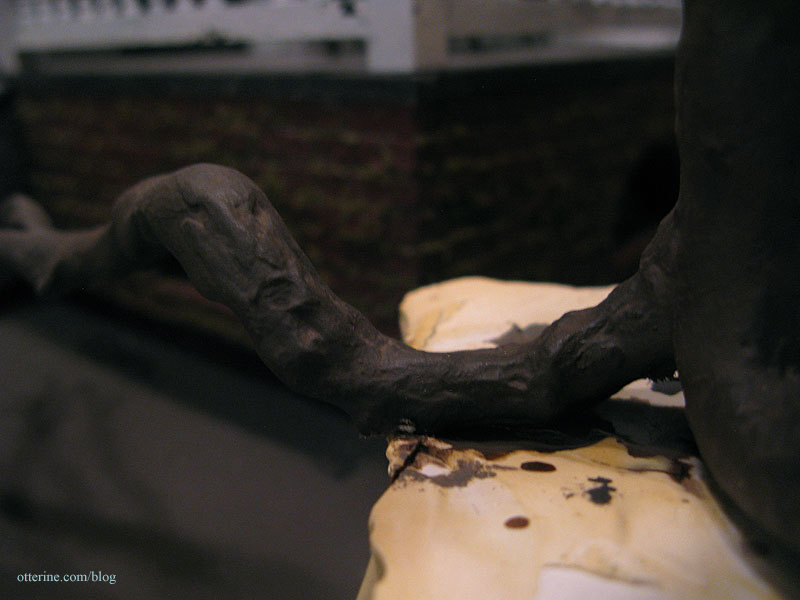
I think the lower trunk and root structure turned out great! :D
The next few steps were messy, so I didn’t take photos throughout. I did my second coat of paint with an undiluted mix of Asphaltum and Neutral Grey by Americana, with a dash of black. It darkened the tree too much. I followed that with a heavily diluted wash of Traditional Burnt Umber. It made the tree too brown. I followed that with a heavily diluted wash of Neutral Grey and Traditional Burnt Umber (like my first coat of paint), and that seemed to set things right. All these layered washes bring out a depth not achieved with a single application of regular paint.
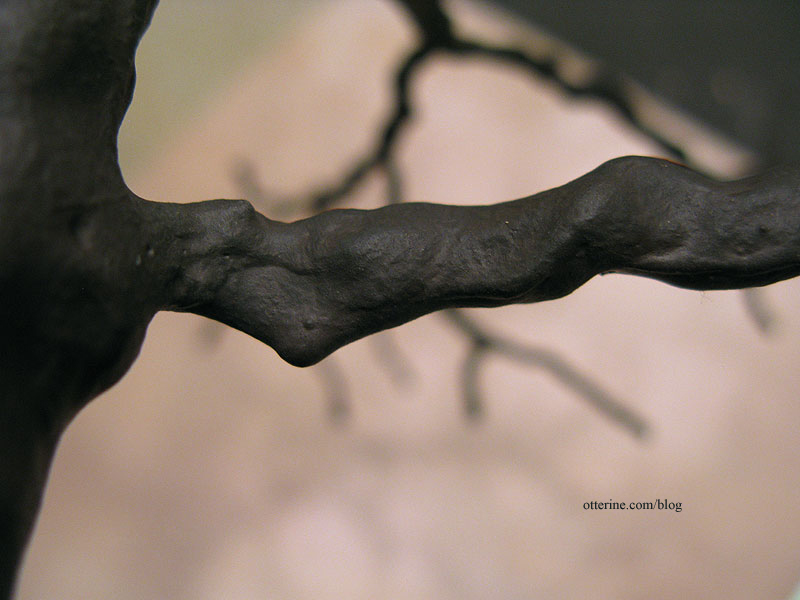
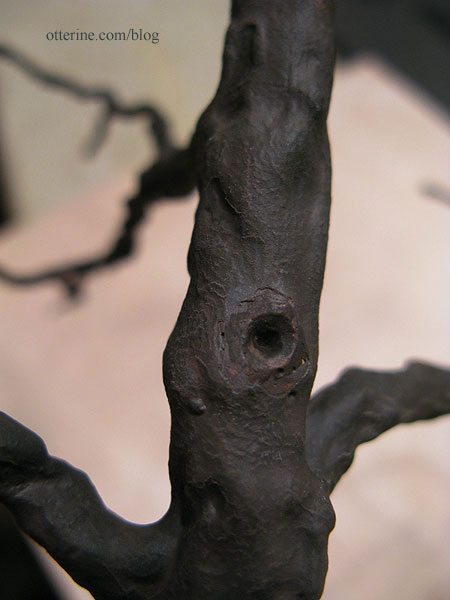
On some of the bare portions, I scraped away where branches have fallen from the tree during its lifetime.
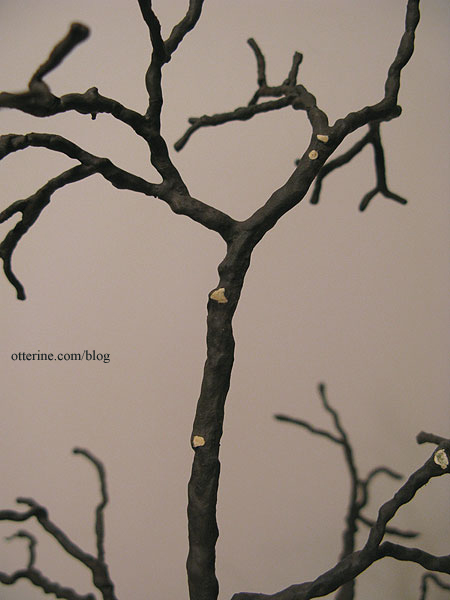
Some I made larger than others, carving out an actual hole.
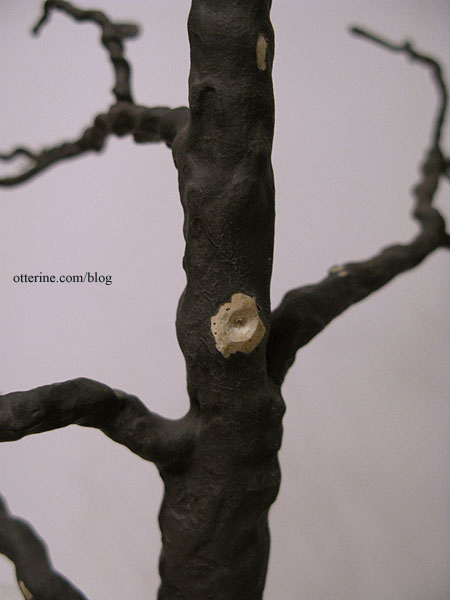
I then painted these individually to darken them. Now, if I wanted it to look like the village just came through to trim the trees along the street, I could have left them. :D
I love the texture on this tree! I am so pleased with the results.
Love, love, love it!
And, like any good haunted tree, you should be able to see faces in it. :O
The tree will remain dormant for now, until I get to the landscaping part. I need to finish up the interior and shingle the roof first. I don’t need to be reaching over a tree trying to work! :D
Update: foliage added here.
Categories: Flowers, plants, and trees, The Haunted Heritage
July 1, 2012 | 0 commentsHeritage – The Tree, part 1
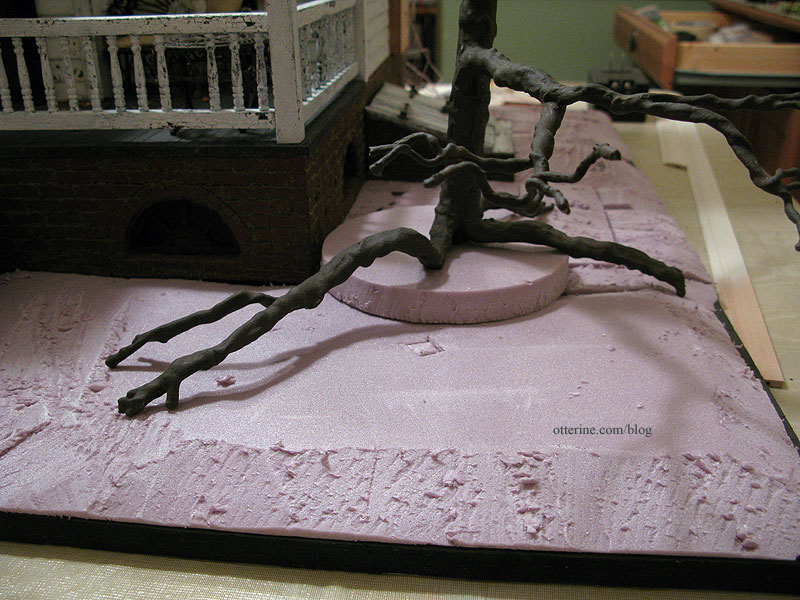
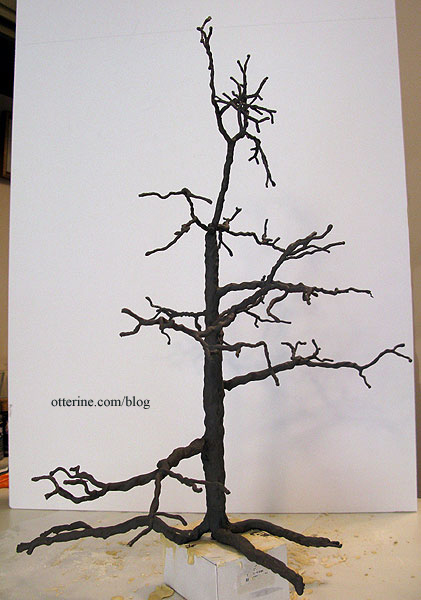
What’s a haunted farmhouse without a big ol’ creepy tree in the yard? :O
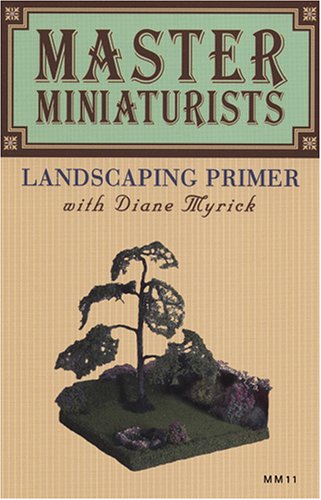
To build my tree, I used the tutorial from the DVD Master Miniaturists: Landscaping Primer with Diane Myrick. This whole series is just awesome!
Diane made her tree from 40 pieces of floral wire, but I used 66 pieces: a mixture of 18″ pre-cut floral wire in 18 and 22 gauge. I supplemented the height with 14 pieces of 32 gauge floral wire purchased on a spool that I cut into 20″ lengths.
I wanted roots on mine, so I staggered the wires so that the thinnest wires were loose at the top and the thickest wires stuck out at the bottom. I wanted one long root, so I made sure I had a bundle for that as well.
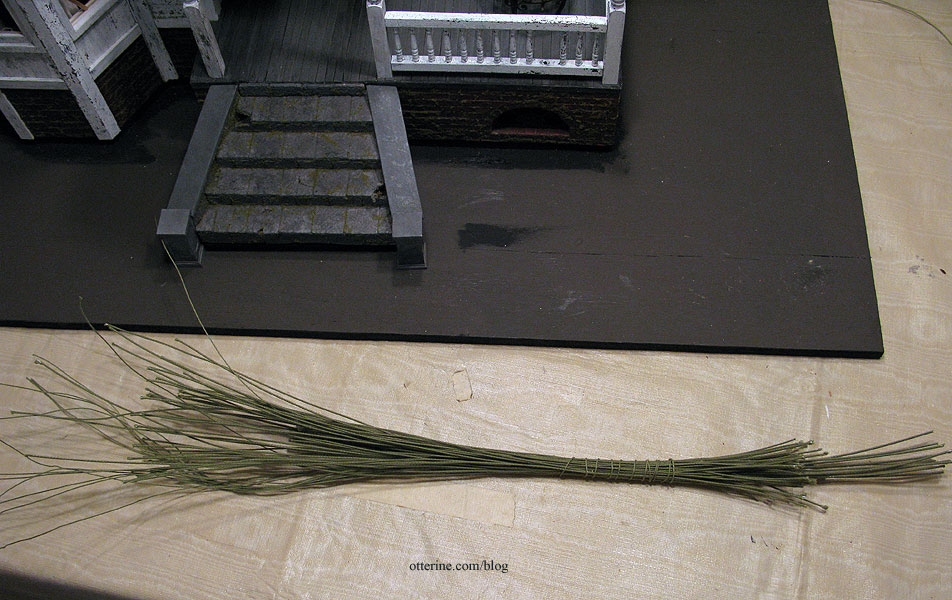
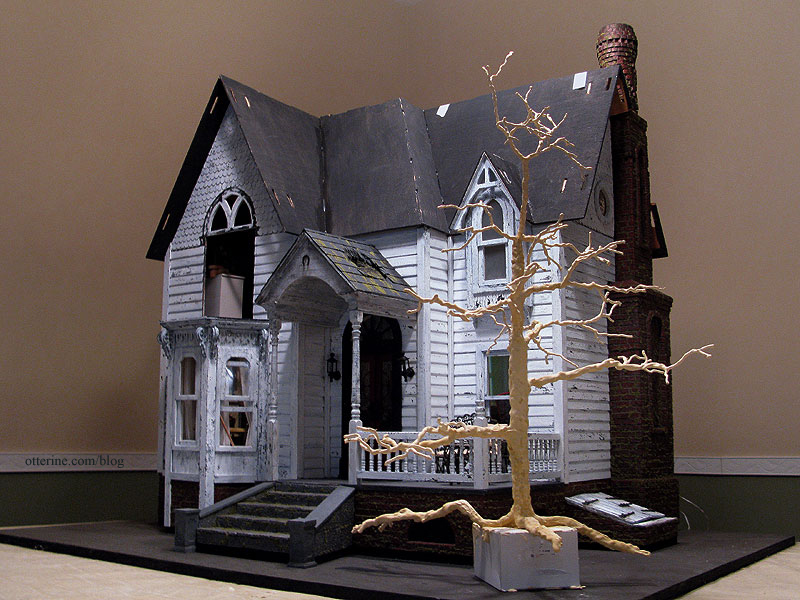
Diane’s tutorial shows a tree with foliage. Since the Heritage is set in the autumn, my tree will be mostly bare (I think). Ha ha. To that end, I spent a lot of time shaping the branches. I also left the house side minus a branch, which might have hit the portico at some point. ;]
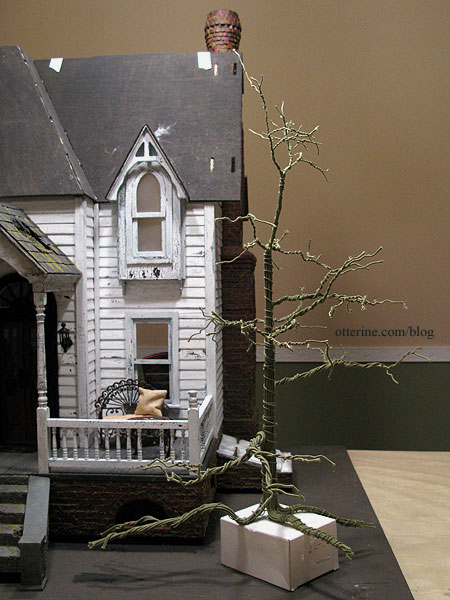
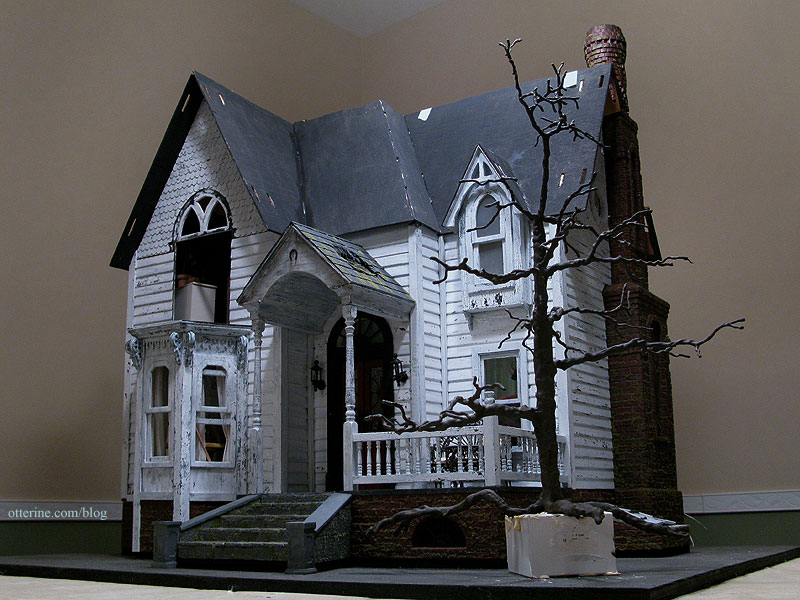
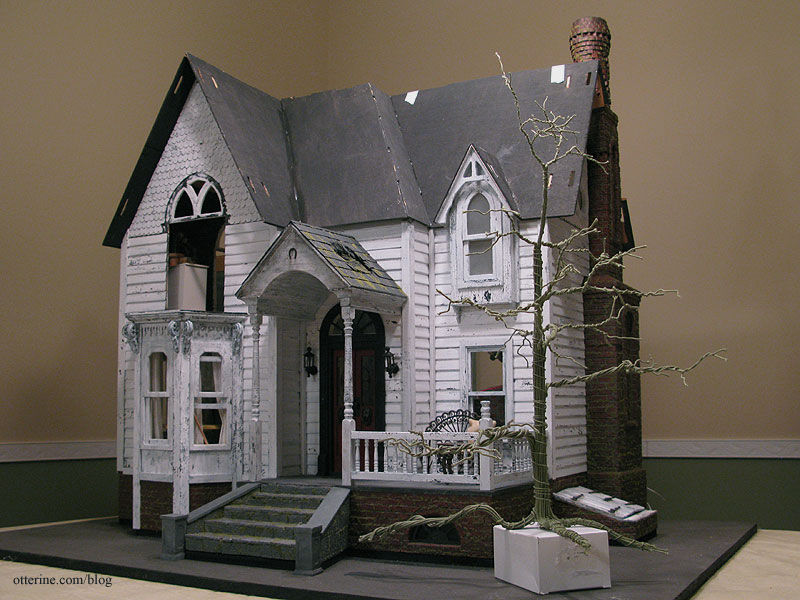
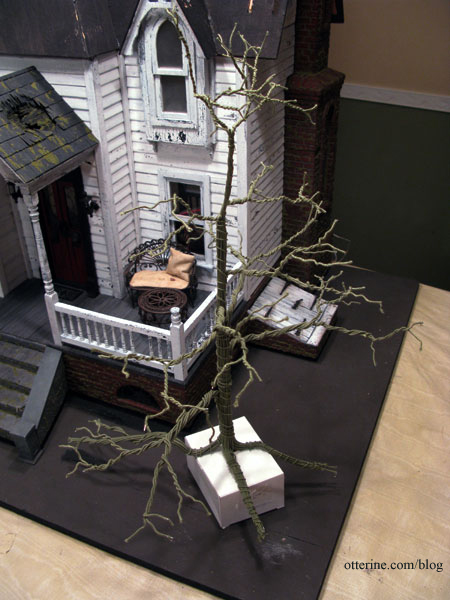
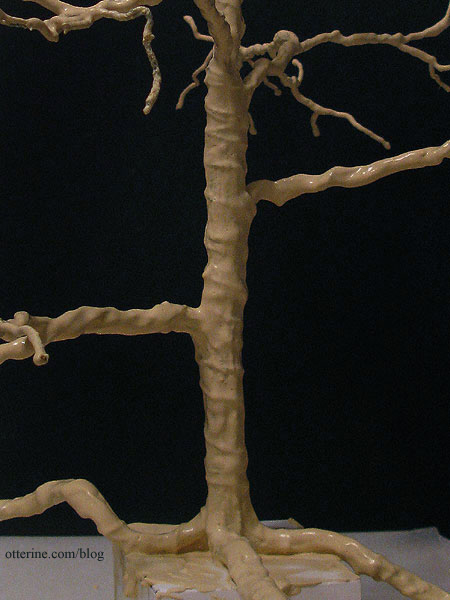
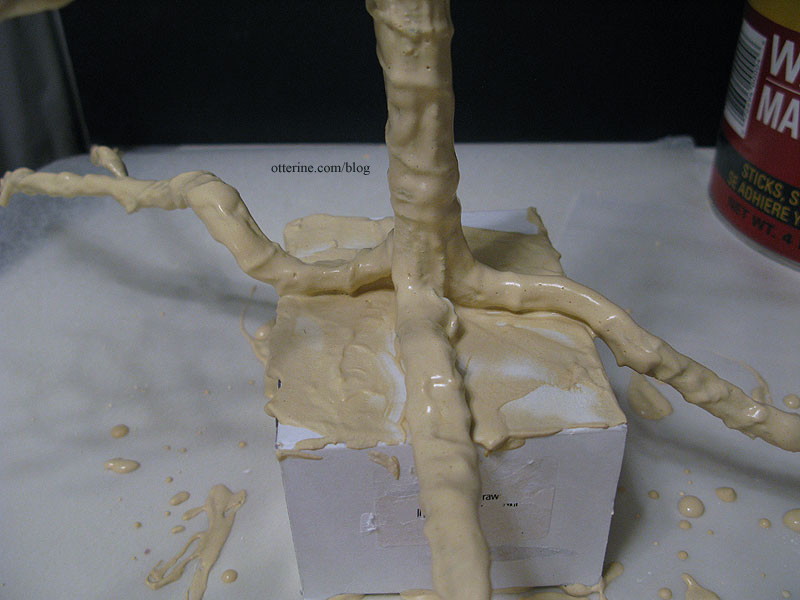
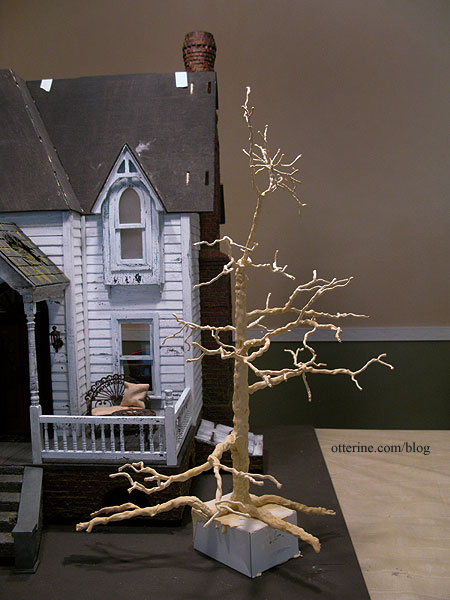
Here’s a nice aerial view of the tree, which stands 18″ tall. The tree has a spindle on the bottom that’s inserted into a box for right now. I will be adding a foam base when I get to the yard portion of landscaping for the tree to sit on, and the root tips will disappear into the ground.
In the tutorial, Diane used Durham’s Water Putty. I ended up with a 4-pound container of it from Home Depot. Did I need four pounds of water putty powder? Uh, no, but it was what was available locally (no shipping) and I had a Home Depot giftcard with enough on it to cover the modest $7.98 price tag. :D
Here it is just after the application.
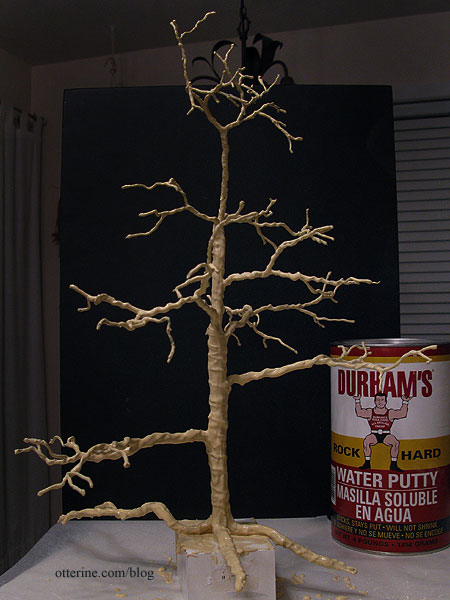
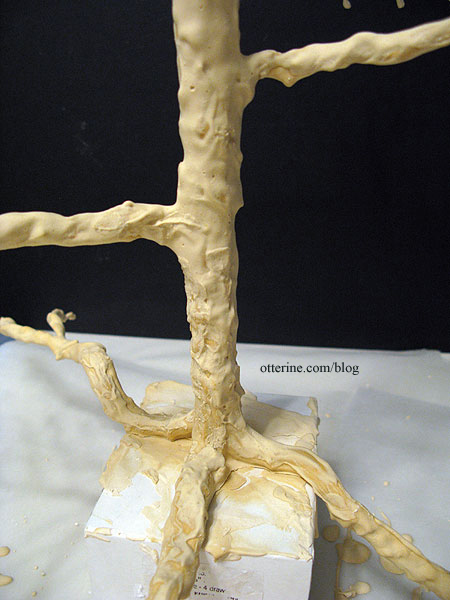
This was the first time I had worked with the putty and I found it to be a great material. The binding wires around the tree still show under the putty more than I think I want them to, so I might add another thin layer once this one sets. I do like the texture overall, though.
I scraped the excess putty from around the roots to keep them rounded and separate as the putty dried.
I left it overnight, and it dried hard and treelike! :D Some of the binding wires had softened in appearance but others still looked unnatural. I added another layer of putty over the areas that needed blending.
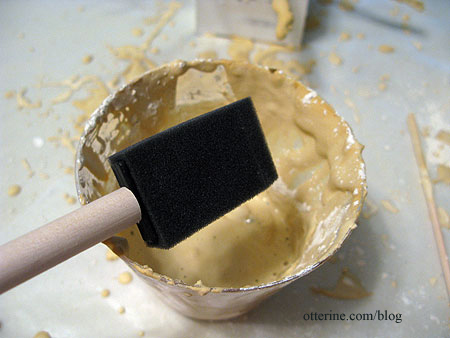
I had kept the cup from the night before, so I just mixed more putty in there. I used a fresh foam brush, though, because the other had hardened. You can’t put this stuff down the drain, so the cups and brushes you use must be thrown away in the trash.
Mike had recently used this material for making river rocks, so I asked him about the properties of it, namely whether you could carve it. He sent me to the Durham’s Water Putty site, and apparently you can do all sorts of things with it.
I used an awl and a file on the dried puddle from last night to see what it was like. It took the carved texturing very easily.
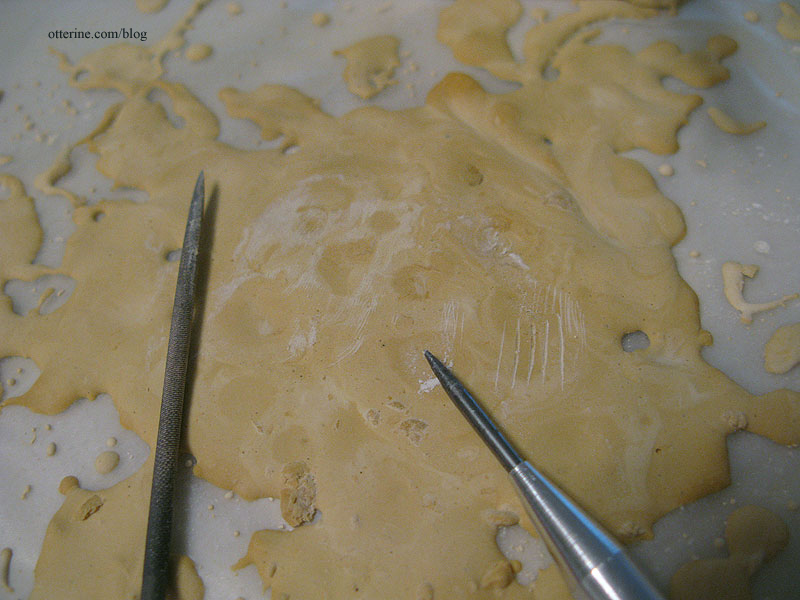
Even with the yellow coloration, it already looks like a real tree.
Next up will be painting once the second layer of putty dries.
Part 2 here.
Categories: Flowers, plants, and trees, The Haunted Heritage
June 30, 2012 | 0 comments
NOTE: All content on otterine.com is copyrighted and may not be reproduced in part or in whole. It takes a lot of time and effort to write and photograph for my blog. Please ask permission before reproducing any of my content. (More on copyright)