

Heritage interior staircase, part 3
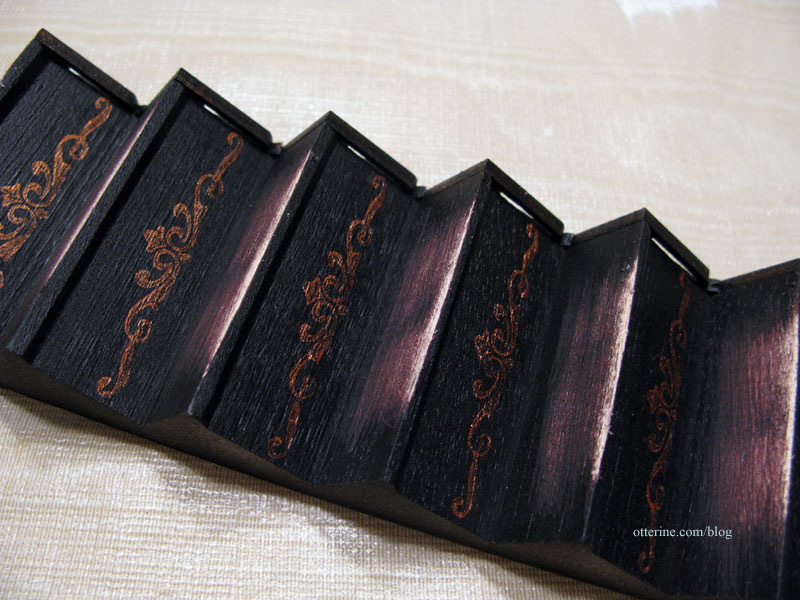
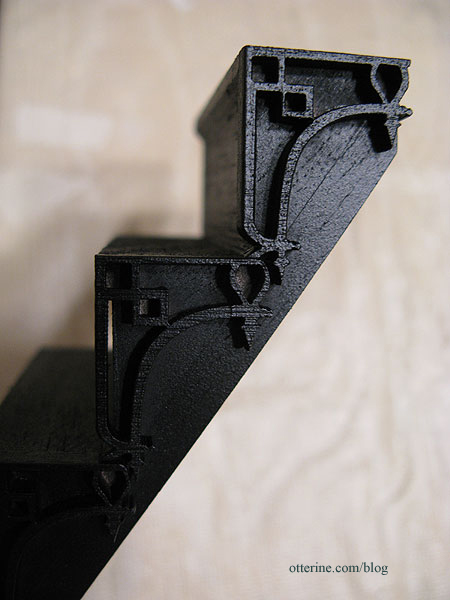
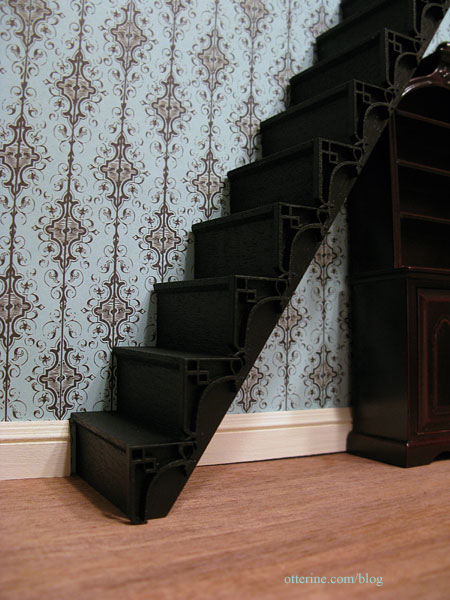
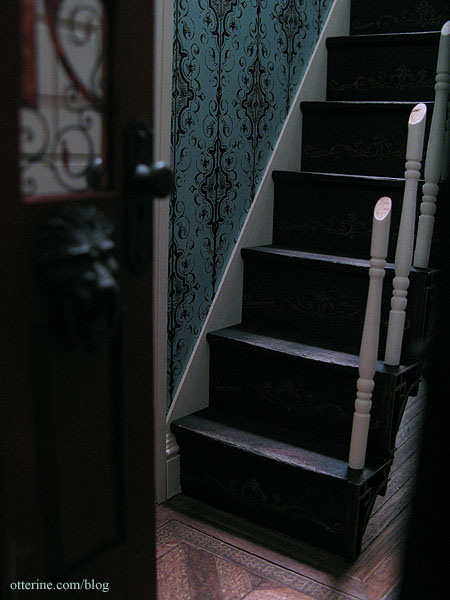
Evelyne’s suggestion from my last stairs update to dry-brush some metallic paint onto the laser cut trims to bring out the detail also brought on another idea…painted risers.
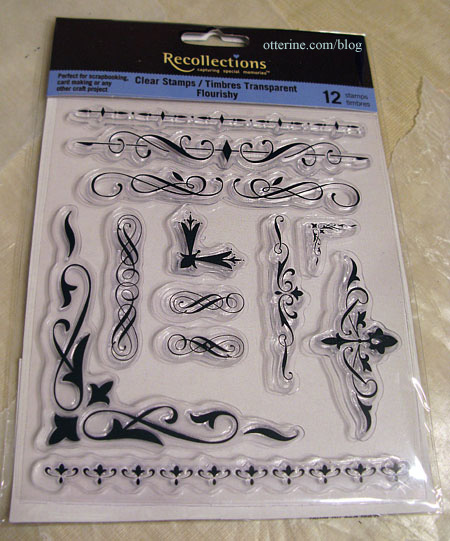
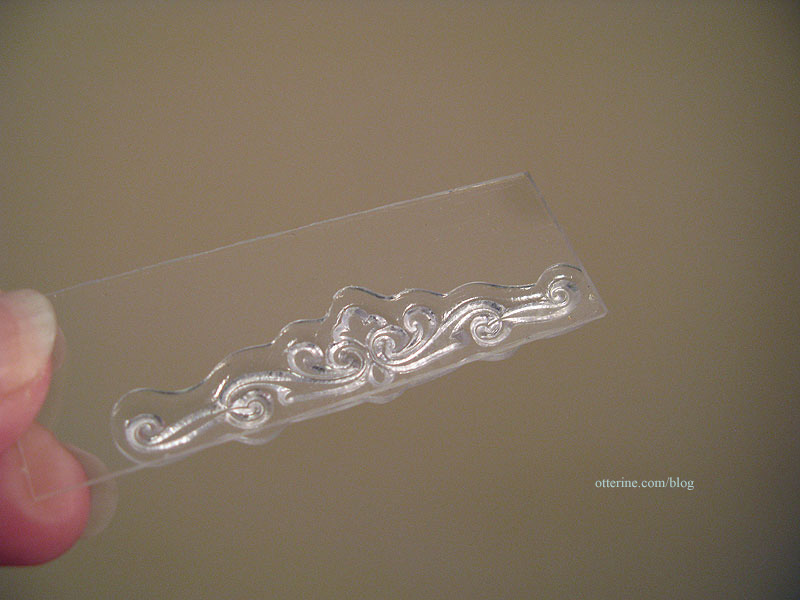
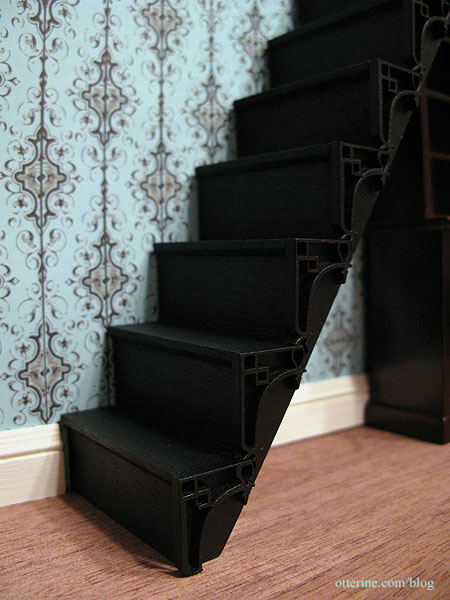
I used a scroll design clear stamp by Recollections (bought with a coupon since these are expensive).
You’re supposed to peel these rubbery stamps off the sheet and stick to a clear acrylic block to use them. I didn’t have an acrylic block (also expensive and only one coupon allowed per day) so I used the glass insert from the front door! :D
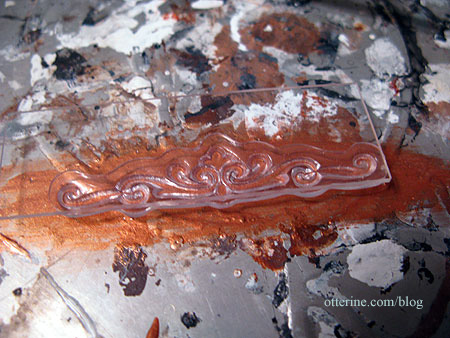
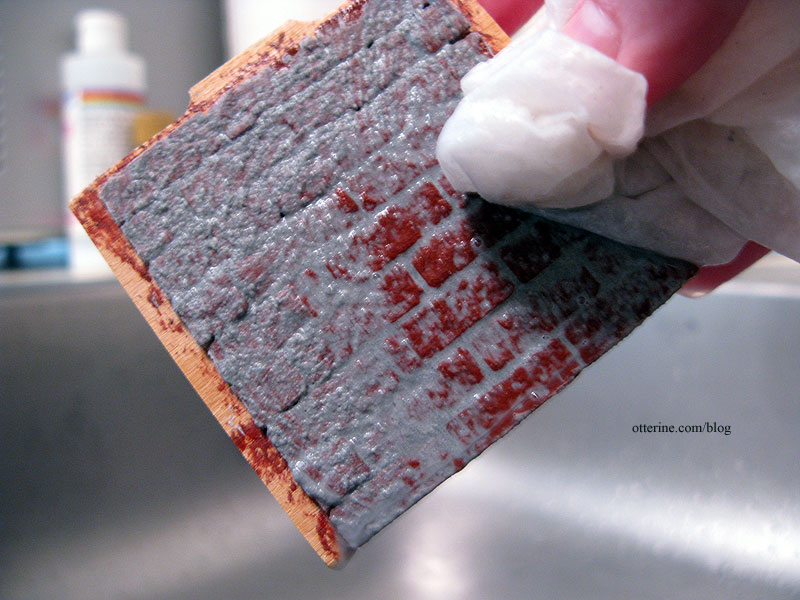
I spread some Pure Bronze paint by Apple Barrel in a pie tin with a brush and then pressed the stamp into the paint.
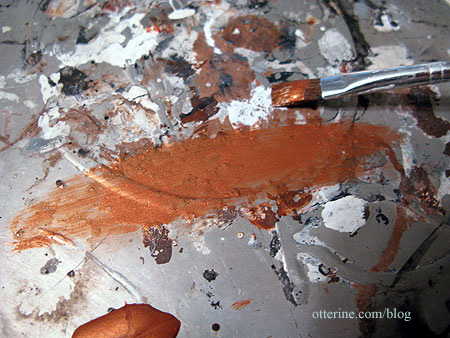
I touched up any sparse areas with the flat side of the brush.
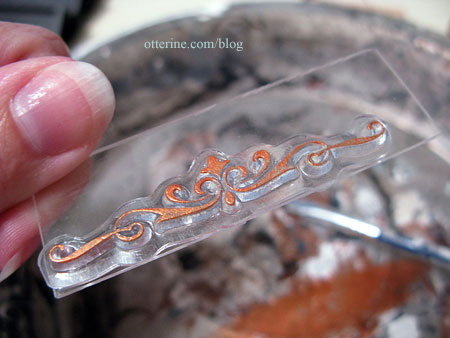
I then pressed the stamp onto the riser. The glass insert worked better as a stabilizer since it was small and I was able to line it up with the stairs as I went.
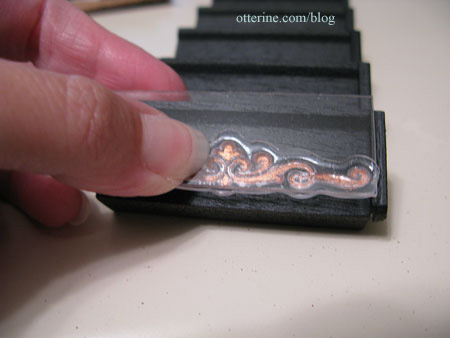
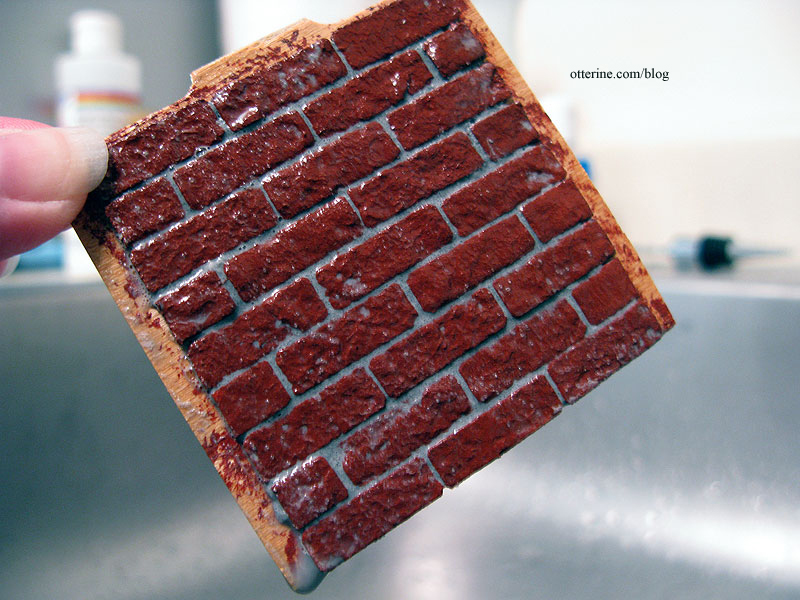
Voilà! :D
With some further practice, I probably could have gotten more even coverage from the stamp…but this worked well for old worn out stairs.
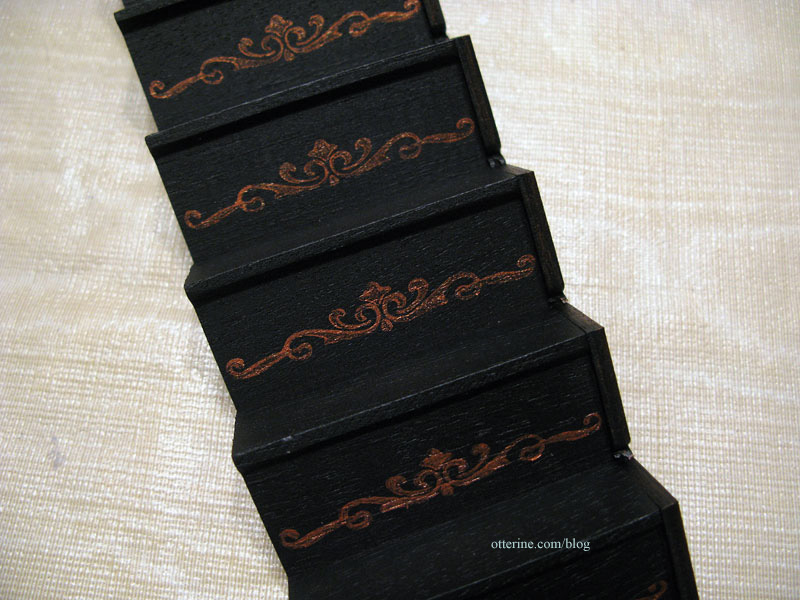
Using the same flat brush, I stippled some paint onto the laser cut trims. I must say, it looks even more fabulous! Thanks, Evelyne, for the fantastic suggestion!
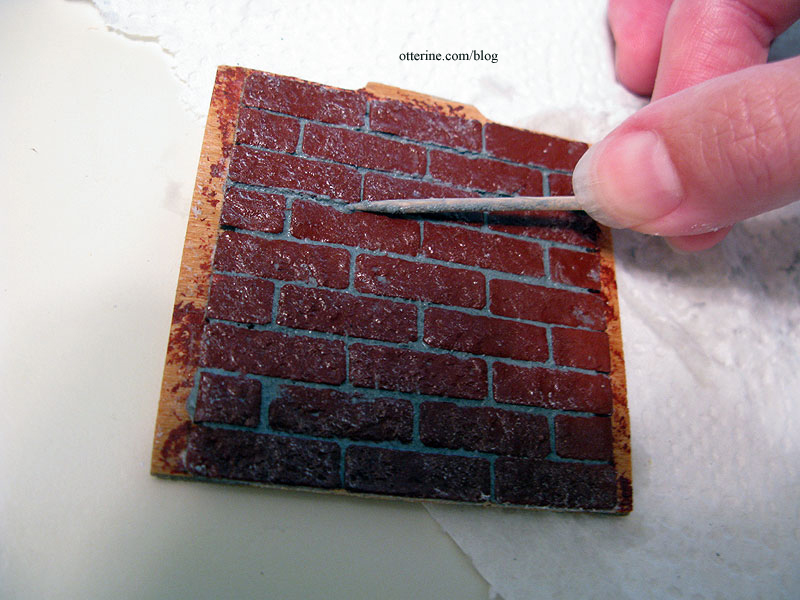
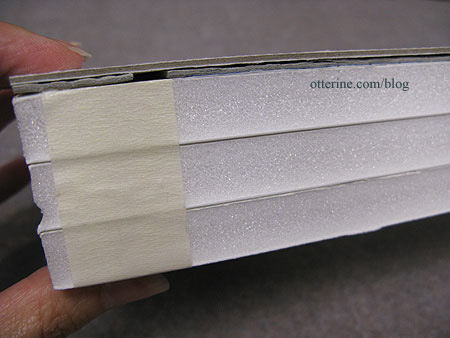
Once the stair detailing was good and dry, I used some coarse sandpaper to wear down the front edges of the treads and put in some minor indentations mimicking years of parallel footfalls.
I then used fine sandpaper to even out the obvious scratch marks and to soften the painted risers.
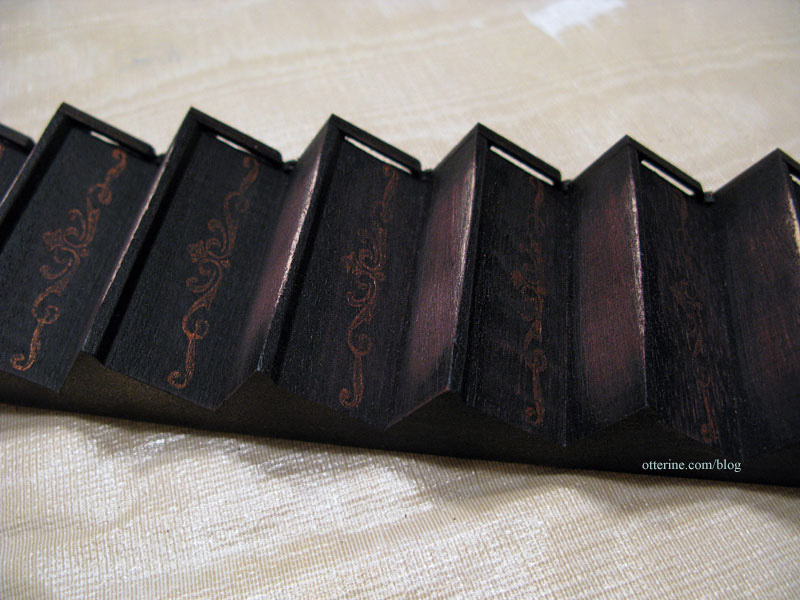
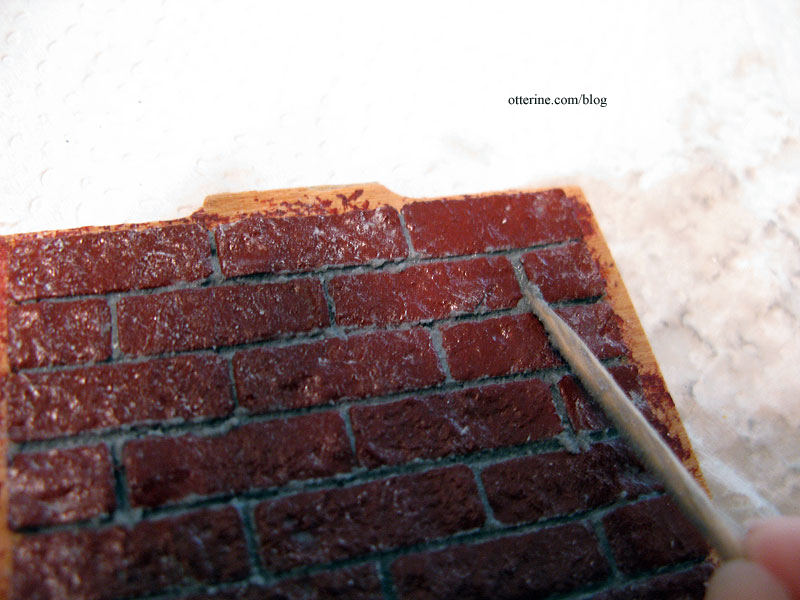
To fill the color back in, I used a wash of Bittersweet Chocolate by Americana and black paint. This toned down the deep black and made it look as though the heavier stain had worn away over the years. Here you can see where the red base layer comes into play. That dark stain would have penetrated the wood into the deep layers. Leaving it all light wood underneath would be out of character with worn dark wood.

And there you have it…fabulous stairs made better and older!
Categories: The Haunted Heritage
September 14, 2011 | 0 commentsHeritage interior staircase, part 2
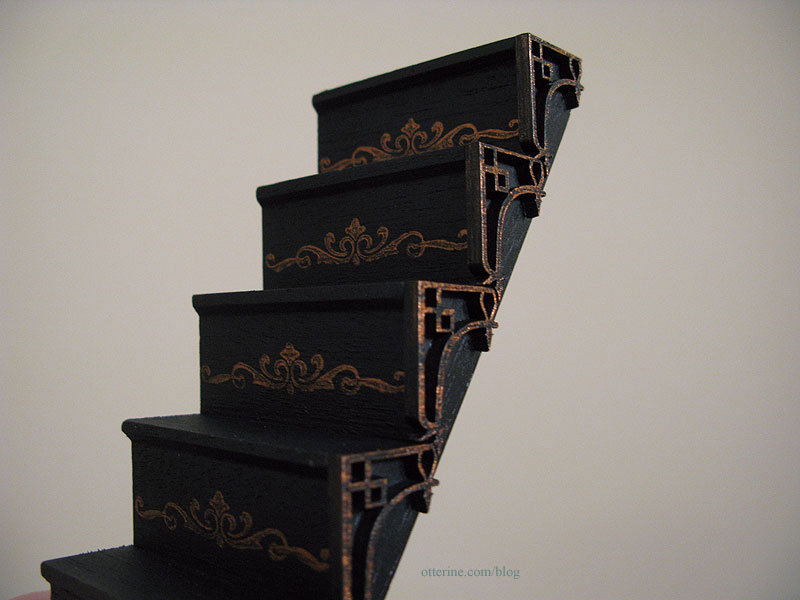
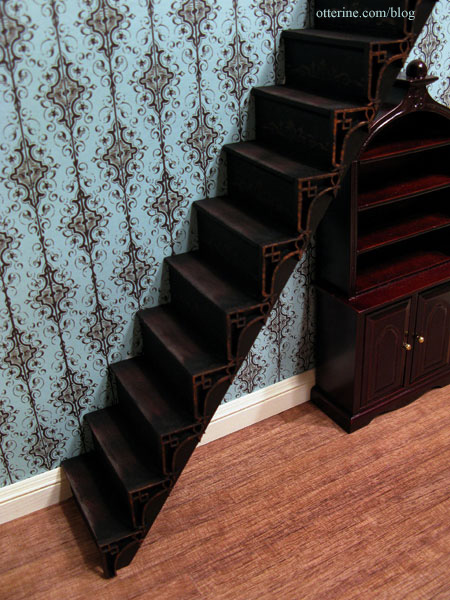
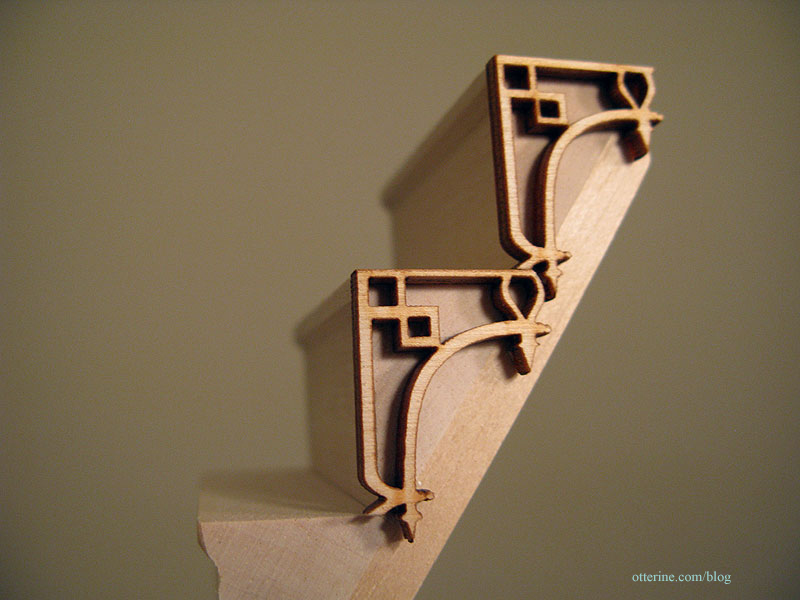
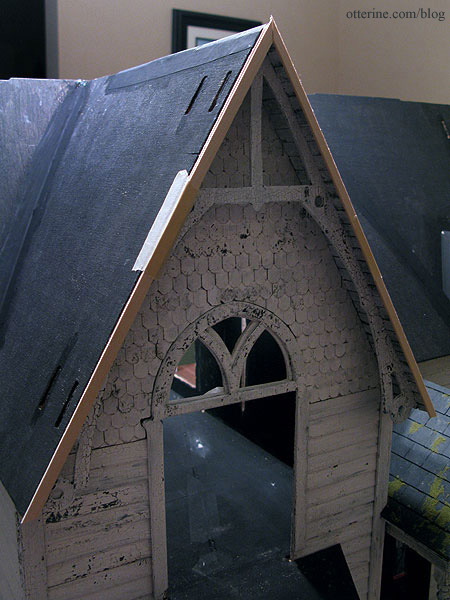
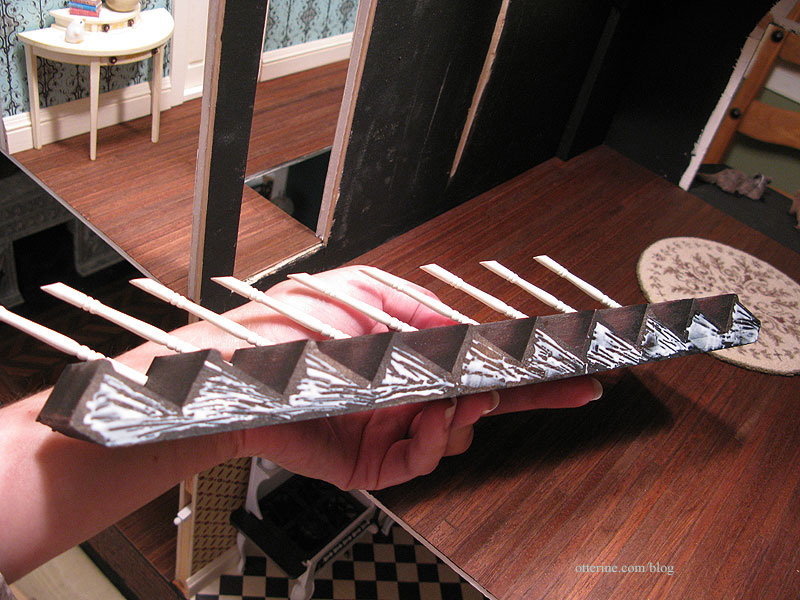
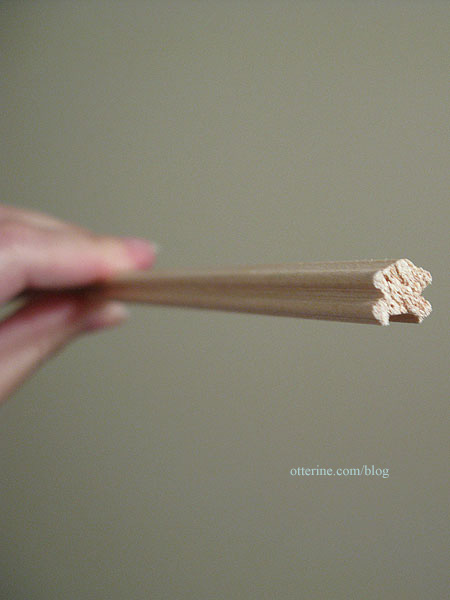
I wanted to figure out a way to make a straight, narrow staircase look interesting and perhaps a bit spooky. I first took a page from the Newport book and added laser cut corners to the side of the stairs. These are by Judy’s Create-a-House purchased from miniatures.com. The quality isn’t bad, though they were not as uniform in design and thickness as other laser cut trims I’ve used.
I had to remove portions of the pieces to get them to fit together uniformly along the side of the stairs.
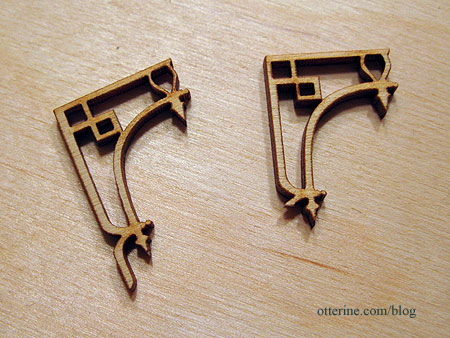
I think the result looks planned and natural.

I started with a base coat of Barn Red by Americana on the risers and treads. This was mainly to keep any bare wood from showing through in the next step. It looks creepy already! Perhaps a bit too creepy. :D
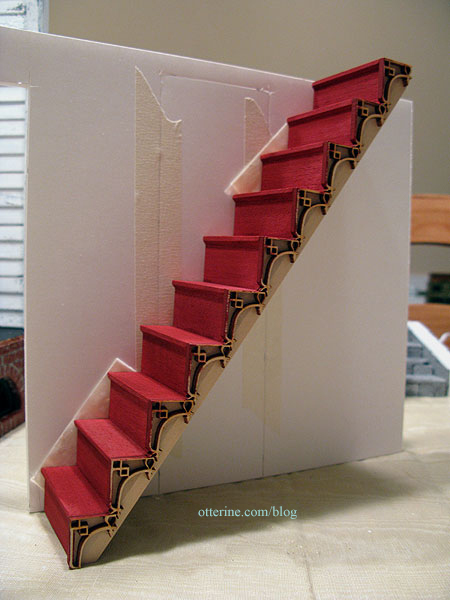
Since painting laser cut trims with a brush takes forever and I planned on making the whole thing black anyway, I taped the assembly to a board and sprayed it with Krylon flat black. Interestingly, flat black ended up satin black, so no added sealer was necessary.
This left only minor touch-ups in smaller areas of the laser cut pieces to do with a brush and regular acrylic paint. Much easier and faster with the sprayed based coat!
Here it is with Turquoise Gothic Stripe paper by The Paper Studio. I’ll use this paper in the foyer and upper hallway.
The area behind the stairs will be in the parlor and will be the deep glittery green paper by Recollections.

I wasn’t sure about having such dark stairs, but I think they’ll work wonderfully.
Categories: The Haunted Heritage
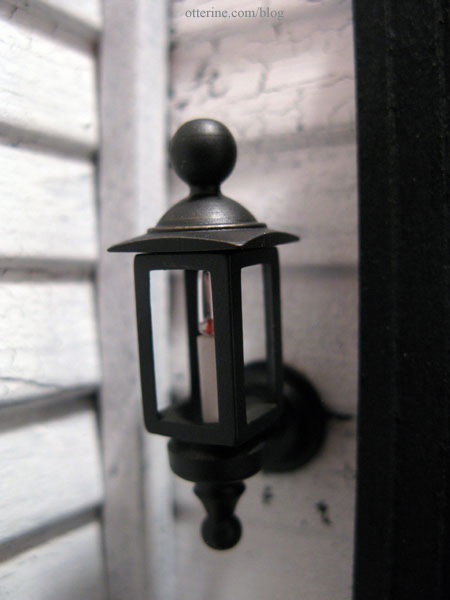
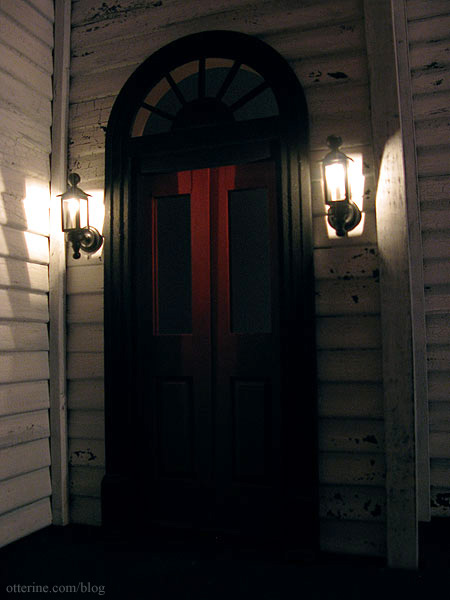
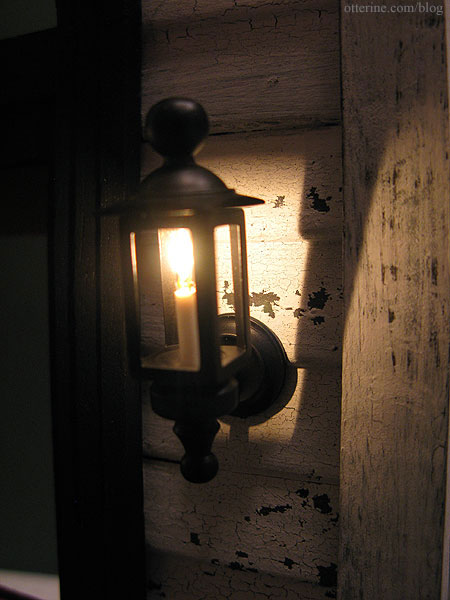
September 11, 2011 | 0 commentsFront door coach lamps
These are Clare Bell Brass Coach Lamps.

There’s nothing quite like adding light to a dollhouse to bring it to life!
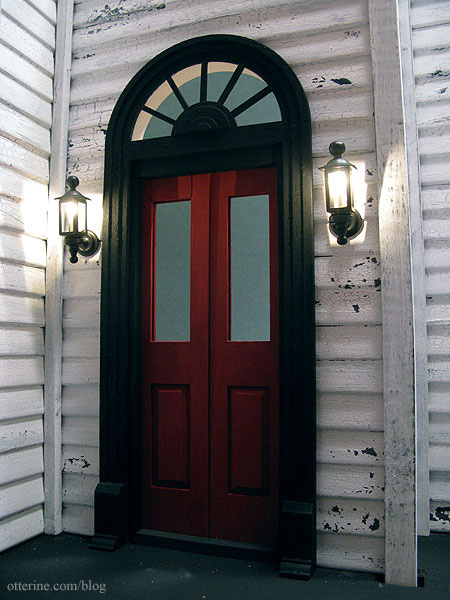
They are shiny and new and will need to be weathered, but they have a wonderful old time look about them.
I need to get to work on the glass inserts for the front door to finish off the spooky mood! :O
As I was trying to capture a detail shot of the coach lamps, the macro setting on the camera focused on the paint instead. I cannot believe how well the crackle paint effect mimics old, lifted paint – especially right below the light. It’s so exciting! :D
Categories: The Haunted Heritage
September 7, 2011 | 0 commentsMiniature Treasures: Catacombs Clock Case
I recently found my way to a blog on some of the most amazing miniatures I’ve ever seen. The artist uses old, sometimes ancient, pieces and creates wonderful works with such character. One of these works I instantly loved…his dark but beautiful debut miniature that he based on an old clock case and the French catacombs.
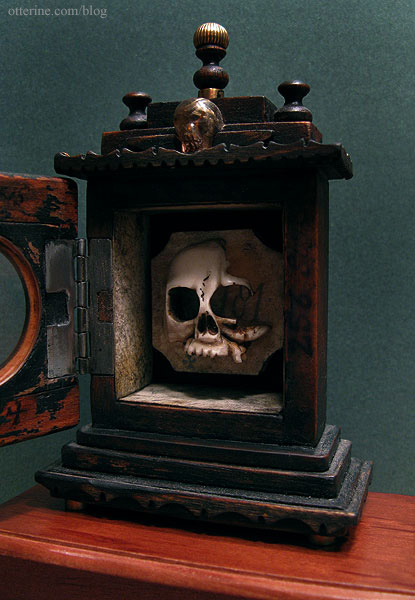
When Tony later posted on his blog that all of his works were for sale, I don’t think I could have sent that email to him any faster! :D He replied promptly, and after some email exchanges, all was set and that beautiful piece was on its way to me.
It soon arrived safe and sound. It’s just so gorgeous, so well made. I tell you – it even smells awesome!!!! :D It smells of wood and parchment and leather. The scent reminds me of ‘new car smell’ most of all.
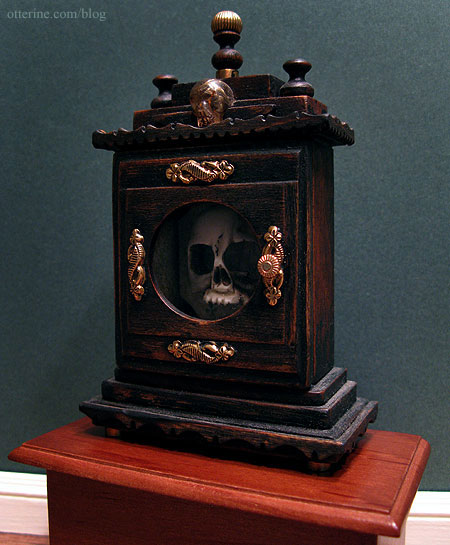
Tony used a skull carved from genuine bone, genuine 18th century vellum, optical glass from a pair of broken Victorian spectacles, a hand carved rutile quartz skull, and items from broken watches and clocks.
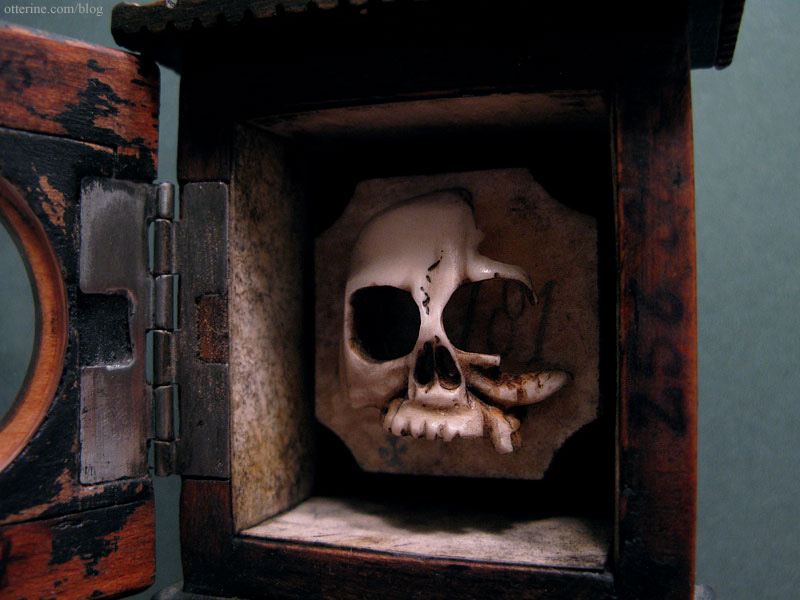
Thank you, thank you, thank you, Tony, for this beautiful work of art. I will indeed treasure it!

(As of 2024, his blog is no more, but you can find the artist here.)
Categories: Miniatures, The Haunted Heritage
September 6, 2011 | 0 commentsCellar windows and lighting
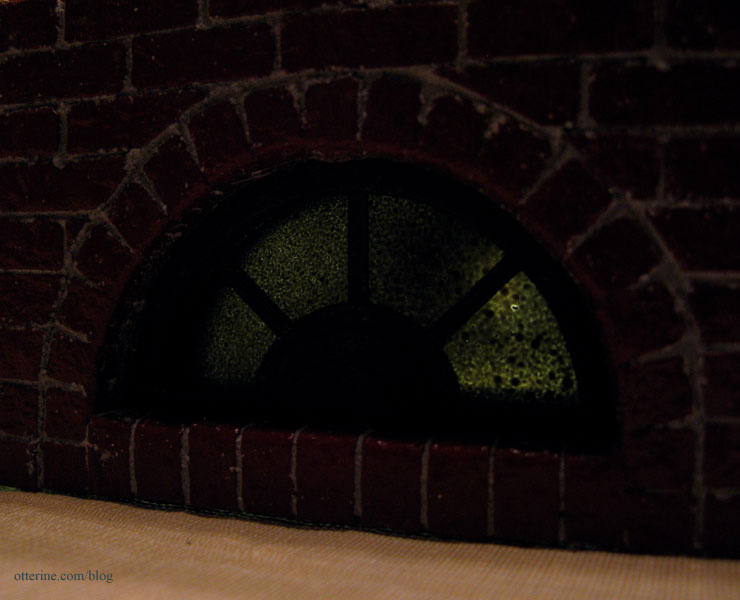
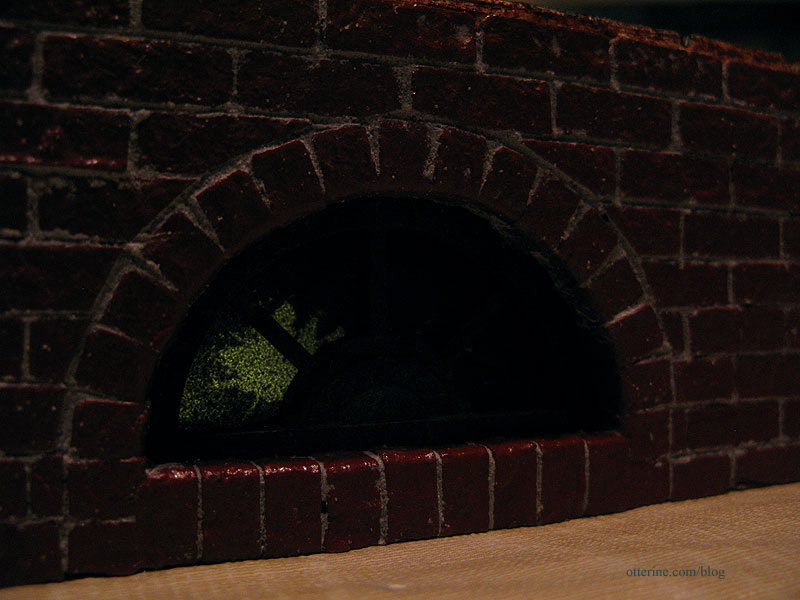
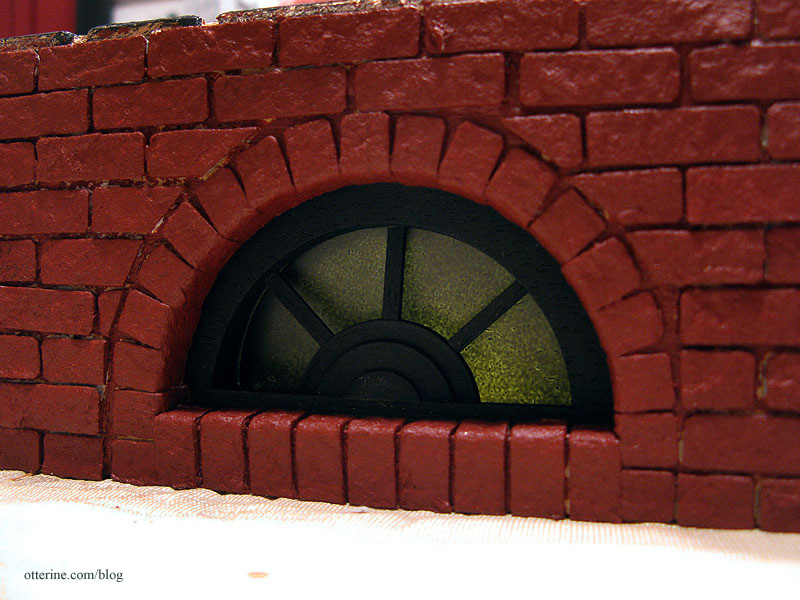
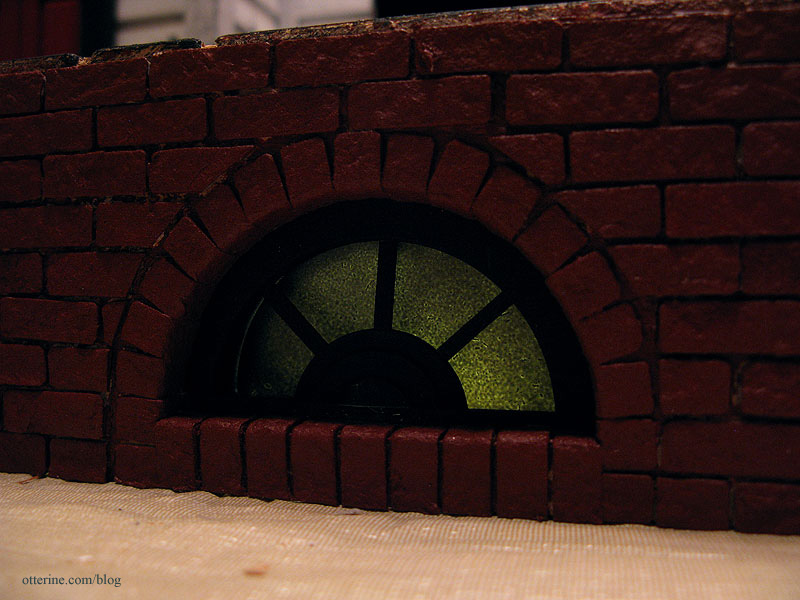
After painting the cellar windows black on the exterior and interior, I applied some paint washes in Bittersweet Chocolate and Terra Cotta, both by Americana. This gives the windows the look of rusted wrought iron.
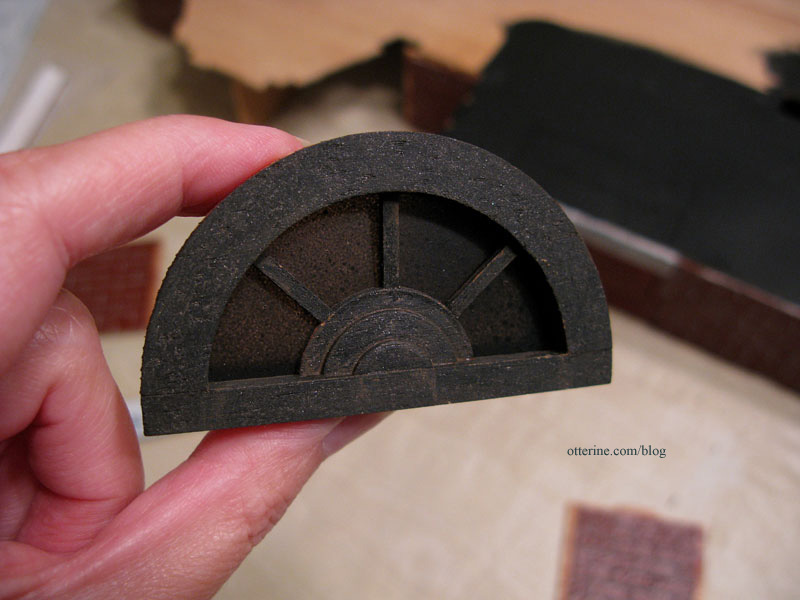
I added the windows previously spray painted lightly with flat black to give the appearance of years of accumulated dirt, holding them in place by gluing a spare wood piece behind the semicircle of the outer trim (so they won’t show from the outside). Once the foundation is attached to the base, I don’t want those windows budging one bit!
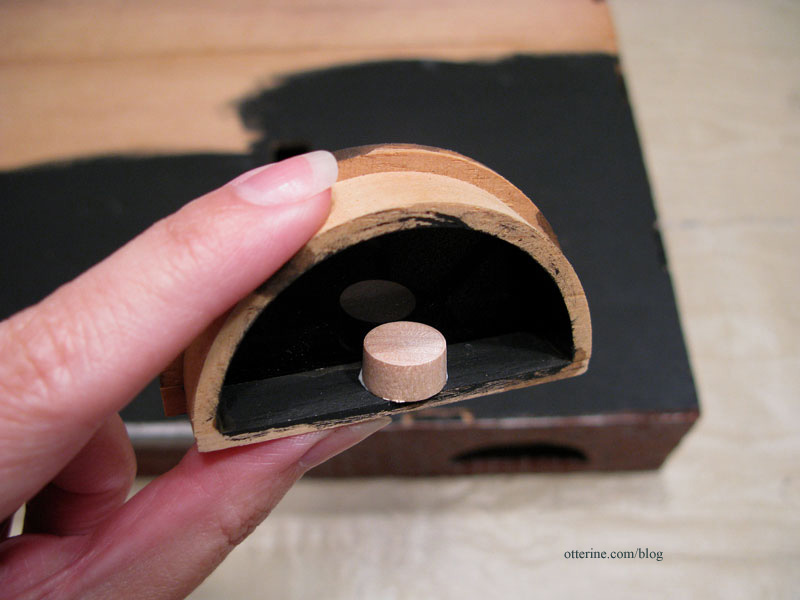
I then glued the windows inside the foundation.

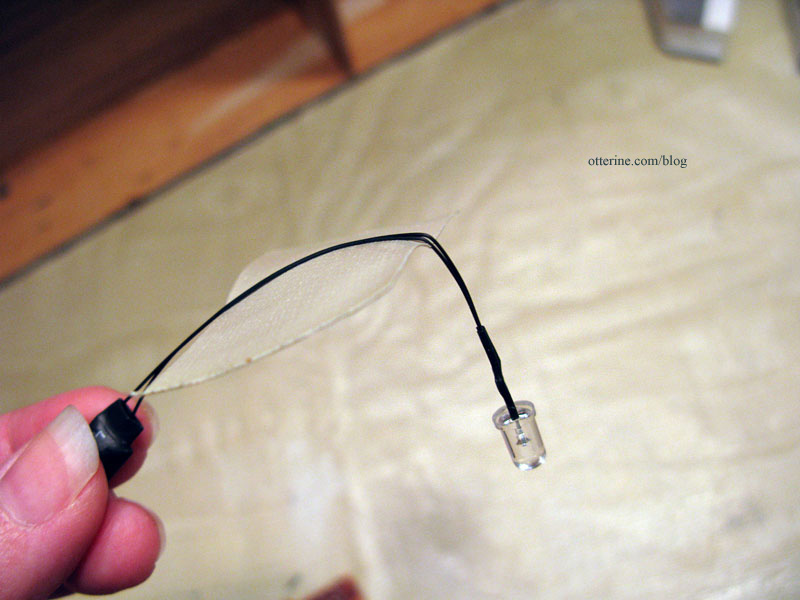
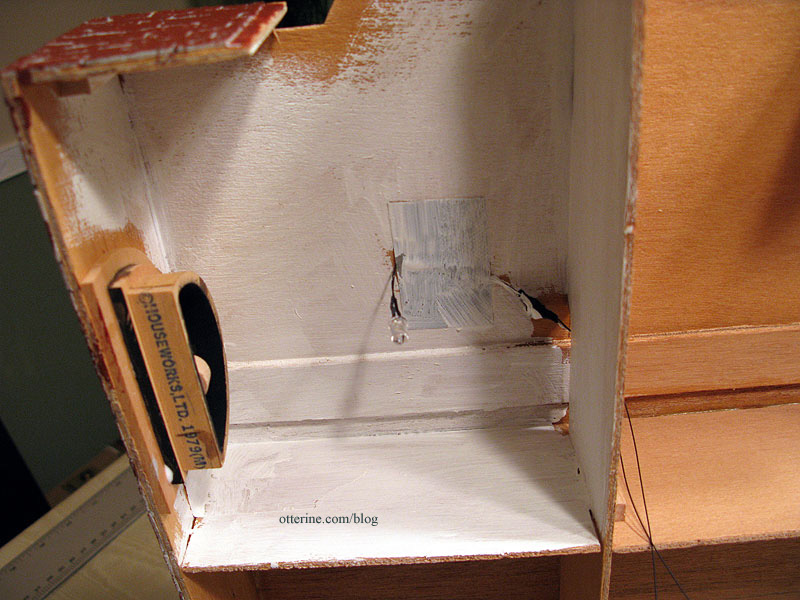
I used warm white 5mm LEDs from Evan Designs for the lighting. I like them since they have the look of a bare lightbulb. To give the LEDs the proper placement behind the windows, I bent the ends approximately 1.5″ from the tip of the bulb and secured them in place with duct tape to the foundation ceiling.
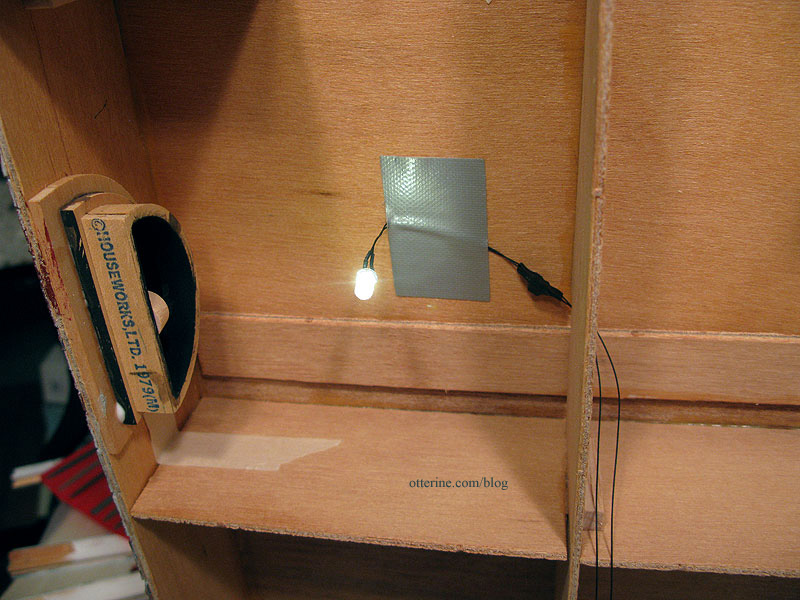
I found that an off-center placement worked best since the spindles on the window were blocking the light otherwise.
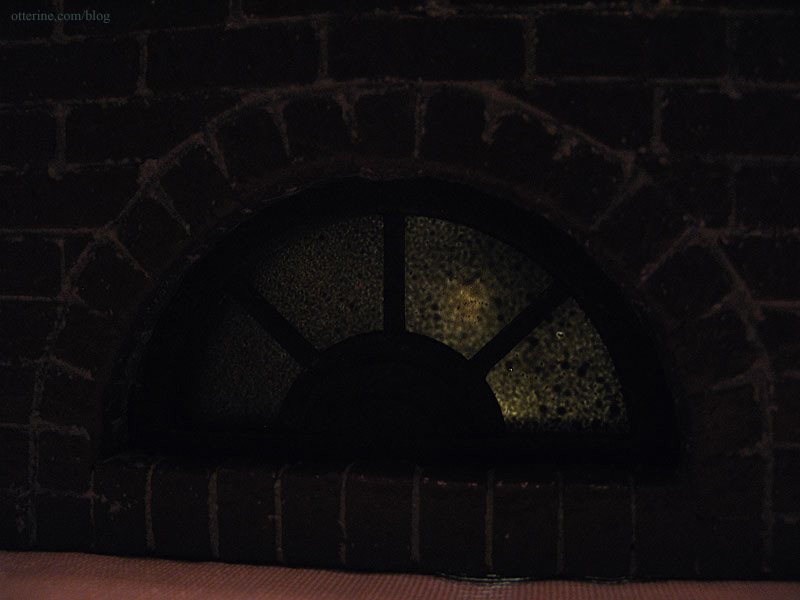
The light is not terribly bright with the thin layer of black paint on the windows, so I painted the “room” behind the window white.
It reflected back just enough light to enhance the eerie green glow that works so well.
For the corner with two adjacent windows, I used one LED.

For one of the windows, I sprayed one side first with flat black paint and scraped away some of the paint after it dried. I then sprayed the other side to act as the outside. Now it looks as though someone has tried to see out from the cellar. :O
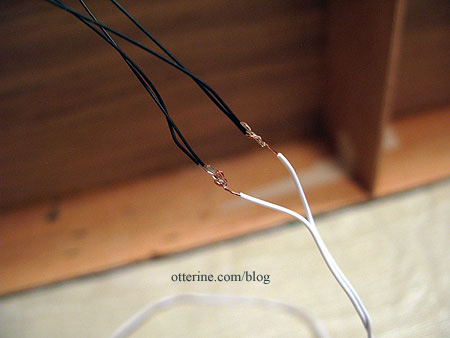
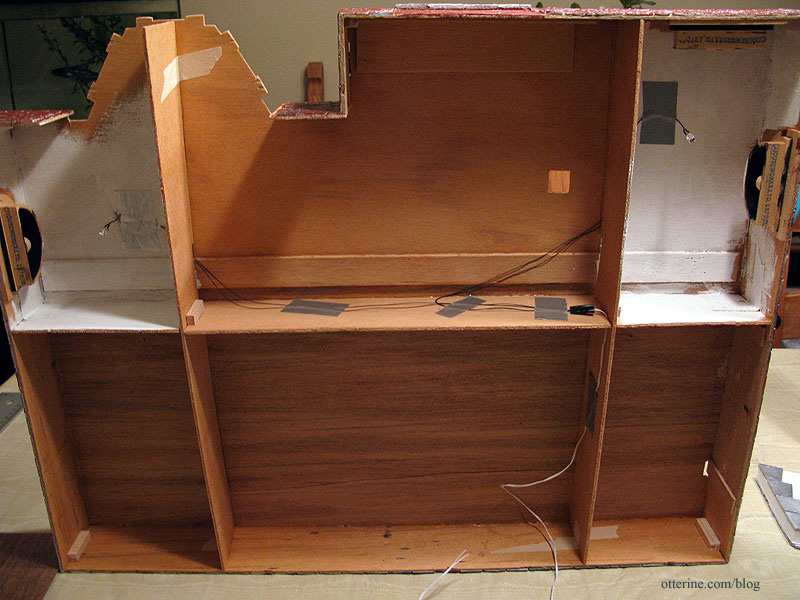
Since there is so much room in the foundation, I left all of the wiring here instead of running channels on the opposite side as I usually do. I ran the two sets of wires through existing openings under the foundation and spliced them together to work as one. These will have one plug that will operate both lights.
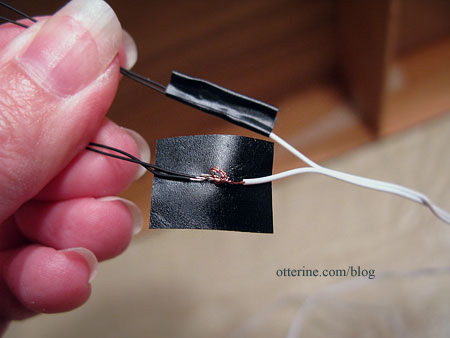
I taped all the wiring in place with duct tape to make sure it stays in place.
Categories: The Haunted Heritage
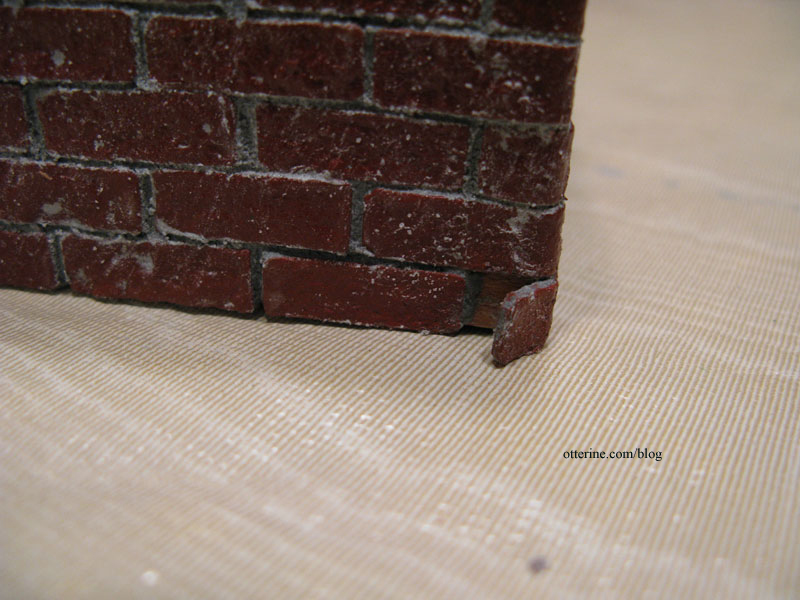
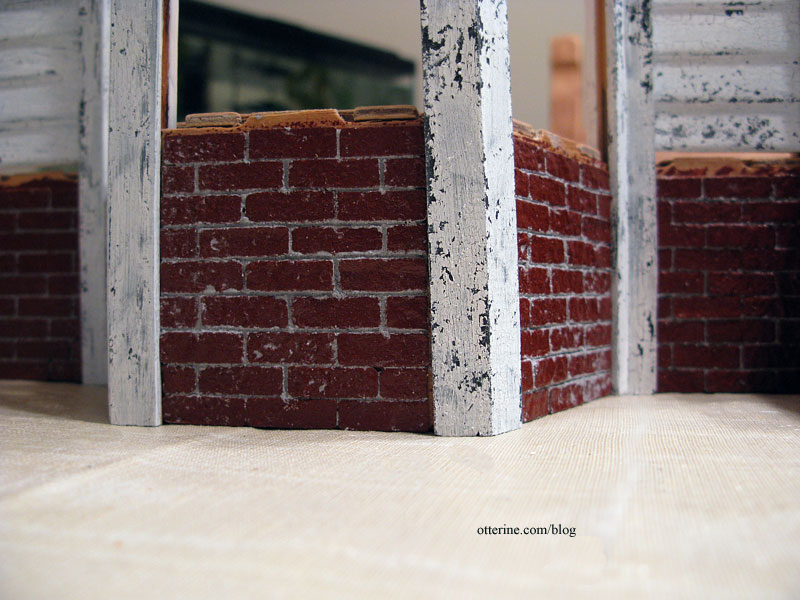
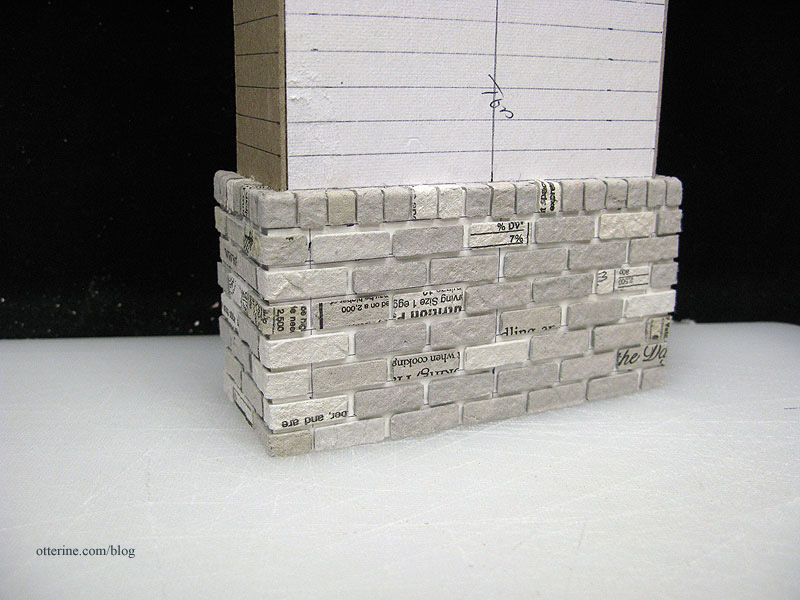
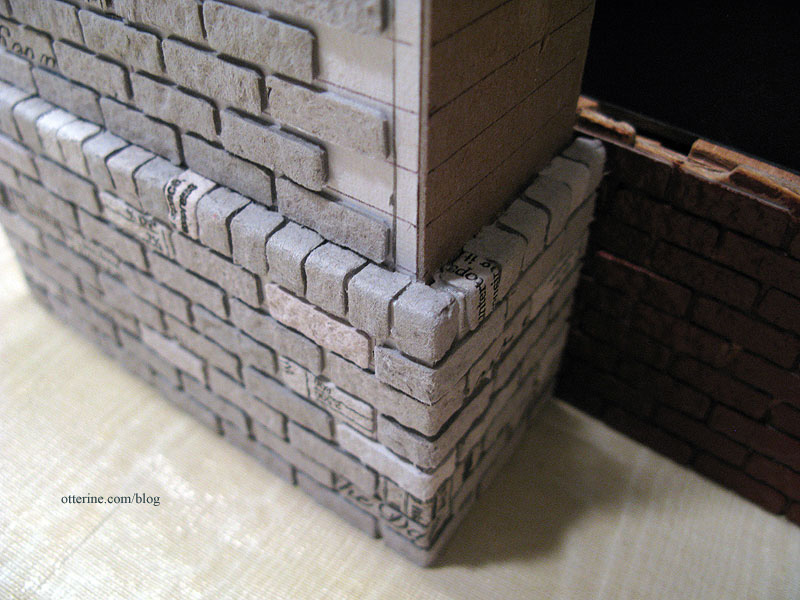
September 5, 2011 | 0 commentsHaunted Heritage red brick foundation
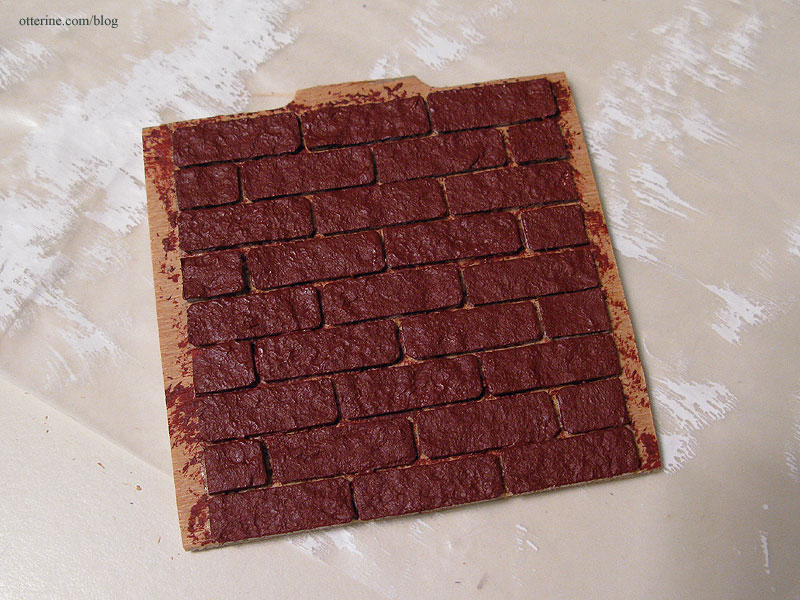
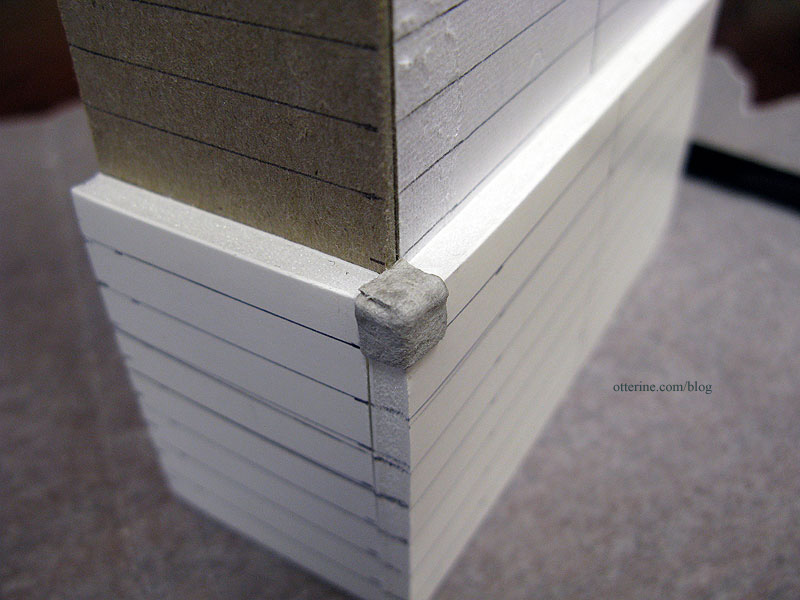
The bricks for my Heritage foundation are 1/4″ x 3/4″ except for the corner bricks, which measure 1″ in length. I also did a special treatment around the arch windows of the cellar, which I detailed earlier.
Once all of the bricks were in place, I dabbed on Liquitex Burnt Sienna. This is a thicker artist color acrylic, but it is a wonderful brick red color and has a great texture when stippled on with a stencil brush (two coats).
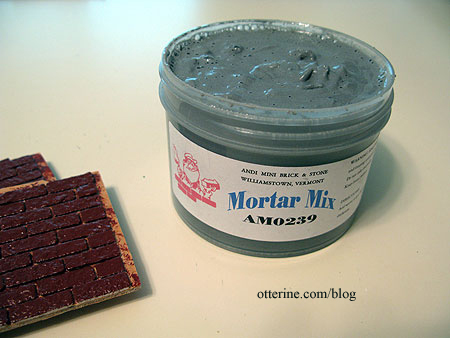
I let it dry overnight before grouting. I usually use Andi Mini Brick and Stone Mortar Mix for the grout since it has a good consistency and gives great results. If it gets thick, you can also soften with water.
First, I spread on a little bit at a time with my fingers, pushing into the gaps between the bricks. I use my middle finger so I can apply with lesser pressure than I would with my index finger. The grout is abrasive and can mar the surface. Please forgive the blurry photos; I was trying to photograph with my left hand while working. :D
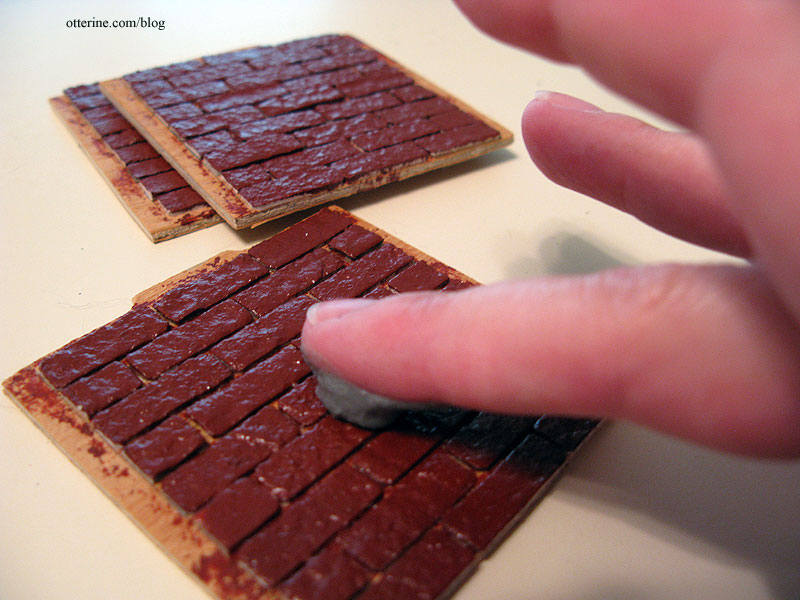
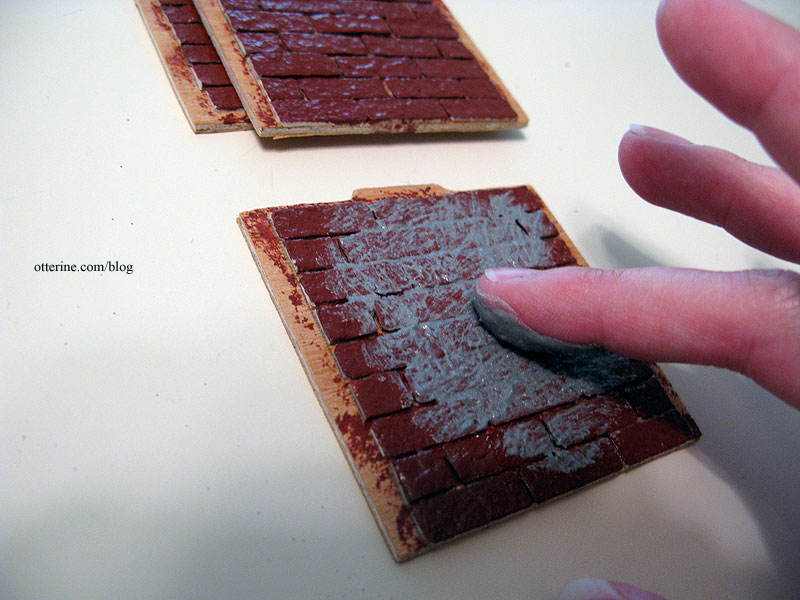
I try to keep the amount to just enough to fill the gaps without being too heavy on the surface. The more excess, the more you have to remove.
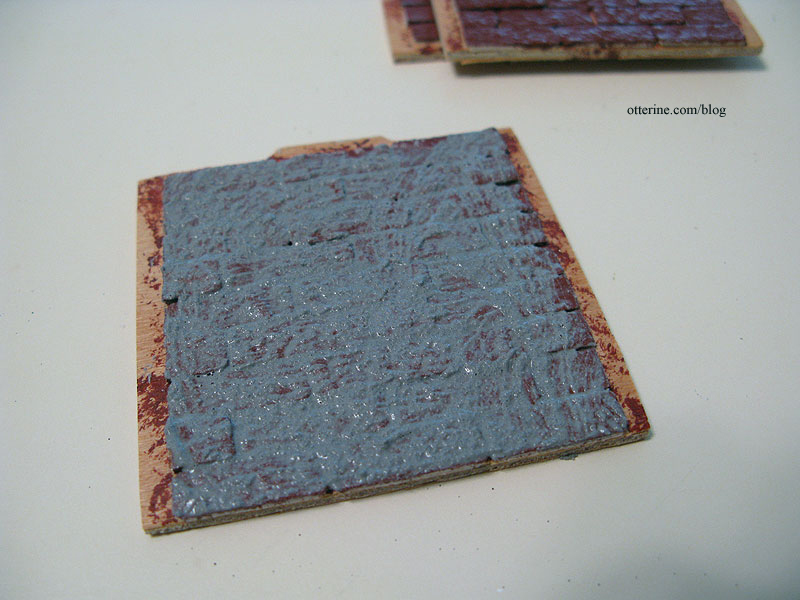
I do a section at a time and then take a wet towel and wipe away the excess. I do use a fair amount of water, which can lift some of the bricks and warp wood if I’m not careful. The key is to let the water do the work and not scrub the excess grout off. Doing so will lift not only the paint but in some places the entire paper surface of the egg carton bricks. This can be fixed, but why mess it up to begin with if you can avoid it? :D
I leave some in the indentations of the bricks since I find it looks more realistic in the end.
I then pat the bricks and surrounding wood dry.

The next step is to pull a toothpick across the grout and then down each separation for a more realistic finish. Since I want to end up with a more weathered look, I did gouge out a few areas and wasn’t especially careful when tracing the lines.
I sprayed on a light coat of matte sealer to finish and then let the whole thing dry. As it dries, the grout lightens a bit and any excess loose sand and dust can be brushed away. After drying completely, some bricks may need to be glued back down where they have lifted from the surface.
This is pretty shiny and new for my purposes, so I will age it more with paint and moss later on.
Update: see this post for the aging and moss application.
Categories: The Haunted Heritage
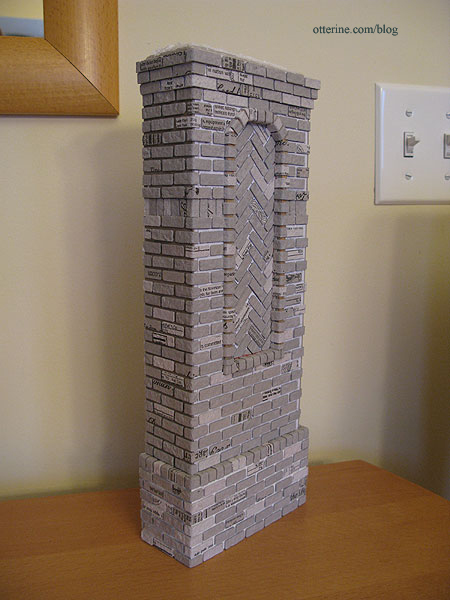
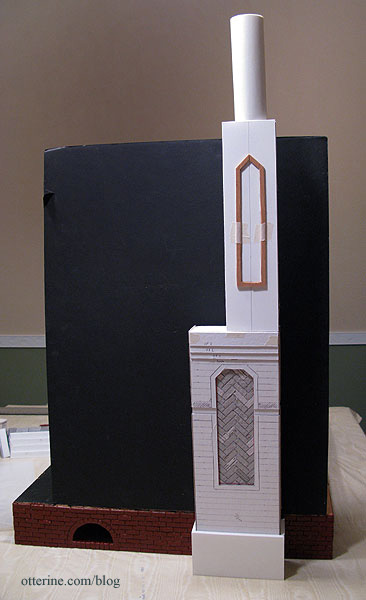
September 5, 2011 | 0 commentsHaunted Heritage chimney, part 3
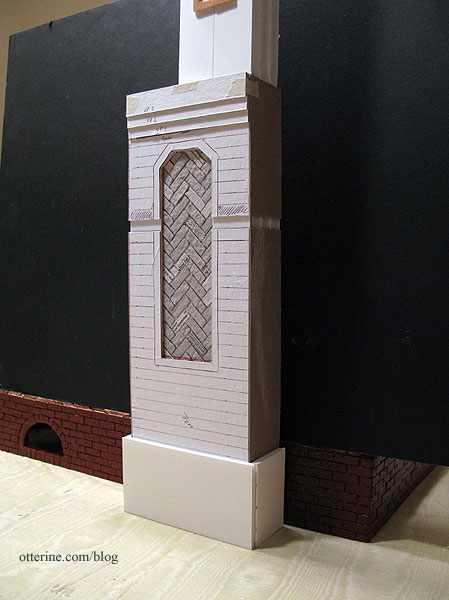
Continuing work on the chimney. As I was applying the bricks up to where the bricks start to build out from the main surface, I discovered that my vertical row was too short for the opening between horizontal bricks. I removed them, cut a wider opening and applied a new vertical row.
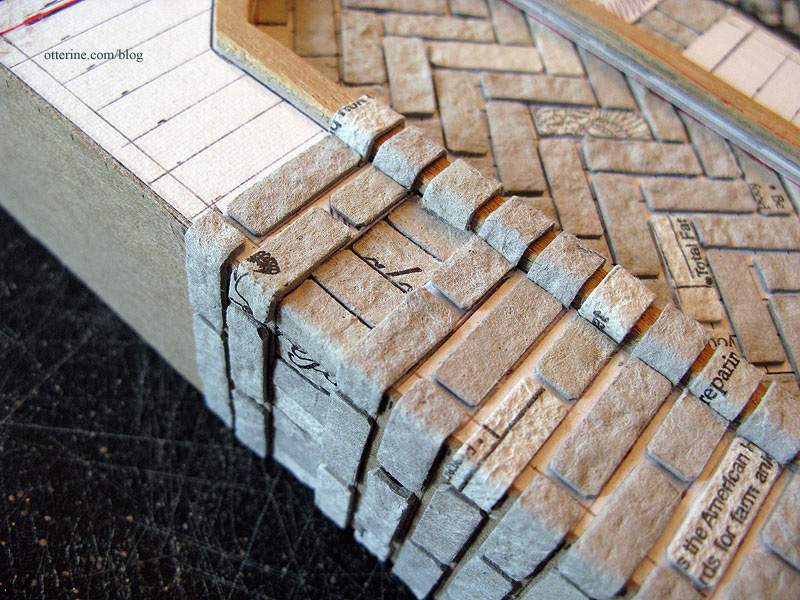
Once near the top, I cut the uppermost portion at an angle. This will be built up once I get the middle section of the chimney completed. To create the topper on the lower section, I added a 3/4″ wide strip of cardboard to the front and sides above the topmost row of bricks and then applied bricks to the bottom of the cardboard.
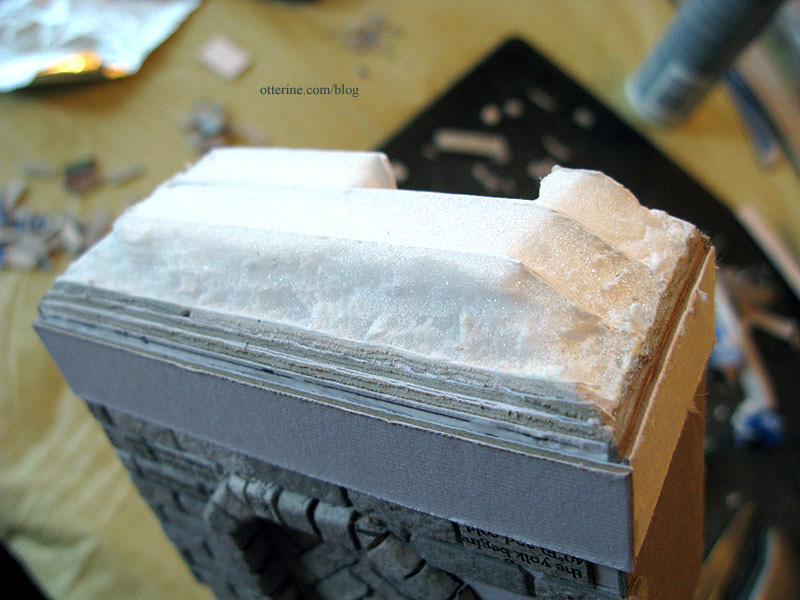
For the next row, I added a 1/2″ wide strip of cardboard to the front and sides above the last row of bricks.
I then added bricks to the bottom of this piece. For the final row, I added a 1/4″ strip of cardboard to the front above that last row of bricks.
I added bricks to the 1/4″ strip to finish up the extension.

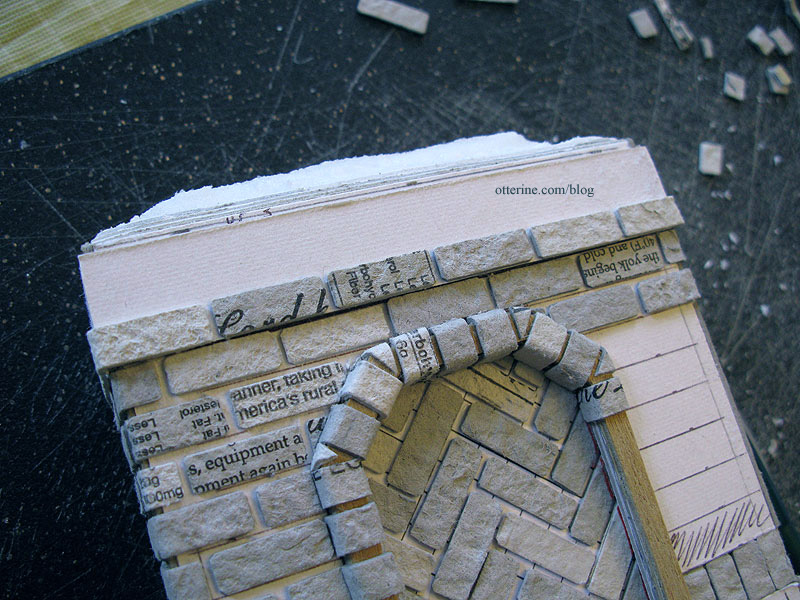
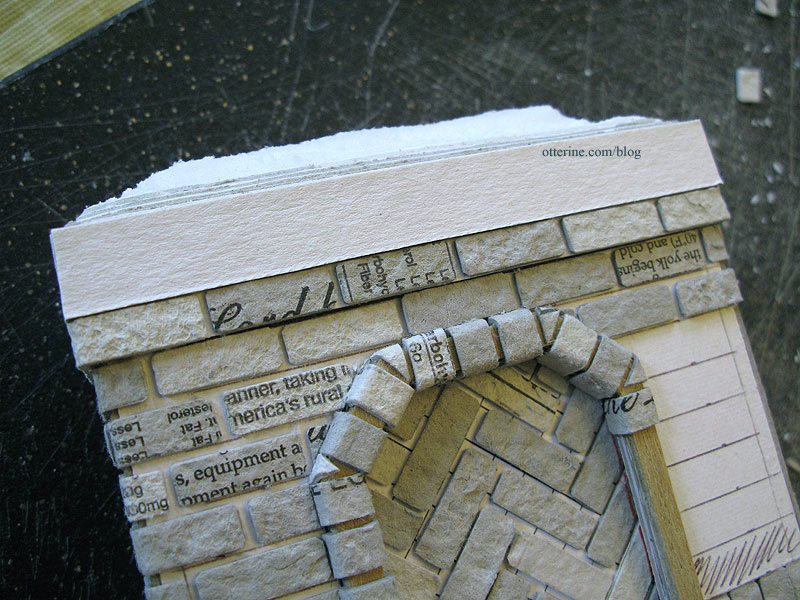
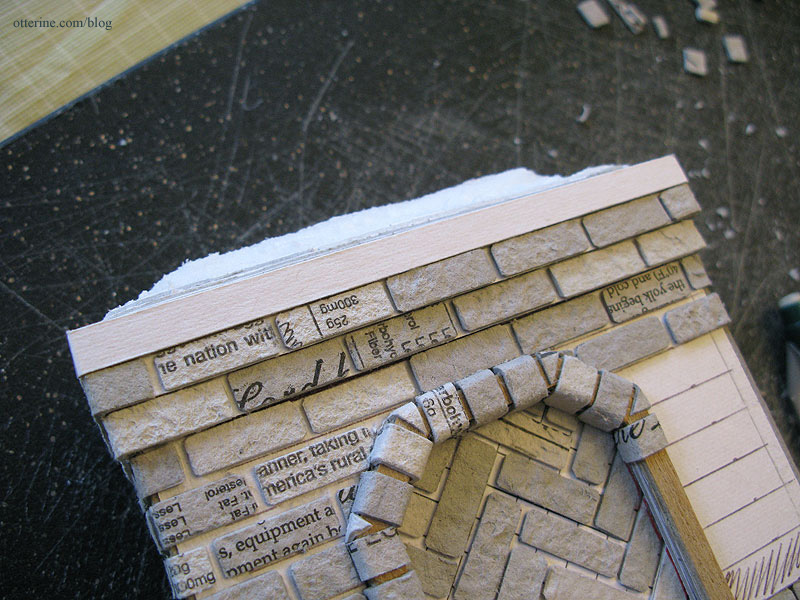
I then finished up the herringbone frame and part of the right side before running out of bricks. So, it’s back to the cutting board! :D
Categories: The Haunted Heritage
September 3, 2011 | 0 commentsHaunted Heritage chimney, part 2
Continuing to work on the chimney. I cut out space for the firebox and any wiring I might end up running through the house. To do this, I scored lines in the foam core, and then lifted the pieces out with a putty knife. I waited until after assembling the chimney since it’s far easier to cut portions out in the size and shape I want than to attempt to frame the area with thin pieces of foam core board.
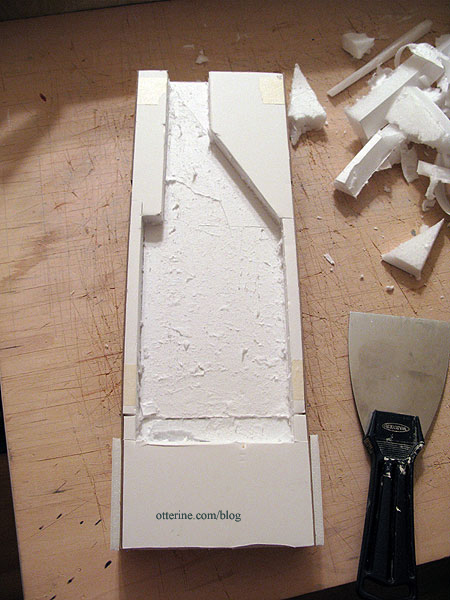
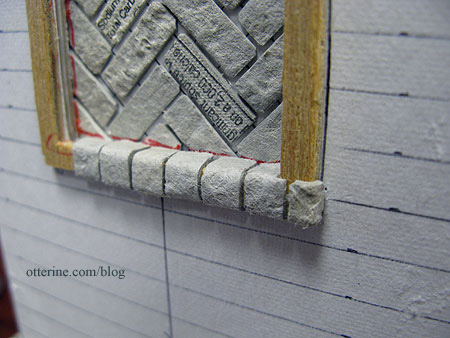
I added vertical bricks to the slightly recessed section at the sides by cutting the pieces to fit individually and gluing them in place between the cardboard top and bottom. Putting the outer brick surface on the adjacent cardboard while leaving this section as is will create the indented layer. I then glued the wood frame in place.
For the bottom portion of the chimney, I created a vertical row at the upper edge. To cover the corners I cut special corner shaped bricks and glued them around the corners. Once painted and grouted, the seams won’t show.
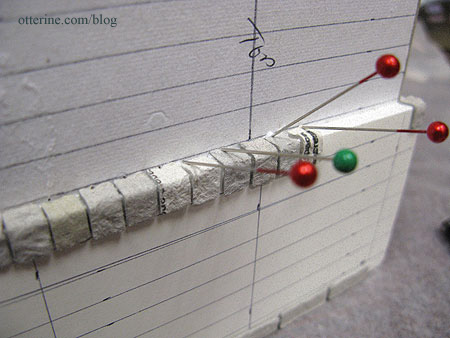
Sometimes when the bricks didn’t want to stay put while the glue dried (I use Aleene’s Quick Dry for bricking), I used sewing pins to hold them in place.
Mini masonry goes much faster (and with better results) with guidelines, though there is the time involved in making said guidelines to be considered. ;]
Amazing but my white cutting board looks a lot like ice in this photo. :D
After completing the base, I started applying the bricks to the herringbone frame.
This part was tedious even for me, so I took a break and started to brick the rest of the lower portion from the base upward.

I think having the extra base the same height as the foundation will work out nicely.
Categories: The Haunted Heritage
September 2, 2011 | 0 commentsHaunted Heritage chimney, part 1
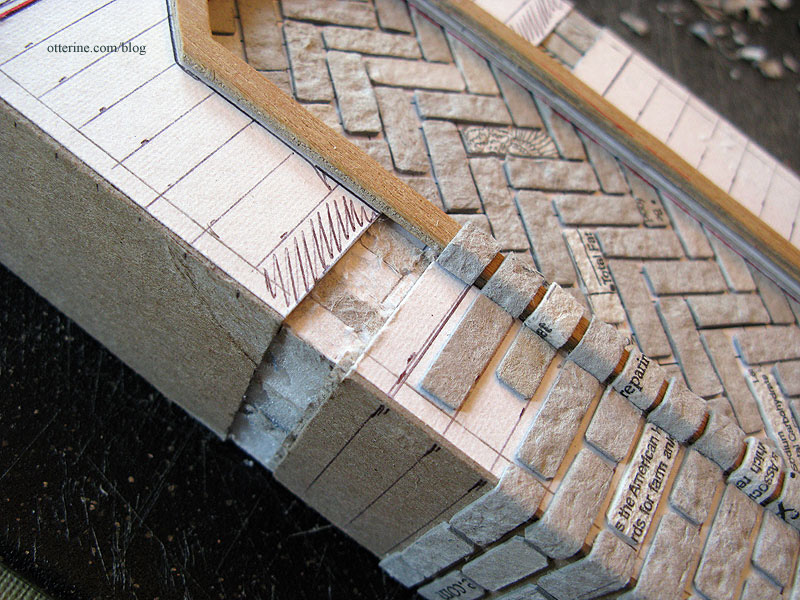
Continuing work on the chimney. Here’s a refresher on what the original looks like, by W E Masonry.
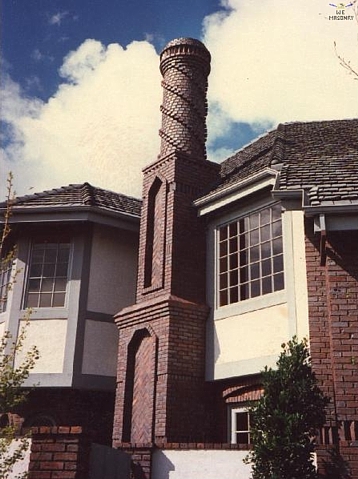
In order to get the same dimensional design with egg carton bricks as the original, I built up the foam core base with layers of cardboard. Using the wood pieces I had cut from the original kit’s bay window pieces as guides, I cut two whole front pieces from thick cardboard with the design portion removed. Once I am done building up the cardboard, the wood pieces will sit on top of the layers.
Unlike my normal process of just starting the bricks at the bottom and measuring evenly as I go, this time I opted for guidelines. The design requires different depths and I wanted to make sure I wasn’t going to end up with half bricks somewhere along the top where the pattern is most obvious. So, I started from the top and worked my way down.
At the top of the lower section, I used strips of cardboard to build up the levels. These will not be glued in place until I start applying bricks. This way I have some room to move if my guidelines are off.
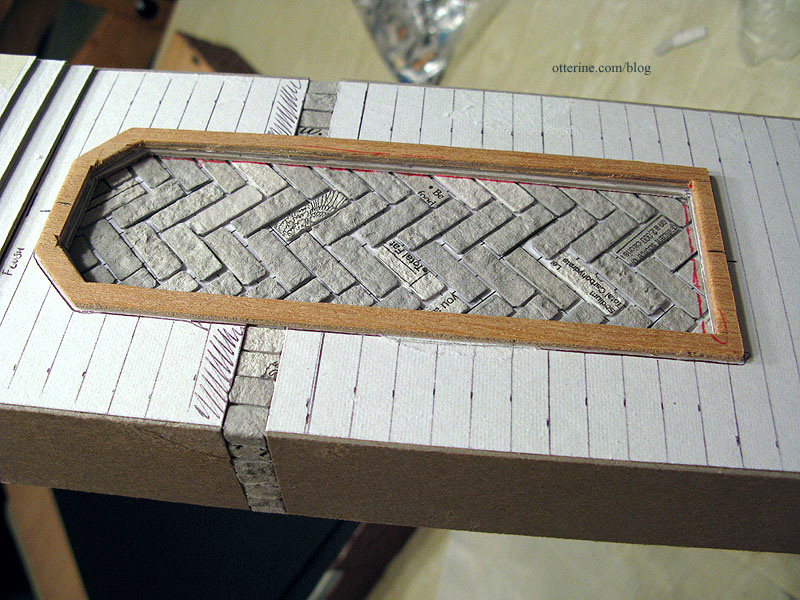
For the herringbone brickwork, I glued the 1/4″ by 3/4″ bricks to a piece of graph paper. I didn’t follow the boxes exactly, but the lines made it easier to keep a consistent pattern. By putting it on paper instead of directly on the foam core base, I was able to move the wood frame piece over the herringbone to find the best possible design.
I traced the outline and then cut the herringbone piece to fit under the bottom layer of cardboard. I then glued that piece in place on the foam core frame.
Since I didn’t need to brick this whole layer but needed to match the thickness of it, I added random bits of egg carton filler to the rest of this layer.

I then added the next cardboard layer on top, matching up the outline on the herringbone bricks.
I cut out one row on the top layer of cardboard to allow for a slightly indented vertical row, as in the original. I glued the two pieces in place, following the herringbone frame outline.
Next, I built up the sides, also leaving space for the indented vertical row.
Since the original photos don’t show much of the ground portion, I had to wing it. I figured a straight shot to the ground might look top heavy, so I added just a bit more weight to the very bottom where it sits with the foundation by adding some 1/4″ thick foam core board the same height as the bricks on the foundation.
So far, so good.
Categories: The Haunted Heritage
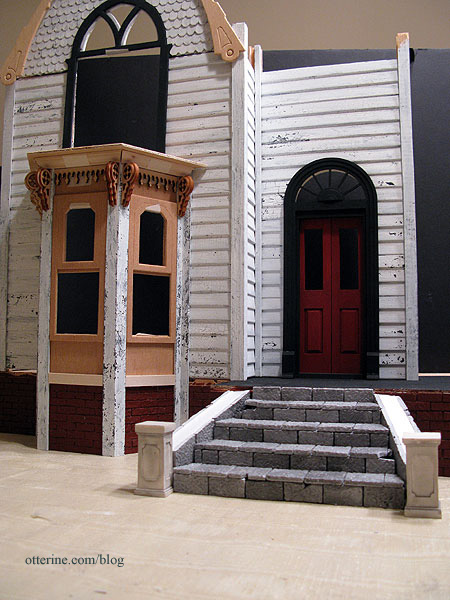
September 1, 2011 | 0 commentsHeritage – front bay window, part 2
One of the nicer elements of the Heritage dollhouse is the inclusion of the bay windows (well, now one window in my case). But, straight out of the box, they are somewhat lacking in pizzazz.
I did a bit of sleuthing around the internet and found the lovely B Street House Bed & Breakfast in Virginia City, Nevada, which has very nice details.

Photo: B Street House B&B, Virginia City – Christof Eichin Well, this is what it looked like before restoration.

Photo: B Street House B&B, Virginia City – Steve Bingham Whoa! Now, that’s an awesome inspiration for my old haunted Heritage! In order to capture some of this essence, I modified existing pieces and added some laser cut trims. I first removed the excess framed bottoms from the kit window pieces. It’s amazing how just cutting off some clunky trim can make such a huge difference. I will add the small frame detail under the windows similar to the inspiration house later since I don’t have any thin strip wood on hand.
I swapped out the old corbel brackets for Laser Tech fancy corbels (purchased from Manchester Woodworks).
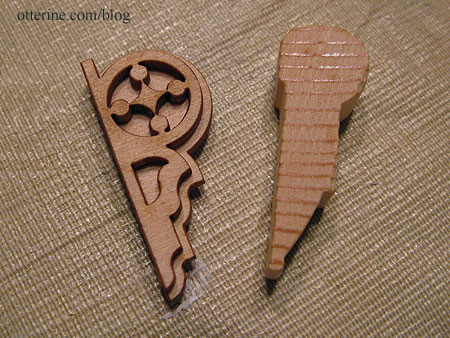
These come two to a pack and needed to be assembled.
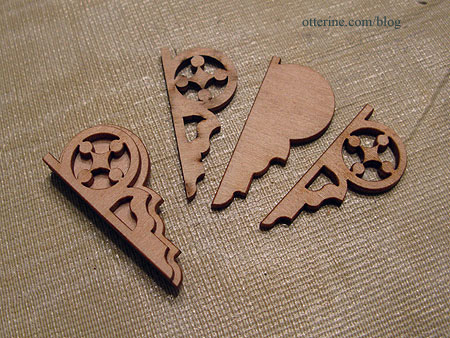
I added some Laser Tech fancy roof trim purchased from Green Gables Dollhouse to the upper flat portion of the window walls. I added a more decorative molding along the upper edge that sits just under the roof piece. Nothing here is glued; the gaps seen will be gone once it’s all put together. I’ll also be finishing off that terrible (non-laser-cut) plywood edge.
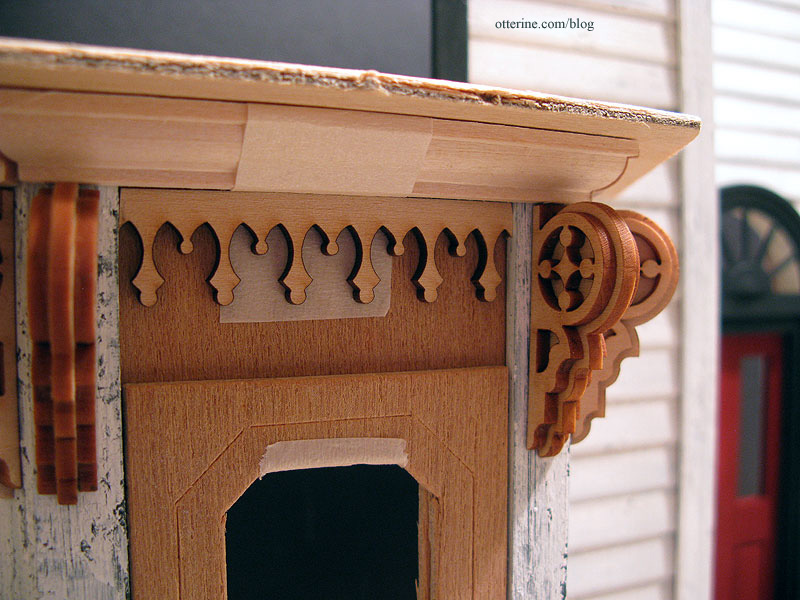
I absolutely love it! I need to cut the excess roof down, too, but I love it!!!! :D
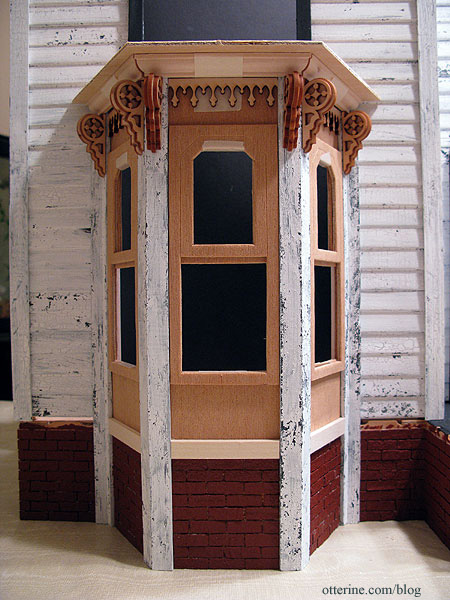
I think once it’s painted and aged it will really bring out that certain melancholy of times gone by.
Categories: The Haunted Heritage
August 29, 2011 | 0 commentsHoosier cabinet from Keli
The autumn Bishop show is being held in my area this weekend, and tonight I had the pleasure of meeting Keli in person. I met Keli and her nephew at a local pizza place before the show, and she had made a wonderful surprise for me for the haunted Heritage: an old, well-loved Hoosier cabinet.
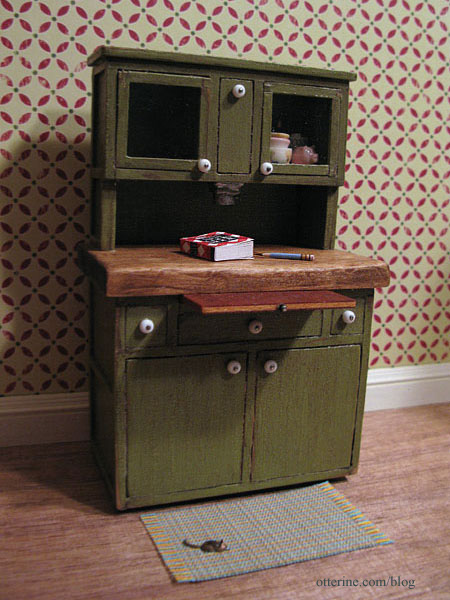
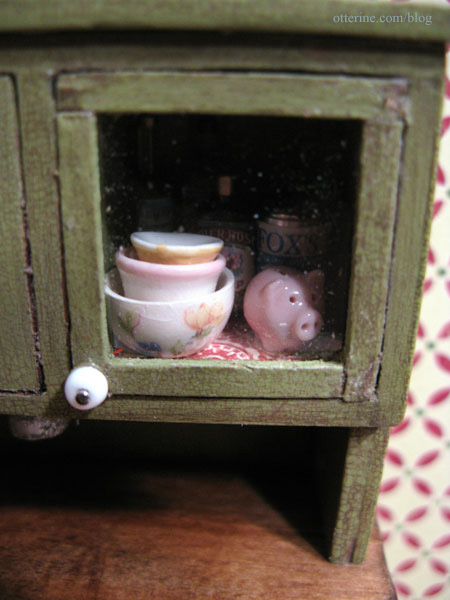
I just adore it! There are so many wonderful details to it, from the perfectly crackled green paint that will go so well with the wallpaper to the tiny pink piggy bank inside one of the glass front cabinets. I think that piggy bank is just the cutest! She has also included a stack of bowls, a can and some liquor bottles.
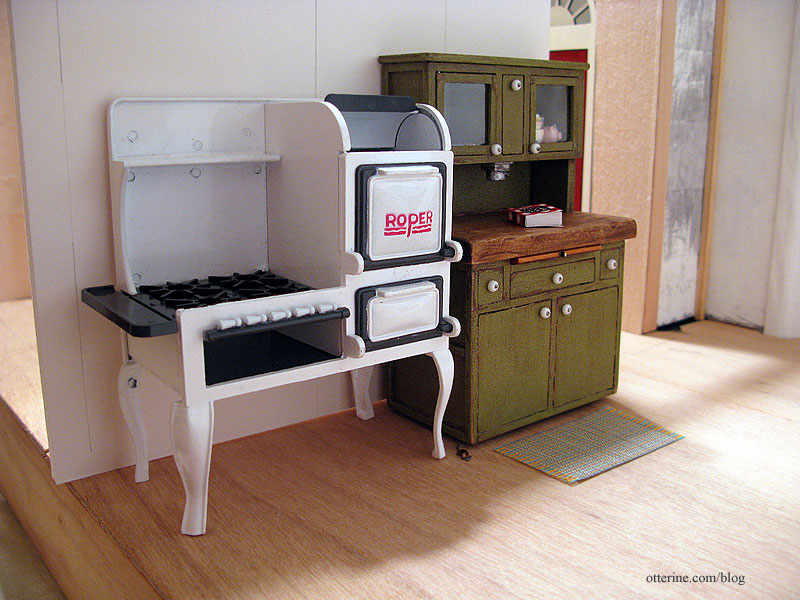
She said she was glad I liked it so much since it is hard to make things for others. That is so true. But, this is really the sort of thing I had planned to do with the space next to the Roper stove – only with a wall hutch and a butcher block top floor cabinet. It was as though she read my mind.
She thought I was going more for an old vibe than kitschy and macabre on the interior, and she’s exactly right. I think of an old woman living in the house she’s always loved, though it has fallen into disrepair on the outside. On the inside, it is warm and cozy, just old but well-loved. I love that she included some liquor bottles in the cabinet. I said, “Grandma likes her liquor,” and we had a laugh. Grandma doesn’t even make an attempt to hide it – it’s right there in the glass-door cabinet when she wants it! :D
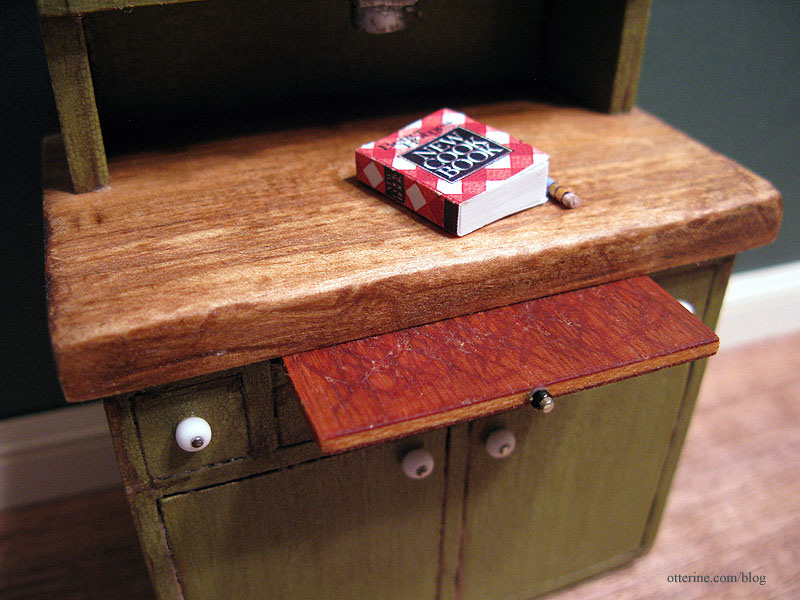
The aging she added is superb – the cutting board showing its wear. It’s even fitting that it sticks a bit trying to slide it in and out, just like any antique wood cabinet is bound to do over the years. She even included some loose pencils she made (the cookbook I already had but thought it looked right at home here). The ceramic knobs are a fun vintage touch as is the flour sifter.
It fits perfectly next to the Roper range. I needed something substantial in the space since the stove is so large. This cabinet really balances out the visual weight of the stove.
Keli also gave me a laser cut double gate. She had bought two and gave me the extra.
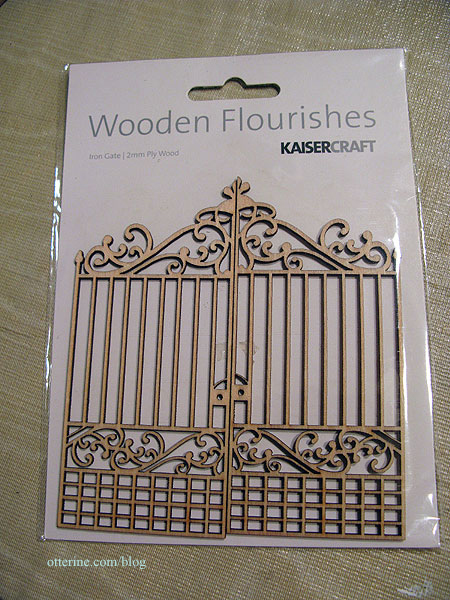
Thank you, Keli, not only for the cabinet and the gate but for the enjoyable evening out at the show.
Categories: The Haunted Heritage
August 27, 2011 | 0 commentsHeritage progress – foundation, porch, cellar
In between cutting what seems to be an endless amount of bricks for the chimney I have planned, I’ve been continuing to work on the exterior. I have only the front of the foundation covered in bricks, but I painted it to see how the coloration was going to work. I like the visual weight of the dark foundation, and the landscaping I have in mind will work well with it as a backdrop.
I’ve aged the gables with white paint crackled over a black-grey base as I did for the siding and the connectors. The crackle didn’t work as well on these pieces, but it still looks aged since I lifted some of the paint with a paper towel while it was wet. I probably should have put two coats of crackle medium on since the wood seemed to really soak it up.
Now that the gables are also in the aged white finish, it’s really starting to look like a cohesive build. I’ve painted the gable window trim black-grey. I doubt I will leave it dark but instead crackle white paint over this layer. I like the idea of the door being the main focal point and everything else looking in a state of disrepair. Plus, I think it will start to look more whimsical instead of creepy if I make the house all black, white and red.
I’ve also painted the front porch floor black in preparation for worn out porch boards. I don’t want bare wood peeking through!
I primed the cellar windows with black paint, and I’ll probably paint them to look like rusted iron windows. Aging them with white paint will make the foundation look like a candy cane.
I taped an LED in warm white from Evan Designs inside the foundation. It seems a little dim in real life, though the camera picks it up well. I’ll need to figure out a good way to make the most of the basement lighting.
Categories: The Haunted Heritage
August 24, 2011 | 0 comments


NOTE: All content on otterine.com is copyrighted and may not be reproduced in part or in whole. It takes a lot of time and effort to write and photograph for my blog. Please ask permission before reproducing any of my content. (More on copyright)

Categories:
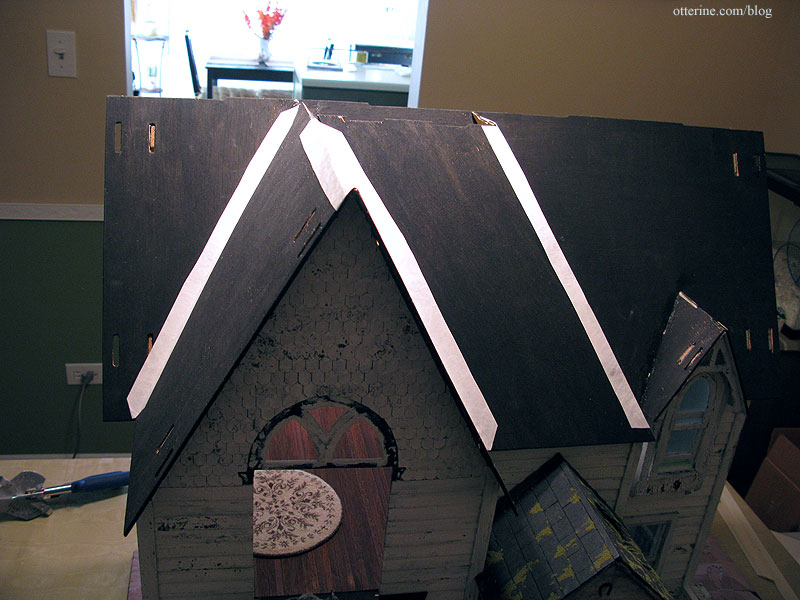
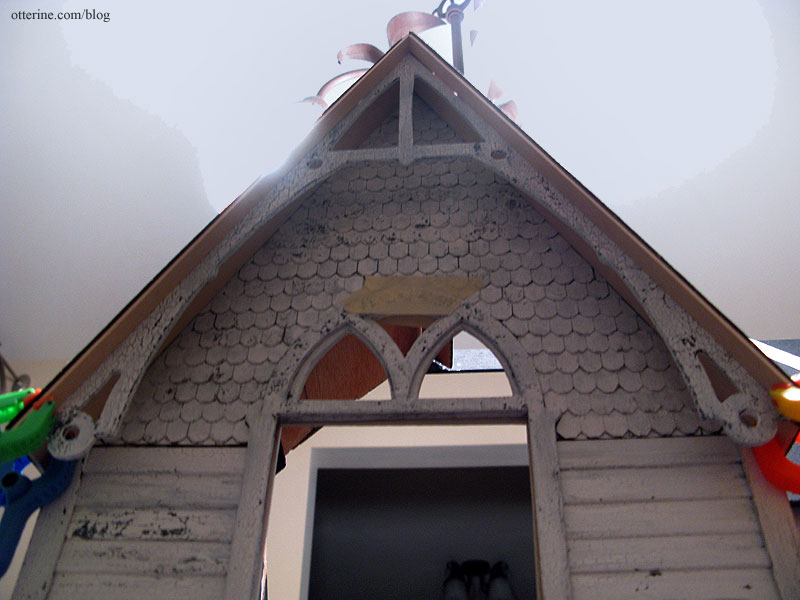
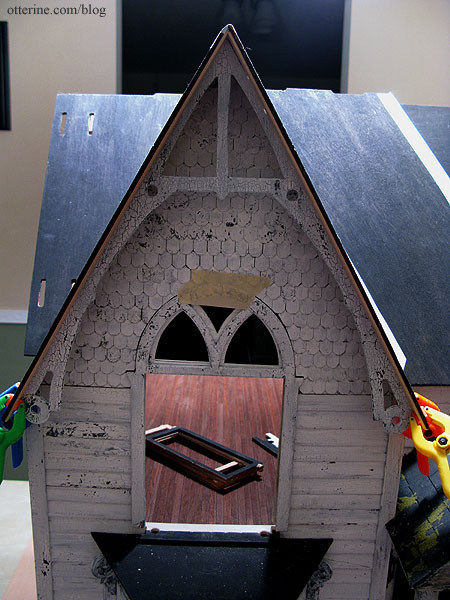
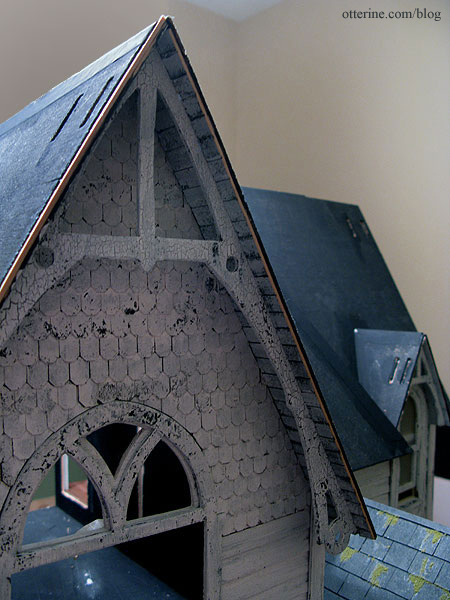
Heritage – roof shingling, part 2
Continuing work on the roof. I finished the other side of the gable in the same manner as the first.
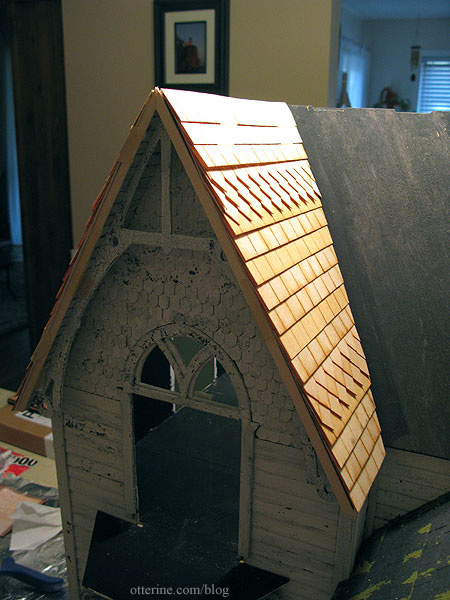
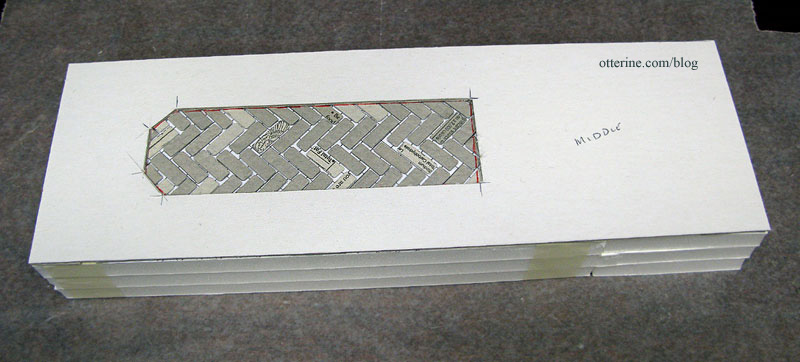
I then cut and adjusted my templates for the main front, side front and middle front pieces.
I started with the main front piece, following the same pattern.

I then finished the side front and middle front, leaving the outer edge of the middle front long. I will adjust that edge during the gluing process.
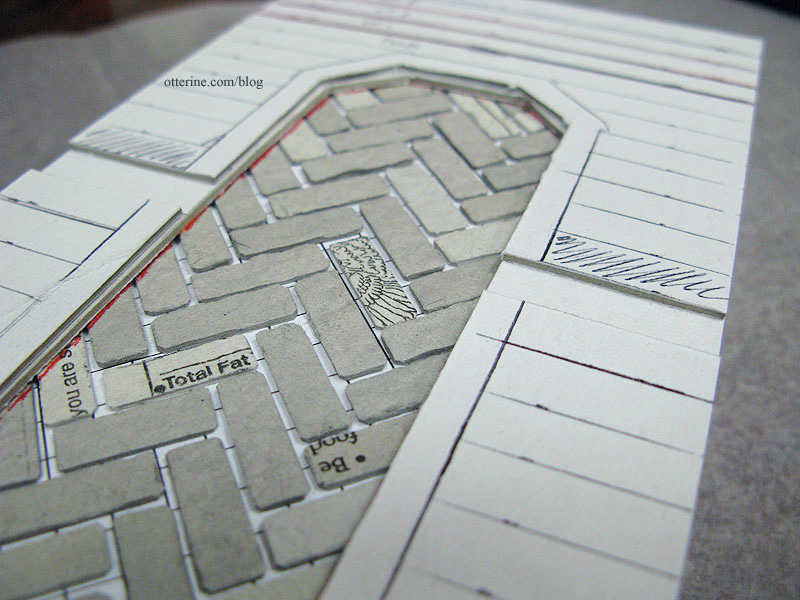
The middle front is where things are off the most with the roof alignment, which also translates into poor alignment of the shingle rows when following the template. This is the main reason I chose to cut all pieces before gluing the shingle strips to the house instead of first gluing the shingles to the templates and then the templates to the house. I can now apply each row and make sure the rows line up as precisely as possible. Of course, a few sagging rows might be appropriate for the Haunted Heritage. :D
I will cut and apply the dormer shingles after the house shingles are glued in place.
Categories: The Haunted Heritage
September 30, 2012 | 0 commentsHeritage – roof shingling, part 1
Continuing work on the roof. I will be using the same Greenleaf speed shingles as I did for the portico, though the roof will be remarkably intact. Either that, or grandma has had enough sense not to let the main roof go without repairs.
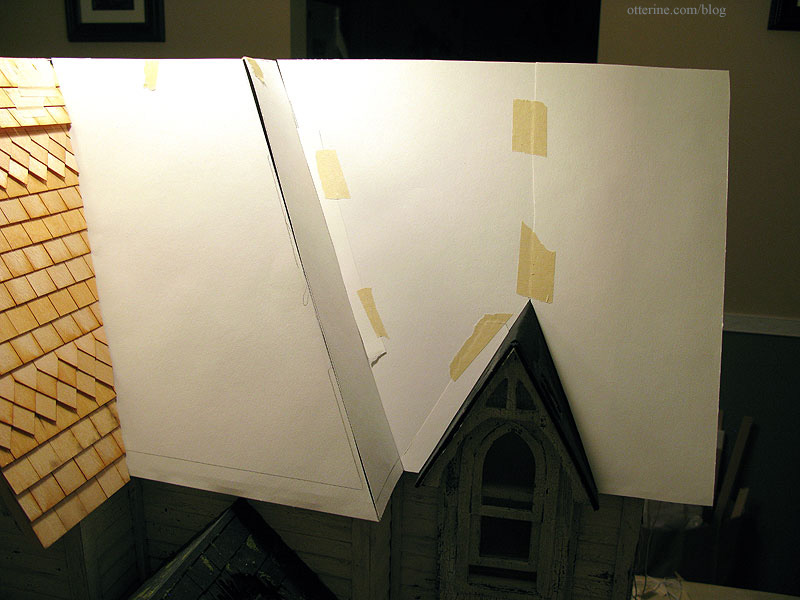
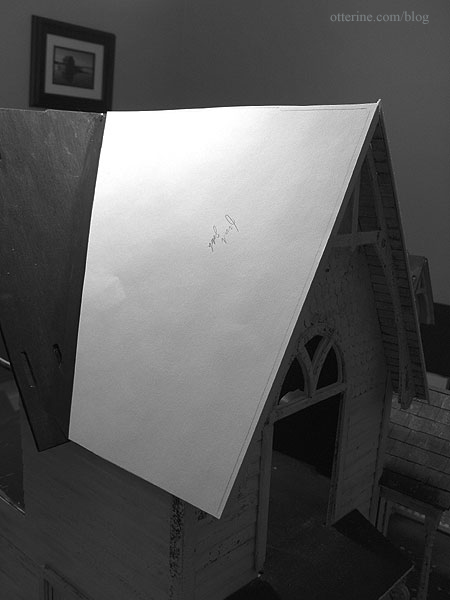
Back before I assembled the roof pieces, I had traced each piece onto drawing paper. These templates will now come in handy to measure out the speed shingle strips.
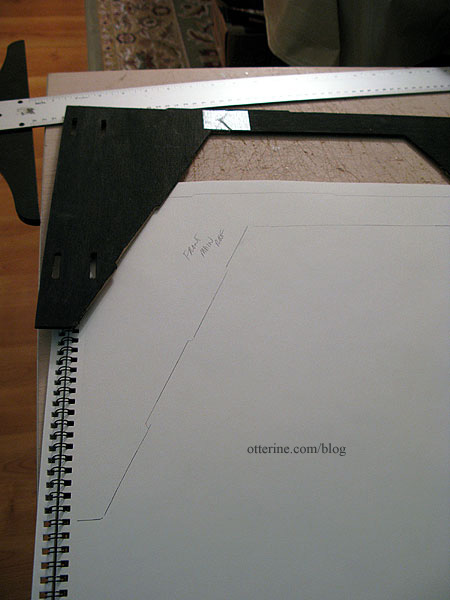
I cut the front gable template to fit.
Starting at the bottom, I cut the first shingle strip to fit the template.
I tested it out on the house to make sure I was off to a good start.
I won’t be gluing the shingles to the template but rather to the house directly, but I will cut the shingles using the template first.
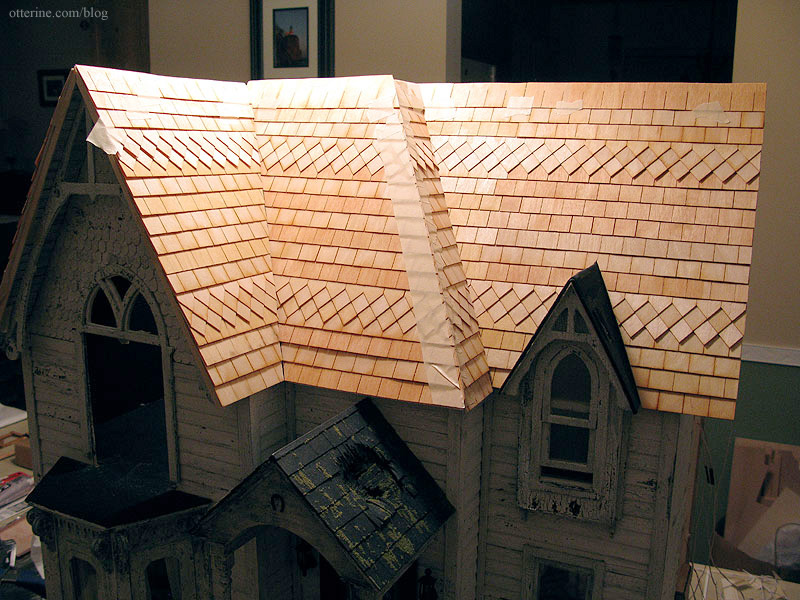
Instead of following the tops of the laser cut lines, I am leaving a little less of each shingle exposed – 5/8″ to be precise. This is what I had done for the portico since it seemed to scale down the singles to a more realistic proportion for this particular house.
To add some visual interest, I inserted a few rows of diamond shaped shingles between the rectangular ones.
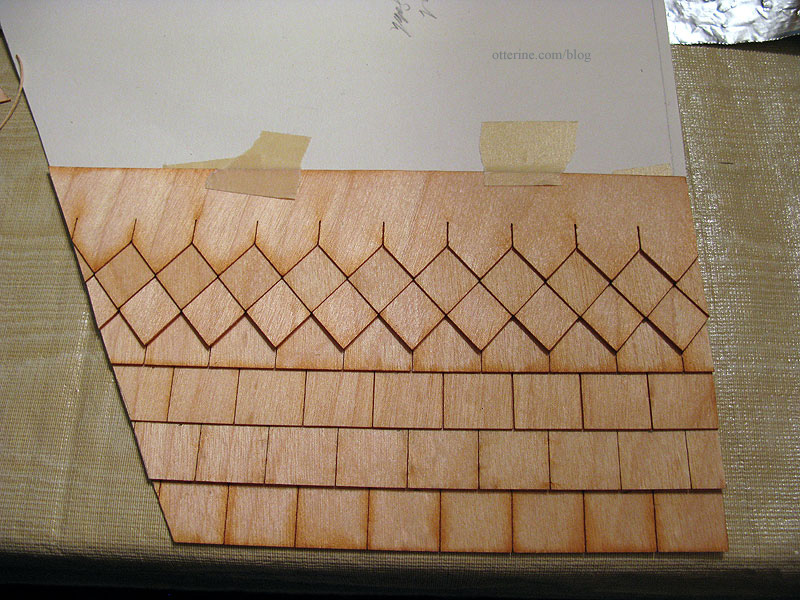
I added the second set of diamond shingles near the top, and I think it creates a lovely balance.

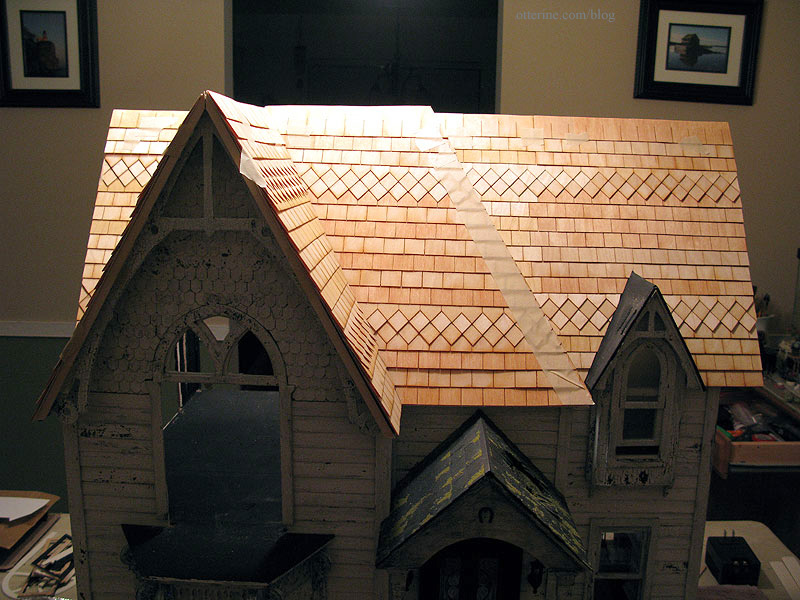
Next up was the left side of the front main roof. I cut my template and adjusted the fit behind the front gable template. All shingles will remain taped in place until I get the proper layouts completed, at least for adjacent panels. Once I get this side panel done, I can start gluing these two sections to the roof.
I took into consideration the front trim that will be added to the side gable and began applying shingles to the left front template.
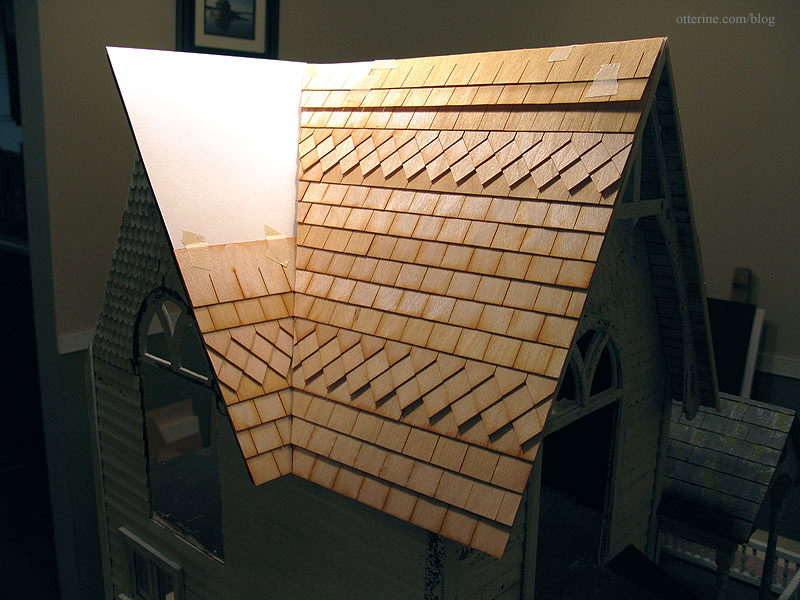
I think I’m on roll now!
It looks a little unbalanced without the back portion of the side gable in place, not to mention the bright tones of the natural wood against the worn appearance of the house itself. I think it’s going to be marvelous and a little spooky once the dark colors are on.
I need a break from shingling for a bit. :D Good thing there is plenty to do.
Categories: The Haunted Heritage
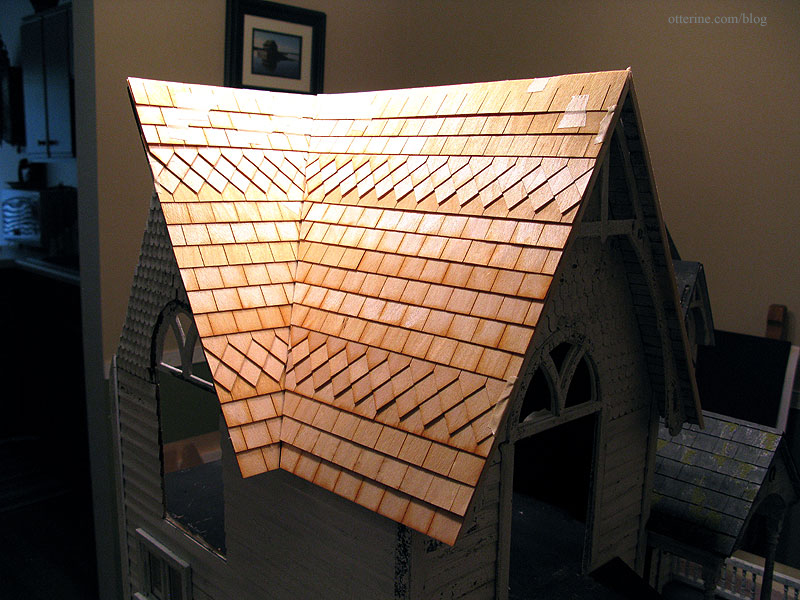
September 29, 2012 | 0 commentsHeritage – roof assembly, part 2
Continuing work on the roof. I have had the roof pieces glued in place for some time, except for the back piece which will need to remain removable until the interior has been completed. I also have to add the topmost piece, but that I will need to cut from plywood since the kit piece doesn’t fit at all. Luckily, the front can be shingled and mostly finished without worrying about the top and back just yet.
There were gaps between the roof pieces when I assembled that part of the kit. It was either operator error or old kit pieces, or a combination.
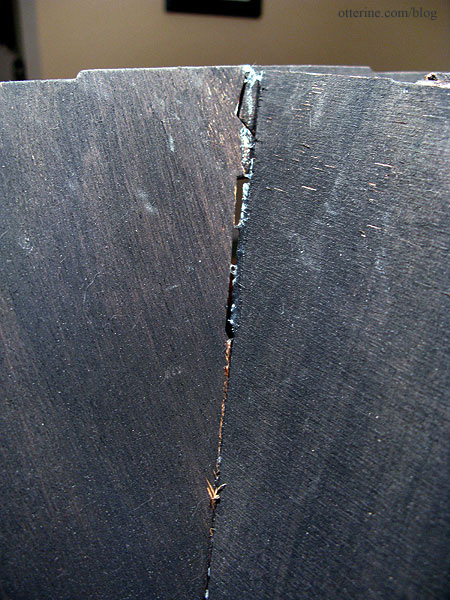
To reinforce the joins, I glued strips of Tyvek across the seams. Tyvek is the durable fiber paper that is used in FedEx envelopes, for instance. It’s thin enough to not interfere with the shingles and strong enough to add stability to the roof joins.
I painted over the reinforced seams in preparation for shingling. It already looks better!
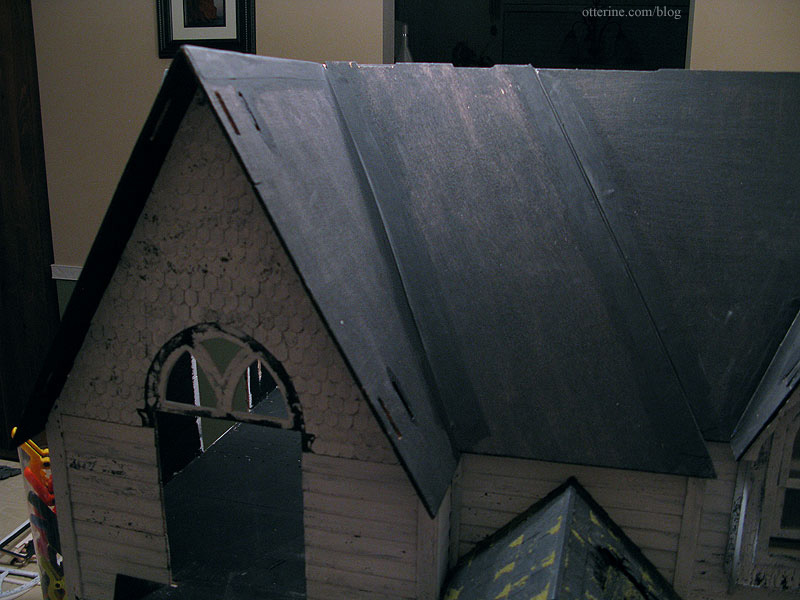
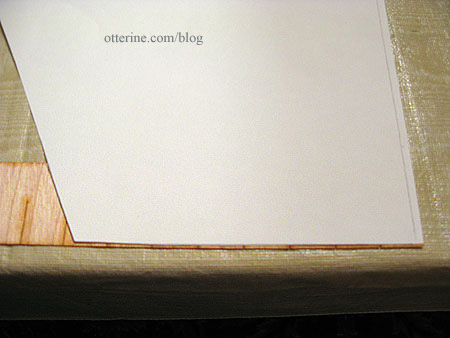
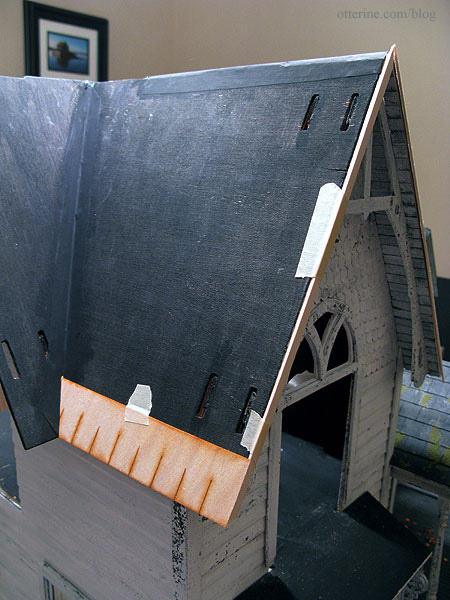
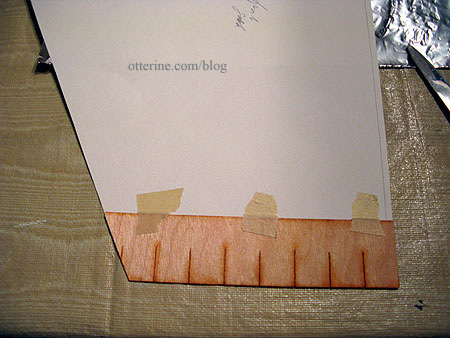
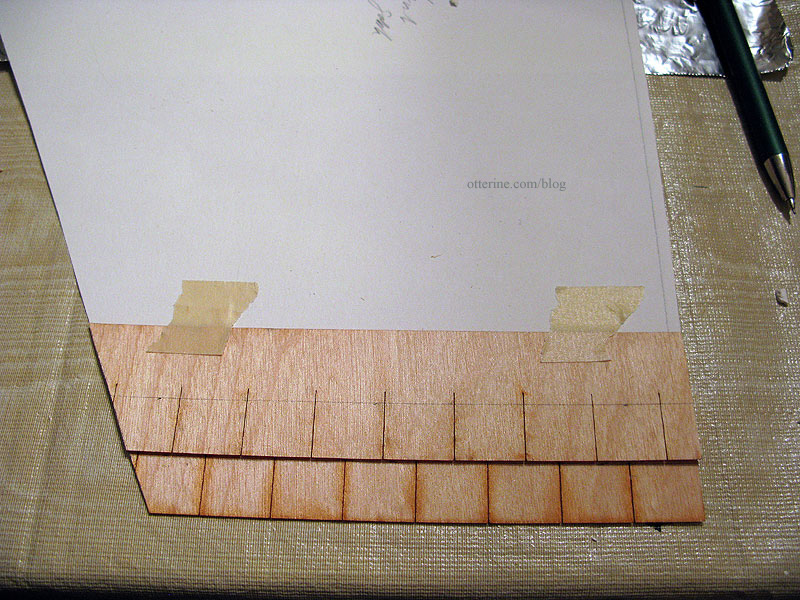
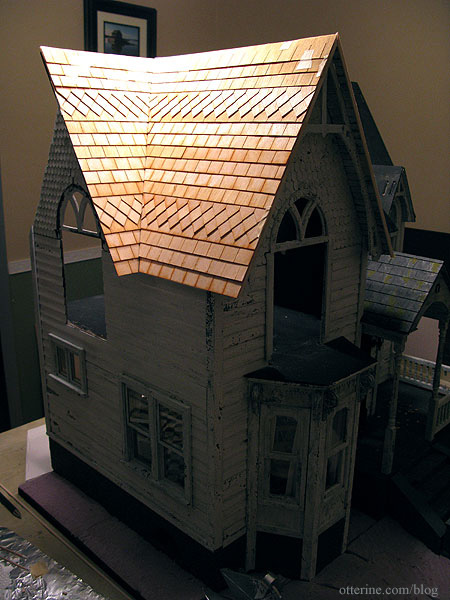
As I had done for the dormer window, I finished the eaves of the large front gable with trim wood scored to look like individual boards. I started with the space between the large gable trim and the house.
Apologies for the harsh lighting, but the house is turned on my work table in such a way that the light is in an awkward spot. I’ve masked out the light’s more severe glare as much as possible.

I then attached the gable trim before finishing the front portion of the eave.
This will hide the various gaps and imperfections from the construction problems I ran into while putting on the roof.
The side eaves can’t be finished until the interior is done, but this finished gable brings a lot of life to the front of the house.
For the dormer eave panels, the scored detailing was lost after painting. To solve that problem for the front eave, I used the awl to score the previous lines again after painting. It helped bring back the board detail. I love the way it looks!
I shaved the right front to even out the eave panel with the roof panel. On the left side, I had to add wood to make the two sides even. I then shaved the excess from the added wood to make a smooth edge.
I cut trim from 1/4″ x 1/16″ strip wood to finish the front edges of the eave. These will be finished and glued in place after the roof is complete.
I’m ready to start shingling! :D
Categories: The Haunted Heritage
September 29, 2012 | 0 commentsHeritage interior staircase, part 5
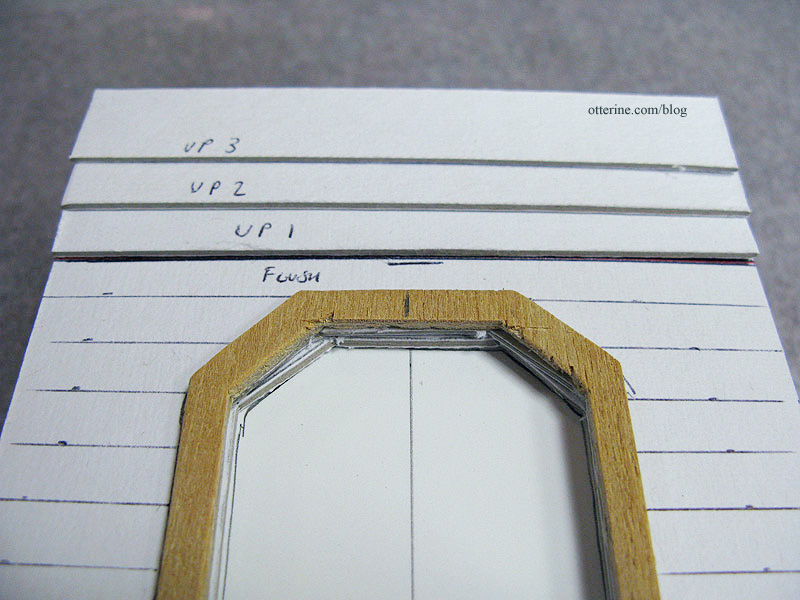
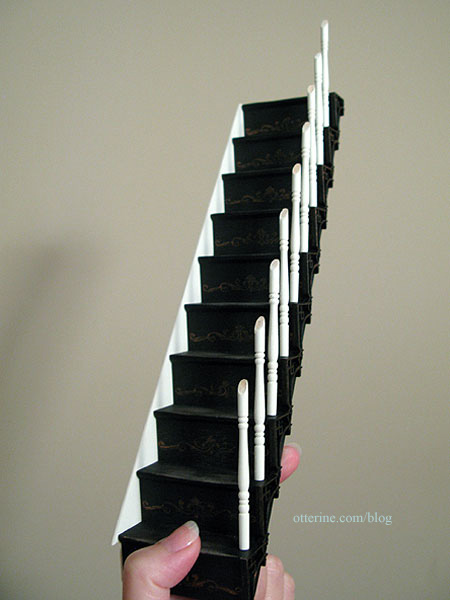
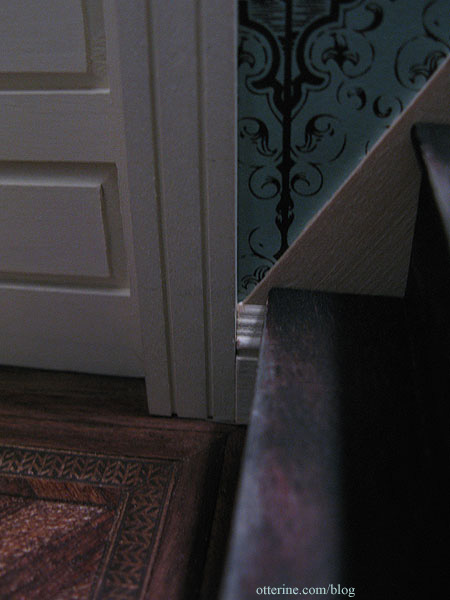
Continuing work on the interior staircase. When I cut the balcony and the adjacent stair opening, I left enough room to add a stringer. This completes the look of the baseboard trim up the staircase and addresses the slight warp in the pocket door wall that the stairs follow.
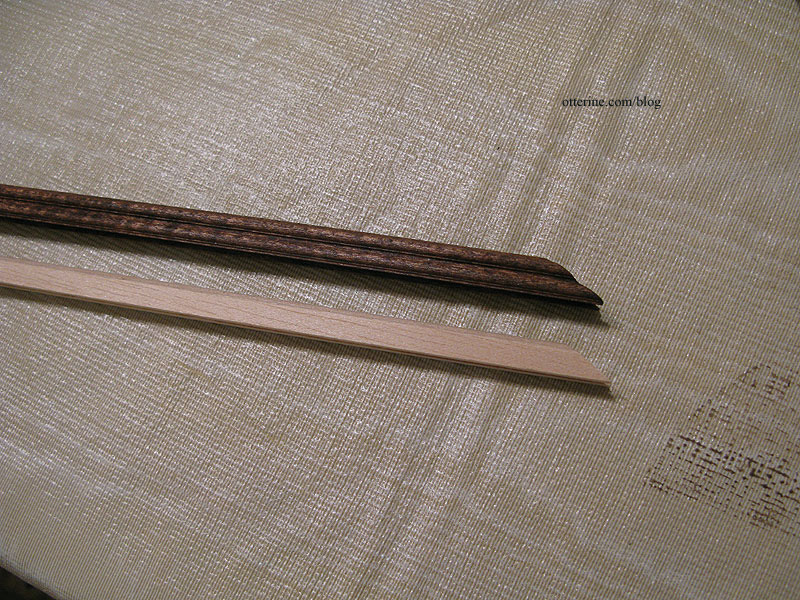
I used 1/16″ thick basswood sheet to make the stringer, tracing the outline of the stairs flush with the back and lower front. I added a little extra to the top to trim the stairs. I painted the visible part of the stringer Vintage White by Folk Art and the back edge black.
At the base of the stairs, the stringer meets the baseboard trim. Here the stringer is shown before finishing. This is one of my favorite views of this house that can be seen only with a camera.
I glued the stringer to the stairs to keep it in place.
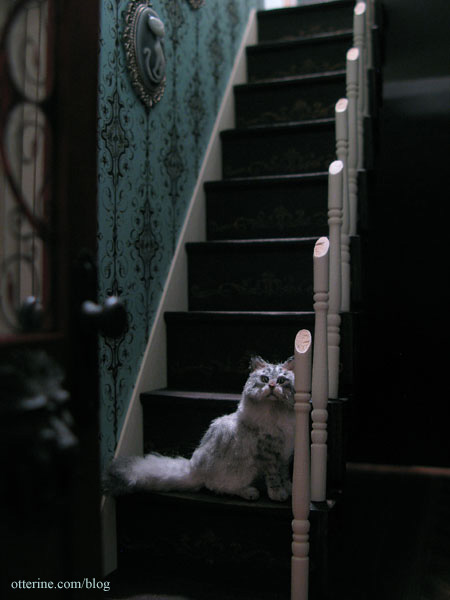
The stairs are still removable at this point, because I need to be able to work on the railing and newel posts. Oh, hello, Ophelia. :D
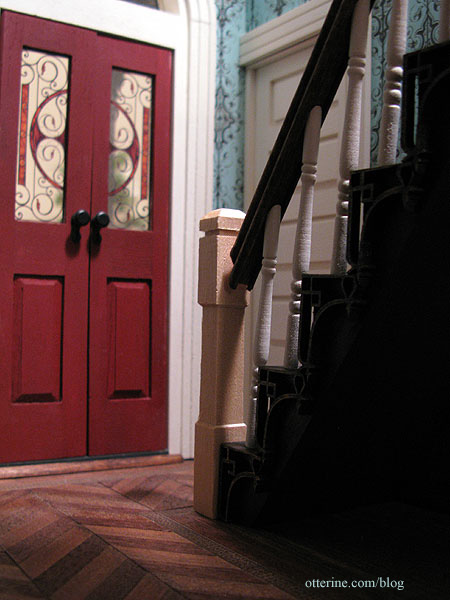
The railing supplied with the narrow staircase kit was obviously made for the flat balusters that came with the kit. The rounded spindles I used instead would not work with the supplied railing since the opening in the bottom of the railing was too narrow.
I bought replacement railing from Manchester Woodworks. This has a 3/16″ groove in the bottom, perfect for the tops of the spindles. I like the profile of this particular railing, too. It has a fancier look than the standard railing stock.
I like the look of white spindles with a stained railing, but I wasn’t sure if I should match the railing to the stairs or the flooring. Since the railing will continue around the upstairs balcony, I opted to match the railing to the floor and stained it Minwax English Chestnut.
When I stain or spray paint, I use a rubber glove to hold the piece (or the board with the pieces taped on). Saves me from soaking up chemicals through my skin, and there’s no clean-up involved. These gloves usually last through many applications, so I just set them aside to dry until next time.

I used the kit supplied railing as a guide to make the lower angle cut for the stair railing.
I fit the railing in place, leaving it long for now until I determine the length I need.
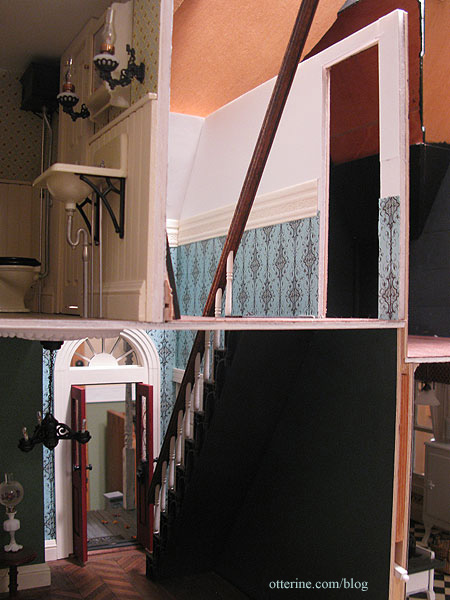
It fits perfectly over the angled tops of the spindles. It’s actually just sitting on them without any glue or wax. As hoped, the imperfections near the tops of the spindles are no longer noticeable with the railing in place.

This is the square newel post that came with the narrow stairs kit. I like it because of its heavy visual weight. I will stain it English Chestnut to match the floor and railing. I think painting it Vintage White would make it stand out too much since it is a sizeable piece.
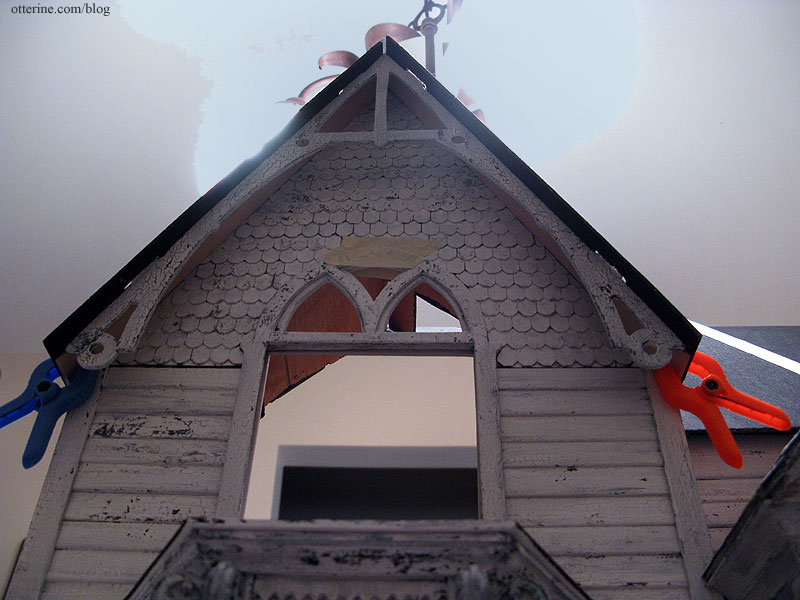
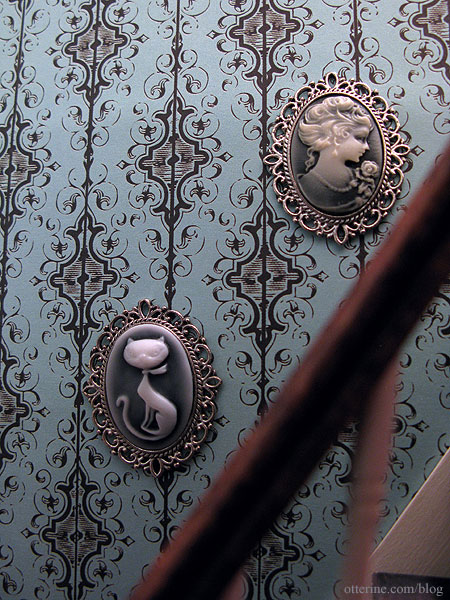
The cameos that will hang in the stairway are pendants from Fairy Tale Fantasies. One is a retro kitty and the other a beautiful vintage lady. I cut the loops from the tops to use them as framed art. I love their ghostly appearance.
Finishing the railing here.
Categories: The Haunted Heritage
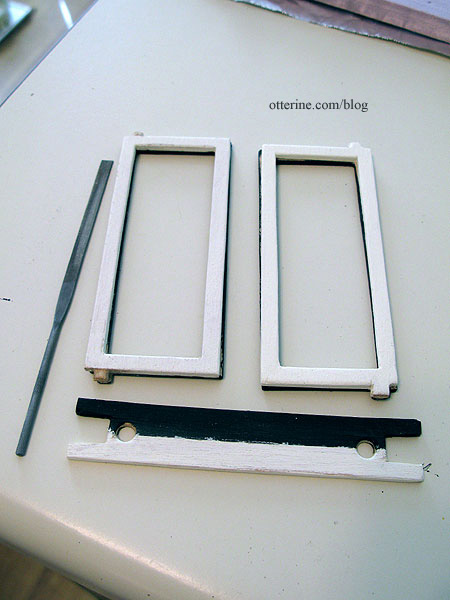
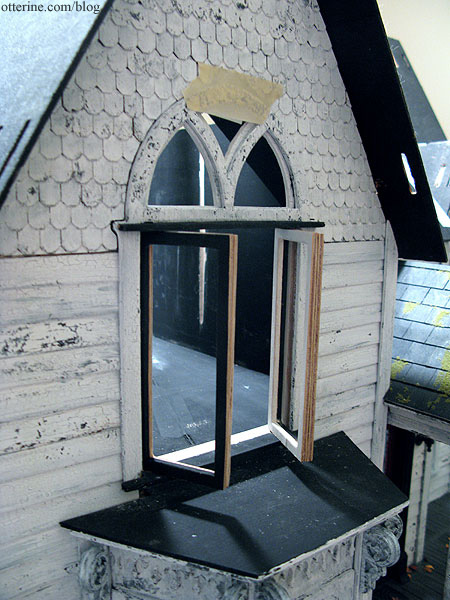
September 26, 2012 | 0 commentsHeritage – bedroom swinging windows, part 2
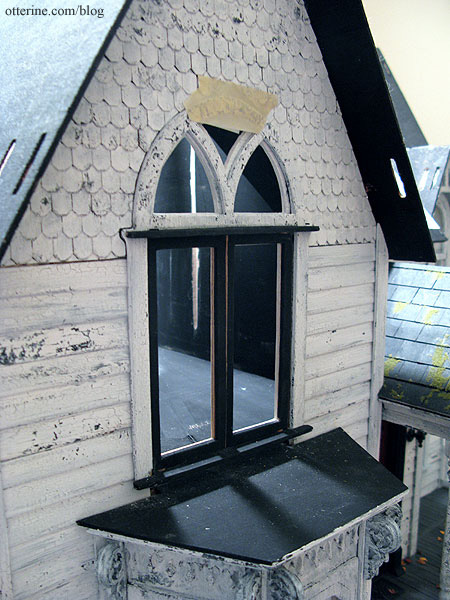
I was able to use the kit pieces for the bay windows and ended up with two of the three working. Just like a real life old house – one window is painted shut, one window sticks and one won’t stay open!!! :D The dormer window in the bathroom is also original and working, though I had to scratch build the dormer itself. I had to replace the front and side regular windows with Houseworks components since the kit pieces were too far gone to salvage. I also added a casement window in the kitchen and a round window in the bathroom.
The remaining two windows are the floor to ceiling swinging windows in the bedroom. Here’s the last mockup I did for them back in March, but I have worked on finishing the parts in the interim.
The kit pieces were in relatively good condition, and I was able to use them. I had to do a little repair work and filling with spackling as I had done for the bay windows. I have a post on salvaging shoddy wood here.
I primed and painted the interior Antique White by Folk Art, the color of all the interior trim. I primed the outside with black, the underlayer for eventual white crackled paint like the rest of the exterior.
Each swinging window is made from an interior and exterior piece with an acetate window insert between them. I don’t plan to use the printed kit acetate but plain clear acetate instead.
The windows have square tabs at the bottom that are to be sanded into a round peg and fitted into the upper and lower supports of the window frame. I used a metal file, and it worked very well.
The holes and pegs are not a perfect fit, but as long as they work that’s good enough for me.

Again, there will be a little “chicken or the egg” to the process of installing these windows, which seems to be a major theme of this house. The interior wallpaper needs to be completed before the windows are installed, otherwise you’d have to cut around the fancy trim after the fact. But, I didn’t want to risk ruining the paper, so I am doing as much fitting and finishing as possible before I work on the bedroom wallpaper.
The main problem with these windows is that they don’t close due to overlap in the middle and there is too much excess wood to use the “sand to fit” method.
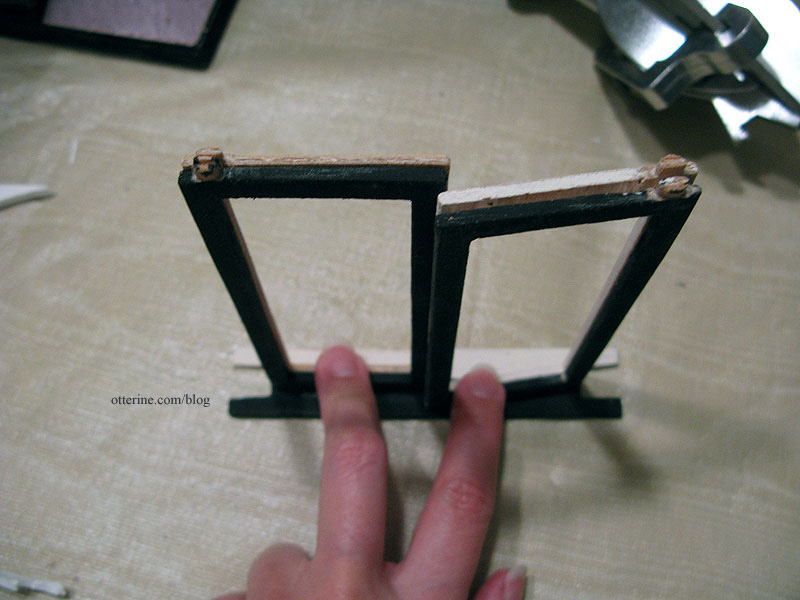
I managed to cut enough from the tops and the outer edge where the two windows meet in the middle to get this first one to close. It’s still tight, but I fear removing any more wood will just make it look lopsided. Good thing it’s an old, battered house, because I don’t know how I would get these original parts to turn out well otherwise.
There were originally three swinging windows – one in the bathroom and two in the bedroom. Since I eliminated the one in the bathroom when I added the chimney, I have extra parts to use in case of disaster. As you can see, I’ve already pulled one of the pinch hitters into play.
There will be open spaces all around the moving portions due to the nature of how the window is constructed. This bothers me for realism, but there really isn’t an easy way for me to address this. Even though I wanted the windows to function completely and close, I’ll likely display them open most of the time.
Continued here.
Categories: The Haunted Heritage
September 22, 2012 | 0 comments
NOTE: All content on otterine.com is copyrighted and may not be reproduced in part or in whole. It takes a lot of time and effort to write and photograph for my blog. Please ask permission before reproducing any of my content. (More on copyright)