

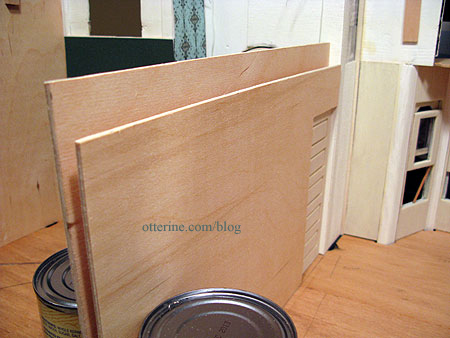
Foyer to kitchen pocket door, part 2
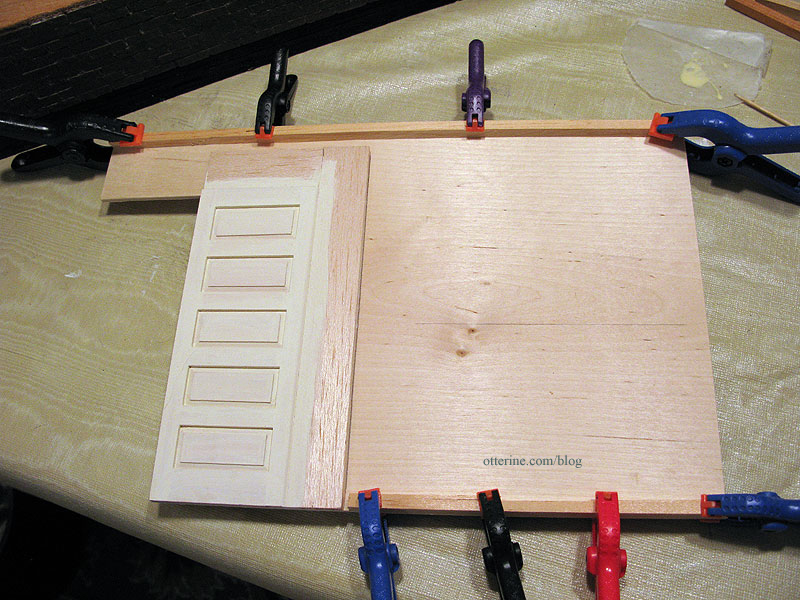
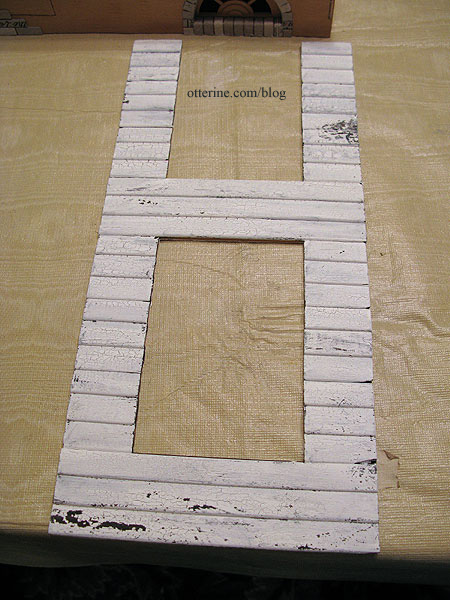
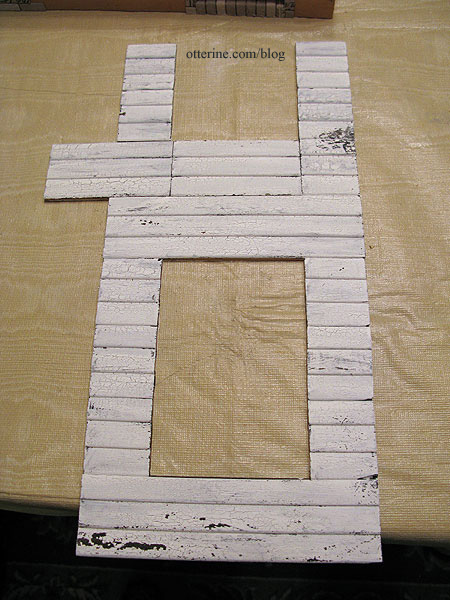
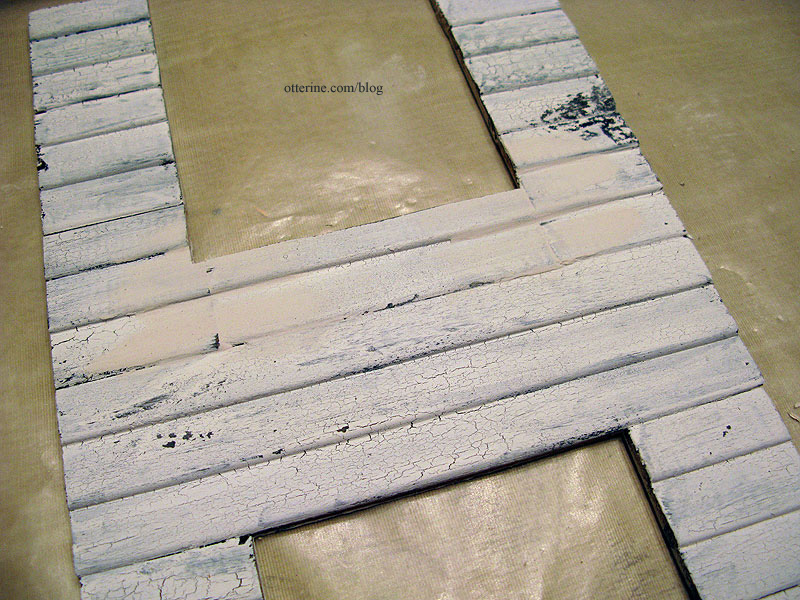
Continuing work on the pocket door. I decided to use 1/4″ thick wood for the inner connectors and pocket door mechanism instead of foam core board, using wood glue to create an especially strong bond. The reason for this is that the wall will serve as a structural wall and I want to cut down on the amount of give and warping it might have. Unlike Kathie’s tab and slot house example, this wall just sits inside the house and will be glued at contact points only, so I need a straight, strong wall.
I asked Kathie what she would have done differently, and she said she wished she had built in a way to open and close the door from the outside, like a string. As it is, she has to reach in to show that it works, and that requires the removal of furniture.
That got me thinking! How about a lever that comes out of an opening in the back of the pocket door wall. You would push the door closed and pull it open like a pop-up book. The lever itself could be hinged to lay flat when the door is open.
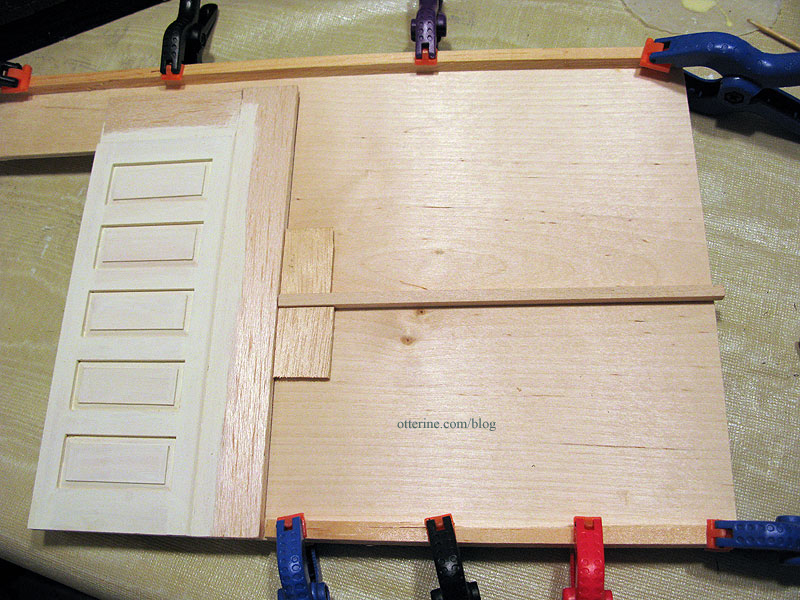
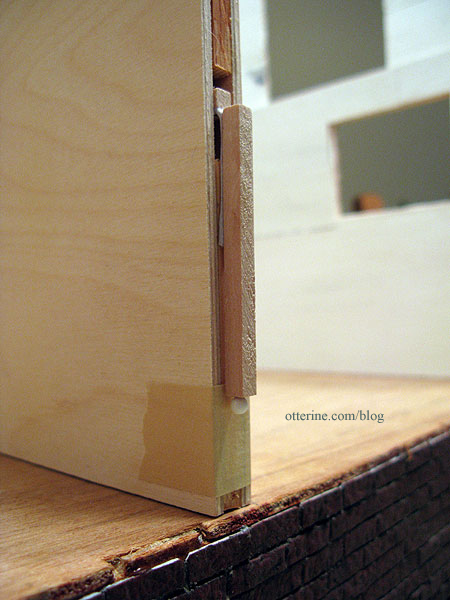
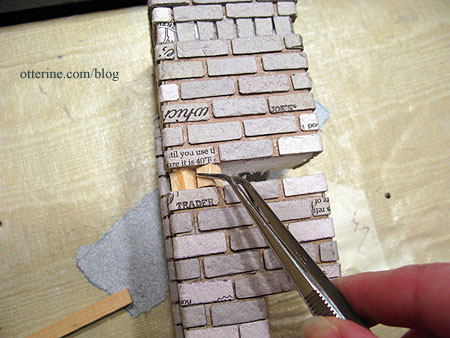
I added a piece of 3/16″ strip wood cut to the distance between the edge of the door assembly and the open back when the pocket door is open, with a little to spare. I added block supports to the end where the lever attaches to the door assembly to strengthen the connection.
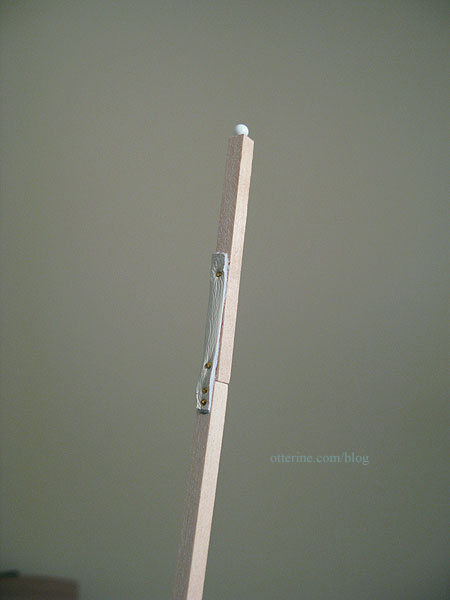
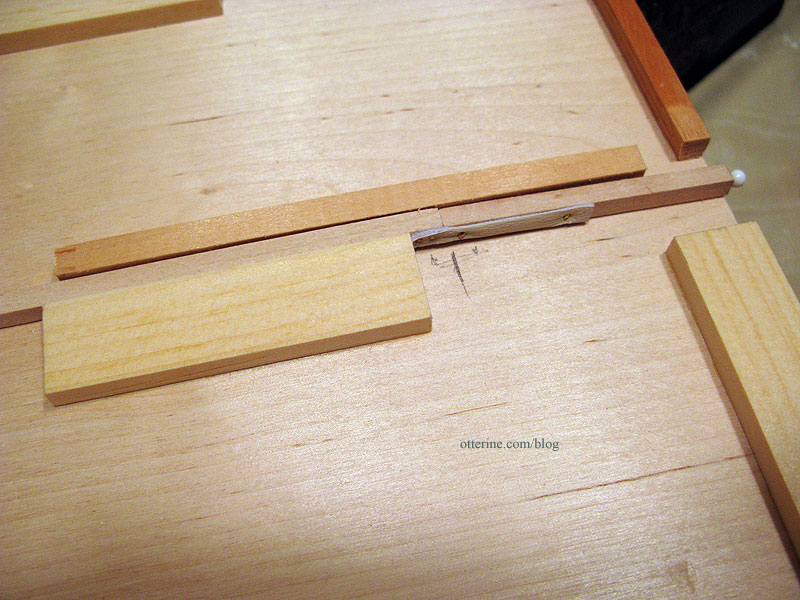
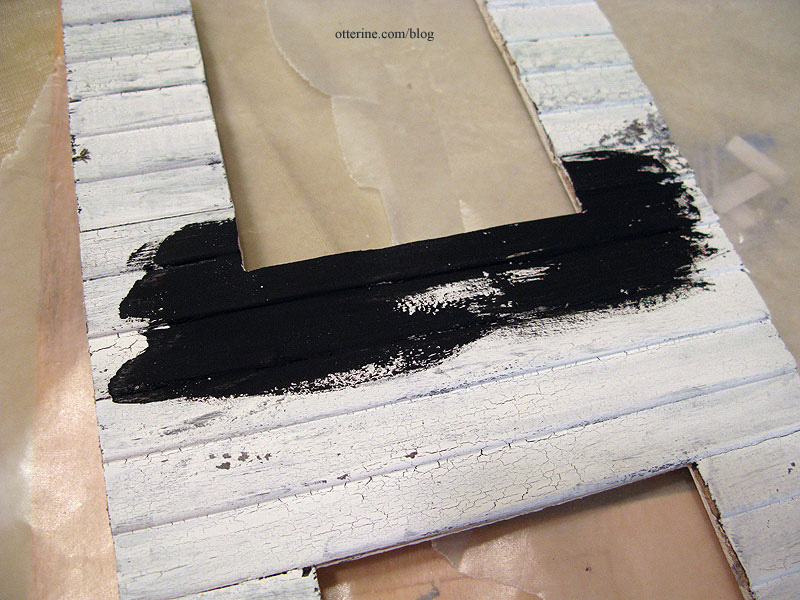
I added a hinge at the end of the lever and added more 3/16″ strip wood cut to the amount needed to make up the difference when the pocket door is closed. Even though there are tiny hinges on the market, I opted for a leather hinge instead. It’s flexible and won’t be damaged with some turning and bending the way a tiny metal hinge might be over time. I used brass brads for additional security after gluing the leather in place. To finish the lever, I added a sewing pin glued into the end.
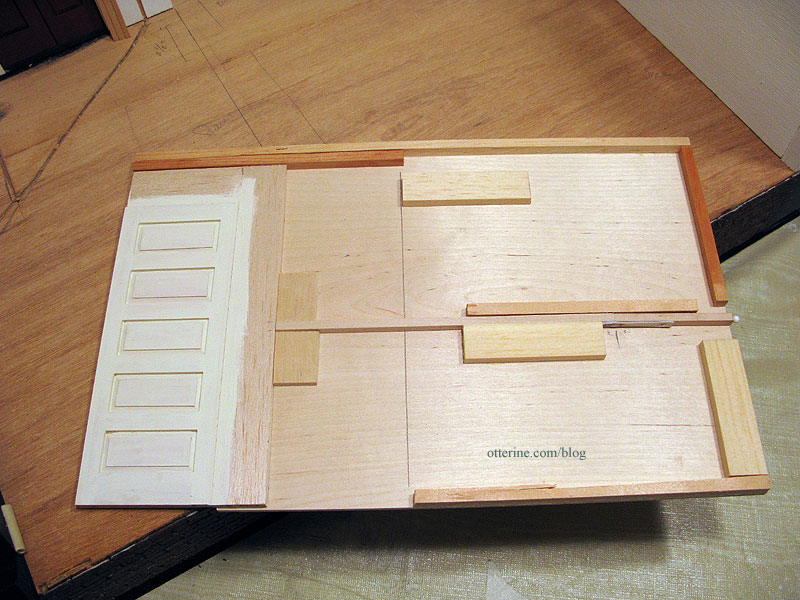
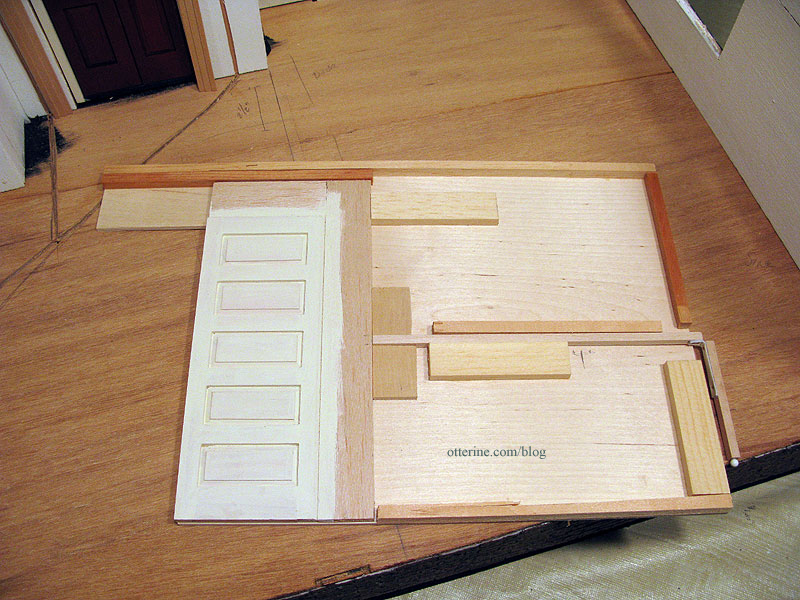
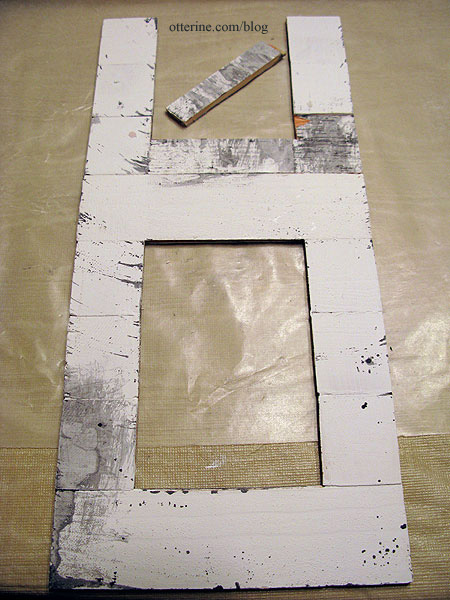
I used scrap bits of 1/4″ thick wood to create a channel for the door lever, a guide above the door and a stop to keep the door from going too far back into the wall when open. I also finished off the back with 1/4″ thick wood, leaving a larger opening than necessary for the lever. I will cover the back of this wall with a single piece of wood in the end, so these pieces are merely structural and not meant to serve as a clean finish for the back edge of this wall. Before final assembly, I’ll add some more 1/4″ thick wood scraps in the open areas to make sure the parlor wall has enough surface to bond to.
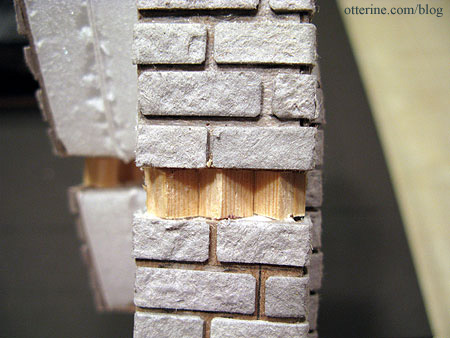
Here are the inner workings with the door closed…
And with the door open…
A close up of the hinge in place.
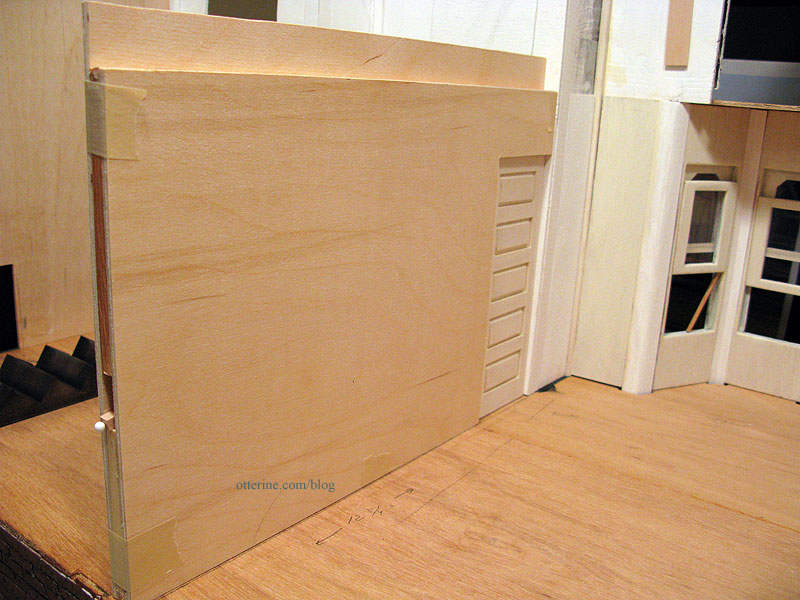
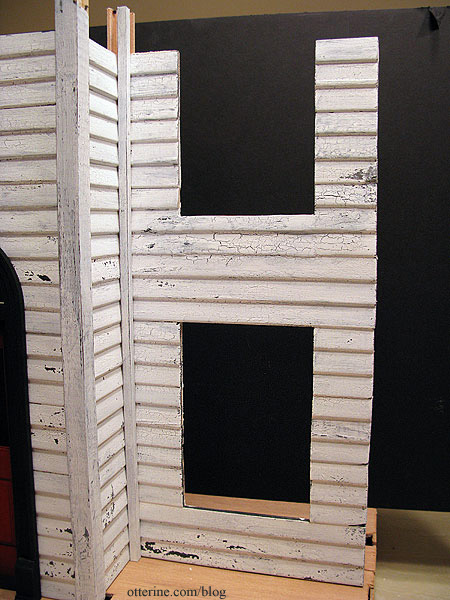
I taped the parlor wall to the assembly and set it in place. The mechanism needs to be treated gently, but it works! :D
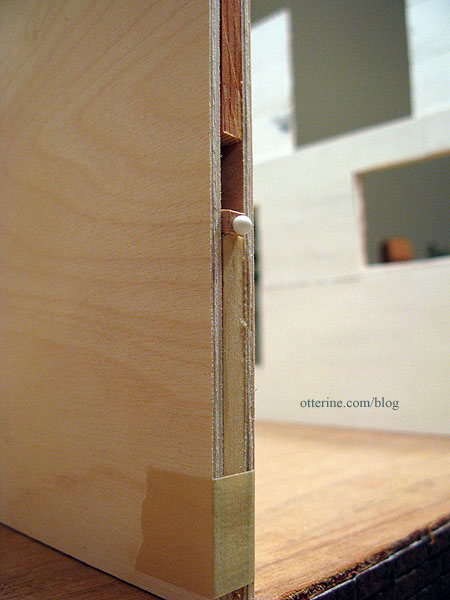
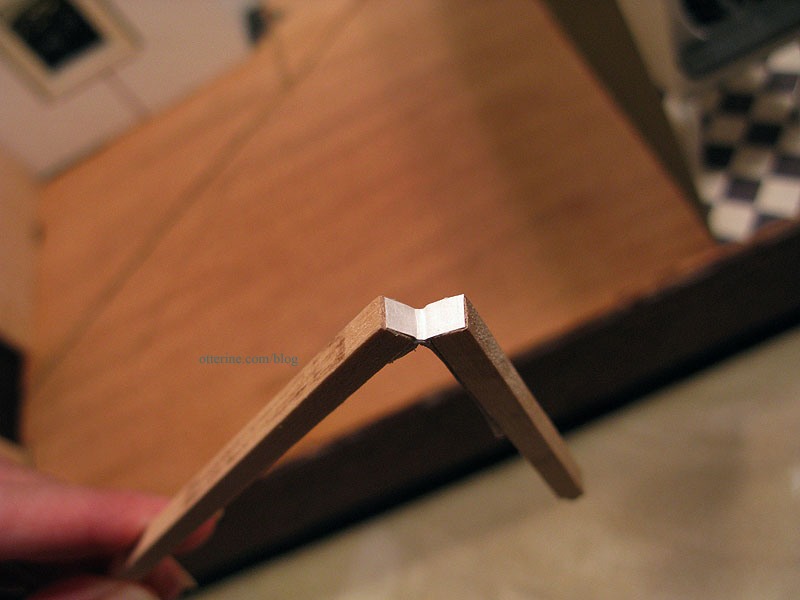
Here is the lever pushed in for the door closed, with the head of the pin showing. It is angled down for now since there is no finishing wood to keep it propped up.
Here is the lever pulled out for the open door, with the hinge allowing the lever to sit flat against the back of the wall. I need to paint the lever, prime the walls and finish the door before I can glue the wall together permanently, but I am so pleased it works!
Fran sent me a suggestion for reinforcing the pocket door hinge: adding a piece of Tyvek to the inner part of the hinge. Tyvek is the strong, waxy paper that tear proof envelopes are made from, and since I work in an office, it is a daily material for me. I snipped a corner from a FedEx envelope and cut a tiny piece for the hinge.
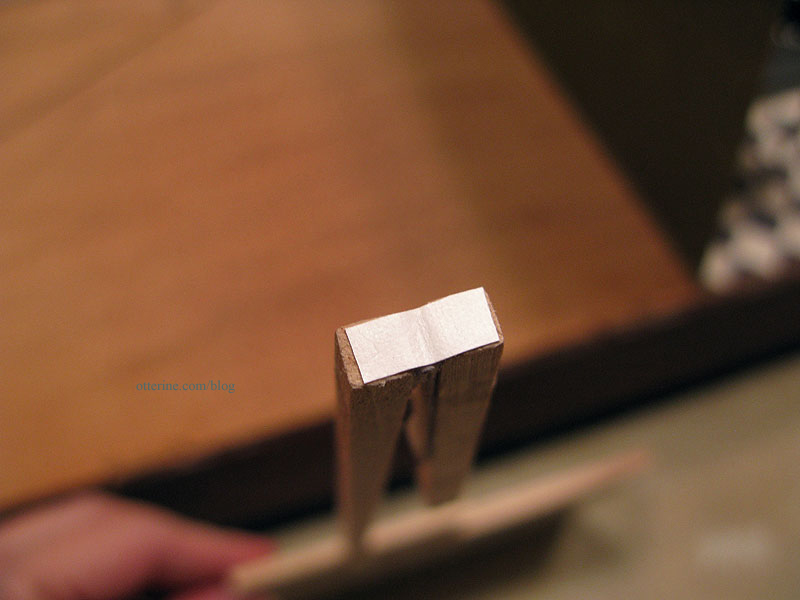
Once glued in place, it keeps the hinge from twisting as it had been doing with the leather on only the one side. And, it’s so thin it doesn’t interfere with the hinge when the lever is straightened. Excellent idea, Fran! Thank you!
Part 3 here.
Categories: The Haunted Heritage
November 25, 2011 | 0 commentsFoyer to kitchen pocket door, part 1
I wasn’t opposed to putting in a regular swinging door from the foyer leading to the kitchen, but I’ve wanted to try making a pocket door for some time now. There are two excellent blog posts on dollhouse pocket doors that I found while researching. First, a fine set of pocket doors at Myrtlewood Manor where an upper track was used to keep the doors in place. Second, KathieB’s single pocket door where extra wood was attached to the door and foam core used to create the pocket.
I ended up choosing Kathie’s guide to follow since it seemed the easiest for me to figure out and I already had the materials on hand. It was also exactly the type of setup I wanted with a single door.
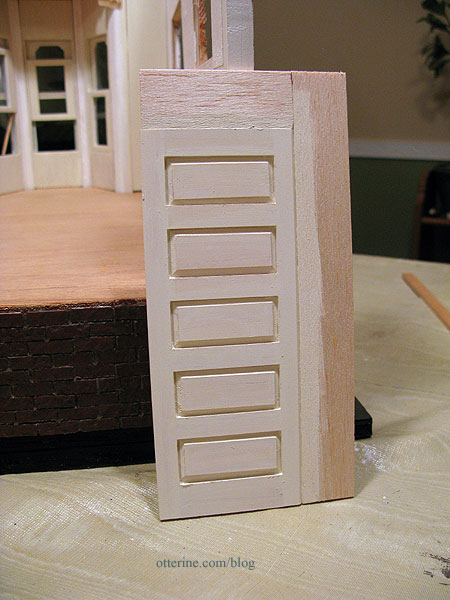
I added the extra pieces to the door and cut two outer wall pieces from 1/8″ thick plywood. I’ll use 1/4″ foam core board as the inner layer, just as in Kathie’s example. I’ve started painting the door Vintage White by Folk Art to match the trim I’ll be using.
Putting in a pocket door wall also allows me to tackle another problem. My parlor ceiling will be a different height than my kitchen ceiling. However, the board for the second floor is a single piece that spans the entire area of the house. By having a wall made from various layers, each outside layer could be built to act as a support for its adjacent ceiling and I could cut the floor board into two separate pieces. Oh, that sounds so simple on paper. Ha ha.
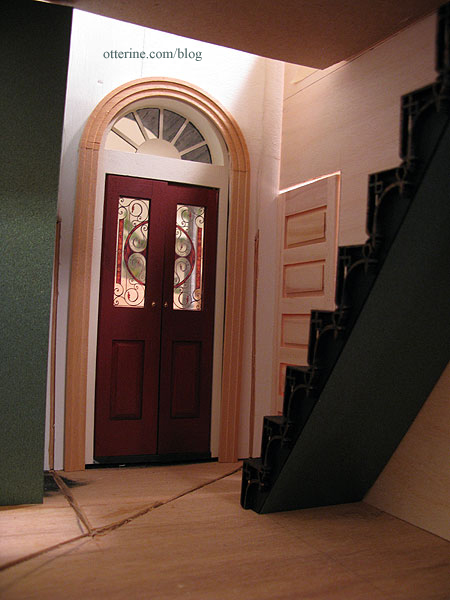
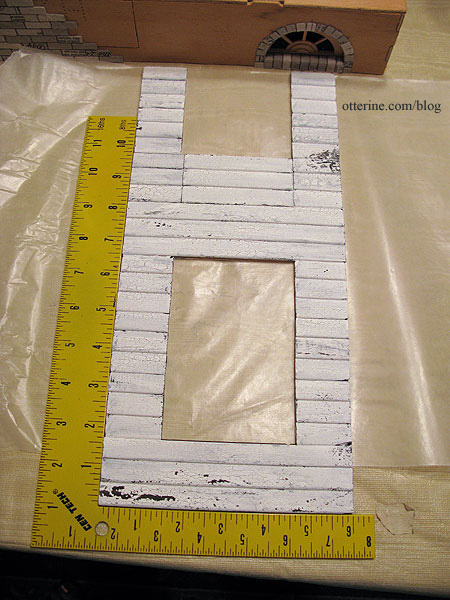
My parlor wall is 9″ tall to accommodate the new Houseworks narrow stairs. I have the stairs as close as possible to the pocket door while still allowing for proper trim around the new doorway. If it were back much further, it would encroach on the bookcase and leave very little at the top of the stairs on the second floor.
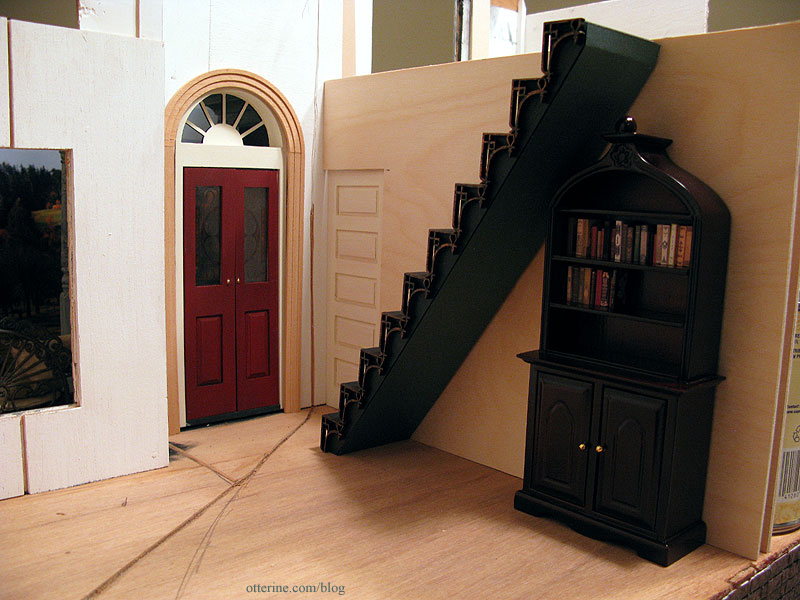
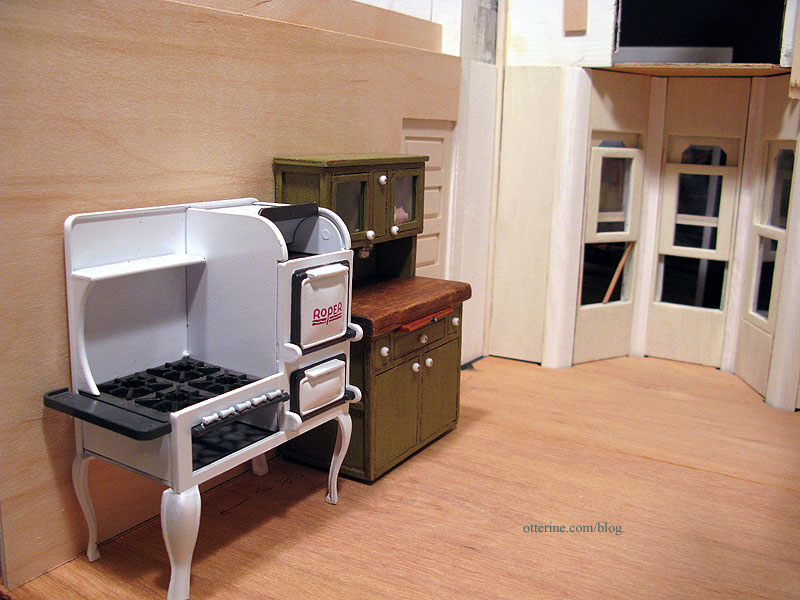
My kitchen wall is 8 1/8″ inches tall as intended for the original kit. The pocket door will be hard to see in this room with Keli’s fabulous Hoosier cabinet next to it. As you can see, there is just enough room for the Roper range, the Hoosier cabinet and the door. :D
There are two remaining issues concerning the second floor board: the interior trim around the front door will hit right at ceiling height and the placement of the stairs presents challenges for fitting in a door to the bedroom (the room above the kitchen). I knew these would be issues to address when I chose the new front door and decided to place the stairs in the middle of the first floor.
My plan is to have a two-story foyer to address the trim around the front door. I’ll work out the upper hallway layout later but I already have some ideas in mind.
Part 2 here.
Categories: The Haunted Heritage
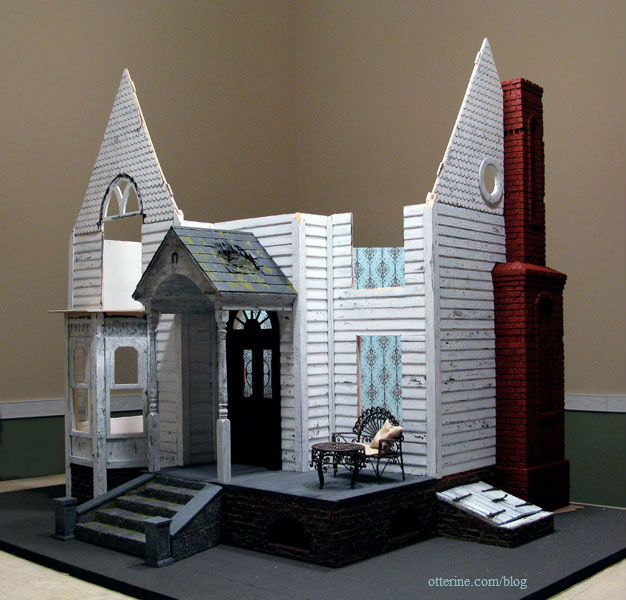
November 22, 2011 | 0 commentsHaunted Heritage chimney, part 7
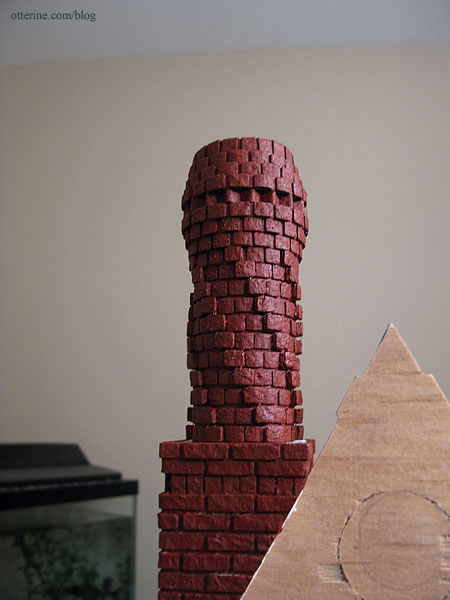
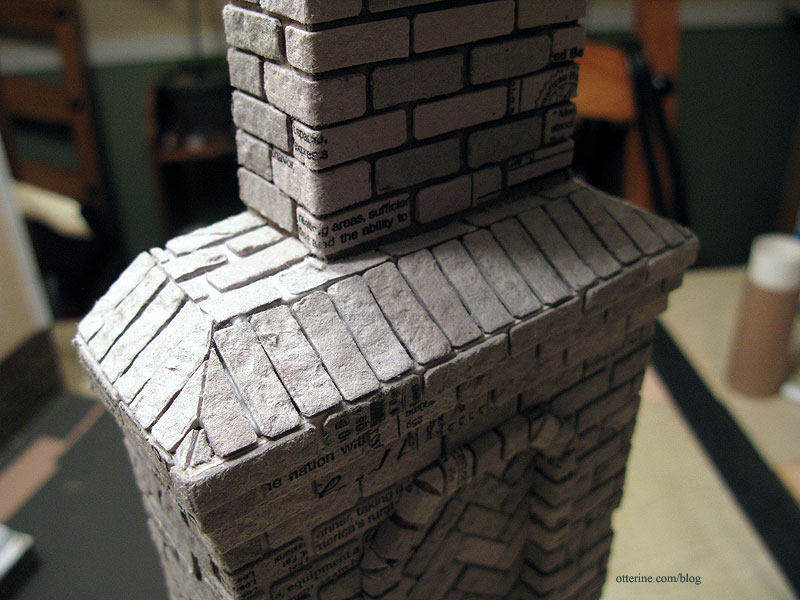
Continuing work on the chimney. After completing the topper, I had painted and set up some photos. After a few days of looking over the chimney and the photos, I still didn’t like the way the spirals were a little lost on my rendition. I added another later of egg carton bricks to the spirals to make them stand out more.
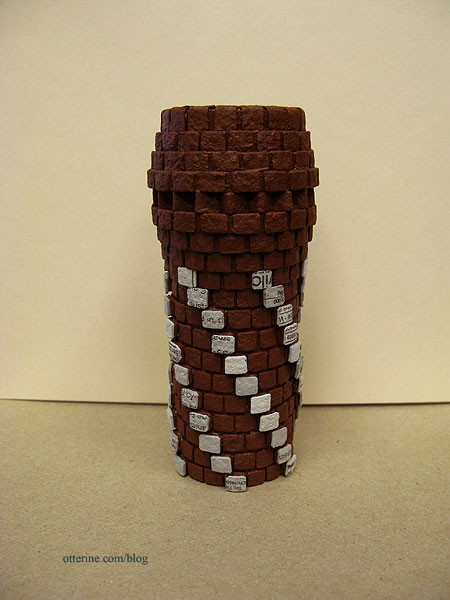
Once painted, I think the spirals look much better.
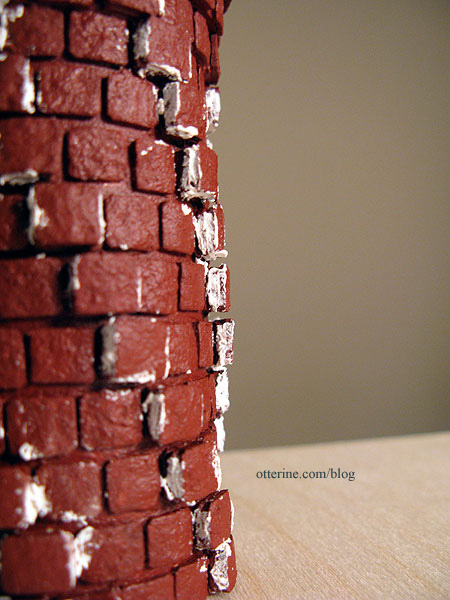
Since the sides show quite a bit, I filled in the gaps with spackling – using a toothpick to apply it.
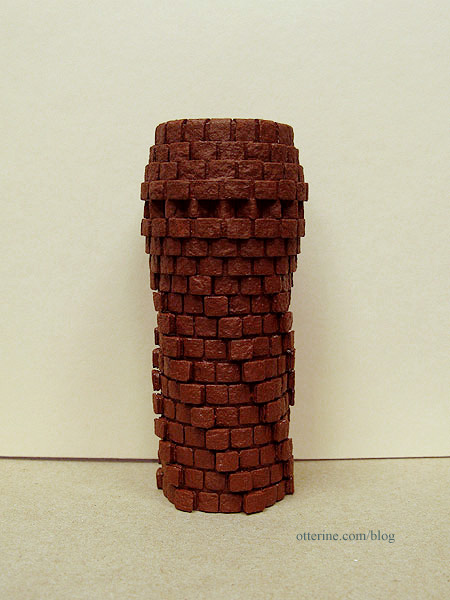
Once dry, I painted again and now the bricks look solid instead of layered.
The spirals stand out much better, and the effect will be even more pronounced after I grout and age the chimney (you were so right, Keli).
I also finished up the bridge between the topper and the middle section by adding a layer of 1/8″ foam core board.
I covered this section with bricks. The large gaps will be covered by the topper.
The topper is still removable since that section will be the most challenging to grout.
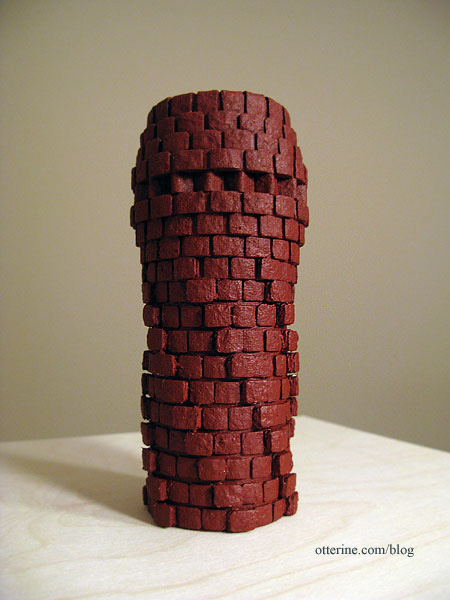
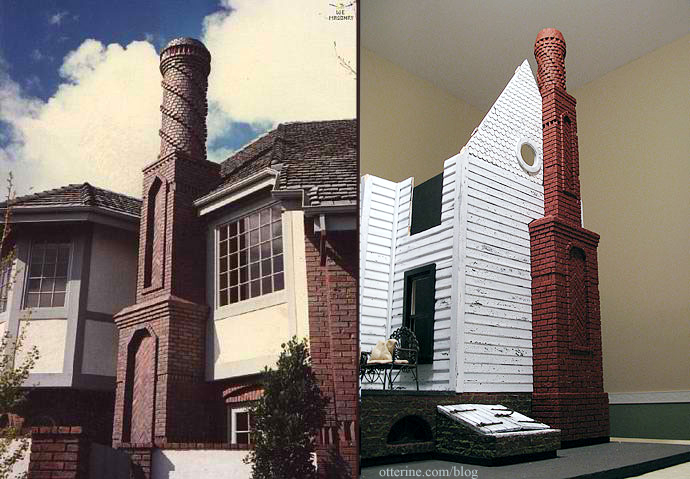
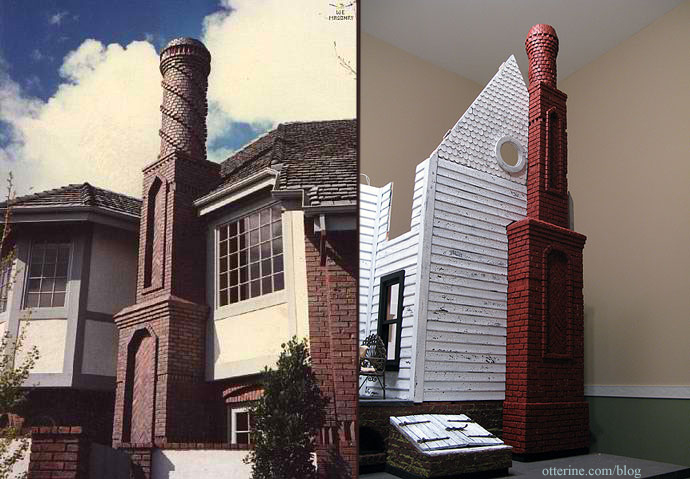
Here’s a new comparison shot with the W E Masonry original.
And, another overall shot. :D
Categories: The Haunted Heritage
November 19, 2011 | 0 commentsHeritage – front bay window, part 5
I finally got around to painting the fancy laser cut corbels for the bay window, crackling white paint over black the same as the rest of the exterior. I also added the fancy molding that finishes off the top of the bay window.
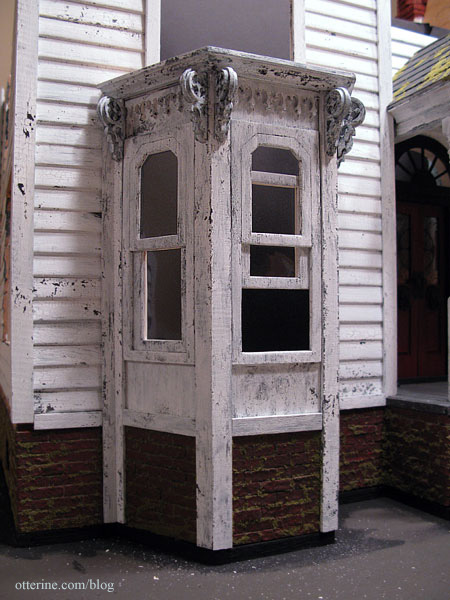
I wasn’t sure how well they would take the aging process, but I love the way they turned out.
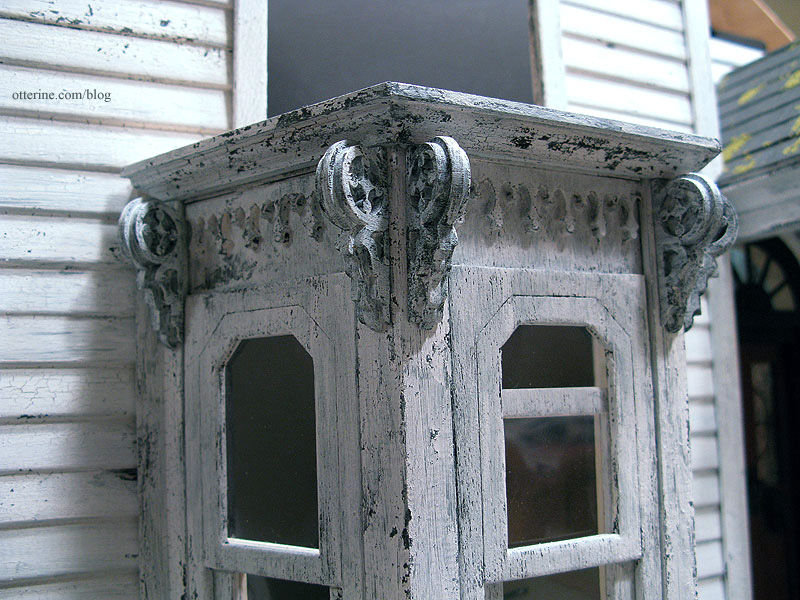
The corbels spice up the bay window to match the new fancy portico. :D
Finishing the rooftop here.
Categories: The Haunted Heritage
November 17, 2011 | 0 commentsHaunted Heritage chimney, part 6
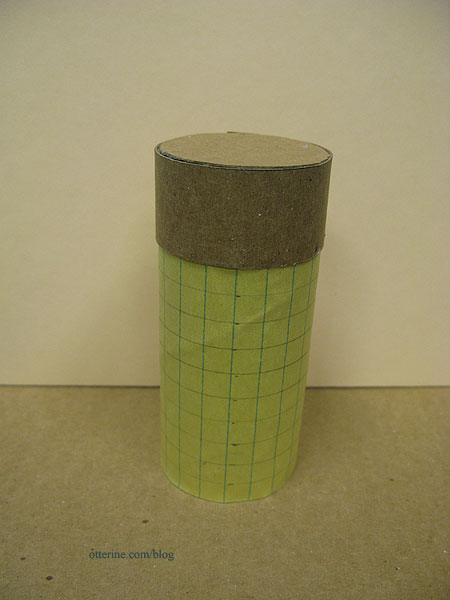
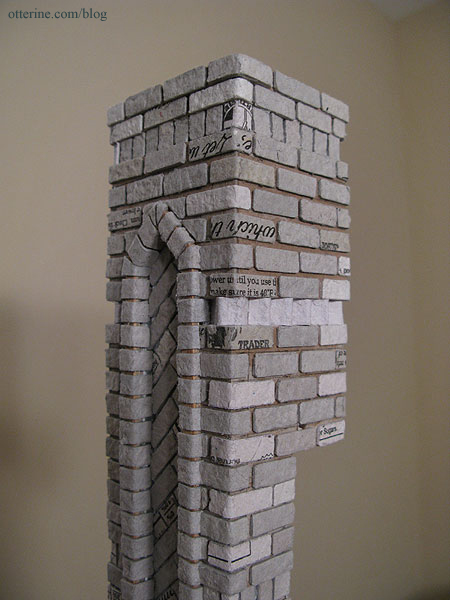
Continuing work on the chimney. Now that I’ve had plenty of practice with the lower and middle portions of my chimney, it is time to tackle the topper. The challenges include the fact that it is cylindrical, there are spirals of bricks around it, those bricks are smaller (the short ends) and there is a row built from bricks at an angle. :D
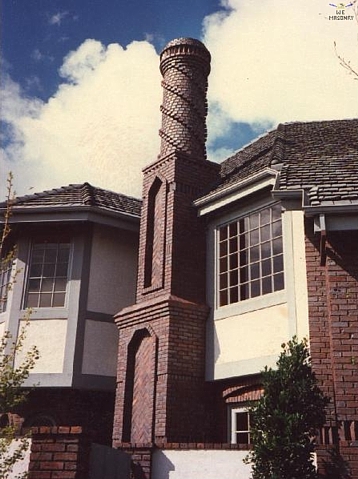
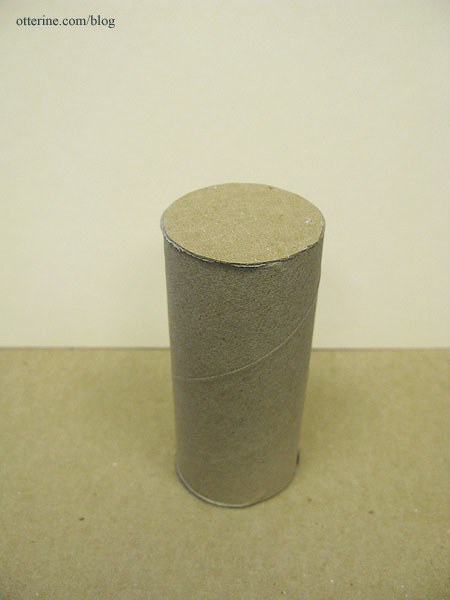
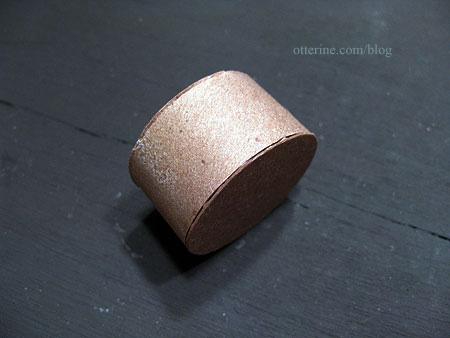
the original W E Masonry chimney What to address first? The basic shape. In my mockup version, I had used drawing paper rolled into a tube since I didn’t have a toilet paper tube on hand. After saving a few for this project, I started with one at its full height of 4 3/32″. I then stuffed the inside with aluminum foil to keep the tube from being crushed as I worked on it, or after completion for that matter.

I planned to make the angled bricks a bit differently than I had for the middle section, where I had gouged out the foam core and used wood supports for the bricks. I would be using the same wood supports, but this time there was no foam to glue the supports into. I made a cardboard circle and glued that to the top end of the tube. The supports would be glued to this circle. Above that row of supports, I would construct the very top portion with another toilet paper tube cut down to size.
I started with main base for the dimensional rows just under the angled bricks. I built this layer up with cardboard as I had done for the lower and middle sections.
Using a paper tube provided a uniform support structure, but measuring evenly all around to draw guidelines wouldn’t be easy. Guess what has evenly spaced 5/16″ increments? Notebook paper! I cut a piece to size and drew the horizontal guidelines on it. It’s a rough guide not an exact pattern but it would help me keep things in line.
I thought about bricking on the flat paper and then gluing it to the tube, but I didn’t want to take the chance that I wouldn’t end up with a consistent and correct fit after putting in all the work. So, I glued the paper pattern to the tube before the brickwork.
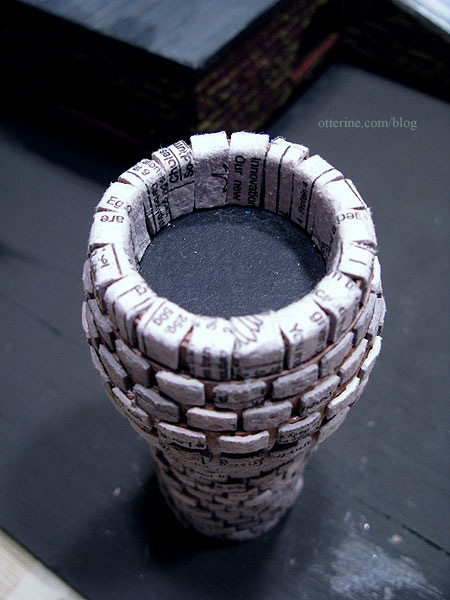
Since this portion was made from the “ends” of the bricks, I cut the bricks to just under 5/16″ in length. To make the egg carton bricks more cooperative, I bent each one to get it to curve slightly before gluing in place. These are a little tighter together than the rest of the chimney, but I think that works well for the design.
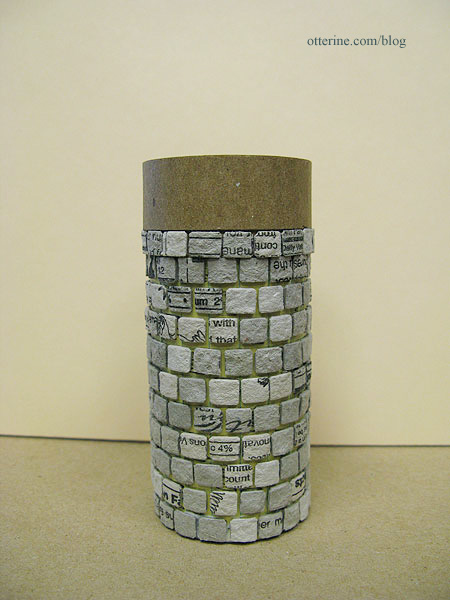
I marked the spiral brick pattern, ending up with six spirals. For the spiral design, I glued another brick on top of each brick in the pattern. The camera is flattening them out (there is one spiral completed in the photo below from top left to bottom right), but I think they’ll show up better once the chimney is painted and grouted (which is not going to be easy for this section). The spirals are more vertical than the original design, but I like them!
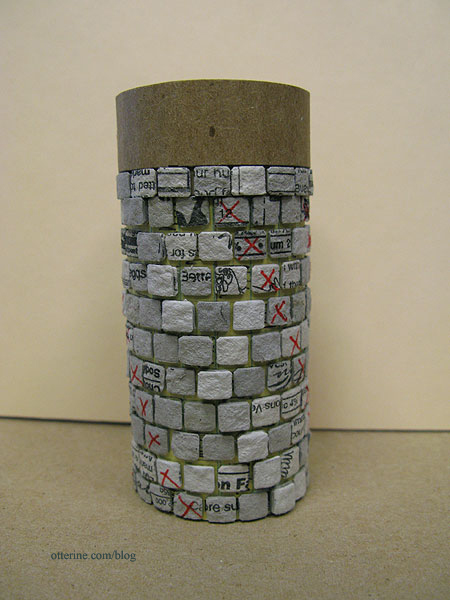
I finished up the bottom portion of the topper and ended up with a little castle turret. :D

To make the angled bricks, I cut 1/4″ strip wood into rough cubes and glued these to the top. Could I have purchased 1/4″ cubes to make things easier? Probably, but I was in my jammies at home and I already had a length of 1/4″ strip wood. :D
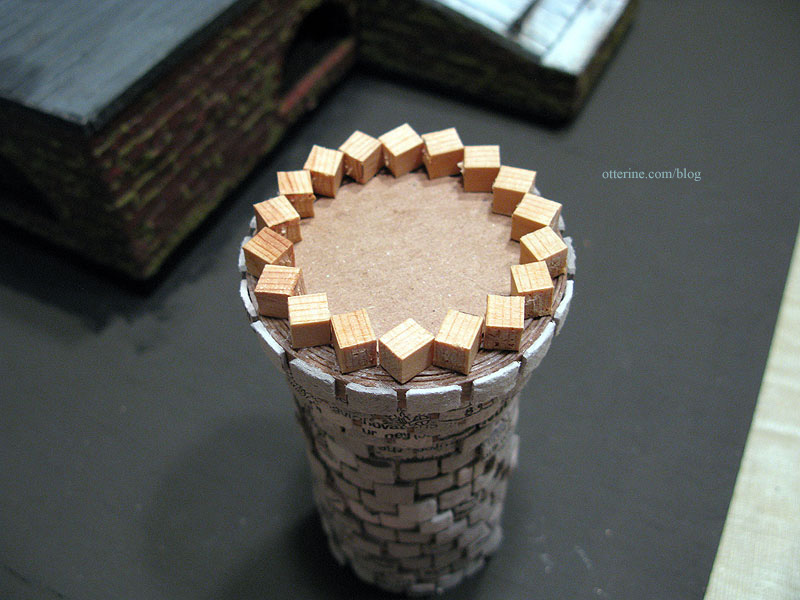
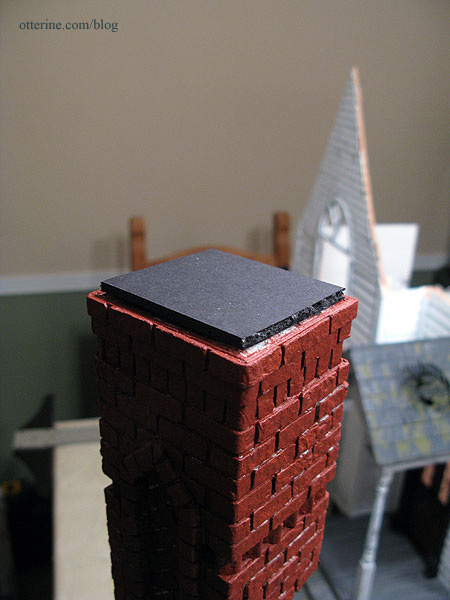
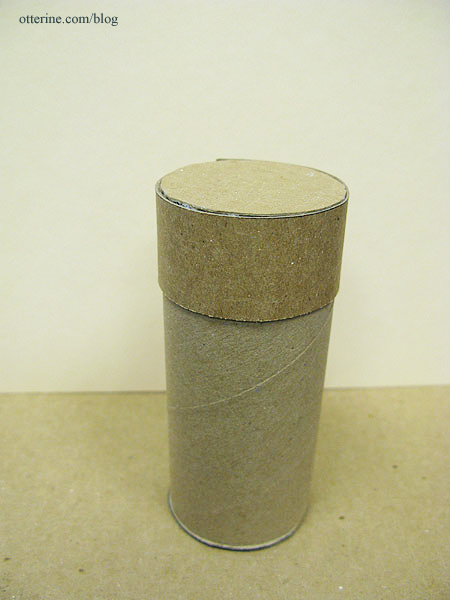
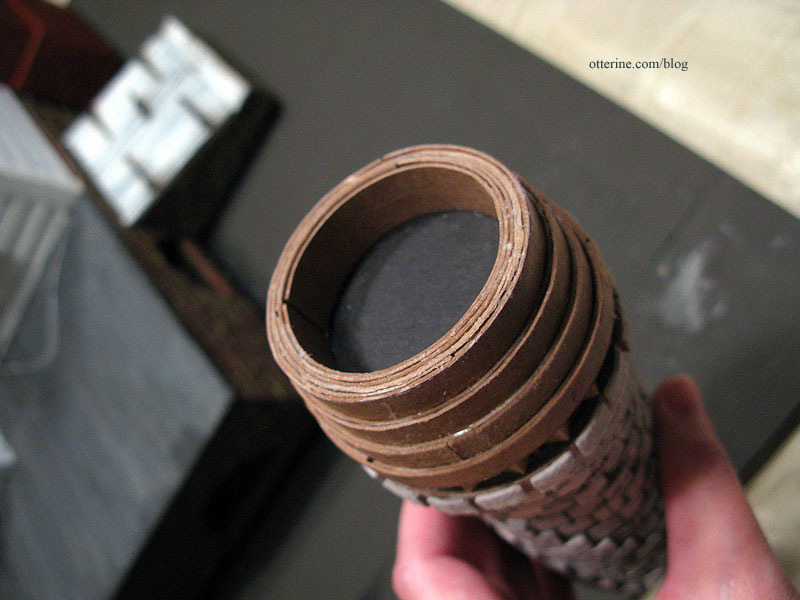
While these dried, I worked on the very top portion. I cut another toilet paper tube to 1″ tall and glued a cardboard circle to the bottom. This portion will be a mirror image of the rows below the angled bricks.
To finish the interior of the top, I cut three circles from 1/8″ black foam core board and glued them in place. This gave the top support as well.

Then came the cardboard layers before gluing the top onto the angled brick row.
I wound some more cardboard on the inside of the tube to build up the thickness of the chimney wall.
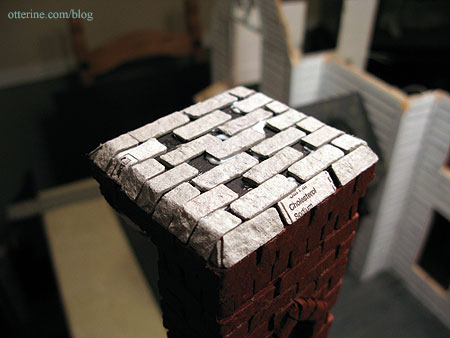
Once this assembly was secure, I glued on the tiny bricks trying to match the pattern of the rows below the angled bricks. Using egg carton pieces cut to fit, I covered the wood supports. I finished off the top of the chimney by folding the bricks over the top edge down to the foam core interior.
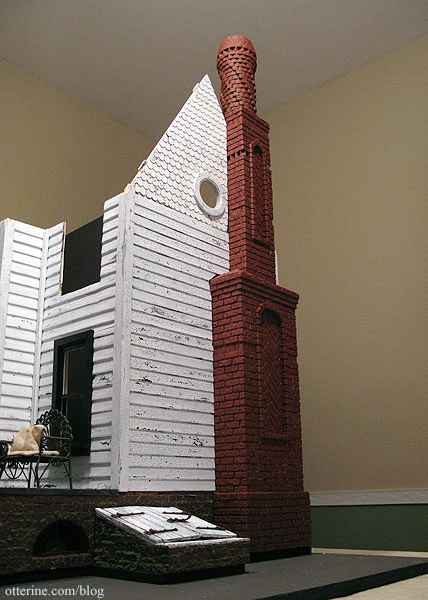
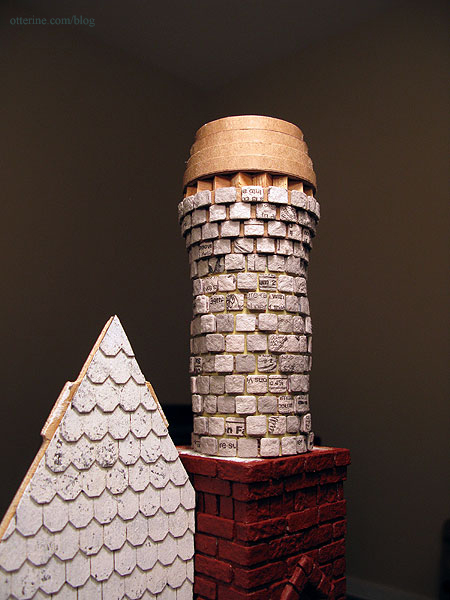
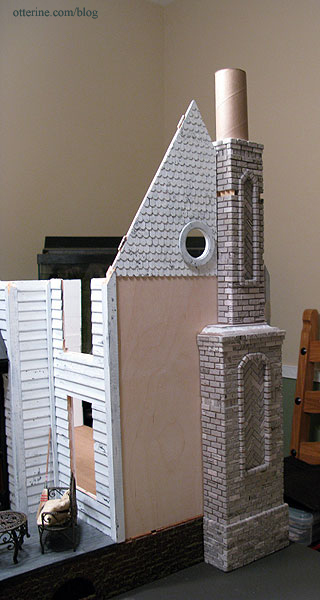
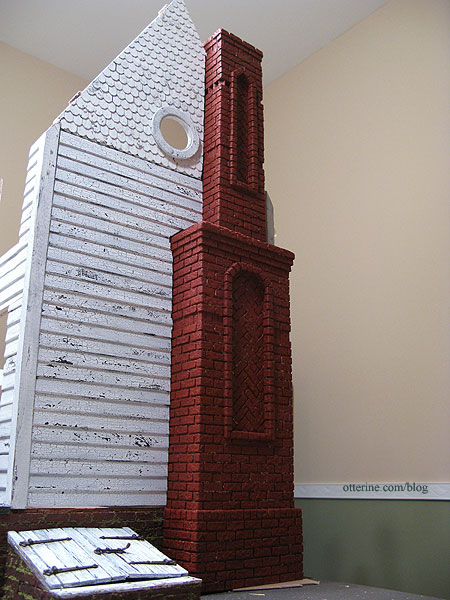
A quick coat of Liquitex Burnt Sienna and we’re starting to get somewhere! I still need to work on the bridge between the topper and middle section, but it will be of minimal visual impact.
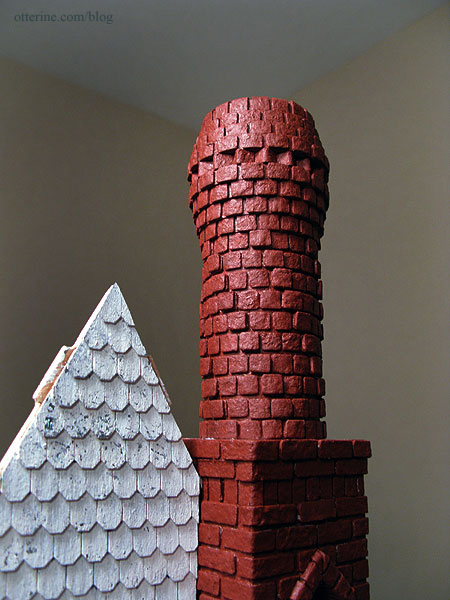
That’s one tall chimney — just under 28 1/2 inches high.
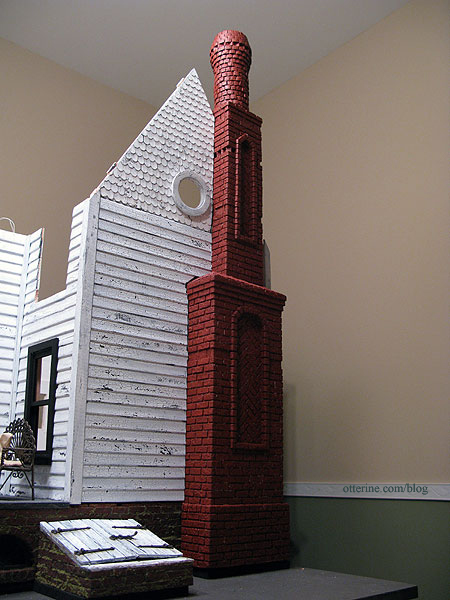
I was worried it was going to end up a smidge too tall but I think it works well.

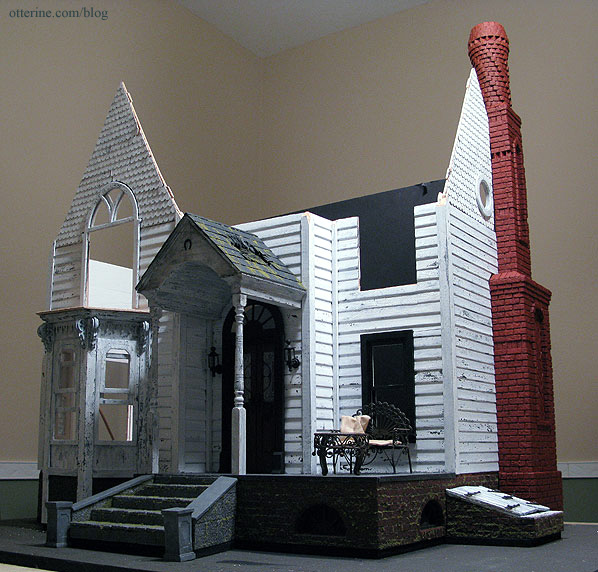
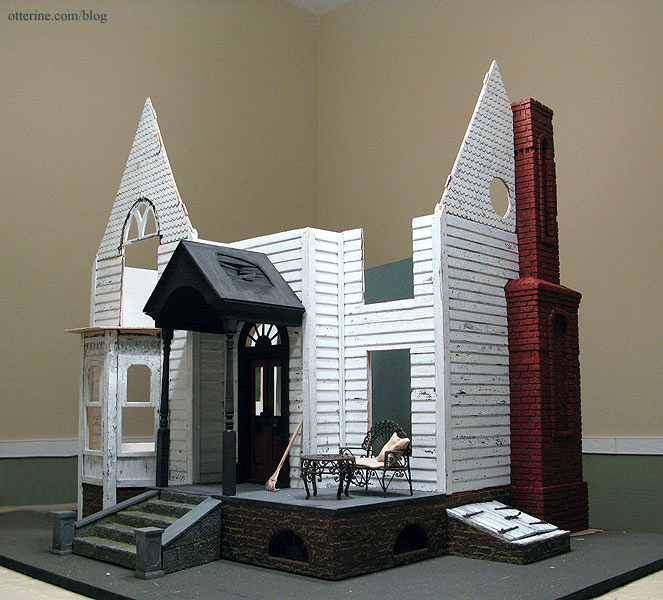
And, with the whole house as it is at the moment. :D Love!!!
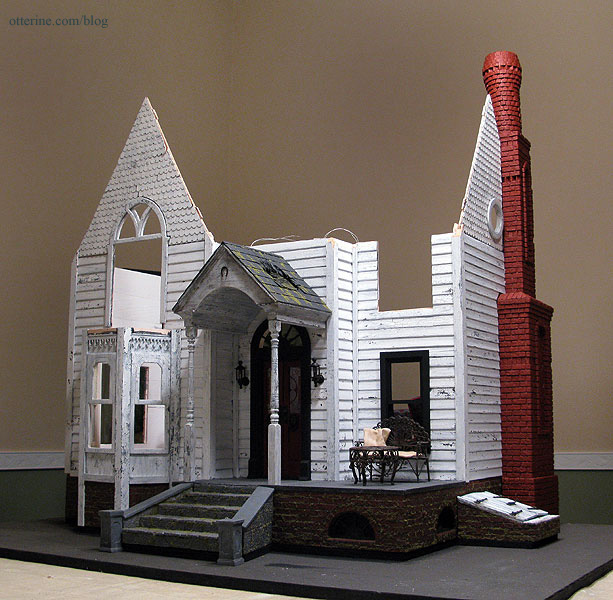
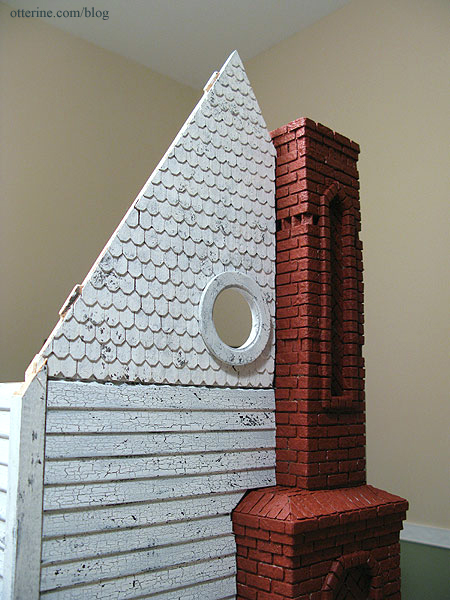
So, what do you think? Have I captured the essence of the original W E Masonry chimney? :D
Next up: finishing the bridge between the topper and middle section, painting touch-ups, sealing and grouting.
Categories: The Haunted Heritage
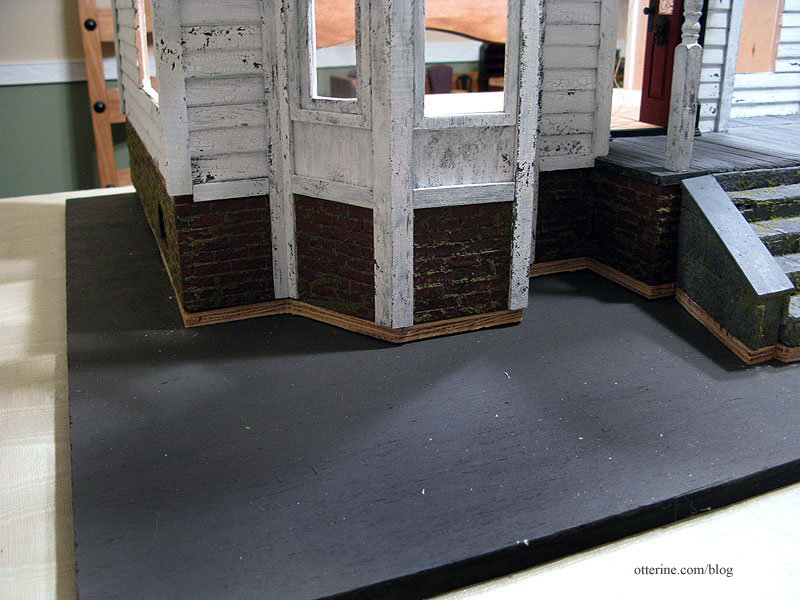
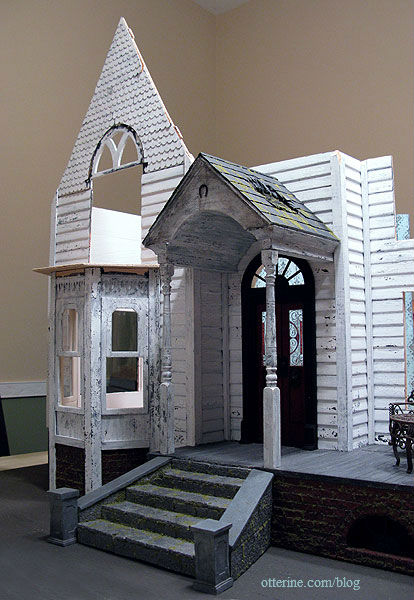
November 12, 2011 | 0 commentsHaunted Heritage – first floor, two ceiling heights
In upgrading the front door and adding a narrow Houseworks staircase, I needed to address the issue of a too-short ceiling for those two items. I couldn’t just raise the whole first floor, since the front bay window ceiling and the swinging window above it are based on the kit’s original ceiling height.
The only workable solution was to raise the parlor ceiling height and leave the kitchen ceiling height as originally intended. Since I had already eliminated the side bay window, there was no issue with raising the ceiling on that side. But, there was still a front window on the second floor that would need to be addressed. The original front side wall had an opening for that window.
I took the spare pieces from one of the original side walls (eliminated along with the side bay window) and used this to build up the bottom of that opening.
After the glue dried, I cut the new opening.
I then used spackling to fill the joins on the front and touched up the aged paint.
Now the opening is set for the higher second floor, and the patch is invisible.
Categories: The Haunted Heritage
November 9, 2011 | 0 commentsThe Sofa
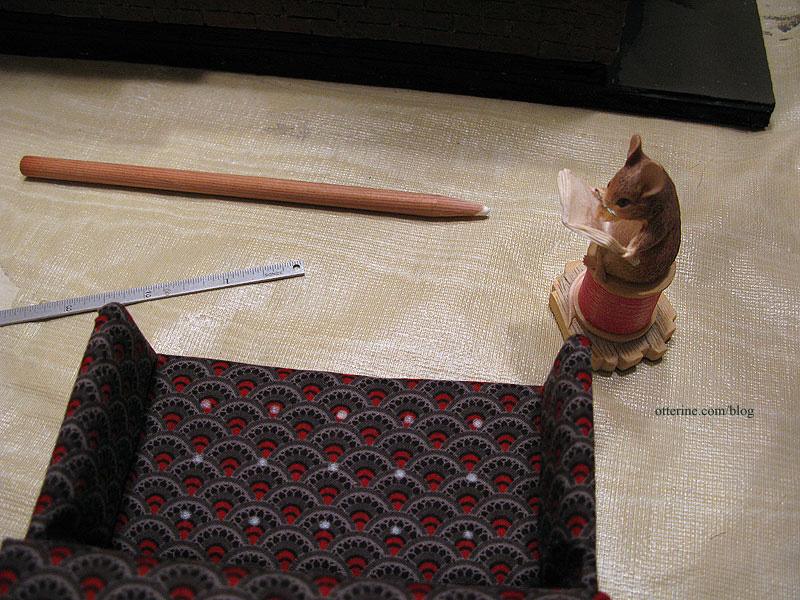
As you’ve seen before, I bought the beautiful conversation piece known as The Chair made by Kris of 1 Inch Minis. She was kind enough to send me the extra fabric she had and let me know where she bought it. Unfortunately, there wasn’t enough for more than pillows and curtains or maybe an ottoman, and I really wanted to make a sofa to match. The Heritage just would not stand for mismatched furniture in the parlor. What would people say?! ;D
Sarah, a fellow member of the Greenleaf forum, mentioned that she saw the fabric at her local Joann store. I was unable to find any in my area, and she was kind enough to buy some for me during her next visit and sent it to me. Hooray!
I went back through my idea file to see what would be able to hold its own with The Chair and still have a similar style to it. I found this beautiful high back sofa from AT Design Group.
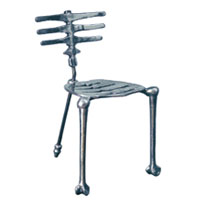
As an aside, check out their skeleton chair! :D I foresee a plastic Halloween decoration becoming a 1:12 scale chair in the future. Ha ha! Creeptastic!
I used my knowledge from the Millie August sofa kit I put together and my initial attempt at an upholstered couch made with dried out (new) kitchen sponges.
I built a quick mockup in 1/2″ foam core board, 1/8″ foam core board and kitchen sponges (new and dried before using), leaving a bit of wiggle room for batting and fabric upholstery. I used 1/2″ wood cubes for the feet, though I planned to make legs like the original later in the build. I had to piece the sponges since the ones I bought were not long enough, though they were the perfect thickness.
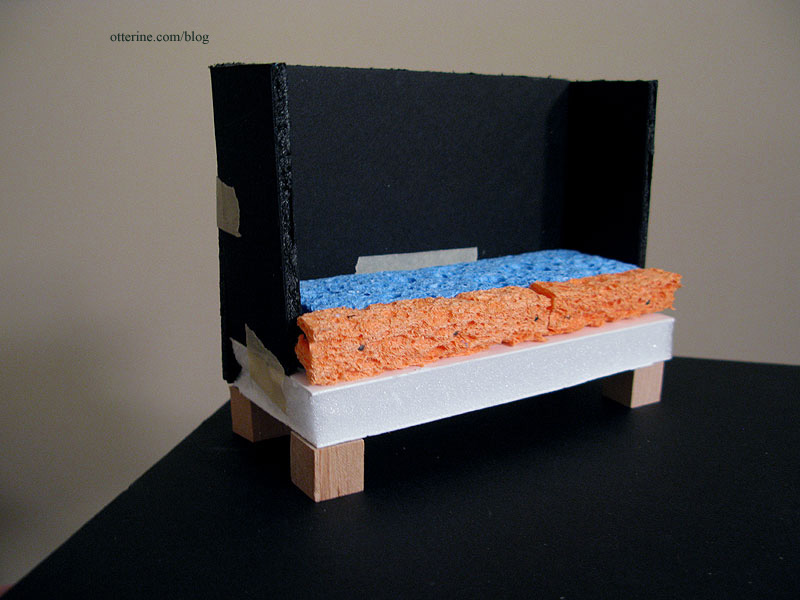
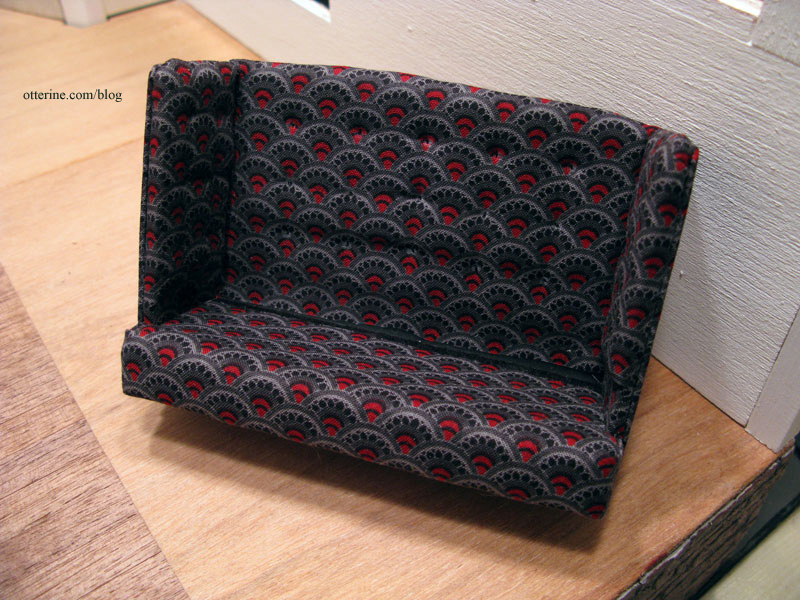
I put the mockup in the parlor to see if the size was good in relation to the chair and for the room itself. I made it shorter than The Chair since it looked off being the same height. As the models show, it works well have a tall chair and a slightly shorter sofa.
I then began putting the sofa together, first by covering most of the pieces with a layer of black felt under the printed fabric. I usually use millinery batting, but since this is a darker fabric I went with a darker under layer. It’s also thin enough cotton that I worried the lighter batting would show through. I didn’t take step by step photos here mainly because I had to work fast with the quick dry glue and parts of the assembly process were rather fiddly. :D
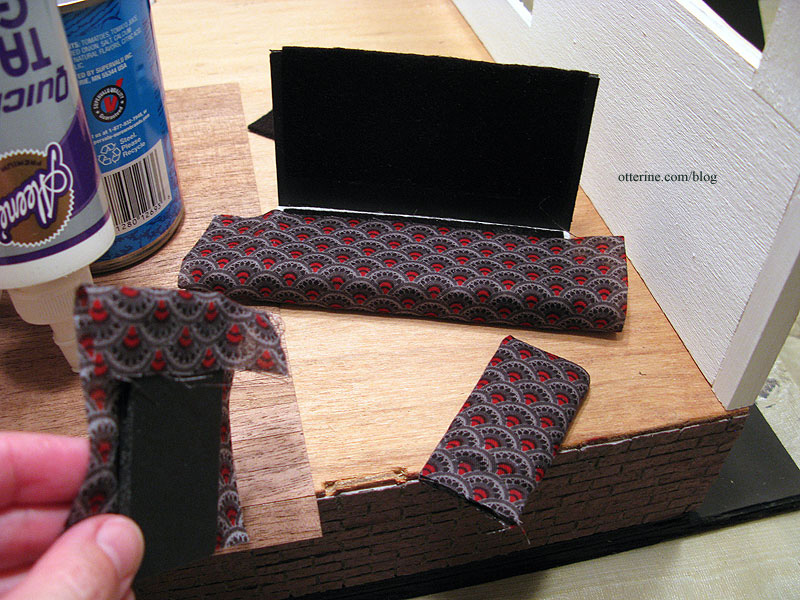
I added three rows of buttons to recreate the tufted appearance of the original by looping thread through the fabric and tying in the back. Shown here is the layout marked with a chalk pencil. Looks like my secret is out, too…I have a mouse tailor for guidance. ;]
The tufting was a lot of work, but it was worth the effort. I just love the effect. I foresee other tufted minis in my future.
Using a glittery bead smiley face I bought for a dollar, I made buttons to cover the threads creating the tufts by gluing the crystals in place.

I made the tufted cushions using sewn pillows stuffed with flat pieces of felt and tufted with the same thread and buttons I had used for the tall back and sides. I like that they ended up a bit misshapen as though they’ve been used and moved about over the years.
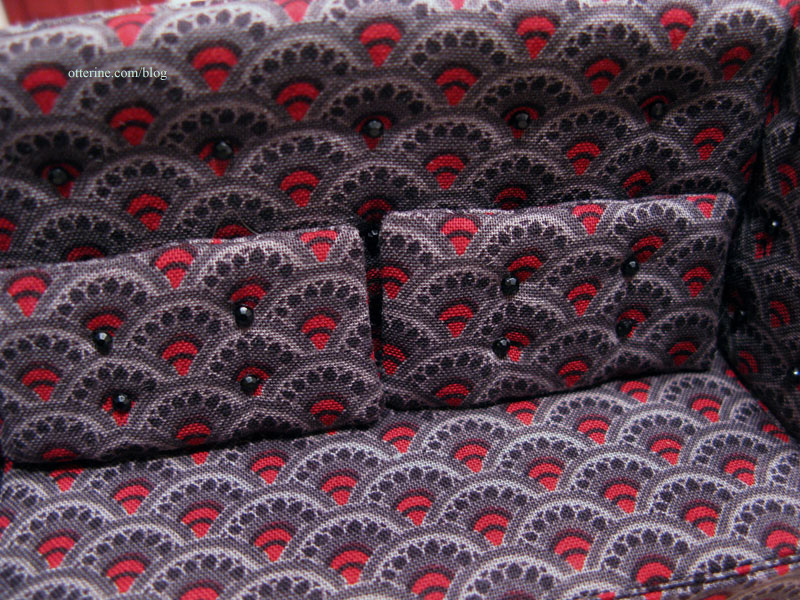
I think the crystal buttons work rather well, though I’ll need to buy another sticker not only because there were not enough to complete all the tufts (the missing ones are hidden behind the pillows) but also in case these pop off as time goes by. I’d never be able to match them otherwise.
The original appears to have a wood base, and I liked this detail. I built a frame and legs from bass wood and painted the assembly black followed by a satin varnish.
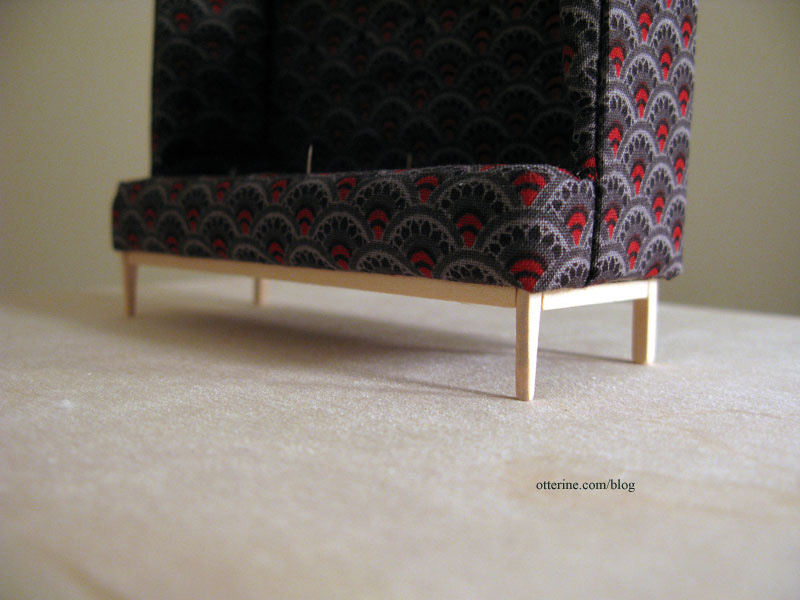
For the main cushion made from the kitchen sponges, I used the method of making cording that I learned from the Millie August kits to add a bit of realism. I opted for self fabric cording instead of red as on The Chair. Not only would it be unlikely to match, but there is so much going on with The Sofa that I worried contrast cording would detract from it. I may add a small red throw pillow or blanket over the back when I get further into the decorating phase to tie it in more with The Chair.
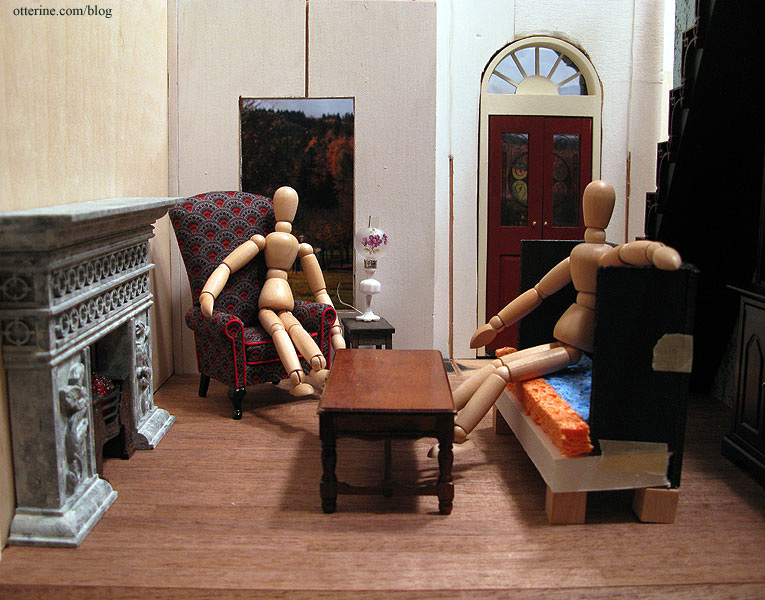
And, here is The Sofa!!! It is my second “from scratch” upholstered piece. :D Love!
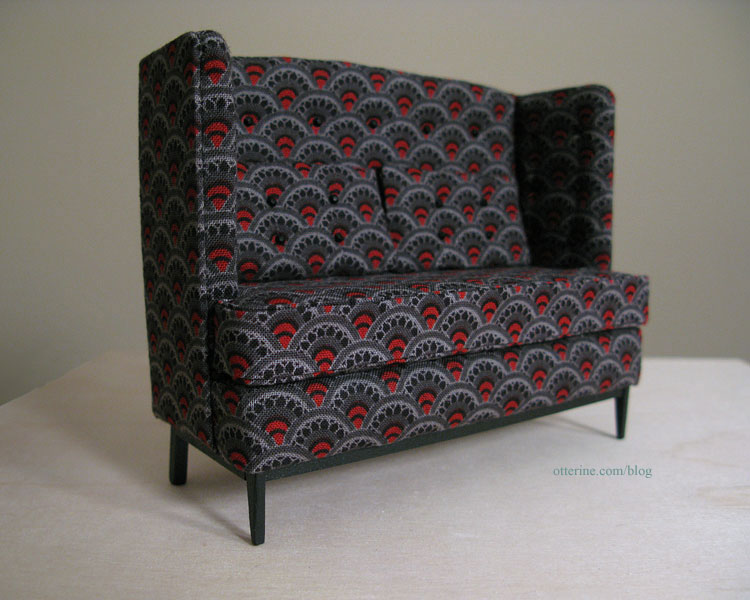
And, here it is with The Chair.
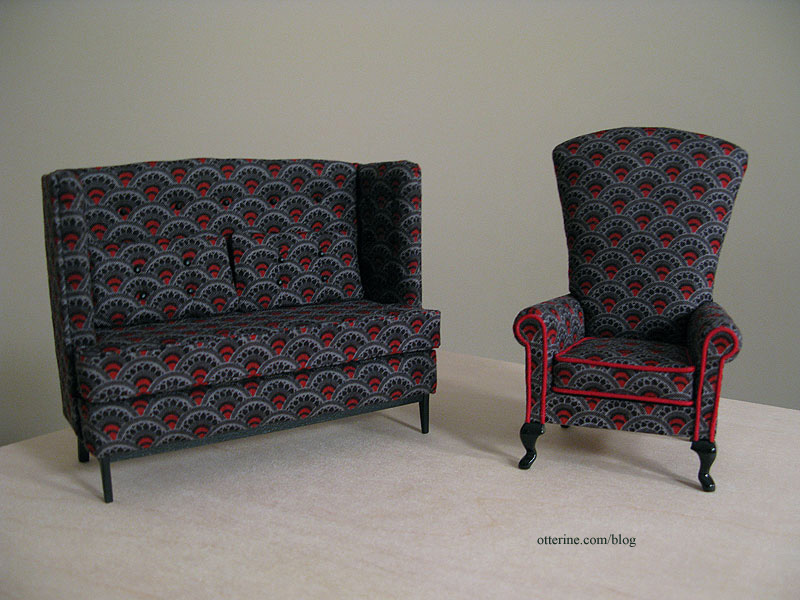
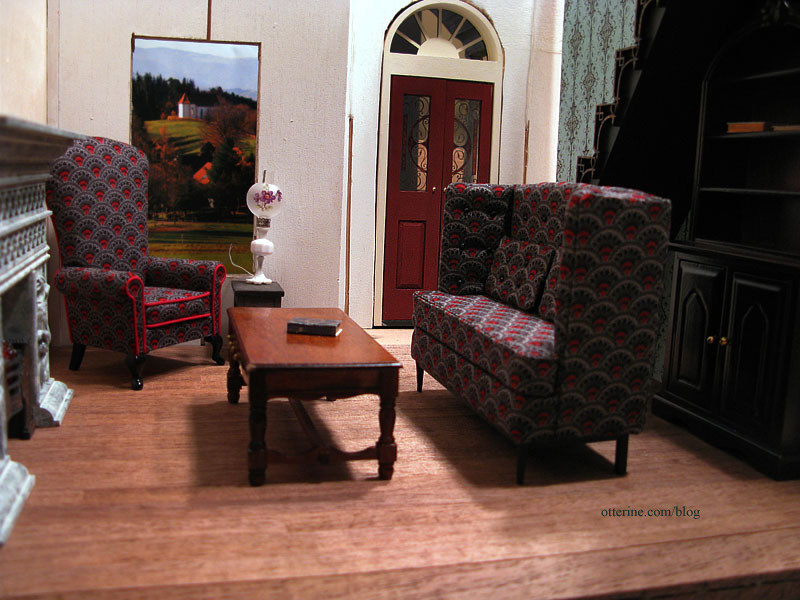
The lack of red in The Sofa is a little glaring with them side by side, but it’s less intrusive when in place in the parlor. Plus, there will be a lot of other things going on in the room as well.
Categories: Furniture, The Haunted Heritage
November 8, 2011 | 0 commentsPreparing for landscaping and moving inside
In order to have a “house on the hill” feeling, my friend suggested adding some extra height to the foundation so I could actually landscape and not end up with a completely flat yard. Smart cookie, that one! :D
I traced the foundation, stairs, chimney and cellar doors onto a 3/8″ plywood sheet, and he used a jigsaw to cut them out. He cut the component bases separate so I could have the ability to move them as needed.
The house and the related components will sit off the ground and I can make the lawn rolling and uneven.
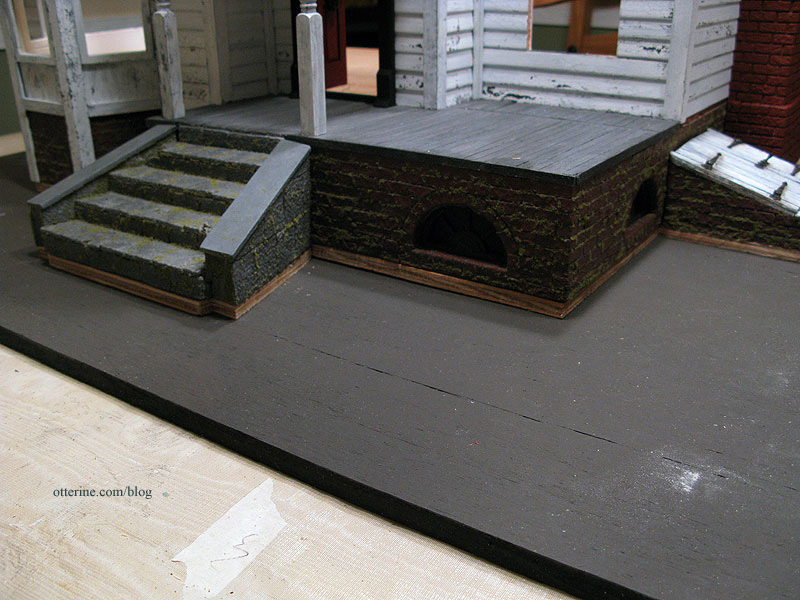
He suggested cutting the cellar and chimney pieces small so I could add holes in the ground around them if I wanted. Another great idea!
One thing I needed to take care of before adding this extra base was to create my main wire channels on the bottom of the main landscape board. Most of the wiring will run through the house and toward the chimney. Some of the first floor wiring will go directly through the floor and open foundation…and the cellar lights are already in the foundation. These cellar lights will be completely inaccessible once the house is built, so I used LEDs with insanely long lifespans.
I drilled three holes under the area where the chimney will stand, though I might need only one or two in the end. Easier to drill them now than to attempt adding more later.
Next came the wide channel for the wiring made using a Dremel. All the wiring will run out toward the back and I’ll add plugs to use with the power strip. I’ll be covering the bottom of the baseboard with felt to protect the wires and to keep the plywood from scratching its display table, but I won’t glue the felt in this corner so I can access the wires if ever needed.

I glued the extra house base to the larger lawn board and will paint the exposed edges once dry. I’m not going to glue the house to its new base right now since I am not quite sure how I’ll address the landscaping anyway. But, I can now move onto the interior, even with the base unattached.
Categories: The Haunted Heritage
November 2, 2011 | 0 commentsThe Money Pit
Here are the models after the shoot from Halloween. This photo reminds me a little of the movie The Money Pit. :D
Her: “What did we get ourselves into buying this house?”
Him: “It’s going to be great! All it needs is a little paint and it’ll be just like new.”
Her: <worried sigh>
Categories: The Haunted Heritage
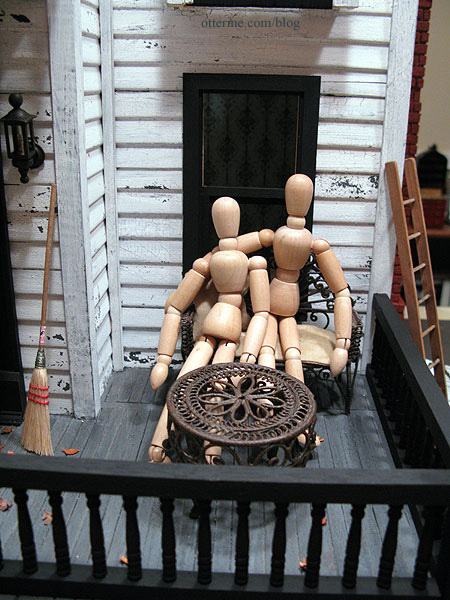
November 2, 2011 | 0 commentsA little Halloween humor
There was a challenge posted on Very Little Humor in which a scene had to be created with mini artist models. I had bought two of these earlier this year to help me with making furniture.
Here’s my mini scene. Since I’ve been working on the Heritage, I decided to set them up with the house while it was in dry fit. I leave the interpretation of the events up to your own imagination! :D
Categories: The Haunted Heritage
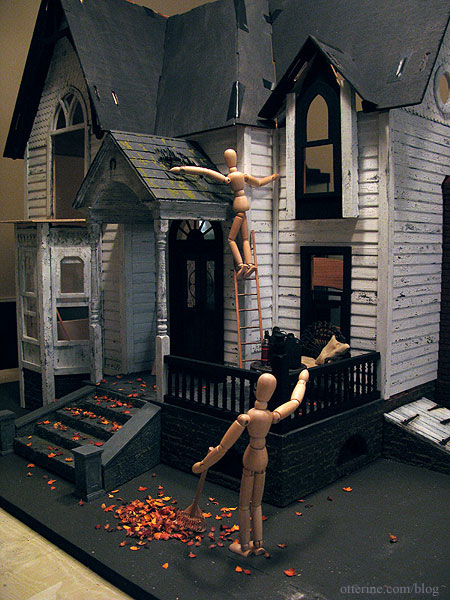
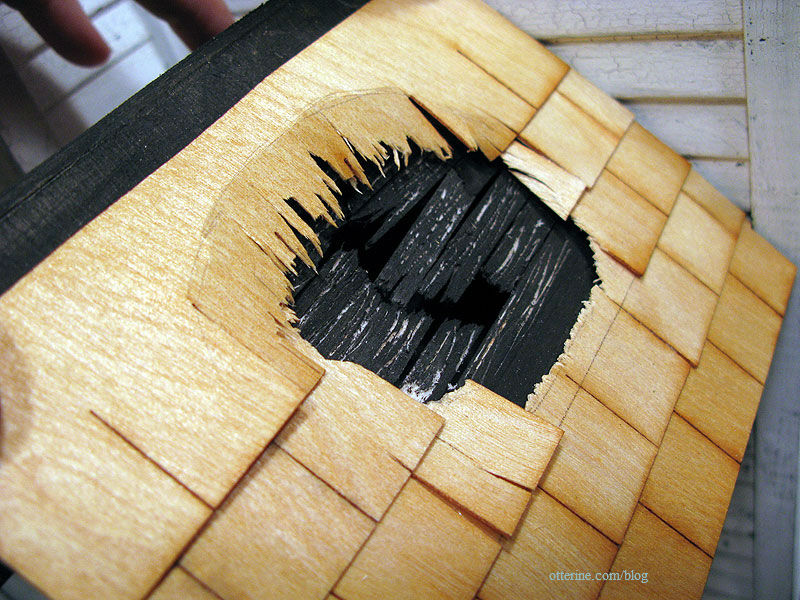
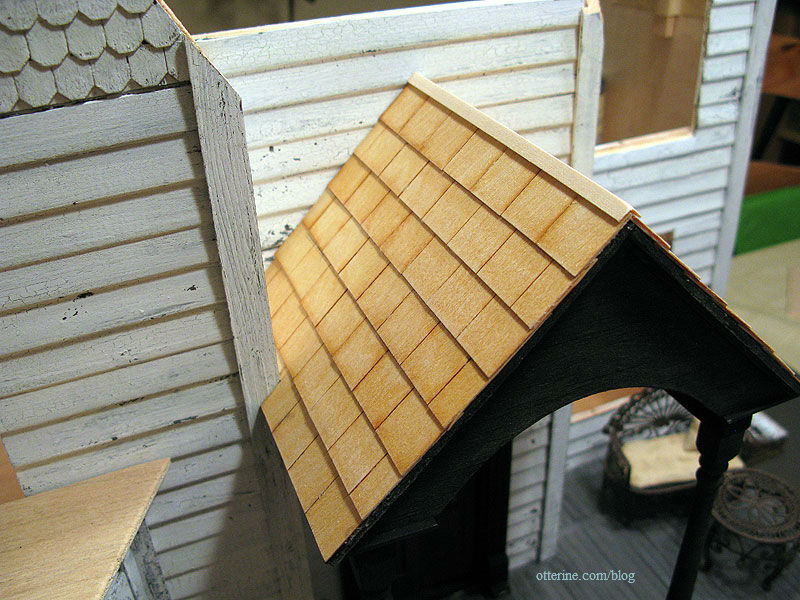
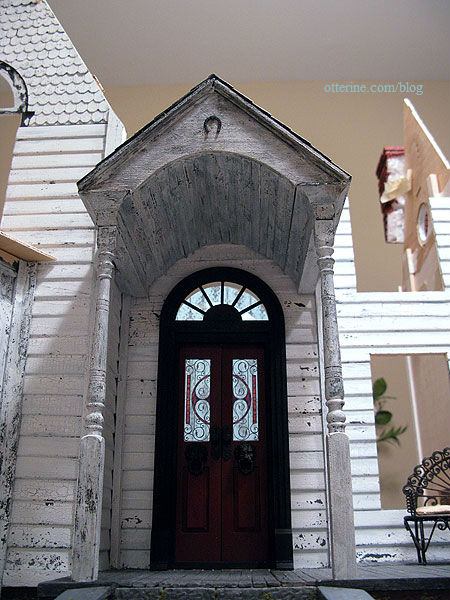
October 31, 2011 | 0 commentsHeritage – Portico, part 8
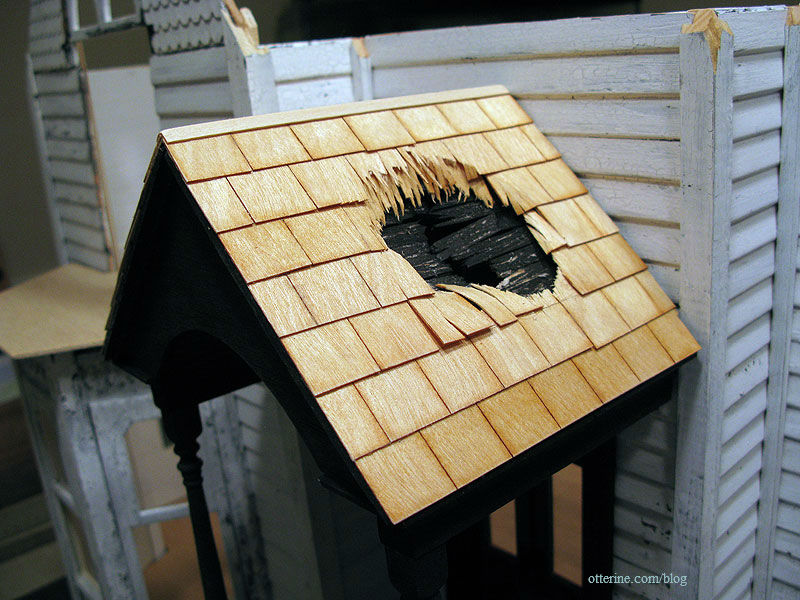
Completing work on the portico. I used Greenleaf speed shingles on the portico roof, this time in full scale. They are easily cut with scissors and bend with a bit of coaxing. I opted for Quick Grip glue since it worked so well on the half scale speed shingles on the gables.
To hold some of the shape, I stuck dressmaker’s pins through the shingles and into the soft balsa. I’ll make sure to hide any of these extra supports with the shingles in the row above them.
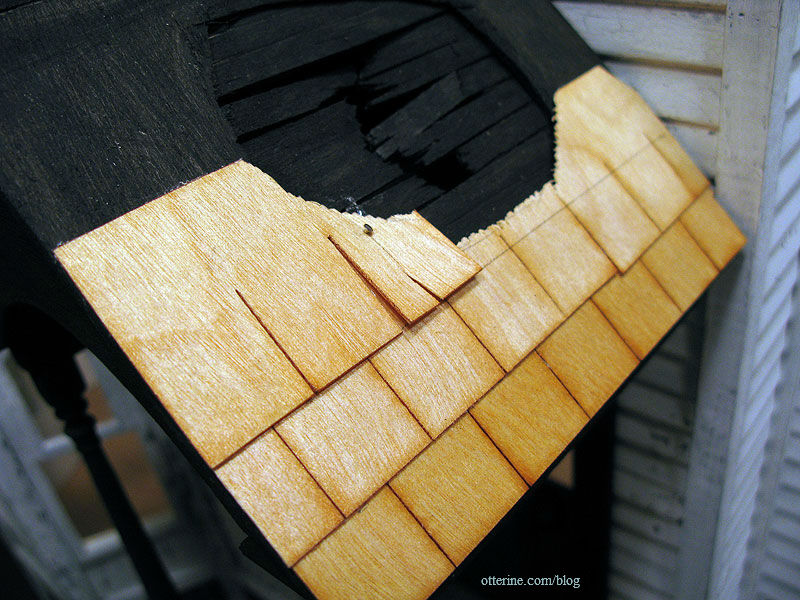
Around the hole, I shredded the edges with scissors and then broke excess pieces off with my fingers. I glued a few loose pieces around the bottom of the hole.
The house side is rather plain at the moment. The ridge cap is corner trim.
That must have been a rather large tree branch!
I painted the shingles black to start, stippled on with a stencil brush for just a bit of texture.
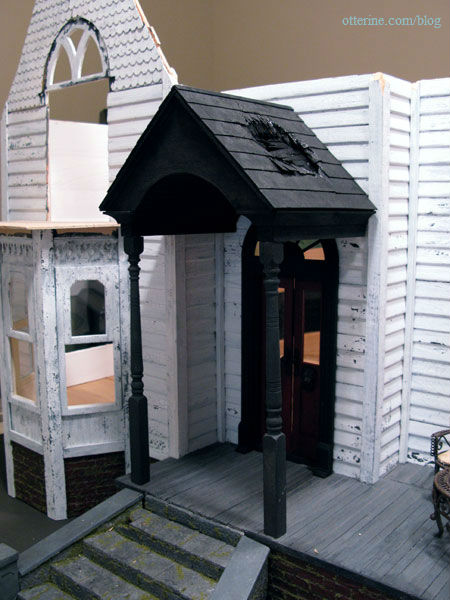
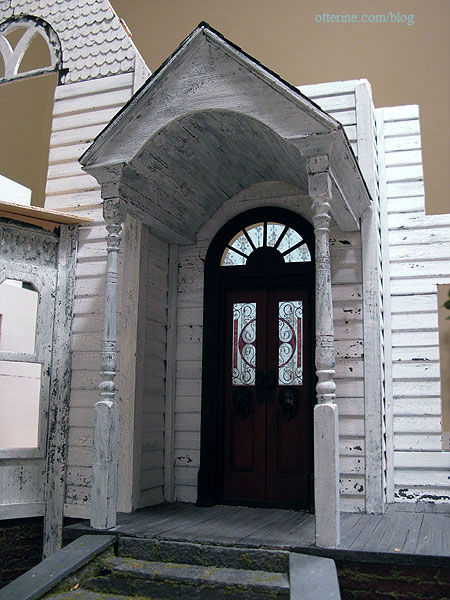
After this dried, I added the crackle medium to the main portico structure followed by white paint. It brightened up the entryway and put the focus back on the front door.
I aged the portico roof with various washes and then added some moss.
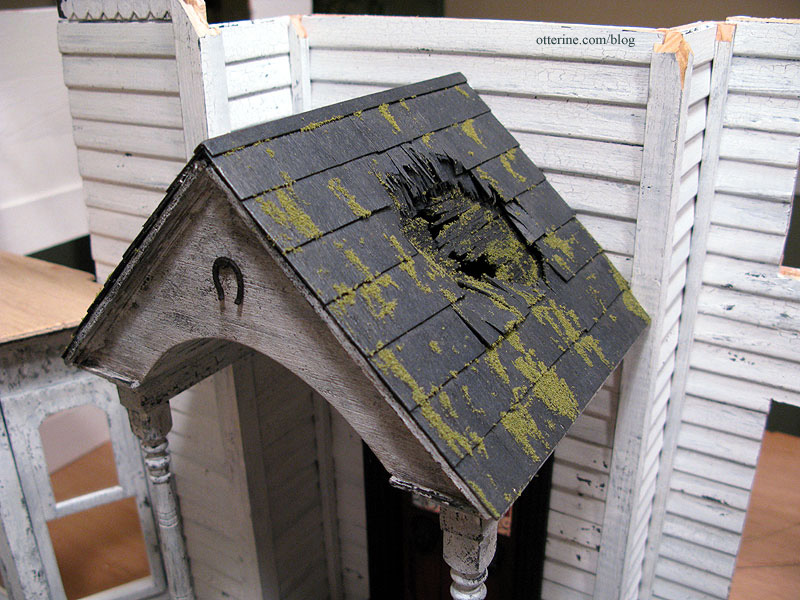
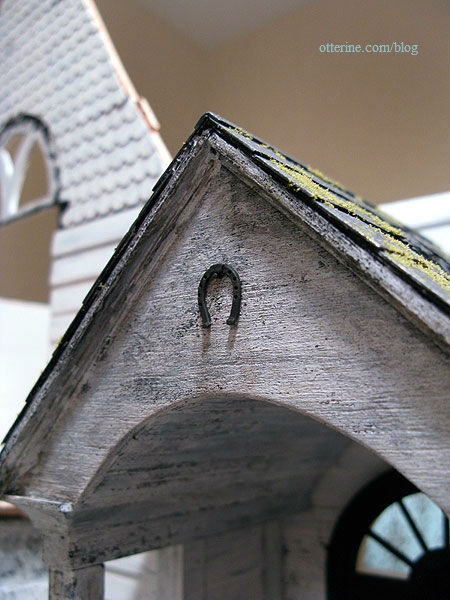
In a nod to my childhood farmhouse, I hung an aged horseshoe on a nail on the portico facade. Do you think it will bring you good luck? ;]
Just to clarify since a couple of people mentioned the upside down horseshoe was letting all the luck run out, I believe the horseshoe has an unlimited supply of good luck and it is hung upside down to shower you with this good luck as you pass under it. Chalk it up to my generally optimistic outlook. :D
Once the entire portico assembly was dry, it was finally time to attach it to the house.
The portico tips forward, suggesting whatever caused the damage might eventually lead to its falling off the house completely.
Raccoon peeking out or not, I love the way the portico turned out.
Categories: The Haunted Heritage
October 30, 2011 | 0 commentsHaunted Heritage chimney, part 5
Continuing work on the chimney. I finished bricking the flat surfaces of the middle section and then had to address the row of angled bricks. The easiest way I figured I could manage the illusion of three-dimensional bricks stacked on an angle was with strip wood covered with egg carton on the exposed edge.
I used 1/4″ strip wood cut into pieces roughly 5/16″ tall. I glued these individual blocks into place with the corner pointing outward. I set them in just a bit to leave room for the egg carton and to offset them from the face of the brick, just in case I didn’t get them lined up perfectly, it wouldn’t show as much.
I was able to get the sides lined up evenly front to back, but there are gaps in the front and one in the back. I plan to either cut the faces long for these or put in straight half-bricks, whichever looks best.
left side, even front to back 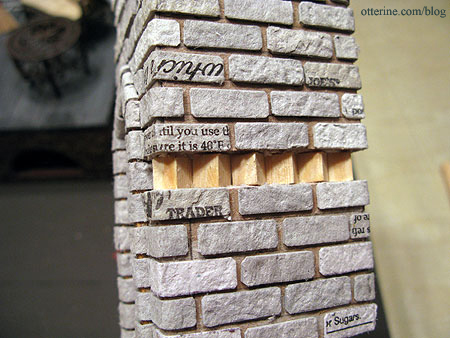
right side, even front to back 
front, two gaps on either side of the herringbone portion 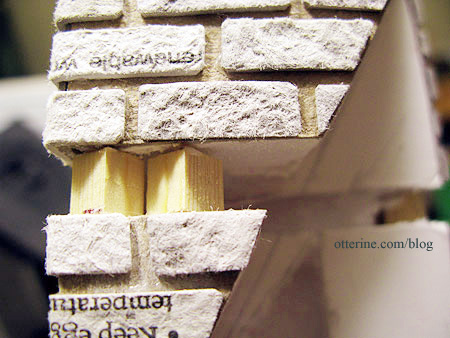
back, gap toward the roof Once the glue holding these dries completely, I’ll add the egg carton faces. Right now, I think this just might work. :D
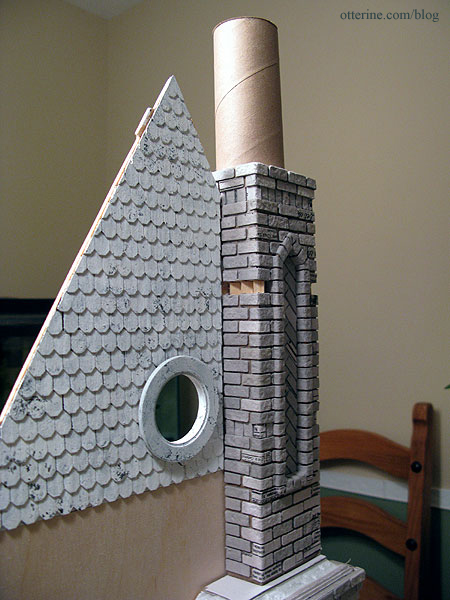
Yep, that’s a toilet paper tube on top. It might be just a little short, so I’ll likely end up using a paper towel tube cut down to the proper size.
To finish the angled portion between the lower and middle portions of the chimney, I first added a row of vertical bricks all around. For this entire portion, I used a lot of glue to make sure the assembly remained secure. I finished the very top with flat bricks. The gap between the two sections seems a bit large now but once paint and grout are added this will be much less obvious.
I added the egg carton material to the angled wood supports.
I painted the chimney Liquitex Burnt Sienna, even though I still have the topper to complete. Ok, the creep factor on this house just went through the roof! :O
With the paint added, the dimensional bricks look a lot more realistic. I’m glad I took the time to figure out how to make them work.
It’s starting to come together! :D
Categories: The Haunted Heritage
October 29, 2011 | 0 comments


NOTE: All content on otterine.com is copyrighted and may not be reproduced in part or in whole. It takes a lot of time and effort to write and photograph for my blog. Please ask permission before reproducing any of my content. (More on copyright)

Categories:
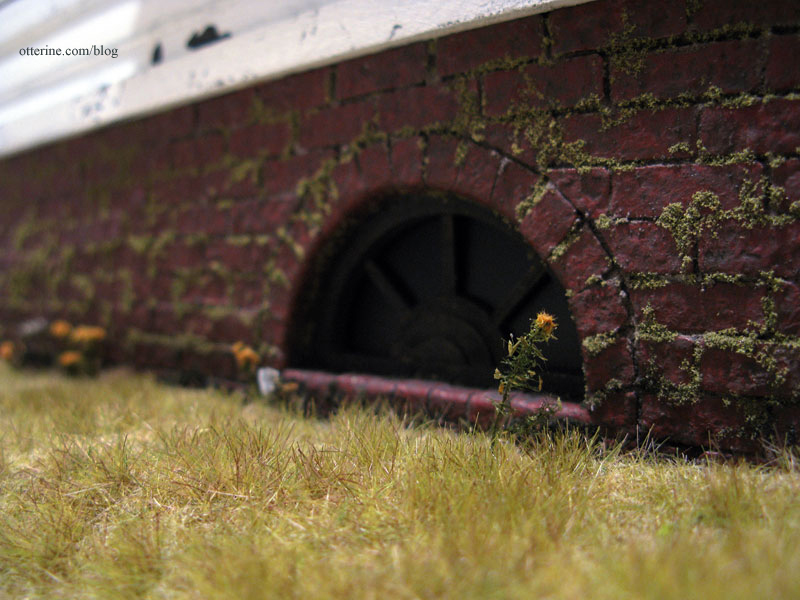
Heritage – grandma’s neglected lawn, part 5
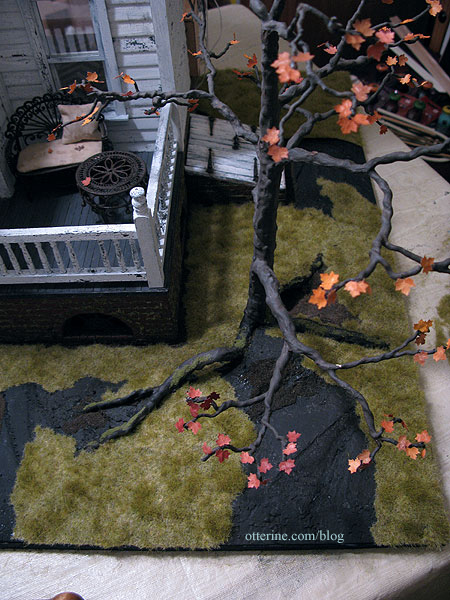
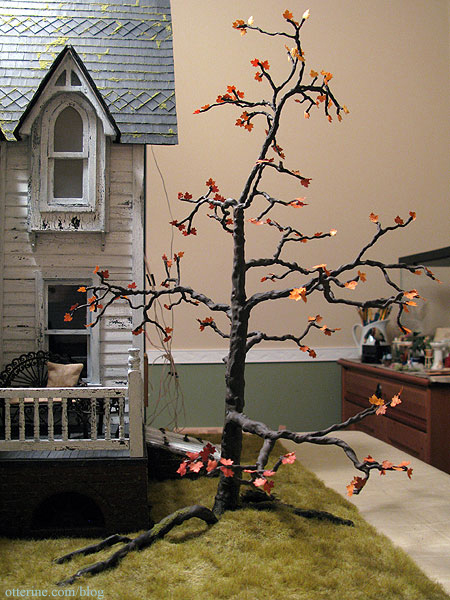
Continuing work on the lawn. Around The Tree, there was a whole lot of winging it. I first glued in a few larger pieces of the Savannah TuftGrass by Heki, including leftovers from the left side of the lawn, and then just patched and patched and patched. Here is a work in progress shot. I applied the grass in the same manner as I had done for the left side.
I have a large piece set aside for the back corner where the chimney will be. That will remain unglued until much later.
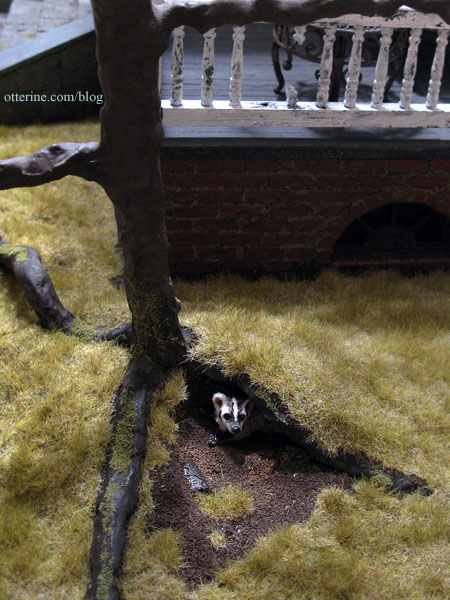
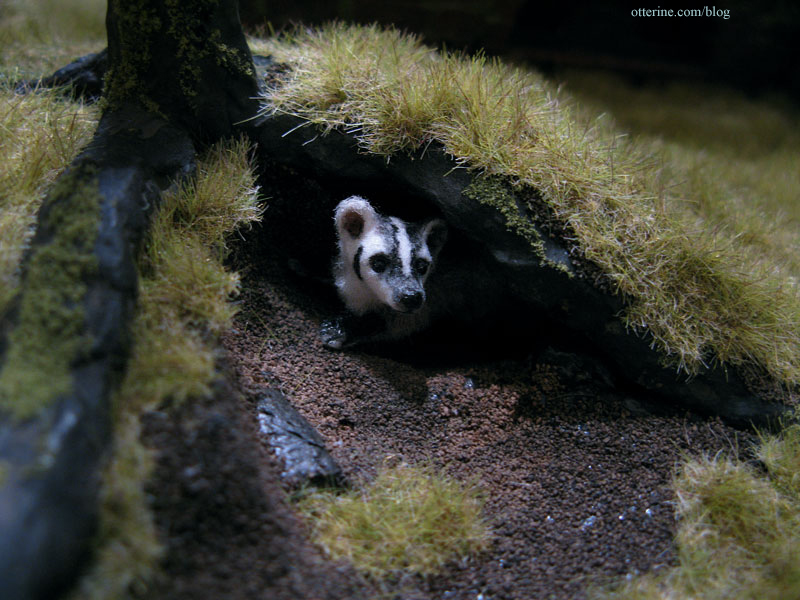
I love the way the burrow looks with the grass in place. Before it was somewhat obscured by the dark base all around it, but now it stands out amongst the green. :D
The roots also stand out more now.
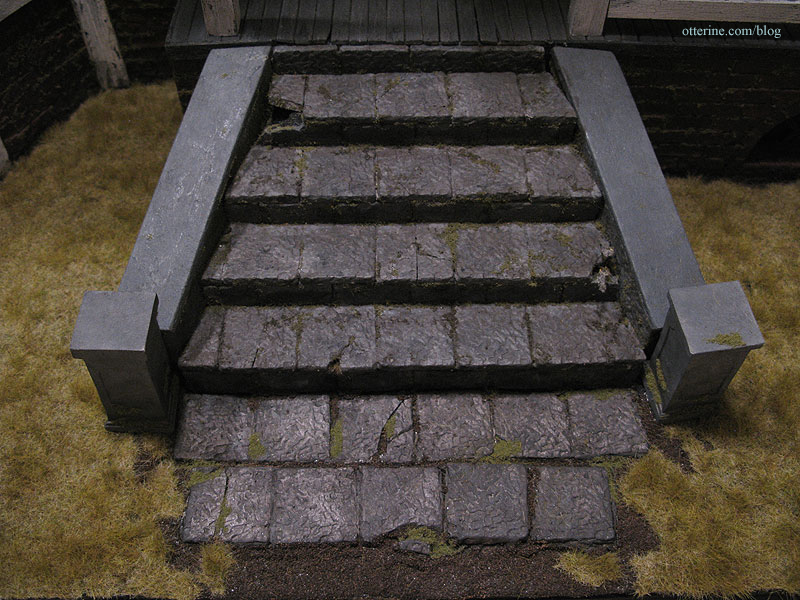
Since the stone steps are mossy, I added moss to the walkway pavers and the pedestals. :] The stone step assembly and pedestals will remain removable even after completion of the build.
While I was at it, I gave the tree trunk and roots a little moss covering here and there. I might add more to fine-tune the landscape but wanted to get at least the base coat on. I think I need mushrooms, too. I’ll have to work on that. (Here they are!)
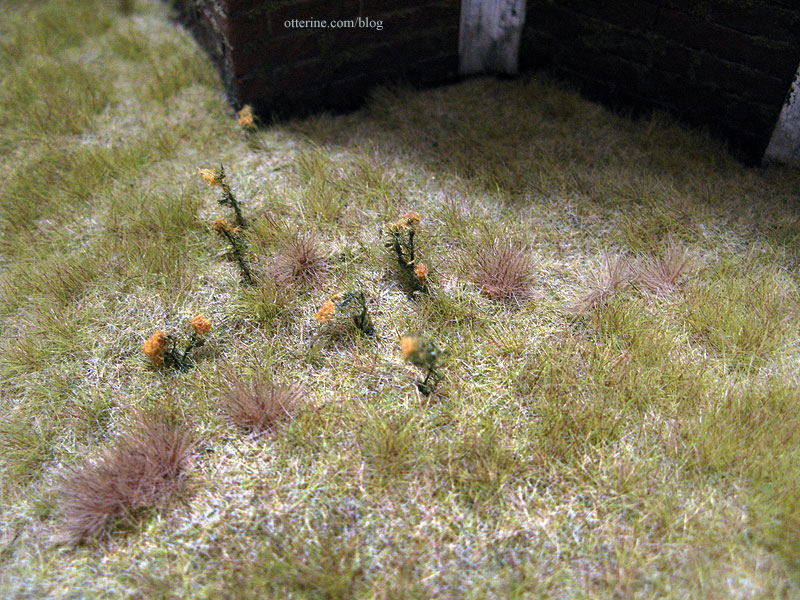
I have yet to add the rest of the goldenrod flowers since I was battling a headache today. But, I love it so far.
Pretty Ophelia. :D
Categories: The Haunted Heritage
October 21, 2012 | 0 commentsHeritage – grandma’s neglected lawn, part 4
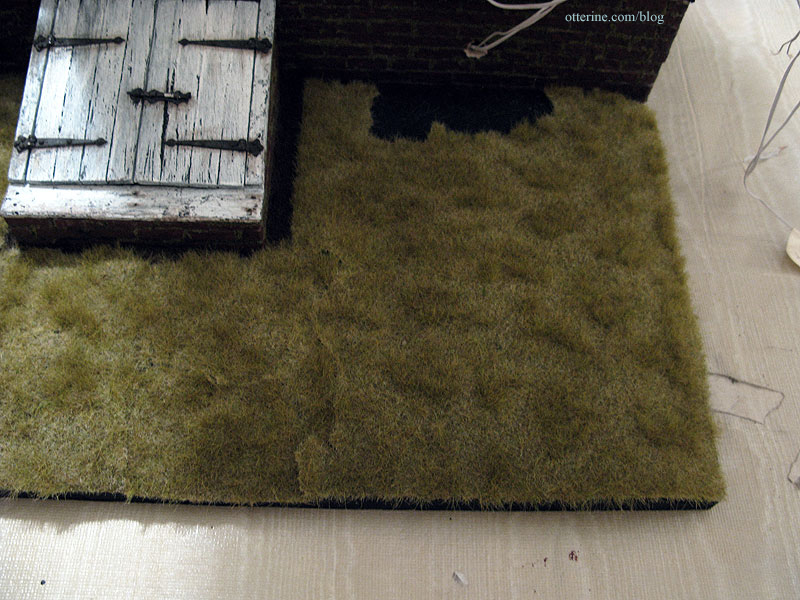
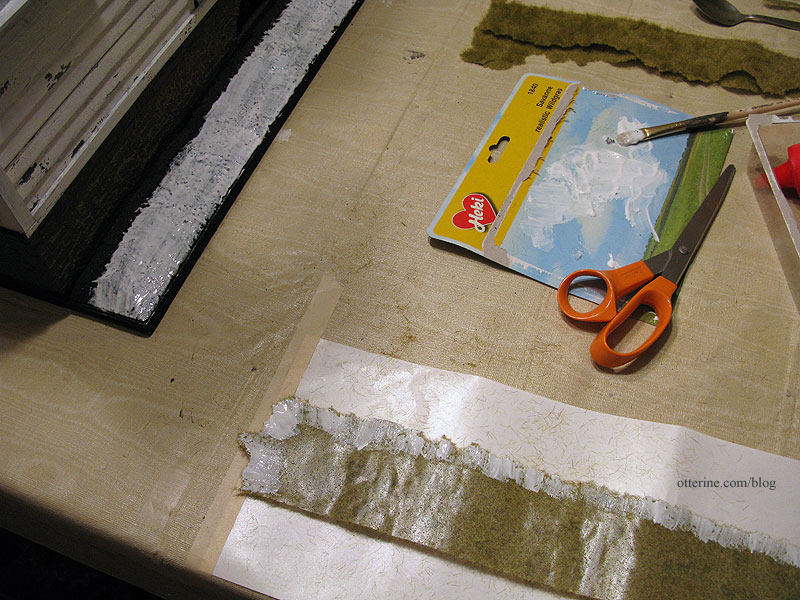
Continuing work on the lawn. The grass mat I will be using is Savannah TuftGrass by Heki from Scenery Express. It has low and high grasses in variegated coloration to simulate a late autumn lawn. It’s pricey, but the look is spot on in scale for a poorly kept lawn with some overgrown and dying spots in the grass. The sheets are only 6″ wide, though they are 17″ long, so there are places on the landscaping board that will need to be pieced. I bought four sheets, which should be plenty.
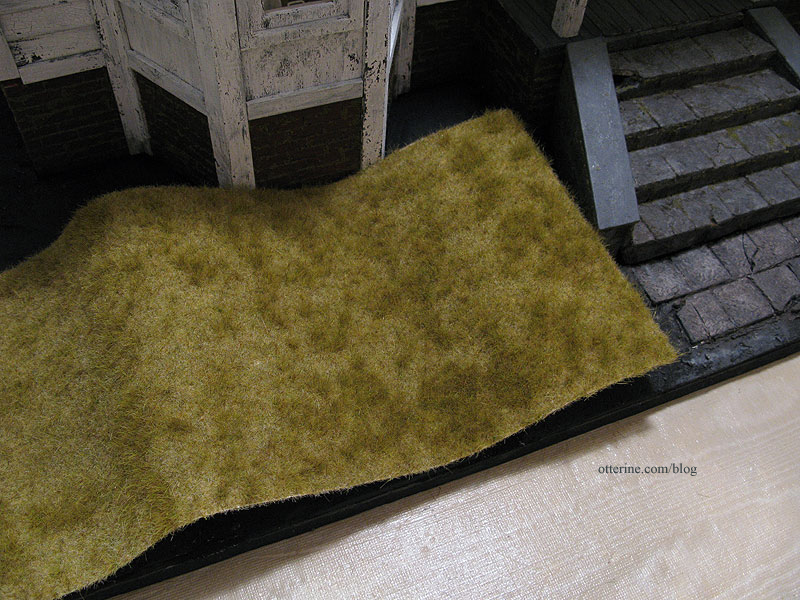
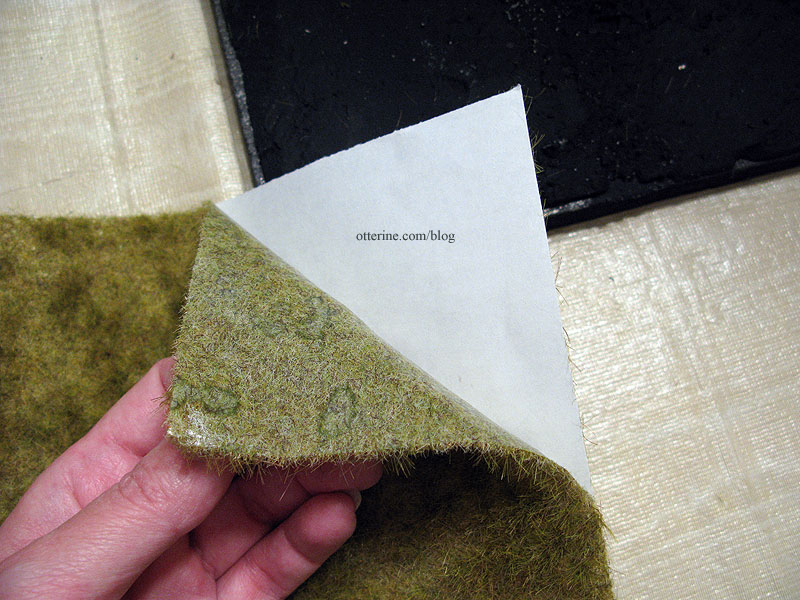
The backing of the grass is a clear, rubbery substance though not sticky. This makes it more flexible than the grass mat I had used for The Aero Squadron Lounge, which will be good for the uneven landscape I need to cover.
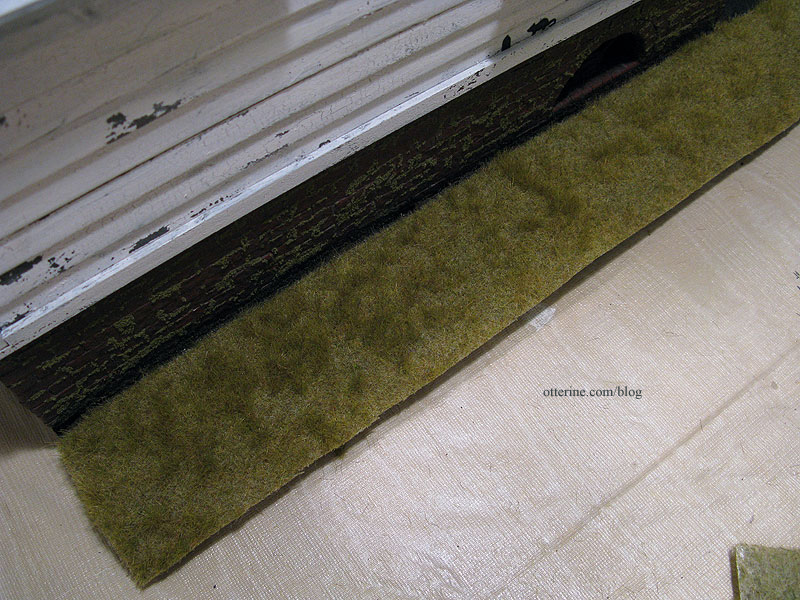
I cut the side piece to fit.
To make the divide between the grass and the dirt look less planned, I tore the grass mat backing along the house edge, removing only the tiniest bit of material.
I spread glue on the base board and on the edges of the grass mat.
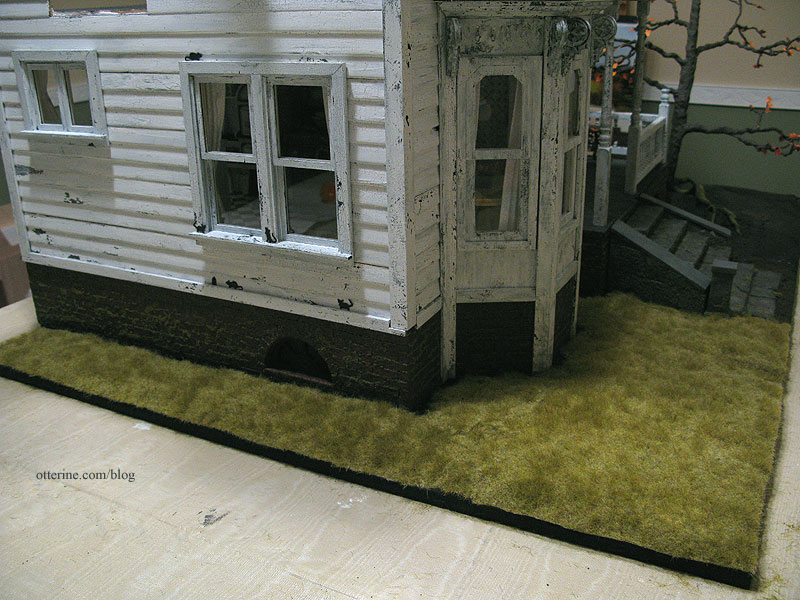
I pressed it into place and then moved on to the front pieces. Here the side and side front are shown mostly filled in. The camera tends to flatten things, so you can’t really see just how well the grass conforms to the uneven ground underneath. There will eventually be finishing trim along the edges of the baseboard (I now do this finishing step from the beginning to make things easier).
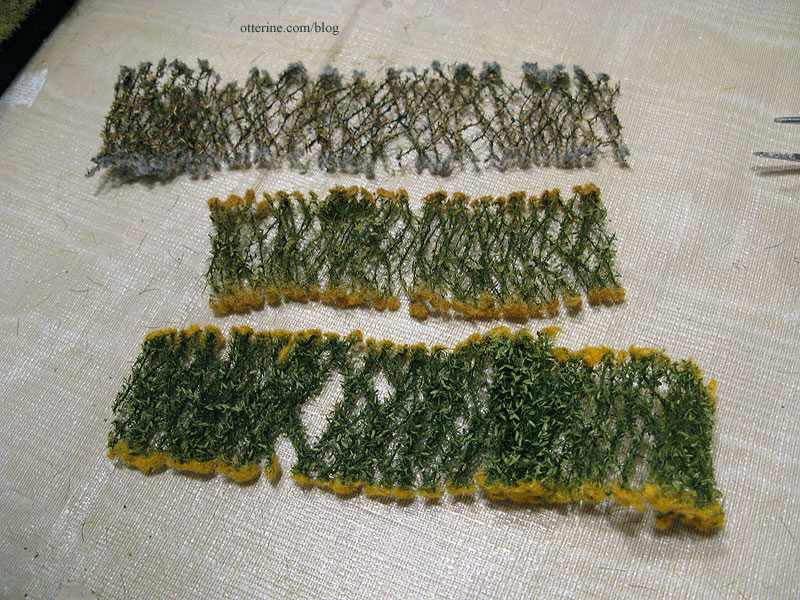
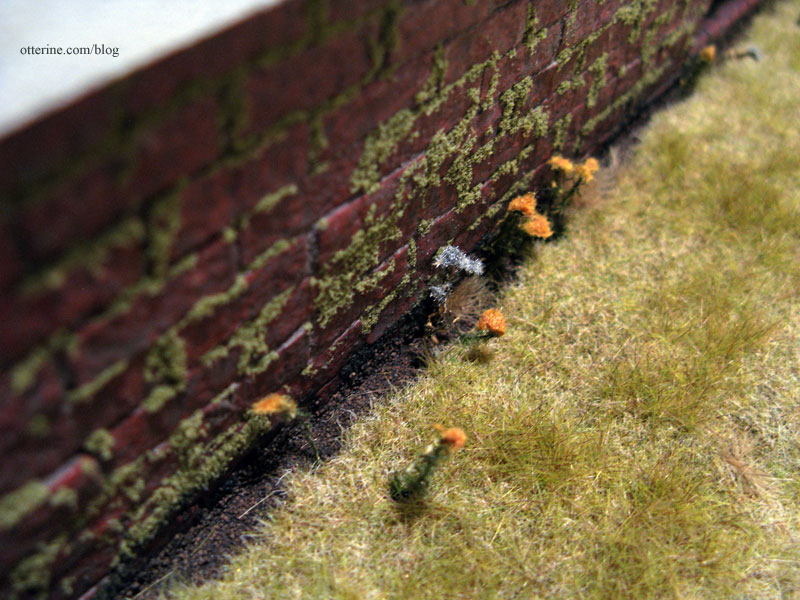
For a bit of non-grass vegetation, I have the Goldenrod Weeds “Silflorettes” by MiniNatur. These come all webbed together, and you cut the stalks off the web to apply individually. I have summer, late summer, and autumn colors but I might not use the summer ones for this particular project. The others have softer, muted tones.
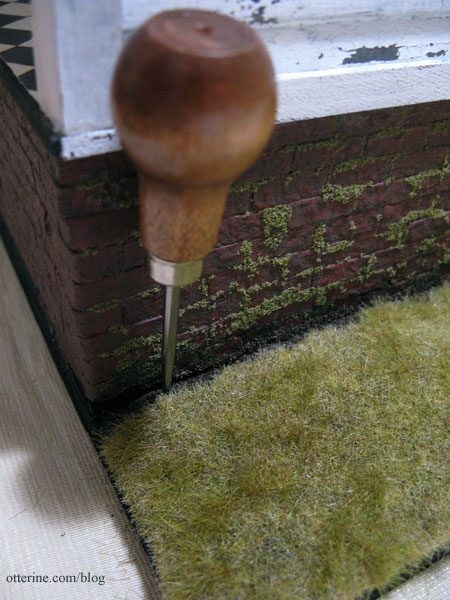
These are obviously not in-scale goldenrod stalks for 1:12 scale, but they do look like little flowering plants. I used an awl to make holes in the ground to plant them. I left the awl in place while I prepped the individual flowers for planting, otherwise I’d lose track of the hole.
I’ll be adding more, but I already love the way they look.
Here you can see the ballast dirt dried to a nice dark color. :]
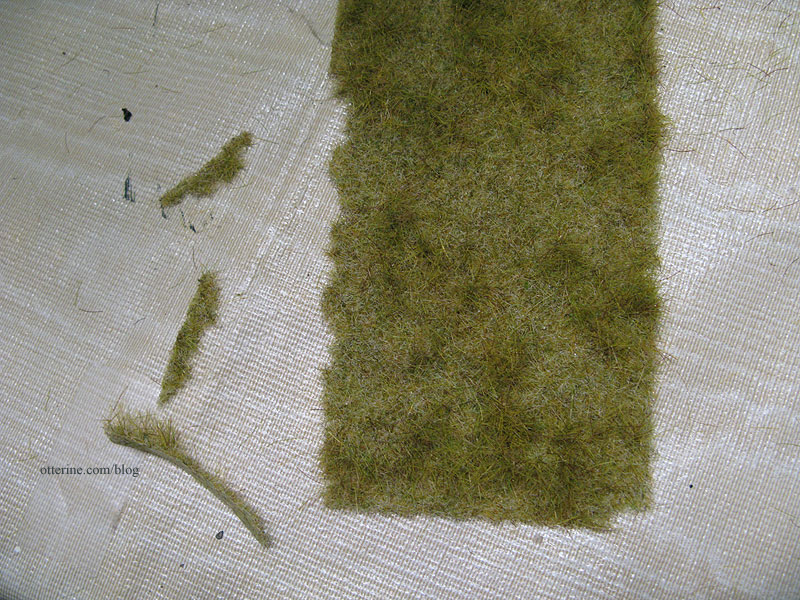
I had to piece the grass mat together in many places, so I saved every corner and edge removed from the larger sheets. I used these scraps to fill in areas where the grass sheets met the house and each other. If you look to the left, you can see it wasn’t always seamless.
If you have something that sticks out and could be mistaken for sloppy work instead of a planned aesthetic, often the best solution is to draw more attention to it. I used the goldenrod flowers as well as Extra Long Autumn Tufts “Silflorettes” by MiniNatur — little clumps of grass material that you apply individually to fill in here and there — to address a few of the problem areas. The autumn tones coordinate perfectly with the grass mat while looking like a different sort of weed grass.
Your eye is now drawn to these plants and not to the bare patches and inconsistent seams between the grass sheets. :D
I have the other side to tackle next and more planned for finishing this side as well, but wow, does a little greenery ever change the look of the house! :D
Categories: The Haunted Heritage
October 21, 2012 | 0 commentsHeritage – grandma’s neglected lawn, part 3
Continuing work on the lawn. Now that The Tree is planted, Grahame’s burrow is in place and the stone walkway is in, I can start landscaping.
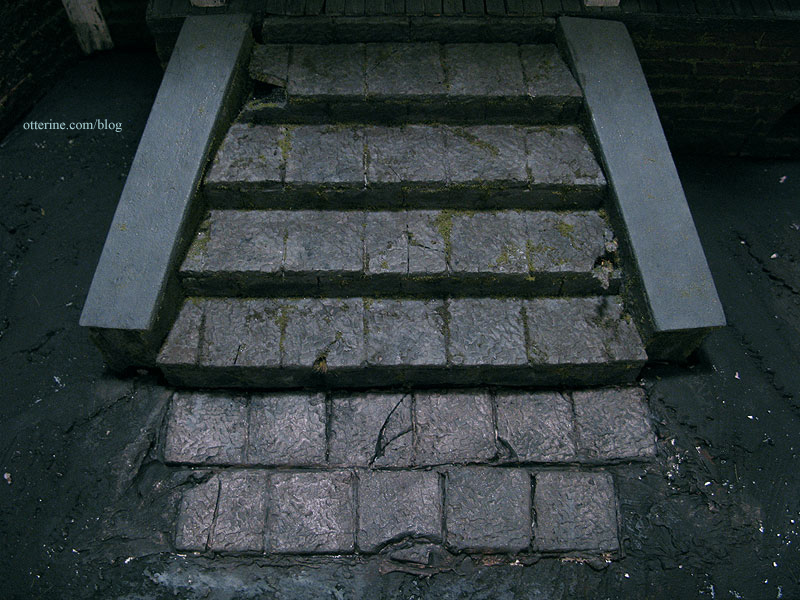
The pavers attached with a mix of spackling and glue held tight! Hooray! In fact, if I had to remove them, I think they might take the foam base with them. :D
I added paint washes to stain the grout and to darken the stones, which also brought out the cracks. Moss will be added later to the walkway pavers so the coloration looks a little off on them at the moment.
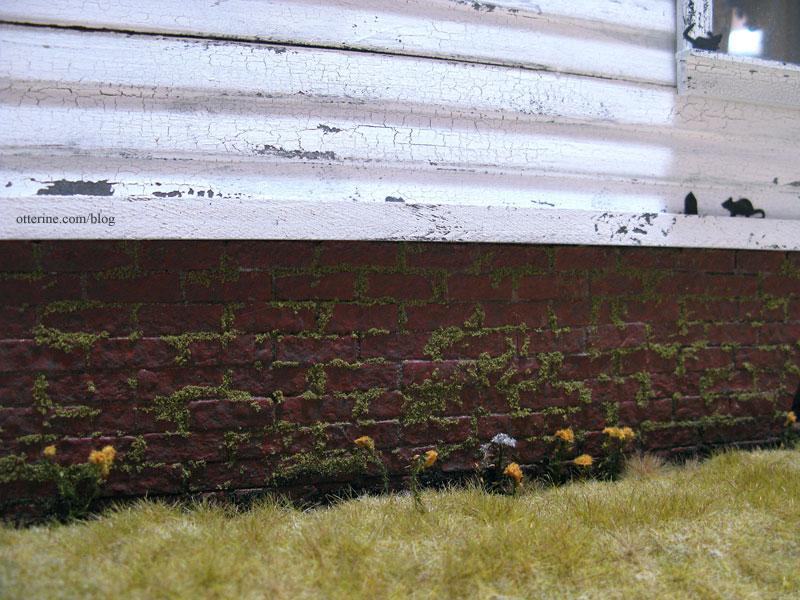
I then dirtied up the lower portion of the brick foundation, the pillars and stairs with a brown and black paint wash.
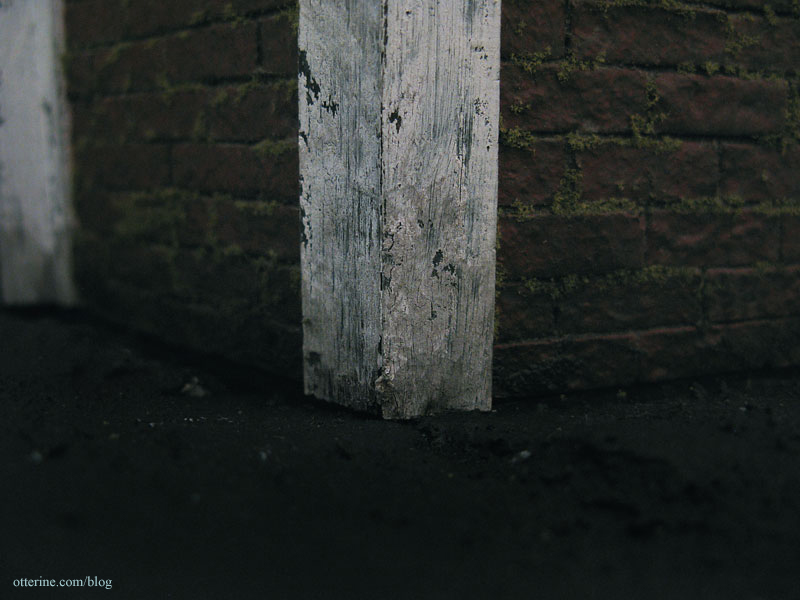
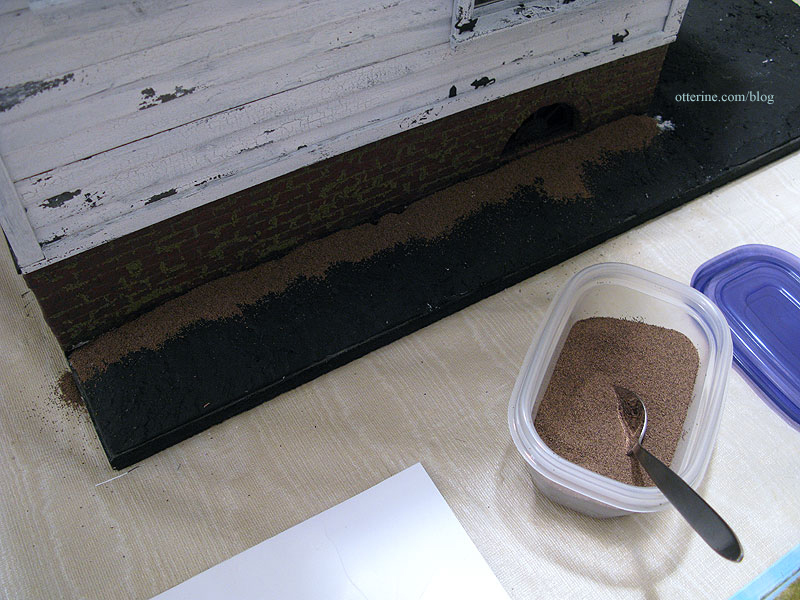
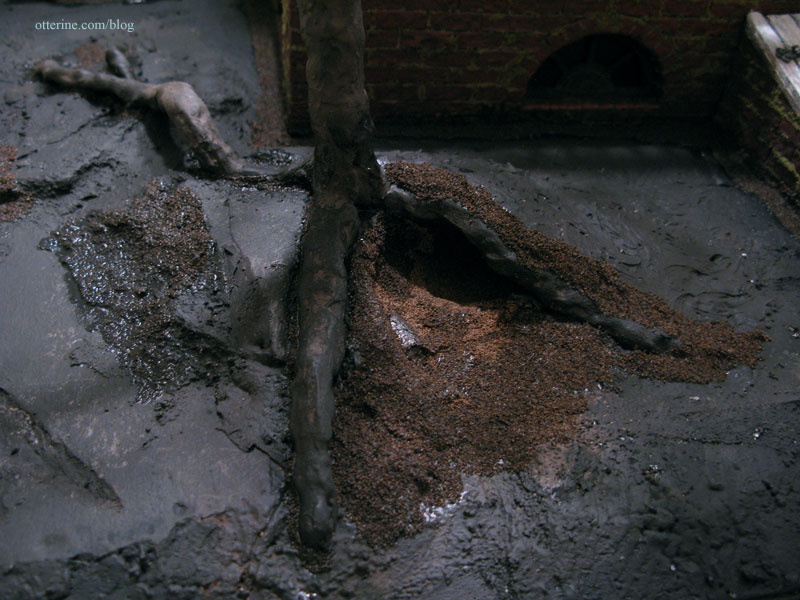
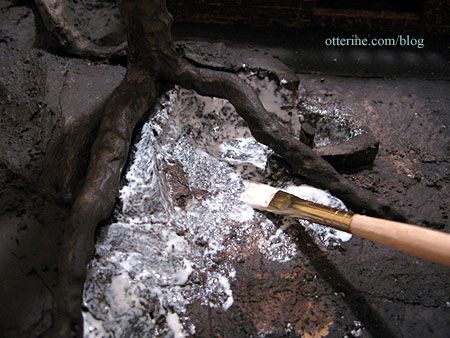
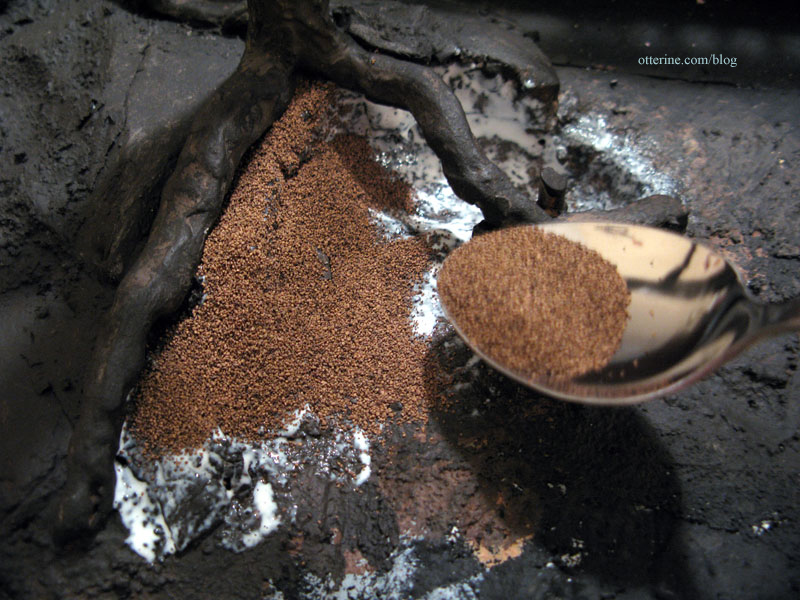
Instead of having the grass go all the way to the house, I decided to have dirt showing along the foundation. After spreading a layer of glue with a brush, I added the Ballast Fine Dark Brown by Woodland Scenics. I worked in small sections so the glue wouldn’t dry out before the ballast could be added. (Note from 2024: I would now use Scenic Cement for projects such as these but didn’t know about it in 2012.)
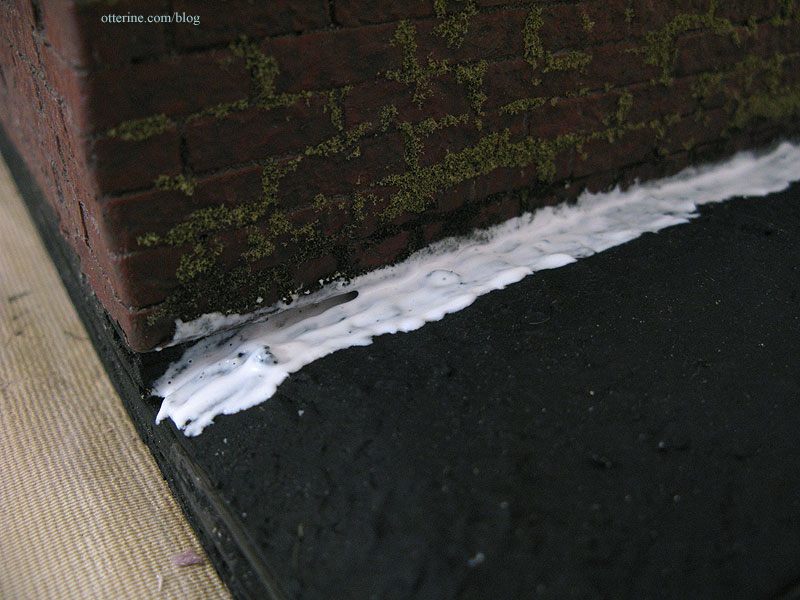
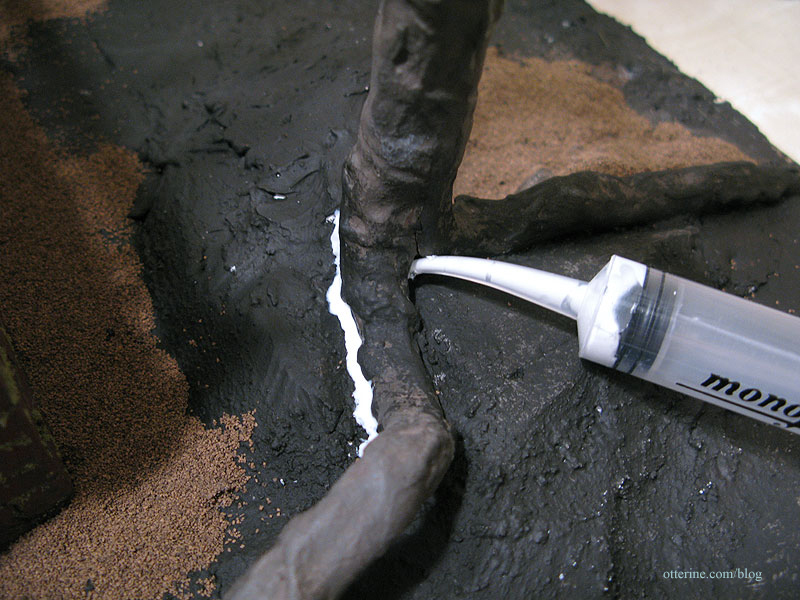
I used a glue syringe to fill part of the lines between the stone pavers.

I used the syringe to fill the areas around the roots.
I glued the cellar doors onto the base board but didn’t add the ballast dirt on the main wall behind them. I’ll have to complete this portion of the landscaping after the chimney is installed, which can’t be done until all of the wiring in the house is complete.

I let it set for quite awhile before brushing the excess back into the container, then vacuuming the remainder. I have a good amount of ballast dirt around The Tree and the house, but I can always add more when I get to the grass portion of the lawn.
I added a dark wash of brown and black to the dirt, though this may lighten in color as it dries.

I think the front walkway looks fabulous so far. :D
I left Grahame’s burrow the original lighter color inside so it would remain visible. Besides, that dirt has been dug out and is fresher. :]
I’ll need to let this dry completely before moving on to the lawn.
Categories: The Haunted Heritage
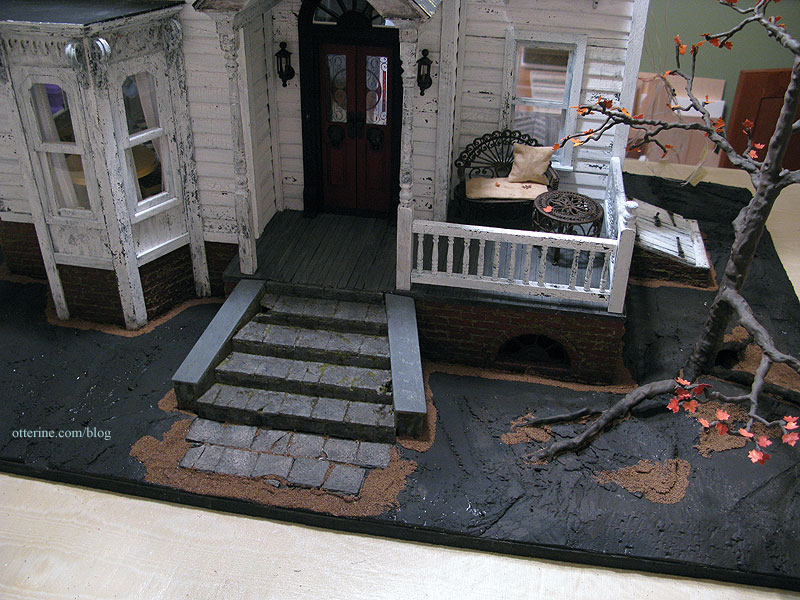
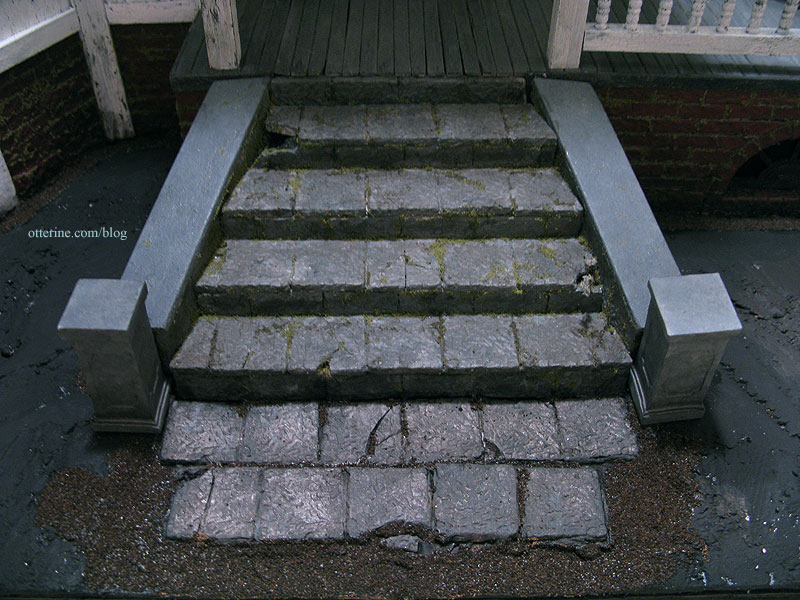
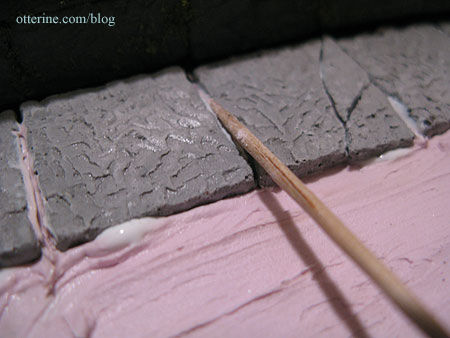
October 20, 2012 | 0 commentsHeritage – stone walkway
To plan for the walkway at the bottom of the stone steps, I placed loose pavers in a rough layout to see what would look best.
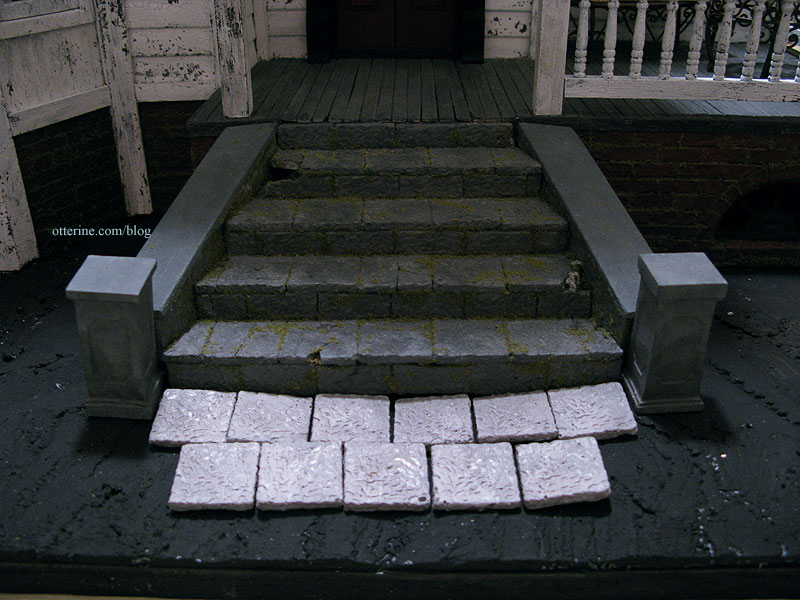
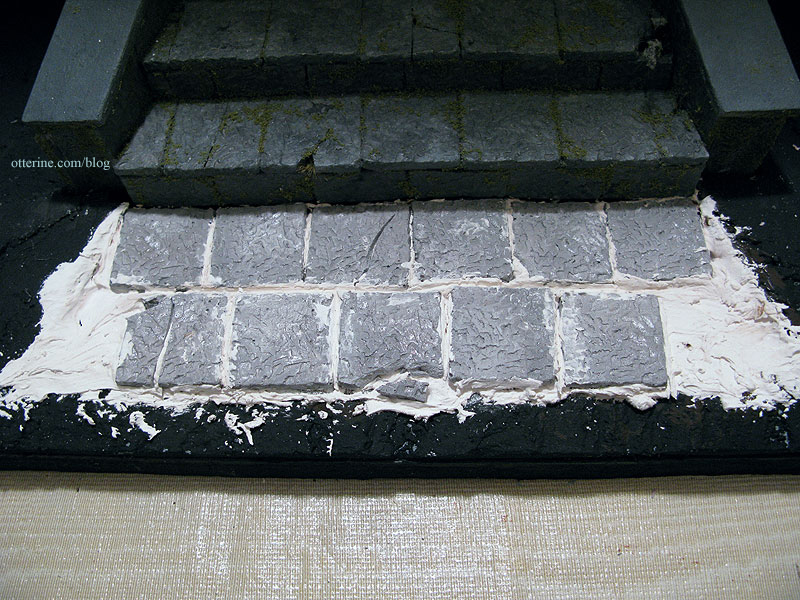
When I cut the foam base for the walkway, it ended up being a little more breakneck than I wanted. :D I used a knife to even out the ground and replaced the stones. Much better.
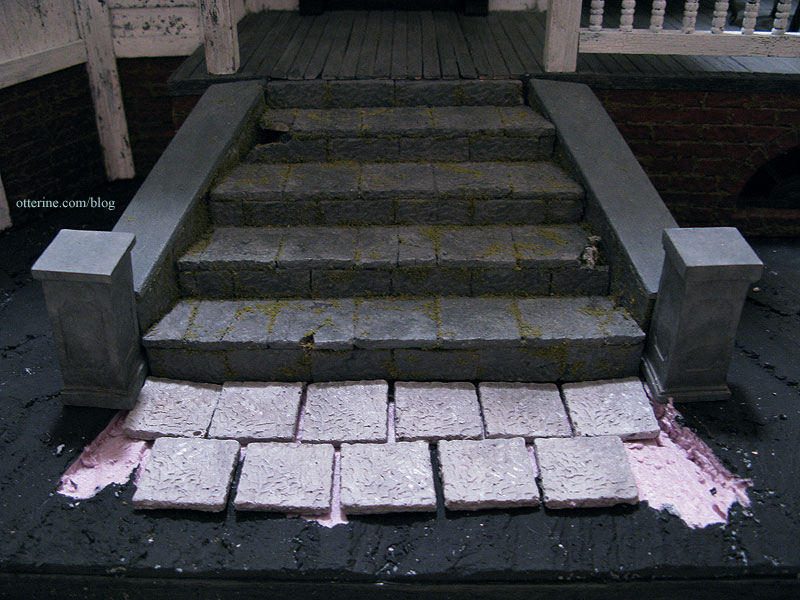
I primed the newly cut area and the wood base for the stairs.
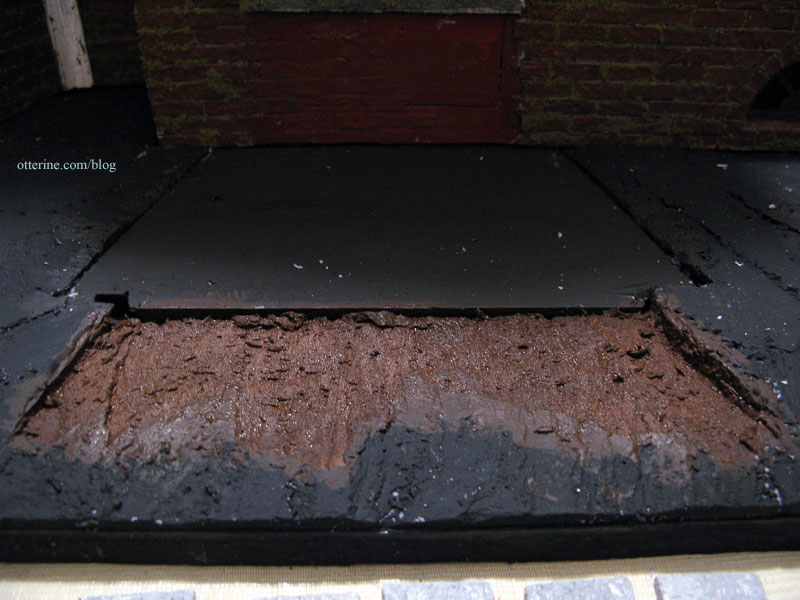
I added some spackling compound to further even out the ground. To save time in grouting, I decided to add the pavers while the spackling was still wet. I added glue to the bottom of each stone and then pressed it into the spackling.
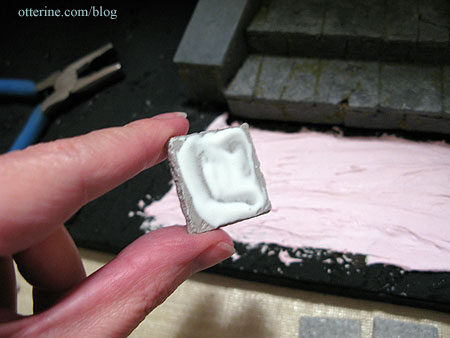
I consulted with Lyssa earlier today, and she agreed my spackle-plus-glue technique should work. We’ll see if we’re both full of beans! :O Of course, if they do pop out, I can just glue them back in place.
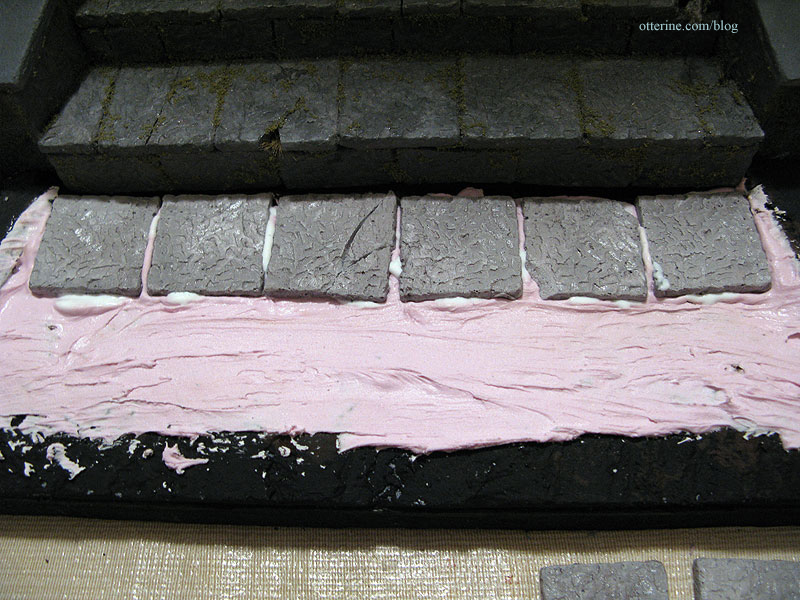
I used a toothpick to smooth the excess spackling and glue into the grooves between the pavers.
Grahame has come to inspect.
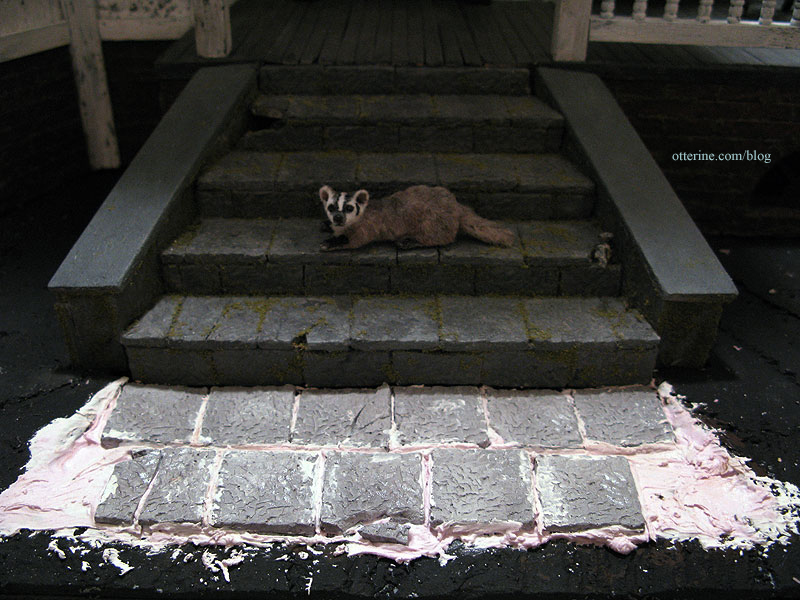
As you can see, I broke a few pavers to match the steps.

Categories: The Haunted Heritage
October 19, 2012 | 0 commentsHeritage – Planting The Tree, part 4
Continuing planting The Tree. I apologize for the few blurry pictures. :\ I was trying to work quickly and still take photos.
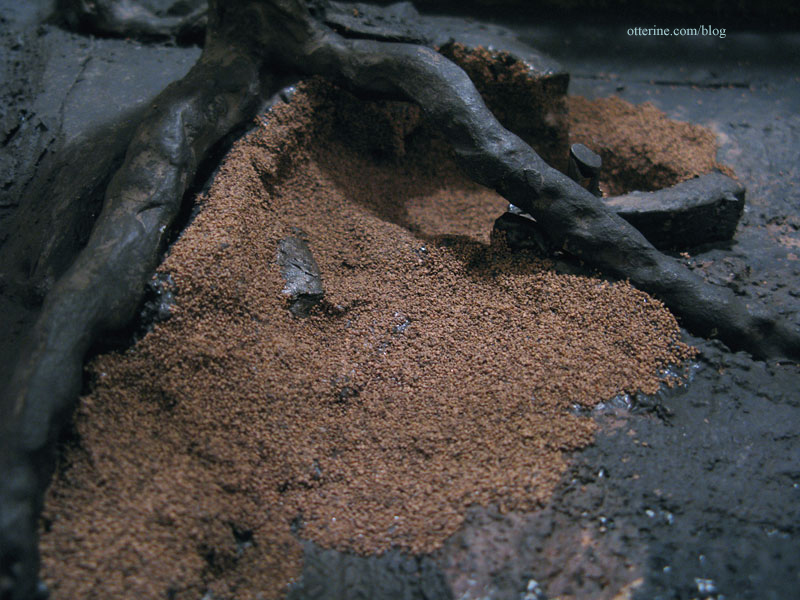
I used Ballast Fine Dark Brown by Woodland Scenics for the earth portion of the landscaping. I’ll add more later in other areas, but I mainly needed to finish the interior of the burrow. I probably should have used a finer material for good scale approximation, but it was important that the landscaping materials not be “dirty” or have the ability to rub off easily for the simple fact that I would be placing Grahame inside the burrow and didn’t want anything to stain or mar his fur. I was afraid anything with a powdery texture would do just that. During the painting and finishing portion, I had him far away from the mess.
I started with Aleene’s Quick Dry glue put on with a brush.
Using a spoon, I added the ballast to the glue.
And, it didn’t work at all! Hahahahaha. Quick Draw McGraw glue is right! Hardly any ballast stuck and I was left with shiny dirt. Well, I guess I now know how to create slippery waterfront rock.
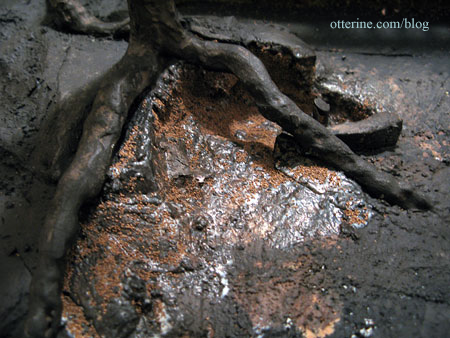
I applied Weldbond this time, and in smaller sections, and spooned more ballast over the areas. After letting it set while I had a snack, I brushed away the excess and vacuumed what the brush couldn’t remove. Success!!! I had left one ledge of foam bare, because I thought it looked like a rock. (Note from 2024: I would now use Scenic Cement for projects such as these but didn’t know about it in 2012.)
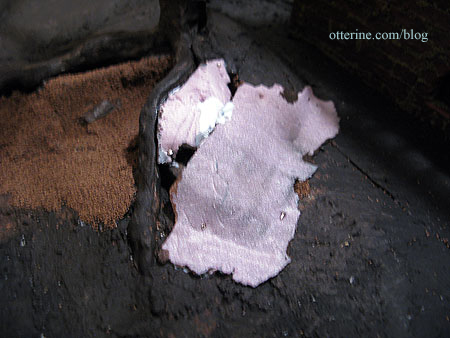
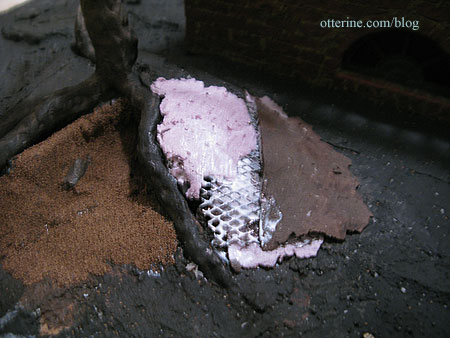
Prior to gluing them in place, I had painted the mesh and some foam pieces to be used to complete the upper portion of the burrow. I don’t think the interior of the burrow will be readily seen, but this will keep any silver metal or purple foam from showing on the off chance you can see inside once it’s complete. I painted more foam than I needed since I wasn’t sure of the configuration I would need.
I glued the piece of foam that contoured to the tree root first and then added a very thin piece of foam to enclose the back. The painted sides are facing down over the burrow.
I adjusted the shape of the mesh and glued it in place, again painted side down. I used straight pins throughout this whole process.
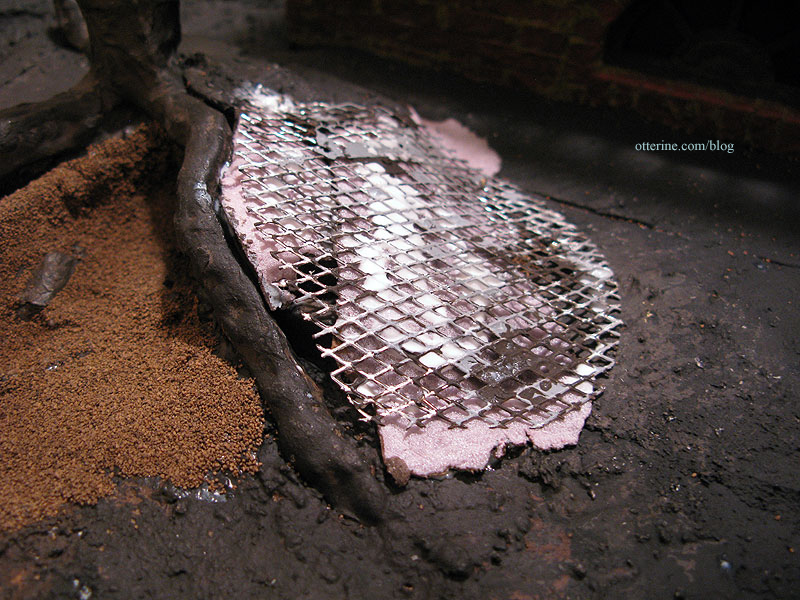
I glued the remaining foam on top of the mesh then stuck my finger into the burrow to make sure there was nothing sharp or intrusive sticking out. :]
There was no more stucco left, so I spread spackling compound to even out the edges and gaps for this final portion of the landscaping.
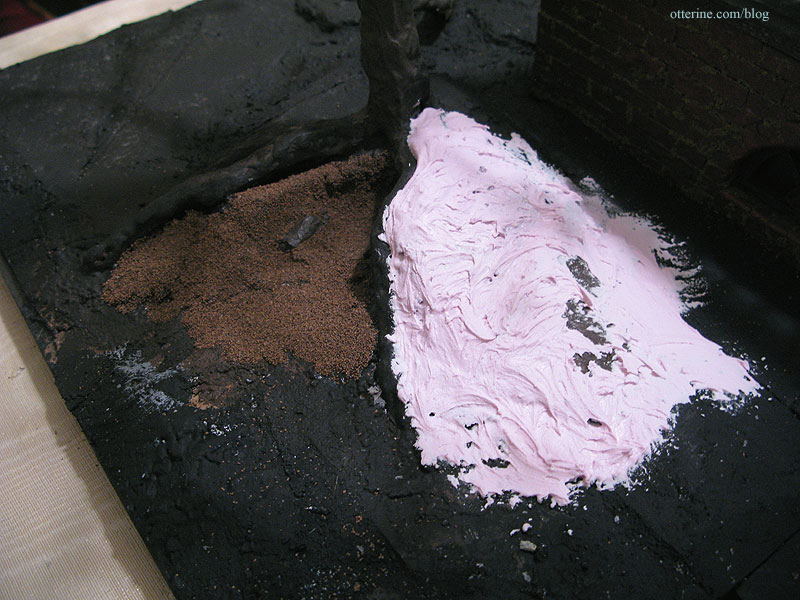
I am really resisting the urge to put Grahame in that burrow!!! But, I don’t want to risk getting any wet glue or stucco on him.
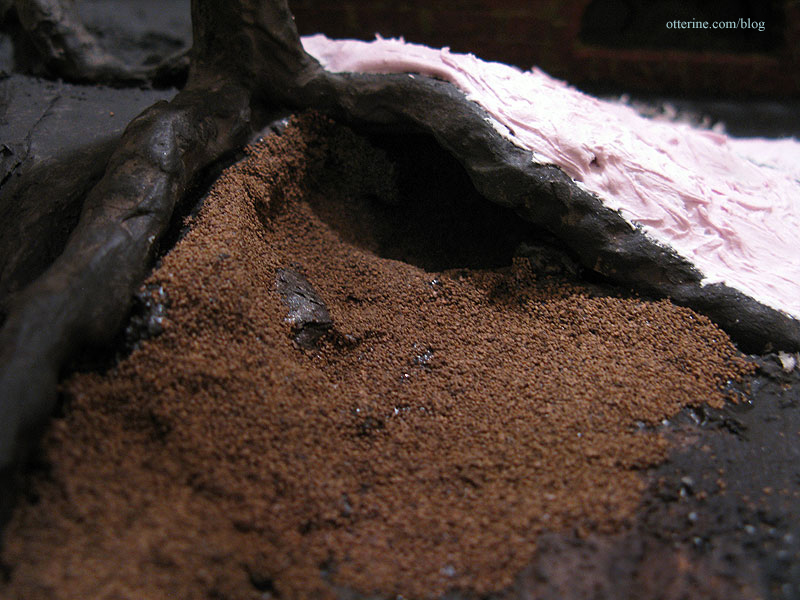
After letting this all dry completely, I primed and painted the spackling. He certainly does look right at home.
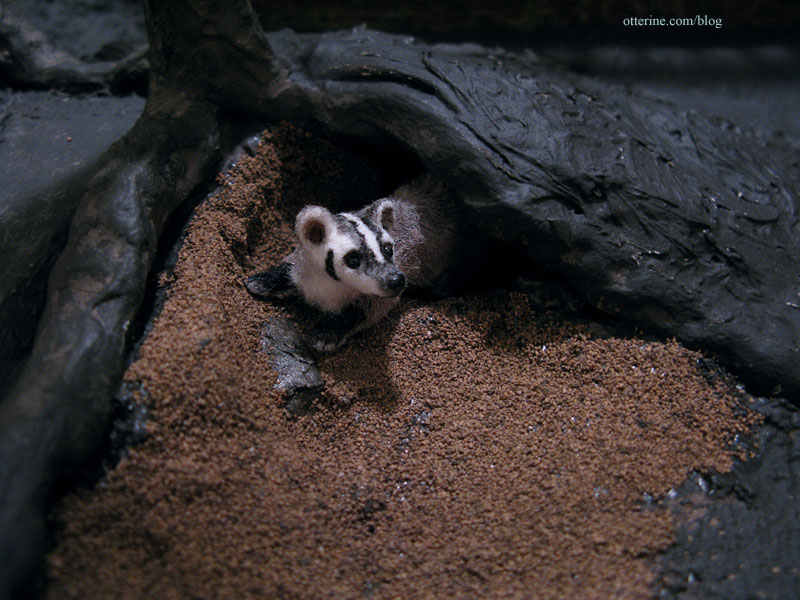
And, he goes way back in there! :D I love it so far!
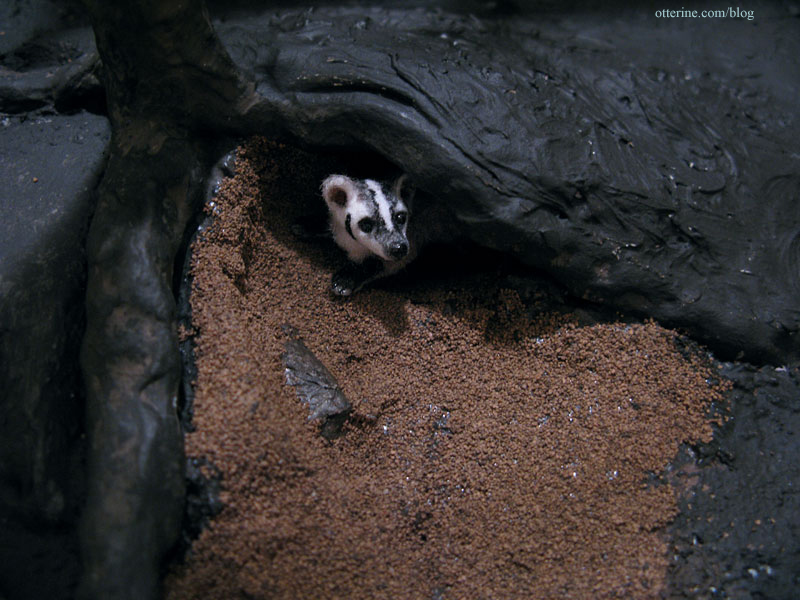
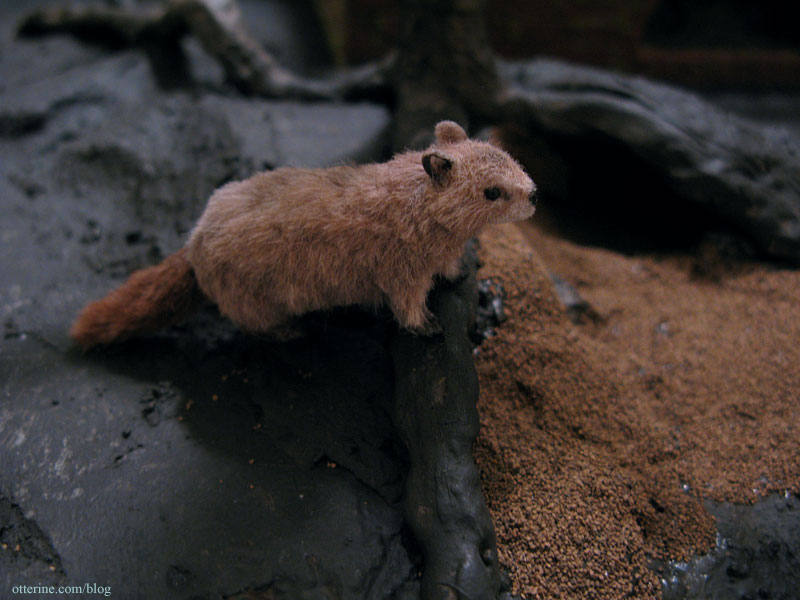
Woodrow came to check things out, but that is a Grahame-sized burrow. It’s too short for Woodrow. Good thing he’ll have his own home elsewhere.
Categories: The Haunted Heritage
October 18, 2012 | 0 comments
NOTE: All content on otterine.com is copyrighted and may not be reproduced in part or in whole. It takes a lot of time and effort to write and photograph for my blog. Please ask permission before reproducing any of my content. (More on copyright)