

Pretty things for grandma
I bought some new minis for grandma, and the first is a beautiful peacock box made by Cathy Rohal. The detailing is superb! So delicate. I think this will be for the vanity in the Heritage bedroom.
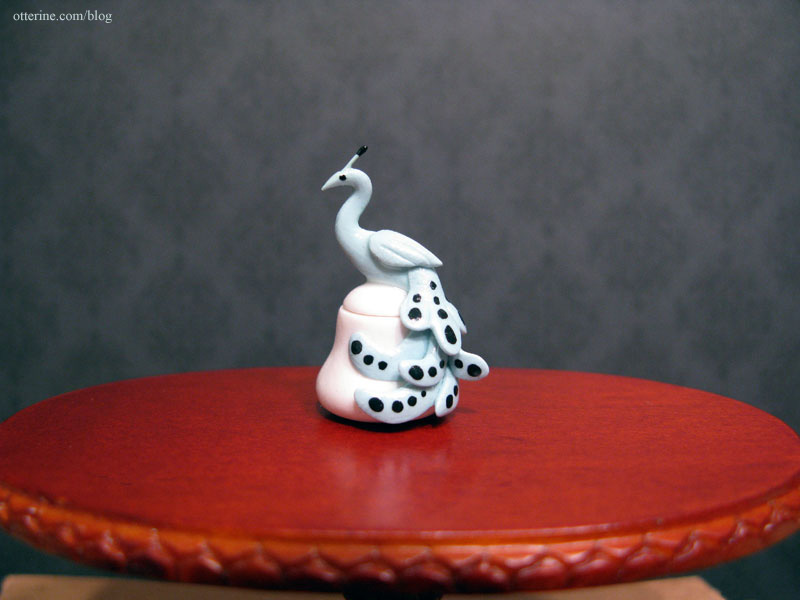
Yes, it opens!
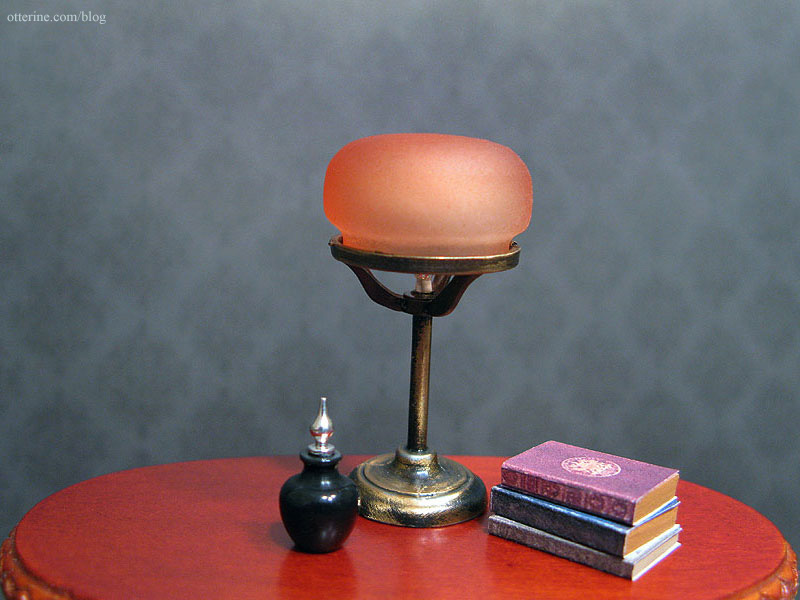
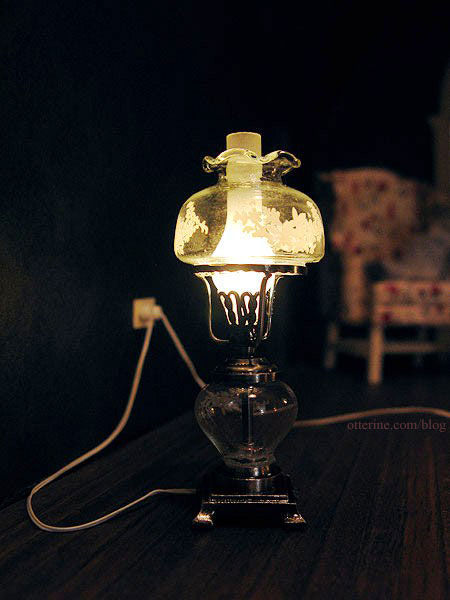
Another lovely vanity item is this black turned bottle with an aluminum stopper by CW Lubin. The gorgeous lamp is from Art of Mini, a perfect vanity light for the Heritage.
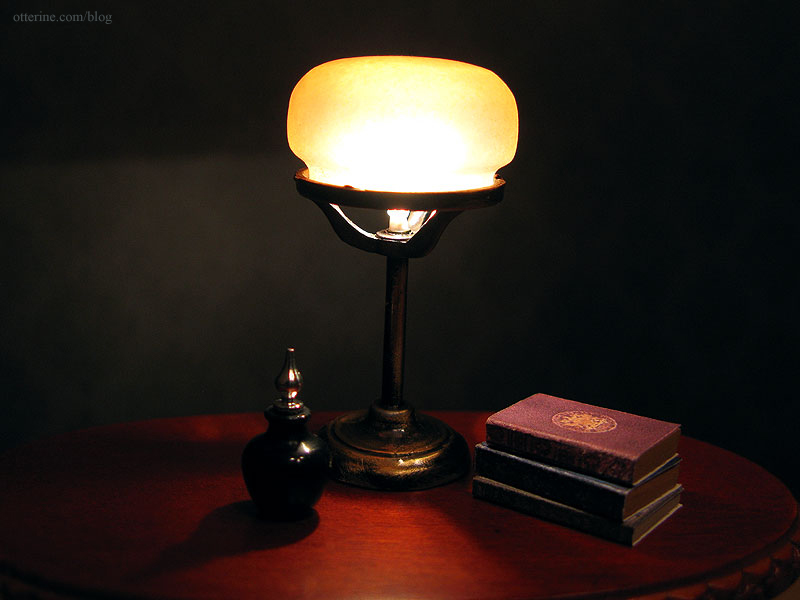
It’s currently a non-replaceable bulb, so I’ll swap that out for a replaceable socket before I install it.
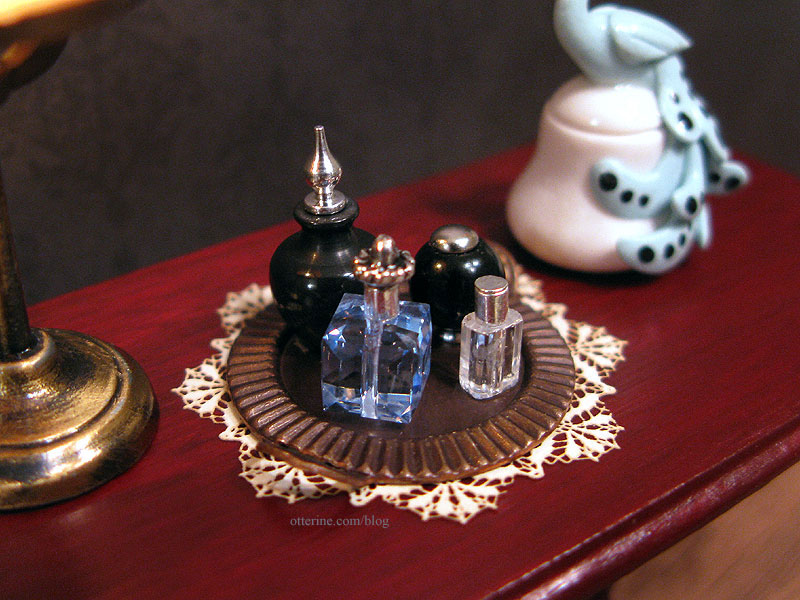
I decided to make a small vanity tray in anticipation of a new bedroom vanity.
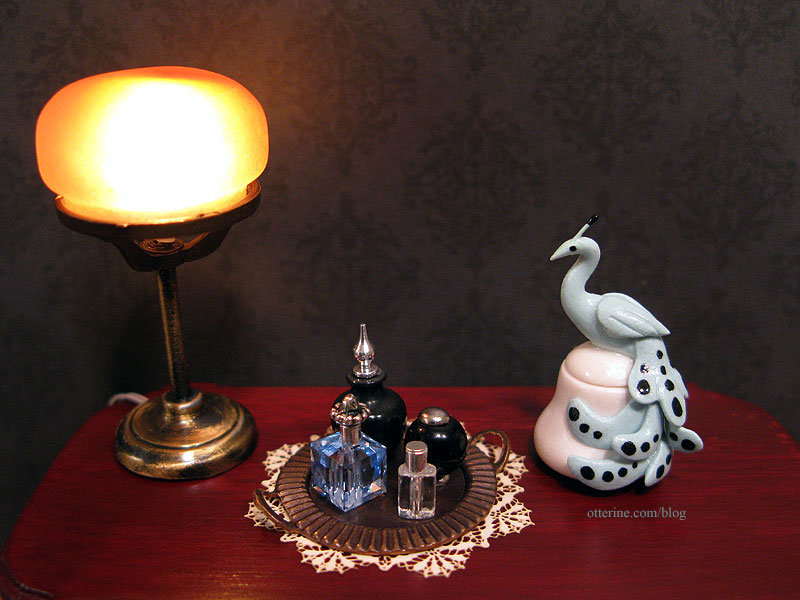
The tray is a jewelry finding that had been completely flat. I used pliers to bend the handles up. The blue crystal bottle has a silver crimp bead and a fancy head pin to make the topper. The round black bottle has an earring stud for a base and a brad as a lid. The clear bottle has a silver crimp bead and a flat head pin for the topper. Are all attached to the tray with mini hold wax.
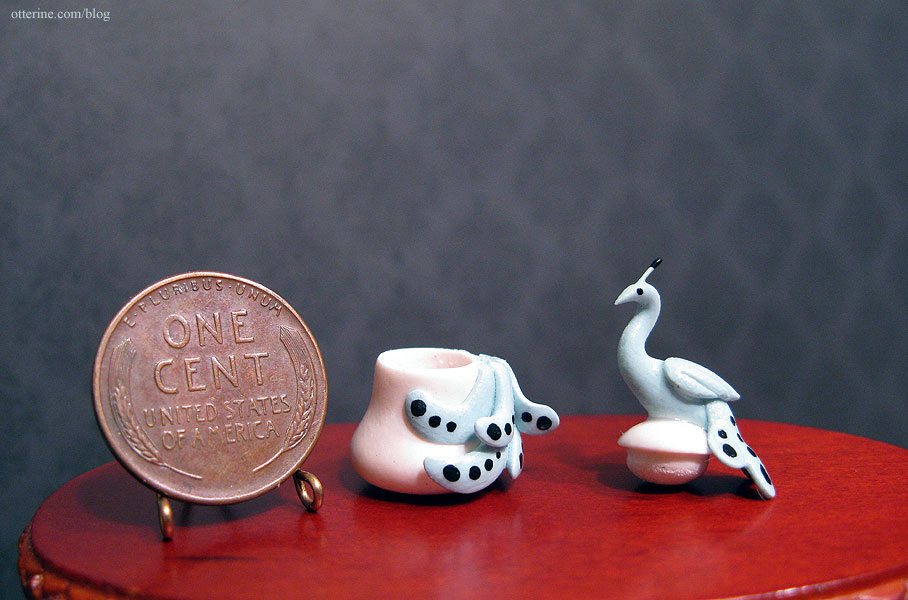
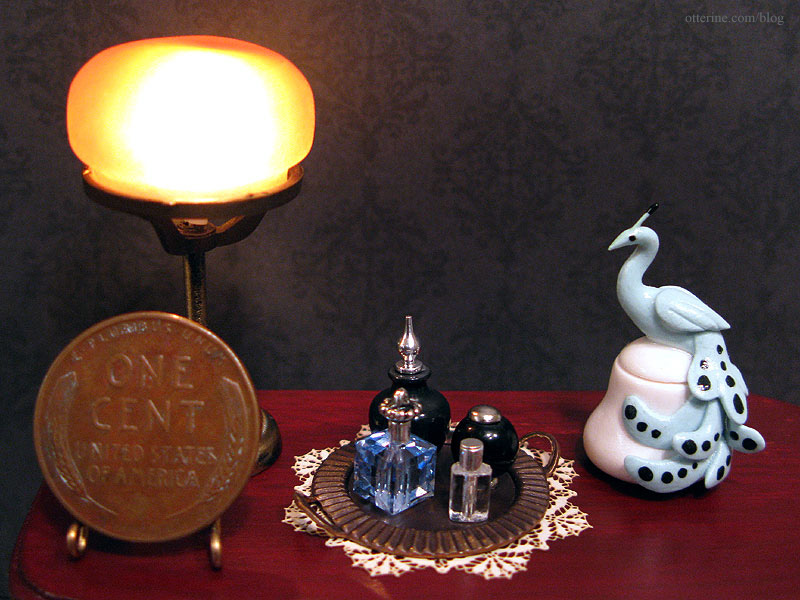
With a penny sitting on the table, you can see just how small the bottles are. :D
Categories: The Haunted Heritage
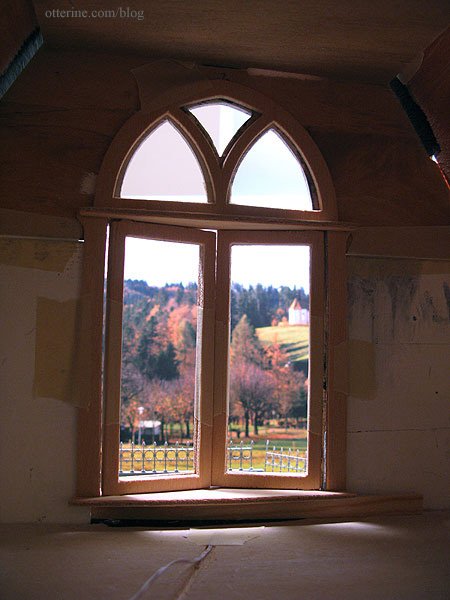
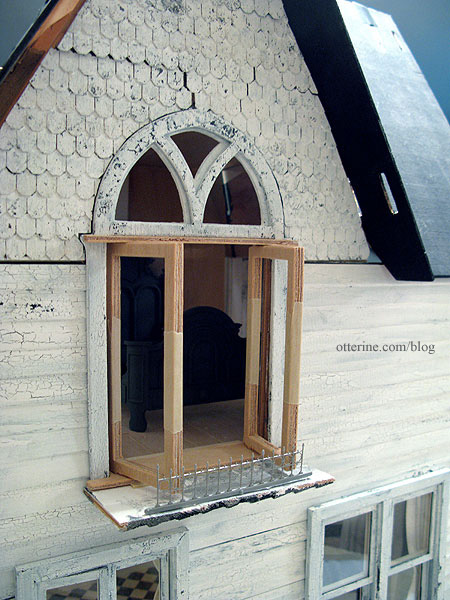
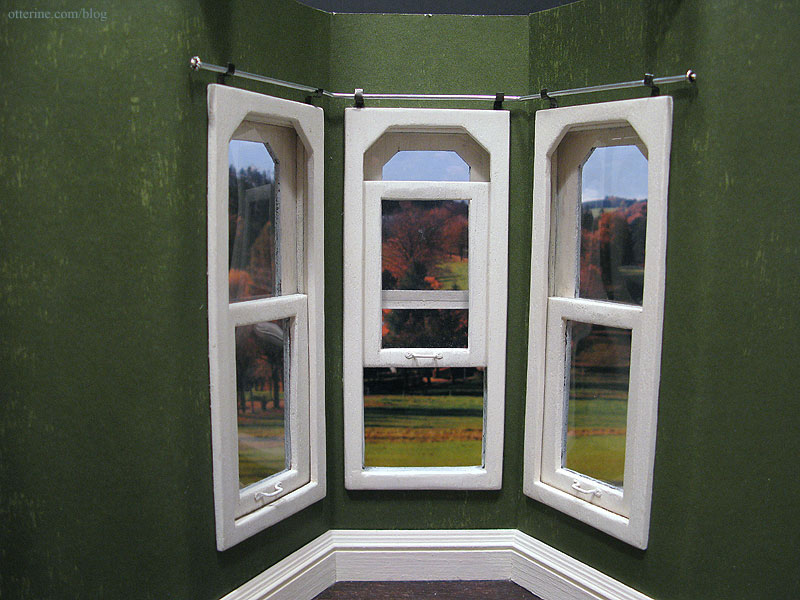
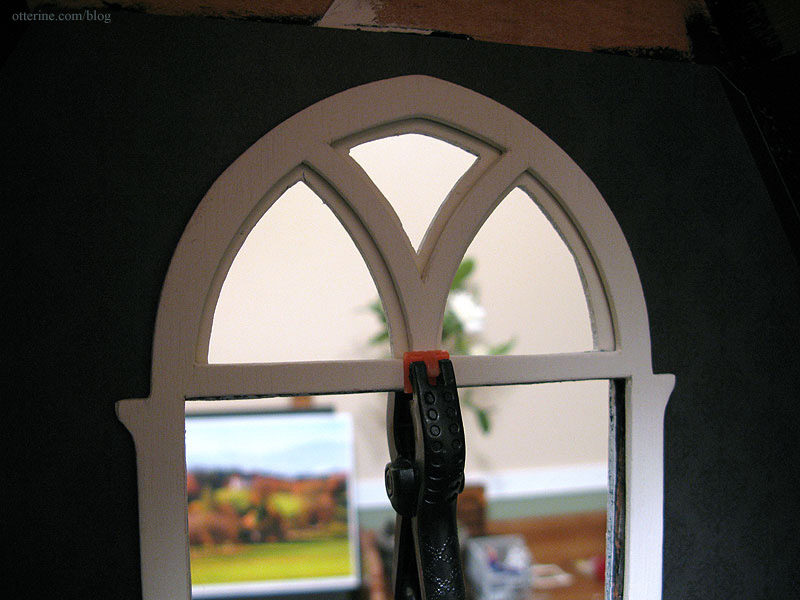
March 4, 2012 | 0 commentsHeritage – bedroom swinging windows, part 1
I admit to stalling on this part. The bay windows were 99% salvageable from the original kit pieces; only one window is glued shut for structural integrity and the other two work flawlessly. The kitchen side window and the front porch window both had to be replaced with Houseworks components because the original wood pieces were too far gone to save.
There were originally three swinging windows – one in the bathroom and two in the bedroom. Since I eliminated the one in the bathroom when I added the chimney, I had two left. The extra parts from the bathroom window assembly tipped the odds in my favor that I would be left with enough good kit pieces to get these to work without having to build my own from scratch.
Since the exterior of the house is old and weathered, I chose the worst looking parts for the outer portion of the windows. These have been sanded only once to remove the main splinters…there will be a lot more work done on the wood before I put it all together. I also have boards propping them in place that won’t be part of the final construction.
For instance, the one I have taped together in dry fit won’t close all the way…it will have to be displayed open at all times. That’s not necessarily bad, but I would rather have them work completely.
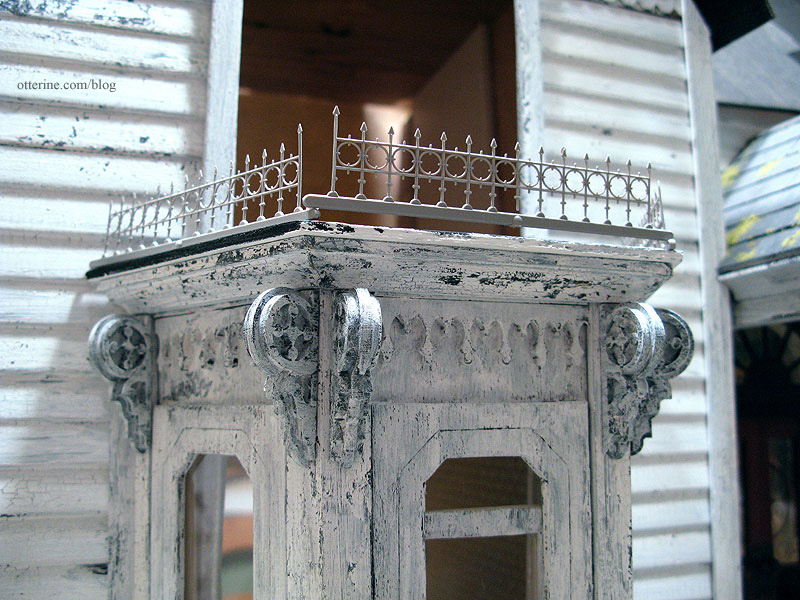
One of these windows opens over the front bay window on the first floor. While this isn’t really a balcony, I will be installing decorative railings so it will at least finish it off in a manner that looks finished.
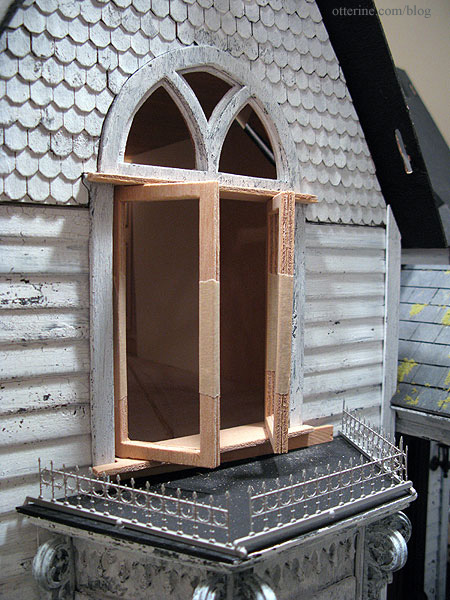
These are quarter scale widow’s walk railings by Grandt Line. I’ll cut them to fit, then paint and age them. They are very delicate but look suitable in scale for the bay window.
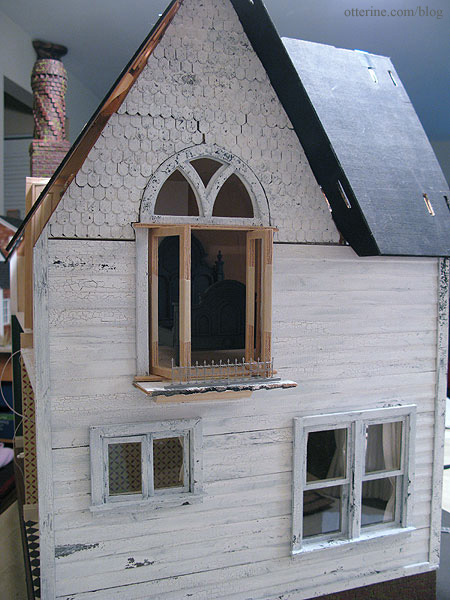
The other window, however, opens floor to ceiling with nothing outside but the ground one story below, leaving the possibility of grandma tumbling out the window! :O In the original kit design, this window was to be located in the open stairway, so the floor wouldn’t lead up to it. I moved the stairs to the middle of the house, which in turn caused a major problem with safety.
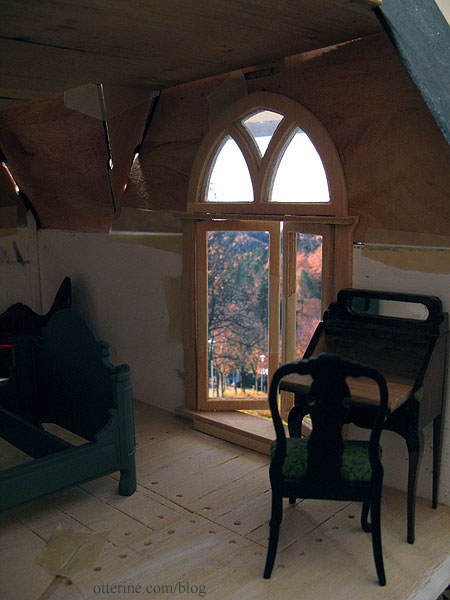
To make this a safer option, I could add a Juliet balcony. This is just a rough mockup with spare parts, but it shows the general idea.
There isn’t a whole lot of room for the necessary support structure due to the first floor casement window if the bedroom windows are to swing out but it’s workable. Plus, it won’t detract from the interior view and seems a realistic option.
Categories: The Haunted Heritage
March 3, 2012 | 0 commentsMy 1920s inspired kitchen
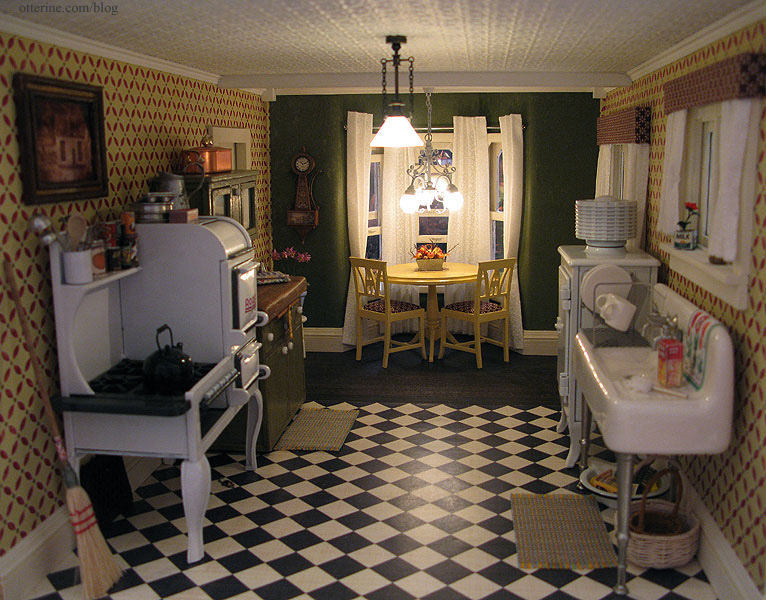
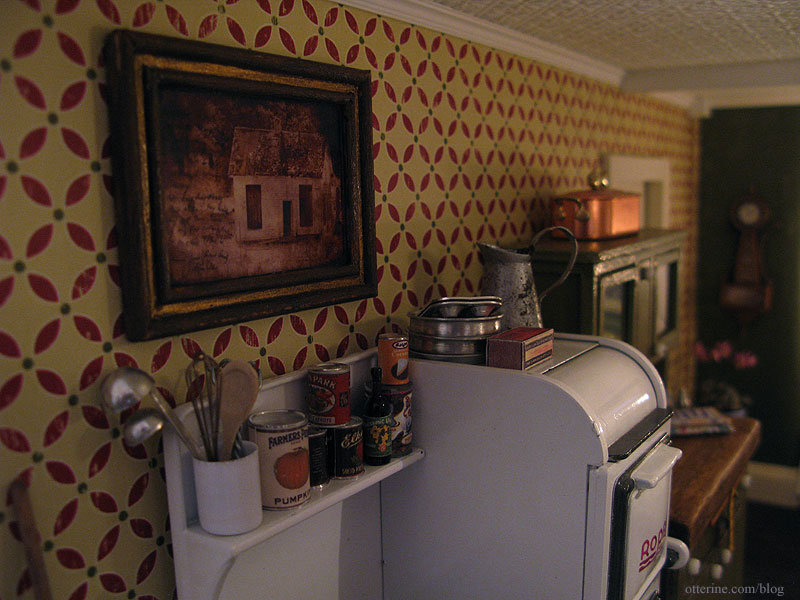
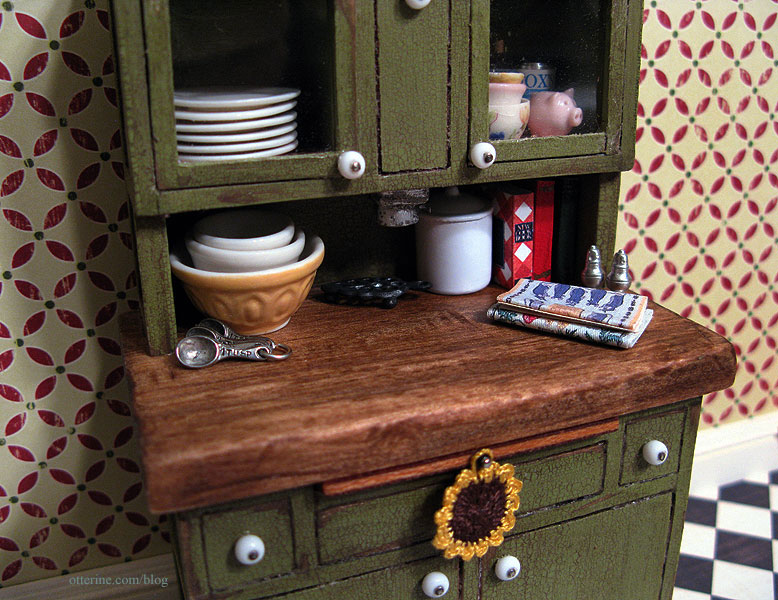
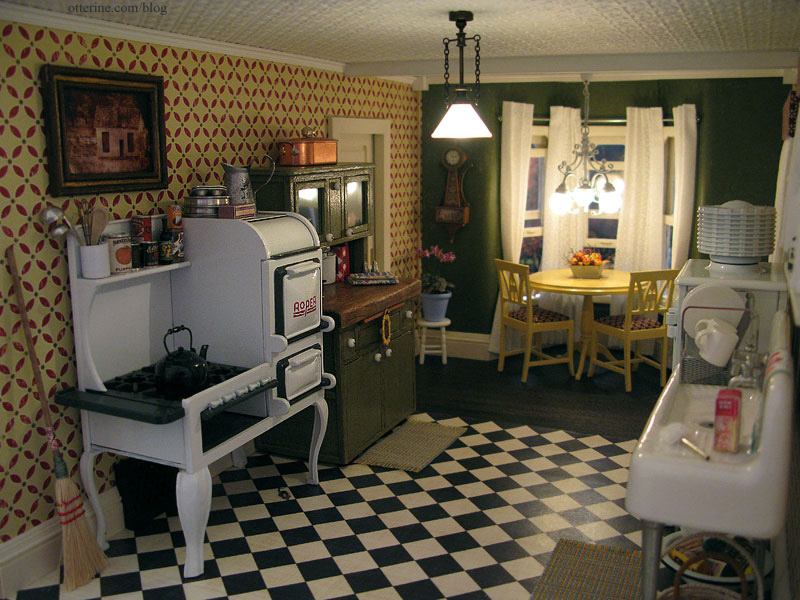
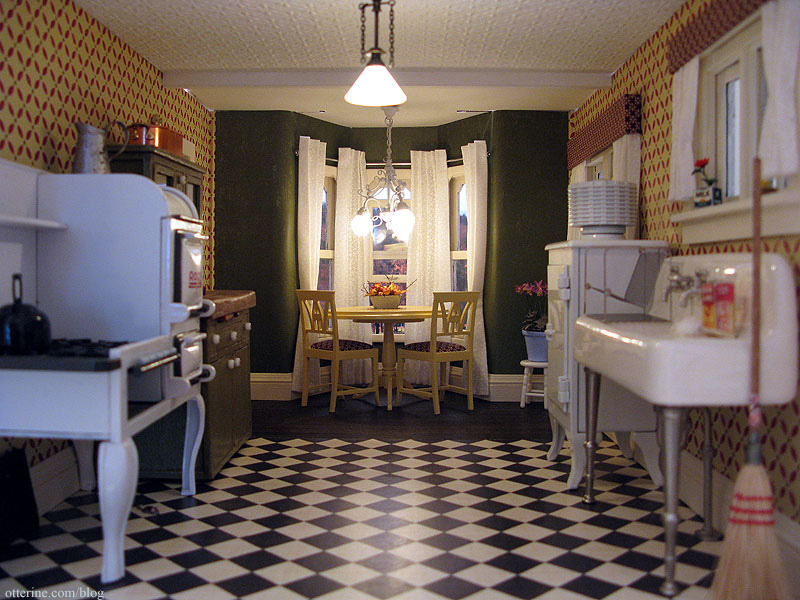
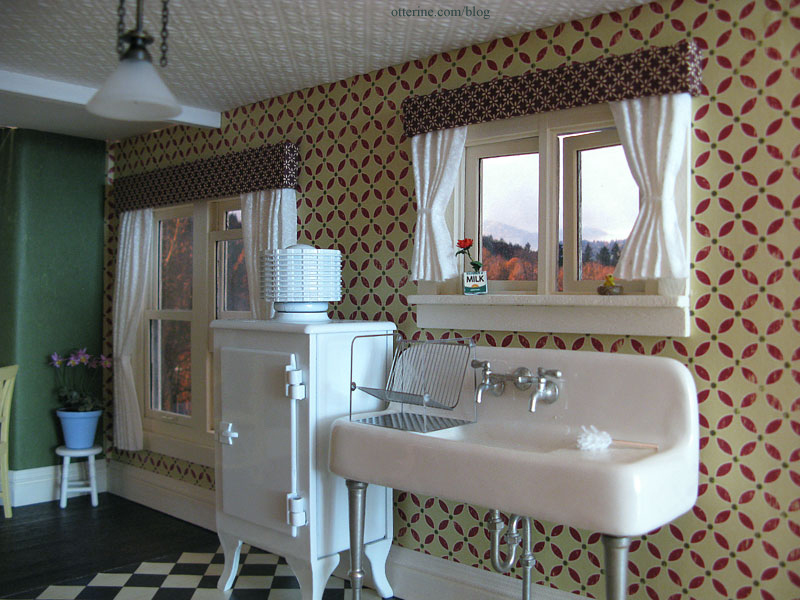
Before delving into the final push on the first floor so I can begin the second floor, I went through my stash of minis to fully set up the kitchen.
Grandma has been out in the garden again. :D
I tried to not clutter the room, but just a few added accessories really change the feel.
For the Hoosier cabinet, I had to set up the vignette outside of the kitchen to get a decent photograph.
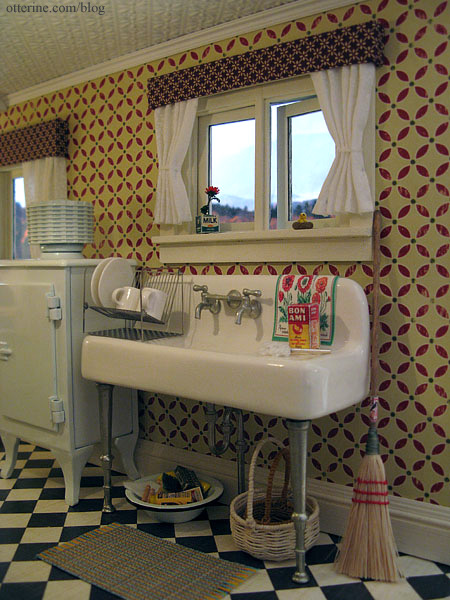
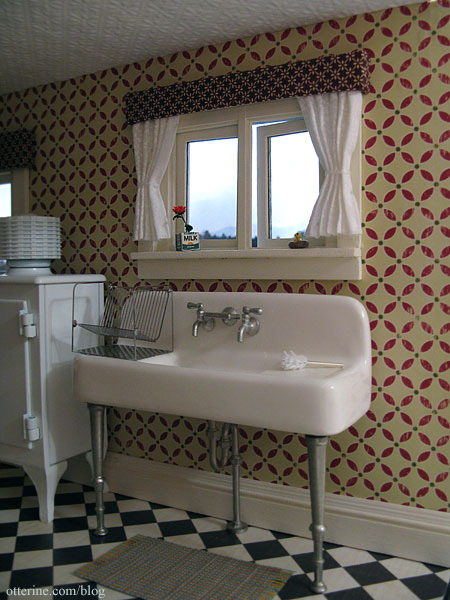
The kitchen sink is one of my favorite minis!
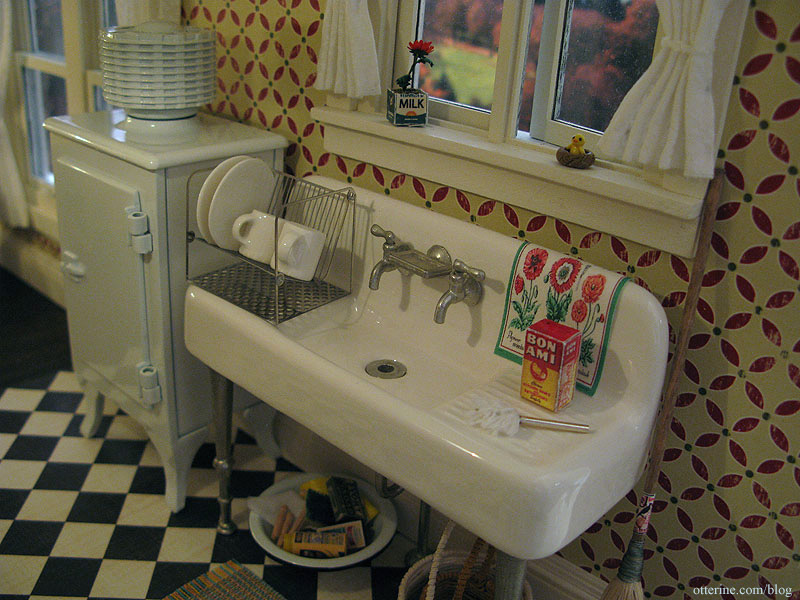
Grandma has her cleaning supplies and some extra baskets under the sink.
I love the way this room has come together. :D
Artist credits:
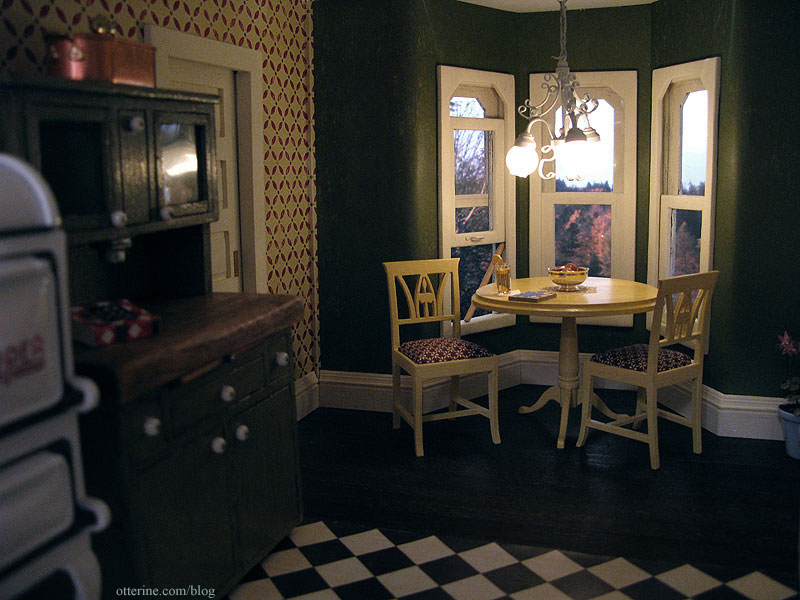
Hoosier cabinet by Keli; vintage photo art by Kelly; potted flowering plant by Michelle; autumn fruit basket by Hungarian Miniatures; tea towels – Marlene; white and brown baskets under the sink by Lyssa; aged silver pitcher on the range by Caterina; large basket by Lidi (Bonnie Lavish flowers assembled by me); tiny chick in the nest by Cathy Rohal.Categories: The Haunted Heritage
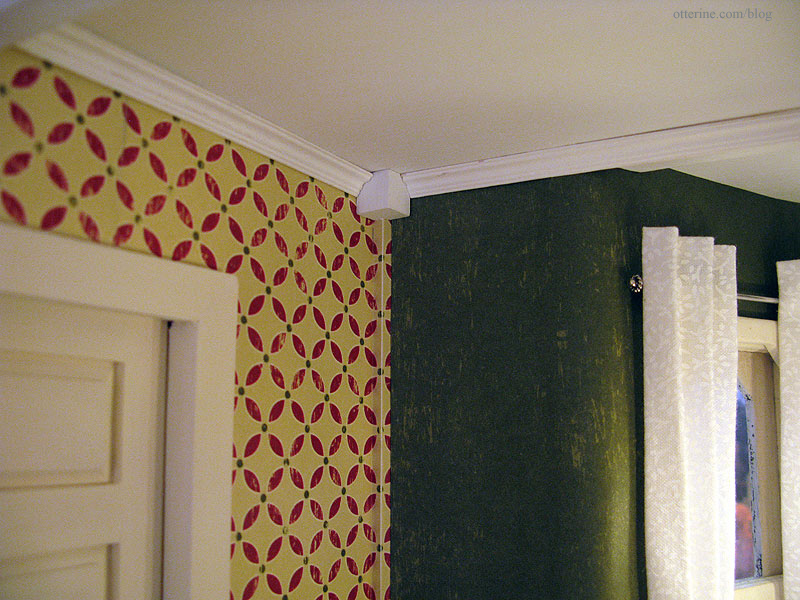
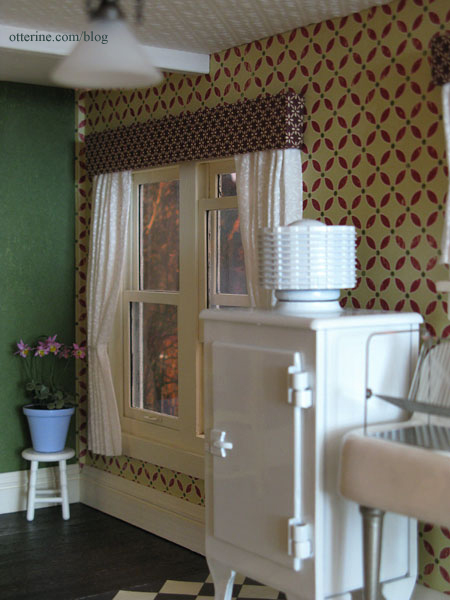
February 28, 2012 | 0 commentsHeritage – kitchen crown molding
I’ve had crown molding painted for the Newport for some time but didn’t end up using it in any of the rooms. Since the kitchen has a partially textured ceiling and gaps in the non-textured part (a characteristic of the way the kit is constructed), I decided to add some crown molding painted white to match the ceiling.
The two inner corners have small protrusions created by the dividers used in the construction of the house. On the Greenleaf forum, Mike had posted a picture of corner blocks used in crown molding (here’s a real life example). These fill in the corners and you need to cut only 90-degree mitres – much easier than angled mitres.
I opted for 3/8″ wood blocks from Hobby Lobby, cutting a notch in the back to fit the corner protrusion. As you can see, it’s easier to cut these without the ceiling board in place yet.
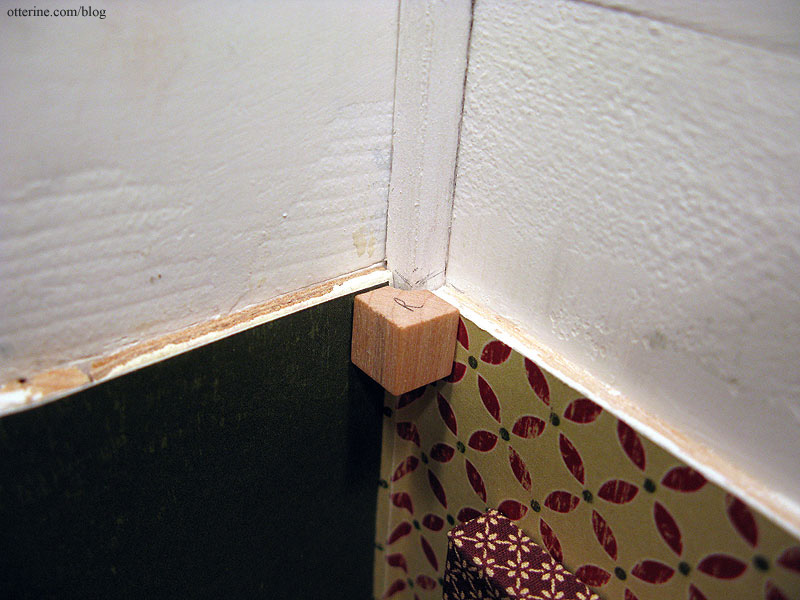
Here they are held in place with some mini hold wax. I couldn’t install them until the ceiling board was glued in permanently to ensure a good fit. The corner blocks might be slightly too big, but they should blend well enough once they’re painted white.
After cutting wiring channels for the kitchen ceiling lights, I glued the ceiling board in place and used a few finishing nails for added structural support.
I installed the strip of wood across the front of the bay window to hide more ceiling gaps. Working in this deep, narrow room was not easy, so I am glad I installed all of the windows, window treatments, interior trims and baseboards before putting the ceiling board in permanently.
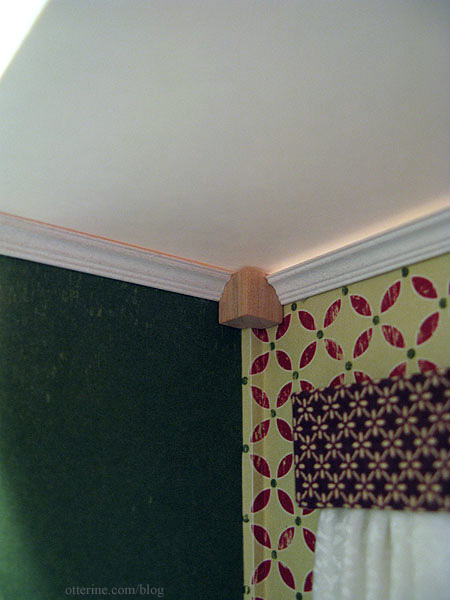
I really love the way the crown molding completes the room.
I glued in the corner blocks and decided to span the crown molding across the front of bay window ceiling board instead of continuing the crown molding inside the bay. The bay window is now a cozy nook.
As expected, there are some minor gaps here and there as well as some paint chips. I’ll fill those in next, but not tonight.
Once the touch-ups are done and the lights are permanently installed, this room will be done except for decorating! :D
Categories: The Haunted Heritage
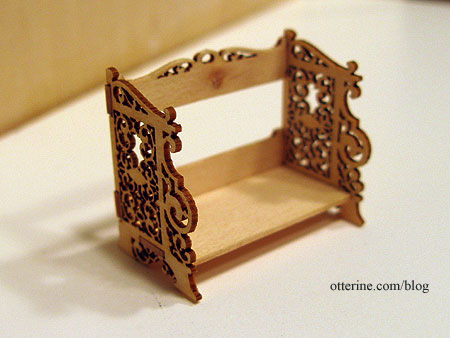
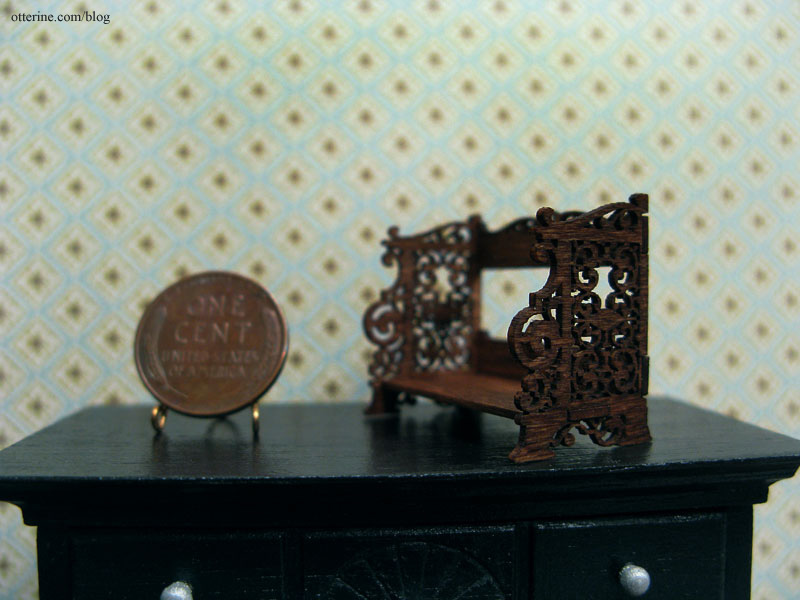
February 23, 2012 | 0 commentsFancy bookshelf
In addition to the banjo clock, I also put together the Jacobean book rest kit from Cynthia Howe Miniatures. It was so delicate that I ended up breaking a piece of the fretwork while removing the excess wood pieces. I cut the other side to mimic the design. ;D
The instructions said to put it together before staining, but I was worried about warping and I wanted to get a good glue hold, often better with bare wood.
I stained the shelf with Minwax English Chestnut, leaving the color light to show off the wood grain. This is some seriously psychedelic wallpaper! :O This is Flower Frenzy by We R Memory Keepers.
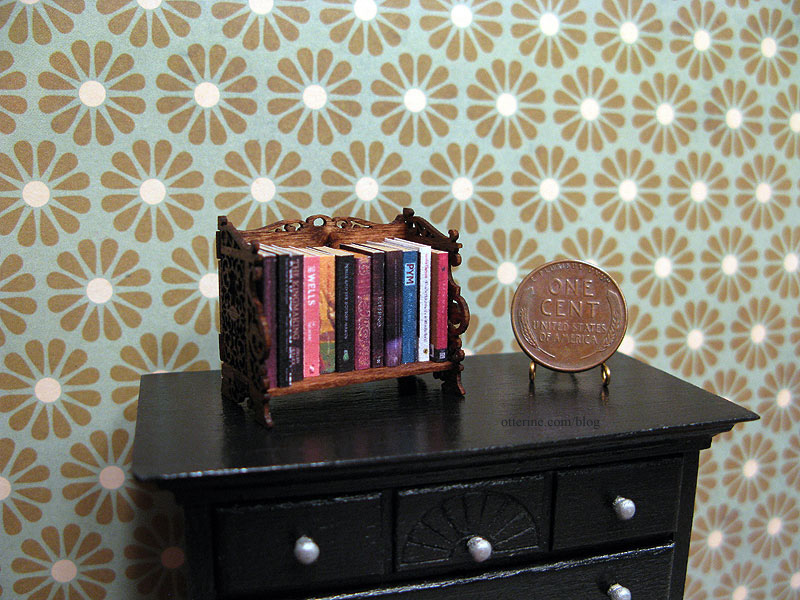
That’s better. :D I’m not sure if either of these papers will find their way into the bathroom upstairs, but I wanted to photograph them with some furniture to see what they looked like. This is Cute Little Diamonds by The Paper Studio.

The shelf will likely end up in one of the upstairs rooms in the Heritage, probably the bathroom. The kitchen and parlor are pretty much set for furnishings. :D
Categories: Miniatures, The Haunted Heritage
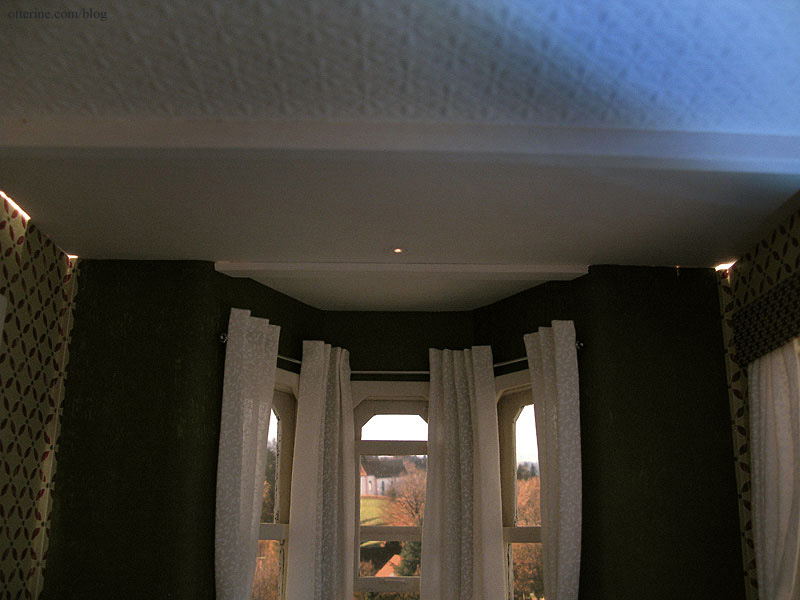
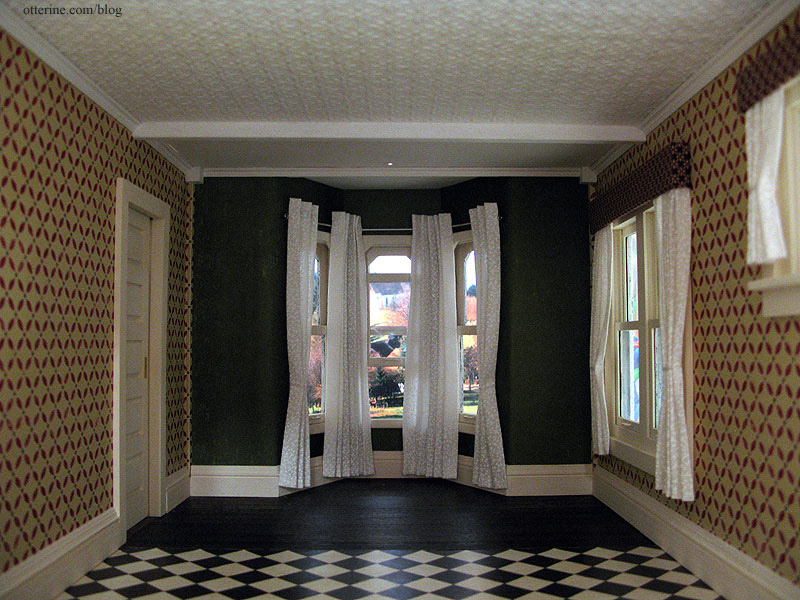
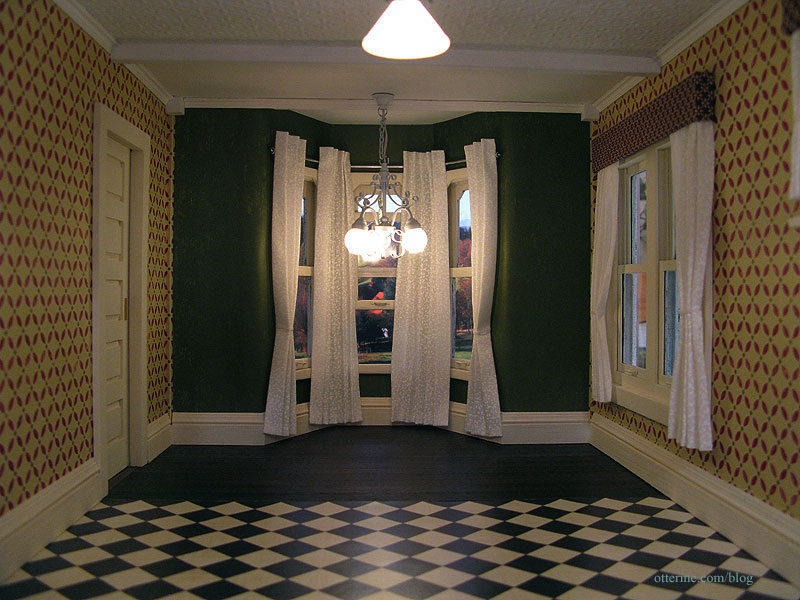
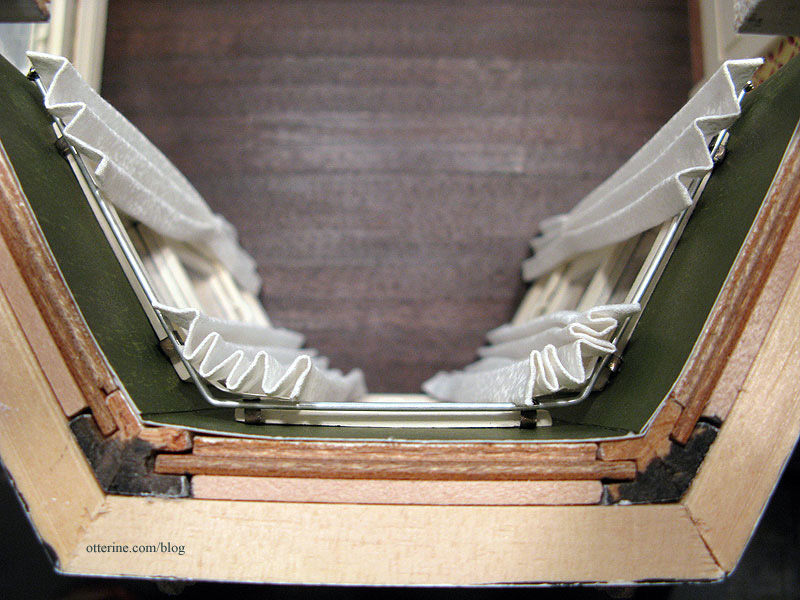
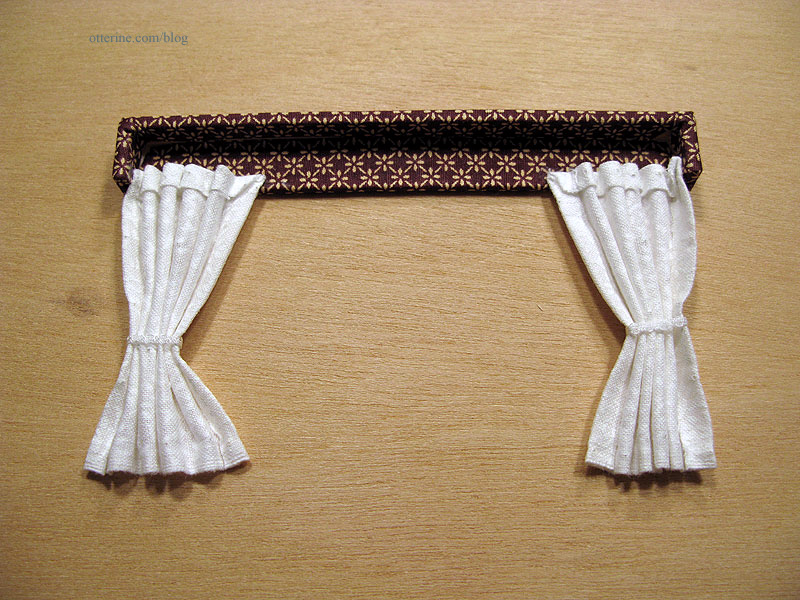
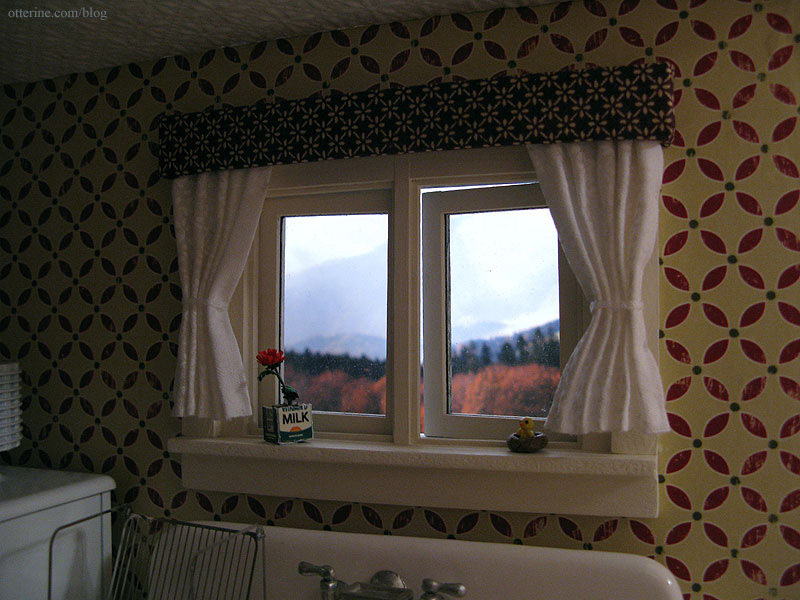
February 22, 2012 | 0 commentsHeritage – bay window curtains
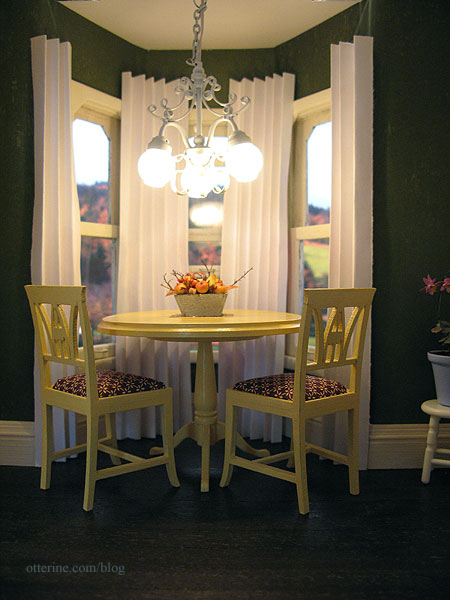
I decided to leave the pelmets off the bay windows since they weren’t as complementary with the green paper. I didn’t want to add another fabric into the mix or obscure the nice detailing of the interior bay window trim. It’s also a limited space with the table, chairs and chandelier already taking up a lot of actual and visual space. My first impression was to leave the space open. If I add anything at all to this space, it will be plain white curtains on metal rods.
The easiest way to try things out is with paper mockups. A few folds in plain white paper give the same impression as pinned and shaped curtains. I propped the mockups in place and was surprised by how much I liked them. It really dressed up the space.
Awhile ago, I acquired a Millie August Magic Mini pleating tool. It creates pleats too large to use on the curtains with pelmet tops, but I decided to give it a try on the free-standing drapery. The instructions indicate you should wrap the fabric around the metal slats, steam iron and then let dry inside the pleater.
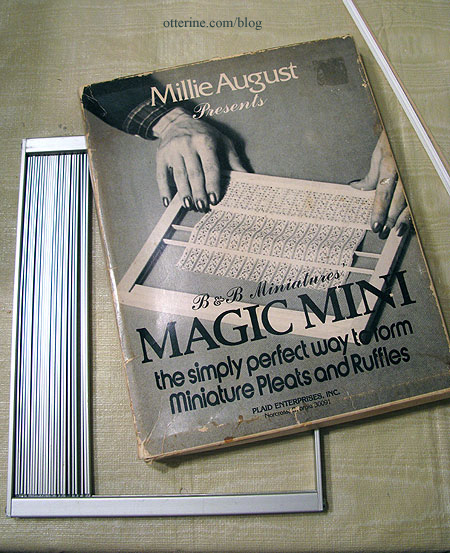
I wanted a bit more movement to my draperies, so I wrapped the fabric and steamed the pleats as indicated but then removed the fabric right away and pressed the drapes by hand. It made the pleats uneven and softer, more realistic in my opinion. These aren’t meant to be formal, starched panels.
I propped the fabric in place to see if I liked the look of it the way I had the paper mockups. Yeah, they’re pretty great! :D
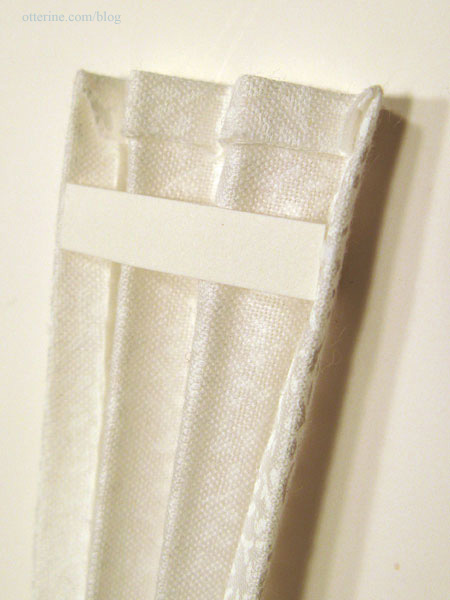
With the drapery pleated, I needed to get the panels ready for installation. To keep the drapery in shape and contained to the proper width, I glued strips of paper at the tops.
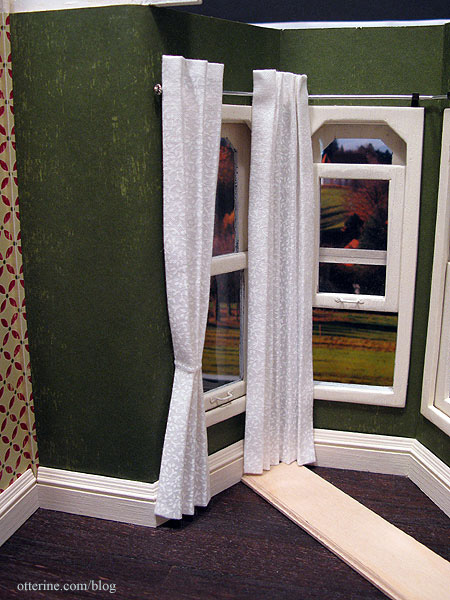
Next, I had to address the curtain rods. I left them out of the pelmet topped windows since they wouldn’t show anyway. For the support brackets, I cut the backs from some metal brads and shaped them to hold the curtain rod.
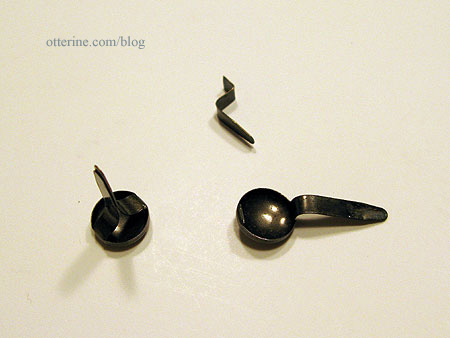
They are fastened with glue as well as being placed between the window trim and the wall for stability. I chose darker metal than the rod just in case they show after the curtains are in place. The darker metal wouldn’t attract your eye the way silver metal would.
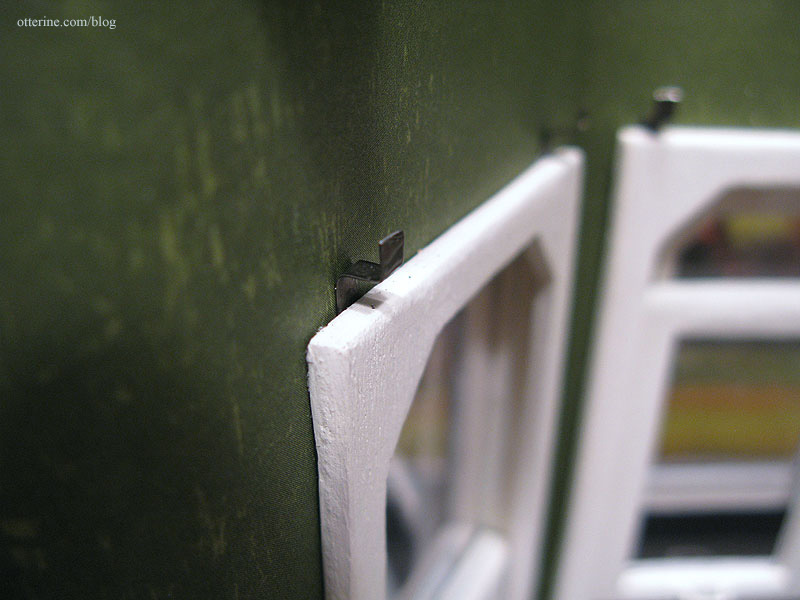
I used aluminum tubing that you can find at most hobby stores and shaped it to fit the bay window brackets. I added some super glue gel to keep the rod from shifting or coming loose from the brackets. For the ends, I glued in decorative jewelry headpins.
I glued the curtains to the rods along the paper reinforcements.
To have the curtains raised off the floor just a little, I slid a scrap of plywood under the bottoms for support while the glue dried. I used fairy lace tiebacks on the outer panels but I liked the look of the inner panels left straight. This way, grandma doesn’t have to reach over the table to untie them every time she wants a little privacy. ;D
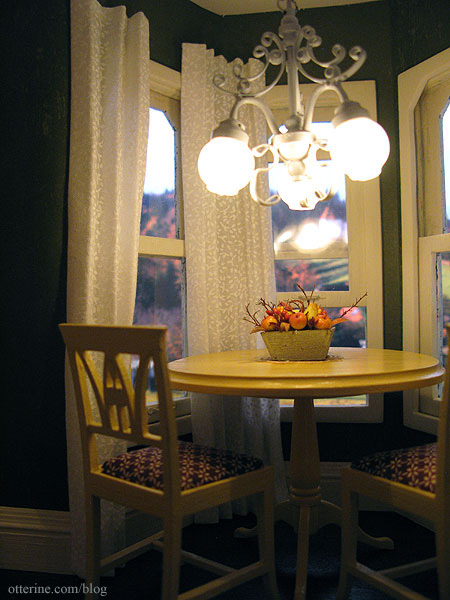
Love!
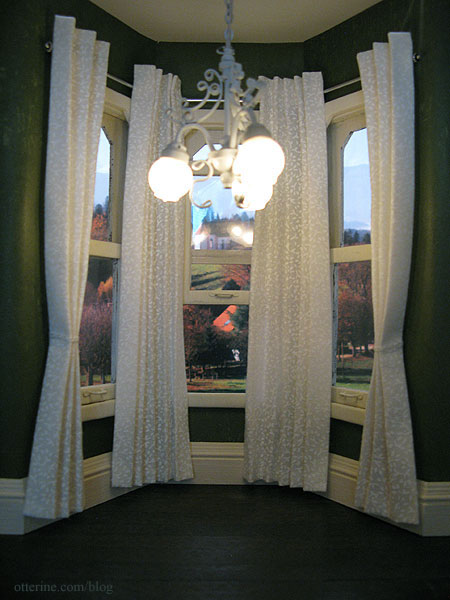
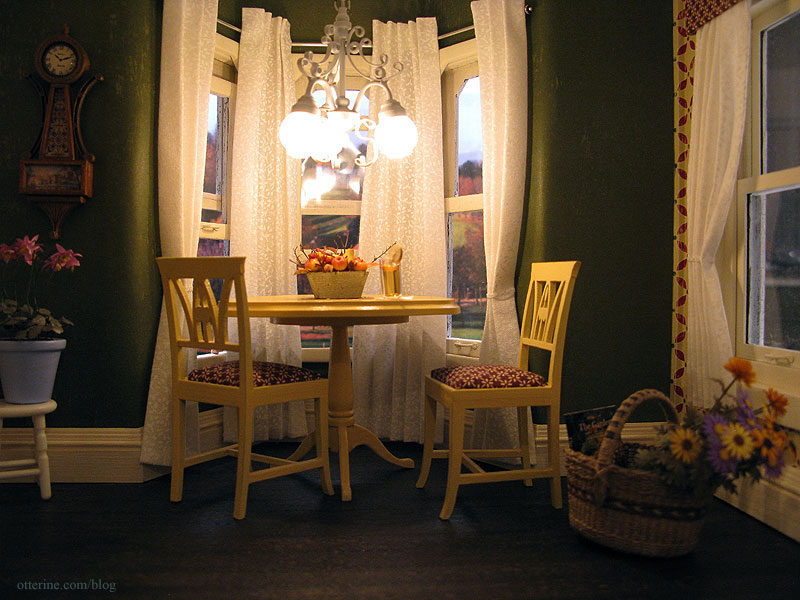
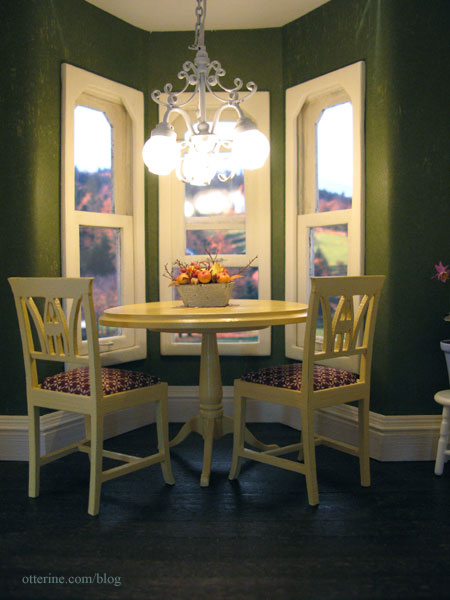
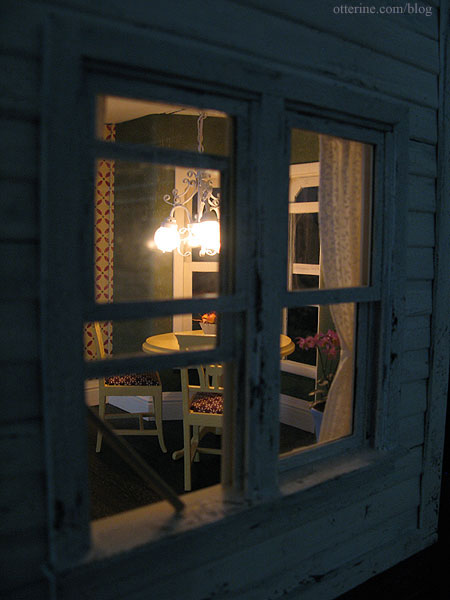
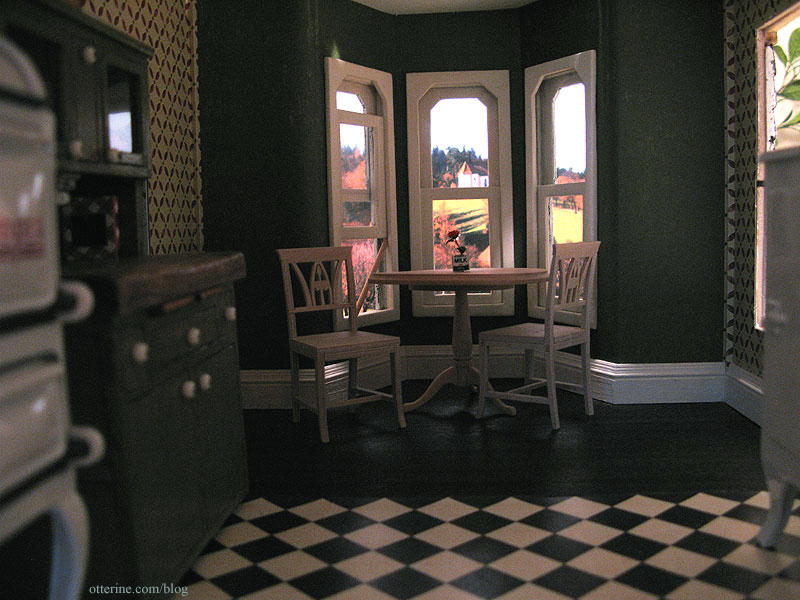
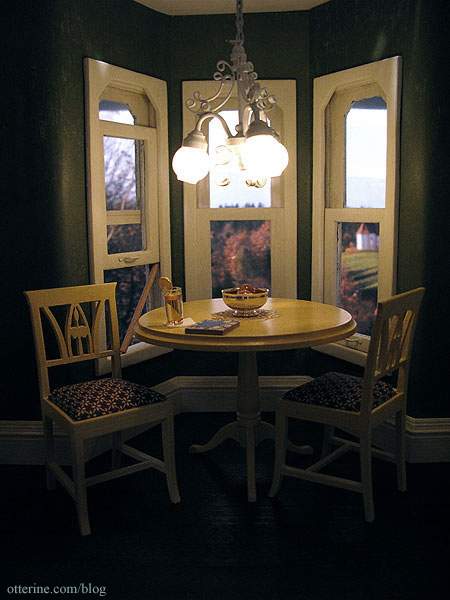
With the table and chairs in place, it really sets the mood. First, with the curtains in focus.

And, then with the furniture in focus.
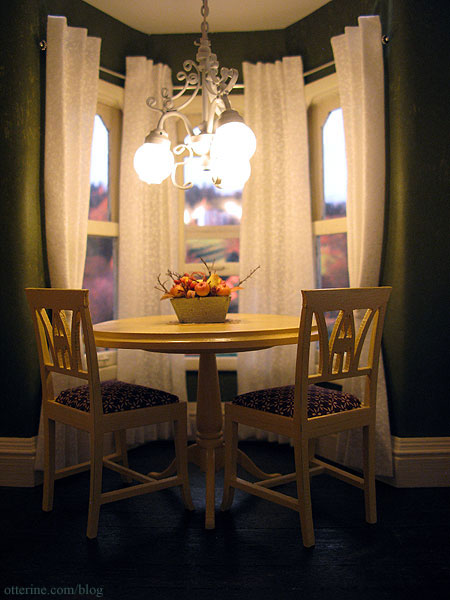
It really adds so much warmth and softness to the kitchen.
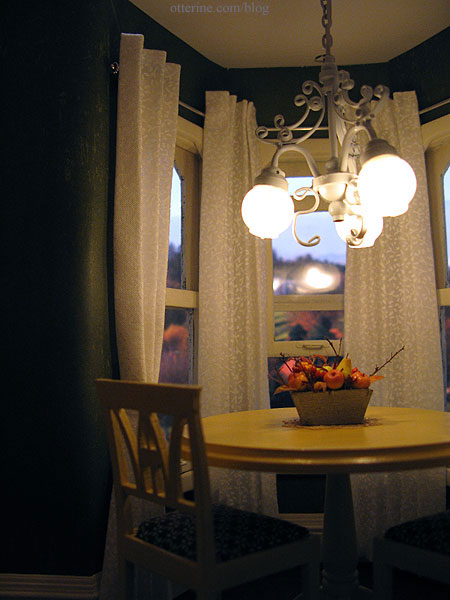
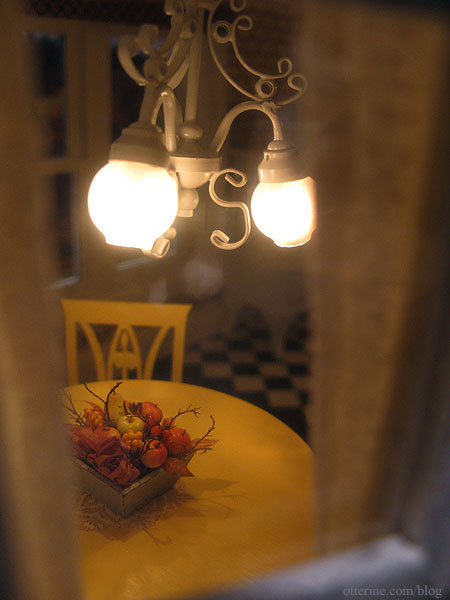
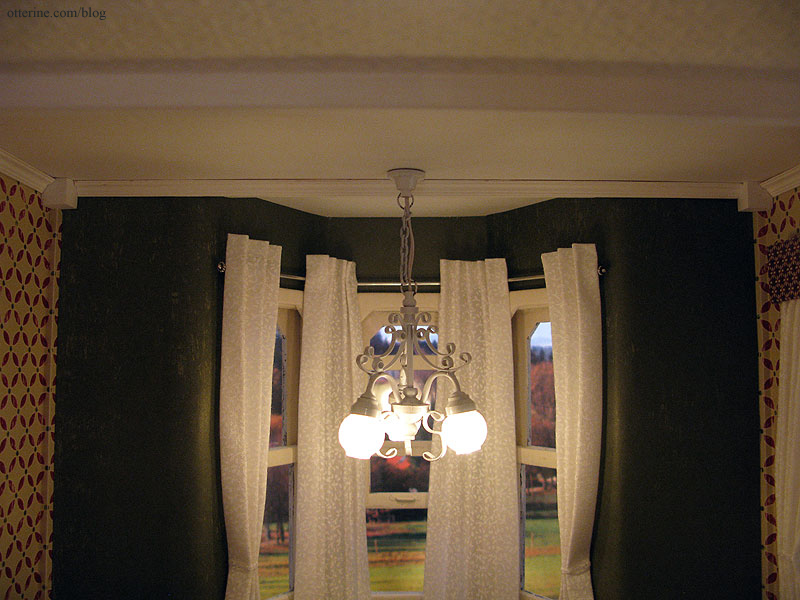
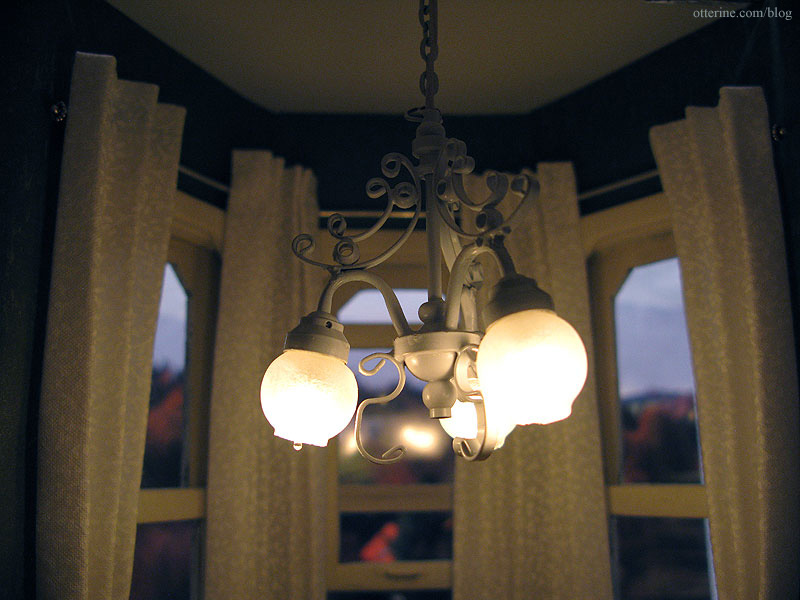
While taking photos, I finally captured a nice shot of the dining area chandelier.
Okay, I am just about ready to put the kitchen ceiling on permanently. :D
Categories: The Haunted Heritage
February 20, 2012 | 0 commentsHeritage – kitchen pelmets and curtains
Other than a rolling shade and some paper curtain mockups, I’ve never made window treatments. I decided to give it a go for the Heritage.
A great resource in general is the book The Design Directory of Window Treatments by Jackie Von Tobel. It’s a book for real life sized decorating, but the ideas are marvelous and could be translated into miniature settings. And, the book comes with a CD of the designs in black and white drawings so you can color and manipulate to your tastes.
I also did a google image search for ideas and discovered that the terms pelmet, cornice and valance all mean similar things. Though, it seems valance might be fabric only and the other two have some sort of structure under it. Either way, I decided a pelmet/cornice would be the way to go.
An excellent book for miniature window treatments is Curtains by Sue Heaser. I’ve used her methods here with a few alterations.
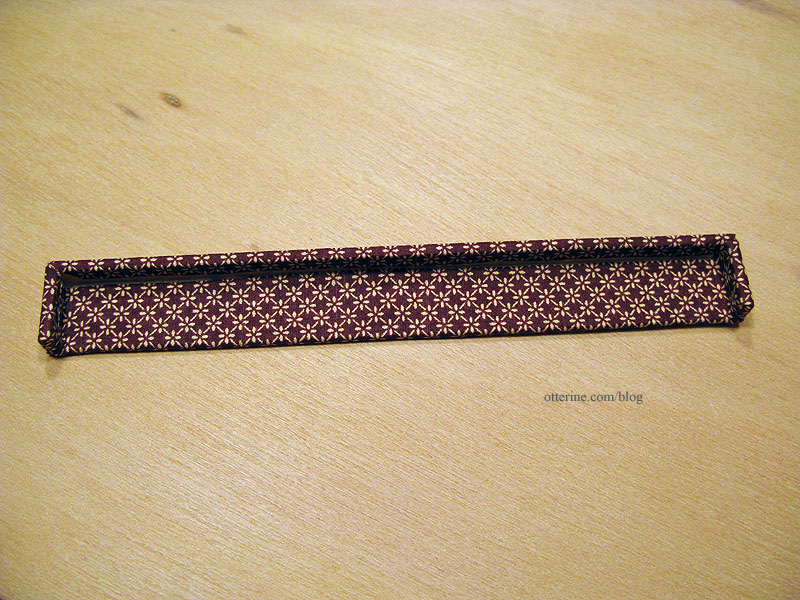
Since there was already a lot of pattern and color in the room, I opted for a plain rectangular shape built from bass wood and mat board.
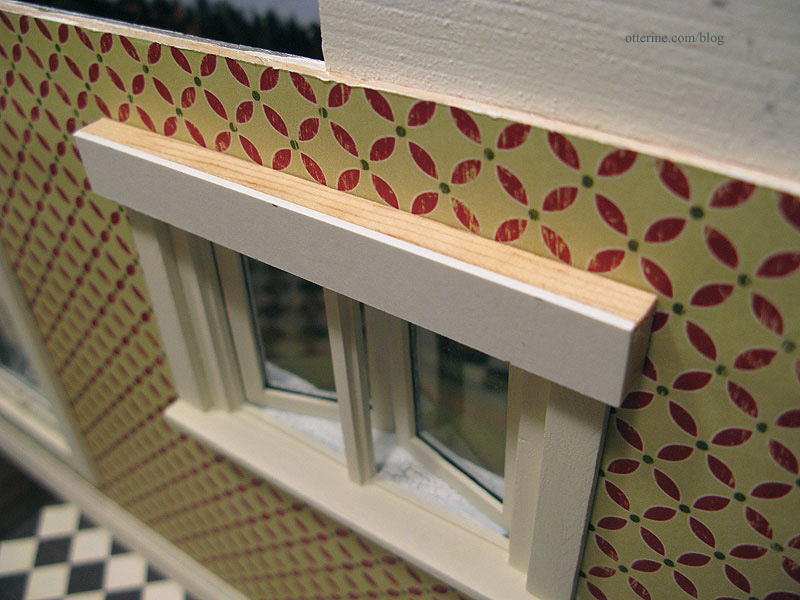
For the casement window, I made the pelmet 1/2″ tall. The pelmet for for the double window is 3/4″ tall. I thought the thinner measurement didn’t look right on the wide window.
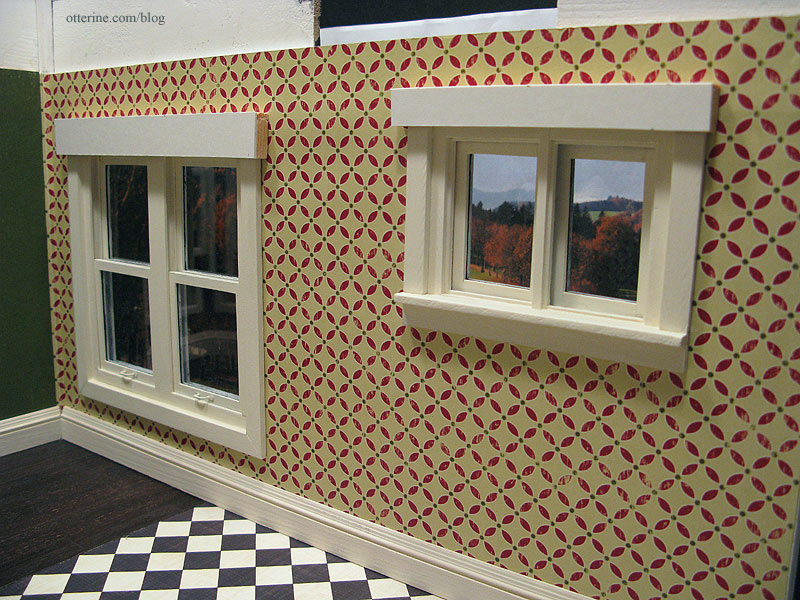
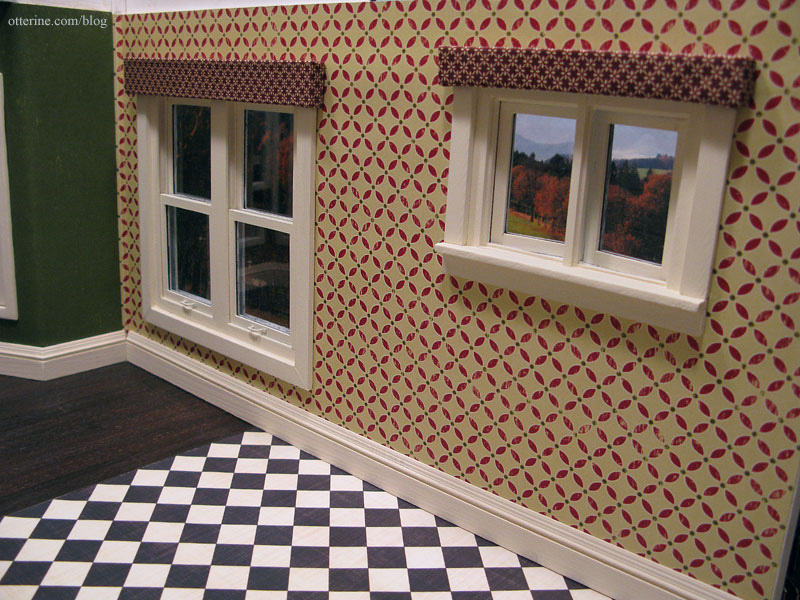
I covered both pieces with the same fabric I used to upholster the kitchen chairs.
I think they add the perfect amount of decoration to the windows.
To make the curtains, I used the pin and spray method using a piece of foam core board and fabric stiffener. I started with the casement window curtains since they require less fabric. If I decided this was not for me, then I wouldn’t have wasted very much fabric. I used printed cotton fabric from Hobby Lobby, and it worked really well. I used the selvage edge of the fabric for the bottom hem which kept the bulk to a minimum.
This method creates holes in the fabric, but these can be worked back into shape with your fingernail or a pin. While working the holes out, I ended up with a few dark spots. But, what’s a spot or two on old curtains?! :D
I used fairy lace I bought at the Bishop Show one year for the tiebacks.
I glued the curtains to the pelmet.
I then glued the pelmet to the window frame.
The curtains might be a tad too short, but I like them well enough not to start over. Maybe grandma washed them once and they shrank.
After installing the pelmet and curtains for the casement window, I worked on the curtains for the double working window.
These are a much better length than the casement window curtains.
I love the way the fabric looks from the outside, too!
Categories: The Haunted Heritage
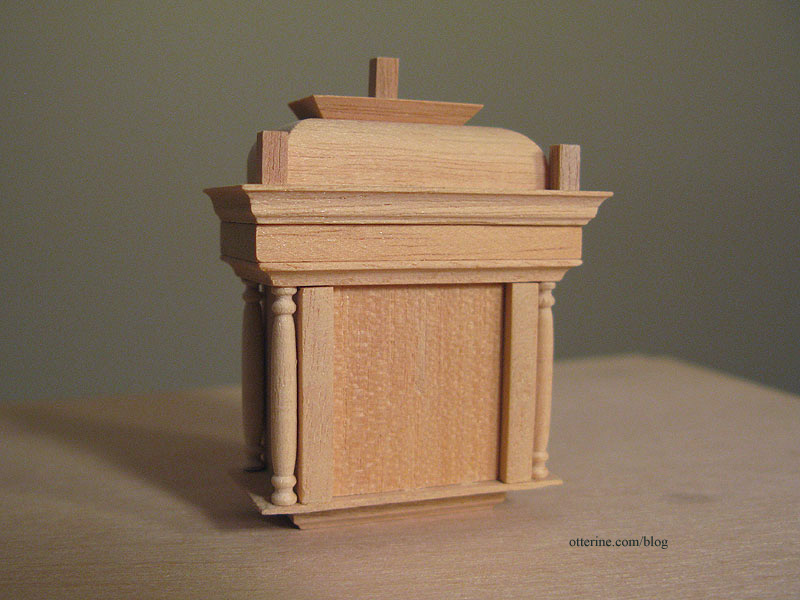
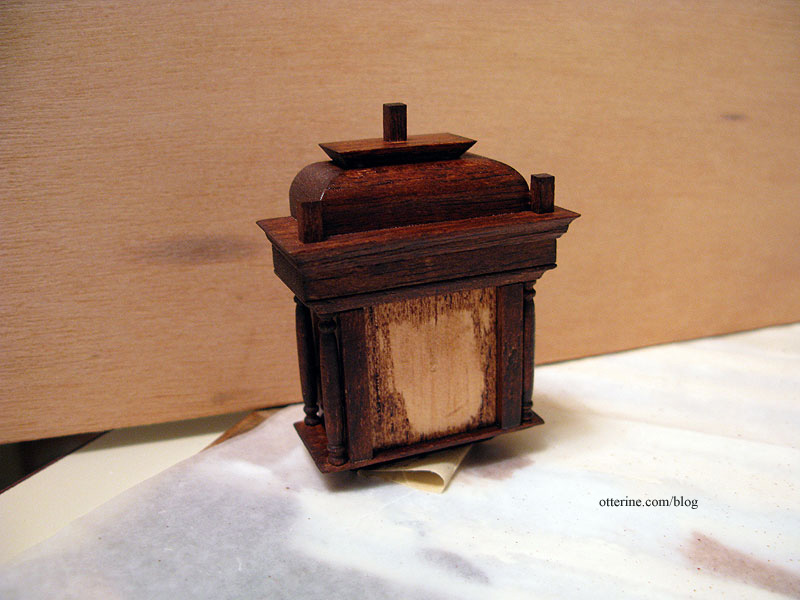
February 19, 2012 | 0 commentsBagnall tall case clock
I am a huge fan of House of Miniatures kits because they can become anything you want – traditional or modern. I stumbled upon the Bagnall clock when I was searching for other House of Miniatures kits and started stalking eBay for a good price. This is a more difficult kit to find.
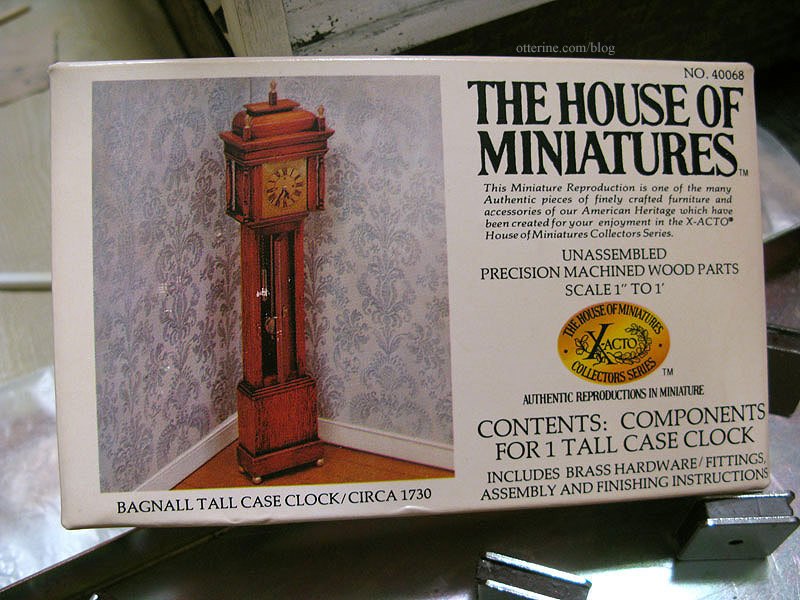
The assembly is more challenging than other House of Miniatures kits I’ve put together, but I am taking my time and using Minwax wood filler to smooth any rough edges and mask the seams. So far so good.
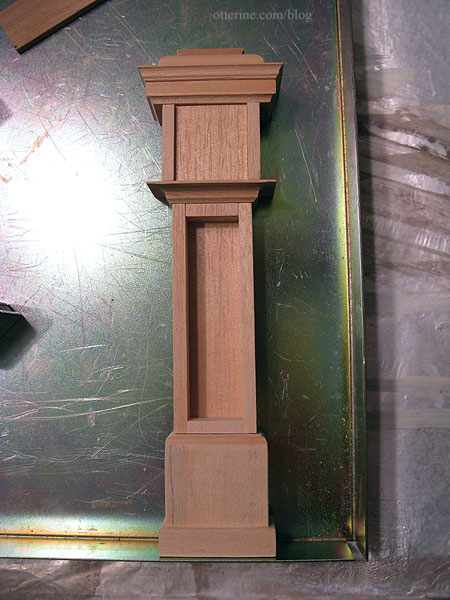
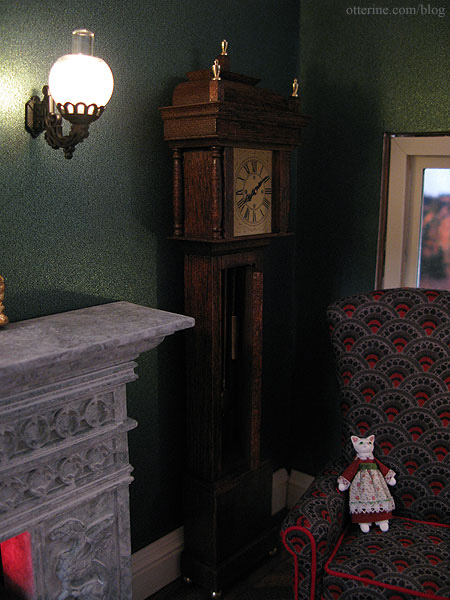
I knew it would be perfect for the Haunted Heritage, but I couldn’t wait to put it in the parlor just to check the size and positioning. The stained finish will be darker than the natural wood shown here, but I think it will brighten the far corner in this dark-walled room.
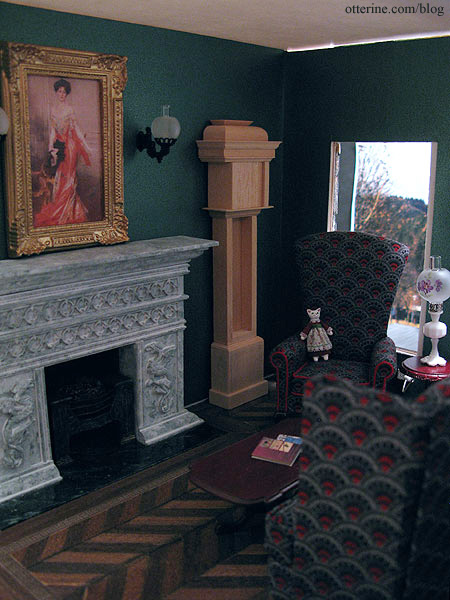
It might be a shame to stick it in the corner between the fireplace and The Chair, but I can just imagine hearing the gentle clicks and whirs of a clock in this room. My grandparents had clocks in their house, and I loved when it was quiet and all you could hear were the subtle sounds of the various clock movements.
I finished the preliminary assembly by adding the turned posts and toppers.
Marlene mentioned making the kit a working clock, but I hadn’t even thought to do that since I liked the face that came with the kit. Interestingly enough, I stumbled across a blog post detailing how to make a House of Miniatures grandmother clock kit into a working clock. I bought a pocket watch from Hobby Lobby and took it apart the same way.
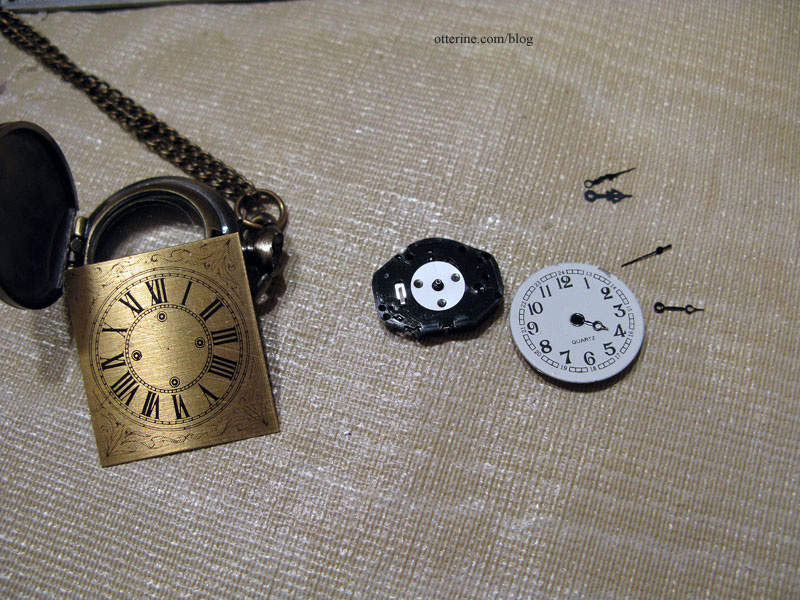
I had even bought one with fancy hands so I could use the mechanism as a complete unit.

Unfortunately, it wasn’t that simple to just swap out the faces. At least, I don’t know enough about watch movements and placement to get it to work. I could see what needed to be done. It just didn’t work for me. (What didn’t work for me was that the pocket watch face had two metal spacers on the back keeping it a certain distance from the mechanism. The kit face didn’t have these spacers, so there was no way to keep the face the right distance from the mechanism. Too close, and the hands couldn’t move correctly. Too far away, and the hands would just hang loosely and not turn at all.)
All was not a waste, though, since I was able to salvage the watch battery for the Reutter Porzellan clock I bought awhile ago, and I’ll keep the clock hands and chain from the watch in my materials stash.
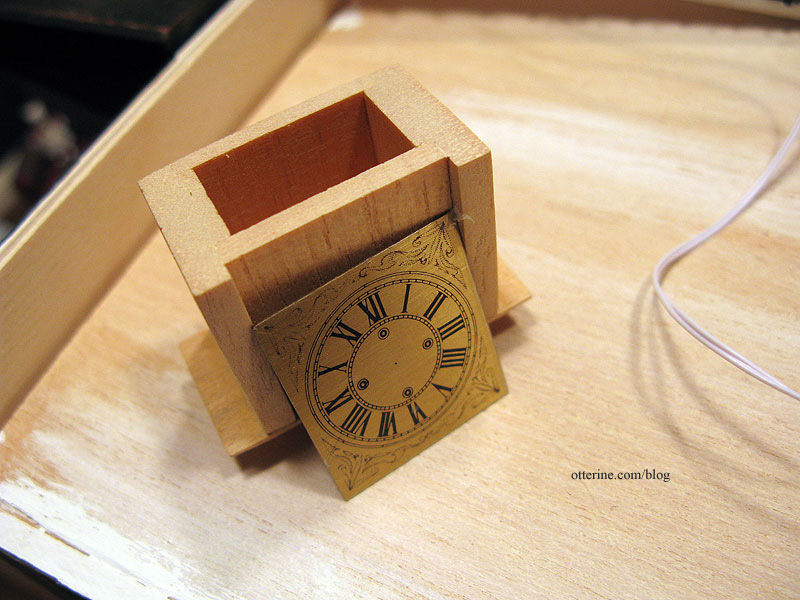
I thought about buying another Reutter clock just for the face, but it really wasn’t that important to me to make the Bagnall clock a working clock. It was the overall design that drew me in to begin with, including the beautiful face included with the kit (shown here with the plastic protective covering still in place).
So, I’ve gone ahead and stained the parts with Minwax English Chestnut to keep moving forward with the project. I had used this stain on the parlor floor, but I originally bought it for this clock kit.
The wood took the stain unevenly because some of the surfaces are the “ends” of the wood and some are the “faces” of the wood grain. I’ll address that once the stain dries, but so far I love it!
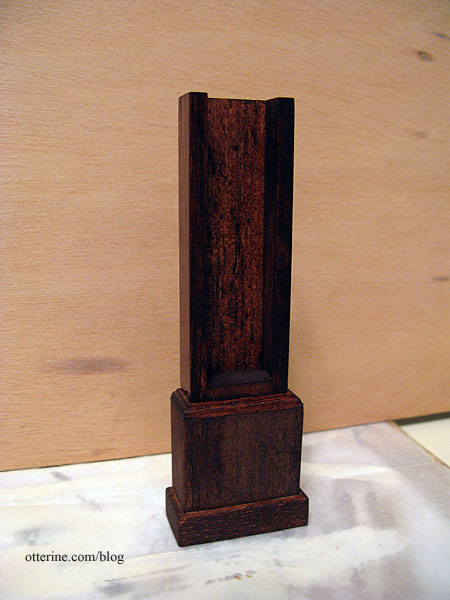
After the stain dried, I used antiquing medium to fill in the more obvious portions of uneven stain and then sealed the wood with two thin coats of Delta Ceramcoat satin varnish. It brought out the beauty of the wood and deep color of the stain for a perfect antique finish.
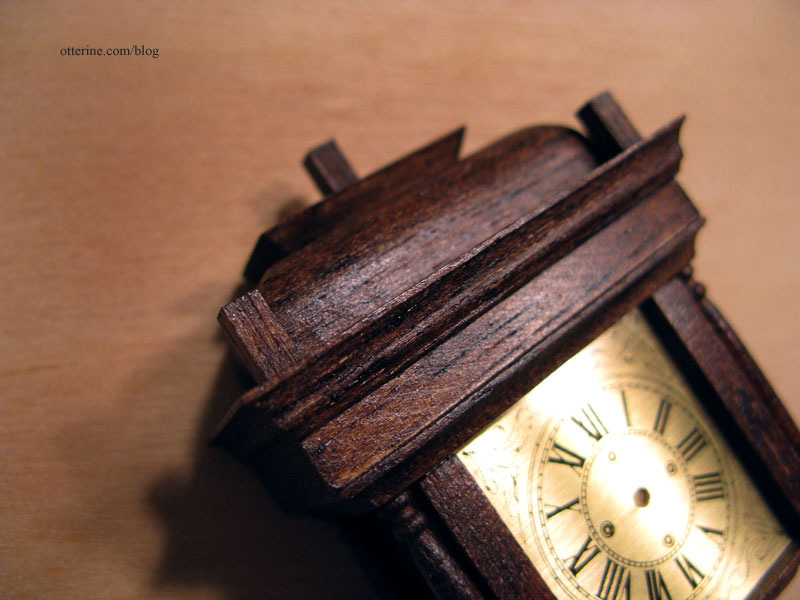
Since I had attempted to make this a working clock and drilled a hole in the kit face, I had to use a brass brad to fill in the middle point where the hands met. It still looks natural to me.
The brass components included with the kit, while not easy to install, are high quality and really make all the difference.
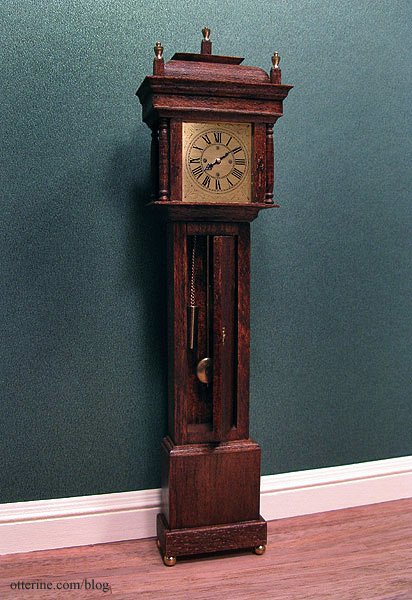
The door hides the weights and pendulum, but it looks beautiful closed as well. One of the things I liked about the kit was you could assemble it so the door could open the other way – say, if you were putting it on a wall where you couldn’t see the pendulum when the door was open.

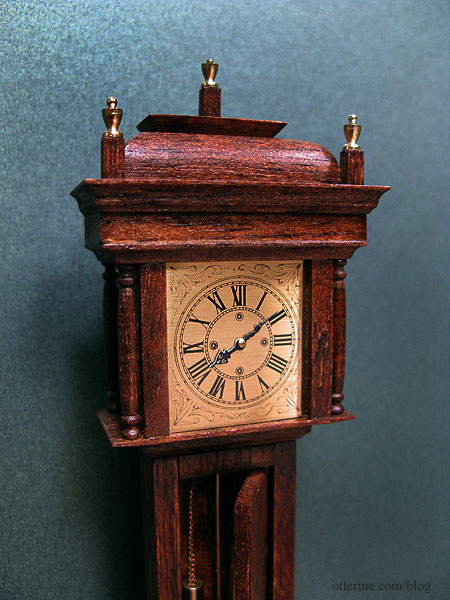
It fits the parlor wonderfully. :D
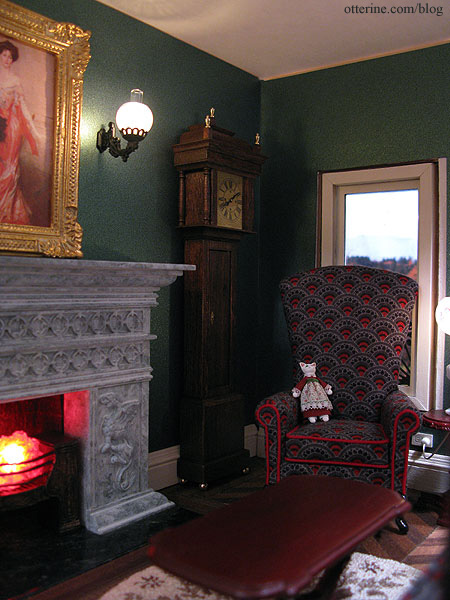
It’s a beautiful clock.
Categories: Furniture, The Haunted Heritage
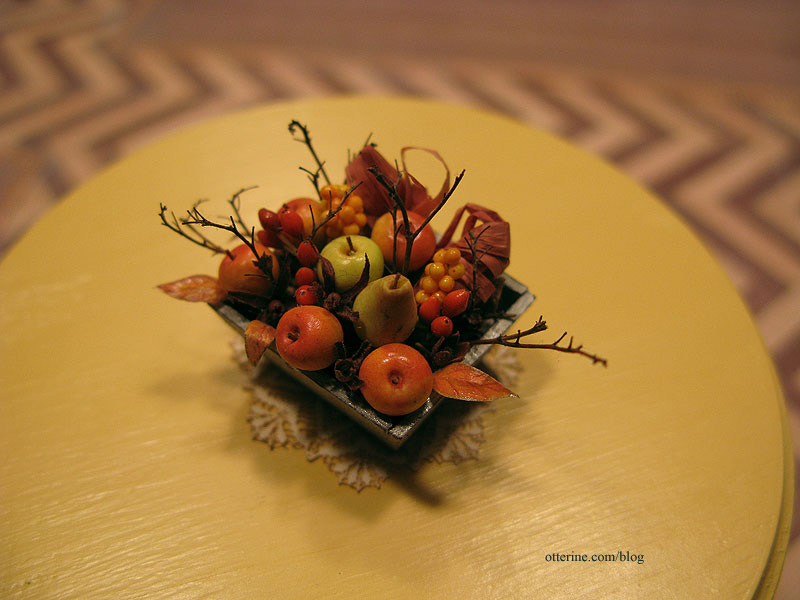
February 17, 2012 | 0 commentsAutumn fruit basket, handmade rug, kitchen stool
I plan to make some polymer clay food somewhere down the line, but when I saw this beautiful basket from Hungarian Miniatures on etsy I just knew it would be perfect for the Heritage.

You would not believe the amount of detail! Bözse makes beautiful minis, and I am proud to display this wonderful creation in the Heritage.
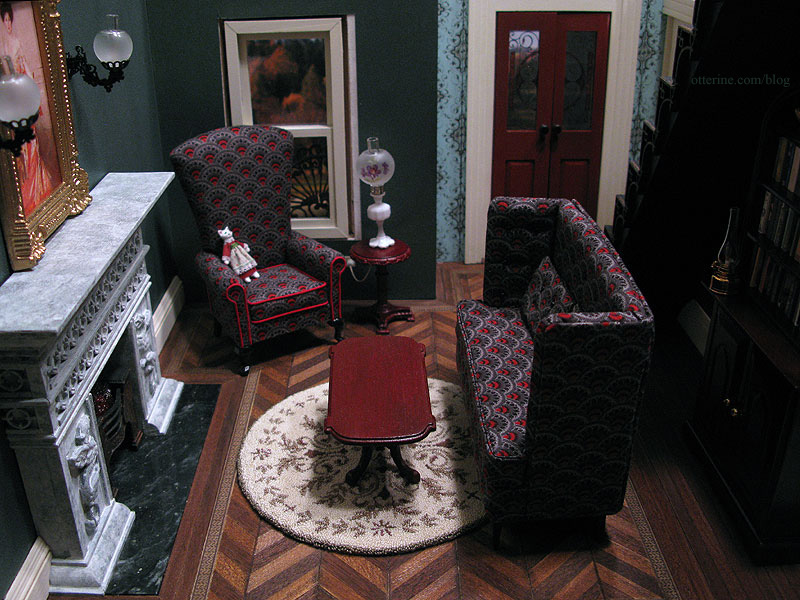
I found this beautiful rug by Katie Arthur of Dollhouse Littles on etsy and loved it. The texture of it is amazingly lifelike.
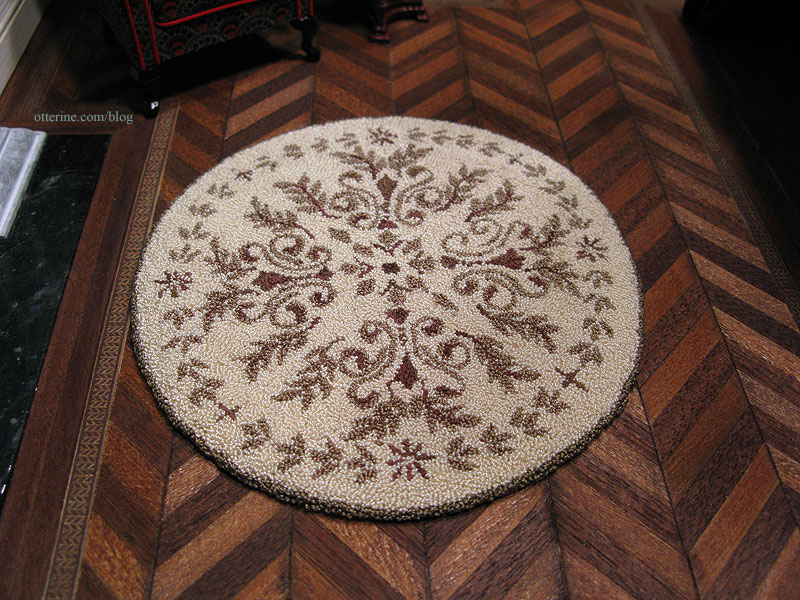
I really hadn’t intended for it to be for the Heritage, but when I put it on the wood floor to photograph it the room felt complete with it. I added the furniture and discovered that the round shape worked perfectly. It didn’t cover too much of the floor and didn’t interfere with the legs of The Sofa. The legs of the coffee table are thin enough so most of the rug shows underneath it.
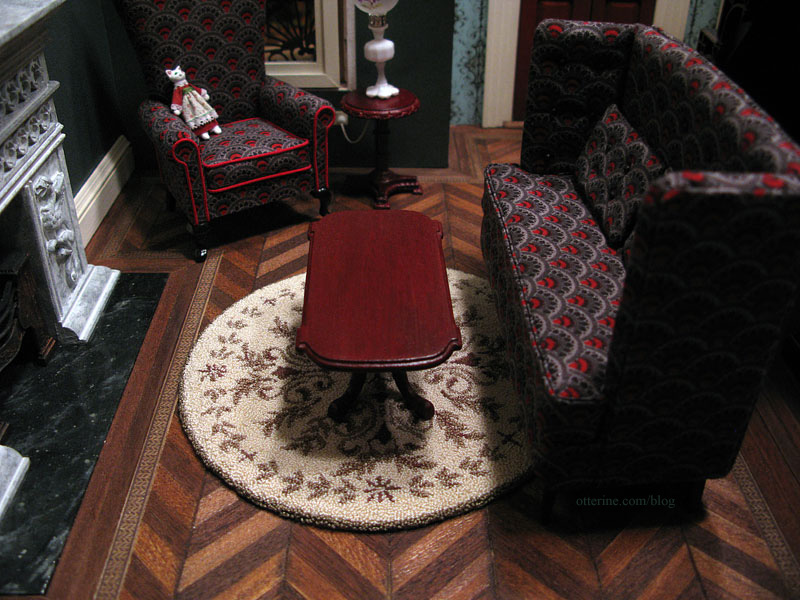
The soft colors and light tone of the rug work well to tie in the fireplace in an otherwise dark room.
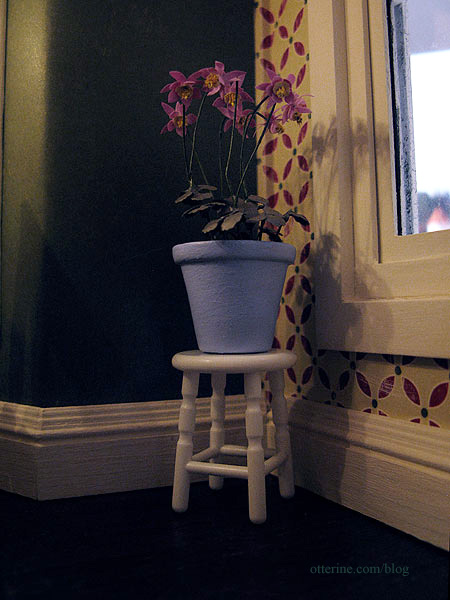
I started making a small Chrysnbon plastic stool for the kitchen. It’s from the Victorian bathroom kit and had been originally intended for Baxter Pointe Villa, but I ran out of time with that build. I needed something to keep the flower pot off the floor and in case grandma needs to reach for something up high. Right now it is just plain white plastic, but I’ll paint it to give it an old, well worn look.
Categories: Miniatures, The Haunted Heritage
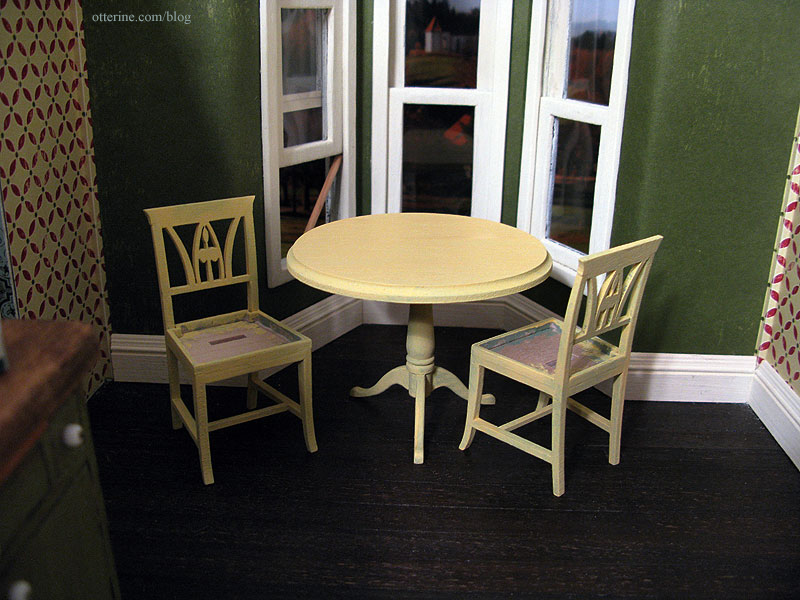
February 16, 2012 | 0 commentsHeritage – kitchen table and chairs
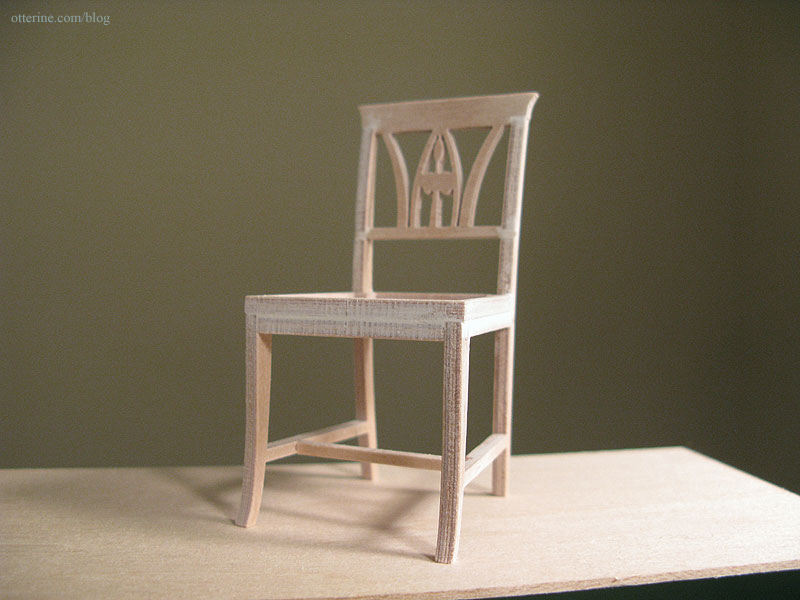
The Lilje chairs kit from Art of Mini is similar to the laser cut kits I’ve worked with, but they are made using what is described as a “water cut technique.”
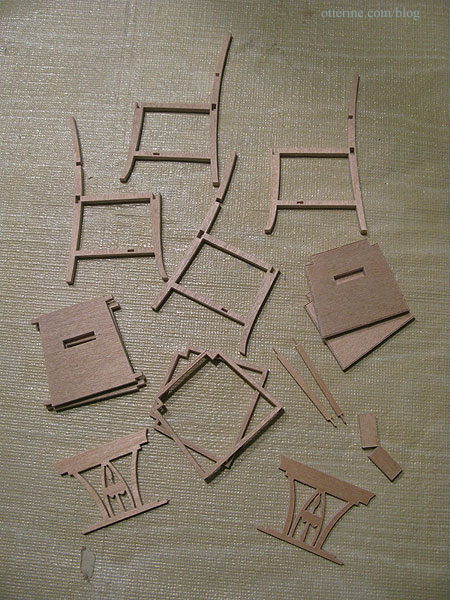
They don’t have the dark ashen residue of laser cut kits but have the same clean and precise cuts.
The instructions were in Dutch, but I was able to scan the document, use OCR on the file and paste the text into google translate for a reasonable translation. ;] It also helped that I had made similar items before.
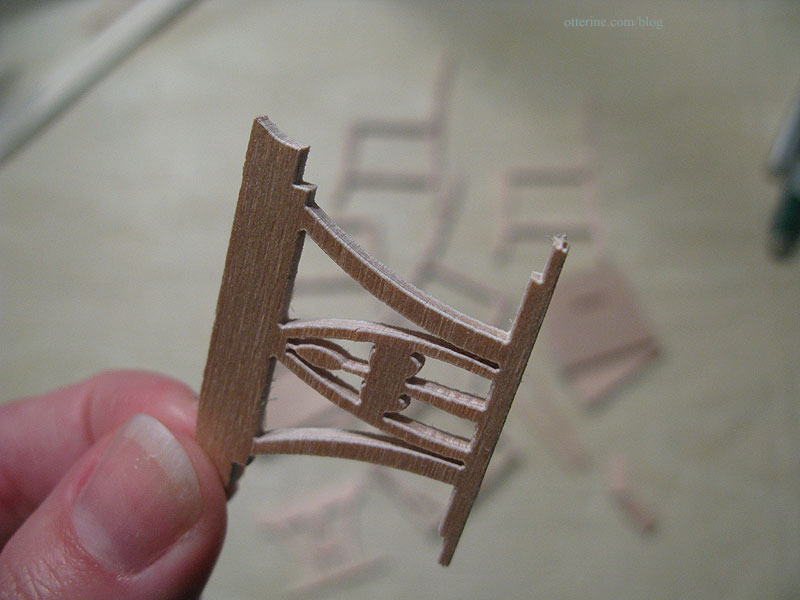
With just a light sanding, the parts were clean and easily fit together. This is a very high quality kit.
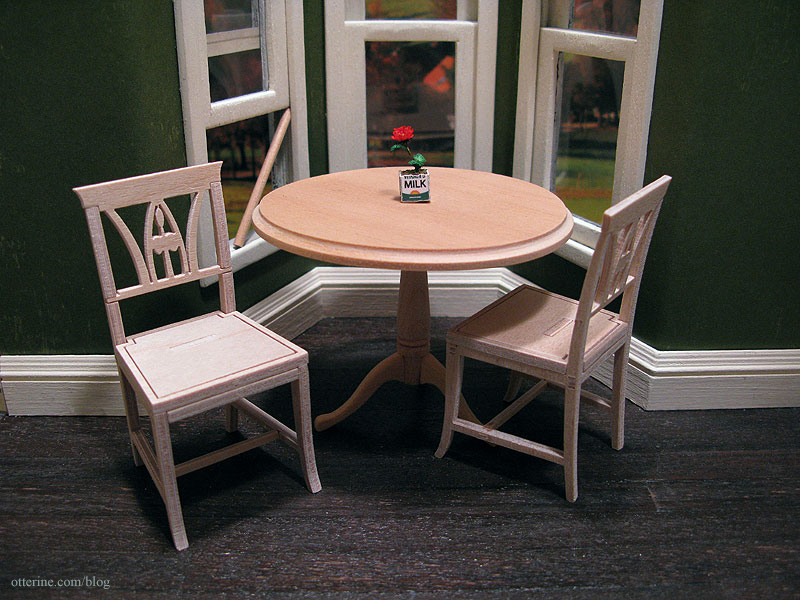
These seem a good match with the House of Miniatures dining table. The seats will be upholstered and the entire set painted.
They have a wonderful cottage feel, perfect for my vintage kitchen.
Some gaps show due to the way they are assembled from parts, so I added a bit of spackling to minimize the appearance and sanded smooth before painting.
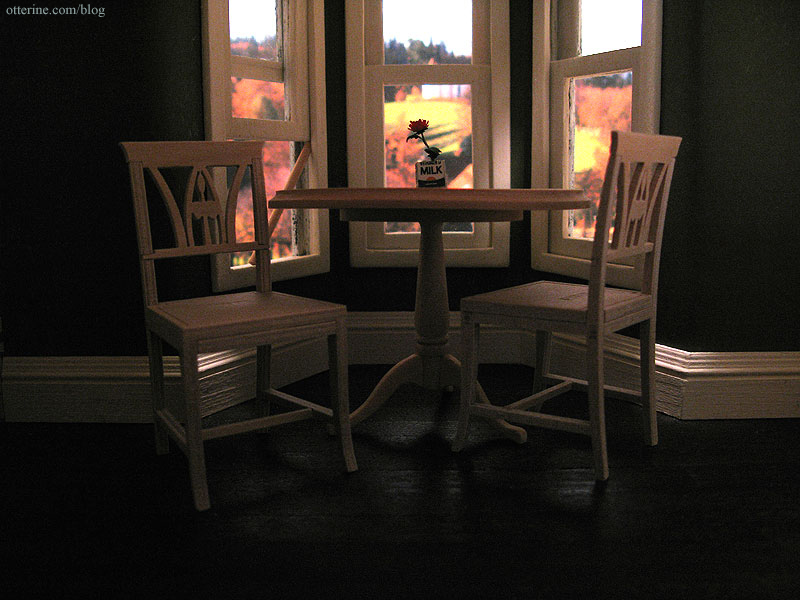
I painted the table and chairs Italian Sage by Folk Art. I wanted to keep the table and chairs lighter in hue so they wouldn’t be lost in the deep room, though I do plan to install a light above the table. Here they are shown with only one coat of paint and a swatch of the plaid I had intended for the upholstery.
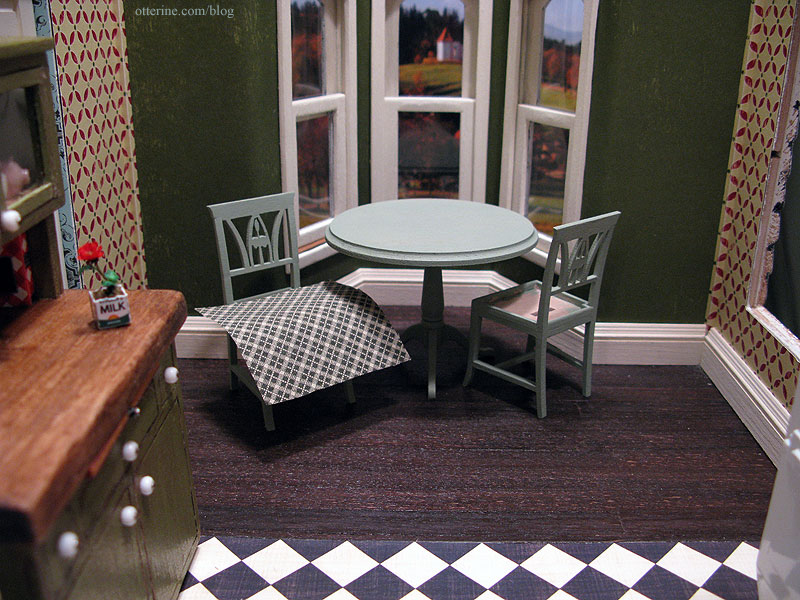
But, in the room, the set was lost and the green didn’t work well.
I opted for Sunflower by Folk Art to cover the Italian Sage used originally.
I was sloppy and heavy handed with the paint for a few reasons. First, I still haven’t sanded it after painting so the wood is rough anyway. I didn’t want to sand the sage paint and create green dust to mix with the new yellow paint. Second, I wanted to see if it even made things better. And, lastly, if it still wasn’t the right color, the yellow is still light enough to cover.
I do like it better already. I discovered the secret to making things look like they’ve been painted over and over. Just paint them over and over. :D

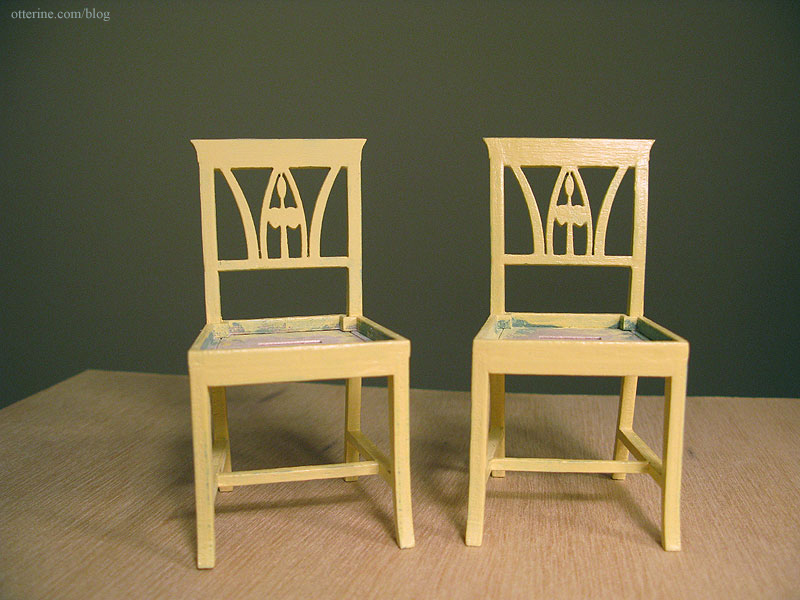
Since these are meant to be old chairs, likely repainted over the years, I rubbed a bit of the yellow off the top to let the green show through. I then added a light coat of Delta Ceramcoat satin varnish. It darkened the yellow and gave the set a nice, hand-painted look. The one on the right is the finished chair.
There are a lot of great quilting cottons in the fabric stores, but finding the right scale isn’t always easy. There are some great miniature fabrics on the market, but they are most often found online and sometimes you just want to be able to see them in person. I printed out a sheet of paper with a 1 inch square opening, a 1.5 inch square opening, and a 1″ x 4″ rectangular opening to take to the local fabric store. Looks like robot! :[]
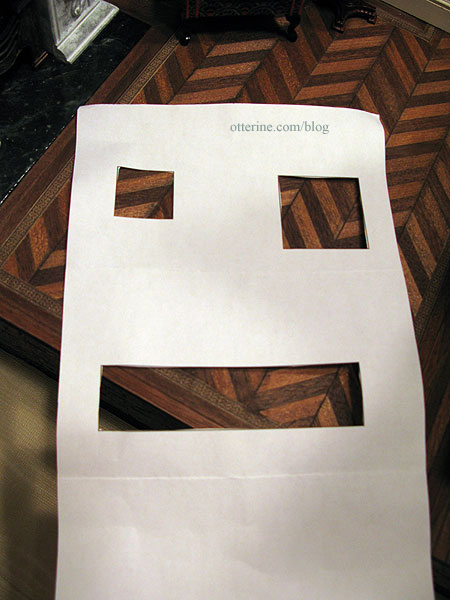
The 1.5 inch square is roughly the size of an upholstered chair seat or a throw pillow.
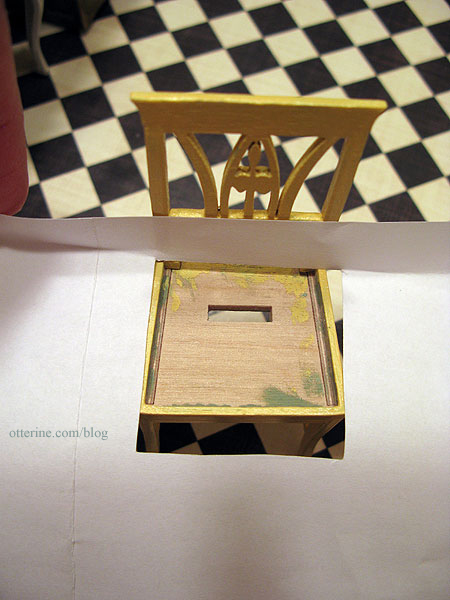
Holding these over various fabrics allows me to see how small or large the patterns would be in miniature.
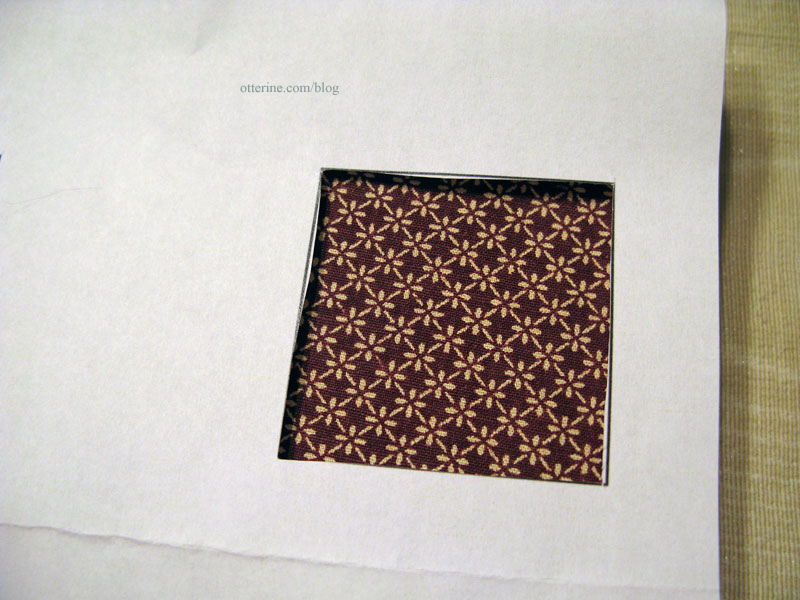
For the kitchen chairs, I chose a brown and ivory print. I think it is close enough to the dark red to tie in well with the wallpaper.
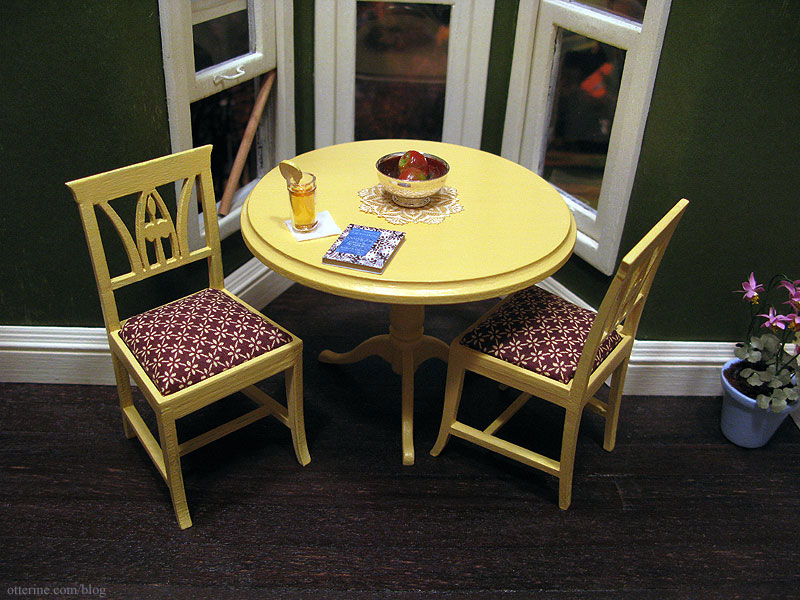
Grandma is enjoying an iced tea and reading about lacemaking. The paper doily is from miniatures.com, and the Clare Bell Brass silver Revere bowl is from Green Gables Dollhouse. The apples were purchased some time ago, though I can’t recall where. The flowers are from Michelle at Little Rabbit Miniatures.
I love the soft sheen on the table from the satin varnish, and those cushions sure look comfy! :D
Categories: Furniture, The Haunted Heritage
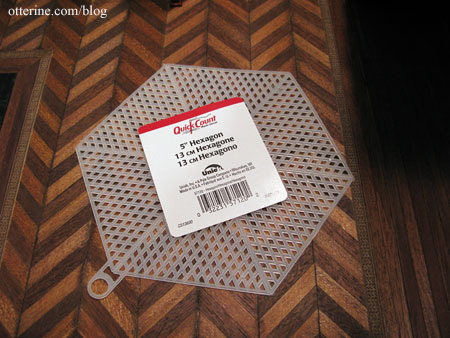
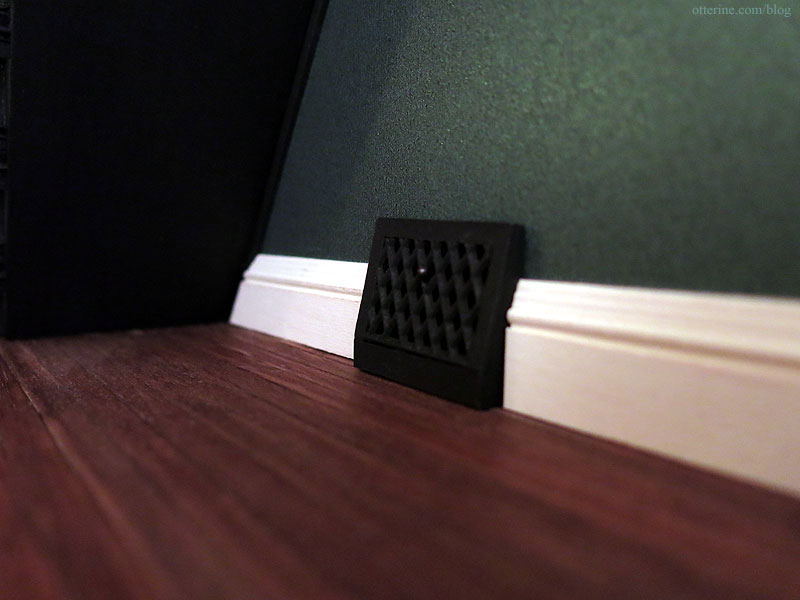
February 14, 2012 | 0 commentsHeat registers
My original thought for heating the Heritage beyond the parlor fireplace was to place painted radiators in the rooms. Even though the rooms are somewhat spacious, radiators do take up a decent amount of space. Then I ran into this fantastic tutorial by Kris at 1 Inch Minis: gravity baseboard registers. Perfect!

I followed her notation that the registers would be located on the inside walls not so much for accuracy but mainly because I had already tacked down the baseboard under the bay window and large window in the kitchen. I didn’t want to have them in the more modern under-the-window fashion in the rest of the house while the ones in the kitchen were the old-fashioned kind on the inside walls. And, why go through the trouble of building fun features only to stick them deep into the house where they aren’t readily seen? :]
When I went to Michael’s to pick up a piece of plastic canvas, they also had a hexagon shape with diamond shaped holes. I thought that might make for some fancy grates, so I picked that up as well. I still bought the regular canvas with square holes just in case; I didn’t need to be running back out to the store for it if the other didn’t work. The extra trip’s worth of gas would have cost more than the sheet of canvas. :D I cut the canvas so that the solid border served as the bottom of the grate.
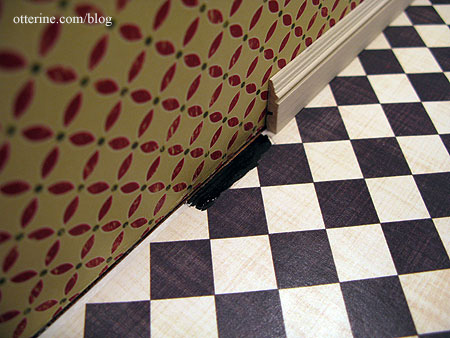
I’ve opted for one in the kitchen and one in the parlor, though I made only one just to try out the method. I’ll figure out the placement of the upstairs registers when I get there but will probably end up with one in the bedroom and one in the bathroom for certain, maybe one in the hallway.
This was my first time working with mat board, and I rather liked it. It was easy to cut but could still be sanded like wood. And, it doesn’t fall apart like wood often does when you cut thin strips of it. The only part I used bass wood for was the 1/16″ strip at the top since I already had the wood in my stash of materials. For the inside flap, I used leftover scraps of the parlor wallpaper since it is plain black on the reverse side. Nothing goes to waste! :D For the lever, I used a black nickel head pin cut to size.
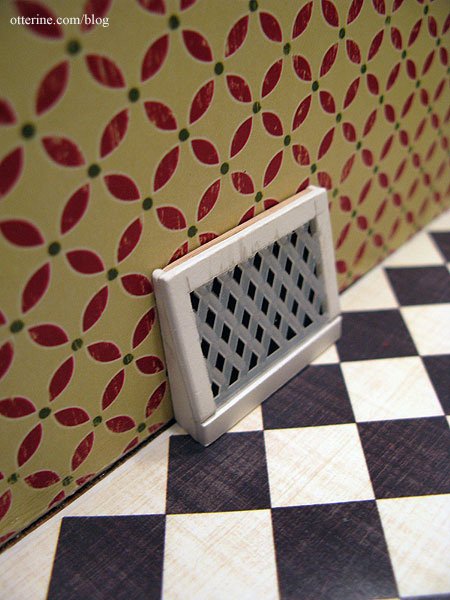
I also painted the floor black since it showed through when I did the dry fit.
I placed the register under the Roper range so it could be seen, though it’s one of those details that’s mainly for me. :D It’s not strikingly obvious, but I am glad it’s there.
For this house, I’m not going to worry about the cold air returns…but I have some ideas for The Brownstone. ;]
Categories: The Haunted Heritage
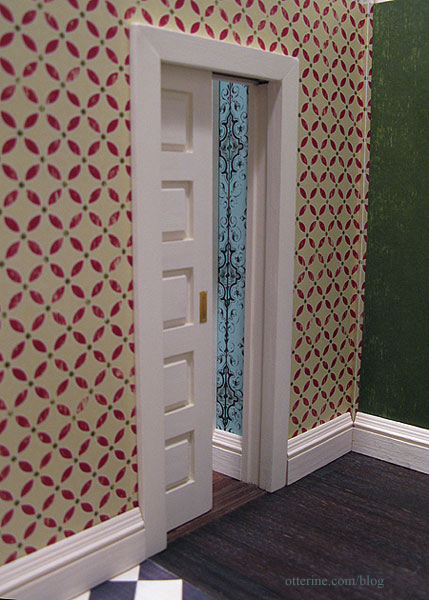
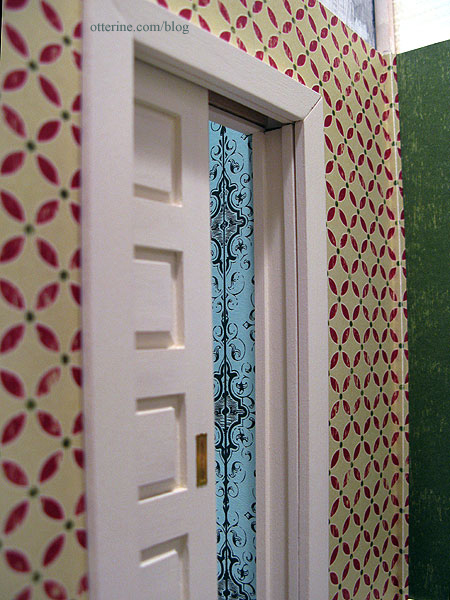
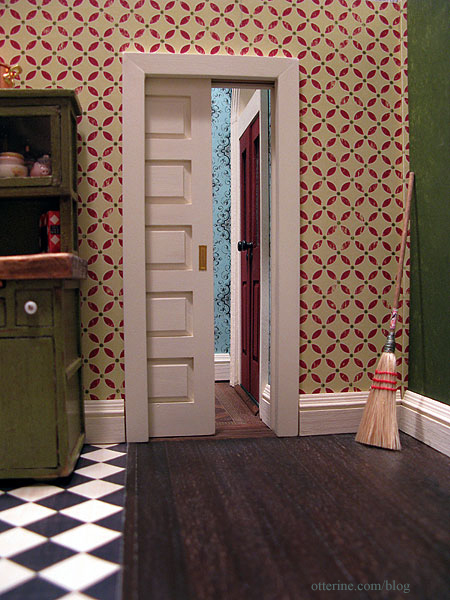
February 12, 2012 | 0 commentsFoyer to kitchen pocket door, part 4
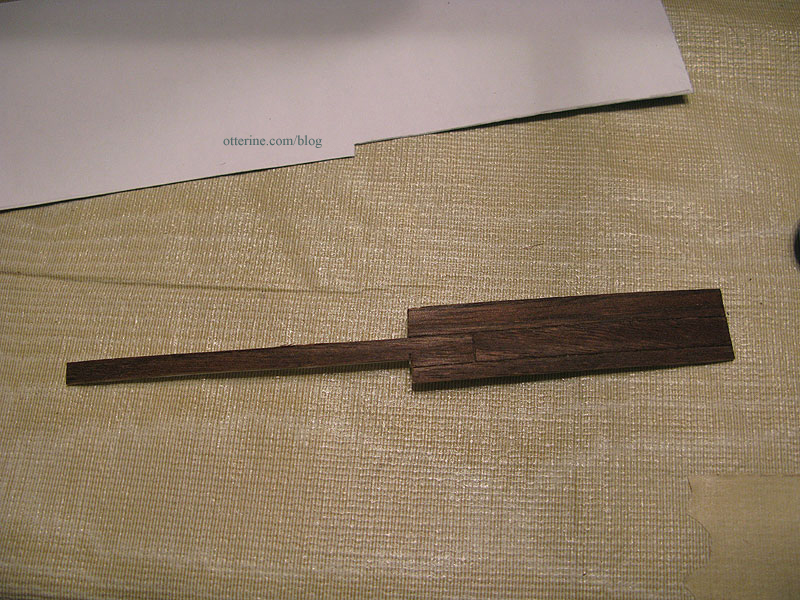
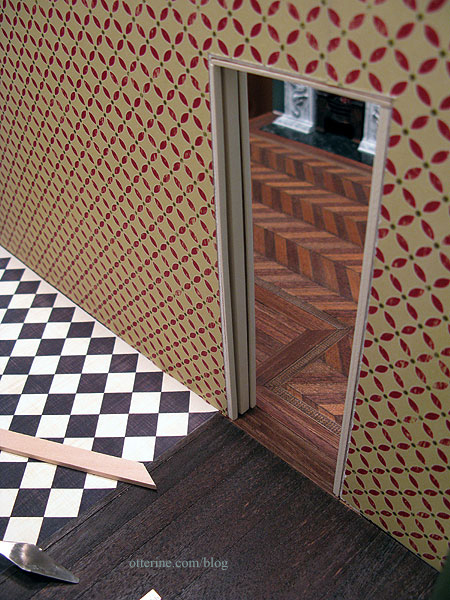
Completing work on the pocket door. With the parlor floor and wallpaper in place, I can now trim the pocket door. I started by finishing the threshold between the parlor and the kitchen. I used the same flooring as the parlor, figuring it would matter more to have a clean finish from the parlor leading to the door than it would from the kitchen which is a less formal room.
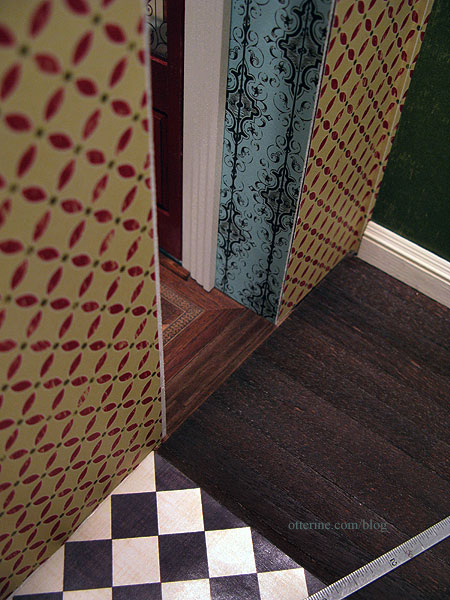
I cut a small tab of floor material to sit inside the pocket door wall. This will keep the lead edge of the pocket door elevated inside the pocket wall so it doesn’t get hung up on the flooring when closing.
I lined the top of the pocket door opening with 1/8″ x 1/16″ strip wood, checking all the while to make sure the pocket door remained functional. This trim was planned when I cut the initial opening and was calculated into that measurement. All the trim will be painted Vintage White to match the rest of the interior trims before I install it permanently.
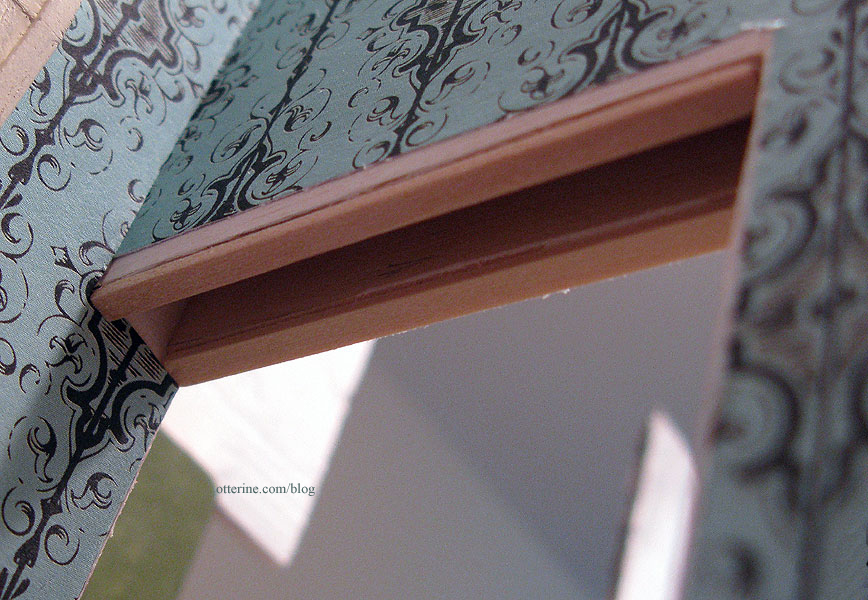
Since the house itself isn’t square, there is a larger gap between the closed pocket door and the wall at the top than there is at the bottom.
I built a door frame to mask some of the gap and to finish off the lead edge of the pocket doorway.
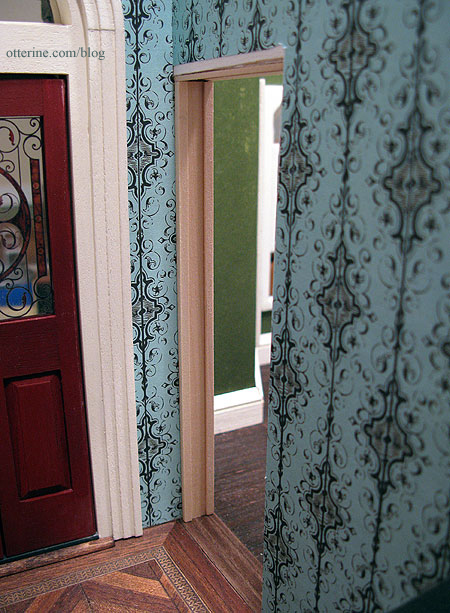
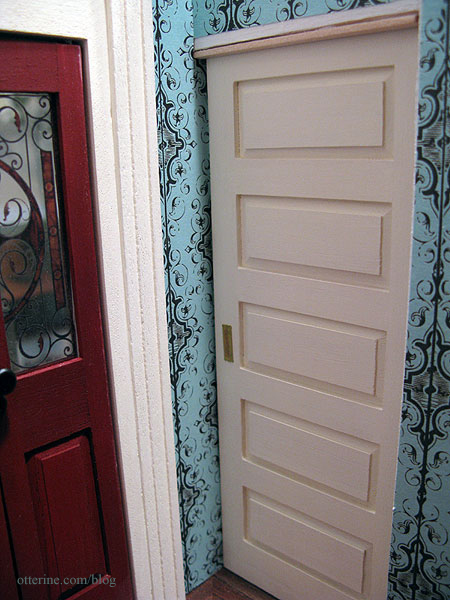
It doesn’t fix the problem completely in the kitchen, but it at least looks more polished.
With the frame painted and installed, the gap is invisible in the parlor.
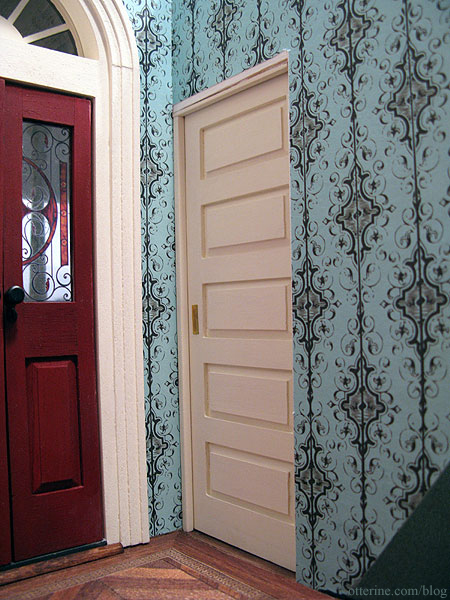
The painted trim around the door frame really completes the look of the pocket door. As you can see, the pocket wall is a little warped — just the nature of thin plywood — but it doesn’t really seem to show except in this head on shot. This will not be a vantage point once the kitchen ceiling board is installed, and it doesn’t interfere with the functionality of the pocket door.
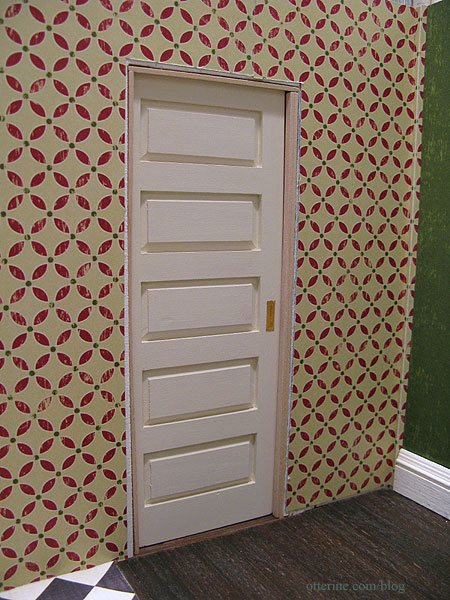
Once the interior trims were in place, I could line the kitchen and parlor walls with trim. For the kitchen, I opted for plain bass wood since it matches the trim used on the kitchen windows.
I again used spackling to fill in the small gaps, shown here before filling.
For the parlor, I used fancier molding to coordinate with the interior trim of the front door. It’s not exactly the same as the front door trim, but it has similar detailing.
These small details always increase the realism by finishing off raw edges and giving a sense of completeness.
Categories: The Haunted Heritage
February 11, 2012 | 0 comments


NOTE: All content on otterine.com is copyrighted and may not be reproduced in part or in whole. It takes a lot of time and effort to write and photograph for my blog. Please ask permission before reproducing any of my content. (More on copyright)

Categories:
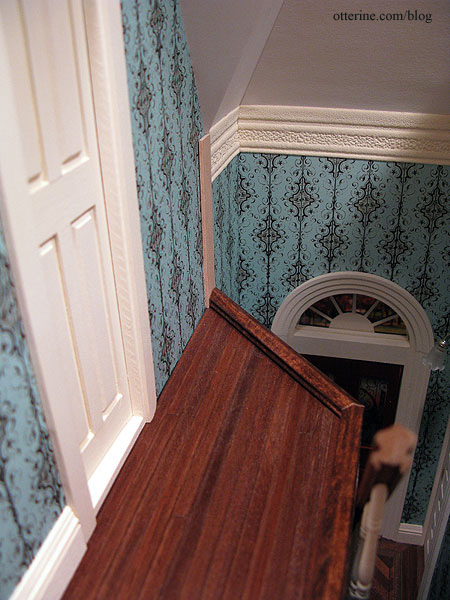
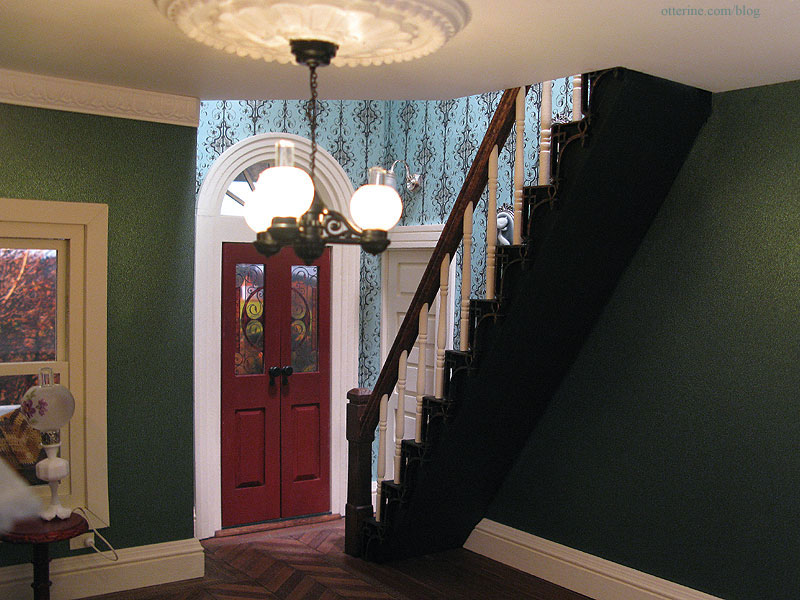
Heritage – hallway railing
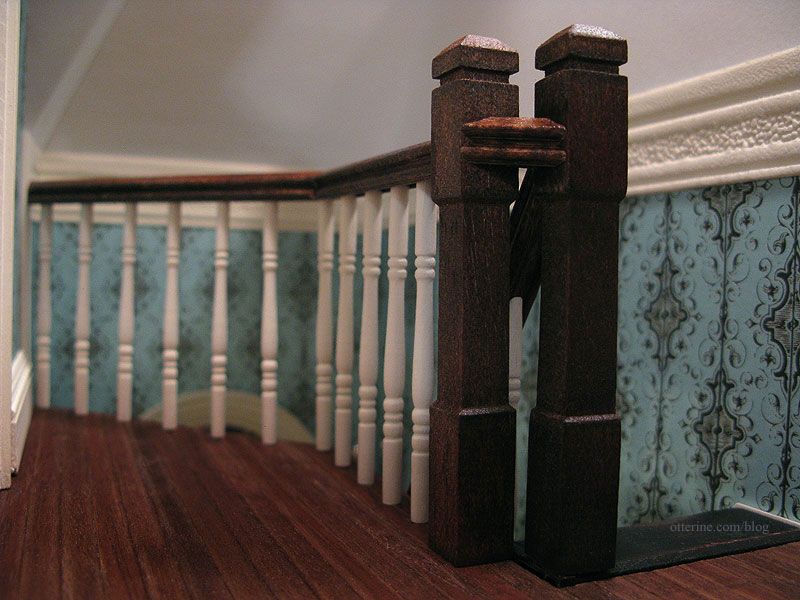
I’ve seen a few treatments for joining a stair railing to a balcony railing. The easiest by far is a double newel post option, but the way the room is set up they would have to be literally side by side with no gap between them. Not the most appealing aesthetic. :\
My Dremel savvy friend and I were talking about this today, and he had a brilliant solution: offset the newel posts and have a small angled section of railing between them. I think this will make perfect visual sense and it also eliminates having to navigate around a harsh corner on the way to the bathroom. :D
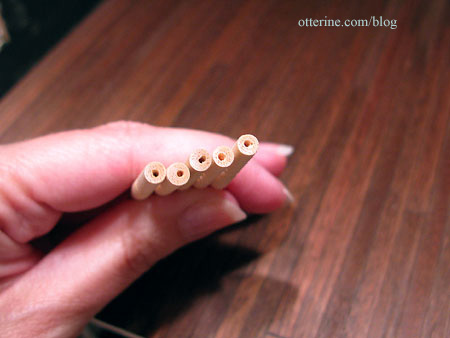
Before I could address that, I needed to tackle the railing and spindles around the balcony. I marked the floor where the spindles should go starting with the spindles adjacent to the stairs. I thought those adjacent spindles should line up, even though you probably won’t be able to see that once this room is enclosed. This made the spindles on the straightaway 5/8″ apart. On the angled section, I just put a dot at the space between every pair of boards.
There was a gap between the foyer paper and the hallway paper. I cut a scrap of basswood to hide this area and painted it Vintage White to match the trim. I’ll show that board further in this post.

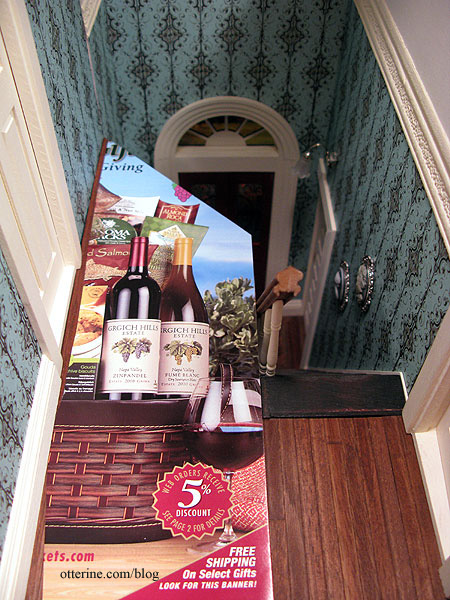
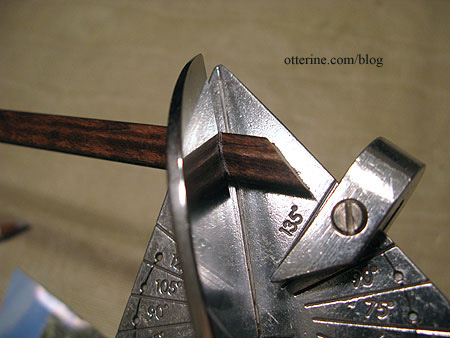
I had to do some math to determine the angle at which the two railing pieces would meet on the balcony. I took a piece of scrap paper (a wine gift catalog…how distracting) and folded it over the edge of the balcony.
I folded the point in half.

I lined up the fold with the end of the railing strip and marked it with a light pencil. I had already cut this piece to length, with a 45° angle at the end by the wall.
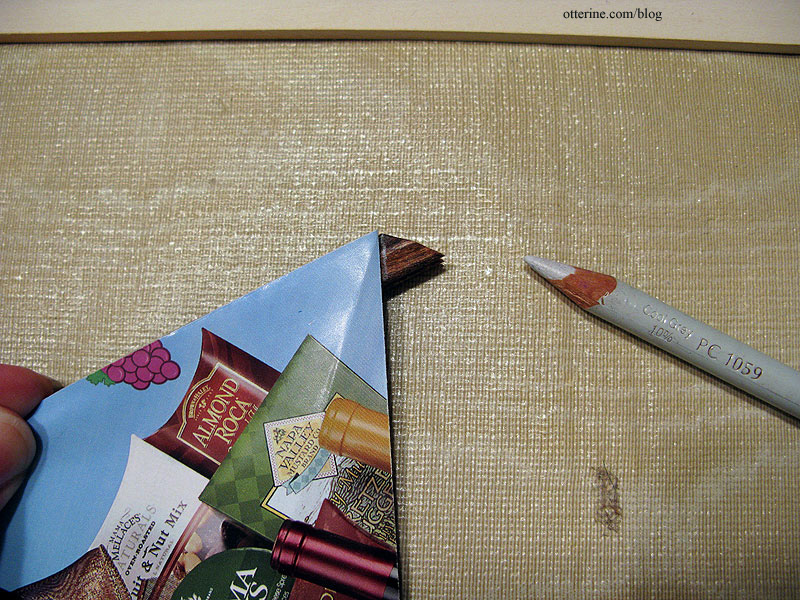
I then flipped the paper guide over and marked the railing piece that would join the first.
You can use an Easy Cutter even if the angle you want isn’t one of the presets on the tool. Just line up your blade with your guideline and cut using the tip of the cutter. The tip stays sharper longer because it doesn’t get used as much as the lower part of the blade.
The wall board and two railings are cut and ready for spindles. I will cut the excess from the long straightaway railing piece after I get the spindles in place and the newel post position marked.
The floor board is just over 1/8″ thick. I cut down the wires I had glued into each spindle to sit within this depth.
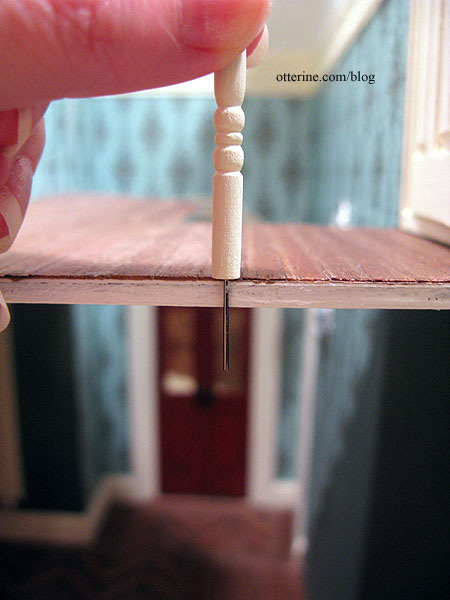
I taped around my drill bit to make sure I didn’t drill through the ceiling.
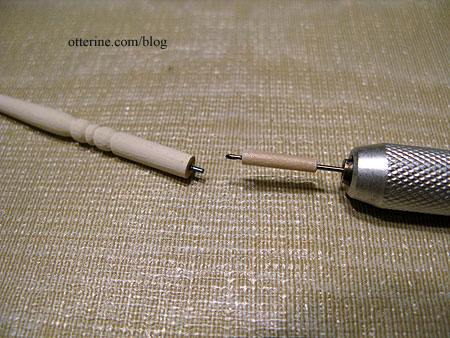
As with the stair spindles, I didn’t get the holes drilled in the bottoms of the spindles exactly in the middle, so there was some visual adjustment done for each one.
These are glued in place in addition to having the wire supports. I also installed the remaining baseboard now that I had the vertical finishing trim glued in place.
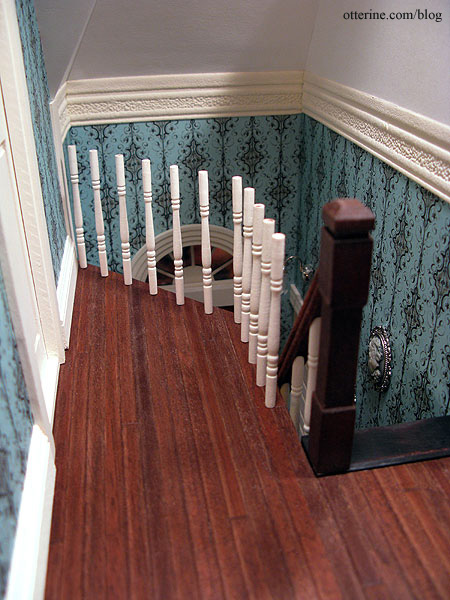
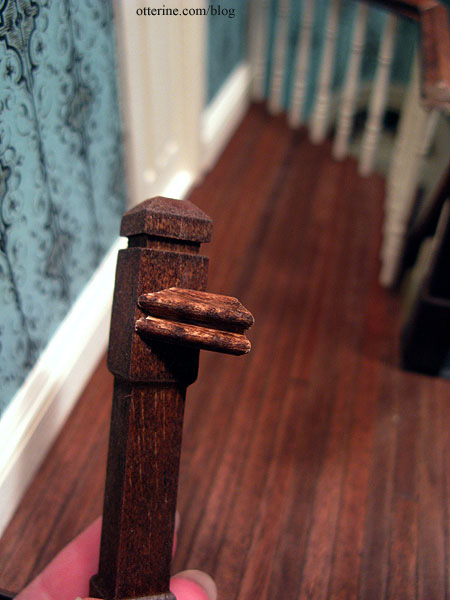
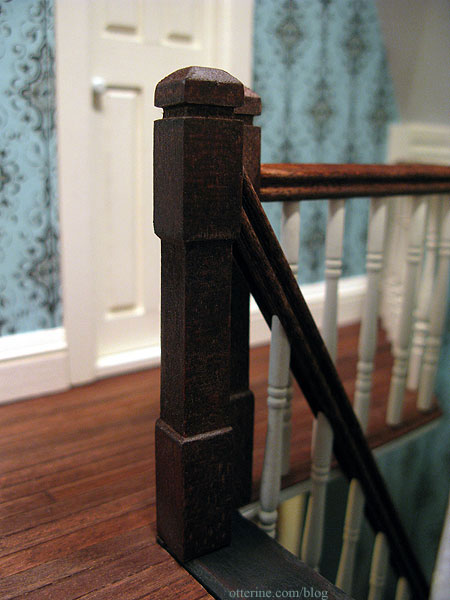
I cut a piece of railing with 45° cuts at either end to join the newel post at the top of the stairs with that of the balcony. Took me three times to get this to work, and it’s still not the cleanest cut. The wood kept splitting. I also had to shave off a little from bottom of the stair newel post since the staircase extended above the hallway flooring. I needed the two newel post tops to match relative to one another.
I did a dry fit of the railings, then it was time to glue it all in! Once I had it all in place, I touched up the stain on the railing. Success!!!! :D
And, from overhead. The angle join could be cleaner but with the stain touch-up and the low light in the hallway, the minor gap isn’t really noticeable.
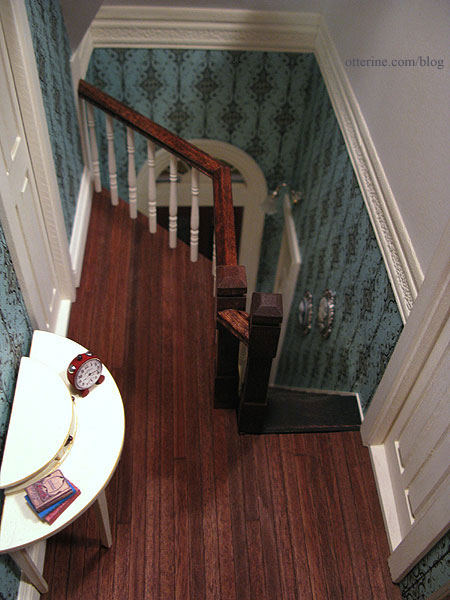
Overall, this part of the project was about as difficult as I thought it would be and turned out about as well as I had hoped. Definitely a success all around.
Categories: The Haunted Heritage
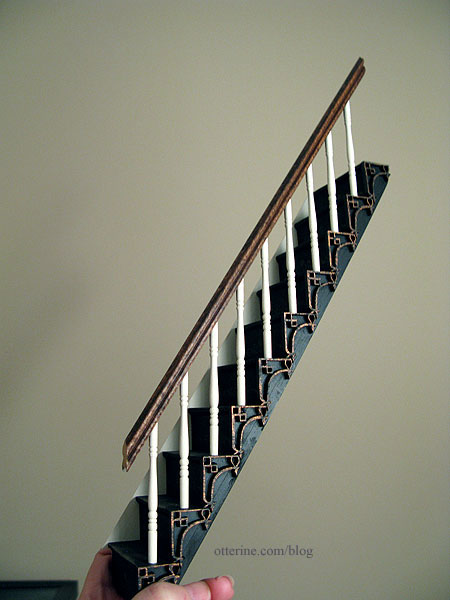
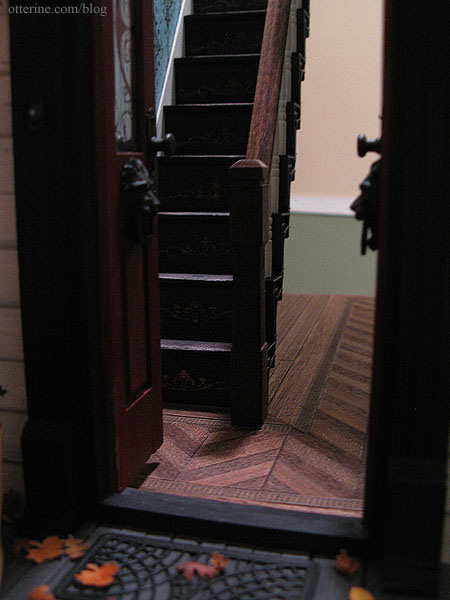
December 16, 2012 | 0 commentsHeritage interior staircase, part 6
Completing work on the interior staircase. After getting the new spindles painted and installed on the stairs, I stained the replacement railing from Manchester Woodworks. From there, I procrastinated, even breaking a new kit out of its box. :D I am now prepared to tackle the rest of this project. Truth be told, I can’t put the hallway ceiling on until I do, and that is holding up progress on the attic and finishing the house overall. In simpler terms, I have no choice! :O
I wish I could tell you there was a magical formula I used to get this railing on. I was just winging it with some visual measuring and crossed fingers. I have no idea if it is actually straight, but it looks it, so I suppose that is all that matters. Here’s what I did.
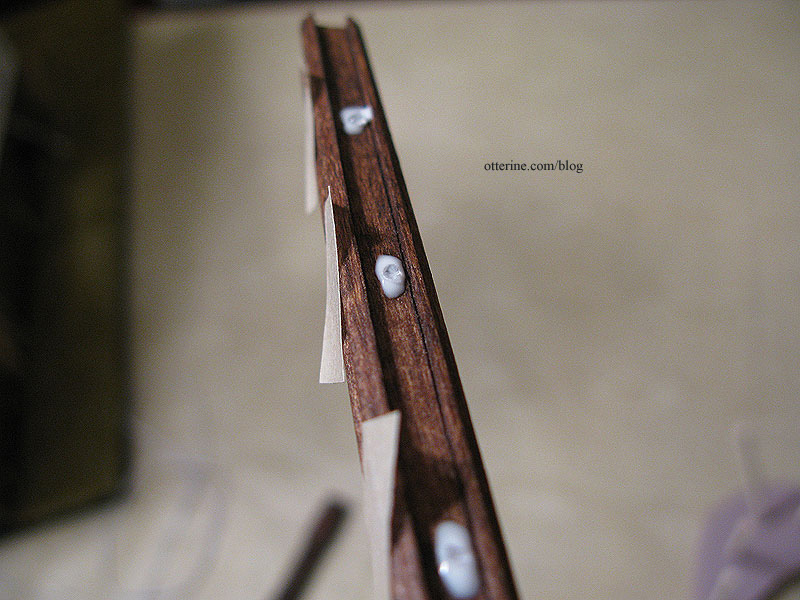
I used the back of my Micro-Mark gluing jig to hold the stair assembly in place. I bent all of the spindles to make them as even as possible (they have wires in the bottom that were glued into each stair). I dry fitted the railing onto the spindles to determine where the railing would hit the front newel post. I also measured where the top newel post would hit the railing and snipped the end.
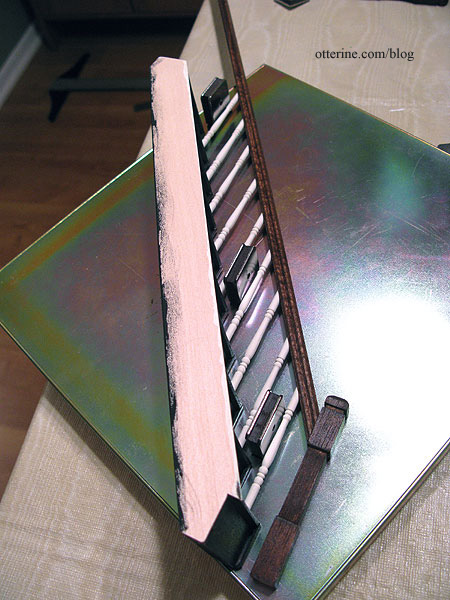
I marked where the spindles hit the railing with masking tape strips.
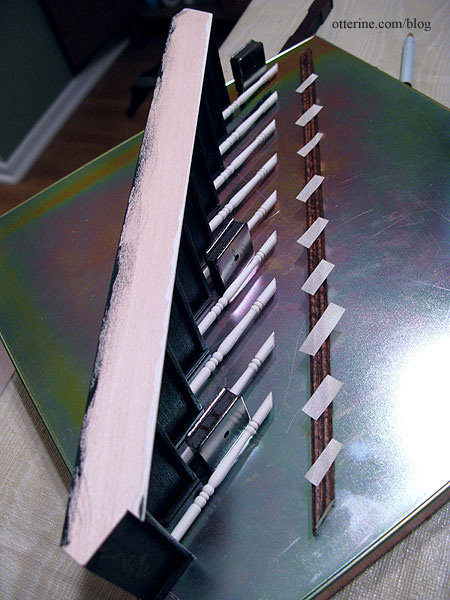
I added a drop of tacky glue and super glue gel behind each piece of tape.
I placed the railing onto the spindles while the stairs were still on the jig but immediately lifted the assembly off the jig and adjusted the railing quickly before the glue set.
The stair assembly fits so snugly that I didn’t bother with glue along the wall. I did glue the foyer newel post to the floor and the railing.
It worked!!! :D
I was able to then add the final baseboard trim and crown molding behind the staircase. I also added a baseboard heat register (my bash of a tutorial by Kris at 1 Inch Minis).
Next up, the upper hallway balcony railing.
Categories: The Haunted Heritage
December 15, 2012 | 0 commentsHeritage – bedroom stairs
As you may recall, I raised the ceiling in the parlor on the first floor to accommodate the new narrow staircase but left the kitchen the original lower height so I wouldn’t have to alter the swinging windows of the upper floor. This means the hallway floor is higher than the bedroom floor. My childhood home had a door that opened to reveal the bottoms of a staircase, and I’ve seen this in other old house. I’ve also seen a set of two to three steps leading up a wall to a door. So, I figured this was the way to go for the Heritage.
When Lyssa and I went to the Art Institute during her visit this past October, we naturally saw the Thorne Miniature Rooms first. In one of the fine bedrooms, there was just such a setup. :] I already had a vague image in my mind, but this helped solidify the idea.
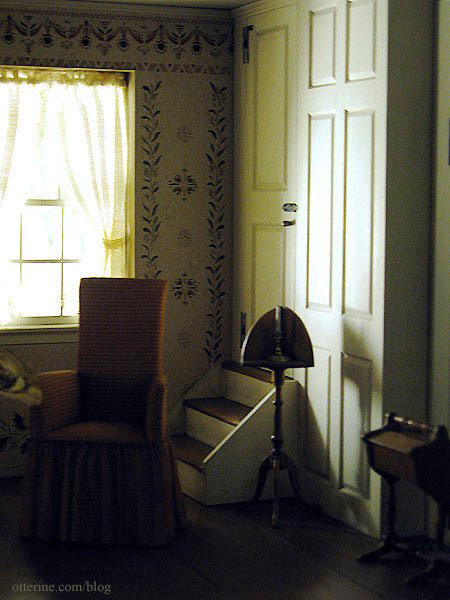
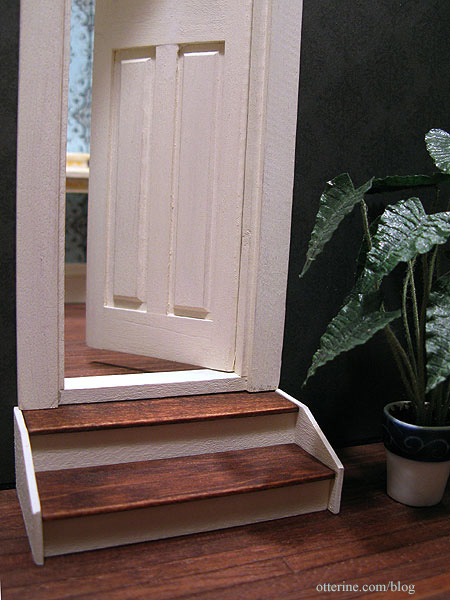
I like how the top step is even with the door, as though it were a continuation of the floor on the other side. This makes sense to me, so that one doesn’t open the door and immediately fall down a drop off.
I didn’t need to make up that much height between the floor and the bottom of the door, so I used pieces of foam core board to build two steps. I chose this material mainly because I had scraps and it is easy to cut. I cut two pieces 2 3/4″ L x 1 1/4″ W, and two pieces 2 3/4″ L x 1/2″ W. It wasn’t quite high enough, so I add a shim of 1/16″ thick balsa.

I then added risers from 1/16″ thick basswood.
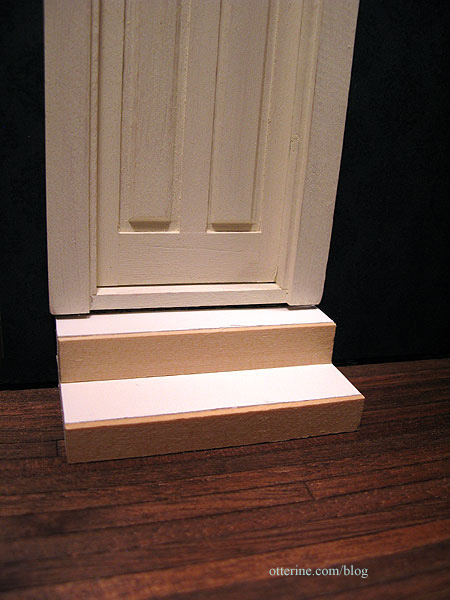
I cut treads from 1/16″ thick basswood but didn’t glue them to the assembly since I wanted to stain them to match the floor.
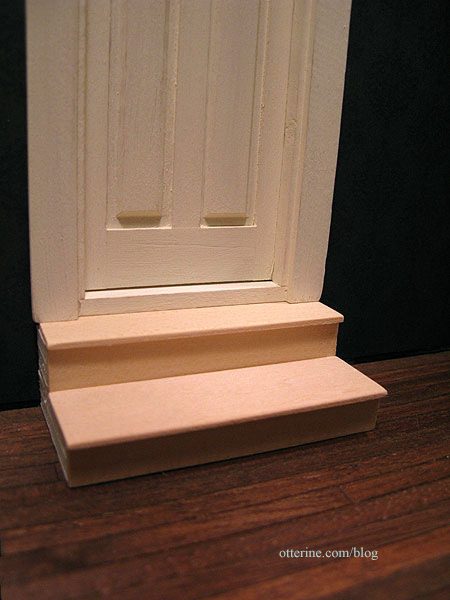
I cut side pieces from 1/16″ thick basswood that will enclose the entire unit.
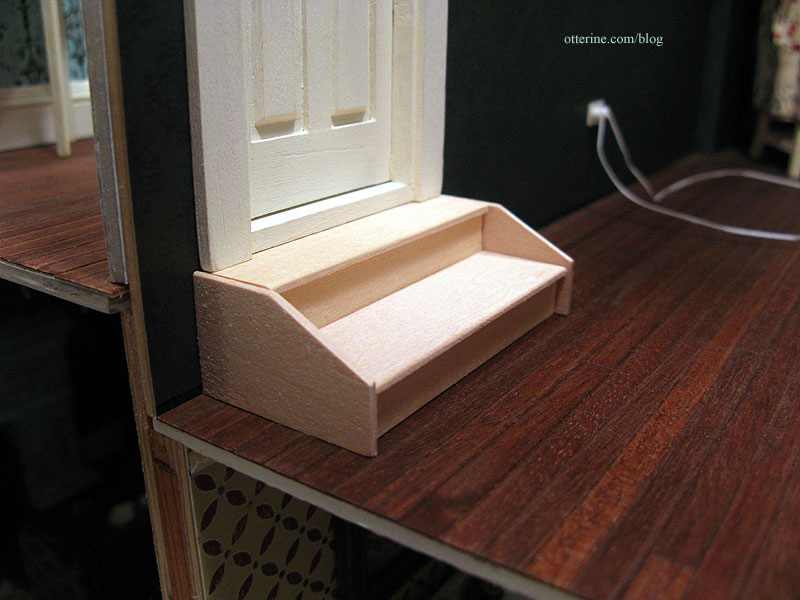
I stained the treads Minwax English Chestnut and painted the remaining pieces Vintage White by Folk Art to match the trim throughout the house. I was impatient for the stain to dry, so I’ve assembled the stairs for a quick photo shoot. No more floating door. :D
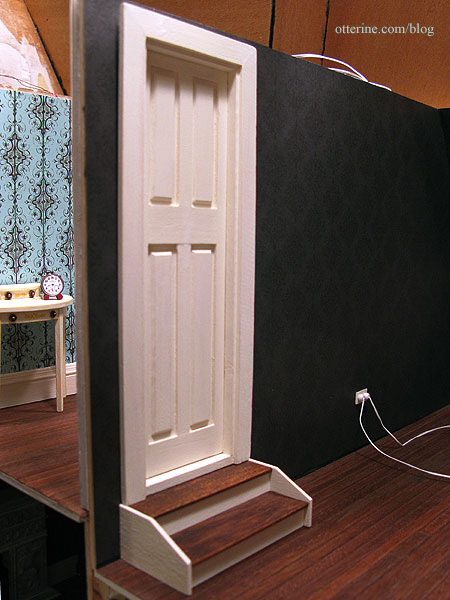
When installed permanently, the door will open into the bedroom, but the photos look better with the finished frame showing. The door is also in need of final finishing.
Categories: The Haunted Heritage
December 13, 2012 | 0 commentsHeritage – bedroom wallpaper, part 4
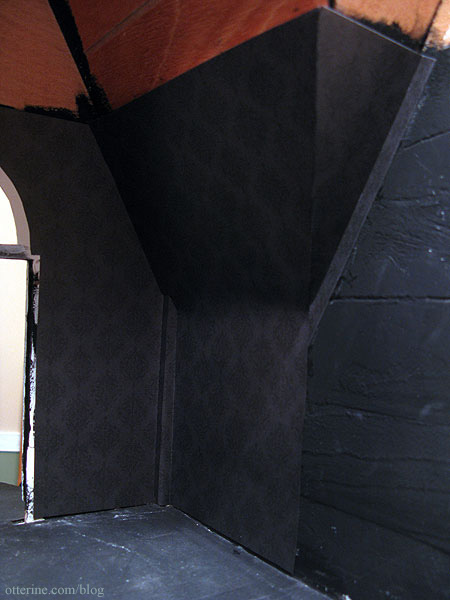
Completing work on the bedroom wallpaper. The wallpaper pieces had to be glued in place in a particular order for the tabs to work. I started with the two side triangle pieces and then added the pieces for the left side angled wall and the front window wall.
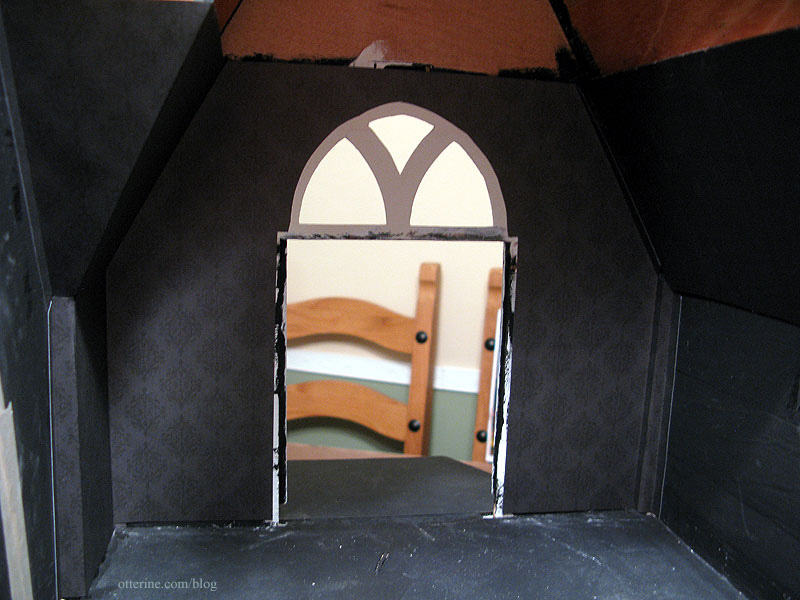
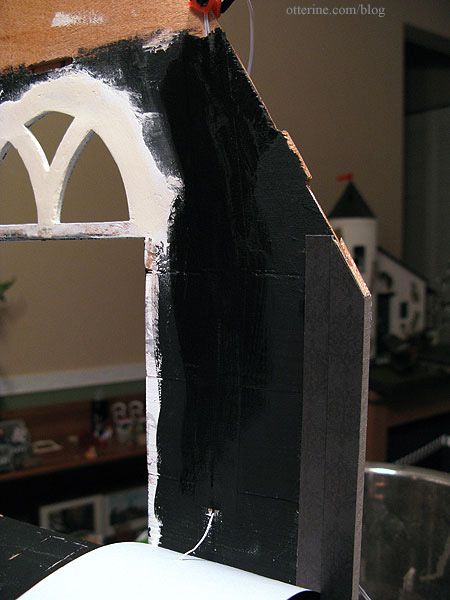
Next, the right side angled wall. The darkness of the paper made it hard to work with but it also helped mask any issues with the fit. As you can see, the outer wall is rather rough in texture. I didn’t smooth it because any modest bumps that show under the paper should work in my favor for an old house and it’s not as rough as it looks in the photo. :]
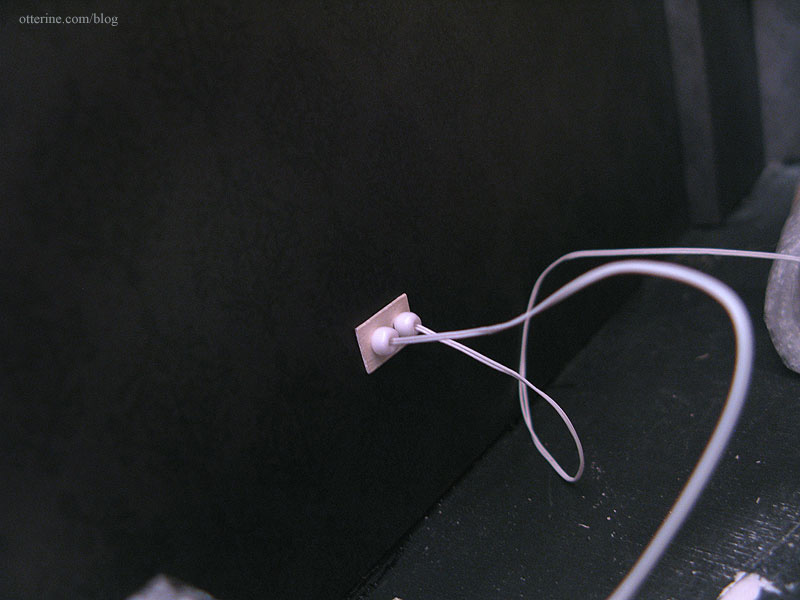
I had to wire the two bedside lamps and the vanity lamp before I could proceed. I used my usual faux outlet technique for the wiring: a bead for the plug and a handmade wooden outlet to disguise where the wire enters the wall. I had made the wiring channels previously.
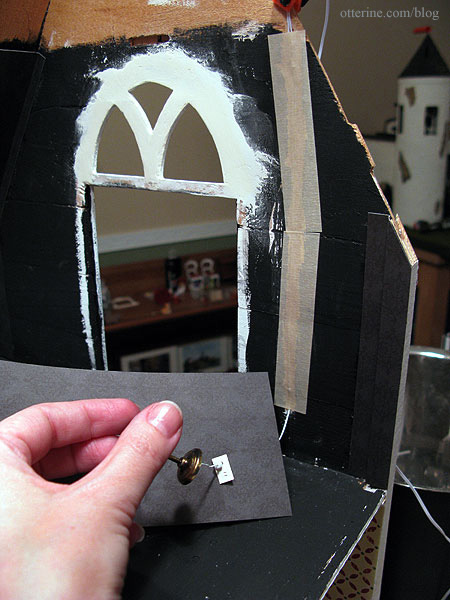
I used masking tape to keep the wires in their respective channels and then painted it black.
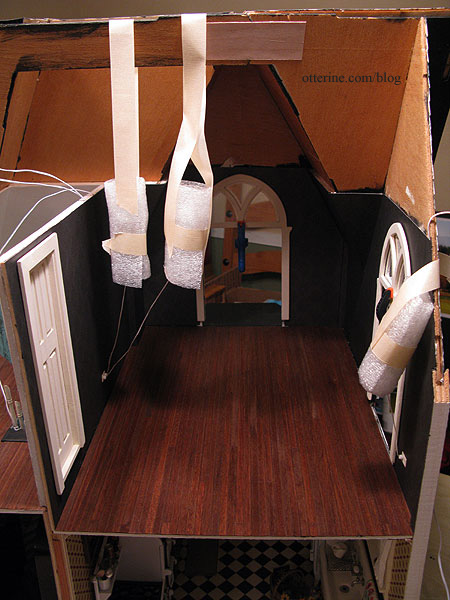
Since there was a lot of work left to be done in and around this room, I encased the lights in protective wraps.
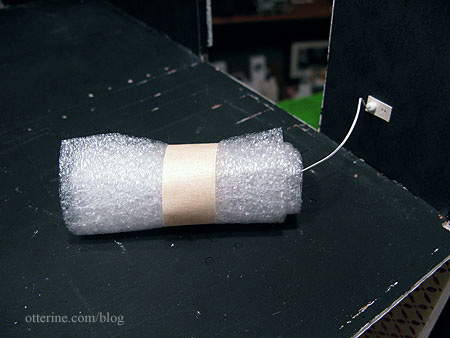
The bedside lamps were both plugged into the same outlet, which will be behind the headboard, but I didn’t wire them to work as a set. I thought it would be nice to take photos with only one or the other lit.
The pattern didn’t end up matching on the outer wall where it was pieced, but it doesn’t bother me enough to cut a new piece from the reserve sheet. Once the ceiling, baseboard and furnishings are in the room, I doubt it will even be noticeable.

I used tape to suspend the wrapped lights and glued the flooring in place.
The interior window trim and door aren’t glued in place just yet, but we’re getting there! (Yes, I plan to address the floating door.)
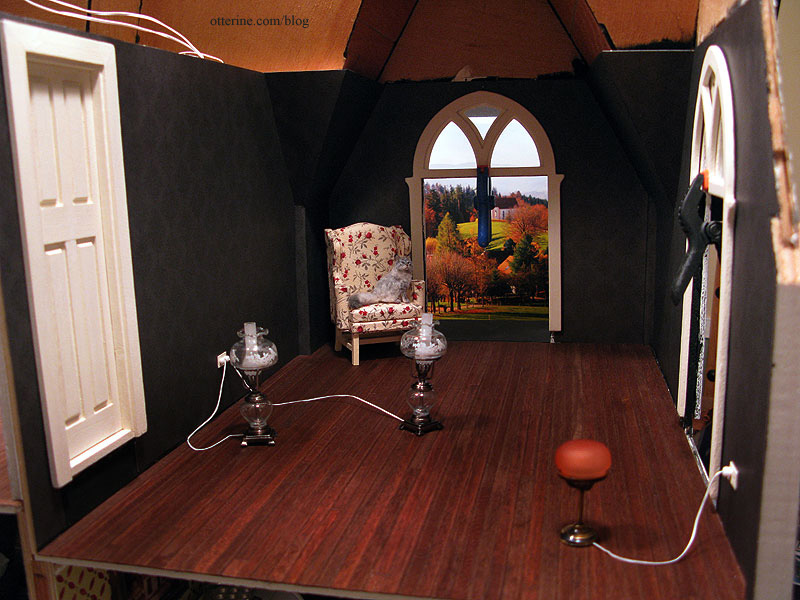
I love these lamps! :D
Categories: The Haunted Heritage
December 12, 2012 | 0 commentsHeritage – bedroom wallpaper, part 3
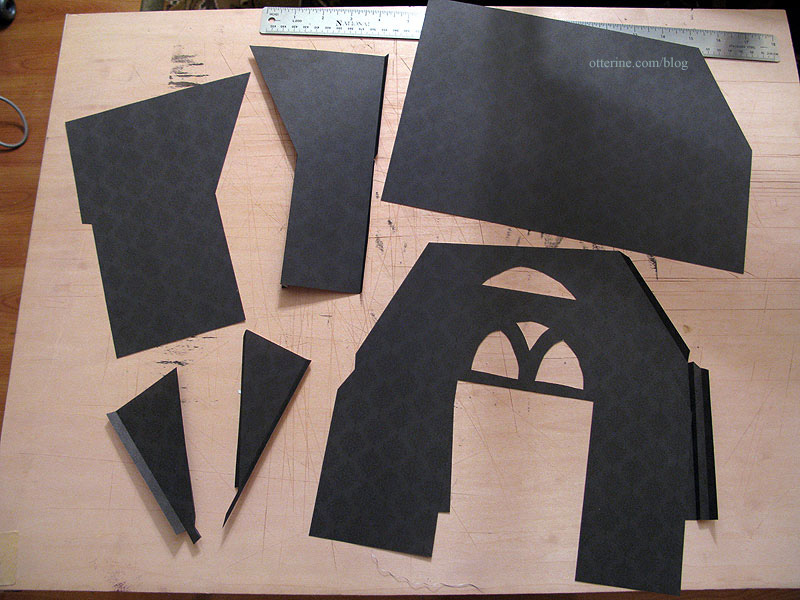
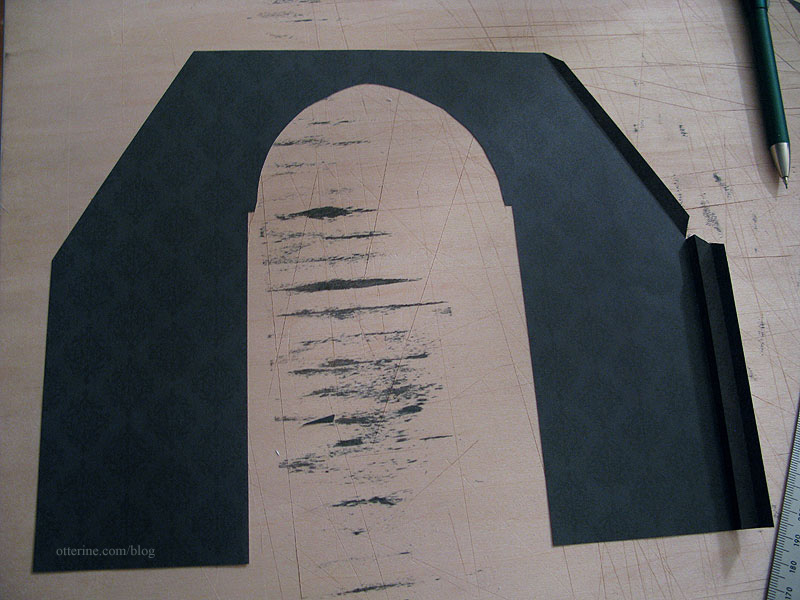
Continuing work on the bedroom wallpaper. With the patterned paper copies ready to serve as templates, I started cutting the actual scrapbook paper – Out of Time by Recollections. I matched the pattern so the final pieces were exactly like the templates. (If I were to do this again, I would have mounted the final paper to an acid free backing paper to build up the thickness for durability.)
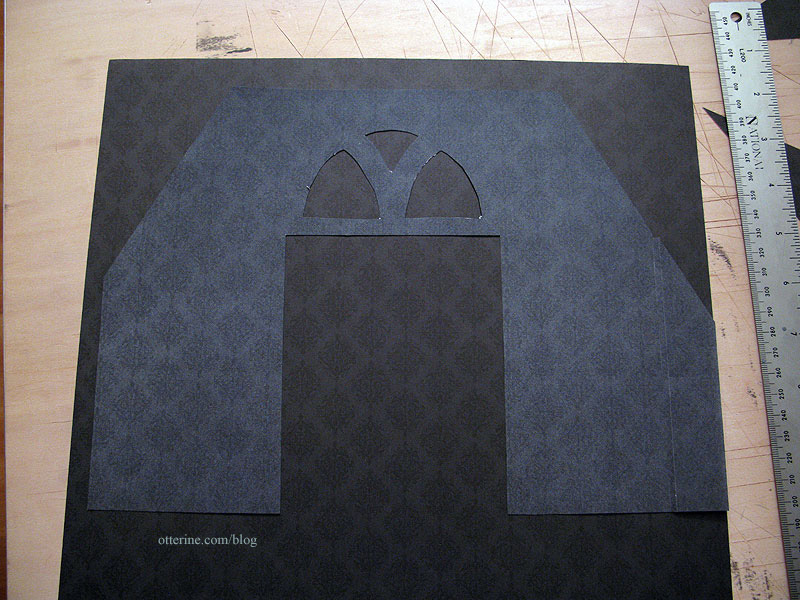
I cut all pieces before starting to glue them in place.
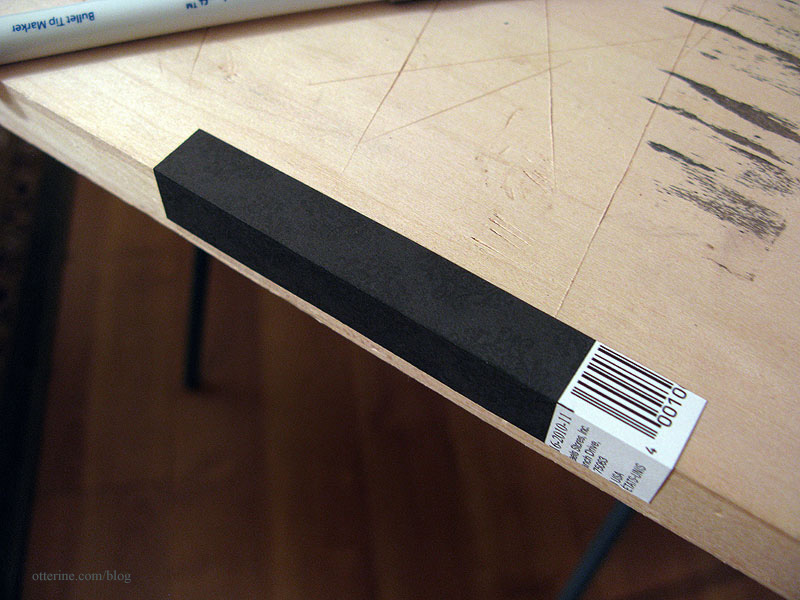
Unlike solid cardstock papers, printed papers often have a white paper core. When you score along the paper to make a crisp edge, the white core can show. As expected, the scored lines showed readily since the paper is black printed on white paper and any exposed core showed as a white line.
I ran a grey marker along the scored creases and exposed edges to mask these white lines. Here was my test scrap, used to find which of the various markers I had would be the best color match.
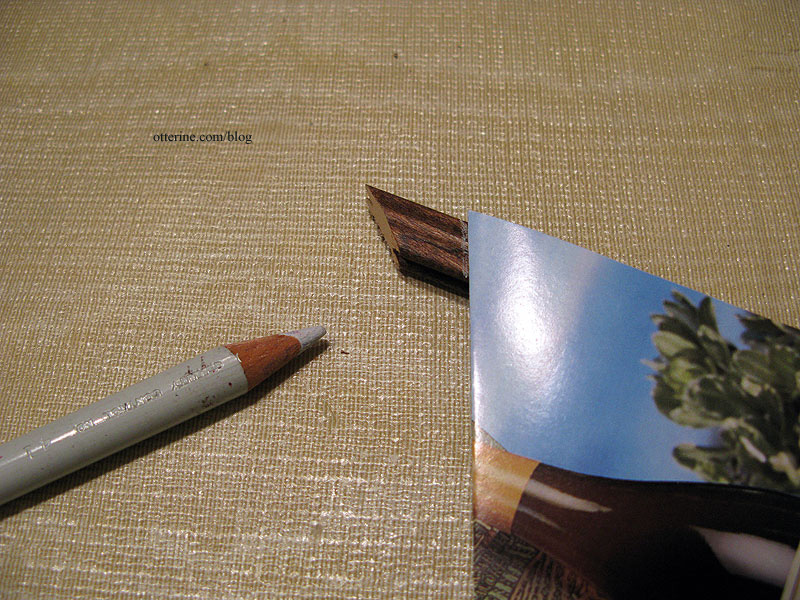
The front window wall piece required some trimming. I used a light colored pencil to mark the inside lines of the interior trim.
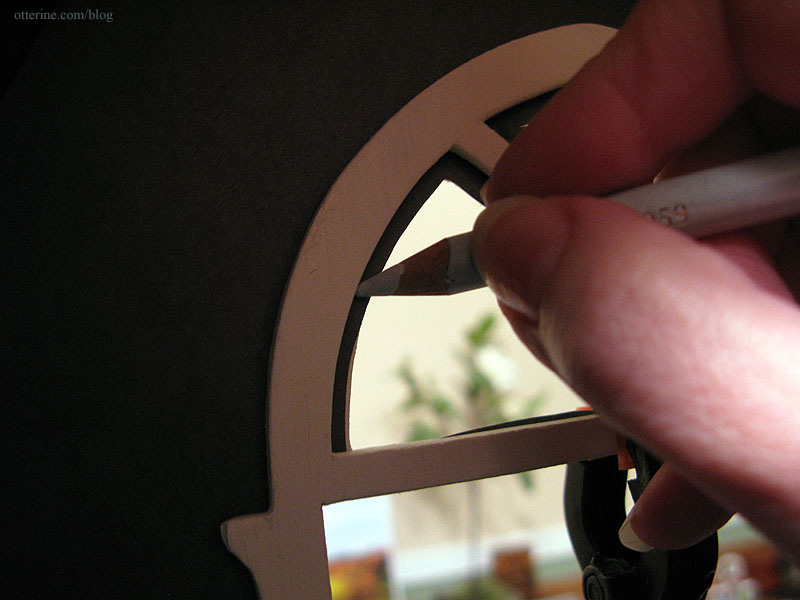
I cut outside these lines.
I checked the fit with the trim – no wallpaper showing. :]
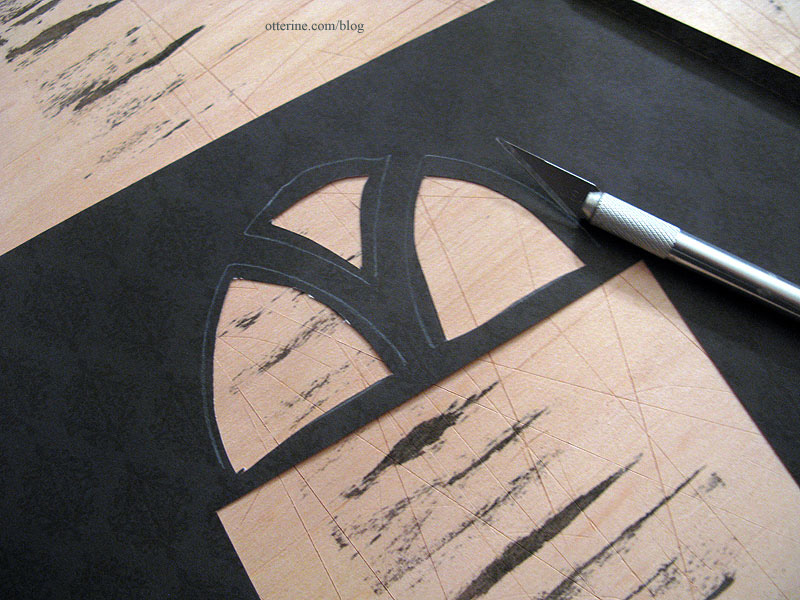
I also had to finish the interior portion of the diecut openings that would show through. They aren’t the cleanest, but they are workable enough for me. I can get away with sloppy chipped paint since this is an old house. Note to April (or anyone else who is building a Heritage) – had I wanted this to be a more pristine house, I would have finished these before assembly. It was hard to work with them upright.

Continued here.
Categories: The Haunted Heritage
December 11, 2012 | 0 comments
NOTE: All content on otterine.com is copyrighted and may not be reproduced in part or in whole. It takes a lot of time and effort to write and photograph for my blog. Please ask permission before reproducing any of my content. (More on copyright)