

Heritage – porch railings
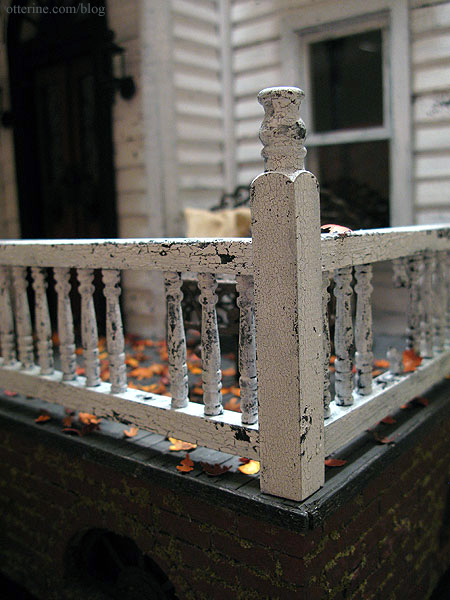
Just a quick side trip back to the exterior. After putting the portico together, I felt the rest of the porch was unfinished. Quite awhile ago, I decided to make the open portion a sun porch. Tonight, I finished up the pieces and installed them.
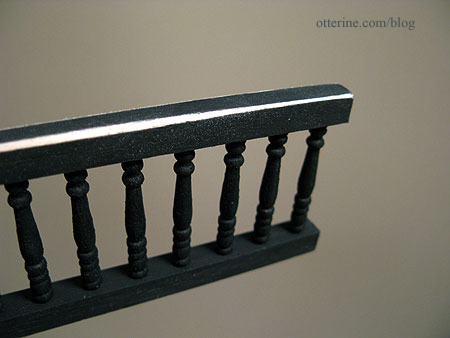
I had previously painted the railings and corner post with an underlayer of black paint. I forgot to round out the edges of the tops, so I went ahead and added that bit of aging before touching up the black paint.
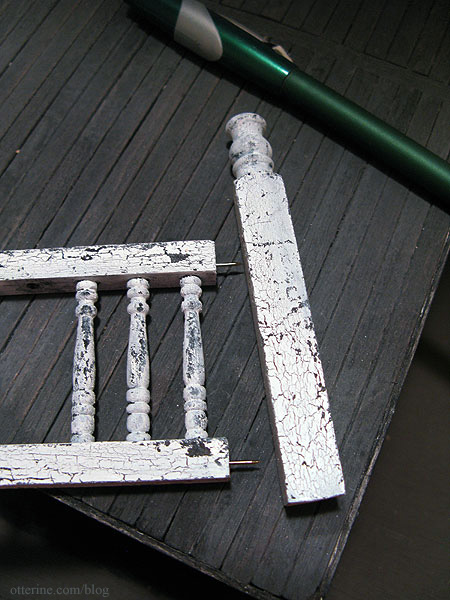
I used crackle medium and followed it up with white paint. I used headless pins instead of glue to hold the railing assembly together and to attach it to the house and portico. This way I can remove it if I need to for roof shingling and other construction. It’s actually sturdy enough that I could skip adding glue completely.
The corner post is the same as the tall railings used in the portico construction. I cut one down to include some of the turned detailing and rounded out the top by sanding.
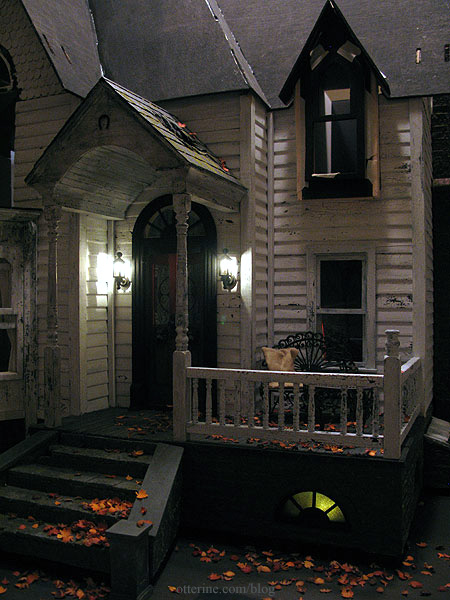
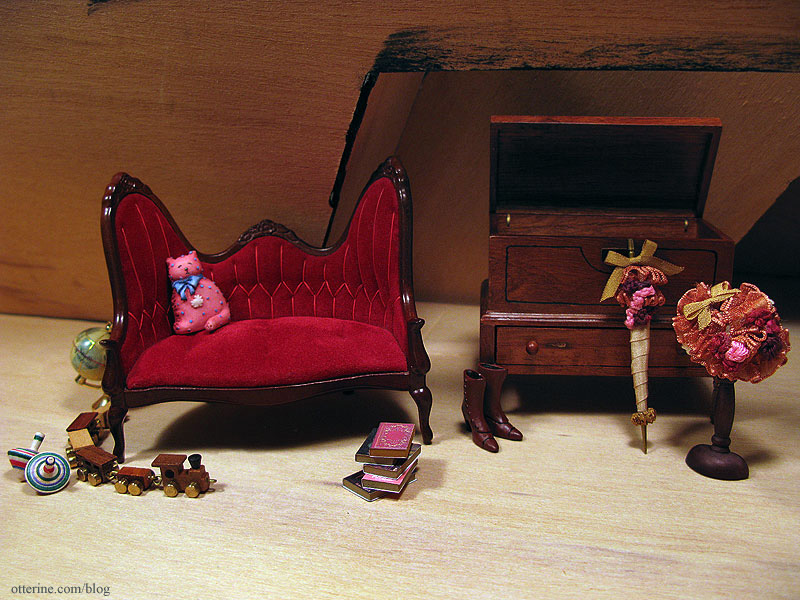
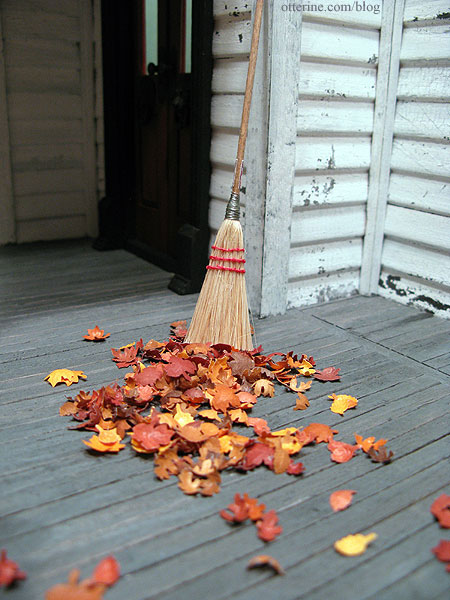
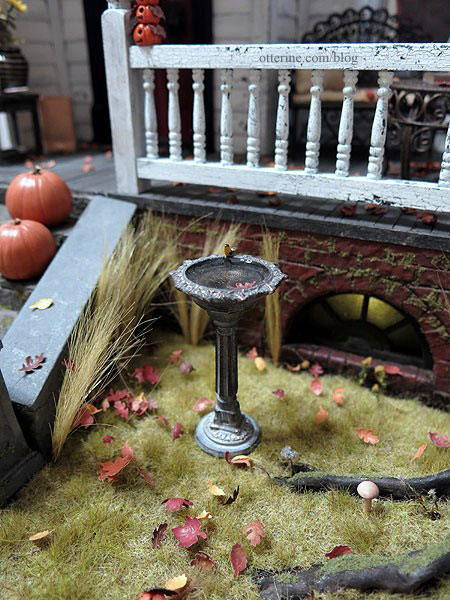
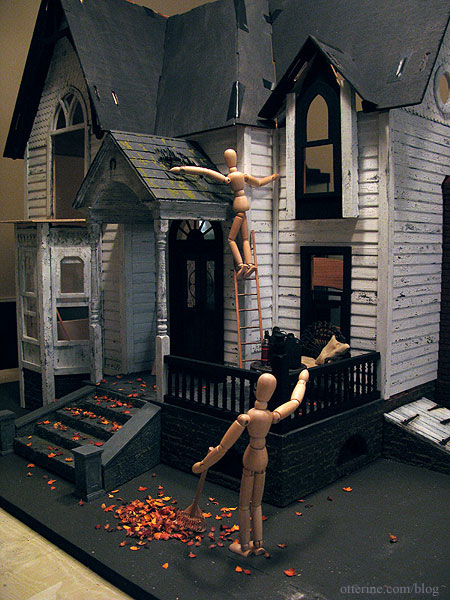
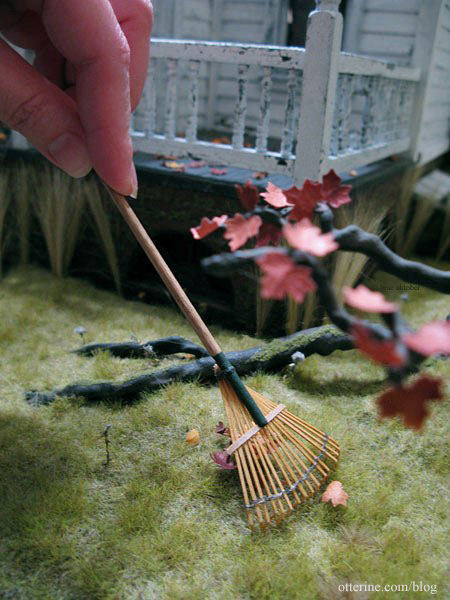
A sprinkling of the leaves I made, and we’re ready for some fun photos!
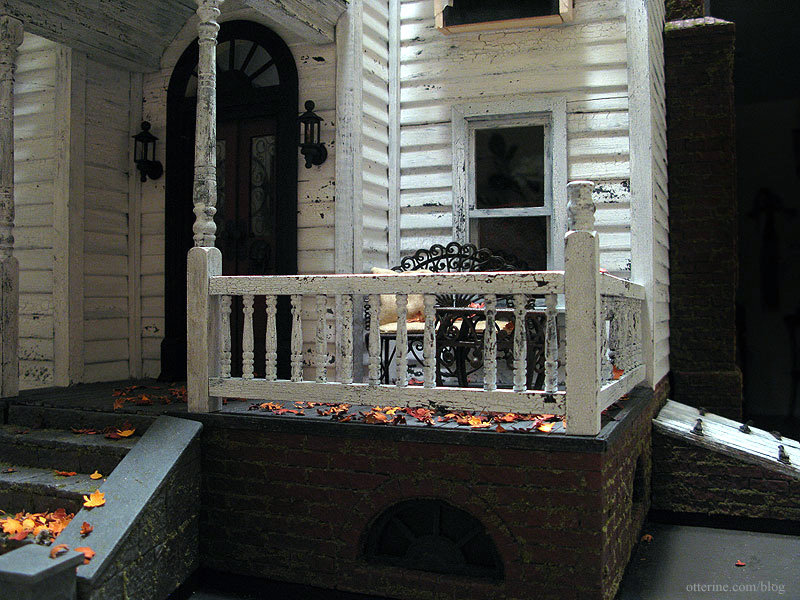
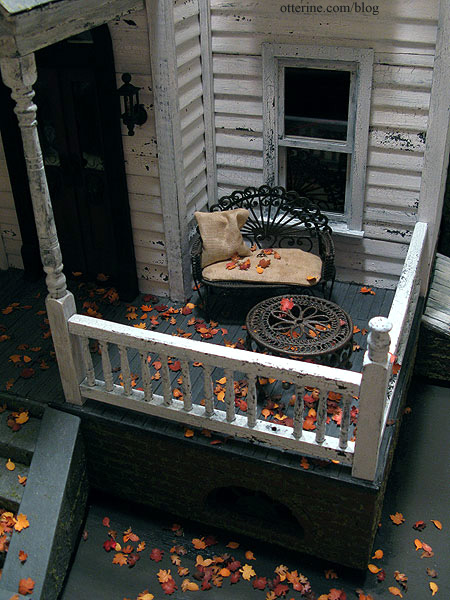
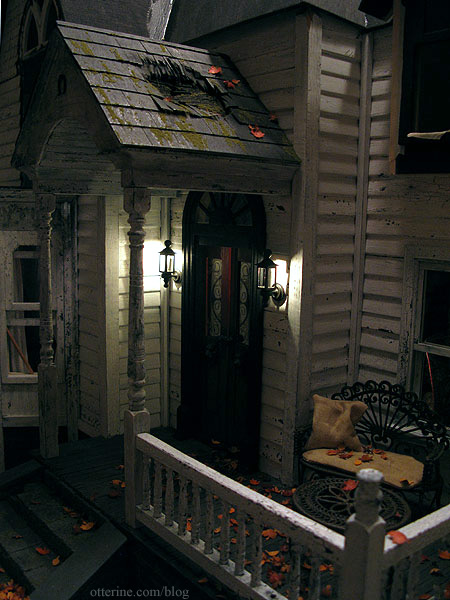
Even in its worn out condition, that settee looks pretty comfortable.
Hmm…what has happened here? Looks like there’s a post or two missing. ;]
Every little detail brings the house to life!
I had fun tonight. :D
Categories: The Haunted Heritage
March 22, 2012 | 0 commentsGrandma’s attic, planning
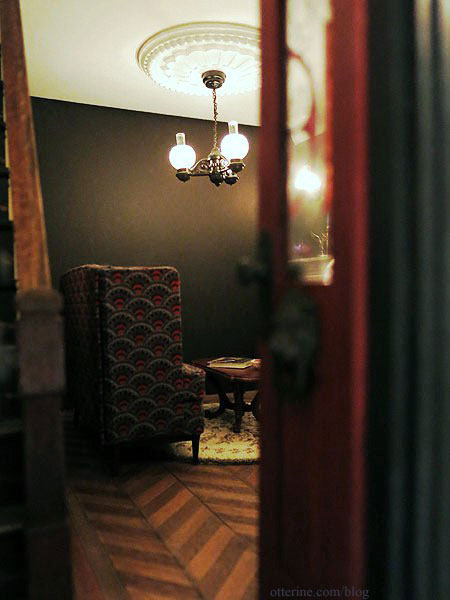
In my world, grandma is able to navigate those pull down attic stairs easily, walk about the attic without hitting her head and sit comfortably for hours in a space that doesn’t appear to have any airflow for the warmer months or heating for the colder ones. :D To that end, the attic will be a collection of fine (or not so fine) antiques set into vignettes where Grandma can get away from it all.
I recently entered a competition hosted by Minimum World in the UK. Contestants were to submit pictures of their “period” room in any era or design style they wished. I entered the 1920s inspired kitchen from the Heritage. You can see all the contestants and the winner on the Minimum World facebook page.
Though I didn’t win the top prize, each contestant was sent a prize for participating. I received my gift today: a lovely set of granny boots, a fancy hat with stand and a parasol by Katy Sue Designs. They are lovely and the perfect addition for grandma’s attic! :D A huge thank you to Minimum World for holding the competition and for the lovely participation prizes!
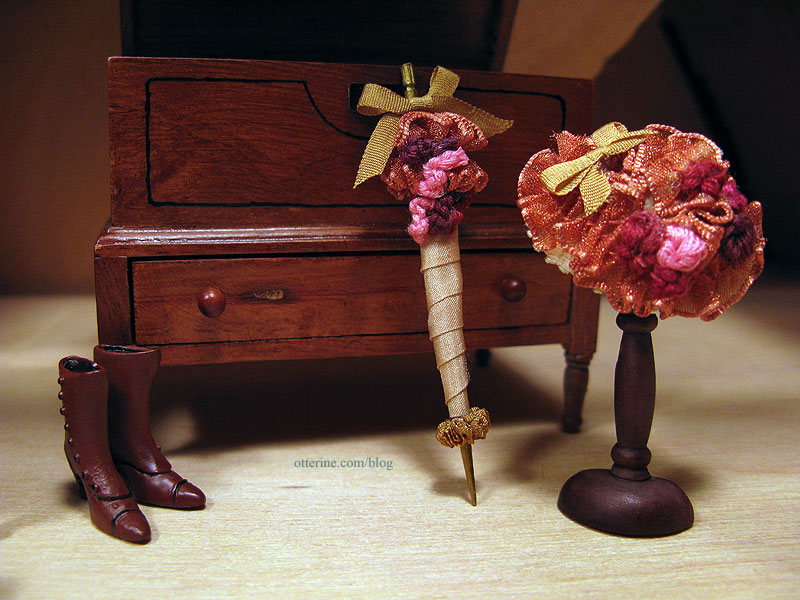
Here are a few other things that might end up in grandma’s attic. I have plenty of ideas up my sleeve, but these are things I already had on hand.
Categories: The Haunted Heritage
March 21, 2012 | 0 commentsRickety persnickety house
Alright, Heritage, I’ve accepted your challenge of rough interior walls, warping and large gaps! :D
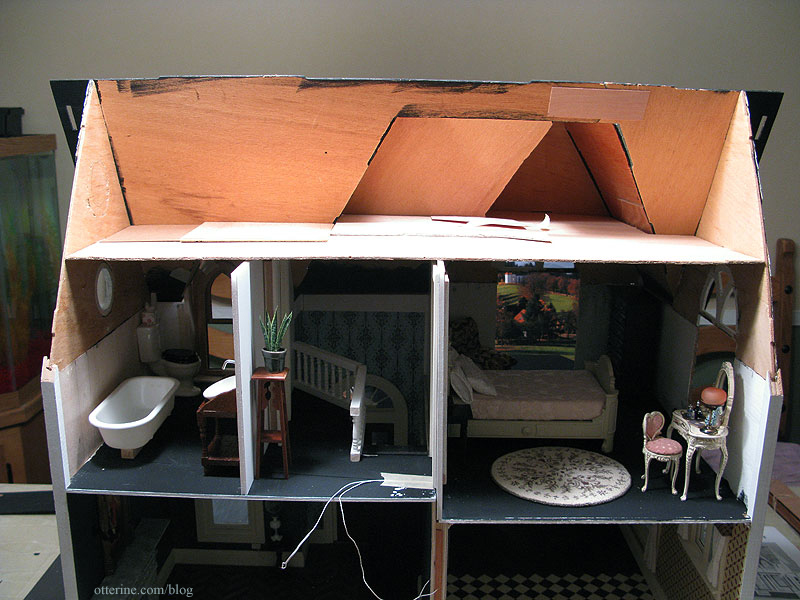
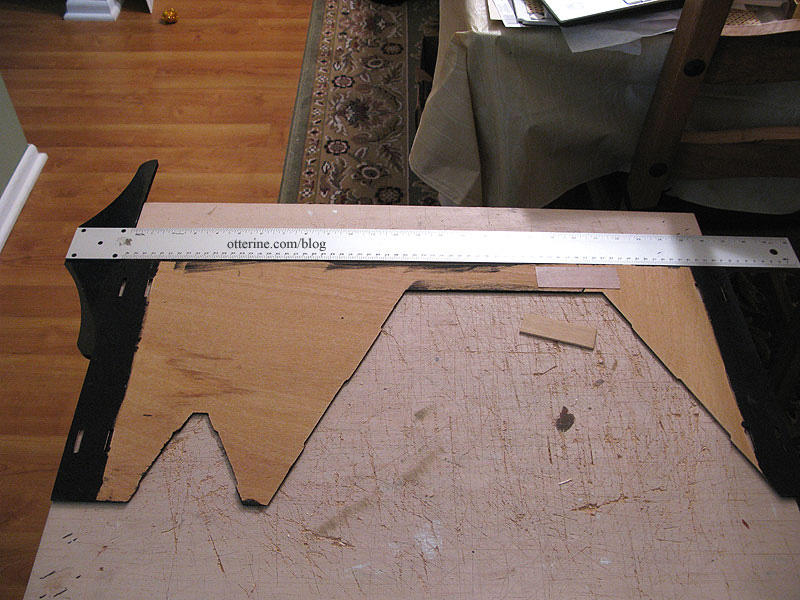
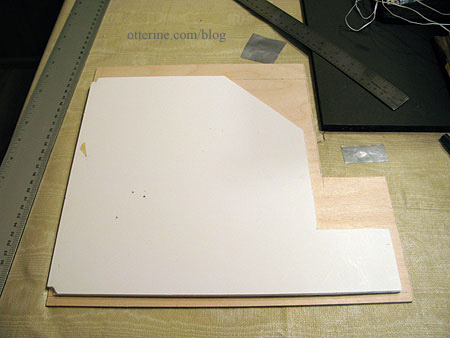
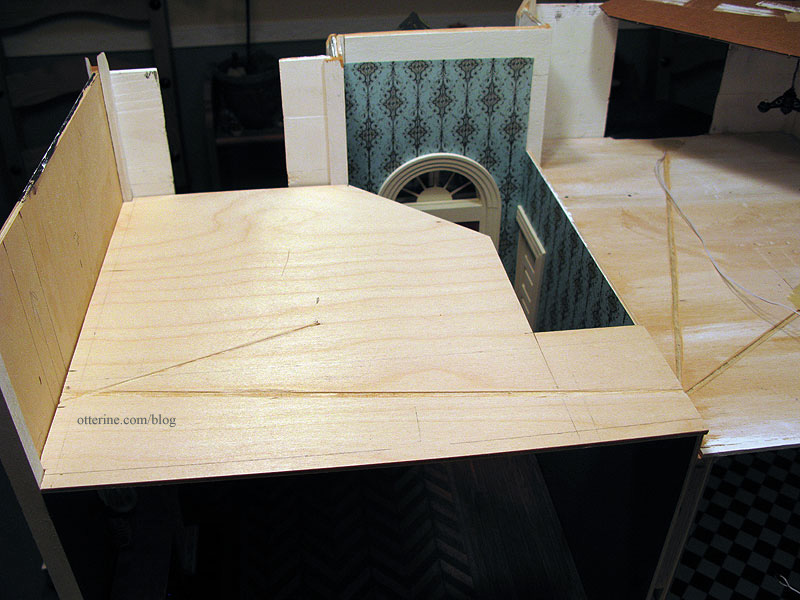
I put together the attic floor, though it won’t be glued in for quite some time. I tested the fit against the roof that gave me such trouble. It doesn’t fit in the same places where there are gaps between the walls and the roof. With minor adjustments, I should be able to keep and use most of this board. I know I will have to re-cut the part that fits into the front gable because the gaps are all around and there is no way to attach it to the house.
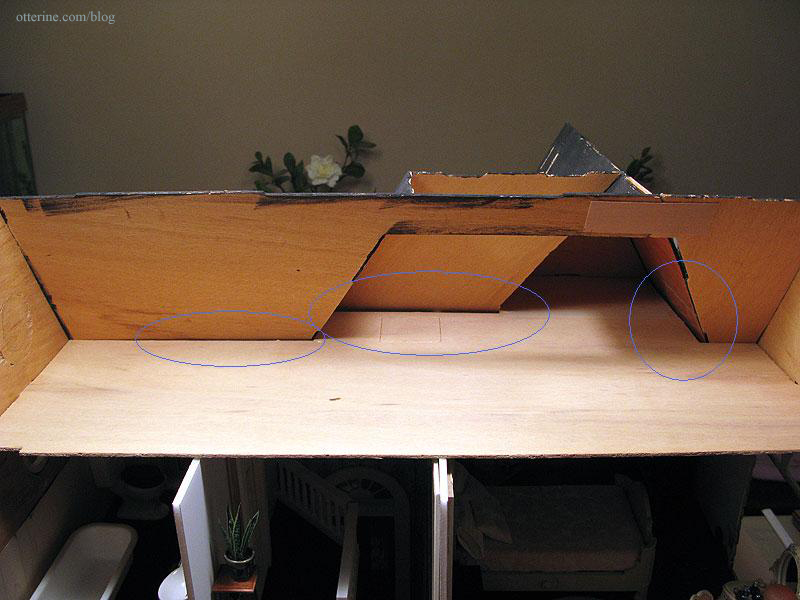
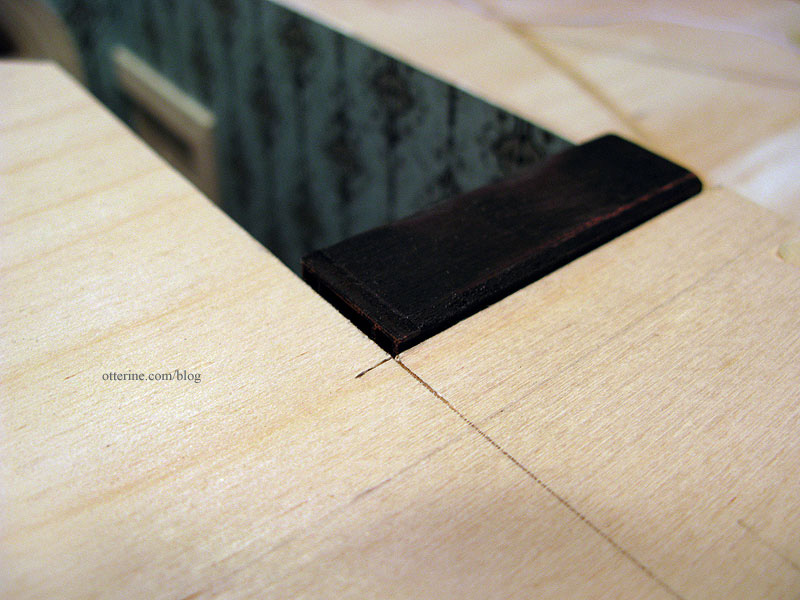
I marked the line around the house where the attic board sits: 7 1/4″ on the bathroom/parlor side and 8 3/16″ on the bedroom/kitchen side. This guideline shows me where the walls end on the second floor.
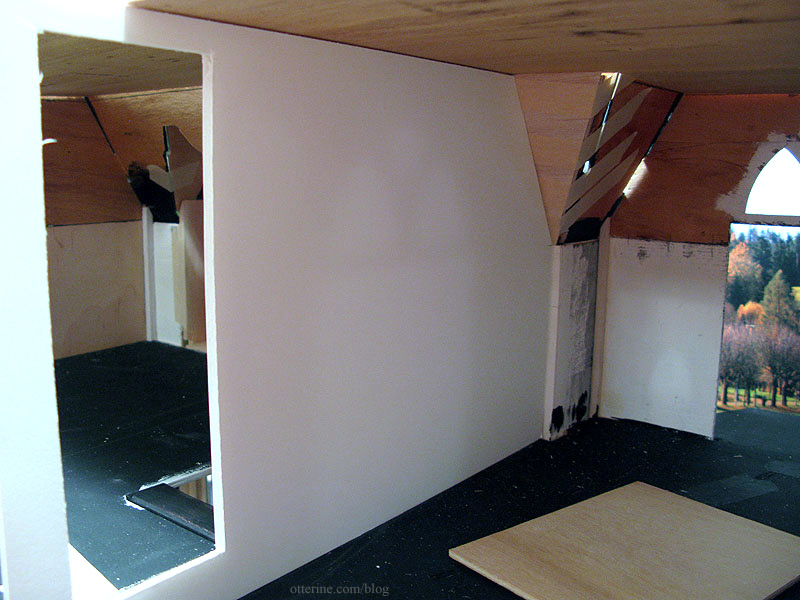
Now, for the gaps. Even though the two main gaps between the lower edge of the roof and the upper walls don’t show from the outside unless you look for them, light will stream through if they are left uncovered. They also make it difficult to wallpaper since there are uneven surfaces and breaks in the wall.
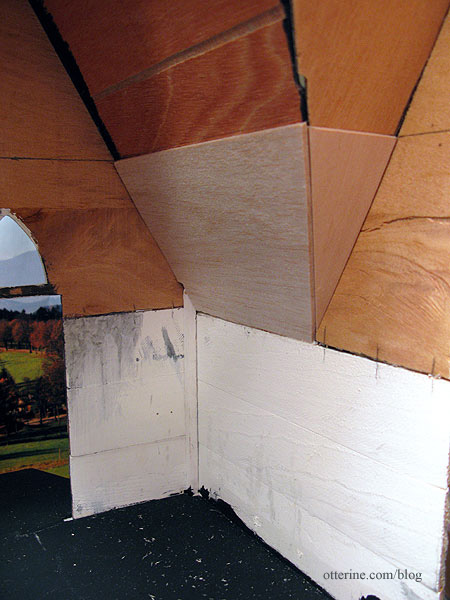
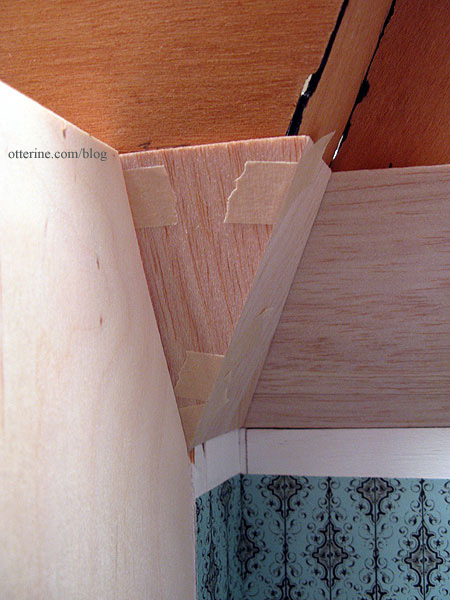
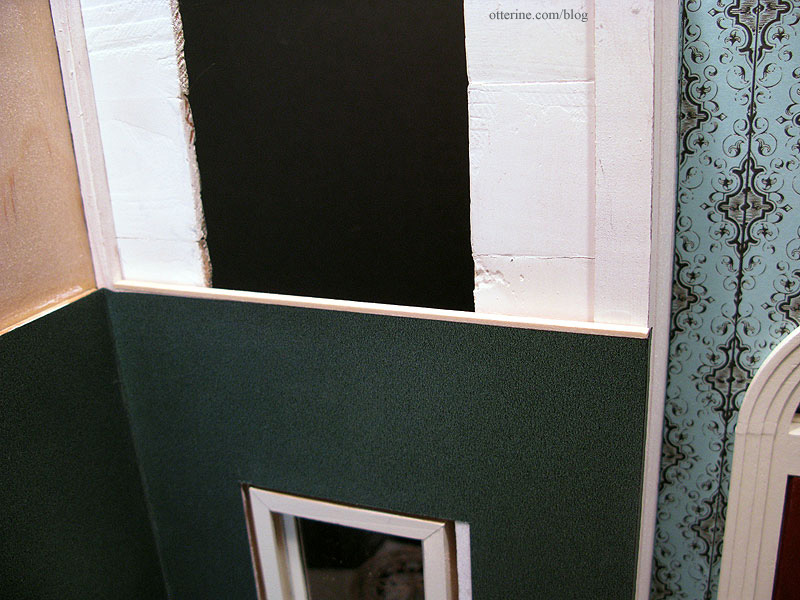
I decided to address the bedroom gap first since it seemed the most straightforward. I needed to join the wall with the ceiling in a fluid manner. I started by adding a scrap wood brace at the top of the wall.
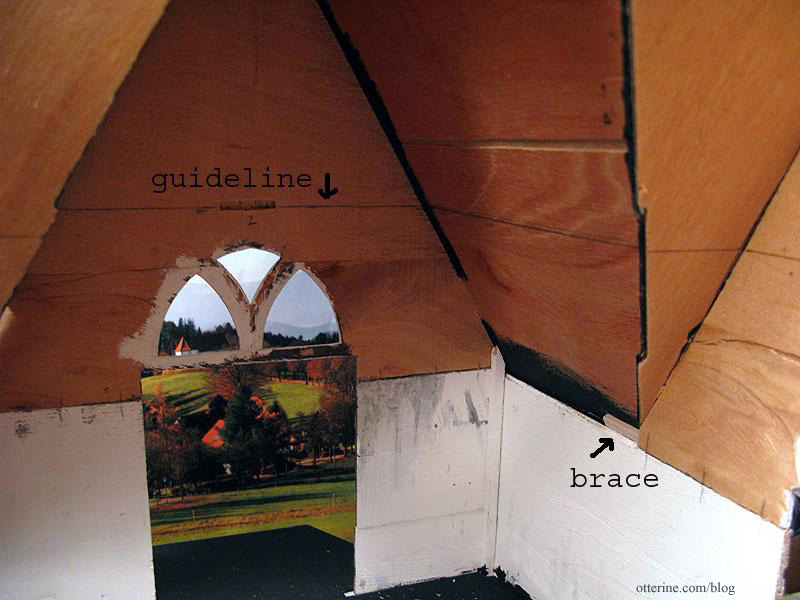
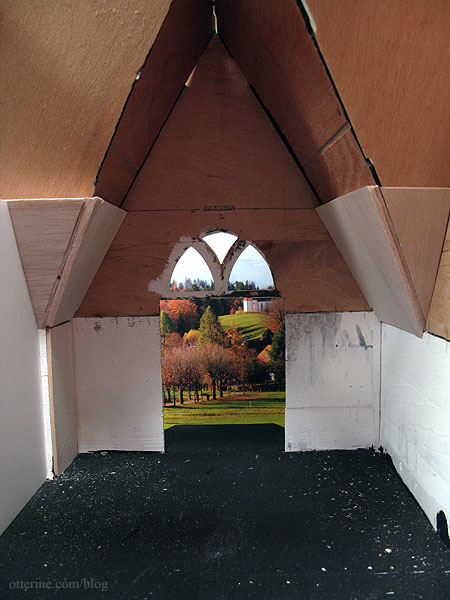
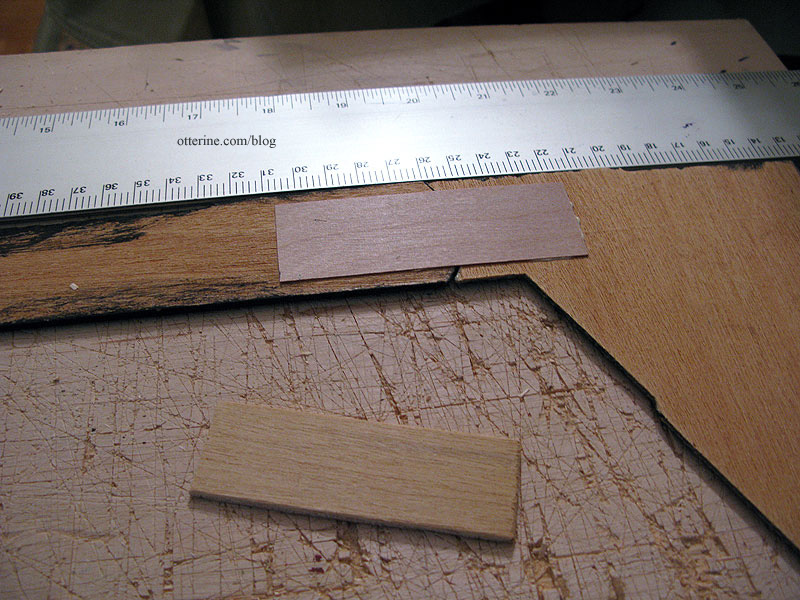
I then covered the surface of the wall with balsa cut to meet the ceiling guideline and the triangular bend in the wall. This minor bit of padding won’t interfere with the fit of the windows and smooths out this entire corner.
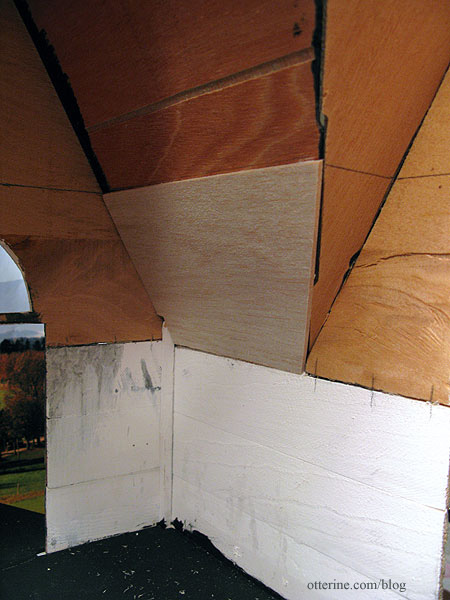
I added a small basswood triangle to finish off the edge. There is now a flat, even surface for the wallpaper.
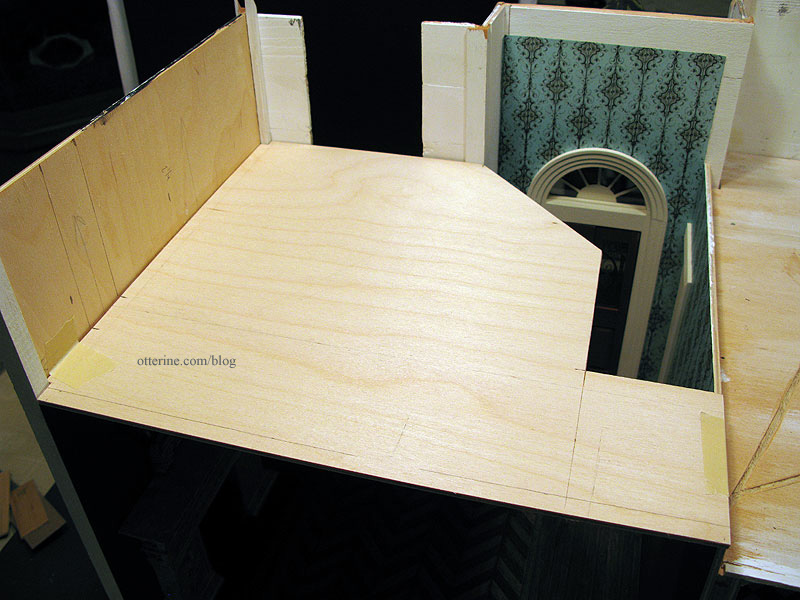
The large front gap in the two-story foyer was at least uniform. I built up the front wall with strip wood and used black paint on the side that might show from the outside (if you were standing on your head and looking where you shouldn’t be looking).
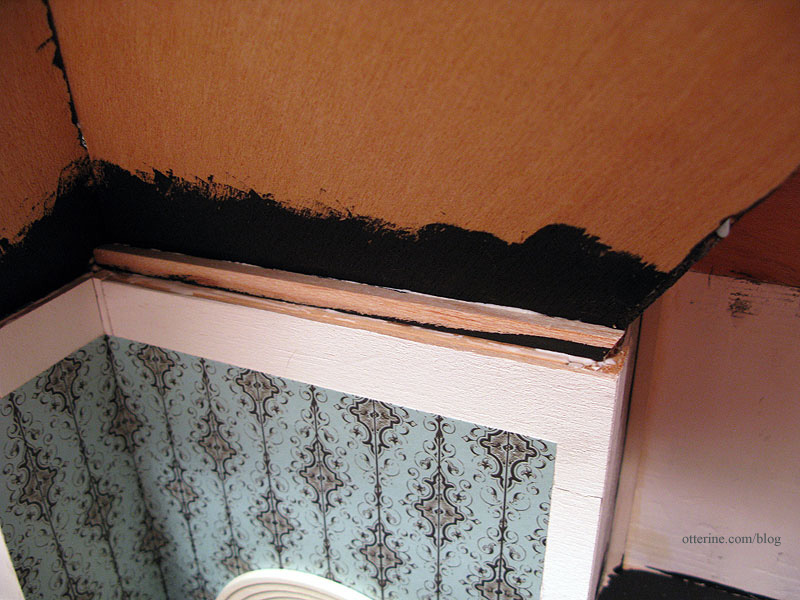
There was more to build up on this wall, so I made makeshift rafters, cutting the top one at an angle to support the attic floor. I’d like to avoid putting in crown molding if possible. If anything, flat decorative trim would be the only thing possible with all the angles and pitch changes in the roof. I also made sure the ends of the rafters followed the angle of the side wall into the bedroom.
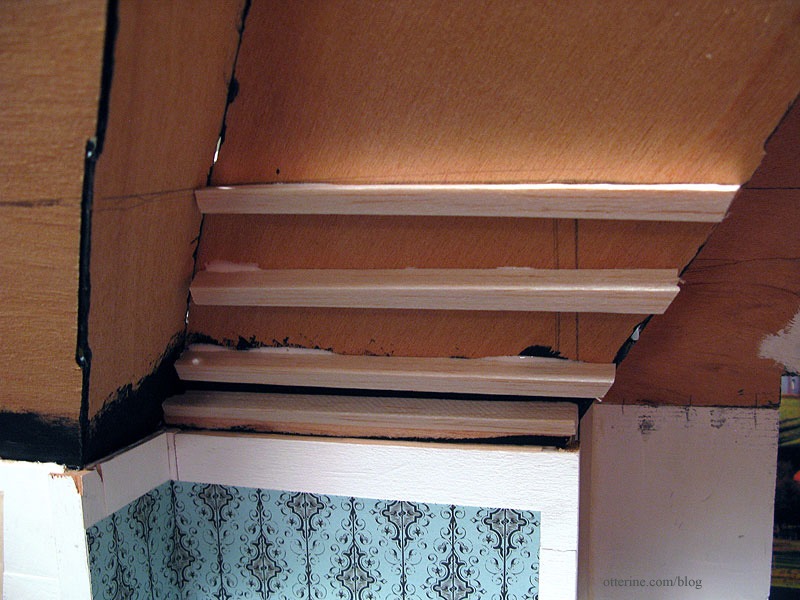
I cut pieces of balsa sheet to cover the rafters, using two layers. The start of the first layer is shown here.
I had to adjust the angle of the bedroom wall template.
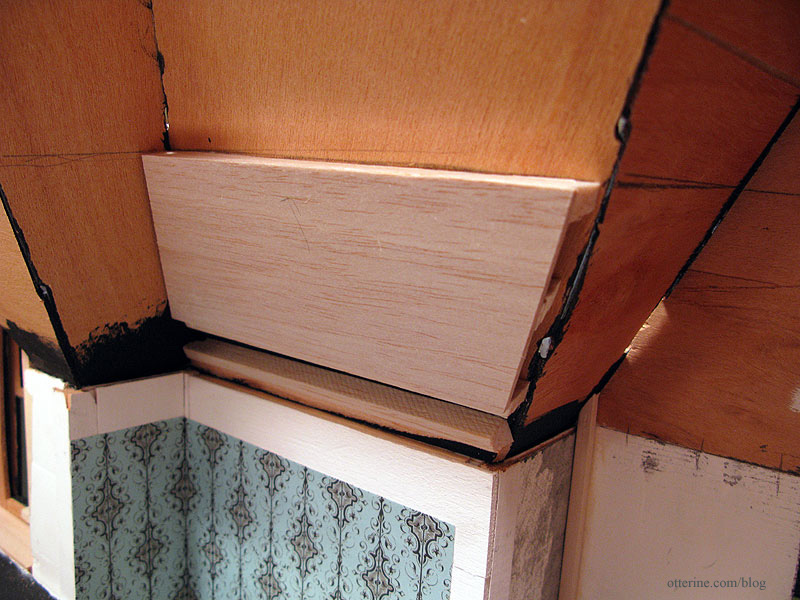
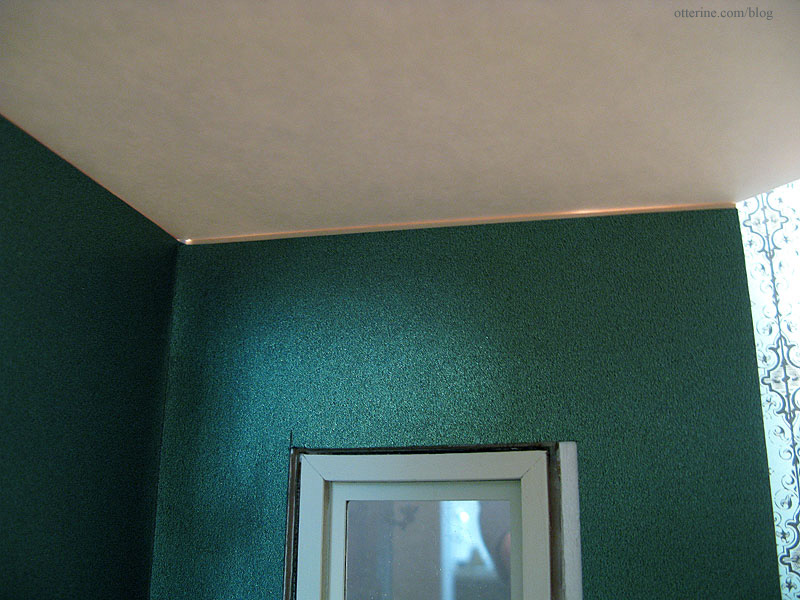
On the left side of the bedroom, I finished padding the wall and angled ceiling. I first added scraps of 3/32″ thick wood to fill in to the depth of the inner wall connector.
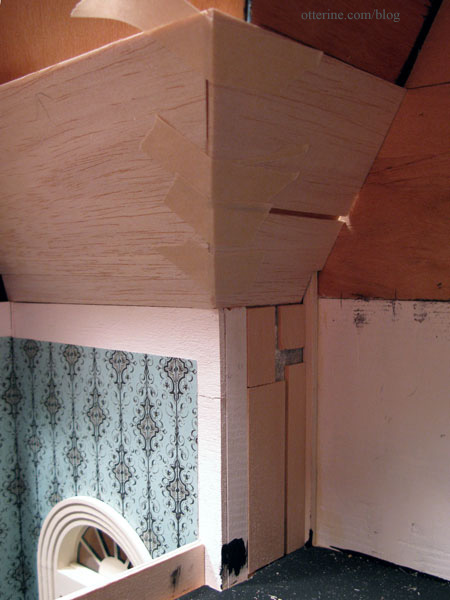
I then filled in with 1/8″ thick wood to the depth of the outer wall connector. Now I won’t have to wallpaper around those angles.
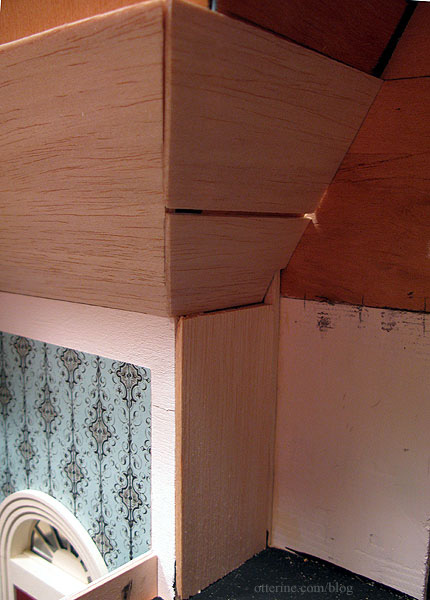
I finished the angled ceiling with 1/8″ thick balsa to even out the transition between the wall and the ceiling. Since I added more wood to this side than I had to the opposite wall, I added one more layer to that wall to balance out the sides. I have since applied spackling over the few gaps and ends to even out the surfaces further.
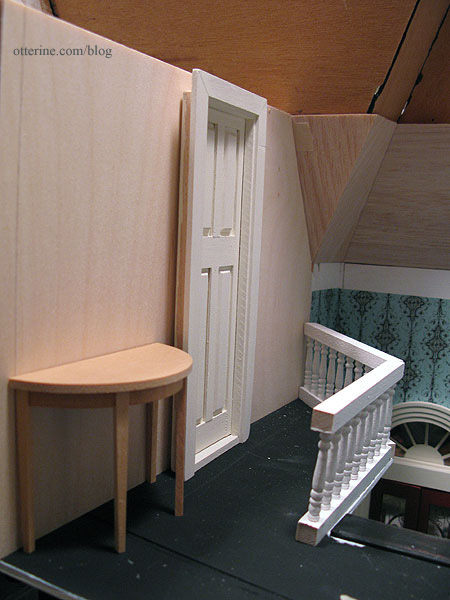
I finished padding the left upper corner in the two story foyer and cut the new bathroom wall from 1/4″ thick plywood.
The wall isn’t yet installed since I need to cut the door opening. I think the House of Miniatures Hepplewhite Side Table will be the perfect addition to this small space.
Categories: The Haunted Heritage
March 20, 2012 | 0 commentsHeritage – second story planning
With the roof on, the next order of business was cutting new walls for the bathroom and bedroom. I won’t glue these in just yet, but I needed to get a feel for the final walls so I could begin to address the imperfections caused by the ill-fitting roof.
I started with foam core board to make templates which I will later use to cut the wall from plywood. The bathroom wall continues from the top of the foyer side wall to the open back. I’ll have a fancy railing; these are just mockup pieces. There will be room for a small table and some artwork.
The narrow doors are going to be a tight fit for height, but I didn’t have room to raise the ceiling board. I want the attic to be usable space, so that’s the sacrifice I will make — doors that almost touch the ceiling.

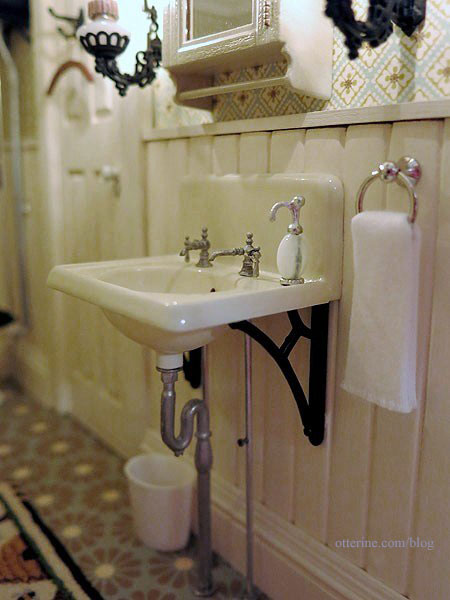
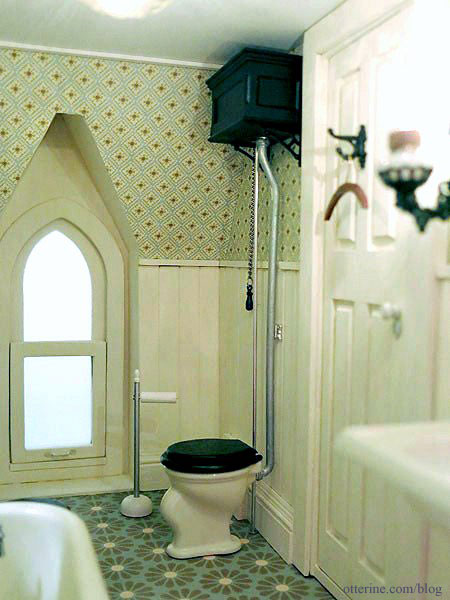
On the other side of this wall, there’s the bathroom. I’ll be using a Chrysnbon bathtub (not yet built) and sink (where the washstand sits in the photo). In the back will be a toilet (this one is from Baxter Pointe Villa) and a small shelving unit (this one is borrowed from the Newport). Grandma is going to need some frosted glass on that window!

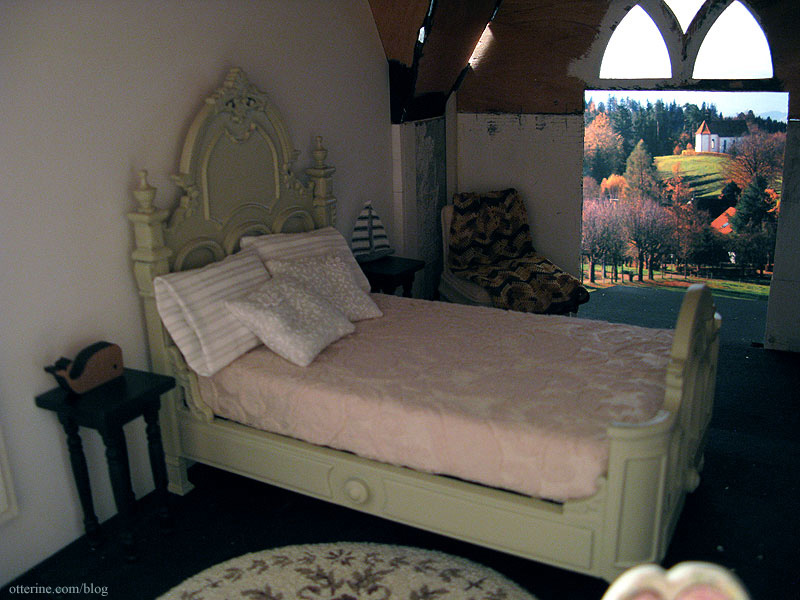
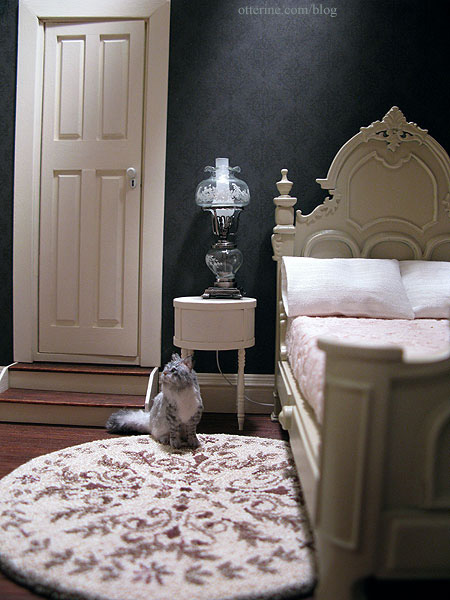
The bedroom wall continues from the front of the house to the open back. With the open foyer below, I had no other choice but to put the door at the top of the stairs even though the attic floor isn’t quite deep enough to cover the either of the two new walls. The pitch of the back roof would make this door impossible, so we’re going to need a change in pitch for the back of the house. More on that later.
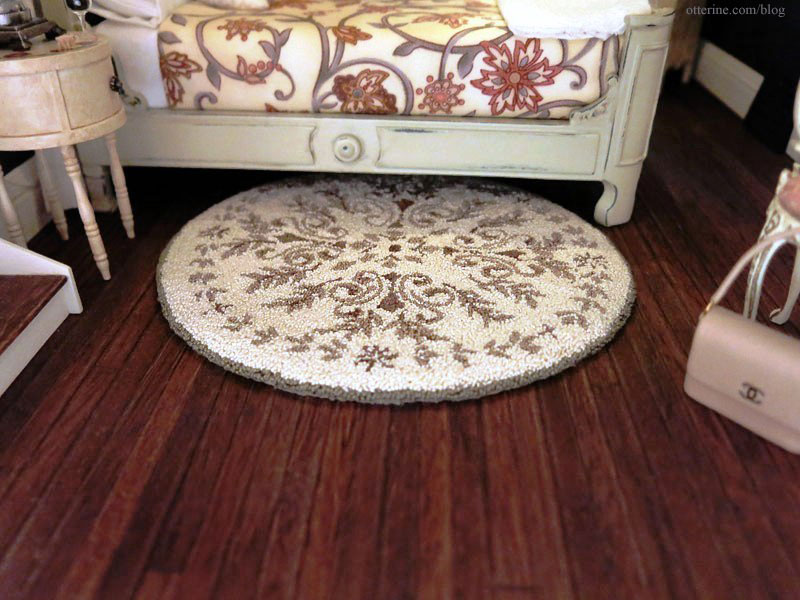
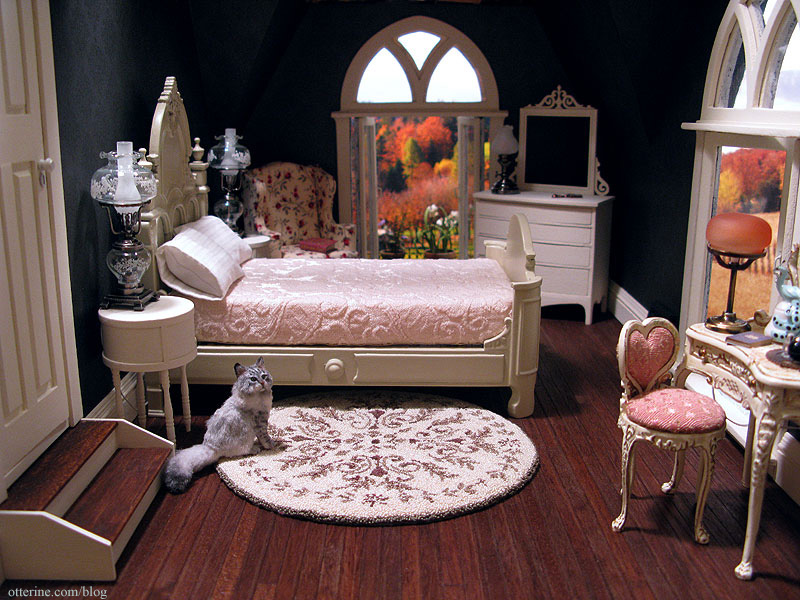
There will be steps down from the door. I borrowed the rug by Katie Arthur from the parlor during setup tonight. It might just end up finding a new home here in the bedroom leaving a vacancy in the parlor. :]
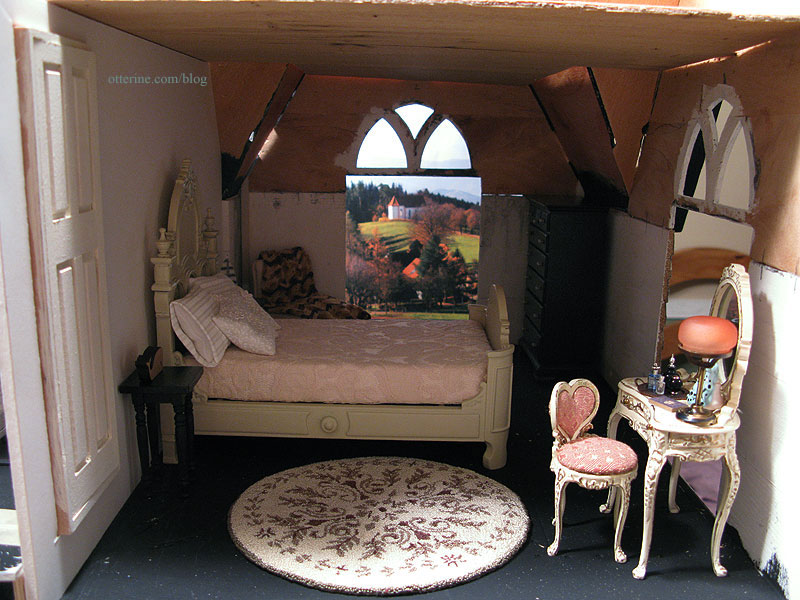
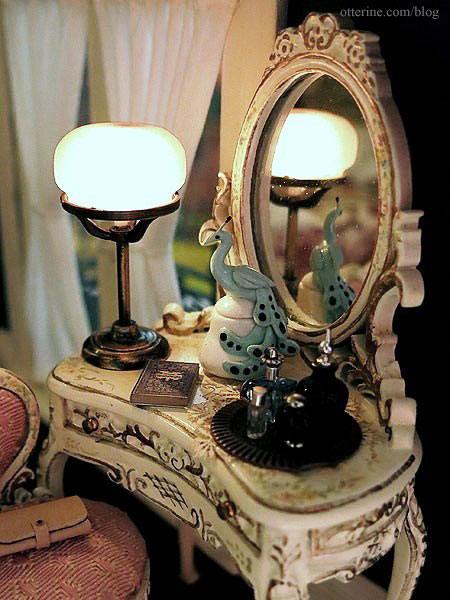
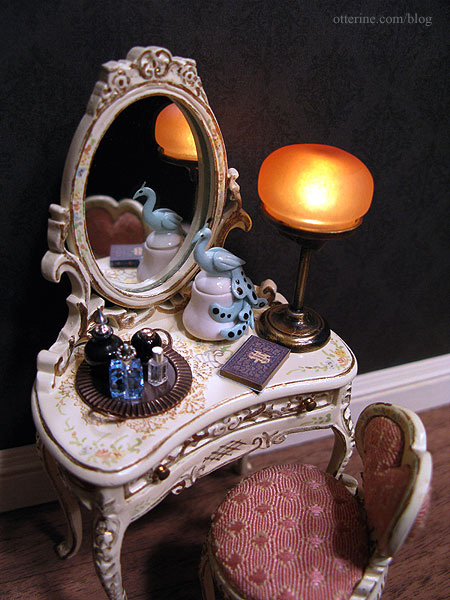
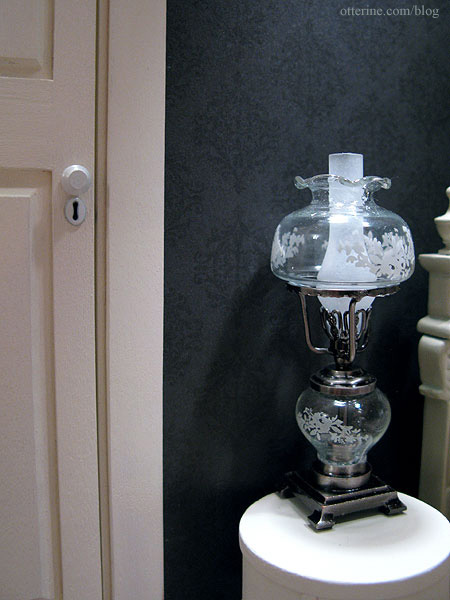
Love the vanity in this space! I’ll probably move the lamp to the other side so it won’t obscure the peacock box and vanity tray details.
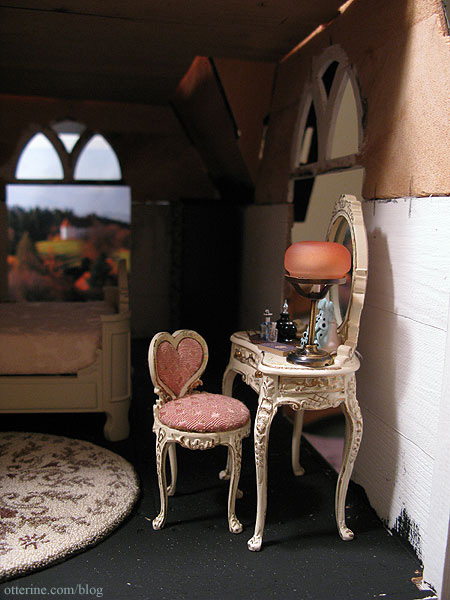
I’ve put the original Bespaq mattress on the bed for mockup purposes along with a few of the pillows I’ve made. The nightstands are from Baxter Pointe Villa. I think grandma needs a comfy chair in the corner. This one is from Baxter Pointe Villa but I like the way it fills the space though it needs to be a little taller.
Categories: The Haunted Heritage
March 19, 2012 | 0 commentsHeritage – roof assembly, part 1
A number of pieces in the Heritage kit need splicing together, including the two main roof pieces. I didn’t use the splicing method for the various floor boards since nothing ruins the illusion of is it real or miniature faster than big hunks of wood holding pieces together. For the roof, though, I opted to keep them in for two reasons.
First, there isn’t anything else that will hold the pieces together besides shingles. I didn’t want to take the chance that this would be unstable. And, second, it’s an attic and uneven textures can be more easily disguised.
Instead of using the 1/8″ thick plywood splices included in the kit, I used thin wood veneer held in place with wood glue. I have some plans for the attic that will make this just the first level of stability – something to mainly hold the pieces together until I get to that part.
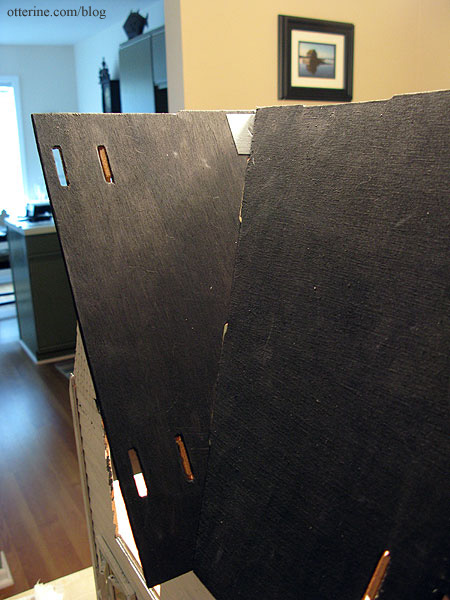
Since the diecut pieces did not fit all that well side by side, I used a T-square to make sure the roof pieces were properly aligned as the glue dried.
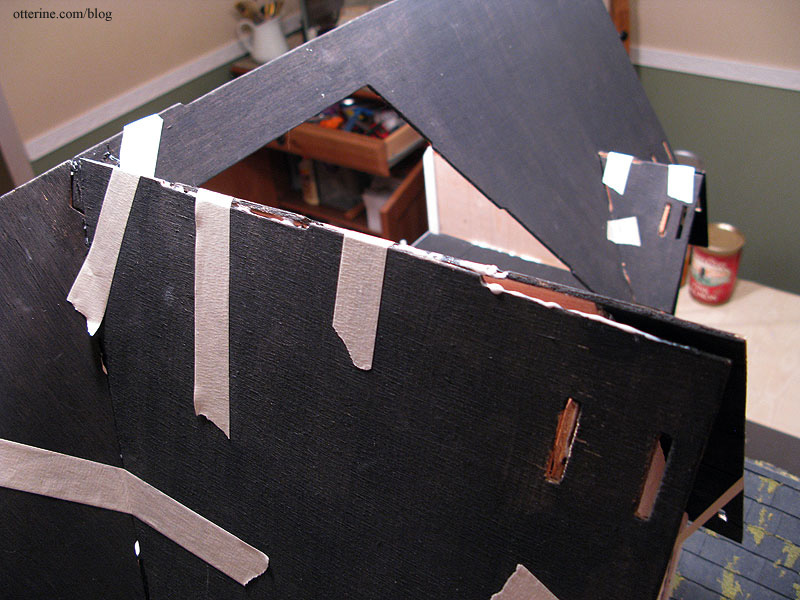
On the outside, as a temporary measure to reduce the strain on the thin wood splice on the interior, I added a piece of duct tape across the join. One more odd thing about this kit is that the splice is right where you are supposed to join the front gable roof to the main front roof. Seems like it would make more sense to have a solid support there instead of the splice. I have some ideas on how to reinforce the area and I’ll share those when I get to that part.
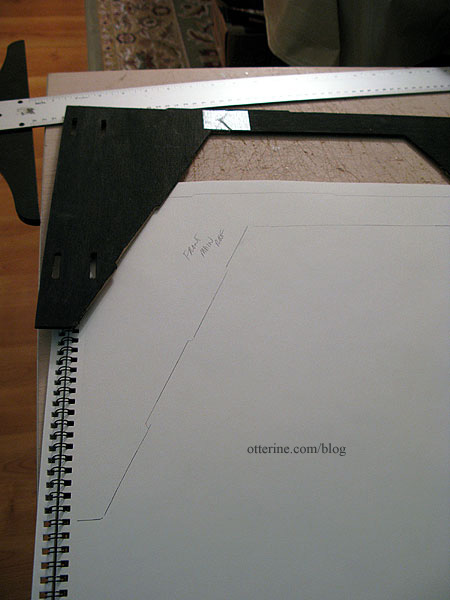
I decided to not add the shingle guidelines at this point, because I doubt they would be helpful due to the ill-fitting pieces. I plan to use Greenleaf speed shingles, which are strips of thin laser cut wood shingles. I traced all of the roof pieces onto drawing paper that I’ll later use to refine my final templates.
I glued the main front roof board to the gables. I’ll have to do some work on the attic floor before I can glue on the back roof piece. It then occurred to me that I hadn’t looked at the kit instructions for awhile, so took a look just to make sure I hadn’t missed something. :D

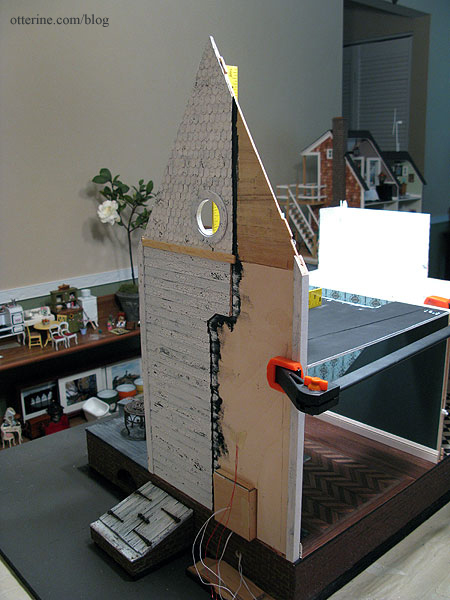
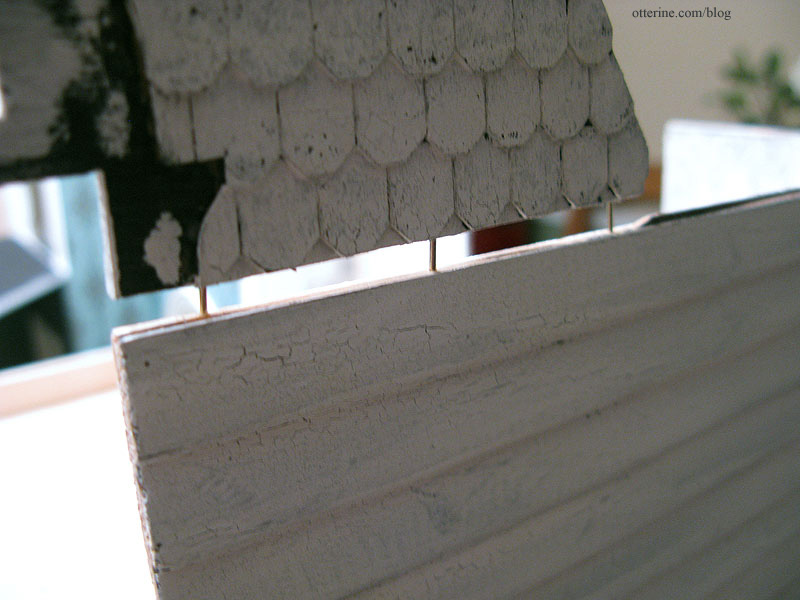
The front gable roof pieces were a bear to say the least. These two pieces did not want to fit at all. I tried to get them to match up as best as possible and just accepted the imperfections. Figuring it would be easier to mask gaps and uneven lines on the interior with wall and ceiling treatments as well as furnishings, I tried to make the roof look as best as possible on the outside.
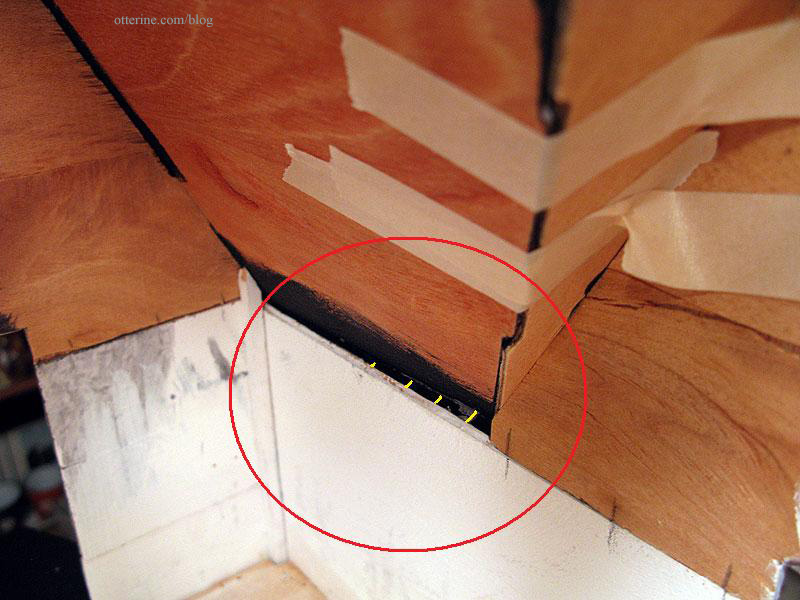
For example, I made sure the roof pieces matched up at the bottom edge, were relatively level, and were consistent with the siding lines.
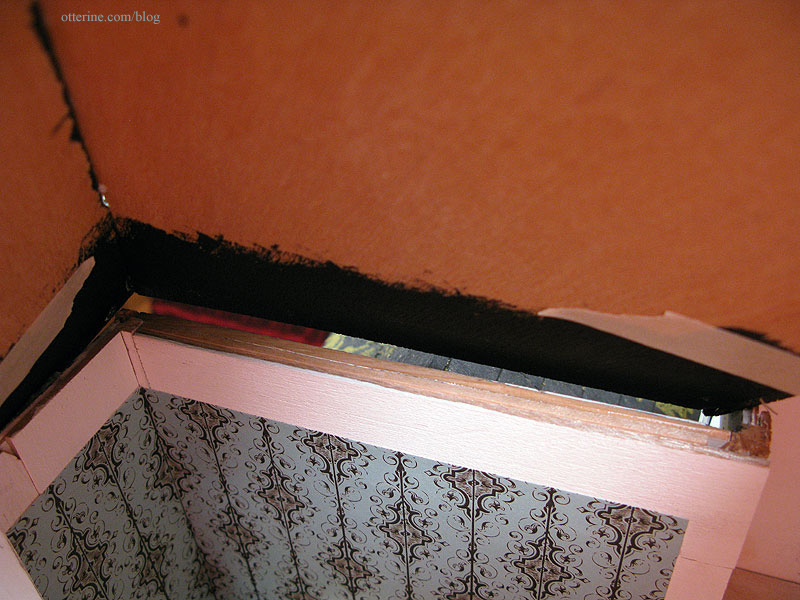
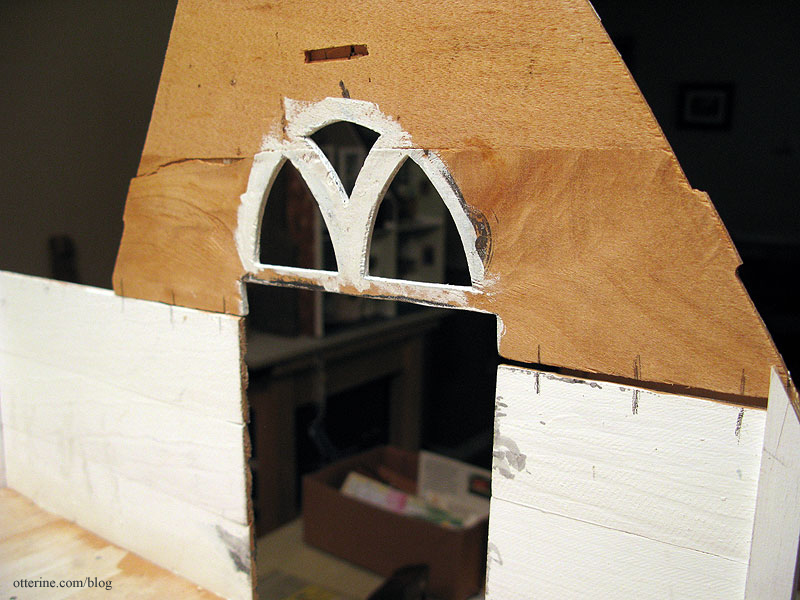
But, on the inside, the gable roof piece doesn’t meet up with the wall and there’s a large gap (shown with the yellow lines).
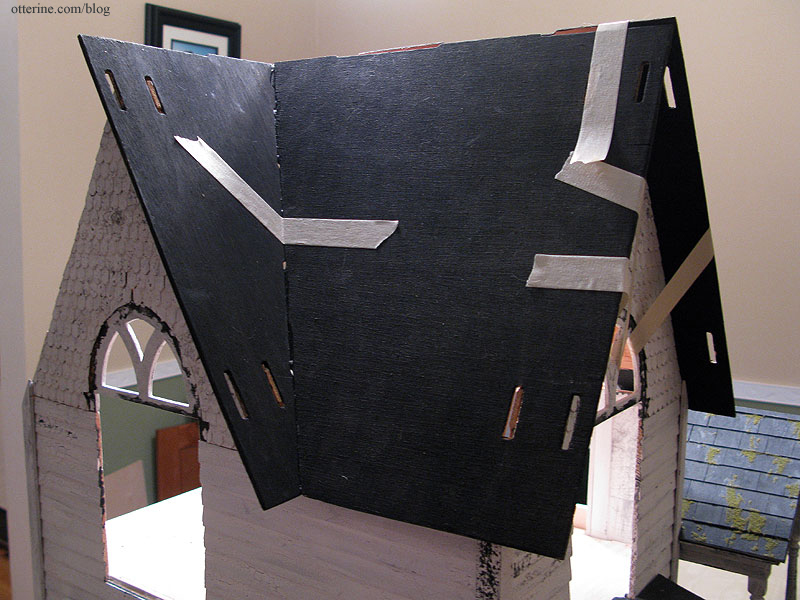
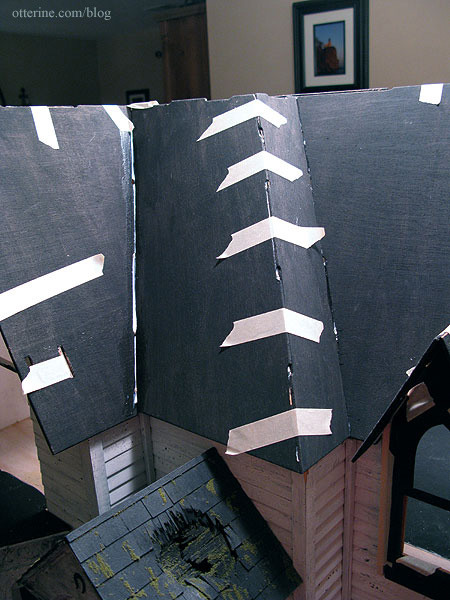
The gable roof peak is really off. No amount of pulling or taping was going to make the seam uniform. If I pulled too tight, then the front gable itself was pulled out of whack. It didn’t really work in dry fit, either, so I wasn’t surprised to find that these pieces were so far off in the final assembly. I taped the gable peak as close as possible and glued where the pieces would meet. I’ll reinforce the gaps later on as I work on the interior, but the roof is still structurally solid even with all the gaps.
Of course, once one part is off, the rest are sure to follow. I couldn’t even figure out where the problems came from. It just seemed a general problem of ill-fitting pieces from the ground up. From the other blogs and photo sites I’ve found regarding the Heritage, no one else has mentioned the roof being such a problem. It could be just a reflection of the age and wood condition in this particular kit.
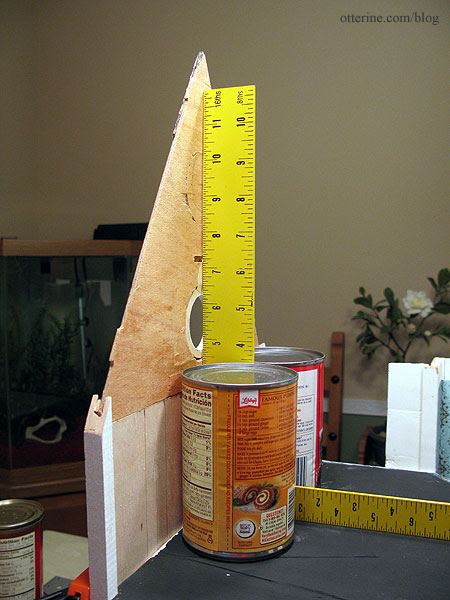
There is a sizable gap in the roof over the portico, and this seems due to a piece that is larger than it should be. Since these fit together with tab and slot construction, it’s clear the instructions didn’t intend for the parts to be altered to fit.
From the outside, however, it’s not even noticeable and the roof line seems generally solid. So, I just shrugged. (Note from the future in 2024 – now that I have more experience, I would cut new parts or alter the ones to fit better.)
The Haunted Heritage wants (and will benefit from) an old, rickety, crooked roof. :D And, I have to address the imperfections and gaps already – dealing with a large gap is just the same as dealing with a small one. I have to tell you, though, I am glad I didn’t waste my time drawing those shingle guidelines! My templates might even be unusable, but that took only five minutes to do. ;]
—–
Continued in part 2.
Categories: The Haunted Heritage
March 18, 2012 | 0 commentsHeritage – Stable gables
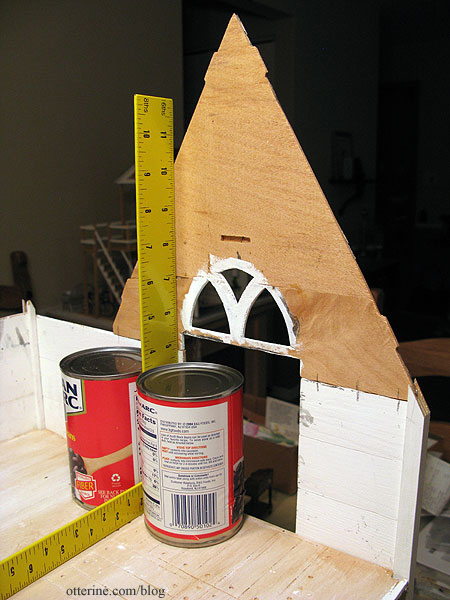
With the parlor ceiling installed, I glued in the first gable; this is the bathroom side wall. I used a carpenter’s square held up with canned goods to keep the wall straight.
Since the gables are loose in the connector channels, I added small shims of wood to hold the wall flush on the inside.
Added trim on the exterior will help hold the gable in place. Right now, the trim is just held in place with mini hold wax.
This trim piece will be cut to fit next to the chimney, then painted and aged later in the build.

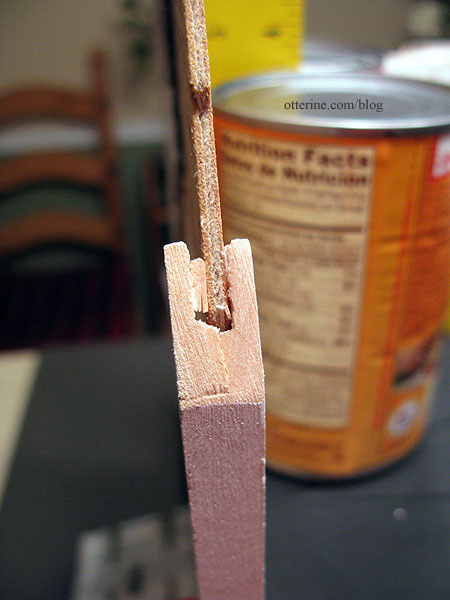
The bathroom side gable was easy to install since I had replaced the side wall with plywood that had a nice smooth, even surface for gluing the pieces together. The two gables in the bedroom were another matter. Both were fitted above the Dura-Craft siding pieces, which have a lip exposed at the top. One gable also has only one side connector with the other side free until the main front roof piece is put in place. To top it all off, both of these gables were cut from probably the worst piece of wood possible. They have a long strip of knotted, whirled wood along the bottom creating a severe warp in both pieces.
To adjust the warp, I ran them under the faucet – yes, water logged the hell out of them – then pressed them flat for two weeks. I ended up with relatively flat boards. However, I figured glue and wallpaper paste moisture would put me right back up Warped Creek.
To achieve more stability for the gables, I first scraped off the extra lip from the tops of the siding pieces. I then drew connecting lines on the wall and gable pieces.
I drilled holes for headless pins in the base wall.

I added three headless pins on either side of the gable window opening on the base wall.
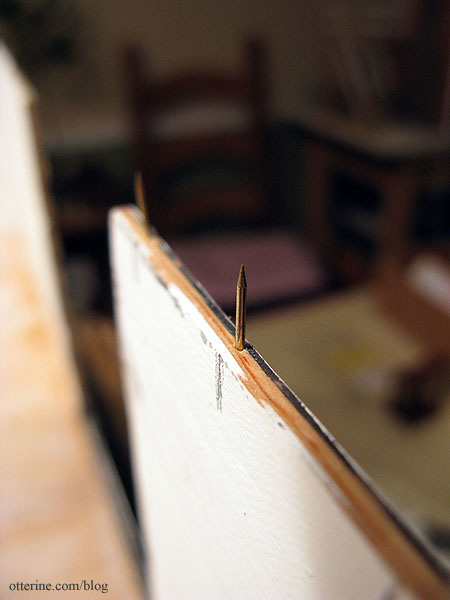
I drilled holes in the gables to line up, applied glue along the bottom edge and then pressed the gable onto the base wall over the headless pins.
I lined up the carpenter’s square to check it, but the pins were doing their job perfectly. :D
I repeated the process for the front gable even though it has two side connectors.
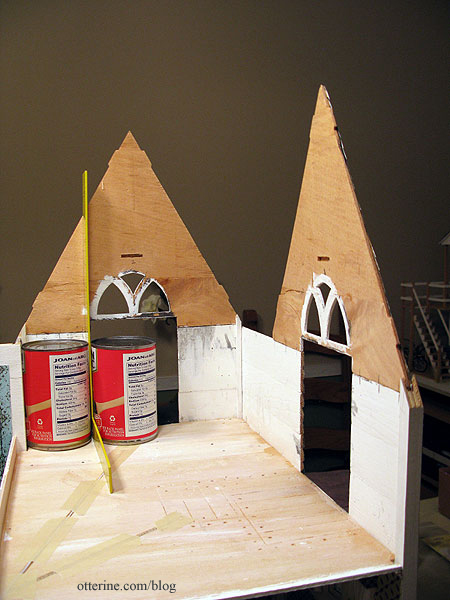
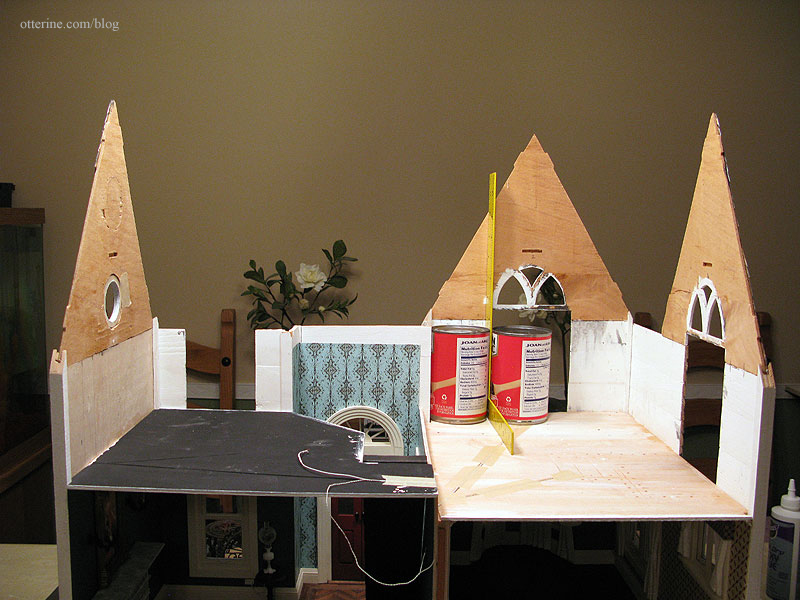
All of the gables are now installed. Since the roof pieces make up part of the second floor walls, those will be next for fitting and finishing.
Categories: The Haunted Heritage
March 17, 2012 | 0 commentsElizabeth Wharton Drexel
I visited the mansions in Newport, Rhode Island many years ago. It’s a beautiful place and the mansions are well worth touring if you are ever in the area. It is amazing to see the wealth and art that went into the places.
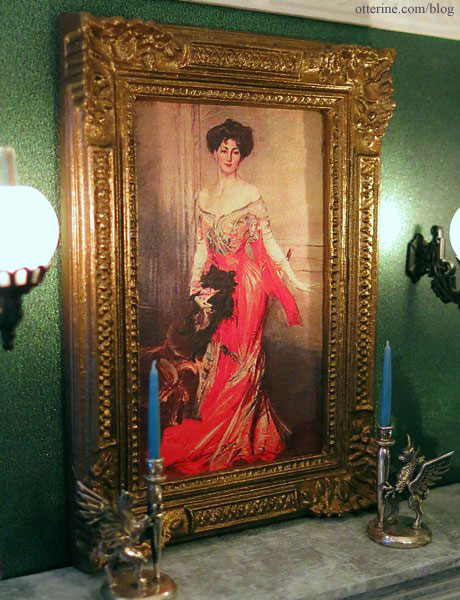
In one of the mansions, The Elms, hangs a beautiful painting by Giovanni Boldini of Elizabeth Wharton Drexel, 1905. I loved the painting the moment I saw it, and when planning the Heritage parlor I thought it would be perfect.

I bought the frame at a local mini show for its shape, size and detailing, though I didn’t care much for the color. It’s too bright for the room and the only gold piece. Here is the frame before refinishing and the painting as an unaltered paper printout.
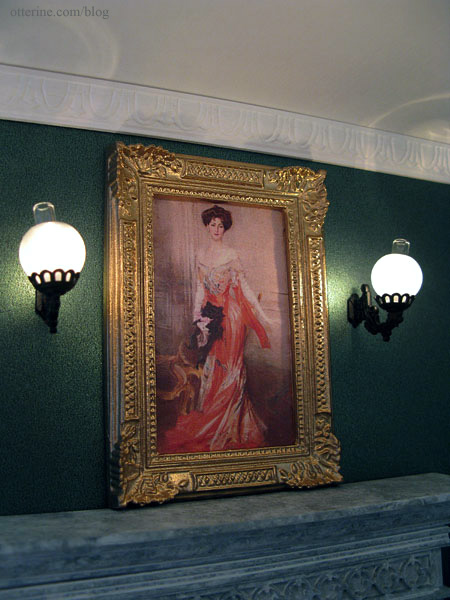
I used Liquitex Iridescent Bronze paint to darken the bright gold finish. It’s a subtle change, but it makes such a difference.
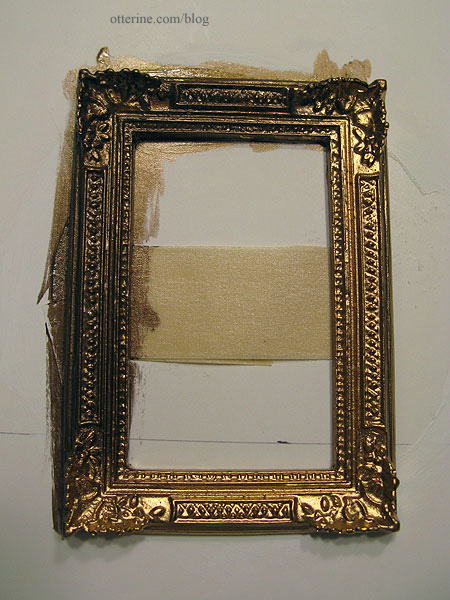
I sharpened and brightened the painting image in PhotoShop and printed on bond paper. It has a less shiny surface than regular computer paper. I think the painting looks older and richer now.

Categories: The Haunted Heritage
March 16, 2012 | 0 commentsParlor ceiling and related progress, part 2
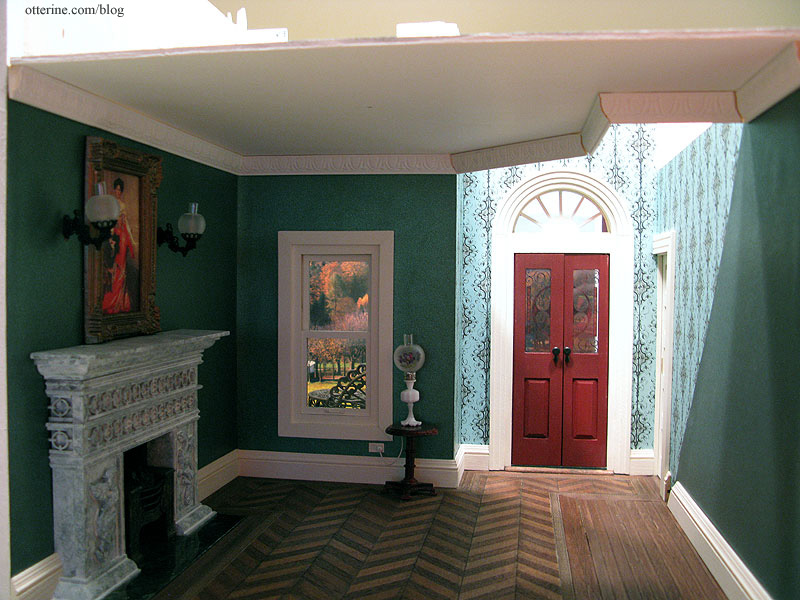
Continuing work on the parlor ceiling. I pasted in the remaining foyer wallpaper piece now that I had the new ceiling board cut.
As you can see, the front and side walls have wallpaper continuing up to the second story while the pocket door wall is short. Since I couldn’t build the pocket door wall as a single two-story wall, I’ll have to piece the wallpaper on this side. If the seam is very noticeable, I’ll add some decorative trim to cover it.
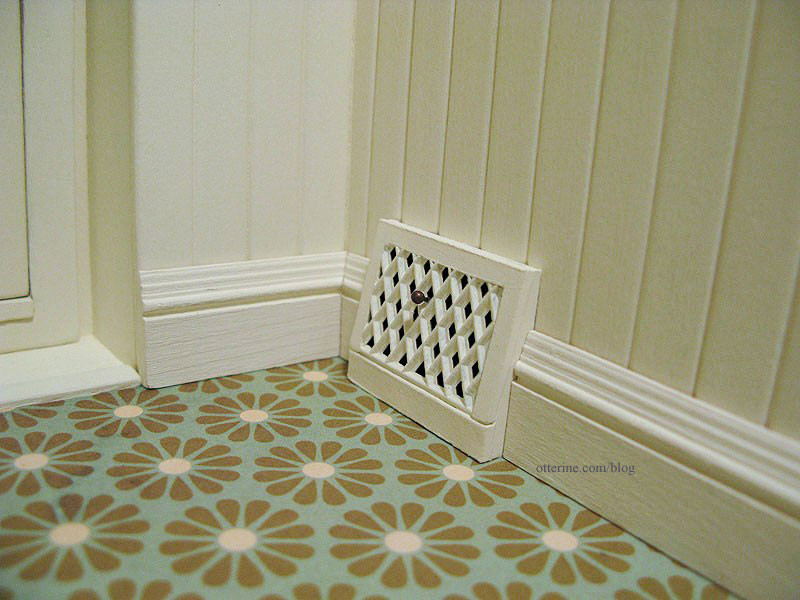
I liked the heat register in the kitchen so well that I’ll add another here in the parlor behind the staircase. It will barely show since it’s a dark corner, but I add these relatively hidden details just for myself. For right now, I have a straight piece of baseboard cut to fit behind the stairs. I will work on the heat register and final baseboard trim behind the stairs after I get the stairs installed permanently. Since this in near the open back, it’s not necessary to complete it before the ceiling board is in place.
Baseboard really brings forth a lot of realism.
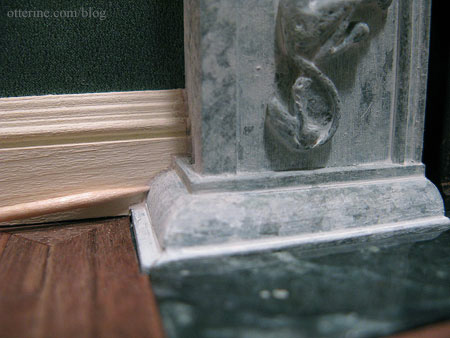
The baseboard on either side of the fireplace was tricky since it doesn’t have flat sides. I shaped the baseboard to wrap around the fireplace as well as I could possibly do, but there were still gaps that distracted me.
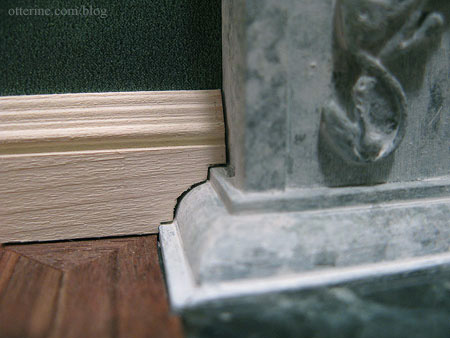
Since it would be difficult to add spackling after installation, I coated the ends with some of the material before gluing the pieces in place.
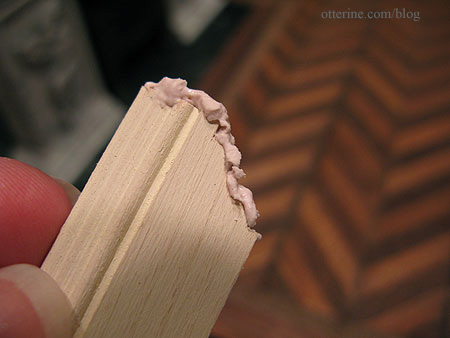
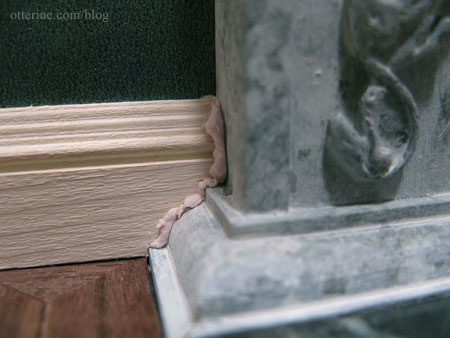
While the spackling was still wet, I was able to shape it with a toothpick. Even before touching up with paint, the joins are less distracting now.
For the crown molding, I went with a fancy real life sized carved trim that ties in well with the large medallion. I’ve painted the trim white to match the ceiling. I decided to finish cutting the crown molding pieces while the ceiling board was removable but I won’t install them until later. I might have to re-cut one piece that seems temperamental, but it’s a good start.
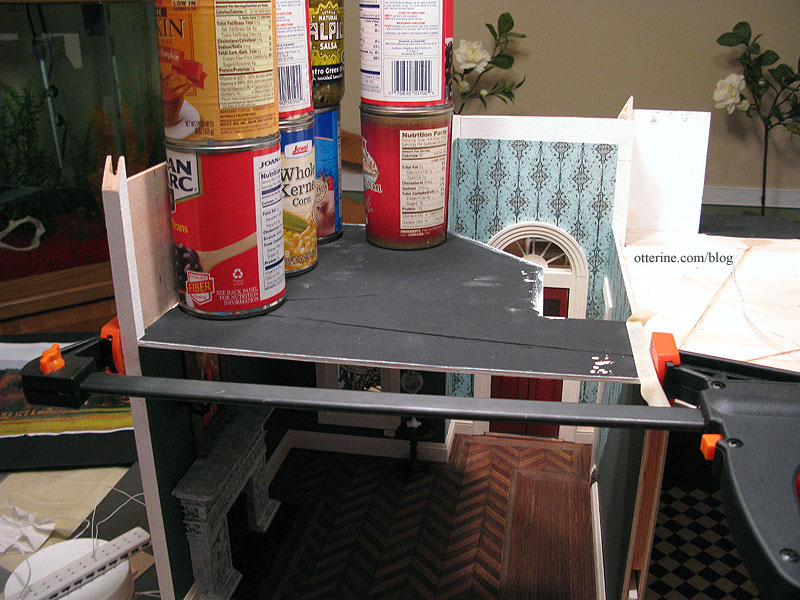
I then glued the ceiling board in place. I used a large clamp to hold the side wall inward and canned goods for weight along the outer edge. So far, so good.
Categories: The Haunted Heritage
March 15, 2012 | 0 commentsParlor ceiling and related progress, part 1
The padding I added to the side wall ended up a little higher than the padding on the front wall when I assembled the house, so I added a slim strip of wood to make up the difference.
This shim will keep the ceiling board level. I am already planning to use crown molding in the room so it won’t show later on.
For the ceiling board, I was able to use the plywood board that I had cut incorrectly when making the pocket door wall. Nothing goes to waste! :D I added the additional depth needed and measured for the placement of the stairs.
The board is relatively flat to begin with, so I am hopeful there will be minimal warping once the flooring and trims are installed. I plan to prime it on both sides and press it while it dries to help with this, too.
I positioned the stairs in such a way that they stick up above the plywood. This will allow for the thickness of the second story flooring materials.
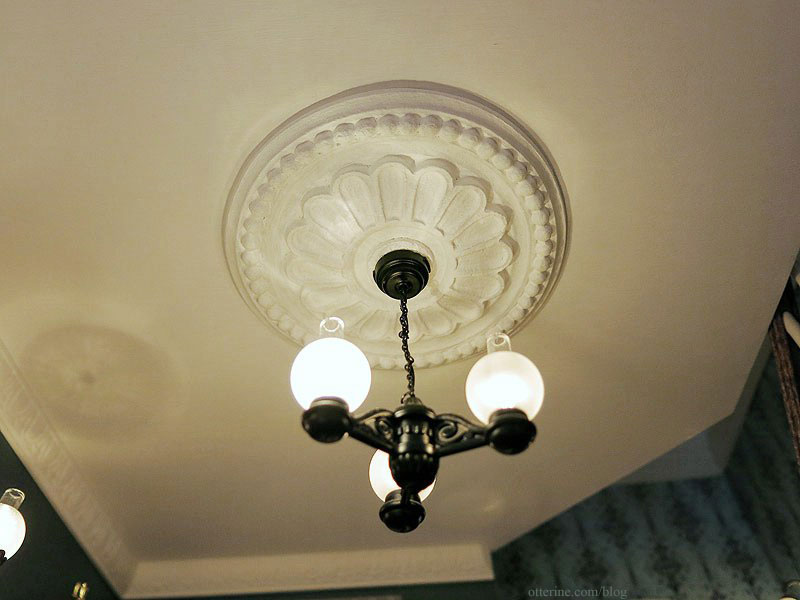
I taped a ceiling medallion by Unique Miniatures on the ceiling, using the Katie Arthur rug as a guide. There will be a chandelier in this room that coordinates with the sconces above the fireplace. The ceiling, crown molding and medallion will all be painted white to lighten the rather dark room.
I have a hard time with fancy rooms since they aren’t my usual thing.
The next order of business was cutting the wire channels for the parlor ceiling light as well as the two kitchen ceiling fixtures. These wires all terminate inside the chimney. The lights in the upstairs rooms will run along the attic floor and out to the chimney.
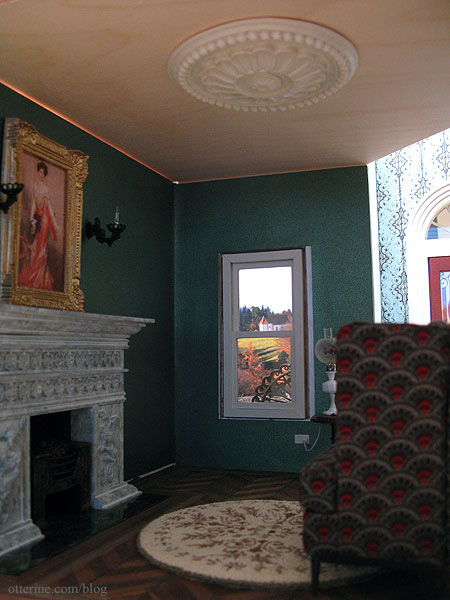
I already had the front window trim painted and ready to install. When I cut this new opening, however, I must have measured incorrectly since there is a lot of space on either side of the window.
I was lucky that the outer trim covered this completely. I wanted to make sure no light would show through, so I added some strip wood to plug the gaps.
Once the trim was glued in place, I filled in any gaps, touched up the paint and added a window pull. I plan to add some drapery to this window, but it already looks so much more realistic. I think Miss Kitty approves. :D

Part 2 here.
Categories: The Haunted Heritage
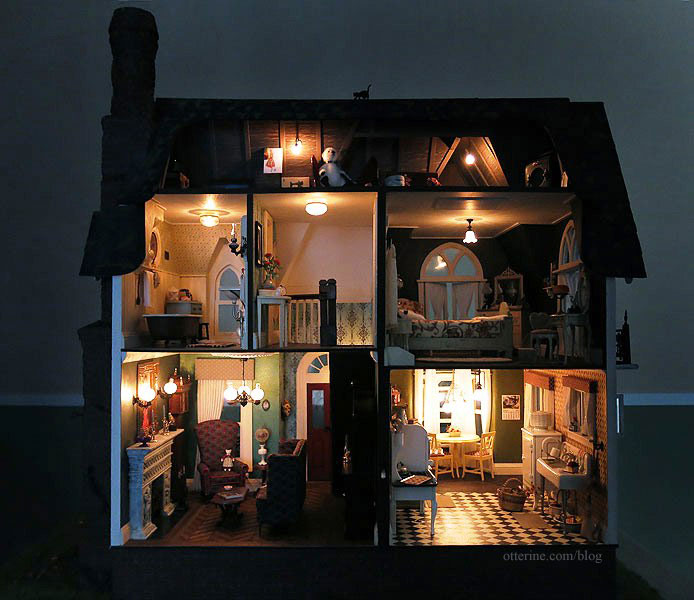
March 14, 2012 | 0 commentsThe Haunted Heritage – a pictorial recap
The Haunted Heritage was inspired by my childhood home and forged from the bones of a Dura-Craft Heritage dollhouse kit. Even though my childhood home had 1970s décor on the inside, I opted for 1920s inspired for my project. It seemed a good marshmallow center for the crusty exterior I had planned, like a time capsule.
This post contains a little sampling of each interior room as well as the exterior. For more detailed room specific posts, please click on the links below. Click here for a full list of Heritage posts, including how I made things and the materials used.
– 1920s inspired kitchen
– Grandma’s fine parlor
– Elegant entry, staircase and upstairs hallway
– Vintage farmhouse bathroom
– Grandma’s resplendent bedroom
– Grandma’s dusty old attic
– The Haunted Heritage exterior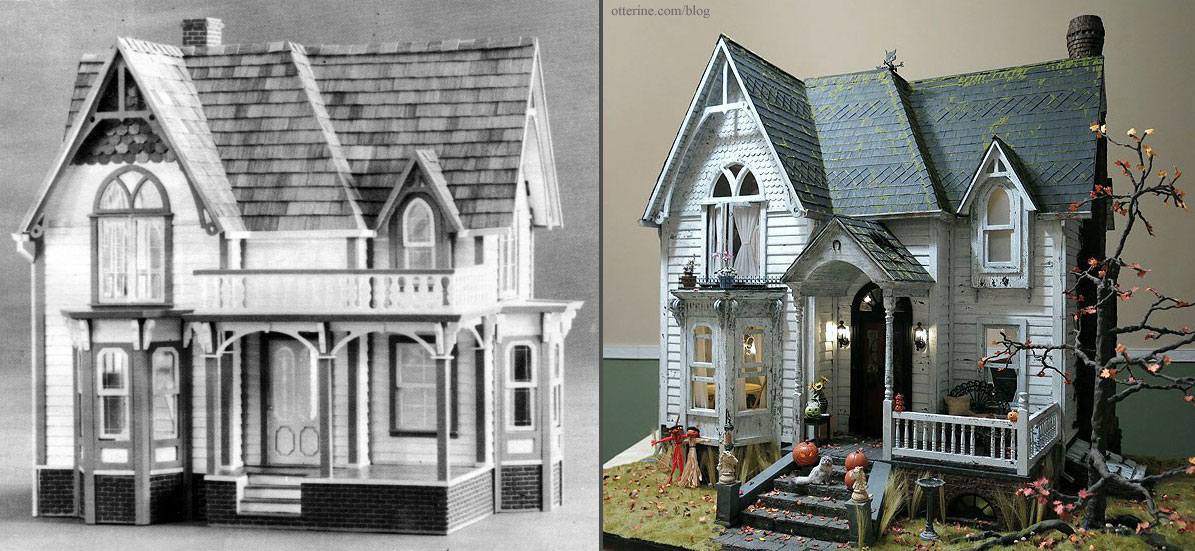
kit photo compared to my build photo – front 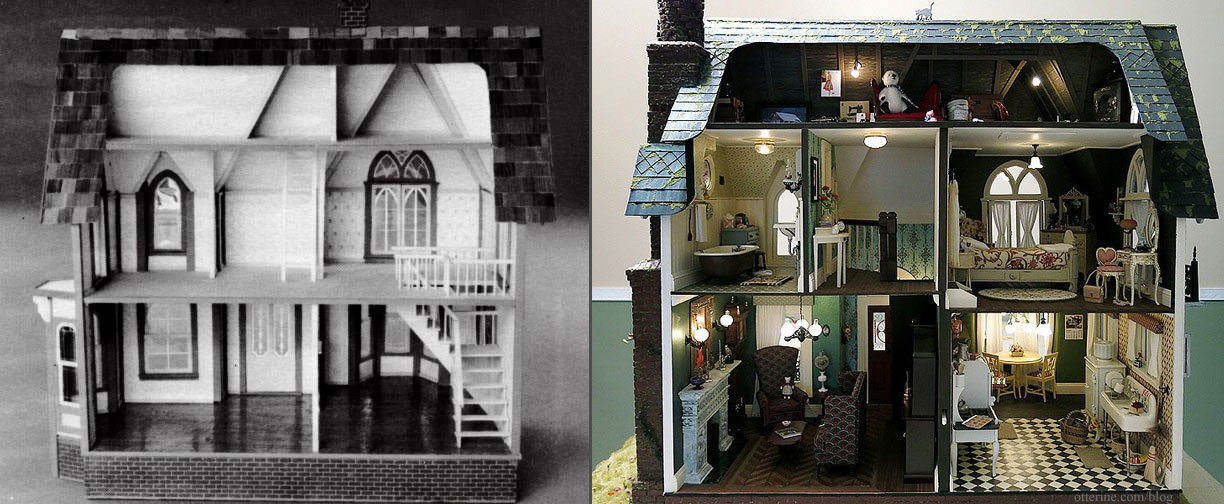
kit photo compared to my build photo – back 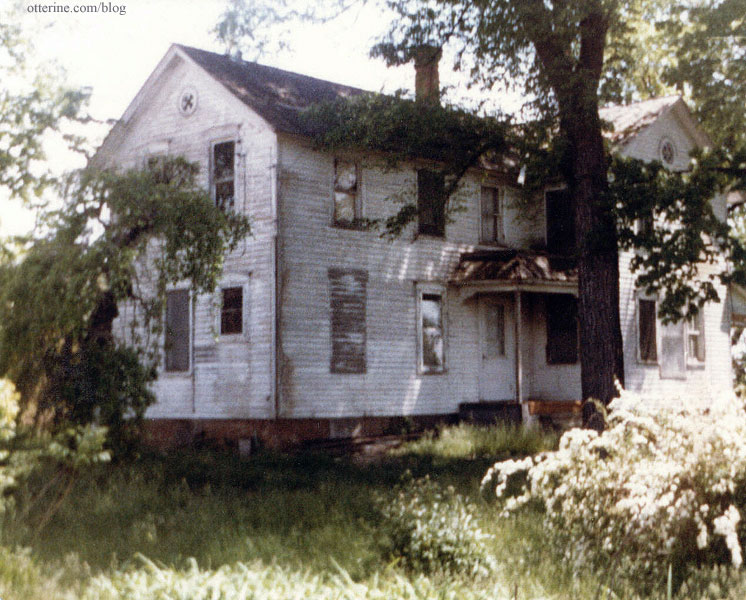
the inspiration – my childhood home The Heritage is fully electrified.
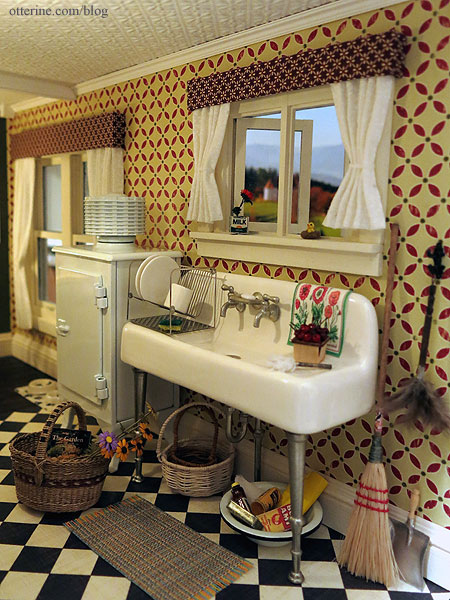
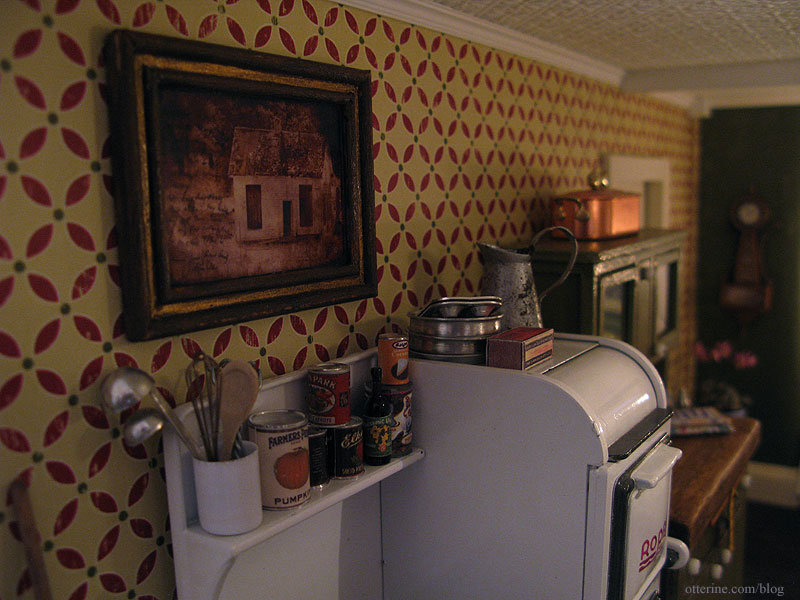
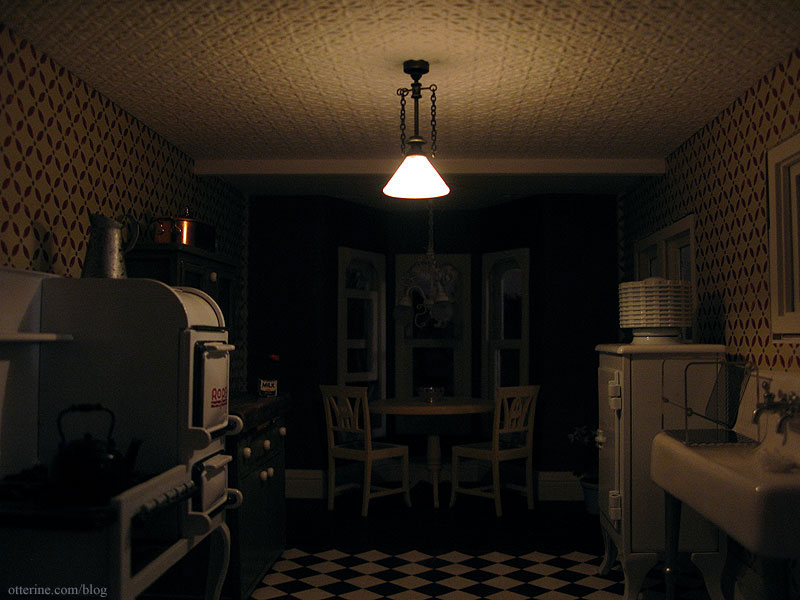
The 1920s inspired kitchen:
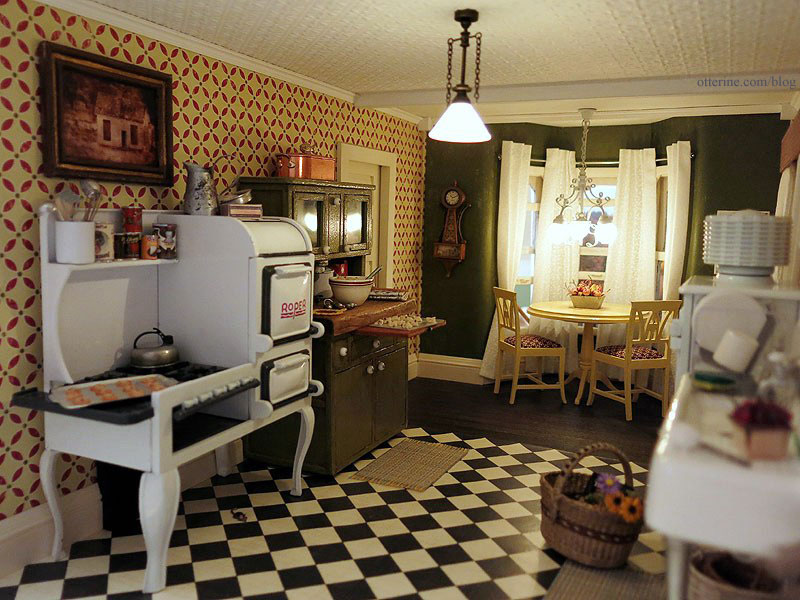
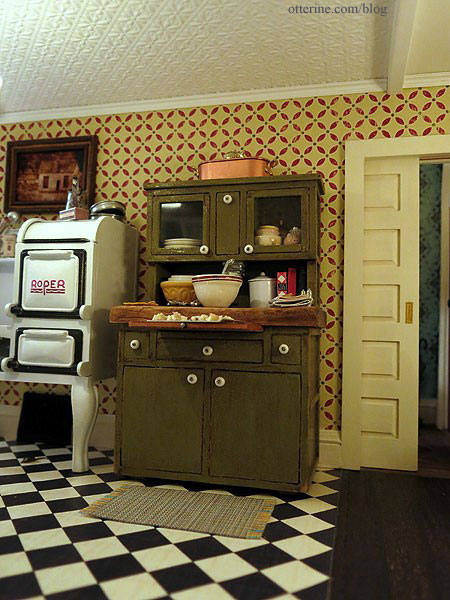
The flooring is Cream Diamonds by The Paper Studio and the wallpaper in Geometric Fa La La by Making Memories. The back of the wallpaper is aged green, so I used that in the bay window section.
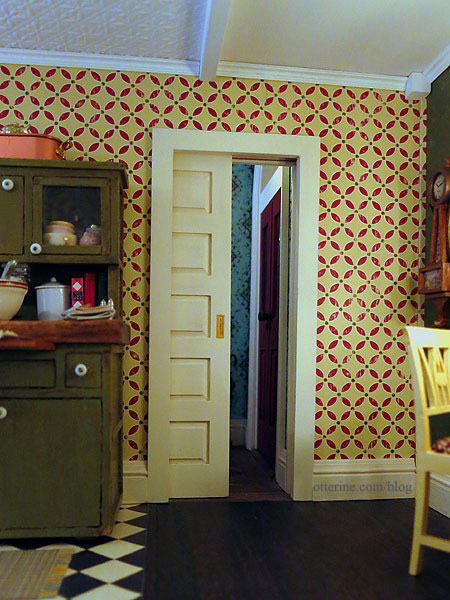
The working pocket door was challenging, but I love the way it turned out!
My first attempt at curtains came up short on length but I love what they add to the realism of the kitchen. Grandma has her cleaning supplies and some extra baskets under the sink. Lyssa made the baskets, and the tea towels throughout the kitchen are from Marlene.
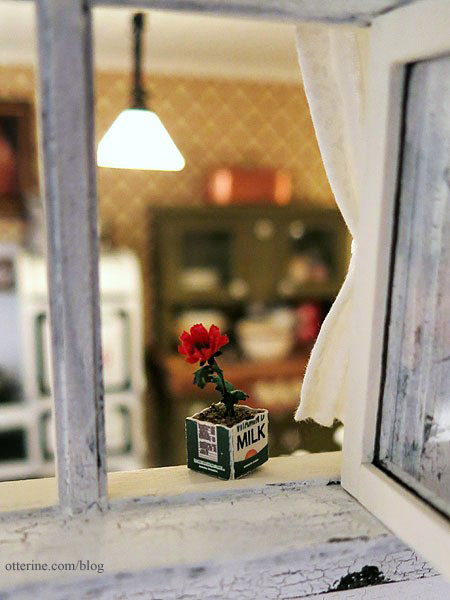
The flower in the milk carton was made from a true2scale kit.
I figured out what I was doing before I got to the bay window curtains.
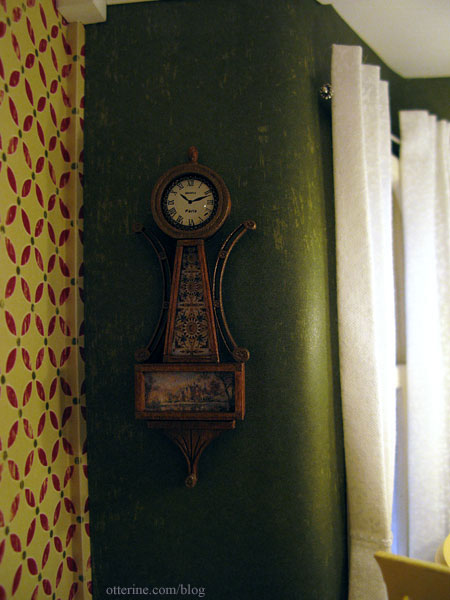
The banjo wall clock was made from a Cynthia Howe Miniatures kit.
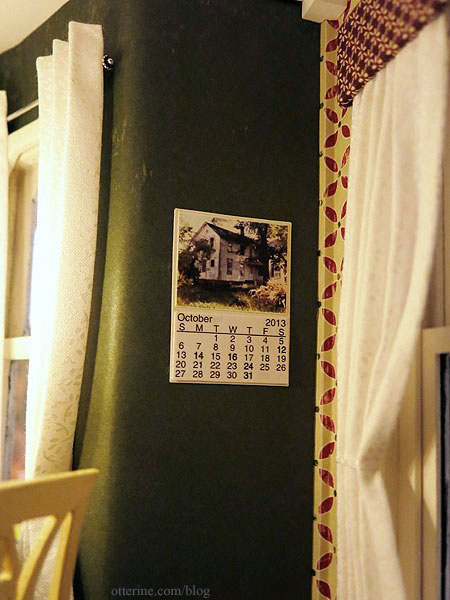
I made a wall calendar using the image of my childhood home, the lovely place from my dreams that inspired this build.
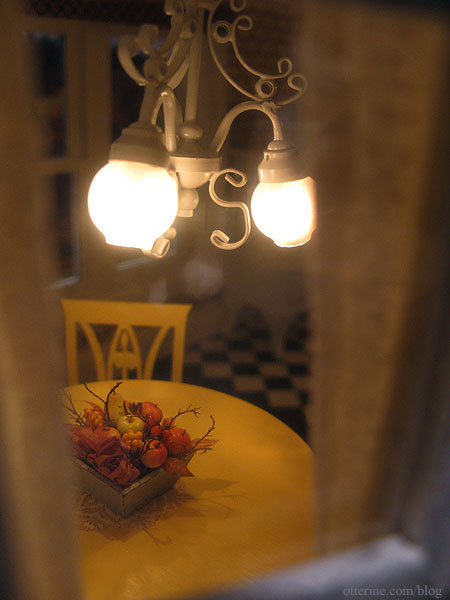
The autumn fruit basket is from Hungarian Miniatures.
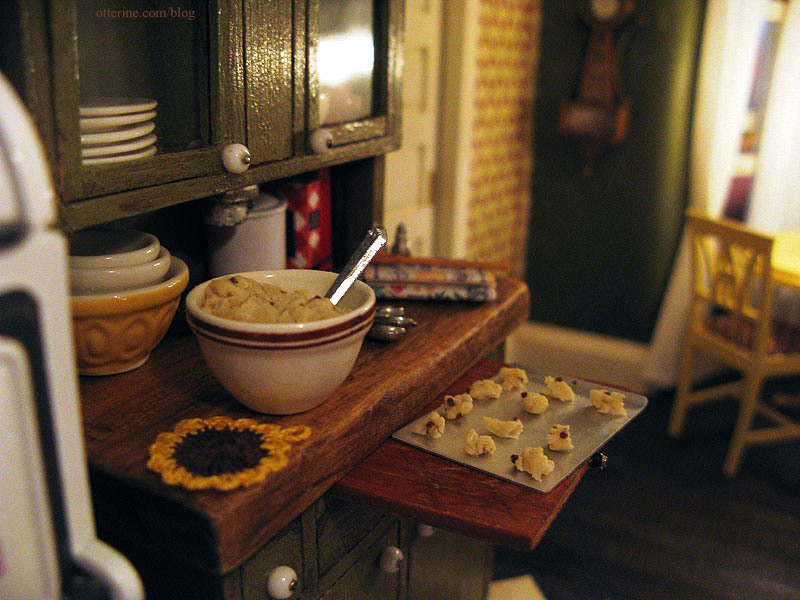
Keli made this amazing Hoosier cabinet for me – such a wonderful and generous gift.
Kelly made this wonderful artwork called Ghosts of the Past. I think it works wonderfully here in the kitchen. Maybe it’s an old faded photo of grandma’s childhood home. :] The lovely pitcher is from Caterina.
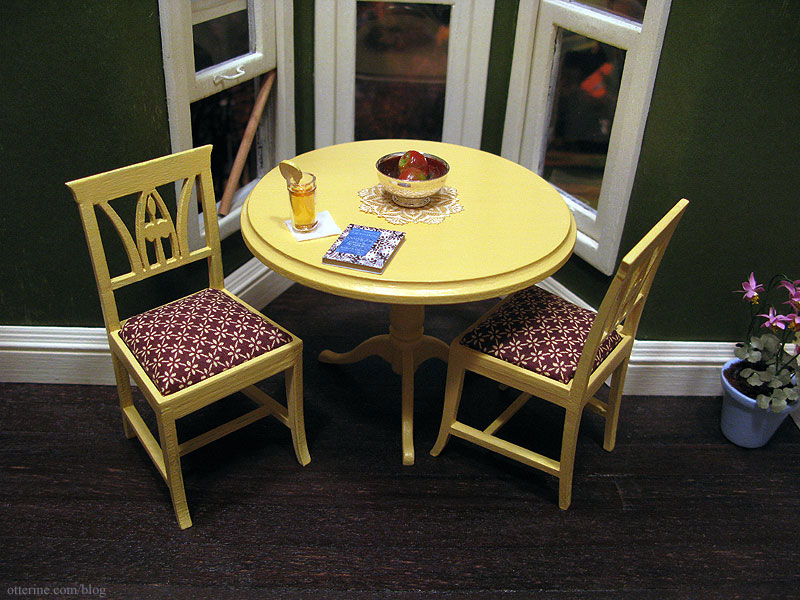
The dining table was made from a House of Miniatures kit, and the Lilje chairs kit came from Art of Mini. For the upholstery, I chose a brown and ivory print. I think it is close enough to the dark red to tie in well with the wallpaper.
I won a lovely cookie baking set from Creating Dollhouse Miniatures. The pieces are so well made and realistic.
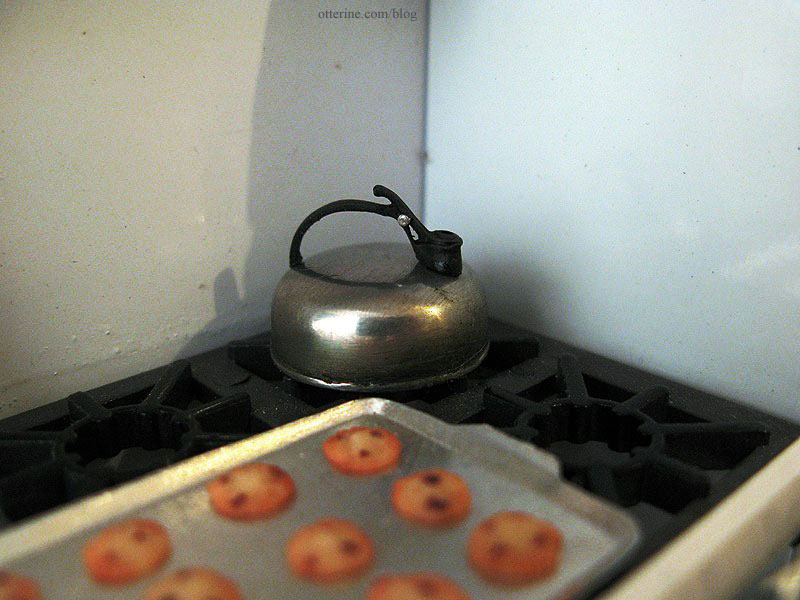
The whistling tea kettle is by Ulus Miniatures – purchased from Mainly Minis. We had one of these in real life at my childhood farmhouse. Mom still has it and uses it, too!
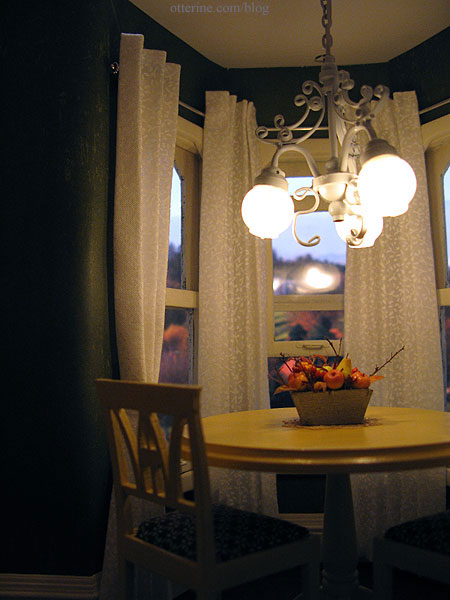
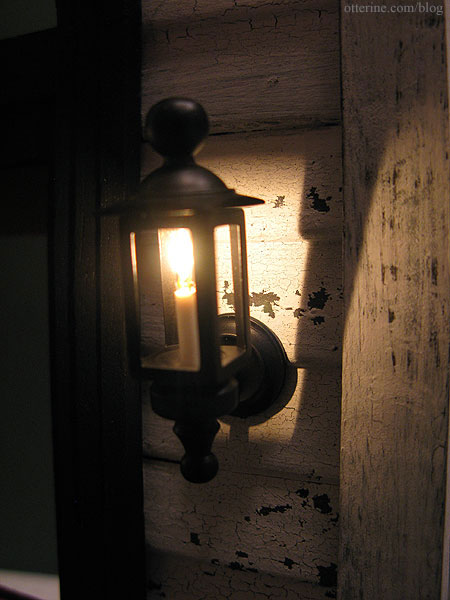
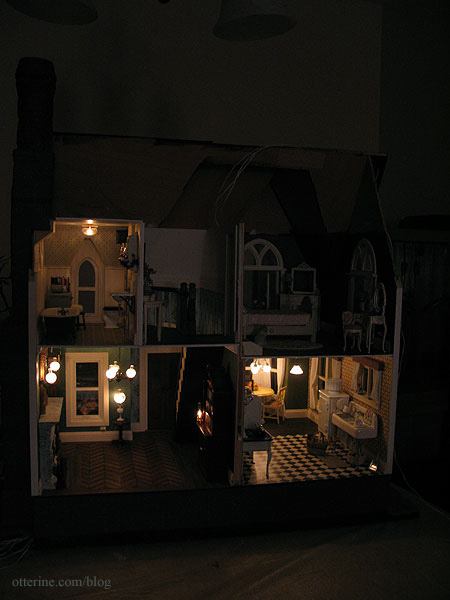
Lighting always makes a dollhouse magical…
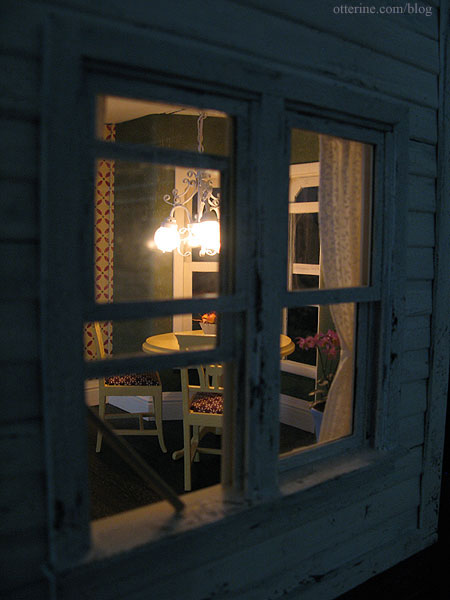
Or creepy…
Or it can make it just plain scary.
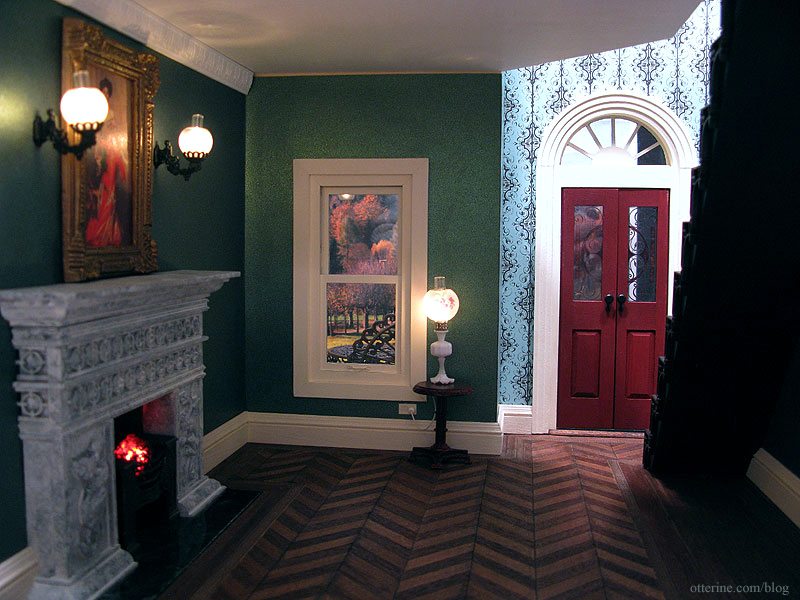
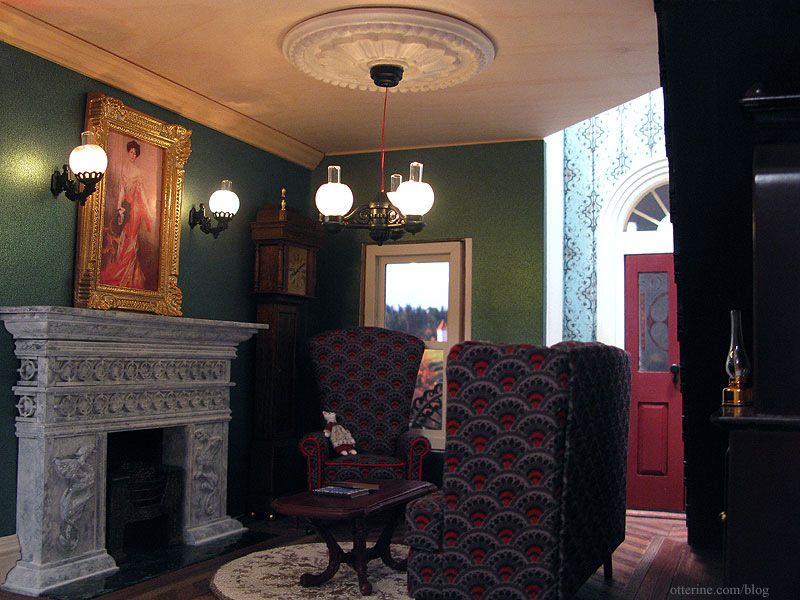
Grandma’s fine parlor:
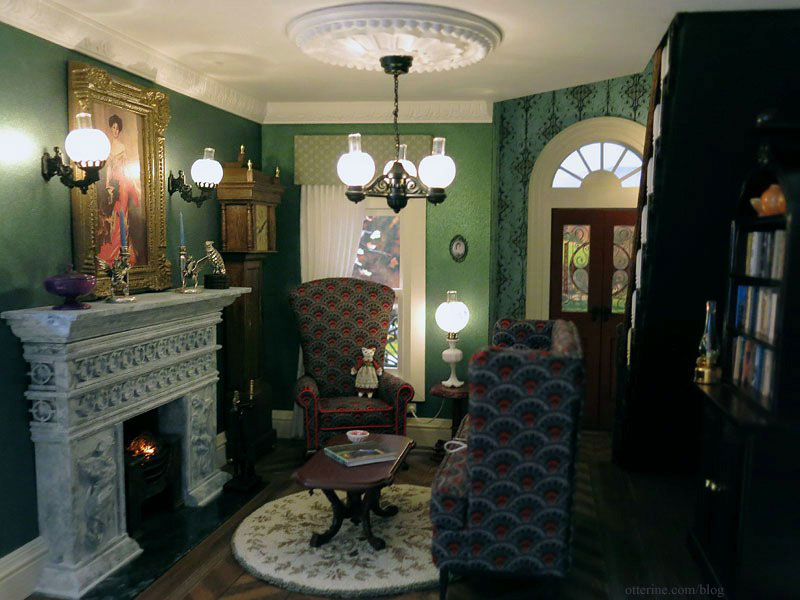
On the left side of the room is a large fireplace.
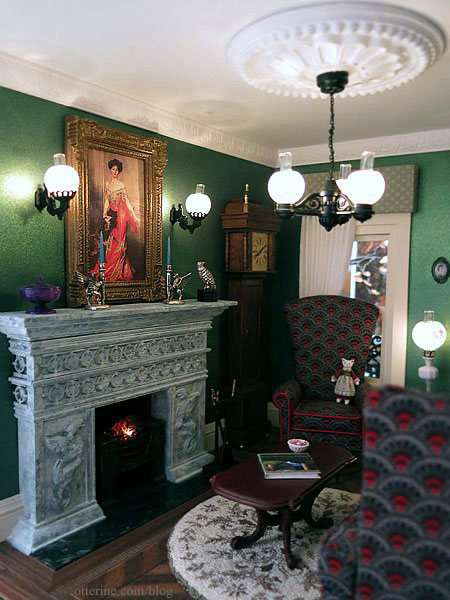
On the opposite side, the stairs lead to the second floor.
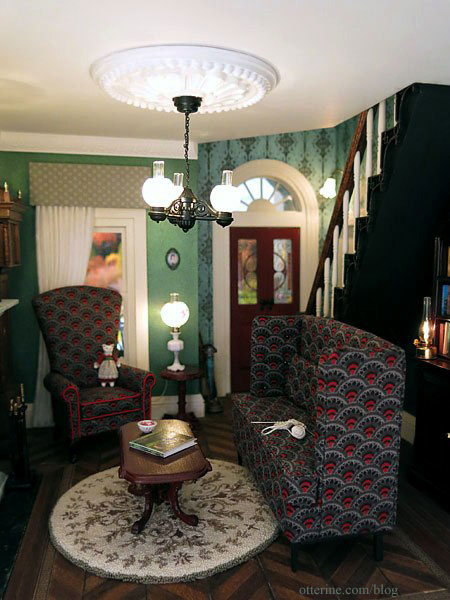
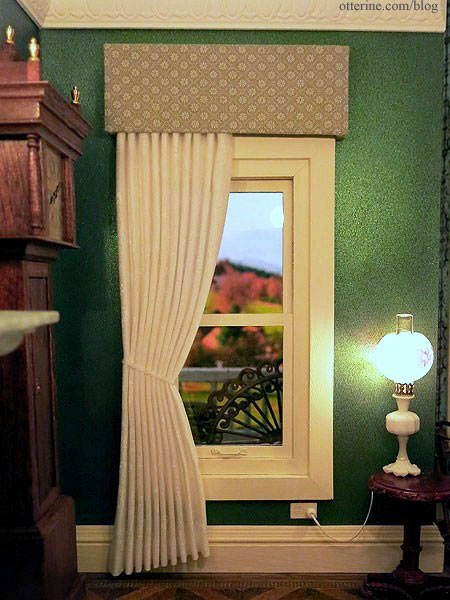
I opted for a single side swept curtain for the sole purpose of not hiding that little outlet I took the time to add. Though The Chair will block both the curtains and the outlet for the most part, anyone who looks for the details will find them.
The fancy parlor floor was a labor of love but so worth the effort.
I assembled the wall sconces above the fireplace as well as the gaslight chandelier. At first I thought the ceiling medallion was too much, but I love the way it frames the chandelier. This particular chandelier is a little temperamental since I wired it to have replaceable bulbs. The slightest movement makes the globes teeter. It’s not easy to adjust three of them with two hands. Haha! :D
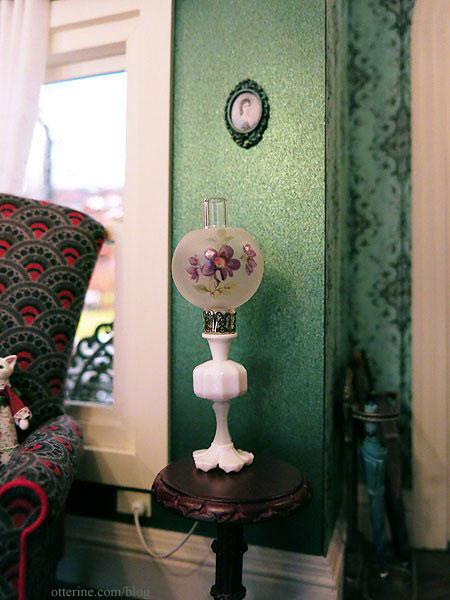
The table lamp was purchased already assembled and is wired with one of my signature faux outlets. The side table is a Bespaq piece purchased at a local mini show.
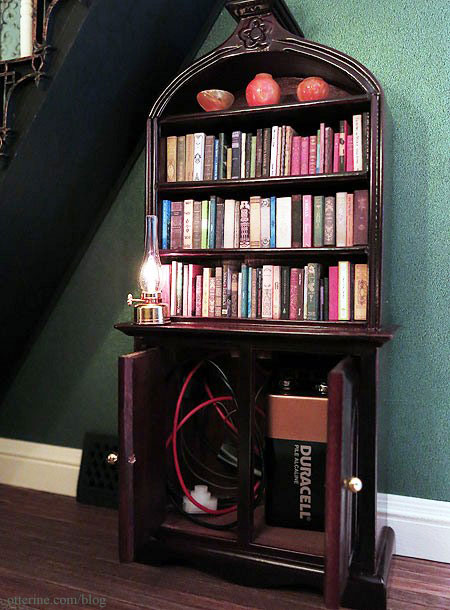
The bookshelf was purchased, but I made all the tiny books that line the shelves. The top shelf holds a matched set of orange acrylic turned items from CW Lubin Wood Turning, two vases and a bowl.
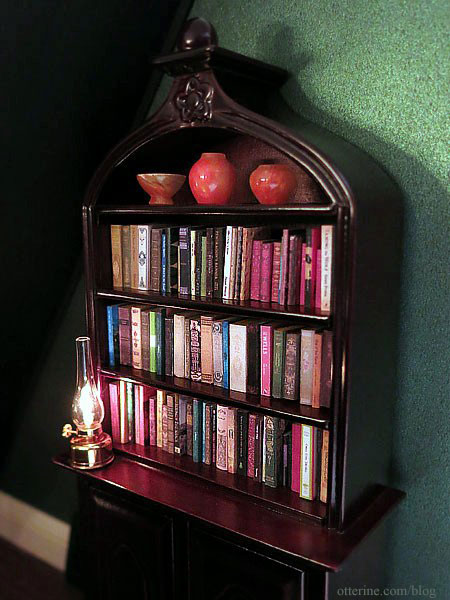
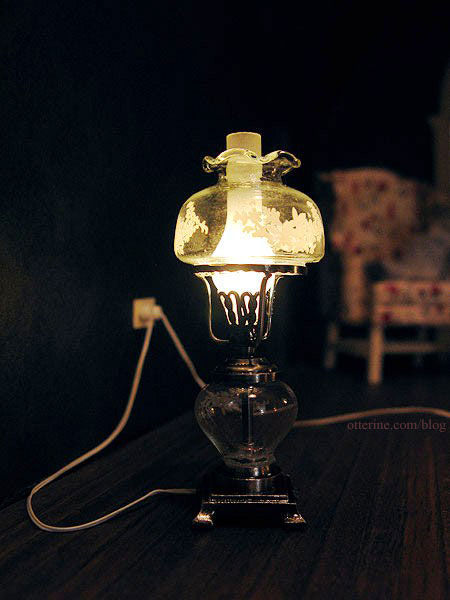
The hurricane lamp is battery operated.
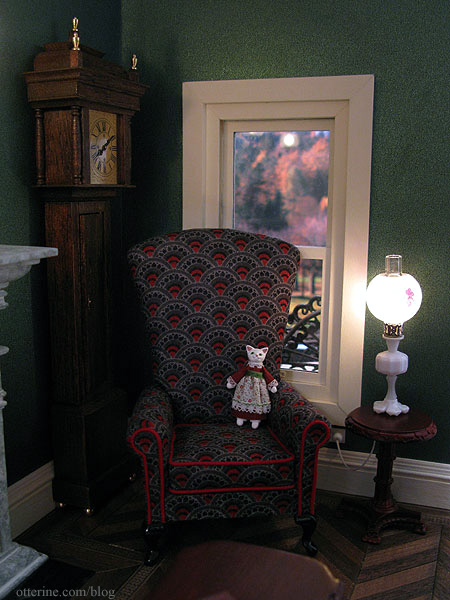
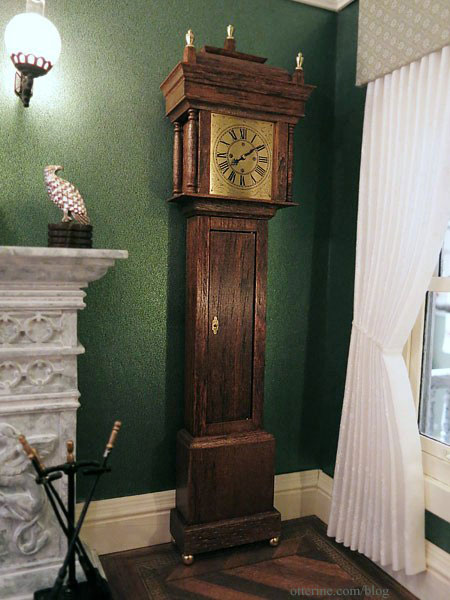
The beautiful Bagnall clock is a House of Miniatures kit.
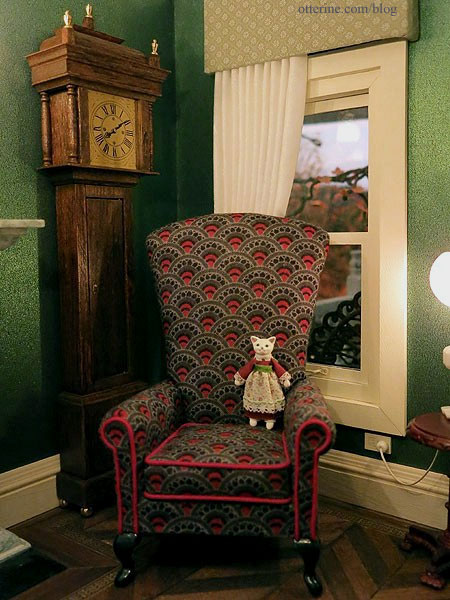
Miss Kitty was made by Pamela of PamelaJunkMinis. The Chair was made by Kris of 1 Inch Minis.
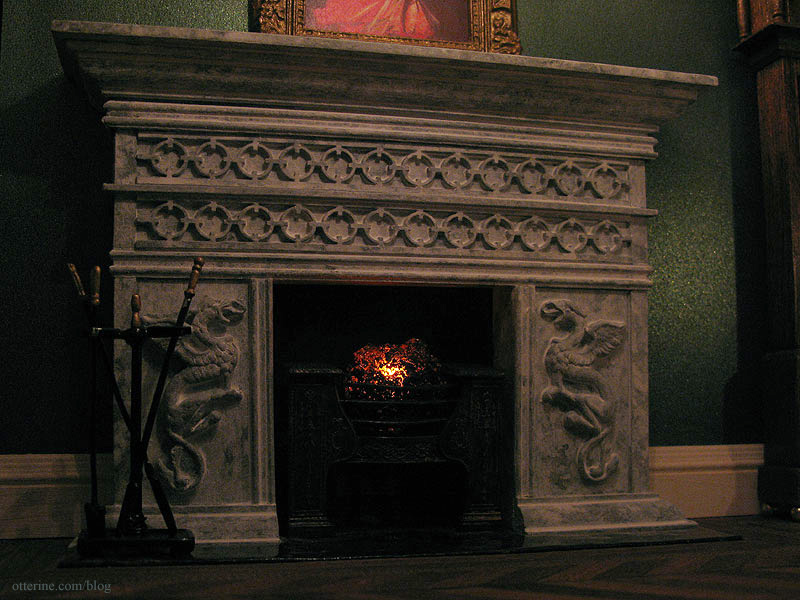
The white stone griffin fireplace was made from foam core board, wood trims and polymer clay, then painted to a faux stone finish. The marble hearth started out as cardboard. The resin coals are held by the Phoenix Parlour Hob Grate. I painted it Burnished Copper Metal by Rustoleum, then aged it with layers of black and grey acrylic to get the look I wanted. I installed a flickering LED to light the resin coals.
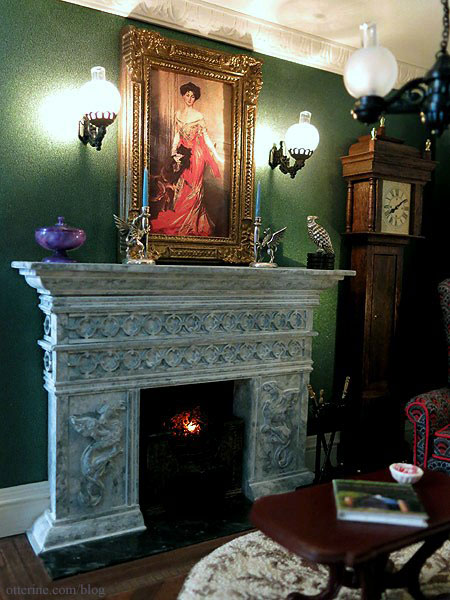
A close-up of one of the griffins.

The painting above the fireplace is by Giovanni Boldini of Elizabeth Wharton Drexel, 1905. I printed the image on regular paper and painted the purchased frame to tone down the original gold finish.
Next time you are invited for tea, don’t let the bedraggled exterior of the Heritage scare you away. :D
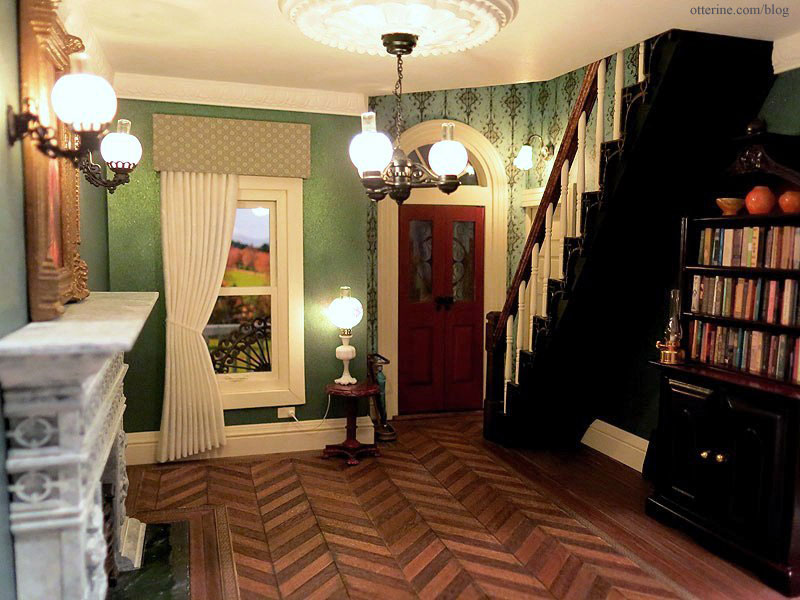
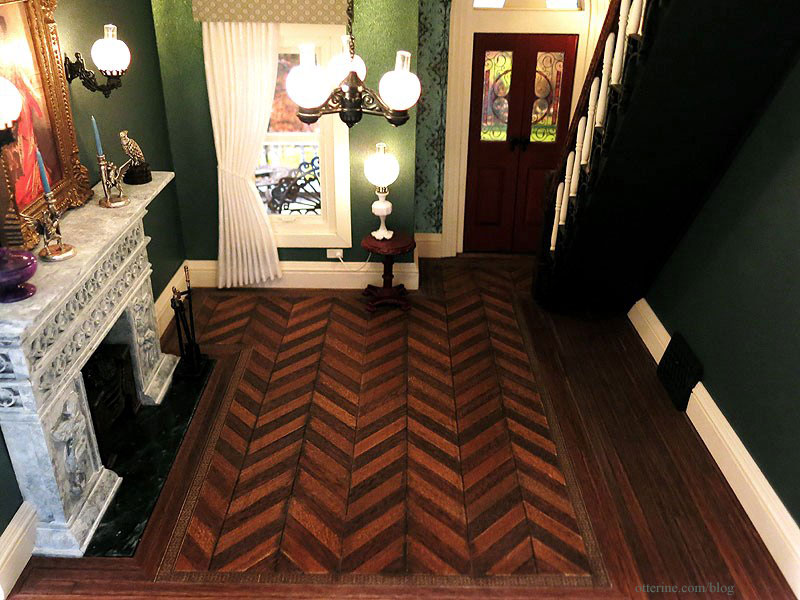
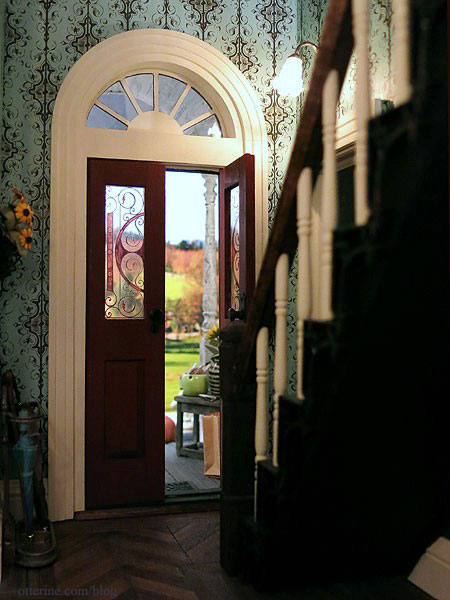
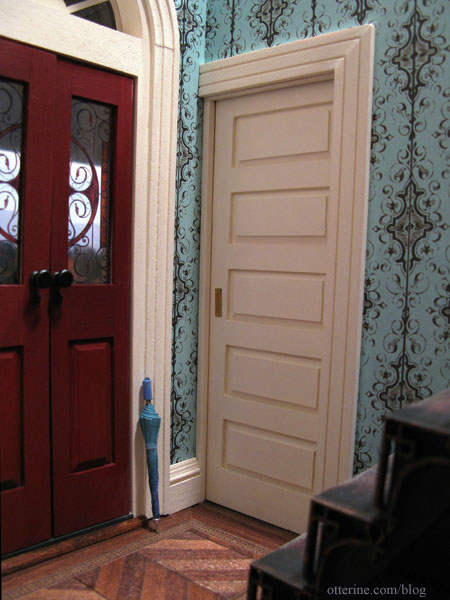
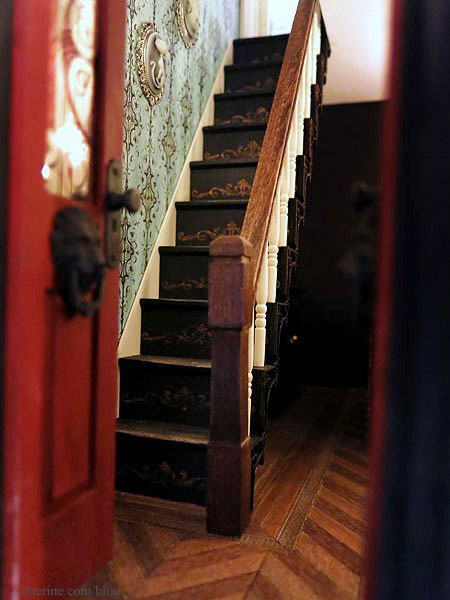
The elegant entryway, staircase and upstairs hallway:
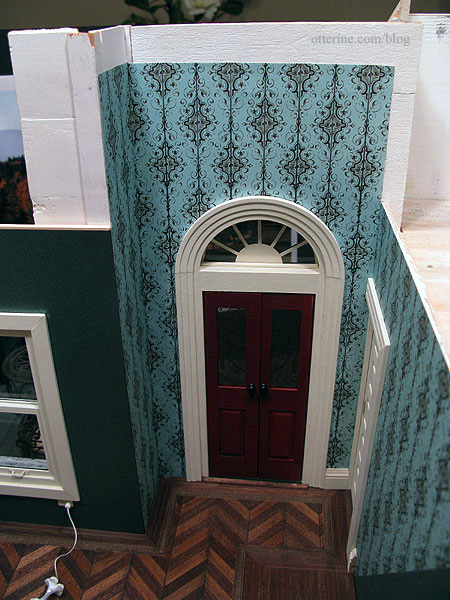
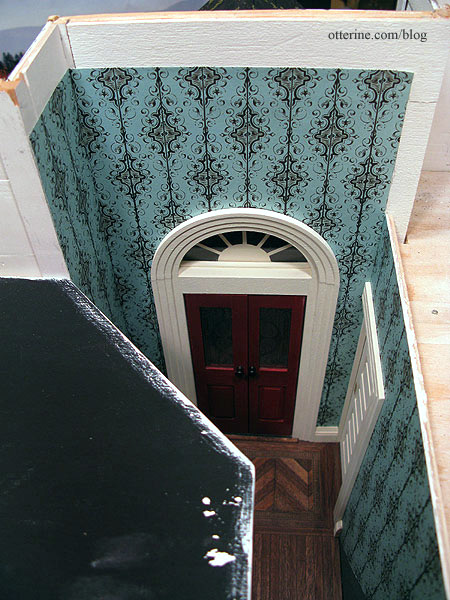
Here are a couple of work in progress shots before the permanent installation of the final floor and staircase.
View from the front door.
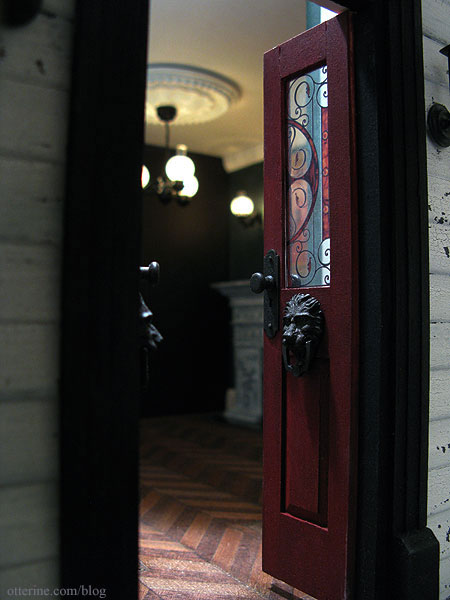
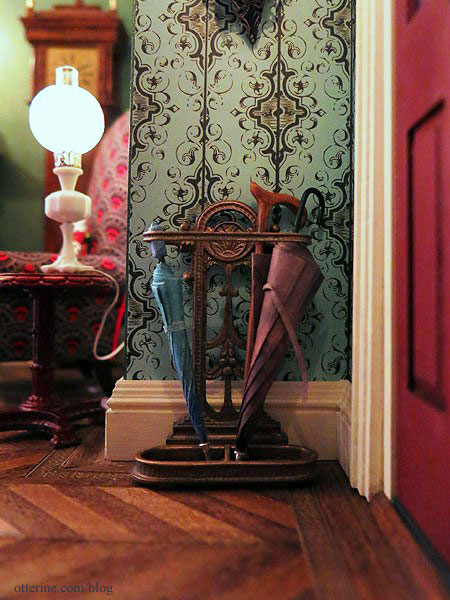
Adjacent to the front door is the working pocket door that leads to the kitchen. The beautiful umbrella is from FranMadeMinis on etsy.

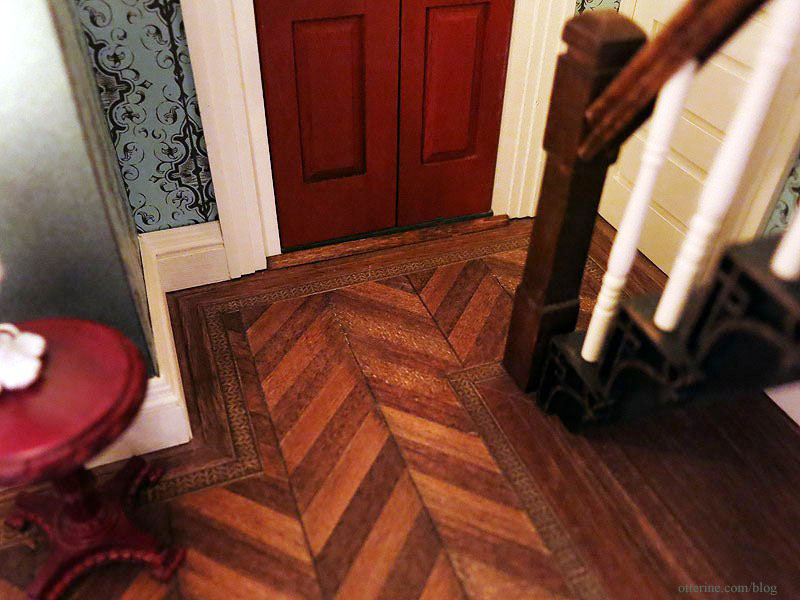
The entryway floor was planned and installed to coordinate with the parlor.
I assembled and painted a Phoenix Model umbrella stand kit to hold the two beautiful umbrellas by Fran and a walking stick.
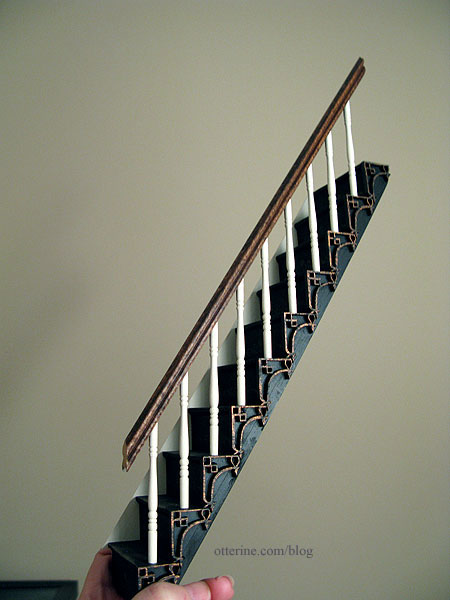
I didn’t use the kit parts and installed a Houseworks narrow staircase instead. I added laser cut trim, dry brushed bronze paint and stenciled detailing. I upgraded the stair railing, painting the spindles and staining the railing to match the floors. Assembling the railing was a huge challenge, but it all worked out in the end. :D
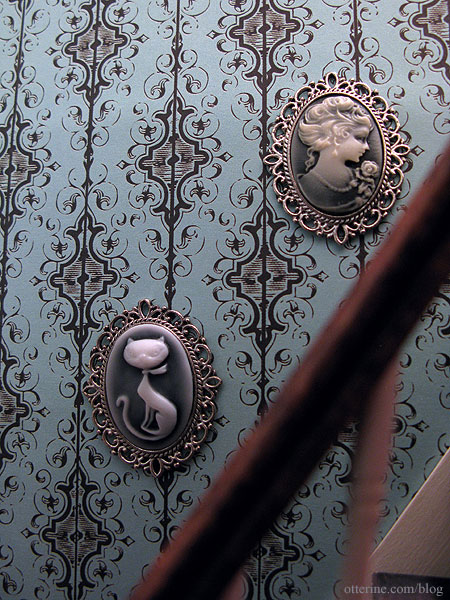
The cameos that hang in the stairway are pendants from Fairy Tale Fantasies. One is a retro kitty and the other a beautiful vintage lady. I cut the loops from the tops to use them as framed art. I love their ghostly appearance.
The balcony railing was challenging but I love the way it turned out.
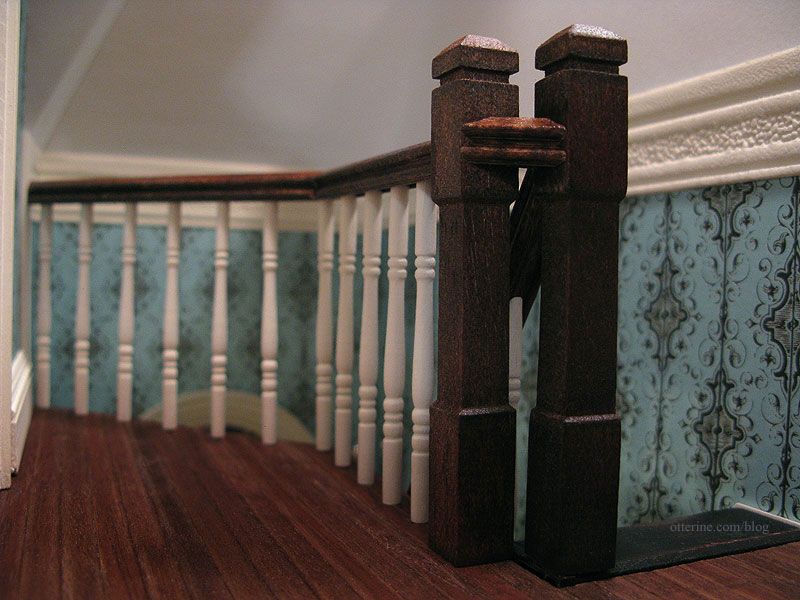
And, from overhead.
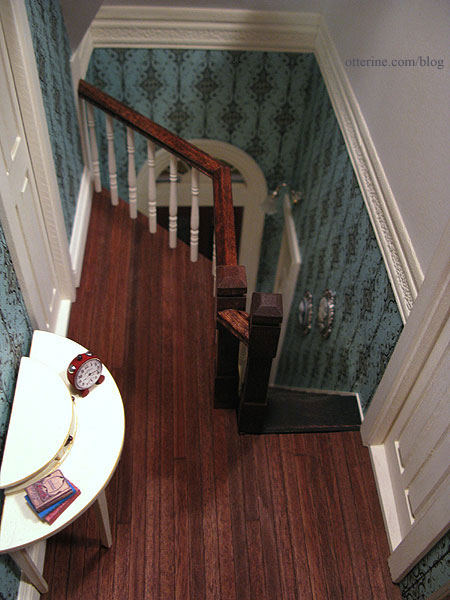
There’s a simple vignette that occupies the area to the left of the bathroom door. The table is a House of Miniatures Hepplewhite Side table with hand painted designs and added elements inspired by a real life sized antique table. The artwork is a photograph from artisan Natasha Fadeeva. She makes the most amazing little animals. I just swoon over her mice!!! :D I contacted her about using the vintage mice photos in the Heritage, and she graciously gave me her permission.
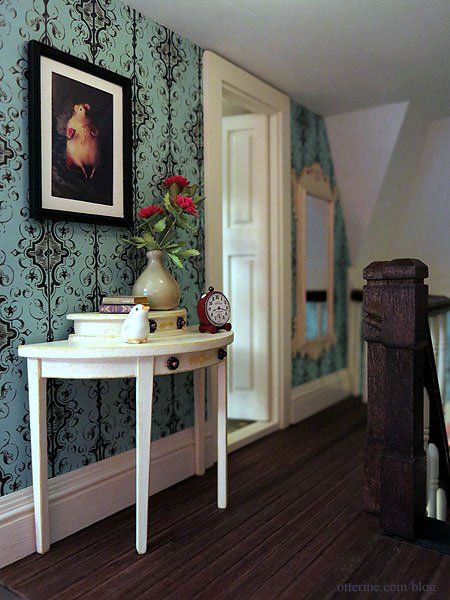
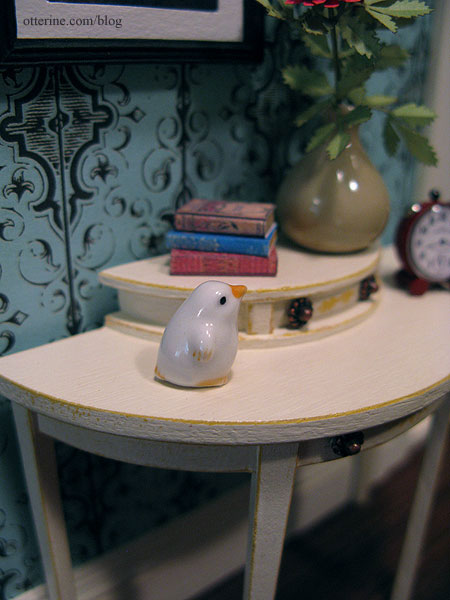
The vase and bird figurine were purchased awhile ago, but I’m no longer sure of the vendor. The flowers are Bonnie Lavish red dahlias.
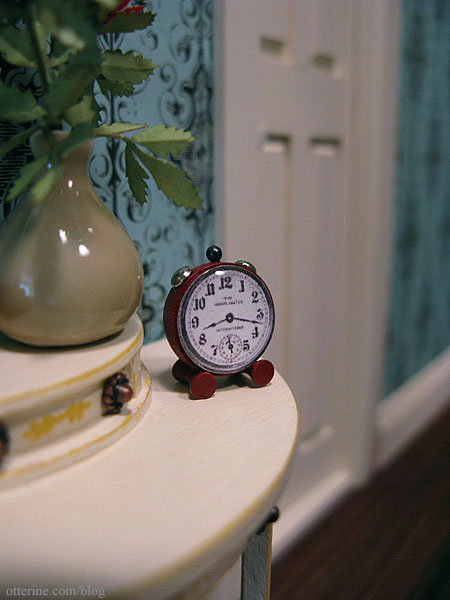
I made the tiny red alarm clock with a face printed image from The Graphics Fairy with a clear cabochon sticker to simulate glass. I had made a set of vintage table clocks for another miniaturist through my etsy shop, and I liked the red one so well I knew I would need one for the Heritage.
Bugs in the light fixtures. :D
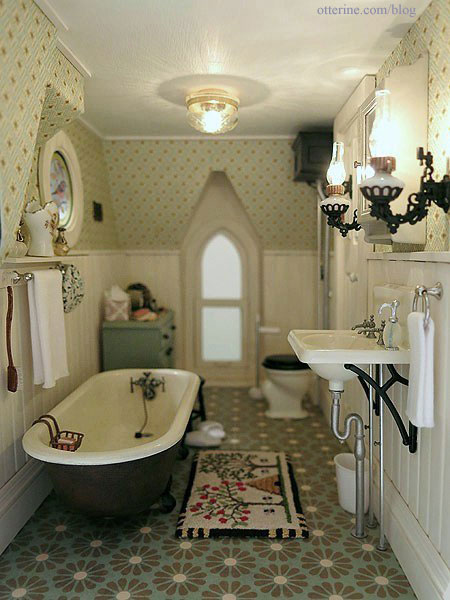
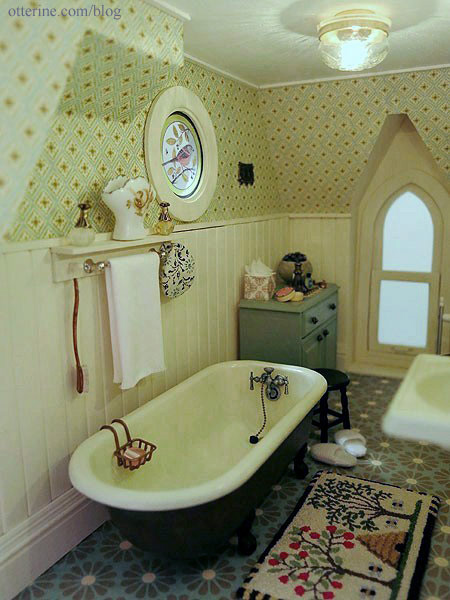
Vintage farmhouse bathroom:
The bathroom is one of two rooms on the second floor of The Haunted Heritage. It’s a small room but just right for an old farmhouse.
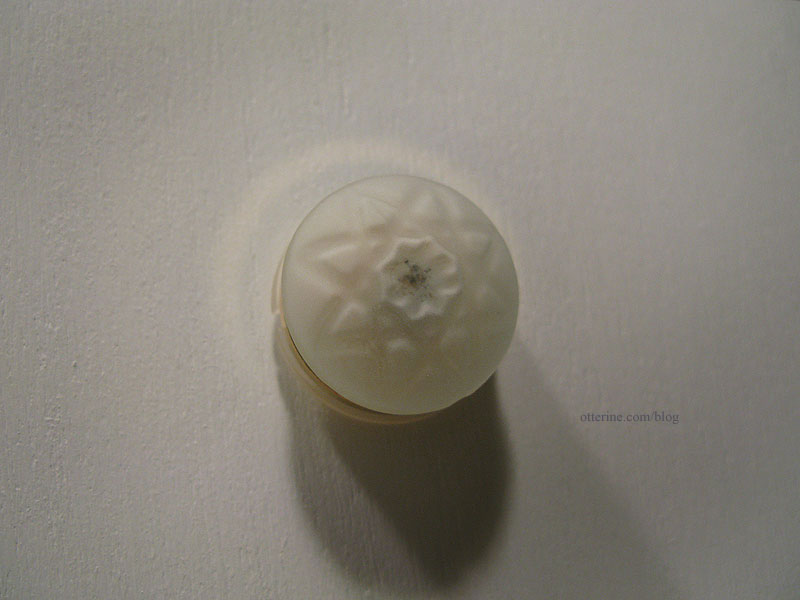
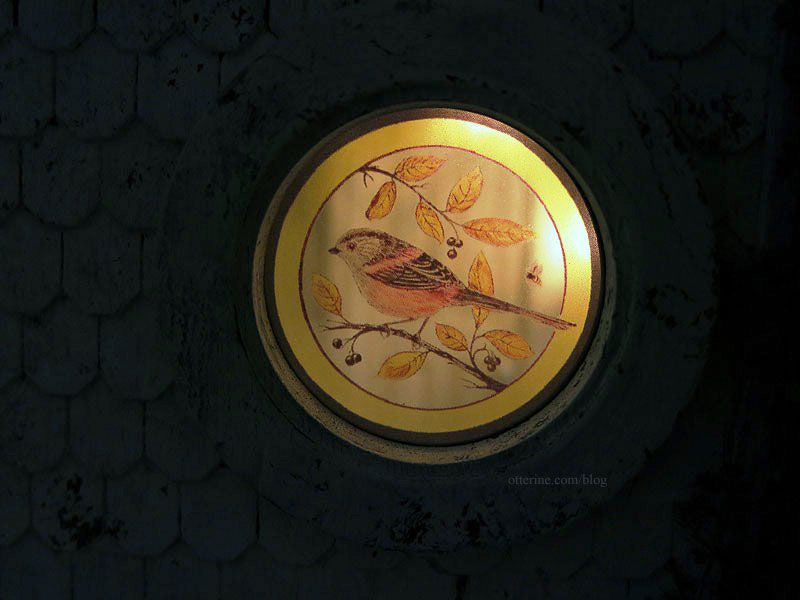
The bird and bee design by Flora for the bathroom window really sets the room apart.
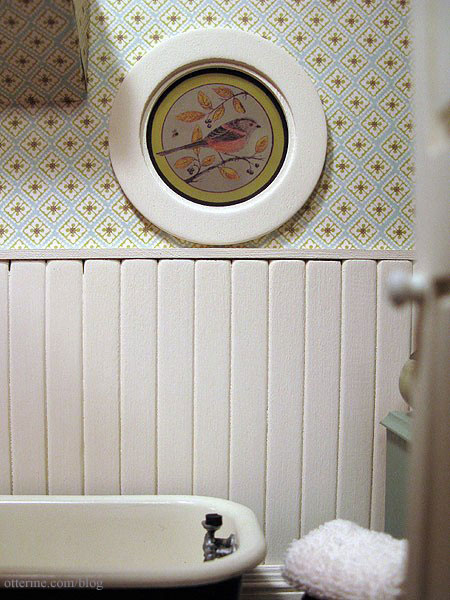
After Flora graciously permitted me to use her artwork, I edited the image in PhotoShop, turning the bird more grey and removing all stray spots. The white in the bird wouldn’t print on transparency and any spots would be magnified in this small scale. I bumped up the coloration since printing on transparency usually results in some color loss. Beautiful.
The heat register was adapted from a tutorial by Kris at 1InchMinis.
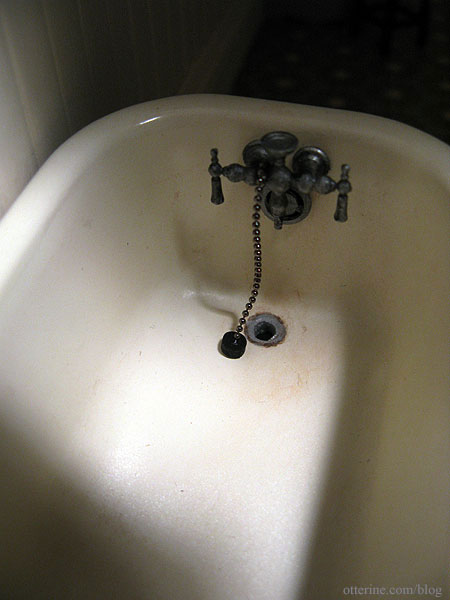
The bathroom fixtures were made from a Chrysnbon kit. I love this style of vintage tub!

The inside of the tub is also aged, with a custom made overflow drain made from a pen cap.
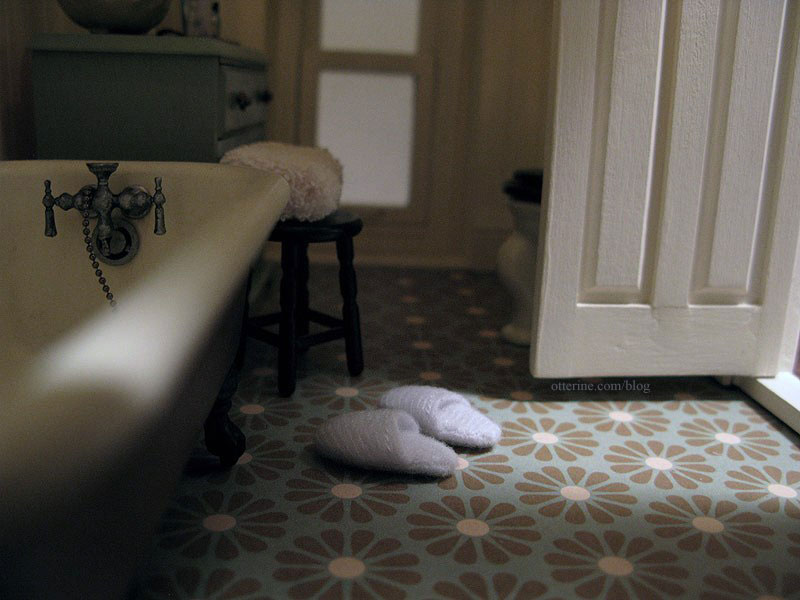
Grandma’s white fuzzy slippers are from The Dolls House Emporium. They’re quite cute. :D
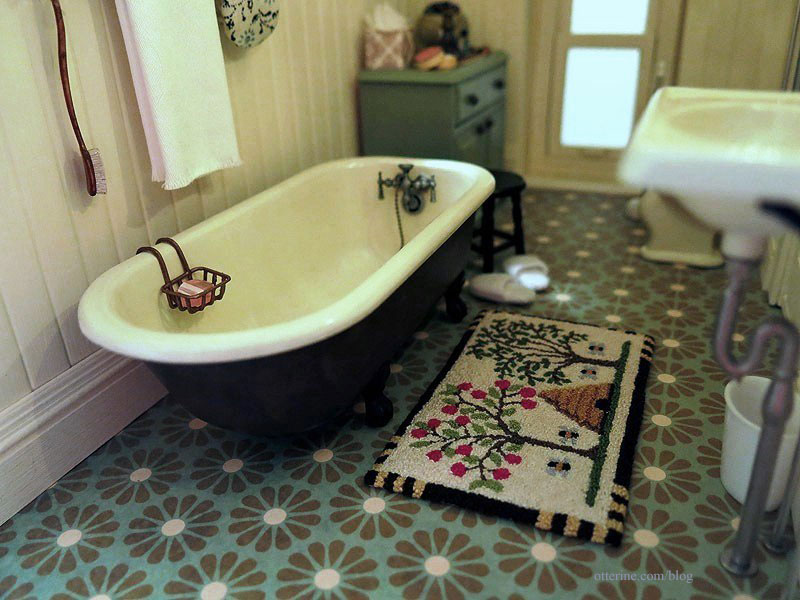
The Bees and Trees rug made from a Teresa Layman French knot kit sits in front of the tub.
I added a small shelf with a towel bar and two knob hooks. The pot was a gift from Jeannette. I made the shower cap from a scrap of floral fabric. The bath brush and soap holder were made from a Chrysnbon kit. The two bead bottles are from Thyme Soul Miniatures.
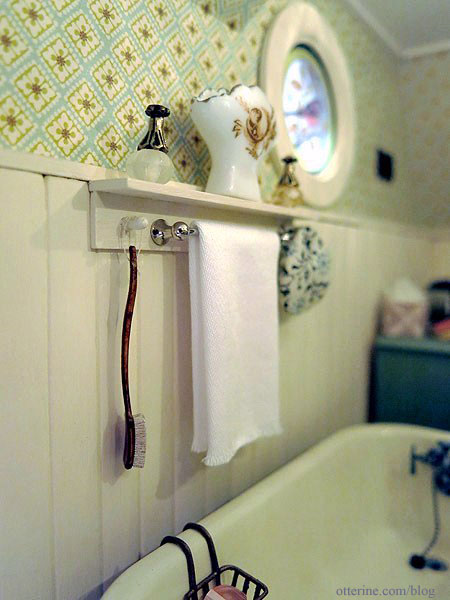
Here’s a view of the items outside of the bathroom.

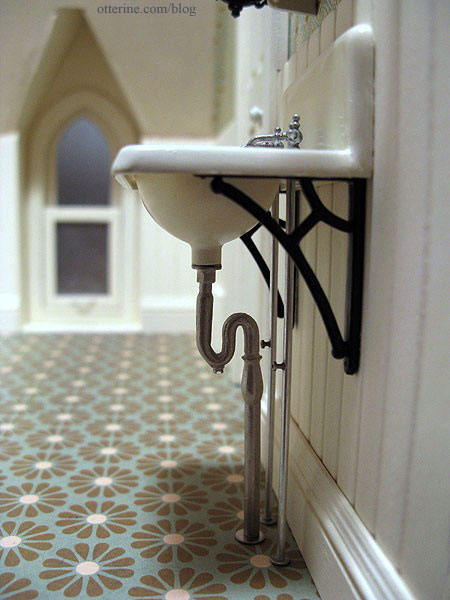
The pipe included with the kit would have made the wall sink too low, so I used a spare pipe I purchased from Sussex Crafts. It also bothered the realist in me that there was no way for the water to get to the taps. So, I added two lines of aluminum tubing from the sink to the floor.
I added tiny washers for these new pipes as well as little valve knobs so grandma can turn off the water in an emergency. :D I know these are typically oval, but all I could find were round ones in my box of watch parts. I drilled holes into the aluminum tubing and glued them in place with super glue gel.
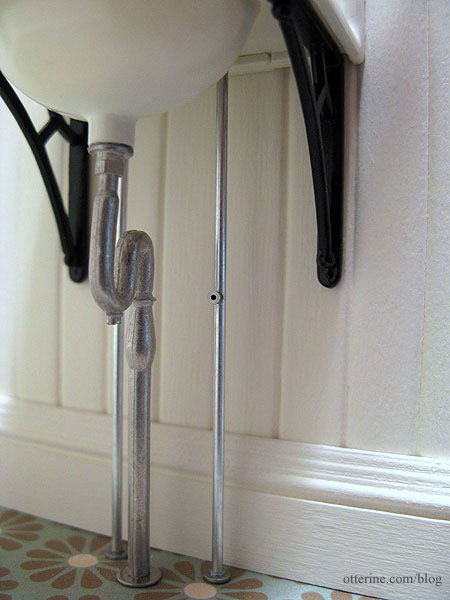
It might not be up to code, but I love the way it looks!
I added a washer to the sink bowl and drilled out a hole for the overflow. I placed a piece of black paper behind the overflow so no light would show through. I added a couple of brown paint washes but didn’t dirty it up too much…just enough to tone down the shine and make it look like it has been there awhile.
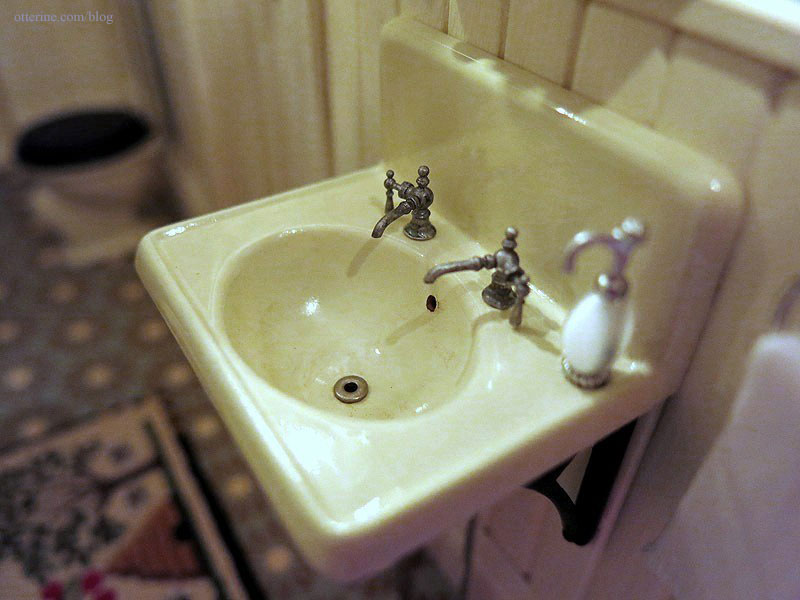
Keli sent me some fabulous soap bottles, so I’ve put one here on the sink. The towels are fine cotton sateen, pressed into shape and with a few rows of thread removed to make the fringed edge.
I also added a water line with a shutoff valve to the toilet tank, though I didn’t think to take a better picture of it before I had the loo in place. Because the beadboard wall treatment adds some thickness, I had to glue the loo to the floor and the tank to the wall.
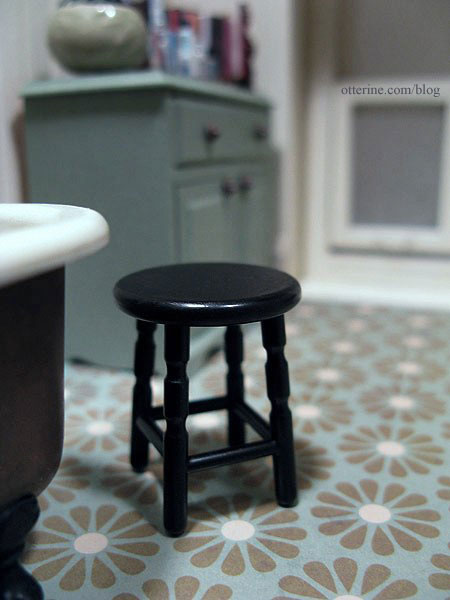
I made the small stool from the bath kit, too. I sprayed it flat black, but the top was rough so I had to follow up with acrylic paint. I topped it off with satin varnish, and now it looks like a vintage piece that’s been painted and painted and painted.
For the flooring, I used spray adhesive to mount the Flower Frenzy paper by We R Memory Keepers onto a sheet of regular drawing paper for stability and then sprayed it with matte sealer. I didn’t want it to be shiny, just a little deeper in color and not so paper-y. ;] I like the way it looks like worn down linoleum.
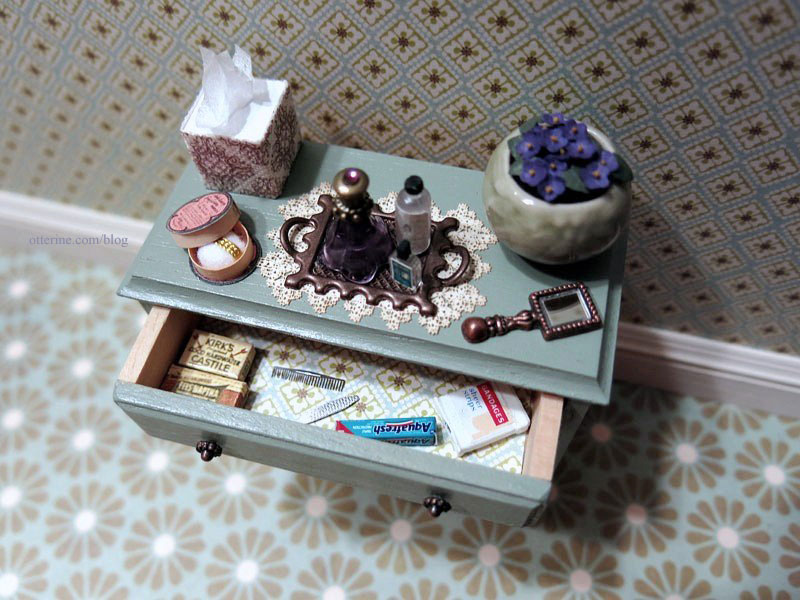
Opposite the loo sits a bath cabinet made from a House of Miniatures kit. I’ve taken it out of the room to photograph the details.
The tissue box is a wood block covered with Martha Stewart sticky ribbon and a bit of real tissue glued to the top. The mirror is a jewelry charm with the loop removed. The doily is from Stewart Dollhouse Creations, and the tray is a jewelry finding. The purple bottle and powder are Thyme Soul Miniatures. The other two bottles were purchased blanks for which I made the labels.
I lined the drawer with a scrap of Cute Little Diamonds paper by The Paper Studio, the same paper used for the wallpaper. Grandma is frugal and has found a use for her leftover wallpaper scraps!
The African violets were made from a kit from Georgie at The Miniature Garden. The kit makes three colors of violets, but I chose the darkest purple since those are the ones my great grandma kept.
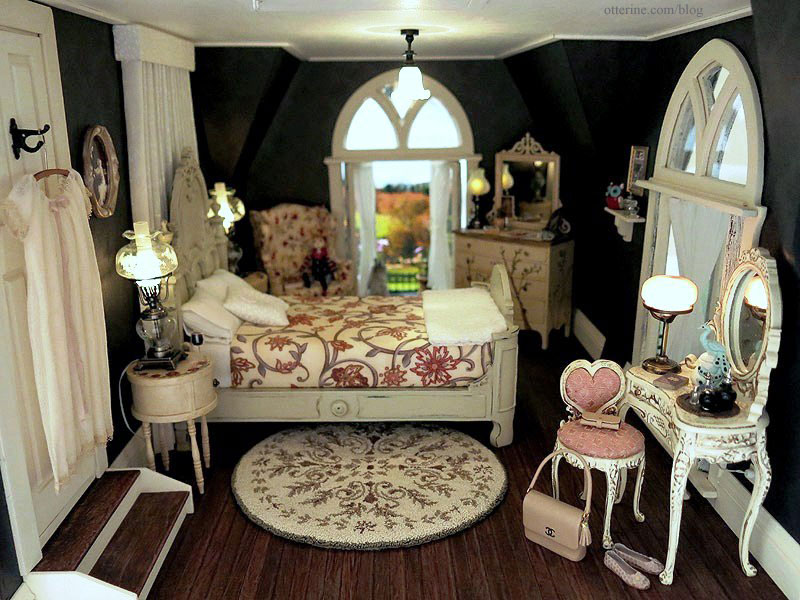
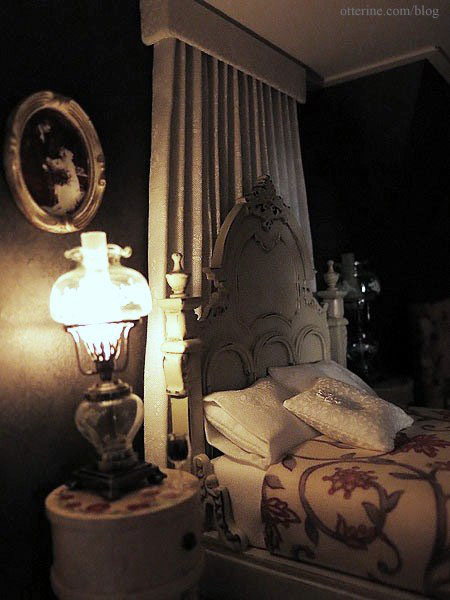
Grandma’s resplendent bedroom:
I just adore this room with its feminine décor and the play between light and dark.
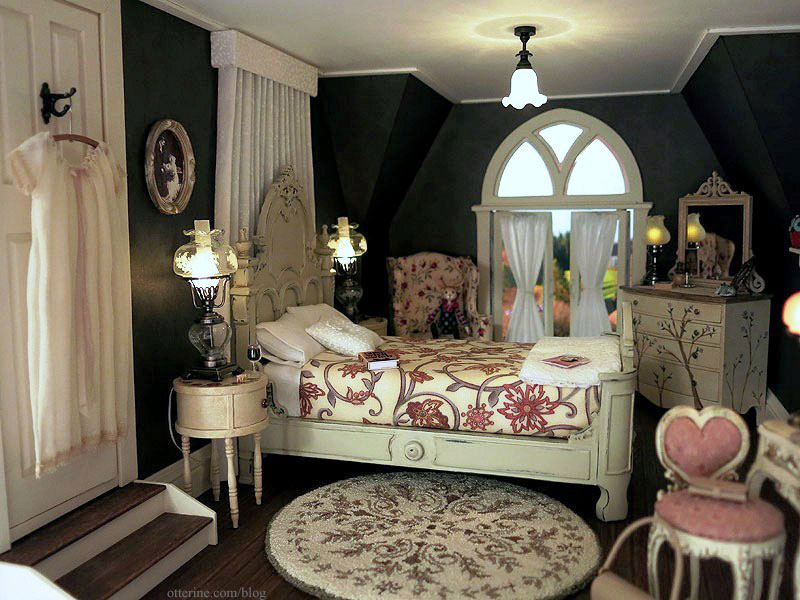
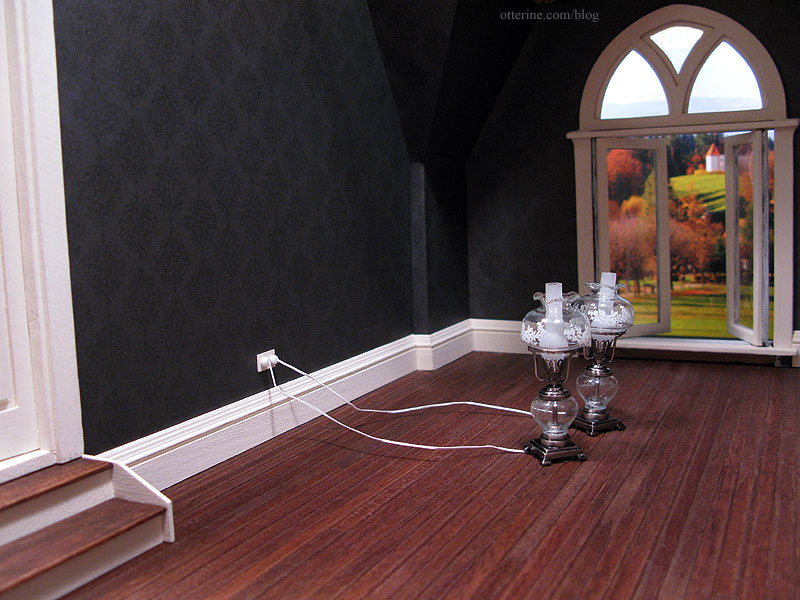
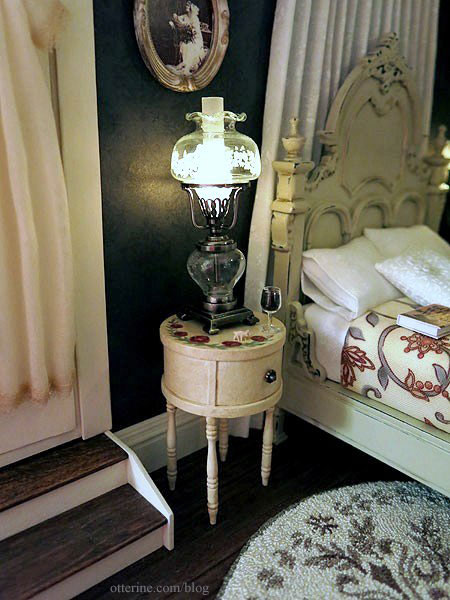
The bedside lamps are from Heidi Ott. I love these lamps!
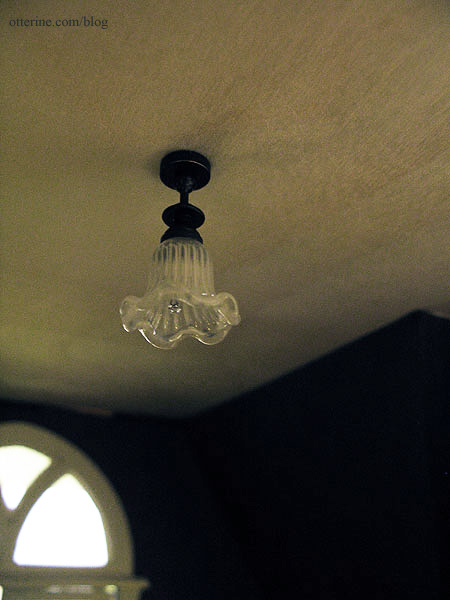
The ceiling light is a Ray Storey fixture. I had thought about using a small, simple ceiling medallion here with the fixture, but when I looked at the resin piece I had on hand more closely I just didn’t like it. It was rough and uneven, and spending a lot of time to get it in paint-ready condition wasn’t something I wanted to do. Besides, it is a relatively short ceiling so it probably would not have been a good idea to lower the light fixture any more.

The wallpaper is Out of Time by Recollections.
When Lyssa and I went to the Art Institute when she came for a visit last October, we naturally saw the Thorne Miniature Rooms first. In one of the fine bedrooms, there was a perfect tiny staircase. :] I already had a vague image in my mind of how to address the problem of my floating door, but this helped solidify the idea. I built my stairs from foam core board and basswood, then stained and painted to match the flooring and trim.
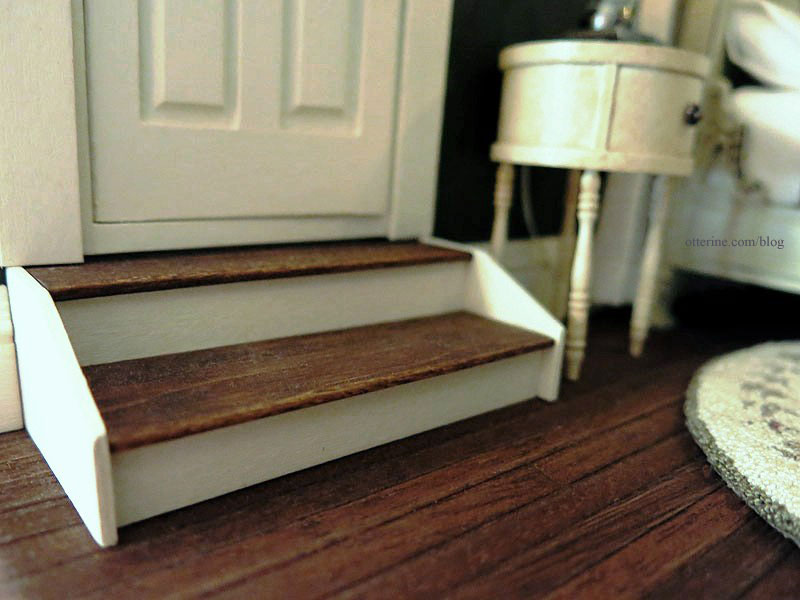
They are exactly that sort of vintage detail you often see in old houses.
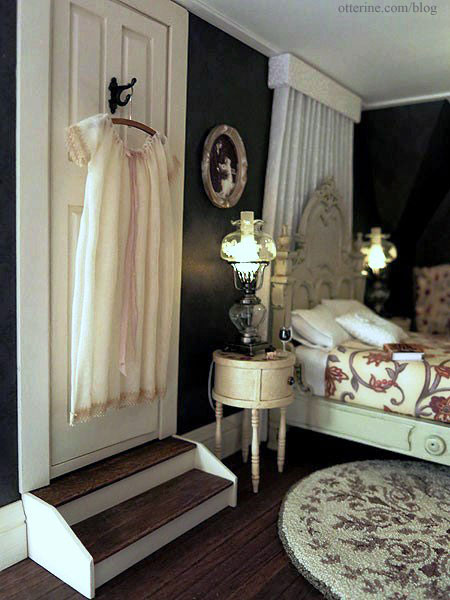
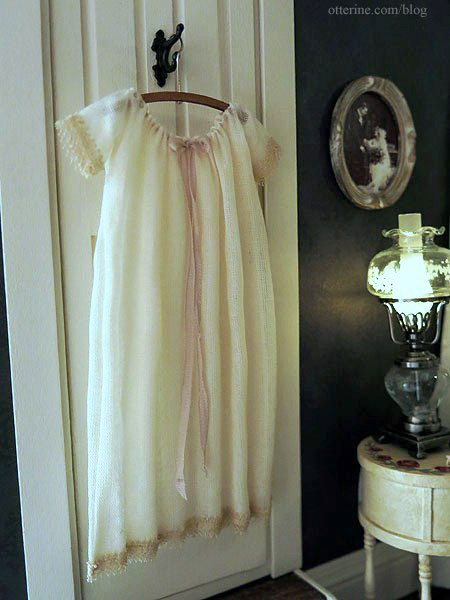
This gorgeous nightgown is from Janet Middlebrook – so perfect for grandma and the Heritage. Simply beautiful work!
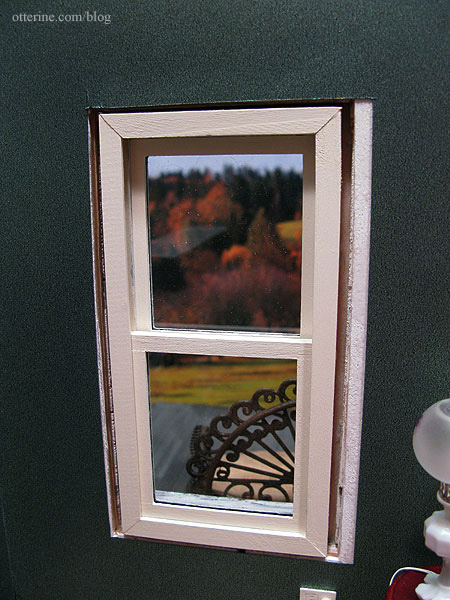
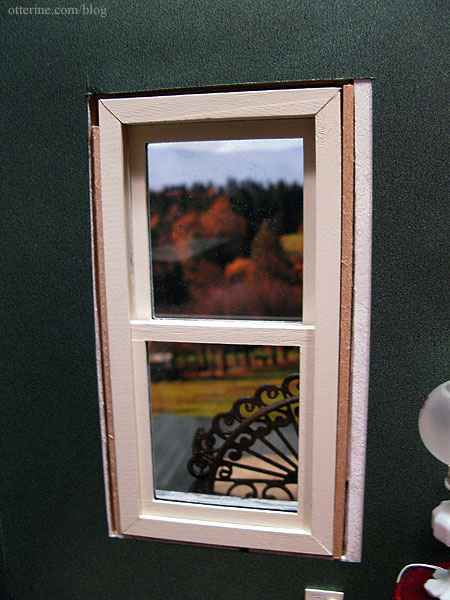
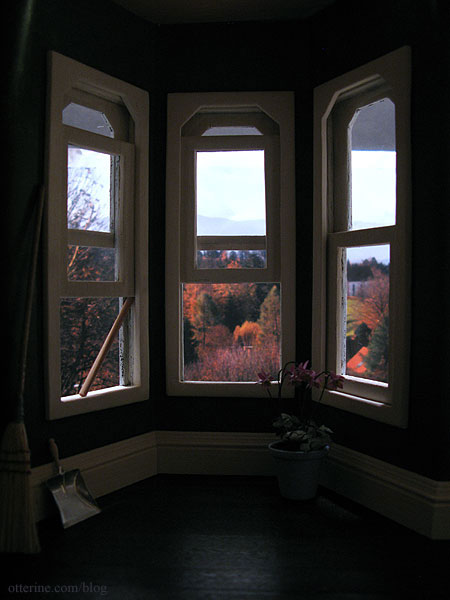
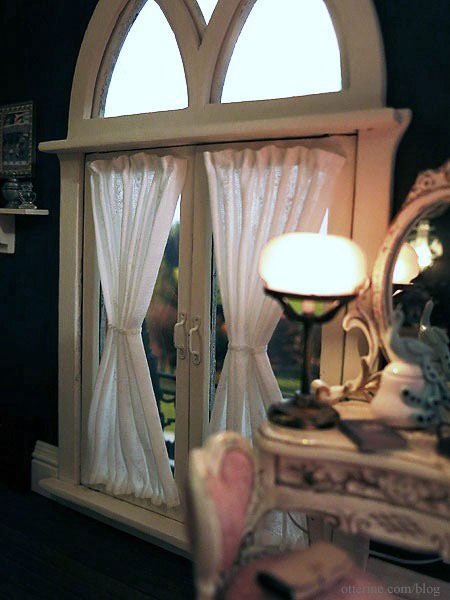
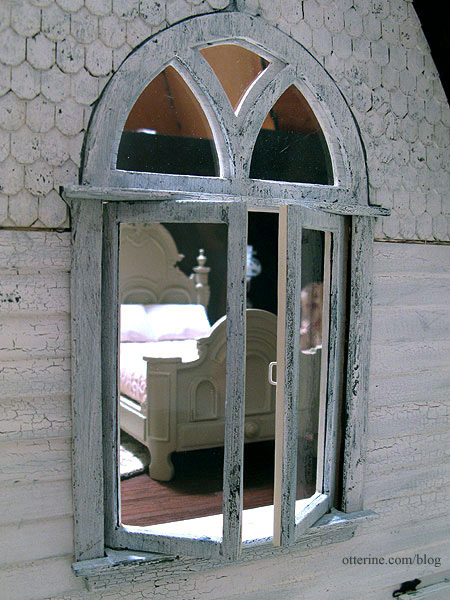
I was able to salvage the swinging windows from the original kit parts. Now that I know how to use a scroll saw, I would be able to cut new ones without an issue. At the time, however, I thought making all new parts would be more trouble than it was worth.
I added individual panels to each window, mimicking the look of rod pocket top and bottom curtains. I used relatively sheer printed white cotton fabric. I normally don’t glue the seam allowances on the edges, but I did for these. I turned under 1/8″ all around the panels, used pins to shape them on a foam core board and sprayed them with Aleene’s Stiffen Quik. I added fairy lace around the middles and then glued the panels directly to the windows. I wanted to make curtain rods, but the space was just to tight to fit them properly.
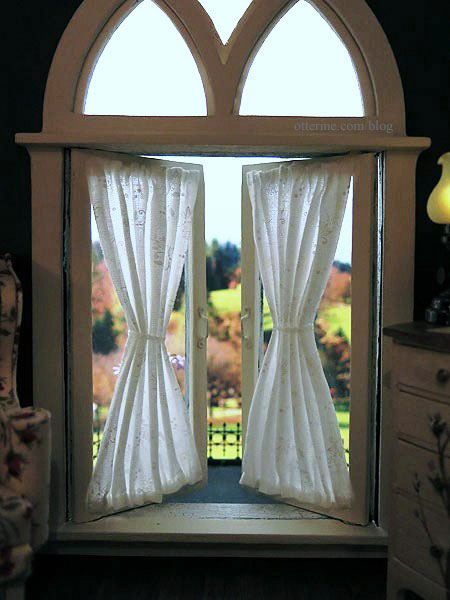
They add just that little something that completes the windows without overpowering or detracting from the beautiful arch windows. There’s still a hint of the view, and the windows can still be opened wide. The side window closes all the way with some tension between the two sides, but I was just happy they worked at all.
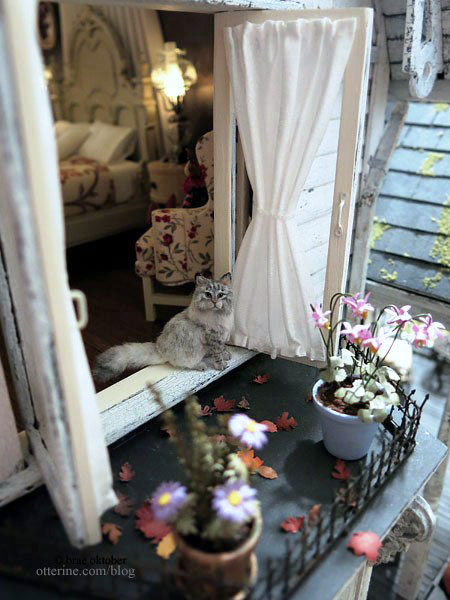
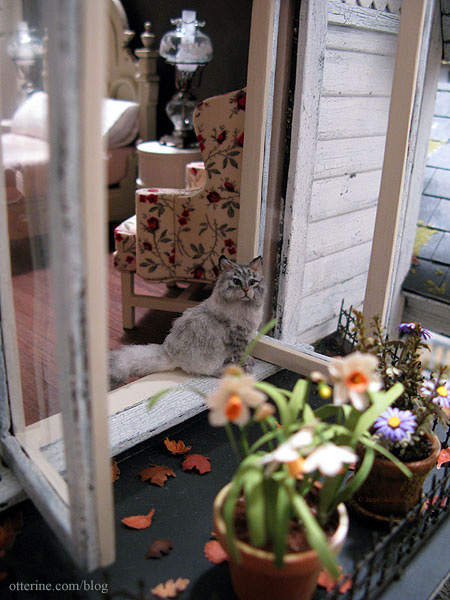
I get the feeling Ophelia spends a lot of time on the bay balcony. :D
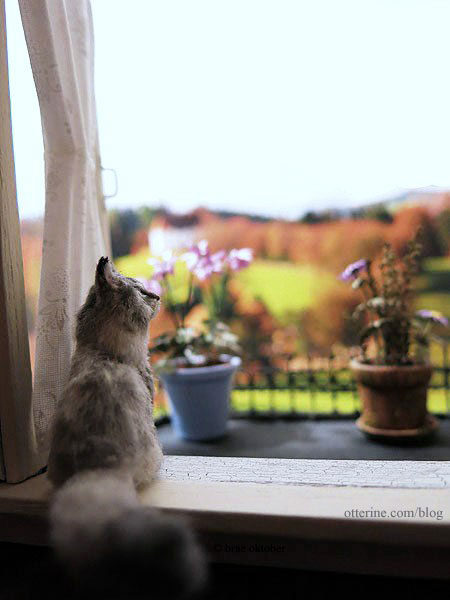
Pretty kitty.
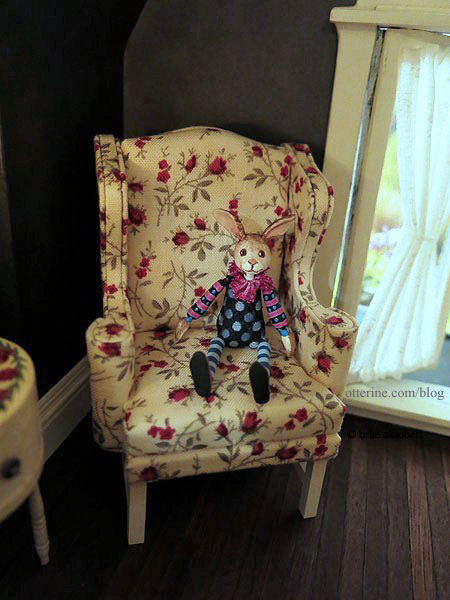
Grandma’s comfy chair was made from a House of Miniatures Chippendale Wing Chair kit. Mr. Rabbit is from K. Kuti Designs.
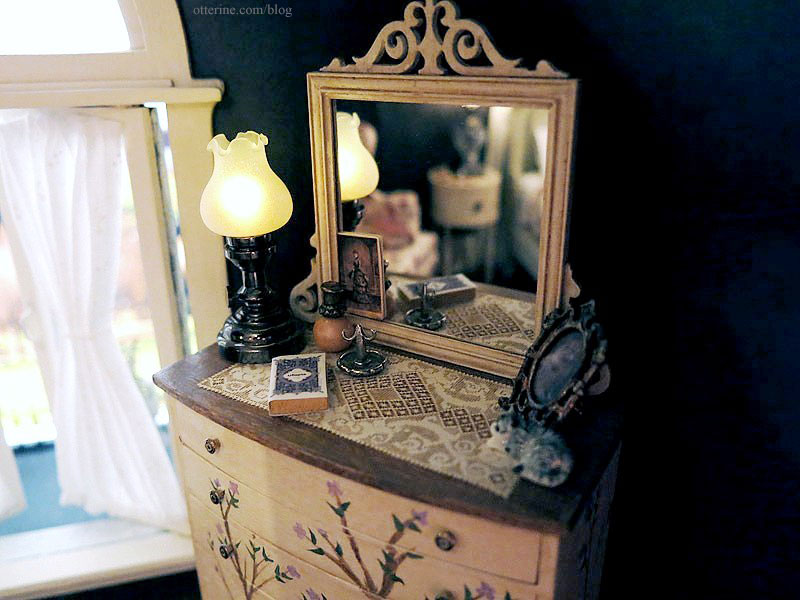
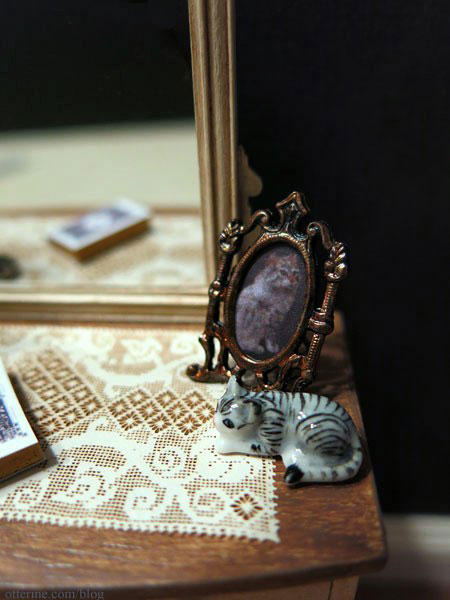
The dresser was made from a kit I picked up in a furniture lot. I made no changes to the base kit, though I did add a mirror made of frame strip wood. I hand painted the branches, leaves and flowers. I would like to add a bird and left space for one, but I need to practice painting that small. The knobs are vintage hardware I bought from The Little Dollhouse Company at the Bishop Show.
The paper lace doily is from Stewart Dollhouse Creations. The cat figurine, ring holder and doily were purchased at the local mini shows. The Bentham Tulip Table Lamp by Houseworks is from miniatures.com, and I painted the LED to make the light more natural — a tip picked up on the Greenleaf forum. The vintage photo on the mirror is from L Delaney, and the bottle is the remaining one from Thyme Soul Miniatures. The book is Utopia by Thomas Moore. This is a book first published in 1516, though I don’t believe this is the original cover. Ever After is one of my favorite movies for its fun take on the Cinderella story, not to mention the costumes, and this book plays a part in that movie. When I first stumbled onto the cover during my online searches, I knew I had to use it.
When I bought Ophelia from *Reve*, there was a photo in the listing that I loved. I asked the artist if I could use the photo, and she graciously said yes. I edited it in PhotoShop and printed a teeny tiny copy for a vintage looking frame I had.
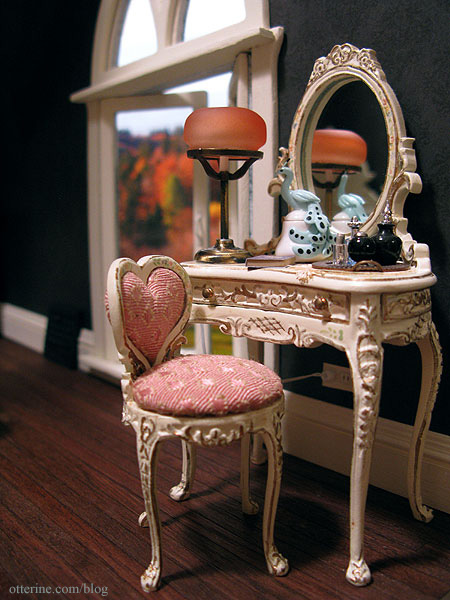
The beautiful Bespaq vanity and heart-shaped chair came from Small World Miniatures (now Regent Miniatures), one of my favorite eBay sellers. I think the pieces look wonderful against the wallpaper.
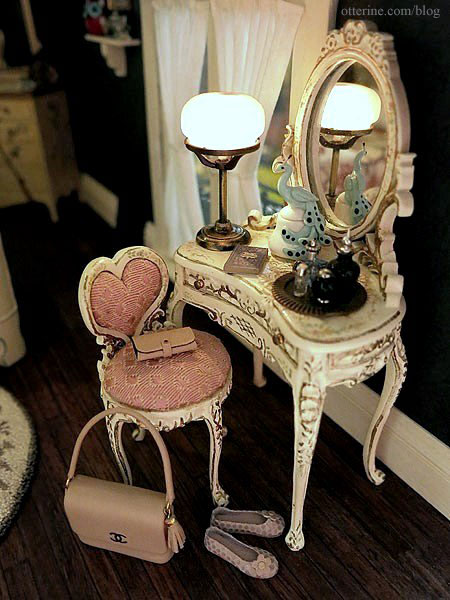
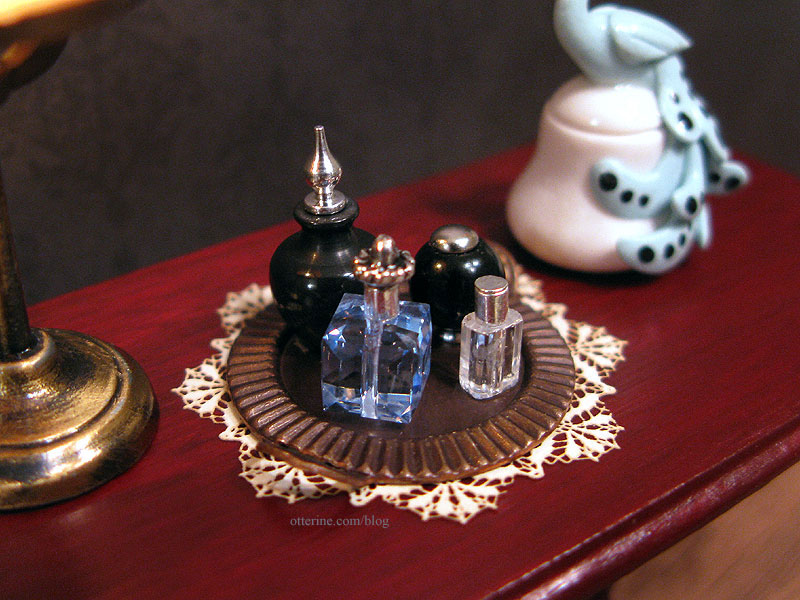
I chose vintage inspired accessories for the vanity. The vanity tray I made fits perfectly on one side with the C. Rohal peacock box and Art of Mini lamp on the other. Not much room for anything else besides a small book. At first I thought the lamp might be too big for the vanity, but I rather like it. It has a warm glow and the perfect vintage feel.
The tray is a jewelry finding that had been completely flat. I used pliers to bend the handles up. The tall black bottle with the silver stopper is a turning from CW Lubin, but the others I made. The blue crystal bottle has a silver crimp bead and a fancy head pin to make the topper. The round black bottle has an earring stud for a base and a brad as a lid. The clear bottle has a silver crimp bead and a flat head pin for the topper. All are attached to the tray with mini hold wax.
The Italian leather shoes are from Patrizia Santi.
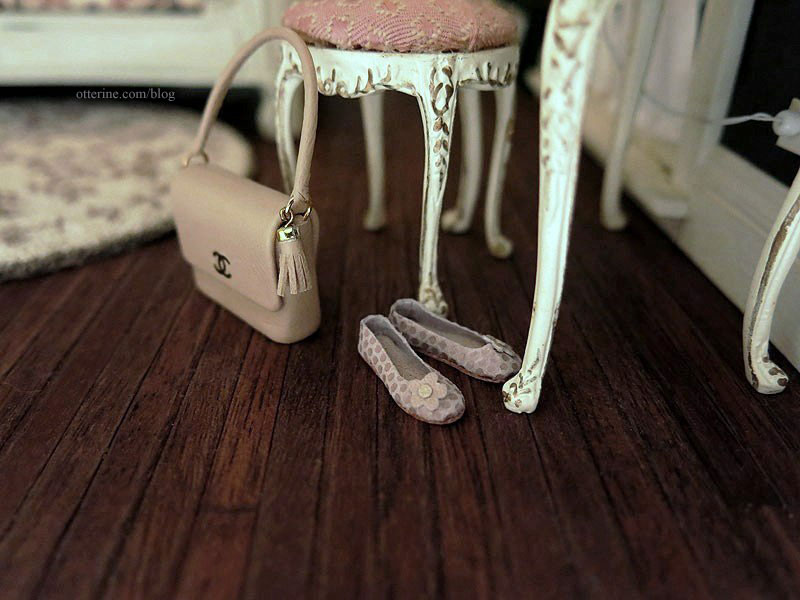
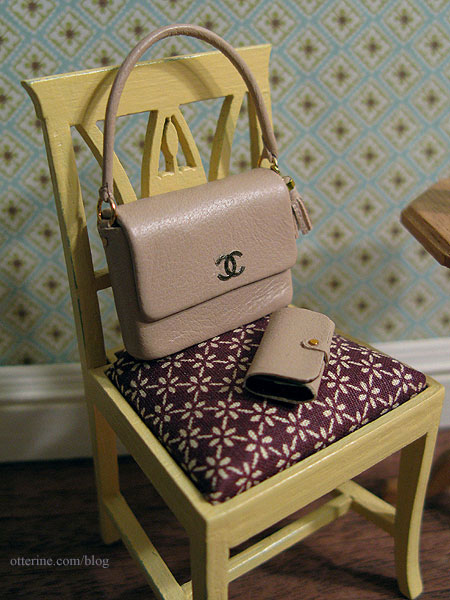
The pale pink Chanel replica handbag and wallet are from Dollhouse Ara. They are so well made and have a nice weight to them. I chose this set for the Heritage since they are a nice classic style that shouldn’t interfere with the era of the house. Grandma has good taste! :D
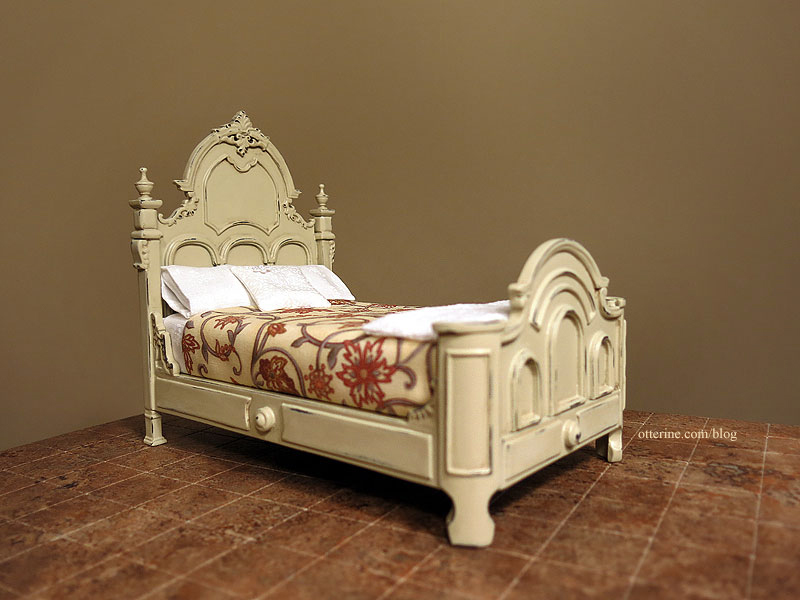
The Bespaq bed started as shiny mahogany with pink chenille bedding that was too large for scale. After the makeover, you’d barely recognize it.
I sewed some pillows and made pillowcases from the same sheer white floral fabric as the sheets. I added one small white printed floral pillow to complete the bedding. It has a tiny venise lace flower attached in the corner.

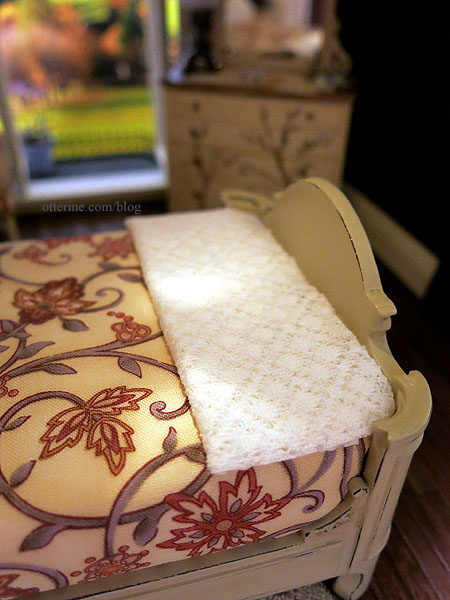
I made a small lace throw from some open weave fabric. It is full sized to cover the entire bed when opened, but I’ve pressed it flat to sit at the end of the bed as an extra blanket for those chilly autumn evenings. :]
Ophelia has found her favorite spot on the bed.
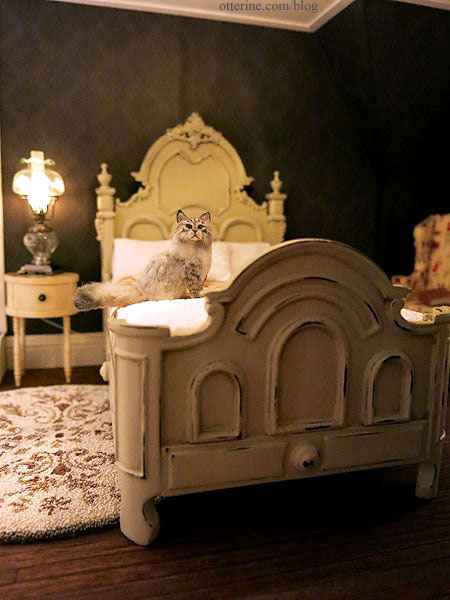
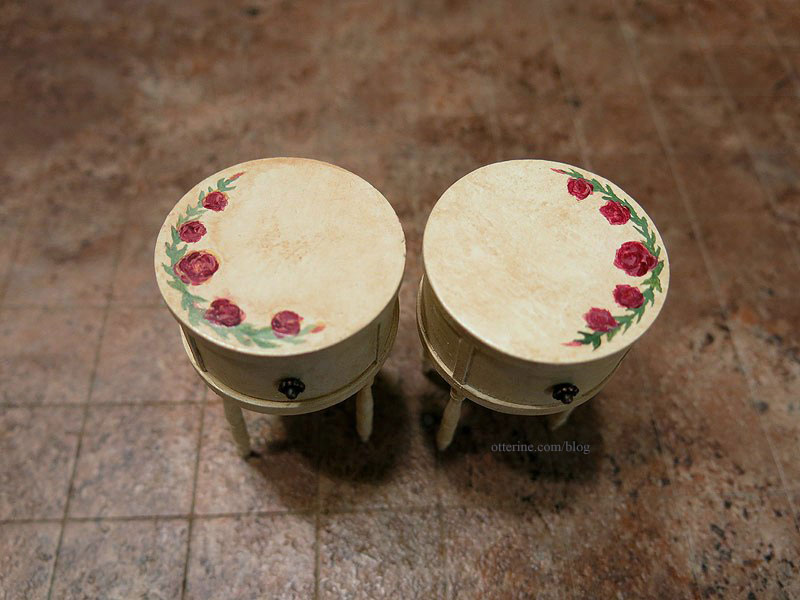
The antique drum nightstands were made from the round stands that came with my artist models, 1 1/2″ x 1/8″ wood circles and Houseworks 1 9/16″ long spindles. I painted them with a base coat of Tapioca by Folk Art then added an aging wash of light brown. I then painted the green vines, followed by red and yellow for the roses. I opted for doing mirror image painting so they would look more like a planned set than two of the same table. The knob is the fancy end of an antique copper headpin.
There’s not much room on them for anything besides the lamps, but it all seems to work well together. Looks like grandma is going to have a glass of port and read for a bit.
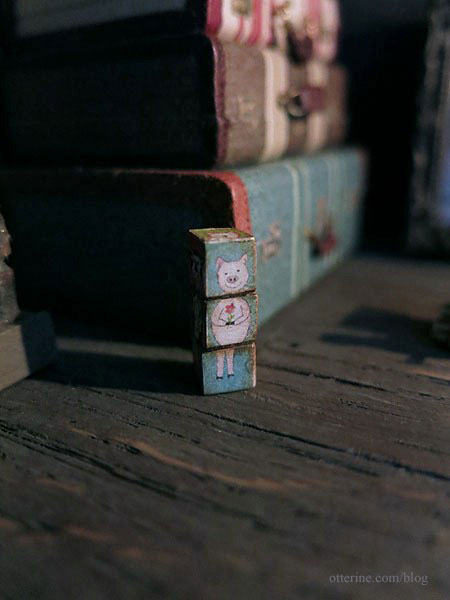
This was the perfect place for the smallest piggy I’ve ever seen! :D
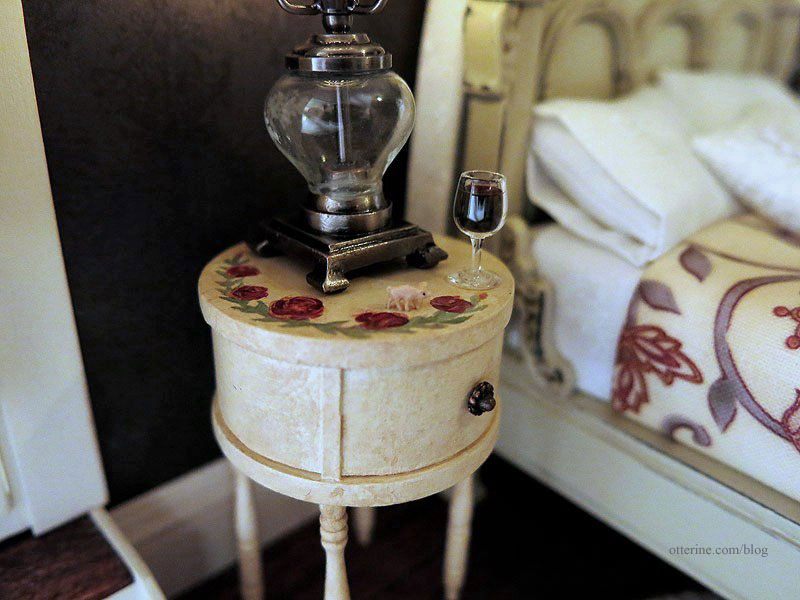
I bought this from The Kennedys at a local miniature show. So cute, so wee! I put the tiniest amount of tacky glue on his feet, and I hope he doesn’t get the notion to wander off.

The beautiful rug by Katie Arthur of Dollhouse Littles used to reside in the parlor, but it fits so well with the bedroom colors and patterns that right now it shifts between the two rooms.
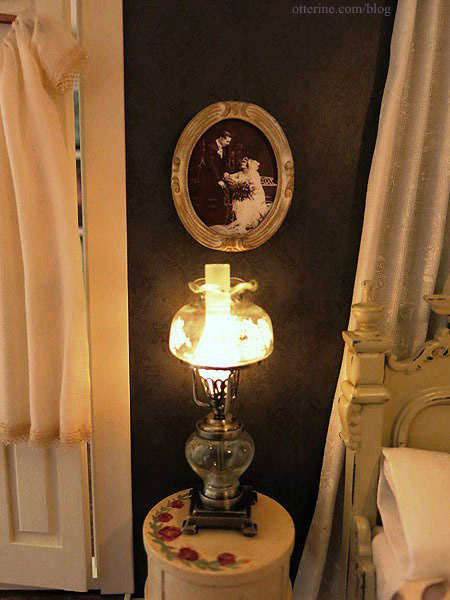
The wall curtain disguises the buckled wallpaper repair.
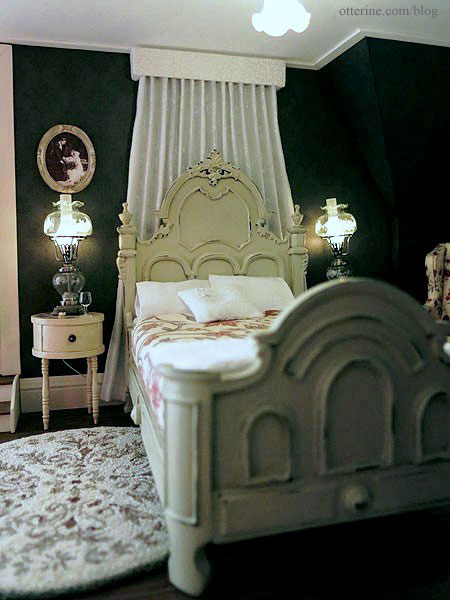
This beautiful 1920s wedding photo hides the repair seam in the wallpaper. Photo from Rick Zolla, used with permission.
I think the black wallpaper works well in this room only because the room is so large and all of the furnishings are painted varying shades of ivory. I didn’t want a matched set of furniture for this room. I preferred that the ensemble be cherished pieces purchased over the years.
yawn…and stretch…

‘night, all!
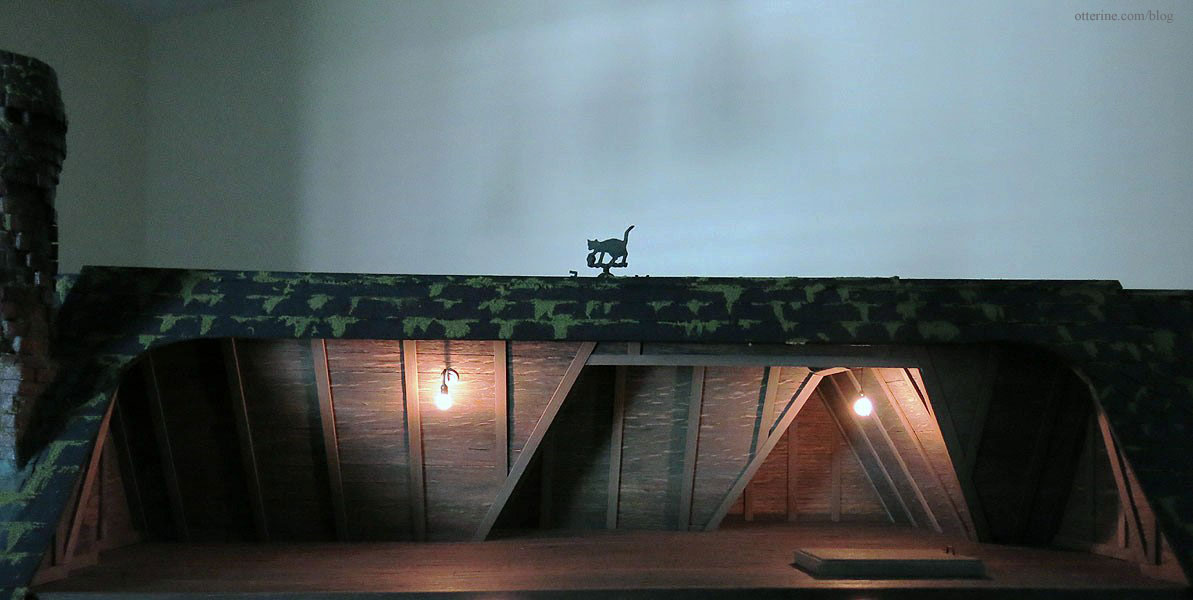
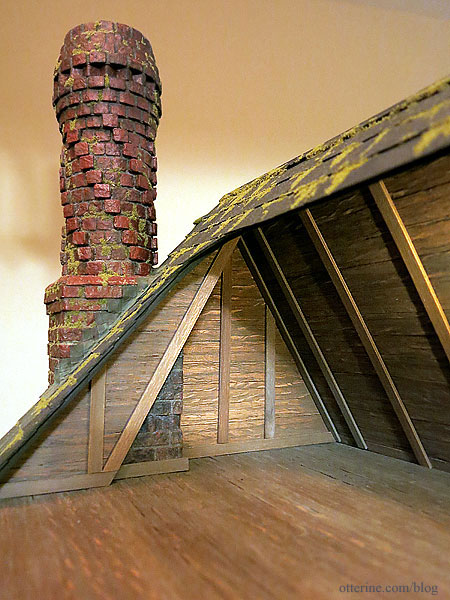
Grandma’s dusty old attic:
The final room in The Haunted Heritage is the third floor attic space. This was a lot of fun to put together, and I am sure to add a few more things to it over the years.
In my world, grandma is able to navigate those pull down attic stairs easily, walk about the attic without hitting her head and sit comfortably for hours in a space that doesn’t appear to have any airflow for the warmer months or heating for the colder ones. :D To that end, the attic is a collection of fine (or not so fine) antiques set into vignettes where grandma can get away from it all.
I installed faux attic stairs as I had done for Baslow Ranch based on the Greenleaf tutorial. I altered the upper portion a little, making the door taller than the sides.
Some of the chimney is visible in the attic.
The two lights are from The Lighting Bug. Love these bare bulb fixtures!
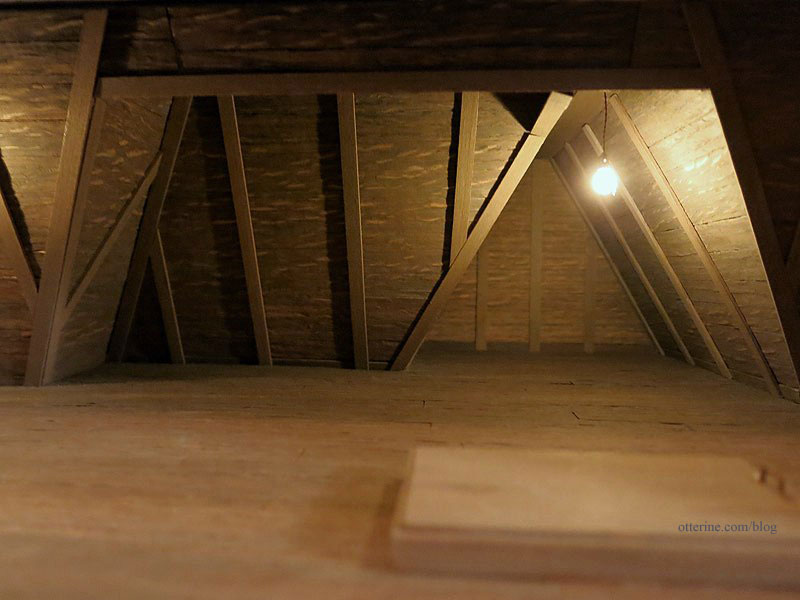
These lights are the perfect lights for the attic.

I aged the hanging bulb with dabs of brown acrylic paint.

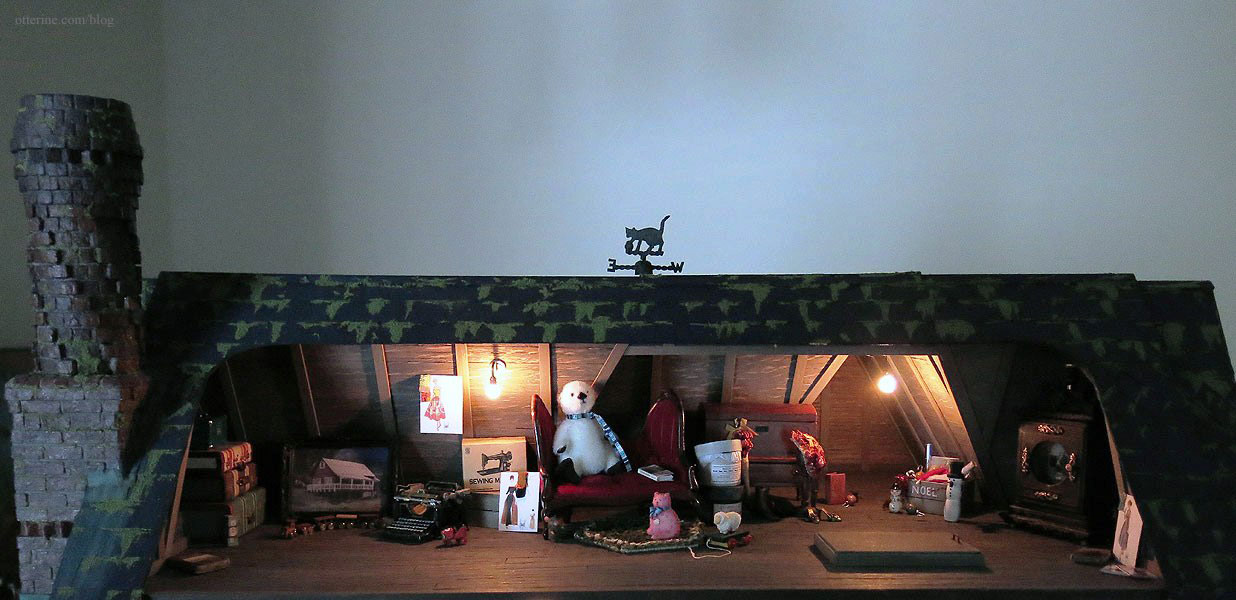
I was the lucky winner of Andrea’s giveaway on her new blog, and I chose her Farm Animals Funny Cubes in miniature for grandma’s attic…so vintage, so cute!!! :D Aw, look at the cute Piggie! Each cube measures 1/4″ and each side has part of one of six animals, the others being Kitty, Doggie, Fox, Cow, and Bunny.
Stacks of vintage suitcases are all over the design blogs and Pinterest. They combine nostalgia and beauty. I knew I wanted a set for grandma’s attic, and there is no better artisan to turn to than Fran at FranMadeMinis. I sent her some of my favorite pictures of vintage suitcases, and she knocked it out of the park once again!

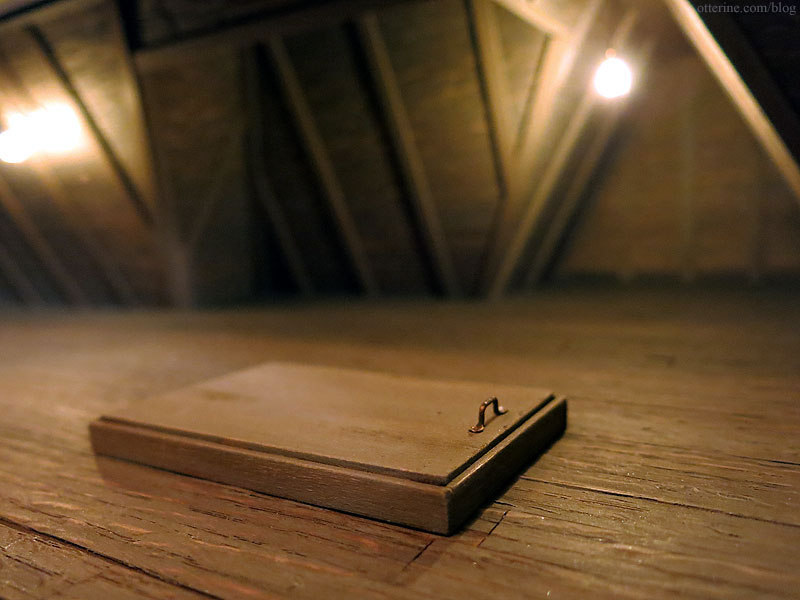
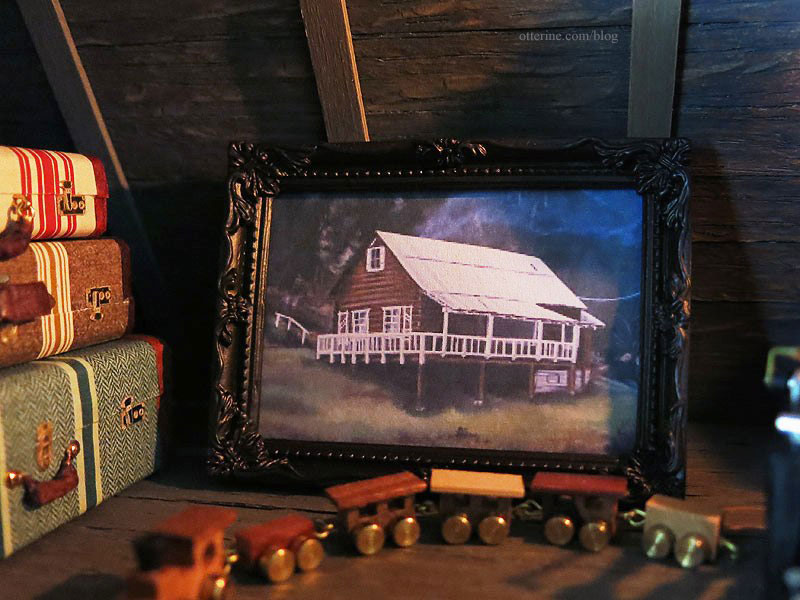
This lovely painting is a miniature reproduction of one created by my dear friend Lyssa. This is here in the attic only for holding. It will be proudly displayed in a future house. The wood and brass toy train was in a miniatures lot I bought on craigslist. It’s very well made, and the wheels turn. It actually rolls around along the uneven attic floor.
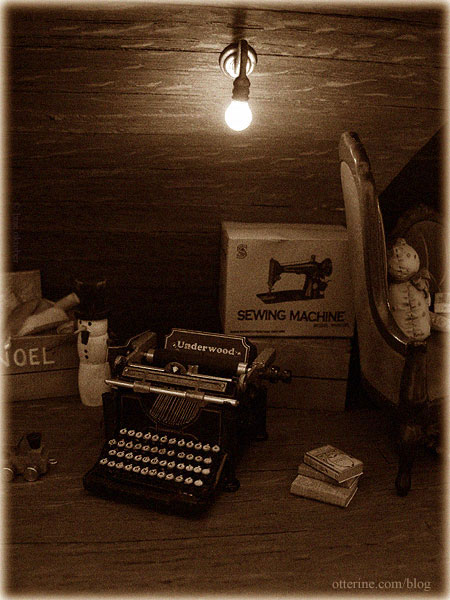
With my work bonus, I spoiled myself a little and bought this 1908 Miniature Underwood Typewriter by Ken Byers of Shaker Works West.
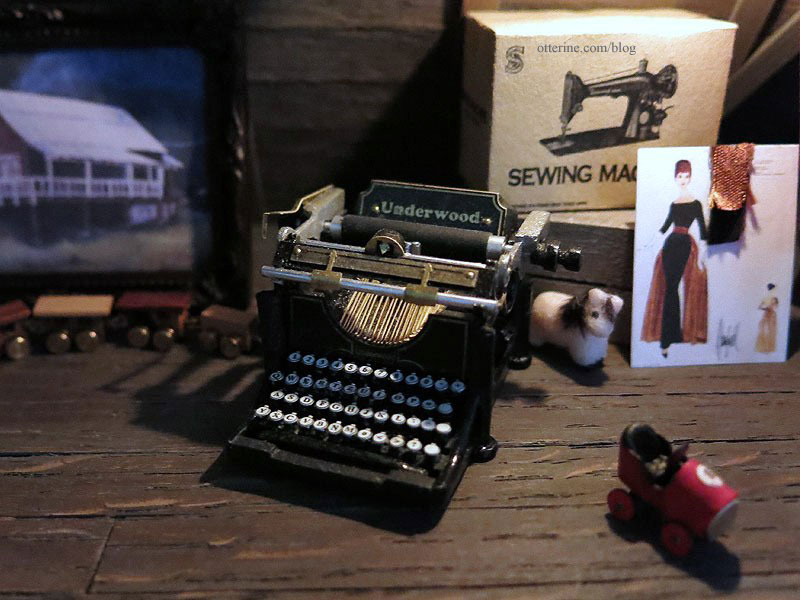
It fits wonderfully in grandma’s attic, though I foresee this piece making the rounds in my various builds just as Mary’s afghans tend to do.

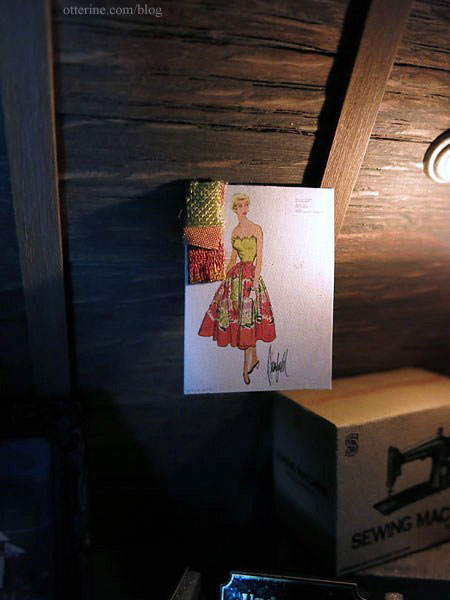
I’d love to find this tulip dress pattern in real life size and make one for myself. The sketch and fabric swatches are from L Delaney.
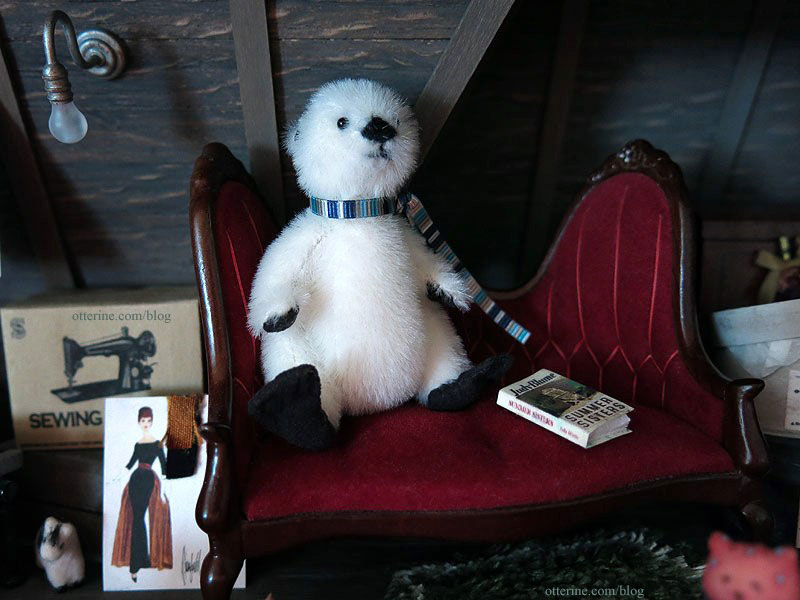
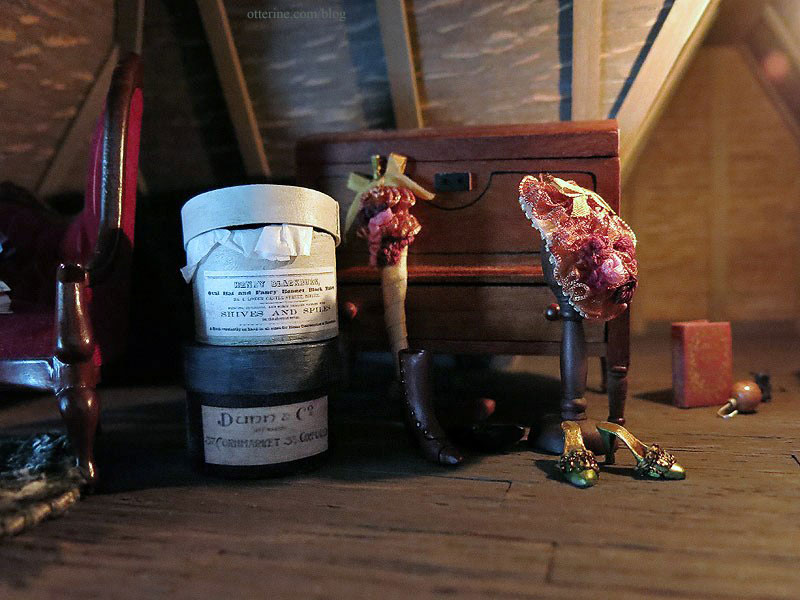
The red vintage sofa is one of my favorite pieces, but I couldn’t imagine making a whole room around it. It fits perfectly in the attic. Lyssa sent me the Summer Sisters book, a miniature of the one she lent me to read. Marion sent me the most adorable plush sea otter that she made!!! :D He’s so well made and soft, standing at 2 7/8″ tall. He’s poseable, too!
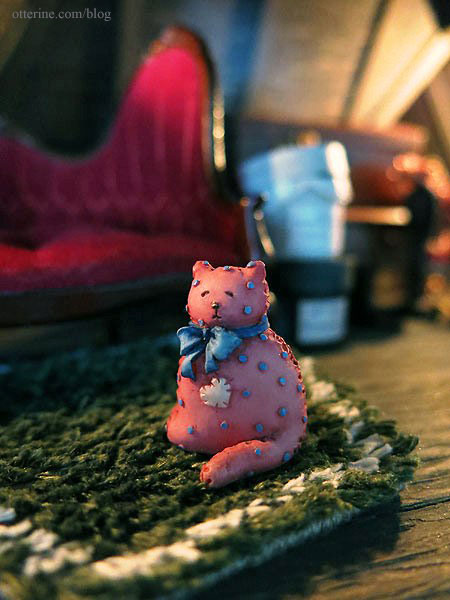
The vintage kitty doll is from my childhood dollhouse.
The Lincoln chest is from miniatures.com, the hat boxes are from Thyme Soul Miniatures, and the green shoes are from Spencer’s Nook.
The box of Christmas items was made by M Carmen; the snowman bead and primitive snowman statue were purchased. Caterina sent me the Christmas Carol book.

Now, the primitive snowman has an interesting story to tell. I once noticed he was facing backwards. I thought this was odd of me to do, but I just shrugged and turned him around. About a week later I went to set up an attic scene, and he was facing backwards again!!!! :O Haunted attic indeed! I was seriously disturbed by this because I knew I had turned him around days earlier. Later that day, I was using the scroll saw and something fell out of the Heritage (the saw is attached to the same table). After picking up the wayward mini, I checked the attic and sure enough, that snowman had walked forward! Mystery solved…or was it? Hmm….
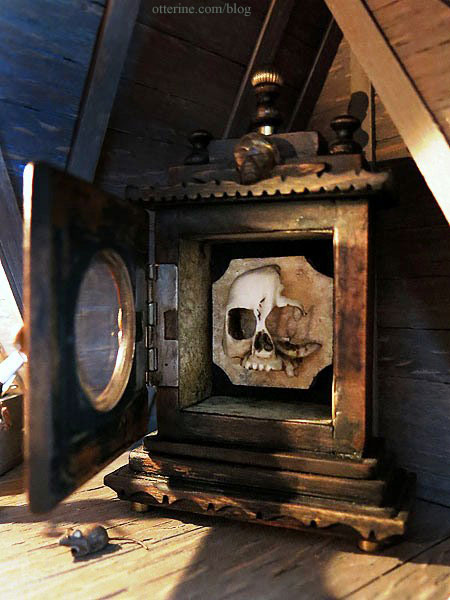
The catacombs case clock is the debut miniature from Tony at Miniature Treasures. The tiny mouse is from Sussex Crafts.
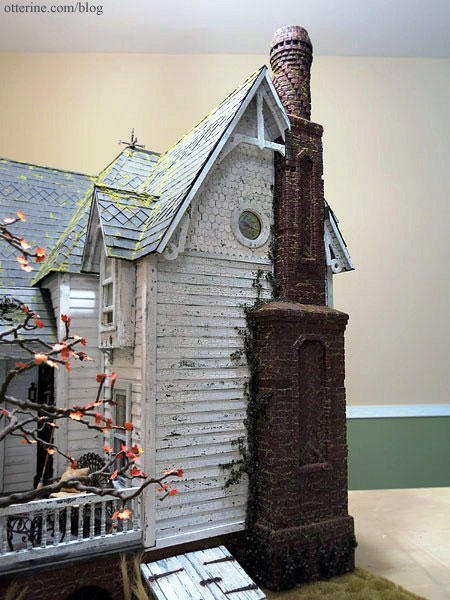
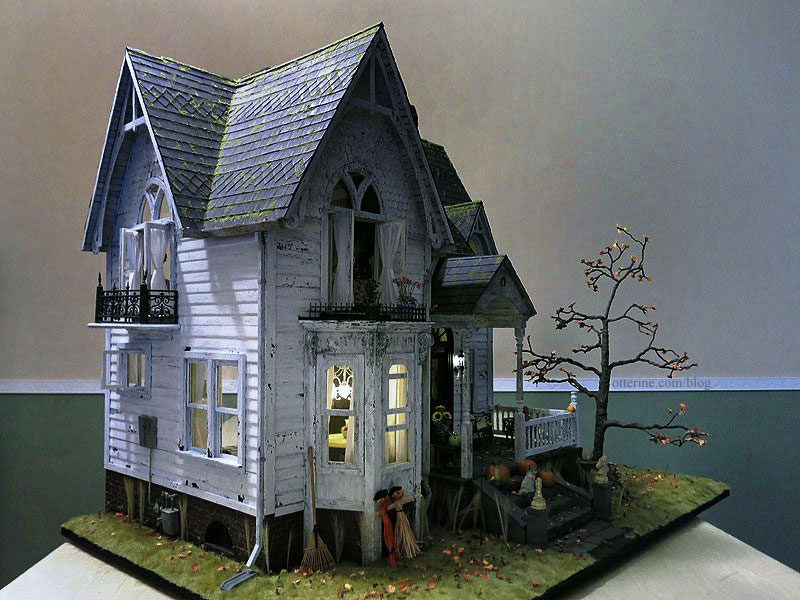
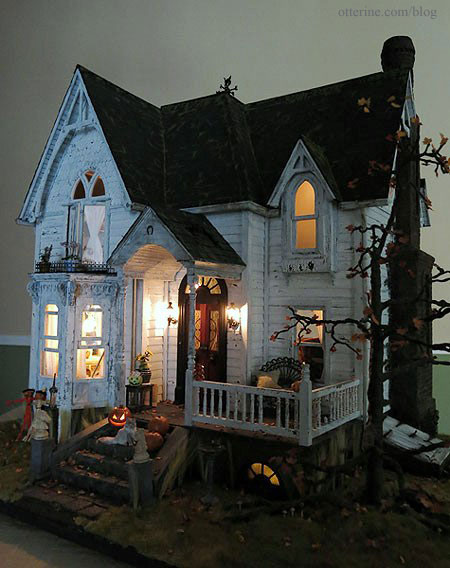
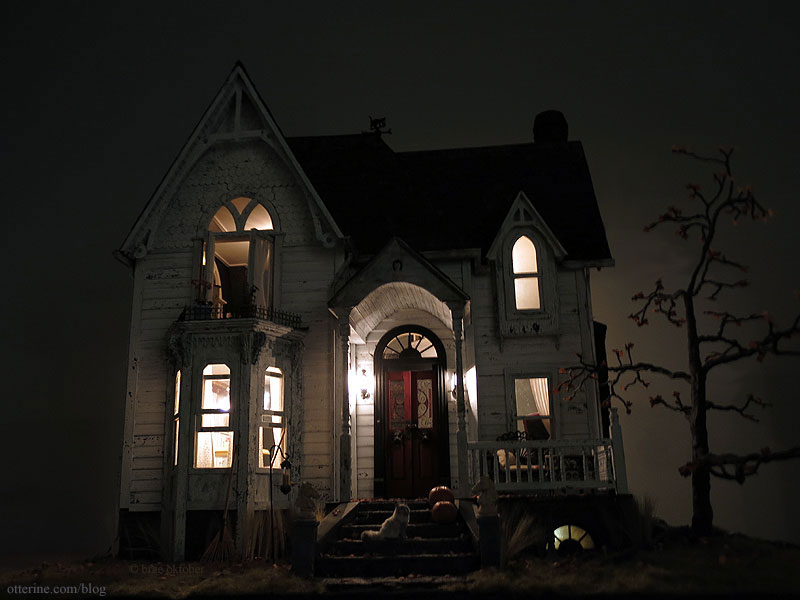
The Haunted Heritage exterior:
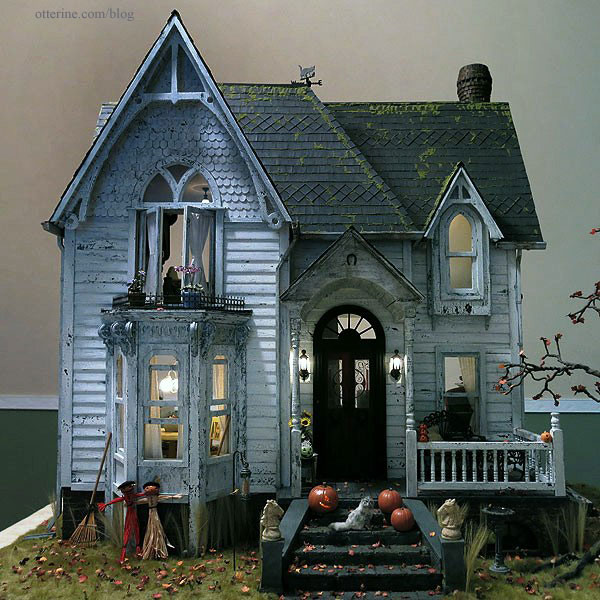
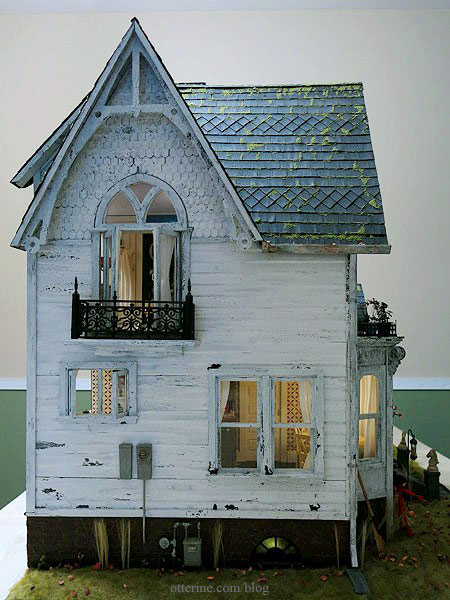
I love the crusty old paint effect on this house.
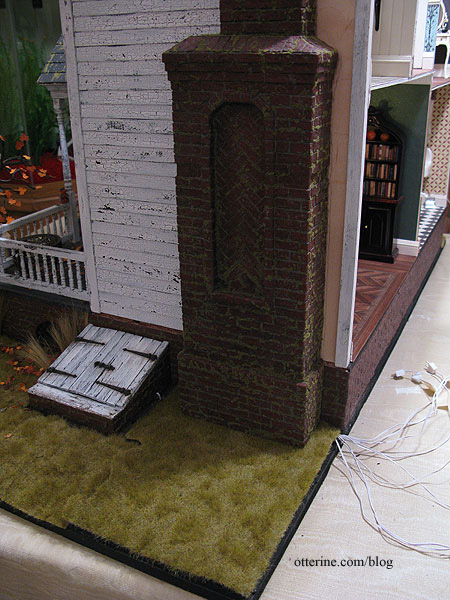
The chimney was modeled after a W E Masonry original. It was scratch built from foam core board, mat board, cardboard, wood and egg carton bricks individually cut and applied. It was then painted, grouted, finished with moss and purchased ivy. It measures 27″ tall, and the inside is hollow to hold the wiring for the house. The side wall had to be scratch built to accommodate the chimney.
The chimney side gable trim had to be cut down to go around the chimney. There still could have been better planning with this since the roof extends past the chimney and wouldn’t likely be that way in real life…but I still love the way it turned out.
This outside wall originally had a bay window on the first floor with a large Gothic arched swinging window above. I eliminated these two windows to make room for the fireplace and chimney. I replaced the swinging window with a small round window to keep some light flowing into the bathroom. The bird and bee design by Flora for the bathroom window adds so much to the build. Beautiful.
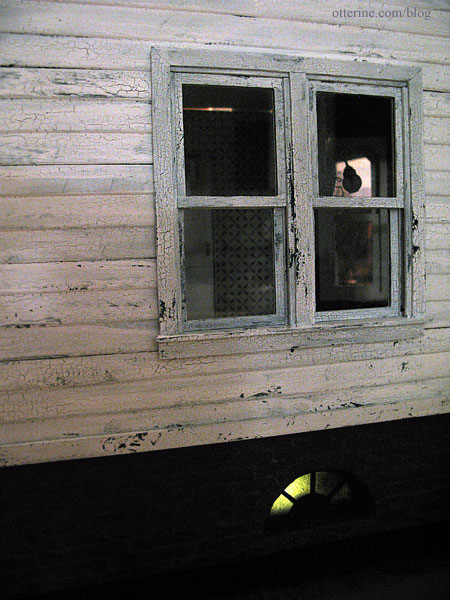
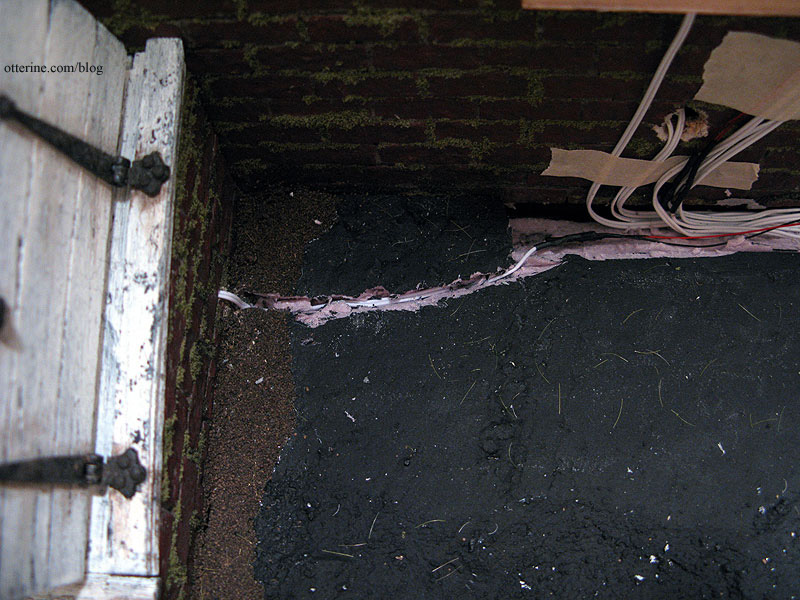
The creepy cellar windows were one of the first additions to the kit foundation that otherwise had no particular interest.
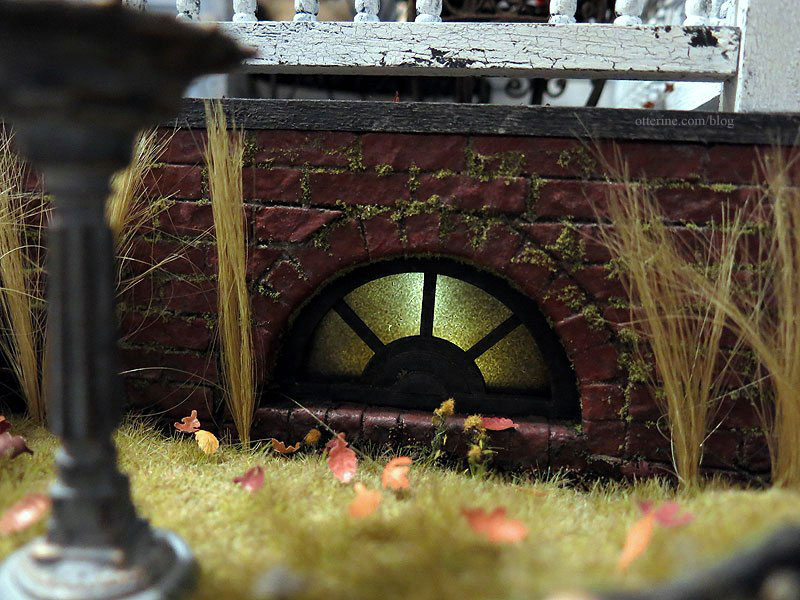
With the added cellar lights, I needed cellar doors.
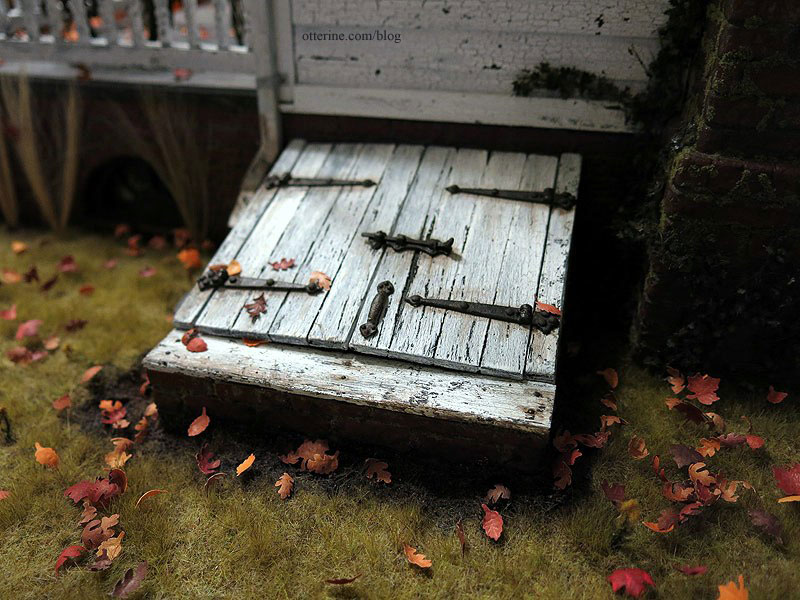
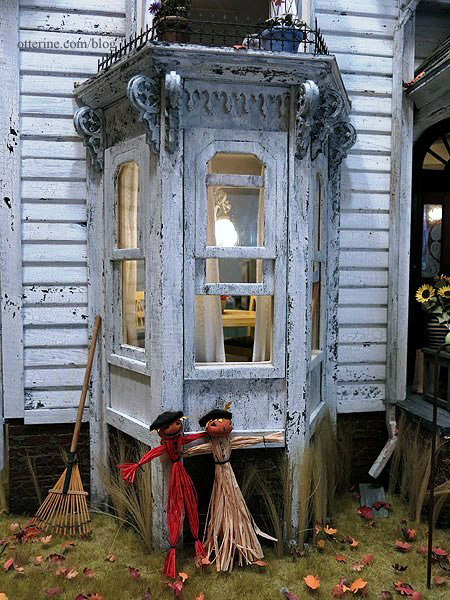
The sunporch went through a lot of stages in mockup, and I’m so pleased with the design I chose in the end.

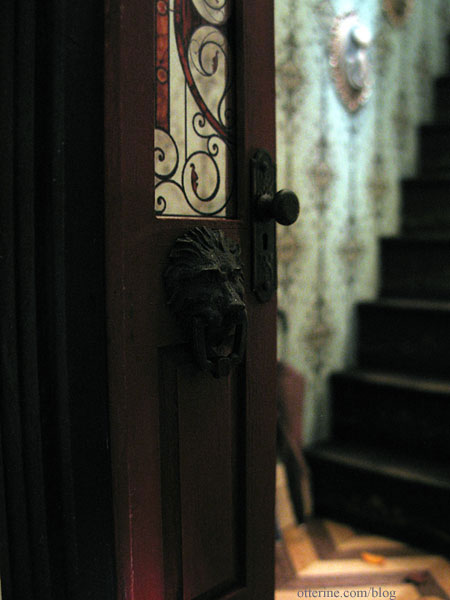
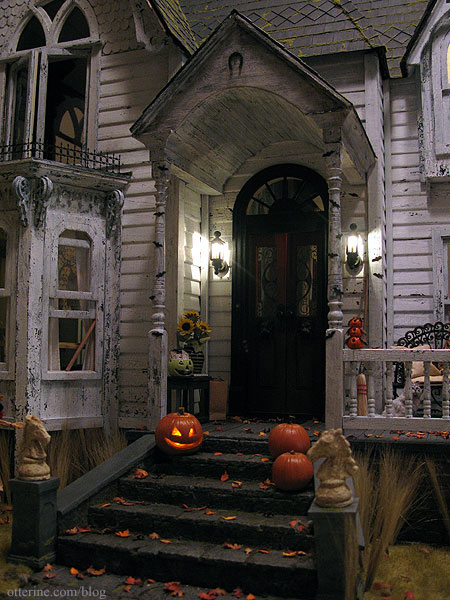
The portico is one of my favorite additions to the exterior and was completely scratch built. The kit’s front door was replaced with a Houseworks Palladian double door. The stained glass inserts are printed designs from MD Doors. The new portico adds a stateliness that the original kit entrance didn’t have.

Considering the age of the kit wood I was happy with the way the kitchen bay window turned out. One window assembly is completely glued together and the window is shut since the wood for these pieces was beyond repair. But, guess what? The other two windows actually work!!!! The second window is set partially open, and though the window slider isn’t glued in place, the wood for this assembly is not in the best condition and doesn’t allow for very fluid raising and lowering of the window. But, it works! The third window, however, works so well that I need a dowel to keep it propped open! How positively wonderful! It’s just like a real life old house – one window is painted shut, one window sticks and one won’t stay open!!! :D
Around the side wall, I added a casement window and also replaced the original side window with a Houseworks working component.
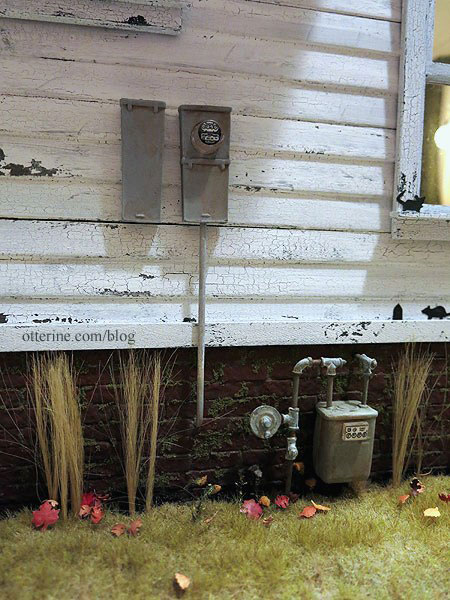
I added the Handley House electric and gas meters. These are well designed metal kits that take paint finishes readily.
I had to add a Juliet balcony for grandma’s safety. In the original layout, there would have been a stairway here and no way for someone to fall out of the floor to ceiling window. By moving the stairs to the center of the house and adding a full floor in the bedroom, that meant grandma could tumble straight out the window. Not good. :[ The Juliet balcony was made from was made from wood dowels, plastic railing from The Dolls House Emporium, bead caps, Houseworks finials and pins.

I wanted to do something special for the roof and opted for two designs of shingles. There are two sections of diamond shingles between the rectangular rows.
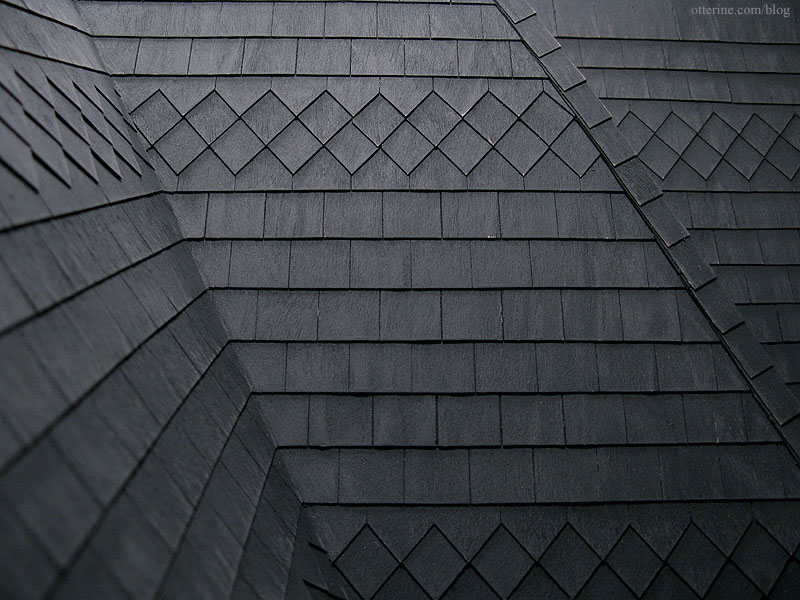
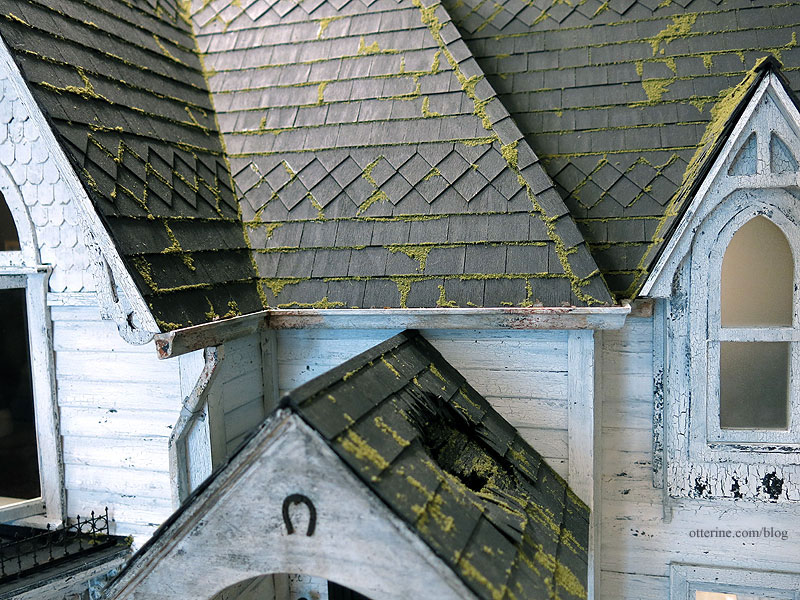
Once the roof was completed, I added moss to make it older and spookier.
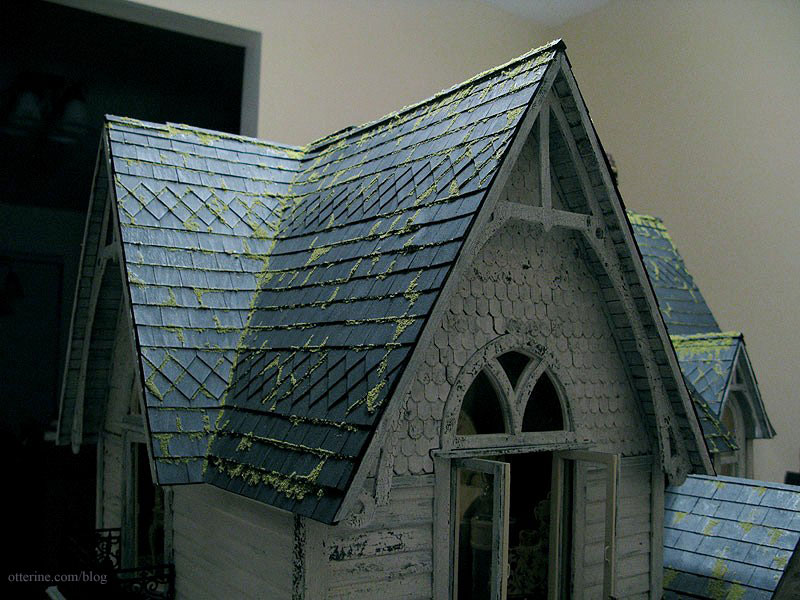
The fancy gables are one of the best features of this house, and I kept them as is for the most part. I did shingle the entire surface of the gables instead of only partial coverage as indicated in the original kit. I also used half scale shingles for a better representation of what these would look like on a real life house.
The Heritage kit included gutters and downspout materials that were acceptable, but I went with different parts. I painted the pieces to look old and rusty, filling the gutters with leaves and moss.
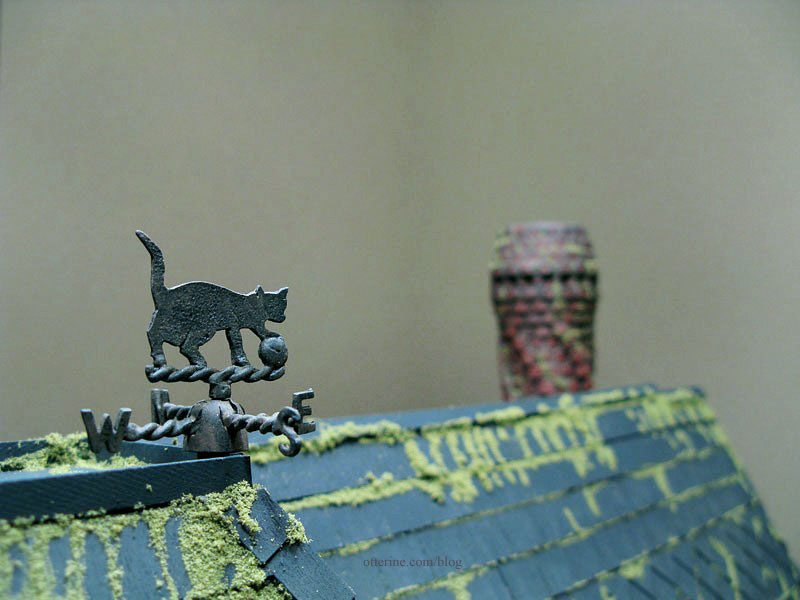
What’s a haunted house without a black cat? Boring and unfinished, that’s what it is. I bought this delightful weathervane from Minimum World. It’s made from silver metal, so you can paint it any color you like. I sprayed the pieces flat black then applied a little Bittersweet Chocolate followed by a wash of Terra Cotta, both by Americana.
The landscaping started with scraps of builders foam to make the ground uneven. Then came planting The Tree made following the tutorial from the DVD Master Miniaturists: Landscaping Primer with Diane Myrick. I love the texture on this tree! Instead of using the foliage materials recommended in the DVD, I punched colored leaves from paper and shaped each one individually. This old tree isn’t dead or dying by any means. It’s just ready for its winter slumber.
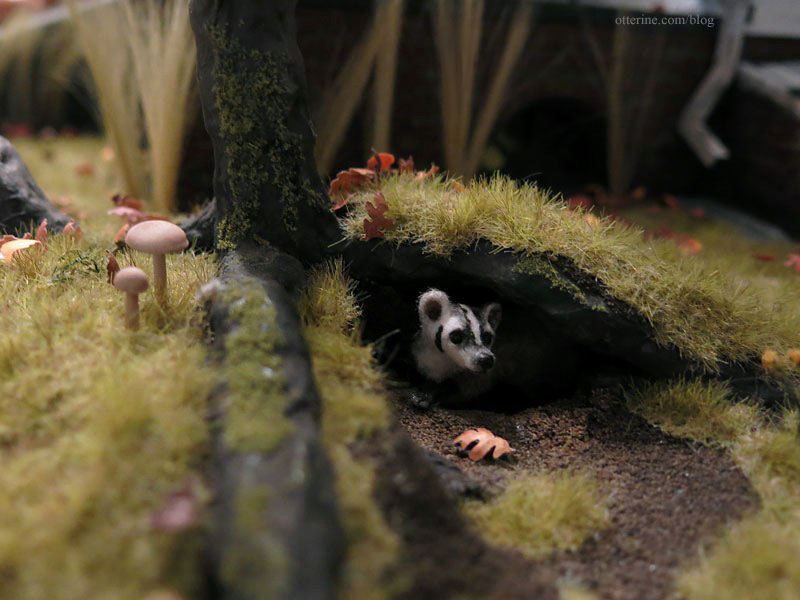
When planting The Tree, I formed Grahame’s burrow. Grahame the badger was made by *Reve*.
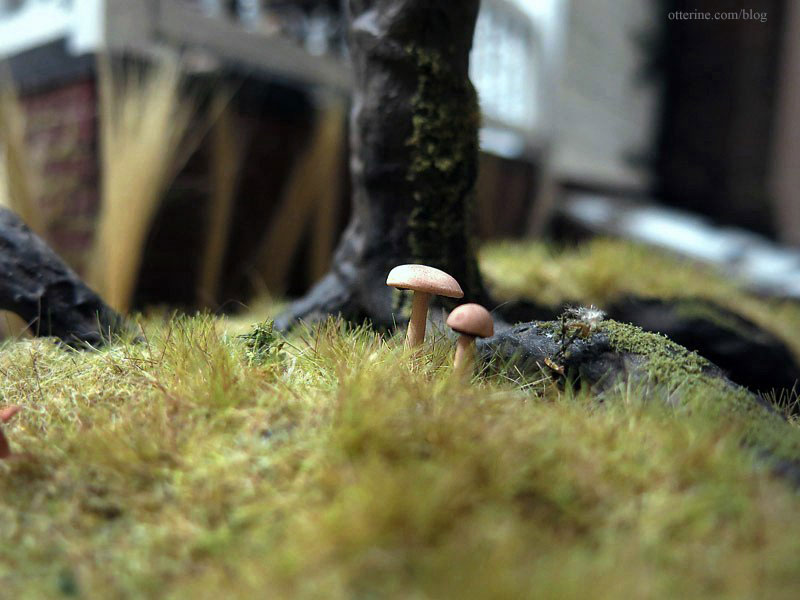
The main grass texture is Savannah TuftGrass by Heki. I added Goldenrod Weeds and Extra Long Autumn Tufts, both “Silflorettes” by MiniNatur for some variety in the vegetation. There’s also a bit of moss on the trunk and roots. The long grass tufts are Woodland Scenics Field Grass. The mushrooms were made starting with Peiwen Petitgrand‘s polymer clay book, though I made some modifications to achieve the look I wanted.
The leaves you see scattered around were handmade from paper – individually punched from marker colored paper and shaped.
I added a beautiful aged metal birdbath by Island Crafts & Miniatures to the front lawn. The last time I made an aquarium, I used some leftover Acrylic Water resin to fill the bowl.
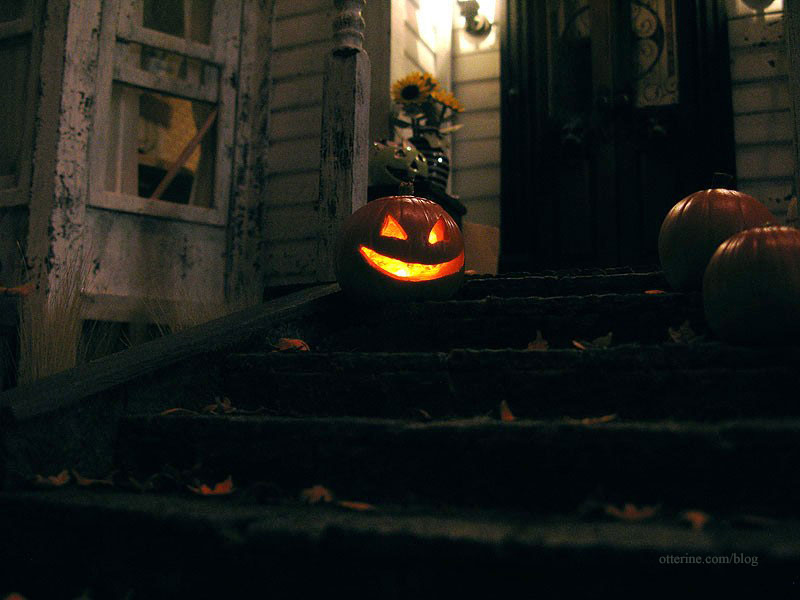
I missed Halloween 2011…
But, even though the house was still incomplete at the time, grandma did it up big for Halloween 2012.
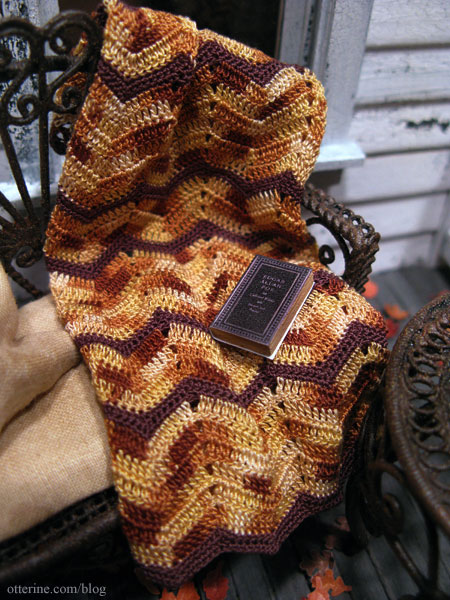
Grandma read Edgar Allan Poe outside while enjoying the crisp autumn air. The afghan was made by Mary of Woodland Miniatures. I made the book for the Heritage parlor bookcase.
Every Halloween display needs a jack-o’-lantern! Ophelia wouldn’t have it otherwise.

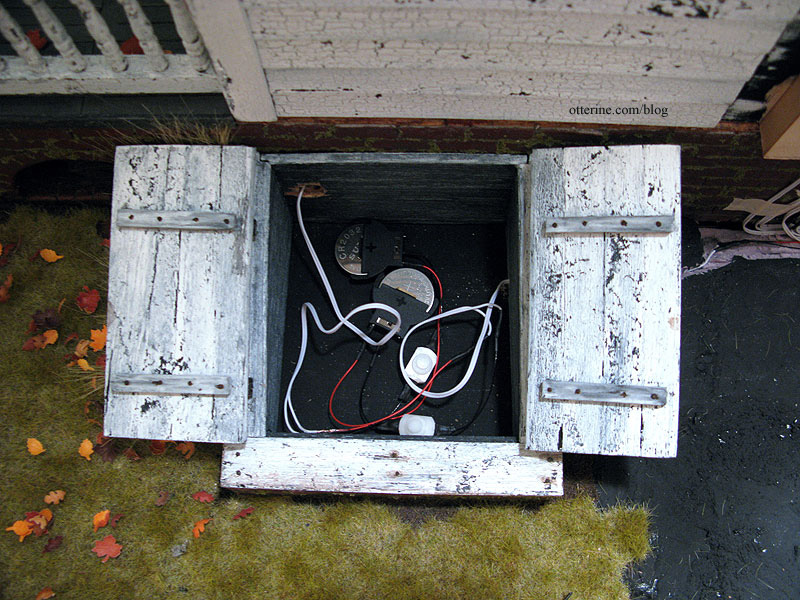
I made the pumpkins out of two colors of clay baked around foil spheres. I was planning to carve all three, but the first one was hard enough to make me skip the other two. :D I used a single orange bulb flickering LED from Evan Designs. It is attached to a 3V battery adapter with a switch, which sits inside the cellar doors. Hooray!
With The Haunted Heritage completed, grandma is looking forward to Halloween 2013. It’s certain to be a big celebration inside and out!
Always love a nighttime photo…
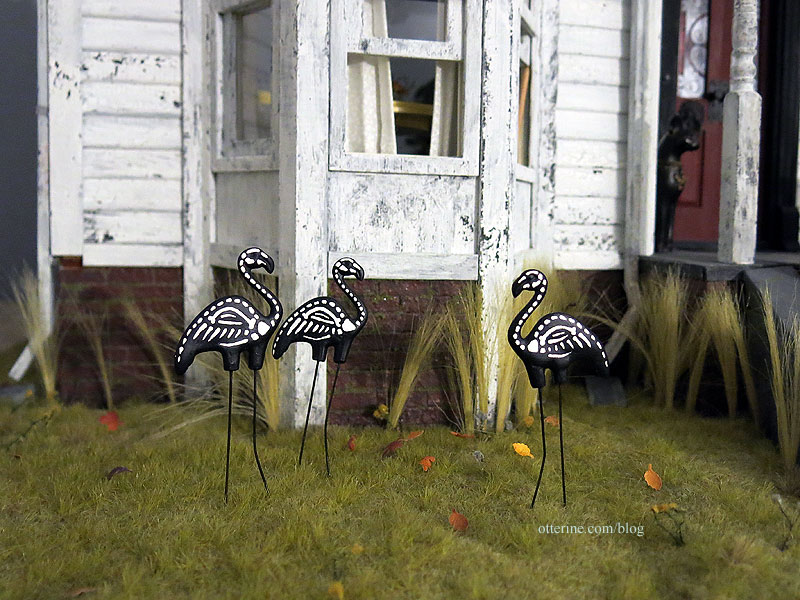
Added some new skeleton flamingo lawn ornaments. :D
——-
I hope you’ve enjoyed following this build as much as I have enjoyed swearing while putting it together! Haaaaaa! In all seriousness, thank you all for the kind comments, invaluable help and generous gifts along the way. Hugs all around!!! :DOk…I have yard work to do…. Ta!
Categories: The Haunted Heritage
March 13, 2012 | 0 commentsChrysolite gaslight chandelier kit
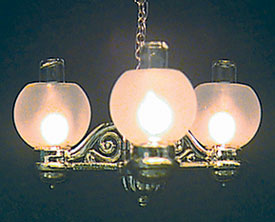
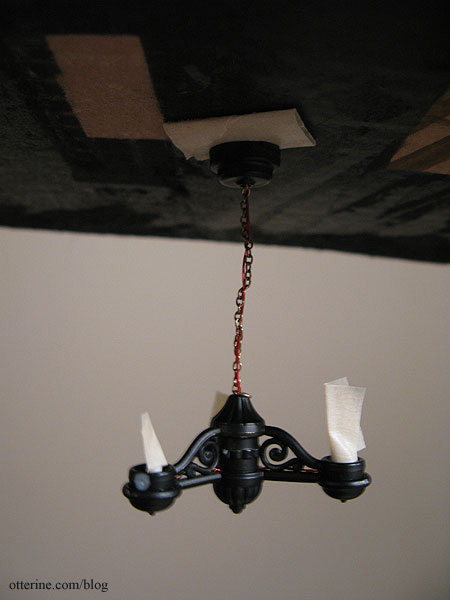
The chandelier was plated in a brass finish, which is not to my taste.
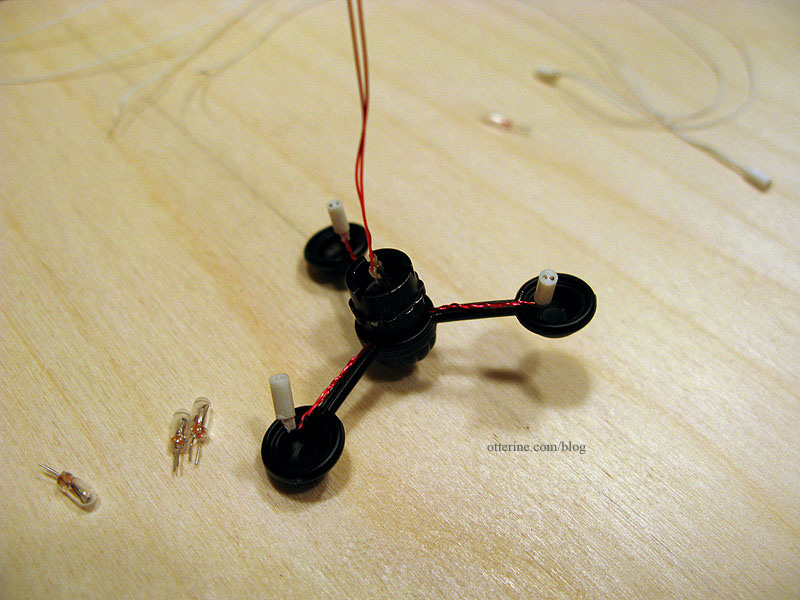
I taped the pieces to a board and sprayed all the pieces flat black. The chandelier kit version I chose had replaceable bulbs but with white wires that were relatively thick. I used candle sockets with varnished wires instead.
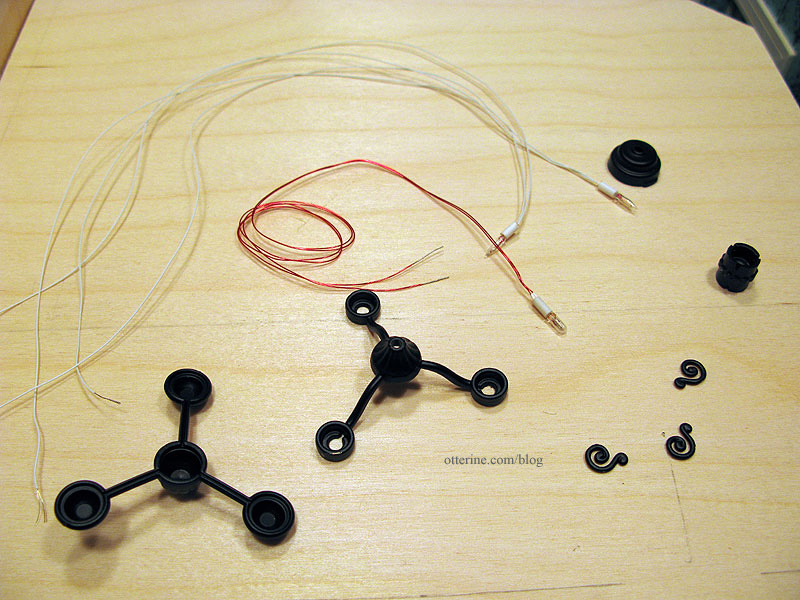
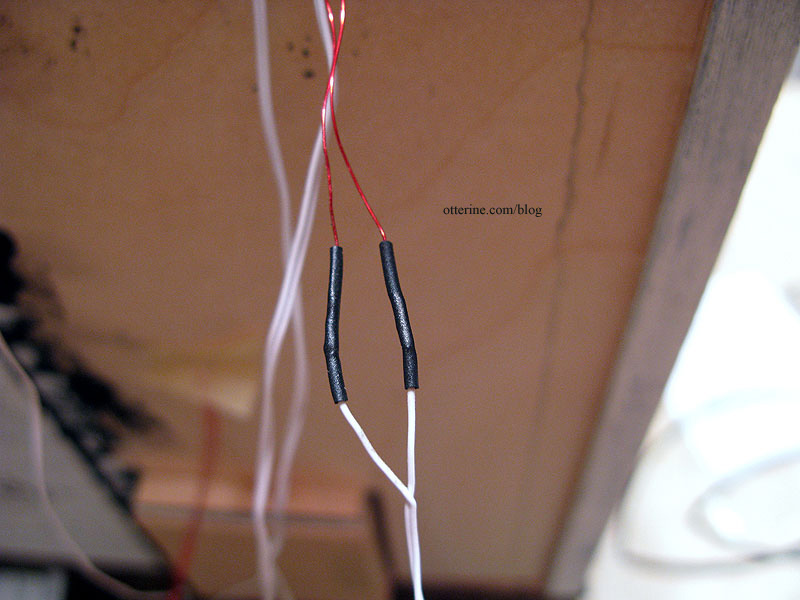
The sconces were very easy to put together, but this contraption took some doing. You basically cut two of the bulb wires short to attach to the longer third, twist all the wires together and feed this spidery assembly through the plastic pieces. Right. Soldering was suggested, but I’ve never done any soldering and certainly don’t have the supplies to do so.
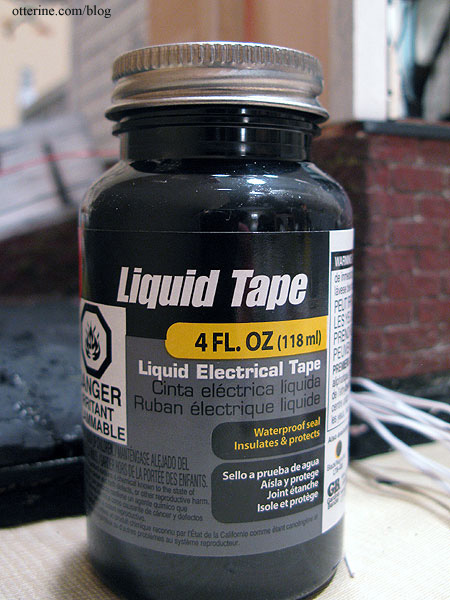
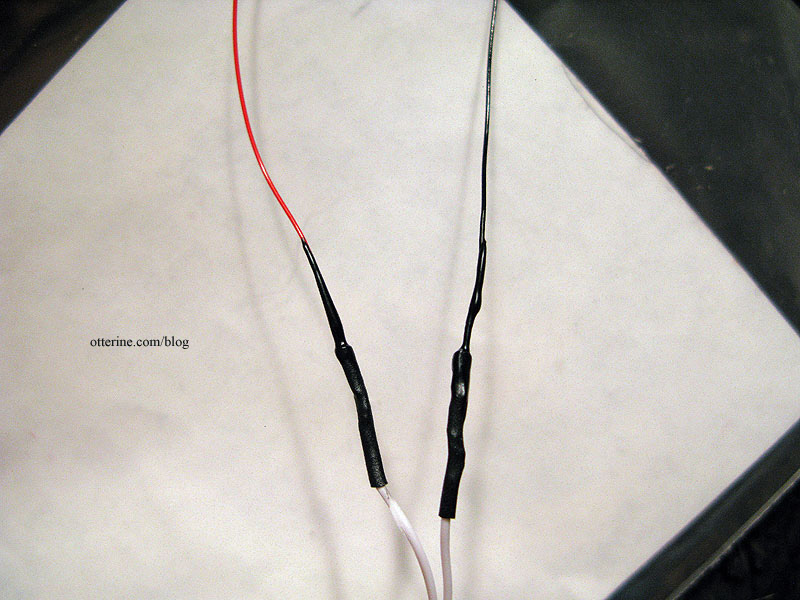
I used shrink tubes to keep the wires together, but in fiddling with them some of the varnish came off the wires in places not covered by the shrink tubes. I bought a jar of liquid electrical tape some time ago but had yet to try it out. I figured this was the best time to test it out. I put a small dab on my “glue” board and applied it to the wire connections with a toothpick. There were no instructions on the bottle, mind you.
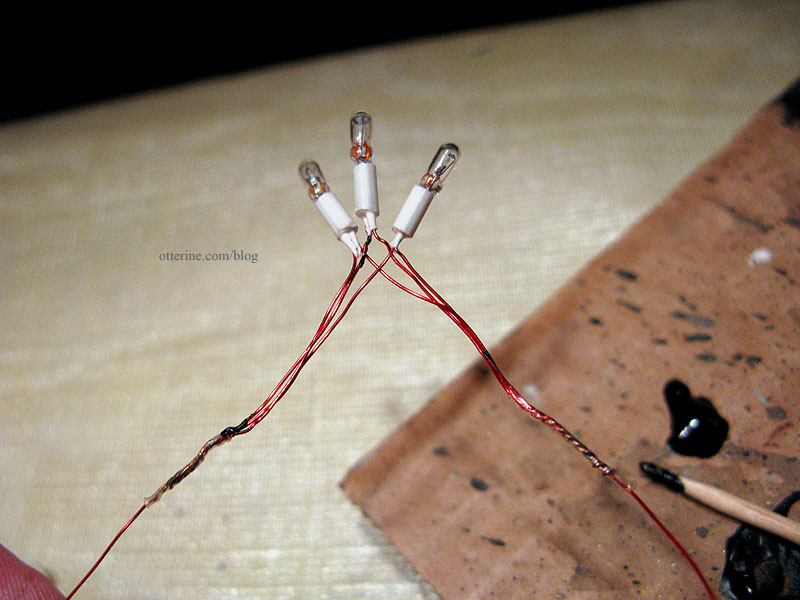
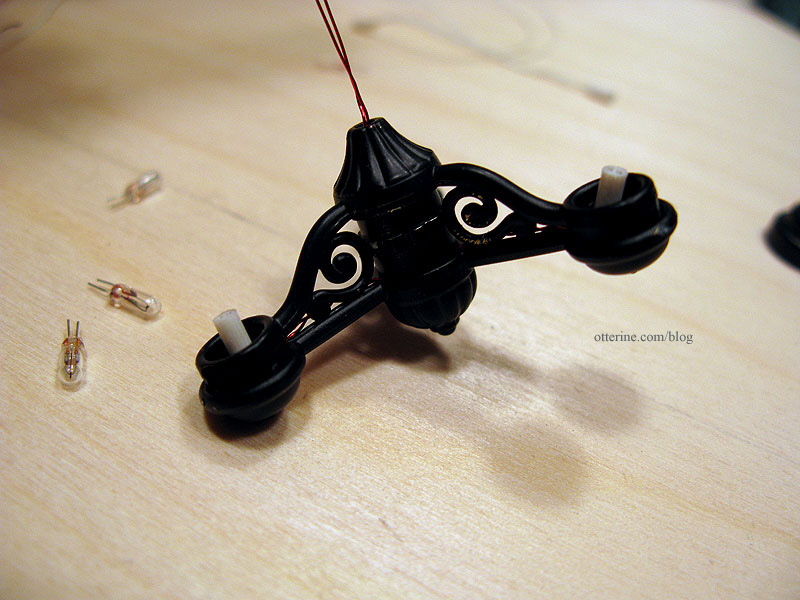
You’re supposed to feed half of the wires through the top channel and the other half through the bottom channel. After three failed attempts, I twisted the wires for each bulb together and fed them through the bottom channel.
This meant I had to run the wires around the scroll details which were supposedly “snap in place” wire holders. I glued the scrolls in place.
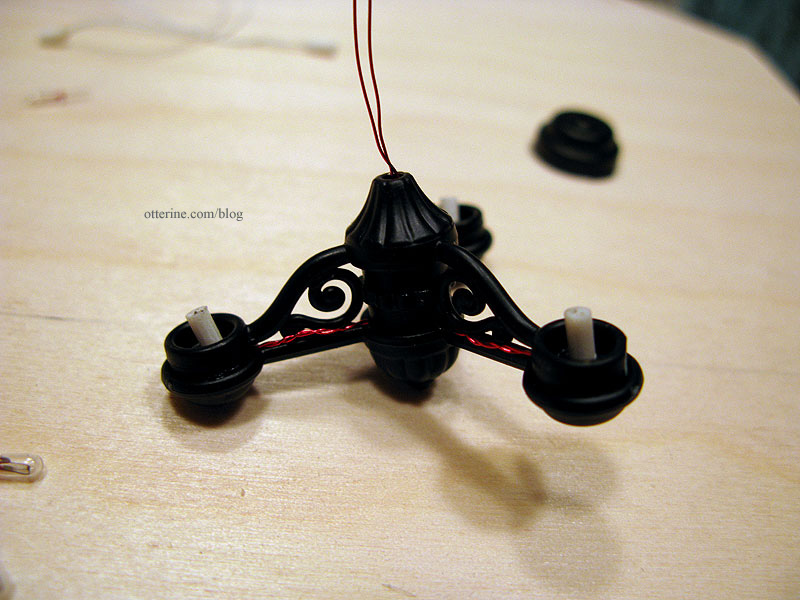
I’ll install the chandelier so the wires face the front wall. I’ll also paint them black to match as I had done for the wall sconces.
I tested the bulbs repeatedly during the process to make sure they were all working. They are temperamental, but they work! Here’s the chandelier in place without its chain, which is at the moment brass in color. I am going to attempt to spray paint it when I do the touch-ups on the chandelier paint.
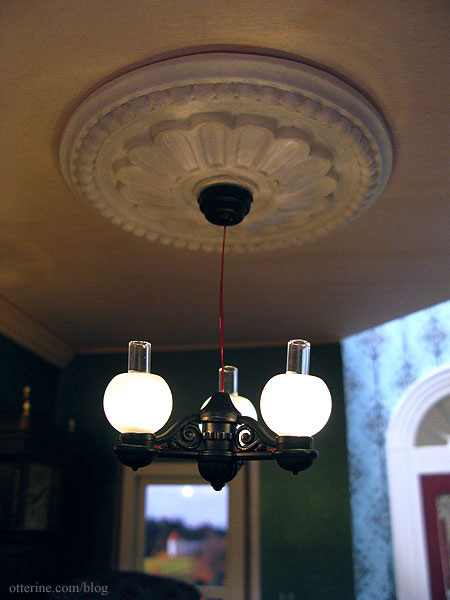
I love it with the large medallion!

I placed a piece of large crown molding in for mockup purposes, too. The one I plan to use is about the same size but a little fancier.
I next added the chain to the chandelier, using half of the length provided in the kit.
Once assembled, I suspended the fixture from a piece of cardboard and sprayed painted the chain and wires as well as a few of the areas marred by the construction process. I had a few areas of brass chain and red wire still showing, so I touched those up with black acrylic paint and a tiny paintbrush.
It’s a little crooked here, but the nice thing about the varnished wires is the fact that they are more rigid than the typical white wires. You can bend and position them, and they stay put. This helps combat the fact that this plastic chandelier is too lightweight for gravity to hold it straight.
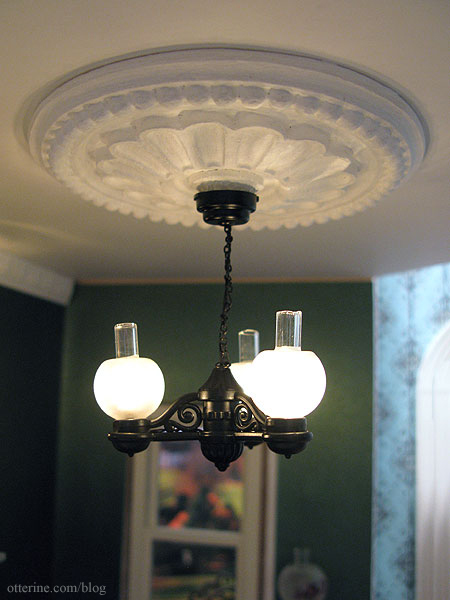
Painting the ceiling, medallion and crown molding all white really helped unify the look. I think it’s going to work really well for this room.

You can’t see much through the front door, but I like this photo. :D
Categories: The Haunted Heritage
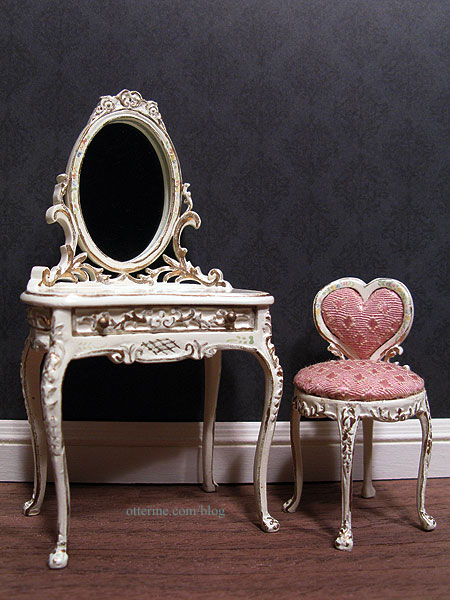
March 10, 2012 | 0 commentsBeautiful Bespaq vanity and heart-shaped chair
Those of you who know me in real life know that I wear skirts and dresses 360 days a year, even in the dead of a Chicago winter. But, my home isn’t excessively girly or feminine. It’s more New England cottage meets French Country rustic.
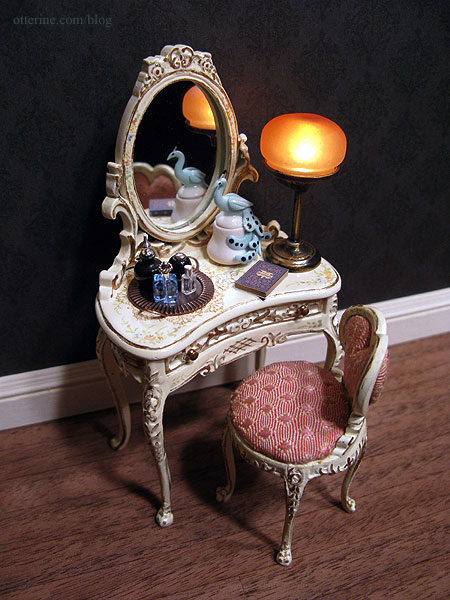
However, I am head over heels for this tiny, ultra feminine Bespaq vanity and heart-shaped chair. :D It’s from Small World Miniatures. I think they look wonderful against the Out of Time scrapbook paper by Recollections that I plan to use as wallpaper in the bedroom. The hand painted details are incredible.
The vanity tray I made fits perfectly on one side with the C. Rohal peacock box and Art of Mini lamp on the other. Not much room for anything else besides a small book. At first I thought the lamp might be too big for the vanity, but I rather like it. It has a warm glow and the perfect vintage feel.
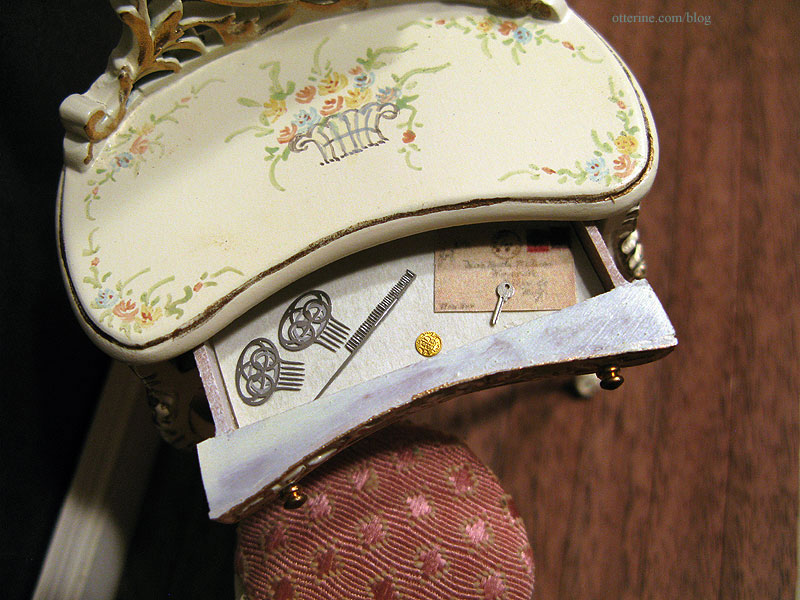
I’ve lined the drawer with pretty parchment paper and added a few things I had on hand. The laser cut hair combs are from The Dolls House Mall. The letter is just a paper cutout for now, but I’ll have to make a pretty opening envelop and letter for the drawer. The laser cut key is by le mini di Pierliugi, purchased at one of the Bishop shows. Grandma’s lucky gold coin is made by Phoenix Models.
The vanity and chair are the perfect pieces I was looking for and will be wonderful in the Heritage bedroom!
Categories: Furniture, The Haunted Heritage
March 8, 2012 | 0 comments


NOTE: All content on otterine.com is copyrighted and may not be reproduced in part or in whole. It takes a lot of time and effort to write and photograph for my blog. Please ask permission before reproducing any of my content. (More on copyright)

Categories:
Heritage – bedroom ceiling, part 1
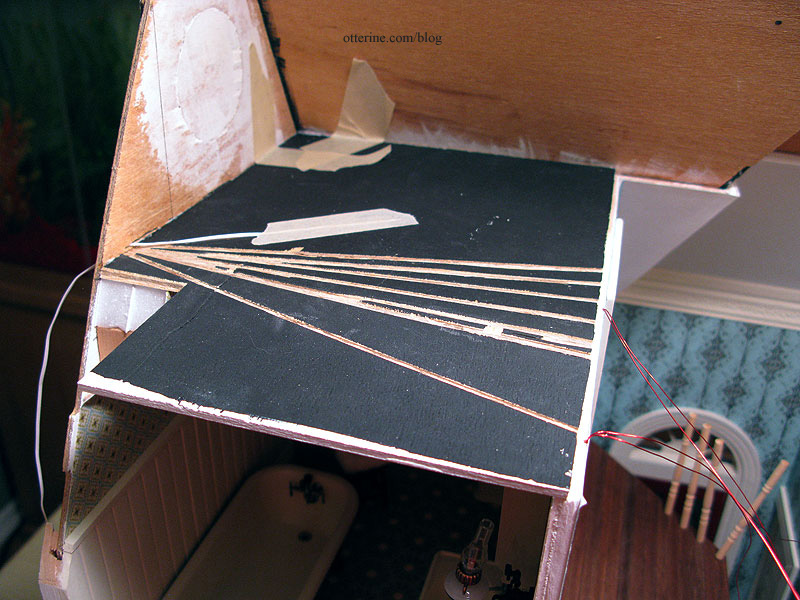
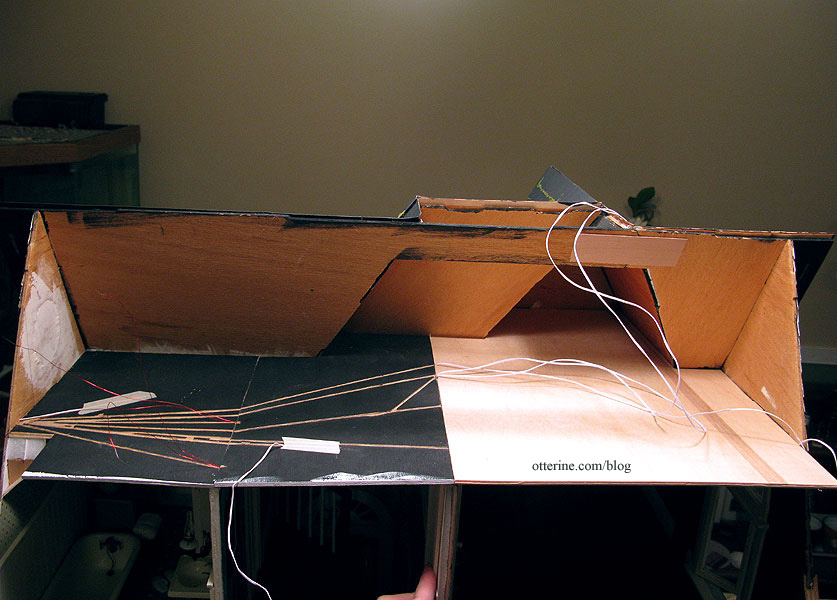
The original kit attic floor was a poor-fitting board to begin with, and it was pieced over the bedroom causing a noticeable seam on the ceiling. Additionally, since I added two walls on the second floor not originally intended as part of the house, I needed an attic floor that covered more area than the original. Trying to cut one board to span the entire house without having any fitting issues didn’t seem like something I wanted to attempt. So, I cut each ceiling board individually, having the seams over each new second floor wall.
The bathroom ceiling had its wiring channels cut prior to installation. All wires lead to the outer wall and will be hidden inside the chimney. The notch on the left side is where the back roof piece sits.
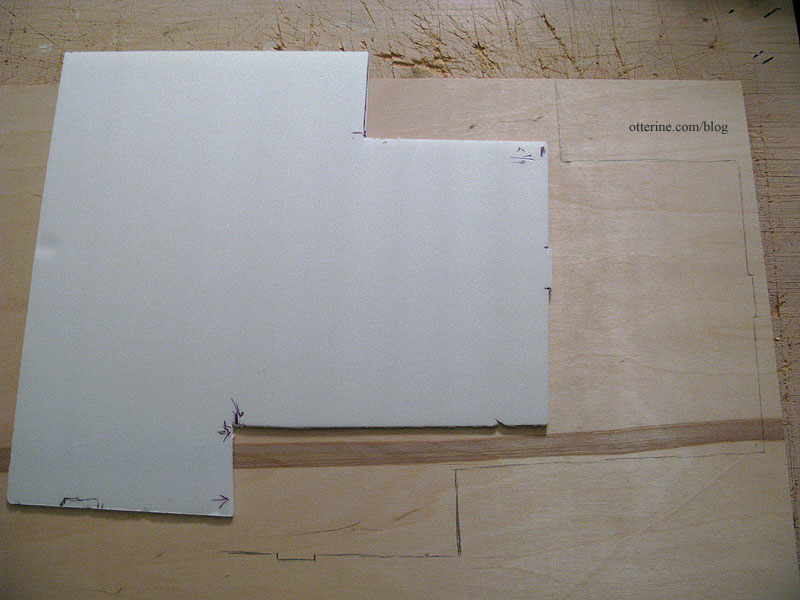
To make a template for the bedroom ceiling, I used a spare piece of Cellfoam 88. It’s the same thickness as the plywood I would be using for the final board, and it was easy to cut and adjust. First, some rough measurements.

I snipped and adjusted. I was still off in the end, so I marked where I needed to add more. I also marked where the tabs should be. Since there were slots on the front and side, I figured I might as well use them.

I traced the foam template onto a new piece of 1/8″ plywood and cut out the ceiling board. Here you can see my foam template was just of the front cuts. I projected the full length back from there.
Here are the notches I cut for the foyer light and bedroom table lamps previously installed.
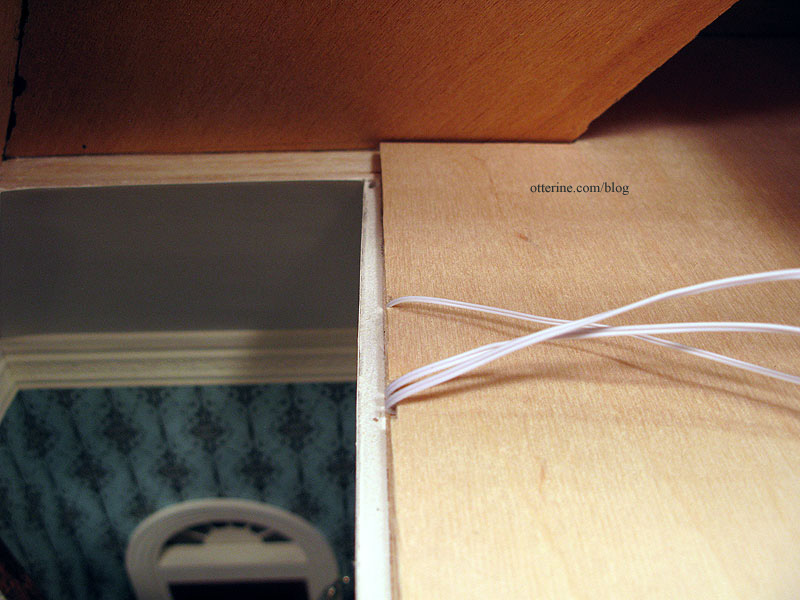
The hallway ceiling has been started, too, but it remains separate. It needs to be installed last since it is a snug fit between the two outer sections. Here are the hallway and bedroom boards in place.
I made minor adjustments until the new ceiling board fit…mostly. I have to tell you, this is the most lopsided board I’ve ever had to cut for a build. That ought to tell you just how out of square this house is. Even at that, it’s still not a great fit, and I cannot figure out where the rub is that’s causing the problem. So, it stays its 95% self, and I will add flat molding along the edges of the ceiling. Crown molding on all those angles makes my head hurt just thinking about it, so flat molding it shall be.
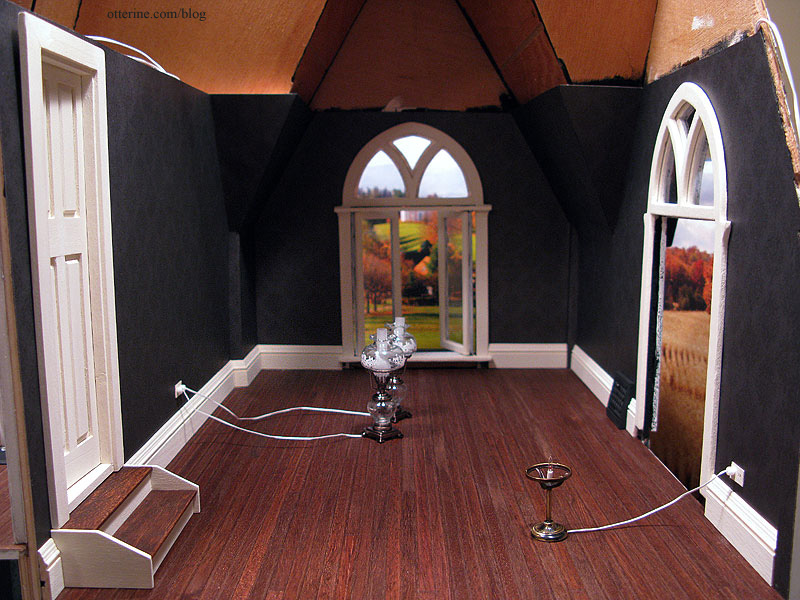
With the ceiling in place, I plugged in all the lights for the room. The lantern on the dresser is battery operated.
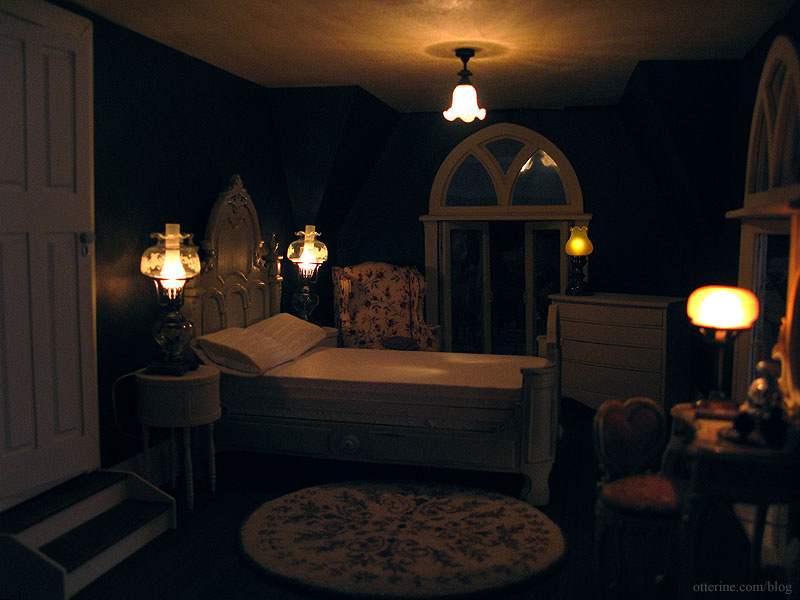
The Ray Storey ceiling fixture adds a good overhead glow to the room. I had thought about using a smaller, simpler ceiling medallion here with the fixture, but when I looked at the resin piece more closely I just didn’t like it. It was rough and uneven, and spending a lot of time to get it in paint-ready condition wasn’t something I wanted to do. Besides, this room has a relatively short ceiling so it’s probably not a good idea to lower the light fixture any more.
I had also thought about putting in a lamp over the comfy chair, but I think there is plenty of light in this room. Besides, grandma might just have a clip-on LED lamp for supplemental lighting just like I do for my needlework. Once I get the ceiling painted bright white, it will reflect more light as well.
I cut the notch for the back roof piece and carved the two remaining wire channels on the top surface of the bedroom ceiling board.
Part 2 here.
Categories: The Haunted Heritage
December 30, 2012 | 0 commentsBespaq bed makeover, part 1
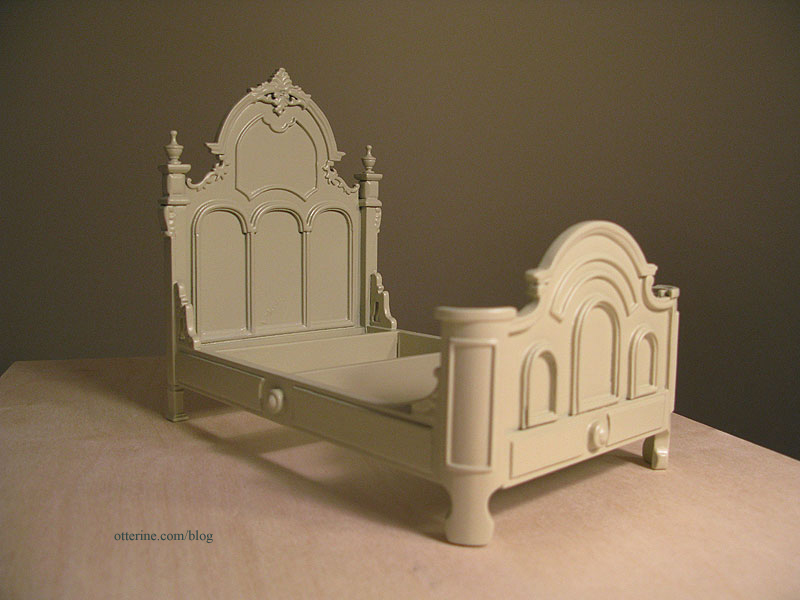
You might recall from my previous post, this is where the bed started. The finish was too dark and the bedding too large for scale.
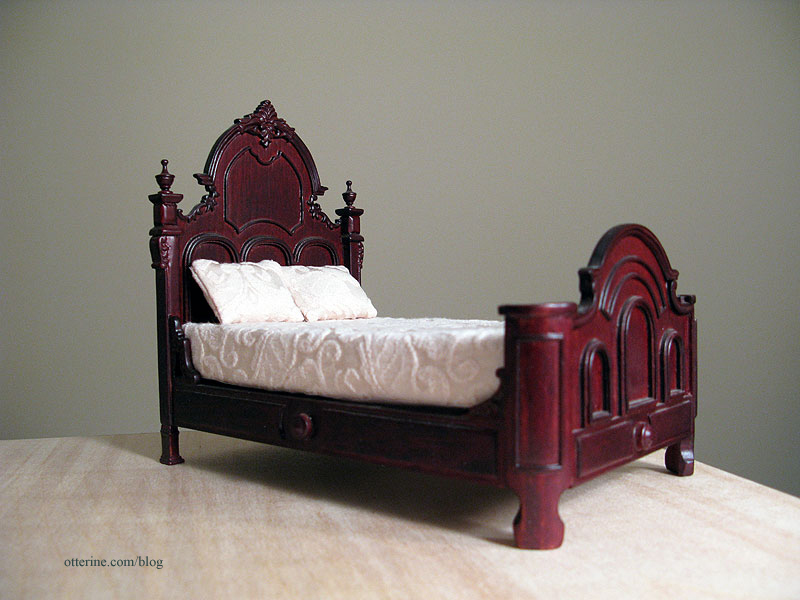
I then primed it with grey spray paint to cover the red wood and varnish shine. Of course, I didn’t take a better photo of it in grey. :\
Here it is after a few coats of Krylon Almond in satin finish. :D We’re already getting somewhere!
There are a few imperfections in the paint coverage, but those will be hidden by the bedding.

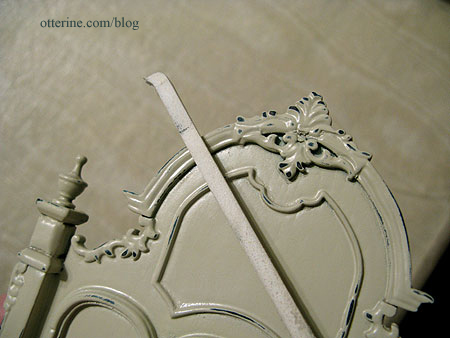
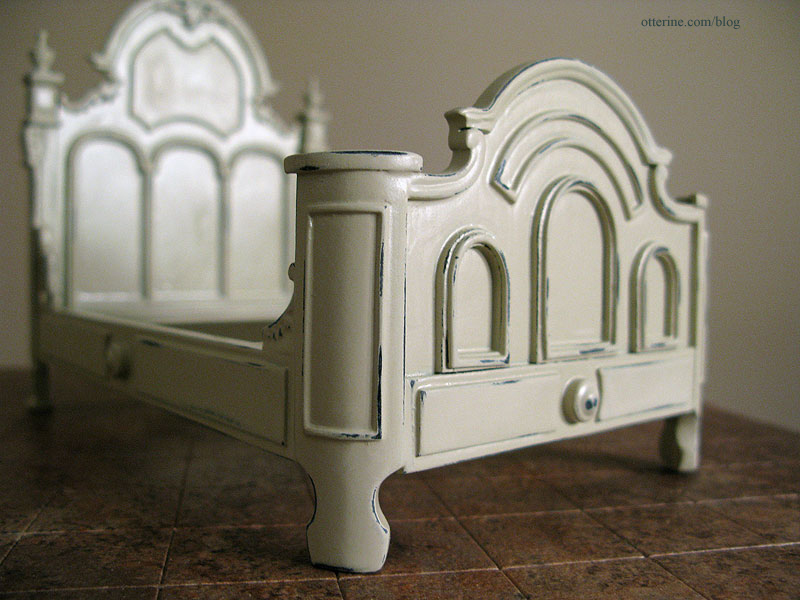
To age the bed, I removed some of the Krylon Almond satin paint using a sanding stick. I picked up a package of these at Hobby Lobby.
I went for a little less wear than my inspiration photo.
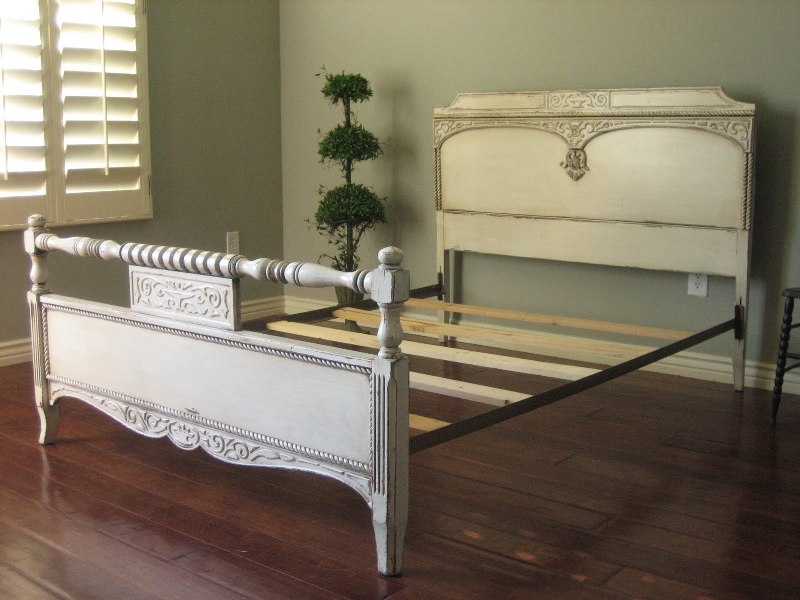
image from European Paint Finishes Detail of the wear patterns on the inspiration bed.
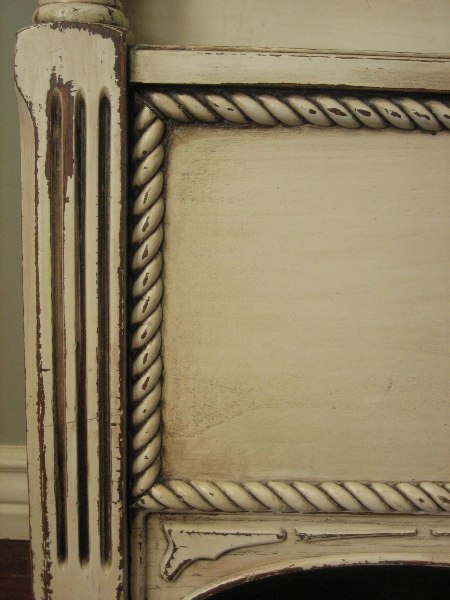
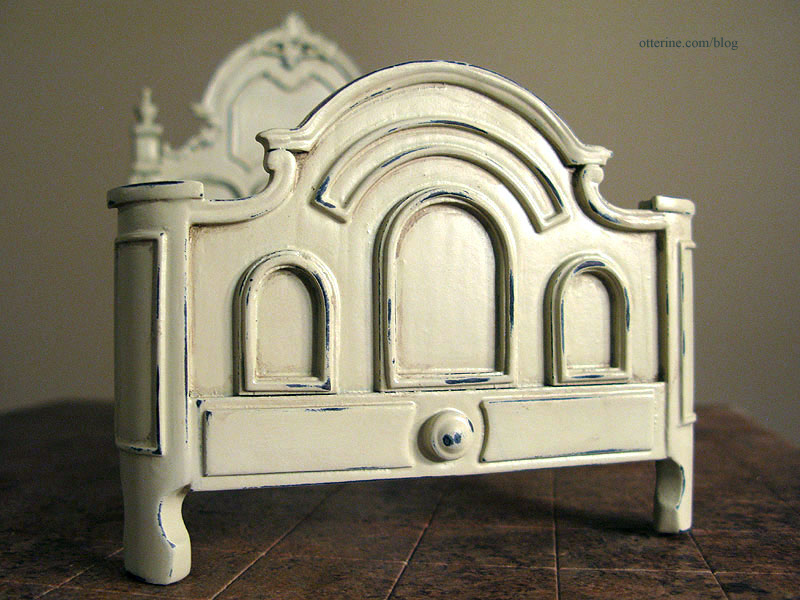
Detail of the wear on my bed. I wanted to emphasize the lines and details of the bed without overdoing it, especially since miniature finishes tend to work best when they are subtle.
I dry brushed some brown paint into the grooves and recesses, again using only a little. It added some nice depth.
I cut new foam core board pieces to replace the original mattress.
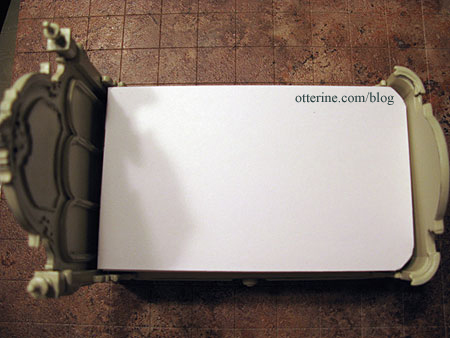
We’re ready for bedding!
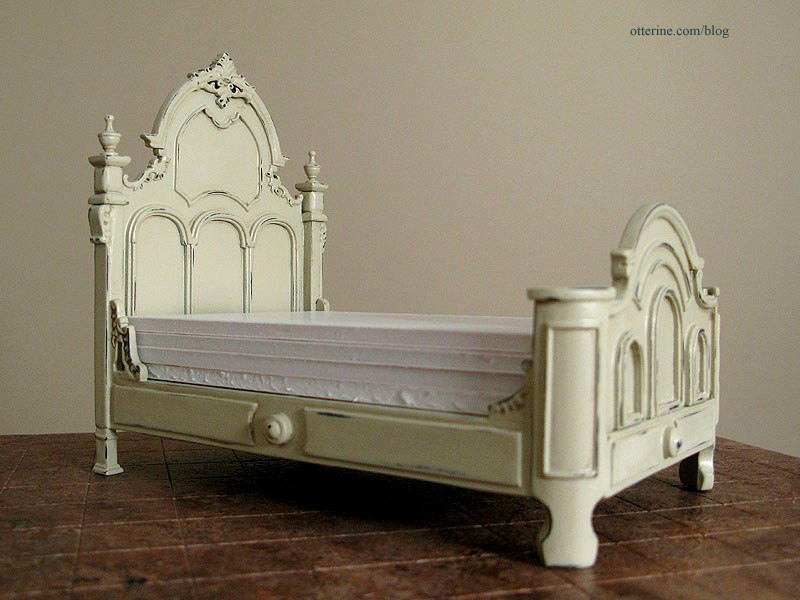
The bed looks somehow heavier now than it did in plain almond, don’t you think? :D
Categories: Furniture, The Haunted Heritage
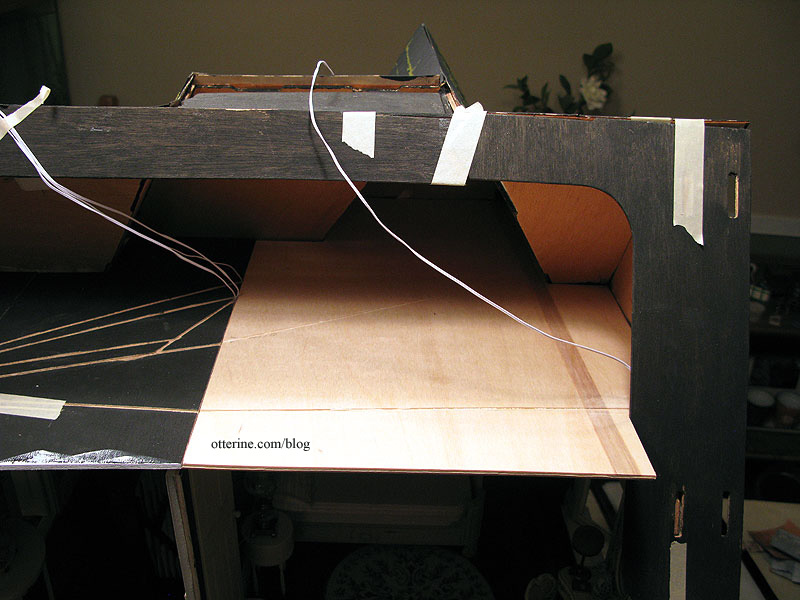
December 28, 2012 | 0 commentsWiring…a necessary task
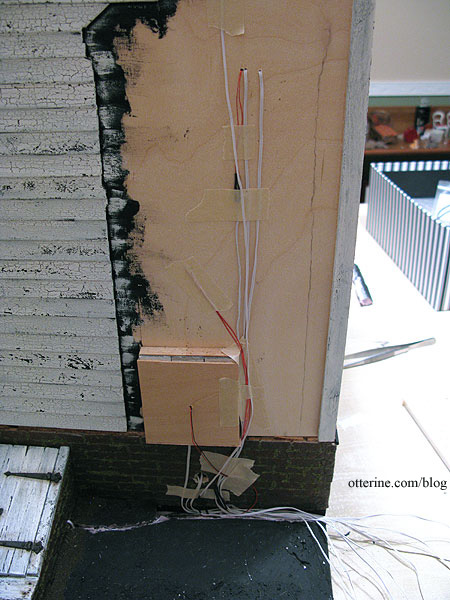
I’ve gotten far enough into the build that I need to start addressing the wires that will eventually be housed in the chimney. I have some wires lengthened and marked with masking tape so I know what is what.
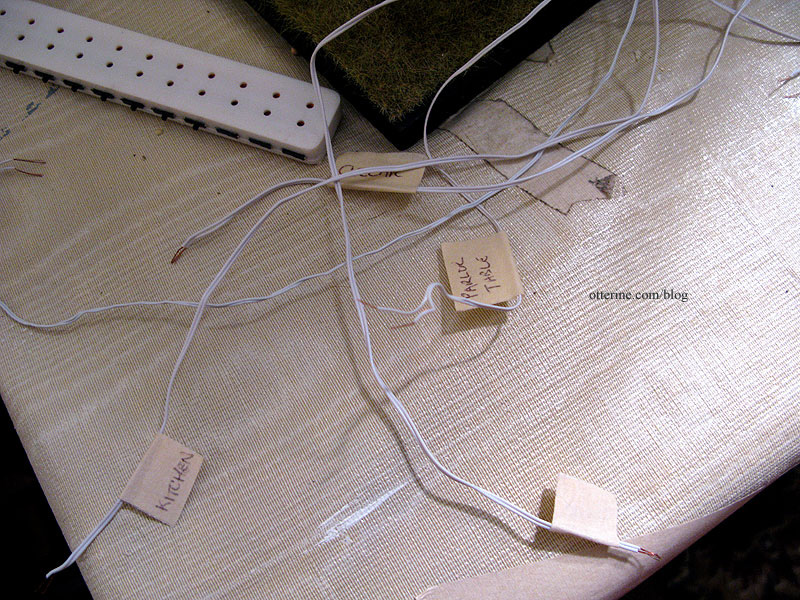
Others are just hanging around, too short, and I need to plug them in to see what happens. Haaaaa! What a mess….
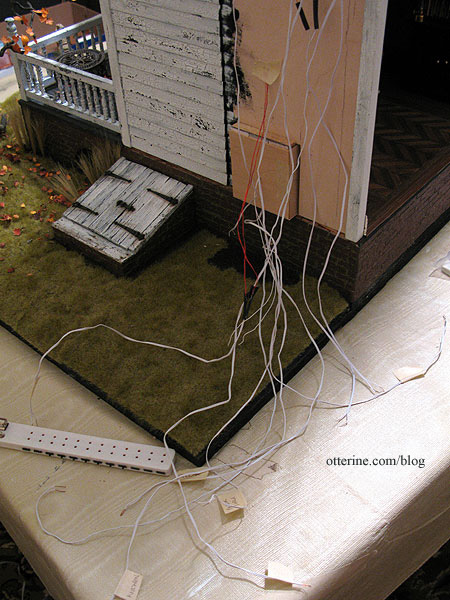
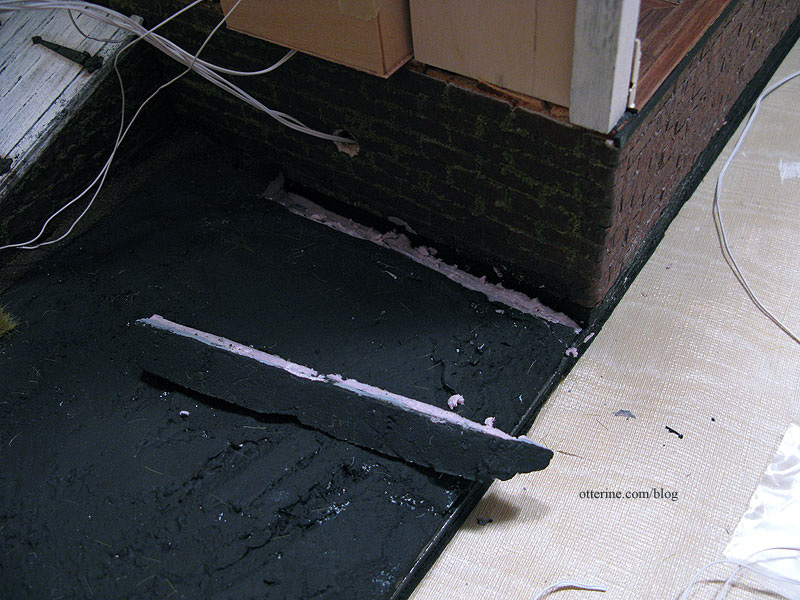
I decided to take some time tonight and remedy that issue. All the wires will come down the wall behind the chimney and that will require a track to the back of the baseboard. I cut the landscaping foam but kept the piece to later plug the channel over the wires.
I use the tiny clear, pre-cut shrink tubes by Cir-Kit when when I need to keep the wire joins thin, usually within a channel inside the walls or floor boards of the building itself.

For the wires that join inside the chimney, the thickness of the wire joins doesn’t matter since they will be loose in the flue so I use shrink tubing from Evan Designs instead. This is a length of black tubing you cut yourself.
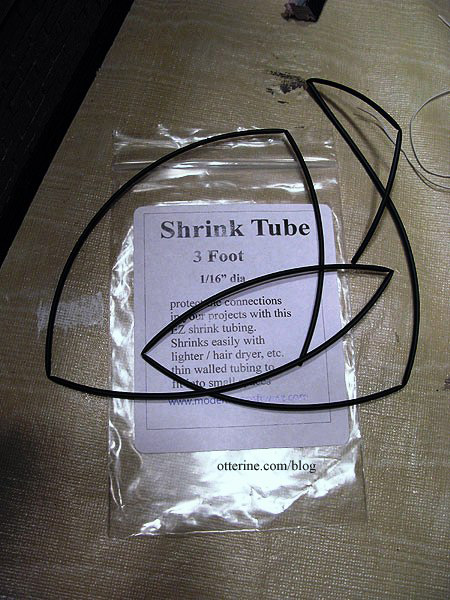
The result is comparable to the clear tubes just slightly thicker. I use a small lighter to shrink the tubing, putting the flame just close enough.
If you get the flame too close, you can use liquid electrical tape. This won’t hold wires together like a shrink tube, but it replaces any lost insulation.
I decided to use a 3V flickering orange LED for the parlor fireplace, the same method used for the jack-o’-lantern on the front porch. I cut a channel in the landscaping foam and then drilled a hole into the cellar doors.
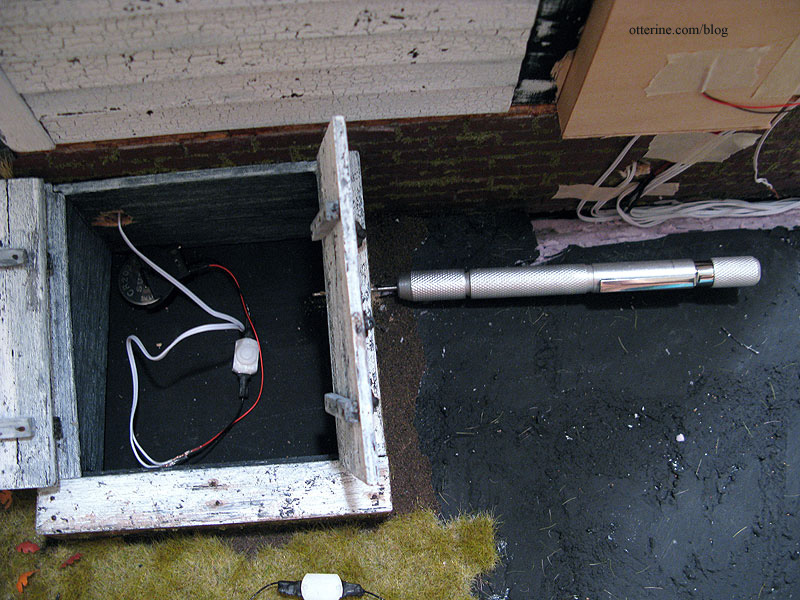
I wired the LED to a 3V battery adapter with a switch.
It’s a softer, more realistic light than the static red bulb. I love how spooky the fireplace looks in low light.
I taped the wires in place here and there to keep them tidy. Much better.
Once the remaining wires are in place, I’ll finish the landscaping and then add the chimney, but you can see the general idea of how it will look in the end. Having the chimney hiding the wires makes the Heritage completion seem like a solid reality.
I even added the plugs at the ends of the wires. I use a 12-switch power strip, and yes, there are more than 12 lights to be plugged in at any given time. My transformer can definitely handle them all on at once, but I am more of a use-them-when-you-need-them type when it comes to lighting anyway. I could certainly add another power strip, but I don’t. And, yes, I know it’s already a bit of an octopus…ah, well, it works for me.
All this work is worth it once you see the soft glow of the light fixtures in place.
Categories: The Haunted Heritage
December 20, 2012 | 0 commentsHeritage – bedroom final trims
With the wallpaper installed, I cut the baseboard trim to fit around the room after putting in the front window. I later added the trim underneath the swinging window on the interior side.
I added another baseboard heat register (my bash of a tutorial by Kris at 1 Inch Minis), this time by the window. Having it on the wall behind the bed would defeat the purpose of adding the detail at all, and the double outlet was already on the inside wall besides. The mismatched seam is definitely less noticeable, too. Hooray!
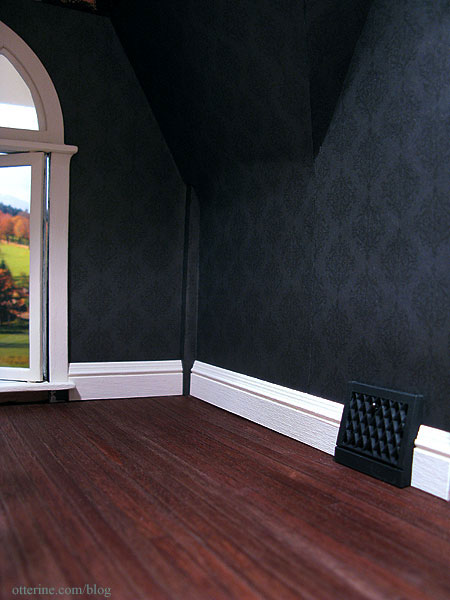
While I did cut the trim to follow the small outcropping on the left, I didn’t bother to cut the trim around the corner post in the back on the right. Cutting pieces that small tends to be more of an exercise in futility with limited results. Besides, a big dresser is going there. Cheating? Maybe. :D Less stress? Definitely!
The bedroom door has been finished, including door knobs from miniatures.com and keyholes from Bindels Ornaments. :D
I glued the door in place and added the interior trim.
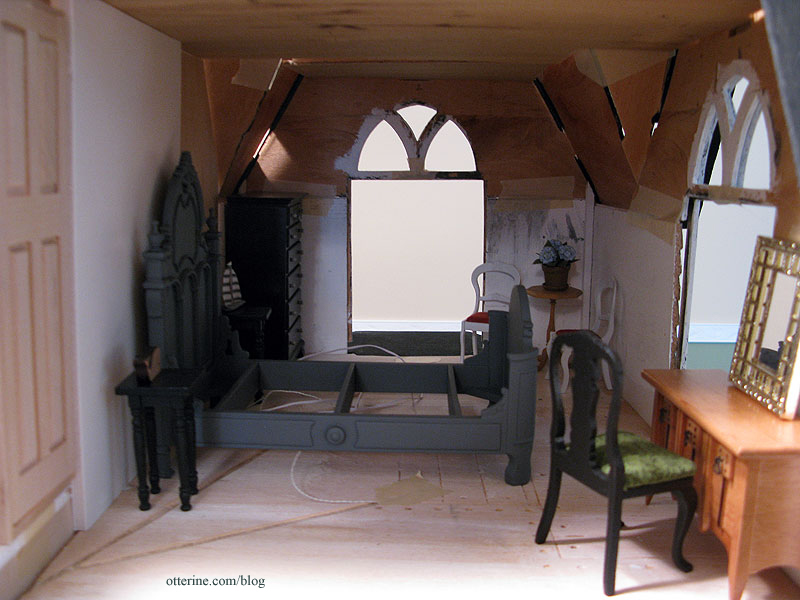
Here’s the furniture placement, though the dresser, bed and nightstands still need final finishing.
The Bespaq vanity and heart shaped chair fit perfectly in this corner.
We are ready for the ceiling!

Categories: The Haunted Heritage
December 18, 2012 | 0 commentsHeritage – bedroom swinging windows, part 4
Completing work on the swinging windows. After touching up any exposed wood that might show in the side tracks, I glued the window interior trim pieces in place.
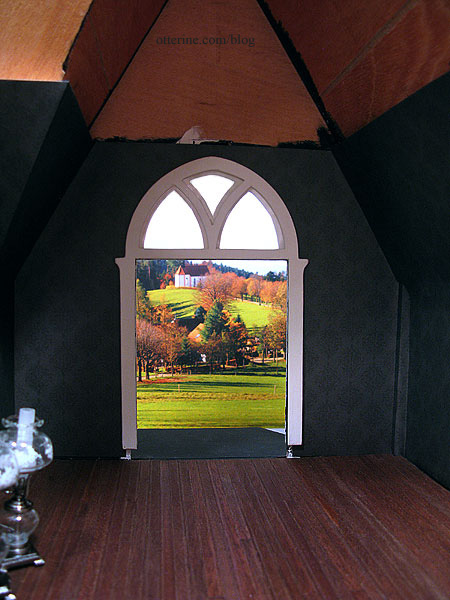
I rechecked the fit of the front swinging window pieces previously finished and installed the window. It doesn’t close all the way without some tension, so I’ll just leave it open. I couldn’t trim any more wood from the panes to make it fit without weakening the whole assembly, and I don’t mind them open.
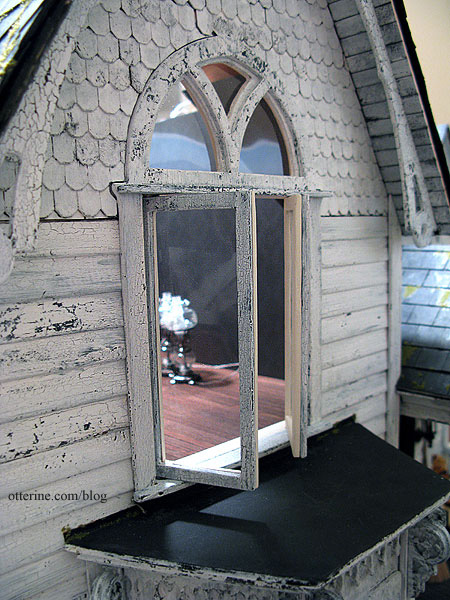
I added the exterior trim to hold the window in place. There’s no glue here; it’s all held together with tension. That’s probably not a bad thing in case I ever need to adjust or repair it.
After finishing the bay window roof, I added some leaves and potted plants. The plant on the left is from Michelle of Little Rabbit Minis, and I made the potted daisies for The Aero Squadron Lounge.

The lower trim has been added under the swinging window on the interior side here. Ophelia seems to be enjoying the view.
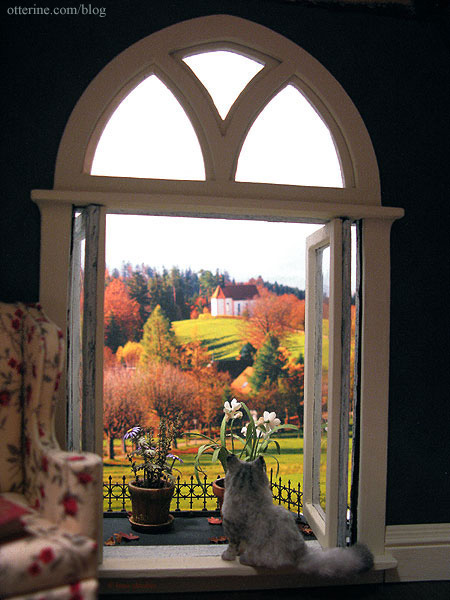
I get the feeling she spends a lot of time on the bay balcony. :D
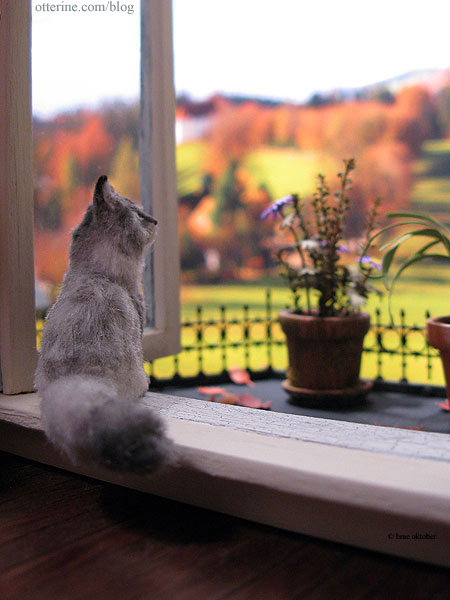
Pretty kitty.
I finished up the side swinging window and installed the trims to hold it all in place. The side gable finishing trims will be completed after the attic is completed and the back roof added.
There were slight gaps just below the arch windows for both swinging windows, so I added thin pieces of trim to hide these.
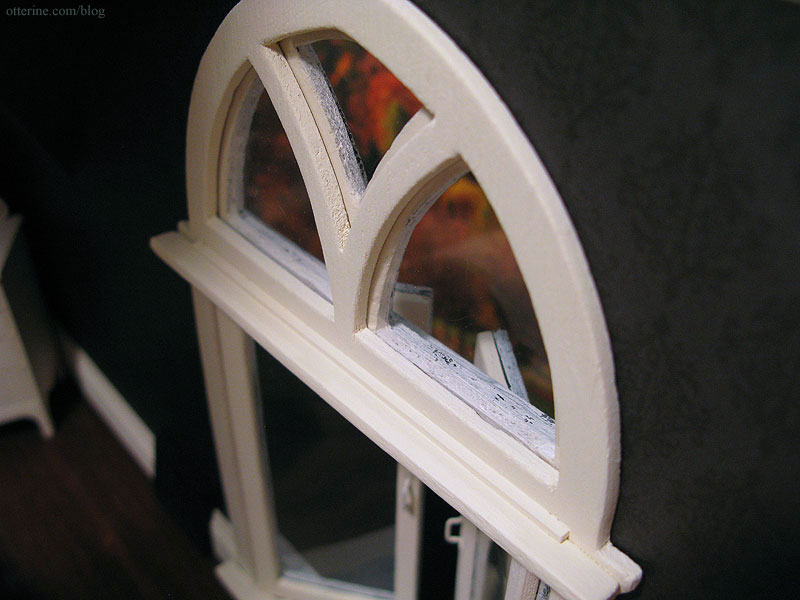
I also added window pulls. These were brass but have been painted Vintage White by Folk Art. Nothing says old house like painted over hardware.

Categories: The Haunted Heritage
December 17, 2012 | 0 comments
NOTE: All content on otterine.com is copyrighted and may not be reproduced in part or in whole. It takes a lot of time and effort to write and photograph for my blog. Please ask permission before reproducing any of my content. (More on copyright)