


NOTE: All content on otterine.com is copyrighted and may not be reproduced in part or in whole. It takes a lot of time and effort to write and photograph for my blog. Please ask permission before reproducing any of my content. (More on copyright)

Categories:
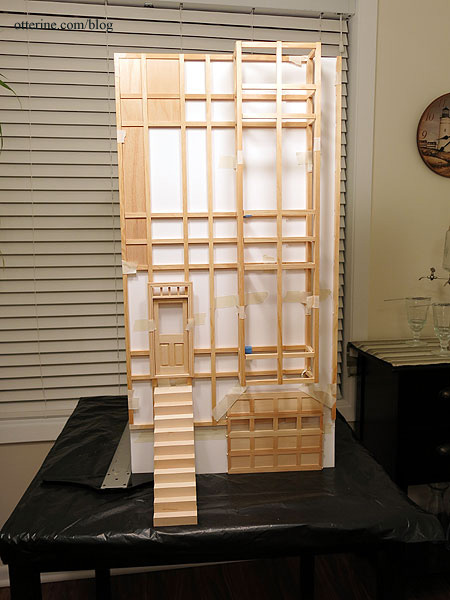
The Brownstone – entrance and front steps, part 1
Update on The Brownstone. I tend to keep my bashed builds in dry fit a long time, because while I can think of a lot of things that will come up along the way, there are always things I don’t think of, problems with materials or a change in direction. The facade has to be the first thing I do overall, but there are a lot of parts to it.
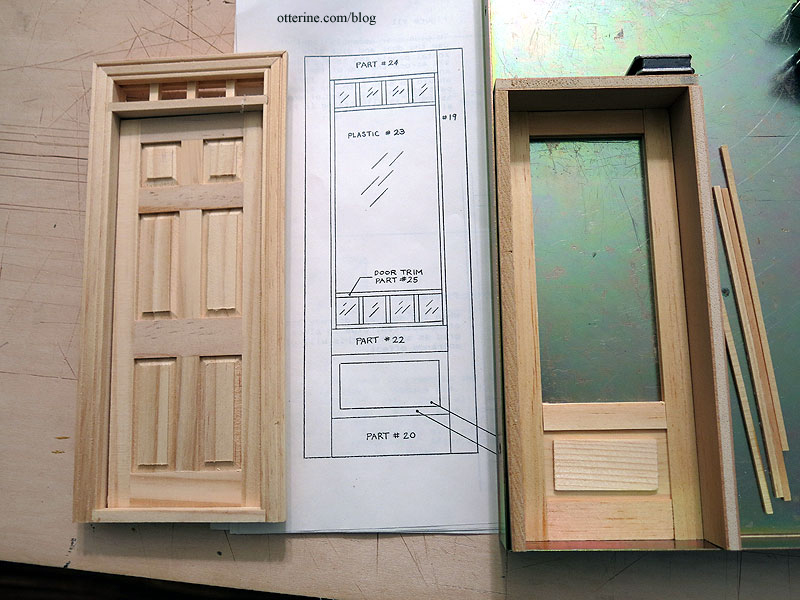
I will keep the bay windows and upper window the same as the original kit, but the front entrance needs some consideration. I’d like to keep the original kit door if possible, and it needs to be assembled from pieces. If I do keep this door, then I need to figure out a way to make it a working door, which will in turn change the way the recessed entryway is constructed. The kit instructions have you glue the door in place, but I want a functional door. So, I can’t cut my new facade backer board until I figure out the entryway in dry fit.
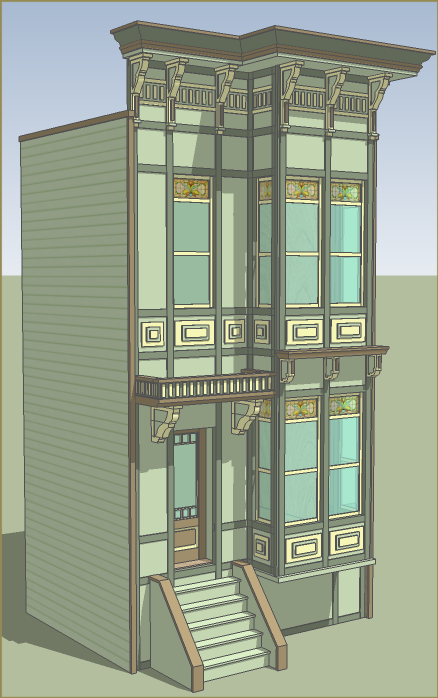
You can see from the drawing how this door will look with all the trim in place. The plywood surround creates the recess, but the door fills the whole interior space…there’s no frame.
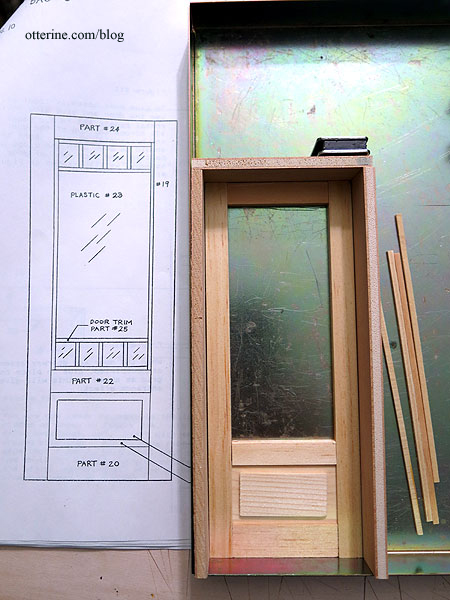
The Houseworks door I have as a backup plan is shorter and narrower than the original door, so I’m going to try to get the original to work. The original just says “row house” to me. :]
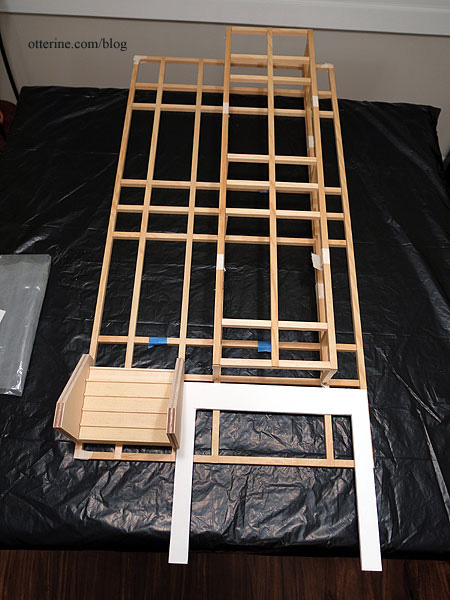
I pretty much need to address the front steps at the same time in case I want to make further changes to the entryway based on the stairs layout. With the added height to the bottom of the building to accommodate the garage door, a new front staircase needs to be constructed since the kit steps will be too short.
I bought some stair molding from Manchester Woodworks so I could cut my own steps. The original stairs are 3/4″ tall whereas the trim molding is 11/16″ tall, but it’s such a small difference that I will use the kit stairs and the trim molding stairs together to make the taller staircase.
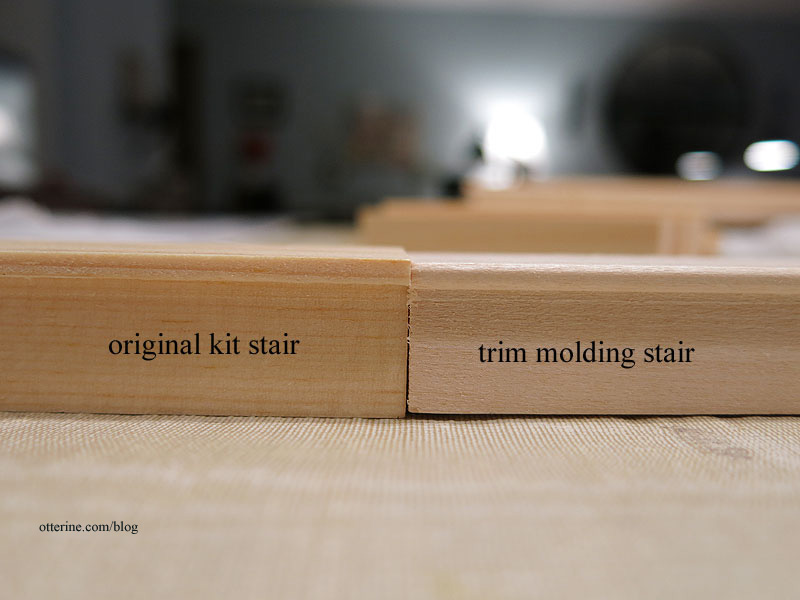
The kit stairs are 4 1/2″ wide, so I cut 8 new stairs from the molding using this measurement and glued them together as a set. I’ve left the bottom three kit steps separate for now but taped them in place to check the fit.
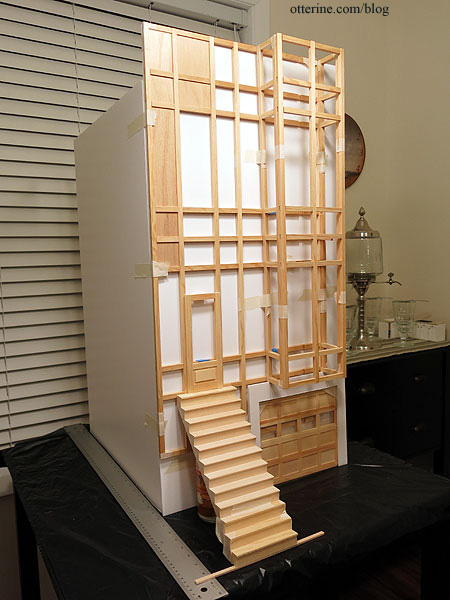
I also propped the smaller top step from the kit in place.
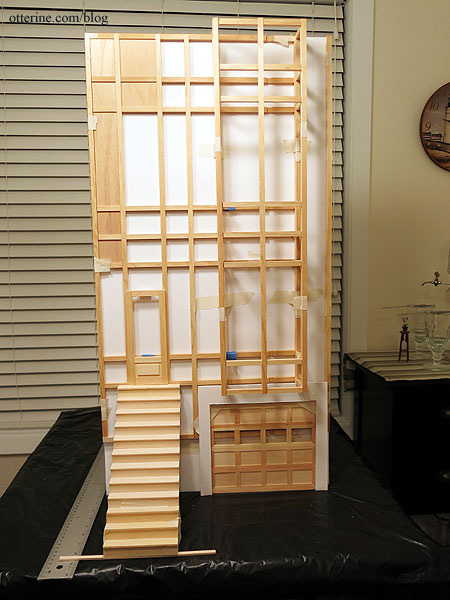
It certainly looks better than the skinny steps I used in the first mockup.
Mike on the Greenleaf forum has a wonderful drawing of the Golden Gate View that shows the construction better than the small kit box photo. One thing I don’t like is there is no front porch to speak of; the recess in the doorway is essentially the porch. Not what I want at all and not very realistic. I mean, where’s the postal carrier going to leave packages? :\
I have two choices: add a modest front porch board that will push the steps forward or I can alter the front wall to push the entrance back into the building. I really don’t want to add any more depth to the landscape board than necessary. This build will have next to no lawn, because I don’t think its necessary for the style. Leaving 1-2 inches of ease around the building should be sufficient for transport and display. If I add a porch board to the front, I just make the footprint larger.
So, that leaves pushing the entrance back into the building. I do have some room to move the interior stairs back, so I think that’s what I’ll mock up next.
Categories: The Brownstone
January 30, 2014 | 0 commentsThe Brownstone – foam core board mockup
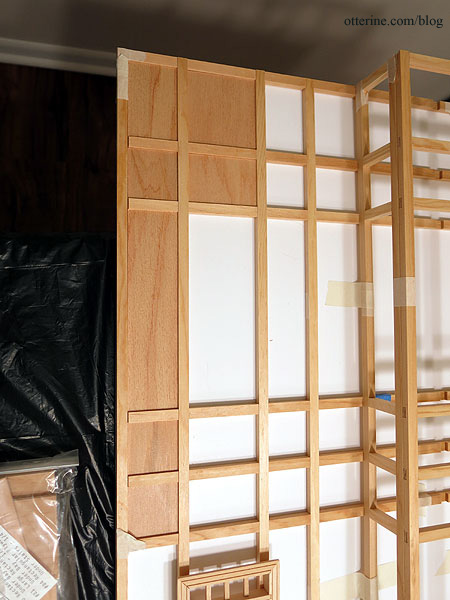
Update on The Brownstone. The kit instructions have you assemble a grid from vertical and horizontal notched pieces, as you have seen in previous dry fit photos.
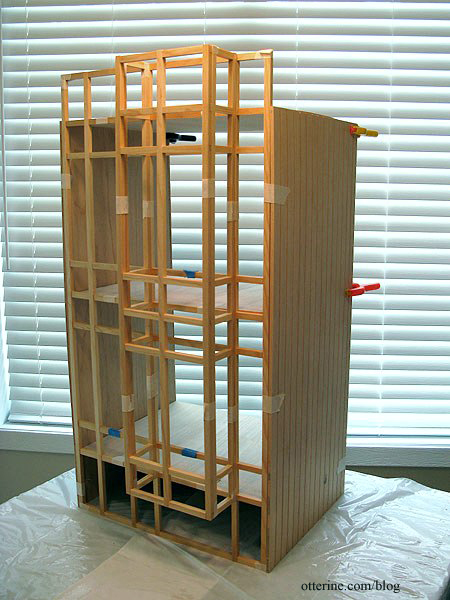
Later in the build, you add pre-cut inserts to complete the walls.
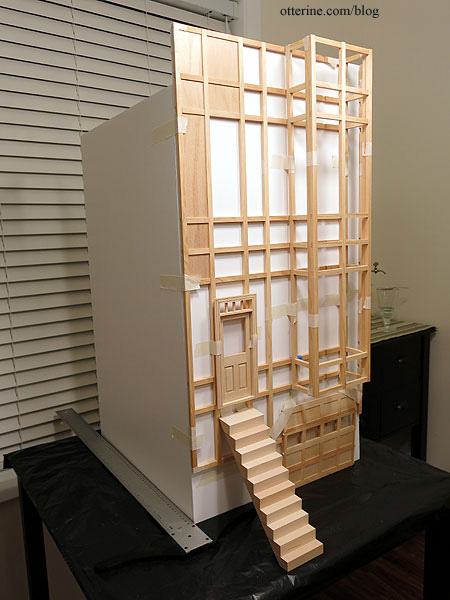
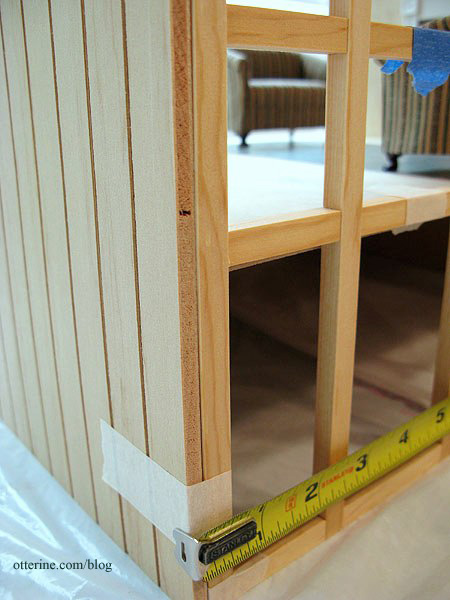
Since I need to add some width and height to the facade, I’m going to approach the assembly in a different manner as well. I’ll start with a full board cut to size. I had to piece the foam core board but my final wood panel will be one solid piece. To this front panel, I will add the grid trim and finishing inserts. I will trim the bottom of the grid flush with bay portion since I’ll need the lower portion open for the garage door.
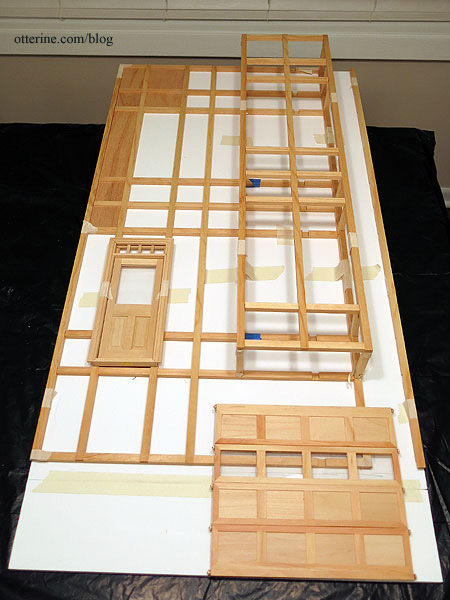
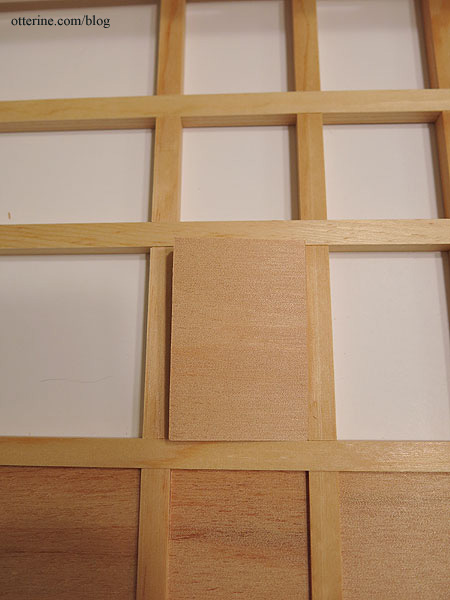
A few inserts worked just fine. As I noted before, I would think it prudent to use these as spacers when assembling the front wall and bay window grids to make sure it all fits precisely, but the instructions don’t have you do this. The grid is tight because there are notches to match up on the verticals and horizontals.
And, a few brought forth my least favorite phrase: “sand to fit.” I foresee some issues later on. I have to cut new pieces for the added width anyway.
Having a solid front board allows for a smooth surface on the interior and a stable base for the front detailing of the structure. This front board ended up being 33 1/2″ tall by 17 1/4″ wide. The build is just shy of knocking into the ceiling light fixture above my work table. Whew!
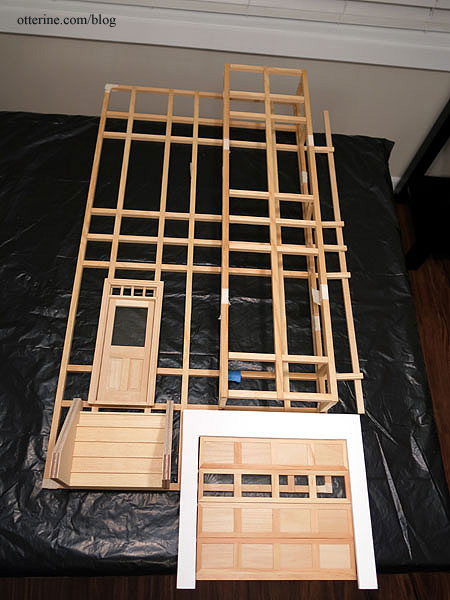
I’ve used the interior stairs kit just as a trial. I have some supplies ordered for the new staircase. The front door will also be recessed and not floating in space. The original kit has a portico top, so there will be good visual interest here.
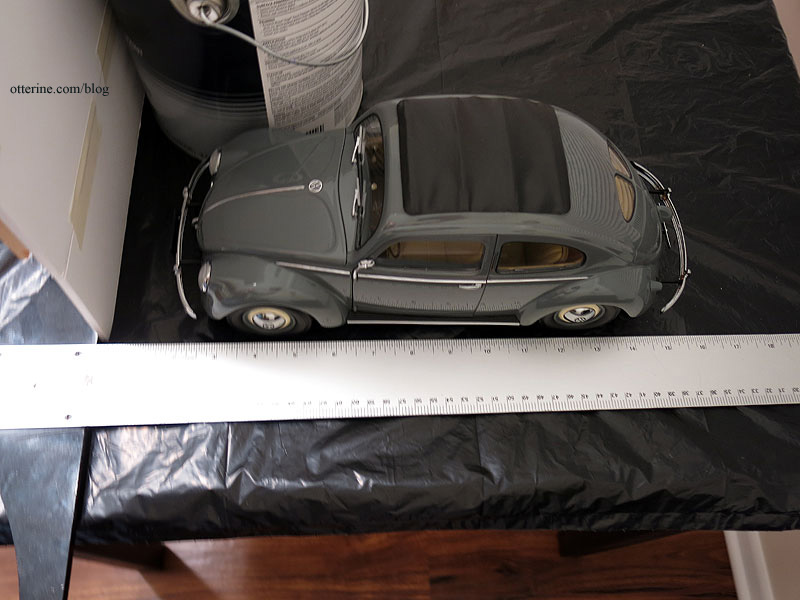
The next step was determining the depth I will need to fit the rooms and accessories I want. The garage needs to be at least 16″ deep to accommodate the Beetle comfortably, but this is the least of the issues.
The side walls are shorter than the front in the original kit as well, so I started with a piece of foam core board 30″ tall by 20″ deep.
As you can see, I didn’t bother to put in the first floor for the interior layout since the overall shape is a tall rectangle. Each room is the same as the next.
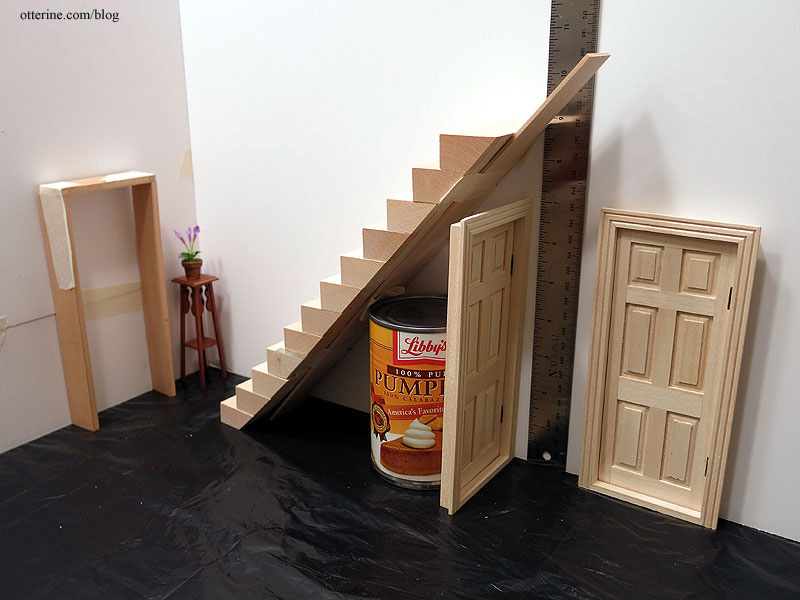
I put the pieces for the recessed entrance of the original kit in dry fit to see how much room this will take up on the inside. Only about an inch. I am going to see if I can keep the kit door, which needs assembly. I will be foregoing working windows to follow the kit construction, but I must have a working front door. There may be some bashing involved here, and I have a Houseworks door (not the one shown in the mockup pictures) as a backup.
From the front door, I want a full staircase to the second floor. I will be using the Architect’s Choice stairs purchased at the 3 Blind Mice show earlier this month. I taped most of the steps together to get a feel for the size. They are 3″ wide before any embellishment, which I am sure to add. I need enough room behind the stairs to add a door to the garage stairs and a door to the side addition. I also need enough room for a realistic landing on the second floor. The 20″ depth seems to be perfect since it will give me some breathing room during construction.
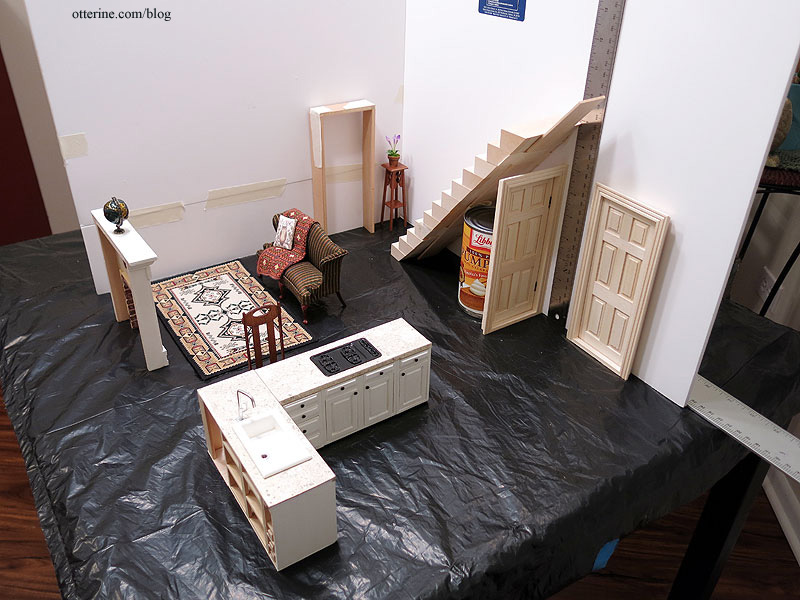
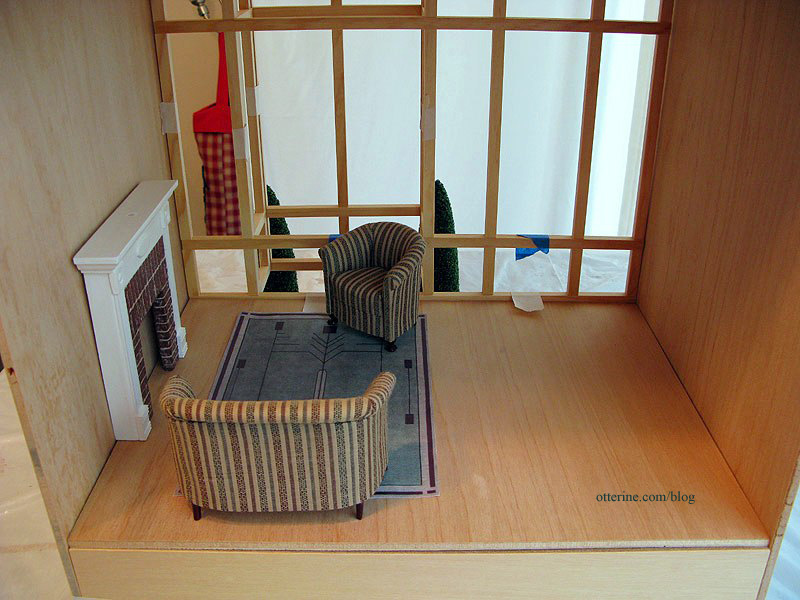
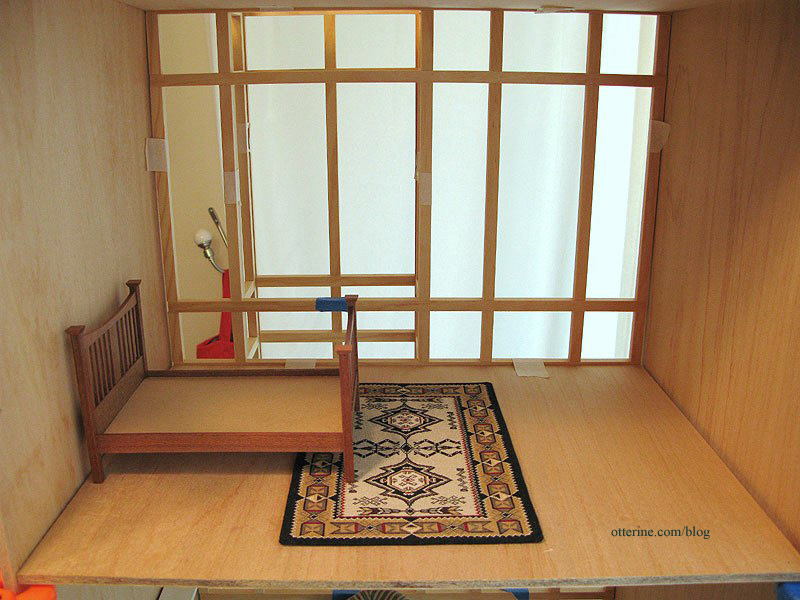
There will be a wall between the staircase and the living room. I borrowed the Newport study fireplace and a Bespaq sofa for placement. The Navajo rug will live in this room permanently, but the other pieces will be replaced.
I borrowed the Baxter Pointe Villa kitchen cabinets since they are out for the remodel of that kitchen. This won’t be the exact layout, but the kitchen can be sizeable with the added depth. I like the idea of a breakfast counter, but there might end up being enough room for a table. We shall see. I like the idea of an open concept here between the kitchen and living room, so I’ll likely add only what support is needed to keep the ceiling level.
I already know the landscape base board will be deeper than 25″, which is the maximum measurement I use for the shortest side of any build’s base. The reason for this is that I need the builds to fit through the doorways in my house. Yes, the exterior doors are wider to move the builds out if I need to, but I don’t want to be limited to where I can put my finished builds since I don’t have a ton of room in the first place.
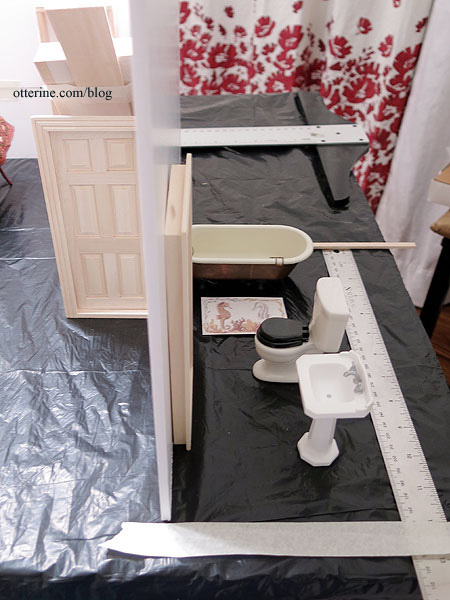
So, this meant the width of the landscape board has to be 25″ and that didn’t give me a lot to work with for the side addition. Mainly, I’m looking to add a full bath on the second floor, so I used that as my guideline. I want to make this beautiful bathroom (the warm brown tone bathroom) using the shower set I won in a giveaway by Pepper at MitchyMooMiniatures.

I borrowed the bathtub from the Heritage, the toilet from Baxter Pointe Villa and added the sink from Houseworks. The side addition will be 5 3/4″ wide by 12″ deep. Just enough for a cozy vintage inspired bath.
On the first floor, I’m thinking a washer dryer set inside a mudroom. The imagined back door will be in the open back. In the garage, there can be a work room with mini tools. And, if I’m ever going to construct a furnace and water heater, this is the build.
Categories: The Brownstone
January 27, 2014 | 0 commentsThe Brownstone…the beginning
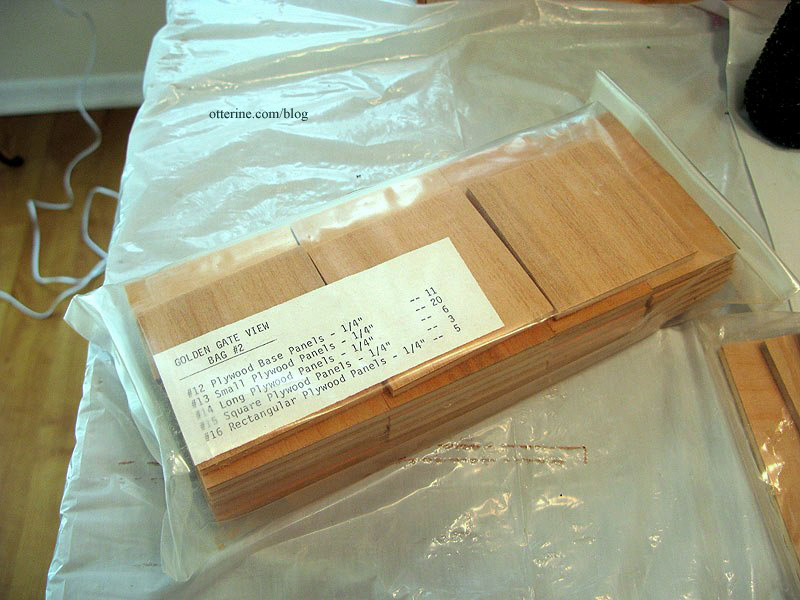
Back in January, I took some photos of the kit pieces since there was some buzz about the Golden Gate View dollhouse kit on the Greenleaf forum.
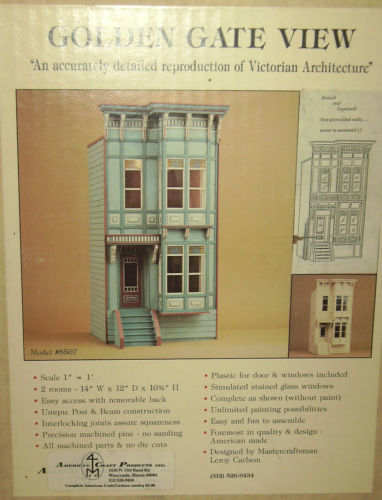
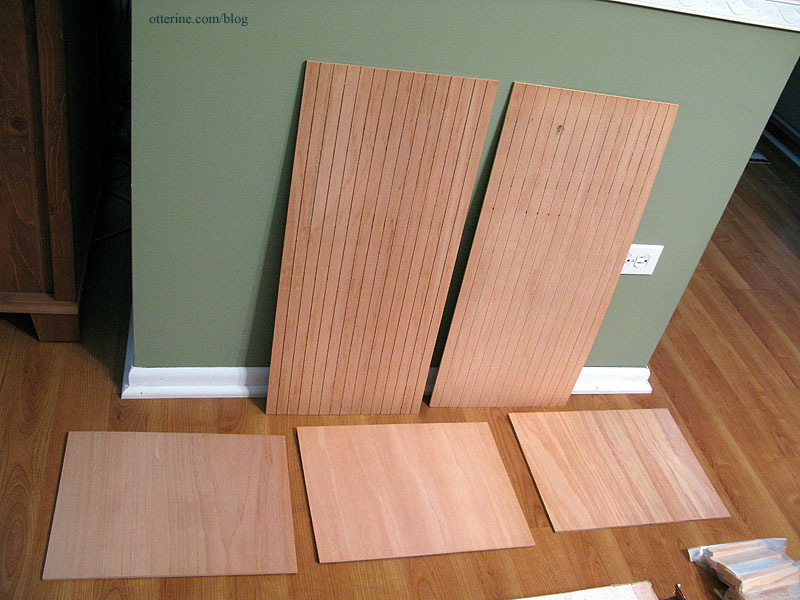
Golden Gate View kit photo I put it back in the closet, but today I took it back out to take some more detailed measurements. The front wall is made from notched trim pieces with the inserts for windows and walls assembled separately.
The side walls are detailed with vertical siding lines. As you can see, it’s a relatively straightforward kit as far as basic structure goes. It seems some Golden Gate View kits were made differently with studs in the walls, but mine is just plywood.
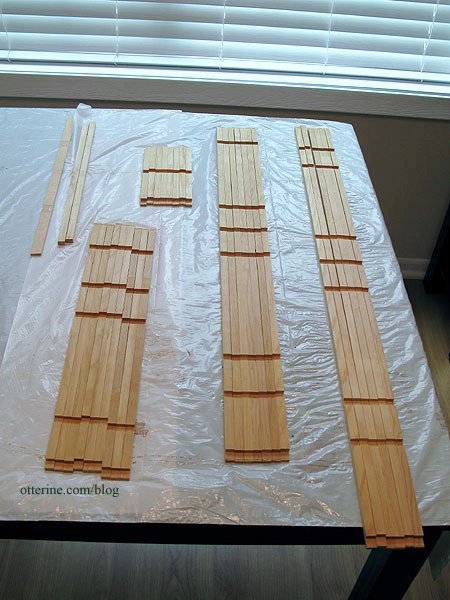
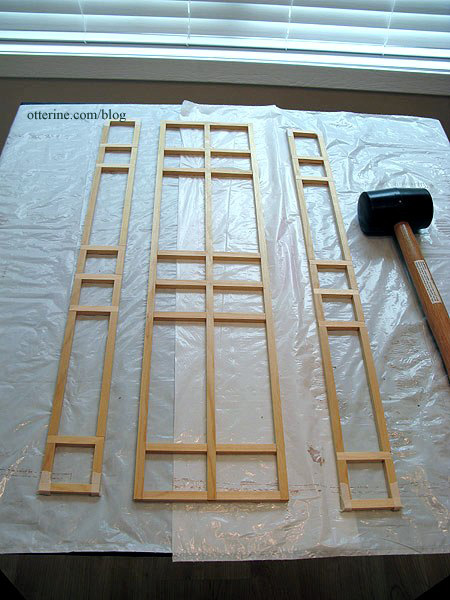
After studying the instructions, I taped together the front wall trim pieces to get a feel for the kit.
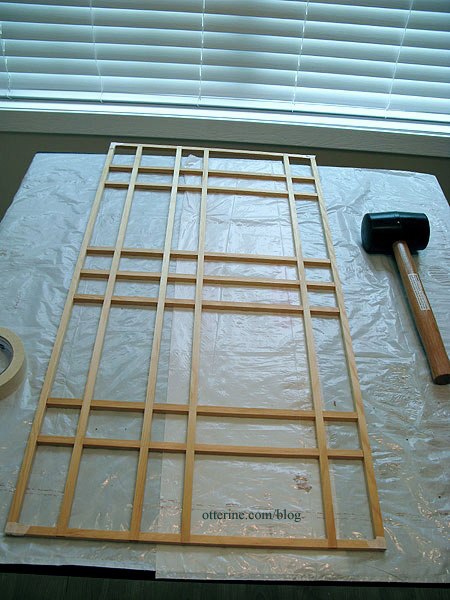
And then the bay window structure.
The blue marked pieces are to be cut away during assembly.
Also, the pieces didn’t fit the way the instructions indicated. The instructions show the side walls fitting behind the front assembly, but the floor boards don’t fit properly when you do that. In order for the kit pieces to fit, you have to have the side walls on the outside edges of the front wall. Then the floor boards fit precisely and cleanly. It throws off the design of the front, though. So, I can either cut new floor boards or mask the outer corners with trim.
The kit box has incorrect measurements in general and based on the above error. The building in my dry fit is 14″ deep from the outer plane of the front bay window to the back of the building, 15 3/8″ wide with the side walls attached to the outside of the front wall instead of behind it, 29 1/4″ tall at the highest point in front, and 26 3/8″ tall on the side walls.
There are inserts to complete the wall structure. I would think it prudent to use these as spacers when assembling the front wall and bay window to make sure it all fits precisely, but the instructions don’t have you do this. I will likely do it, though and number the pieces as I go along. The instructions also have you add these inserts later after you’ve built the structure, but I think it makes more sense to have a flat surface behind them. So, in essence, I’m pretty much tossing the instructions at this point. Haaa!
The first floor room is roughly 4 1/2″ off the ground. There is no support for it whatsoever…just glued in place on the front and side walls. I will be adding beam structure for sure. The room measures just under 15″ across, just over 10 5/8″ high and 11 1/4″ deep, not including the bay window extension.
The second floor room has the same measurements. Both nice large rooms
But, two rooms is really not going to work for a realistic brownstone home. At a minimum, I would want a foyer with full staircase, parlor with fireplace, kitchen, bedroom, and bathroom. I would love to add a powder room and/or mudroom.
Option 1 is to build a side addition toward the back to allow more room on the inside, like in this example below. You can barely see the left addition from the front, so it doesn’t ruin the lines of the facade but adds room inside.
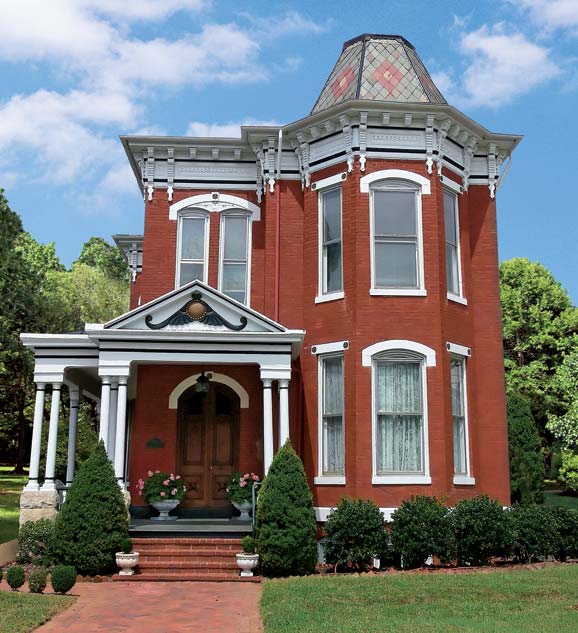
image from Old House Online Option 2 is to add a garage underneath since there is already roughly 4 inches of dead space under the first floor already and adding another 4-5 inches in height would be straightforward.
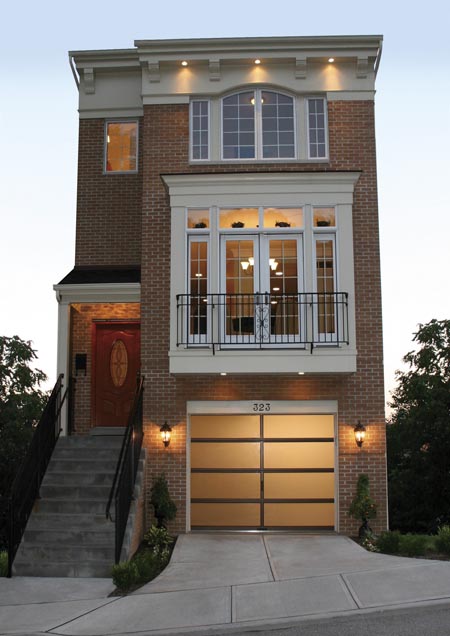
image from Clopay Option 3 is to make this a side opening dollhouse to get more depth like a real life row house. That’s where I stalled. I’m just not falling in love with the idea of a side opening house. Apparently I’m a traditionalist when it comes to dollhouses. I like the idea of the garage and need the extra space inside, so I am almost decided on adding to the width with a side extension and adding height for the garage.
I made a mockup for the garage door kit to test the fit for the 1950 Beetle in a previous post.
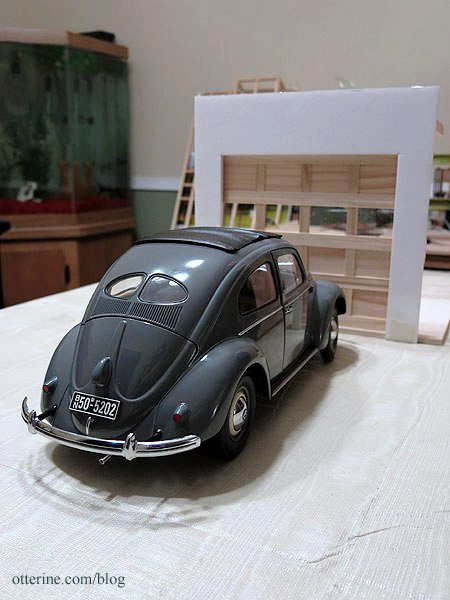
The garage facade and opening required to fit the garage door worked well under the bay window portion, but this did not take the front stairs into consideration. Now, I know I will have to make a new set of stairs since the original kit pieces will be too short with the added height to accommodate the garage, but I will keep them roughly the same width. I would have to move them over to fit the garage door, and this throws off the line of the front door.
I popped off the bay window section and moved it over. I will have to add to the right of the bay window section, mimicking the construction of the original pieces (I added some strip wood below to show that addition). Now, the garage door is centered under the bay window and there is enough room to center the stairs and front door.
I think I’m on to something here.
Categories: The Brownstone
June 8, 2013 | 0 commentsGolden Gate View
I recently stumbled across an old (albeit new in the box) kit no longer made: Golden Gate View by American Craft Products. I could not pass it up for its unusual design, its relatively compact size and the price. :D
I’m thinking a Brownstone with a two-story efficiency apartment, though I am not sure if it will be contemporary or vintage or some mix of the two.
Categories: The Brownstone
December 13, 2011 | 0 comments
NOTE: All content on otterine.com is copyrighted and may not be reproduced in part or in whole. It takes a lot of time and effort to write and photograph for my blog. Please ask permission before reproducing any of my content. (More on copyright)