

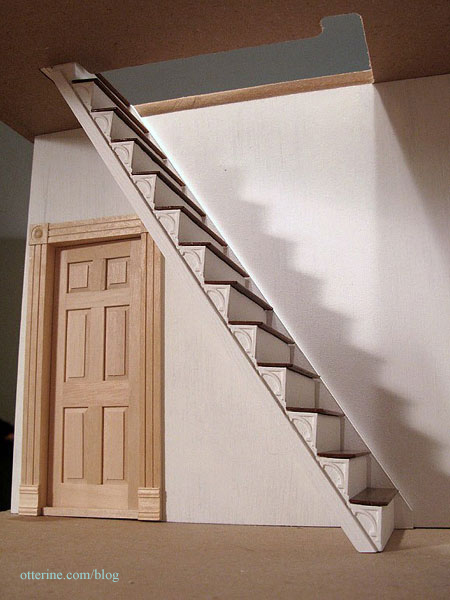
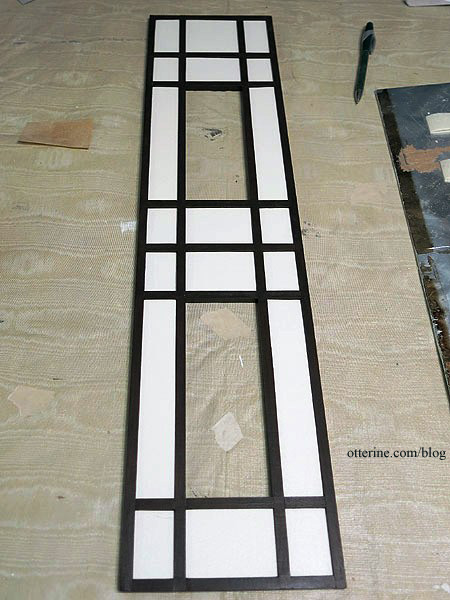
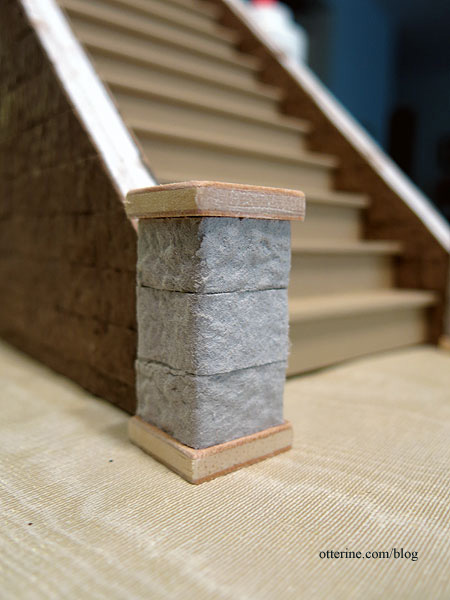
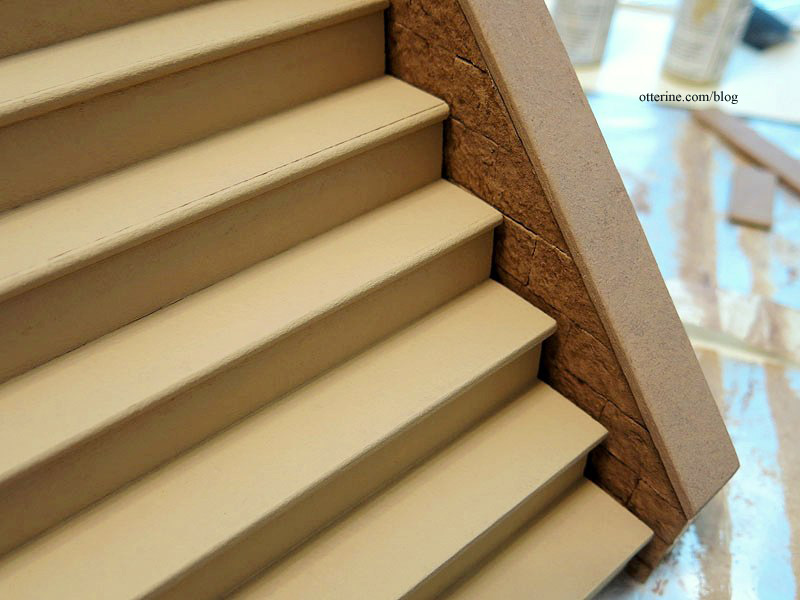
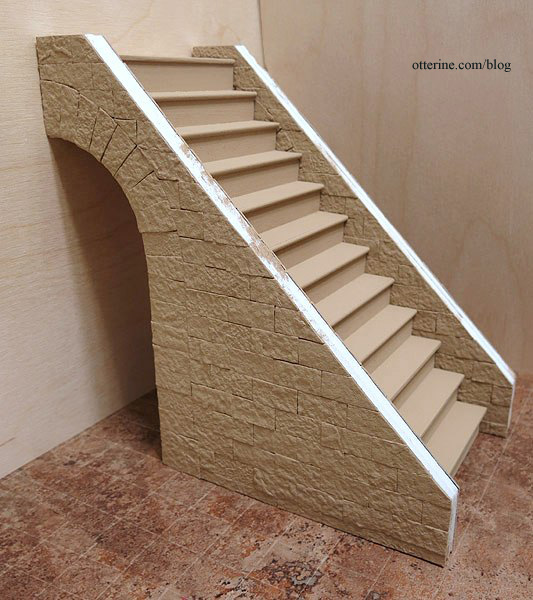
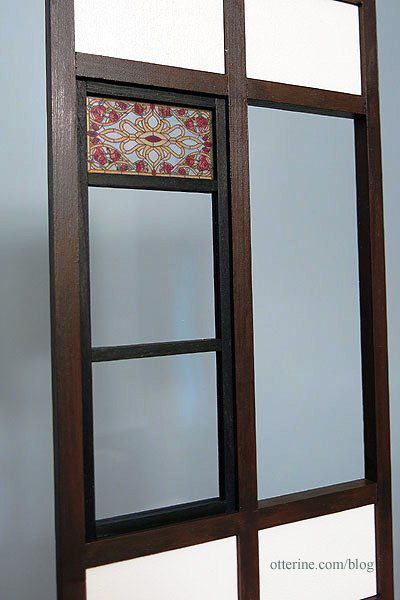
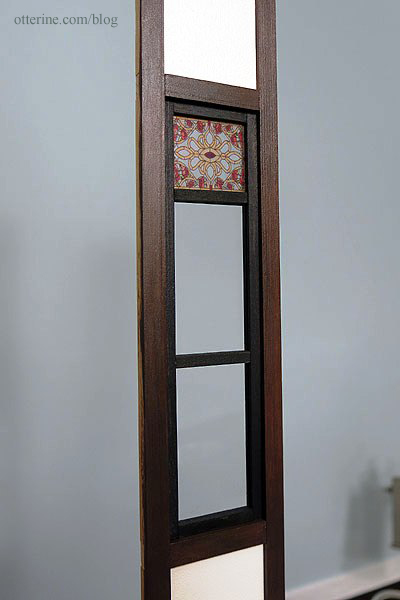
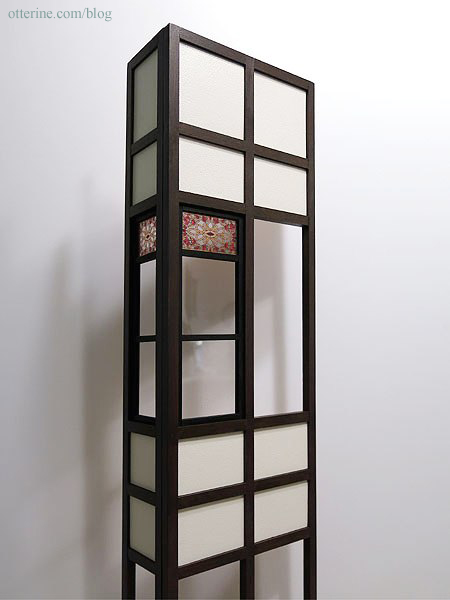
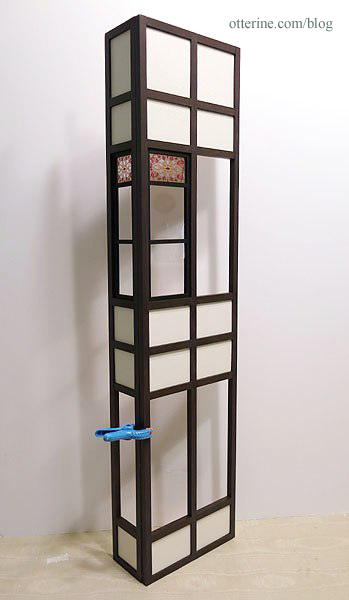
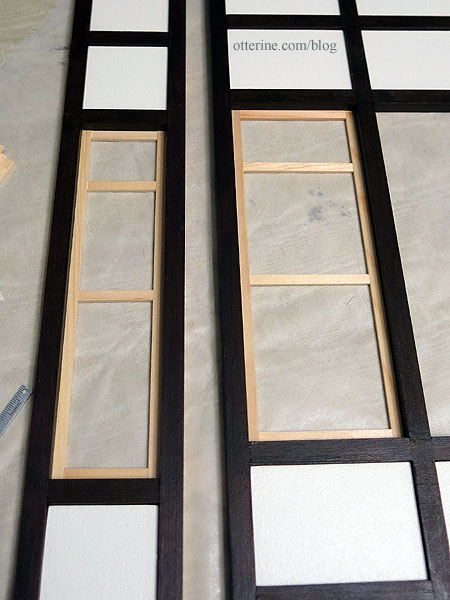
The Brownstone – main floor staircase, part 1
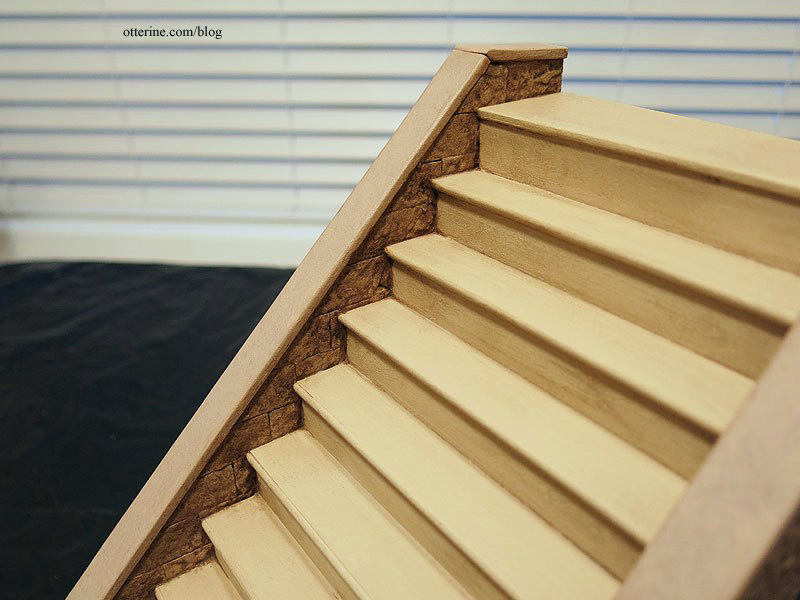
Before cutting the final holes for doorways and windows in the main floor, I worked on the staircase to make sure I didn’t need to adjust the ceiling height on the main floor. I’m making the main floor staircase from an Architect’s Choice kit purchased from All About Miniatures at the 3 Blind Mice Show.
The instructions could use a few additional drawings, but I managed to figure out what they meant. These are made for a 9 3/4″ floor to floor measurement. Since I don’t have a building to fit them into, it’s hard to visualize what that means. I think it means from the surface of the lower floor to the top surface of the upper floor. Either way, that won’t work for me since my main floor ceiling height is 10 1/2″ from the floor surface to the ceiling surface.
I have two of these kits, and the lower level will have a shorter ceiling height. So, I took an extra step from the other kit and added it to the main floor staircase. I assembled it following the kit instructions otherwise. I will still need to make adjustments once the structure is built, but my existing plans don’t need to be altered.
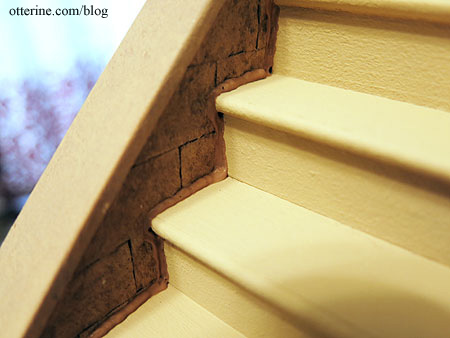
I love the look of white stairs with stained treads, so that is the look I’m going with here. I did this style in the Newport.
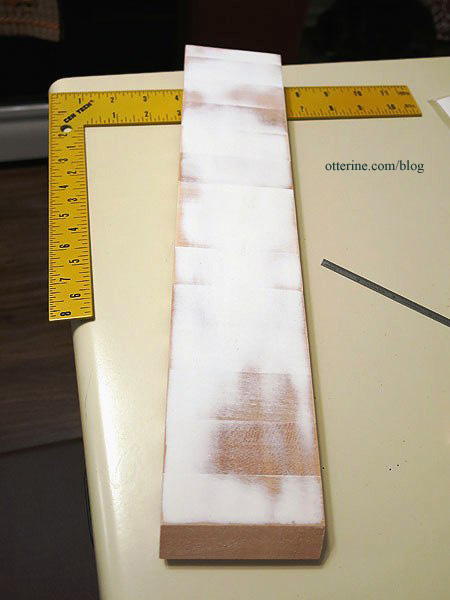
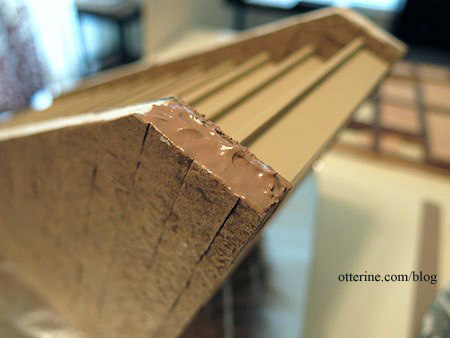
I spackled the back of the assembly and sanded it smooth.
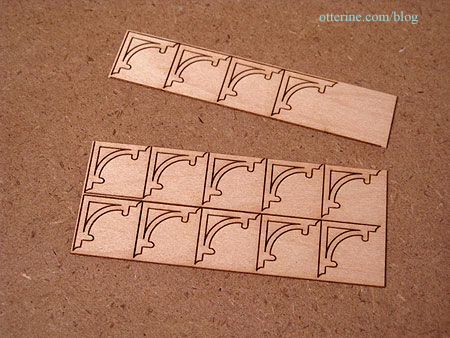
I added Laser Tech corners on 12 of the steps, just as I had done for the Newport.
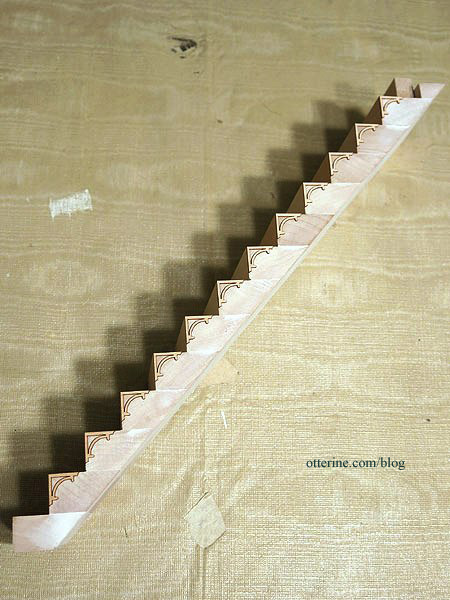
These are simple in design but add just enough interest.
I painted the assembly white. Once dry, I’ll sand it smooth and put on a final coat of paint.
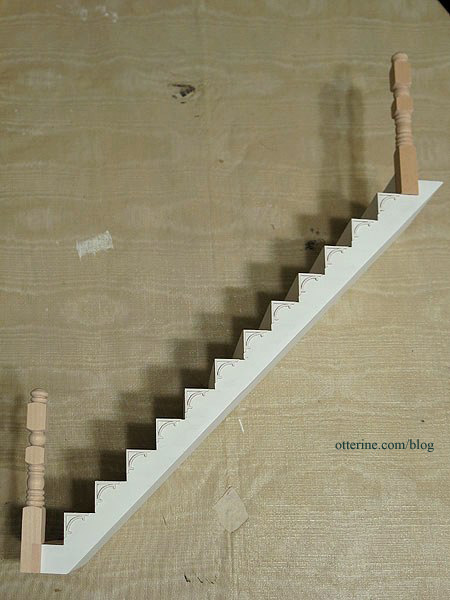
The newel posts really are spectacular in this kit. :]
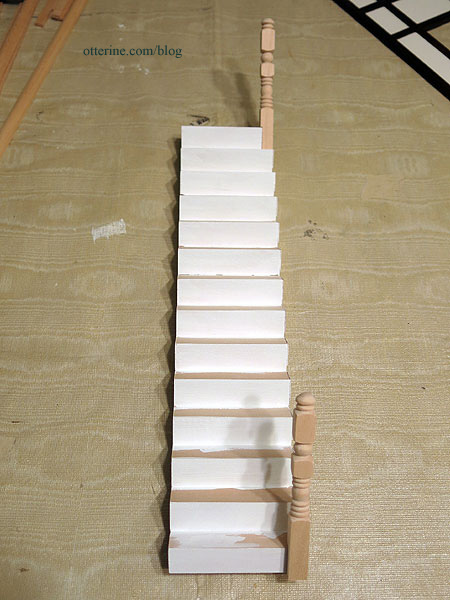
Next up, shaping the treads and staining the accent pieces.
Categories: The Brownstone
March 8, 2014 | 0 commentsThe Brownstone – trying out the final finishes
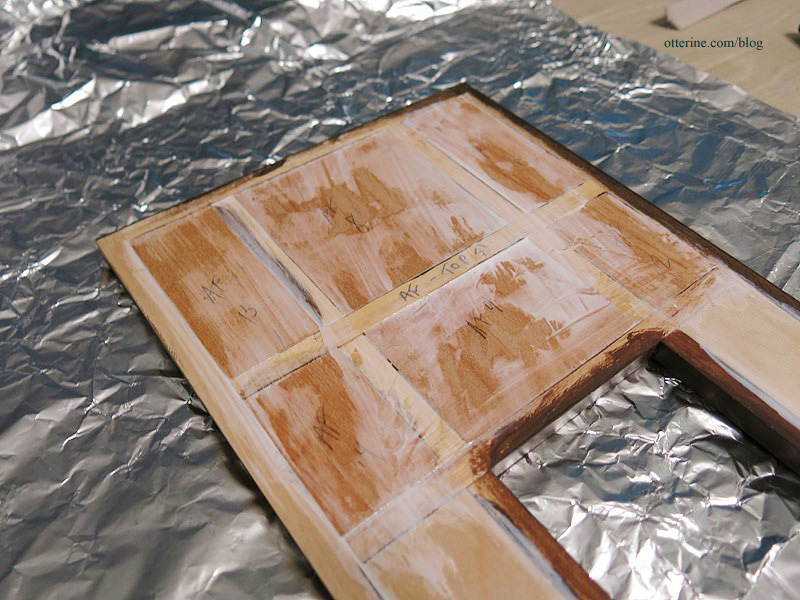
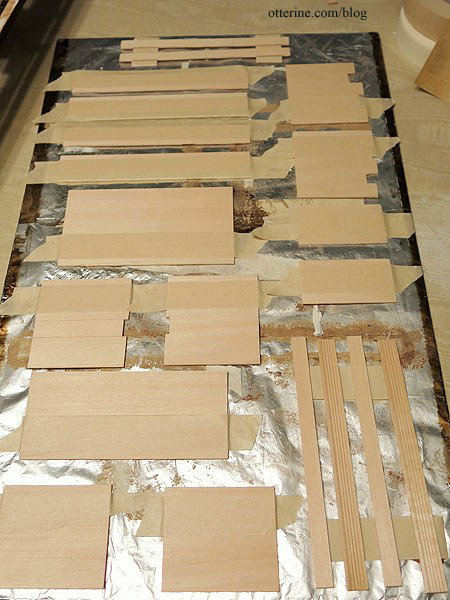
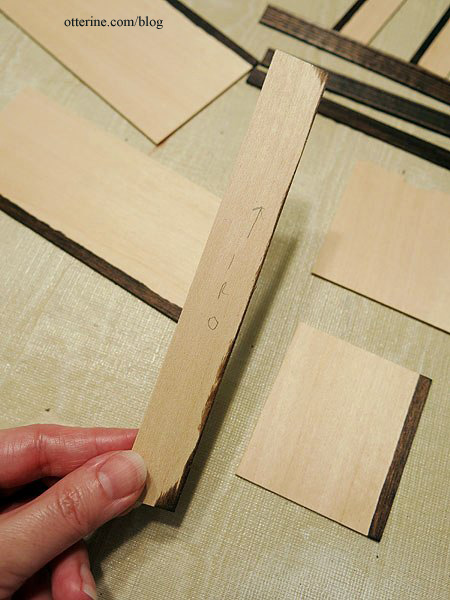
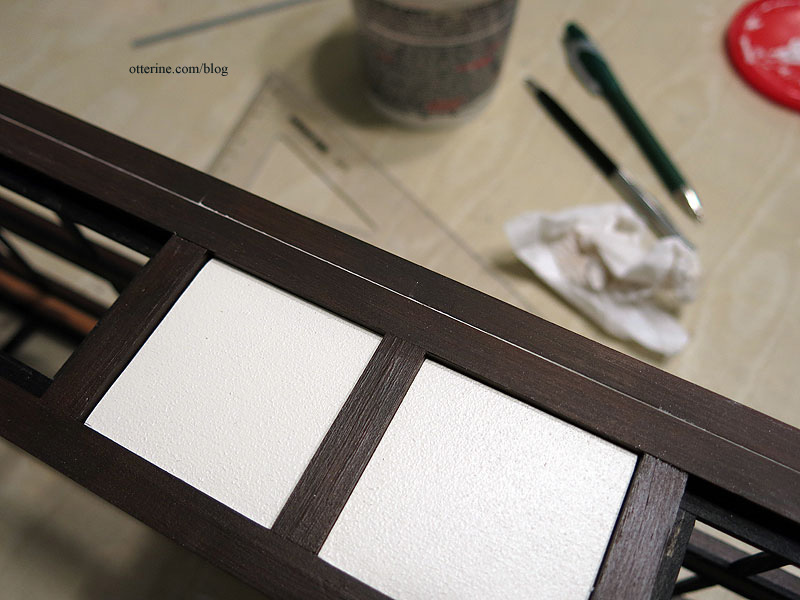
Today, I decided to proceed with the final finishes on the front wall of the side addition. I finished cutting the filler pieces and taped them to a painting board after numbering them on the back to help with reassembly.
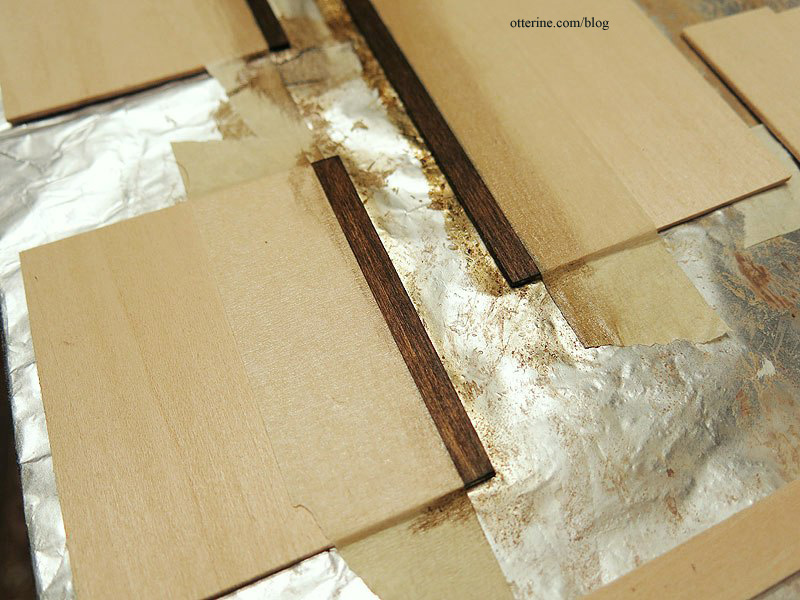
I painted the timber grid with a mix of Staining Medium and Bittersweet Chocolate by Americana. The previous base coat of Coffee Bean by Folk Art underneath created a subtle variegated color.
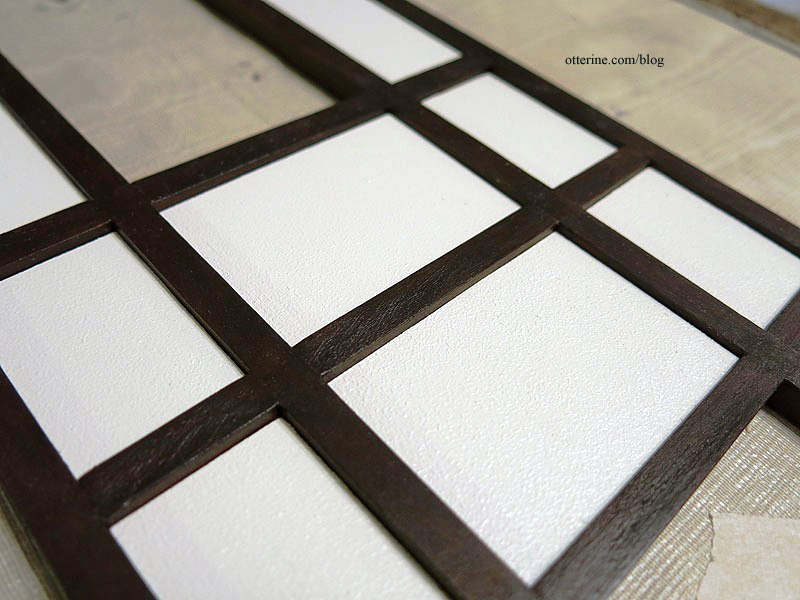
I finished the filler pieces in the same manner as the front door recess: one coat of matte gel medium and three coats of White Birch satin paint by Americana. I finished the timber grid with Delta Ceramcoat Satin Varnish. Once the pieces were dry, I pushed the filler pieces into the grid from the back. Most were so tight that no glue was needed. A few were looser.
I flipped the assembly over and spread glue into the joins.
I love the colors and textures. :D
The surface assembly will stay separate until I get the windows built, but I placed it on the backer board to fit the top row of egg carton stones. The side pieces will be done later after the walls are joined, but it’s easier to do as much as possible while the boards can be placed flat on the work table.
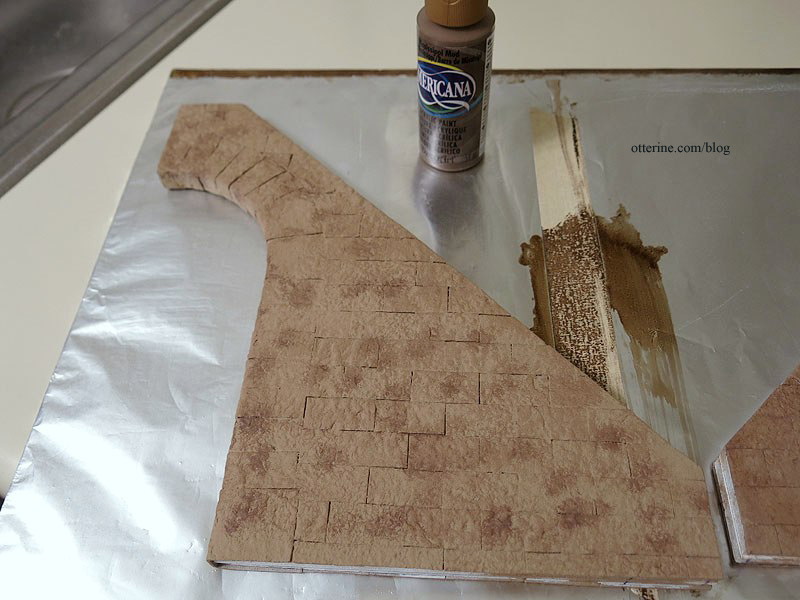
The base coat is Fawn by Americana. The stones will be deeper in color, like the front steps, but I will do the final washes all at once so that the color is consistent around the base of the entire building. So far, it’s turning out as I had hoped.
Categories: The Brownstone
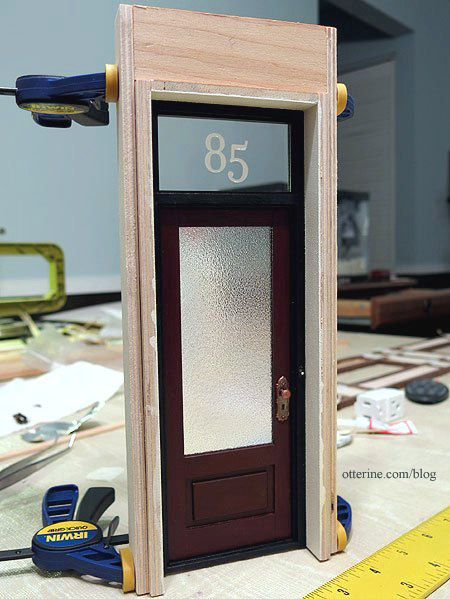
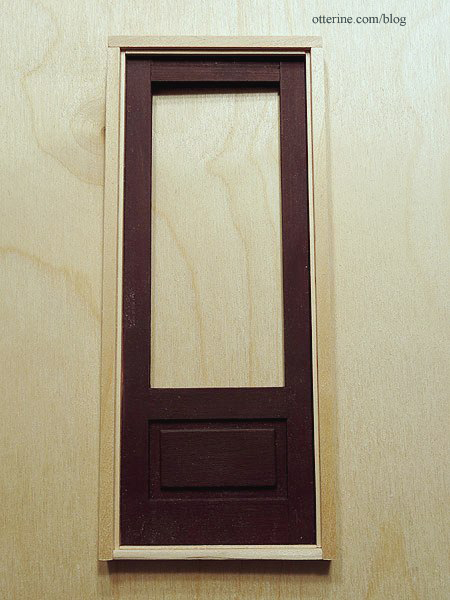
March 2, 2014 | 0 commentsThe Brownstone – front door, part 4
Completed work on the front door. I cut two new sides from 1/4″ plywood to fit the kit top piece to form the recess. This mimics the kit construction with taller side boards.

I dabbed on matte gel medium using a foam brush onto the exterior surfaces of the recess after masking the gluing surfaces. I set these aside to dry.

Next up was addressing the interior trim. I used door and window casing that coordinates with the 5-panel doors I will use throughout. The trim will surround both the door and the transom window. I held it in place with mini hold wax for measuring purposes.

With the previously textured pieces now dry, I added three coats of White Birch satin paint by Americana. This will be one of the main exterior house colors. I again dabbed the paint on with a foam brush. This texture has the appearance of fine plaster without the added weight, thickness or mess of stucco.

The doorknobs are bronze, which I think works rather well with the color scheme. I painted a metal doorbell from my stash for the door frame.

I like to go that extra mile and drill holes for the lock mechanism. Just some dabs of black and bronze paint, and it gives the illusion of a lock plate at first glance.

With the paint dry on the recess pieces, I glued them to the door frame.

I used the new boards to mark the cut opening on the front backer board.

The height of my first floor ceiling will be 10 1/2″ so I cut another two side boards from 1/4″ plywood measuring 10 1/2″ long and glued them to the door frame. I also cut two boards to fill in the dead space above the front door recess.

Looks like a fine recessed door to me. :D
Categories: The Brownstone
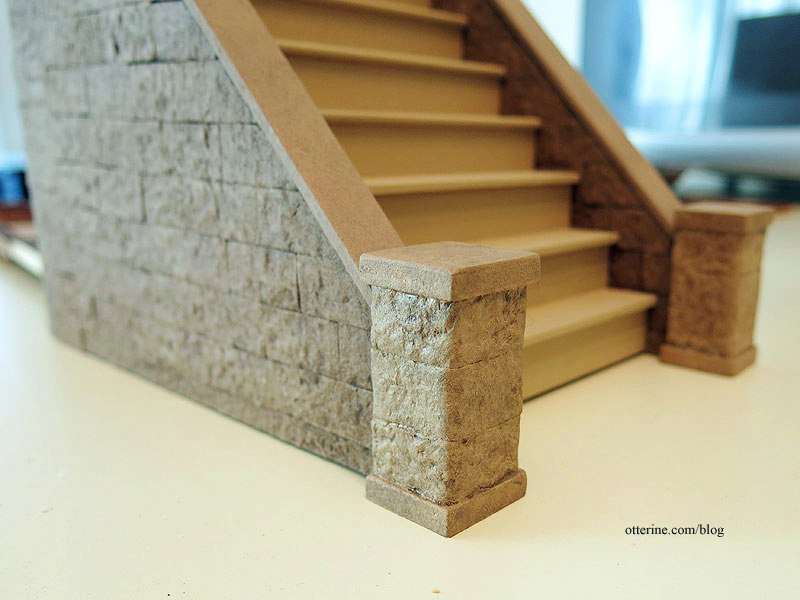
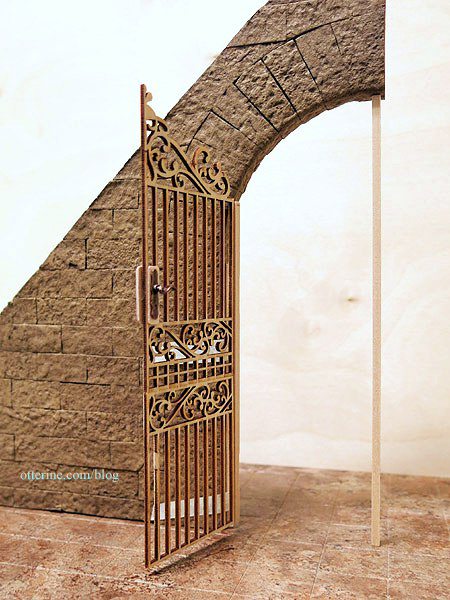
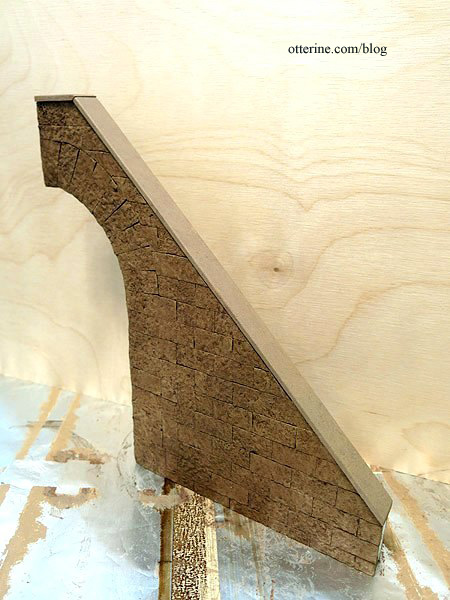
February 25, 2014 | 0 commentsThe Brownstone – entrance and front steps, part 9
Continuing work on the entrance and front steps. With the gate built and set aside for spray-painting weather, I was able to glue the side walls to the stairs. I used Weldbond and super glue gel, then a large clamp and some masking tape to hold the piece together while the glue dried. The minor gaps will be addressed later.
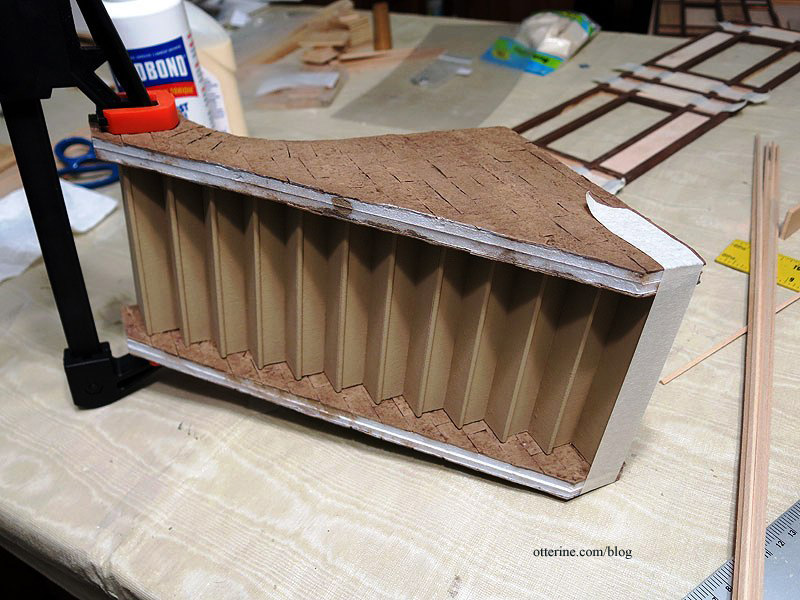
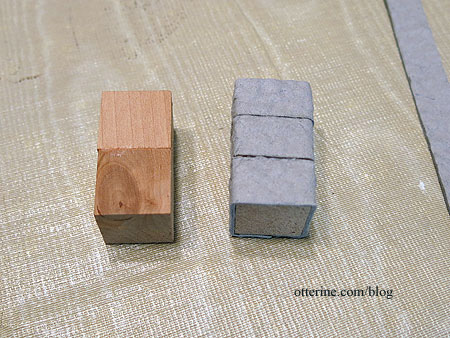
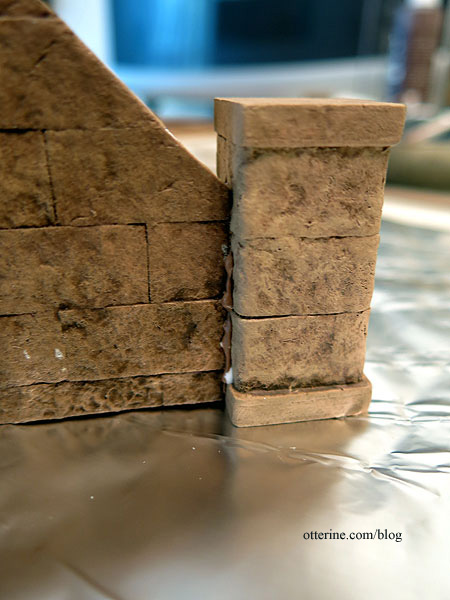
I glued two 3/4″ wood blocks together to make each pedestal to finish the front edges of the stone walls, adding long strips of 1/2″ wide egg carton material around them.
I cut plywood bases and toppers.
I painted the new pieces to match the previous finishes.
Since the top surfaces of the side walls aren’t perfectly uniform, there would be gaps if I glued the toppers on as is.
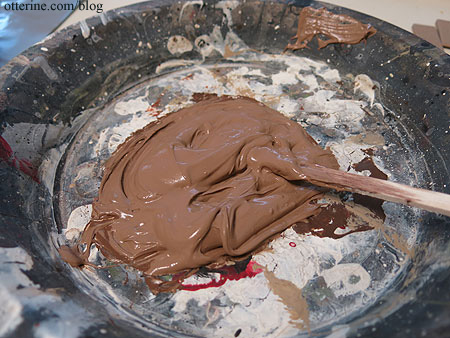
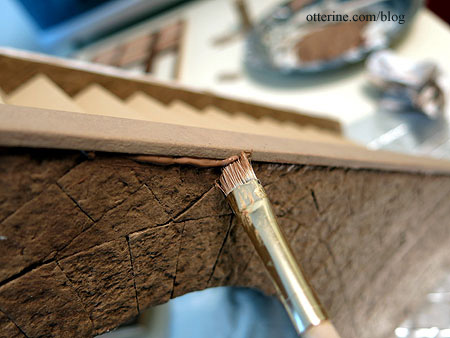
I made a mixture of spackling, Weldbond glue and brown paint. Yum, pudding! :D
I slathered this onto the side walls and then pressed the pedestals in place.
I did the same for the toppers and wiped away any excess with a brush followed by a damp cloth.
I put some of the mixture into my glue syringe.
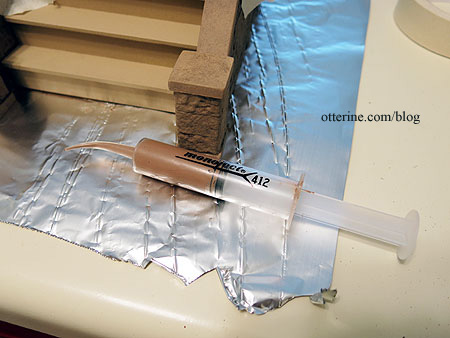
There were gaps along the sides of the steps, so I squeezed the mixture into the gaps.
I then smoothed the material and added final paint washes to finish the steps.
I’m still thinking about the railing, so I’ll leave this as is for now.
I like the way the plain sealed wood looks on the back, so it will stay as is.
Categories: The Brownstone
February 22, 2014 | 0 commentsThe Brownstone – front door, part 3
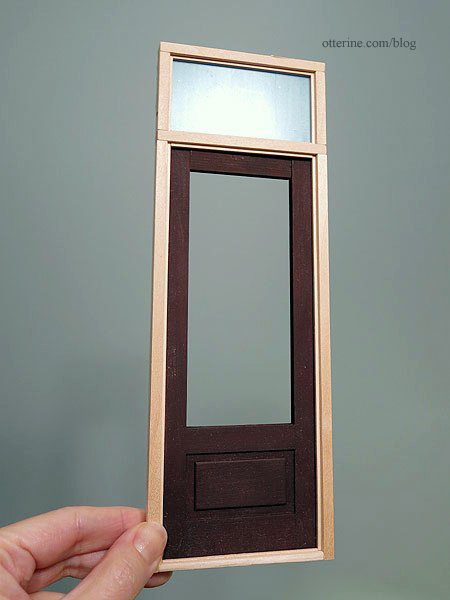
Continuing work on the front door. I painted the door surround black followed with a satin varnish. I thought the original Black Plum by Americana was too brown, so I covered the door with two thin coats of Black Cherry by Folk Art. The Black Cherry would have been too bright on its own, so the two layers of color worked out well. I finished the door with satin varnish as well.
I added textured glass using two layers of rippled water sheet from HBS in place of the acrylic insert included with the kit. This allows light to come in while adding some privacy. The top window is clear acrylic.
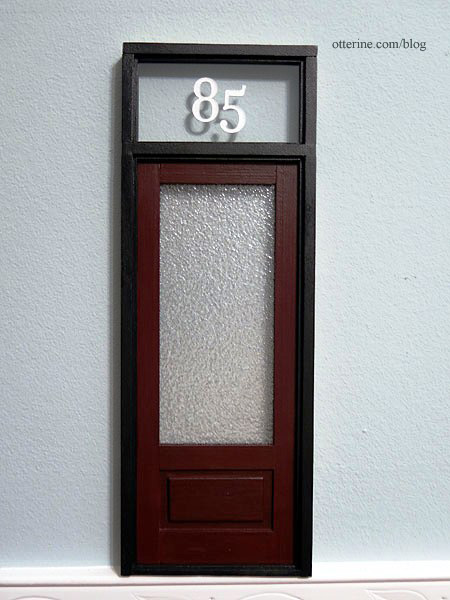
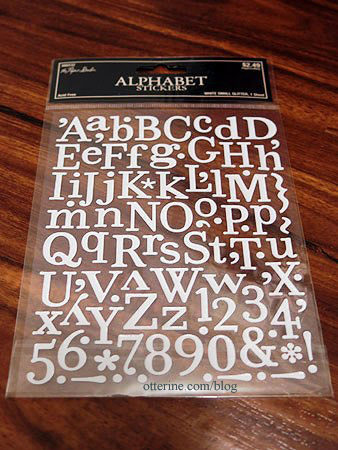
I added white numbers for the house address using stickers from Hobby Lobby purchased for less than $2. :]
They are fairly large numbers at 3/4″, but real life 9″ house numbers aren’t unusual. I decided to limit the number to two stickers so I wouldn’t overwhelm the window. Instead of trying to eyeball the placement, I printed out a similar font size as a guide.
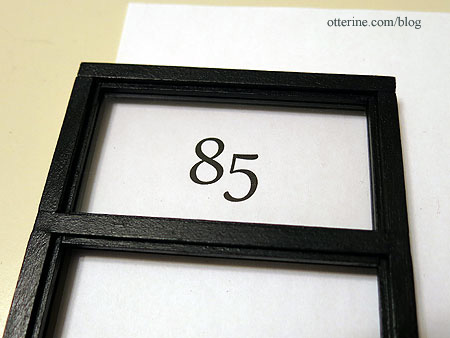
Why 85? I was trying to think of some historical figure to serve an inspiration, and Edgar Allen Poe popped into my head. I found this article on one of his residences at 85 West Third Street in Greenwich Village, so 85 it was! :D
Categories: The Brownstone
February 21, 2014 | 0 commentsThe Brownstone – security gate, part 1
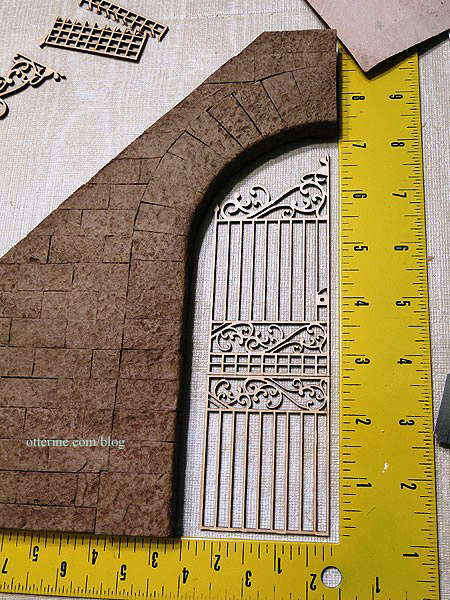
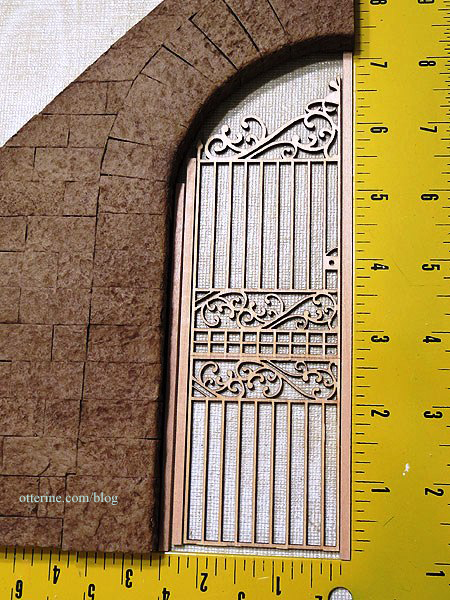
Before I could put the front steps together, I needed to address security for the lower level entrance. Wrought iron gates seem to be the norm, but my metalworking in miniature skill set isn’t quite there yet. Maybe someday. I started with a gate that Keli sent me a long time ago.
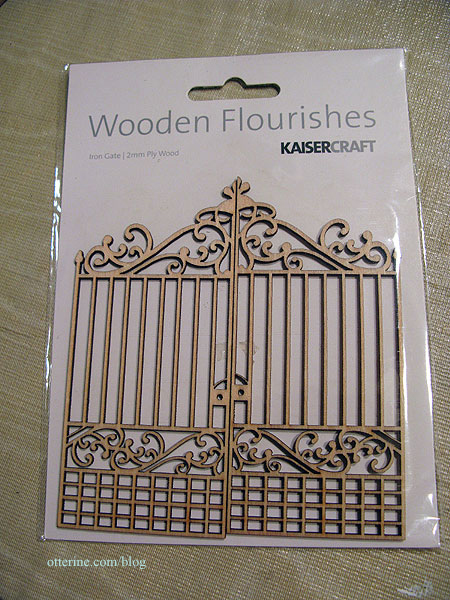
Using a carpenter’s square as a guide for the wall and ground, I set one of the gate pieces so there was very little space left uncovered at the top. I carefully removed bits from the other gate to create a complete iron door. I glued the pieces together using wood glue.
Now, to get it to function. I cut three lengths of 1/8″ x 1/8″ strip wood: two on the left and one on the right.
I installed hinges between the two left posts. I carved recesses for the hinges, drilled pilot holes with a mini drill, added a thin layer of super glue gel to help secure the hinges and then pushed the tiny nails into the pilot holes.
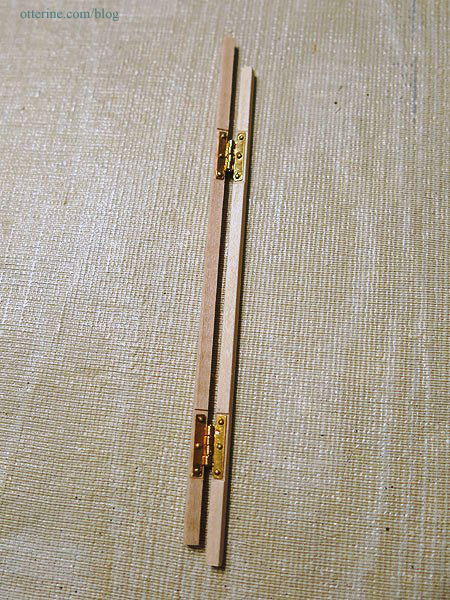
Once I had the hinges functioning smoothly, I glued the gate to the right hand post. I covered the existing lock detail with wood veneer to mimic a lock box. The back piece is flush with the gate, but the front piece hangs over a little to catch the adjacent post.
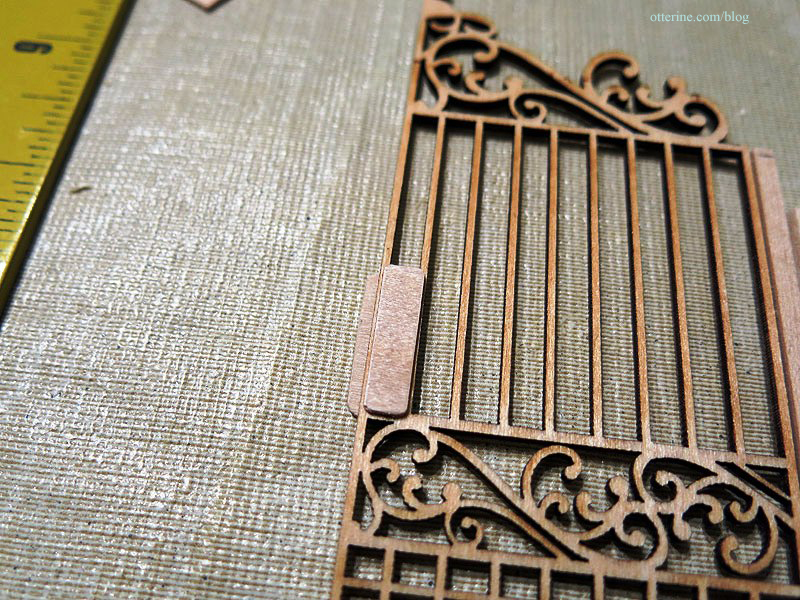
I added a pair of French door handles from Mary’s Miniatures.
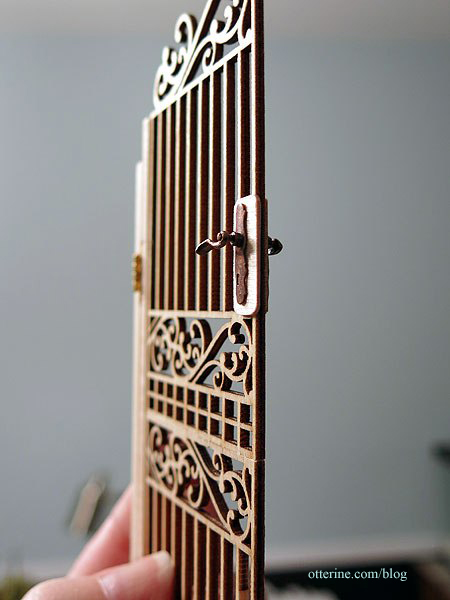
Check the fit. Looking good! :D
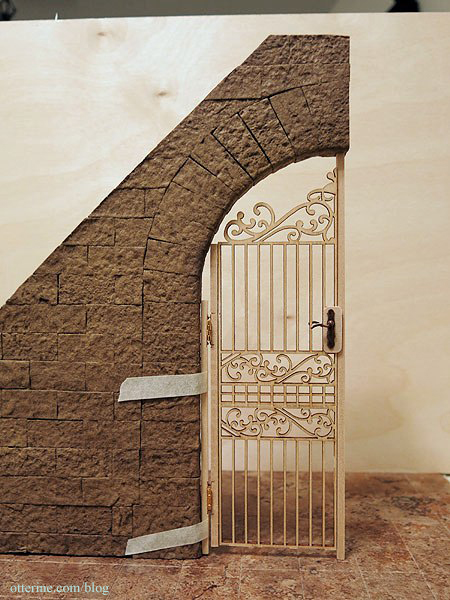
It’s 39° outside…let’s go spray paint! :D Okay, maybe not…it’s also dark outside. I don’t need to have this finished and installed to move forward. I just needed to figure out the basic fit.
Categories: The Brownstone
February 18, 2014 | 0 commentsThe Brownstone – entrance and front steps, part 8
Continuing work on the entrance and front steps. I cut two pieces of balsa to finish each of the tops. I would have used basswood, but I didn’t have any 1/8″ thick on hand and this is the hardest sheet of balsa I’ve ever seen. You can’t bruise it with your fingernail at all. Very dense fibers on this one.

I sanded the edges and adjusted the fit before coating the pieces with spackling to remove any hint of grain.

I sanded the pieces smooth.
I then painted them to look like stained concrete. :D
After a light sanding of the base coat of Fawn by Americana, I applied a mixture of Fawn, Desert Tan and Staining Medium to the stairs. The Staining Medium made the paint more of a glaze, so there is a subtle variation of color that is hard to see in photographs. I will add more aging once it is all glued together.
But, I have one more thing to address first. Stay tuned.
Categories: The Brownstone
February 16, 2014 | 0 commentsThe Brownstone – front door, part 2
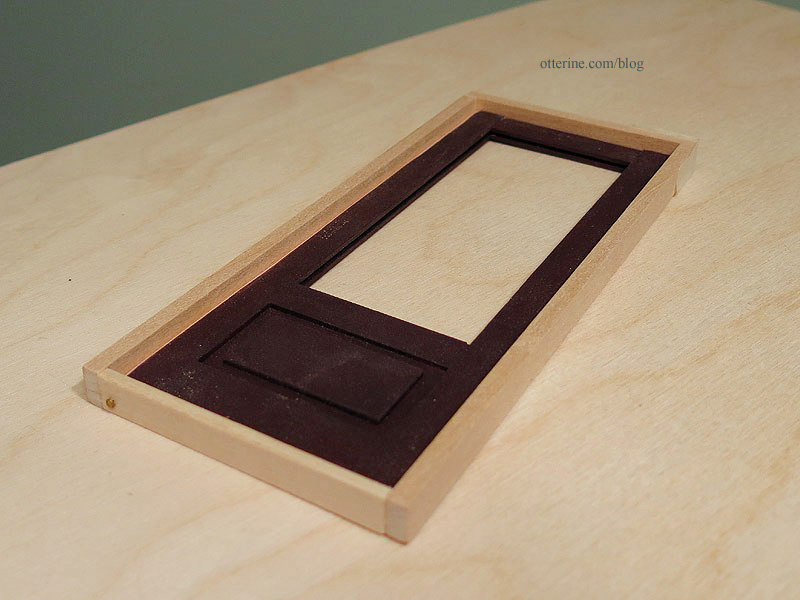
Continuing work on the front door. Now that the frame has been constructed, it’s time to add the 1/16″ x 1/16″ trim to keep drafts out. This also serves as the door stop to keep the door from swinging freely in and out. No more drafty door!
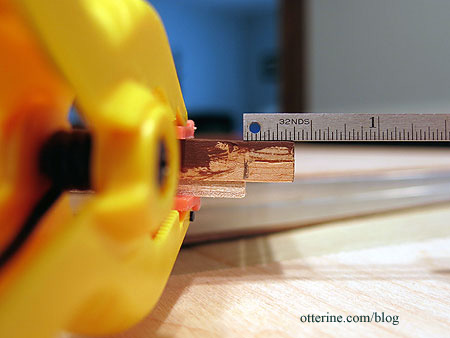
The threshold trim is 1/32″ x 1/16″ for added realism in proportion.
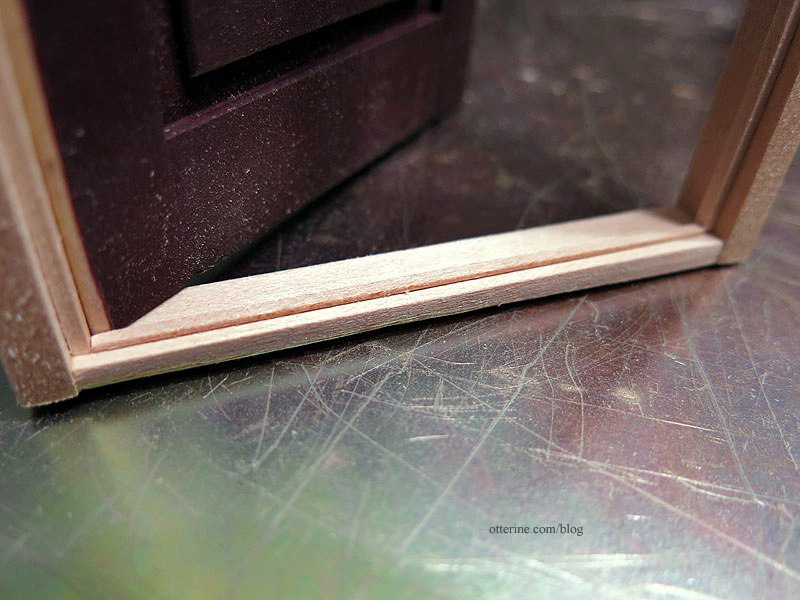
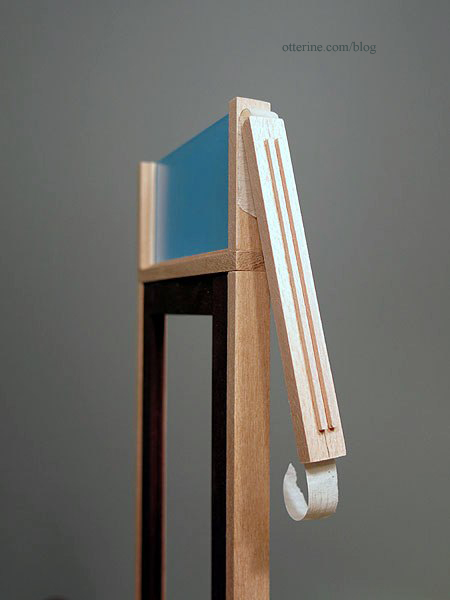
Next up was the transom window. I used more 3/16″ x 3/8″ trim to make the sides and top. I glued only the sides in place. I made a channel from the same trim used on the door frame.

This will hold the acrylic window in place. Here you can see I’m using the acrylic sheet during the gluing process to ensure a secure fit.
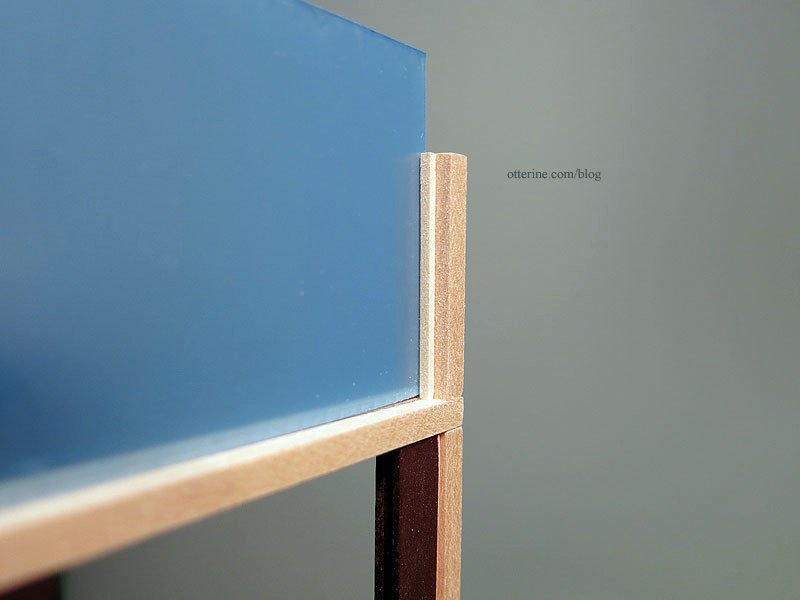
I taped the top to the sides and fashioned the remaining channel. The top piece will remain removable until I get the whole thing painted.
Ok…time to do some painting and staining before I can move forward. :D
Categories: The Brownstone
February 13, 2014 | 0 commentsThe Brownstone – entrance and front steps, part 7
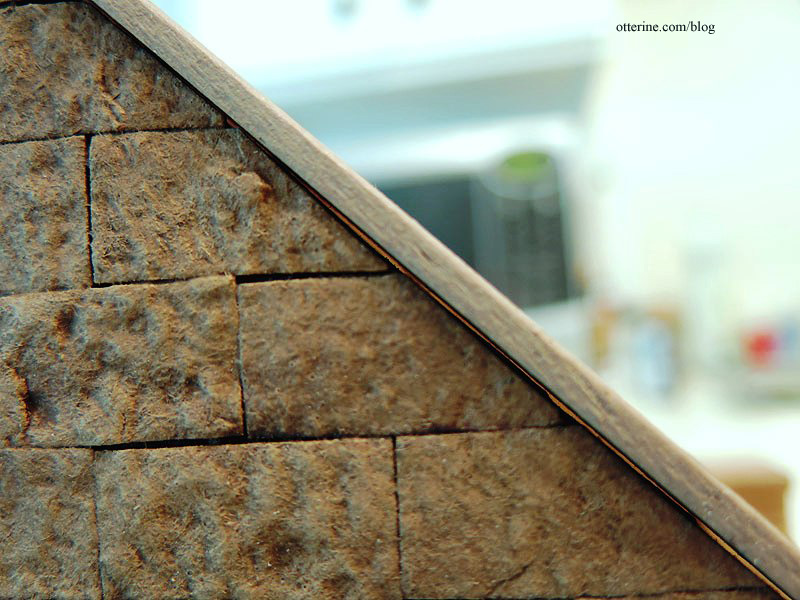
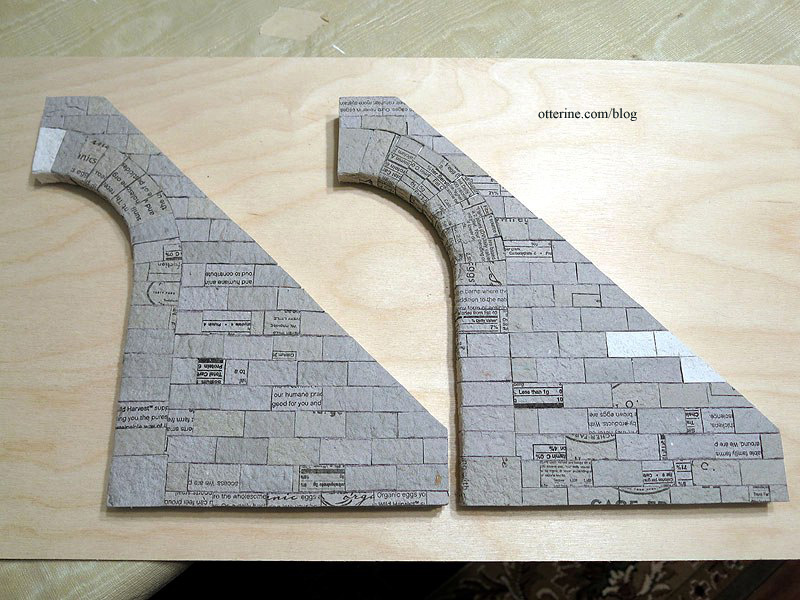
Continuing work on the entrance and front steps. My second arch turned out better, so I altered the first one. My second wall also lined up better, so the two don’t match. I’m not going to redo them since you won’t see them side by side…well…except here. :D
I painted the stone with a base coat of Fawn by Americana.
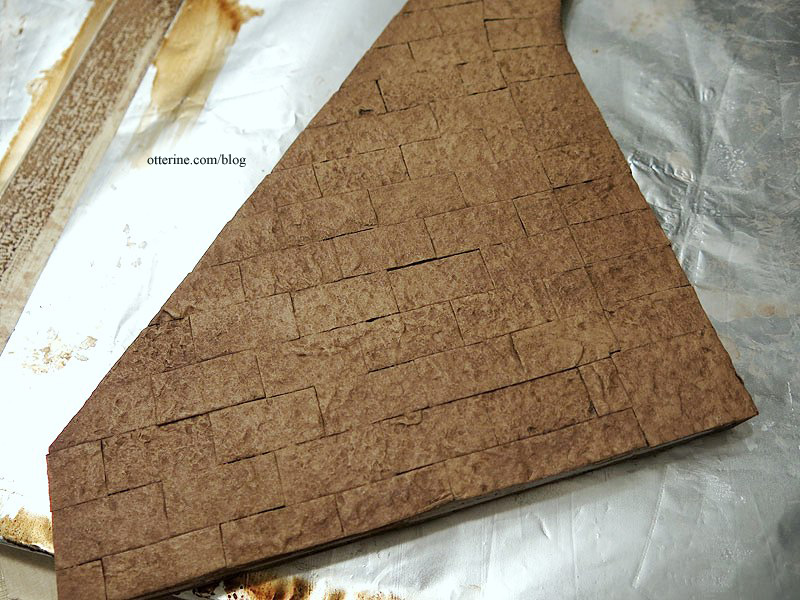
After the base coat of Fawn by Americana had dried, it was time to start adding color washes and glazes to add some dimension. I mixed Mississippi Mud with Staining Medium, both by Americana, and dotted the color at random. I wiped it off immediately.
I added a number of paint washes to get a deeper color variation. It ended up a lovely warm color. Now the texture and outlines show up well.
Categories: The Brownstone
February 12, 2014 | 0 commentsThe Brownstone – front door, part 1
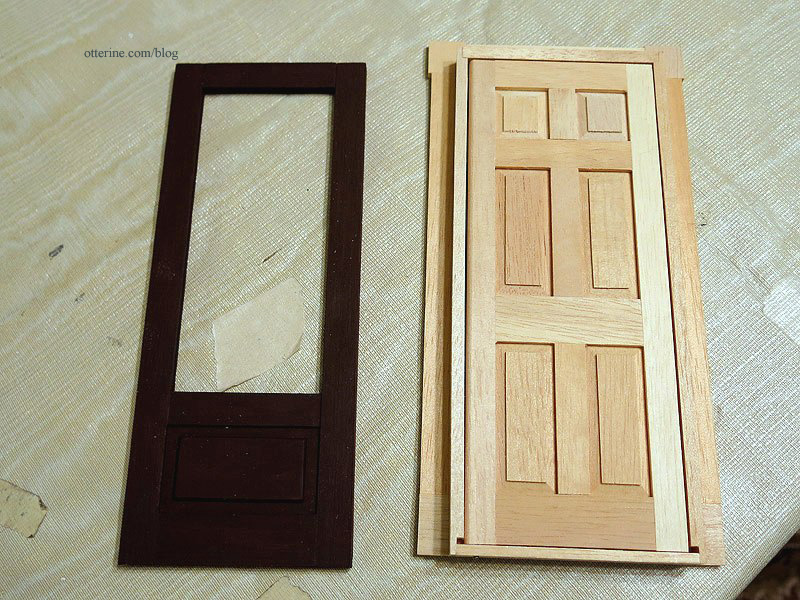
I’m keeping the original kit door, but the instructions have you glue the door in place whereas I want a working door. Houseworks doors are a different size than the kit door, so I couldn’t use an existing frame on the kit door.
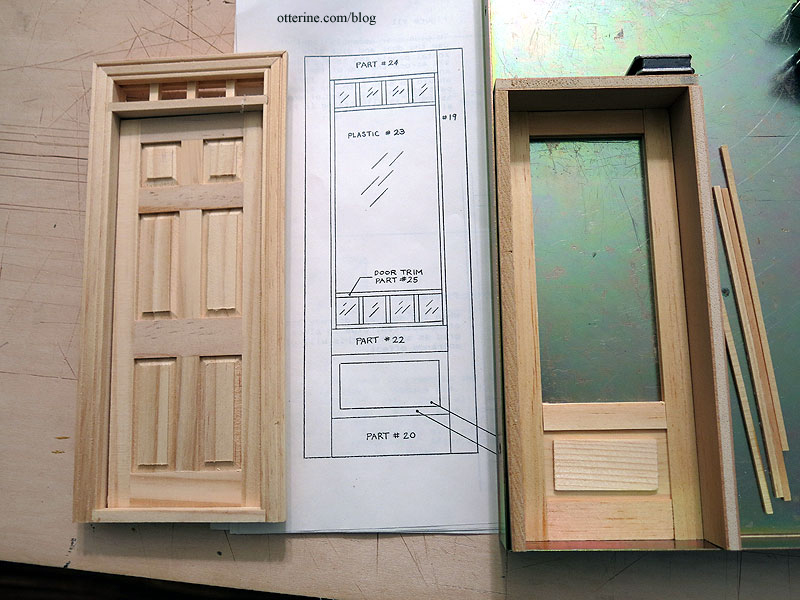
The kit door has been assembled without the glass insert and pane detail for now. The kit door had only one lower rectangle detail, so I cut another for the other side.
To make the frame, I used a Houseworks door for reference. Unlike the Houseworks door, though, I won’t have exterior and interior trim. Instead, the door will be built into the recessed entry and have trim only on the interior. The door has one coat of Black Plum by Americana. It’s more brown than I wanted, so I’ll top it with another color.
Like the Houseworks door, I curved one edge of the door using a metal file.
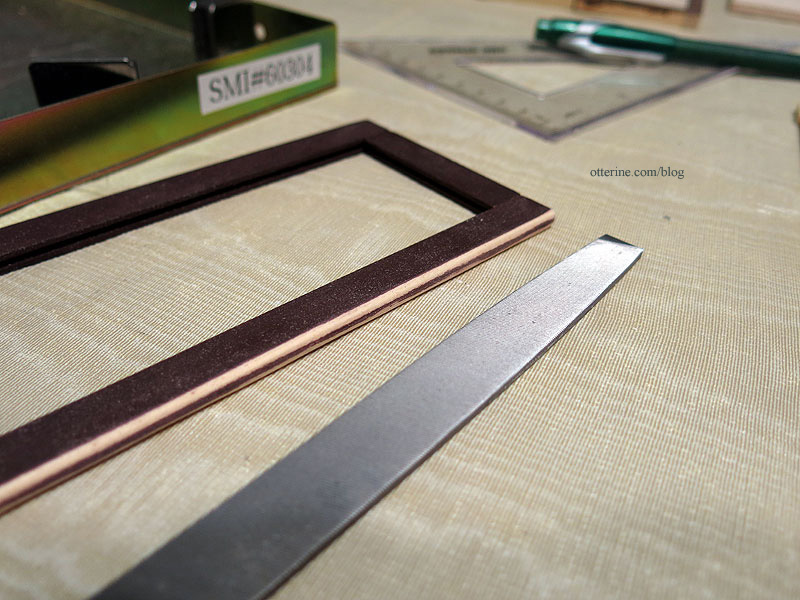
I used 3/16″ x 3/8″ basswood for the top and sides. The bottom of the frame is made from 1/8″ x 3/8″ basswood. The frame is built close around the door while allowing it to move freely.
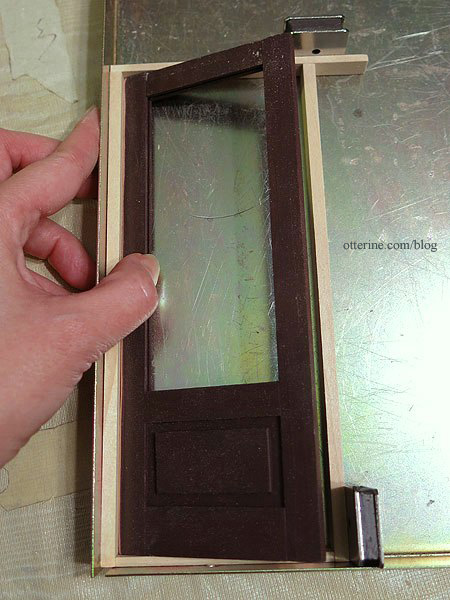
After making the pocket door for the Heritage, I had an extra set of hinge pins. I drilled holes in the kit door and finished fitting the frame with those in place. It works!
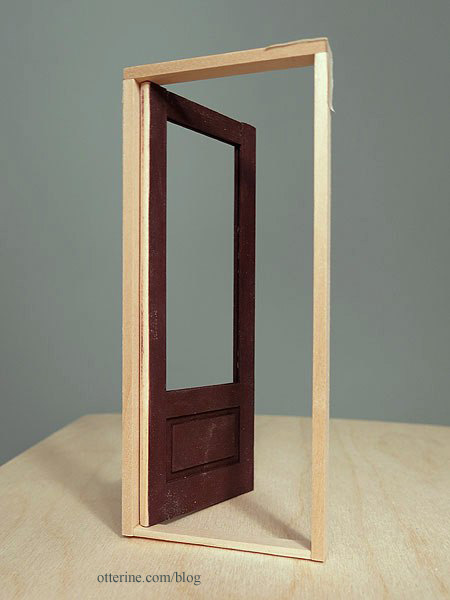
It sits flush with the back of the frame as planned; this is the interior side.
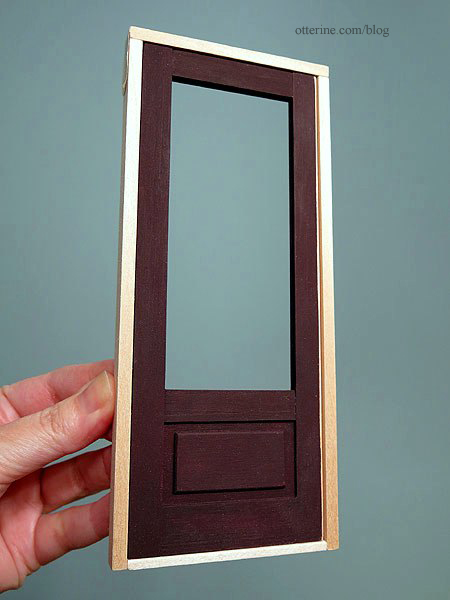
There’s enough room in front of the door for added trim to keep drafts out…that’s next. :D
Categories: The Brownstone
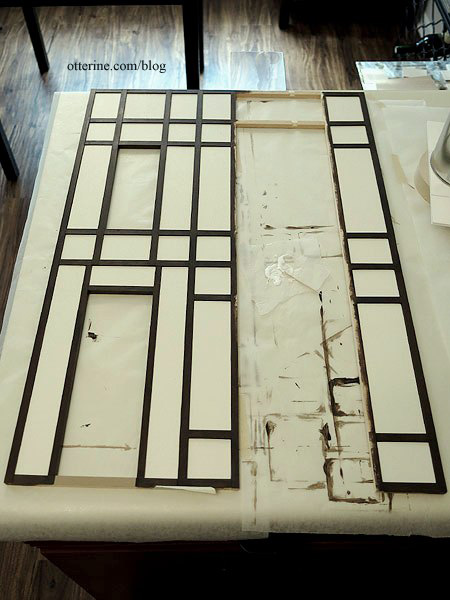
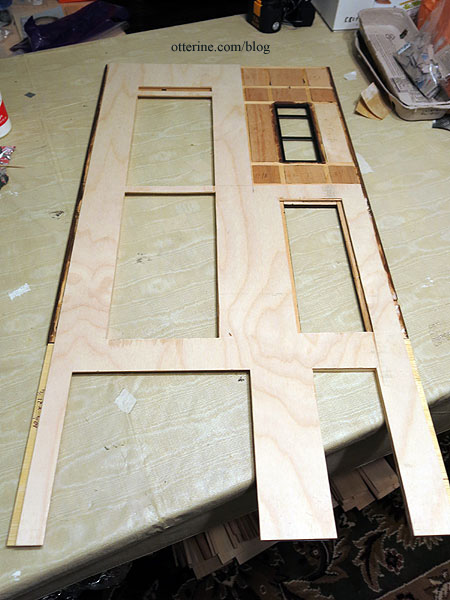
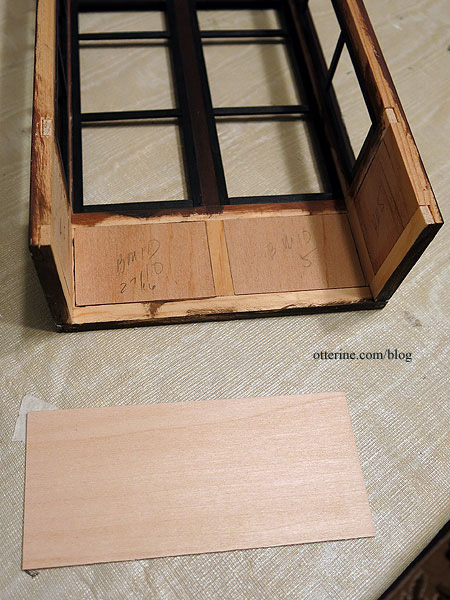
February 11, 2014 | 0 commentsThe Brownstone – backer boards and filler pieces
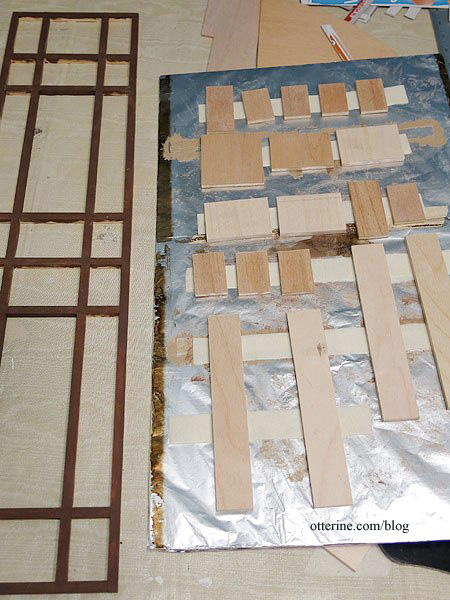
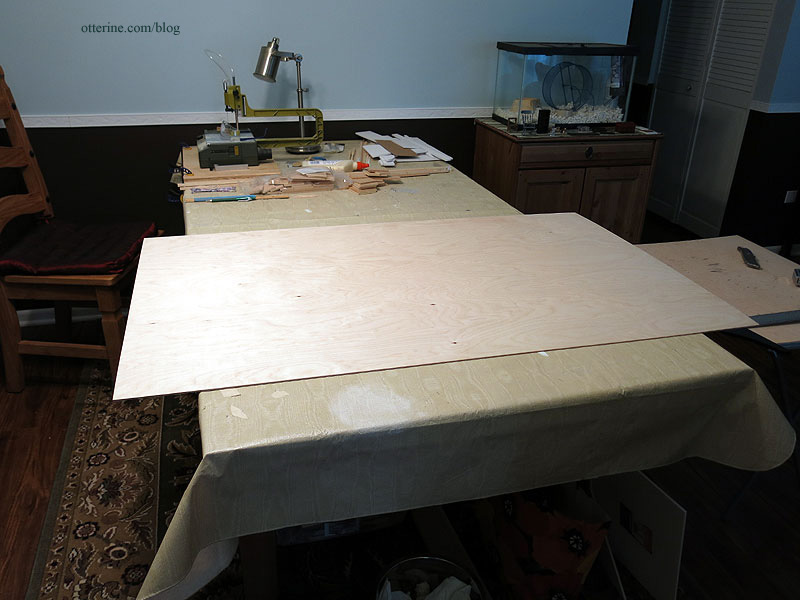
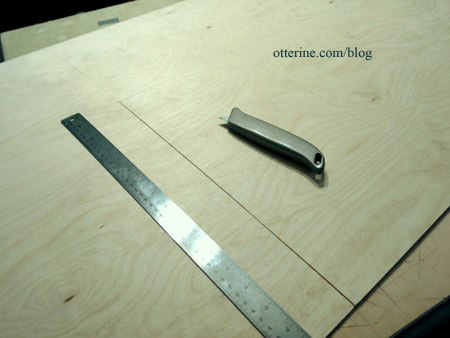
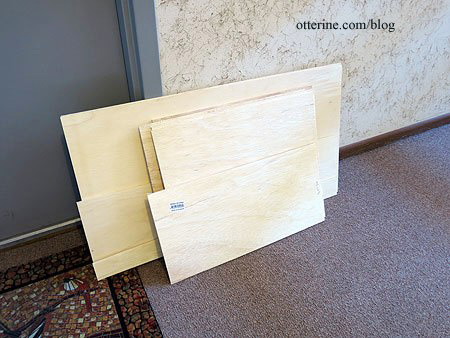
Now that I have my final timber layouts for the main facade and side addition front, and have had some time to consider the overall construction, I’m ready to cut my grid backer boards. I bought a 30″ x 48″ sheet of 1/8″ thick plywood from the local Woodcraft store. This thickness is not easy to find in large sheets, at least not locally. They had only this one in stock.
That’s a big board on my big work table! :O
I added 1/4″ to the height of the facade and the front assembled grid ended up being 1/16″ wider than planned, making the final facade measurement 17 5/16″ wide by 33 3/4″ tall. But, I will be doing a grid treatment on either side of the facade and need to take into consideration where the side boards will abut the front board as well as the depth of the grid. The math is as follows: 1/8 + 1/4 = 3/8 * 2 = 3/4″. Did I lose some of you there? :D
So, my interior board needs to be 16 9/16″ wide, so the two 1/4″ thick side walls with their 1/8″ thick treatments will be flush with the 17 5/16″ wide front grid when glued together. Right? Yes.
I measured out a box 16 9/16″ wide by 33 3/4″ tall, marking the 8 3/4″ dividing line between the grid and the lower stone finish. I had one shot at this, so I sat on the couch, emailed my friends, confused them with math, and measured three times. All good!
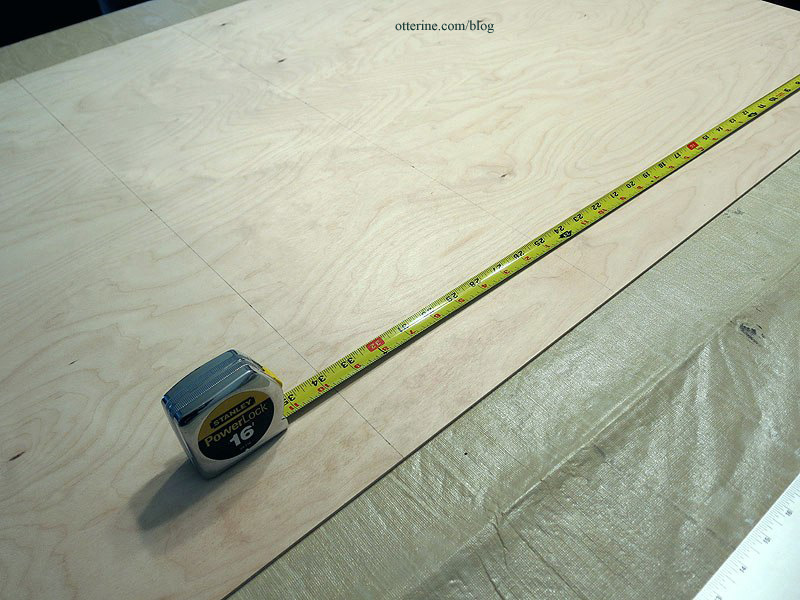
I slid my cutting board under the plywood on my work table. I used a utility blade for this part mainly because 1/8″ thick plywood doesn’t take that much effort to cut by hand.
The math worked! There is 3/8″ on either side of the grid to accommodate the finished side walls.
The wood of the grid is warped in places, but the filler pieces should take care of that.

The side backer board measures 5 5/8″ wide by 33 3/4″ tall for a 6″ wide grid. I needed to indent the 3/8″ on only one side since the other side will abut the main building directly. I won’t mark the openings until after the grid fillers are in place, but I wanted to get this large sheet of plywood cut into pieces and out of my way.
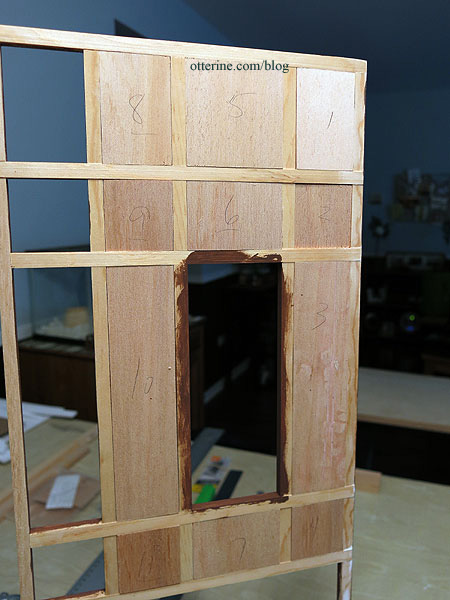
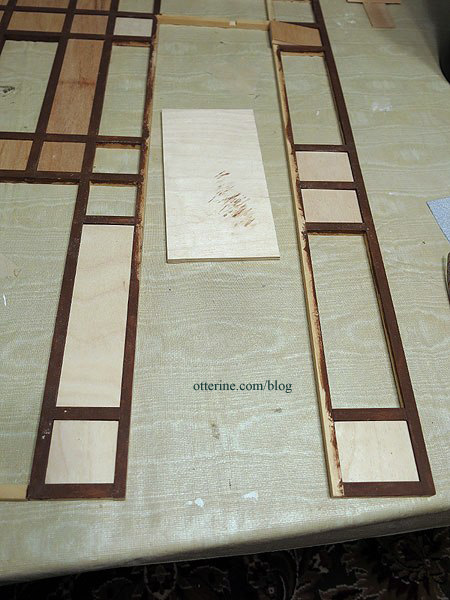
I took the original kit filler pieces and played jigsaw puzzle. Some pieces fit perfectly, so I popped those in place. From the leftovers, I sanded them to fit or cut them if more wood needed to be removed than sandpaper would efficiently do.
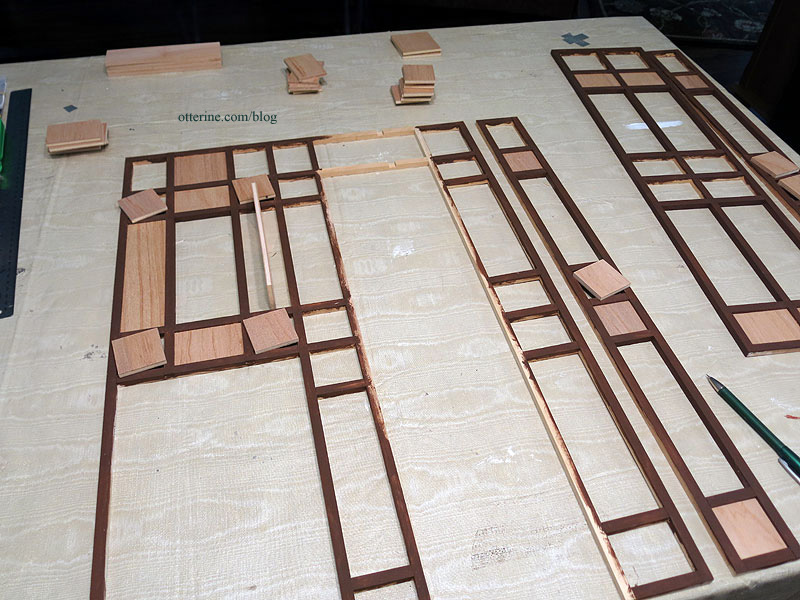
I numbered them on the back to keep track.
Since I had new and altered sections, I cut new filler pieces from 1/4″ thick plywood scraps from my stash for those openings.
I’m not using the original kit side walls since they were too small after my alterations to the interior layout and one was severely warped. The original kit floors are going to someone whose kit was missing those pieces so they won’t go to waste. So, very little of the original kit will go unused. Besides, the leftovers from kits always come in handy later for other builds.
Since I have limited space for power tools and needed a lot of boards cut, I went to Home Depot. Their 1/4″ plywood is actually 3/16″ plywood, but it all worked out in the end. The saw at Home Depot will not get you precise, square cuts, but it will get you close. Bringing in the boards….
I spent part of the day cleaning up the cuts to make the boards work. I also had the scrap leftover from the 4′ x 8′ sheet to use as needed. But, I’m not ready to start building just yet. There’s more planning and prep work to be done. I just wanted to get the boards cut and ready to build as I need them. It won’t be that much longer.
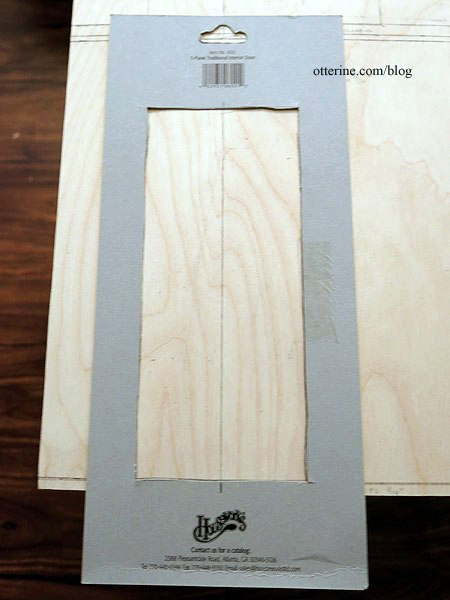
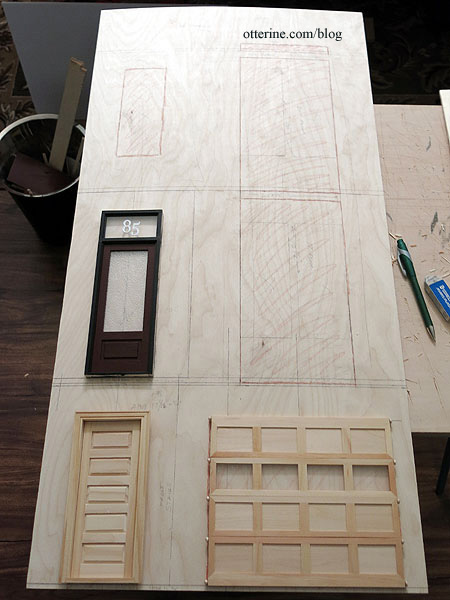
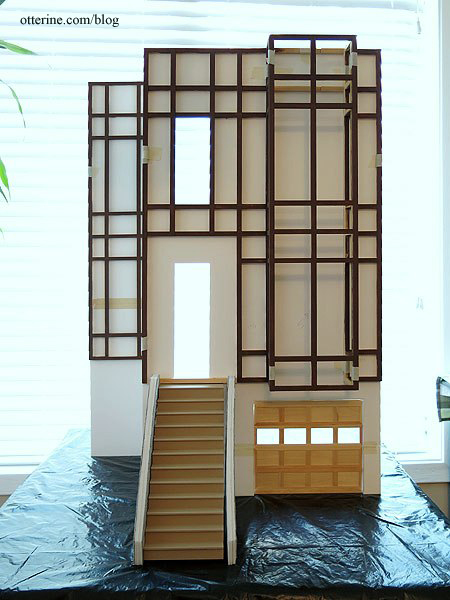
By far, the front board was the most complicated. I mapped out where the inner floors would hit as well as the openings for the bay windows, upper window, front door, lower level door and garage door. I still have to work on the front door recess before I can mark that final opening.
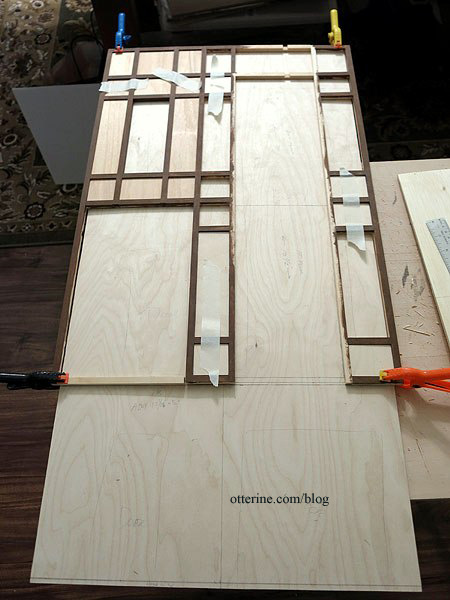
Houseworks doors come with a template on the package. To center the lower door under the main door, I marked the center line on the board and the template. I lined up the marks and traced the outline.
I marked the cutaway areas with a colored pencil since there were lines all over the place.
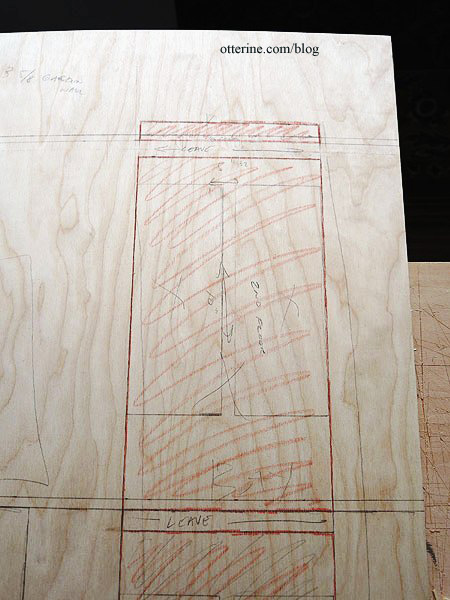
I centered the garage door under the bay window, which I hadn’t done in my original foam core board mockup.
This layout will give me ceiling heights of 8 5/8″ in the garage, 10 1/2″ on the first floor (stately) and 10″ on the top floor (spacious). Did I mention I’m planning a rooftop garden? This layout will also give me a 3 5/8″ wall around the rooftop space before any added trim.
Categories: The Brownstone
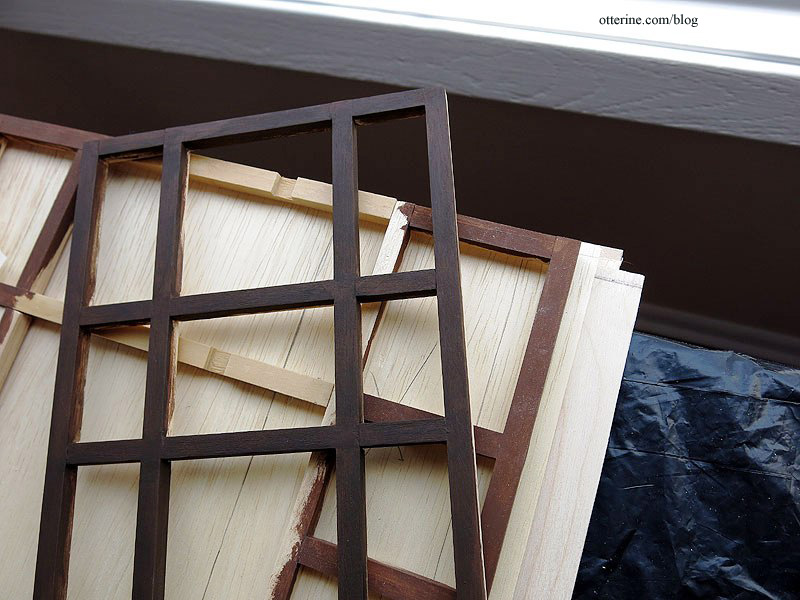
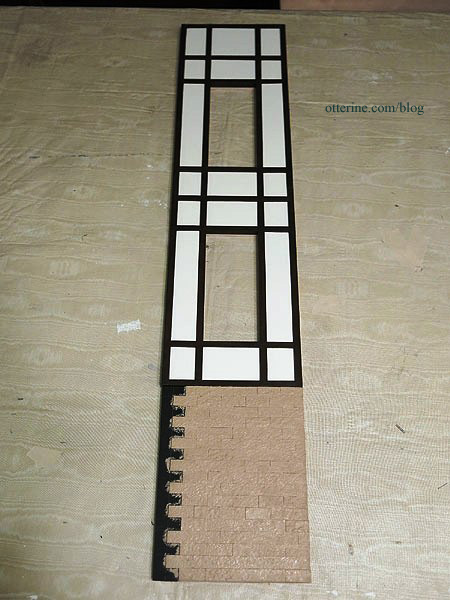
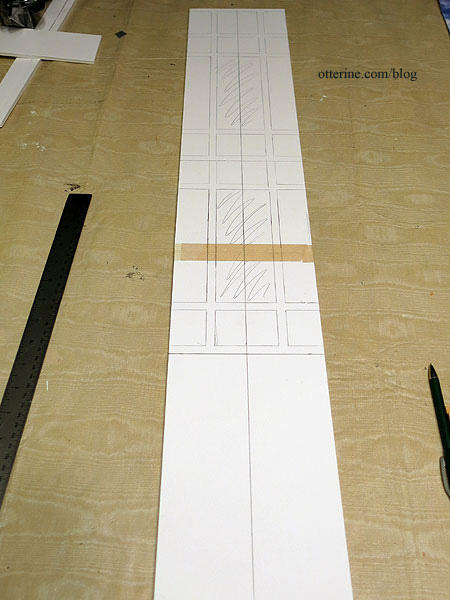
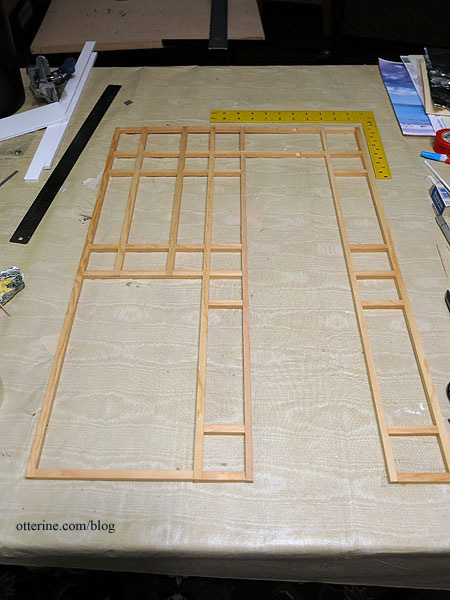
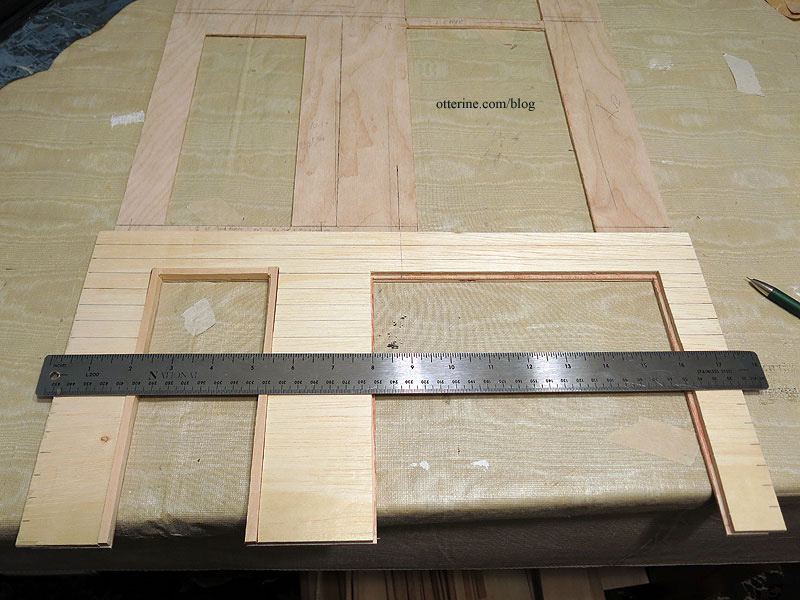
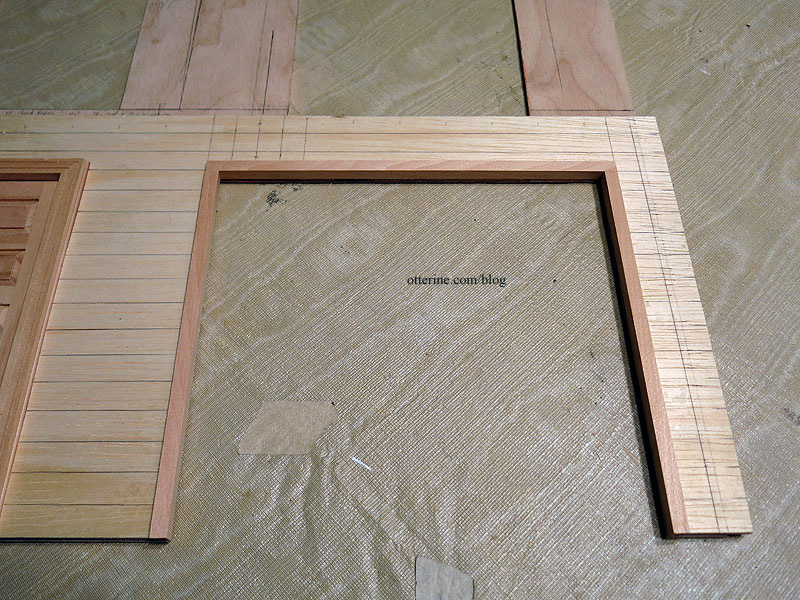
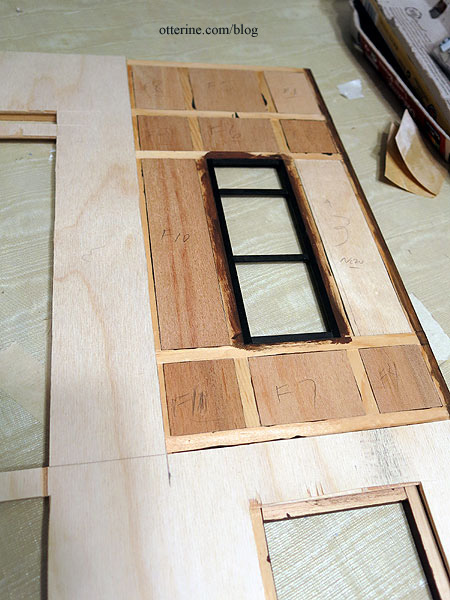
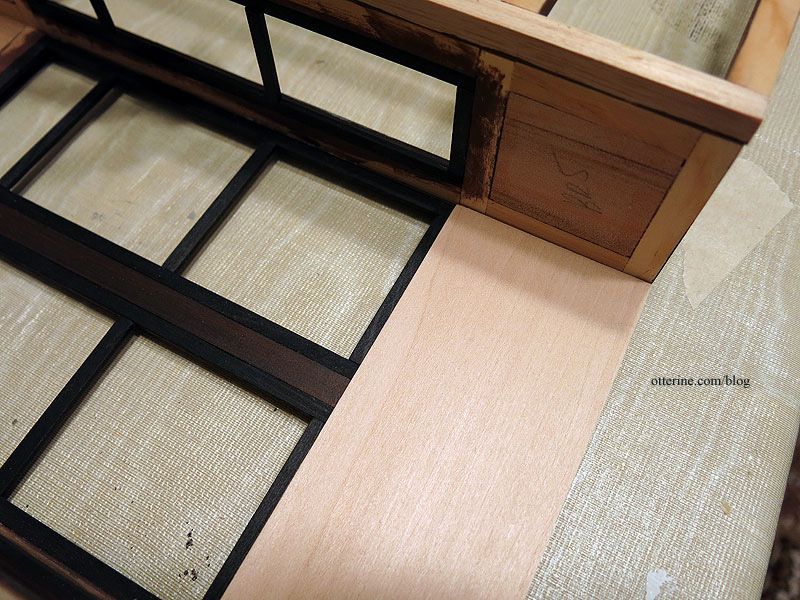
February 10, 2014 | 0 commentsThe Brownstone – timber grid, part 2
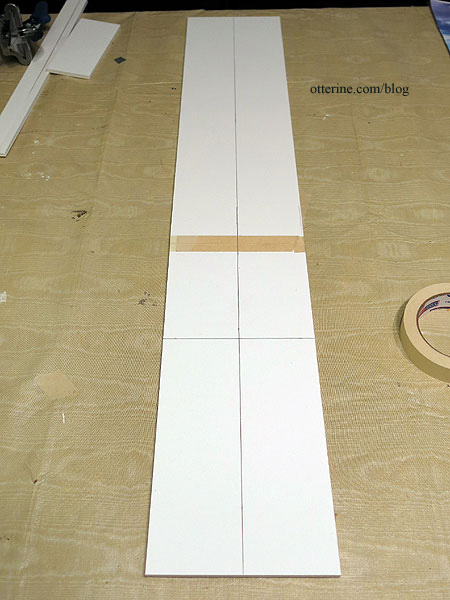
Continuing work on the timber grid. Since I plan to make the side addition in the same manner as the facade, I cut a foam core board mockup to configure the layout. After having some time to consider the overall construction, I added 1/4″ to the height of the facade, making the final measurement 17 1/4″ wide by 33 3/4″ tall. For the side addition, I made its front board 6″ wide by 33 3/4″ tall.
I started by marking the lower edge where the stone ends and the timber begins, 8 3/4″ from the ground. I also marked the center of the board.
I used the timber grid for the main facade to trace the window locations on the side addition, centering the window openings.
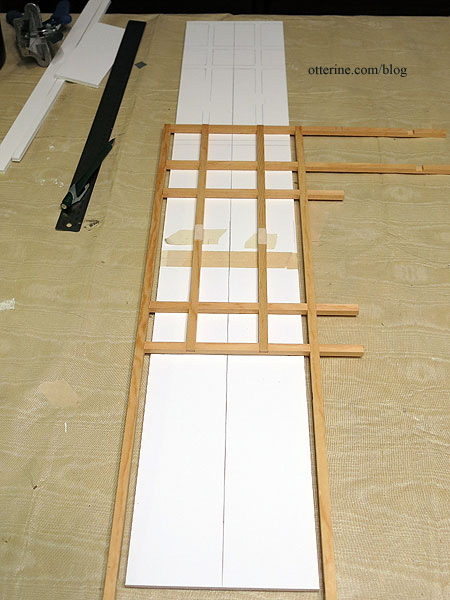
The side grid timbers will be 5/16″ wide as opposed to 11/32″ wide as on the facade, but I marked the entire original grid on the side board as a general guide.
I cut new timbers from 5/16″ basswood and notched the center pieces like the original to help keep the grid even and secure.
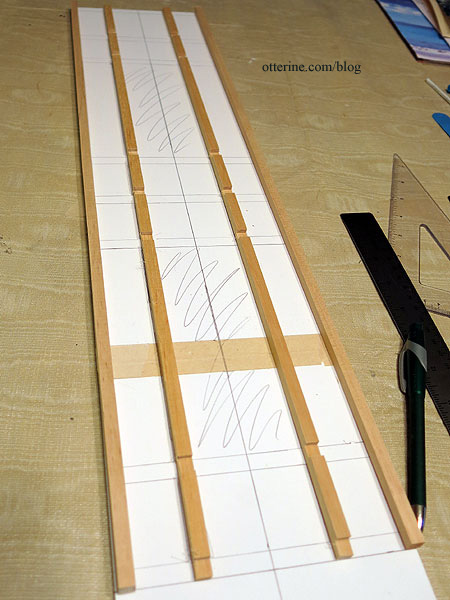
I cut the horizontals individually to fit, numbering them along the way.
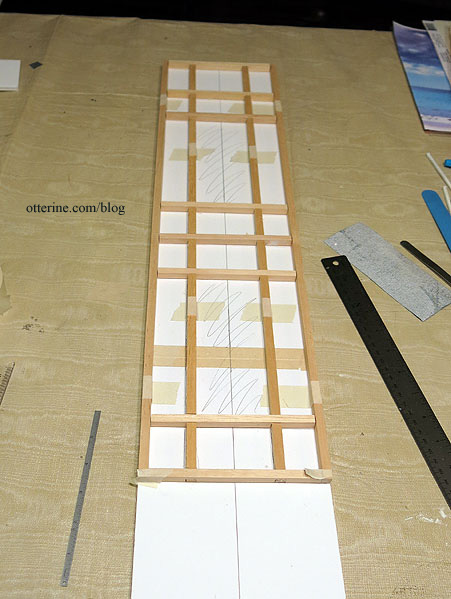
Since I will determine the remaining walls separately and don’t need either of these as a guide, I glued the grids together.
I spackled the areas where my joins weren’t as clean as I’d like. I also covered the notches on the sides.
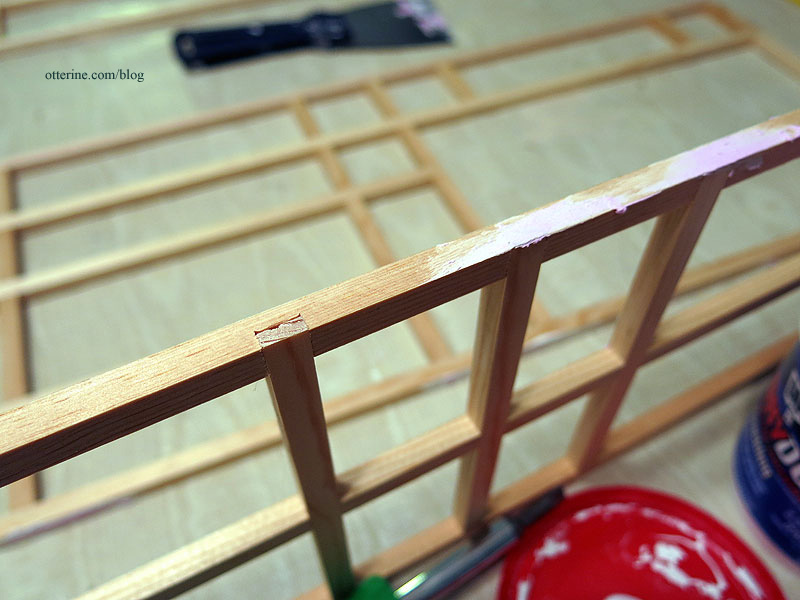
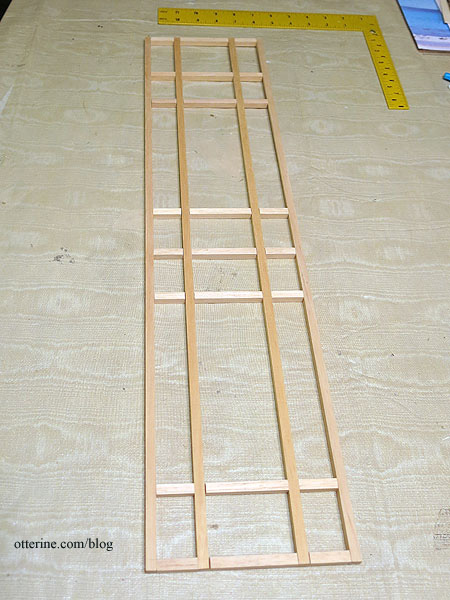
Time for painting! This is Coffee Bean by Folk Art. I can’t stain the pieces since they are made from different types of wood and there is tape and glue residue all over them — some of this tape residue is from the original bundling of the beams. This basic brown will serve as the base coat for faux staining, so it’s fine that it’s rough and uneven for now.
I didn’t paint inside the grid other than a bit around the edges and inside where the windows will be. There are filler pieces for the enclosed spaces, and only 1/16″ will show of the sides. I also left the beam under the front door unpainted for now.
Here they are back in dry fit on the foam core board bases. The side grid layout is narrower than the one for the facade, but it matches well for style. It’s actually the same overall width as the bay window, so it’s also good for balance.
Categories: The Brownstone
February 9, 2014 | 0 comments


NOTE: All content on otterine.com is copyrighted and may not be reproduced in part or in whole. It takes a lot of time and effort to write and photograph for my blog. Please ask permission before reproducing any of my content. (More on copyright)

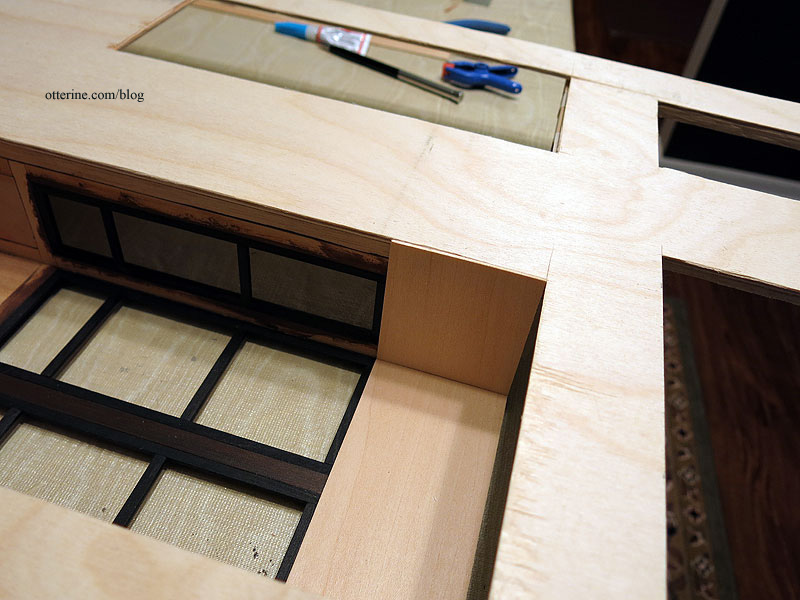
The Brownstone – front wall progress
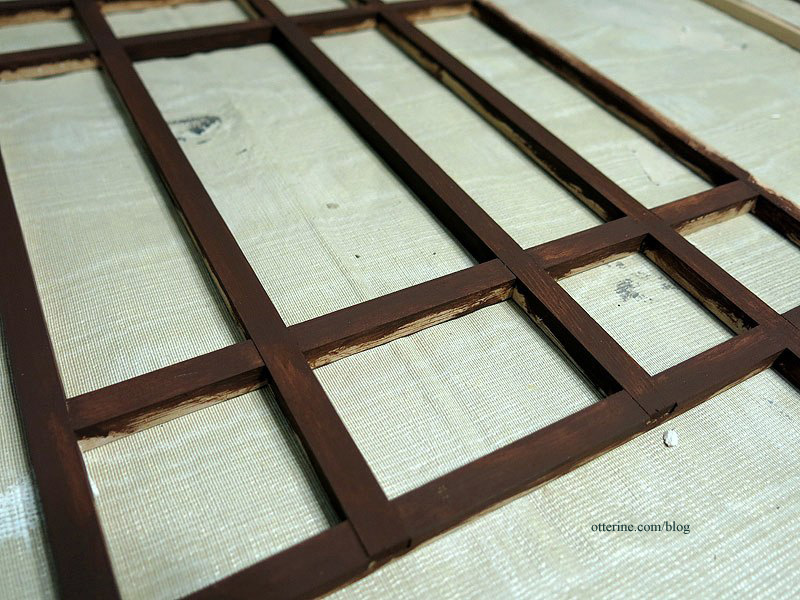
I finished painting and sealing the timber grid and then added the completed filler pieces.
I drew guidelines for the lower stonework.
I cut trim for the garage door opening since the wood included in the Timberbrook kit is rather wide. I like this thin trim look better.
I applied the egg carton stones, leaving the edges open. These pieces will be added after the structure is glued together.
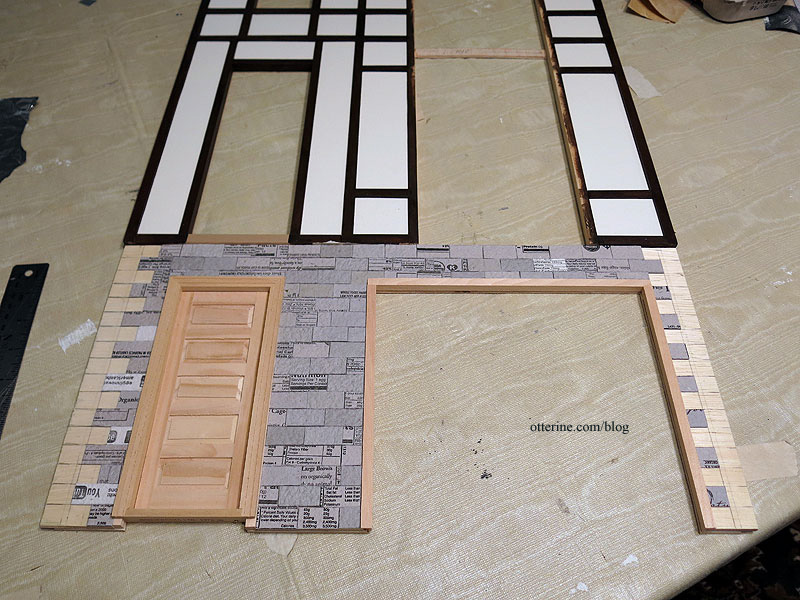
The backer board is 1/8″ thick and won’t allow the same finishing process I used on the bay windows, using 1/16″ basswood to act as inner trim work. (Here’s the post outlining this process.)
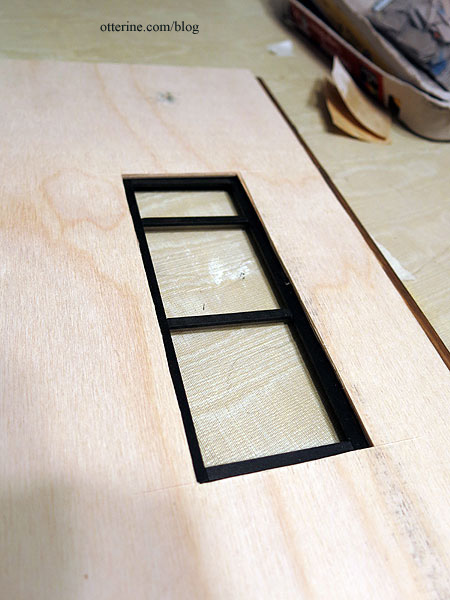
I determined the bedroom size (on the left) as well as the place where the floor board will hit. I cut the marked corner from the backer board.
I will finish the window and pad the wall for a smooth surface using the basswood trim method. (Here’s the finishing post for this window.)
I painted the stonework with the base coat of Fawn by Americana. I then glued the backer board in place.
Categories: The Brownstone
April 16, 2014 | 0 commentsThe Brownstone – bay window section, part 4
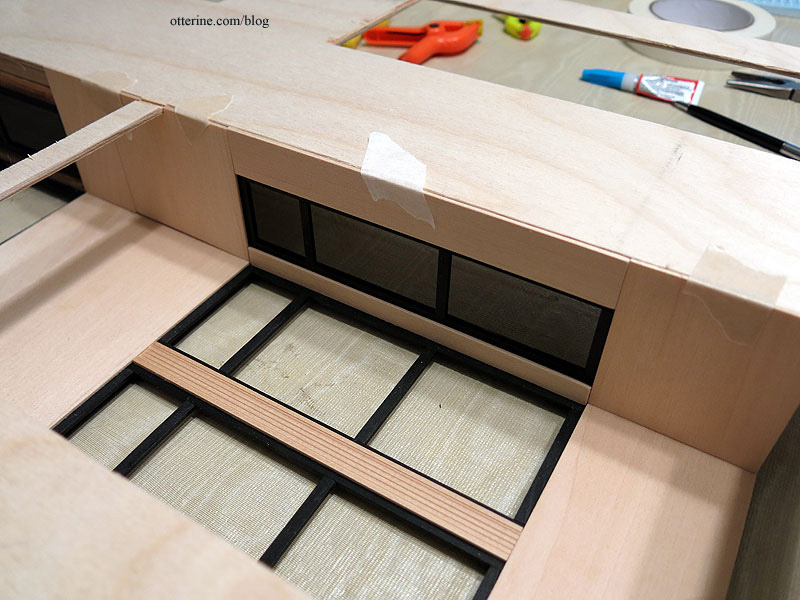
Continuing work on the bay window section. I masked off the top portion of each basswood padding piece and affixed the pieces to my work board.
The edges will serve as part of the window trim, so I stained them with Minwax Dark Walnut.
When working with a lot of pieces of similar shape and size, I mark the backs for reference. This one shows the upward direction, first section, right side, outer trim.
I will prime the remaining portions before applying wallpaper, but I am choosing not to prime before installation since I don’t want to risk warping the boards. Instead, I glued in the forward boards, the middle trim and interior corner boards.
The remaining boards will be installed after I glue the bay window section to the front wall, so this part is as completed as it can be to this point. Here they are in dry fit, so you can see what I’m after. :D
Categories: The Brownstone
April 8, 2014 | 0 commentsThe Brownstone – bay window section, part 3
Continuing work on the bay window section. I glued the previously stained interior window frames into place for the three bay window sections. As noted before, the stained glass and acrylic inserts will be added much later in the construction process.
With those in place, I glued the sides onto the front, using a triangle to make sure the pieces were square. So exciting to finally have a portion of the build glued together! :D
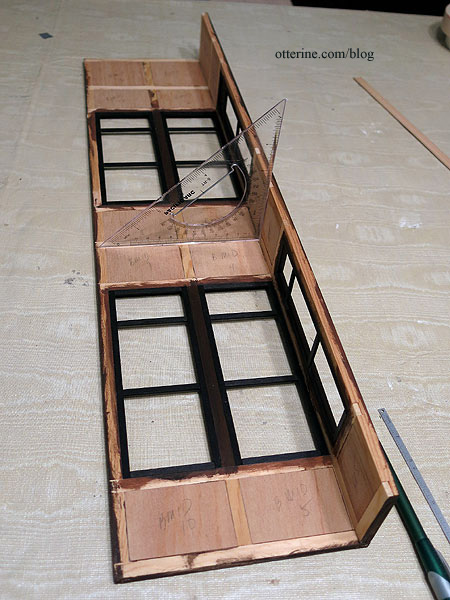
Since there were slight gaps between the pieces, I pushed a small amount of spackling into the crevices. I wiped the excess from the timbers so I wouldn’t have to make a mess sanding. I will touch up the paint and sealer later.
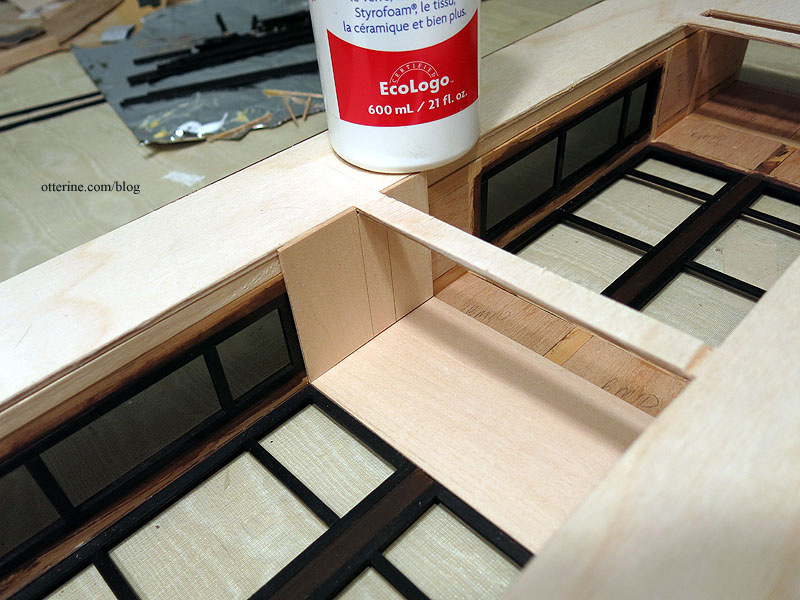
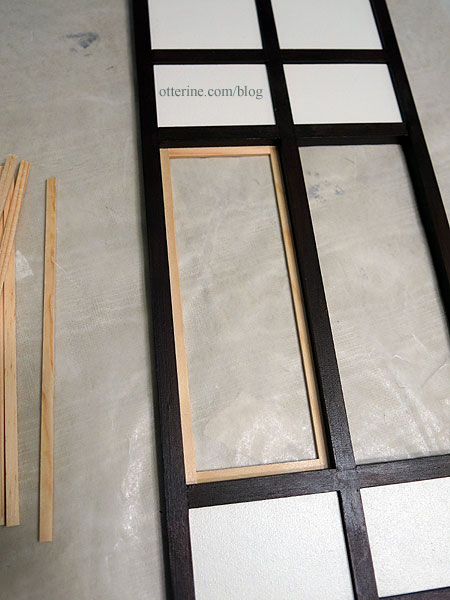
Since the bay window sections have no added backer board, the interior surface is uneven due to the way the walls are created — with a grid and inserts. I cut pieces of 1/16″ thick basswood to cover the surfaces.
The pieces overlap the edges where the interior window frames meet the timber grid since I plan to use these basswood pieces as both surface smoothers and window trim. This will make more sense later. This also lends support to the interior window frames. There is not a lot of gluing surface for those thin pieces, so they do like to shift and pop out at random. This should help alleviate that problem by adding another gluing surface.
In order to measure and cut the side pieces, I had to put the facade grid and its backer board on in dry fit so the depth would be accurate. The side bay pieces end flush with the interior surface of the backer board.
I continued cutting the basswood parts, fitting around the backer board cross sections. I left these beams across the bay window section to support the floor boards. Since my basswood sheets were only 3″ wide, I had to piece the middle portion.
To finish the middle of the window frame, I used 1/2″ wide fancy trim from Manchester Woodworks. It is centered, though the angle of the photo makes it seem otherwise.
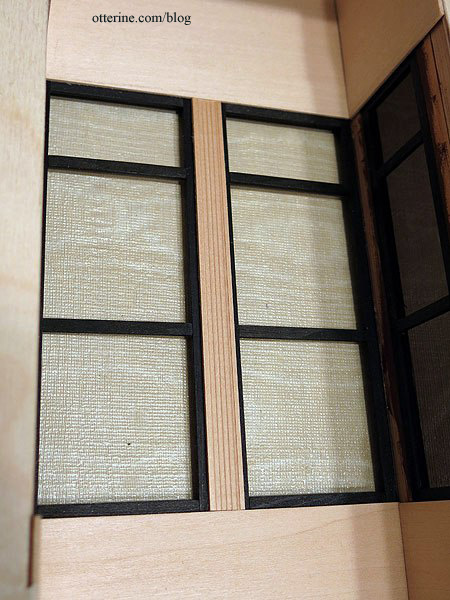
I added long strips in the corners and along the outer edges of the windows.
All of this padding will allow for a smooth surface for wall treatments and a finished look for the interior portion of the windows.

Next up, more staining…. :D
Categories: The Brownstone
April 6, 2014 | 0 commentsThe Brownstone – bay window section, part 2
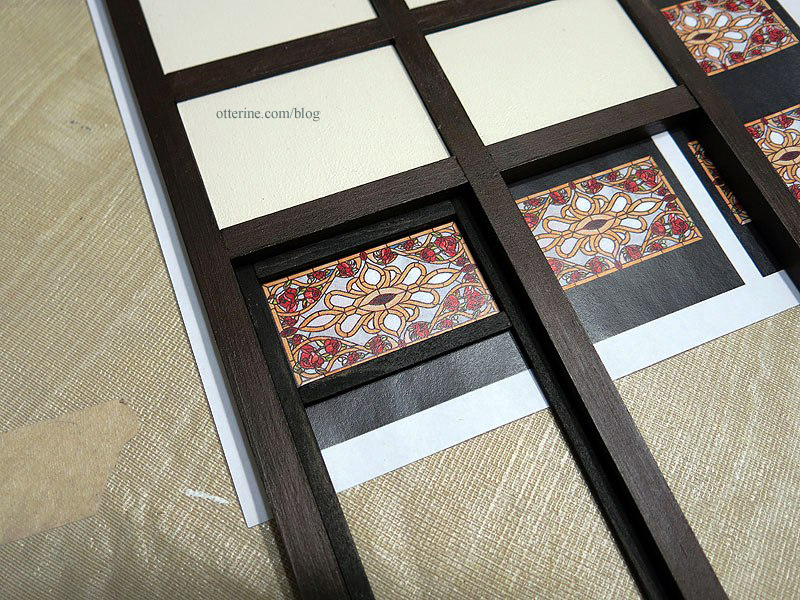
Continuing work on the bay window section. The glass is to be placed on top of the wood pieces and an identical set is glued in place over the glass to keep it secure, but I need to create the stained glass inserts first.
As a reminder, this beautiful Meyda Tiffany Bed of Roses stained glass panel at Wayfair is the image I’m going to use for the stained glass. Since the side bay windows are smaller, I had to alter the image in PhotoShop so the smaller panels would coordinate. In the original kit, stained glass decals were applied to the front windows only. Here’s my test print.
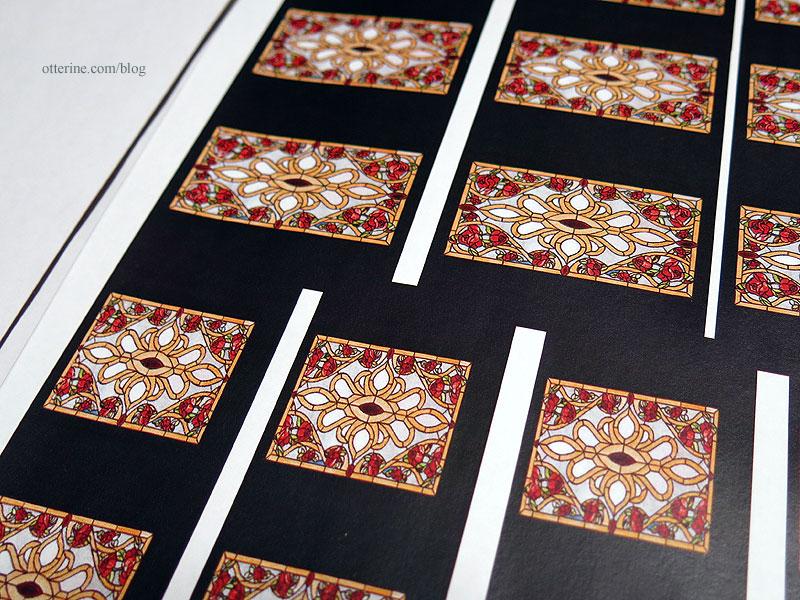
And, these are the finals printed on transparency film.

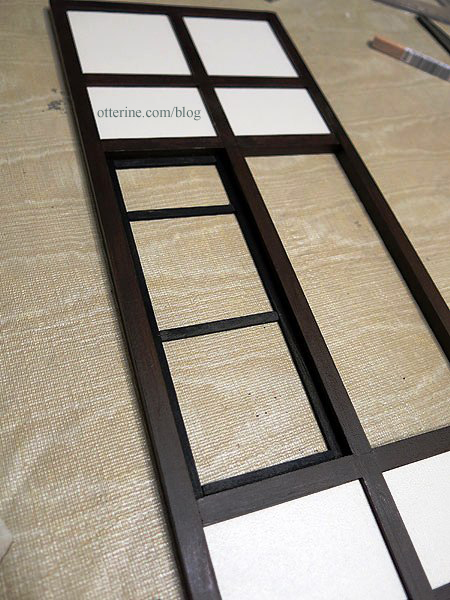
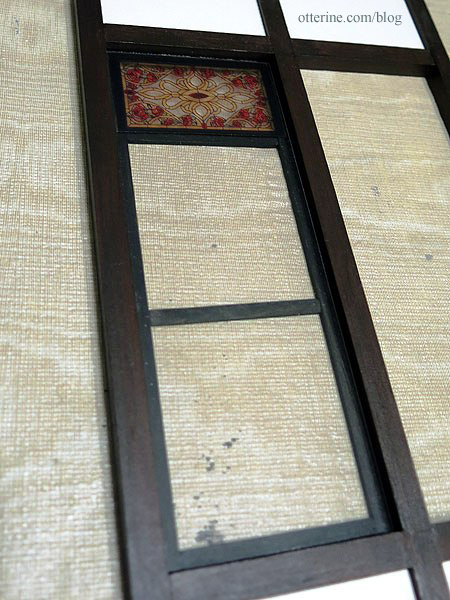
Since the stained pieces aren’t 100% dry, I dry fit one window frame into place. The instructions indicate the placement of the interior frames while you can keep the front grid on a flat surface since the frames need to be flush on the interior. I stained both sides of the framing pieces. This eliminates any bare wood showing from either viewing direction. I’m keeping the imperfect side facing the yet to be installed acrylic insert.
I used my test print to determine the placement of the lower horizontal for the stained glass portion.
I measured to find the center in the remaining space and fit the middle horizontal in place.
I cut one transparency and tested the fit, placing one of the kit acrylic inserts into the opening underneath it. The top surface of the transparency is shiny, but the back is not. Having the acrylic behind the transparency will disguise the dull back.
The transparency floats so I can adjust or replace. :]

I then dry fit the exterior frame and cross pieces. The instructions indicate adding the acrylic inserts and final framing later in the build, and I like that idea for keeping the windows clean and unharmed during decorating. I like it! :D
I did the same for the side bay window opening to make sure my measurements worked for both configurations.
I put the bay back into dry fit.
All good! :D
Next up – gluing the interior framing for all window openings, cutting new pieces as needed.
Categories: The Brownstone
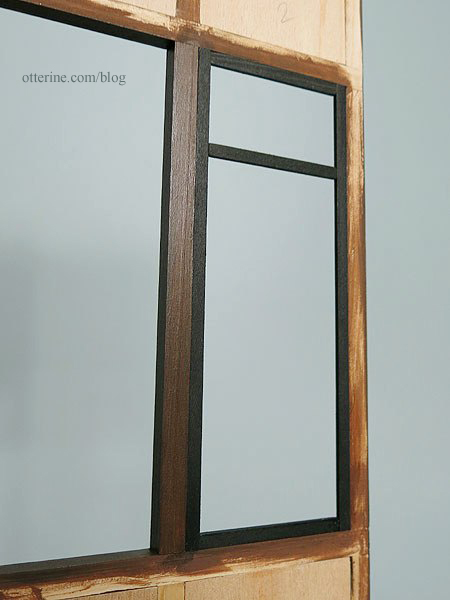
March 25, 2014 | 0 commentsThe Brownstone – bay window section, part 1
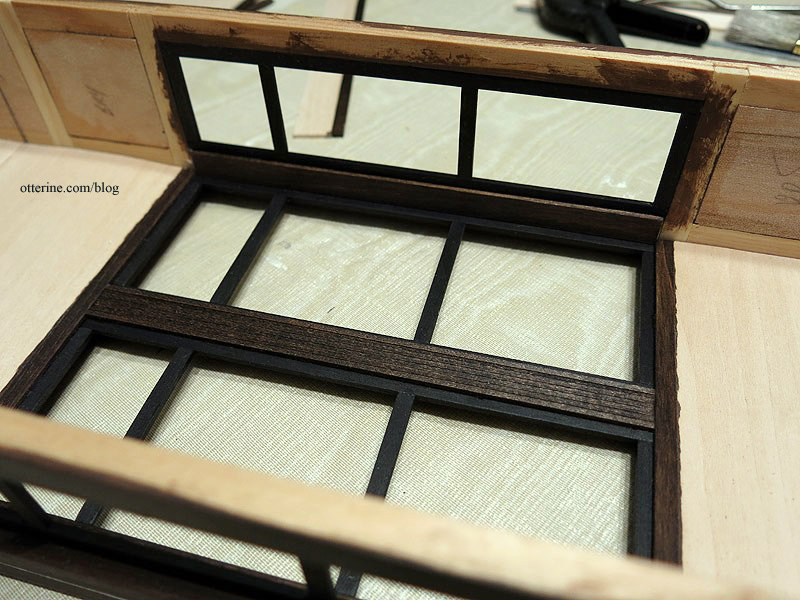
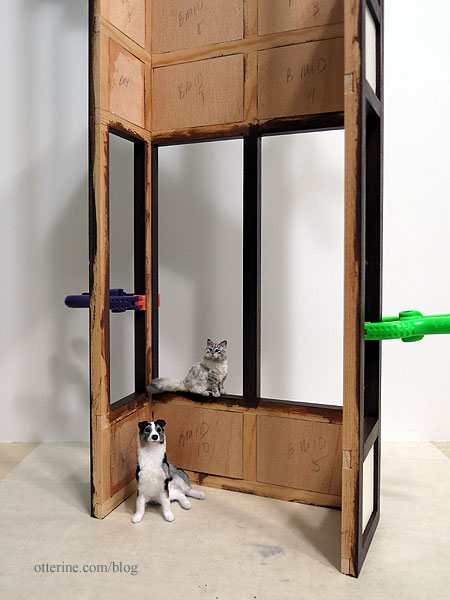
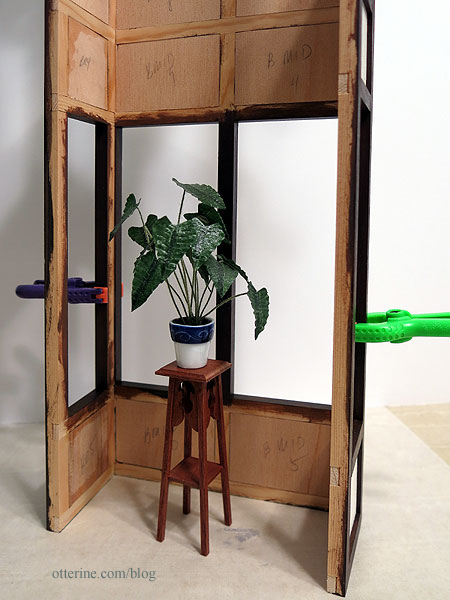
Here’s the bay window section. I have the timbers and filler pieces painted and glued together, but the three sections will remain separate until I complete work on the windows. These are nice large window openings, as you can see from our lovely model Ophelia.
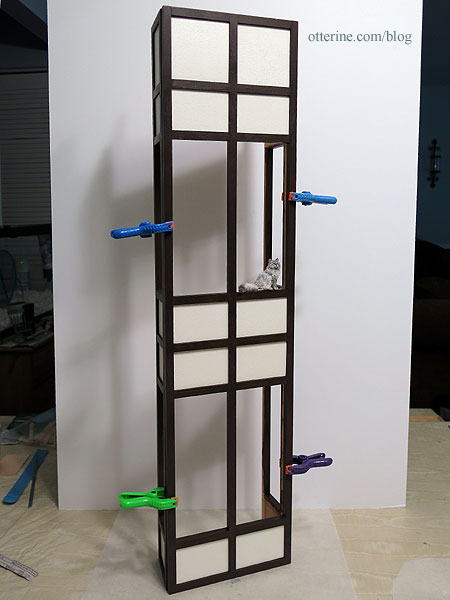
Inside, the grid creates an uneven surface that will need to be addressed after the windows are in place. I’m thinking 1/32″ thick veneer for a smooth wallpapering surface. There will also be trim work to finish the interior windows. All of my ideas are still floating around.
It’s a good interior space, as shown by Sherwood and Ophelia.
I’m thinking plants for the main level (maybe a settee or window seat in the bedroom above).
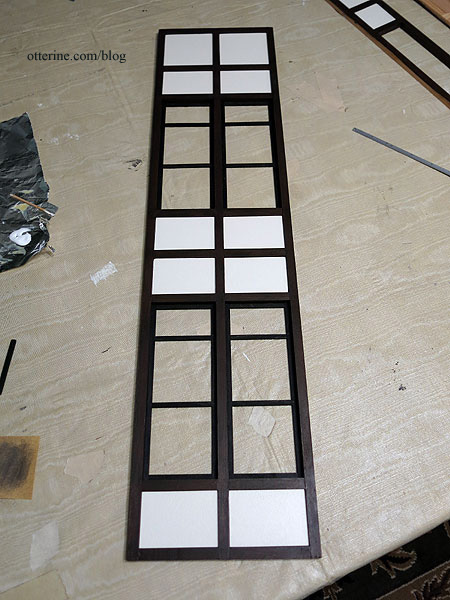
The original kit has non-working windows and for the ease of assembly, I am using those. I do love working windows but not enough to overhaul the entire assembly process.
The kit comes with pre-cut pieces to make the window frames. Some fit perfectly and some will require my least favorite phrase “sand to fit.” The pieces are to be glued in, but they hold well on tension alone.
The top divider for the stained glass detail and the middle divider are added after the frame. I’ll actually measure when I do the final installation.

The side bay windows are slightly thinner than the front bay windows but created the same way.
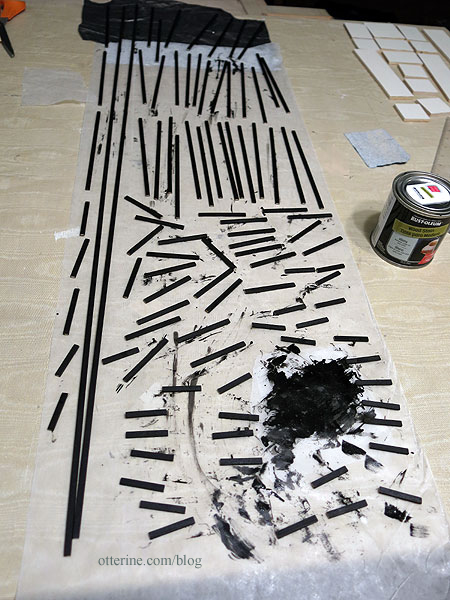
Since I added windows to the side addition and the kit also has the wrong amount of pre-cut pieces for the existing windows (the amount listed in the instructions is incorrect for the amount needed), I bought some additional lengths of wood from National Balsa when I placed my large order. I stained all the pre-cut pieces and two of the additional lengths I bought using Rust-Oleum Ebony.
Next up – preparing the stained glass inserts and gluing the pieces in place.
Categories: The Brownstone
March 24, 2014 | 0 comments
NOTE: All content on otterine.com is copyrighted and may not be reproduced in part or in whole. It takes a lot of time and effort to write and photograph for my blog. Please ask permission before reproducing any of my content. (More on copyright)