

The Brownstone – timber grid, part 4
Continuing work on the timber grid. Slogging along is more like. Oy, this is mind-numbingly dull work. :\
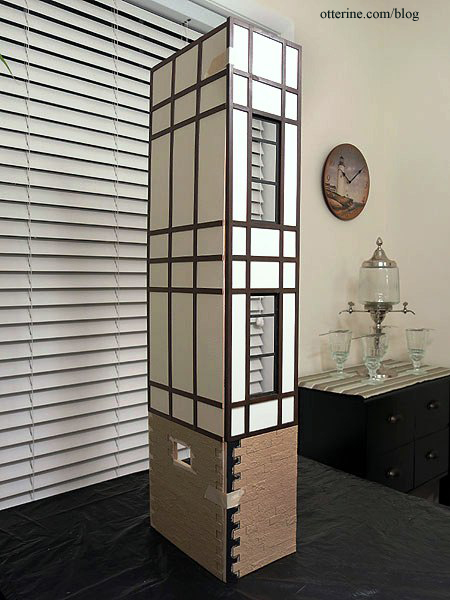
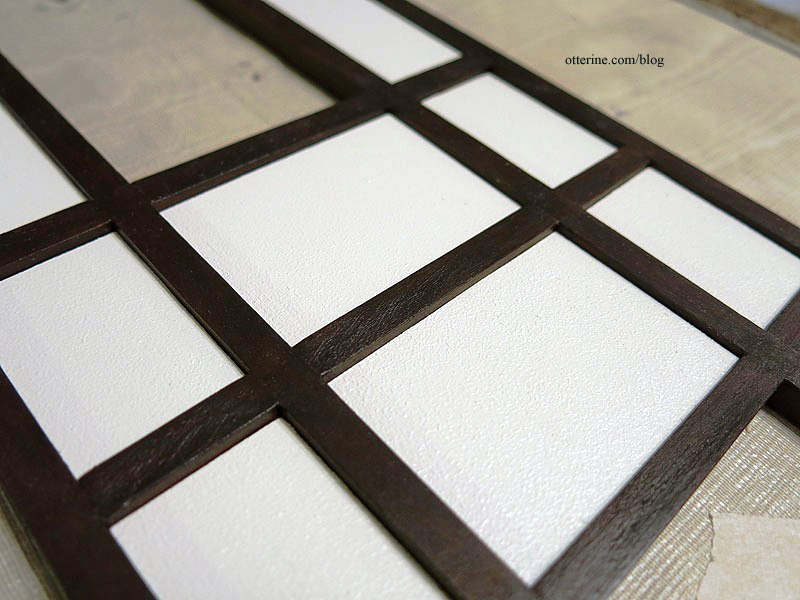
The side wall opposite the addition is the largest solid wall in the build. I used the same technique as the side wall of the addition, with 5/16″ x 1/8″ grid boards and 1/16″ thick filler pieces. Here’s the initial grid.
And, with the filler pieces.
I thought about adding a window in the kitchen but decided against it mainly because of how the other windows in the build are constructed. It was simpler to leave it out, and having a solid wall would give me greater flexibility in decorating. We’ll just imagine there’s a window on the invisible back wall. :]
I numbered the backer board and the filler pieces to make it easy to reassemble after painting.
I filled in the gaps in the grid with spackling and started bricking the bottom portion.
After this, there will be a partial wall on the other side…then no more grid work for this build! Is that a light at the end of the tunnel? :D
Categories: The Brownstone
May 11, 2014 | 0 commentsThe Brownstone – timber grid stonework, part 1
Somewhere in all this work, I realized I had forgotten all about the stonework in the color plan.
Luckily, I am only halfway through…and it’s an easy fix. Before going through the trouble, though, I got out my trusty PhotoShop. Here’s the addition with the stone…
And the front…yep, it’s worth adding.
I started with thin cardstock templates, each numbered so I could match them up again later.

Instead of using the 3/4″ x 1″ stones I had been cutting for the base, I determined the layout using the individual templates. I thought it would look off to have partial stones, so I cut three even strips slightly wider than the base stones. I then cut the length to make a pleasing pattern, gluing the stones to the cardboard template.
I’ll paint the inserts with the base coat of Fawn by Americana. Once I create the final two grids for the side walls, I’ll make the stone inserts for those as well. I’ll then paint the final washes and glazes when I do the base stone so it will all coordinate in color.

Categories: The Brownstone
April 21, 2014 | 0 commentsThe Brownstone – a pictorial review
This post will change as the build progresses.
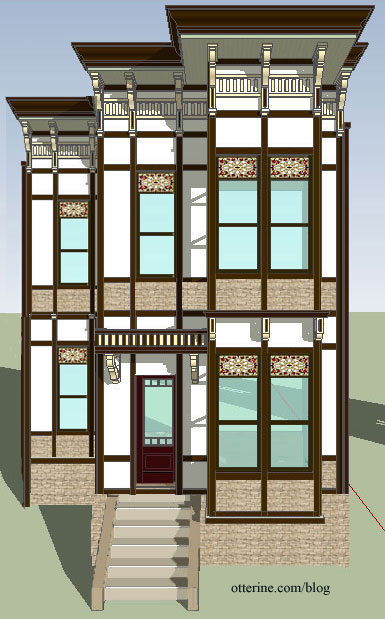
The back story for The Brownstone is that it is the home of a world traveler. I toyed with the idea that this occupant is the grandson of The Haunted Heritage’s grandma, and it stuck. Our world traveler likely won’t have a name, but I’ll have to figure out something to call him. He is a collector of interesting items and lives in an upscale neighborhood.
The Brownstone is a modified version of The Golden Gate view kit from American Craft Products. These kits are no longer in production, but they show up on the market from time to time.
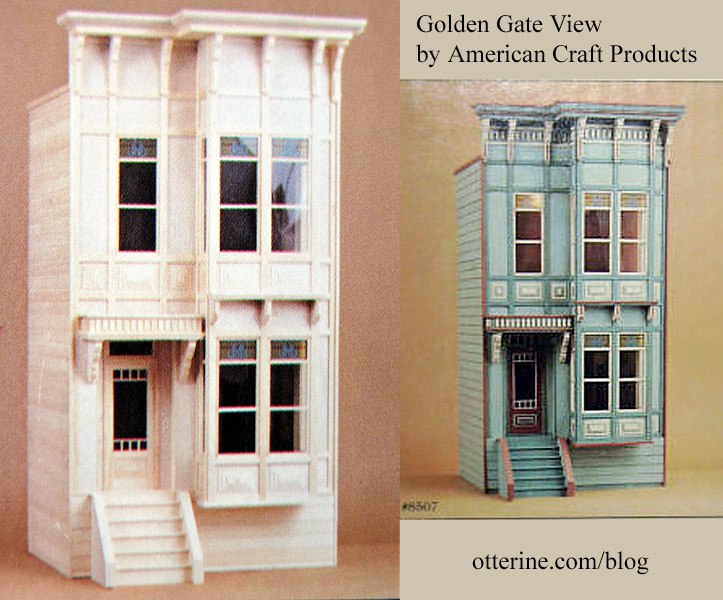
kit photos from the box The first dry fit shows the kit’s original configuration of two rooms with a dead space underneath the first floor.
Below is my modified version in the latest dry fit. I added height to the bottom to add a garage.
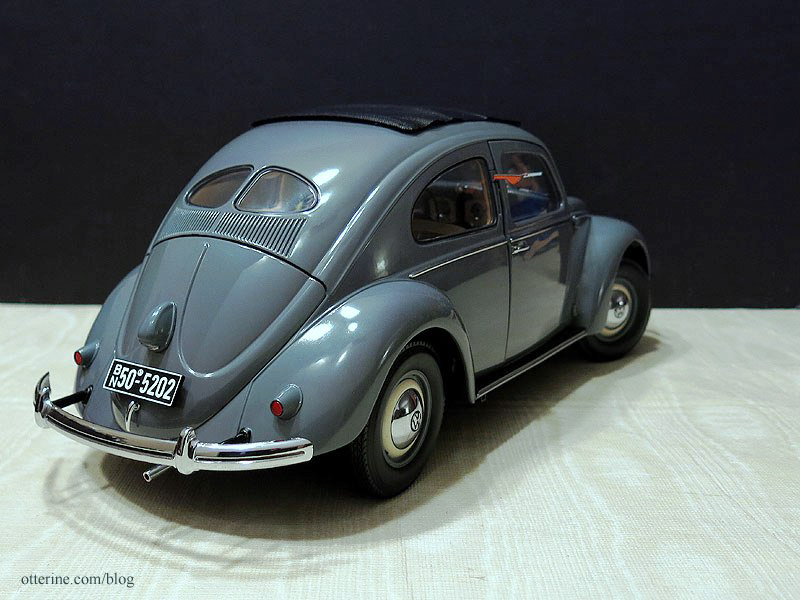
The vintage 1950 Beetle will be housed here.
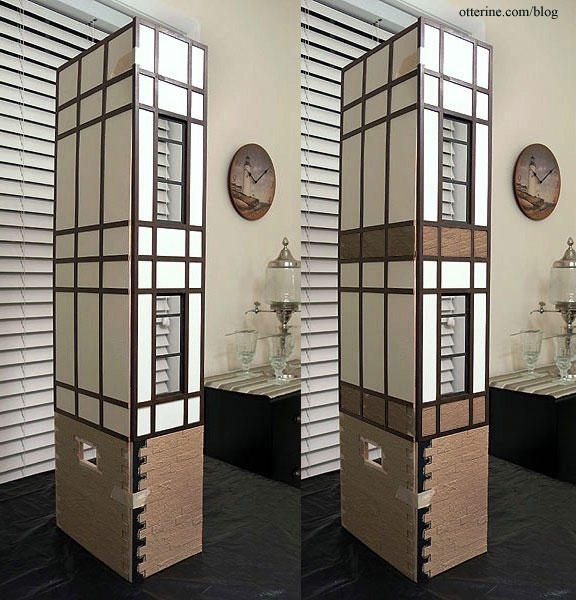
I also built a side addition to add three more small rooms.
Mike was gracious to lend me his Sketchup drawing so I could try out some colors. I decided on a Tudor inspired exterior (shown here without the height addition and garage).
I love the colors and textures. :D
Testing the bay window stained glass inserts.
The front steps are scratch built.
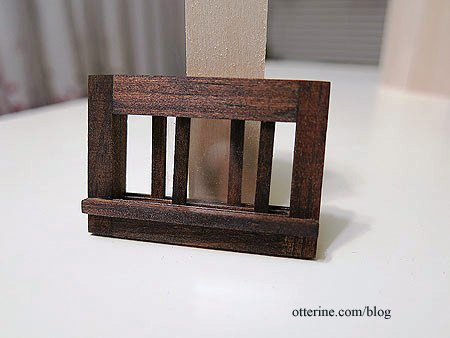
The security gate under the stairs is a work in progress — just needs paint.
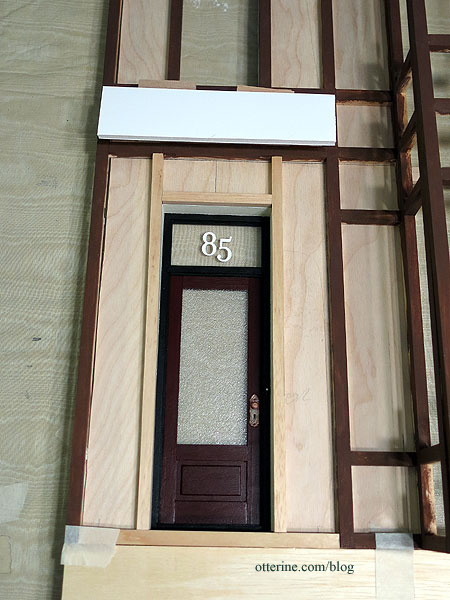
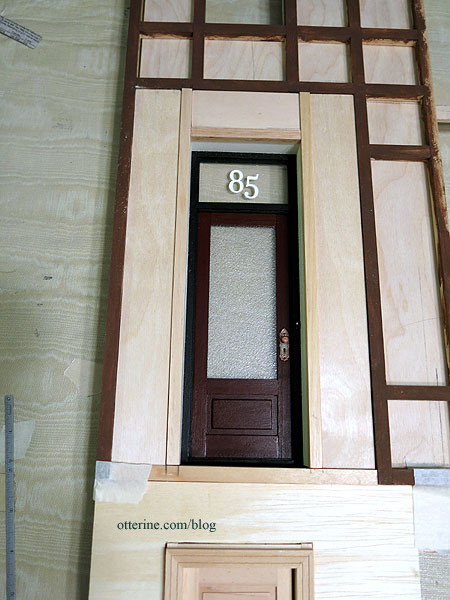
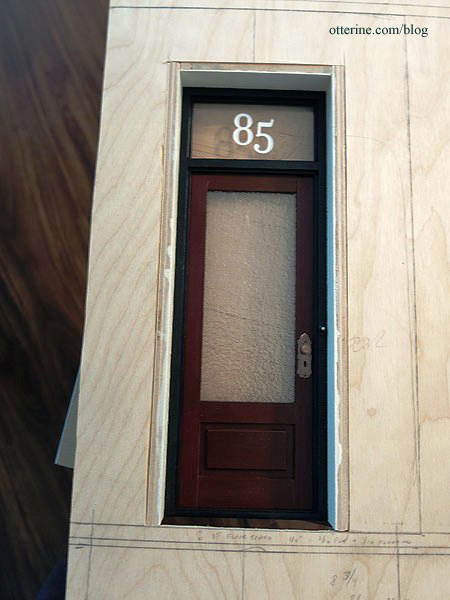
I used the kit door but built the custom frame to get the door to function, adding a transom window in the process. Why 85 as the house number? I was trying to think of some historical figure to serve an inspiration, and Edgar Allen Poe popped into my head. I found this article on one of his residences at 85 West Third Street in Greenwich Village, so 85 it was! :D
Roland Sneakypants, made by Steve Panner, will skulk about the city block in search of food. :D
Too cute!
Stay tuned…
Categories: The Brownstone
April 19, 2014 | 0 commentsThe Brownstone – side addition progress
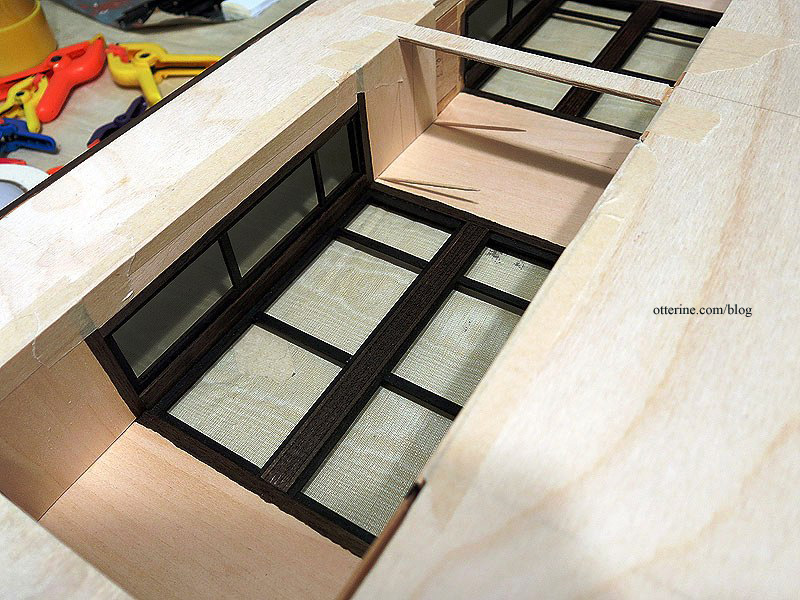
The side addition has a front wall with two large windows made in the same manner as the original kit. As with the front main wall, I had to modify the backer board for the addition to trim the windows. I had originally planned to rout channels for the floor boards, but I don’t have the right setup for making straight channels with my Dremel tools. You can see my initial Dremel attempt here on the left. On the side wall, which is solid without window openings, I cut the floor channel by hand. The note about the lights reminds me not to glue the unit together without first addressing the wire channels. :]

I didn’t think the wall would be stable enough glued end to end, so I needed some of the backer board to remain intact. I will cover this thicker portion with a built-in window seat.
When I textured and painted the filler pieces for the side wall, they curled since they are only 1/16″ thick.
Once the surface was dry, but before the pieces had dried completely, I covered them with a layer of aluminum foil and pressed them flat with magazines. Problem solved. :]
I added the stone to the side wall. I will install the basement window “backward” meaning the front of the window will be inside. I did this for a couple of reasons. First, the depth of the wall is thicker than needed for the window, so I would have to add trim to get it to fit properly. Second, the stain wouldn’t match the exterior paint colors. And, third, a window such as this would be set into the stonework. I didn’t treat the lower front door and garage door in the same manner since it would have been more work than it was worth in the end.
For the thicker grids and fillers, I glued the pieces together and then added the backer board. For the thinner pieces here, it was easier to glue the grid to the backer board and then adjust the fit of the filler pieces afterward. I glued the filler pieces in place with wood glue supplemented with drops of super glue gel to keep them flat.
I added the black window frames to the addition front wall. These had to be cut from lengths of wood I purchased since there was only so much wood trim included in the original kit. I glued the bottom stone portion to the top grid assembly.
Next up, window trim and interior padding for the addition front wall, but here’s the addition in dry fit. :D
Categories: The Brownstone
April 18, 2014 | 0 commentsThe Brownstone – bay window section, part 5
Continuing work on the bay window section. After assembling the front wall, I added the trim to the interior upper window.
It was then time to add the bay window section. I drilled holes along the front grid opening.
I used a drop of super glue gel to insert headless pins into the drilled holes.
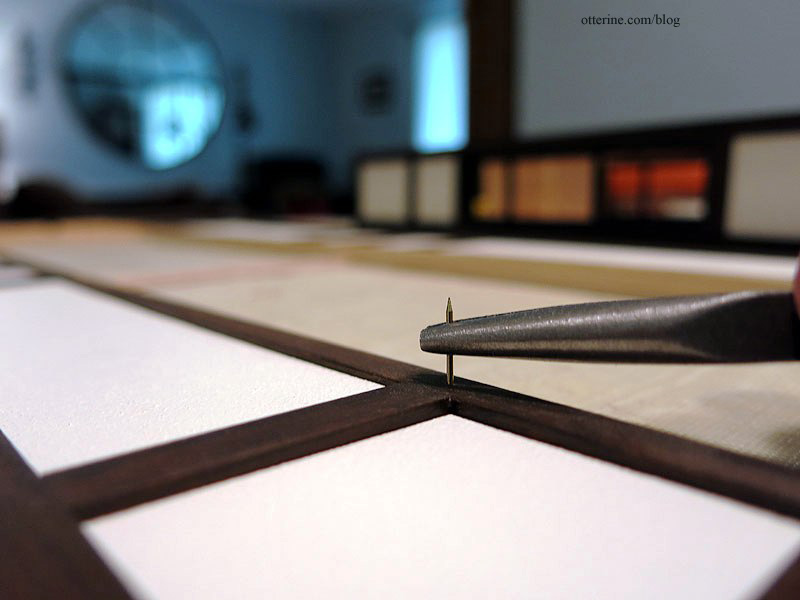
These are meant to add stability to the joins as opposed to just gluing the bay section onto the front.
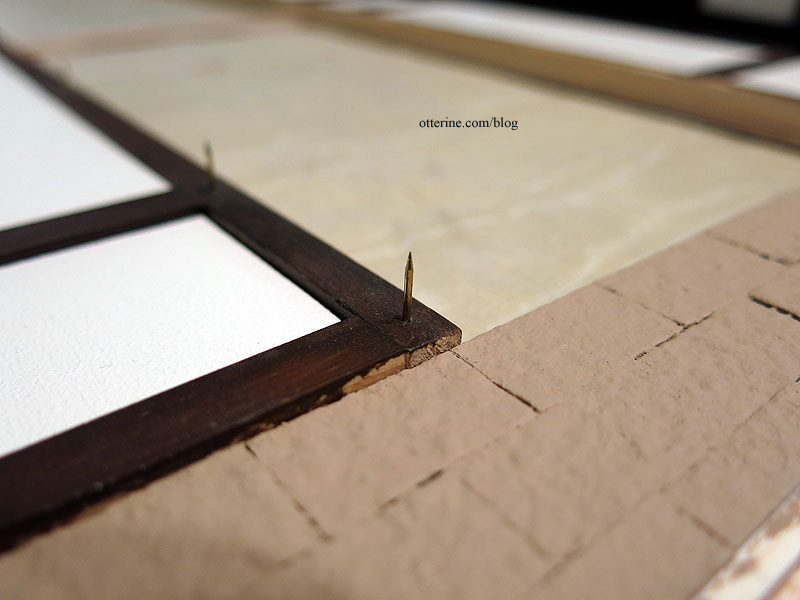
I lined up the bay window section to mark where pilot holes should be drilled in the opposite grid. After drilling the holes, I tapped it into place without glue in dry fit…but then it wouldn’t come back off. Haaaaaaaa! Well, it’s sturdy at least. :D
The front panel of the bay window popped loose in the process, so I had to glue that back in place. No biggie.
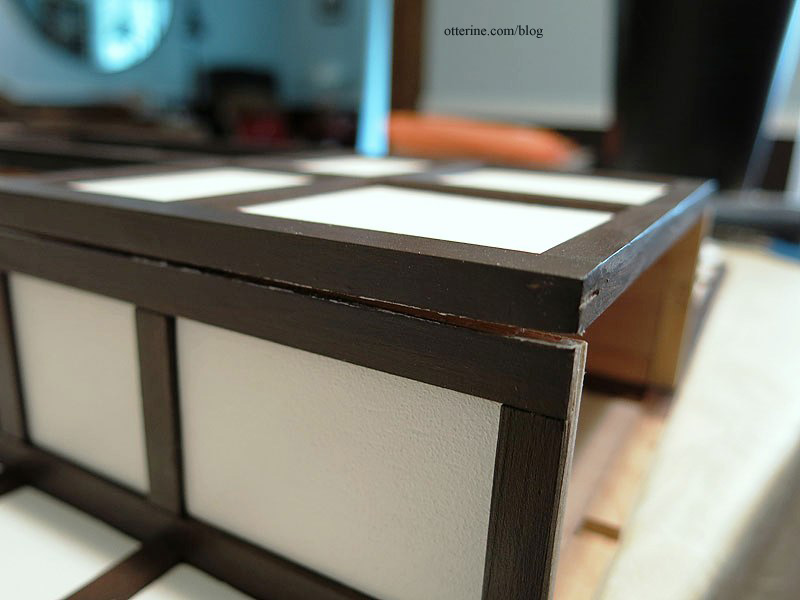
There was also one section where the bay window met the front wall that needed extra glue as well. Once the interior basswood padding is glued in place, any gaps between the two sections will be masked.
Some of the black window frame pieces popped out with the hammering and handling, not an unusual occurrence. I’m foreseeing a lifelong battle keeping these pieces intact.
I glued the interior window trim/padding pieces in place. This creates a solid, smooth surface for finishing later on in the build. :] I used toothpicks wedged into the corners to hold the boards in place while the glue dried.
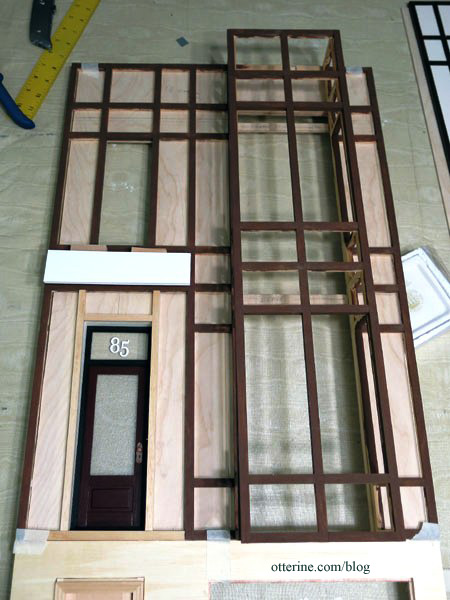
Here’s the front wall with the side addition, front door and front steps propped in place.
I think we’re getting somewhere! :D
Categories: The Brownstone
April 17, 2014 | 0 commentsThe Brownstone – front wall progress
I finished painting and sealing the timber grid and then added the completed filler pieces.
I drew guidelines for the lower stonework.
I cut trim for the garage door opening since the wood included in the Timberbrook kit is rather wide. I like this thin trim look better.
I applied the egg carton stones, leaving the edges open. These pieces will be added after the structure is glued together.
The backer board is 1/8″ thick and won’t allow the same finishing process I used on the bay windows, using 1/16″ basswood to act as inner trim work. (Here’s the post outlining this process.)
I determined the bedroom size (on the left) as well as the place where the floor board will hit. I cut the marked corner from the backer board.
I will finish the window and pad the wall for a smooth surface using the basswood trim method. (Here’s the finishing post for this window.)
I painted the stonework with the base coat of Fawn by Americana. I then glued the backer board in place.
Categories: The Brownstone
April 16, 2014 | 0 commentsThe Brownstone – bay window section, part 4
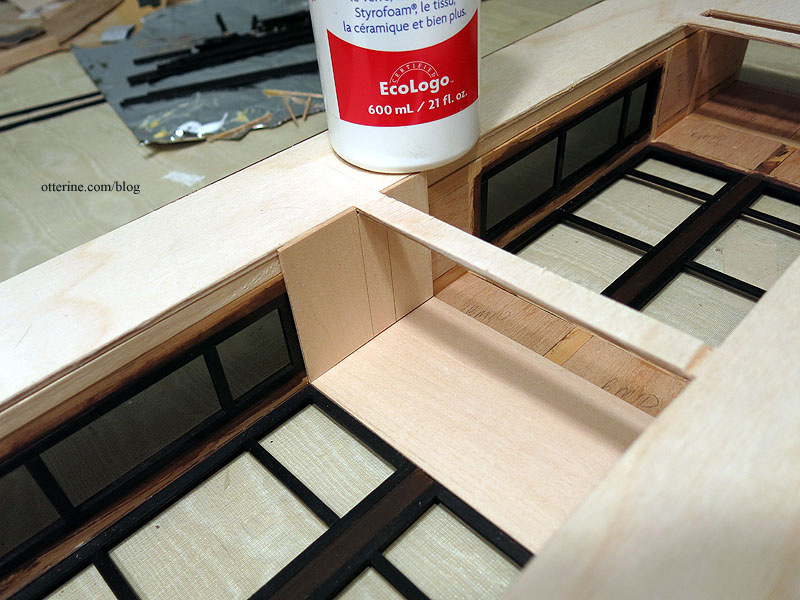
Continuing work on the bay window section. I masked off the top portion of each basswood padding piece and affixed the pieces to my work board.
The edges will serve as part of the window trim, so I stained them with Minwax Dark Walnut.
When working with a lot of pieces of similar shape and size, I mark the backs for reference. This one shows the upward direction, first section, right side, outer trim.
I will prime the remaining portions before applying wallpaper, but I am choosing not to prime before installation since I don’t want to risk warping the boards. Instead, I glued in the forward boards, the middle trim and interior corner boards.
The remaining boards will be installed after I glue the bay window section to the front wall, so this part is as completed as it can be to this point. Here they are in dry fit, so you can see what I’m after. :D
Categories: The Brownstone
April 8, 2014 | 0 commentsThe Brownstone – bay window section, part 3
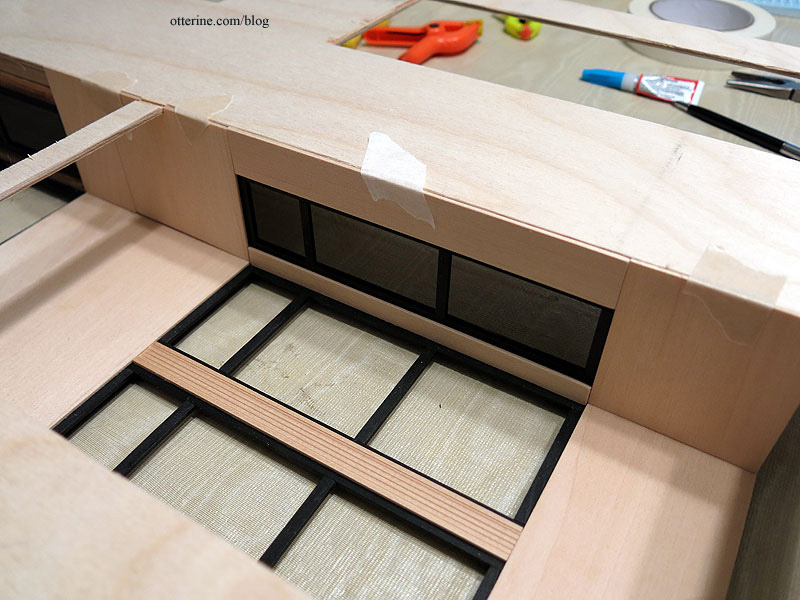
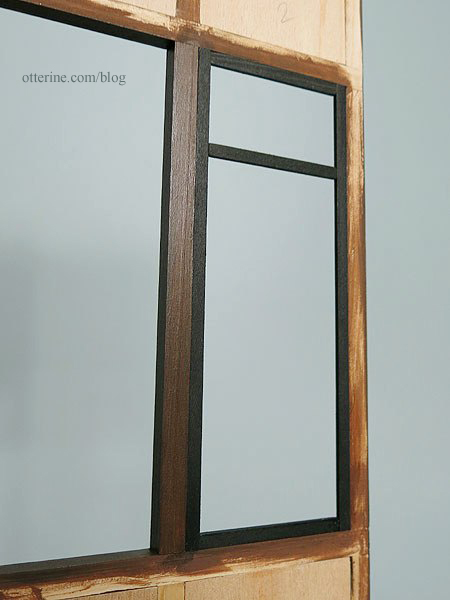
Continuing work on the bay window section. I glued the previously stained interior window frames into place for the three bay window sections. As noted before, the stained glass and acrylic inserts will be added much later in the construction process.
With those in place, I glued the sides onto the front, using a triangle to make sure the pieces were square. So exciting to finally have a portion of the build glued together! :D
Since there were slight gaps between the pieces, I pushed a small amount of spackling into the crevices. I wiped the excess from the timbers so I wouldn’t have to make a mess sanding. I will touch up the paint and sealer later.
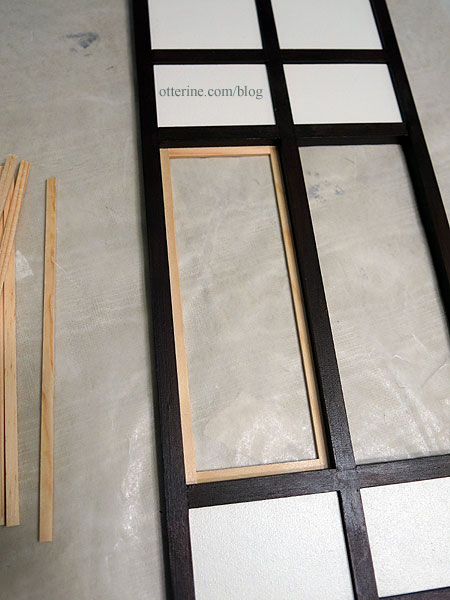
Since the bay window sections have no added backer board, the interior surface is uneven due to the way the walls are created — with a grid and inserts. I cut pieces of 1/16″ thick basswood to cover the surfaces.
The pieces overlap the edges where the interior window frames meet the timber grid since I plan to use these basswood pieces as both surface smoothers and window trim. This will make more sense later. This also lends support to the interior window frames. There is not a lot of gluing surface for those thin pieces, so they do like to shift and pop out at random. This should help alleviate that problem by adding another gluing surface.
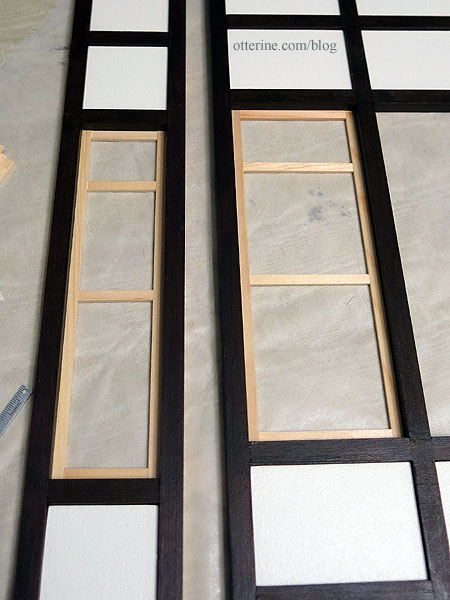
In order to measure and cut the side pieces, I had to put the facade grid and its backer board on in dry fit so the depth would be accurate. The side bay pieces end flush with the interior surface of the backer board.
I continued cutting the basswood parts, fitting around the backer board cross sections. I left these beams across the bay window section to support the floor boards. Since my basswood sheets were only 3″ wide, I had to piece the middle portion.
To finish the middle of the window frame, I used 1/2″ wide fancy trim from Manchester Woodworks. It is centered, though the angle of the photo makes it seem otherwise.
I added long strips in the corners and along the outer edges of the windows.
All of this padding will allow for a smooth surface for wall treatments and a finished look for the interior portion of the windows.

Next up, more staining…. :D
Categories: The Brownstone
April 6, 2014 | 0 commentsThe Brownstone – bay window section, part 2
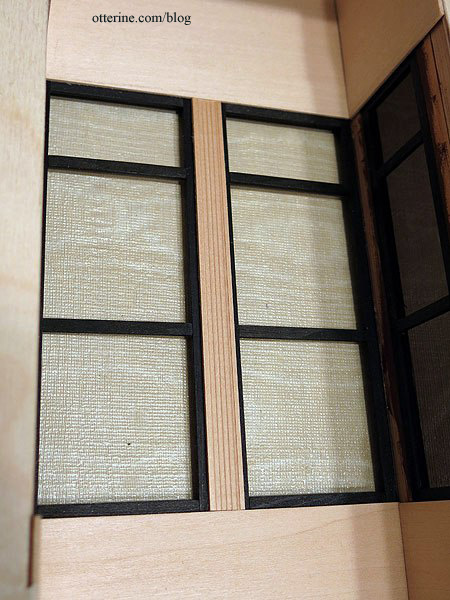
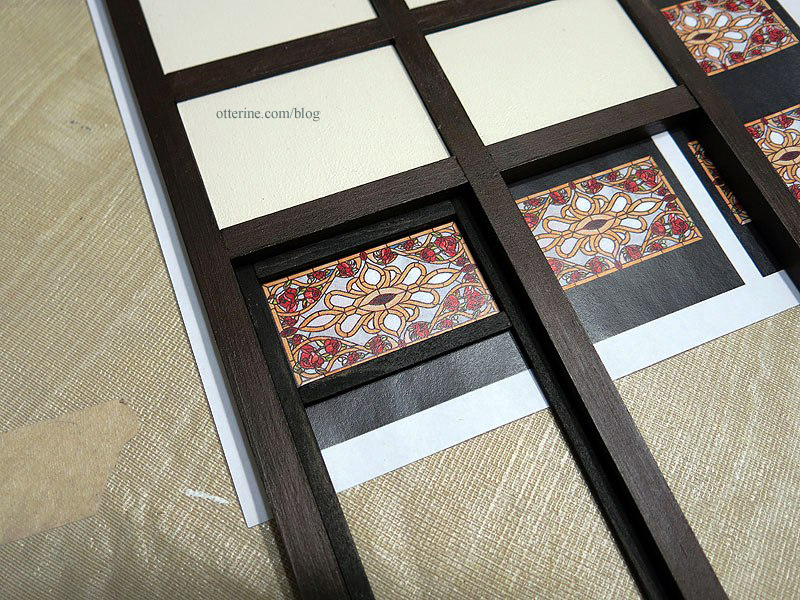
Continuing work on the bay window section. The glass is to be placed on top of the wood pieces and an identical set is glued in place over the glass to keep it secure, but I need to create the stained glass inserts first.
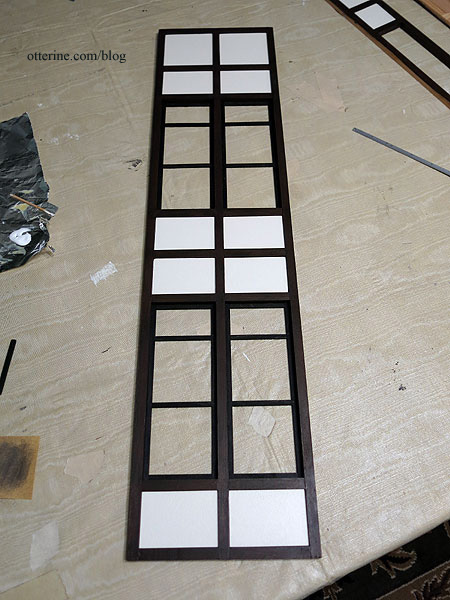
As a reminder, this beautiful Meyda Tiffany Bed of Roses stained glass panel at Wayfair is the image I’m going to use for the stained glass. Since the side bay windows are smaller, I had to alter the image in PhotoShop so the smaller panels would coordinate. In the original kit, stained glass decals were applied to the front windows only. Here’s my test print.
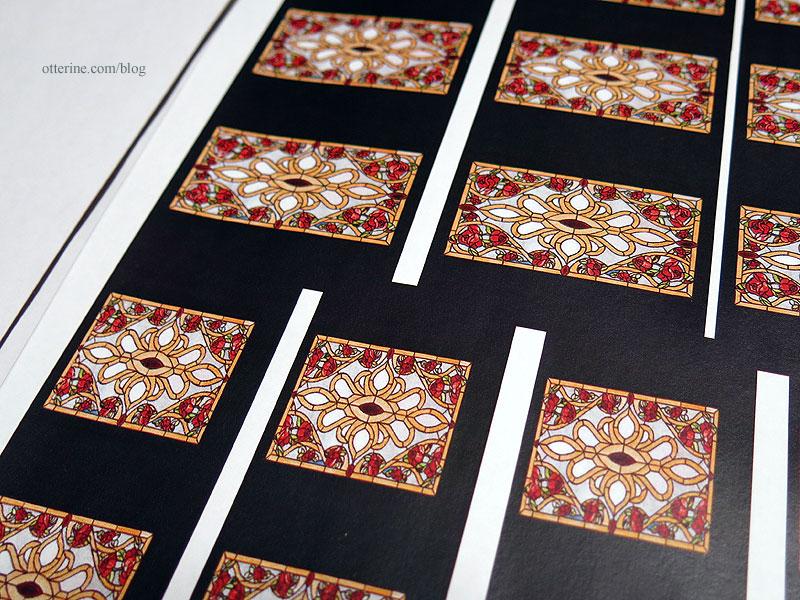
And, these are the finals printed on transparency film.

Since the stained pieces aren’t 100% dry, I dry fit one window frame into place. The instructions indicate the placement of the interior frames while you can keep the front grid on a flat surface since the frames need to be flush on the interior. I stained both sides of the framing pieces. This eliminates any bare wood showing from either viewing direction. I’m keeping the imperfect side facing the yet to be installed acrylic insert.
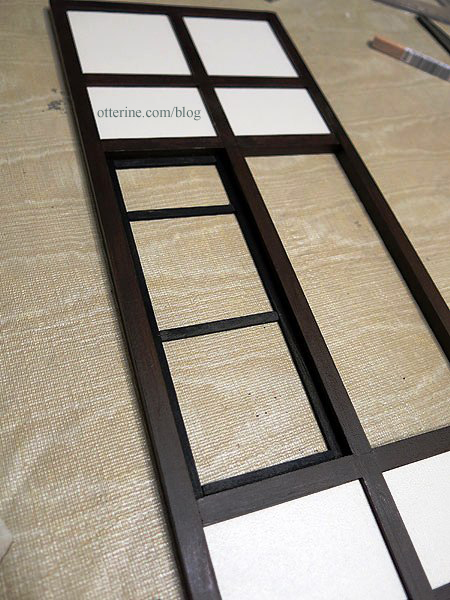
I used my test print to determine the placement of the lower horizontal for the stained glass portion.
I measured to find the center in the remaining space and fit the middle horizontal in place.
I cut one transparency and tested the fit, placing one of the kit acrylic inserts into the opening underneath it. The top surface of the transparency is shiny, but the back is not. Having the acrylic behind the transparency will disguise the dull back.
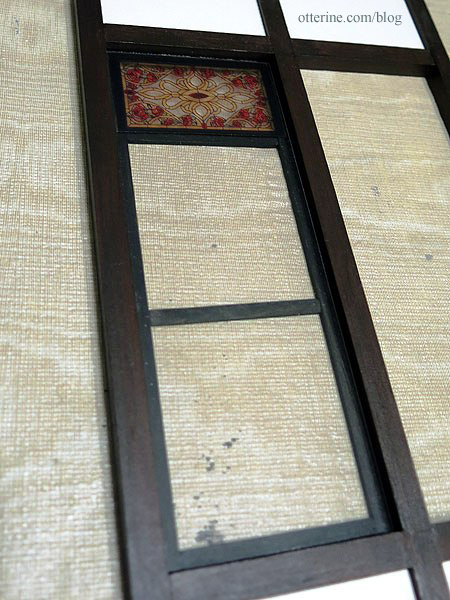
The transparency floats so I can adjust or replace. :]

I then dry fit the exterior frame and cross pieces. The instructions indicate adding the acrylic inserts and final framing later in the build, and I like that idea for keeping the windows clean and unharmed during decorating. I like it! :D
I did the same for the side bay window opening to make sure my measurements worked for both configurations.
I put the bay back into dry fit.
All good! :D
Next up – gluing the interior framing for all window openings, cutting new pieces as needed.
Categories: The Brownstone
March 25, 2014 | 0 commentsThe Brownstone – bay window section, part 1
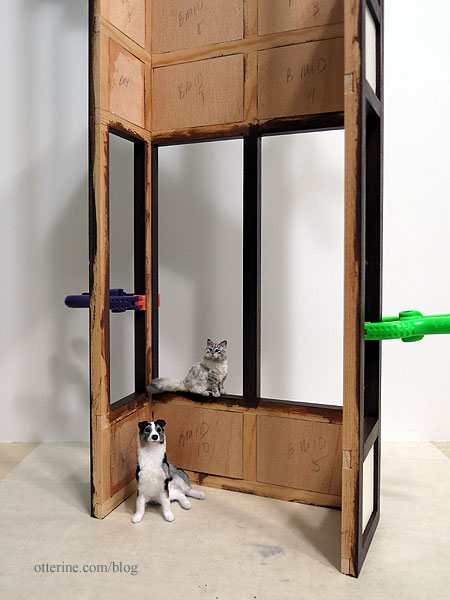
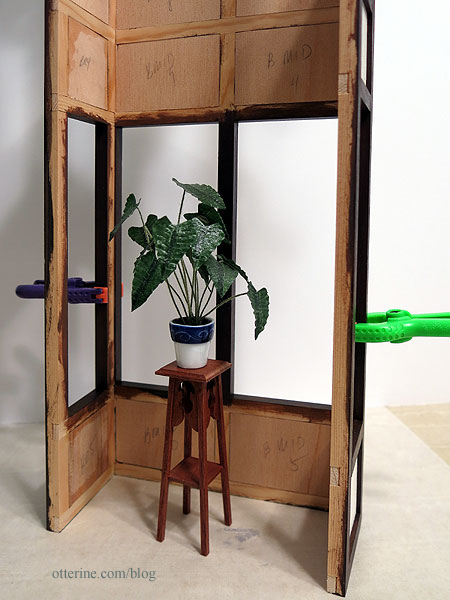
Here’s the bay window section. I have the timbers and filler pieces painted and glued together, but the three sections will remain separate until I complete work on the windows. These are nice large window openings, as you can see from our lovely model Ophelia.
Inside, the grid creates an uneven surface that will need to be addressed after the windows are in place. I’m thinking 1/32″ thick veneer for a smooth wallpapering surface. There will also be trim work to finish the interior windows. All of my ideas are still floating around.
It’s a good interior space, as shown by Sherwood and Ophelia.
I’m thinking plants for the main level (maybe a settee or window seat in the bedroom above).
The original kit has non-working windows and for the ease of assembly, I am using those. I do love working windows but not enough to overhaul the entire assembly process.
The kit comes with pre-cut pieces to make the window frames. Some fit perfectly and some will require my least favorite phrase “sand to fit.” The pieces are to be glued in, but they hold well on tension alone.
The top divider for the stained glass detail and the middle divider are added after the frame. I’ll actually measure when I do the final installation.

The side bay windows are slightly thinner than the front bay windows but created the same way.
Since I added windows to the side addition and the kit also has the wrong amount of pre-cut pieces for the existing windows (the amount listed in the instructions is incorrect for the amount needed), I bought some additional lengths of wood from National Balsa when I placed my large order. I stained all the pre-cut pieces and two of the additional lengths I bought using Rust-Oleum Ebony.
Next up – preparing the stained glass inserts and gluing the pieces in place.
Categories: The Brownstone
March 24, 2014 | 0 commentsThe Brownstone – timber grid, part 3
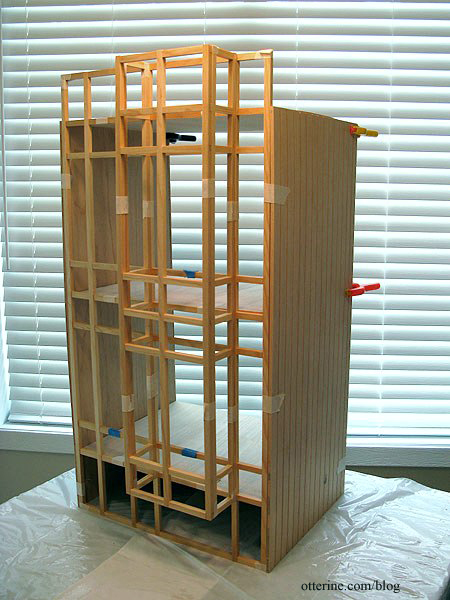
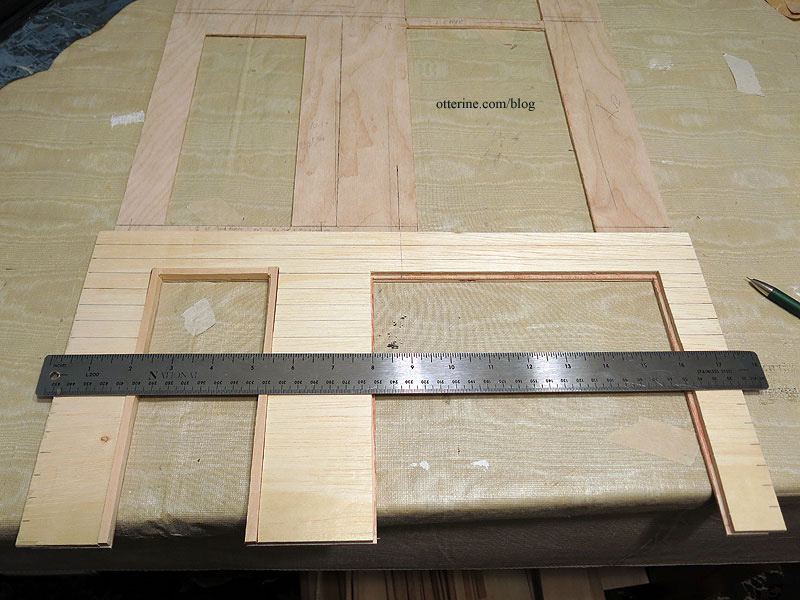
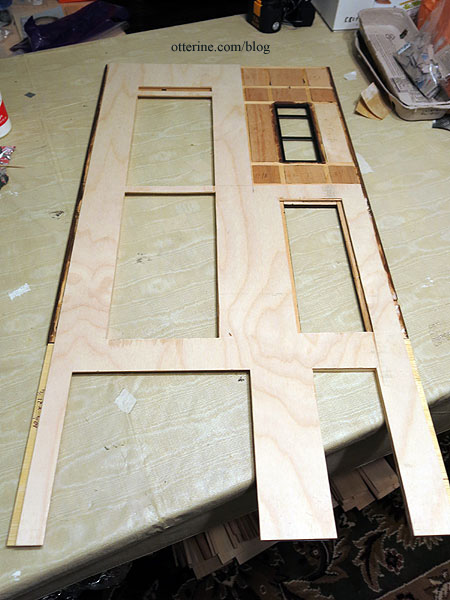
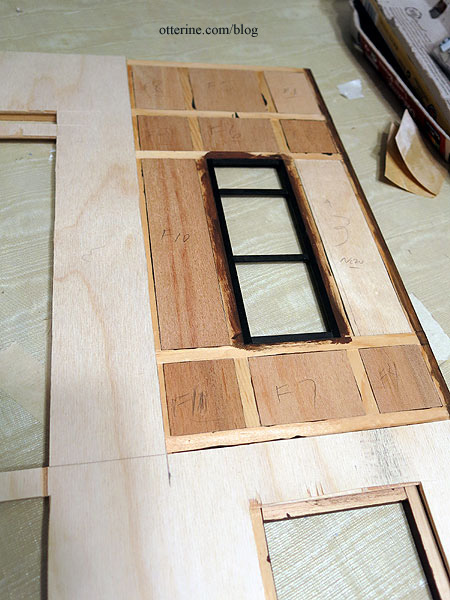
Continuing work on the timber grid. The front wall of the main structure was made from the original kit grid, with the grid pieces measuring 11/32″ wide by 5/16″ deep and the filler pieces measuring 1/4″ thick, leaving 1/16″ of the grid depth exposed. The front wall of the side addition was made from purchased basswood, with the grid pieces measuring 5/16″ wide by 5/16″ deep and the filler pieces measuring 1/4″ thick, also leaving 1/16″ of the grid depth exposed.
To cut down on the overall width of the structure, I approached the side walls differently. For these, I used grid pieces measuring 5/16″ wide by 1/8″ deep and the filler pieces measuring 1/16″ thick, still leaving 1/16″ of the grid depth exposed. I followed the horizontal pattern of the front wall but spaced the vertical beams evenly across the width of the wall. I marked the grid on the side wall of the addition and cut the beams to match. There is no right-hand vertical beam on the side wall since the horizontal beams will abut the corner beam of the front wall of the addition, which will be turned perpendicular when built.
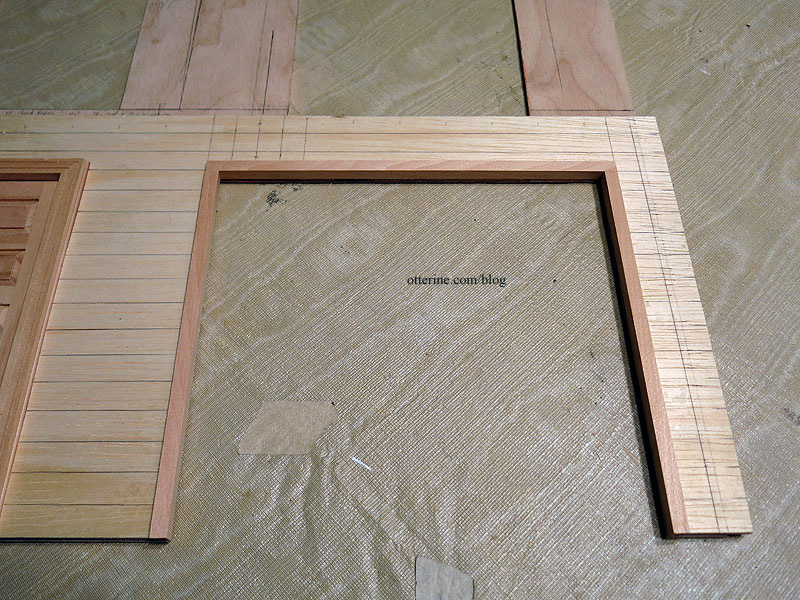
I notched the center beams as I had done for the front wall of the addition.
To get them even, I measured the bottom board first and locked them together in my gluing jig. I then used a triangle and pencil to mark the measurement across all the boards.
I cut the horizontal beams to abut the back vertical beam so I wouldn’t have to spackle the joins on the back surface. I cut filler pieces for the new grid from 1/16″ thick basswood. Cutting thinner wood is easier and faster. That and the lower cost of supplies are the reasons I switched to smaller thicknesses for the side walls.
I bought all this wood from National Balsa because finding 36″ lengths of basswood strips and sheets locally is impossible. They shipped fast, and it’s good quality wood.
I opted to omit windows on the upper two floors since these will be small rooms with interior doors and I need all the wall space I can get. There will be front-facing windows in each upper room (mudroom on the main floor, bathroom on the top floor), so there will be ample light. The bottom floor will have only the basement window on this side.
I’ve filled a few knots and joins in the beam structure so the grid and filler pieces are ready for painting. This particular wall likes to warp, so I ran the plywood board under water and pressed it flat to dry for several days. When it is not on my work table, it is pressed under magazines and paint cans. I won’t let it loose until it’s time for final assembly, which should fix the warp permanently.
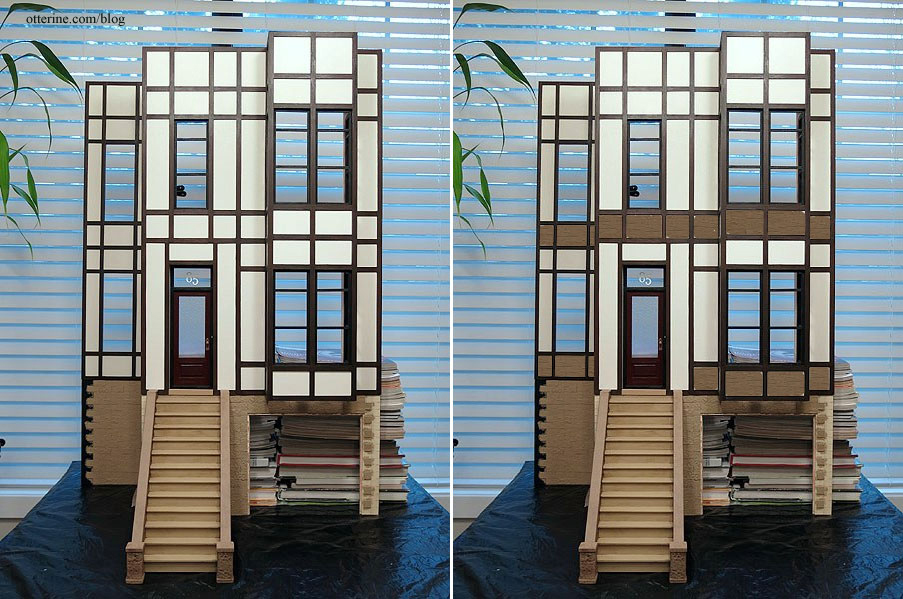
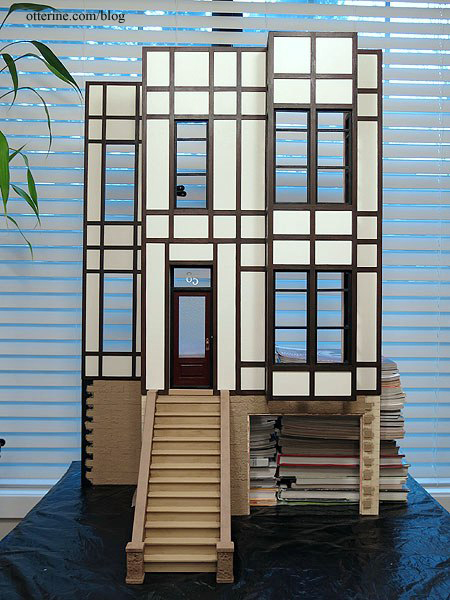
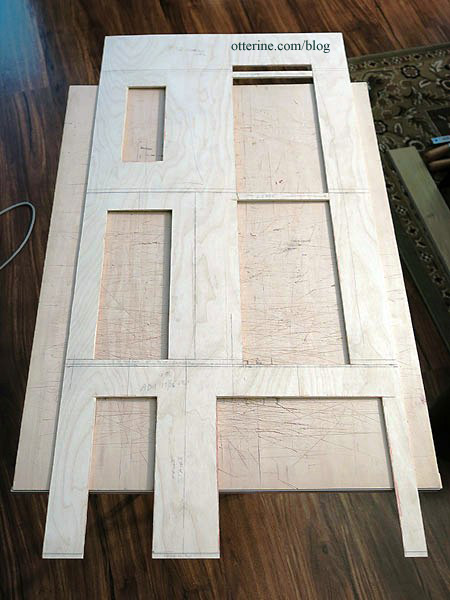
With the opening for the front door assembly cut, I could finish the grid for the main front. I slipped the door into the new opening and taped the previous grid in place.
I cut two vertical pieces to finish the sides of the front door and a short horizontal just above the door.

The upper canopy (shown here with foam core board and wood scraps) will disguise the fact that these verticals don’t match with the upper existing design. Since the horizontal along the top doesn’t match either, I opted to leave off the horizontal detailing. This makes the door panel its own design element.
The overall grid still works as a cohesive design with the front door now a focal point.
I cut filler pieces to complete this section.
Categories: The Brownstone
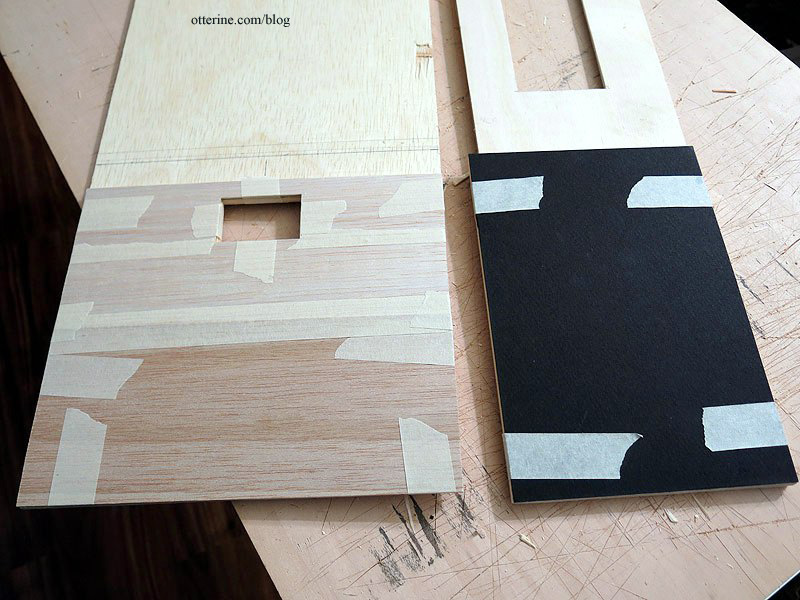
March 16, 2014 | 0 commentsThe Brownstone – openings and padding
With the new boards cut and marked, I needed to start cutting the openings for the windows and doors. I am cutting them with a utility blade. The thickest boards are 3/16″, so it is reasonably easy and quick.
Since the timber assemblies sit on top of the structure boards, I needed to pad the lower areas that will be covered in egg carton stone. The side addition front has 5/16″ thick timbers, so I first added a 3/16″ plywood layer.
I then added a 1/16″ mat board layer. I could have used 1/4″ plywood, yes, but I was trying to use up the scraps I had on hand. The sides will have 1/8″ thick timber assemblies, so I added a layer of 3/32″ balsa — again using up the scraps I had on hand.
I have a small Timberbrook working basement window from All About Miniatures that I’ve added to the lower side wall.

Since you can’t take it apart to finish, I decided to try staining it before cutting the opening. If it turned out to be a disaster, I wouldn’t have wasted my time and energy cutting the opening for it (and then have to fill it back in). It worked well. This is Minwax Dark Walnut.
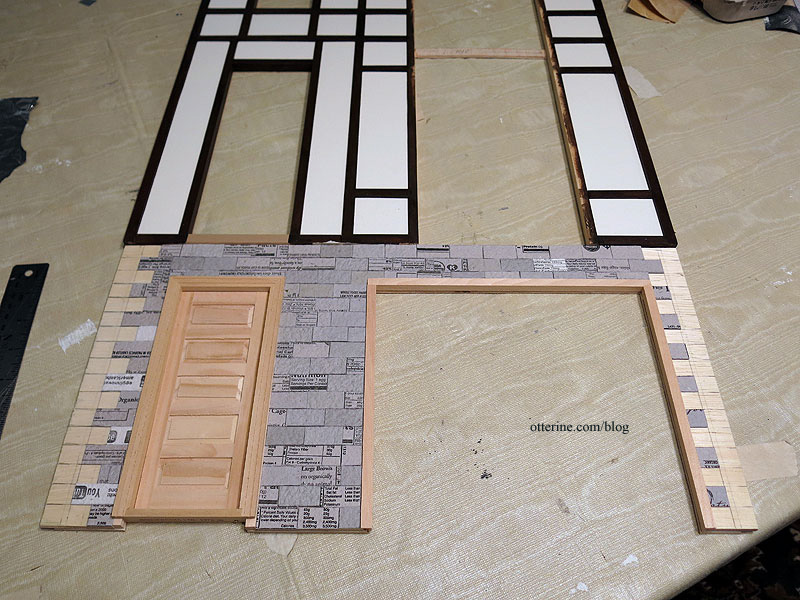
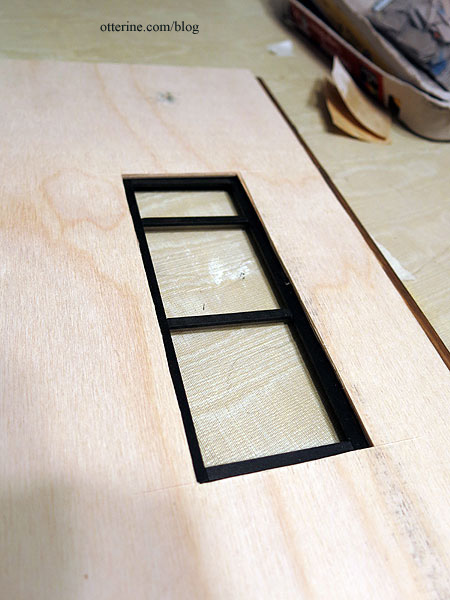
I cut the garage door and lower entry door holes in the 1/8″ thick main backer board. I cut a 3/16″ thick padding board for the lower front (not glued in place yet). This will have egg carton stone covering it.

I cut the opening for the front door and checked the fit. Hooray! :D
I cut the three openings for the bay window section and the single upper window above the door.
Categories: The Brownstone
March 9, 2014 | 0 comments


NOTE: All content on otterine.com is copyrighted and may not be reproduced in part or in whole. It takes a lot of time and effort to write and photograph for my blog. Please ask permission before reproducing any of my content. (More on copyright)

The Brownstone – timber grid, part 4
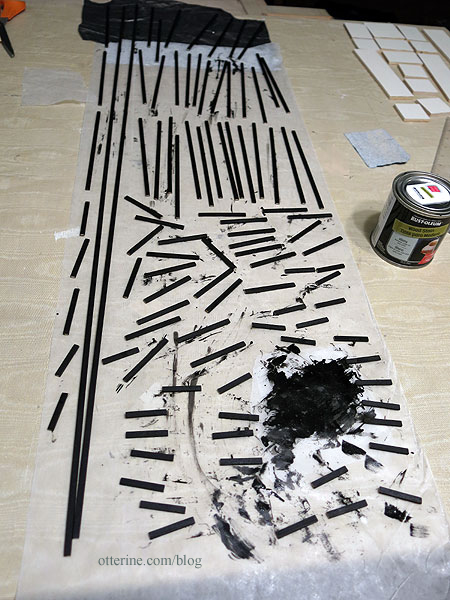
Continuing work on the timber grid. Slogging along is more like. Oy, this is mind-numbingly dull work. :\
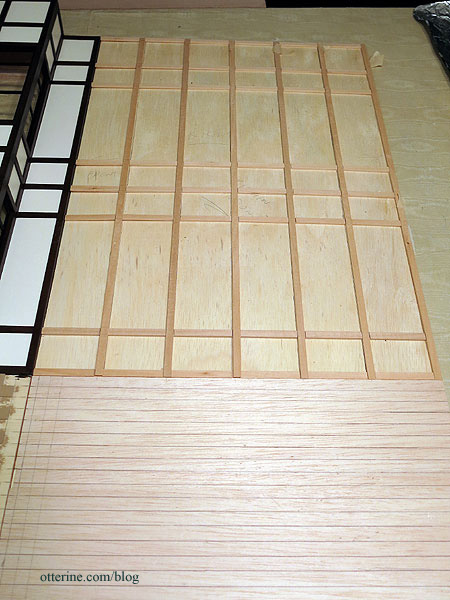
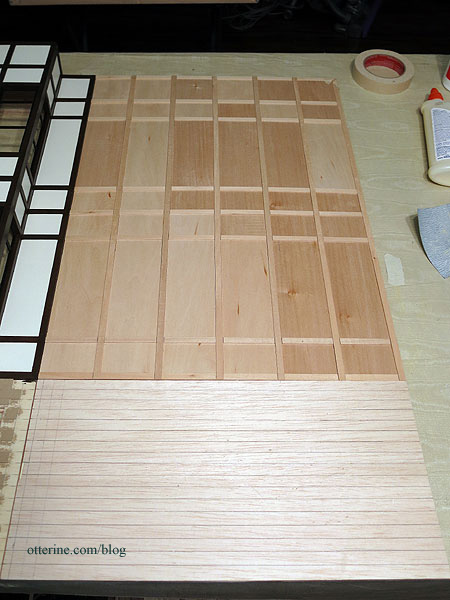
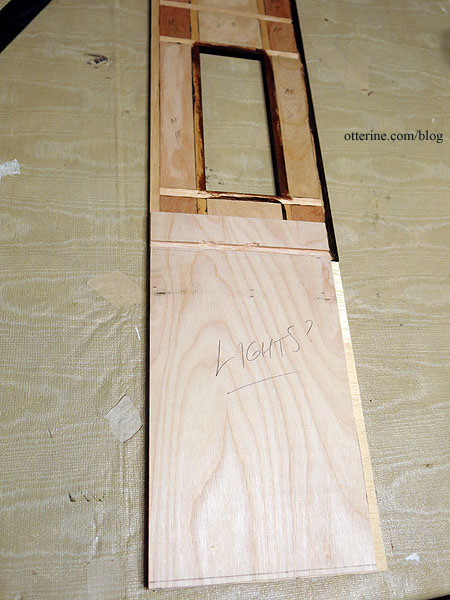
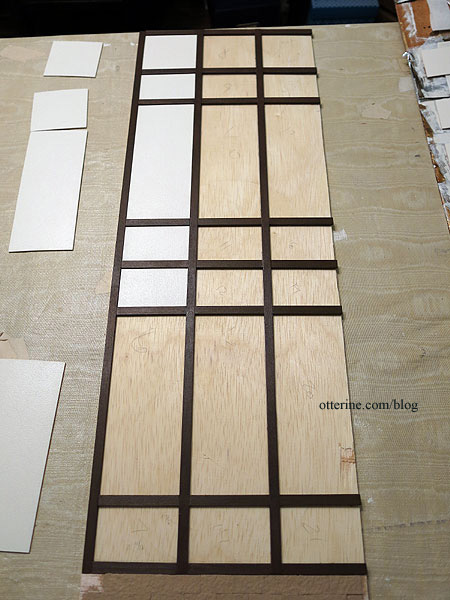
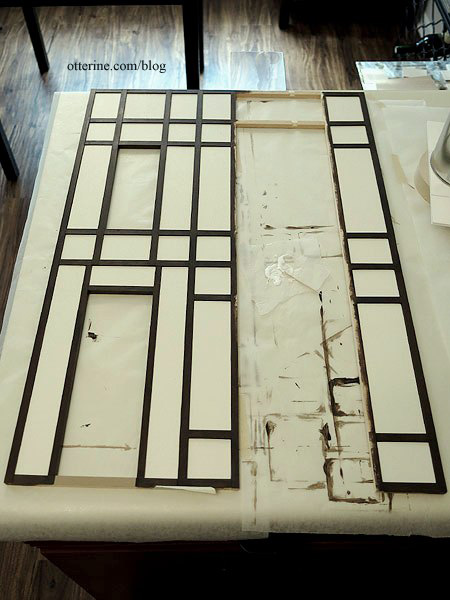
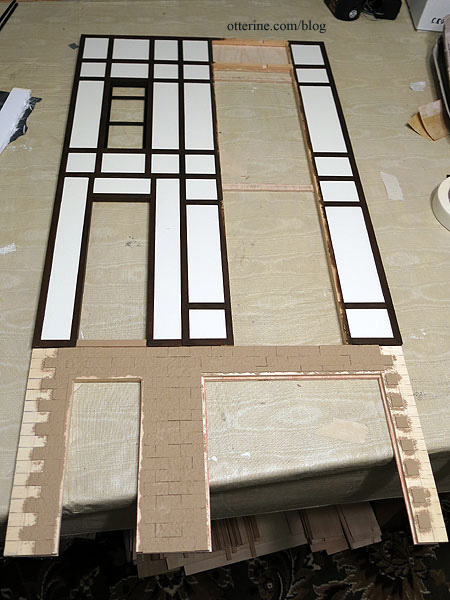
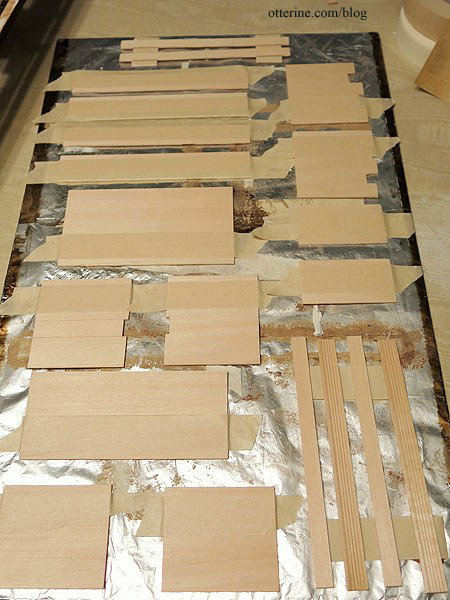
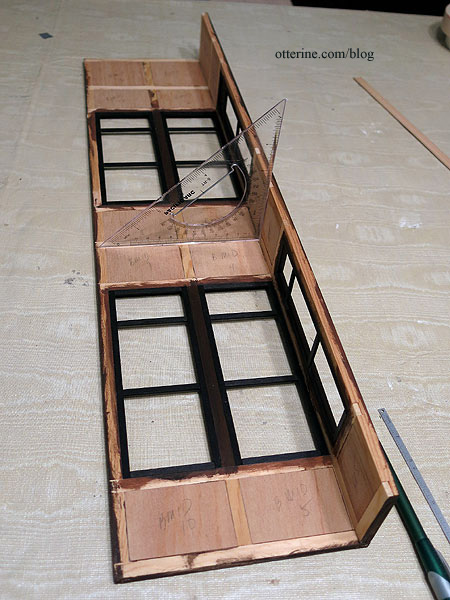
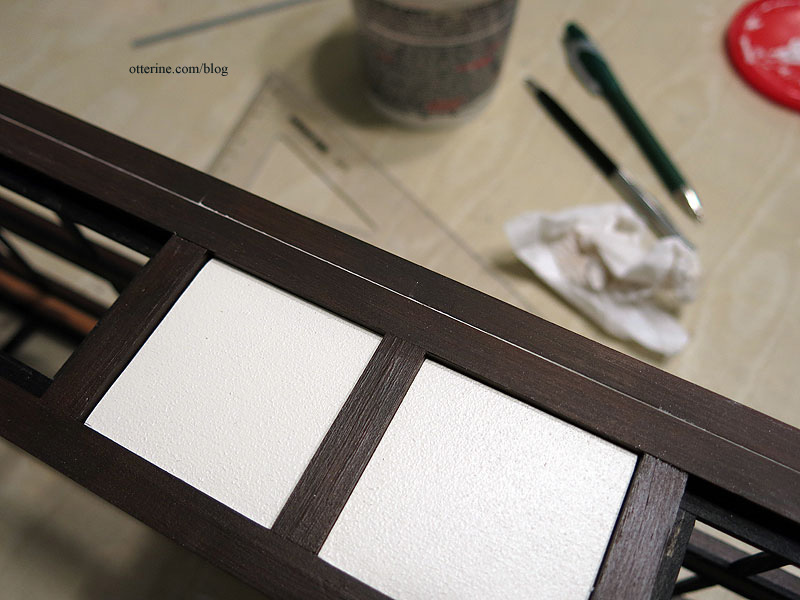
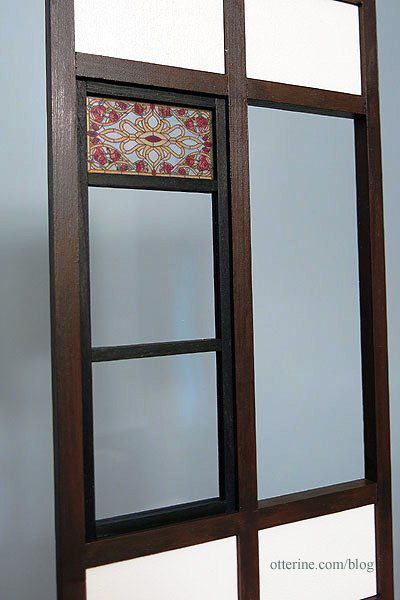
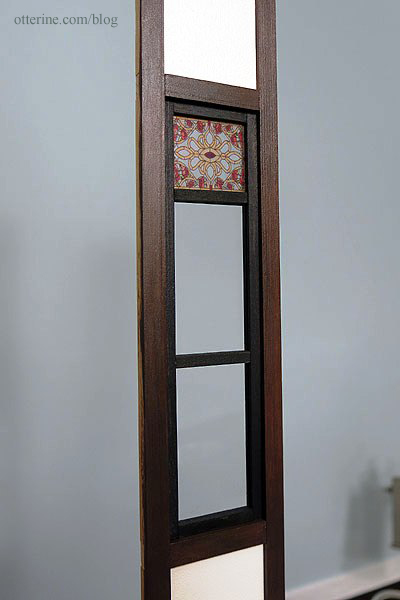
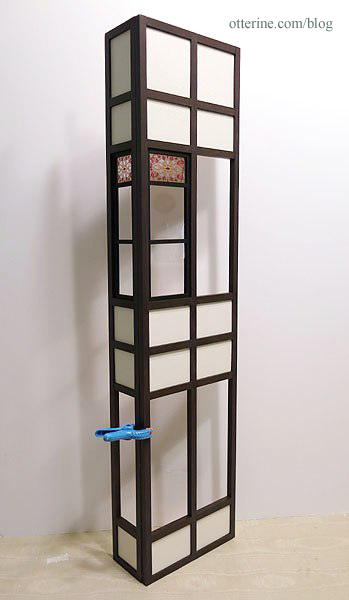
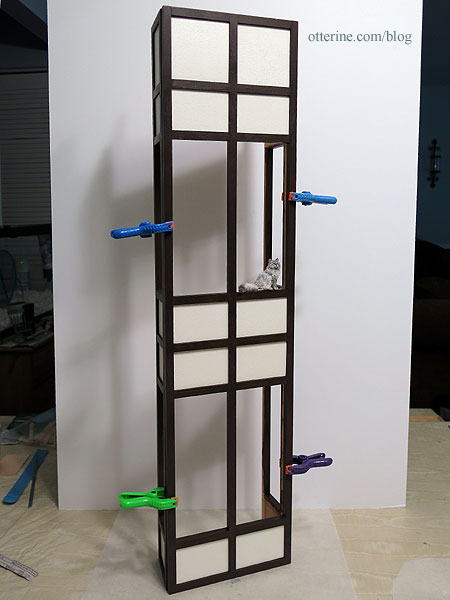
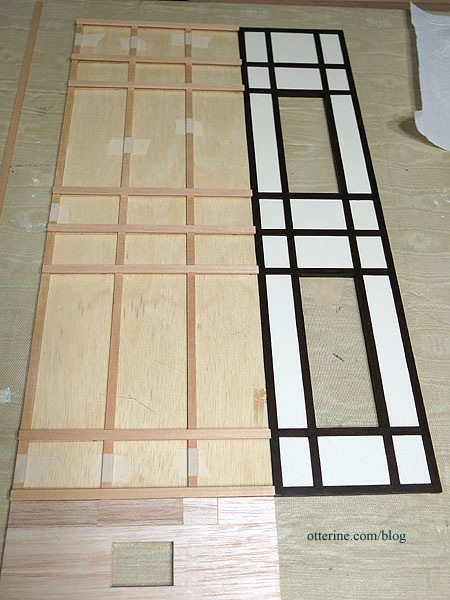
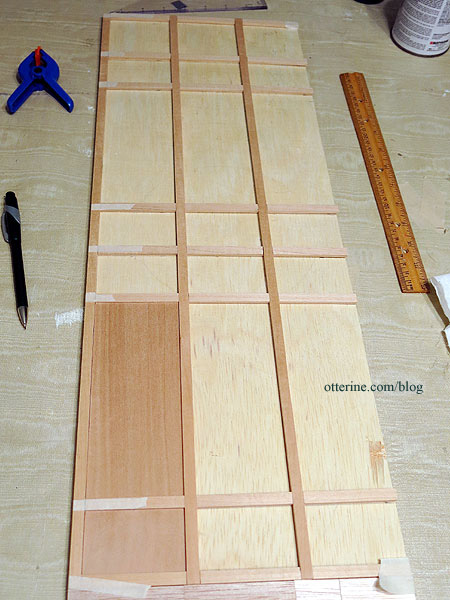
The side wall opposite the addition is the largest solid wall in the build. I used the same technique as the side wall of the addition, with 5/16″ x 1/8″ grid boards and 1/16″ thick filler pieces. Here’s the initial grid.
And, with the filler pieces.
I thought about adding a window in the kitchen but decided against it mainly because of how the other windows in the build are constructed. It was simpler to leave it out, and having a solid wall would give me greater flexibility in decorating. We’ll just imagine there’s a window on the invisible back wall. :]
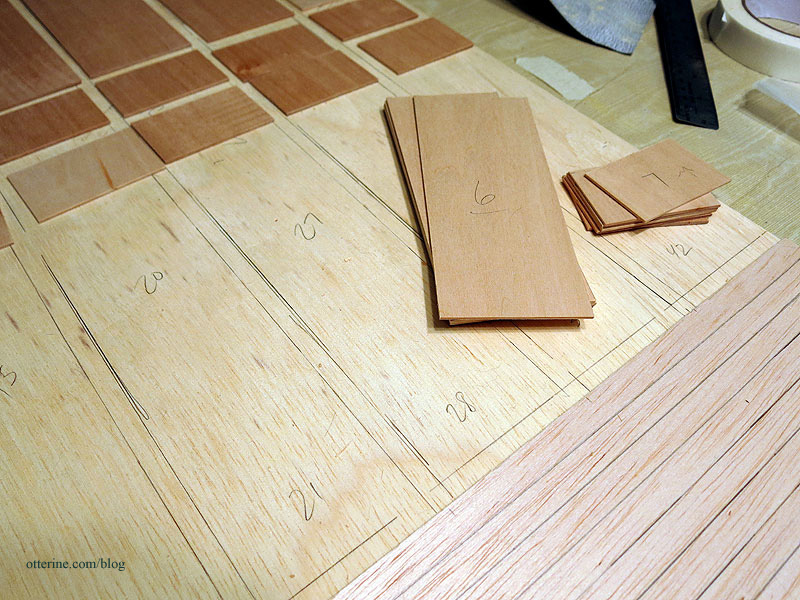
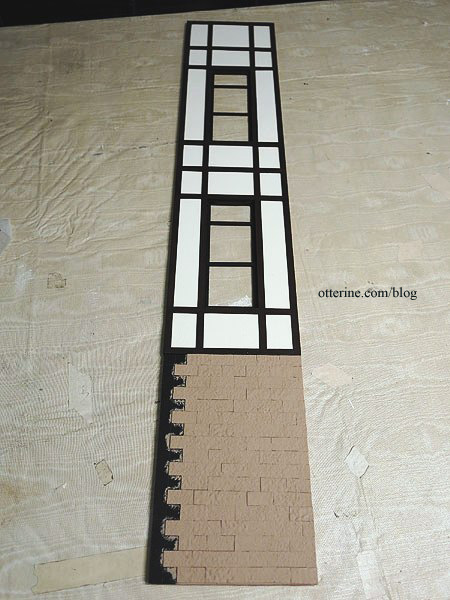
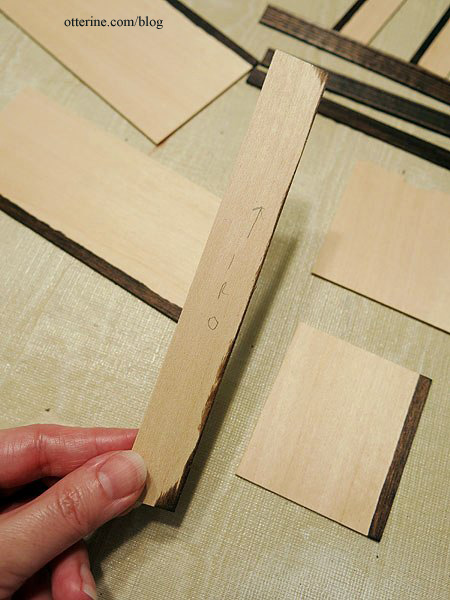
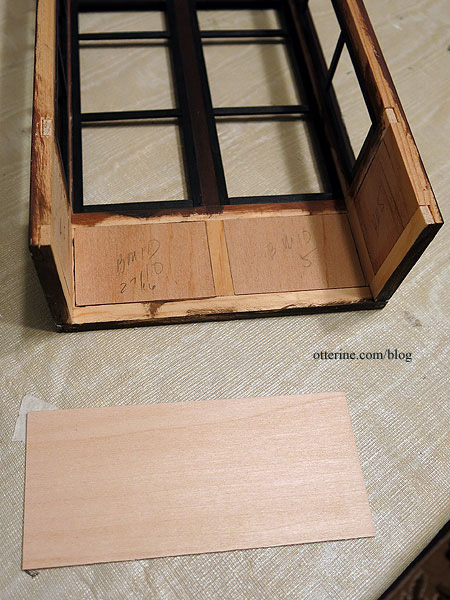
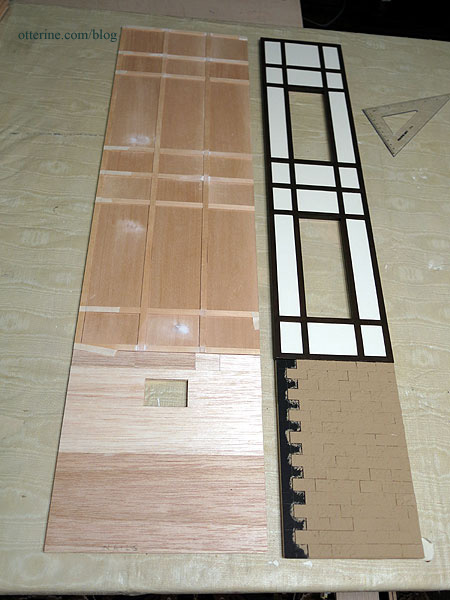
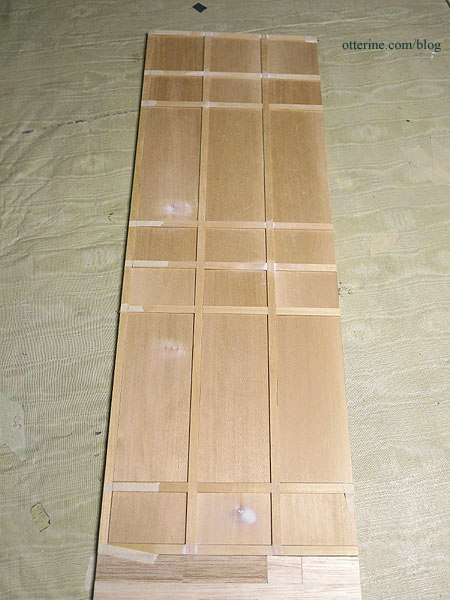
I numbered the backer board and the filler pieces to make it easy to reassemble after painting.
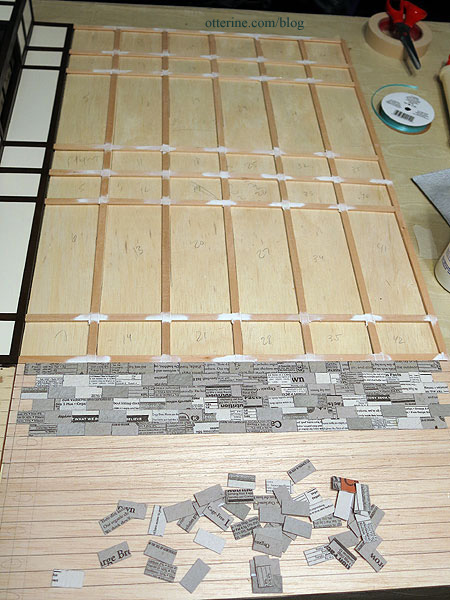
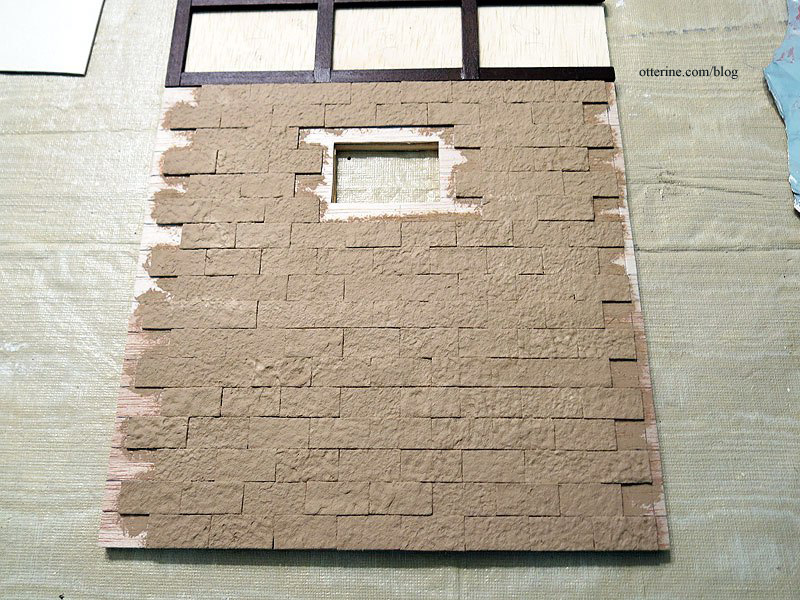
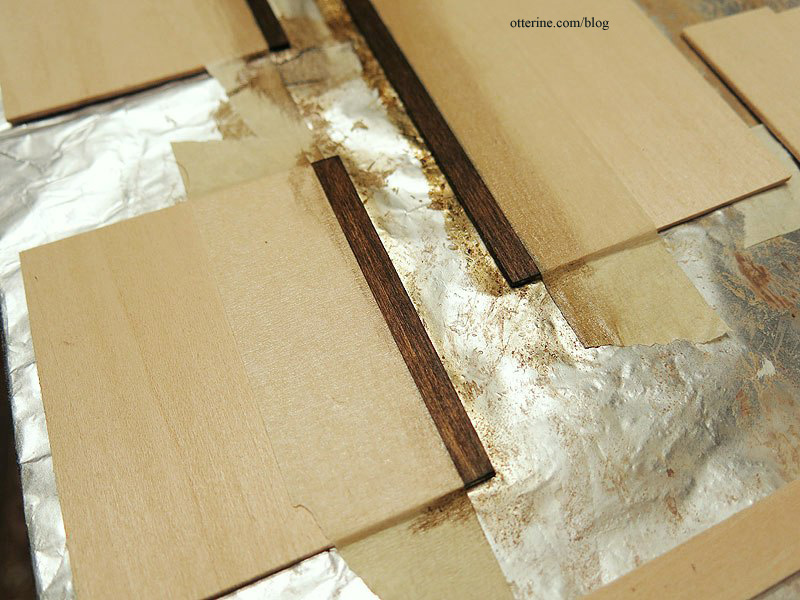
I filled in the gaps in the grid with spackling and started bricking the bottom portion.
After this, there will be a partial wall on the other side…then no more grid work for this build! Is that a light at the end of the tunnel? :D
Categories: The Brownstone
May 11, 2014 | 0 commentsThe Brownstone – timber grid stonework, part 1
Somewhere in all this work, I realized I had forgotten all about the stonework in the color plan.
Luckily, I am only halfway through…and it’s an easy fix. Before going through the trouble, though, I got out my trusty PhotoShop. Here’s the addition with the stone…
And the front…yep, it’s worth adding.
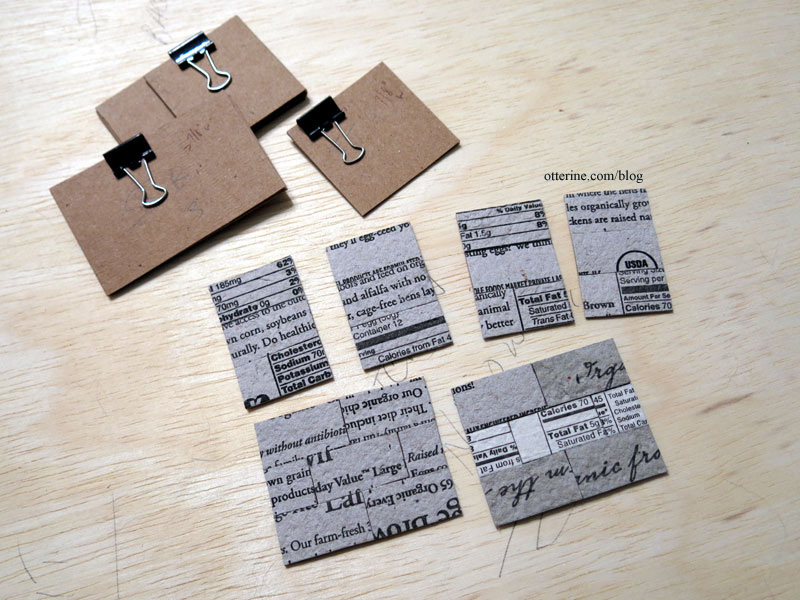
I started with thin cardstock templates, each numbered so I could match them up again later.
Instead of using the 3/4″ x 1″ stones I had been cutting for the base, I determined the layout using the individual templates. I thought it would look off to have partial stones, so I cut three even strips slightly wider than the base stones. I then cut the length to make a pleasing pattern, gluing the stones to the cardboard template.
I’ll paint the inserts with the base coat of Fawn by Americana. Once I create the final two grids for the side walls, I’ll make the stone inserts for those as well. I’ll then paint the final washes and glazes when I do the base stone so it will all coordinate in color.
Categories: The Brownstone
April 21, 2014 | 0 commentsThe Brownstone – a pictorial review
This post will change as the build progresses.
The back story for The Brownstone is that it is the home of a world traveler. I toyed with the idea that this occupant is the grandson of The Haunted Heritage’s grandma, and it stuck. Our world traveler likely won’t have a name, but I’ll have to figure out something to call him. He is a collector of interesting items and lives in an upscale neighborhood.
The Brownstone is a modified version of The Golden Gate view kit from American Craft Products. These kits are no longer in production, but they show up on the market from time to time.
kit photos from the box The first dry fit shows the kit’s original configuration of two rooms with a dead space underneath the first floor.
Below is my modified version in the latest dry fit. I added height to the bottom to add a garage.
The vintage 1950 Beetle will be housed here.
I also built a side addition to add three more small rooms.
Mike was gracious to lend me his Sketchup drawing so I could try out some colors. I decided on a Tudor inspired exterior (shown here without the height addition and garage).
I love the colors and textures. :D
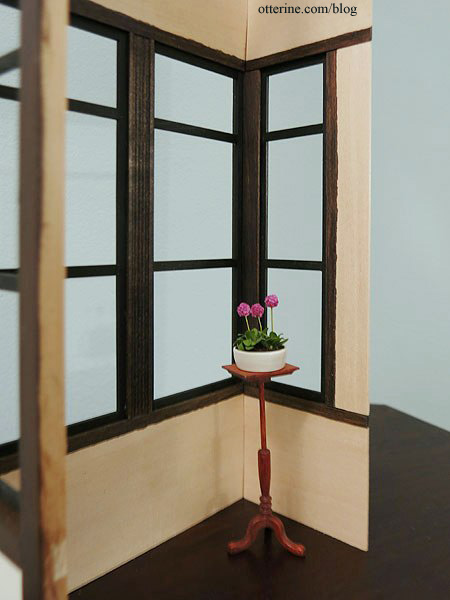
Testing the bay window stained glass inserts.
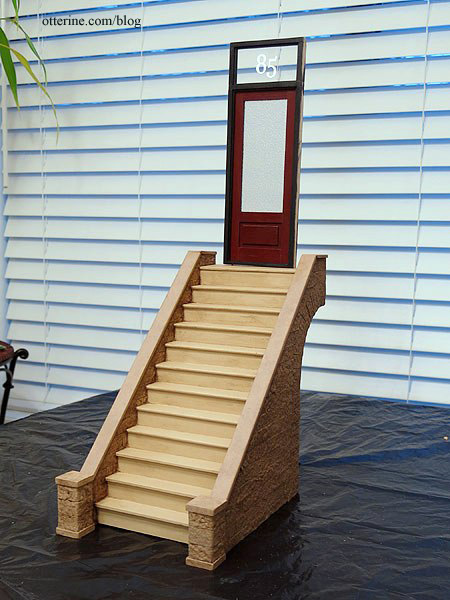
The front steps are scratch built.
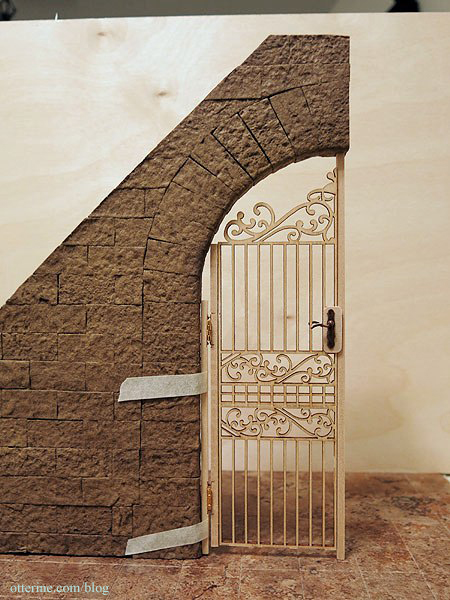
The security gate under the stairs is a work in progress — just needs paint.
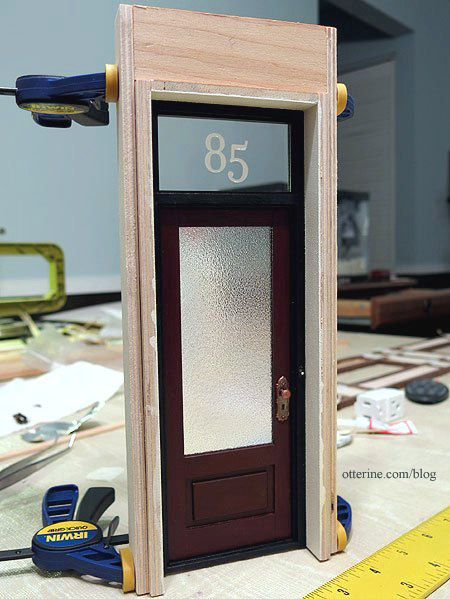
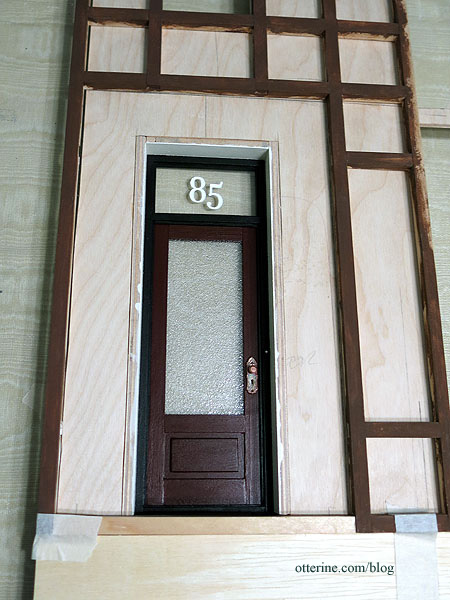
I used the kit door but built the custom frame to get the door to function, adding a transom window in the process. Why 85 as the house number? I was trying to think of some historical figure to serve an inspiration, and Edgar Allen Poe popped into my head. I found this article on one of his residences at 85 West Third Street in Greenwich Village, so 85 it was! :D
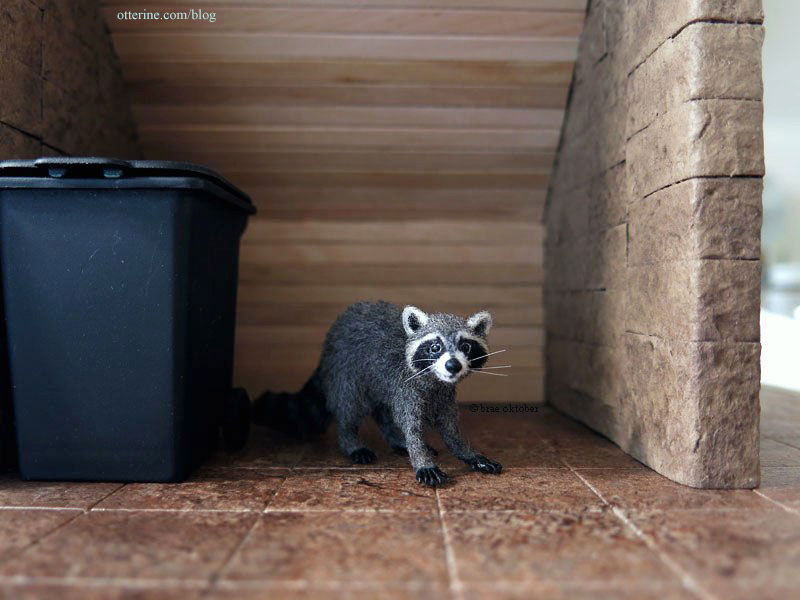
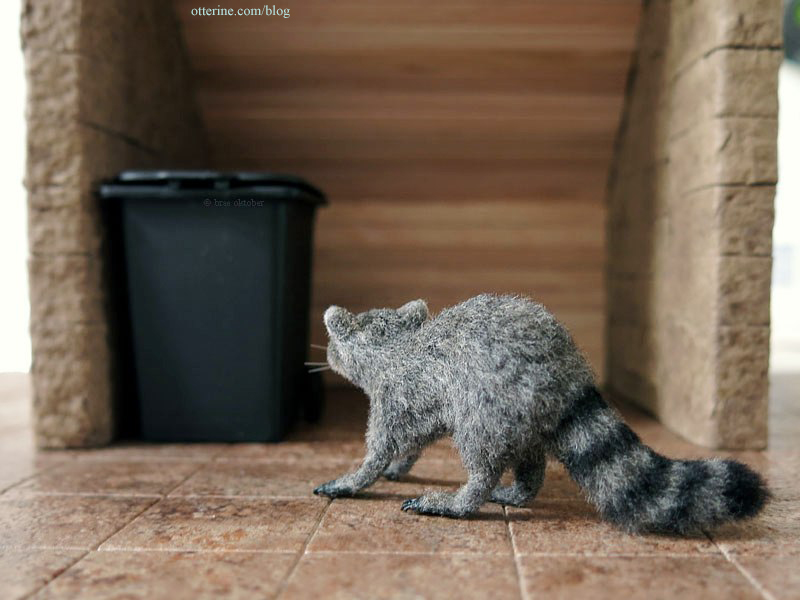
Roland Sneakypants, made by Steve Panner, will skulk about the city block in search of food. :D
Too cute!
Stay tuned…
Categories: The Brownstone
April 19, 2014 | 0 commentsThe Brownstone – side addition progress
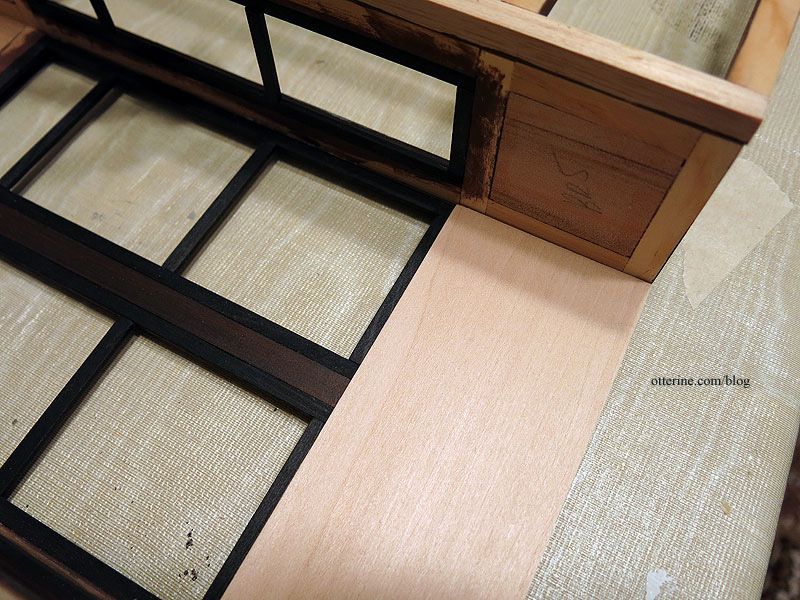
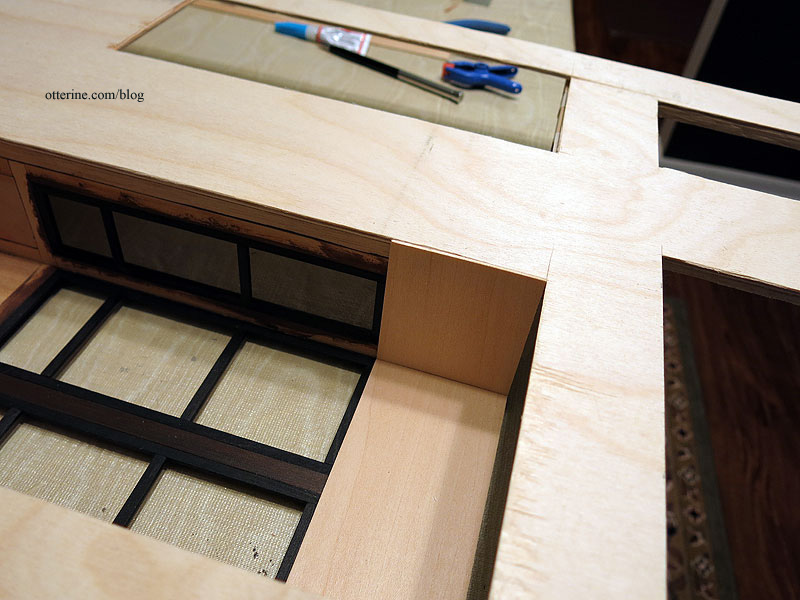
The side addition has a front wall with two large windows made in the same manner as the original kit. As with the front main wall, I had to modify the backer board for the addition to trim the windows. I had originally planned to rout channels for the floor boards, but I don’t have the right setup for making straight channels with my Dremel tools. You can see my initial Dremel attempt here on the left. On the side wall, which is solid without window openings, I cut the floor channel by hand. The note about the lights reminds me not to glue the unit together without first addressing the wire channels. :]
I didn’t think the wall would be stable enough glued end to end, so I needed some of the backer board to remain intact. I will cover this thicker portion with a built-in window seat.
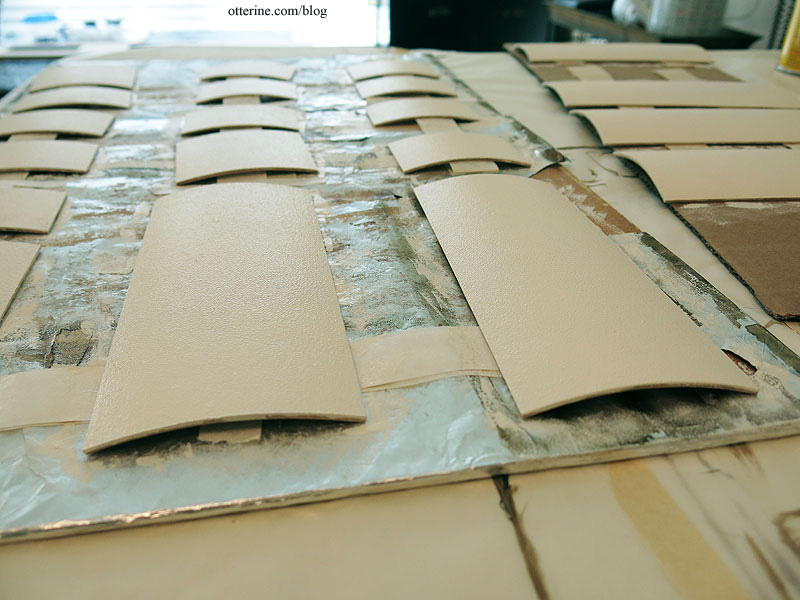
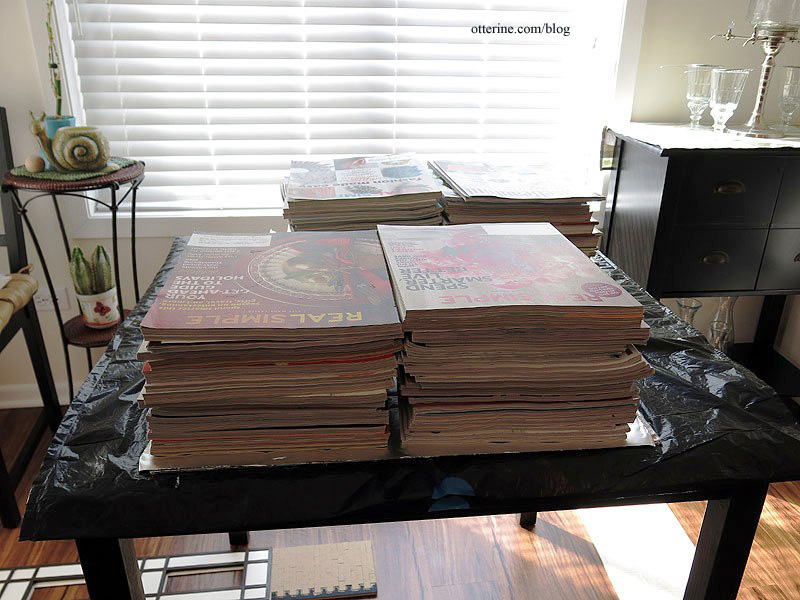
When I textured and painted the filler pieces for the side wall, they curled since they are only 1/16″ thick.
Once the surface was dry, but before the pieces had dried completely, I covered them with a layer of aluminum foil and pressed them flat with magazines. Problem solved. :]
I added the stone to the side wall. I will install the basement window “backward” meaning the front of the window will be inside. I did this for a couple of reasons. First, the depth of the wall is thicker than needed for the window, so I would have to add trim to get it to fit properly. Second, the stain wouldn’t match the exterior paint colors. And, third, a window such as this would be set into the stonework. I didn’t treat the lower front door and garage door in the same manner since it would have been more work than it was worth in the end.
For the thicker grids and fillers, I glued the pieces together and then added the backer board. For the thinner pieces here, it was easier to glue the grid to the backer board and then adjust the fit of the filler pieces afterward. I glued the filler pieces in place with wood glue supplemented with drops of super glue gel to keep them flat.
I added the black window frames to the addition front wall. These had to be cut from lengths of wood I purchased since there was only so much wood trim included in the original kit. I glued the bottom stone portion to the top grid assembly.
Next up, window trim and interior padding for the addition front wall, but here’s the addition in dry fit. :D
Categories: The Brownstone
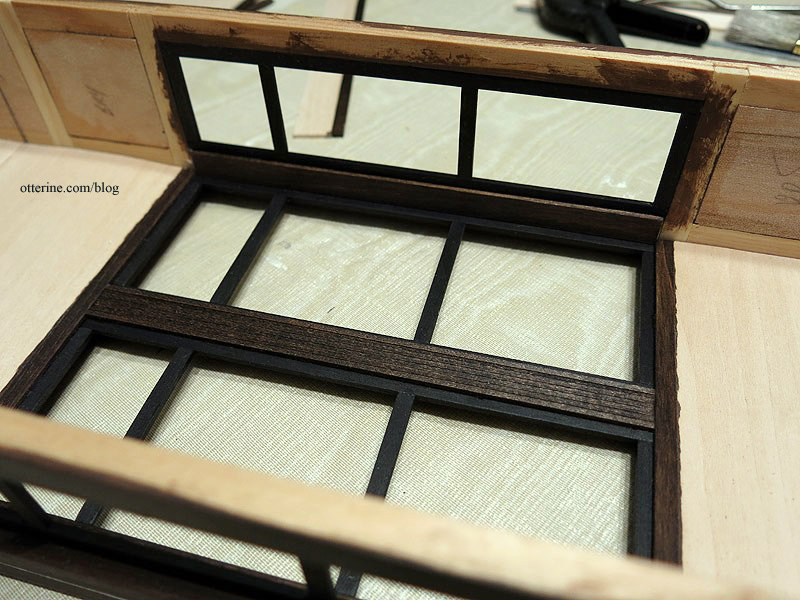
April 18, 2014 | 0 commentsThe Brownstone – bay window section, part 5
Continuing work on the bay window section. After assembling the front wall, I added the trim to the interior upper window.
It was then time to add the bay window section. I drilled holes along the front grid opening.
I used a drop of super glue gel to insert headless pins into the drilled holes.
These are meant to add stability to the joins as opposed to just gluing the bay section onto the front.
I lined up the bay window section to mark where pilot holes should be drilled in the opposite grid. After drilling the holes, I tapped it into place without glue in dry fit…but then it wouldn’t come back off. Haaaaaaaa! Well, it’s sturdy at least. :D
The front panel of the bay window popped loose in the process, so I had to glue that back in place. No biggie.
There was also one section where the bay window met the front wall that needed extra glue as well. Once the interior basswood padding is glued in place, any gaps between the two sections will be masked.
Some of the black window frame pieces popped out with the hammering and handling, not an unusual occurrence. I’m foreseeing a lifelong battle keeping these pieces intact.
I glued the interior window trim/padding pieces in place. This creates a solid, smooth surface for finishing later on in the build. :] I used toothpicks wedged into the corners to hold the boards in place while the glue dried.
Here’s the front wall with the side addition, front door and front steps propped in place.
I think we’re getting somewhere! :D
Categories: The Brownstone
April 17, 2014 | 0 comments
NOTE: All content on otterine.com is copyrighted and may not be reproduced in part or in whole. It takes a lot of time and effort to write and photograph for my blog. Please ask permission before reproducing any of my content. (More on copyright)