

Watercolor paintings from 1916, wartime
One of the drawbacks of working on a project in secret is that others can’t pipe in and say, “I have just the thing for your mini scene!” Now that The Aero Squadron Lounge has been revealed, a friend and fellow miniaturist was able to do just that.
Elga inherited two small paintings from a collection belonging to her late Mother-in-Law and offered to send me scans so that I might add these little paintings to The Aero Squadron Lounge. I was overjoyed at the thought, and I fell in love with them when I saw them.
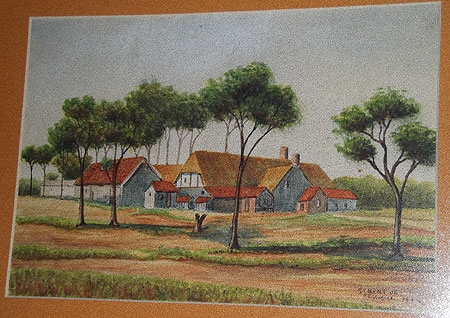
The watercolor paintings measure 10″ x 7″ and are signed by F. E. Glazier. One is titled St. Gent, JE and dated April 24, 1916. The inscription on the back reads, “D. Companies first billet in France.”
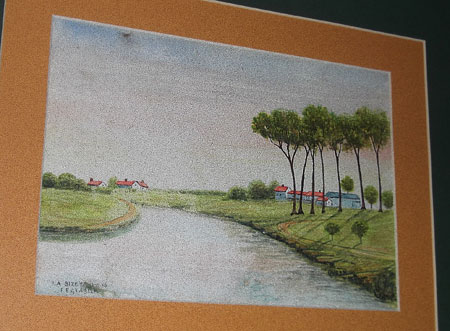
The other is titled La Bizet and dated May 12, 1916. The inscription on the back reads, “Le Bizet canal at back of Le Bizet Trench.”
Elga wrote, “I always wonder if it was a soldier that painted them and send them home to the family as they are quite small, wanting to show them the farm he lived on and the place where he was fighting in the trenches.”
We both did a little bit of sleuthing on the internet to see if we could make a connection to anything more recent. Even though one painting’s inscription states this was in France, Elga wondered if it was actually Ghent, Belgium. I’m not sure what the “JE” stands for on the front, either. Le Bizet seems like it also might be in Belgium based on a limited google search, though Elga found that it is right on the border with France. She also found a few online references to Le Bizet in WWI related links.
Elga was able to find an F. E. Glazier listed in the 1940 U.S. Census, working under the assumption that D Company was from America. However, Elga lives in South Africa along with the paintings, as did her Mother-in-Law.
I found a listing for Private F. E. Glazier on a July 14, 1916 roll call page from the South African Infantry, stating that he was injured July 19th.
Elga looked in her phone book and found two listings for people with the surname Glazier in the Cape Province. Her Mother-in-Law lived in Cape Town for over 20 years, and Elga surmises she bought the paintings at a fair or market. She’s not sure her Mother-in-Law even knew what they were, their age or the fact that they are original watercolor paintings of historical significance. She thinks they were purchased simply because they are beautiful landscapes.
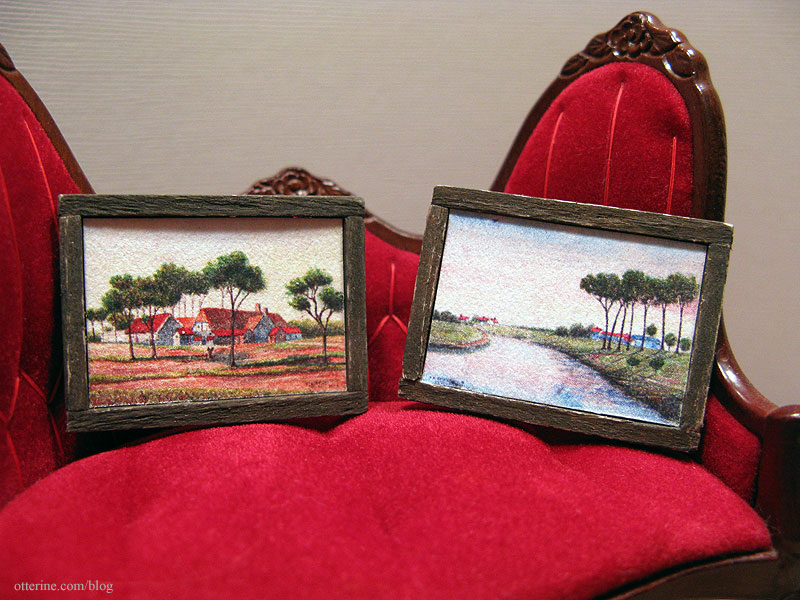
That they are, so I’ve printed the scans in miniature and made matchstick frames for them. Since the Lounge is dark, I’ve set up a vignette to show their detail and color.
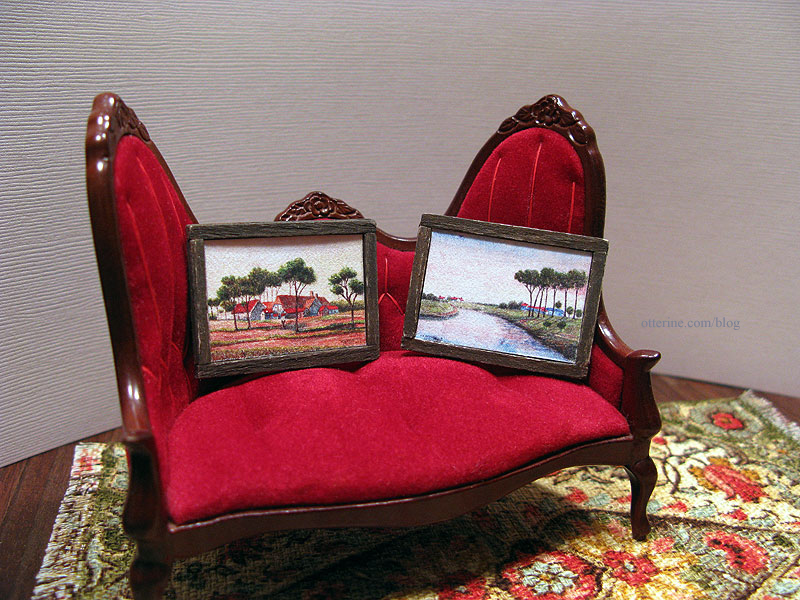
Even in miniature, they look like real paintings.
I moved some things around to make room for them in the Lounge.
Adds a bit of authenticity, don’t you think? Thanks so much, Elga!

So, there’s our clever little mystery. Maybe someone will stumble upon this blog post and have something to add. Elga and I would love to know the rest of the story. :D
——
Someone reached out to me from this post and emailed more information about Mr. Glazier (edited to remove identifying information). Thank you for adding to the story.
“Fred Glazier was a veteran of WWI. He served with the South African army and was injured at the battle of Delville Wood (15 July – 21 July, 1916). In fact, he lost a leg during that skirmish. At some point after the end of WWI, Fred moved to live in the little town of Port St Johns, on the east coast of South Africa. My dad … vividly remembers Fred Glazier, whom he called ‘Old Man Glazier’ in the years after WWII. Fred was an artist who painted a number of pictures of the landscapes around Port St Johns. My uncle … owns a painting done by Fred Glazier depicting the mountains and river mouth around Port St Johns. Fred Glazier was a great fan of cricket, obviously not as a player because he was an amputee, but as a supporter, and was the first President of the Port St Johns Cricket Club.”
Categories: The Aero Squadron Lounge
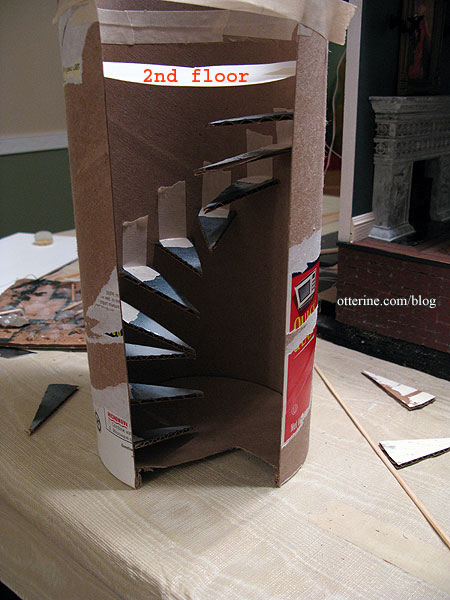
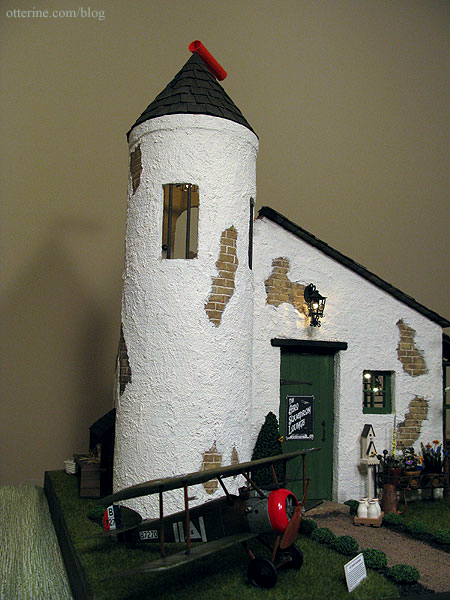
September 9, 2012 | 0 commentsThe Aero Squadron Lounge – tower spiral stairs
This post will give you some background on the mockup portion I did and then explain how I made the final set of stairs for the tower.

My idea from the beginning was to have spiral stairs leading to a balcony overlooking the main room and a window to see the Sopwith Camel from above.
The diameter of the original oatmeal container tower was roughly 5″, so I cut some quick triangle shaped steps from a 5″ diameter cardboard circle. I taped them into the oatmeal container before I cut the 5″ diameter mailing tube that would serve as the final tower. I wanted to make sure I could get the stairs to work before altering the mailing tube. However, I did cut the 31″ tall mailing tube into two pieces each 15 1/2″ tall since anything taller would have looked out of proportion with the single story main building.
The stairs worked great. I haven’t measured here or made the triangles uniform. I just wanted to see the layout in three dimensional form.
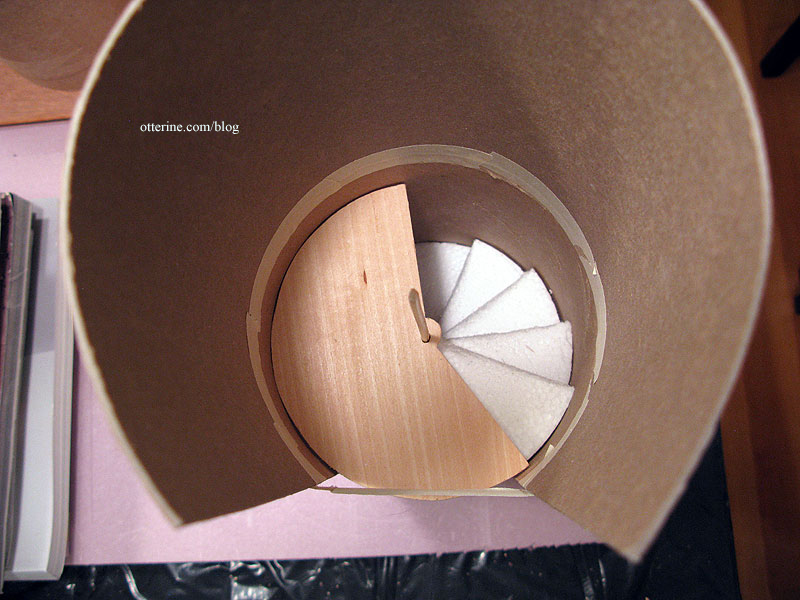
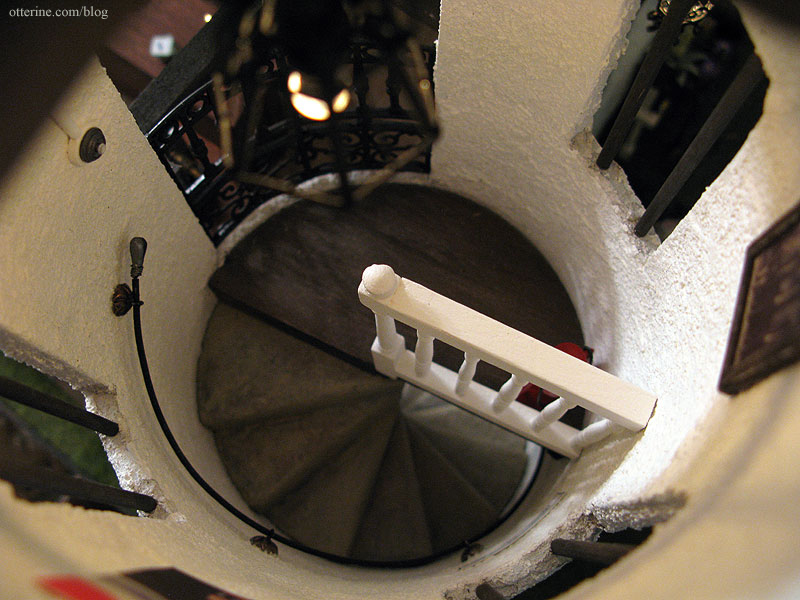
Originally, I thought in order for the balcony to bridge the gap in the opening and access the window, it had to be cut in a “greater than half” shape. I later changed this to a semicircle.
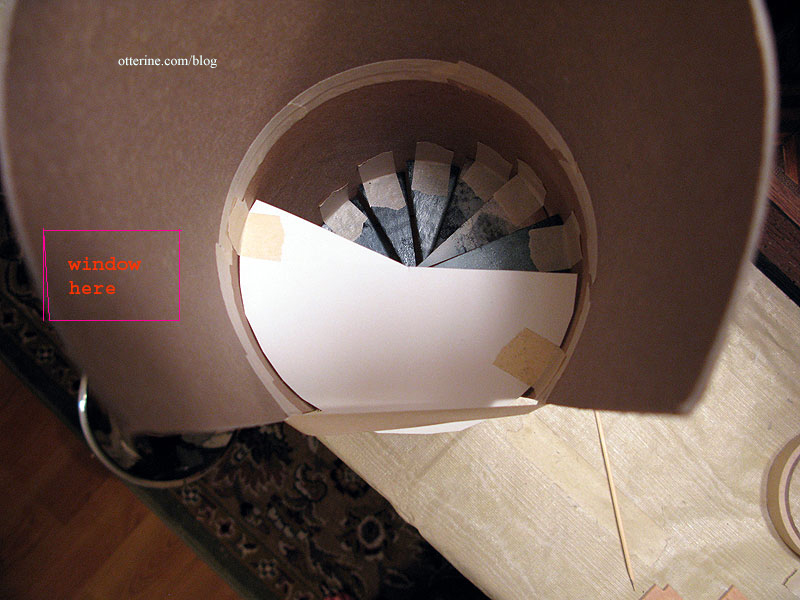
The problem with the stairs was that part way up them, my model hits her little head!!!! :O

I couldn’t raise the balcony, because (a) the spiral staircase would have had to cross the arched opening if it were any taller and (b) with a maximum tower height of 15.5″ raising the balcony would have made the second story too short.
I could have cut the balcony to “less than half” so that it only overlooked the main room and didn’t allow access to the window…but I didn’t really care for that idea. As it turned out, the semicircle still worked, though there really isn’t much head clearance to speak of in the final tower.
Anyway, as I was figuring this all out, there were three possible solutions:
- Close up the tower completely, including the roof (no exposed beams in the conical roof) but have a faux door on the inside to look like there is access to the tower. Add windows and interior lighting (but make the windows like the Heritage cellar windows so you can’t really see in). Seemed like cheating, no?
- Make the spiral stairs and the balcony as is, but still close up the tower…except…make a doorway on the inside so you can see the lower stairs. And, leave some of the roof beams exposed so you can see the balcony from the top and through the windows. You won’t see both the stairs and the balcony at the same time so you can’t tell they don’t make sense spatially. That seemed more complicated than it needed to be.
- Lyssa suggested building it as is, adding a WATCH YOUR HEAD sign and leaving the mini people to fend for themselves! :D Winner winner, chicken dinner!
And, it was settled…on to the spiral stairs construction! Warning: lots of math ahead, so WATCH YOUR HEAD! :D I’ve written this out as plainly as possible, but it might not be easy to see what I am getting at without doing your own mockup.
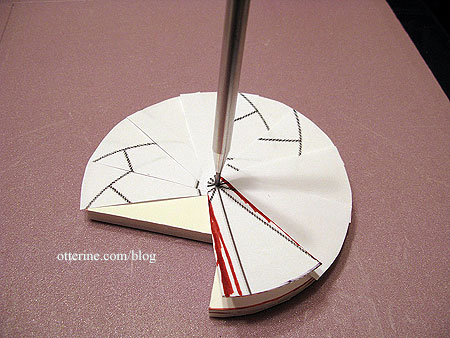
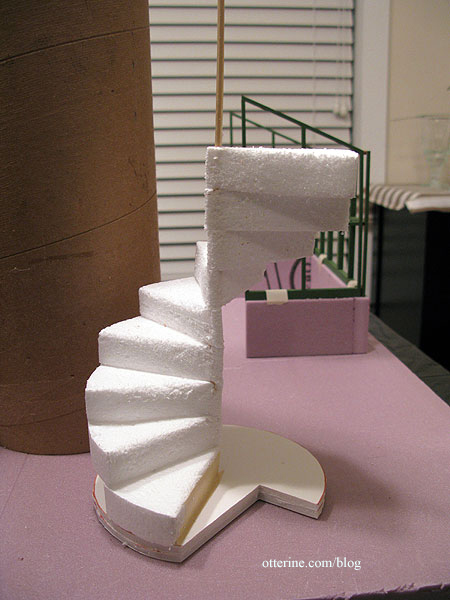
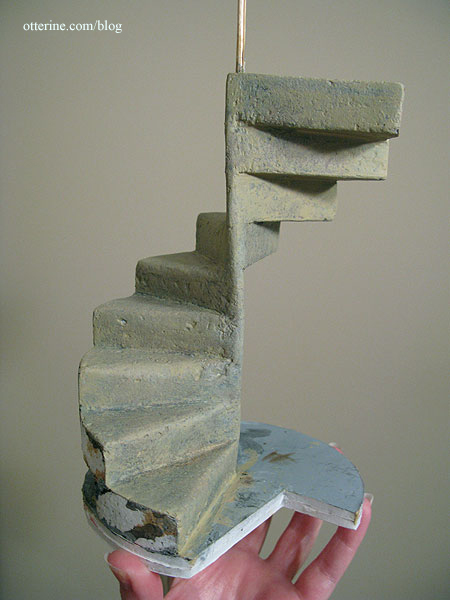
After studying my mockup, I determined that the best layout included nine steps each 3/4″ thick (tall) leading to the balcony 7 1/4″ above the first floor. The nine steps equal a height of 6 3/4″ so the last step up onto the balcony would be 1/2″ tall.
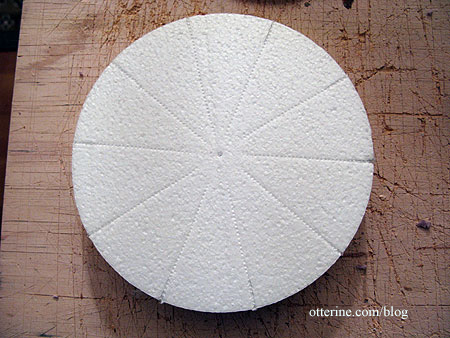
I found two drawings of circles with equal sections online at Enchanted Learning, one with 10 sections and one with 12. I used the 12-section circle for the visible width of each step but cut the steps using the 10-section circle as a template; they will stack on top of one another and I needed added width to glue them together. This will be shown and further detailed in the photos below.
I used the 12-section circle template to determine the best shape for the second floor base. I left a full circle in the middle since I thought I might need it to stabilize the spiral stairs. Remember, I later made this balcony a semicircle instead, but that was near the end right before installation. My construction photos show the “greater than half” balcony.
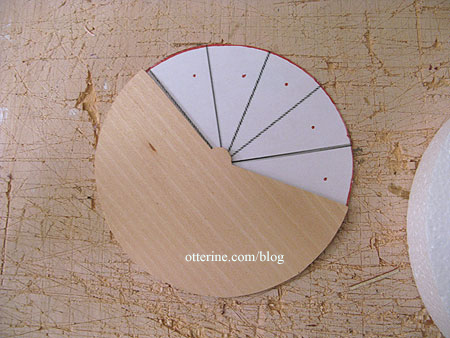
I was able to find a circle of white styrofoam at Michaels that measured 6″ in diameter and was 1″ thick. My mailing tube tower was 5″ in diameter and the steps needed to be 3/4″ thick, but the styrofoam circle was actually the perfect size for the project.
I first attached my 10-section circle template to the styrofoam circle with an awl, matching centers. Using my tracing wheel (a sewing tool), I transferred the lines onto the styrofoam so I could cut out the pieces.
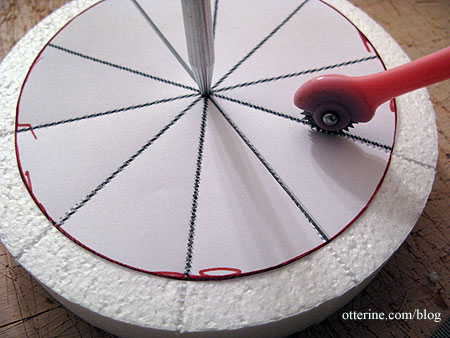
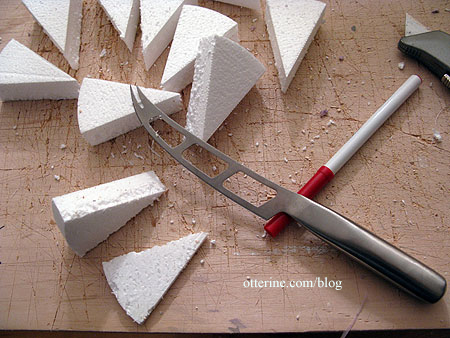
I cut the steps from the circle along the guidelines with a utility blade and then, using a cheese knife I’ve always thought looked like a Klingon blade, I cut off 1/4″ of thickness from each section. I’m good at eyeing measurements freehand, so I didn’t mark them first. I also planned to shape them to look like natural cut stone steps, so they didn’t need to be exact.
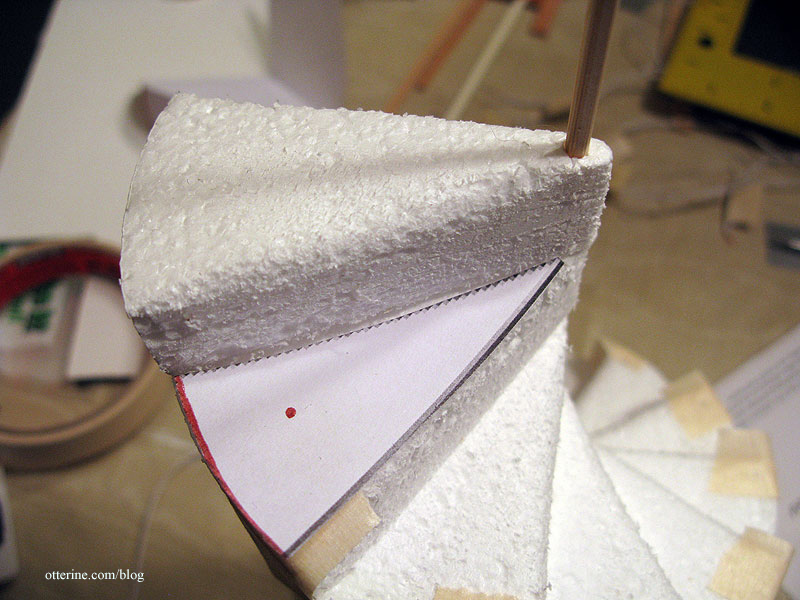
Based on my reference photo, each slice needed to have a rounded hub at one end. These rounded centers would line up and the stairs would pivot around that center point. I cut a template using the 12-section circle as a guide, adding excess to the back edge of the slice as well as the rounded tip.
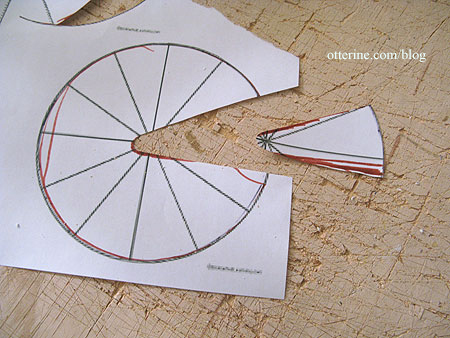
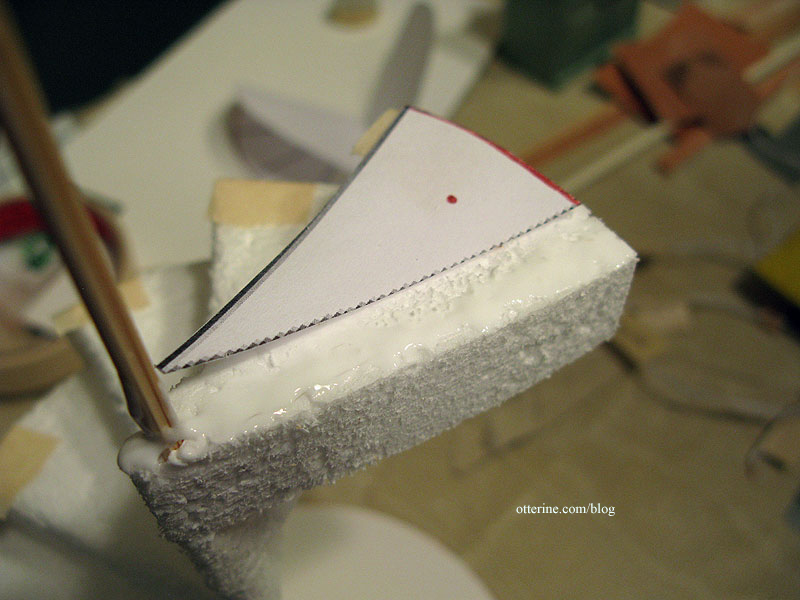
Before altering my styrofoam pieces, I cut nine paper steps, joined them in the middle and tested the fit. This paper mockup indicated I needed to cut the template down just a bit on the outer curved edge.
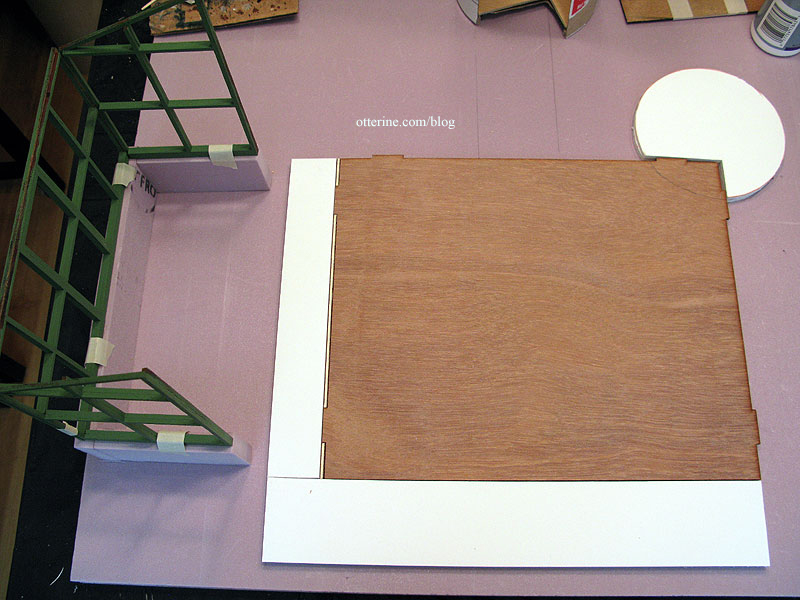
In the above photo, you can see the floor base I made for the tower from two layers of 1/4″ foam core board. The rectangular notch abuts the kit floor so the tower and main room share the same level surface. Here you can also see the floor space I added (also with double layers of foam core board).
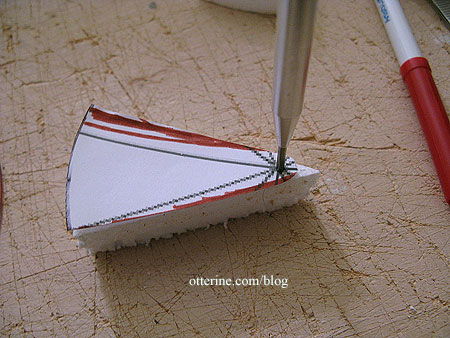
I used the paper template to fine tune the styrofoam pieces. Not much needed to be removed – just a little in the center to make the rounded hub. I used the awl to make a hole in each tip while I was at it.
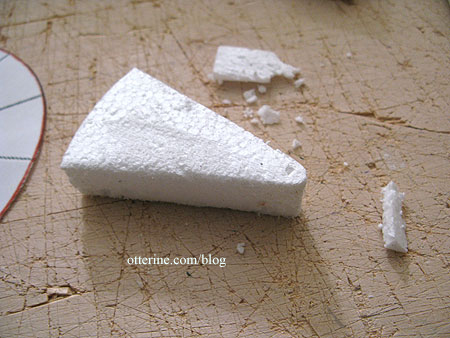
I sanded the steps to give them a more natural appearance.
I fed the steps onto a bamboo skewer but left them unglued until I could check the final fit of all the steps in place.
For this photo, I added a bit of builders foam after the ninth step to hold up the second floor balcony though I later added a full wooden riser to keep people from stumbling on the top step and getting their feet and legs caught in the opening. Here’s the styrofoam assembly shown in the oatmeal container mockup.
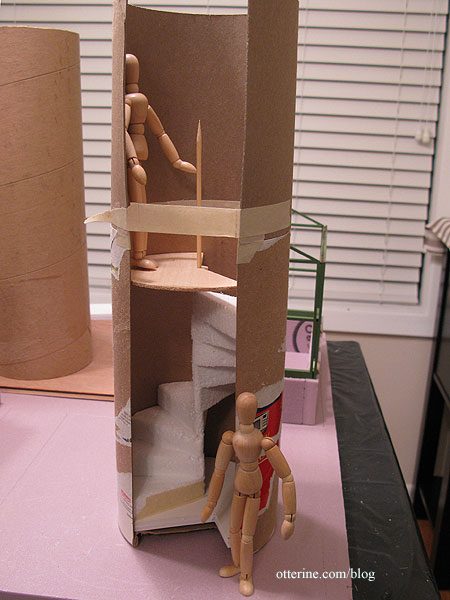
I love it!
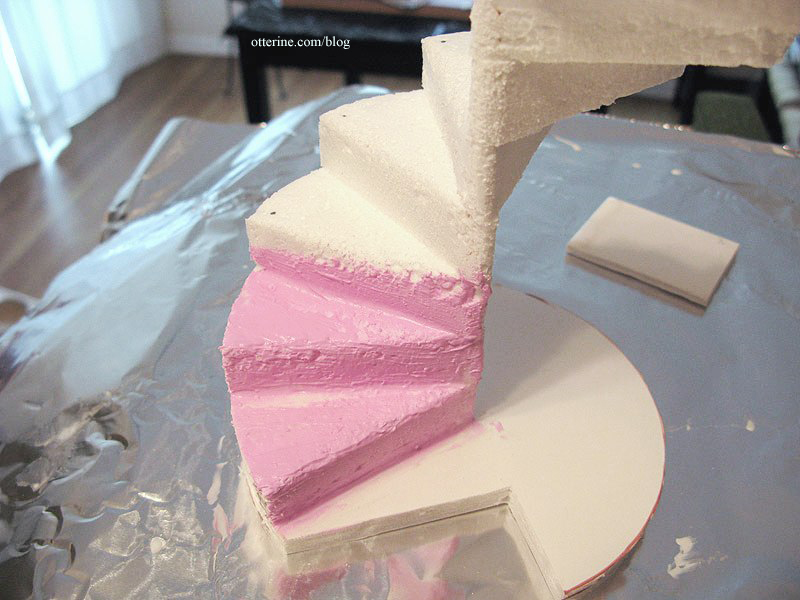
I glued the first step in place on the floor base and then used a template cut from the 12-section circle to determine where to apply glue for all subsequent steps. I taped the stairs to hold them in place while the glue dried.
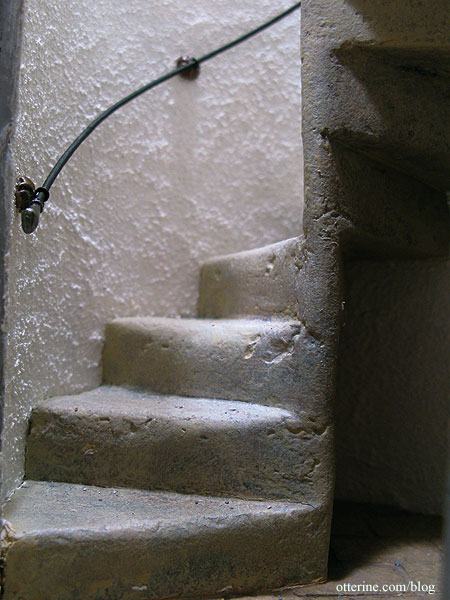
Once the glue was dry, I spread spackling over the surface with my fingertips. I was heavy handed with it so it would cover any holes in the styrofoam and allow me to sand a smooth “stone” surface once it was dry. Here you can also see the permanent flat head straight pins I added to each outer edge for stability.
The sanding resulted in smooth stone with chips…a nice touch I hadn’t expected. :D Here the lower three steps are sanded; the remaining steps are shown before any sanding was done.
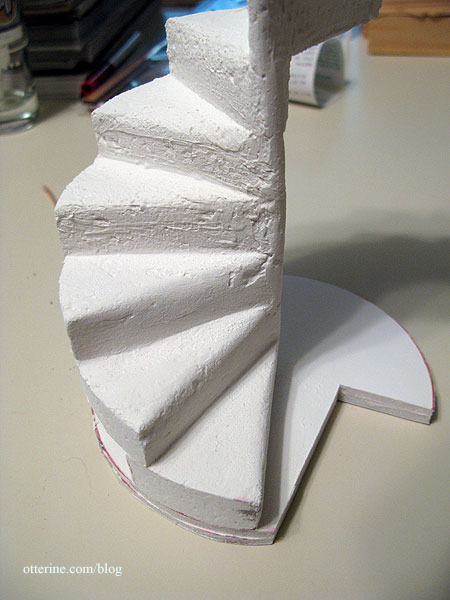
I primed the whole assembly with gesso.
The paint colors I used are first Camel and then Desert Sand, both by Americana. I then just kept adding washes of browns (Coffee Latte, Asphaltum by Folk Art and Traditional Burnt Umber by Americana) and tiny bit of black. I lifted off the excess with a paper towel and just kept adding until I got to the coloration I wanted. Here it is mid-process.
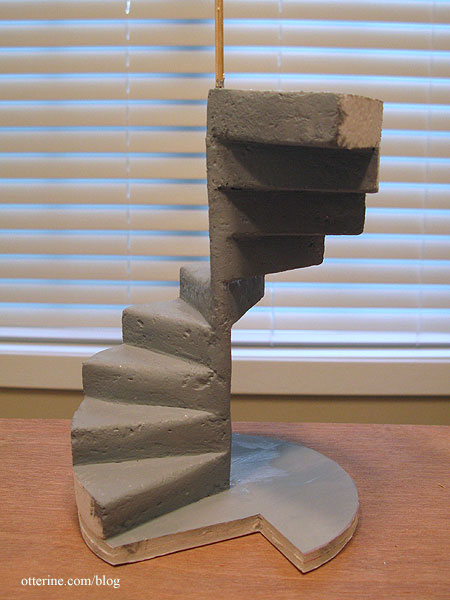
There was a great deal of “chicken or the egg” with the spiral stairs, and I ended up finishing them completely on their base before gluing them next to the main room and then adding the final tower over the top of them at the end. I kept constantly fitting the tower over the stairs to make sure they would still fit.
Here’s how they look in the final layout. From this angle, they look built right into the wall, though there is a very small gap between the stairs and the tower wall. This was so the tower could be lowered over the staircase as the final step in construction.
From above, you can somewhat see it. But, I love the way they turned out…just like I had it in my head! :D
I will detail the tower construction, including the balcony and railing, in future posts.
—-
Update: Tower construction, part 1, part 2 and part 3.
Categories: The Aero Squadron Lounge
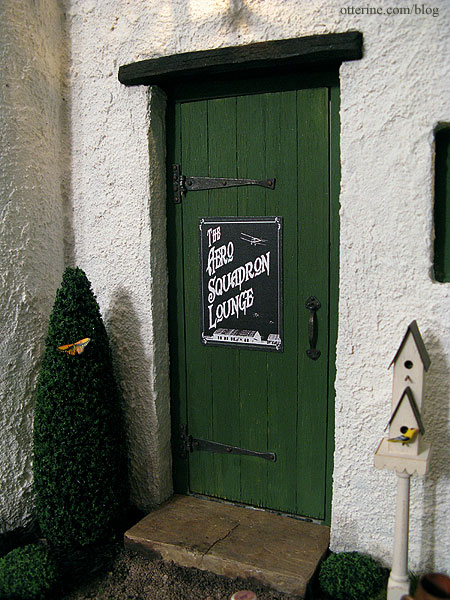
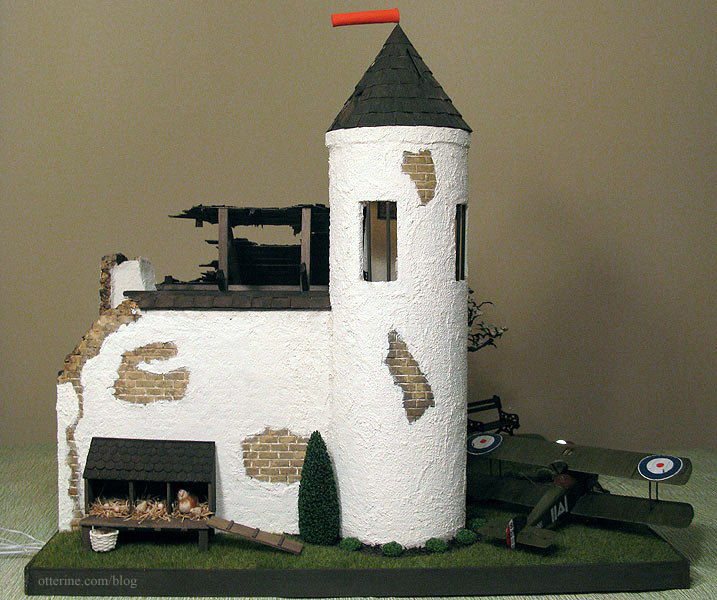
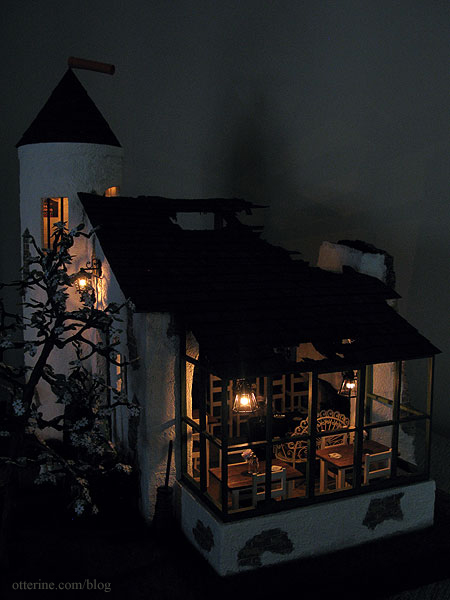
September 7, 2012 | 0 commentsThe Aero Squadron Lounge – Exterior accessories
There aren’t a lot of exterior accessories on The Aero Squadron Lounge compared to the interior, but I tried to make what I did add to the outside count for a lot. I’ll detail the landscaping and construction changes separately, but here are some close-ups of the exterior details.
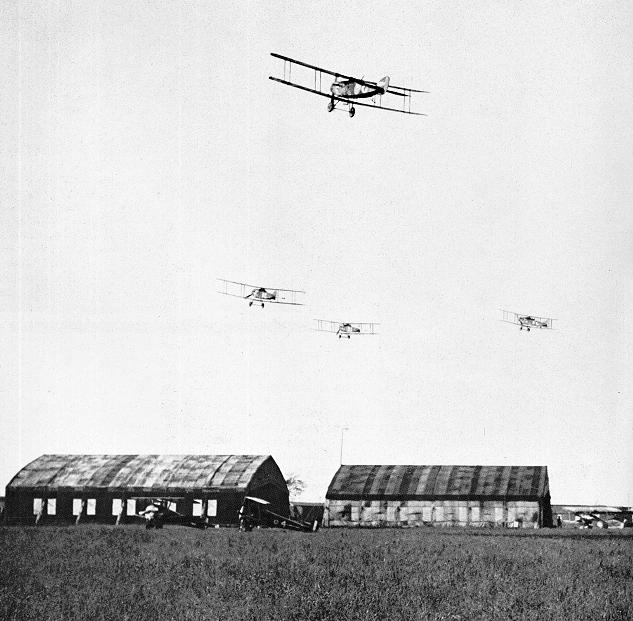
I used a WWI photograph to make the main Lounge sign. I tried out a number of colorations for the background and ended up liking the black and white “negative” version the best. The others seemed to either compete with the color of the front door or be too washed out.
Here is the original photograph from 9thinfdivsociety.org.
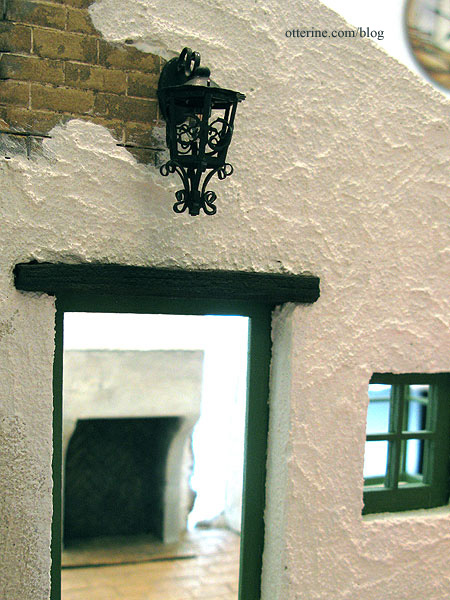
The overhead light is by Heidi Ott. It’s similar to the indoor lighting, but it originally had a shiny finish. I dabbed on black acrylic paint to tone down the shine and removed the plastic “glass” from inside the cage.
This lovely birdhouse was made from a kit by Twilla’s Tiny Treasures, the bird is from A
Little More in Miniatures.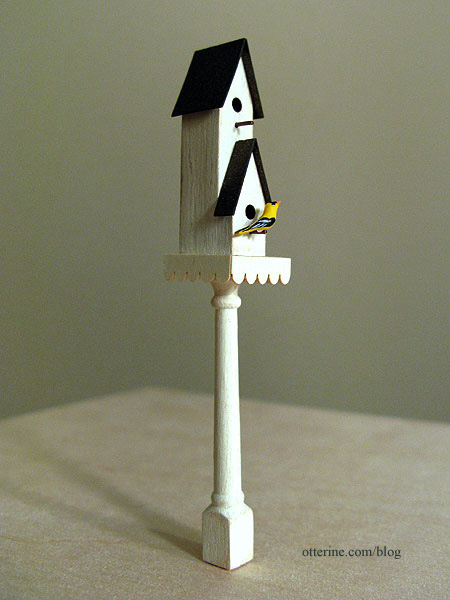
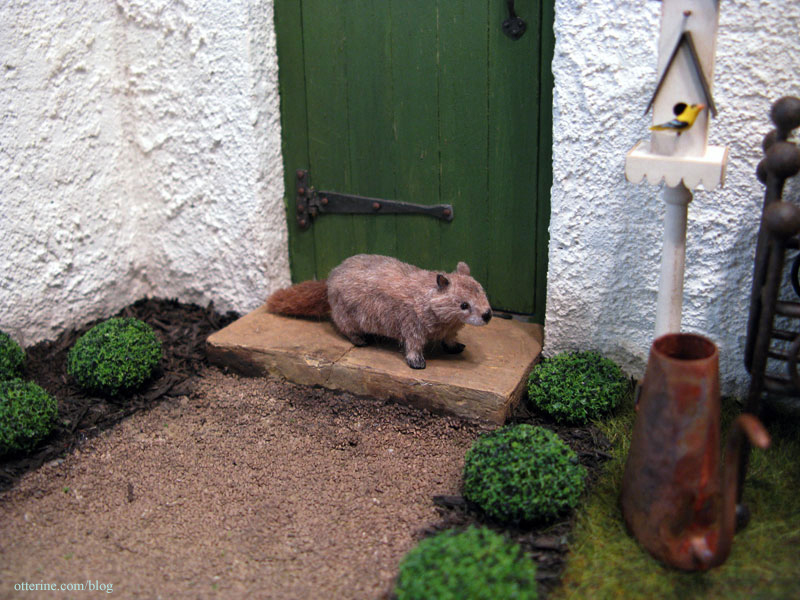
I used a small length of wire glued into the bottom of the post to hold it in place in the builders foam base. Uh, oh! Looks like a kitty has wandered over and spotted the birdie! :O
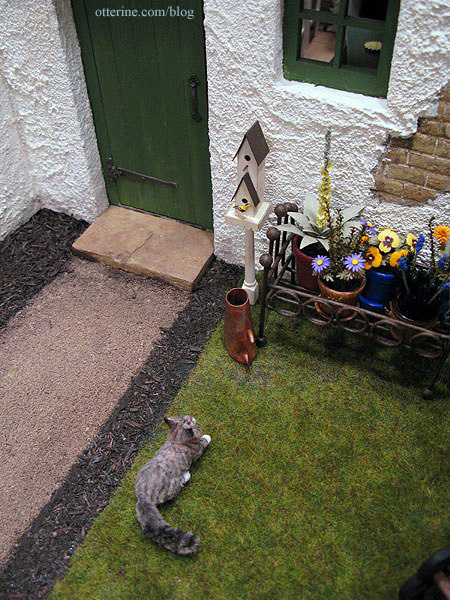
Woodrow also made an appearance as I was building, but neither of these critters will live at the Lounge permanently. :]
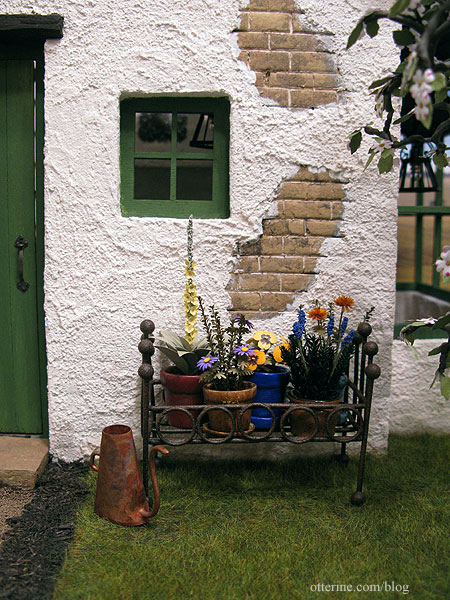
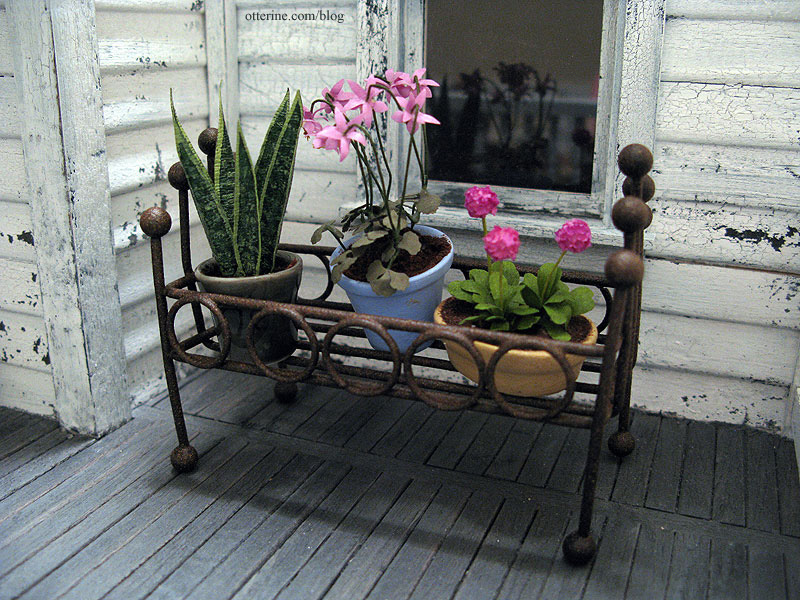
I also showed the planter and plants in earlier post, though I didn’t end up using one of the plants I made. I really like the way this small potted garden fills the space without taking over. The watercan is from Celtic Juju. The plants are made from a combination of kits from The Miniature Garden and Bonnie Lavish with added greenery from A Little More in Miniatures.
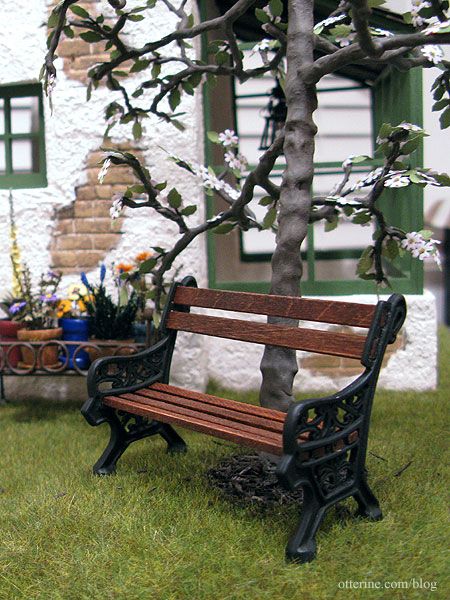
The bench was assembled from a Phoenix Models kit. The “kit” comes with two white metal bench ends that you can paint, and you supply the wood in whatever length you wish. It’s a perfect solution when you need a completely custom size bench. It’s a sturdy little piece once you manage to wrangle all the wood ends into place.
I used some leftover Dura-Craft trim wood for the seat slats and skinny sticks for the back rest, stained with Minwax English Chestnut. I cut the boards 3.25″ in length, so the seat ended up at 3″ wide — a perfect loveseat under a pretty tree. :D
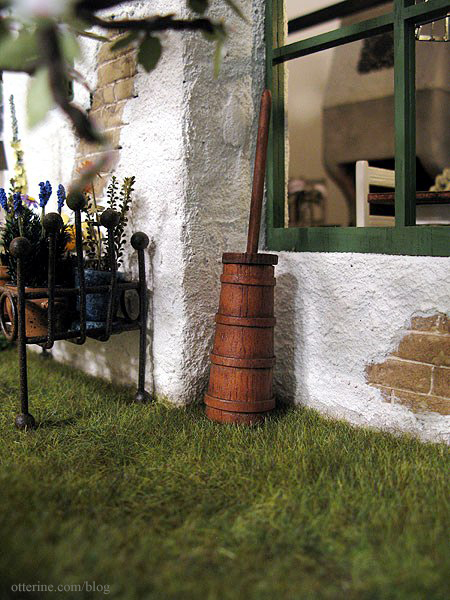
I bought this cheapy butter churn at the Bishop Show and added some black and brown washes to it. That subtle aging made all the difference; it looks like a high quality piece now. :D
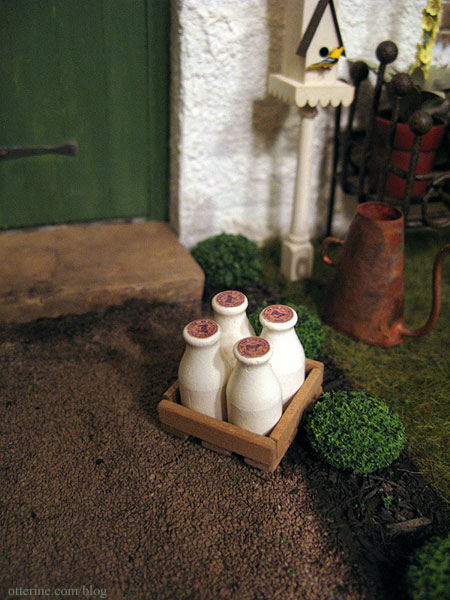
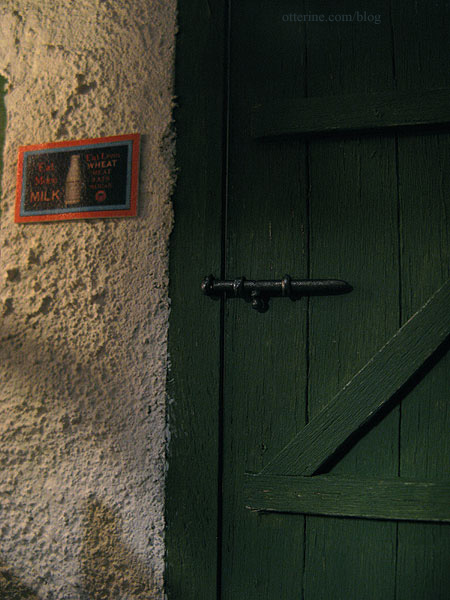
I purchased the milk bottles for I think a quarter each last April at the Bishop Show…or fifty cents each, some small amount. They were wonderfully painted. I added a light grey paint wash to tone down the bright white and printed vintage milk caps for the tops.

I made a quick milk crate from skinny sticks and placed them on the pathway. They would look great on the front stone step other than the fun fact that as soon as you opened the door, the milk would go flying. :\
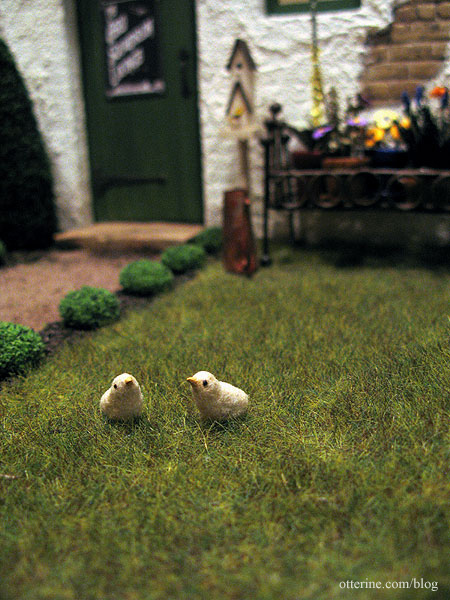
The henhouse is not easily seen in the overall build because of the tower, but I’m glad I included it. The breed of hens I’ve made are Faverolles, a French hen suggested by Teddi. I have a standing hen not yet completed.
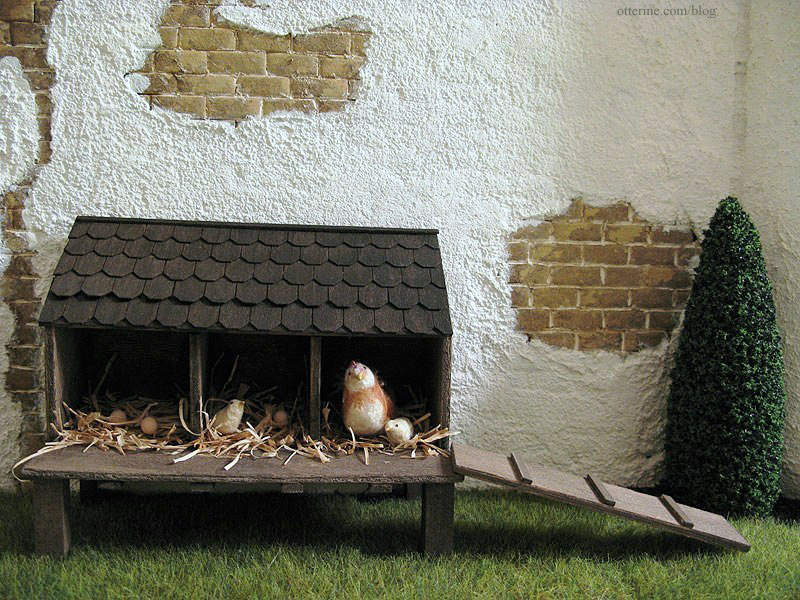
I’ve used a few of the eggs I made, too.
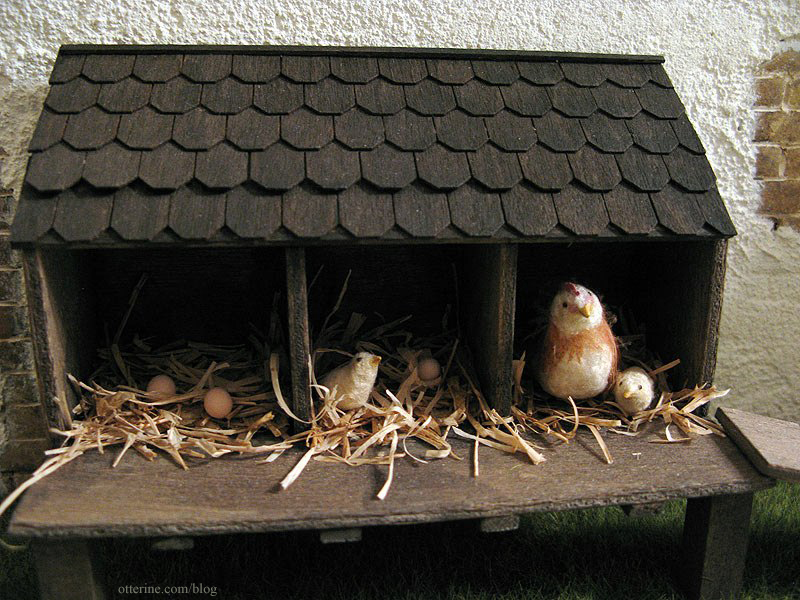
The henhouse is just what was needed to fill the open area on this side.
And, speaking of hens…there’s chicks on the lawn.
The full post on the 1:32 Scale Academy Sopwith Camel can be found here. The sign verbiage is taken from the Wikipedia article on the Sopwith Camel. I printed it on paper, pasted it onto a primed wood scrap and staked it into the ground with some wire.
And, of course, the windsock that sits on top of the tower isn’t easily missed. ;D It’s a glued tube of orange cotton held in place with a head pin. Yes, it rotates, though it pretty much always falls back into the same place.
Stop on by for a nightcap.
Categories: The Aero Squadron Lounge
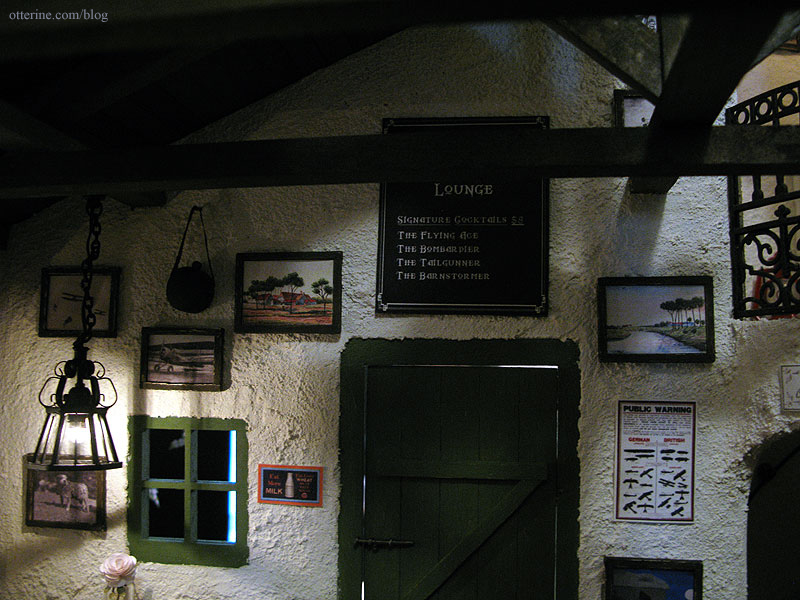
September 6, 2012 | 0 commentsThe Aero Squadron Lounge – Interior accessories
I added a lot of accessories to the interior of The Aero Squadron Lounge. Some are WWI or aviation related, some are bar related and some are just plain fun. :D These are in no particular order. I’ll cover the interior construction portion in a separate post.
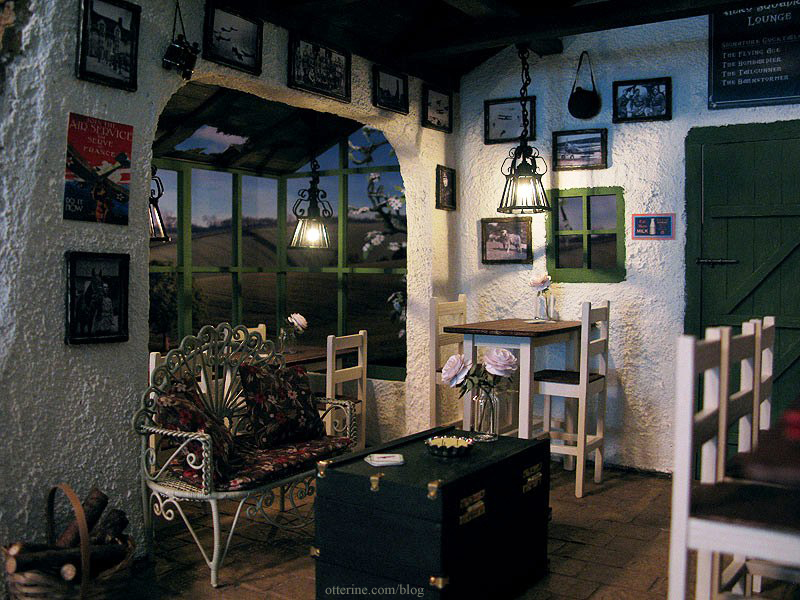
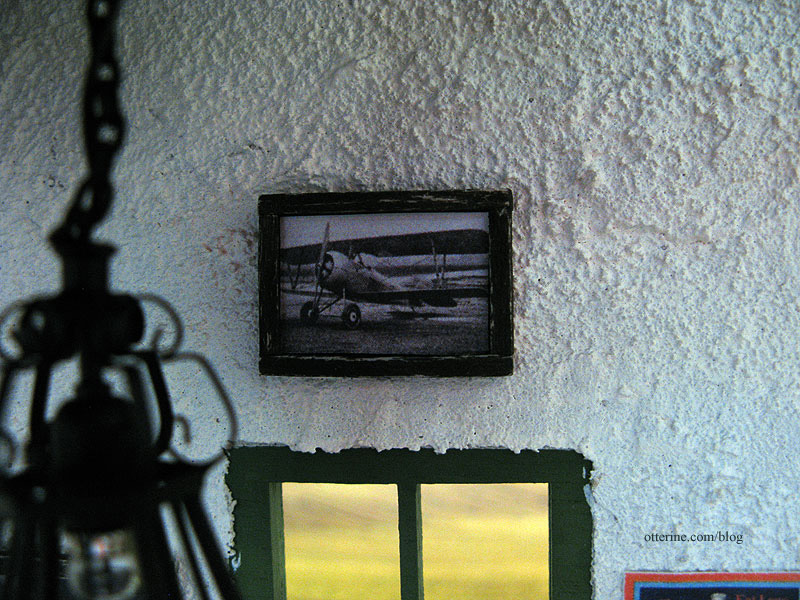
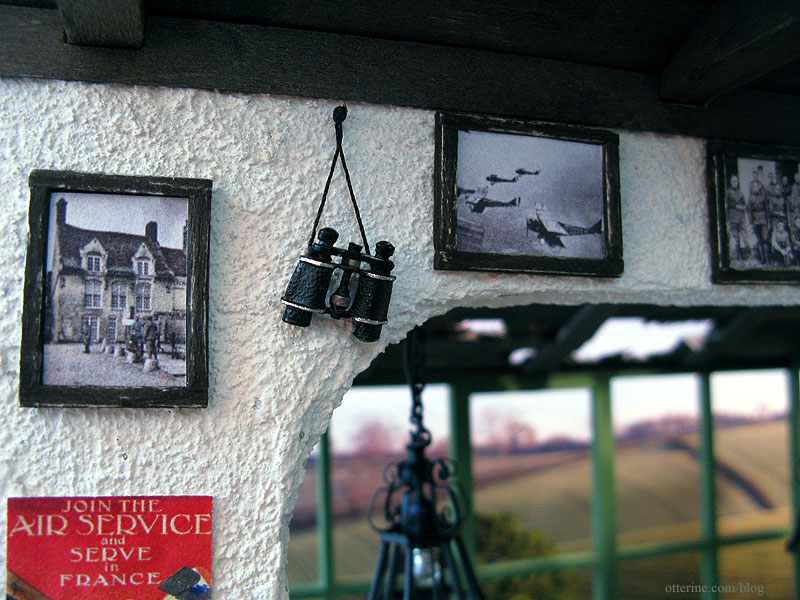
For the artwork, I used all WWI photographs found online and built matchstick frames for each and every one of them.
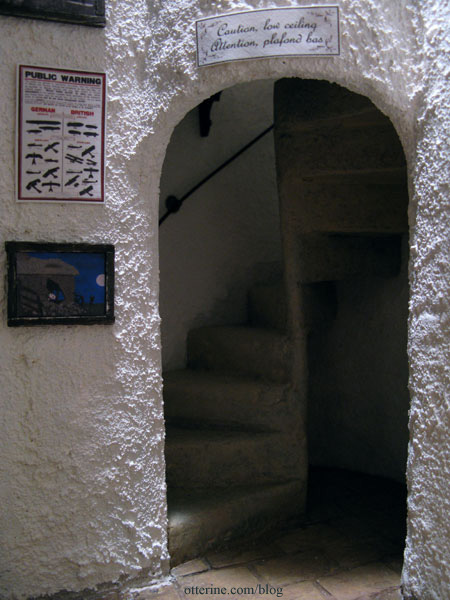
There’s even one of Snoopy in WWI France from It’s the Great Pumpkin, Charlie Brown. The public warning poster shows the difference between German and British aircraft. Thank you to Carole for the French translation on my low ceiling sign.
The door has a working latch from Olde Mountain Miniatures. You can also see the flyer reminding you to eat more eggs and milk…to save the meat for the soldiers.
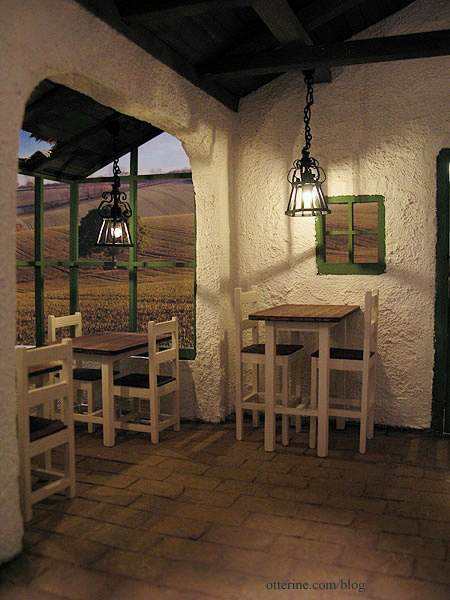
The tables and chairs are made from patterns in the book Finishing Touches by Jane Harrop, though I modified the height measurements for the pub chairs and table. My backdrop is from thundafunda called Oak Tree Countryside. The lights are from miniatures.com.
The autumn Bishop Show comes to town in mid August, so I was able to pick up a few things there. Sir Thomas Thumb saved me the trouble of trying to figure out how to make binoculars. :D The image on the upper left is a print from an actual color image from WWI; they are rare but they do exist.
I was unsuccessful in finding a canteen at the show. Yes, you can buy them for about $12 online, but why do that when you can spend 4 hours making one?!!! :D It was made from two self covered buttons, leather scrapbook paper, ribbon, headpins, a wood bead and the tiniest laser cut paper buckles I’ve ever seen. Teeny, tiny buckles!!! (From Dragonfly International.)

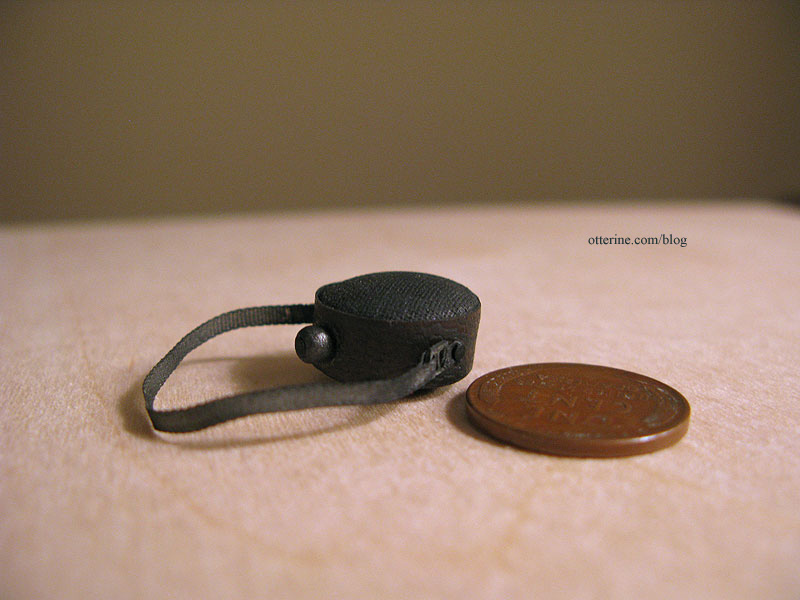
The canteen was originally meant for the display case, but after all that work I placed it prominently on the wall over the pub table.
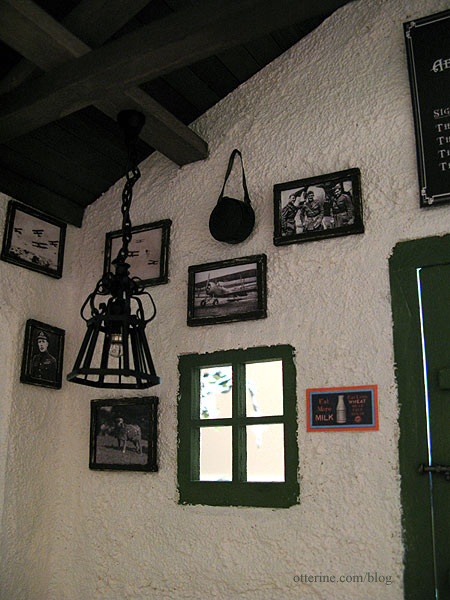
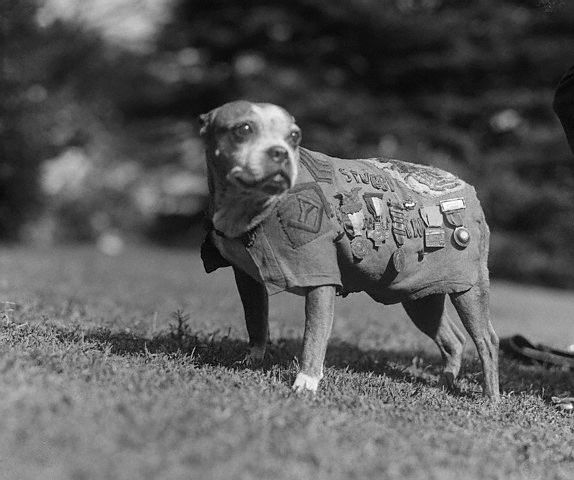
Yes, that’s a dog in uniform in one of the photos. :D Read the story of Sergeant Stubby the pit bull on Wikipedia here.
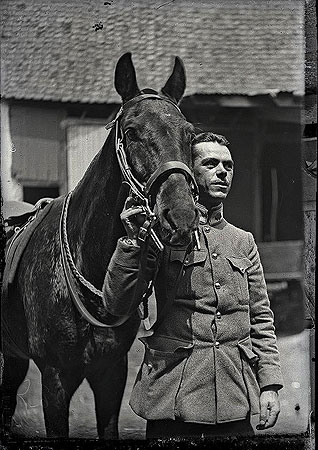
He’s not the only animal featured in the Lounge. I found a story on a wonderful group of photographs that were found in an old French farmhouse. They are called The Lost Diggers, and unfortunately their main site seems to be only on facebook. I’m not a member of facebook, so it’s hard to see them there. You can also find them here. They are remarkable images, some very candid.
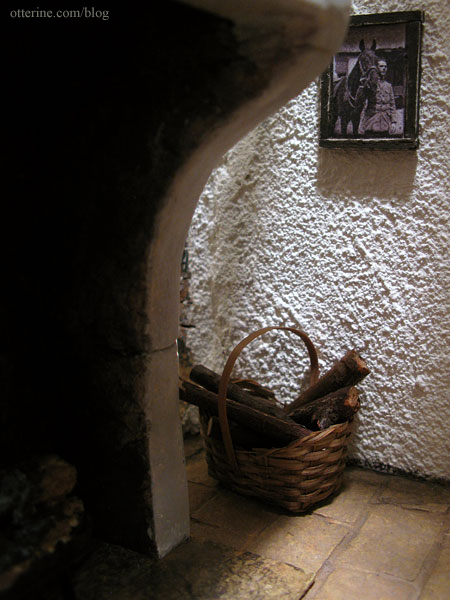
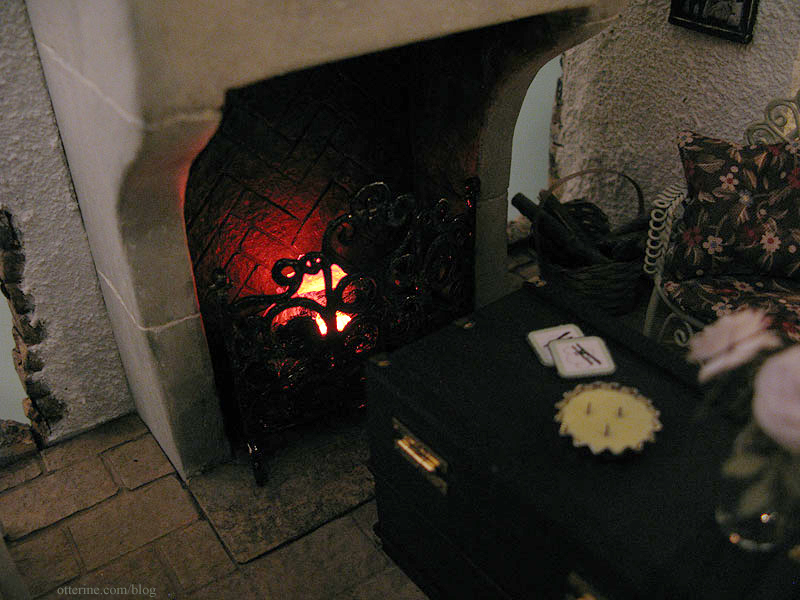
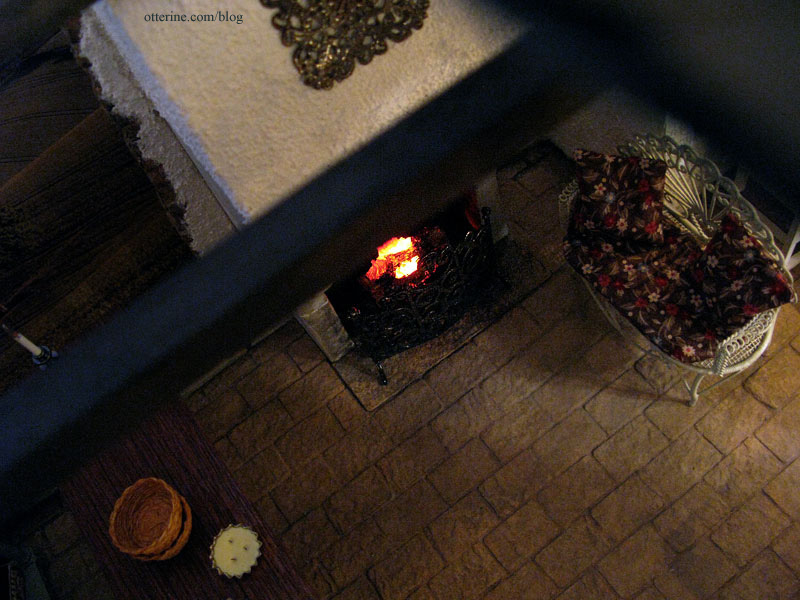
The basket was a free door prize from the 3 Blind Mice show. I aged it with a brown paint wash and added logs from the various fire grates I’ve ordered and then used lighted coals instead. Always pays to save the odds and ends.
The fireplace screen is by Jeannetta Kendall and purchased from lacyhome4boys on eBay. Here’s the shiny new screen in place; it looks like I built the fireplace around it but that’s just coincidence. :D I bought this as a last minute addition.
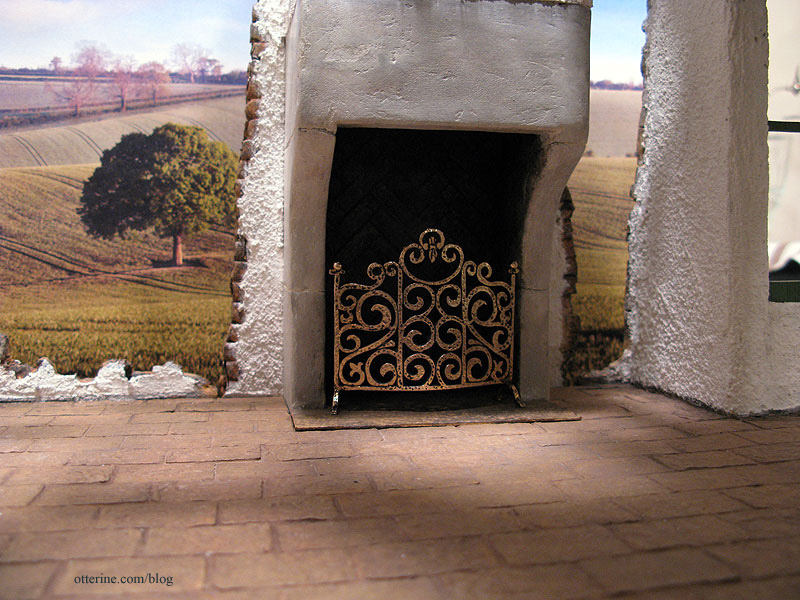
I used black acrylic paint to age it and tone down the shine. Much better.
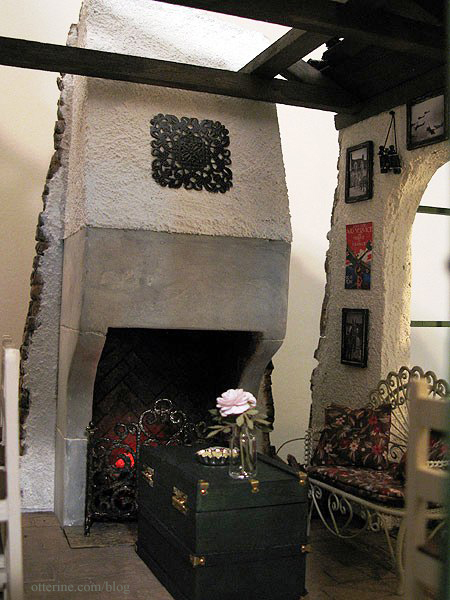
The medallion above the fireplace is a jewelry finding. The metal settee was painted and upholstered. The trunk was made from a kit by Catland (bought from bluebearcountry on eBay), though I didn’t use the artwork included. I also added brass hinges and brad detailing.
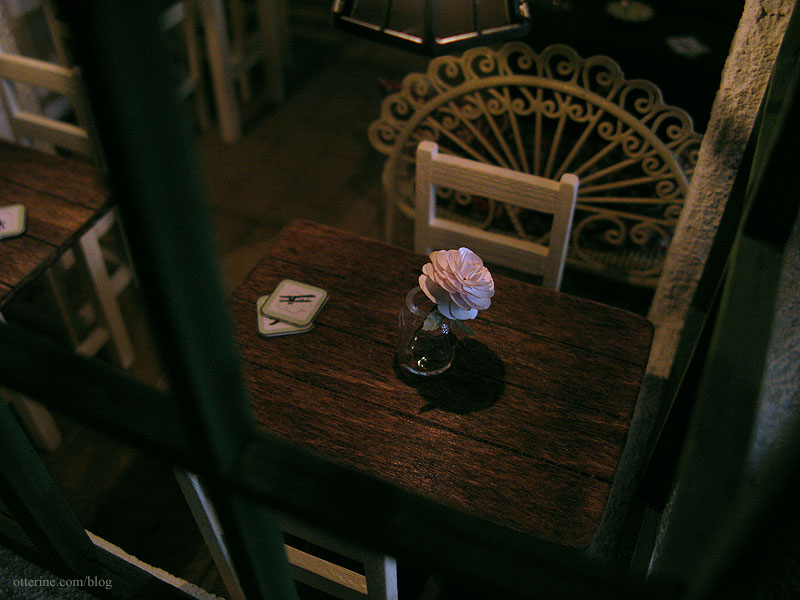
The coasters were made in Word from a biplane image from The Graphics Fairy. They were printed on Avery labels, stuck to cardstock and then cut out with scissors.
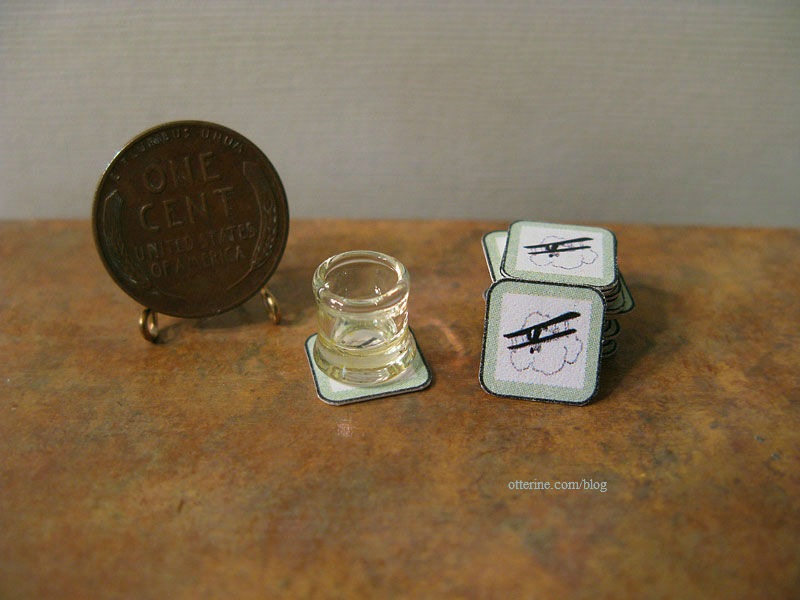
Here are the coasters in place. The rose is one of the Bonnie Lavish grandaflora roses I made.
I purchased the tiny metal plane from A Pocket Full of Wishes at the 3 Blind Mice show last April. The candlestick lamps are from Minimum World.
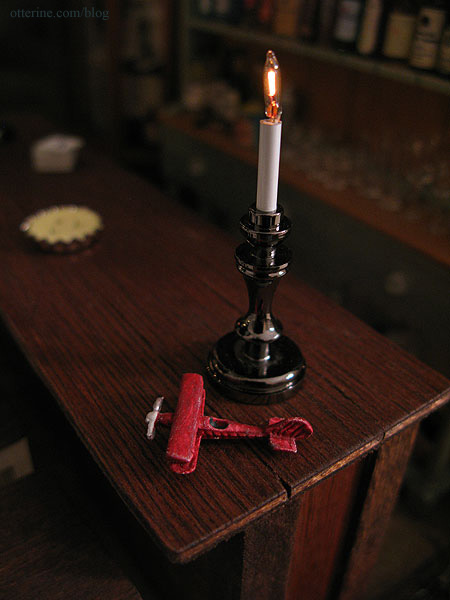
I’ve used two of the citronella candle tins I made awhile back – one on the bar and one on the trunk. (These are in my etsy shop as new and “burned” wick styles.)

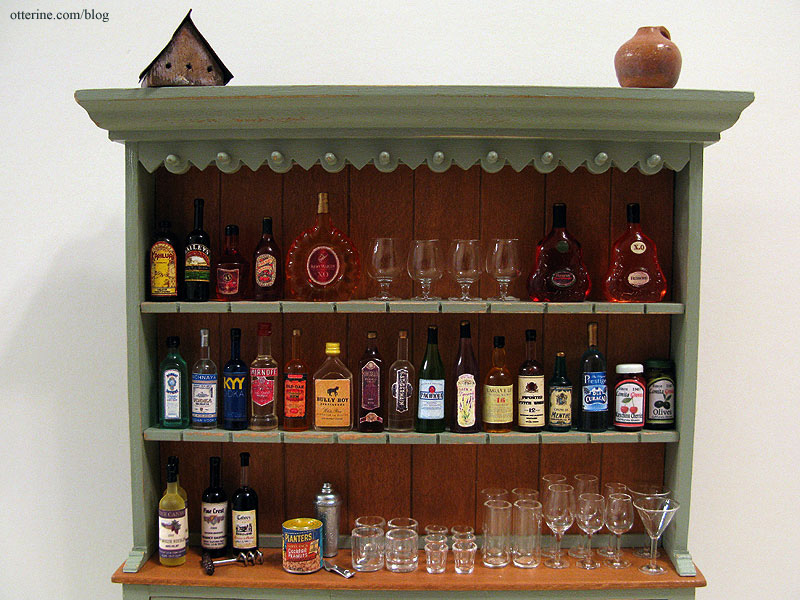
The bar itself is a scratch build using leftover wood from Baxter Pointe Villa stained English Chestnut by Minwax.
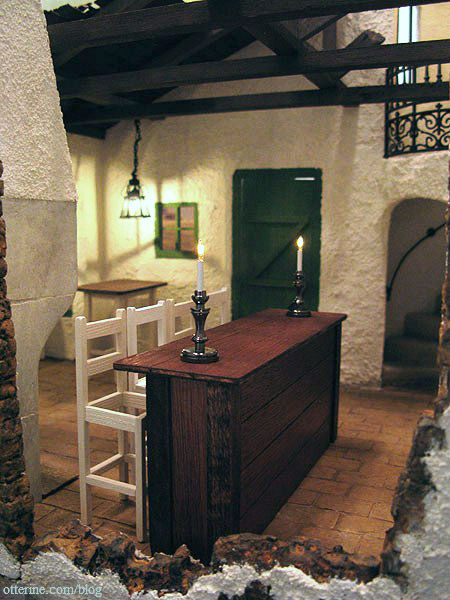
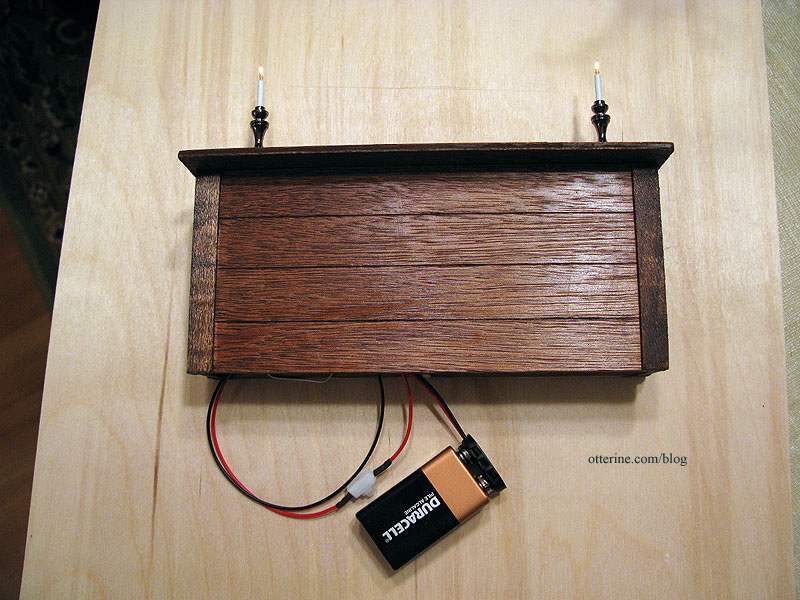
To keep the bar removable, I wired the two lamps to a 9V battery adapter with an on/off switch from Evan Designs. Ingenious, right? Ha! There are two main issues with this idea. First, the bar is definitely removable, but it is hard to get it back into place without the wires sticking out…very fiddly. More importantly, the battery doesn’t last long and the candlesticks are very dim. I tried wiring each lamp to its own battery but the difference in brightness was negligible and it doubled the fiddly nature of trying to get the bar in place with two battery assemblies fighting for freedom. What I should have done was made a plug in the floor.
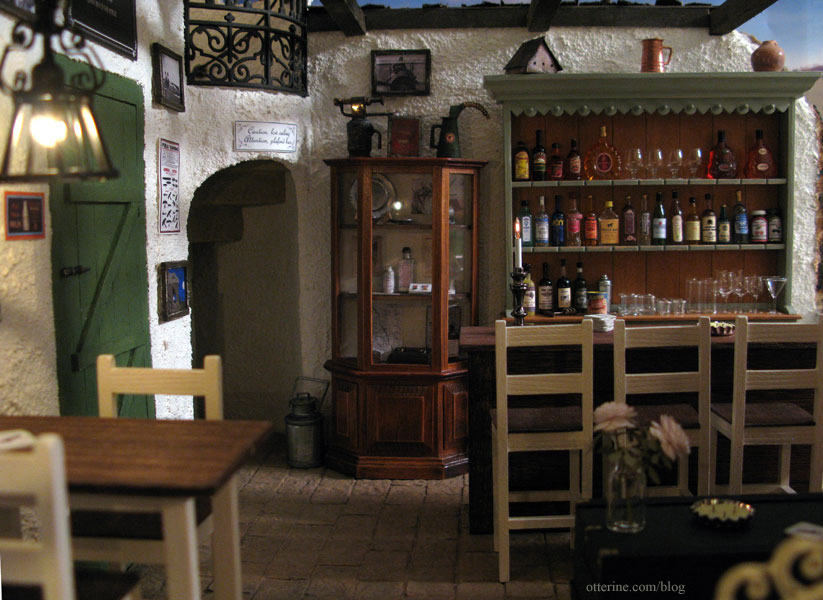
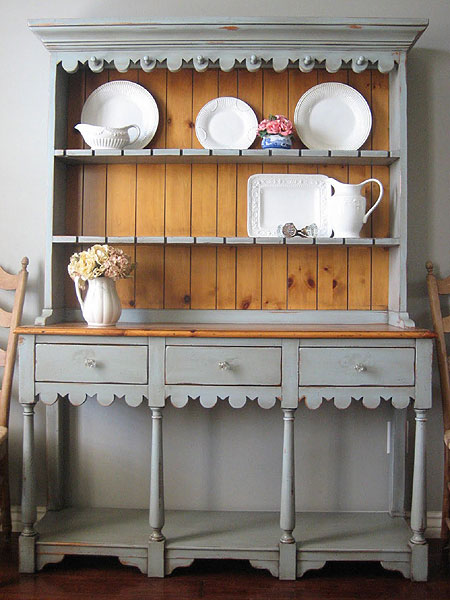
The reproduction farmhouse hutch I made serves as the back of the bar.
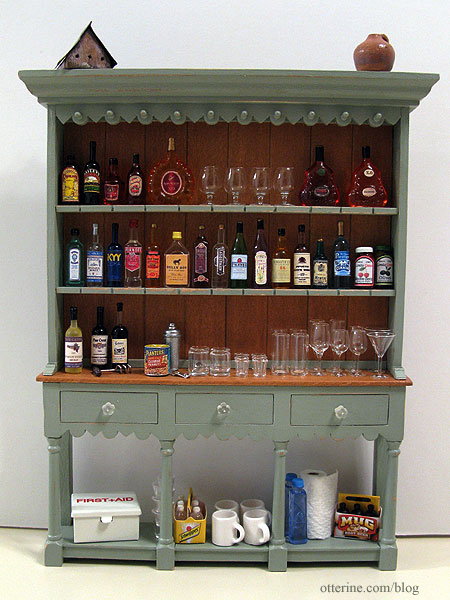
I purchased some of the bottles, and Keli sent me some. I made a number of the labels myself from images found online. I even replaced a few of the labels on the purchased ones with more authentic versions. The glassware is all from The Little Dollhouse Company and is by far the priciest part of the build but looks so realistic. There’s a corkscrew, bottle opener, cocktail shaker and can of peanuts, too. :] The birdhouse on top is from Celtic Juju.
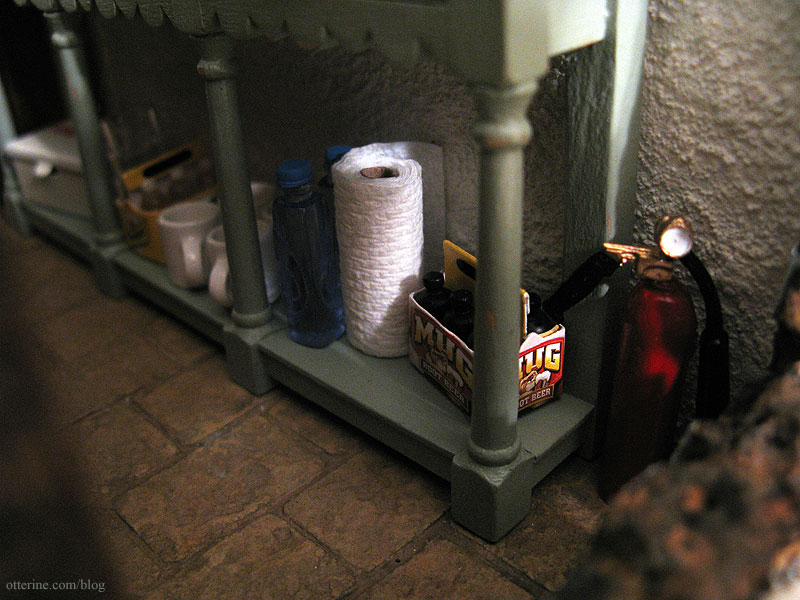
I have to point out the fab paper towels from Lyssa! There’s root beer for Snoopy as well as some Schweppes for mixing. Our safety features include a first aid kit and a fire extinguisher. ;]
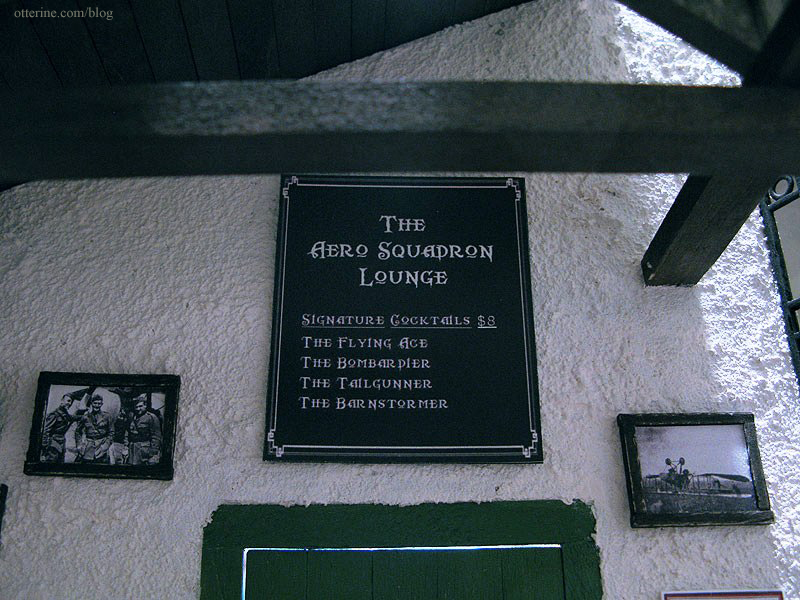
The menu board above the front door listing the signature cocktails. I wanted it to have a chalkboard look to it.
The vintage display cabinet I bought has all WWI and aviation memorabilia. The metal, plastic and leather goods were purchased, though I added labels to the metal bottles and aged the plastic compass. All of the paper items were printed from images found online of actual period items.
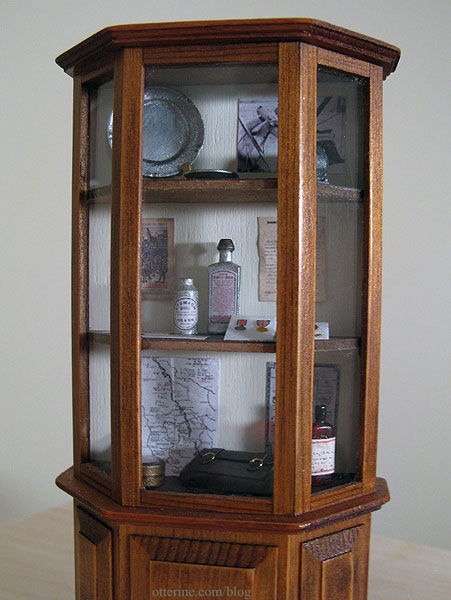
On the top shelf, there’s a photo of a Sopwith Camel cockpit as well as two metal plates and a small motor.
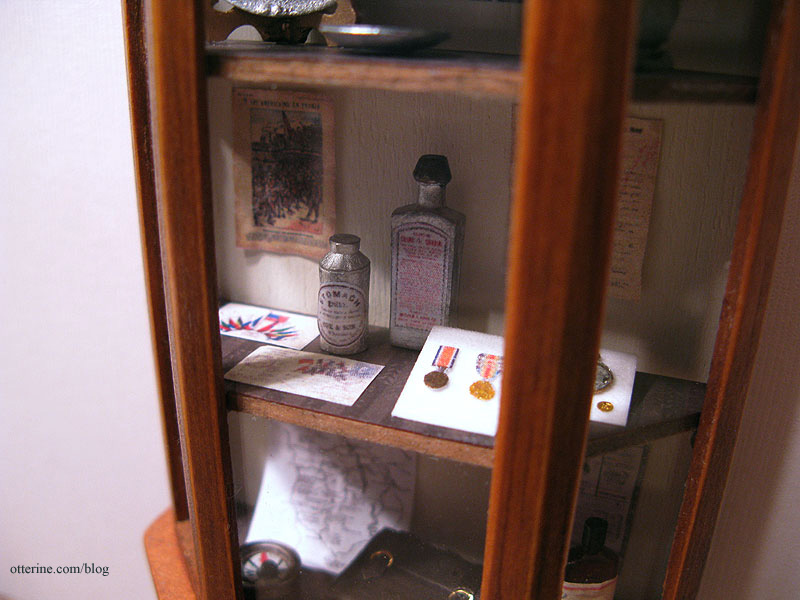
On the second shelf, there’s a magazine page showing an illustration of American troops arriving in France, two postcards, two metal bottles of vintage remedies (I added the labels), an honorable discharge letter for an Army aviation mechanic from Dec 1918, two medals, a pocket watch and two coins. For the magazine page and letter, I crumpled the paper and straightened it back out to add to its age. The British war medal and the WWI Victory medal with aviation band were printed on paper. I dabbed metallic paint on the medal portion to give it depth and shine. The pocket watch was assembled from a tiny laser cut paper kit from Dragonfly International. The coins are laser cut brass from a fret I’ve had awhile – not sure of the vendor.
On the bottom shelf, there is a map of American air service units from Nov 1918 and a vintage medicine advertisement from a shop in London selling remedies. It states: “Remember there are no Chemists’ Shops in the Trenches.” Also on the shelf are a compass (aged with paint), a purchased leather satchel and a purchased medicine bottle (this last piece is from Wright Guide Miniatures).
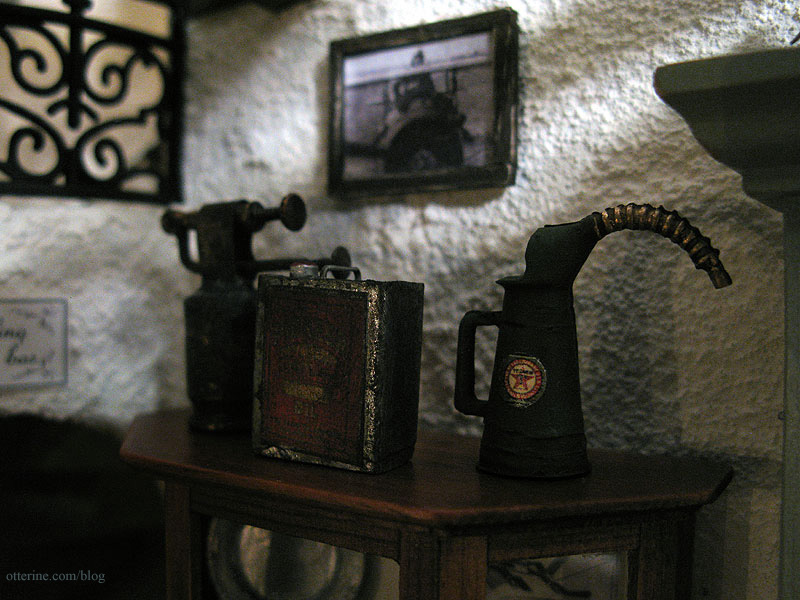
On top of the display case is a blow torch from the mini shows in April (I can’t recall the vendor) and two gas cans from Wright Guide Miniatures.
There’s a metal milk can from Minimum World on the floor by the display case, too. I love the way the interior looks through the windows of the greenhouse addition.
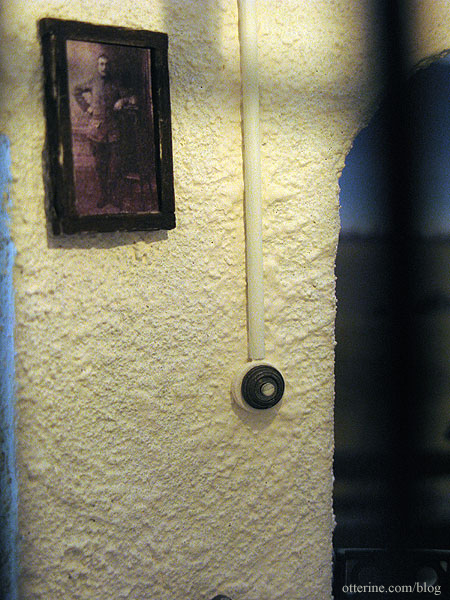
Upstairs in the tower, there’s a small platform so visitors can see outside. There’s artwork here, too, but it is hard to photograph. The tower roof is removable so you can see inside. See that switch on the wall? I’ll tell you about that later. ;D
I have a small lantern from Hobby Lobby up here in case the lights go out. We don’t need people tumbling down the stairs in the dark. There’s the other low ceiling sign on the right.
Update: One of the drawbacks of working on a project in secret is that others can’t pipe in and say, “I have just the thing for your mini scene!” Now that The Aero Squadron Lounge has been revealed, a friend and fellow miniaturist was able to do just that.
Elga inherited two small paintings from a collection belonging to her late Mother-in-Law and offered to send me scans so that I might add these little paintings to The Aero Squadron Lounge. I was overjoyed at the thought, and I fell in love with them when I saw them. I reproduced them in miniature and moved things around in the Lounge to include even more real history. (Full post here.)
Categories: The Aero Squadron Lounge
September 5, 2012 | 0 commentsThe Aero Squadron Lounge – reference material
I like to do a fair amount of research when bringing a build to life, and The Aero Squadron Lounge was no exception. In addition to the online research I did on the Sopwith Camel, I checked out books and watched movies on the subjects of WWI, known at the time as The Great War, and French country design. I am by no means an expert on either, and I didn’t really delve into the politics of the war, but a lot of this material helped me come up with ideas for the look and feel of the build. For any online sources, I have linked (or will link) to them in the various relevant blog posts about the build, so they are not listed specifically here.
I promise there are posts with more pretty pictures coming soon, but I thought you might like to read about where some of the inspiration comes from.
Films:
Wings, 1927
This silent movie was a real treat to watch and I highly recommend it. The plot surrounds two WWI pilots and the people connected to their lives. Being that it was made in 1927, the locales, sets, planes, fashion and other details are all as close to the real thing as possible. The accompanying score and sound effects are great, too! Without dialogue, there is the usual demonstrative acting which is so endearing of silent film. The subject matter is obviously grave, but there was such an innocence to the way it was portrayed without making light of it. There was also some farcical humor, and the action scenes are amazing given the film technology of the times. Just a great movie.Flyboys, 2006
This movie is about American volunteer pilots in the Lafayette Escadrille, and while it isn’t the best or most historically accurate drama around, the settings and planes are well worth seeing.The Red Baron, 2008
Again, not the most thrilling or in-depth movie, but the planes! :DInfluenza 1918, 2005
This PBS documentary details the influenza outbreak in 1918-1919. While not directly related to my build, I ran across it while searching for reference material. What I found remarkable about it is the same as what many say, that I had never heard about it until later in my life and just how “forgotten” the pandemic seems to be. Even in the documentary, people who survived said they wanted to forget, that it was too horrible and too inexplicable. Medical knowledge about the flu was virtually nonexistent at the time, too. Looking back, you can see how so many of the things people did likely increased the spread, most notably all the large public gatherings and parades going on at the time. It’s an interesting documentary to watch with interviews of the people who survived as children being the most moving part.Books:
Diary of a WWI Pilot, 2004
This is the authentic diary of Harvey Conover, a WWI pilot. This book is funny, moving and a real treasure. It is so interesting, for the lack of a better word, to see the experience of it all through the eyes of someone who was there. The tributes Mr. Conover wrote about fallen friends and the epilogue written by his daughter after the diary are wonderfully poignant. I highly recommend this book, even if you have no interest in WWI history, simply for its thoughtfulness and emotion.One caveat is that the daughter edited out some content that was racially charged since she knew her father to no longer hold those feelings later in life. While I understand her reasons for not wanting to show her father in a bad light, it does a certain disservice to the authenticity of the diary.
Sopwith Camel – King of Combat by Chaz Bowler, 1978
An excellent source for the airplane build with many great photographs not only of the planes but the pilots as well.As an aside, I often check out books from interlibrary loan when working on a project since I might need the reference but don’t necessarily want to add the books to my own library. This one was a sight! It came from Embry-Riddle Aeronautical University in Daytona Beach, FL and looks like it was first checked out in 1980 with a relatively consistent borrowing pattern with a few gaps here and there. My guess is somewhere along the line it was misplaced in a window. It’s all sun bleached, water stained and frayed on the outside, but the inside is in very good condition. :D Poor book…but now it has been featured on the internet!

Sopwith Fighters in Action by Peter Cooksley, 1991
This is a wonderful little paperback with loads of information on the various versions of Sopwith planes. There was no shortage of photographs and illustrations. This one came through interlibrary loan from the Marine Corps University Library in Quantico, VA.Sopwith Camel Aces of World War 1 by Norman Franks, 2003
This is a great compilation of pilots and planes, including fourteen pages of color plates showing various Camel markings.Sopwith Aircraft by Mick Davis, 1999
This book has a good sized chapter on the Camel along with a lot of photos, including some of the internal framework.French Country Style at Home by Sébastien Siraudeau, 2010
This is a lovely collection of French country interiors – beautiful photographs and lots of inspiration. This is where I found my inspiration for the stone fireplace.The French Country Garden by Louisa Jones, 2000
Wonderful collection of garden photographs, including old stone cottages.French Country Kitchens by Linda Dannenberg, 2008
I found many ideas here for hutches and general kitchen décor.Categories: Books and media, The Aero Squadron Lounge
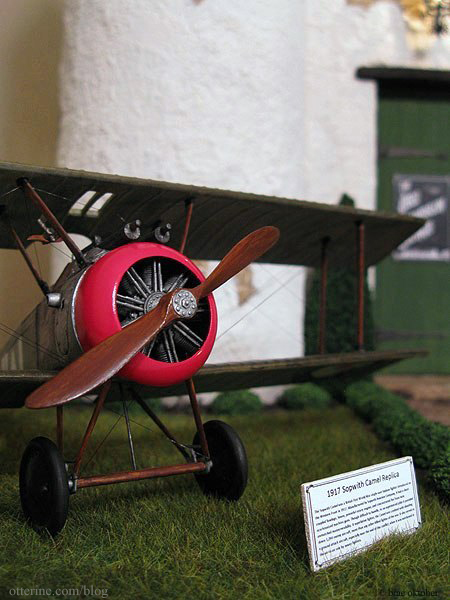
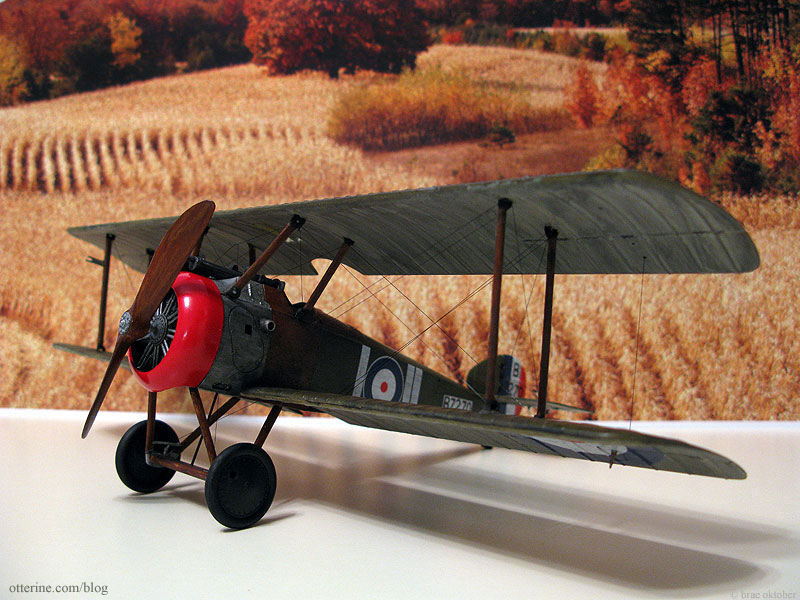
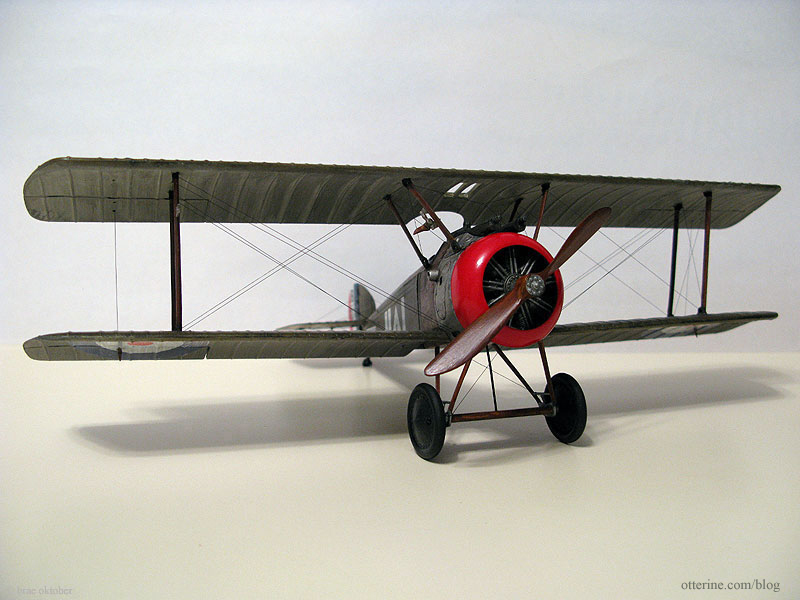
September 4, 2012 | 0 comments1:32 Scale Academy Sopwith Camel
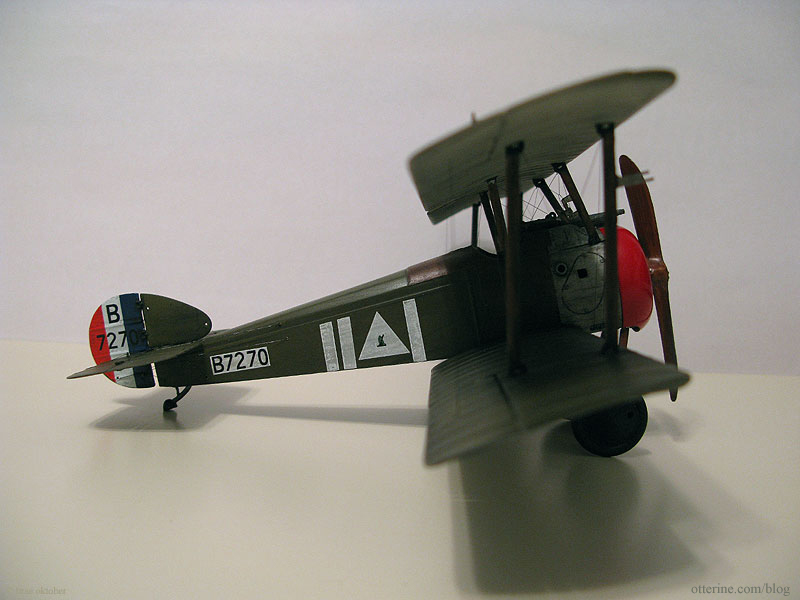
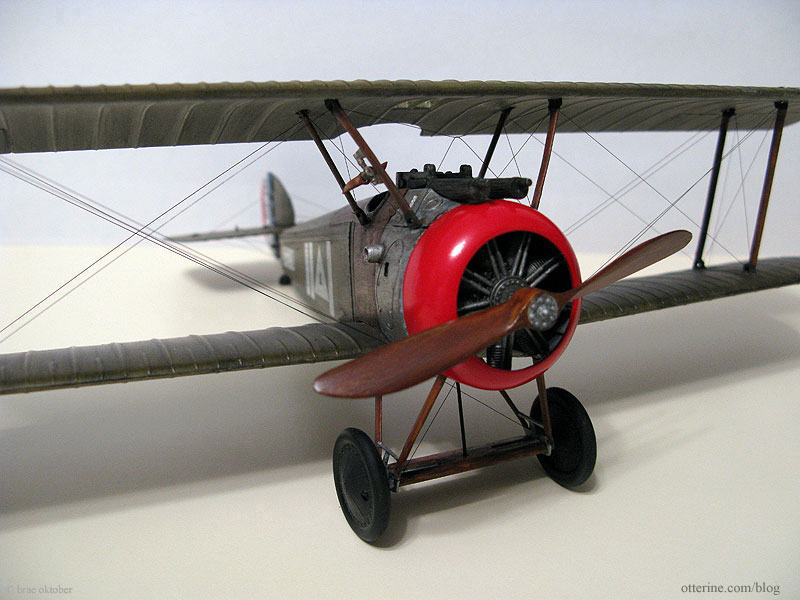
My finished 1917 Sopwith Camel Replica.
It has been a long time since I put together a plastic car model, and I have never done any sort of aircraft before let alone one with rigging. I learned a whole bunch of new vocabulary words during this part of the project, too! No, not new curse words…actual aeroplane terminology. :D
As with scale houses, there is a wealth of information out there on the internet. I found everything from novice builds to finely detailed expert builds. I opted for a 1:32 scale plane since a 1:12 scale replica would have overpowered the building itself as well as my condo. I think the one I chose looks appropriate for scale and enhances the project without taking over completely.
Considering the scope of my project and the fact that the aeroplane was meant to be one element in that larger project instead of a stand-alone piece, I used the base kit as is but put my painting and aging expertise to work! This is your basic plastic model and, as such, some detailing is lost and some is likely historically inaccurate. The kit was inexpensive, but I was able to eek out enough detail to suit my tastes without breaking the bank.
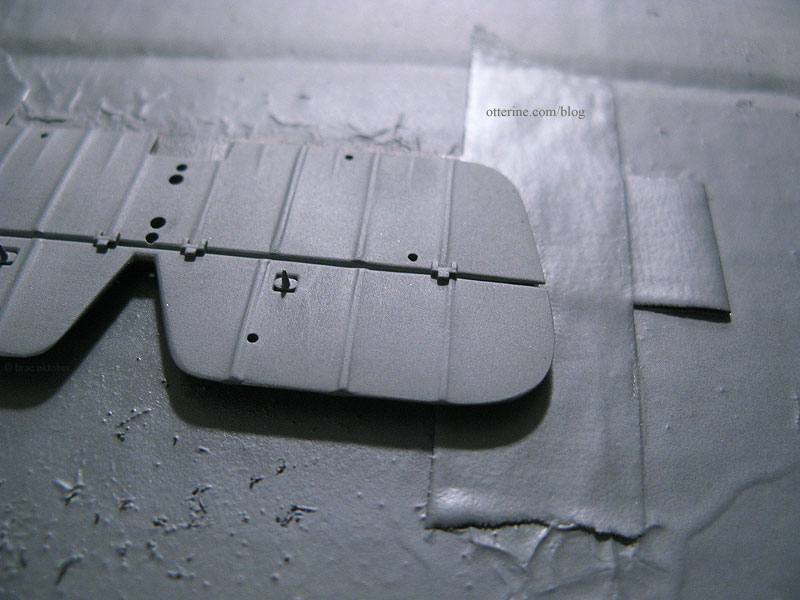
The wings of the original were fabric as were the tail and back portion of the body. After working with the Chrysnbon bathroom in the Heritage, I knew any little mark would show under spray paint. And, I had to fill in many injection marks on the pieces. So, while I was at it, I decided to try an experiment. I sanded the pieces with a linen weave pattern with a sanding stick. I sanded front to back and then perpendicular from side to side to create a very subtle matte cross-weave texture. Since flat paint still often has a sheen when sprayed over shiny plastic, I figured that even if the fabric texture didn’t show up clearly it would at least tone down the shine on the paint finish.
Here is the original shiny plastic.
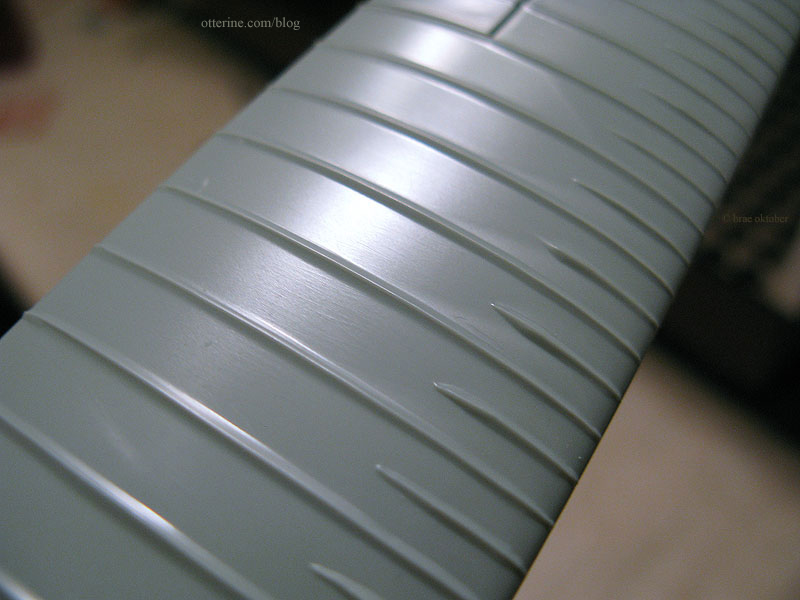
And, after the sanding…

After the spray primer coat, the finish didn’t necessarily register as fabric, but it had a great matte, non-plastic finish. That was a success to me!
After the spray top coat of Testors Flat Light Aircraft Grey for the underside and Testors Flat Olive for the top side, the finish was just as I wanted. Well, I did have a few spray paint mishaps that required sanding and refinishing…but it’s an old replica, right? :D
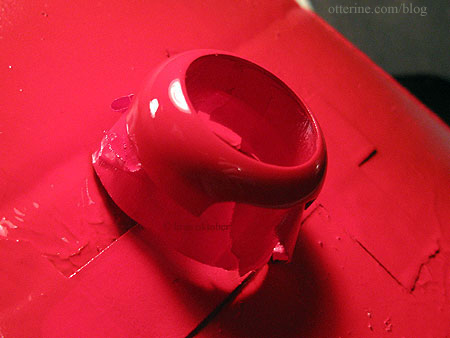
The shiny red nose turned out so well, I couldn’t bring myself to age it or dirty it in any way.
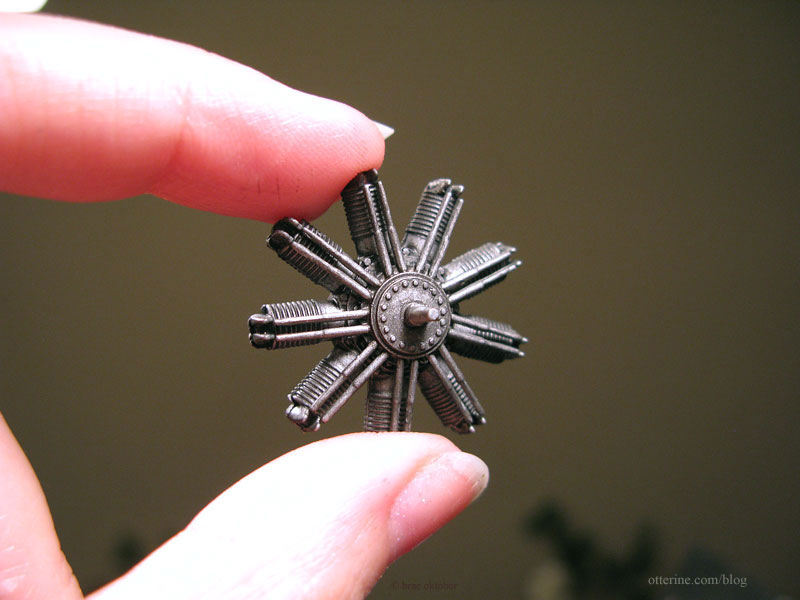
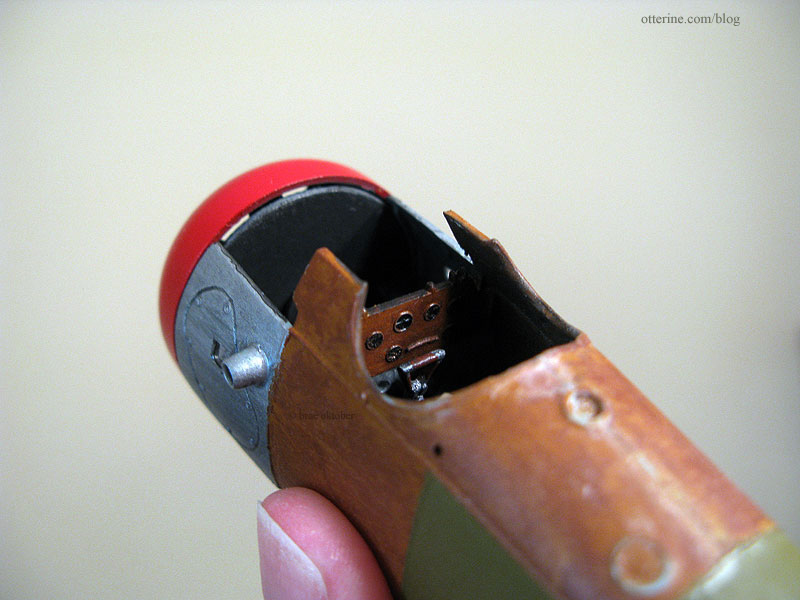
Not much of the engine shows, but I detailed what would be seen. It’s obviously a simplified version of the original, but I figured painting and making it grungy would be detailing enough. I brush painted the four engine parts with Testors Aluminum. Once that was dry I used black and brown acrylic washes to fill in the details, which it did wonderfully. It has the look of an oiled and working machine. :D
The “wood” portions were easier to mimic than I thought they would be. When I read that you were to first paint the base color and then paint on the wood grain, I thought, “Riiiiiiiiiiiight.” But, it works! I used a hand painted base coat of Testors Flat Light Tan followed by Testors Flat Military Brown, also hand painted and then wiped away with a paper towel. Maybe it’s not fine wood grain, but it is remarkably convincing.
There are some fantastic scale cockpit modifications people have done to accurately reflect the original planes, but I ended up using the original kit piece as is. I did the same wood grain finish on the interior walls, floor and dash based on the various models I had seen other modelers build. On the interior, I used black and brown acrylic washes to tone down the shiny new finishes. The instruments were first painted with a toothpick to fill in the black background. I then used a sewing pin to paint the instrument details using Liquitex Iridescent Bronze acrylic paint.
I had read that the guns were molded upside down in this kit, but with my shortened build timeline and the fact that I really didn’t want to start deconstructing parts, I used the guns as is. My model wouldn’t be the most accurate besides, and it would have been a lot of work for a minor payoff. :D

Show of hands…who knew what a turnbuckle was? :D I sure didn’t…but I found out about them in a hurry when researching biplane rigging. I found a tutorial on making these scale miniature approximations, but after seeing just how blasted tiny the materials were, I went with a more simplified approach.
I basically used the kit method, though I used black “transparent” thread instead of the kit supplied black fiber thread. I also waited until after the plane was assembled to add the lines. I didn’t see how you could add the lines during the body assembly, then keep them out of the way and clean during the painting process. This meant a bit more headache in the end, but it worked out well.
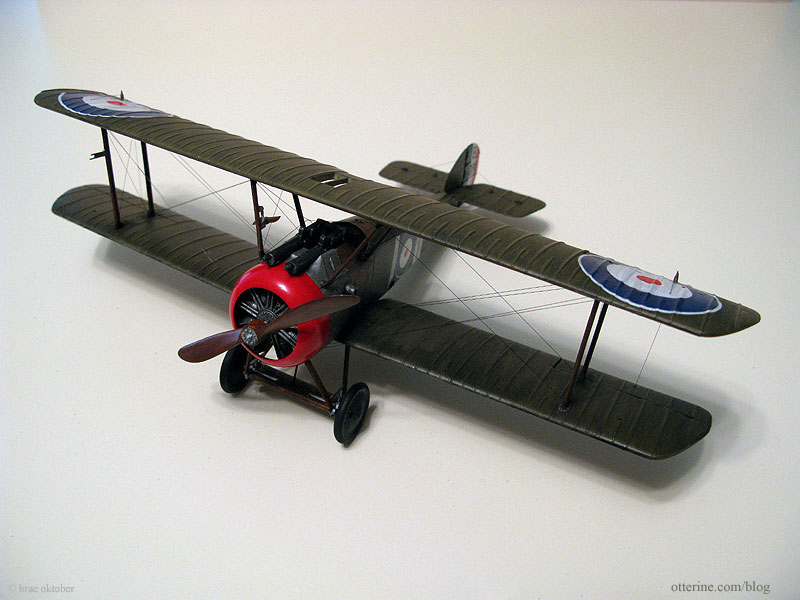
I mostly just used super glue gel to hold the wires in place in the pre-drilled kit holes. For the ones in the body, I cut small lengths of brass wire and slipped them into the holes with the wires. This plugged the hole and held the wire more securely. I dabbed black paint on them later to remove the obvious brass shine.
I started with the tail section, and in this photo you can see the brass pins before I painted them.

The decals were not the easiest things to deal with, and I admit to being out of practice using them. But, the end result was pretty good and this was meant to be a weathered replica, so any imperfections actually worked to my advantage.
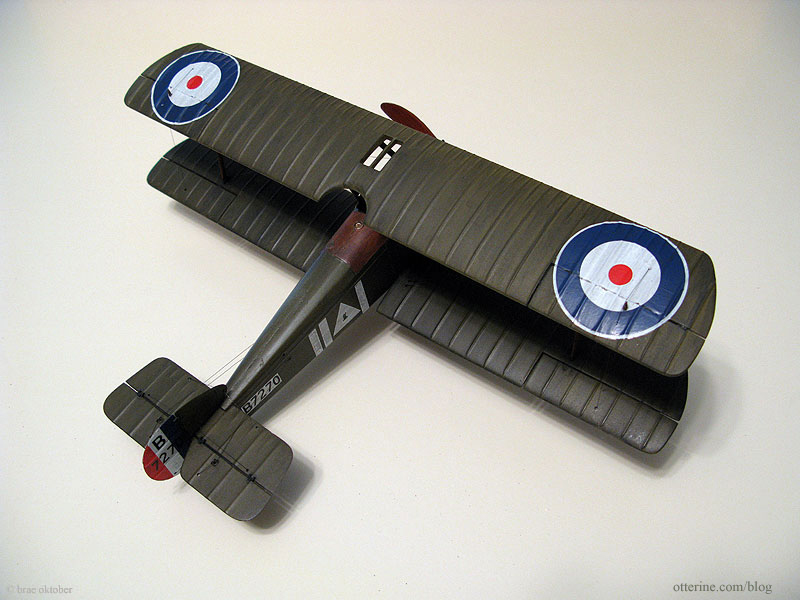
I followed most of the recommended placements and others I made up from the available decals…like the triangle with a logo in it shown below.
I made one substitution during the rigging process. There was supposed to be a straight wire from the bottom of the plane running perpendicular to the wheel assembly. I knew there would be no way to get the tension correct, so I used a cut off head pin. It doesn’t look like a substitution at first glance and it added stability to wheels besides.
I was terribly out of practice with building plastic models and this was my maiden voyage with rigging, but I love the end result! Overall, I enjoyed the process of putting the model together even if I don’t foresee myself making a whole squadron of these. ;D
I found these fantastic Scene Master spotlights on amazon.com and instantly knew they would be perfect for lighting up the plane. They have a vintage industrial look about them that complements the plane and building. They are labeled multi-scale, and I think they work wonderfully in my scene. In the final layout, I used only one of the pair that were included in the package.
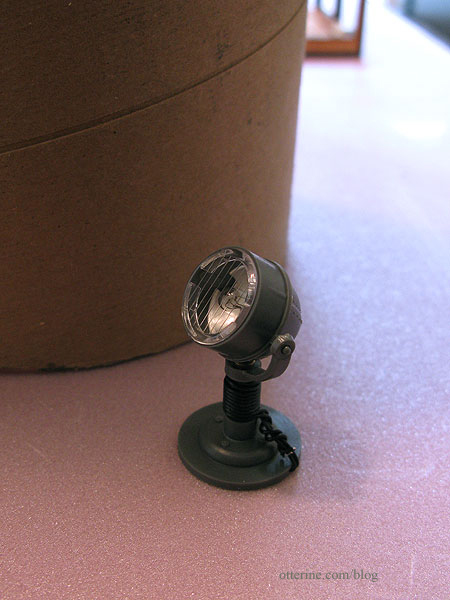
I aged it with brown and black acrylic to remove the plastic sheen.
The sign verbiage is taken from the Wikipedia article on the Sopwith Camel. I printed it on paper, pasted it onto a primed wood scrap and staked it into the ground with some wire.
Be sure to check out these sources and inspirations:
– Excellent video of the same model kit with snappy music
– Beautiful kit model by Des DelatorreCategories: Model Cars, Vehicles, The Aero Squadron Lounge
September 1, 2012 | 0 commentsMaking pretty plants
The one on the left is a verbascum plant by The Miniature Garden, and the one on the right has three daisies by Bonnie Lavish with some greenery from A Little More in Miniatures.
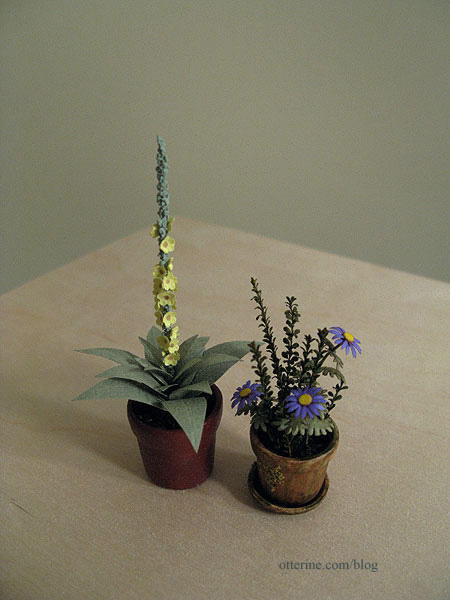
I’ve made the daisies before. They are quick and easy to put together. The aged and mossy pot was purchased.

The verbascum plant took longer, but the results are lovely. The kit had a lot of steps but it was very easy to follow and didn’t take as long as I thought it would. I put it in one of the terracotta pots I painted and glazed. Both plants have styrofoam inserts under Earl Grey tea dirt.

I made more plants. From left to right:
– Bonnie Lavish pansies
– Lavender and Erica moss from The Miniature Garden
– Bonnie Lavish cushion mums
– Greenery (yes, I am aware it’s orange) from A Little More in Miniatures
As it turns out, they were too crowded in the planter so one gets to sit on the ground. :D

I love minis and mini-ing. :D But, the best part of starting this creative outlet for me has been the friendships I’ve discovered, from all around the world. Some of you I know only through our respective blogs, some of you I know through forums as well. Some I’ve conversed with outside of the online communities and some I’ve met and formed friendships in person.
I have one such friendship with Lyssa. She and I met through the mini forums, and she is one of the best people I’ve met in my life. So young and so devoted to her young children, she is an inspiration to me. And, when I am feeling blue, she cheers me up and helps me get back on my feet. She even sent me a care package some time ago with books, movies, tissues, chocolate, Scotch and even some minis in need of makeovers. It made a blue period in my life better, and I treasure the friendship minis have brought to me.
One of the minis was this gaudy and rickety brass thing we both had a laugh about. I am not sure if it was meant as a crib or shelf, but I saw it as a planter. After a makeover, it became an old rusty plant stand. Thank you, Lyssa, not only for the minis and Scotch but especially the friendship!
Categories: Flowers, plants, and trees, The Aero Squadron Lounge
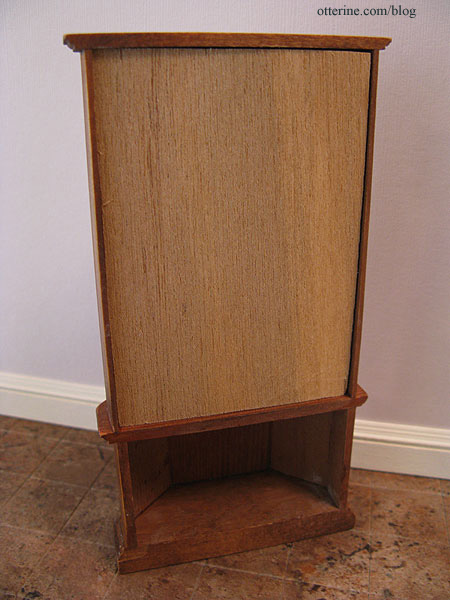
August 3, 2012 | 0 commentsVintage display cabinet
I was going to build a display cabinet, but with the projects still to be completed and the due date in just over a month, I started looking around for something ready-made. I stumbled across this vintage curio cabinet on etsy at Vintage Calico Garden. Perfect!
Here is it after a good cleaning. There are no maker or manufacturer markings as far as I can tell.
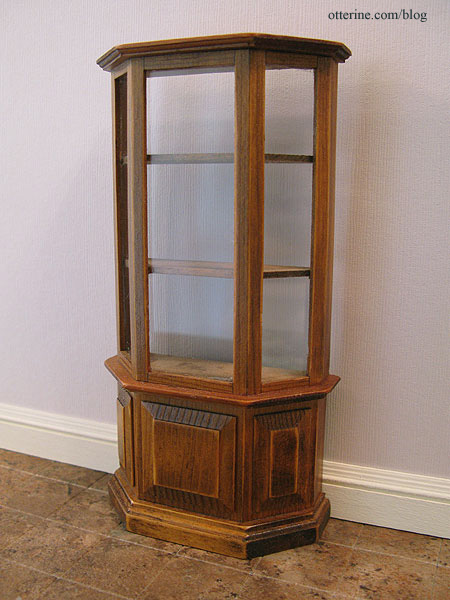
The piece is in excellent condition overall, though the shelves were a bit rough for what I needed.
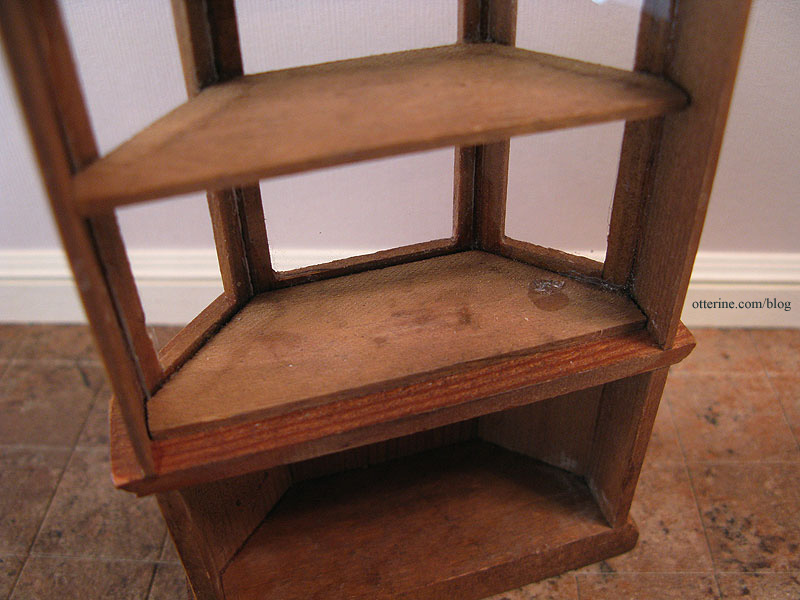
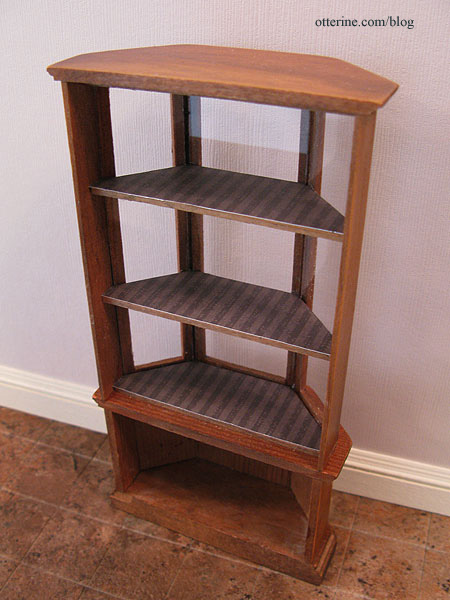
Heather helped me by sending some scraps of paper for the Heritage bedroom, and she included some coordinating dark striped paper in the package. I used this striped paper to make liners for the shelves. I colored the edges for the top two shelves with a marker (not seen here), because the white paper edges would have shown through the front and side glass panels.
The cabinet needed a backer to complete it, so I cut a piece of spare Heritage plywood.
The wood backer just slides in place and is held straight by the shelves.
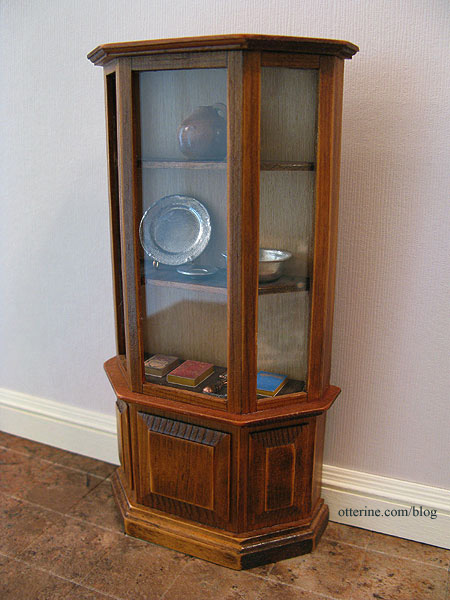
Knowing I would never be able to match the stain of the outside, I painted the backer Vintage White by Folk Art. The items I put in the cabinet will stand out nicely against the pale backdrop. Perhaps one or two of these things might stay in the cabinet, but I just filled it quickly with items I had around to take photos.

Update: Here it is after being filled with items appropriate for The Aero Squadron Lounge. It really is a lovely piece. :D
Categories: Furniture, The Aero Squadron Lounge
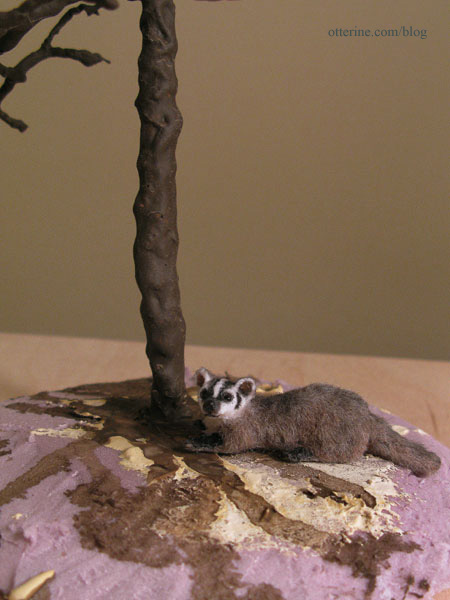
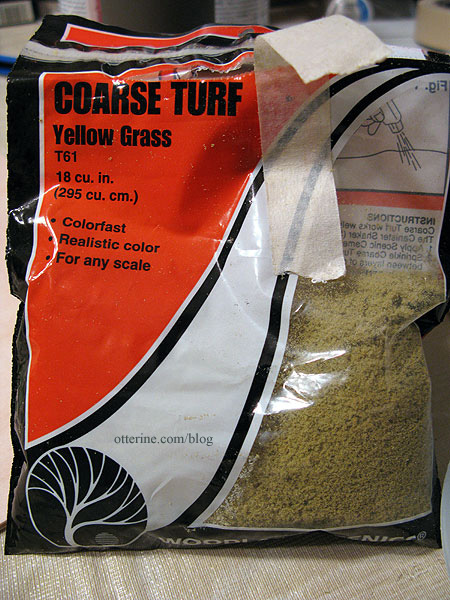
July 29, 2012 | 0 commentsDogwood Tree
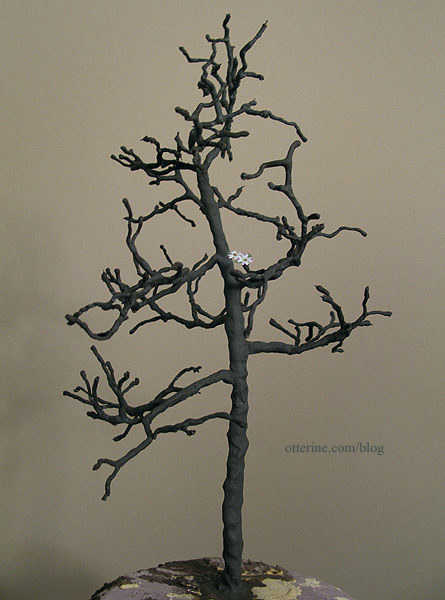
I am following the same DVD tutorial as I did for the Heritage tree: Master Miniaturists:
Landscaping Primer with Diane Myrick. This tree, however, is fuller, shorter and much less
knobby. Here’s the tree after adding the water putty and paint washes. The tree stands just under 11″ tall.
Who’s that there? Looks like Grahame the badger has wandered over. :D
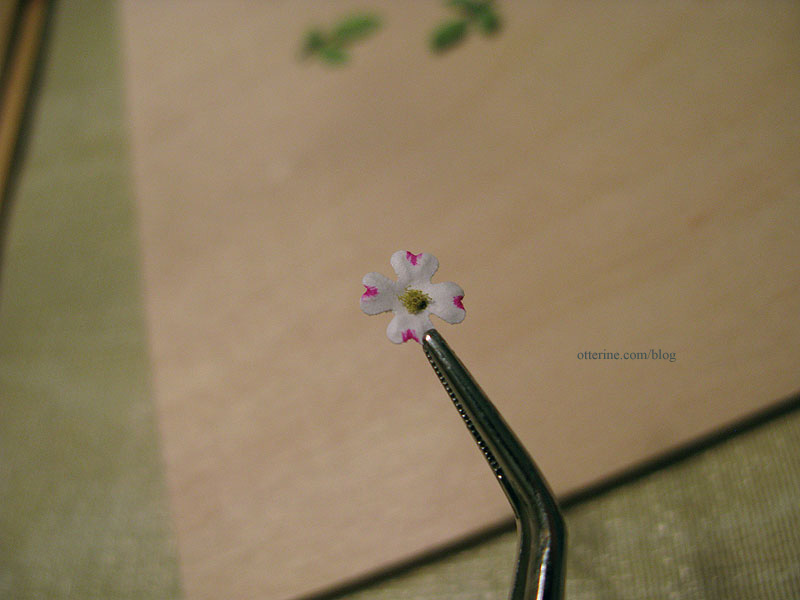
Instead of using the foliage techniques used in the DVD tutorial, I wanted to use a technique to make a dogwood tree that would allow for close-up photos. This is what the flowers look like on a real dogwood.

Image from James Hawkins I decided to use scrapbooking punches to make flowers and leaves. I have just under 100 branch tips on my tree, so I punched out 400 white flowers using the mini Hydrangea punch by Punch Bunch and colored each of them individually with markers. I ended up dumping about 20 or so for bad marker wielding. :D
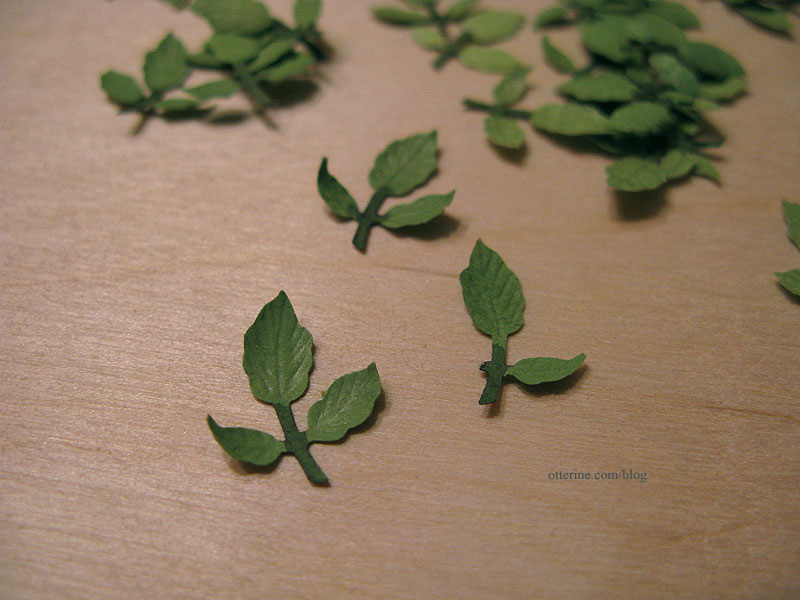
I had two leaf choices – both with multiple leaves from each punch. This is the small ash punch by Punch Bunch with flowers.
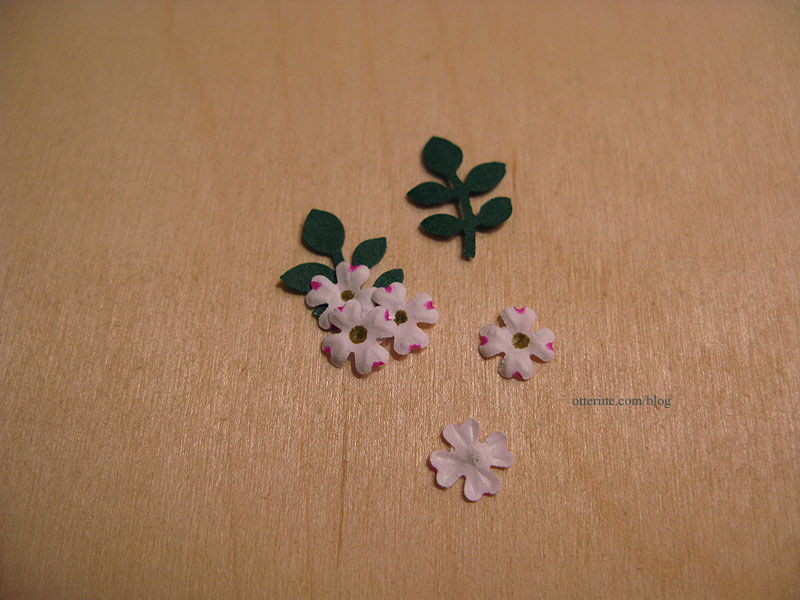
This is the small tri leaf punch by Punch Bunch with flowers.
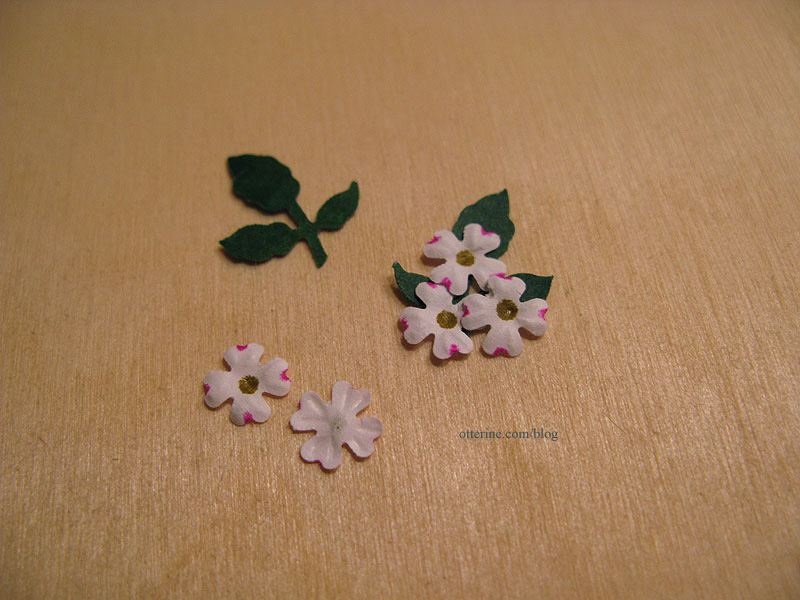
Both leaf sprigs are 5/8″ high, but the tri leaf sprig seems to work better overall in scale and shape. I will shape these to add vein texture and then glue the flowers and leaf sprigs to the tree skeleton. I’m also planning to add some dimension to the flower centers.
I knew I needed lighter color leaves, but none of my markers were the right shade of green. I ended up painting the strips of paper which resulted in a slight variation of greens. I think that’s okay considering it might add to the dimensionality instead of having a uniform green as the backdrop for the flowers.
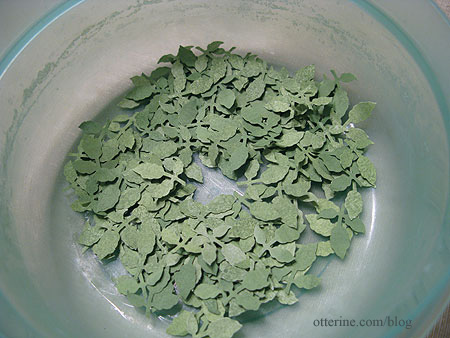
Here they are…165 leaf sprigs. I’m not sure if I will need more flowers and leaves, but it seemed a good place to start.
I colored each stem with a brown marker. With the green paint base color, it turned the stems greyish green…perfect for matching the trunk. I then added veins to each leaf on the sprigs with a ball stylus. I had a few leaf casualties, but I kept the sprigs and the loose leaves.
The middle of a dogwood flower is actually a cluster of smaller flowers. To add dimension to mimic these clusters, I glued landscaping material by Woodland Scenics to the centers of my shaped flowers.
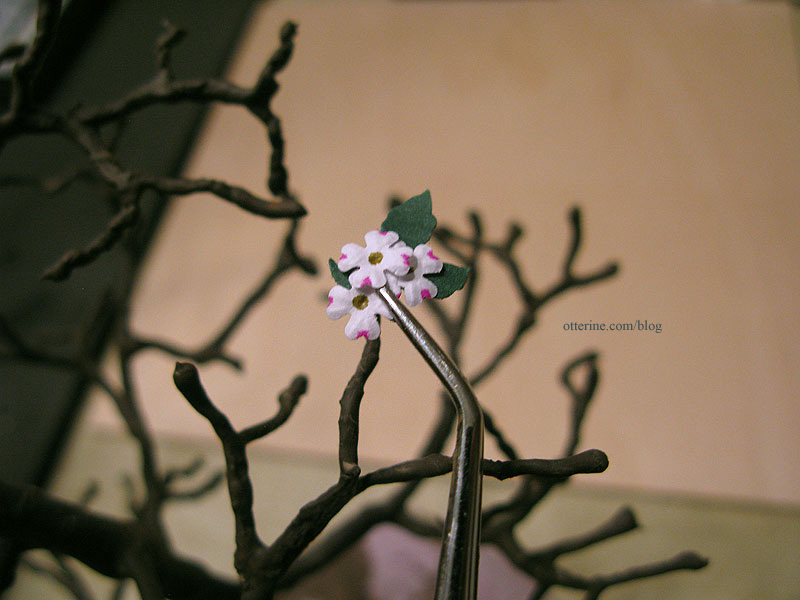
I glued flowers to a leaf sprig and then glued that assembly to the tree branch using Aleene’s Fast Grab. I usually use Aleene’s Quick Dry for just about everything, but this is a thicker glue that does what it says…it grabs fast! :D
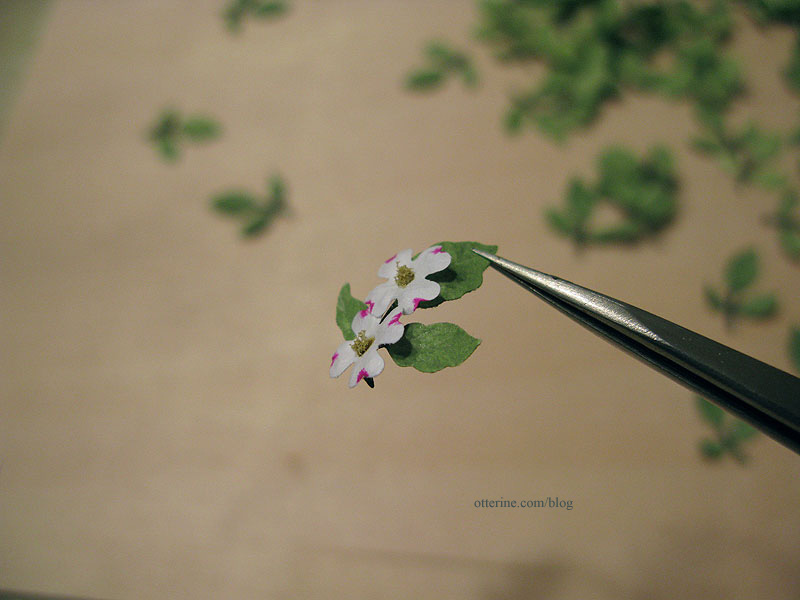

Okay…164 more to go!
I finished putting on as many leaves and flowers on the dogwood tree as I thought looked good. I have a bunch left over, which is fine since this tree may need touching up from time to time and I won’t have to start the process of making new leaves and flowers from scratch.

The bench is by Phoenix Models. The “kit” comes with two white metal bench ends that you can paint, and you supply the wood in whatever length you wish. It’s a perfect solution when you need a completely custom size bench. It’s a sturdy little piece once you manage to wrangle all the wood ends into place.
I used some leftover Dura-Craft trim wood for the seat slats and skinny sticks for the back rest, stained with Minwax English Chestnut. I cut the boards 3.25″ in length, so the seat ended up at 3″ wide — a perfect loveseat under a pretty tree. :D

From the back, the tree looks a little fuller since there are more branches on this side. I had made it sparse on the front since I planned to have a bench there from the beginning.

It looks fullest from an aerial view (and in person since you can walk around it at the right level).

Overall, I love the way it turned out. It’s full but still allows you to see the building behind it.
Categories: Flowers, plants, and trees, The Aero Squadron Lounge
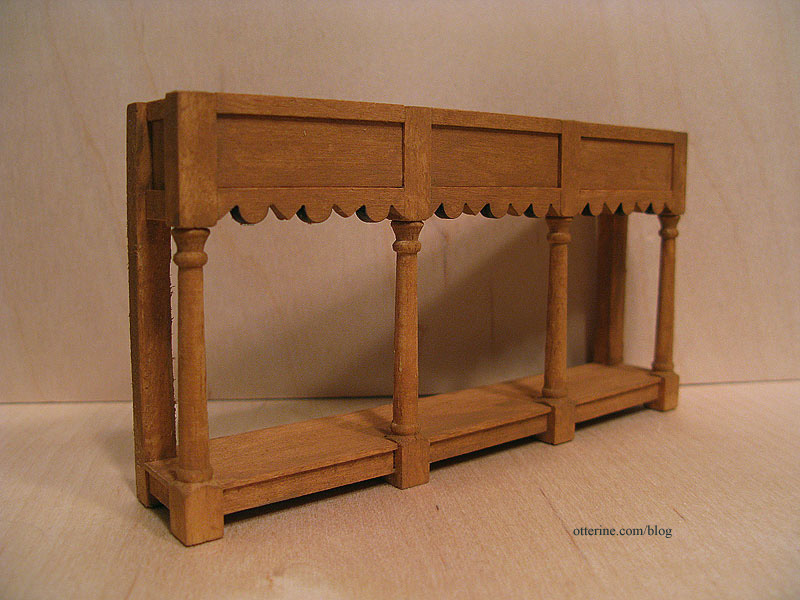
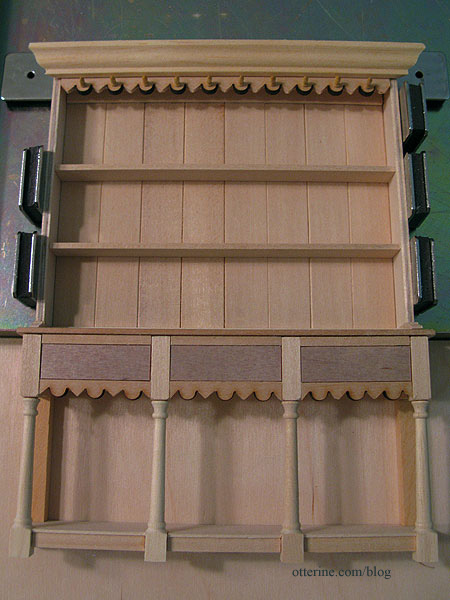
July 19, 2012 | 0 commentsFarmhouse hutch reproduction, part 2
Continuing work on the farmhouse hutch I found on European Paint Finishes. With the hutch mostly built, I needed to stain the entire surface. I plan to paint all except the back and counter top, but I will sand that top layer down to show the stain color underneath. One of my favorite materials is Staining Antiquing Medium by Americana. It acts somewhat like a glaze, looks a little like an ointment, and makes acrylic paint behave like a liquid stain.
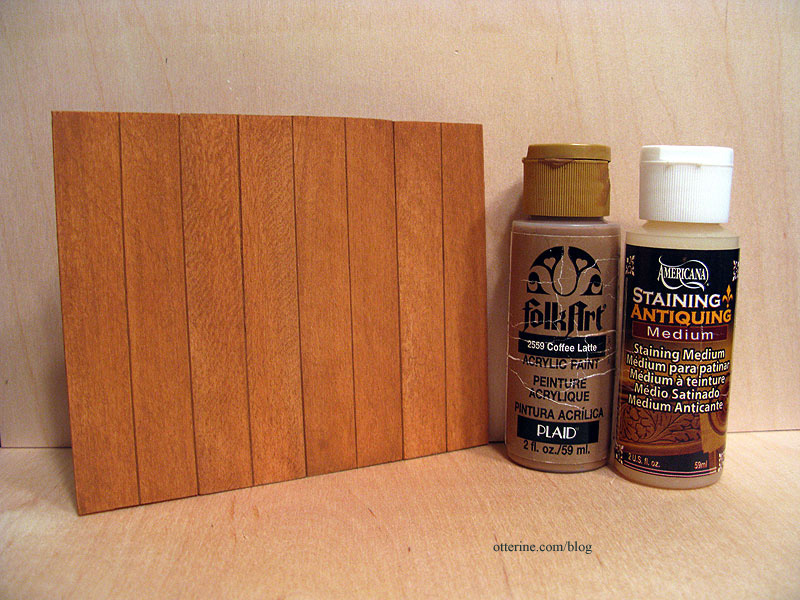
You can use any color you want and still have the wood grain show through. And, you don’t have to buy a whole can of stain every time you need just a little color. Here I’ve used Coffee Latte by Folk Art, which has a warm honey color.
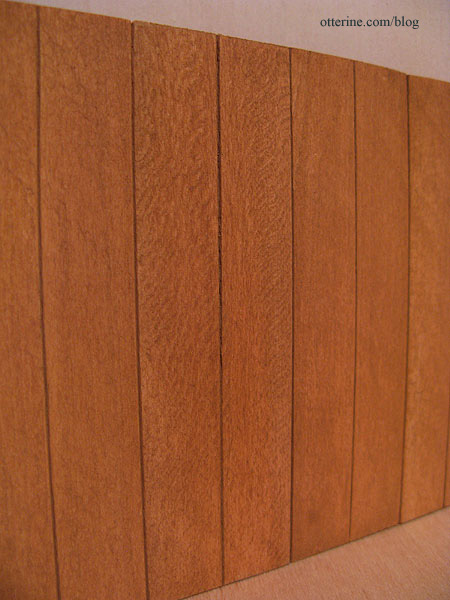
The hutch looks rather rustic, though I will neither confirm nor deny if that is my intention. :D
I let the stain/paint dry overnight then sanded all the pieces smooth and reapplied the stain as needed.
I painted all of the pieces except the counter top and the hutch back boards Slate Green by Americana.
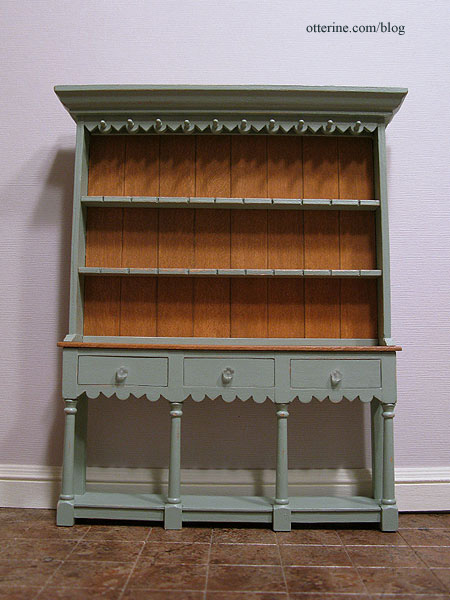
It’s close to the color used on the inspiration piece.
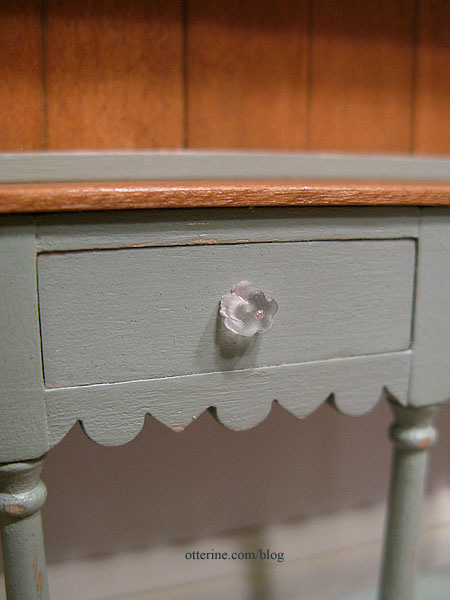
I sanded the pieces to reveal some of the stained wood underneath the top coat and then sealed with Delta Ceramcoat satin varnish. The knobs are clear flower-shaped beads held in place by silver pins. The faux drawer fronts look convincing, no?
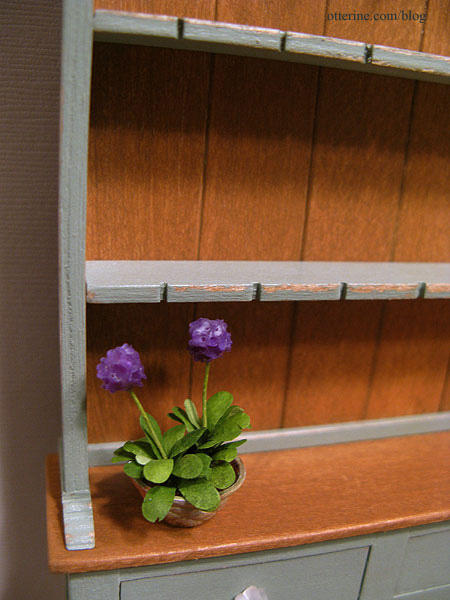
I added the notched detail on the shelves. Fran suggested this might be for displaying spoons, and even though I don’t intend to display mini spoons, I liked the detailing. The lovely flowers are by Michelle from Little Rabbit Miniatures.
I moved the crown molding up slightly during final finishing, so the entire unit measures 6 1/4″ W x 7 5/8″ H x 1 1/16″ D.
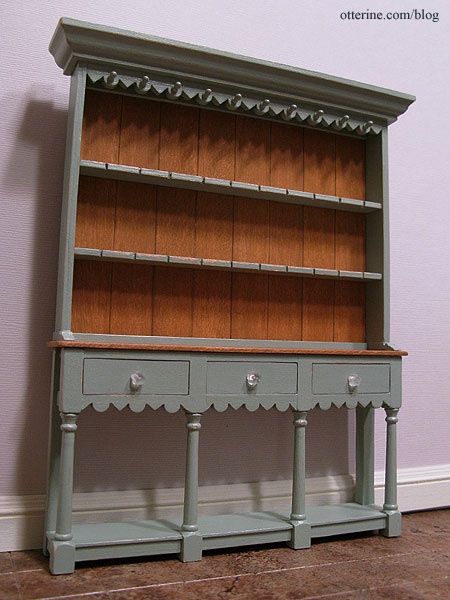
I think it turned out very close to the original. :D
Now to fill it. I won’t be using these items with it, but I wanted to show the relative size with some minis.
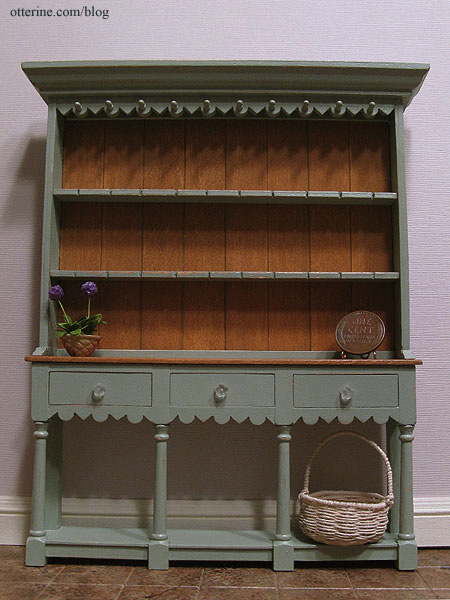
Basket by Lyssa. :D
Categories: Furniture, The Aero Squadron Lounge
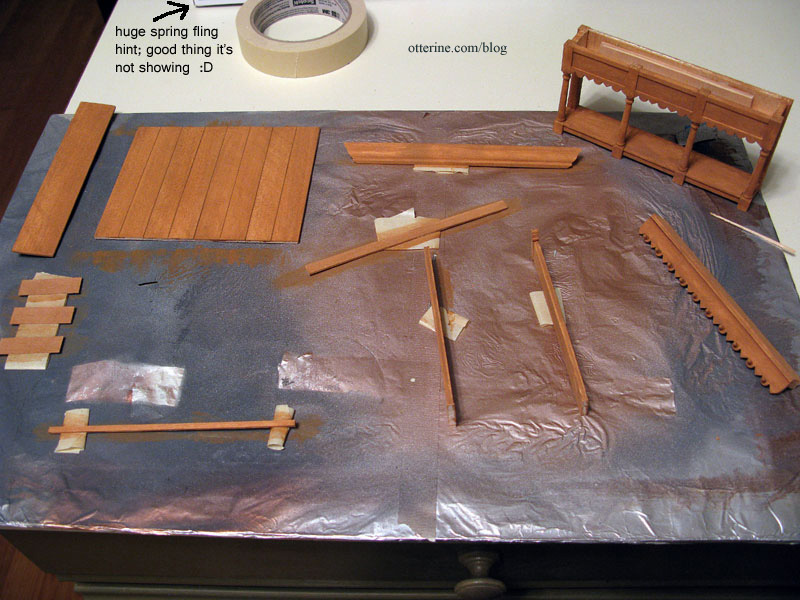
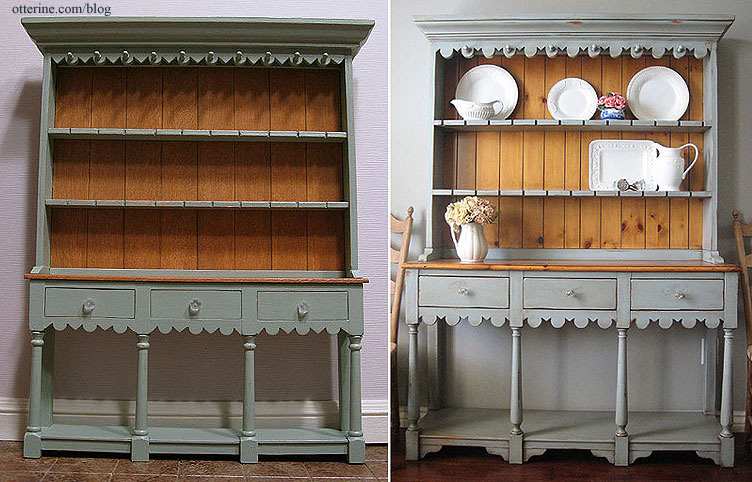
July 15, 2012 | 0 commentsFarmhouse hutch reproduction, part 1
I have started my miniature reproduction of a farmhouse hutch I found on European Paint Finishes. Here’s the original farmhouse hutch for reference.
I have the base assembled and ready for paint and stain. The counter top is separate since I plan to stain it and paint the rest.
The drawers in my version are not functional, so I’ve recessed the front portions for now. I will make faux fronts to “float” in these openings to make the drawers more convincing.
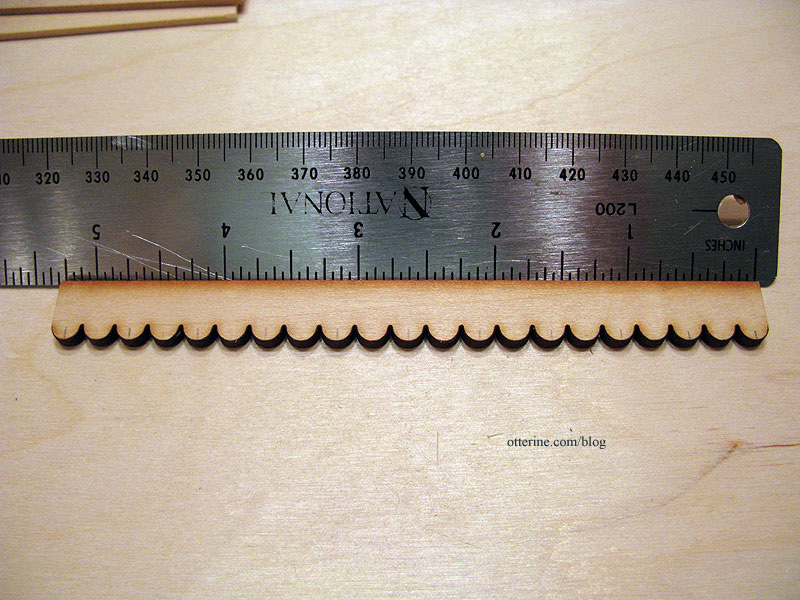
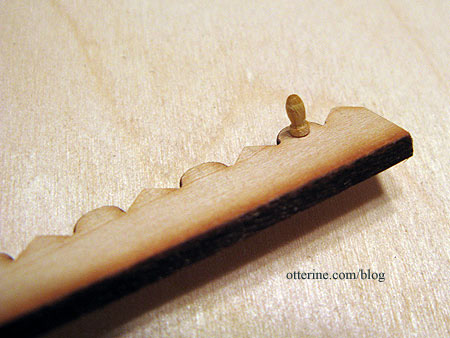
I used laser cut scallop trim from Heritage Laser Works, cutting every other scallop to a point to mimic the original. Mine has three complete scallops instead of four like the original to maintain the look of proper proportions.
Below is a more detailed shot of the original. The hutch is shown on a similarly colored wall, so at first I thought the bottom was enclosed on the back. It’s actually open between the back two square posts.
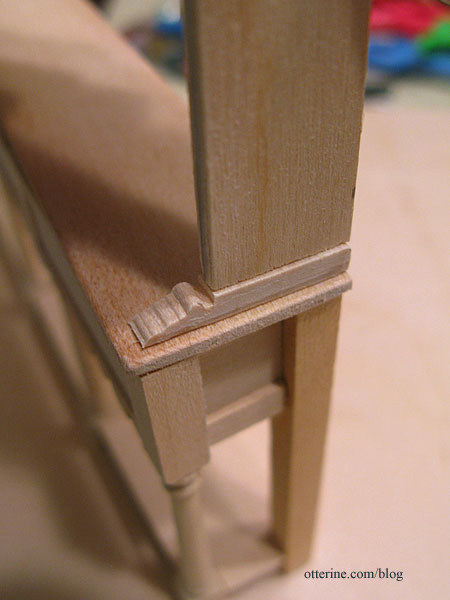
The front posts are Houseworks newel posts cut to fit. I may or may not add the bottom brackets. I have an idea how to make them, but they will be tiny and perhaps more trouble than they’re worth. I was trying to keep the height down on the overall piece and haven’t left much room for them.
This part of the hutch measures 5 3/4″ W x 3″ H x 1 1/16″ D.
I forgot to mention that Patie of minisx2, where I found that delightful and whimsical modern cabinet, sent me some Dura-Craft wood from my want ad and included two bundles of cut wood for projects. It’s very nice wood, unlike what I’ve been finding in the craft and hobby stores lately. I’ve used it for the counter top of the base and the back of the hutch top.
Very little of the top is glued since the back will be stained and the rest painted, so it’s being held together with magnets in my gluing jig. Here’s an approximation of what it will look like with lower portion. As you can see, I’ve cut the veneer inserts for the faux drawers.
My first measurement for the top had to be the scallop trim since I needed complete scallops all the way across. Having them uneven, with one chopped off on one side and another whole on the opposite side would have offended my sensibilities. ;D
I order wood trims and parts from Manchester Wood Works quite often, and they include a small sample bag of various wood trims. I use these samples all the time when I just need a little bit of something to add to a project.
To create the decorative bases for the side panels, I used 1 1/16″ tall baseboard trim – a sample from Manchester Wood Works. I am guessing this might be for play scale. I’ve used half scale and quarter scale items in my full scale builds before, too. I cut thin cross sections, then measured the depth I would need based on my side panels.
Now I have wonderfully decorative bases without having to carve them individually. This was the method I had planned to use to make the lower brackets, but the space is just too small. Until I delve into quarter scale building, cutting wood that small just eludes me. :D
The pegs on the upper trim are model ship belaying pins. Just a quick drilled pilot hole and some glue, and there you have it!
Here is a close up of the original hutch top.

I ended up with 1 1/4″ spaces between my shelves to accommodate what the hutch will eventually hold. I’ll cut sides for the crown molding on top after it is all painted, stained and assembled. Things have a way of shifting during the building process and I find it’s best to fit that final trim at the end. I still need to add the notched details on the shelves, but I’m taking a break from the project for now. I can fiddle with these things only so long.
The hutch top measures 5 1/2″ W (not including the crown molding) x 4 1/2″ H x5/8″ D (not including the decorative bases), making the total unit 6 1/4″ W (with the crown molding) x 7 1/2″ H x 1 1/16″ D.
Categories: Furniture, The Aero Squadron Lounge
July 7, 2012 | 0 commentsHenhouse
After doing a quick bit of counting, I realized there are four and a half months until the Spring Fling contest deadline. I had planned to work on both the contest kit and the Heritage so my blog wouldn’t go silent, but this realization sent me into a bit of a panic. There are a lot of things I want to do for this build, so I have to get to it…and there may be some days of radio silence.
While the build will be secret as a whole, there are things I am building along the way that I can share without giving any clue as to what the total project is. The first of which is a little scratch built henhouse. Trust me when I say this really gives very little away about my project.
I saw one of these at the Bishop show made by Terry Harville and instantly knew I needed one.
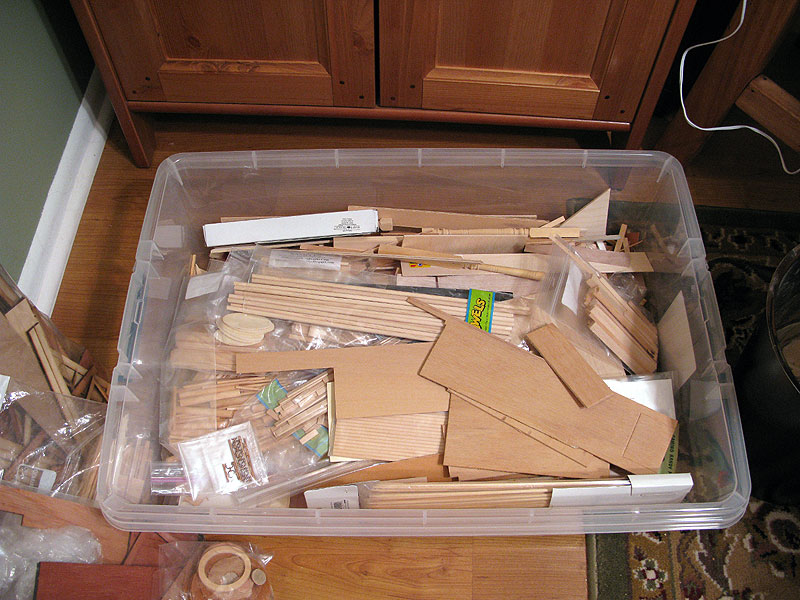
If there’s one thing I have, it’s leftover scrap wood, especially from the Heritage build. I’ve been throwing all my scraps and punched out pieces into a plastic bin that I can rummage through as projects come up. The henhouse was made using only scrap items from this bin.
Since this is inspired by someone else’s work, I’m not posting a full tutorial of the construction. But, you can probably see how it is made as it is a very straightforward design. I have it all assembled except for the roof board, which I still need to shingle. I thought it would be easier to keep that piece separate so I can press it flat if need be.
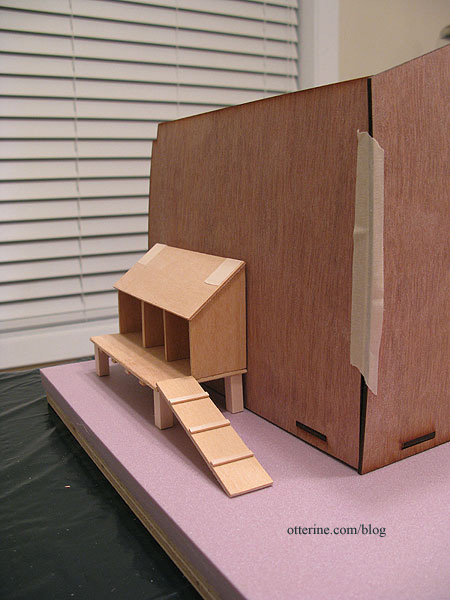
Update: The henhouse is not easily seen in the overall build because of the tower, but I’m glad I included it. The breed of hens I’ve made are Faverolles, a French hen suggested by Teddi. I have a standing hen not yet completed.
I’ve used a few of the eggs I made, too.
Categories: The Aero Squadron Lounge
April 24, 2012 | 0 comments


NOTE: All content on otterine.com is copyrighted and may not be reproduced in part or in whole. It takes a lot of time and effort to write and photograph for my blog. Please ask permission before reproducing any of my content. (More on copyright)

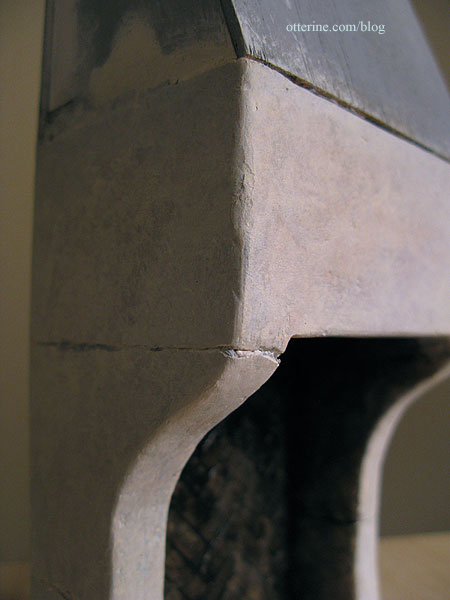
The Aero Squadron Lounge – removable fireplace
Or, turning stryofoam into stone. For the initial structure, I used regular white stryofoam for the side walls since it was easy to cut and shape with sandpaper.
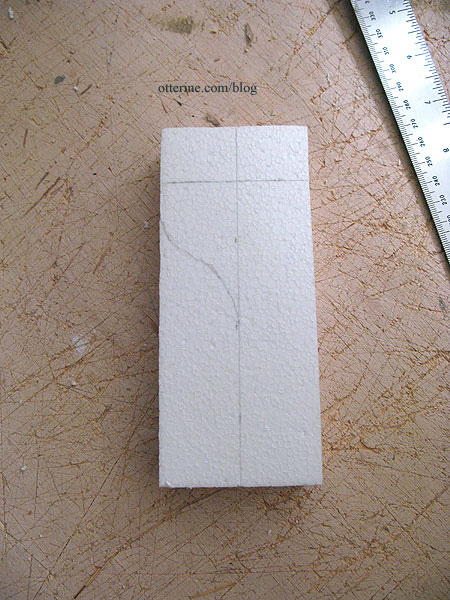
I added builders foam across the front only because I had the perfect sized scrap for the opening. The back and upper sides are foam core board and the upper front is balsa…a little bit of everything from the scrap box.

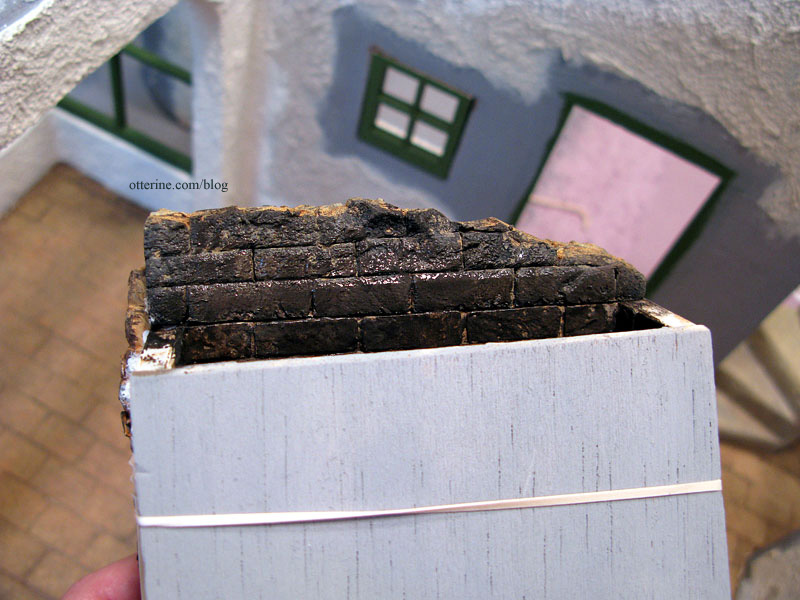
The back of the fireplace is made from egg carton bricks placed in a herringbone pattern. As I had done for the Heritage chimney, I used a printed grid to help keep the pattern consistent.

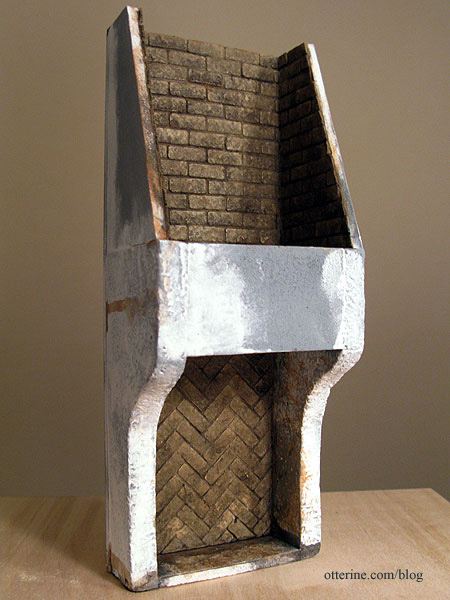
The fireplace is actually bricked all the way up inside as you can see in this work-in-progress shot. I changed to regular brick pattern from the upper edge of the stone fireplace through to the top of the chimney opening.
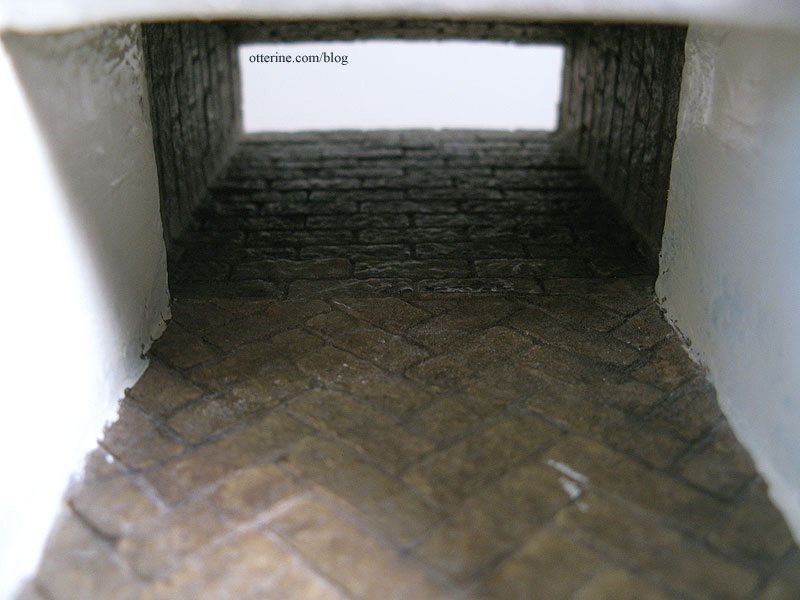
I had to do this in two sections, the back and sides first and then the top front, which wasn’t glued in place until after all the painting and grouting was complete. Below, you can see the brick on the back and sides in progress as well as the initial coat of spackling on the stone portion of the fireplace.
I painted the bricks with Camel by Americana using a stencil brush to stipple on the paint. I did the same thing with Desert Sand by Americana, leaving some of the Camel underlayer showing here and there. I sealed the bricks with Delta Ceramcoat satin varnish and then used spackling for grout. I followed that with washes of browns and black to reach this coloration.
I was very heavy handed with the spackling on the fireplace.
After sanding, it really did start to look like real stone.
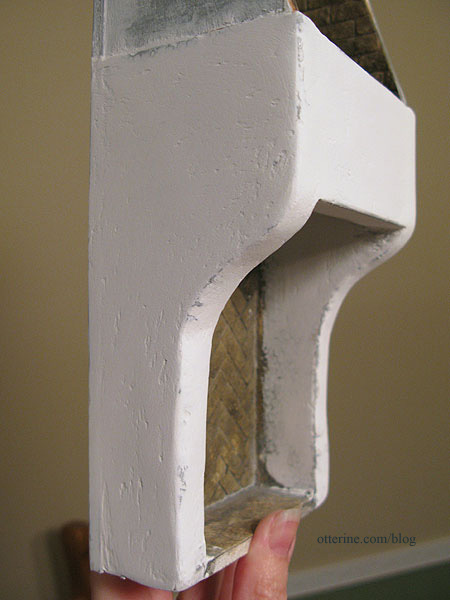
I then layered on paint washes, rubbing the surface with my fingers to make sure there were no brush marks left. I used an X-Acto knife to draw lines on the stone. I wanted it to appear to be made from stone slabs. Going over the lines with an awl chipped the stone and made the seam lines more realistic.
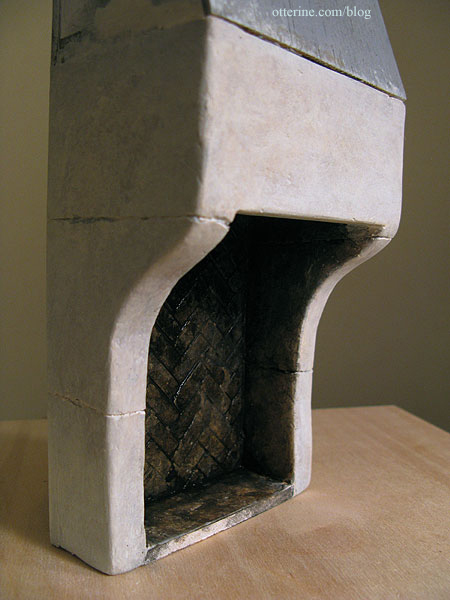
The fine detail is something I didn’t expect but just love about it. It now even feels cool to the touch like real stone.
I bricked, painted and grouted the interior of the front top piece (no photo unfortunately) and glued it in place. I then cut builders foam pieces to make the back wall that the fireplace would have been attached to at some point, with some extra broken bits to fill in the space.
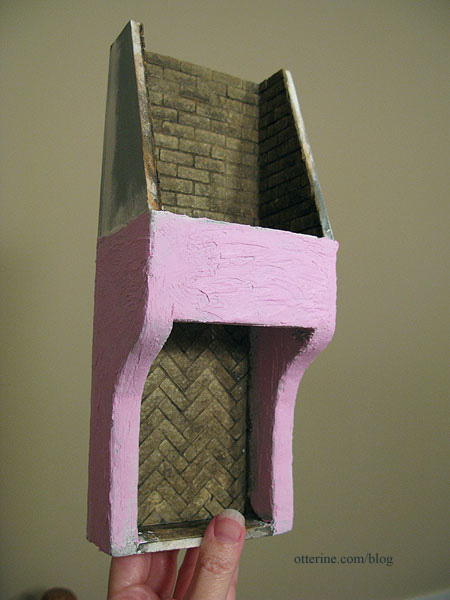
This was painted and covered with stucco to match the rest of the building.
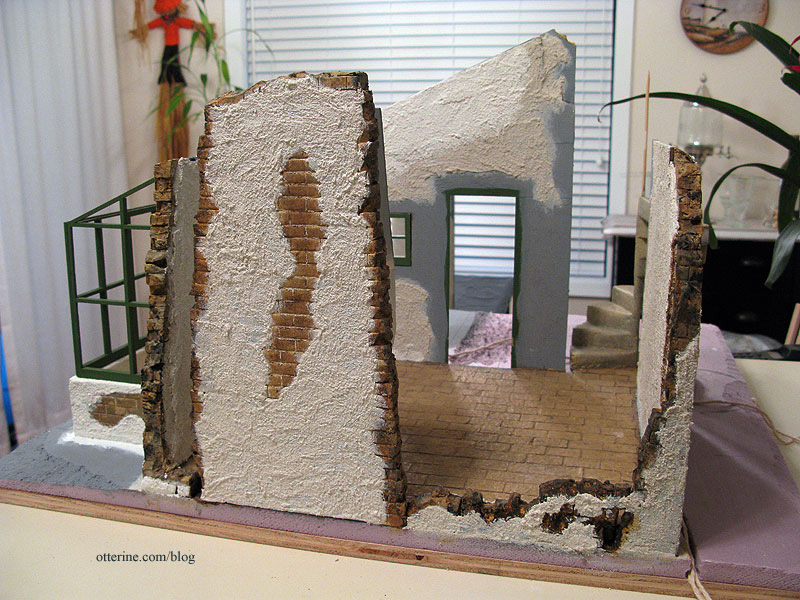
On the inside of the back foam piece, I scored the surface to mimic the egg carton brick on the interior. It was then painted to match. Here it is still wet from the paint washes.
I made the top front and sides of the broken chimney from scraps of builders foam, finishing in the same manner. Here they are before painting.
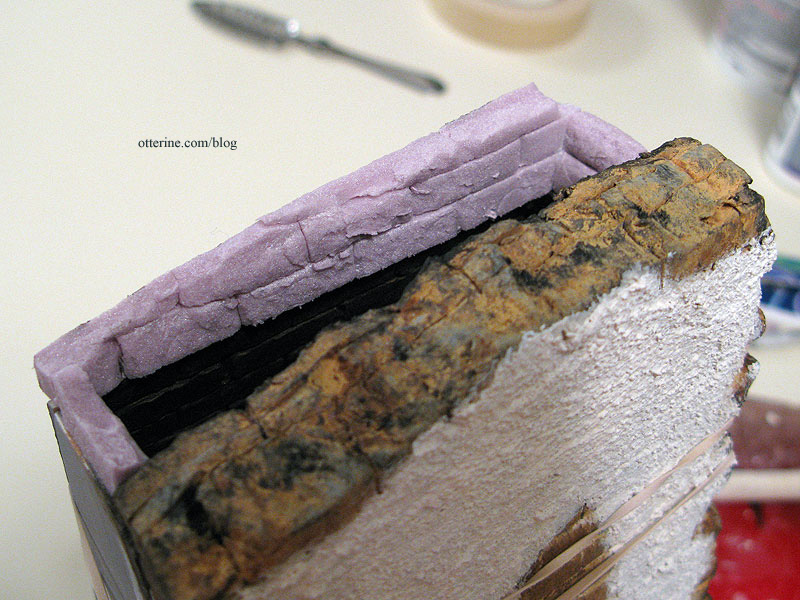
I then covered the front and sides with stucco to make a complete unit.
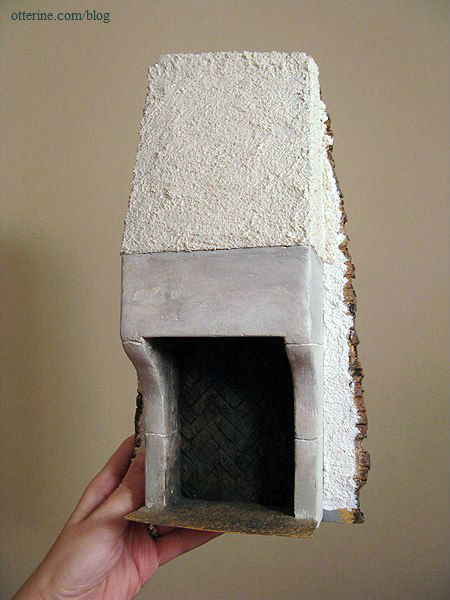
The lit fire is an acrylic log piece with a red bulb. I drilled the hole for the bulb through the bottom and later made a channel in the floor for it to curl out of sight when the fireplace is removed. More about that later.
The fireplace screen is by Jeannetta Kendall and purchased from lacyhome4boys on eBay. Here’s the shiny new screen in place; it looks like I built the fireplace around it but that’s just coincidence. :D I bought this as a last minute addition.
I used black acrylic paint to age it and tone down the shine. Much better.
The medallion above the fireplace is a jewelry finding. Overall, the fireplace is not that easily seen in the final layout, but I love it and think it adds so much.
Categories: The Aero Squadron Lounge
September 19, 2012 | 0 commentsThe Aero Squadron Lounge – structure, part 2
Continued from structural details, part 1 for The Aero Squadron Lounge.
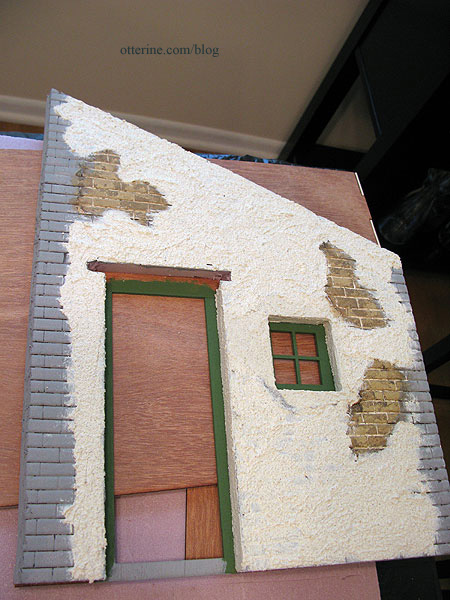
I used regular household stucco patch from Home Depot to cover the walls inside and out. I eventually painted the stucco surfaces Warm White by Americana. In the photos for this post, you’ll see a lot of back and forth with painted and unpainted stucco. I applied most of the stucco while the walls were flat and left the areas where the walls would join clear.

I cut out a recess in the foam above the front door to leave room for a cross beam. As I had done for the window, I painted the area around the door opening green, applied the stucco and painted it before gluing the foam outer wall to the wood inner wall.
The original kit wall leading to the greenhouse had a square opening, but I cut the foam padding with an arch. I filled in the gap between the two layers with stucco so you couldn’t see where the square points had been. I later broke apart this wall’s back edge (right side in this photo) but I wasn’t sure how much I would need to keep the building complete…so I left it intact during the first part of construction.
I’ve detailed the tower construction, including its stonework, in separate posts starting here.
The spiral stairs inside the tower were added after the floor was secured to the base board but before the tower was attached. I have a more extensive blog post on the stairs here; these required a good amount of math and planning. :D
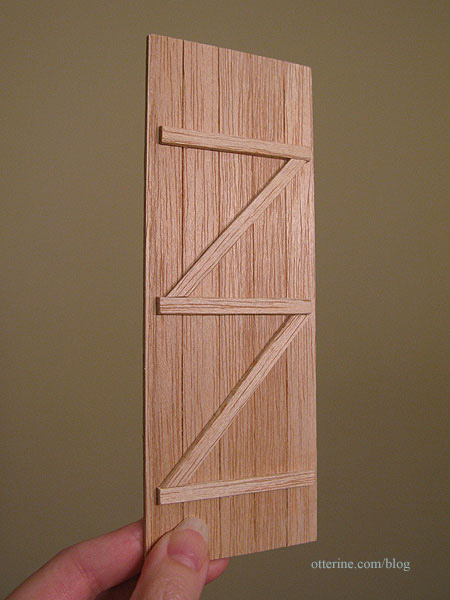
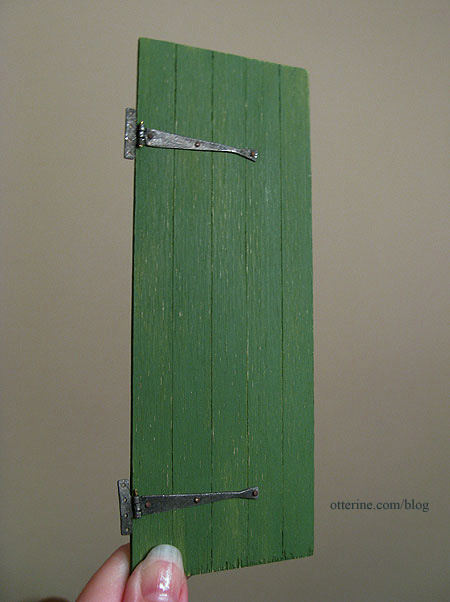
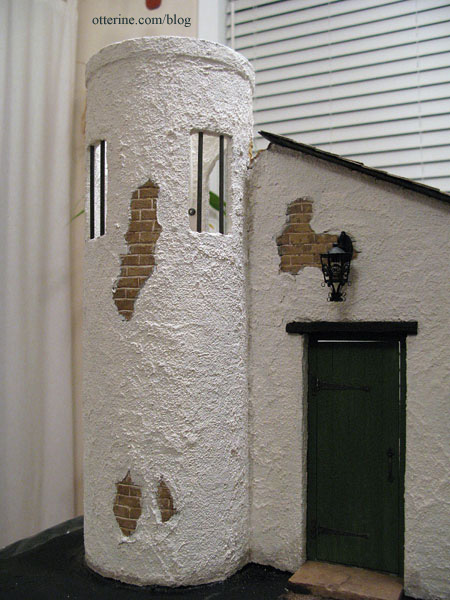
The front door from the kit originally had a window. I opted to make a solid door from balsa, scored to look like it was made from planks. I added a Z support structure on the inside.
I painted the door Clover by Folk Art with a light sanding afterward. The working hinges are from Olde Mountain Miniatures.
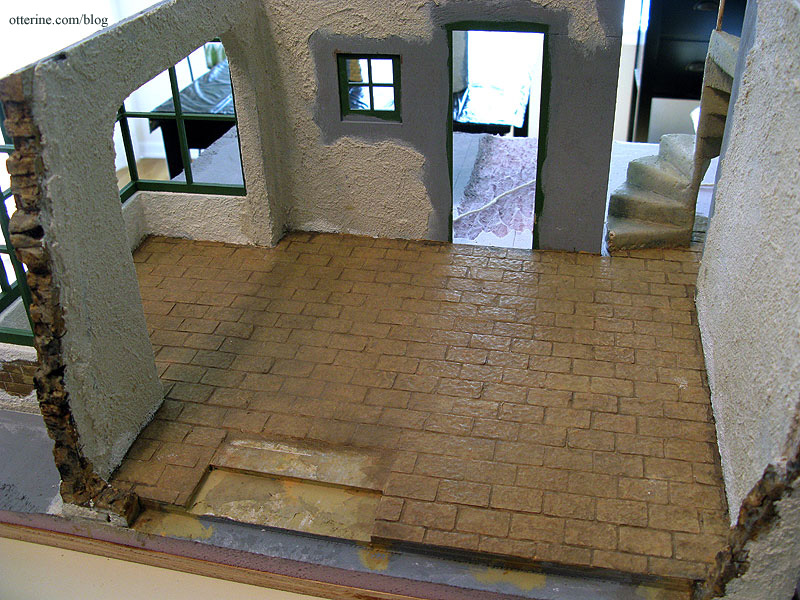
The flooring is made from 5/8″ x 1″ egg carton tiles. The fireplace hearth is a solid piece of egg carton material as well. It is attached to the fireplace but not to the main floor.
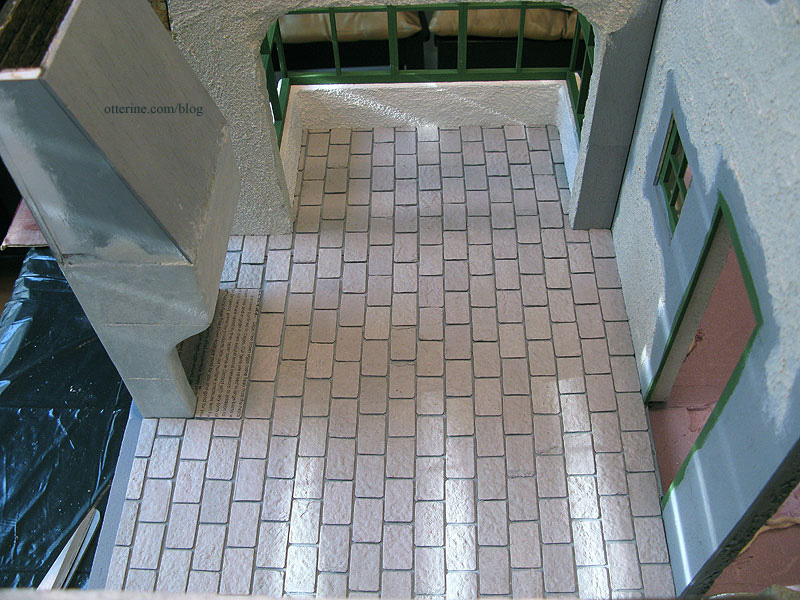
I painted and sealed the tiles before grouting with spackling, then added multiple washes to add depth to the coloration. The recess in the back is where the fireplace sits; I later painted it to blend in.
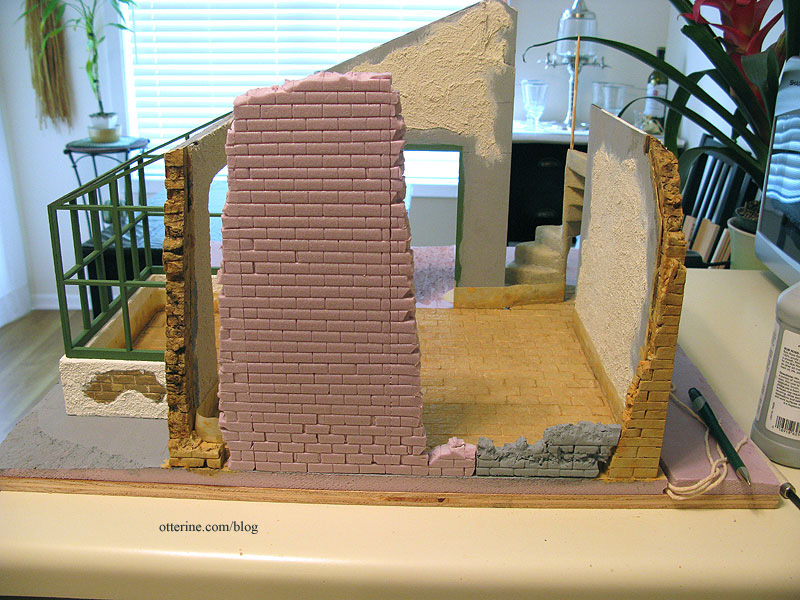
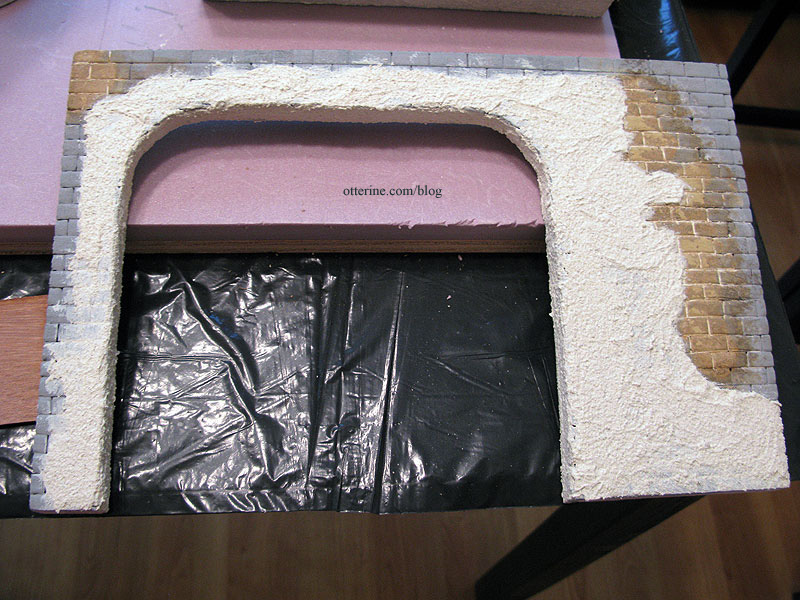
The fireplace unit is situated in the open back. To make this a 360° build, I added rubble walls to the back wall that tied in with the back edges of the side walls and the back of the fireplace. I was able to do this only because I planned for part of the roof to be open. This and the bombed out condition of the back wall would allow access inside the structure even when the fireplace is in.
Here you can see what is permanent to the building when the fireplace is removed.
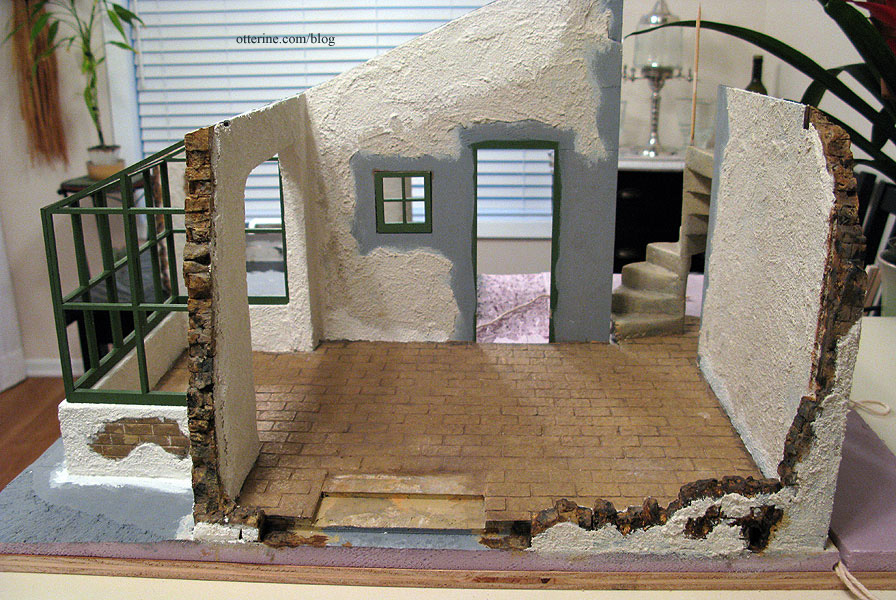
And with the fireplace in.
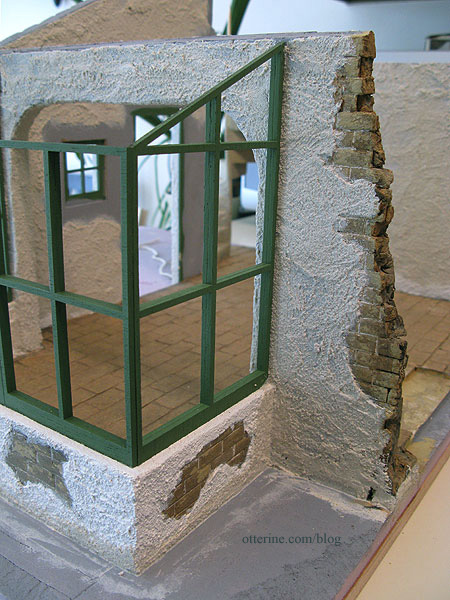
Here you can see the broken side back wall near the greenhouse. I used flat nose pliers to rip pieces away at random before painting and grouting. This wasn’t easy as the builders foam was rather resistant to tearing. You can also see that when I joined the greenhouse to the main room, I applied stucco over the seams and around the base of the walls.
Continued in part 3.
Categories: The Aero Squadron Lounge
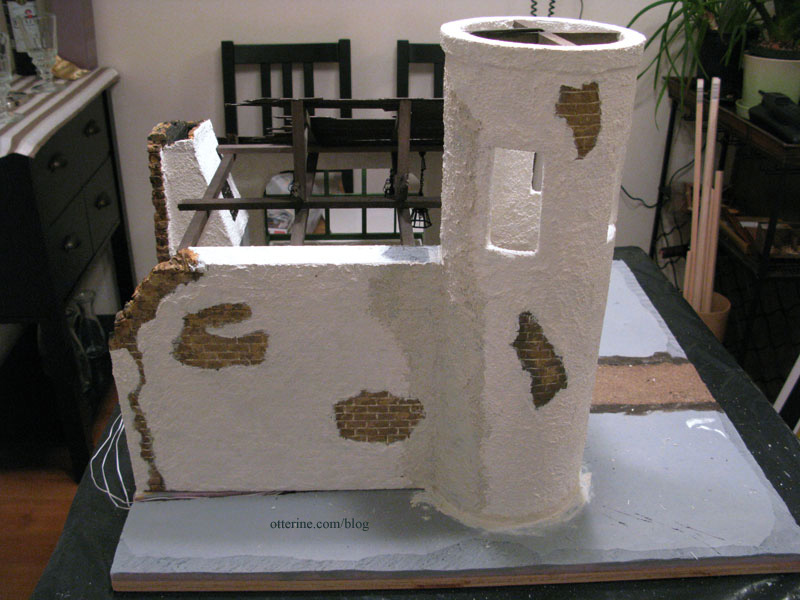
September 18, 2012 | 0 commentsThe Aero Squadron Lounge – structure, part 1
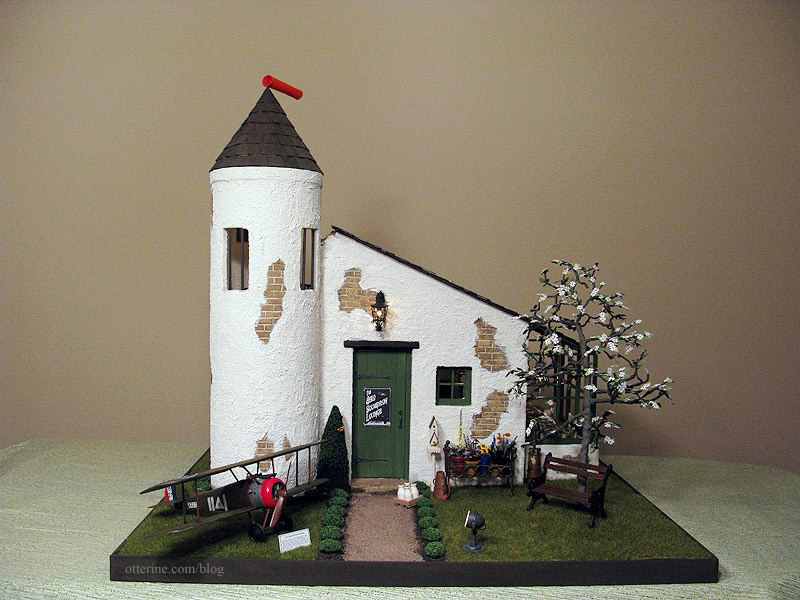
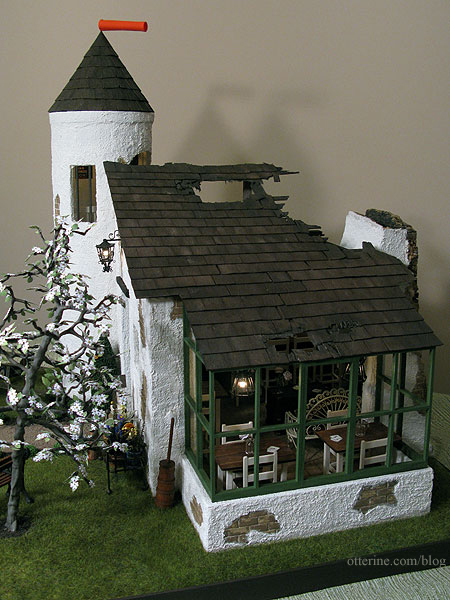
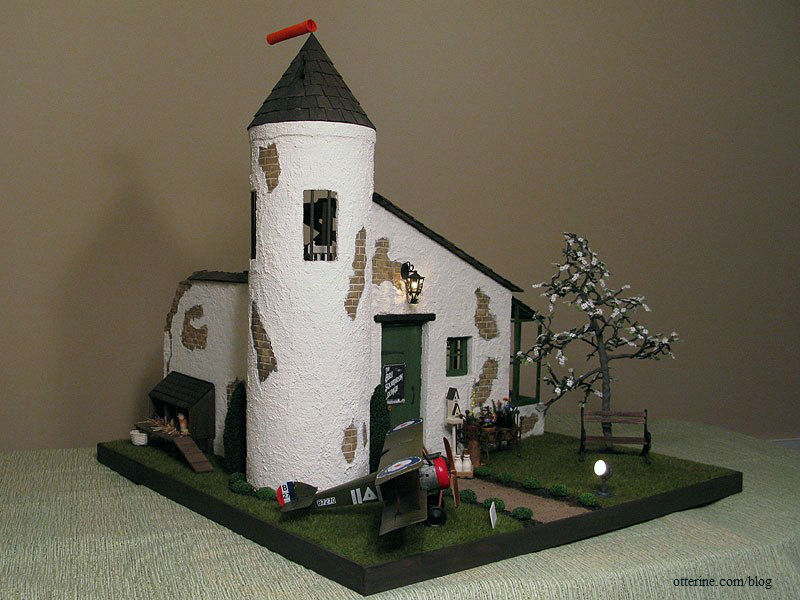
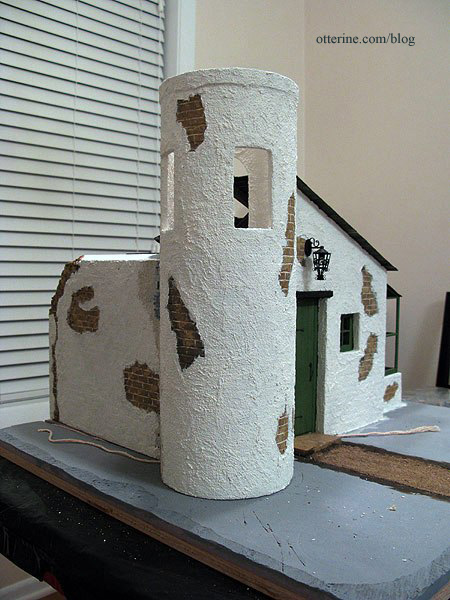
To build The Aero Squadron Lounge, I made only a few changes to the basic Greenleaf kit but they dramatically changed the look of the building.
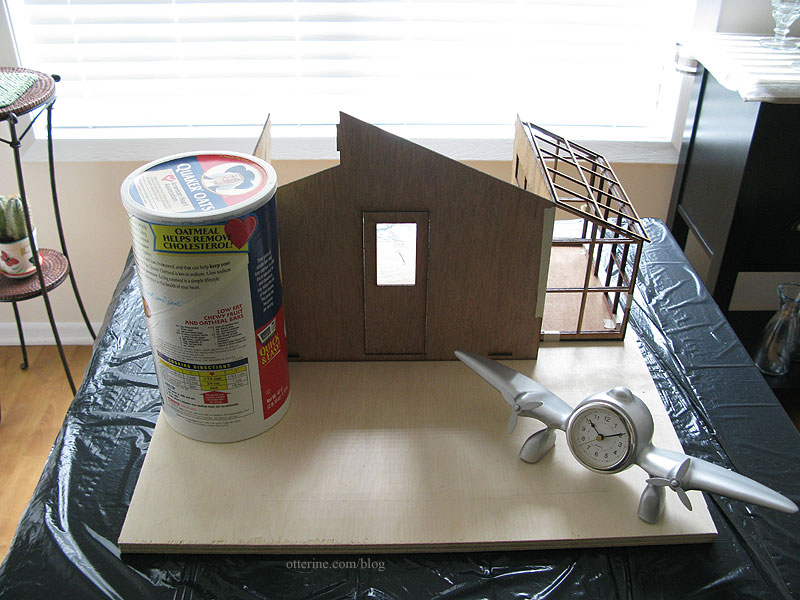
the original dry fit for concept I added a tower made from a 5″ diameter mailing tube which required cutting off a portion of the front and side walls to make an opening for it. I also cut a large arch in the opposite side wall that originally had a row of windows near the top and used the scraps from these cuts to add 2″ in height to the main kit. This photo was taken before I determined I needed more floor space and before adding height to the tower.
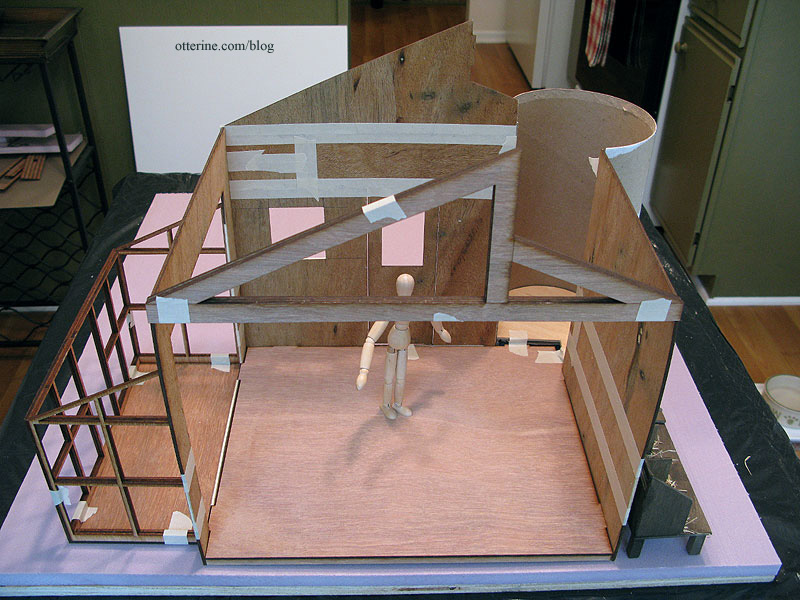
After figuring out the furniture placement, I realized the building was too small for all that I wanted to include. It’s fun looking back at the layout photos and seeing that I included everything I wanted to in the first place.
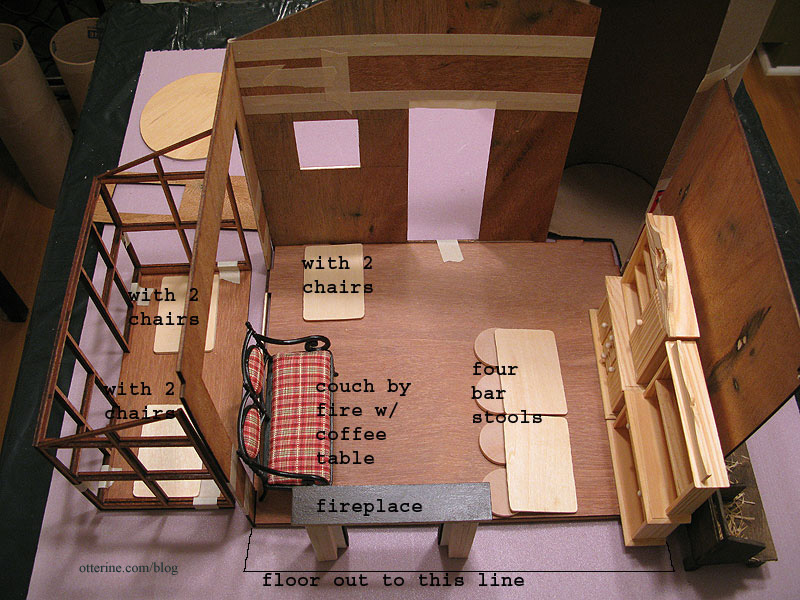
I built the floor from the base kit, adding cross support beams underneath to straighten out the warp in the floor. I didn’t get a picture of that part, unfortunately. Using a double layer of foam core board, I added 1.5″ inches to the width of the room and 2″ to the depth in the back. I also added a partial circle to serve as the tower floor.
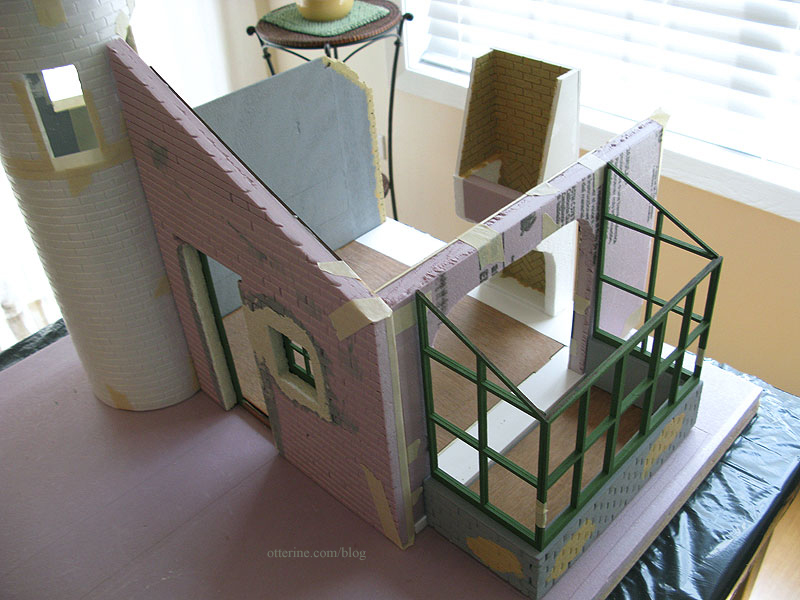
I covered the exterior of all three walls with 1/2″ thick builders foam, taking into consideration the extra floor space. I added scrap wood to pad any excess foam showing beyond the kit walls.
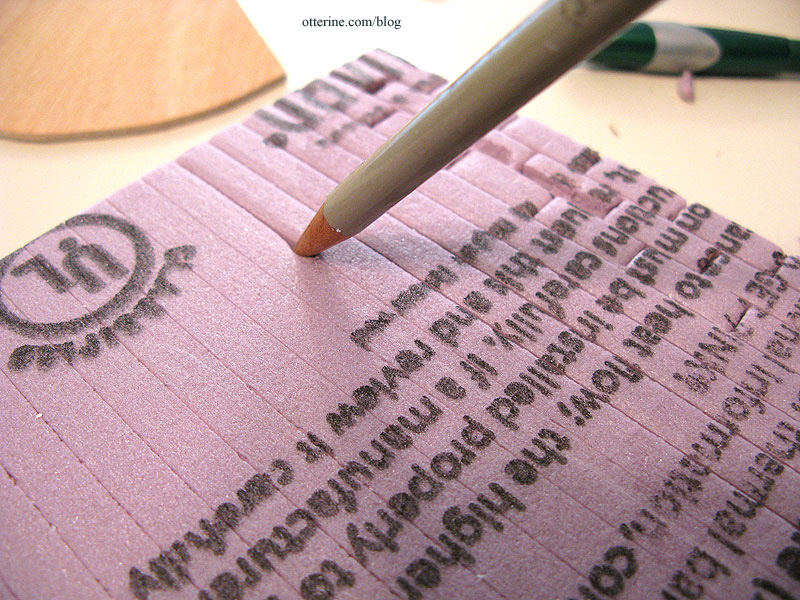
I learned the process I used to make the stone from a Scenery & Terrain Making website (as of 2024, the link is defunct). On the exterior of the building, I measured a grid of stones each measuring 5/16″ by 3/4″ on the entire surface even though I planned to add stucco to most of the build. I wanted my brickwork to be consistent. As it turned out, in some portions where the stucco is thinner, you can see the texture of stone underneath. I rather like the extra push of realism it brings.
I first measured and marked lines 5/16″ apart.
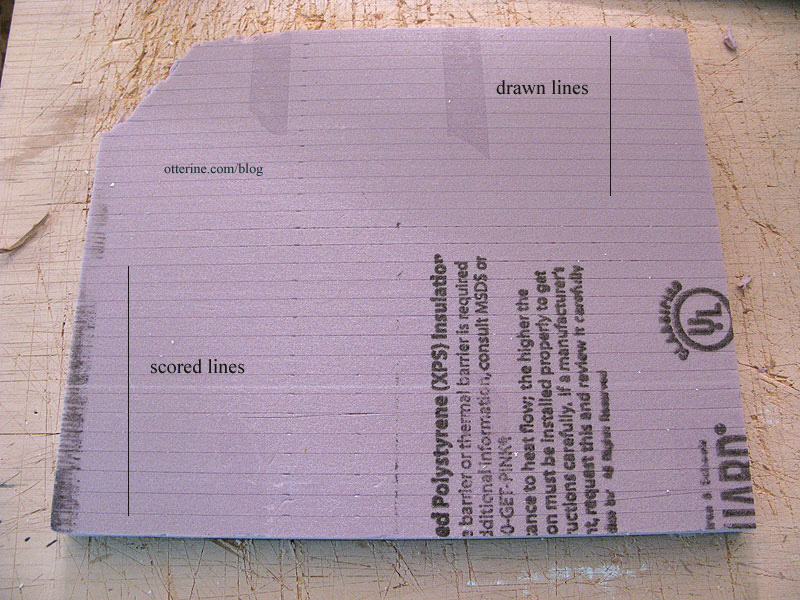
I then scored the drawn lines with a special adjustable X-Acto knife that allows you to cut into a surface at a controlled depth. You turn the knob to allow more or less of the blade to sink into the material. This kept the back of the sheet whole while allowing me to carve the stonework on the front.

Here’s a close-up of the scored lines. Every once in awhile my blade wandered. It wasn’t a problem since I planned to stucco over the stone and could easily cover mistakes. Besides, broken out stone would only add to the age of the building had I left it exposed.

Using a dull wood pencil, I followed those cuts to make grout indentations.
The vertical grout lines were made with a cutting tool from a set bought at Michael’s to press and cut the vertical lines forming the individual stone blocks.
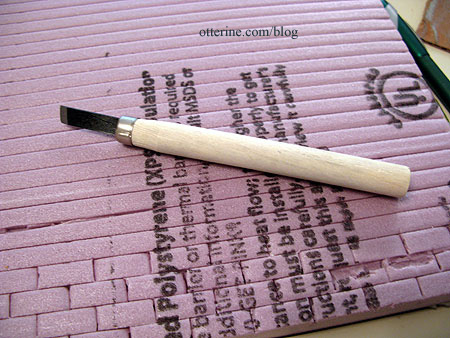
I just lined the blade up between the horizontal lines and pressed until it broke the front surface without cutting through the back. I used the dull wood pencil to indent these lines, too. Yes, it was a lot of work but much less work than using egg carton stone.
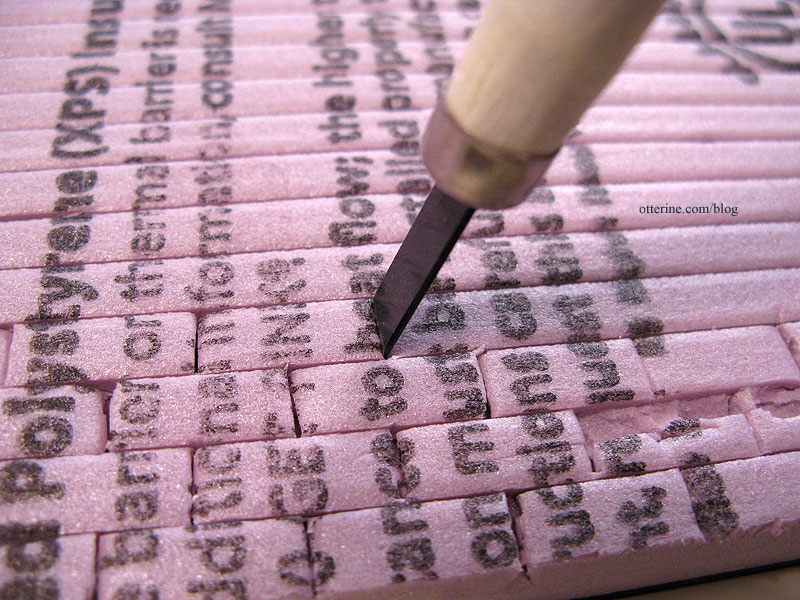
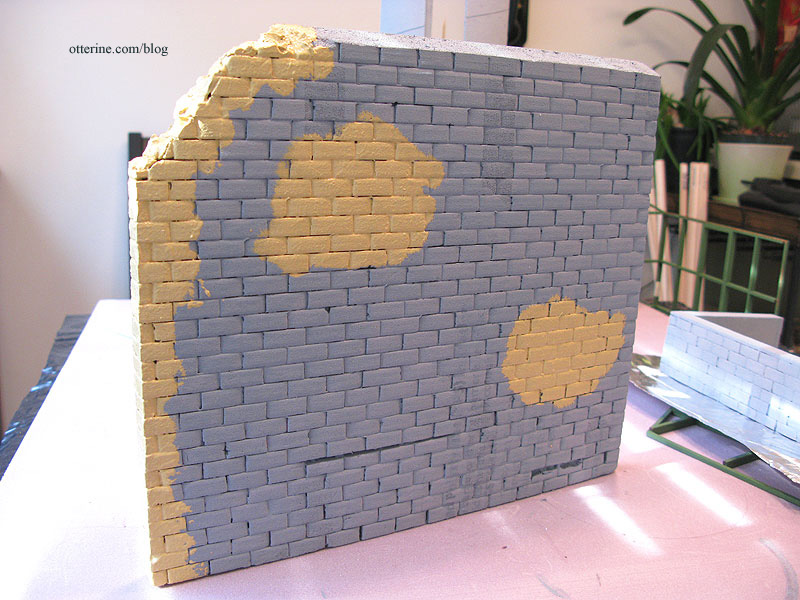
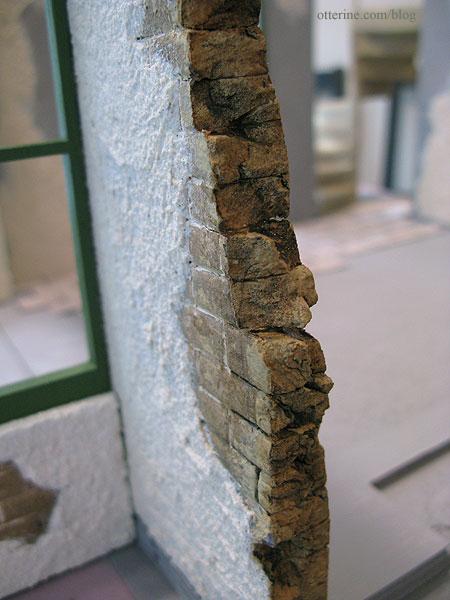
I primed all of the exposed foam with grey gesso and then painted random areas where the stone would be fully exposed using Camel by Americana as a base coat. Here is the side wall showing the back edge cut and painted. I still wasn’t decided on whether this would be an open back or a 360° build, so I prepared the wall to have an entire edge of exposed stone. I ended up doing the bombed back and the stone along the straight edge was covered with stucco in the end.
I grouted the exposed stone areas with spackling compound and then added paint washes to perfect the coloration. I also experimented with texture medium, though much of it fell away during the paint wash application. Still, it adds a little something.
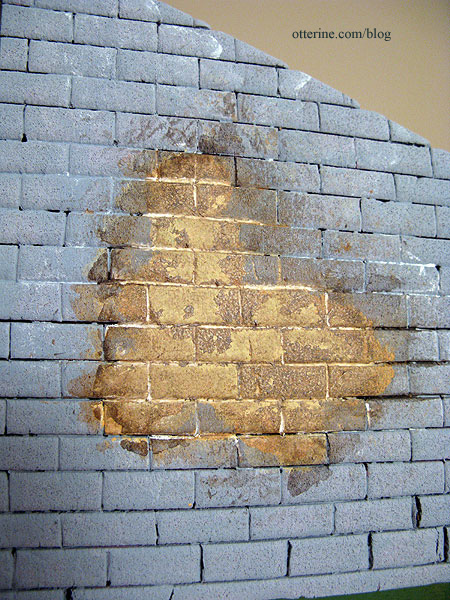
For the back edge where there would be broken walls, I used flat nosed pliers to rip pieces off at random. I then continued the previously scored grout lines around the edges to make individual stones. I grouted random portions and applied the same painting technique as I had done for the exposed stone on the other walls. I couldn’t believe just how much the foam looked like real stone.
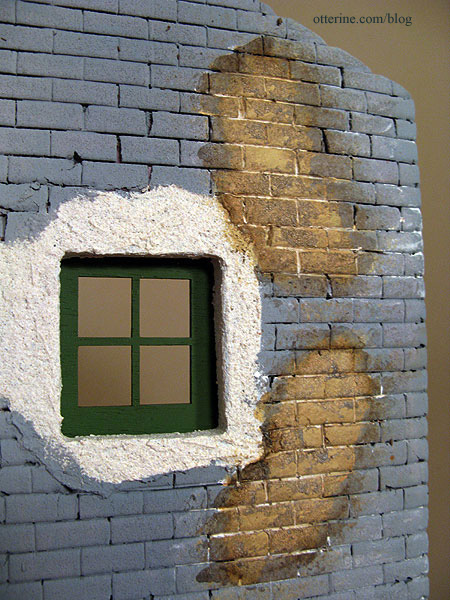
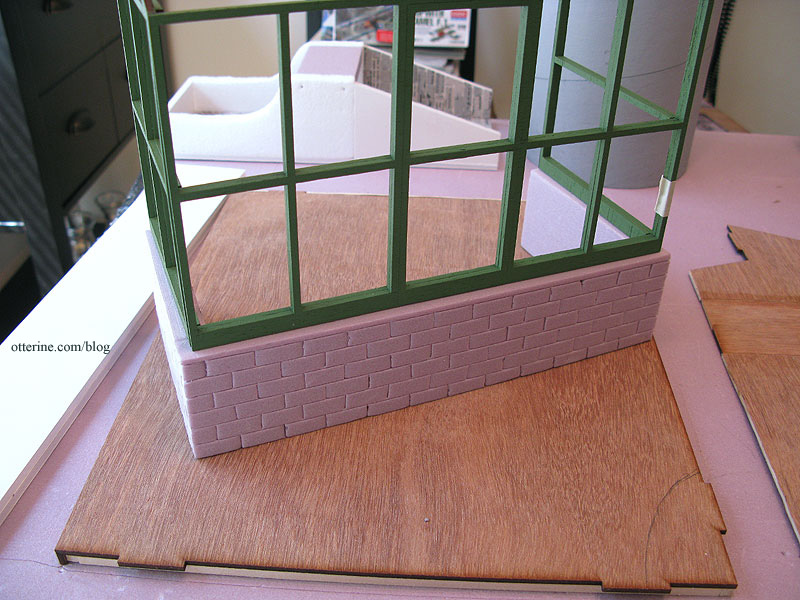
Before attaching the foam to the front wall, I added a window using leftover parts from Baxter Pointe Villa, last year’s Spring Fling entry. I hadn’t used the short front wall from that kit, and on it were two laser cut windows. I cut around the windows and used the two pieces to make one whole window in the new build.
I cut out a recess in the foam and set one of the window pieces into it. This window piece was between the outer foam and the kit wall. For the other window piece, I cut an opening in the front kit wall and glued it in place.
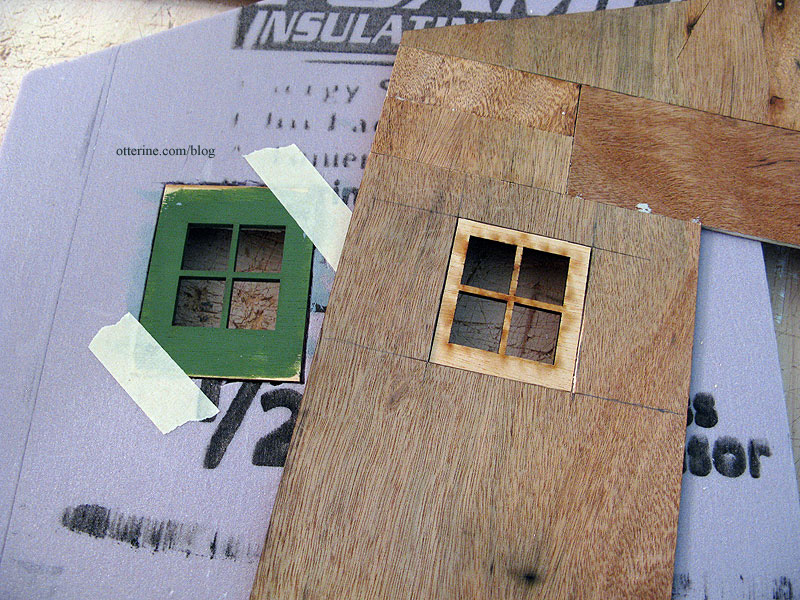
I painted both window sections Clover by Folk Art. I also applied the stucco to the foam around the window opening and painted the stucco Warm White by Americana before gluing the window in place. I didn’t think I would be able to apply the stucco or paint without getting it on the green window.
From the outside, it is a deep set window. I left the glass out of all the windows in this build, because really…what sort of weather are we trying to keep out? Have you seen the condition of the roof? ;D
I used the greenhouse addition with the Spring Fling kit, though I’ve eliminated the working door. I added 2″ of builders foam to serve as a base for the greenhouse and built a new floor for it using a double layer of foam core board (floor not shown here). The paint is Clover by Folk Art.
I got ahead of myself and glued the pieces together before scoring the stone into the foam. It was a little more challenging to score the lines on a three-dimensional piece, but I managed.
Continued in part 2.
Categories: The Aero Squadron Lounge
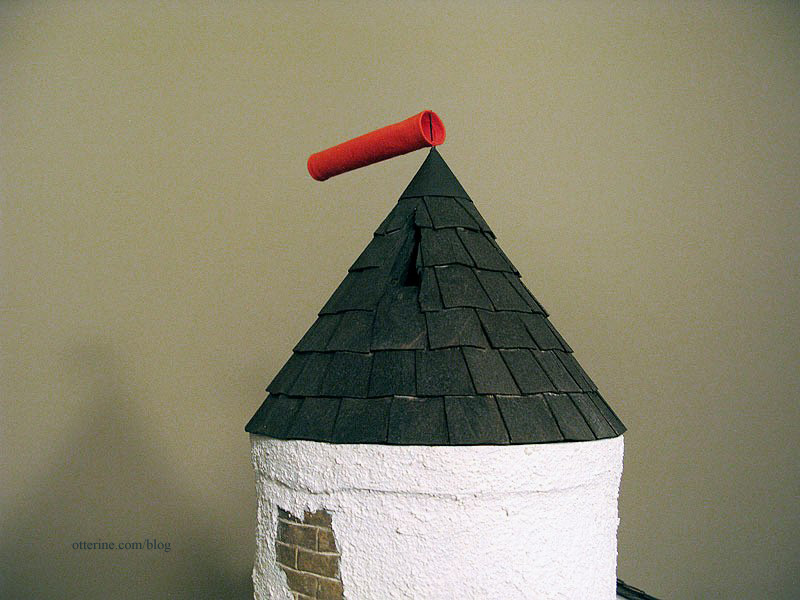
September 15, 2012 | 0 commentsThe Aero Squadron Lounge – tower roof
Continuing from the tower construction part 3 for The Aero Squadron Lounge.
The tower roof was my second major foray into math after the spiral stairs. I found this forum thread on conical roof framing, which had exactly the reference photo I needed to help it click for me.
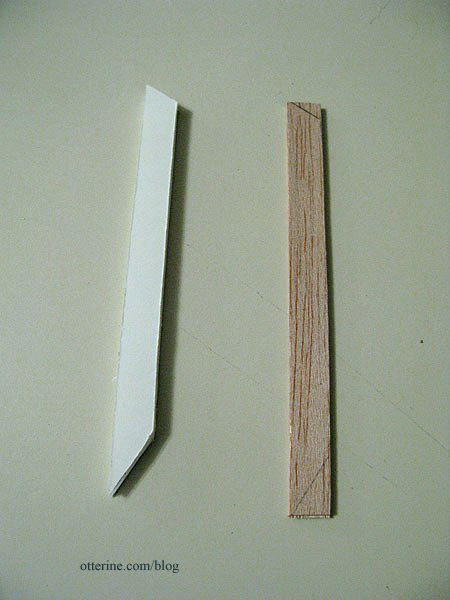
I started with a piece of octagonal trim wood from a sample pack from Manchester Woodworks. They include these packs when you order trim wood from them, and I always find uses for it. I cut two pieces of foam core board to figure out the exact length and angle for the initial support beams.
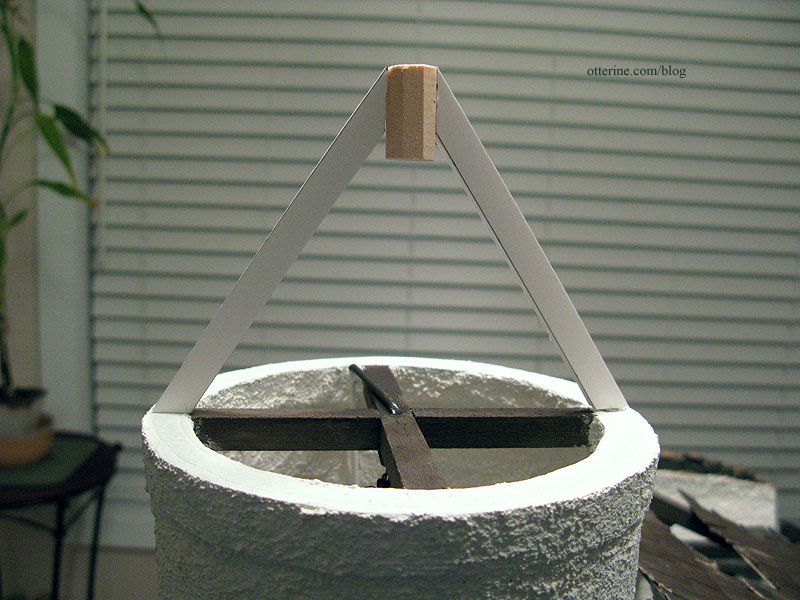
I used these as patterns to cut beams from balsa wood.
I used Aleene’s Quick Dry supplemented with super glue gel to attach the beams to the octagonal support.
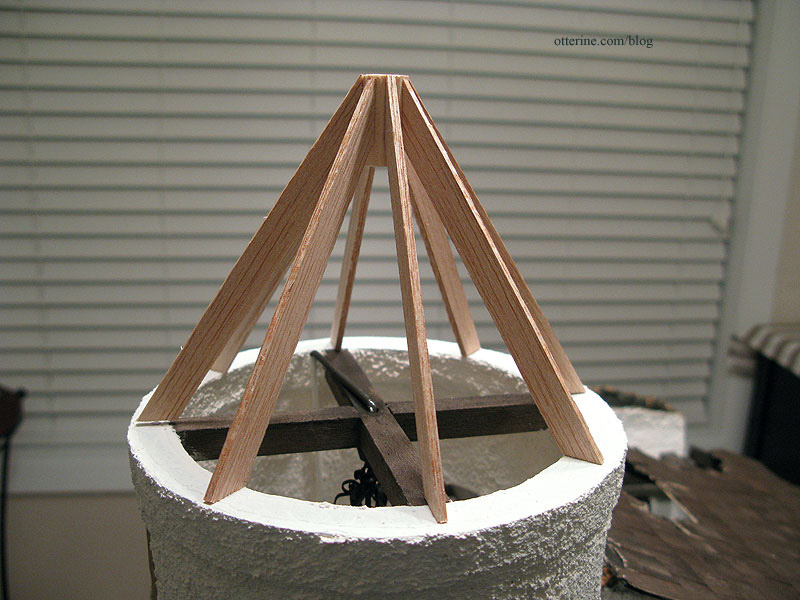
I then cut cross supports for the upper portion, again gluing in place as I went. Nothing in this support structure is completely uniform or strictly measured. I kept measuring the pieces against the top of the tower, and it ended up being somewhat organic in nature.
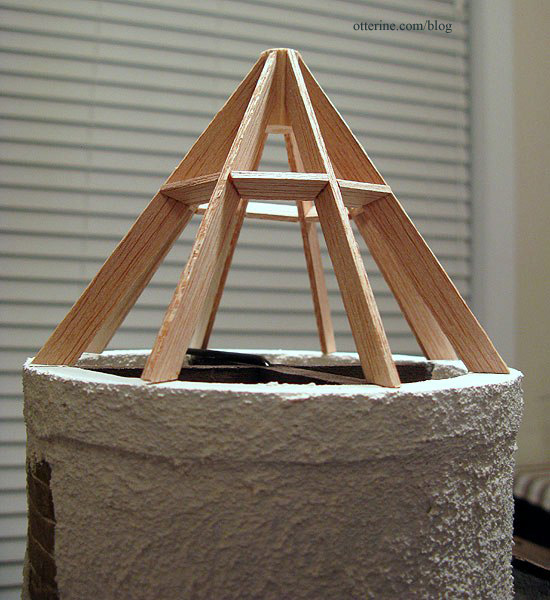
Next came the lower beams that ran from the center cross supports to the top of the tower.
After these beams were in place, I added cross supports at the base where the roof meets the tower. These were measured individually and glued as I went along. Around this time, I discovered the best fit for the tower and drew an arrow to keep track of the direction.

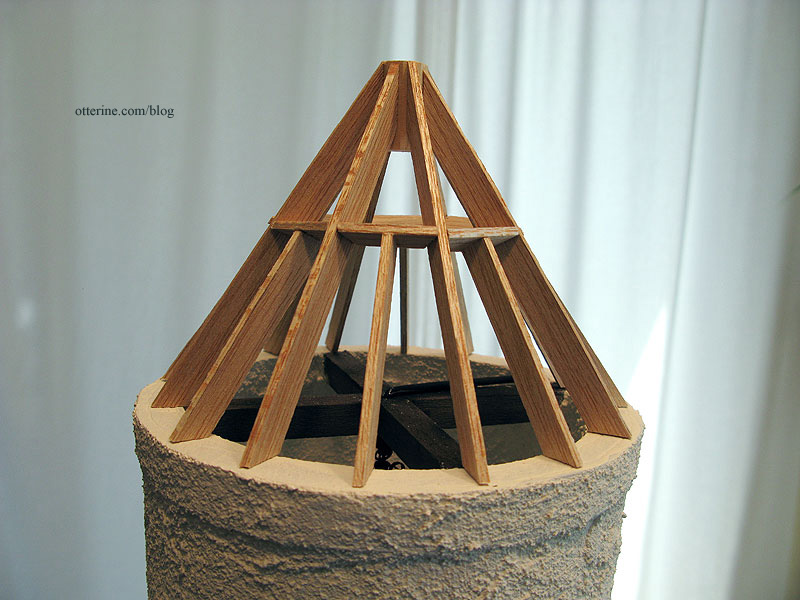
Here’s how it stood for quite some time while I procrastinated…er…thought about how to finish the structure to achieve a conical surface.
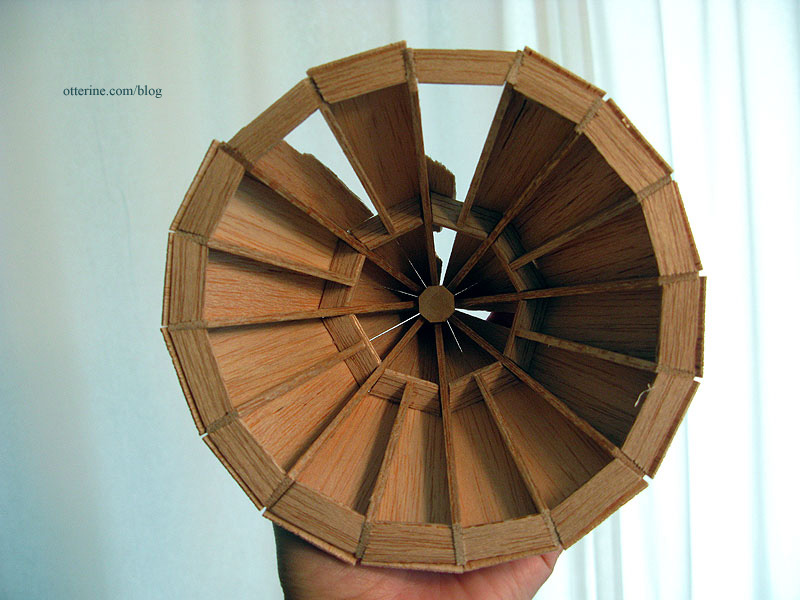
After about a month, I decided to go on a leap of faith and added thin sheets of balsa to the support structure. I used balsa because it was easy to bend as well as to break for the holes I planned to include.
There’s one hole in the front and two larger holes in the back.
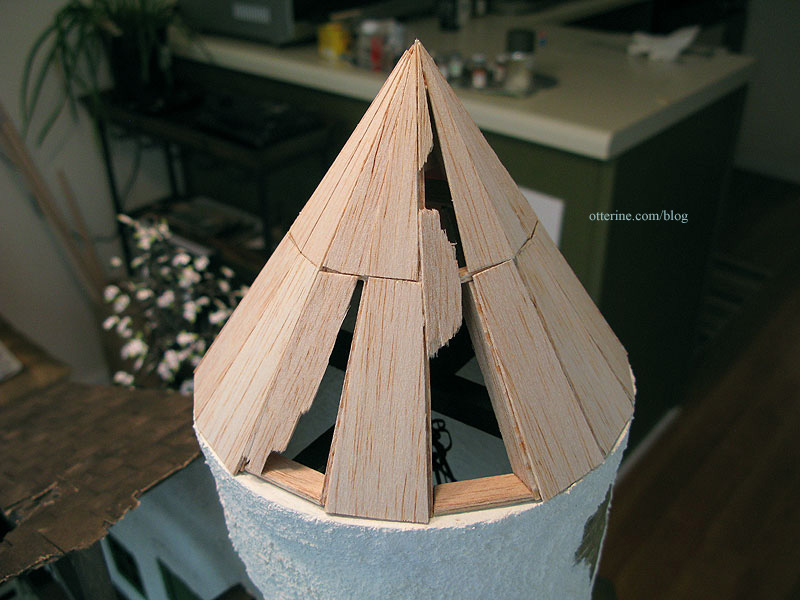
Here’s a fun view. :D As you can see, it’s not completely circular but it does follow the contour of the tower.
I gave the structure a quick wash of brown and black paint before shingling. It didn’t look any more rounded to me, but I forged ahead!
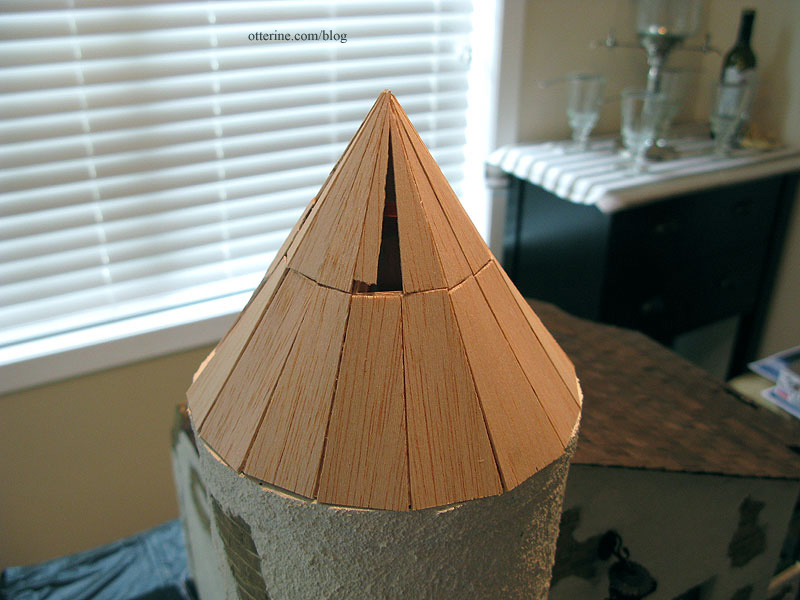
Shingling a conical roof is a test of not only patience but also the strength of super glue. :D I used the same Greenleaf speed shingles I used on the main building, but I cut and applied them one at a time before staining. I used super glue gel to supplement the Aleene’s Quick Dry glue.
The first row was relatively painless.
As you work up the tower, you have to cut and shape the shingles more. Covering the shingles below in a uniform manner also becomes more challenging. When you add holes in a roof, that challenge is amplified.
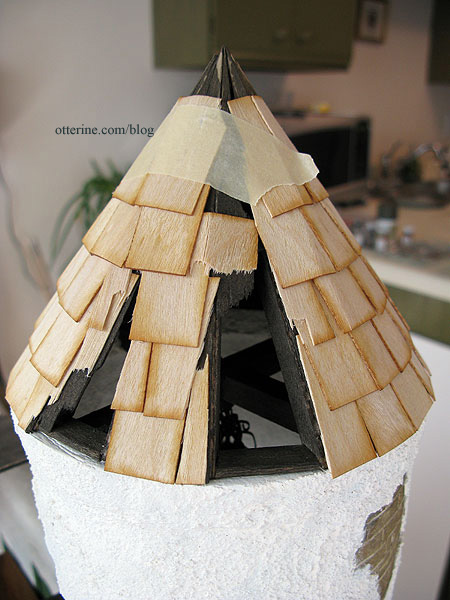
Surprisingly, though, applying the shingles to this relatively flat surface still amounted to the conical shape I had hoped to achieve.
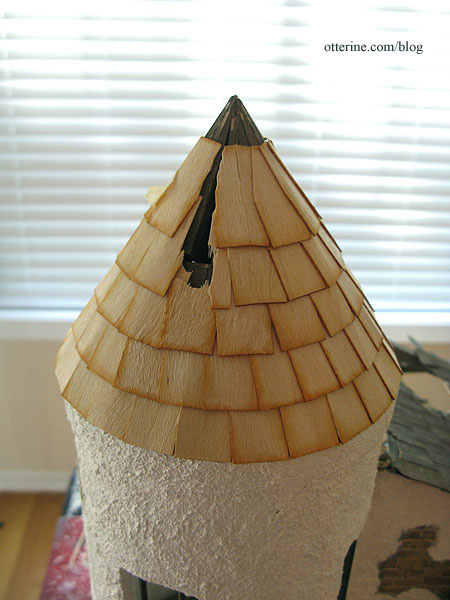
The topmost row is cut to follow the pointed tip as well as the row beneath it.
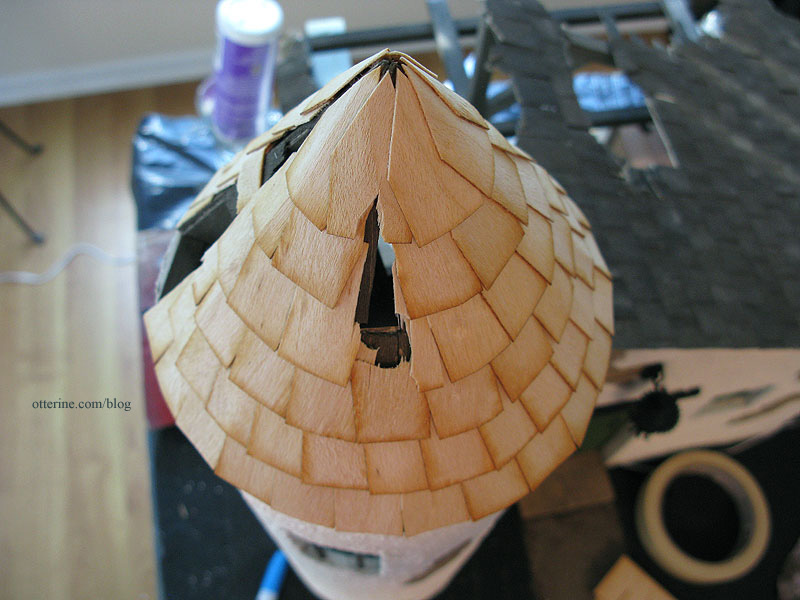
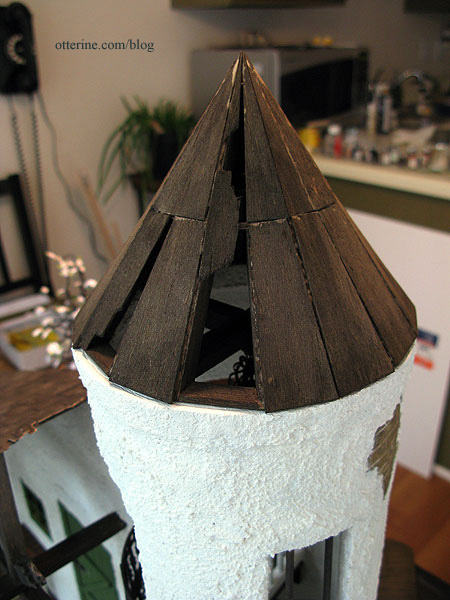
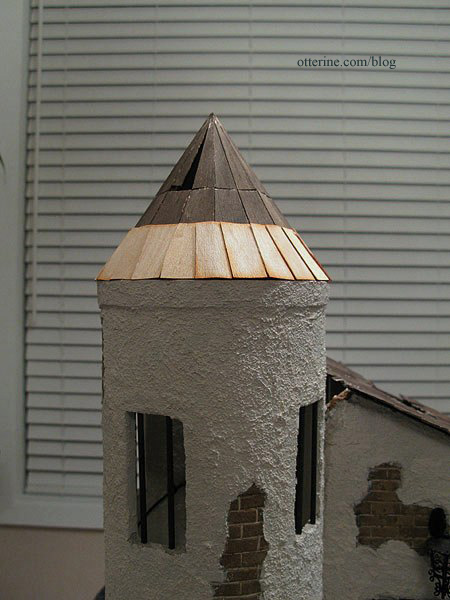
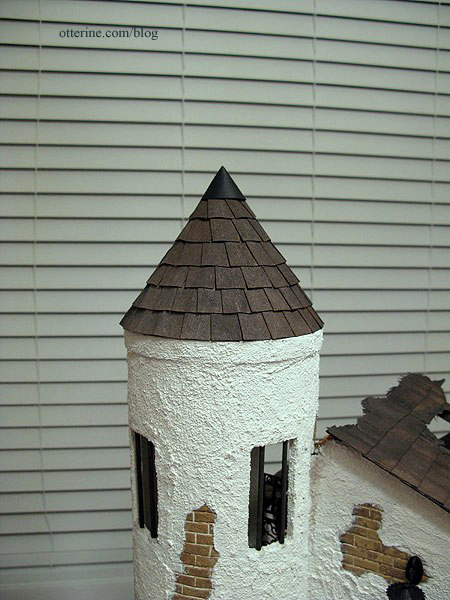
With all the layers, the roof ended up being very stable, so I’ve left it removable. I painted it with several washes of brown and black, trying to match the main roof as much as possible.
For the cone cap, I used heavy black paper cut to fit.
I had used a scrap of paper to make a template first. When I cut my final, I added a little flap to glue under the opposite edge.
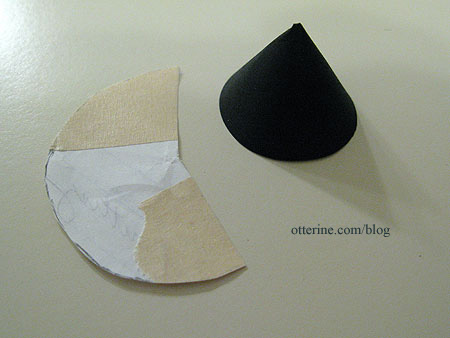
After gluing the cone into shape, I applied spackling to disguise the seam.
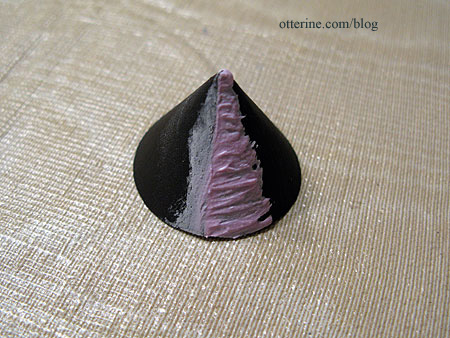
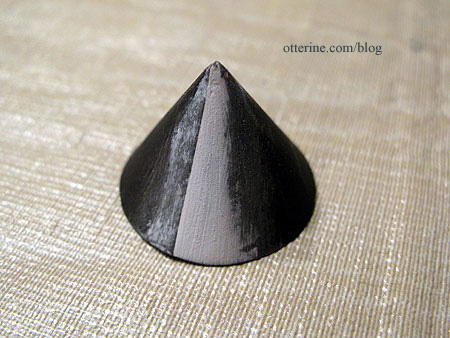
I then painted the paper brown to match the roof. The windsock is a glued tube of orange cotton held in place with a head pin. Yes, it rotates, though it pretty much always falls back into the same place.
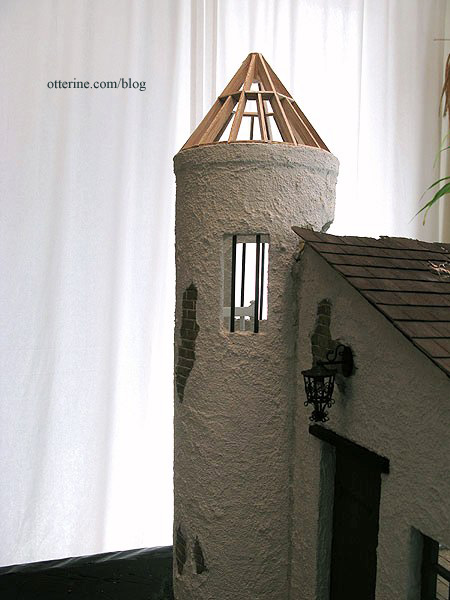
And, that’s the tower! :D
A close-up of the holes in the back.
Categories: The Aero Squadron Lounge
September 13, 2012 | 0 commentsThe Aero Squadron Lounge – tower, part 3
Continuing from the tower construction part 2 for The Aero Squadron Lounge.
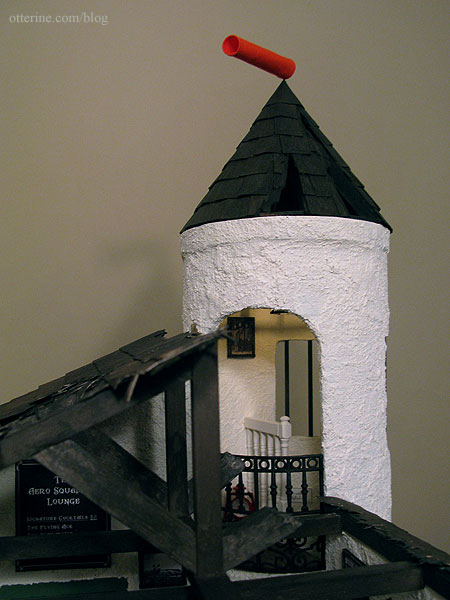
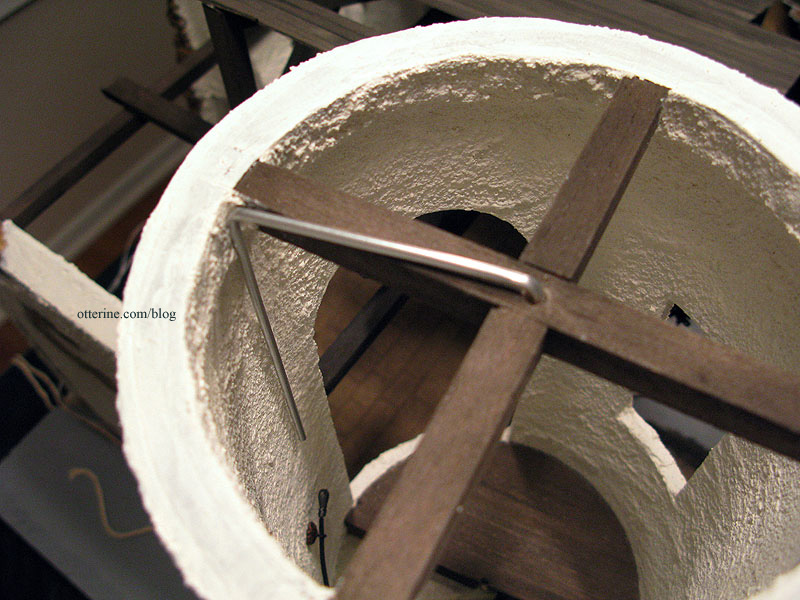
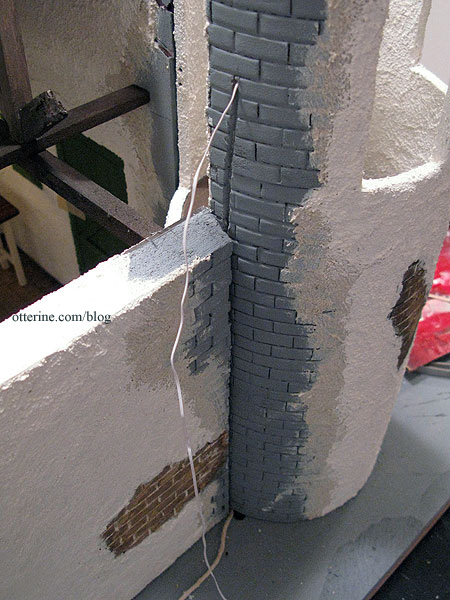
I went ahead and cut off the bamboo skewer support at the top of the spiral stairs, which was scary but ended up being okay. I added stucco to the window and arched opening edges. I also glued the foam ring and beam assembly to the top of the tower, added the stucco and painted the final finish. This sealed off access to the inside of the tower from the top opening, but I needed it in place to install the tower light. Yes, the tower was still removable at this point.
The most challenging light to wire in this build was this one in the tower. Even if I hadn’t made the tower roof removable in the end, I wanted exposed rafters and holes in the roof. That meant you would be able to see the wire, even if I cut a channel into the balsa beam and painted it.
I opted to hide the wire in plain sight with conduit made from 3/32″ aluminum tubing from my local hobby shop Ad-Venture Hobbies. Remember the tubing bender I posted about awhile back? This is why I bought it. Now, bending aluminum tubing didn’t work out to be as easy as bending brass tubing. The aluminum was softer and more prone to tearing. I had to make a few attempts before getting it to work properly. I ended up making 3 or 4 small bends right next to one another to stretch it out a little before doing the final bend. It’s not as clean as the brass, but it does work.
I eliminated the chain on this light and made it a ceiling fixture. This is a much later photo from when I started working on the tower roof, but it’s the best shot I have of the shortened light.
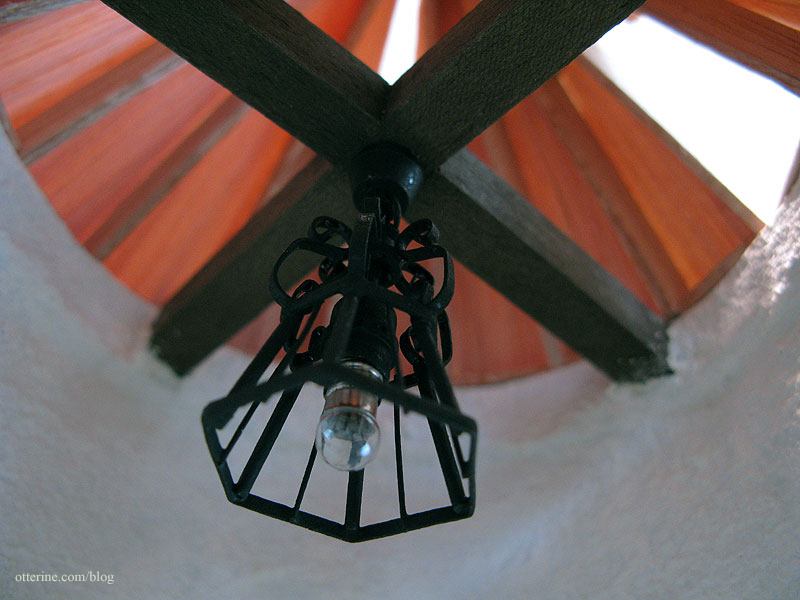
The wire goes up through the beam, through the conduit and out the side of the tower.
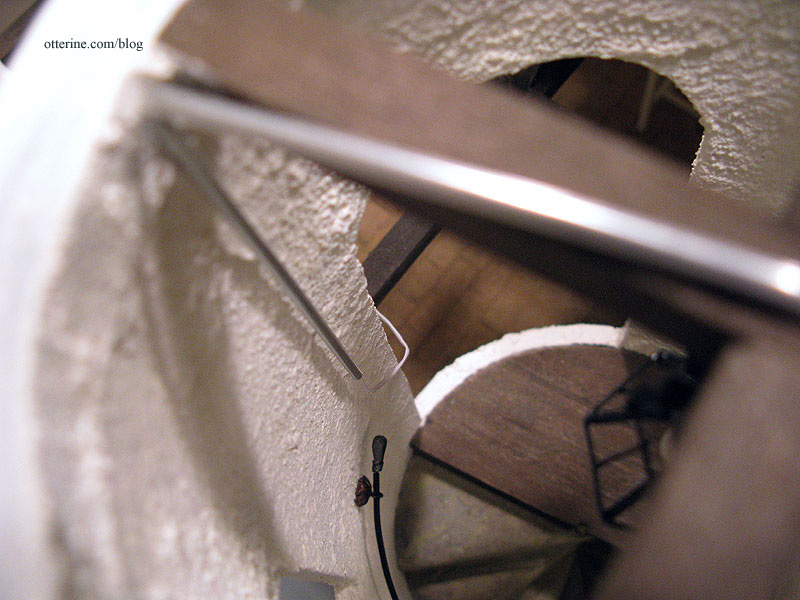
The wire exits the wall through the end of the tubing.
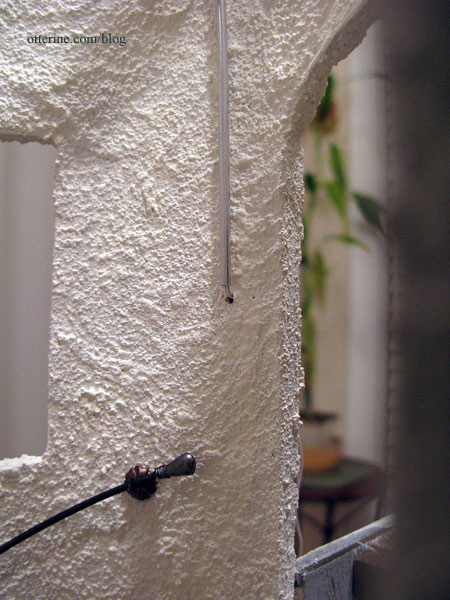
The end wire runs between the tower and side wall, eventually to be covered with stucco.
To disguise the end of the wire inside, I used a round wooden bead.
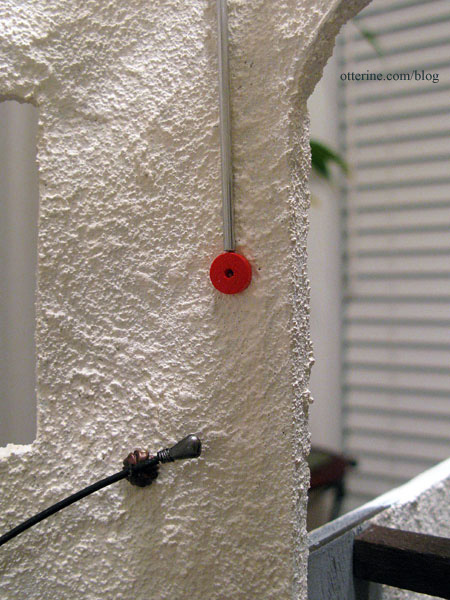
I painted the conduit on the beam brown to match the wood. I painted the conduit along the wall and the wooden bead warm white to make it blend in with the wall color. I have seen conduit done like this in real life many times.

I added a metal doorbell from Sussex Crafts to act as a vintage light switch. :D Now the illusion is complete.
With the tower wiring finished, I got ahead of myself, glued the tower in place and finished the stucco application between the tower and the main building, shown here before painting.
I had forgotten to add one important element before doing all this. Once you have a balcony, you have to keep people from tumbling over its edges. Luckily, there was good enough access through the upper arched opening so I could reach the top of the balcony. Whew!
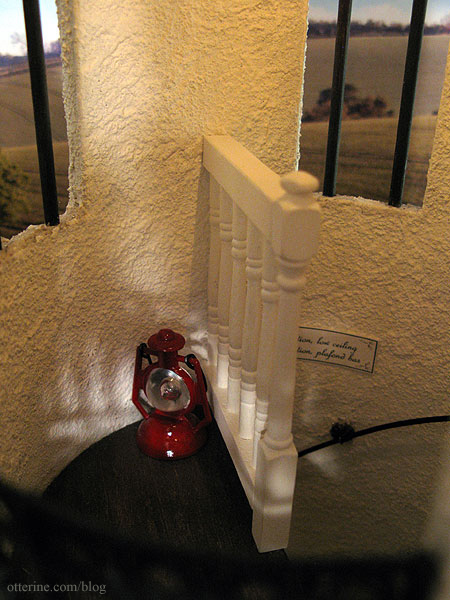
At the edge of the staircase, I used a portion of pre-assembled wood railing and a Houseworks narrow newel post. I opted to paint it Warm White to blend in with the tower wall. It’s a small space and too much contrast wouldn’t have worked.
For the portion overlooking the main room, I bent a piece of plastic railing from The Dolls House Emporium. I also cut off the finials from the upper edge. It wasn’t easy to bend and I did snap one of the small connections which had to be super glued, but overall it worked well. The curve isn’t that severe. I later sprayed it with flat black to tone down the plastic sheen and glued it in place.
In this photo, both railings are shown as works in progress.
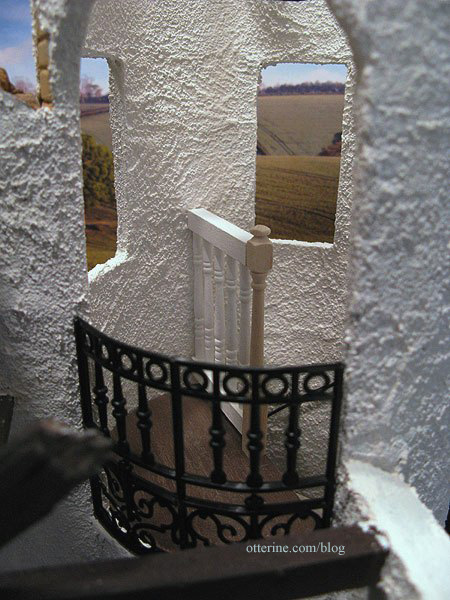
And, here is what they look like finished.
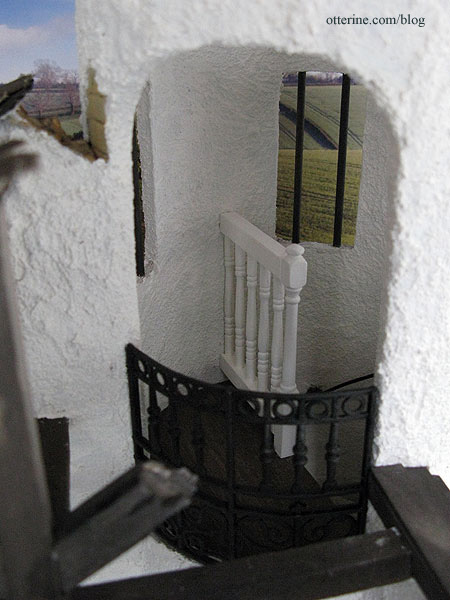
I added lengths cut from an 1/8″ diameter dowel to make the window bars. These were painted Bittersweet Chocolate by Americana with a wash of black to age them. I like that you can see the light switch through the window here.
Continued here. I thought the tower roof deserved its own post. :D
Categories: The Aero Squadron Lounge
September 12, 2012 | 0 comments
NOTE: All content on otterine.com is copyrighted and may not be reproduced in part or in whole. It takes a lot of time and effort to write and photograph for my blog. Please ask permission before reproducing any of my content. (More on copyright)