

The Aero Squadron Lounge in Dolls House & Miniature Scene
I’m honored to have The Aero Squadron Lounge featured in Dolls House & Miniature Scene for February 2020.


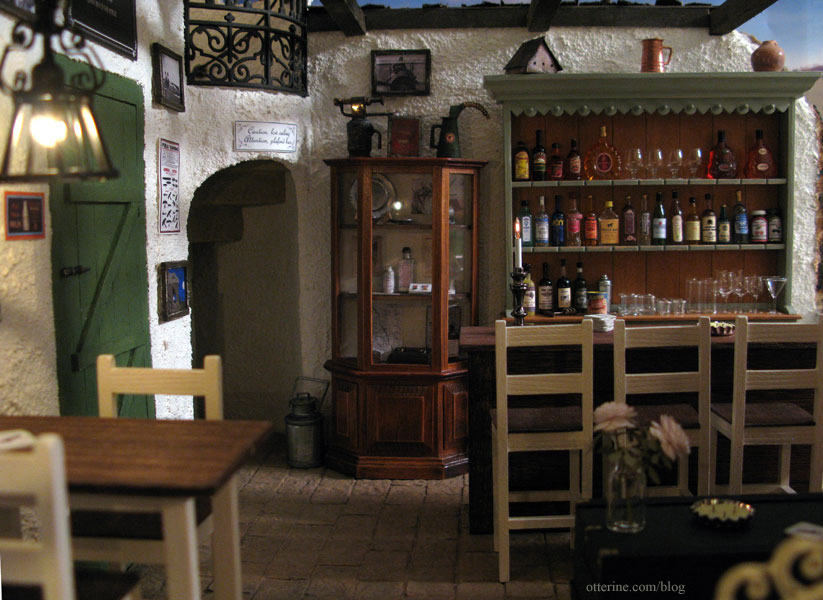
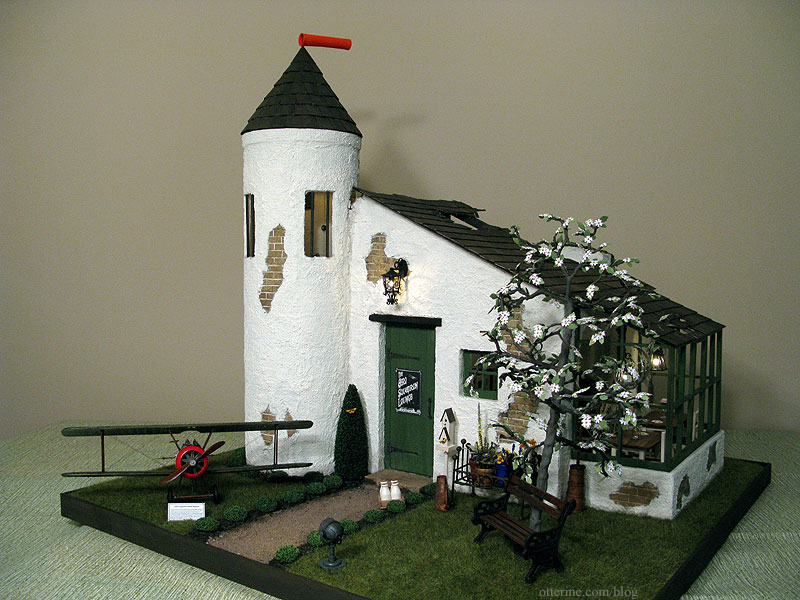
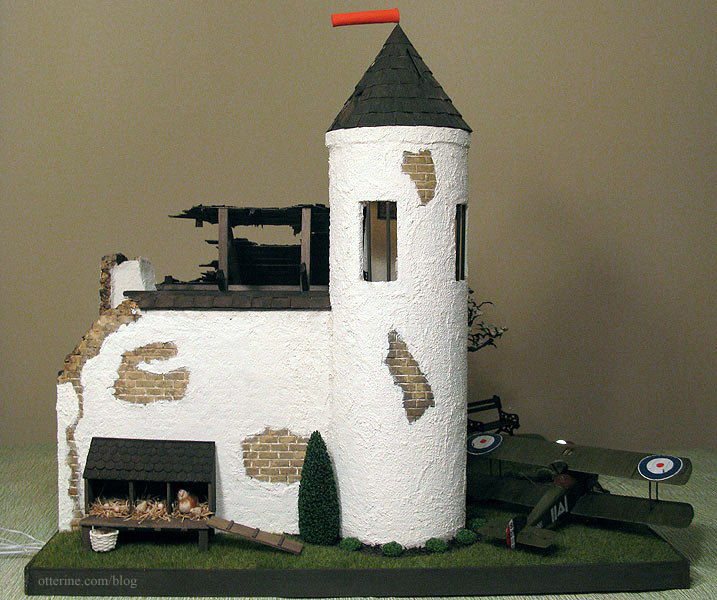
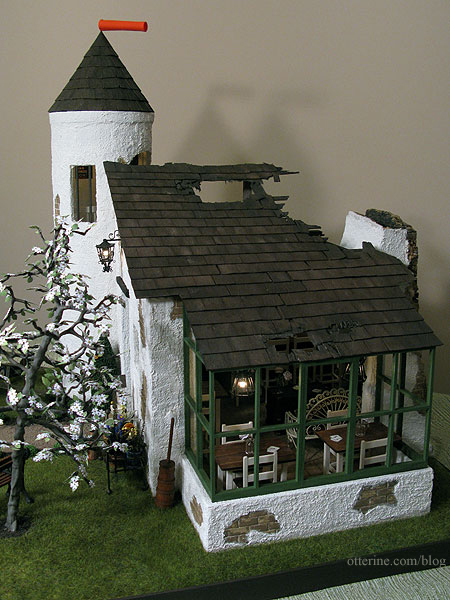
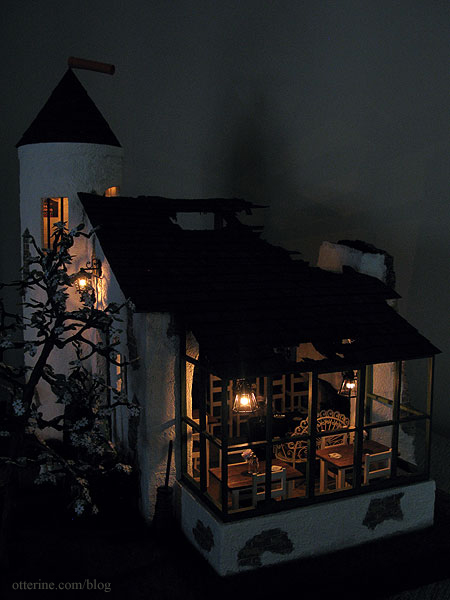
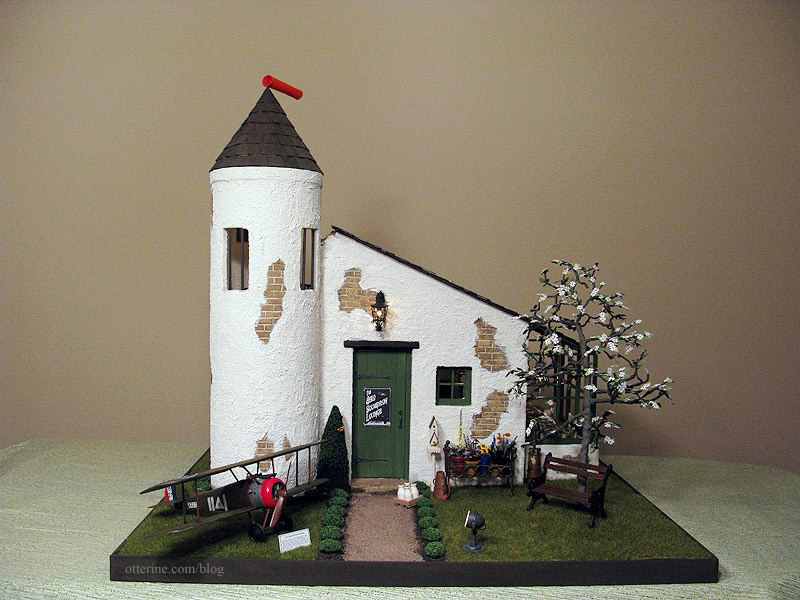
This was a build based on a local restaurant called The 94th Aero Squadron. It had war memorabilia throughout, and the structure was reminiscent of an old French farmhouse. There were planes on display outside, and the back patio featured burned and broken rafters.
It was an interesting place with great food, but it went out of business. After sitting vacant for years, they finally razed the building completely. It’s a shame, because it was unique. There are still a few throughout the US.
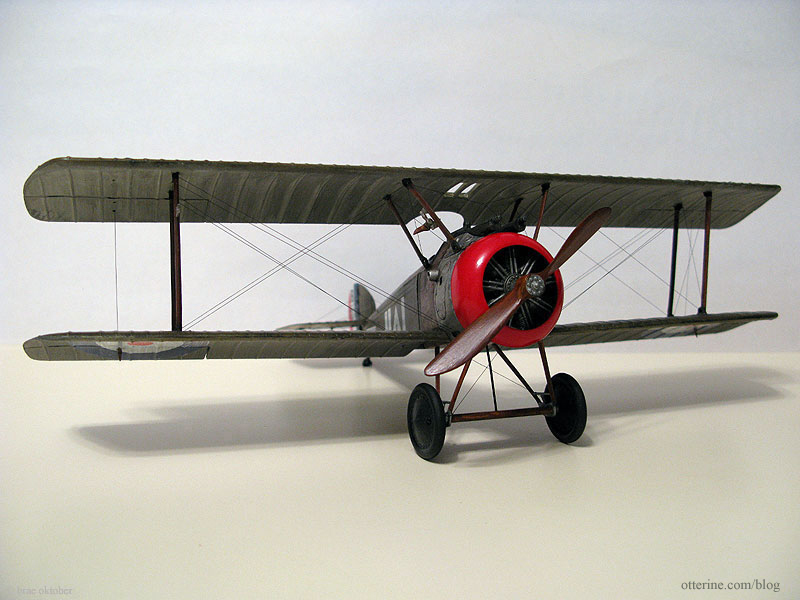
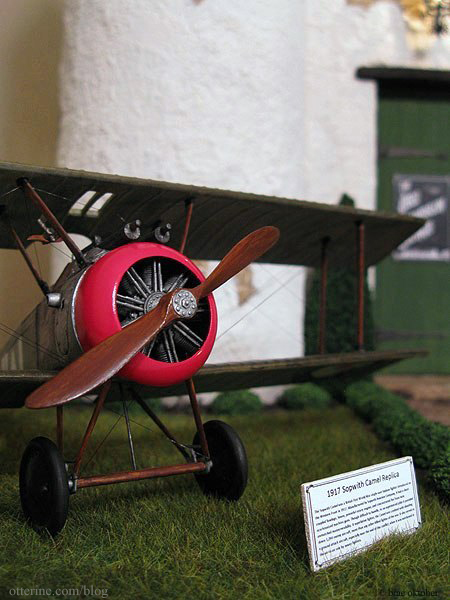
The most challenging part of the build had to be the 1:32 scale Sopwith Camel, built from a plastic kit by Academy. I had built model cars previously, but I had never built an airplane let alone one with rigging.
A special thank you to Sadie and Carl at Dolls House & Miniature Scene for a wonderful feature!
Categories: Books and media, The Aero Squadron Lounge
February 5, 2020 | 0 commentsUnfettered
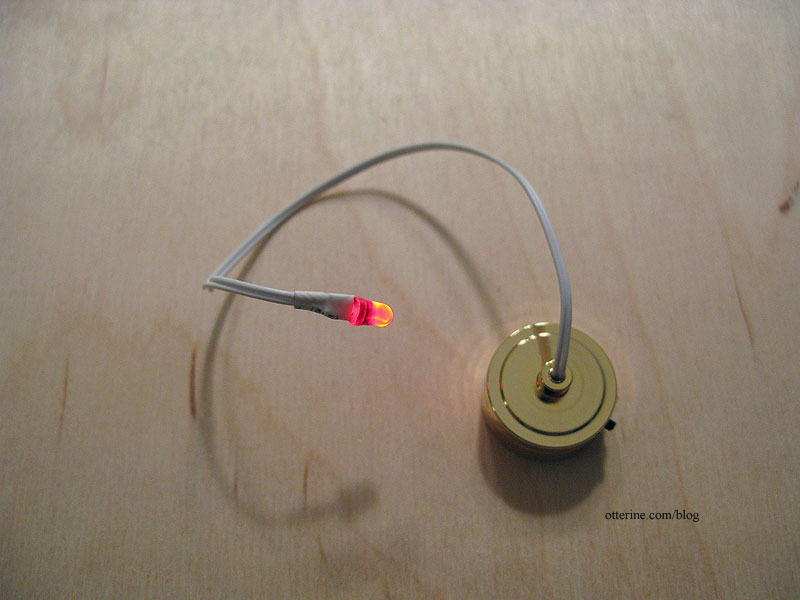
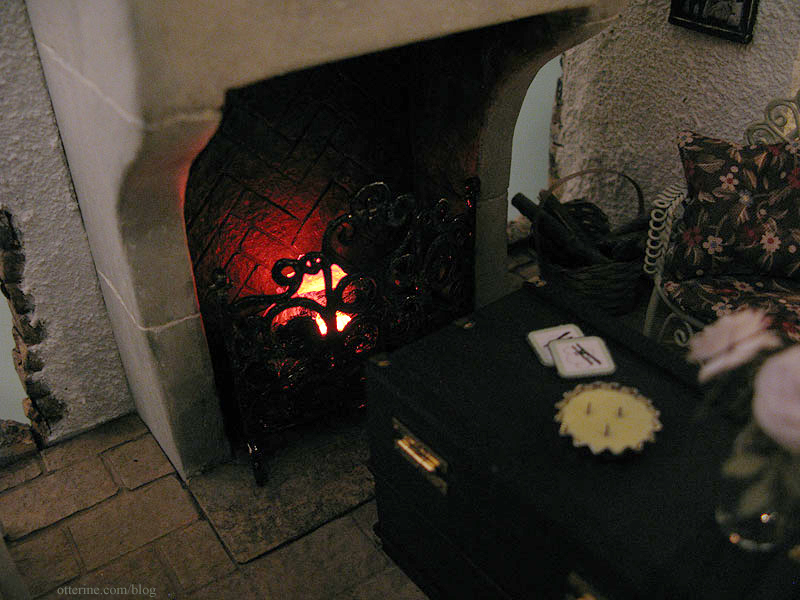
While buying supplies for The Artist’s Studio, I picked up a battery operated flickering firelight from Minimum World for The Aero Squadron Lounge.
If you recall, I had hardwired the fireplace bulb, which hampers the removal of the removable fireplace.
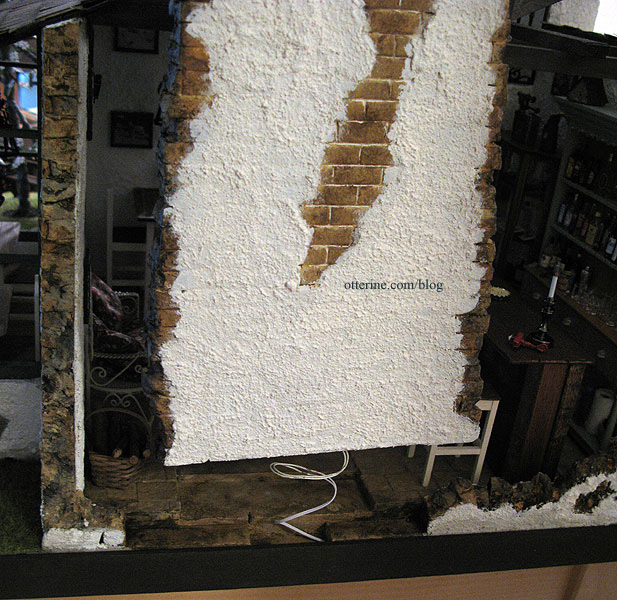
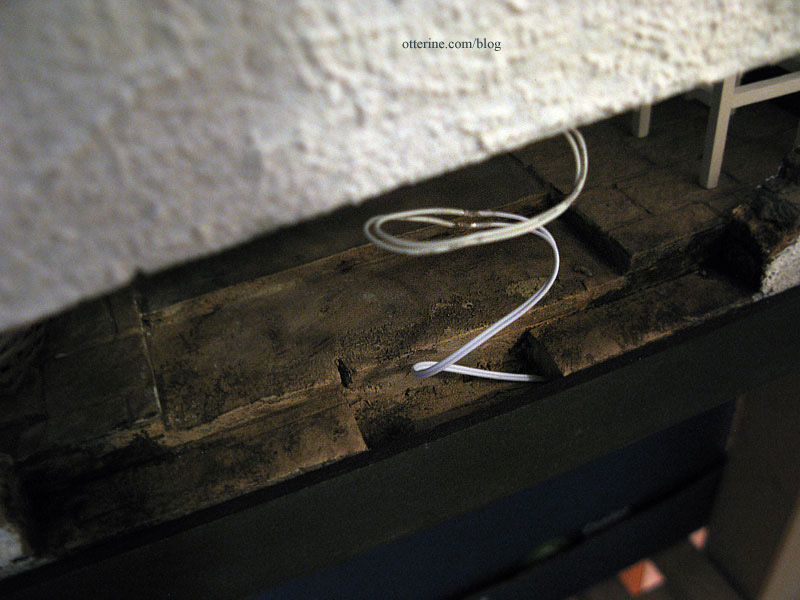
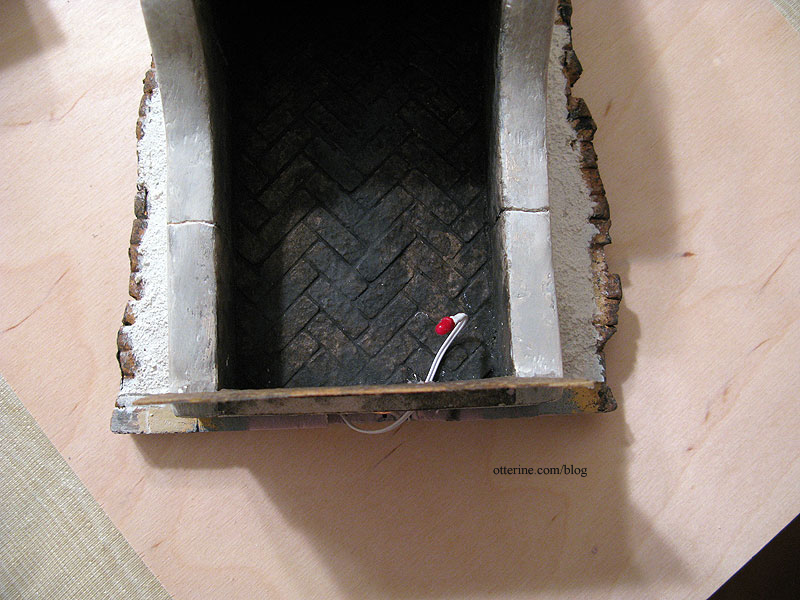
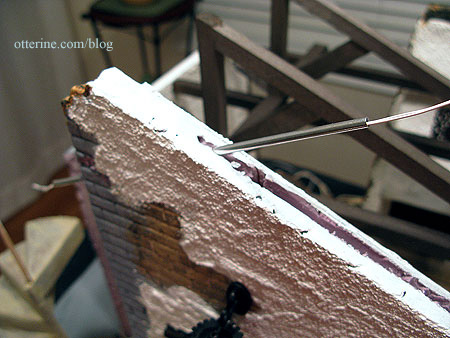
Close-up of the recess and fireplace wire.
I have to slip the bulb out of the hole drilled for it in order to truly remove the fireplace.
Before deconstructing any of the hard wiring, I made modifications to see if the new battery light would work for this instance. I fed the bulb and wire into the fireplace to see if the wire was long enough.

Since the back wall of the fireplace is made of foam, I was able to cut a space to house the battery mechanism, switch side down, as well as some excess wire.
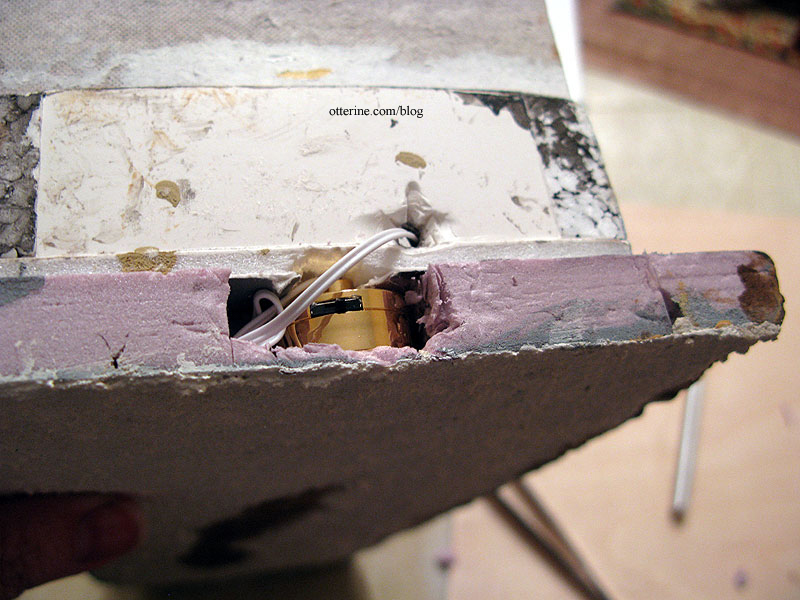
It worked! :D
I will probably paint the wire black to blend in more, but it doesn’t really show with the fire screen in place.
The flickering isn’t as smooth as the LEDs from Evan Designs that I used in the jack-o’-lantern, but it is bright enough and relatively convincing. Even a solid red bulb with this battery setup would be nice to have for fireplaces and stoves.
I decided to leave the hardwired bulb in as a backup since it is already in place, so I curled the wire and bulb into the recess made for it.

The fireplace with its new battery firelight sits perfectly in place and is now quickly and easily removable.
My final assessment is it’s a great light for easy access with the caveat that it does not have a completely realistic flickering motion for imitating fire. It is somewhat pricey, too, but overall I’m pleased with it and would likely use it again in the right situation. If I had enough room for full hard wiring, however, I would use the orange flickering LEDs from Evan Designs instead. Those are brighter and more realistic, but they have a larger battery adapter that’s not as easily hidden as this unit from Minimum World.
Categories: The Aero Squadron Lounge
December 26, 2012 | 0 commentsThe Aero Squadron Lounge – Landscaping
This was my first time landscaping in earnest, and I enjoyed the process so much! The feel I went for was manicured rustic. This is a vintage bar in a more modern setting, so I tried to bridge the gap between farmhouse natural and tidy grounds.
I started with a sheet of builders foam for the base, and used a carving knife to slope the edges. Out the front door, I carved (ok…butchered, whatever) a pathway out of the foam. I sealed the foam with grey gesso.
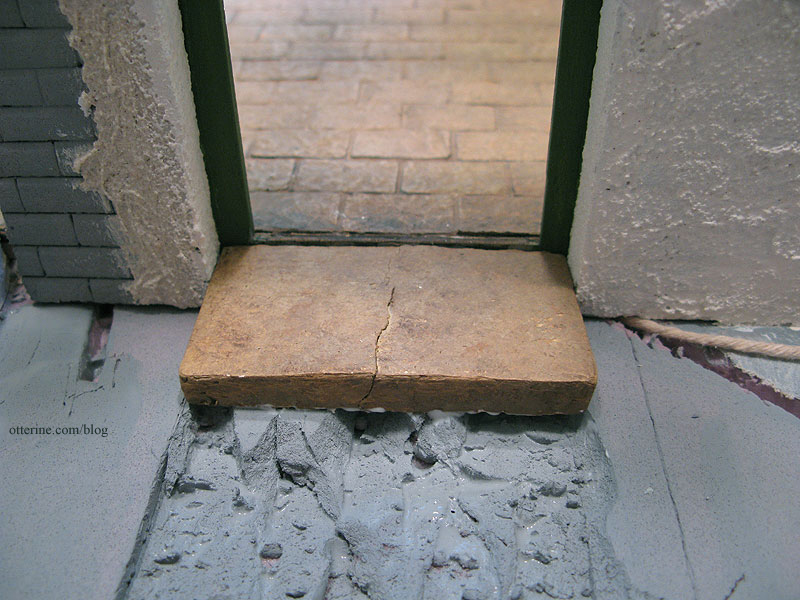
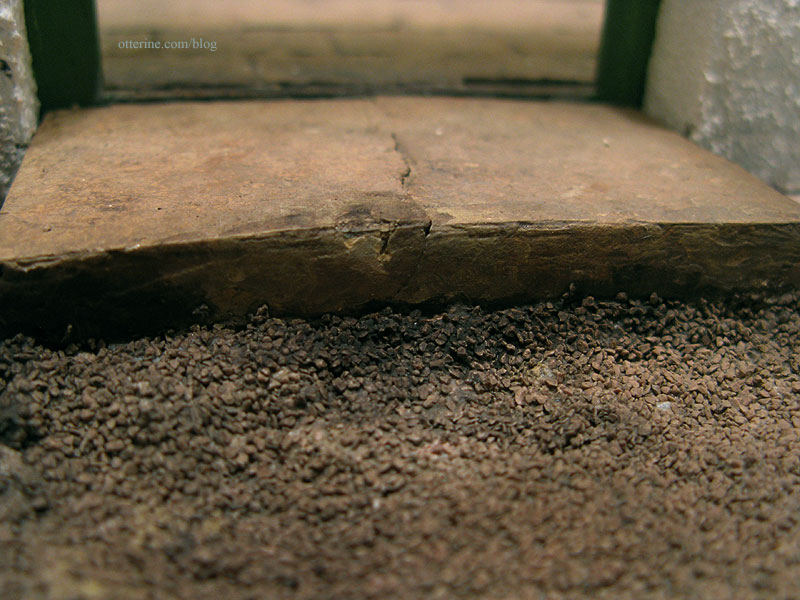
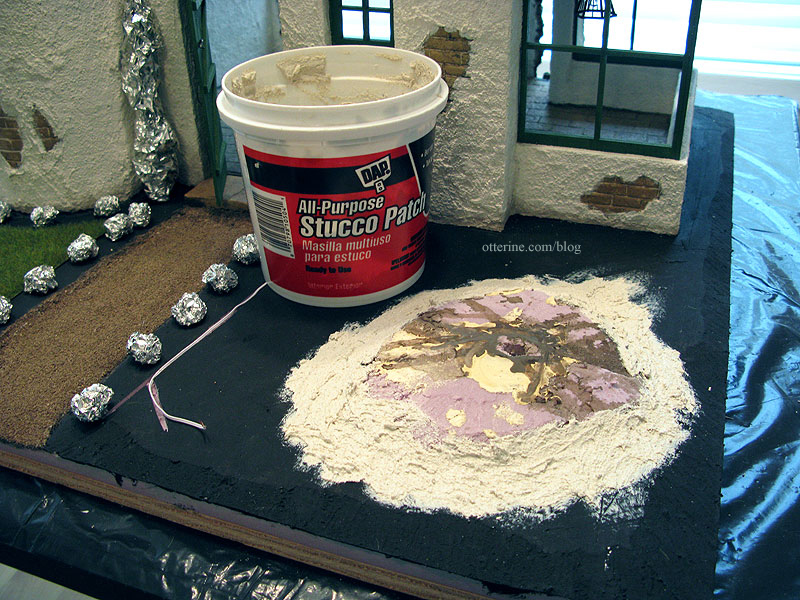
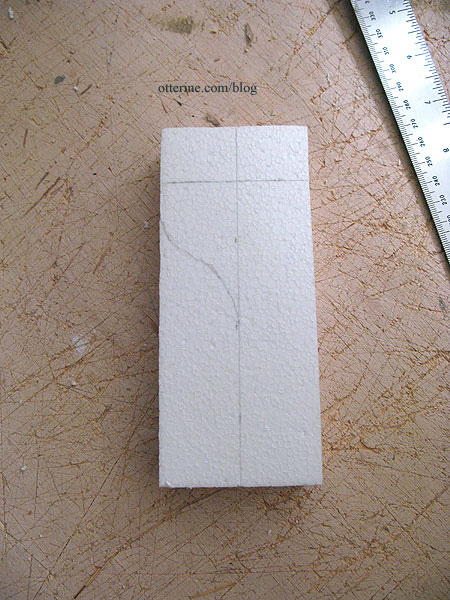
I made the front stone step in the same manner as I had for the fireplace. It’s a scrap of white styrofoam covered with spackling, sanded and painted to look like stone. The crack in it was a happy accident. It didn’t quite fit into its allotted space, and when I bent it to make it fit, the surface popped. I love the cracked detail and wish I had thought of it myself. I added further paint washes to really accentuate it. That front chip is also a happy accident. :D
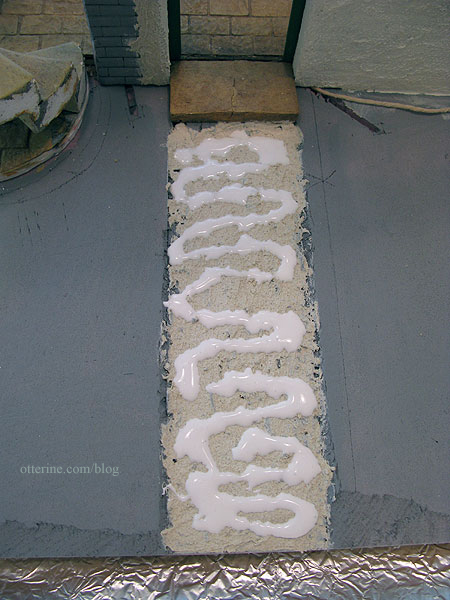
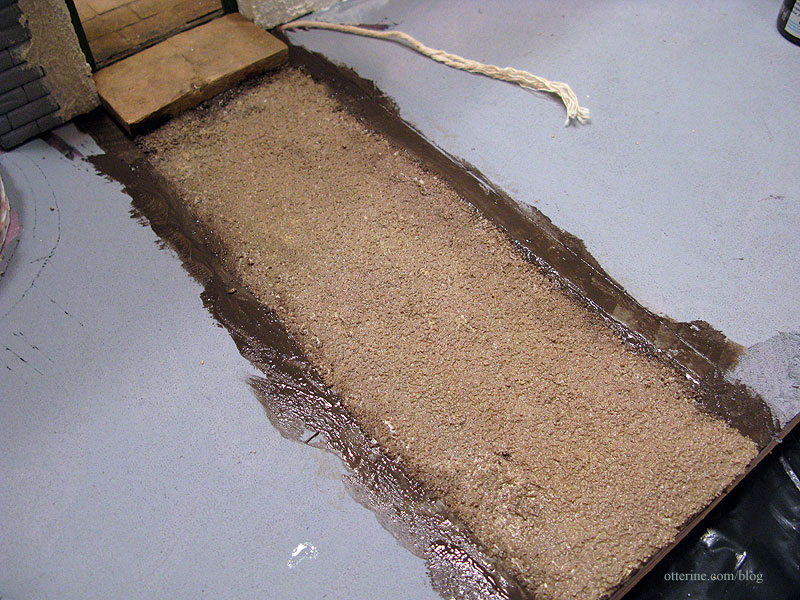
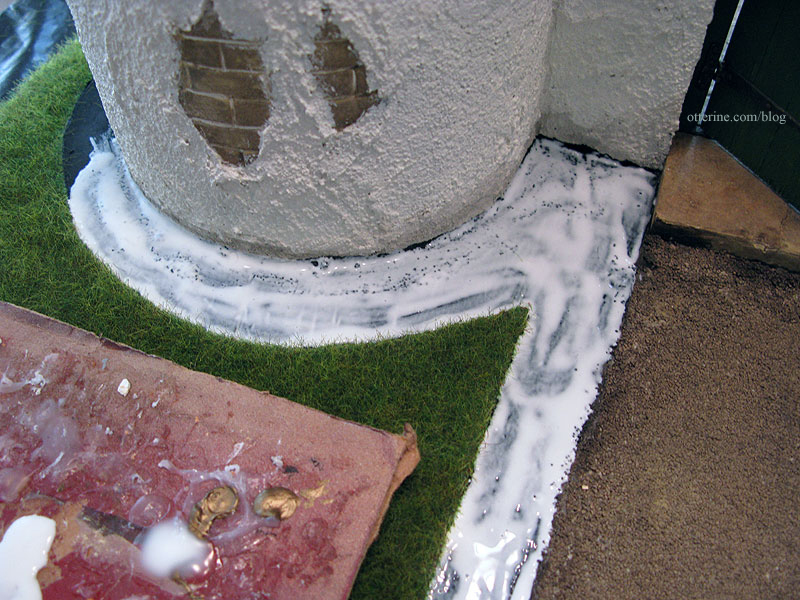
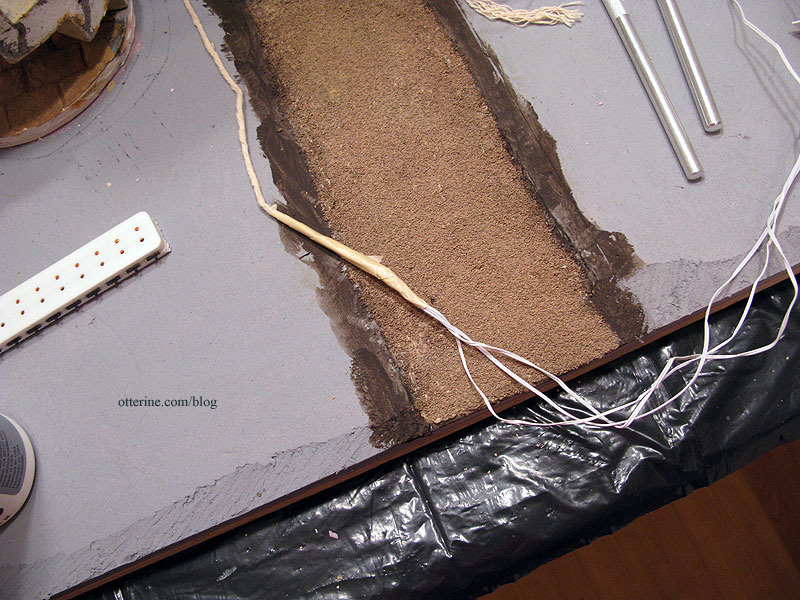
To make the walkway less treacherous, I first used some stucco patch to even out the surface. Once that had set, I applied a thick layer of Aleene’s Quick Dry glue, shown here before I spread the glue with a brush.
The gravel is Woodland Scenics Ballast left over from Baslow Ranch. I poured it on generously, pressed it gently and let it dry overnight.
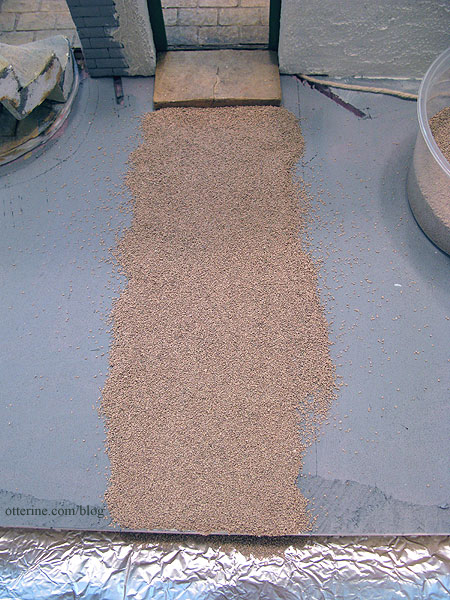
I brushed off the excess back into my bowl for later use in another project. I then added some paint washes to make the gravel look more natural.
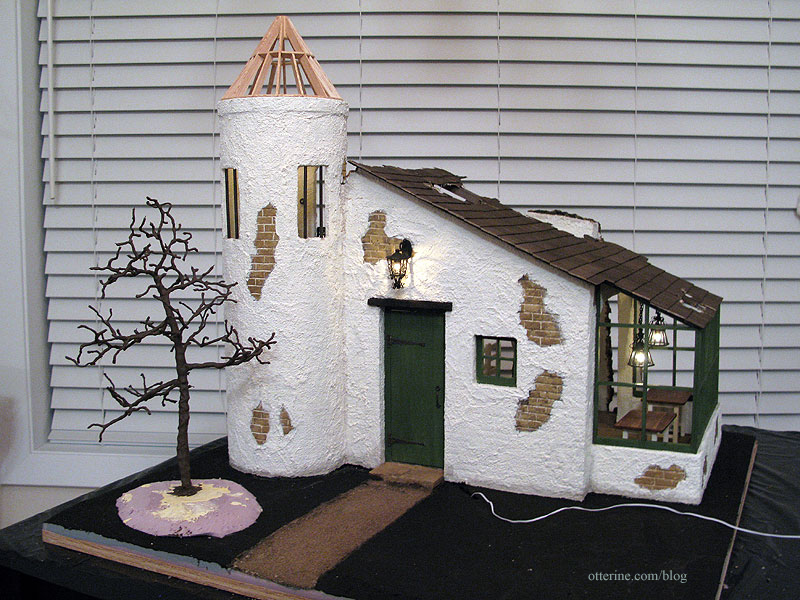
I had originally planned to have the plane and dogwood trees switched, but when I did the layout, it didn’t work out so well. The tree blocked too much of the tower, and the plane was lost in the larger space on the right. Here you can see I painted the landscape portion black just in case the ground might show through in areas.
After determining the amount of mulch I would need on either side of the pathway and around the tower, I cut pieces of newspaper to make patterns for the Woodland Meadow Field Grass sheets by Heki, from Scenic Express. I marked the outlines on the landscaping board.
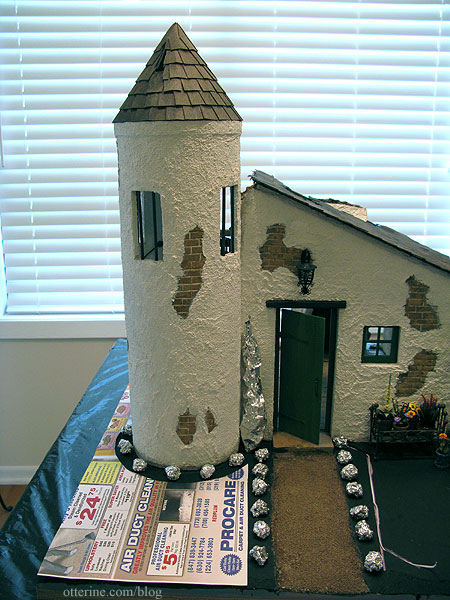
The shrubs and smaller trees I used for the final layout are Squeeze Me trees from Model Builders Supply. While I was awaiting their arrival, I was reduced to using aluminum foil stand-ins. ;D
It was messy cutting the grass sheets, so I made all of my cuts on the counter and shook the excess from them there as well.
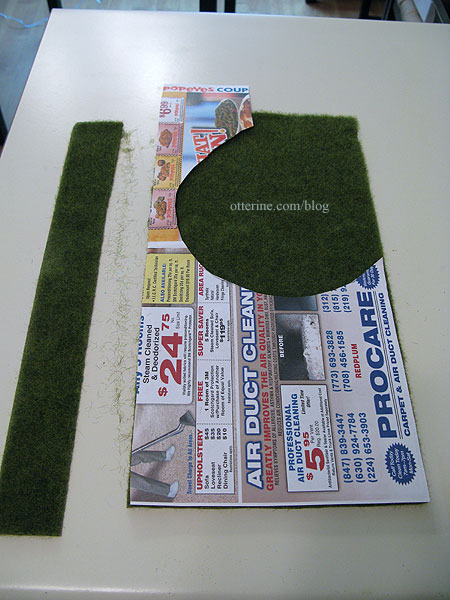
I used newspaper scraps to make templates for ease in cutting.
I saved all of the clippings for filling in later on where needed.
I spread glue evenly over the landscaping board with a brush.
I pressed the grass pieces in place and kept an eye on them until the glue set a little, continuing to press the edges down. The sheets measured 15 3/4″ x 9 1/2″, so there was some piecing required to cover the entire lawn. For the henhouse side, I cut a curve along each piece since I thought it would make for a less noticeable seam. I cut the back piece and applied glue just as I had before.
This time I applied glue to the edge of the back piece where it would meet the front piece.
It turned out very well.
With the henhouse in place, you can barely see it at all.
The back seam worked out very well, too.
I carefully applied glue to where the mulch would be.
I applied mulch from A Little More in Miniatures with a spoon.
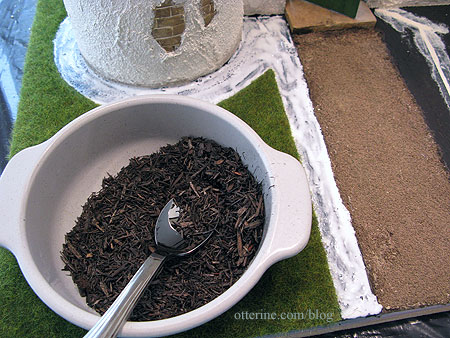
I added generous amounts of mulch.
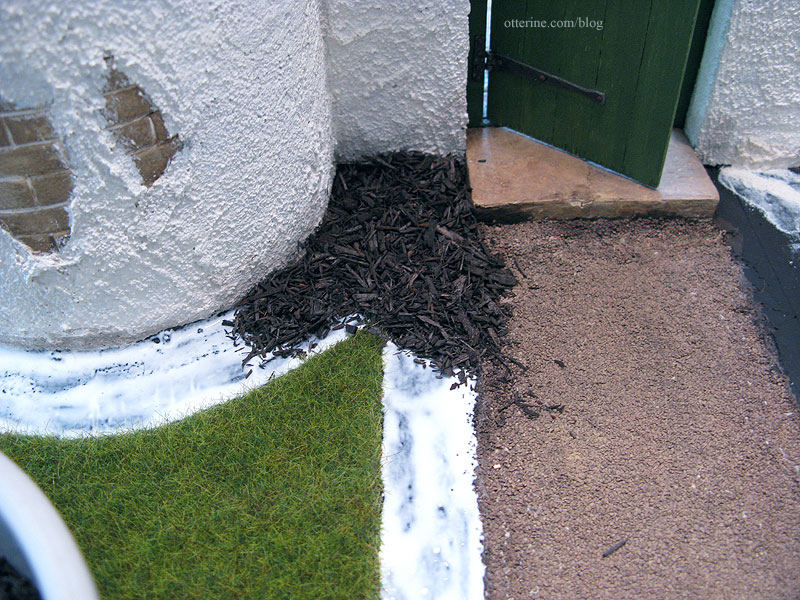
I lightly pressed it into the glue with my fingertips. While the glue was still wet, I removed any obviously out of scale pieces with tweezers.
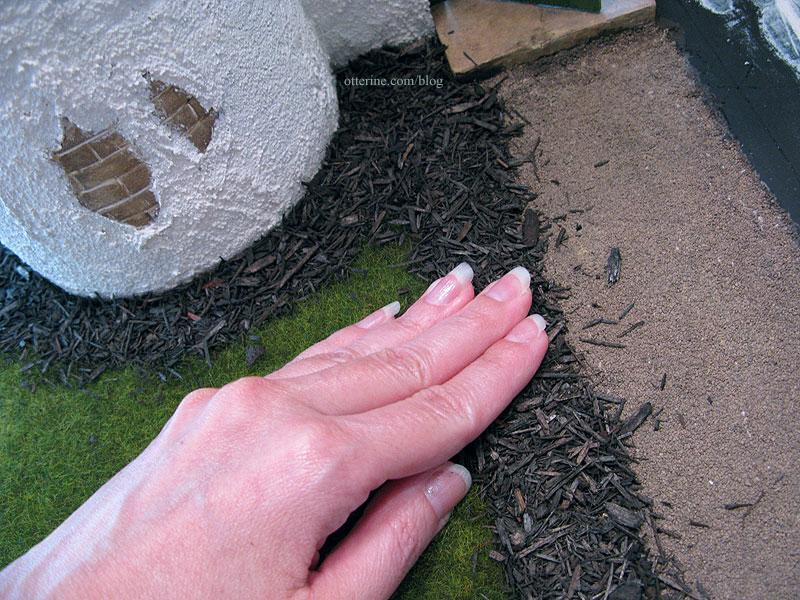
I then mowed the lawn and raked the mulch with…my vacuum cleaner. :D
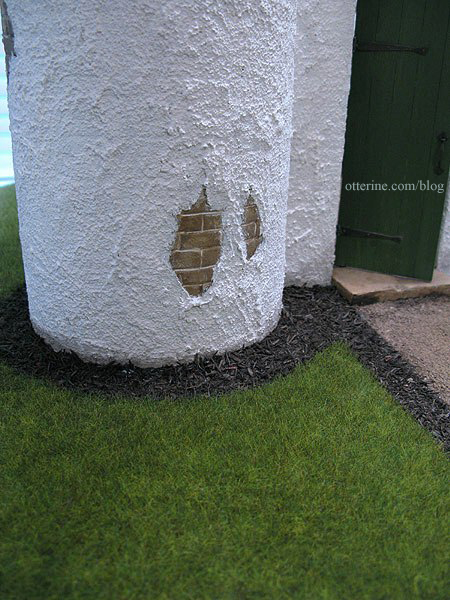
In this close-up, you can see where I dirtied up the lower edge of the building all the way around using a very diluted black and brown paint wash. This was done prior to all landscaping applications.
The materials turned out so realistic!
The dogwood tree has been detailed previously, and it had its own raised base created during the assembly phase.

I had the scary task of removing the tree from its base in order to apply the grass first. I used stucco patch to even out the ground around the raised tree base after gluing it to the landscaping board. Once that dried, I sealed the new surface with gesso and painted it black.
I cut a rough circle in the grass to surround the dogwood.
I had to patch the area behind this piece, so I cut a pattern to fit. Oh, don’t let the hens see the grocery ads! :O
After planting the tree, I applied glue inside the circle and to the remaining edge of the pathway and added mulch.
I love the way it looks with the bench in front of the tree.
The rustic planter filled in the remaining area and helps disguise the front lawn seam, which is slightly visible from some angles.
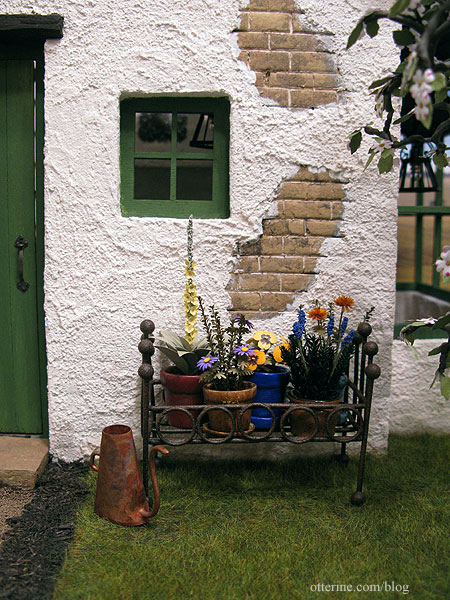
Once all of the grass was in, I planted the Squeeze-Me trees with a dab of glue on the bottoms. The lovely birdhouse was made from a kit by Twilla’s Tiny Treasures, the bird is from A Little More in Miniatures.
I had originally considered making them flowering shrubs, and below I’ve placed some impatiens from Small Talk (no web address) in mockup. I thought the white and peach competed with the building and the dogwood. The dark crimson was so dark that it was hardly worth the effort to add them. I really liked the bluish purple, but I didn’t think they added so much that it would be worth taking the time to shape and add centers to the amount I would need to cover twenty shrubs. The dogwood had exhausted me!
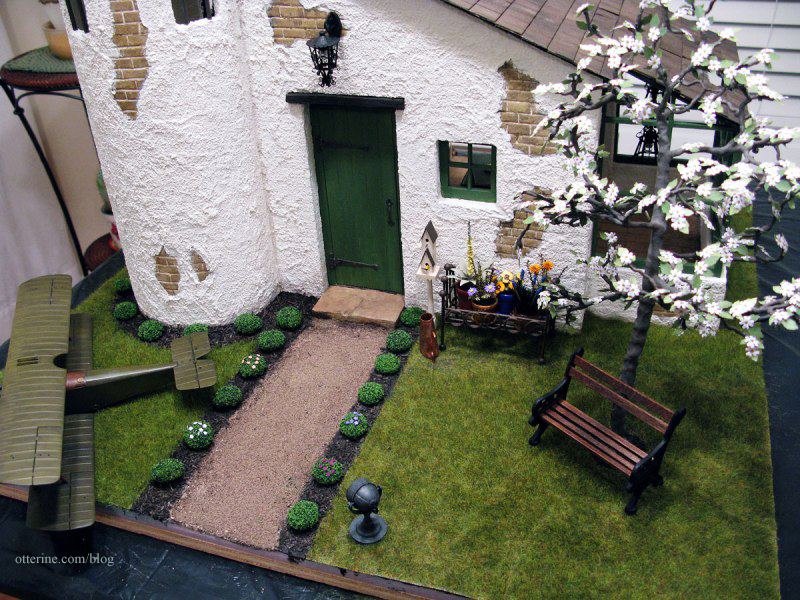
I added plain wood trim around the baseboard to finish, and here is the end result. :D
And from the other side…
That should do it for the Lounge posts. If there is anything I’ve missed or there is something you want to see closer, just leave a comment.
Categories: The Aero Squadron Lounge
September 22, 2012 | 0 commentsThe Aero Squadron Lounge – structure, part 3
Continued from structural details, part 2 for The Aero Squadron Lounge.
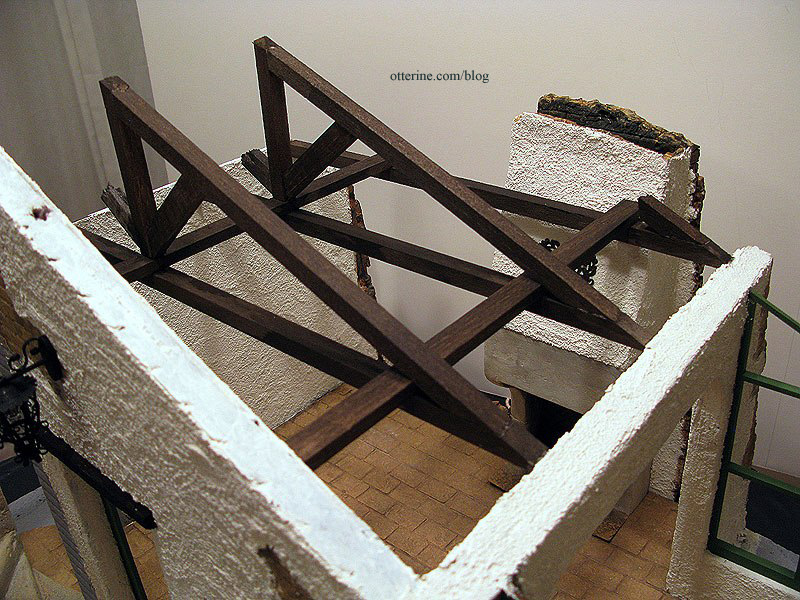
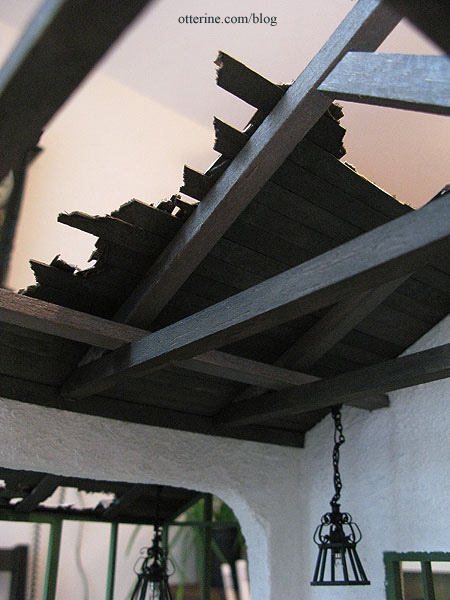
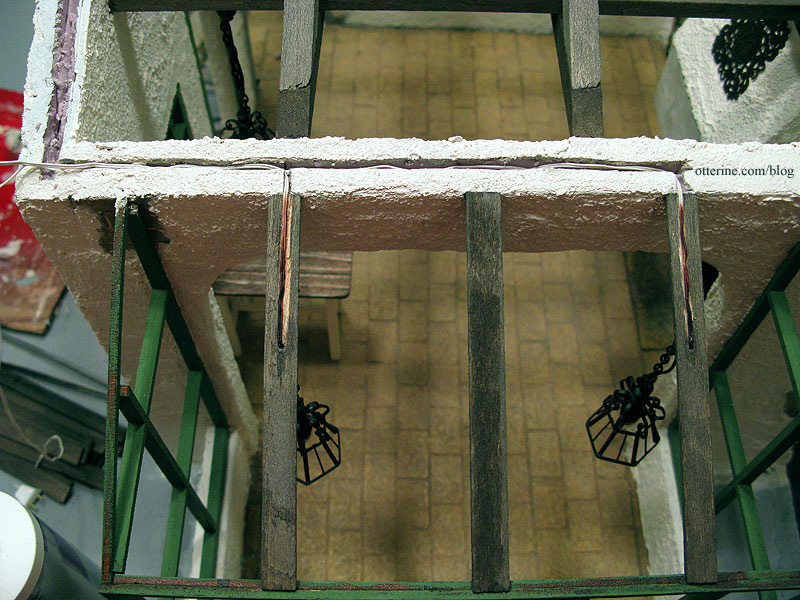
The beams are made from balsa, marred and painted to look like slightly burned and weathered wood. I didn’t go overboard on the weathering, because I didn’t think it needed to look like it was still smoking. This photo shows the base color…more aging was added later after shingling.
I originally wanted vertical beams to rise up from the floor to hold the ceiling beams in place. I would have been able to hang pictures and other items related to my theme there. Even with the added floor space, though, there was not enough room to have them without messing up the furniture floor plan.
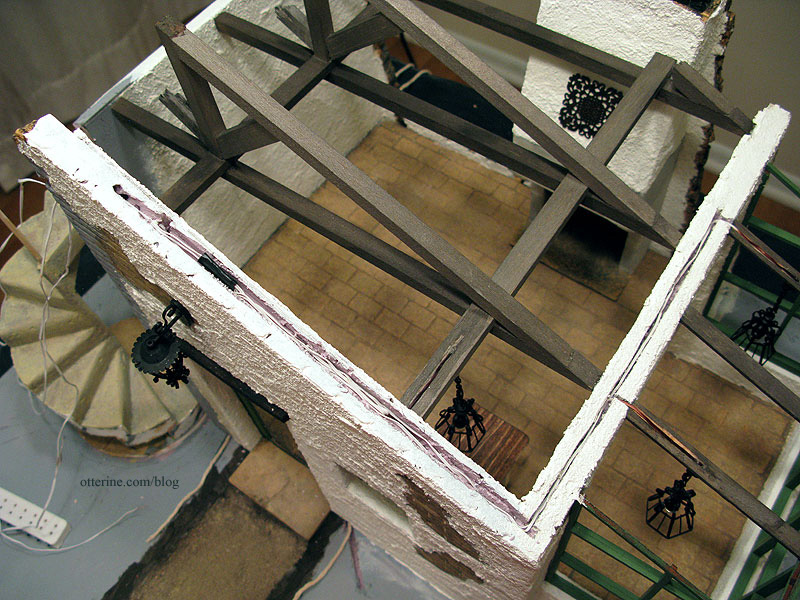
One of the ceiling beams terminates at the fireplace and serves to keep the fireplace unit from tipping into the room.
I completed the wiring for the hanging lamps for the tables as well as the front door carriage lamp. All the wiring for this build is detailed in a separate post.
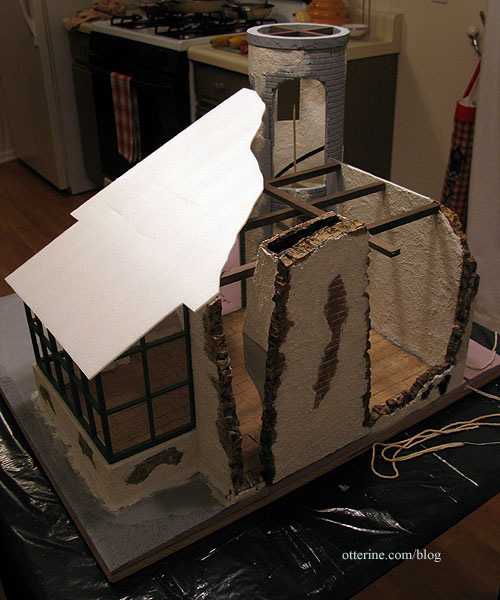
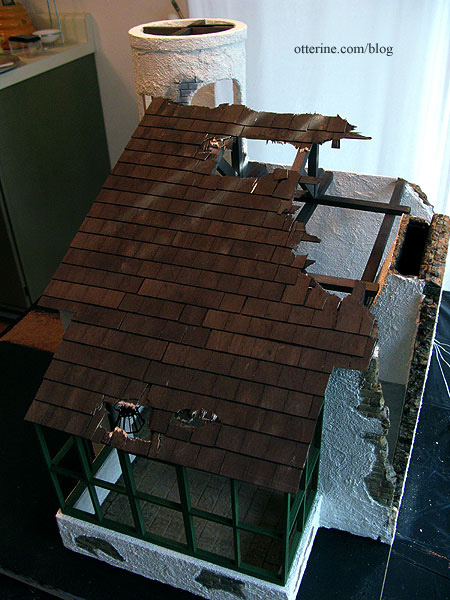
Roof planning was next, and I used a scrap of the Cellfoam 88 I had used on the tower to determine just how much roof decay I could have.
I determined the amount of strip wood I would need to cover this space, then cut sixteen strips of wood measuring 3/8″ x 12″ from 1/16″ thick bass wood. I stained these boards, front and back, with a wash of black and brown acrylic.
I glued the strip wood planks to complete the partial roof structure, breaking the ends where it opens into the main room.
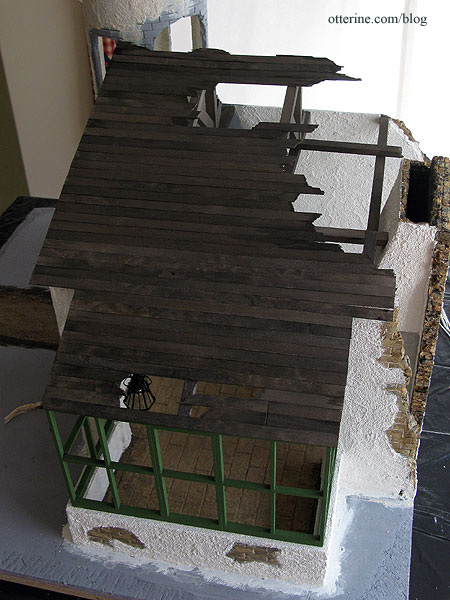
To create a front eave, I left excess hanging over the front wall.
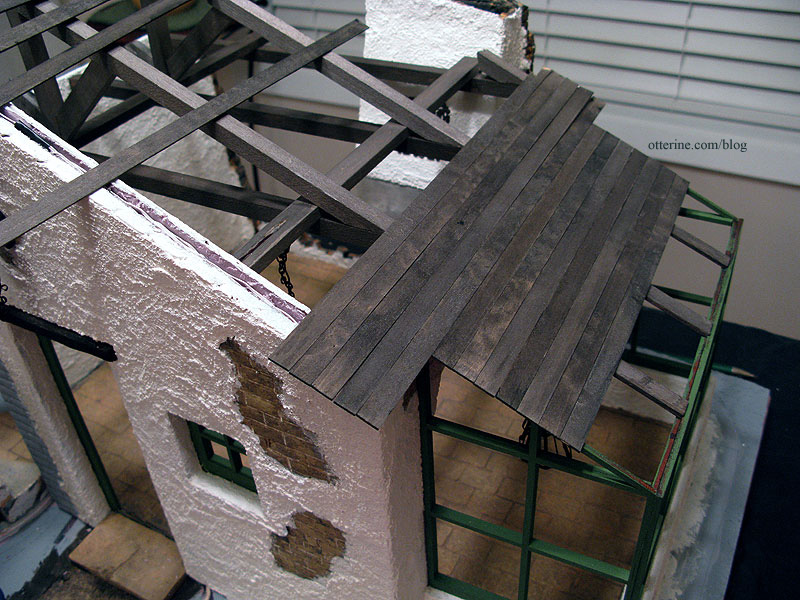
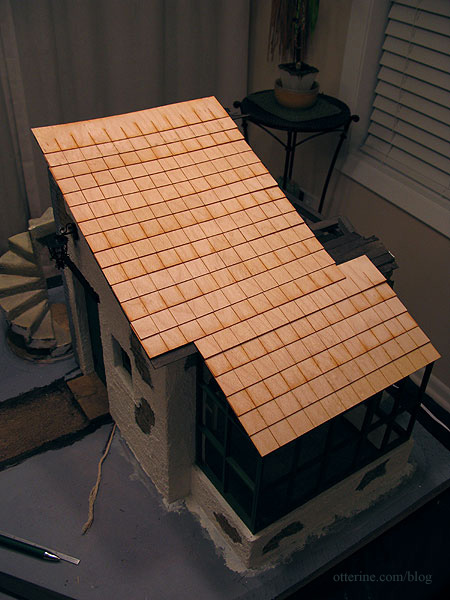
I shingled the roof with Greenleaf speed shingles – love these! :D I first covered the roof with loose shingle strips to determine how many I would need.
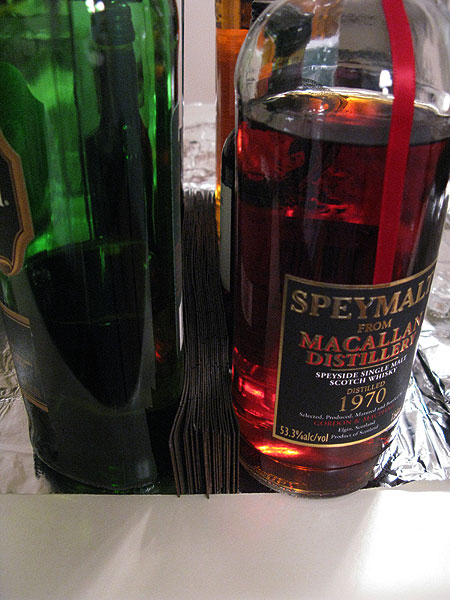
I stained these before applying, and this is my shingle drying apparatus. Rather fitting for a Lounge.
I followed the bass wood planks and broke the shingles to form the jagged bombed edge and a few holes.
Here is the view from inside.
I touched up the paint toward the end of the build, and here is the finished product.
Finishing the roof essentially completed the main room build, and the rest of the time was dedicated to the tower. Those posts begin here. The conical roof for the tower was another math challenge, and its detailed post is here.
Categories: The Aero Squadron Lounge
September 22, 2012 | 0 commentsThe Aero Squadron Lounge – wiring
Nothing brings a miniature build together quite like lights, but wiring a structure always has challenges.
This was my first time working with builders foam for landscaping and building walls, but it won’t be my last. It was a great material for hard wiring the lighting, too.
Before I glued the base of The Aero Squadron Lounge onto the landscaping board, I cut wire channels that would run underneath. I draped twine inside the channels so I could tie the wires to it and then pull the wires through the channels later in the build. You’ve probably noticed these strings in the posts I’ve been writing about the tower and main room construction.
The front door carriage lamp was the first light to be installed but I don’t have good photos of what I did.
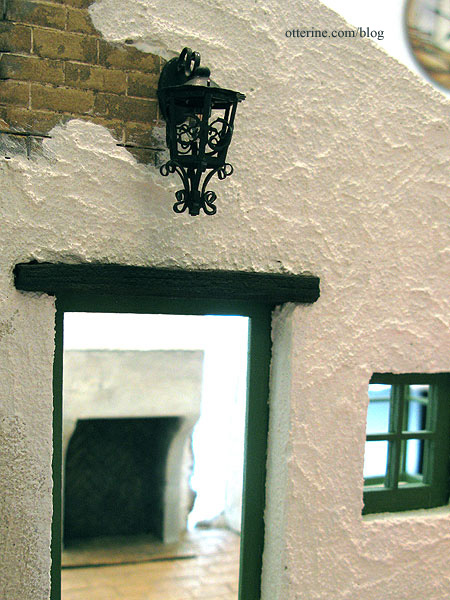
I poked a bamboo skewer into the foam to make a wire channel and pulled the wire up toward the roof. I used the skewer to then make a channel toward the join with the tower. On the side of the front wall, I cut a channel into the foam so the wires would run toward the ground and through the baseboard channel.
Fortunately, I did take better pictures when I wired the three hanging lights over the three tables inside. For the one over the pub table by the front door, I cut a channel into the balsa wood beam and pulled the wire through the front wall. I then painted the wire to match the beam. This was the only wire that might possibly be noticeable if left white.
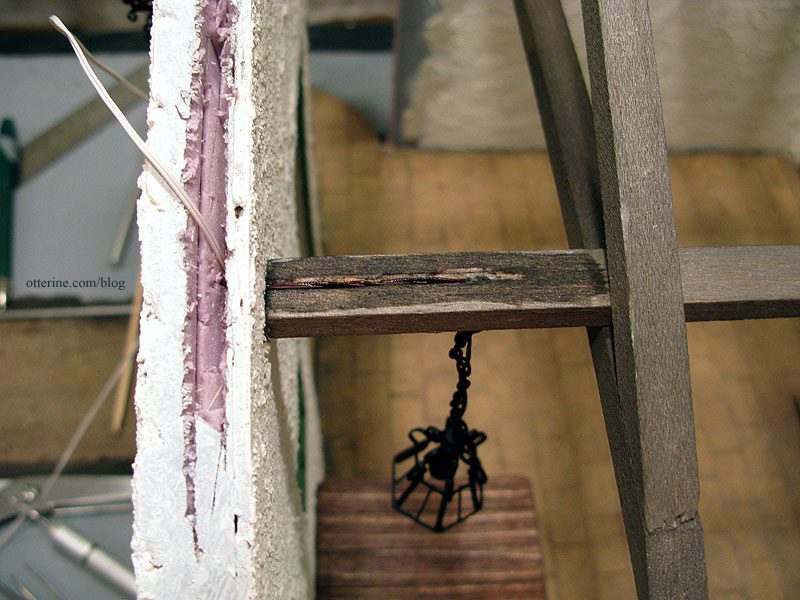
For the other two hanging lights, the roof rafters covered the channels made in their respective beams.
I cut a channel into the builders foam all along the top edge leading toward the earlier channel made for the front door carriage lamp.
I used a length of tubing to feed the wires through the channel.
I taped all the wires to the twine and pulled the twine through the channel.
Once I cut the twine from the wires, I fed them into the side baseboard channel toward the back and to the power strip. The remaining length of twine here is for the tower light.
I pressed the wires into the side wall channel on the front wall. Once the tower was attached, this would be sealed up with stucco.
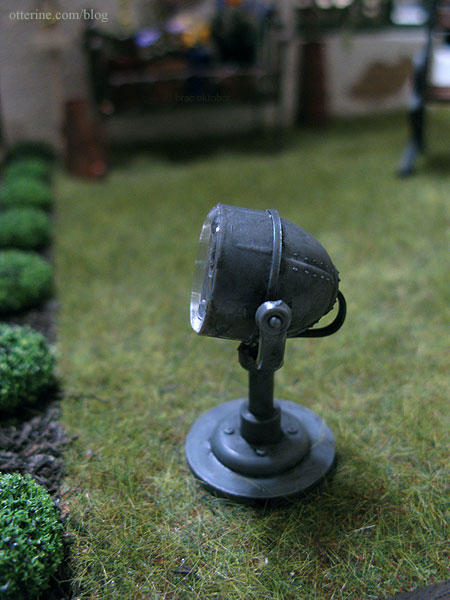
The front spotlight was fairly straightforward as well. I bought a pack of two Scene Master spotlights on amazon.com but used only one of the pair included in the package.
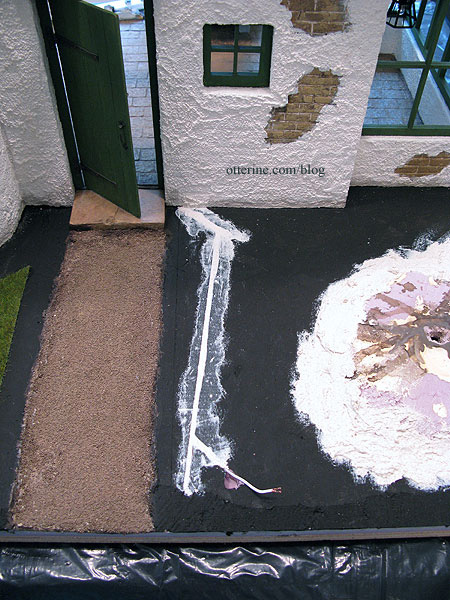
Once I knew where I wanted the spotlight, I cut a further channel to it from the other baseboard channel. I ran a length of wire underneath the house and left a small bit exposed to wire the light. I had to plant the grass before I could install it.
I filled in the channel with leftover stucco when I added the dogwood tree base, where I used stucco to sculpt the hill. I filled in the other front baseboard channel with stucco after attaching the tower. You can see where I adjusted the channel at the front of the board.
Once the grass was planted, I was able to wire the spotlight. I cut the spotlight wires short and then spliced them to the exposed wire from the ground.
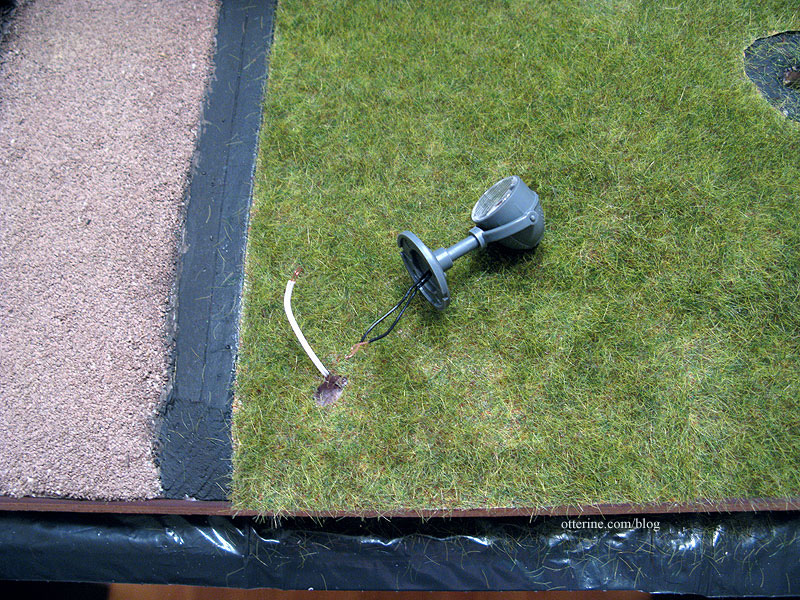
I made a small hole in the ground to sink the spliced wires into.
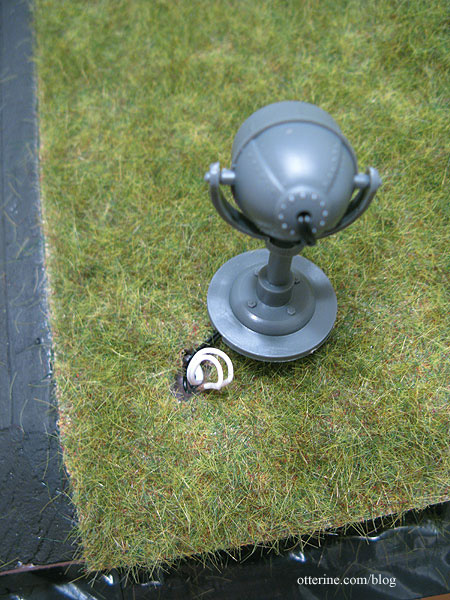
I glued the spotlight to the grass over the hole.
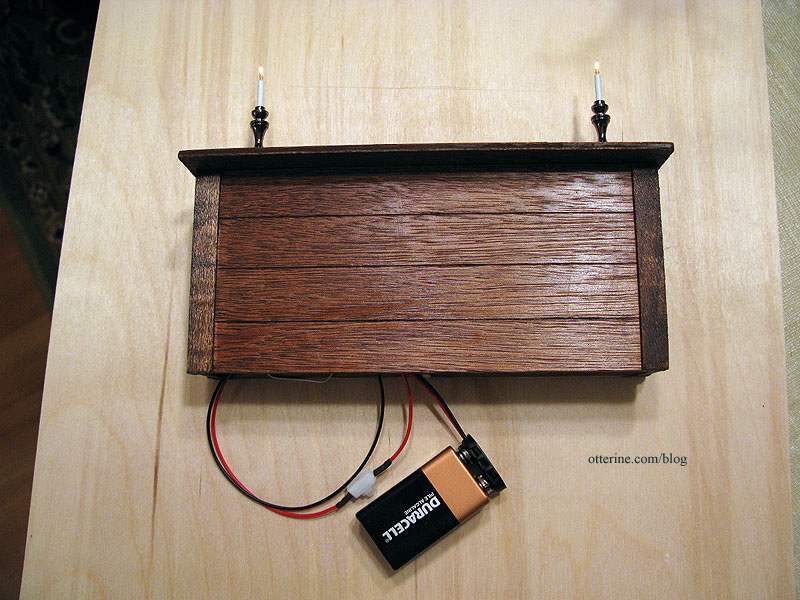
As noted in a previous post, the bar lights are operated by a 9V battery.
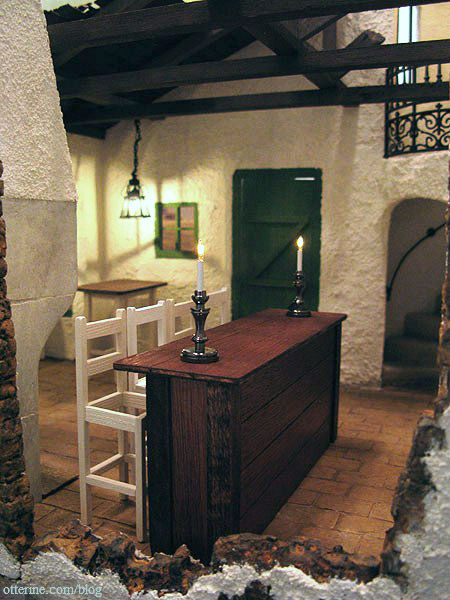
To keep the bar removable, I wired the two lamps to a 9V battery adapter with an on/off switch from Evan Designs. Ingenious, right? Ha! There are two main issues with this idea. First, the bar is definitely removable, but it is hard to get it back into place without the wires sticking out…very fiddly. More importantly, the battery doesn’t last long and the candlesticks are very dim. I tried wiring each lamp to its own battery but the difference in brightness was negligible and it doubled the fiddly nature of trying to get the bar in place with two battery assemblies fighting for freedom. What I should have done was made a plug in the floor.
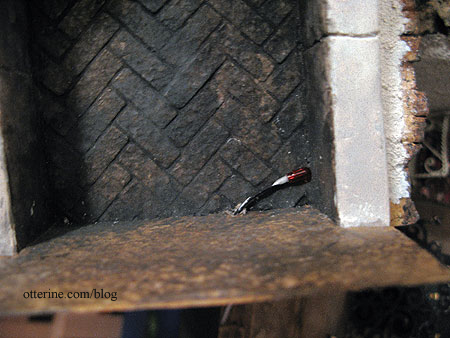
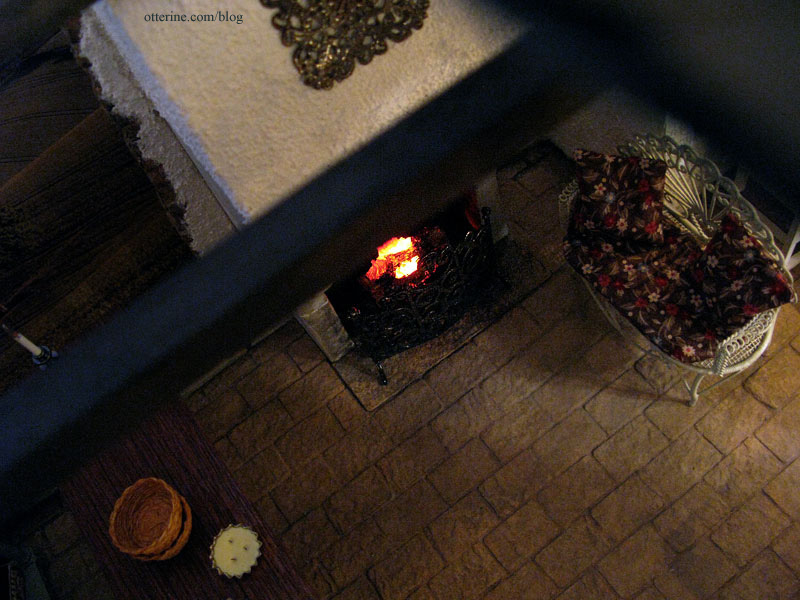
The lit fire is an acrylic log piece with a red bulb. I drilled a hole for the bulb to fit through the bottom of the egg carton hearth, and its wire runs inside a channel through the baseboard foam along the back.
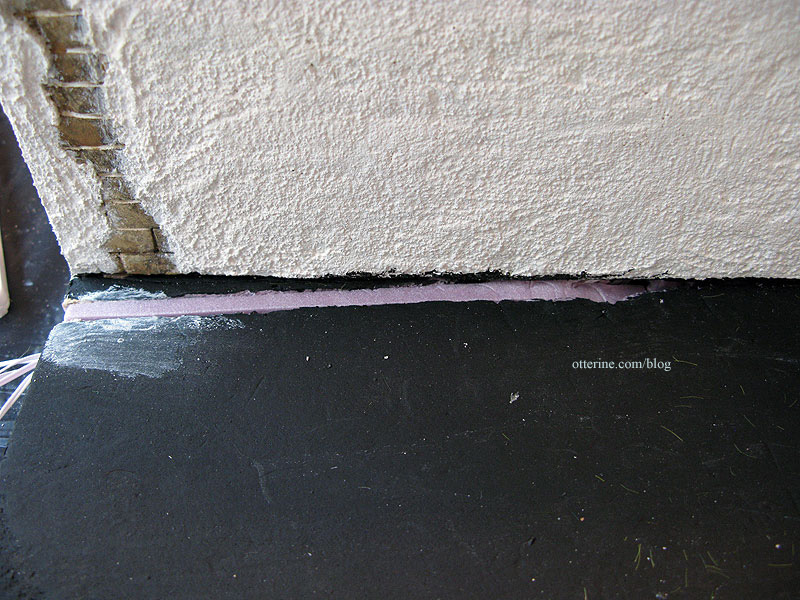
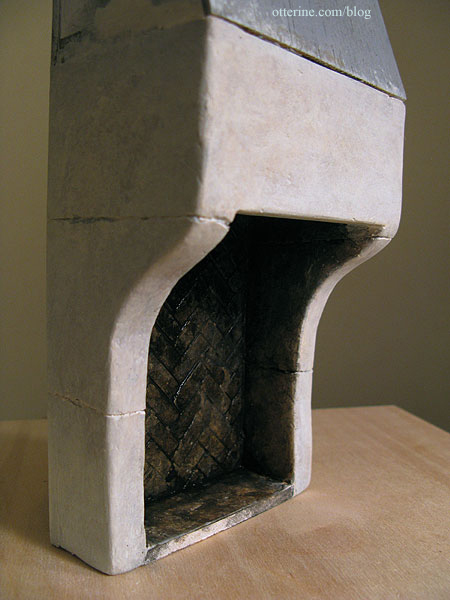
Since the fireplace is removable, I have a small recess where the wire and bulb can curl into when the fireplace is removed.
However, now I see Minimum World has a battery operated flickering fire light that would certainly make removing the fireplace less of a hassle. (Update: I installed the Minimum World battery light here.)
Close-up of the recess and fireplace wire.
The most challenging light to wire was the tower light.
Even if I hadn’t made the tower roof removable in the end, I wanted exposed rafters and holes in the roof. That meant you would be able to see the wire, even if I cut a channel into the balsa beam and painted it.
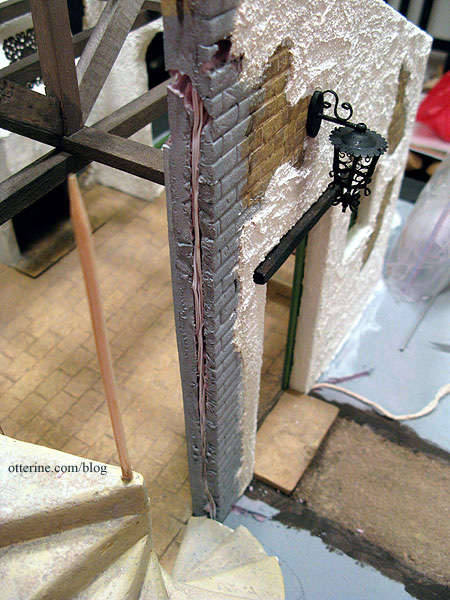
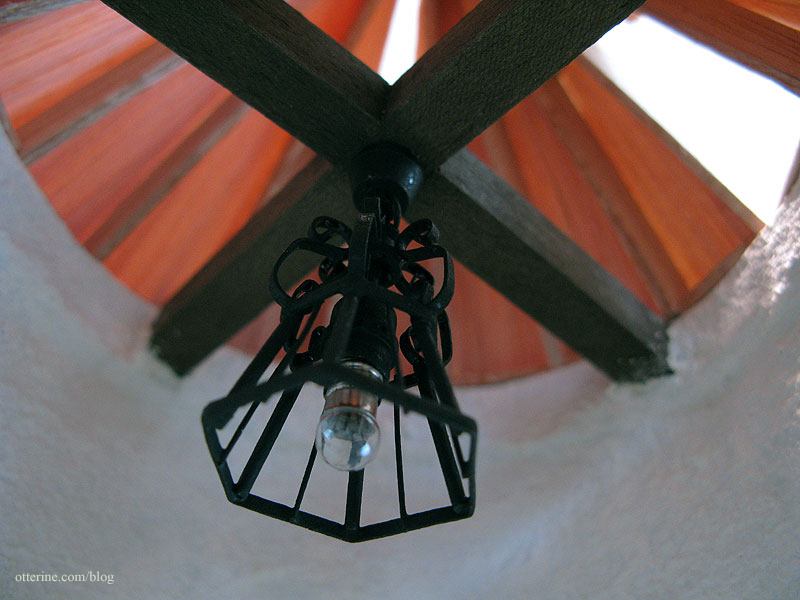
I opted to hide the wire in plain sight with conduit made from 3/32″ aluminum tubing from my local hobby shop. I eliminated the chain on this light and made it a ceiling fixture. The wire goes up through the beam, through the conduit and out the side of the tower. The end wire runs between the tower and side wall, eventually to be covered with stucco.
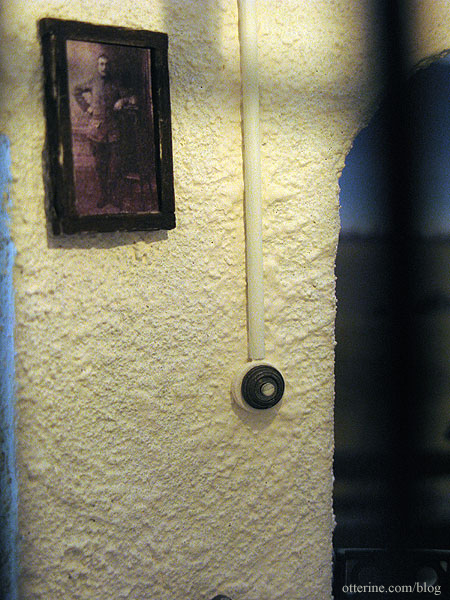
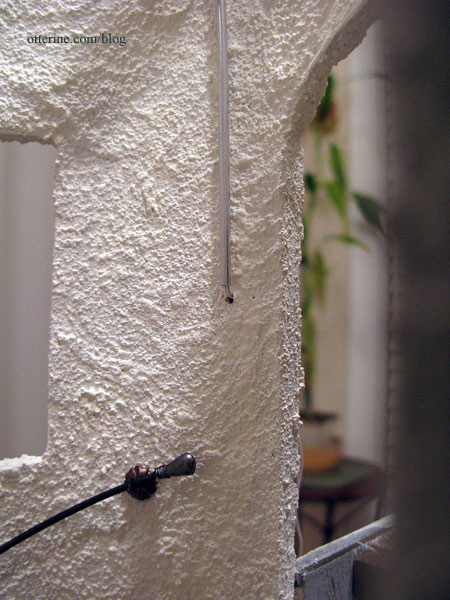
To disguise the end of the wire inside, I used a round wooden bead. I painted the conduit on the beam brown to match the wood. I painted the conduit along the wall and the wooden bead warm white to make it blend in with the wall color. I have seen conduit done like this in real life many times. I added a metal doorbell from Sussex Crafts to act as a vintage light switch. Now the illusion is complete. The whole process is detailed in the tower construction post, part 3.
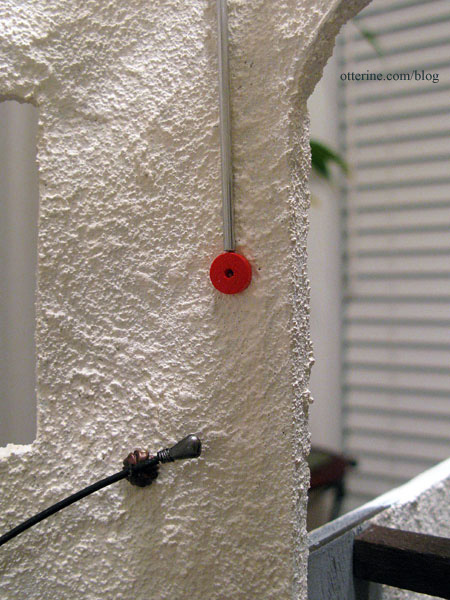
Here is the faux switch for the tower light.
I started to fill in the side baseboard channel with stucco but realized the moisture from the stucco might mess with the spliced wires and I didn’t want to take any chances. Instead, I cut a sliver of builders foam to plug the channel. These channels don’t have to be pretty, they just need to work and be hidden in the end.
Categories: The Aero Squadron Lounge
September 20, 2012 | 0 commentsThe Aero Squadron Lounge – removable fireplace
Or, turning stryofoam into stone. For the initial structure, I used regular white stryofoam for the side walls since it was easy to cut and shape with sandpaper.
I added builders foam across the front only because I had the perfect sized scrap for the opening. The back and upper sides are foam core board and the upper front is balsa…a little bit of everything from the scrap box.

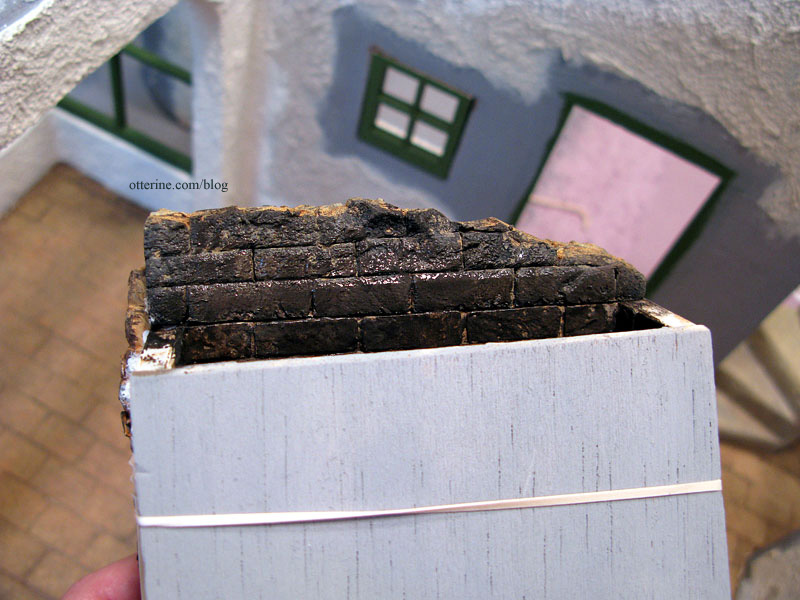
The back of the fireplace is made from egg carton bricks placed in a herringbone pattern. As I had done for the Heritage chimney, I used a printed grid to help keep the pattern consistent.

The fireplace is actually bricked all the way up inside as you can see in this work-in-progress shot. I changed to regular brick pattern from the upper edge of the stone fireplace through to the top of the chimney opening.
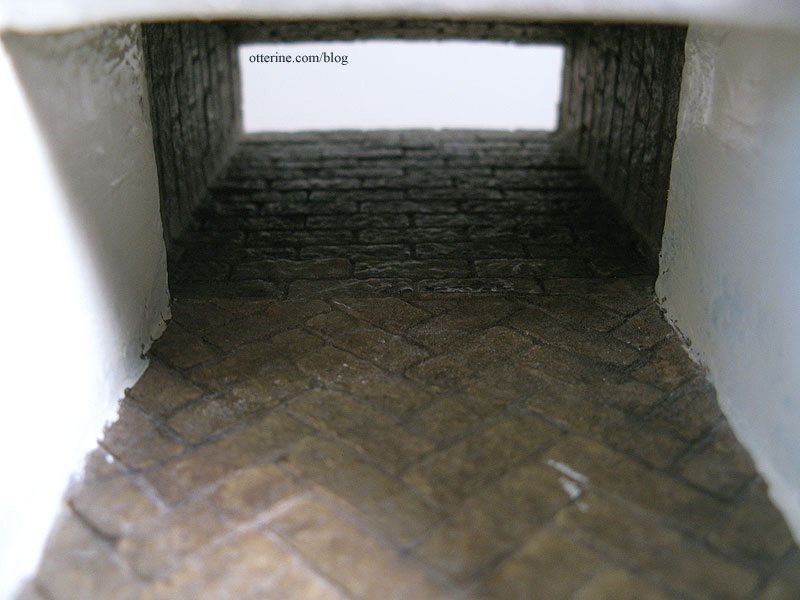
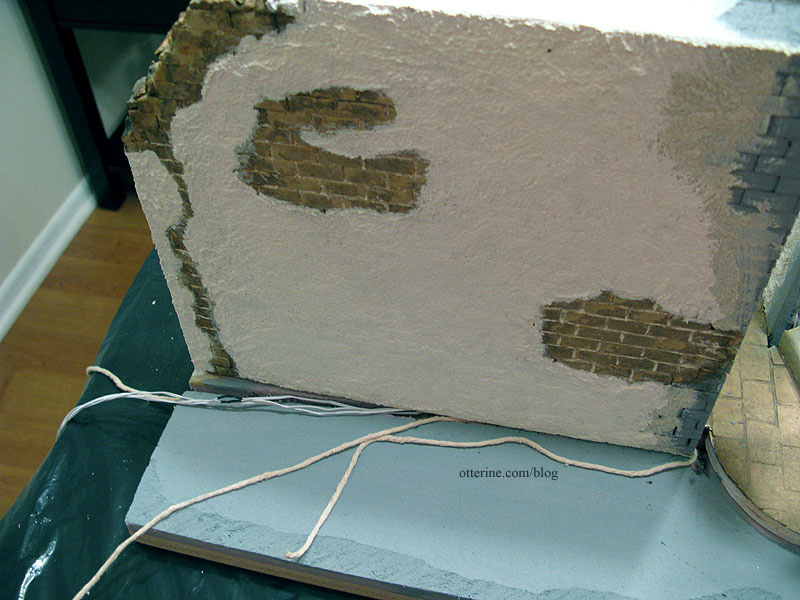
I had to do this in two sections, the back and sides first and then the top front, which wasn’t glued in place until after all the painting and grouting was complete. Below, you can see the brick on the back and sides in progress as well as the initial coat of spackling on the stone portion of the fireplace.
I painted the bricks with Camel by Americana using a stencil brush to stipple on the paint. I did the same thing with Desert Sand by Americana, leaving some of the Camel underlayer showing here and there. I sealed the bricks with Delta Ceramcoat satin varnish and then used spackling for grout. I followed that with washes of browns and black to reach this coloration.
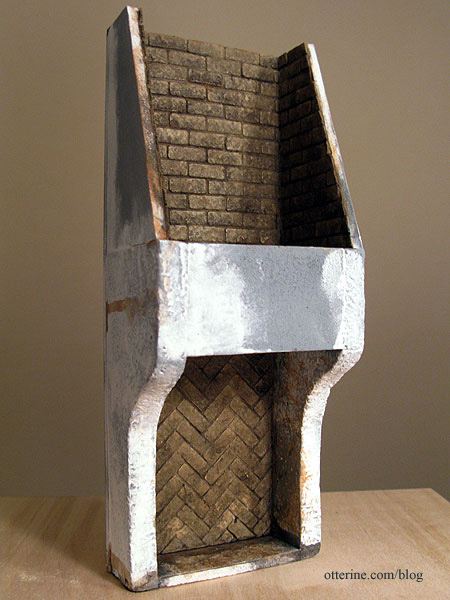
I was very heavy handed with the spackling on the fireplace.
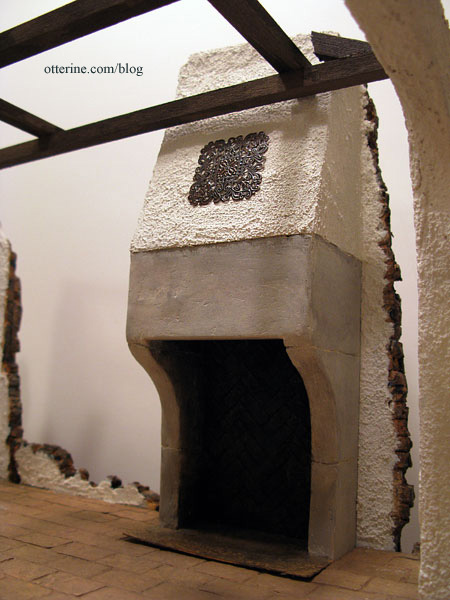
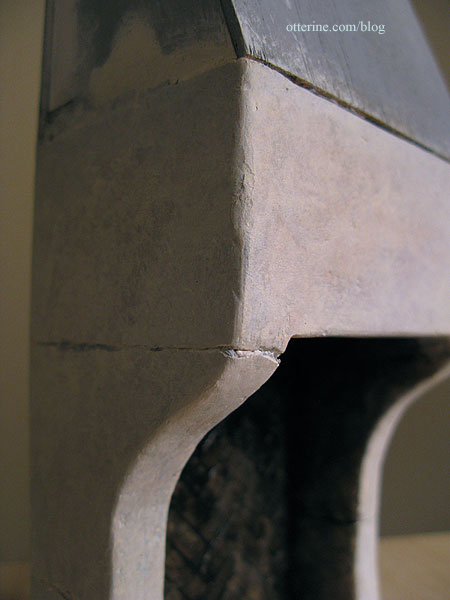
After sanding, it really did start to look like real stone.
I then layered on paint washes, rubbing the surface with my fingers to make sure there were no brush marks left. I used an X-Acto knife to draw lines on the stone. I wanted it to appear to be made from stone slabs. Going over the lines with an awl chipped the stone and made the seam lines more realistic.
The fine detail is something I didn’t expect but just love about it. It now even feels cool to the touch like real stone.
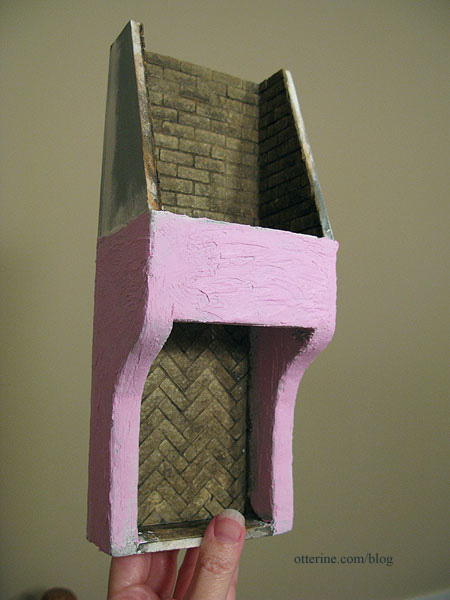
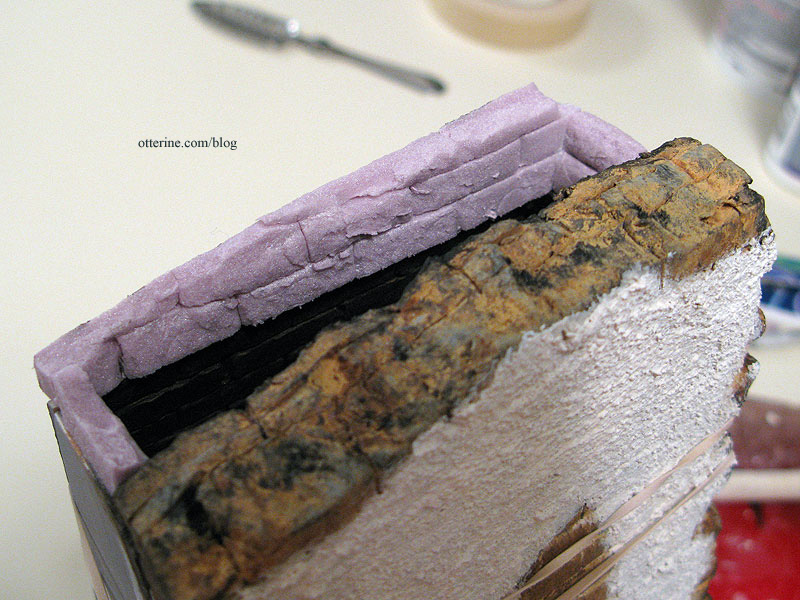
I bricked, painted and grouted the interior of the front top piece (no photo unfortunately) and glued it in place. I then cut builders foam pieces to make the back wall that the fireplace would have been attached to at some point, with some extra broken bits to fill in the space.
This was painted and covered with stucco to match the rest of the building.
On the inside of the back foam piece, I scored the surface to mimic the egg carton brick on the interior. It was then painted to match. Here it is still wet from the paint washes.
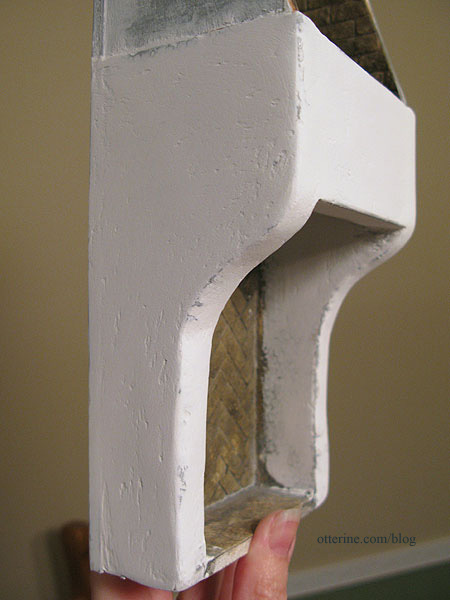
I made the top front and sides of the broken chimney from scraps of builders foam, finishing in the same manner. Here they are before painting.
I then covered the front and sides with stucco to make a complete unit.
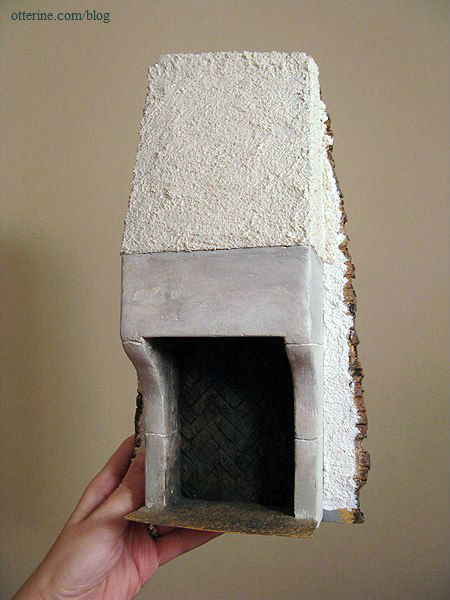
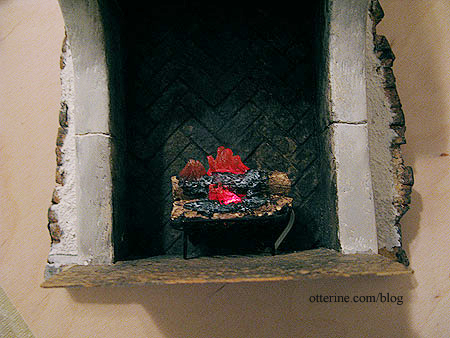
The lit fire is an acrylic log piece with a red bulb. I drilled the hole for the bulb through the bottom and later made a channel in the floor for it to curl out of sight when the fireplace is removed. More about that later.
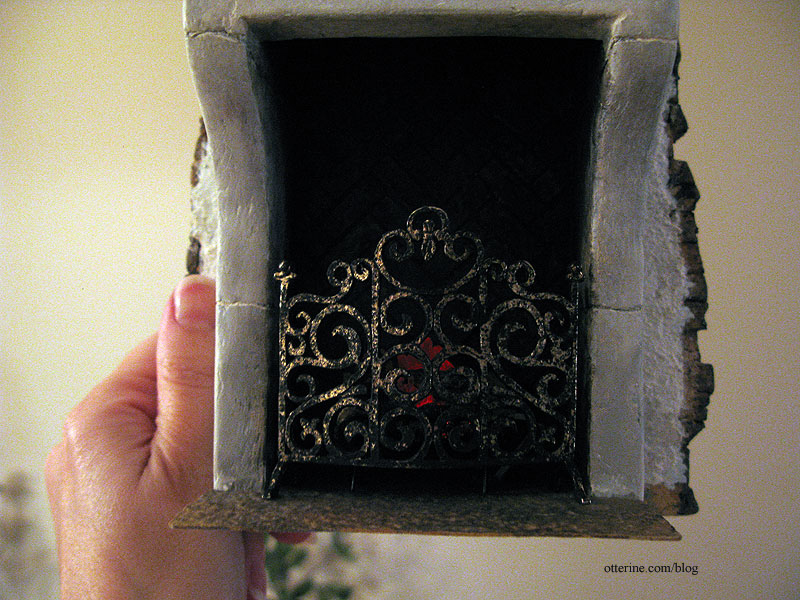
The fireplace screen is by Jeannetta Kendall and purchased from lacyhome4boys on eBay. Here’s the shiny new screen in place; it looks like I built the fireplace around it but that’s just coincidence. :D I bought this as a last minute addition.
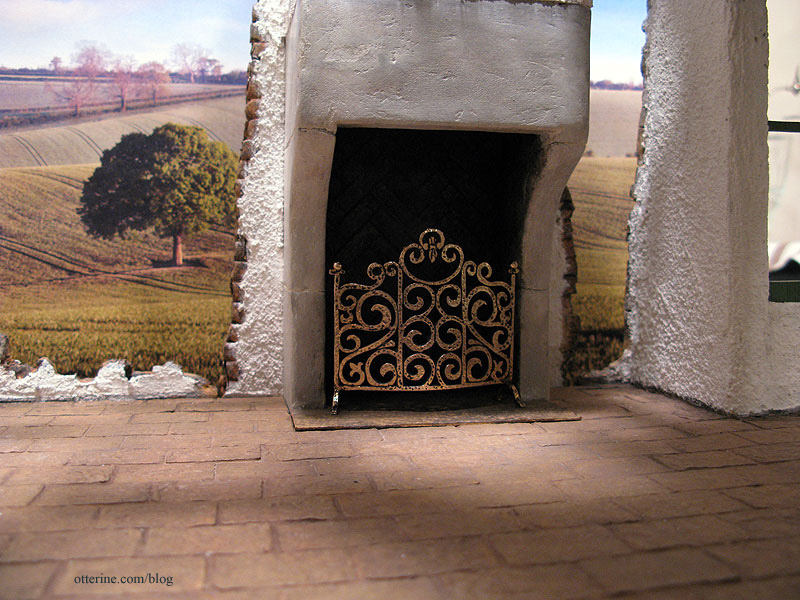
I used black acrylic paint to age it and tone down the shine. Much better.
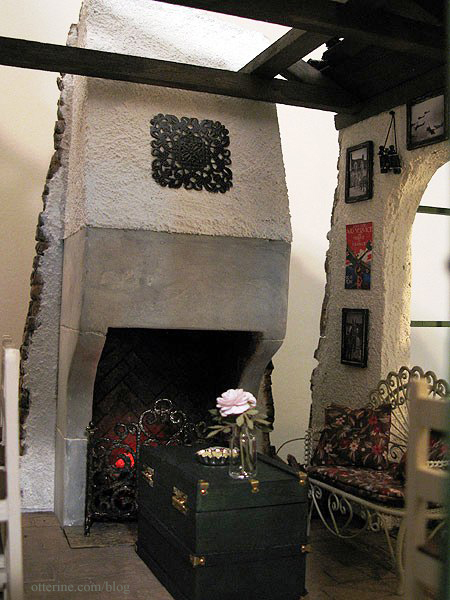
The medallion above the fireplace is a jewelry finding. Overall, the fireplace is not that easily seen in the final layout, but I love it and think it adds so much.
Categories: The Aero Squadron Lounge
September 19, 2012 | 0 commentsThe Aero Squadron Lounge – structure, part 2
Continued from structural details, part 1 for The Aero Squadron Lounge.
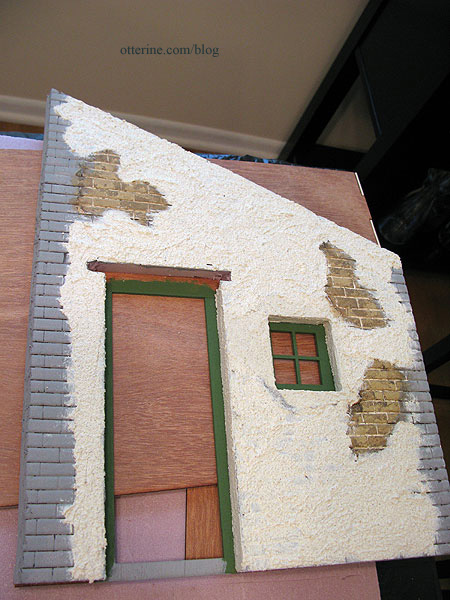
I used regular household stucco patch from Home Depot to cover the walls inside and out. I eventually painted the stucco surfaces Warm White by Americana. In the photos for this post, you’ll see a lot of back and forth with painted and unpainted stucco. I applied most of the stucco while the walls were flat and left the areas where the walls would join clear.

I cut out a recess in the foam above the front door to leave room for a cross beam. As I had done for the window, I painted the area around the door opening green, applied the stucco and painted it before gluing the foam outer wall to the wood inner wall.
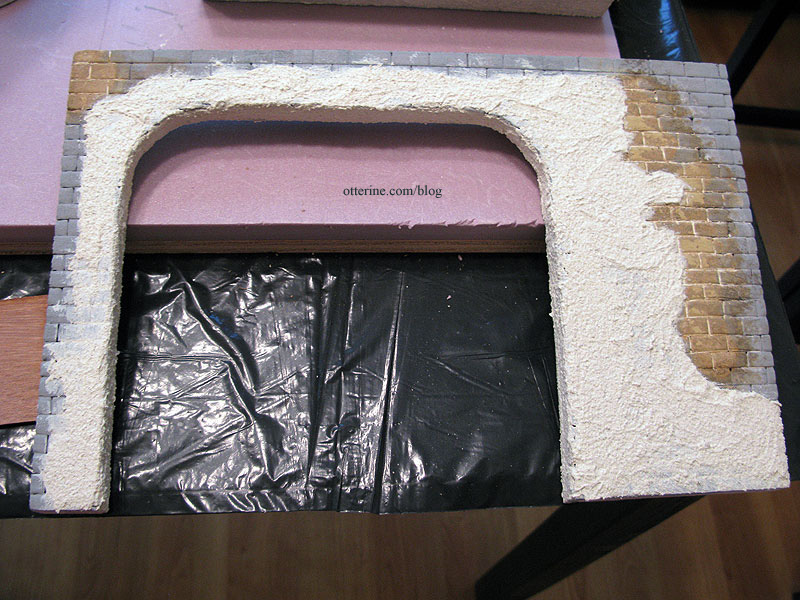
The original kit wall leading to the greenhouse had a square opening, but I cut the foam padding with an arch. I filled in the gap between the two layers with stucco so you couldn’t see where the square points had been. I later broke apart this wall’s back edge (right side in this photo) but I wasn’t sure how much I would need to keep the building complete…so I left it intact during the first part of construction.
I’ve detailed the tower construction, including its stonework, in separate posts starting here.
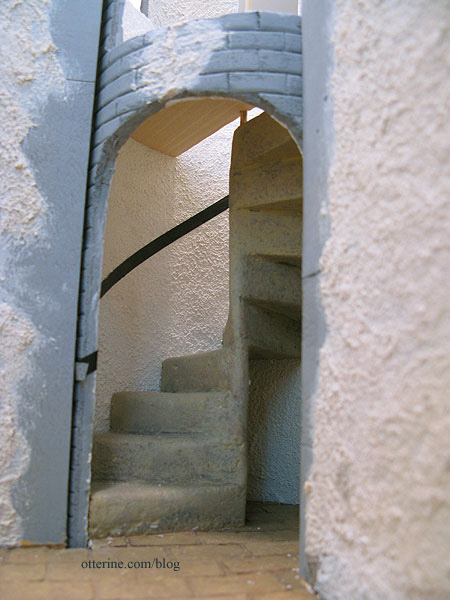
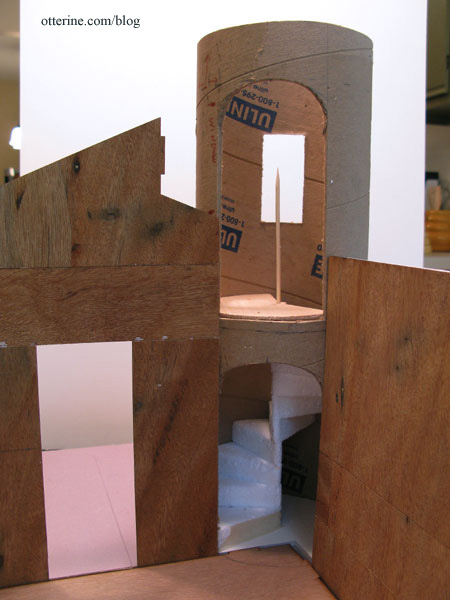
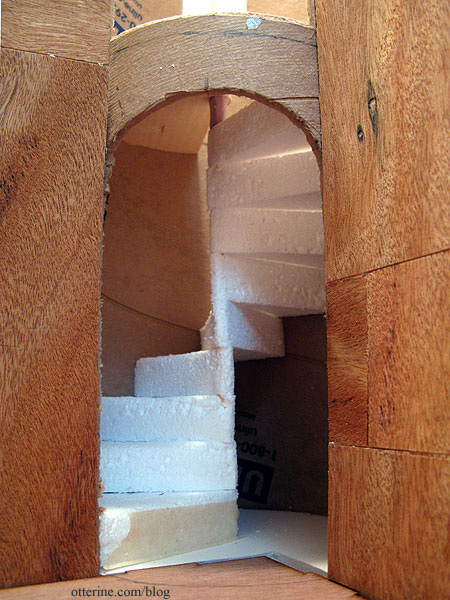
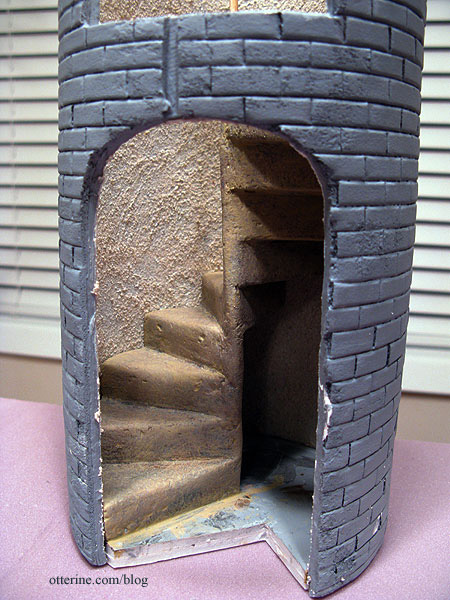
The spiral stairs inside the tower were added after the floor was secured to the base board but before the tower was attached. I have a more extensive blog post on the stairs here; these required a good amount of math and planning. :D

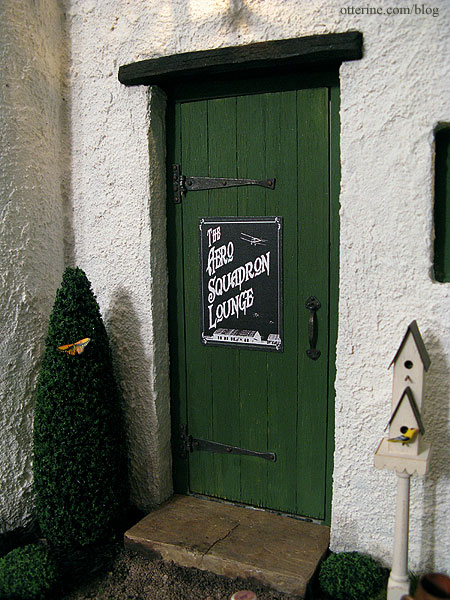
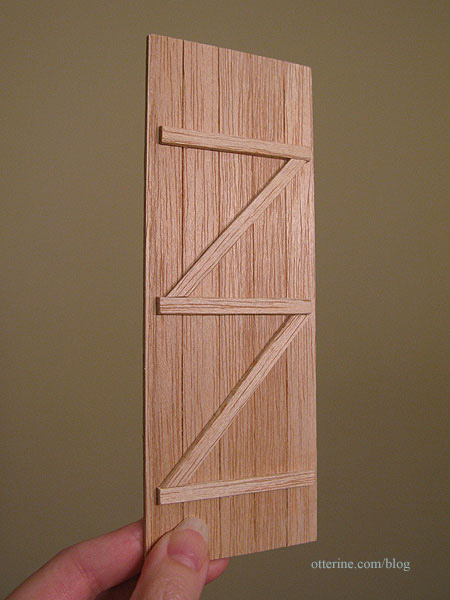
The front door from the kit originally had a window. I opted to make a solid door from balsa, scored to look like it was made from planks. I added a Z support structure on the inside.
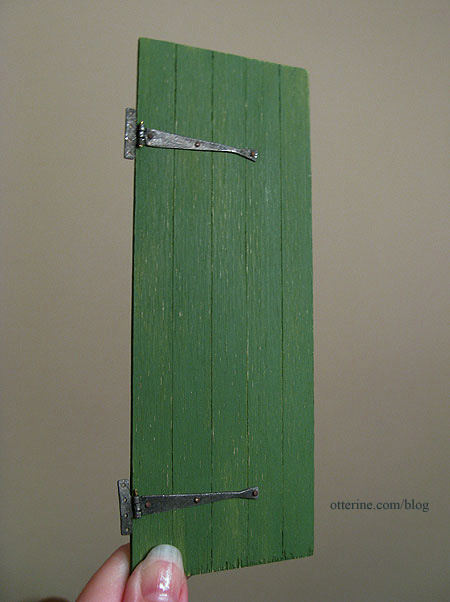
I painted the door Clover by Folk Art with a light sanding afterward. The working hinges are from Olde Mountain Miniatures.
The flooring is made from 5/8″ x 1″ egg carton tiles. The fireplace hearth is a solid piece of egg carton material as well. It is attached to the fireplace but not to the main floor.
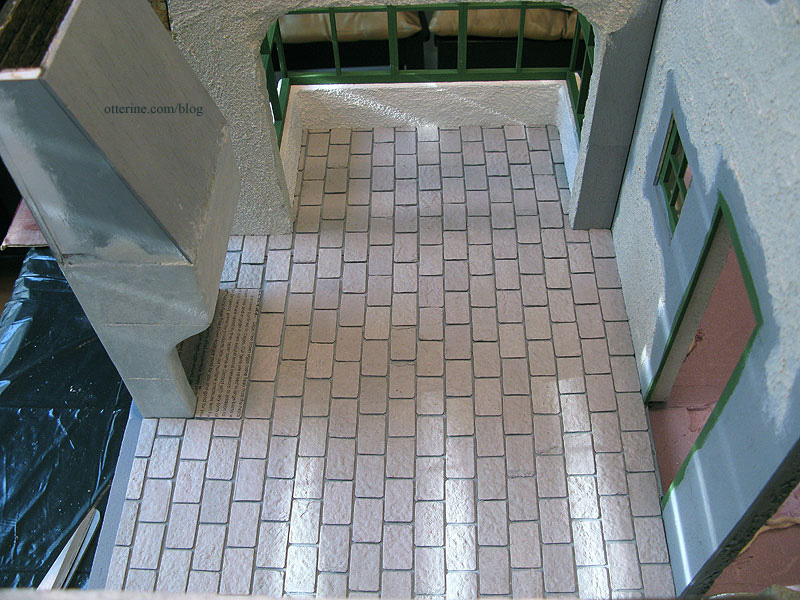
I painted and sealed the tiles before grouting with spackling, then added multiple washes to add depth to the coloration. The recess in the back is where the fireplace sits; I later painted it to blend in.
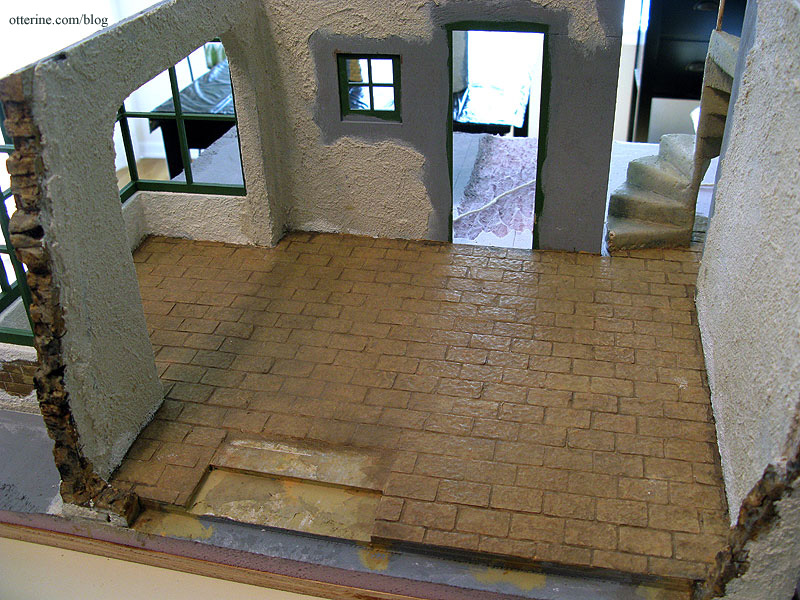
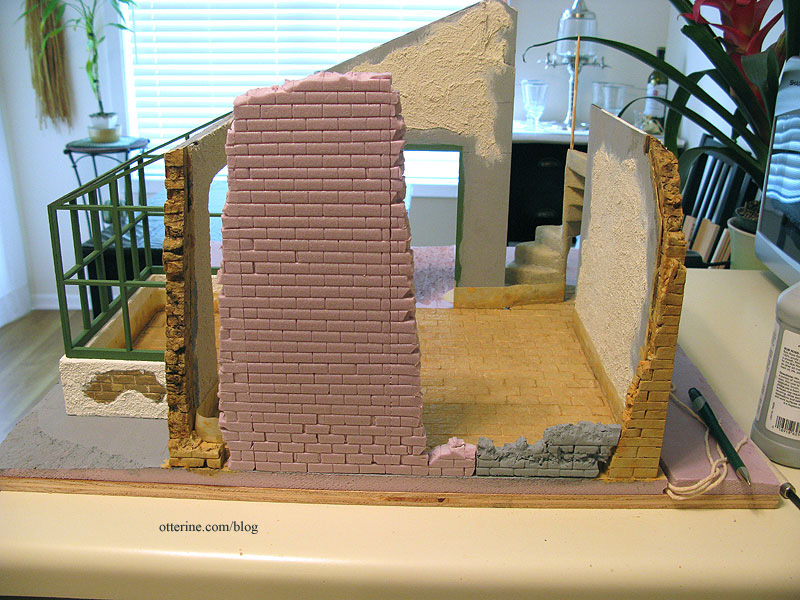
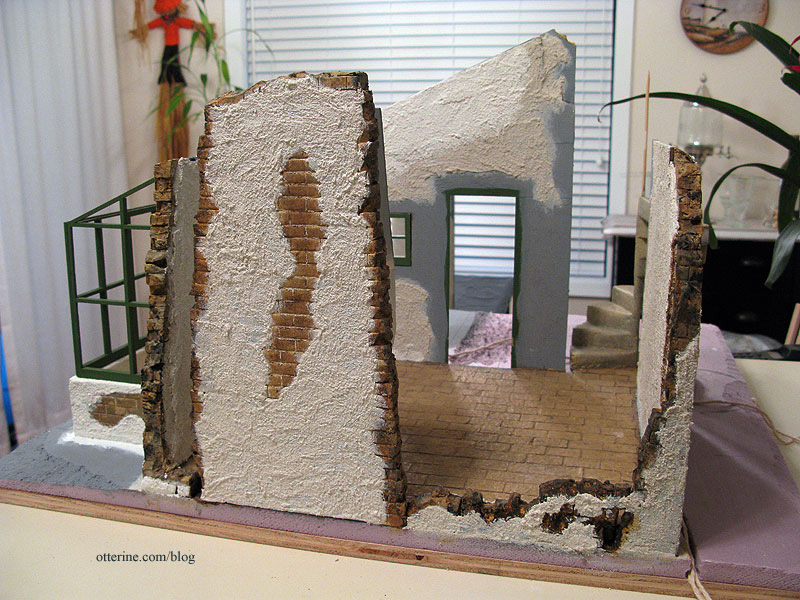
The fireplace unit is situated in the open back. To make this a 360° build, I added rubble walls to the back wall that tied in with the back edges of the side walls and the back of the fireplace. I was able to do this only because I planned for part of the roof to be open. This and the bombed out condition of the back wall would allow access inside the structure even when the fireplace is in.
Here you can see what is permanent to the building when the fireplace is removed.
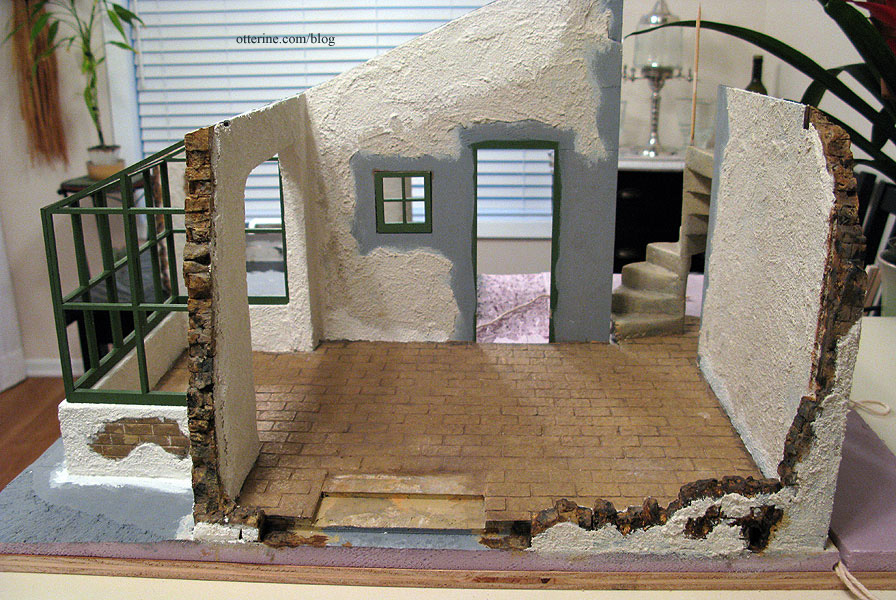
And with the fireplace in.
Here you can see the broken side back wall near the greenhouse. I used flat nose pliers to rip pieces away at random before painting and grouting. This wasn’t easy as the builders foam was rather resistant to tearing. You can also see that when I joined the greenhouse to the main room, I applied stucco over the seams and around the base of the walls.
Continued in part 3.
Categories: The Aero Squadron Lounge
September 18, 2012 | 0 commentsThe Aero Squadron Lounge – structure, part 1
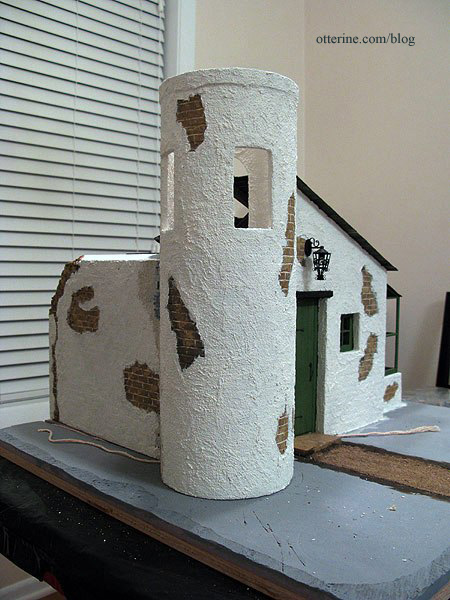
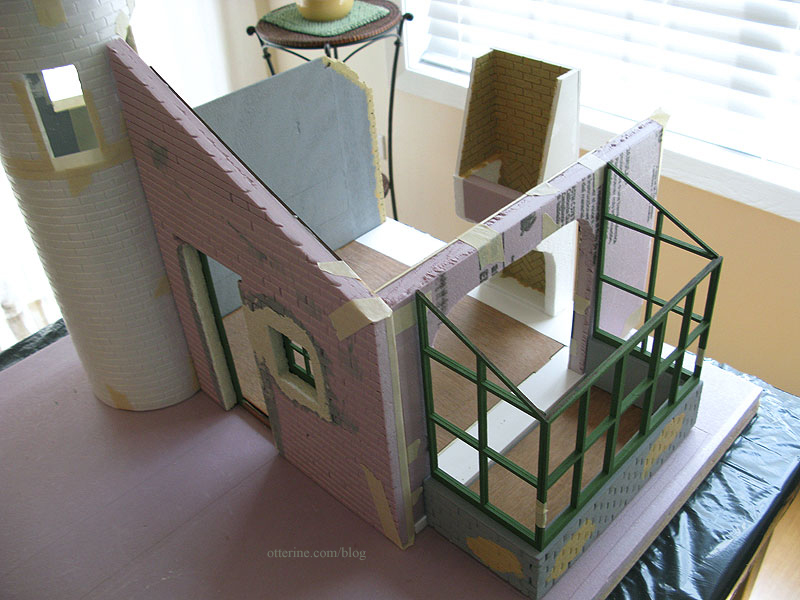
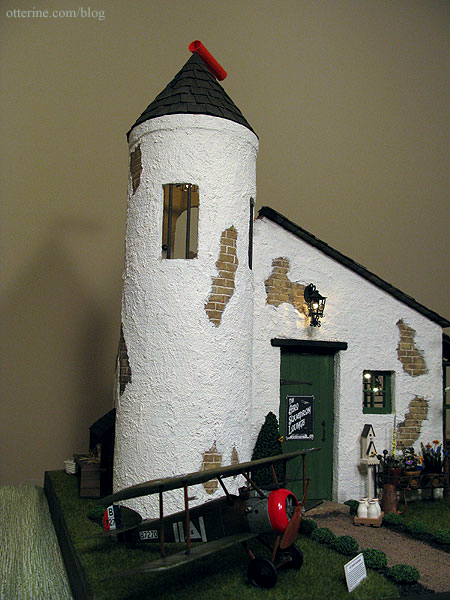
To build The Aero Squadron Lounge, I made only a few changes to the basic Greenleaf kit but they dramatically changed the look of the building.
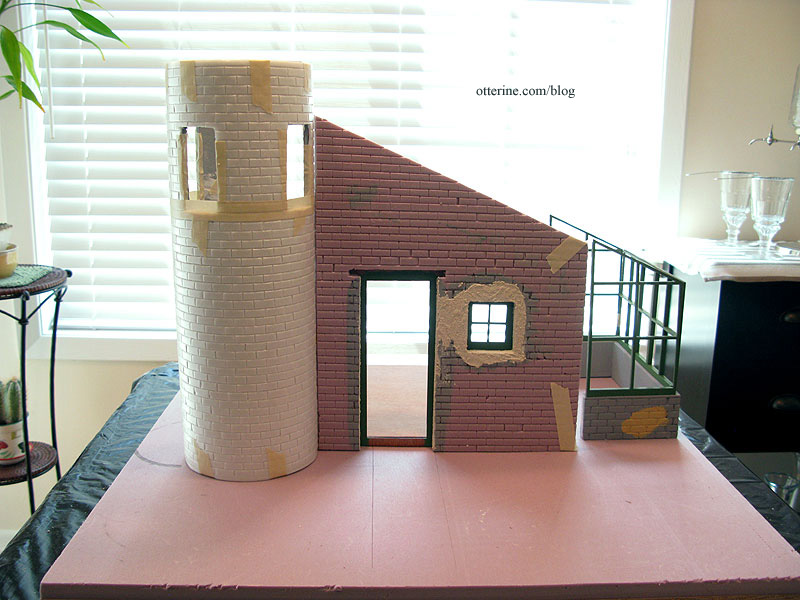
the original dry fit for concept I added a tower made from a 5″ diameter mailing tube which required cutting off a portion of the front and side walls to make an opening for it. I also cut a large arch in the opposite side wall that originally had a row of windows near the top and used the scraps from these cuts to add 2″ in height to the main kit. This photo was taken before I determined I needed more floor space and before adding height to the tower.
After figuring out the furniture placement, I realized the building was too small for all that I wanted to include. It’s fun looking back at the layout photos and seeing that I included everything I wanted to in the first place.
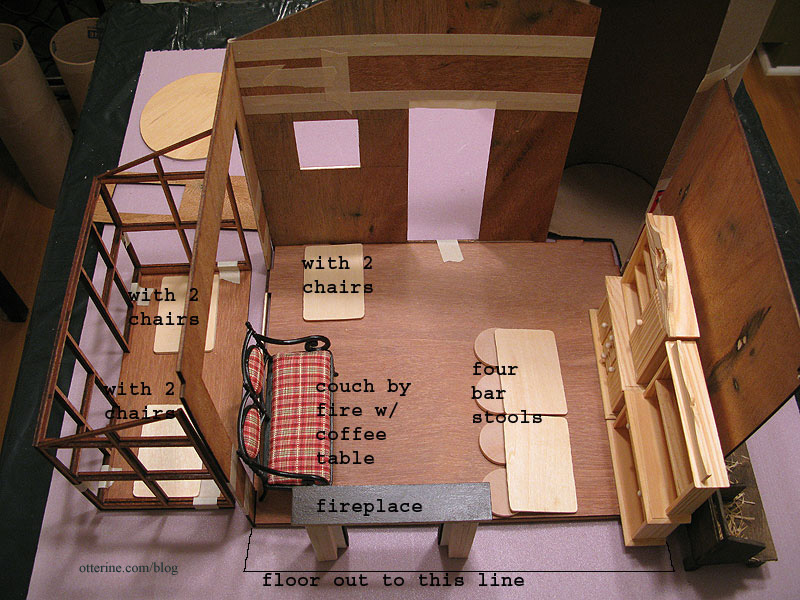
I built the floor from the base kit, adding cross support beams underneath to straighten out the warp in the floor. I didn’t get a picture of that part, unfortunately. Using a double layer of foam core board, I added 1.5″ inches to the width of the room and 2″ to the depth in the back. I also added a partial circle to serve as the tower floor.
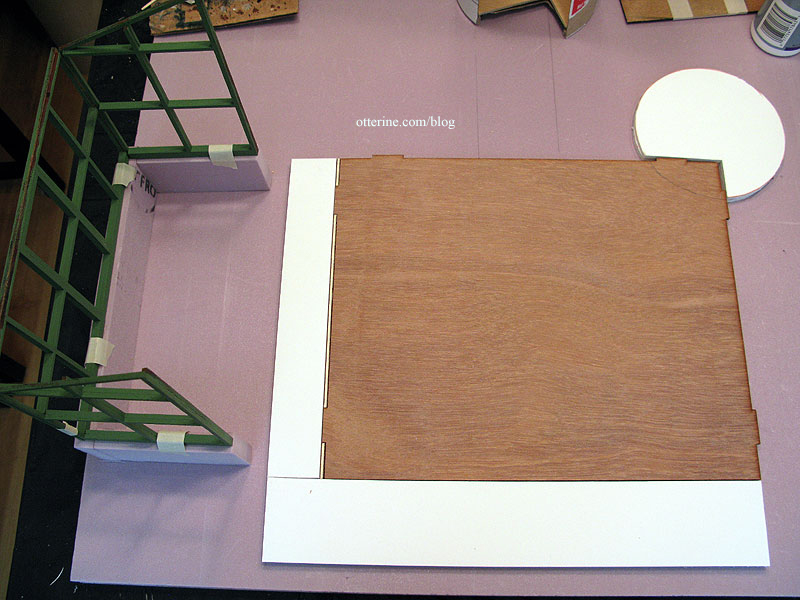
I covered the exterior of all three walls with 1/2″ thick builders foam, taking into consideration the extra floor space. I added scrap wood to pad any excess foam showing beyond the kit walls.
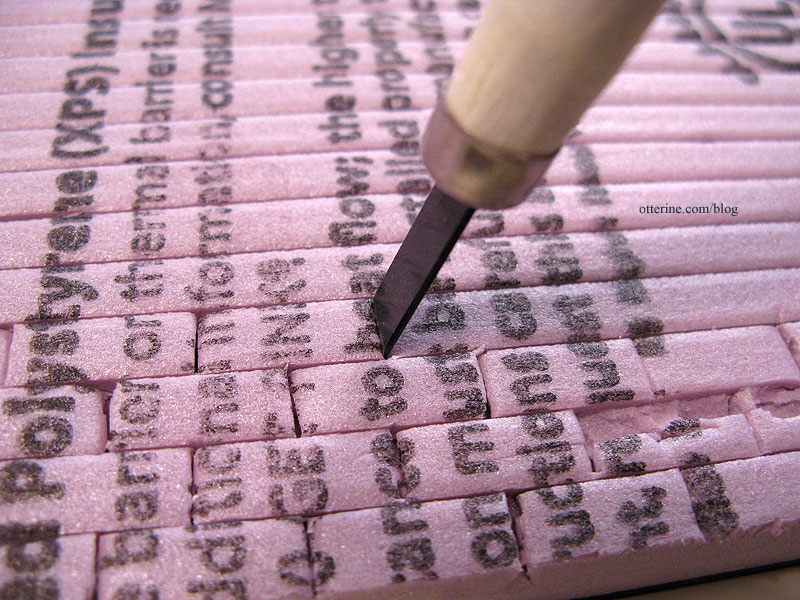
I learned the process I used to make the stone from a Scenery & Terrain Making website (as of 2024, the link is defunct). On the exterior of the building, I measured a grid of stones each measuring 5/16″ by 3/4″ on the entire surface even though I planned to add stucco to most of the build. I wanted my brickwork to be consistent. As it turned out, in some portions where the stucco is thinner, you can see the texture of stone underneath. I rather like the extra push of realism it brings.
I first measured and marked lines 5/16″ apart.
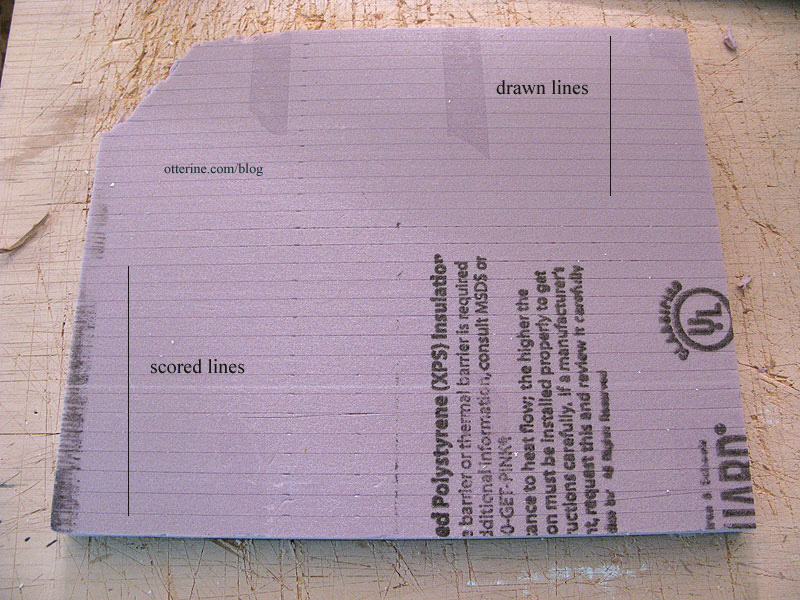
I then scored the drawn lines with a special adjustable X-Acto knife that allows you to cut into a surface at a controlled depth. You turn the knob to allow more or less of the blade to sink into the material. This kept the back of the sheet whole while allowing me to carve the stonework on the front.

Here’s a close-up of the scored lines. Every once in awhile my blade wandered. It wasn’t a problem since I planned to stucco over the stone and could easily cover mistakes. Besides, broken out stone would only add to the age of the building had I left it exposed.

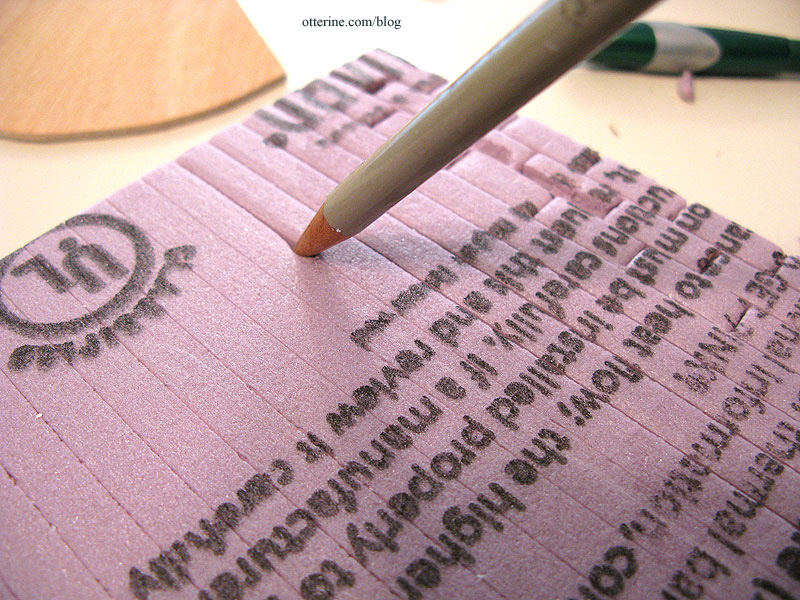
Using a dull wood pencil, I followed those cuts to make grout indentations.
The vertical grout lines were made with a cutting tool from a set bought at Michael’s to press and cut the vertical lines forming the individual stone blocks.
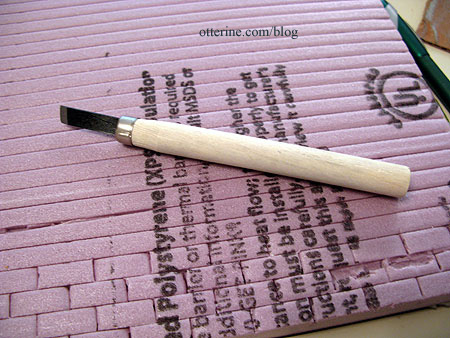
I just lined the blade up between the horizontal lines and pressed until it broke the front surface without cutting through the back. I used the dull wood pencil to indent these lines, too. Yes, it was a lot of work but much less work than using egg carton stone.
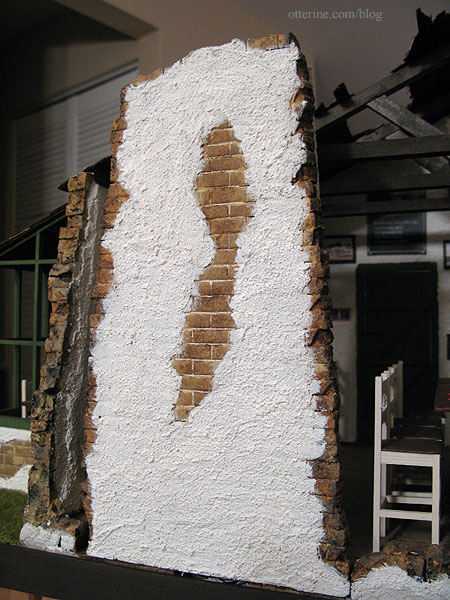
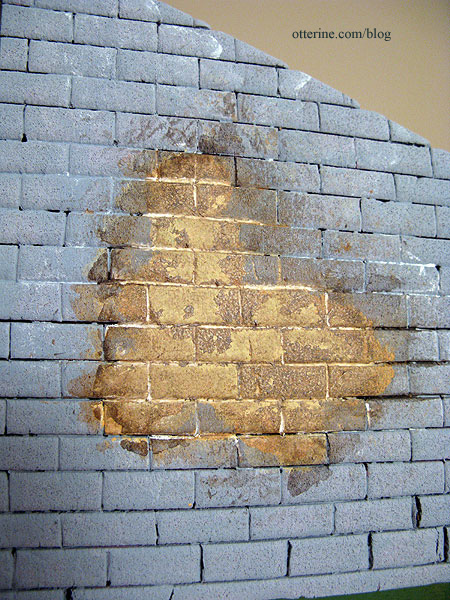
I primed all of the exposed foam with grey gesso and then painted random areas where the stone would be fully exposed using Camel by Americana as a base coat. Here is the side wall showing the back edge cut and painted. I still wasn’t decided on whether this would be an open back or a 360° build, so I prepared the wall to have an entire edge of exposed stone. I ended up doing the bombed back and the stone along the straight edge was covered with stucco in the end.
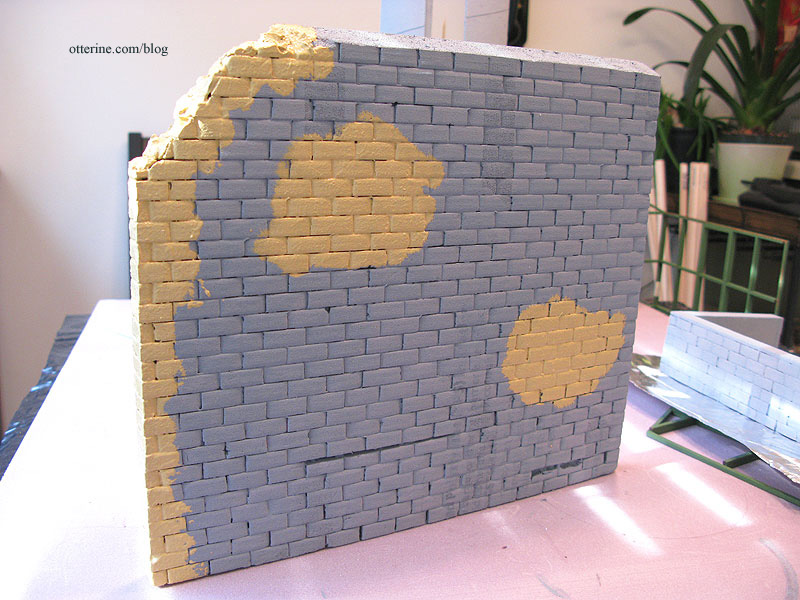
I grouted the exposed stone areas with spackling compound and then added paint washes to perfect the coloration. I also experimented with texture medium, though much of it fell away during the paint wash application. Still, it adds a little something.
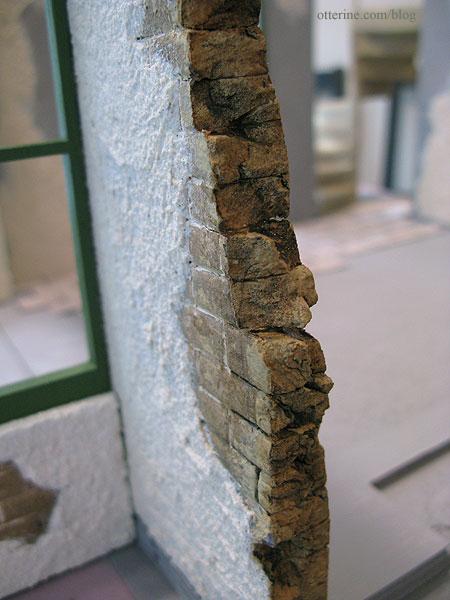
For the back edge where there would be broken walls, I used flat nosed pliers to rip pieces off at random. I then continued the previously scored grout lines around the edges to make individual stones. I grouted random portions and applied the same painting technique as I had done for the exposed stone on the other walls. I couldn’t believe just how much the foam looked like real stone.
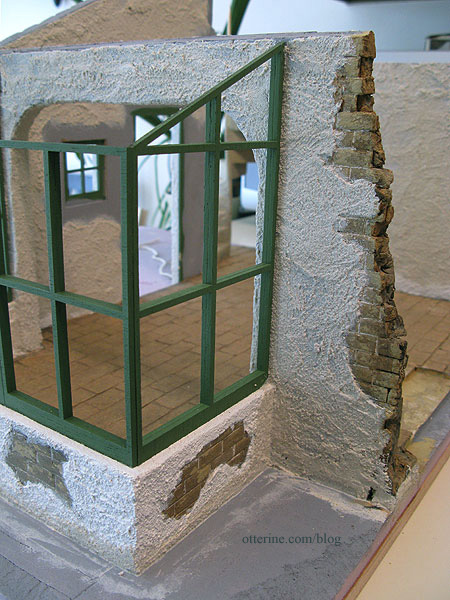
Before attaching the foam to the front wall, I added a window using leftover parts from Baxter Pointe Villa, last year’s Spring Fling entry. I hadn’t used the short front wall from that kit, and on it were two laser cut windows. I cut around the windows and used the two pieces to make one whole window in the new build.
I cut out a recess in the foam and set one of the window pieces into it. This window piece was between the outer foam and the kit wall. For the other window piece, I cut an opening in the front kit wall and glued it in place.
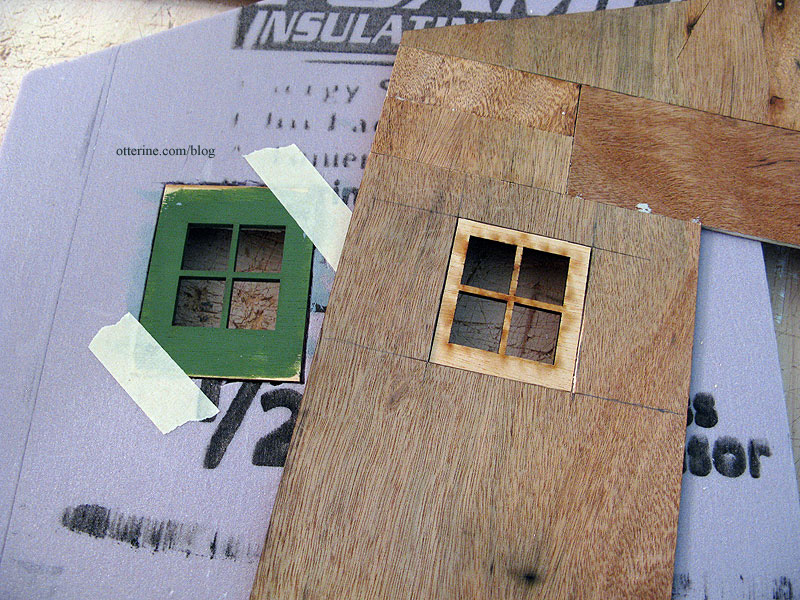
I painted both window sections Clover by Folk Art. I also applied the stucco to the foam around the window opening and painted the stucco Warm White by Americana before gluing the window in place. I didn’t think I would be able to apply the stucco or paint without getting it on the green window.
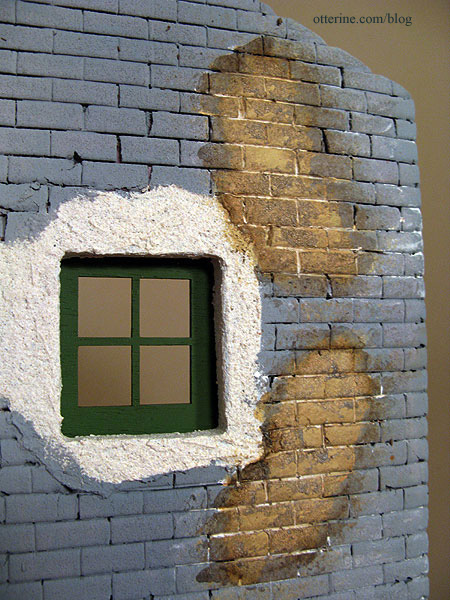
From the outside, it is a deep set window. I left the glass out of all the windows in this build, because really…what sort of weather are we trying to keep out? Have you seen the condition of the roof? ;D
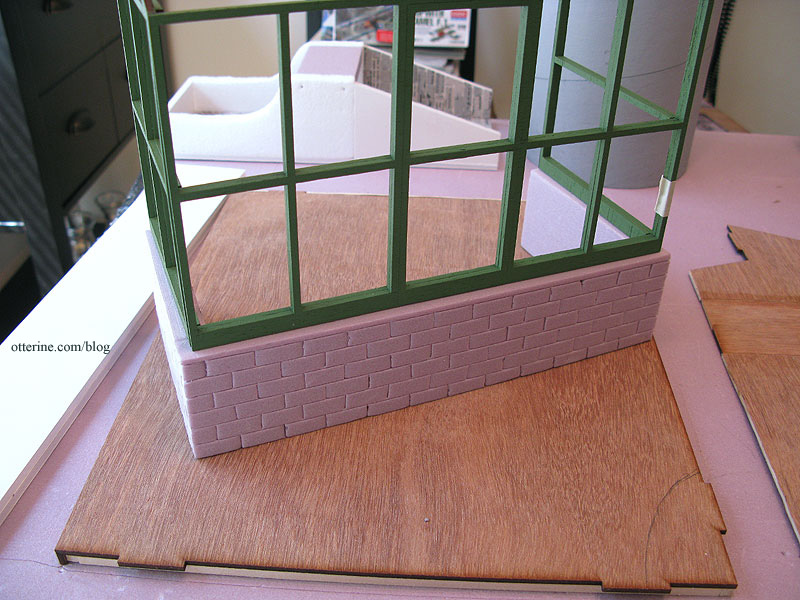
I used the greenhouse addition with the Spring Fling kit, though I’ve eliminated the working door. I added 2″ of builders foam to serve as a base for the greenhouse and built a new floor for it using a double layer of foam core board (floor not shown here). The paint is Clover by Folk Art.
I got ahead of myself and glued the pieces together before scoring the stone into the foam. It was a little more challenging to score the lines on a three-dimensional piece, but I managed.
Continued in part 2.
Categories: The Aero Squadron Lounge
September 15, 2012 | 0 commentsThe Aero Squadron Lounge – tower roof
Continuing from the tower construction part 3 for The Aero Squadron Lounge.
The tower roof was my second major foray into math after the spiral stairs. I found this forum thread on conical roof framing, which had exactly the reference photo I needed to help it click for me.
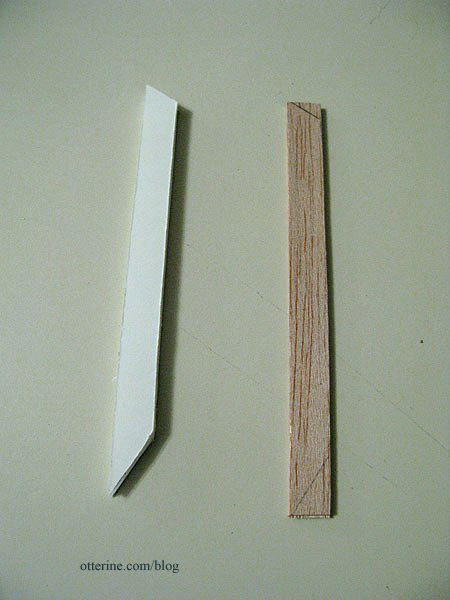
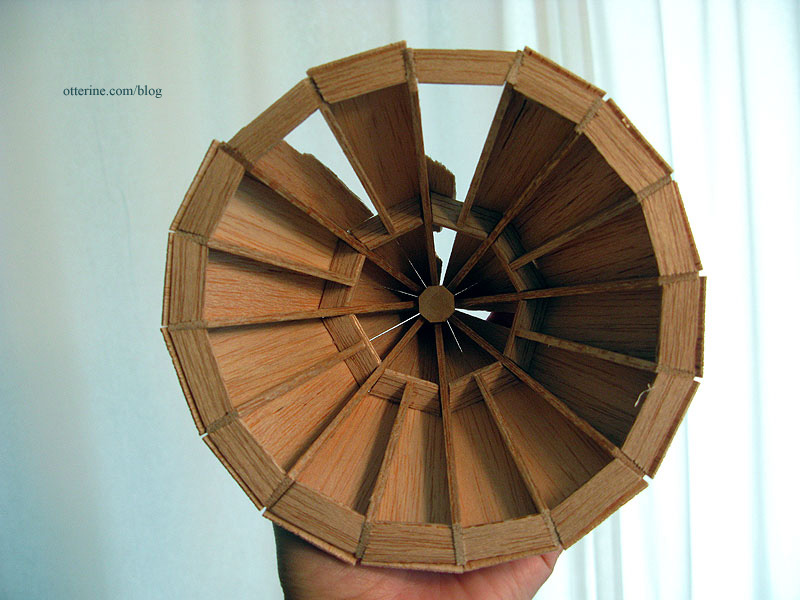
I started with a piece of octagonal trim wood from a sample pack from Manchester Woodworks. They include these packs when you order trim wood from them, and I always find uses for it. I cut two pieces of foam core board to figure out the exact length and angle for the initial support beams.
I used these as patterns to cut beams from balsa wood.
I used Aleene’s Quick Dry supplemented with super glue gel to attach the beams to the octagonal support.
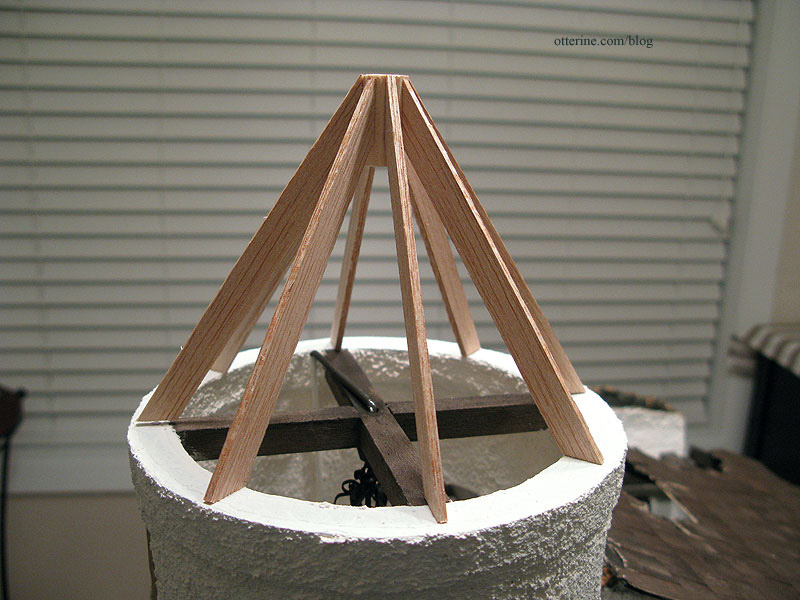
I then cut cross supports for the upper portion, again gluing in place as I went. Nothing in this support structure is completely uniform or strictly measured. I kept measuring the pieces against the top of the tower, and it ended up being somewhat organic in nature.
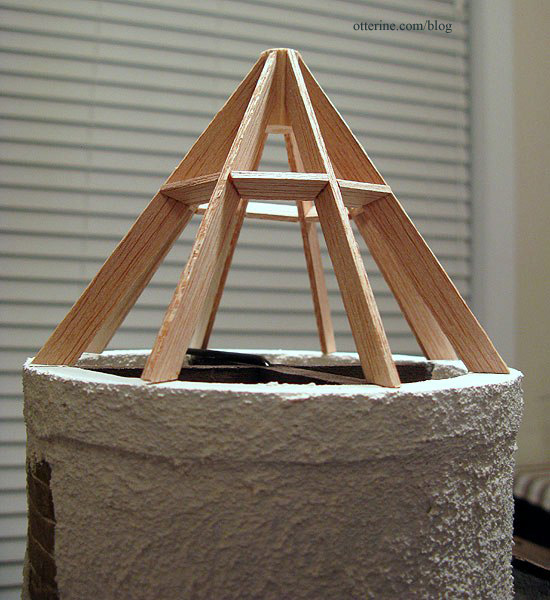
Next came the lower beams that ran from the center cross supports to the top of the tower.
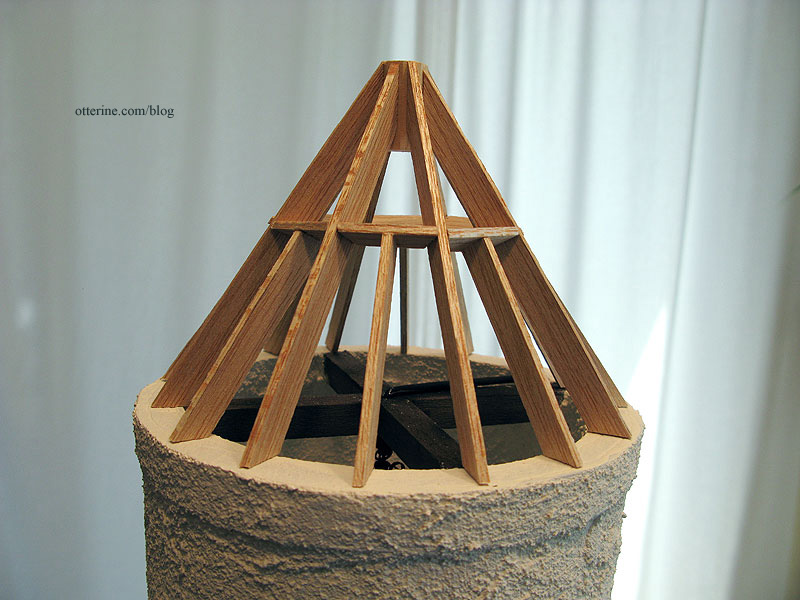
After these beams were in place, I added cross supports at the base where the roof meets the tower. These were measured individually and glued as I went along. Around this time, I discovered the best fit for the tower and drew an arrow to keep track of the direction.

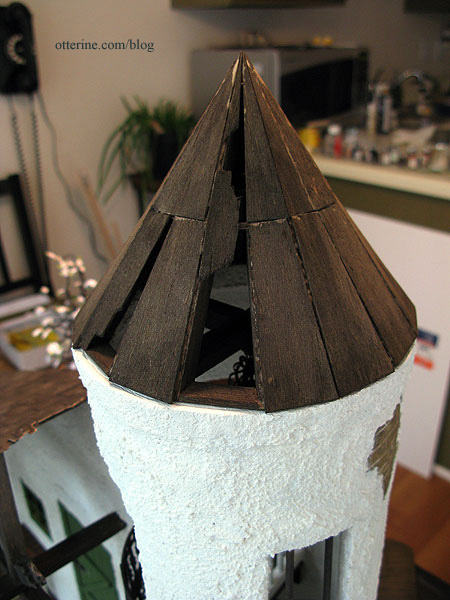
Here’s how it stood for quite some time while I procrastinated…er…thought about how to finish the structure to achieve a conical surface.
After about a month, I decided to go on a leap of faith and added thin sheets of balsa to the support structure. I used balsa because it was easy to bend as well as to break for the holes I planned to include.
There’s one hole in the front and two larger holes in the back.
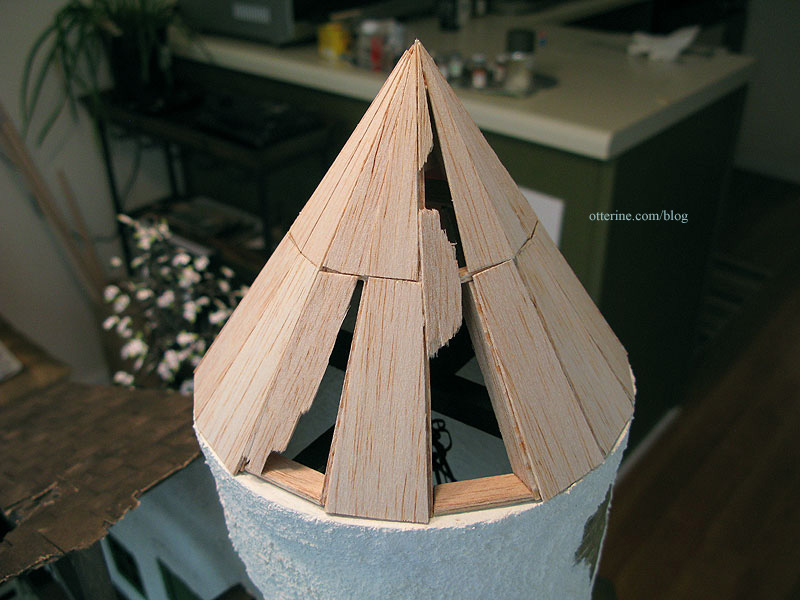
Here’s a fun view. :D As you can see, it’s not completely circular but it does follow the contour of the tower.
I gave the structure a quick wash of brown and black paint before shingling. It didn’t look any more rounded to me, but I forged ahead!
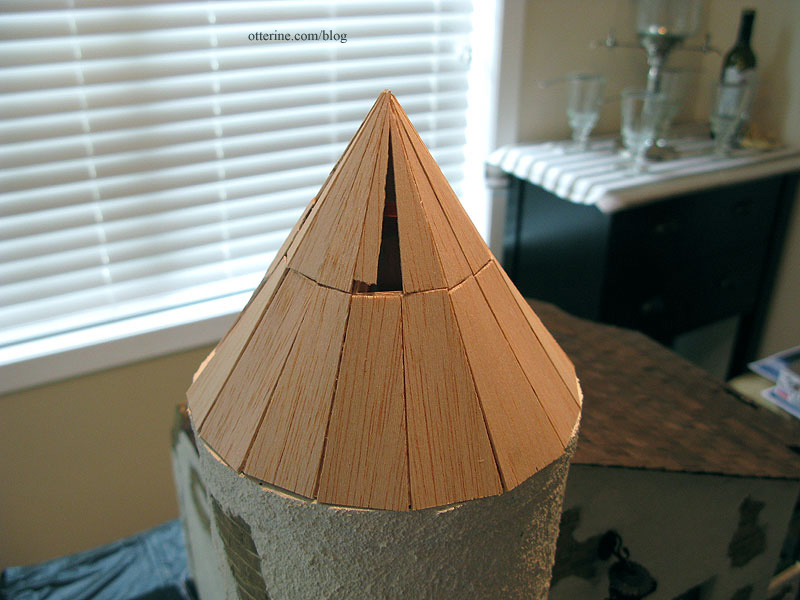
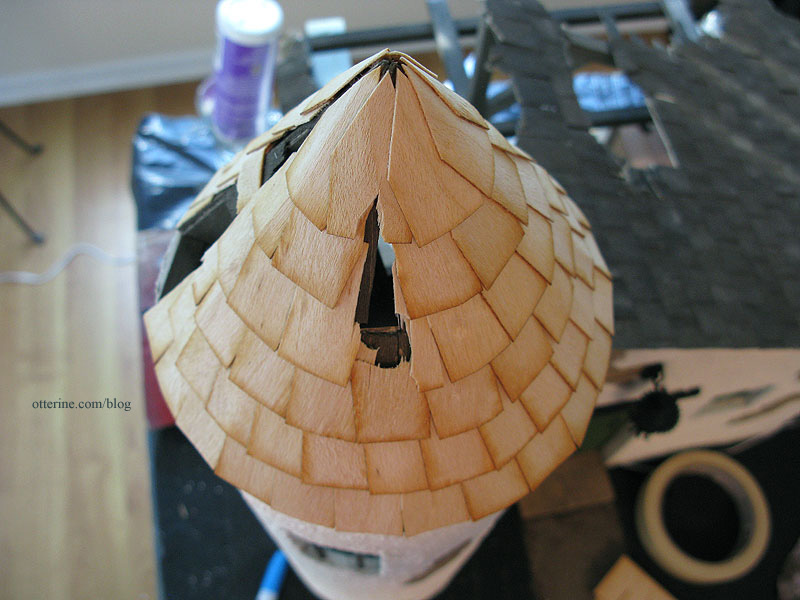
Shingling a conical roof is a test of not only patience but also the strength of super glue. :D I used the same Greenleaf speed shingles I used on the main building, but I cut and applied them one at a time before staining. I used super glue gel to supplement the Aleene’s Quick Dry glue.
The first row was relatively painless.
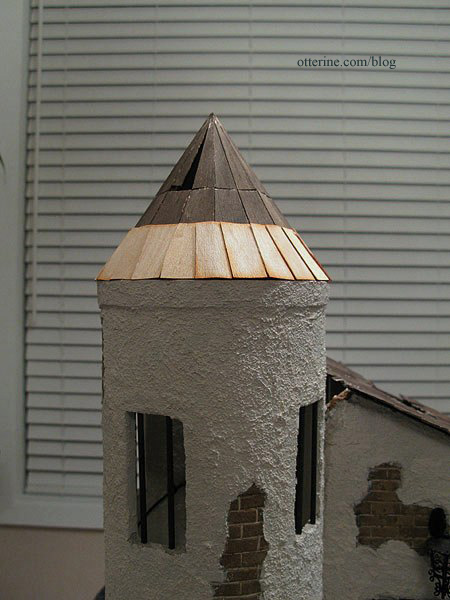
As you work up the tower, you have to cut and shape the shingles more. Covering the shingles below in a uniform manner also becomes more challenging. When you add holes in a roof, that challenge is amplified.
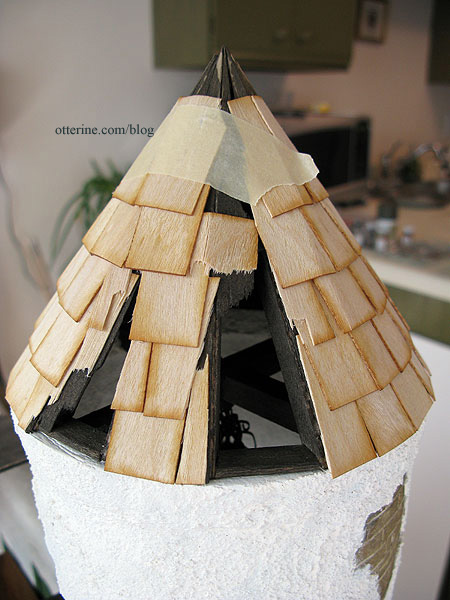
Surprisingly, though, applying the shingles to this relatively flat surface still amounted to the conical shape I had hoped to achieve.
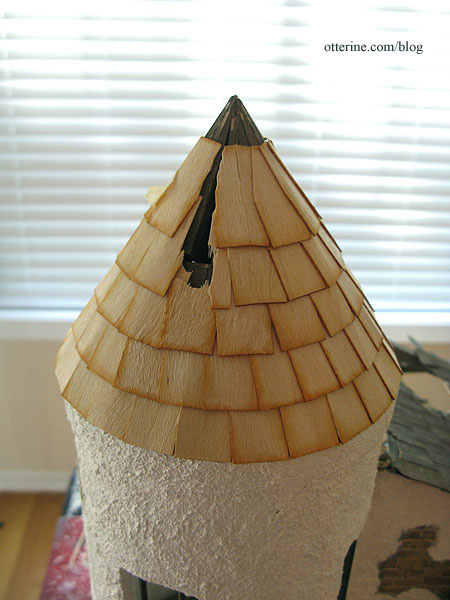
The topmost row is cut to follow the pointed tip as well as the row beneath it.
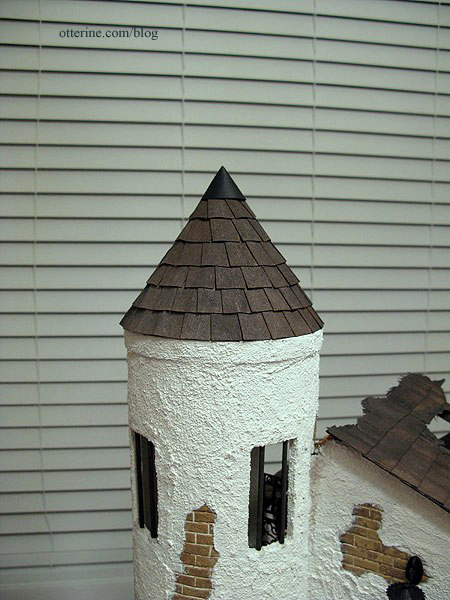
With all the layers, the roof ended up being very stable, so I’ve left it removable. I painted it with several washes of brown and black, trying to match the main roof as much as possible.
For the cone cap, I used heavy black paper cut to fit.
I had used a scrap of paper to make a template first. When I cut my final, I added a little flap to glue under the opposite edge.
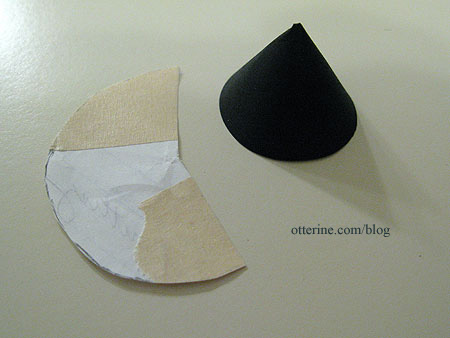
After gluing the cone into shape, I applied spackling to disguise the seam.
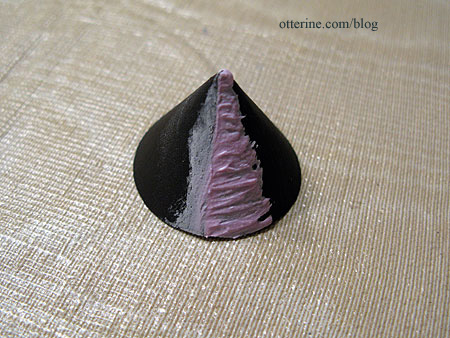
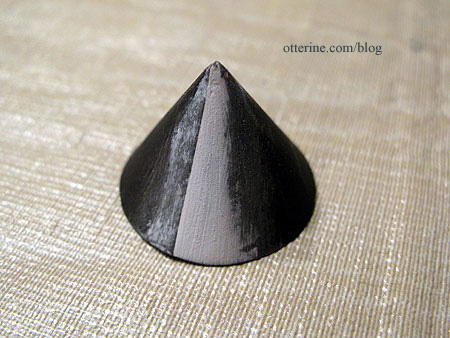
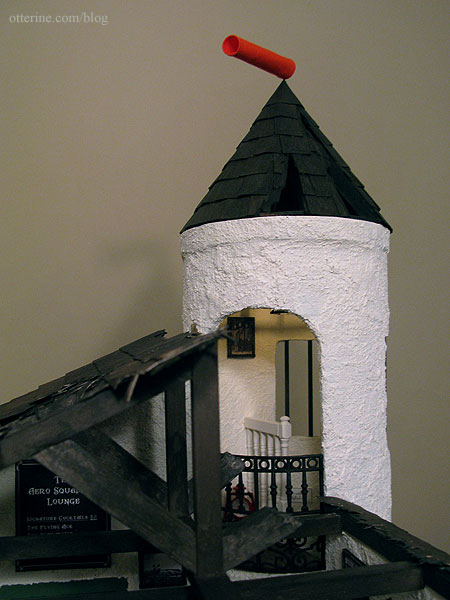
I then painted the paper brown to match the roof. The windsock is a glued tube of orange cotton held in place with a head pin. Yes, it rotates, though it pretty much always falls back into the same place.
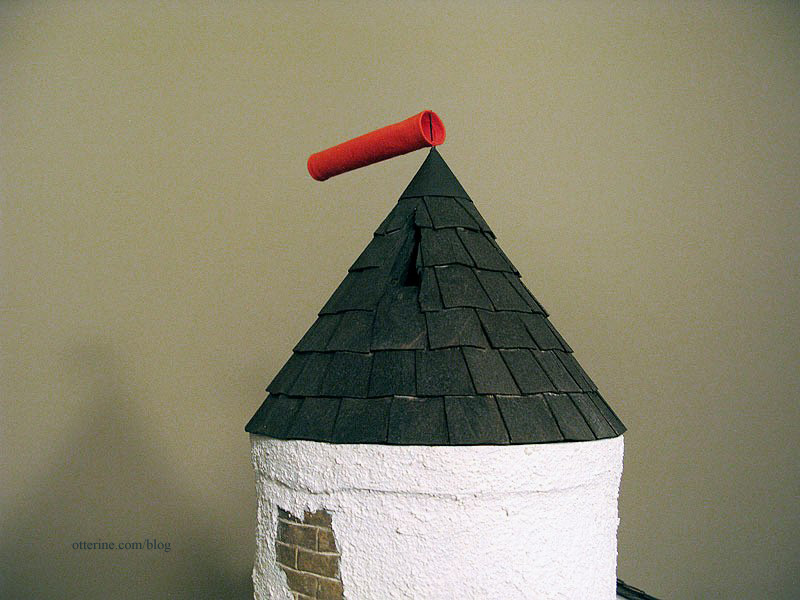
And, that’s the tower! :D
A close-up of the holes in the back.
Categories: The Aero Squadron Lounge
September 13, 2012 | 0 commentsThe Aero Squadron Lounge – tower, part 3
Continuing from the tower construction part 2 for The Aero Squadron Lounge.
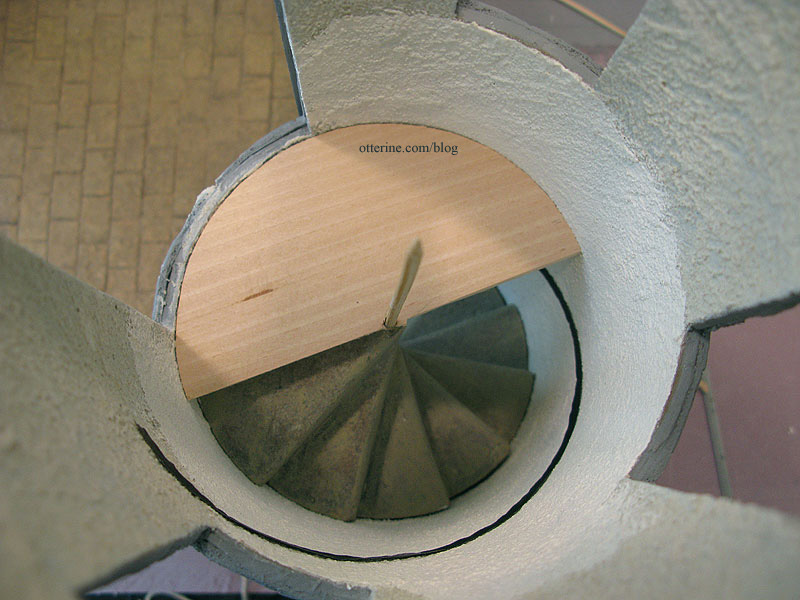
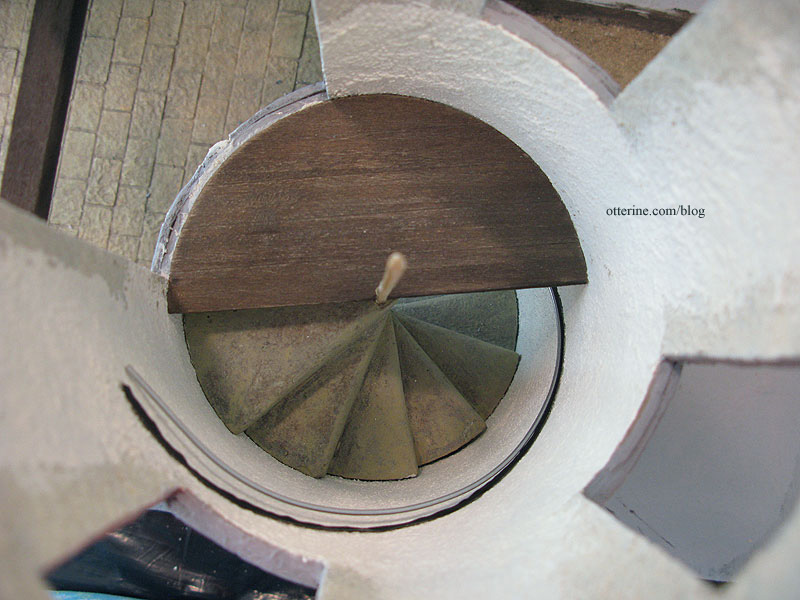
I went ahead and cut off the bamboo skewer support at the top of the spiral stairs, which was scary but ended up being okay. I added stucco to the window and arched opening edges. I also glued the foam ring and beam assembly to the top of the tower, added the stucco and painted the final finish. This sealed off access to the inside of the tower from the top opening, but I needed it in place to install the tower light. Yes, the tower was still removable at this point.
The most challenging light to wire in this build was this one in the tower. Even if I hadn’t made the tower roof removable in the end, I wanted exposed rafters and holes in the roof. That meant you would be able to see the wire, even if I cut a channel into the balsa beam and painted it.
I opted to hide the wire in plain sight with conduit made from 3/32″ aluminum tubing from my local hobby shop Ad-Venture Hobbies. Remember the tubing bender I posted about awhile back? This is why I bought it. Now, bending aluminum tubing didn’t work out to be as easy as bending brass tubing. The aluminum was softer and more prone to tearing. I had to make a few attempts before getting it to work properly. I ended up making 3 or 4 small bends right next to one another to stretch it out a little before doing the final bend. It’s not as clean as the brass, but it does work.
I eliminated the chain on this light and made it a ceiling fixture. This is a much later photo from when I started working on the tower roof, but it’s the best shot I have of the shortened light.
The wire goes up through the beam, through the conduit and out the side of the tower.
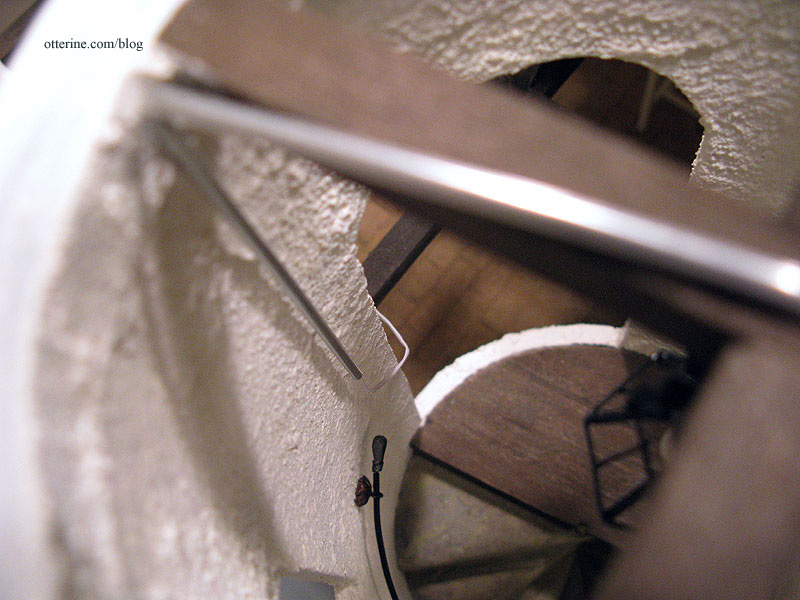
The wire exits the wall through the end of the tubing.
The end wire runs between the tower and side wall, eventually to be covered with stucco.
To disguise the end of the wire inside, I used a round wooden bead.
I painted the conduit on the beam brown to match the wood. I painted the conduit along the wall and the wooden bead warm white to make it blend in with the wall color. I have seen conduit done like this in real life many times.

I added a metal doorbell from Sussex Crafts to act as a vintage light switch. :D Now the illusion is complete.
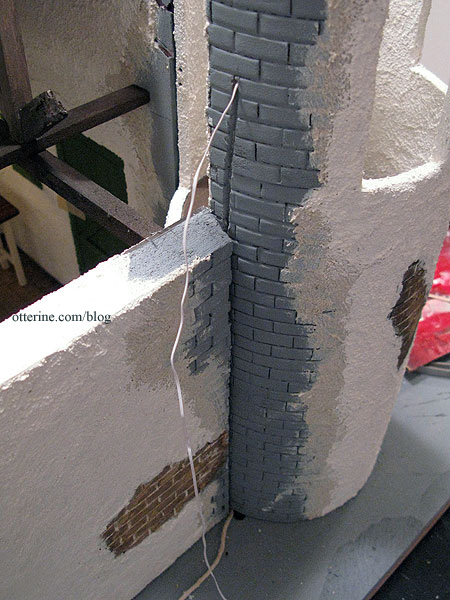
With the tower wiring finished, I got ahead of myself, glued the tower in place and finished the stucco application between the tower and the main building, shown here before painting.
I had forgotten to add one important element before doing all this. Once you have a balcony, you have to keep people from tumbling over its edges. Luckily, there was good enough access through the upper arched opening so I could reach the top of the balcony. Whew!
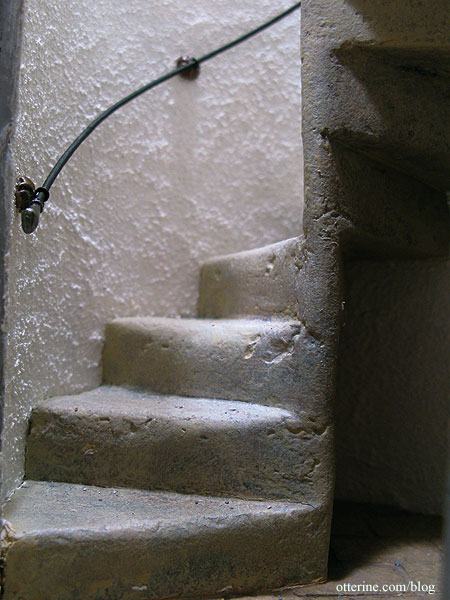
At the edge of the staircase, I used a portion of pre-assembled wood railing and a Houseworks narrow newel post. I opted to paint it Warm White to blend in with the tower wall. It’s a small space and too much contrast wouldn’t have worked.
For the portion overlooking the main room, I bent a piece of plastic railing from The Dolls House Emporium. I also cut off the finials from the upper edge. It wasn’t easy to bend and I did snap one of the small connections which had to be super glued, but overall it worked well. The curve isn’t that severe. I later sprayed it with flat black to tone down the plastic sheen and glued it in place.
In this photo, both railings are shown as works in progress.
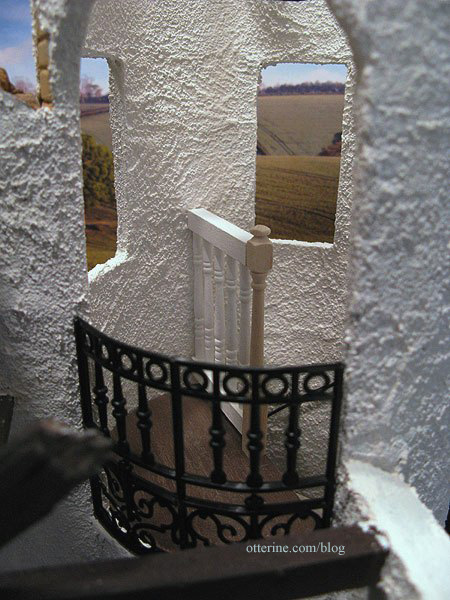
And, here is what they look like finished.
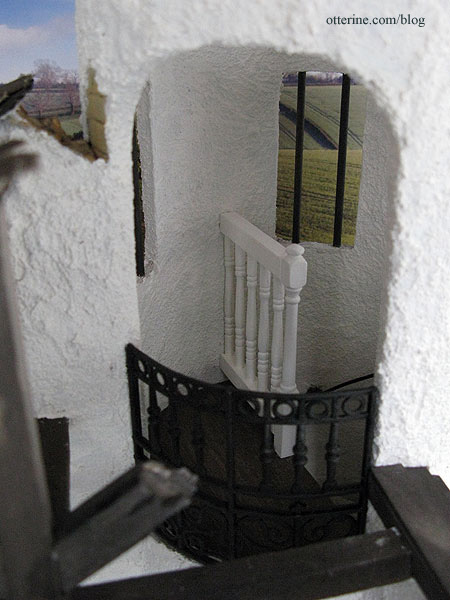
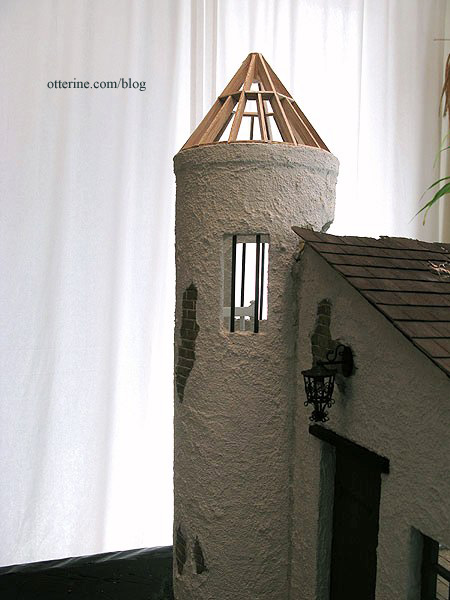
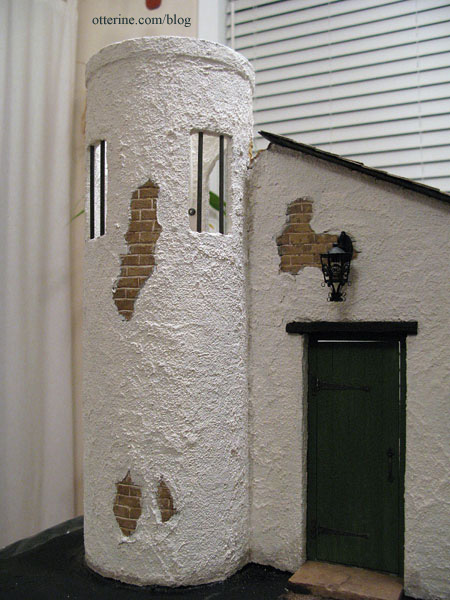
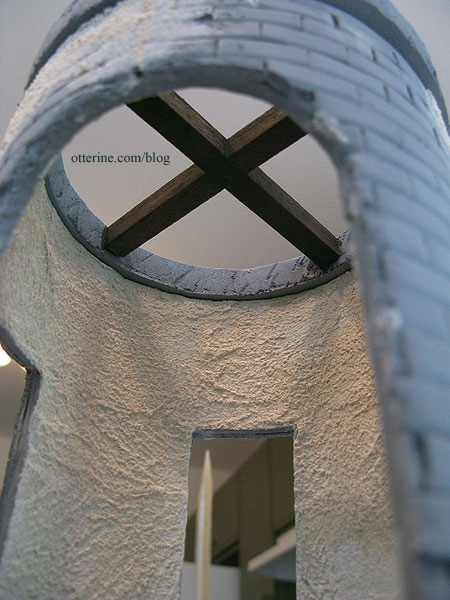
I added lengths cut from an 1/8″ diameter dowel to make the window bars. These were painted Bittersweet Chocolate by Americana with a wash of black to age them. I like that you can see the light switch through the window here.
Continued here. I thought the tower roof deserved its own post. :D
Categories: The Aero Squadron Lounge
September 12, 2012 | 0 commentsThe Aero Squadron Lounge – tower, part 2
Continuing from the tower construction part 1 for The Aero Squadron Lounge.
I will detail the main room build in another post, but I do need to mention a few things I did before the next steps in the tower construction. I glued the main room floor to the landscaping base, which was a layer of builders foam over a 24″ square plywood board. I glued the side walls in place and glued the spiral stairs base adjacent to the main floor.
The slight gaps between the two pieces didn’t matter since I would be covering the whole surface with egg carton stone. I didn’t tile that tiny space behind the bottom steps.
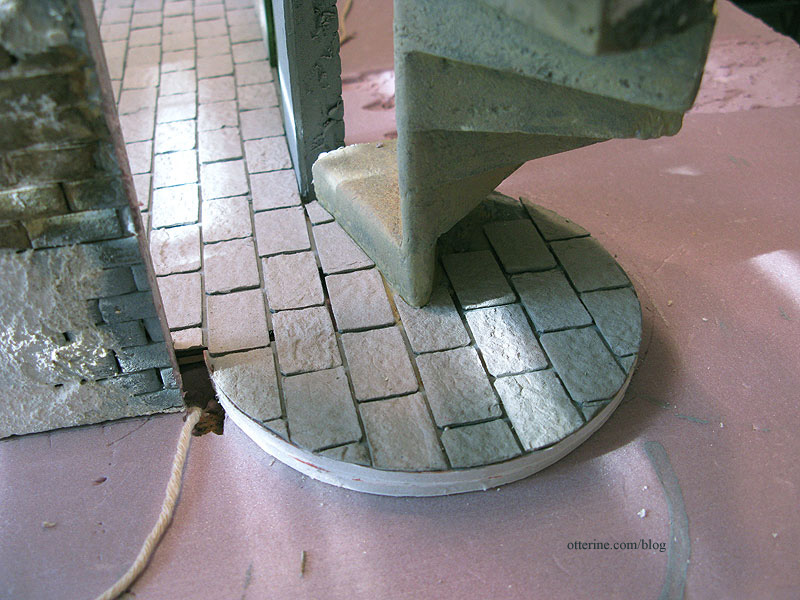
I painted, sealed and grouted the stone floor before proceeding with the tower. I also painted the lower portion of the tower interior Warm White by Americana, the same color used inside and out on the stucco surface.
I didn’t paint all the way up since I still needed to finish the window openings and I was still thinking about what I wanted to do. I considered actual windows but ended up with bars to keep wayward tourists from tumbling out of the tower. More about that in part 3 (link at the bottom).
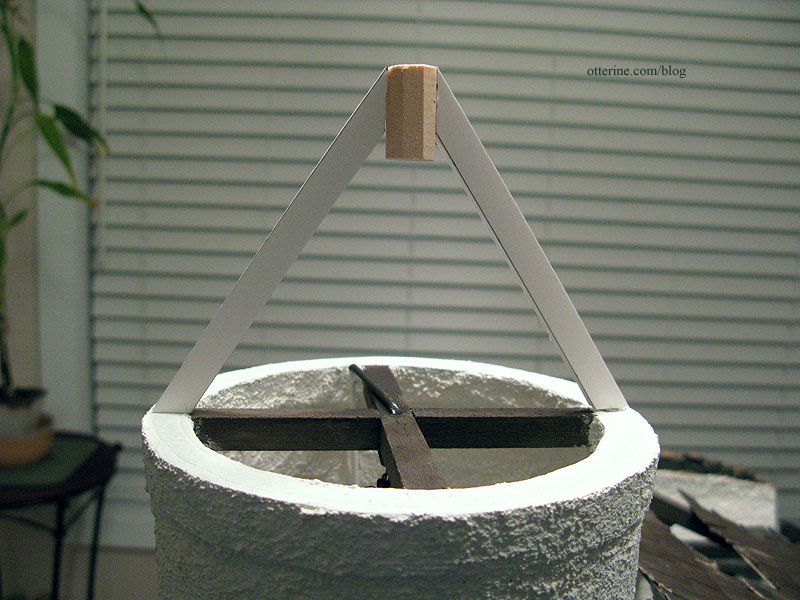
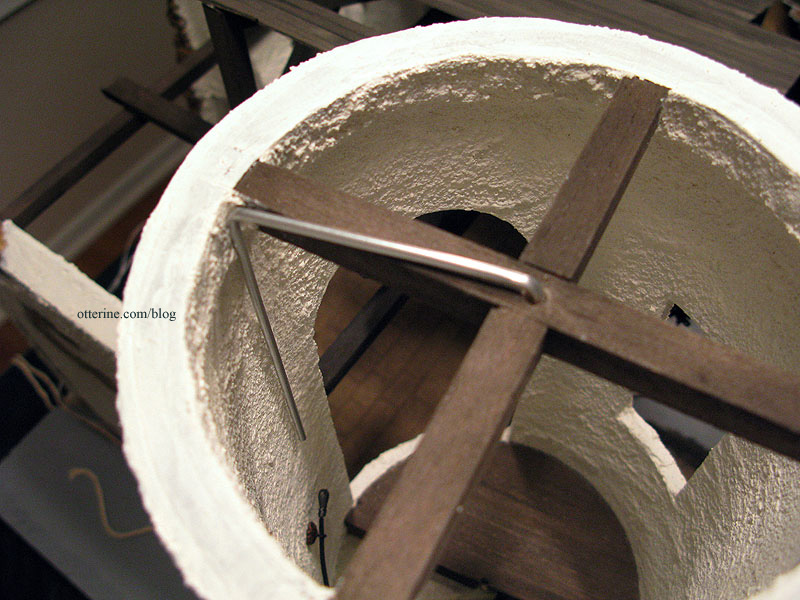
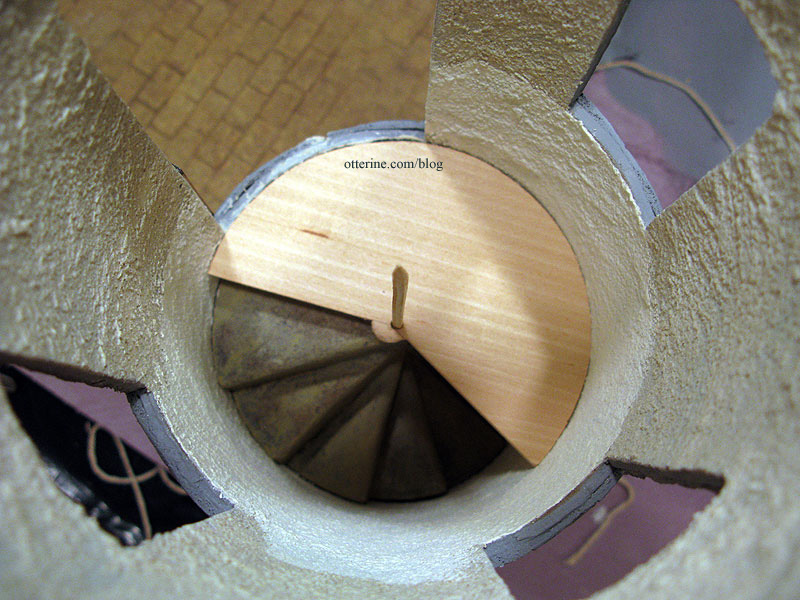
I wanted a light in the tower and needed cross beams to hold it. I also needed something to finish off the top of the tower. I cut a rough circle from builders foam (primed with gesso) and made beams from balsa. I like balsa for old beams and rafters because it is easy to dent and score, and it has a nice grain to it when paint washes are used.
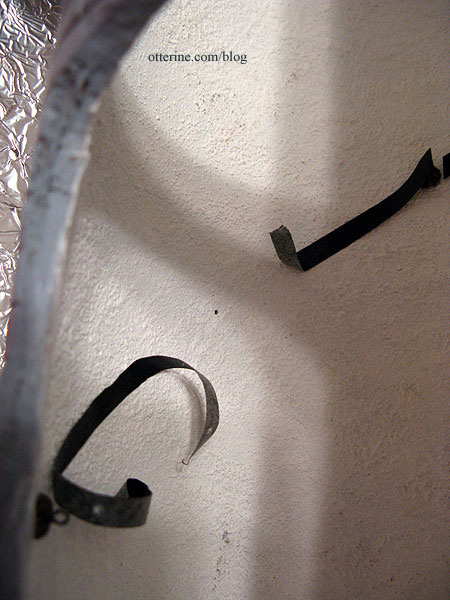
Since gluing this ring in place would effectively seal off the tower access from the top, I put it aside and worked on the handrail instead. I used thin black tape to mark where I wanted the railing. It was here that I discovered my “greater than half” balcony would not work. While I could fool your eye into thinking there was enough room for someone to walk up the stairs beforehand, the railing would run right into the balcony’s back edge and ruin the illusion.
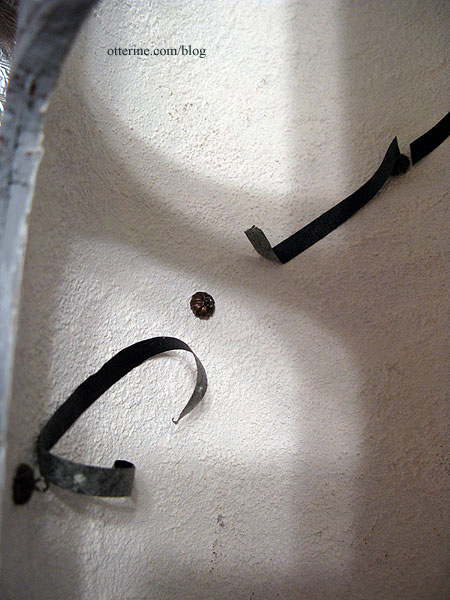
Cut, cut, cut, and problem is solved!
I scored lines in the top and bottom with an awl.
I used an absinthe bottle to bend 1/16″ aluminum tubing (from Hobby Lobby) into the right curve to fit inside the tower and tested it against the black tape guide. The balcony is painted a blend of Bittersweet Chocolate by Americana and black, then sanded for a bit of wear. As for why I used an absinthe bottle, it was slightly wider than any other bottle I had on hand, and it made for a looser curve.
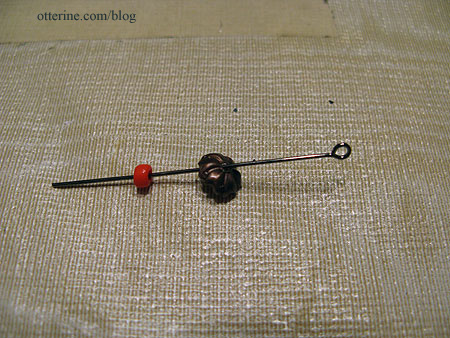
I made the railing brackets from eyelet headpins, bead caps and beads. Even with holes punched into the tower, I knew gluing only the end of the eyelet headpin into the wall would not hold the railing. So, I added the plastic bead inside the bead cap to increase the gluing surface. Glue holds the bead cap and bead together, and glue holds that assembly to the wall. Somewhat. I used super glue gel to supplement the Aleene’s Fast Grab glue.
Following the tape guide, I used an awl to punch evenly spaced holes in the tower where the five railing brackets would be.

I left the tape in place throughout the process to make sure I didn’t lose the proper alignment.
I cut the bracket assemblies down so there was only a small bit of wire left.

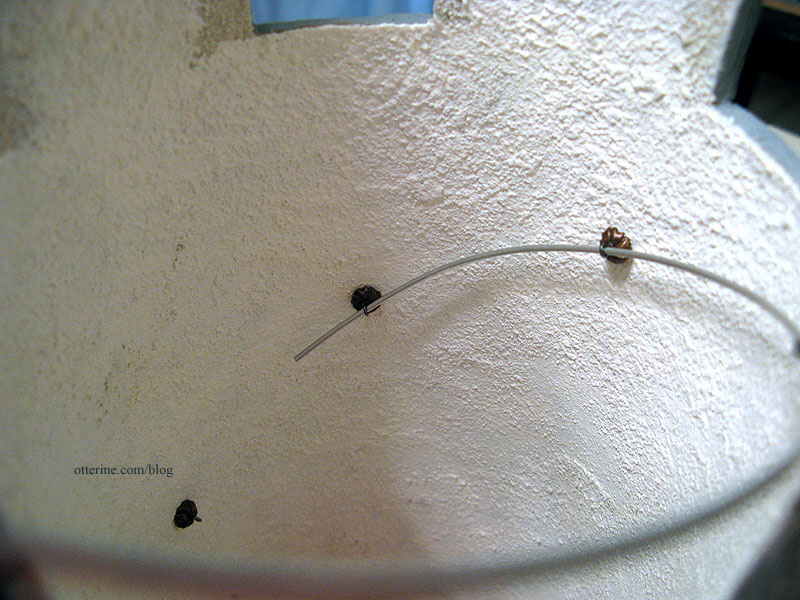
I glued the bracket assemblies onto each of these spots, trying to get them as flush against the stucco surface as possible.
I then fed the tube through the eyelets, and it worked perfectly!!! No, it didn’t. Two of those brackets popped right off the wall. So, I glued them again, tweaked the arc of the tubing and waited for the glue to dry. There was one stubborn bracket that popped again, but I just let it hang there and glued it back in place after I had the tubing fed through all five eyelets. I held it by hand, even with the super glue, for about 15 minutes just to be sure. Success! :D
I painted the railing with black acrylic after it was on the wall. I knew painting it beforehand would be useless for a couple of reasons. First, threading it through the eyelets would scrape the paint off, and second, the paint flecks would gum up my fingers and get all over the place, namely the lovely white stucco. With the tower still being removable, I was able to paint from the bottom and top openings, a relatively easy task.
I then added fancy headpins to either end of the railing for finishing. From above…
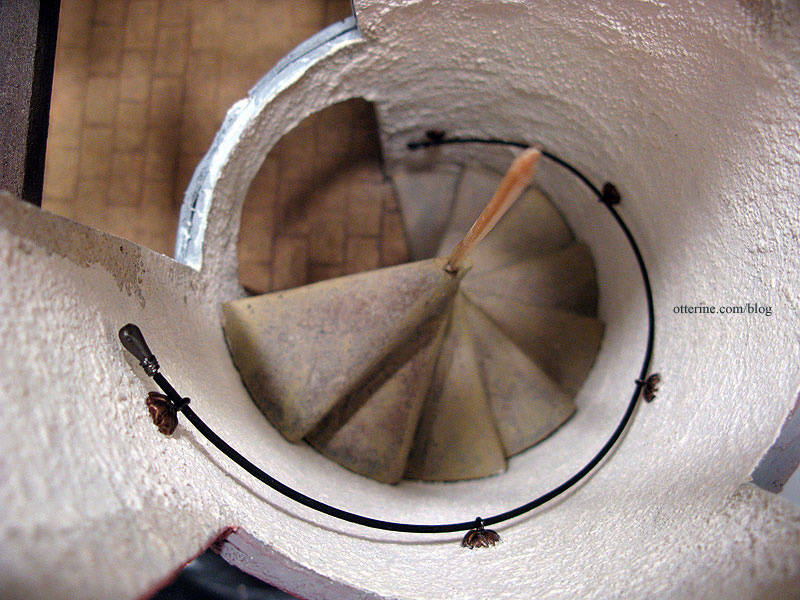
And a close up. I have to say it turned out even better than I had hoped. This gives me ideas for freestanding spiral staircase railings now, too.
Time for the balcony, but first prayers that we don’t knock the railing brackets out of place while we work on said balcony. :D
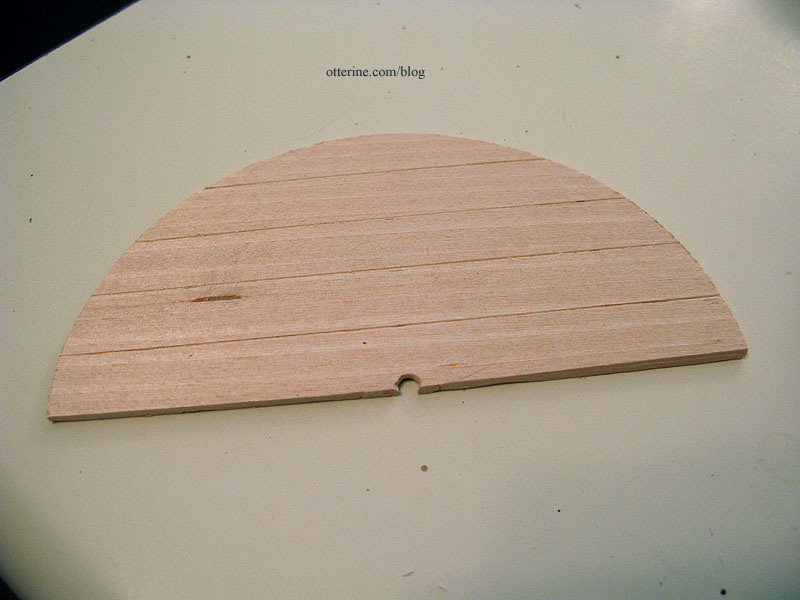
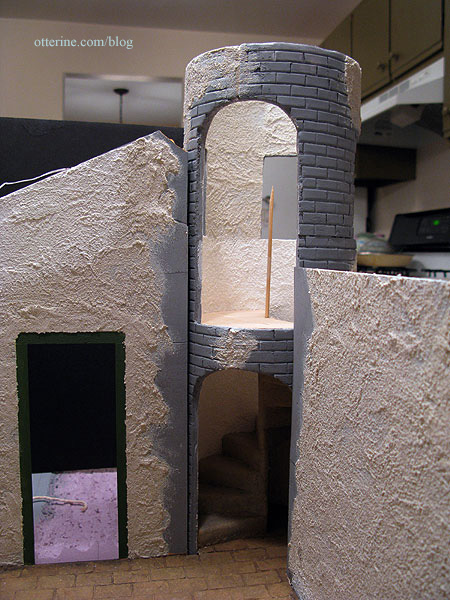
On the underside, I added floor supports from scrap wood as well as laser cut brackets to hold the balcony level on the wall. I also added a riser piece needed to bridge the gap between the top stone step and the balcony. This is a shot never to be seen again, but do I love the way it looks.
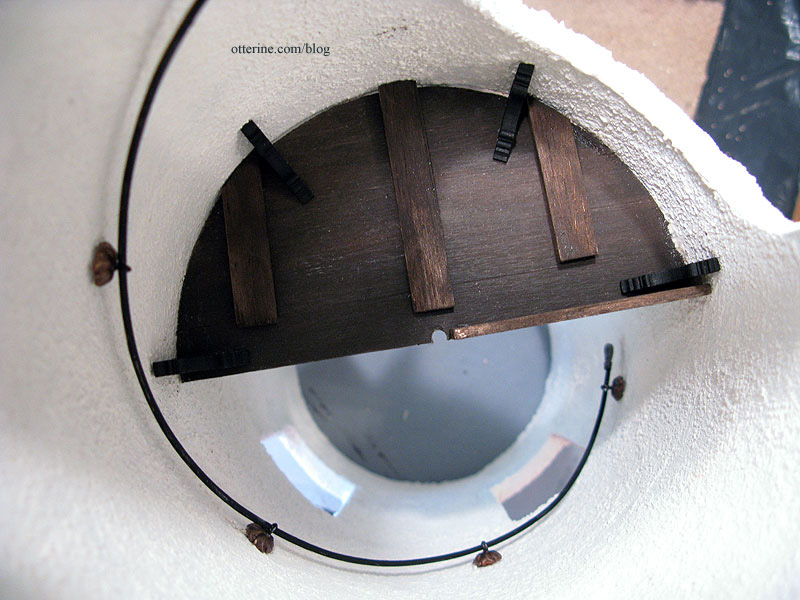
And, you can see a little of my efforts — the brackets — when you look into the archway. :D It was worth it to me, because I know the added details are there.
Continued in part 3.
Categories: The Aero Squadron Lounge
September 11, 2012 | 0 commentsThe Aero Squadron Lounge – tower, part 1
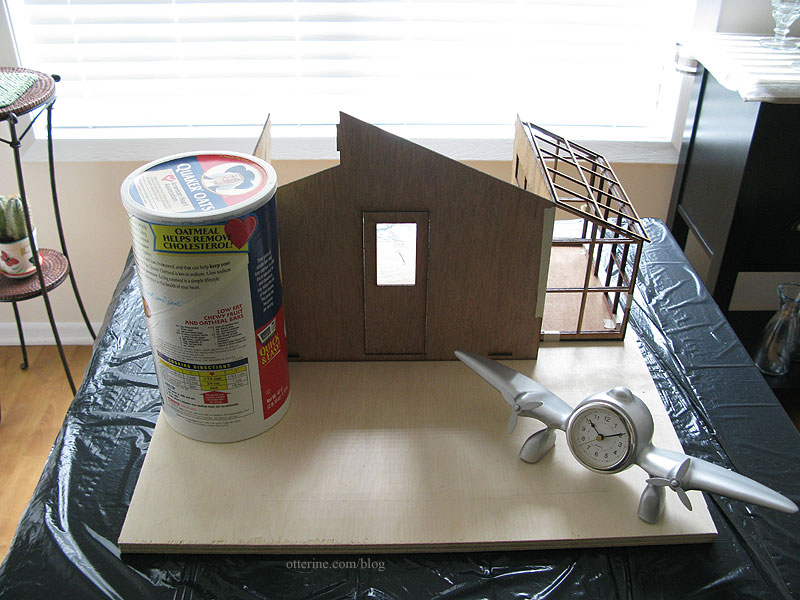
One of the aspects I liked most about the French farmhouses I found in reference photos was the tower. I thought it would be wonderful to add one to The Aero Squadron Lounge since the main kit building was a single room and lent itself well to the addition. The first tower I attempted was made from a large oatmeal container. Boy, did I ever eat a lot of oatmeal! :P No, I just transferred the contents into another container. :D
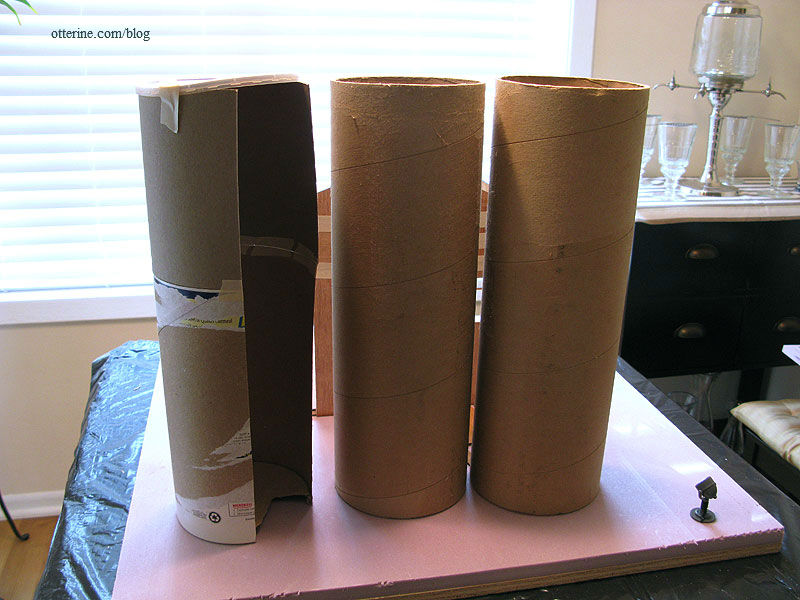
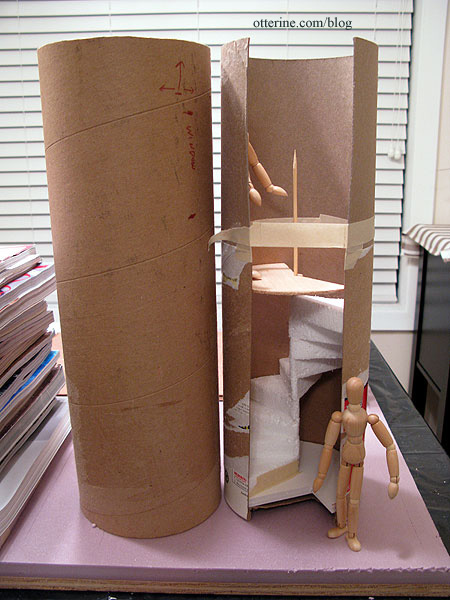
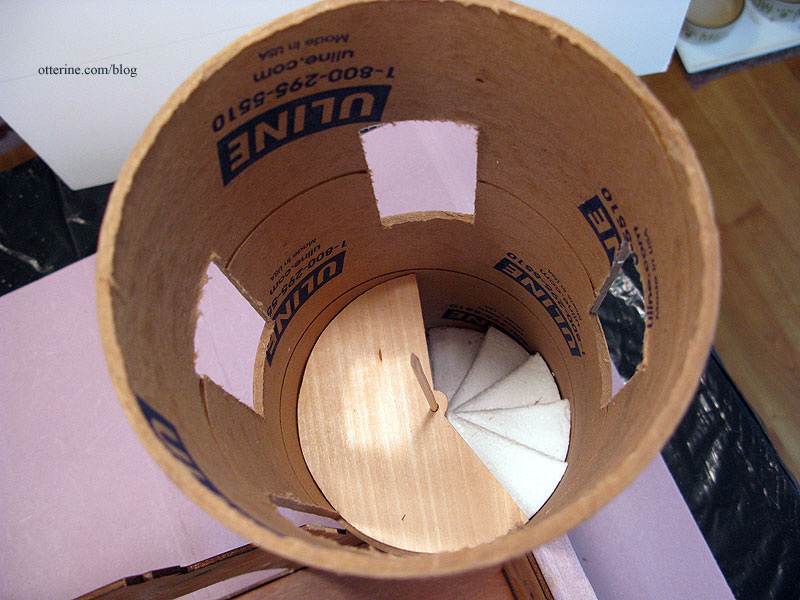
With a 5″ diameter, it was the perfect size, but it was too short. I attempted to add some cardboard to the top, but it was too flimsy. I was able to obtain a 31″ tall, 5″ diameter Uline mailing tube from Freecycle, and it was exactly twice the height I needed. I cut the tube into two 15.5″ lengths which gave me two attempts to get it right. I still have the second one left over.
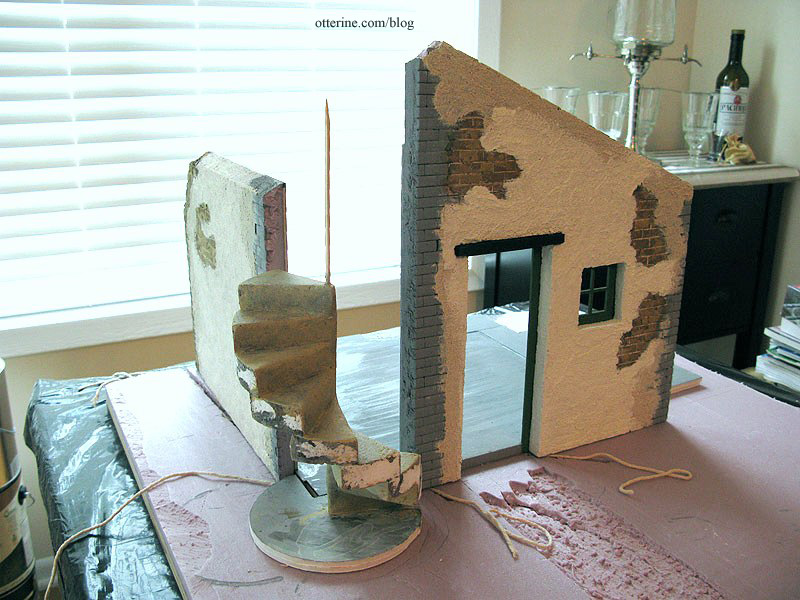
With my model on the balcony at the top of spiral stairs in the mockup tower, I was able to mark where the window overlooking the Sopwith Camel should be.
I measured and marked a line 1.5″ from the edge all the way around the top of the tube. This ring would stay intact and serve to hold the roundness of the tower in shape.
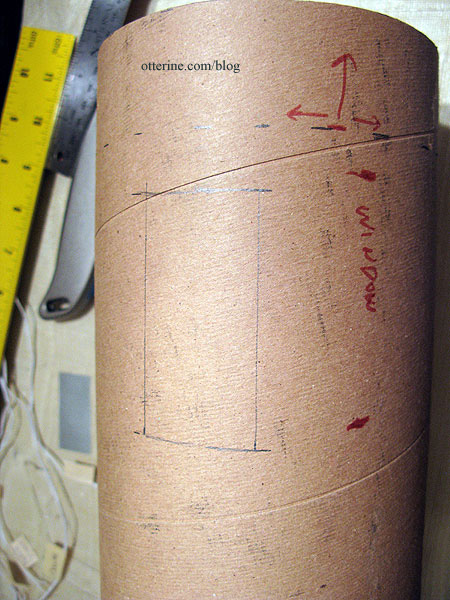
I cut the smaller 1.5″ x 3″ window openings before cutting the arched openings, because I had to press the utility blade into the thick cardboard with significant pressure and I thought having the large openings already cut would make the tube more likely to buckle as I pressed.
The arched openings join the side walls of the main room.
I drew the arched tops freehand, leaving another full band intact in the middle for stability.
Here you can see the three windows I cut.
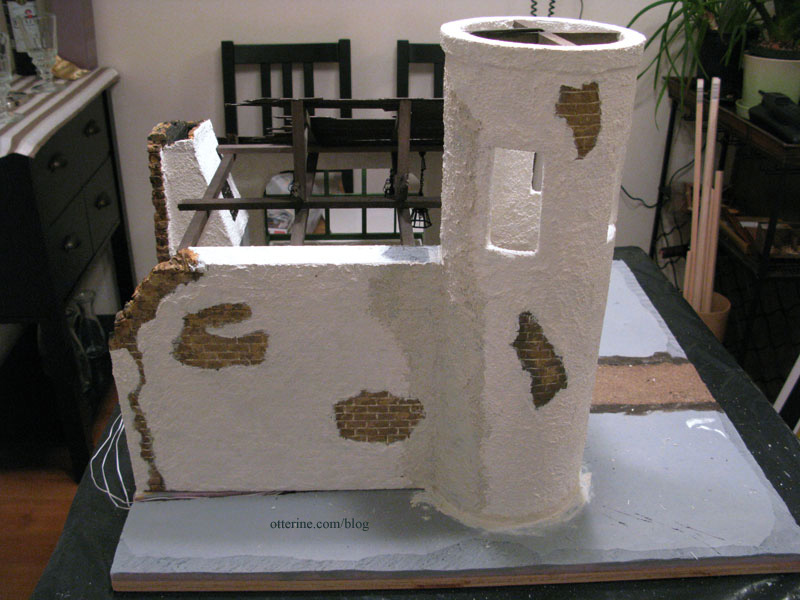
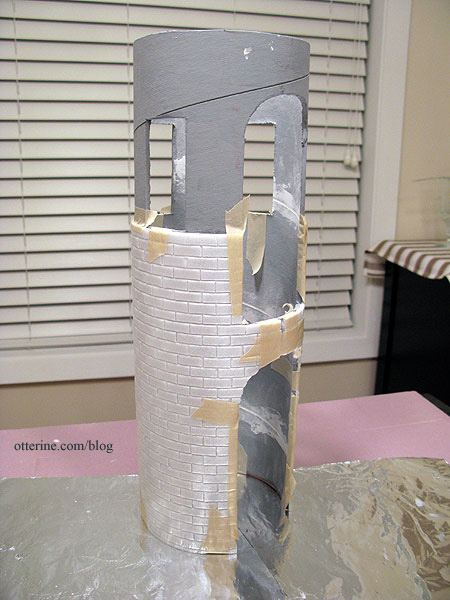
I covered the exterior of the tower with Cellfoam 88. It’s white foam sheeting approximately 1/8″ thick. I bought a two-pack at Hobby Lobby with a 40% off coupon. The sheets measure 12″ wide by roughly 4ft long. I measured the amount needed to cover the surface of the tower, and then marked my stone lines 5/16″ apart on the sheet while it was flat and unattached to the tube.
I used a special adjustable X-Acto knife that allows you to cut into a surface at a controlled depth. You turn the knob to allow more or less of the blade to sink into the material. This kept the back of the sheet whole while allowing me to carve the stonework on the front.
After scoring the lines with the blade, I used a dull wooden pencil to indent the lines. It’s a small step that makes all the difference.

I used a carving tool from a set bought at Michael’s to press and cut the vertical lines forming the individual stone blocks. I thought I had a photo of it, but apparently not. Here’s the tool with the builders foam stone started (I’ll detail this portion in a later post). I just lined the blade up between the horizontal lines and pressed until it broke the front surface without cutting through the back. The bricks measure 3/4″ wide.
I used Weldbond glue to attach the carved stone sheet to the bottom of the tower tube, applying the glue to the tube and then pressing the sheet onto it. My measurement was a little off, so I had a gap over the arched opening, but this would be filled in with stucco besides.
The Weldbond glue held the sheet well enough to allow me cut the arched openings after the foam was attached. I then taped down the edges.
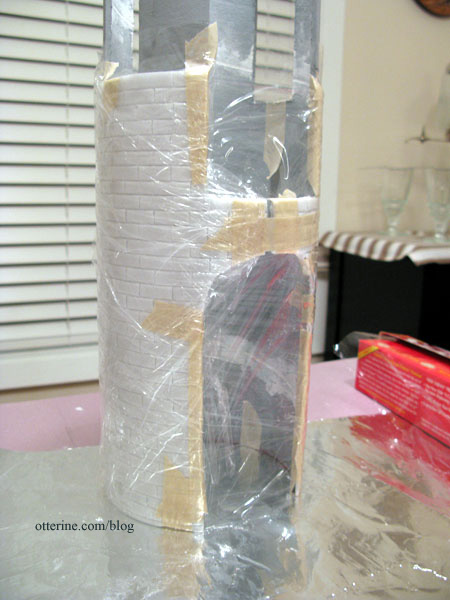
Since there was no way to press the foam flat on the tube, I wrapped it tightly with cling wrap and let it set.
In the meantime, I prepared the next sheet of foam needed to cover the remaining exposed tube in the same manner as the bottom sheet. I made sure the stone pattern continued seamlessly between the two sheets.
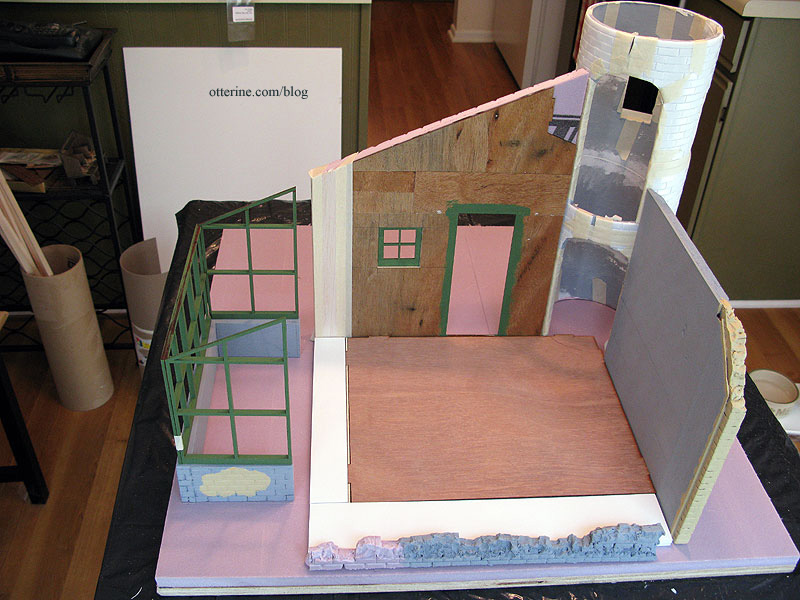
Here it is in place with the main room.
And, from the inside. Now you can see why I keep my kits in dry fit so long. I build parts, check the fit, and so on until I am ready to assemble all the pieces. Even when I am ready, I still usually wait a day to make sure I haven’t missed something. :D
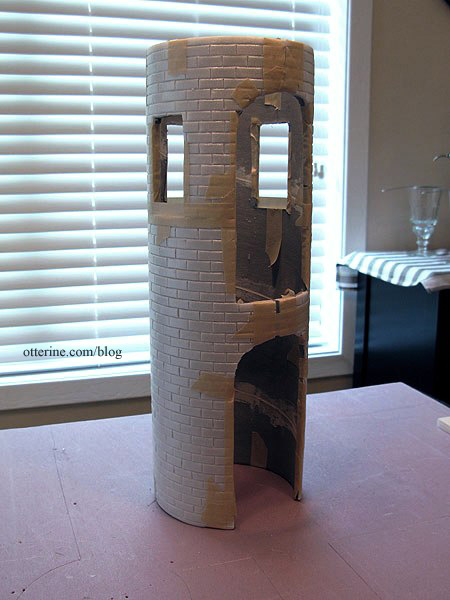
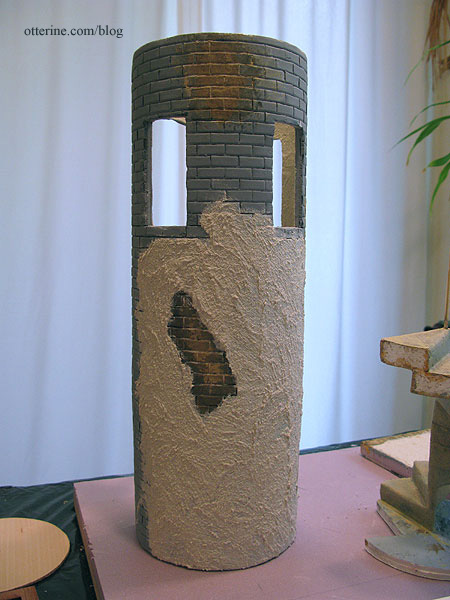
I primed the tower inside and out with gesso to seal it.
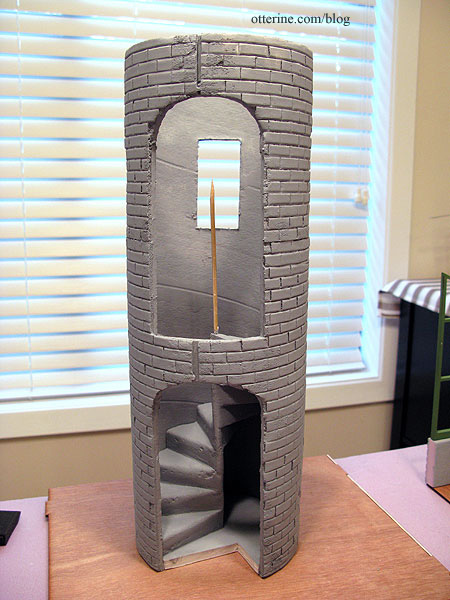
I covered the interior surface of the tower with stucco patch from Home Depot. Since the spiral stair base was a snug fit in the mailing tube, I made sure there was no stucco on that portion at the bottom. Once painted, you wouldn’t be able to tell the difference even if you could see that far into the tower.
Checking the fit of the spiral stairs after stucco application.
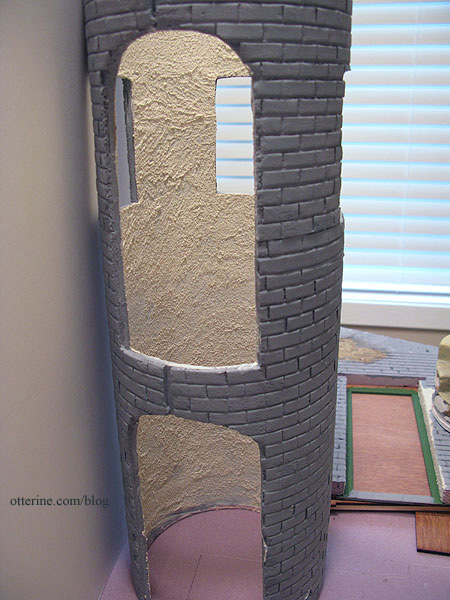
I painted portions of the tower Desert Sand by Americana. Once dry, I grouted with spackling compound.
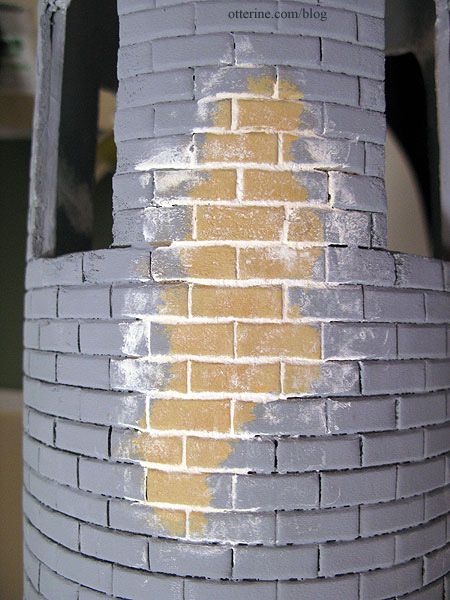
I layered on washes of browns and a little black to stain the grout and give the stone a natural mottled appearance. I then covered the exterior with stucco, leaving the painted stone areas untouched.
I also left the edges of the windows, the attachment points where the tower meets the main room and the arched openings uncovered. The stucco would be added later to those areas. Here the tower is still not glued in place.
Continued in part 2.
Categories: The Aero Squadron Lounge
September 10, 2012 | 0 comments


NOTE: All content on otterine.com is copyrighted and may not be reproduced in part or in whole. It takes a lot of time and effort to write and photograph for my blog. Please ask permission before reproducing any of my content. (More on copyright)

The Aero Squadron Lounge in Dolls House & Miniature Scene
I’m honored to have The Aero Squadron Lounge featured in Dolls House & Miniature Scene for February 2020.
This was a build based on a local restaurant called The 94th Aero Squadron. It had war memorabilia throughout, and the structure was reminiscent of an old French farmhouse. There were planes on display outside, and the back patio featured burned and broken rafters.
It was an interesting place with great food, but it went out of business. After sitting vacant for years, they finally razed the building completely. It’s a shame, because it was unique. There are still a few throughout the US.
The most challenging part of the build had to be the 1:32 scale Sopwith Camel, built from a plastic kit by Academy. I had built model cars previously, but I had never built an airplane let alone one with rigging.
A special thank you to Sadie and Carl at Dolls House & Miniature Scene for a wonderful feature!
Categories: Books and media, The Aero Squadron Lounge
February 5, 2020 | 0 commentsUnfettered
While buying supplies for The Artist’s Studio, I picked up a battery operated flickering firelight from Minimum World for The Aero Squadron Lounge.
If you recall, I had hardwired the fireplace bulb, which hampers the removal of the removable fireplace.
Close-up of the recess and fireplace wire.
I have to slip the bulb out of the hole drilled for it in order to truly remove the fireplace.
Before deconstructing any of the hard wiring, I made modifications to see if the new battery light would work for this instance. I fed the bulb and wire into the fireplace to see if the wire was long enough.
Since the back wall of the fireplace is made of foam, I was able to cut a space to house the battery mechanism, switch side down, as well as some excess wire.
It worked! :D
I will probably paint the wire black to blend in more, but it doesn’t really show with the fire screen in place.
The flickering isn’t as smooth as the LEDs from Evan Designs that I used in the jack-o’-lantern, but it is bright enough and relatively convincing. Even a solid red bulb with this battery setup would be nice to have for fireplaces and stoves.
I decided to leave the hardwired bulb in as a backup since it is already in place, so I curled the wire and bulb into the recess made for it.
The fireplace with its new battery firelight sits perfectly in place and is now quickly and easily removable.
My final assessment is it’s a great light for easy access with the caveat that it does not have a completely realistic flickering motion for imitating fire. It is somewhat pricey, too, but overall I’m pleased with it and would likely use it again in the right situation. If I had enough room for full hard wiring, however, I would use the orange flickering LEDs from Evan Designs instead. Those are brighter and more realistic, but they have a larger battery adapter that’s not as easily hidden as this unit from Minimum World.
Categories: The Aero Squadron Lounge
December 26, 2012 | 0 commentsThe Aero Squadron Lounge – Landscaping
This was my first time landscaping in earnest, and I enjoyed the process so much! The feel I went for was manicured rustic. This is a vintage bar in a more modern setting, so I tried to bridge the gap between farmhouse natural and tidy grounds.
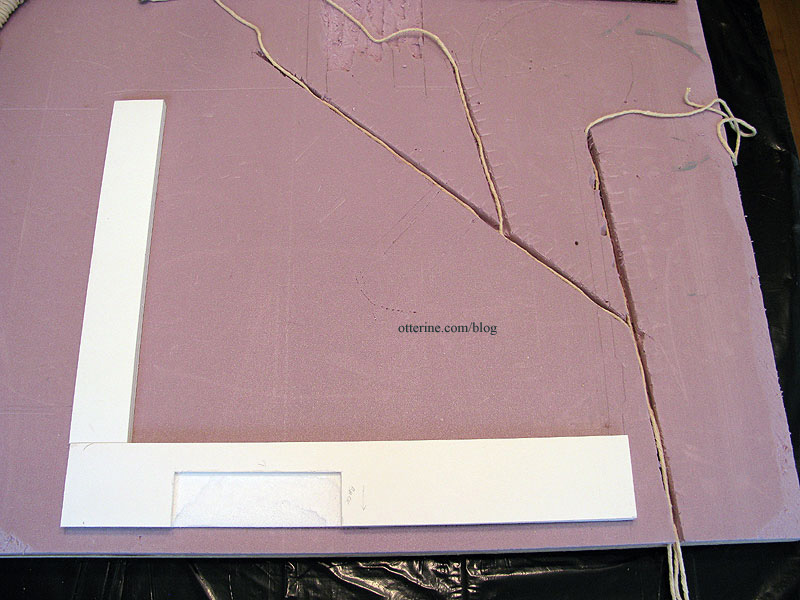
I started with a sheet of builders foam for the base, and used a carving knife to slope the edges. Out the front door, I carved (ok…butchered, whatever) a pathway out of the foam. I sealed the foam with grey gesso.
I made the front stone step in the same manner as I had for the fireplace. It’s a scrap of white styrofoam covered with spackling, sanded and painted to look like stone. The crack in it was a happy accident. It didn’t quite fit into its allotted space, and when I bent it to make it fit, the surface popped. I love the cracked detail and wish I had thought of it myself. I added further paint washes to really accentuate it. That front chip is also a happy accident. :D
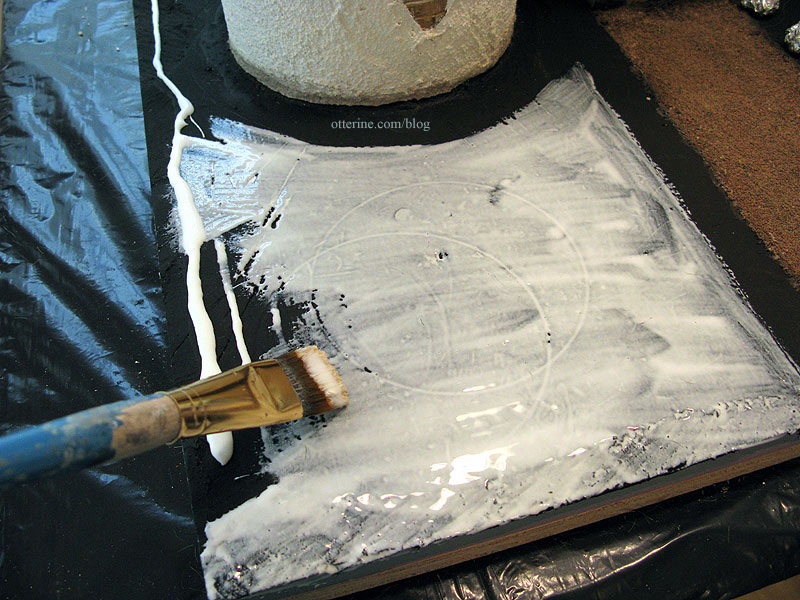
To make the walkway less treacherous, I first used some stucco patch to even out the surface. Once that had set, I applied a thick layer of Aleene’s Quick Dry glue, shown here before I spread the glue with a brush.
The gravel is Woodland Scenics Ballast left over from Baslow Ranch. I poured it on generously, pressed it gently and let it dry overnight.
I brushed off the excess back into my bowl for later use in another project. I then added some paint washes to make the gravel look more natural.
I had originally planned to have the plane and dogwood trees switched, but when I did the layout, it didn’t work out so well. The tree blocked too much of the tower, and the plane was lost in the larger space on the right. Here you can see I painted the landscape portion black just in case the ground might show through in areas.
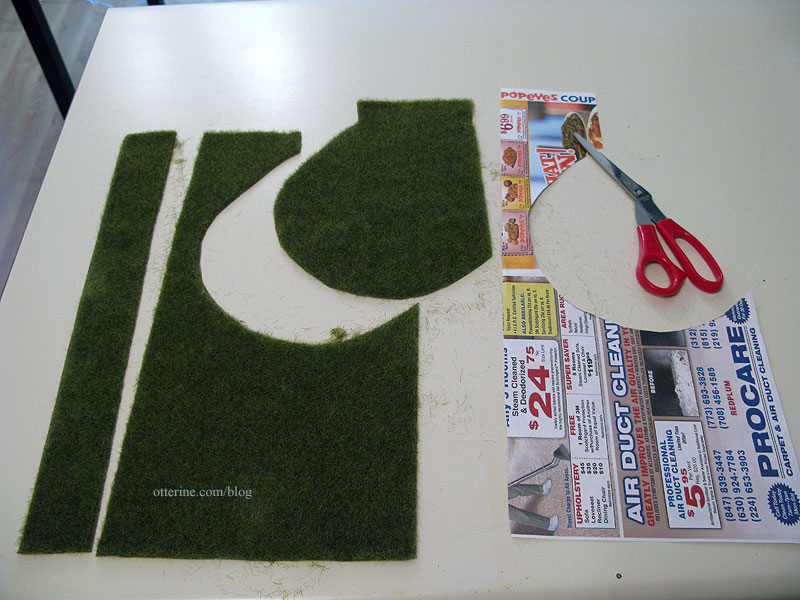
After determining the amount of mulch I would need on either side of the pathway and around the tower, I cut pieces of newspaper to make patterns for the Woodland Meadow Field Grass sheets by Heki, from Scenic Express. I marked the outlines on the landscaping board.
The shrubs and smaller trees I used for the final layout are Squeeze Me trees from Model Builders Supply. While I was awaiting their arrival, I was reduced to using aluminum foil stand-ins. ;D
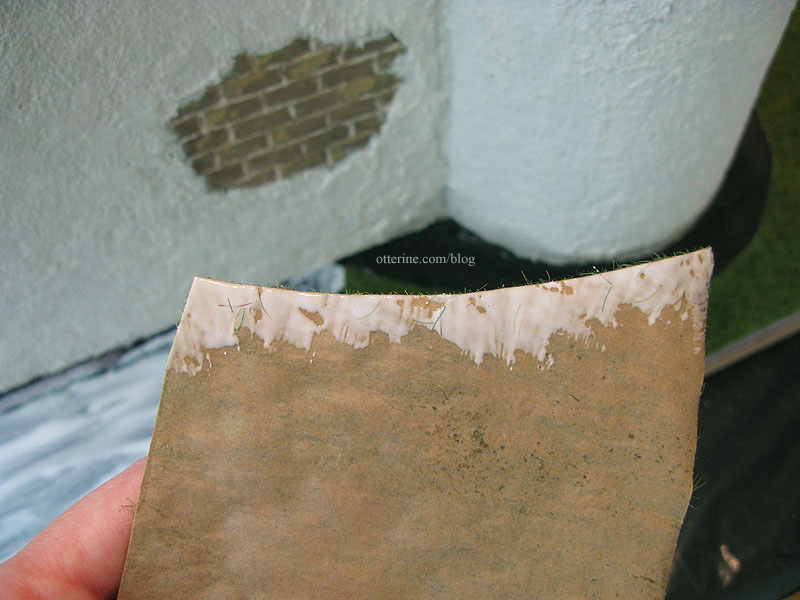
It was messy cutting the grass sheets, so I made all of my cuts on the counter and shook the excess from them there as well.
I used newspaper scraps to make templates for ease in cutting.
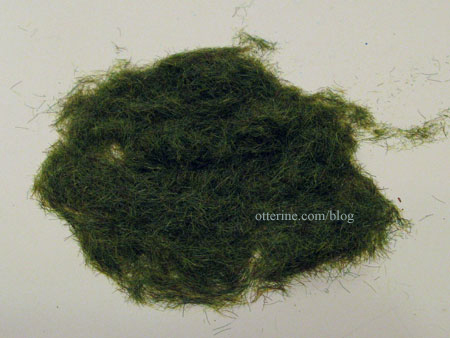
I saved all of the clippings for filling in later on where needed.
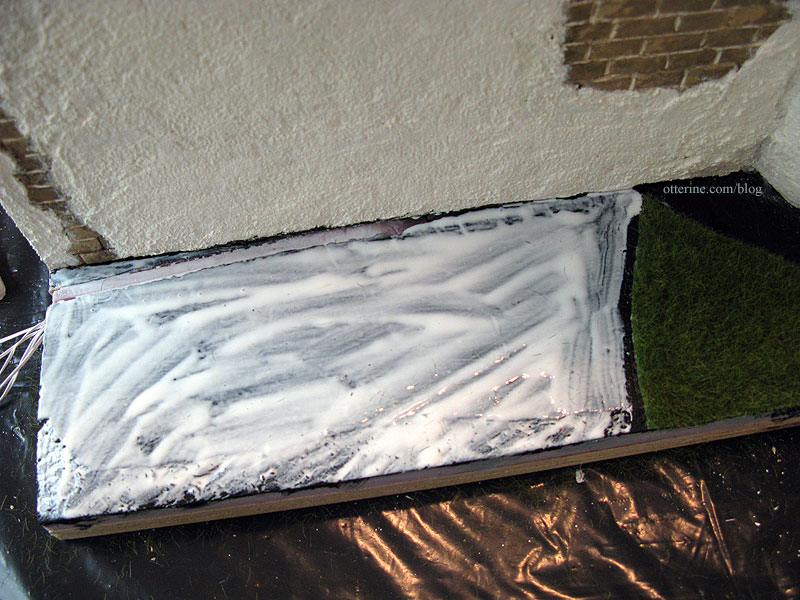
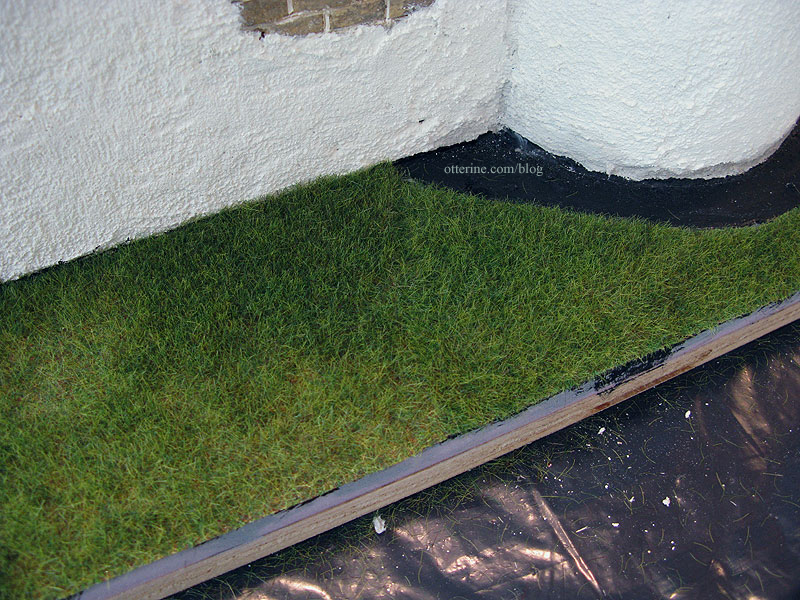
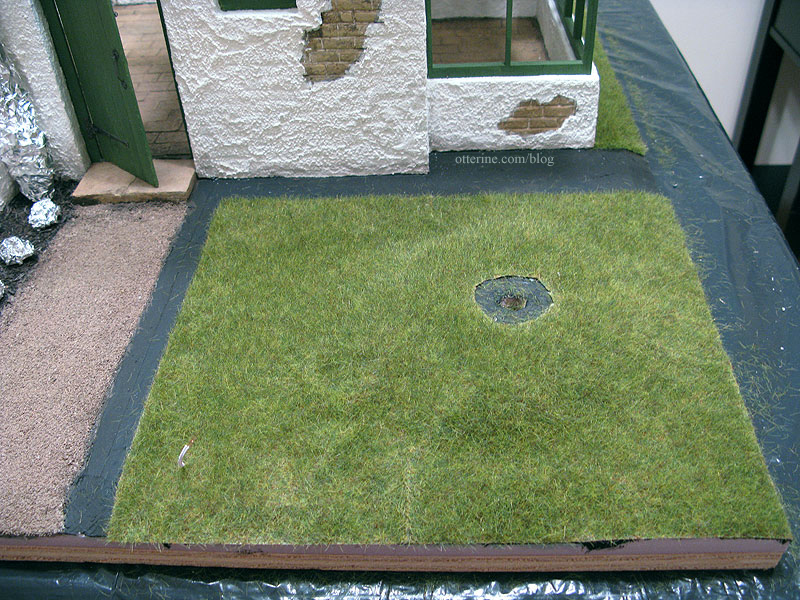
I spread glue evenly over the landscaping board with a brush.
I pressed the grass pieces in place and kept an eye on them until the glue set a little, continuing to press the edges down. The sheets measured 15 3/4″ x 9 1/2″, so there was some piecing required to cover the entire lawn. For the henhouse side, I cut a curve along each piece since I thought it would make for a less noticeable seam. I cut the back piece and applied glue just as I had before.
This time I applied glue to the edge of the back piece where it would meet the front piece.
It turned out very well.
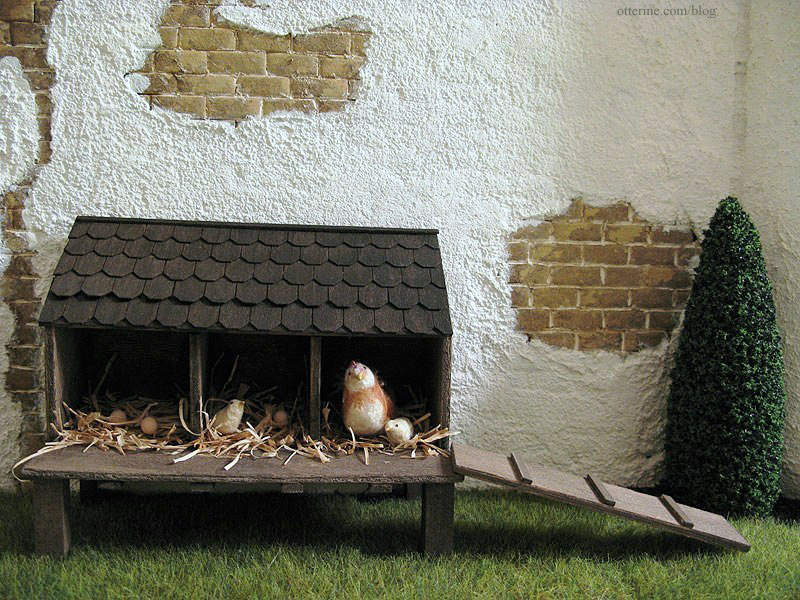
With the henhouse in place, you can barely see it at all.
The back seam worked out very well, too.
I carefully applied glue to where the mulch would be.
I applied mulch from A Little More in Miniatures with a spoon.
I added generous amounts of mulch.
I lightly pressed it into the glue with my fingertips. While the glue was still wet, I removed any obviously out of scale pieces with tweezers.
I then mowed the lawn and raked the mulch with…my vacuum cleaner. :D
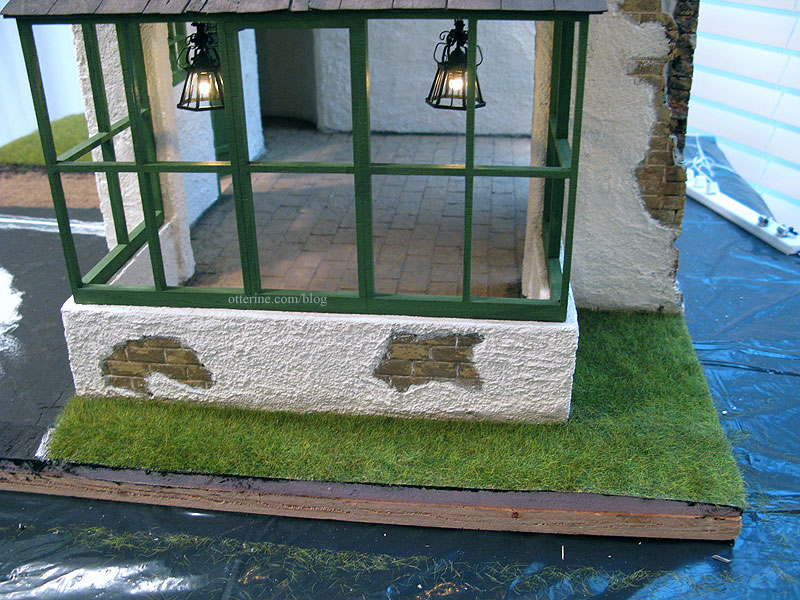
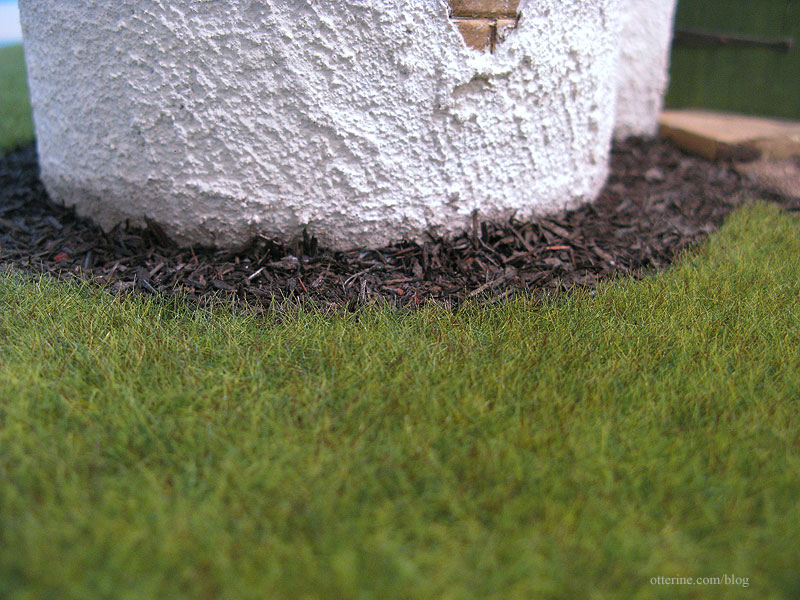
In this close-up, you can see where I dirtied up the lower edge of the building all the way around using a very diluted black and brown paint wash. This was done prior to all landscaping applications.
The materials turned out so realistic!
The dogwood tree has been detailed previously, and it had its own raised base created during the assembly phase.
I had the scary task of removing the tree from its base in order to apply the grass first. I used stucco patch to even out the ground around the raised tree base after gluing it to the landscaping board. Once that dried, I sealed the new surface with gesso and painted it black.
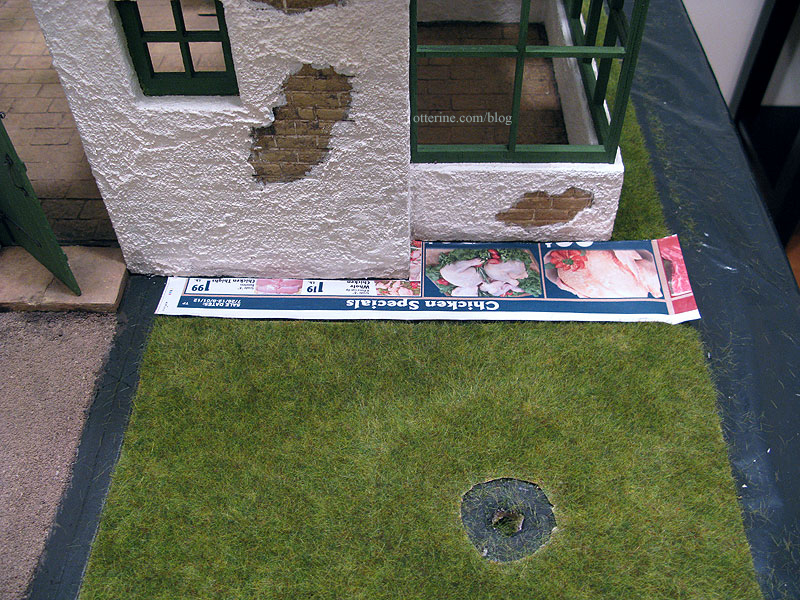
I cut a rough circle in the grass to surround the dogwood.
I had to patch the area behind this piece, so I cut a pattern to fit. Oh, don’t let the hens see the grocery ads! :O
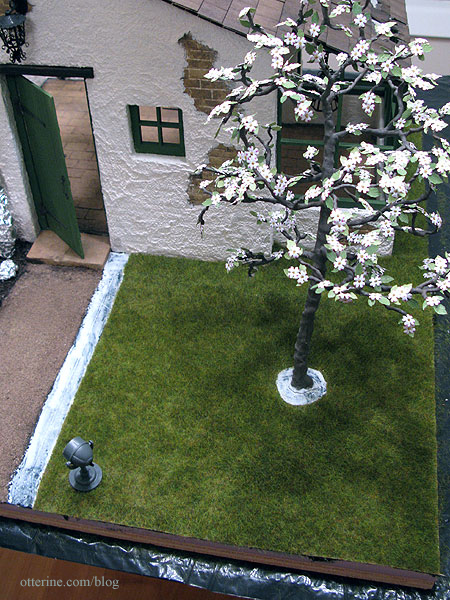
After planting the tree, I applied glue inside the circle and to the remaining edge of the pathway and added mulch.
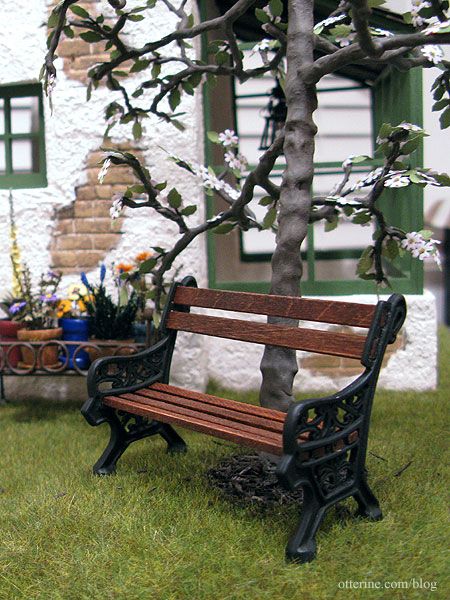
I love the way it looks with the bench in front of the tree.
The rustic planter filled in the remaining area and helps disguise the front lawn seam, which is slightly visible from some angles.
Once all of the grass was in, I planted the Squeeze-Me trees with a dab of glue on the bottoms. The lovely birdhouse was made from a kit by Twilla’s Tiny Treasures, the bird is from A Little More in Miniatures.
I had originally considered making them flowering shrubs, and below I’ve placed some impatiens from Small Talk (no web address) in mockup. I thought the white and peach competed with the building and the dogwood. The dark crimson was so dark that it was hardly worth the effort to add them. I really liked the bluish purple, but I didn’t think they added so much that it would be worth taking the time to shape and add centers to the amount I would need to cover twenty shrubs. The dogwood had exhausted me!
I added plain wood trim around the baseboard to finish, and here is the end result. :D
And from the other side…
That should do it for the Lounge posts. If there is anything I’ve missed or there is something you want to see closer, just leave a comment.
Categories: The Aero Squadron Lounge
September 22, 2012 | 0 commentsThe Aero Squadron Lounge – structure, part 3
Continued from structural details, part 2 for The Aero Squadron Lounge.
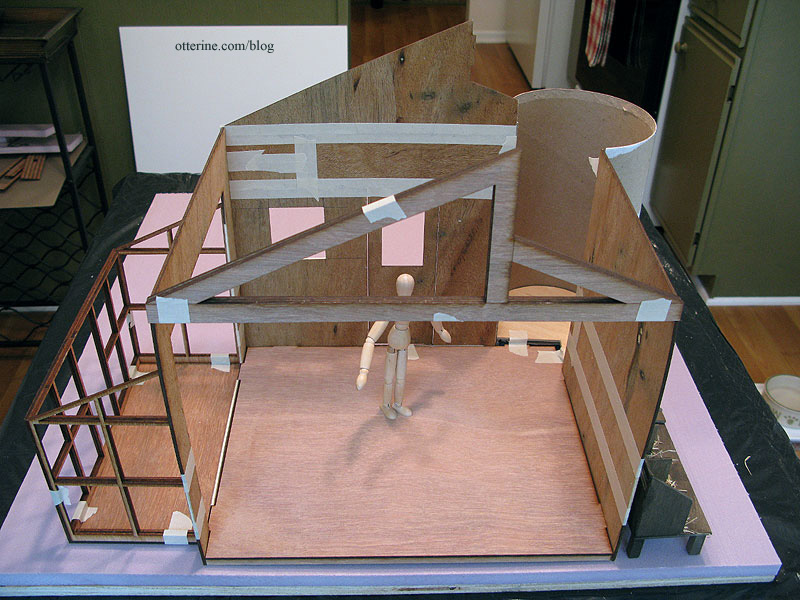
The beams are made from balsa, marred and painted to look like slightly burned and weathered wood. I didn’t go overboard on the weathering, because I didn’t think it needed to look like it was still smoking. This photo shows the base color…more aging was added later after shingling.
I originally wanted vertical beams to rise up from the floor to hold the ceiling beams in place. I would have been able to hang pictures and other items related to my theme there. Even with the added floor space, though, there was not enough room to have them without messing up the furniture floor plan.
One of the ceiling beams terminates at the fireplace and serves to keep the fireplace unit from tipping into the room.
I completed the wiring for the hanging lamps for the tables as well as the front door carriage lamp. All the wiring for this build is detailed in a separate post.
Roof planning was next, and I used a scrap of the Cellfoam 88 I had used on the tower to determine just how much roof decay I could have.
I determined the amount of strip wood I would need to cover this space, then cut sixteen strips of wood measuring 3/8″ x 12″ from 1/16″ thick bass wood. I stained these boards, front and back, with a wash of black and brown acrylic.
I glued the strip wood planks to complete the partial roof structure, breaking the ends where it opens into the main room.
To create a front eave, I left excess hanging over the front wall.
I shingled the roof with Greenleaf speed shingles – love these! :D I first covered the roof with loose shingle strips to determine how many I would need.
I stained these before applying, and this is my shingle drying apparatus. Rather fitting for a Lounge.
I followed the bass wood planks and broke the shingles to form the jagged bombed edge and a few holes.
Here is the view from inside.
I touched up the paint toward the end of the build, and here is the finished product.
Finishing the roof essentially completed the main room build, and the rest of the time was dedicated to the tower. Those posts begin here. The conical roof for the tower was another math challenge, and its detailed post is here.
Categories: The Aero Squadron Lounge
September 22, 2012 | 0 commentsThe Aero Squadron Lounge – wiring
Nothing brings a miniature build together quite like lights, but wiring a structure always has challenges.
This was my first time working with builders foam for landscaping and building walls, but it won’t be my last. It was a great material for hard wiring the lighting, too.
Before I glued the base of The Aero Squadron Lounge onto the landscaping board, I cut wire channels that would run underneath. I draped twine inside the channels so I could tie the wires to it and then pull the wires through the channels later in the build. You’ve probably noticed these strings in the posts I’ve been writing about the tower and main room construction.
The front door carriage lamp was the first light to be installed but I don’t have good photos of what I did.
I poked a bamboo skewer into the foam to make a wire channel and pulled the wire up toward the roof. I used the skewer to then make a channel toward the join with the tower. On the side of the front wall, I cut a channel into the foam so the wires would run toward the ground and through the baseboard channel.
Fortunately, I did take better pictures when I wired the three hanging lights over the three tables inside. For the one over the pub table by the front door, I cut a channel into the balsa wood beam and pulled the wire through the front wall. I then painted the wire to match the beam. This was the only wire that might possibly be noticeable if left white.
For the other two hanging lights, the roof rafters covered the channels made in their respective beams.
I cut a channel into the builders foam all along the top edge leading toward the earlier channel made for the front door carriage lamp.
I used a length of tubing to feed the wires through the channel.
I taped all the wires to the twine and pulled the twine through the channel.
Once I cut the twine from the wires, I fed them into the side baseboard channel toward the back and to the power strip. The remaining length of twine here is for the tower light.
I pressed the wires into the side wall channel on the front wall. Once the tower was attached, this would be sealed up with stucco.
The front spotlight was fairly straightforward as well. I bought a pack of two Scene Master spotlights on amazon.com but used only one of the pair included in the package.
Once I knew where I wanted the spotlight, I cut a further channel to it from the other baseboard channel. I ran a length of wire underneath the house and left a small bit exposed to wire the light. I had to plant the grass before I could install it.
I filled in the channel with leftover stucco when I added the dogwood tree base, where I used stucco to sculpt the hill. I filled in the other front baseboard channel with stucco after attaching the tower. You can see where I adjusted the channel at the front of the board.
Once the grass was planted, I was able to wire the spotlight. I cut the spotlight wires short and then spliced them to the exposed wire from the ground.
I made a small hole in the ground to sink the spliced wires into.
I glued the spotlight to the grass over the hole.
As noted in a previous post, the bar lights are operated by a 9V battery.
To keep the bar removable, I wired the two lamps to a 9V battery adapter with an on/off switch from Evan Designs. Ingenious, right? Ha! There are two main issues with this idea. First, the bar is definitely removable, but it is hard to get it back into place without the wires sticking out…very fiddly. More importantly, the battery doesn’t last long and the candlesticks are very dim. I tried wiring each lamp to its own battery but the difference in brightness was negligible and it doubled the fiddly nature of trying to get the bar in place with two battery assemblies fighting for freedom. What I should have done was made a plug in the floor.
The lit fire is an acrylic log piece with a red bulb. I drilled a hole for the bulb to fit through the bottom of the egg carton hearth, and its wire runs inside a channel through the baseboard foam along the back.
Since the fireplace is removable, I have a small recess where the wire and bulb can curl into when the fireplace is removed.
However, now I see Minimum World has a battery operated flickering fire light that would certainly make removing the fireplace less of a hassle. (Update: I installed the Minimum World battery light here.)
Close-up of the recess and fireplace wire.
The most challenging light to wire was the tower light.
Even if I hadn’t made the tower roof removable in the end, I wanted exposed rafters and holes in the roof. That meant you would be able to see the wire, even if I cut a channel into the balsa beam and painted it.
I opted to hide the wire in plain sight with conduit made from 3/32″ aluminum tubing from my local hobby shop. I eliminated the chain on this light and made it a ceiling fixture. The wire goes up through the beam, through the conduit and out the side of the tower. The end wire runs between the tower and side wall, eventually to be covered with stucco.
To disguise the end of the wire inside, I used a round wooden bead. I painted the conduit on the beam brown to match the wood. I painted the conduit along the wall and the wooden bead warm white to make it blend in with the wall color. I have seen conduit done like this in real life many times. I added a metal doorbell from Sussex Crafts to act as a vintage light switch. Now the illusion is complete. The whole process is detailed in the tower construction post, part 3.
Here is the faux switch for the tower light.
I started to fill in the side baseboard channel with stucco but realized the moisture from the stucco might mess with the spliced wires and I didn’t want to take any chances. Instead, I cut a sliver of builders foam to plug the channel. These channels don’t have to be pretty, they just need to work and be hidden in the end.
Categories: The Aero Squadron Lounge
September 20, 2012 | 0 comments
NOTE: All content on otterine.com is copyrighted and may not be reproduced in part or in whole. It takes a lot of time and effort to write and photograph for my blog. Please ask permission before reproducing any of my content. (More on copyright)