

Roland’s Retreat
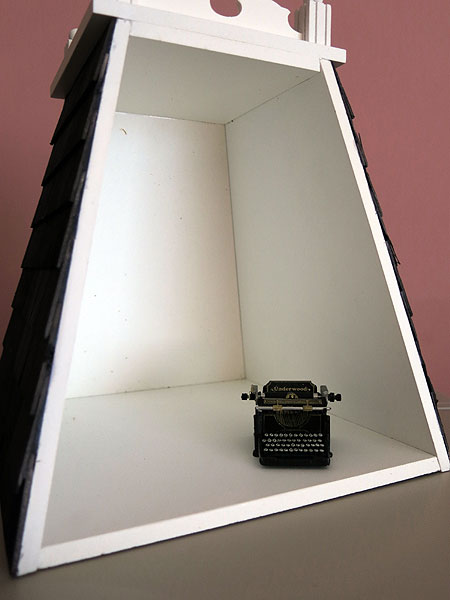
If you’ve ever wondered what that scratching and clicking is in the attic, it’s just Roland Sneakypants up late typing away on the Underwood as he writes his next best-seller. :D

Well, when he isn’t jumping on the bed.
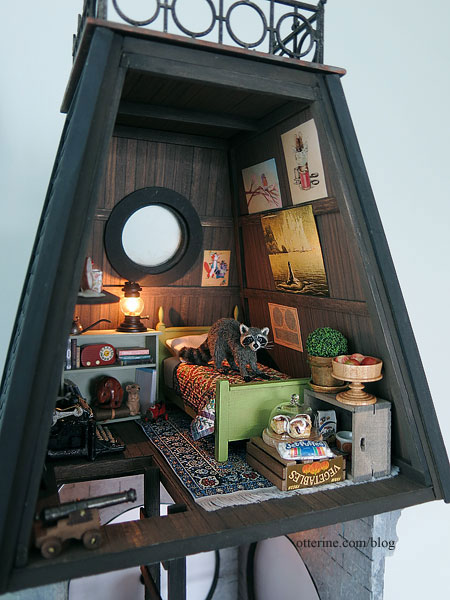
He has everything he could need from a comfy bed to a modest kitchen area with snacks to a workspace.
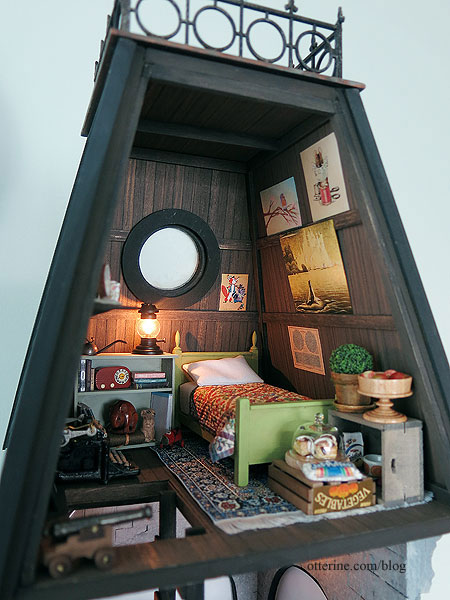
At least he doesn’t have to deal with the distraction of an hourly chime. It used to work, but no one can figure out how to fix it. I think Roland has something to do with that. ;D
Real Good Toys recently held a mini mini contest called What’s in Your Attic? Each participant was to purchase their ready-made attic tower top.
The rules were simple — buy at least one Attic Tower Top and furnish it with what you may find in your attic. Then there was the dangerous statement, “Use your imagination because there is no right or wrong.”
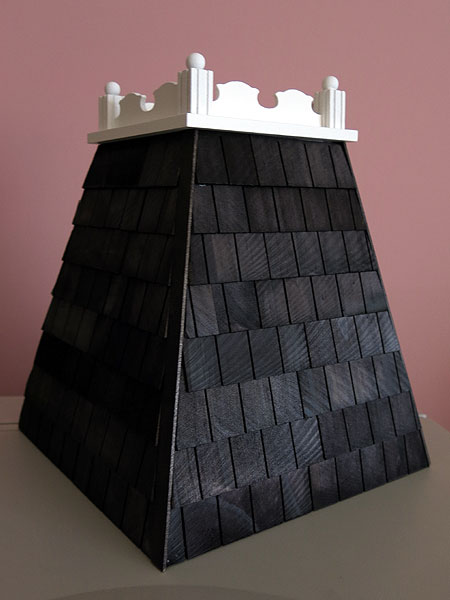
You know me. I couldn’t just decorate and fill it. So, into the microwave it went! :O
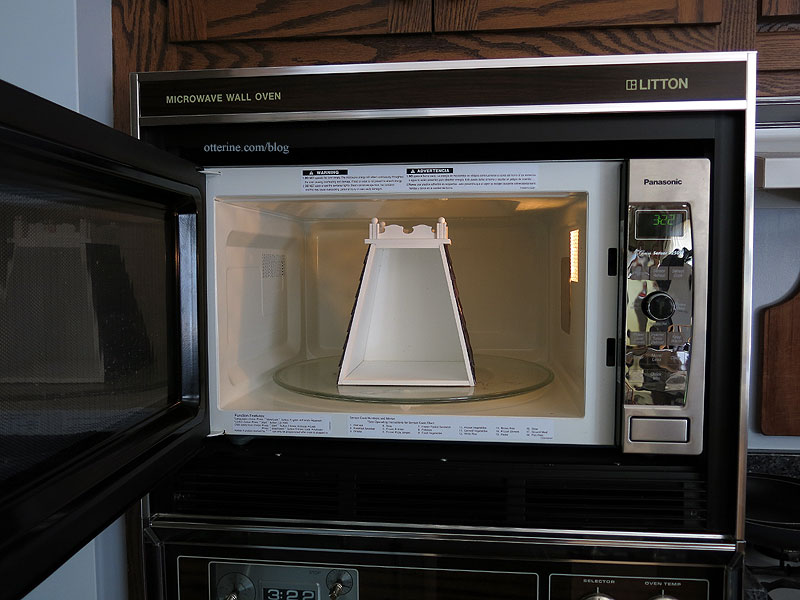
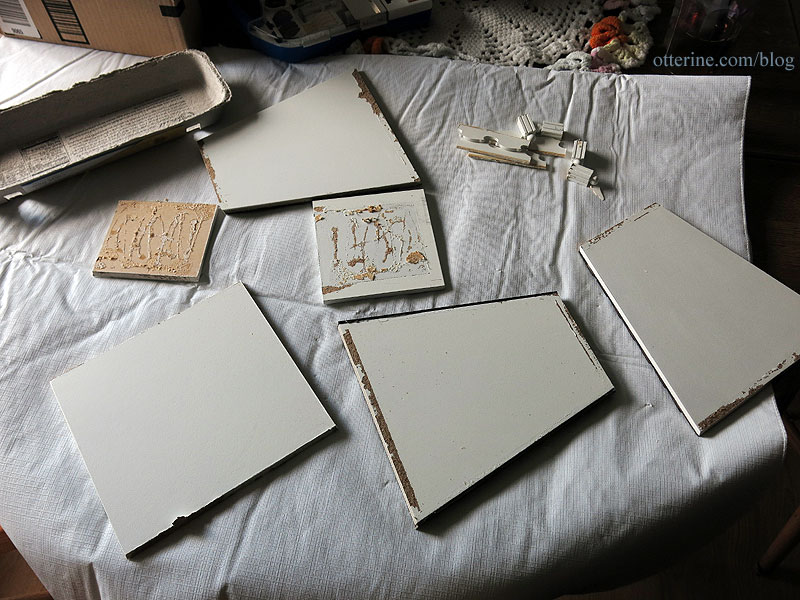
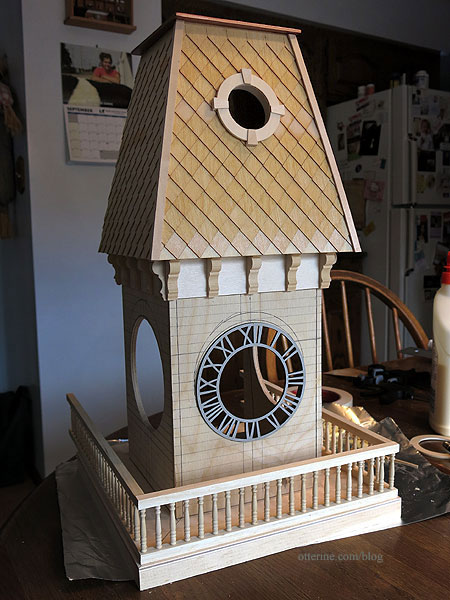
Beep…Beep…Beep…Enjoy Your Meal I took it apart completely, right down to removing the shingles.
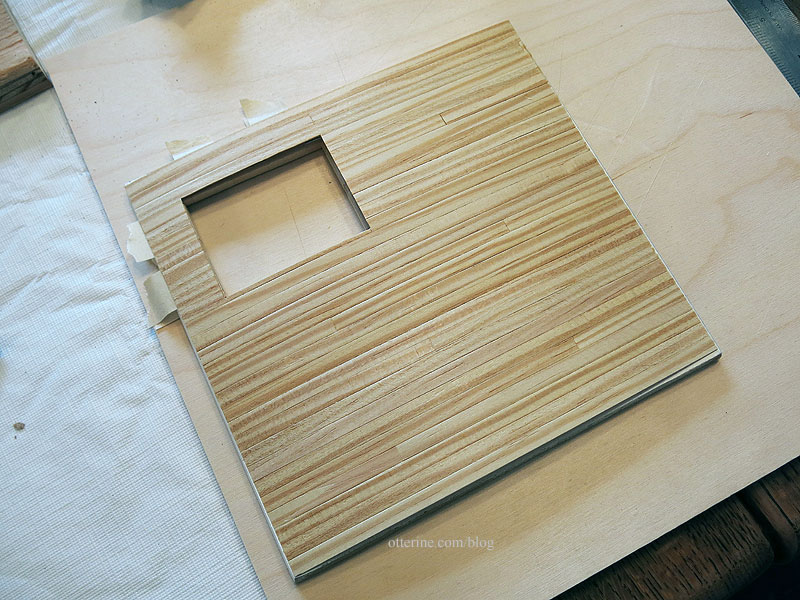
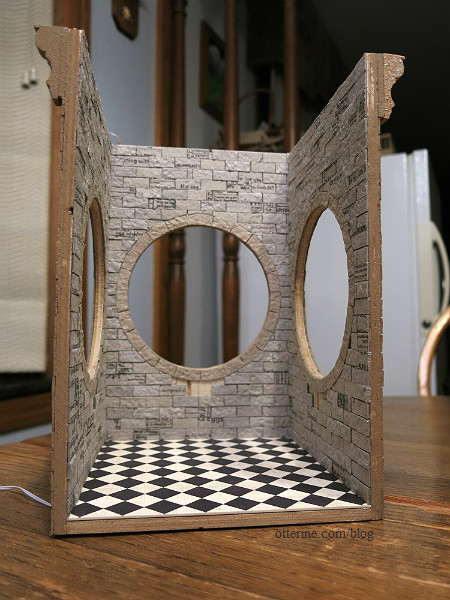
I cut an opening in the floor for an added lower room and cut an opening in the front for a new window. From there I made templates of the interior walls and floor to add Houseworks flooring sheets to simulate rafters and floor boards.
After staining and aging, I glued the flooring pieces in place. I cut cross beams from bass wood.
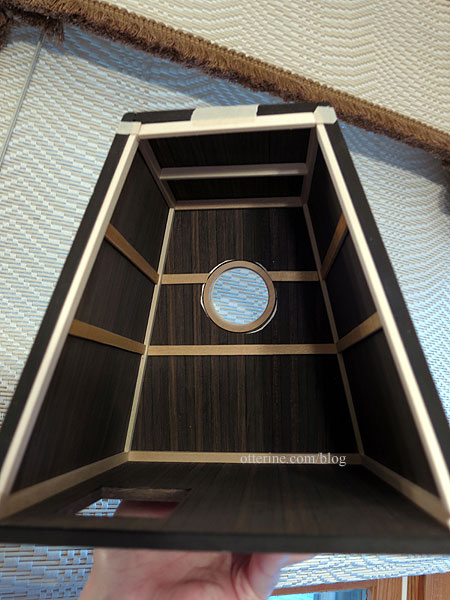
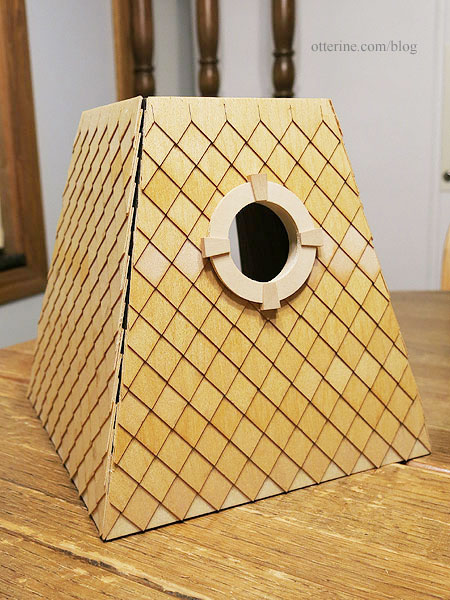
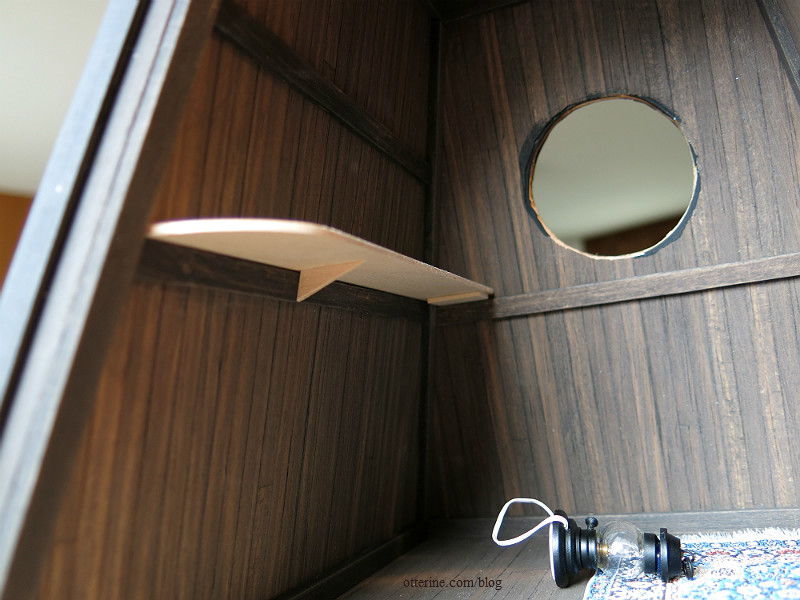
I added a Houseworks round window to the front wall and shingled the exterior with Greenleaf speed shingles in a diamond pattern. As you can see, I applied mine so that it made true diamonds and not an elongated version.
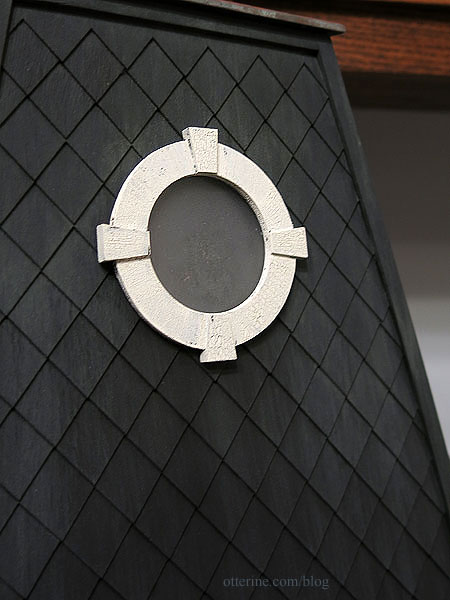
I sprayed the window insert with Testors frosted glass paint. It worked well to create an old, dingy window.
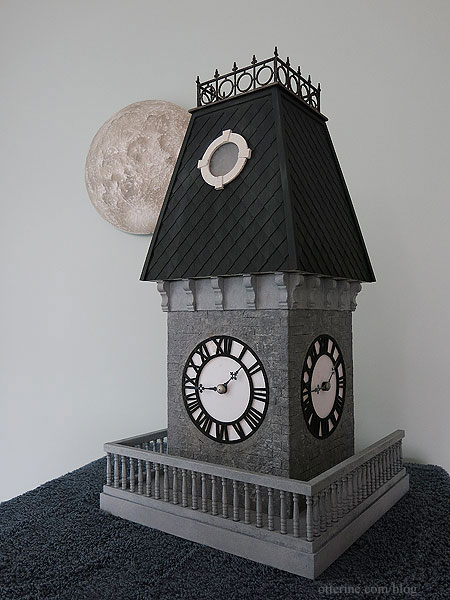
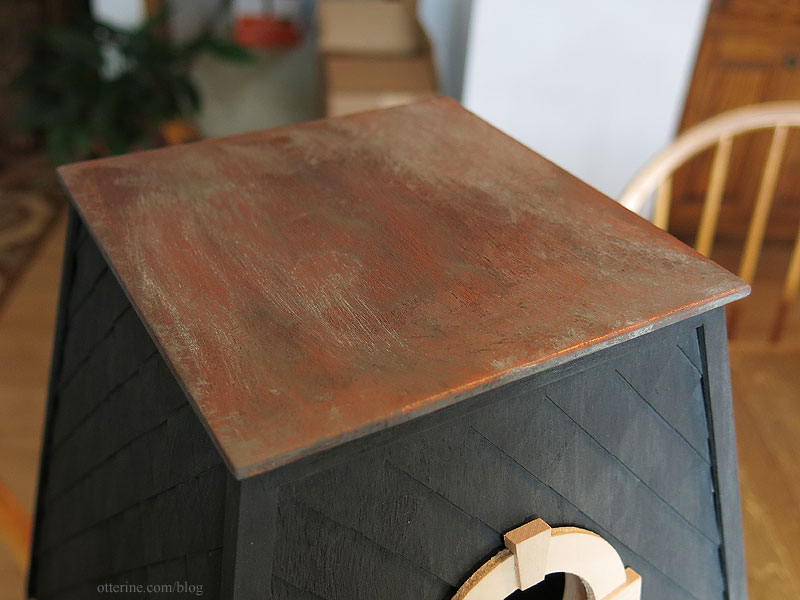
I cut a new roof topper from 1/8″ plywood and painted it to mimic copper. I added washes to give it a patina. The widow’s walk added later and not shown here is plastic but worked very well as wrought iron.
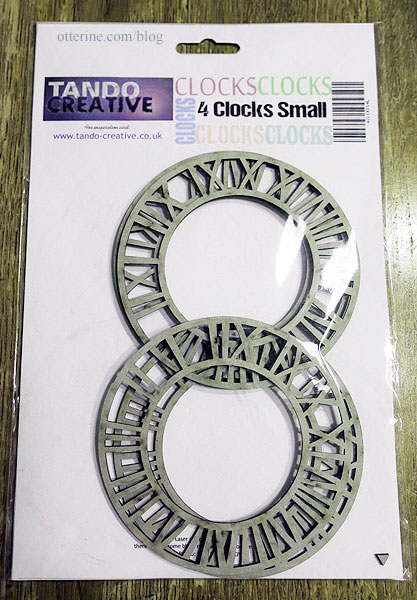
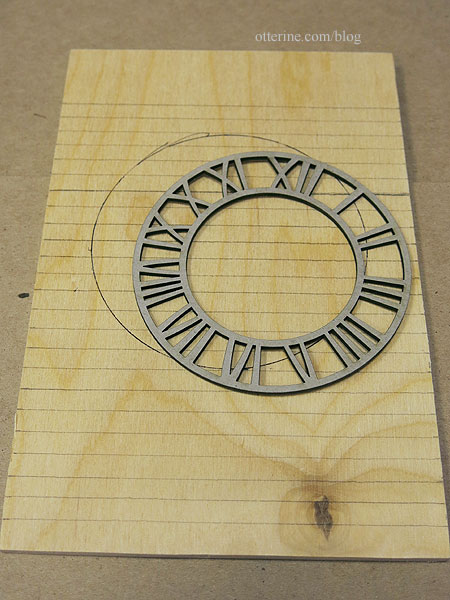
I used 1/4″ thick plywood to build the clock tower room that would sit below the attic. I found a set of Tando Creative chipboard clock faces from The Stamproom that worked perfectly for what I had in mind. They are roughly 4.25″ in diameter.
I used those to plan the openings though I later lowered the guidelines before cutting.
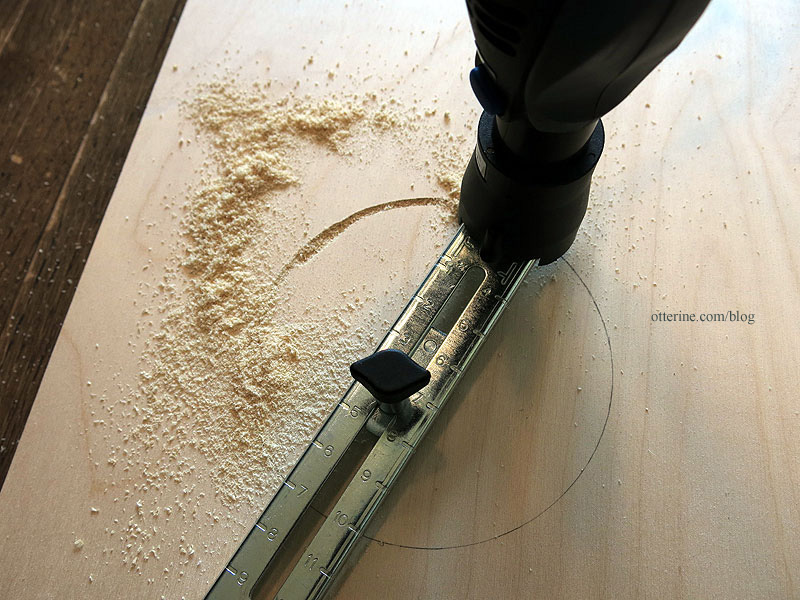
I used my Dremel circle cutting guide to get as close as I could to an exact match. Here’s my practice cut.
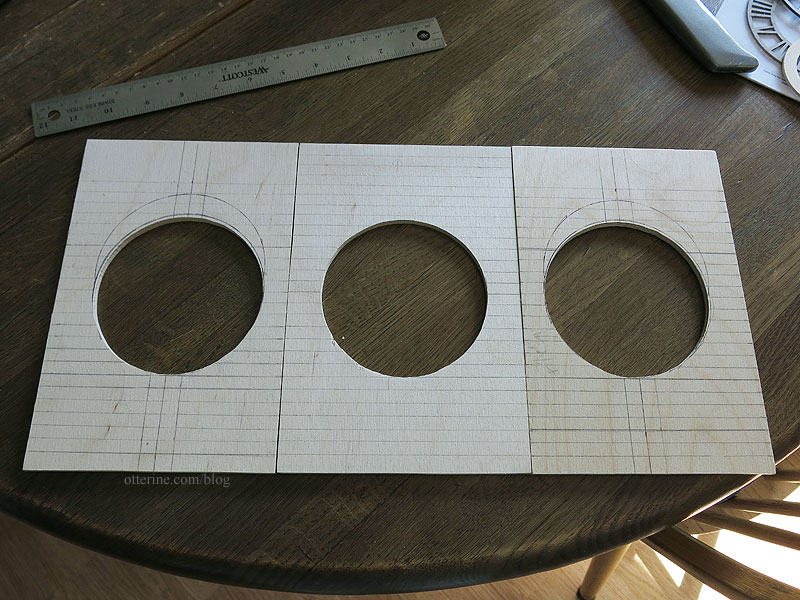
And, the real deal, times three!
I used some cardboard food trays to make the stones around each circular opening, cutting them to fit precisely. At this point, all pieces were marked according to which hole they fit and in which direction.
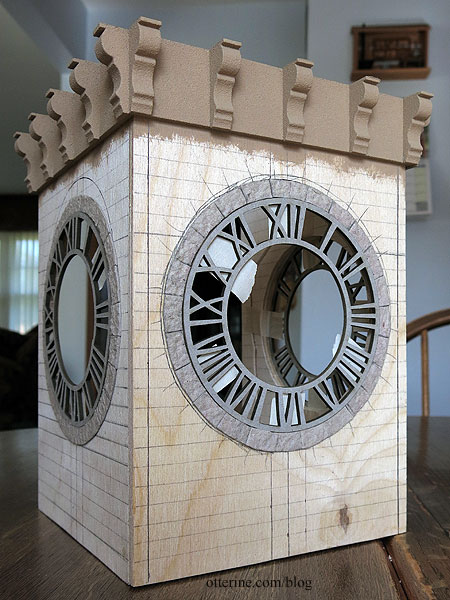
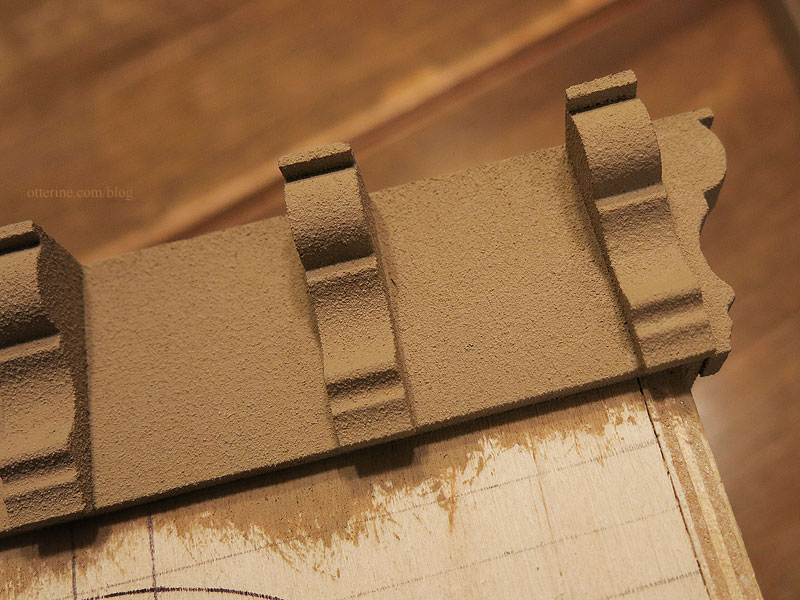
I added a strip of bass wood around the top edge of the clock room and then glued brackets in place. These came from Ross’ Miniatures in North Vancouver and were originally for The Brownstone. I have other plans now.
I needed a base so it wouldn’t be top heavy. I ended up finding a suitable base at Joann. It’s a board with a frame attached to the base.
I added some Real Good Toys railings around the edge. Here’s a look at one of the dry fit photos of the build progress.
I sprayed the base, railings and brackets with stone textured paint.
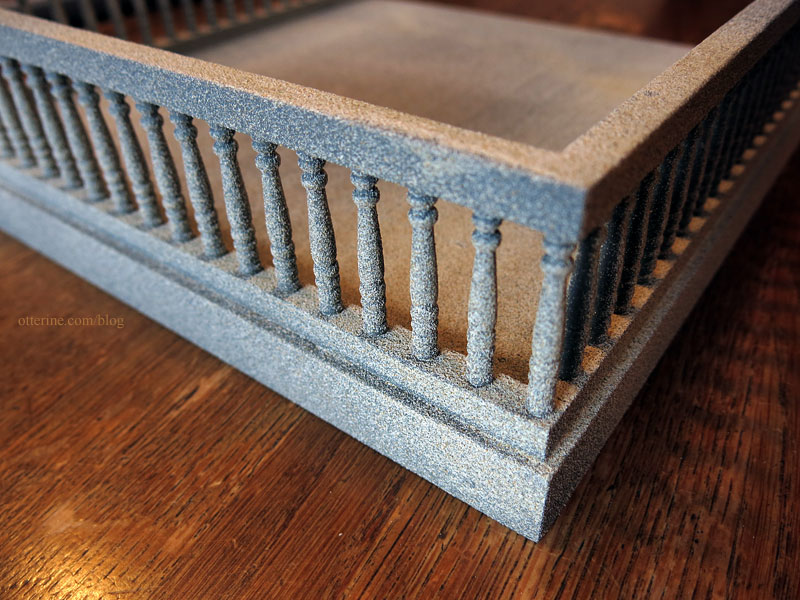
I applied acrylic paint and aging washes over the texture to get the color I was after. Even after the base coat, it had a wonderful stone texture.
The clock room is finished with egg carton stone inside and out. The flooring is scrapbook paper called Vintage Black Checkered by The Paper Studio (from Hobby Lobby). I glued it to a piece of mat board to keep it removable until I was ready to glue it into place. I had to leave a gap at the bottom of each wall to be able to slide the board in and out.
The eave of the attic room is finished with crackled white paint.

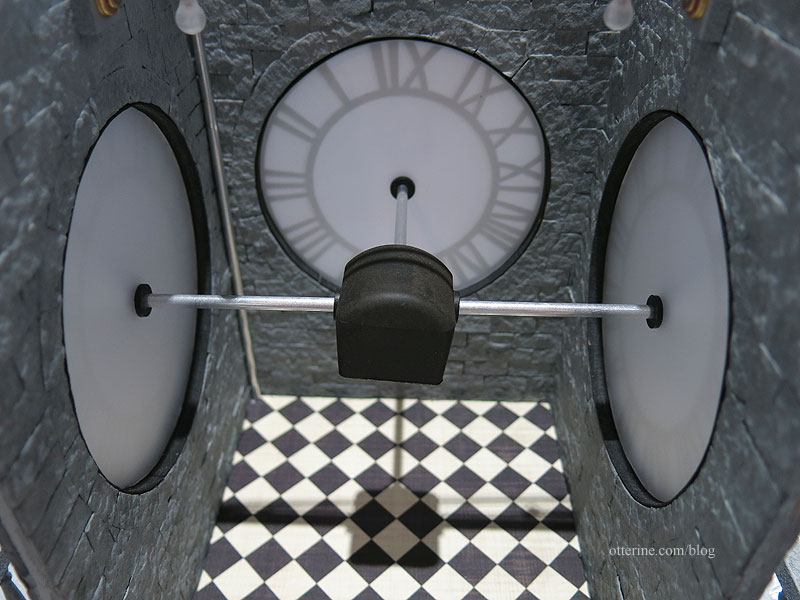
Inside the clock room, I built a faux motor and stand from a plastic cap from Ace Hardware, spare pieces of walnut, aluminum tubing and rubber washers. I added some random paint buckets, a toolbox and an old washboard.
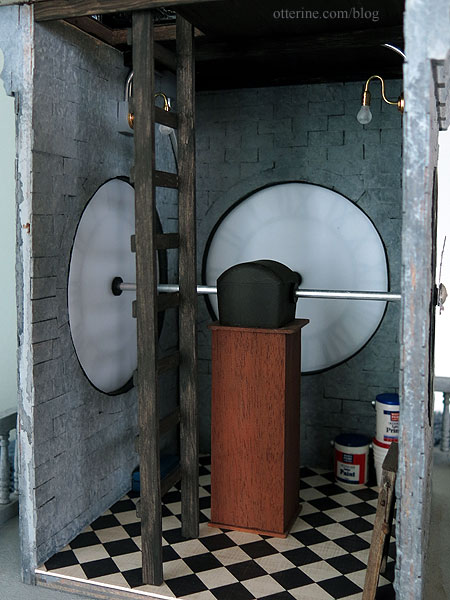
The clock inserts have a layer of thin white polystyrene backed by thicker clear polystyrene. The clear interior circles were also sprayed with Testors frosted glass paint to remove the shine. The interior edges of the clock holes are lined with cardboard strips painted black.
There are finishing nails inserted through the clock faces and into the tubing to hold it all steady. It was like having an extra pair of hands to keep it in place while I situated the base underneath.
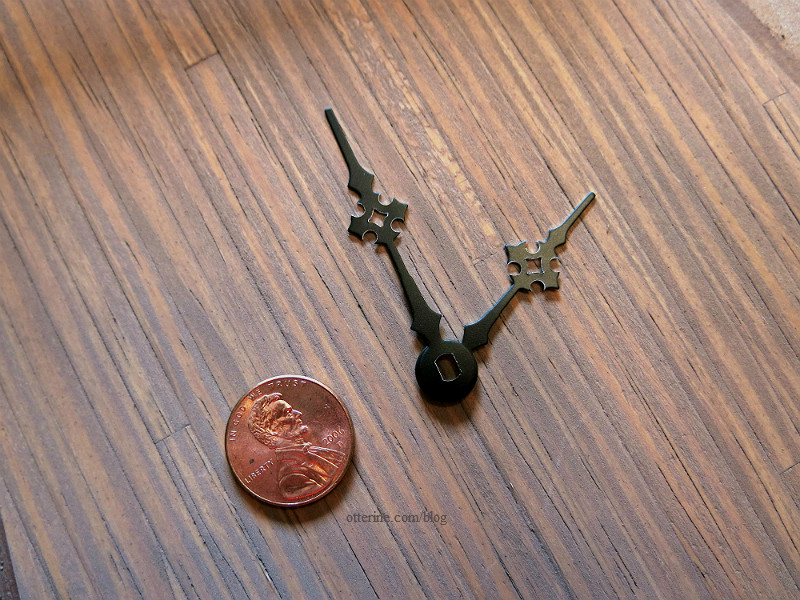
The clock hands from Clockworks have a wonderful Old World feel to them.
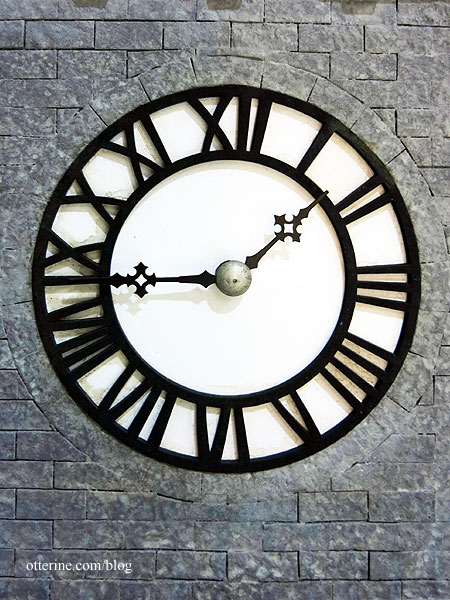
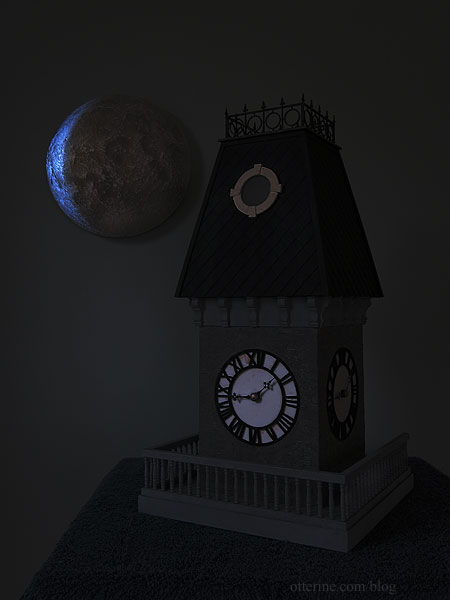
I used rubber washers and miscellaneous findings to finish off the look on the exterior. They are glued in place. I chose 1:45 since it would work well for daytime and nighttime photos.
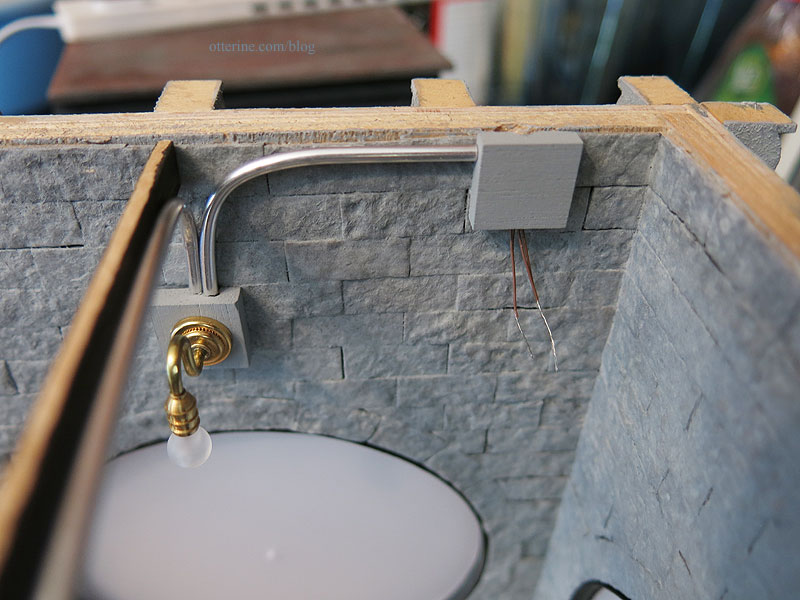
I built a ladder to the attic room and added conduit for the wiring. In this case, the conduit isn’t just for show — all the wiring for this build travels through it out the bottom to the power strip.
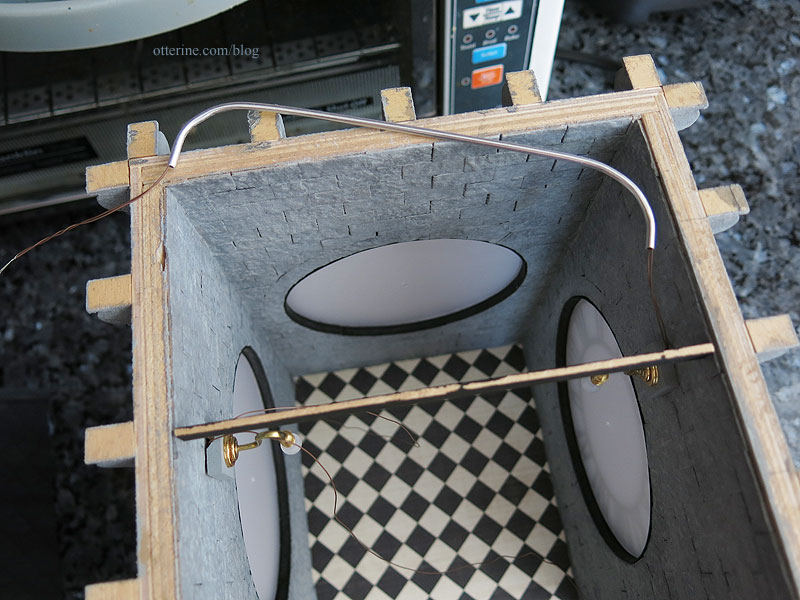
I made junction boxes from wood squares to support the bare bulb fixtures from The Lighting Bug.
For the attic, I wanted a room reminiscent of a storybook illustration. I built the bed from scrap wood and Houseworks finials cut down to size.
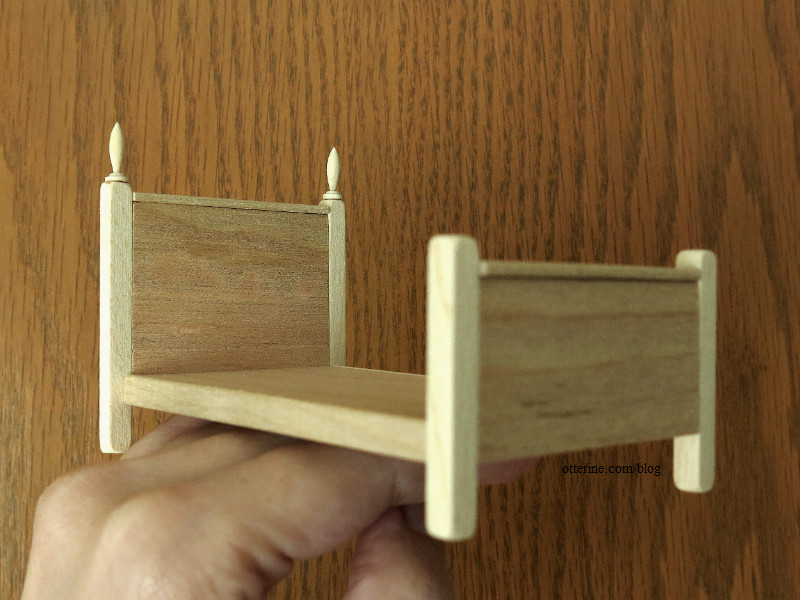
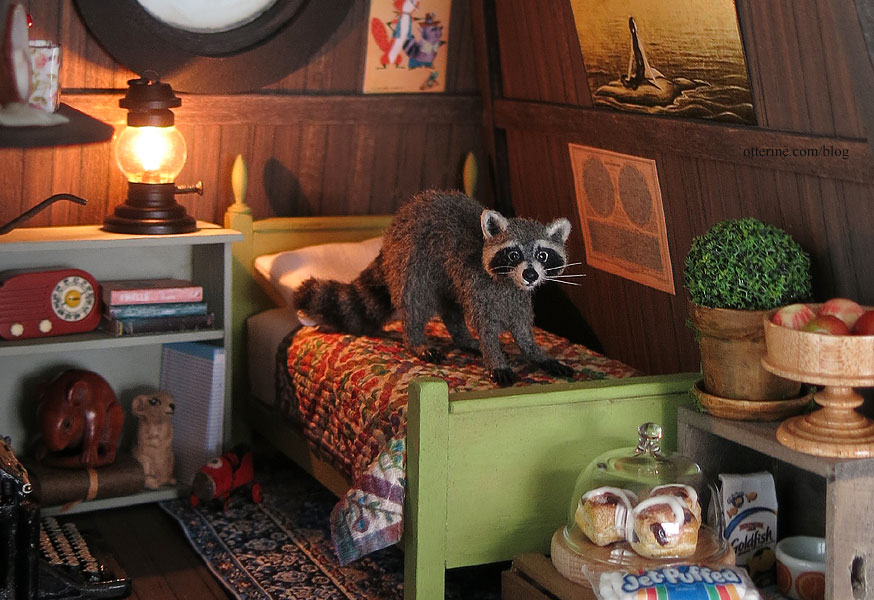
The mattress is a piece of packing foam with millinery batting and white cotton sheets. The bedspread is a custom order from L. Delaney — she sells this one in full scale size, but I needed one Roland-sized. The rug is from Hobby Lobby. The bird painting is by Lyssa, and the wall chart is from L. Delaney. All the other artwork was found online and printed to inspire fantastic stories.
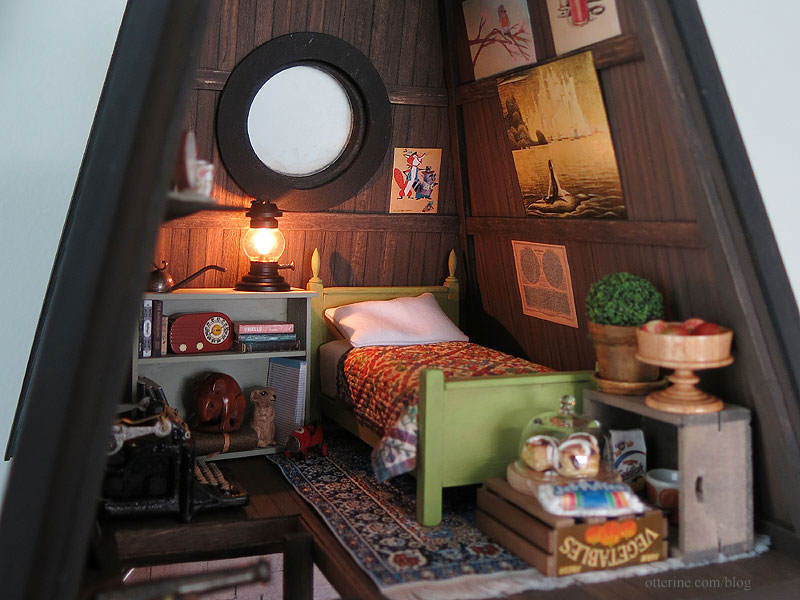
Roland the raccoon is a fine miniature made by Steve Panner. The marshmallows are from LugArt Petit, and the hot cross buns are from Greenleaf member Amy. The goldfish crackers are by Cindy at Snowfern Clover. The jam pots are from Something Tiny – one in orange and one in gooseberry pattern. My friend Debora sent me the turned bowl, and I filled it with mini apples. The lantern is from The Dolls House Emporium, and the racecar was made by Andrea Thieck.
Yes, there are tiny goldfish crackers inside that bag. Well, at least for a little while longer….

I built a shelf to hold some other collected goodies.
The cat jar, bird and mug are by Jane Graber. The tins are from LugArt Petit, and the shell sculpture is from Marco Island Shells. I built the bookcase not only to hold minis but to hide the wiring for the lantern. Some of the books are purchased, some were made by me for previous builds, some were gifts. The carved bead is from Bill, who made the wonderful items for Walnut Bay Light, and the mouse statue came from a mini swap. The vintage radio is from Halls Miniature Clocks, and the watering can is from Wright Guide Miniatures.
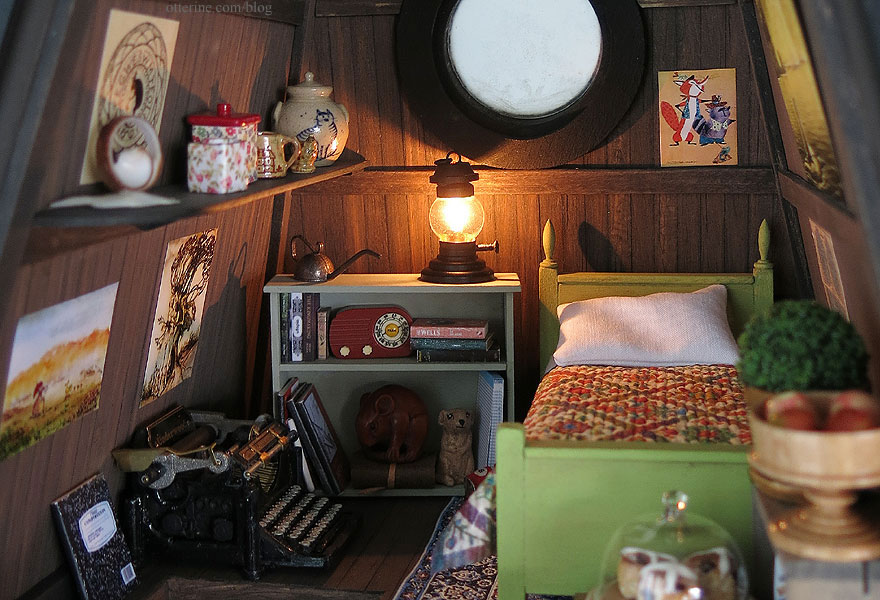
The 1908 Underwood Typewriter is by Ken Byers of Shaker Works West.

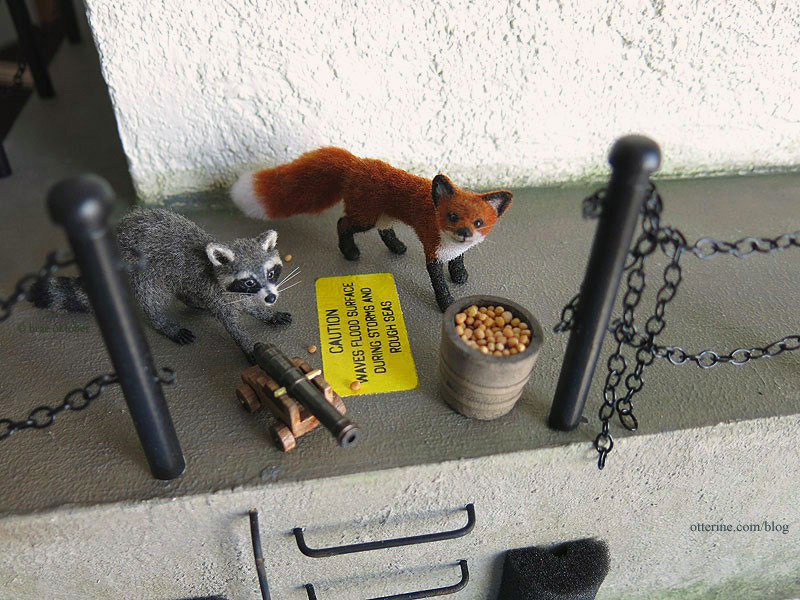
Remember the shenanigans Roland and Sanford got into with that cannon?
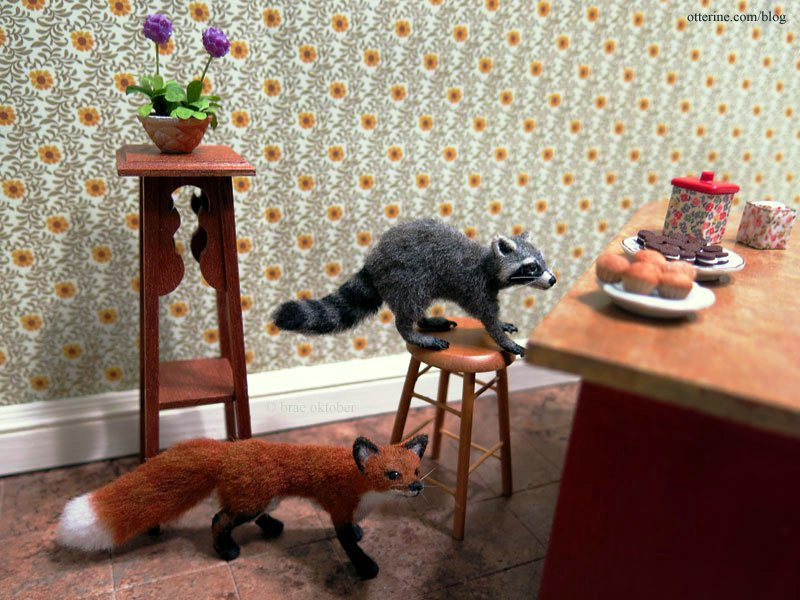
You might also recall where he got those lovely tins. :D
And, lastly, there’s the huge moon hanging in the sky. That is Uncle Milton’s Moon in My Room. It’s a 10″ diameter textured moon that you hang on the wall. It’s wonderful as a backdrop.
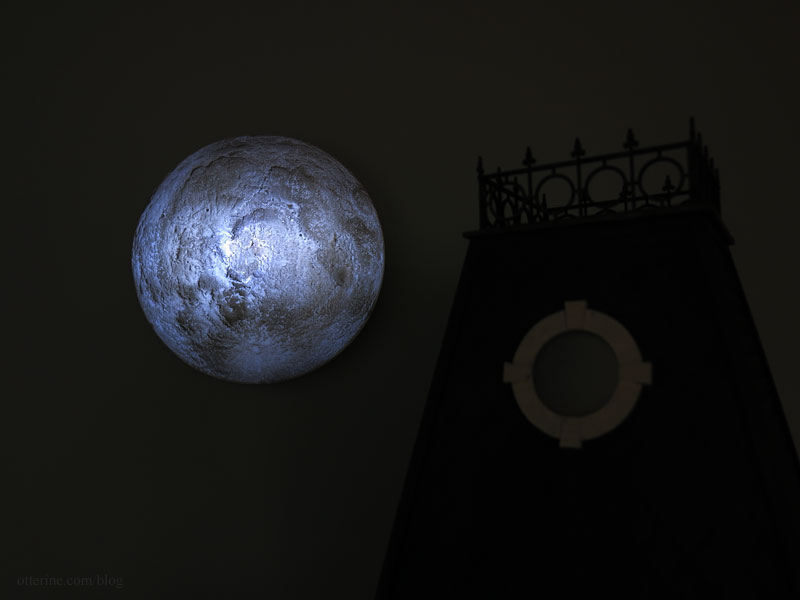
I especially like that you can display all the phases of the moon.
I hope you’ve enjoyed Roland’s Retreat. It was a great, short build to keep me sane in the midst of packing up the old place, staying at my parents’ in the interim and moving into the new place. We’re nowhere near close to being settled, but I hope to be on to the next mini build shortly!
————–
To see all 14 entries, click here. Votes were cast by “liking” the first photo of each contestant’s entry to determine the five finalists. The judges at Real Good Toys then selected the top three winners and announced the results two days later.
Roland’s Retreat made it to the final round and took 1st place! :D Hooray!!!
Categories: Roland's Retreat
November 12, 2014 | 0 commentsMoon in My Room
I always use backdrops behind windows and doors when photographing interior miniature rooms. A few years back, I thought about getting one of the Lemax light up moon accessories that they had for their Halloween town. I never got around to it since I wasn’t sure how well it would work as it would have to be propped somehow.
I then ran across Uncle Milton’s Moon in My Room. It’s a 10″ diameter textured moon that you hang on the wall.
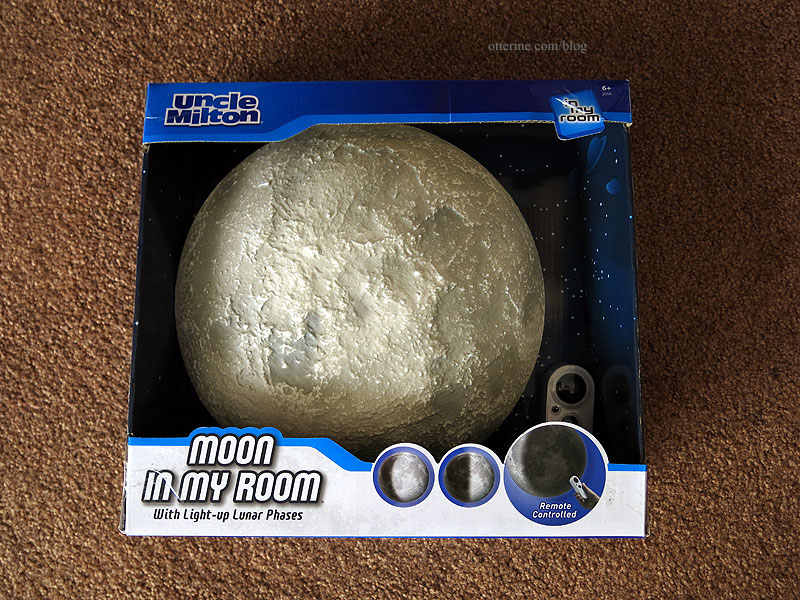
It comes with a remote so you can manually control the phases of the moon. There is also an automatic setting that plays for half an hour.

The first one I bought had off coloration and a brownish spot in the middle. It was also easy to see the delineation between the phases when lighted, so I returned it and tried again.

The second one was much better. It had better shadows and the spot in the middle was less noticeable. You also couldn’t see obvious lines when the moon was lighted in full.


Categories: Roland's Retreat
November 8, 2014 | 0 comments


NOTE: All content on otterine.com is copyrighted and may not be reproduced in part or in whole. It takes a lot of time and effort to write and photograph for my blog. Please ask permission before reproducing any of my content. (More on copyright)

Roland’s Retreat
If you’ve ever wondered what that scratching and clicking is in the attic, it’s just Roland Sneakypants up late typing away on the Underwood as he writes his next best-seller. :D
Well, when he isn’t jumping on the bed.
He has everything he could need from a comfy bed to a modest kitchen area with snacks to a workspace.
At least he doesn’t have to deal with the distraction of an hourly chime. It used to work, but no one can figure out how to fix it. I think Roland has something to do with that. ;D
Real Good Toys recently held a mini mini contest called What’s in Your Attic? Each participant was to purchase their ready-made attic tower top.
The rules were simple — buy at least one Attic Tower Top and furnish it with what you may find in your attic. Then there was the dangerous statement, “Use your imagination because there is no right or wrong.”
You know me. I couldn’t just decorate and fill it. So, into the microwave it went! :O
Beep…Beep…Beep…Enjoy Your Meal I took it apart completely, right down to removing the shingles.
I cut an opening in the floor for an added lower room and cut an opening in the front for a new window. From there I made templates of the interior walls and floor to add Houseworks flooring sheets to simulate rafters and floor boards.
After staining and aging, I glued the flooring pieces in place. I cut cross beams from bass wood.
I added a Houseworks round window to the front wall and shingled the exterior with Greenleaf speed shingles in a diamond pattern. As you can see, I applied mine so that it made true diamonds and not an elongated version.
I sprayed the window insert with Testors frosted glass paint. It worked well to create an old, dingy window.
I cut a new roof topper from 1/8″ plywood and painted it to mimic copper. I added washes to give it a patina. The widow’s walk added later and not shown here is plastic but worked very well as wrought iron.
I used 1/4″ thick plywood to build the clock tower room that would sit below the attic. I found a set of Tando Creative chipboard clock faces from The Stamproom that worked perfectly for what I had in mind. They are roughly 4.25″ in diameter.
I used those to plan the openings though I later lowered the guidelines before cutting.
I used my Dremel circle cutting guide to get as close as I could to an exact match. Here’s my practice cut.
And, the real deal, times three!
I used some cardboard food trays to make the stones around each circular opening, cutting them to fit precisely. At this point, all pieces were marked according to which hole they fit and in which direction.
I added a strip of bass wood around the top edge of the clock room and then glued brackets in place. These came from Ross’ Miniatures in North Vancouver and were originally for The Brownstone. I have other plans now.
I needed a base so it wouldn’t be top heavy. I ended up finding a suitable base at Joann. It’s a board with a frame attached to the base.
I added some Real Good Toys railings around the edge. Here’s a look at one of the dry fit photos of the build progress.
I sprayed the base, railings and brackets with stone textured paint.
I applied acrylic paint and aging washes over the texture to get the color I was after. Even after the base coat, it had a wonderful stone texture.
The clock room is finished with egg carton stone inside and out. The flooring is scrapbook paper called Vintage Black Checkered by The Paper Studio (from Hobby Lobby). I glued it to a piece of mat board to keep it removable until I was ready to glue it into place. I had to leave a gap at the bottom of each wall to be able to slide the board in and out.
The eave of the attic room is finished with crackled white paint.
Inside the clock room, I built a faux motor and stand from a plastic cap from Ace Hardware, spare pieces of walnut, aluminum tubing and rubber washers. I added some random paint buckets, a toolbox and an old washboard.
The clock inserts have a layer of thin white polystyrene backed by thicker clear polystyrene. The clear interior circles were also sprayed with Testors frosted glass paint to remove the shine. The interior edges of the clock holes are lined with cardboard strips painted black.
There are finishing nails inserted through the clock faces and into the tubing to hold it all steady. It was like having an extra pair of hands to keep it in place while I situated the base underneath.
The clock hands from Clockworks have a wonderful Old World feel to them.
I used rubber washers and miscellaneous findings to finish off the look on the exterior. They are glued in place. I chose 1:45 since it would work well for daytime and nighttime photos.
I built a ladder to the attic room and added conduit for the wiring. In this case, the conduit isn’t just for show — all the wiring for this build travels through it out the bottom to the power strip.
I made junction boxes from wood squares to support the bare bulb fixtures from The Lighting Bug.
For the attic, I wanted a room reminiscent of a storybook illustration. I built the bed from scrap wood and Houseworks finials cut down to size.
The mattress is a piece of packing foam with millinery batting and white cotton sheets. The bedspread is a custom order from L. Delaney — she sells this one in full scale size, but I needed one Roland-sized. The rug is from Hobby Lobby. The bird painting is by Lyssa, and the wall chart is from L. Delaney. All the other artwork was found online and printed to inspire fantastic stories.
Roland the raccoon is a fine miniature made by Steve Panner. The marshmallows are from LugArt Petit, and the hot cross buns are from Greenleaf member Amy. The goldfish crackers are by Cindy at Snowfern Clover. The jam pots are from Something Tiny – one in orange and one in gooseberry pattern. My friend Debora sent me the turned bowl, and I filled it with mini apples. The lantern is from The Dolls House Emporium, and the racecar was made by Andrea Thieck.
Yes, there are tiny goldfish crackers inside that bag. Well, at least for a little while longer….
I built a shelf to hold some other collected goodies.
The cat jar, bird and mug are by Jane Graber. The tins are from LugArt Petit, and the shell sculpture is from Marco Island Shells. I built the bookcase not only to hold minis but to hide the wiring for the lantern. Some of the books are purchased, some were made by me for previous builds, some were gifts. The carved bead is from Bill, who made the wonderful items for Walnut Bay Light, and the mouse statue came from a mini swap. The vintage radio is from Halls Miniature Clocks, and the watering can is from Wright Guide Miniatures.
The 1908 Underwood Typewriter is by Ken Byers of Shaker Works West.
Remember the shenanigans Roland and Sanford got into with that cannon?
You might also recall where he got those lovely tins. :D
And, lastly, there’s the huge moon hanging in the sky. That is Uncle Milton’s Moon in My Room. It’s a 10″ diameter textured moon that you hang on the wall. It’s wonderful as a backdrop.
I especially like that you can display all the phases of the moon.
I hope you’ve enjoyed Roland’s Retreat. It was a great, short build to keep me sane in the midst of packing up the old place, staying at my parents’ in the interim and moving into the new place. We’re nowhere near close to being settled, but I hope to be on to the next mini build shortly!
————–
To see all 14 entries, click here. Votes were cast by “liking” the first photo of each contestant’s entry to determine the five finalists. The judges at Real Good Toys then selected the top three winners and announced the results two days later.Roland’s Retreat made it to the final round and took 1st place! :D Hooray!!!
Categories: Roland's Retreat
November 12, 2014 | 0 commentsMoon in My Room
I always use backdrops behind windows and doors when photographing interior miniature rooms. A few years back, I thought about getting one of the Lemax light up moon accessories that they had for their Halloween town. I never got around to it since I wasn’t sure how well it would work as it would have to be propped somehow.
I then ran across Uncle Milton’s Moon in My Room. It’s a 10″ diameter textured moon that you hang on the wall.
It comes with a remote so you can manually control the phases of the moon. There is also an automatic setting that plays for half an hour.
The first one I bought had off coloration and a brownish spot in the middle. It was also easy to see the delineation between the phases when lighted, so I returned it and tried again.
The second one was much better. It had better shadows and the spot in the middle was less noticeable. You also couldn’t see obvious lines when the moon was lighted in full.
Categories: Roland's Retreat
November 8, 2014 | 0 comments
NOTE: All content on otterine.com is copyrighted and may not be reproduced in part or in whole. It takes a lot of time and effort to write and photograph for my blog. Please ask permission before reproducing any of my content. (More on copyright)