

Otter Cove – a pictorial review
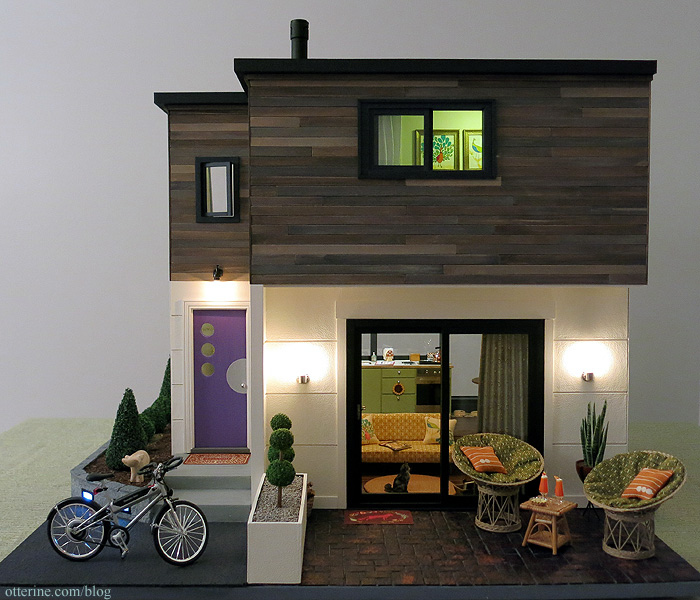
Restful waterfront living is yours to be had at Otter Cove. The luxury of an off-the-beaten-path getaway awaits with its picturesque views and creature comforts. Enjoy a walk along the extensive beaches or through the guided trails along the coast. If the weather is warm, take a nap or read a book on the patio. If the weather is cool, warm up inside by the fire as you listen to music and let your cares fall away. Make your reservations soon! We’ll leave the lava lamp on for you.
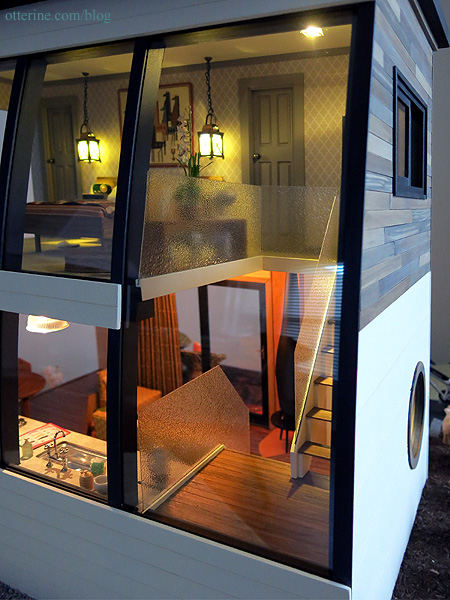
When I mapped out the space, I tried to envision the open back as possibly another wall of large windows. Making glass inserts would have been a challenge for the curved spaces, so I held off on that. Maybe someday I’ll revisit and engineer something. :D
I love that you can still see the kit in the lines of the house, but it’s thoroughly modern…nothing like Milo Valley Farm though they started as the same kit.
Here’s Denise’s City Cottage as it looks built to spec.
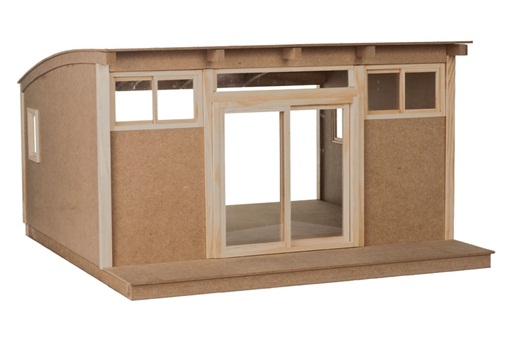
from miniatures.com Structural changes
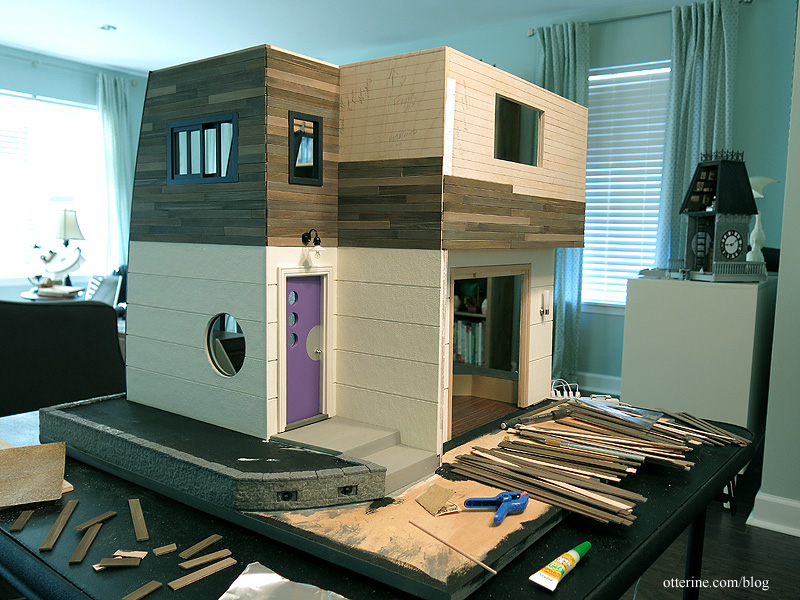
I mentioned previously that I had two ideas when I first bought the kit, one of which was a barn find that turned into Milo Valley Farm. I had nixed that idea for the contest since I needed to change the kit so much it seemed it might be better suited to a different kit. I tried a few layouts for furnishings and even contemplated adding a lower floor, but nothing worked for me until I tipped it over. :D
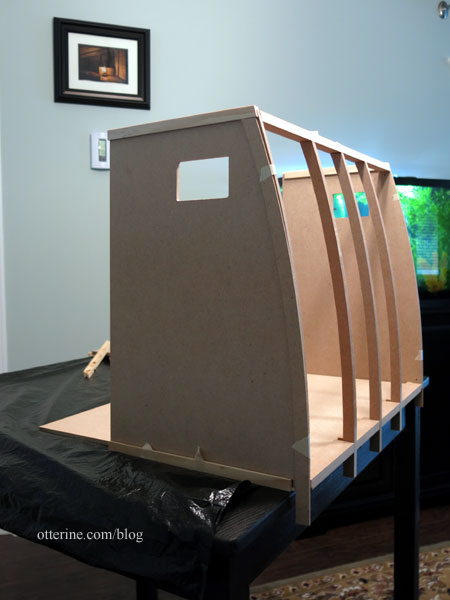
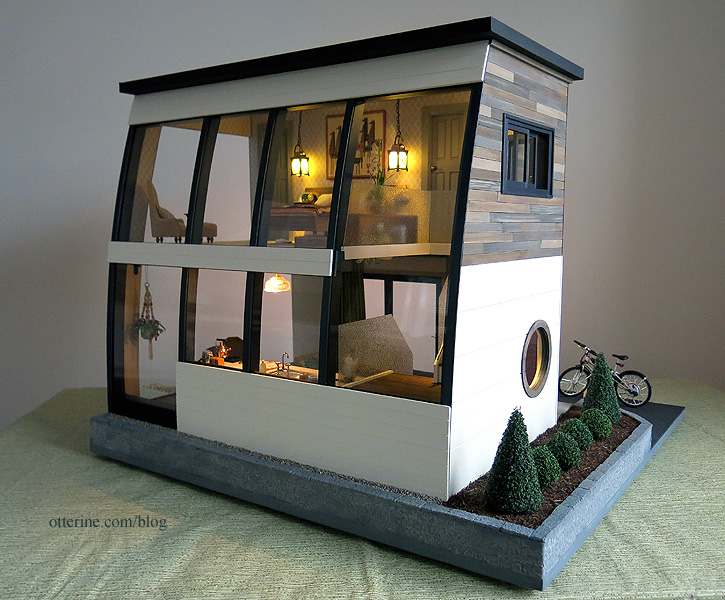
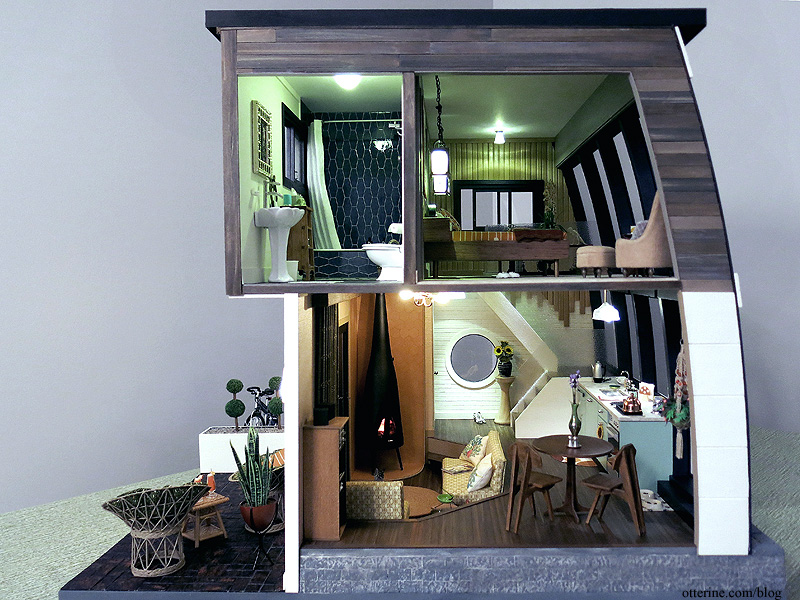
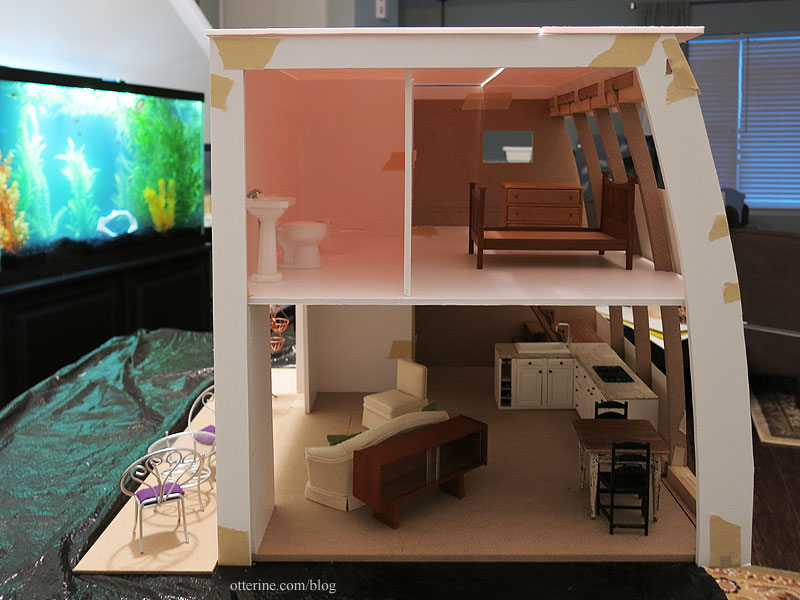
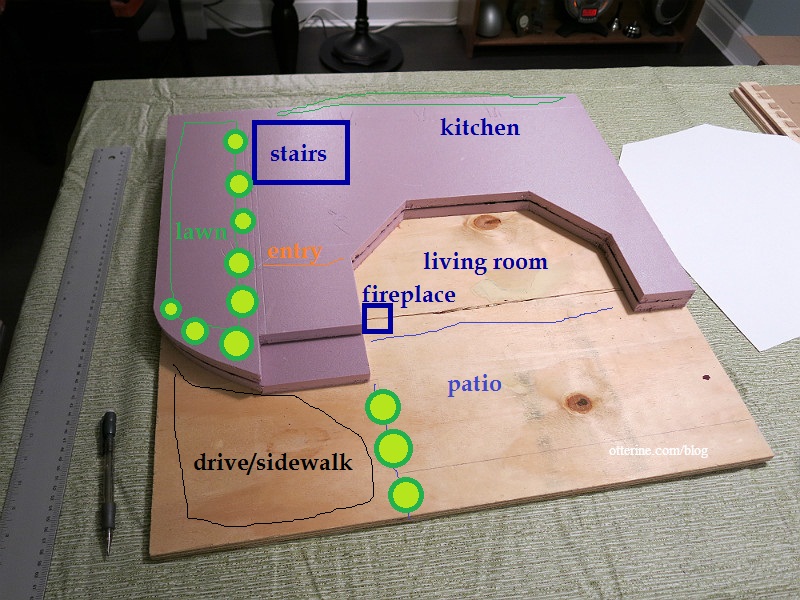
The rafters reminded me of the windows from The Artist’s Studio, so I ran with that idea. This now made it a two story house, though I did need to add 3/4″ in height to make the second floor a viable living space. There wasn’t enough room front to back to have a small kitchen, living room, staircase, bedroom and bath. I also didn’t like the idea of the entire side being open. So, I built out from the side opposite the wall of curved windows. This allowed me to have a sunken living room leading to an outdoor patio and a modest kitchen along the window wall on the first floor. On the second floor, there is a bedroom and full bath with a built-in tub. Here’s one of the original mock-ups; I made the patio larger and the living room smaller from this plan.
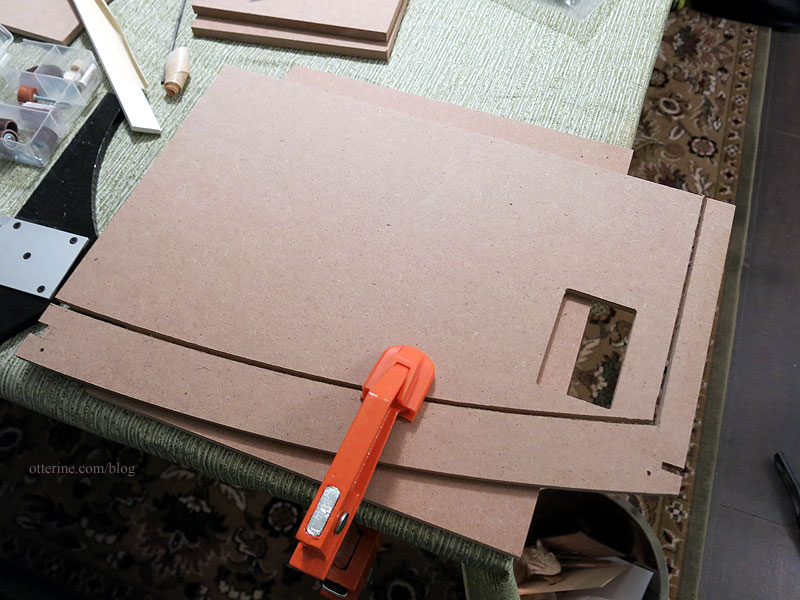
To that end, I needed to open up one side wall to form the back. :] Luckily, using the Dremel Trio edge guide worked. It’s not just for straight edges; it will follow a curve just as well.
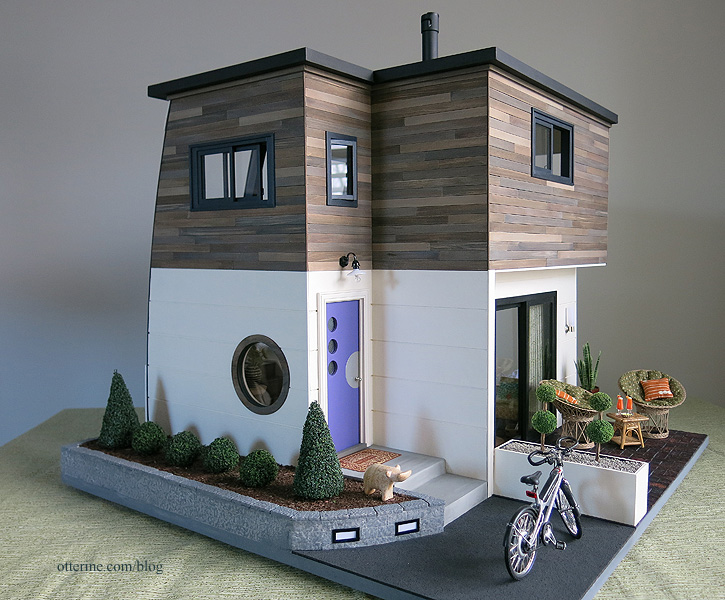
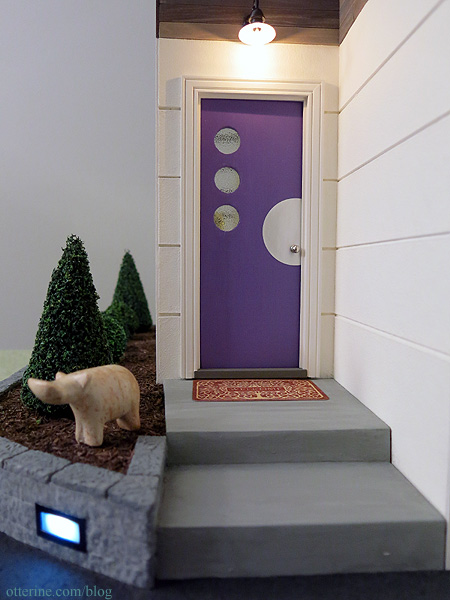
I moved one of the former front windows to the upper level at the top of the stairs. Adjacent to that, I used one of the single casement windows. The other former front window went into the bathroom. I made my own front door (actually tucked in on the side) since I wanted a more modern look for it. My inspiration came from Kropat Interior Design. The overhead lamp is a Meyers Wall Light from HBS; I removed the turnkey from the light and touched up the spot with black paint.
I made the base from two layers of builders foam so I could achieve the sunken living room. This was all glued to a plywood base.
Wall of windows
This photo is only possible with the window inserts removed, otherwise you would see me and my kitchen. :D Even if I dressed in all black, you’d see a Ninja in my kitchen. That’s a lot of reflective surface!
After tipping the kit over onto its side, I had to figure out my wall of windows. Unlike The Artist’s Studio, which had an entire wall of open windows, this build would require some portions to be solid to hide the back of the kitchen cabinets, base of the stairs, floor board and upper beam structure. Here’s the earliest mock-up using paper. I ended up making the wall a bit more open in the end.
To make things easiest, I decided to make the window inserts go from top to bottom and built the solid portions to encase them where needed. Plexiglass will bend in long strips but wants to stay straight in short runs. Having long pieces would allow for a gentle curve.
Once the window channels were in place, I used the original scored roof board to fill in the areas that needed to be covered. I painted these Warm White by Americana, patting the surface with a sponge brush to eliminate brush strokes. The scored lines look like siding.
One thing that bothered me was the idea of not being able to photograph the interior without glass glare (or my reflection looming there). But, once the roof was on, there would be no way to slide the window panes out of their pockets. It hit me late in the game — a week before the deadline — to add a slot in the roof to remove the panes. It’s not as elegantly executed as it would have been had I planned ahead for it…but it works! The windows fit through the slot in the roof and slide into the channels. The roof cork covers the hole and can be peeled back as needed.
The entire roof is topped with cork painted black, leaving a hole to access the wiring closet. It’s not really usable as an electrical access, but it’s better than nothing and it helped with wiring the lights attached to the roof board. The chimney is made from bits and bobs.

Entryway and staircase
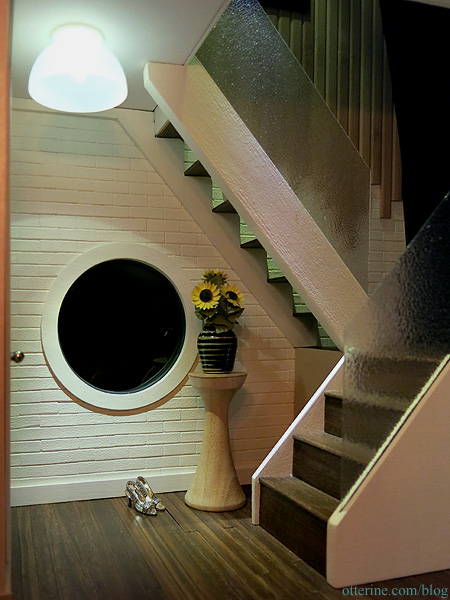
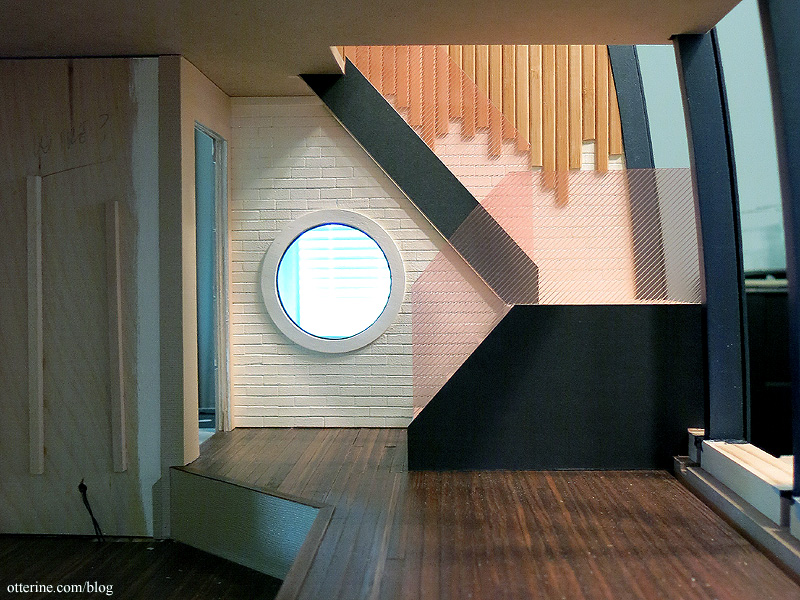
I added a circular window to mimic the circular windows in the front door and break up the dead space of the entryway. I used my wood brick technique for this portion of the interior, painted the same warm white as the exterior. The sunflowers were made from a Bonnie Lavish kit, and the vase is from Manor House Miniatures. The turned stand was made by Bill, and the shoes were purchased at the Wee “c” Miniatures Show. The foyer light is a huge modern fixture sent from Daphne. I wondered about using such a large fixture, but the fact that it is white and coordinates with the circular theme made it work well in the space.
The two-story front wall has what I call waterfall bamboo paneling made from a bamboo table runner. I’ve painted this material in the past, but this time I left it untouched. The paneling is floor to ceiling on the upper floor but cascades in a random pattern next to the open staircase. It was almost a shame to block the view with a floor board, so I might revisit this design for a future build where there is nothing in the way.
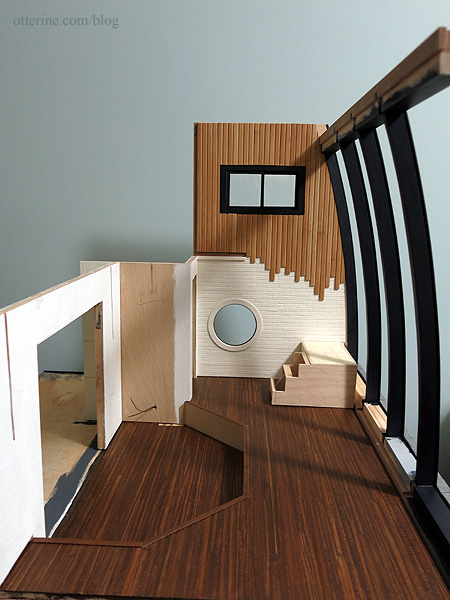
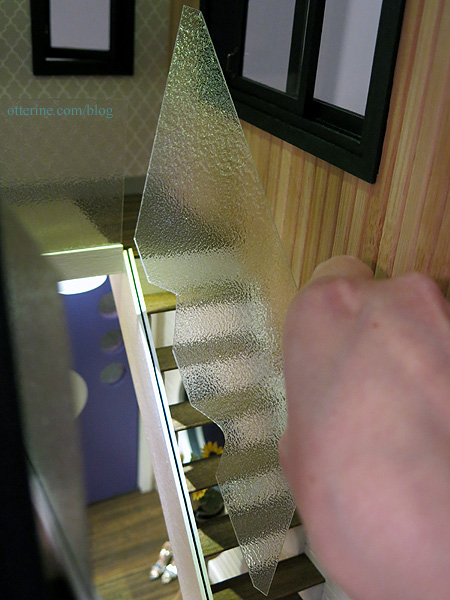
With that in place, I could work on the staircase. The staircase is a full turnaround set of stairs with rippled glass railings made from Rippled Water Sheet.
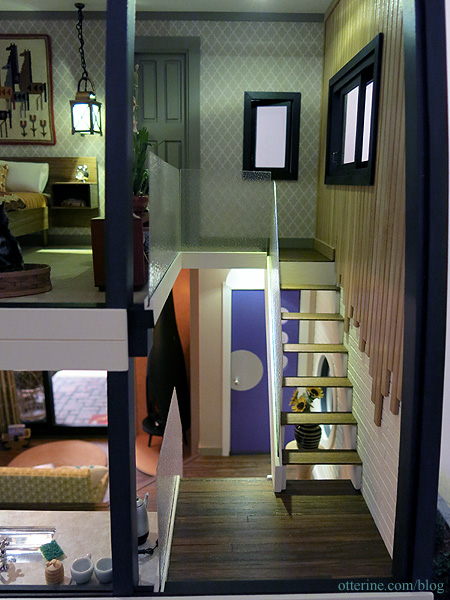
The railings required a decent amount of engineering. The lower stairs are enclosed, so that was fairly straightforward. The upper portion required a bit more finesse. There are no risers on the upper stairs except for the top one. I like the light that carries through the open space.

It was a fair amount of maths, but I love the way it turned out. :D
Kitchen
I seem to build a lot of vacation rentals and tourist spots. Since this is also a vacation house, I went with a modest efficiency kitchen. I included a sink, range and stove, and half fridge. The drawers and doors are non-functioning but they work well for looks. The under-counter half fridge has a handle made from an ink pen clip.
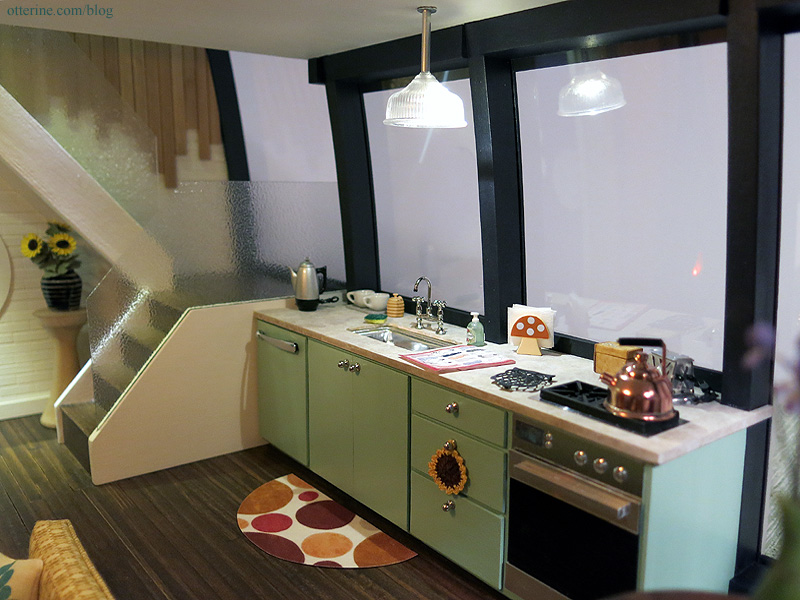
The light over the sink was bashed from a Lundby lamp using aluminum tubing and a NovaLyte LED. The rug is a design by Safavieh printed on Velour Card Stock from The Crafty PC (now out of business). The crocheted sunflower potholder is by Blohm Design.
The counter is basswood painted to look like formica. The stainless steel sink is by Houseworks by I added a drain from my stash and a tap from ELF Miniatures. The soap dispenser is from LugArt Petit, and the honey pot is by David Provan.

The stovetop is made from laser cut burners with hobby store aluminum sheet cut to fit underneath. The knobs and oven front parts are from ELF Miniatures, though I cut my own steel top and acrylic door to fit the space.
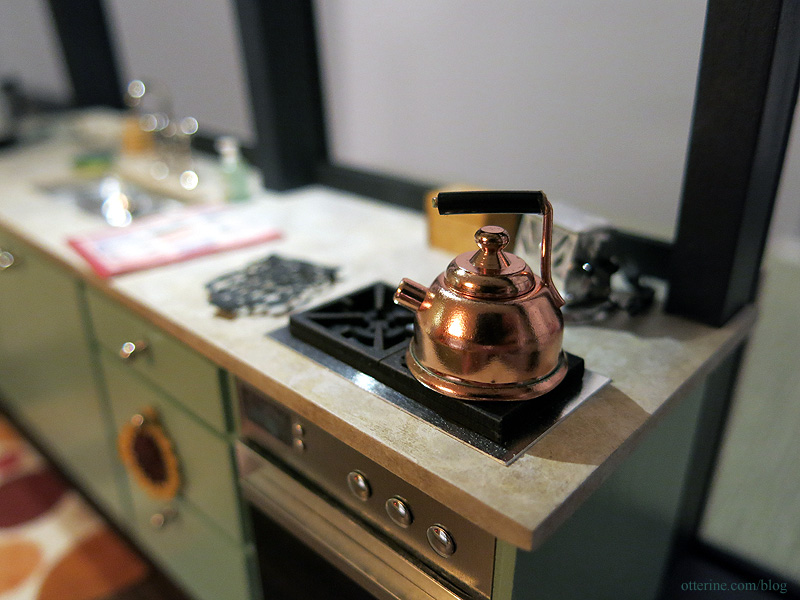
The kitty tea towel is from Marlene, and the owl trivet is by le mini di Pierluigi from The Little Dollhouse Company. The vintage toaster, mushroom napkin holder and recipe box are from eBay.
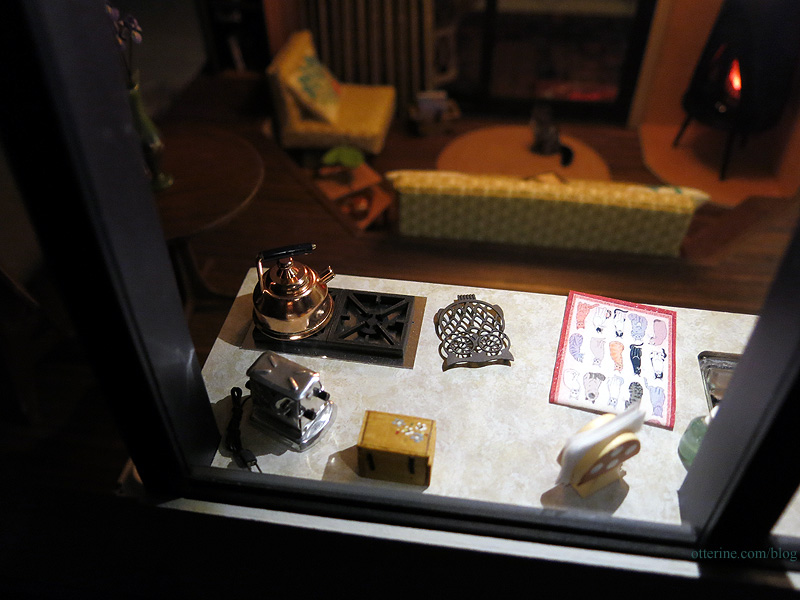
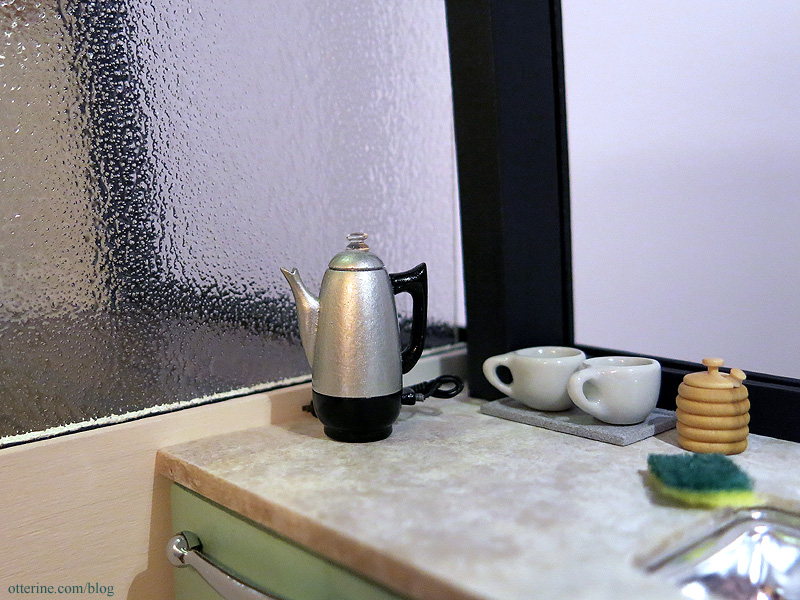
Who remembers the percolator? :D Even though my parents weren’t coffee drinkers, I remember someone in the family having one of these. This is a vintage mini from eBay.
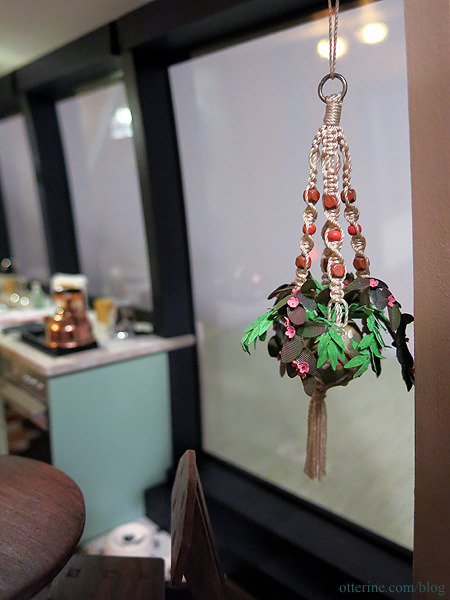
This great macramé hanging planter is from Linda’s Creations.
I built two Arjen Spinhoven Arts & Crafts chair kits for the eating area. I like that Monique put the back on upside down and ended up with a better design than the original, so I did the same. The table is an attempt at a reproduction of a Heywood-Wakefield Cliff House table. Mine is a bit skinnier than the original near the bottom.

It was a challenge to get the wood table and mdf chairs the same color and approximate grain, but I love the way it turned out. The lovely irises are from Patricia Hopkins Studio, the vase is from Vitreus Ignis and the salt and pepper shakers are from Hartland Miniatures.

There’s a small section of floor space off the kitchen just perfect for something interesting. :D One thing I was hoping to have time and room for was the stereo. This is the piece I finished at midnight one day before the deadline. These are components from a 1/12 scale Aoshima Pioneer Project A99 kit.
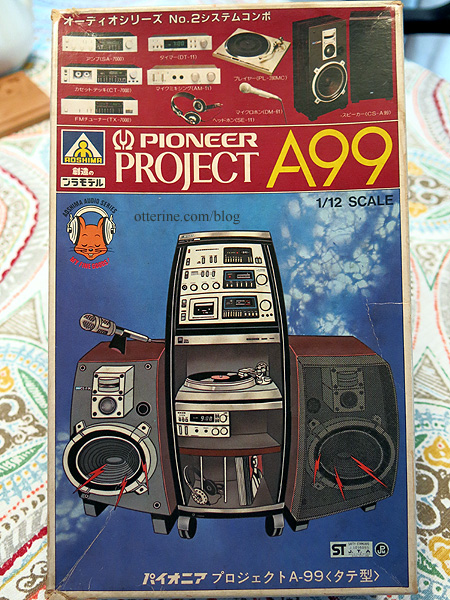
I put together the record player, tape deck, tuner and equalizer. There’s a smaller component I don’t know. The two LPs are from the kit. They were printed on glossy paper backed with cardboard and die cut. The problem is, the die cuts were not on the lines, so only two were really useful at all.
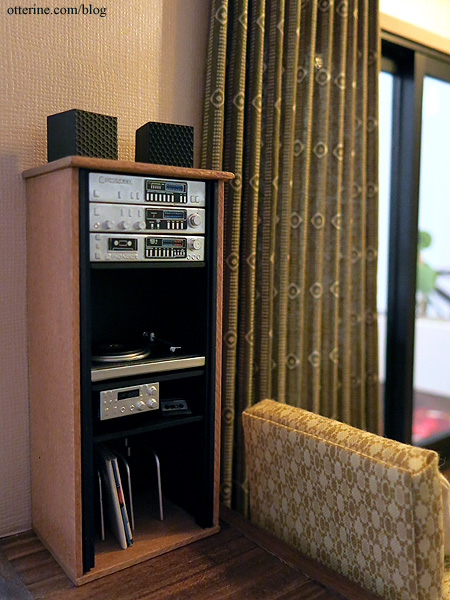
Look at those wee cassettes! :D I could not find a 1/12 scale 8-track player and tapes.

The kit came with a cabinet and huge floor speakers, but there was no room for speakers and the cabinet looked a bit cheap on its own. I made a custom surround to enclose the plastic cabinet, leaving off the door. I also made two cube speakers from wood blocks and textured material from a photo album page. I think it fits the space perfectly. :D
Sunken Living Room
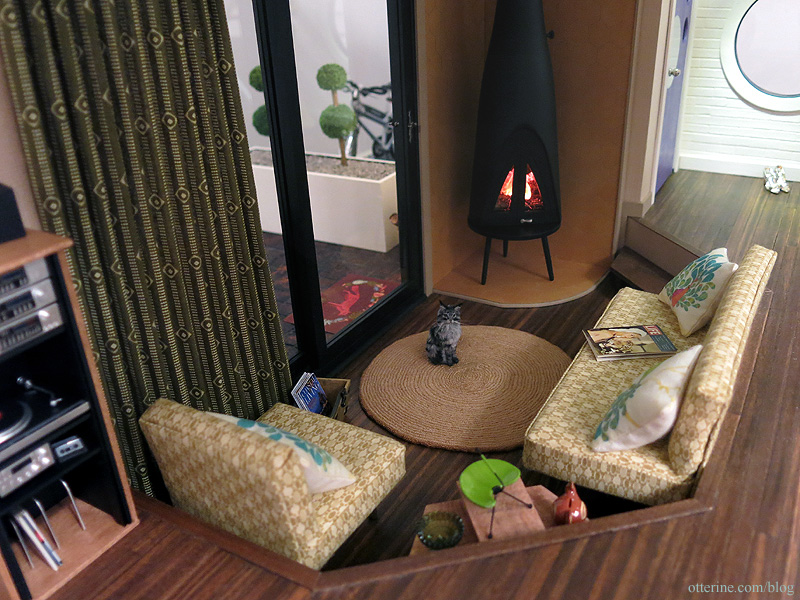
There is one stair step into the sunken living room from the entryway. The modern ceiling fixture is from The Dolls House Emporium.
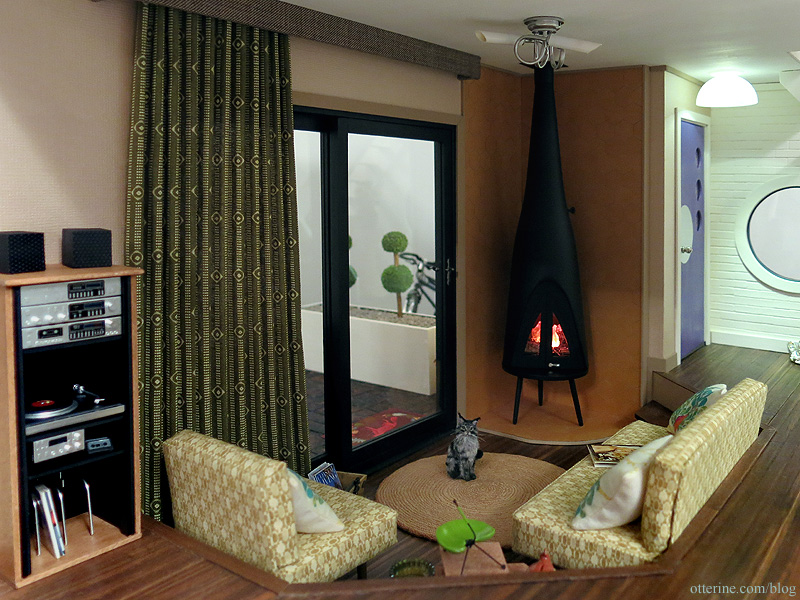
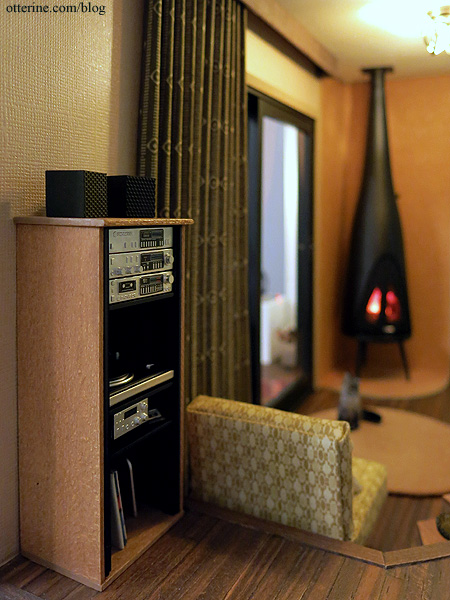
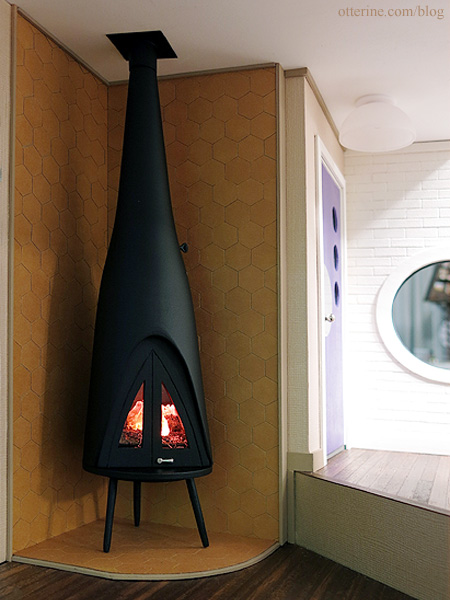
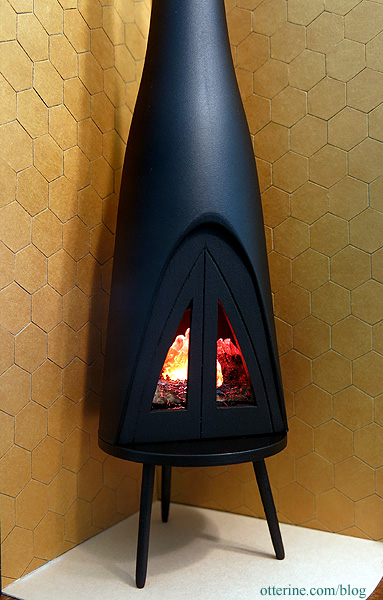
I made a retro stove for those cooler nights. It’s held in place with tension alone. I have it wired through the ceiling with a lot of extra wire looped inside the stove in case I need to remove it to replace the red bulb inside. The base is separate from the main stove; the flange top and fire insert are also removable. My inspiration was the Invicta Pow Wow wood stove. The surround is made from scrapbook paper cut with a hexagon paper punch. The damper handle is from a defunct Chrysnbon kit that’s being used for parts.
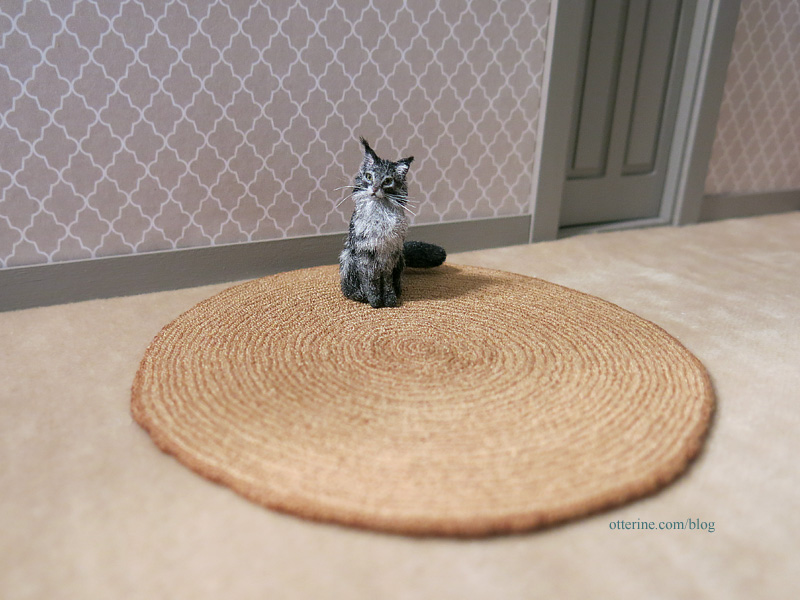
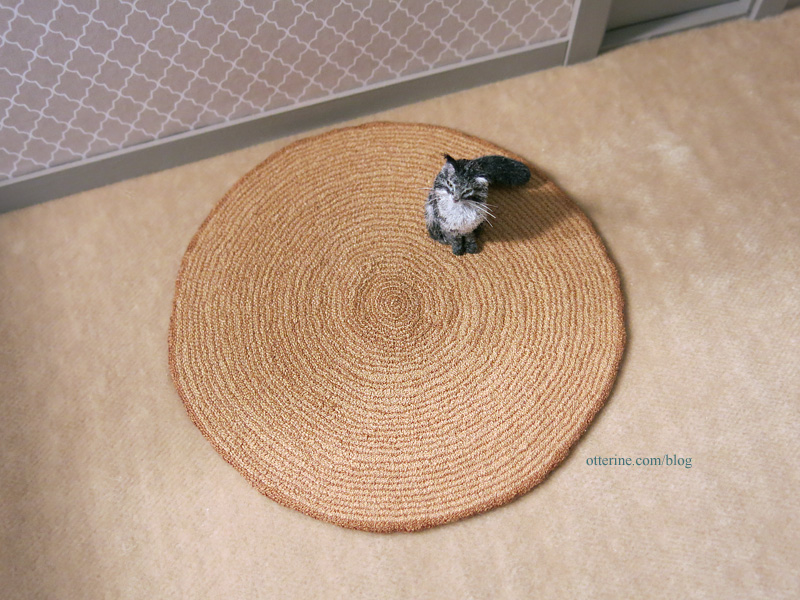
The Tree Ring rug was made freehand using French knots and was based on an original printed rug by Dutch designer Yvette Laduk called the Woody Wood Carpet. :D I stitched this rug in 77 hours over the course of 61 days. Yeow. Isabeau is a beautifully made Maine Coon cat by Maya Schippl.
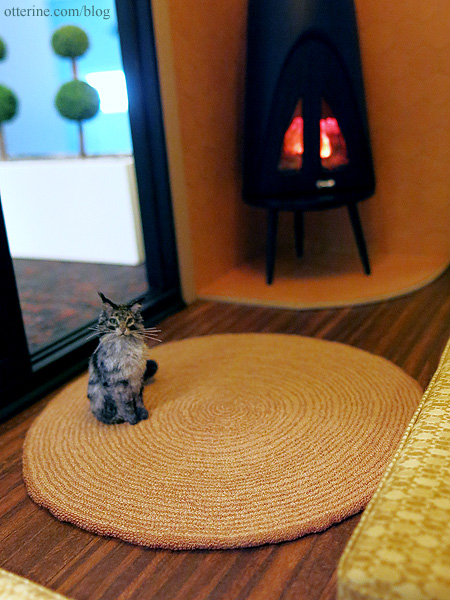
There are 37 rings to the rug, and each of those rings is made from 1-4 rows of light tan (DMC 422) and 1 row of brown (DMC 167). The outer edge bark is the same brown from the ring portion with a border edge in a slightly darker brown (DMC 869).
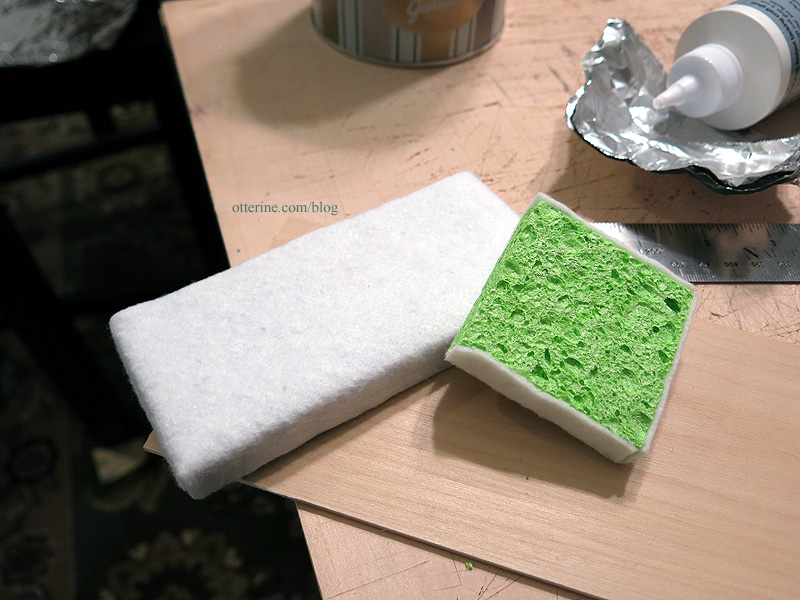
The sofa and chair are based on a general search of armless mid century modern furnishings. The pillows were made using Mod Peacock artwork by Sue Schlabach.
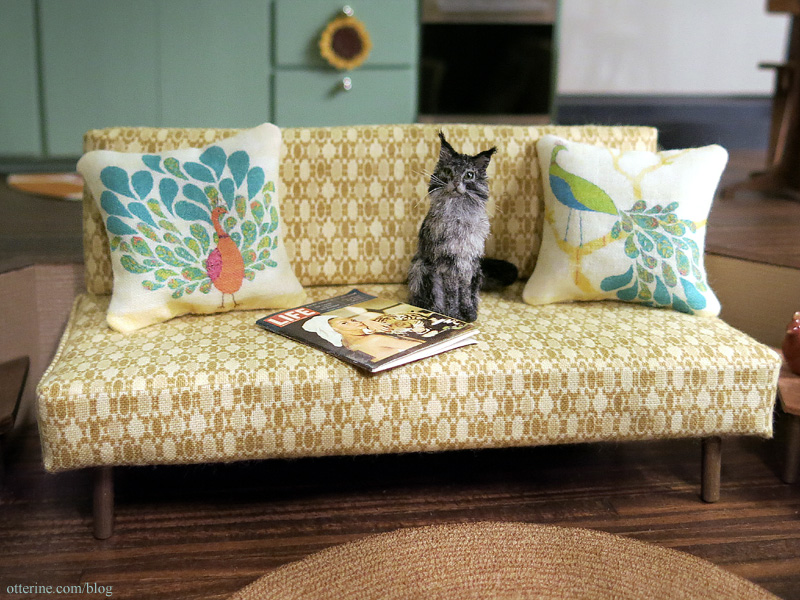
I made them from sponges, batting, fabric and wood.
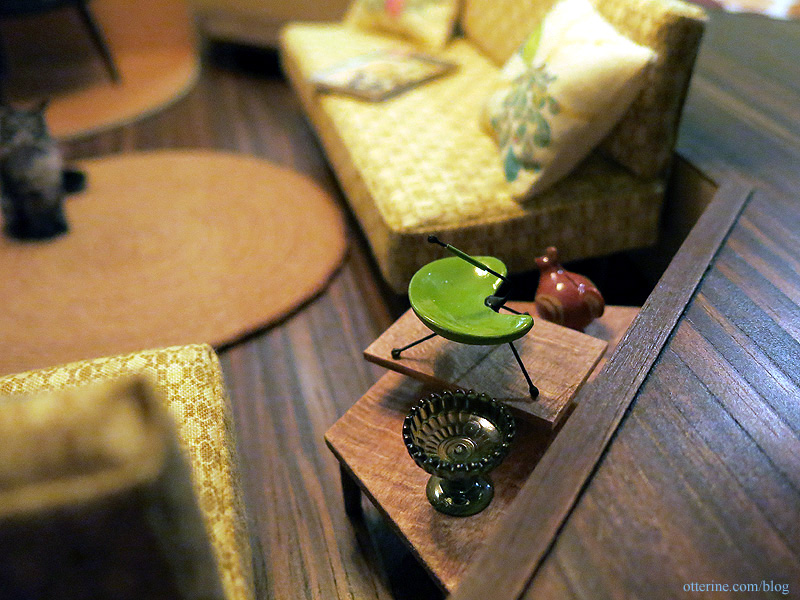
I made the end table from scrap wood, making a shelf for the mod ashtray by Atomic Miniature. There’s a Chrysnbon candy dish from Hartland Miniatures and a Jane Graber bird bank as well.
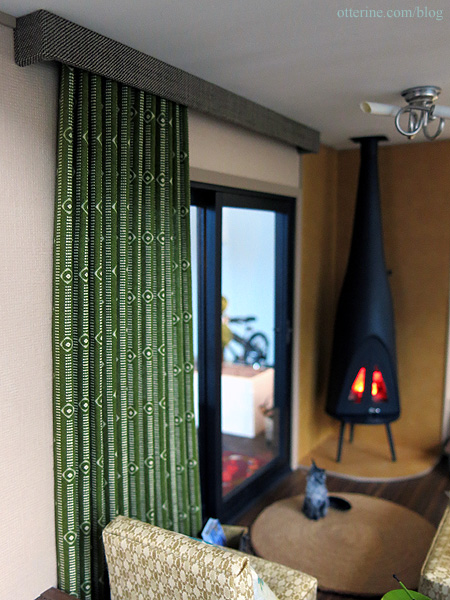
The drapery panel was pleated using my vintage Millie August Magic Mini pleating tool. I chose the fabric for its vague green hue reminiscent of vintage interiors. The valance is made from scrap wood and covered in fabric. The valance is glued to the wall, but the drapery panel just slips into place underneath so it can be removed for cleaning or replacement.
Come have a seat. :D
Bedroom with a view
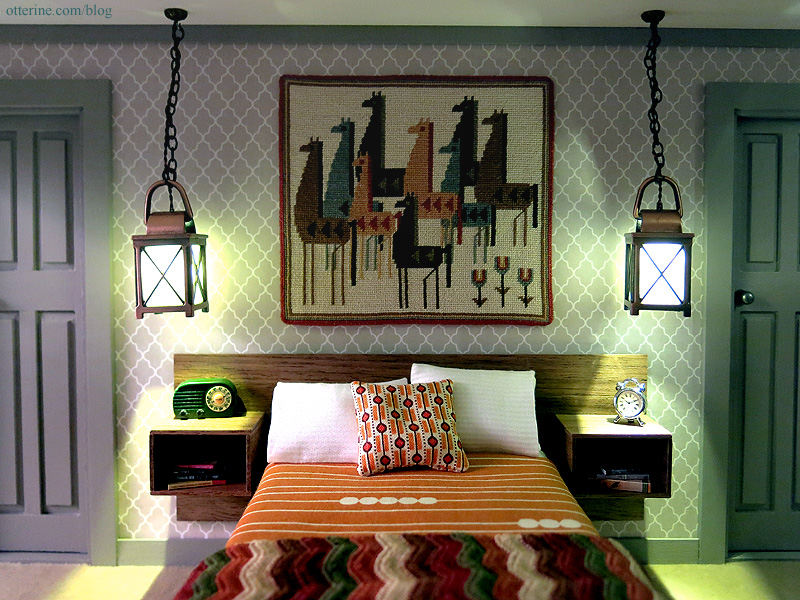
The bedroom is carpeted, which is a first for me in any of my custom builds. The carpet here is installed with Elmer’s acid free double sided tape, as recommended. The wallpaper is Tan Wag Pattern by Recollections. The doors and trim are painted Battleship by Americana. It’s a satin paint that saves the time of sealing and offers a lovely sheen.
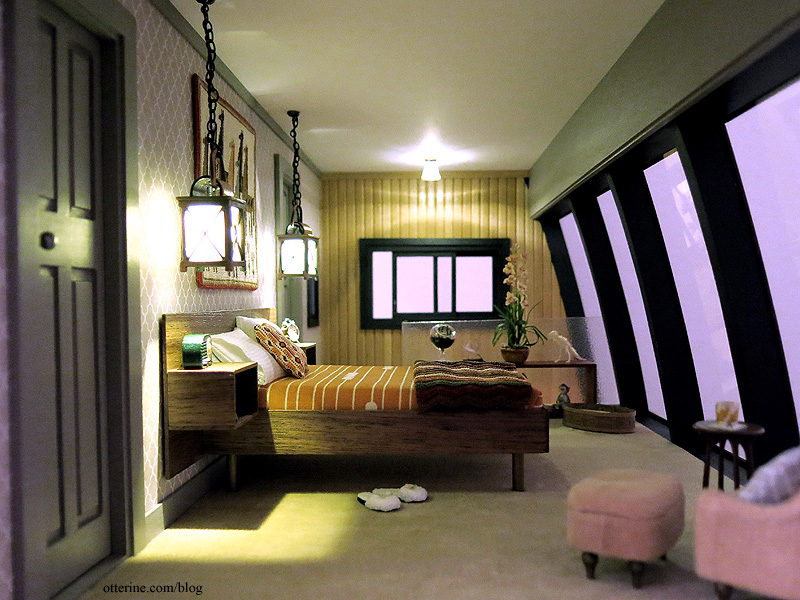
The lanterns were 12V to begin with, but I rewired them for a couple of reasons. First, the hue on these lamps didn’t go well with the hue of the hall lamp at the top of the stairs. The 12V lights didn’t put off enough light, and the bulbs while replaceable were not any kind that I recognized (I’m not sure where I bought these). I replaced the chain, added a ceiling plate and wire hook, and painted the wires of the new LED.
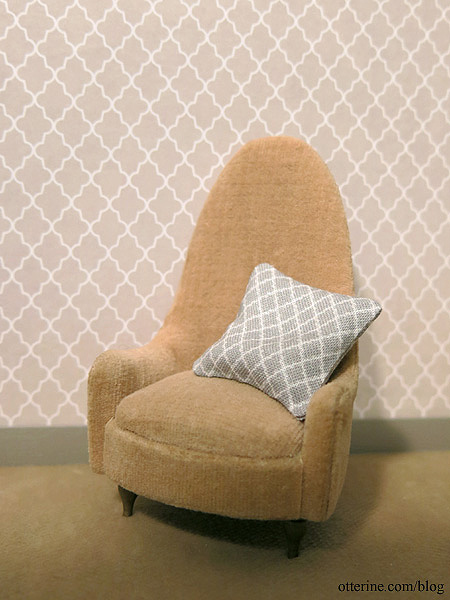
The slipper chair and ottoman are vintage Petite Princess pieces. Because this is a smallish build, the smaller scale of these pieces work well in the space and makes the room seem larger. I made a smaller than usual pillow to fit the Petite Princess slipper chair. It’s 1.25″ square instead of the usual 1.5″ square. You wouldn’t think it would make much of a difference, but it does when it comes to turning the fabric through a smaller hole.
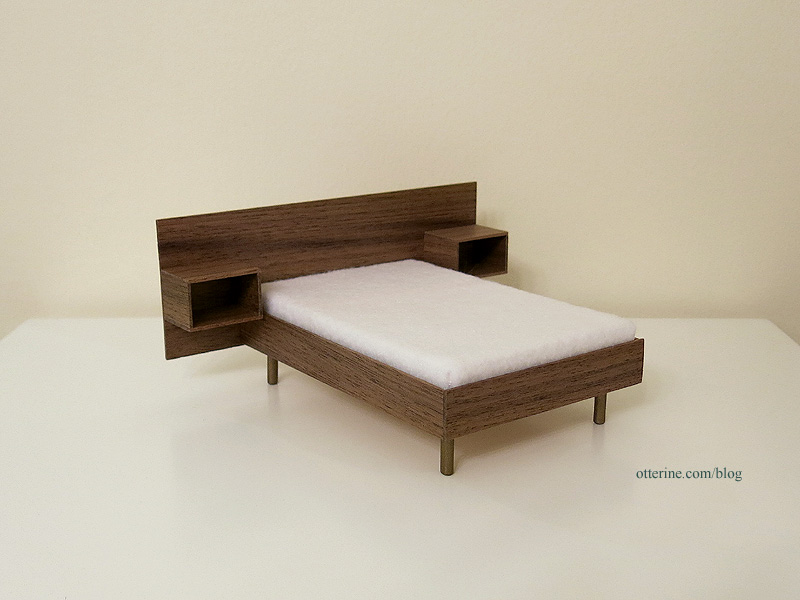
The bed is a scratch build based on a standard mid century modern design. It’s made from walnut with bronze painted wood legs and a foam core board mattress.
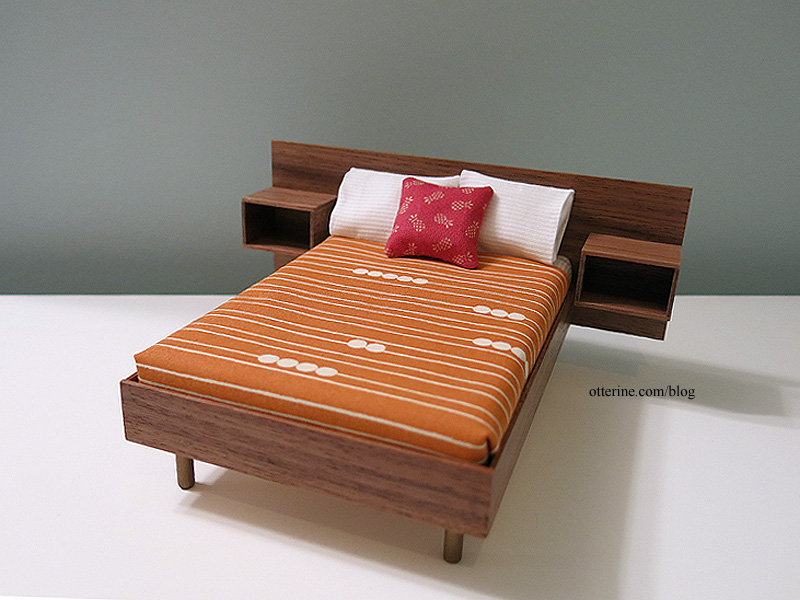
I went with mod orange bedding to coordinate with the copper lanterns and wall tapestry. I later swapped out the red pineapple pillow.
The afghan is by Mary at Roslyn Treasures.
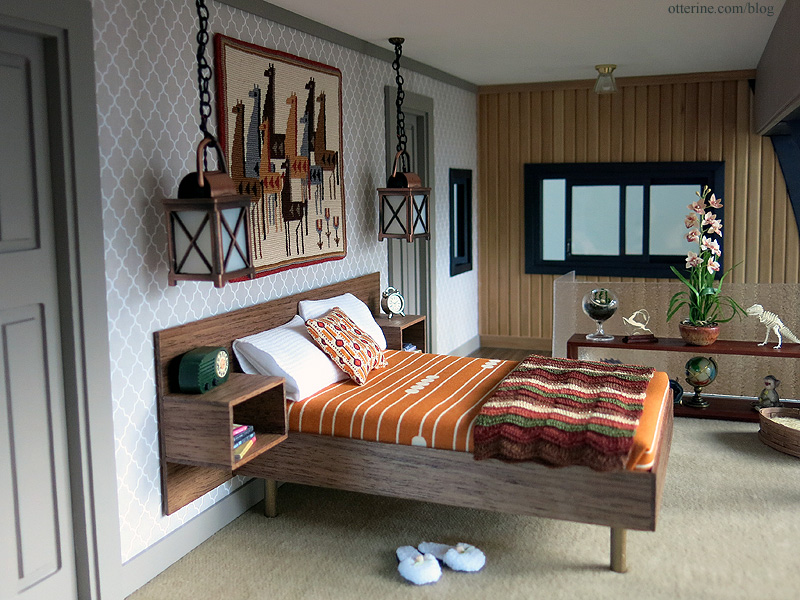
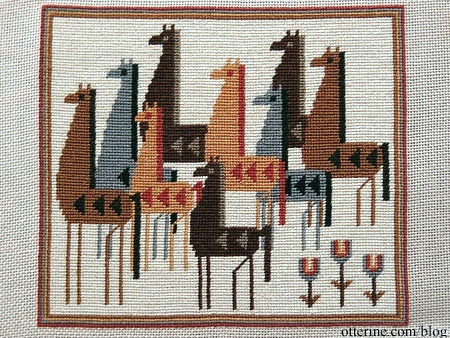
The Nine Horses tapestry was stitched using half cross-stitch on 32ct Jobelan. Total stitching time was 38.5 hours. It measures 4 x 3.5 inches, and the design based on a vintage original.
I’ve added some books in the end table shelves. The radio is from Halls Miniature Clocks, and the clock is from Manor House Minis.
The closet door is duct taped closed with only dead space behind it. I didn’t want to build a closet interior you could never see or be able to directly access, but I didn’t want an absurdly long bathroom either. So, I enclosed the unneeded space and put a narrow door on it to serve as a closet. The wiring empties into this space so while it’s not used space in 1:12 scale, it is in real life.
Since there was the illusion of a closet, I didn’t really need a dresser clogging up the bedroom space. I kept the minimalist look with a low open shelf by minisx2. The pineapple bookends and globe are from HBS, the geode is from Stewart Dollhouse Creations, and the monkey statue was purchased awhile back.
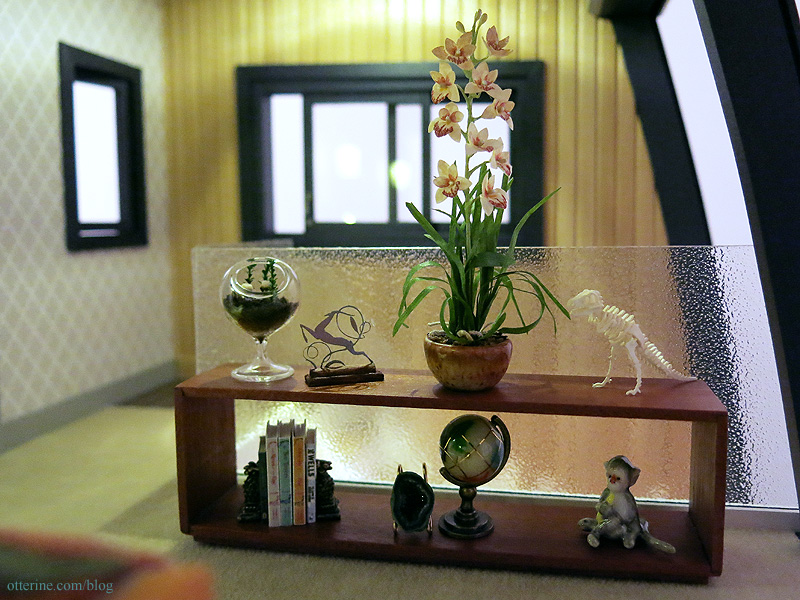
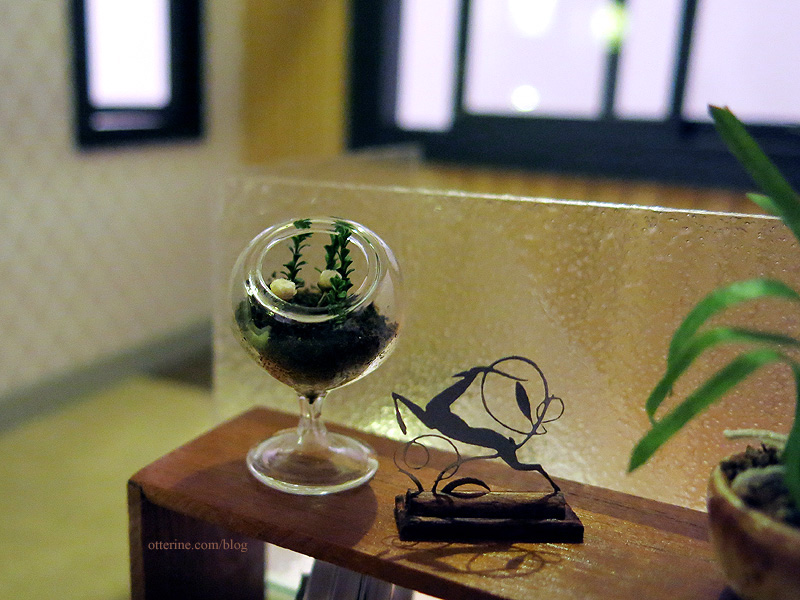
I made the terrarium from a glass vase from A Little More in Miniatures. The eland sculpture is from The Dolls House Mall.
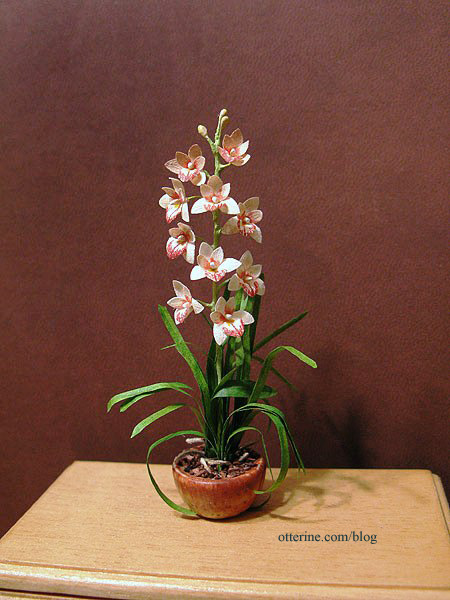
April made the unbelievably gorgeous orchid.
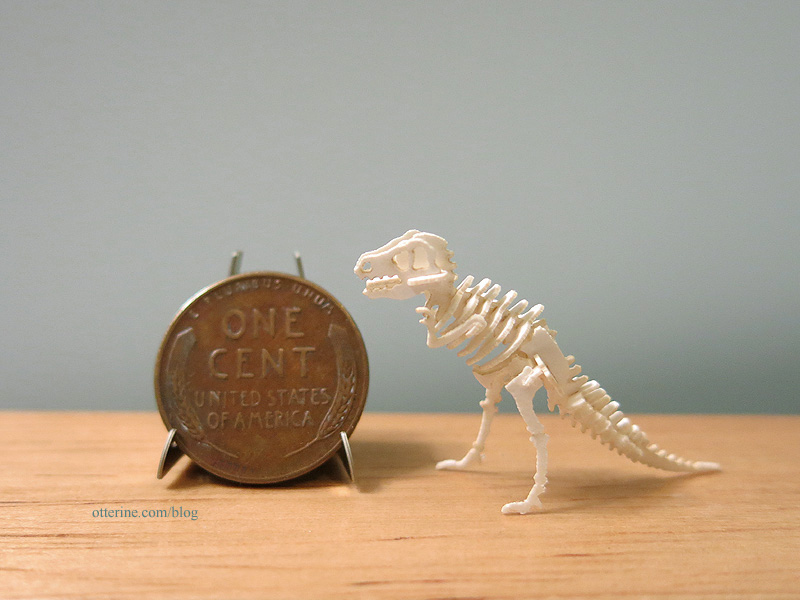
The Tinysaurus Rex was built from a kit.
Here’s a good airplane view. :D The cat bed is a basket by Al Chandronnait from miniatures.com, though I added my own tufted insert. The table is a half scale item from Jancrafted, the coaster is from The Aero Squadron Lounge and the tea cup was a find at a local show from A Pocket Full of Wishes.
I’ve been asked about whether the doors have been installed upside down anytime I use one of these narrow doors. I can tell you, this is how these narrow doors are made. They sit in the frame as you see them with the short section on top and there is no way to install them other than this direction unless you were to remove the door from the frame and flip it. These two in particular did not have headpins in the bottom to remove the doors, which is a first. Usually you can remove the door for painting and staining. Even still, I like the aesthetic of the smaller sections on top even if it’s technically inaccurate.
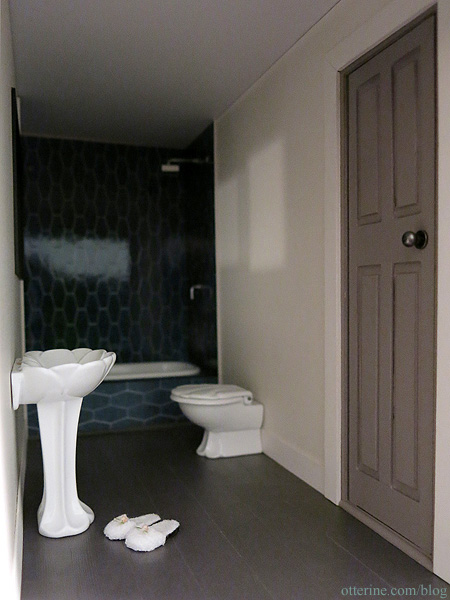
Bathroom
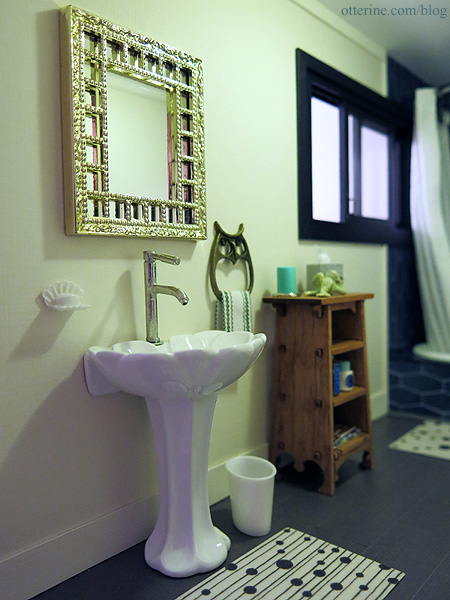
The bathroom features a built-in tub/shower combo and Dora Kuhn fixtures. The mirror is a vintage Lundby piece from Vintage Lundby with a replacement insert made from Darice plastic mirror sheet. I’ve added a Chrysnbon trash can and soap dish. The new faucet is from ELF Miniatures. Keli sent me the owl pendant awhile ago. I removed the bail and added a towel. :D
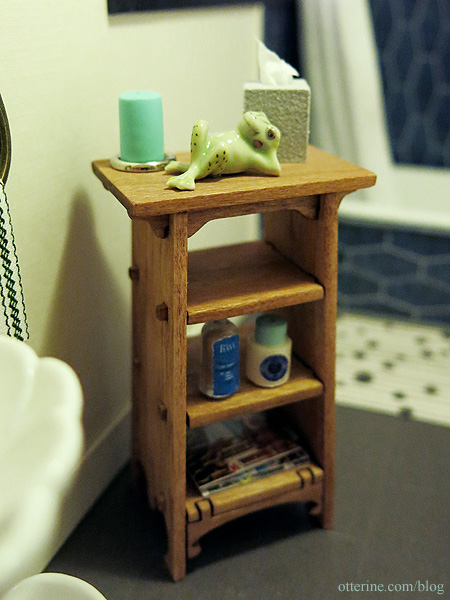
The magazine rack was made from a kit by Kari Bloom. It took some doing to remove the laser cut residue from the edges, but I was able to achieve a lovely stain using Minwax Cherry.
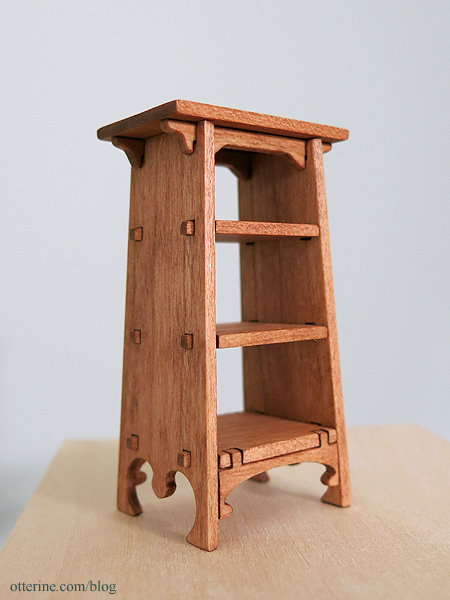
It’s the perfect accent piece for a smallish bathroom. The tissue box is from modernminifan, and I added a little hint of real tissue.
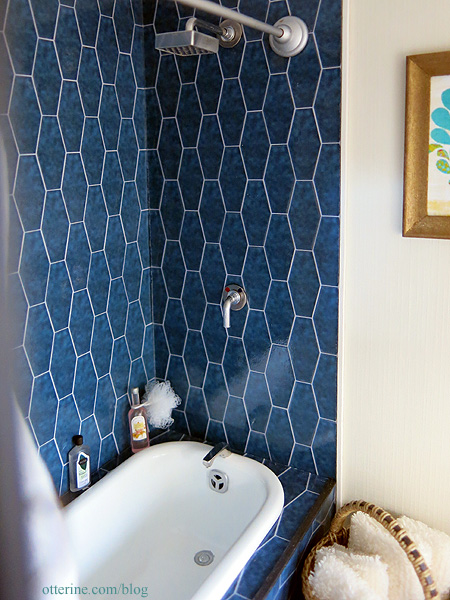
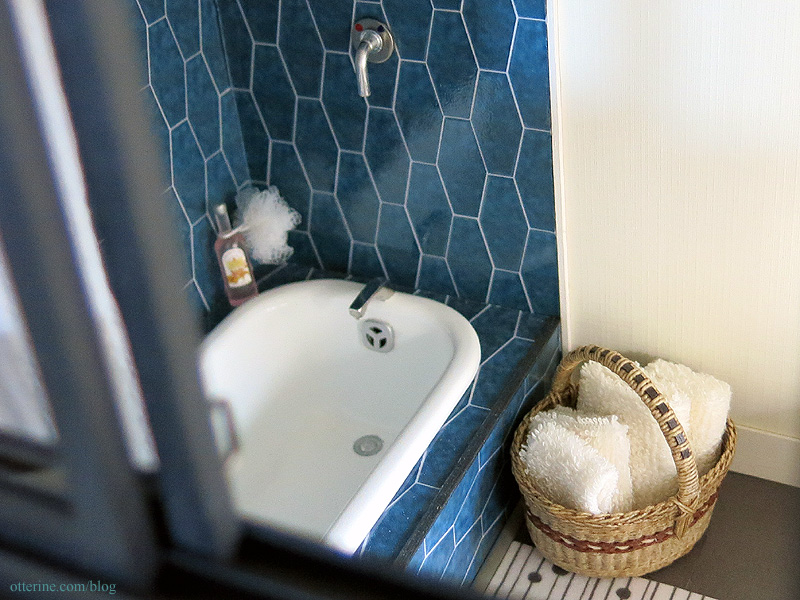
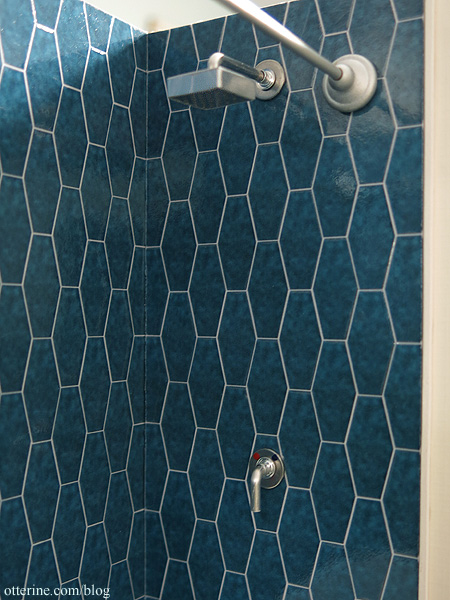
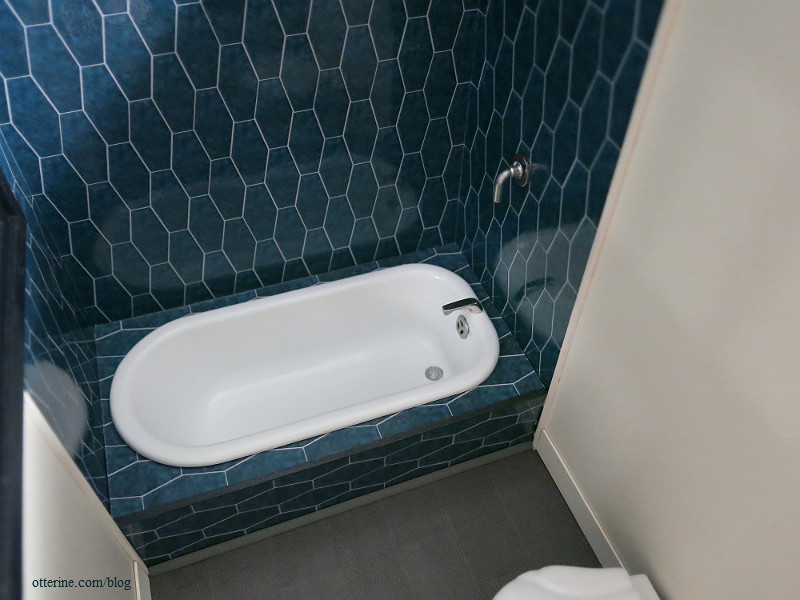
I made the shower tile using Word. (Yes, Microsoft Word.) The tub is a spare Chrysnbon piece purchased from Sir Thomas Thumb at the local mini shows; these came without hardware but are perfect when you want the tub to make a built-in. The bath tub is removable so I can clean/dust it. The overflow is the tip of a pen cap. I had a drain cover, but I had to snag that for the kitchen sink so I ended up painting the molded drain in the tub. The faucet is vintage hardware. The shower head and control lever are from ELF Miniatures, but I added washer escutcheons and painted hot/cold detailing.
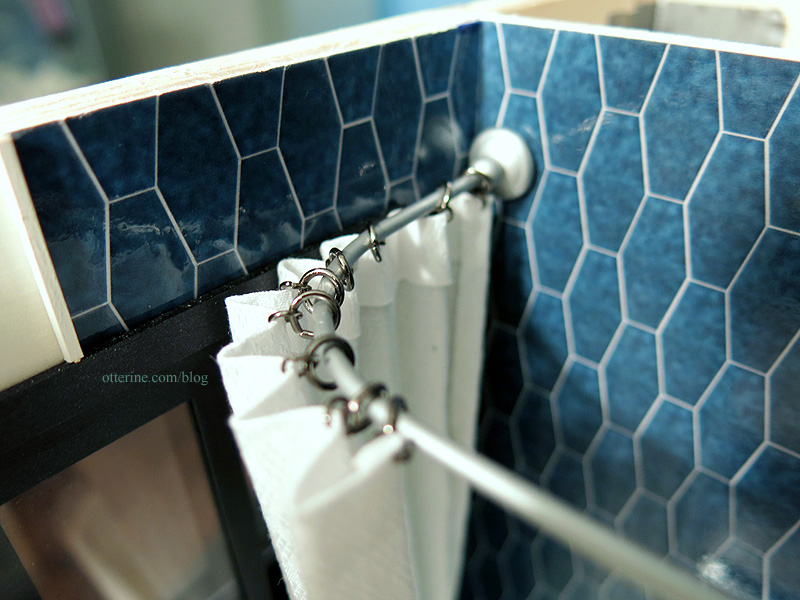
The shower rod is a vintage brass piece that used to be curved on both ends. I straightened and trimmed one end then sprayed it satin silver. The shower curtain was made using my vintage pleater and some textured cotton. I added jump rings and slid it onto the rod before installation.
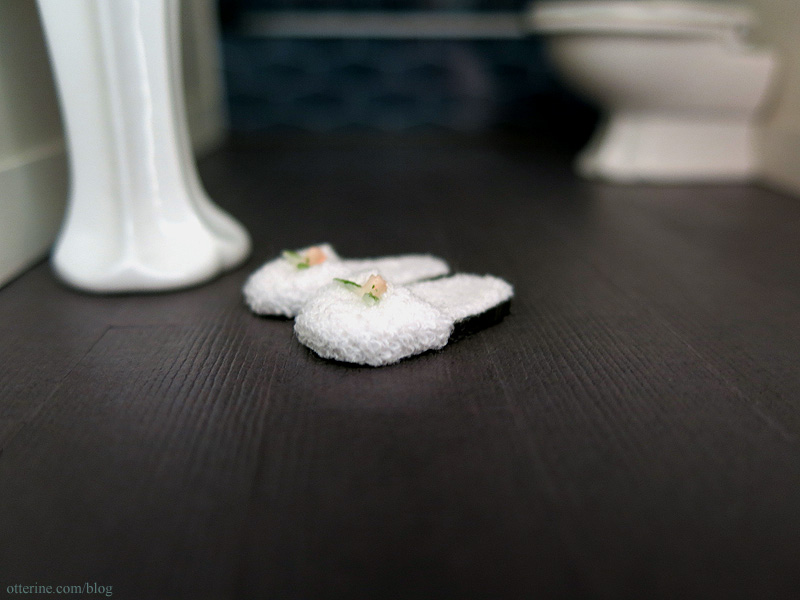
I made the towels, bath products, scrubby and magazines. The exquisite basket was made by Lidi at Basketcase Miniatures.
The ceiling light is an LED by Evan Designs with a loose frosted shade held in place with mini hold wax. I sprayed the metal ring silver to match the shower rod. The rugs are designs by Candice Olson printed on Velour Card Stock from The Crafty PC. I added a wall flush button and made a free standing toilet paper holder.

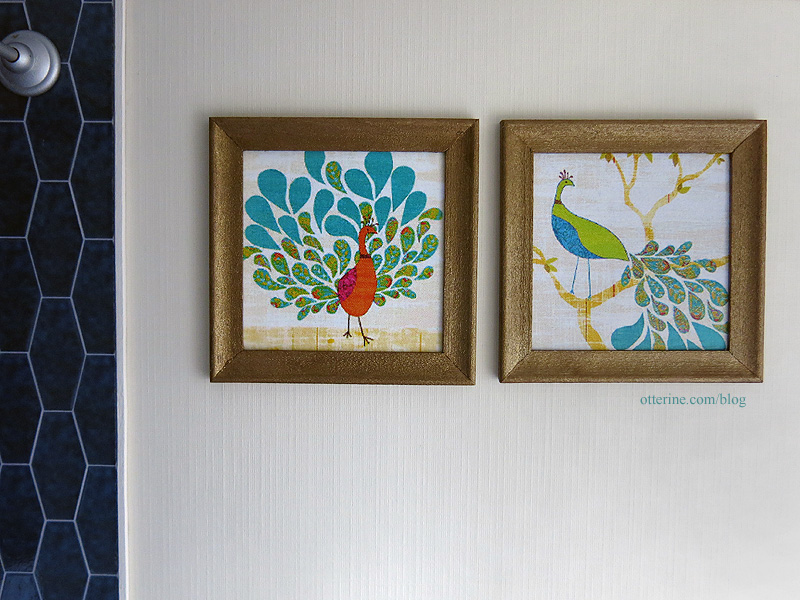
The Mod Peacock artwork is by Sue Schlabach. I painted two wood frames bronze to mount the art.
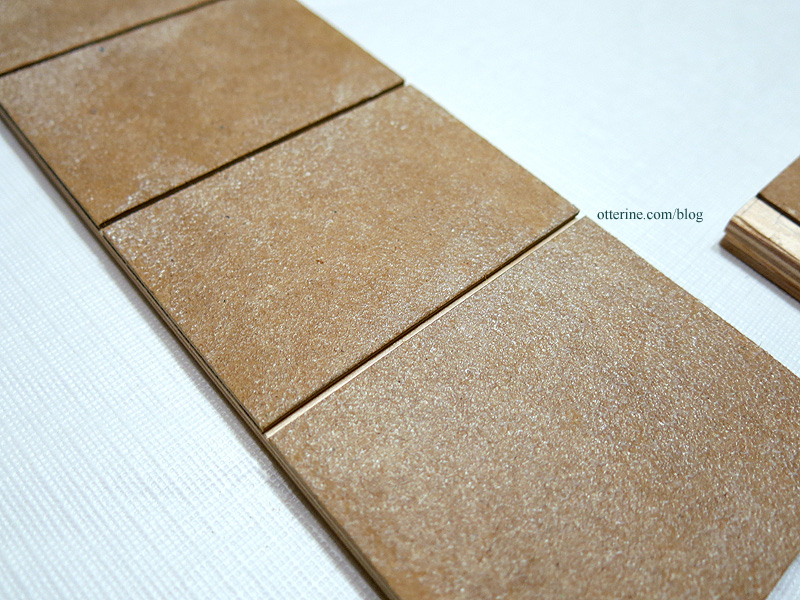
The flooring is Bazzill Basics paper in Dusk; it has a subtle texture. I used 3M Super 77 spray glue to mount the paper to a layer of bristol board. I sealed it with Delta Ceramcoat Satin Varnish and cut the tiles in 3/4″ x 1 1/2″ pieces. I was going for the modern porcelain tile look.
Exterior details
The inspiration for the exterior finishes came from this grand modern house by Christopher Simmonds Architect. I love the crisp white paired with reclaimed siding.
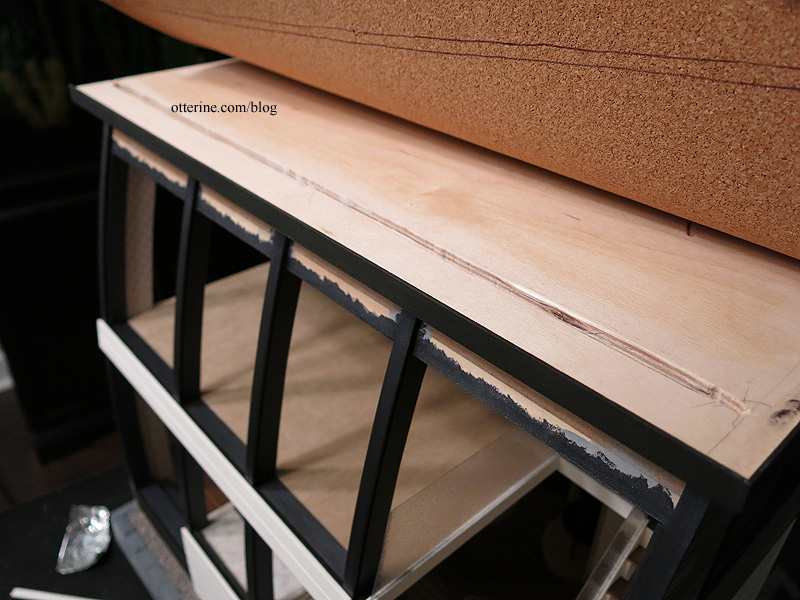
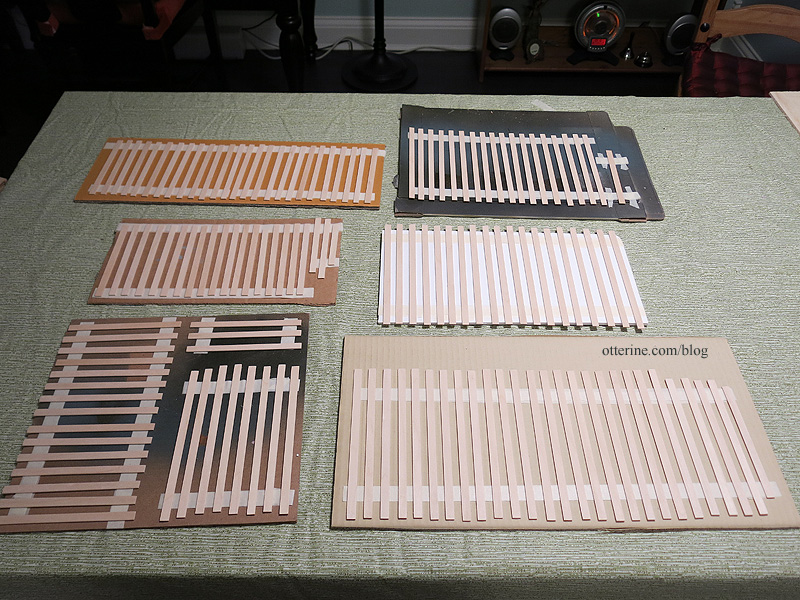
For the lower portion, I liked the idea of large sections dividing the space instead of a flat, uniform surface. I tried using the roof board since it already had even lines scored into the surface. I could not get the unwanted lines to fill in sufficiently. I kept seeing their halos, so I switched to cardboard panels.
I used matte medium gel dabbed on with a foam brush to make the surface texture.
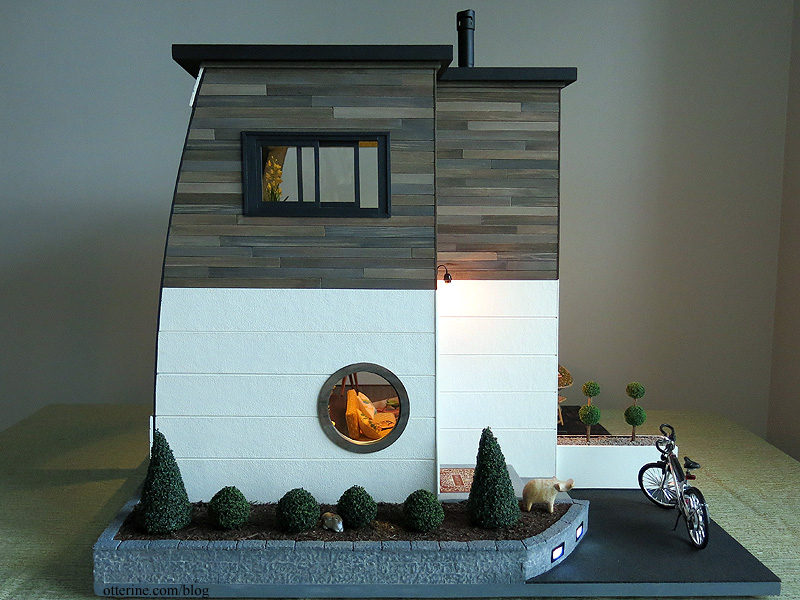
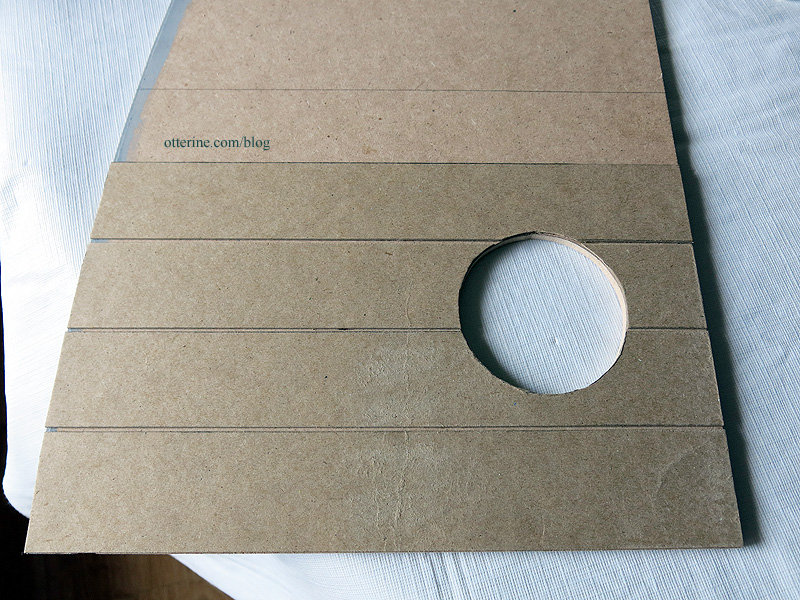
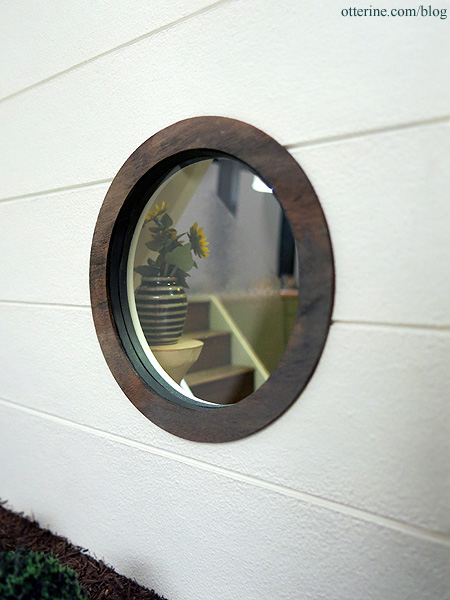
I followed this up with three applications of Warm White by Americana using the same dabbing technique. The circle trim here and on the inside was a custom order from Cut Line Craft. I gave them my precise measurements, and they cut the circle to fit my window. There was no way I was going to get one neat circle let alone two without a laser cutter! :D
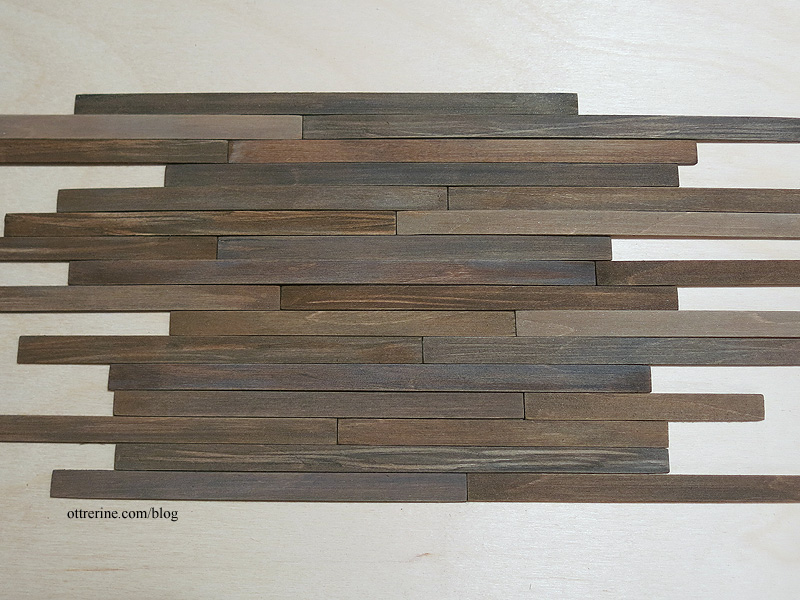
I showed a sneak peek of the reclaimed siding made from basswood sheets earlier. :]
I applied this to all of the surfaces on the upper portion of the house. To mask the joins, I used 1/16″ x 1/16″ strip wood, painted to match each section.
Landscaping
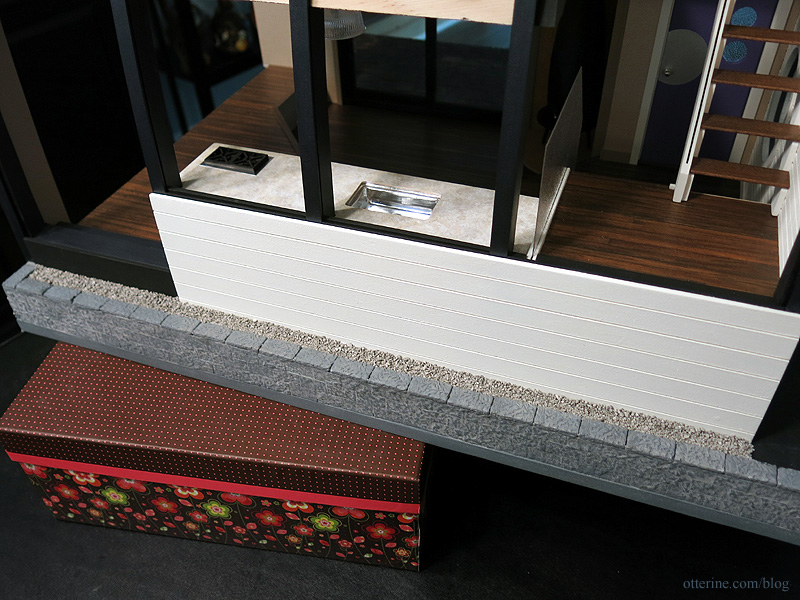
I made the base from two layers of builders foam so I could achieve the sunken living room. To enclose the edges of the grounds, I added scrap wood to even out the surface. I made a retaining wall to finish off the edge using egg carton stone on the side surfaces and resin pavers for the top edge. Behind the window wall, there is a tiny strip of land. I filled this with gravel and used Scenic Cement to hold it in place.
Along what is technically the front wall, there’s a slightly larger patch of land. I considered gravel, grass and mulch. The mulch won! :D I’ve planted a modest amount of Squeeze Me greenery from Model Builders Supply to fill in the space.
The hippo is a vintage carving. I thought it made a wonderful garden statue.
There’s a small driveway on the actual base, but I envision a larger one just off the main board. ;D There’s a Mercedes Benz Hybrid Bike, a 1:12 scale model by Maisto.
I love the driveway lights. :D They are LEDs from Evan Designs with covers and frames cut from recycled office materials.
I built a large planter to separate the driveway from the patio and planted two topiary trees in it.
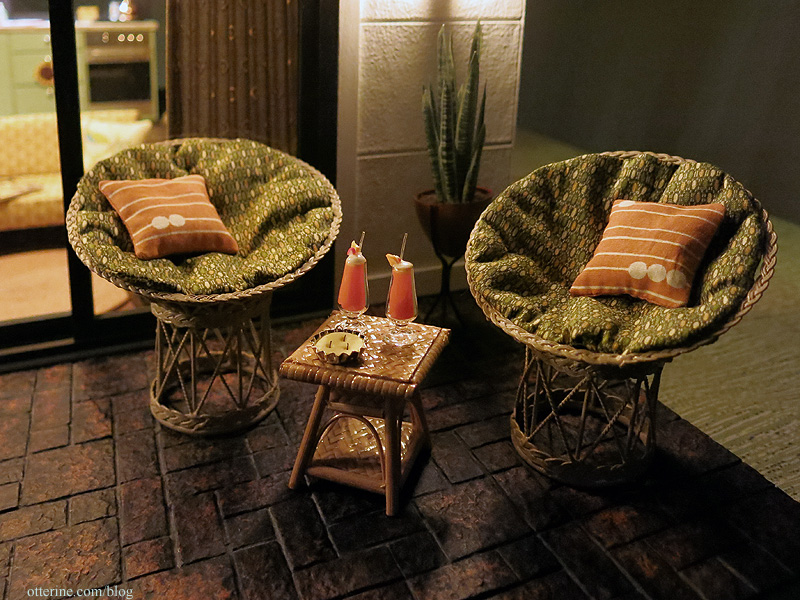
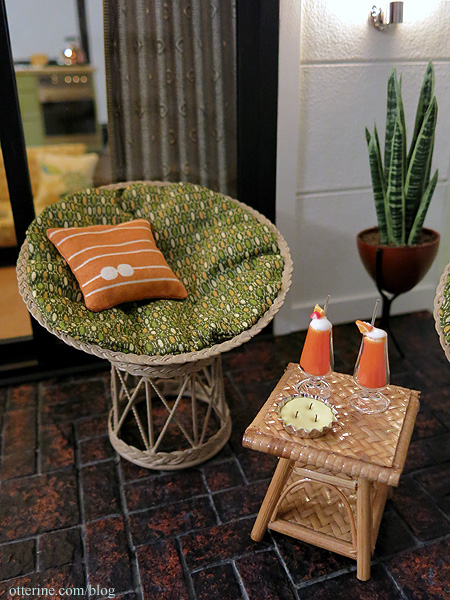
Having a sizeable patio did make the living room a little smaller than I would have normally made it, but both ended up being cozy spaces. The patio has two Papasan chairs and a vintage rattan table. The chairs are vintage minis that got a makeover with new cushions and pillows. The table was purchased on a business trip to Vancouver from Ross’ Miniatures. I made the citronella candle tin, and the creamsicle cocktails are from Karen Aird Miniatures.
The patio surface is made from egg carton pavers set in a Versailles pattern and grouted with spackling. The final glazes (paint mixed with Americana Staining Medium) gave the pavers a slight sheen that’s really lovely.
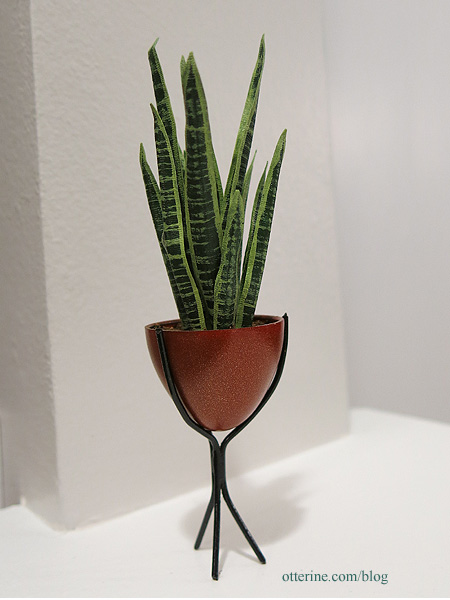
To make the snake plant, I used the technique found in a book on making miniature plants out of florist tape called Miniature House Plants by Ruth Hanke. In the book example, while the author did include painting the rough stripes of the plant, she didn’t include the wide light green outer edges so I added those based on the real deal. I used fine ballast from Woodland Scenics and used Scenic Cement to keep it all together. The pot and stand came from Mod Pod Miniatures, but I sprayed the bucket a deep metallic orange.
And, that’s a wrap! Now, where’s my fruity cocktail?! :D
Hear the crickets? :D
—-
Thank you to everyone for your encouragement throughout the build and your patience through gritted teeth during sneak peeks! I had a lot of fun working in the modern style again.Contest results: Otter Cove won the Second Place award in the HBS Creatin’ Contest! I’m so thrilled to be among the top winners! Congratulations to the other winners and a hearty pat on the back to all the contestants for finishing on time and putting in their efforts and creativity. You can see all of the entries here.
Categories: Otter Cove
February 1, 2016 | 0 commentsOtter Cove – flooring and staircase
There’s wood flooring throughout the first floor. Since the room is longer than the standard wood flooring sheets, I had to piece it end to end.
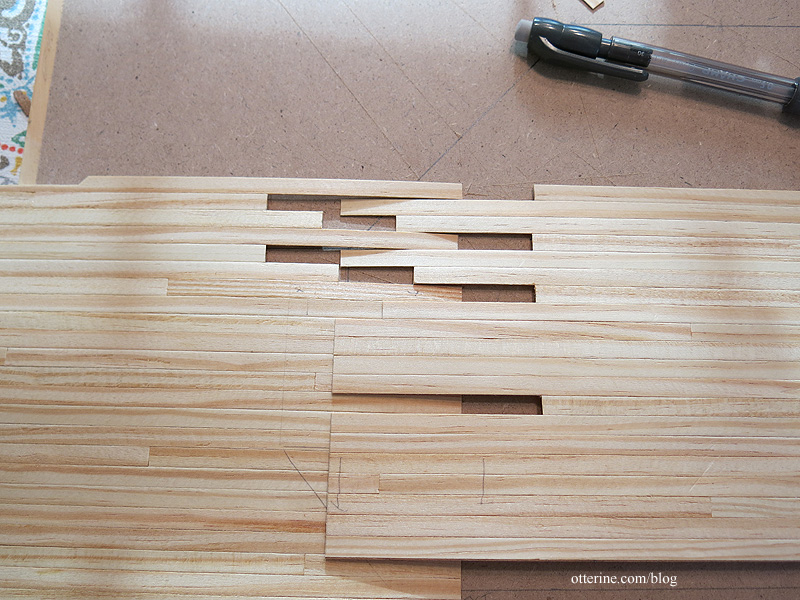
You can somewhat see it still after staining, but it worked as best it could without being a solid sheet.
The two-story front wall has what I call waterfall bamboo paneling made from a bamboo table runner. I’ve painted this material in the past, but this time I left it untouched. The paneling is floor to ceiling on the upper floor but cascades in a random pattern next to the open staircase. It was almost a shame to block the view with a floor board…so I might revisit this design for a future build where there is nothing in the way. :]
With that in place, I could work on the staircase. The staircase is a full turnaround set of stairs with rippled glass railings made from Rippled Water Sheet.
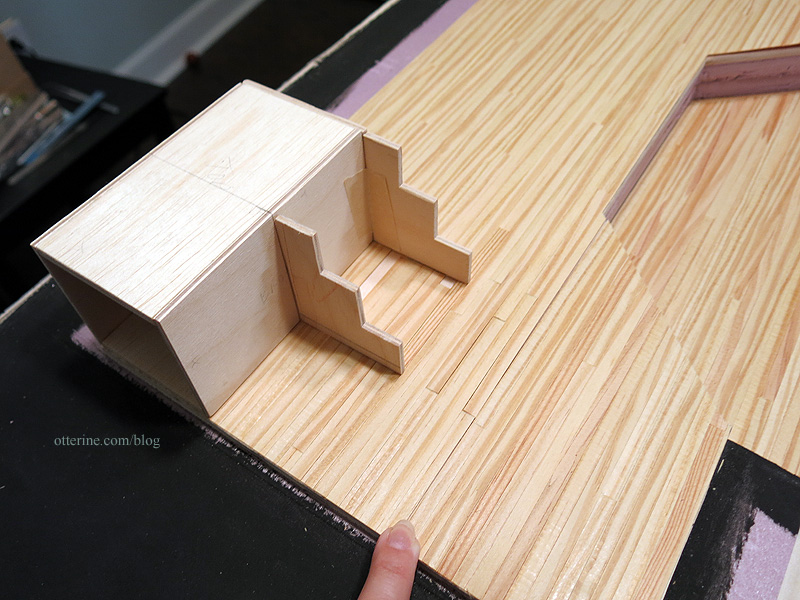
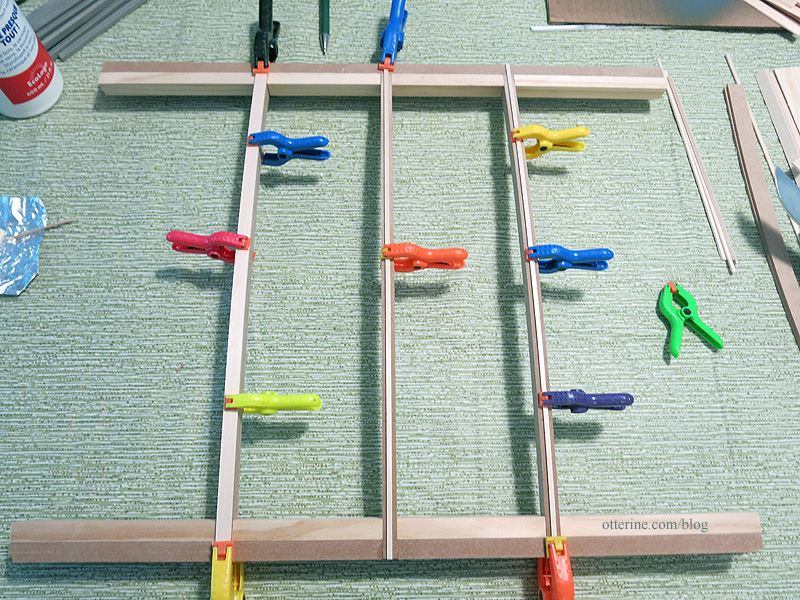
I started with a box. This would serve as the landing portion for the turn of direction. I used the stair step wood stringer that is available on the market to make my supports.
The railings required a decent amount of engineering, so I used mat board and random recycled office materials to test out the process.
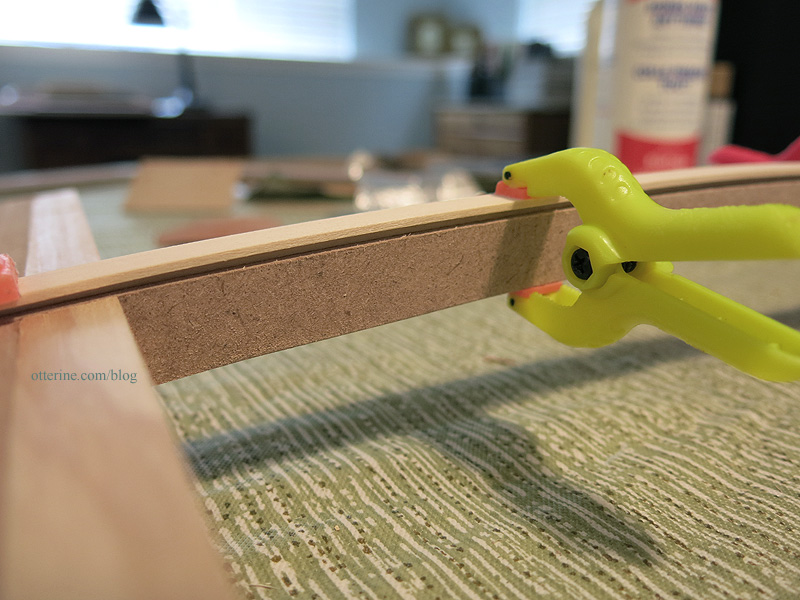
The lower stairs are enclosed, so that was fairly straightforward. I used scrap wood to keep the structure square and sound, topped the treads with basswood and used the same flooring for the landing. It is all stained to match.
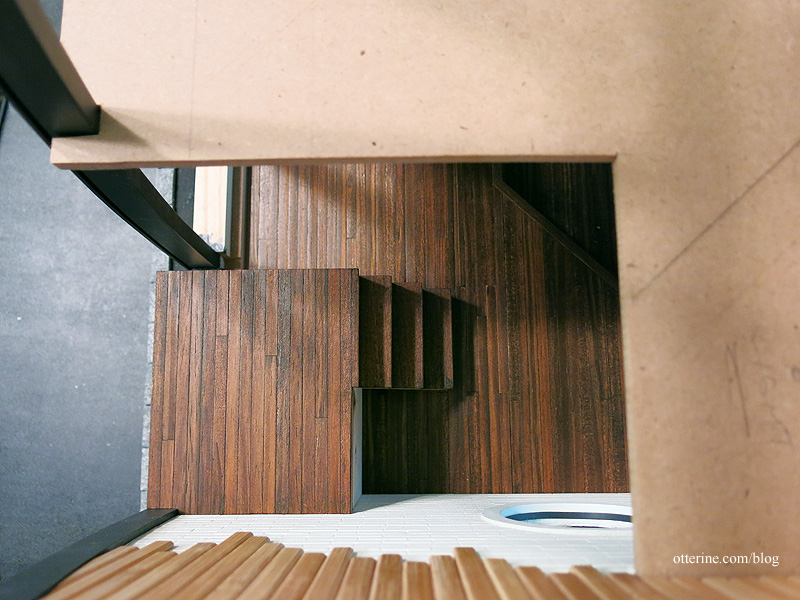
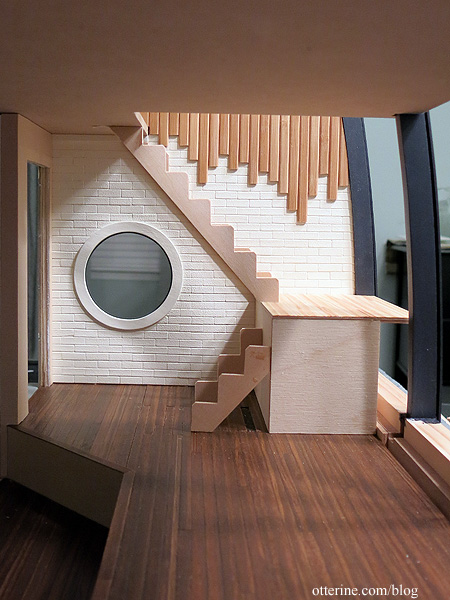
The upper portion required a bit more finesse. I made similar base strips to support the treads, but there are no risers on the upper stairs except for the top one. I like the light that carries through the open space.
The glass pieces slip into grooves so they can be cleaned or replaced as needed.
It was a fair amount of maths, but I love the way it turned out. :D
Categories: Otter Cove
December 13, 2015 | 0 commentsTree Ring Rug
My inspiration is a lovely rug by YLdesign called the Woody Wood Carpet. While theirs is printed, mine will be done in French knots. I like the idea of an organic process for an organic subject matter. And, I can just stop stitching once I reach the diameter I want. I’ll be using four colors of tan and brown — two lighter ones (DMC 422 and DMC 167) for the interior rings and two darker ones (DMC 839 and DMC 938) for the bark edges. I usually keep track of my time when stitching, but I don’t think I’ve ever captured the first stitch of a project. One French knot down….

This was a completely freehand project. I made no pattern or markings on the fabric.

At 13 hours, I reached 1 3/4″ diameter. I planned to reach roughly 5 3/4″ diameter. The progress was deceiving since it took longer to make a full perimeter of French knots each time around.
At 31.25 hours, the diameter was 2 3/4″ and taking on a lovely shape as I would make some areas of the lighter tan wider in areas.

I finished stitching the Tree Ring rug for Otter Cove just in time! I stitched this rug in 77 hours over the course of 61 days. Yeow.
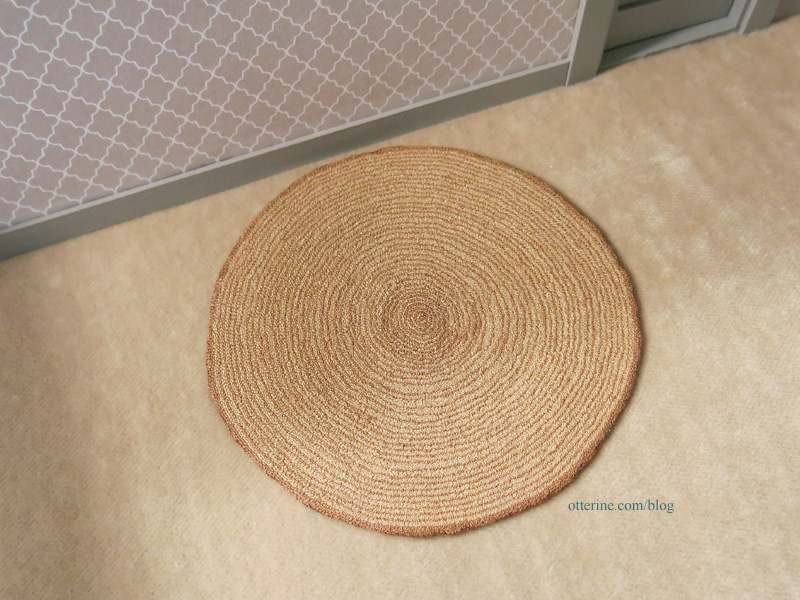
The inner ring portion ended up 4.25″ in diameter, a full inch smaller than I had originally planned. As the rug grew larger, I tested out the sizes and was able to save myself a lot of stitching time. Toward the end, making one full circle of French knots took over an hour and added a mere 1/32″ in diameter. After final finishing, the diameter ended up at roughly 4 5/16″.
There are 37 rings to the rug, and each of those rings is made from 1-4 rows of light tan (DMC 422) and 1 row of brown (DMC 167). The outer edge bark is the same brown from the ring portion with a border edge in a slightly darker brown (DMC 869). I didn’t make my bark portion as pronounced as the inspiration rug.
To finish the edge, I added a thin line of Fray Check around the perimeter. I then snipped up to the stitching and turned the pieces to the back.
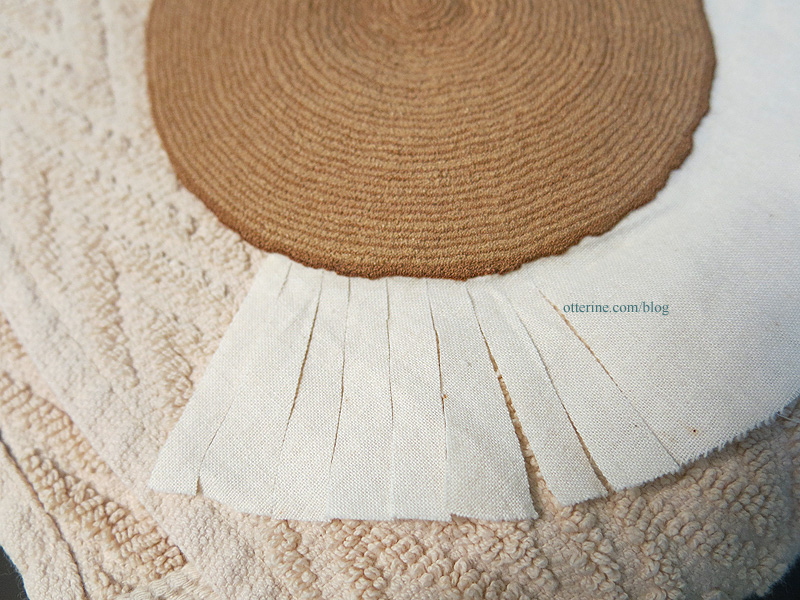
Once done, I trimmed the loose pieces.
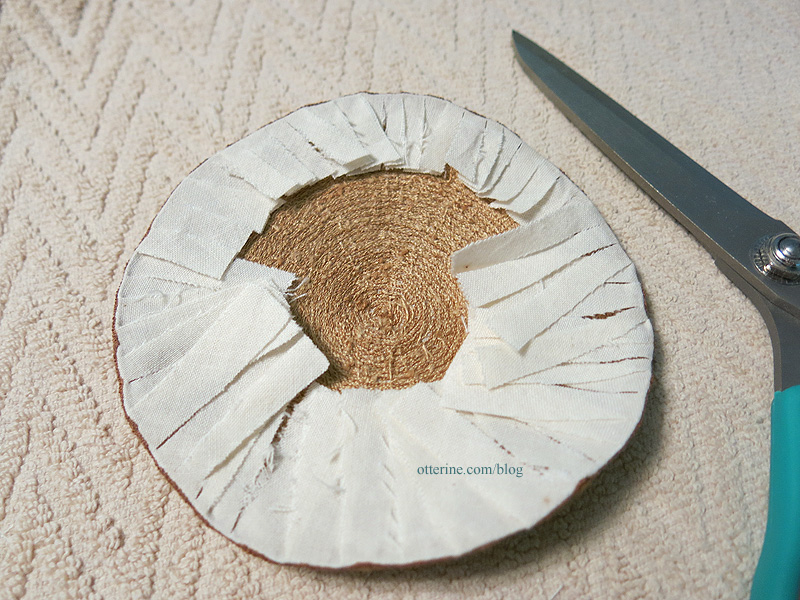
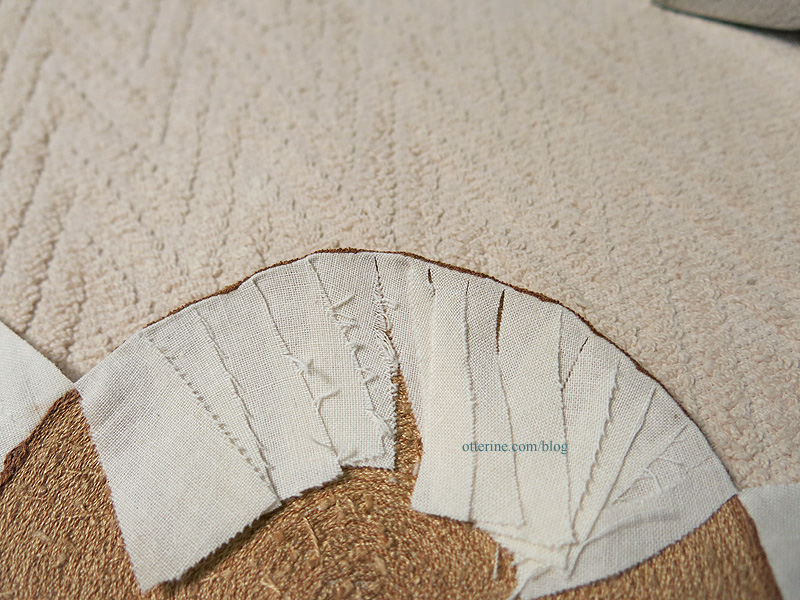
I added a circle of muslin to cover the back using Heat -n Bond (full process here).

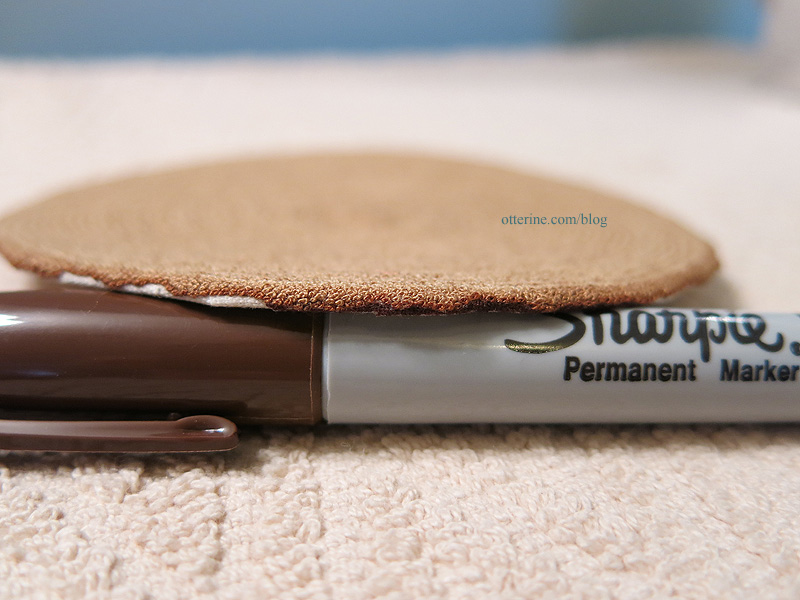
Because of the uneven edge, some of the fabric showed. I used a brown Sharpie to color in the slight underneath edge. You do have to be careful with this method and use a light touch, but it works well.
Though mine differs from the original rug by, I think I’ve captured the essence. And, I love the texture.
Isabeau approves.
Categories: Needlework - French knot rugs, Otter Cove
December 12, 2015 | 0 commentsOtter Cove – Wall of Windows
This photo is only possible with the window inserts removed, otherwise you would see me and my kitchen. :D Even if I dressed in all black, you’d see a Ninja in my kitchen. That’s a lot of reflective surface!
After tipping the kit over onto its side, I had to figure out my wall of windows. Unlike The Artist’s Studio, which had an entire wall of open windows, this build would require some portions to be solid to hide the back of the kitchen cabinets, base of the stairs, floor board and upper beam structure. Here’s the earliest mock-up using paper. I ended up making the wall a bit more open in the end.
To make things easiest, I decided to make the window inserts go from top to bottom and built the solid portions to encase them where needed. Plexiglass will bend in long strips but wants to stay straight in short runs. Having long pieces would allow for a gentle curve.
I started by gluing the beam structure together along with the added support pieces. Along the center of each beam, I glued a piece of 1/16″ x 1/8″ strip wood.
Over these, I centered 1/16″ x 3/8″ strip wood.
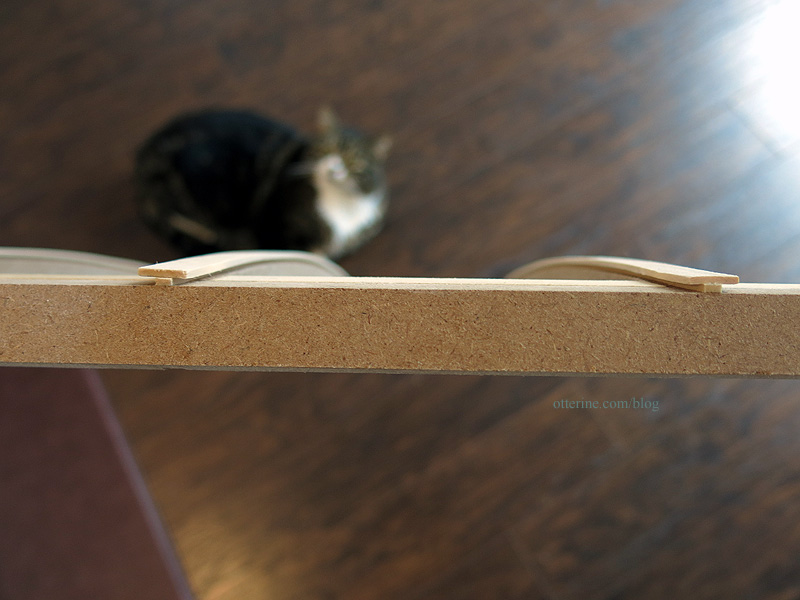
This created a channel on either side to add plexiglass strips. Hey, there’s my building buddy. :D
I painted the pieces using a mix of 2/3 Liquitex Payne’s Grey and 1/3 Silver by Apple Barrel. It’s a dark navy metallic – a beautiful color that is hard to see in photographs and ends up looking like coated steel.
Once the window channels were in place, I used the original scored roof board to fill in the areas that needed to be covered. I painted these Warm White by Americana, patting the surface with a sponge brush to eliminate brush strokes. The scored lines look like siding.
I added strip wood trim painted black to the tops and bottoms of the siding panels as needed to enclose the glass and serve as weather-stripping. It just sort of blends in and would only be truly noticeable if it were absent. :D Here’s the test window insert in place.
One thing that bothered me was the idea of not being able to photograph the interior without glass glare (or my reflection looming there). But, once the roof was on, there would be no way to slide the window panes out of their pockets. It hit me late in the game — a week before the deadline — to add a slot in the roof to remove the panes.
It’s not as elegantly executed as it would have been had I planned ahead for it…but it works! The windows fit through the slot in the roof and slide into the channels.
The cork covers the hole and can be peeled back as needed.
The entire roof is topped with cork painted black, leaving a hole to access the wiring closet. It’s not really usable as an electrical access, but it’s better than nothing and it helped with wiring the lights attached to the roof board. The chimney is made from bits and bobs.
Categories: Otter Cove
December 8, 2015 | 0 commentsVintage dining table and chairs
For the kitchen, I am using two Arjen Spinhoven Arts & Crafts chair kits. I like that Monique put the back on upside down and ended up with a better design than the original. So, I am doing the same. I’ve sanded the laser cut edges to remove the brown residue and to round off the edges.
The table is an attempt at a reproduction of a Heywood-Wakefield Cliff House table. Mine is a bit skinnier than the original near the bottom. Also, in real life woodworking, you would make each of the legs from two pieces since the grain goes only one direction and the feet would be too breakable on the cross grain. I cut the curved fronts on the scroll saw, taping the wood layers together. I then cut the backs manually.
I used 1/16″ thick wood for the legs since my purchased wood circle top was also thin, but 3/32″ thick wood might have been better for stability. They are very delicate, and perhaps when I have more time, I will redo it the right way though I do love it as is.
I glued the chairs and table base together before final finishing. I figured it would be easier, go faster and keep warping to a minimum. I did leave the table top separate, though, because the feet have to be held so gently.
I started by layering on stains in the yellow and brown spectrum using Staining Medium by Americana. This darkened the basswood table.
I then painted the chairs a light Fawn by Americana. This brought up the base hue of the chairs to match the lighter color of the table. I’m not especially worried about the square detailing on the chairs; that can be painted back in later.
I then layered on some darker stains until they met in the middle. It was a challenge to get the wood table and mdf chairs the same color and approximate grain, but I love the way it turned out. The lovely irises are from Patricia Hopkins Studio, the vase is from Vitreus Ignis and the salt and pepper shakers are from Hartland Miniatures.
Categories: Otter Cove
December 4, 2015 | 0 commentsMaking draperies
Now that I’ve picked my favorite from the paper mockups, it’s time to make the pleated draperies for real.
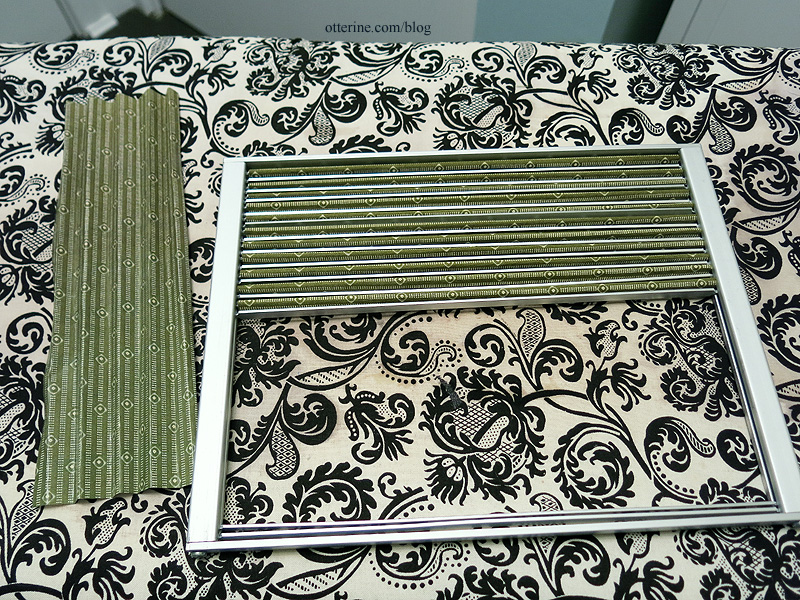
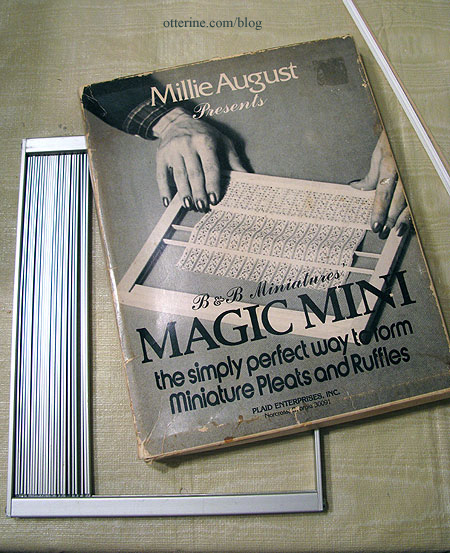
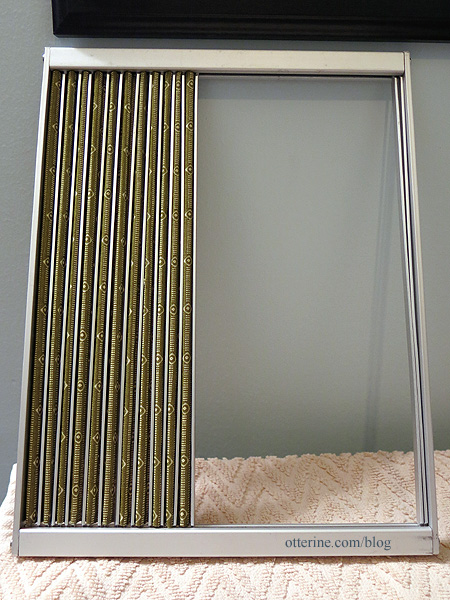
I’m using my vintage Millie August Magic Mini pleating tool. I have a post on the process here. The only difference was this time I used Fray Check along all the edges since the fabric wanted to fray just looking at it.
I’ve set them aside to dry until I’m ready for them…should have a good pleat by then. I’ll likely spray them once I remove them from the pleater so they keep their shape, but for now it keeps them out of the way to leave them in the pleater.
Here’s how it looks installed in Otter Cove. The valance is made from scrap wood and covered in fabric. The valance is glued to the wall, but the drapery panel just slips into place underneath so it can be removed for cleaning or replacement.
Categories: Otter Cove
November 24, 2015 | 0 commentsModern bathroom tiles
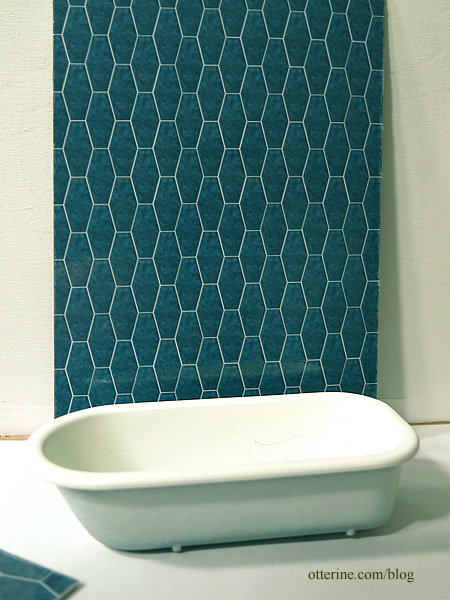
I made the shower tile using Word. (Yes, Microsoft Word.) I started by making a page of long hexagons filled with a tile texture sampled from real life tile and edged with a thin white border. I printed this on computer paper and used 3M Super77 spray glue to adhere the paper to mat board. I applied a generous coat of Triple Thick Gloss Glaze. Once dry, I cut the tile sheets to fit my space and used a stylus to score the grout lines.
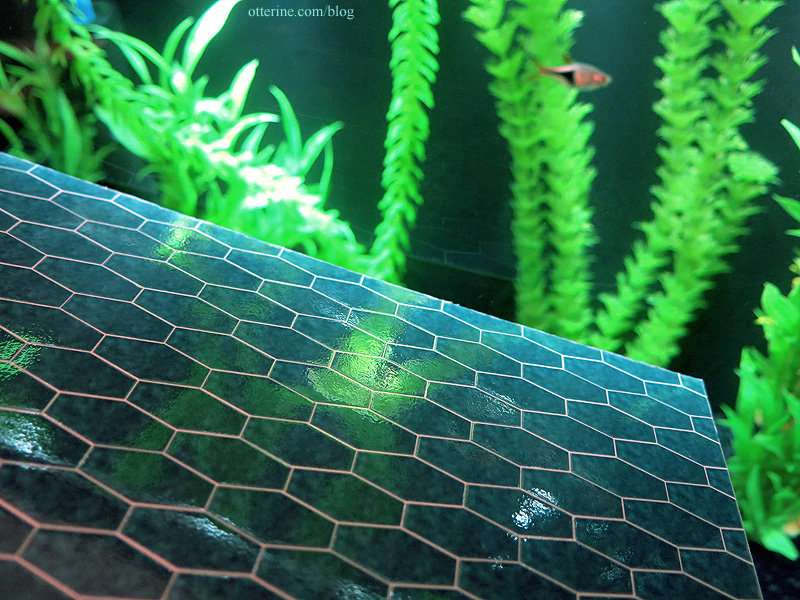
The tub is a spare Chrysnbon piece purchased from Sir Thomas Thumb at the local mini shows; these came without hardware but are perfect when you want the tub to make a built-in.
The floor tile is Bazzill Basics paper in Dusk; it has a subtle texture. I used 3M Super 77 spray glue to mount the paper to a layer of bristol board. I sealed it with Delta Ceramcoat Satin Varnish and cut the tiles in 3/4″ x 1 1/2″ pieces. I was going for the modern porcelain tile look.
I’ve been adding trims and bath hardware.
The shower head is from ELF Miniatures. I added washers around both the water lever and the shower head then painted color detail for hot and cold.
The overflow is the tip of a pen cap. I had a drain cover, but I had to snag that for the kitchen sink so I ended up painting the molded drain in the tub. The faucet is vintage hardware.
Categories: Otter Cove
November 19, 2015 | 0 commentsModern wood stove
I finished up the stove and have it installed. It’s held in place with tension alone. I have it wired through the ceiling with a lot of extra wire looped inside the stove in case I need to remove it to replace the red bulb inside. The base is separate from the main stove; the flange top and fire insert are also removable.
My inspiration was the Invicta Pow Wow wood stove. The surround is made from scrapbook paper cut with a hexagon paper punch. Yep, applied those tiles one at a time. The damper handle is from a defunct Chrysnbon kit that’s being used for parts.
Categories: Otter Cove
November 6, 2015 | 0 commentsMaking a custom door, part 4
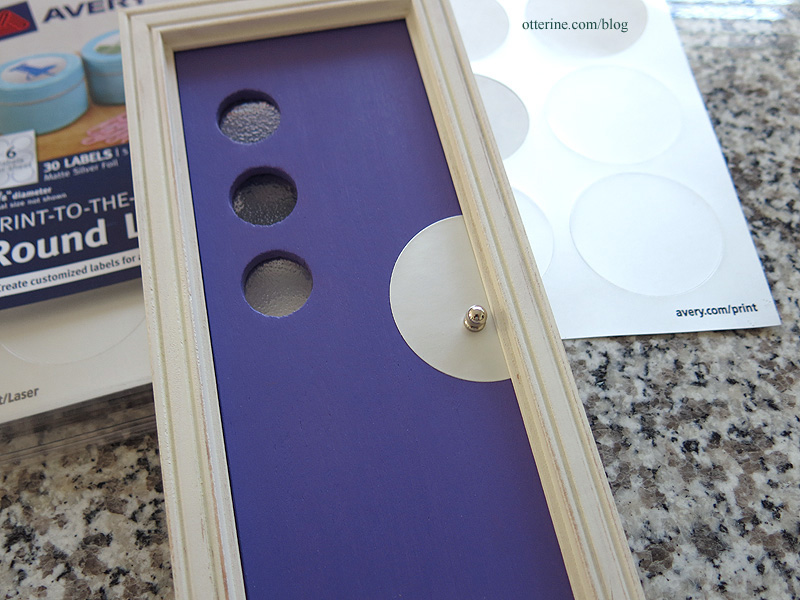
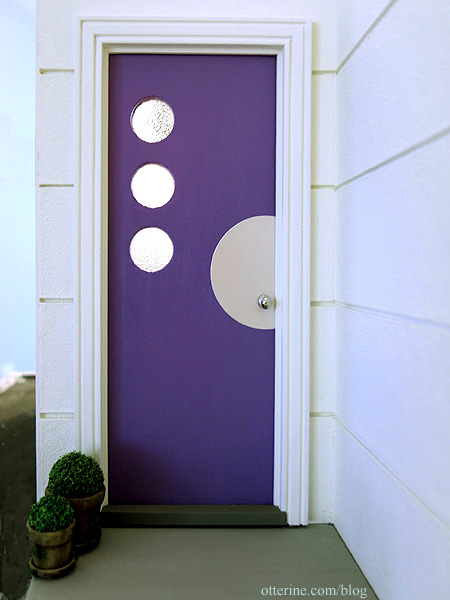
I’ve finished working on the custom door. I cut some Avery silver labels to add some interest around the door knob from ELF Miniatures. I didn’t add a lock detail because all of my attempts fell short of what I wanted. So, we’ll just say it’s a smart house and it knows who should come and go. :D
I like to cut out the underside of the hinge pin to countersink the pin head. This will keep the door from tipping or floating over the flooring surface.
I painted the door frame Warm White and the base step Neutral Grey, both by Americana. Here’s a sneak peek!
Categories: Otter Cove
October 21, 2015 | 0 commentsNine Horses wall tapestry
I’ve mentioned before that I save things in an inspiration folder. Quite a few years ago, I ran across a mousepad with an image of vintage needlepoint on it. I couldn’t tell if they were supposed to be llamas or horses, but they were definitely 1960s-1970s colors and style. Into the file the image went.
I later thought about that old image, so I looked for the mousepad website again but couldn’t find it. I did find another website showing the same image, with the same name as old seller with the mousepads. I wrote to the person for info about the origin of the design, but never received a reply. The image was clear enough and the design simple enough that I was able to draft a pattern to make a miniature reproduction for my personal collection. That was as far as I got.
Moving has its upside in that you find stuff you forgot about. As I was sorting needlework patterns, I ran across my pattern. I went back to the website with the photo of the needlework and found a different website for the same seller. I wrote to her again and heard back this time. She wasn’t sure of the origin and thought the needlework had been done 35 years ago.
In the meantime, I also did a new google search and a different image of the same design showed up at an auction house. No idea if this was related to the mousepad seller or not. I don’t even know if it is a one of a kind work or if there was a pattern for it way back when.
I stitched my adaptation of the design on 32ct Jobelan fabric in parchment using two strands of DMC floss in half cross stitch. Needlepoint (half cross stitch) goes twice as fast as full cross stitch. I finished the stitching portion of the Nine Horses tapestry in 38.5 hours.
I turned under the edges and hung it in the bedroom of Otter Cove. The final measurements are roughly 4 x 3.5 inches.
Categories: Needlework - French knot rugs, Otter Cove
September 17, 2015 | 0 commentsMaking a custom door, part 3
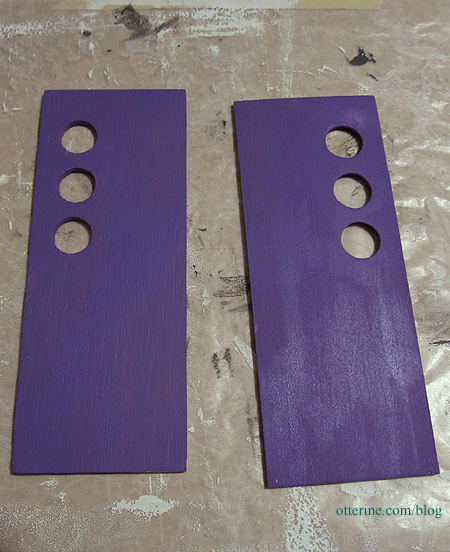
Continuing work on the custom door. I opted for Lilac Love by Folk Art for the final color. It’s a beautiful color that will stand out nicely from the final finishes without being overbearing. I painted the front and back sections while the door was unassembled because I didn’t want to risk getting paint on the window inserts.
I then applied Delta Ceramcoat Satin Varnish around the window openings to finish those edges. I cut three pieces of rippled plastic sheet from HBS to serve as the window inserts.
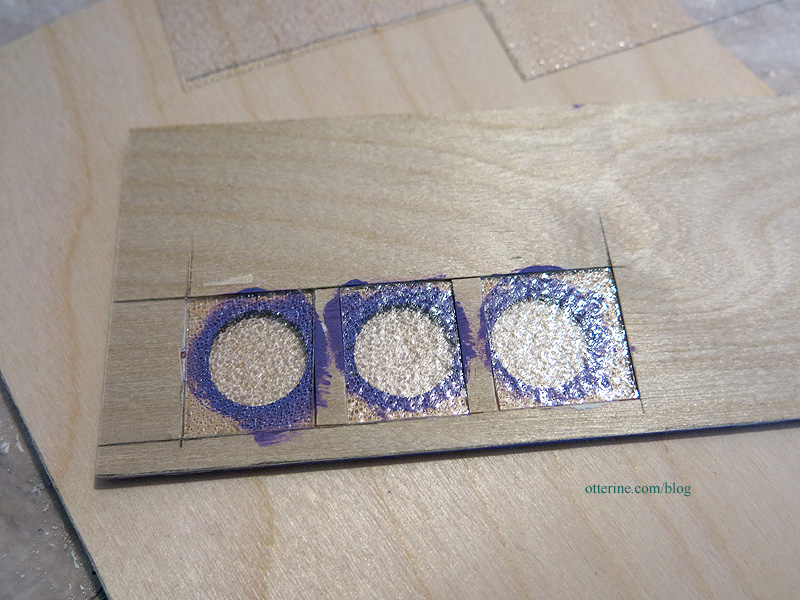
I glued the front to the back and pressed flat for a few days to make sure it was a solid bond. Here you can see all three layers that make up the door.
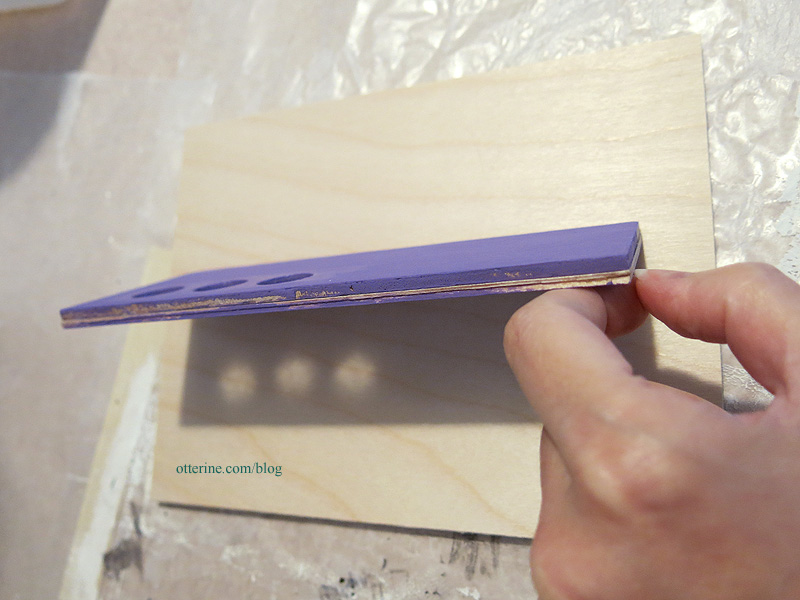
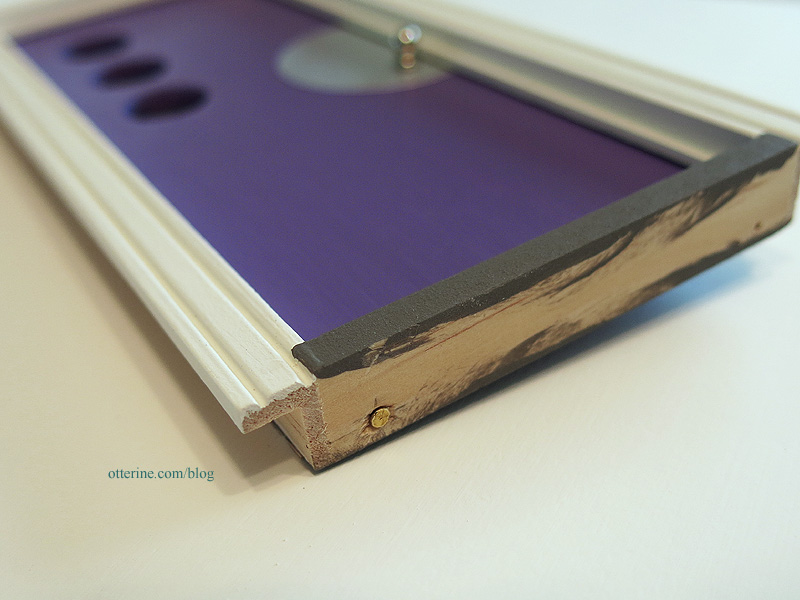
I filled in the edges with spackling to even out the surfaces. I sanded these smooth by laying sandpaper on my table surface and gliding the door over the flat paper. This keeps from rounding the edges inadvertently.
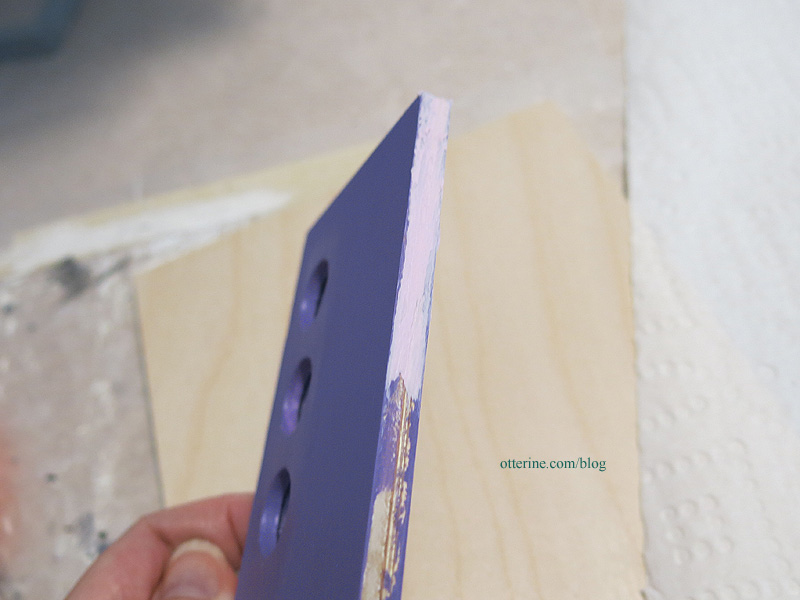
On the hinge side, however, I did round the edges. With a pin hinged door, you need that edge to be rounded otherwise it will bind.

I flipped the opening direction of the door by transferring the holes to the opposite side. I have a full post on that process here. I then added the pin hinge to the new door.
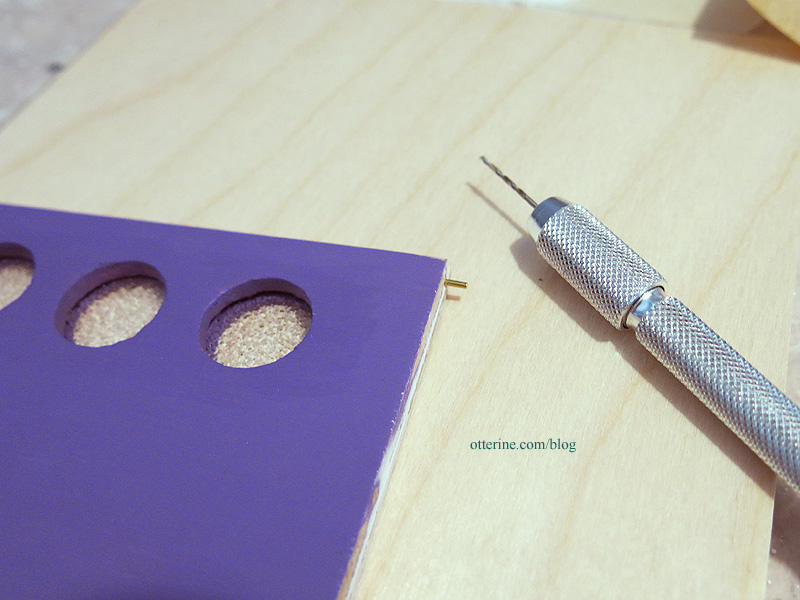
Checking the fit.
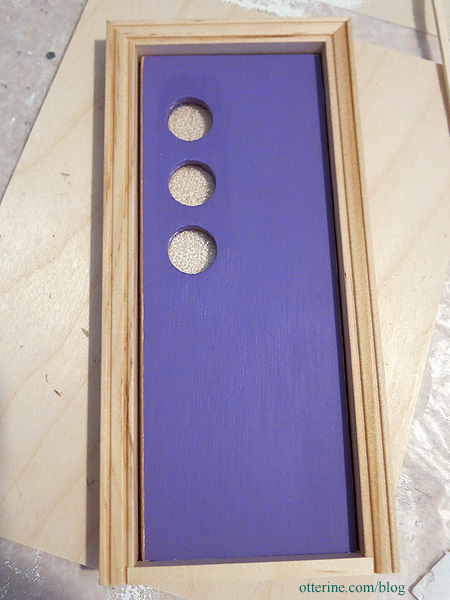
To remove the drafty edges, I applied thin strip wood. I have a full post on that process here. I finished painting the edges and sealed the door.
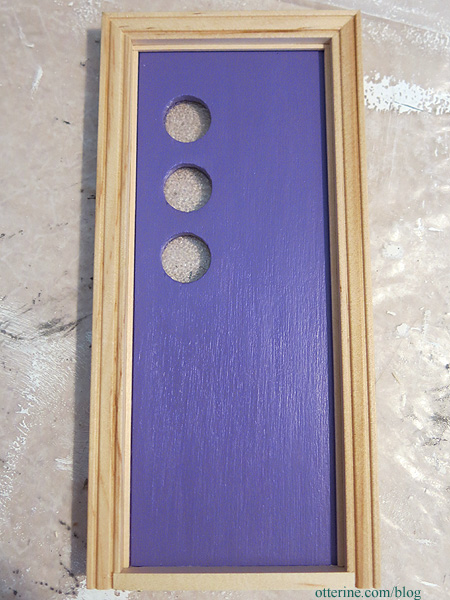
The door is thicker than the usual Houseworks door that sits in this frame, but the overhang is so slight that I opted not to pad the frame. It won’t be noticeable with the final interior trim in place.
Next up…painting the frame and adding hardware.
Categories: Otter Cove
August 18, 2015 | 0 commentsMaking siding from basswood sheets
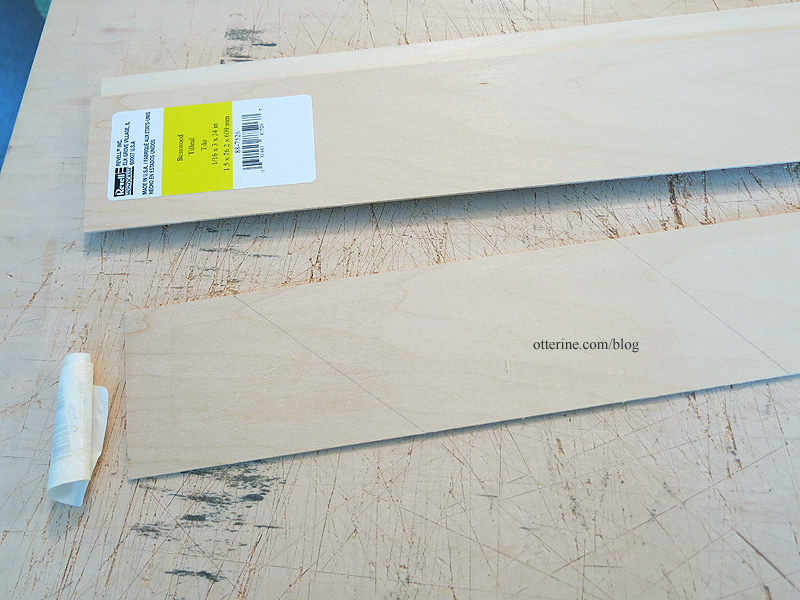
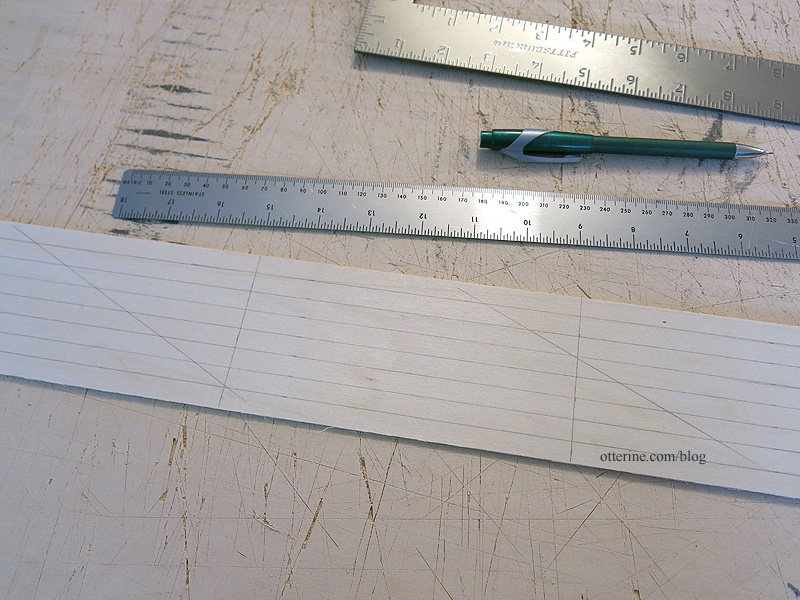
For this build, I decided to make my own siding from basswood sheets. You can buy pre-cut basswood strips, but it is cheaper to buy the sheets and cut your own. No, it won’t be as uniform as buying the factory cut strips, but the kind of siding I am after makes that okay. :D
Since the sheets (and the strips for that matter) had stickers on one side, I marked that side with diagonal pencil lines. The glue residue will prevent even staining, so I need to make sure I can always tell which side was the back.
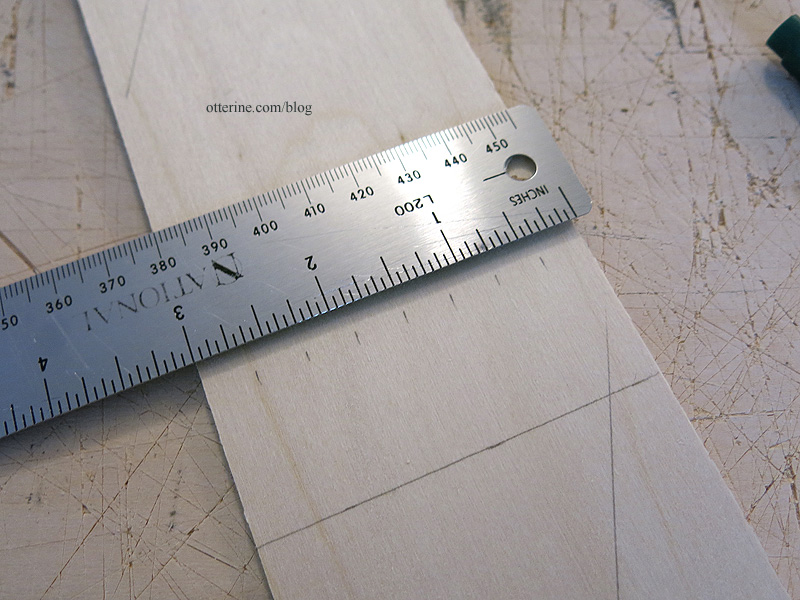
I then marked 6″ increments. I also made some of the sections in 8″ increments.
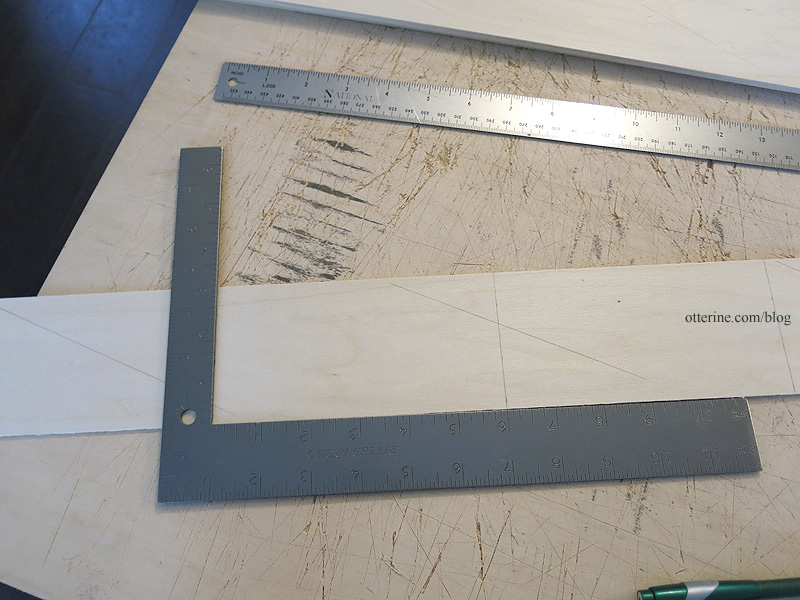
I marked 3/8″ wide planks.
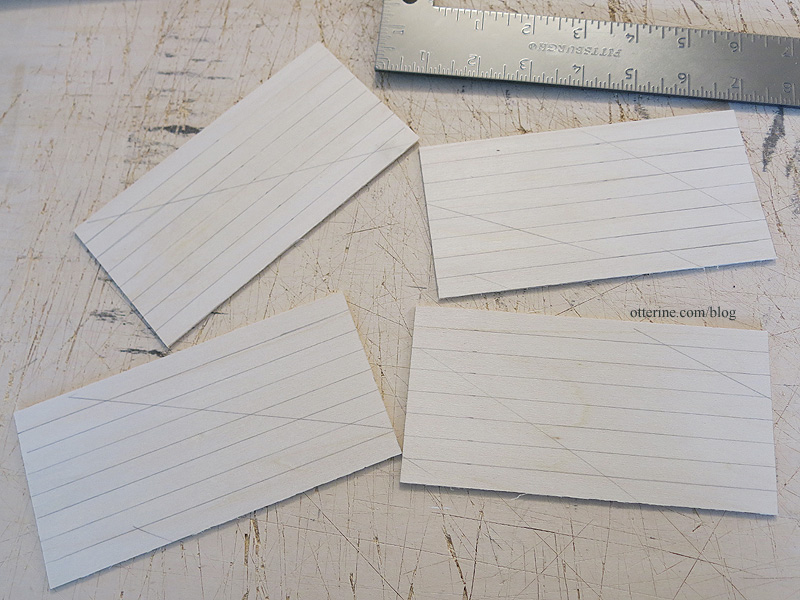
I cut the sections apart. In some places, I had to make additional marks to indicate the back.
I then cut the planks.
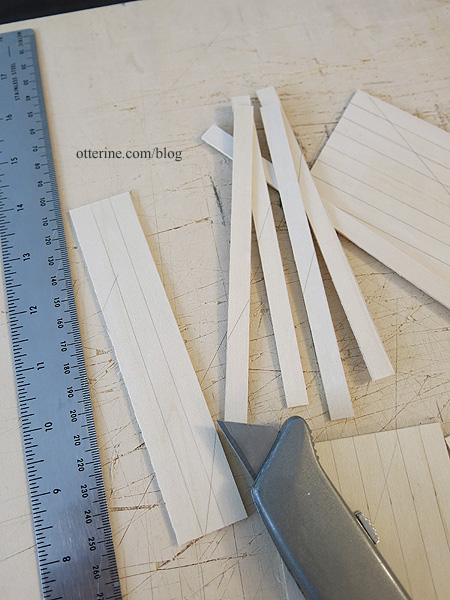
Here’s my pile of planks. You can see the back markings here and there.
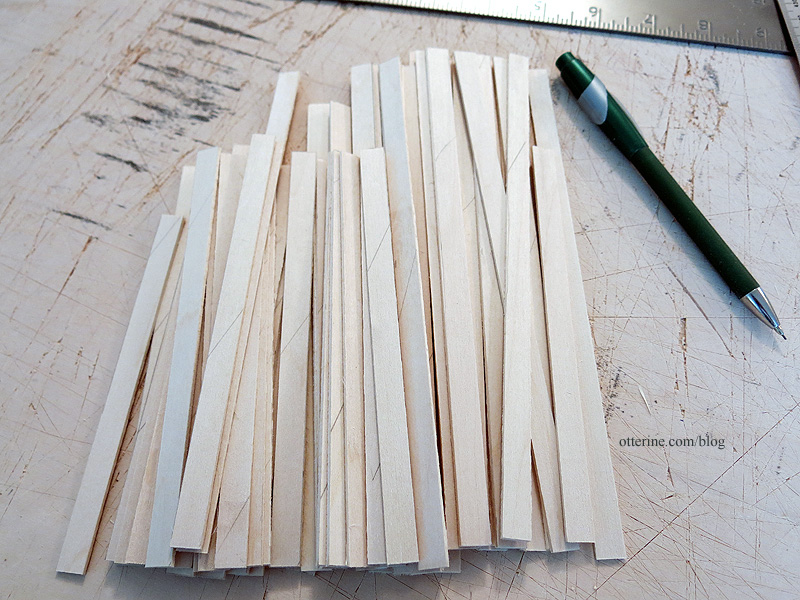
I sanded the fronts and front edges then taped the planks to painting boards for staining.
I stained the various boards using slightly different stains to end up with variegated, reclaimed siding.
Categories: Otter Cove
July 14, 2015 | 0 comments


NOTE: All content on otterine.com is copyrighted and may not be reproduced in part or in whole. It takes a lot of time and effort to write and photograph for my blog. Please ask permission before reproducing any of my content. (More on copyright)

Otter Cove – a pictorial review
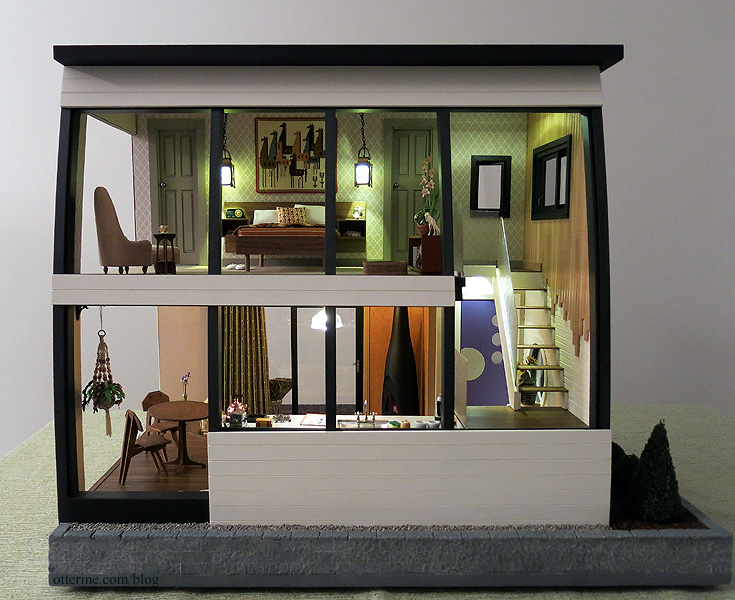
Restful waterfront living is yours to be had at Otter Cove. The luxury of an off-the-beaten-path getaway awaits with its picturesque views and creature comforts. Enjoy a walk along the extensive beaches or through the guided trails along the coast. If the weather is warm, take a nap or read a book on the patio. If the weather is cool, warm up inside by the fire as you listen to music and let your cares fall away. Make your reservations soon! We’ll leave the lava lamp on for you.
When I mapped out the space, I tried to envision the open back as possibly another wall of large windows. Making glass inserts would have been a challenge for the curved spaces, so I held off on that. Maybe someday I’ll revisit and engineer something. :D
I love that you can still see the kit in the lines of the house, but it’s thoroughly modern…nothing like Milo Valley Farm though they started as the same kit.
Here’s Denise’s City Cottage as it looks built to spec.
from miniatures.com Structural changes
I mentioned previously that I had two ideas when I first bought the kit, one of which was a barn find that turned into Milo Valley Farm. I had nixed that idea for the contest since I needed to change the kit so much it seemed it might be better suited to a different kit. I tried a few layouts for furnishings and even contemplated adding a lower floor, but nothing worked for me until I tipped it over. :D
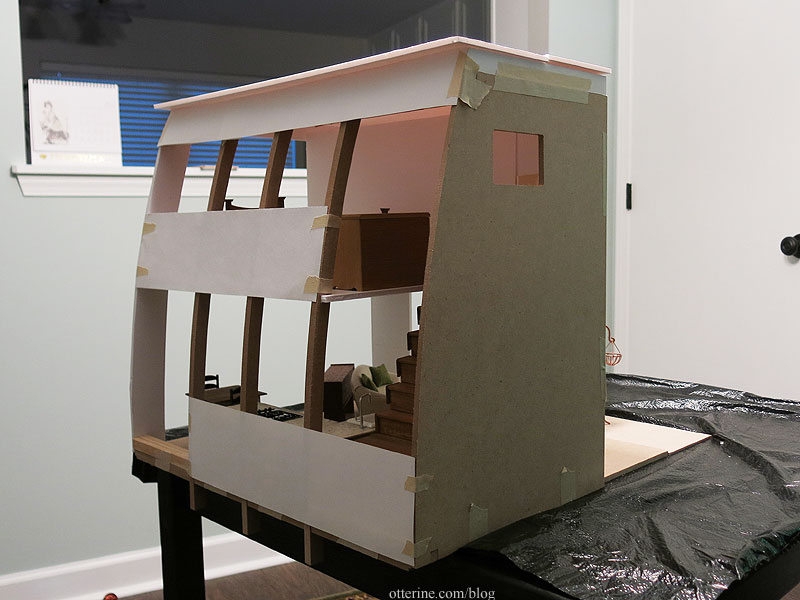
The rafters reminded me of the windows from The Artist’s Studio, so I ran with that idea. This now made it a two story house, though I did need to add 3/4″ in height to make the second floor a viable living space. There wasn’t enough room front to back to have a small kitchen, living room, staircase, bedroom and bath. I also didn’t like the idea of the entire side being open. So, I built out from the side opposite the wall of curved windows. This allowed me to have a sunken living room leading to an outdoor patio and a modest kitchen along the window wall on the first floor. On the second floor, there is a bedroom and full bath with a built-in tub. Here’s one of the original mock-ups; I made the patio larger and the living room smaller from this plan.
To that end, I needed to open up one side wall to form the back. :] Luckily, using the Dremel Trio edge guide worked. It’s not just for straight edges; it will follow a curve just as well.
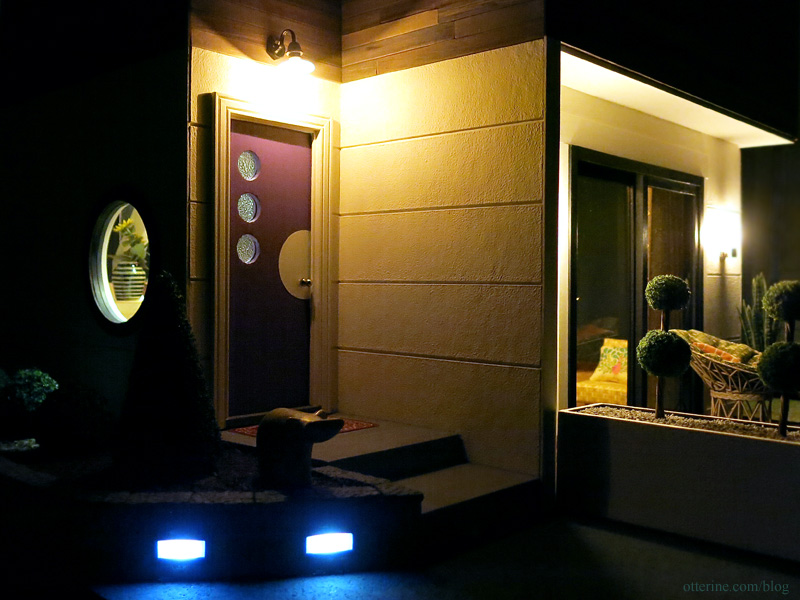
I moved one of the former front windows to the upper level at the top of the stairs. Adjacent to that, I used one of the single casement windows. The other former front window went into the bathroom. I made my own front door (actually tucked in on the side) since I wanted a more modern look for it. My inspiration came from Kropat Interior Design. The overhead lamp is a Meyers Wall Light from HBS; I removed the turnkey from the light and touched up the spot with black paint.
I made the base from two layers of builders foam so I could achieve the sunken living room. This was all glued to a plywood base.
Wall of windows
This photo is only possible with the window inserts removed, otherwise you would see me and my kitchen. :D Even if I dressed in all black, you’d see a Ninja in my kitchen. That’s a lot of reflective surface!
After tipping the kit over onto its side, I had to figure out my wall of windows. Unlike The Artist’s Studio, which had an entire wall of open windows, this build would require some portions to be solid to hide the back of the kitchen cabinets, base of the stairs, floor board and upper beam structure. Here’s the earliest mock-up using paper. I ended up making the wall a bit more open in the end.
To make things easiest, I decided to make the window inserts go from top to bottom and built the solid portions to encase them where needed. Plexiglass will bend in long strips but wants to stay straight in short runs. Having long pieces would allow for a gentle curve.
Once the window channels were in place, I used the original scored roof board to fill in the areas that needed to be covered. I painted these Warm White by Americana, patting the surface with a sponge brush to eliminate brush strokes. The scored lines look like siding.
One thing that bothered me was the idea of not being able to photograph the interior without glass glare (or my reflection looming there). But, once the roof was on, there would be no way to slide the window panes out of their pockets. It hit me late in the game — a week before the deadline — to add a slot in the roof to remove the panes. It’s not as elegantly executed as it would have been had I planned ahead for it…but it works! The windows fit through the slot in the roof and slide into the channels. The roof cork covers the hole and can be peeled back as needed.
The entire roof is topped with cork painted black, leaving a hole to access the wiring closet. It’s not really usable as an electrical access, but it’s better than nothing and it helped with wiring the lights attached to the roof board. The chimney is made from bits and bobs.
Entryway and staircase
I added a circular window to mimic the circular windows in the front door and break up the dead space of the entryway. I used my wood brick technique for this portion of the interior, painted the same warm white as the exterior. The sunflowers were made from a Bonnie Lavish kit, and the vase is from Manor House Miniatures. The turned stand was made by Bill, and the shoes were purchased at the Wee “c” Miniatures Show. The foyer light is a huge modern fixture sent from Daphne. I wondered about using such a large fixture, but the fact that it is white and coordinates with the circular theme made it work well in the space.
The two-story front wall has what I call waterfall bamboo paneling made from a bamboo table runner. I’ve painted this material in the past, but this time I left it untouched. The paneling is floor to ceiling on the upper floor but cascades in a random pattern next to the open staircase. It was almost a shame to block the view with a floor board, so I might revisit this design for a future build where there is nothing in the way.
With that in place, I could work on the staircase. The staircase is a full turnaround set of stairs with rippled glass railings made from Rippled Water Sheet.
The railings required a decent amount of engineering. The lower stairs are enclosed, so that was fairly straightforward. The upper portion required a bit more finesse. There are no risers on the upper stairs except for the top one. I like the light that carries through the open space.
It was a fair amount of maths, but I love the way it turned out. :D
Kitchen
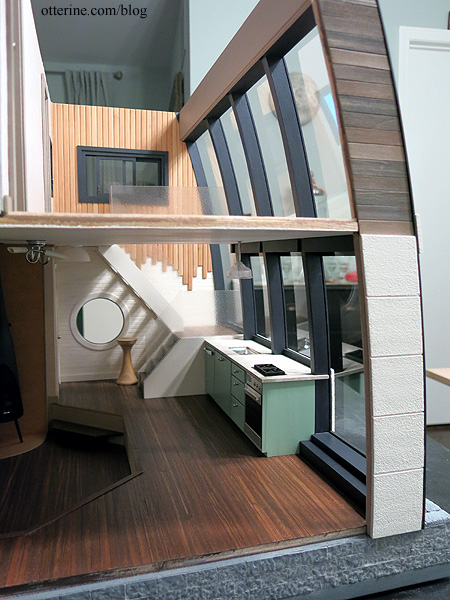
I seem to build a lot of vacation rentals and tourist spots. Since this is also a vacation house, I went with a modest efficiency kitchen. I included a sink, range and stove, and half fridge. The drawers and doors are non-functioning but they work well for looks. The under-counter half fridge has a handle made from an ink pen clip.
The light over the sink was bashed from a Lundby lamp using aluminum tubing and a NovaLyte LED. The rug is a design by Safavieh printed on Velour Card Stock from The Crafty PC (now out of business). The crocheted sunflower potholder is by Blohm Design.
The counter is basswood painted to look like formica. The stainless steel sink is by Houseworks by I added a drain from my stash and a tap from ELF Miniatures. The soap dispenser is from LugArt Petit, and the honey pot is by David Provan.
The stovetop is made from laser cut burners with hobby store aluminum sheet cut to fit underneath. The knobs and oven front parts are from ELF Miniatures, though I cut my own steel top and acrylic door to fit the space.
The kitty tea towel is from Marlene, and the owl trivet is by le mini di Pierluigi from The Little Dollhouse Company. The vintage toaster, mushroom napkin holder and recipe box are from eBay.
Who remembers the percolator? :D Even though my parents weren’t coffee drinkers, I remember someone in the family having one of these. This is a vintage mini from eBay.
This great macramé hanging planter is from Linda’s Creations.
I built two Arjen Spinhoven Arts & Crafts chair kits for the eating area. I like that Monique put the back on upside down and ended up with a better design than the original, so I did the same. The table is an attempt at a reproduction of a Heywood-Wakefield Cliff House table. Mine is a bit skinnier than the original near the bottom.
It was a challenge to get the wood table and mdf chairs the same color and approximate grain, but I love the way it turned out. The lovely irises are from Patricia Hopkins Studio, the vase is from Vitreus Ignis and the salt and pepper shakers are from Hartland Miniatures.
There’s a small section of floor space off the kitchen just perfect for something interesting. :D One thing I was hoping to have time and room for was the stereo. This is the piece I finished at midnight one day before the deadline. These are components from a 1/12 scale Aoshima Pioneer Project A99 kit.
I put together the record player, tape deck, tuner and equalizer. There’s a smaller component I don’t know. The two LPs are from the kit. They were printed on glossy paper backed with cardboard and die cut. The problem is, the die cuts were not on the lines, so only two were really useful at all.
Look at those wee cassettes! :D I could not find a 1/12 scale 8-track player and tapes.
The kit came with a cabinet and huge floor speakers, but there was no room for speakers and the cabinet looked a bit cheap on its own. I made a custom surround to enclose the plastic cabinet, leaving off the door. I also made two cube speakers from wood blocks and textured material from a photo album page. I think it fits the space perfectly. :D
Sunken Living Room
There is one stair step into the sunken living room from the entryway. The modern ceiling fixture is from The Dolls House Emporium.
I made a retro stove for those cooler nights. It’s held in place with tension alone. I have it wired through the ceiling with a lot of extra wire looped inside the stove in case I need to remove it to replace the red bulb inside. The base is separate from the main stove; the flange top and fire insert are also removable. My inspiration was the Invicta Pow Wow wood stove. The surround is made from scrapbook paper cut with a hexagon paper punch. The damper handle is from a defunct Chrysnbon kit that’s being used for parts.
The Tree Ring rug was made freehand using French knots and was based on an original printed rug by Dutch designer Yvette Laduk called the Woody Wood Carpet. :D I stitched this rug in 77 hours over the course of 61 days. Yeow. Isabeau is a beautifully made Maine Coon cat by Maya Schippl.
There are 37 rings to the rug, and each of those rings is made from 1-4 rows of light tan (DMC 422) and 1 row of brown (DMC 167). The outer edge bark is the same brown from the ring portion with a border edge in a slightly darker brown (DMC 869).
The sofa and chair are based on a general search of armless mid century modern furnishings. The pillows were made using Mod Peacock artwork by Sue Schlabach.
I made them from sponges, batting, fabric and wood.
I made the end table from scrap wood, making a shelf for the mod ashtray by Atomic Miniature. There’s a Chrysnbon candy dish from Hartland Miniatures and a Jane Graber bird bank as well.
The drapery panel was pleated using my vintage Millie August Magic Mini pleating tool. I chose the fabric for its vague green hue reminiscent of vintage interiors. The valance is made from scrap wood and covered in fabric. The valance is glued to the wall, but the drapery panel just slips into place underneath so it can be removed for cleaning or replacement.
Come have a seat. :D
Bedroom with a view
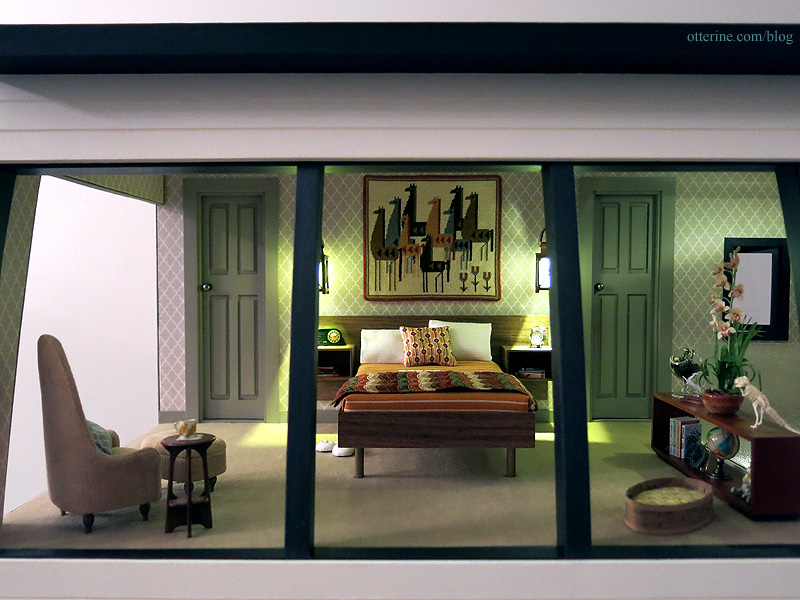
The bedroom is carpeted, which is a first for me in any of my custom builds. The carpet here is installed with Elmer’s acid free double sided tape, as recommended. The wallpaper is Tan Wag Pattern by Recollections. The doors and trim are painted Battleship by Americana. It’s a satin paint that saves the time of sealing and offers a lovely sheen.
The lanterns were 12V to begin with, but I rewired them for a couple of reasons. First, the hue on these lamps didn’t go well with the hue of the hall lamp at the top of the stairs. The 12V lights didn’t put off enough light, and the bulbs while replaceable were not any kind that I recognized (I’m not sure where I bought these). I replaced the chain, added a ceiling plate and wire hook, and painted the wires of the new LED.
The slipper chair and ottoman are vintage Petite Princess pieces. Because this is a smallish build, the smaller scale of these pieces work well in the space and makes the room seem larger. I made a smaller than usual pillow to fit the Petite Princess slipper chair. It’s 1.25″ square instead of the usual 1.5″ square. You wouldn’t think it would make much of a difference, but it does when it comes to turning the fabric through a smaller hole.
The bed is a scratch build based on a standard mid century modern design. It’s made from walnut with bronze painted wood legs and a foam core board mattress.
I went with mod orange bedding to coordinate with the copper lanterns and wall tapestry. I later swapped out the red pineapple pillow.
The afghan is by Mary at Roslyn Treasures.
The Nine Horses tapestry was stitched using half cross-stitch on 32ct Jobelan. Total stitching time was 38.5 hours. It measures 4 x 3.5 inches, and the design based on a vintage original.
I’ve added some books in the end table shelves. The radio is from Halls Miniature Clocks, and the clock is from Manor House Minis.
The closet door is duct taped closed with only dead space behind it. I didn’t want to build a closet interior you could never see or be able to directly access, but I didn’t want an absurdly long bathroom either. So, I enclosed the unneeded space and put a narrow door on it to serve as a closet. The wiring empties into this space so while it’s not used space in 1:12 scale, it is in real life.
Since there was the illusion of a closet, I didn’t really need a dresser clogging up the bedroom space. I kept the minimalist look with a low open shelf by minisx2. The pineapple bookends and globe are from HBS, the geode is from Stewart Dollhouse Creations, and the monkey statue was purchased awhile back.
I made the terrarium from a glass vase from A Little More in Miniatures. The eland sculpture is from The Dolls House Mall.
April made the unbelievably gorgeous orchid.
The Tinysaurus Rex was built from a kit.
Here’s a good airplane view. :D The cat bed is a basket by Al Chandronnait from miniatures.com, though I added my own tufted insert. The table is a half scale item from Jancrafted, the coaster is from The Aero Squadron Lounge and the tea cup was a find at a local show from A Pocket Full of Wishes.
I’ve been asked about whether the doors have been installed upside down anytime I use one of these narrow doors. I can tell you, this is how these narrow doors are made. They sit in the frame as you see them with the short section on top and there is no way to install them other than this direction unless you were to remove the door from the frame and flip it. These two in particular did not have headpins in the bottom to remove the doors, which is a first. Usually you can remove the door for painting and staining. Even still, I like the aesthetic of the smaller sections on top even if it’s technically inaccurate.
Bathroom
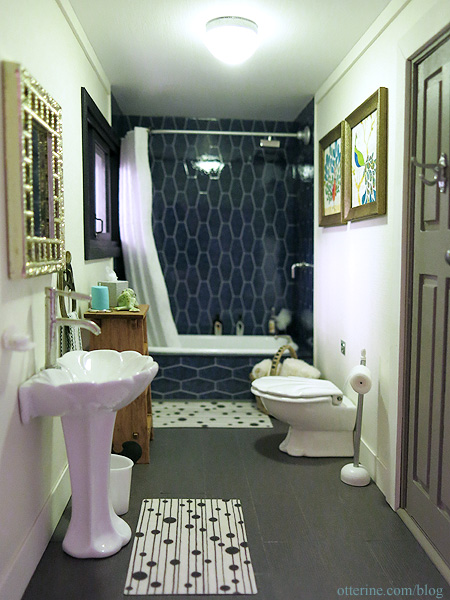
The bathroom features a built-in tub/shower combo and Dora Kuhn fixtures. The mirror is a vintage Lundby piece from Vintage Lundby with a replacement insert made from Darice plastic mirror sheet. I’ve added a Chrysnbon trash can and soap dish. The new faucet is from ELF Miniatures. Keli sent me the owl pendant awhile ago. I removed the bail and added a towel. :D
The magazine rack was made from a kit by Kari Bloom. It took some doing to remove the laser cut residue from the edges, but I was able to achieve a lovely stain using Minwax Cherry.
It’s the perfect accent piece for a smallish bathroom. The tissue box is from modernminifan, and I added a little hint of real tissue.
I made the shower tile using Word. (Yes, Microsoft Word.) The tub is a spare Chrysnbon piece purchased from Sir Thomas Thumb at the local mini shows; these came without hardware but are perfect when you want the tub to make a built-in. The bath tub is removable so I can clean/dust it. The overflow is the tip of a pen cap. I had a drain cover, but I had to snag that for the kitchen sink so I ended up painting the molded drain in the tub. The faucet is vintage hardware. The shower head and control lever are from ELF Miniatures, but I added washer escutcheons and painted hot/cold detailing.
The shower rod is a vintage brass piece that used to be curved on both ends. I straightened and trimmed one end then sprayed it satin silver. The shower curtain was made using my vintage pleater and some textured cotton. I added jump rings and slid it onto the rod before installation.
I made the towels, bath products, scrubby and magazines. The exquisite basket was made by Lidi at Basketcase Miniatures.
The ceiling light is an LED by Evan Designs with a loose frosted shade held in place with mini hold wax. I sprayed the metal ring silver to match the shower rod. The rugs are designs by Candice Olson printed on Velour Card Stock from The Crafty PC. I added a wall flush button and made a free standing toilet paper holder.
The Mod Peacock artwork is by Sue Schlabach. I painted two wood frames bronze to mount the art.
The flooring is Bazzill Basics paper in Dusk; it has a subtle texture. I used 3M Super 77 spray glue to mount the paper to a layer of bristol board. I sealed it with Delta Ceramcoat Satin Varnish and cut the tiles in 3/4″ x 1 1/2″ pieces. I was going for the modern porcelain tile look.
Exterior details
The inspiration for the exterior finishes came from this grand modern house by Christopher Simmonds Architect. I love the crisp white paired with reclaimed siding.
For the lower portion, I liked the idea of large sections dividing the space instead of a flat, uniform surface. I tried using the roof board since it already had even lines scored into the surface. I could not get the unwanted lines to fill in sufficiently. I kept seeing their halos, so I switched to cardboard panels.
I used matte medium gel dabbed on with a foam brush to make the surface texture.
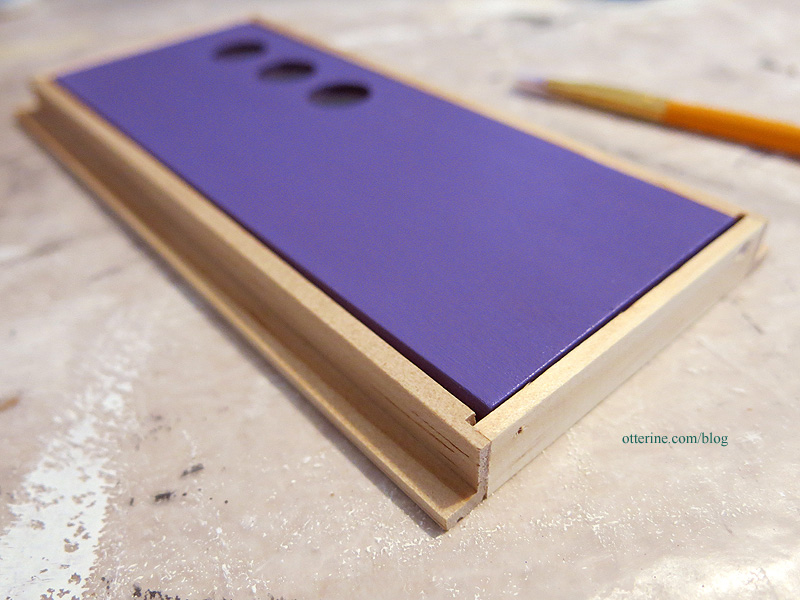
I followed this up with three applications of Warm White by Americana using the same dabbing technique. The circle trim here and on the inside was a custom order from Cut Line Craft. I gave them my precise measurements, and they cut the circle to fit my window. There was no way I was going to get one neat circle let alone two without a laser cutter! :D
I showed a sneak peek of the reclaimed siding made from basswood sheets earlier. :]
I applied this to all of the surfaces on the upper portion of the house. To mask the joins, I used 1/16″ x 1/16″ strip wood, painted to match each section.
Landscaping
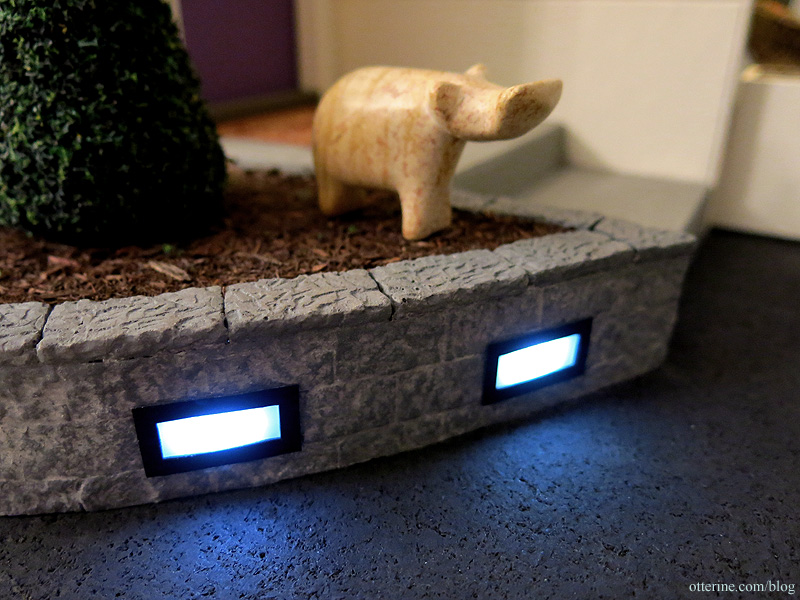
I made the base from two layers of builders foam so I could achieve the sunken living room. To enclose the edges of the grounds, I added scrap wood to even out the surface. I made a retaining wall to finish off the edge using egg carton stone on the side surfaces and resin pavers for the top edge. Behind the window wall, there is a tiny strip of land. I filled this with gravel and used Scenic Cement to hold it in place.
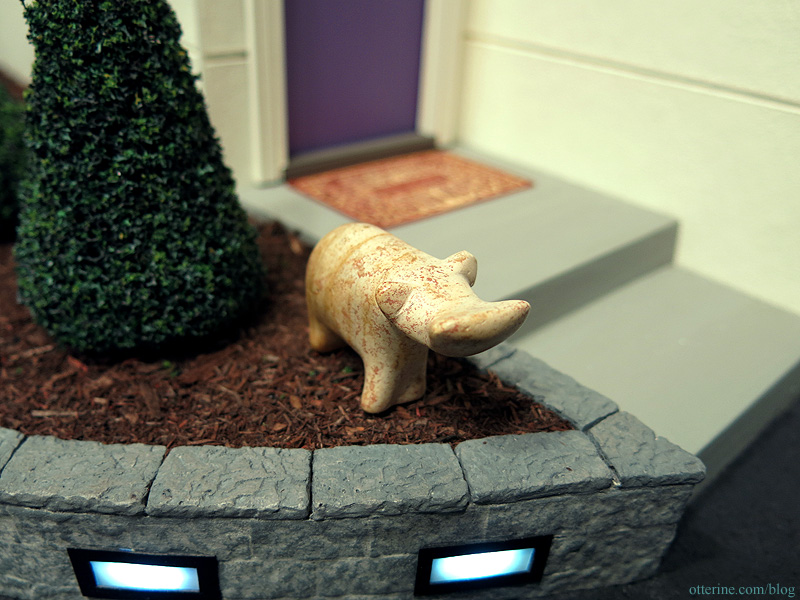
Along what is technically the front wall, there’s a slightly larger patch of land. I considered gravel, grass and mulch. The mulch won! :D I’ve planted a modest amount of Squeeze Me greenery from Model Builders Supply to fill in the space.
The hippo is a vintage carving. I thought it made a wonderful garden statue.
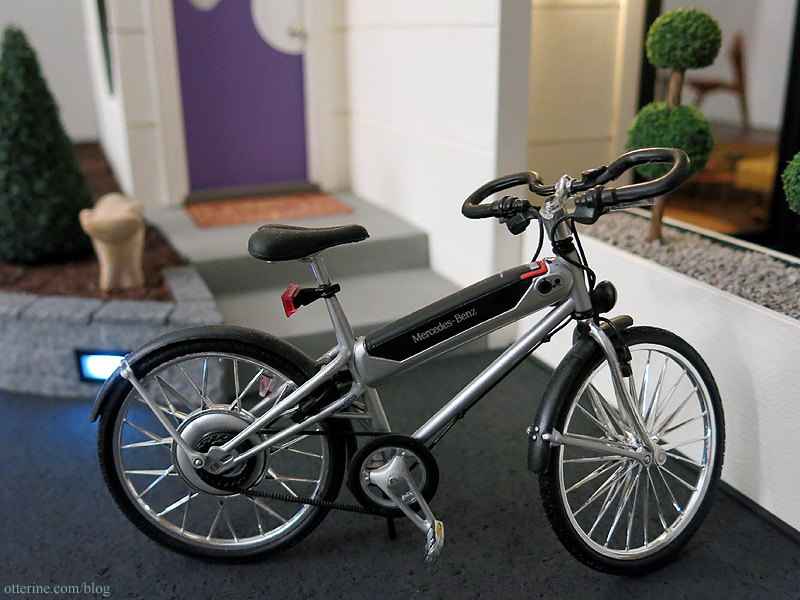
There’s a small driveway on the actual base, but I envision a larger one just off the main board. ;D There’s a Mercedes Benz Hybrid Bike, a 1:12 scale model by Maisto.
I love the driveway lights. :D They are LEDs from Evan Designs with covers and frames cut from recycled office materials.
I built a large planter to separate the driveway from the patio and planted two topiary trees in it.
Having a sizeable patio did make the living room a little smaller than I would have normally made it, but both ended up being cozy spaces. The patio has two Papasan chairs and a vintage rattan table. The chairs are vintage minis that got a makeover with new cushions and pillows. The table was purchased on a business trip to Vancouver from Ross’ Miniatures. I made the citronella candle tin, and the creamsicle cocktails are from Karen Aird Miniatures.
The patio surface is made from egg carton pavers set in a Versailles pattern and grouted with spackling. The final glazes (paint mixed with Americana Staining Medium) gave the pavers a slight sheen that’s really lovely.
To make the snake plant, I used the technique found in a book on making miniature plants out of florist tape called Miniature House Plants by Ruth Hanke. In the book example, while the author did include painting the rough stripes of the plant, she didn’t include the wide light green outer edges so I added those based on the real deal. I used fine ballast from Woodland Scenics and used Scenic Cement to keep it all together. The pot and stand came from Mod Pod Miniatures, but I sprayed the bucket a deep metallic orange.
And, that’s a wrap! Now, where’s my fruity cocktail?! :D
Hear the crickets? :D
—-
Thank you to everyone for your encouragement throughout the build and your patience through gritted teeth during sneak peeks! I had a lot of fun working in the modern style again.Contest results: Otter Cove won the Second Place award in the HBS Creatin’ Contest! I’m so thrilled to be among the top winners! Congratulations to the other winners and a hearty pat on the back to all the contestants for finishing on time and putting in their efforts and creativity. You can see all of the entries here.
Categories: Otter Cove
February 1, 2016 | 0 commentsOtter Cove – flooring and staircase
There’s wood flooring throughout the first floor. Since the room is longer than the standard wood flooring sheets, I had to piece it end to end.
You can somewhat see it still after staining, but it worked as best it could without being a solid sheet.
The two-story front wall has what I call waterfall bamboo paneling made from a bamboo table runner. I’ve painted this material in the past, but this time I left it untouched. The paneling is floor to ceiling on the upper floor but cascades in a random pattern next to the open staircase. It was almost a shame to block the view with a floor board…so I might revisit this design for a future build where there is nothing in the way. :]
With that in place, I could work on the staircase. The staircase is a full turnaround set of stairs with rippled glass railings made from Rippled Water Sheet.
I started with a box. This would serve as the landing portion for the turn of direction. I used the stair step wood stringer that is available on the market to make my supports.
The railings required a decent amount of engineering, so I used mat board and random recycled office materials to test out the process.
The lower stairs are enclosed, so that was fairly straightforward. I used scrap wood to keep the structure square and sound, topped the treads with basswood and used the same flooring for the landing. It is all stained to match.
The upper portion required a bit more finesse. I made similar base strips to support the treads, but there are no risers on the upper stairs except for the top one. I like the light that carries through the open space.
The glass pieces slip into grooves so they can be cleaned or replaced as needed.
It was a fair amount of maths, but I love the way it turned out. :D
Categories: Otter Cove
December 13, 2015 | 0 commentsTree Ring Rug
My inspiration is a lovely rug by YLdesign called the Woody Wood Carpet. While theirs is printed, mine will be done in French knots. I like the idea of an organic process for an organic subject matter. And, I can just stop stitching once I reach the diameter I want. I’ll be using four colors of tan and brown — two lighter ones (DMC 422 and DMC 167) for the interior rings and two darker ones (DMC 839 and DMC 938) for the bark edges. I usually keep track of my time when stitching, but I don’t think I’ve ever captured the first stitch of a project. One French knot down….
This was a completely freehand project. I made no pattern or markings on the fabric.
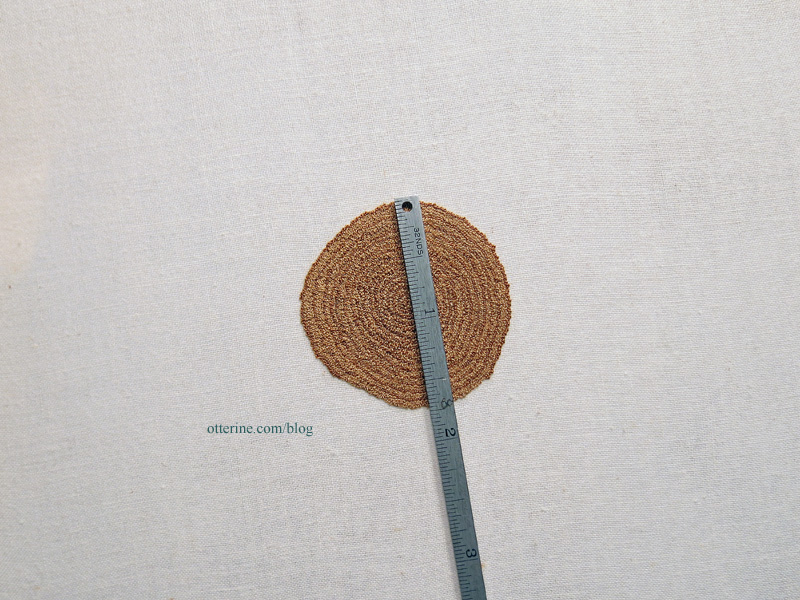
At 13 hours, I reached 1 3/4″ diameter. I planned to reach roughly 5 3/4″ diameter. The progress was deceiving since it took longer to make a full perimeter of French knots each time around.
At 31.25 hours, the diameter was 2 3/4″ and taking on a lovely shape as I would make some areas of the lighter tan wider in areas.
I finished stitching the Tree Ring rug for Otter Cove just in time! I stitched this rug in 77 hours over the course of 61 days. Yeow.
The inner ring portion ended up 4.25″ in diameter, a full inch smaller than I had originally planned. As the rug grew larger, I tested out the sizes and was able to save myself a lot of stitching time. Toward the end, making one full circle of French knots took over an hour and added a mere 1/32″ in diameter. After final finishing, the diameter ended up at roughly 4 5/16″.
There are 37 rings to the rug, and each of those rings is made from 1-4 rows of light tan (DMC 422) and 1 row of brown (DMC 167). The outer edge bark is the same brown from the ring portion with a border edge in a slightly darker brown (DMC 869). I didn’t make my bark portion as pronounced as the inspiration rug.
To finish the edge, I added a thin line of Fray Check around the perimeter. I then snipped up to the stitching and turned the pieces to the back.
Once done, I trimmed the loose pieces.
I added a circle of muslin to cover the back using Heat -n Bond (full process here).
Because of the uneven edge, some of the fabric showed. I used a brown Sharpie to color in the slight underneath edge. You do have to be careful with this method and use a light touch, but it works well.
Though mine differs from the original rug by, I think I’ve captured the essence. And, I love the texture.
Isabeau approves.
Categories: Needlework - French knot rugs, Otter Cove
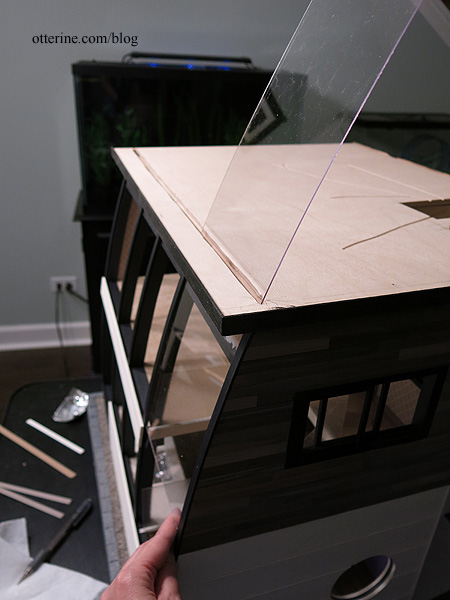
December 12, 2015 | 0 commentsOtter Cove – Wall of Windows
This photo is only possible with the window inserts removed, otherwise you would see me and my kitchen. :D Even if I dressed in all black, you’d see a Ninja in my kitchen. That’s a lot of reflective surface!
After tipping the kit over onto its side, I had to figure out my wall of windows. Unlike The Artist’s Studio, which had an entire wall of open windows, this build would require some portions to be solid to hide the back of the kitchen cabinets, base of the stairs, floor board and upper beam structure. Here’s the earliest mock-up using paper. I ended up making the wall a bit more open in the end.
To make things easiest, I decided to make the window inserts go from top to bottom and built the solid portions to encase them where needed. Plexiglass will bend in long strips but wants to stay straight in short runs. Having long pieces would allow for a gentle curve.
I started by gluing the beam structure together along with the added support pieces. Along the center of each beam, I glued a piece of 1/16″ x 1/8″ strip wood.
Over these, I centered 1/16″ x 3/8″ strip wood.
This created a channel on either side to add plexiglass strips. Hey, there’s my building buddy. :D
I painted the pieces using a mix of 2/3 Liquitex Payne’s Grey and 1/3 Silver by Apple Barrel. It’s a dark navy metallic – a beautiful color that is hard to see in photographs and ends up looking like coated steel.
Once the window channels were in place, I used the original scored roof board to fill in the areas that needed to be covered. I painted these Warm White by Americana, patting the surface with a sponge brush to eliminate brush strokes. The scored lines look like siding.
I added strip wood trim painted black to the tops and bottoms of the siding panels as needed to enclose the glass and serve as weather-stripping. It just sort of blends in and would only be truly noticeable if it were absent. :D Here’s the test window insert in place.
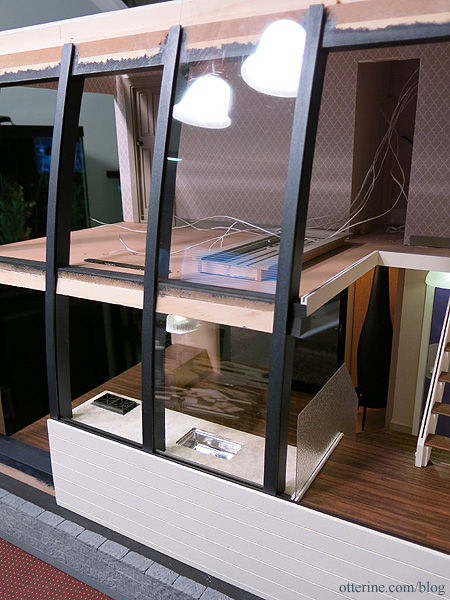
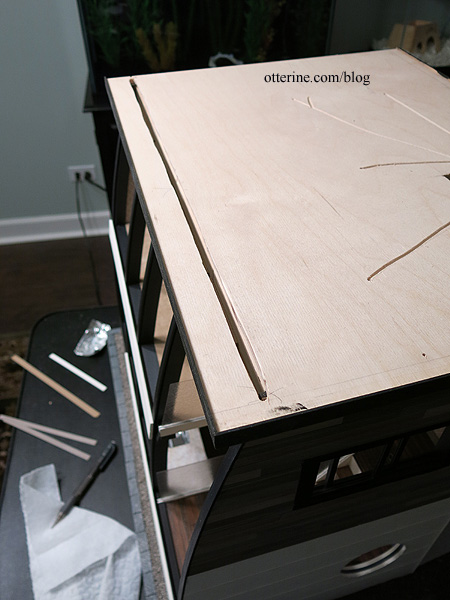
One thing that bothered me was the idea of not being able to photograph the interior without glass glare (or my reflection looming there). But, once the roof was on, there would be no way to slide the window panes out of their pockets. It hit me late in the game — a week before the deadline — to add a slot in the roof to remove the panes.
It’s not as elegantly executed as it would have been had I planned ahead for it…but it works! The windows fit through the slot in the roof and slide into the channels.
The cork covers the hole and can be peeled back as needed.
The entire roof is topped with cork painted black, leaving a hole to access the wiring closet. It’s not really usable as an electrical access, but it’s better than nothing and it helped with wiring the lights attached to the roof board. The chimney is made from bits and bobs.
Categories: Otter Cove
December 8, 2015 | 0 commentsVintage dining table and chairs
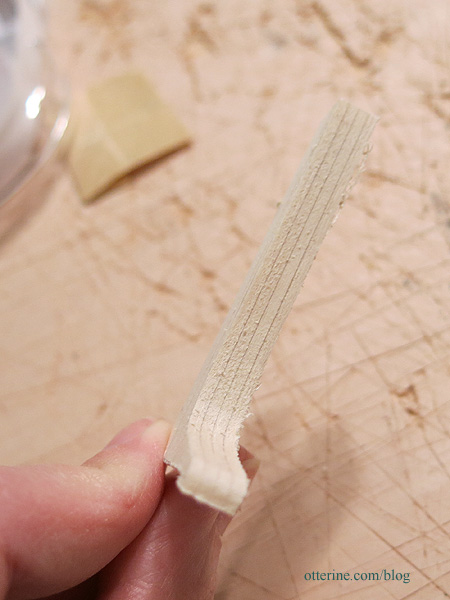
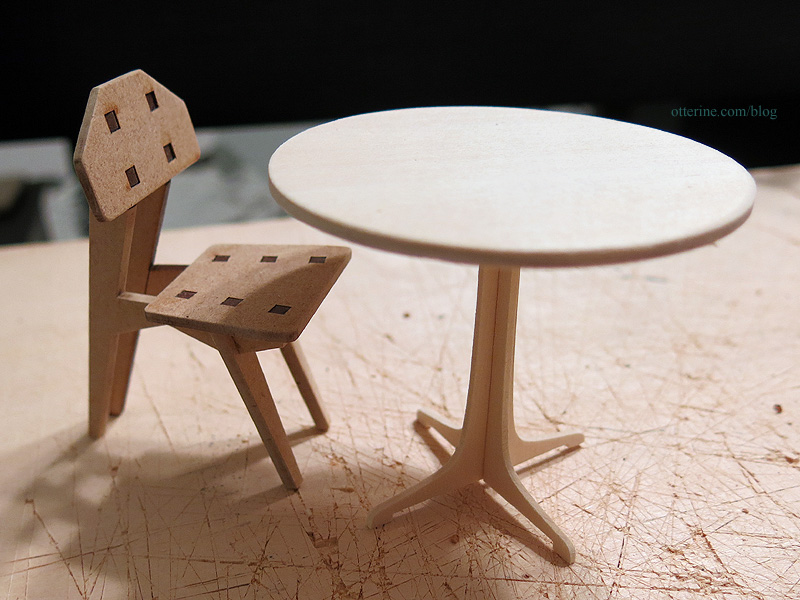
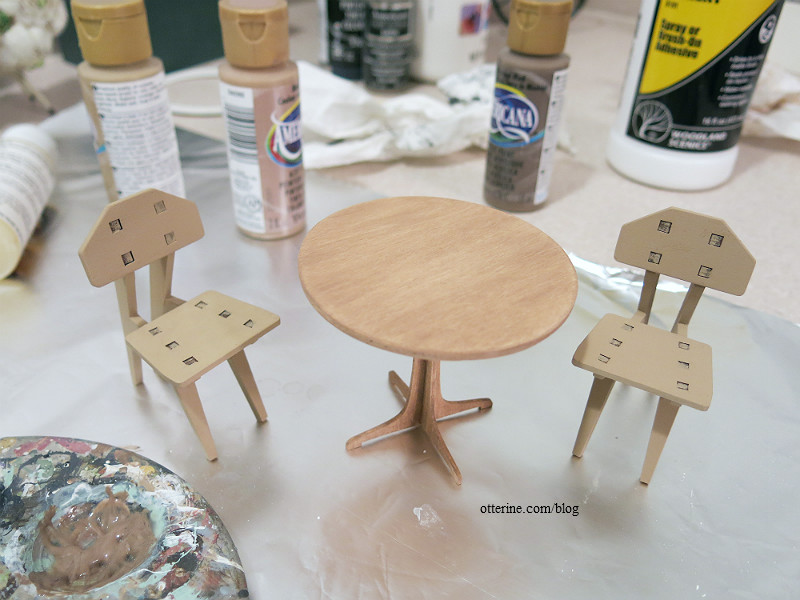
For the kitchen, I am using two Arjen Spinhoven Arts & Crafts chair kits. I like that Monique put the back on upside down and ended up with a better design than the original. So, I am doing the same. I’ve sanded the laser cut edges to remove the brown residue and to round off the edges.
The table is an attempt at a reproduction of a Heywood-Wakefield Cliff House table. Mine is a bit skinnier than the original near the bottom. Also, in real life woodworking, you would make each of the legs from two pieces since the grain goes only one direction and the feet would be too breakable on the cross grain. I cut the curved fronts on the scroll saw, taping the wood layers together. I then cut the backs manually.
I used 1/16″ thick wood for the legs since my purchased wood circle top was also thin, but 3/32″ thick wood might have been better for stability. They are very delicate, and perhaps when I have more time, I will redo it the right way though I do love it as is.
I glued the chairs and table base together before final finishing. I figured it would be easier, go faster and keep warping to a minimum. I did leave the table top separate, though, because the feet have to be held so gently.
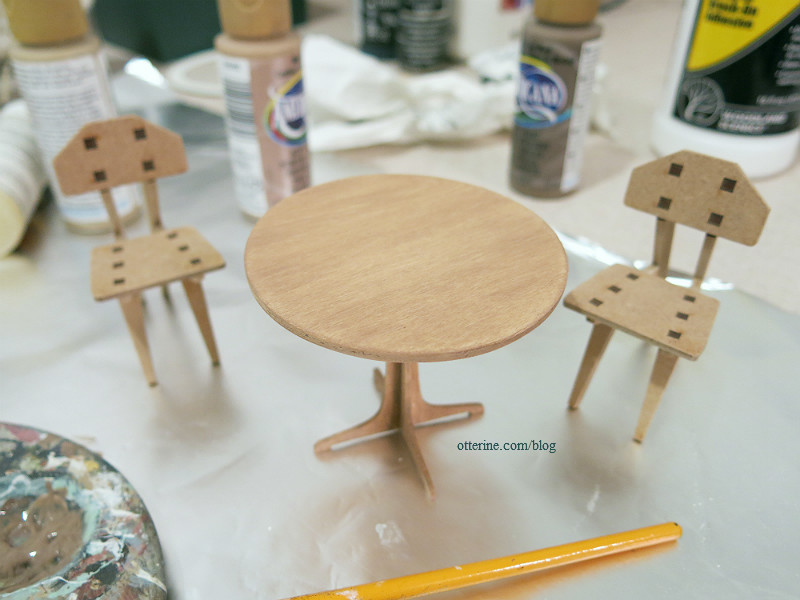
I started by layering on stains in the yellow and brown spectrum using Staining Medium by Americana. This darkened the basswood table.
I then painted the chairs a light Fawn by Americana. This brought up the base hue of the chairs to match the lighter color of the table. I’m not especially worried about the square detailing on the chairs; that can be painted back in later.
I then layered on some darker stains until they met in the middle. It was a challenge to get the wood table and mdf chairs the same color and approximate grain, but I love the way it turned out. The lovely irises are from Patricia Hopkins Studio, the vase is from Vitreus Ignis and the salt and pepper shakers are from Hartland Miniatures.
Categories: Otter Cove
December 4, 2015 | 0 comments
NOTE: All content on otterine.com is copyrighted and may not be reproduced in part or in whole. It takes a lot of time and effort to write and photograph for my blog. Please ask permission before reproducing any of my content. (More on copyright)