

1913 Model T Van – part 9
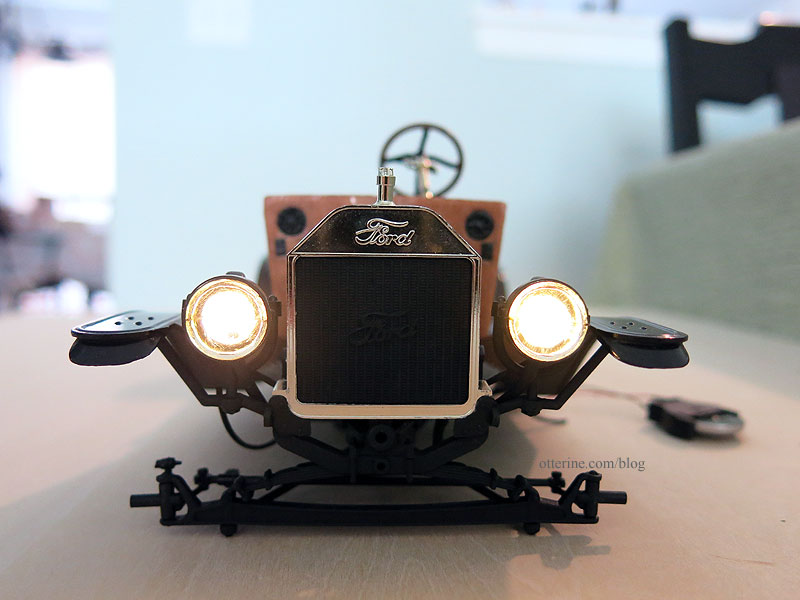
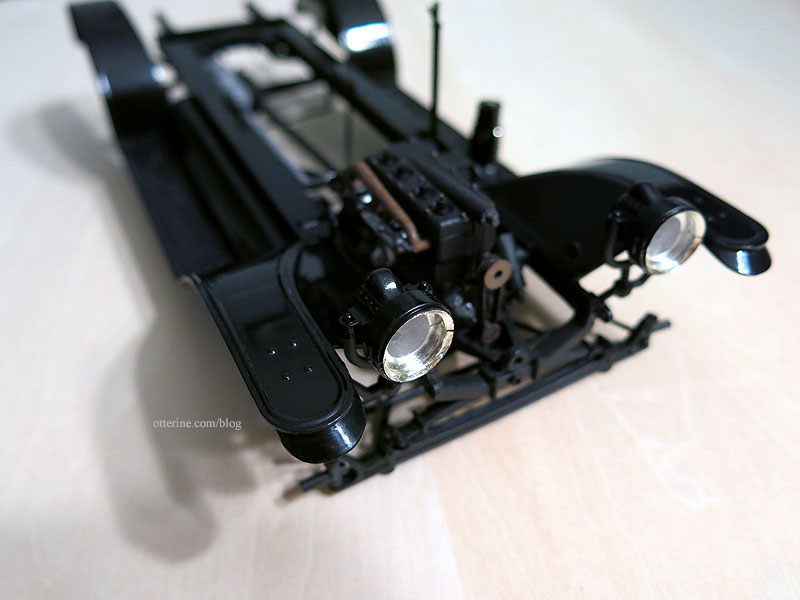
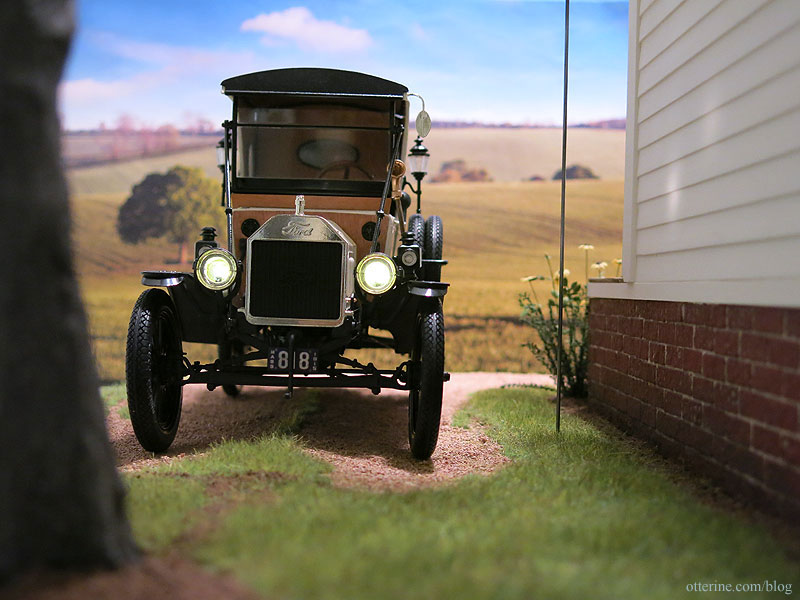
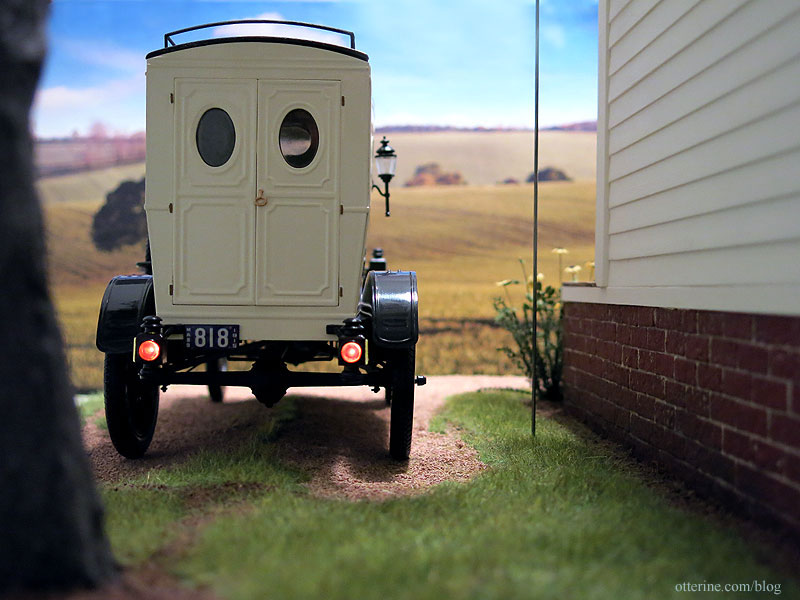
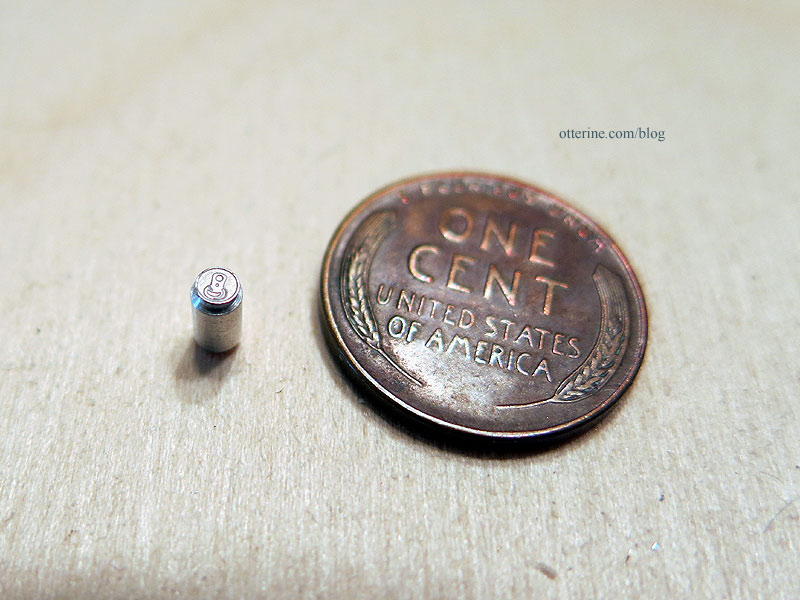
Continuing work on the Model T Van. There are eight lights on this model: two headlights, two side lamps, two coach lamps and two taillights. I figured I would give LED lighting a go for the headlights and possibly the taillights. I opted not to attempt wiring the side lamps and coach lamps mainly because there was no way to hide the wires inside the cabin.
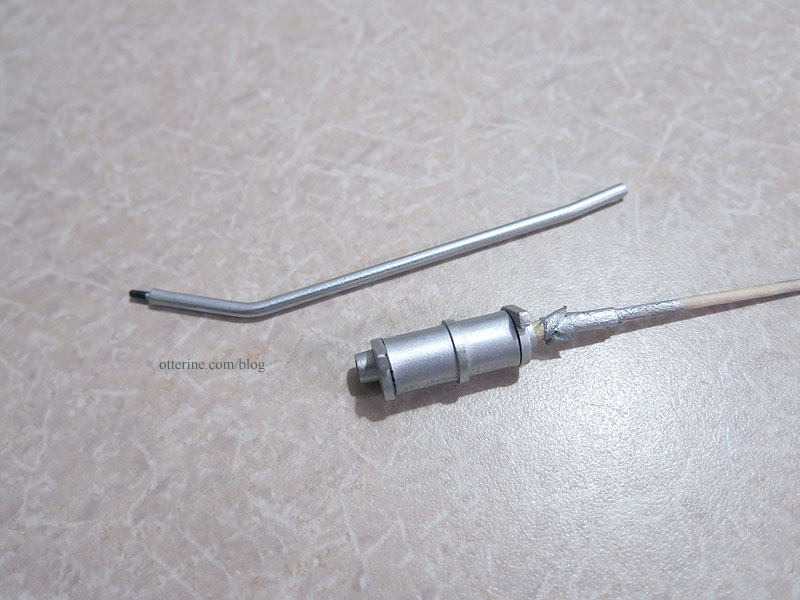
I detailed the headlight installation in part 5. The lamps are mounted, but I left off the brass valves and tubing so I could give this a whirl. If it didn’t work out, I could just install the original parts that simulate the gas lines.
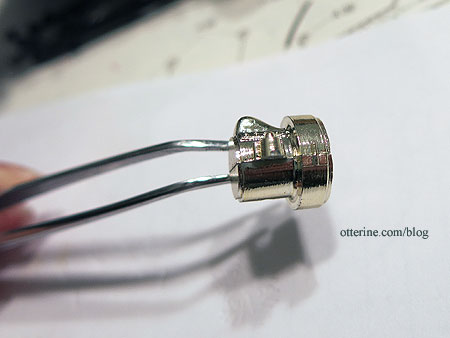
I am using pico size 3V LEDs in warm white from Evan Designs. I could have probably used nano size, but the chips I had on hand were too large and I ordered the pico to be on the safe side. It’s plenty of light for the purpose; they are quite bright for the size. Besides, it’s not like the Model T was equipped with halogen high beams.

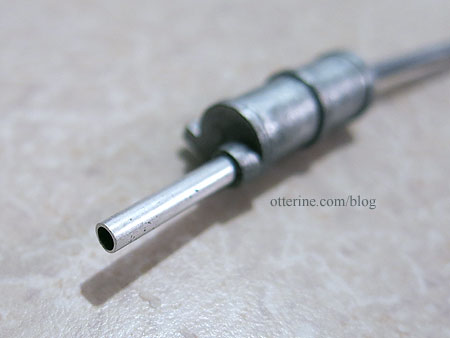
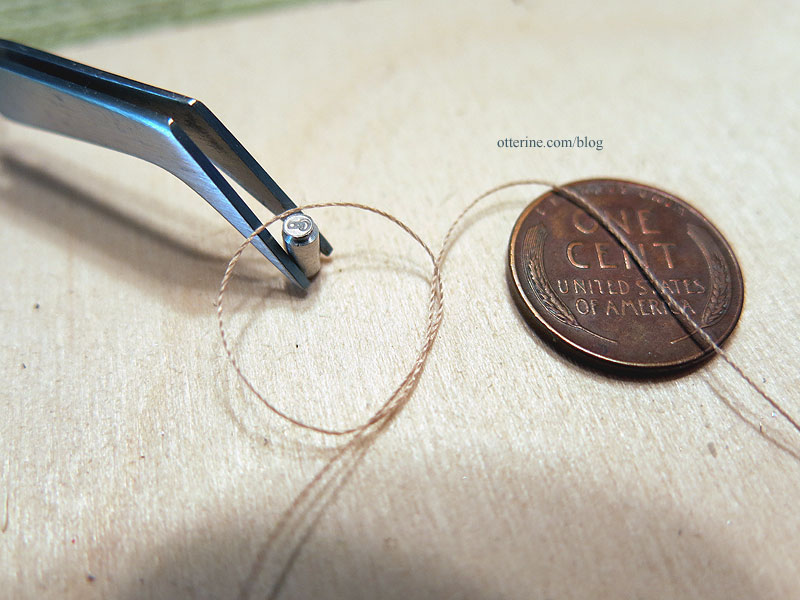
I found tubing in an unlikely place — the pony bead jewelry section at Hobby Lobby. It’s not exactly to scale, but it should blend in well enough. It’s also more malleable than the tubing included with the kit.

There’s a hole on the bottom for the brass valve in each headlight, and I made these larger before installation to allow the tubing to fit.

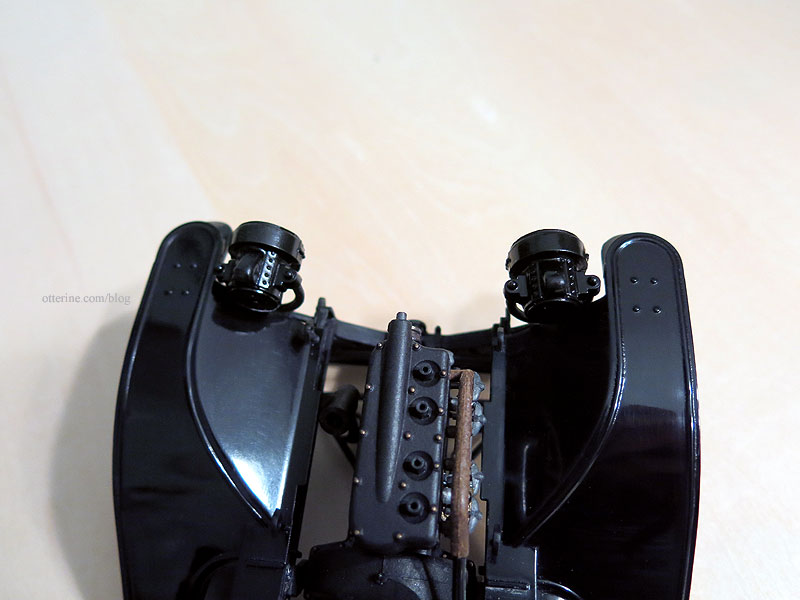
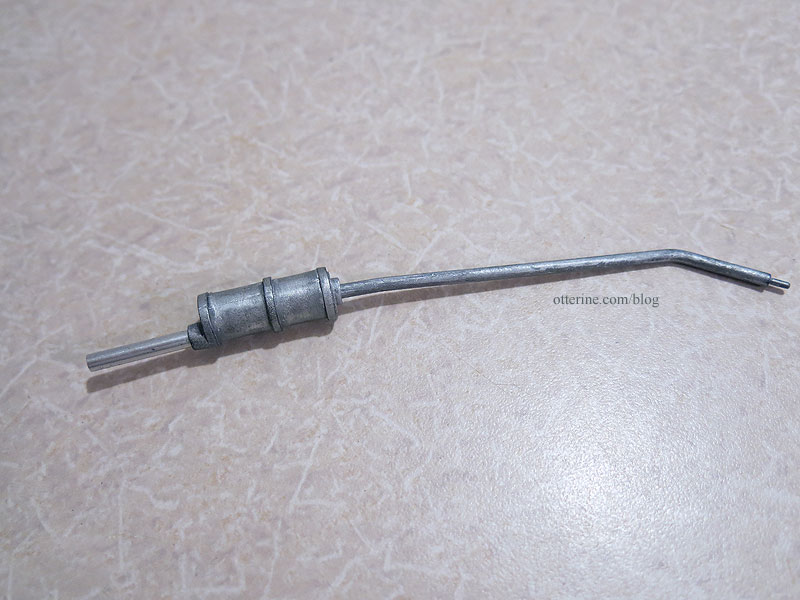
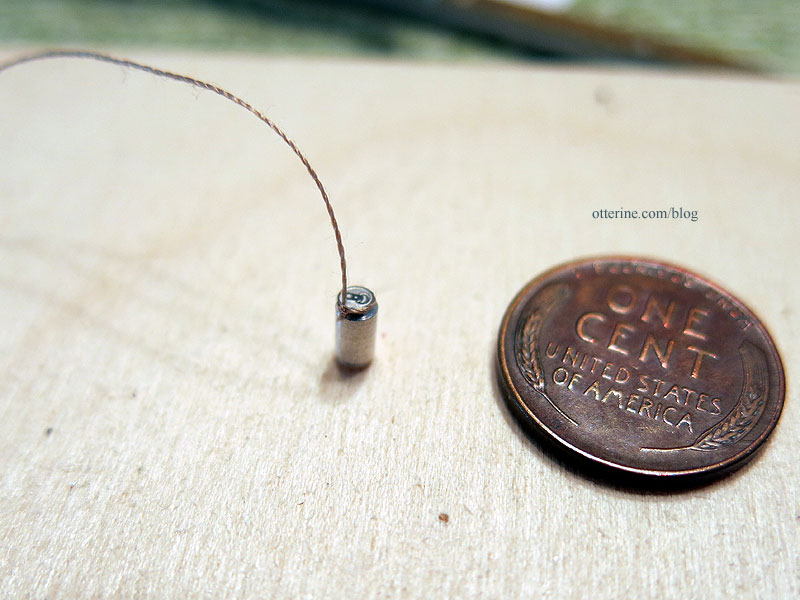
I threaded the wires through the tubing, leaving it as long as possible for now. There was already a tubing map in the instructions since you were to fake these gas lines in the original kit. I didn’t follow it; instead I used electrical tape to hold things in place along a route leading to the rear cabin.

I’ll put the battery and switch there.

Electrical tape can look like rubber bands in a model and holds well. Being black, it blends in with the chassis.

The lights work well, but as I mentioned before one of the headlight glass inserts is scratched and the super glue brought out that flaw even more. :\

Photographed in regular lighting conditions, though, the lights look marvelous. This is one of those rare instances where the camera can mask the flaw. :D
I need to do some additional thinking and building before I can see about the taillights. :]
Categories: Model Cars, Vehicles
November 5, 2016 | 0 comments1913 Model T Van – part 8
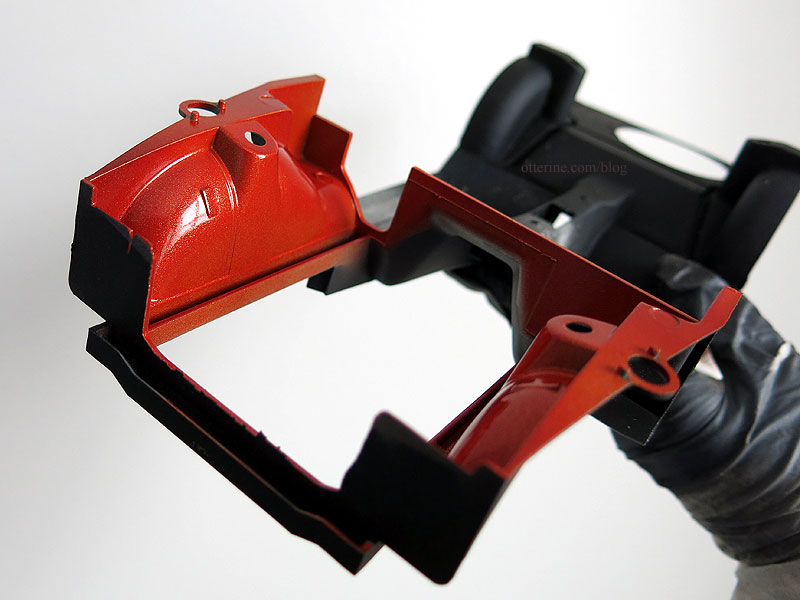
Continuing work on the Model T Van. From now on, I will be a purist and buy spray paints made for car models if I want a showroom new vehicle. I do love the “craft” spray paints I’ve used in the past on other materials, but for plastic models it has to be the real deal. The reason I ended up with two kits is because the craft spray paint didn’t work on the body panels and there was no way to salvage and end up with a newish looking vehicle. Having two kits was a lifesaver anyway because this kit has quite a few unforgiving pieces, and I’ve delved into both kits to get this one model built.
Initially, I primed the body panels with Krylon grey, then Krylon flat white, then Krylon gloss Dover White. This was a new can and while I ended up with better results than I did with the old can on the first model, it wasn’t as pristine as I wanted. I sanded back down to an even finish as I had for the chassis/fenders. I primed with Krylon flat white because Krylon flat paints are very good for even, fine coverage.
After doing the previous assembly work, I was able to better understand how the body panels fit into the process. Instead of leaving them on the sprue for the final finishing, I prepped them individually for painting. This eliminates overspray from one piece to the next, and you can concentrate on each part.
Model T lollipops. :D

I used a two-part lacquer system called Model Master (a Testors product) of Wimbeldon White and Gloss clear coat. The Wimbeldon White was a lovely finish right out of the can.This paint levels out so much better than the gloss craft paints. You have to let the paint cure before adding the top coat.

The hood ended up with three coats of paint, but I ran out before I could put a third coat on the rest (small can, larger model). The hood looked fabulous, so I bought a second can for the remaining panels. For those panels, I sanded with the 8,000 and 12,000 grit mesh papers before the final coat. My coverage wasn’t completely uniform across the parts, but that was operator error. I get nervous making things new and that can cause mistakes. After the third coat on the body panels, I ended up with slight orange peel texture.
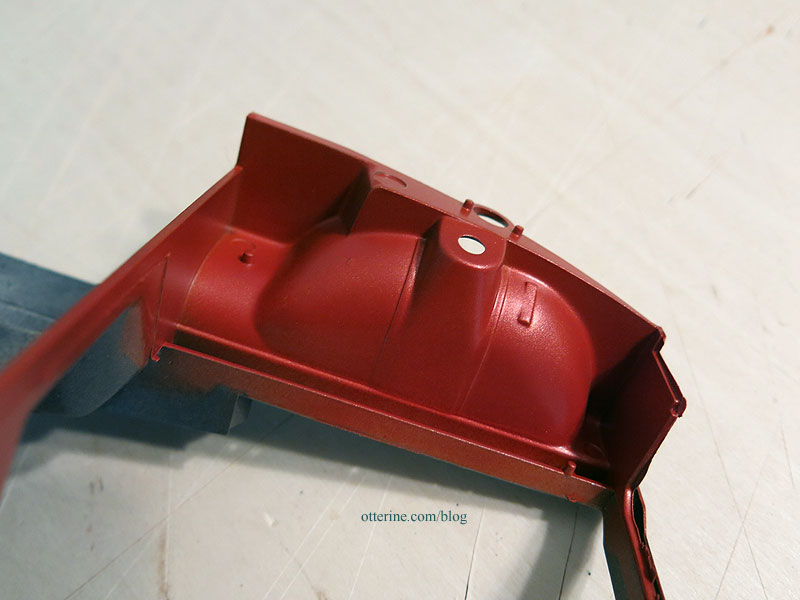
I let the parts dry overnight before sanding lightly with the 6,000, 8,000 and 12,000 grit mesh papers. This removed dust and scratches and made it shinier overall. I had to wait overnight for better weather and then added the gloss coat. It’s a delicate balance to spray enough to get a gloss sheen without ending up with drips. Nervous, nervous, nervous process. It was a 99.9% success. Of course I ended up with a dust varmint in the one panel I wanted to be as pristine as possible. I had even brushed each part before spraying. :\ So, I sanded that particle out the following night and finished the sealer after. The finish was slightly textured and pitted in places, but all of this might be due to the fact that I was not working with fresh, pristine plastic. I had removed the initial poor finish from the craft spray paint.

Again, I waited overnight before sanding lightly with the 6,000, 8,000 and 12,000 grit mesh papers to tone down the slight texture and bring out the shine. The finish has slight imperfections, but I am going to quit while ahead. I didn’t bother with the small indented areas because I was worried about stripping the finish too much. There’s one raised bit that has some primer showing, but I am done messing with it for now. I can always do spot touch-ups later.
In retrospect, I wish I had used this sealer on the chassis/fenders. There is no way to do it now. But, the way I see it, dust and dirt would settle on the fenders while the body would be more pristine. Right?

The panels have raised lines that you can paint for added detail. I know this to be above my pay grade, so I’ve left the van uniform in color. I did try it on the spare panels and just couldn’t get the feel for it. Besides, it takes only one mess-up to ruin a project and there are far too many lines to take the risk. Now that I have them in great shape, I will leave them be for a few days while I do other things.
Categories: Model Cars, Vehicles
November 4, 2016 | 0 comments1913 Model T Van – part 7
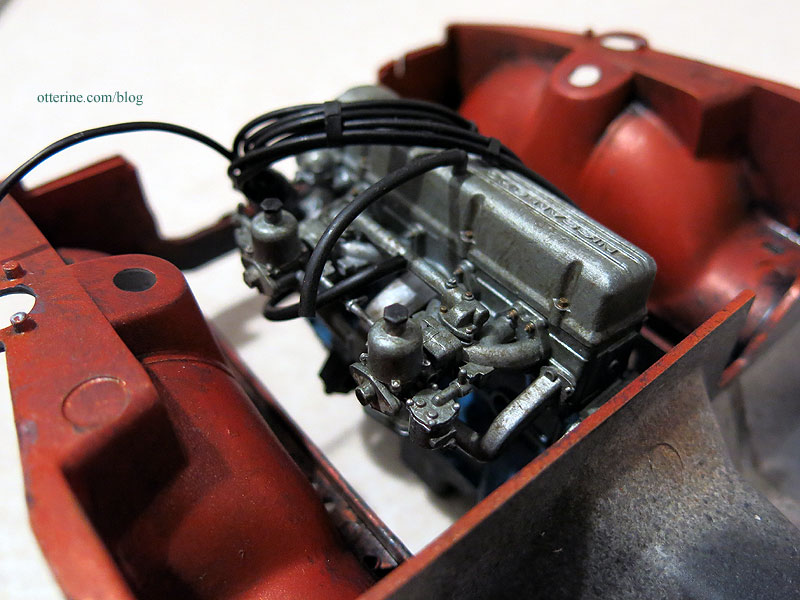
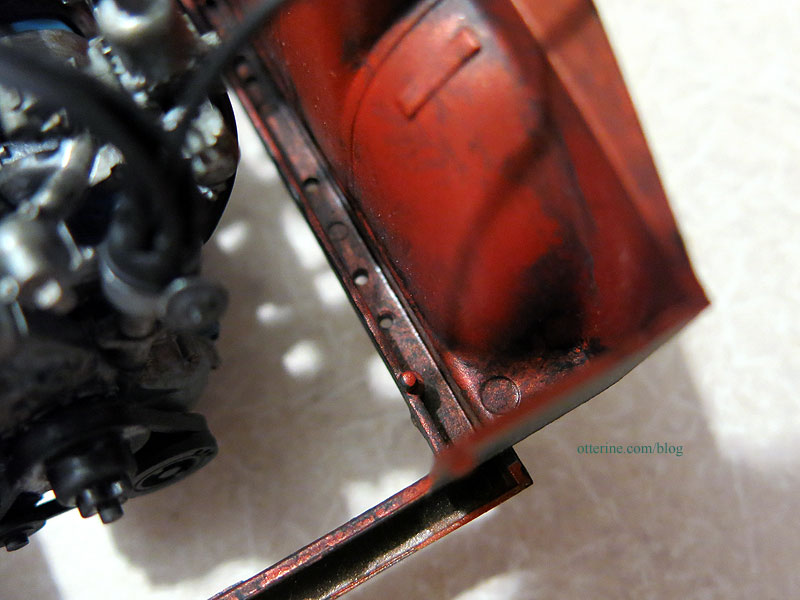
Continuing work on the Model T Van. The kit comes with tubing and wires to add realistic detailing to the engine compartment. The thin tubing is rather stiff, so in just about every instance it has broken off the tiny plastic rod that’s supposed to hold it in place. =rolls eyes and mutters a swear= Instead of fighting a losing battle, I just snapped off the rods and drilled holes instead. :D Now the tubes and wires are secure with super glue and there are no parts to snap off under pressure.

They do add so much, no?
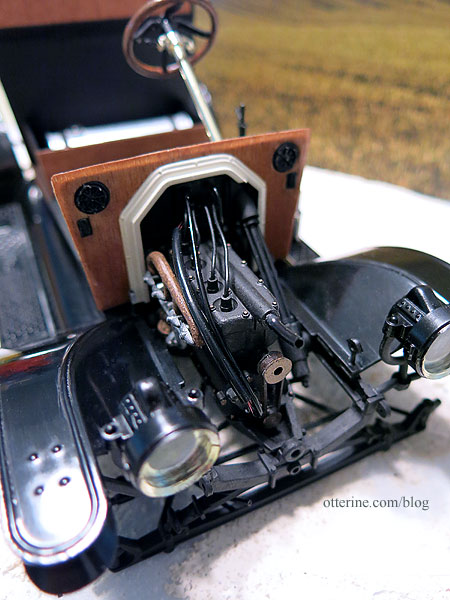
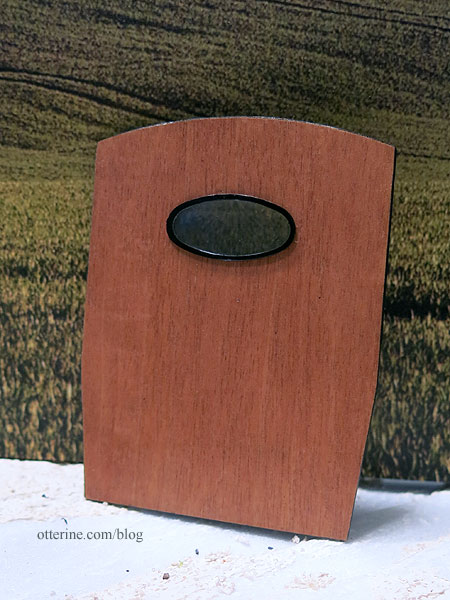
I’ve got the body panels in process behind the scenes and I am up to that point in the instructions, so it’s time to jump around a bit while those are finished. The front and rear cabins are separated by a wall with an oval window. Since the pre-cut micro wood panel didn’t fit well, I cut a new one instead. Since I knew I would never match the wood grain on the frame, I painted it black. I’ve stained all the micro wood with Minwax Cherry sealed with Delta Ceramcoat gloss varnish.
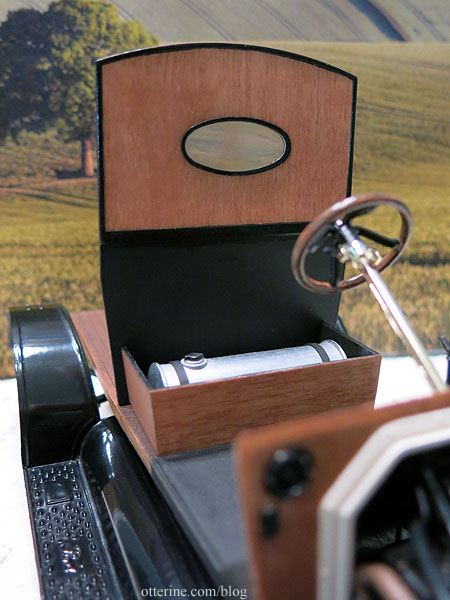
The back of the panel was to be left bare except for the very top, so I cut a piece of micro wood to finish it as well. I might have to do some trimming later in case this throws off the fit, but the wood is very thin and shouldn’t cause too many issues. The oval window is meant to be installed from the back, but it looked unfinished to me without a frame on both sides. Since I have two kits, I was able to use both windows and have a frame on each side.
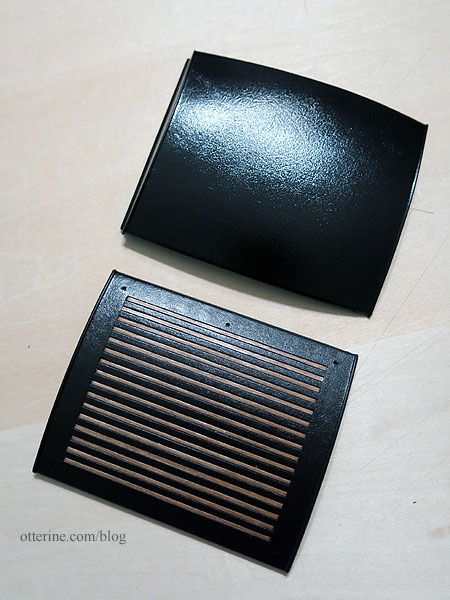
The black roof portions were sprayed flat black to even out the tone followed by Rust-Oleum Painter’s Touch 2X Ultra Cover sealer in semi-gloss clear.
On the inside of the front roof, there’s an included wood piece cut to fit. It’s stained and sealed to match the rest of the wood.

I prepped the radiator, which will be needed in the steps to come. It might need a few flies. :D

Oh, and it’s National Cat Day. :D Hooray for furry friends!

Categories: Model Cars, Vehicles
October 29, 2016 | 0 comments1913 Model T Van – part 6
Continuing work on the Model T van. The kit includes adhesive backed micro wood to simulate the parts that were wood on the real van. Since I have two kits, I have some excess. One of the kits had the pieces pre-cut and the other was not cut but had a printed pattern. So, I basically had the proper amount I need but with some extra wood to use otherwise. I wanted the option to add more wood where it was lacking and have some extra in case of disaster, so I bought two sheets of adhesive backed wood veneer from eBay. One was likely more than enough, but why pay for shipping twice? This is also a good material to have in my stash for other projects as well.

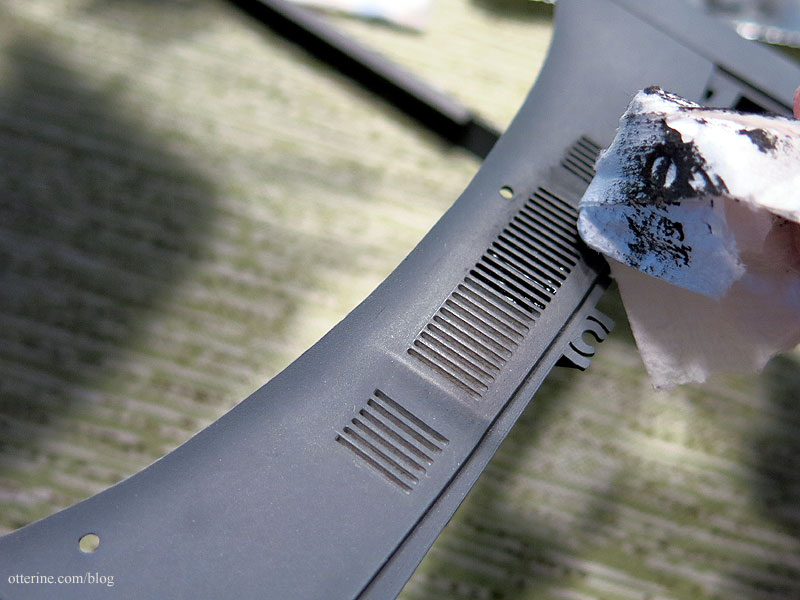
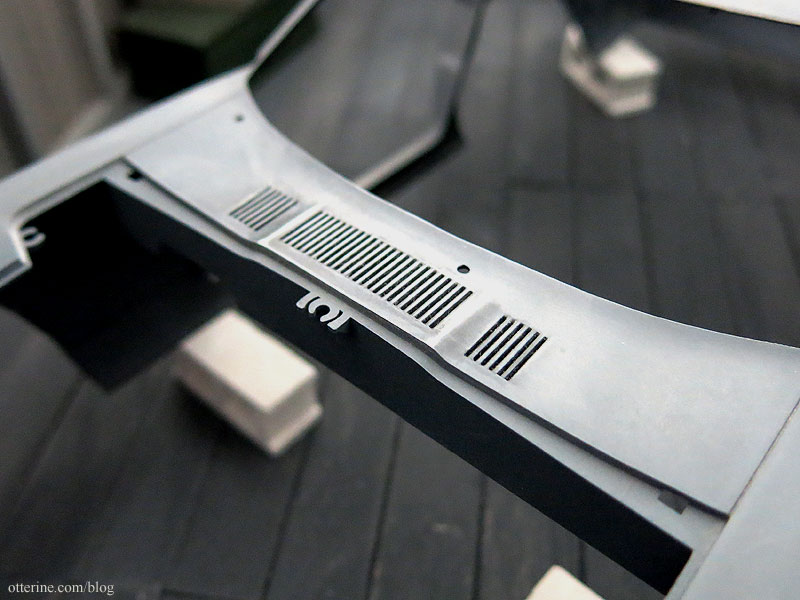
I like to talk in correct terminology, but as of writing this post I am still trying to figure out which parts are which…so bear with me. The original kit fire wall has the wood on the outside (like the original auto). There is no wood piece for the interior, though you can certainly paint the simulation. I used the pre-cut wood for the exterior fire wall. I finished all of the micro wood pieces in Minwax Cherry with Delta Ceramcoat gloss varnish. The cherry is a warm finish without being too dark. I painted the raised details gloss black since there would not have been a way to get matching brass accents.
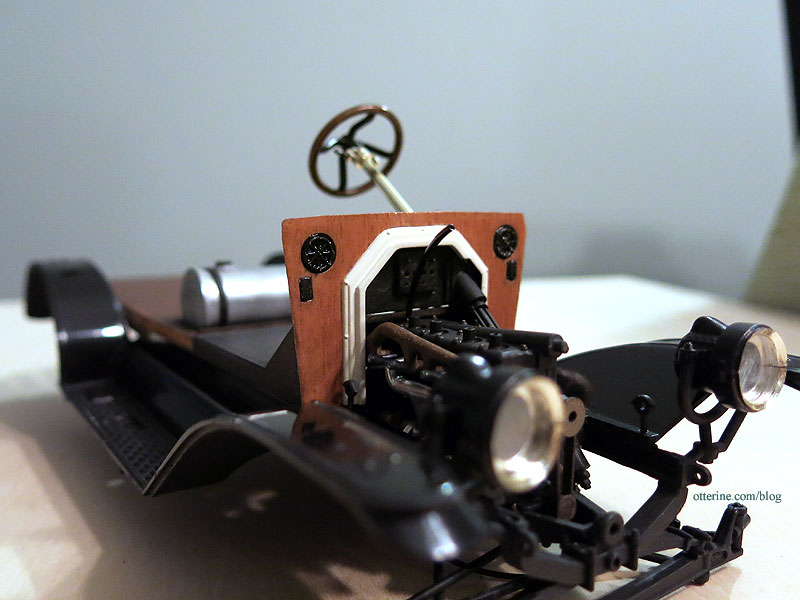
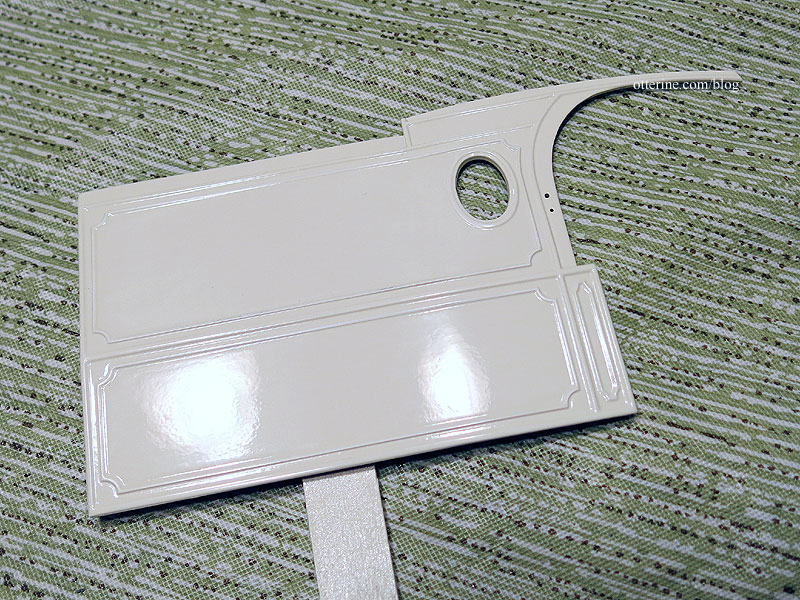
Unlike the real auto, the kit dash is molded in two pieces. The front piece has the coil box molded in place. I’ve seen these boxes in wood (with dovetail joints) and black. As a compromise, I painted the front dash piece black in its entirety since masking would have been difficult. I cut micro wood for the back dash piece. I masked the front cabin floor and sprayed it flat black. After the paint dried, I dry brushed some browns and greys to add some weathering to make it seem like a separate mat. The speedometer was molded in brass, and I added black to the face to make the details stand out.

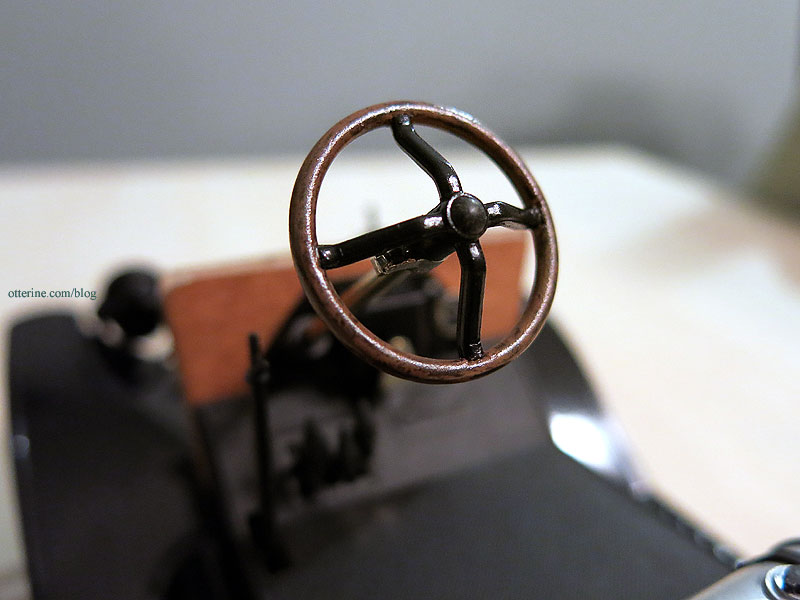
I painted a faux wood finish to the steering wheel.
I painted the wood grain portions of the floor board with Krylon Brown Boots satin spray paint. I used acrylic washes to accent the grain and add weathering.

I showed the ga tank in a previous post, but now it’s time to install it. The kit didn’t come with the straps, so I’ve fashioned those from paper. This great video details how to check the gas level (no dash indicator) and the oil (no built-in dipstick). :D The video shows a later model than what I am building, so there’s a lot less wood on it.

The bottom has darker washes from road exposure. I haven’t yet aged the bottom of the gas tank.

Looks like we’re getting somewhere! :D

Categories: Model Cars, Vehicles
October 23, 2016 | 0 comments1913 Model T Van – part 5
Continuing work on the Model T Van. The past couple of steps have used the “brass” finish parts that are factory painted in high gloss. While having the brass parts modeled in shiny color is great, sometimes they are not attached to the sprue in the best locations. When you separate them, you can end up with bare plastic showing in spots. Additionally, sometimes the kit manufacturer will put parts on the “brass” sprue that weren’t brass on the original automobile.
I want a reasonably accurate model, though I am willing to fudge for the sake of sanity and aesthetics in many places. For parts that are supposed to be brass but end up with bare plastic showing, my fix is to paint black accents. Accurate? It’s questionable. Does it look better on the model? Definitely. For parts that aren’t supposed to be brass but come with that finish, you can just repaint them the proper color.
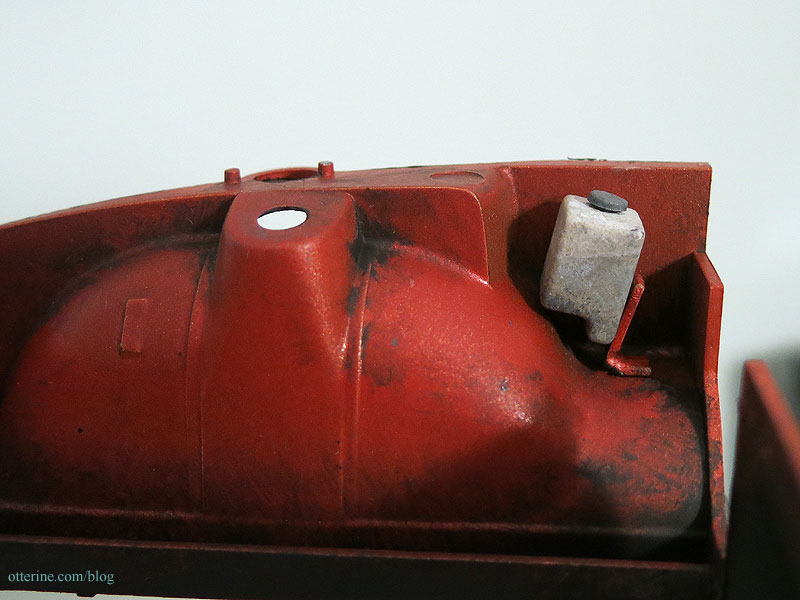
The lamps and acetylene generator are made from multiple pieces, so you end up with seams and bare spots from the sprue connections. I briefly read about the lights here, but I am certainly no expert and didn’t do exhaustive research. I have seen some lamps in partial black and some in all black. The same applies to the acetylene generator. This seems dependent on year of manufacture. So, I am using some artistic license and going with black housings accented in brass. This will allow me to make the seams less noticeable and cover the bare spots as needed. I’ll sacrifice complete accuracy for a model that looks more polished and realistic.
The original acetylene generator looks cheap and plastic in the factory brass finish.
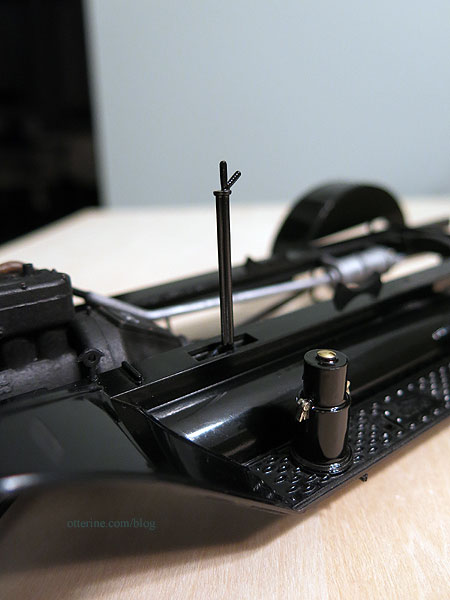
After two coats of Testors semi-gloss black, it looks more like a metal canister (I masked the side clips to leave them brass). The emergency brake and clutch lever as shown in this informative video on how to drive a Model T is black but the kit part was brass. I painted it Testors semi-gloss black.
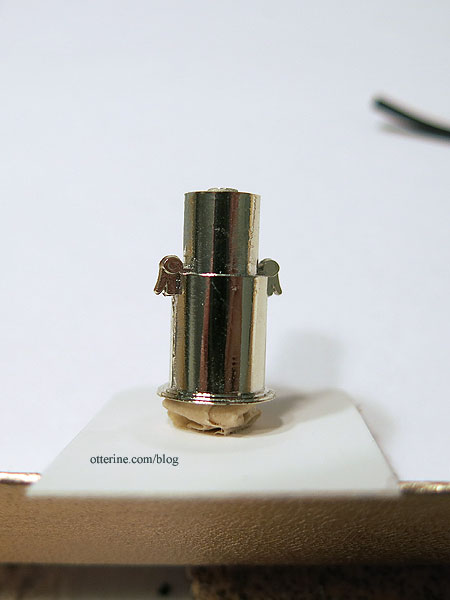
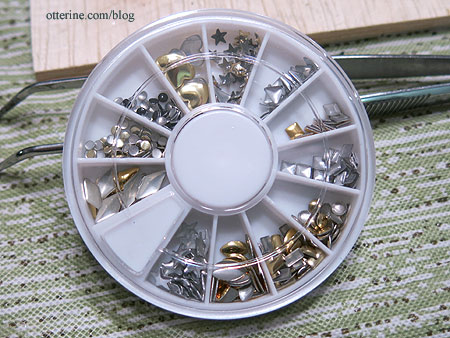
I added a jewelry finding to the top of the generator since there was no way to paint a topper to match the side clips. I bought this box of bits at one of the local mini shows.
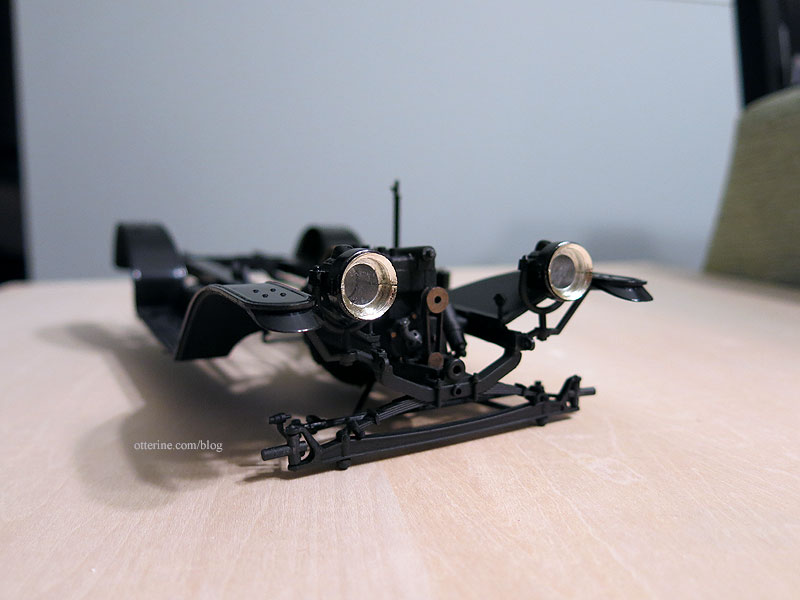
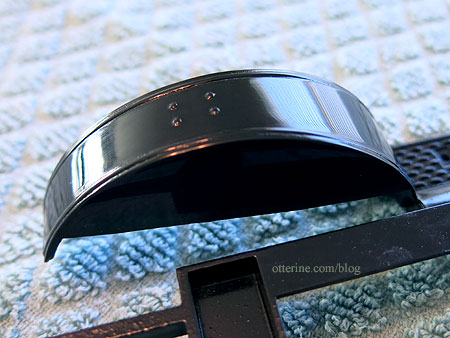
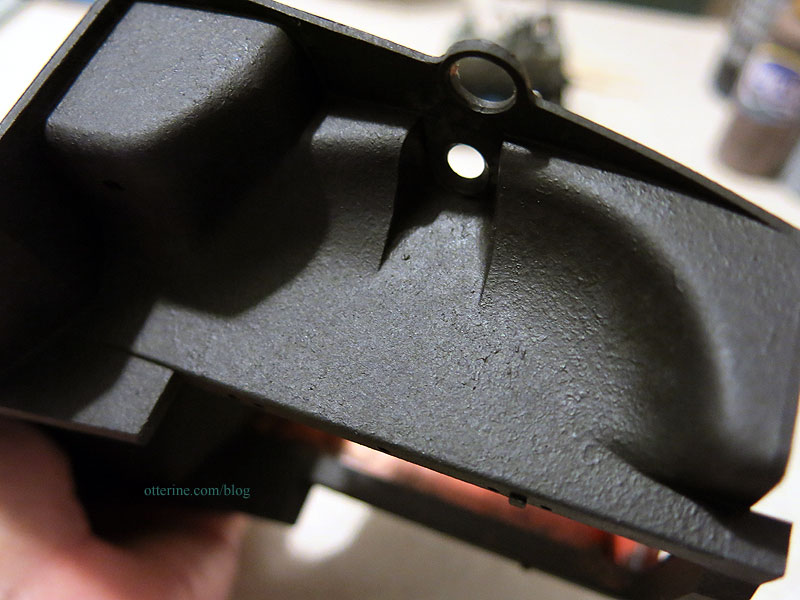
Here’s one headlight with some of the brass finish missing after cutting from the sprue.
I painted the inside of the housings silver to add realism and reflective surface. I also added punched metal circles to the backs to make the seam less obvious. I had to sand the edges of the glass inserts to get the right fit then carefully glued the housings together. I primed them in flat black and painted gloss black.
I then glued the housings to the lamp brackets already attached to the chassis in an earlier step. I’m thinking brass jewelry findings can be added to the front to clean up the frame and make for a more convincing lamp, but for now this will work. One of the lenses fogged from the glue, but it’s not terrible. We’ll just say that it’s dusty. :D
I like the black, though the light body color should make them stand out a bit more than they do right now.
Once the glue sets overnight I’ll add the gas lines. The kit comes with thin tubing to simulate these.
Next up, some front cabin work.
Categories: Model Cars, Vehicles
October 20, 2016 | 0 comments1913 Model T Van – part 4
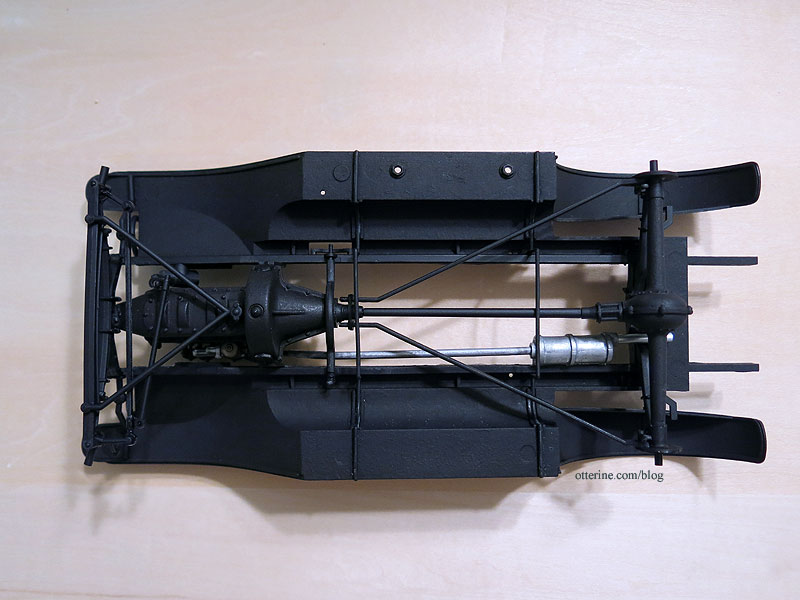
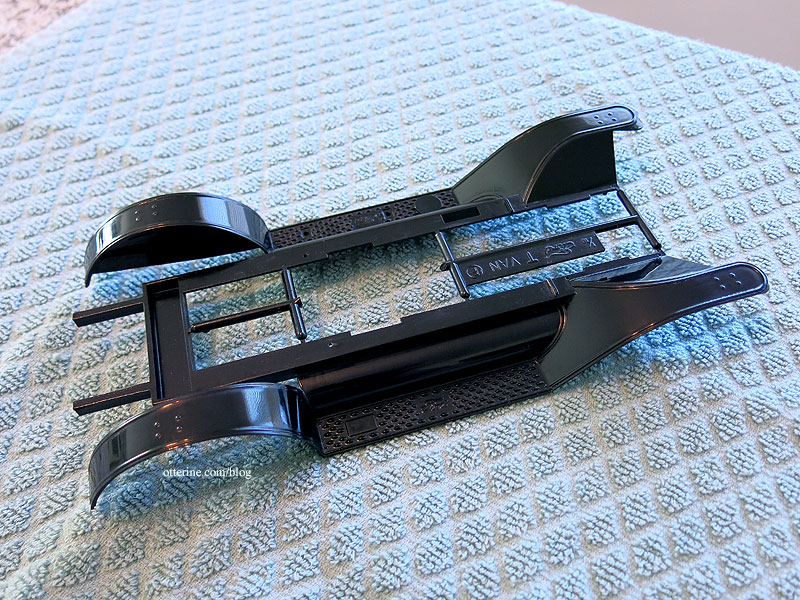
Continuing work on the Model T Van. We’ve reached page two of the instructions! The frame has been attached to the fenders and the engine glued in place. This is all extremely fiddly after removing the stabilizing sprue connectors from the fender/chassis part. I was (am) concerned about the van sitting level on a surface, but maybe this setup will act like the original and make it conform to any surface? Fingers crossed. As a fix, I can always pack some serious ballast into the rear cabin.
As feared, I ended up getting super glue on the black fender paint even though I was trying to be so careful. It’s in a not-so-obvious spot and should be covered when the hood is in place so it’s not the worst that could have happened. I polished it as best I could.

Worded instructions and drawings get you only so far. Sometimes it is hard to tell how something is meant to be aligned and you won’t know you’ve done it wrong until a later part or assembly doesn’t fit. This was the case of hanging the engine in place. There are two brackets on either side that sit neatly into the frame.

My best guess is that the engine should be level based on viewing the real life autos and well, logic. But, there didn’t seem to be an attachment point for the front of the engine assembly that allowed for the engine to be level. Mounted too low in the front, and it rubbed against some moving parts, which didn’t seem right. Too high, and it was probable that the hood wouldn’t fit over it. I ended up shaving away a bit of plastic and then glued the engine in place so it was mostly level. I couldn’t shave any more plastic without causing issues, so let’s hope it works.

I mention moving parts as I think this contraption is meant to have working steering once I’m done. Considering the delicate nature of plastic parts, if I end up with a solid model with good suspension, I’ll consider myself successful. Anything beyond that will be gravy. It’s looking good so far, though.
And, here’s the underside.
Categories: Model Cars, Vehicles
October 18, 2016 | 0 comments1913 Model T Van – part 3
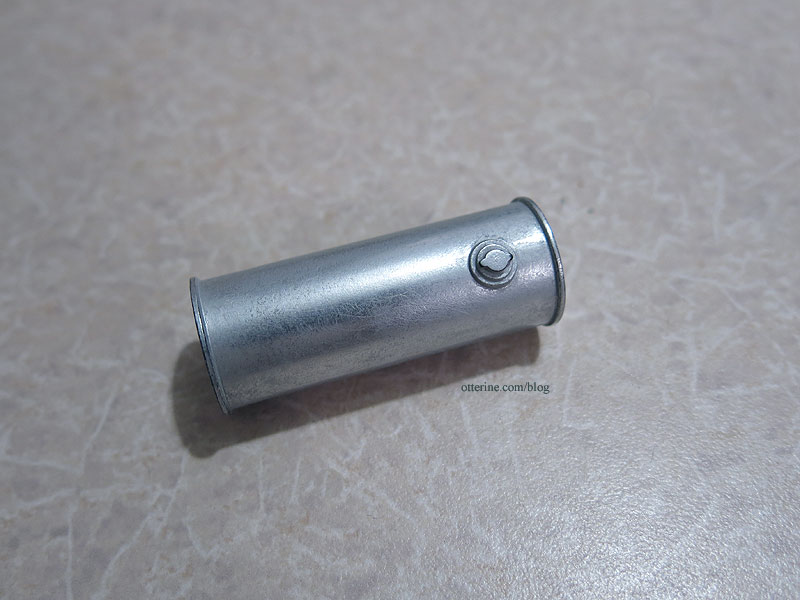
Continuing work on the Model T Van. The gas tank in a Model T sits under the seat and likely won’t be seen much in my model, but that’s no reason to skimp on detailing. The pieces that make up the tank were primed in flat black since they were on the sprue of parts that were mostly that color. I assembled the two halves and then sprayed it with Model Master Metalizer Lacquer in Aluminum Plate.

The initial finish is light matte silver. I didn’t worry much about the join lines along the sides since they will be hard to see once the part is in place.
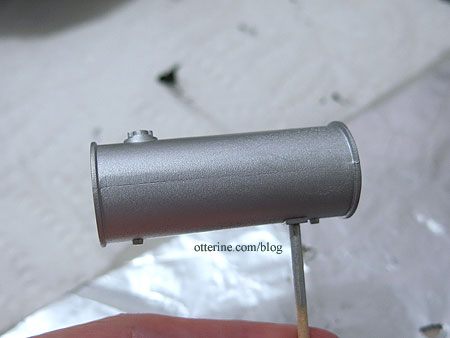
Once you buff it with a paper towel, it gets all shiny. :D
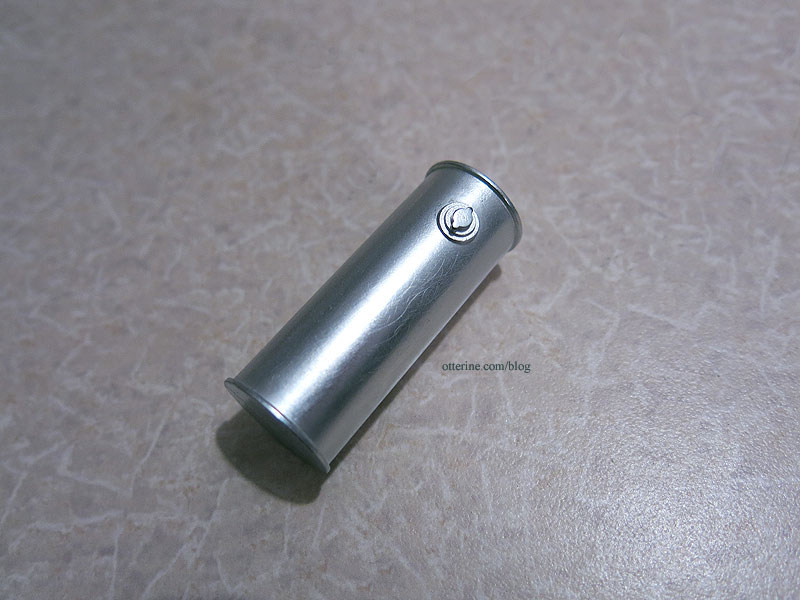
That’s just a little too new, so I added a couple of grey acrylic paint washes dabbed with a paper towel. A bit of dust and light weathering always adds depth and visual weight.
I also painted the exhaust system with the Aluminum Plate spray.
I then added a bunch of colored acrylic paint washes to tone down the color and shine. It also has more depth now.
I swapped out the original tail pipe and cut a piece of aluminum tubing to take its place.
I also painted the underside of the chassis and fenders a mix of flat black, brown and grey. From the restored cars I’ve seen, the undersides are all glossy. This might be for showroom condition, but mine has been on the road and our owner doesn’t wash the underside. :D
Categories: Model Cars, Vehicles
October 17, 2016 | 0 commentsModel cars, vehicles
Just a recap post to make it easier to locate past models and works in progress. Each section has a link to the latest post in the build, which can be followed back through the process.
RX-7 in 1:24 scale – melding of Aoshima C-West, Fujimi and Tamiya kits.
—————-
Citroën DS 19 by Heller – 1:16 scale – work in progress
—————-
1913 Model T Van by Entex – 1:16 scale
—————-
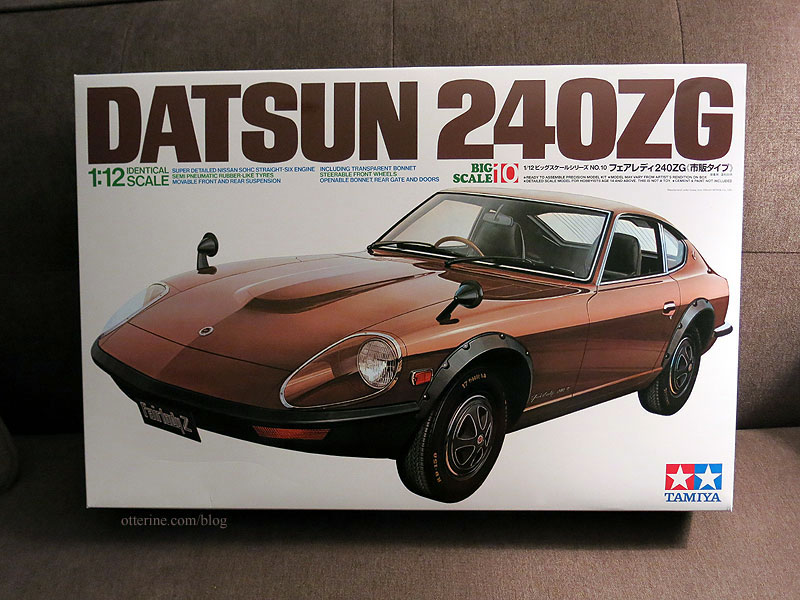
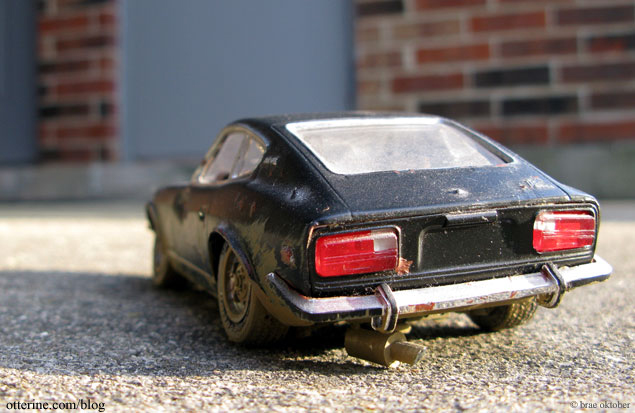
Datsun 240ZG by Tamiya – 1:12 scale – work in progress
—————-
—————-
Motor Racing Team Tool set by Tamiya – 1:12 scale

—————-
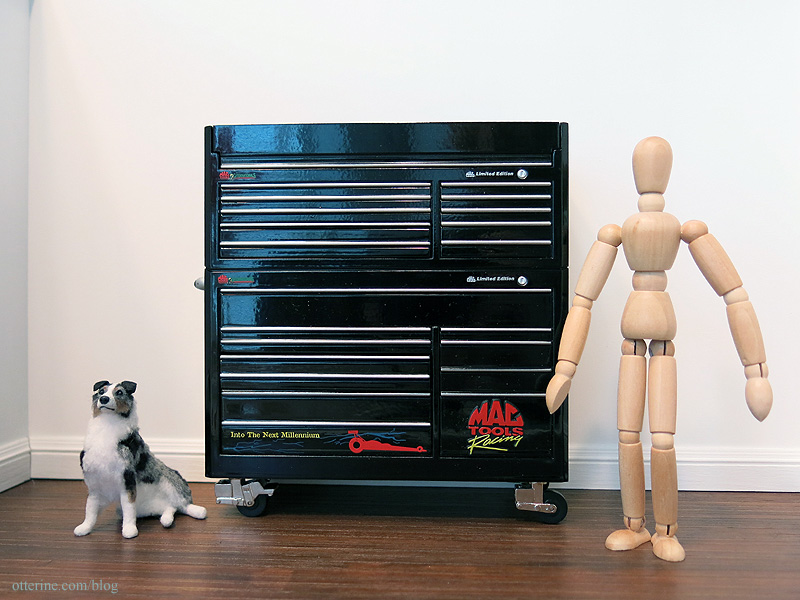
Mac Tools 1:12 scale tool locker – purchased model
—————-
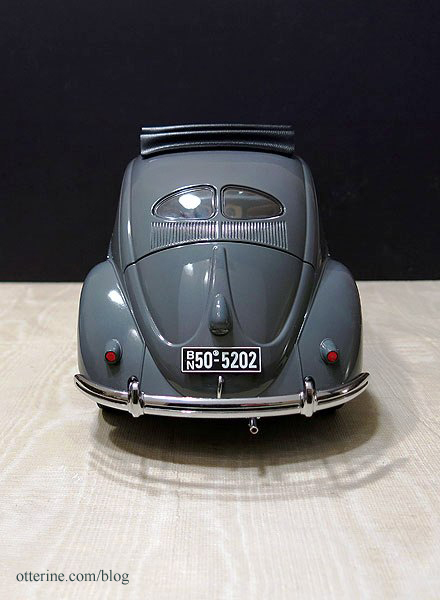
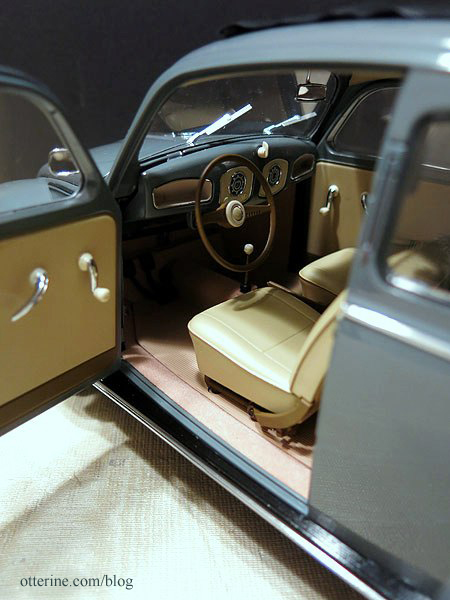
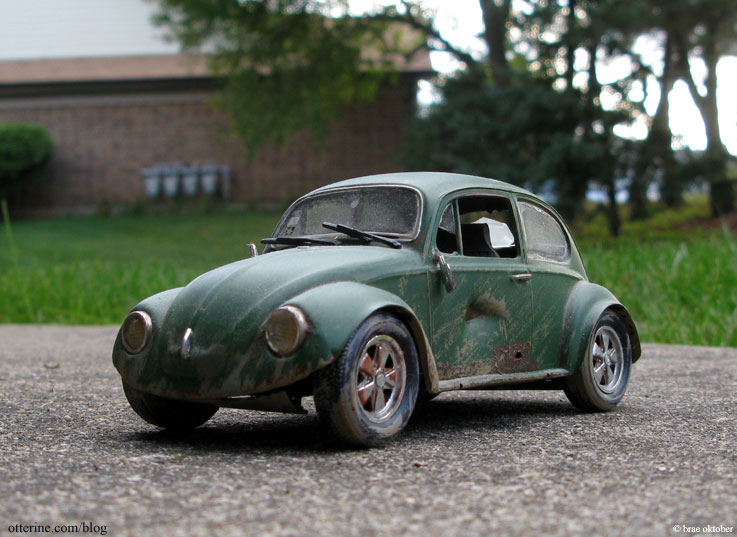
1950 Volkswagen Beetle Saloon by Sun Star – 1:12 scale – purchased model

—————-
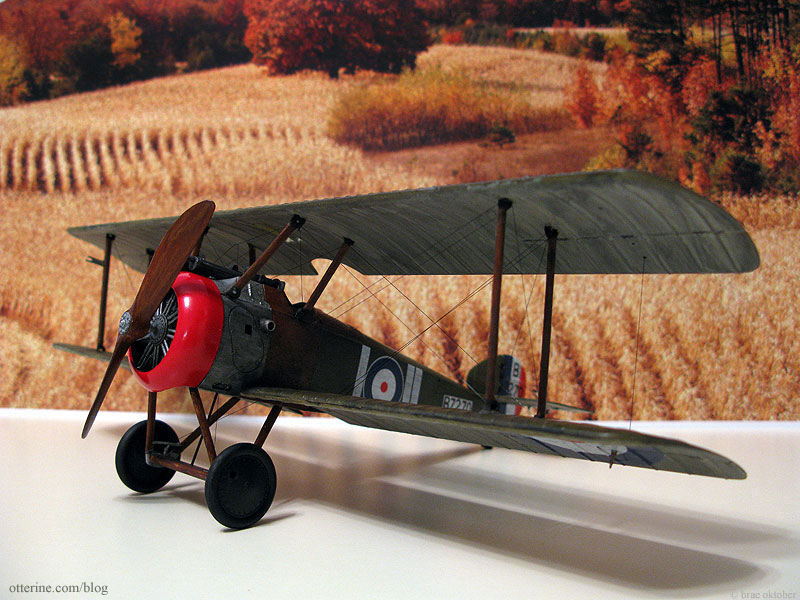
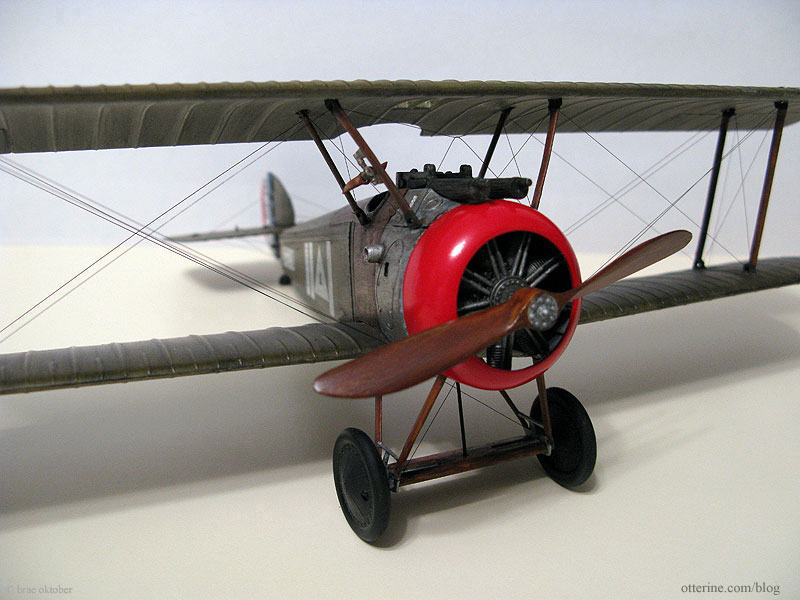
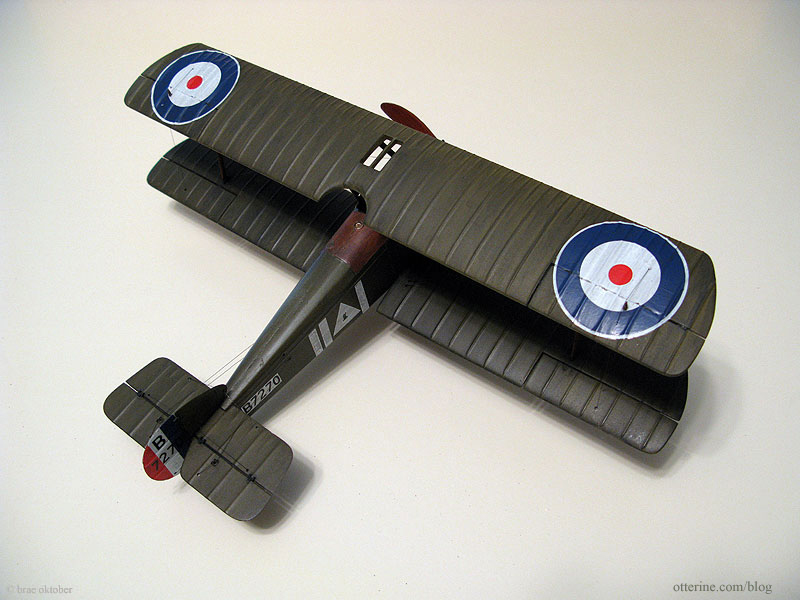
Sopwith Camel by Academy – 1:32 Scale
—————-
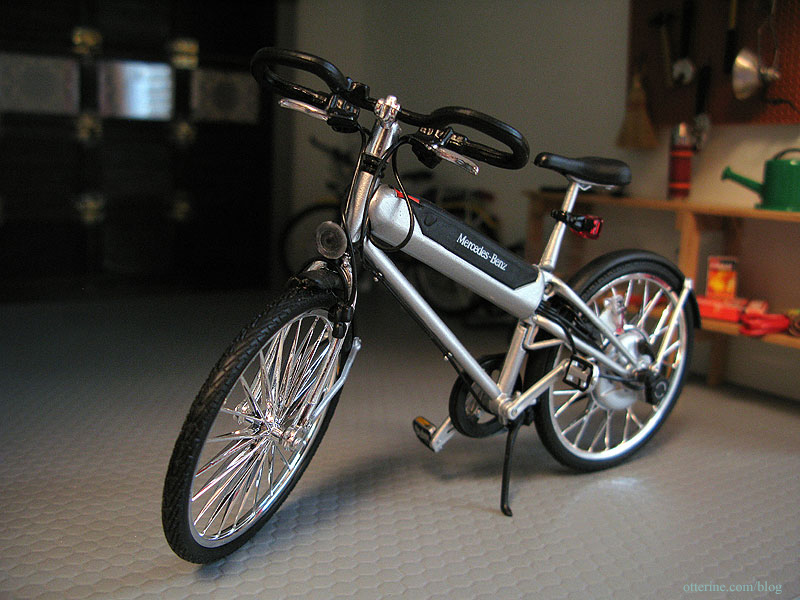
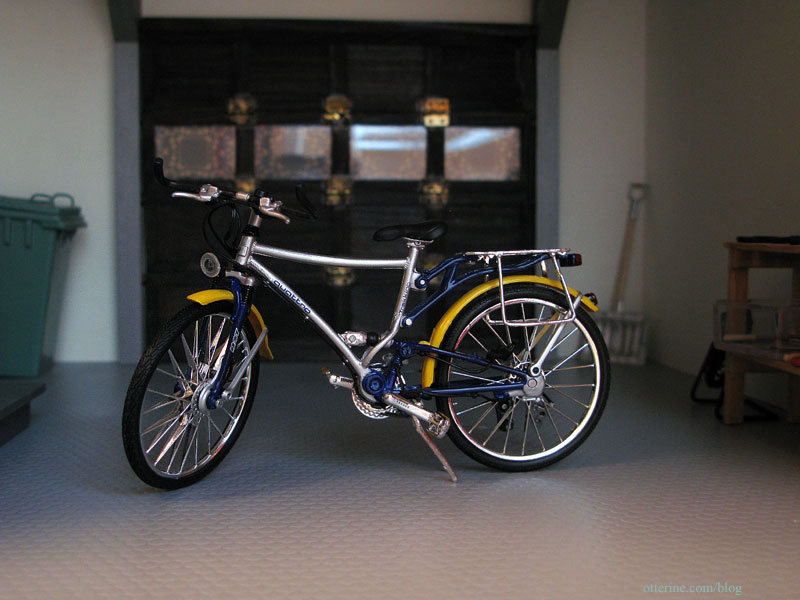
Mercedes Benz Hybrid Bike – 1:12 scale diecast model by Maisto – purchased model
Audi Quattro Citybike – 1:12 scale diecast model by Maisto – purchased model
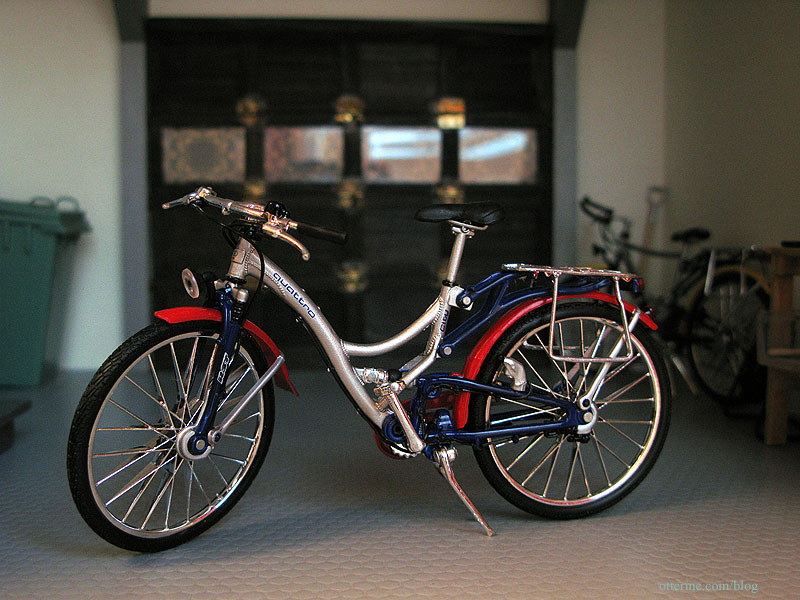
Audi Quattro Trekkingbike – 1:12 scale diecast model by Maisto – purchased model
—————-
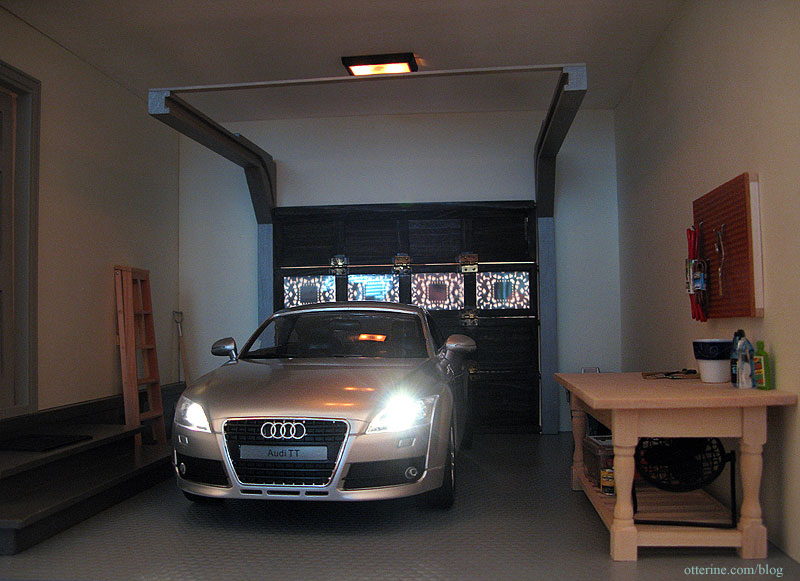
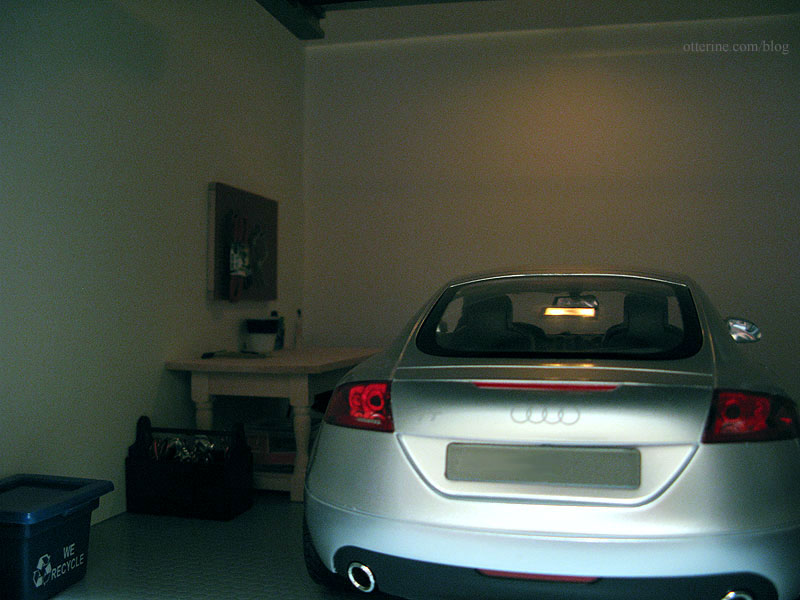
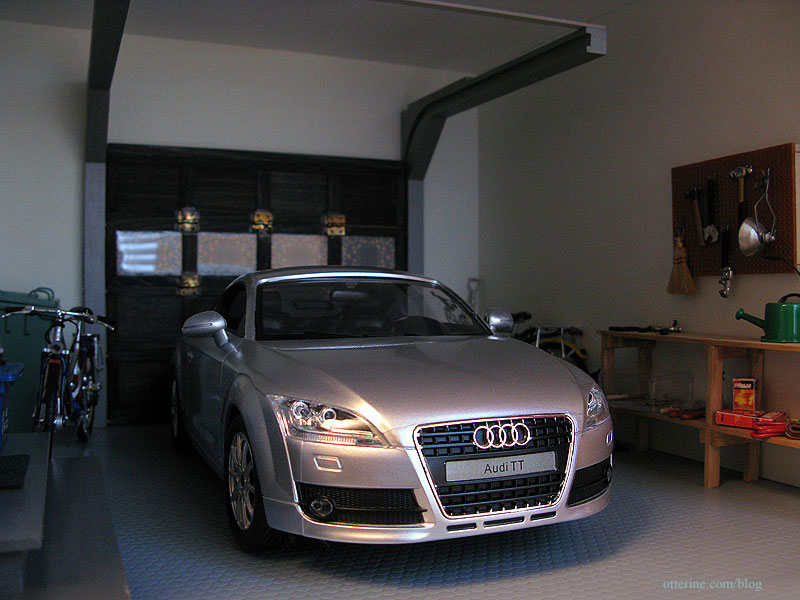
Remote control Audi TT – 1:14 scale – purchased model
—————-
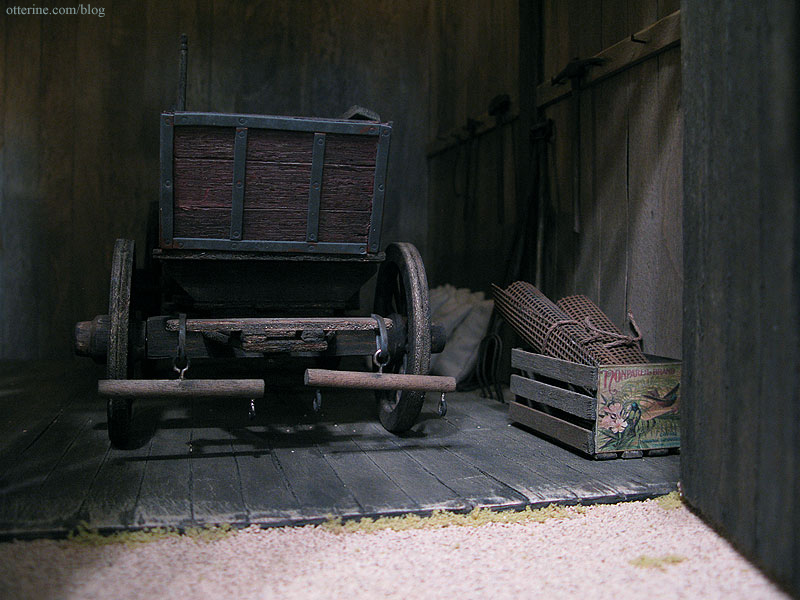
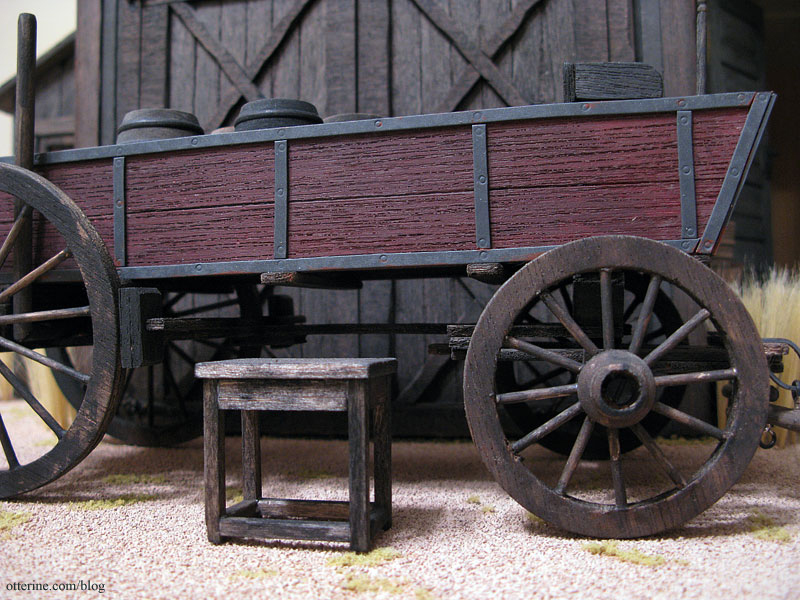
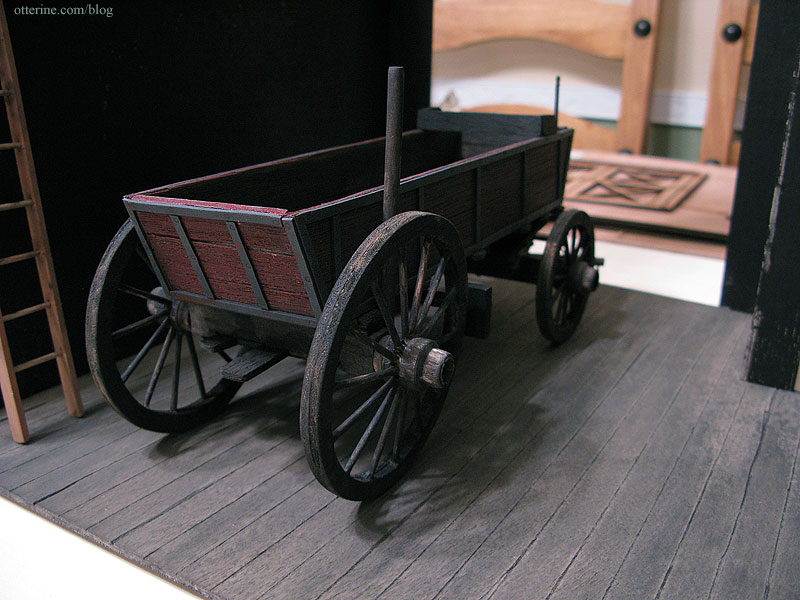
Baslow Ranch Farm Wagon – built from a covered wagon kit by Allwood
—————-
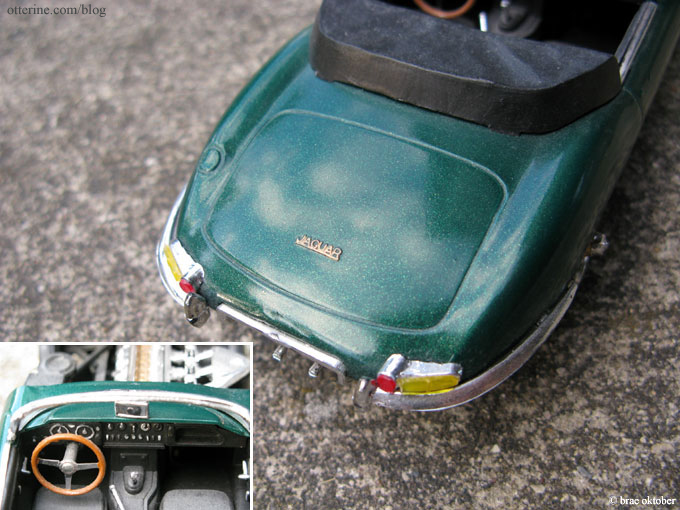
The wayback machine — this post features three model cars from many years ago, all in 1:25 scale.
Jaguar XKE
Volkswagen Beetle
Datsun 240Z
Categories: Model Cars, Vehicles
October 10, 2016 | 0 comments1913 Model T Van – part 2
Continuing work on the Model T Van. Making models showroom new is not easy, at least not for me. I can age and wear anything down with ease, but new takes time, effort and luck. Gloss is also not an easy finish to achieve, but with a newish truck I have to give it a go. I’m going for a vehicle that is a couple of years old, so new but with some mileage and weather exposure.
Since I have two kits, I can test some techniques out on the spares. I spray painted the chassis flat black, keeping the flat black as is for the underside. For the top side, I used Krylon Short Cuts Gloss Black. I don’t make many things in gloss since it looks out of place in most miniature situations and I find the gloss paints go bad more readily, so I buy the small cans of paint. Krylon was on sale, but I do think paints designed for model cars are worth the cost, too.
My spare chassis ended up with better gloss but lots of orange peel texture due to old paint (lesson learned the hard way). The body paint was even worse, which is why I ended up with two kits. Right now, we’re dealing with the chassis. The second attempt with a new can was nearly perfect in coverage but a bit dull over all. Still, this more even finish helps a lot for getting the rest of the way there.

If you don’t achieve good gloss the first time, you can salvage the pieces by wet sanding between paint coats using super high grit papers. I picked up a set of Micro-Mesh Sanding Sheets that includes 3″ x 4″ sheets of 1500, 1800, 2400, 3200, 3600, 4000,6000, 8000, and 12000 grit. They might seem pricey but will last a long time with good care.
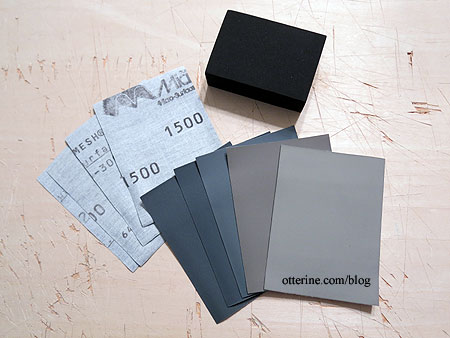
The set came with a block that you can use to hold the papers, which have more of a cloth feel than regular sandpaper, but I used them on their own.

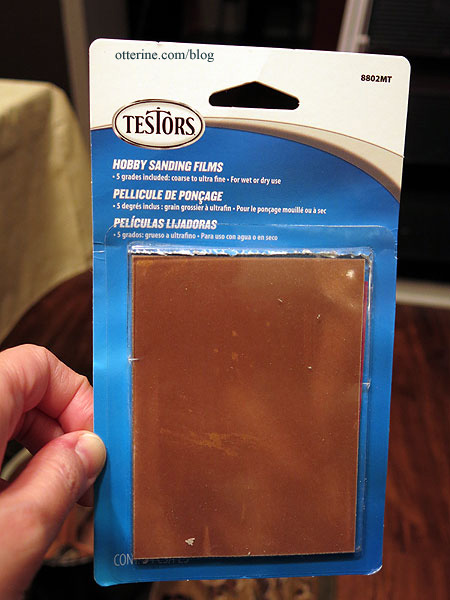
I also like Testors sanding films for when you need a bit more oomph, say for drips, trapped dust particles or crud stuck in crevices. I tend to use the red (600 grit) the most.
I dipped the papers in water to wet sand. It is recommended that you be careful to stay away from raised areas where you would strip too much paint, but this process is more forgiving when the plastic is molded in black, primed in black and then painted black. I started with 6,000 and worked through 12,000. This mainly took out any dust particles and smoothed the surface.

You want to make sure the piece is completely dry and free from dust before painting again. Better. :D

After a couple of days drying time, I did the wet sanding process again this time with only the 12,000. I did use the 600 and the 8,000 on two areas where there were larger dust particles, though. Buffing with the 12,000 grit paper was time-consuming and hard on my arms and hands. :D I did each fender and the middle rails, not worrying about the textured steps on either side. I started to get tired and glanced at the clock. Holy hell, have I really been sanding this @#$%er for an hour?!! Yes, yes indeed.

For good measure, I lightly buffed the part for another fifteen minutes until I was sure a genie was about to appear. It’s not a perfect mirror finish, but it’s damn close for the effort (that’s the overhead light fixture reflected in the fender).

Since the chassis will soon be up in the assembly process, I decided to go ahead and polish the rest of the way. Touch-ups can always be done later, but it’s easier to work with the parts while they are separate.
I bought the Novus Plastic Polish Trio from The Container Store, of all places. You can buy this from amazon and also in larger sizes, but the 2 oz. bottles are perfect for small projects. The set includes #1 Plastic Clean & Shine, #2 Fine Scratch Remover and #3 Heavy Scratch Remover as well as polishing cloths. I used Q-tips in addition to cut pieces of the cloth due to the shape of the fenders.

The instructions indicate to use #1 to clean first, but I used it in between the steps as well to remove any grit or dust left behind. I used #3, cleaned with #1, used #2 next and finished with another cleaning of #1.
I wouldn’t say it eliminated all scratches, but the surface has a waxed and buffed finish that seems more realistic for scale. It also didn’t take nearly as long as the wet sanding process. If you’ve ever had a black car you know they never look as good as when they are new unless you spend countless hours waxing to remove scratches. I’m just glad I’m not making the whole van black.
It polished closer to the raised details that I couldn’t reach with wet sanding, so that was a positive for sure.
It’s just a tad more mirror-like as well – minimal halo effect reflecting the stove clock. :]

Categories: Model Cars, Vehicles
October 9, 2016 | 0 comments1913 Model T Van – part 1
This is a 1/16 scale Model T Van by Entex. There are decidedly fewer parts to the Model T kit than the Datsun, but my summation is there were fewer parts to the real Model T than the real Datsun as well. :D
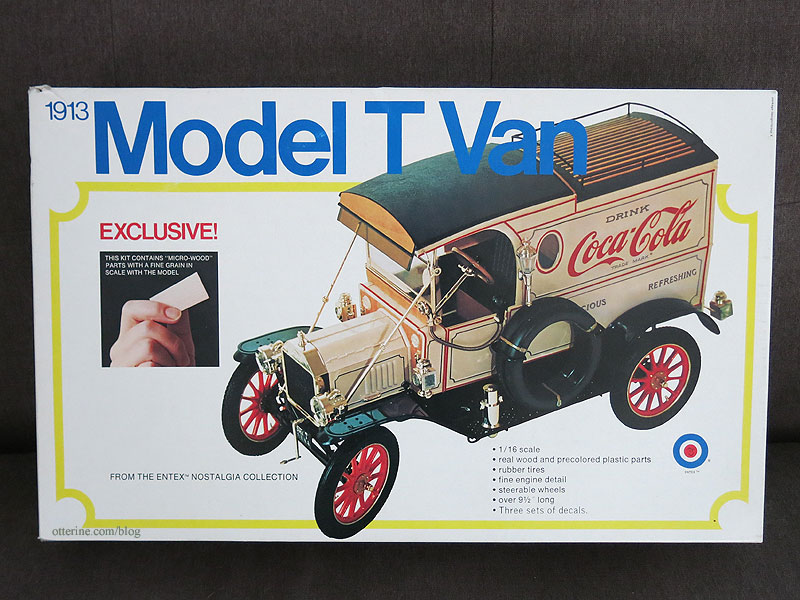
The final model will be 9.5 inches long, so it should work well regardless of being a smaller scale than the building. The kit even has real wood — they call it micro wood. I’ll be making my own decals as well as a few adjustments here and there.

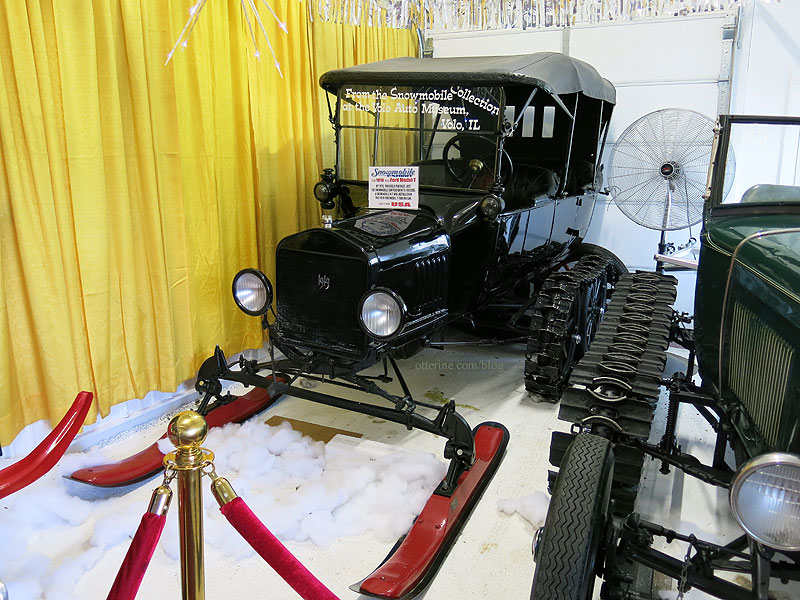
I even went to the local Volo Auto Museum to have a looksee at their vintage Fords. This is quite the contraption, no? Many a Chicago winter would call for such a beast.
Before I begin, I thought you might like to check out a few videos I found while researching. The first one shows a gal learning to drive a Model T at the Henry Ford Museum along with some excellent vintage off-road footage. The second just takes you for a ride. Feel that wind in your hair?!! Brisk! The last one is just awesome. :D
The sprues have been primed with their respective base colors. Even though models are molded in color, I still prefer a painted finish for more realism. I use spray primers for uniform coverage.
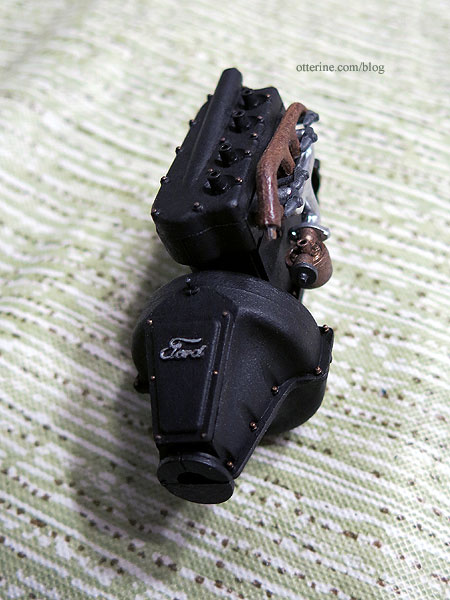
There are ten pages of assembly instructions, and as usual this build starts with the engine. I actually ended up buying two kits because of operator error (oops), but that means I have plenty of spare parts. I think some of the leftovers will make for delightful junk at Milo Valley Farm.
In addition to the videos, I located some engine photos online and saw some cars in person at the Volo Auto Museum, so I’ve followed those as a guideline for color and finish. I use Testors jar paints and acrylics on plastic models after priming in base colors. These are the tiny brushes I use, though many of the smaller details are painted with toothpicks and straight pins.

Here is the engine in the primed metallic base color. Rather fake looking.

After some further painting, I now have a relatively clean engine in flat black with bronze bolts that looks heavier and more solid. I have more bolts to detail, but I’m calling it a night. I rusted one part that might not have rusted this quickly in a newer vehicle, but we’ll call it artistic license. Once I’m further along, the whole assembly will receive washes and such to tone down the shiny newness. I want a recent vehicle with a little bit of road experience. :]
Half of page one done! :D
Categories: Model Cars, Vehicles
September 27, 2016 | 0 commentsDatsun 240ZG – part 5 – initial aging
Continuing work on the Datsun 240ZG. The engine compartment of my barn find auto shouldn’t be showroom new, but of course the Testors Fiery Orange turned out showroom new. :\ Ah, well…easily fixed.
I sprayed the compartment with Testors Frosted Glass. I am sure you can use any matte finish spray, but I had this one on hand. It tones down the shine and gives the subsequent paint treatments something to grab.
Next up, adding grime. The easiest way for me to add grime is with acrylic paint and Americana Staining Medium. I mixed blobs of browns, greys and black with the staining medium and used a variety of soft brushes.

I didn’t worry about areas where parts will be glued in place since it’s part of the process to scrape those places clean before gluing anyway. The transparent stain mixtures created realistic dark areas without completely obscuring the orange body color. The staining medium adds a bit of sheen, which works well for engine grease. :]
Flip it over to age the underside, turning the pristine flat black into road-worn dirt. :D Here I brushed on undiluted paint using a stencil brush, repeating the process for several layers.

This removed the smooth finish of the plastic base.
Using the leftover staining mixtures, I added a bit of light aging to the engine assembly. More can be added later, but it works in my favor to add some now while tight areas are easily accessible.
I’m not overdoing the process. I prefer subtle aging that adds depth and visual weight. :]

I started sanding and detailing the main body piece. This is an excellent model, so there was very little to do in the way of prep work, just light sanding here and there. I had spray painted the body with a quick pass of grey. This paint layer helps highlight the imperfections and excess plastic from the molding process. Cinder blocks from Mini Materials.
There’s a vent detail in front of the windshield. It didn’t take the initial coating of primer spray very well, so I decided to detail it now. Any subsequent spray-painting shouldn’t interfere with the work. I used a toothpick to drop in Testors flat black.

I wiped the excess with a paper towel.
This fills the vent and makes it look like an opening in the body. I can touch up the effect after the final body color by using acrylic paint, which won’t stain the enamel color the way the Testors paint would. This is a good base to build on later.
Back in the engine compartment, I wanted the washer fluid tank to look like it contains actual fluid so I spent several hours painting it. The tank isn’t glued in yet, but the holding bracket is. I needed to know the angle of the tank to paint the fluid line at the appropriate slant. Dirtying up the surface helps sell the idea. :]
Categories: Milo Valley Farm, Model Cars, Vehicles
April 3, 2016 | 0 commentsDatsun 240ZG – part 4 – engine work
I knocked out two pages of instructions for the Datsun 240ZG this weekend! This isn’t all of the work I completed from those pages, but this is the main piece in progress.
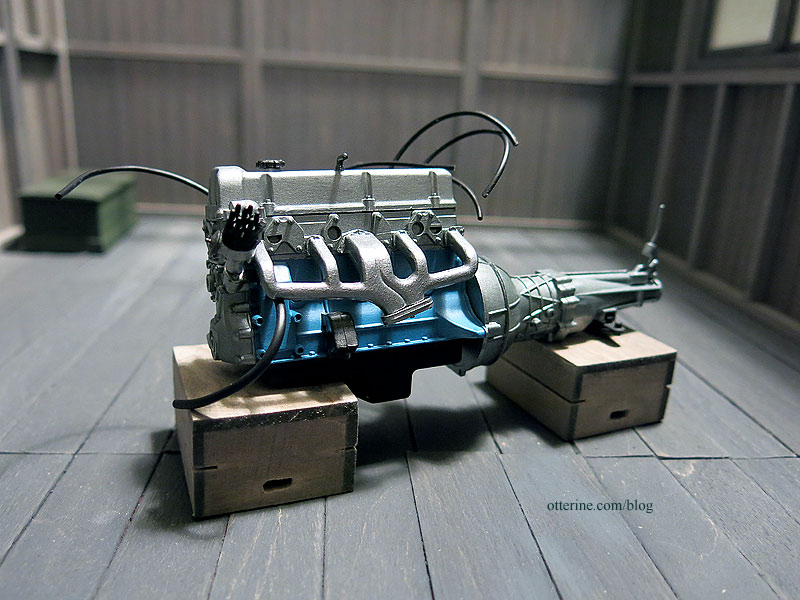
I’ve looked at some real life engine photos for color but I’ve mostly followed the instructions. Fine detailing, aging and grime will come later.
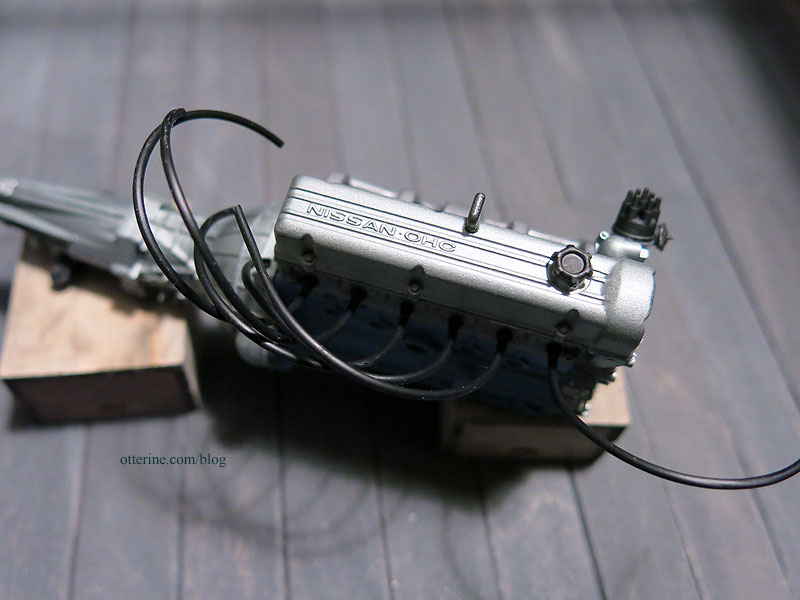
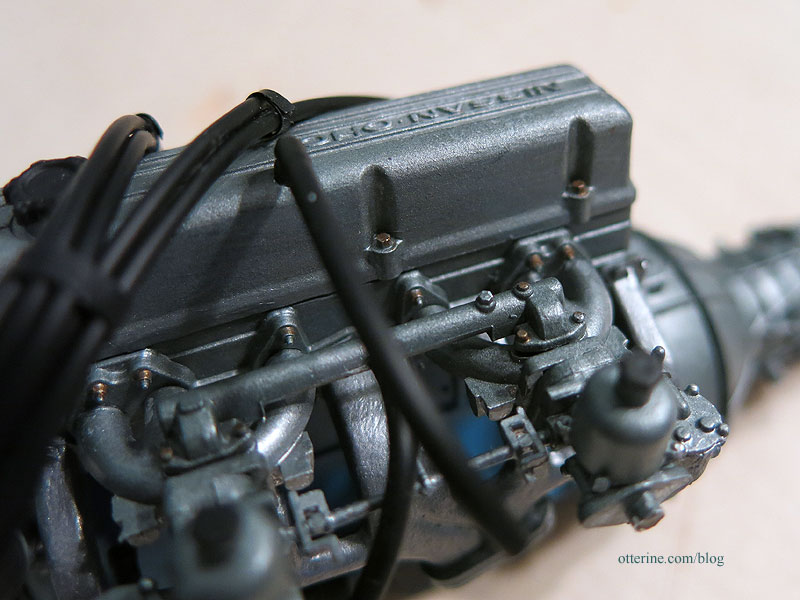
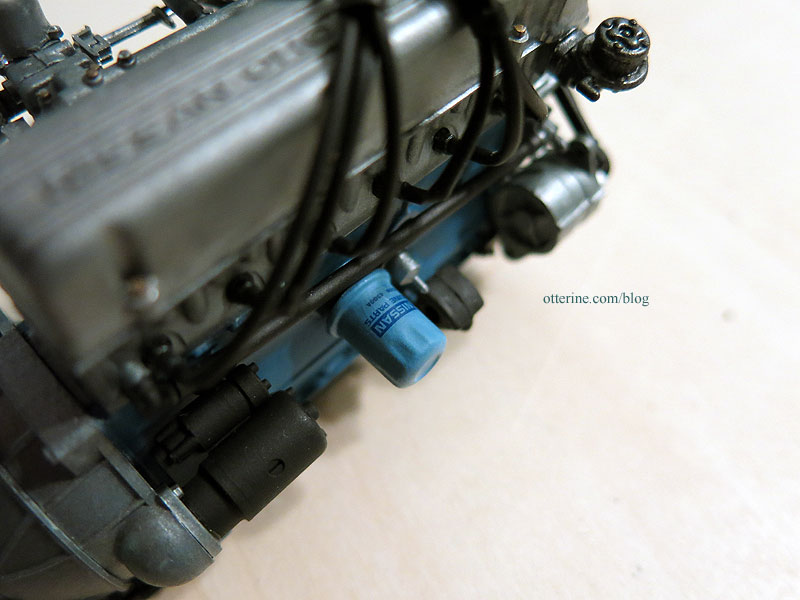
It’s coming together nicely. I added some painted detailing in the way of bronze nuts and bolts. Making nuts and bolts a different color can add realism with a minimal amount of work. I also used electrical tape to group the spark plug wires together.
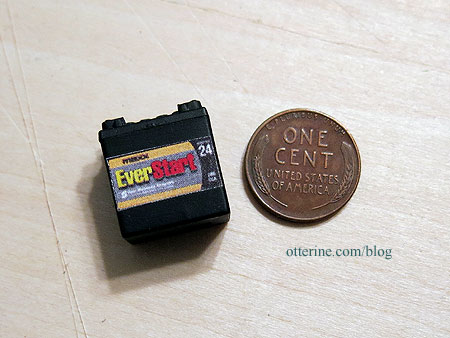
I printed up some labels and decals. Yes, I filled out the “Battery Finder” form to get the right label for a replacement battery. :D I haven’t finished painting the detailing on the battery or other engine parts just yet.
There are two for the air cleaner (love that Hugger Orange by Model Masters). I found the replica images online. I printed one of the air cleaner labels and the VIN plate (not shown) on Avery silver labels. The material gives it just enough sheen.
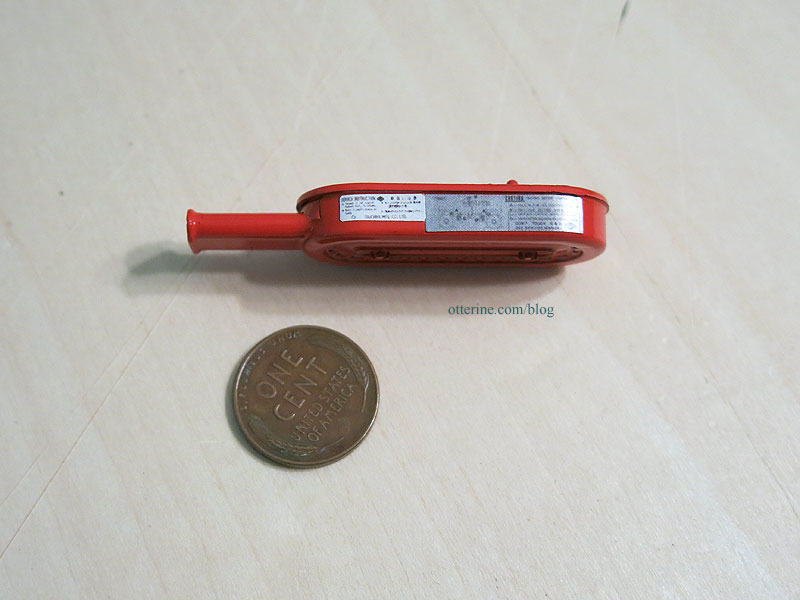
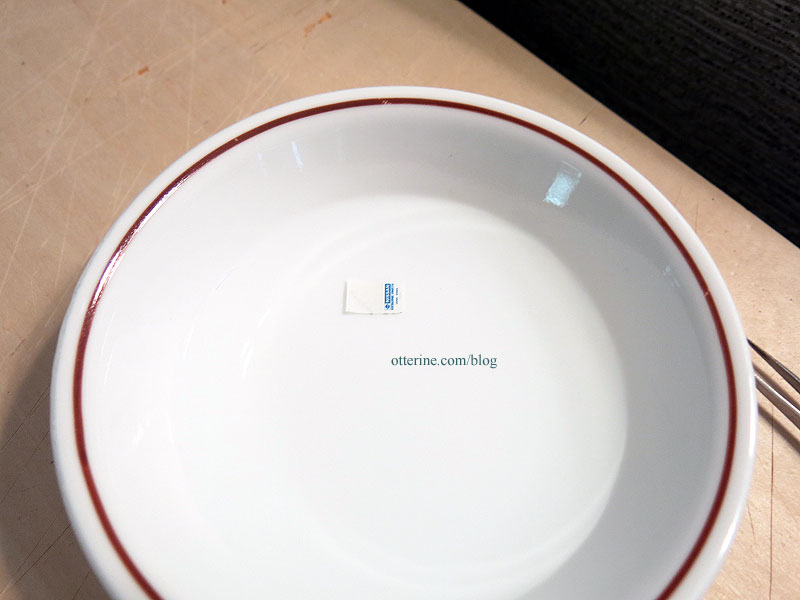
The last item was a decal for the oil filter. This was my first time making my own decals, and I love it! I will definitely do more of this in other mini situations. I used SuperCal Waterslip Decals from The Crafty PC, which is now out of business, but there are other similar products on the marketplace, including one by Testors. I can’t speak to that specific item, though I like their other products.
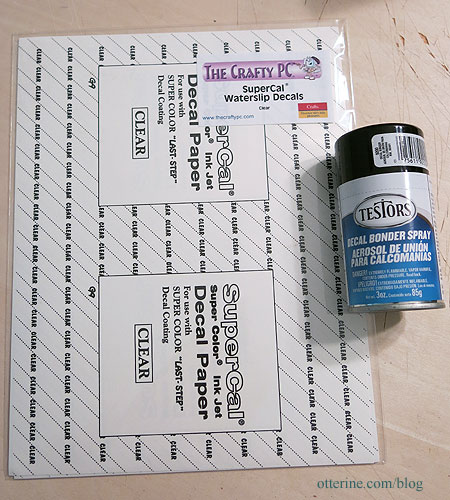
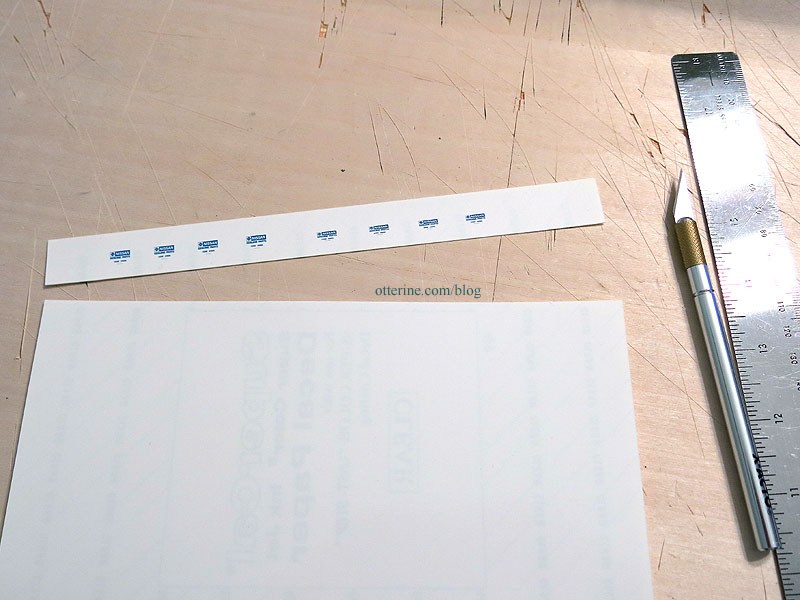
I mocked up the design using a Nissan logo and text in PhotoShop. I then printed on the decal paper. You can print along one edge and then cut cleanly across to use the remaining sheet for printing again. As you can see, I made a few at the same time to have extras in case of disaster. I also like to make a couple of sizes just in case. I ended up using the smaller one and had to make two attempts.
I used Testors Decal Bonder for the spray. I put on one thin coat, let it dry for half an hour. I then added a second heavier coat and let that dry overnight. I wanted something to grab onto during the process, so I cut the paper larger than I needed and scored a line where I wanted the decal to separate.
I soaked the decal for 15-20 seconds until it slipped easily.
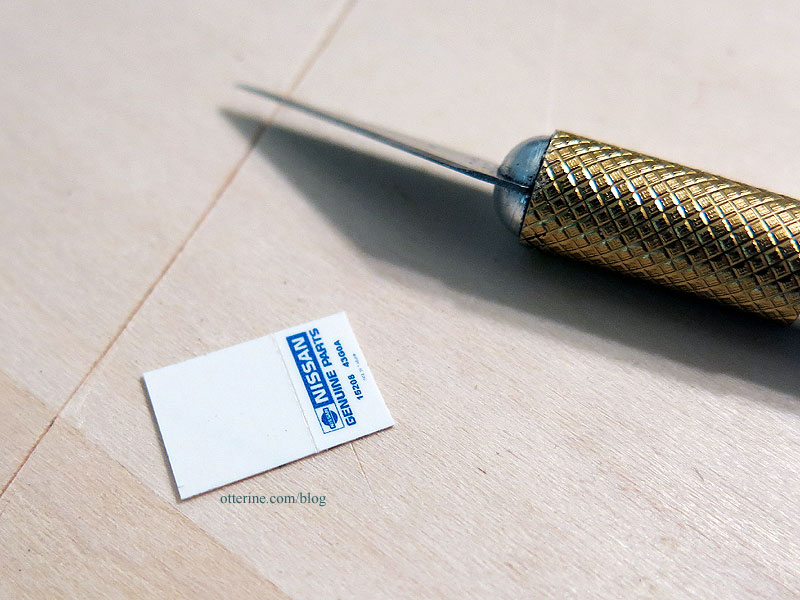
In that time, I wiped the oil filter with a Q-tip dipped in Testors Decal Set. I slipped the decal onto the oil filter and positioned it with the Q-tip. Once it was set, I dabbed it with a paper towel.
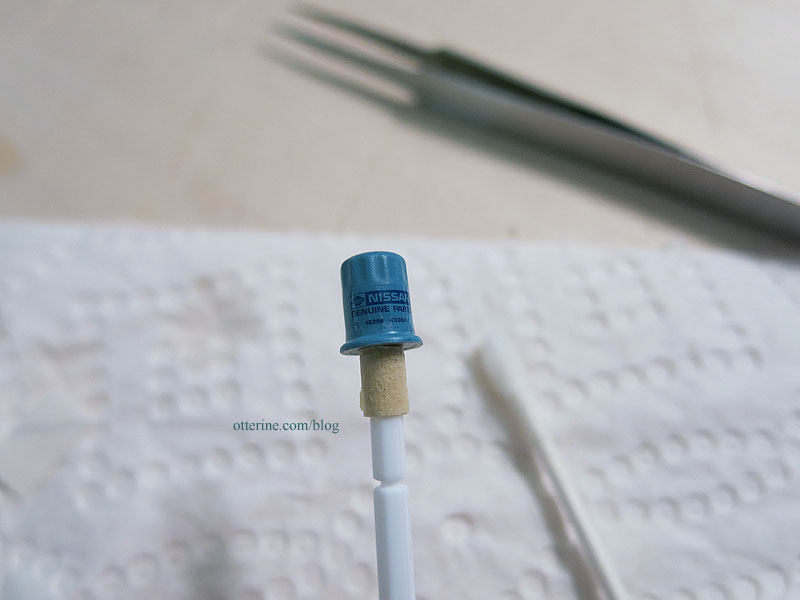
In order to remove the sheen, I sprayed the oil filter with Testors Frosted Glass spray. It was the only matte finish spray I had on hand, and it worked perfectly. Adding a decal to the oil filter is a minor detail, but it adds a lot. :]
Categories: Milo Valley Farm, Model Cars, Vehicles
March 22, 2016 | 0 comments


NOTE: All content on otterine.com is copyrighted and may not be reproduced in part or in whole. It takes a lot of time and effort to write and photograph for my blog. Please ask permission before reproducing any of my content. (More on copyright)

Mail Wagon – part 1
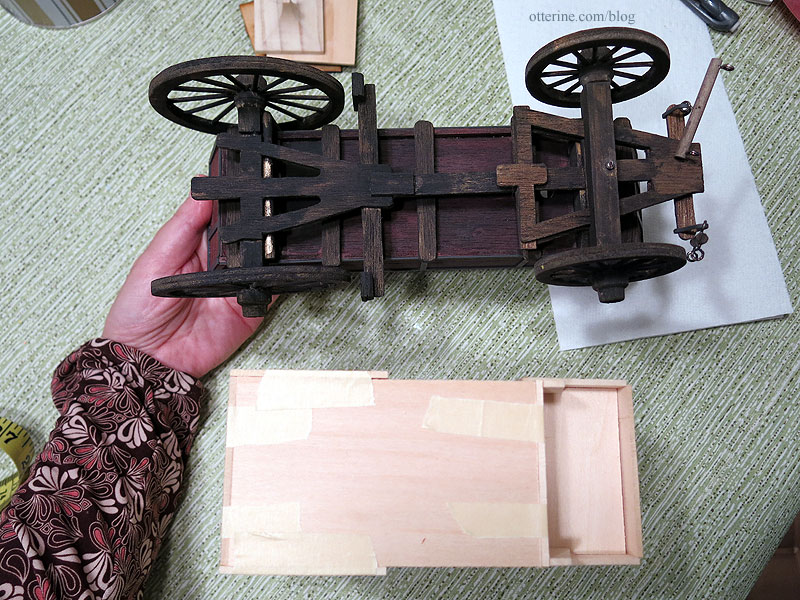
Today, I did a dry fit of the mail wagon. To say the instructions are lacking is an understatement. You are given a blueprint drawing and a typed list of instructions.
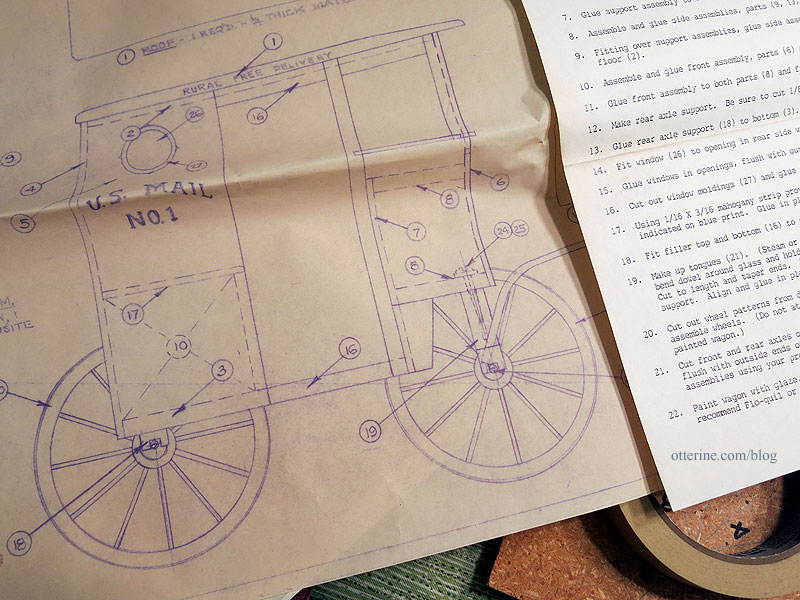
There are no photos or diagrams of the steps, and the kit photo is minuscule and not at all detailed.
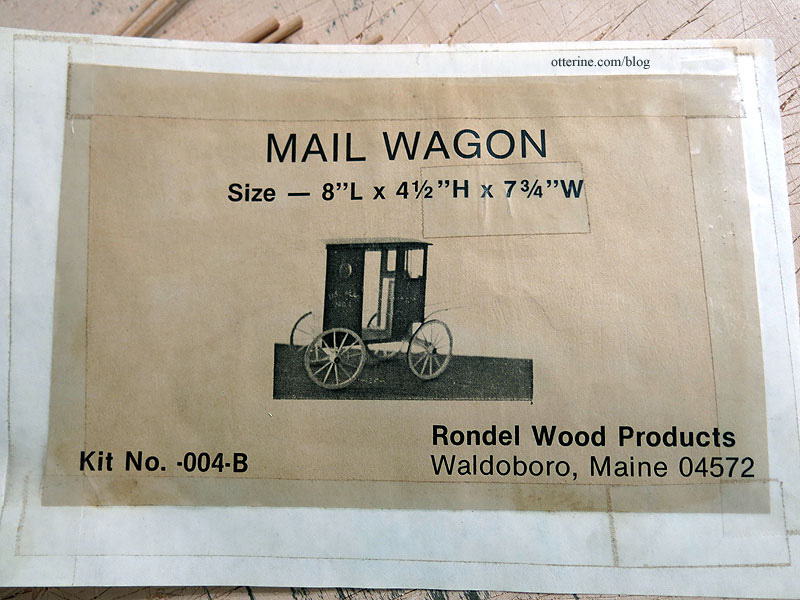
I blundered my way through a dry fit, and one piece still made no sense and didn’t seem to fit properly. But, it does give me a good basis for size and how far away the wheels are supposed to be from the passenger compartment. It’s a very simplistic kit, so you know me…I’ll probably end up building most of it from scratch and using this as only a guide.
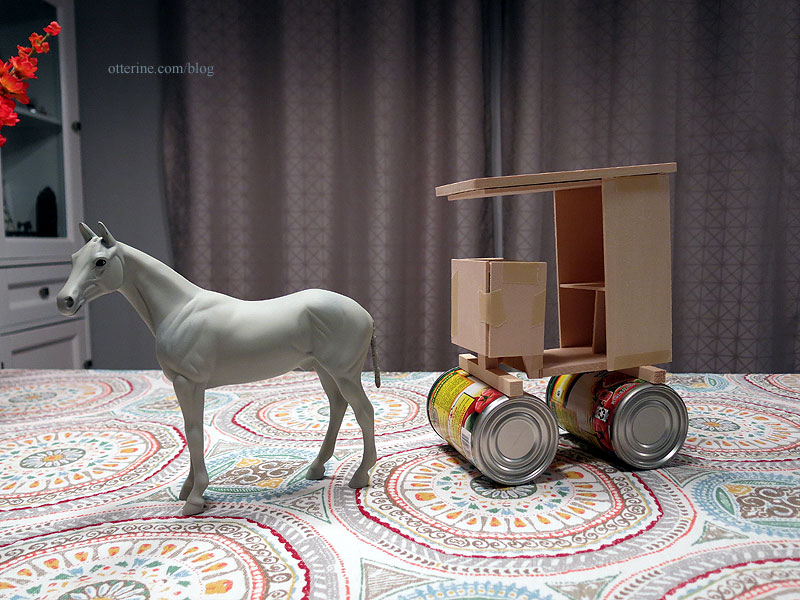
The wheels are incredibly detailed in their assembly, much like the real deal. If I can get them to work, the wheels alone will be worth having bought the kit.
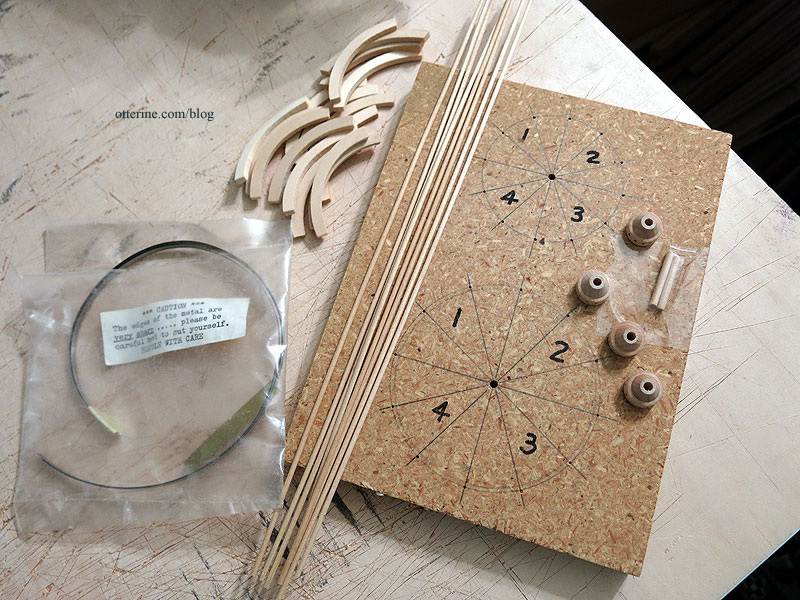
However, this is the extent of the chassis – two wood blocks. The front wheels will turn, but the lack of detail is disappointing.
Here’s a real life mail wagon for example. This is more complicated than I want to attempt, but there has to be a happy medium.
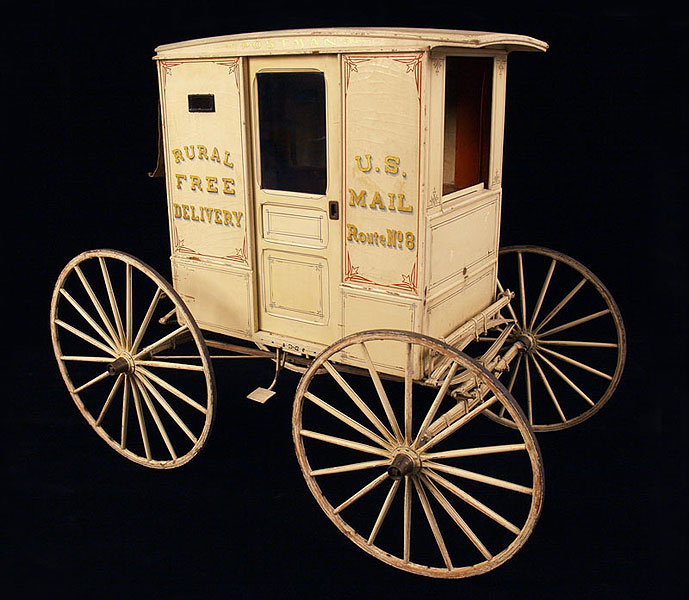
image from The Smithsonian The inexpensive wagon kit I put together for Baslow Ranch has better detailing without being overly complicated.
It’s longer than the mail wagon, but I could likely customize something better than two simple wood blocks. I do have another of these kits, but I could cut pieces myself using the general pattern.
I’m checking some other sources for ideas. Plus, I’m planning a trip to a local museum that has carriages for in-person study and better photographs.
Categories: Ivy Hollow RFD, Model Cars, Vehicles
March 2, 2019 | 0 commentsRX-7 in half scale, hitting the road…
Work has been completed on the RX-7 in half scale. This lovely auto is on its way to Florida where it will be placed on the cake table at a friend’s wedding. This was a side commission and a super fun project to boot!
I’ve included some photos of the original car we were trying to emulate. Fingers crossed that it travels safely and provides some mini wow for the cake table. Sending out a huge congrats to the happy couple! I am honored to have contributed to your special day.


The original:


Categories: Model Cars, Vehicles
October 26, 2018 | 0 commentsHalf scale is nutters!
Continuing work on the RX-7 in half scale. I am making tiny half scale soda cans. Why? We’ll get to that.
This is a kit from Mr. Model in Brazil.
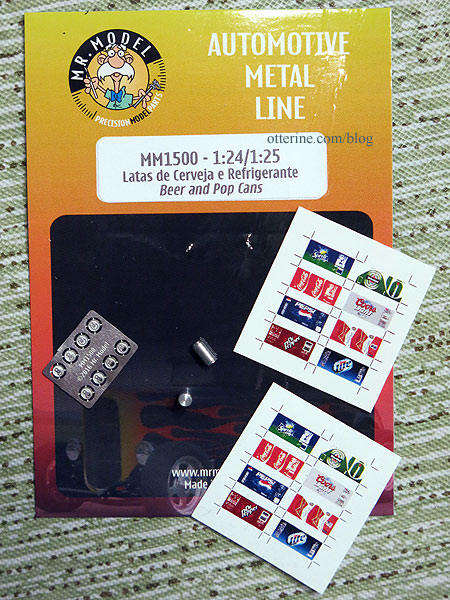
It comes with four turned metal cans, photo etched tops (open and closed) and labels for beer and soda (clear and white decals).
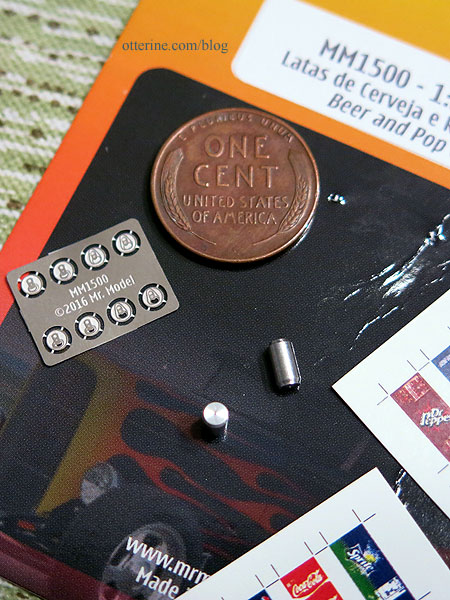
I had to use my 4X magnifying readers and even still I was cross-eyed. I am ever in awe of those who can work so small.
I had considered making them with the open tops since empty cans make more sense for my purpose, but drilling was not easy for lack of being able to hold the can well and I didn’t want to risk the glue not taking if I painted under the opening. Good luck telling the difference with the naked eye, anyway!
After gluing the top to the can, I needed a hand, but no one was available. So, out came the Cricut tweezers. They are the kind that you squeeze to open, then they close and hold until you release them (or they shoot the mini across the table like a wet watermelon seed).
With the thick rope tied around (yeah, that’s plain sewing thread).
Then came the tiny water slide decal that liked my fingers better than the can. :\

One down, three to go…

Categories: Model Cars, Vehicles
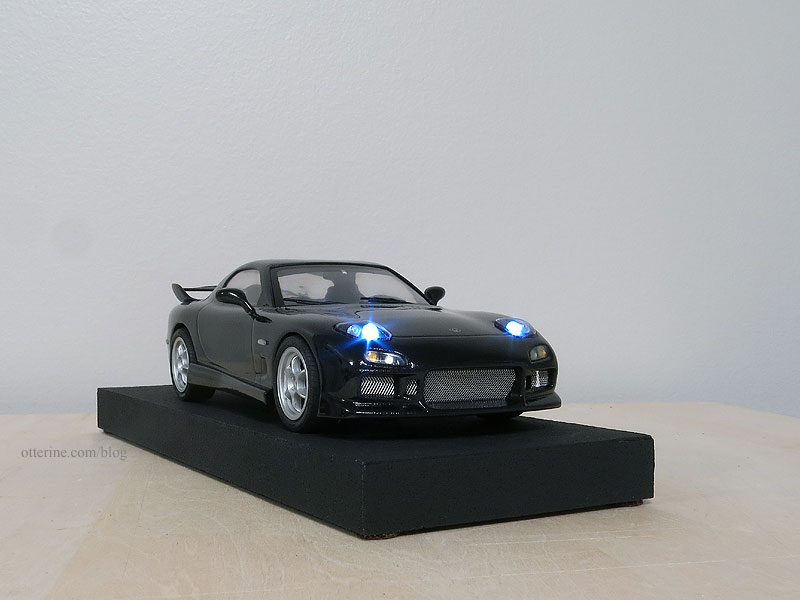
October 25, 2018 | 0 commentsRX-7 in half scale – lights, part 2
Continuing work on the RX-7 in half scale. After letting the paint rest awhile, I decided to tackle the few dust particles on the hood. The second attempt at painting brought the finish from a 95% to a 95%, just different. The hood looked great, but the sides were orange peeled. :\ I let it rest again, then tried a third time. This time, the hood and sides were 98% and the back end was 60%. Oy. Instead of risking the entire car, I masked the back along the panel lines and painted only the damaged portion, just like a real auto. Now the whole thing is a 98%, and I would have to say that’s the best paint job I’ve ever achieved.
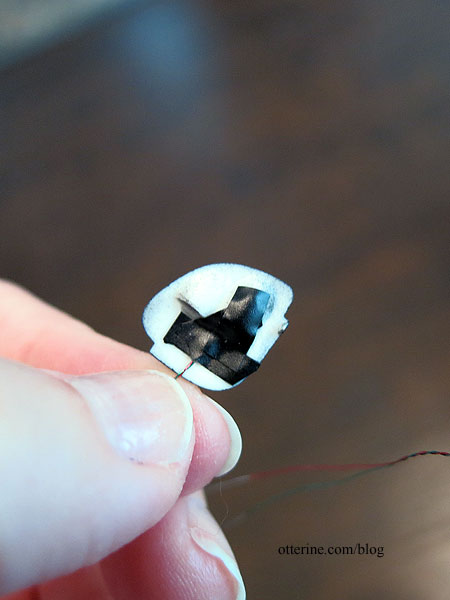
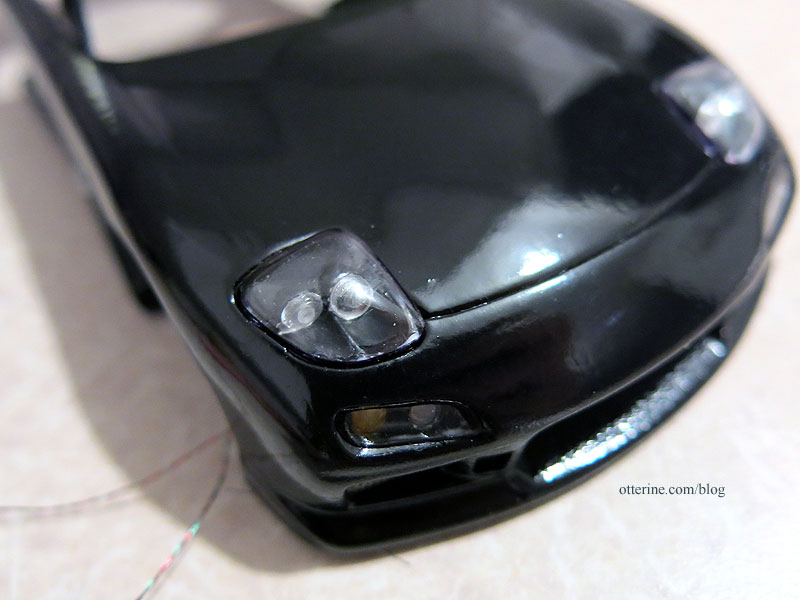
Now, when tackling the LED headlights (using 3V pico cool white from Evan Designs), I had to be mindful of where my fingers were on the finish at all times. One slight brush of glue, and it’s all over! I did as much as I could while the lights were separate from the body. First, I drilled holes for the LEDs (headlamps only, not the high beams).
I fed in the LED, then secured it on the back with electrical tape. I don’t want light escaping through any cracks; the light needs to be forward only.
You may recall, I had to cut away the body panels for the inset light customization.
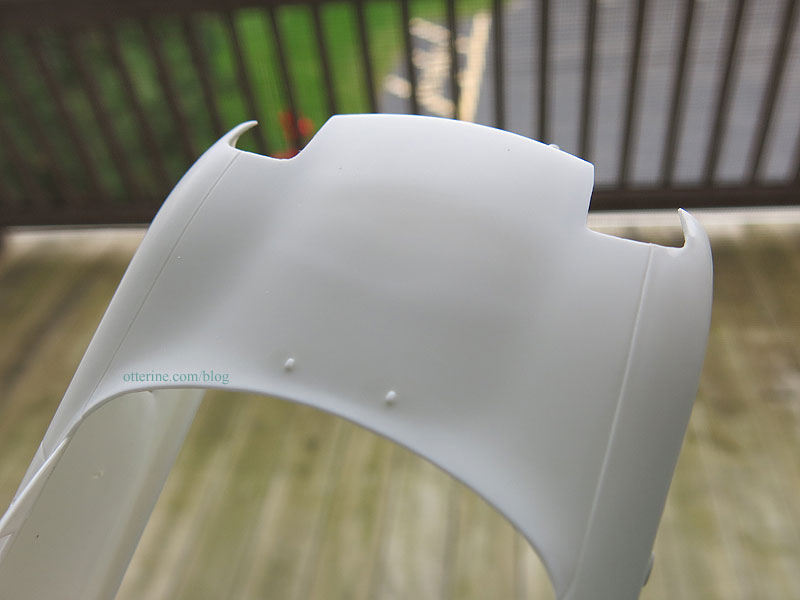
Since the front skirts are a separate piece, you’re going to get only so close in alignment. There were gaps around the piece since it’s not exactly the shape I need on either side.
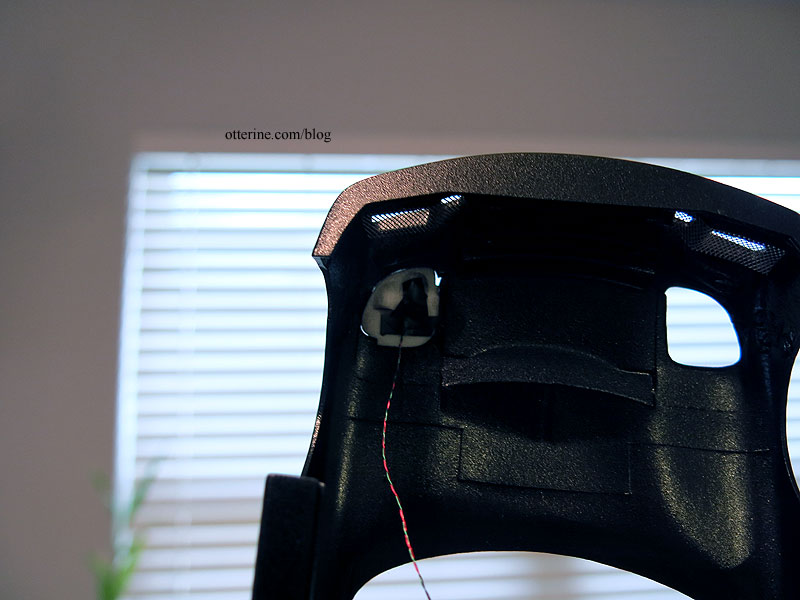
The light assembly is glued into the car, but there are contact points on only two of the four sides. Yeah, that’s glue overrun you see below since you have to work from the back. After everything dried, I touched up the flat black paint as best I could. These marks should be concealed once the clear covers are on, but I wanted to prep it just in case.

I cut a larger piece of electrical tape and supplemented the adhesion with super glue gel. I want this patch to stay put.
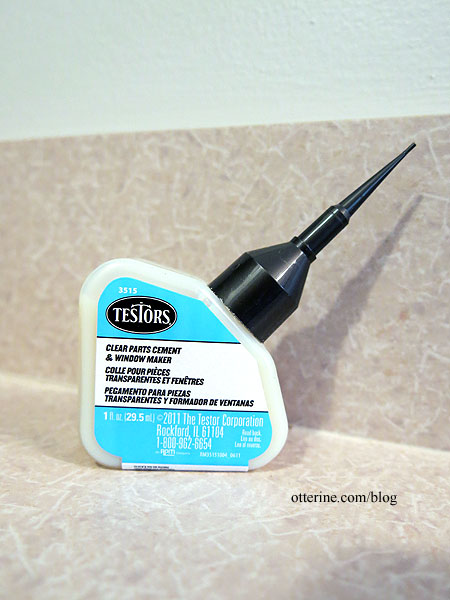
Since I had used super glue on the headlight assemblies, I let this sit for two days before touching it again. I had had some fogging issues with the Model T and didn’t want to risk it with this one, so I let the glue gas out completely. I glued the tiny circular lenses over the LED headlights and unlighted high beams with Testors Clear Parts Cement. Most of the clear parts are attached with this glue. I lined the edges of the clear covers with a black Sharpie marker.
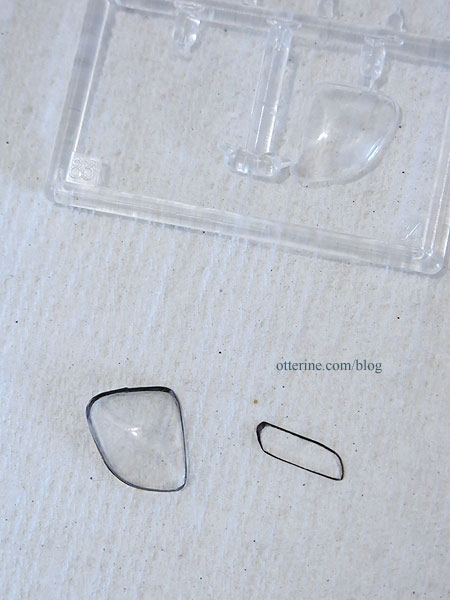
It’s a cleaner look than just plopping them on top. The one on the left is with the outline, the one on the right is without. You can see it appears more a part of the car with the outline.

I tried using the Testors Clear Parts Cement on the headlight covers, but they would not stay. I ended up using Weldbond, a white glue. It’s not the cleanest if you study it closely, but there is so much going on there, it fades into the background relatively well.
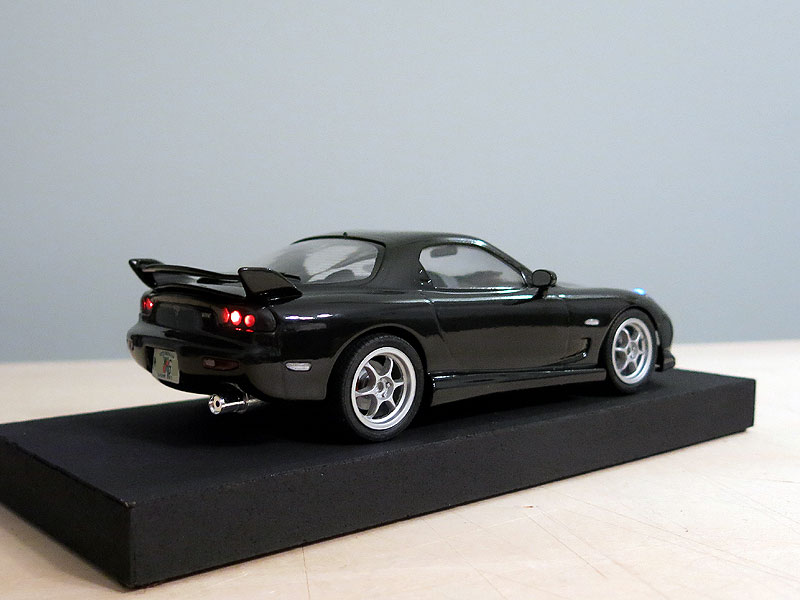
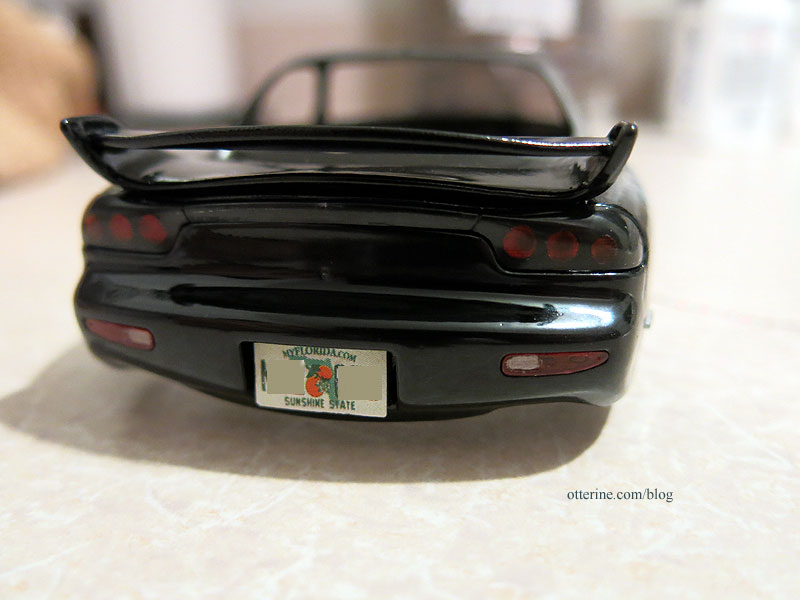
I also glued on the taillight cover.
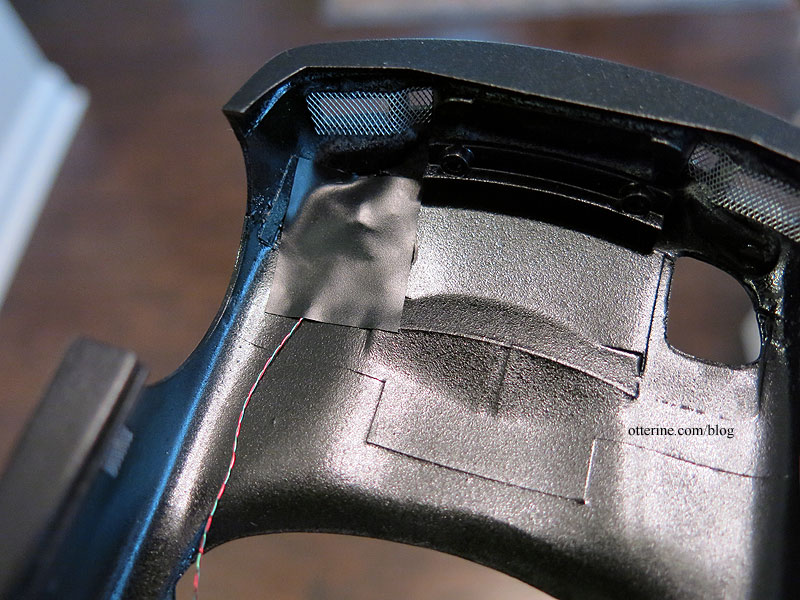
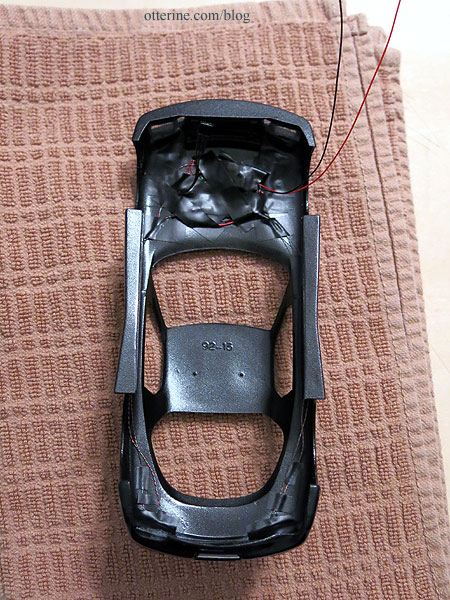
I taped the taillight wires toward the front to join with the headlamp wires. There is more room in the empty space where there would normally be an engine. The wires are matched up to work as one.
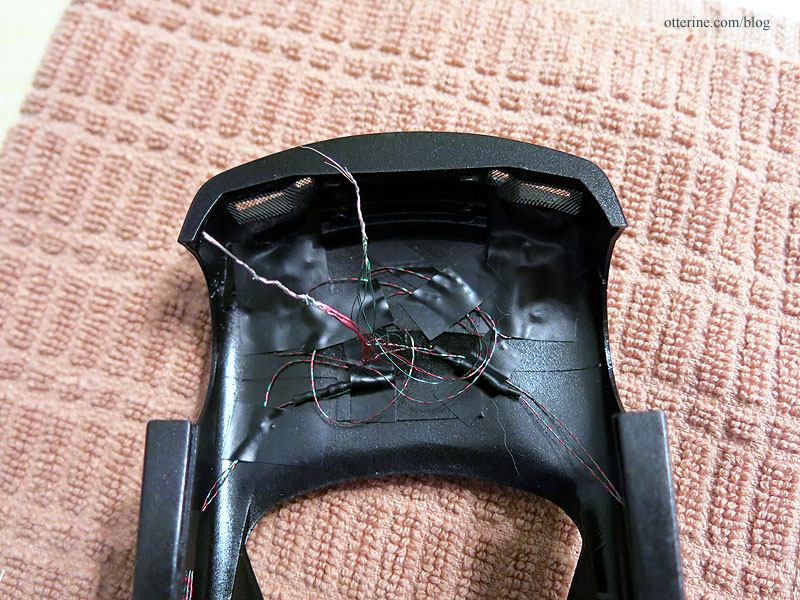
I am using a 3V battery with switch and a remote control unit. However, there is no way to hide the battery and access it in the small auto, so I am also using a connector. I built a base from wood, covered it in adhesive backed cork and painted it black. I drilled a sizeable hole in the base so the connector can be fed through and hidden underneath. It’s not the cleanest solution, but it’s the only way I could have the car disconnect from the base and have the wire relatively hidden. The battery will be housed underneath.
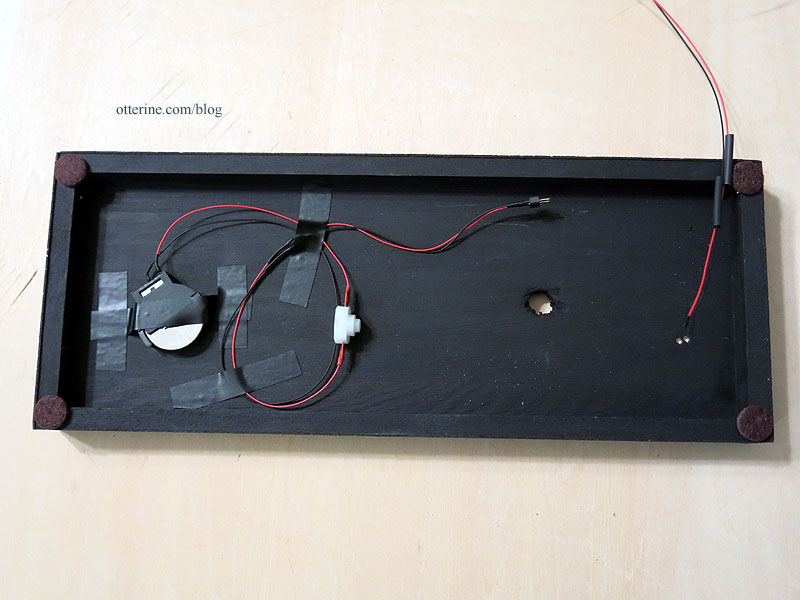
The sensor will need to be mounted on the car outside of the engine compartment, and it has plenty of excess length so I can position it on the chassis after I get the car assembled. It’s easy enough to push any unneeded length of wire back in after assembly. The remaining half of the connector will hang from the car to be plugged into the base. On the inside, there is plenty of electrical tape holding things neatly in place.
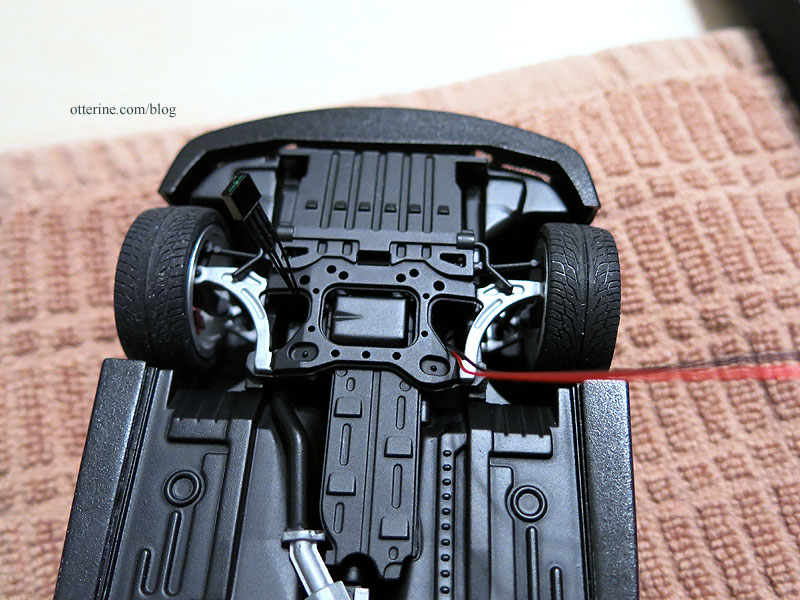
Here I am checking the fit without glue.
Checking that the lights work after each step is imperative in working with LEDs. You don’t want to get through the whole ordeal just to backtrack to find your issue.
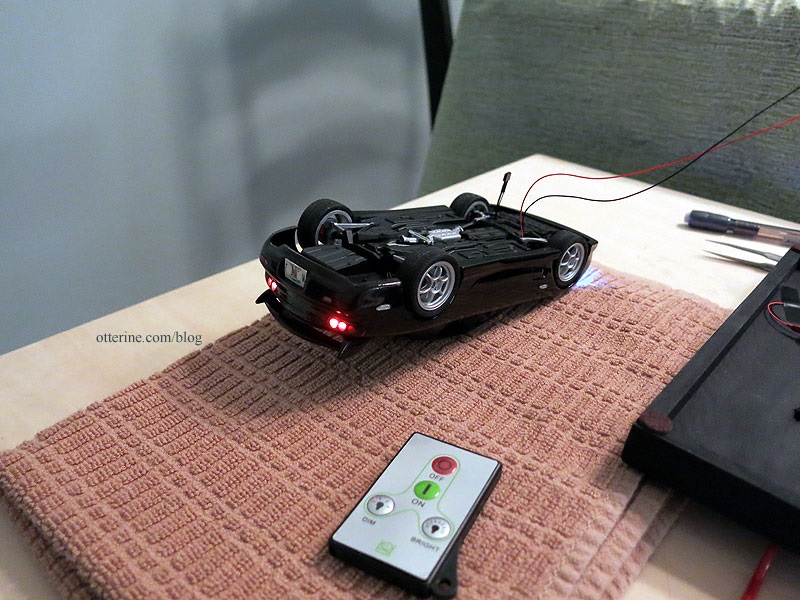
I know, all this chatter about lights, and I leave you without a photo of the pizzazz? You won’t have to wait long. I want to finish up the build and use the wow photos for the final post.
Categories: Model Cars, Vehicles
October 25, 2018 | 0 commentsRX-7 in half scale – more miscellaneous detailing
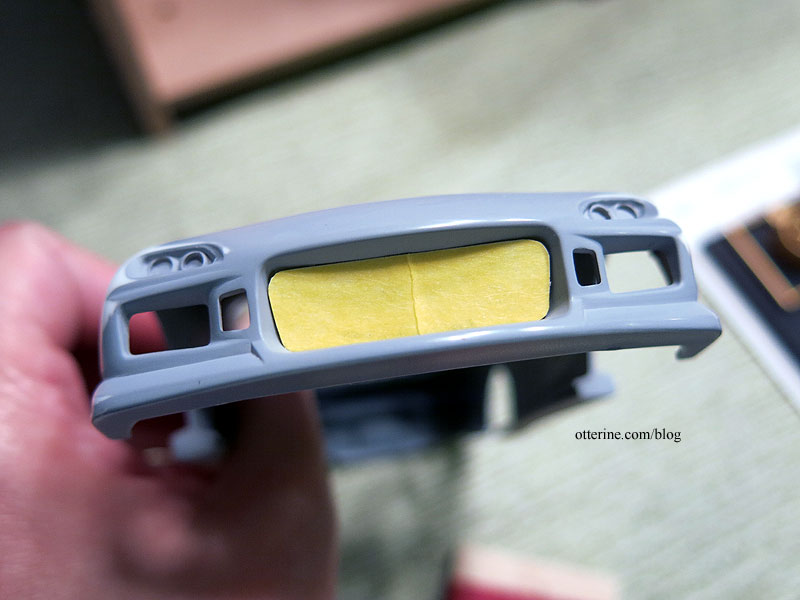
Continuing work on the RX-7 in half scale. To detail the front, I added some aluminum mesh by Scale Scenics.
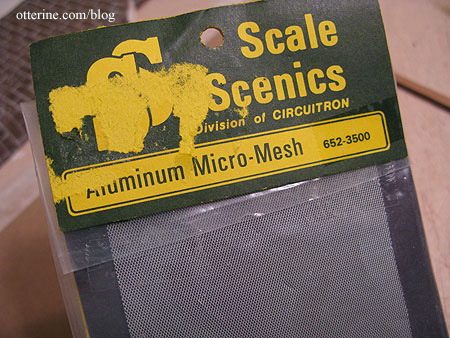
The center required a template since I didn’t want to risk obliterating the skirt trying to remove the excess plastic.
For the two side vents, I just glued the mesh behind the openings. It’s a subtle addition, but it amps up the sports appeal. :D
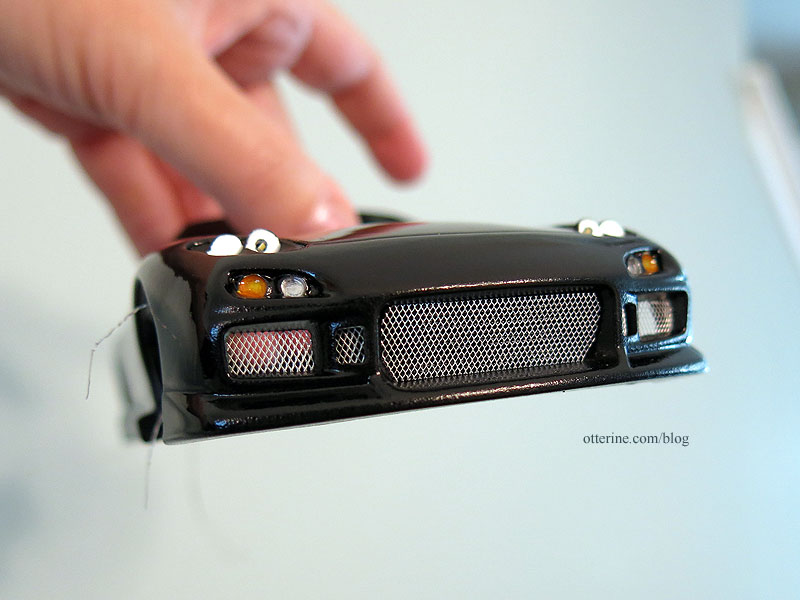
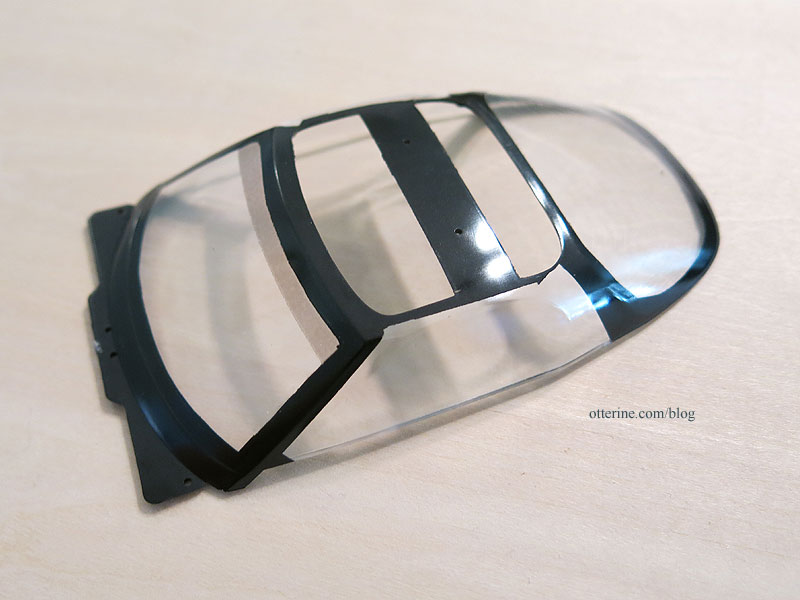
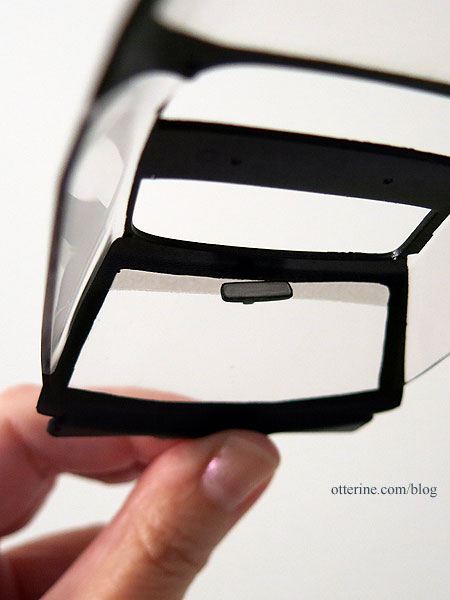
I got the windows masked and painted. I then added a line of shading with the Tamiya Smoke spray. Have to keep the sun out of our eyes while driving.
I bought Testors Clear Parts Cement for working with any of the clear parts. Usually, any kind of super glue will make clear plastic foggy. I tried it out on a spare clear part to be sure, and it worked as advertised.
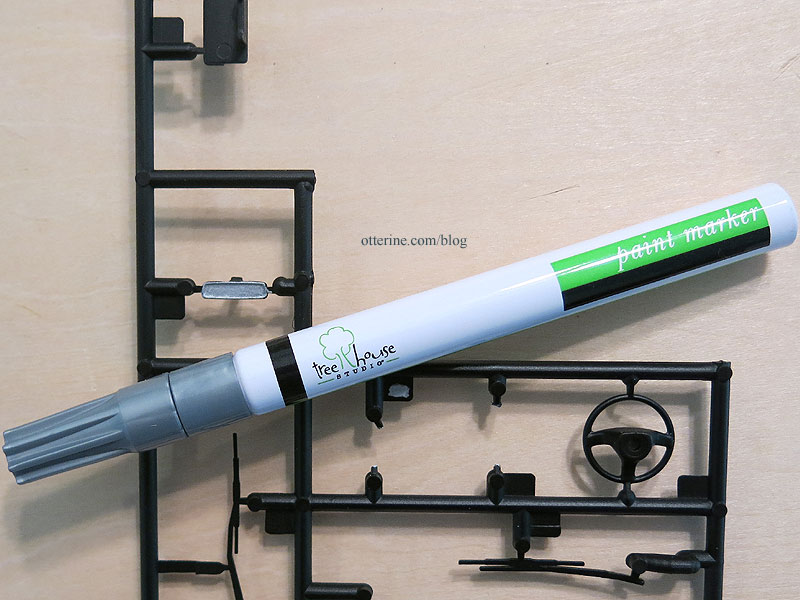
You are to paint the rearview mirror silver, so I used a paint pen.
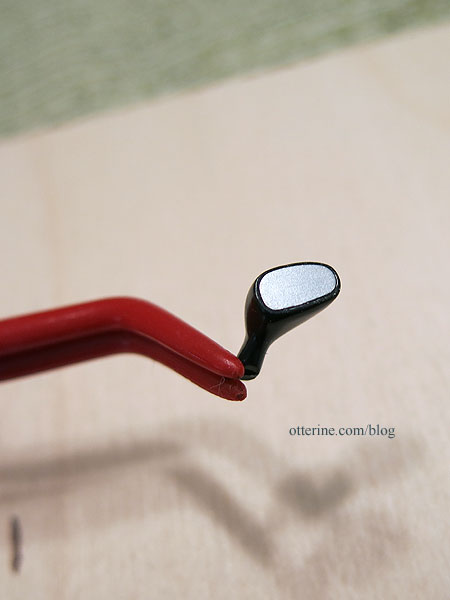
I cleaned up the black outline once I removed the part from the sprue. It gives the impression well enough. I will install this assembly at the end when I put the body on the chassis. These are notoriously bad at staying in place over time, so let’s hope it doesn’t end up rattling around the interior.
The side mirrors have inserts that are also not truly reflective. These I will attach at the end to minimize the risk of breaking them off.
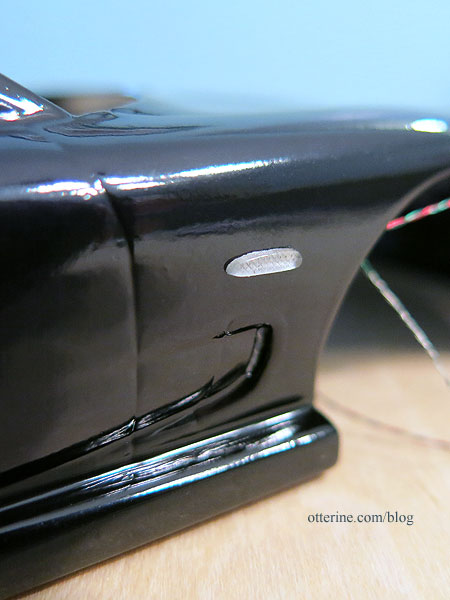
I glued in the various reflectors around the car and installed the upper portion of the rear spoiler. Looks like we’re getting somewhere. :D
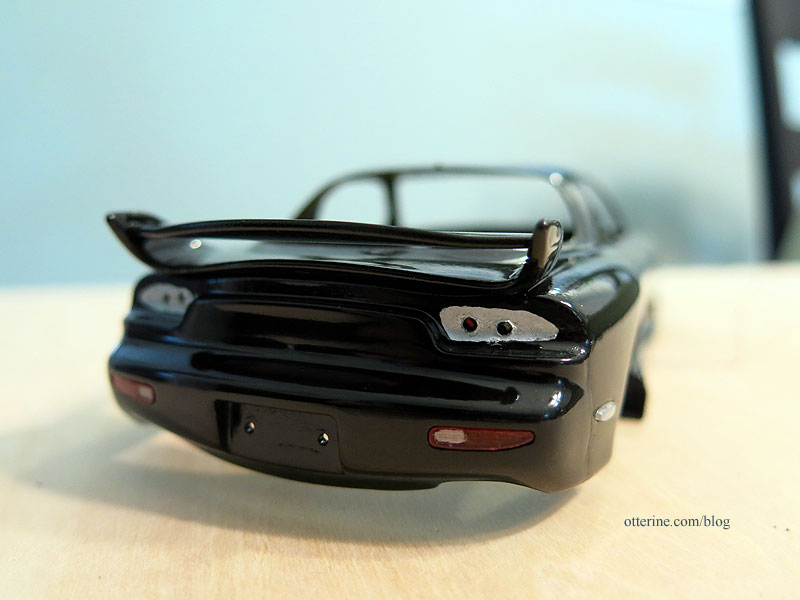
I added spare reflectors where I had removed the molded in side lights. Much better than trying to paint tiny nubs of plastic without ruining the body paint.
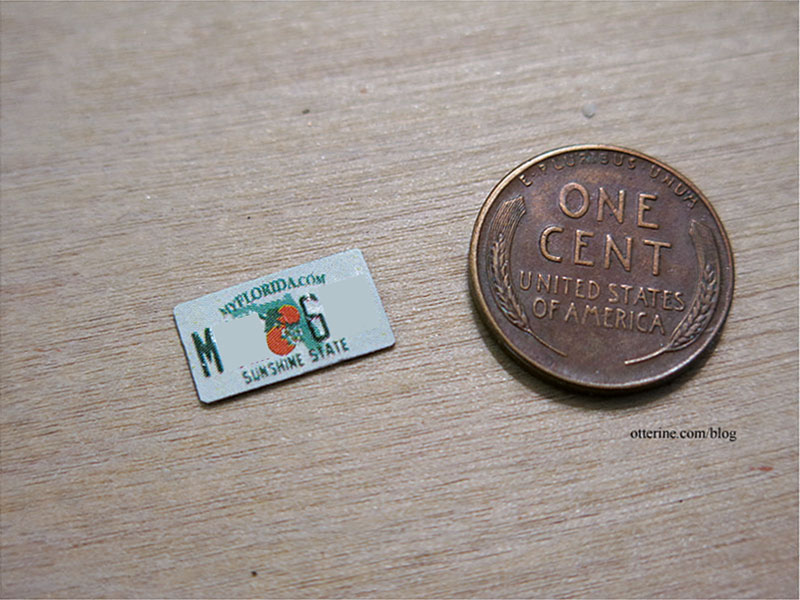
I also made a tiny license plate. I didn’t think I would be able to emboss a half scale plate, but it worked! (I’ve covered most of the numbers to protect privacy.)
Categories: Model Cars, Vehicles
October 21, 2018 | 0 comments
NOTE: All content on otterine.com is copyrighted and may not be reproduced in part or in whole. It takes a lot of time and effort to write and photograph for my blog. Please ask permission before reproducing any of my content. (More on copyright)