

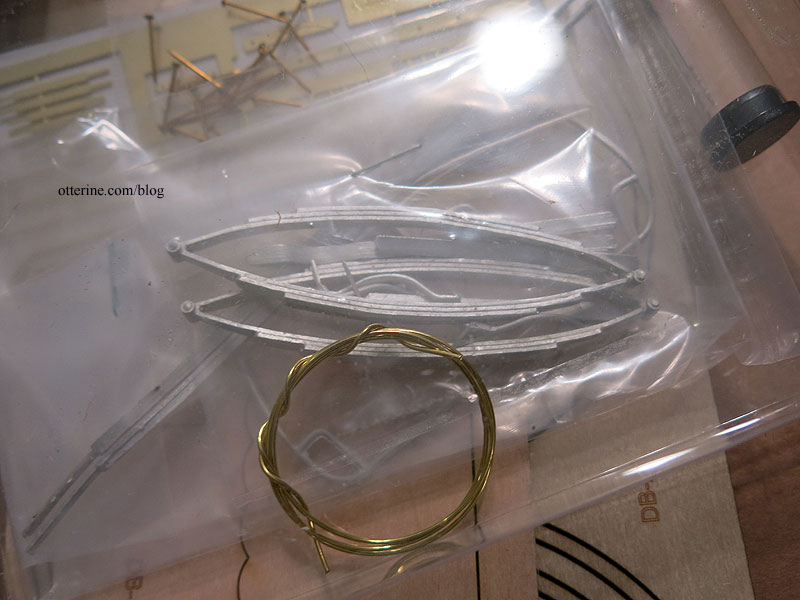
RX-7 in half scale – wheels and warping
Continuing work on the RX-7 in half scale. The Tamiya kit has wider wheels and tires, which look sportier, so I tested to see if I could put them on the C-West kit. Nope. They stick out past the fenders.

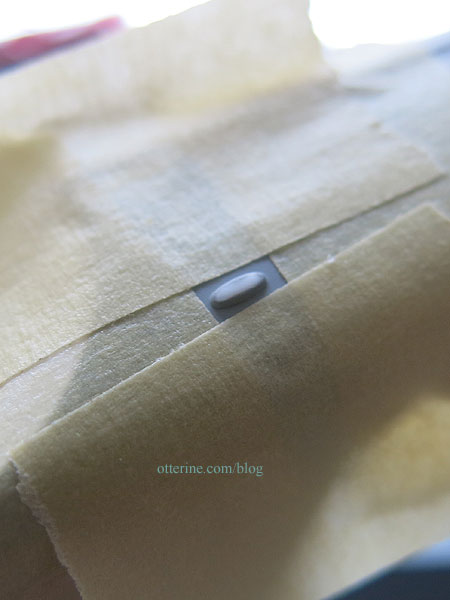
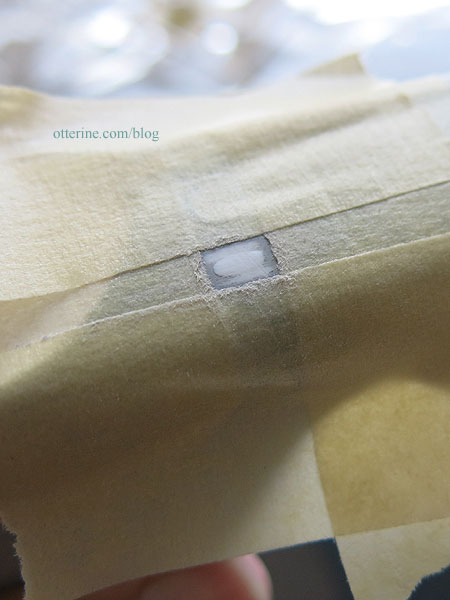
The C-West kit comes with both gold and silver wheels. I planned to use the silver ones, but the tires are loose on the wheels – they just fall right off. Oy. The gold ones fit perfectly, of course. This is what I mean when I say getting one kit to fit properly is hard, let alone mixing more than one. Even the parts provided in a single kit don’t fit at times. =shakes head=

I tried wrapping one of the silver wheels with electrical tape, and if I was set on this design, it could work in a pinch. It’s not the cleanest solution from the back, but up front it’s not too noticeable to the naked eye.

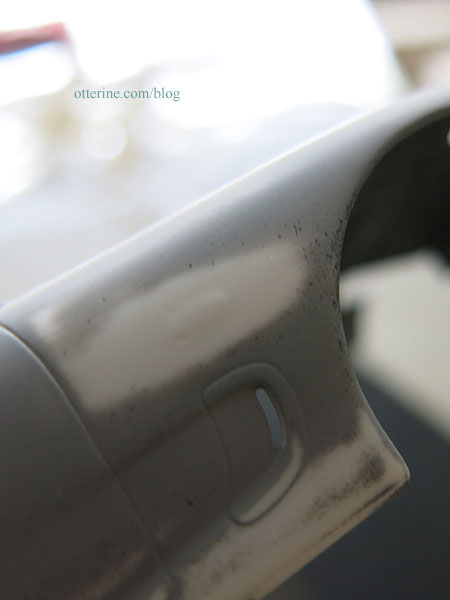
So, on to painting the gold wheels using Model Master Metalizer Lacquer in Aluminum Plate. The initial finish is light matte silver. Once you buff it with a paper towel, it gets all shiny. :D

I then sealed with Model Master Metalizer Sealer.

Much better. All four wheels roll well, and the front ones turn from side to side.

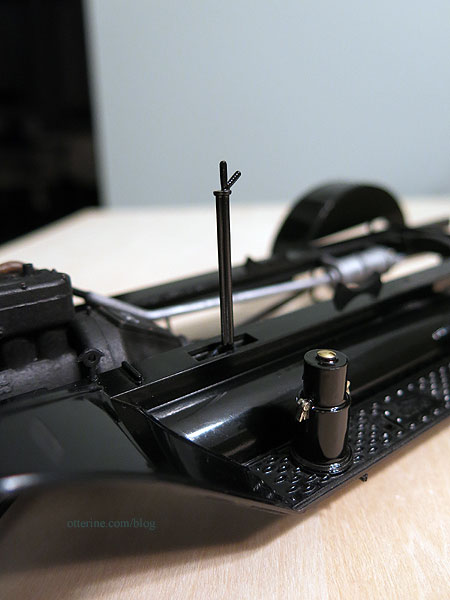
Of course, once I got the wheels on, I could see that the main body piece was warped leaving one tire roughly 1/8″ up in the air. Oy. I heated the plastic along the warp line using the hot setting on my hair dryer, stretched the plastic past the point of being level, and taped it to an mdf board to cool. I’ll give it a looksee tomorrow and see if it needs more. If the heat doesn’t fix the issue, or gets it at least close to level, there are small weights I can add to the empty spaces inside – one good thing about not having an open engine compartment.

Categories: Model Cars, Vehicles
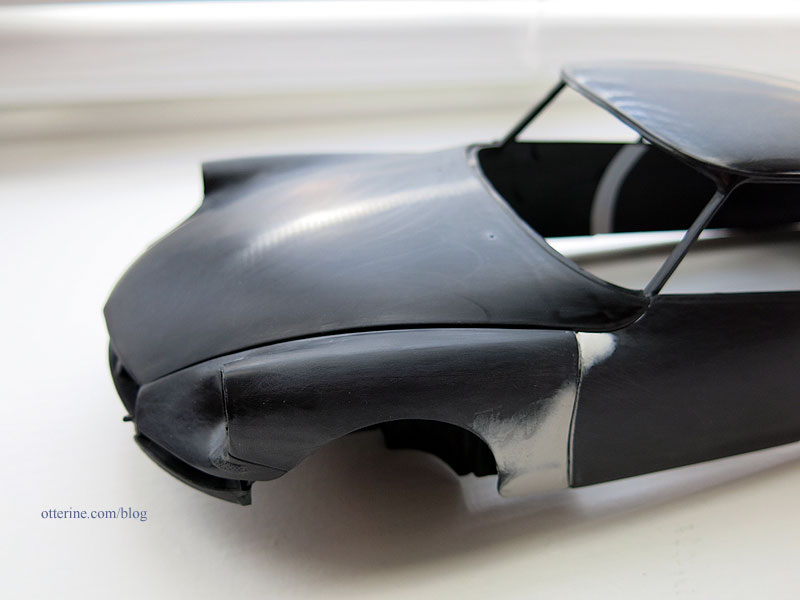
September 26, 2018 | 0 commentsRX-7 in half scale – body work
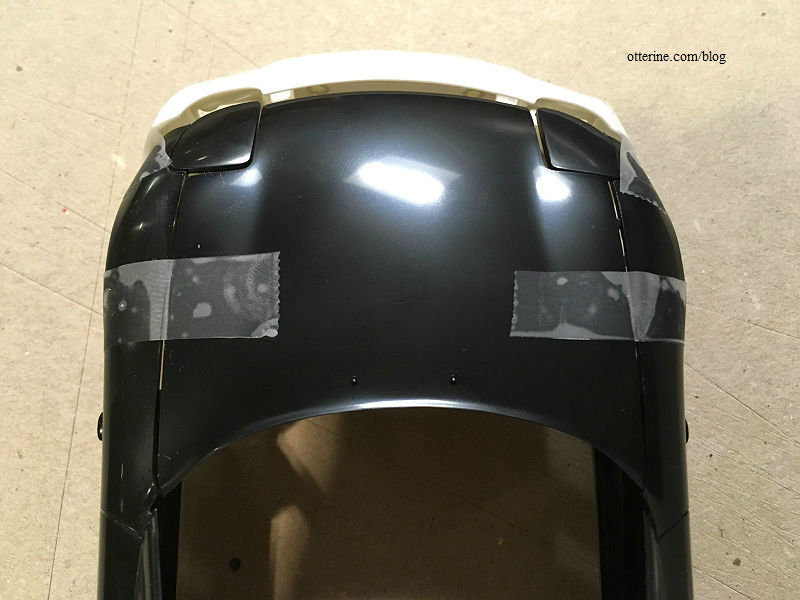
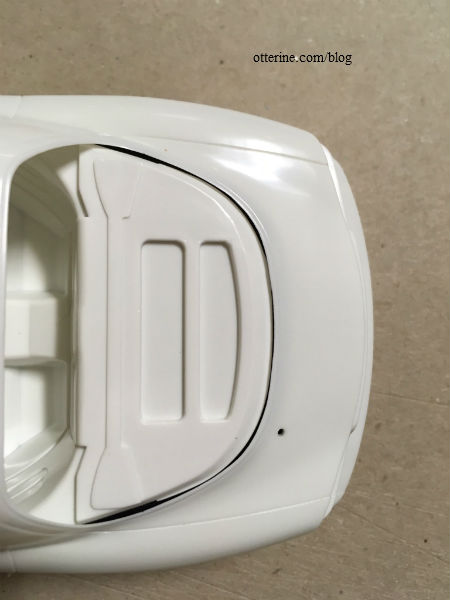
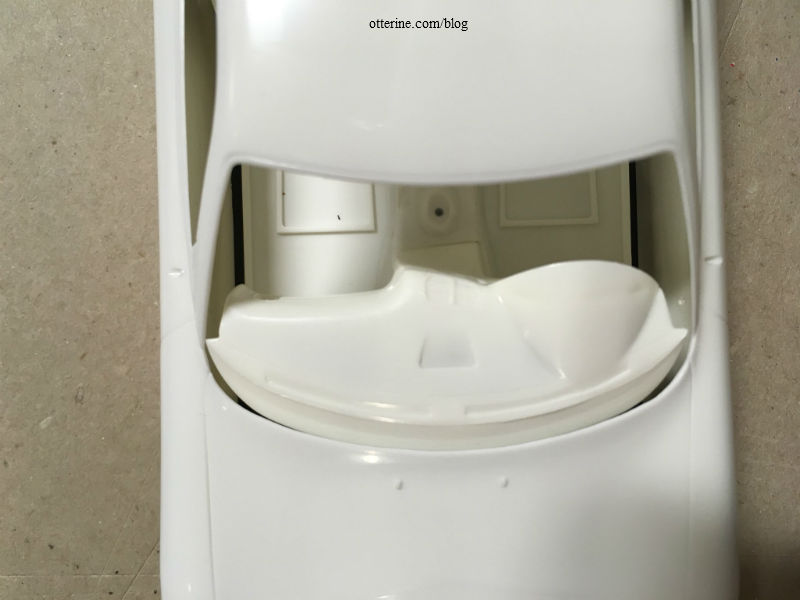
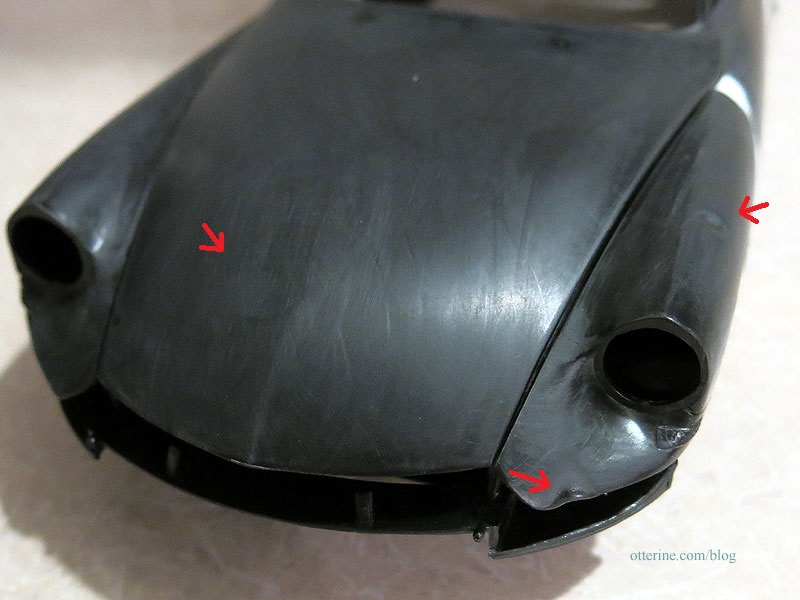
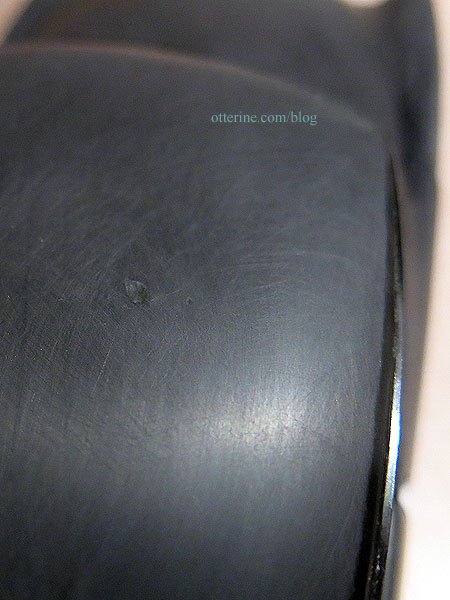
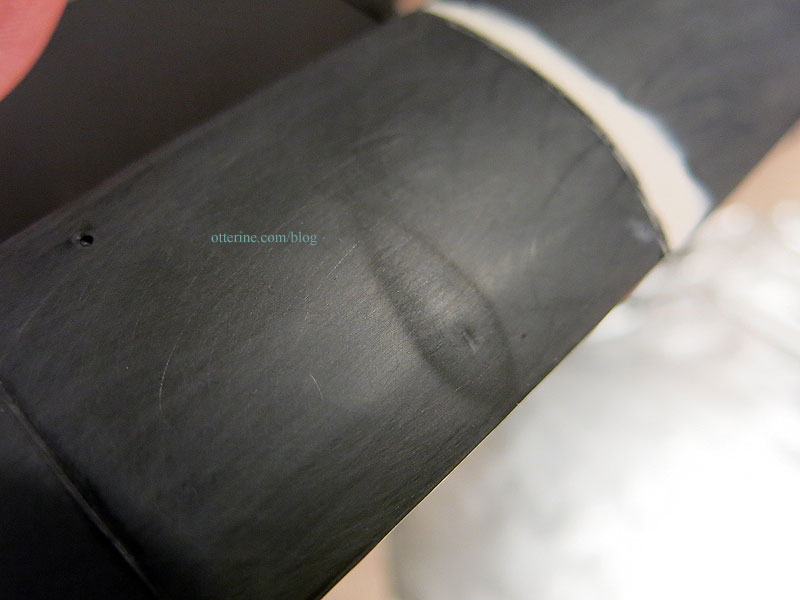
Continuing work on the RX-7 in half scale. One of the imperfections of the C-West kit is the mold line on the hood. It’s not meant to be decorative from what I can tell from the kit box photo, and no part is meant to sit in the depression inside the mold line.
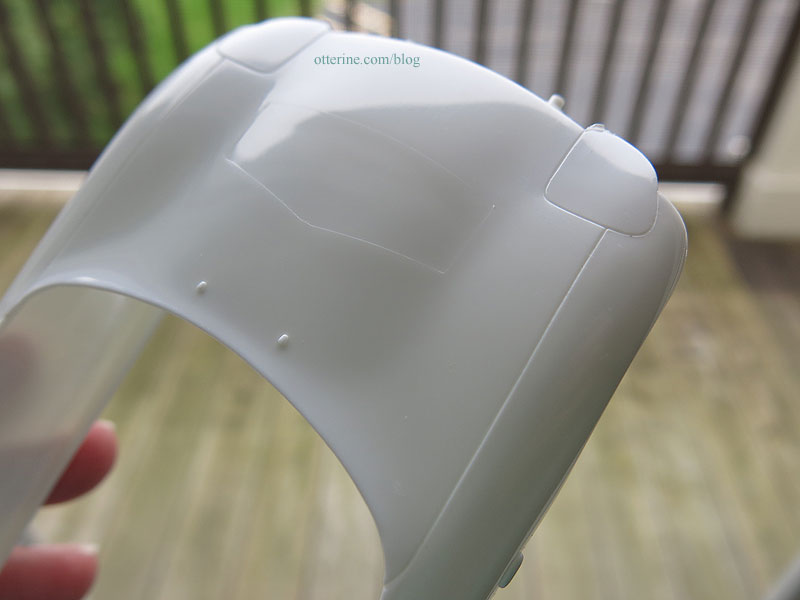
Here is the underside of the hood.

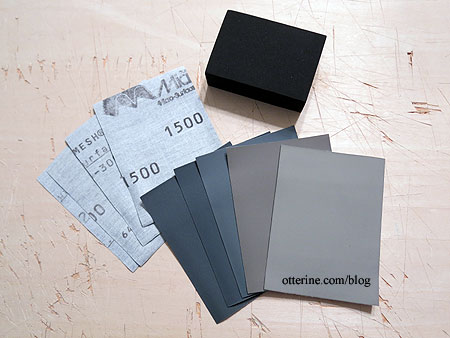
I used Micro-Mesh Sanding Sheets, starting with 2400 grit to remove the mold line and then 4000 grit to prepare the finish for priming.
The mold lines are now gone, but the halo might end up showing in the end. I don’t want to risk filling in such a low depression with putty and making a bigger mess, so I will forge ahead to see if paint layers will soften the look. Also, the kit comes molded with light covers, but it has the clear covers for situated headlights as well. You have to cut away the light covers from the body if you want to use the clear covers. Yeah…. Holding my breath the whole time and using a very sharp X-Acto, it worked. Oy!
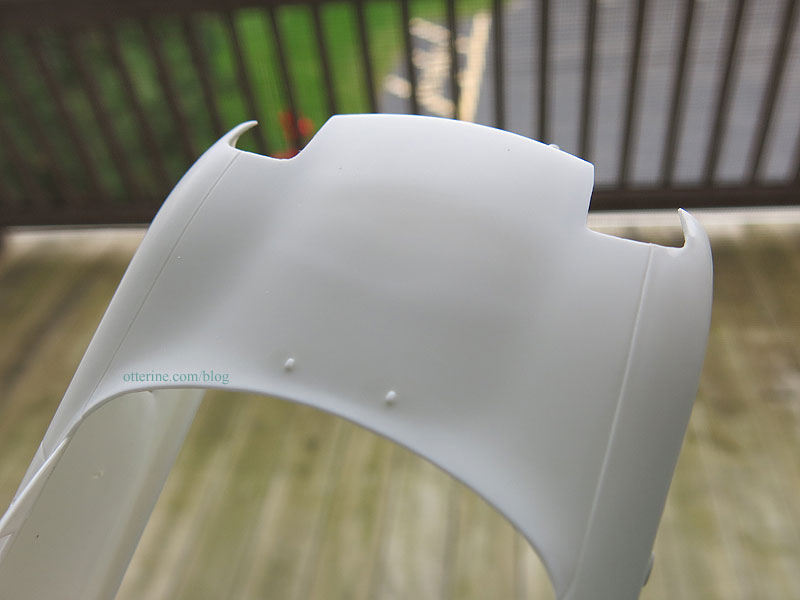
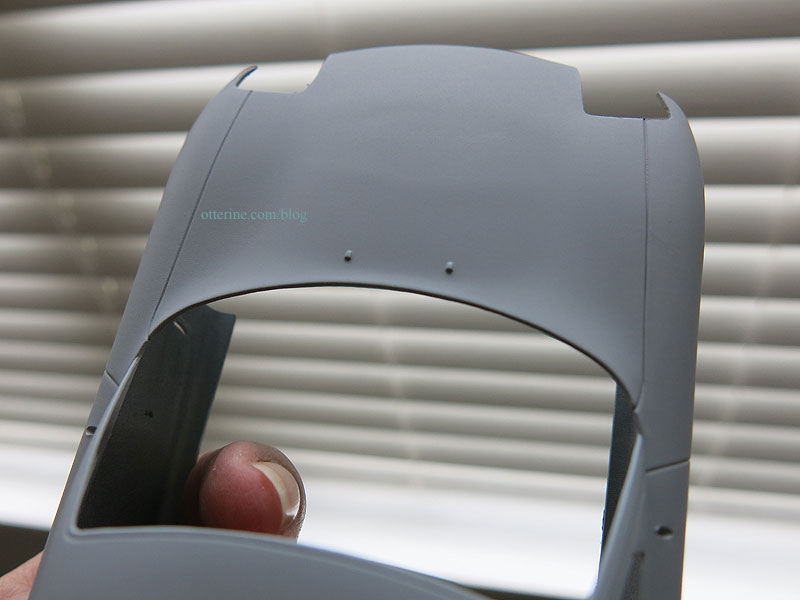
Here it is after the first primer coat. I think the halo of the mold lines will still show in the end, but it should be minimal.
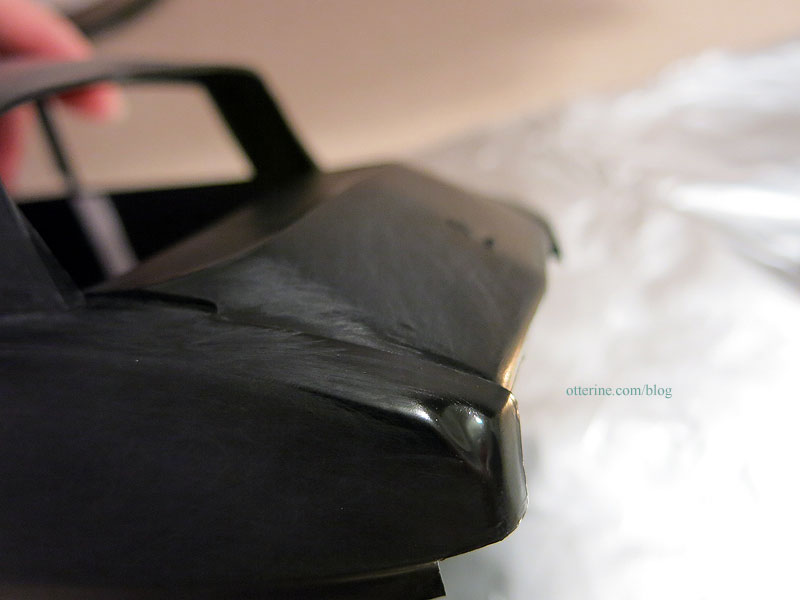
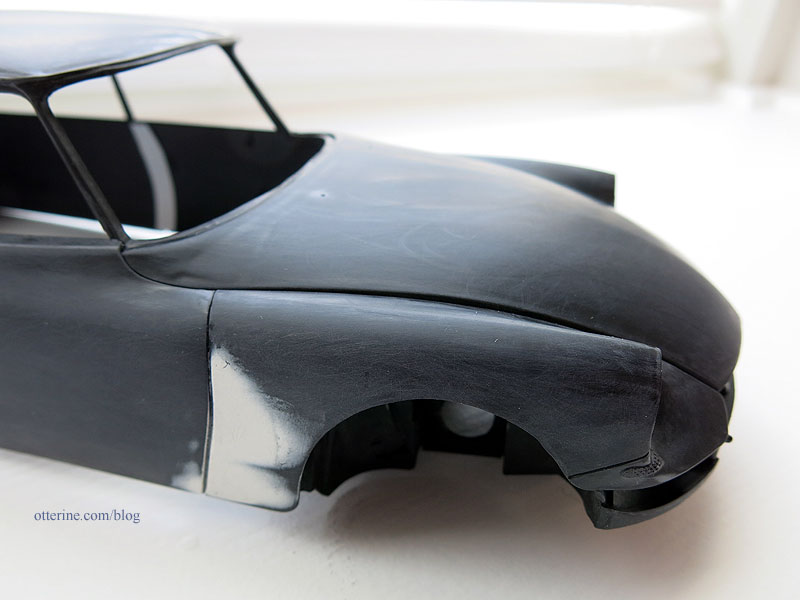
I removed the molded side lights. There are extra clear parts between the three kits, so I will add these more like the real deal. Besides, these are always so hard to paint when they are molded in place. I used masking tape to protect the area around the parts I planned to remove.
I then scraped away the lights with an X-Acto blade and then sanded.
I did a final wet sanding with a high grit to smooth it out. Any halo will just help with placement of the final parts later, but it is pretty smooth.
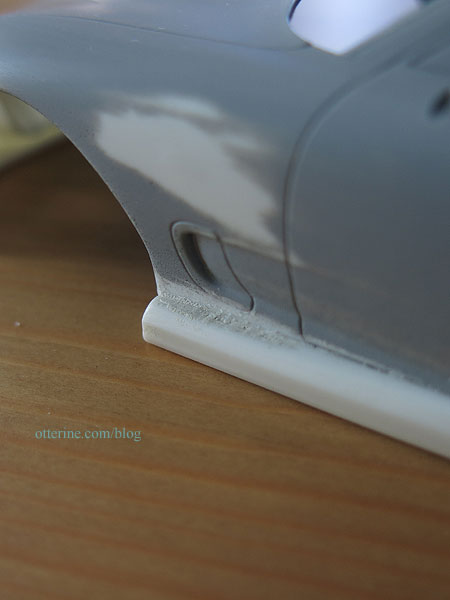
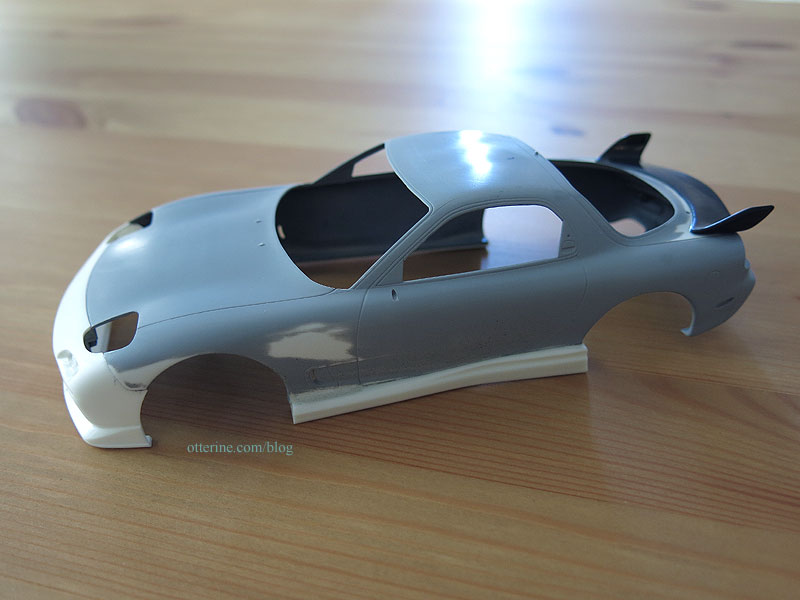
The side skirts were a bit taller than I wanted, so I cut them down. Here is the original skirt (shown on the other kit body) as a reminder.
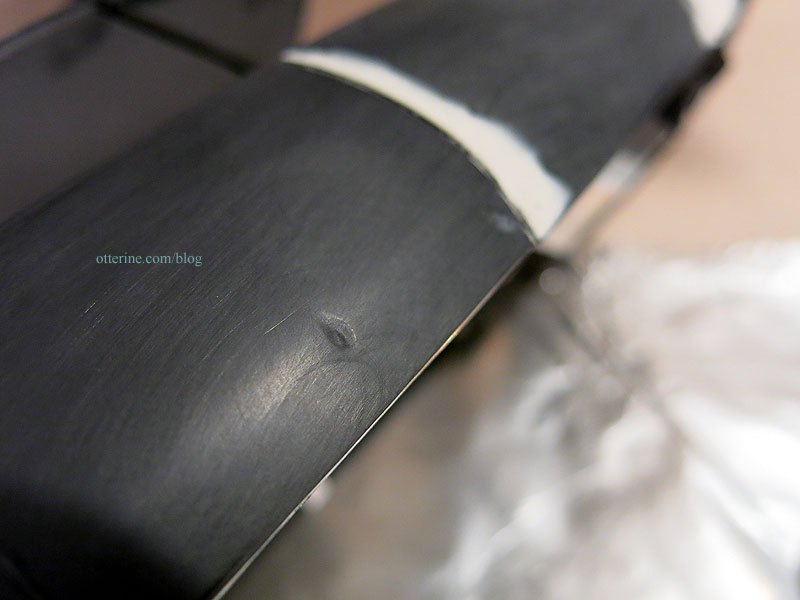
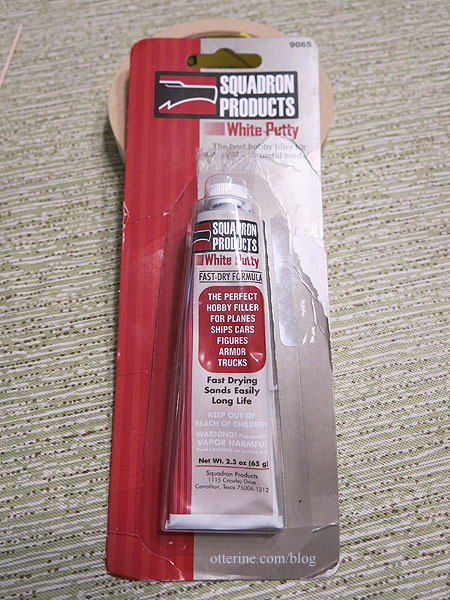
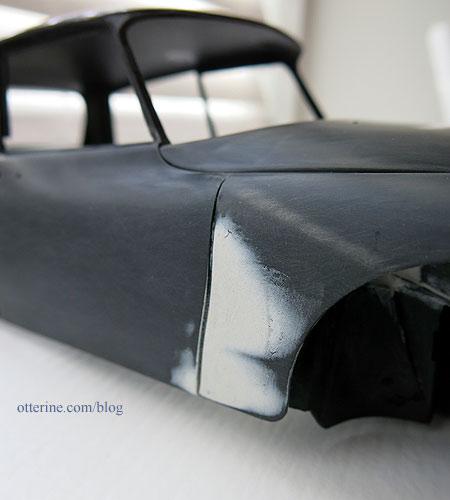
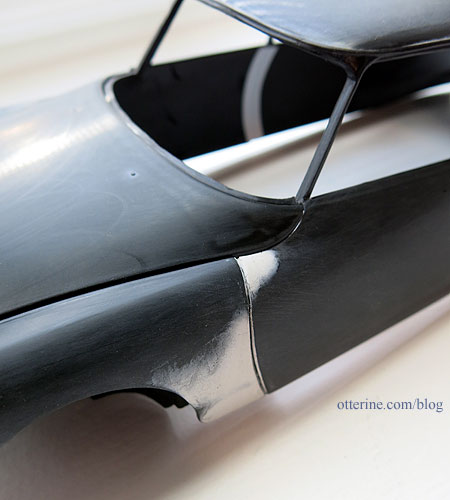
After cutting away the parts I didn’t need, I glued them to the body. There were gaps since they are not solid pieces, so I filled in with Squadron Products White Putty. It’s a good product that bonds well and sands smooth. Right now it’s rough since I’m letting it cure before final sanding and touch-ups.
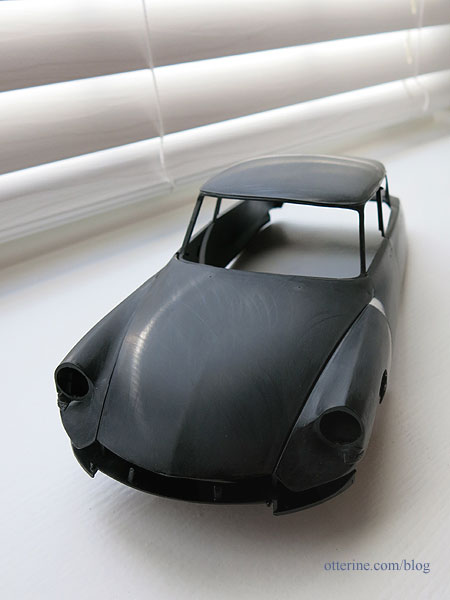
The next thing was adding the rear wing from the Fujimi kit to the C-West body. There will be minimal gaps, and since I plan to paint the car black, it should look mostly seamless. There’s a top piece that goes to the wing, but you can’t spray inside of a tight space like that, so it will be finished separately and added at the end.
Once the putty has set and I’ve touched up where needed, it will be time to prime again. I have the undercarriage parts primed and ready for finishing and assembly.
Categories: Model Cars, Vehicles
September 9, 2018 | 0 commentsRX-7 in half scale
I know I have countless model cars started, but there’s another one in the body shop: the Mazda RX-7 in 1:24 scale. Half scale?!! Yes, you read that right. Don’t worry…it will all make sense later on.
I have three models hoping to morph into one exotic model.
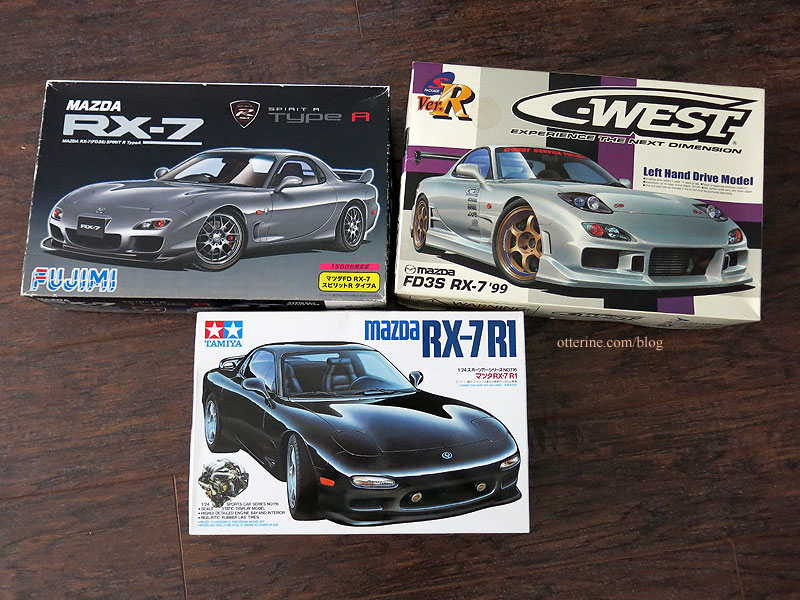
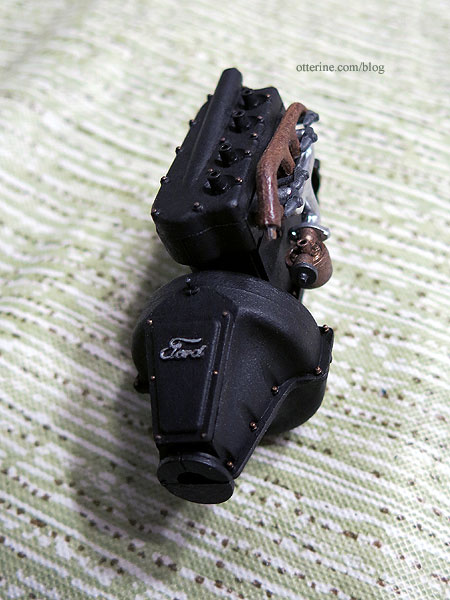
If I’m not able to make all the changes I want, then the white C-West kit will be the closest to the end result I need. Unfortunately, this one doesn’t have an engine for display, which is much of the fun in building car models.

I’ll start by trying to alter the body of the black Tamiya model to hold the skirts of the C-West model so there will be an engine. Plus the C-West model’s hood has mold lines that might be difficult to sand away. Fingers crossed.
Otherwise, the cross kit parts seem to fit well, so if I am successful in adding the front skirt to the black body, then I’ll be ready to dive in.
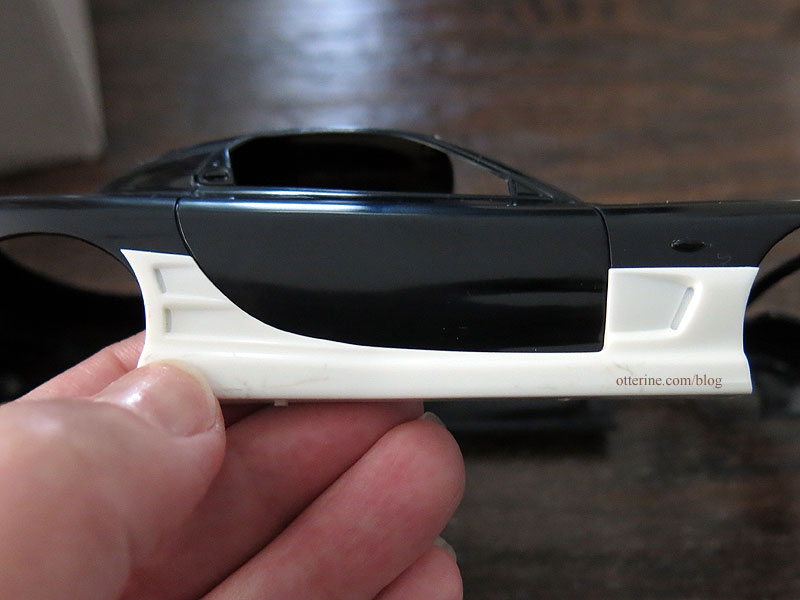
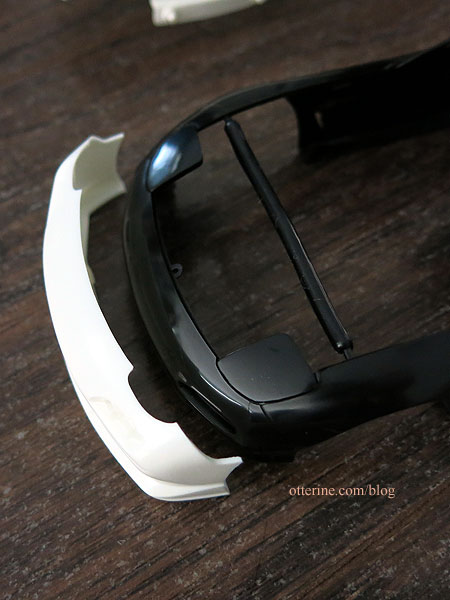
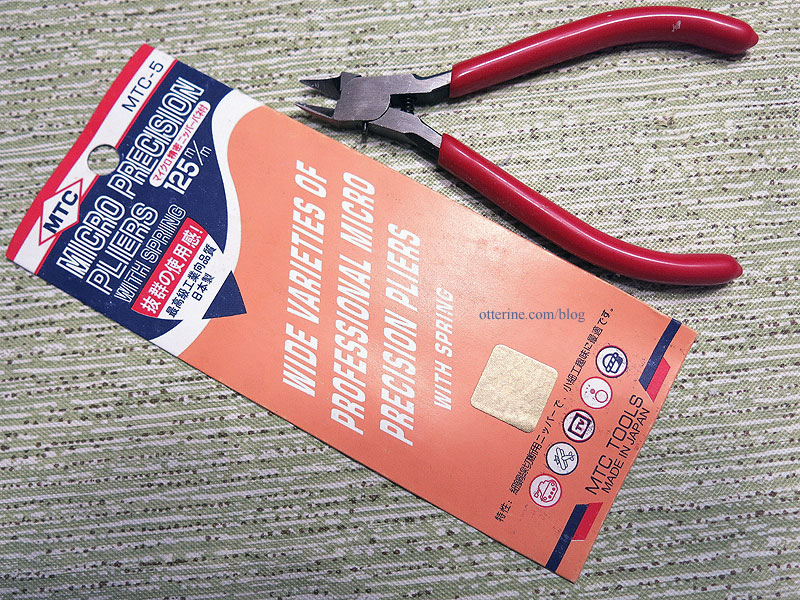
Before work could start in earnest, I wanted to try a few things. First, I attempted to alter the body of the black Tamiya model to hold the skirts of the C-West model so there would be an engine with the fancier sports car exterior. Cutting the front from the black body wasn’t so bad since I used the below pliers to clip away the excess.
But, the white front skirt is significantly wider than the black body, more than can be filled or sanded. The headlight covers are also slightly different shapes. Unfortunately, there are too many gaps to make this feasible.
I then checked to see if the whole white body would fit over the chassis/interior/engine of the black kit. Then I could potentially cut the hood from the white body. That was even less likely because the white hood is thick and not properly detailed underneath. The black hood would likely not fit as a replacement since the black body is narrower than the white body, as noted above. It was worth a look before giving up on the engine, though. As expected, it didn’t pan out.
This is the white body on the Tamiya assembly in back…
and in front. The pieces are molded to slightly different shapes and there are a lot of gaps.
This is the fit of the white body on its own back…
and front (the dash piece is tipped toward the front seat since it’s not glued yet, but you can see the curve matches so it will fit without gaps)
I’m still planning a hella beautiful ride, though…so not to worry. :] I will forge ahead with the white C-West kit without an engine.
Categories: Model Cars, Vehicles
August 31, 2018 | 0 commentsRX-7 in half scale – chassis work
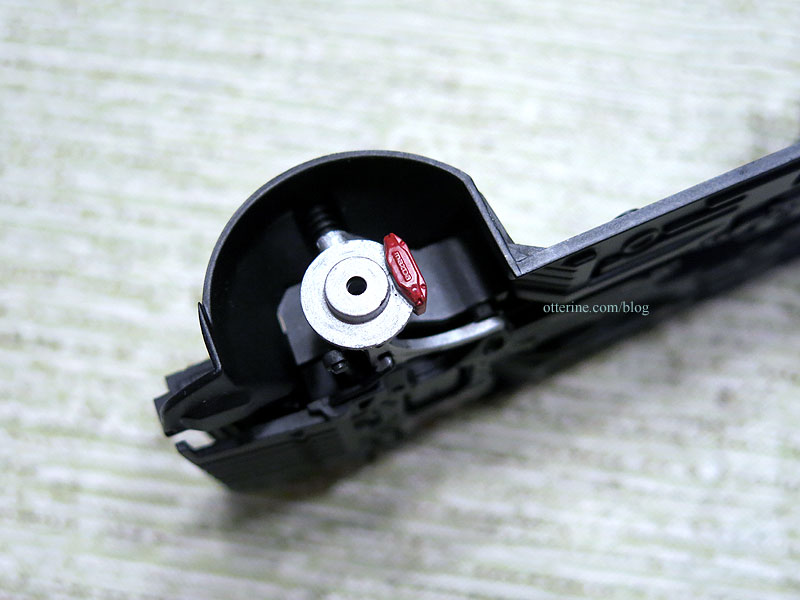
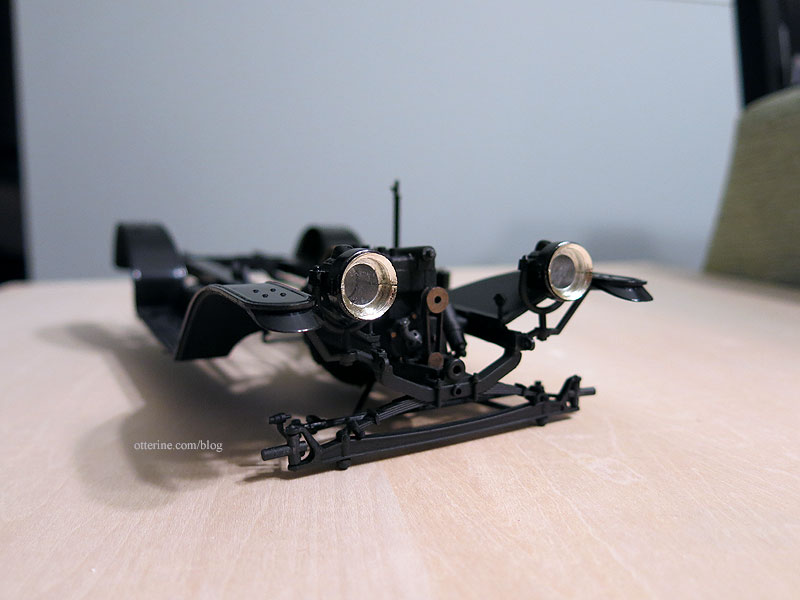
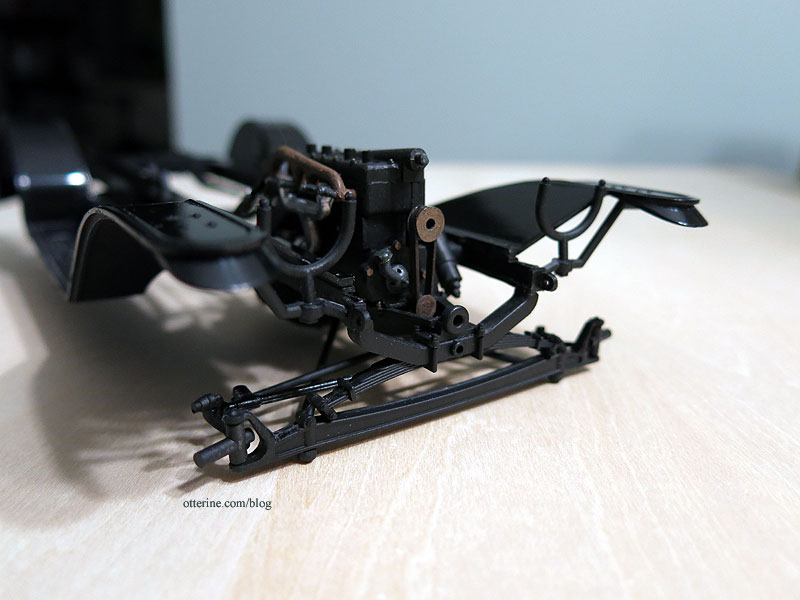
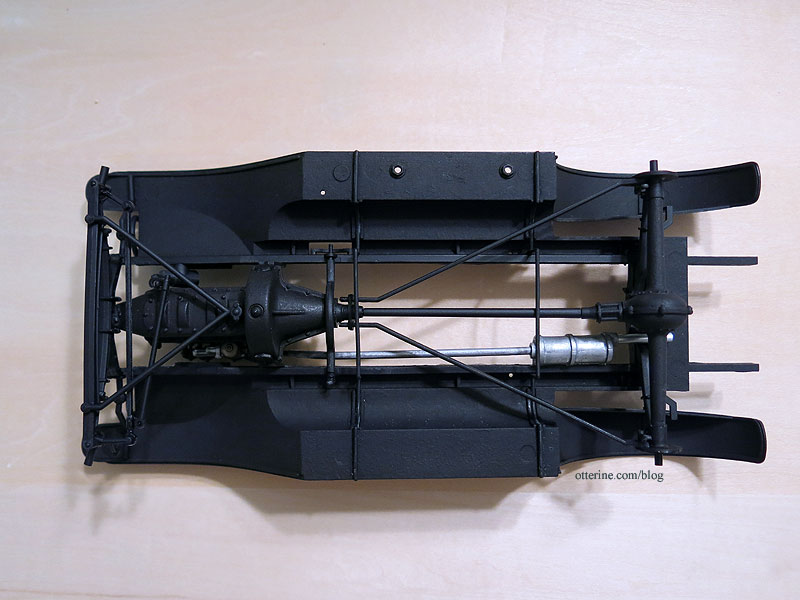
Continuing work on the RX-7 in half scale. A smaller scale model has less detailing and fewer individual parts, but they are often sturdier because so much is molded as one piece. Case in point, I could not get the delicate suspension of the 1:16 scale Model T to work and ended up gluing the whole thing as a solid assembly. The RX-7, though, has an articulated front that actually works. The wheels angle from side to side.
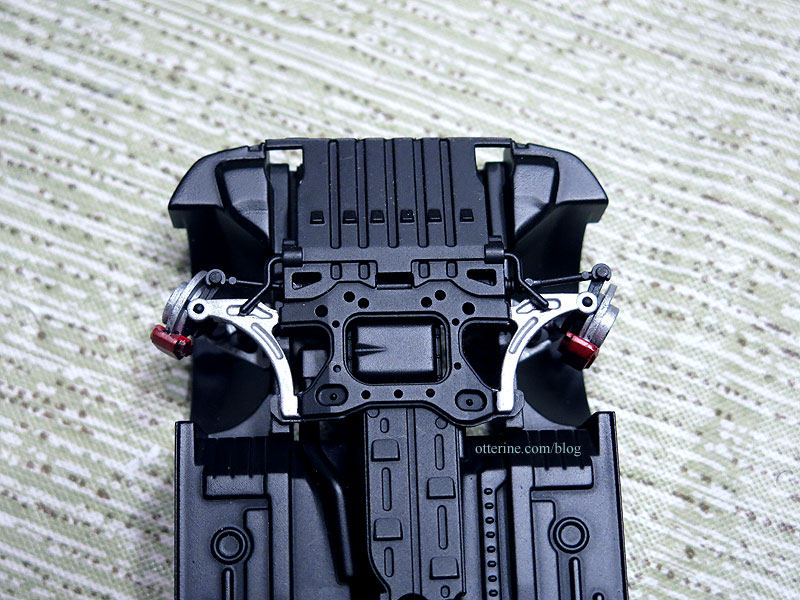

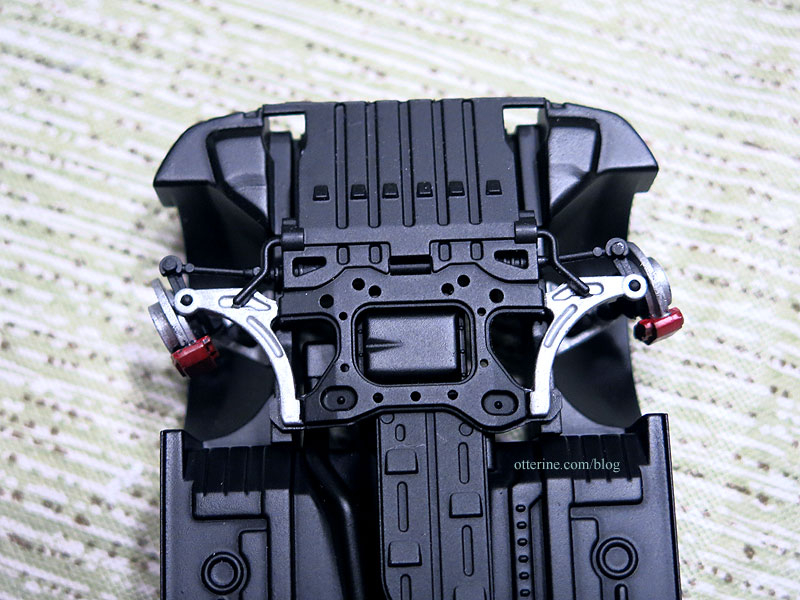
I’ve put on the fancy chrome muffler that is included with the kit.
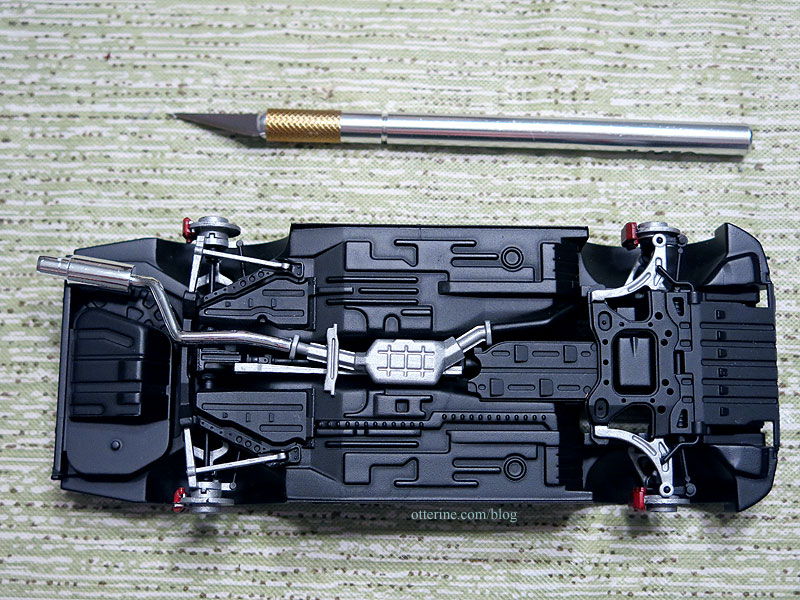
I also painted the brake calipers red. :]
Next up in assembly is the interior, and I need to get back to the body paint.
Categories: Model Cars, Vehicles
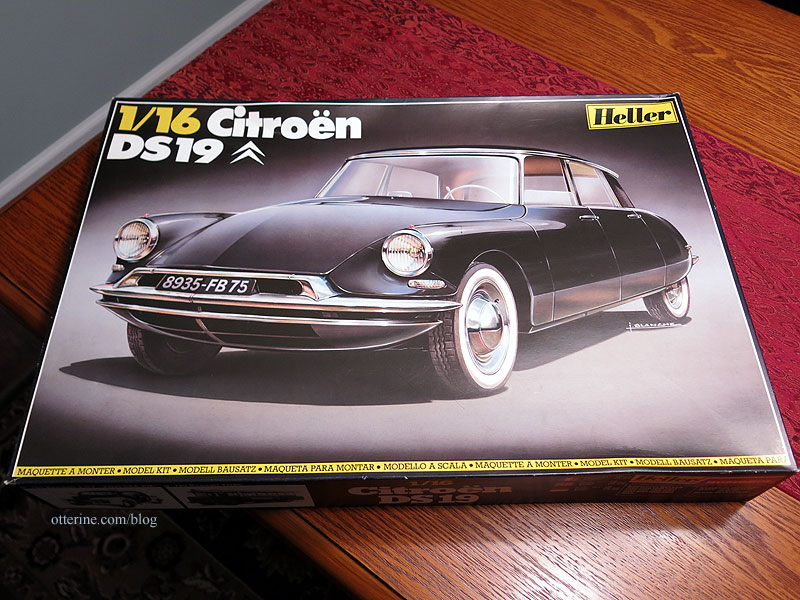
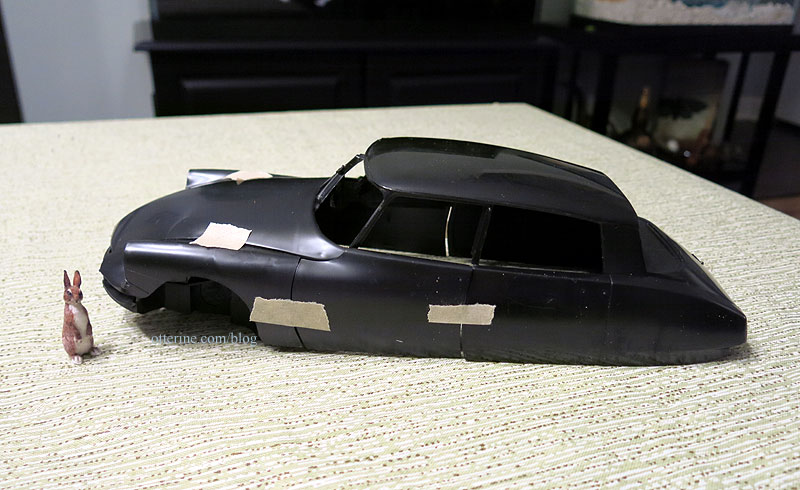
April 19, 2018 | 0 commentsCitroën DS19 1/16 – part 3
After applying putty to even out the body panels and letting the Citroën DS19 sit for a few days, I came to the realization that I don’t need this kind of stress. pffft. If there’s one thing I do well, it’s making junkers.
So, let’s have some fun and aim for making this a rally car. :D I sanded out the mini bondo, and I’m still glad I put in the effort. A better overall fit makes for better realism, but a rally car can get away with an ill-fitting hood. It’s likely a replacement anyway. Thus, I move on.
First order of business, perhaps a dent or two. This is done by heating the plastic with a candle and using the rounded end of a butter knife to push the plastic into shape. You do have to take care not to cause problems with the fit later. Only a tiny bit of heat and soft pressure with the knife are needed.
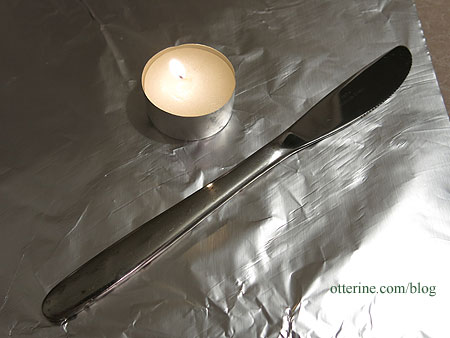
Fenders are a good place since there aren’t usually parts inside. I’m being modest with the damage, just a little road wear for our experienced trophy winner. I can’t recall what we hit that dented the hood.
You can melt a corner and let it sink in for a realistic back up collision. Just wait for it to cool completely before touching or sanding since you can tear the plastic or leave your fingerprint in the finish.
Sometimes branches fall on the roof.
The candle heat can raise the plastic around the dent.
Just sand to get it smooth again so the dent takes center stage.
Next up, priming the various engine sprues for assembly, painting and aging. I’ll still follow the assembly instructions from the modeler who made the closed door new Citroën, but I will have different painting and aging techniques along the way. I already feel more relaxed and ready to enjoy the build.
Categories: Model Cars, Vehicles
May 4, 2017 | 0 commentsCitroën DS19 1/16 – part 2
Beginning work on the Citroën DS19 in 1/16 scale. As I mentioned previously, there’s a modeler who built one to completion with excellent results so I am following those instructions as well as those from the kit. The main change made is putting the doors on now and not bothering with function. These models can be so delicate and unless you are lucky, the doors never sit right. So, I will go with aesthetic over function.
I’ve decided to work on the body first, so if I throw my hands up with this model, I won’t have wasted time on the unseen details. I am not at all confident this model will work.
A huge thank you to Nancy Enge for recommending these pliers. Having the proper tool is key, and it works unbelievably well in removing parts from the sprue.
I had to repair two small areas where the main body mold had broken during shipment as well, but the breaks were in inconspicuous places. Unfortunately, these remain delicate joins and can cause issues later. Additionally, the body panels were not uniform in thickness, so gluing them end to end resulted in different depths. Real cars are streamlined, so that was something I needed to address. I used Squadron Products White Putty to build up and fill. Yes, it stinks to high heaven but it’s a great filler for plastic models.
This can take a few tries to get it to look right.
At this point, it’s hard to tell the depth with a light patch on a dark base, so I need to give it a uniform primer coat to see where further adjustments need to be made.
Even with careful planning, there’s still a rough fit to the hood when viewed from the side. I am considering gluing the hood in place, too, since I am going more for aesthetic and I could live without opening the hood…ever. Gluing it in place would save on fine engine detailing, though I would still add all weight to the engine bay for stability.
Here’s the other side.
I have the basic body assembled and prepped for the next good day of spray painting weather. Not throwing in the towel just yet, but I have already accepted that it’s a 50-50 chance this car will turn out looking newish.
Categories: Model Cars, Vehicles
April 24, 2017 | 0 commentsHell on wheels
I’ve been rather busy the past couple of weekends socially and have another busy one ahead, but I am mulling ideas and of course buying minis behind the scenes. I even got a NEW CAR (now I have The Price is Right theme song in my head).
Errmmm, some assembly required. The Citroën DS19 is one of my favorite vintage autos, and I know I’m not alone.
It’s 1/16 scale like the Model T Van, but it’s longer still. Who knew? :]

The reviews on this kit range from “if you’re an experienced builder, you can get a decent result with a lot of work” all the way to “I threw it in the trash and said ‘see you in hell!'” So, we shall see. But, the car keys from Whimsy Cottage Minis are fabulous anyway even if they end up belonging to a different car.

A new model car, especially one with cautionary reviews, always starts with extensive research. I look at many forums, blogs and online photo albums from people who have built, or attempted to build, the same kit. I even look at other scales of the same car for ideas on additional detailing and color schemes. While I do look at real life examples and vintage literature, sometimes it’s nice to build a car without adhering to the limitations of the real life examples. This modeler built one to completion, and it’s gorgeous. If I can get even close to this result, I will call it a success. :D
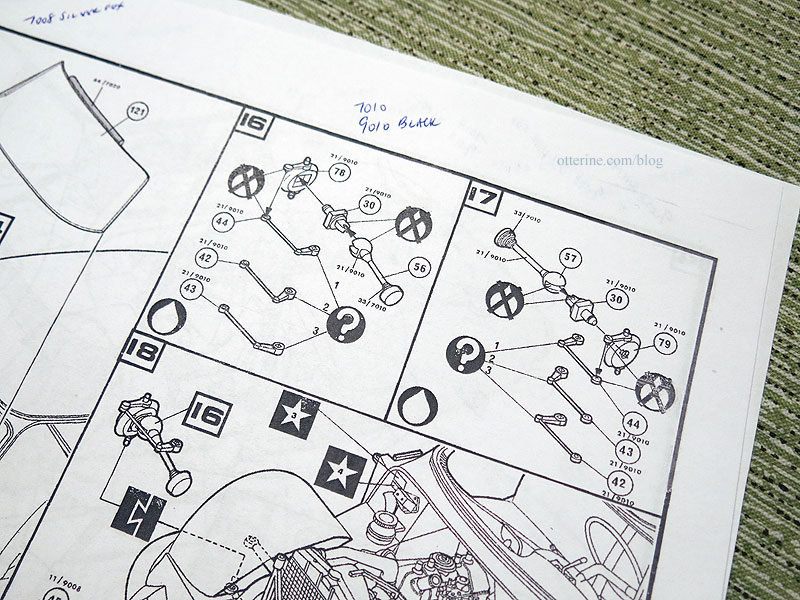
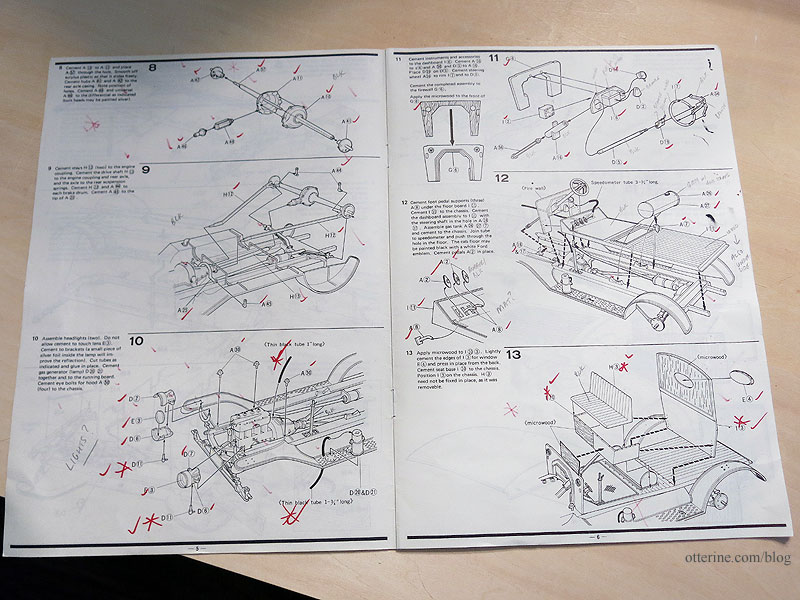
The other thing I do is make a copy of the instructions to mark up along the way. These particular instructions have symbols, arrows and numbers, none of which are indicated in any legend so there’s some guesswork to be done. Fat teardrop is likely glue; fat teardrop with X through it is likely “don’t” glue. Squares with stars are decals; circled numbers are part numbers, though there will still be a lot of hunting around.
The tiny numbers are paint indicators, which meant nothing until I found an online post that I printed out for desk reference and marked up the directions for ease of keeping it all straight. I don’t know why some are 70 numbers and some are 90 numbers when they indicate the same color, i.e., 7010 and 9010 are both black. =shrug= I googled the other colors to see if I could find an approximation online so I could make an educated substitution from my existing stash of paints (or shop for new ones).
The other thing to do is figure out which sprues or parts of sprues will be primed in which color. Spraying primer on an intact sprue always makes for an easiest start. You can scrape paint for gluing parts and touch up a lot easier with a good base coat. Sometimes you have loose parts that you’re better off removing cleanly so they don’t end up in the grass when you’re spray painting outside.
Large sprues can be unwieldy and make parts prone to overspray from one side to the next, so I cut those down, too. There aren’t a whole lot of pieces to this model, so for the larger parts I might end up with a lot of popsicle stick mounts and spray them individually for even better paint control.
Of course, sometimes you need to fill in injection marks (or sand them down). I try to determine early on which are worth doing and which won’t be seen later on anyway. Why do the work if it won’t show? At first glance, this one doesn’t seem to have many unruly spots, just a few scratches to buff and a bubble or two to sand and fill.
Dry fitting parts also makes a lot of sense for a car touted as being difficult, though you want to remove tape right away to keep the residue from marring the surfaces. This one does appear to have a bit of gap-itis, so I will likely follow suit of the builder who glued the doors in place from the beginning. I want “pretty to look at” over functional at this point. And, no, this will not stay a black car in the end. While black looks sleek, it’s a pain to photograph and keep clean. :\
The last part of the initial process is to give yourself permission to launch the project into high speed traffic if it truly becomes a bear that you just know you can’t tackle any longer. :]
Categories: Model Cars, Vehicles
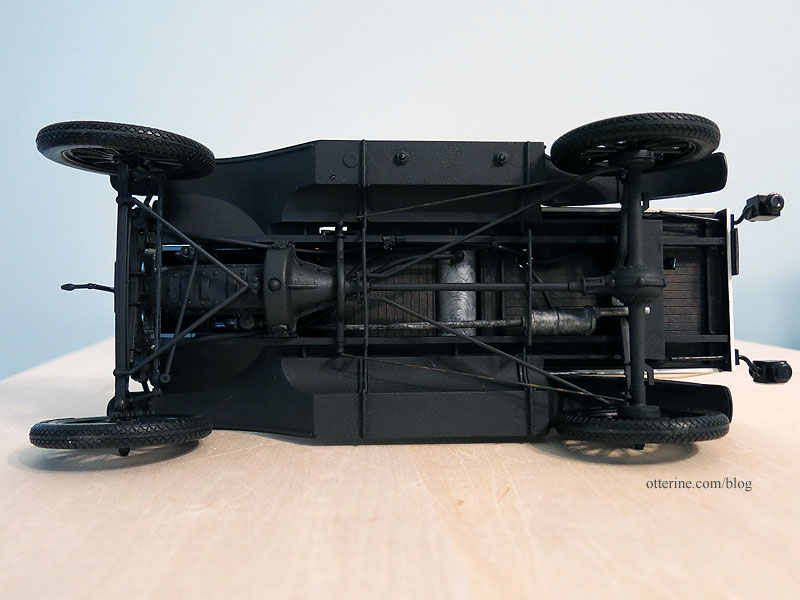
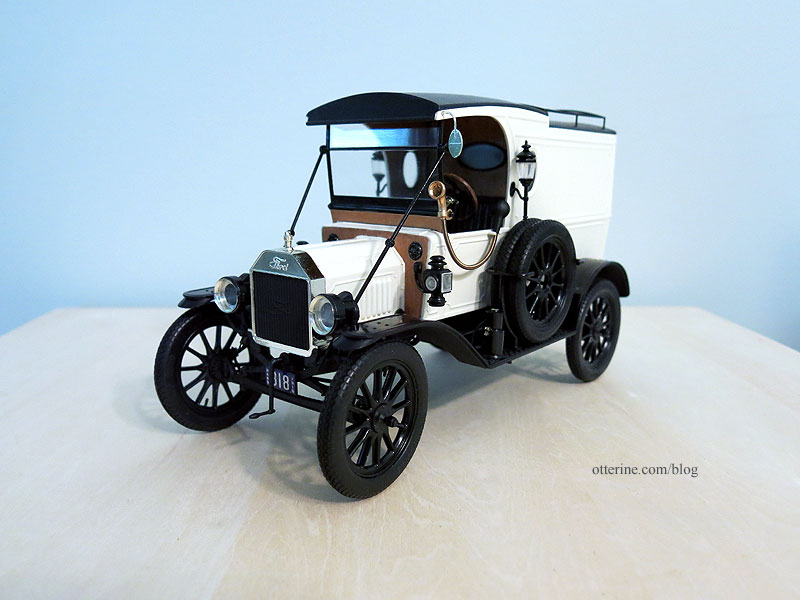
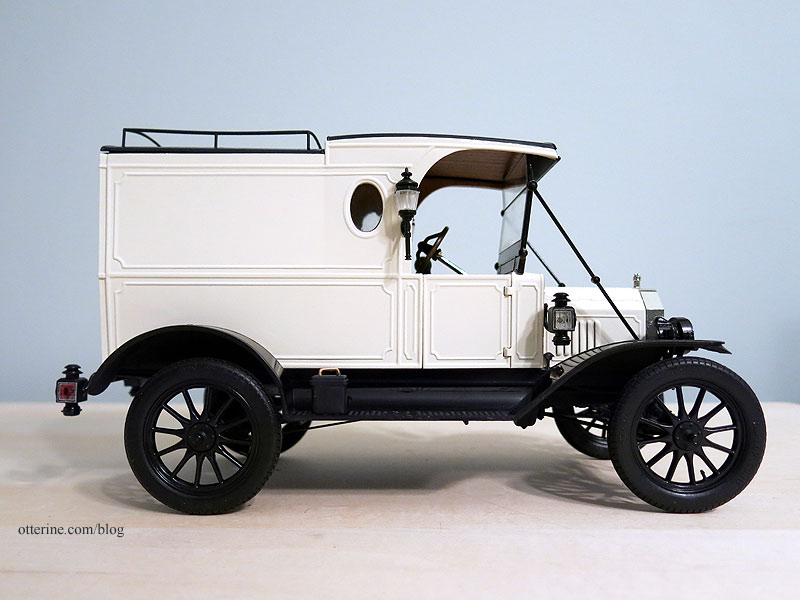
March 2, 2017 | 0 comments1913 Model T Van, completed
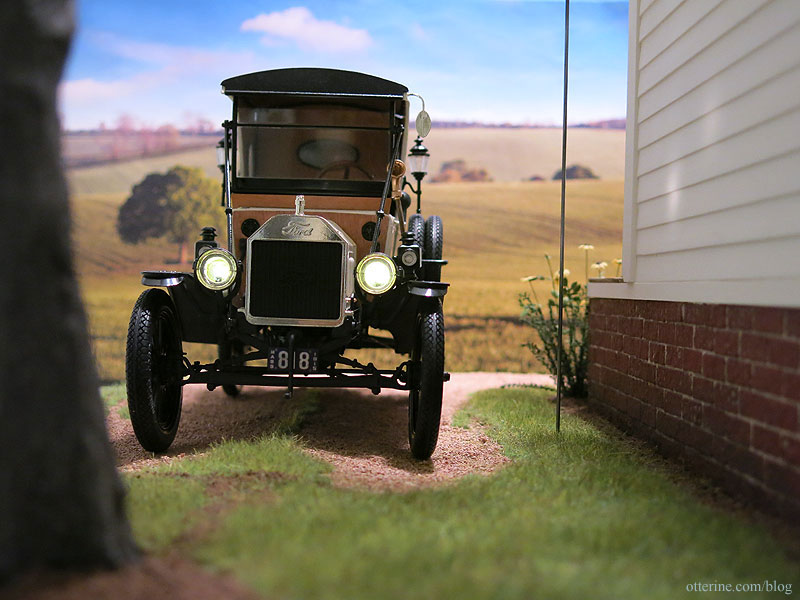
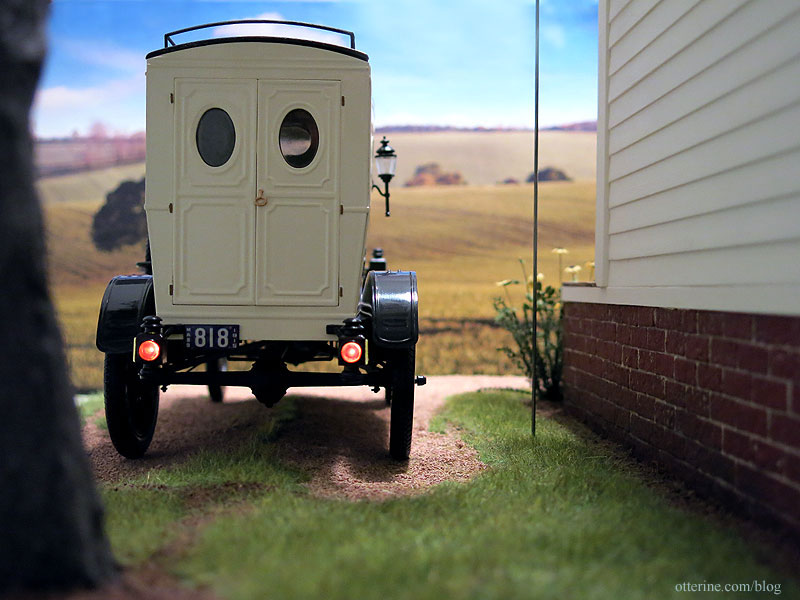
I have finished the 1/16 scale 1913 Model T Van! In this post are the final photos and links back to the individual posts along the way for easier reference.

It fits relatively well for scale in my final project, but I do love it even on its own.
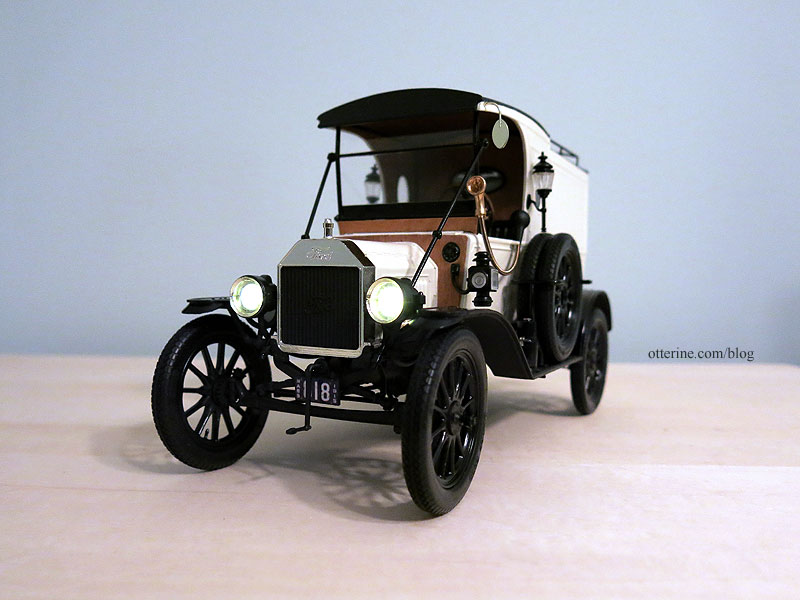
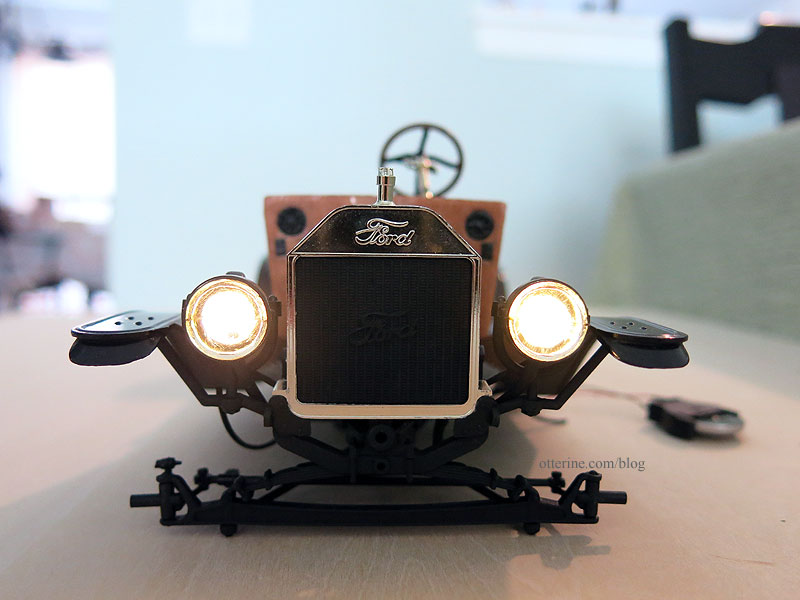
This was not an easy or forgiving kit. So many parts broke during assembly, and a few were even broken from the start. I had two kits, and even with that, I ended up having to glue the suspension so the front wheels would not turn and the van would not roll. But, I was able to add LED headlights and taillights. Overall, I’m glad I took on the task and I’m pleased with the look of the final model. :]
Only one back door opens due to broken hinge parts, but the back cabin contains all the LED wiring so it doesn’t matter much. The headlights and taillights work by remote control, so I won’t need access to the back cabin all that often. There are mock porcelain plates dated 1915.
I knew I would never be able to make this 1913 van showroom new, so setting it in 1915 gave me two years of road wear and weather exposure to work with in detailing. Just enough dirt, wear and grime to make it realistic.
Still looks pretty clean, though. :D
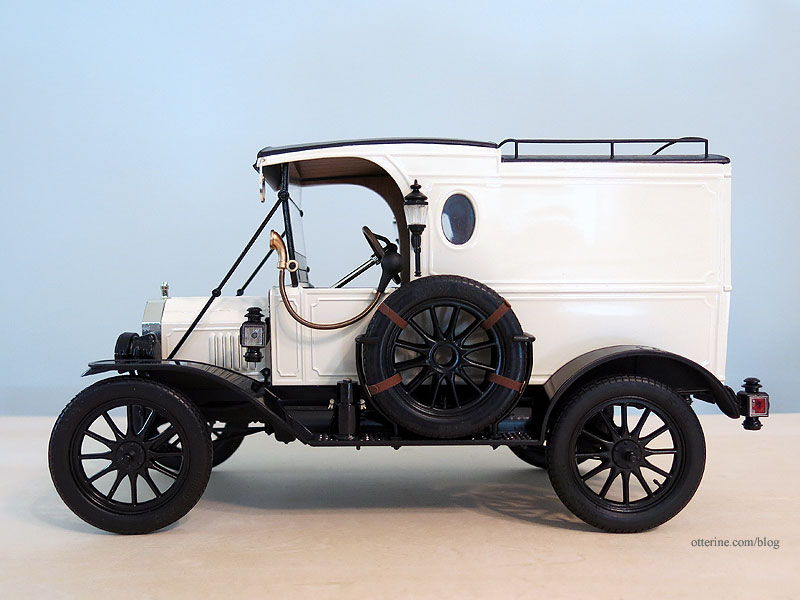
The hood lifts off, whereas the real life van would have had hinged access to the engine compartment.
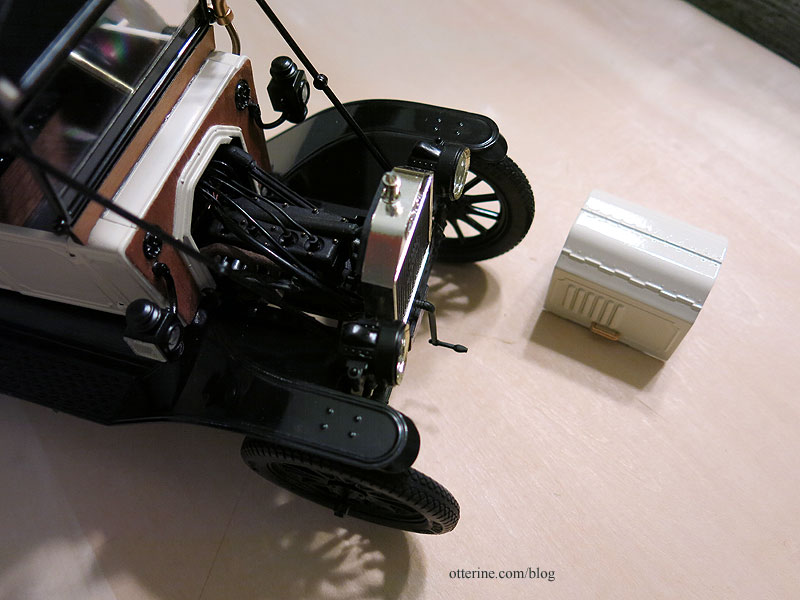
The door is glued shut due to delicate hinges, but I did split the seat in two so I could lift out the lower part to see the detail I put into the gas tank. :D I keep the lower part in place with mini hold wax.
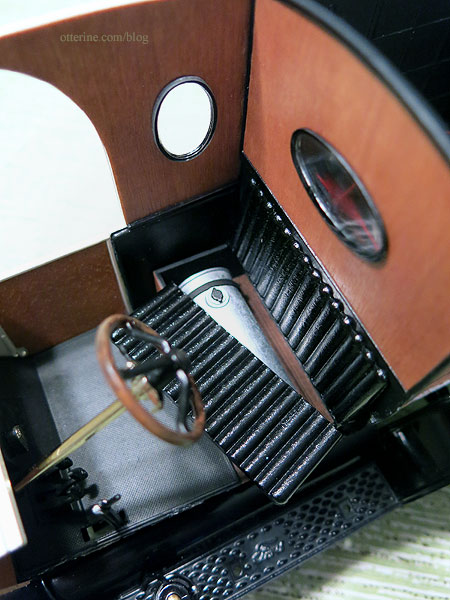
The interior is not easily photographed in the final model, but you can see the detailing in person.
A lot of the kit “brass” ended up painted black to disguise the glued joining lines and bare spots from removing from the sprue.
The spare tires were supposed to be solid parts to mimic covers. These had belt detailing that I knew would be impossible for me to paint to my satisfaction, so I used two of the spare tires I had from the second kit. I find it much more realistic, and the tires hide the main flaw I had when putting this side together. I didn’t put any permanent decals on the van for reasons soon to be revealed. The main reason is I might want to use this for other builds, and removable signs seemed the right way to go.
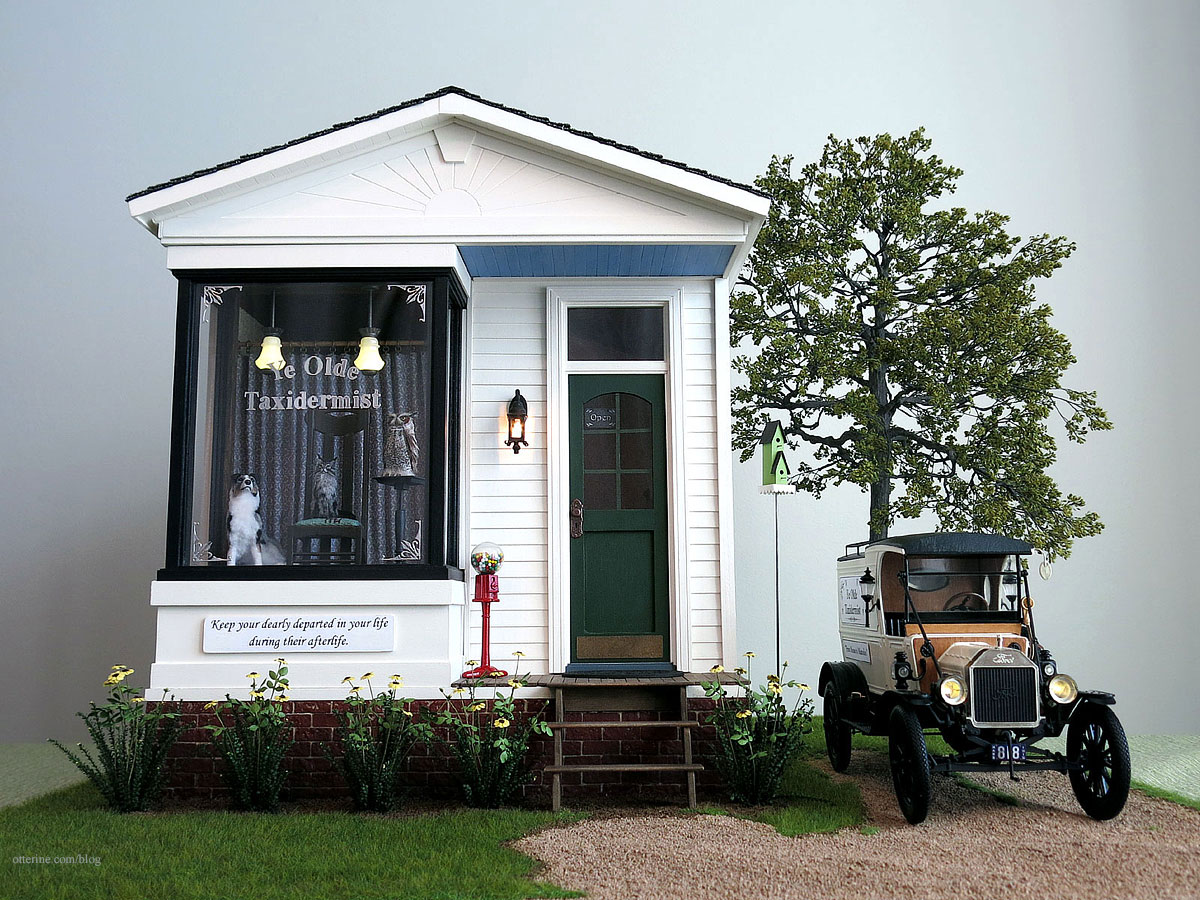
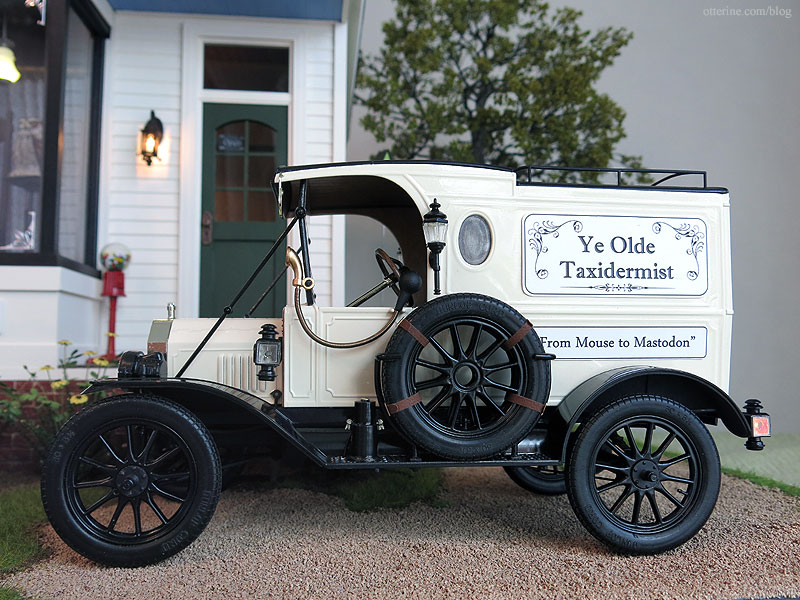
I went through many ideas before finally stopping on a vintage taxidermy shop set c. 1915 where the van would sit.

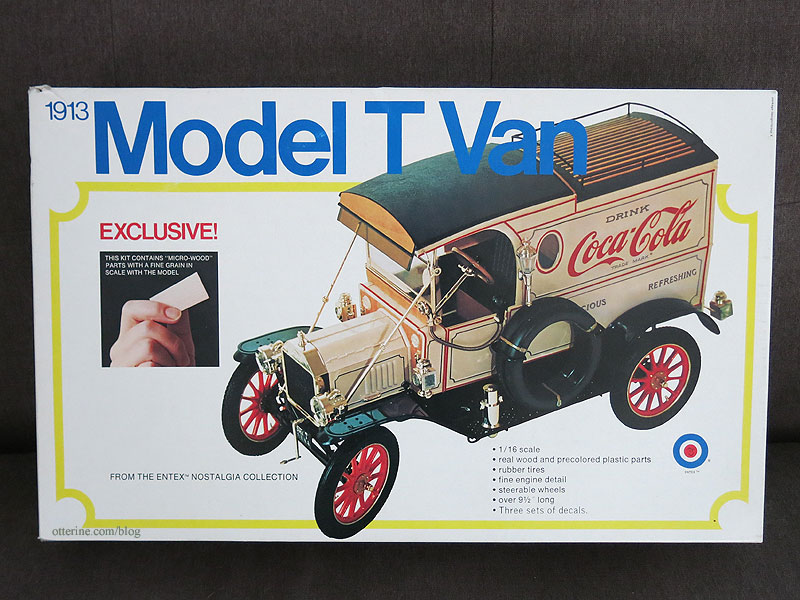
The other ideas were sound, but it was all decided once I found the 1:16 scale 1913 Model T Van kit by Entex that included decals for a taxidermist. From Mouse to Mastodon. I love it! :D
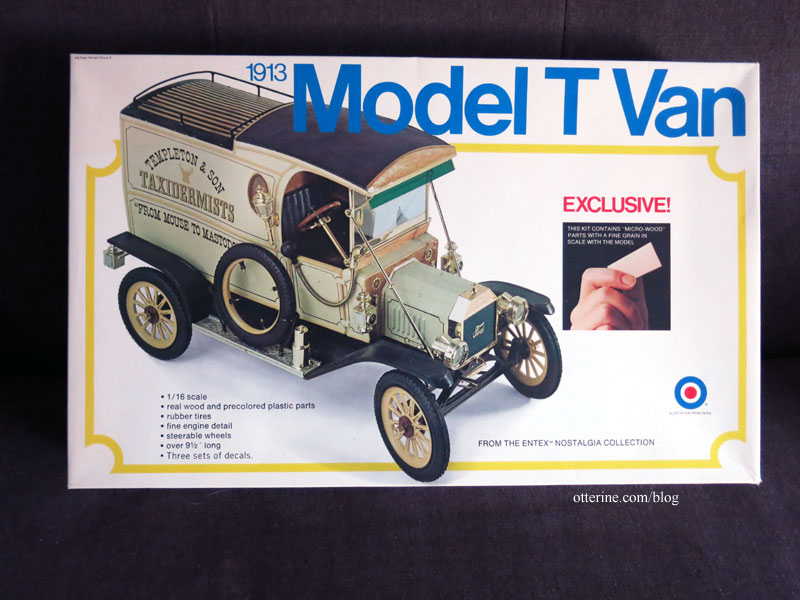
Yes, that’s a different image on the box cover than what I’ve been showing. There was more than one kit release over time, but even though I had two kits with different front images, the parts were identical for both. Interestingly, this one is shown built with the driver’s side opposite but with the use of a spare tire instead of the plastic covers. That would not have been possible with the parts molded as they were. Four different sets of decals were included: Carnation Milk, Coca Cola, The Texas Company and Templeton & Son Taxidermists.
I ended up making my own removable sign boards for the van for a few reasons. I wasn’t keen on using the name on the included decals, and I wasn’t sure about my success in applying large decals either. And, I might want to use the van for something else in the future, so I can just swap out the boards. :] These are printed on regular paper and mounted to bristol paper for added weight. Mini hold wax keeps them in place without marring the paint finish.
My instruction sheet showing my markup along the way….
I learned a lot about Model T Fords and early motorized transportation during the build, and here are a few of the references I sited along the way:
- A video on learning to drive a Model T at the Henry Ford Museum along with some excellent vintage off-road footage
- A video that takes you for a ride in a Model T
- An awesome video showing the fabulous articulation of a Model T
- Article on Model T lights
- Article on porcelain license plates
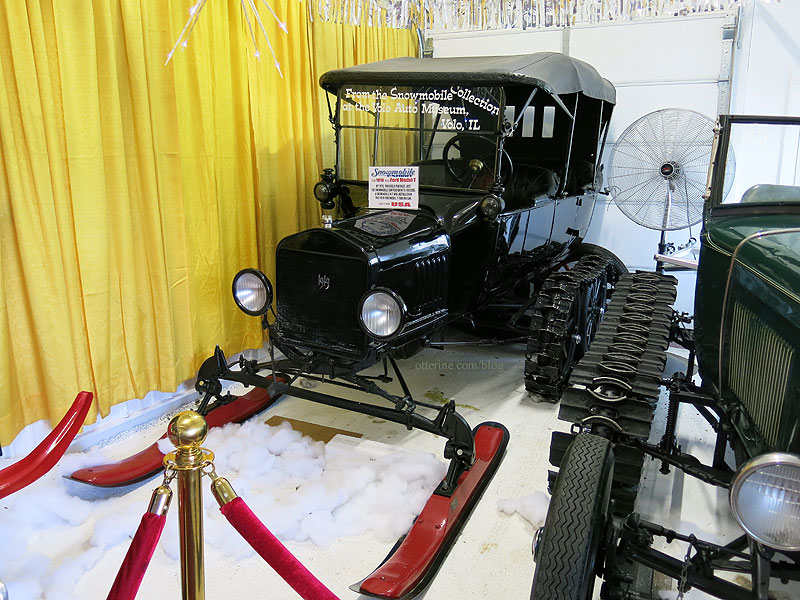
Here’s an interesting contraption I photographed at the local Volo Auto Museum. Many a Chicago winter would call for such a beast. :D
——————–
Here is the Entex kit photo to kick off the recap. I’ve listed the links in reverse order from newest to oldest.
Part 13 – body assembly, final detailing, belts for the spare tires
Part 12 – taillights, micro wood and body assembly
Part 11 – tags for the devil wagon
Part 10 – wheels and tires
Part 9 – headlights!
Part 8 – painting the body panels
Part 7 – wiring details and more wood finishes
Part 6 – wood finishes, front cabin and installing the floor board

Part 5 – acetylene generator and headlamps
Part 4 – installing the engine and assembling the frame
Part 3 – metal gas tank and exhaust system
Part 2 – painting the chassis and getting those fenders to shine
Part 1 – the beginning of the engine build
Categories: Model Cars, Vehicles
December 11, 2016 | 0 comments1913 Model T Van – part 13
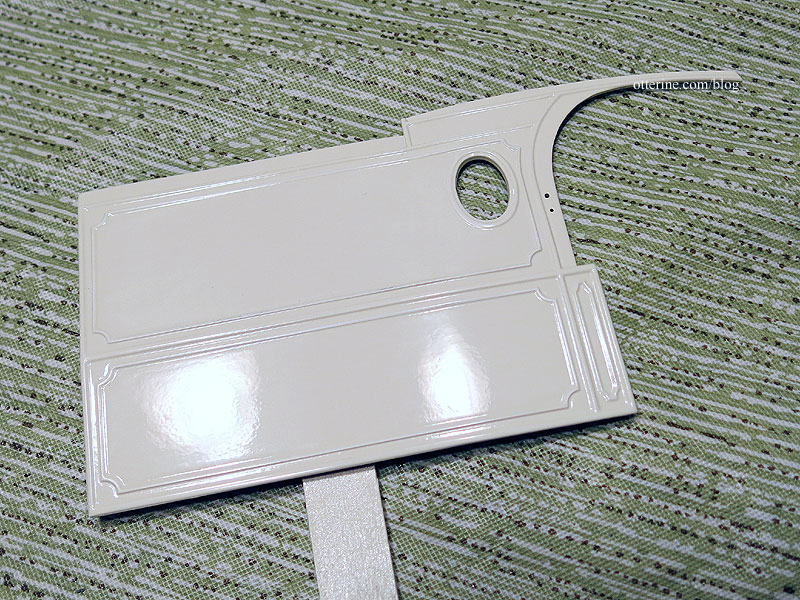
Finalizing work on the 1913 Model T Van. It’s time to put on the remaining body panels and get to the final details. I mentioned that I had a problem with the driver’s side panels. Because the passenger side has a door that was supposed to be operational, the front panel and the door were molded as two separate pieces. The driver’s side front panel and door are molded as one piece, which makes it slightly shorter. There was a gap between the door and the back body panel (larger than the thickness of the micro wood I put on the separating wall, so that effect was negligible).
I added a tiny strip of styrene to make up the difference and repainted the panel. It’s not as clean of a fix as it would have been had I noticed it earlier, but it’s less noticeable than a dark gap. I used plastic cement to glue the front and side panels together before putting them on the frame because they didn’t want to line up properly otherwise. The front middle panel is a little off, but I am happy with the results as is because this was not easy to assemble.

I had wanted to leave the back cabin roof removable to access the wiring due to the delicate back door hinges, and it does sit well without glue. The side panel top edges show just slightly, so I ran a black Sharpie along them to disguise them as best I could. I still won’t have room to work on the LED wiring, but this does give me access to the battery without having to open the one back door that functions.

For the hood handles and horn, I used Testors Metallic Gold spray paint. It’s not a precise substitute for the brass factory finish, but it will do in a pinch.

I didn’t think the gold paint would work as well for the window surrounds and long stays, so I sprayed those black. I used Crafter’s Pick The Ultimate glue to hold the window panes in place since super glue makes clear plastic cloudy. These panes often need to be glued repeatedly over time in car models because the glue fails with age.

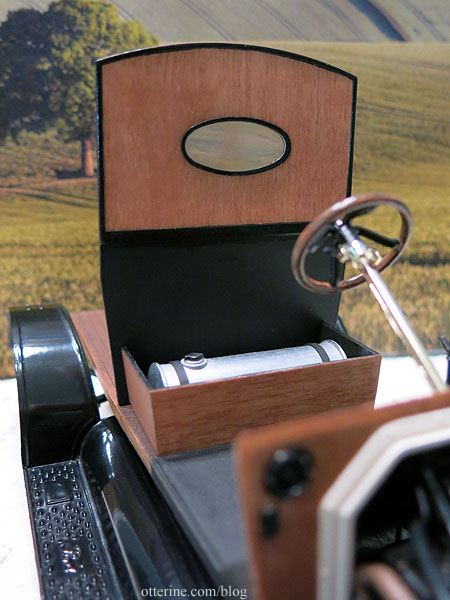
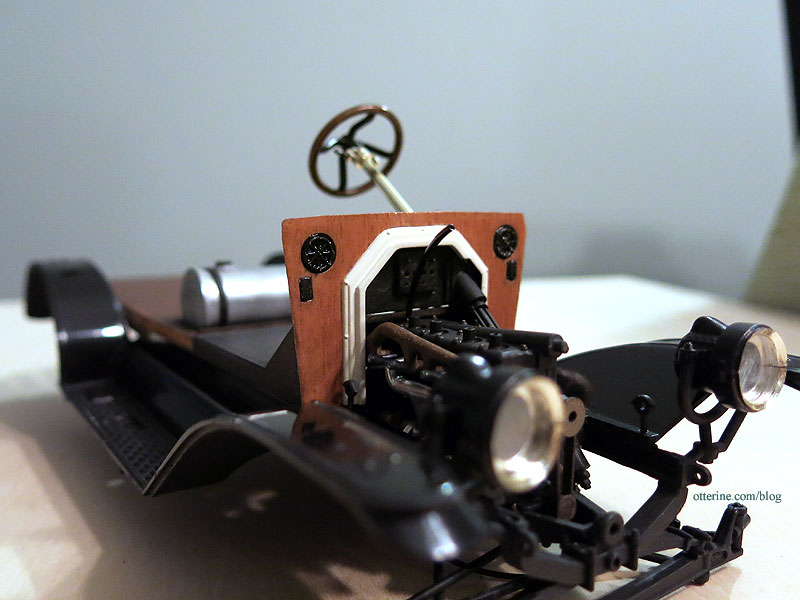
The front cabin roof didn’t fit very well, which was odd. It seemed to be molded at a different angle than the side panels. I managed to wrangle it into shape. I skipped the green sun visor since the pieces from both of my kits were not in great shape. Better to just leave it off than have it look like a sloppy afterthought.
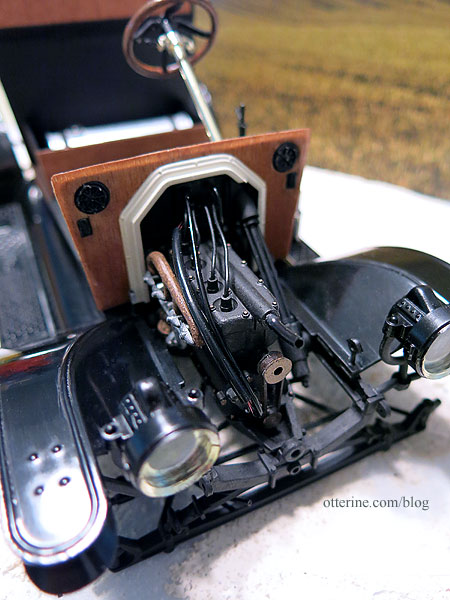
I snipped the speedometer and gas light tubes under the chassis since I knew they would just end up snapping parts off as well. You can still see them in the front cabin and next to the acetylene canister.
The two side lamps and two coach lamps are painted black to match the other lights. I didn’t wire these since there wasn’t a way to disguise the wires in the open front cabin.
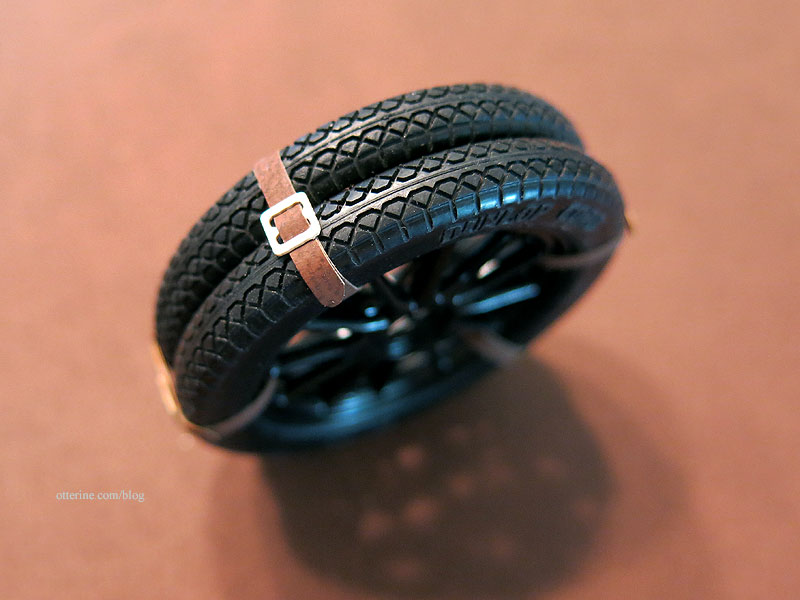
The spare tires were supposed to be solid parts to mimic covers.

These had belt detailing that I knew would be impossible for me to paint to my satisfaction, so I used two of the spare tires I had from the second kit. I used super glue gel to hold the two tires together to keep them uniform. I glued the brackets to the running board, and slipped the tires in to fit. Using the tires with the spindle wheels helps disguise that body panel gap repair, too. :]
I added belts made from scrapbook paper called Buckskin Brown by The Paper Company. The silver buckles are laser cut paper representations from Dragonfly International, bought at the local shows. They are a little large for scale perhaps, but I like the added detail.
So, that’s it…99.9% done. I’ll be making my own removable sign boards for the van for a few reasons. I didn’t plan to use the included decals, and even though I can print my own, I wasn’t sure about my success in applying such large decals. The last thing I wanted to do was muck it all up at the 11th hour since this model gave me so many fits along the way as is. Finally, I might want to use the van for something else in the future, so I can just swap out the boards. :]
Categories: Model Cars, Vehicles
December 10, 2016 | 0 comments1913 Model T Van – part 12
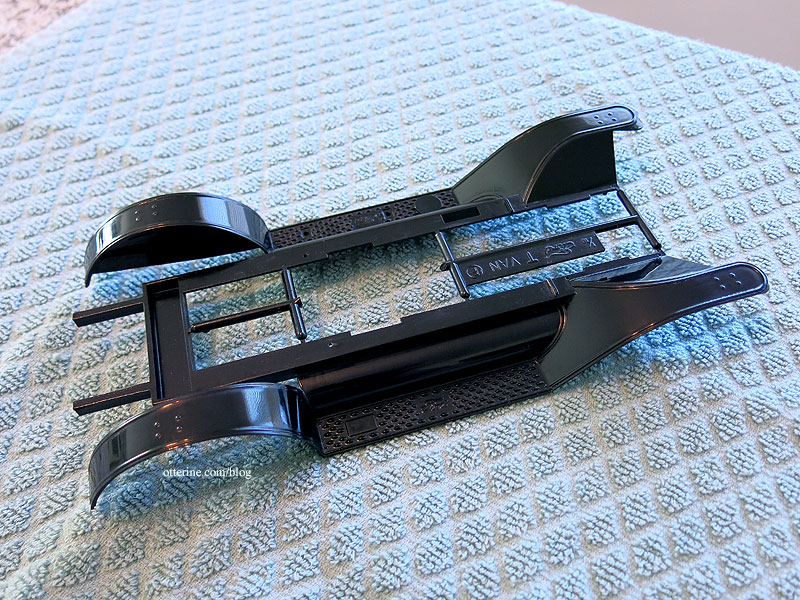
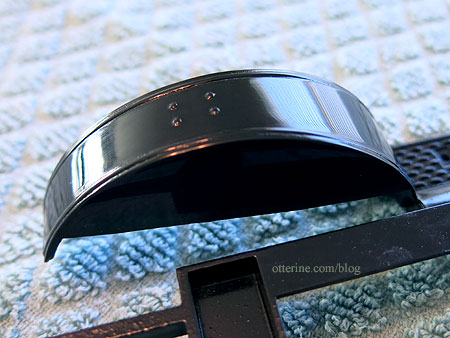
Continuing work on the Model T Van. A dry fit of the body panels shows that the back doors do not open fully.

This is partly due to the outer raised hinge detail, the hinge brackets not being wide enough to clear the body panel and my heavy-handed paint job. I’ve seen one other model with the doors open wide, so this is also likely operator error on my part. :D

Had I known this earlier, I would have removed the hinge detail altogether before painting. If you didn’t know it was supposed to be there, would you miss it? I took an X-Acto blade and scraped off some of the paint. I’ll touch it up with paint later.

The rear cabin has molded rack detailing on the inside walls. You are to add pre-cut micro wood strips as accent. Since there will be such limited visibility, I opted for the easy way out and painted the interior black, leaving the one forward wood wall I did as is. I won’t open the cabin often, just to change the battery, so seeing inside is irrelevant. I’ve added the remaining micro wood pieces to the interior as well as the side seat padding and the oval window.

I drilled a hole in the floor board so I could run all the wiring into the rear cabin. Why such a large hole? I didn’t want to have to do this more than once! :D

Jasper offering moral support while stealing my chair….

To limit the wear and tear on the rear door hinges, I installed a remote control from Evan Designs for the lights.

It will even dim the lights.

The sensor is installed on the rear frame for ease of access while blending in with the undercarriage.

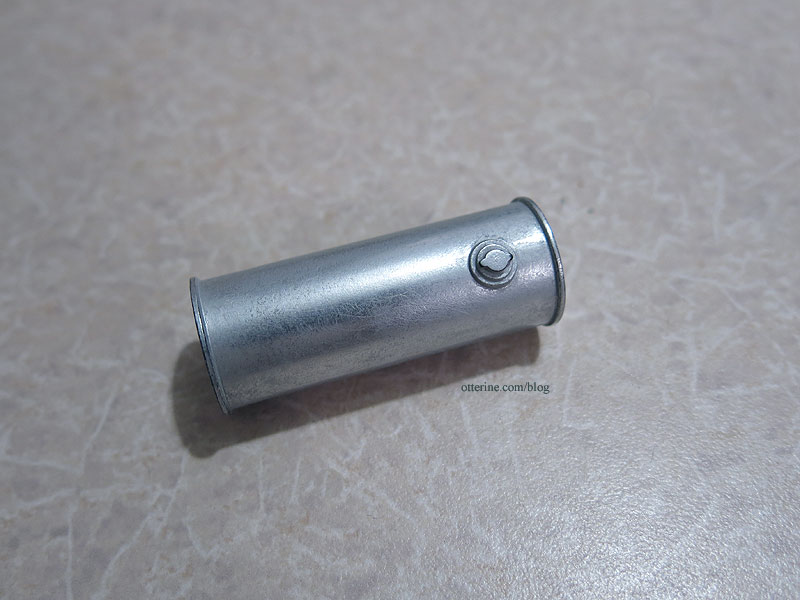
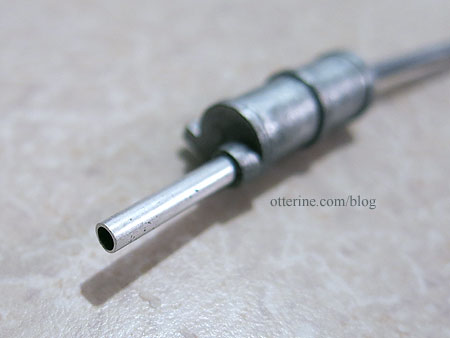
The taillights had solid brackets, so there was no way to just feed wires as is. Since I have two kits, I had spare parts to see what I could come up with. I modified the lamps using custom cut and bent 1/16″ diameter aluminum tubing to hold the wires.

I kept the plate that attaches the lamp to the bumper, drilling a hole adequate for the tubing. The left shows the original bracket; the right shows my modified plate before painting.

At this point, I needed to glue on some of the body panels. I had a problem with the driver’s side, so I ended up prying those off. More on that later. I needed one side on to glue on the back piece, so I used the other side instead. The door is meant to open, but I have no idea how these parts were supposed to snap together without breaking the hinges. I tried with the spares and the tiny pieces snapped off as expected. So, I cut the tab on the interior and glued the door in place. Considering just how many parts have broken during assembly, opening and closing the door is not a priority.

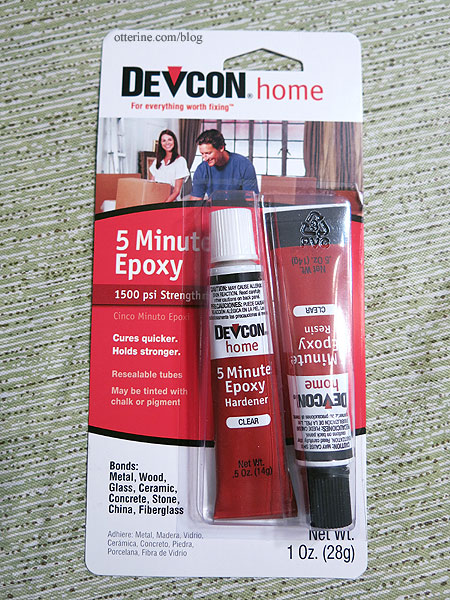
I used Devcon 5 Minute Epoxy on the taillights to get a firm hold since I was using mixed materials. This stuff stinks to high heaven with the hardener smelling like rancid, rotten eggs, but it is as advertised.
I painted the lamps black to disguise the sprue marks and to blend the aluminum.

The red is Testors Metallic Red paint. Using a tip from the guys at Hobby Town USA, I didn’t shake the bottle to mix the paint but used the clear tint from the top of the bottle. It colors while remaining transparent, though it takes a few passes. I touched up any bare spots with a red Sharpie.

The tube runs long under the bed for stability and connects to the same type of flexible tubing I had used for the headlights. I’ll do touch-ups later.

All the tubing and wires enter through the hole in the floorboard. The electrical work is all enclosed in the rear cabin. The door hinges are very delicate. If one breaks after assembly, I don’t think there’s a way to repair it. As it is, one broke as I assembled the hinge holders, so I had to glue one door closed. I am not hopeful for its longevity. With this system, I will need to open the door only every once in awhile to change or remove the battery. The wire length allows me to work outside of the van for battery replacement. As for accessing the wires in the cabin, if one goes out, it will be out for good.

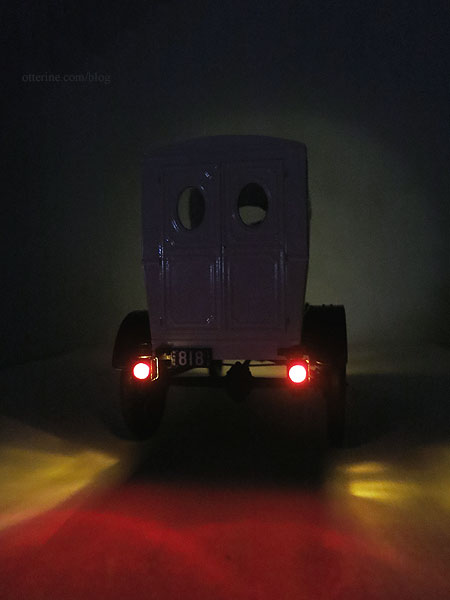
I dabbed a bit of amber glass paint on the LEDs to tone down the whiteness for the rear lights.

The license plate further disguises the sensor. It’s pretty sensitive; you don’t need to aim the remote directly at the sensor for the lights to work.

Testing…okay, so now we can be seen coming and going. :D
They might look a little rigged if studied closely, but at least the taillights work. :]

I will let the epoxy gas out for awhile before adding the clear side glass pieces to the taillights.
Categories: Model Cars, Vehicles
December 8, 2016 | 0 commentsTags for the devil wagon
I’ve been working on getting through the remaining steps for the Model T Van, and things have not been going well. Mishaps with the insanely delicate steering and suspension parts means the wheels had to be glued so they will not turn or spin. The model is still salvageable overall for looks, so far that is, but it’s disappointing that it won’t be poseable or roll around. But, I forge ahead…
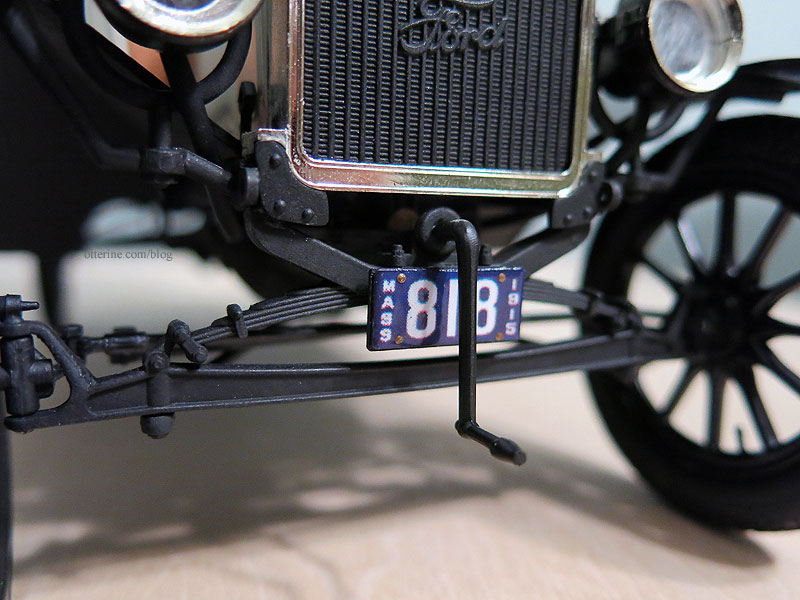
———————Apparently, license plates started out as porcelain not stamped metal, and the 1913 Model T Van fits squarely in that time frame. This is an awesome article on porcelain plates. I find it amusing (and not surprising) that tags came about due to miscreants wreaking havoc on the general public in their “devil wagons.” :D Yes, I so would have been one of those miscreants.
I measured the plate holders for the model and printed up some old time plates. I edited the image to remove imperfections and the long holes that would have been part of the plate. Instead of making these stamped like my previous versions, these are finished in a smooth gloss surface using Triple Thick. They are glued on with paint dabs simulating screws. Crank it up and hit the road! We’re street legal! :]
Categories: Model Cars, Vehicles
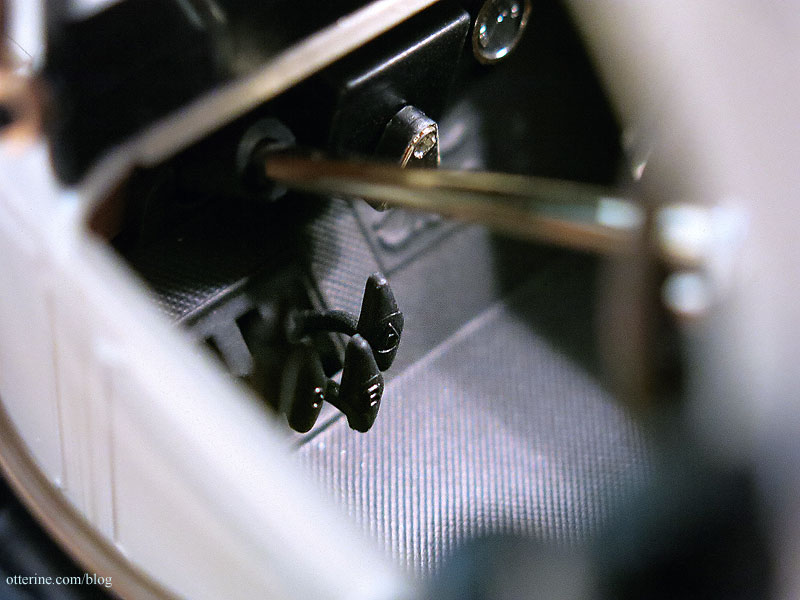
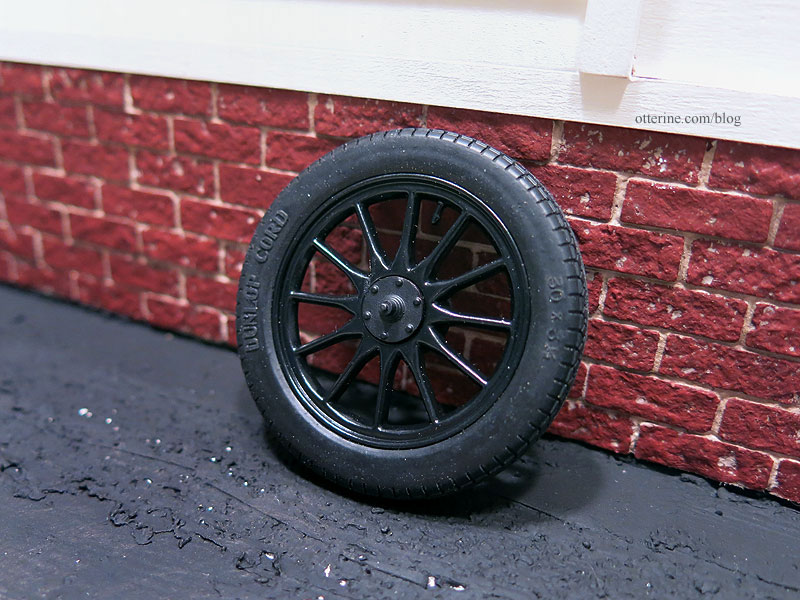
December 4, 2016 | 0 comments1913 Model T Van – part 10
Continuing work on the Model T Van. The kit comes with rubber tires that you stretch over the plastic wheels. The wheels are substantial, so you don’t risk snapping them in half during this process.

From the examples I’ve seen, the real life wheels were natural wood or painted. I opted for semi-gloss black. The tires have a nice tread.

My second kit’s tires were defective with a mottled surface, but one of those four was in decent condition on one side. These extras will be used for something else.

You are to sand the hub parts so the wheels turn freely. I’ve never been a fan of the phrase sand to fit, but these worked relatively well. I left them a little stiff so the Model T doesn’t roll away on me, but one ended up really stiff. If it doesn’t end up spinning in the end, I won’t worry about it. Since I opted to make these parts black and thought added paint would hinder functionality, I colored the sanded edges with a Sharpie.

This was by far the easiest part of the building process. :D
I love how it’s turning out so far.

Categories: Model Cars, Vehicles
November 8, 2016 | 0 comments


NOTE: All content on otterine.com is copyrighted and may not be reproduced in part or in whole. It takes a lot of time and effort to write and photograph for my blog. Please ask permission before reproducing any of my content. (More on copyright)

Mail Wagon – part 5
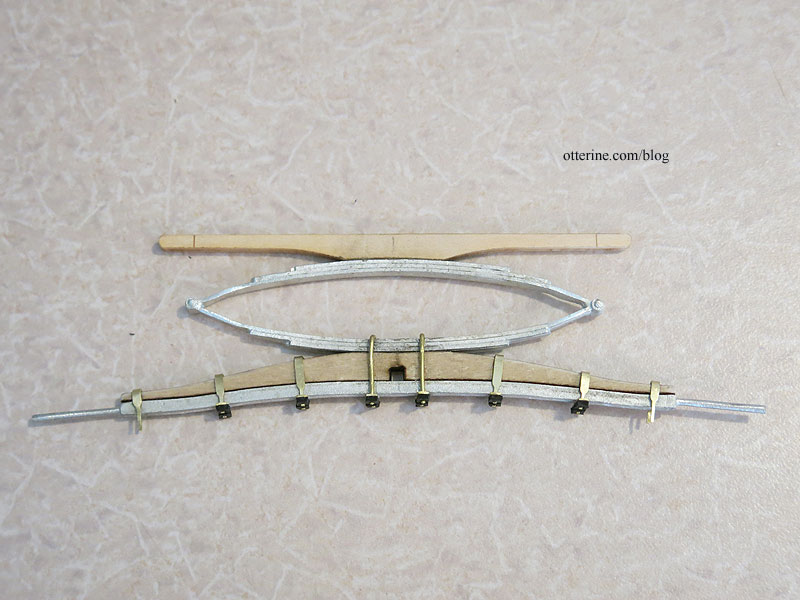
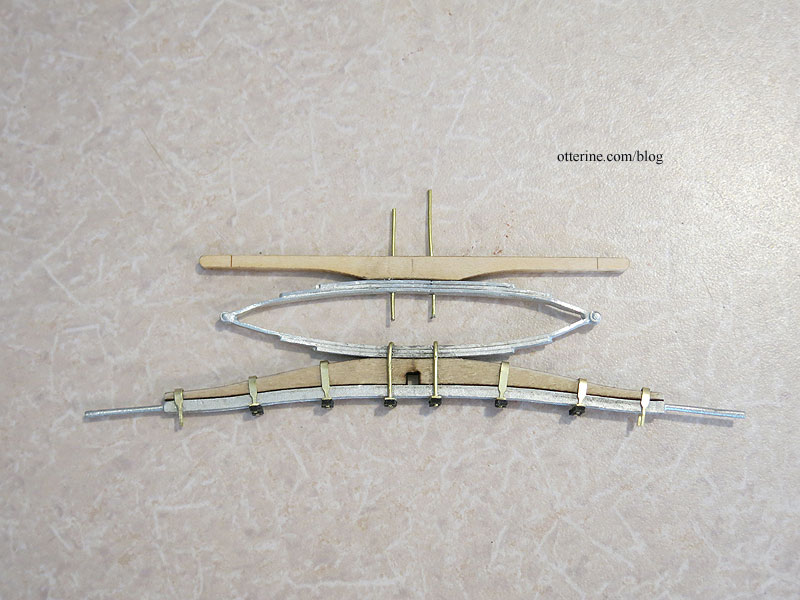
Continuing work on the Mail Wagon. I put together the rear axle assembly.
The front assembly required drilling a hole using the provided jig. I was able to use my hand tools – a pin vise – to make this hole. For the rear assembly, the metal was thicker and the pinvise was no match. I got a blister and two shallow pilot holes for my efforts. :\
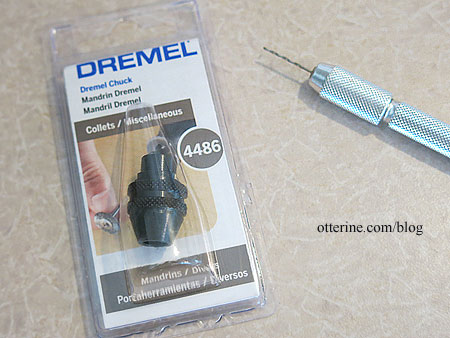
To finish drilling the holes, I bought the Dremel chuck #4486, which holds bits with 1/32″ to 1/8″ shanks. The buggy kit provides a 1/32″ drill bit (shown here in the pin vise).
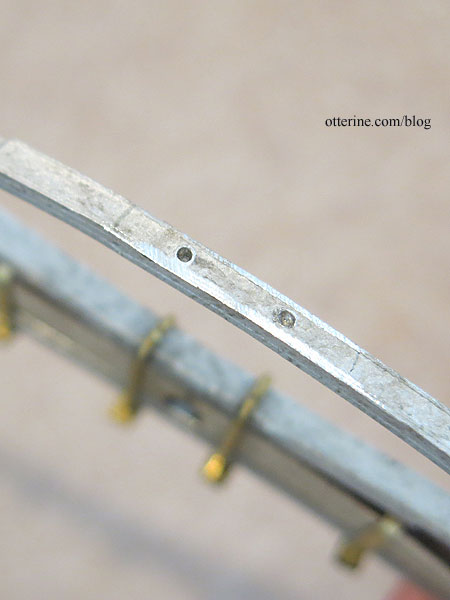
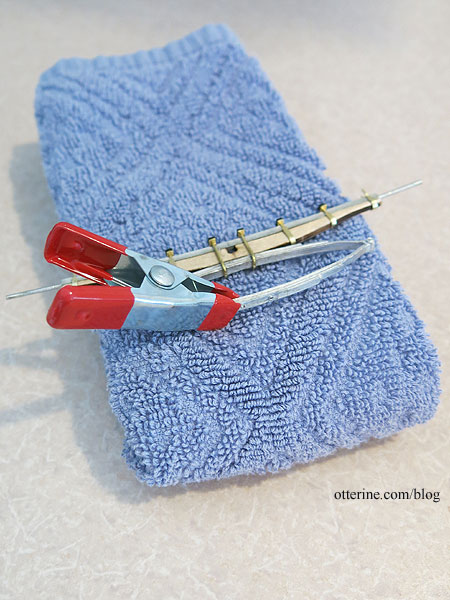
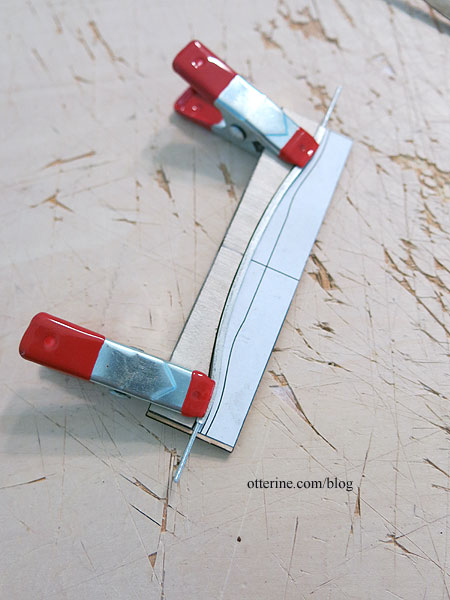
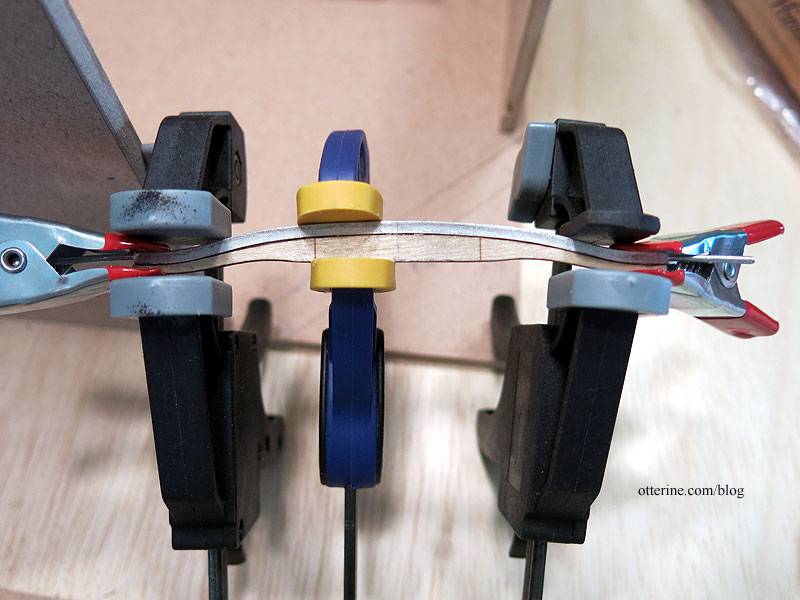
Since the metal parts are delicate and easily marred by pliers, I had to figure out a way to safely hold the assembly while also not breaking any of the parts already assembled. I folded a small hand towel to protect and brace the assembly. I attempted to drill, and the metal wagon spring heated up fast, so I added a tipped clamp to hold and protect my fingers from the heat.
The first hole worked great since I had been able to get further into the metal with the pin vise. The other hole wanted to wander, so I had to work more with the pin vise to get the pilot hole deeper and in the right line. The excess hole will not be visible after assembly.
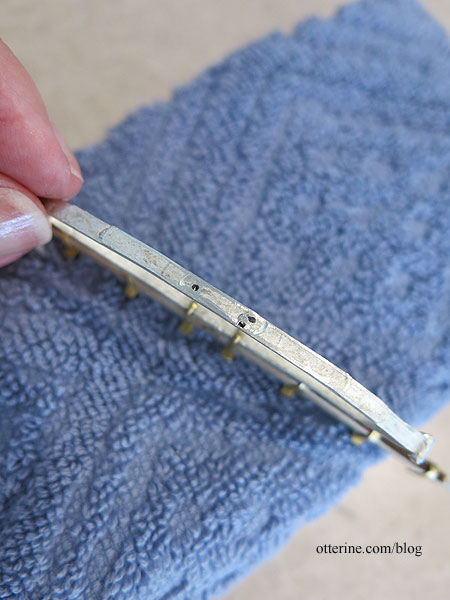
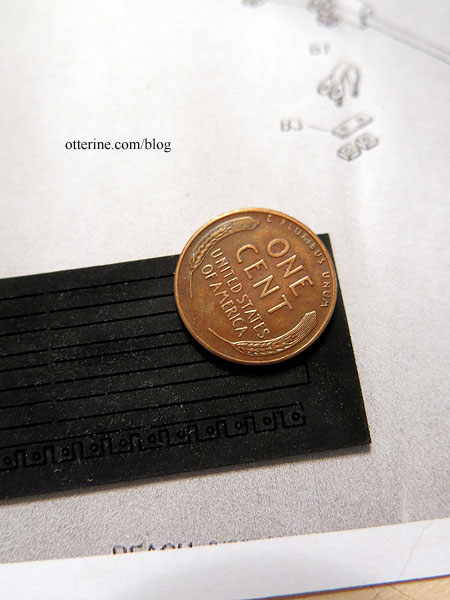
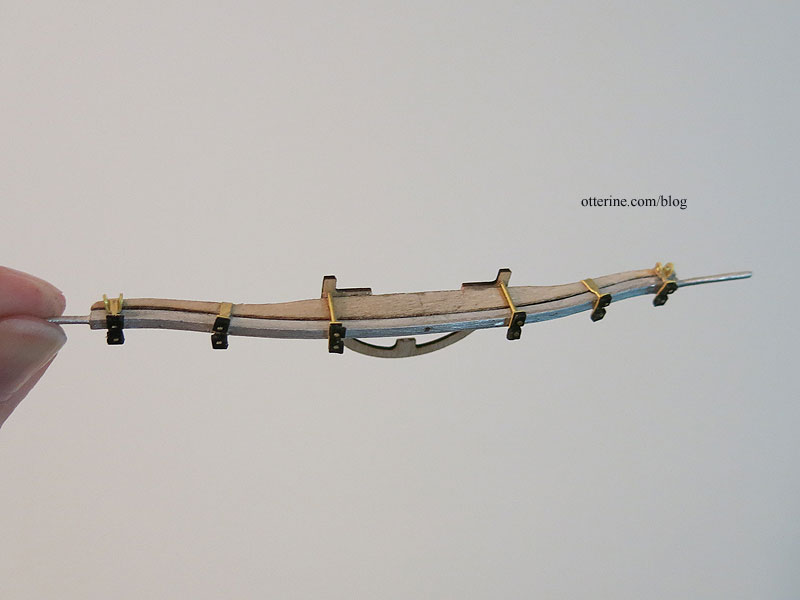
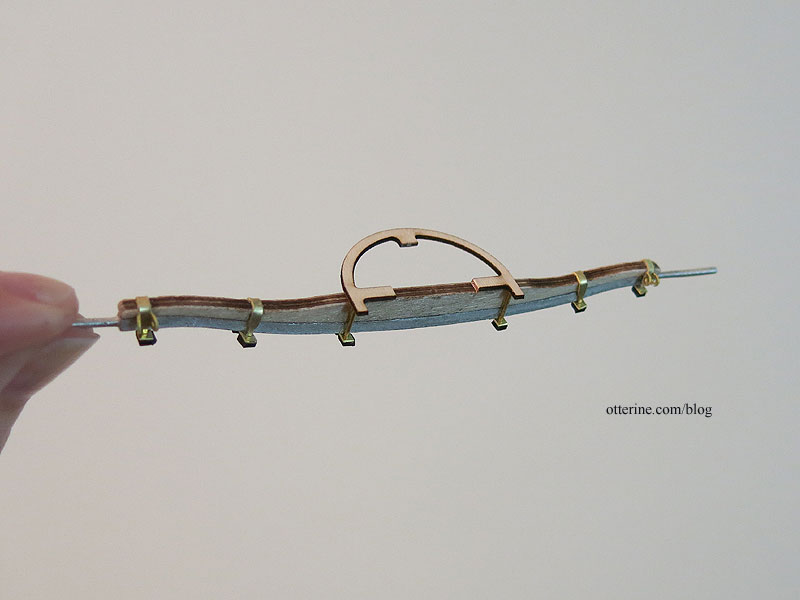
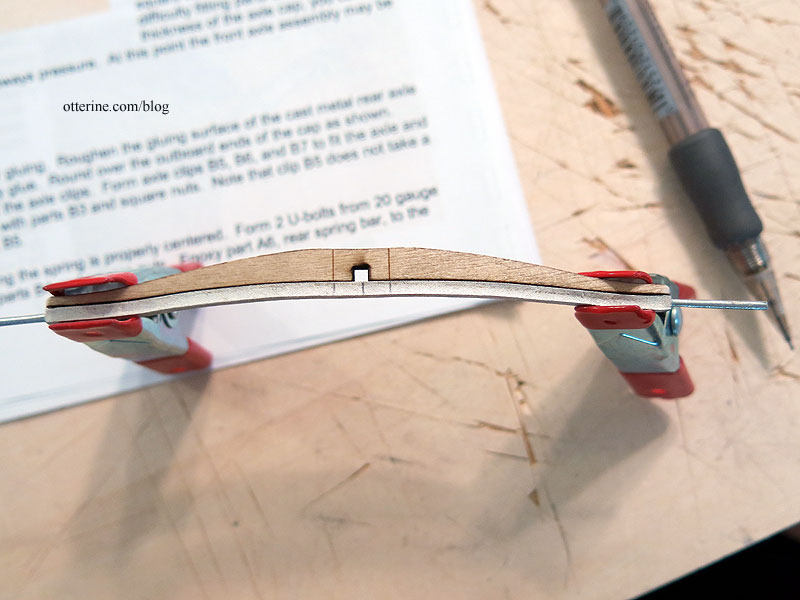
I reapplied the epoxy to the wood piece that sits on top of the wagon spring. I added the brass rods right away to make sure everything lined up properly while the epoxy set.
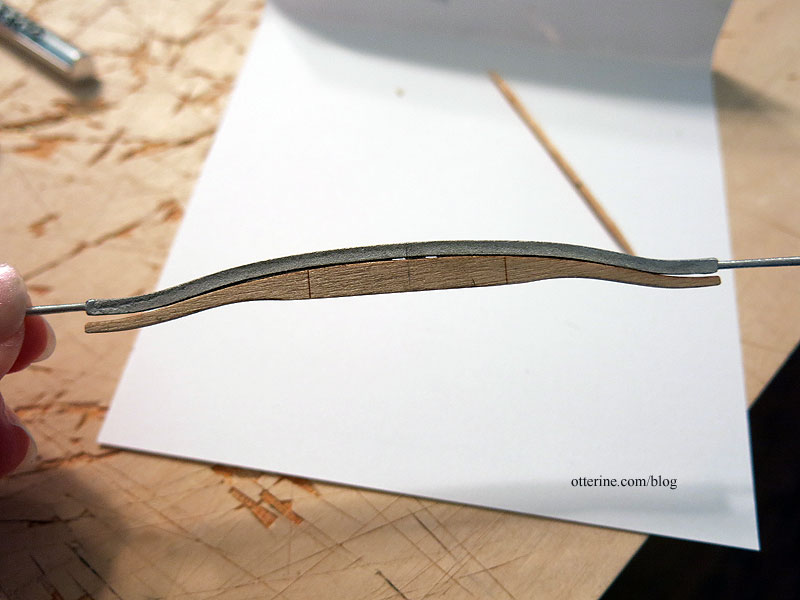
I added the square nuts and trimmed the brass rod to complete the rear axle assembly. It’s not very level or straight, but that is a limitation of the cast metal spring. It’s somewhat pliable, so it doesn’t want to hold the proper shape. I think it will be barely noticeable once the parts are painted a uniform color and the wagon cabin is added.
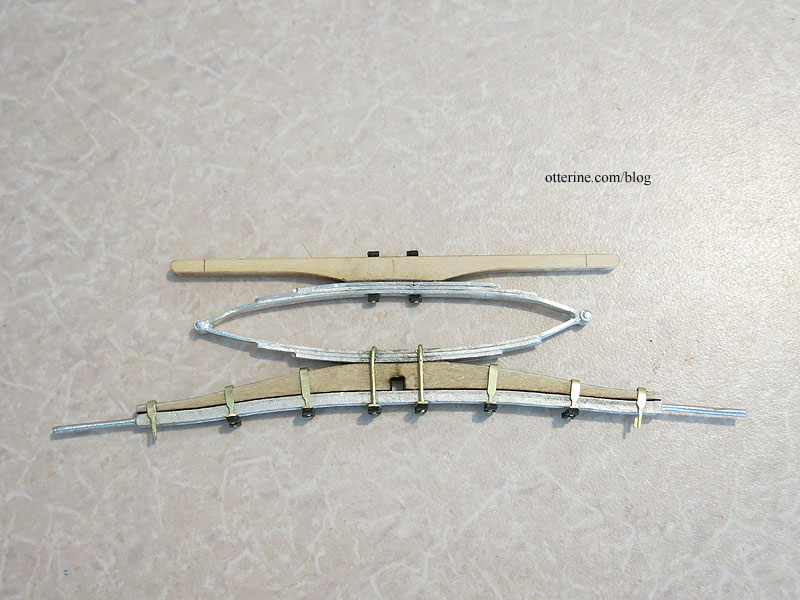
There is a spring for the front axle assembly, but that will have to be added later since I’m not using the reach (the rod that connects the front and rear axle assemblies). I’ll be making my own reach once I have the wagon cabin built, so the front spring will have to wait for now. Next up will be working on the wheels, which seems like it will labor intensive. If all turns out, they should be beautiful.
Categories: Ivy Hollow RFD, Model Cars, Vehicles
June 9, 2019 | 0 commentsMail Wagon – part 4
Continuing
to swear atwork on the Mail Wagon. To make it easier to work on the next part, I took closeup photos of the large schematics and printed the sections I needed. This eliminated the need to keep walking into the kitchen to look at the blueprint sized papers. I could sit and work in one area.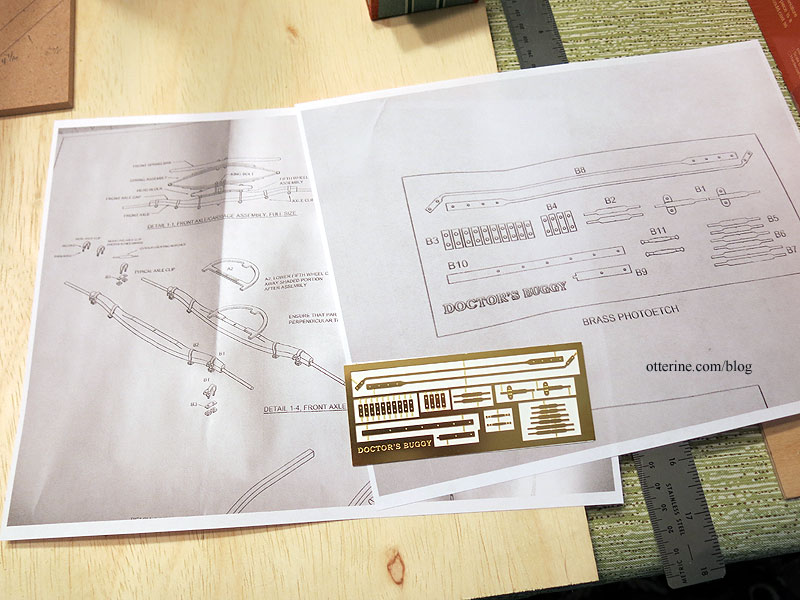
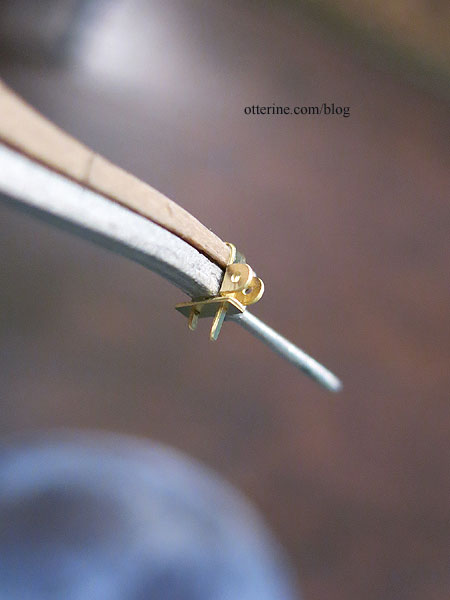
The laser etched brass pieces add fantastic detail, but they are tiny and challenging to work with.
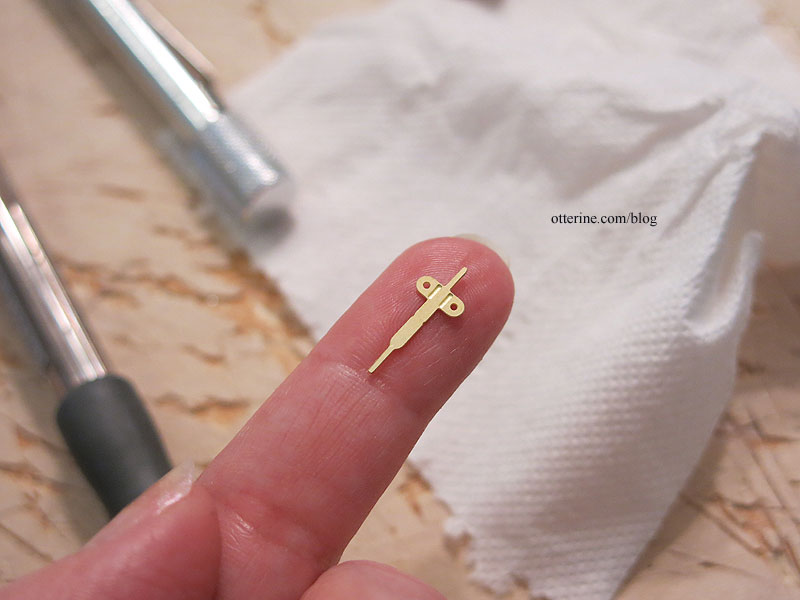
They fit well once you wrangle them into submission. I do worry about the longevity, even with using super glue. I think that’s because of how delicate the parts seem.
The bolts are made from another type of laser cut material. Fiddly, but again the detailing is wonderful.
I clipped the excess brass as recommended, and they do now look like tiny bolts. :]
The front axle assembly is done.
Next up, the rear axle assembly and wheels.
Categories: Ivy Hollow RFD, Model Cars, Vehicles
June 8, 2019 | 0 commentsMail Wagon – part 3
Continuing work on the Mail Wagon. I’m starting with the Doctor’s Buggy by Model Trailways. What I like about the kit are the well made parts, the detailed instructions and good pictures. I’m not much of a fan of the huge blueprint sized diagrams, though. I suppose it is easier from a manufacturing standpoint, but there isn’t always a lot of room to spread these things out while working. I have to keep them in another room and walk over to view them since I don’t want to keep clearing my workspace as I move back and forth between steps. As nice as it is to have large diagrams, the huge sheets are cumbersome. As usual, though, I made a photocopy of the regular sized instructions and diagrams so I can mark them up as needed.
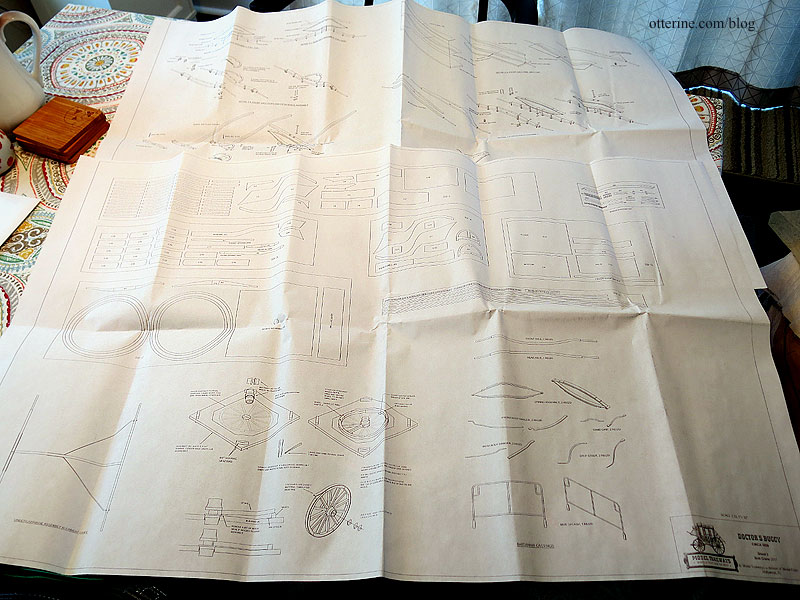
Another issue is the lack of numbering on the individual parts on the wood sheets as well as the detailed diagrams. The detailed diagrams call the parts by their functional name but don’t indicate a number, so you have to look for a part that resembles the drawing among the wood sheets. It’s doable but inefficient. If I didn’t have the model building experience I do, this might be a bigger issue.
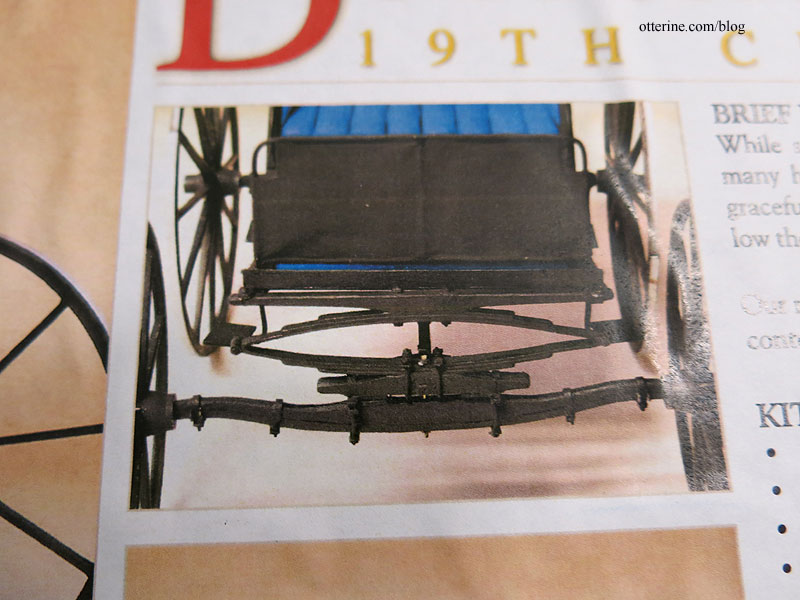
As noted before, I plan to make the front and rear axle assemblies, including the wheels, and then build my wagon cabin to suit. The instructions start with the axle assemblies, so that’s where I begin. You make a jig to help with drilling an accurate bolt hole. It’s a great feature of the kit.
The laser cut front axle cap is longer than the metal front axle, so I had to trim it to match the photo. The instructions mention nothing about this trimming, so luckily I had studied the photo.

In addition, the laser cut front axle cap and the metal front axle have slightly different bends. While the metal is somewhat pliable, it wasn’t possible to get a bond without gaps. After painting, this should be no issue. Since clamping was not possible without a lot of shifting (I used my fingers to hold the parts until the epoxy set), I glued the middle portion first.
I used Devcon 5 Minute Epoxy from amazon. This stuff stinks to high heaven with the hardener smelling like rancid, rotten eggs, but it is as advertised.
Once the epoxy set on the middle portion, I was able to go back and glue the ends. I held the pieces until the epoxy set, then for the final curing time, I clamped the hell out of it. :D
The rear axle cap and rear axle fit much better, but I had to trim the ends of the wood part here as well.
I need to swear at the instructions some more to figure out the next steps. Back soon…
Categories: Ivy Hollow RFD, Model Cars, Vehicles
May 25, 2019 | 0 commentsMail Wagon in real life
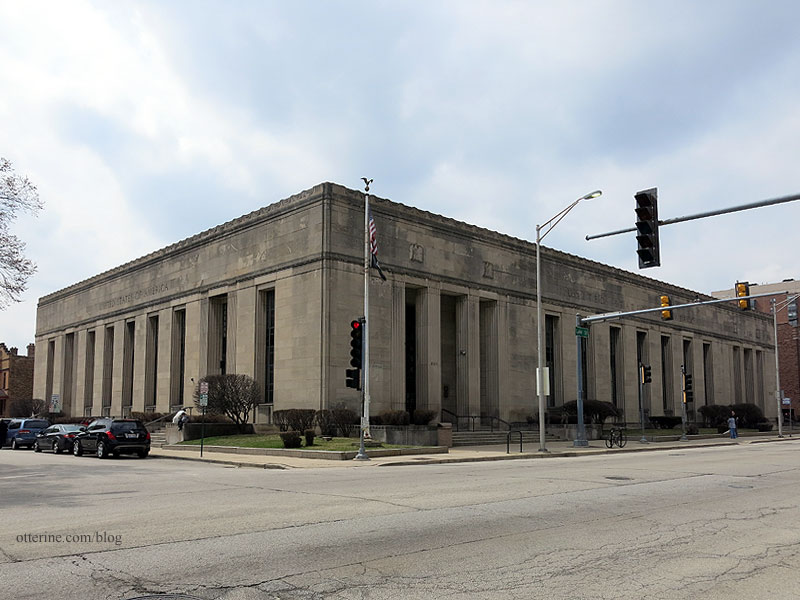
After discovering the Wesley W. Jung Carriage Museum, I figured I would try to find the real deal within road trip distance. As luck would have it, there’s one at an old post office about 40 minutes south of me. And, further to my good fortune, a lovely blog reader generously offered me her collection of miniatures magazine and a few books. Since she was also south of me, I made a morning of it. I met with her to pick up the magazines and then headed over to the Oak Park post office. This is a beautiful building, but there is no dedicated parking. Luckily, it was a nice day and the library parking garage was just across the street.
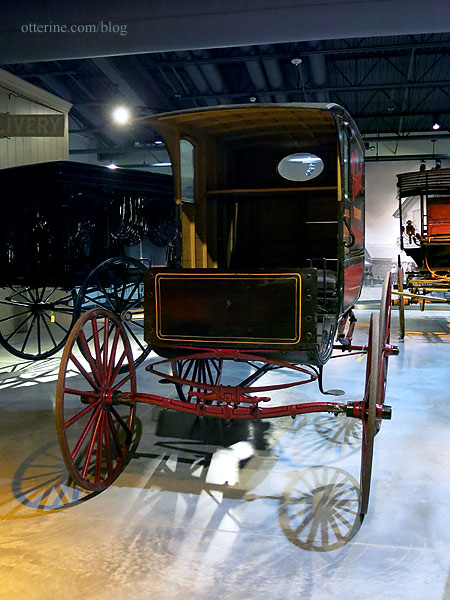
The mail wagon did not disappoint. :D
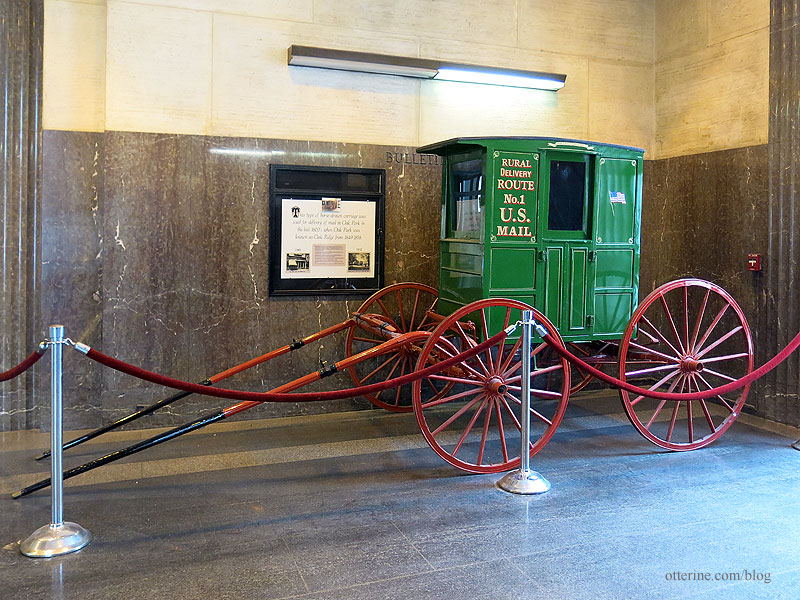
I knew the cabin itself would be skinny, but you can see just how wide the wheel axles are in relation.
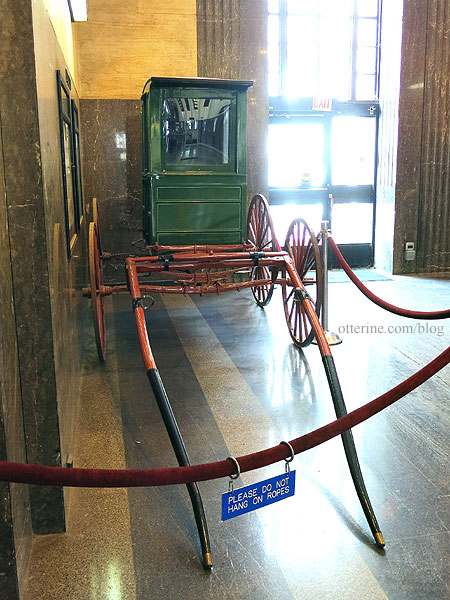
It’s very shiny, so I had to be mindful of not getting my own reflection.
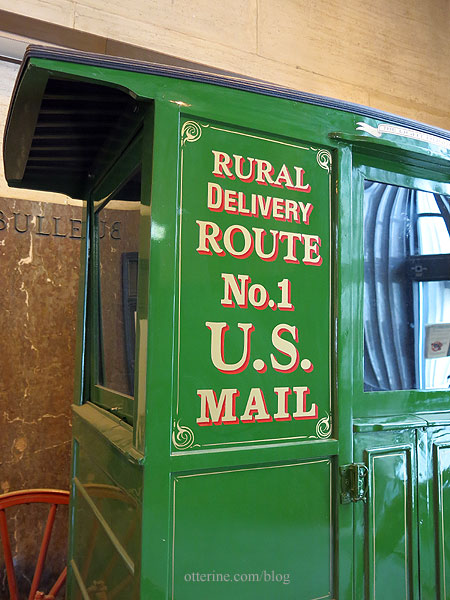
Now I have detailed pics of the undercarriage and detailing of an actual mail wagon.

Categories: Ivy Hollow RFD, Model Cars, Vehicles
April 6, 2019 | 0 commentsMail Wagon – part 2
Continuing work on the Mail Wagon. After my visit to the Wesley W. Jung Carriage Museum, I was even more inspired to make the mail wagon as realistic as possible. If you do a google search for RFD mail wagons, you will find a wide array of vehicles. Some are tiny and some are posh, and even the suspensions vary. This is because the carriers were to buy, store and maintain their own vehicles (and horses). I’m choosing to make what appeals to me aesthetically as well as what I think will be a reasonable build to attempt. Since most cabins were basic boxes, the more challenging part is emulating the suspension.
Tobacco wagon at the Wesley W. Jung Carriage Museum with similar suspension The Rondell mail wagon kit is completely lacking these suspension details, and after seeing the real life examples, I’m thinking the wheels from that kit would be too bulky as well. The farm wagons and other utility vehicles had substantial wheels, but the mail wagon wheels were rather slight and dainty.
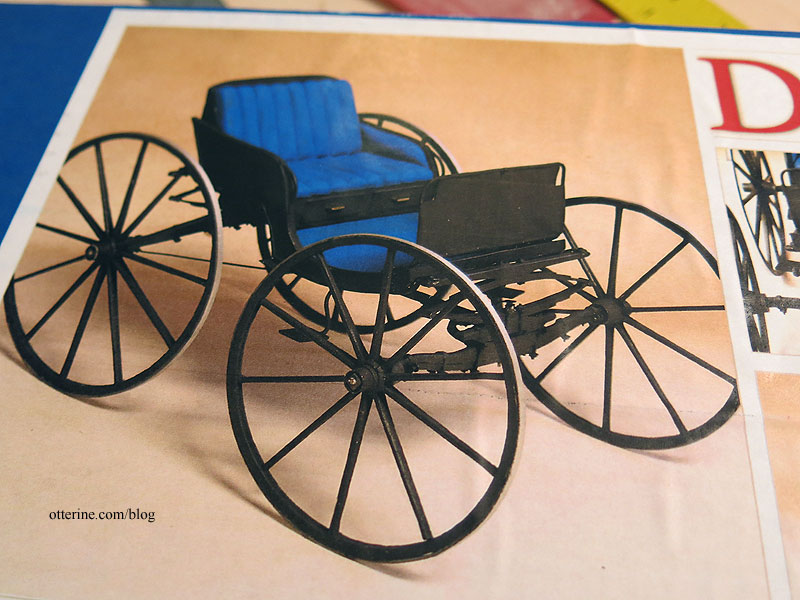
During my research this week, I happened upon a 1:12 scale Doctor’s Buggy by Model Trailways. This can be pricey depending on the retailer, but I found a great deal on amazon for $50 plus free shipping.
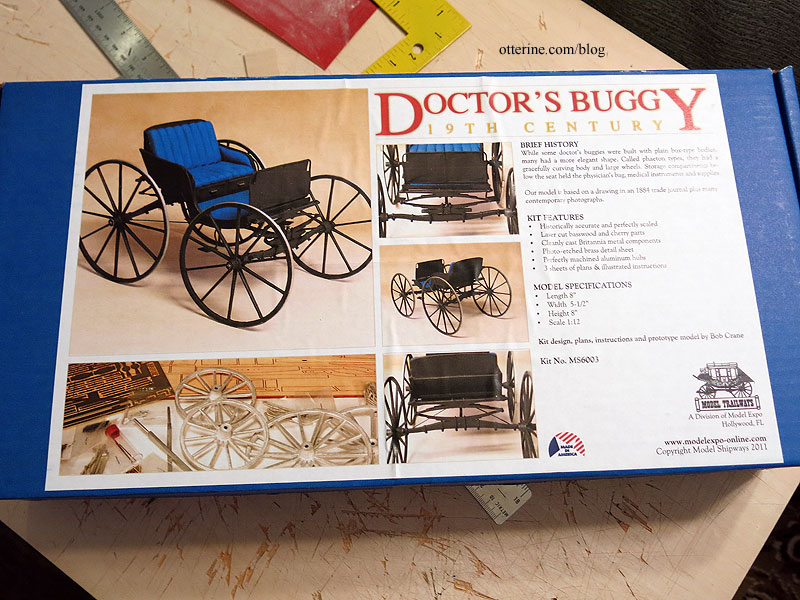
It has the exact suspension I need and daintier wheels than the Rondell kit.
Considering the time and effort I would expend to recreate these parts, the kit is worth it for those parts alone.
The springs and axles are actually metal in this kit. The wheels will spin and turn, which is just fabulous! I think it should be fairly straightforward for me to extend the suspension front to back to accommodate a mail cabin that will likely be longer than the kit’s buggy compartment. Those compartment parts are equally fabulous – laser cut and precise.
Now, the reviews say these are challenging kits, but I’m up for it. :D Plus, I’ve made many model cars, so I’m used to confusing, vague and outright erroneous instructions. I’ll start by making the front and back assemblies independently, including the wheels, then build my mail cabin to fit before I make adjustments to the length of the suspension. I’ll need to be mindful of adding too much weight in case the metal parts are more delicate than they seem. I’ll weigh the doctor’s buggy parts as a guide.
Categories: Ivy Hollow RFD, Model Cars, Vehicles
March 15, 2019 | 0 comments
NOTE: All content on otterine.com is copyrighted and may not be reproduced in part or in whole. It takes a lot of time and effort to write and photograph for my blog. Please ask permission before reproducing any of my content. (More on copyright)