

Mail Wagon – part 3
Continuing work on the Mail Wagon. I’m starting with the Doctor’s Buggy by Model Trailways. What I like about the kit are the well made parts, the detailed instructions and good pictures. I’m not much of a fan of the huge blueprint sized diagrams, though. I suppose it is easier from a manufacturing standpoint, but there isn’t always a lot of room to spread these things out while working. I have to keep them in another room and walk over to view them since I don’t want to keep clearing my workspace as I move back and forth between steps. As nice as it is to have large diagrams, the huge sheets are cumbersome. As usual, though, I made a photocopy of the regular sized instructions and diagrams so I can mark them up as needed.
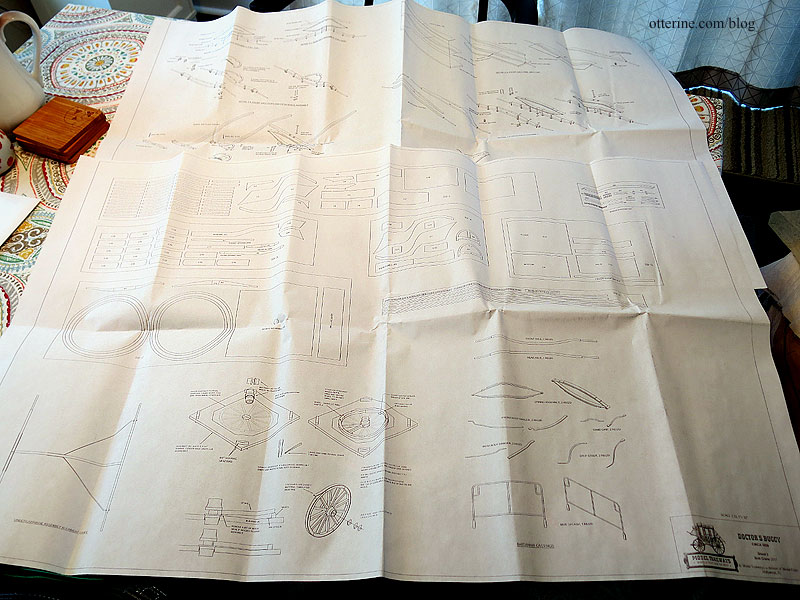
Another issue is the lack of numbering on the individual parts on the wood sheets as well as the detailed diagrams. The detailed diagrams call the parts by their functional name but don’t indicate a number, so you have to look for a part that resembles the drawing among the wood sheets. It’s doable but inefficient. If I didn’t have the model building experience I do, this might be a bigger issue.
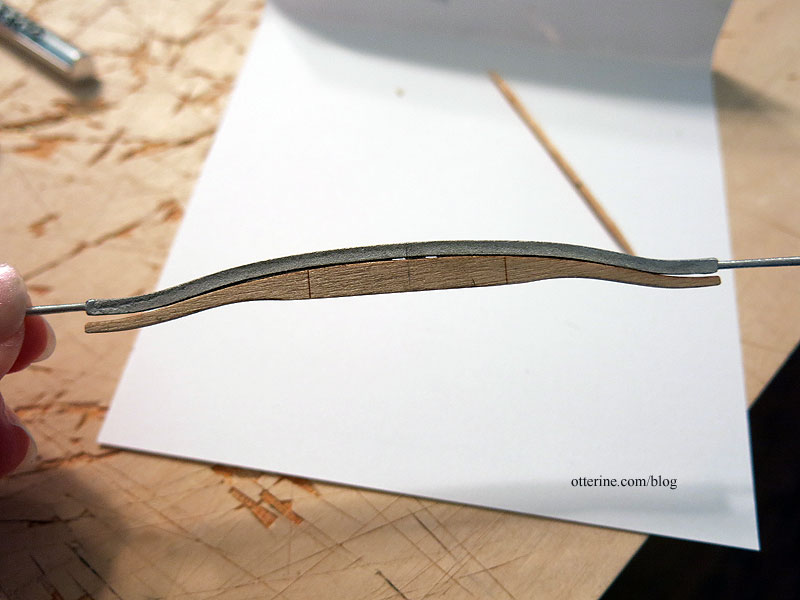
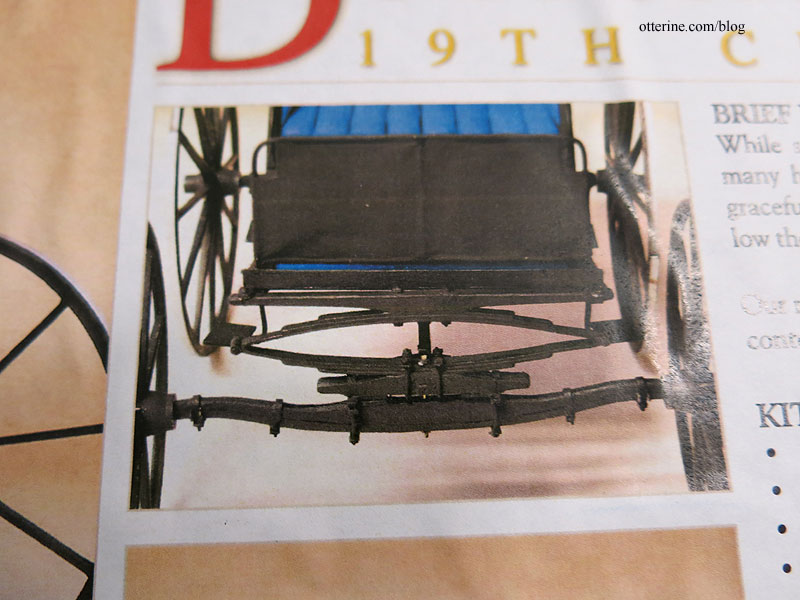
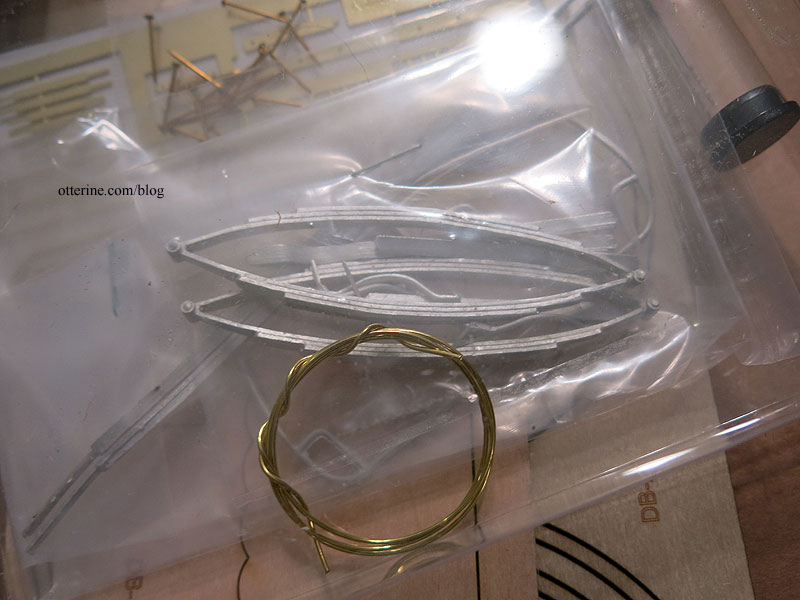
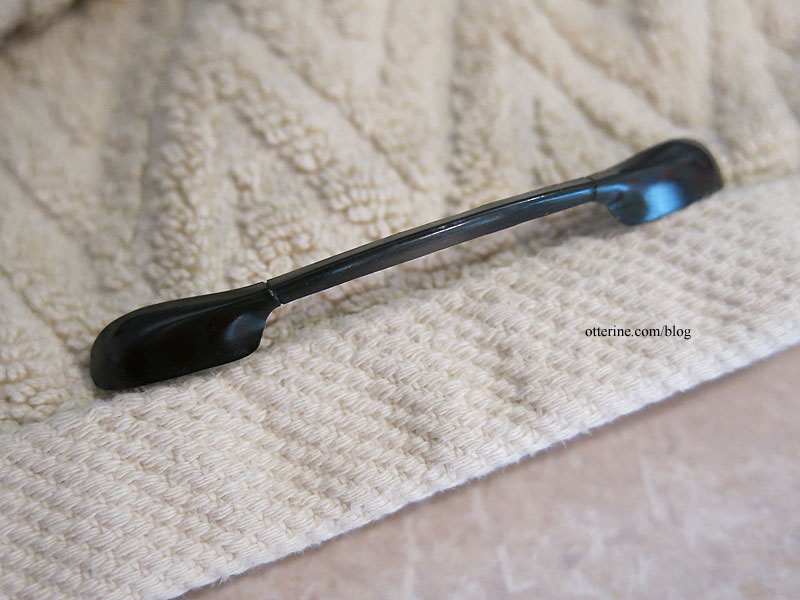
As noted before, I plan to make the front and rear axle assemblies, including the wheels, and then build my wagon cabin to suit. The instructions start with the axle assemblies, so that’s where I begin. You make a jig to help with drilling an accurate bolt hole. It’s a great feature of the kit.
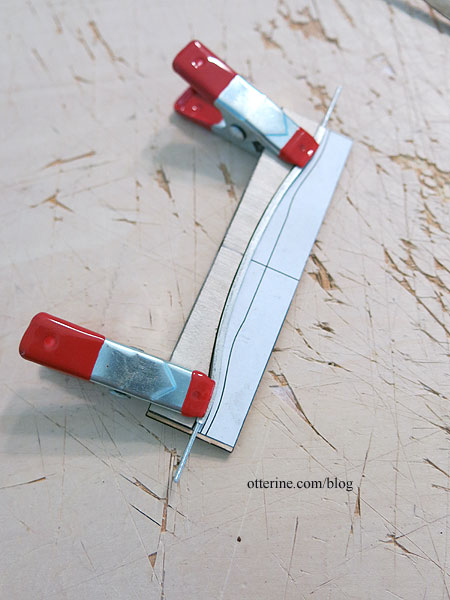
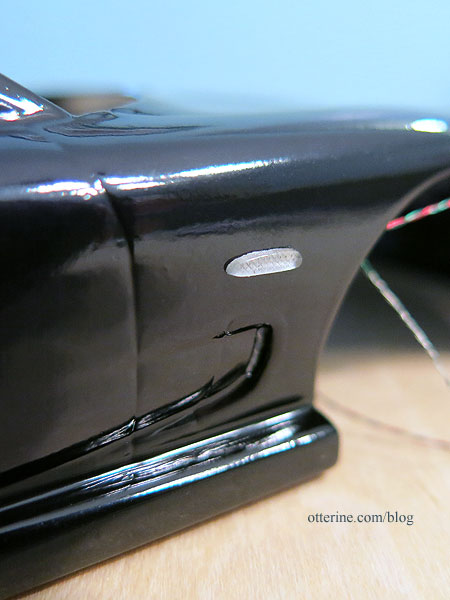
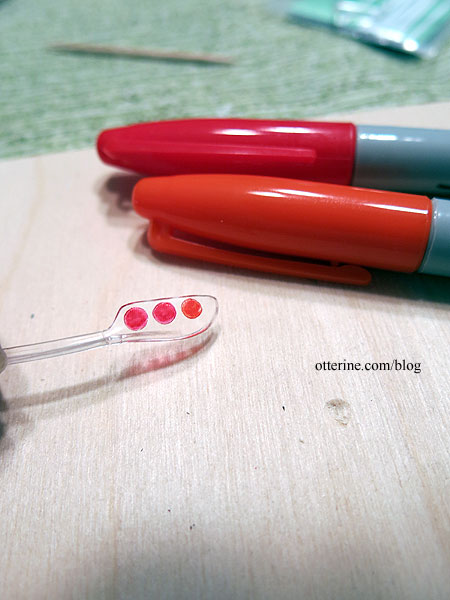
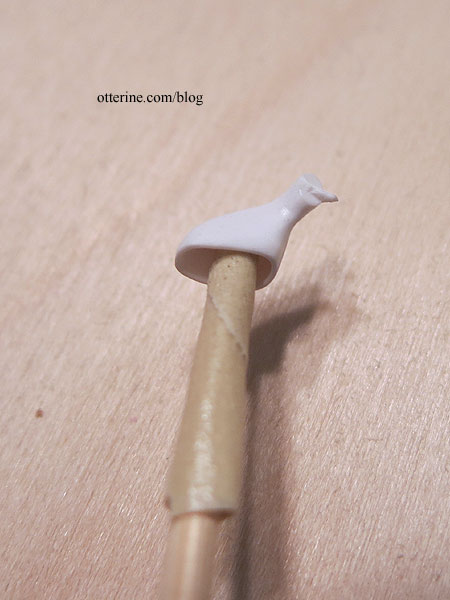
The laser cut front axle cap is longer than the metal front axle, so I had to trim it to match the photo. The instructions mention nothing about this trimming, so luckily I had studied the photo.

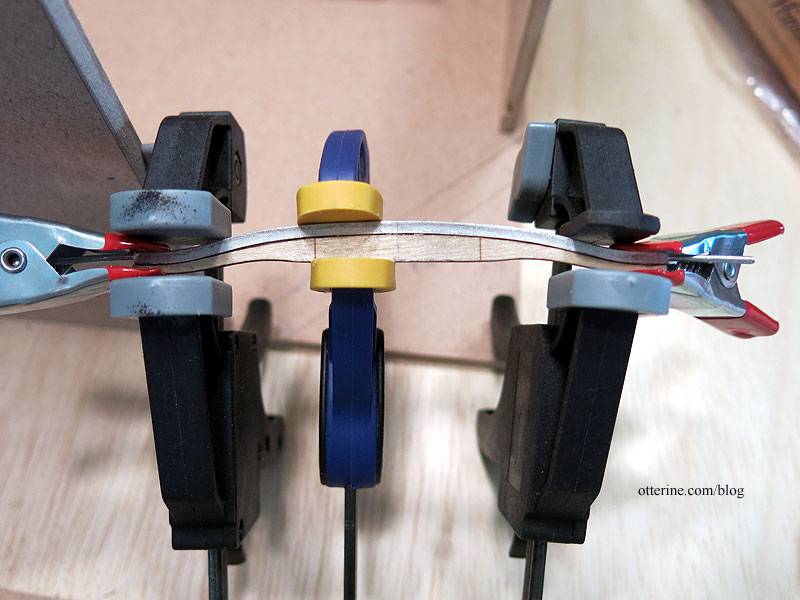
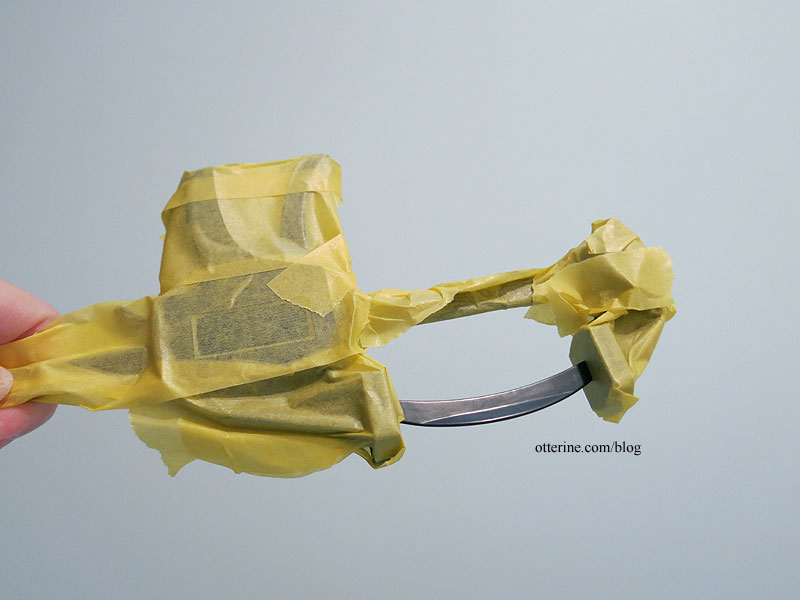
In addition, the laser cut front axle cap and the metal front axle have slightly different bends. While the metal is somewhat pliable, it wasn’t possible to get a bond without gaps. After painting, this should be no issue. Since clamping was not possible without a lot of shifting (I used my fingers to hold the parts until the epoxy set), I glued the middle portion first.
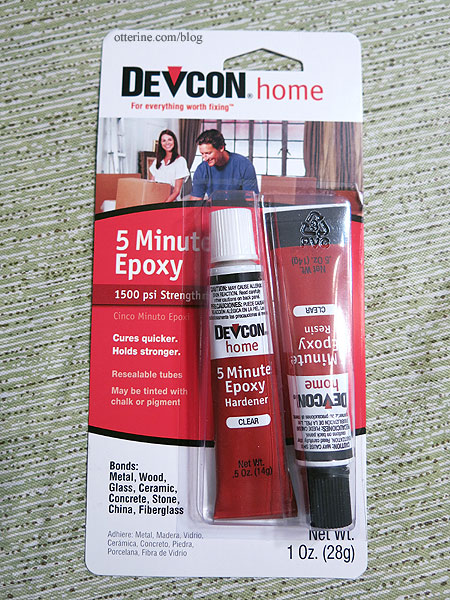
I used Devcon 5 Minute Epoxy from amazon. This stuff stinks to high heaven with the hardener smelling like rancid, rotten eggs, but it is as advertised.
Once the epoxy set on the middle portion, I was able to go back and glue the ends. I held the pieces until the epoxy set, then for the final curing time, I clamped the hell out of it. :D
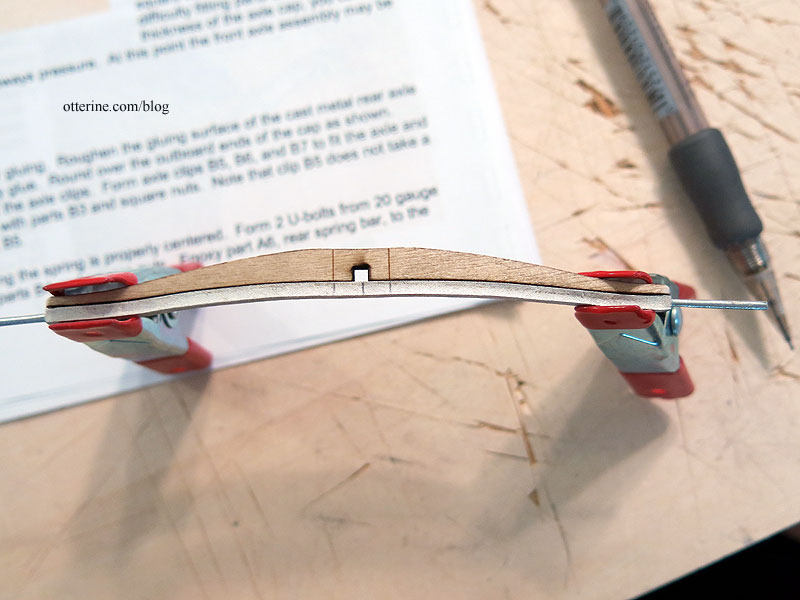
The rear axle cap and rear axle fit much better, but I had to trim the ends of the wood part here as well.
I need to swear at the instructions some more to figure out the next steps. Back soon…
Categories: Ivy Hollow RFD, Model Cars, Vehicles
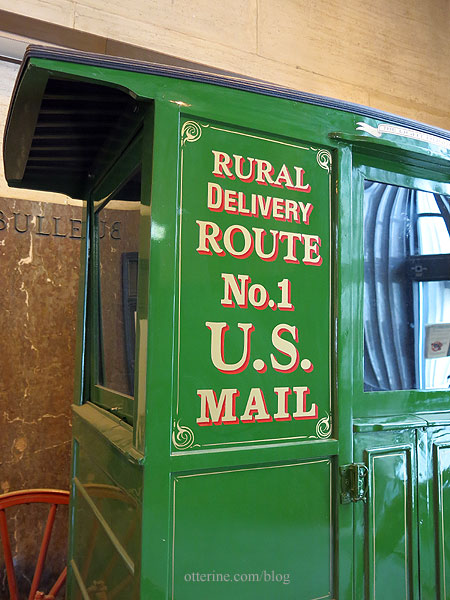
May 25, 2019 | 0 commentsMail Wagon in real life
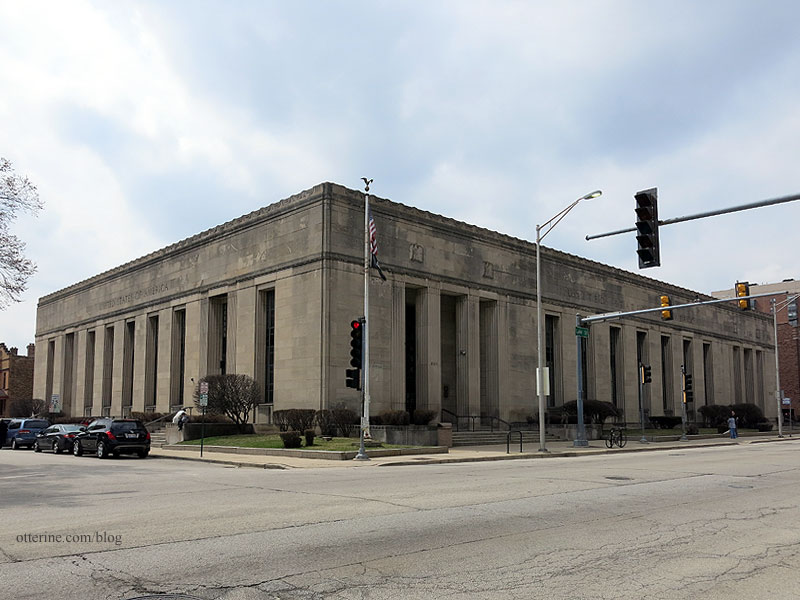
After discovering the Wesley W. Jung Carriage Museum, I figured I would try to find the real deal within road trip distance. As luck would have it, there’s one at an old post office about 40 minutes south of me. And, further to my good fortune, a lovely blog reader generously offered me her collection of miniatures magazine and a few books. Since she was also south of me, I made a morning of it. I met with her to pick up the magazines and then headed over to the Oak Park post office. This is a beautiful building, but there is no dedicated parking. Luckily, it was a nice day and the library parking garage was just across the street.
The mail wagon did not disappoint. :D
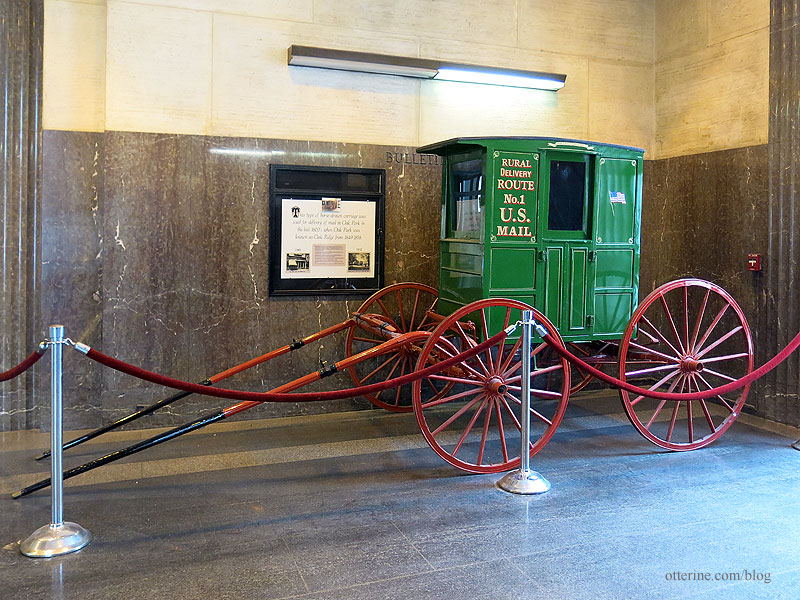
I knew the cabin itself would be skinny, but you can see just how wide the wheel axles are in relation.
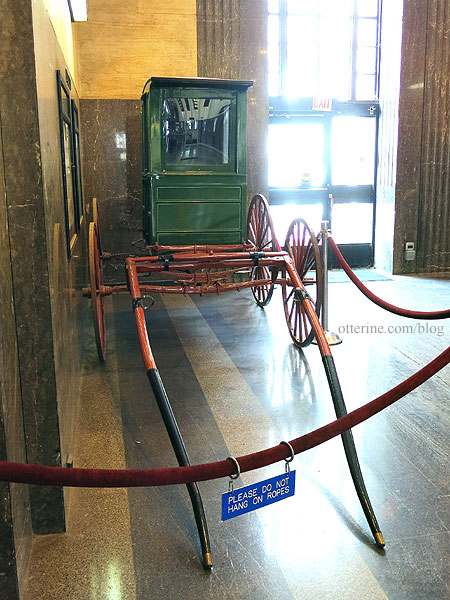
It’s very shiny, so I had to be mindful of not getting my own reflection.
Now I have detailed pics of the undercarriage and detailing of an actual mail wagon.

Categories: Ivy Hollow RFD, Model Cars, Vehicles
April 6, 2019 | 0 commentsMail Wagon – part 2
Continuing work on the Mail Wagon. After my visit to the Wesley W. Jung Carriage Museum, I was even more inspired to make the mail wagon as realistic as possible. If you do a google search for RFD mail wagons, you will find a wide array of vehicles. Some are tiny and some are posh, and even the suspensions vary. This is because the carriers were to buy, store and maintain their own vehicles (and horses). I’m choosing to make what appeals to me aesthetically as well as what I think will be a reasonable build to attempt. Since most cabins were basic boxes, the more challenging part is emulating the suspension.
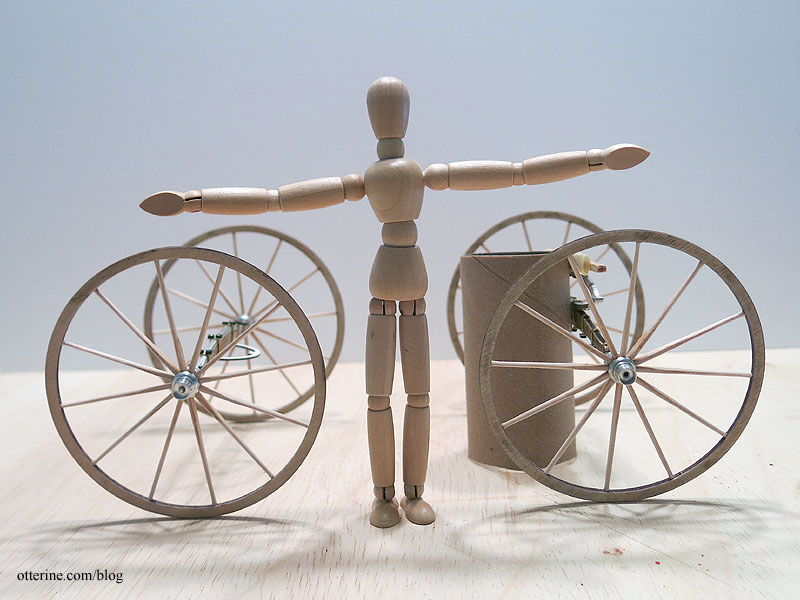
Tobacco wagon at the Wesley W. Jung Carriage Museum with similar suspension The Rondell mail wagon kit is completely lacking these suspension details, and after seeing the real life examples, I’m thinking the wheels from that kit would be too bulky as well. The farm wagons and other utility vehicles had substantial wheels, but the mail wagon wheels were rather slight and dainty.
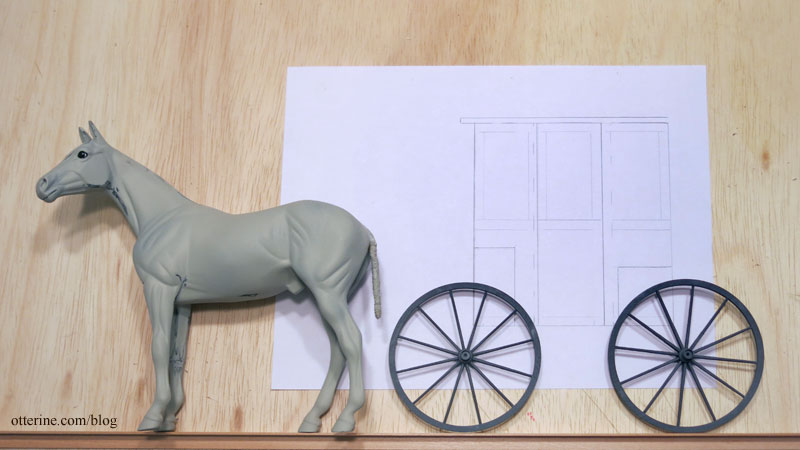
During my research this week, I happened upon a 1:12 scale Doctor’s Buggy by Model Trailways. This can be pricey depending on the retailer, but I found a great deal on amazon for $50 plus free shipping.
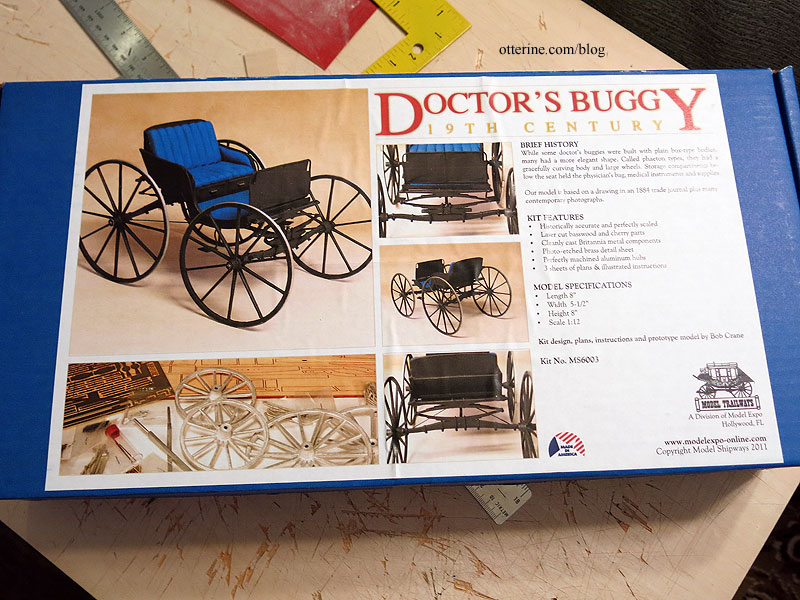
It has the exact suspension I need and daintier wheels than the Rondell kit.
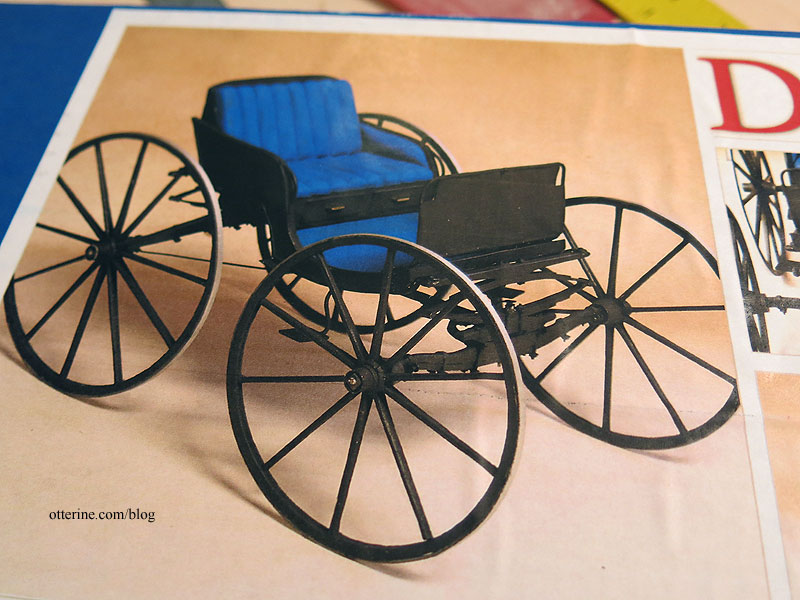
Considering the time and effort I would expend to recreate these parts, the kit is worth it for those parts alone.
The springs and axles are actually metal in this kit. The wheels will spin and turn, which is just fabulous! I think it should be fairly straightforward for me to extend the suspension front to back to accommodate a mail cabin that will likely be longer than the kit’s buggy compartment. Those compartment parts are equally fabulous – laser cut and precise.
Now, the reviews say these are challenging kits, but I’m up for it. :D Plus, I’ve made many model cars, so I’m used to confusing, vague and outright erroneous instructions. I’ll start by making the front and back assemblies independently, including the wheels, then build my mail cabin to fit before I make adjustments to the length of the suspension. I’ll need to be mindful of adding too much weight in case the metal parts are more delicate than they seem. I’ll weigh the doctor’s buggy parts as a guide.
Categories: Ivy Hollow RFD, Model Cars, Vehicles
March 15, 2019 | 0 commentsMail Wagon – part 1
Today, I did a dry fit of the mail wagon. To say the instructions are lacking is an understatement. You are given a blueprint drawing and a typed list of instructions.
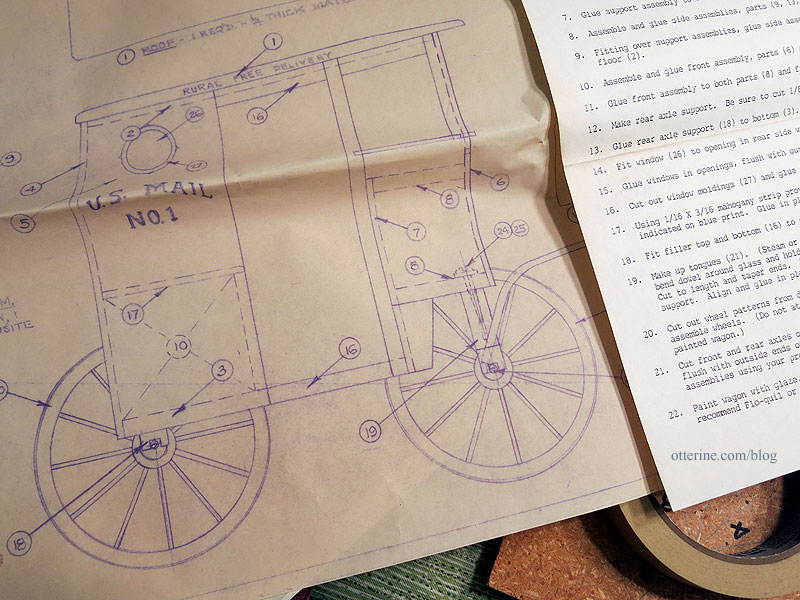
There are no photos or diagrams of the steps, and the kit photo is minuscule and not at all detailed.
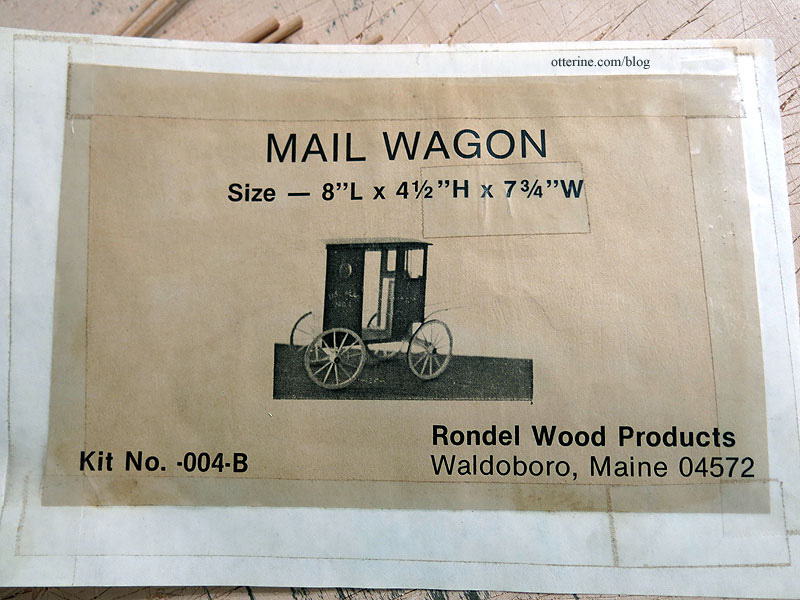
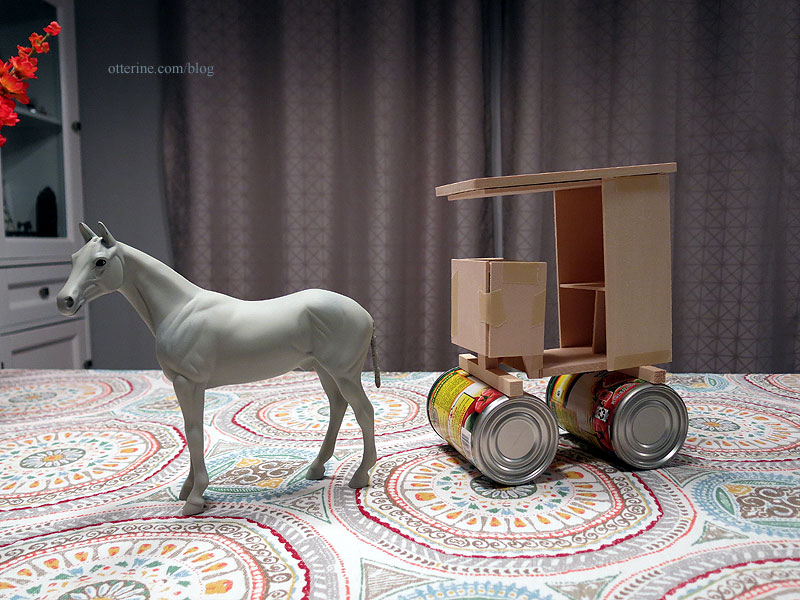
I blundered my way through a dry fit, and one piece still made no sense and didn’t seem to fit properly. But, it does give me a good basis for size and how far away the wheels are supposed to be from the passenger compartment. It’s a very simplistic kit, so you know me…I’ll probably end up building most of it from scratch and using this as only a guide.
The wheels are incredibly detailed in their assembly, much like the real deal. If I can get them to work, the wheels alone will be worth having bought the kit.
However, this is the extent of the chassis – two wood blocks. The front wheels will turn, but the lack of detail is disappointing.
Here’s a real life mail wagon for example. This is more complicated than I want to attempt, but there has to be a happy medium.
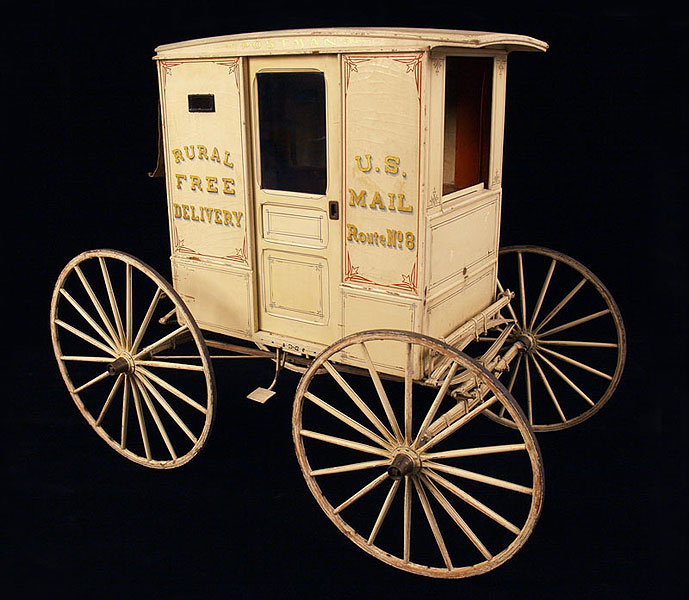
image from The Smithsonian The inexpensive wagon kit I put together for Baslow Ranch has better detailing without being overly complicated.
It’s longer than the mail wagon, but I could likely customize something better than two simple wood blocks. I do have another of these kits, but I could cut pieces myself using the general pattern.
I’m checking some other sources for ideas. Plus, I’m planning a trip to a local museum that has carriages for in-person study and better photographs.
Categories: Ivy Hollow RFD, Model Cars, Vehicles
March 2, 2019 | 0 commentsRX-7 in half scale, hitting the road…
Work has been completed on the RX-7 in half scale. This lovely auto is on its way to Florida where it will be placed on the cake table at a friend’s wedding. This was a side commission and a super fun project to boot!
I’ve included some photos of the original car we were trying to emulate. Fingers crossed that it travels safely and provides some mini wow for the cake table. Sending out a huge congrats to the happy couple! I am honored to have contributed to your special day.


The original:


Categories: Model Cars, Vehicles
October 26, 2018 | 0 commentsHalf scale is nutters!
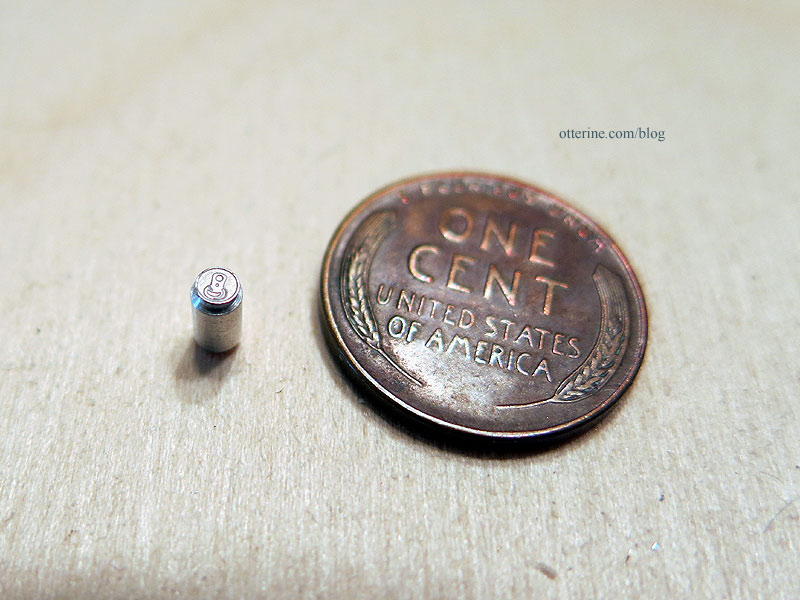
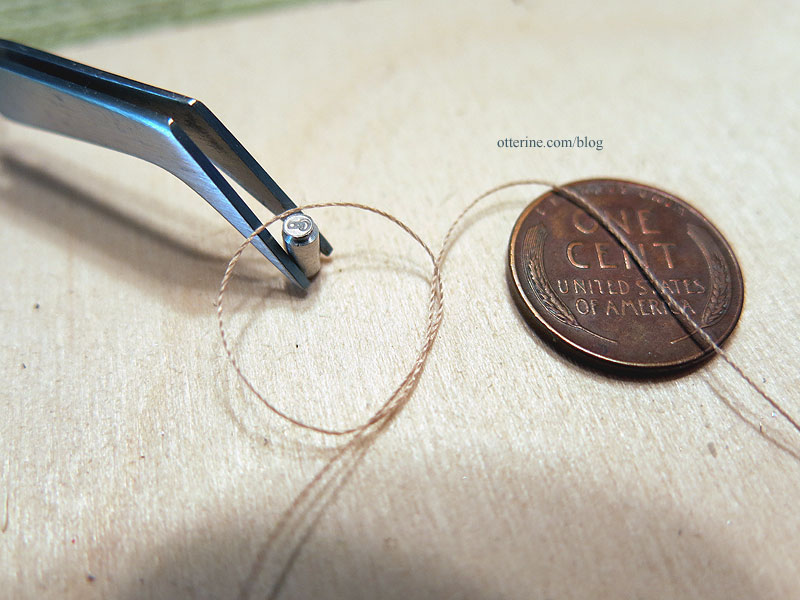
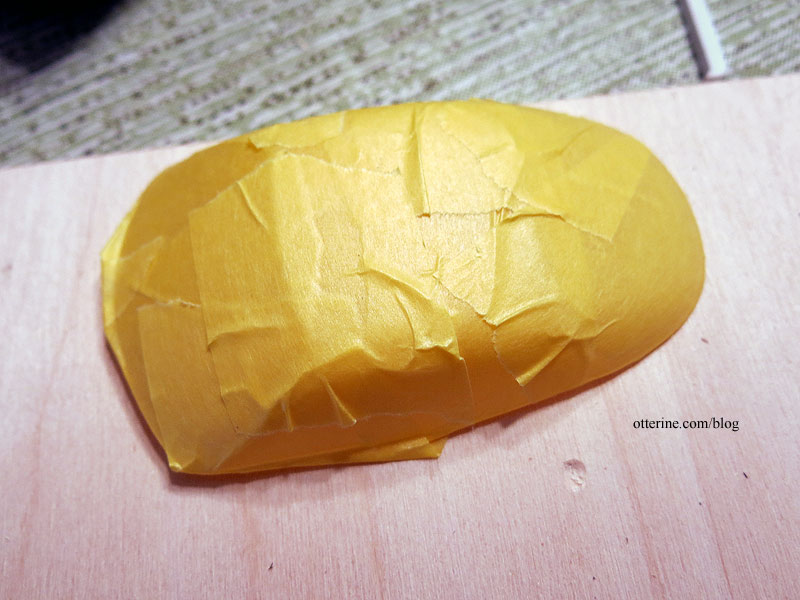
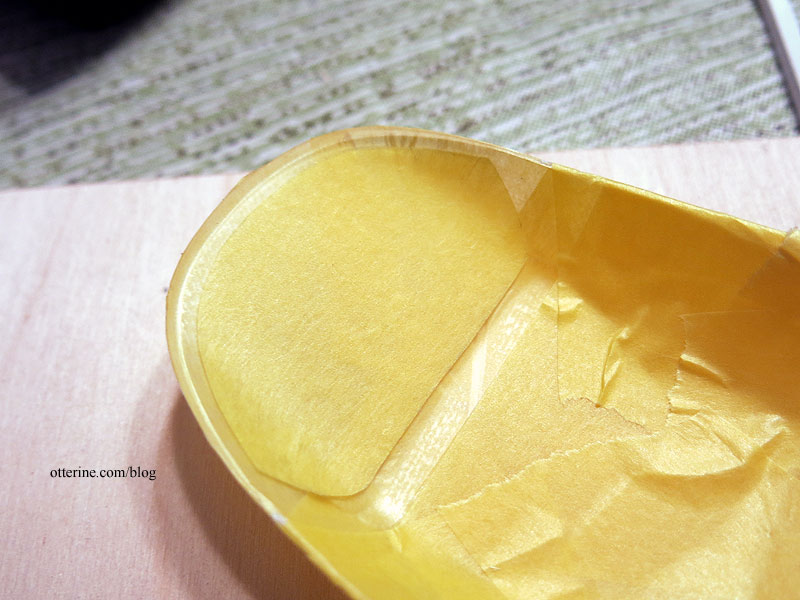
Continuing work on the RX-7 in half scale. I am making tiny half scale soda cans. Why? We’ll get to that.
This is a kit from Mr. Model in Brazil.
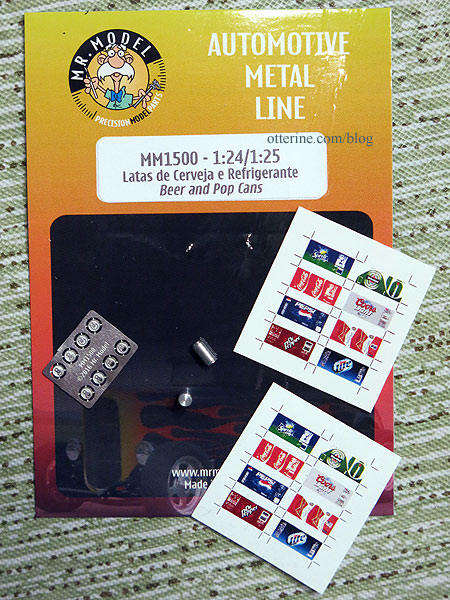
It comes with four turned metal cans, photo etched tops (open and closed) and labels for beer and soda (clear and white decals).
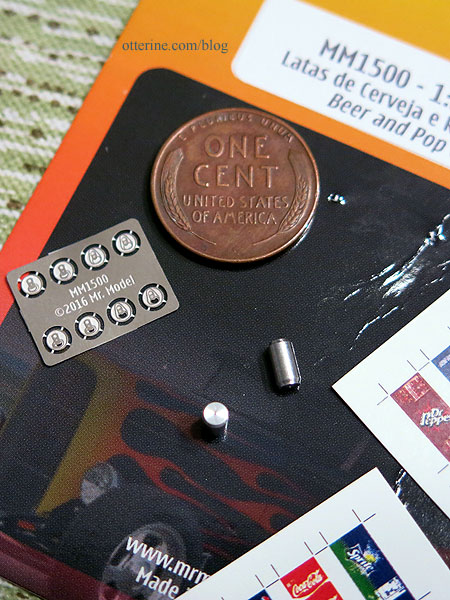
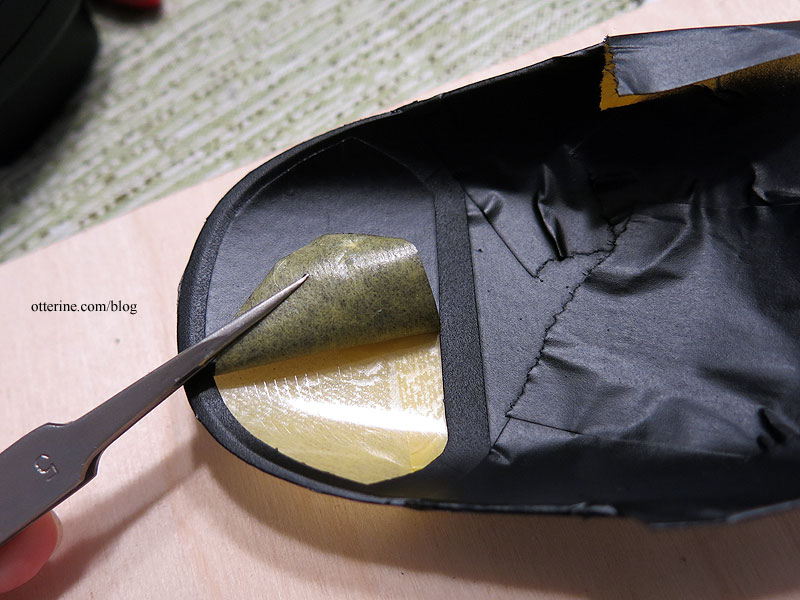
I had to use my 4X magnifying readers and even still I was cross-eyed. I am ever in awe of those who can work so small.
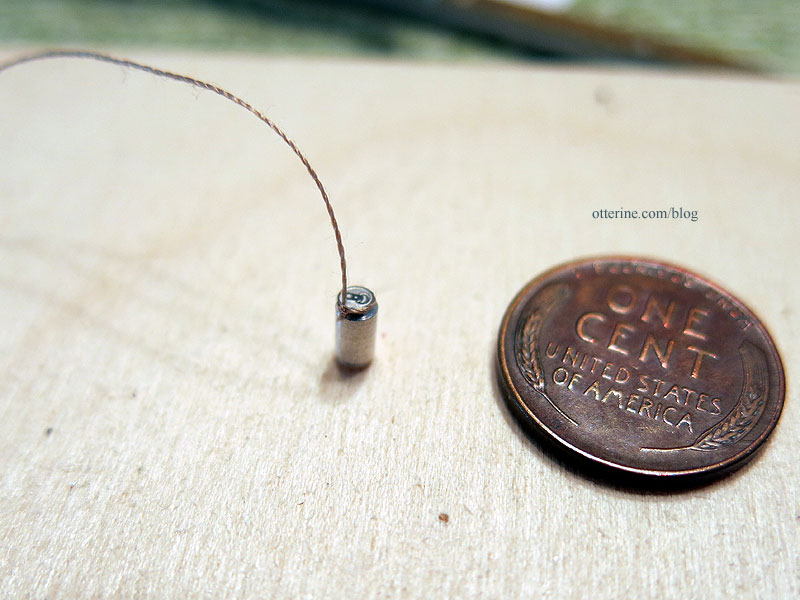
I had considered making them with the open tops since empty cans make more sense for my purpose, but drilling was not easy for lack of being able to hold the can well and I didn’t want to risk the glue not taking if I painted under the opening. Good luck telling the difference with the naked eye, anyway!
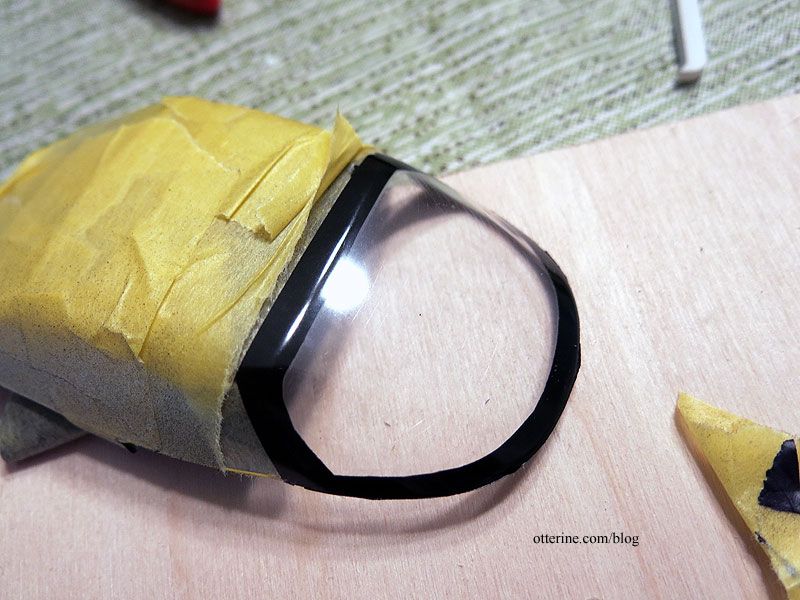
After gluing the top to the can, I needed a hand, but no one was available. So, out came the Cricut tweezers. They are the kind that you squeeze to open, then they close and hold until you release them (or they shoot the mini across the table like a wet watermelon seed).
With the thick rope tied around (yeah, that’s plain sewing thread).
Then came the tiny water slide decal that liked my fingers better than the can. :\

One down, three to go…

Categories: Model Cars, Vehicles
October 25, 2018 | 0 commentsRX-7 in half scale – lights, part 2
Continuing work on the RX-7 in half scale. After letting the paint rest awhile, I decided to tackle the few dust particles on the hood. The second attempt at painting brought the finish from a 95% to a 95%, just different. The hood looked great, but the sides were orange peeled. :\ I let it rest again, then tried a third time. This time, the hood and sides were 98% and the back end was 60%. Oy. Instead of risking the entire car, I masked the back along the panel lines and painted only the damaged portion, just like a real auto. Now the whole thing is a 98%, and I would have to say that’s the best paint job I’ve ever achieved.
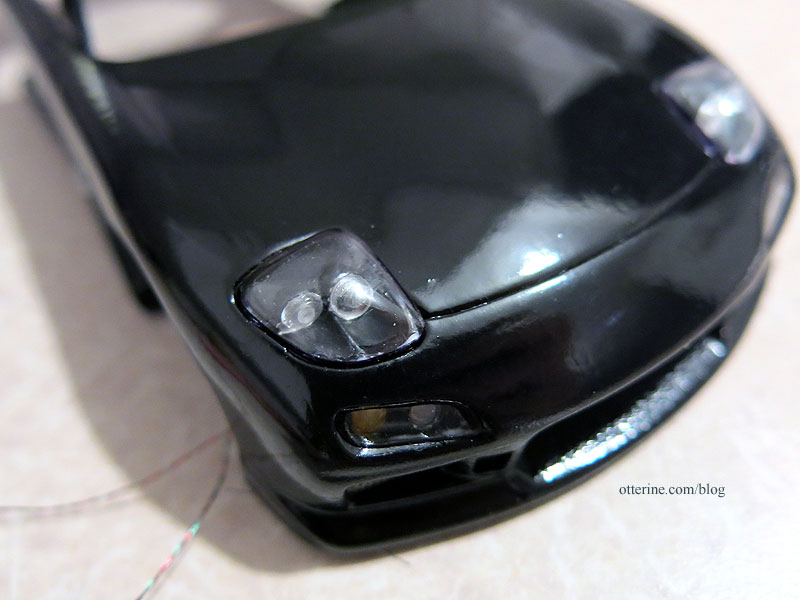
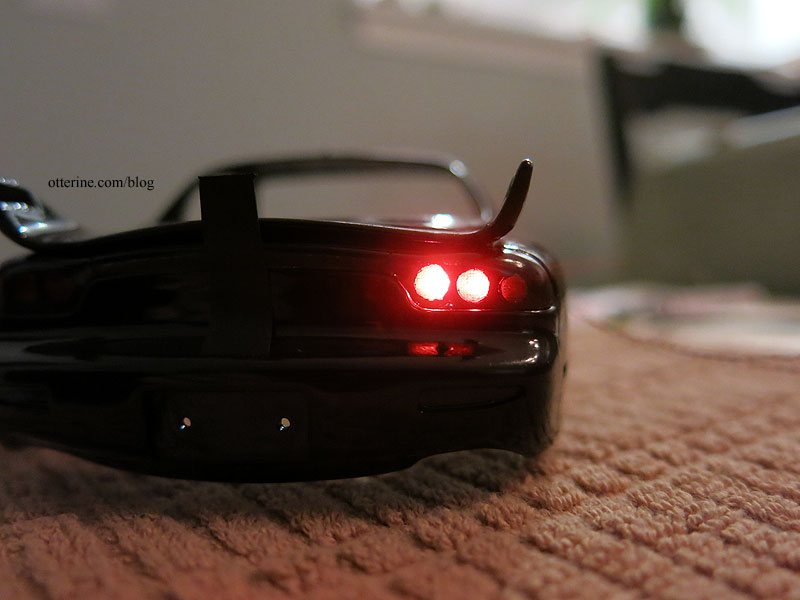
Now, when tackling the LED headlights (using 3V pico cool white from Evan Designs), I had to be mindful of where my fingers were on the finish at all times. One slight brush of glue, and it’s all over! I did as much as I could while the lights were separate from the body. First, I drilled holes for the LEDs (headlamps only, not the high beams).
I fed in the LED, then secured it on the back with electrical tape. I don’t want light escaping through any cracks; the light needs to be forward only.
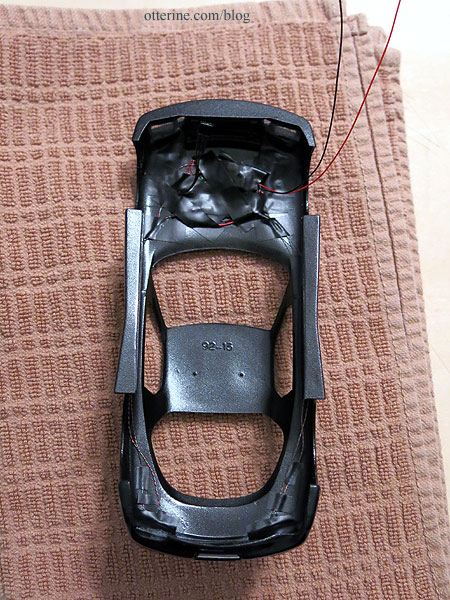
You may recall, I had to cut away the body panels for the inset light customization.
Since the front skirts are a separate piece, you’re going to get only so close in alignment. There were gaps around the piece since it’s not exactly the shape I need on either side.
The light assembly is glued into the car, but there are contact points on only two of the four sides. Yeah, that’s glue overrun you see below since you have to work from the back. After everything dried, I touched up the flat black paint as best I could. These marks should be concealed once the clear covers are on, but I wanted to prep it just in case.

I cut a larger piece of electrical tape and supplemented the adhesion with super glue gel. I want this patch to stay put.
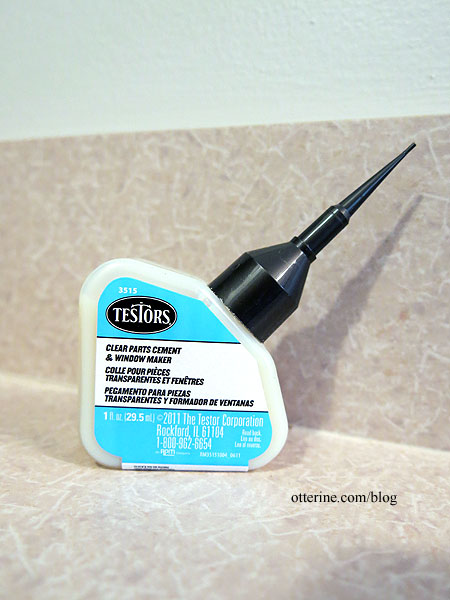
Since I had used super glue on the headlight assemblies, I let this sit for two days before touching it again. I had had some fogging issues with the Model T and didn’t want to risk it with this one, so I let the glue gas out completely. I glued the tiny circular lenses over the LED headlights and unlighted high beams with Testors Clear Parts Cement. Most of the clear parts are attached with this glue. I lined the edges of the clear covers with a black Sharpie marker.
It’s a cleaner look than just plopping them on top. The one on the left is with the outline, the one on the right is without. You can see it appears more a part of the car with the outline.

I tried using the Testors Clear Parts Cement on the headlight covers, but they would not stay. I ended up using Weldbond, a white glue. It’s not the cleanest if you study it closely, but there is so much going on there, it fades into the background relatively well.
I also glued on the taillight cover.
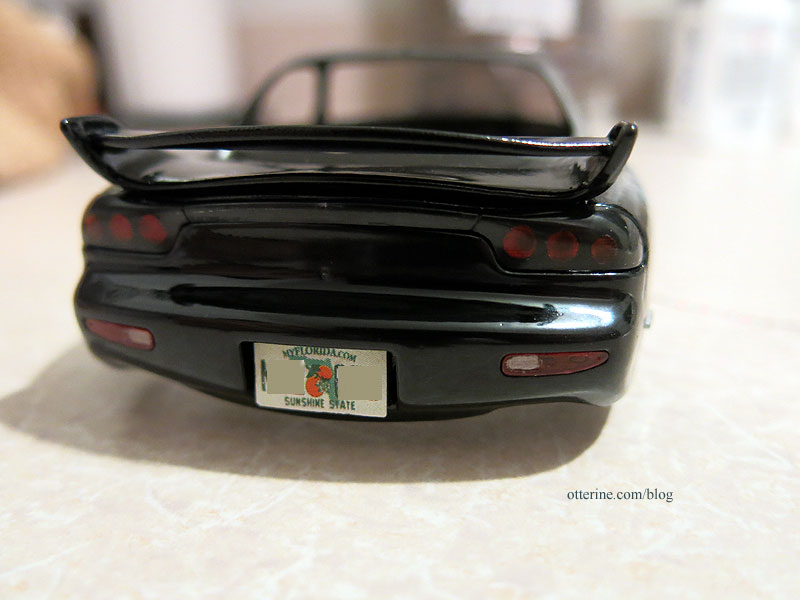
I taped the taillight wires toward the front to join with the headlamp wires. There is more room in the empty space where there would normally be an engine. The wires are matched up to work as one.
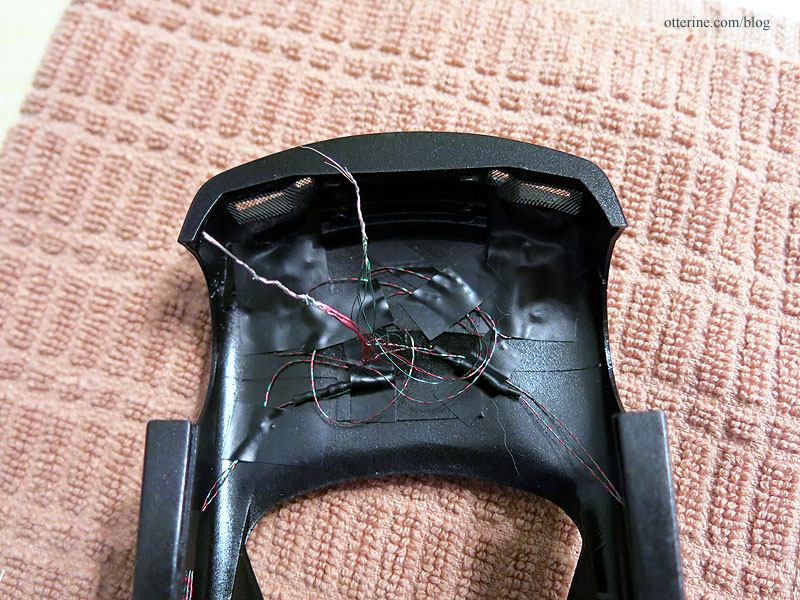
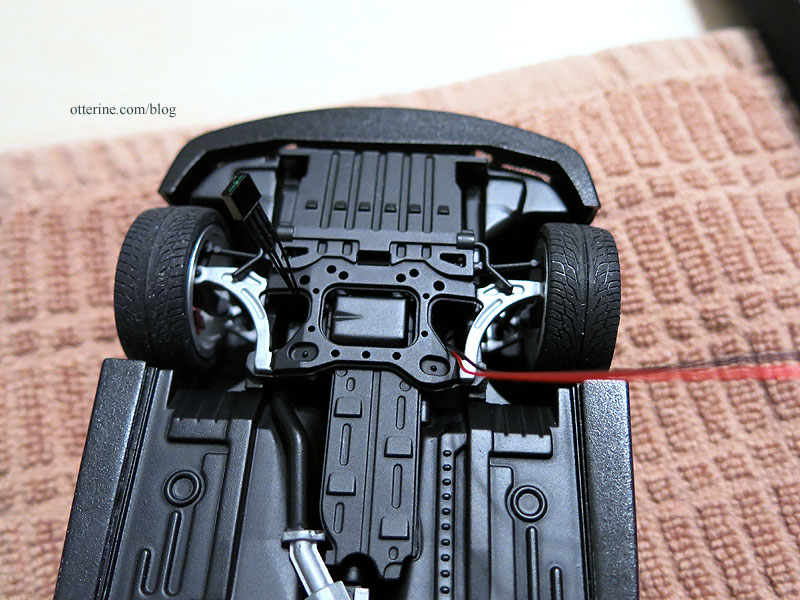
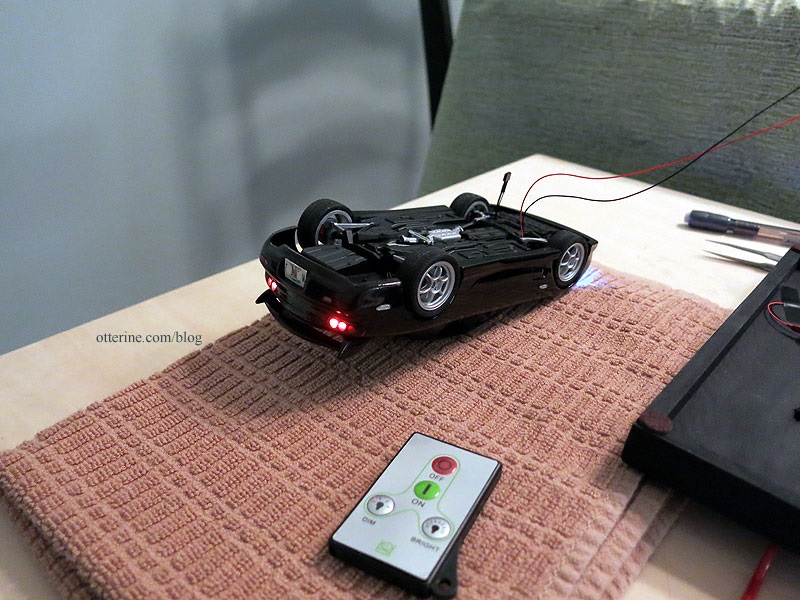
I am using a 3V battery with switch and a remote control unit. However, there is no way to hide the battery and access it in the small auto, so I am also using a connector. I built a base from wood, covered it in adhesive backed cork and painted it black. I drilled a sizeable hole in the base so the connector can be fed through and hidden underneath. It’s not the cleanest solution, but it’s the only way I could have the car disconnect from the base and have the wire relatively hidden. The battery will be housed underneath.
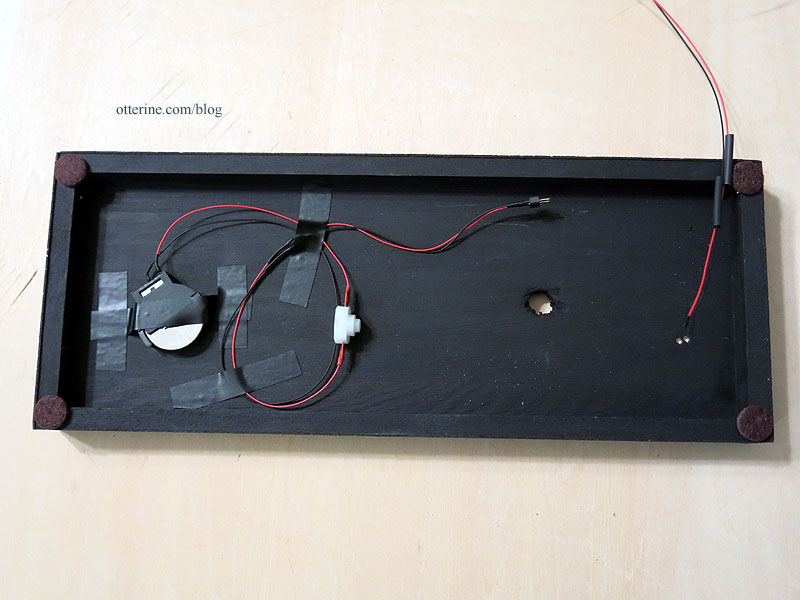
The sensor will need to be mounted on the car outside of the engine compartment, and it has plenty of excess length so I can position it on the chassis after I get the car assembled. It’s easy enough to push any unneeded length of wire back in after assembly. The remaining half of the connector will hang from the car to be plugged into the base. On the inside, there is plenty of electrical tape holding things neatly in place.
Here I am checking the fit without glue.
Checking that the lights work after each step is imperative in working with LEDs. You don’t want to get through the whole ordeal just to backtrack to find your issue.
I know, all this chatter about lights, and I leave you without a photo of the pizzazz? You won’t have to wait long. I want to finish up the build and use the wow photos for the final post.
Categories: Model Cars, Vehicles
October 25, 2018 | 0 commentsRX-7 in half scale – more miscellaneous detailing
Continuing work on the RX-7 in half scale. To detail the front, I added some aluminum mesh by Scale Scenics.
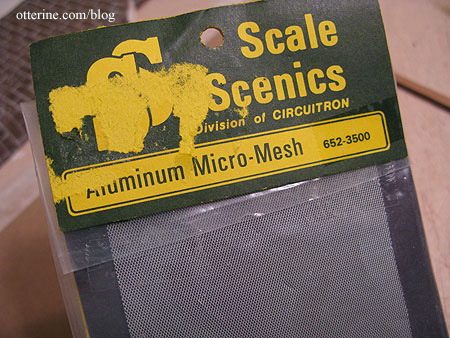
The center required a template since I didn’t want to risk obliterating the skirt trying to remove the excess plastic.
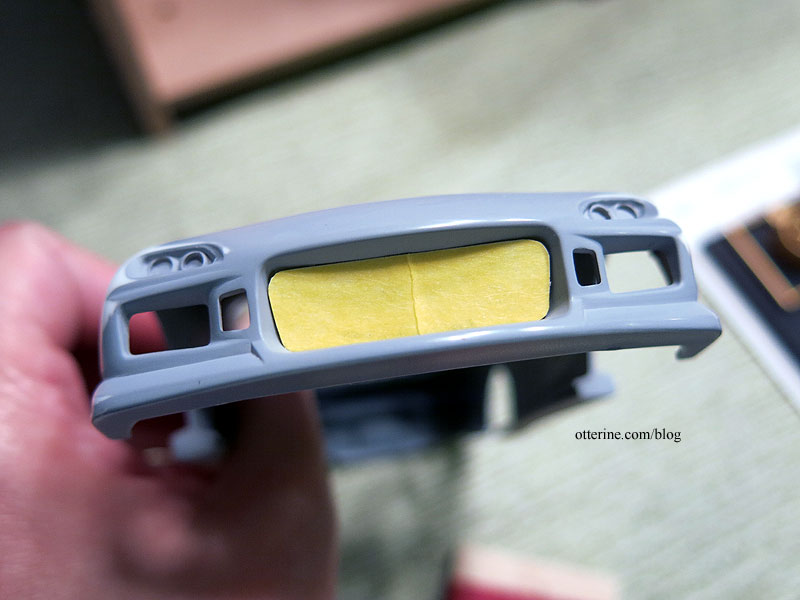
For the two side vents, I just glued the mesh behind the openings. It’s a subtle addition, but it amps up the sports appeal. :D
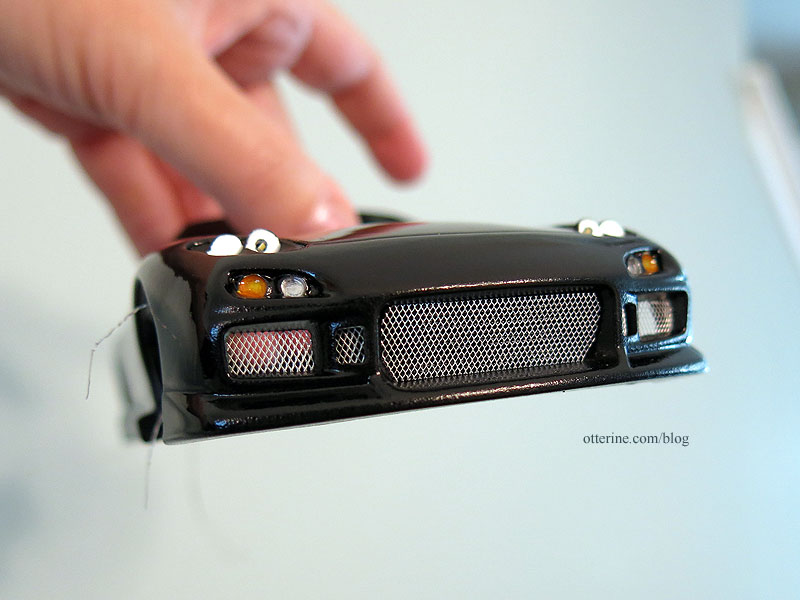
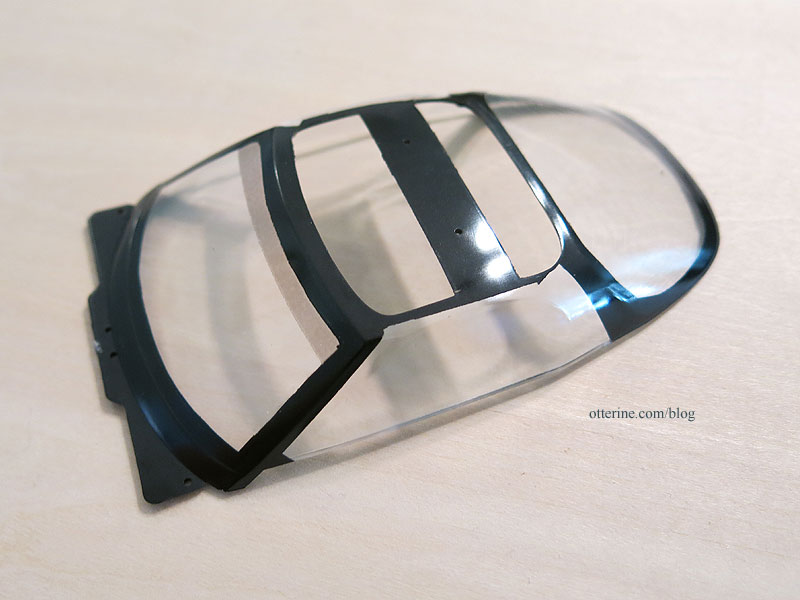
I got the windows masked and painted. I then added a line of shading with the Tamiya Smoke spray. Have to keep the sun out of our eyes while driving.
I bought Testors Clear Parts Cement for working with any of the clear parts. Usually, any kind of super glue will make clear plastic foggy. I tried it out on a spare clear part to be sure, and it worked as advertised.
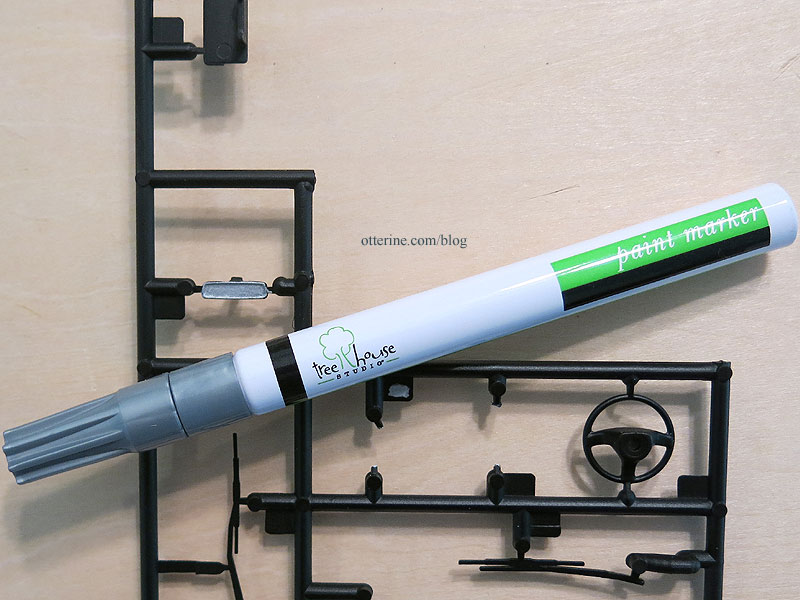
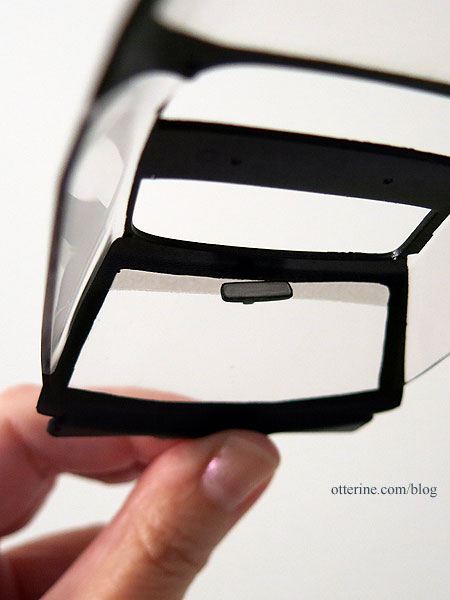
You are to paint the rearview mirror silver, so I used a paint pen.
I cleaned up the black outline once I removed the part from the sprue. It gives the impression well enough. I will install this assembly at the end when I put the body on the chassis. These are notoriously bad at staying in place over time, so let’s hope it doesn’t end up rattling around the interior.
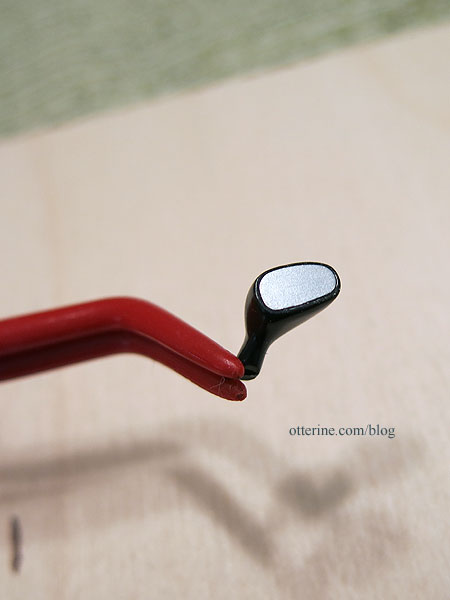
The side mirrors have inserts that are also not truly reflective. These I will attach at the end to minimize the risk of breaking them off.
I glued in the various reflectors around the car and installed the upper portion of the rear spoiler. Looks like we’re getting somewhere. :D
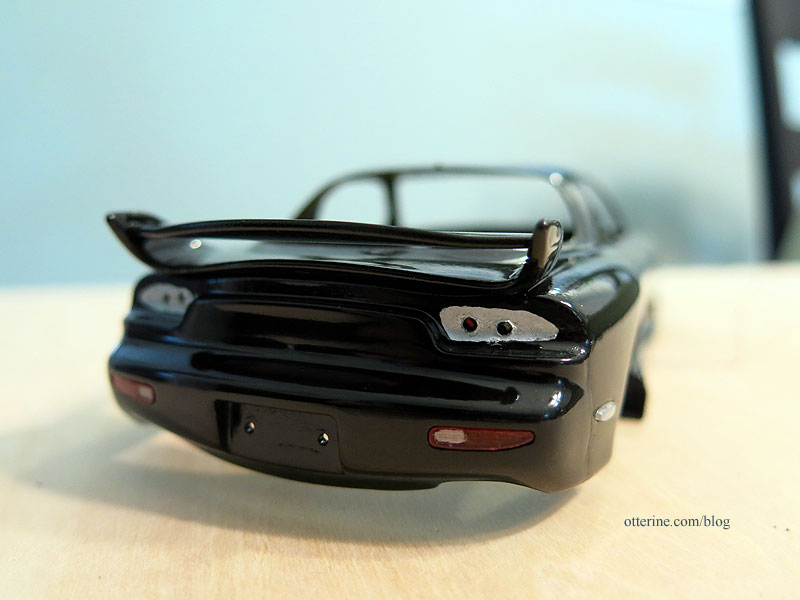
I added spare reflectors where I had removed the molded in side lights. Much better than trying to paint tiny nubs of plastic without ruining the body paint.
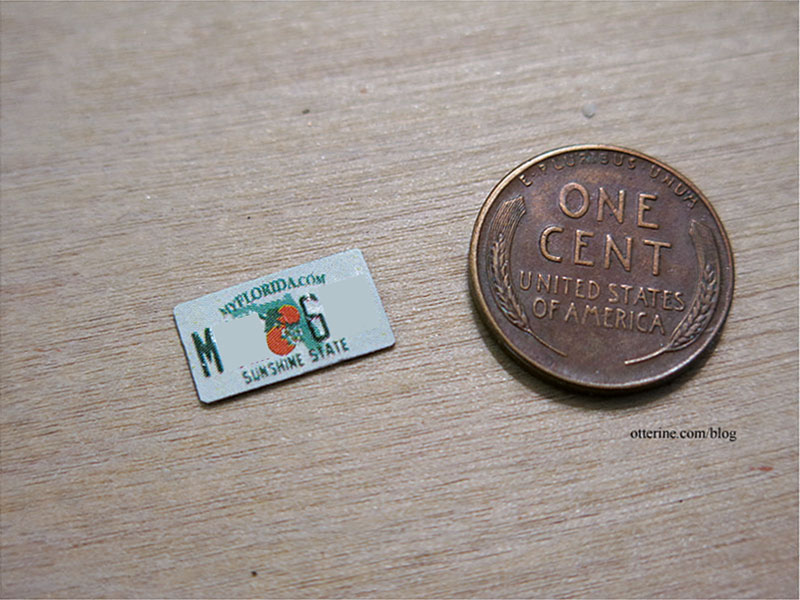
I also made a tiny license plate. I didn’t think I would be able to emboss a half scale plate, but it worked! (I’ve covered most of the numbers to protect privacy.)
Categories: Model Cars, Vehicles
October 21, 2018 | 0 commentsRX-7 in half scale – lights, part 1
Continuing work on the RX-7 in half scale. Yeah, ever since I wired the Model T for LEDs, I’m going to have a hard time not wiring all my cars going forward.
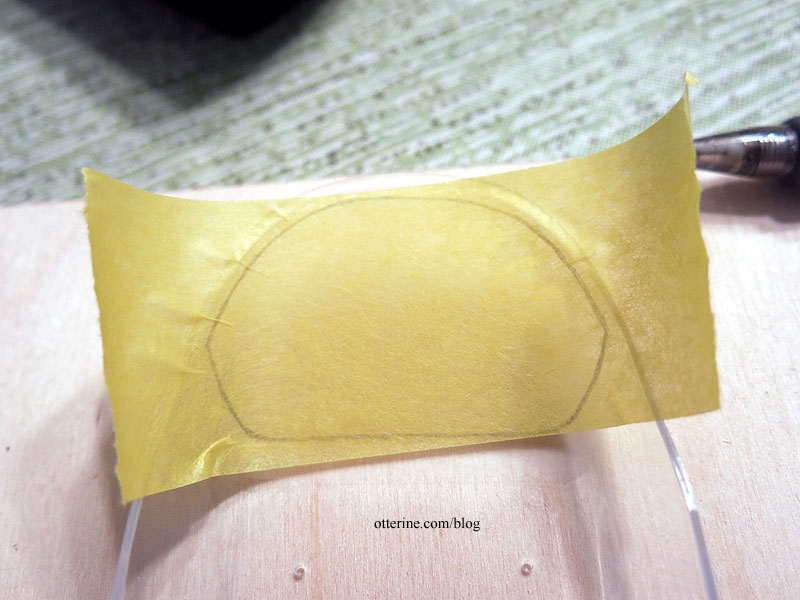
Since I’m looking to put in only headlights and taillights, I painted the back of the clear reflectors/side lights silver. The paint brings out the detailing and makes them appear brighter.
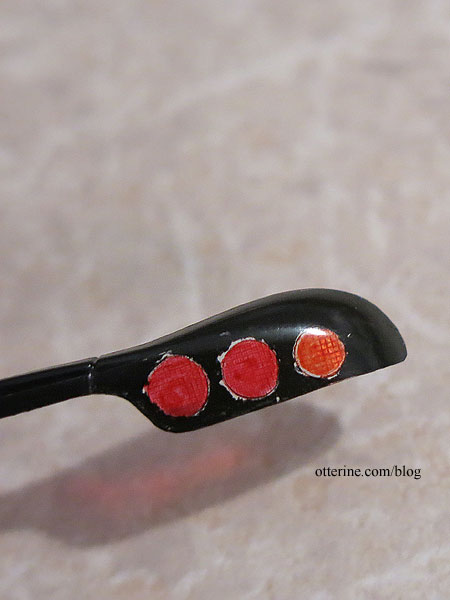
The rear lights are one continuous clear piece. I colored the red and orange portions with Sharpie markers. There is a slight third brake light in between, but there was no way I could have painted that without getting red all over the rest – it’s a tiny sliver too narrow for my markers. So, we’re not going to worry about it. Picking my battles. :D
I masked the colored areas with Winsor & Newton Masking Fluid. This is a pricey fluid used for watercolor painting; it covers any space you want to remain white on a painting. You use an eraser to remove it from the paper after the paint has dried. I used a 50% off coupon at Michaels.

I thought it would work well to mask the lights since I didn’t think tape would really seal the area that well if I could even cut circles that small.
The nice thing about the liquid is if you don’t like the mask, you just let it dry and remove it to start over. It dries clear, which is good or bad, depending on how you look at it. Just make sure you are happy with the mask while it’s still white.
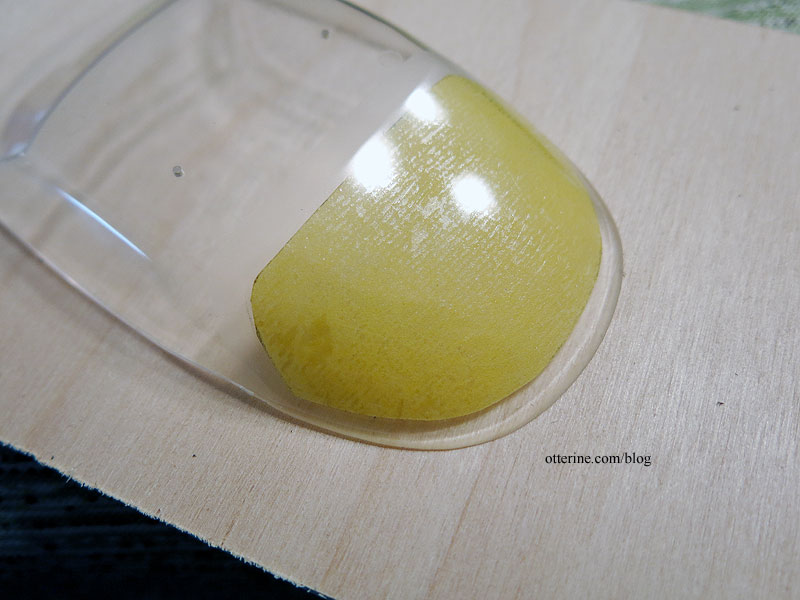
I painted the back of the piece with black acrylic. I used acrylic instead of enamels since I wasn’t able to figure out how to mask the outside well enough to prevent marring the finish. Acrylics clean up easily, and this back side will not be seen.
The exterior surface remains glossy, and the color fills in the back. It looks great like this, but the masking is still in place.
I removed the masking, and you can see how uneven the mask ended up being. Still better than I could have done free hand painting around the circles. I touched up the paint with a tiny brush as best I could (sorry, forgot to take a pic after touching up).
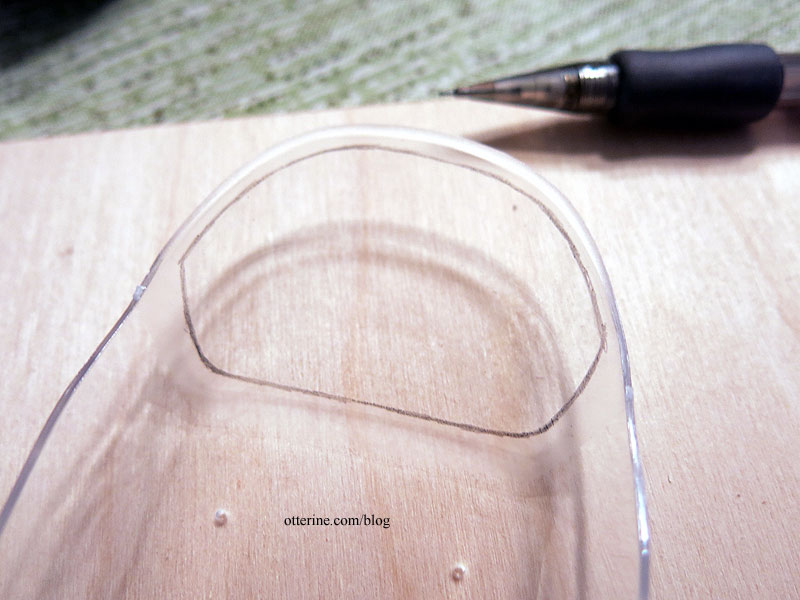
I am using 3V pico LEDs from Evan Designs. These are so wee! I lined up the cover piece with the back of the car to determine where to drill holes for the lights. I painted the area under the light covers silver.
I pushed the pico lights into place and fastened with electrical tape on the inside.
I don’t want to glue the plastic cover on just yet to limit the handling, but it looks like it will work well. :D
I didn’t put in lighting under the orange. Working turn signals are for another time. The headlights are up next.
Categories: Model Cars, Vehicles
October 20, 2018 | 0 commentsRX-7 in half scale – miscellaneous detailing
Continuing work on the RX-7 in half scale. When trying out new techniques, it’s nice to have spare parts to use so you don’t risk ruining the final parts. It doesn’t guarantee that you won’t mess up the final parts, unfortunately. But, it gives you practice that is invaluable.
Many cars have black edge detailing around the windows, and to paint those, you need to make a mask of the area. I use the process detailed in this video (starting at 1:10). I’m using Frog tape and painted with flat black spray paint instead of hand painting with bottled paint. Bottled paint goes on heavier and can wick under the tape whereas spray paint can be put on in light coats that stay put.
You have to get a good mask on the outside to prevent overspray on the “good” side.
The small exposed area is where I sprayed the paint.
The trial worked well. Let’s hope I can replicate the results on the final piece.
I wanted to try tinting the windows as well. I used Tamiya Smoke.
This paint needs to put on sparingly and from a distance on the underside of the window (again you mask the outside to protect the surface). You build up the layers to get the level of tint you want while the outside stays glossy like glass. While the effect is nice, I think it will block too much of the interior detailing. You can’t easily discern the tweezers through the tint in the photo below.
This will be a great resource for dirty windows on other projects, though. :] I usually just use overspray, but this was easier to control.
The side mirrors are molded separately from the body, which makes it easier to get a good finish, but there are mold lines and sprue connections that need to be cleaned before painting.
That also makes it difficult to paint since you have to hold the parts somehow while painting. Here is one mirror after removing the lines and nubs.
I put tape on the end of a bamboo skewer to hold each mirror. Since there will be a simulated mirror in each one, it’s okay to not paint the interiors.
The spoiler top was also problematic in finishing since there is no way to hold it while painting. Well, you can hold it, but putting it down while it dries is the main issue. I masked a clamp and held the part by the ends where it will be glued to the spoiler base already on the car. It was the easiest way to hold the part without ruining the clamp in the process.
Bits and pieces get the job done….
Categories: Model Cars, Vehicles
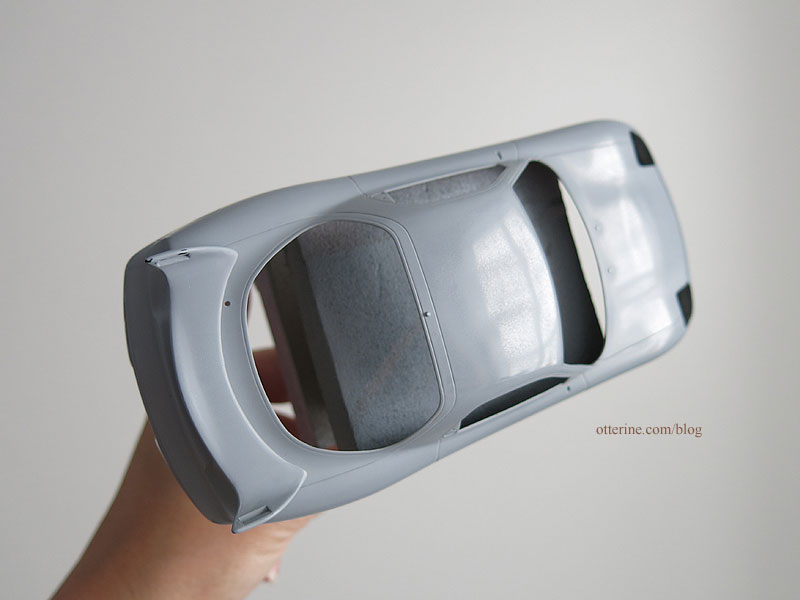
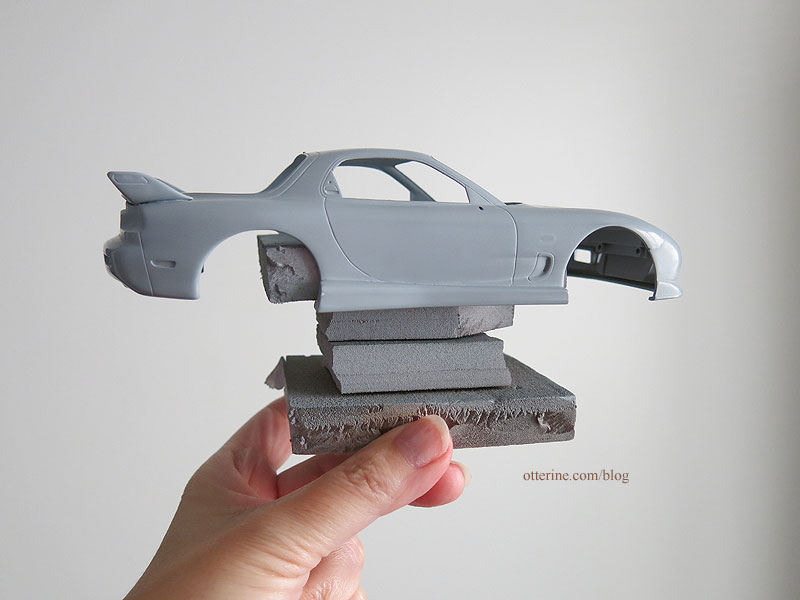
October 14, 2018 | 0 commentsRX-7 in half scale – body paint
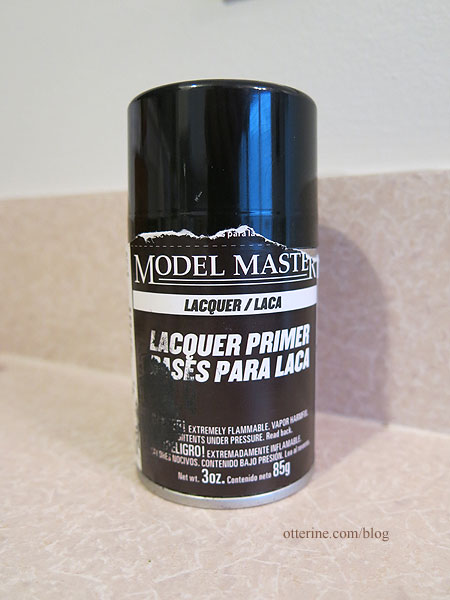
Continuing work on the RX-7 in half scale. For the base coat, I’ve used Model Master Gray Sandable Lacquer Primer Spray (yeah, that’s a mouthful). :D
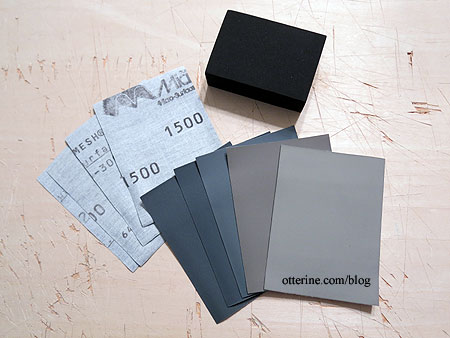
I then wet-sanded using the Micro-Mesh Sanding Sheets in 4000, 6000, 8000 and 12,000 to get as smooth a surface as possible.
The better the primed surface, the better the top coat. You can see the sheen in the reflection.
My makeshift holder is made from scraps of builders foam.
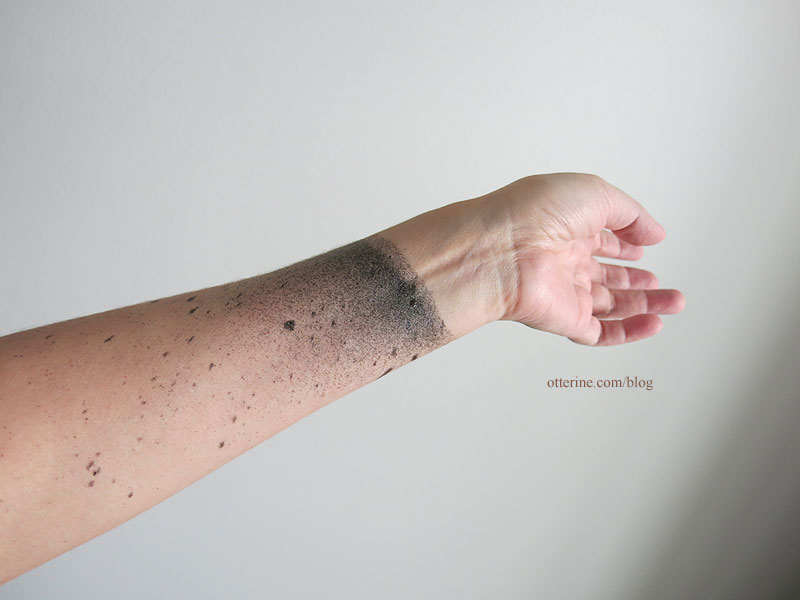
My new tattoo. Looks like I need a longer glove when spray painting. :D
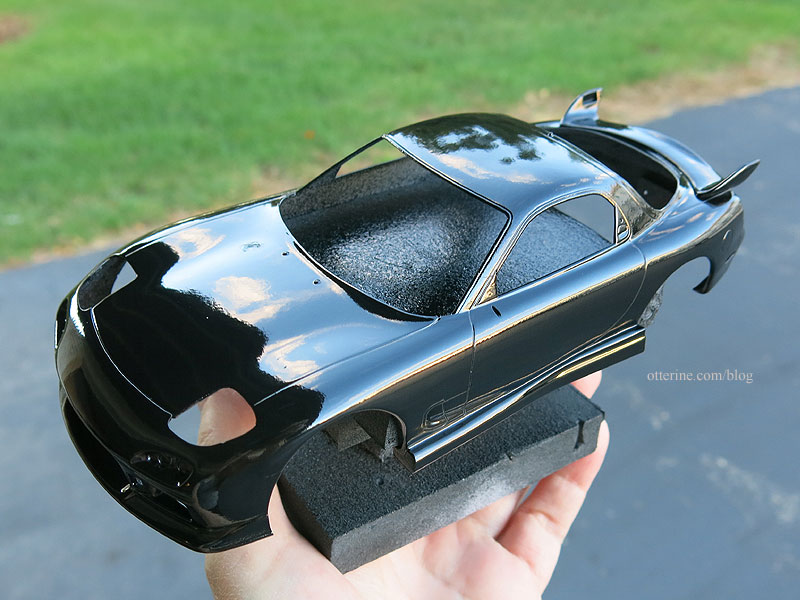
The paint is 95% perfect, which is about the best you can hope for most of the time. Woot! Once it has set, I’ll see if I want to attempt to buff out the few dust particles that invariably get caught in the finish. Sometimes messing with it makes it worse. So far, so good, though. :] The side skirts and new wing look pretty seamless now, which is what I had hoped.
Categories: Model Cars, Vehicles
October 4, 2018 | 0 commentsRX-7 in half scale – interior
Continuing work on the RX-7 in half scale. The interior is fairly straightforward, just tedious and time-consuming. The C-West kit comes with both left- and right-hand driver dashboards, which is fun. However, the seats are lacking. The Tamiya kit has seats that are molded as one piece – much cleaner than trying to get fronts and backs to match seamlessly. So, I swapped out the seats.

Decal placement takes a steady hand and some patience, though there is one thing the instructions don’t mention. Each one has a halo around the actual image that should be removed as close as possible. This is especially important for fitting into depressions made for the decals, such as the dashboard.

If you don’t remove the halos, the decals will simply not fit the spaces. Those three on the left are super tiny.

I glued the various interior pieces…

…and glued the bucket to the chassis. :D

Categories: Model Cars, Vehicles
September 28, 2018 | 0 comments


NOTE: All content on otterine.com is copyrighted and may not be reproduced in part or in whole. It takes a lot of time and effort to write and photograph for my blog. Please ask permission before reproducing any of my content. (More on copyright)

Mail Wagon – part 10
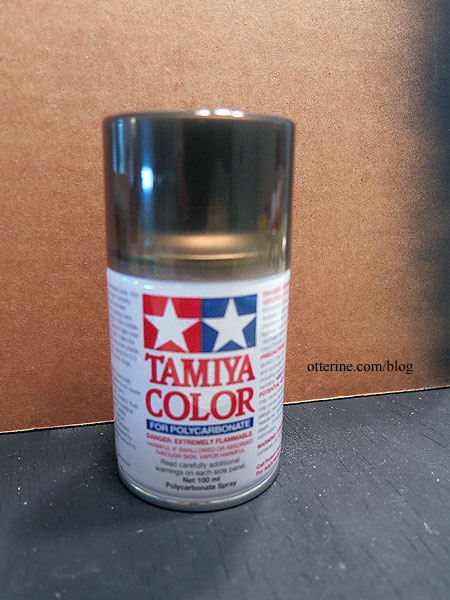
Continuing work on the mail wagon. As you saw last time, I had primed the wagon wheels. On the hubs, I used Rust-Oleum Aluminum Primer, which is light grey. It bonds specifically to aluminum, and an aluminum primer was recommended in the instructions for the doctor’s buggy.
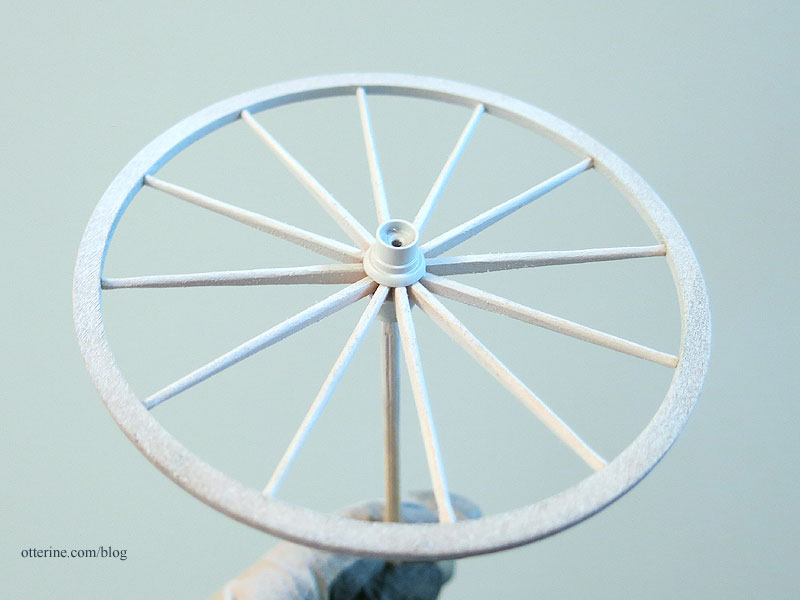
I then used plain flat grey Rust-Oleum primer. As you can see, the wheels are rather fuzzy.
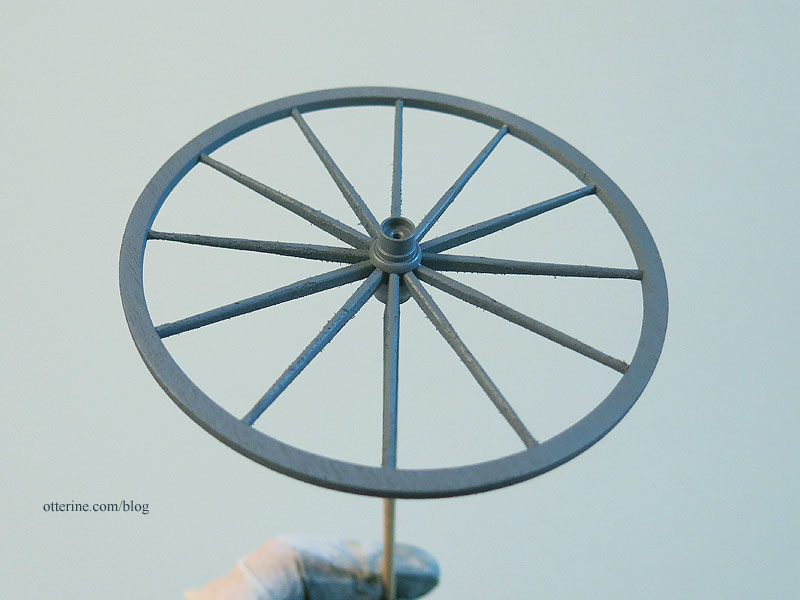
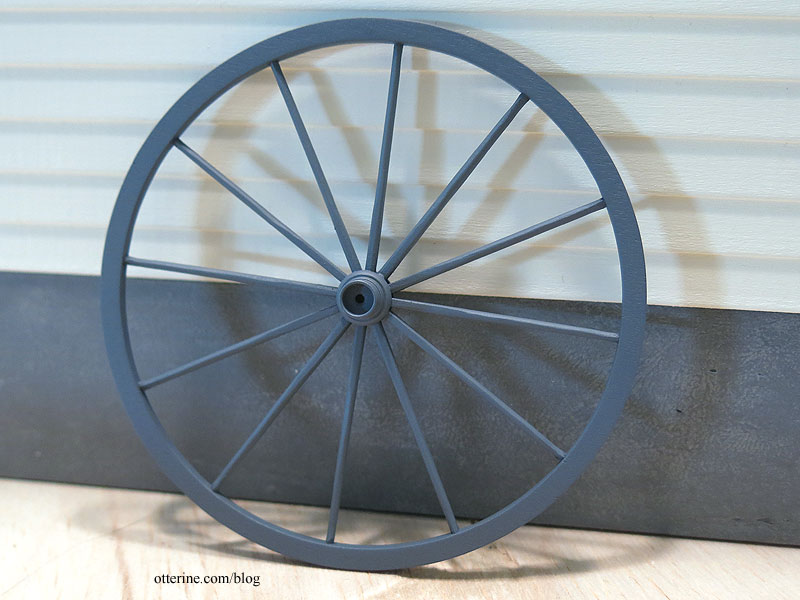
Sanding after priming a first coat always helps smooth the fibers away. Then a second quick spray of the same grey primer and they are now ready for final color when I get there….
Back to the cabin. I made a drawing for the front based on my built walls, not the previously drawing of the sides. My final measurements for the sides ended up being different from how I had drawn them.
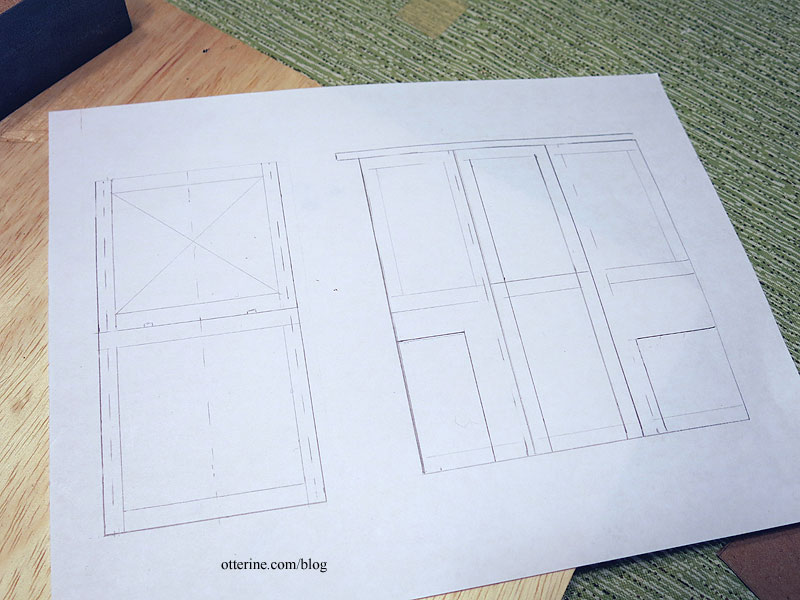
Before continuing, I cut the front and back from cardboard to get a feel for the final size. Easier to adjust here than after I started building the front hinged window.
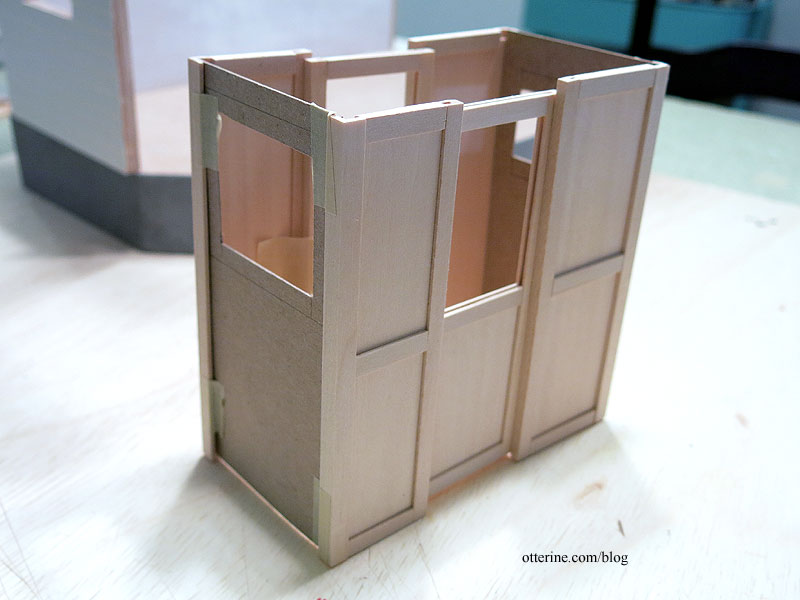
I checked the width against the rear axle assembly, which can be adjusted to fit, but I think the cabin size is good for proportion.

Categories: Ivy Hollow RFD, Model Cars, Vehicles
September 21, 2019 | 0 commentsMail Wagon – part 9
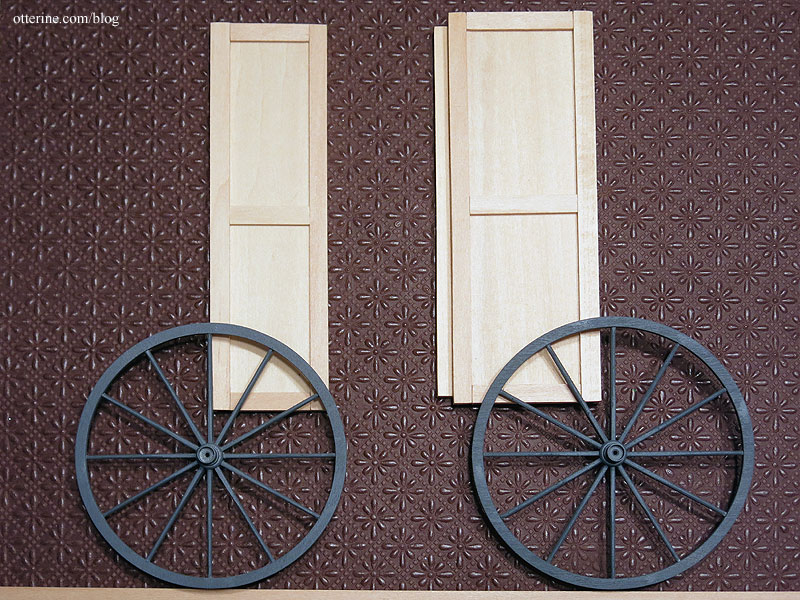
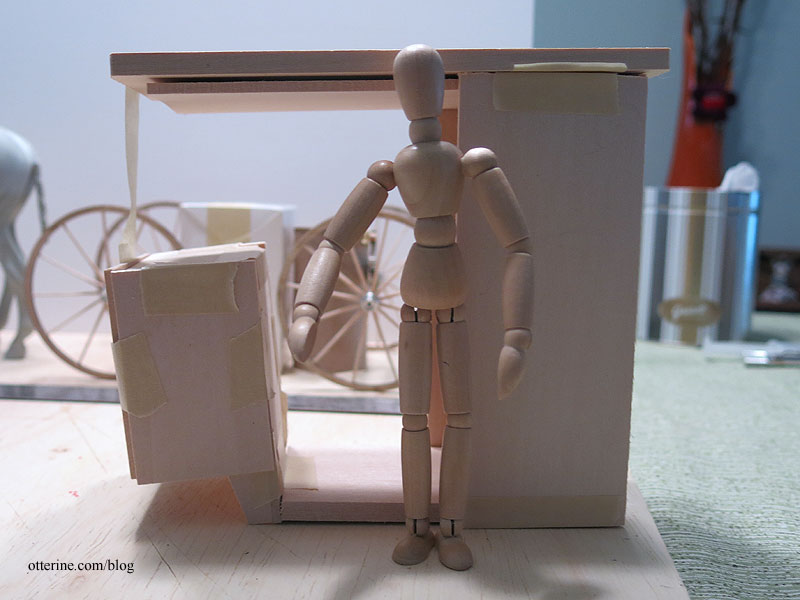
Continuing work on the mail wagon. I’m planning a basic box cabin with trimmed details, a hinged front window, and sliding side doors. I’m using 3/64″ thick basswood sheets (3″ x 24″) for the majority of the parts. It’s thinner than 1/16″ and therefore lighter in weight but still durable when trimmed.
I started by drawing a quick sketch using the Rondel kit sides as a starting point, then refining from there based on measurements for average seat height, the seated height of my artist model and general proportions from the various mail wagon examples I’ve reviewed.
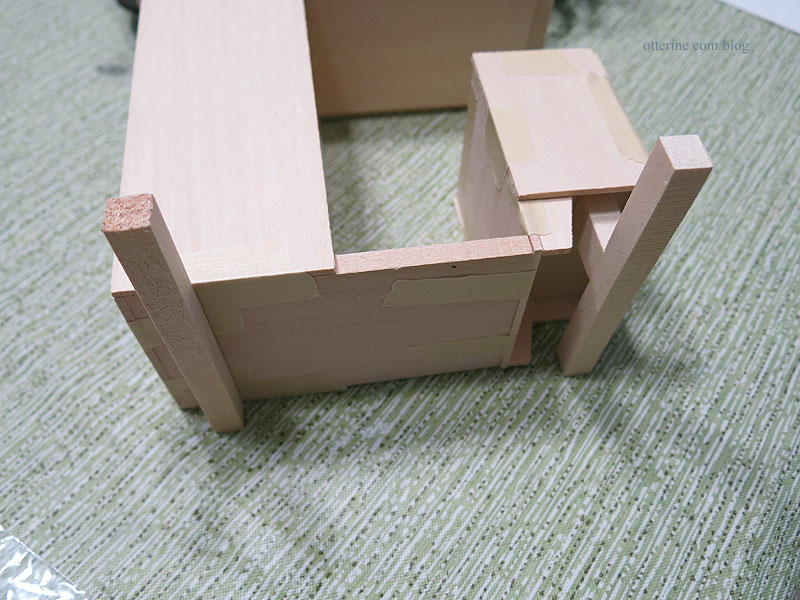
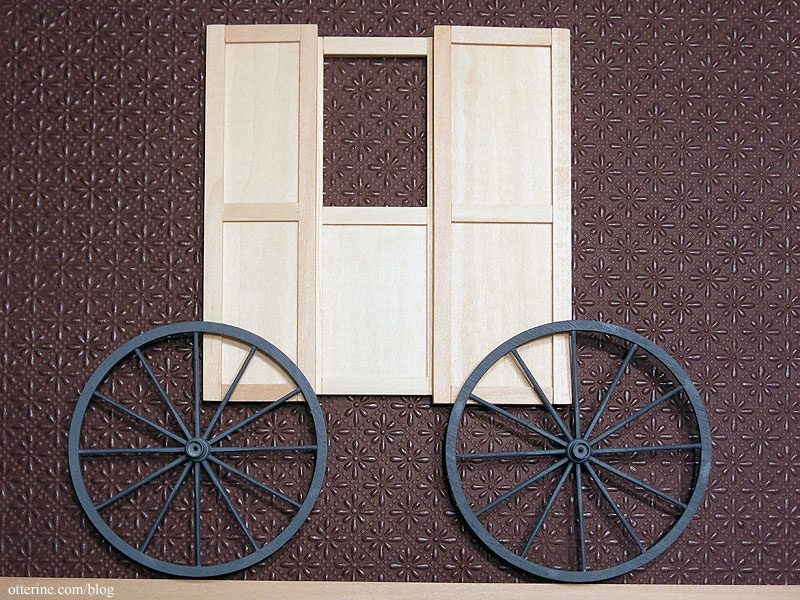
The two doors are where I will begin, then I can build the walls to enclose around them. If these don’t work, then my basic construction will change since I’ll make hinged doors instead. I’m using door frames from Northeastern Scale Lumber, cutting them down width-wise. I am sure there must be a place to get the window channel that Houseworks uses to make their windows, but I have yet to discover it.
The door frame material holds the 3/64″ thick basswood perfectly as an insert, and 3/64″ thick trim finishes the frame. The top will have acrylic sheet for the window. As I was working, I decided to make my door a little wider than my drawing for practicality. This will add a modest amount to the length of the wagon, but it seemed necessary for better proportion. Here is one door with the original width of door frame material on the side and the other with the width cut down.
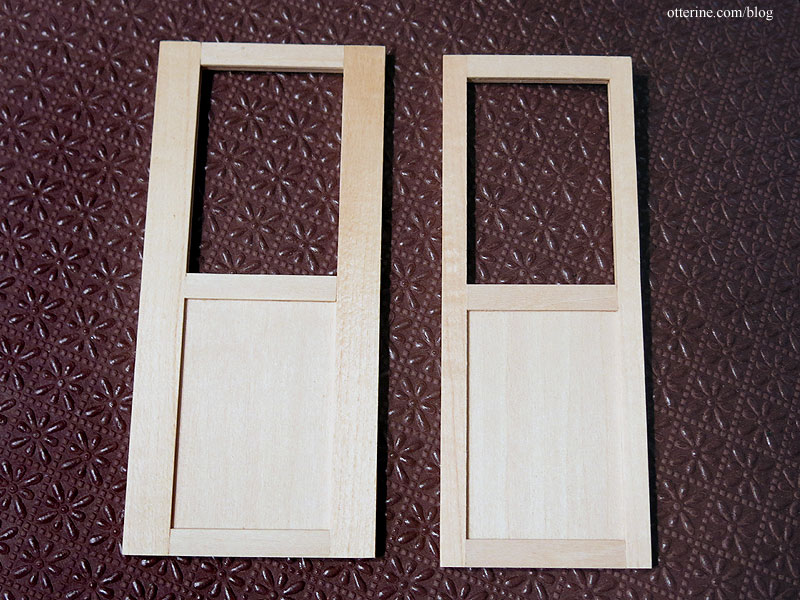
I built the side front and side back walls using the door frame material for the lead edge of the door openings as well as the tops and bottoms, cut down to size width-wise. I used 1/4″ corner trim for the front and back edges to make it easier to join the front and back of the cabin when I get to that stage.

Most of the examples I saw had no side windows, sometimes small slits to peer through, so I’ve left the side walls solid to have more room for the lettering. The cross trim on the side front and side back panels isn’t glued in place yet, since I want it to line up with the door in the end. Leaving it unattached allows for adjustment later.
Each door will slide to the back just short of its door handle.
I think this will work well, so next I will make the front, back and floor.
Categories: Ivy Hollow RFD, Model Cars, Vehicles
September 8, 2019 | 0 commentsMail Wagon – part 8
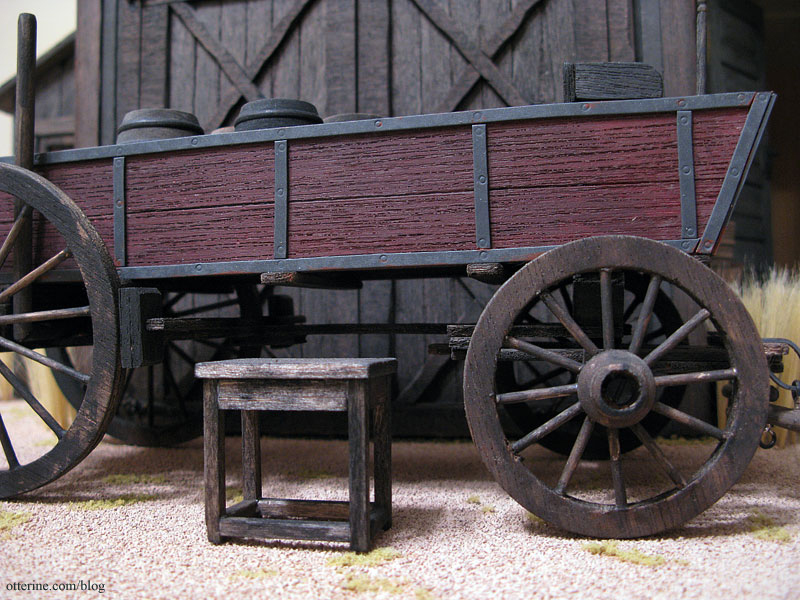
Continuing work on the mail wagon. With the front and rear axle assemblies and wheels made, I can start to build the cabin. I’ve pretty much been researching mail wagons since I started down this path, and there was no standard type of wagon over the years. RFD was such a novel thing, though horse wagons were not, it really was each man for himself. So, I get a lot of room to play.
There were sliding doors and front windows that could be lowered into the front wall.
image from The Smithsonian There were hinged doors.
There were hinged windows and mail slots.
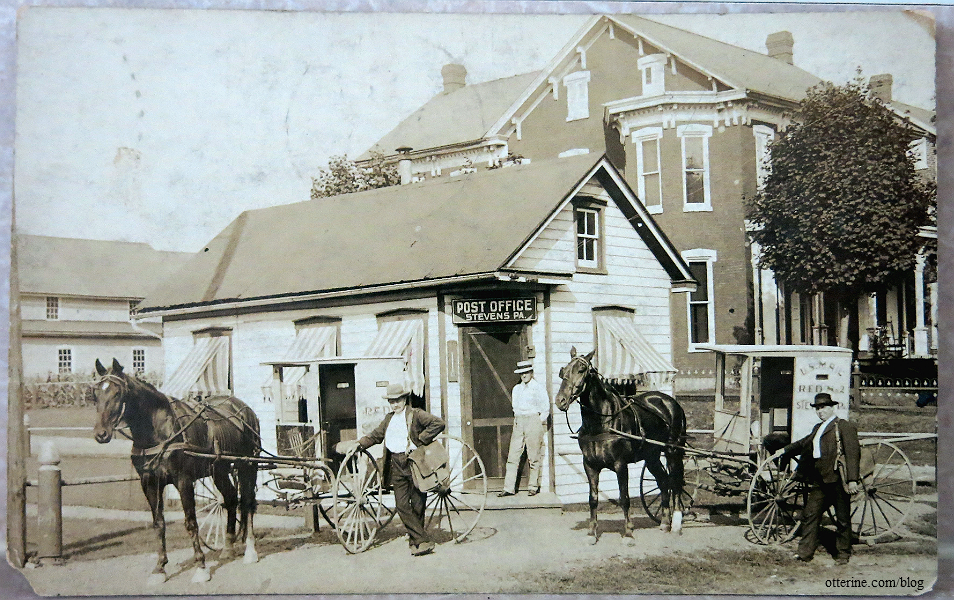
If you look at the original wagons from the postcard, there was no room in front – just the window wall.
There were built in heaters and portable heaters.
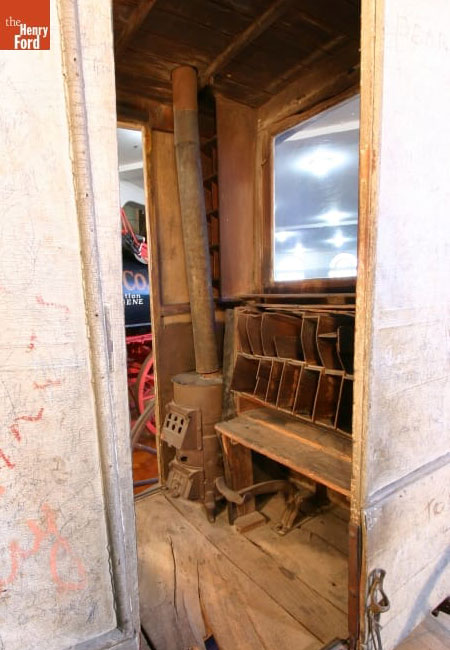
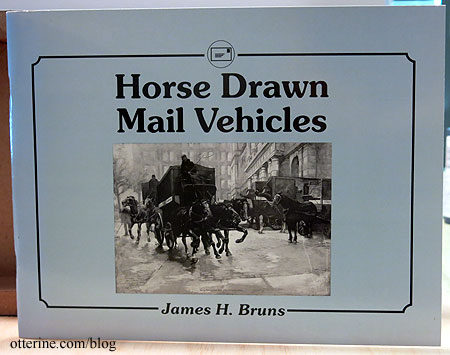
image from The Henry Ford One great source is Horse Drawn Mail Vehicles by James H. Bruns
Look at this tiny thing that’s barely a box built around a chair and a heater! Where did the mail fit? I’m also pretty sure only one horse was needed. :]
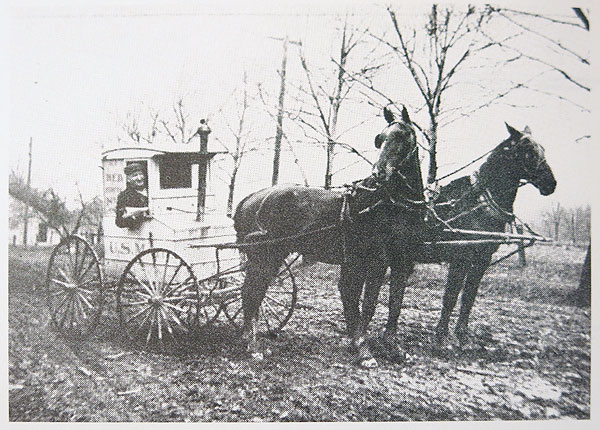
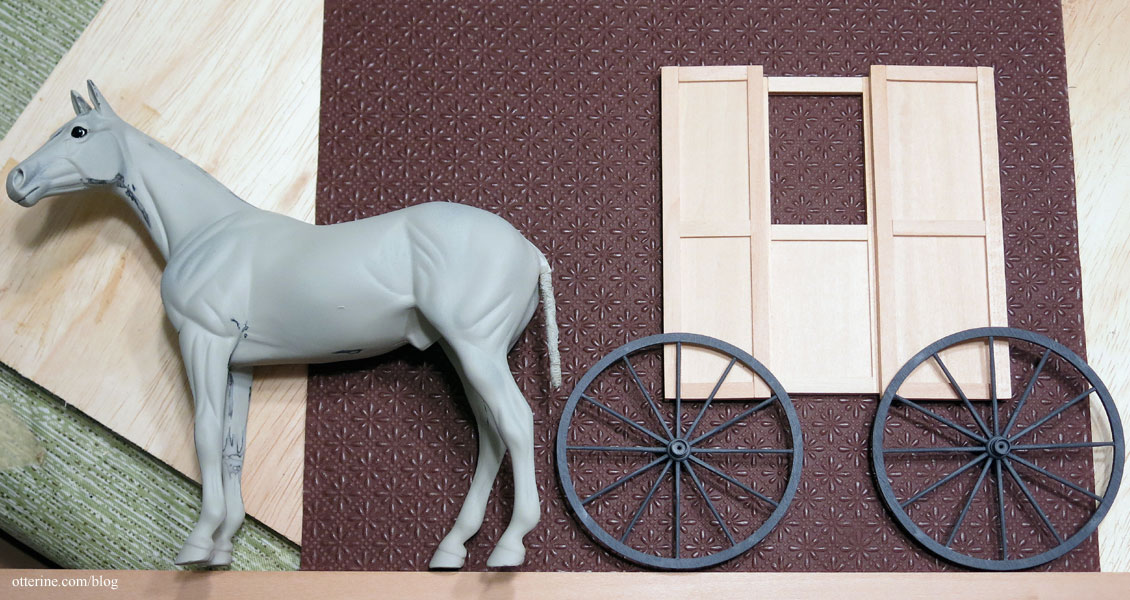
from Horse Drawn Mail Vehicles by James H. Bruns I set up my wheels and axles with Jebediah and one of my artist models. I can probably back Jebediah to the wagon a bit more, but this total span is 17 inches from his nose to the back of the wheels.
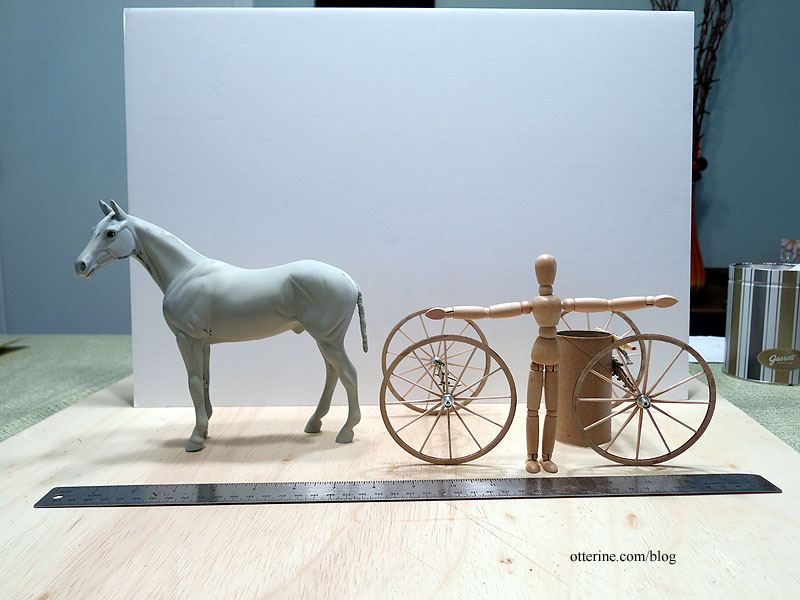
The span from the axle centers is 5.5 inches. Having a very narrow space between the wheels for the mail carrier to enter the wagon was not uncommon.
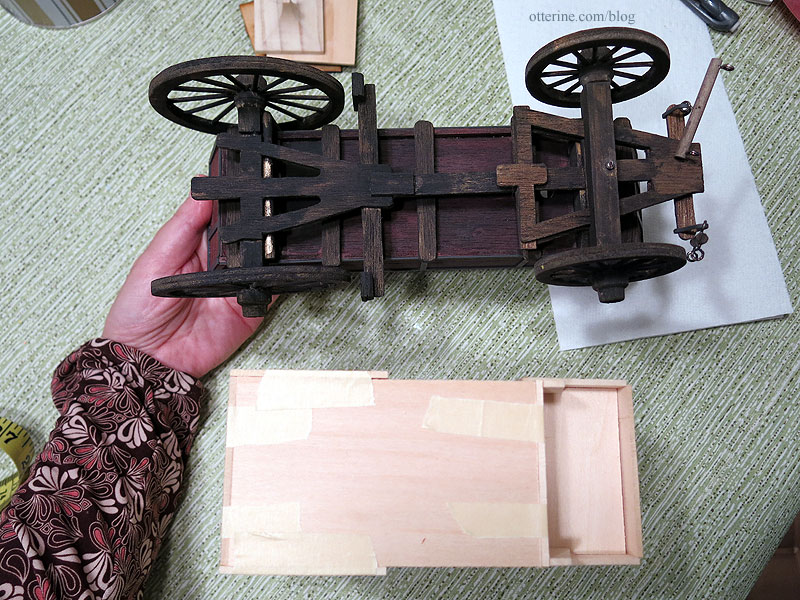
I won’t be using the Rondel kit, but here is that cabin in dry fit for size comparison (obviously not this tall).
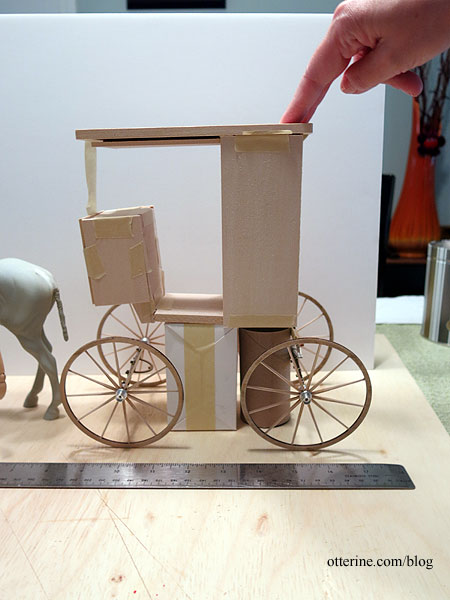
This should be a good gauge for overall size, though.
I’ll need to make the cabin as light as possible since the axles are fairly delicate, but I can layer thin wood to get good detailing without adding a lot of weight.
Categories: Ivy Hollow RFD, Model Cars, Vehicles
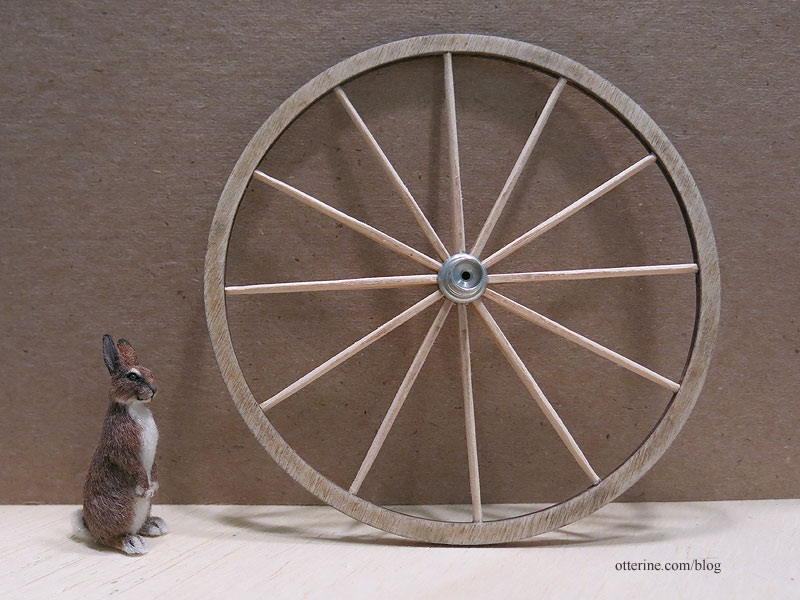
September 1, 2019 | 0 commentsMail Wagon – part 7
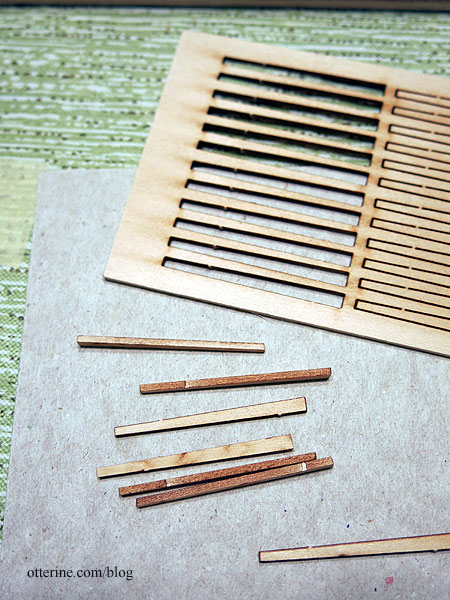
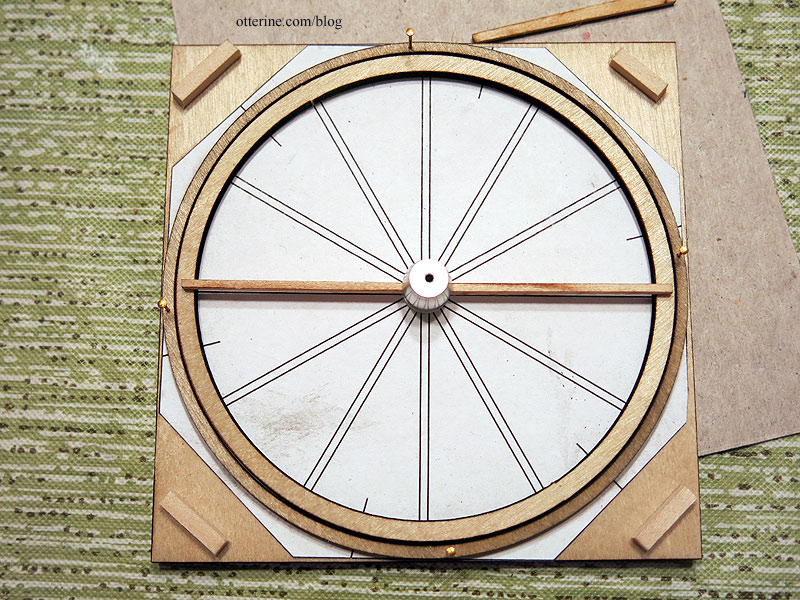
Continuing work on the Mail Wagon. With the replacement wheel parts received, I was able to assemble all four wheels. I decided to use the “scrap” wheels that were cut between the thin true parts. The scrap wheels are more substantial for a mail wagon versus a doctor’s buggy, and I will be handling the wagon and therefore the wheels a lot during the cabin construction. As expected, the replacement scrap wheels are slightly smaller than the original wheels, but this works without issue. I’ve seen mail wagons with all the same size wheel and those with smaller wheels in the front.
I left the previous large wheel on the jig and fit its corresponding scrap wheel inside since the paper pattern isn’t meant as a guide for the scrap wheels. I’m using only the long spokes, measuring and cutting them to fit one at a time. While there are two extras in each set of spokes in case of disaster, I am assembling the larger wheels first. If I get a spoke too short for these, those shortened pieces will likely work for the smaller wheels.
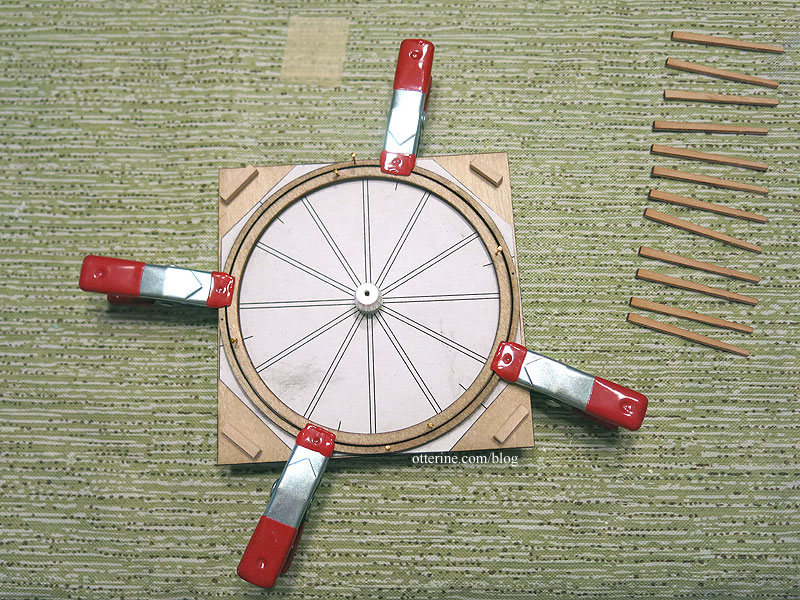
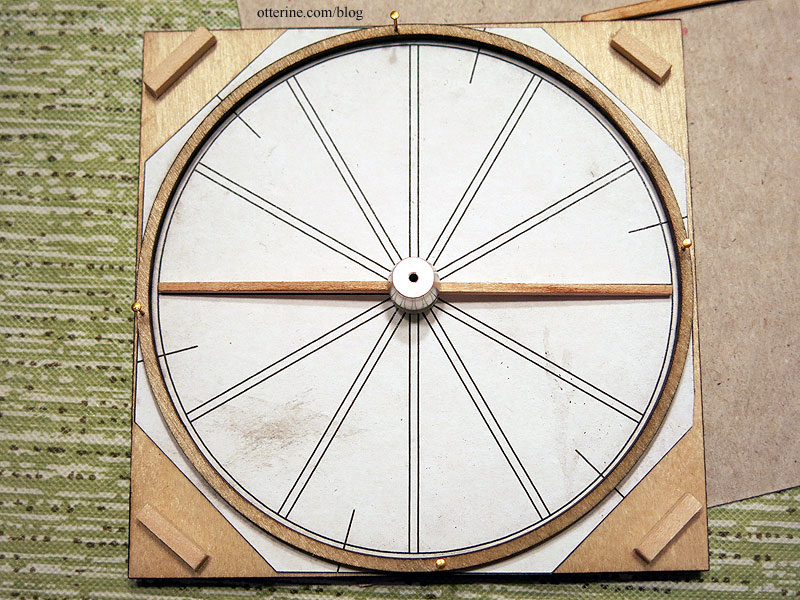
You are to complete the spokes in opposing pairs so the wheel stays uniform and flat. I built in a little tension to help the minimal amount of super glue gel used, but too much tension can make the wheel buckle.
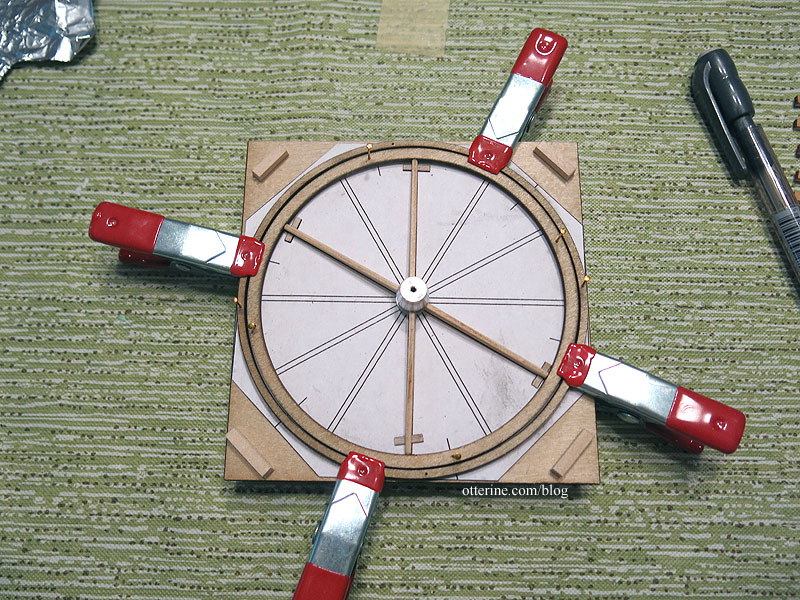
The assembly was actually very sturdy once removed from the jig.
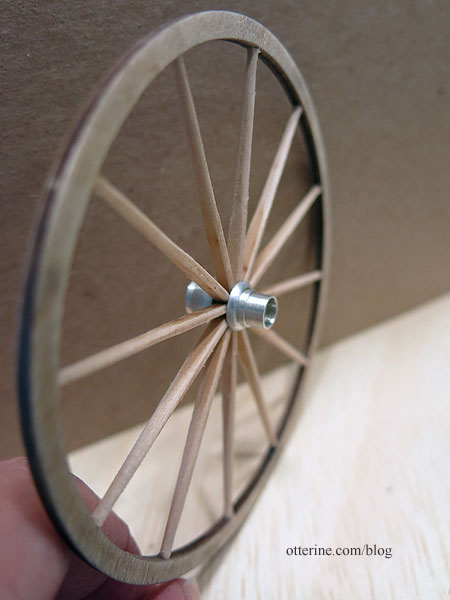
While I did round the edges a touch before assembly, the instructions indicate to fine-tune the small ends into rods. This worked only so well in that each one will always turn out differently. Once painted and with added grime, they should be fine. I filled the nail holes with wood putty.
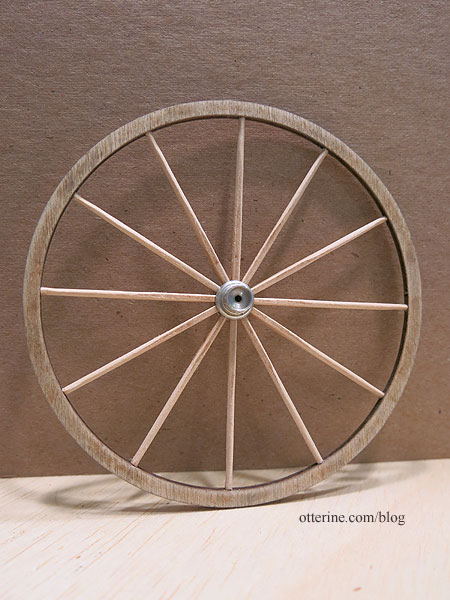
Three more to go….
Categories: Ivy Hollow RFD, Model Cars, Vehicles
August 10, 2019 | 0 commentsMail Wagon – part 6
Continuing work on the Mail Wagon. With the front and rear axle assemblies started, it was time to work on the wheels. Most instructions tell you to read through the whole process before starting. This is to familiarize yourself with the parts and process. In this case, the instructions indicate it was noticed during the prototype stage, the manufacturer found it was easier to sand the spokes after assembly. That saves a lot of initial prep work on individual fiddly parts.
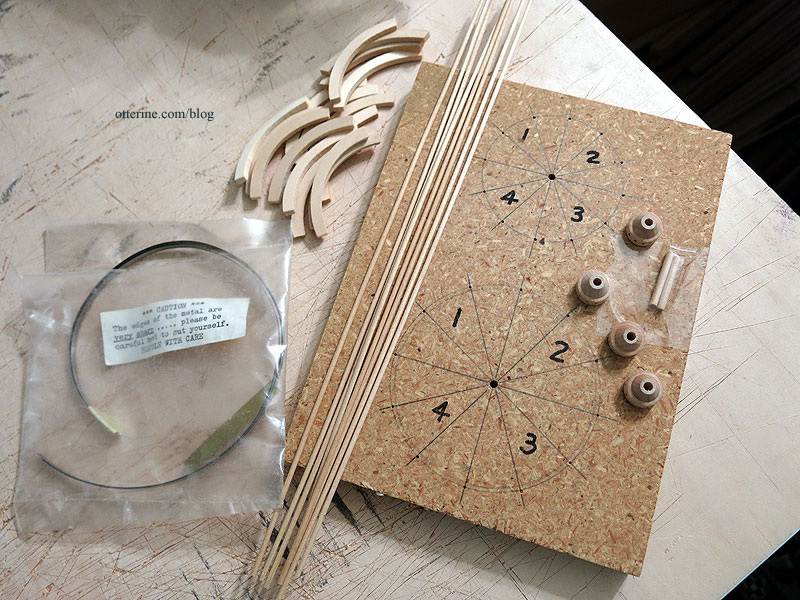
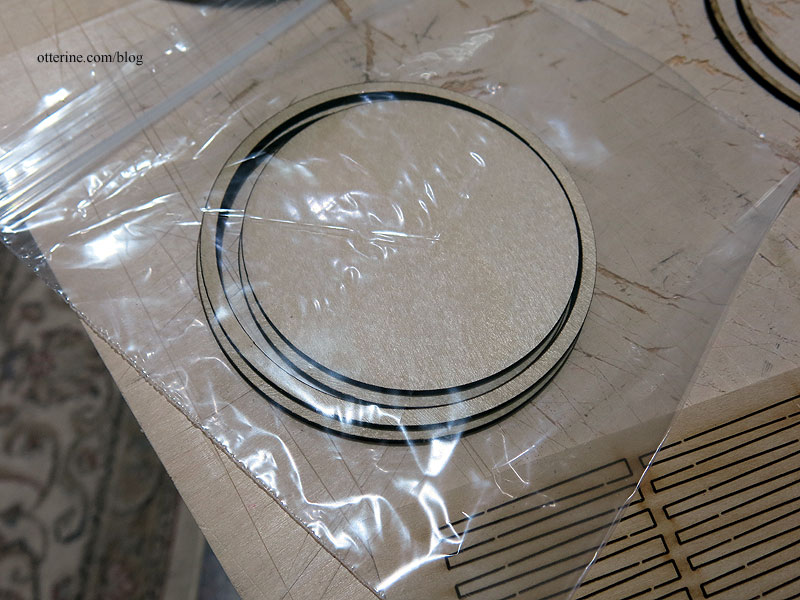
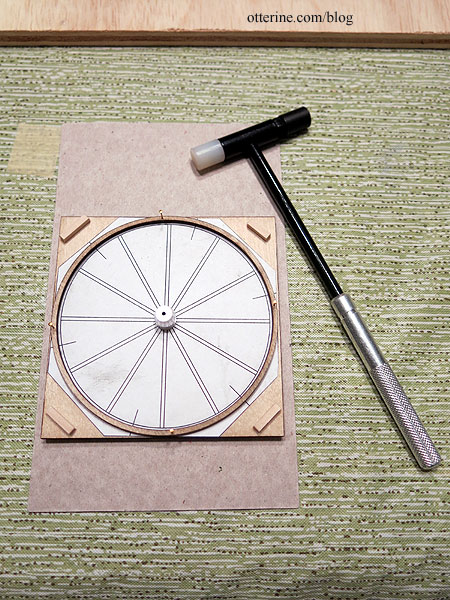
The wheels are made from laser cut wood parts, aluminum hubs and a jig.
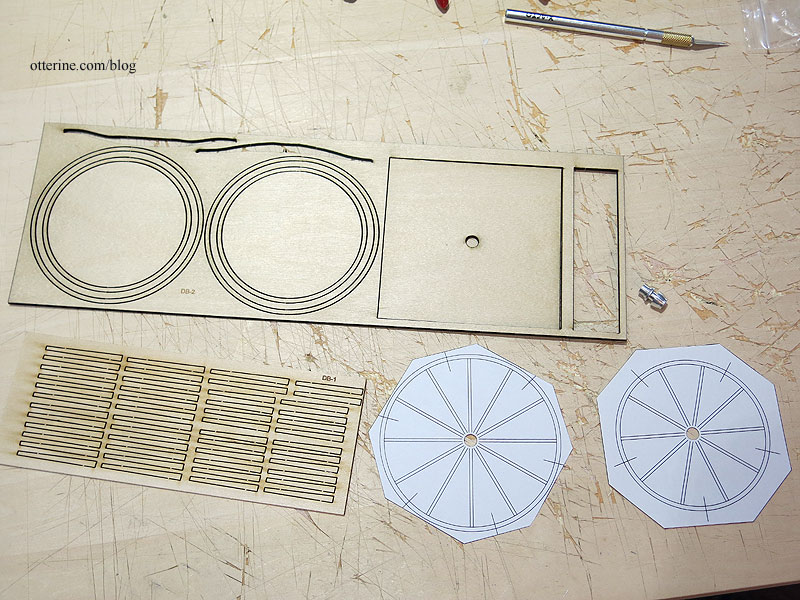
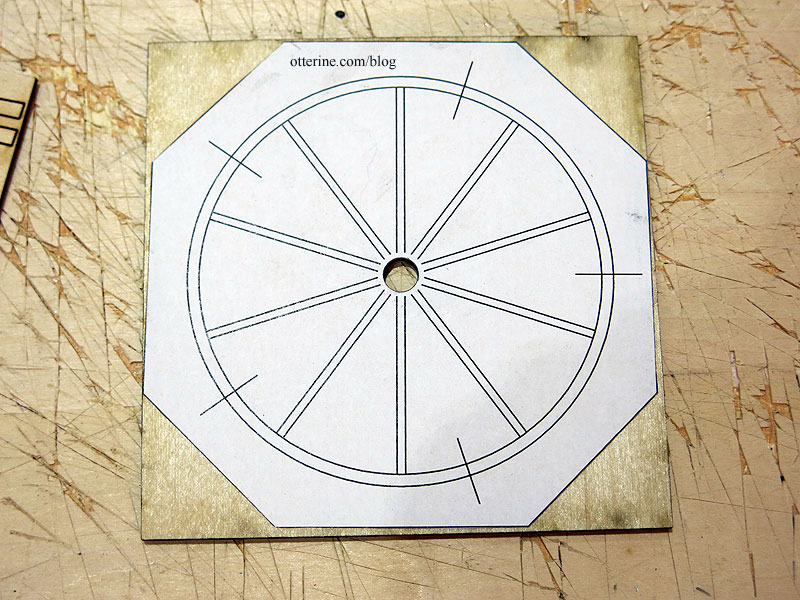
I used MiniGraphics Wallpaper Mucilage to apply the paper patterns to the wood base. Here is the smaller wheel pattern. The larger wheel pattern is on the reverse, but in reality, you would work on one wheel at a time so it’s not an issue.
Another nice thing is the intact inner circle and middle “wheel” waste pieces. I saved those in my stash. Never know when I might need pieces like these. :]
I decided to use the recommended nails to hold the wheels in place while assembling. The paper pattern did not match up with the wheel size, so I centered as best as I could. Using the nails also helped keep the circular shape while working whereas clamps might not have.
Even though I will be doing the final shaping after assembly, I did clean the laser char from the edges of the spokes beforehand.
I did the same for the wheels to have a cleaner gluing surface.
That’s when things went off the rails. The spokes fit well into the hub, but overall the wheels, hubs and spokes simply did not work together. (These will have a snug fit, but I was just testing parts at this point and didn’t trim the spoke ends to fit all the way into the hub groove.)

The wheels are larger than the jig pattern as noted, and the spokes are too short. I am putting the parts together as instructed and have removed the parts precisely from the laser cut sheets without removing any length from the spokes.
I could use the “scrap” wheels between the two true wheels with the longer spokes, but that would give me only two wheels instead of four.
Luckily, this kit is made by a company still in business, so I sent them these photos and told them about my issues. They checked their production, and what they have now is correct. Mine must have been an errant batch. They sent me a new wheel sheet, another spoke sheet and four hubs just to make sure it all worked well together. It’s fantastic when a company will stand behind its product. :]
Now, I need to prep the new parts for assembly. Back soon….
Categories: Ivy Hollow RFD, Model Cars, Vehicles
July 17, 2019 | 0 comments
NOTE: All content on otterine.com is copyrighted and may not be reproduced in part or in whole. It takes a lot of time and effort to write and photograph for my blog. Please ask permission before reproducing any of my content. (More on copyright)