

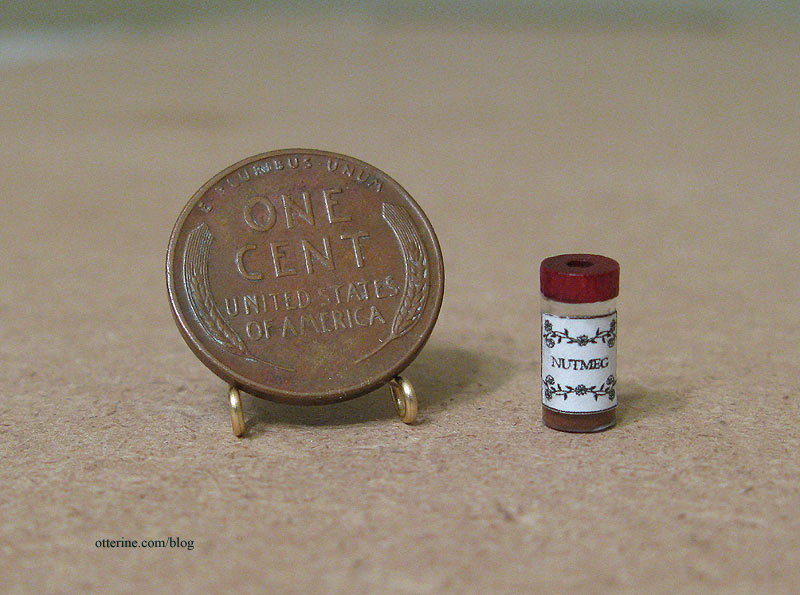
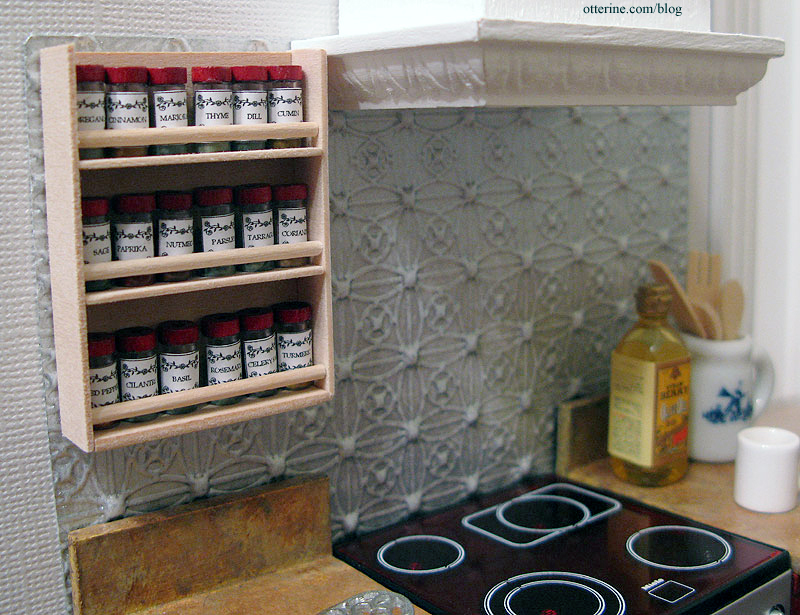
Spice rack
I wanted a wall mounted spice rack, but I wasn’t sure how to go about making the little spice jars to go in it. I considered using beads for the base and perhaps polymer clay to make the caps, but I couldn’t really find anything that matched the idea I had in my head. Most things were either too large or not the right color, texture or shape.
What I ended up using was 3/16″ diameter rigid aquarium tubing for the jars and 3/16″ diameter wooden beads for the caps.

I cut 3/8″ lengths of the tubing using a sharp X-Acto knife and a lot of patience.
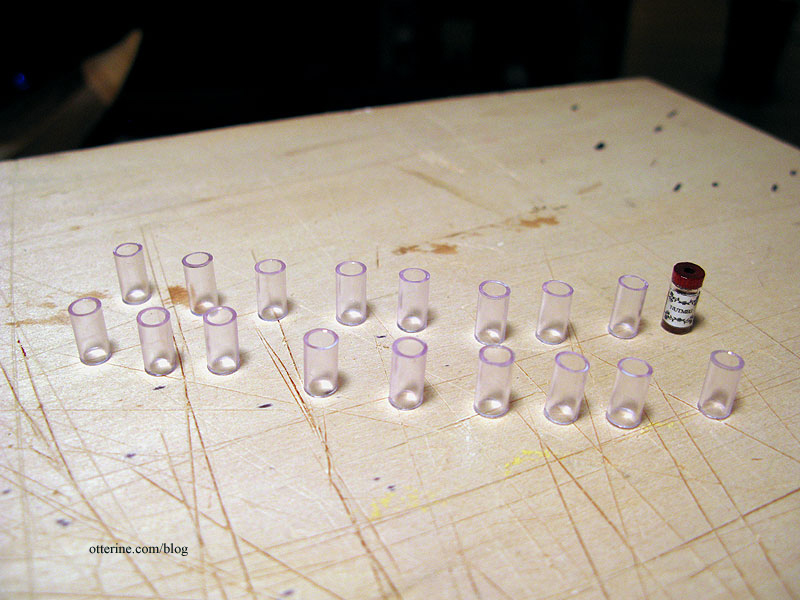
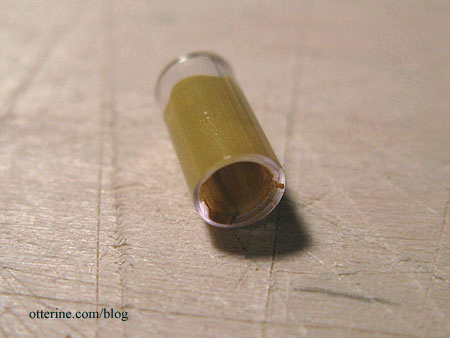
I painted part of the inside with colors matching the various spices I wanted to mimic.
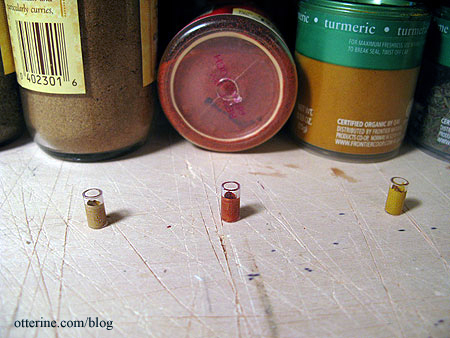
I didn’t seal the bottoms since the jars would be displayed either in a rack or standing upright on a countertop, and since they were merely painted, there was nothing to spill out.
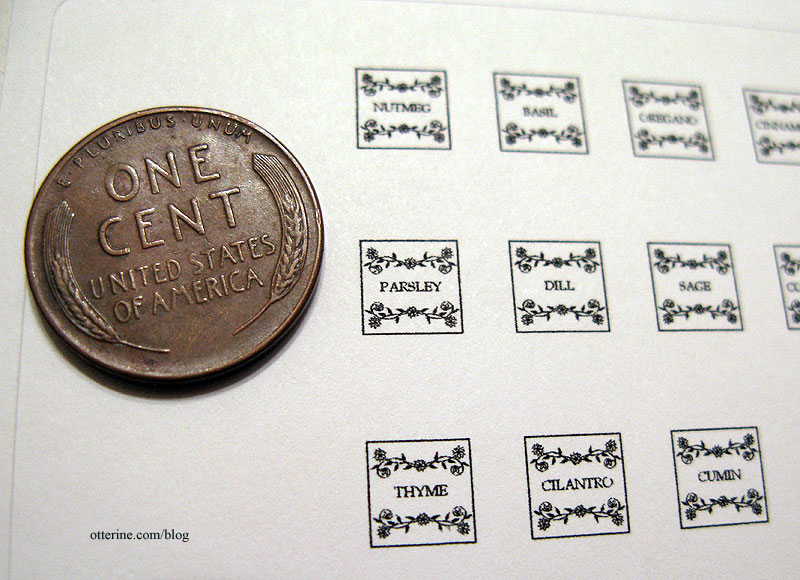
I created labels in Word using clip art borders for the design. These measure just 1/4″ square but they are legible. I printed them on Avery label paper since I figured I’d get more glue on myself than on the tiny labels if I tried applying an adhesive after cutting them out.
I cut out each label along the lines and found it relatively easy to pull the backing off even though the paper was so tiny. Using the sticky label paper made it very easy to attach the nameplates to the miniature bottles. I then glued on the wooden beads to the serve as caps; I liked the existing reddish color so I decided to leave them as is. The hole in the top didn’t bother me since the jars wouldn’t normally be viewed directly from above. From the front perspective, the hole seems like a design detail.
Once the jars were made, I built a spice rack out of basswood and mini dowels, leaving it unfinished for now since I like the color. I will likely seal it but not paint it. Here you can also see the finished backsplash; I used two light coats of metallic silver paint that I wiped off before drying to create variegated shades of silver.
Categories: Miniatures
January 22, 2010 | 0 commentsKitchen sink
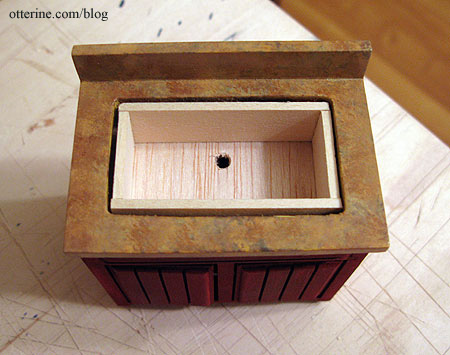
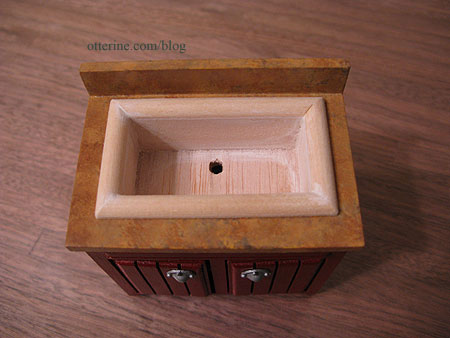
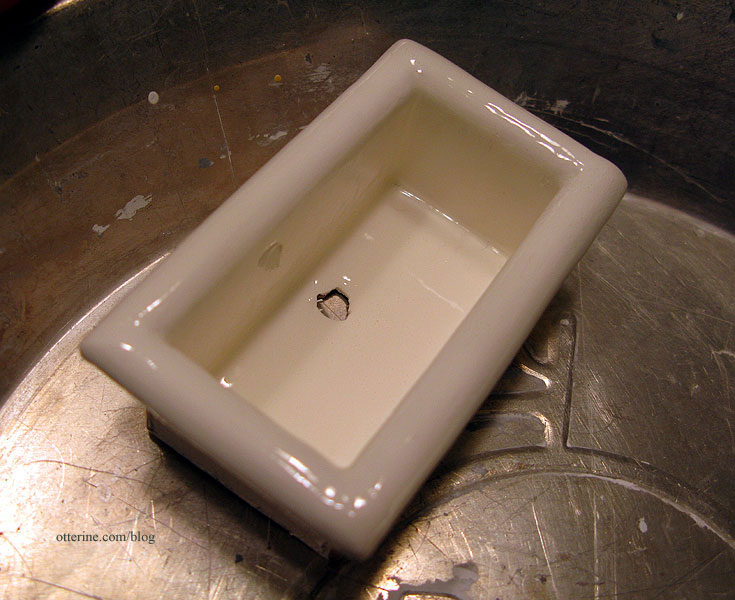
The kitchen sink that came with the Euro Mini’s sink cabinet was very shallow and not exactly what I wanted.
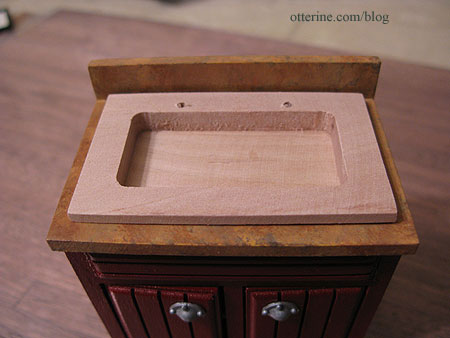
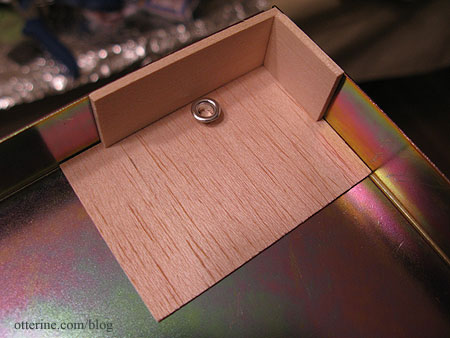
The hole in the top of the cabinet for the sink was deep, so there was plenty of room to add a deeper sink. My attempts at making a sink out of polymer clay were lumpy and rather sad. So, I built one out of 1/8″ basswood and balsa.
I first measured and cut the vertical pieces to fit inside the opening in the cabinet. I then glued them onto a thin sheet of balsa using a jig. Before enclosing the box, I used a metal sewing eyelet to punch a hole for a drain.
Once the basic box was dry, I cut the balsa base to fit and drilled a hole in the base cabinet to match up with the drain.
Using 1/4″ half round strip wood, I built a frame for the top of the sink box.
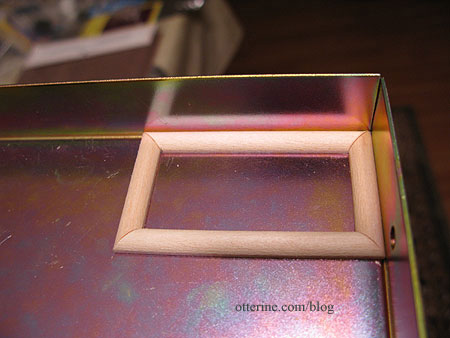
I used a tiny bit of spackling to fill in any gaps between the frame and the box.
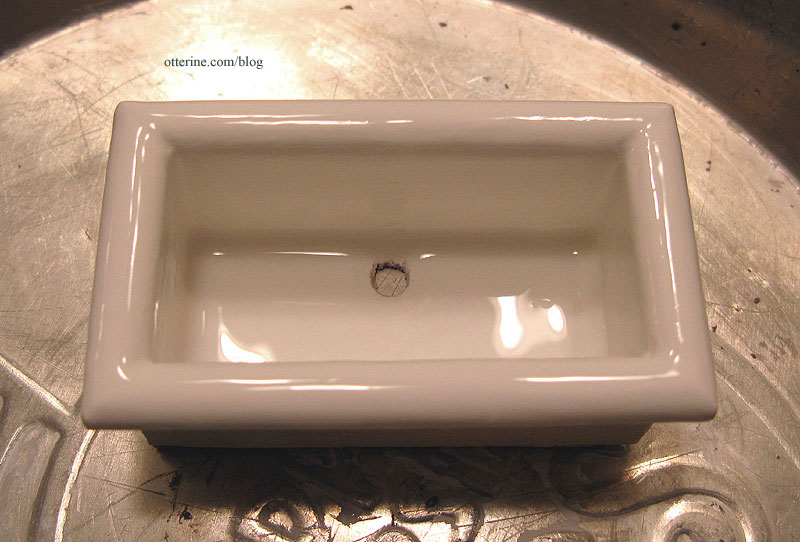
I watered down the paint so the finish would dry without any brush marks, sanding in between coats to remove any imperfections that would give away the fact that the sink is wood and not porcelain. Once the paint finish was dry, I added a couple of coats of gloss sealer (Delta Ceramcoat gloss varnish). To get the effect in the bottom of the sink, I let the gloss sealer pool. I also covered it after applying the gloss to keep dust from settling on the finish.
UPDATE (01-12-10)
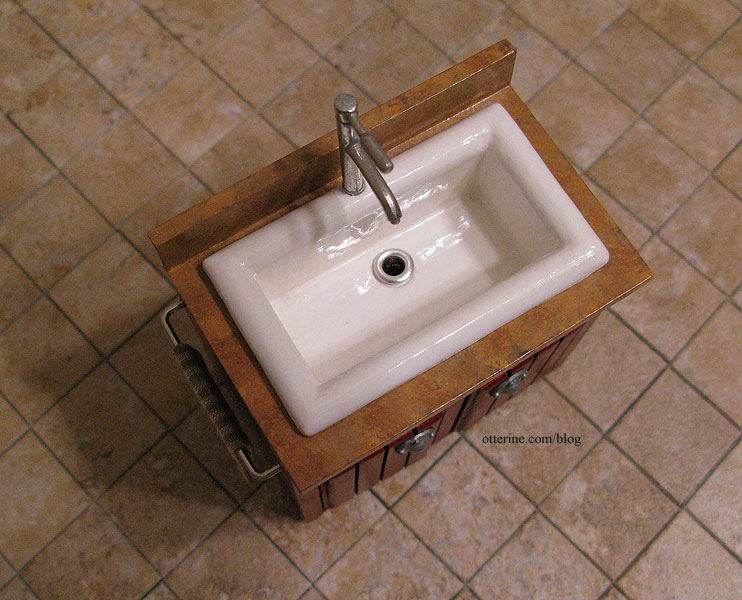
Alas, the above sink is no more. The gloss varnish cracked and yellowed in the thicker areas when it dried. I had used it on the faux granite without a problem. Thin coats of this varnish work great.I made a second sink, and this time I used Triple Thick Brilliant Brush-On Gloss Glaze by DecoArt for the finish.
The finish turned out like porcelain again, though the glaze was definitely thick and not easy to use. You have to work fast because it dries so fast. I am pleased with the second sink but disappointed that the varnish I had used ruined the first.
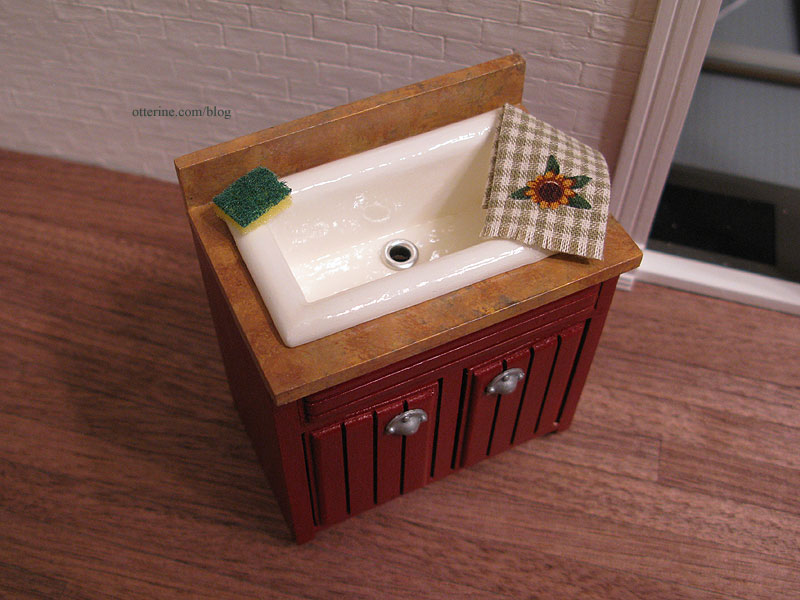
Here the sink is installed in the cabinet with the sewing eyelet drain pressed into place. Crisis averted! :D
Update 02-20-10:
Well, I spoke too soon. The second varnish (Triple Thick Brilliant Brush-On Gloss Glaze by DecoArt) turned yellow, too. There are big letters on the front of the package that read, “Non-Yellowing,” so I don’t know what happened.
I wasn’t going to give up on the second sink without trying to fix it first. I removed it from the cabinet, removed the hardware and gave it two coats of Krylon indoor/outdoor gloss white spray paint. It worked! :D
Categories: Miniatures
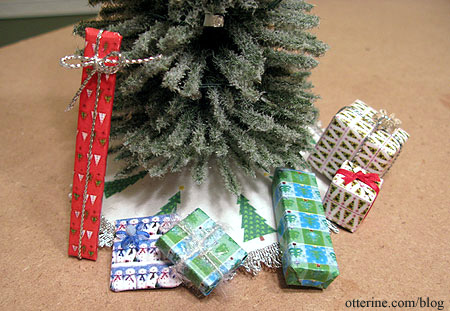
January 10, 2010 | 0 commentsChristmas wrap and presents, tree skirt
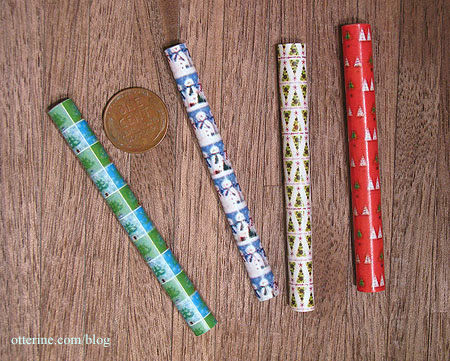
I made some wrapping paper for both presents and rolls. I found images of wrapping paper online and then used PhotoShop to replicate the design into larger sheets and then resize to an appropriate scale.
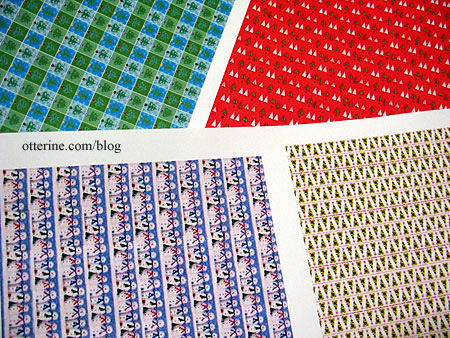
For the rolls, I cut the paper into 3″ wide strips of varying lengths, rolled the paper into tubes using a small dowel and glued the edge in place.
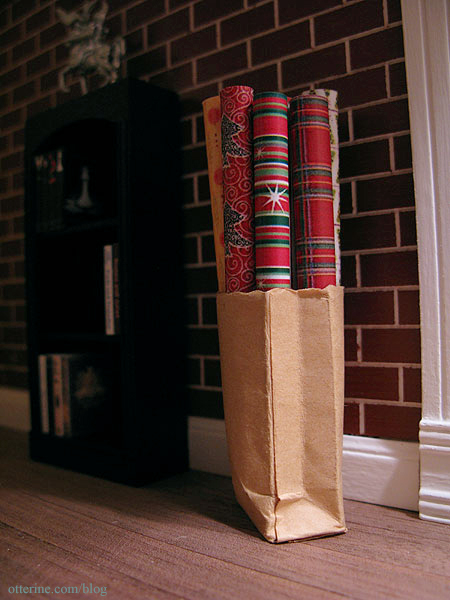
I bought a bag of random minis from craigslist, and this paper bag was part of the loot.
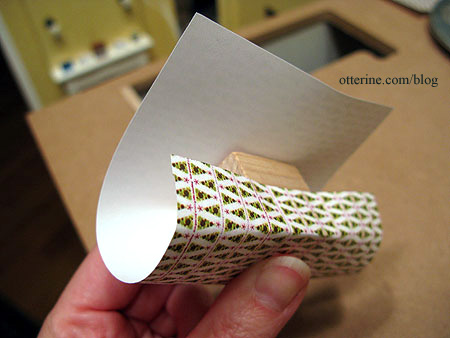
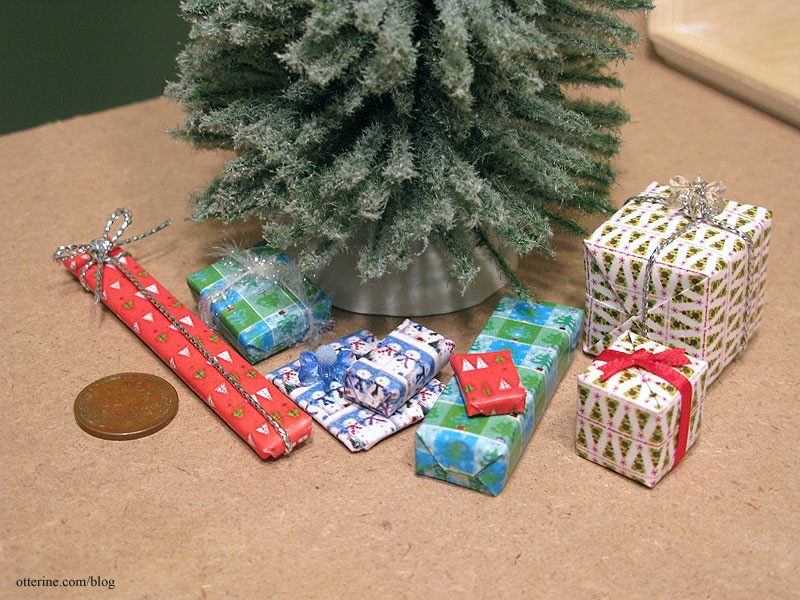
For the presents, I took scraps of wood and wrapped them in paper.
For some of the presents I added textured thread or ribbon; the bows are plastic beads (one is topped with a tiny pompom).
I used Word to create a circle 4.5″ in diameter and then added clipart trees around the edge. I printed it on fabric and adhered it to sticky-backed felt. I then sewed some silver trim around the edge.

It’s the perfect thing to cover the plastic snow mound of the Lemax tree.
Categories: Miniatures
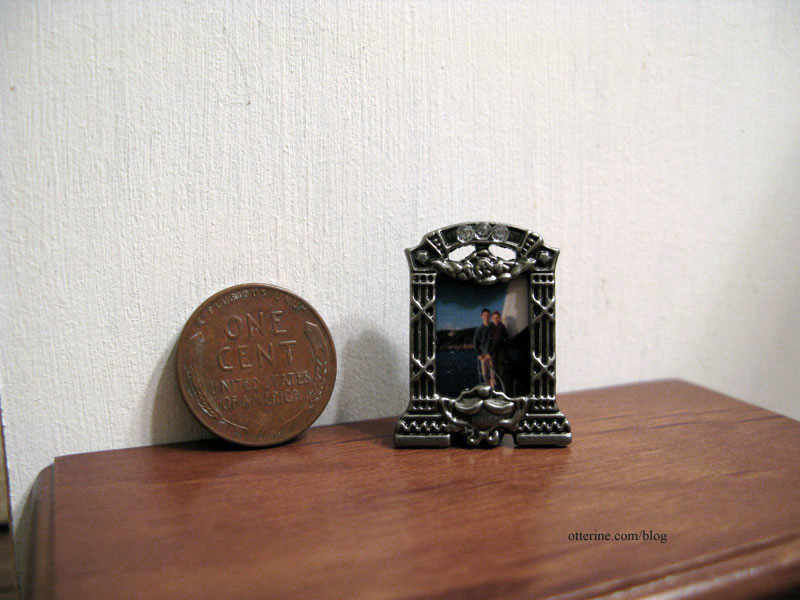
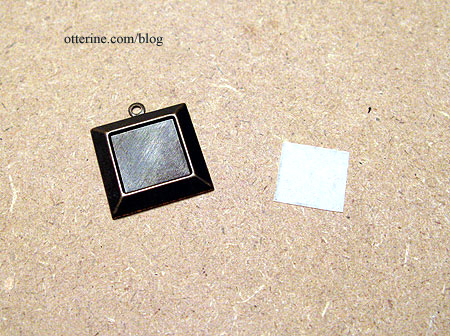
December 11, 2009 | 0 commentsPhotos from contact sheets
When I order regular size photos from Kodak Gallery online, they send a contact sheet of what is in the packet. These sheets have mini photos that are 9/16″ x 13/16″. I also have some from Sam’s Club that are roughly the same size, but those have numbers printed in the corners, which limits their usability depending on the photo’s composition and the size you need.
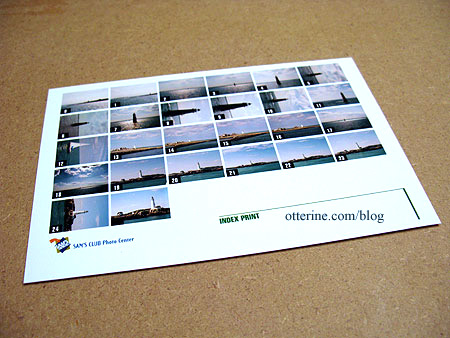
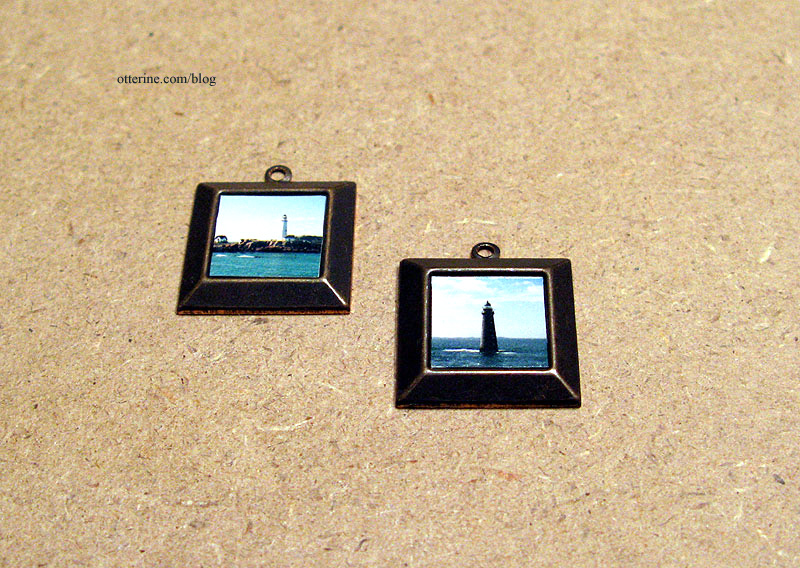
This first example was made using a Kodak contact sheet without the numbers printed in the corners. The mini frame has an acetate “glass” that I used to center over the part of the image I wanted. I cut out the image and glued into place with the backer.
The second example uses brass jewelry findings with 1/2″ photo openings. I first cut a template out of vellum paper, which is translucent enough to see through. This way you can center the template over the image without guessing if you’re centered over the portion you want.
I like these since the images are crisp and printed on quality photo paper and the frames already have holes to hang them on the wall.
Categories: Miniatures
November 26, 2009 | 0 commentsMiniature area rug
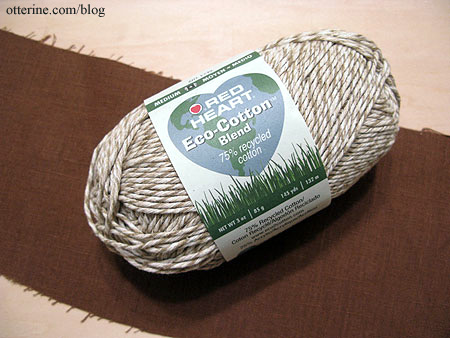
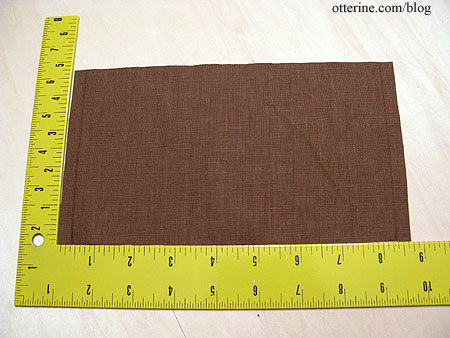
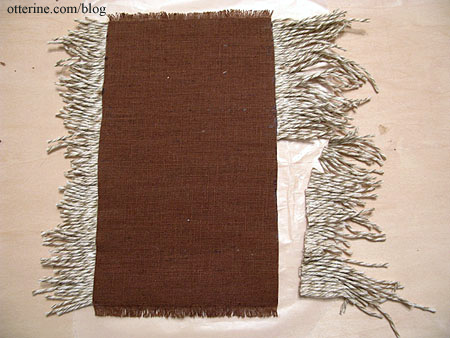
I followed the technique on this Finnish website. I couldn’t read the instructions, but the photos were clear enough: glue pieces of yarn to a fabric backing. I used Red Heart cotton yarn in a variegated pattern and a piece of scrap linen blend fabric.
I measured and cut the fabric for a full size area rug, leaving a little on the ends to create fringe.
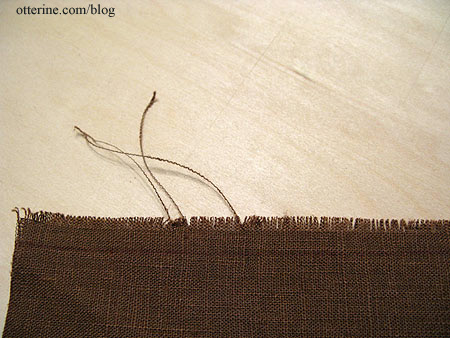
Pulling out the cross fibers on each end created fringe.
I taped a piece of wax paper to my work table. I then taped the fabric backing to the wax paper making sure to cover the fringe on both ends to keep from getting glue on it. Working on a small area at a time, I cut pieces of yarn longer than the width of the fabric and glued them to the fabric backing. I measured repeatedly to make sure I was keeping the rows straight. The fabric stretched as I went along, so I ended once I reached the length I wanted.

I cut off the original bottom fringe and made new fringe below the end of the glued yarn. Flipping the rug over, I cut the excess from either side of the fabric backing.
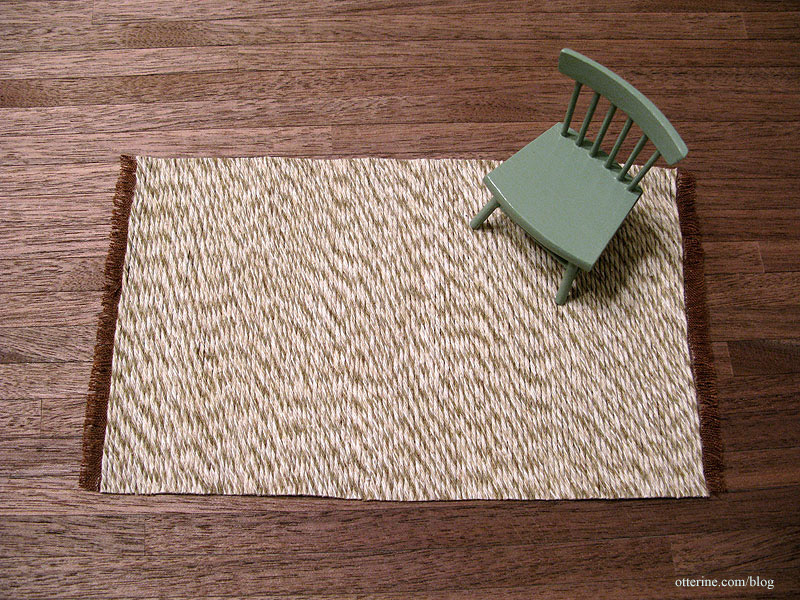
Here is the finished area rug. :)
Categories: Miniatures
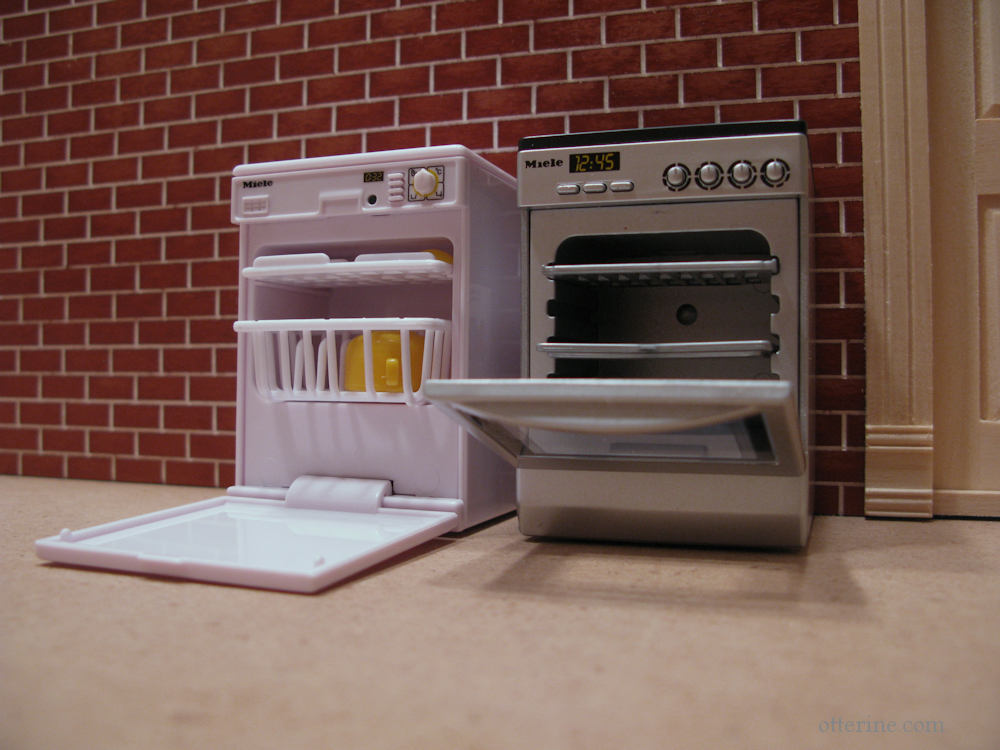
November 13, 2009 | 0 commentsMiniature Miele kitchen appliances
There are some fabulous miniatures on the market, and some carry “fabulous” prices. The miniaturist hobby itself can be pricey as a lot of little (pardon the pun) things add up. I’ve budgeted in some areas to be able to afford the more expensive items I want. In order to save money, I will be building a lot of the basic furniture myself, and I have found some good deals on craigslist and eBay for other things. I am getting ready to start building and decorating the kitchen, so I bought these miniature Miele appliances.
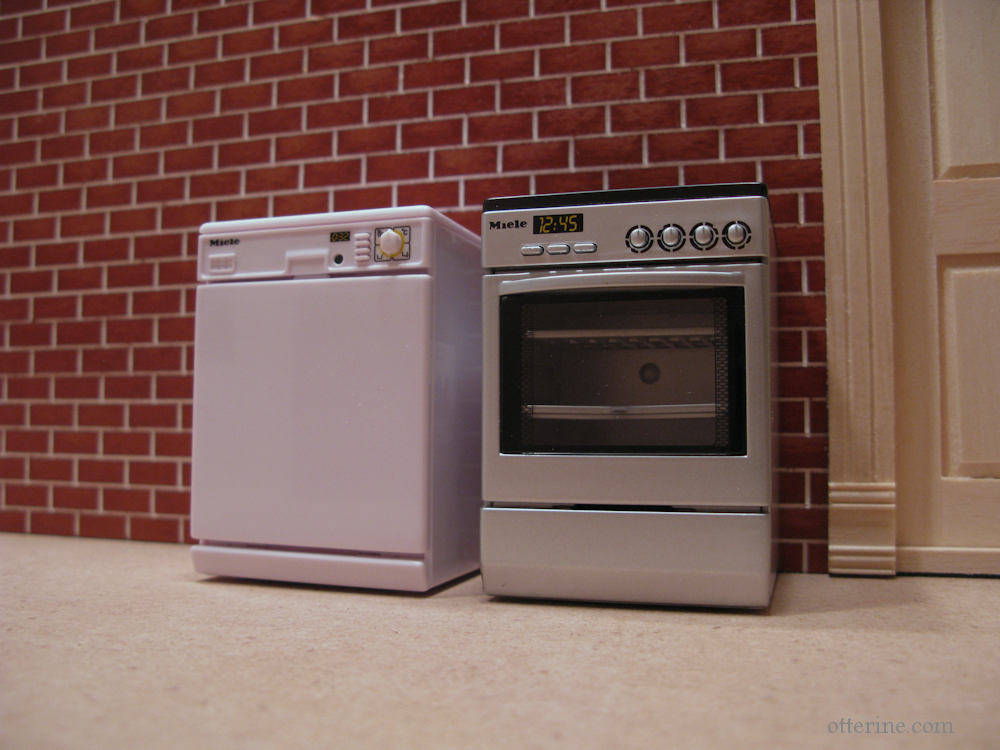
Both are battery operated and make sounds. The oven also lights up, and the dishwasher came with the yellow dishes.
Categories: Miniatures, The Newport
October 10, 2009 | 0 comments


NOTE: All content on otterine.com is copyrighted and may not be reproduced in part or in whole. It takes a lot of time and effort to write and photograph for my blog. Please ask permission before reproducing any of my content. (More on copyright)

Categories:
Tamiya tool set – part 2
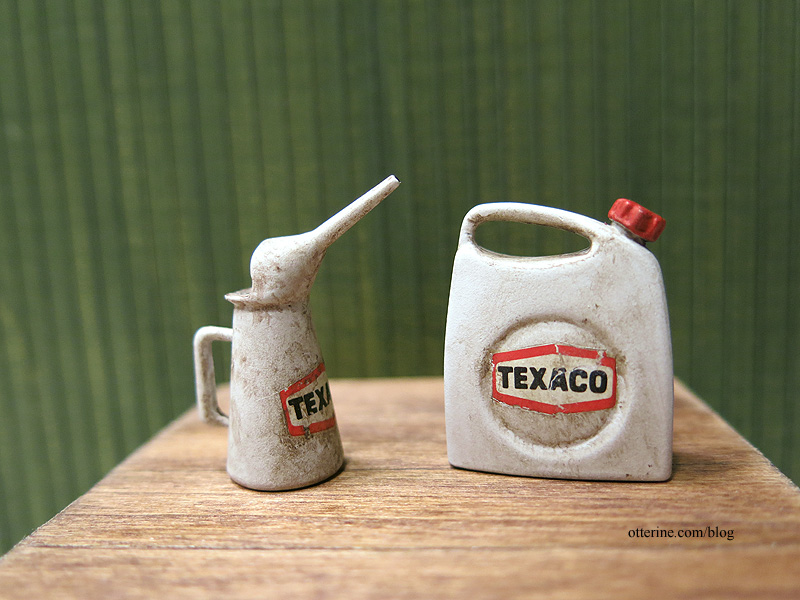
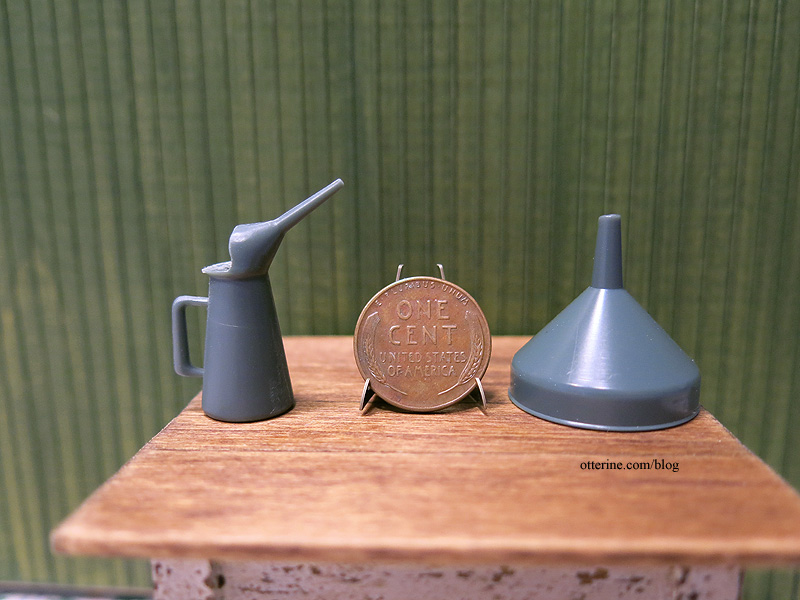
Continuing work on the 1:12 scale Tamiya tool set. I’m starting with the polyethylene tank and oil jug. Here’s a reminder of what these looked like after assembly and initial sanding.


I primed them with grey spray primer and then followed that up with flat white spray paint. The grey toned down the white, which is good for a base to start aging.
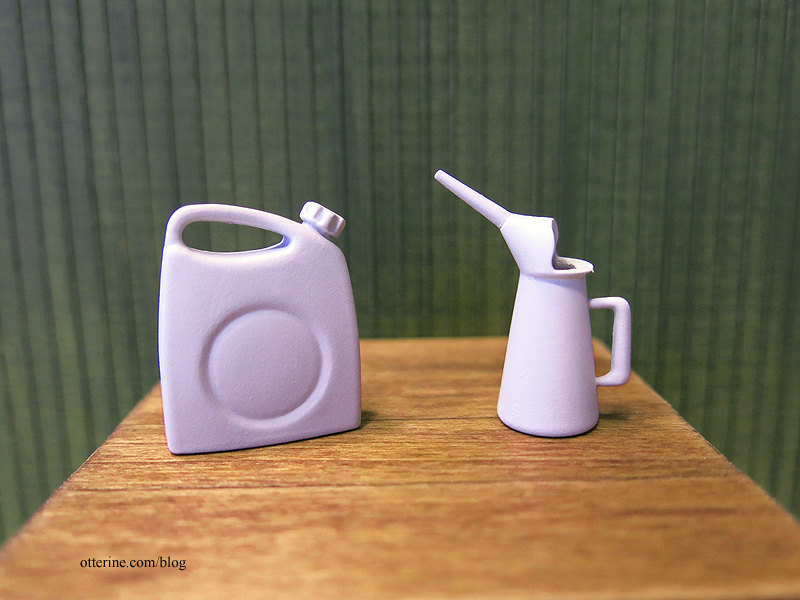
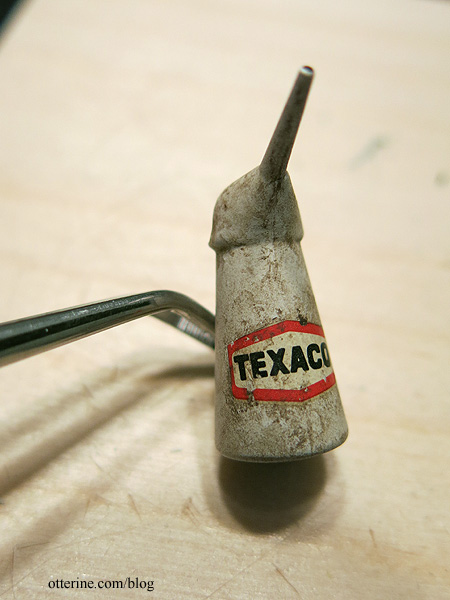
The vintage Texaco jugs I found online were all red, but I liked the white on the kit box, so I stuck with that. I painted the interior of the jug silver.

I added grime with acrylic paints thinned with Staining Medium. I left the decal whole when applying but scraped some holes from it after it dried in place. I also cut away the shiny clear portion around the outside of the decal as best I could. I put a dot of black paint at the tip of the spout to give the illusion of an opening.
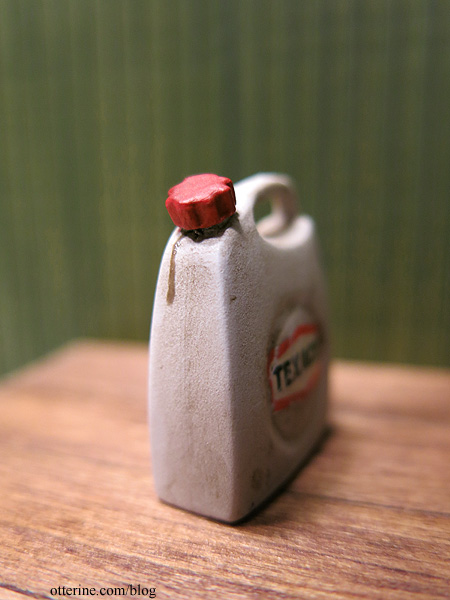
For the polyethylene tank, I added the same grime and painted the cap red. I mixed some of the grime paint wash with satin varnish. Using a tiny paintbrush, I made a dribble of dried liquid down the side.
For these decals, I split them before applying so they appear broken and misshapen. I scraped holes and removed the clear halo from these as well.
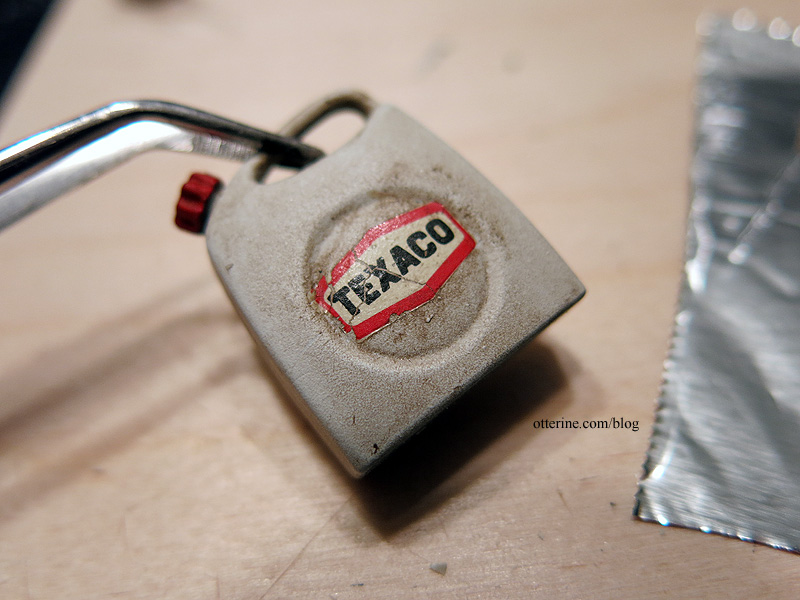
I built up the cracks in the label with white paint, followed by an aging wash to tone down the brightness. Now it looks like a paper label that has loosened, cracked and moved after getting wet.

I love the way they turned out.
Categories: Miniatures, Model Cars, Vehicles
June 19, 2015 | 0 commentsTurn, turn, turn
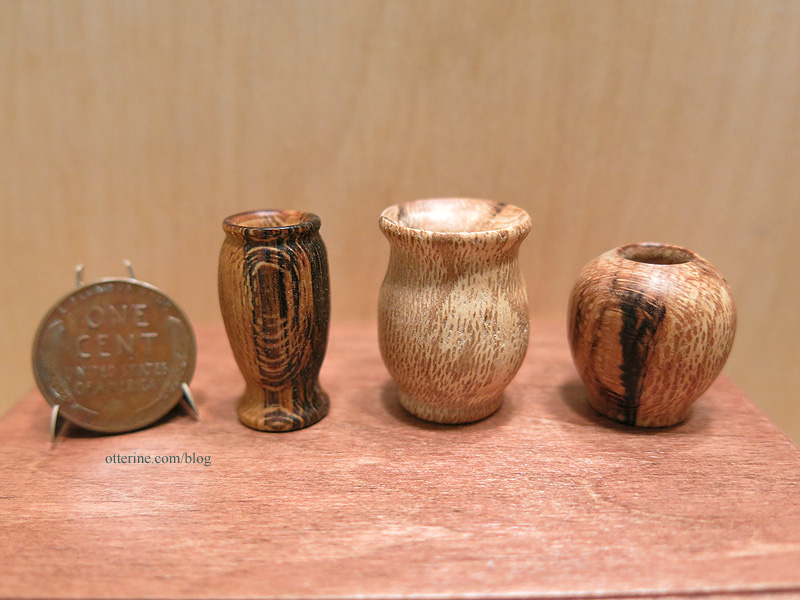
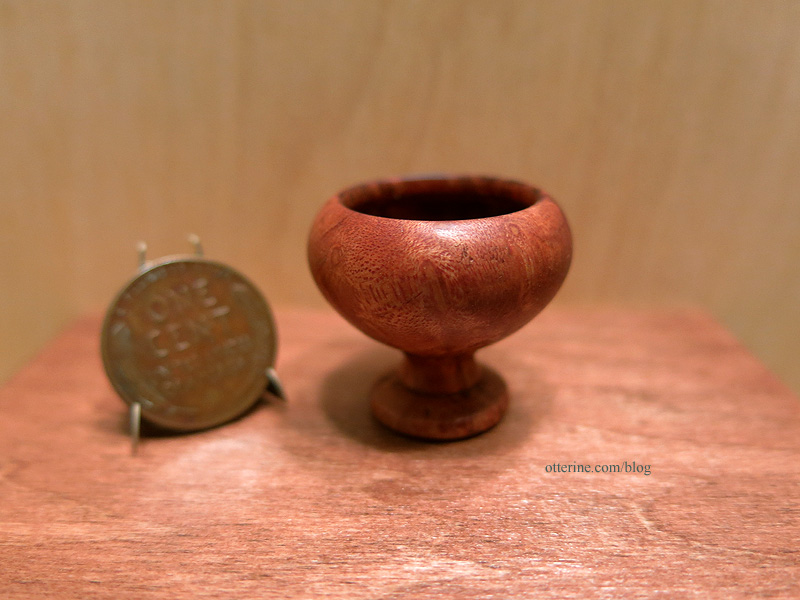
In addition to the lovely tools Bill sent, he’s been trying his hand at turnings as well (with much success if you ask me). The woods he used are so interesting. :D
California Lilac, green
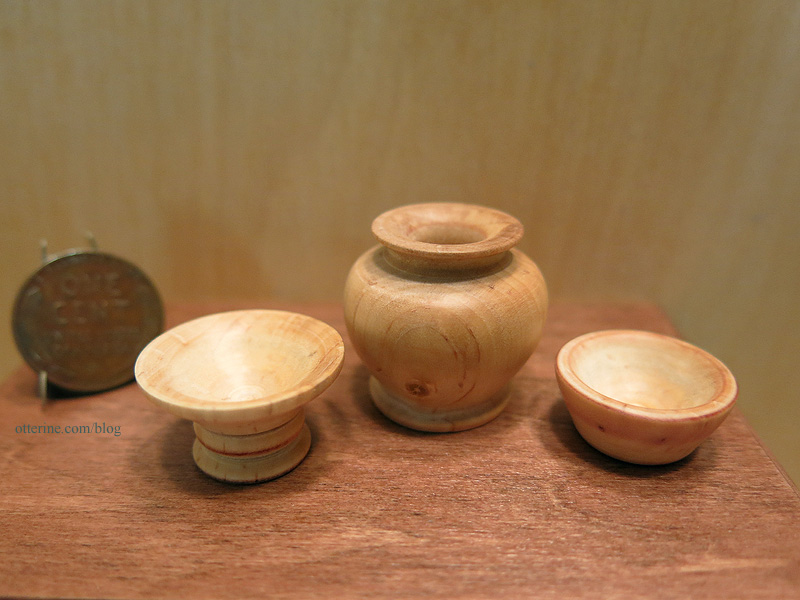
California Lilac, aged
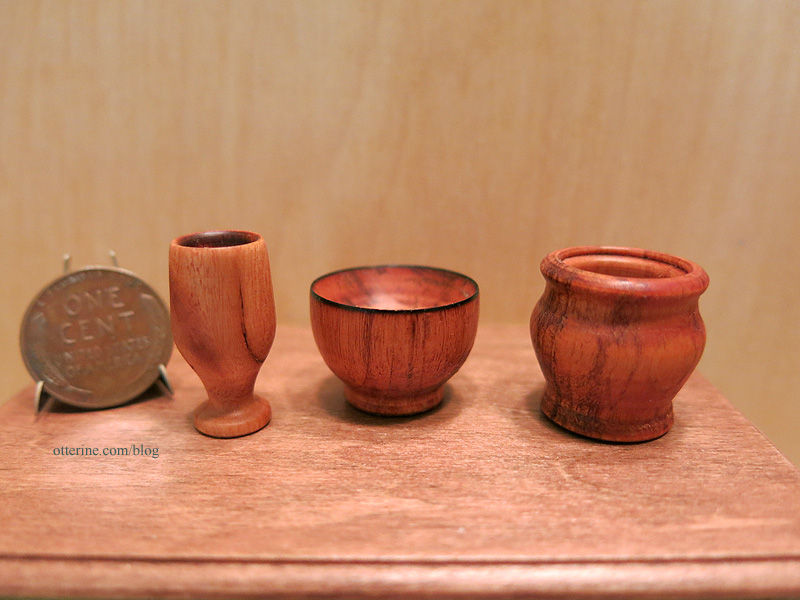
Timber bamboo – I zoomed in on these to show the leopard like patterns.

Bamboo garden stake
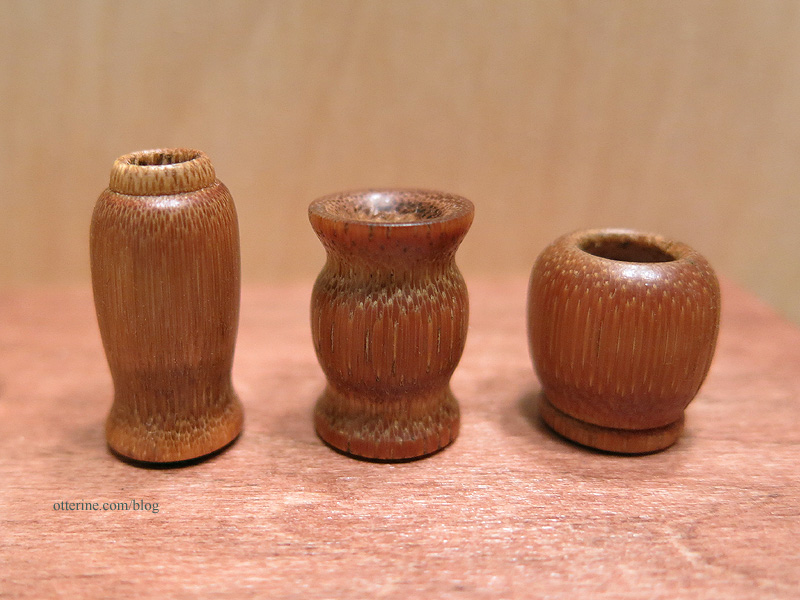
Wild rose trunk – I love the range of patterns
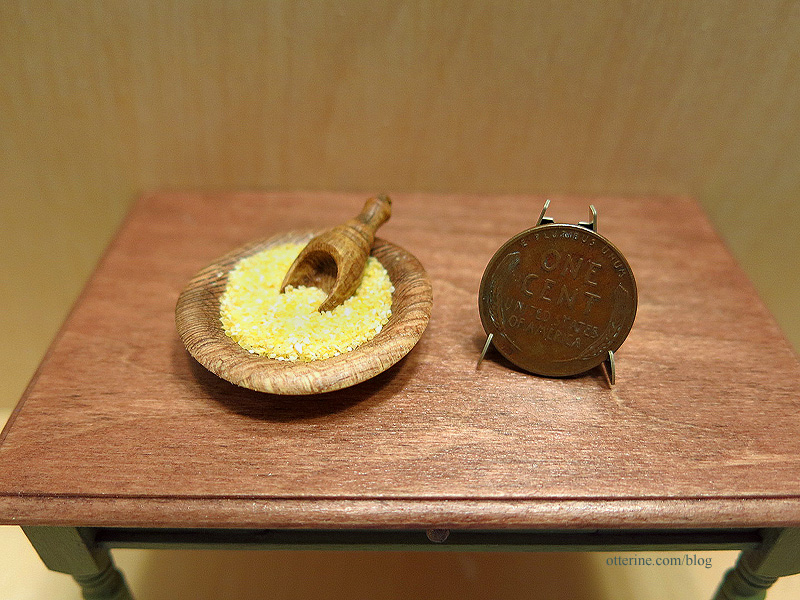
He sent me some test shots of the bowl and scoop, and I used some polenta to mimic those. :]
Arbutus burl
I think they are all wonderful, but this is my favorite. :D

Thank you, Bill! These are all so lovely. :D Spoiled rotten, I tell you…spoiled rotten!
Categories: Miniatures
June 11, 2015 | 0 commentsCopyright and Pinterest use
This is not an all inclusive list, but here are some basic guidelines about copyright and internet etiquette. All content on otterine.com is copyrighted and may not be reproduced in part or in whole. It takes a lot of time and effort to write and photograph for my blog. Please ask permission before reproducing any of my content.
Copyright exists as soon as you create something, though there is of course an added legal process to further that notion. It should be understood that one can’t copy posts from one place and post them on one’s own blog or website without permission. Just because my work is on the internet does not mean it is in the public domain or meant to be reproduced freely. You do not have to make money using someone else’s work to violate copyright. Even if you are using the work for personal use only, if you reproduce it in print on the web or otherwise, it can be a violation of copyright. Please visit Copyright.gov for complete information.
Please do not republish my blog posts, images, and/or tutorials on other websites or blogs, including Pinterest, without permission.
Pinterest users: Please pin only one photo from a blog post — do not post multiple photos or entire tutorials on Pinterest.
If you’ve had a Pinterest pin or other image removed at my request, it is typically due to that image being hot-linked on multiple other websites and the only way to resolve the issue is to remove the source image from Pinterest. I will also have Pinterest remove multiple pins from the same post as well as any pins where the link directs to a location other than my blog or website related to me.
I do understand that Pinterest is a means for people to both save links to tutorials and to discover artists’ work in the first place. However, please understand that when large sections of my work and tutorials are pinned, it essentially equates to my work being reproduced in its entirety on another website. In fact, each pin creates a new but exact duplicate of a copyrighted work using Pinterest’s numbering/naming system. From there, the images can be republished onto other websites without links back to the original source, which is harder to track. If my work is published in its entirety elsewhere, then people have no reason to visit my blog.
Pinterest also puts the responsibility solely on the user as to whether they have the right to use the images they choose to pin. A copyright holder can ask Pinterest to levy “strikes” against a user for violating copyright. I don’t know the full policy for Pinterest, but I do know Facebook will block repeat offenders. Just because Pinterest exists doesn’t mean users are exempt from copyright law or in any way protected by Pinterest if they get into legal trouble.
I don’t mind a photo or two pinned, but this large scale copying has often gotten out of hand. I understand that many people who pin responsibly might be caught in these sweeps to remove images. It’s not a commentary on those users, and I’m sorry if it causes confusion, offense or hurt feelings. That is not my intention. As they say, it takes one bad apple to spoil the bunch.
There is no easy answer, so I try to strike a balance between being flattered at one or two images pinned and fighting copyright infringement where entire sections are posted to Pinterest, Facebook, VK.com, YouTube, or other websites.
As for images posted on other websites, if I can find a way to contact the website owner or blog writer, I try to do so. In cases of foreign language sites and sites without any obvious contact information, my only recourse is to go to the source website or hosting company.
When I contact people about removing my copyrighted works, I address it professionally and in a friendly manner. Sometimes, with the use of Google translate, it doesn’t always come across well. There are also certain legal statements that often need to be included in DMCA reports, and that legal language can seem harsh and unforgiving. I understand that some people don’t understand copyright, so I give the benefit of the doubt as much as possible.
It should go without saying that no one should put their logo on any work that is not their own, but many have done so and not just on any one particular website. I’ve read praises for my work and the work of others, but all of the photos have the writer’s logo or name superimposed on the work. Please do not put your logo or name on my work.
I offer my guidance and ideas free of charge, but my work should also be respected. I always give credit to others when I use their ideas or share their work. I love to create and share ideas on my blog, but I do think the rights of artists should be protected and respected. It bothers me when I find my friends’ works unattributed or copied in whole as well. It’s a fine balance between publicity and infringement. I am doing the best I can.
There is a contact form at the top of the page so you can send me a private message at any time.
Categories: Miniatures
June 11, 2015 | 0 commentsTamiya tool set – part 1
I’ve started working on the 1:12 scale Tamiya tool set.

I might not make everything in the box, mainly because I already have better examples of these tools in metal and wood. The first bit of business is to remove the pieces from the sprue then sand or fill the imperfections.
Many of the pieces are assembled with glue, so I’ve done my best to fill in the joins. I won’t know how successful I’ve been until after I spray on the primer. :] They are obviously visible, but they feel smooth and might disappear under the primer.

I’ll likely age these pieces, so that will give me some flexibility.
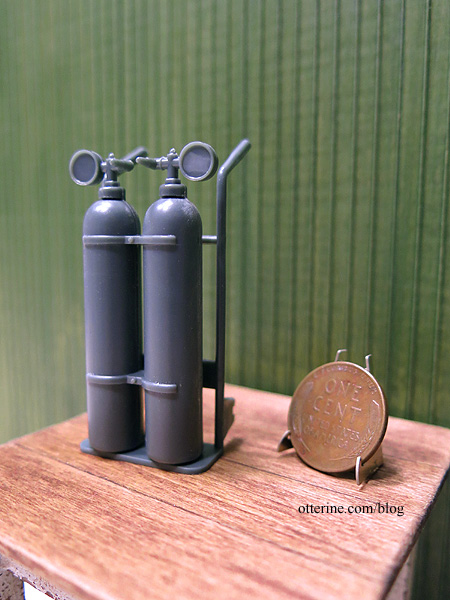
Depending on how the cart for the oxy-acetylene torch turns out, I might remake it in metal for better realism and weight. I plan to paint the wheels separately, so they are not attached to the cart yet.
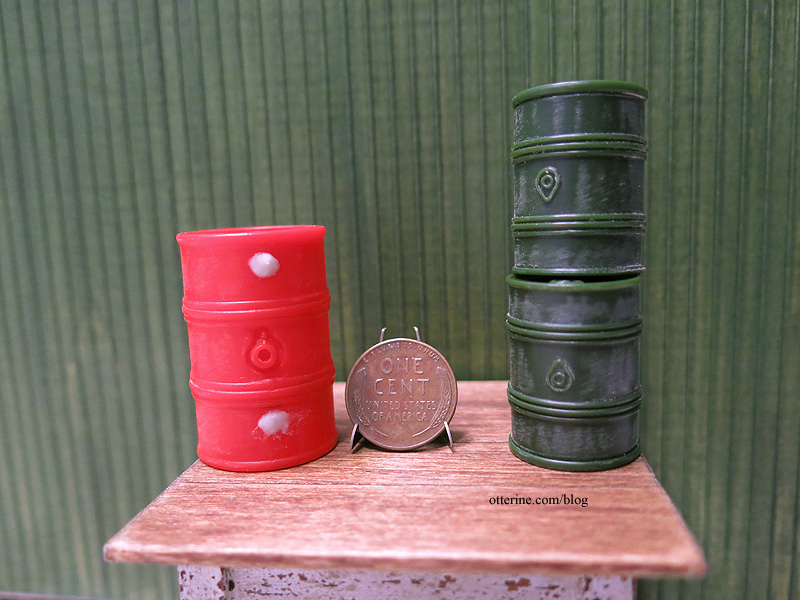
While I was at it, I’ve included the barrels from Bill. I’ve filled in a couple of holes in the red barrel with contour putty, which I will sand down once dry. I also removed the molded lines and injection marks. These have great detailing, so I hope the painting works out well.
Categories: Miniatures, Model Cars, Vehicles
June 9, 2015 | 0 commentsPresto!
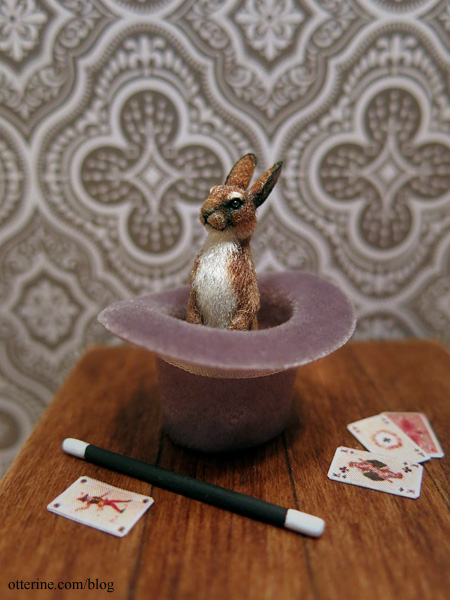
I’m channeling my inner Bullwinkle and working some mini magic!
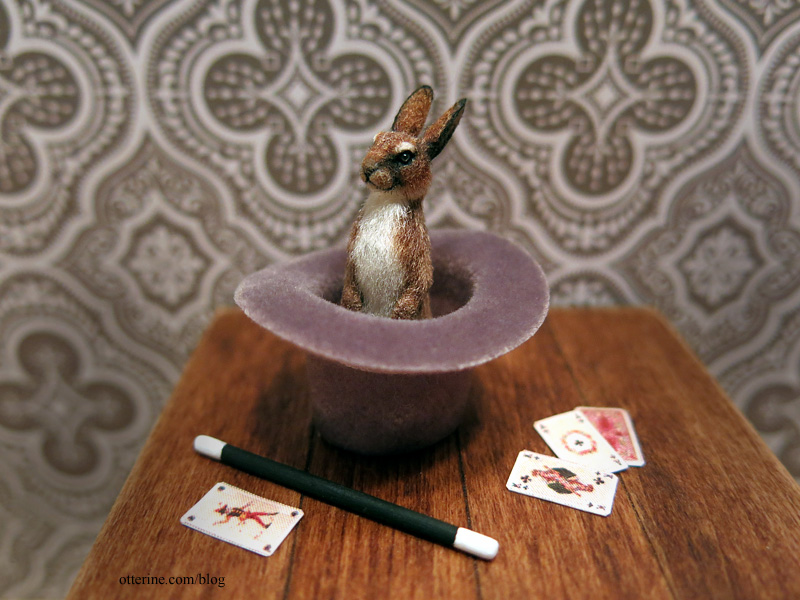
I made a few playing cards from this free printable on Wings of Whimsy. I sanded down a thin wooden dowel and painted it to look like an old fashioned magic wand. The top hat is by Heidi Ott. I chose a grey hat since it’s easier to keep the dust away in photos. Friedrich is ready to amaze you.
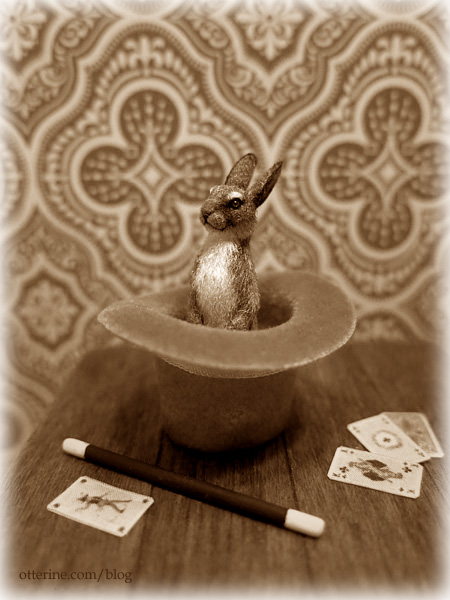
Presto! :O Whoa…we’ve gone back in time. :]
Categories: Animals and birds, Miniatures
June 4, 2015 | 0 comments
NOTE: All content on otterine.com is copyrighted and may not be reproduced in part or in whole. It takes a lot of time and effort to write and photograph for my blog. Please ask permission before reproducing any of my content. (More on copyright)