

Milo Valley Farm – porcelain fuse block
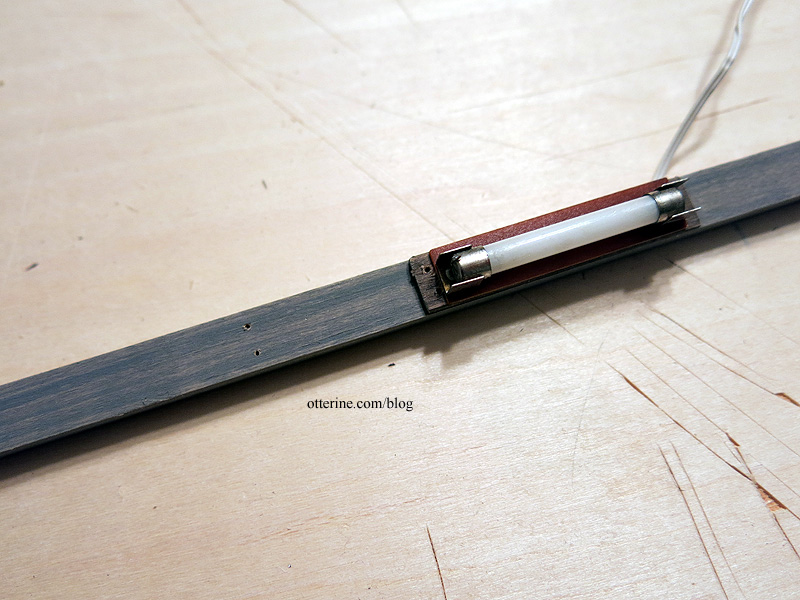
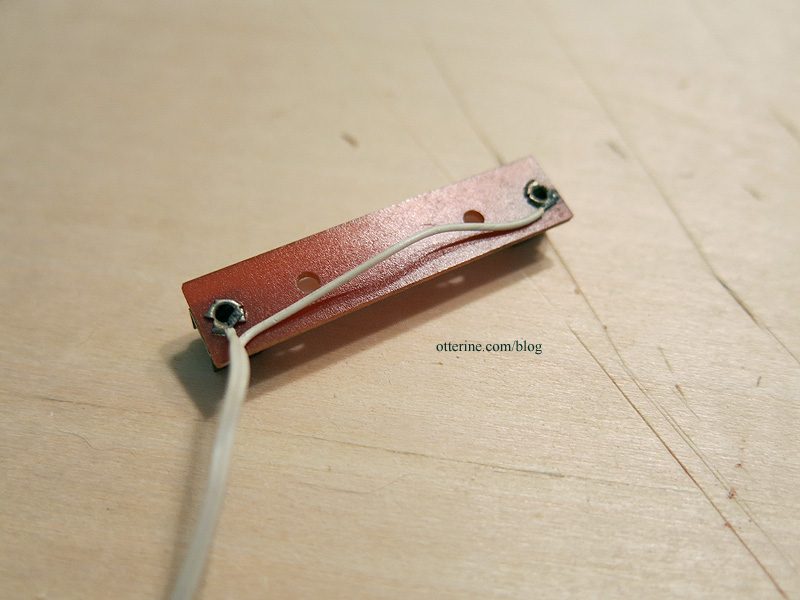
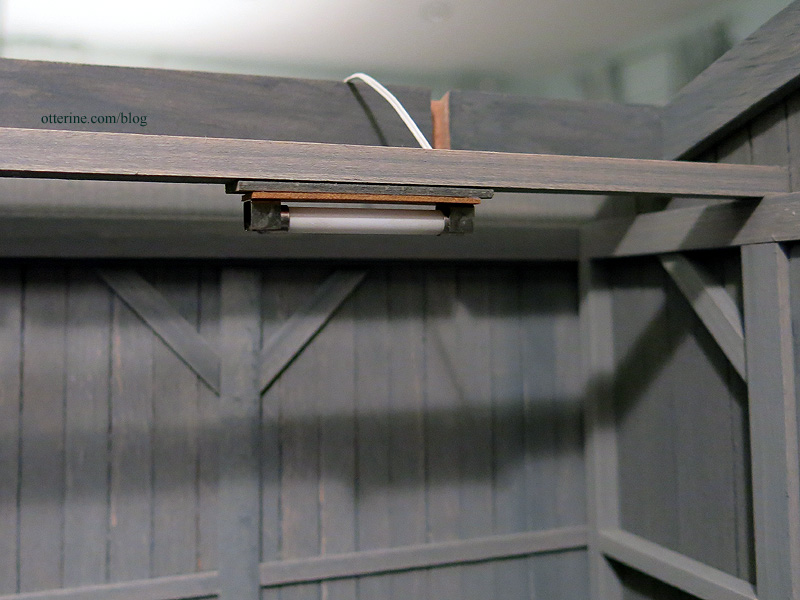
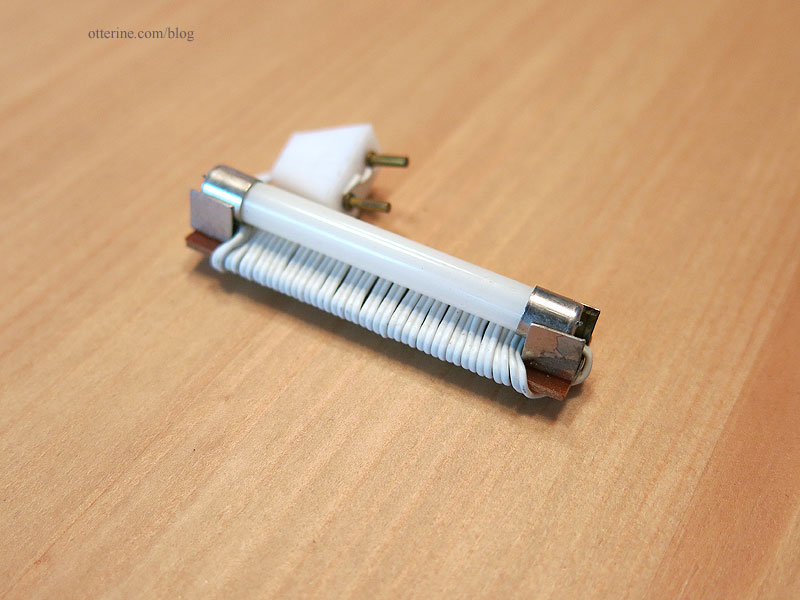
I worked on making a porcelain fuse block for the knob and tube system. This is for the service entrance. I used polymer clay (Sculpey in Pearl) since it was easiest to mold and shape and would look enough like porcelain to pass.
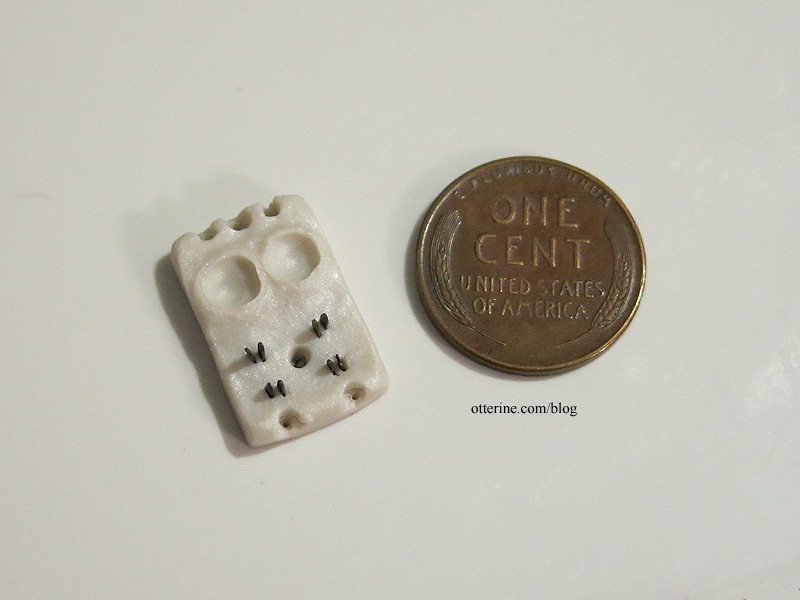
I used jewelry findings for the connectors. The measurements for the real deal are roughly 3″ x 6″ from the few I saw listed for sale. Mine is a little large for scale at 1/2″ x 3/4″, but it’s all relative in the barn and it shouldn’t make a difference for realism. I didn’t think I could successfully work any smaller. :D

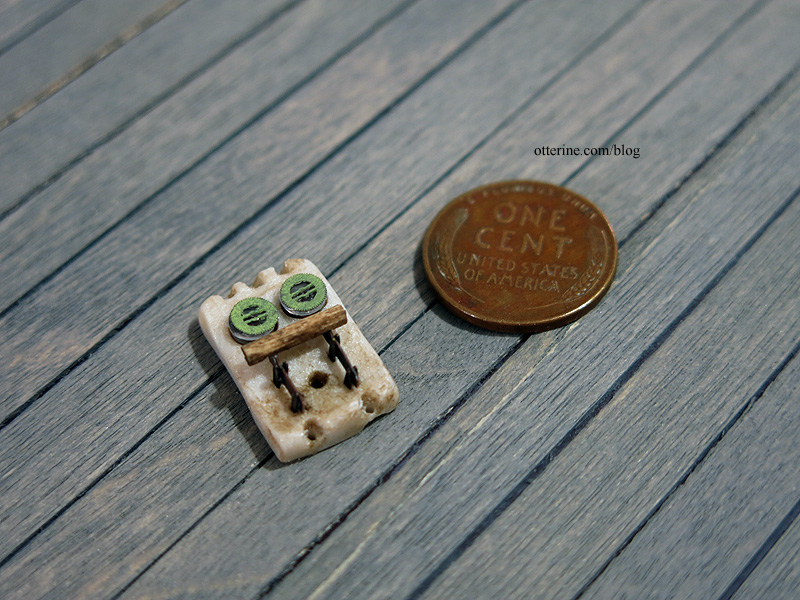
I finished the porcelain fuse block by adding the knife switch and two fuses. The fuses are made from brass and silver watch parts (painted) and two clear plastic discs. The switch doesn’t pivot; it’s glued in place. I mixed some brown paint with Americana Staining Medium to age the assembly.
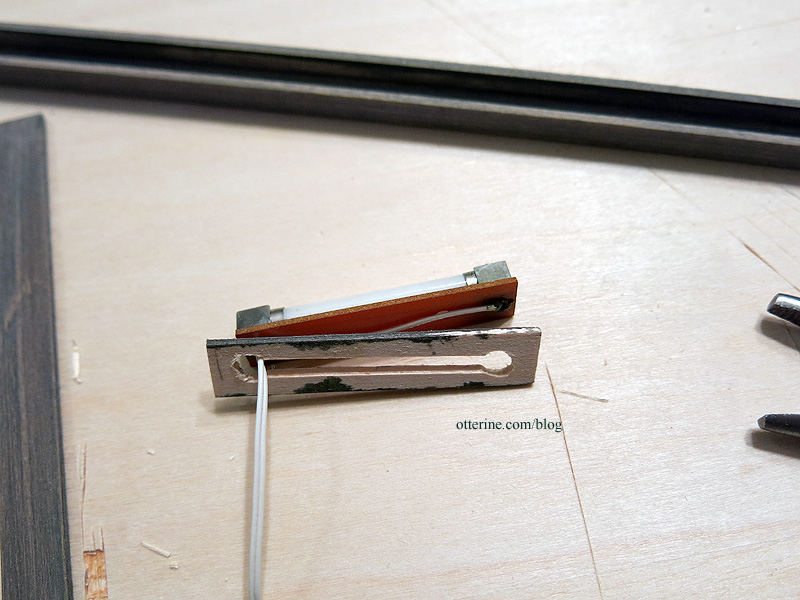
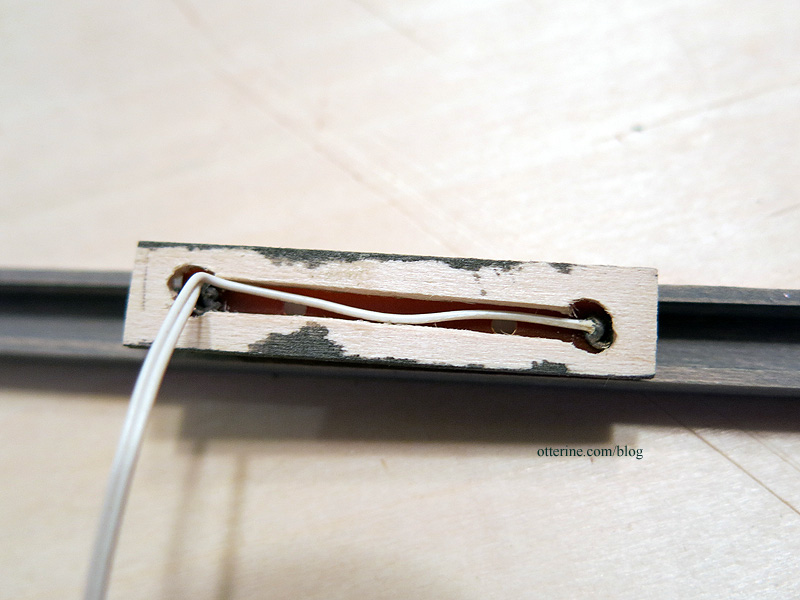
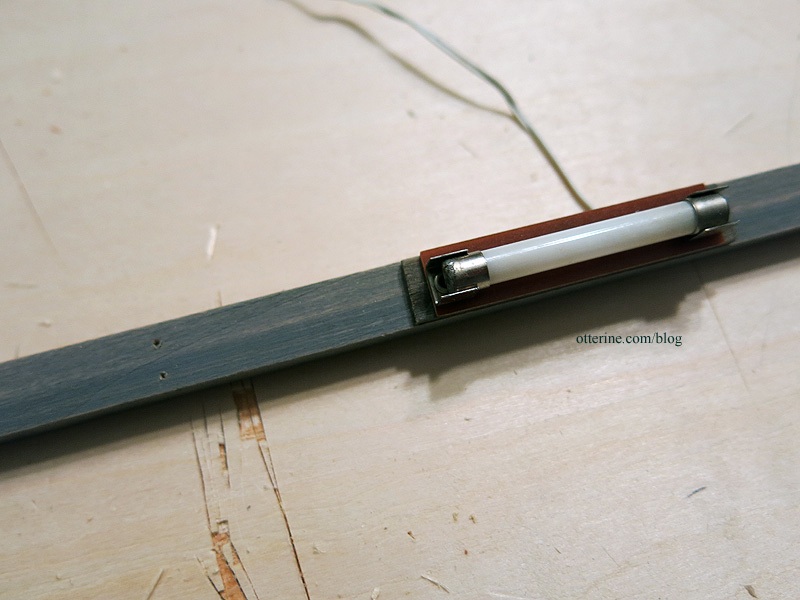
I drilled holes through the wall to insert tubes to the exterior. I’ll address the exterior electrical portion later. My original attempt at mimicking the shaped end of the porcelain tube was done with contour putty.
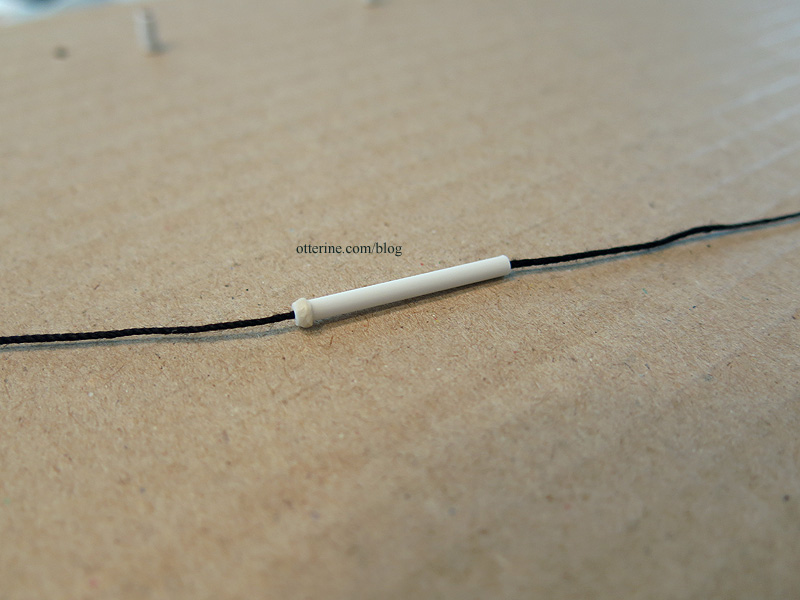
It was too brittle and fell to pieces, so I cut the tubes and pressed one end onto an awl to stretch it a bit. This allows for a slight shape even if it’s not an exact replica.

I glued the box to the wall and then added two brass nails clipped short to fit. The bottom screw holes disintegrated when I drilled the larger holes, but you won’t see this once the final cording is in place.
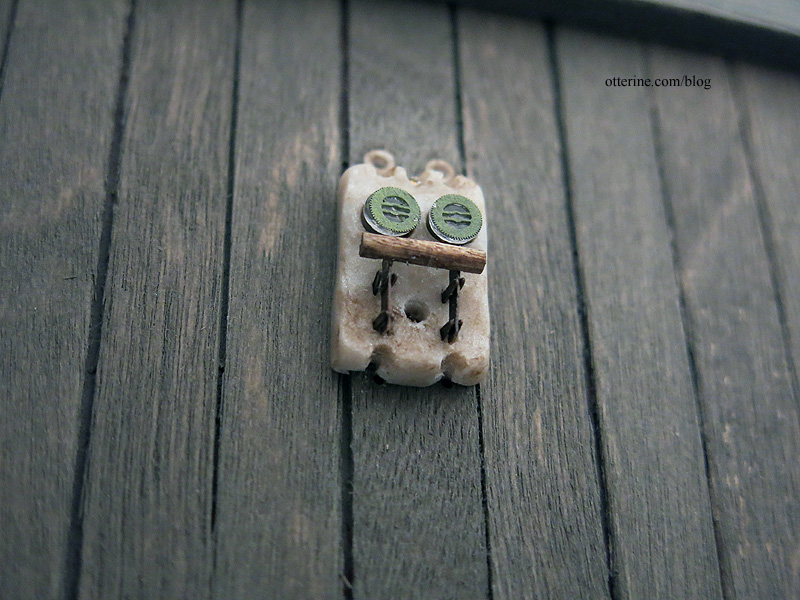
I chose to mount the fuse block higher than I had it in initial map. From what I’ve read, it was difficult not to shock yourself (i.e., electrocute yourself) when throwing the switch. I figured it would be best to keep it in a place where nothing would lean on it by accident, something like a metal rake.
I’m now ready to finish up the cording through the remaining knobs and tubes.
Categories: Milo Valley Farm
January 24, 2016 | 0 commentsMilo Valley Farm – lighting, part 3
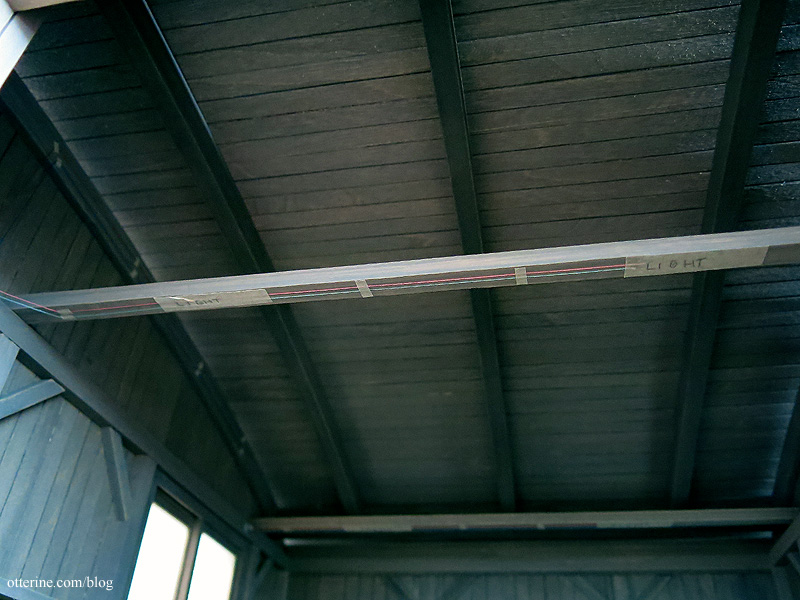
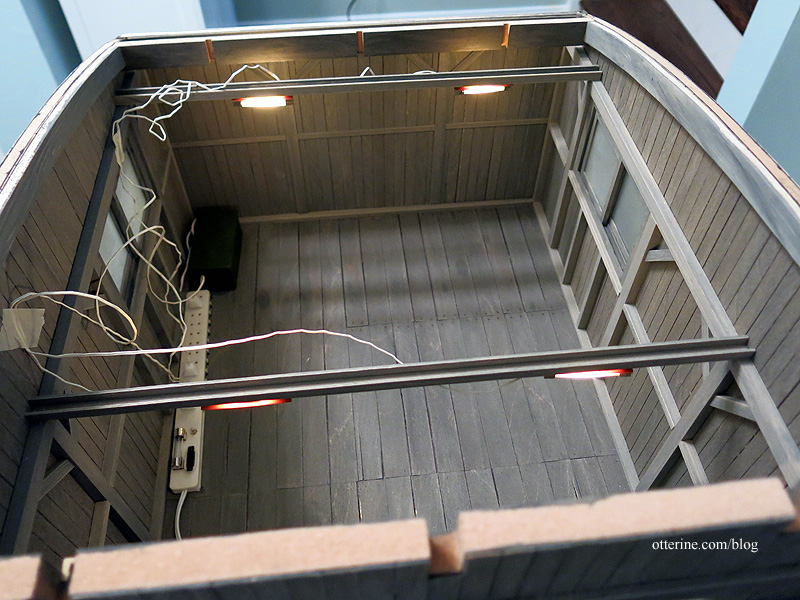
With the knobs installed on the cross beams, I could wire the 12V lights. As noted in this post, I ran three wires into the barn — one more than I thought I would need. I usually install one extra in case inspiration strikes later, and it has. More on that later.
Inside the sea chest, there will be a receptacle, which will use one of the wires. I can plug three light fixtures into the hidden receptacle, though I plan to plug in only two. That aspect will be addressed in a later post.
I chipped out a portion of the floor beam to run two wires up the wall.
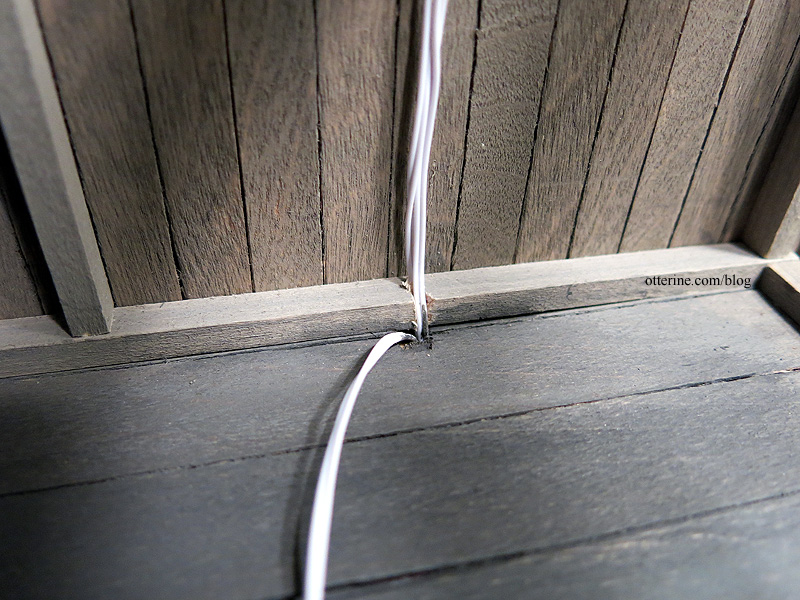
These are hidden by the vertical channel molding that looks like a support beam.

I spliced a length of wire to one of the lead wires and taped it along a route to the front of the building. This will be for any exterior lighting on the front of the barn. I’ll be undecided on that fixture until I get the barn doors installed, but I needed to pull the wire through now. I can disguise the wire with channel trim whether I use it or not.
I spliced the two lights from each cross beam onto a single length of wire, taping the wires into the channels of the cross beams as I worked.
I fed the front cross beam end wire through a hole drilled in the channel that serves as the horizontal support beam and joined it with the end wire of the back cross beam.
I tacked the vertical support beam to the wall with small dabs of glue, but the horizontal support beam and two cross beams are held in place with tension alone. The pieces can be snapped out of place if I ever need to address any wiring issues.
I spliced the two cross beam lighting wires to the remaining lead wire. Once the roof is on, this wiring will be unseen but still accessible through the removable back wall. It will be a cramped space to work in, but it’s better than having no access.
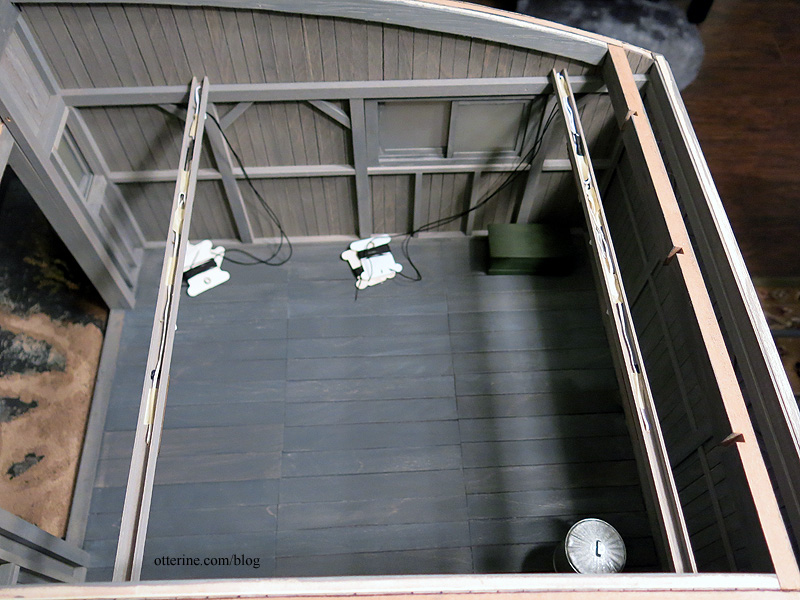
You can’t see any of the channel wires from the barn door opening.
Next up, continuing the knob and tube system from the cross beams onto the side wall. We’re getting there!
It has been so cold here the past few days, with windchills well below zero. Jasper is one smart kitty. He’s left the kitty bed and cat tree behind for the comfort of sleeping directly on the heat register. :D

Categories: Milo Valley Farm
January 13, 2016 | 0 commentsMilo Valley Farm – knob and tube wiring, part 3
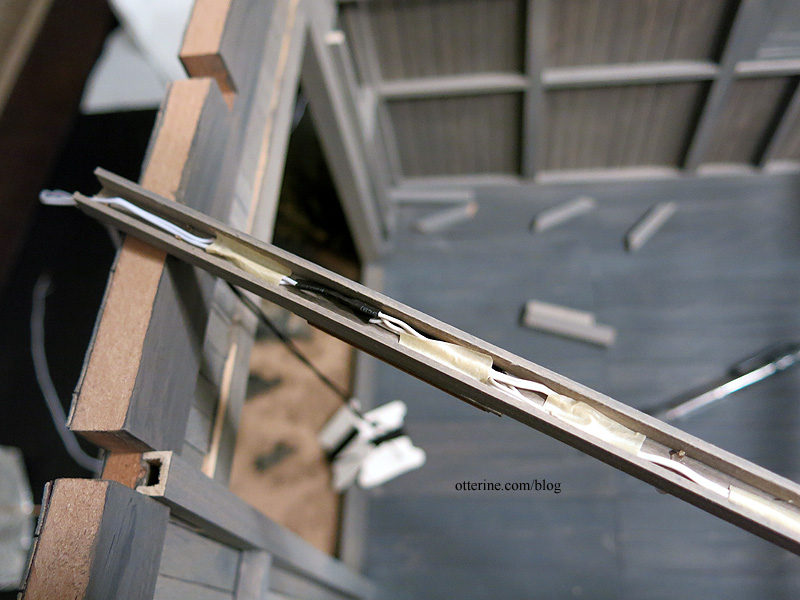
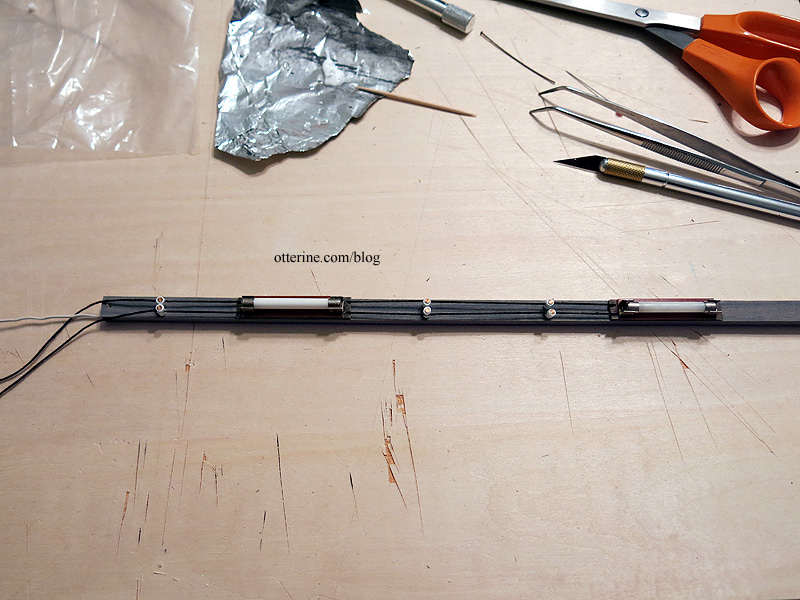
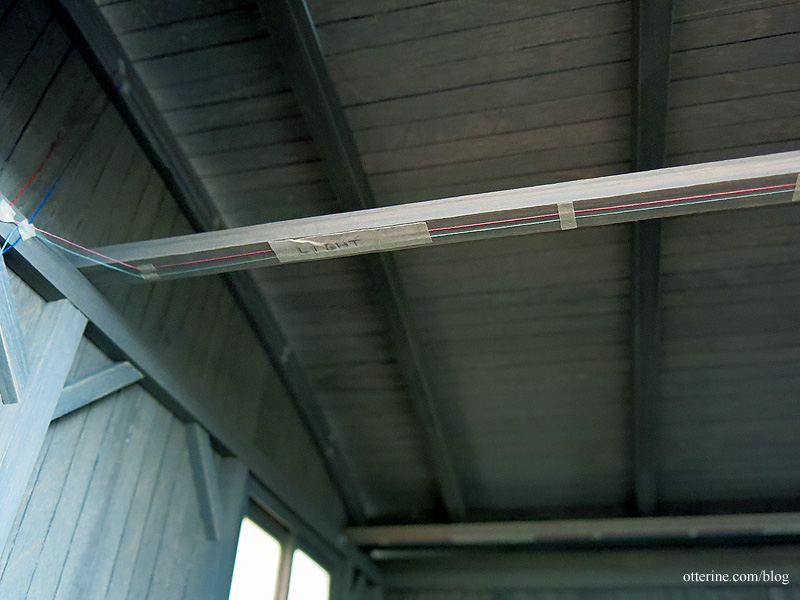
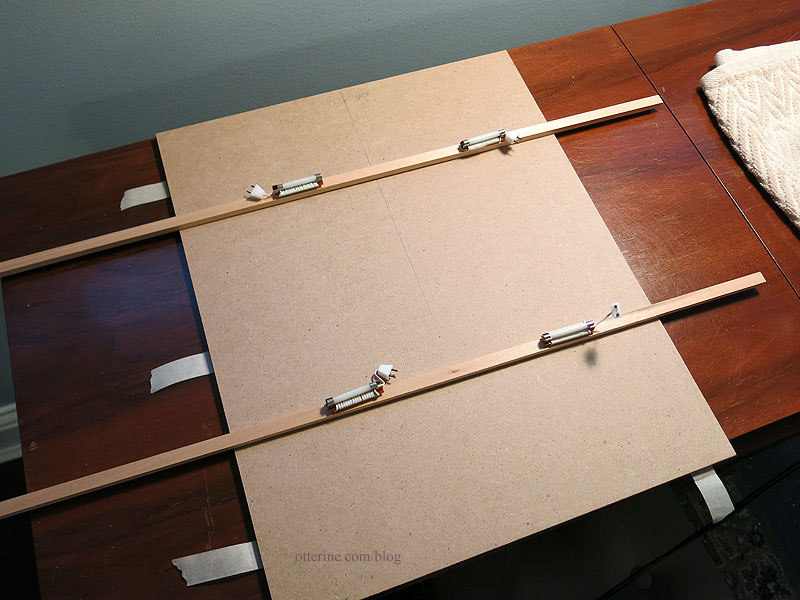
With the light fixtures installed, I could start running the cord wire for the knob and tube system. I started with the cross beams.
I mentioned adding cleats. These allow two wires to travel a parallel path. Knobs also carry wires parallel, but I believe the difference is that knobs can be enclosed whereas cleats are used for external use, like running along a ceiling out in the open. After some further consideration, I decided to skip the cleats and just go with knobs and tubes.
I drilled holes in the ends of the light fixture back plates.
I cut two extra long pieces of crochet cord and knotted one end for each. I used glue to stiffen the leading end.
I fed the cord through the holes of the first light fixture, across the beam, into the holes of the next fixture and out the other side of the second fixture.
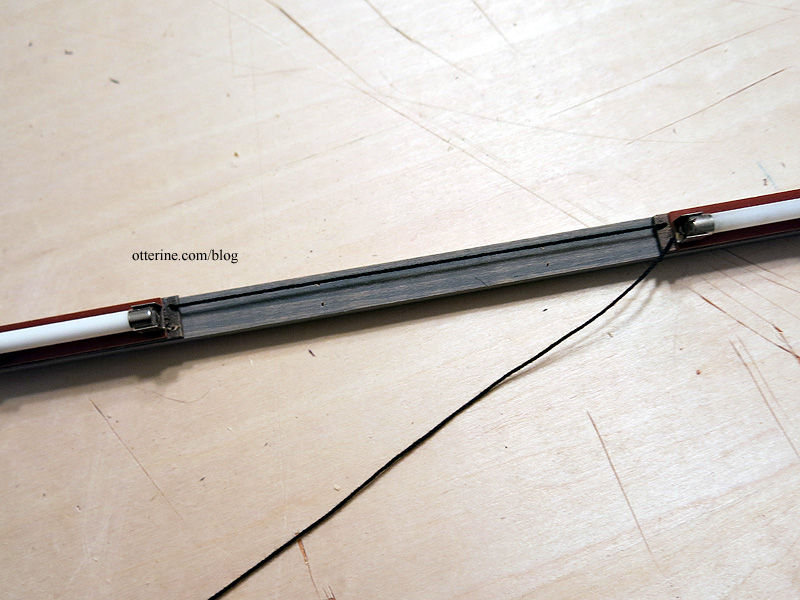
In real life, the nails would not touch or intersect the corded wire, but in my mini version, the nails keep it all in place. I’m using aged copper headpins for nails cut down to size. I fed the nails through the upper knob section, then through the cord and into the lower knob section, using a dab of glue to secure. I added larger globs of glue inside the channel.
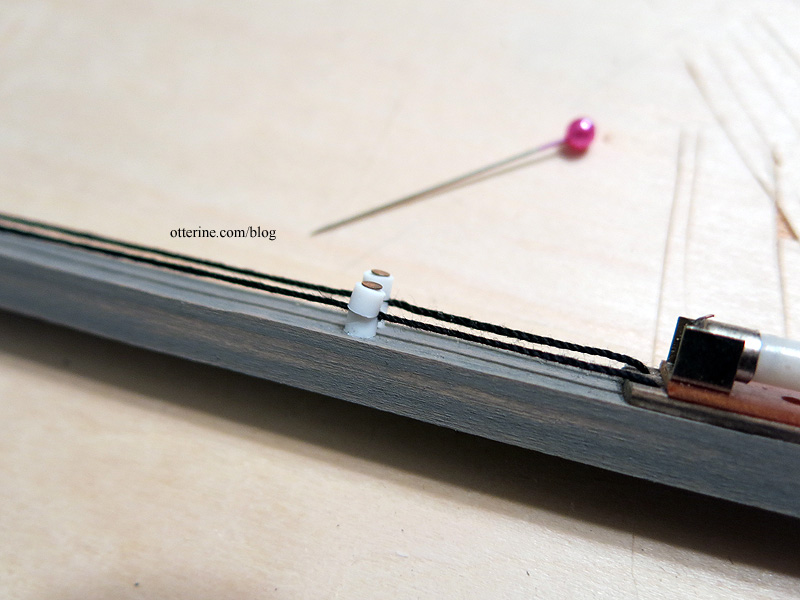
I tightened the cord as I secured the knobs in place and continued the length of the cross beam.
I used cardboard floss bobbins to keep the lengths of cord tidy.
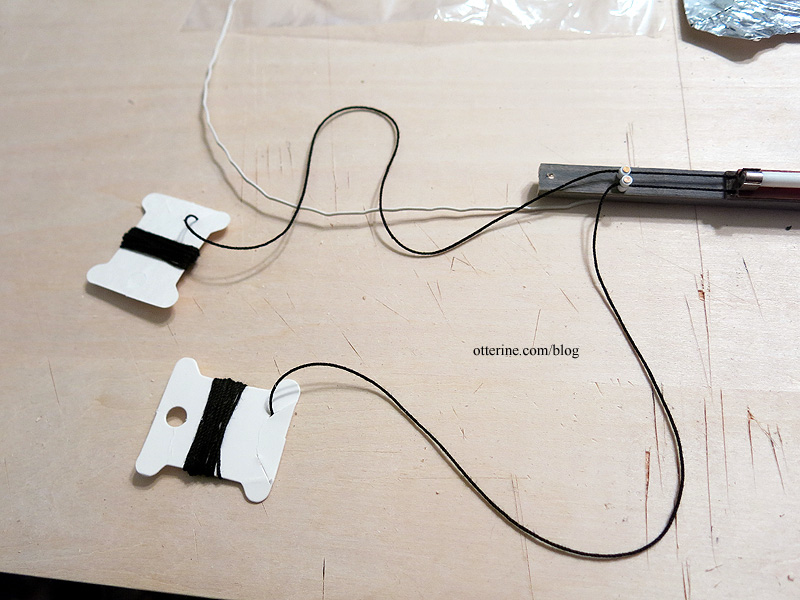
I repeated the process with the second beam. I made this cord just as long though I intend to splice them together once I get to the knobs on the side wall. I figured, just in case that didn’t work, I wouldn’t have to redo the whole thing. I would already have a good length of cord to work with.
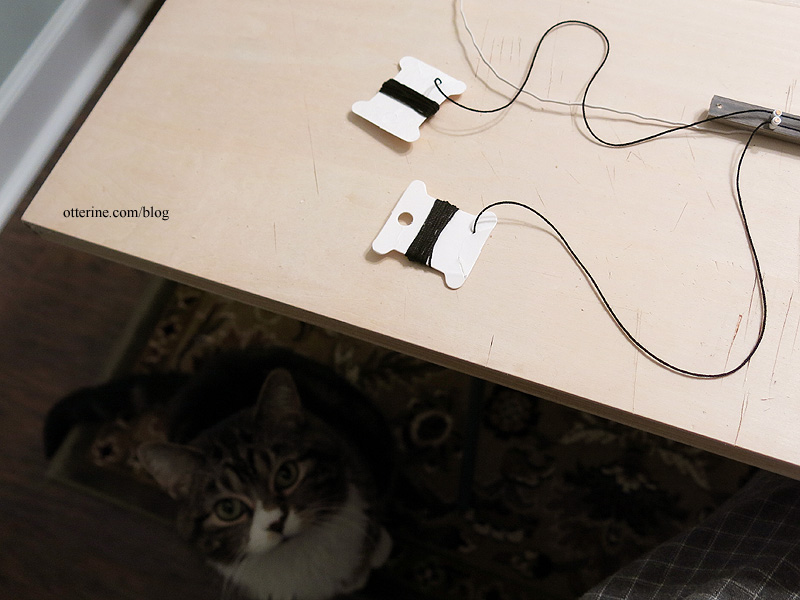
Overall, it was a fiddly process, but the biggest obstacle was Jasper chasing the string ends as I worked.
The cross beams are almost ready for installation. Next up, wiring the 12V lights.
Categories: Milo Valley Farm
January 12, 2016 | 0 commentsMilo Valley Farm – lighting, part 2
Continuing work on the 12V lighting for the barn. I’ve shown you the new old stock E-Z-Lectric light fixtures from Itsy Bitsy Old Stuff. I also mapped out my lighting plan.
Before I could install the actual 12V lights and the mock knob and tube system, I needed to address the fixtures. They seem to have rather delicate connections for the backside wiring. Those wires would prevent them from sitting flush on the cross beams besides.
So, I cut thin plaques from 3/8″ x 1/16″ strip wood to mount them.
The fixtures are glued to the plaques, leaving room for the wiring to exit the back while protecting the delicate connections.
I touched up the weathered stain finish on the sides and ends. I marked the wire location on the cross beams and drilled holes for the 12V wires to pass through. I also drilled holes for the knob and tube system to be covered in a later post.
The lights are mounted to the cross beams, but now I need to work on the knob and tube system. :]
Categories: Milo Valley Farm
January 9, 2016 | 0 commentsMilo Valley Farm – knob and tube wiring, part 2
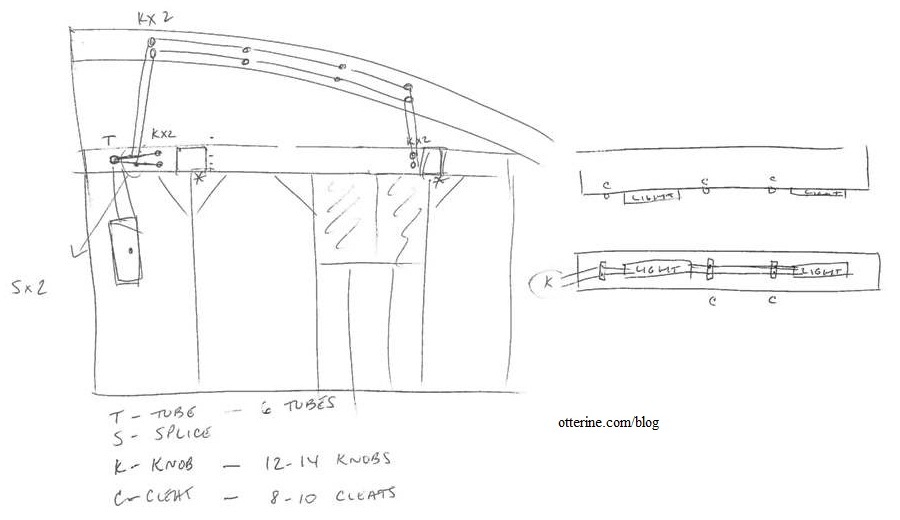
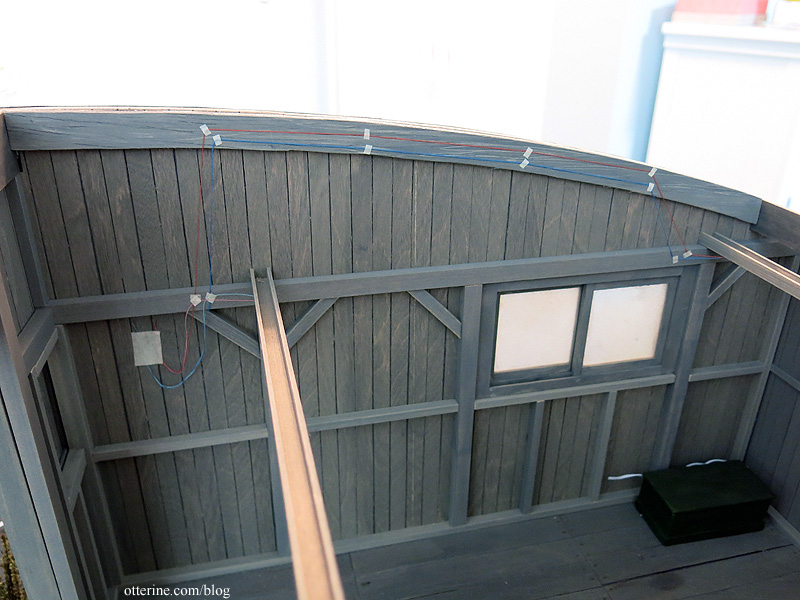
With the lighting plan in place, it’s time to start wiring — both the actual 12V dollhouse system and the fake knob and tube system. I started by drawing a rough sketch of where the knob and tube wiring would be placed. This also gave me a rough idea of how many of each piece I would need.
While I didn’t study antiquated electrical work in depth, the gist is I need two wires — one hot and one neutral — and you don’t want them to touch the building surfaces or each other. The final crochet thread wiring will come later since I’ll need to pull enough through to reach all of the areas where it is needed. Better to plot its course first. So, for right now, I am just taping some colored sewing thread in place as a trial run. I can then label by color for the length of thread I will need in each run.
From the fuse block, the wires will be spliced with one set to go directly up and the other set to hit the first cross beam. There’s a reason why the wires don’t start at the top, but that has to do with the exterior lead-in setup. I’ll get to that later.
I will drill holes in the cross beams and feed the 12V wires through the channels, splicing the lights on each beam to work as a single unit. In between those lights, I will need to add a wire path. One thing I showed you in the previous post but didn’t make were the cleats. These allow two wires to travel a parallel path. I’ll need to construct these as well.
I will space the knobs evenly along the top curved beam toward the second cross beam. Again, I’ve used small bits of tape to go through the whole path before making any permanent marks or holes. The wires then drop to the second beam.
I’m going to mull this over a bit now. I realized in looking at these pictures that I haven’t installed the support brackets for the cross beams, and that will interfere with this setup. I might also move the fuse box above the top horizontal beam instead of having it sit right below it. I have a few ideas, just need to sort them out. :]
Categories: Milo Valley Farm
August 22, 2015 | 0 commentsMilo Valley Farm – lighting, part 1
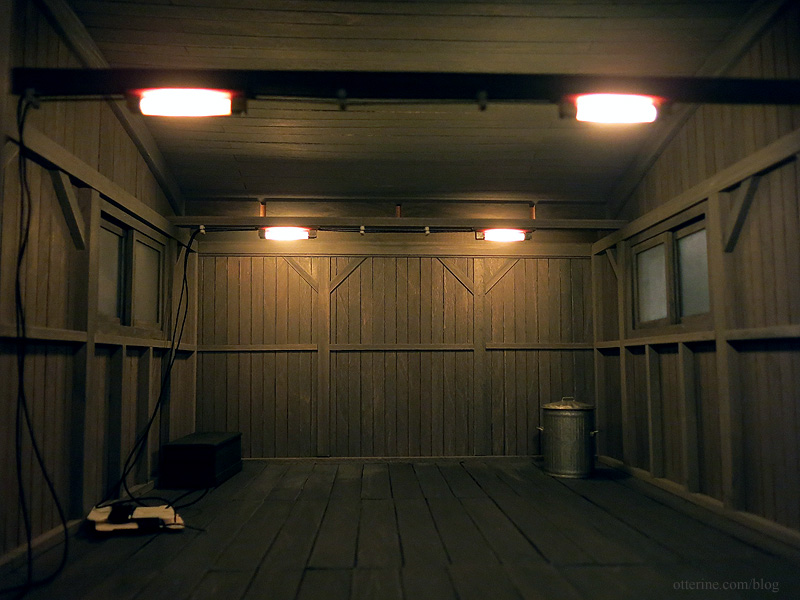
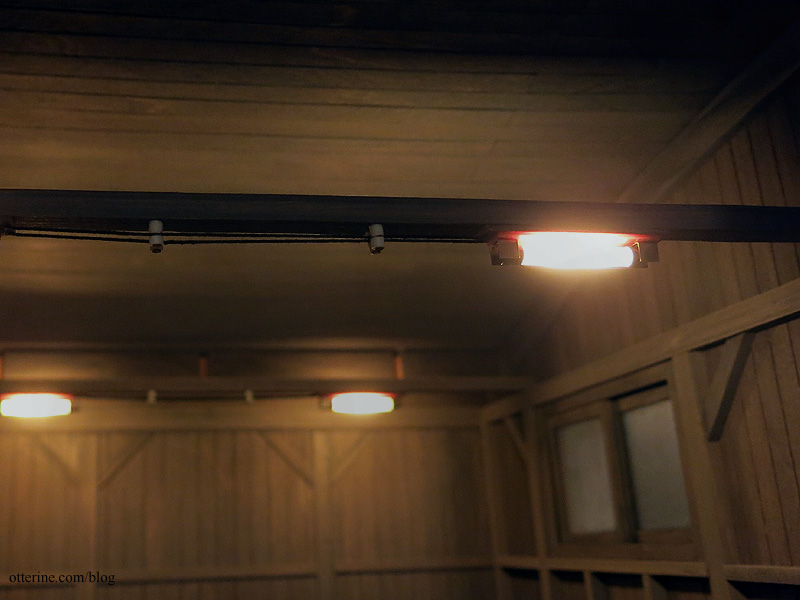
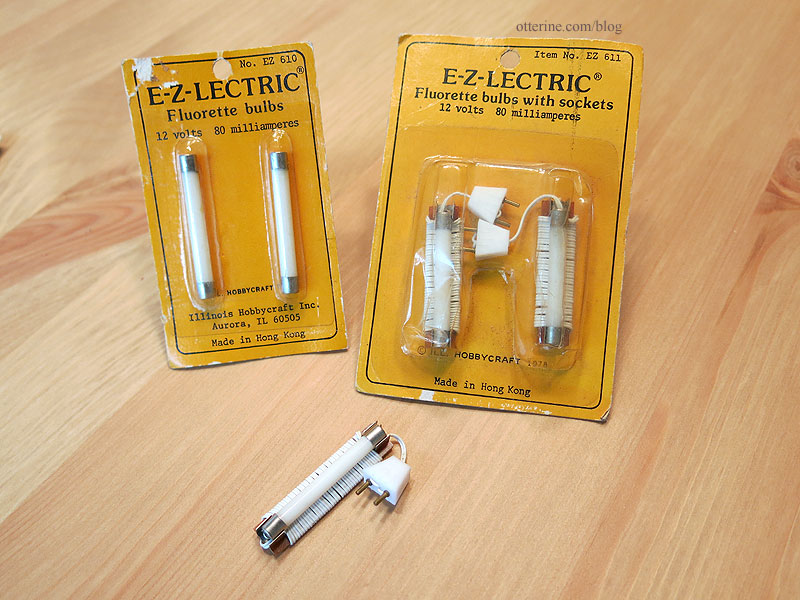
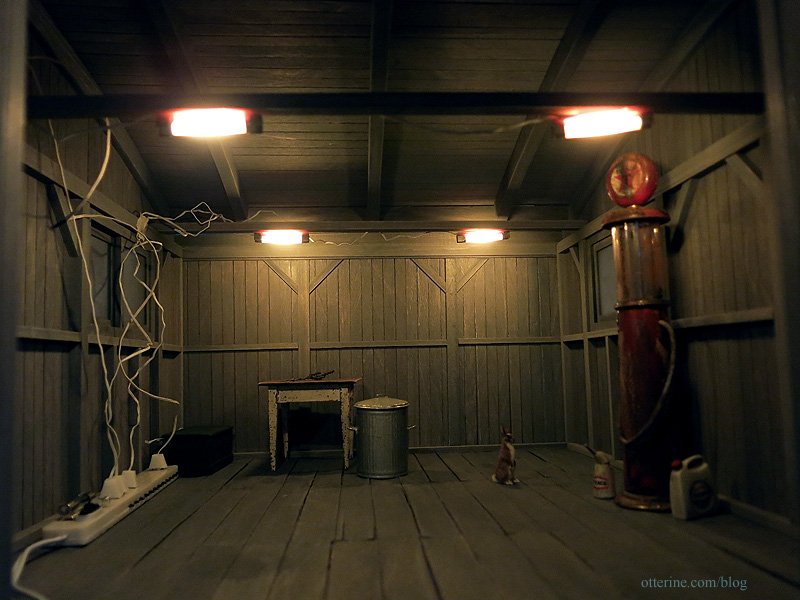
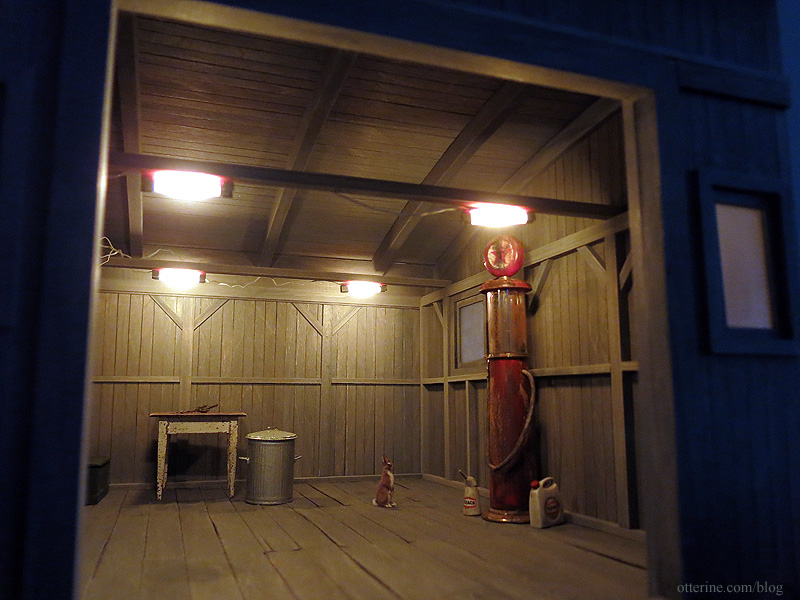
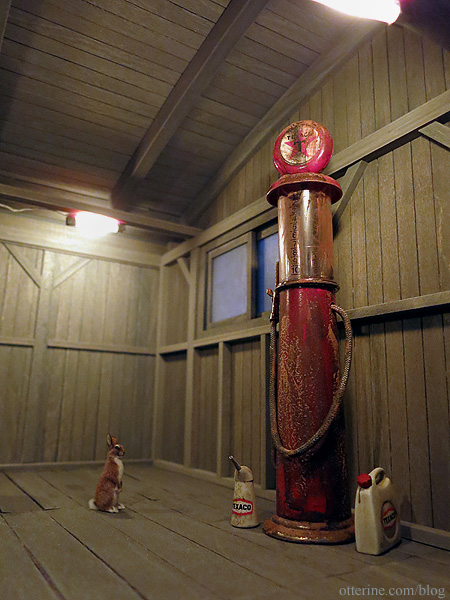
Now that I have the ceiling board started, I can test out the lighting. As a reminder, I bought some new old stock E-Z-Lectric light fixtures from Itsy Bitsy Old Stuff. They had four packages of two lights and one package of two spare bulbs. They all worked. :D
These are great since they already look a bit aged; a few of the bulbs show crackling in the frosted glass finish. There are similar fixtures on the market today, but they have black backings. I liked the older look of these brown backings. You could paint the more modern ones as well.
My original plan was to have four on the cross beams.
So, I unwrapped the wiring, taped them in place and plugged them in to test the brightness. The cross beams and left side beams are all still removable so I can hide the 12V system.
I think it’s the right amount of light with the four overhead lamps.
And, why not take some fun test shots while I’m at it? :D
Now I just need to finish up the knob and tube prep work.
Categories: Milo Valley Farm
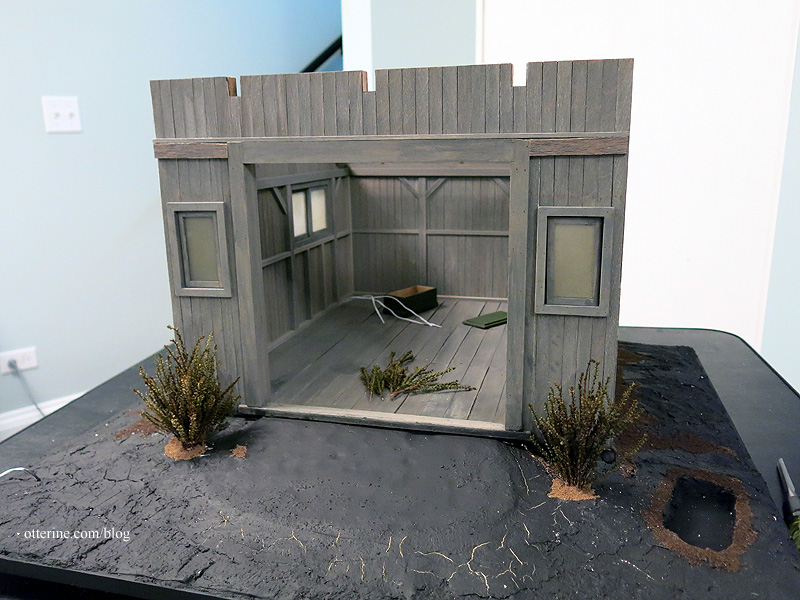
August 19, 2015 | 0 commentsMilo Valley Farm – landscaping, part 3
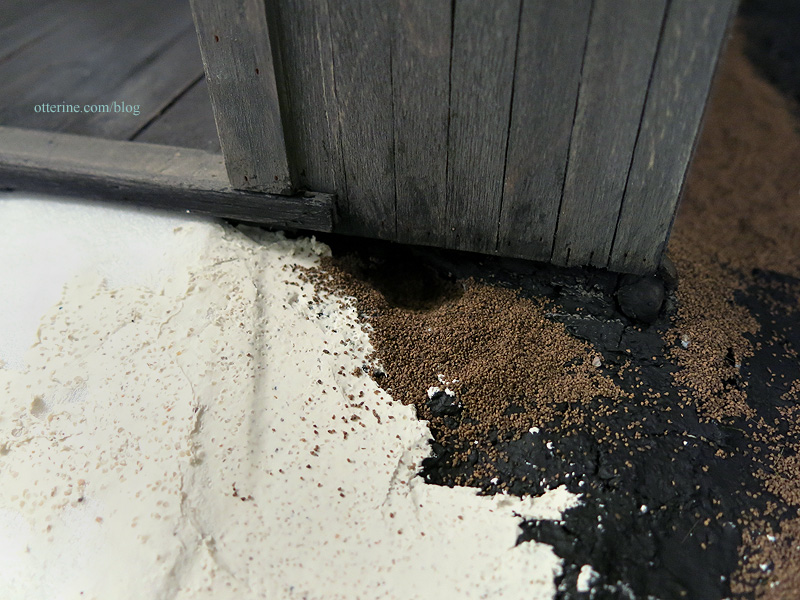
Continuing work on the landscaping. I added additional dark brown fine ballast around the bushes and touched up the rabbit hole.
I am still deciding on the grass mat I will use, but I will need a template no matter which I choose. I made the template using tracing paper. Since I couldn’t see the dark dirt line through the paper, I lightly pressed masking tape along the edge.
I traced the line with a pencil, adding more toward the dirt since I can always trim any excess.
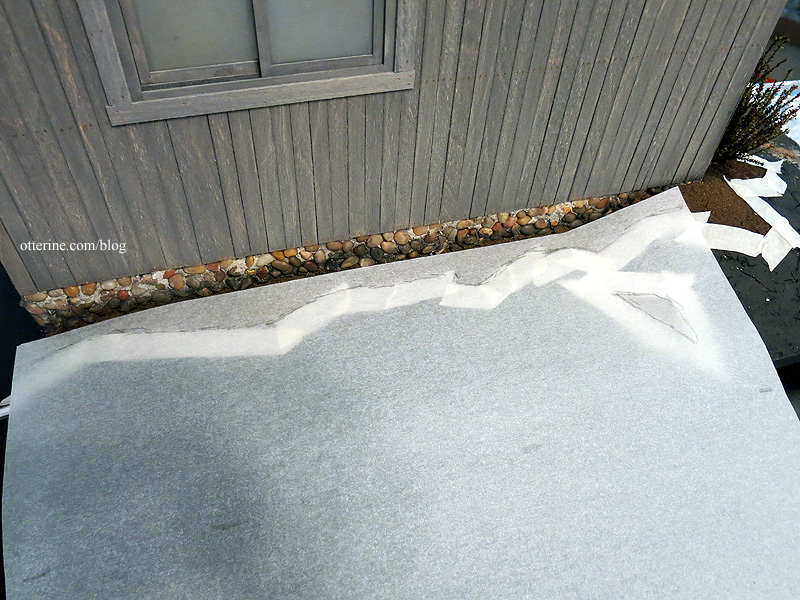
I cut the template and checked the fit.
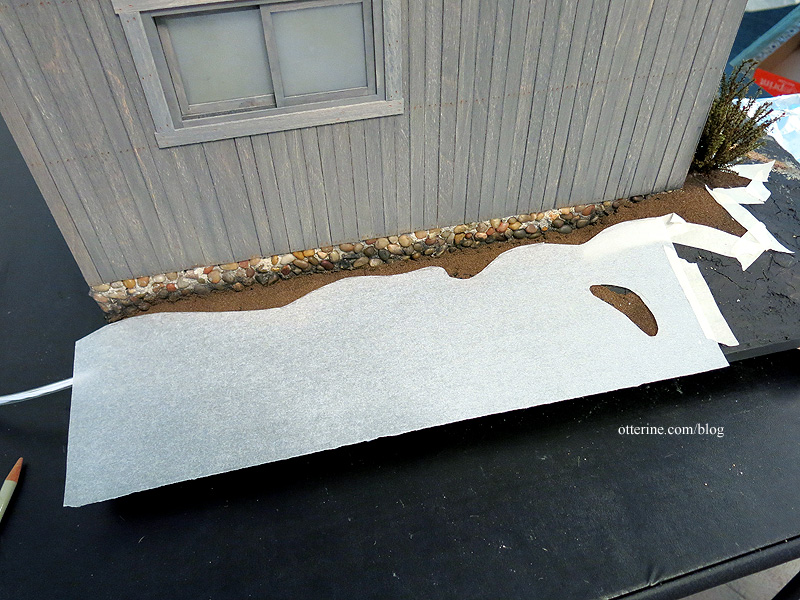
I continued around the front and opposite side, taping pieces together as needed.
I’ll use this template to cut the grass mat.
Categories: Milo Valley Farm
August 9, 2015 | 0 commentsMilo Valley Farm – landscaping, part 2
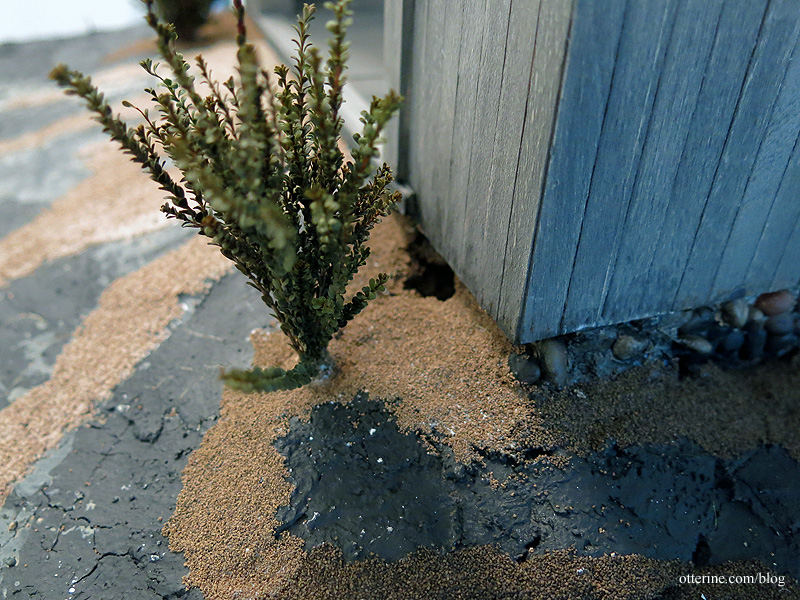
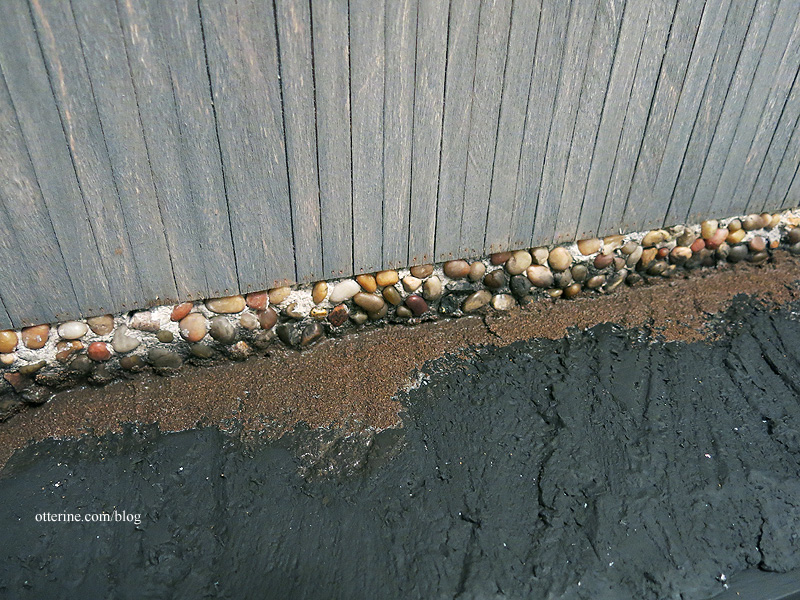
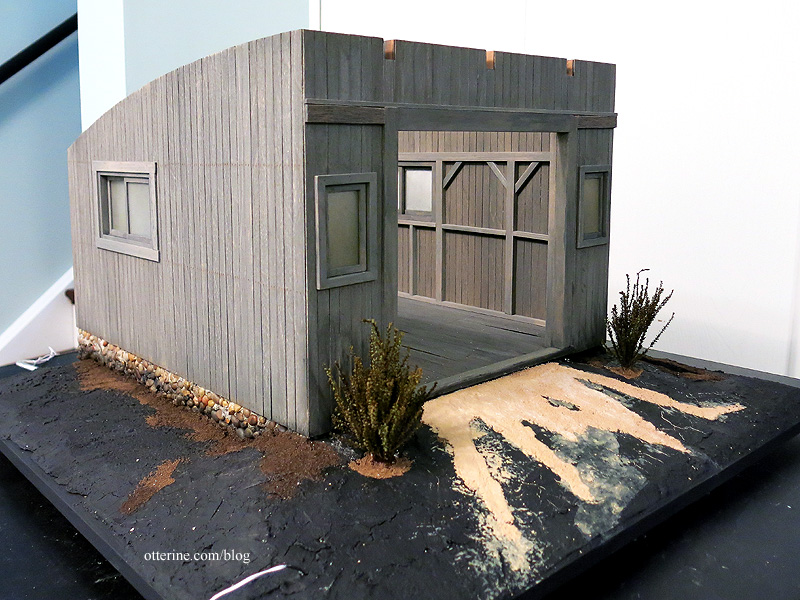
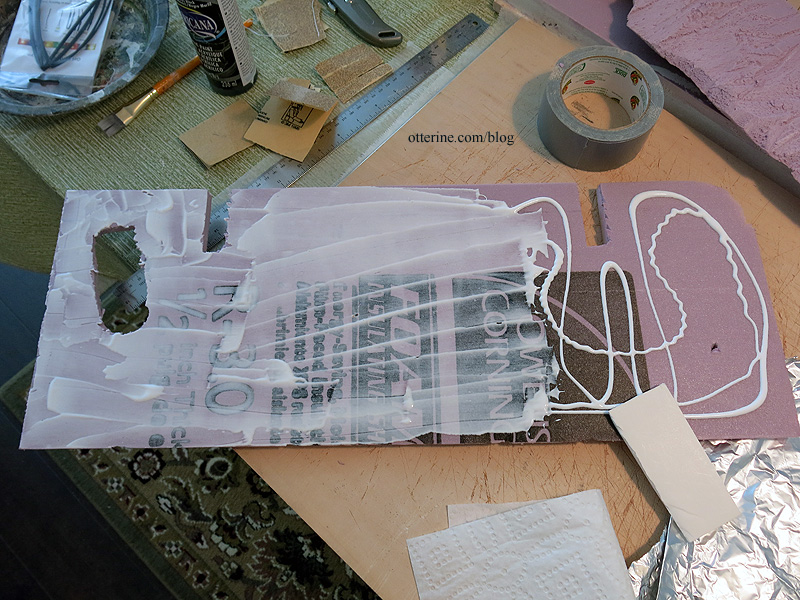
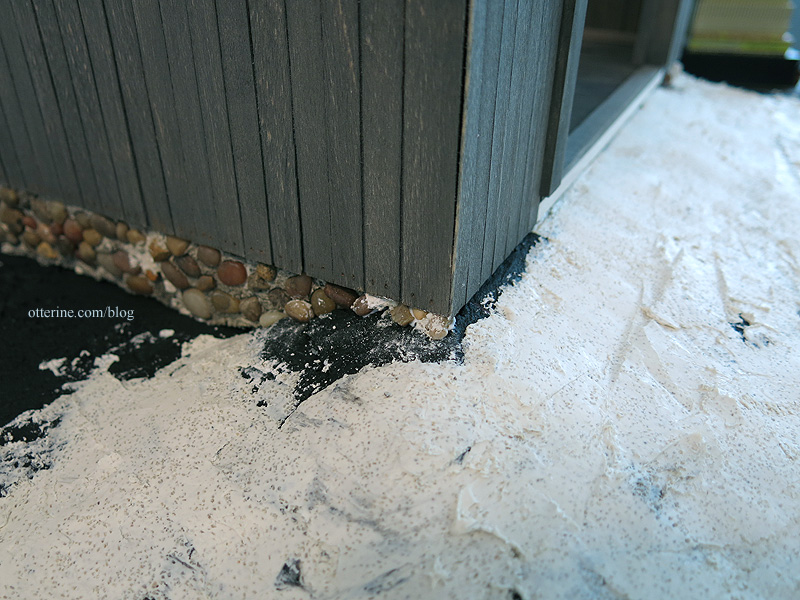
Continuing work on the landscaping. I touched up the paint over the stucco application and dirtied up the lower portion of the stone foundation with a brown and black paint wash.
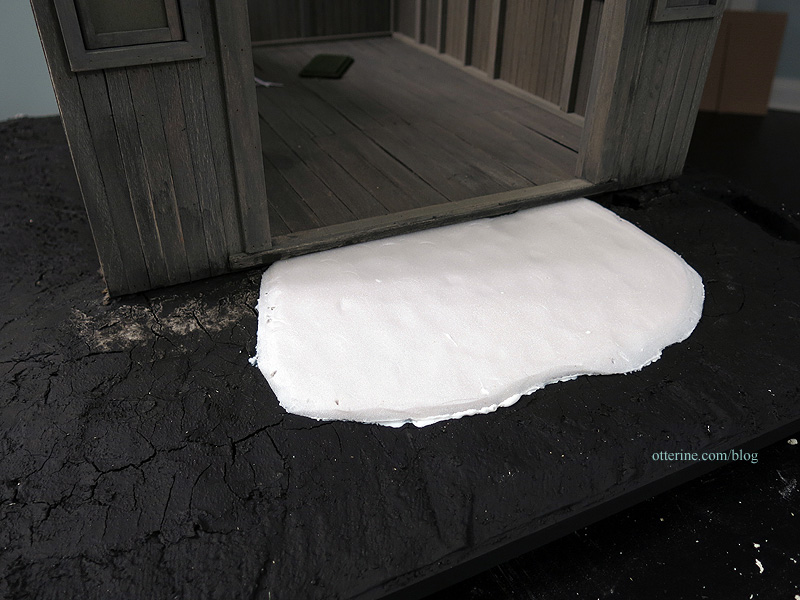
After looking at it some more, I decided I needed to build up the land to the barn door. I glued and pinned a piece of thin foam to the existing ground. I cut it to fit.
I then built up more stucco to even out the edges.
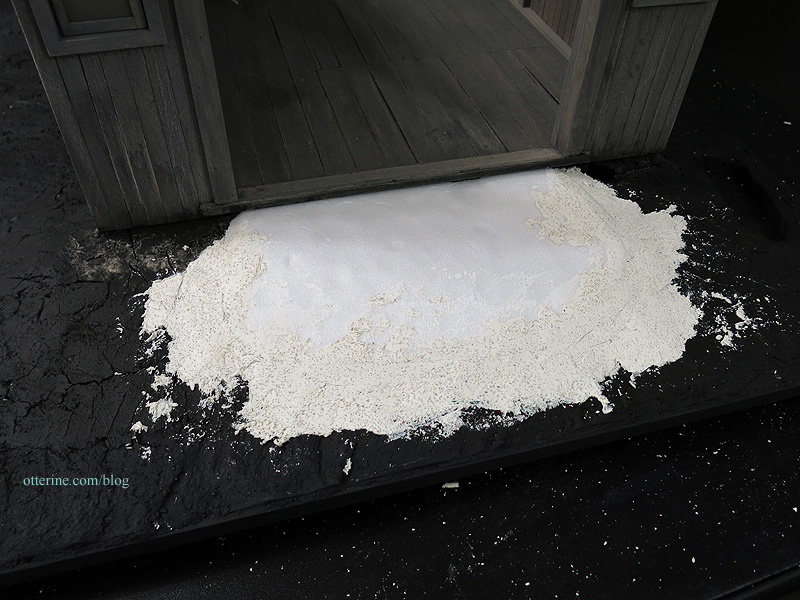
I painted it to blend with the rest of the land.
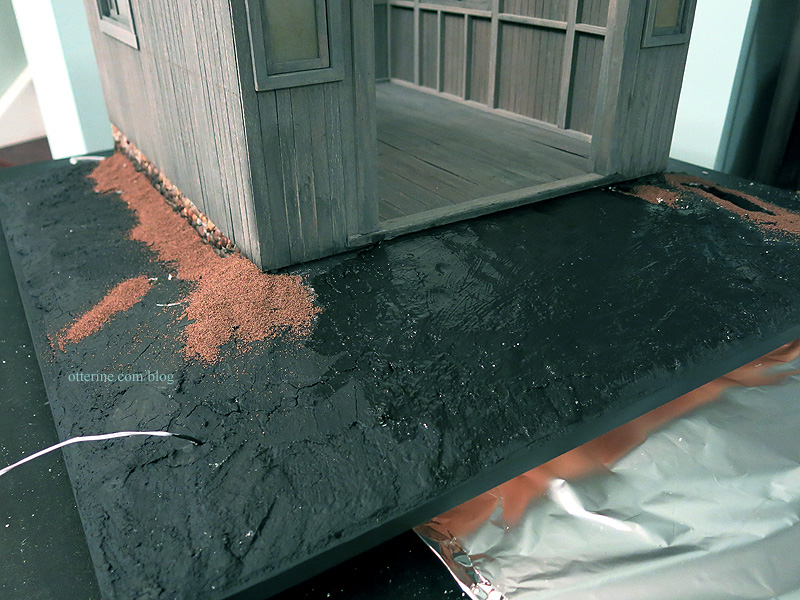
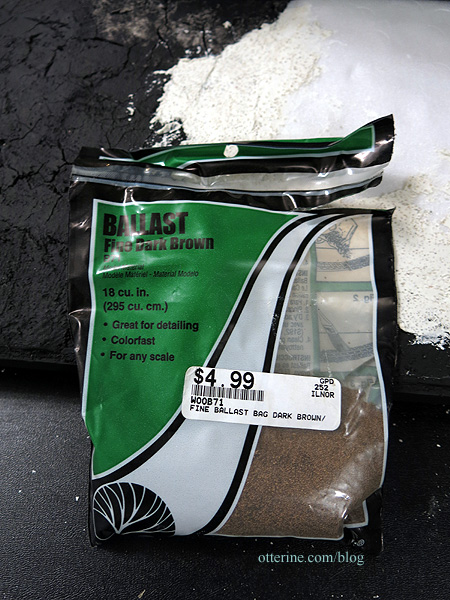
Instead of having the grass go all the way to the barn, I will have dirt showing along the foundation. I started with Fine Ballast Dark Brown by Woodland Scenics.
I spread a layer of glue with a brush.
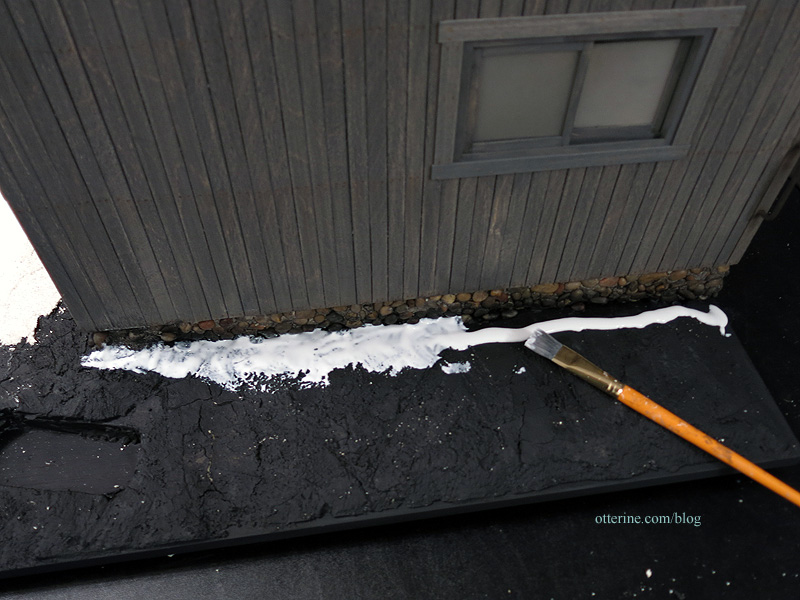
I applied the ballast liberally and gently pressed it into place.
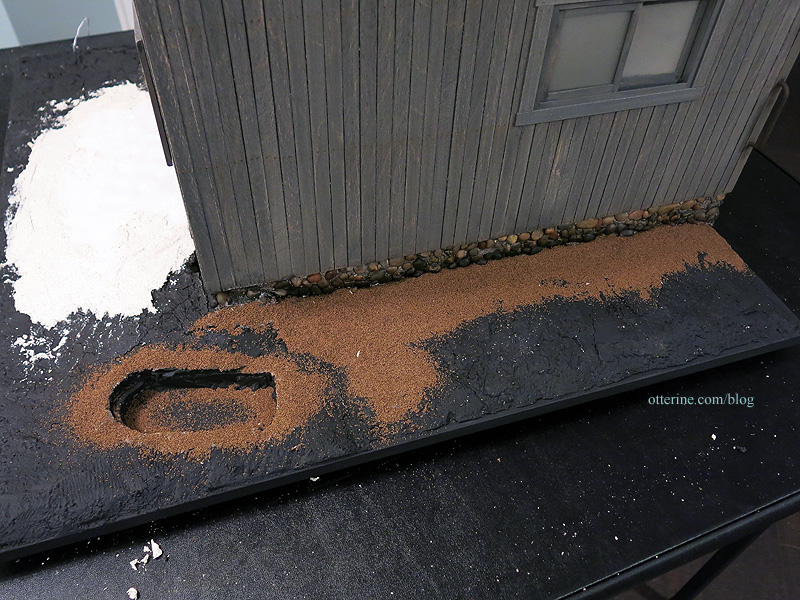
The rabbit hole has a layer of ballast as well. :]
I let it set overnight before brushing the excess back into the container, then vacuuming the remainder. I added a dark black brown paint wash to the ballast after I cleared the excess. This will dry a little lighter than it looks now.
While that dried, I planted two greenery bushes purchased from A Little More in Miniatures at the mini shows earlier this year. They smell awesome. I dug out holes for the bases and glued each bush into the foam, spreading some brown ballast over the bases. Why not plant these later after the barn doors are in? No reason really. :]
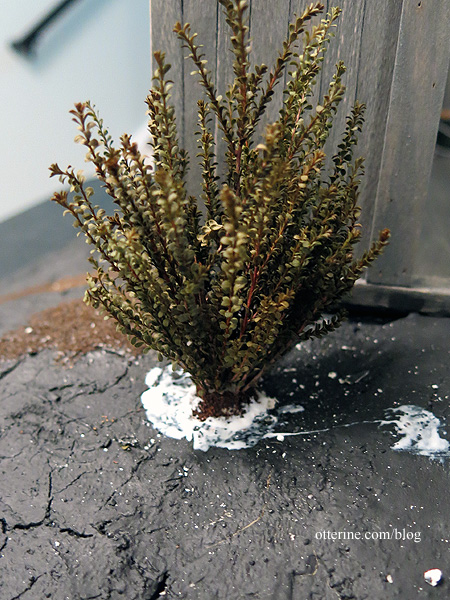
Operator error led to the bush by the rabbit hole losing a few branches. I will use these as final touches, so all is not lost! These are natural elements and as such might not last the test of time. Nice thing about an old barn is it won’t matter if they end up bare and sad looking.
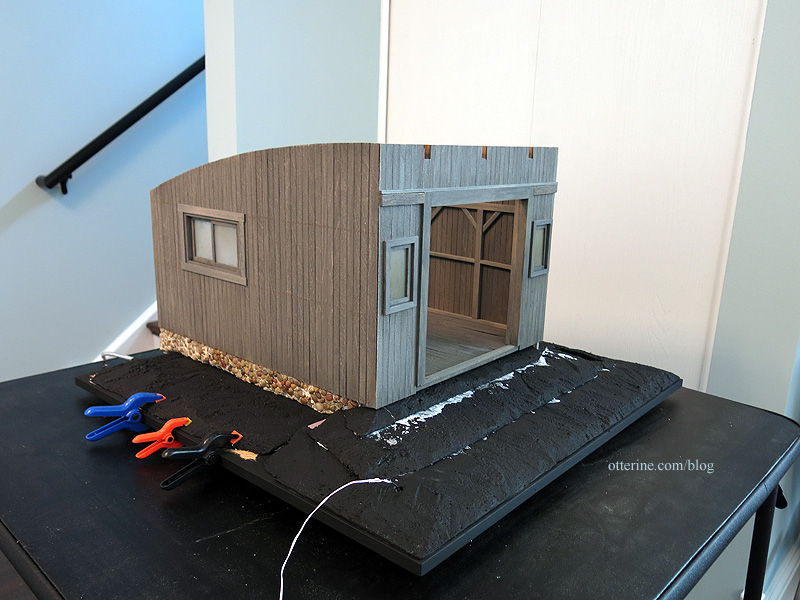
On the ramp, I applied random streaks of glue and then spread the glue with a brush. The gravel is Woodland Scenics Ballast left over from Baslow Ranch. I poured it on generously and pressed it gently. I didn’t bother to let it dry overnight before brushing the excess back into the container, then vacuuming the remainder. I added some paint washes to make the gravel look more natural.

We’re getting somewhere. :]
Categories: Milo Valley Farm
August 7, 2015 | 0 commentsMilo Valley Farm – landscaping, part 1
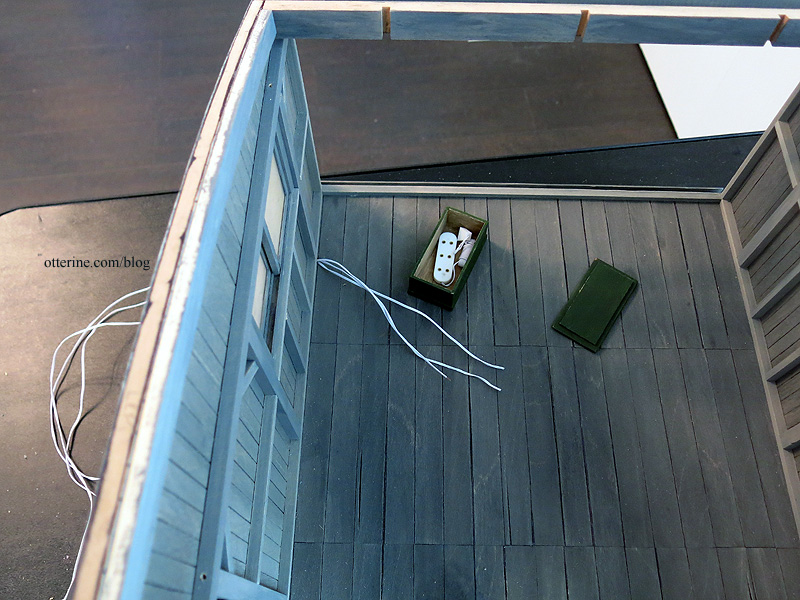
I made the initial landscaping base from builders foam. Before going further, I went ahead and ran wiring for the barn since the landscaping will be put in place over it.
I used my floral lead wire that I had installed when I glued the floor board to pull one final wire and one scrap wire through the hole. Once those were through, I taped the final wire to hold it in place and used the scrap wire to bring another final wire and the floral wire back through the hole. I used the floral wire to bring one final wire back through. Why not do them all at once? For some reason, it never fits. I end up with the same amount of wire through the hole at any given time, but it never wants to budge. :D
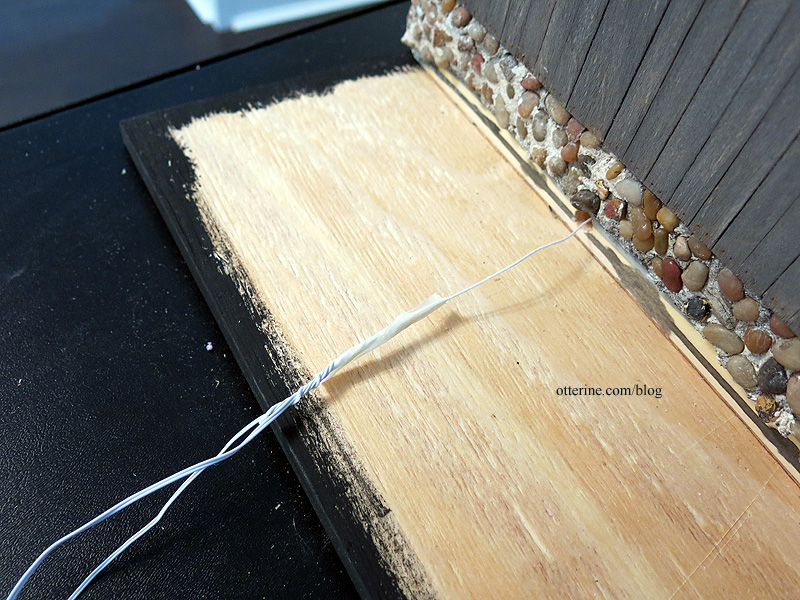
I opted for three wires though I am figuring on needing only two in the barn. I can always pull the extra out in the end or leave it curled in the sea chest in case inspiration strikes later.
To protect the wires, I taped aquarium airline tubing to the main board near the end and over the edge. I don’t usually do this step, but there are so few wires that will come out of the building, and I wanted to make sure they didn’t pull or get damaged. I usually have a lot more wires.
I did need to make a channel in the foam for the tubing and wires going into the foundation. I dabbed black paint onto the tube and then pressed the foam over it.
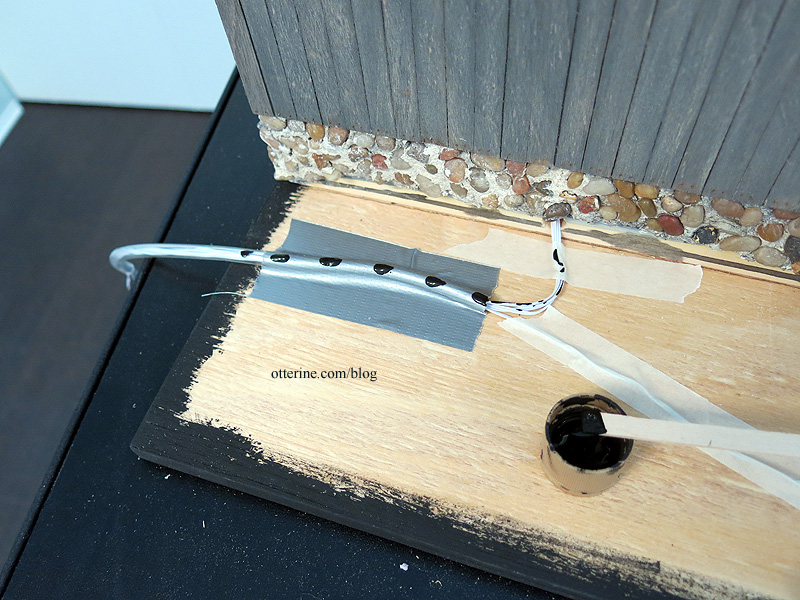
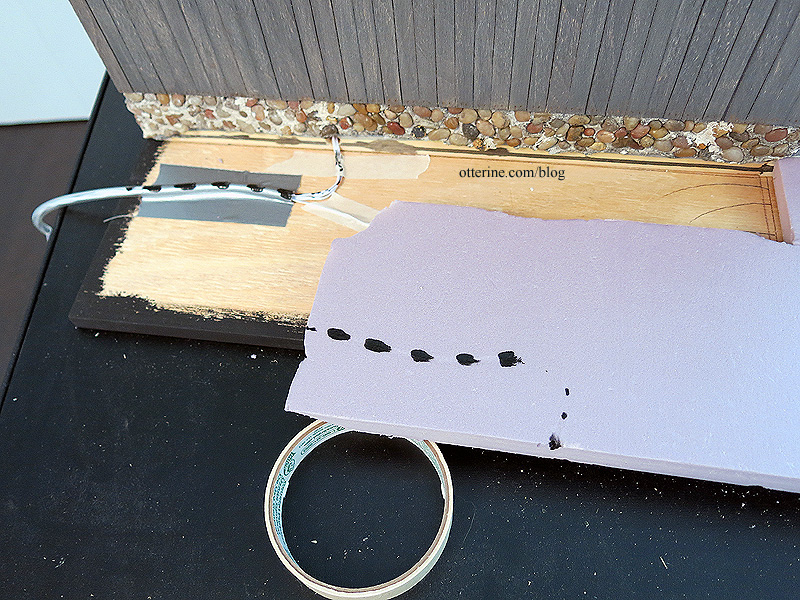
I cut where the paint line was. :]
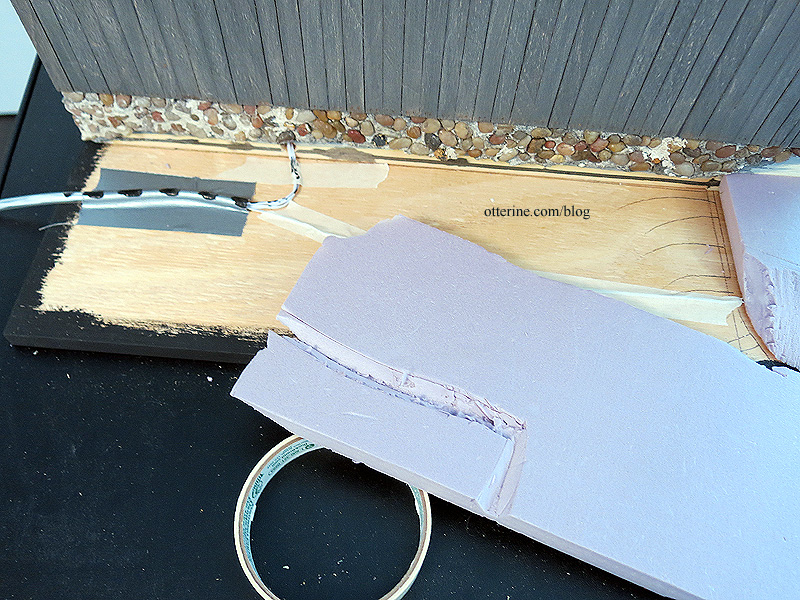
I glued the front lower foam piece to the landscaping board using Weldbond glue. I applied glue to the foam with a scrap of foam core board and then pressed it into place.
I painted the pieces with gesso. I had left the pieces closest to the building removable since I didn’t want to risk getting gesso or paint on the foundation.
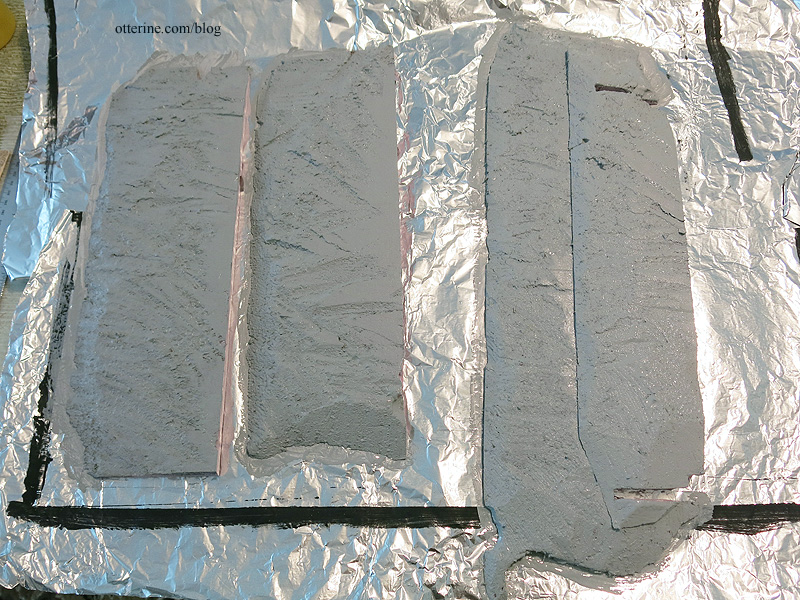
Once dry, I painted them with a mix of black and brown. I won’t bother touching up the base trim until I’m done with the landscaping prep work. I glued the remaining pieces of foam in place.
I added some stucco patch to fill in the gaps between the pieces and to even out the ramp. It will be easy enough to touch up the paint once it dries without marring the foundation.
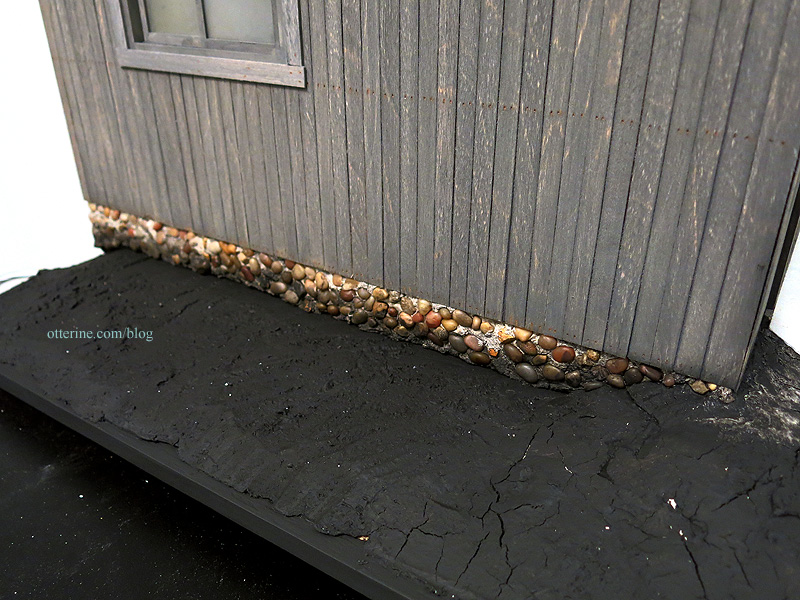
I added stone near the front edges where I hadn’t been able to apply earlier. This completes the stone foundation toward the front of the barn.
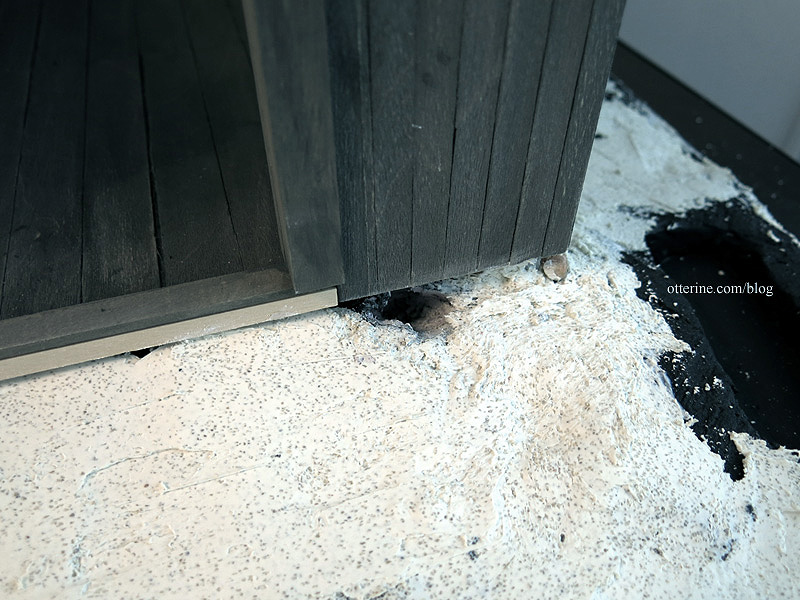
We need a rabbit hole, of course. :D
Categories: Milo Valley Farm
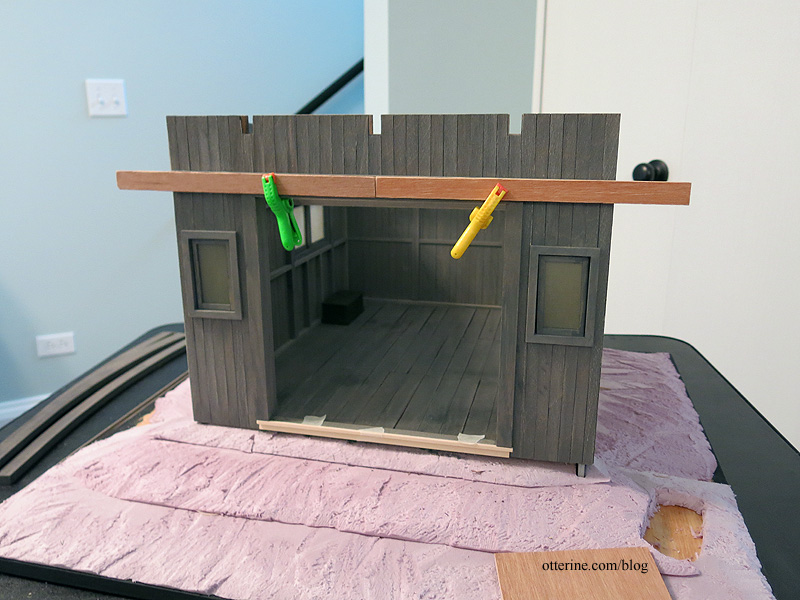
August 2, 2015 | 0 commentsMilo Valley Farm – the roof, part 1
Well, more like “the ceiling” since that’s where I will start. I cut the roof board down since I had narrowed the building. I had to cut an additional piece for the back since I had made the building deeper. Interestingly enough, I ended up with an extra roof board since the one that came with the kit originally was damaged so I had enough to cut the extra piece for the back from the same material.

I flipped the board over and marked the side wall and curved beam locations.

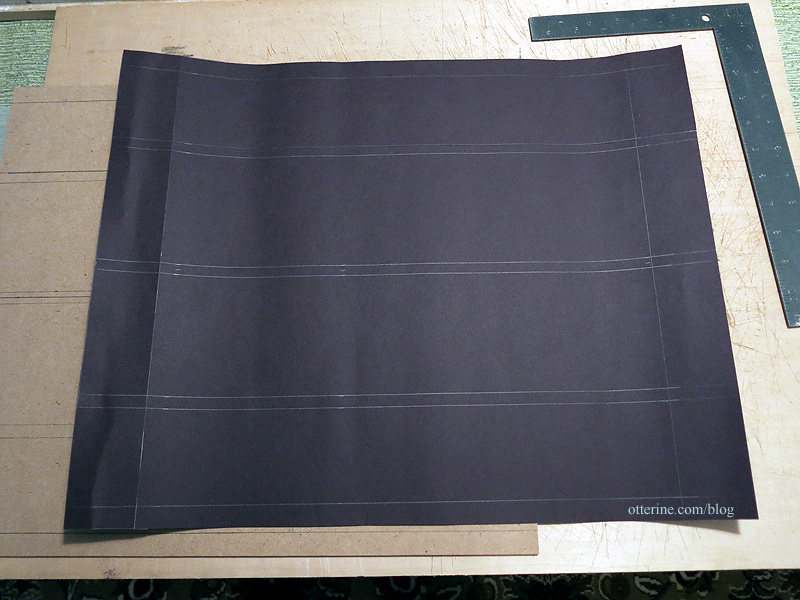
I made a template for the board from black paper, transferring the markings for the beams and side walls.
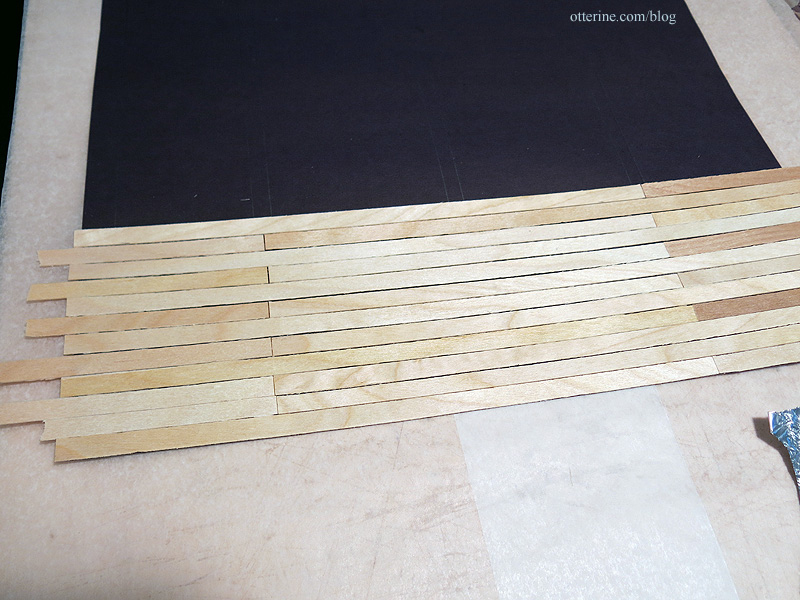
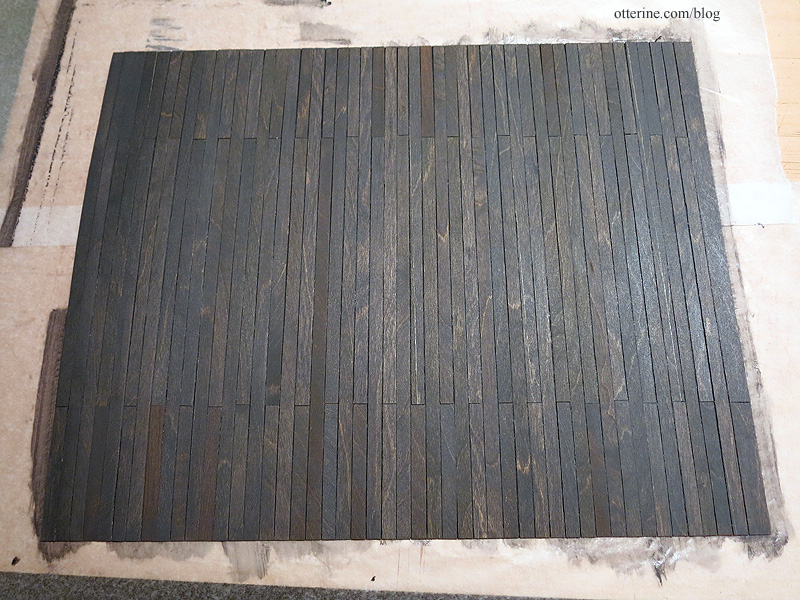
I used the same thin wood strips as I did for the siding to mimic a plank ceiling. I made sure seams hit where a beam would cover the gap, and I alternated the placement so it wouldn’t tend to bend along that break. I left a tiny bit of room between the boards to allow for the curve.
Painted…
And, propped in place to check the fit.
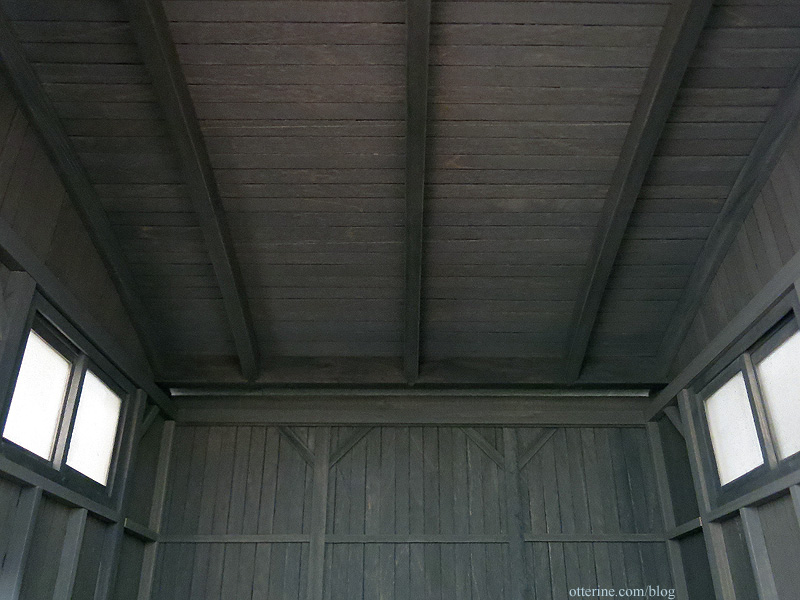
Marvelous, but we’re not ready to close up just yet. :]
Categories: Milo Valley Farm
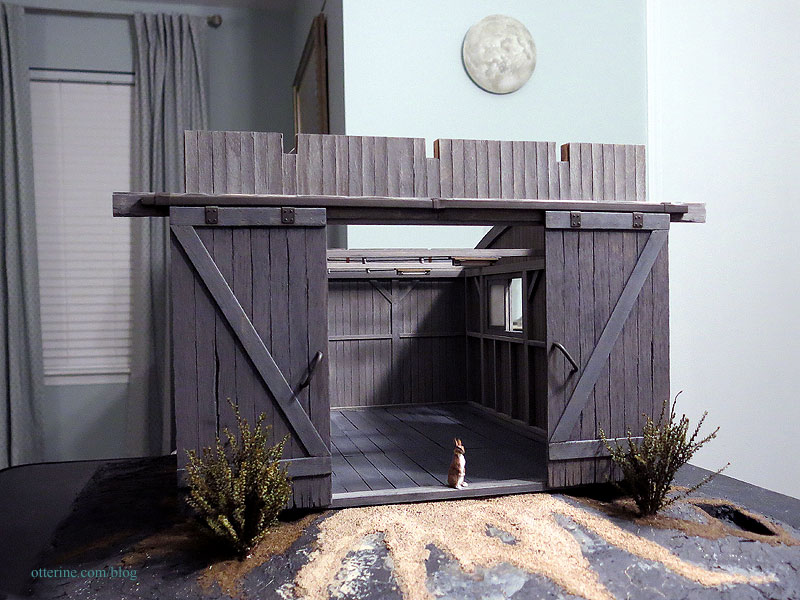
July 30, 2015 | 0 commentsMilo Valley Farm – barn doors, part 1
Sometimes during a build, I’ll get stuck on something and need to think for a bit while I work on other projects or even other aspects of a build. I don’t know how many barns I will make in my lifetime, and I wanted a sliding door for Milo Valley Farm. The problem arose when I narrowed the building. The door width required for the framed openings equates to two 4 1/8″ wide doors. The space on either side of the framed opening is only 2.75″ wide.
I’ve always said I need only one real life example to justify a solution used in miniature. This past weekend, I went to my cousin’s wedding and ran into just such an example. :D The event was held at Proven Ground Farm, and what an awesome place! The barn and grain bins were preserved and converted into a fabulous indoor-outdoor event space. I foolishly left my camera behind (not realizing the venue ahead of time), but mom lent me her phone which took adequate photos. :]
The door on the left side slides to the left, where it would extend past the building’s edge. The solution used was an elongated board to hold the hardware past that edge. :D
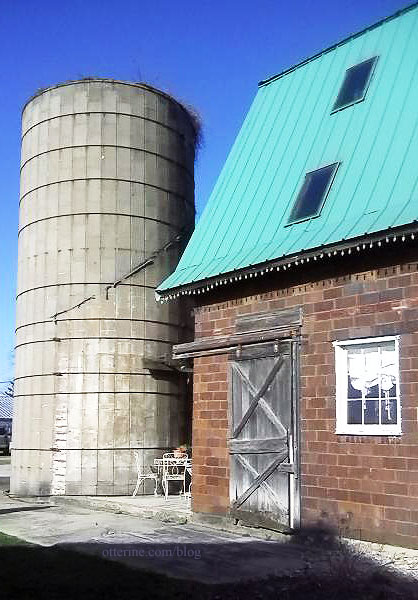
There was someone I didn’t know sitting here, so I had to crop the close-up, but that’s a great old door! :D The hardware gives me some ideas as well.

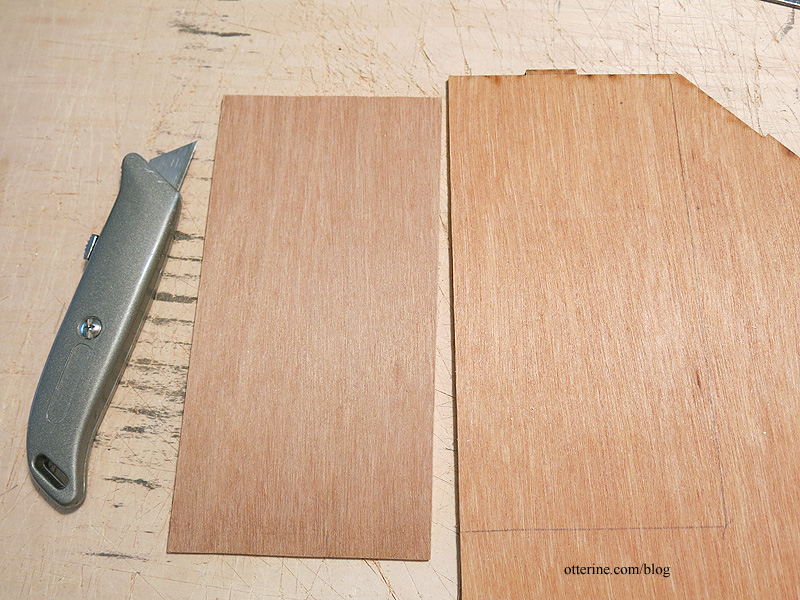
Before I get to that part, I need to build the barn doors. I’ve made weathered doors before for Baslow Ranch, and those were made from laser cut plywood. You can still get a good approximation starting there, so I used those as inspiration.
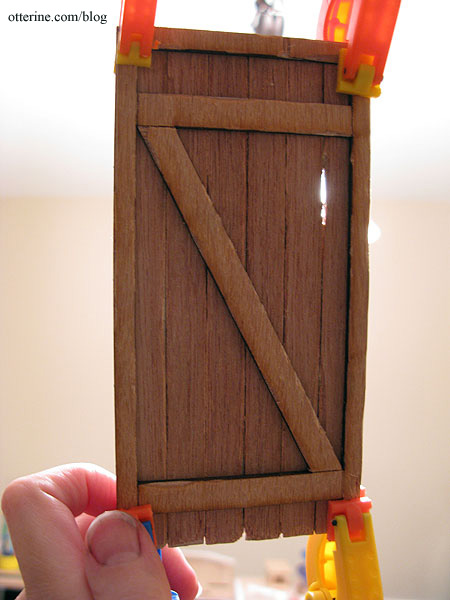
from Baslow Ranch I dug through my bins of scrap wood and cut two pieces of 1/8″ thick plywood measuring 4 3/16″ wide by8 3/8″ tall.
I measured and scored 1/2″ wide planks for each door on both sides. I cut, marred and applied strips of basswood to make the supports. Using the same technique as I had for the siding, I made fake nail holes.
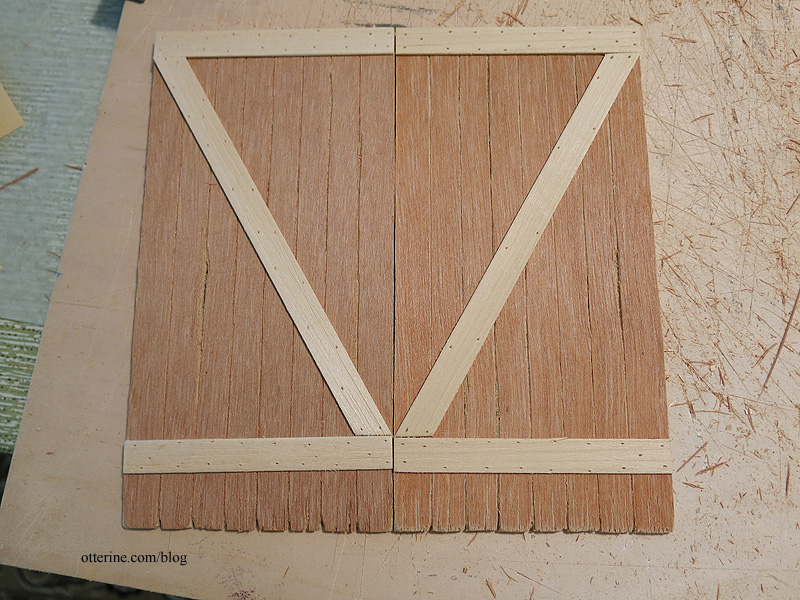
I painted the doors to match the barn. Since the wood started as a different color, the barn doors are slightly off from the rest. They are also still wet. We’ll see what they look like after drying.
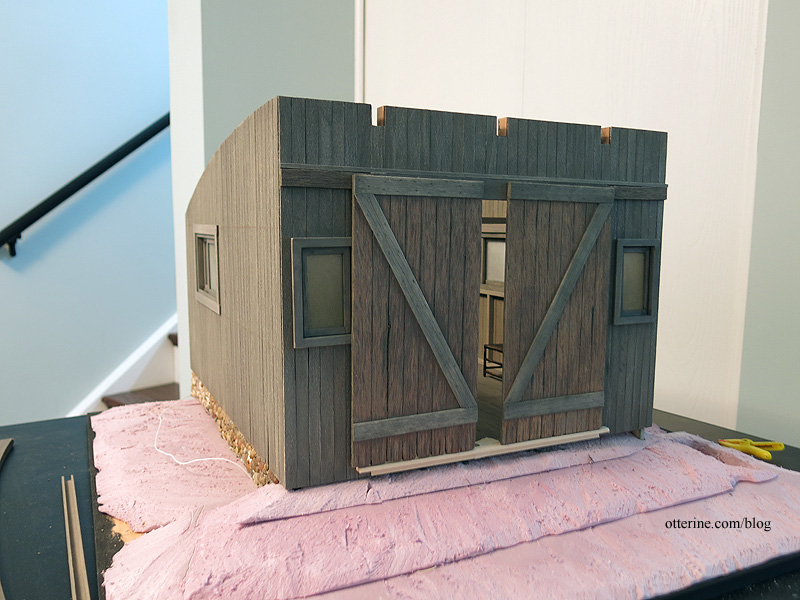
I added support for the main cross boards.
I then cut the cross boards from the same wood as the doors and added basswood pieces to fill in under the door opening.
Meow. :D
Categories: Milo Valley Farm
July 26, 2015 | 0 commentsMilo Valley Farm – faking a structure
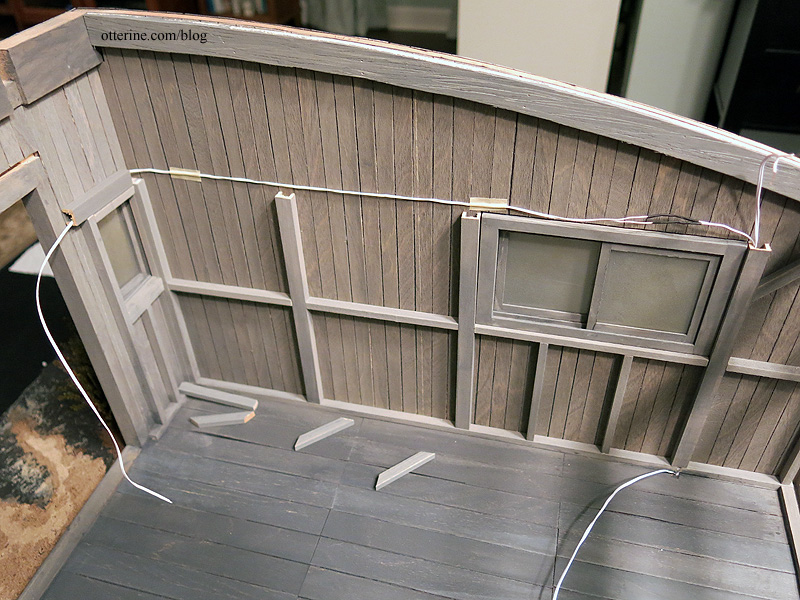
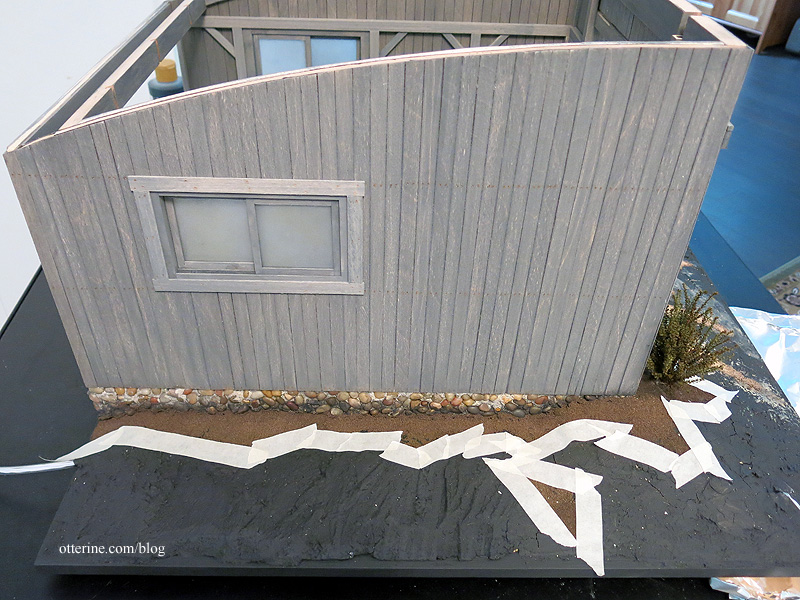
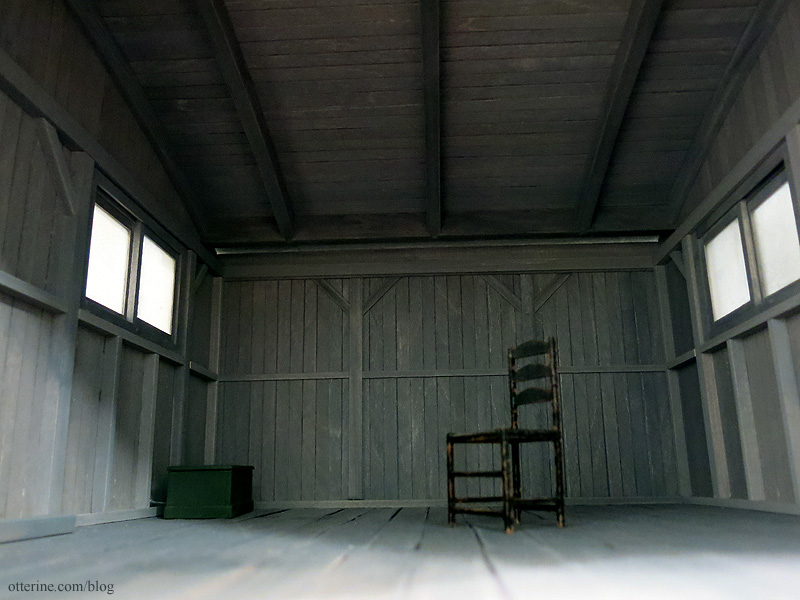
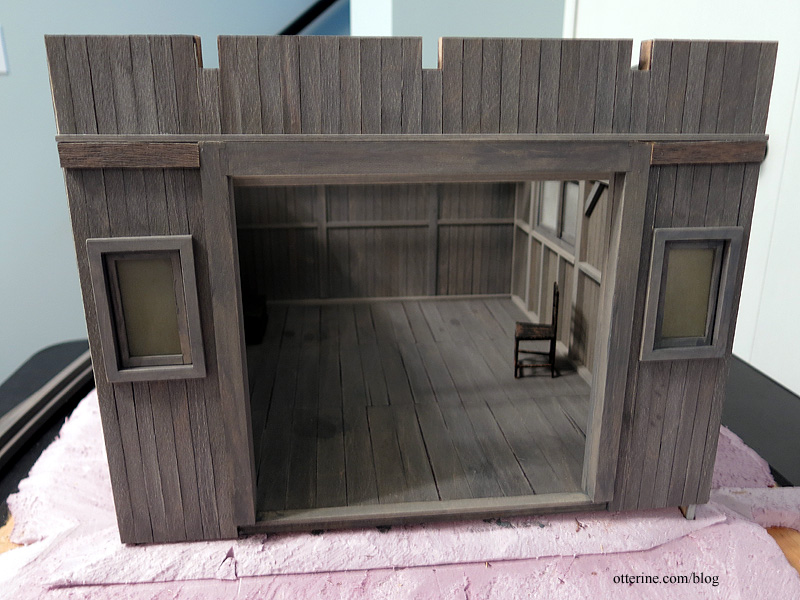
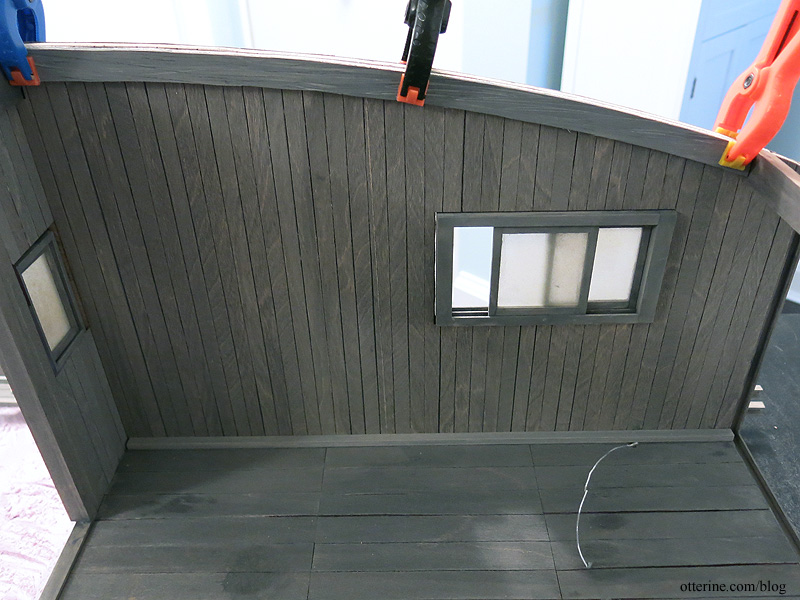
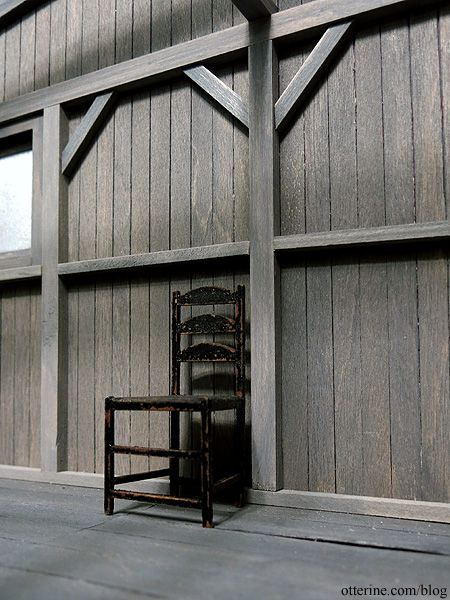
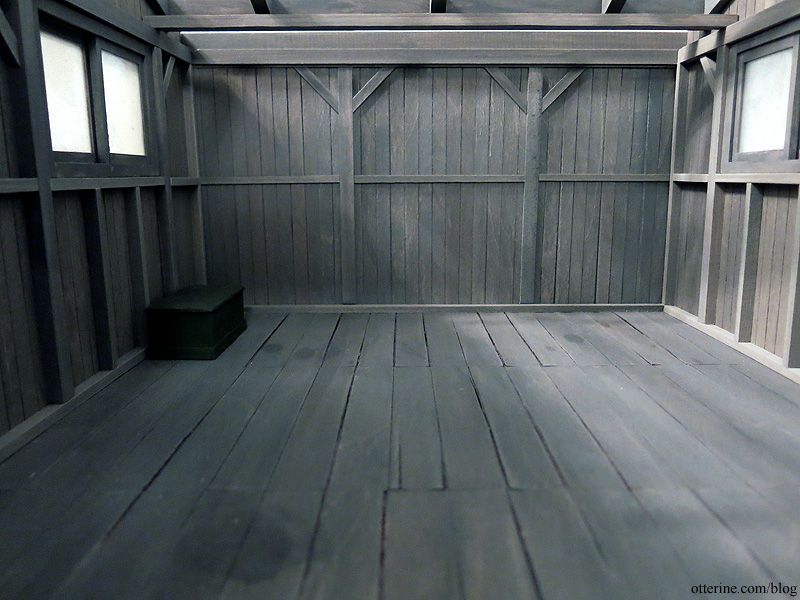
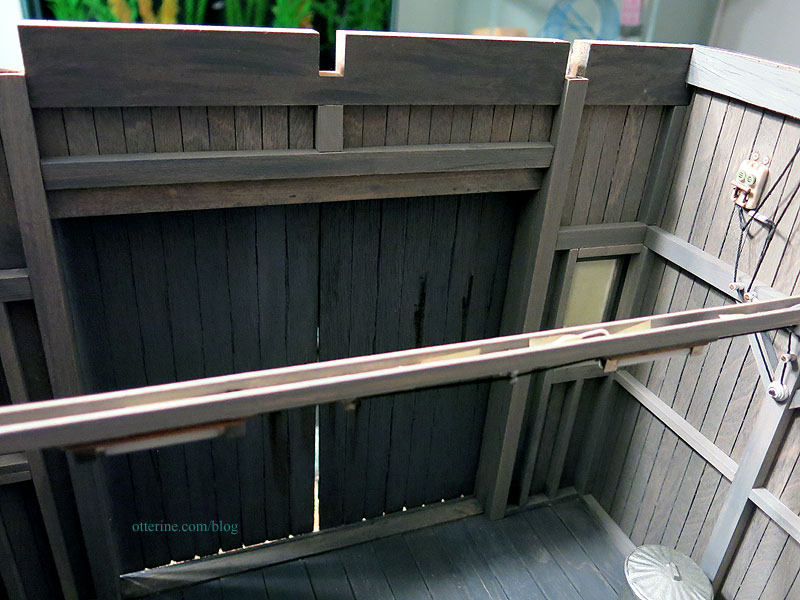
I roughed up the windows with sandpaper and added one last dark wash to the frames before gluing them in place. They sit flush on the outside and protrude on the interior. With the windows and flooring installed, I can now address the interior structure. This is by no means meant to be a precise carpentry replica. It’s meant to disguise seams and give the illusion of a structured barn as well as provide a way to hide the 12V wiring system. I painted all the pieces prior to cutting and gluing.
I started with adding 3/16″ x 1/4″ boards along the outside edges of the floor. For the board on the side with the electricity, I made sure not to cover the hole in the board with my floral wire lead. (This lead is for the actual 12V system.)
Along the roof line, I had to cut curved pieces from 3/16″ thick plywood since I didn’t have extra trim pieces to spare. I would have needed a double thickness of the supplied trim on each side to match the rest of the beams, and the kit comes with only two pieces. I used the kit exterior trim as a pattern then cut the pieces to fit inside.
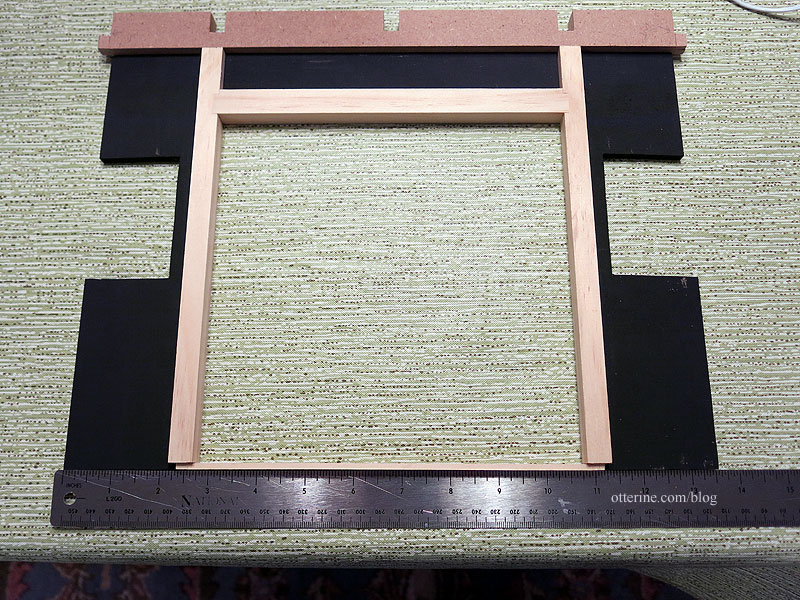
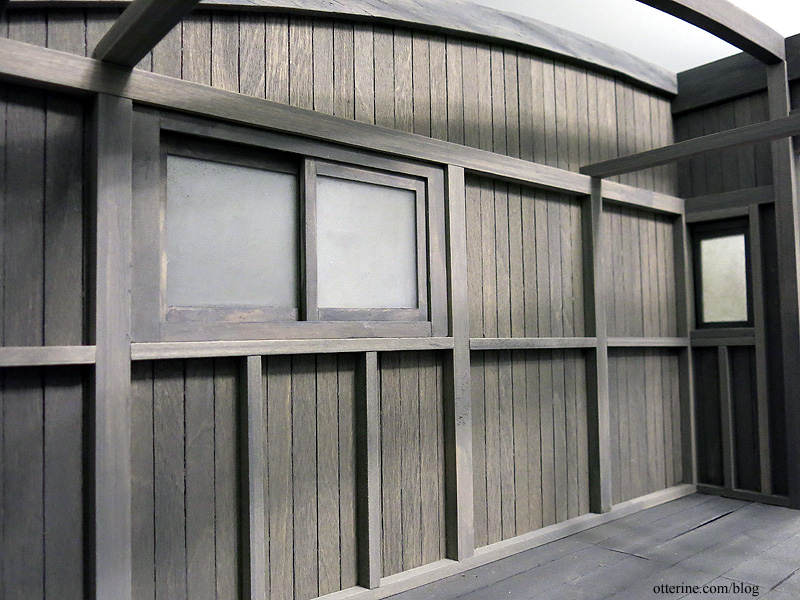
I used 1/4″ x 3/8″ channel molding along the top of the side windows and to make three main vertical supports, one each on either side of the window and one roughly centered toward the front. I added 3/16″ x 1/4″ vertical studs in the corners.
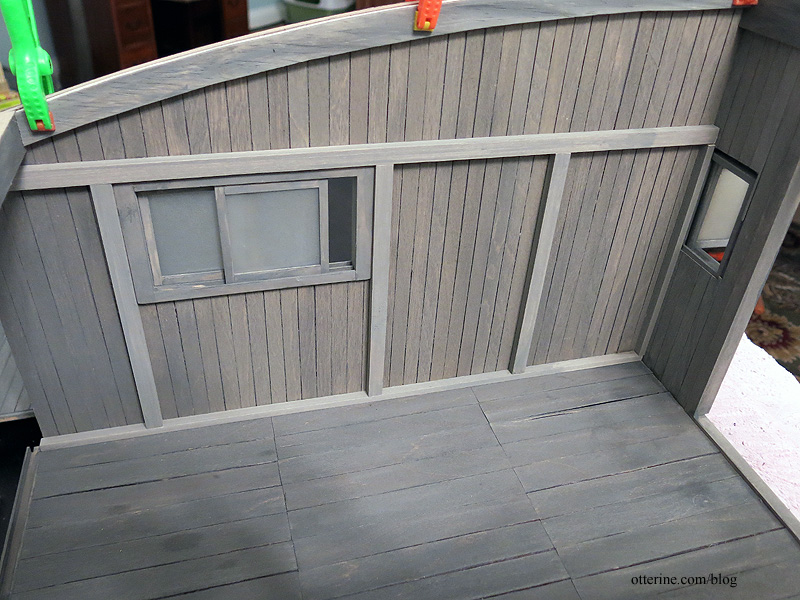
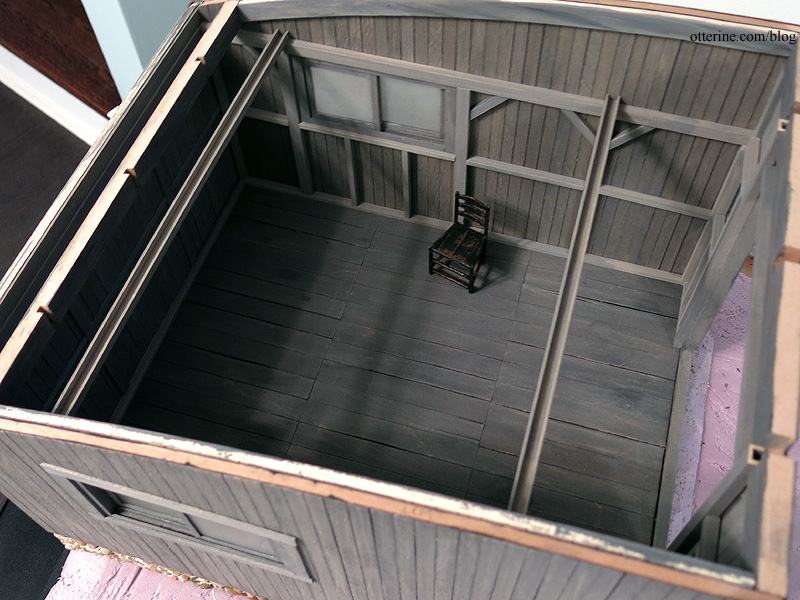
I cut channel molding pieces to span the room in two places, hitting at the tops of the two outer vertical supports. These cross beams are not glued and will hold the lighting fixtures when I get to that part (the wall beams on the electrical side were also left loose for now). I thought about adding a third, but with the curved ceiling beams yet to be added, this will be busy enough. These two will serve a purpose of holding lights whereas the middle one would just add visual clutter.
I added additional trim under the windows. You can somewhat see on the far right in the photo below that I also added channel trims from floor to ceiling on either side of the barn door opening.
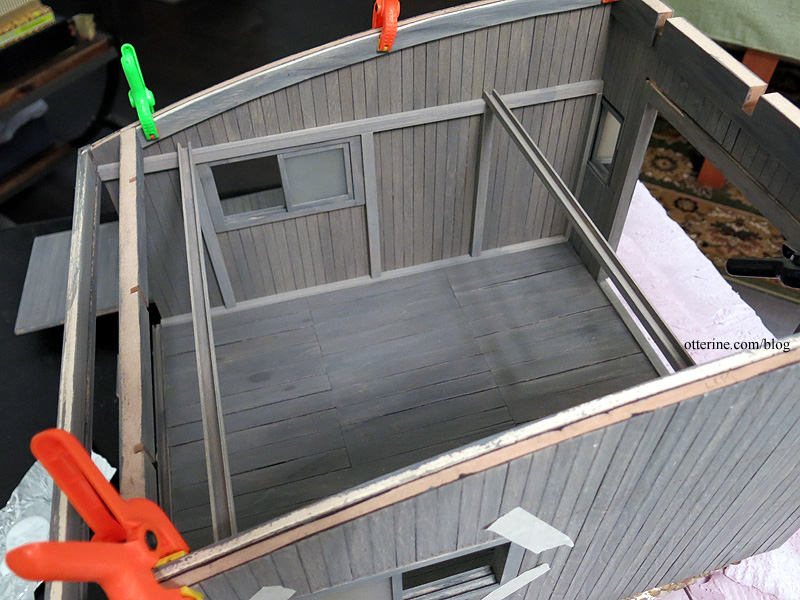
I made angled supports for the vertical beams. I will make angled supports for the cross beams later on.
To finish the upper part of the back wall, I just added a piece of strip wood instead of making tiny siding boards. The curved ceiling beams will remain removable until I am ready to put on the roof.
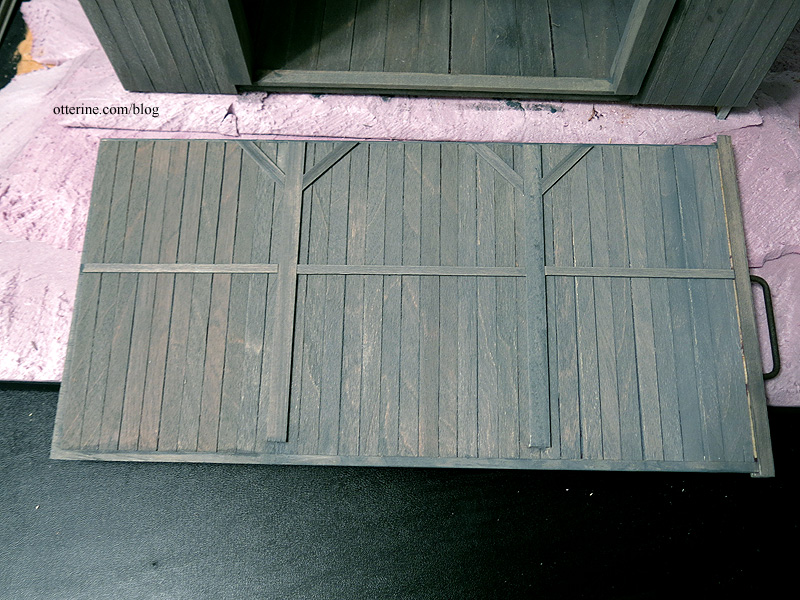
For the removable back wall, the floor trim is glued to the floor but not to the back wall and the top trim is glued to the channel that holds the sliding wall. The faux beam trim is thin and glued to the wall but doesn’t interfere with the functionality.
It’s a decent illusion at first glance and creates continuity with the side wall detailing.
I think we’re getting somewhere. :D
Categories: Milo Valley Farm
July 24, 2015 | 0 comments


NOTE: All content on otterine.com is copyrighted and may not be reproduced in part or in whole. It takes a lot of time and effort to write and photograph for my blog. Please ask permission before reproducing any of my content. (More on copyright)

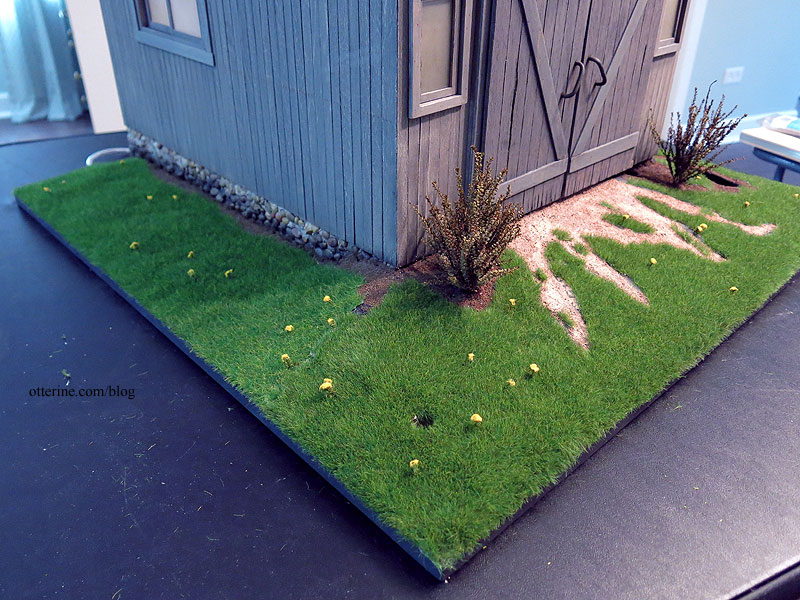
Milo Valley Farm – landscaping, part 5
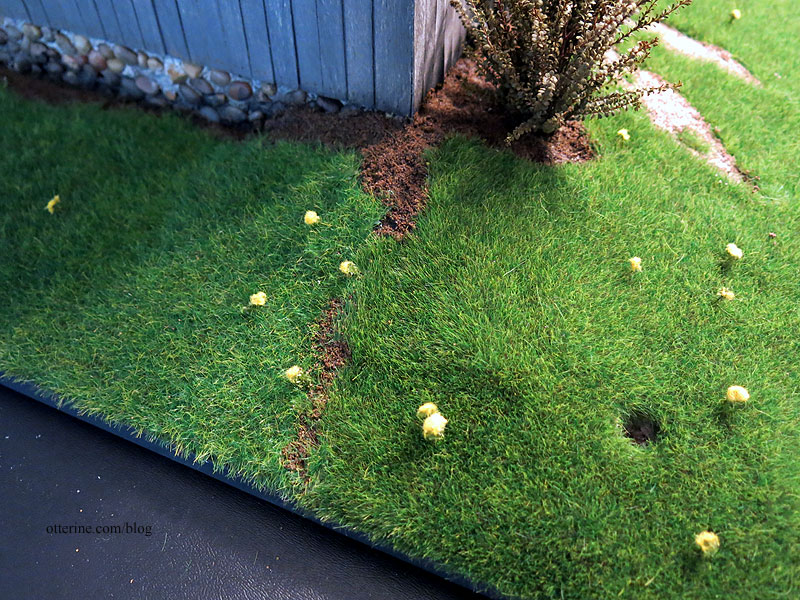
Continuing work on the landscaping. For a bit of non-grass vegetation, I have the Goldenrod Weeds “Silflorettes” by MiniNatur. These come all webbed together, and you cut the stalks off the web to apply individually. I have summer, late summer, and autumn colors. I will use the summer color here.
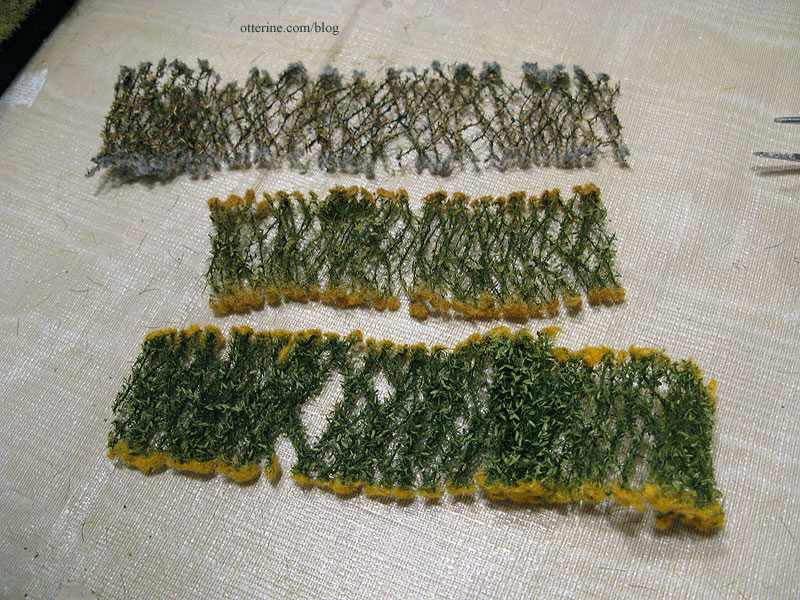
These are obviously not in-scale goldenrod stalks for 1:12 scale, but they do look like little flowering weeds. I used an awl to make holes in the ground to plant them. I left the awl in place while I prepped the individual flowers for planting, otherwise I’d lose track of the hole.

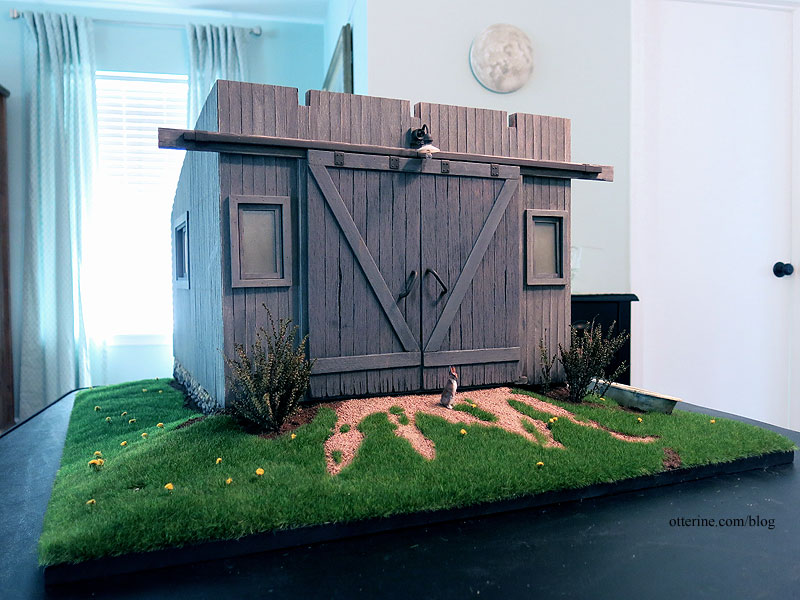
The landscaping here is spring/summer grass with a weed or two cropping up between mowing with the big riding mower.
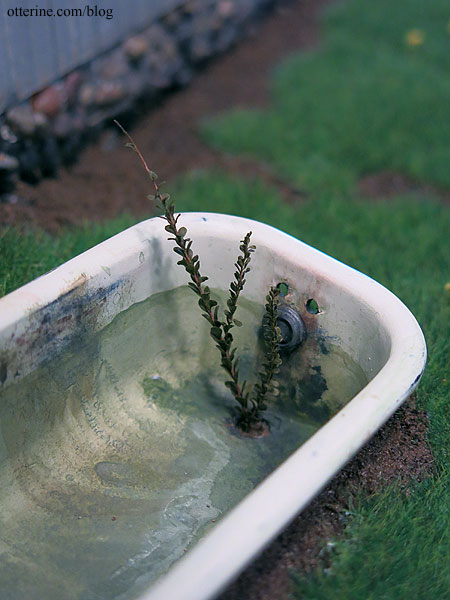
Time to plant the bathtub! I didn’t glue it into place; it’s just wedged into the foam.
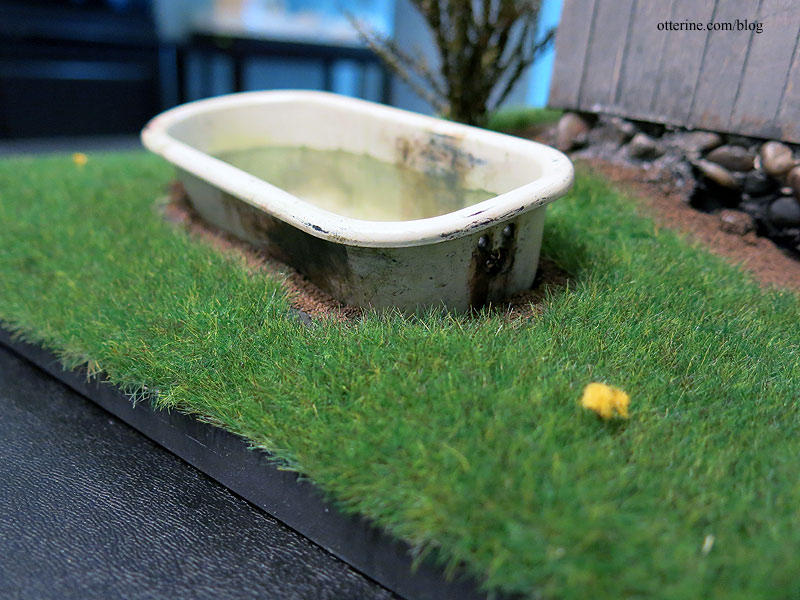
Looks like our weedy bush is proliferating. :D
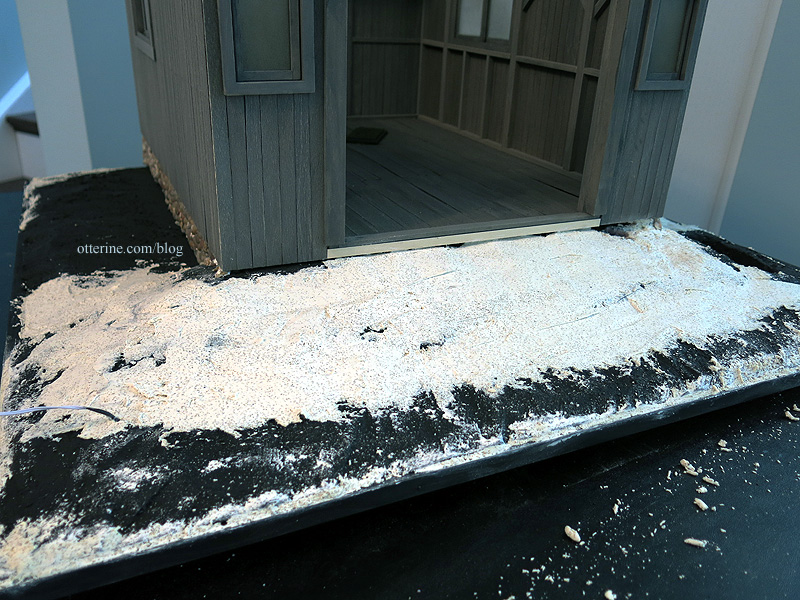
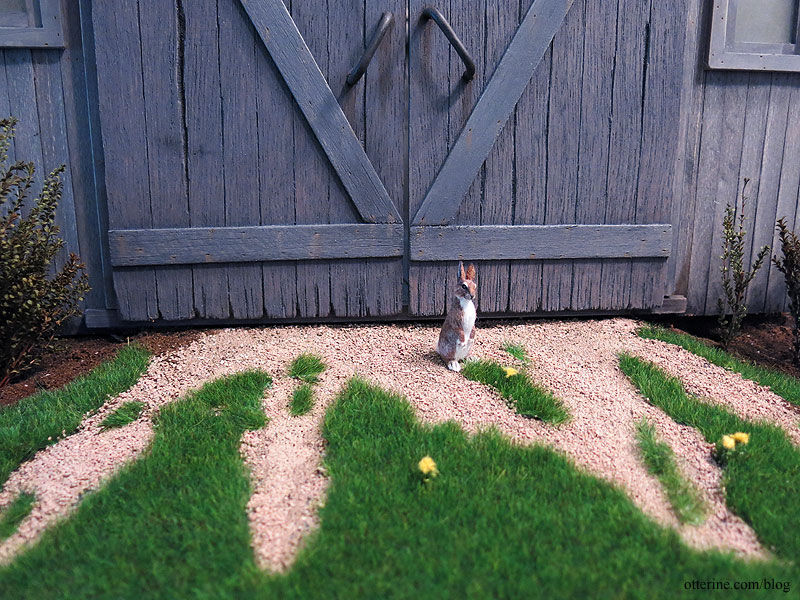
Here is the gravel ramp as it was after the initial grass was added.

I added smaller bits of grass torn from the scraps to the gravel ramp to give it all a more realistic appearance.
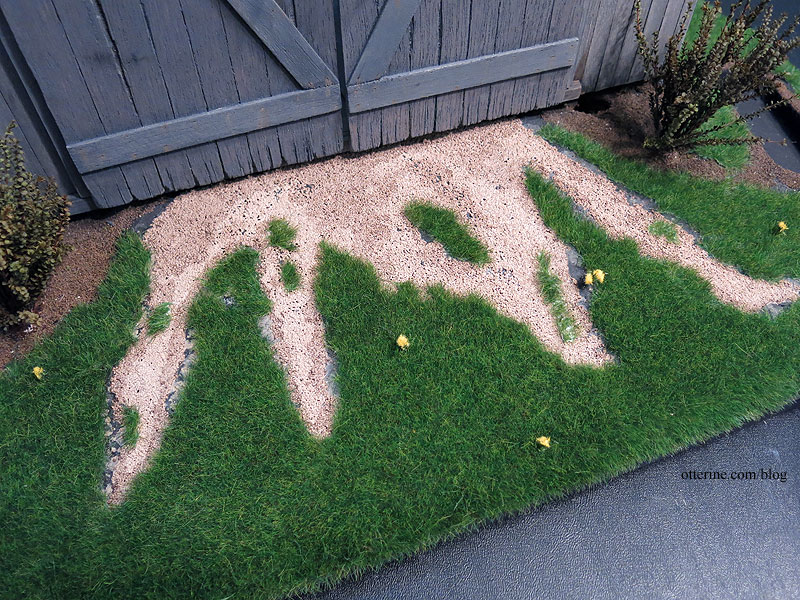
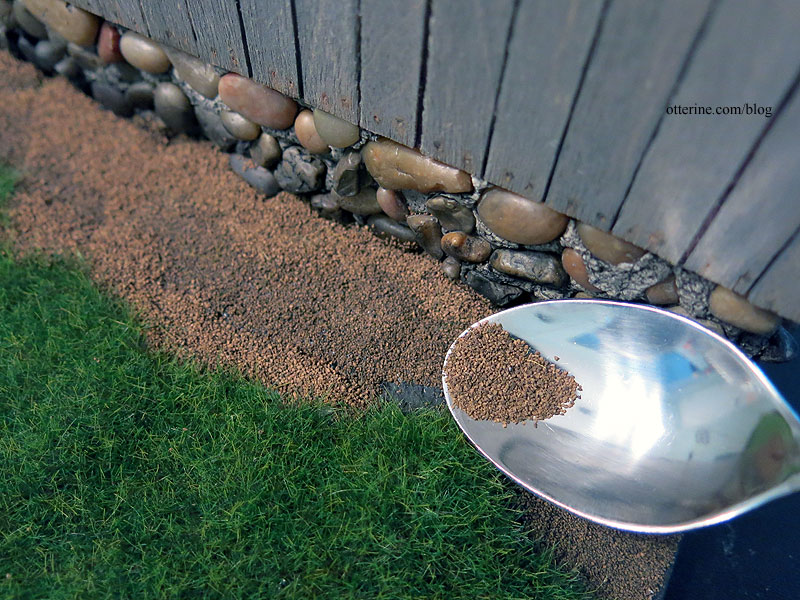
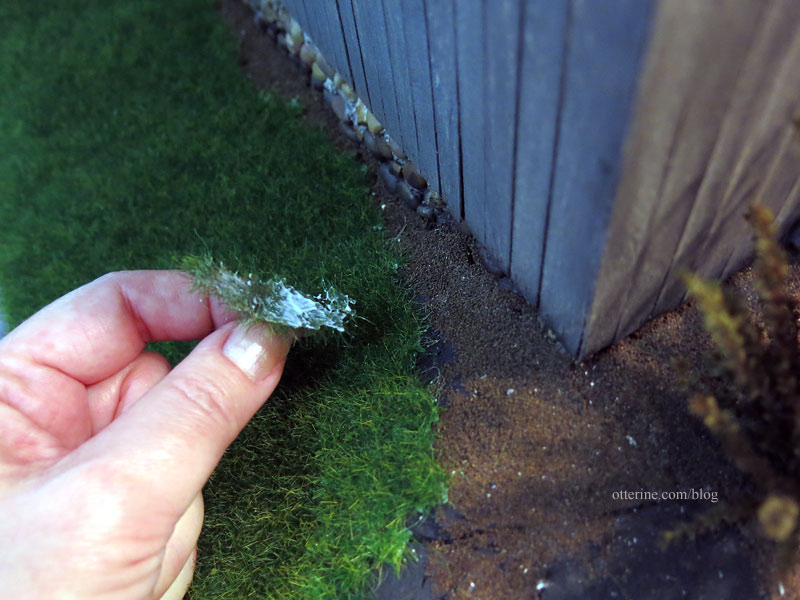
Previously, I had brushed glue onto the foam landscape, pressed gravel and ballast into place and removed the excess. This time, I carefully added the same material to fill in any uneven areas around the grass mat using a spoon.
I didn’t worry about strays in the grass since that can be brushed away after the glue has set.
I used Scenic Cement to fix it all in place. Debora sent me some pipettes for application, and I had a cup of water on hand to rinse off the pipette in between sips from the bottle.

The Scenic Cement wanted to form droplets on top of the ballast materials, likely because they are smaller particles. I was able to break the surface tension and get the liquid to sink in by tapping the pipette along the surface. I didn’t want to use a sprayer since it wouldn’t be as easy to control.

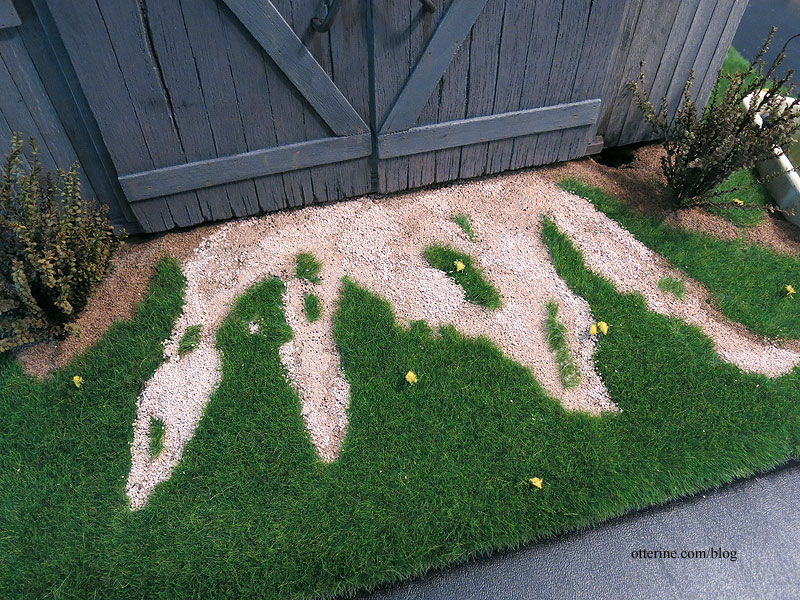
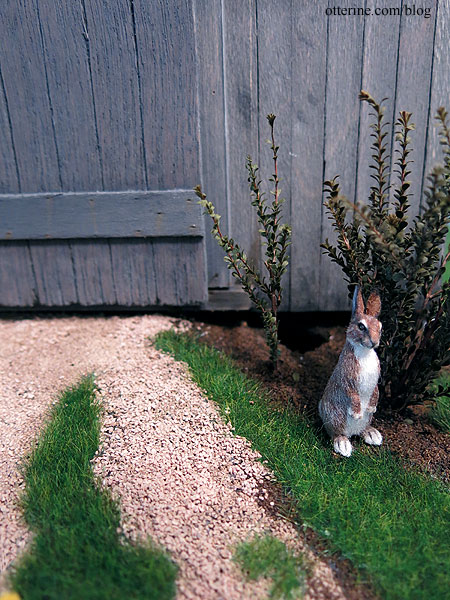
I have learned that if you have something that sticks out and could be mistaken for sloppy work instead of a planned aesthetic, often the best solution is to draw more attention to it. Like this seam that didn’t go too well. If you have one of these, don’t overwork it. Just let it dry and address it after.

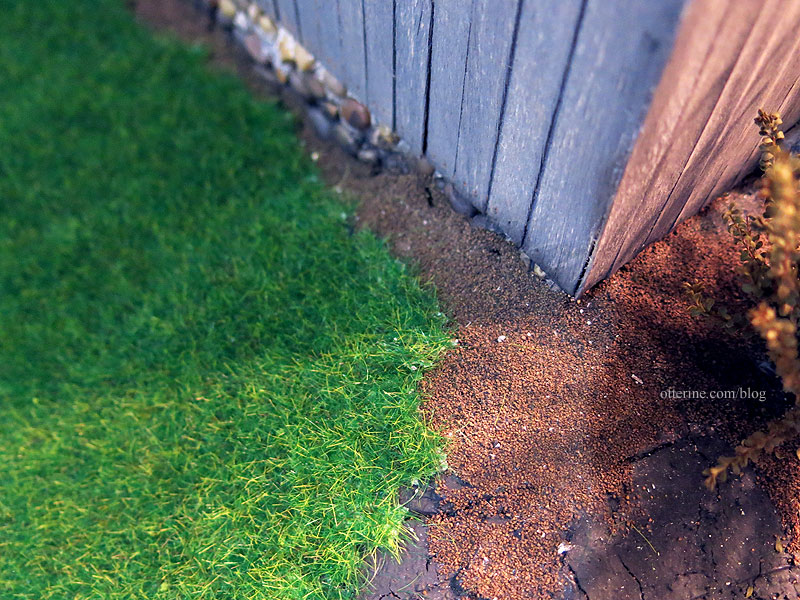
I added some dirt ballast and set it in place with Scenic Cement.
This seam on the other side is much more natural, so I left it as is. In fact, there are three seams here — only one can be readily seen but natural, one is faint and one is invisible. :]
Once the glue set, I vacuumed the strays.
Friedrich is pleased with his burrow. :]
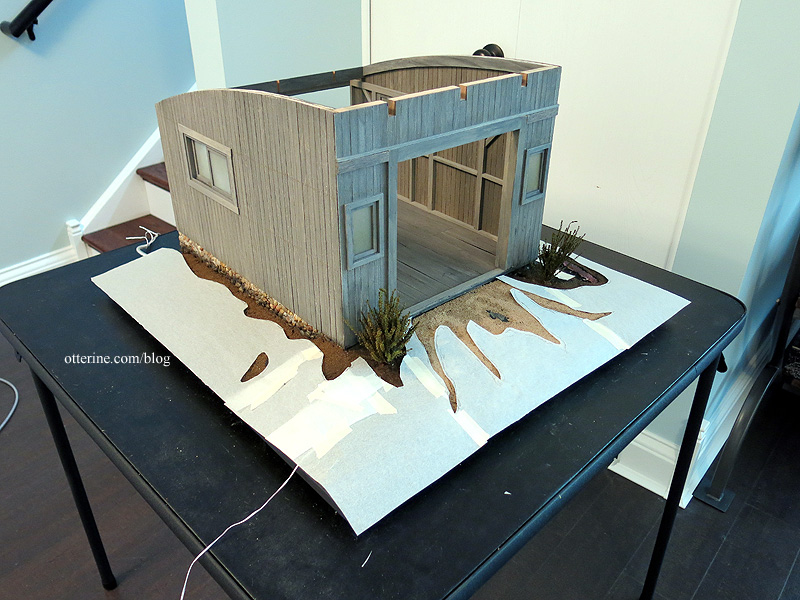
So, there we have it! No more floating barn. :D
Categories: Milo Valley Farm
February 21, 2016 | 0 commentsMilo Valley Farm – landscaping, part 4
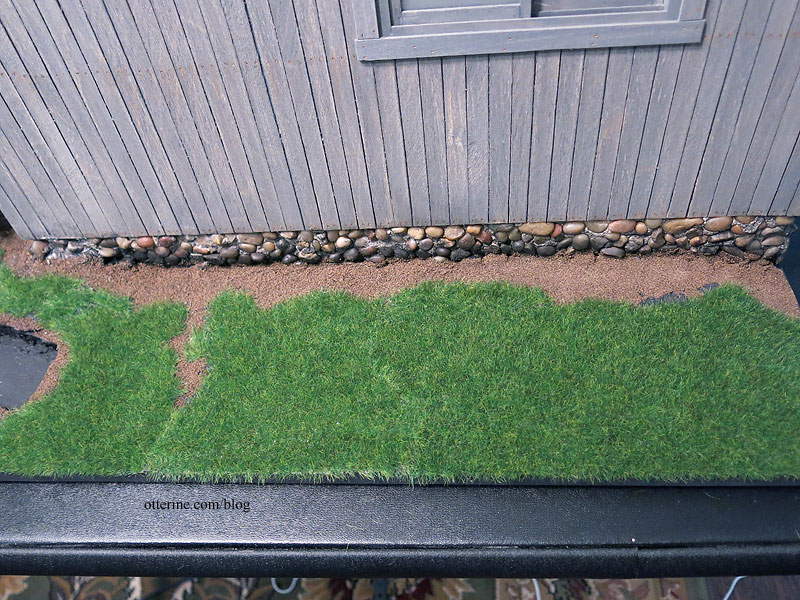
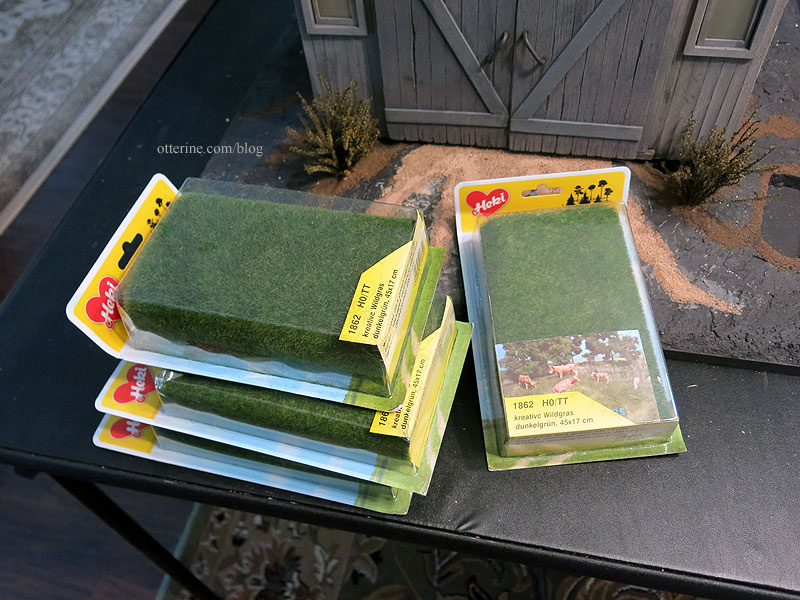
Continuing work on the landscaping. The grass mat I will be using is Wild Grass in Dark Green by Heki from Scenic Express (they call it Summer Green TurfGrass on their website). It has high dark green grasses with some variegated coloration to simulate a wild but well-kept lawn. Just because there’s a barn find car inside doesn’t mean the whole property has to be an eyesore.
The grass mats are pricey, but the look is spot on in scale. The sheets are only 6″ wide, though they are 17″ long, so there are places on the landscaping board that will need to be pieced. I bought four to have enough, though I wasn’t sure I would need all of them.
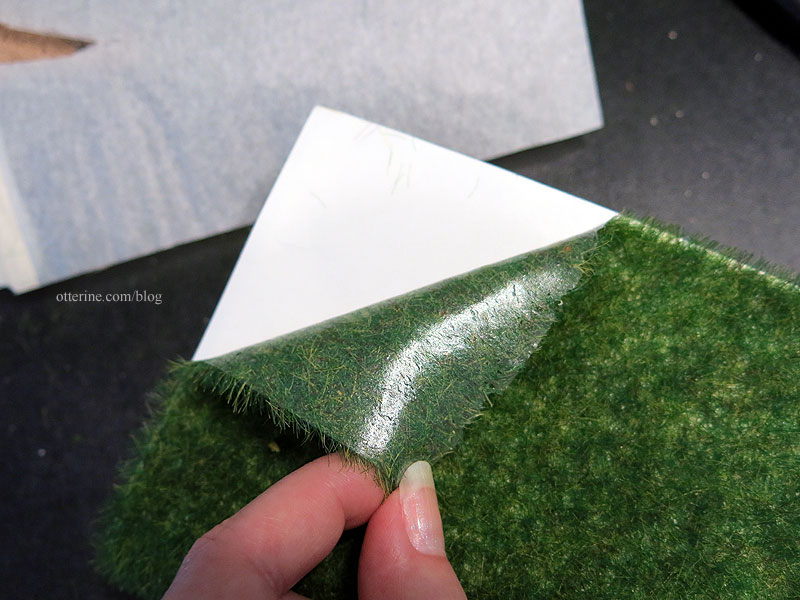
The backing of the grass is a clear, rubbery substance though not sticky. This makes it more flexible than the paper-backed grass mats, which will be good for the uneven landscape I need to cover. I peeled the grass sheet from the protective paper.
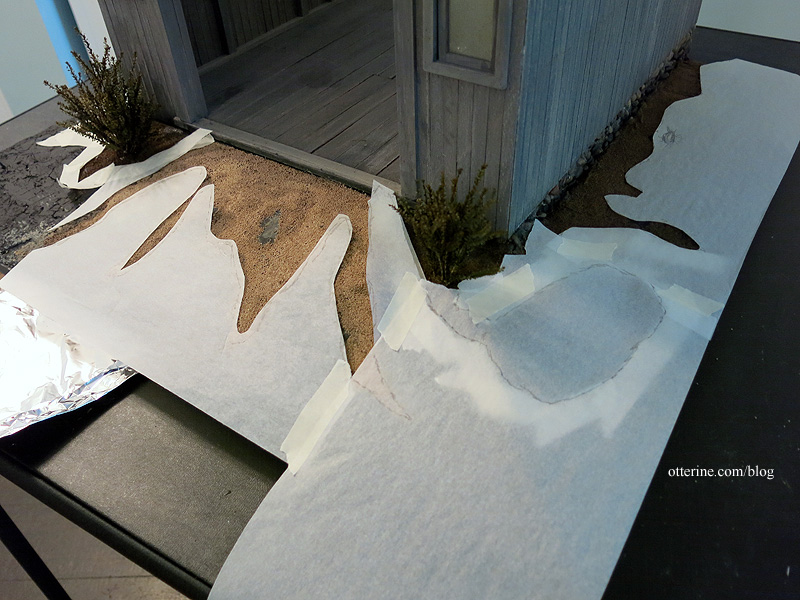
I pinned the paper template to the grass mat — there’s my sewing background coming into play. :D
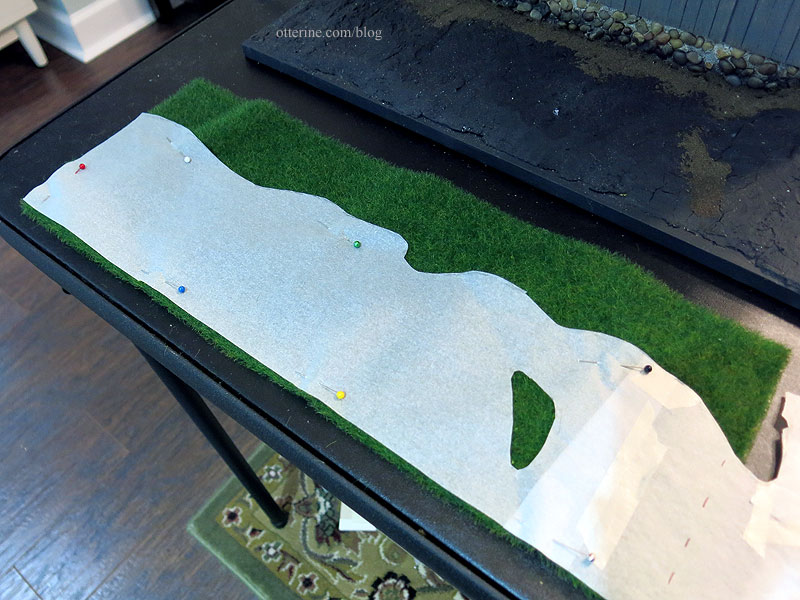
To make the divide between the grass and the dirt look less planned, I tore the grass mat backing along the edge. I checked the fit and made further adjustments. I decided to cover the bare dirt patch I originally had planned.
I spread Weldbond glue on the base board and on the edges of the grass mat.
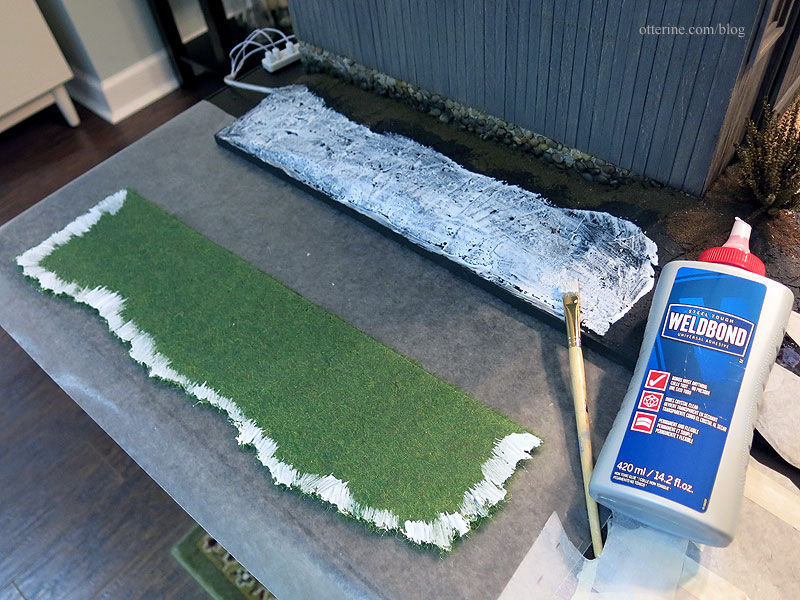
I pressed the grass into place, using a scrap of strip wood to fine tune the edges so I could press the grass into place without flattening it.
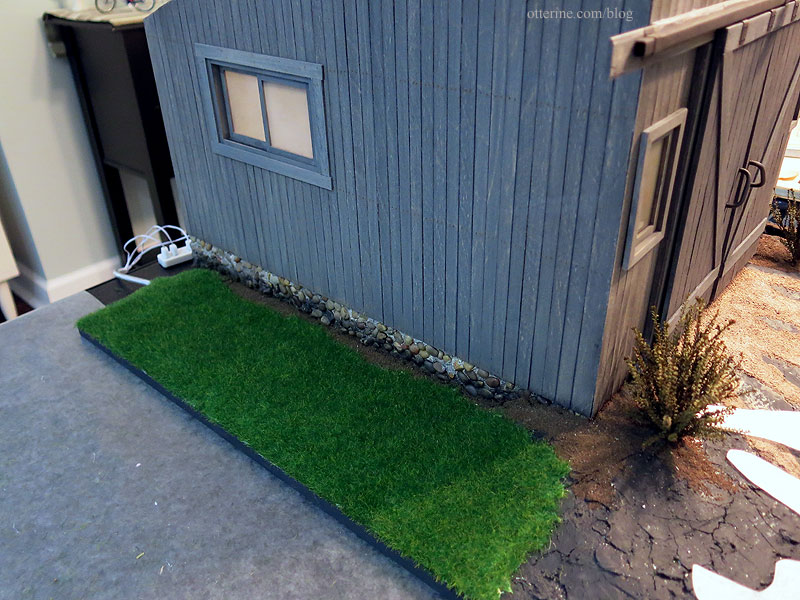
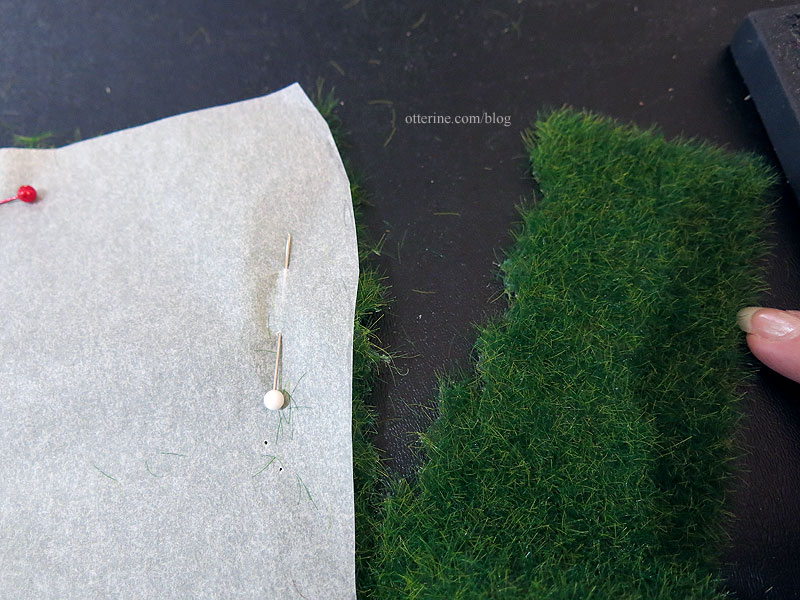
Any bare spots are easily pieced from the saved excess.
The material backing is what makes this type of seamless piecing possible. I’m not worried about any of the backing showing at the edges right now. All of this will be addressed in the final detailing.
I continued the process until the entire surface was covered. And, yes, this is a messy process. :D
Categories: Milo Valley Farm
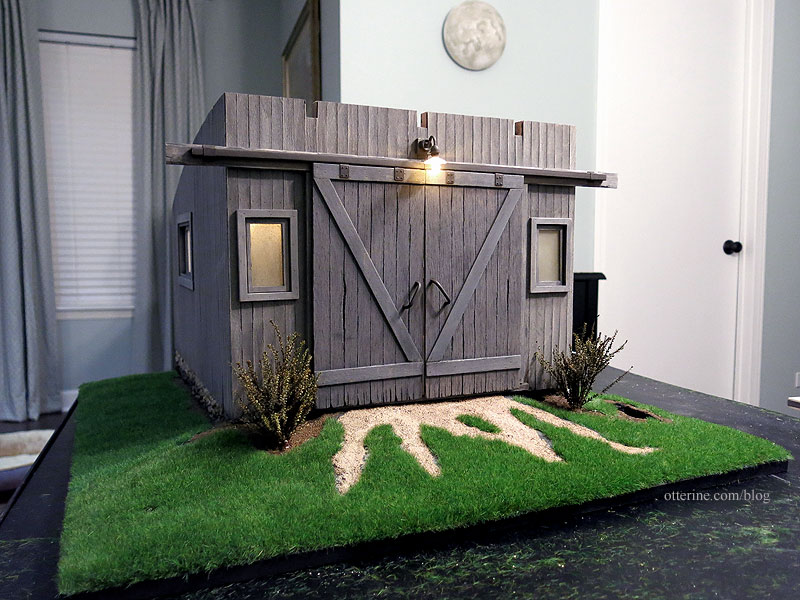
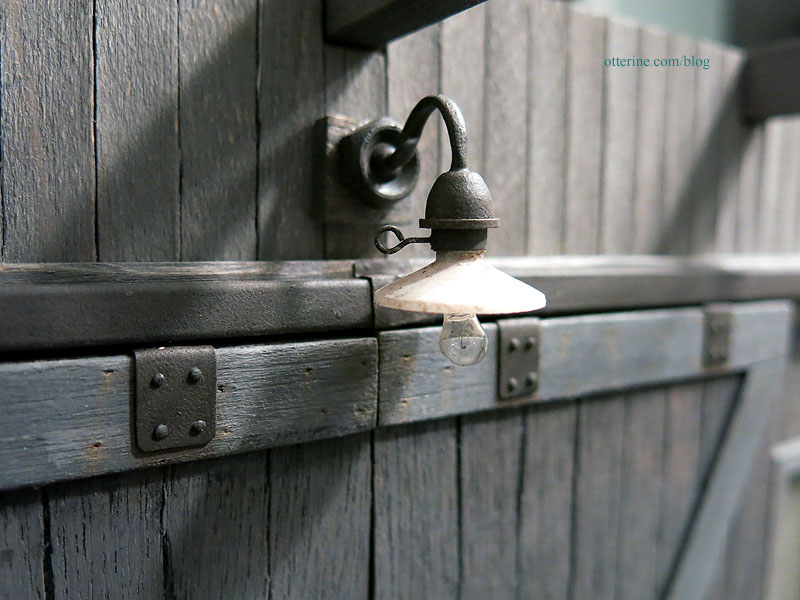
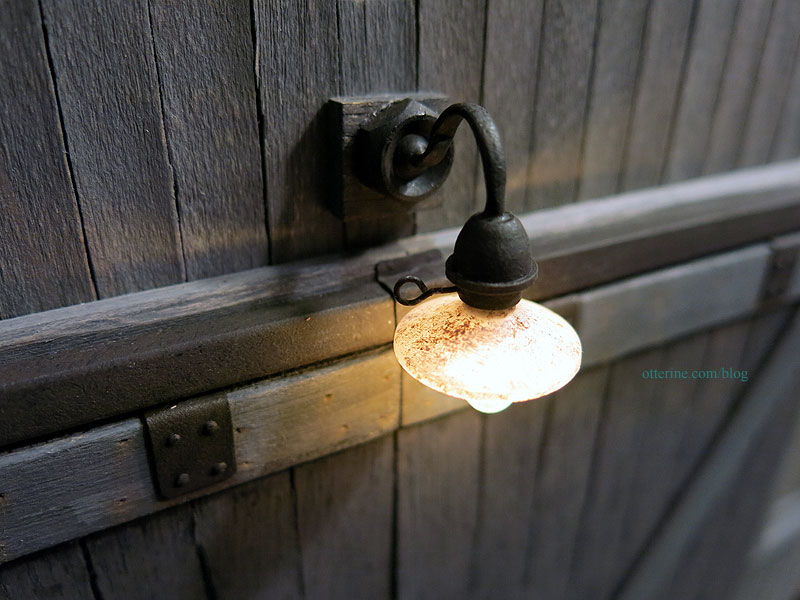
February 15, 2016 | 0 commentsMilo Valley Farm – overhead light
I’m using a Meyers Wall Light for the front of the barn. I used pliers to bend it outward a bit, which removed some of the paint. That’s fine for an old light, and I brushed on flat black paint to remove the gloss shine. Once that was dry, I dry brushed on dark brown to make the finish appear corroded and dirty.
Since the door frame sticks out, I added a square of scrap wood to serve as a base for the light.
On the inside, I connected the lamp wire to the 12V wire I fed during the overhead light installation.
before – showing the wire I covered the wires with channel molding. I didn’t bother adding knob and tube wiring for this lamp since it would have been hard to see and just make a mess of the work I did previously. :]
Just a few modifications and it looks like an old barn light that’s been there a long time.
Categories: Milo Valley Farm
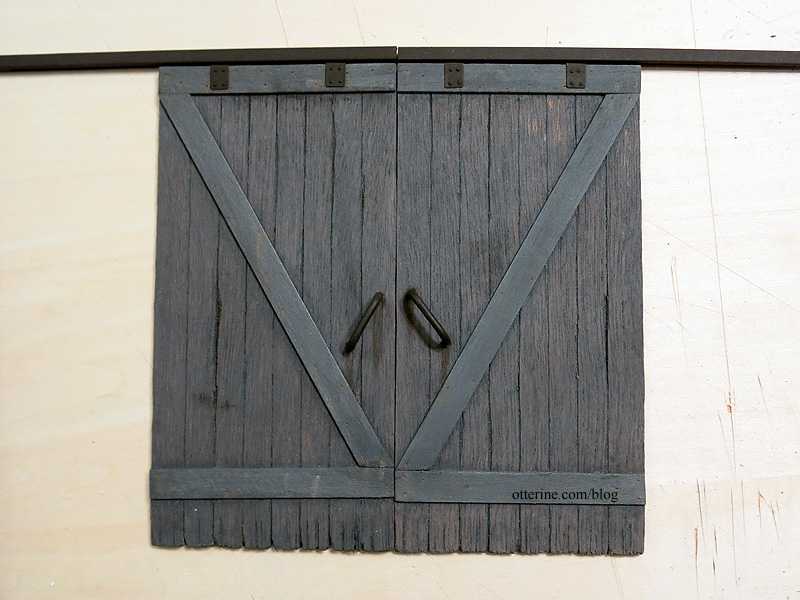
February 14, 2016 | 0 commentsMilo Valley Farm – barn doors, part 4
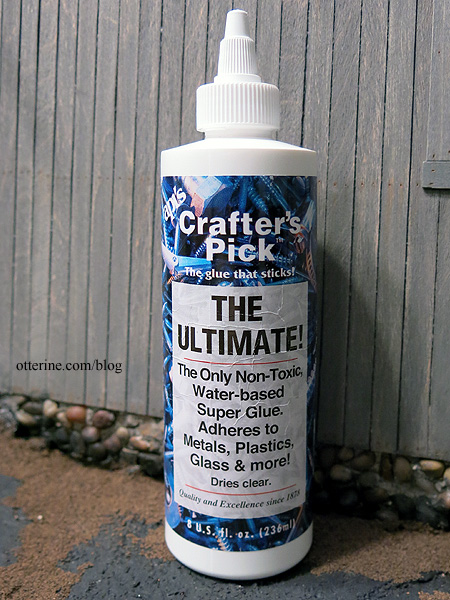
Finishing up the barn doors. Glue will be the main support for the tubes. I used The Ultimate by Crafter’s Pick supplemented with dots of super glue gel, leaving a slight gap in the middle. I’ll explain why in a moment.
I added strips of wood around the rest of the door opening to help with the slight gap between the door frame and the doors. This won’t block all of the gap, but it will help. This might not have been necessary had I planned better, but let’s just say this is a replacement set of doors tacked onto the front after a wayward tractor mishap. haaaaaaaaaaa!

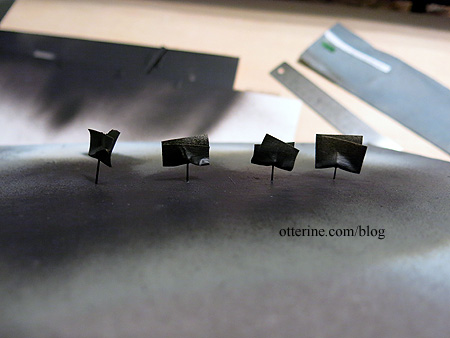
I added brackets to either end. These are black craft paper not zinc since they are mainly for show not function. Plus, it was easier to make them from paper and get a good fit.

I faked the tiny nails with paint.
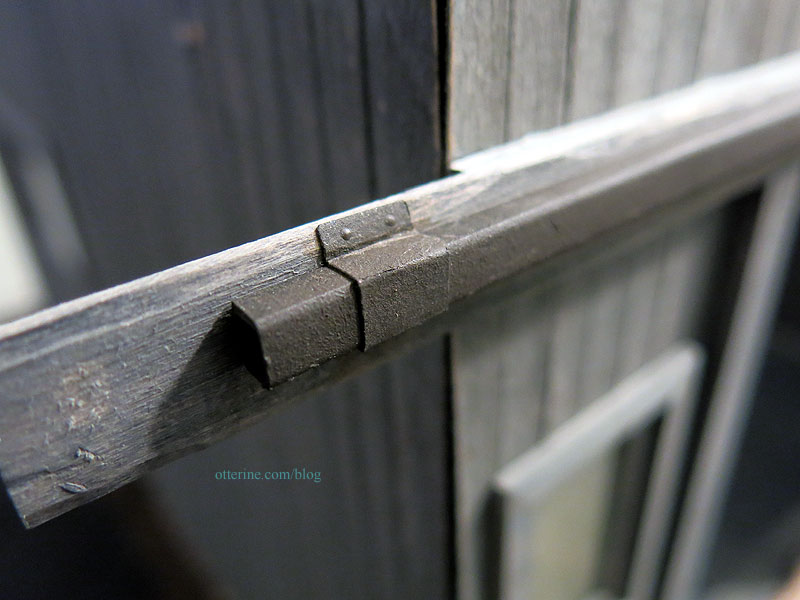
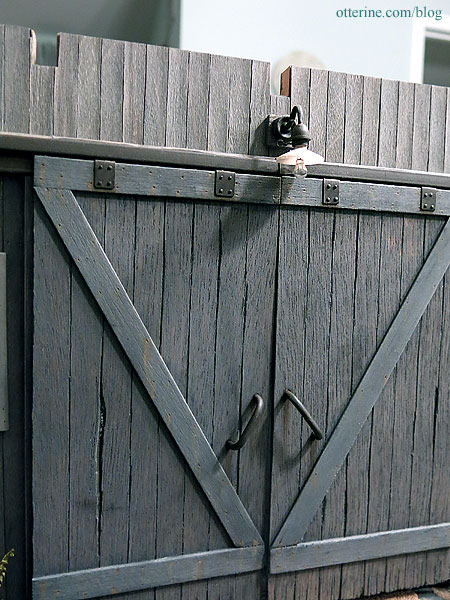
Moment of truth! I slipped in one door and then the other. The gap allows the pin head (hahaha – it never gets old) to fit in between.
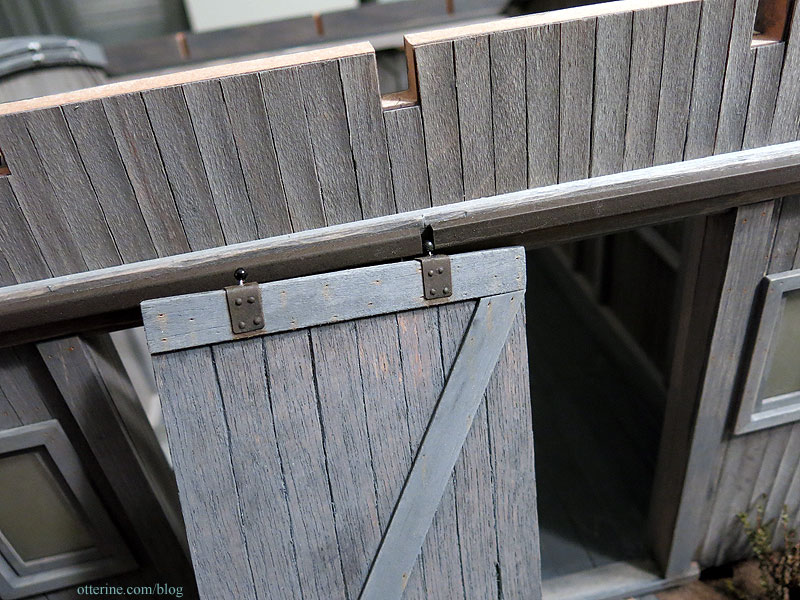
The door slides in the track until the other pin head can slip into place. It took a few tries to fit the doors well. I bent the pins until they hung properly in the track. They can’t be moved using only the handles; I have to grip them by the sides to slide, but that’s just fine with me. :]
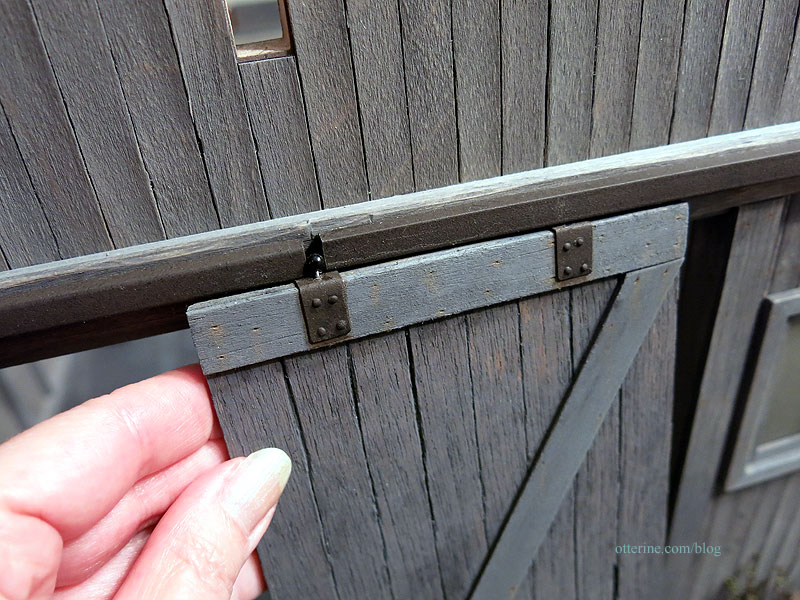
I added the final bracket in the middle to cover the gap. If I ever have to work on the doors, I can peel the paper bracket loose.
Hooray! :D
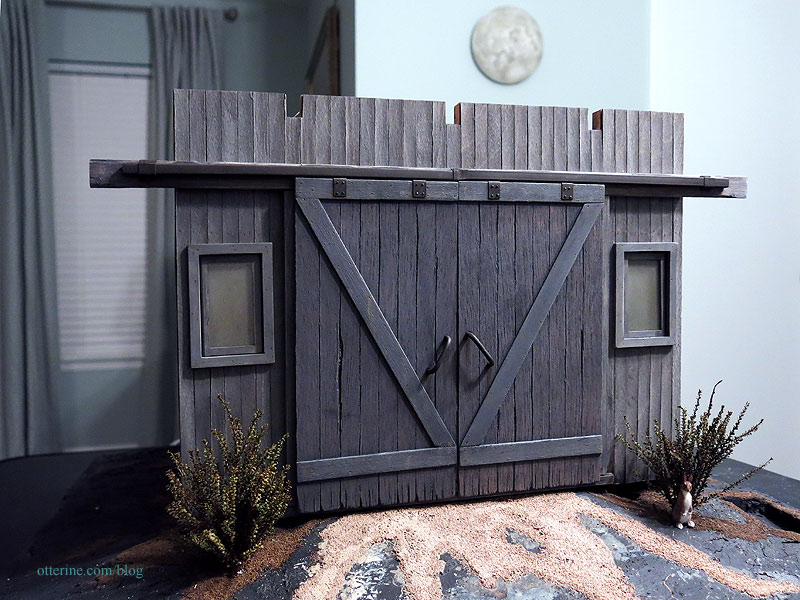
Perhaps there should be a handle inside, but…I kinda love it as is. One of my art professors once said it takes two people to make a work of art; one to do the work and one to hit that person over the head when it’s done. :D I going to hit myself on the head concerning the doors. We’ll just say there’s enough of a gap to get a hand in there to pry them open.

Categories: Milo Valley Farm
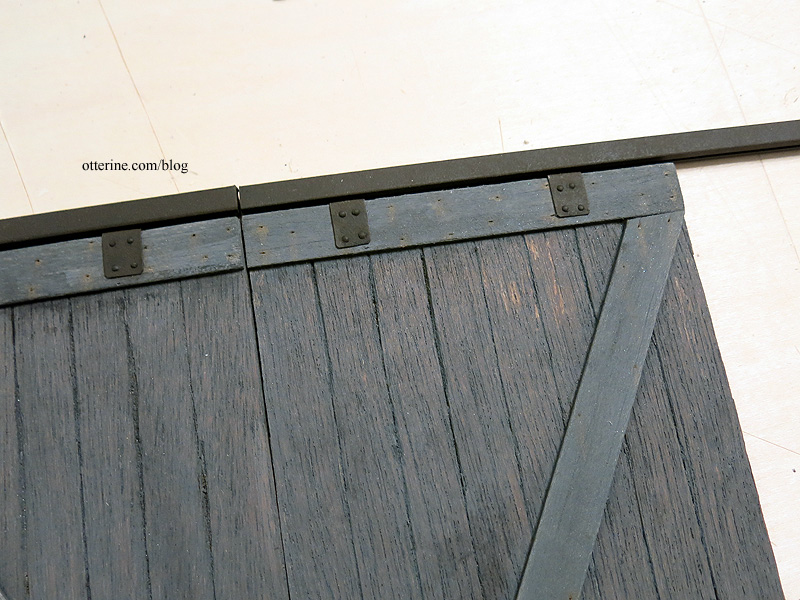
February 11, 2016 | 0 commentsMilo Valley Farm – barn doors, part 3
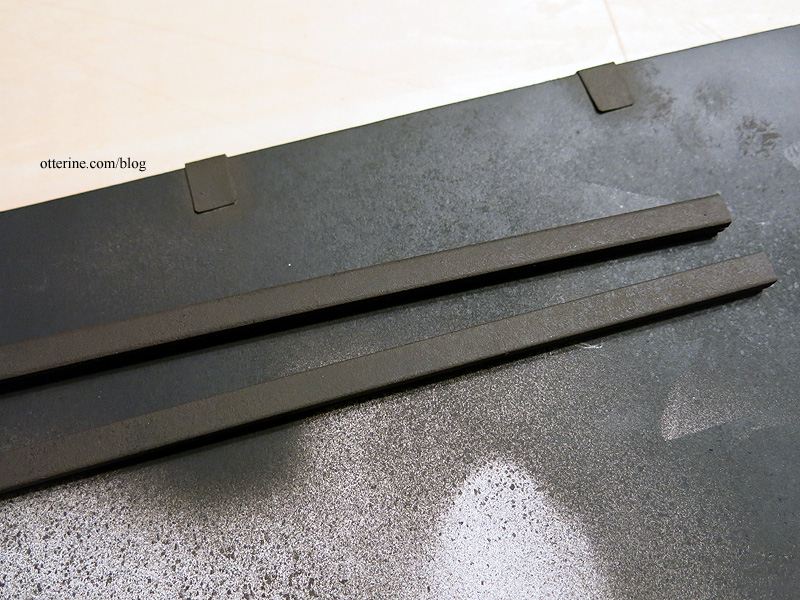
Continuing work on the barn doors. I brushed Testors black inside the plastic tubes as best I could. I let it dribble through from each end and soaked up the excess with a paper towel. It didn’t need to be perfect, just to hide most of the white plastic.
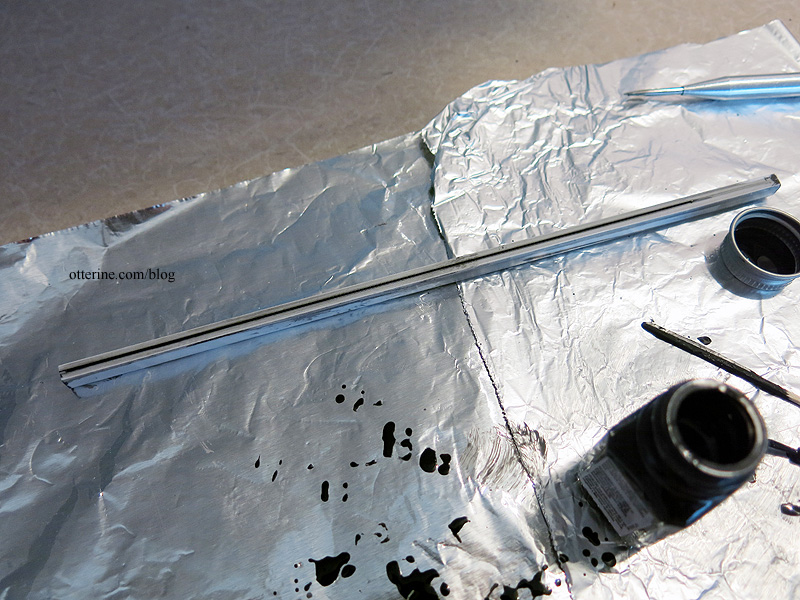
I then spray painted the plastic tubes and bracket hardware flat black. I stippled on dark brown to simulate aged and corroded metal. It’s a subtle finish.
I made door handles from brass tubing and sprayed those and the sewing pins with Rust-Oleum Self Etching Primer to help the paint stick better. I taped the pin heads (hahaha I said pinheads) to keep them free of paint. I then sprayed them flat black and added the stippled brown paint. The etching primer did not matter on the pins — the metal is too smooth. So, they will require touch-ups for life. =shrug=
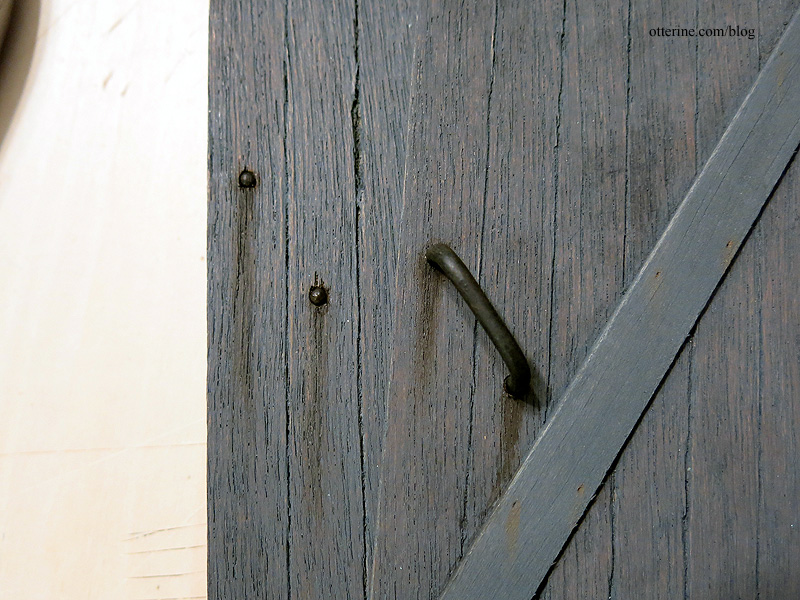
I drilled holes through the door and glued in black brads to finish the end holes. I added aging washes to the surrounding wood and painted the brads to look like corroded metal. I installed the handles at an angle, because I liked the look of it. :] Here you can see the back of one door and the front of the other.
I drilled pilot holes in the brackets for tiny nails. I glued the brackets in place and supplemented the hold with the tiny nails. The fronts have four nails and the backs have two so they wouldn’t interfere with each other.
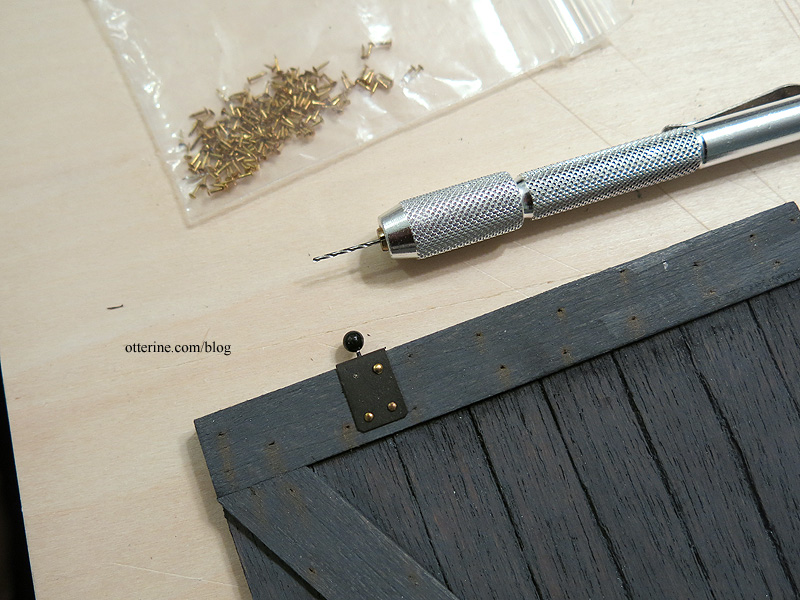
I used The Ultimate by Crafter’s Pick (thanks to Keli for recommending this glue for attaching metal to wood) for the brackets and dipped the nails in super glue gel.
The nail heads varied in size in the packet (noticed after they were glued in place, of course) but once painted to match they weren’t noticeable.
I will let all of this dry before installing the doors.
Categories: Milo Valley Farm
February 9, 2016 | 0 comments
NOTE: All content on otterine.com is copyrighted and may not be reproduced in part or in whole. It takes a lot of time and effort to write and photograph for my blog. Please ask permission before reproducing any of my content. (More on copyright)