
Ivy Hollow, Rural Free Delivery Post Office
Rural Free Delivery has come to the village of Ivy Hollow! Mr. McCants and his trusty equine companion Jebediah will make sure your mail arrives at your home safely and in a timely manner. Register your address at the local post office today!
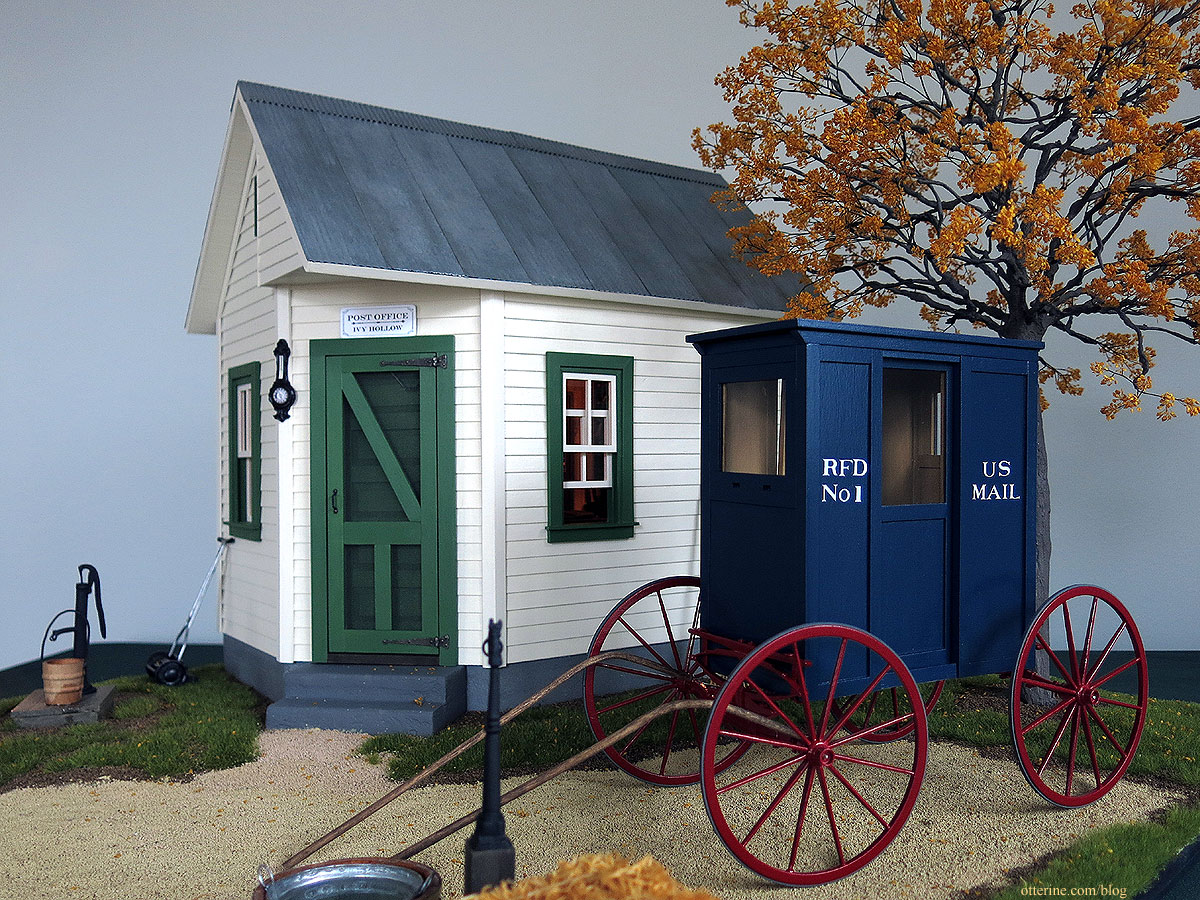
RFD – Rural Free Delivery – transformed the landscape of rural towns by removing the arduous chore of traveling long miles to the post office as well as providing greater access to goods and services. Mail order increased purchasing options for individuals and fueled business. Mail carriers were responsible for providing their own wagons and horses, having to traverse poor roads in all types of weather. RFD eventually led to the Rural Post Roads Act, which further developed rural communities by improving roads.
I set my post office in 1917, a number of years after the advent of RFD. The mail wagon passenger cabin was scratch built and fitted over a doctor’s buggy kit chassis. Jebediah the horse started as a plastic Breyer model. I didn’t get to making my own harness, but Tiki from Kulp Model Horse Store saved me at the last minute. I do still plan to make my own.
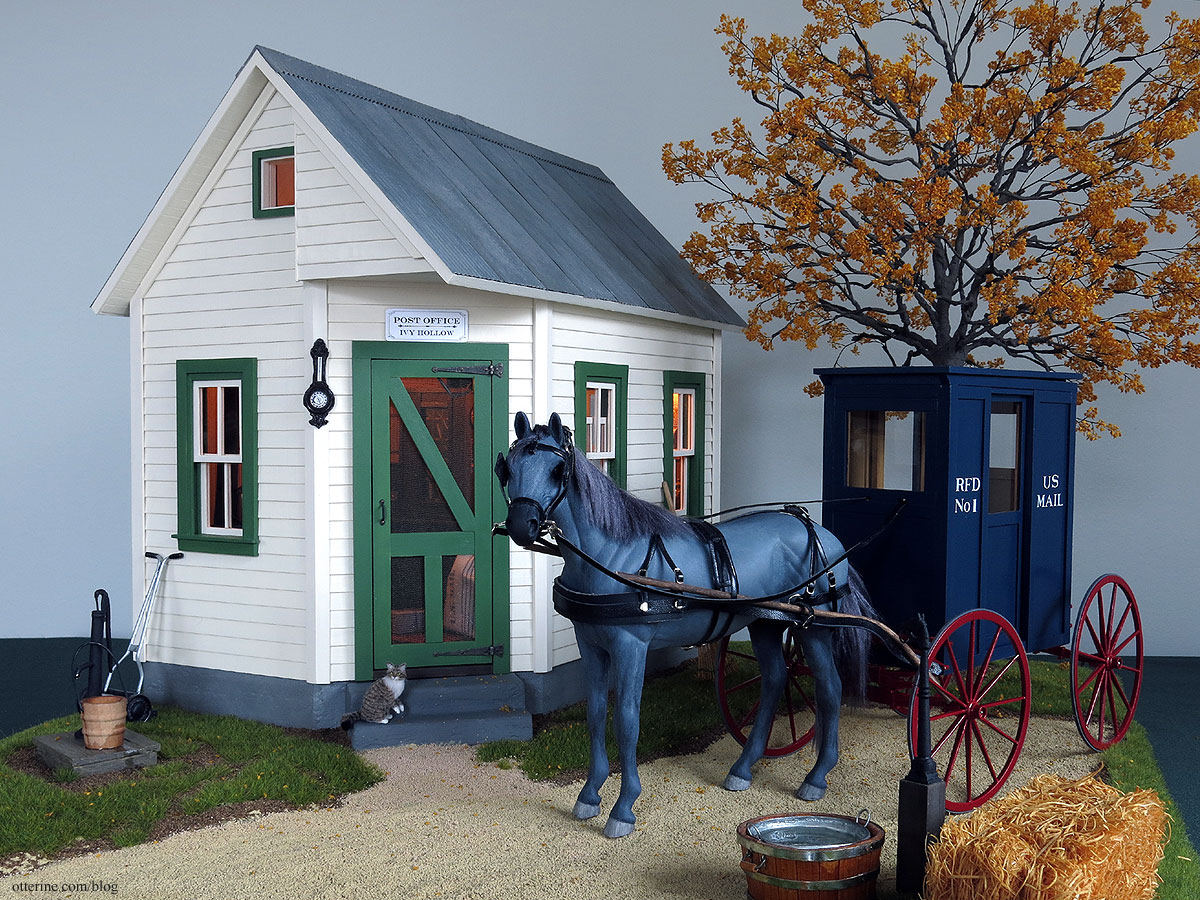
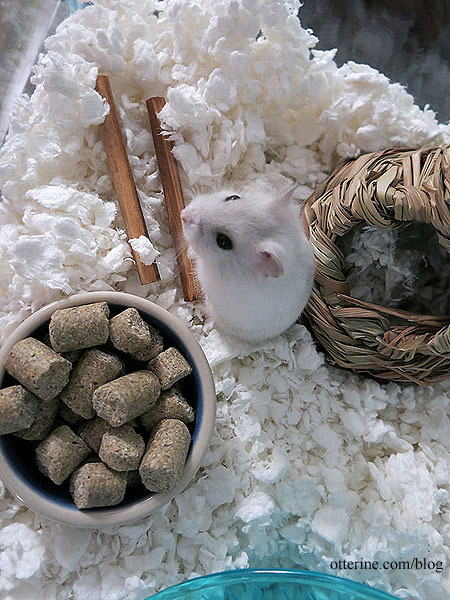
The name I’ve chosen for the town where my little post office stands is Ivy Hollow. I usually pull names from pet companions, past or present, or other sentimental connections. My current dwarf hamster friend is Ivy, hence the town name.
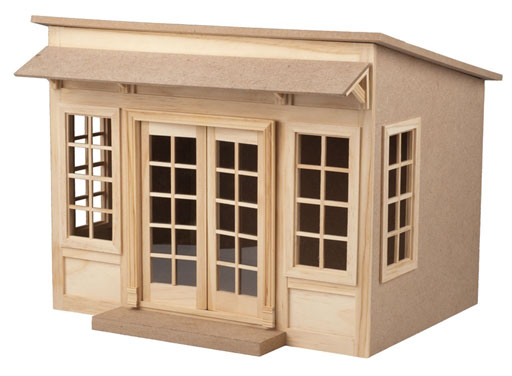
Modifications and Basic StructureUsually, I limit myself to the shape of the kit even if I add or delete height, width or depth. This is the Serendipity Shed as it came.
This year, my research led me to a postcard from 1917 showing a post office with the RFD horse wagons picking up the mail, and I fell in love with the shape of the building and its details. I later bought this postcard and was able to determine who wrote the RFD postcard (postmarked Nov 14, 1917) and to whom it was addressed, as well as the likely people in the image. I have a lengthy post on my research.
The postcard itself is a very interesting piece. The print is almost like a daguerreotype on paper. It has that weird metallic shimmer at a certain angle.
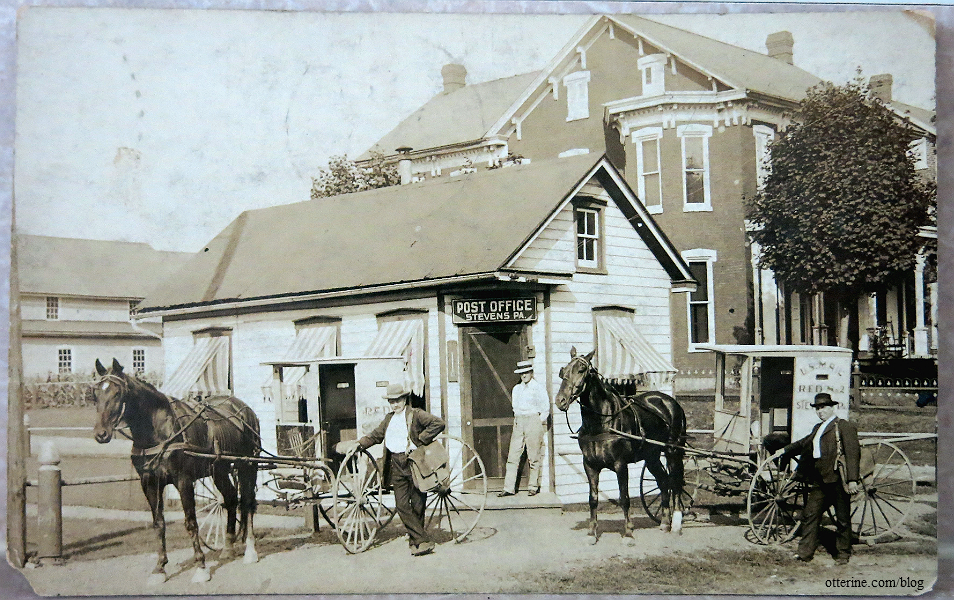
Amazingly, I was able to find a second photo of this same post office, though there are differences between the two images.
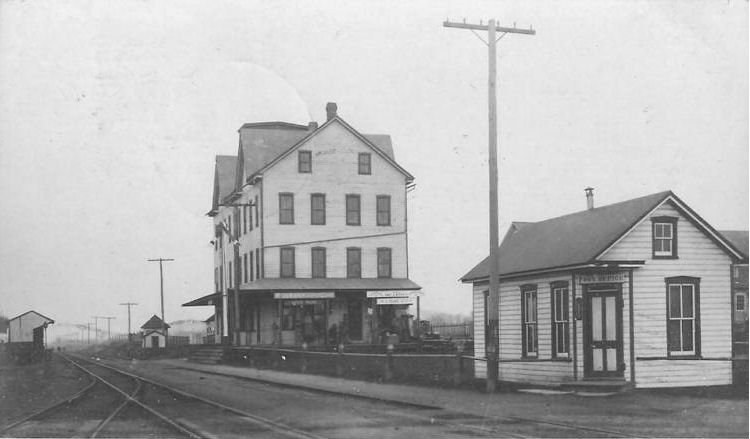
image from West2K, used with permission I modified the walls to match the roof pitch of my inspiration. I also needed to cut new roof boards, but I used the kit ceiling board for the new front wall. I had originally planned to have my building face as shown in the two photographic examples. But, my horse was facing the wrong direction. Might be a good candid shot, but we could do better. :D
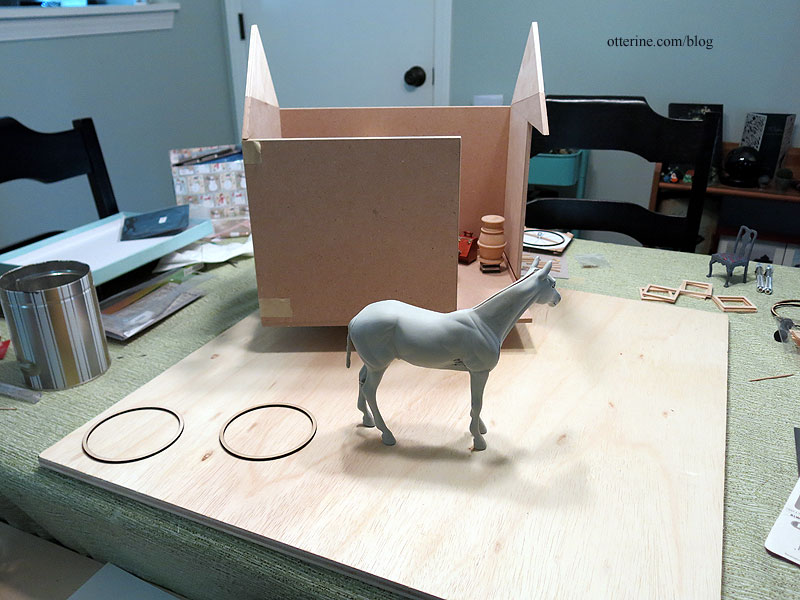
I flipped my building to better use the space and flow with the direction of my horse’s gaze.
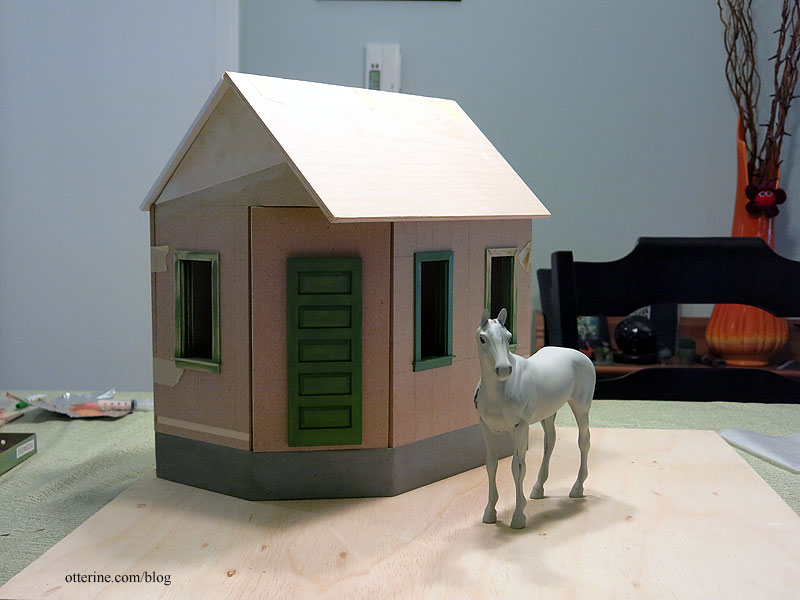
I built the foundation from some square lengths of mdf from a former HBS Creatin’ Contest kit foundation that measure 1 17/32″ tall when double stacked. After looking up the history of concrete to make sure it would be appropriate for 1917, I coated the edges with spackling. After applying matte gel medium, paint and some washes, I sprayed the base with Testors Dullcote spray to move the acrylic paint sheen (see previous post on my technique).
When HBS had their April Fool’s sale, I bought a pack of siding. It was way more than I needed for this building, but it’s a material I know I will use in the future and it was a great deal at 40% off. I have a detailed post on how I applied the siding for this build.
A fun feature of the original inspiration is the bumped out gable. I made a base for mine from scrap wood and covered with the same siding. I painted all the siding Vintage White by Folk Art.
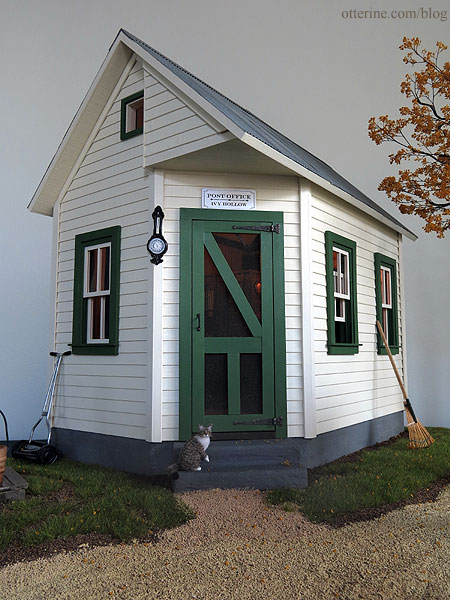
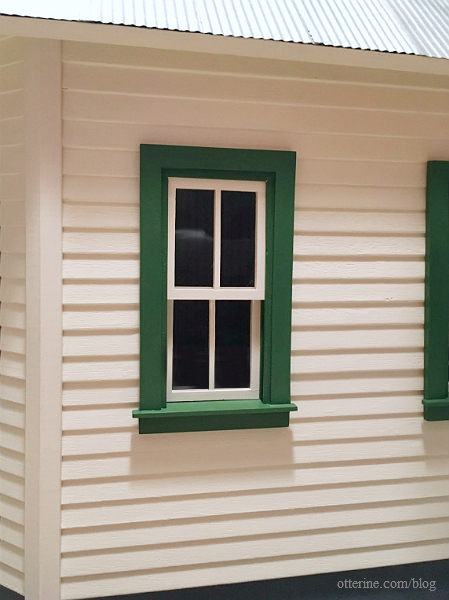
Since my structure is so small, I used attic windows instead of full sized components for better balance. I painted the frames Woodland Green satin paint by Americana and painted the sashes Vintage White by Folk Art. This is the first time I’ve painted a window two different colors! I doubt I will ever do this on a deadline again. I added the mullions as well, which instantly transformed the look.
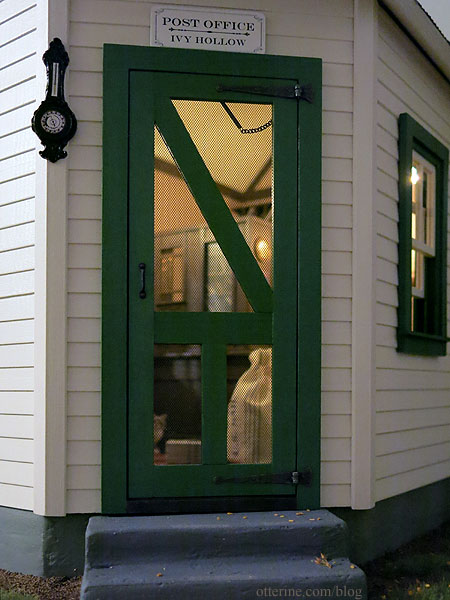
The screen door and coordinating main door were mostly scratch built (the process ends here, but you can click back through the links at the beginning of each post to see the full process).
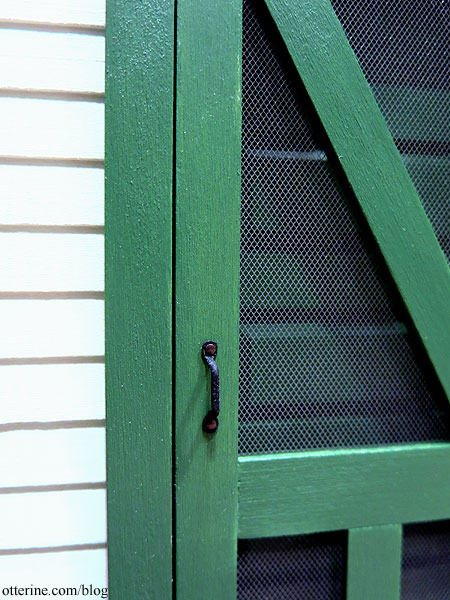
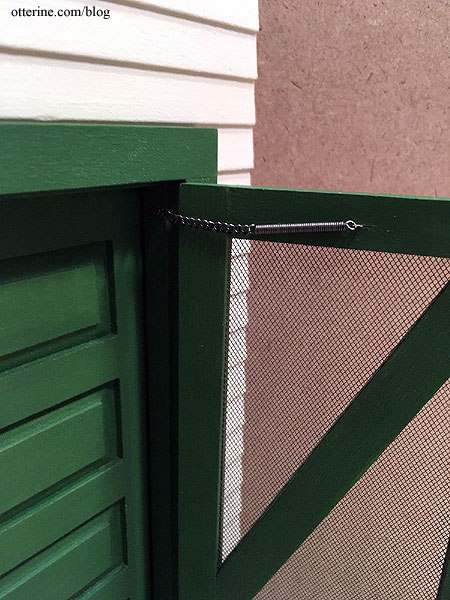
I tried to research the history of screen door hardware, but I ran into a lot of sites selling refurbished or reproduction hardware without much commentary on what was used when. I’m going with what I remember from my childhood farm memories – a spring and hook latch. Bill sent me length of thin spring awhile back, and I put it in the bits-n-bobs box for a time such as this. I opted not to install this so that opening the screen door will actually pull the spring for two reasons. The spring is likely to stretch out of shape over time, but more to the point, the spring has a tension force greater than the strength of tiny eyelets and some glue. boioioioing!
So, we fake it! I’m actually doing a mix of a typical screen door spring and storm door stop chain.
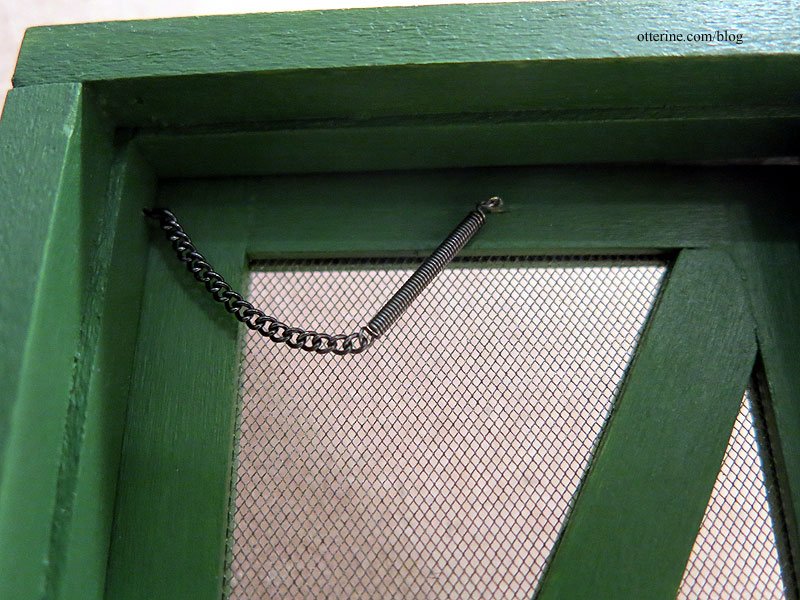
This is probably more modern, but it will add visual interest overall.
It was a lot of work, but I will definitely make another screen door in the future.
Landscaping and exterior detailing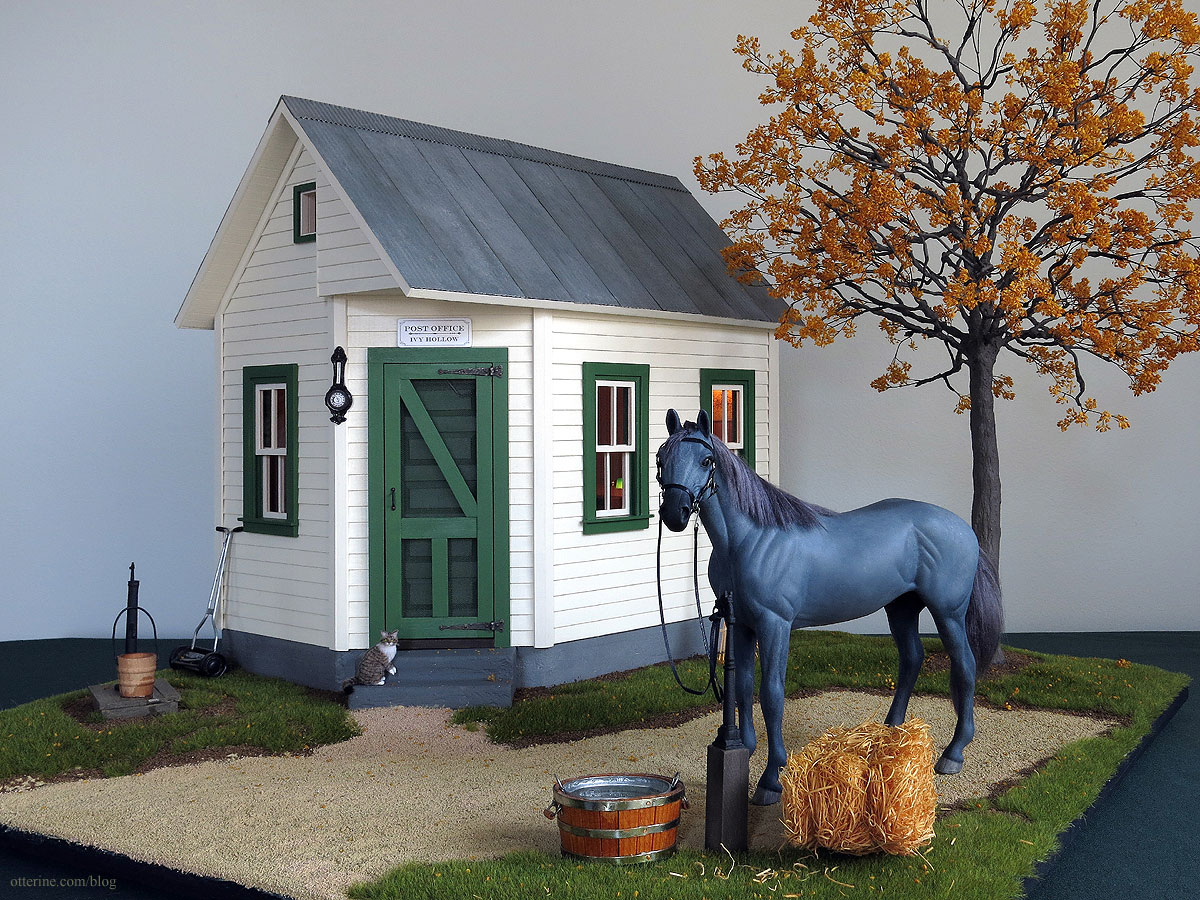
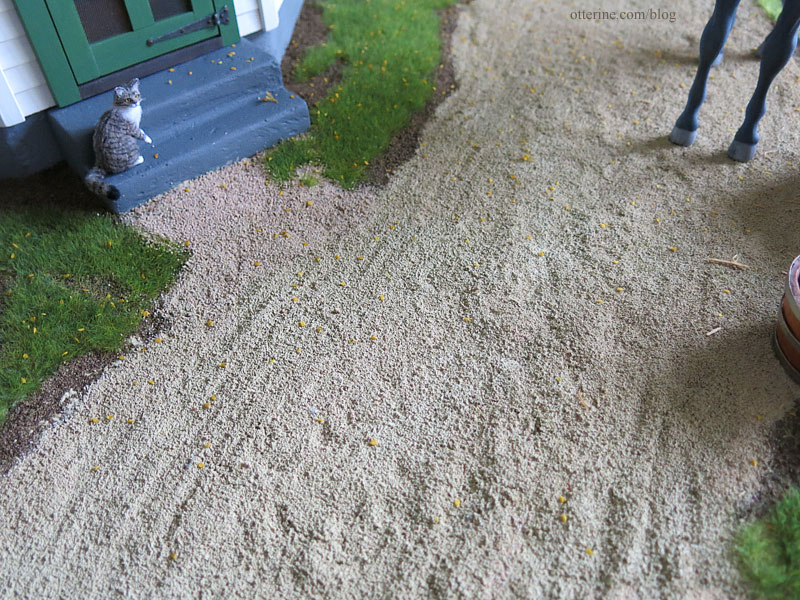
The landscaping (parts one and two) is simple and rural. I think this might be the first time I’ve angled a building on its base. I used Woodland Scenics Fine Dark Brown Ballast to serve as dirt and Fine Ballast Buff as the gravel. I ran the wagon wheels and patted Jebediah’s hooves on the loose gravel before setting it in place with Woodland Scenics Scenic Cement applied with a pipette.
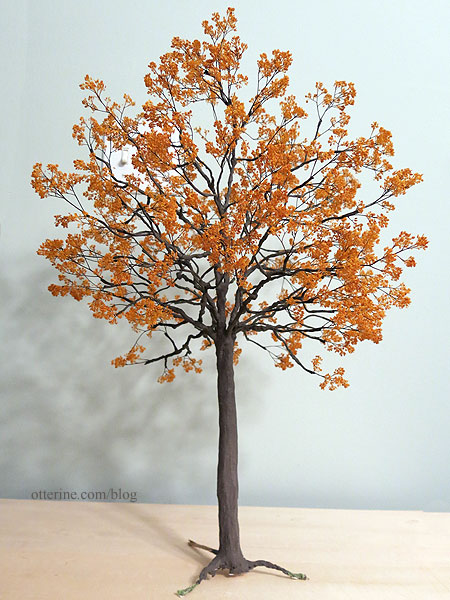
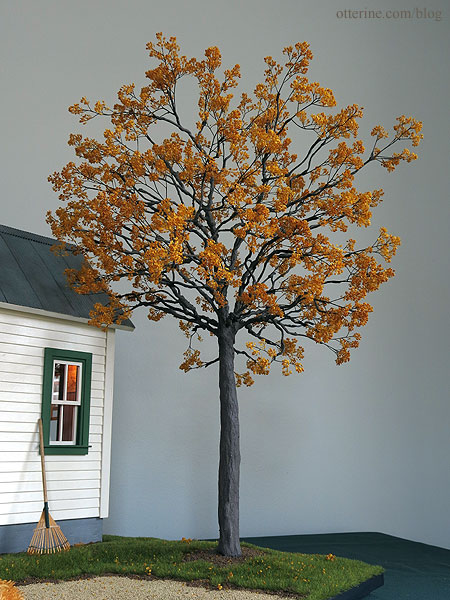
I made an autumn tree this year using the same wire and putty technique I’ve used in the past for the trunk. For the foliage, I used a tutorial by Connie Sauve on using candytuft, but the tutorial link is no longer active. I bought the candytuft from Scenery Solutions, but they no longer sell it.
Having a sparse tree meant it took less time to create, which helped with my tight deadline.
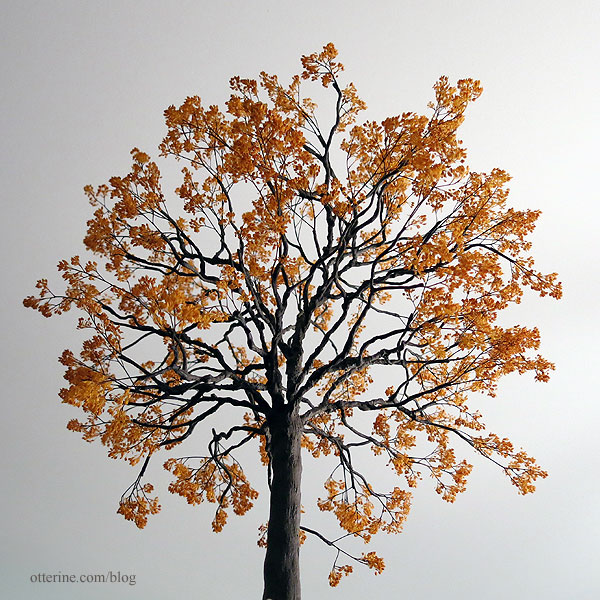
Love looking up through the branches.
The grass mat is Wild Grass Forest Floor by Heki from Scenic Express (they call it Pasture TurfGrass on their website). These particular grass mats are pricey, but the high grass with variegated coloration is spot on in scale. The sheets are only 6″ wide, though they are 17″ long, so there are places on the landscaping board that always need to be pieced. These are my favorite to work with because of the backing, which is a clear, rubbery substance that makes it more flexible than the paper-backed grass mats. (Here is a post on working with the grass material.) Since I had leftover branches, I stripped the leaves from them and littered the ground.
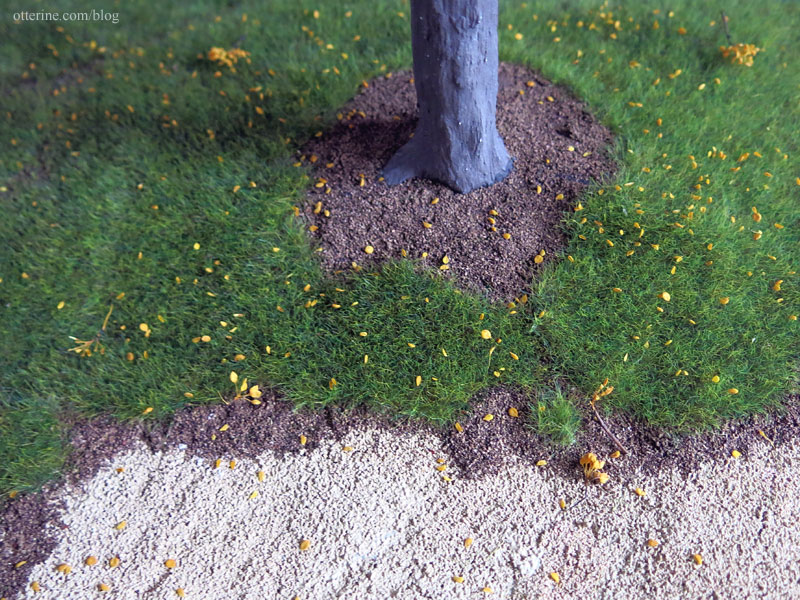
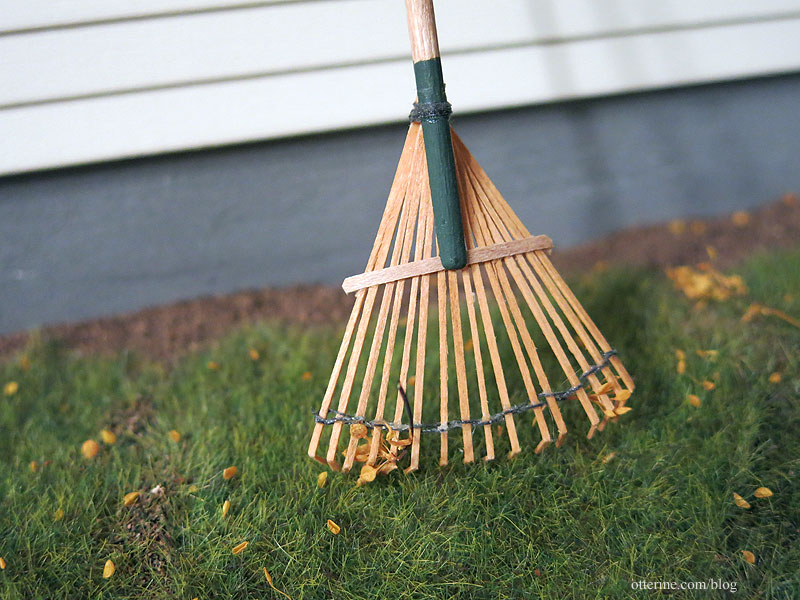
I was sure to get a couple of little bits caught in the lovely rake by Sir Thomas Thumb.
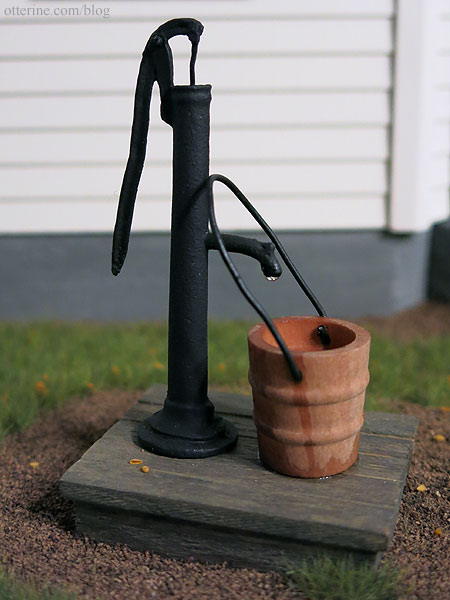
The pump was an unfinished metal mini from the local shows, and I had the bucket in my stash. I built the platform to hold both pieces. When I added the resin (Acrylic Water from Walmart), it leaked through the bucket. I led a path of it over the edge and let it do what it wanted. A happy accident. :] There is also a droplet from the spout.
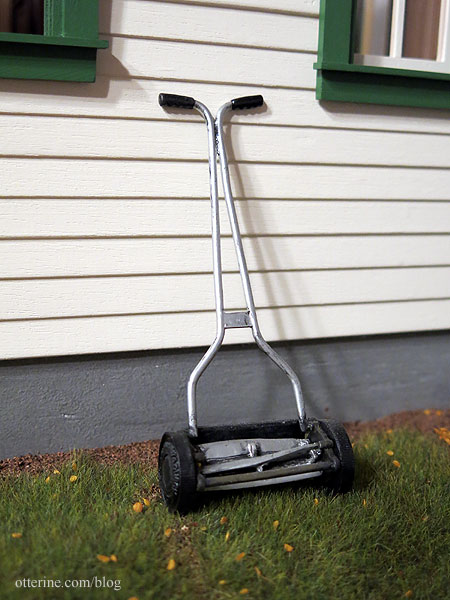
I borrowed the lawn mower from Ye Olde Taxidermist. It was made from a Phoenix Model kit from Jennifer’s of Walsall.
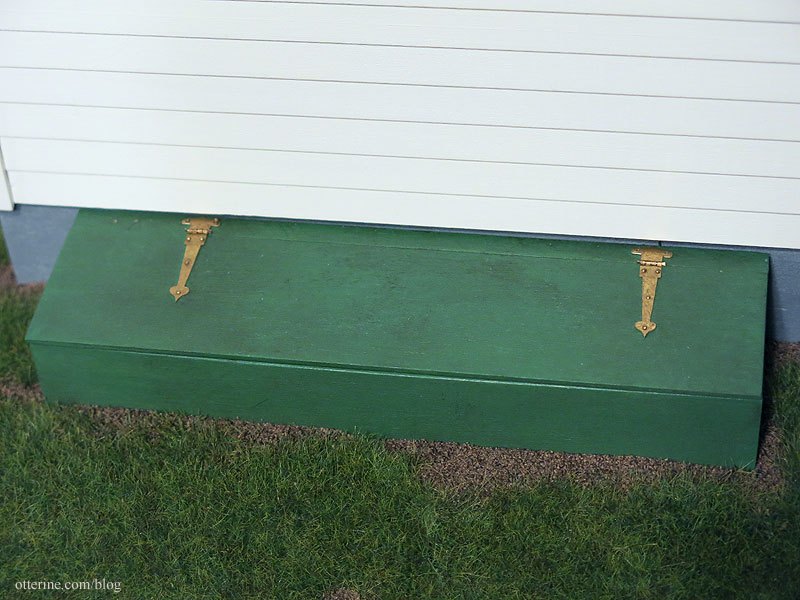
I needed to be able to access the wiring, but there was no room in my tiny post office. I built a shed in the back that will allow me to hide the wiring while looking like a planned part of the build.
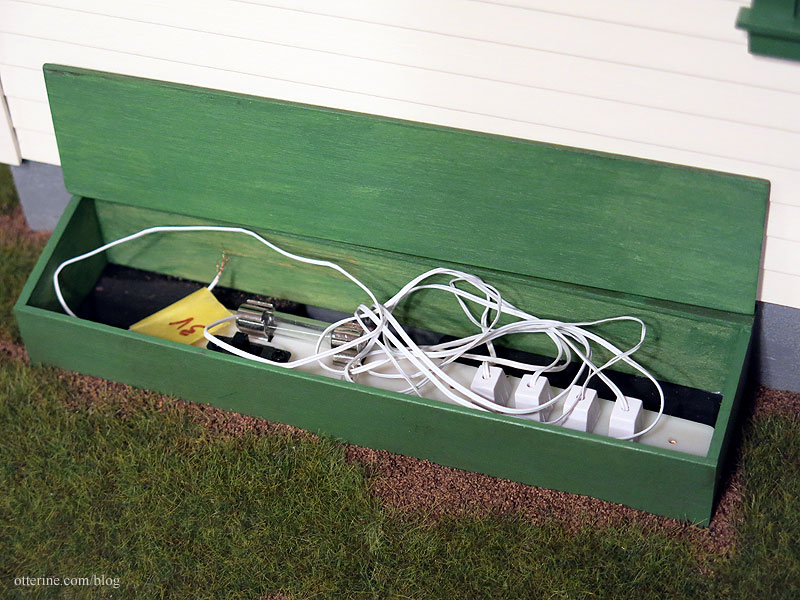
I used some fine brass hinges bought in miniatures lot some time ago, and one of them promptly failed after I glued the shed in place. A little epoxy and new nails, and we’ll be back in business. In the meantime, I hold the top part of the hinge down when I open it.
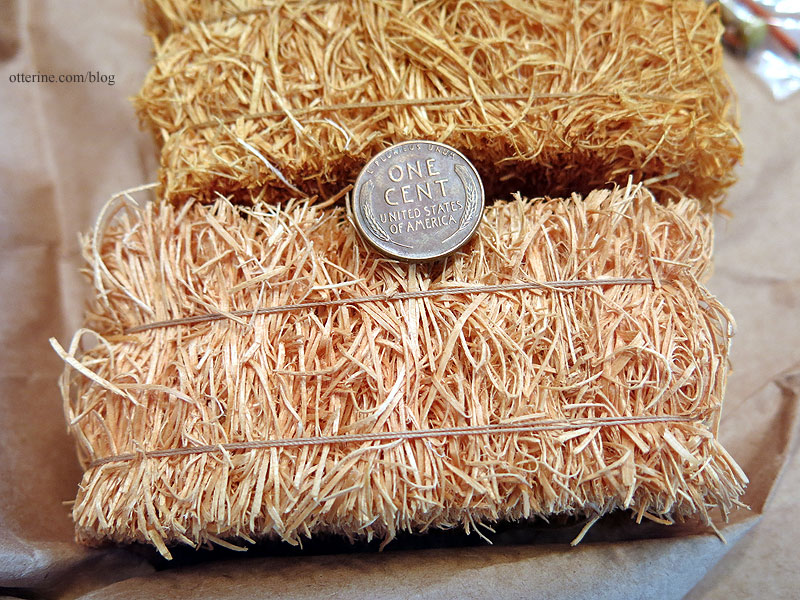
One of the best hay bales I have ever seen in miniature was purchased from Maple Leaf Miniatures.
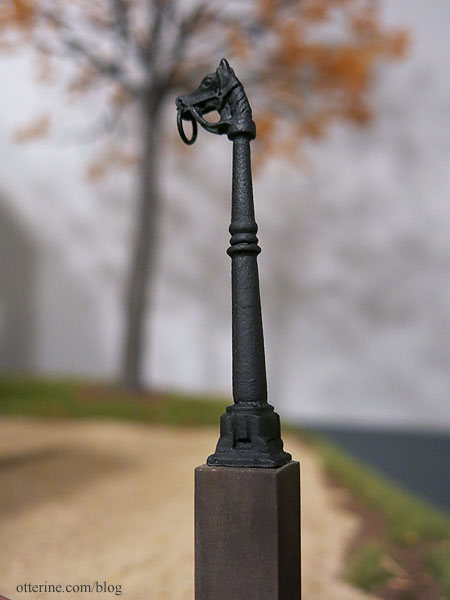
The horse hitching post was an unfinished metal mini from the local shows, and I added a wood base. I swapped the silver ring for a black one to better match the painted finish.
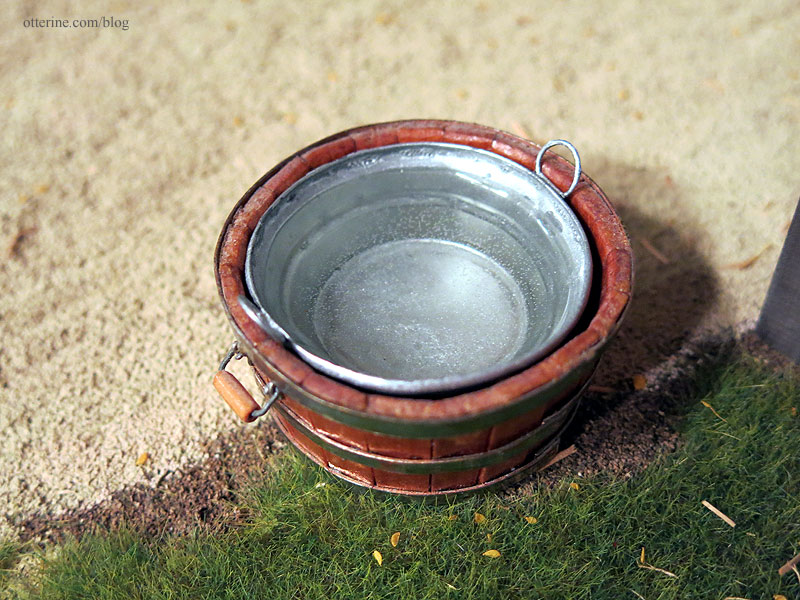
While I was searching for a bucket to add water for Jebediah, I ran across this gem signed March 9, 1964 B.A., numbered 4. It looked great in the photos, but no one else bid on it but me. When I received it, I loved it even more. There was no way resin water was going to be added to this.
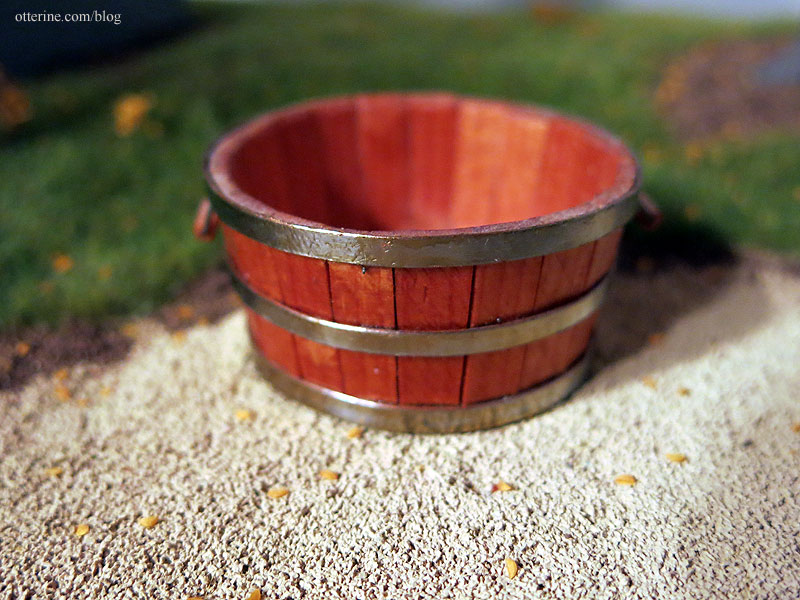
Luckily, I had ordered window pulls from my friend Greg at All About Miniatures, and he included a gift of metal buckets. I was able to add the resin water to one of the metal buckets and set it inside the vintage wood mini. Thank you, Greg!
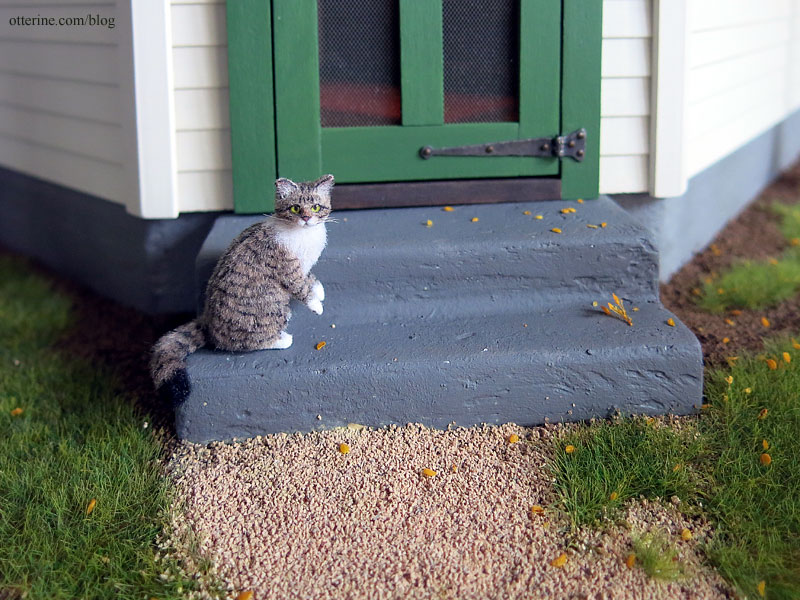
The concrete front steps were made from styrofoam, spackling and paint. Chester was made by 2014erok. I had so much fun playing in the mini dirt this time around – the landscaping got to be a lot less manicured.
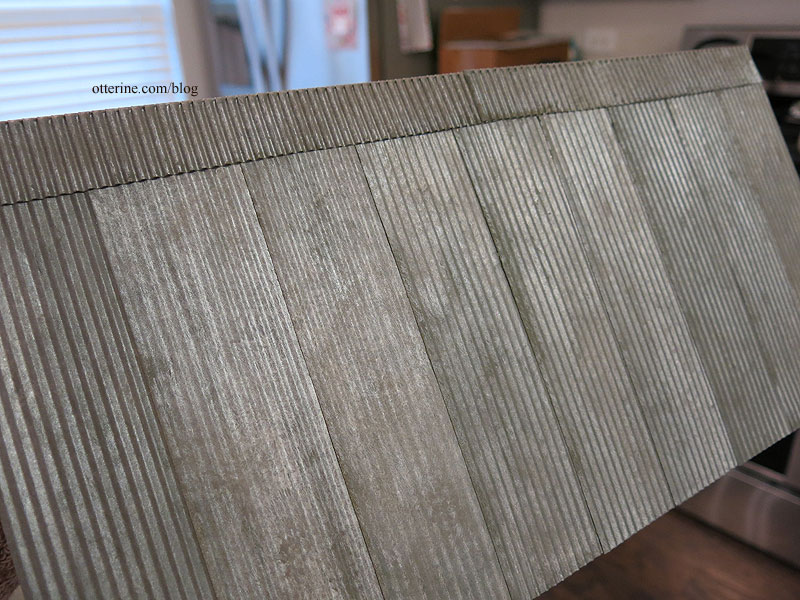
The metal roof is actually metal. :D I’ve made a rusted roof in the past, but this time I needed something that wasn’t new but wasn’t too old. I like the middle ground finish – not new, not old.
Interior AccessoriesI packed a lot into this tiny building.
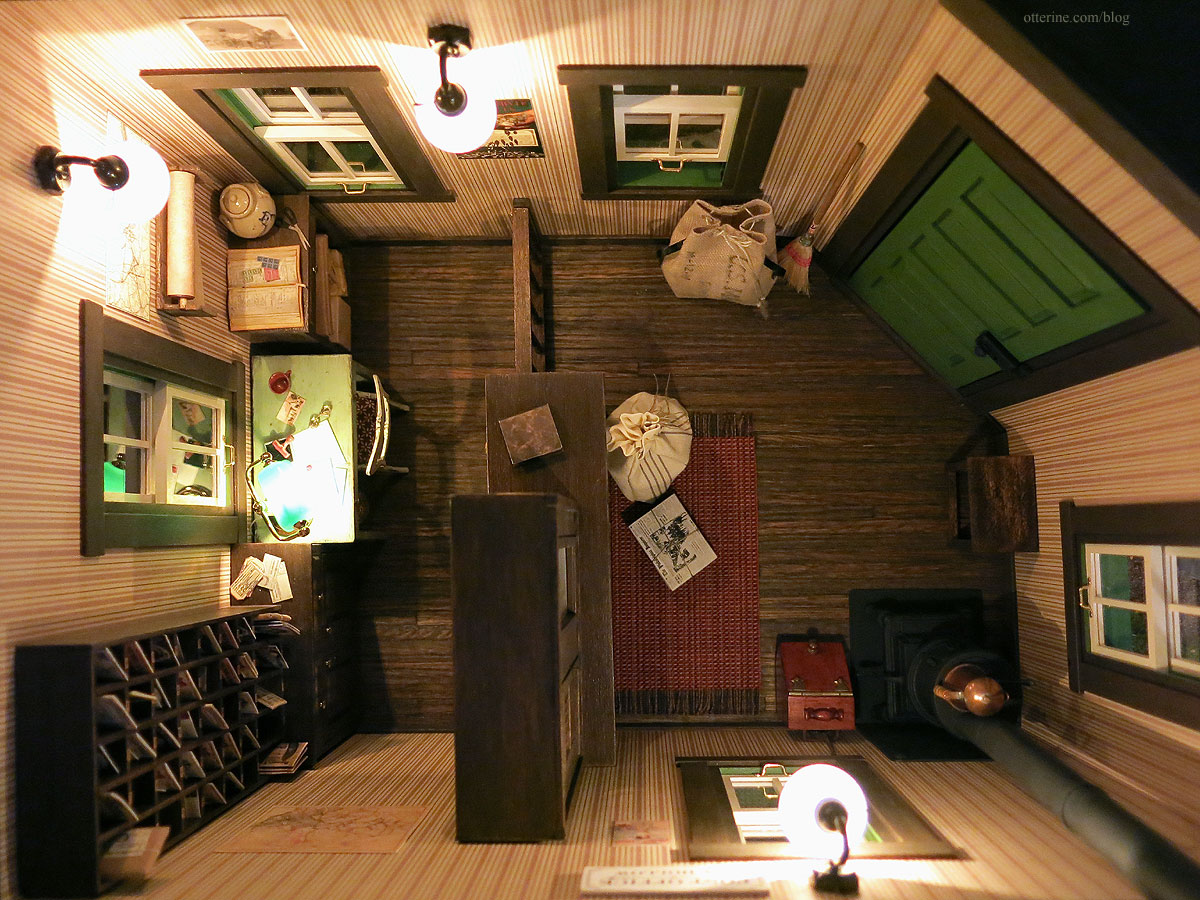
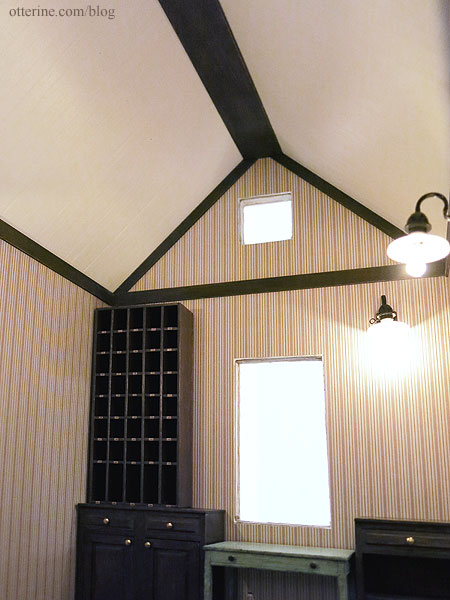
Originally, I thought to have a removable roof and possibly a removable wall. I ended up having only the roof removable which meant ceiling lights would be just too much of a hassle. Possible, but a hassle. I opted instead for wall lights only, and the Meyers Wall Lights are the perfect blend of vintage and shop. While considered outdoor lights, they are small enough to work well indoors. Plus, I like the look of the pea bulb. As for whether there would be electricity in this post office in 1917, I’m deciding yes!
The wallpaper is Brodnax Prints – 1VT344 – Gathering Stripe Green from Manchester Woodworks. The roof (and ceiling beam) remain removable to better access the interior. It’s a little hard to see, but I used wood flooring sheets to make the ceiling, then painted the surface vintage white.
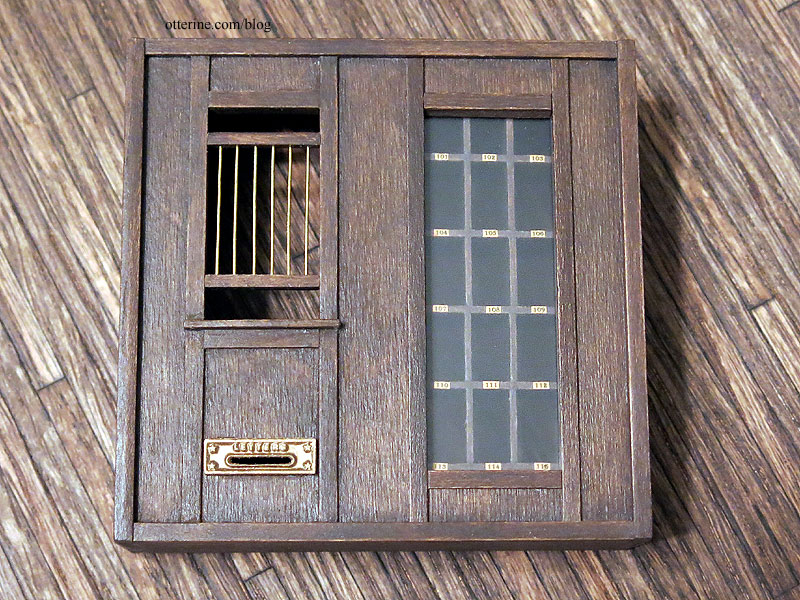
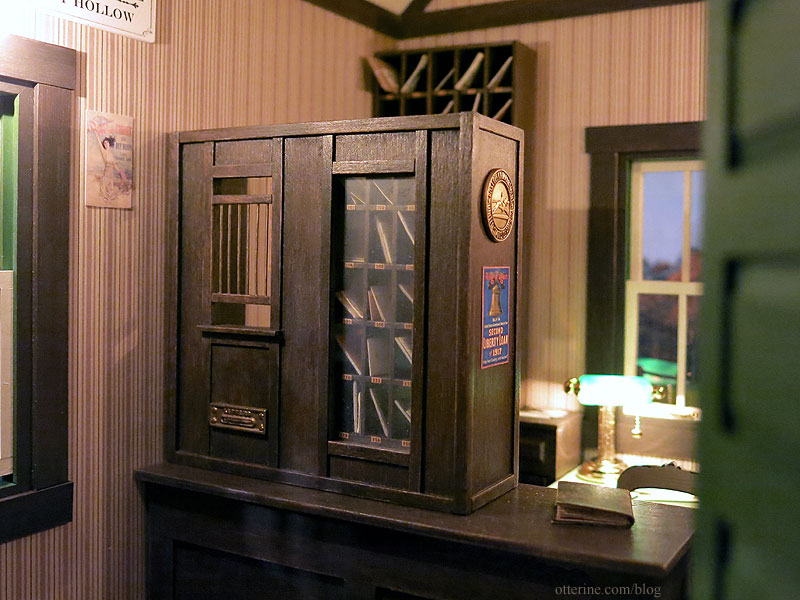
The postal teller (the process ends here, but you can click back through the links at the beginning of each post to see the full process) was made from the bones of a Realife kit. I ended up cutting new parts for much of it because of the poor wood quality and the modifications I wanted.
For finishing, I opted for Bittersweet Chocolate mixed with Staining Medium, both by Americana. Actual stains can be harder to work with in small spaces, and the Staining Medium makes paint behave like a stain without the fumes or the long drying time. There’s the benefit of stained wood grain without as much mess. I added numbers to the 15 pigeon holes in the mail sorter. Yep, on the back, too, so the postmaster and the customer can see which box is which.
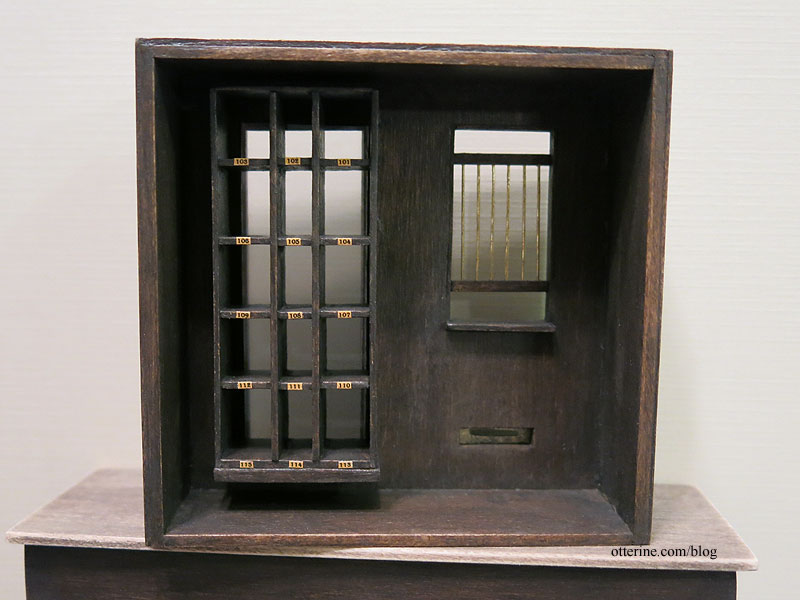
I cut a piece of thin acrylic sheet for the sorter window and then glued trim to hold it in place. I opted to lightly frost the glass to cut down on the glare that would prevent good pictures. I used Testors Dullcote.
This piece took a lot of work to get a good result, but I’m very pleased with the results. The flooring is my staple southern pine flooring stained dark and aged. I’ve used a simple red woven rug by Designing Ways.
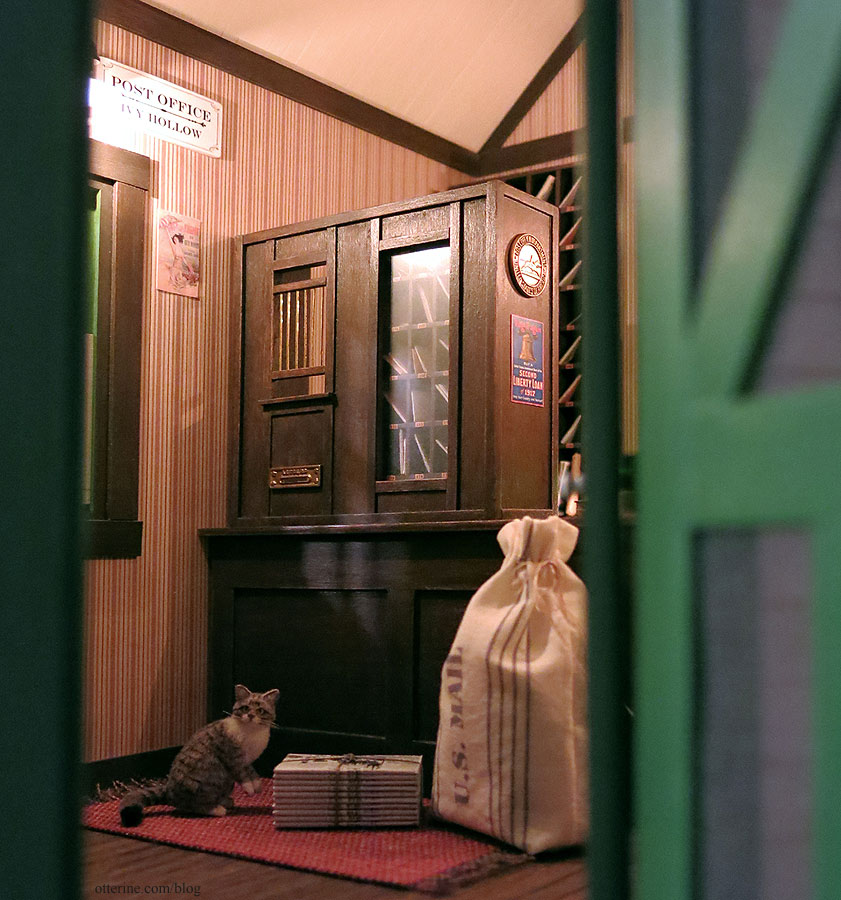
I wonder how many times our postal cat Chester needs to be shooed off the counter. :D
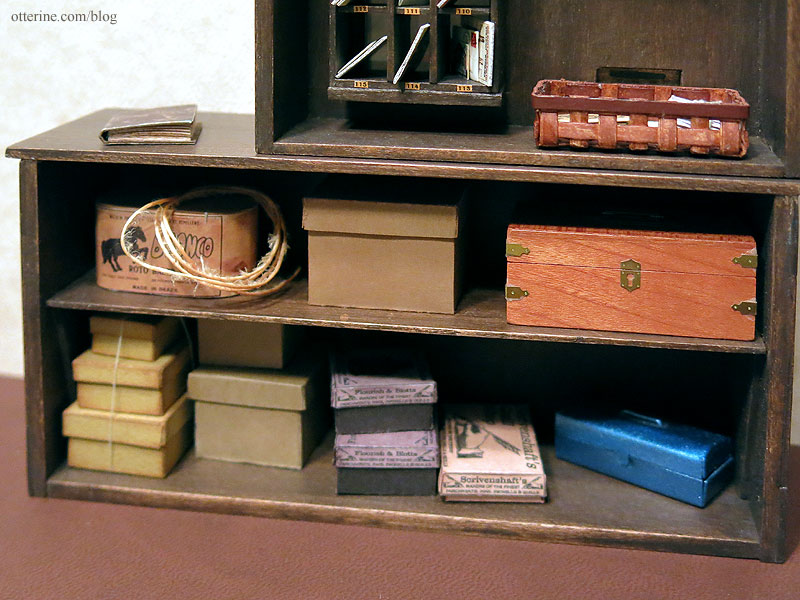
I did add some items to the counter shelves, but they aren’t easily seen unless you peer through the back window. The twine box is a Wright Guide miniature, and the toolbox is from HBS. The remaining boxes are all from Looking Glass Miniature. The delightful wood box has working hardware and was a gift from Debora. By Ron Stetkewicz Miniatures.
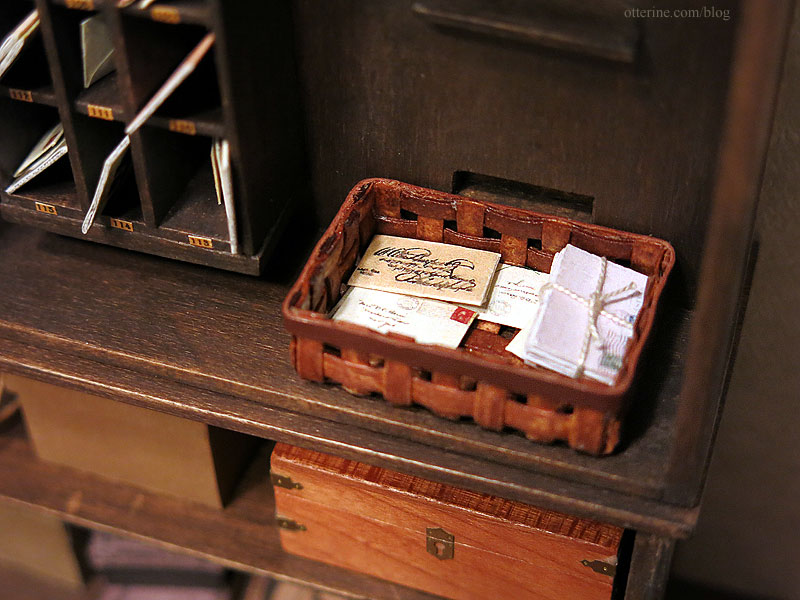
Instead of the kit letter box, I added a fine basket by Al Chandronnait.
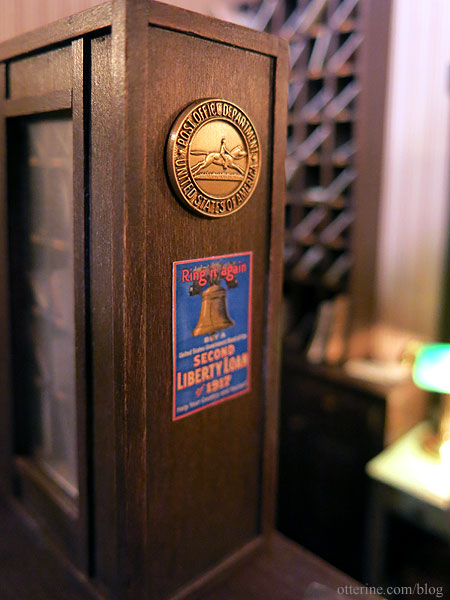
I had always planned to make a sign resembling a porcelain plaque but found a 42-piece lot of vintage charms of the logo for the United States Post Office Department, which was the original name of the United States Postal Service. No, I didn’t need 42 of these suckers, but how perfect for a plaque. The 5/8″ diameter was a perfect fit.
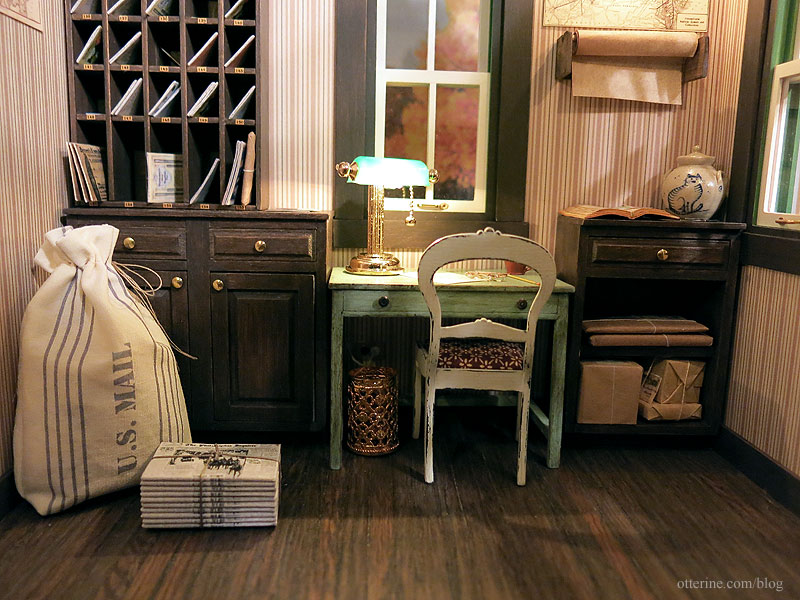
The postmaster’s desk wall (parts one, and two) has more pigeon holes, cabinets and a desk with a chair. The cabinet fills the bottom space, adding storage, but I don’t have to actually fill said space with minis that won’t be seen (nor will I have to dust this space). I figured I would need more pigeon holes than the few in the teller, because having a post office for only 15 mail customers seemed a bit of an extravagance. I modeled the additional pigeon holes after the ones made for the postal teller, making them a little deeper and having 40 on this back wall unit. I think 55 post boxes is more in line for a one-wagon rural post office. It might not be enough for a true post office, so I remind myself this is a mini approximation.
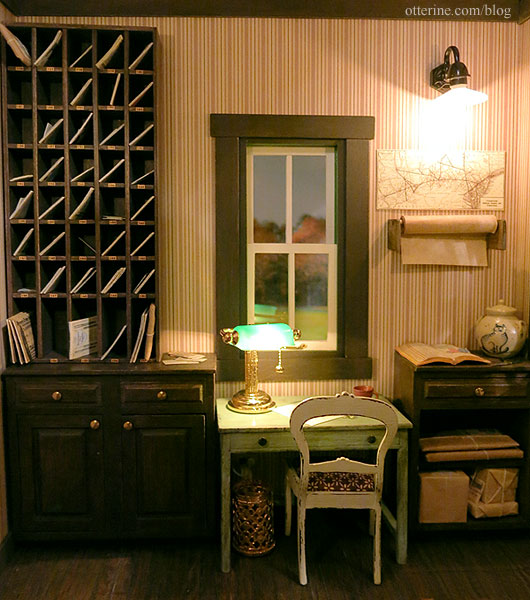
Our rural post office has good cabinets and a postal teller in newish condition, but the desk and chair are hand me down pieces. They are still perfectly usable, after all. The Chrysnbon Victorian chair kit was a gift from Barbara. The desk is adapted from a table pattern in the book Finishing Touches by Jane Harrop.
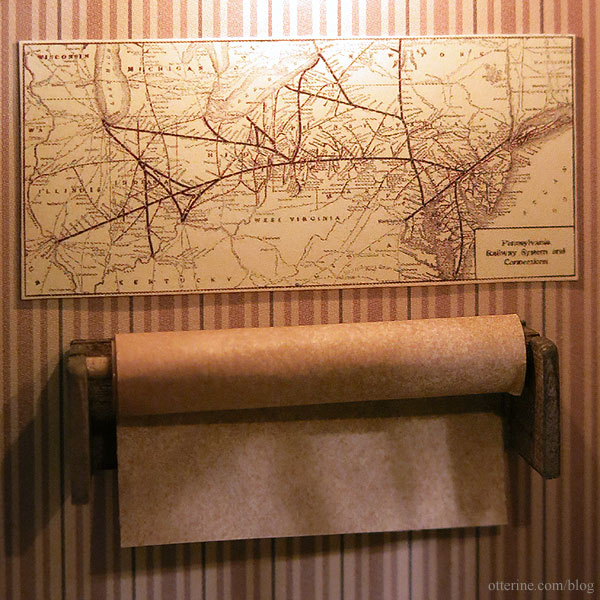
I printed a reproduction of a 1917 Pennsylvania railroad map. The paper is a Wright Guide miniature.
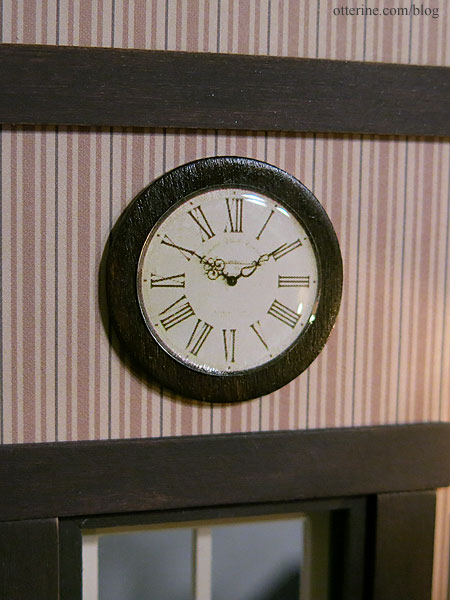
I later added a simple clock made from a wood circle, printed face and self-adhesive cabochon sticker.
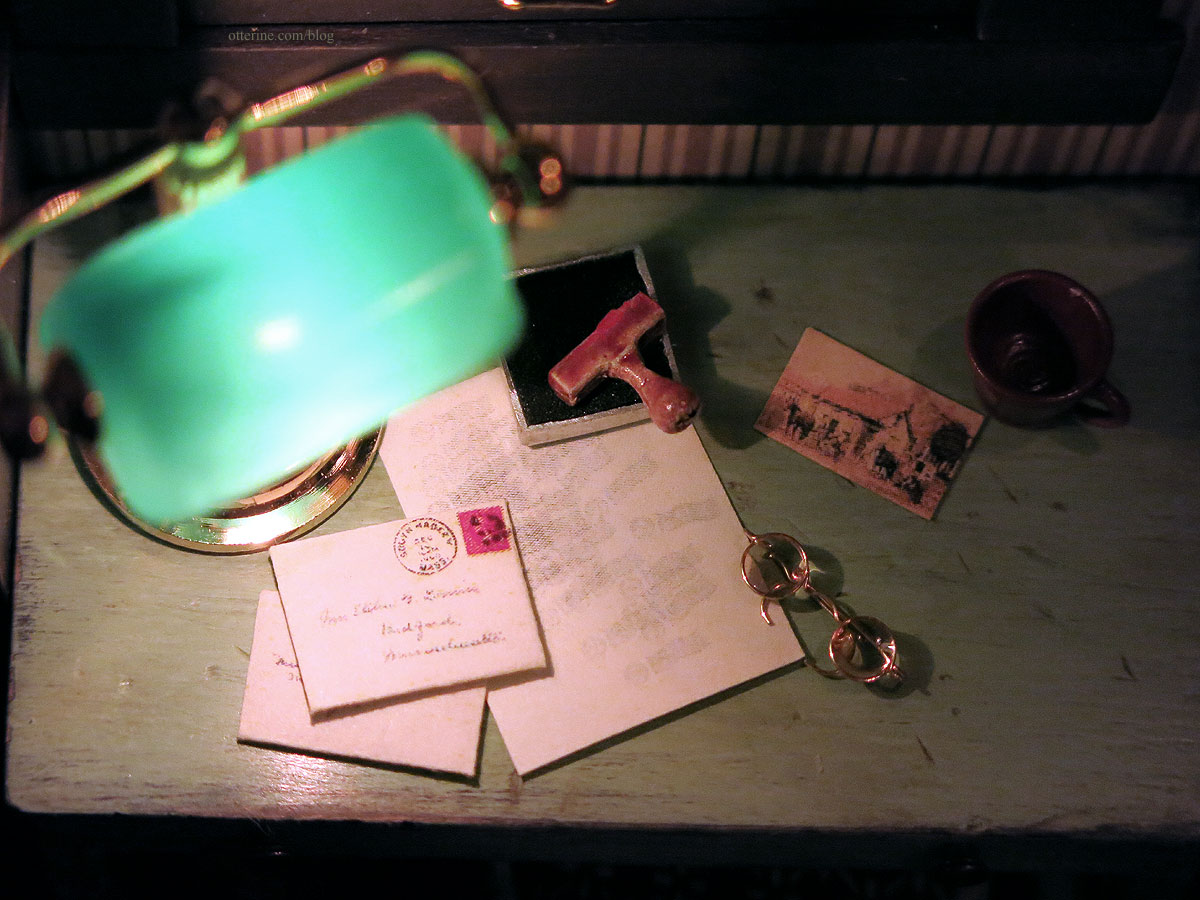
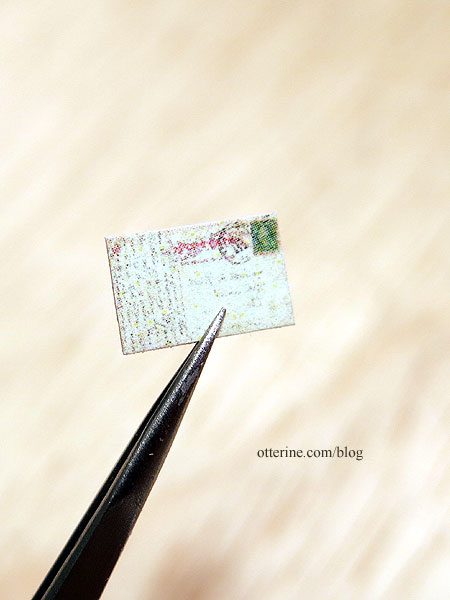
The tiny postcard is a replica of the original inspiration, and the bankers lamp is from HBS. The marvelous eyeglasses are from Lynn O’Shaughnessy (no website), and the coffee mug is from a set by Jane Graber. I made the scratch paper using a cancellation stamp image repeated at random. I ran out of time to make my own stamp and ink pad, but I had a delightful set from Wright Guide. I peeled the parts I needed from the set without damaging it, so I can replace them once I make my own.
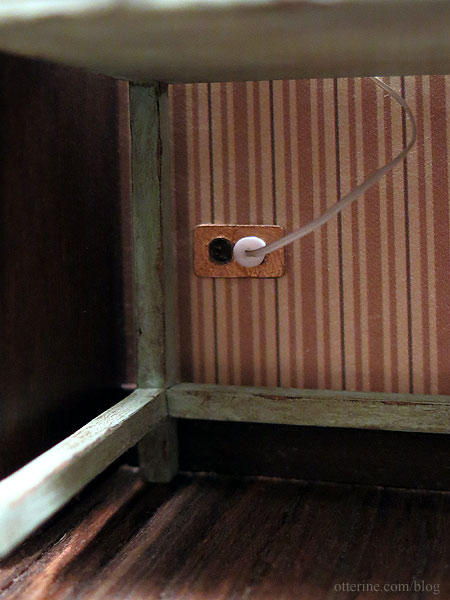
I made a faux outlet for the lamp wire.
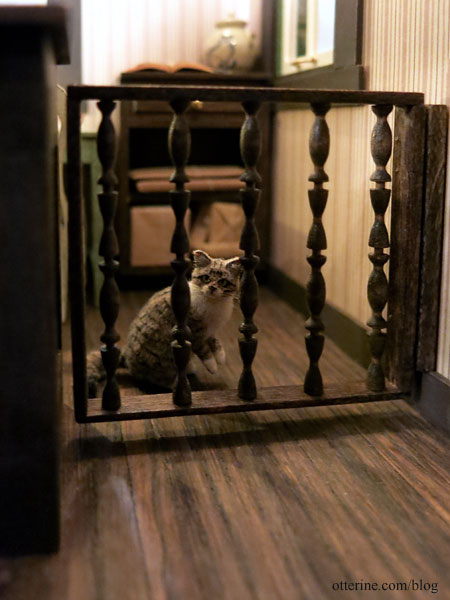
I made a gate from scrap wood and Tiny Turnings, making it up as I went along. I thought the spindles probably could have been closer together, but it turned out well so I went with it. The stain is Minwax Dark Walnut. I used brass Houseworks hinges to make it operational. In the end, I like that the spindles are sparse – allows more to be seen through it. As many people pointed out, too, wider spindles allow a quick escape for our postal cat Chester yet block kids and dogs that might hassle him. :]
The potbelly stove was made from a Chrysnon kit (the process ends here, but you can click back through the links at the beginning of each post to see the full process). I experimented with paints to give the basic kit a boost in realism.
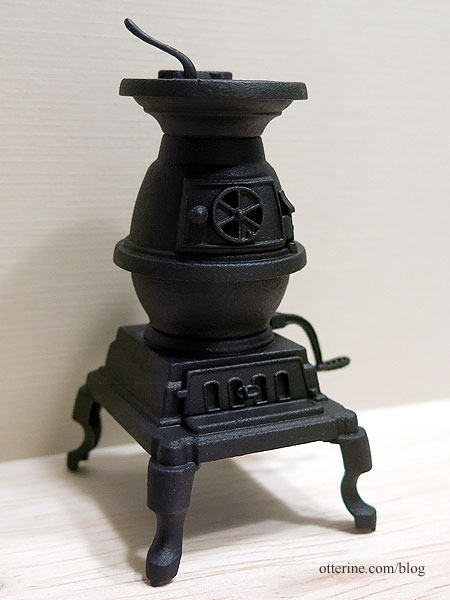
I’ve turned plastic into iron. :]
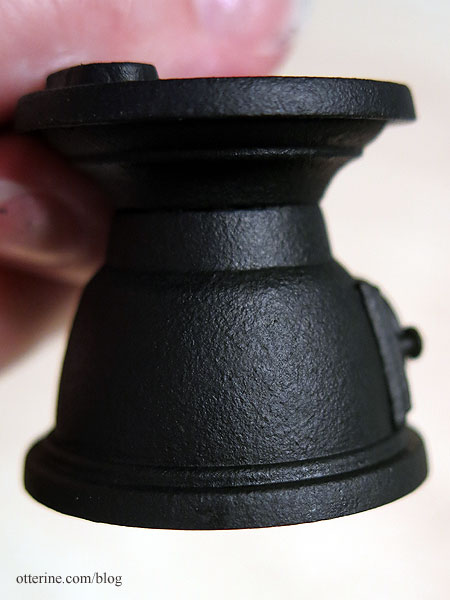
I wanted my stove to have coal light, so I used LEDs, clear plastic pieces and paint to create glowing embers.
Of course, you really won’t be able to see much of them once the stove is in place, but I know they are there…and the next time I need embers, this is the method I will use.
I skipped the kit stovepipe, which has excellent detailing, since I wanted to attempt a straight pipe up through the ceiling. Debora had sent me some defunct Chrysnbon kits for parts some time ago, and one of those was the cook stove. I used that oval to round adapter and 1/2″ polystyrene tubing to make my straight pipe. I cut a thin band of polystyrene and glued it approximately 3 inches from the top of the adapter to make it look like the stovepipe was assembled in two pieces, which it likely would have been.
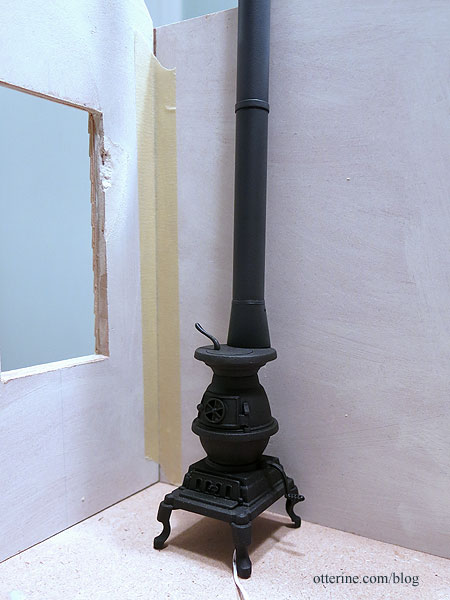
I made a full heat shield from plastic sheet and jewelry findings instead of using the kit floor stand. Once the ceiling was in place, I was able to cut the angle of the stovepipe. There was not much room for customer seating, so I made a quick stool from a pattern in the book Finishing Touches by Jane Harrop.
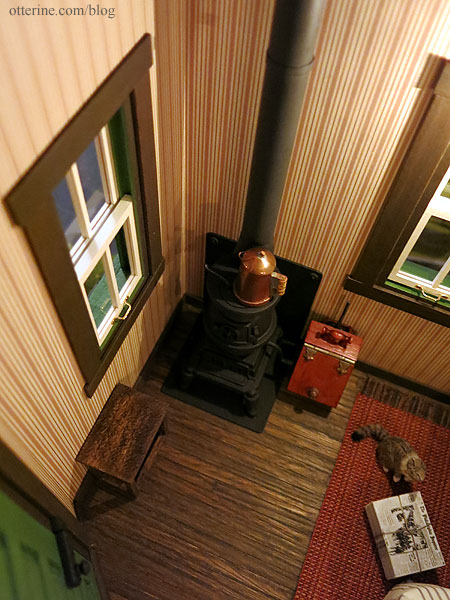
The coffee pot is a gift from Barbara.
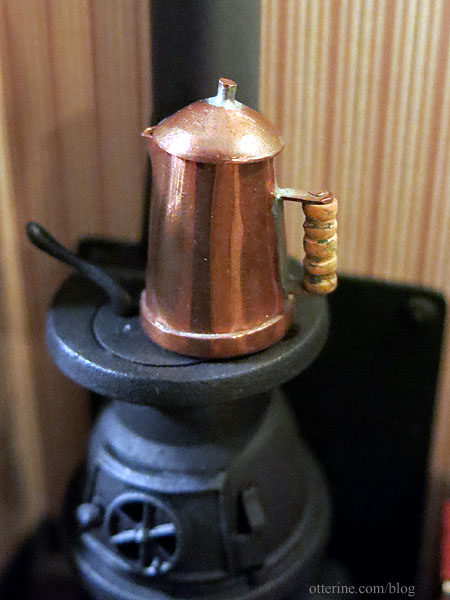
The coal scuttle is from the estate of a talented miniaturist and lovely lady, Elly in Amsterdam. I knew her through a petitpoint group and never met her in person, but she was one of the sweetest ladies and super fun. She’s definitely missed. I made a scoop to go with it from the Chrysnbon potbelly stove kit.
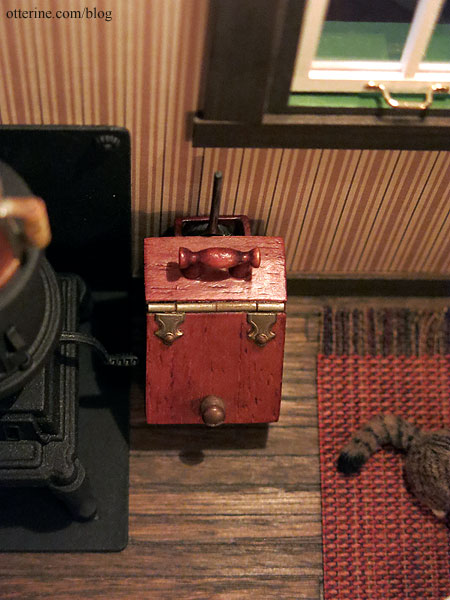
Elly was so fond of cats, she would certainly approve of Chester sneaking into the photo.
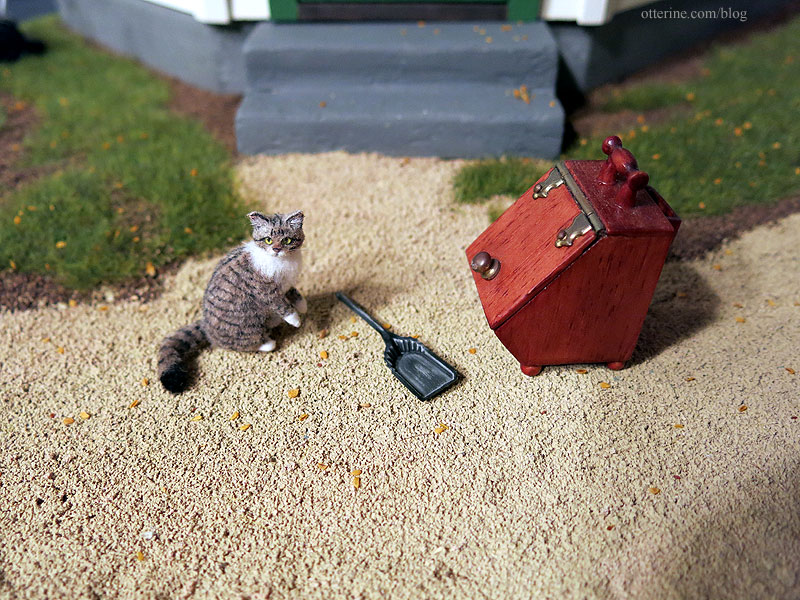
I made up a mini newspaper stack, settling on a midyear 1917 edition of The Philadelphia Inquirer because it had horse drawn carriages on the front page above the fold. These are in scale and not really legible. They do have printed interiors, albeit single-sided. I tried to get them as consistent as possible, but I really needed only one near perfect one for the top of the stack. As long as they were all relatively close in size, they would work as a stack. Once I had a stack of ten, I used buttonhole thread to tie the stack.
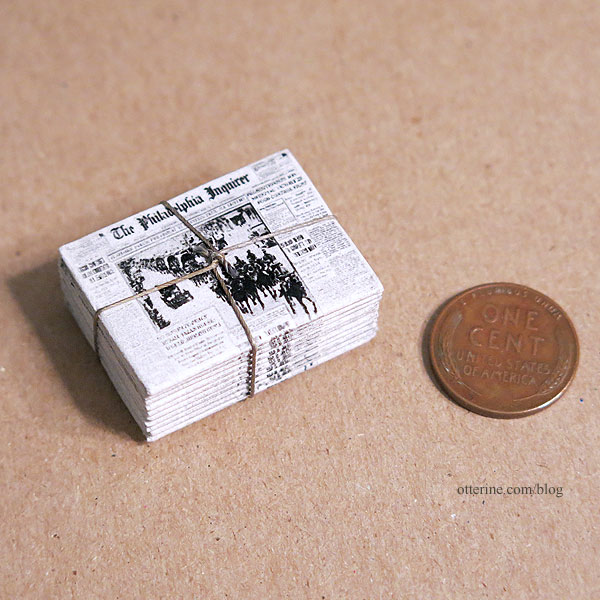
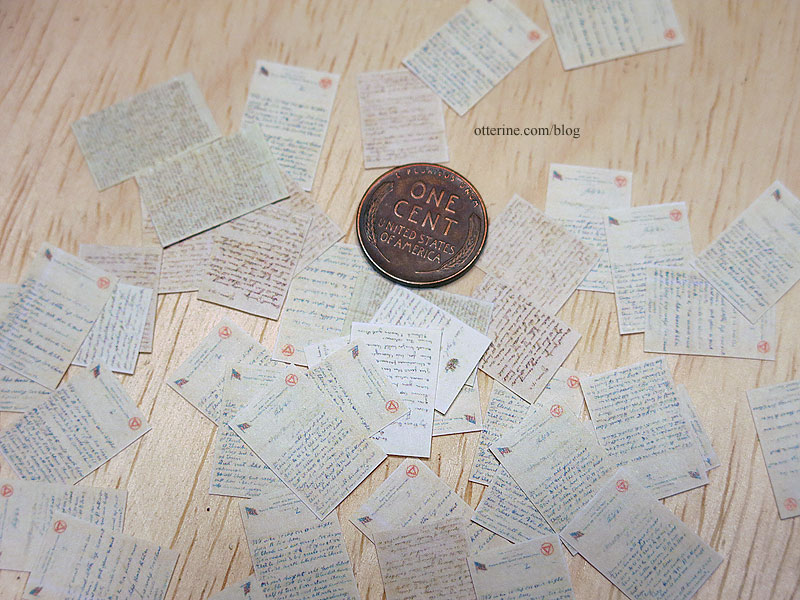
I made a lot of mini mail for this build, and I did have some left over. I started with letters, postcards and mailers. After some scouting about online, I found a few different sites that had scanned letters and their corresponding envelopes. There is also a wealth of postcards, both mailed and unused, listed for sale online. I tried to limit the ones I printed to true 1917 dates, except for a few that I loved and wanted to include. Here are the letters. They are true to scale and not legible, but they add a nice touch.
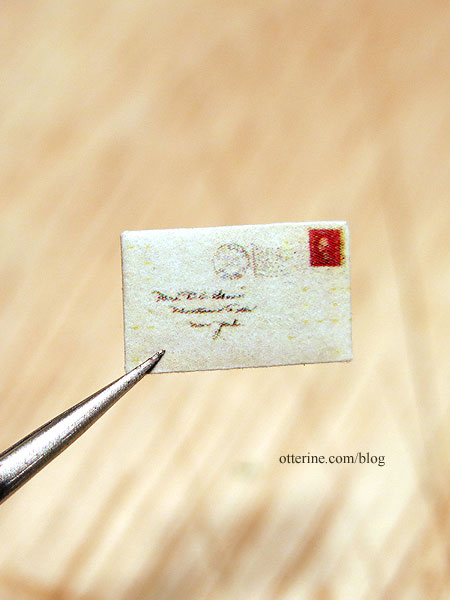
I printed matching envelopes as well.
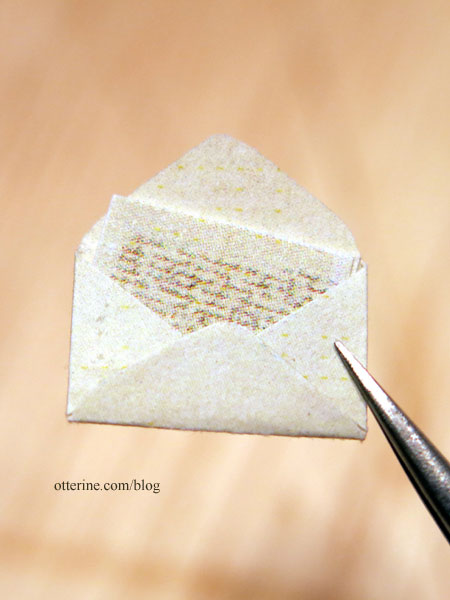
The letters are glued shut, but I like knowing there is a true letter inside.
I cut out the postcard fronts and corresponding backs as pairs so I wouldn’t have to play an impossible match game later.
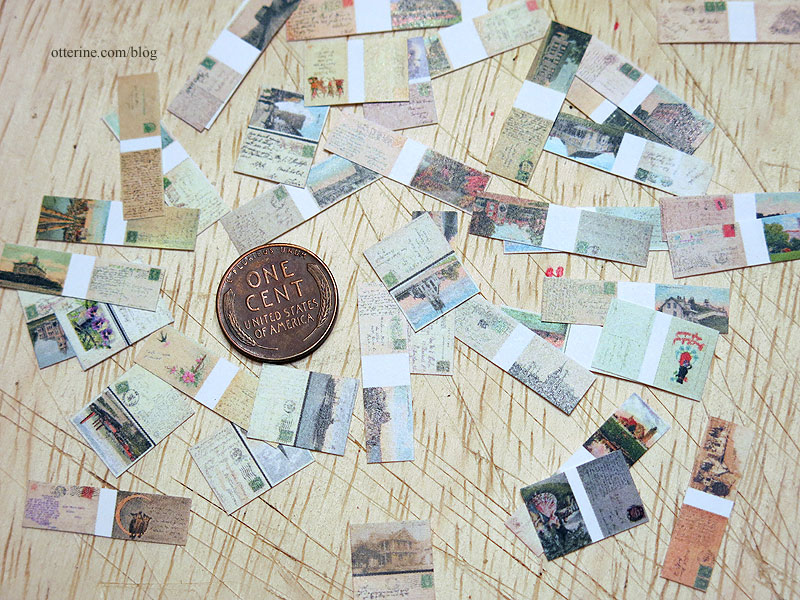
I pasted them back to back for a true postcard facsimile. This is one I fudged – this is a postcard that had a blank back, but I needed the bunnies in my post office.
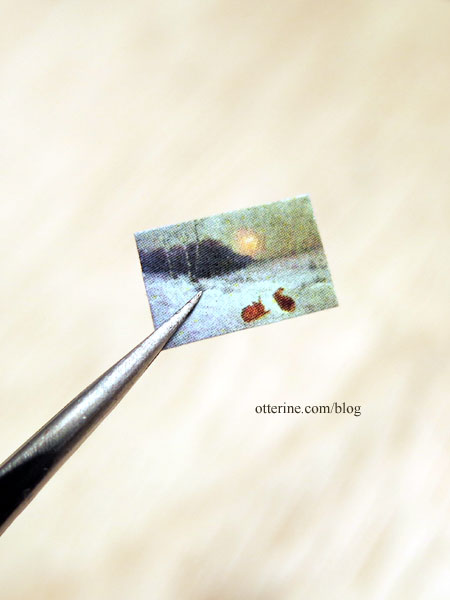
Assembling these will be good busy work for TV time.
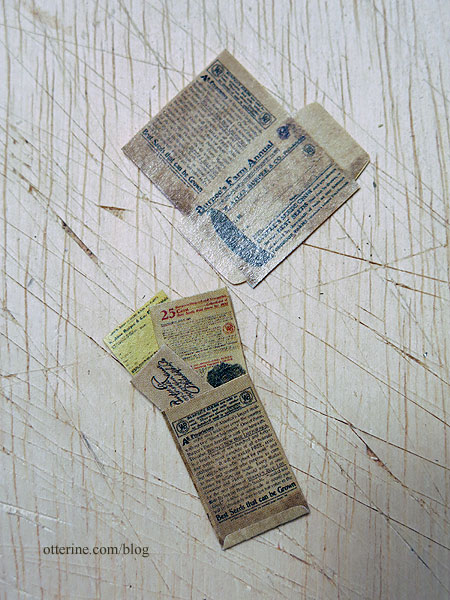
Miniature Collector magazine had printies in their magazines, and I pulled a whole bunch from the recent magazine stash that was gifted to me by a generous reader. One was a sampling of the 1902 Burpee’s Farm Annual. The magazine has a copyright date of March 2007. It included a large envelope to hold a seed mailer, an order form and a return envelope. It’s a lovely set, and the notes indicate you are allowed to copy or have a copy service reprint for personal use. Since the magazine paper was a little shinier than I would like (shown below), I did just that before making up a bunch.
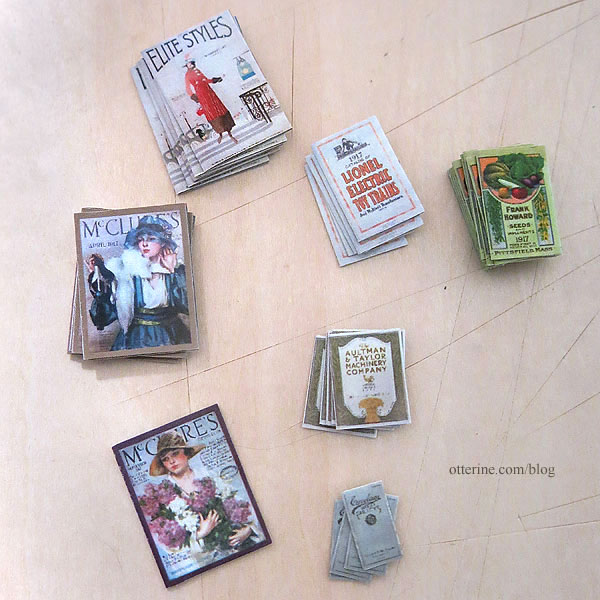
The rest of the mail was made up of magazines and catalogs (be sure to click this link to see more detailed photos). Rural Free Delivery meant businesses could expand and reach more customers, and people in rural areas would have access to goods far from home.
Again, I turned to online image searches, trying to limit those chosen to 1917, give or take a year. Though I was able to find some fully scanned catalogs including the inner pages, I focused on covers and glued each one shut with inserts. These would be placed in the pigeon holes and not opened for viewing. Some of these came from sale listings, so I was able to get accurate measurements for scale, though I had to increase the scale size to get a good print in some instances. Some required more sprucing up in PhotoShop than others as well.
I was later informed that magazines would have sent with brown paper sleeves and mimeograph addresses. Since I spent so much time researching and working on the catalogs and magazines, I didn’t want to hide them away and skipped this part.
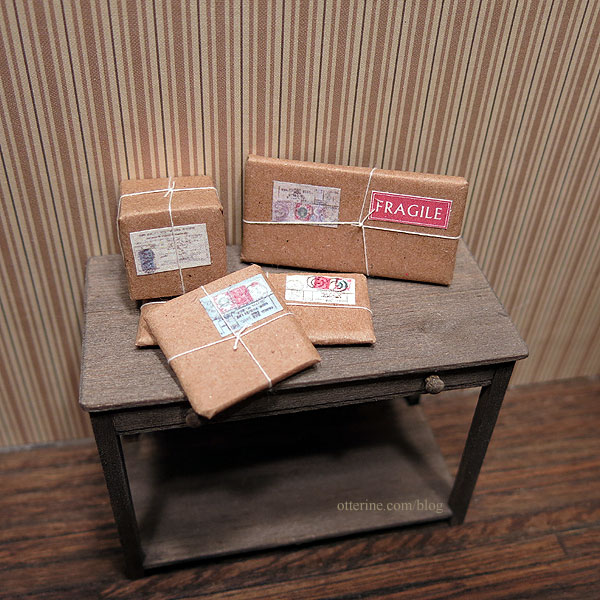
I made tiny parcels from wood and kraft paper. At The Miniature Show in April, I bought some packaging kits from Looking Glass Miniature. I used this kit for its parts and wrapped wood blocks in the kit’s kraft paper and twine, using old labels found online. Obviously, parcel post labels are harder to find than old letters and postcards as the wrapping would usually have been discarded.
We have to receive our mail in bulk at the tiny post office, mostly likely by rail. I printed and sewed a simple mailbag design. It’s one thing to put actual letters in tiny envelopes that will never be opened; it’s entirely different to hide all that work away in a mailbag that will never be opened. But, I needed to be mindful of the weight and shape overall. I started with faux letter bundles, then made wood parcels.
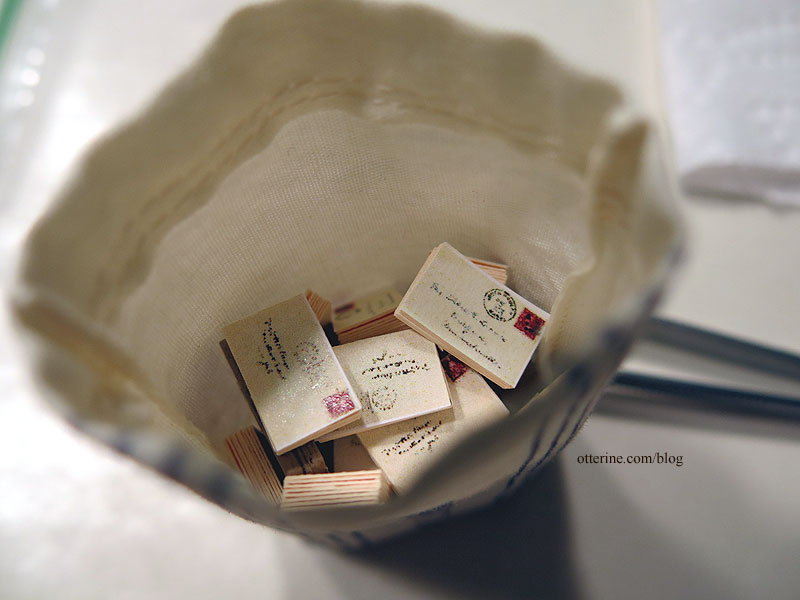
Though it’s hard to tell in the photo, the fabric is just thin enough that the colors and patterns of the faux mail add to the realism of what’s inside.
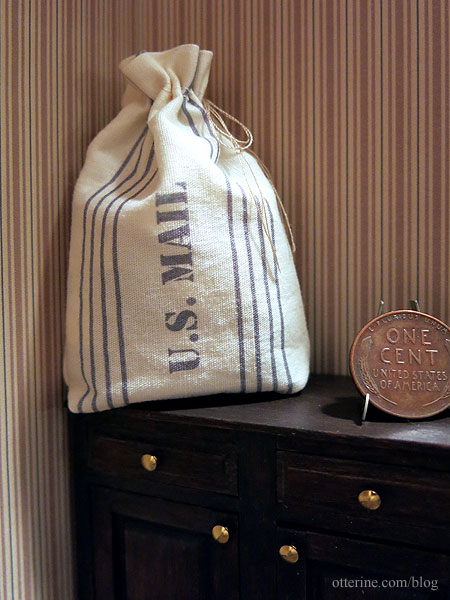
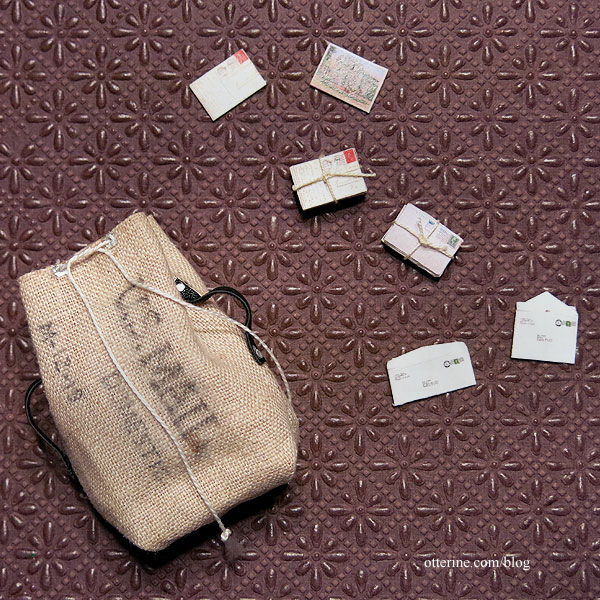
I also participated in a swap this year with a group of talented miniaturists. One of my Santas, Corinne, sent me more mini mail and a mailbag that appears to have just come off the train. All of it is so perfect.
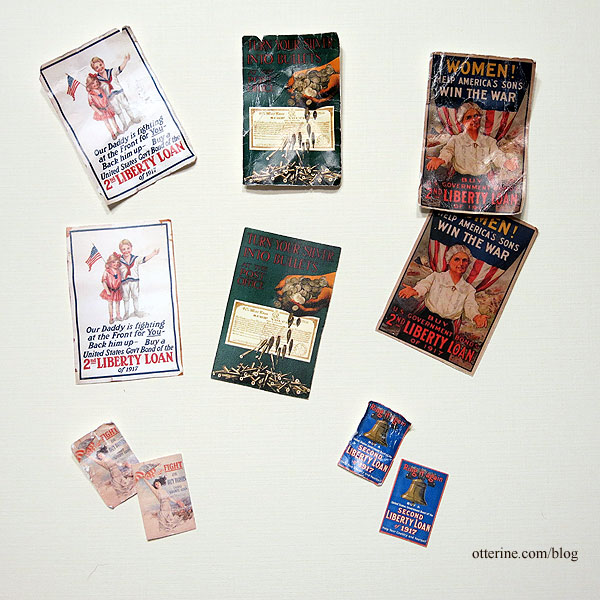
There were also wartime posters – aged and new for my choosing, and I used three of them in the post office. Thank you, Corinne!
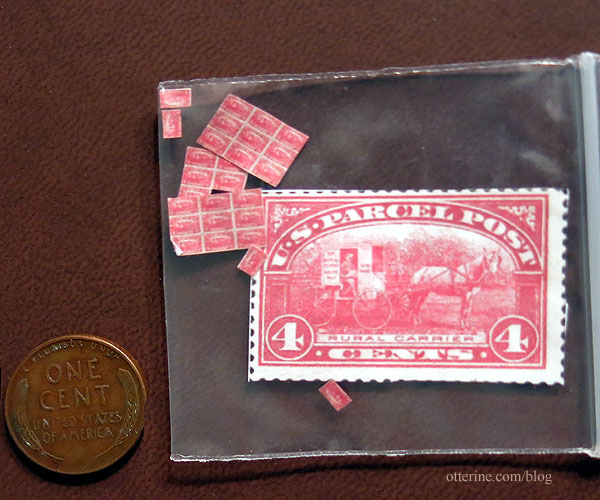
As I was building, the delightfully talented Anna sent me some mini stamps she made. She included real life size prints of the original inspirations as well. There’s even a book to keep them organized for the postmaster. :D Thank you, Anna, for your wonderful and generous gift!
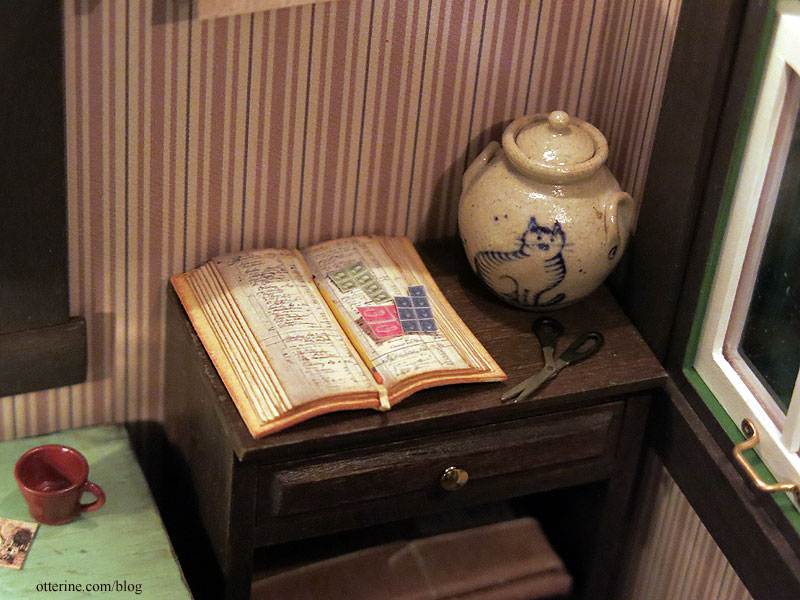
I’ve set a few stamps on the ledger from Looking Glass Miniature. There’s also a cat food jar by Jane Graber for when Chester gets the munchies.
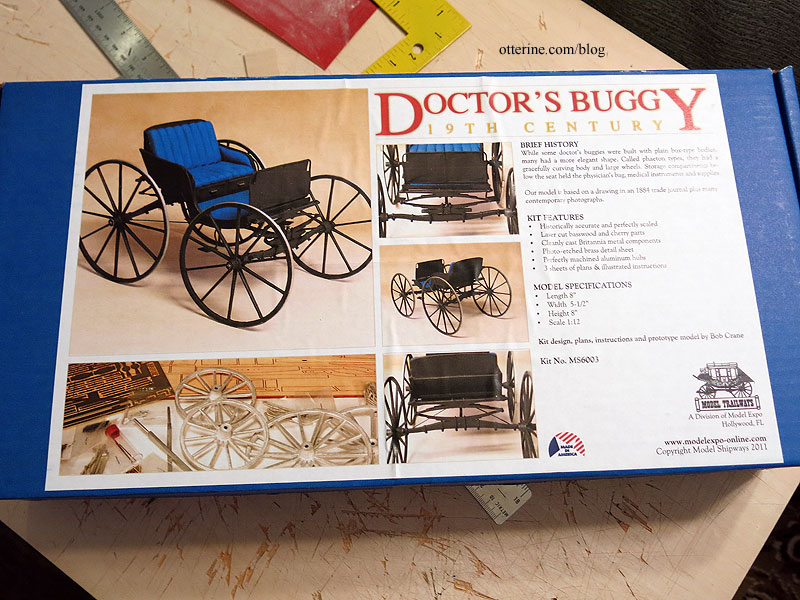
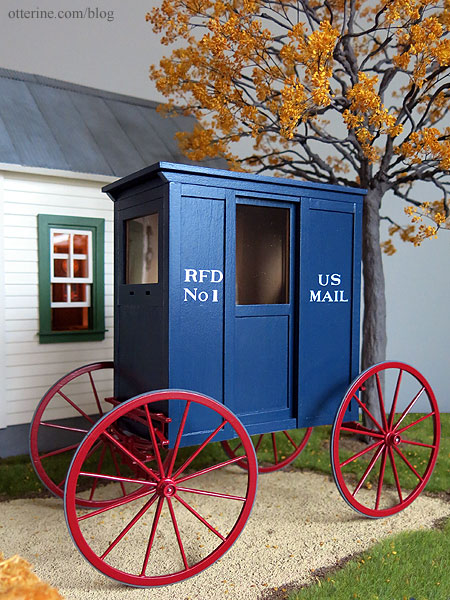
The Mail WagonI am finishing a detailed post with the various parts listed, but for now, you can see the last post and follow the links back for the steps. The mail wagon passenger cabin was scratch built and fitted over the chassis adapted from a 1:12 scale Doctor’s Buggy by Model Trailways. Considering the time and effort I would have expended to recreate the chassis parts, the kit was worth it for those parts alone. (As an Amazon Associate, I earn from qualifying purchases.)
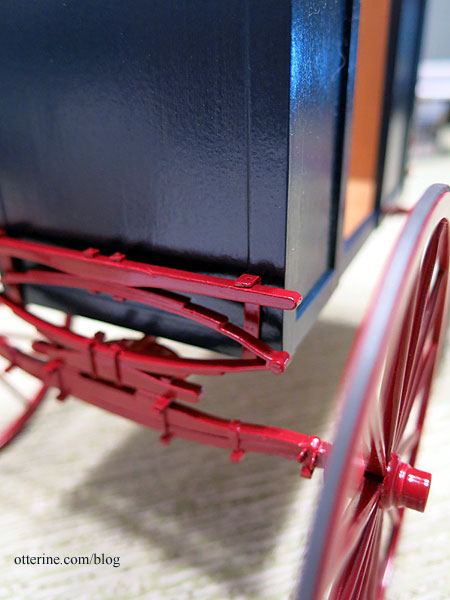
The springs and axles are actually metal in this kit. It was fairly straightforward for me to alter the parts and extend the suspension front to back to accommodate the mail cabin.
The wheels spin and turn, which is just fabulous!
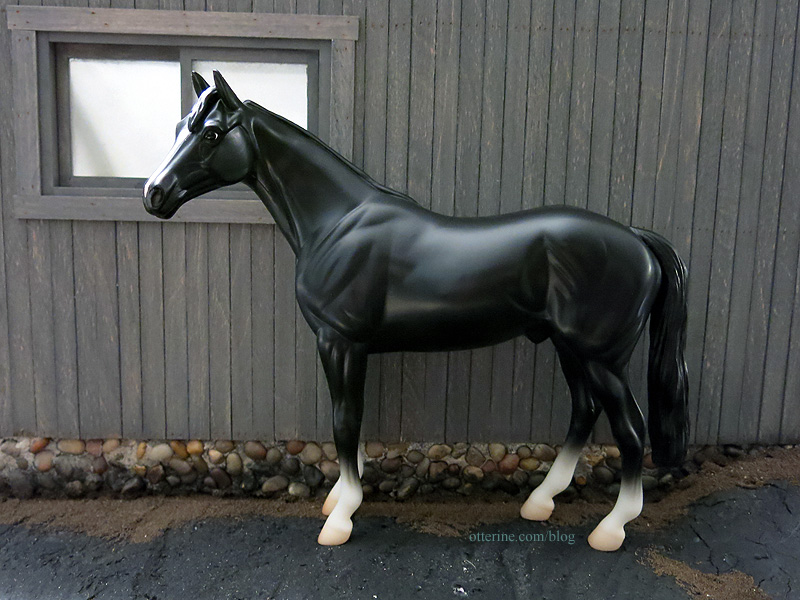
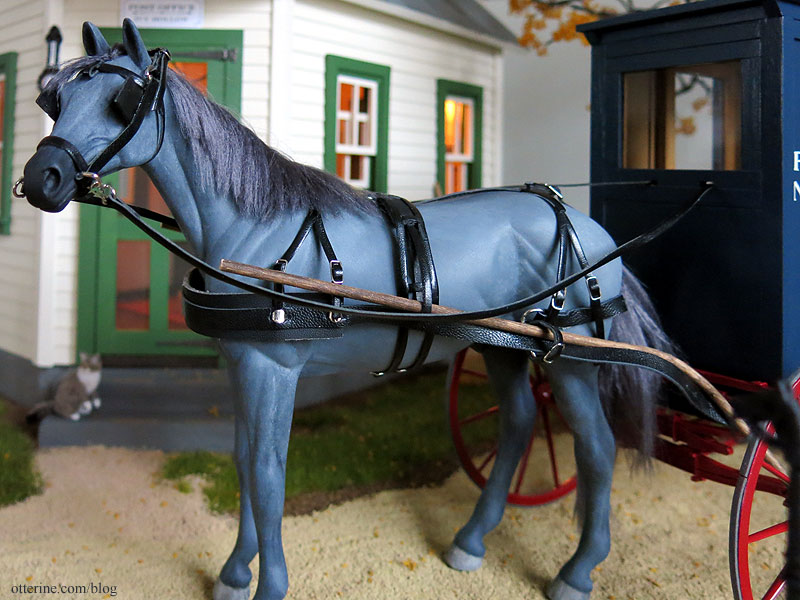
Jebediah McCantsI transformed a plastic 1:12 scale Breyer Thoroughbred to pull the RFD wagon. Here is where we started. (Click here and follow the links back through the steps.)
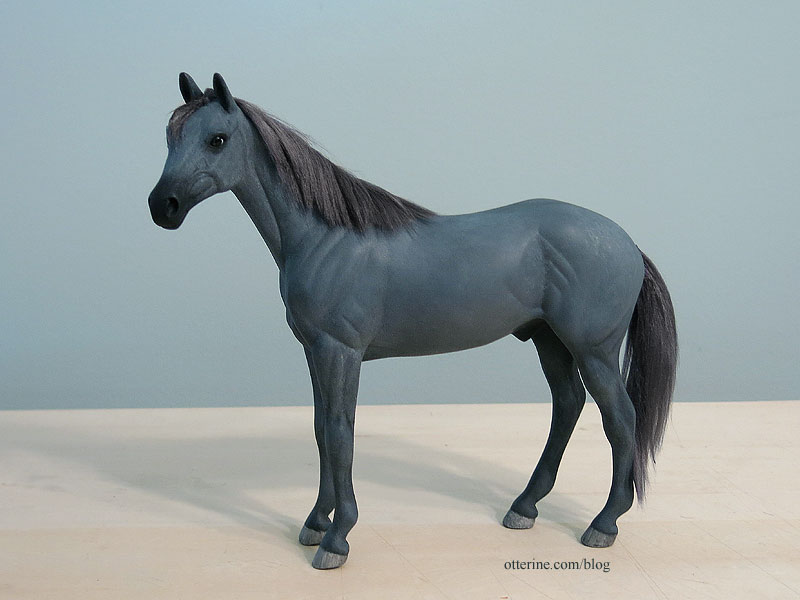
I removed the plastic mane and tail, repainted and added mohair. I might redo this part since the color isn’t exactly what I wanted, but I do like how it turned out for my first time adding hair to a model horse.
Modeled with the bridle by Texas Tiny.
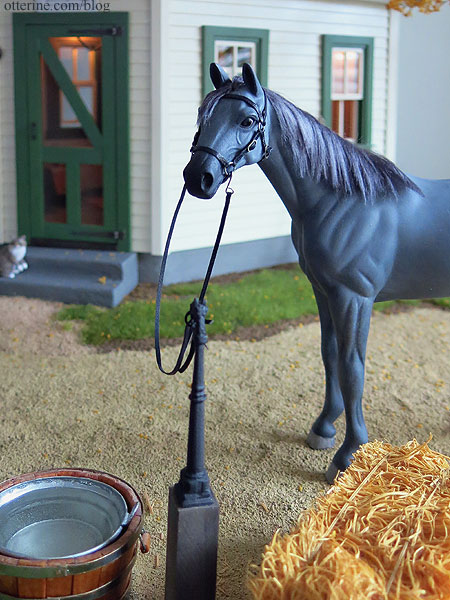
Modeled with the harness from Kulp Model Horse Store.
RFD – Rural Free DeliveryI’ve always been fascinated by the late 1800s to early 1900s, and I had a mail wagon kit (which I didn’t use for this) and a Breyer horse I wanted to remake. I thought making an RFD post office would be perfect for the build.
Rural Free Delivery was started because rural folk would have to go to town to get their mail, which was often far and not easy in poor weather. While free mail delivery existed in the cities by 1863, rural free delivery didn’t truly begin until 1896 with five riders in West Virginia. This video from SmithsonianNPM gives great overview. Those five rural routes spawned better roads all over the country. Fascinating!
Check out this awesome video showing the delivery in action in 1903. :D I know how excited I get when the mail arrives now, and you can’t give sugar cubes to the mail truck!
—–
Special thanks to mom, Matt, Debora, and the ladies from the chat! Thank you to HBS for hosting an always fun competition. I think I had as much fun researching this project as I did making it from the ground up.
Update: Ivy Hollow, Rural Free Delivery Post Office has received an Honorable Mention Award in the HBS Creatin’ Contest 2019. Thank you to all the fine folks at Hobby Builders Supply! You can see all the entries and winners here.
Categories: Ivy Hollow RFD
February 10, 2020 | 0 commentsMail Wagon – part 15
Continuing work on the mail wagon. Many of the pictures in this post show the parts after painting since I was on a deadline and had little time to take progress photos.
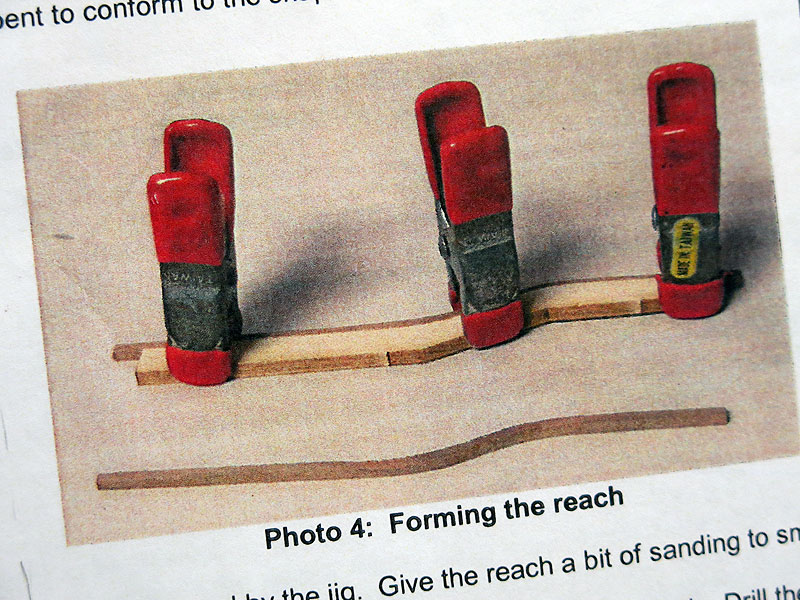
The chassis from the doctor’s buggy kit had wonderful detail, but it was not made for a straight bottom cabin like my mail wagon. The original chassis planned for a curved reach. That’s the long bar that connects the front axle assembly to the rear axle assembly.
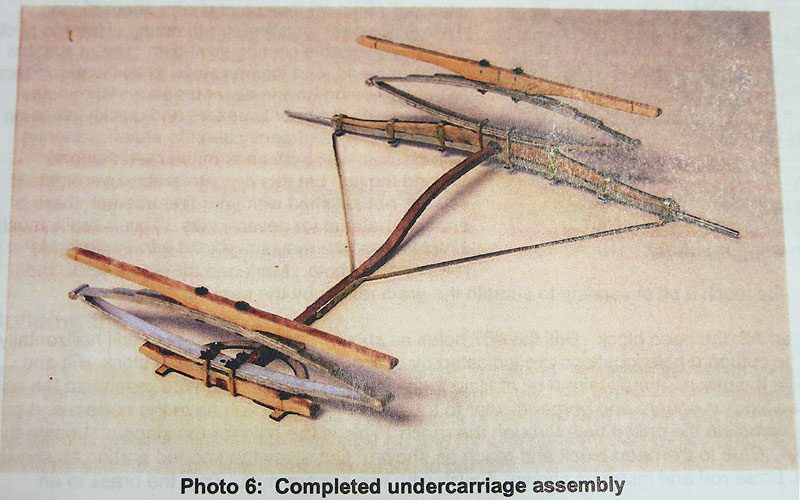
Mine had to be relatively straight but also account for the slight difference in height between the front and back wheel hubs. Since it was such a slight incline, I used a long piece of 3/32″ basswood as my new reach without any curve built in. The kit was supposed to come with a piece of cherry for the reach, but I couldn’t find it. It’s entirely possible it was in the box originally, but I misplaced it.
In case you ever need to know, the small McCormick spice bottles are just under 2 1/4″ tall. :D The spice jars helped me mark where the front and rear spring bars would hit the cabin.
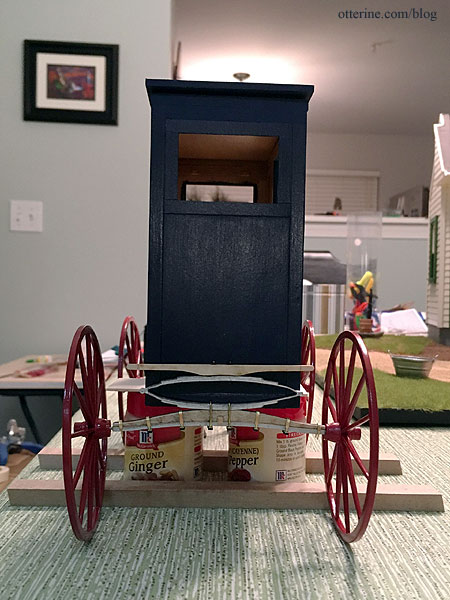
I trimmed the spring bars to fit since my cabin was skinnier than the original doctor’s buggy passenger compartment.
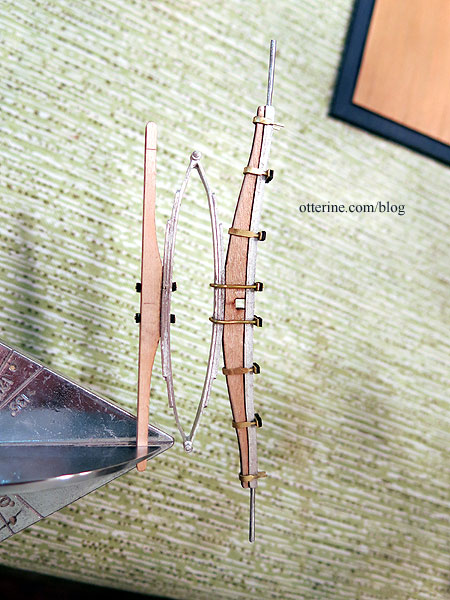
The front and rear body hangers from the original kit are soft metal, so I was able to straighten them out and bend to the new shape needed.
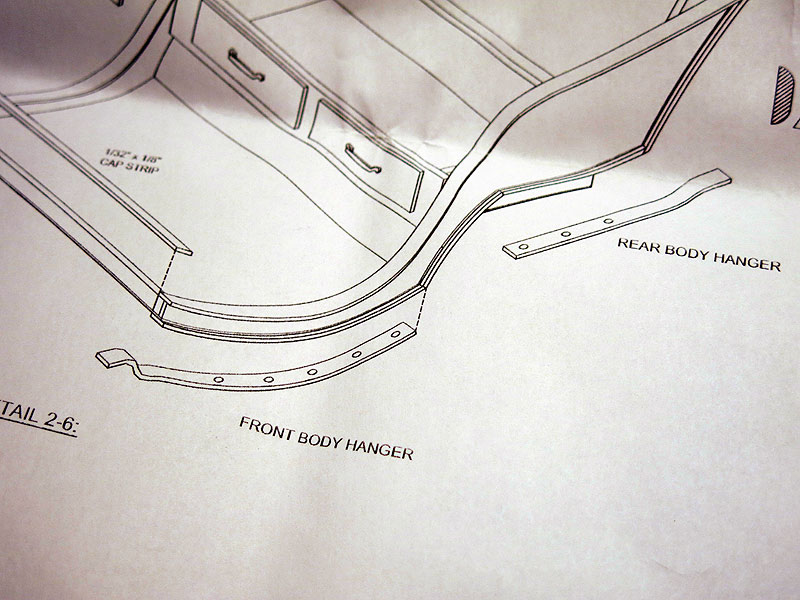
I drilled holes for nails to be added. These are also epoxied in place for stability and durability.
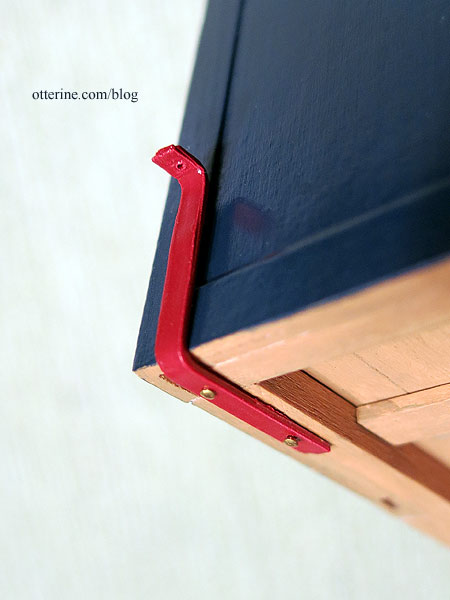
The body hangers sit on top of the spring bars, suspending the cabin above the reach. I left them unattached at this point.

After I had the placement, I could slide the excess reach out the back and trim it to fit.
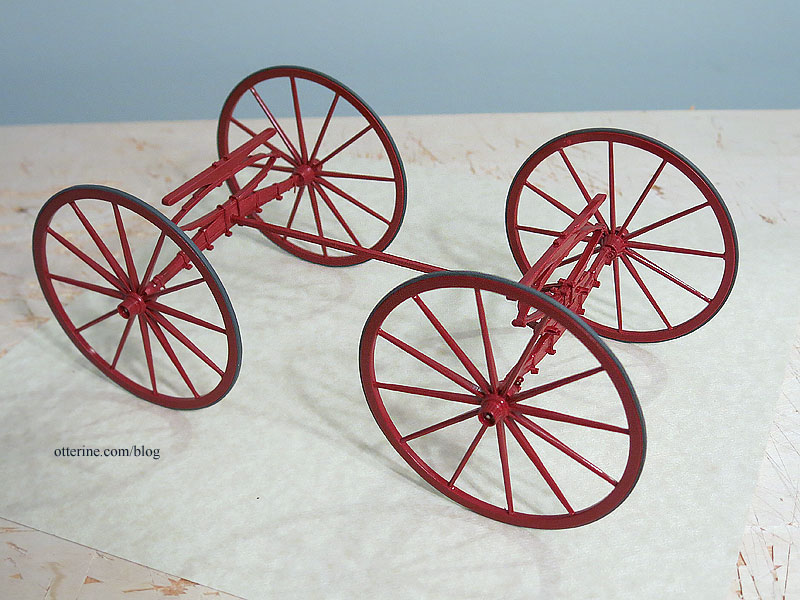
Chassis completion to be continued….
Categories: Ivy Hollow RFD, Model Cars, Vehicles
January 27, 2020 | 0 commentsIvy Hollow – landscaping, part 2
Completing the landscaping. I used Woodland Scenics Fine Dark Brown Ballast to serve as dirt and Fine Ballast Buff as the gravel. I ran the wagon wheels and patted Jebediah’s hooves on the loose gravel before setting it in place with Woodland Scenics Scenic Cement applied with a pipette (thank you, Debora – these pipettes are still among my favorite tools). The buff color is too red for my taste, so I applied tan paint washes over it to change the hue. (I have a post on working with these materials here, though now I usually skip the glued on layer and just use the Scenic Cement.)

I made an autumn tree this year using the same wire and putty technique I’ve used in the past for the trunk. Having a sparse tree meant it took less time to create, which helped with my tight deadline.

The grass mat is Wild Grass Forest Floor by Heki from Scenic Express (they call it Pasture TurfGrass on their website). These particular grass mats are pricey, but the high grass with variegated coloration is spot on in scale. The sheets are only 6″ wide, though they are 17″ long, so there are places on the landscaping board that always need to be pieced. These are my favorite to work with because of the backing, which is a clear, rubbery substance that makes it more flexible than the paper-backed grass mats. (Here is a post on working with the grass material.) Since I had leftover branches, I stripped the leaves from them and littered the ground.

I was sure to get a couple of little bits caught in the lovely rake by Sir Thomas Thumb.

The pump was an unfinished metal mini from the local shows, and I had the bucket in my stash. I built the platform to hold both pieces. When I added the resin (Acrylic Water from Walmart), it leaked through the bucket. I led a path of it over the edge and let it do what it wanted. A happy accident. :] There is also a droplet from the spout.

I borrowed the lawn mower from Ye Olde Taxidermist. It was made from a Phoenix Model kit from Jennifer’s of Walsall.

I needed to be able to access the wiring, but there was no room in my tiny post office. I built a shed in the back that will allow me to hide the wiring while looking like a planned part of the build.

I used some fine brass hinges bought in miniatures lot some time ago, and one of them promptly failed after I glued the shed in place. A little epoxy and new nails, and we’ll be back in business. In the meantime, I just hold the top part of the hinge down when I open it.

One of the best hay bales I have ever seen in miniature was purchased from Maple Leaf Miniatures.

The horse hitching post was an unfinished metal mini from the local shows, and I added a wood base. I swapped the silver ring for a black one to better match the painted finish.

While I was searching for a bucket to add water for Jebediah, I ran across this gem signed March 9, 1964 B.A., numbered 4.
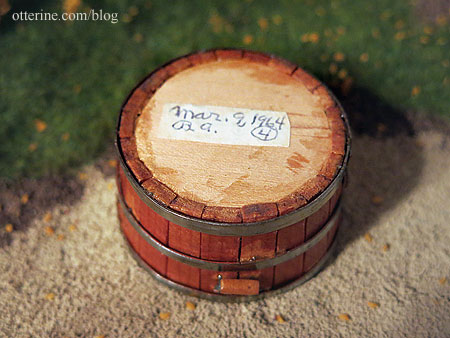
It looked great in the photos, but no one else bid on it but me. When I received it, I loved it even more. There was no way resin water was going to be added to this.

Luckily, I had ordered window pulls from my friend Greg at All About Miniatures, and he included a gift of metal buckets. I was able to add the resin water to one of the metal buckets and set it inside the vintage wood mini. Thank you, Greg!

The concrete front steps were made from styrofoam, spackling and paint.
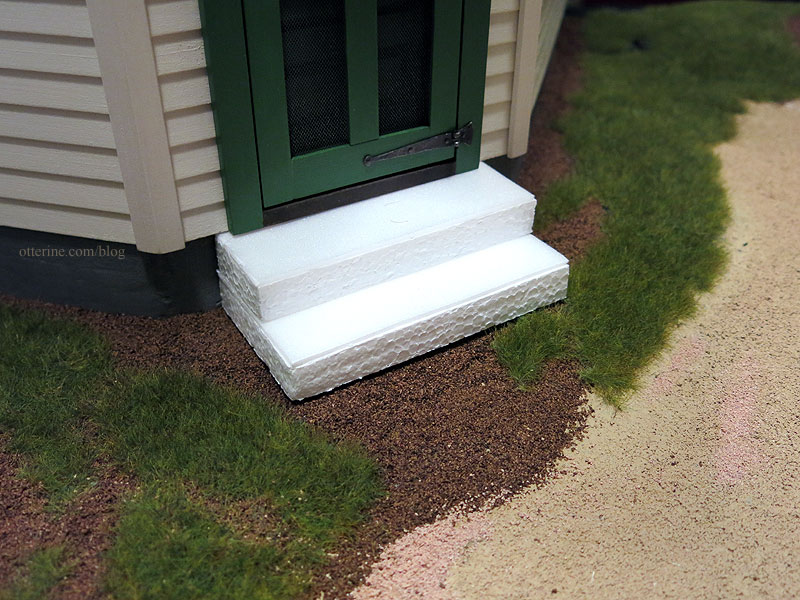
Chester was made by 2014erok. I had so much fun playing in the mini dirt this time around – the landscaping got to be a lot less manicured.

Categories: Ivy Hollow RFD
January 4, 2020 | 0 commentsMail Wagon – part 14
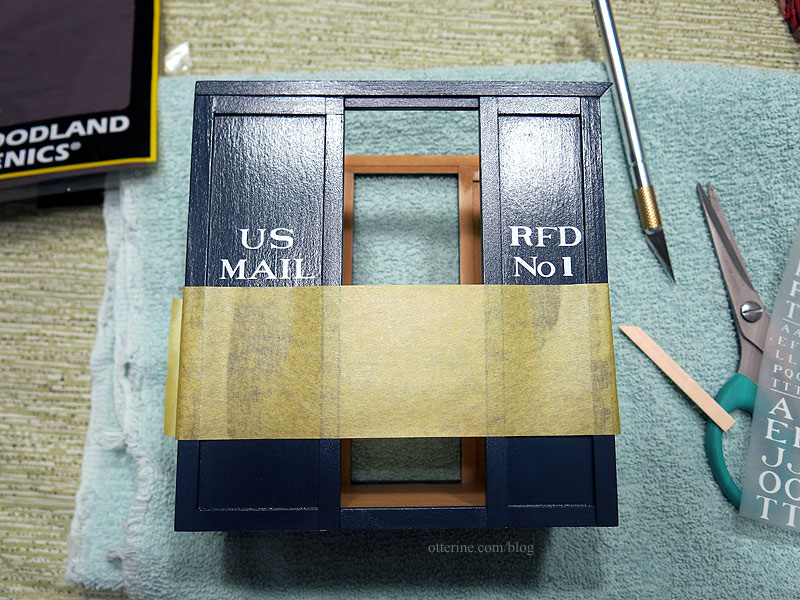
Continuing work on the mail wagon. Once the painting and sealer were done, I could move on to the lettering. I neglected to put on the cross detailing before the last coat of sealer but plan to add it later, so I took that into consideration when I did the layout. I used frog tape to create a line to follow and used a towel to cushion the cabin as I worked.
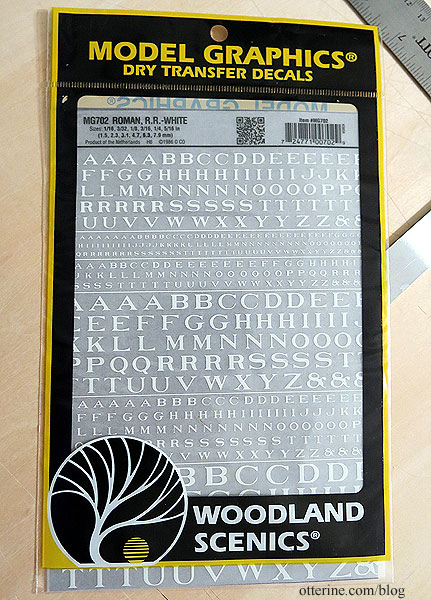
The letters are rub-on transfers by Woodland Scenics – Roman White in six sizes from 1/16″ to 5/16″ on one sheet. I used 1/4″ for the main letters except size 3/16″ for the “o” in No. (As an Amazon Associate, I earn from qualifying purchases.)
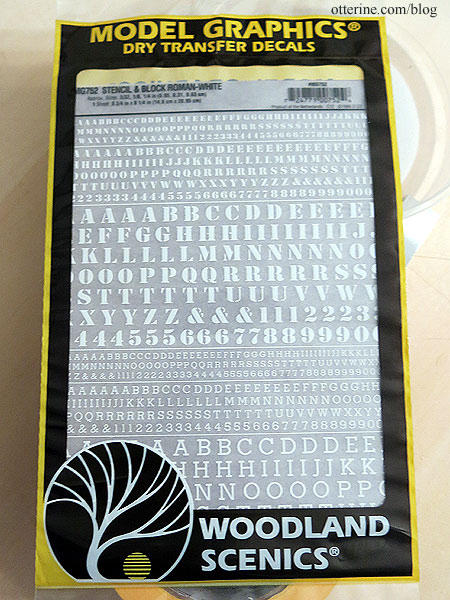
Since these didn’t come with numbers, I bought Roman Stencil/Block Letters White in three sizes from 3/32″ to 1/4″ on one sheet. I used the Stencil font size 1/4″ for the rural route “1” designation.
Since you can transfer all or part of a letter, I cut down the long portions of the “F” and “L” for a cleaner look.
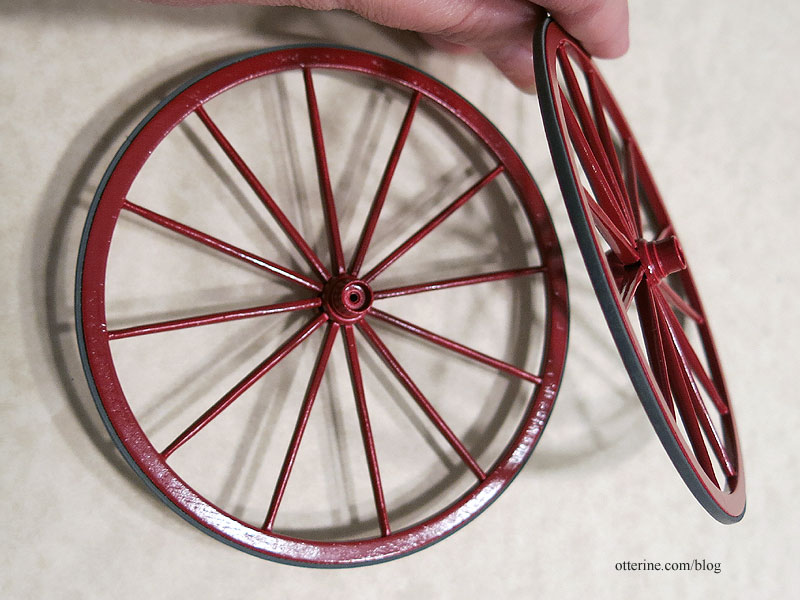
Originally, wheels would have had metal around them to protect the wood. The kit supplied laser cut rubber material for the tires, but there were two issues with this. First, if you recall, the original kit wheels and spokes were not cut correctly and needed to be replaced. Once I received the replacements, I opted to use the “waste” circles between the true wheels for sturdier construction. This meant one set of the rubber tires was too short. Besides that, it would have been very messy to glue these fiddly bands.
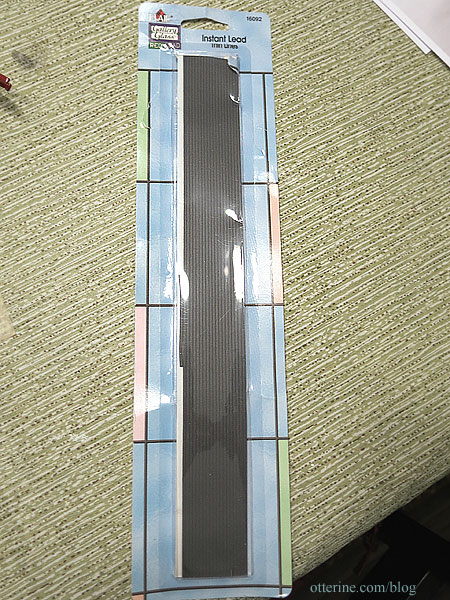
Instead, I turned to a material I had used before for another wagon project – Instant Lead Lines (thin version). These are a rubber like material with adhesive already applied. There is a wider version of this material, but it was too wide for my wheels.
The thin tires add just enough extra detailing to the wheels and were easy to apply and cut to size. They look close enough to metal without further fiddling.
Categories: Ivy Hollow RFD, Model Cars, Vehicles
January 1, 2020 | 0 commentsMail Wagon – part 13
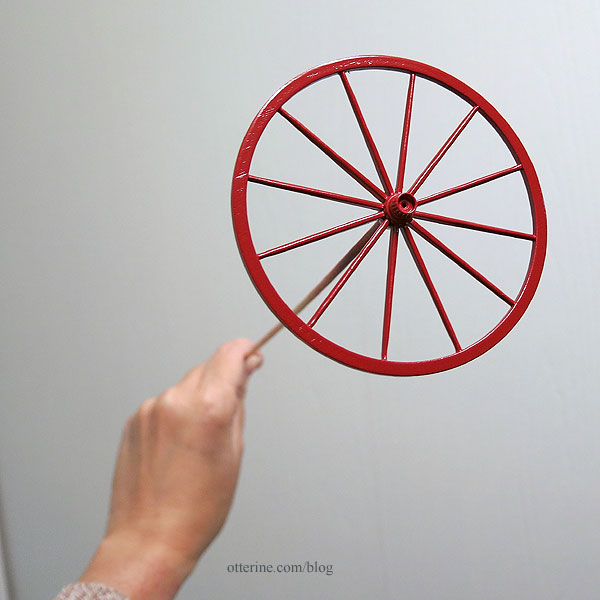
Continuing work on the mail wagon. While I was painting one day, I went ahead and finished up the wheels. I painted them flat white, then gloss Cherry Red by Krylon.
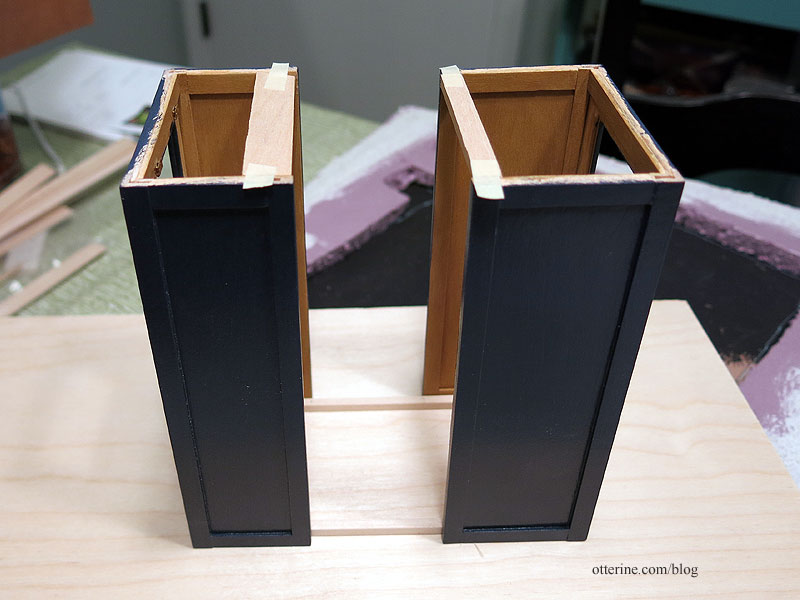
I joined the front and back cabin assemblies using strip wood along the inside bottom, using spacer boards at the top to keep the front and back assemblies square as I worked.
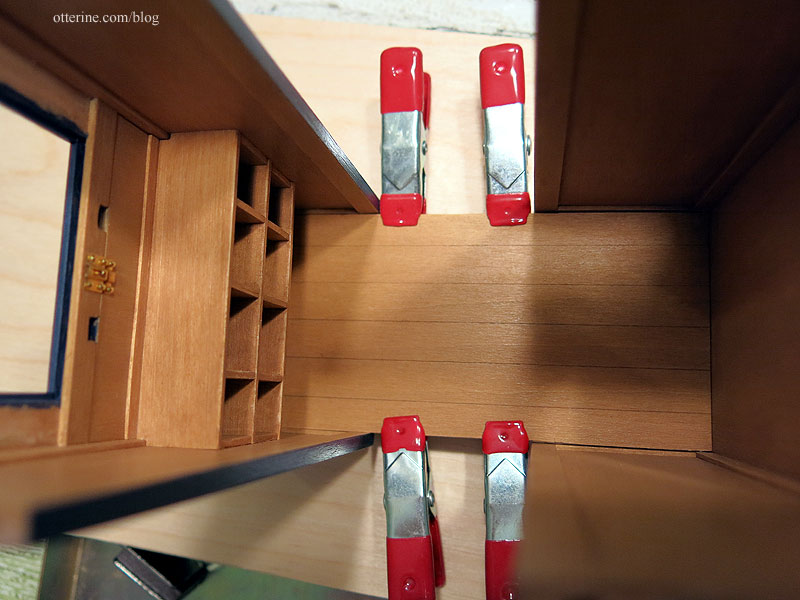
I installed the floor and then added more support boards underneath.
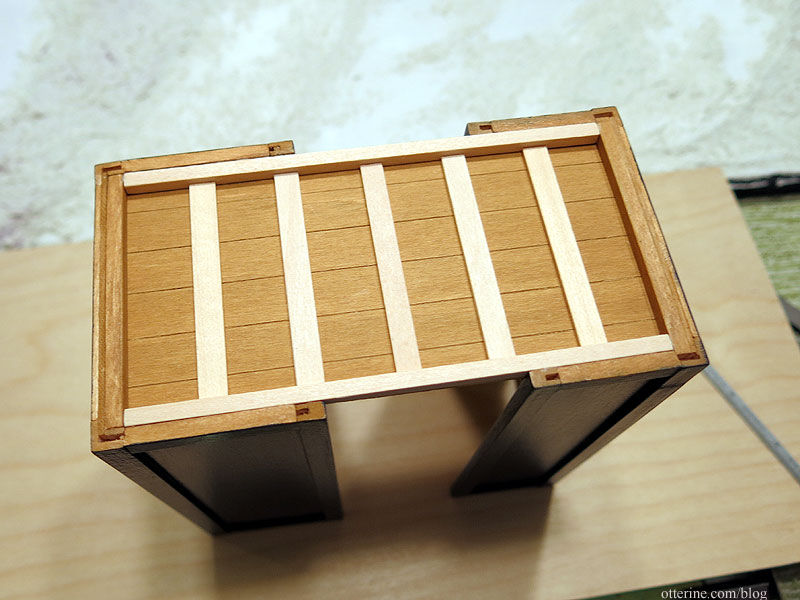
You can see I added the same scored lines on the bottom to mimic individual boards.
I added strip wood along the top to finish the walls and to fill the gaps on the top and bottom of the doorway. These wagons would have had slightly curved rooftops, but I left mine flat for ease of building. I did add some shaping to the front sides.
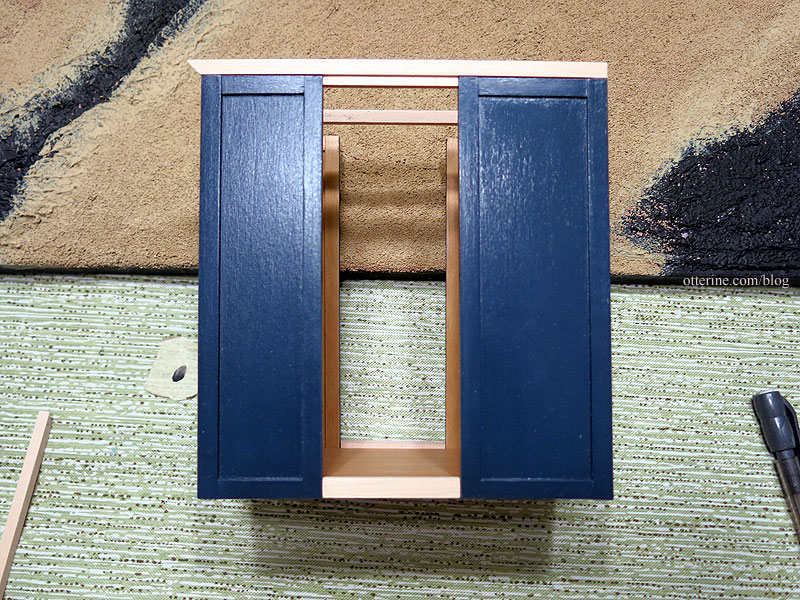
I cut a piece of 1/16″ thick basswood the exact shape of the ceiling opening.
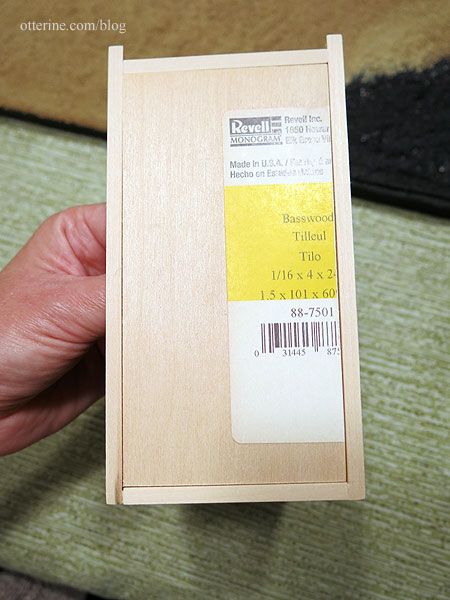
I cut a roof board from 1/8″ thick luan plywood (leftovers from Walnut Bay Light) and covered the edges with thin basswood. I added the 1/16″ thick basswood ceiling to the plywood which would allow the roof to sit firmly in place but remain removable. I again scored the basswood to mimic individual boards. Having a removable roof means I can always try my hand a curved roof later. I apparently didn’t take progress photos of this part, so here is the roof after painting.
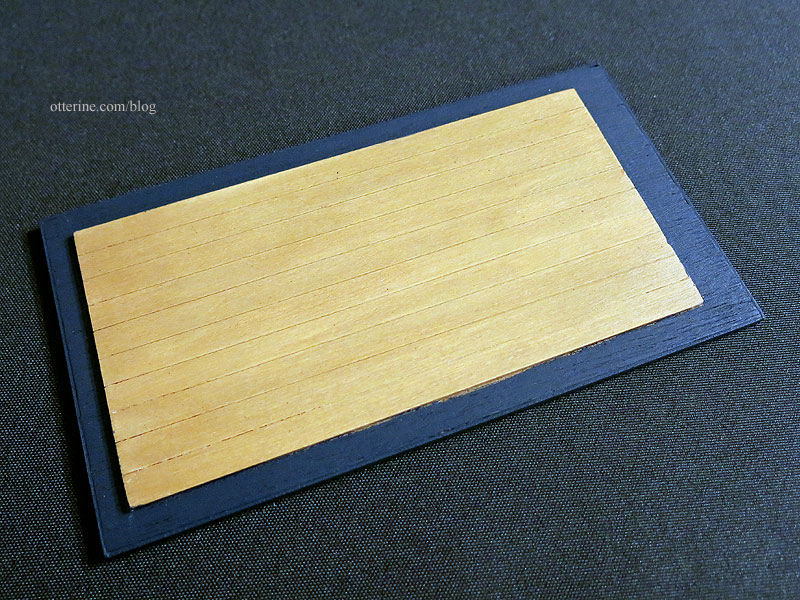
From the inside, it looks solid. :]
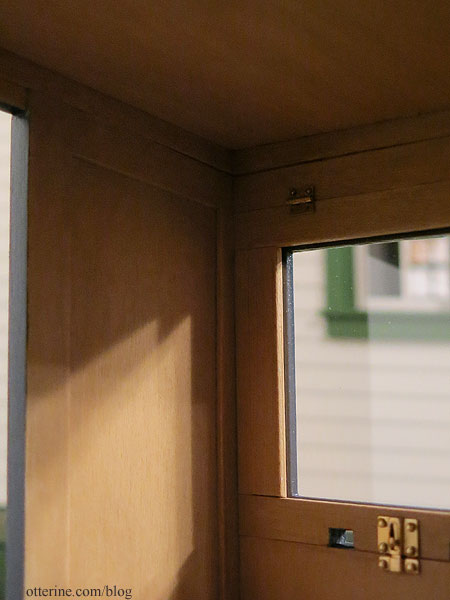
From the outside, you can’t tell it’s not all glued together.

Categories: Ivy Hollow RFD, Model Cars, Vehicles
December 20, 2019 | 0 commentsIvy Hollow – tiny stamps and a postal cat
As I was building, the delightfully talented Anna sent me some mini stamps she made. She included real life size prints of the original inspirations as well.
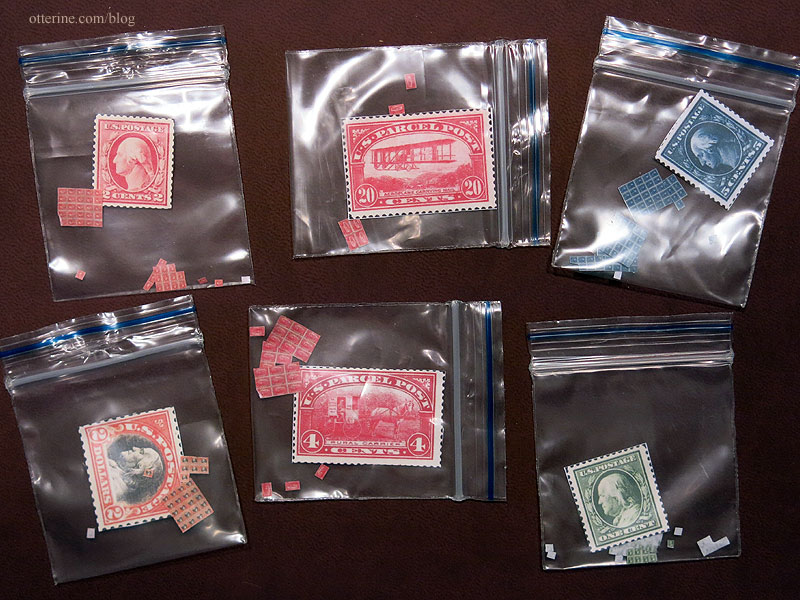
One has a biplane in honor of The Aero Squadron Lounge.
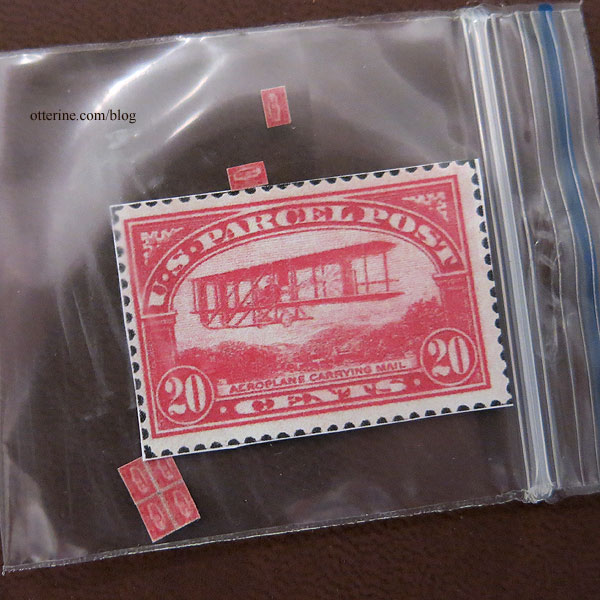
Another has an RFD wagon.

There’s even a book to keep them organized for the postmaster. :D
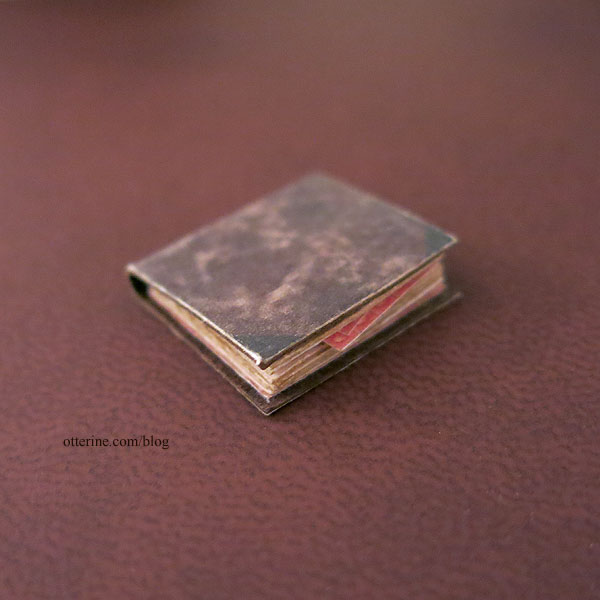
Thank you, Anna, for your wonderful and generous gift!
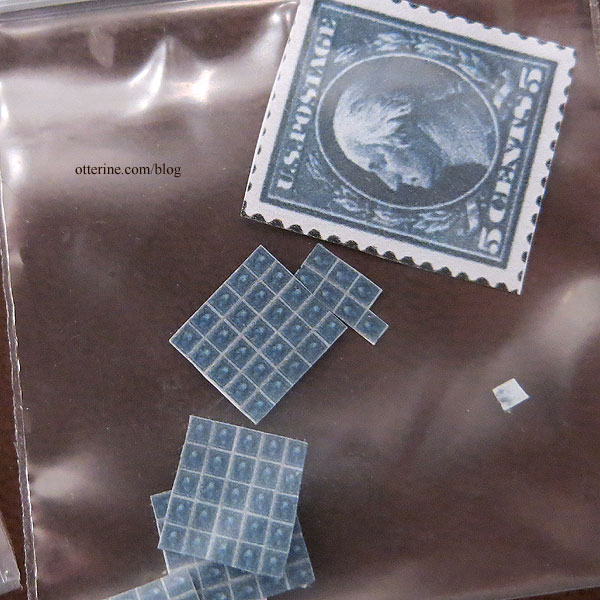
I’ve set a few on the ledger from Looking Glass Miniature. There’s also a cat food jar by Jane Graber for when Chester gets the munchies.

And, you know cats do! Chester was made by 2014erok. I had so much fun playing in the mini dirt this time around – the landscaping got to be a lot less manicured.

Categories: Animals and birds, Ivy Hollow RFD
December 19, 2019 | 0 commentsMaking a 1/12 scale horse – part 5
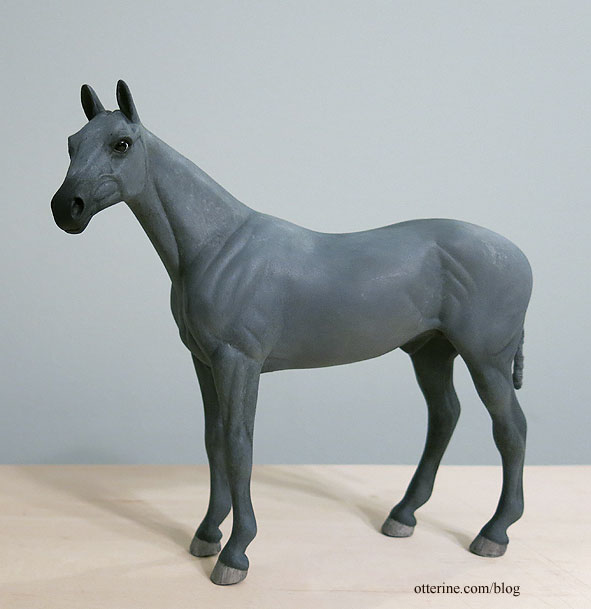
Continuing work on the 1/12 scale model horse. After the initial primer coat, I fine-tuned the body and then did a final primer coat.
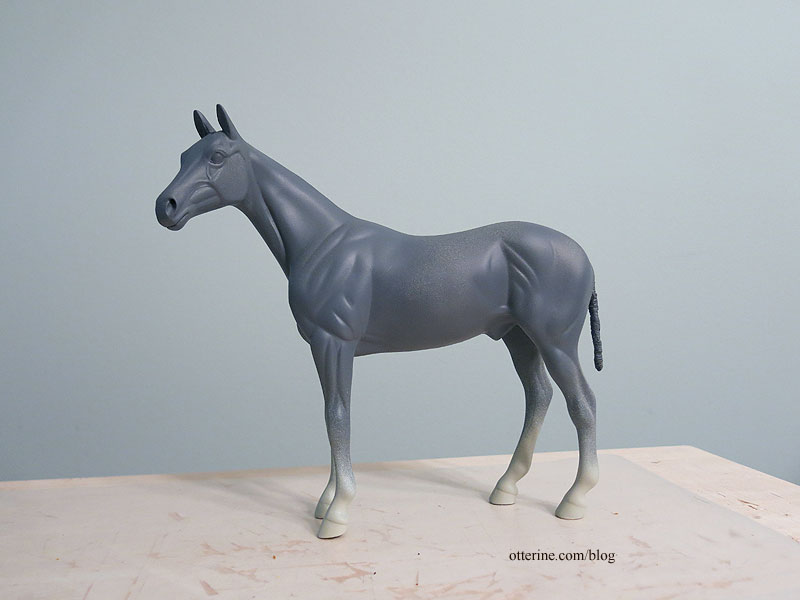
I started the final paint with some shadowing. I thought he looked like Batman right here.
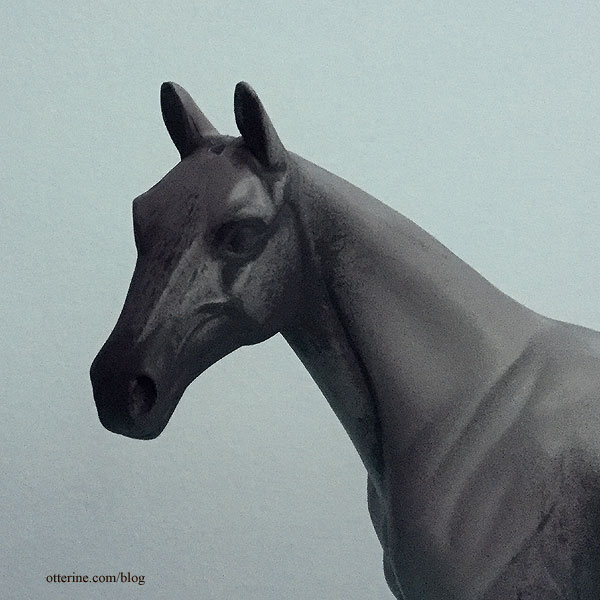
The hair was accomplished with multiple layers of paint using small and large brushes. I made a lot of it up as I went.
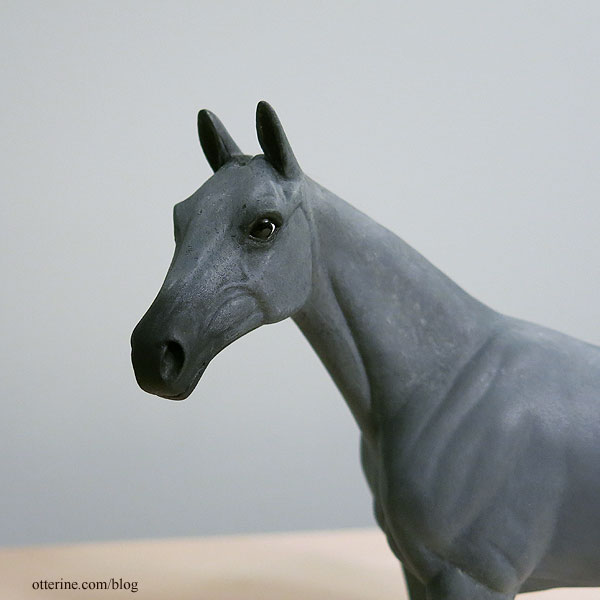
Some areas on the body turned out better than others, and I can always rework later…but I was pleased enough to move on. I do really like the face.
The mohair I bought photographs as muted purple, but it looks charcoal grey in person. Even with the mismatched color, I can see just how having the mane will transform the look overall.
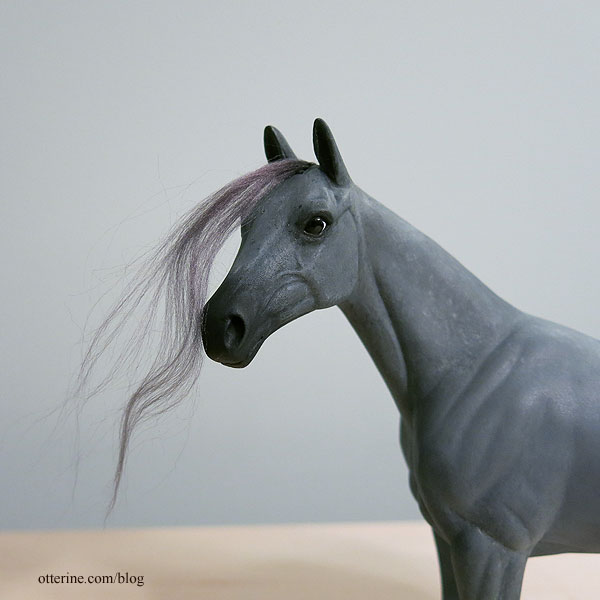
Since I was on a tight deadline, I completed Jebediah with the purple grey mohair, but I can always redo the mane and tail in the future. Here’s what he looked like right after the hair was applied.
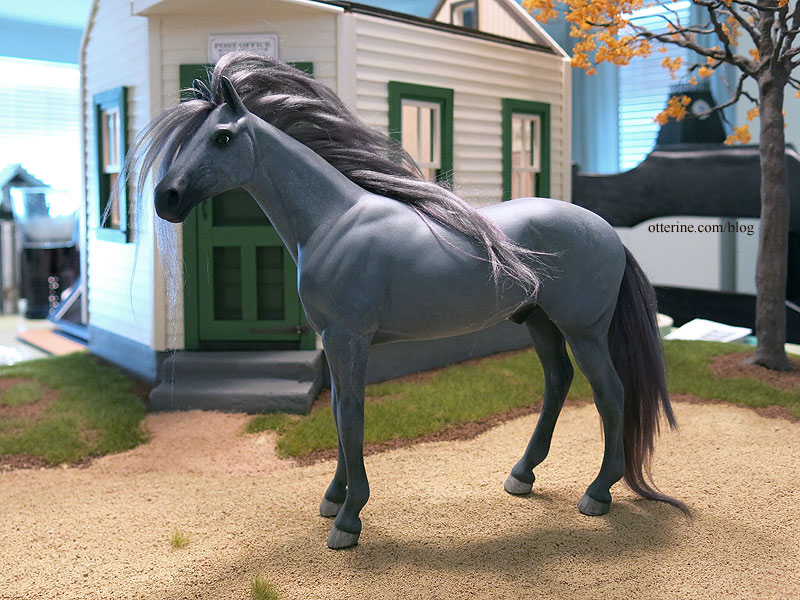
As a reminder, this is where I started – a 1:12 scale Breyer Thoroughbred.

The fibers curled a little when I wet them for styling and cutting, but they flattened out as it dried. It’s less wispy and artificial than it looked out of the package. I’m not a fan of the purple hue of the hair (below I’ve color corrected in PhotoShop, which is a pain), and I think a darker hair would look better overall. This was my first time hairing a horse, and I think it turned out pretty well. :]

Modeled with a driving harness by Tiki from Kulp Model Horse Store. I would like to make my own harness someday, but it is definitely an art that requires a good deal of study and practice.

Categories: Animals and birds, Ivy Hollow RFD
December 15, 2019 | 0 commentsIvy Hollow – windows
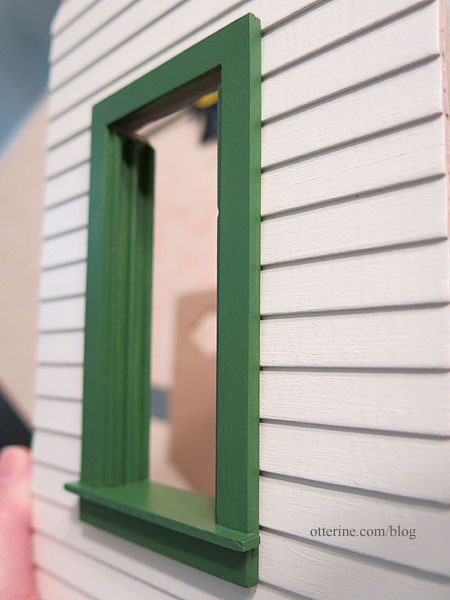
I’m using five attic windows for my tiny post office since they are in better proportion to the building overall. I love working with pre-made components for their time-saving appeal, but they do require some work to get in top shape. One of my favorite aspects is the way the windows come apart completely for finishing. I label the parts per window (including direction, too) since I already know they fit well right out of the package. Labeling them keeps the parts straight during the painting process.
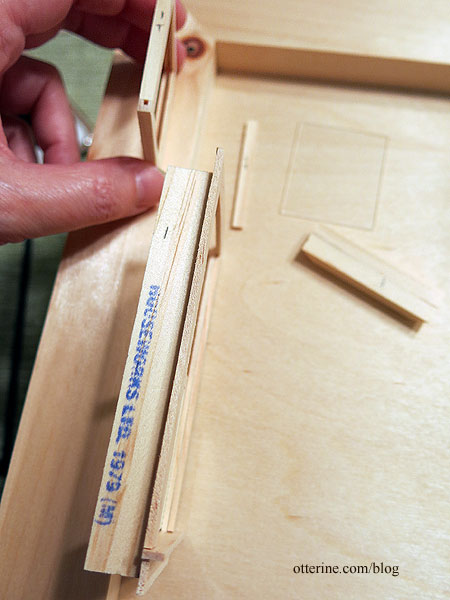
I added 1/16″ thick strip wood under the edge of the outer casing since my walls were thinner than the required depth.
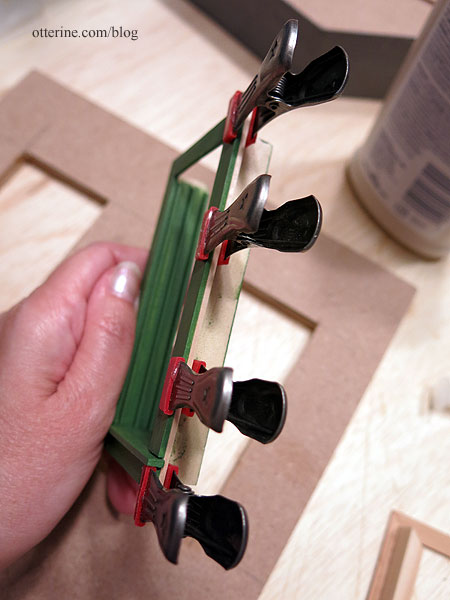
I painted the frames Woodland Green satin paint by Americana. Here you can see the added thickness of the outer frame isn’t even noticeable or out of proportion.
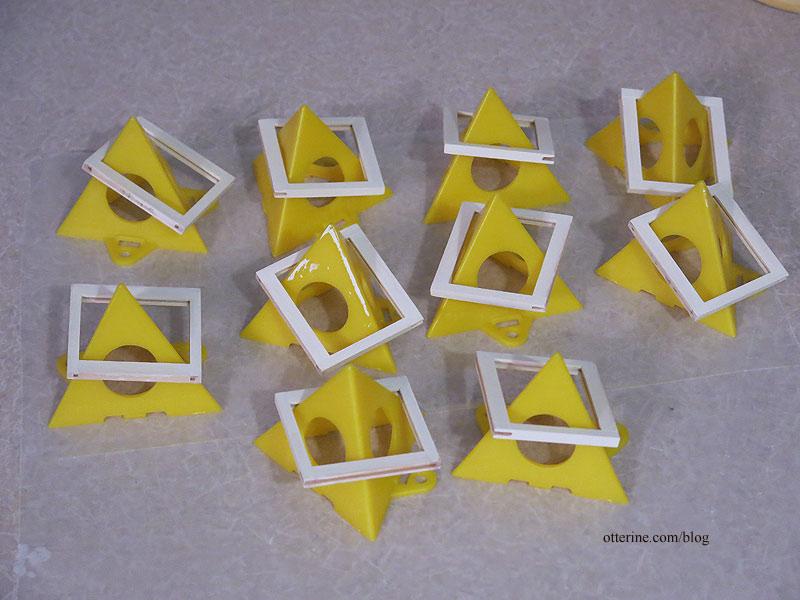
I painted the sashes Vintage White by Folk Art. Here I’m using my Painter’s Pyramids to hold the sashes while they dry (this previous post shows how to use them when painting walls to counteract warping).
This is the first time I’ve painted a window two different colors! I doubt I will ever do this on a deadline again.
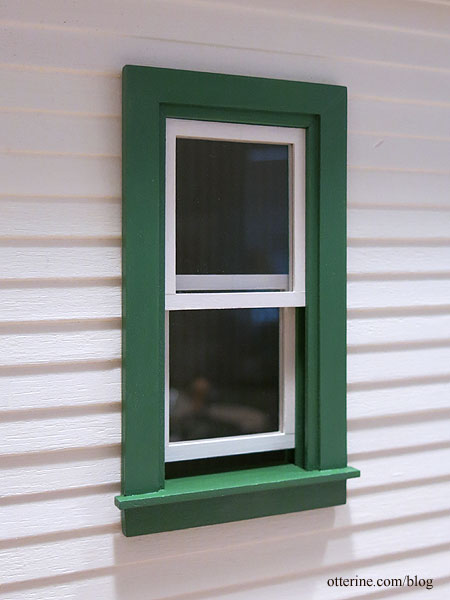
But, my original inspiration had two-tone windows.

image from West2K, used with permission I’m skipping the awnings (shown in the original postcard below) not necessarily for time constraints as I would love to make awnings, but you will be able to see into my post office only through the windows and front door unless you lift off the roof. Adding awnings would restrict viewing.

I ended up adding the mullions, and it transformed the windows instantly. :D

Categories: Ivy Hollow RFD
December 11, 2019 | 0 commentsIvy Hollow – autumn tree
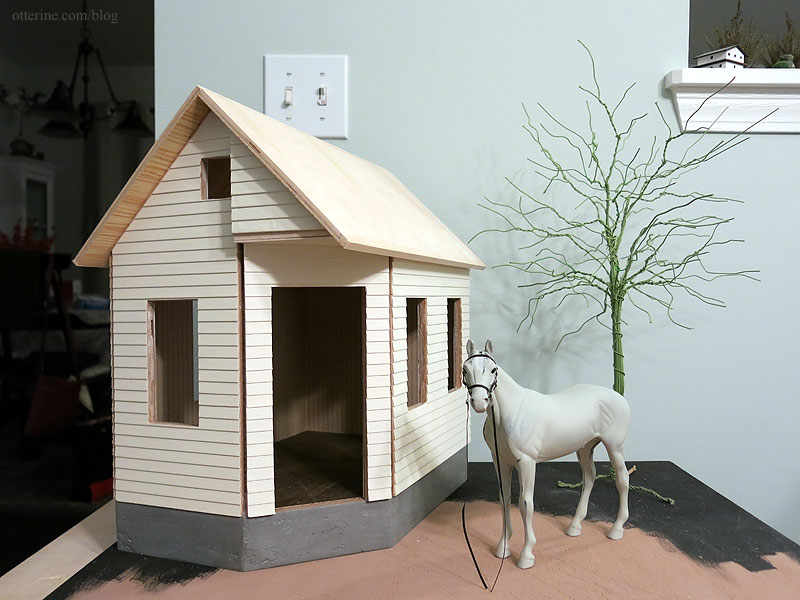
I’m working on another tree this year. I used the same wire and putty technique I’ve used in the past for the trunk, and candytuft for the foliage – notes at the bottom.
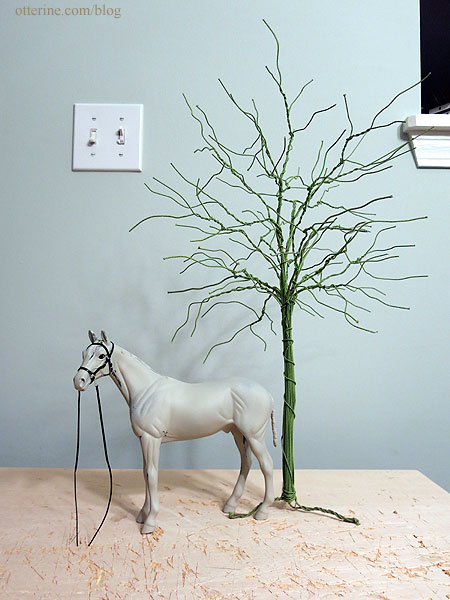
The first layer of putty is on with at least one more to go, where I will add texture.
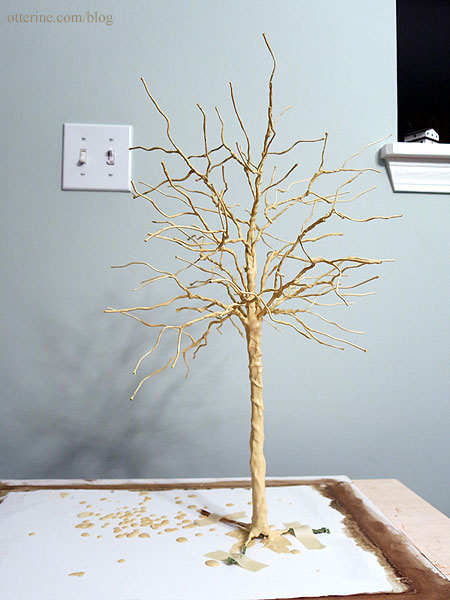
I like how the tall tree forces the perspective. Jebediah looks more in scale with the tree in place.
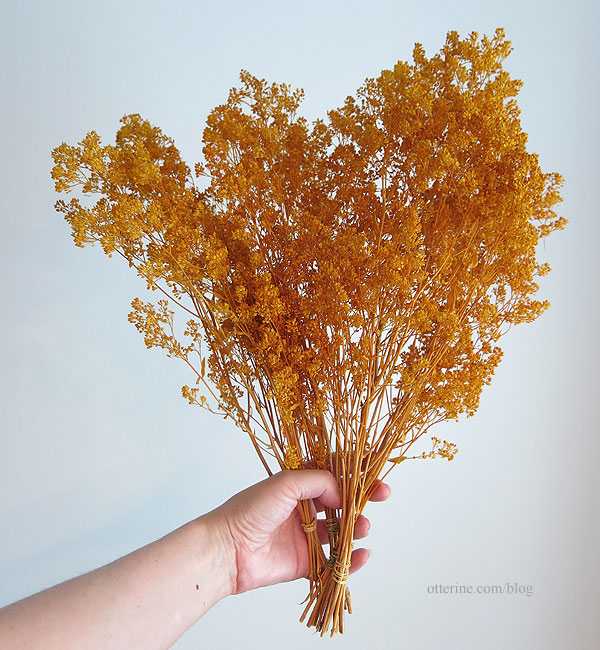
I used candytuft for the foliage. This is autumn gold candytuft from Scenery Solutions (no longer available).
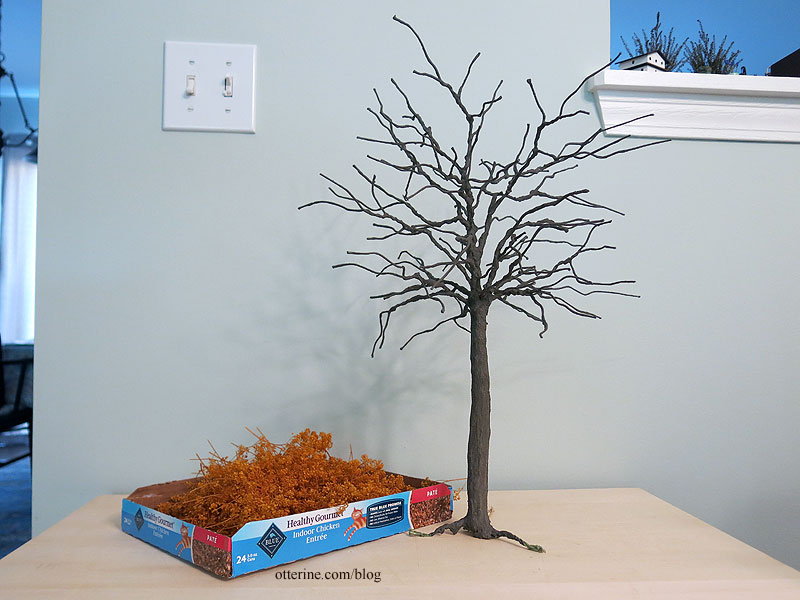
I painted and detailed the trunk and separated the foliage branches from two bundles of candytuft. Too bad I can’t just say “alakazam” and have the foliage appear on the tree.
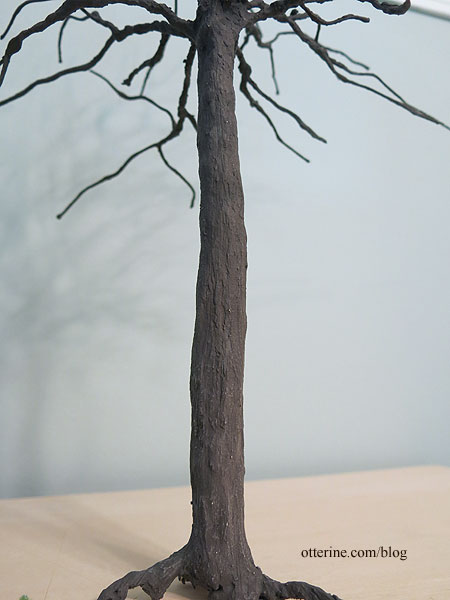
The trunk is somewhere between grey and brown. I mix at random and fine-tune until I get there since there isn’t a good color straight out of the bottle.
Good thing I chose autumn, so my tree can be sparse.
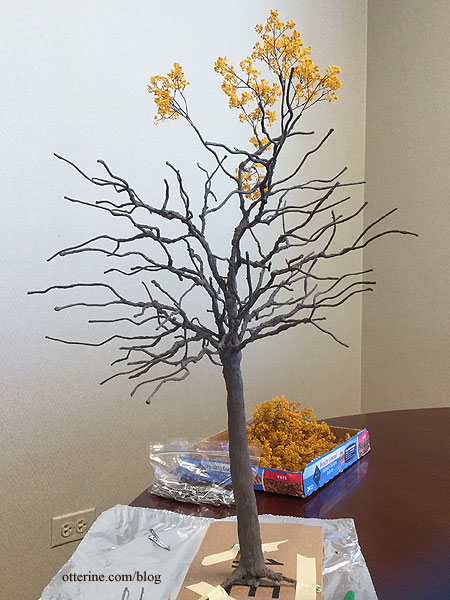
And, finished….

Love looking up through the branches.

———
Notes: Link to the first tree I made using this technique – follow the links in the first sentence back through the process. For the trunk, a good starting source if you can find it is the DVD Master Miniaturists: Landscaping Primer with Diane Myrick. I found mine through interlibrary loan. This whole series is just awesome! For the foliage, I used a tutorial by Connie Sauve on using candytuft, but the tutorial link is no longer active. I bought the candytuft from Scenery Solutions, but they no longer sell it.Categories: Flowers, plants, and trees, Ivy Hollow RFD
December 11, 2019 | 0 commentsIvy Hollow – tin roof
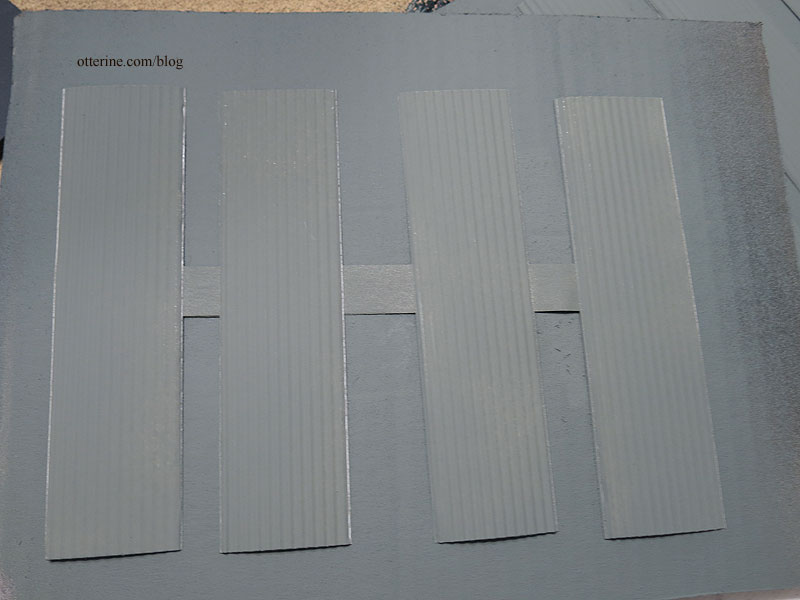
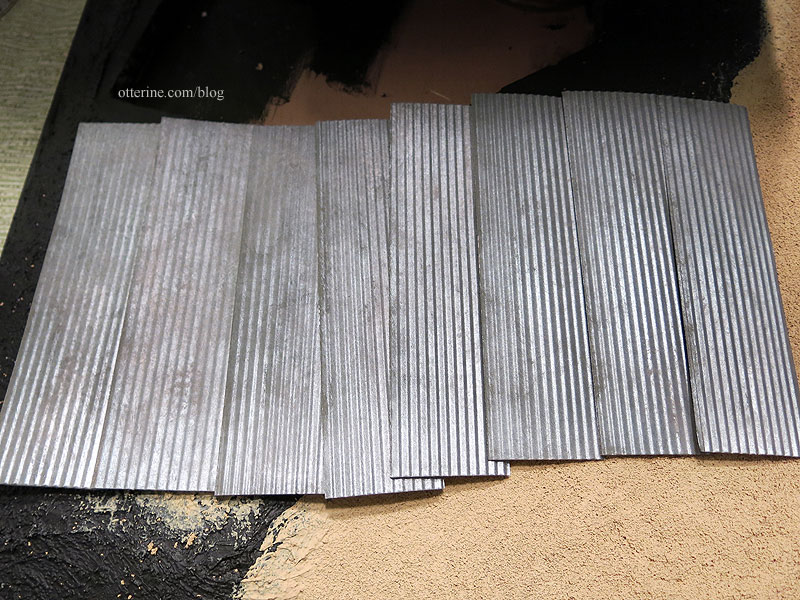
I’ve made a rusted roof in the past, but this time I needed something that wasn’t new but wasn’t too old. I used QUICKUTZ We R Memory Keepers adhesive backed metal sheets. Back in 2010, I purchased a similar material in a 12-pack from Hobby Lobby. I would say the current ones are very similar in quality though fewer sheets come in the pack for a higher price.
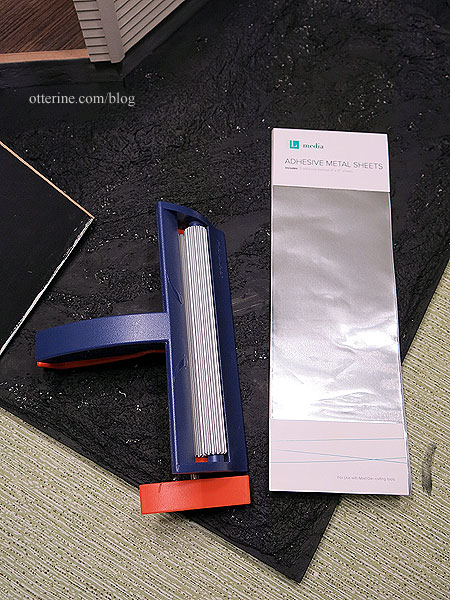
I used a paper crimper by Fiskars, though they have others on the market now that will make wider sheets. I was able to make my old one work for my current project.
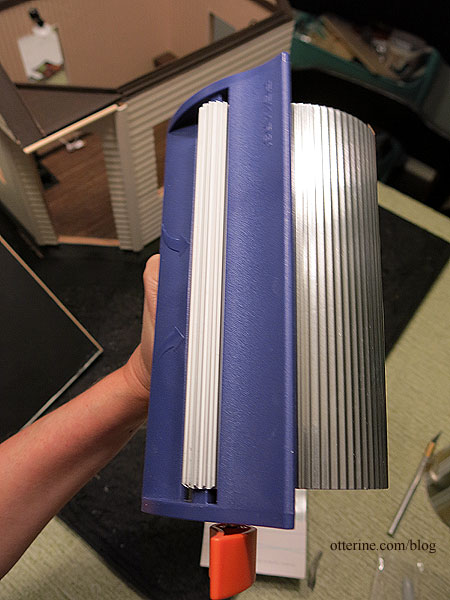
The material is very shiny as is.
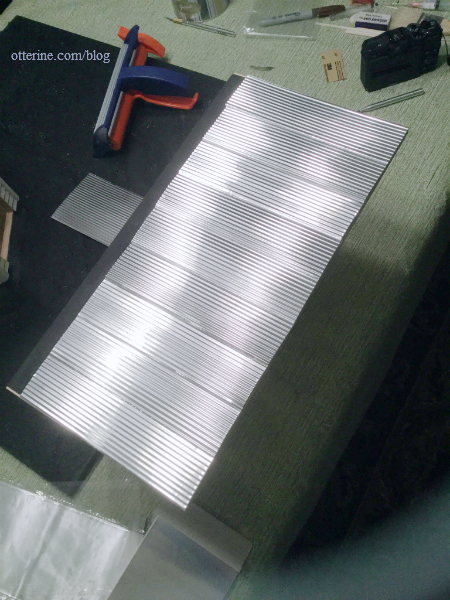
I used Rust-Oleum Self-Etching Primer once I had the pieces measured and cut.
Once that was dry, I stippled on a layer of Liquitex silver and then a layer of Neutral Grey mixed with Staining Medium, both by Americana.
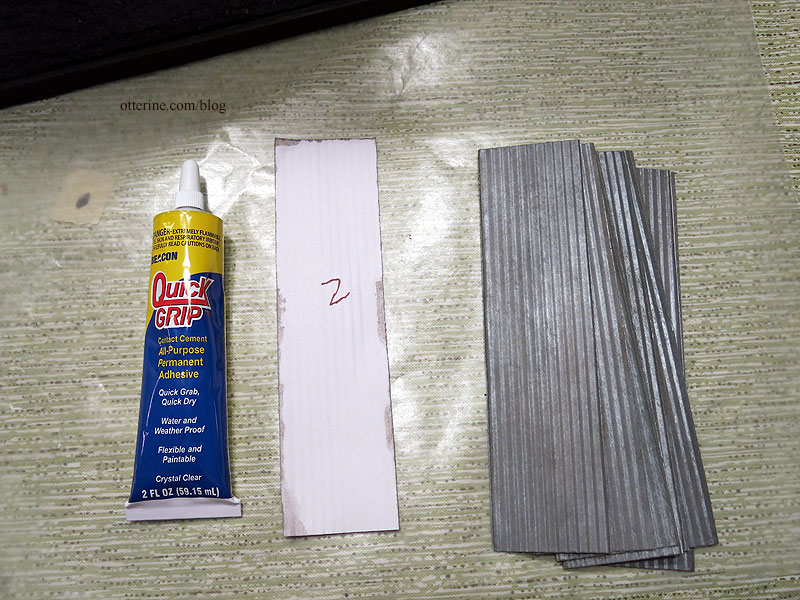
I had labeled the prepared sheets and used Quick Grip as the main adhesive. It’s not the easiest glue to use, but it gives you some time to work. I supplemented the glue with Aleene’s Quick Dry and super glue gel. (As an Amazon Associate, I earn from qualifying purchases.)
I like the middle ground finish – not new, not old. :]

Categories: Ivy Hollow RFD
December 9, 2019 | 0 commentsIvy Hollow – landscaping, part 1
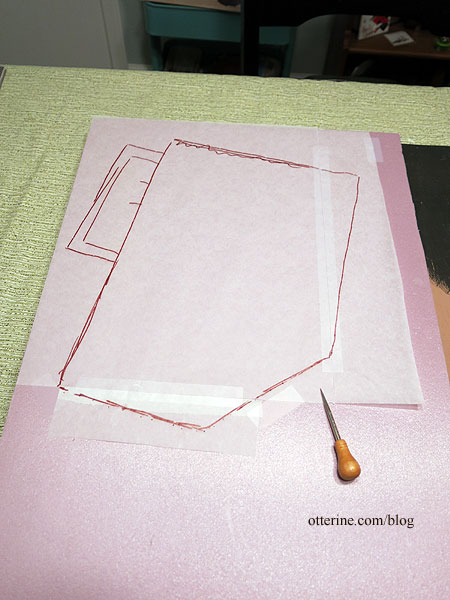
Landscaping takes overnight drying in stages, so I figured I had better get started. I fit the building, tree, mail wagon cabin and Jebediah on the board to figure out the best layout. I traced the foundation and tree base, then added a small electrical shed outline behind the building. I used tracing paper to make patterns of those markings since the next steps would cover the original outline. Can you tell I’ve been using the base board as a second cutting board? :D
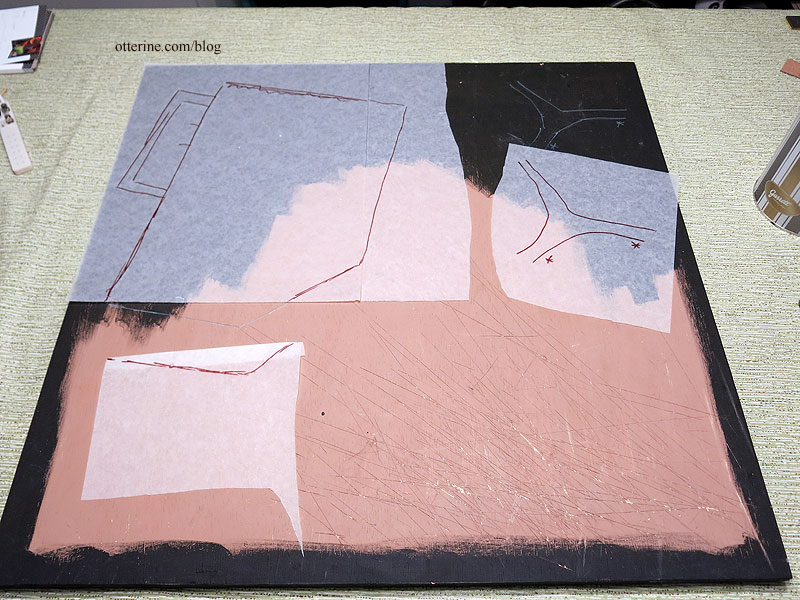
I used an awl to transfer the markings onto 1/2″ thick builders foam.
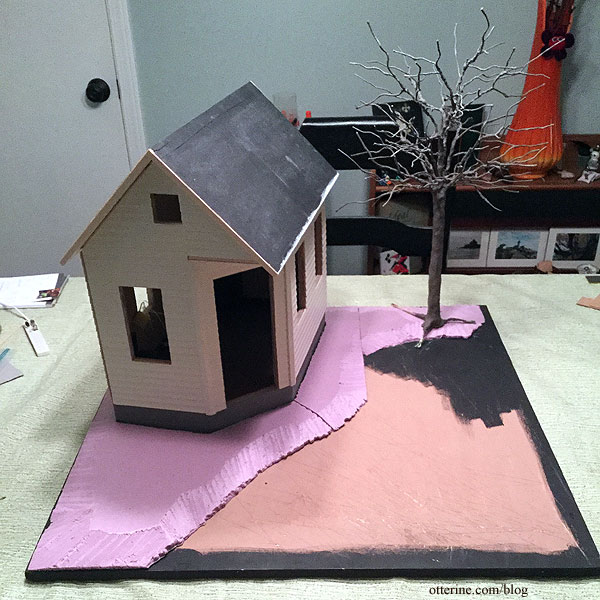
This thicker foam encloses the structure and makes the tall foundation more in proportion to the building. I tapered the outer edge of the foam.
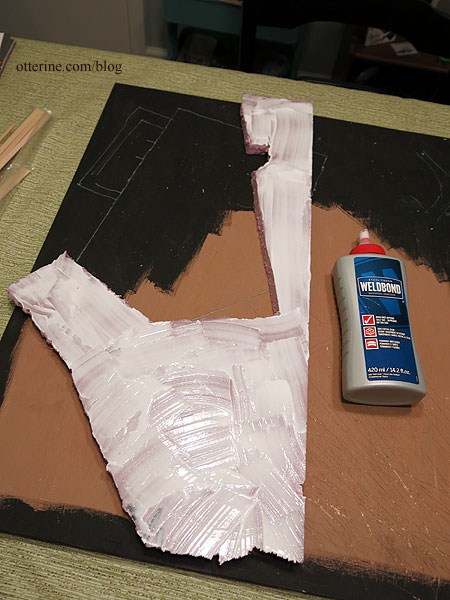
I used Weldbond glue to attach the foam to the primed base board.
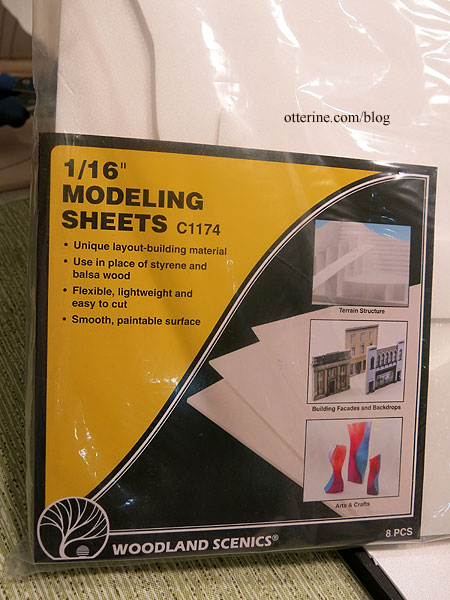
I cut pieces of 1/16″ thick foam sheets by Woodland Scenics to fill in the lower area and add some dimension.
It’s like a topography map. :]
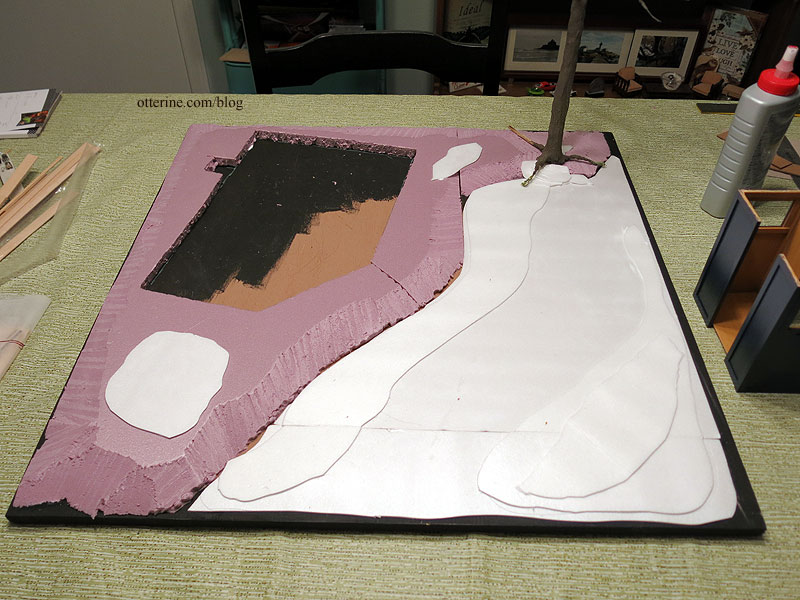
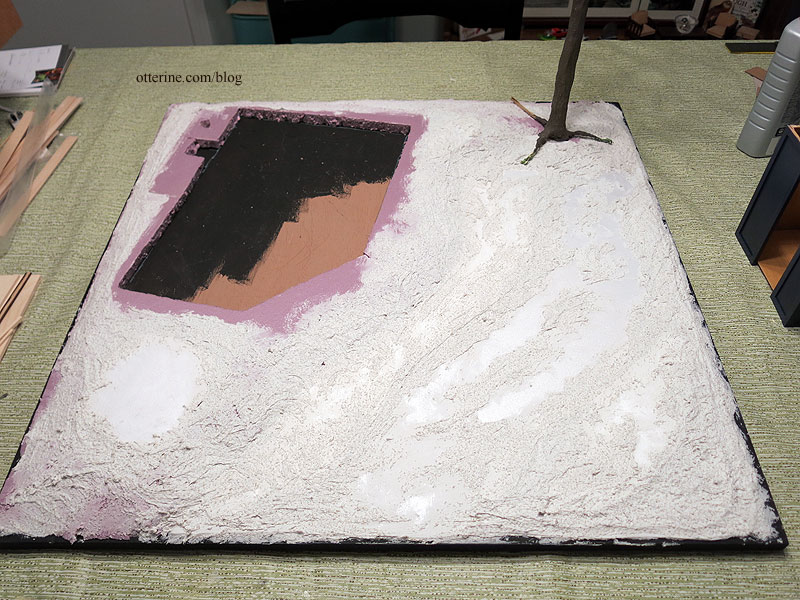
I used pre-mixed stucco patch (bought at Home Depot) to smooth the transitions between the layers of foam. The stucco layer doesn’t have to be perfect, just enough to eliminate hard angles and give the ground a natural feel.
Categories: Ivy Hollow RFD
December 1, 2019 | 0 commentsMail Wagon – part 12
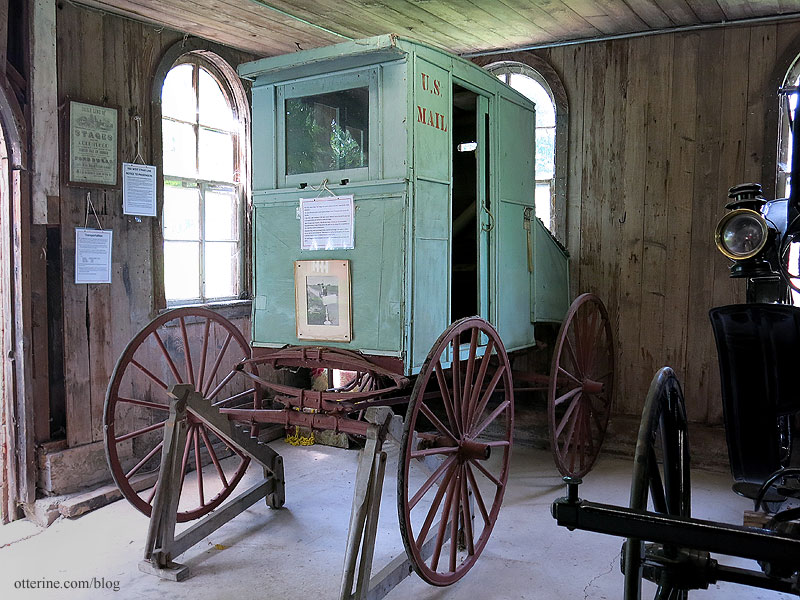
Continuing work on the mail wagon. Here’s a reminder of the mail wagon from the Galloway House and Village in Fond Du Lac, Wisconsin. Since its interior is the only one I’ve been able to photograph up close, I’m modeling many of my details after it.
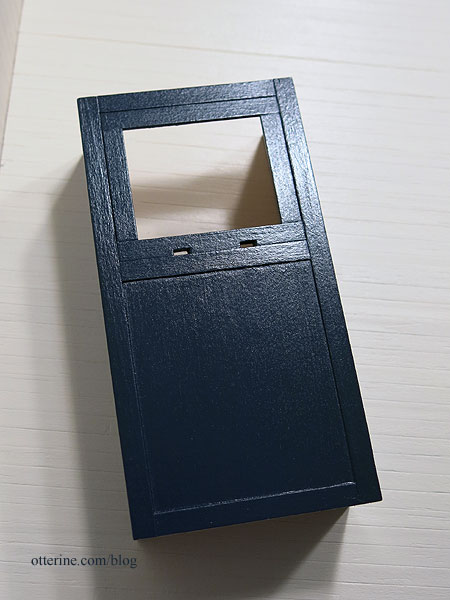
I chose Deep Midnight Blue by Americana for the exterior. I sealed the paint first with a satin spray sealer that must have been old, because it would not dry. I followed that up with a semi-gloss sealer, which ended up looking better overall. I had to wait a few days for it to full cure before I felt comfortable taping or clamping the surface.
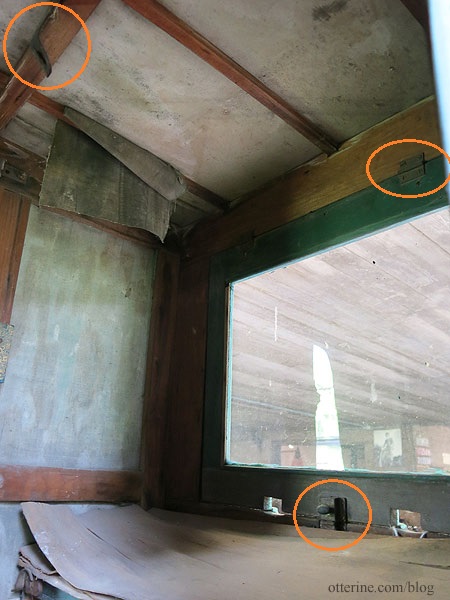
The interior of my inspiration has interesting hardware details.
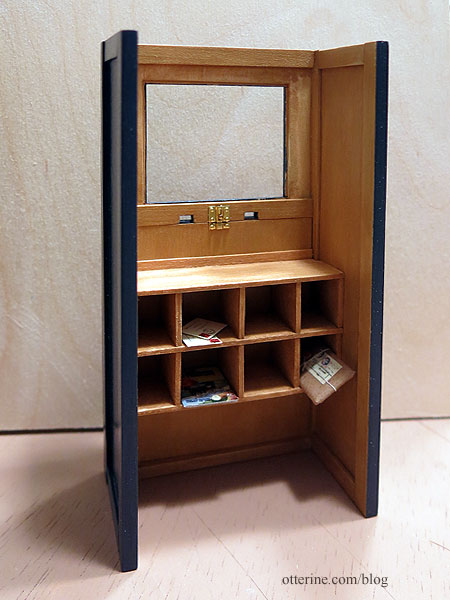
In the beginning, postal carriers were photographed with satchels, but I’ve always liked the look of the sorters inside some mail wagons I’ve seen, including my inspiration. There wasn’t a lot of room, but I was able to add a few cubbyholes. These wouldn’t necessarily be reserved as one per household on the route but a way to sort along the way.
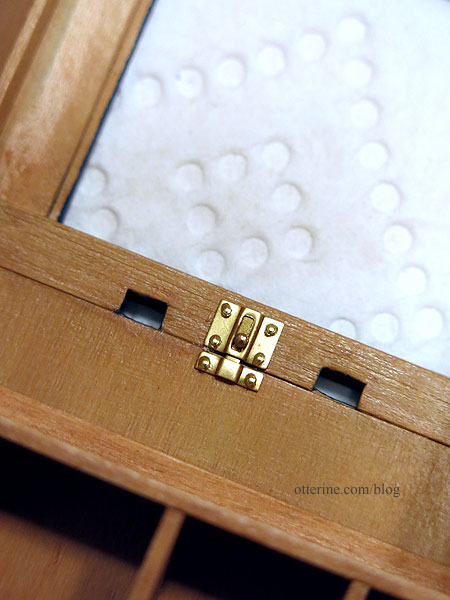
I added a window lock from my stash of interesting hardware (not sure where I even got them or the manufacturer). The lock bar actually slides, though it doesn’t matter much for my non-working window. I’m thinking the hook on the top would hold the window open, maybe? I’ll definitely add small hinges to complete the look of my non-operating front window.
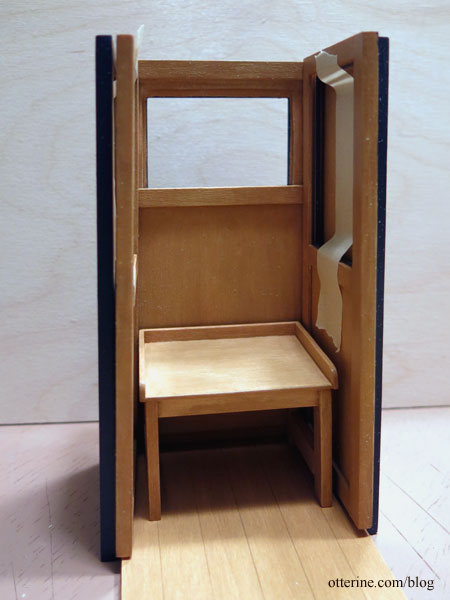
Next up, a comfortable bench seat. This had to be built with the doors held in place to make sure there was clearance for the doors on either side. I’ll make a padded cushion for a softer ride. :D
Categories: Ivy Hollow RFD, Model Cars, Vehicles
November 30, 2019 | 0 comments
NOTE: All content on otterine.com is copyrighted and may not be reproduced in part or in whole. It takes a lot of time and effort to write and photograph for my blog. Please ask permission before reproducing any of my content. (More on copyright)

Ivy Hollow, Rural Free Delivery Post Office
Rural Free Delivery has come to the village of Ivy Hollow! Mr. McCants and his trusty equine companion Jebediah will make sure your mail arrives at your home safely and in a timely manner. Register your address at the local post office today!

RFD – Rural Free Delivery – transformed the landscape of rural towns by removing the arduous chore of traveling long miles to the post office as well as providing greater access to goods and services. Mail order increased purchasing options for individuals and fueled business. Mail carriers were responsible for providing their own wagons and horses, having to traverse poor roads in all types of weather. RFD eventually led to the Rural Post Roads Act, which further developed rural communities by improving roads.
I set my post office in 1917, a number of years after the advent of RFD. The mail wagon passenger cabin was scratch built and fitted over a doctor’s buggy kit chassis. Jebediah the horse started as a plastic Breyer model. I didn’t get to making my own harness, but Tiki from Kulp Model Horse Store saved me at the last minute. I do still plan to make my own.

The name I’ve chosen for the town where my little post office stands is Ivy Hollow. I usually pull names from pet companions, past or present, or other sentimental connections. My current dwarf hamster friend is Ivy, hence the town name.

Modifications and Basic StructureUsually, I limit myself to the shape of the kit even if I add or delete height, width or depth. This is the Serendipity Shed as it came.

This year, my research led me to a postcard from 1917 showing a post office with the RFD horse wagons picking up the mail, and I fell in love with the shape of the building and its details. I later bought this postcard and was able to determine who wrote the RFD postcard (postmarked Nov 14, 1917) and to whom it was addressed, as well as the likely people in the image. I have a lengthy post on my research.
The postcard itself is a very interesting piece. The print is almost like a daguerreotype on paper. It has that weird metallic shimmer at a certain angle.

Amazingly, I was able to find a second photo of this same post office, though there are differences between the two images.

image from West2K, used with permission I modified the walls to match the roof pitch of my inspiration. I also needed to cut new roof boards, but I used the kit ceiling board for the new front wall. I had originally planned to have my building face as shown in the two photographic examples. But, my horse was facing the wrong direction. Might be a good candid shot, but we could do better. :D

I flipped my building to better use the space and flow with the direction of my horse’s gaze.

I built the foundation from some square lengths of mdf from a former HBS Creatin’ Contest kit foundation that measure 1 17/32″ tall when double stacked. After looking up the history of concrete to make sure it would be appropriate for 1917, I coated the edges with spackling. After applying matte gel medium, paint and some washes, I sprayed the base with Testors Dullcote spray to move the acrylic paint sheen (see previous post on my technique).
When HBS had their April Fool’s sale, I bought a pack of siding. It was way more than I needed for this building, but it’s a material I know I will use in the future and it was a great deal at 40% off. I have a detailed post on how I applied the siding for this build.
A fun feature of the original inspiration is the bumped out gable. I made a base for mine from scrap wood and covered with the same siding. I painted all the siding Vintage White by Folk Art.

Since my structure is so small, I used attic windows instead of full sized components for better balance. I painted the frames Woodland Green satin paint by Americana and painted the sashes Vintage White by Folk Art. This is the first time I’ve painted a window two different colors! I doubt I will ever do this on a deadline again. I added the mullions as well, which instantly transformed the look.

The screen door and coordinating main door were mostly scratch built (the process ends here, but you can click back through the links at the beginning of each post to see the full process).

I tried to research the history of screen door hardware, but I ran into a lot of sites selling refurbished or reproduction hardware without much commentary on what was used when. I’m going with what I remember from my childhood farm memories – a spring and hook latch. Bill sent me length of thin spring awhile back, and I put it in the bits-n-bobs box for a time such as this. I opted not to install this so that opening the screen door will actually pull the spring for two reasons. The spring is likely to stretch out of shape over time, but more to the point, the spring has a tension force greater than the strength of tiny eyelets and some glue. boioioioing!
So, we fake it! I’m actually doing a mix of a typical screen door spring and storm door stop chain.

This is probably more modern, but it will add visual interest overall.

It was a lot of work, but I will definitely make another screen door in the future.

Landscaping and exterior detailing
The landscaping (parts one and two) is simple and rural. I think this might be the first time I’ve angled a building on its base. I used Woodland Scenics Fine Dark Brown Ballast to serve as dirt and Fine Ballast Buff as the gravel. I ran the wagon wheels and patted Jebediah’s hooves on the loose gravel before setting it in place with Woodland Scenics Scenic Cement applied with a pipette.

I made an autumn tree this year using the same wire and putty technique I’ve used in the past for the trunk. For the foliage, I used a tutorial by Connie Sauve on using candytuft, but the tutorial link is no longer active. I bought the candytuft from Scenery Solutions, but they no longer sell it.

Having a sparse tree meant it took less time to create, which helped with my tight deadline.

Love looking up through the branches.

The grass mat is Wild Grass Forest Floor by Heki from Scenic Express (they call it Pasture TurfGrass on their website). These particular grass mats are pricey, but the high grass with variegated coloration is spot on in scale. The sheets are only 6″ wide, though they are 17″ long, so there are places on the landscaping board that always need to be pieced. These are my favorite to work with because of the backing, which is a clear, rubbery substance that makes it more flexible than the paper-backed grass mats. (Here is a post on working with the grass material.) Since I had leftover branches, I stripped the leaves from them and littered the ground.

I was sure to get a couple of little bits caught in the lovely rake by Sir Thomas Thumb.

The pump was an unfinished metal mini from the local shows, and I had the bucket in my stash. I built the platform to hold both pieces. When I added the resin (Acrylic Water from Walmart), it leaked through the bucket. I led a path of it over the edge and let it do what it wanted. A happy accident. :] There is also a droplet from the spout.

I borrowed the lawn mower from Ye Olde Taxidermist. It was made from a Phoenix Model kit from Jennifer’s of Walsall.

I needed to be able to access the wiring, but there was no room in my tiny post office. I built a shed in the back that will allow me to hide the wiring while looking like a planned part of the build.

I used some fine brass hinges bought in miniatures lot some time ago, and one of them promptly failed after I glued the shed in place. A little epoxy and new nails, and we’ll be back in business. In the meantime, I hold the top part of the hinge down when I open it.

One of the best hay bales I have ever seen in miniature was purchased from Maple Leaf Miniatures.

The horse hitching post was an unfinished metal mini from the local shows, and I added a wood base. I swapped the silver ring for a black one to better match the painted finish.

While I was searching for a bucket to add water for Jebediah, I ran across this gem signed March 9, 1964 B.A., numbered 4. It looked great in the photos, but no one else bid on it but me. When I received it, I loved it even more. There was no way resin water was going to be added to this.

Luckily, I had ordered window pulls from my friend Greg at All About Miniatures, and he included a gift of metal buckets. I was able to add the resin water to one of the metal buckets and set it inside the vintage wood mini. Thank you, Greg!

The concrete front steps were made from styrofoam, spackling and paint. Chester was made by 2014erok. I had so much fun playing in the mini dirt this time around – the landscaping got to be a lot less manicured.

The metal roof is actually metal. :D I’ve made a rusted roof in the past, but this time I needed something that wasn’t new but wasn’t too old. I like the middle ground finish – not new, not old.

Interior AccessoriesI packed a lot into this tiny building.

Originally, I thought to have a removable roof and possibly a removable wall. I ended up having only the roof removable which meant ceiling lights would be just too much of a hassle. Possible, but a hassle. I opted instead for wall lights only, and the Meyers Wall Lights are the perfect blend of vintage and shop. While considered outdoor lights, they are small enough to work well indoors. Plus, I like the look of the pea bulb. As for whether there would be electricity in this post office in 1917, I’m deciding yes!
The wallpaper is Brodnax Prints – 1VT344 – Gathering Stripe Green from Manchester Woodworks. The roof (and ceiling beam) remain removable to better access the interior. It’s a little hard to see, but I used wood flooring sheets to make the ceiling, then painted the surface vintage white.

The postal teller (the process ends here, but you can click back through the links at the beginning of each post to see the full process) was made from the bones of a Realife kit. I ended up cutting new parts for much of it because of the poor wood quality and the modifications I wanted.
For finishing, I opted for Bittersweet Chocolate mixed with Staining Medium, both by Americana. Actual stains can be harder to work with in small spaces, and the Staining Medium makes paint behave like a stain without the fumes or the long drying time. There’s the benefit of stained wood grain without as much mess. I added numbers to the 15 pigeon holes in the mail sorter. Yep, on the back, too, so the postmaster and the customer can see which box is which.

I cut a piece of thin acrylic sheet for the sorter window and then glued trim to hold it in place. I opted to lightly frost the glass to cut down on the glare that would prevent good pictures. I used Testors Dullcote.

This piece took a lot of work to get a good result, but I’m very pleased with the results. The flooring is my staple southern pine flooring stained dark and aged. I’ve used a simple red woven rug by Designing Ways.

I wonder how many times our postal cat Chester needs to be shooed off the counter. :D

I did add some items to the counter shelves, but they aren’t easily seen unless you peer through the back window. The twine box is a Wright Guide miniature, and the toolbox is from HBS. The remaining boxes are all from Looking Glass Miniature. The delightful wood box has working hardware and was a gift from Debora. By Ron Stetkewicz Miniatures.

Instead of the kit letter box, I added a fine basket by Al Chandronnait.

I had always planned to make a sign resembling a porcelain plaque but found a 42-piece lot of vintage charms of the logo for the United States Post Office Department, which was the original name of the United States Postal Service. No, I didn’t need 42 of these suckers, but how perfect for a plaque. The 5/8″ diameter was a perfect fit.

The postmaster’s desk wall (parts one, and two) has more pigeon holes, cabinets and a desk with a chair. The cabinet fills the bottom space, adding storage, but I don’t have to actually fill said space with minis that won’t be seen (nor will I have to dust this space). I figured I would need more pigeon holes than the few in the teller, because having a post office for only 15 mail customers seemed a bit of an extravagance. I modeled the additional pigeon holes after the ones made for the postal teller, making them a little deeper and having 40 on this back wall unit. I think 55 post boxes is more in line for a one-wagon rural post office. It might not be enough for a true post office, so I remind myself this is a mini approximation.

Our rural post office has good cabinets and a postal teller in newish condition, but the desk and chair are hand me down pieces. They are still perfectly usable, after all. The Chrysnbon Victorian chair kit was a gift from Barbara. The desk is adapted from a table pattern in the book Finishing Touches by Jane Harrop.

I printed a reproduction of a 1917 Pennsylvania railroad map. The paper is a Wright Guide miniature.

I later added a simple clock made from a wood circle, printed face and self-adhesive cabochon sticker.

The tiny postcard is a replica of the original inspiration, and the bankers lamp is from HBS. The marvelous eyeglasses are from Lynn O’Shaughnessy (no website), and the coffee mug is from a set by Jane Graber. I made the scratch paper using a cancellation stamp image repeated at random. I ran out of time to make my own stamp and ink pad, but I had a delightful set from Wright Guide. I peeled the parts I needed from the set without damaging it, so I can replace them once I make my own.

I made a faux outlet for the lamp wire.

I made a gate from scrap wood and Tiny Turnings, making it up as I went along. I thought the spindles probably could have been closer together, but it turned out well so I went with it. The stain is Minwax Dark Walnut. I used brass Houseworks hinges to make it operational. In the end, I like that the spindles are sparse – allows more to be seen through it. As many people pointed out, too, wider spindles allow a quick escape for our postal cat Chester yet block kids and dogs that might hassle him. :]

The potbelly stove was made from a Chrysnon kit (the process ends here, but you can click back through the links at the beginning of each post to see the full process). I experimented with paints to give the basic kit a boost in realism.

I’ve turned plastic into iron. :]

I wanted my stove to have coal light, so I used LEDs, clear plastic pieces and paint to create glowing embers.
Of course, you really won’t be able to see much of them once the stove is in place, but I know they are there…and the next time I need embers, this is the method I will use.
I skipped the kit stovepipe, which has excellent detailing, since I wanted to attempt a straight pipe up through the ceiling. Debora had sent me some defunct Chrysnbon kits for parts some time ago, and one of those was the cook stove. I used that oval to round adapter and 1/2″ polystyrene tubing to make my straight pipe. I cut a thin band of polystyrene and glued it approximately 3 inches from the top of the adapter to make it look like the stovepipe was assembled in two pieces, which it likely would have been.

I made a full heat shield from plastic sheet and jewelry findings instead of using the kit floor stand. Once the ceiling was in place, I was able to cut the angle of the stovepipe. There was not much room for customer seating, so I made a quick stool from a pattern in the book Finishing Touches by Jane Harrop.

The coffee pot is a gift from Barbara.

The coal scuttle is from the estate of a talented miniaturist and lovely lady, Elly in Amsterdam. I knew her through a petitpoint group and never met her in person, but she was one of the sweetest ladies and super fun. She’s definitely missed. I made a scoop to go with it from the Chrysnbon potbelly stove kit.

Elly was so fond of cats, she would certainly approve of Chester sneaking into the photo.

I made up a mini newspaper stack, settling on a midyear 1917 edition of The Philadelphia Inquirer because it had horse drawn carriages on the front page above the fold. These are in scale and not really legible. They do have printed interiors, albeit single-sided. I tried to get them as consistent as possible, but I really needed only one near perfect one for the top of the stack. As long as they were all relatively close in size, they would work as a stack. Once I had a stack of ten, I used buttonhole thread to tie the stack.

I made a lot of mini mail for this build, and I did have some left over. I started with letters, postcards and mailers. After some scouting about online, I found a few different sites that had scanned letters and their corresponding envelopes. There is also a wealth of postcards, both mailed and unused, listed for sale online. I tried to limit the ones I printed to true 1917 dates, except for a few that I loved and wanted to include. Here are the letters. They are true to scale and not legible, but they add a nice touch.

I printed matching envelopes as well.

The letters are glued shut, but I like knowing there is a true letter inside.

I cut out the postcard fronts and corresponding backs as pairs so I wouldn’t have to play an impossible match game later.

I pasted them back to back for a true postcard facsimile. This is one I fudged – this is a postcard that had a blank back, but I needed the bunnies in my post office.

Assembling these will be good busy work for TV time.

Miniature Collector magazine had printies in their magazines, and I pulled a whole bunch from the recent magazine stash that was gifted to me by a generous reader. One was a sampling of the 1902 Burpee’s Farm Annual. The magazine has a copyright date of March 2007. It included a large envelope to hold a seed mailer, an order form and a return envelope. It’s a lovely set, and the notes indicate you are allowed to copy or have a copy service reprint for personal use. Since the magazine paper was a little shinier than I would like (shown below), I did just that before making up a bunch.

The rest of the mail was made up of magazines and catalogs (be sure to click this link to see more detailed photos). Rural Free Delivery meant businesses could expand and reach more customers, and people in rural areas would have access to goods far from home.
Again, I turned to online image searches, trying to limit those chosen to 1917, give or take a year. Though I was able to find some fully scanned catalogs including the inner pages, I focused on covers and glued each one shut with inserts. These would be placed in the pigeon holes and not opened for viewing. Some of these came from sale listings, so I was able to get accurate measurements for scale, though I had to increase the scale size to get a good print in some instances. Some required more sprucing up in PhotoShop than others as well.
I was later informed that magazines would have sent with brown paper sleeves and mimeograph addresses. Since I spent so much time researching and working on the catalogs and magazines, I didn’t want to hide them away and skipped this part.

I made tiny parcels from wood and kraft paper. At The Miniature Show in April, I bought some packaging kits from Looking Glass Miniature. I used this kit for its parts and wrapped wood blocks in the kit’s kraft paper and twine, using old labels found online. Obviously, parcel post labels are harder to find than old letters and postcards as the wrapping would usually have been discarded.

We have to receive our mail in bulk at the tiny post office, mostly likely by rail. I printed and sewed a simple mailbag design. It’s one thing to put actual letters in tiny envelopes that will never be opened; it’s entirely different to hide all that work away in a mailbag that will never be opened. But, I needed to be mindful of the weight and shape overall. I started with faux letter bundles, then made wood parcels.

Though it’s hard to tell in the photo, the fabric is just thin enough that the colors and patterns of the faux mail add to the realism of what’s inside.

I also participated in a swap this year with a group of talented miniaturists. One of my Santas, Corinne, sent me more mini mail and a mailbag that appears to have just come off the train. All of it is so perfect.

There were also wartime posters – aged and new for my choosing, and I used three of them in the post office. Thank you, Corinne!

As I was building, the delightfully talented Anna sent me some mini stamps she made. She included real life size prints of the original inspirations as well. There’s even a book to keep them organized for the postmaster. :D Thank you, Anna, for your wonderful and generous gift!

I’ve set a few stamps on the ledger from Looking Glass Miniature. There’s also a cat food jar by Jane Graber for when Chester gets the munchies.

The Mail WagonI am finishing a detailed post with the various parts listed, but for now, you can see the last post and follow the links back for the steps. The mail wagon passenger cabin was scratch built and fitted over the chassis adapted from a 1:12 scale Doctor’s Buggy by Model Trailways. Considering the time and effort I would have expended to recreate the chassis parts, the kit was worth it for those parts alone. (As an Amazon Associate, I earn from qualifying purchases.)

The springs and axles are actually metal in this kit. It was fairly straightforward for me to alter the parts and extend the suspension front to back to accommodate the mail cabin.

The wheels spin and turn, which is just fabulous!

Jebediah McCantsI transformed a plastic 1:12 scale Breyer Thoroughbred to pull the RFD wagon. Here is where we started. (Click here and follow the links back through the steps.)

I removed the plastic mane and tail, repainted and added mohair. I might redo this part since the color isn’t exactly what I wanted, but I do like how it turned out for my first time adding hair to a model horse.

Modeled with the bridle by Texas Tiny.

Modeled with the harness from Kulp Model Horse Store.

RFD – Rural Free DeliveryI’ve always been fascinated by the late 1800s to early 1900s, and I had a mail wagon kit (which I didn’t use for this) and a Breyer horse I wanted to remake. I thought making an RFD post office would be perfect for the build.
Rural Free Delivery was started because rural folk would have to go to town to get their mail, which was often far and not easy in poor weather. While free mail delivery existed in the cities by 1863, rural free delivery didn’t truly begin until 1896 with five riders in West Virginia. This video from SmithsonianNPM gives great overview. Those five rural routes spawned better roads all over the country. Fascinating!
Check out this awesome video showing the delivery in action in 1903. :D I know how excited I get when the mail arrives now, and you can’t give sugar cubes to the mail truck!
—–
Special thanks to mom, Matt, Debora, and the ladies from the chat! Thank you to HBS for hosting an always fun competition. I think I had as much fun researching this project as I did making it from the ground up.
Update: Ivy Hollow, Rural Free Delivery Post Office has received an Honorable Mention Award in the HBS Creatin’ Contest 2019. Thank you to all the fine folks at Hobby Builders Supply! You can see all the entries and winners here.
Categories: Ivy Hollow RFD
February 10, 2020 | 0 commentsMail Wagon – part 15
Continuing work on the mail wagon. Many of the pictures in this post show the parts after painting since I was on a deadline and had little time to take progress photos.
The chassis from the doctor’s buggy kit had wonderful detail, but it was not made for a straight bottom cabin like my mail wagon. The original chassis planned for a curved reach. That’s the long bar that connects the front axle assembly to the rear axle assembly.

Mine had to be relatively straight but also account for the slight difference in height between the front and back wheel hubs. Since it was such a slight incline, I used a long piece of 3/32″ basswood as my new reach without any curve built in. The kit was supposed to come with a piece of cherry for the reach, but I couldn’t find it. It’s entirely possible it was in the box originally, but I misplaced it.

In case you ever need to know, the small McCormick spice bottles are just under 2 1/4″ tall. :D The spice jars helped me mark where the front and rear spring bars would hit the cabin.

I trimmed the spring bars to fit since my cabin was skinnier than the original doctor’s buggy passenger compartment.

The front and rear body hangers from the original kit are soft metal, so I was able to straighten them out and bend to the new shape needed.

I drilled holes for nails to be added. These are also epoxied in place for stability and durability.

The body hangers sit on top of the spring bars, suspending the cabin above the reach. I left them unattached at this point.

After I had the placement, I could slide the excess reach out the back and trim it to fit.

Chassis completion to be continued….
Categories: Ivy Hollow RFD, Model Cars, Vehicles
January 27, 2020 | 0 commentsIvy Hollow – landscaping, part 2
Completing the landscaping. I used Woodland Scenics Fine Dark Brown Ballast to serve as dirt and Fine Ballast Buff as the gravel. I ran the wagon wheels and patted Jebediah’s hooves on the loose gravel before setting it in place with Woodland Scenics Scenic Cement applied with a pipette (thank you, Debora – these pipettes are still among my favorite tools). The buff color is too red for my taste, so I applied tan paint washes over it to change the hue. (I have a post on working with these materials here, though now I usually skip the glued on layer and just use the Scenic Cement.)

I made an autumn tree this year using the same wire and putty technique I’ve used in the past for the trunk. Having a sparse tree meant it took less time to create, which helped with my tight deadline.

The grass mat is Wild Grass Forest Floor by Heki from Scenic Express (they call it Pasture TurfGrass on their website). These particular grass mats are pricey, but the high grass with variegated coloration is spot on in scale. The sheets are only 6″ wide, though they are 17″ long, so there are places on the landscaping board that always need to be pieced. These are my favorite to work with because of the backing, which is a clear, rubbery substance that makes it more flexible than the paper-backed grass mats. (Here is a post on working with the grass material.) Since I had leftover branches, I stripped the leaves from them and littered the ground.

I was sure to get a couple of little bits caught in the lovely rake by Sir Thomas Thumb.

The pump was an unfinished metal mini from the local shows, and I had the bucket in my stash. I built the platform to hold both pieces. When I added the resin (Acrylic Water from Walmart), it leaked through the bucket. I led a path of it over the edge and let it do what it wanted. A happy accident. :] There is also a droplet from the spout.

I borrowed the lawn mower from Ye Olde Taxidermist. It was made from a Phoenix Model kit from Jennifer’s of Walsall.

I needed to be able to access the wiring, but there was no room in my tiny post office. I built a shed in the back that will allow me to hide the wiring while looking like a planned part of the build.

I used some fine brass hinges bought in miniatures lot some time ago, and one of them promptly failed after I glued the shed in place. A little epoxy and new nails, and we’ll be back in business. In the meantime, I just hold the top part of the hinge down when I open it.

One of the best hay bales I have ever seen in miniature was purchased from Maple Leaf Miniatures.

The horse hitching post was an unfinished metal mini from the local shows, and I added a wood base. I swapped the silver ring for a black one to better match the painted finish.

While I was searching for a bucket to add water for Jebediah, I ran across this gem signed March 9, 1964 B.A., numbered 4.

It looked great in the photos, but no one else bid on it but me. When I received it, I loved it even more. There was no way resin water was going to be added to this.

Luckily, I had ordered window pulls from my friend Greg at All About Miniatures, and he included a gift of metal buckets. I was able to add the resin water to one of the metal buckets and set it inside the vintage wood mini. Thank you, Greg!

The concrete front steps were made from styrofoam, spackling and paint.

Chester was made by 2014erok. I had so much fun playing in the mini dirt this time around – the landscaping got to be a lot less manicured.

Categories: Ivy Hollow RFD
January 4, 2020 | 0 commentsMail Wagon – part 14
Continuing work on the mail wagon. Once the painting and sealer were done, I could move on to the lettering. I neglected to put on the cross detailing before the last coat of sealer but plan to add it later, so I took that into consideration when I did the layout. I used frog tape to create a line to follow and used a towel to cushion the cabin as I worked.
The letters are rub-on transfers by Woodland Scenics – Roman White in six sizes from 1/16″ to 5/16″ on one sheet. I used 1/4″ for the main letters except size 3/16″ for the “o” in No. (As an Amazon Associate, I earn from qualifying purchases.)

Since these didn’t come with numbers, I bought Roman Stencil/Block Letters White in three sizes from 3/32″ to 1/4″ on one sheet. I used the Stencil font size 1/4″ for the rural route “1” designation.

Since you can transfer all or part of a letter, I cut down the long portions of the “F” and “L” for a cleaner look.

Originally, wheels would have had metal around them to protect the wood. The kit supplied laser cut rubber material for the tires, but there were two issues with this. First, if you recall, the original kit wheels and spokes were not cut correctly and needed to be replaced. Once I received the replacements, I opted to use the “waste” circles between the true wheels for sturdier construction. This meant one set of the rubber tires was too short. Besides that, it would have been very messy to glue these fiddly bands.
Instead, I turned to a material I had used before for another wagon project – Instant Lead Lines (thin version). These are a rubber like material with adhesive already applied. There is a wider version of this material, but it was too wide for my wheels.

The thin tires add just enough extra detailing to the wheels and were easy to apply and cut to size. They look close enough to metal without further fiddling.

Categories: Ivy Hollow RFD, Model Cars, Vehicles
January 1, 2020 | 0 commentsMail Wagon – part 13
Continuing work on the mail wagon. While I was painting one day, I went ahead and finished up the wheels. I painted them flat white, then gloss Cherry Red by Krylon.

I joined the front and back cabin assemblies using strip wood along the inside bottom, using spacer boards at the top to keep the front and back assemblies square as I worked.

I installed the floor and then added more support boards underneath.

You can see I added the same scored lines on the bottom to mimic individual boards.

I added strip wood along the top to finish the walls and to fill the gaps on the top and bottom of the doorway. These wagons would have had slightly curved rooftops, but I left mine flat for ease of building. I did add some shaping to the front sides.

I cut a piece of 1/16″ thick basswood the exact shape of the ceiling opening.

I cut a roof board from 1/8″ thick luan plywood (leftovers from Walnut Bay Light) and covered the edges with thin basswood. I added the 1/16″ thick basswood ceiling to the plywood which would allow the roof to sit firmly in place but remain removable. I again scored the basswood to mimic individual boards. Having a removable roof means I can always try my hand a curved roof later. I apparently didn’t take progress photos of this part, so here is the roof after painting.

From the inside, it looks solid. :]

From the outside, you can’t tell it’s not all glued together.

Categories: Ivy Hollow RFD, Model Cars, Vehicles
December 20, 2019 | 0 comments
NOTE: All content on otterine.com is copyrighted and may not be reproduced in part or in whole. It takes a lot of time and effort to write and photograph for my blog. Please ask permission before reproducing any of my content. (More on copyright)


